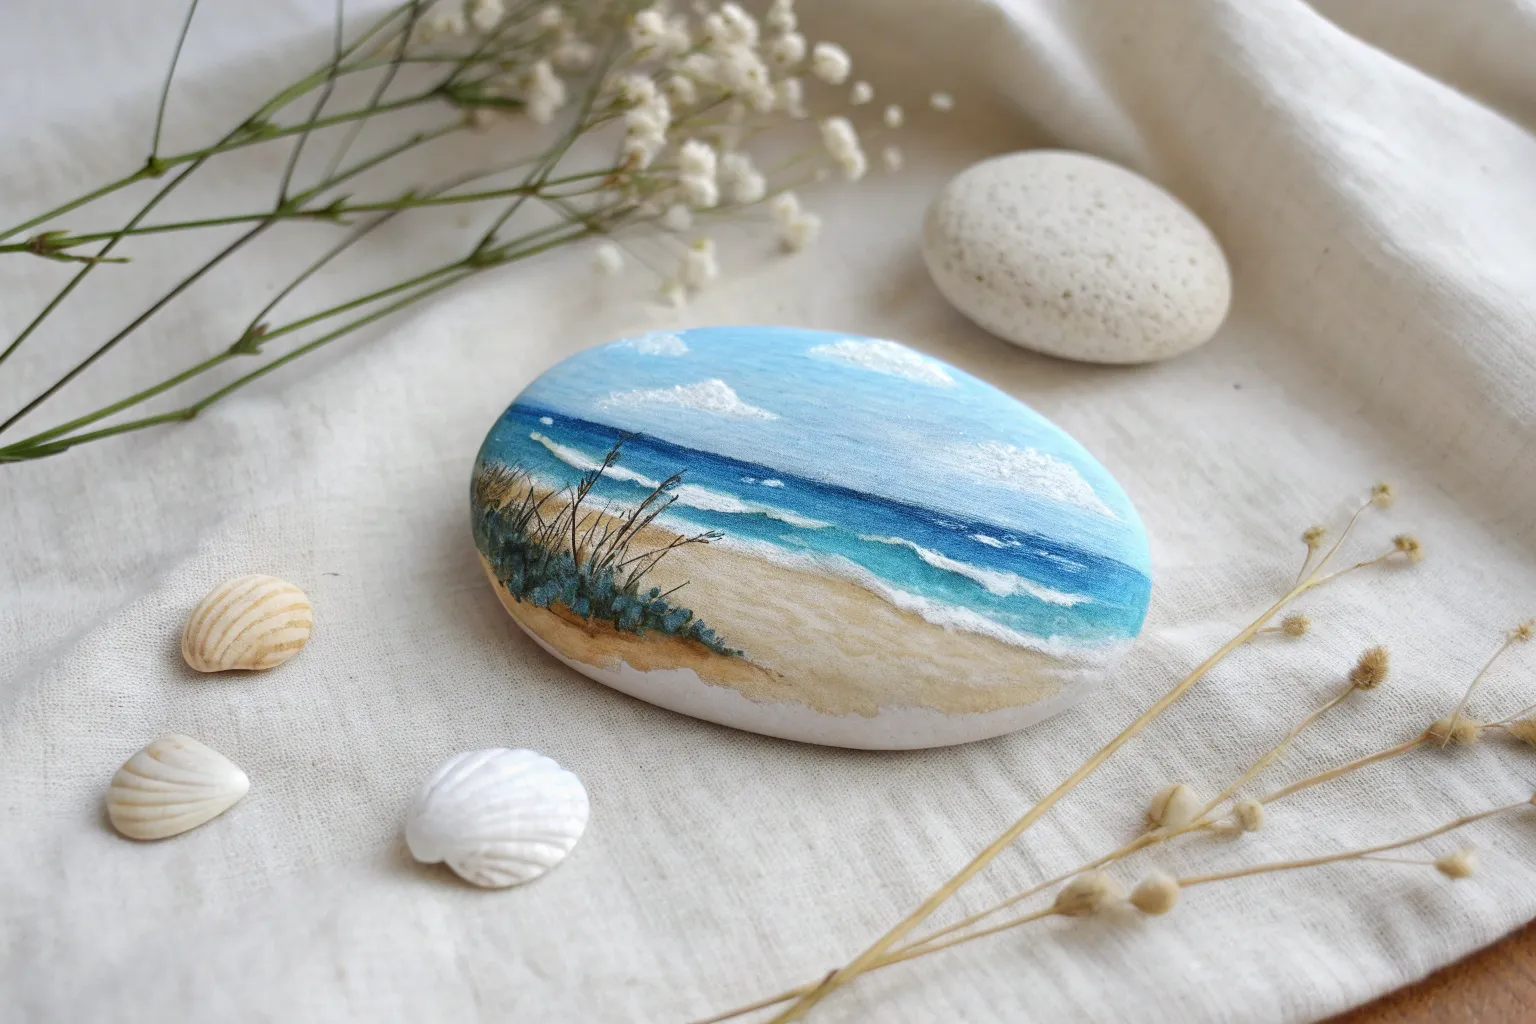
Beach rocks are my favorite tiny canvases because a few clean layers of color can instantly turn a plain stone into a little vacation scene. Below are my go-to simple beach rock painting ideas that look impressive without needing fussy details.
Classic Horizon Beach Scene

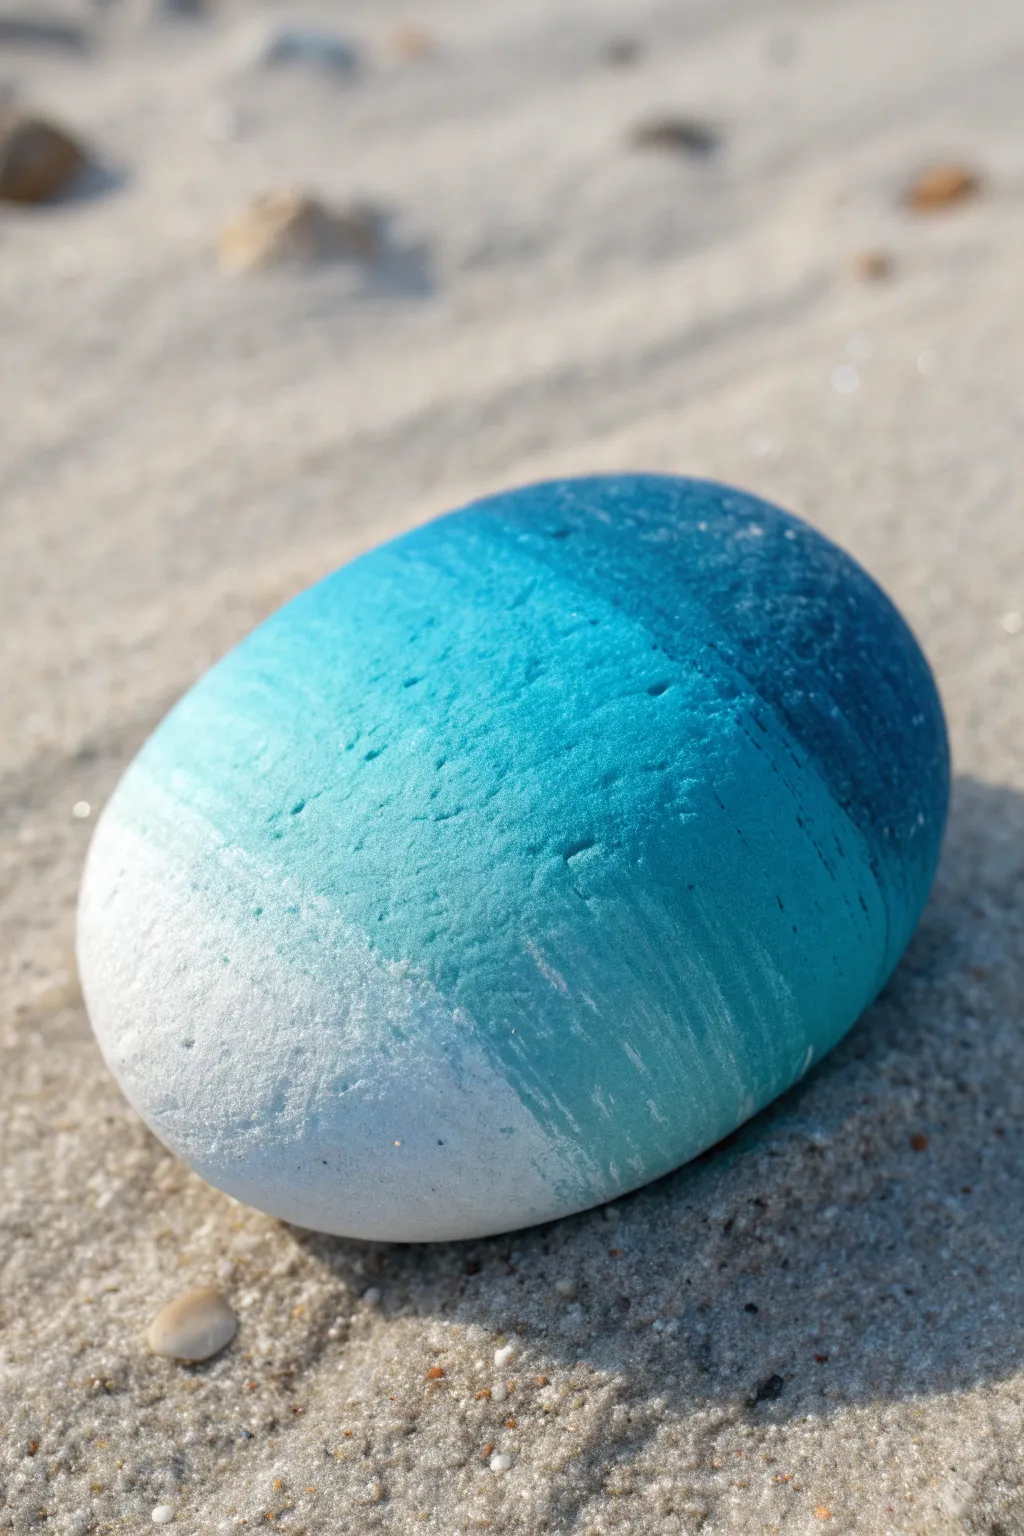
Capture the serenity of a perfect beach day on a single stone. This project transforms a smooth, round rock into a window to the ocean, featuring a vibrant turquoise wave crashing against golden sand under a clear blue sky using a clever horizon-line technique.
How-To Guide
Materials
- Smooth, rounded beach stone (palm-sized)
- Acrylic paints (Titanium White, Phthalo Blue, Turquoise/Teal, Yellow Ochre, Burnt Sienna, Sky Blue)
- Flat brush (small to medium)
- Fine liner brush
- Pencil and eraser
- Palette or paper plate
- Cup of water and paper towels
- Matte or glossy varnish (optional)
Step 1: Preparation and Base
-
Clean Your Canvas:
Begin by scrubbing your chosen stone with warm soapy water to remove any dirt or salt. Let it dry completely in the sun or with a hairdryer. -
Map the Horizon:
With a pencil, lightly draw a straight horizontal line across the upper third of the rock. This will separate your sky from the ocean. -
Define the Shoreline:
Draw a gently curved diagonal line across the lower half of the stone. This marks where the wet sand meets the dry beach. -
Painting the Sky:
Using your flat brush, mix Sky Blue with a touch of Titanium White. Apply this to the very top section above your horizon line. Fade the color slightly lighter as you get closer to the horizon line for atmospheric perspective.
Straight Horizon Trick
Wrap a rubber band around the rock where you want the horizon. Trace along the edge for a perfectly straight line on a curved surface.
Step 2: Creating the Ocean
-
Deep Ocean Water:
Mix Phthalo Blue with a tiny bit of teal. Paint a strip just below the horizon line, about a quarter-inch thick, to represent the deep ocean distance. -
Vibrant Turquoise Mid-ground:
Switch to your main Turquoise or Teal color. Paint the middle section of the water, blending it slightly into the darker blue strip while it’s still tacky. -
The Wave Base:
As you move closer to the shoreline pencil mark, mix a lot of Titanium White into your Turquoise to create a pale, frothy sea-foam green. Paint this up to your diagonal sand line.
Step 3: Sand and Shore
-
Wet Sand Gradient:
Mix Yellow Ochre with a dot of Burnt Sienna to get a wet sand color. Paint a thin strip right below where the water ends. -
Dry Sand Foreground:
For the rest of the bottom section, use pure Yellow Ochre mixed with plenty of white to create a warm, dry beige sand color. Cover the bottom stone area completely. -
Texture the Sand:
While the sand paint is wet, stipple (dab repeatedly) with a dry brush to create a grainy texture. You can spatter extremely tiny dots of brown paint here if you’re feeling adventurous.
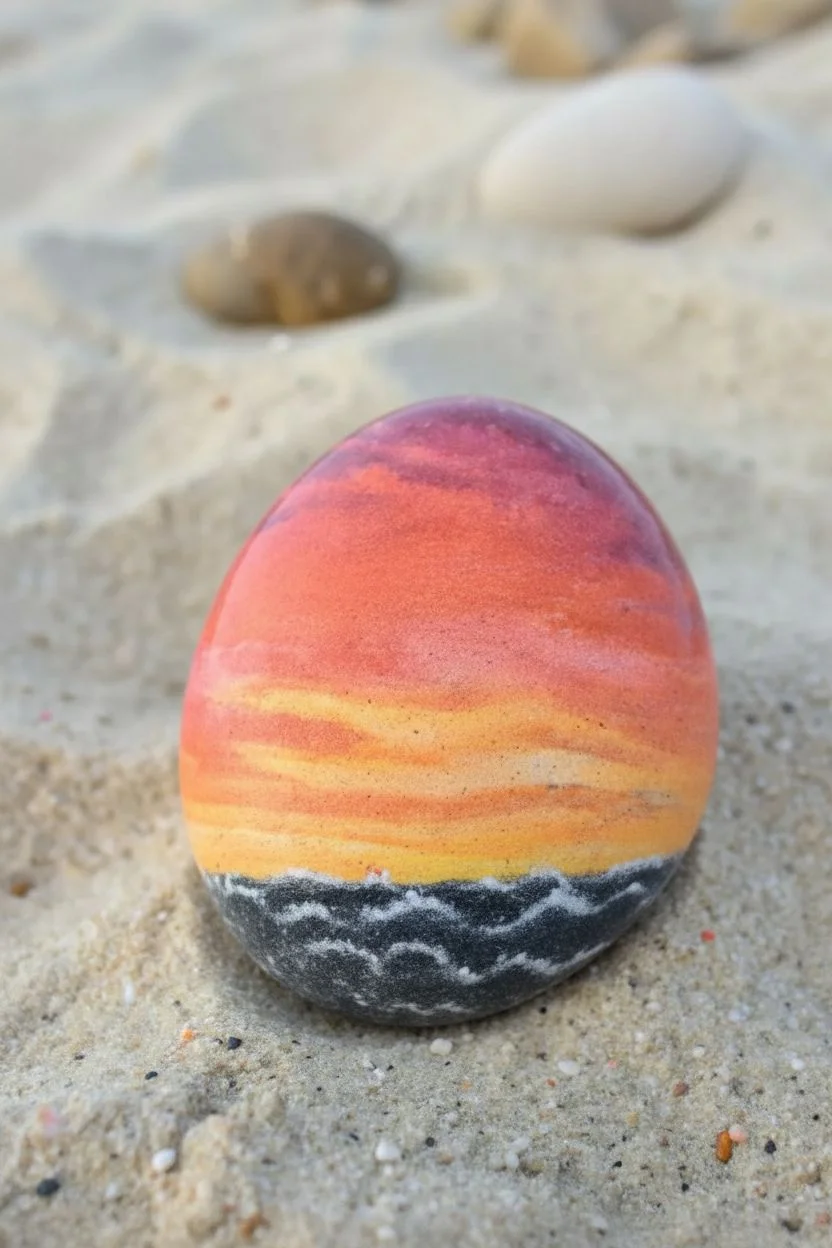
Sunset Variation
Swap the blue sky for a gradient of orange, pink, and purple. Reflect these warm colors into the wet sand for a magical evening scene.
Step 4: Details and Highlights
-
Crashing Wave Foam:
On your palette, prepare pure Titanium White. Using a fine liner brush or the corner of your flat brush, dab thick white paint along the meeting point of the turquoise water and the wet sand. -
Adding Movement:
Extend small, horizontal white streaks back into the turquoise water to mimic smaller ripples and wave crests. -
Sea Spray:
Using the very tip of your stiffest brush, stipple tiny white dots directly above the main white foam line to create the effect of crashing spray. -
Softening the Horizon:
If the horizon line looks too sharp, I like to run a clean, slightly damp brush over it once to blur the edge between sky and sea just a tiny bit. -
Final Dry:
Allow the entire painting to dry for at least an hour. Acrylics dry darker, so check if you need to brighten the white foam with a second layer. -
Seal the Scene:
Apply a coat of varnish to protect your miniature landscape. A glossy finish makes the water look permanently wet.
Now you have a permanent slice of paradise to keep on your desk or give to a friend


Simple Wave Foam Lines
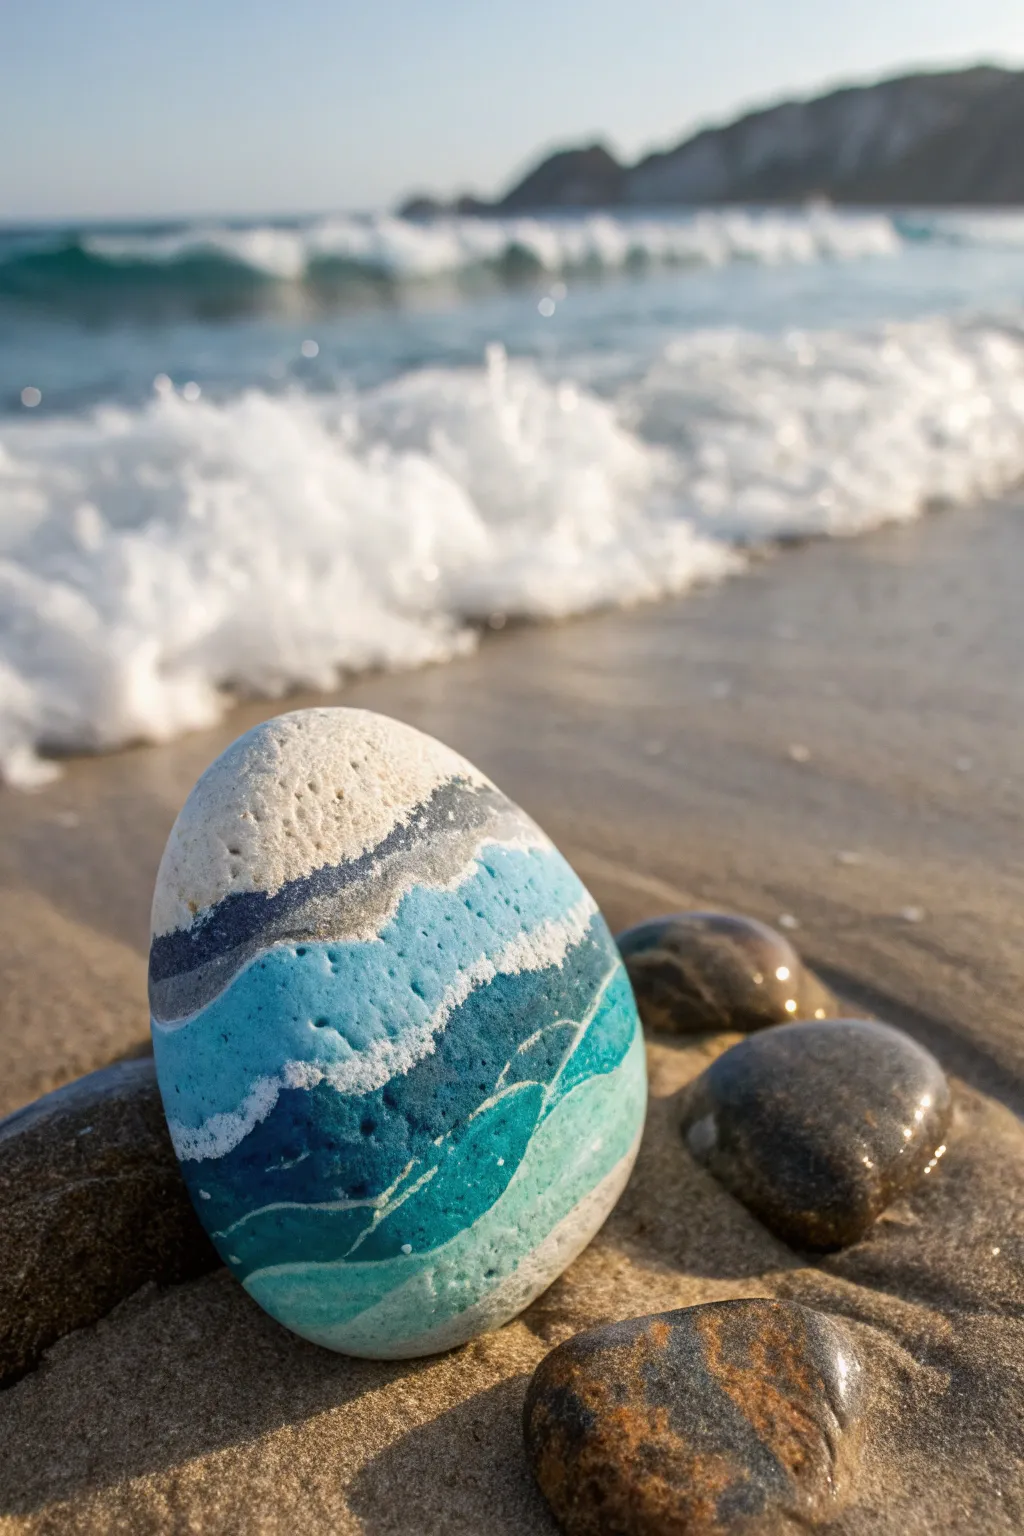
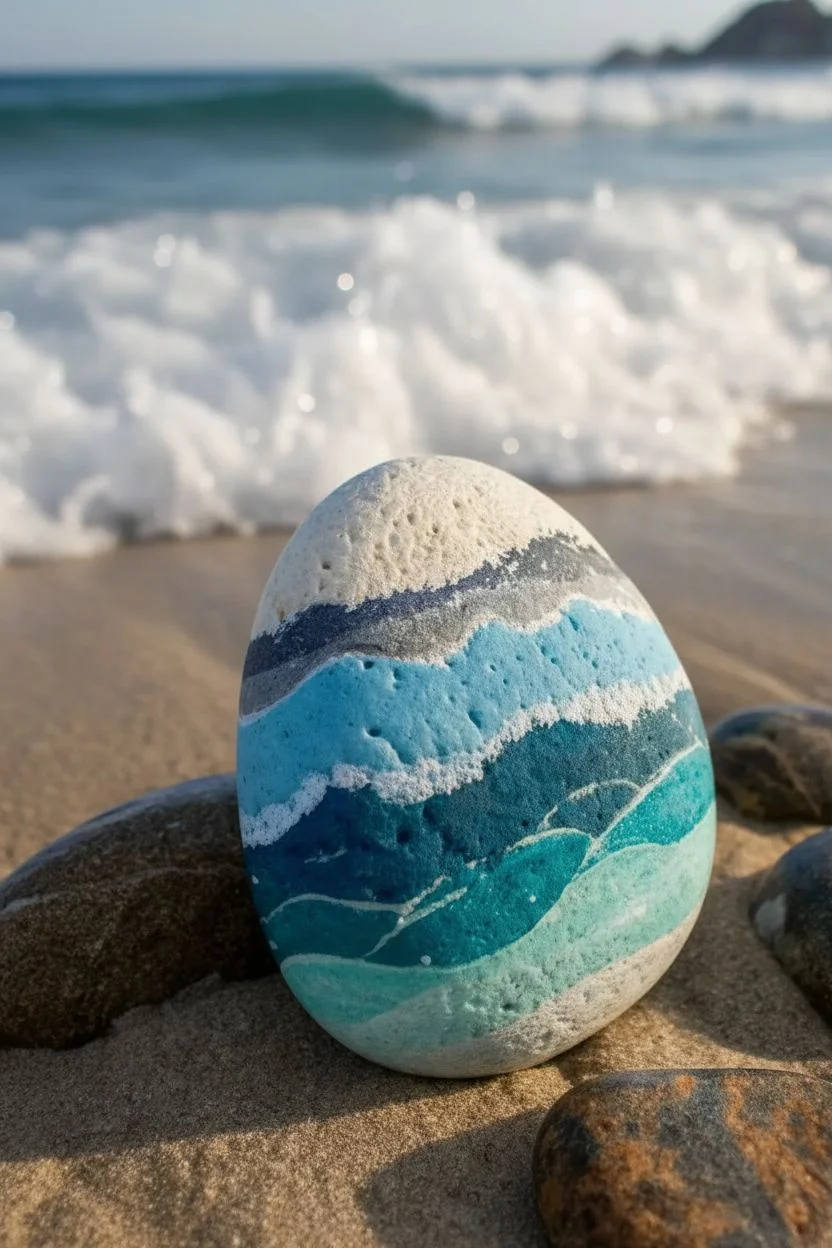
Capture the rhythm of the seaside with this serene wave painting that blends deep blues into foamy whites. This project mimics the natural gradient of the ocean rolling onto the shore, using organic lines and simple layering.
Step-by-Step Tutorial
Materials
- Smooth oval river rock or beach stone
- Acrylic paints: Navy blue, turquoise/teal, sky blue, white
- Flat brush (size 6 or 8)
- Small round detail brush (size 0 or 1)
- Palette or paper plate for mixing
- Cup of water
- Paper towels
- Clear acrylic sealer (matte or gloss)
Step 1: Base Coloring
-
Clean surface:
Begin by scrubbing your rock with soap and water to remove any sand or oils. Let it dry completely before starting, as moisture can trap bubbles under the paint. -
Establish the horizon:
Using your flat brush, paint the top one-third of the rock with plain white acrylic paint. This represents the foam and sky area. Don’t worry if the bottom edge is a bit wavy; organic lines look better here. -
Mix dark navy:
Load your palette with navy blue. Using the flat brush, paint a thick, wavy band directly below the white section. This will be the deepest part of your ocean wave. -
Create the mid-tone:
Clean your brush and pick up the turquoise or teal paint. Apply a band of this color right below the navy strip. Let the edges touch, but don’t blend them fully yet. -
Apply the shallow water:
For the bottom section of the rock, use a mix of sky blue and a tiny touch of turquoise. Paint this remaining area all the way to the bottom edge. -
Dry break:
Allow these base color bands to dry to the touch, which usually takes about 10-15 minutes depending on how thick your paint application is.
Step 2: Layering Waves
-
Add separation lines:
Switch to your small detail brush. Dip it into pure white paint and carefully trace the line where the top white section meets the navy blue section. Make this line jittery and uneven to look like foam. -
Create the second wave:
Paint another white, irregular line separating the navy blue band from the teal band below it. I find that slightly wiggling the brush as I drag it creates the best natural texture. -
Define the shore:
Add a final white line separating the teal section from the lightest blue bottom section. This represents the water thinning out near the sand. -
Build foam texture:
Go back to the top white section. Using a fairly dry brush with a little grey or diluted navy, dab lightly along the bottom edge of the white area to create shadows in the foam.
Foam Texture Tip
Use a piece of torn kitchen sponge instead of a brush to dab on the white foam lines. This creates an instant, natural bubbles effect.
Step 3: Refining Details
-
Add transparency:
Mix a very watery glaze of white paint. Paint thin, translucent curved lines over the teal and light blue sections to mimic sunlight reflecting through the water. -
Stipple the foam:
Dip just the tip of your detail brush into thick white paint. Gently dot or stipple along your white dividing lines to give them a bubbly, foamy appearance. -
Soften edges:
If any blue lines look too harsh, use a damp brush (with no paint) to gently run along the edge of the color to soften the transition before the paint fully cures. -
Highlight crests:
Add a few disconnected, thin white swoops inside the blue bands. These suggest movement and smaller ripples within the larger waves. -
Final dry:
Let the entire rock dry for at least an hour. The thick dabs of white foam might take a little longer than the flat layers. -
Sealing:
Once bone dry, apply a coat of clear acrylic sealer. A gloss finish makes the water look wet and vibrant, while matte looks more natural.
Uneven Lines?
Don’t stress over wobbly lines! Real ocean waves are never perfectly straight. Embrace the shakes; they make the water look more active.
Place your finished stone near a sunny window or in a garden pot to enjoy your portable piece of the ocean


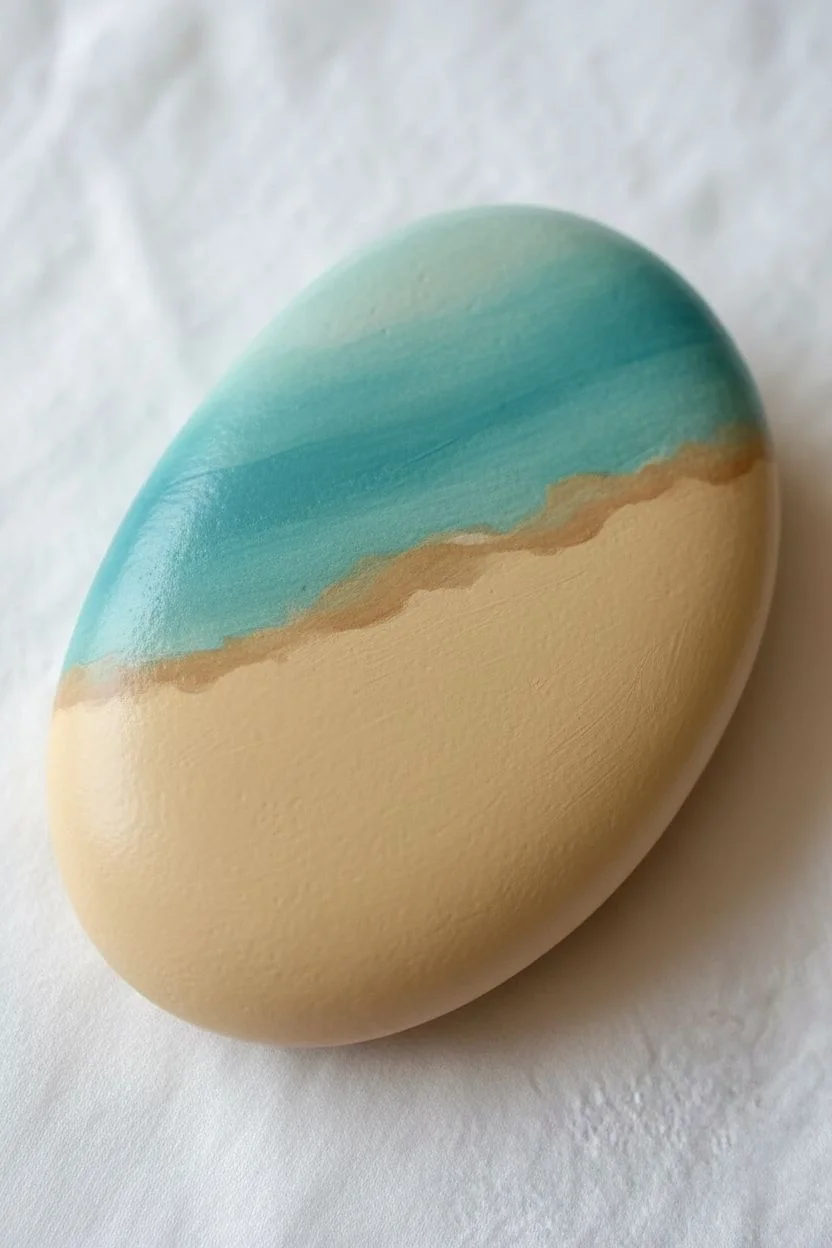
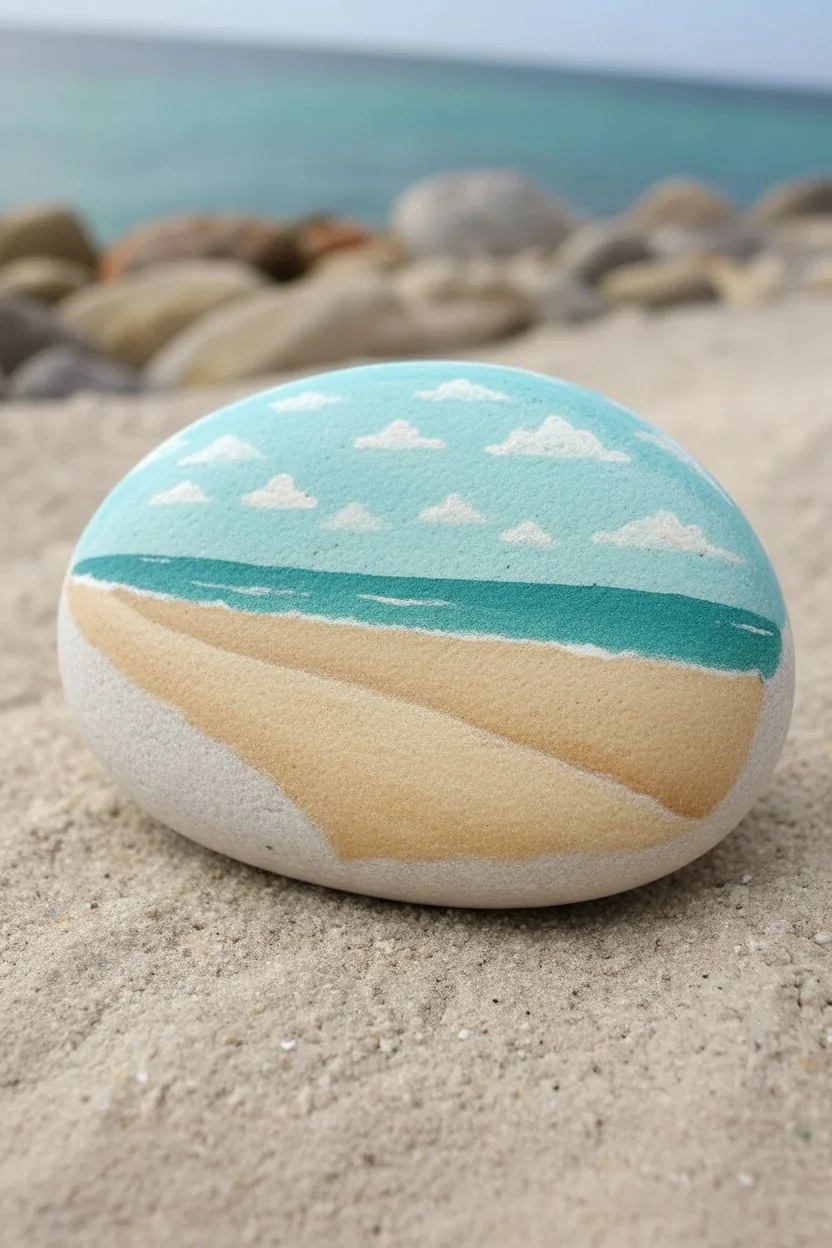
Blue Ombré Sea Gradient
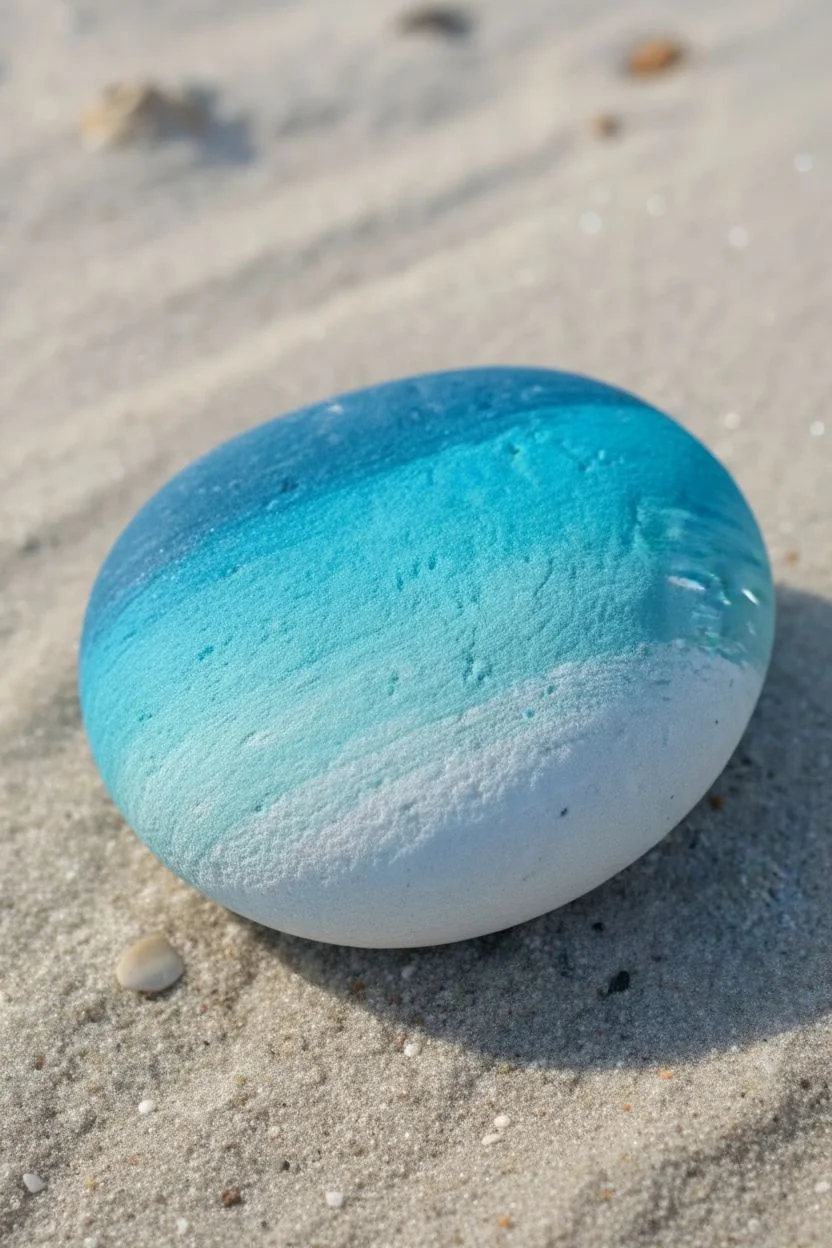
Capture the hues of the deep sea reaching the shore with this soothing ombré rock project. Using just three shades and a simple blending technique, you’ll transform an ordinary stone into a calming piece of coastal decor.
Detailed Instructions
Materials
- Smooth, round river rock or beach stone
- Acrylic paint: Navy Blue
- Acrylic paint: Turquoise or Teal
- Acrylic paint: White
- Flat shader paintbrush (size 6 or 8)
- Small soft blending brush or makeup sponge
- Palette or small dish
- Cup of water and paper towels
- Clear matte or gloss sealant spray (optional)
Step 1: Base and Blocking
-
Clean the surface:
Begin by washing your stone with warm soapy water to remove any sand, salt, or dirt. Scrub gently with an old toothbrush if needed to get into the crevices. -
Dry thoroughly:
Let the rock dry completely either in the sun or with a quick blast from a hair dryer. Paint won’t adhere properly to trapped moisture. -
Prepare your palette:
Squeeze out dime-sized amounts of navy blue, turquoise, and white acrylic paint onto your palette. Keep them slightly separated for now. -
Apply the dark layer:
Using your flat brush, paint the top third of the rock with the navy blue. It doesn’t need to be a perfectly straight line, but try to cover the curve fully. -
Paint the middle band:
Clean your brush quickly, then apply the turquoise paint to the middle section of the rock. Bring this color right up to meet the wet navy blue edge. -
Add the white base:
Finish the bottom third of the stone with pure white paint. Ensure the bottom edge meets the turquoise band while the paint is still workable.
Wet-on-Wet Magic
For the smoothest gradient, work quickly so the paints are still wet when they meet. If paint dries, mist it lightly with water.
Step 2: Blending the Ombré
-
Mix the transition shade:
On your palette, mix a tiny bit of navy blue with the turquoise to create a mid-tone deep teal. -
Blend the upper seam:
With a slightly damp brush, gently stroke back and forth where the navy and turquoise meet on the rock. Use the mixed teal color to soften the transition so no hard line remains. -
Create the light mix:
Mix a small amount of white into your turquoise pile on the palette to create a soft aqua shade. -
Soften the lower seam:
Apply this aqua mix to the line where the turquoise meets the white section. Use light, feathery horizontal strokes to blur the boundary. -
Feather the white:
Clean your brush thoroughly. Drag a little bit of the pure white paint upward slightly into the turquoise area to create a foamy, washed-out look. -
Check texture:
I find that dabbing the wet transition areas lightly with a dry sponge or clean fingertip can help remove brushstrokes and create a more natural stone texture. -
Let it cure:
Allow the first layer to dry for about 15 minutes. Acrylics dry darker, so you’ll see the true gradient emerge.
Add Sea Sparkle
Once the paint is dry, splatter tiny flecks of diluted white paint over the dark blue section to mimic distant stars or sea spray.
Step 3: Finishing Touches
-
Assess opacity:
If the rock’s natural color is showing through too much, repeat the process with a second thin layer. The white section usually needs a second coat for brightness. -
Refine the edges:
Inspect the sides of the rock to ensure the color bands wrap around naturally and don’t stop abruptly. -
Dry completely:
Wait at least one hour for the paint to fully harden before handling. -
Apply sealant:
To protect your gradient from scratching or chipping, apply a thin coat of spray sealant. A matte finish looks natural, while gloss makes it look wet like a sea stone.
Place your finished ombre stone on a shelf or desk for a peaceful reminder of the seaside


Golden Sunset Over the Water
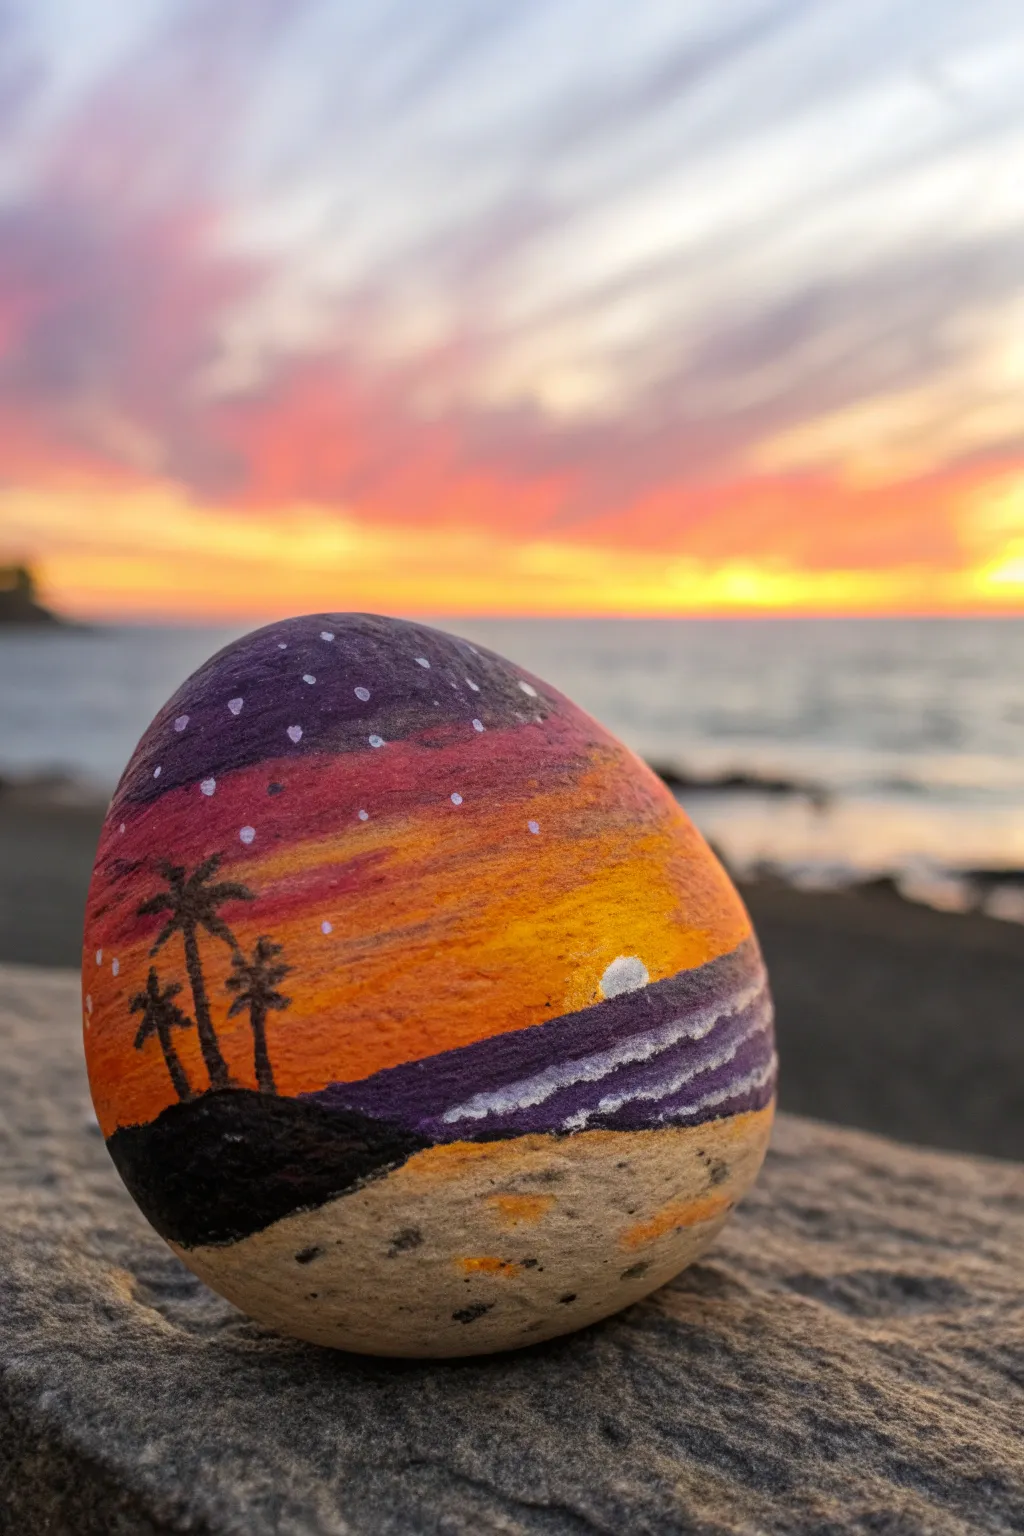
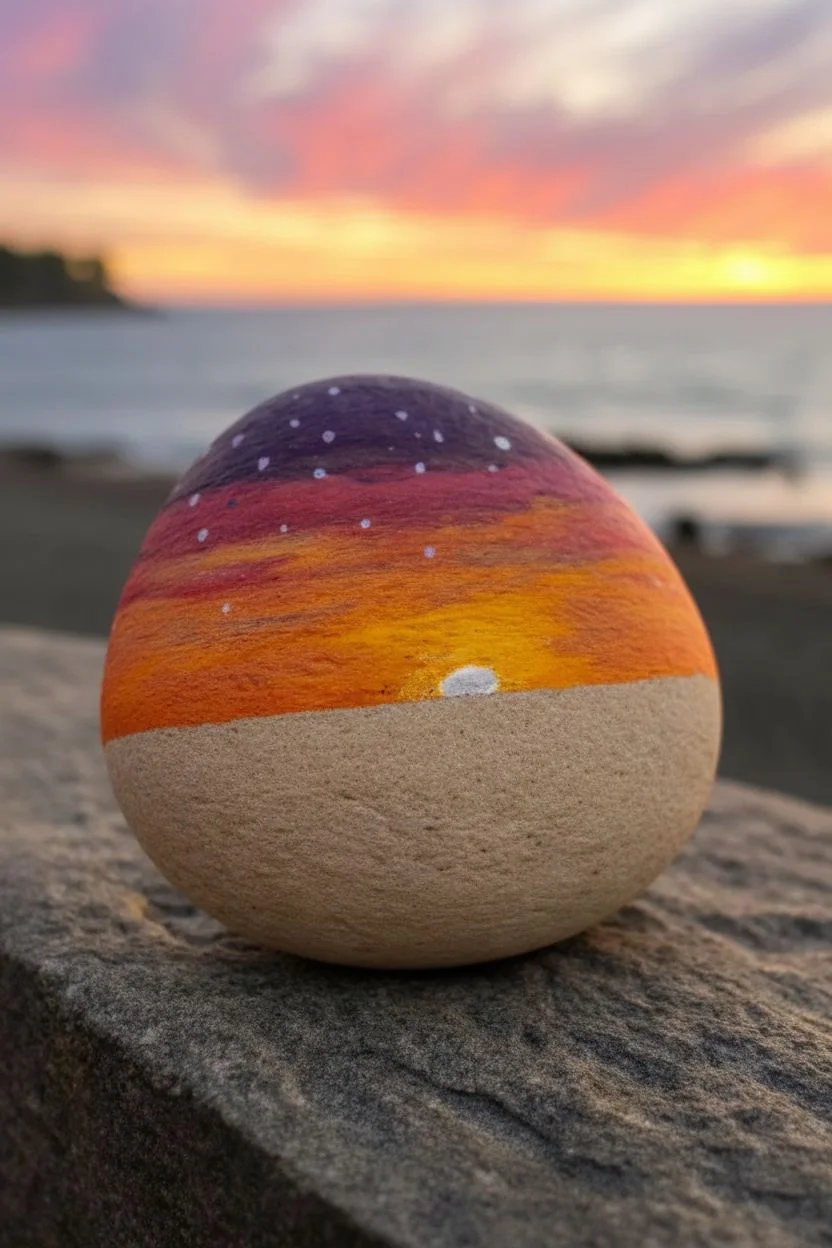
Capture the magic of a fading day with this hand-painted stone featuring a vibrant sunset gradient and silhouetted palm trees. This project transforms a simple smooth rock into a miniature beach escape that radiates warmth and calm.
Step-by-Step Guide
Materials
- Smooth, round river rock (approx. 3-4 inches)
- Acrylic paints (purple, deep red, orange, yellow, white, black, beige/sand color)
- Flat paintbrushes (small and medium)
- Fine detail brush or liner brush
- Palette or paper plate for mixing
- Cup of water and paper towels
- Spray sealer (glossy or matte)
Step 1: Painting the Sky Gradient
-
Prep the Stone:
Begin with a clean, dry rock. If the surface is very dark, you might want to establish a base coat of white acrylic paint on the upper two-thirds where the sky will be, allowing colors to pop more vibrantly. Let this dry completely. -
The Twilight Top:
Load a medium flat brush with deep purple paint. Apply this to the very top section of the rock, curving the stroke slightly to follow the stone’s rounded shape. -
Adding the Red:
While the purple is still slightly wet, pick up some deep red paint. Apply a band directly below the purple, blending the meeting point gently with your brush to create a transition dependent on the wet-on-wet technique. -
Orange Glow:
Clean your brush and switch to bright orange. Paint the next band down, blending it upward into the red layer. I like to work quickly here so the acrylics don’t dry before they mesh together. -
Golden Horizon:
Finish the sky by painting a bright yellow section at the bottom of the gradient. -
Refine the Blend:
If the lines between colors look too harsh, use a slightly damp, clean brush to lightly sweep back and forth over the transition lines to soften them. -
Set the Sun:
Using a small brush or the back of a paintbrush handle, dab a small semi-circle of white paint right at the bottom edge of the yellow horizon line for the setting sun.
Step 2: Ocean and Sand
-
Paint the Water:
Mix a little purple with a touch of blue or use the same purple from the sky. Paint a horizontal band below the yellow sky for the ocean, covering the sun’s bottom edge slightly so it looks like it’s dipping behind the water. -
Create the Beach:
Paint the remaining bottom portion of the rock with a beige or sand-colored paint. Curve the top edge where it meets the water to simulate a shoreline. -
Dry Time:
Allow the entire rock to dry completely before moving on to the silhouette details. This is crucial so the black paint doesn’t muddy the background.
Smooth Blending Trick
Add a tiny drop of retarding medium or water to your acrylics. This slows drying time, giving you longer to blend the intense sunset gradient perfectly.
Step 3: Silhouettes and Details
-
The Black Landmass:
Using black paint, create a small, hilly landmass on the left side of the rock. It should originate from the side and curve down toward the center, overlapping both the water and sky. -
Tree Trunks:
Switch to your finest detail brush. Paint three thin, curved lines rising from the black hill to form the palm tree trunks. Vary their heights for interest. -
Palm Fronds:
Carefully paint small arched strokes radiating from the top of each trunk. Keep the leaves jagged and loose to mimic palm fronds in silhouette. -
Ocean Waves:
Using a very fine brush and white paint, add thin, wavy lines horizontally across the purple water section to suggest rolling waves and foam. -
Shoreline Foam:
Dab white paint along the edge where the purple water meets the beige sand to create the look of water washing up on the beach. -
Starry Sky:
Dip the tip of a toothpick or a clean detail brush into white paint. Gently dot the purple upper section of the sky to create visible stars. -
Sealing:
Once the painting is 100% dry (give it at least an hour), spray it with a clear acrylic sealer to protect your artwork from chipping and fading.
Shaky Hands?
If painting straight horizon lines is difficult, use a piece of painter’s tape or washi tape to mask off the ocean line while you paint the sky.
Place your finished sunset stone on a desk or shelf to keep a piece of endless summer with you all year round
BRUSH GUIDE
The Right Brush for Every Stroke
From clean lines to bold texture — master brush choice, stroke control, and essential techniques.
Explore the Full Guide
Palm Tree Silhouette Beach
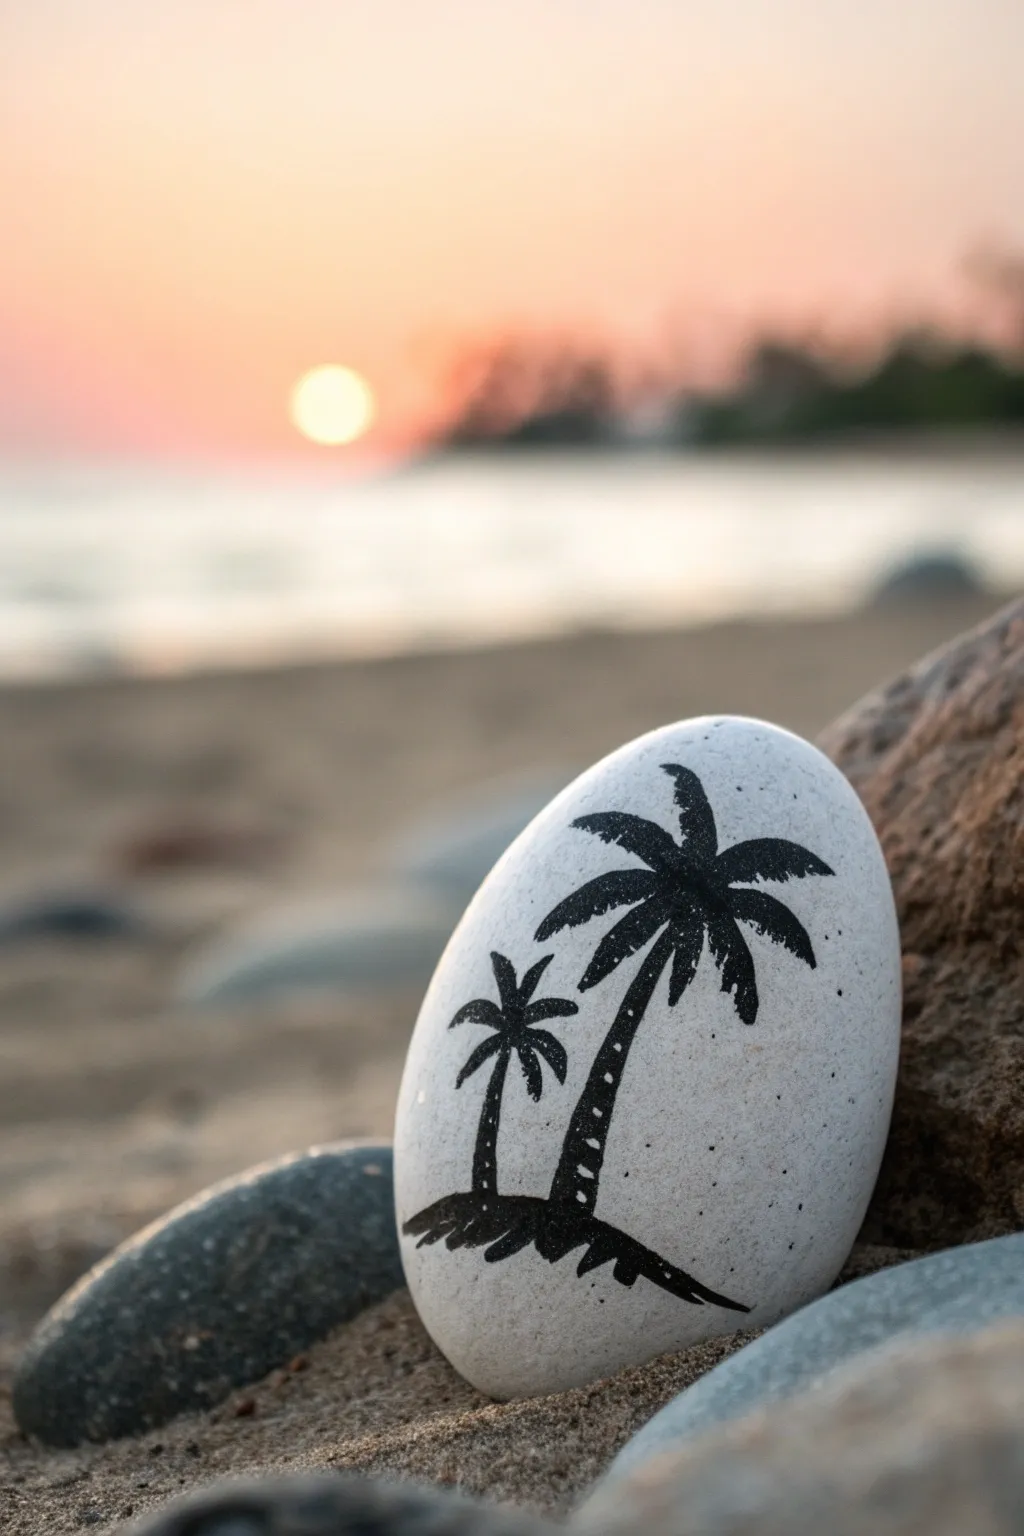
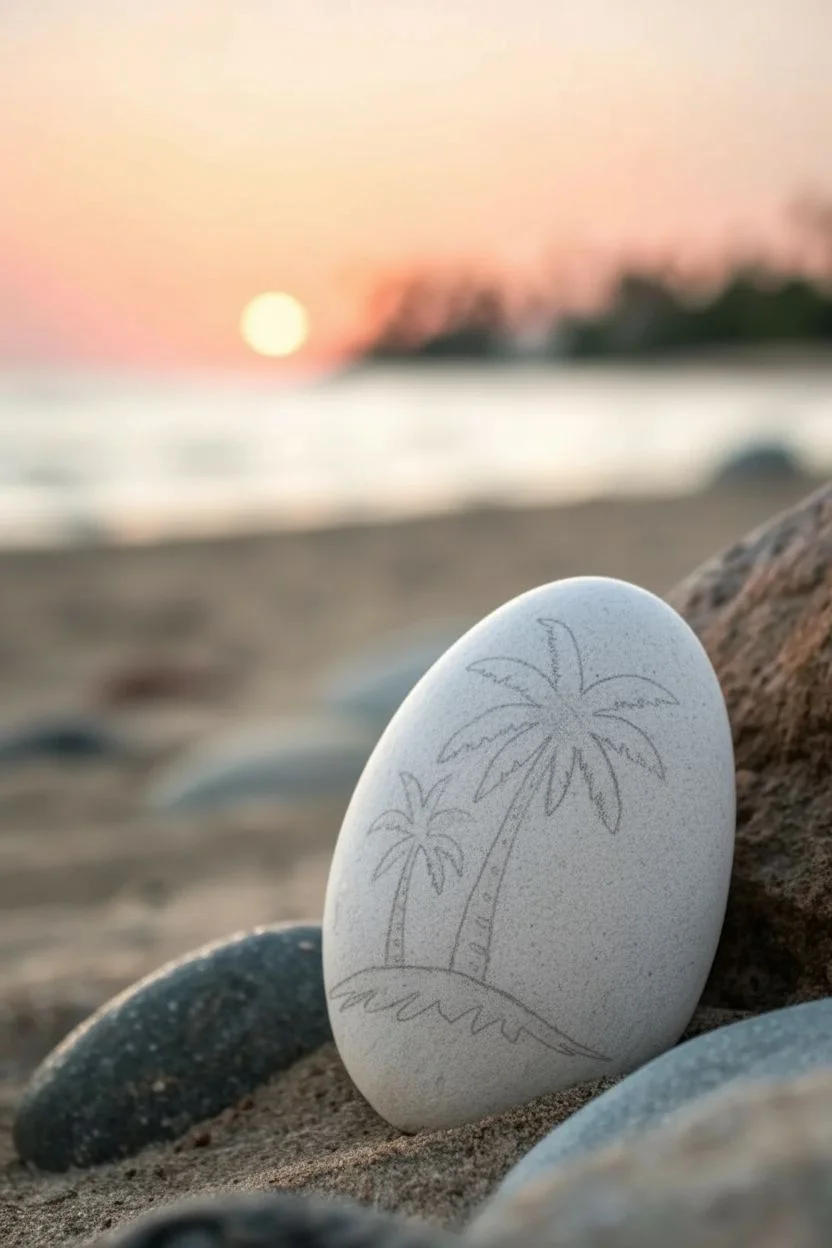
Capture the laid-back vibe of a tropical evening with this minimalist painted stone project. A smooth white rock serves as the perfect canvas for a stark, elegant silhouette of swaying palm trees that transport you straight to the shore.
Step-by-Step Tutorial
Materials
- Smooth, white or light colored river rock (egg-shaped prefered)
- Black acrylic paint or a black paint marker (fine tip)
- Pencil (HB or lighter)
- Eraser
- Fine detail paintbrush (size 0 or 00, if using paint)
- Matte or satin clear sealant spray
Step 1: Preparation and Sketching
-
Clean surface:
Begin by washing your stone with warm soapy water to remove any sand, salt, or oils. Let it dry completely before starting, as moisture can trap bubbles under the paint. -
Position the stone:
Orient your stone so it stands vertically, giving you height for the palm trees. Check that it sits securely; if it wobbles, you might want to prop it or pick a flatter side. -
Draft the ground line:
Using a pencil, lightly sketch a curved, uneven mound near the bottom quarter of the rock. This will be the sandy base for your trees. -
Sketch the trunks:
Draw two curved lines extending upward from the mound. Make the right trunk taller and slightly thicker, curving gently to the right. Add a shorter, thinner trunk on the left. -
Outline the fronds:
At the top of each trunk, lightly sketch the arching shapes of the palm fronds. Think of a firework explosion or a fountain shape—lines dropping down from a central point.
Step 2: Painting the Silhouette
-
Fill the base:
Using your black paint marker or fine brush, fill in the bottom mound completely. Make the edges slightly rough to mimic the texture of sand or grass. -
Draw the main trunk:
Trace over your pencil line for the tall right tree. Start thicker at the base and taper it slightly as you reach the top. -
Add trunk texture:
I like to add tiny triangular ridges along the side of the trunk to replicate the rough bark texture of a palm tree, rather than a perfectly smooth line. -
Draw the smaller trunk:
Repeat the process for the smaller tree on the left, keeping the line relatively thin compared to the main tree. -
Start the big fronds:
For the tall tree, draw the main spine of each frond first. Create about 5-7 spines radiating from the center top of the trunk. -
Add the leaves:
Along each spine, use short, flicking strokes to create the individual leaves. Angle them backward towards the trunk slightly to show gravity pulling them down. -
Paint the small fronds:
Move to the smaller tree and repeat the leaf technique. Keep these strokes smaller and more contained so the trees don’t merge into one blob. -
Refine the silhouette:
Look at the overall shape. If any fronds look too thin, go back and add a few more flicking strokes to thicken them up for a lush, tropical look. -
Add floating details:
Dot the pen or brush tip randomly around the trunk area or near the base to create the look of falling coconuts or distant birds.
Ink Bleeding?
If using a paint marker on a porous rock, the ink might feather. Always apply a clear coat or a layer of white acrylic paint as a primer first to seal the pores.
Step 3: Finishing Touches
-
Erase guidelines:
Wait at least 15 minutes for the ink or paint to cure fully. Gently erase any visible pencil marks that weren’t covered by the black silhouette. -
Seal the stone:
In a well-ventilated area, spray a light coat of matte or satin sealant over the rock. This protects your artwork from chipping if you place it back in the garden.
Add a Sunset
Before painting the black silhouette, sponge a gradient of yellow, orange, and pink acrylic paint onto the background for a true sunset effect.
You now have a miniature tropical escape that fits right in the palm of your hand
Seagulls in a Beach Sky
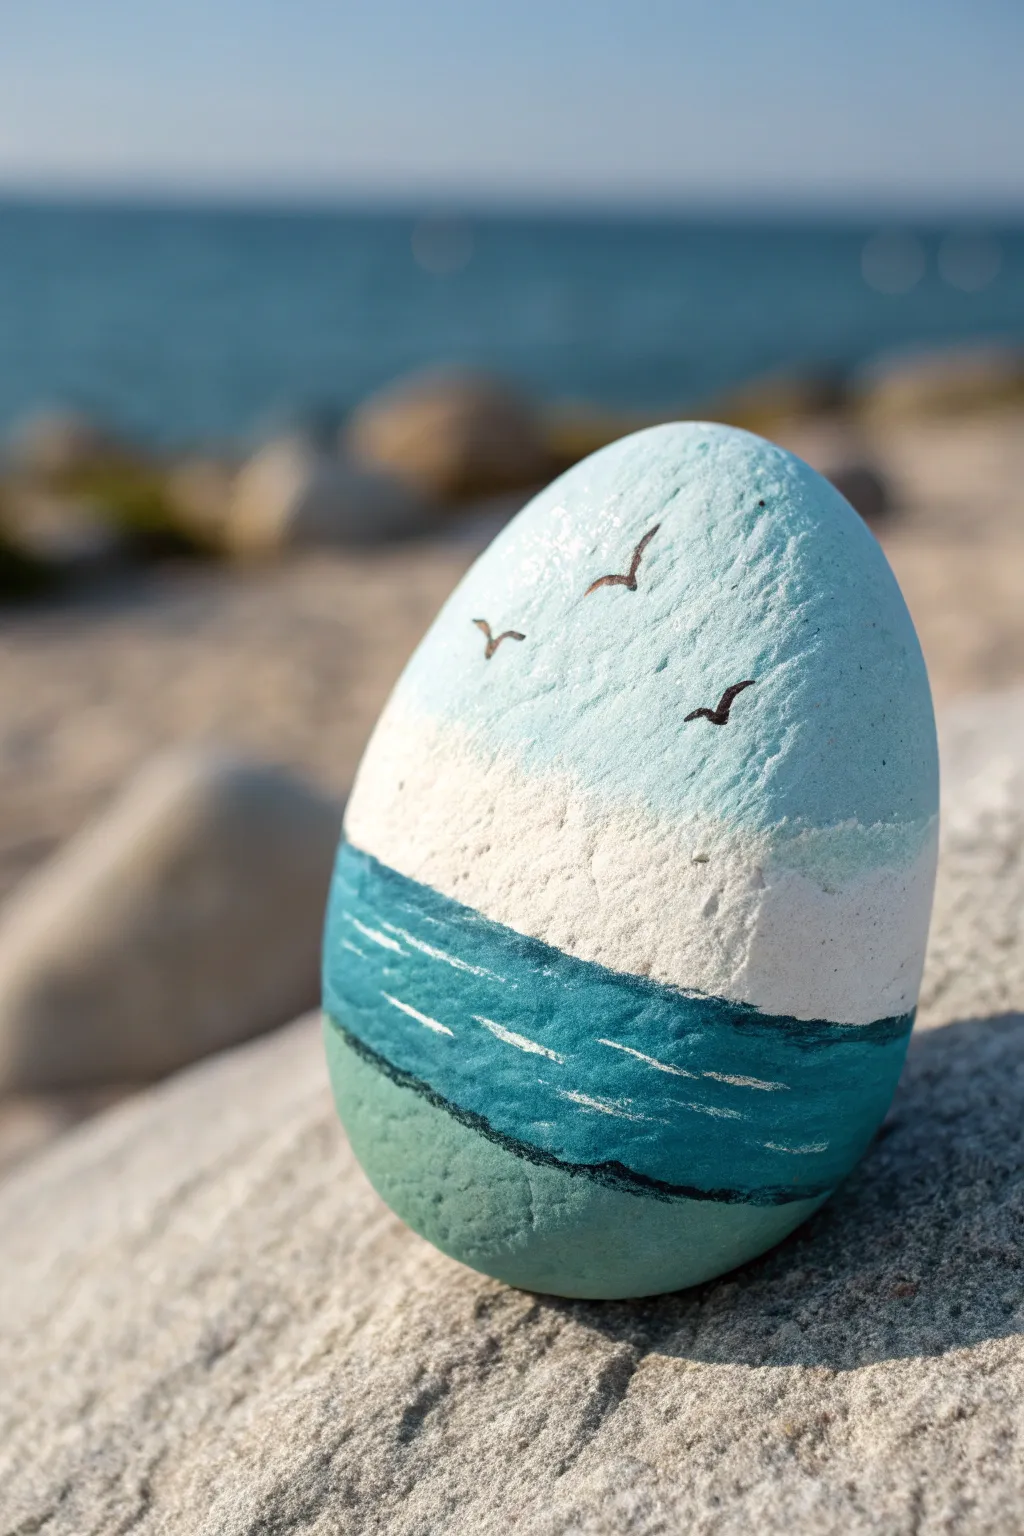

Capture the serenity of a quiet day at the coast with this beautifully simple painted rock design. Using just a few calming shades of blue and teal, you can transform an ordinary stone into a peaceful pocket-sized seascape.
How-To Guide
Materials
- Smooth, egg-shaped rock (clean and dry)
- Acrylic paints: White, Light Blue, Teal/Dark Turquoise, Seafoam Green
- Flat paintbrush (medium size)
- Fine detail brush (liner brush)
- Black fine-tip paint pen or acrylic ink
- Clear acrylic sealant (matte or glossy)
Step 1: Setting the Scene
-
Clean and prep:
Begin by ensuring your rock is completely free of sand or dirt. Wash it with mild soap and water, then let it dry fully before you pick up a brush. -
Paint the sky base:
Mix a generous amount of white with just a tiny drop of light blue to create a very pale, airy sky color. -
Apply the sky layer:
Using your flat brush, cover the top two-thirds of the rock with this pale blue mix. You might need two coats to get solid coverage over a darker stone. -
Create the horizon:
While the sky is drying, clean your flat brush. Now, paint the bottom third of the rock with your teal or dark turquoise paint. Don’t worry about a perfectly straight line just yet; the waves will cover the transition. -
Add the deep depths:
At the very bottom curve of the rock, blend in a touch of seafoam green or a lighter teal to suggest shallower waters or reflection.
Uneven Horizon?
If your horizon line feels crooked, don’t restart. Simply make the white ‘foam’ line thicker in that area to hide the uneven transition between sky and sea.
Step 2: Creating the Ocean
-
Define the horizon line:
Once your base layers are touch-dry, load your flat brush with pure white paint. Dab it along the line where the pale blue sky meets the teal water. -
Texture the waves:
Use a stippling motion (tapping the brush straight down) to create a fluffy, textured white line. Only overlap onto the teal section slightly to represent breaking waves. -
Add water movement:
Switch to your fine detail brush. Dip it in white paint and thin it slightly with a drop of water so it flows smoothly. -
Paint sea foam lines:
Paint thin, horizontal streaks across the teal section. These shouldn’t be perfect straight lines; let them wobble slightly to look like foam riding on the water’s surface. -
Deepen shadows:
If you want more contrast, use a tiny bit of dark blue or black to paint a very thin shadow line right underneath the main white wave line.
Step 3: Taking Flight
-
Dry completely:
Pause here and let the rock dry completely. I like to give it at least 20 minutes because painting fine details on wet paint can smudge the background. -
Draft the birds:
If you are nervous about freehanding, use a pencil to very lightly mark three small ‘V’ shapes in the sky area. -
Ink the seagulls:
Using a black fine-tip paint pen or a liner brush with black ink, carefully trace over your pencil marks. -
Refine the wings:
Make the wings slightly curved rather than straight lines—think of a shallow ‘m’ shape that has been stretched out wide. -
Vary the sizes:
Make one bird slightly larger than the others to create a sense of perspective. -
Seal the artwork:
Once the black ink is totally dry, apply a coat of clear acrylic sealer to protect your seascape from chipping.
Golden Hour Glow
Try blending a tiny drop of pale yellow or soft pink into the bottom of the sky right above the water to create a sunset effect instead of midday sun.
Place your finished stone on a windowsill or desk to bring a breath of fresh sea air into your room

PENCIL GUIDE
Understanding Pencil Grades from H to B
From first sketch to finished drawing — learn pencil grades, line control, and shading techniques.
Explore the Full Guide
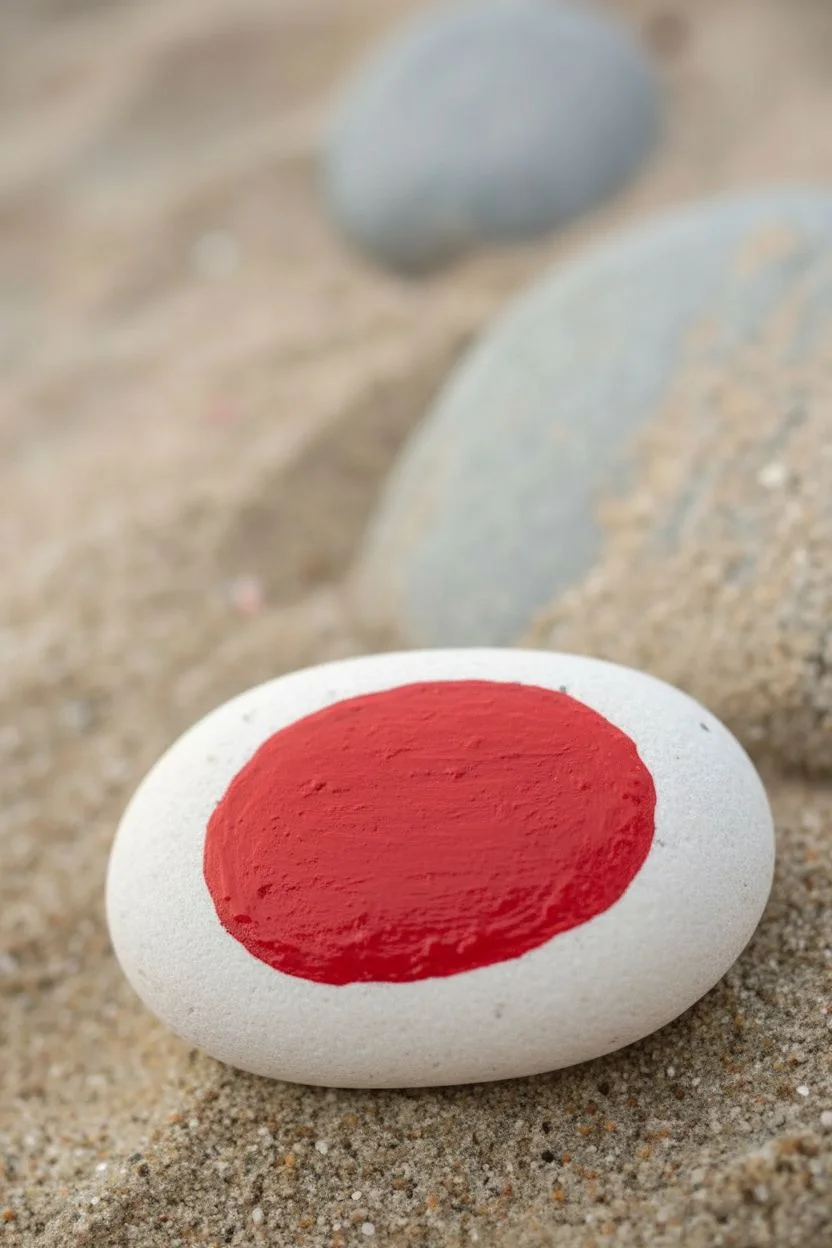
Tiny Lighthouse on the Shore
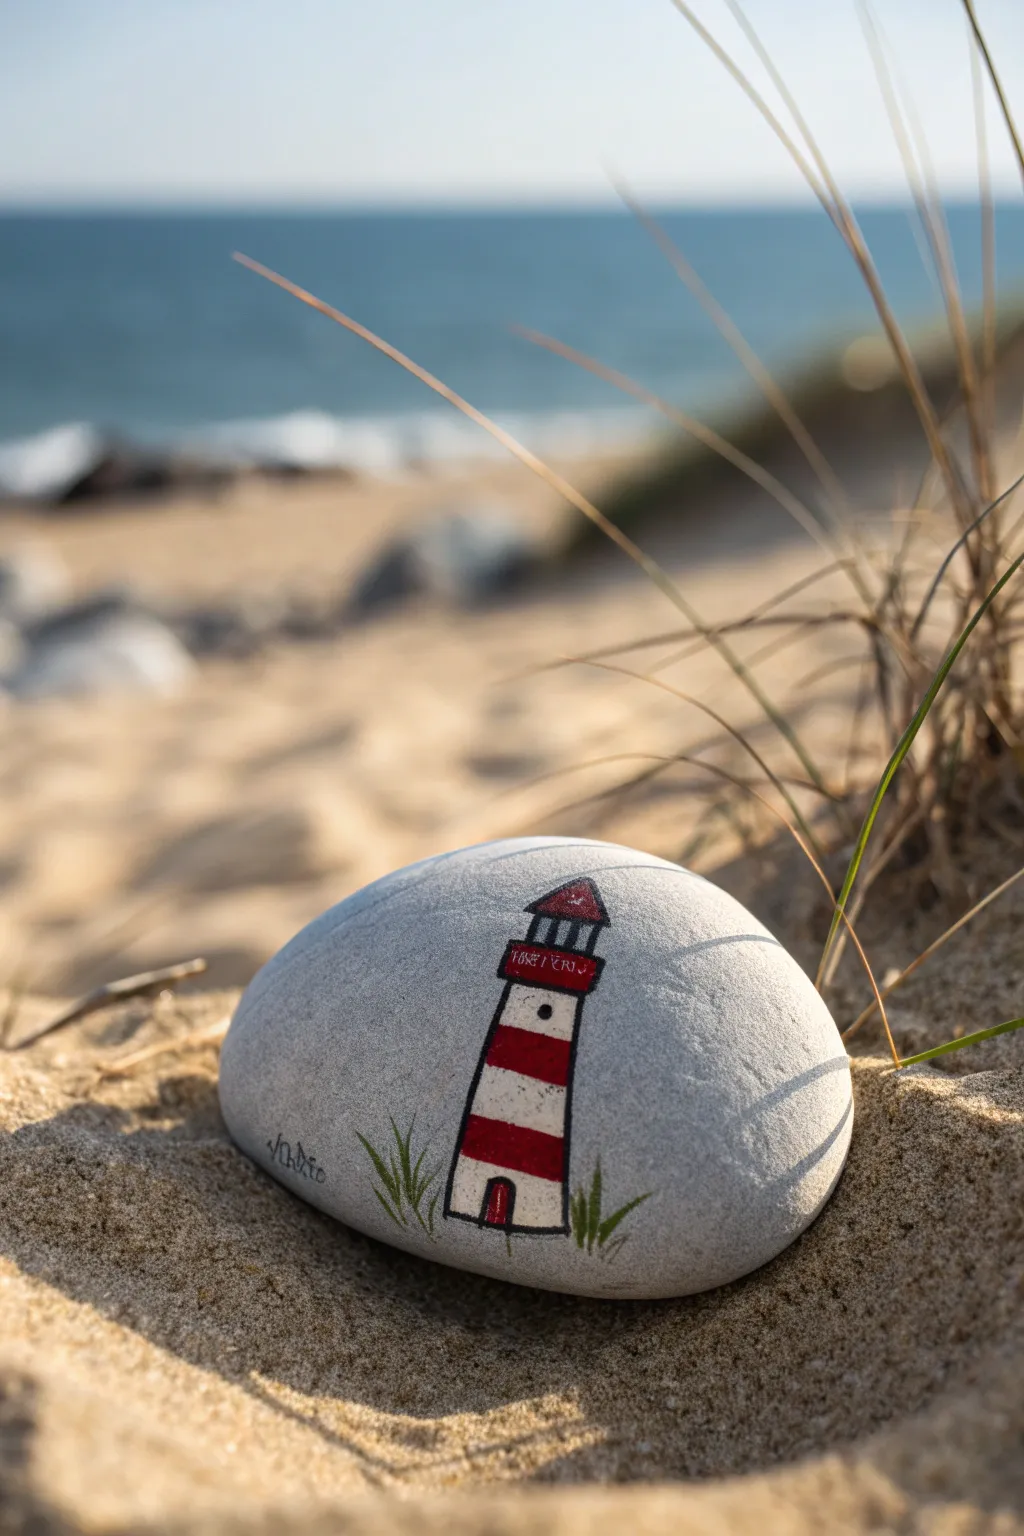
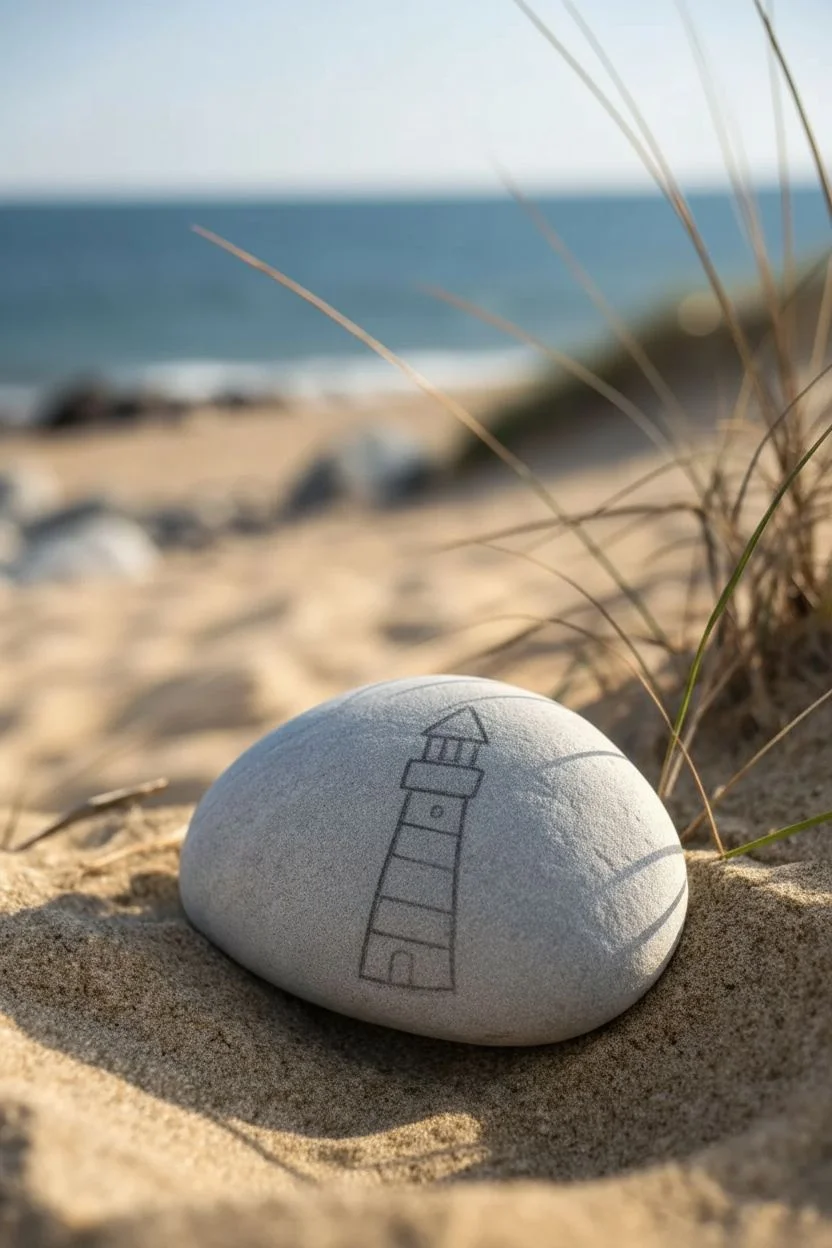
Capture the charm of the coast with this minimalist lighthouse design painted on a smooth river rock. The stark contrast of red and white against natural stone creates a striking little piece of art that looks right at home nestled in the sand.
Detailed Instructions
Materials
- Smooth, oval-shaped river rock or beach stone (grey)
- Acrylic paints: White, Red, Black, Dark Green, Lime Green
- Fine detail paintbrush (size 0 or 00)
- Small flat brush (size 2)
- Pencil for sketching
- Water cup and paper towels
- Matte or satin sealant spray
Step 1: Preparation and Sketching
-
Clean surface:
Begin by washing your stone with warm soapy water to remove any sand, salt, or oils. Let it dry completely in the sun or with a cloth. -
Outline the base:
Using a pencil, lightly sketch a tall, narrow trapezoid shape in the center of the rock. This will be the main tower of the lighthouse. -
Add the lantern room:
Draw a small rectangle on top of the tower, slightly wider than the top edge of the trapezoid. Top this with a small triangle for the roof. -
Mark the stripes:
Lightly sketch three slightly curved horizontal lines across the tower body to create four alternating sections for your red and white stripes.
Step 2: Painting the Structure
-
Base white:
Using your small flat brush, paint the second section from the top and the bottom section with white acrylic paint. You may need two coats for solid opacity. -
Bold red stripes:
Clean your brush thoroughly, then paint the top section and the third section down with a bright, primary red. -
Roof detail:
Paint the small triangle roof at the very top with the same red paint. Be careful to stay inside your sketched lines. -
Lantern deck:
Paint the rectangular area between the tower and the roof with a mix of red and a tiny dot of black to create a darker, maroon shade for contrast. -
Adding the door:
Switch to your fine detail brush. Paint a small, arched doorway at the very bottom center of the white section using red paint. -
Window detail:
Dip the very tip of your detail brush in black paint and place a single, small dot in the center of the upper white stripe for a porthole window.
Smooth Lines Pro-Tip
For the crispest black outlines, dilute your black acrylic with a drop of water until it feels like ink. This helps the paint flow off the brush without dragging.
Step 3: Outlining and Finishing Touches
-
Black outlines:
Using your finest brush and thinned black paint (ink consistency works best), carefully outline the main tower and the roof structure. Keep your hand steady and rest your pinky on the table for balance. -
Lantern bars:
Paint two or three tiny vertical black lines inside the maroon lantern room area to represent the glass panes and railing. -
Door frame:
Outline the red door with a very thin black line to make it pop against the white base. -
Grass base:
Mix dark green with a little black. Using quick, upward flicking motions with your fine brush, paint grass blades growing up around the base of the lighthouse. -
Grass highlights:
Add a few flicks of lime green or yellow-green over the dark grass to add depth and dimension to the foliage. -
Signature:
Sign your initials small and neatly near the bottom edge using the fine liner brush and black paint. -
Seal it:
Once creating the artwork is done and the paint is fully cured (usually 24 hours), spray a light coat of matte sealant over the rock to protect it from the elements.
Level Up: Beams of Light
Use a dry-brush technique with very faint yellow paint to create a soft, transparent beam of light shining out from the lantern room across the grey stone.
This little nautical treasure is now ready to decorate your garden or be hidden for someone else to find
Seashell Motif on Sandy Beach


Create a serene piece of beach art with this minimalist scallop shell design painted on a natural stone. The contrast of the crisp white lines against the warm tan rock captures the essence of a sun-warmed day on the shore.
Step-by-Step Guide
Materials
- Smooth, oval river rock (tan or beige color)
- White acrylic paint (high opacity) or white paint pen (fine tip)
- Very fine detail paintbrush (size 0 or 00, if using paint)
- Pencil (light graphite)
- Eraser
- Paper towel
- Matte spray sealer (optional)
Step 1: Preparation and Sketching
-
Clean the canvas:
Begin by washing your stone thoroughly with soap and water to remove any sand, salt, or oils. Let it dry completely in the sun or with a towel. -
Position the stone:
Place the stone on your work surface, finding its most stable side. Orientation matters, so position it slightly diagonally if that suits the shape best. -
Draft the base shape:
Using a light pencil touch, lightly sketch a fan shape in the center of the rock. This will be the main body of the scallop shell. -
Add the hinge:
At the bottom point of your fan, draw a small triangle pointing downward to represent the shell’s hinge or ‘ear’. -
Segment the shell:
Lightly sketch radiating lines from the bottom hinge point up to the curved top edge. These will guide your painting later. -
Check the proportions:
Step back and look at your sketch. The shell should sit comfortably in the middle, leaving some negative space around the edges.
Paint Pen Alternative
Struggling with brush control? Use a fine-tip white acrylic paint marker (0.7mm) instead. It offers precise lines without the need for constant reloading.
Step 2: Painting the Shell
-
Load your brush:
Dip your fine brush into white acrylic paint. You want a creamy consistency—not too watery, but fluid enough to make smooth lines. -
Paint the radiates:
Start painting the white lines that radiate from the center bottom. I find it easier to stroke upward from the base to the top edge. -
Thicken the lines:
Go back over your radiating lines. They should be thicker at the top and taper slightly as they reach the bottom point. -
Create the scalloped edge:
At the top of each radiating line, paint a small, curved cap to connect them, creating that classic scalloped silhouette. -
Define the hinge:
Paint the small triangular section at the bottom. Use horizontal strokes or fill it in solid white, leaving a tiny gap between it and the main fan. -
Refine the gaps:
If your lines merged too much, you can carefully scratch away excess paint with a toothpick while it’s still tacky to re-define the gaps.
Step 3: Adding Details and Finishing
-
Add texture dots:
Dip the handle end of a paintbrush or a toothpick into the white paint. -
Scatter the bubbles:
Place random dots around the stone. Vary the sizes by using different tools or pressure. Place a few larger dots near the shell and smaller ones further away. -
Create highlight accents:
Add a few tiny white dots directly onto the shell ridges themselves to give it a weathered, textured look. -
Let it cure:
Allow the paint to dry completely. This usually takes about 15-20 minutes depending on how thick your paint application was. -
Erase guidelines:
Once absolutely dry, gently erase any visible pencil marks. Be careful not to rub the paint off. -
Seal the deal:
If you plan to keep this rock outdoors, apply a clear matte spray sealer to protect your design from the elements.
Uneven Coverage?
If the stone color shows through the white paint, let the first layer dry completely, then apply a second coat. Don’t overwork wet paint or it will lift.
Place your finished shell stone in a planter or garden for a lovely coastal touch


Starfish and Shoreline Combo
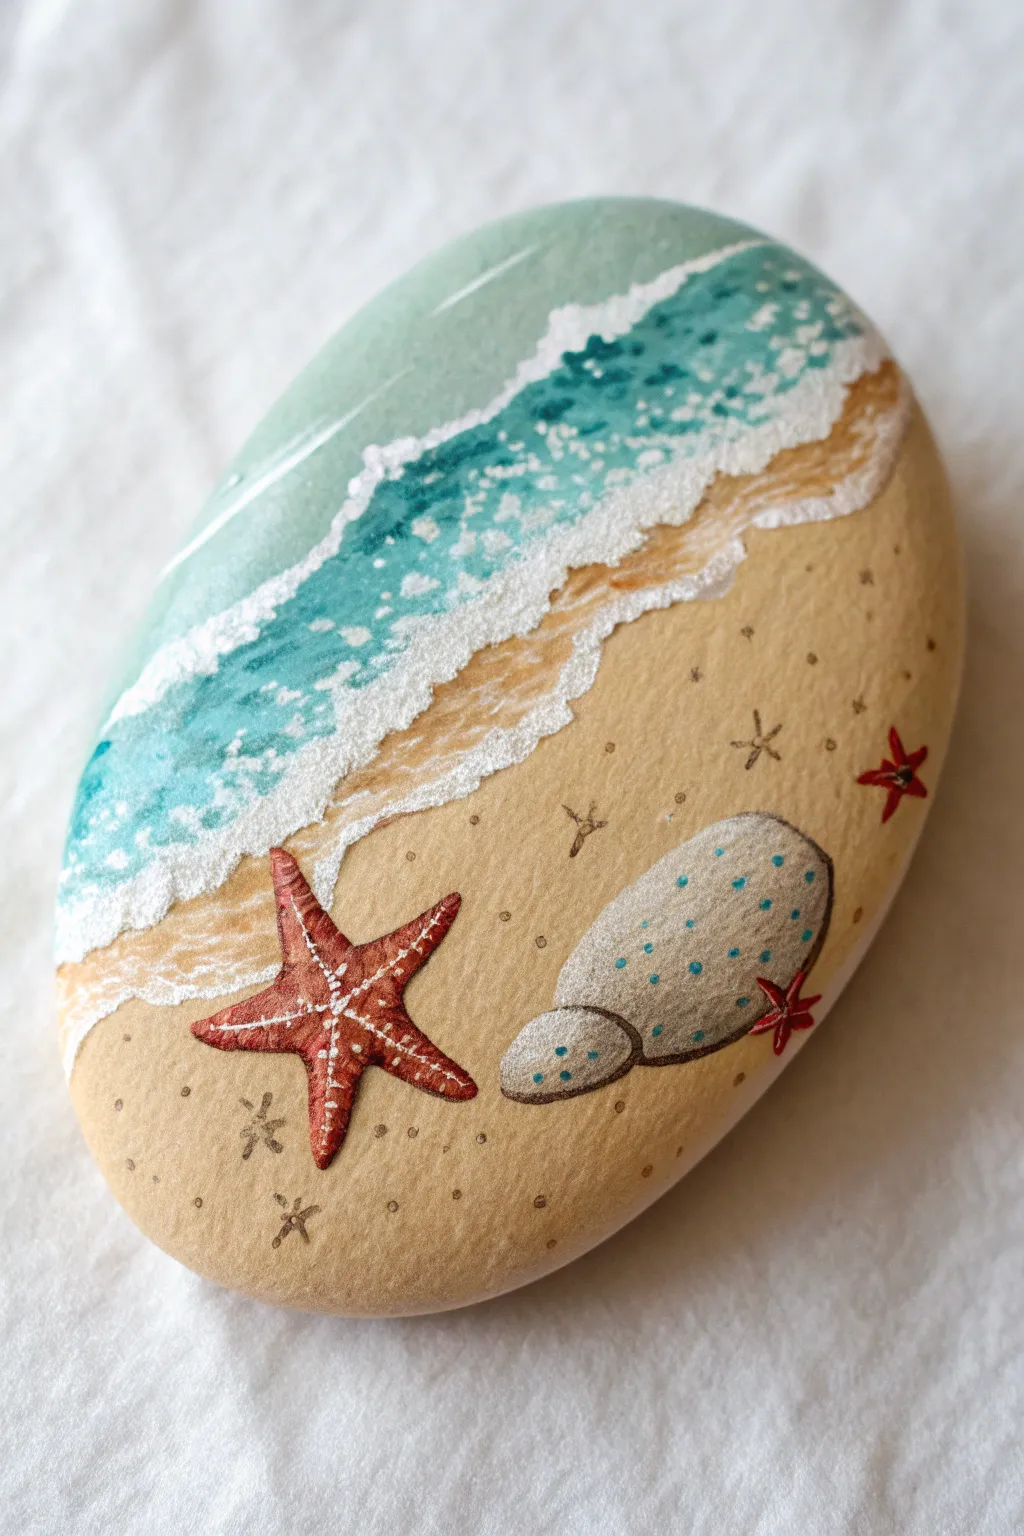
Capture the magic of a shoreline on a smooth river rock with this detailed miniature landscape. This project layers turquoise waves, frothy sea foam, and tiny sandy details to create a serene beach getaway that fits in the palm of your hand.
How-To Guide
Materials
- Smooth, oval river rock (clean and dry)
- Acrylic paints: White, turquoise/teal, beige/sand, light grey, dark grey, reddish-brown
- Paintbrushes: Medium flat brush, small detail round brush (size 0 or 00)
- Dotting tool or toothpick
- Palette or paper plate
- Water cup and paper towels
- Acrylic sealer (gloss or matte spray)
Step 1: Setting the Scene
-
Base Coat:
Begin by painting the bottom two-thirds of your rock with a smooth layer of beige or sand-colored acrylic paint. Depending on the opacity of your paint, you may need a second coat for solid coverage. -
Ocean Gradient:
Paint the top third of the rock with a turquoise or teal shade. While the paint is still slightly wet, blend a tiny amount of white near the top edge to create a soft, sunlit water effect. -
Wet Sand Transition:
Mix a slightly darker shade of beige (add a tiny drop of brown to your base sand color). Paint a thin, irregular band right where the blue water meets the dried sand base to simulate wet sand.
Foam Illusion Tip
For realistic sea foam, don’t paint solid lines. Use a tapping motion with a scruffy, dry brush to create that airy, bubbly texture on the water.
Step 2: Creating the Surf
-
Primary Wave Line:
Load a small round brush with pure white paint. Dab an irregular, bumpy line right over the seam where the blue meets the wet sand color. -
Sea Foam Texture:
Using a very dry brush technique or a toothpick, stipple small white dots and dashes extending from the main wave line back into the blue water area. -
Outer Wave:
Add a second, thinner line of white foam further out in the turquoise section to create depth, making it look like a distant wave forming. -
Shadowing the Foam:
Once the white is fully dry, take a very diluted grey wash and carefully outline the bottom edge of your biggest foam sections to give them 3D volume.
Step 3: Sandy Details
-
Texture Specs:
Dip a toothbrush or stiff brush into diluted brown paint and gently flick it (or use a dotting tool for control) to create tiny speckles across the beige sand area. -
Mini Starfish Outlines:
Use a fine liner brush and brown paint to sketch tiny, five-pointed star shapes scattered on the sand. -
Starfish Accents:
Going back to the tiny brown stars, add subtle red or orange dots in their centers to make them pop against the sand.
Fixing Wobbly Lines
If your fine lines for the starfish get too thick, wait for them to dry, then use the sand color to paint over the edges and ‘erase’ the mistake.
Step 4: The Focal Elements
-
Main Starfish Base:
Paint a five-pointed star shape in the lower left quadrant using a reddish-brown color. Make the legs slightly curved to look organic. -
Starfish Texture:
Using your finest brush and white paint, add a central line of tiny dots down each arm of the starfish, and speckles across its body. -
Bottom Shadow:
Paint a thin, dark brown shadow along one side of each starfish arm to ground it onto the sand. -
Painted Rock Shape:
Paint a smooth, rounded grey oval shape on the right side of the sand. Add a smaller grey circle touching it to form a two-part stone. -
Stone Texture:
Stipple the grey stone shapes with tiny dots of teal and white to mimic granite texture. -
Background Starfish:
Paint one or two tiny red starfish peeking out from behind the grey painted rock for extra visual interest.
Step 5: Final Touches
-
Highlighting:
Add a tiny stroke of white to the top of the grey painted stone and the tips of the main starfish to simulate sunlight hitting them. -
Sealing:
Allow the entire rock to dry for at least 24 hours. Coat with a clear acrylic sealer to protect your miniature beach scene from chipping.
Place this little piece of paradise on your desk or in a planter for a daily dose of beach vibes
Sand Dollar Dot Design
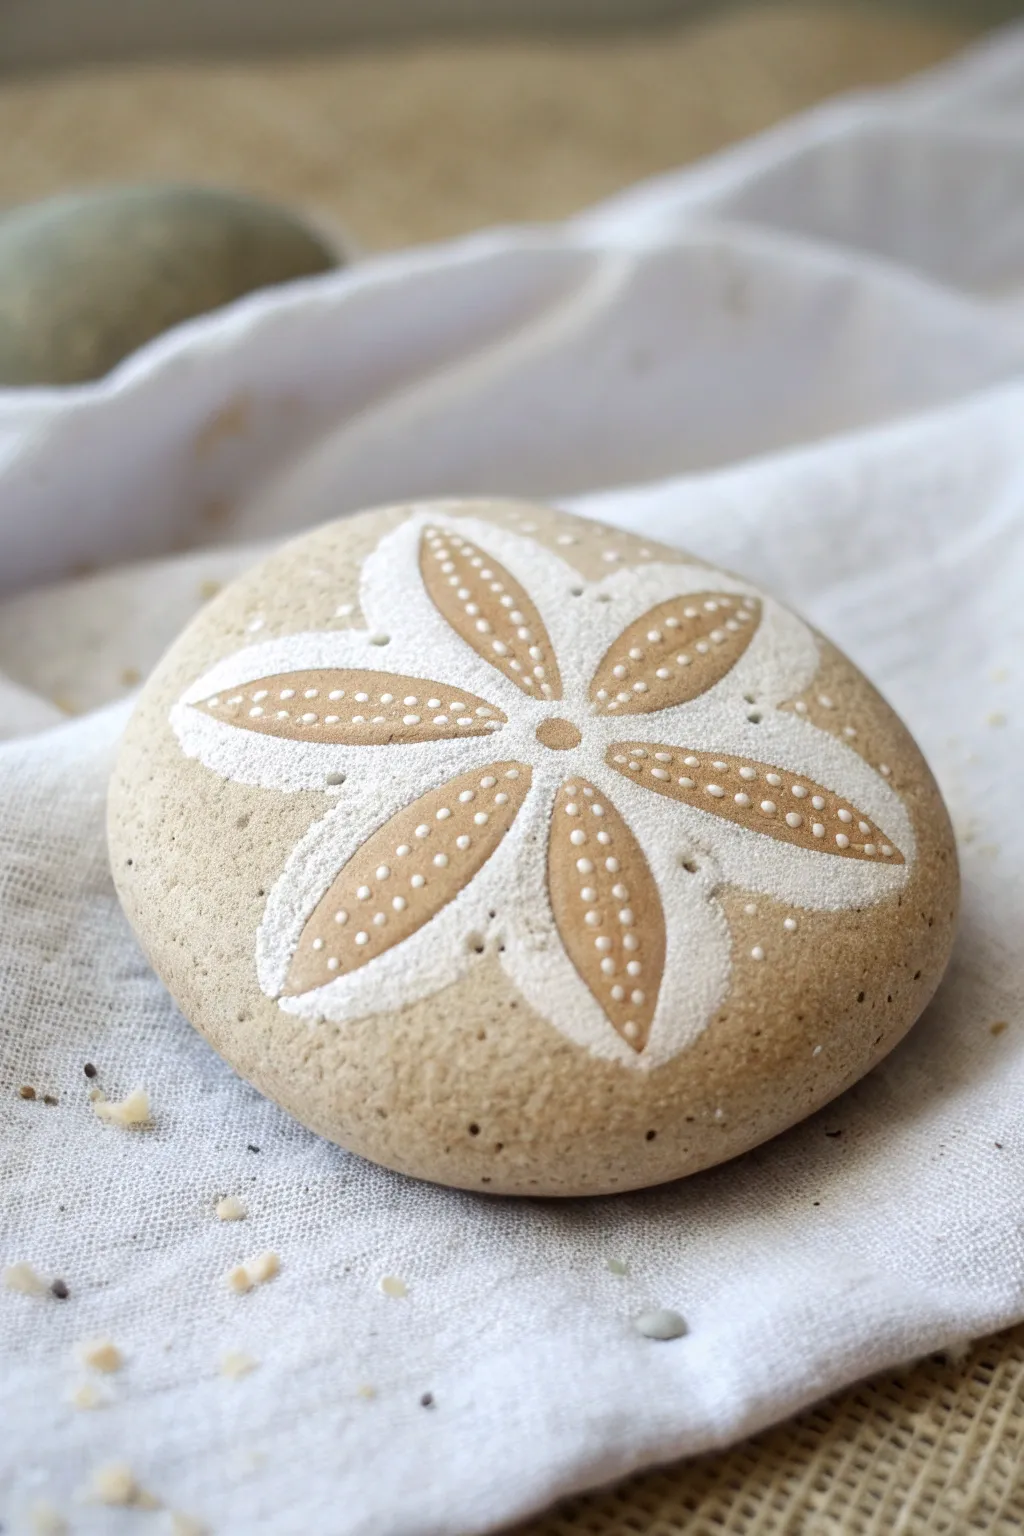
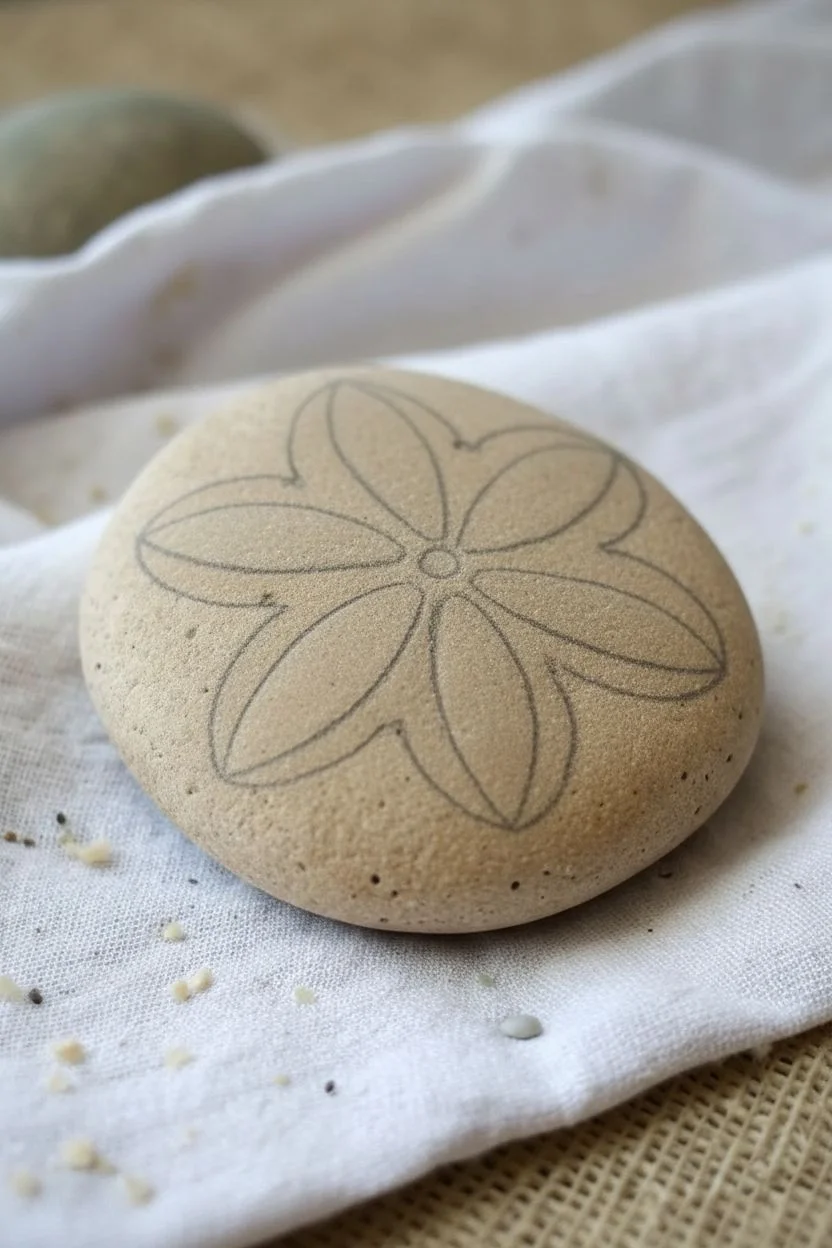
Transform a simple smooth beach stone into a delicate sand dollar using careful dot work and negative space. This design relies on a striking contrast between white acrylic and the natural tan of the stone to mimic the texture of a real sea biscuit.
Detailed Instructions
Materials
- Smooth, round, tan-colored beach stone
- White acrylic paint (high opacity)
- Small round paintbrush (size 0 or 1)
- Dotting tool or toothpick
- Pencil (very light lead)
- Matte varnish or sealant
Step 1: Planning the Layout
-
Clean the surface:
Begin by washing your stone with warm soapy water to remove any salt or sand residue. Let it dry completely before starting, as paint won’t adhere well to damp stone. -
Find the center:
Locate the approximate center of your stone. Using a pencil with a very light touch, mark a small dot here. This will serve as the anchor for your entire radial design. -
Sketch the petals:
Lightly sketch five oval-shaped petals radiating from the center dot, resembling a flower. Aim for symmetry, but remember perfection isn’t necessary for a natural look. Leave a small gap between each petal where they meet at the center.
Step 2: Painting the Base Design
-
Outline the petals:
Load your small round brush with white acrylic paint. Carefully paint an outline around each of your five penciled petals. Keep the line thickness consistent. -
Thicken the outline:
Go back over your outlines to create a thicker band of white. You want a solid, opaque border that is roughly 1/8th of an inch wide, surrounding the empty stone space inside the petal. -
Create the center connection:
Paint a small ring around your original center point, connecting the inner tips of the five petals. This creates the star-like core typical of sand dollars. -
Dry the base layer:
Allow these white outlines to dry completely. Since this layer is thick, I recommend waiting at least 15 minutes so you don’t smudge it while dotting.
Uneven Dots?
If your dots are turning into blobs, your paint is likely too thin or you are overloading the tool. Wipe the tool clean between every few dots for crisp circles.
Step 3: Adding the Dot Details
-
Prepare for stippling:
Place a small amount of fresh white paint on your palette. For the dots, the paint needs to be fluid but not watery, so it holds its shape. -
Dot the center line:
Using a dotting tool or the tip of a toothpick, place a line of tiny dots down the exact center of one unpainted petal area. Use the natural stone color as your background canvas. -
Fill the petal interior:
Add two more rows of dots on either side of your center line within the petal. These dots should be slightly smaller or spaced a bit further apart to create a textured, porous look. -
Repeat for all petals:
Continue this dotting process for the remaining four petals. Try to keep the dot size relatively consistent across the whole stone. -
Add outer texture:
Dip your toothpick in paint again and add a few random, tiny dots on the white painted borders you created earlier. This subtle texture mimics the grainy surface of a real sand dollar. -
Define the center point:
Paint a solid, small round dot directly in the very center of the star shape where all petals converge.
Level Up: Texture
Mix a tiny pinch of baking soda into your white acrylic paint before applying the solid borders. This creates a gritty, calcified texture that feels remarkably real.
Step 4: Finishing Touches
-
Erase guidelines:
Once you are absolutely certain the paint is bone dry, gently erase any visible pencil marks from the unpainted areas of the stone. -
Inspect contrast:
Check if your white paint looks opaque enough. If the stone color is showing through the white borders too much, apply a careful second coat to brighten it up. -
Seal the stone:
To protect your work without making it look artificial, apply a layer of matte varnish. Avoid glossy finishes, as real sand dollars have a distinctively matte, chalky appearance.
Now you have a permanent piece of beach art that captures the fragile beauty of a sand dollar
Flip-Flops on the Beach
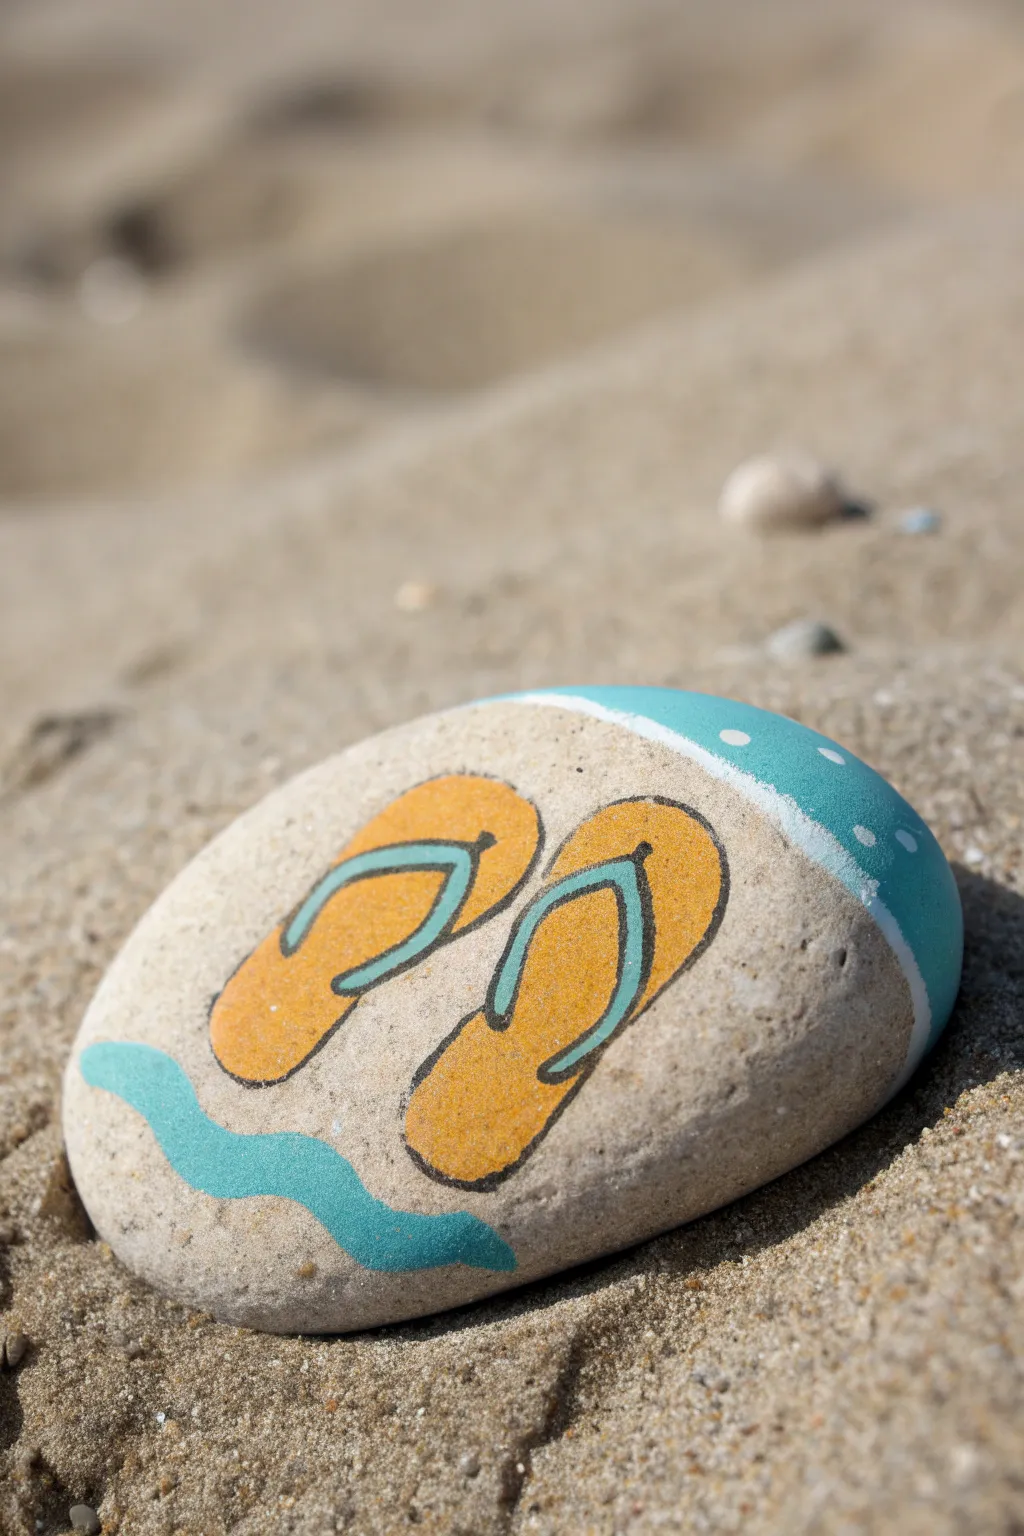
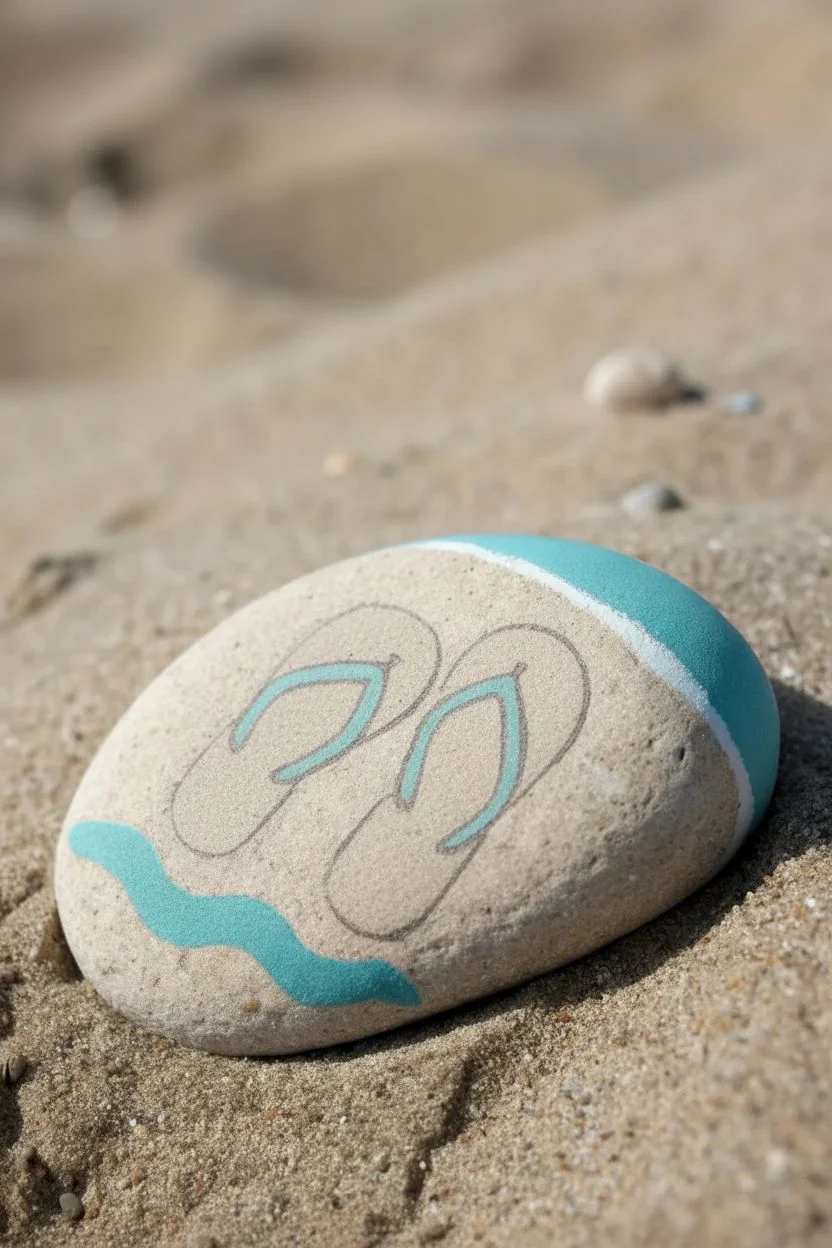
Capture the essence of a relaxing beach day with this cheerful painted stone project. Featuring bright yellow-orange sandals and cool teal accents, this design transforms a simple smooth rock into a tiny piece of summer art.
Step-by-Step Guide
Materials
- Smooth, flat river rock or beach stone (light grey or beige)
- Acrylic paints (Yellow-orange/Ochre, Teal/Turquoise, White, Black)
- Fine detail paintbrush (size 0 or 00)
- Small flat paintbrush (size 2 or 4)
- Pencil for sketching
- Dotting tool or toothpick
- Clear acrylic sealer (matte or satin and spray)
Step 1: Preparing the Canvas
-
Clean the surface:
Begin by washing your stone with warm soapy water to remove any sand, salt, or oils. Let it dry completely in the sun or with a towel. -
Sketch the flip-flops:
Using a pencil, lightly draw two kidney-bean shapes near the center of the rock. These will be the soles of the flip-flops. Angle them slightly outward to look natural. -
Add the straps:
Draw the ‘V’ shape for the straps on each flip-flop. The point of the ‘V’ should land between the big toe area and the rest of the foot. -
Sketch the background elements:
Mark a curved line across the top edge of the rock for the water or sky section. Draw a wavy line near the bottom left to represent a wash of sea foam.
Natural Texture
Don’t paint the background! Leaving the raw stone color visible around the flip-flops mimics the look of wet sand naturally.
Step 2: Painting the Base Colors
-
Paint the soles:
Using your yellow-orange or ochre paint and a small flat brush, fill in the two kidney-bean shapes. Apply a second coat if the stone’s color shows through, letting the first layer dry completely. -
Paint the top section:
Mix a bright teal or turquoise paint. Carefully fill in the curved section you marked at the very top of the rock. -
Add a crisp white border:
While you still have your medium brush out, paint a thin white line separating the teal top section from the bare stone. This acts as a horizon or foam line. -
Paint the wave accent:
Using that same teal color, paint the wavy line at the bottom left of the rock. Taper the ends slightly so it looks like flowing water.
Step 3: Adding Details and Outlines
-
Pause for drying:
Ensure all your color blocks are completely dry before moving to line work. I find that rushing this step usually leads to muddy colors. -
Paint the straps:
Switch to your fine detail brush. Paint the V-shaped straps inside the orange soles using the teal paint. You can add a tiny speck of white highlight on the straps later if you like. -
Outline the soles:
Using black acrylic paint and your finest brush (or a black paint pen), carefully outline the orange soles. Keep your hand steady and rest your pinky on the table for balance. -
Outline the straps:
Outline the teal straps in black as well. Make sure the black line separates the strap from the orange sole clearly. -
Outline the toe post:
Don’t forget to draw a small circle or dot where the straps meet the sole (the toe post) and outline it in black.
Shaky Hands?
If using a brush for the black outlines is too difficult, wait for the paint to dry fully and use a fine-tip black permanent marker instead.
Step 4: Final Touches
-
Add polka dots:
Dip a dotting tool or the tip of a toothpick into white paint. Add small, random dots to the teal section at the top of the rock to simulate bubbles or sea spray. -
Clean up edges:
If you made any smudges, use a clean damp brush to wipe them away, or cover mistakes with a bit of paint that matches the stone color. -
Seal the artwork:
Once the paint is cured (give it a few hours), spray the rock with a clear matte or satin sealer to protect it from sanding and scratching.
Now you have a permanent souvenir of sunny days to keep on your desk or in your garden
Surfboard in the Sand
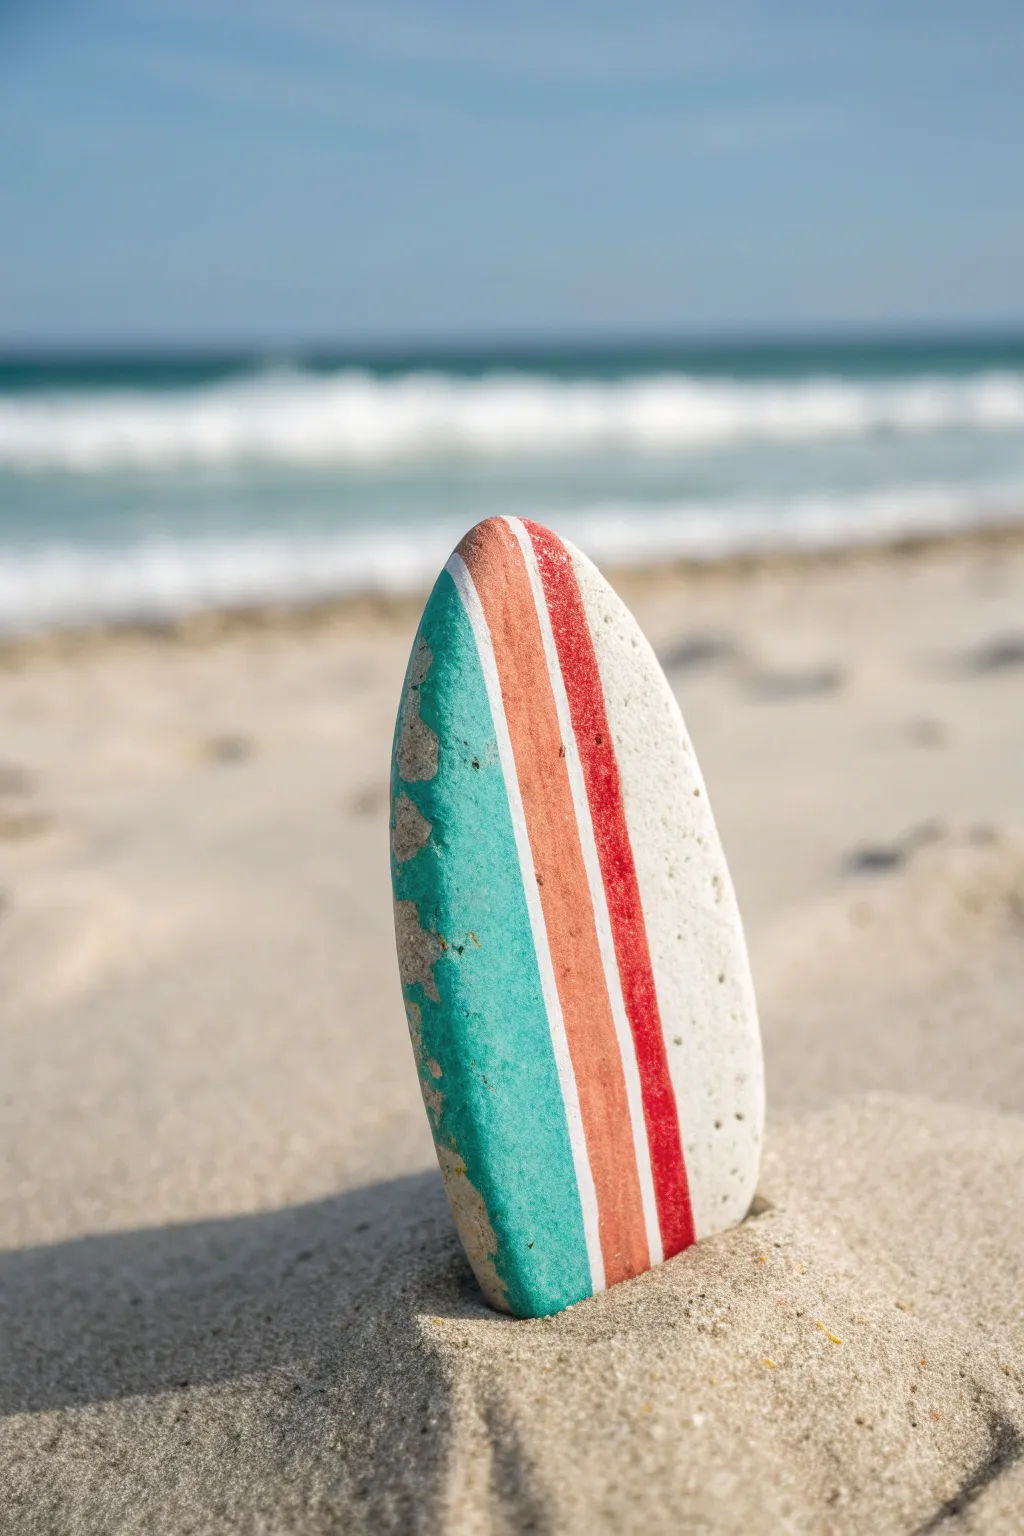
Transform a smooth, oval-shaped stone into a tiny retro surfboard with just a few stripes of paint. This project captures the vintage surf vibe perfectly, using teal, coral, and red tones to create a piece of decor that brings the beach right to your desk or shelf.
Step-by-Step Tutorial
Materials
- Smooth, elongated oval rock (flatter shapes work best)
- Acrylic paint (teal/turquoise, coral/peach, bright red, white)
- Painter’s tape or washi tape (thin width)
- Flat paintbrushes (small and medium sizes)
- Fine grit sandpaper (optional)
- Matte finish spray sealant
- Pencil
Step 1: Preparation & Base Coat
-
Select the perfect stone:
Look for a rock that is naturally long and oval-shaped, closely resembling a miniature surfboard. A relatively flat surface is easier to paint than a very round one. -
Clean the surface:
Wash the rock thoroughly with soap and water to remove any sand, salt, or oils. Let it dry completely in the sun. -
Visualize the orientation:
Hold the rock vertically to determine which end looks more like the nose of the board. The slightly tapered end usually works best as the top.
Step 2: Painting the Design
-
Mark the white zone:
Instead of painting the whole rock white, identify a vertical strip slightly off-center where your white section will be. -
Paint the white stripe:
Use a flat brush to paint a solid white vertical band down the length of the rock. Apply two coats if necessary to ensure it’s opaque against the grey stone. -
Let the white dry:
Allow the white paint to dry completely to the touch. This step is crucial so your tape doesn’t peel up the base layer later. -
Apply tape for sharp lines:
Place a strip of painter’s tape or washi tape vertically over the white paint, covering the area you want to keep white. Press the edges down firmly. -
Paint the teal section:
On the left side of your tape, paint the large section with teal or turquoise acrylic. I like to leave the very edge of the rock unpainted or lightly feathered to show the stone’s natural texture. -
Add the coral stripe:
On the right side of the tape, paint a medium-width stripe using your coral or peach color. -
Paint the red accent:
Next to the coral stripe, add a thinner stripe of bright red. You can do this freehand with a steady hand or use another piece of tape if the coral is dry. -
Fill the remaining side:
If there is any rock surface left to the right of the red stripe, you can paint it white or leave it natural, depending on the width of your stone. -
Remove the tape:
Carefully peel back the tape while the paint is still slightly tacky or fully dry to reveal your crisp white line separating the teal and coral.
Bleeding Lines?
If paint bleeds under your tape, wait for it to dry completely. Then, scratch the excess paint away with a toothpick or a craft knife for a straight edge.
Step 3: Finishing Touches
-
Clean up edges:
Use a very fine brush with a tiny bit of white paint to touch up any spots where the color might have bled under the tape. -
Distress the paint (Optional):
To mimic the weathered look in the photo, take a small piece of fine-grit sandpaper and lightly scuff the teal section, revealing tiny specks of the stone beneath. -
Check the profile:
Inspect the sides of the rock. It often looks best if the paint fades out naturally on the sides rather than forming a hard line against the back of the rock. -
Seal the artwork:
Take the rock outside and apply a light coat of matte spray sealant. A matte finish looks more realistic for a vintage board than a glossy one. -
Let it cure:
Allow the sealant to dry fully according to the can’s instructions before handling or placing it in sand.
Add a Fin
For a 3D effect, cut a small triangle from cardstock or a wood chip. Glue it to the back bottom of the rock to act as a surfboard fin and a stand.
Prop your finished mini surfboard in a small bowl of sand or on a windowsill to enjoy beach vibes all year round
Beach Umbrella and Towel Shapes
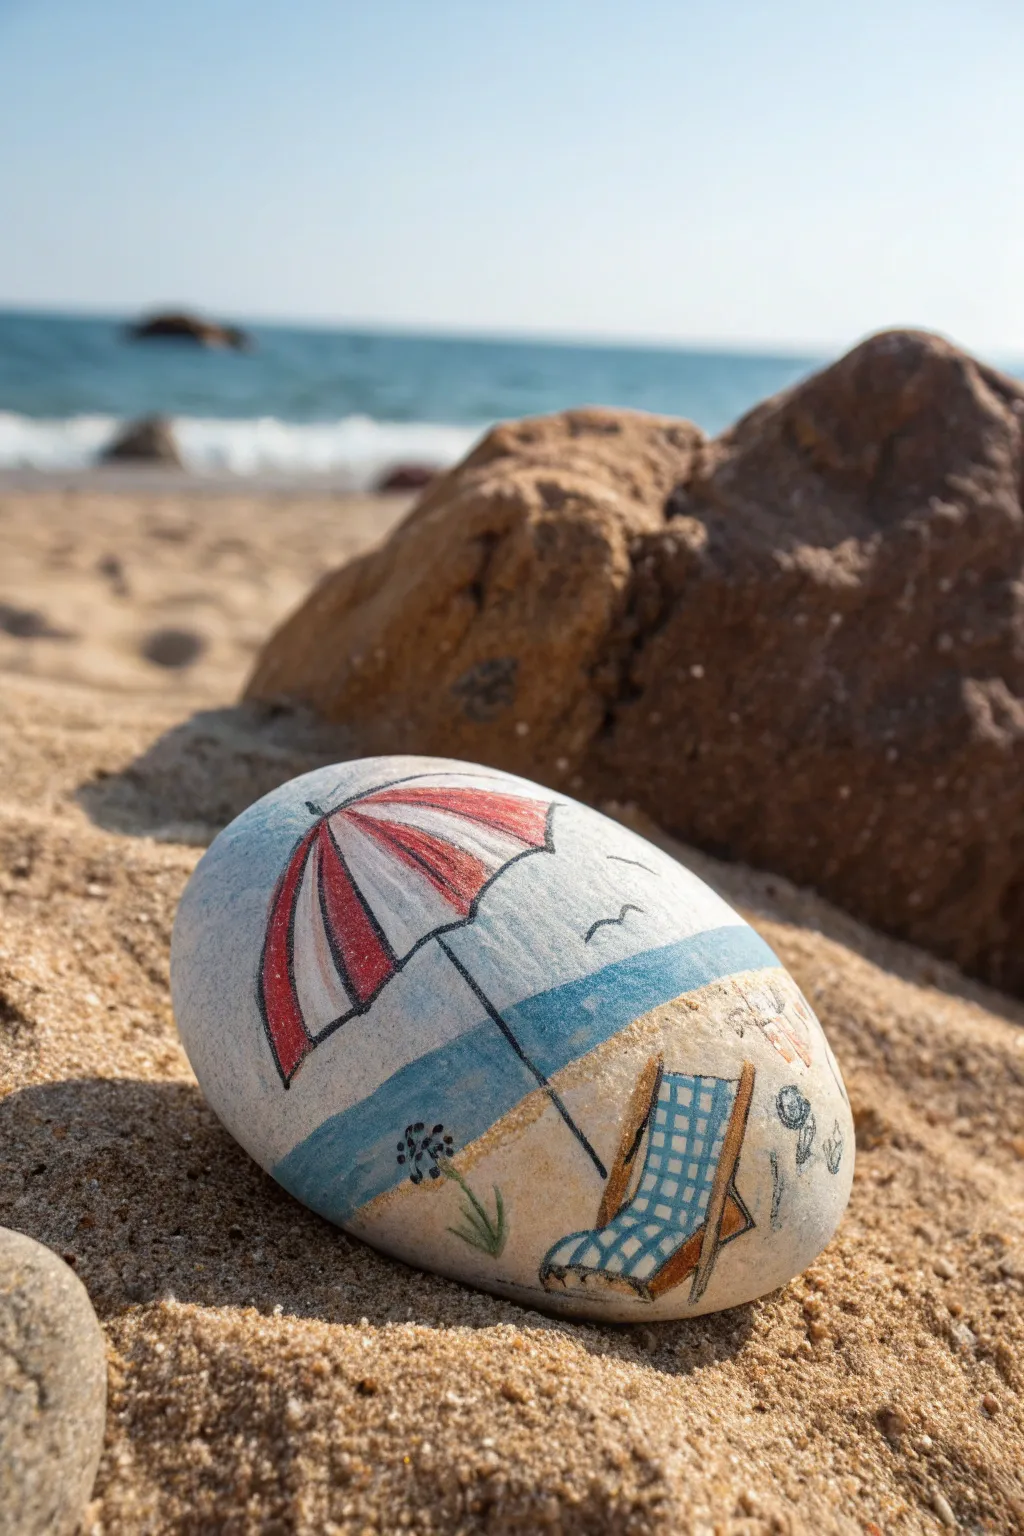
Capture the perfect lazy afternoon by the sea with this delightful painted rock. Featuring a classic striped umbrella and a folding chair, this project uses simple shapes to create a serene coastal scene that fits right in your pocket.
Step-by-Step
Materials
- Smooth, oval river rock
- White acrylic paint (base coat)
- Acrylic paint markers (fine tip: red, blue, black, yellow/ochre, white)
- Lead pencil (HB)
- Clear spray sealer (matte or gloss)
- Wide flat brush
Step 1: Preparation and Sketching
-
Prime the Surface:
Begin by washing and drying your rock thoroughly. Using your wide flat brush, apply two thin coats of white acrylic paint to the smoothest side of the stone. Let the first coat dry completely before adding the second to ensure an opaque, paper-like surface. -
Establish the Horizon:
Once your white base is fully dry, visualize where the ocean meets the sky. Use a pencil to lightly sketch a horizontal line across the middle of the rock. This doesn’t have to be perfectly straight; a slight curve adds character. -
Outline the Umbrella:
In the upper left quadrant, lightly sketch a large semi-circle for the umbrella top. Add a small point at the very top center. From the bottom center of the semi-circle, draw a straight line angled downward toward the right for the pole. -
Add Umbrella Details:
Divide the semi-circle into segments by drawing curved lines radiating from the top center point down to the edge. Sketch the scalloped bottom edge of the umbrella fabric. -
Sketch the Chair:
In the lower right area, draw the basic shape of a folding beach chair. Start with a rectangular backrest angled slightly back, and a seat portion extending forward. Add the simple wooden frame lines.
Clean Lines Tip
Work from the background forward. Paint the sky and sand first, let them dry fully, and then draw the umbrella and chair on top to avoid awkward gaps.
Step 2: Adding Color
-
Paint the Sky and Sea:
Using a very light blue paint marker or diluted blue paint, color the sky area above your horizon line. For the ocean strip just below the horizon, switch to a slightly deeper teal or ocean blue tone. -
Create the Sand:
Fill the bottom half of the rock with a sandy beige or golden ochre color. You can stipple the paint slightly here to mimic the texture of sand grains. -
Color the Umbrella:
Using a fine-tip red marker, color in alternating segments of the umbrella. Leave the other segments white to create the classic candy-stripe look. -
Detail the Chair Fabric:
Fill the fabric area of the chair with white first if the sand color is too dark underneath. Once dry, use a fine blue marker to draw a grid pattern creates a checkered fabric effect. -
Paint the Chair Frame:
Use a light brown or tan marker to carefully trace over the wooden frame parts of the chair, including the legs and armrests.
Step 3: Refining and Sealing
-
Outline the Elements:
With a very fine black marker or detail pen, carefully outline the umbrella, the pole, and the chair. This makes the drawing pop against the background. -
Add Scenic Details:
Draw two simple V-shapes in the sky for seagulls. Near the bottom left, I like to add a tiny flower or tuft of grass to ground the scene. -
Add Texture:
Use the black pen to make tiny dots or stippling on the sand area to add texture. You can also lightly sketch a cooler bag or towel near the chair for extra storytelling. -
Final Cleanup:
Check your horizon line and touch up any areas where the color might have bled. Ensure the white stripes on the umbrella are opaque and bright. -
Seal the Artwork:
Take the rock outside and spray it with a clear acrylic sealer. Several light coats are better than one heavy coat to prevent the ink from running.
Make It 3D
Add tiny shadows under the chair and umbrella pole using a diluted grey marker or a soft pencil smudge to make the objects look like they are sitting on the sand.
Place this little piece of paradise on your desk to remind you of warmer days by the water
Crab With Cute Simple Claws
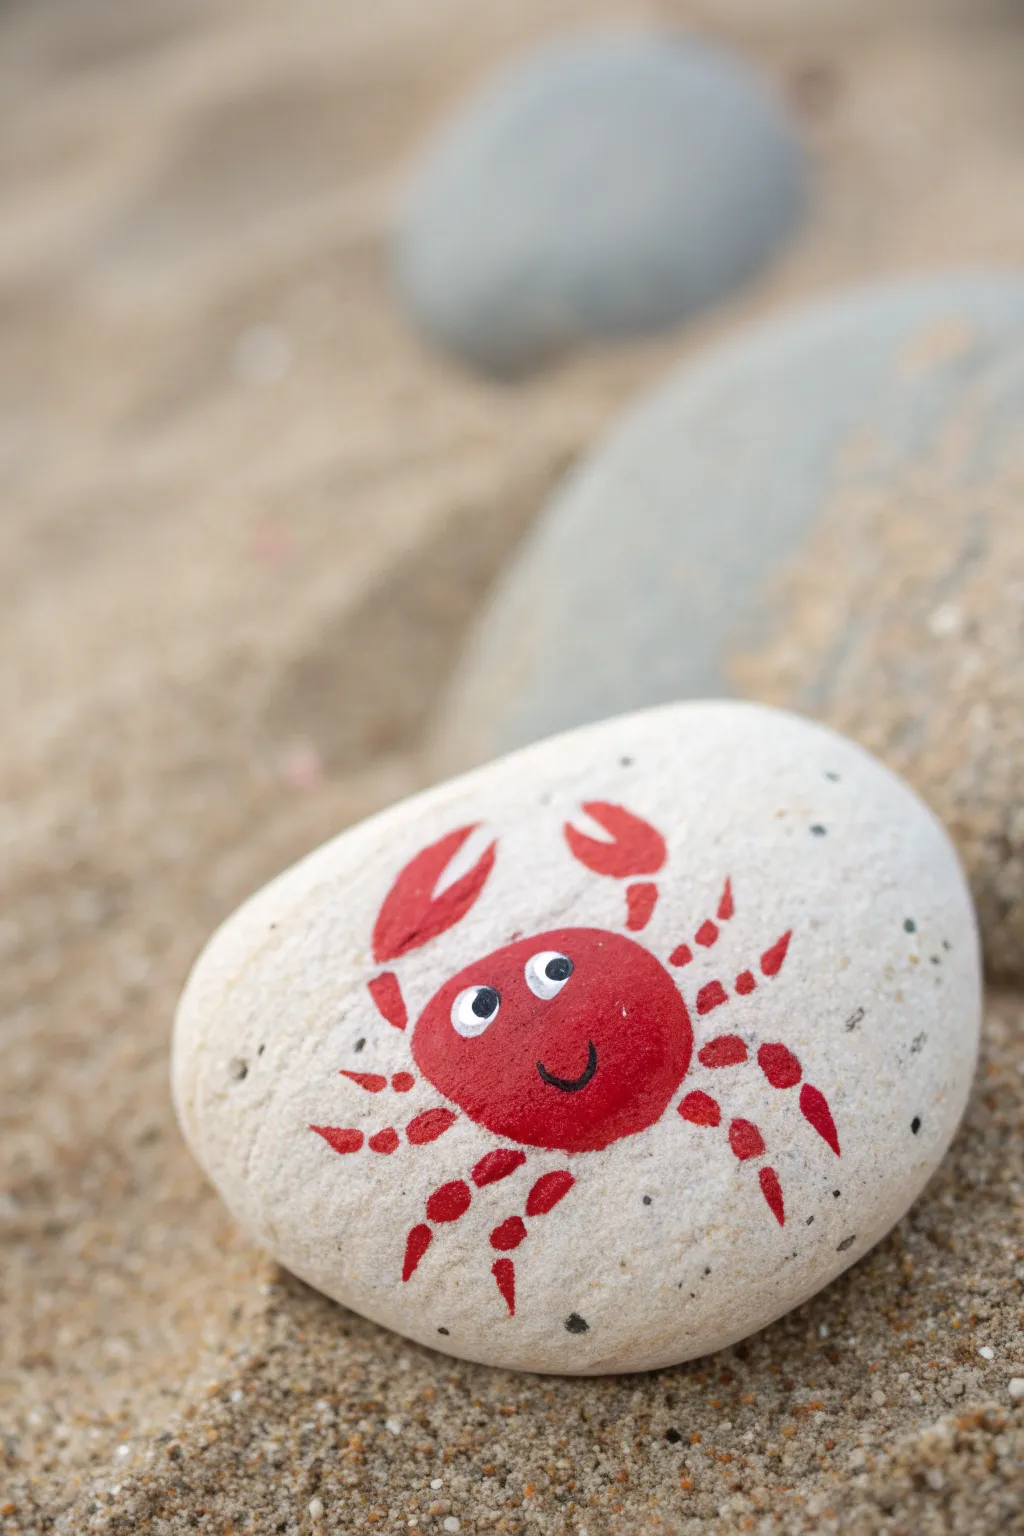
Capture the spirit of the shore with this adorable little crustacean. The design uses simple dashes and circles to create a characterful crab that sits perfectly on a smooth white stone.
Step-by-Step Guide
Materials
- Smooth white beach pebble (medium size)
- Red acrylic paint (bright red)
- White acrylic paint
- Black acrylic paint or black fine-tip paint pen
- Small round paintbrush (size 1 or 2)
- Small dotting tool (or toothpick)
- Fine detail brush (size 0 or 00)
- Sealer (spray or brush-on varnish)
Step 1: Painting the Body
-
Clean the surface:
Before you begin painting, ensure your rock is clean and dry. A quick wash with soapy water removes any sand or salt that might stop the paint from sticking. -
Outline the body:
Using your small round brush and bright red paint, lightly sketch a horizontal oval shape in the center of the rock. This doesn’t need to be perfect first try. -
Fill the oval:
Fill in the oval outline completely with the red paint. Make sure the layer is opaque; if the rock shows through, let the first coat dry and add a second one.
Step 2: Adding the Claws
-
Start the left claw:
Imagine a ‘V’ shape coming from the top left of the body. Paint a thick, curved teardrop shape for the top part of the claw, angled inward. -
Finish the left claw:
Add the bottom pincer by painting a smaller, thinner curved line that meets the base of the top teardrop. -
Paint the right claw:
Repeat this process on the right side. Paint the larger upper claw section first, angling it slightly differently to give the crab some personality. -
Connect the claws:
Use a tiny dab of paint to draw a small connector line between the body and each claw, representing the crab’s arms.
Paint Transparency?
If your red paint looks translucent against the white stone, mix in a tiny drop of white paint to the red base layer to increase opacity.
Step 3: Creating the Legs
-
Plan the legs:
You will need three legs on each side of the body, positioned below the claws. -
Paint the first segments:
Using the tip of your small brush, paint a small red dash coming directly off the side of the body for the top leg. -
Add the joints:
Leave a tiny gap of negative space, then paint the next segment of the leg, angling it slightly downwards. -
Finish the first leg:
Add a final, sharp triangular dash at the end to create the foot. The gap between segments makes the legs look jointed. -
Complete the set:
Repeat this three-segment process for the remaining two legs on this side, and then do all three legs on the opposite side. Keep the strokes loose and fun.
Beach Vibes
Before sealing, lightly dry-brush some pale gold glitter paint around the crab’s feet to make it look like wet shimmering sand.
Step 4: Face and Details
-
Dry check:
Before correcting any mistakes or moving to the face, let the red paint dry completely to the touch. -
Create the eyes:
Dip the back end of your paintbrush or a medium dotting tool into white paint. Place two white dots onto the upper part of the red body oval. -
Add pupils:
Once the white dots are dry, use a smaller dotting tool or a fine black paint pen to adding tiny black pupils inside the white circles. I like placing them slightly off-center for a goofy look. -
Draw the smile:
Using your fine detail brush and black paint, or a paint pen, draw a simple, small ‘u’ shape curve for the mouth. -
Refine the edges:
If any red lines look messy, you can use a tiny bit of white paint (or the rock’s natural color if mixed) to clean up the edges. -
Seal the artwork:
Finish by applying a clear varnish coat to protect your crab from scratching and to make the red color pop.
Now you have a charming seaside friend to decorate your garden or desk
Shark Fin in the Ocean
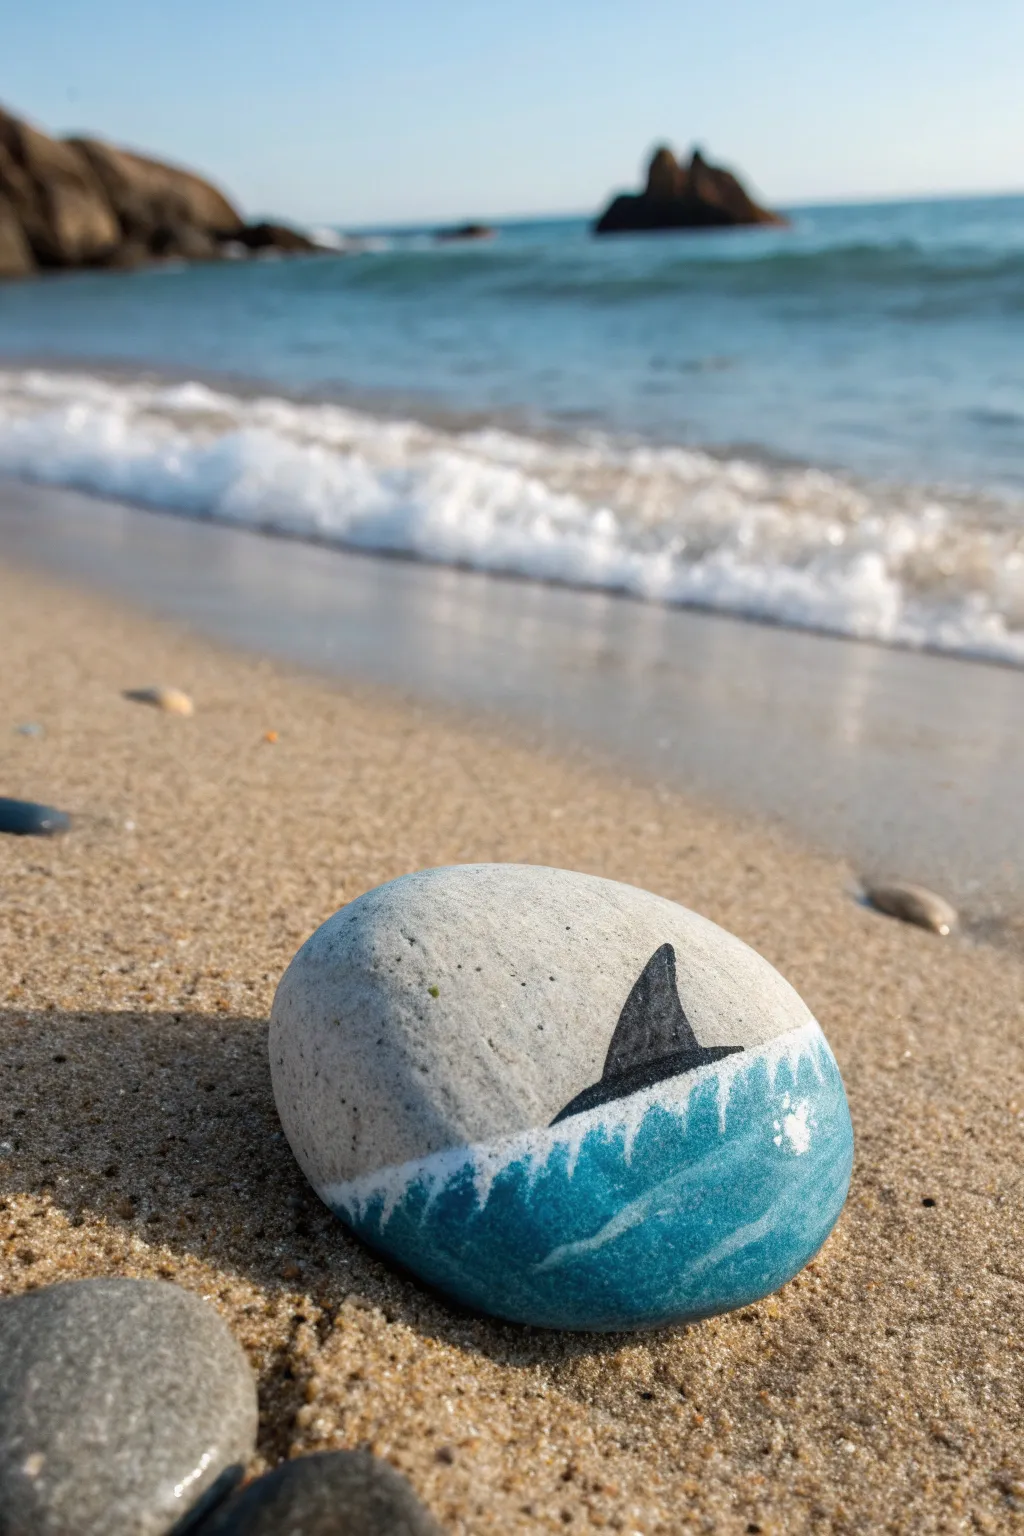
Capture the thrill of the ocean with this simple yet striking rock painting featuring a shark fin slicing through the waves. By leaving the top of the stone natural, you create a seamless blend between your art and the organic texture of the rock.
How-To Guide
Materials
- Smooth, oval-shaped beach stone
- Acrylic paint (Deep Teal, Bright White, Black)
- Small flat paintbrush
- Fine detail liner brush
- Pencil (optional)
- Cup of water and paper towels
- Clear spray sealant
Step 1: Painting the Ocean Base
-
Clean your canvas:
Begin by washing your stone with soapy water and drying it completely to ensure no sand or salt interferes with the paint adhesion. -
Draft the waterline:
Visualize a curved line cutting across the lower third of the rock. You can lightly sketch this with a pencil if you want a guide, aiming for a gentle, wavy slope rather than a straight line. -
Mix your ocean blue:
Squeeze out some Deep Teal acrylic paint. If you want a more varied ocean tone, I like to mix a tiny dot of black into the teal to deepen it slightly for the base layer. -
Fill the water section:
Using your small flat brush, paint the entire area below your imaginary waterline with the teal mixture. Following the curve of the rock helps the paint lay smoothly. -
Add depth:
While the blue is still slightly wet, you can dab a little extra blue near the bottom edge to make the water look deeper. -
First drying phase:
Let this blue layer dry completely. It needs to be touch-dry before you add the white foam detail to prevent muddy colors.
Foam Texture Tip
For realistic sea foam, don’t use a brush at all—try dabbling the white paint on with a small piece of torn sea sponge or a crumpled bit of paper towel.
Step 2: Creating the Shark Fin
-
Outline the fin shape:
Using a fine liner brush and black paint, carefully draw a triangular fin shape rising from the top edge of your blue water. -
Fill in the silhouette:
Fill the triangle with solid black paint. Make the back edge slightly curved and the front edge straighter for a realistic dorsal fin shape. -
Refine the edges:
Go over the edges of the fin one last time to ensure they are crisp and sharp against the natural grey rock background. -
Let it set:
Allow the black paint to dry fully. Black can easily smear into white, so patience here is key for a clean result.
Make it Spooky
Add a few drops of red paint into the water near the fin and swirl slightly while wet to create a ‘Jaws’ inspired dramatic effect.
Step 3: Adding Sea Foam and Finish
-
Load your brush for foam:
Clean your liner brush thoroughly and load it with Bright White paint. You want the paint to be fluid but opaque. -
Paint the wave crest:
Dab the white paint right along the top edge of the blue water line. Use a stippling motion (tapping the brush tip) to mimic the frothy texture of sea foam. -
Blend the splash:
Where the fin meets the water, add a little extra white stippling to look like the shark is breaking the surface, creating a small splash zone. -
Create water ripples:
Paint a few very thin, wavy white lines horizontally through the blue section to suggest movement and light reflection in the water. -
Dry completely:
Set the stone aside until all paint layers are bone dry to the touch. -
Seal the rock:
Take the rock outside and spray it with a clear acrylic sealer. This protects the paint from chipping and gives the water a permanent ‘wet’ look.
Place this little menace on a sandy shelf or gift it to an ocean lover for a fun surprise
Whale Tail at Sunset
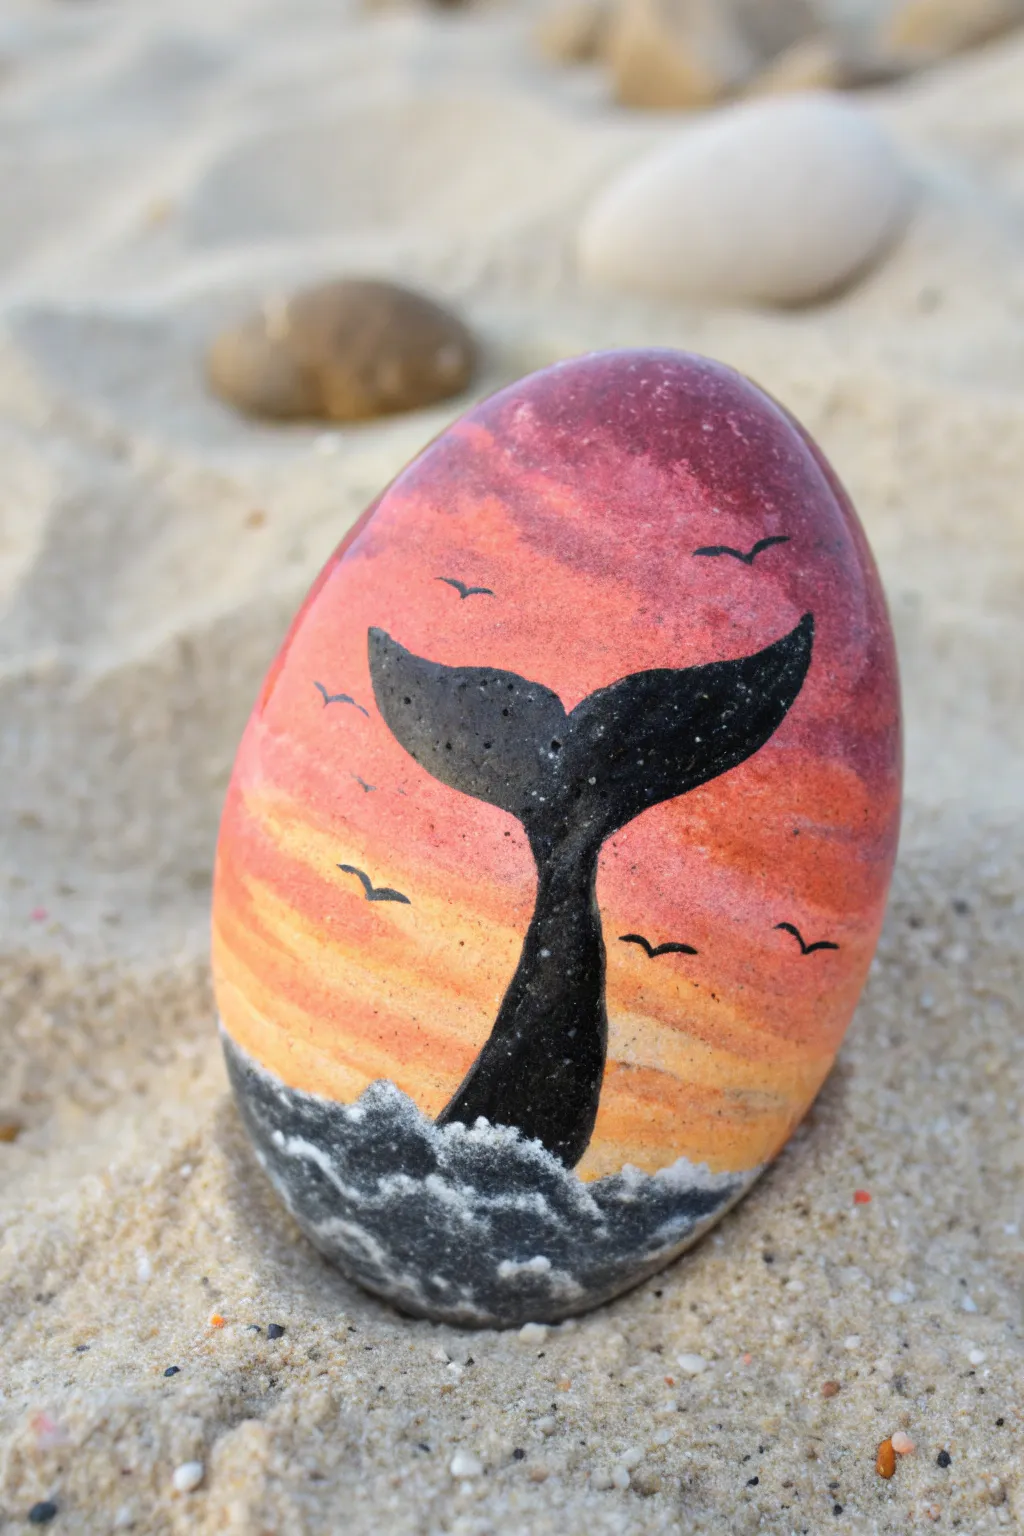
Capture the magic of an ocean sunset with this stunning painted rock project. Blending warm gradients with a striking black silhouette creates a peaceful scene that fits perfectly in any beach-themed collection.
Step-by-Step
Materials
- Smooth, oval-shaped river rock
- Acrylic paints (Burgundy/Deep Red, Orange, Yellow, Black, Titanium White)
- Flat shader brushes (medium size for blending)
- Fine liner detail brush (size 0 or 00)
- Small piece of sponge (optional, for sea foam texture)
- Palette or paper plate
- Cup of water and paper towels
- Spray gloss varnish or sealant
Step 1: Creating the Sunset Gradient
-
Prepare the surface:
Begin by washing your rock with soap and water to remove any dirt or oil. Let it dry completely. If the rock is dark, you may want to paint a base coat of white acrylic first to make the sunset colors pop, though it’s not strictly necessary on lighter stones. -
Apply the yellow horizon:
Squeeze out your yellow, orange, and burgundy paints onto your palette. Using a flat brush, paint a horizontal band of yellow across the lower middle section of the rock. This will be the brightest part of the sunset just above the water line. -
Add the orange layer:
While the yellow is still slightly wet, pick up some orange paint. Apply a band of orange directly above the yellow, slightly overlapping the two colors. -
Blend the transition:
Clean your brush slightly (or just wipe it off) and gently stroke back and forth where the orange meets the yellow to create a soft, seamless transition. If the paint dries too fast, a tiny touch of water on the brush helps reinvigorate the blend. -
Paint the upper sky:
Load your brush with the deep burgundy or reddish-purple paint. Apply this to the top portion of the rock, curving it to follow the stone’s oval shape. -
Final sky blending:
Just like before, blend the burgundy down into the orange layer. You want a smooth gradient from dark top to bright bottom. I like to work quickly here to ensure the acrylics mix well on the stone surface. -
Let the background dry:
Allow the sunset gradient to dry completely before moving on to the silhouette. This is crucial—if the background is wet, the black paint will smear and turn muddy.
Step 2: Painting the Ocean and Whale
-
Establish the water line:
Using black paint and a clean brush, paint the bottom section of the rock. Don’t make the line perfectly straight; create a slightly uneven, wavy edge where the black meets the yellow sky to represent the ocean surface. -
Outline the tail shape:
Switch to your fine liner brush loaded with slightly thinned black paint. In the center of the rock, draw a vertical curved line rising from the water, branching out into a ‘Y’ shape to form the flukes of the whale tail. -
Fill in the silhouette:
Carefully fill in the shape of the tail with black paint. Ensure the edges of the tail are smooth and curved. The tail should look like it is just slapping down onto the water surface. -
Create choppy waves:
Mix a tiny drop of white into your black paint to make a dark charcoal grey. Dab this color randomly into the black water area at the bottom to create depth and the suggestion of turbulent water. -
Add sea foam:
Dip a textured sponge or an old, stiff brush into pure white paint. Remove most of the paint on a paper towel until the brush is almost dry. Lightly stipple or dab white foam right at the base of the whale tail and along the water line where waves would break. -
Refine the splash:
Use your fine liner brush with white paint to add tiny dots and small upward splashes around the base of the tail, mimicking the spray of water from the impact. -
Paint the birds:
Using your finest brush and black paint, add several small ‘V’ shapes in the sky to represent birds flying. Vary their sizes and angles to make the flock look natural. -
Seal the artwork:
Once the entire painting is bone dry (give it at least an hour), take the rock to a well-ventilated area and apply a spray gloss varnish to protect the paint and give the water a wet look.
Smooth Blends
If your acrylics are drying too fast to blend the sunset, mix a drop of ‘slow drying medium’ or ‘retarder’ into your paint. It keeps acrylics workable longer.
Level Up: Glitter Spray
Add a magical touch by mixing a tiny amount of iridescent glitter medium into the white sea foam paint, or finish with a shimmer spray for a sparkling ocean effect.
Place your finished whale tail rock on a sunny windowsill or hide it at the beach for a stranger to find
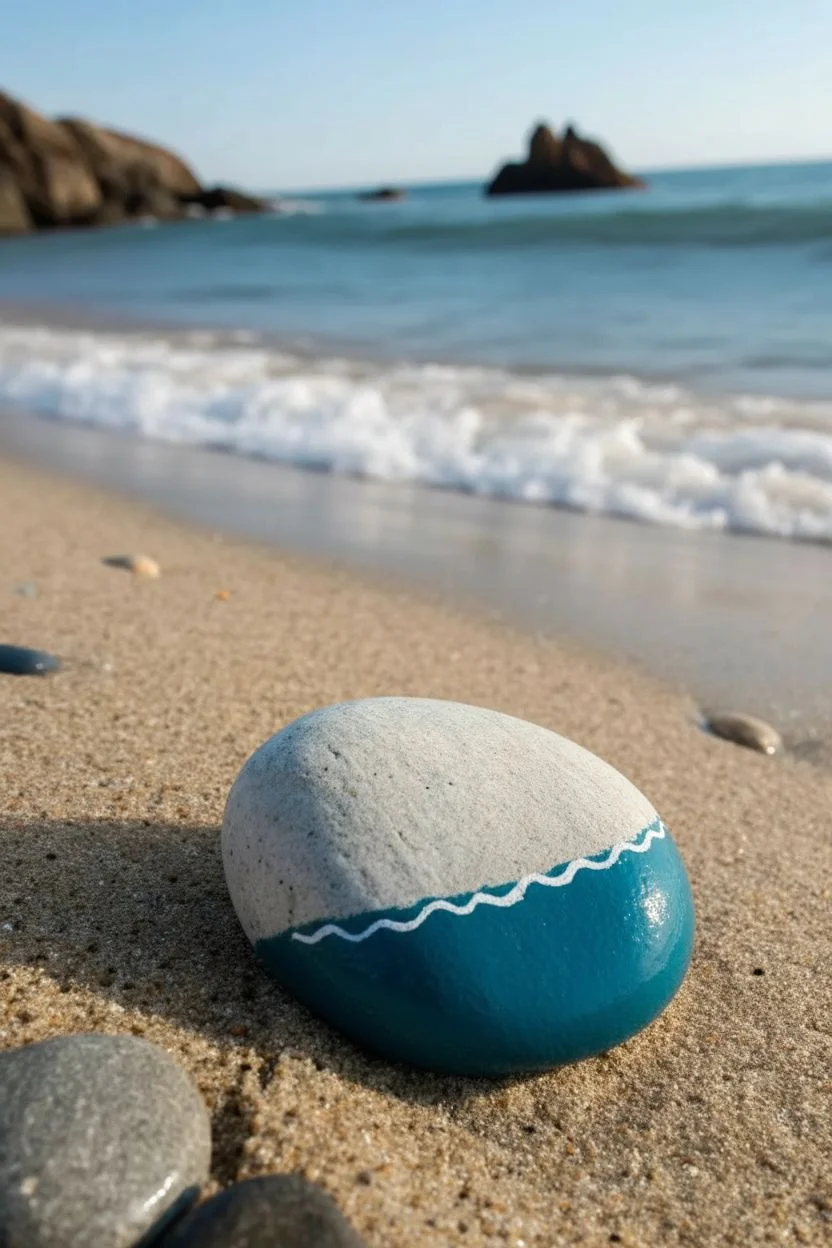
Mermaid Scale Beach Border
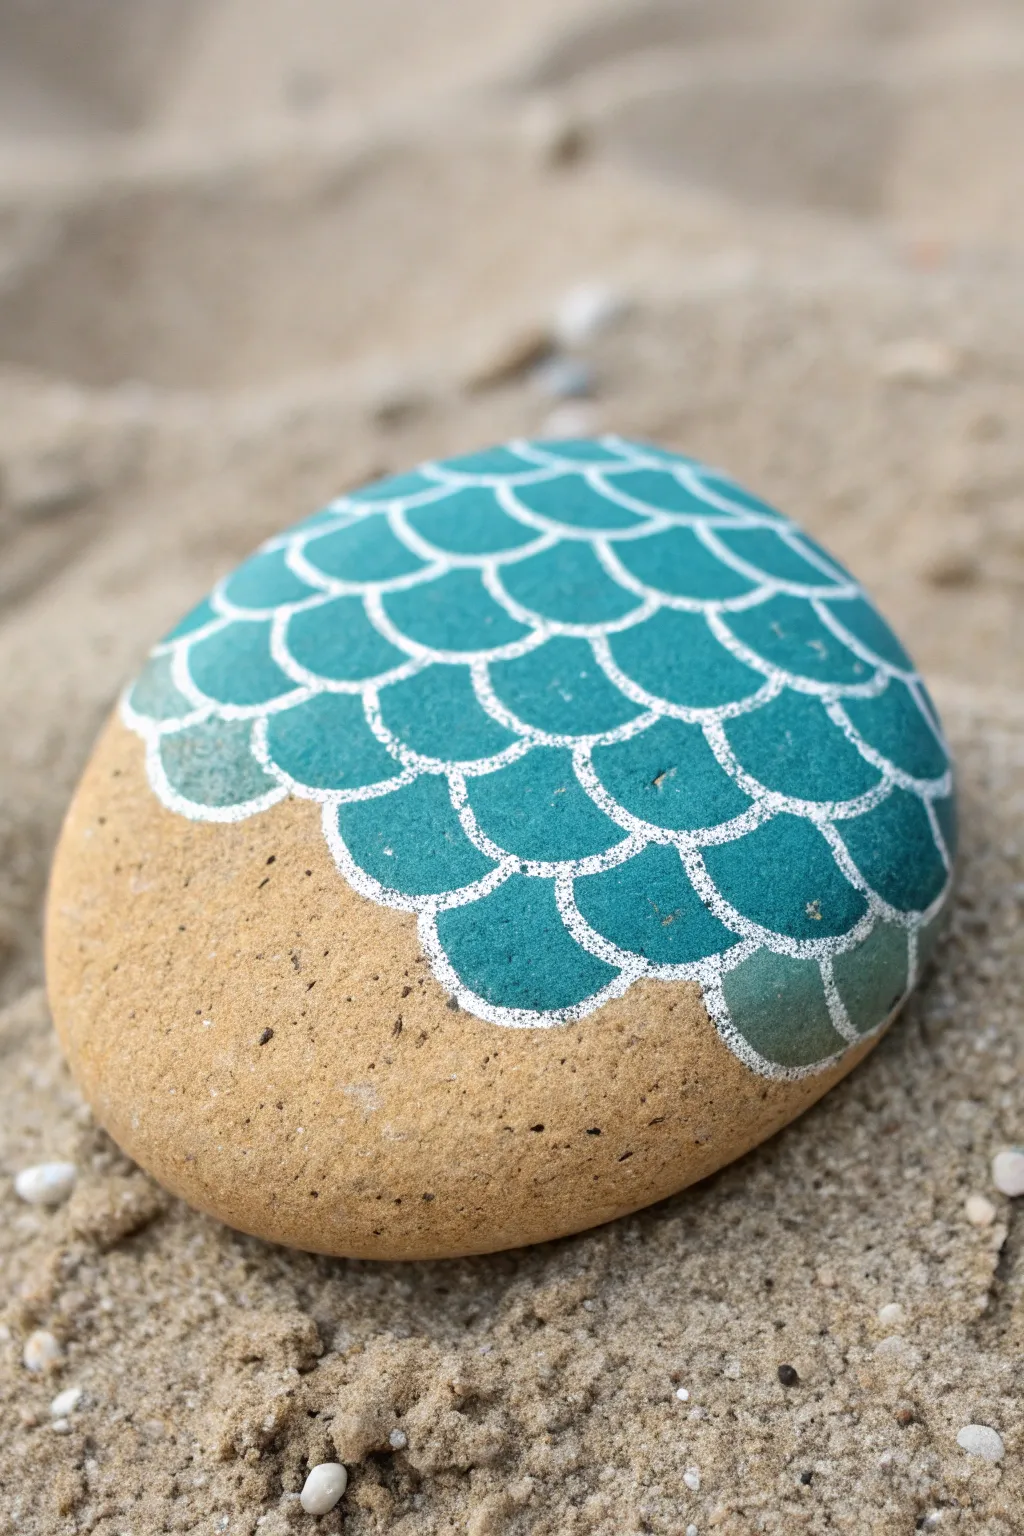
Transform a humble beach stone into a mystical mermaid artifact with this simple scale pattern. The design combines the natural texture of the stone with vibrant teal hues and crisp white outlines for a look that feels washed ashore from Atlantis.
Detailed Instructions
Materials
- Smooth, round river rock or beach stone
- Teal acrylic paint (matte finish)
- White acrylic paint or a white fine-tip paint pen (Posca usually works best)
- Flat shader brush (size 4 or 6)
- Fine liner brush (size 0 or 00) if not using a paint pen
- Pencil (optional)
- Small mixing palette or paper plate
- Water cup and paper towels
- Clear acrylic sealer (matte or gloss)
Step 1: Preparation and Base Coat
-
Clean the canvas:
Begin by scrubbing your rock with warm, soapy water to remove any sand, salt, or oils. Rinse it thoroughly and let it dry completely in the sun or with a hair dryer. -
Plan the waterline:
Visualize a diagonal line across the rock where the ‘scales’ will meet the bare stone. You don’t need to draw a hard line, but keep a mental note of this boundary to create that organic, washed-up look. -
Mix your teal:
Squeeze out your teal acrylic paint. I find that mixing a tiny dot of white into the teal helps it cover the dark rock surface better without losing its vibrancy. -
Paint the background block:
Using your flat shader brush, paint the upper two-thirds of the rock with a solid coat of teal. Follow the natural curve of the stone and create a slightly wavy, organic edge where the paint meets the raw stone. -
Let it dry:
Allow this base coat to dry completely. If the rock color is showing through too much, apply a second coat of teal for a rich, opaque finish.
Scale Sizing
Keep your scales roughly the size of your pinky fingernail. If they are too small, the design gets messy; too big, and you lose the intricate texture effect.
Step 2: Creating the Scales
-
Prepare the outlining tool:
For the scales, you can use a fine liner brush with thinned white paint, but a fine-tip white paint pen offers much better control for these repetitive curves. Shake the pen well to get the ink flowing. -
Start the first row:
Begin at the very top edge of the painted teal area. Draw small, connected ‘U’ shapes or scallops across the width of the painted section. -
Offset the second row:
Start the second row of scales directly below the first. Place the peak of each new curve in the middle of the ‘U’ from the row above (like laying bricks). This offset pattern is key to the mermaid look. -
Continue the pattern:
Work your way down the rock, row by row. Try to keep the size of your scallops consistent, but don’t worry about perfection; slight variations add to the hand-painted charm. -
Handle the edges:
As you reach the sides of the teal area, let the white lines curve off the edge of the paint naturally. It creates the illusion that the pattern wraps around the stone. -
Approach the boundary:
When you reach the bottom wavy edge of your teal paint found in the first phase, carefully outline the final row of scales so they mimic the curve of the paint line. -
Refine the border:
Go back along that bottom edge where the teal meets the bare rock. Use your white pen to add a final scallop line right on the border, sealing the design and creating a crisp transition.
Step 3: Finishing Touches
-
Check for gaps:
Look over your white lines. If the paint pen skipped over a bump in the rock, go back and carefully fill in the line for a solid, opaque white look. -
Clean up smudges:
If you accidentally smudged any white ink, wait for it to dry, then use a tiny bit of teal paint on a detail brush to cover the mistake. -
Final dry time:
Let the white linework dry completely for at least 30 minutes. Paint pens can smear easily if sealed too soon. -
Seal the artwork:
Apply a coat of clear acrylic sealer over the entire rock (or just the painted portion if you prefer the contrast). A gloss finish makes the scales look wet and shimmering, while matte looks more like sea glass.
Glitter Gradient
Mix a small amount of fine iridescent glitter into your teal paint, or dab a lighter turquoise color onto the center of each scale before outlining for a 3D effect.
Place your finished mermaid stone in a potted plant or on a windowsill to catch the light
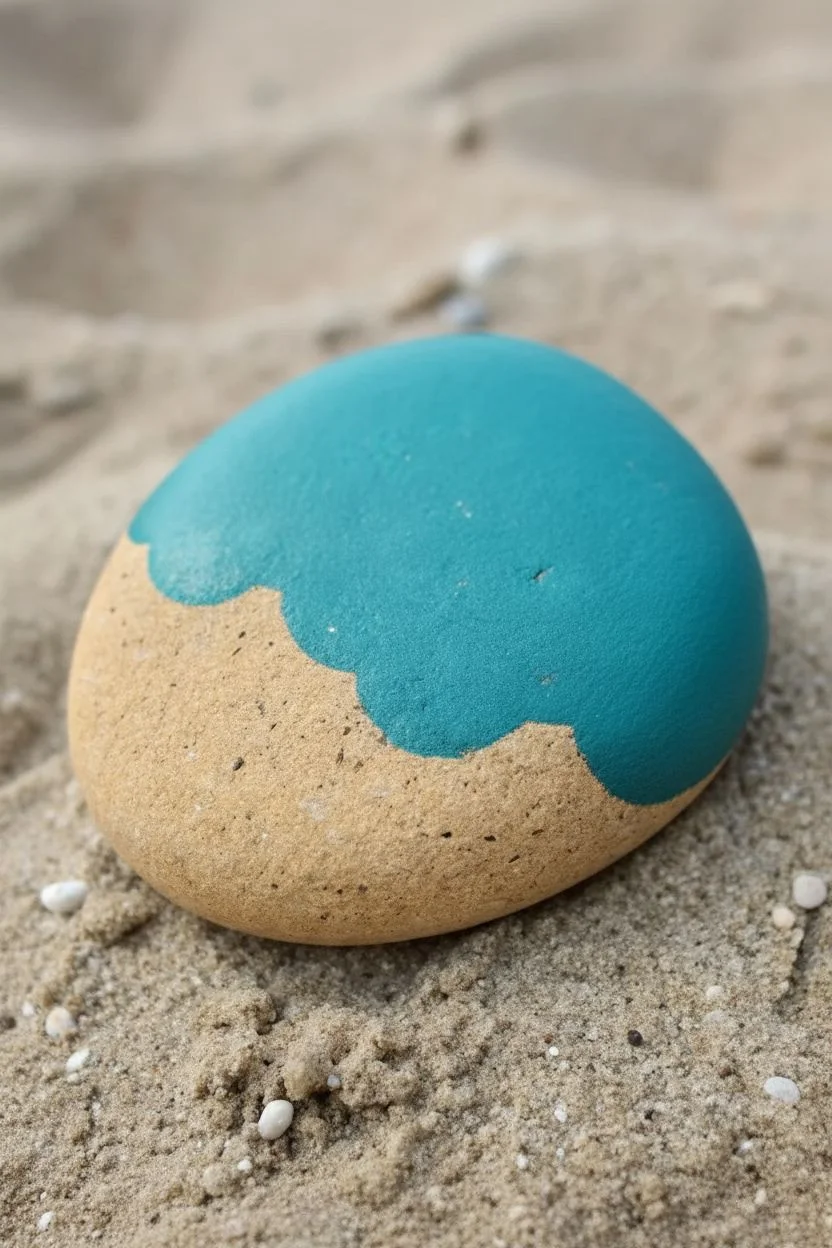
Beach Glass Color Blocks

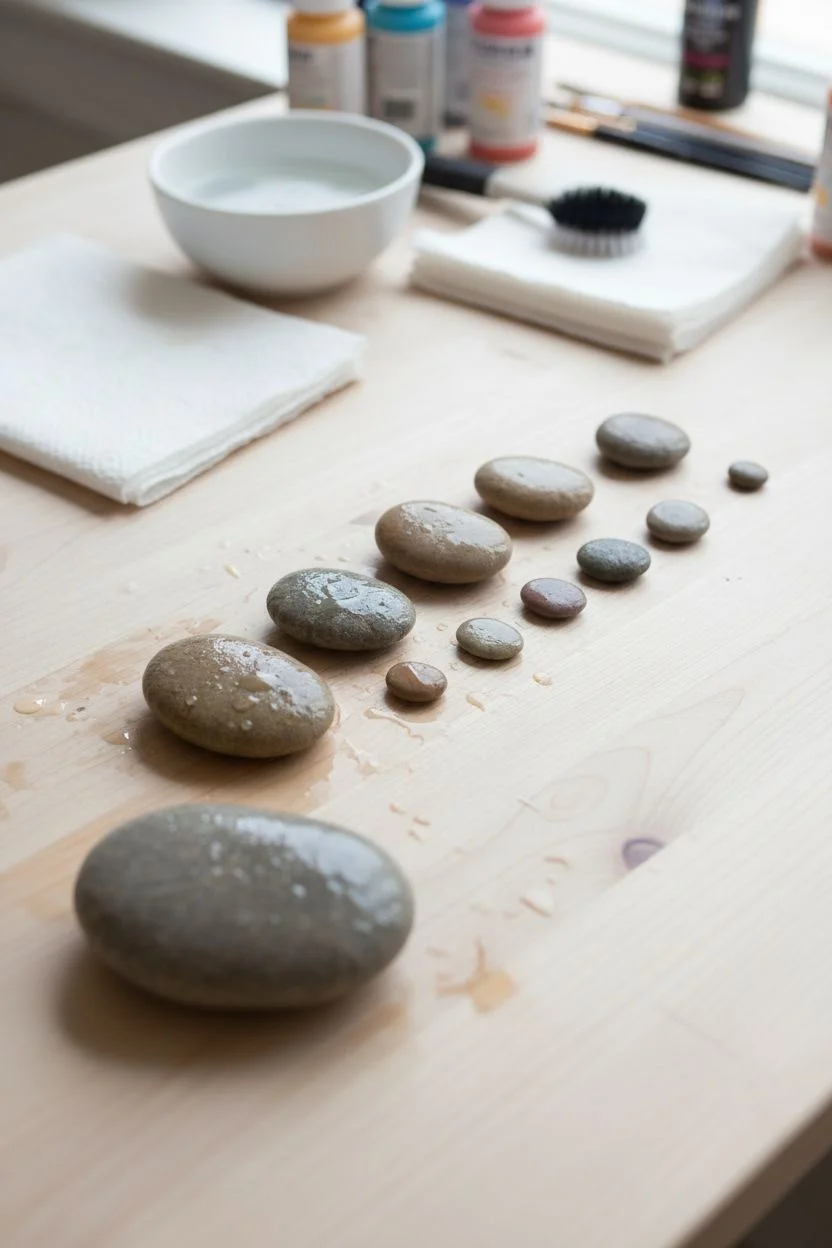
Capture the serene beauty of the ocean by transforming ordinary stones into a balanced cairn of sea glass hues. This soothing project layers translucent washes of aqua, teal, and frosted white over smooth river rocks to mimic the weathered look of treasures found on the shore.
How-To Guide
Materials
- 7-8 smooth, flat oval stones (graduated sizes from large to tiny)
- Acrylic paint (matte white, teal, turquoise, cobalt blue, burnt sienna)
- Glazing medium or water for thinning
- Flat shader brushes (sizes 6 and 8)
- Small round detail brush
- Matte finish spray sealer or varnish
- Paper towels
- Strong craft glue (E6000 or similar heavy-duty adhesive)
Step 1: Preparation & Base Coat
-
Stone selection:
Begin by sorting your stones. You need a large, heavy anchor stone for the base and progressively smaller stones to create the tapered pyramid shape. Test the stack dry to ensure they balance well before you start painting. -
Clean the surface:
Wash all stones thoroughly with soapy water and scrub away any dirt or grit. Let them dry completely, as moisture trapped inside can ruin the paint adhesion. -
Base stone prep:
Set aside the largest bottom stone. Leave this one completely unpainted to provide a natural, grounding foundation for your colorful stack.
Glue Sloping?
If stones slide while gluing, prop them with small balls of clay or crumpled foil to hold them level until the adhesive sets completely.
Step 2: Mixing Sea Glass Colors
-
Create a palette:
On your palette, place dollops of white, teal, and turquoise. The goal is to create a gradient effect, moving from deep ocean blues at the bottom to lighter, airier shades near the top. -
Mix the deepest teal:
For the second-largest stone (the one sitting on the base), mix a strong teal color. Add a tiny drop of glazing medium or water to make the paint slightly translucent, mimicking the quality of real glass. -
Mix the mid-tone turquoise:
For the next two stones up, prepare a lighter turquoise shade by mixing your teal with a bit more white. Keep the consistency thin and wash-like. -
Mix the frosty blue:
For the middle stones, create a very pale, icy blue. Here I prefer to use mostly white paint with just a whisper of cobalt blue mixed in. -
Prepare the sandy top color:
For the tiny top two stones, mix a diluted burnt sienna with plenty of white to create a soft, sandy beige that echoes the natural base stone.
Sandpaper finish
After the paint dries, lightly scuff the painted surfaces with fine-grit sandpaper to reveal the stone underneath for an authentic worn finish.
Step 3: Painting & Texturing
-
Apply the washes:
Paint each stone with its designated color. Use smooth, horizontal strokes that wrap around the edges. -
Let it breathe:
Allow the first layer to dry until it is tacky but not wet. The translucency allows some of the natural stone texture to peek through. -
Add a frosted layer:
To get that ‘beach glass’ look, dry-brush a very thin layer of pure matte white over the painted stones. Wipe most of the paint off your brush first, then lightly drag it over the surface. -
Soften the edges:
While the white dry-brushing is fresh, use your finger to gently smudge it, creating a soft, worn patina rather than harsh brush streaks. -
Detail the natural stones:
If your top tiny stones look too flat painted, use an old toothbrush to flick tiny specks of brown paint onto them for a textured, sandy appearance. -
Check the gradient:
Line up your painted stones next to the unpainted base. Ensure the colors flow nicely from the natural rock into the deep teal, up to the pale blue, and back to the sandy top.
Step 4: Assembly
-
Final drying:
Ensure every stone is bone dry before assembly. Wet paint will prevent the adhesive from bonding securely. -
Apply adhesive:
Place a pea-sized dot of heavy-duty craft glue on the center of the large base stone. -
Begin stacking:
Press the largest painted teal stone onto the base. Hold it in place for 30 seconds to let the glue grab. -
Build the tower:
Continue gluing and stacking, moving up one size at a time. Be careful to center each stone so the tower doesn’t lean. -
Seal the deal:
Once the glue is fully cured (check manufacturer instructions usually 24 hours), take the stack outside and mist it with a matte clear coat. Avoid glossy sprays, as they will destroy the soft sea glass effect.
Place your calming stone stack on a desk or shelf to bring a moment of coastal zen to your daily routine
Driftwood Signpost Beach Scene
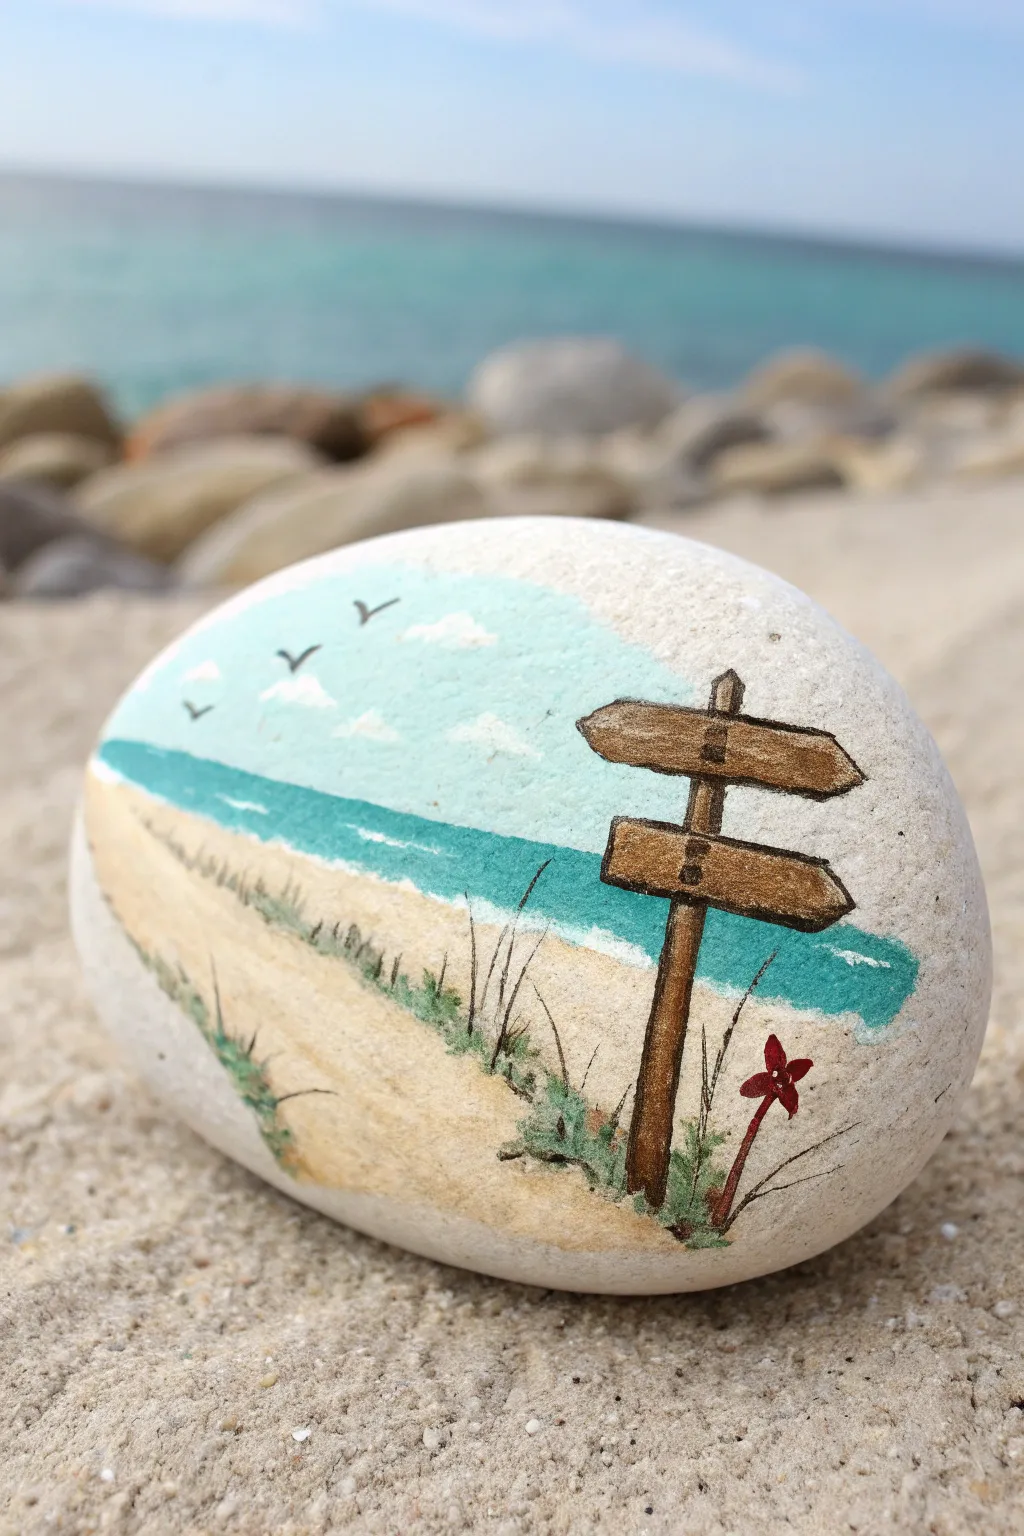
Capture the feeling of a seaside stroll with this charming painted pebble featuring a rustic wooden signpost pointing toward the ocean. This design combines simple landscape layering with detailed wood grain textures for a mini escape you can hold in your palm.
Step-by-Step Guide
Materials
- Smooth, light-colored river rock or beach stone (oval or palm-sized)
- Acrylic paints (Titanium White, Sandy Beige, Turquoise/Aquamarine, Burnt Umber, Burnt Sienna, Black, Leaf Green, Red)
- Fine detail brushes (size 0 and 00)
- Small flat brush (size 2 or 4)
- Palette for mixing
- Water cup and paper towels
- Matte or satin clear sealant spray
Step 1: Setting the Scene
-
Prime the canvas:
Since natural stones can be porous, start by painting a thin layer of white acrylic over the area where your scene will go. This makes the subsequent colors pop and provides a smooth base. Let this dry completely. -
Paint the sky:
Mix a very light blue using white and a tiny touch of turquoise. Using the flat brush, paint the upper third of the rock in a soft, rounded arch shape to define the horizon line. -
Add wispy clouds:
While the sky is still slightly damp or just after drying, dab pure white paint gently to create fluffy, scattered clouds. Keep them soft and undefined for a natural look. -
Create the ocean:
Below the sky, paint a horizontal band of bright turquoise or aquamarine. Make the top edge straight and crisp against the sky. As you move downward, you can blend in a little white to show the shallower water near the shore. -
Lay down the sand:
Fill the bottom half of the painted area with a warm beige color. Curve the painting upward on the left side to create a sense of perspective, as if the beach is wrapping around a dune.
Fixing Wobbly Lines
If your sign outline gets messy, wait for it to dry completely. Then use the background sky or sand color to carefully ‘cut back’ into the shape and clean up the edges.
Step 2: Painting the Signpost
-
Outline the post:
Using a fine liner brush and Burnt Umber mixed with a little water for flow, draw the vertical post of the sign on the right side of the rock. It should start near the bottom and extend up into the sky area. -
Add signboards:
Draw two horizontal, slightly slanted arrow shapes attached to the post. Make the top one point right and the bottom one point right, giving them a jagged, broken wood appearance on the ends. -
Fill the wood color:
Fill in the outlines of the post and signs with a Burnt Sienna or medium brown tone. You want it lighter than the outline so the edges remain visible. -
add wood grain texture:
Once the base brown is dry, take your finest brush with dark brown or black paint. Paint tiny, wiggly lines and knots across the signs and down the post to simulate weathered wood grain. -
Highlight the wood:
Mix a tiny bit of white into your brown paint and add thin highlight lines on the top edges of the signs to give them 3D dimension and show where the sun hits. -
Add nails:
Dot two tiny dark brown or black spots on the center of each signboard where it connects to the main post to look like rusted nails.
Step 3: Final Details
-
Paint the path:
Mix a slightly darker shade of beige or light brown. Paint a sweeping path starting wide at the bottom left and narrowing as it goes toward the horizon line to create depth. -
Add sea foam:
Run a thin line of pure white paint along the border where the blue water meets the beige sand to represent crashing waves. -
Plant grass tufts:
Using your smallest brush and dark green paint, flick tiny upward strokes along the base of the signpost and sporadically along the edge of the path. Keep the strokes quick and tapered. -
Paint the flower:
At the base of the signpost, paint a small, simple five-petaled red flower. Add a tiny dot of yellow or white in the center for contrast. -
Birds in flight:
With black paint and a very steady hand (or a fine-tip paint marker), draw three small ‘V’ shapes in the sky to represent seagulls flying in the distance. -
Seal the artwork:
Allow the rock to dry for at least 24 hours. Finish by spraying a light coat of matte or satin varnish to protect the paint from chipping and fading.
Personalize It
Use a white gel pen to write tiny names of your favorite beaches or vacation spots on the wooden arrow signs for a custom travel keepsake.
Now you have a serene little piece of the beach to keep on your desk or give as a gift
Night Beach With Moon Path
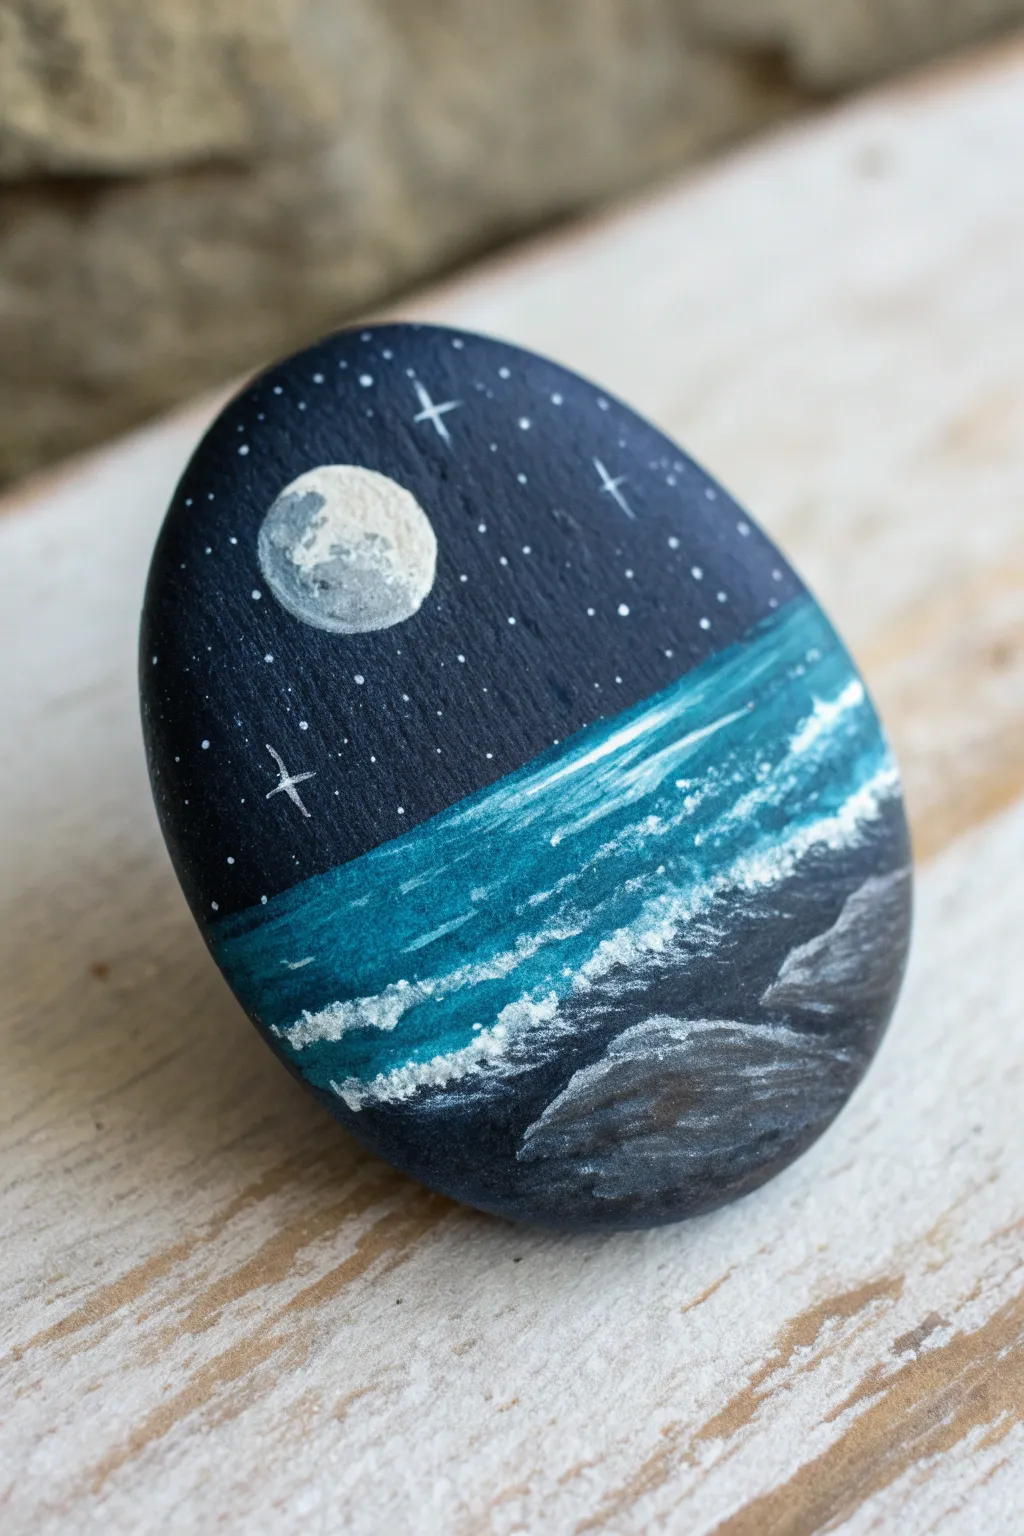
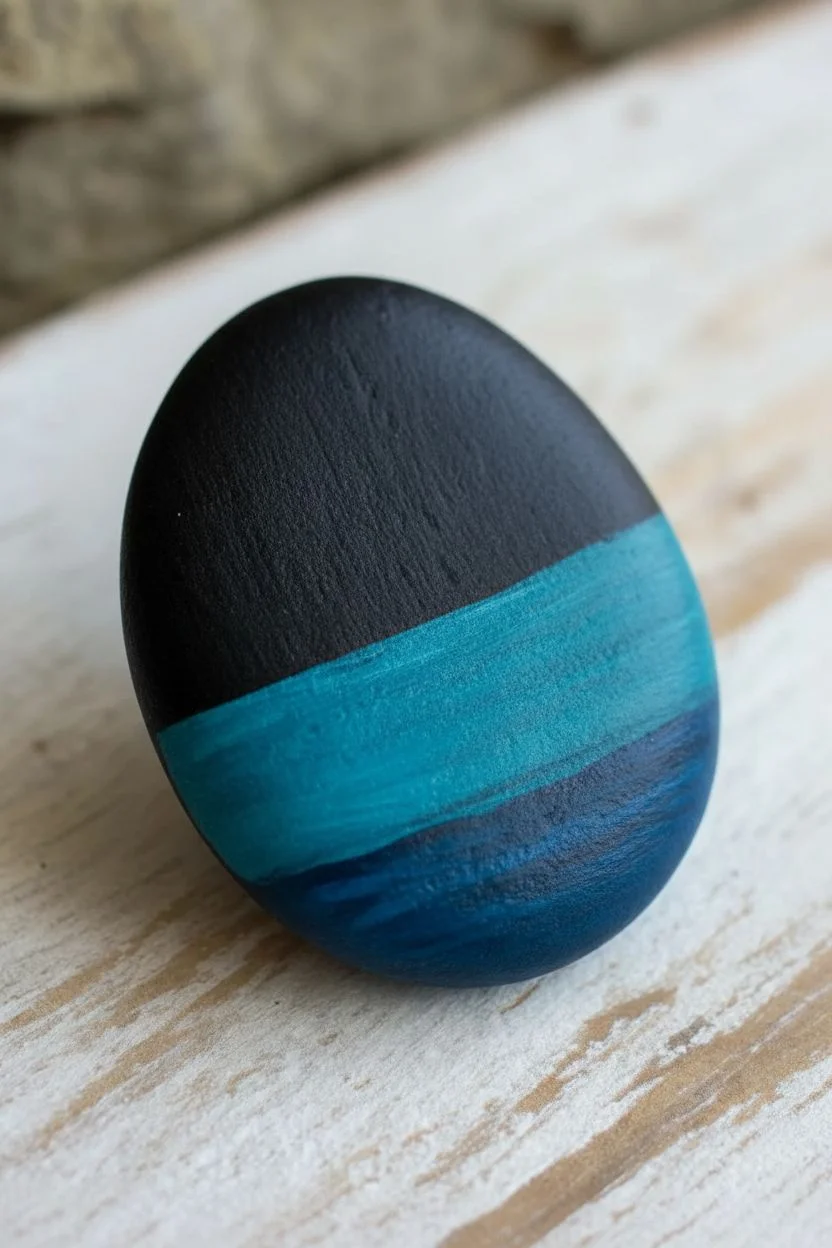
Create a serene nightscape right in the palm of your hand with this moody, moonlit painting. The contrast between deep midnight blues and bright white sea foam captures the peaceful rhythm of waves crashing under a starlit sky.
Step-by-Step Tutorial
Materials
- Smooth, oval-shaped river rock (dark gray or black is best)
- Acrylic paints: Black, White, Prussian Blue (or dark navy), Turquoise or Teal
- Various paintbrushes: Medium flat brush, small detail brush, fine liner brush
- Pencil (optional)
- Palette or paper plate
- Water cup and paper towels
- Matte or glossy varnish (optional)
Step 1: Setting the Scene
-
Prepare the base:
Start with a clean, dry rock. If your rock isn’t naturally dark gray or black, paint the entire surface with a coat of black acrylic paint and let it dry completely to create a uniform midnight background. -
Divide the horizon:
Visualise a line running diagonally across the rock, roughly two-thirds of the way down. This will be your horizon line where the sky creates a boundary with the ocean. -
Block in the water:
Using a flat brush, mix a bit of turquoise with white to get a vibrant teal. Paint a thick band below your imagined horizon line, tapering it off as you get closer to the bottom right corner. -
Deepen the ocean:
While the teal is still slightly wet, blend a tiny amount of Prussian blue or black into the bottom edge of the teal strip to create depth where the water gets deeper.
Step 2: The Night Sky
-
Paint the moon shape:
In the upper left quadrant of the black sky area, use a small round brush to paint a solid white circle. It doesn’t need to be perfectly round; a little irregularity adds realism. -
Add lunar texture:
Mix a tiny drop of black into your white paint to create a light grey. I like to dab this gently onto parts of the moon to suggest craters and surface texture. -
Create the stars:
Using your finest liner brush or even a toothpick, dot tiny specks of white paint across the black sky. Vary the pressure to create stars of different sizes. -
Add twinkling details:
Choose two or three of the larger stars and paint tiny cross shapes over them to make them look like they are twinkling brightly.
Starry Splatter Trick
For a dense star field, load an old toothbrush with watered-down white paint and flick the bristles with your thumb. Test on paper first to control the spray.
Step 3: Waves and Shore
-
Define the wave crests:
Switch back to your fine brush and pure white paint. Draw thin, somewhat wiggly horizontal lines across the teal water section to represent the rolling movement of waves. -
Create sea foam:
At the bottom edge of the water where it meets the dark rock, stipple (dab repeatedly) white paint to create the frothy texture of crashing water. -
Feather the foam:
Lightly drag some of that white foam paint upwards into the teal water using a dry brush technique to show the spray misting up. -
Add rocky details:
In the bottom right corner (the shore area), paint a few jagged, irregular shapes using a dark grey mix (black plus a dot of white). -
Highlight the rocks:
Add subtle highlights to the top edges of these shore rocks using a lighter grey, imagining the moonlight is hitting them from the top left. -
Blend the shoreline:
Ensure the white sea foam overlaps slightly onto the dark grey rocks you just painted, grounding the water to the shore. -
Final touch-ups:
Look at the overall balance. Add a few more tiny star dots near the horizon if it feels too empty. -
Seal that art:
Once the paint is thoroughly dry (give it at least an hour), apply a coat of varnish to protect your miniature landscape and make the colors pop.
Shaky Moon Edges?
If your moon circle looks messy, wait for the white paint to dry completely. Then, use black paint to carefully cut back in around the edges to reshape it.
Place your finished rock on a shelf or gift it to a friend who loves the magic of a night swim


Have a question or want to share your own experience? I'd love to hear from you in the comments below!