Whenever I’m stuck, I reach for triangles—they’re simple, graphic, and somehow always look intentional. Here are my favorite triangle art ideas you can try right away, from classic geometric patterns to the kind of weird, studio-play experiments that spark new styles.
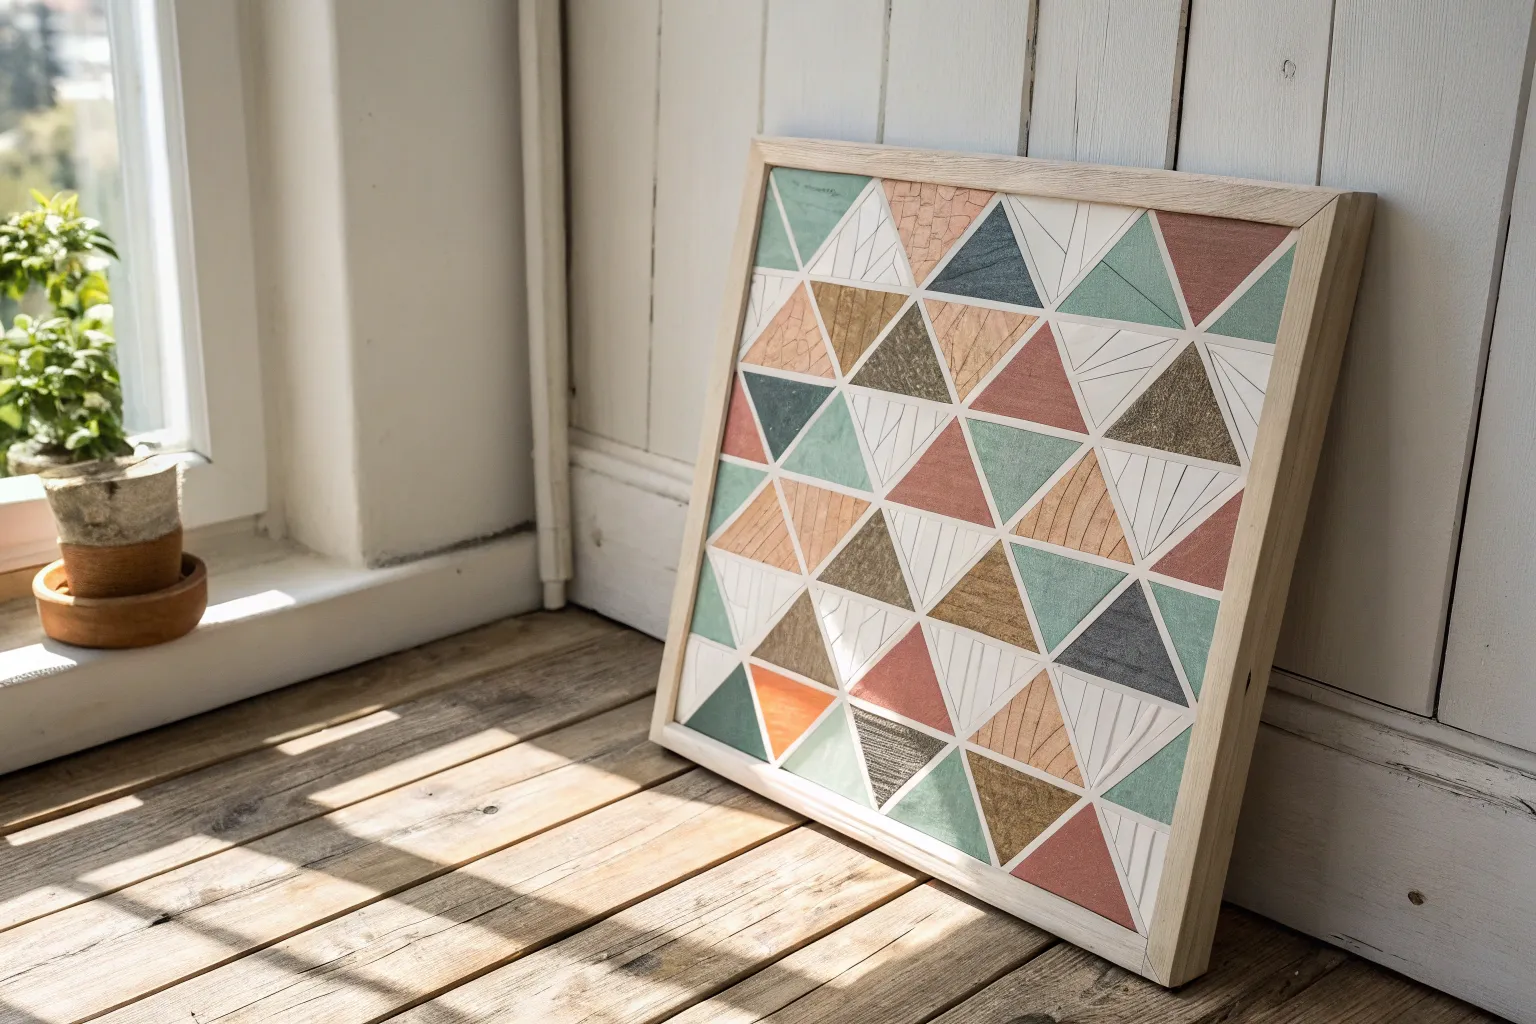
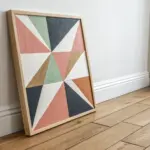
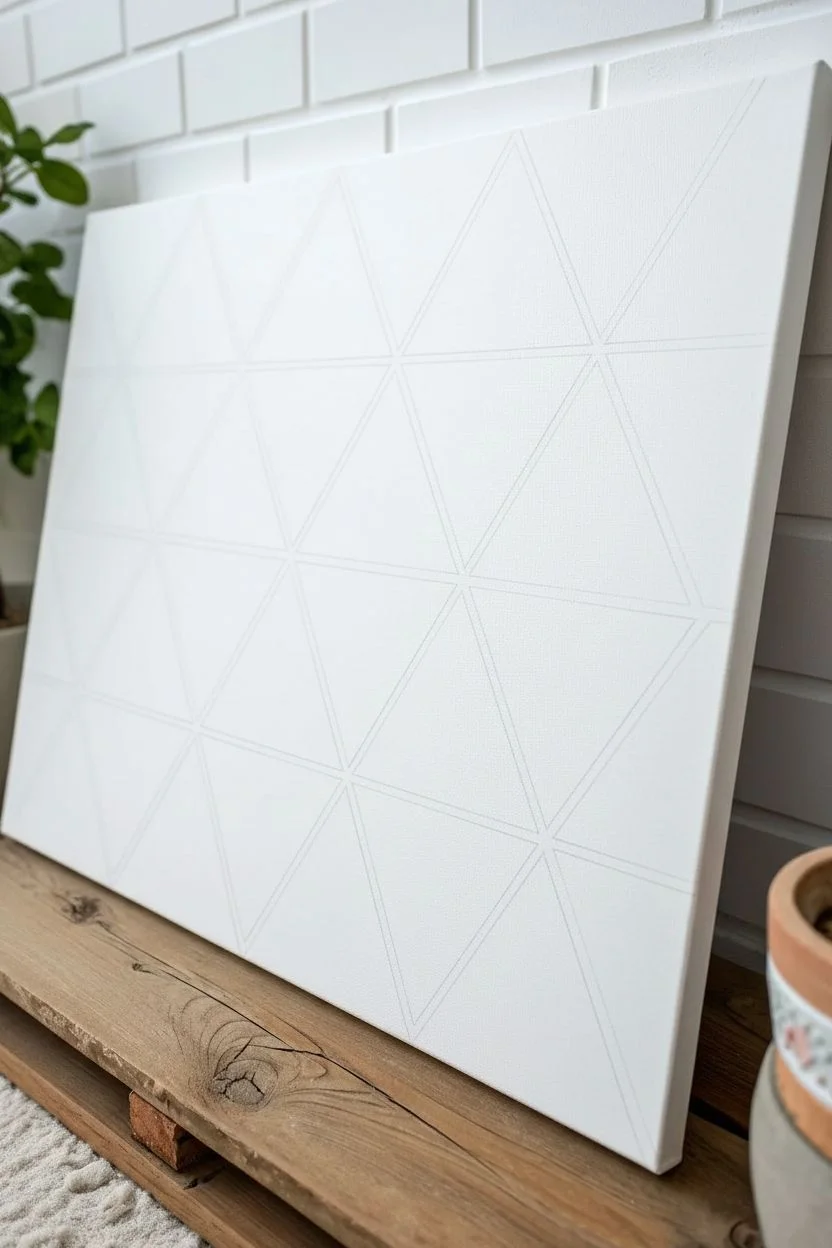
Tape-Resist Triangle Color Blocks
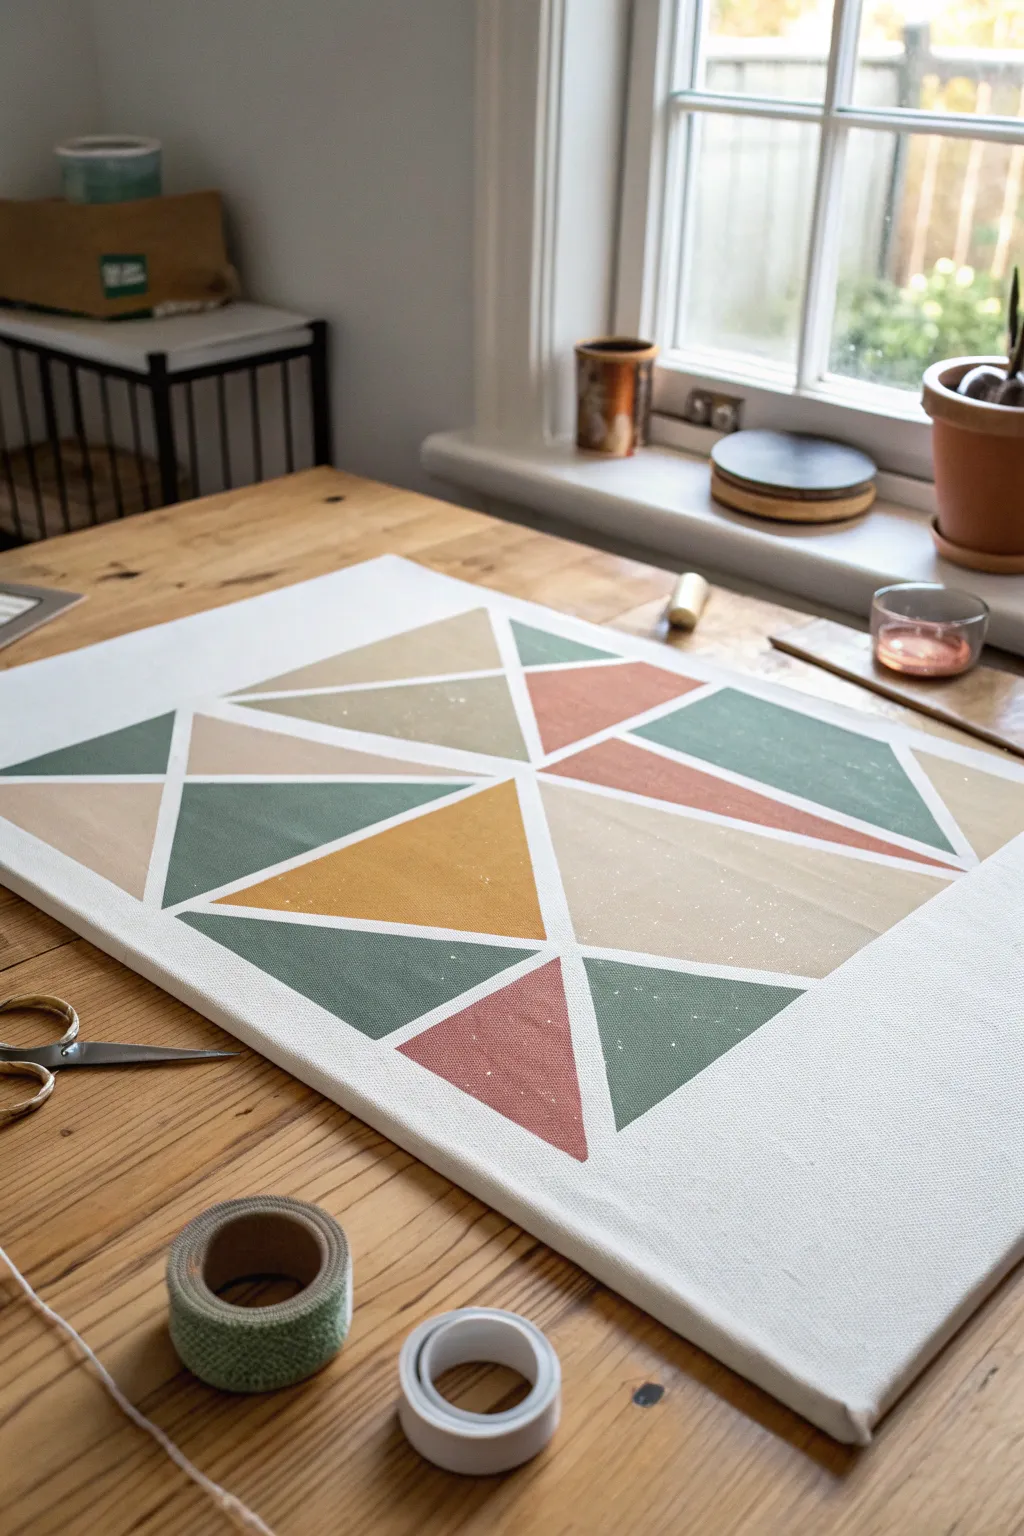

Achieve a clean, modern aesthetic with this simple tape-resist painting technique. By dividing your canvas into geometric sections using painter’s tape, you can create sharp, professional-looking triangles in a soothing palette of earthy greens, terracottas, and mustards.
Step-by-Step Tutorial
Materials
- Stretched canvas (rectangular or square)
- Painter’s tape or masking tape (1/4 inch to 1/2 inch width)
- Acrylic paints (Sage Green, Terracotta, Mustard Yellow, Sand/Beige)
- Flat paintbrush (medium width)
- Scissors
- Gesso (optional, for priming)
- Matte varnish (optional)
Step 1: Preparation and Taping
-
Prime the surface:
If your canvas isn’t pre-primed, apply a coat of white gesso and let it dry completely. This ensures your colors will pop and creates a smoother surface for the tape. -
Create the border:
Apply strips of painter’s tape along the four outer edges of the canvas to create a clean white border. Press the edges down firmly. -
Lay primary intersecting lines:
Begin the design by placing two or three long strips of tape diagonally across the canvas, intersecting each other to create large initial sections. -
Subdivide into triangles:
Add shorter strips of tape within the larger sections to break them down into smaller triangles. Aim for a balanced but random arrangement. -
Seal the tape edges:
To prevent paint bleed, run your fingernail or a credit card firmly over every tape edge. For extra crisp lines, I sometimes paint a thin layer of white paint over the tape edges and let it dry before adding color.
Bleeding Lines?
If paint bleeds under the tape, wait for it to dry fully. Then, use a small flat brush and white paint (or your background color) to carefully paint over the mistake and crisp up the line.
Step 2: Applying Color
-
Plan your palette:
Squeeze your chosen acrylic colors onto a palette. You want a harmonious mix of muted tones like sage, rust, and clay. -
Paint the first color group:
Start with your darkest color (like the deep sage green). Select several non-adjacent triangles and fill them in using a flat brush, stroking away from the tape edges to minimize seepage. -
Apply the warm tones:
Rinse your brush or switch to a clean one, then paint a few scattered triangles with the terracotta or rust color. Ensure these triangles aren’t touching other wet sections if possible. -
Fill with mustard yellow:
Add the bright pop of mustard yellow to two or three prominent triangles to create a focal point in the composition. -
Complete with neutrals:
Fill the remaining empty triangles with a soft beige or sand color. This neutral tone helps balance the stronger colors. -
Check for opacity:
Let the first coat dry for about 15 minutes. If the canvas texture shows through too much, apply a second coat to any patchy areas for a solid, opaque look.
Pro Tip: Thickness Matters
Use tapes of varying widths for visual interest. A mix of thin 1/4″ tape and standard 1/2″ tape creates a dynamic grid that makes the geometry feel more intricate.
Step 3: Reveal and Finish
-
Wait for semi-dryness:
Allow the paint to dry until it is tacky but not fully cured. If the paint is bone dry, it might chip when the tape is pulled. -
Peel the tape:
Slowly peel off the tape at a 45-degree angle. Start with the pieces you laid down last and work your way backward to the base layers. -
Clean up edges:
Inspect the white lines where the tape was. If any paint bled through, use a tiny brush and white paint to carefuly touch up the lines. -
Protect the artwork:
Once the painting is completely dry (after 24 hours), apply a coat of matte varnish to protect the surface from dust and UV light.
Hang your new geometric masterpiece in a spot that needs a touch of modern color


Equilateral Triangle Tessellation Gradient
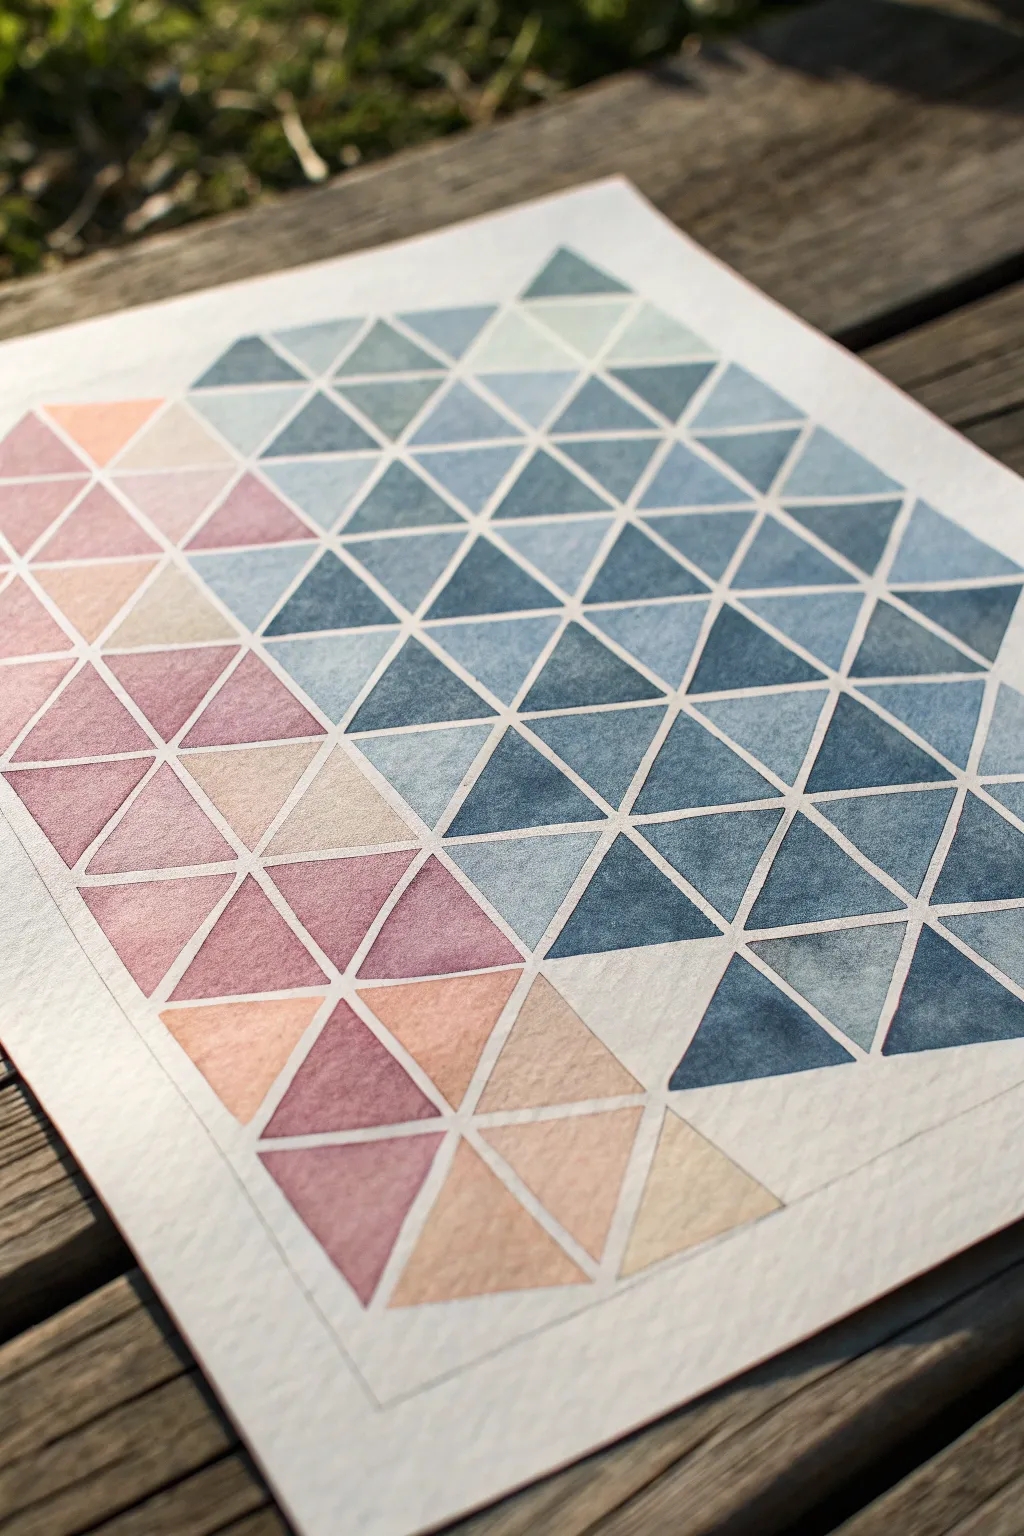
This soothing geometric artwork combines the precision of rigid shapes with the organic, fluid nature of watercolor. The design features a seamless gradient of equilateral triangles transitioning from warm earthy pinks to cool Nordic blues.
How-To Guide
Materials
- Heavyweight cold-press watercolor paper (300gsm)
- Ruler or straight edge
- Lead pencil (harder lead like 2H or H works best)
- Fine tip masking fluid pen or thin masking tape (optional)
- Watercolor paints (Pan set or tubes)
- Medium round brush (size 6 or 8)
- Two cups of water
- Paper towels
- Palette for mixing
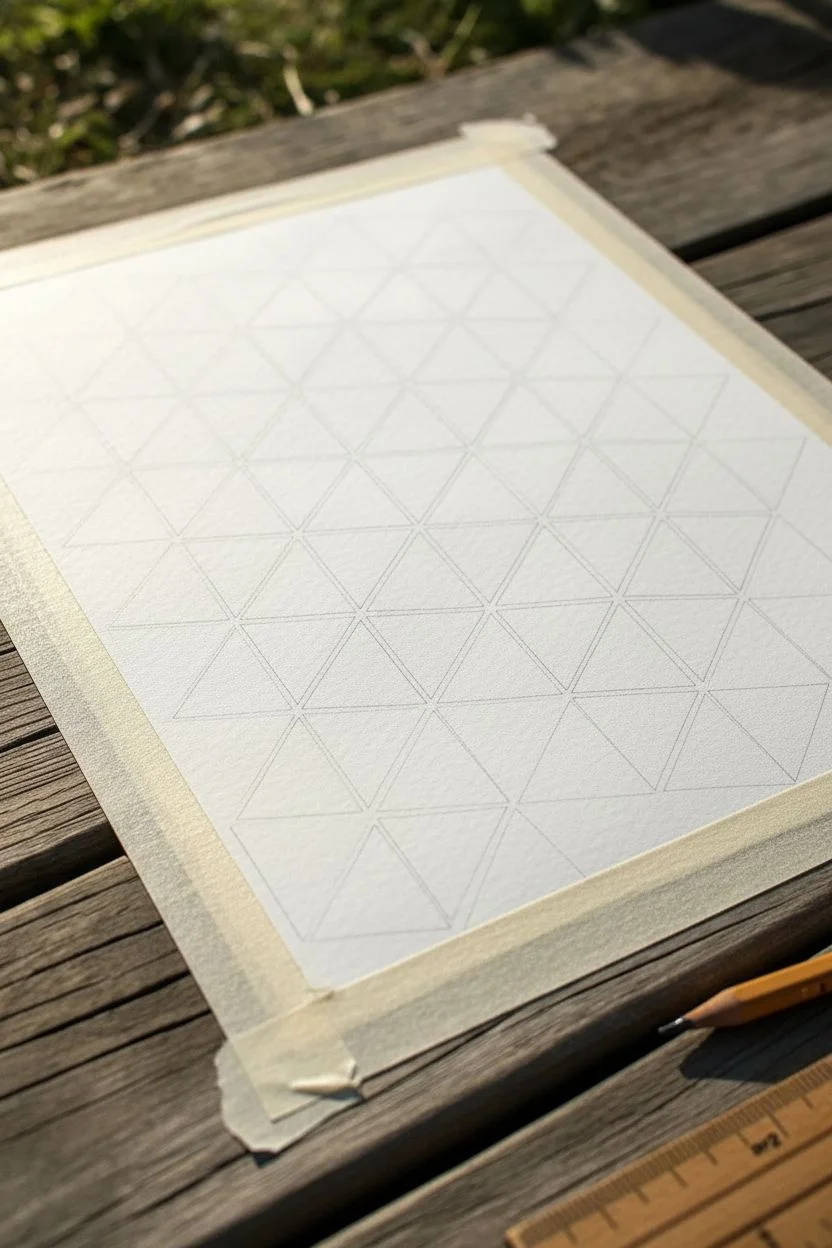
Step 1: Grid Preparation
-
Paper Setup:
Secure your watercolor paper to a flat work surface using masking tape on the edges. This prevents buckling when the paper gets wet and creates a clean border. -
Measure the Baseline:
Using your ruler and pencil, draw a faint horizontal line near the bottom of your working area to serve as the baseline for your first row of triangles. -
Mark Intervals:
Mark equal intervals along this baseline. For equilateral triangles, these marks will determine the side length of your shapes—about 1 inch to 1.5 inches is a manageable size. -
Create the Grid:
Draw your diagonal lines. To ensure they are equilateral, you can use a 60-degree set square or a protractor. Draw lines angling up at 60 degrees to the right, and then a second set angling up at 60 degrees to the left. -
Refine the border:
Once your full grid of triangles is drawn lightly in pencil, decide on the outer boundary of your painted area. You don’t have to fill the whole page; an organic, stepped edge looks lovely.
Step 2: Planning the Gradient
-
Color Selection:
Choose two main color families. For this piece, we are using a warm palette (dusty rose, peach, ochre) and a cool palette (indigo, prussian blue, teal grey). -
Mixing Palette:
Pre-mix puddles of your paint. You’ll want a saturated version of your main blue and your main pink, plus a few watered-down versions to create tints. -
Determine Flow:
Visualize the gradient. In the example, the warmth is concentrated in the bottom left corner, fading into the cool tones that dominate the upper right.
Bleeding edges?
If paint bridges the gap between triangles, dab it immediately with a clean paper towel. Once dry, you can use a tiny distinct dot of opaque white gouache to ‘re-draw’ the separation line.
Step 3: Painting
-
Start with Cool Tones:
Begin painting the triangles in the ‘cool’ section (top right). Load your brush with a mix of indigo and teal. Carefully fill in a triangle, leaving a tiny sliver of white paper unpainted between the paint and your pencil line. -
Create Variation:
As you move to adjacent triangles, slightly alter your blue mix. Add a little more water for a lighter grey-blue, or a touch of black for a deeper tone. This variety keeps the pattern from looking flat. -
Mind the Gaps:
The white ‘grout’ lines are crucial. Paint slowly near the edges. I find holding my breath for just a second while doing the final edge line helps steady my hand. -
Transition Zone:
As you move toward the middle of the paper, begin introducing neutral tones. Let your blues become more washed out and greyer. You can muddy a blue with a tiny dot of orange to desaturate it. -
Introduce Warmth:
Start painting the bottom left triangles. Begin with your dusty pinks and peaches. Just like the blue section, vary the water-to-paint ratio for each triangle to create depth. -
Blending the Meet Point:
Where the two color families meet, use very pale washes. A very light beige or arguably ‘dirty’ water wash works well here to bridge the gap between the pinks and blues without creating purple. -
Drying Time:
Work in non-adjacent sections if possible. If you paint two triangles side-by-side while both are wet, you risk the paint bleeding across the white gap. Let one dry before painting its neighbor. -
Second Layer (Optional):
Once the first layer is fully dry, look at your composition. If some triangles look too pale or uneven, apply a second glaze of the same color to deepen the saturation.
Color Harmony Tip
To make the gradient feel cohesive, mix a tiny bit of your warm color into your cool color (and vice versa) for the transition tiles. This creates ‘grey’ versions that unite the two sides.
Step 4: Finishing Touches
-
Erase Pencil Lines:
Wait until the painting is completely bone dry—if the paper feels cool to the touch, it’s still damp. Once dry, gently erase the visible pencil lines in the white gaps using a kneadable eraser. -
Flattening:
If your paper has buckled slightly from the water, place the dry artwork under a heavy stack of books overnight to flatten it out.
Frame your geometric masterpiece or scan it to use as a beautiful digital background pattern


Low-Poly Animal Portrait
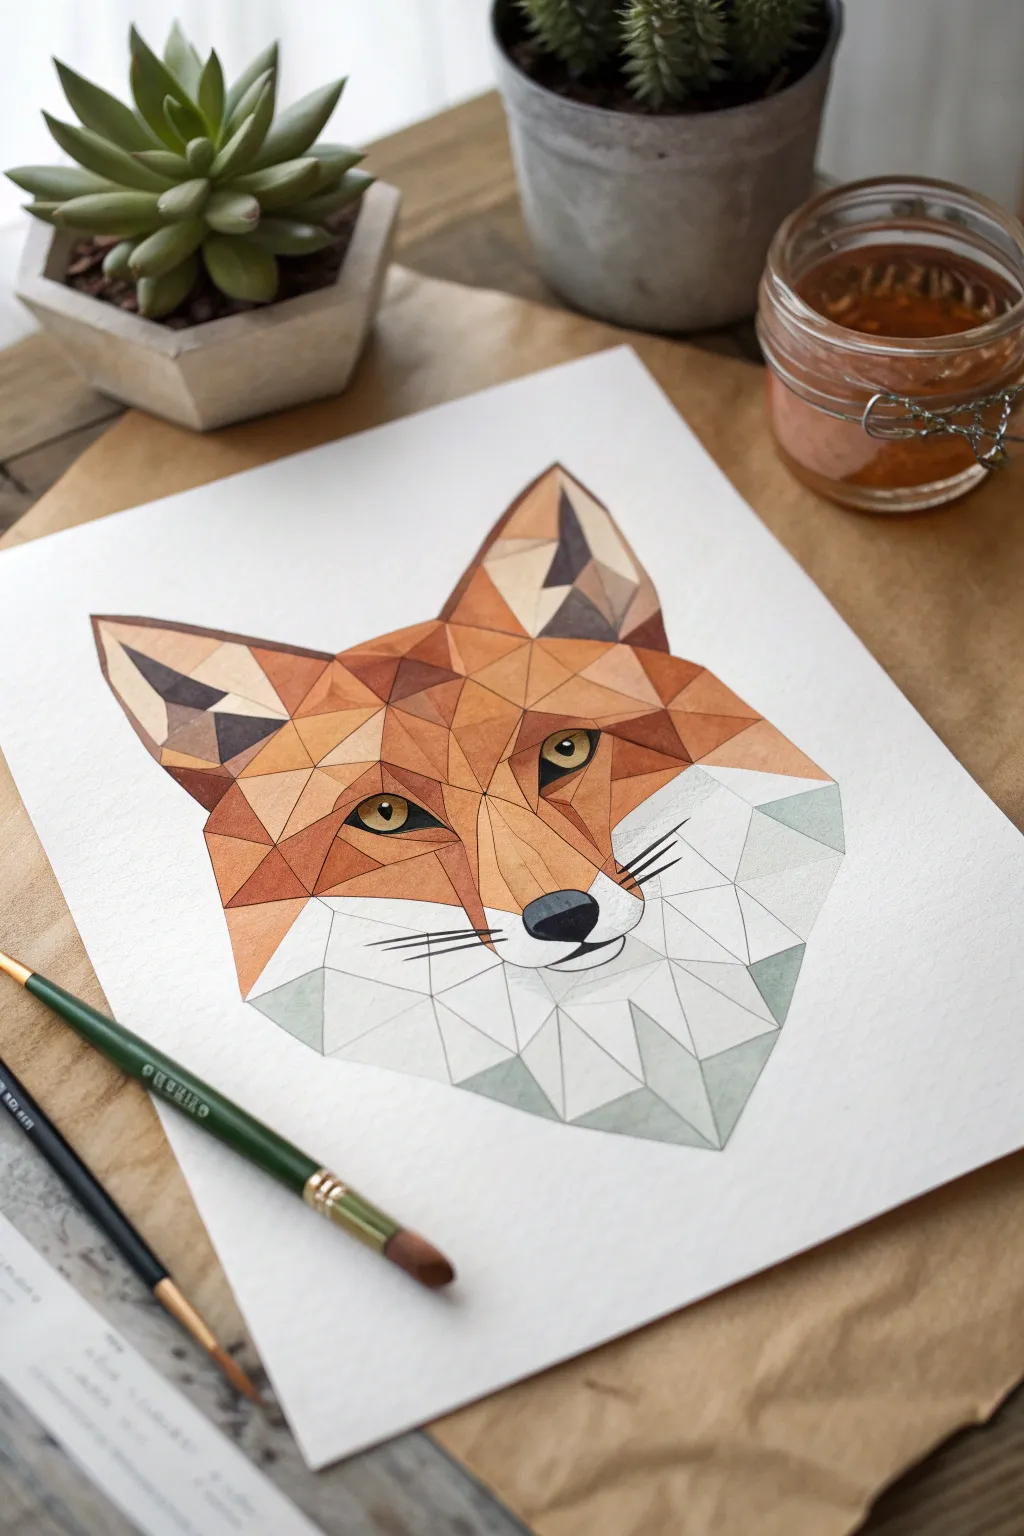
Capture the clever spirit of a fox using sharp geometric shapes and warm, earthy watercolor tones. This low-poly style portrait breaks down organic forms into faceted triangles, creating a modern and structured piece of art.
Step-by-Step Guide
Materials
- Hot press watercolor paper (smooth texture)
- Watercolor paints (burnt sienna, yellow ochre, burnt umber, black, Payne’s gray)
- Fine liner pen (0.1mm or 0.3mm, waterproof)
- Small round watercolor brushes (size 0, 2, and 4)
- Ruler
- HB Pencil
- Eraser
- Masking tape
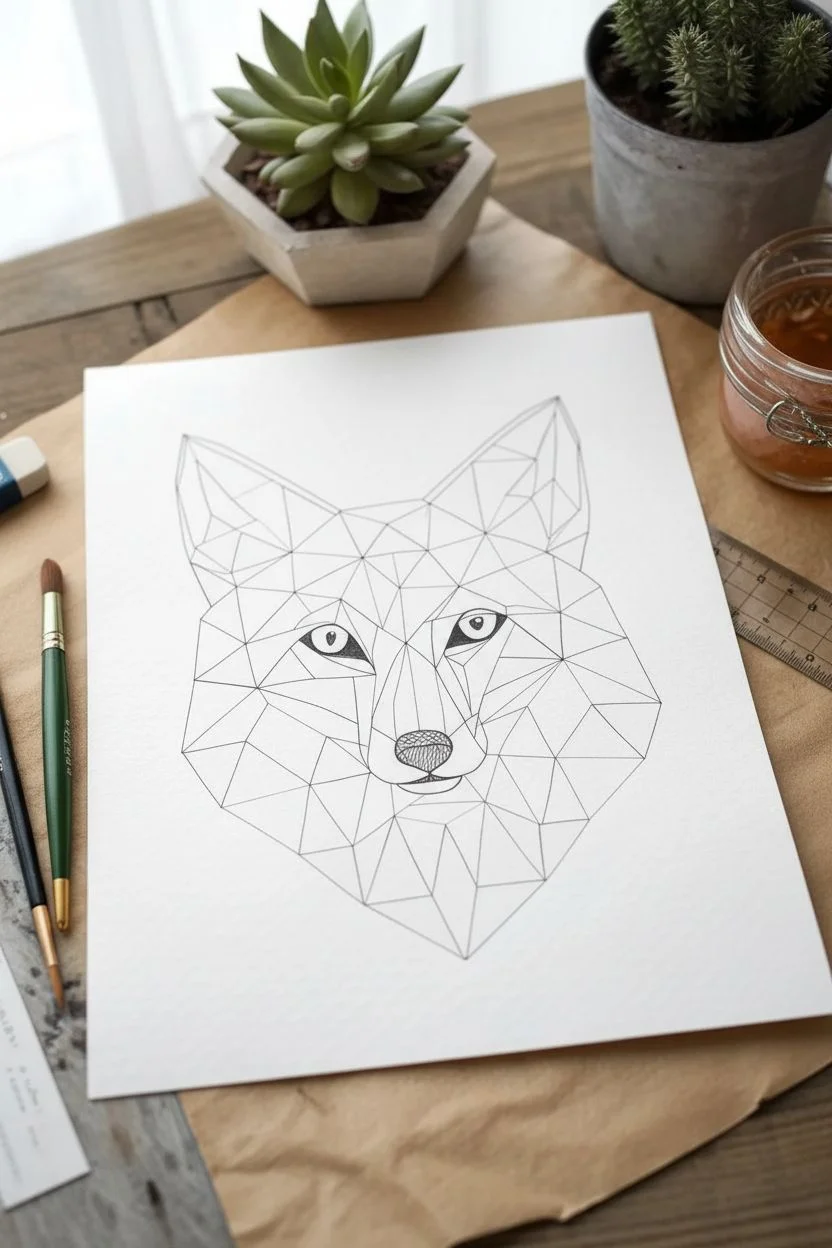
Step 1: Drafting the Geometry
-
Sketch the outline:
Begin by lightly sketching the general contour of the fox’s head in the center of your paper. Focus on the large triangular shape of the ears and the diamond-like shape of the muzzle. -
Define the eyes and nose:
Place the eyes and nose early to anchor the drawing. Draw almond shapes for the eyes and a soft, rounded triangle for the nose tip. -
Create the triangle grid:
Using a ruler, start dividing the face into triangles. Connect the key points—like the corner of the eye to the ear base—with straight lines. Avoid curves entirely; every line must be straight. -
Refine the mesh:
Subdivide larger areas into smaller triangles to create detail. Ensure the triangles are smaller around complex areas like the eyes and nose, and larger on the forehead and cheeks. -
Ink the lines:
Once you are happy with your geometric grid, carefully trace over your pencil lines with a waterproof fine liner pen. Use a ruler for precision. -
Clean up the sketch:
Wait for the ink to dry completely, then gently erase all visible pencil marks so the surface is clean for painting.
Step 2: Watercolor Application
-
Mix your base orange:
Prepare a vibrant mix of burnt sienna and a touch of yellow ochre on your palette. This will be the mid-tone for the fox’s fur. -
Paint the first triangles:
Select non-adjacent triangles on the forehead and cheeks and fill them in. Painting non-adjacent shapes prevents wet paint from bleeding into neighboring sections. -
Create tonal variation:
To give the face dimension, alter your orange mix slightly for different triangles. Add more water for lighter, highlighted facets, and add a tiny bit of brown for shadowed areas. -
Darken the ears:
Mix a darker brown using burnt umber and a touch of black. Apply this to the inner ear triangles and the darker patches above the eyes to create depth. -
Paint the eyes:
Use a diluted yellow ochre for the iris, leaving a tiny white spot for the reflection. Once dry, fill the pupil with solid black. -
Define the nose:
Paint the nose tip black, leaving a small sliver of white at the top to suggest a highlight on wet skin. -
Shade the white fur:
For the lower jaw and neck ruff, use a very watery wash of Payne’s gray or a pale blue-grey. Don’t leave it pure white; subtle grey shading gives the white fur form. -
Add deep contrasts:
Look for areas where shadows would naturally fall, such as under the chin or inside the ears. Glaze a second layer of darker paint over these specific triangles to deepen the contrast.
Bleeding Lines?
If paint bleeds between triangles, your brush is too wet. Blot the excess on a paper towel before touching the paper, or let neighboring shapes dry fully first.
Step 3: Final Details
-
Add whiskers:
Using your finest brush or the fine liner pen, draw straight, sharp lines for the whiskers. Keep them sticking out stiffly to match the geometric style. -
Correct edges:
Check the edges of your painted triangles. If any paint went outside the lines, you can carefully touch up the black grid lines with your pen to clean them up. -
Final assessment:
Step back and look at the shading. If the drawing looks flat, add one final glaze of darker color to the triangles on the side of the face furthest from the light source.
Gradient Effect
Instead of flat color, try a wet-on-wet gradient inside larger triangles. Drop darker pigment into one corner of a wet triangle for a jewel-like effect.
Frame your geometric fox in a simple wood frame to complement the warm tones of the painting


Triangle Mountain Landscape
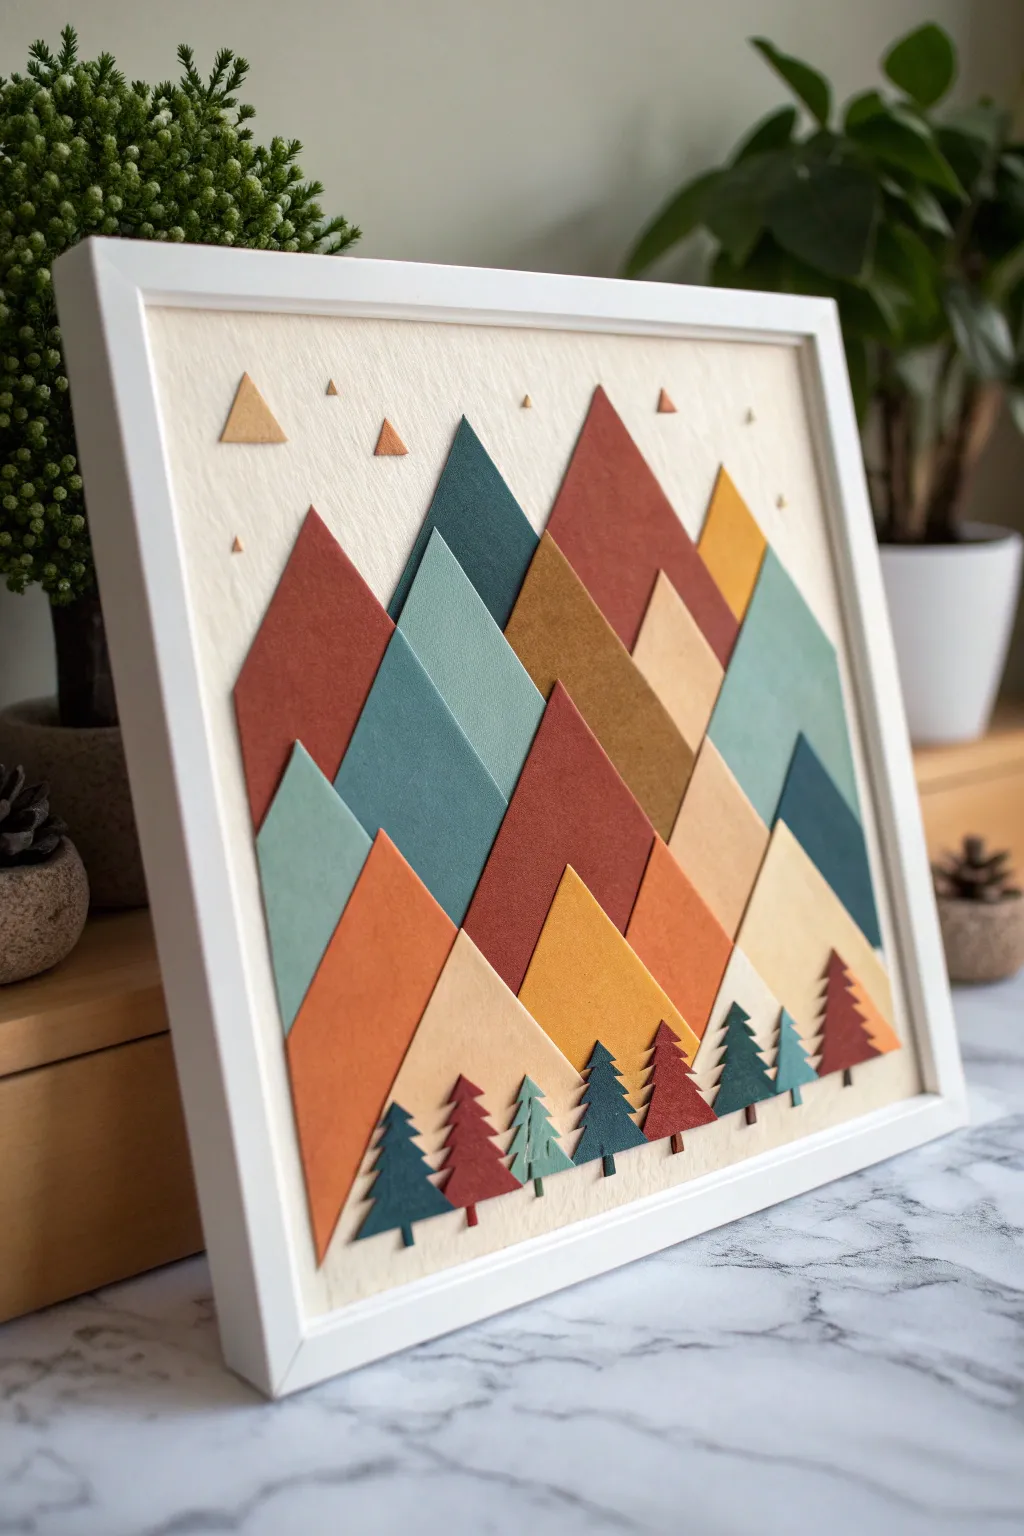
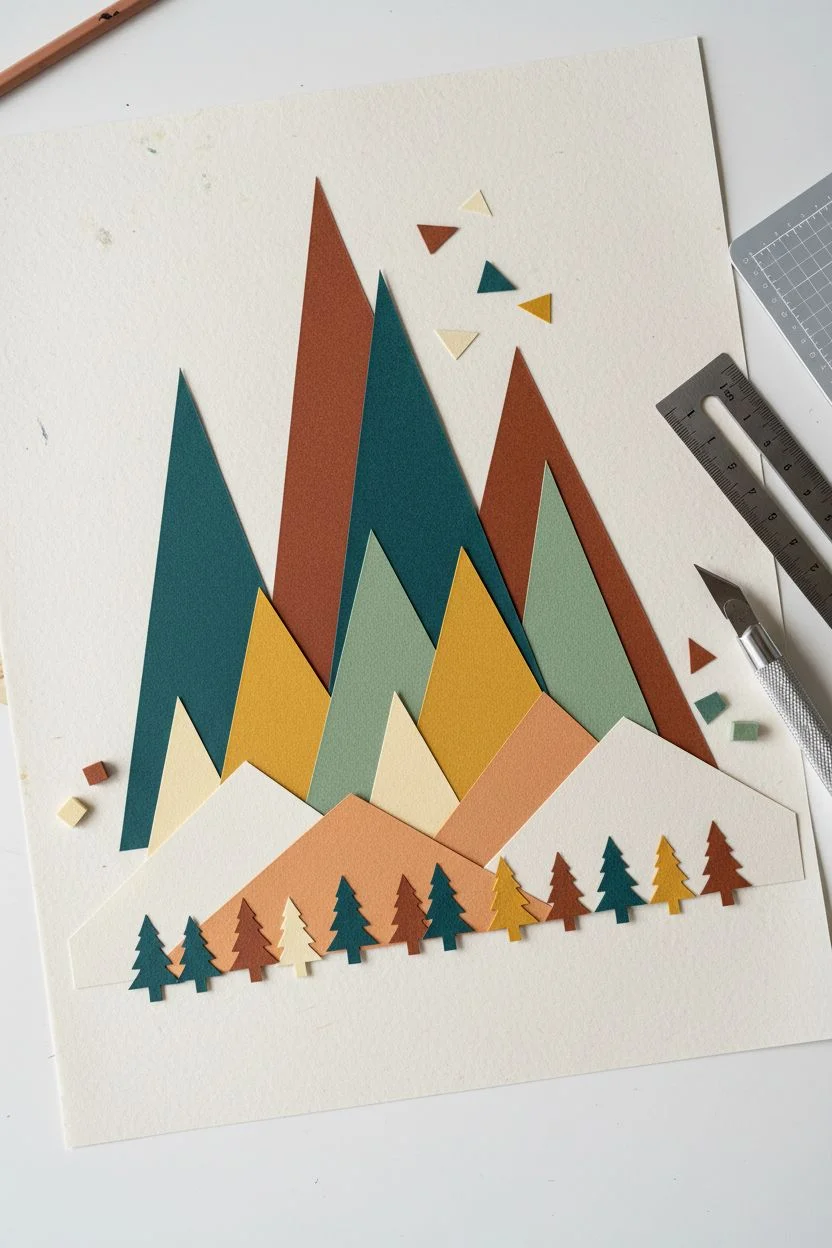
This striking landscape transforms simple triangles into a sophisticated mountain range with depth and texture. By layering varied shades of cardstock, you’ll create a modern, geometric piece that captures the serenity of nature in abstract form.
Step-by-Step Tutorial
Materials
- White or light wood square shadow box frame (approx. 8×8 or 10×10 inches)
- Textured cardstock in varied earth tones (rust, teal, mustard, cream, sage, dark green, brown)
- Heavyweight textured cream paper for background
- Sharp craft knife or precision scissors
- Metal ruler
- Cutting mat
- Double-sided foam tape (various thicknesses)
- Glue stick or acid-free craft glue
- Pencil and eraser
- Tweezers (optional)
Step 1: Design & Cutting
-
Plan your peaks:
Begin by sketching a rough layout on scrap paper. You want three distinct rows of mountains: a tall background range, a mid-ground layer, and smaller foreground hills. -
Select your palette:
Choose 4-5 core colors for the mountains. In the example, deep teal, terracotta, mustard yellow, and sage green work beautifully together. Group your paper scraps to visualize the color balance before cutting. -
Cut the large mountains:
Using your ruler and craft knife, cut large isosceles triangles for the back row. Make them tall and narrow to create a dramatic vertical look. Vary the heights slightly for a natural feel. -
Cut the mid-ground shapes:
Cut medium-sized triangles for the middle layer. Try mixing colors here—place a teal next to a rust orange to create vibrancy. These should be slightly wider and shorter than your back row. -
Cut the foreground hills:
Cut smaller, broader triangles for the front. Use lighter shades like cream or pale orange to help bring these shapes forward visually. -
Create the tiny trees:
For the evergreen trees, cut small triangles in dark green and maroon cardstock. Then, carefully cut tiny jagged notches along the two long sides to mimic pine branches. Leave a small rectangular stem at the bottom. -
Add distant details:
Cut very tiny triangles (about 1/4 inch) from scrap paper to serve as distant peaks, birds, or floating geometric elements for the sky.
Sticky Situation?
If a foam pad is visible from the side, color the white edge of the foam with a marker that matches your paper color to make it disappear into the shadow.
Step 2: Layering & Assembly
-
Prepare the background:
Cut your textured cream background paper to fit exactly inside your frame backing. Secure it with a small amount of glue so it doesn’t shift. -
Dry fit the arrangement:
Lay out all your cut pieces on the background paper without glue. Verify that the overlaps cover any gaps and that the composition feels balanced. -
Attach the back row:
Glue the tallest back mountains directly onto the cream background paper. They should look ‘flat’ and distant. -
Elevate the middle layer:
Apply a single layer of foam tape to the back of your mid-ground mountain triangles. Stick them down so they slightly overlap the bottom edge of the back row, creating a shadow line. -
Pop the foreground:
For the front-most mountains, use a double layer of foam tape (or thicker foam dots). This extra height is crucial for that 3D shadow box effect. -
Plant the forest:
Attach the small pine trees along the very bottom edge of the foreground mountains. Use varying thicknesses of foam tape here too—some trees should sit flush, while others pop out. -
Scatter the sky elements:
Using tweezers, place the tiny distant triangles in the open sky area. Glue them flat to maintain the sense of distance. -
Final inspection:
Check for any loose edges or visible foam tape from the side angles. I find tucked-away bits of foam are easiest to push back into place with the dull tip of a craft knife. -
Frame it up:
Clean the inside of the frame glass to remove dust. Place your artwork into the frame, ensuring the glass doesn’t squash your highest paper layers, and secure the backing.
Level Up: Texture Time
Before cutting, gently rub sandpaper over some cardstock sheets to create a distressed, weathered look on specific mountain ranges.
Hang your geometric masterpiece on a wall that gets side-lighting to really show off those dramatic shadows
BRUSH GUIDE
The Right Brush for Every Stroke
From clean lines to bold texture — master brush choice, stroke control, and essential techniques.
Explore the Full Guide
Stacked Triangle Tree Design
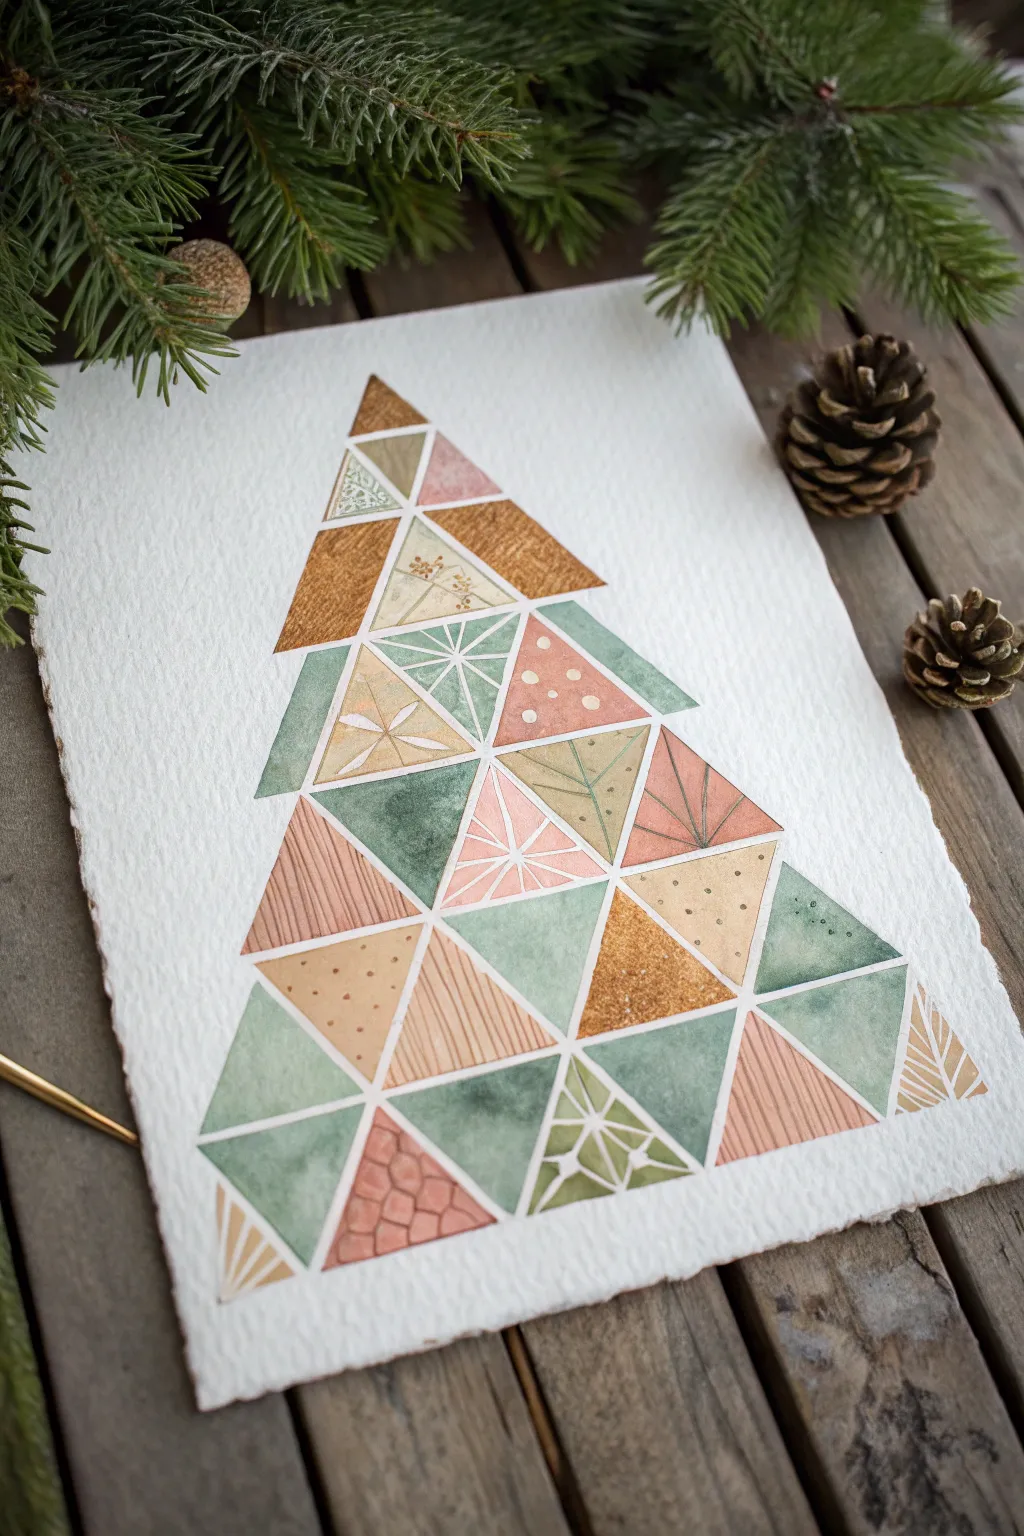
This modern holiday project creates a festive tree shape entirely from stacked triangles, each featuring its own unique color and pattern combination. Using soft watercolors and fine line work, you’ll build a patchwork forest aesthetic that balances warm golds and pinks with cool winter greens.
Step-by-Step Guide
Materials
- Cold press watercolor paper (300 gsm)
- Watercolor paint set (forest green, sage, blush pink, metallic gold, burnt sienna)
- Pencil (HB or 2H)
- Ruler
- Fine detail brushes (sizes 0 and 2)
- White gel pen or white gouache
- Gold metallic pen (optional)
- Washi tape or masking tape
Step 1: Planning the Grid
-
Define the boundaries:
Start by lightly drawing a large isosceles triangle centered on your paper to act as the main boundary for your tree. The base should be wide and the top pointed. -
Draw horizontal guides:
Using your ruler, lightly sketch horizontal lines across the main triangle at even intervals. These will determine the height of your individual triangle rows. -
Create the triangle grid:
Connect points between your horizontal lines to form a tessellating grid of smaller triangles. Aim for a mix of right-side-up and upside-down triangles that fit perfectly together like a puzzle. -
Refine the shape:
Erase the outer boundary lines and any horizontal guides that extend past the tree shape, leaving only the internal grid of triangles visible. -
Protect the gaps:
For crisp white lines between shapes like you see here, carefully apply thin masking fluid or simply be very mindful to leave a 1mm gap of dry paper between each triangle as you paint.
Step 2: Painting the Base Layers
-
Mix your palette:
Prepare puddles of your main colors: a deep forest green, a soft sage green, a dusty blush pink, and a metallic gold or bronze. Keep the water-to-paint ratio high for transparency. -
Paint the solid triangles:
Select random triangles throughout the tree to fill with solid washes of color. Distribute your greens and pinks evenly so no single color dominates one section. -
Add metallic accents:
Fill a few scattered triangles with your metallic gold paint. I find these look best near the top and scattered in the middle to catch the light. -
Create gradient effects:
For some triangles, drop wet paint into one corner and let it fade out with clean water towards the opposite side for a subtle ombré look. -
Let it dry completely:
Wait until every painted section is bone dry. This is crucial before adding patterns to prevent the ink or paint from bleeding.
Clean Lines Secret
Use liquid masking fluid or thin artist tape (1/8 inch) along the grid lines before painting to ensure perfect white gaps without needing a steady hand.
Step 3: Adding Detail and Pattern
-
Paint the stripes:
On a few plain colored triangles (especially pink ones), use a fine brush with a slightly darker shade of the same color to paint thin, vertical or diagonal stripes. -
Add polka dots:
Using a contrasting color or slightly darker shade, dot distinct points onto light-colored triangles. A blush triangle with white or dark pink dots adds great texture. -
Draw starburst lines:
With your fine brush, paint lines radiating from the corner of a triangle outward, resembling a fan or a sunburst design. -
Incorporate botanicals:
On the lighter green and beige triangles, paint tiny, delicate leaf veins or simple twig patterns using a darker green or brown. -
Add white highlights:
Once dry, use your white gel pen or white gouache to add crisp geometric lines, snowflakes, or dots over the darker green and gold sections to make them pop. -
Erase pencil guides:
Check one final time that everything is dry, then gently erase any visible pencil lines left in the white gaps between the triangles.
Embellish It
Once the paint is dry, top random triangles with real gold leaf adhesive and foil for a texture that catches the light much better than metallic paint.
Display your piece in a simple wooden frame to complement the organic tones of the artwork
Triangle Composition Focal Point
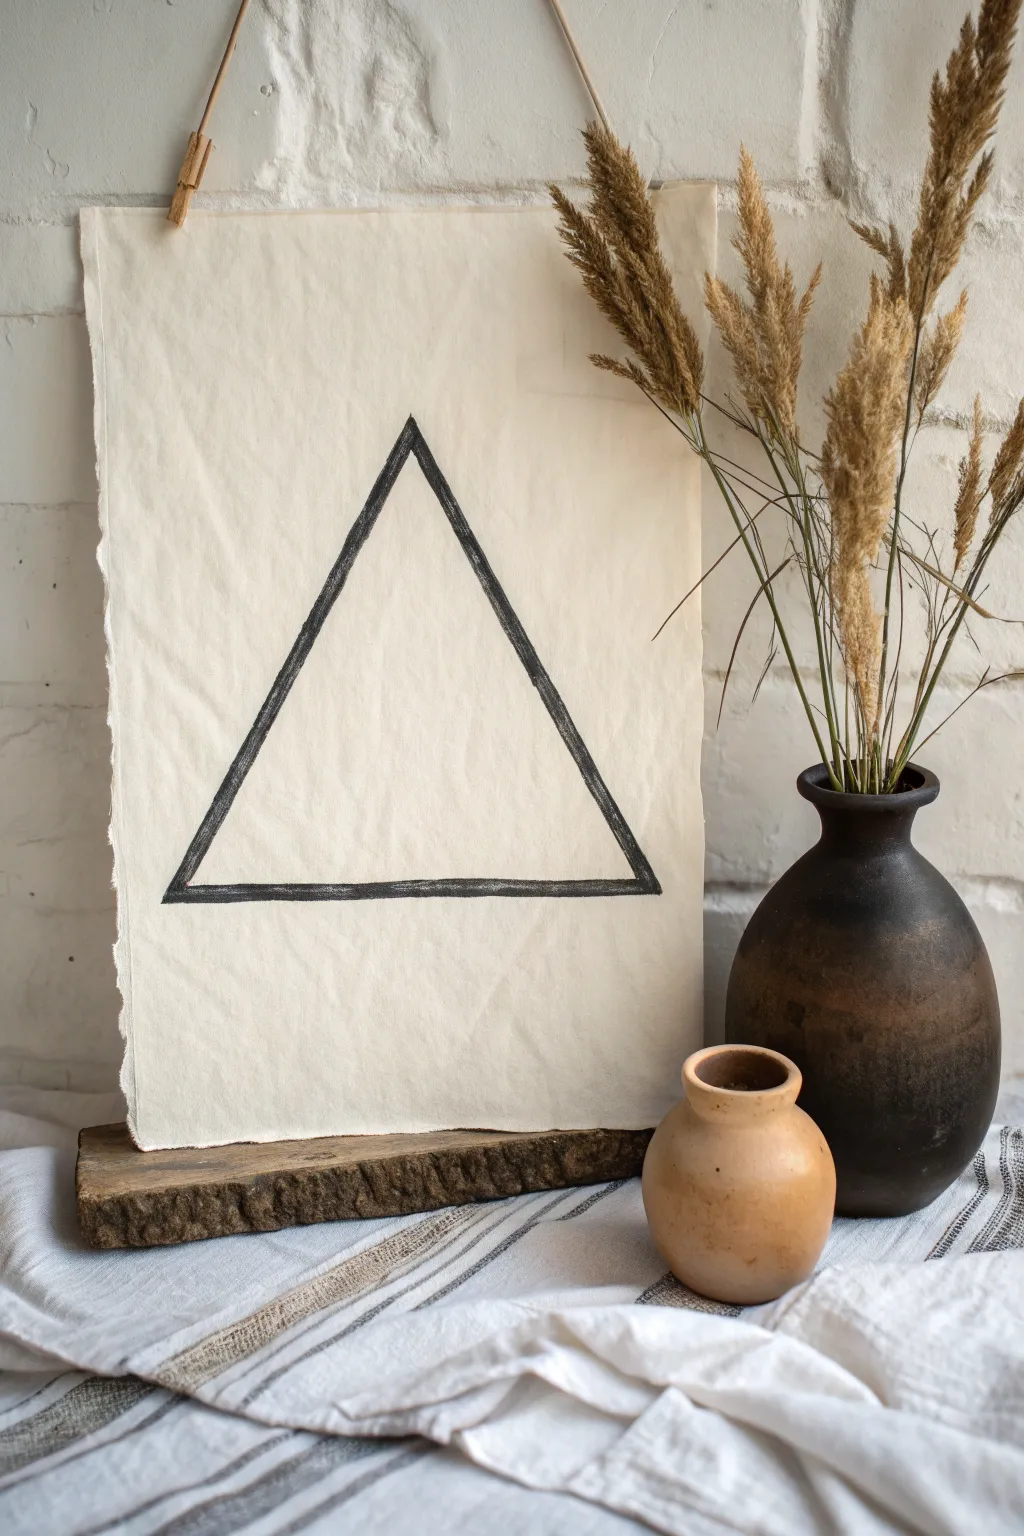
Embrace the beauty of simplicity with this rustic wall hanging that features a bold, geometric focal point on natural texture. This project combines raw canvas or watercolor paper with a striking charcoal or ink triangle to create a piece of art that feels both ancient and modern.
Step-by-Step
Materials
- Heavyweight unbleached cotton canvas or rough watercolor paper (approx. 11×17 inches)
- Thick charcoal stick or black India ink
- Flat paintbrush (medium width) if using ink
- Ruler or straight edge
- Pencil for light sketching
- Matte finish spray fixative
- Natural jute twine
- Two small wooden clothespins or clips
- Scissors
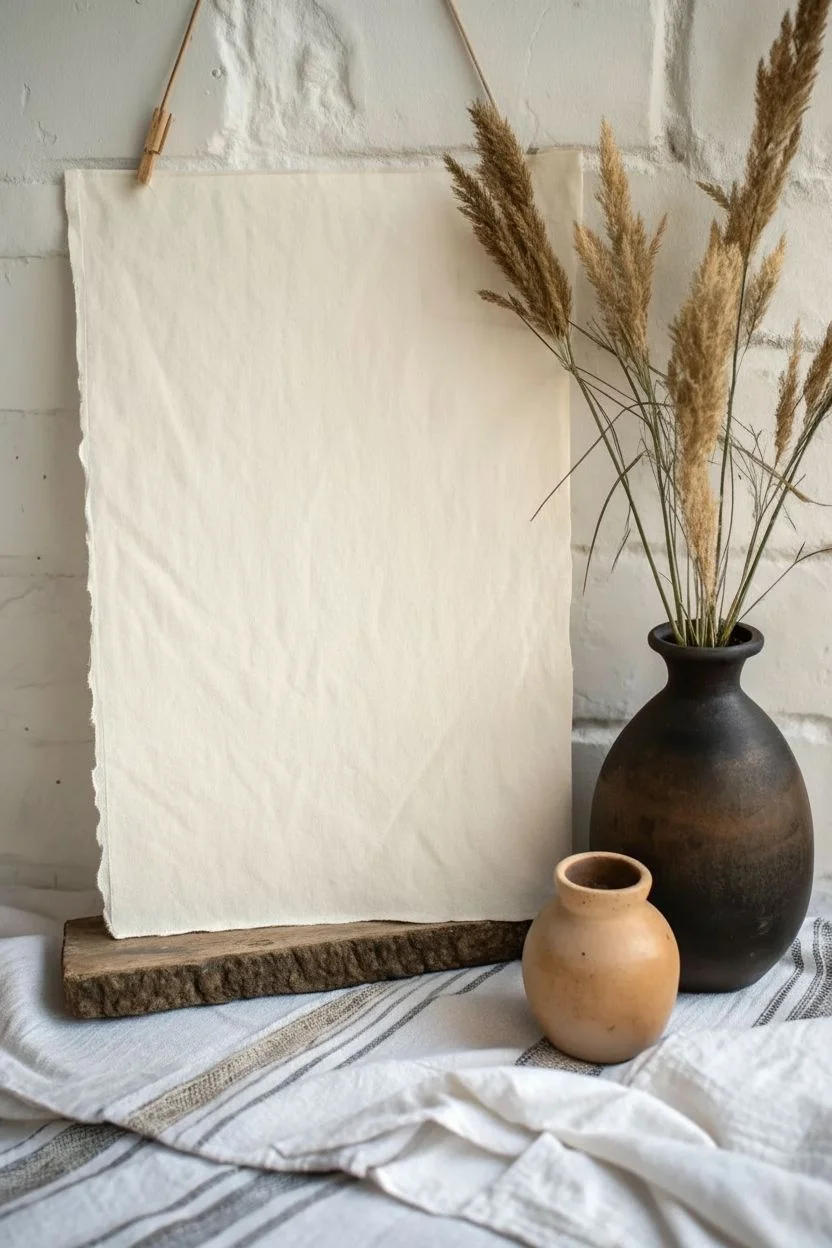
Step 1: Preparing the Surface
-
Select your base:
Choose a piece of unprimed cotton canvas or high-texture handmade paper. The irregularities in the weave or fiber are essential for that rustic aesthetic shown in the photo. -
Create the rough edge:
Instead of cutting the edges with scissors, tear the paper or canvas by hand. This deckled edge adds character and softness that contrasts nicely with the sharp geometry you’ll add later. -
Flatten the surface:
If your canvas is rolled or wrinkled, lay it flat under heavy books for a few hours, or press it lightly with an iron on a low setting (if using canvas) to ensure a smooth working area.
Fixative Alternative
No spray fixative? Cheap, aerosol hairspray works in a pinch to seal charcoal. Test it on a scrap piece first to ensure it dries invisible without yellowing.
Step 2: Drafting the Geometry
-
Find the center:
Measure the width of your material to find the exact horizontal center point. Make a tiny, faint mark with your pencil near the top third of the sheet; this will be the apex of your triangle. -
Mark the base points:
Decide how wide you want the base of the triangle to be. Measure equal distances out from the center line near the bottom third of the paper and mark your two bottom corners lightly. -
Connect the dots:
Using your ruler, lightly sketch the three lines connecting your apex and base points to form the triangle guide. Keep these lines very faint so they don’t show through the final medium.
Aged Paper Hack
Dip the canvas or paper in strong brewed tea and let it dry before painting. This creates a warm, vintage patina that enhances the rustic vibe.
Step 3: Applying the Design
-
Prepare your medium:
If using charcoal, sharpen your stick slightly to get a better edge. If using India ink, pour a small amount into a shallow dish. -
Start the first stroke:
Place your ruler back along one of the pencil lines as a guide. If using charcoal, press firmly and drag along the edge. If using ink, load your brush and paint a confident, even stripe following the line. -
Complete the outline:
Repeat the process for the remaining two sides. Focus on keeping the line width consistent—about a quarter-inch thick creates a bold impact. -
Refine the corners:
Pay special attention to the three corners where the lines meet. Ensure they are sharp and intersect cleanly, touching up any gaps carefully. -
Enhance the texture:
I like to go back over the lines a second time. This builds up opacity and allows the texture of the canvas to catch the charcoal or ink, creating that lovely grainy appearance.
Step 4: Finishing Touches
-
Clean up:
Check for any smudge marks or stray dust outside the triangle. Use a kneaded eraser to gently lift these away without damaging the paper surface. -
Set the artwork:
Take the artwork to a well-ventilated area and spray it with a matte fixative. This is crucial if you used charcoal, as it prevents the design from smearing over time. -
Prepare the hanging string:
Cut a length of jute twine, approximately 20 inches long, depending on how low you want the piece to hang. -
Attach the clips:
Clip a wooden clothespin to the top left and top right corners of the canvas. -
Secure the twine:
Tie the ends of your jute twine securely to the metal spring or the wooden head of each clothespin. -
Final adjustment:
Hang the piece on a wall hook and adjust the clips slightly to ensure the canvas hangs straight and the triangle remains perfectly centered.
Now you have a striking, minimalist masterpiece ready to bring balance to your space

PENCIL GUIDE
Understanding Pencil Grades from H to B
From first sketch to finished drawing — learn pencil grades, line control, and shading techniques.
Explore the Full Guide
Shattered-Glass Triangle Mosaic
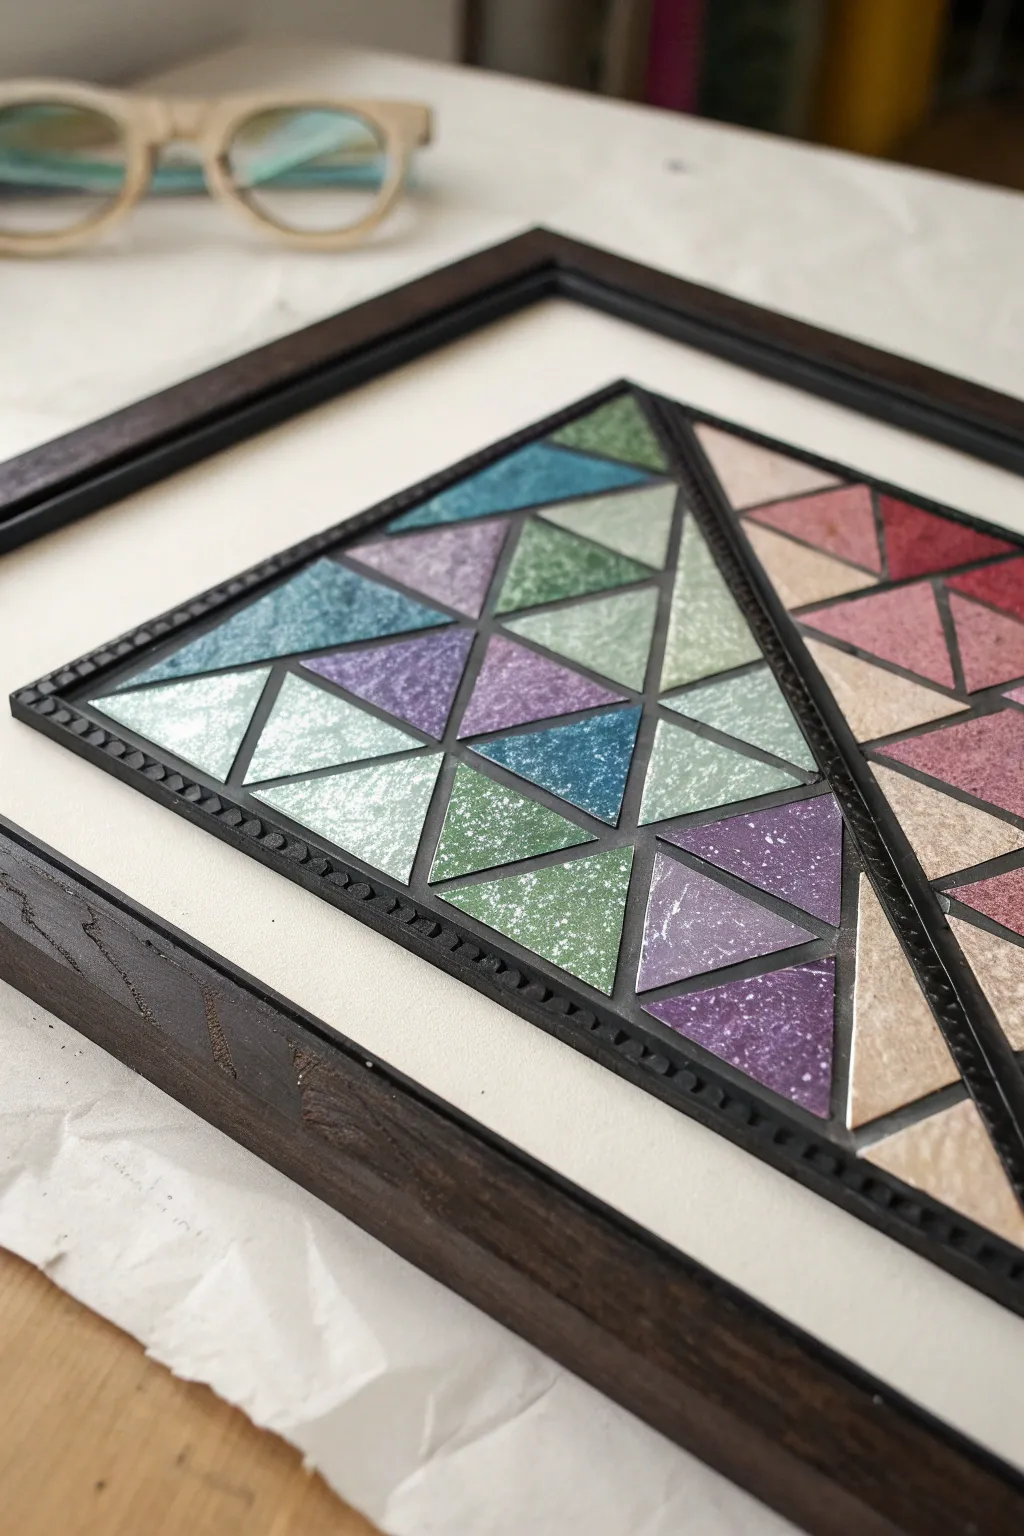
Transform simple paper cutouts into a striking piece of modern art that mimics the look of stained glass or polished terrazzo. By layering textured, painted paper triangles inside a dimensional frame, you’ll create a sophisticated geometric composition that looks far more expensive than its humble materials.
Step-by-Step Tutorial
Materials
- Heavyweight watercolor paper or mixed media cardstock
- Acrylic paints (teal, emerald green, violet, lavender, metallic silver)
- Sponge dabbers or old texture sponge
- Black fine-point pigment liner or thin black tape (1/8 inch)
- Craft knife (X-Acto)
- Metal ruler
- Self-healing cutting mat
- Quick-drying tacky glue or spray adhesive
- White backing board (sized to your frame)
- Dark wood frame (shadow box style works best)
- Thin black decorative trim or beaded molding (optional, for inner border)
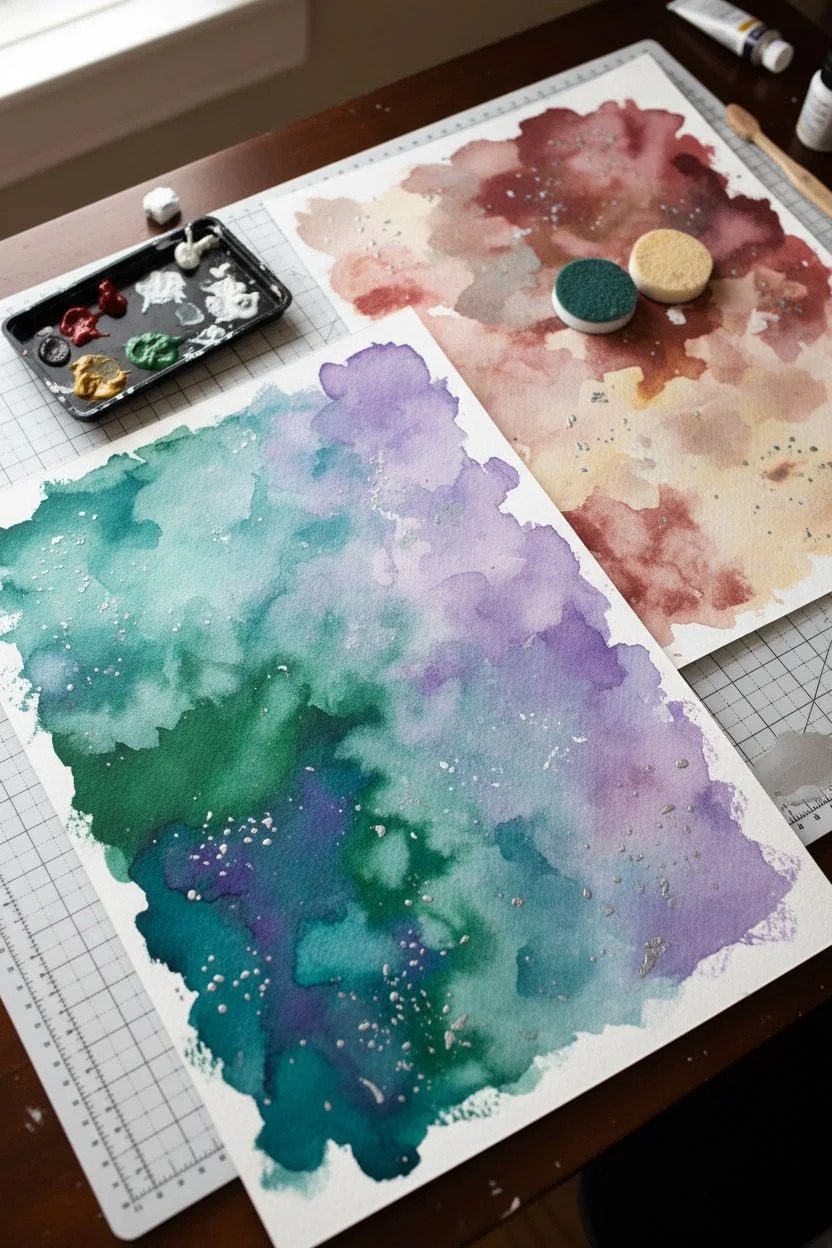
Step 1: Creating the Textured Paper
-
Prepare the palette:
Begin by squeezing out your acrylic colors onto a palette. Mix a few custom shades by blending teal with silver for a shimmer effect, or violet with a touch of white for a softer pastel hue. -
Sponge painting technique:
Dip a sponge dabber into your first color. Don’t overload it; punch off excess paint on a paper towel first. Dab the paint onto your watercolor paper to create a mottled, stone-like texture rather than solid coverage. -
Layering colors:
Once the base layer is tacky but not fully dry, sponge on complementary colors. For the ‘cool’ section shown, overlap greens with blues and occasional purples. Leave some white paper showing through for faux-texture depth. -
Adding the splatter:
Dilute a bit of white or silver metallic paint with water until it’s inky. Flick the bristles of an old toothbrush to spray fine droplets over your colored papers. This mimics the flecks found in terrazzo or natural stone. -
Dry completely:
Let these textured sheets dry fully. If the paper has buckled from the moisture, press it under a heavy book overnight before cutting.
Clean Cuts Only
Change your X-Acto blade frequently! Creating sharp geometric corners on thick watercolor paper requires a razor-sharp edge. A dull blade will tear the paper fibers.
Step 2: Cutting and Assembly
-
Map your design:
On a piece of scrap paper or directly lightly on your backing board, draw a large triangle. Divide this large triangle into a grid of smaller, uniform triangles to serve as your placement guide. -
Cut the triangles:
Using your metal ruler and craft knife on the cutting mat, slice your painted papers into equilateral triangles. Aim for them to be slightly smaller than your grid spaces to allow for ‘grout’ lines between them. -
Dry fit the layout:
Before gluing, arrange your cut triangles onto the backing board. Creating a gradient effect—transitioning from greens to blues to purples—adds a professional touch to the composition. -
Adhere the pieces:
Apply a small dot of tacky glue to the back of each triangle and press it into place. I find tweezers helpful here for precise positioning without getting glue on the textured surface. -
Create the inner border:
To mimic the image’s distinct triangular frame, cut strips of black cardstock or use thin decorative molding. Glue these strips to outline your main triangular shape, effectively framing your mosaic work. -
Optional detailing:
If you want a darker contrast between tiles like in stained glass, you can outline each paper triangle with a very fine black marker, or glue thin strips of black paper between the gaps.
Level Up: Resin Finish
Pour a thin layer of clear UV resin or dimensional glaze (like Mod Podge Dimensional Magic) over each individual triangle to give them a glossy, glass-like domed appearance.
Step 3: Framing the Artwork
-
Mount the backing:
Ensure your mosaic is centered. If you used a separate working sheet, mount it now onto the rigid backing board that fits your frame. -
Inspect and clean:
Check for any loose glue strands or lifted corners. Press down any edges that fit improperly. -
Final assembly:
Place the artwork into the dark wood frame. Using a shadow box frame allows the texture of the paper and the inner border to stand out without being compressed against the glass.
Hang your geometric masterpiece in a well-lit area to let the metallic flecks catch the light
Watercolor Triangles With Soft Bleeds
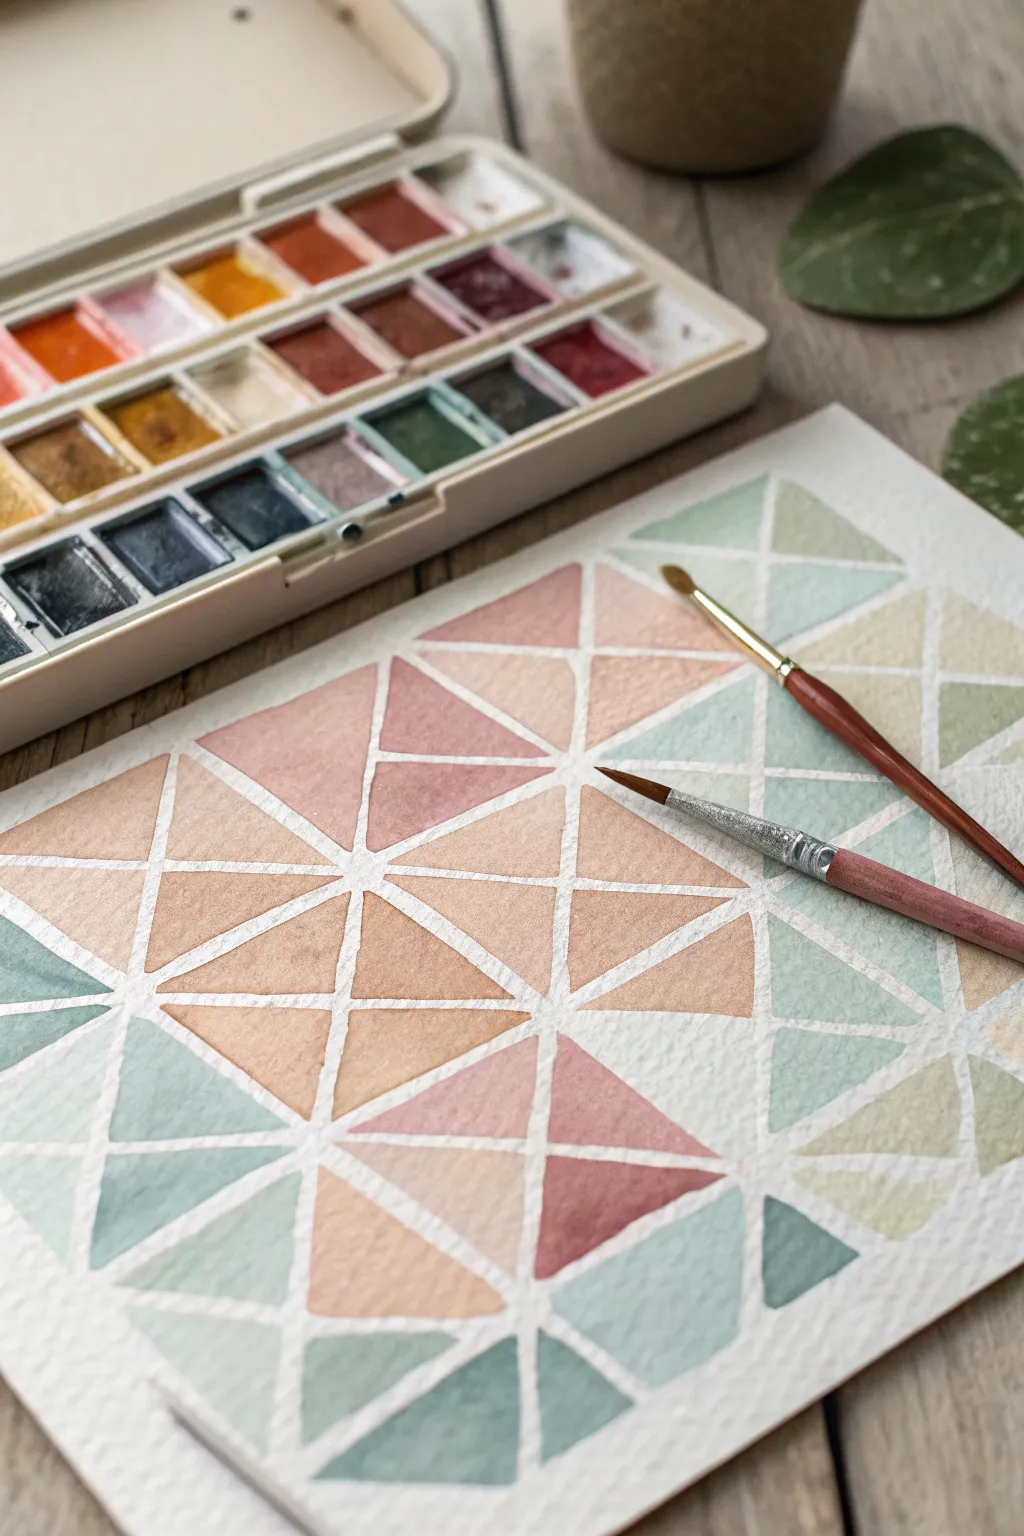
Create a soothing, geometric masterpiece using the clean lines of masking tape and the soft, bleeding nature of watercolors. This project results in a crisp, modern pattern where muted peaches, sage greens, and dusty pinks dance together in structured harmony.
Step-by-Step
Materials
- Cold press watercolor paper (300 gsm)
- Artist’s masking tape or washi tape (1/4 inch width)
- Watercolor paint set (pan or tube)
- Round watercolor brush (size 6)
- Round watercolor brush (size 2 or 4 for details)
- Jar of clean water
- Paper towels
- Ruler (optional, but helpful)
- Pencil (light H grade)
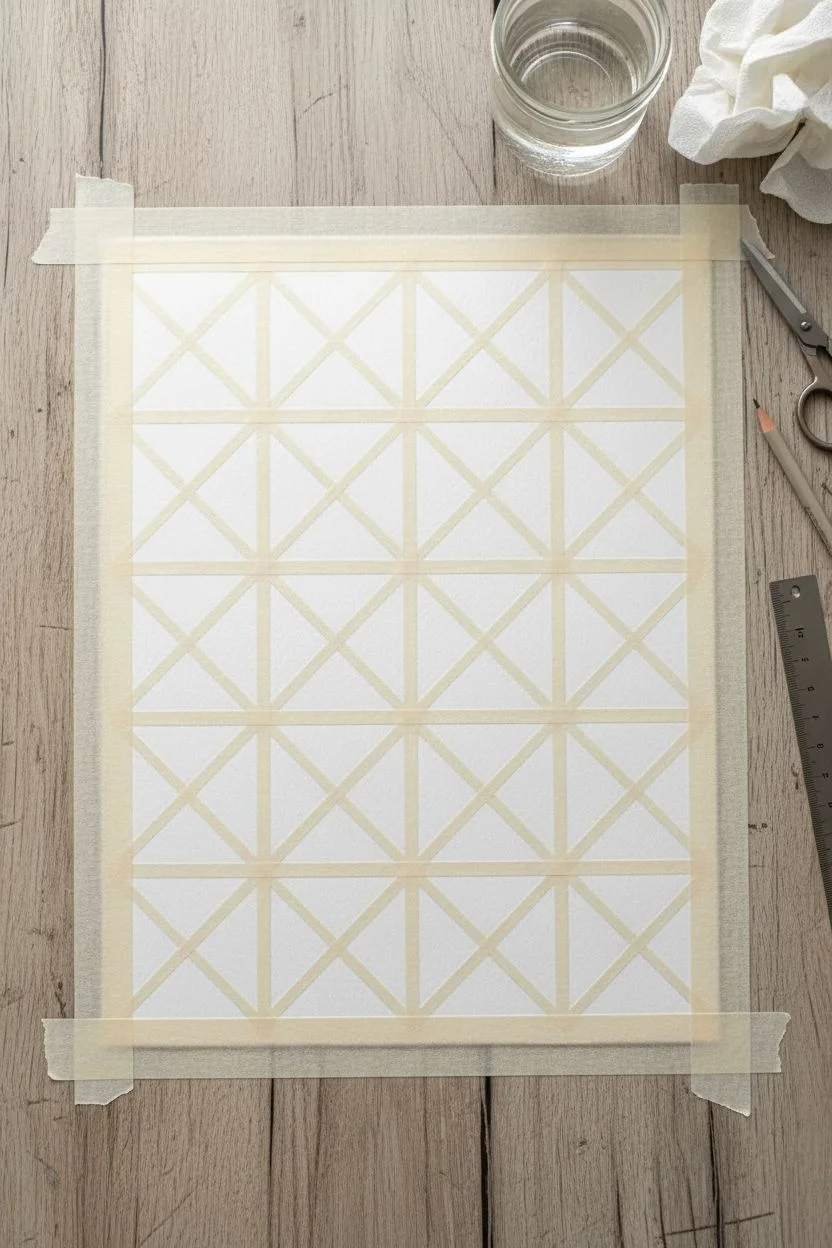
Step 1: Preparation & Masking
-
Secure the paper:
Begin by taping down all four edges of your watercolor paper to your work surface. This creates a clean border and prevents the paper from buckling when wet. -
Establish the grid:
Using your narrow masking tape (or washi tape), create a large grid pattern. Lay down horizontal and vertical strips first to create squares or rectangles. Don’t worry about perfect measurements; an organic look works well. -
Create the triangles:
Now, place diagonal strips of tape through your squares. Alternate the direction of the diagonals—some going left-to-right, others right-to-left—to form a dynamic mix of triangles. -
Seal the edges:
Run the back of your fingernail or a bone folder firmly over every strip of tape. This step is crucial to prevent paint from sneaking underneath and ruining your crisp white lines.
Tearing Paper?
If your tape is ripping the paper upon removal, try heating the tape briefly with a hairdryer first. This softens the adhesive, making it release more gently.
Step 2: Color Selection & Mixing
-
Prepare the palette:
For this soft look, you’ll need three main color families: a dusty rose/pink, a warm peach/terracotta, and a sage/mint green. -
Mix the peach tone:
Create the peach shade by mixing orange with plenty of water and a tiny dot of white or pink to soften it. It should be transparent and light. -
Mix the sage green:
For the green, mix a sap green with a touch of burnt sienna or gray to desaturate it. Add water until it becomes a soft, pastel wash. -
Test your colors:
Swatch your mixed colors on a scrap piece of paper first. You want them to look cohesive and similar in value (lightness) before applying them to the final artwork.
Pro Tip: Masking Fluid
For even thinner, more intricate white lines between geometric shapes, use a ruling pen dipped in liquid masking fluid instead of tape.
Step 3: Painting the Pattern
-
Start with the peach:
Dip your larger round brush into the peach mixture. Select random triangles across the paper to fill. Try not to paint adjacent triangles the same color. -
Apply the pinks:
Clean your brush and switch to the dusty pink. Fill in another set of sporadic triangles, balancing them against the peach sections. -
Add the greens:
Use the sage green mixture to fill in the remaining white spaces. If you notice two greens touching, you can slightly darken the wet mix on one side to create contrast. -
The bleed technique (optional):
For a ‘soft bleed’ look within a single triangle, wet the paper inside the tape shape with clean water first, then drop different pigments into the corners and let them merge naturally. -
Vary the saturation:
I like to water down the paint significantly for some triangles while keeping others more pigmented. This variation adds depth and interest to the flat pattern. -
Check for gaps:
Scan the painting for any missed spots or uneven pools of water. Use a thirsty (dry) brush to soak up excess puddles before they dry to avoid hard water marks (blooms). -
Let it dry completely:
This is the hardest part—patience! Let the painting sit until the paper is bone dry and cool to the touch. Using a hairdryer on low heat can speed this up.
Step 4: The Reveal
-
Peel the tape:
Once absolutely dry, begin peeling the tape. Pull it slowly at a 45-degree angle away from the painted area to minimize the risk of tearing the paper. -
Clean up edges:
If any paint did bleed under the tape, you can gently scratch it away with an X-Acto knife or cover it with a tiny bit of white gouache. -
Final assessment:
Step back and admire the clean geometric lines contrasting with the soft watercolor textures.
Enjoy the satisfying moment of peeling back the tape to reveal your crisp, colorful artistry


Triangle Mandala Burst
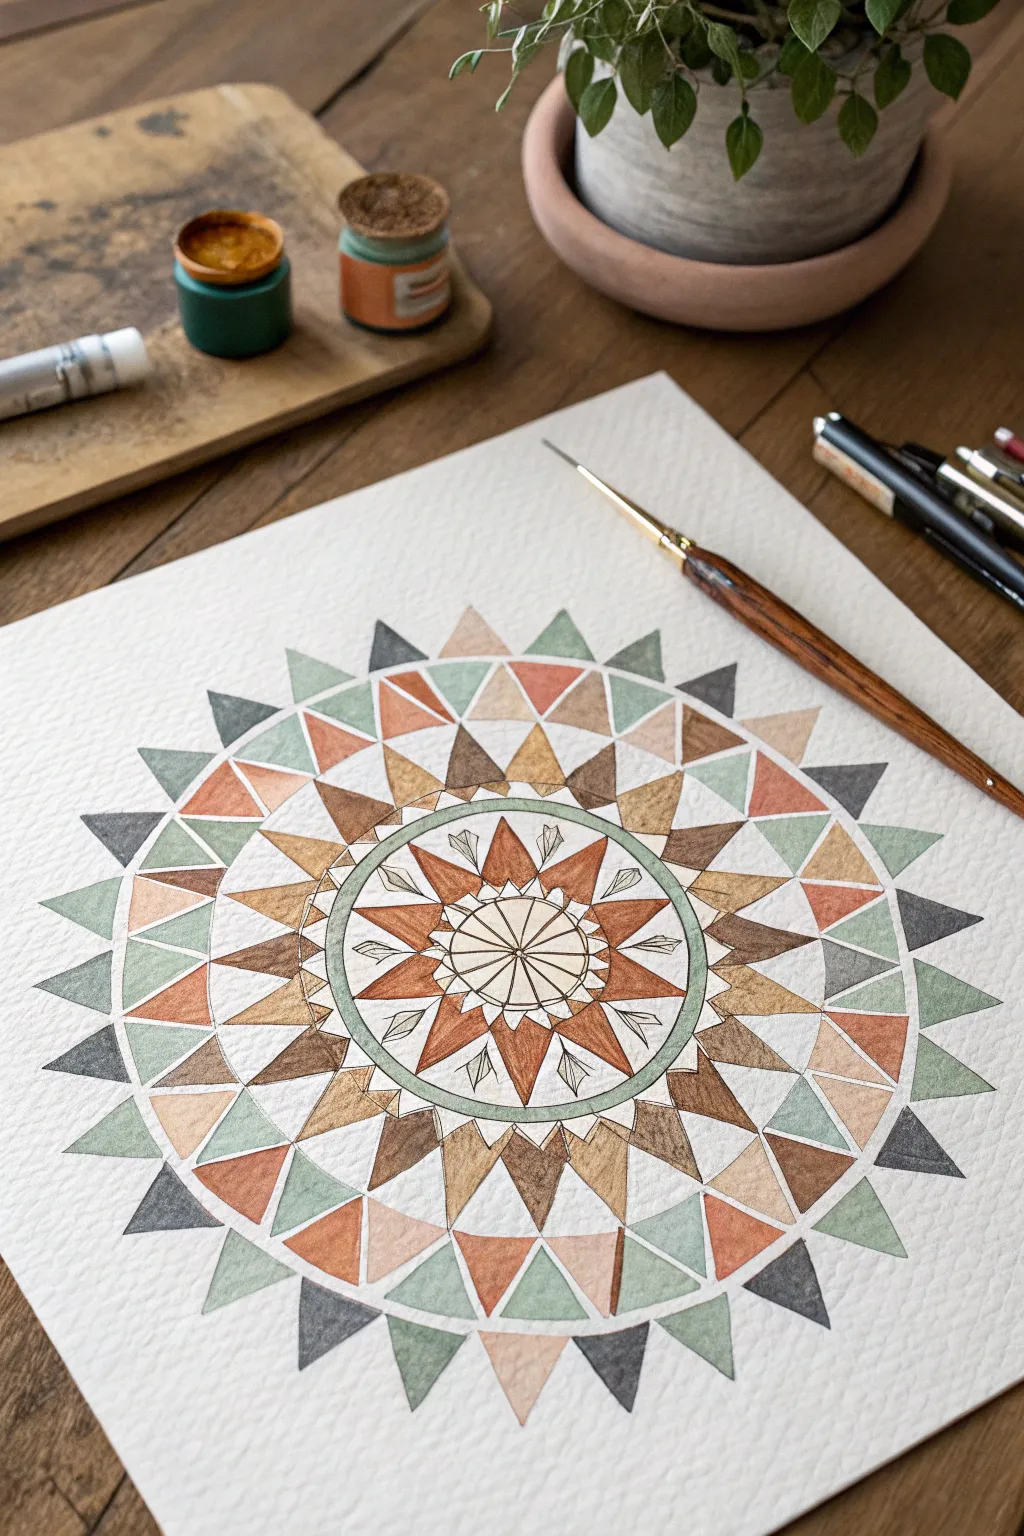
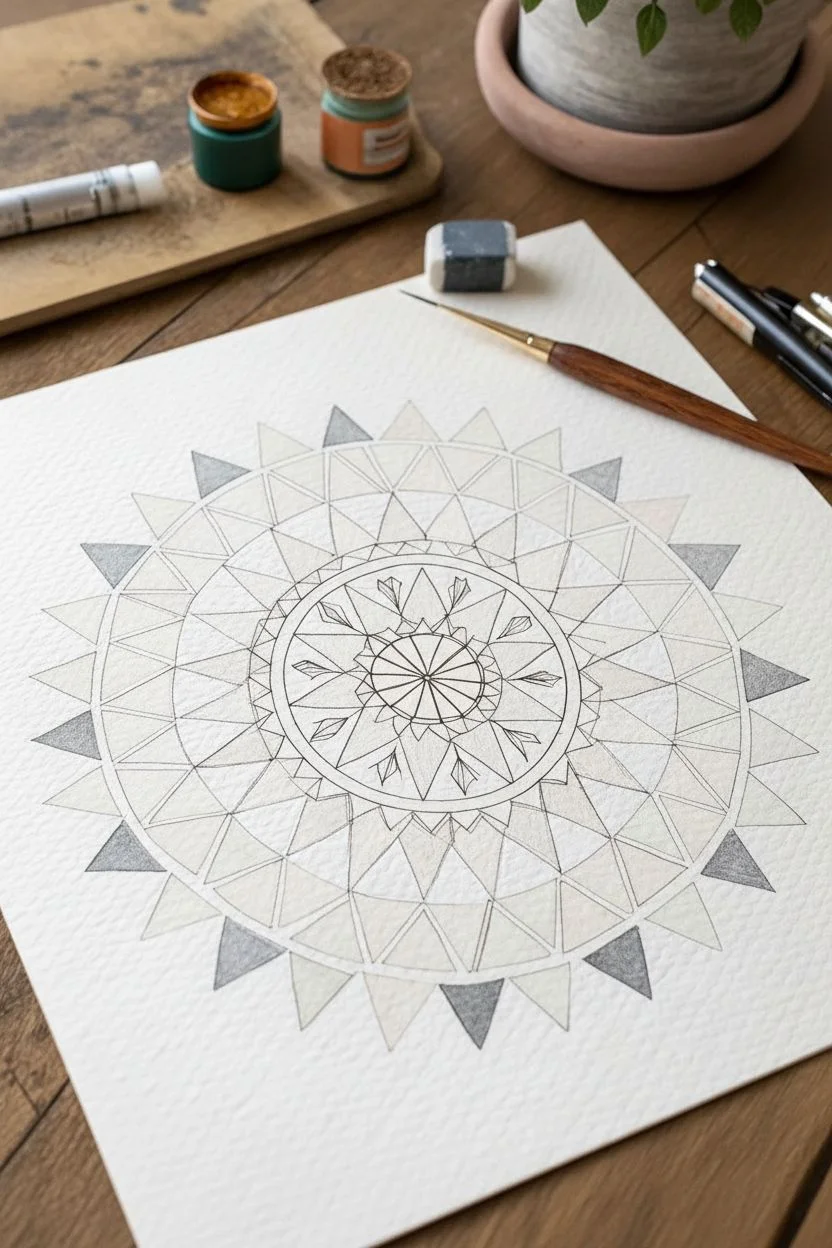
Capture the grounded beauty of geometric forms with this mandala that radiates outward in earthy, calming tones. Using a combination of pen drawing and watercolor filling, this project balances structure with the softness of hand-painted textures.
Detailed Instructions
Materials
- Cold press watercolor paper (textured)
- Pencil and eraser
- Compass for drawing circles
- Ruler or straightedge
- Fine liner pen (waterproof, brown or dark grey)
- Watercolor paints (burnt sienna, ochre, sage green, slate grey, rust)
- Round watercolor brush (size 2 or 4)
- Jar of water and paper towels
Step 1: Drafting the Structure
-
Find the center:
Begin by marking the precise center of your watercolor paper. Lightly use a ruler to find the midpoint, as symmetry is crucial for this radial design. -
Draw concentric circles:
Using your compass, draw a series of light concentric circles. Start with a small central circle (about 1 inch diameter) and add four or five increasingly larger rings around it to serve as guidelines. -
Divide the circle:
Divide your circles into equal sections. For this 16-point star design, start by drawing a vertical and horizontal line through the center, then bisect those quadrants twice more until you have 16 even ‘slices’ like a pie. -
Sketch the central star:
In the innermost rings, connect your guide lines to form the central 16-point starburst shape. The points should touch the edge of your second or third circle ring. -
Create the outer triangles:
Moving outward, draw rings of triangles. The middle ring should have triangles pointing outward, while the outermost ring features larger, detached floating triangles that frame the entire piece. -
Inking the lines:
Once satisfied with the pencil draft, trace over your lines with a waterproof fine liner. While black is standard, I prefer using a dark brown or sepia pen here to match the earthy palette. -
Erase pencil marks:
Wait until the ink is completely dry—give it a few extra minutes to be safe—then gently erase all visible pencil guidelines to leave a clean skeleton for painting.
Step 2: Painting the Layers
-
Prepare your palette:
Mix your colors before starting. You’ll need a warm rust, a golden ochre, a cool sage green, a deep slate grey, and a lighter beige. Keep the mixtures relatively watery for transparency. -
Paint the center star:
Start from the center and work outward. Alternating between rust and white (unpainted paper) segments in the central flower creates a nice rhythm immediately. -
Fill the detail ring:
For the thin ring surrounding the center star, use a very pale wash of sage green. Keep your hand steady and use the very tip of your brush. -
Layer the middle triangles:
Paint the next tier of triangles, alternating between golden ochre and coffee brown. Allow the watercolor to pool slightly in the corners for that characteristic textured look. -
Add the sage accents:
In the larger outer ring, paint specific triangles with your sage green mix. Distribute the green evenly (every fourth triangle, for example) to balance the warmth of the other tones. -
Paint the floating border:
Finish with the outermost floating triangles. Use your darkest slate grey and lighter blush tones here to create a strong visual boundary that fades softly. -
Refine edges:
Once the main colors are down, check your edges. If any paint went outside the lines, you can sometimes lift it while damp or simply thicken the ink line slightly to cover it. -
Add final details:
Look closely at the center ring; you can use your fine liner to add tiny internal shapes or tick marks inside the green band for extra intricate detail.
Uneven Color?
If your watercolor dries with hard lines (blooms), your brush was too wet. Blot your brush on a paper towel before touching the paper to control the moisture better.
Go Metallic
Swap the golden ochre paint for a metallic gold watercolor pan. It adds a subtle shimmer that catches the light and elevates the geometric design.
Step back and admire how simple triangles can combine to create such a complex and harmonious whole
Paper-Cut Triangle Ombre Collage
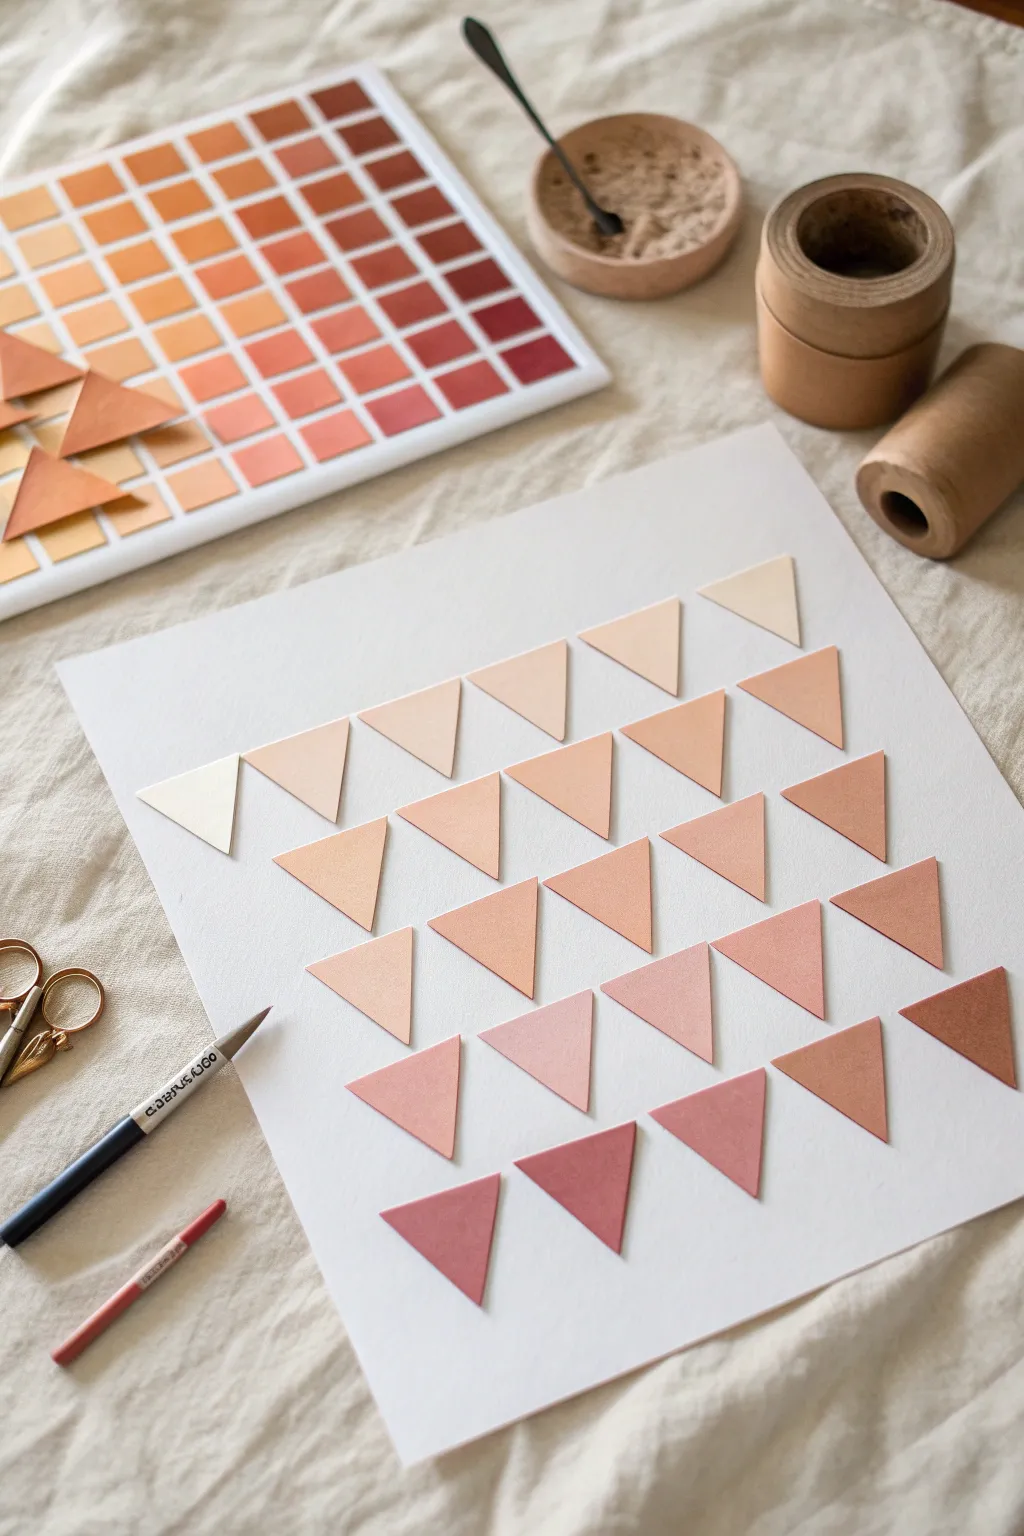
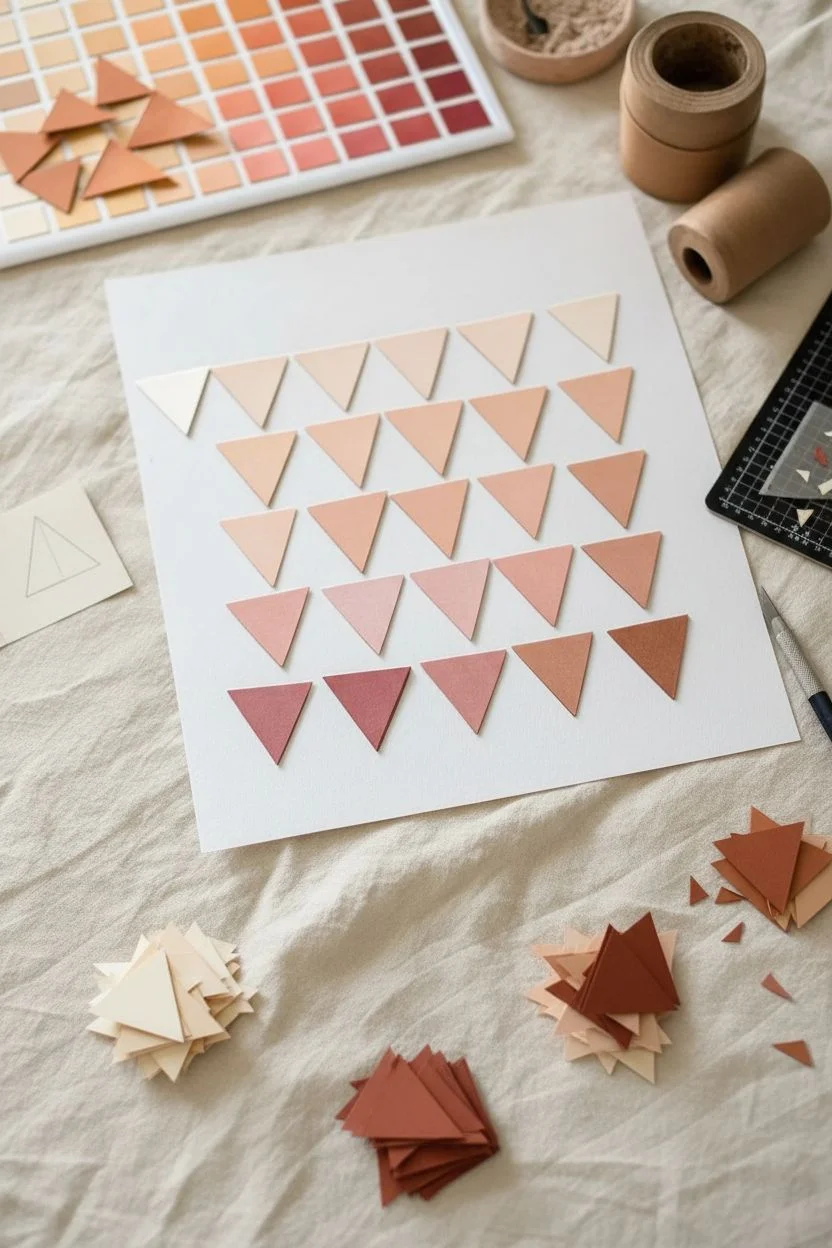
Bring warmth and geometric harmony to your space with this serene ombre collage. By arranging precisely cut paper triangles in a subtle gradient, you’ll create a minimalist piece that feels both modern and handmade.
Step-by-Step Tutorial
Materials
- A variety of cardstock or colored paper in a warm gradient (cream to terracotta)
- White or cream heavy cardstock for the background (approx. 12×12 inches)
- Sharp crafting knife (like an X-Acto)
- Metal ruler
- Self-healing cutting mat
- Pencil
- Craft glue or double-sided tape
- Optional: Color swatch palette
Step 1: Planning and Cutting
-
Select your palette:
Gather your colored papers. You want a smooth transition of colors, starting from a very pale off-white or cream, moving through beige and peach, and ending in a deep terracotta or brick red. Aim for about 5-6 distinct shades. -
Create a template:
Draw an equilateral triangle on a scrap piece of stiff cardstock to use as your master template. For the scale shown, a side length of about 1.5 to 2 inches works well. -
Trace the shapes:
Using your template, trace the triangle shape onto your colored papers. You will need roughly 3-5 triangles of each shade causing the gradient to flow naturally. -
Cut with precision:
Place your paper on the cutting mat. Using your metal ruler as a guide, carefully cut out each triangle with your craft knife to ensure sharp, clean edges. -
Check your edges:
Inspect each cutout. If any corners are fuzzy or uneven, gently trim them. Crisp points are essential for the geometric look.
Step 2: Arrangement and Assembly
-
Prepare the background:
Lay out your large white backing sheet. Ensure it is clean and creating a flat surface. -
Dry run the layout:
Without gluing anything yet, arrange your triangles in rows. Start with the lightest colors at the top left and transition to the darkest at the bottom right. I like to fuss with the spacing here until it feels balanced. -
Establish spacing:
Aim for a uniform gap between each triangle—roughly 1/4 inch gives a nice breathing room. Use your ruler to check alignment horizontally and vertically. -
Mark the positions:
Once happy with the layout, very lightly mark the corners of the top-left and top-right triangles with a pencil to serve as anchor points. -
Begin gluing:
Start with the top row. Apply a thin layer of glue to the back of the first pale triangle. Press it down firmly on your mark. -
Complete the first row:
Continue gluing the top row left to right. double-check the alignment with your ruler before the glue sets completely. -
Stagger the rows:
Move to the second row. Ensure these triangles are directly below the ones above, maintaing that vertical alignment for a clean grid look. -
Blend the colors:
As you move down the rows, introduce your darker shades. The transition should feel gradual, so stepped changes row-by-row work best. -
Finish the assembly:
Glue down the final, darkest row of triangles at the bottom. Press each one gently to ensure good adhesion without warping the paper. -
Clean up:
Once the glue is fully dry, gently erase any visible pencil marks. Check for any stray glue strands and carefully remove them.
Uneven Spacing?
Cut a small square of scrap cardboard to the width of your desired gap. Use this ‘spacer’ between every triangle as you glue to keep gaps identical.
Create Depth
Use foam adhesive squares instead of glue. This lifts the triangles slightly off the page, creating subtle shadows and a cool 3D effect.
Hang your new geometric artwork in a spot that gets good light to show off the subtle color transitions
Triangle Stamp Pattern Play

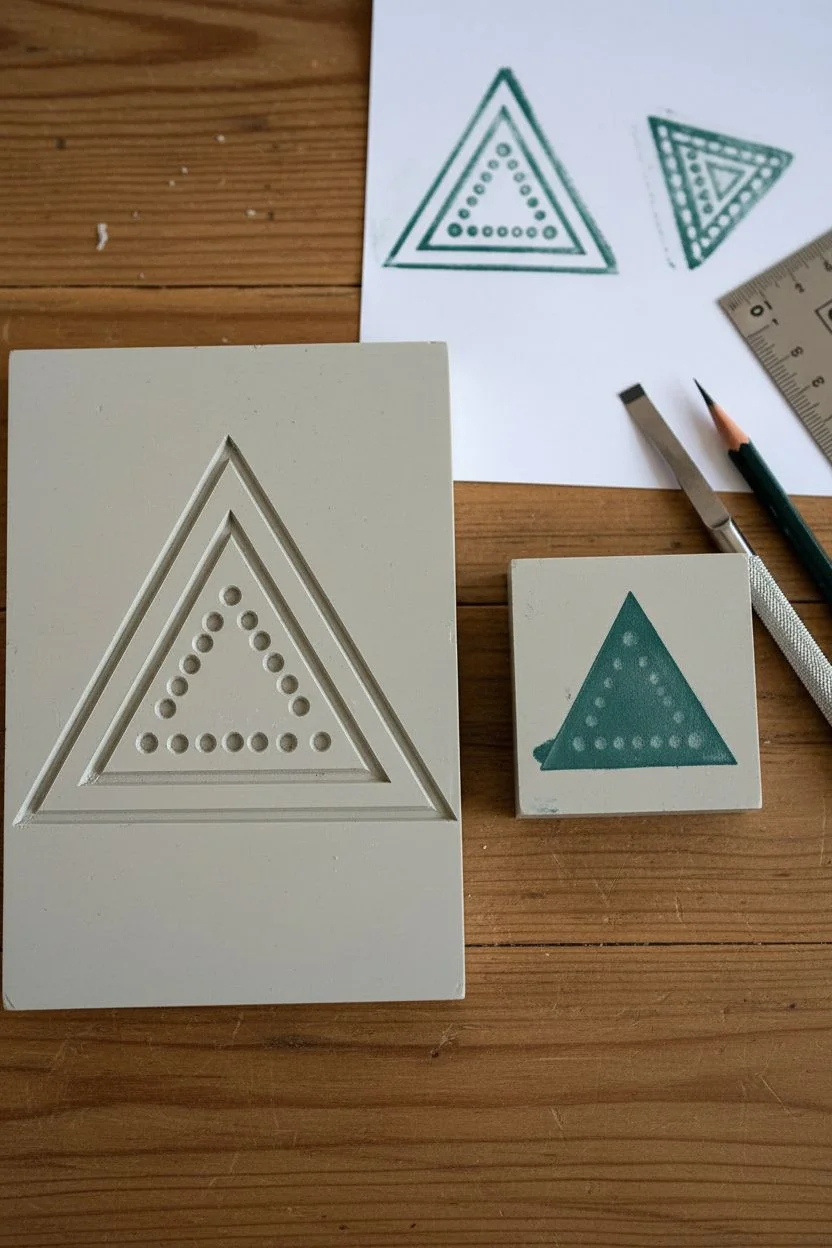
Embrace the imperfect charm of block printing with this rhythmic geometric pattern on fabric or paper. The design features alternating large, detailed triangles and small, solid accent triangles in a soothing palette of teal, rust, and mustard.
Detailed Instructions
Materials
- Soft linoleum block or rubber stamp carving block
- Linoleum carving tools (V-gouge and U-gouge)
- Pencil and ruler
- Tracing paper (optional)
- Block printing ink (water-soluble for paper, oil-based for fabric)
- Brayer (rubber roller)
- Smooth surface for rolling ink (glass or acrylic sheet)
- Long sheet of heavy rice paper, kraft paper, or cotton fabric
- Iron (if printing on fabric for heat setting)
Step 1: Designing & Carving
-
Draft the main triangle:
On your carving block, draw an equilateral triangle about 1.5 to 2 inches wide. Sketch a smaller triangle inside it, leaving a thick border of about 1/4 inch. -
Add the details:
Inside the inner triangle, draw a pattern of small dots or dashes following the triangular shape. These will be the texture within the negative space. -
Draft the accent triangle:
Next to your main design, draw a small, solid equilateral triangle, roughly 1/2 inch in size. You can carve this on the same block if spaced correctly, or separate it later. -
Carve the outlines:
Using a fine V-gouge, carefully carve around the exterior lines of your large triangle and the small accent triangle. Remember to carve away from your body for safety. -
Clear the negative space:
Switch to a wider U-gouge to remove the background rubber around your shapes. You want the triangles to be raised high relief. -
Carve the inner details:
Switch back to your smallest tool. Carve out the space inside the large triangle, but carefully leave the little dots or dashes raised. This requires patience and a steady hand. -
Test the stamp:
Ink up your block lightly and stamp it on scrap paper. I find this crucial to spot any stray ridges that need trimming before starting the final piece.
Step 2: Inking & Printing
-
Prepare your palette:
Squeeze out small amounts of teal, rust-orange, and mustard yellow ink onto your palette. Use the brayer to roll out the teal ink until it sounds ‘sticky’ or like velcro. -
Plan the layout:
Lay out your long paper or fabric on a flat table. You can lightly mark a grid with a pencil if you want perfection, or eyeball it for a more organic look. -
First color application:
Ink the large triangle stamp with teal. Press it firmly onto the paper. Apply even pressure with the heel of your hand to ensure the textured dots transfer clearly. -
Add the accent:
Using the small solid triangle stamp, ink it with the same teal color and stamp it next to the large triangle, pointing the same direction. The gap between them creates a nice tension. -
Create the diagonal flow:
Continue stamping the teal motifs in a diagonal line across the paper. Spacing them evenly is key to the rhythm. -
Switch colors:
Clean your stamps and brayer thoroughly, or use a second set of tools. Roll out the rust-orange ink next. -
Stamp the second row:
Stamp a diagonal row of rust-colored triangles parallel to the teal ones. Offset the position slightly so the pattern feels dynamic rather than grid-locked. -
Clean and repeat:
Clean tools again and switch to the mustard yellow ink. Stamp the third diagonal row. -
Fill the page:
Continue alternating your three colors across the entire length of the material. If your ink starts to dry on the palette, add a tiny spritz of water or ink retarder. -
Dry and set:
Let the print dry completely. This can take overnight depending on ink thickness. If you printed on fabric, heat set it with an iron according to the ink manufacturer’s instructions.
Uneven Ink Transfer?
If your print looks patchy, your table might not be perfectly flat. Place a sheet of craft foam or a folded towel under your paper to provide a little ‘give’ for a cleaner impression.
Sharp Edges
To keep the triangular edges crisp, wipe the recessed areas of the rubber stamp with a Q-tip or rag between color changes to prevent ink buildup in the non-printing crevices.
Roll up your finished piece to use as custom wrapping paper or frame a section as modern wall art
Sierpiński Triangle Fractal Study
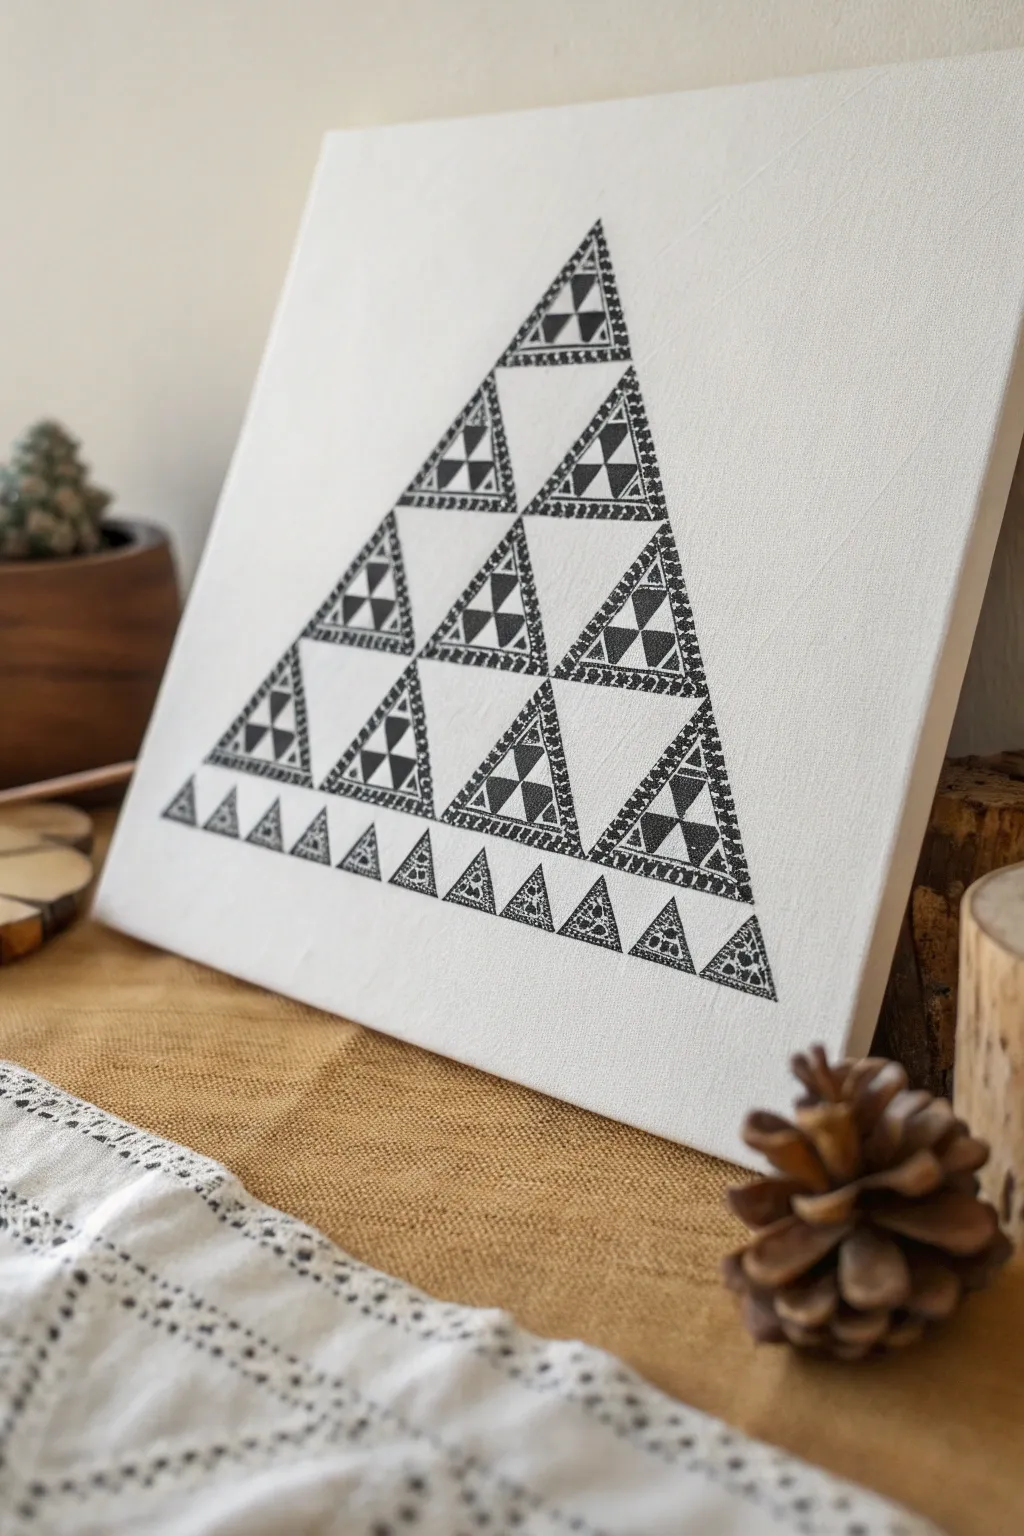
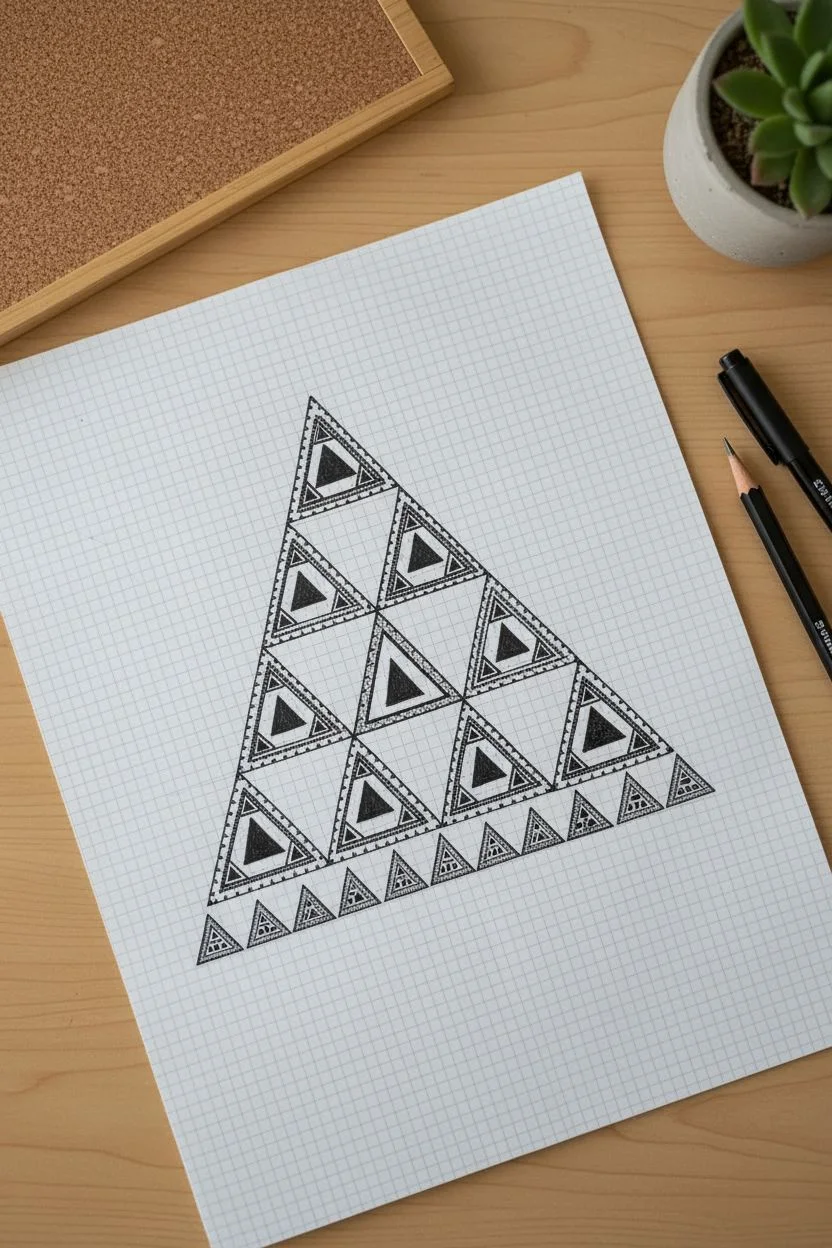
This striking fractal study relies on the beauty of repetition, building a large triangle from smaller, intricately patterned ones. The result is a modern, monochromatic piece that adds geometric sophistication to any space.
How-To Guide
Materials
- Square stretched canvas (approx. 12×12 inches)
- Black acrylic paint or block printing ink
- Soft rubber brayer (if using stamp method)
- High-density foam sheet or linoleum block
- Carving tools (for linoleum) or X-Acto knife (for foam)
- Pencil
- Ruler
- Grid paper
- Fine-point black paint pen or permanent marker
Step 1: Designing the Master Triangle
-
Draft the pattern:
On grid paper, draw an equilateral triangle about 1.5 to 2 inches per side. This will be your repeating unit. -
Add internal geometry:
Sketch a smaller inverted triangle in the center of your draft to create the ‘void’ space typical of Sierpiński triangles. -
Create the texture:
Fill the three surrounding solid triangles with the specific pattern shown: concentric triangles and a distinct border of small dots or dashes along the edges. -
Detail the center:
Inside the three smaller solid triangles, draw a central solid black triangle to mimic the reference image’s density.
Step 2: Creating the Stamp
-
Transfer to block:
Trace your design onto the high-density foam or linoleum block. If using linoleum, remember to reverse the image if directional patterns matter (though less critical for symmetrical triangles). -
Carve the relief:
Using your carving tool or knife, carefully remove the ‘white’ areas, leaving only the black lines and solid shapes raised. -
Refine edges:
Clean up the outer edges of the triangle stamp so you can align them perfectly later without stray markings.
Stamp Blurring?
If your prints look smudged, you are likely using too much paint. Roll the brayer on scrap paper until it sounds sticky (like velcro) before inking the stamp.
Step 3: Printing the Fractal
-
Map the canvas:
Lightly mark the center bottom of your canvas; this is where your bottom row will center. -
Plan the rows:
You will be building a pyramid: 8 triangles on the bottom, then 4 above (leaving gaps), then 2, then 1 at the top. Wait, look closely at the reference—it’s actually a recursive structure. Let’s simplify: A base of 8 units, then 4, then 2, then 1 encompasses the logic, but the visual spacing is key. -
Correct mapping strategy:
The pattern is 4 rows deep. Row 1 (bottom) has 8 triangles. Row 2 has 4 triangles. Row 3 has 2 triangles. Row 4 has 1 triangle. Mark horizontal guidelines lightly with a pencil to keep rows straight. -
Ink the stamp:
Roll a thin, even layer of black paint or ink onto your stamp using the brayer. I find a glass plate works best for loading the roller evenly. -
Stamp the bottom row:
Start with the bottom row of small triangles. Stamp four groups of two triangles, or eight individual stamps if your stamp is a single unit. Ensure the points touch perfectly. -
Build the next tier:
Move up to the second row. Stamp triangles directly above the ‘peaks’ of the bottom row, leaving triangular gaps (inverted triangles) pointing down. -
Continue upward:
Repeat the process for the third tier and the final single triangle at the apex. Check alignment frequently to ensure the overall shape remains a perfect equilateral triangle.
Negative Space
Paint the background canvas a soft charcoal gray and use metallic gold ink for the stamping to invert the color scheme for a luxe, moody look.
Step 4: Finishing Touches
-
Fill imperfections:
Once dry, use a fine-point black paint pen to touch up any stamped areas that didn’t transfer clearly, especially the delicate dotted borders. -
Add the bottom row detail:
In the reference, there is an extra row of ‘half’ or smaller triangles at the very bottom left and right. Use a ruler to hand-draw these tiny geometric details if your stamp is too large. -
Clean up:
Gently erase any visible pencil guidelines, being careful not to smudge the ink. -
Seal:
Apply a matte spray varnish to protect the ink and prevent fading over time.
Hang your mathematical masterpiece in a well-lit area to appreciate the intricate details
Tangram-Style Triangle Creatures
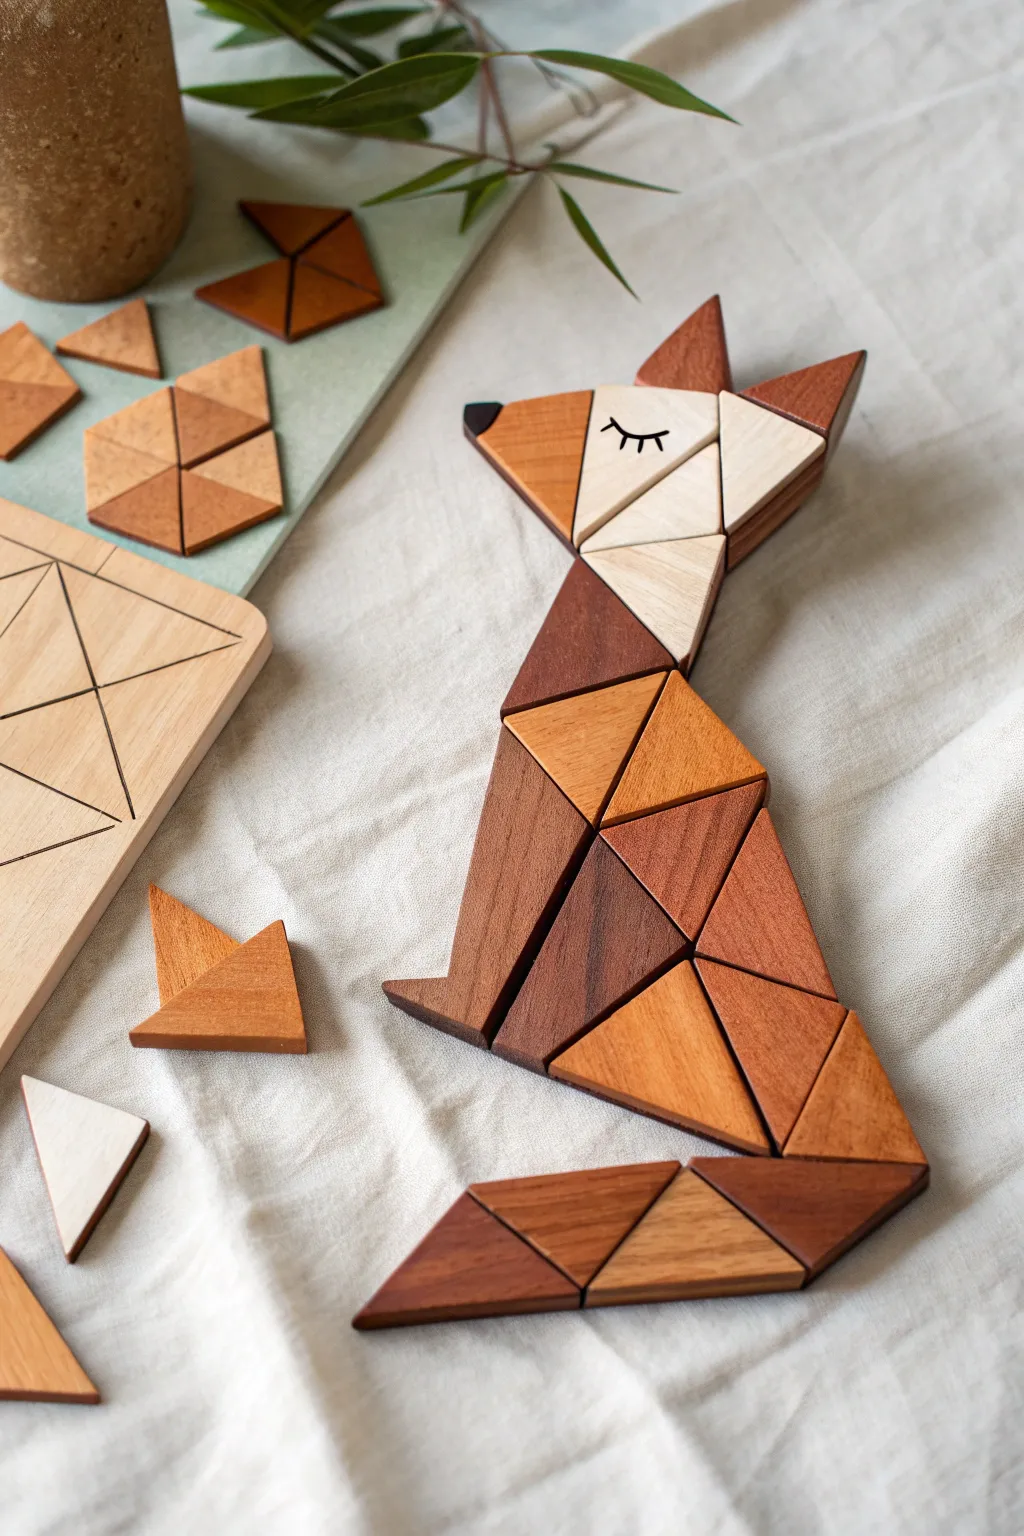
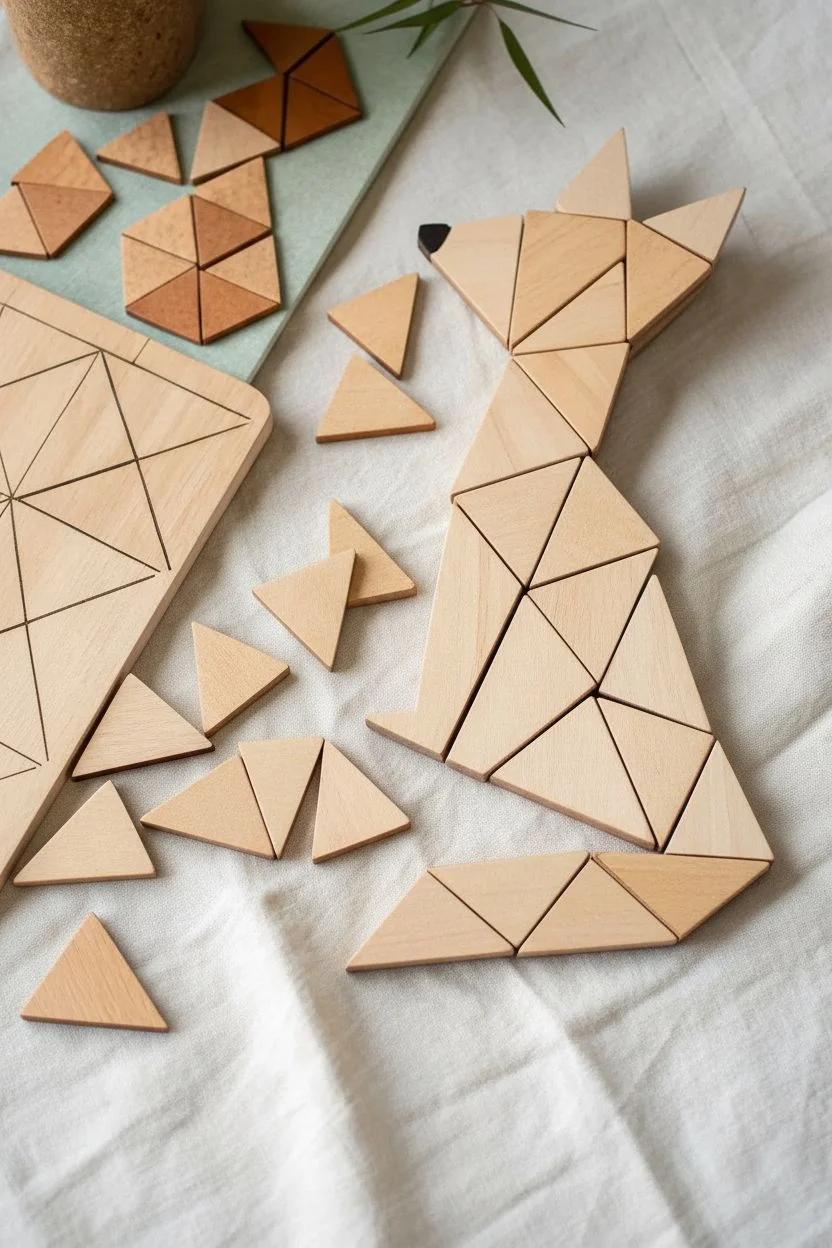
Piece together a charming fox sculpture using geometric simplicity and the natural warmth of wood. This tangram-style project relies on various shades of wood stain to create depth and character in a playful, modern design.
Step-by-Step Guide
Materials
- Thin crafting wood sheets (basswood or birch plywood, 1/8 inch thick)
- Scroll saw, coping saw, or heavy-duty craft knife
- Sandpaper (220 grit)
- Wood stains in 3-4 shades (dark walnut, cherry, golden oak, natural/clear)
- White acrylic paint or whitewash stain
- Black fine-tip paint marker or detail brush
- Wood glue
- Ruler and pencil
- Clear matte sealer (spray or brush-on)
Step 1: Planning & Cutting
-
Draft your design:
Begin by sketching the fox shape on paper using only triangles. You will need approximately 20-25 triangles of varying sizes. Focus on a mixture of right-angle triangles and equilateral triangles to mimic the tangram look. -
Create templates:
Once you are happy with the layout, refine your lines with a ruler. Number each triangle on your paper sketch to keep track of the assembly later, then cut out the paper shapes to use as stencils. -
Trace onto wood:
Trace each paper triangle onto your wood sheet. Try to group pieces by the color they will eventually be stained to make the next phases easier, though this isn’t strictly necessary. -
Cut the shapes:
Carefully cut out each wooden triangle. A scroll saw works fastest for this, but a sharp craft knife with a metal ruler guide works well for thin basswood. Take your time to ensure the edges are crisp and straight. -
Sand the edges:
Gently sand the edges of every triangle with 220-grit sandpaper. You want to remove any splinters or fuzz, but be careful not to round over the sharp corners that give the geometric look its crispness.
Uneven Gaps?
If your triangles don’t fit perfectly flush, don’t force them. Sand the touching edge lightly to adjust the angle. Dark gaps can actually add to the mosaic aesthetic.
Step 2: Staining & Coloring
-
Sort by shade:
referencing the reference image, separate your wood triangles into four groups: dark brown (ears, tail tip, lower body), medium reddish-brown (main body), light golden brown (face, tail base), and white/cream (face cheeks, chest). -
Apply the darkest stain:
Using a rag or sponge brush, apply a dark walnut stain to the first group. This includes the small triangular nose tip, the back of the ears, and the shadowed leg pieces. Wipe off excess stain quickly so the grain still shows. -
Apply medium tones:
Stain the main body pieces with a warm cherry or mahogany color. This reddish hue brings out the ‘fox’ character. For the slightly lighter sections like the top of the head using a golden oak stain. -
Whiten the highlights:
For the cheek, ear interior, and chest pieces, use a whitewash stain or watered-down white acrylic paint. You want a creamy pale look that contrasts with the dark wood but isn’t solid plastic-looking white. -
Let everything dry:
Allow all stained pieces to dry completely according to the manufacturer’s instructions. I usually leave them overnight to ensure the colors don’t bleed during assembly.
Make it Magnetic
Instead of gluing the pieces together permanently, glue a small magnet to the back of each triangle. Now you possess a functional tonal fridge puzzle.
Step 3: Assembly & Detail
-
Dry fit the fox:
Arrange all your dry pieces on a flat surface to recreate the fox shape. This is the moment to check if any pieces need a tiny bit of sanding to fit perfectly against their neighbors. -
Glue the segments:
Apply a small amount of wood glue to the edges where pieces touch. You can glue them edge-to-edge if the wood is thick enough, or glue them down onto a thin backing board cut to the outline shape for better durability. -
Press and hold:
As you glue sections together (like the tail or the head), press them firmly for 30 seconds. If gluing onto a backer board, place a heavy book on top of the whole assembly while it sets. -
Paint the eye:
On the white cheek triangle, use a fine-tip black paint marker to draw a closed, sleeping eyelid with three small lashes. Keep the line smooth and simple. -
Add the nose:
If you didn’t cut a separate wood piece for the nose tip, you can simply paint the tip of the muzzle triangle black. In the project shown, a tiny separate dark triangle is attached to the very end of the snout. -
Final seal:
Once the marker ink is fully dry, spray the entire fox with a clear matte sealer. This protects the wood and unifies the sheen of the different stains without making it glossy.
Display your woodland creature on a shelf or mount it in a shadow box to enjoy the geometric warmth it brings to the room
3D Triangle Prism Pop-Up Art
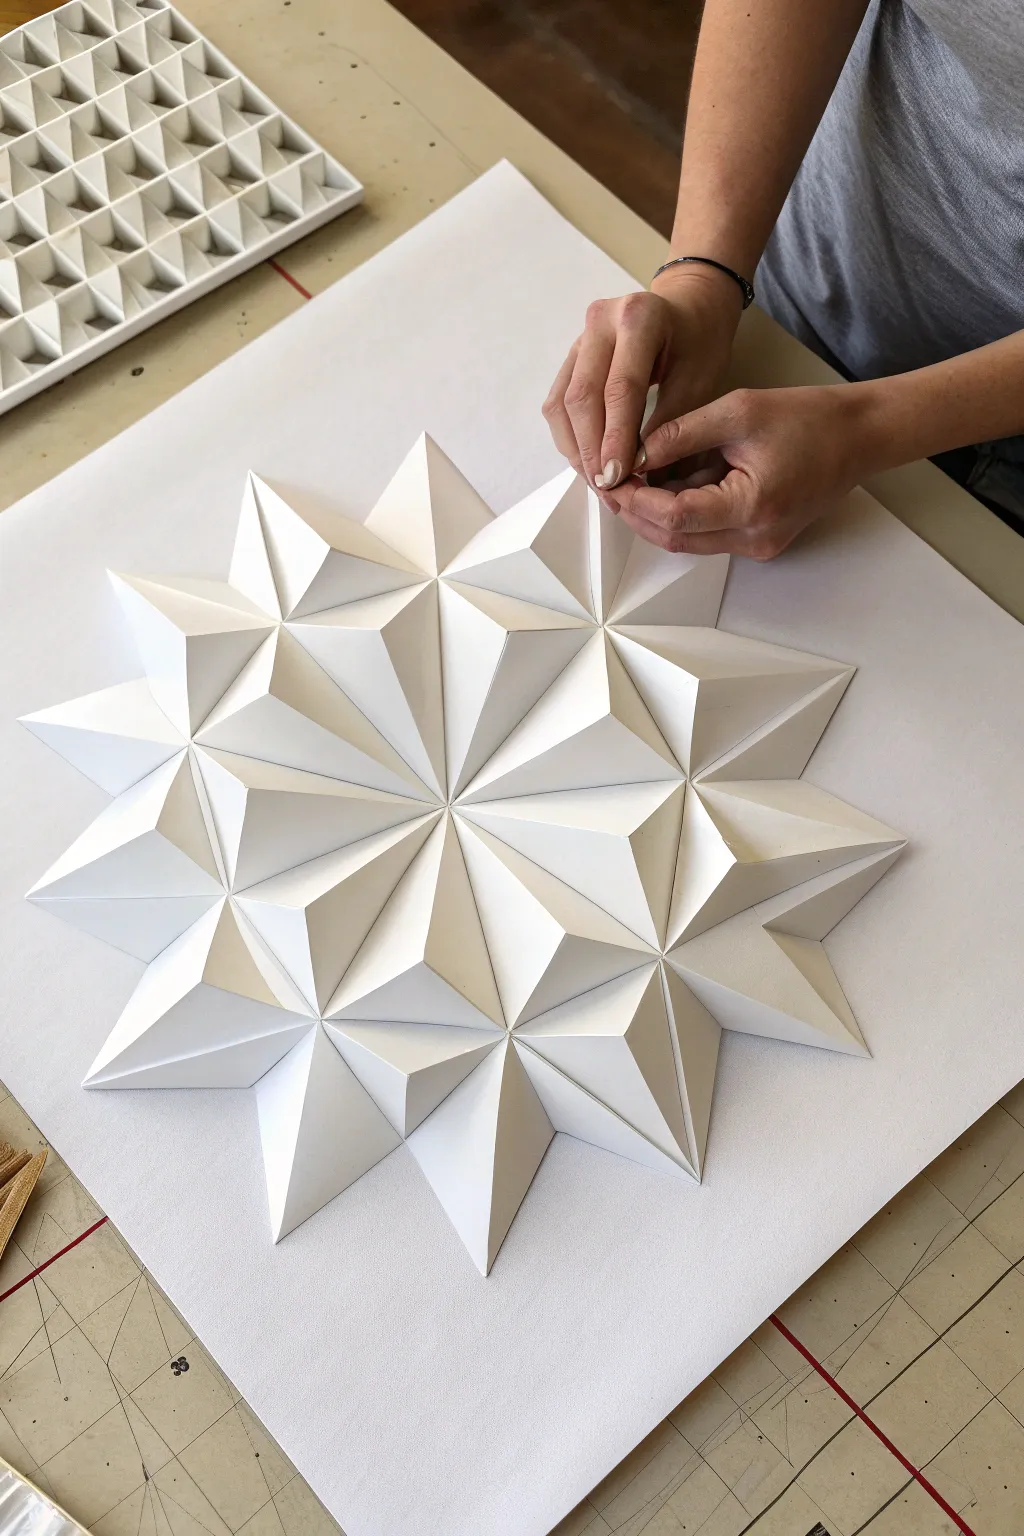
Transform flat cardstock into a striking three-dimensional sculpture with this intricate geometric relief project. By repeating simple folded triangular pyramids, you will create a mesmerizing starburst pattern that plays with light and shadow.
Detailed Instructions
Materials
- High-quality white cardstock (heavyweight, e.g., 80lb or 100lb)
- Bone folder
- Precision craft knife (e.g., X-Acto)
- Self-healing cutting mat
- Metal ruler
- Pencil
- Quick-setting tacky glue or double-sided craft tape
- Large white foam board or illustration board (for mounting)
- Protractor (optional but helpful)
Step 1: Drafting the Pattern
-
Calculate the geometry:
This design relies on a specific repeating unit: a four-sided pyramid with a rhombus base. To achieve the 12-point star look, you’ll need the center angles of your rhombus wedges to be 30 degrees (since 360 divided by 12 equals 30). -
Draw the template:
On a scrap piece of cardstock, draw your template. Create a rhombus where the sharpest angle is 30 degrees. The side lengths can be whatever size you prefer, but 2-3 inches works well for a manageable sculpture. -
Add folding tabs:
Draw flaps or tabs (about 0.25 inches wide) along two adjacent edges of your rhombus. You will use these to glue the pyramid to the base board later. -
Create the pyramid faces:
To make this a 3D pyramid instead of a flat rhombus, you actually need to draft it as an unfolded ‘net’. Draw a long diagonal line (the spine). Then, draw two triangles mirroring each other across that spine. The outer edges must match your intended base size. -
Cut the master template:
Cut out your final drafted shape carefully. This will serve as the master guide for every piece in the sculpture, so ensure the lines are perfectly straight.
Uneven Gaps?
If slight gaps appear between units near the center, don’t force them. The paper tension might warp the board. Instead, fill tiny gaps with slivers of matching paper.
Step 2: Fabricating the Units
-
Trace the components:
Using your master template, trace the shape repeatedly onto your white cardstock. For the full 12-point star design shown, you will need 12 large central diamonds, and potentially 12 smaller alternating diamonds if you are doing a complex dual-layer. -
Score the fold lines:
Before cutting anything out, use your ruler and a bone folder (or the back of your knife blade) to heavily score all internal geometric lines. This includes the central spine of each diamond. -
Cut out the shapes:
Using a fresh blade in your craft knife, cut out all the traced shapes. Keep your metal ruler firm against the paper to ensure crisp, unwavering edges. -
Fold into 3D:
Gently fold along your scored lines. The central spine should generally fold outward (mountain fold) to create the peak of the pyramid, while the side tabs fold inward.
Step 3: Assembly
-
Prepare the base:
Mark the exact center of your mounting board. Lightly draw twelve radiating lines spaced 30 degrees apart to act as guide rails for your pieces. -
Test the fit:
Lay your folded pyramids onto the board without glue first. Arrange them in a circle around the center point to ensure your geometry works and the pieces sit flush against each other. -
Apply adhesive:
Apply a thin, even layer of tacky glue to the bottom tabs of your first pyramid unit. I prefer using a small brush here to avoid oozing excess glue. -
Place the first unit:
Press the unit onto the board, aligning its central spine perfectly with one of your penciled guide lines. Hold it in place for 30 seconds until the tack holds. -
Complete the inner ring:
Continue gluing units around the center point, ensuring the sides of adjacent pyramids touch seamlessly. This creates the primary starburst. -
Add outer layers:
If adding a second row of shapes (like the outer ring shown in the inspiration image), align these points into the ‘valleys’ created by the first ring of stars to create an interlocking tessellation effect. -
Clean and dry:
Once all pieces are secured, use a clean eraser to remove any visible pencil guidelines on the base board. Let the sculpture dry flat for at least 24 hours.
Add Color Depth
Before assembly, spray paint the pieces from a low angle on just one side. This creates an artificial shadow effect that enhances the 3D relief look.
Hang your distinct geometric relief on a wall where directional light will highlight the architectural beauty of your folding work
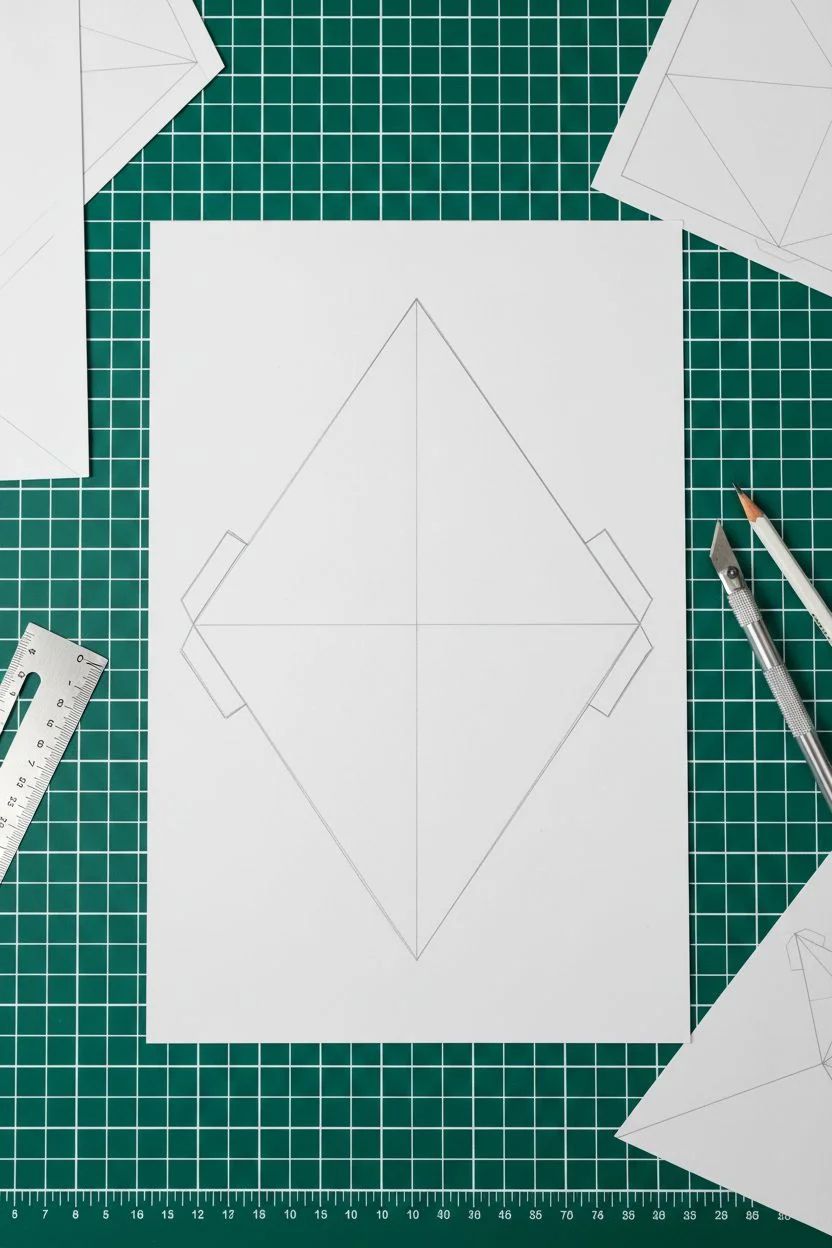
String Geometry Triangle Web
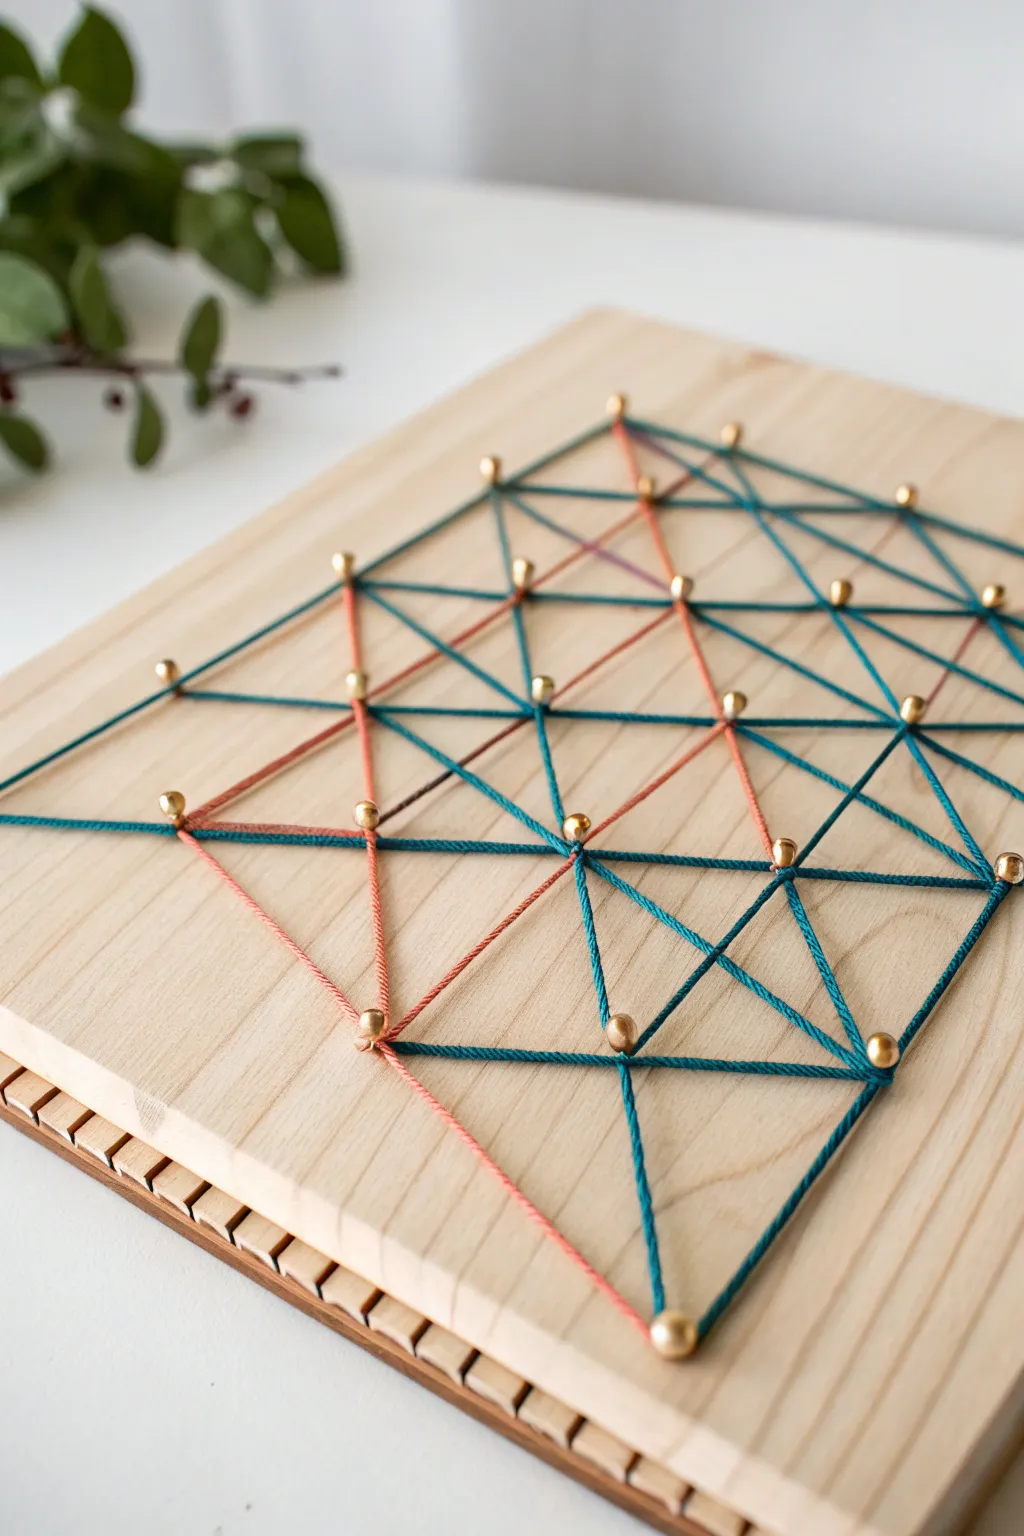
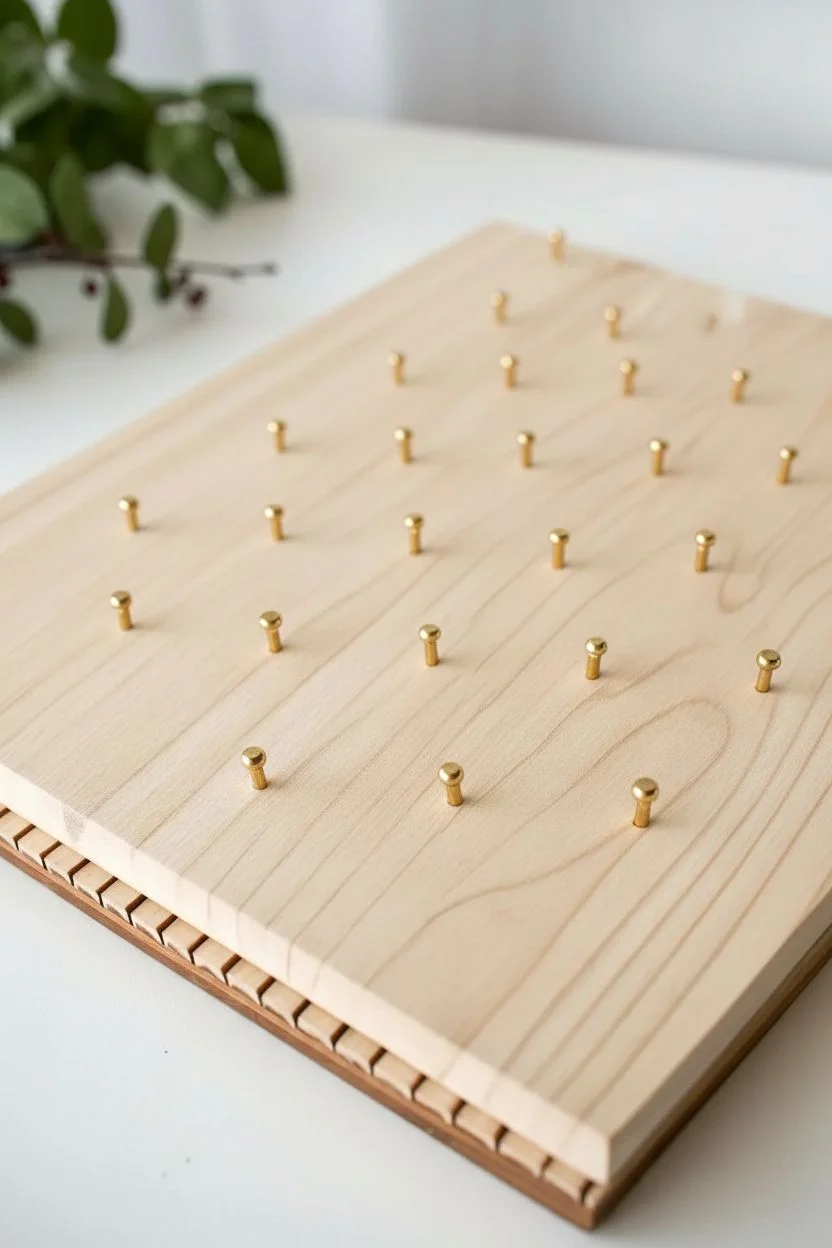
This project combines minimalist design with mathematical precision to create a striking piece of wall decor. By weaving teal and coral threads around a grid of brass nails, you’ll form a fascinating web involves varying triangular connections that look complex but are surprisingly simple to master.
Step-by-Step Tutorial
Materials
- Light-colored wooden board (approx. 12×12 inches, pine or birch plywood)
- Brass round-head nails or linoleum nails (approx. 25-30)
- Small hammer
- Graph paper or dot grid paper
- Pencil and ruler
- Tape
- Teal embroidery floss or thin yarn
- Coral or salmon pink embroidery floss or thin yarn
- Scissors
- Fabric glue or clear craft glue (optional)
Step 1: Planning and Structure
-
Prepare the wood base:
Begin by sanding your wooden board until it feels smooth to the touch. The raw wood look is beautiful here, but ensure there are no splinters or rough edges that might catch on your thread later. -
Create the grid pattern:
On a sheet of graph paper, draw a dot grid. The pattern in the image relies on a grid that is tilted or staggered to create equilateral triangles, often called an isometric grid. Alternatively, draw parallel horizontal lines and stagger your dots on every other line. -
Transfer the template:
Cut your paper template to size and center it on your wooden board. Use small pieces of tape to secure the corners so the paper won’t shift while you work. -
Pre-punch the nail holes:
Using a sharp awl or a spare nail, make a small indentation at every mark on your grid. This helps guide your nails straight into the wood grain without slipping. -
Hammer the nails:
Drive a brass nail into each pre-marked spot. Try to keep them at a uniform height, leaving about 1/4 to 1/2 inch of the nail shaft exposed above the wood surface for wrapping string. -
Remove the paper:
Gently tear the paper template away from the board. Use tweezers or small pliers to remove any stubborn scraps of paper trapped underneath the nail heads.
Hold it steady
Use needle-nose pliers to hold the tiny nails while hammering. This saves your fingers from accidental hits and ensures the nails go in perfectly straight.
Step 2: Weaving the Web
-
Start the primary color:
Tie one end of your teal thread securely to a central or corner nail using a double knot. Trim the tail short so it hides under the nail head. -
Create the horizontal lines:
Run the thread horizontally across the rows of nails. Wrap the thread once around each nail head as you pass it to keep the line taut and straight. -
Form the diagonals:
Once your horizontal base is set, begin creating diagonal lines. Connect nails from one row to offset nails in the row above or below to form the sides of your triangles. -
Build the larger triangles:
Skip over nearest neighbors to create longer lines that span across two or three nail spaces. This creates the larger, intersecting geometric shapes seen in the reference image. -
Secure the teal thread:
When you are satisfied with the teal complexity, tie off the thread on a final nail with a tight knot. A tiny dot of clear glue on the knot will ensure it never unravels. -
Introduce the accent color:
Tie on the coral or pink thread. I like to start this color in a different section of the board to create asymmetry. -
Highlight specific paths:
Instead of covering the whole board, use the coral thread to trace just a few specific triangles or a single long zigzag path through the teal web. This creates a focal point. -
Double wrapping:
For extra definition on the accent lines, run the thread back and forth over the same path twice. This makes the color pop more vibrantly against the wood. -
Final adjustments:
Gently push the windings of thread down the nail shafts so they sit neatly. If any lines look loose, you can carefully unwrap back to that point and re-tighten. -
Trim and finish:
Snip any remaining loose thread tails as close to the knots as possible. Your geometric web is now ready to display.
Mixed Media Twist
Paint the heads of the nails a contrasting color (like neon or matte black) before hammering them in to add an extra layer of detail to your grid.
Hang your new geometric creation in a spot that gets good side lighting to enjoy the intricate shadows the string casts
Textured Triangle Patchwork Painting
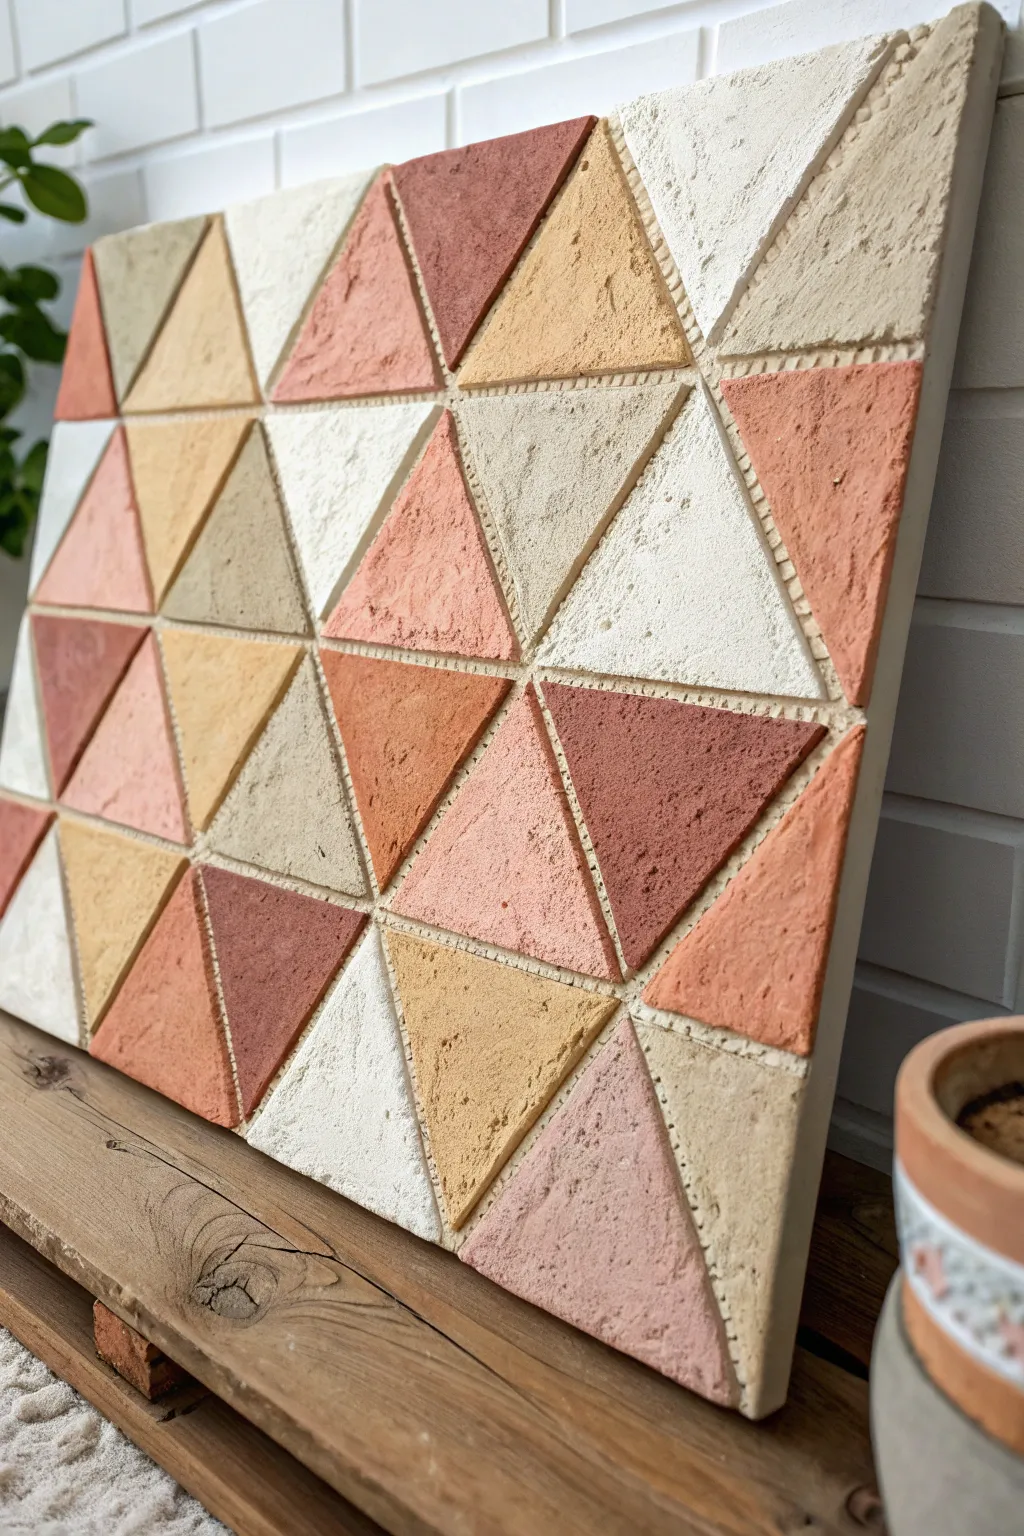
Bring earthy warmth to your walls with this heavy-textured geometric masterpiece. Using modeling paste or spackle, you’ll sculpt a tactile patchwork of dusty pinks, terracottas, and creamy neutrals that mimics the look of raw stone tile.
How-To Guide
Materials
- Large canvas (square or rectangular, gallery wrapped)
- Modeling paste (heavy body) or lightweight spackle
- Palette knives (assorted sizes)
- Acrylic paints (terracotta, burnt sienna, ochre, unbleached titanium, warm grey, pink)
- Pencil and long ruler
- Masking tape (low tack)
- Sea sponge or stiff bristle brush
- Sandpaper (medium grit)
- Matte finish sealer spray
Step 1: Preparation & Mapping
-
Prepare your canvas:
Ensure your canvas is clean and taut. If the surface feels too slick, give it a very light sanding to help the heavy texture medium adhere better. -
Draft the grid:
Using a pencil and a long ruler, draw a grid of squares lightly across the entire canvas. The size depends on your canvas, but 4-inch or 5-inch squares work well for this scale. -
Create the triangles:
Draw diagonal lines through each square to bisect them into right-angled triangles. Vary the direction of the diagonal lines in adjacent squares to create a randomized, quilt-like pattern rather than a uniform zigzag.
Clean Lines Hack
Use thin masking tape along your pencil grid lines before applying paste. Peel the tape off while the paste is still wet to reveal perfect, crisp channels between triangles.
Step 2: Creating the Texture
-
Mix your base medium:
Scoop a generous amount of modeling paste or spackle into several disposable cups or a large palette. You will need separate batches for each color tone. -
Tint the mixtures:
Add acrylic paint to your texture medium batches. Create a palette of earthy tones: deep terracotta, soft ochre, dusty rose, warm beige, and off-white. Mix partially if you want a marbled stone look, or fully for solid colors. -
Apply the first triangle:
Using a palette knife, scoop a tinted paste and apply it within one of your pencil-outlined triangles. Spread it thick—about 1/8 to 1/4 inch high. -
Define the edges:
Use the edge of your palette knife to clean up the borders of the triangle. You want a distinct gap or ‘grout line’ between shapes, so push the paste slightly away from your pencil lines. -
Add surface texture:
While the paste is wet, dab the surface gently with a sea sponge, a crumpled ball of foil, or striate it with the flat side of the knife to create that rough, pitted stone effect.
Step 3: Filling the Pattern
-
Work in sections:
Continue filling adjacent triangles, switching colors frequently to ensure no two touching triangles are the exact same shade. This creates the dynamic patchwork effect. -
Mind the gaps:
Pay close attention to the negative space. I find using a chopstick or the handle of a brush to run along the pencil lines helps keep the channels deep and uniform between the colored shapes. -
Detail the texture:
For some triangles, add extra grit by sprinkling a little sand into the wet paint or stippling repeatedly with a stiff brush to vary the finish across the artwork. -
Refine the borders:
If paste spills over into the ‘grout’ lines, wipe it away immediately with a damp Q-tip or a clean, narrow tool to maintain the separation. -
Let it cure:
Allow the piece to dry completely. Because the application is thick, this can take 24 to 48 hours. Do not rush this step, as the center of the triangles needs to harden.
Sandstone Effect
Mix fine crafting sand or even dry coffee grounds into your modeling paste. This adds literal grit that mimics real sandstone texture when painted.
Step 4: Finishing Touches
-
Sand the peaks:
Once fully dry, lightly run a medium-grit sandpaper over the tops of the triangles. This knocks down any overly sharp spikes and enhances the weathered stone aesthetic. -
Clean the dust:
Use a dry brush or vacuum attachment to remove all sanding dust from the crevices and deep texture pockets. -
Seal the work:
Spray the entire piece with a matte finish sealer. This protects the textured surface from chipping and locks in the earthy vibrancy of the colors.
Hang your new textured art piece in a well-lit spot where shadows will play across the surface throughout the day
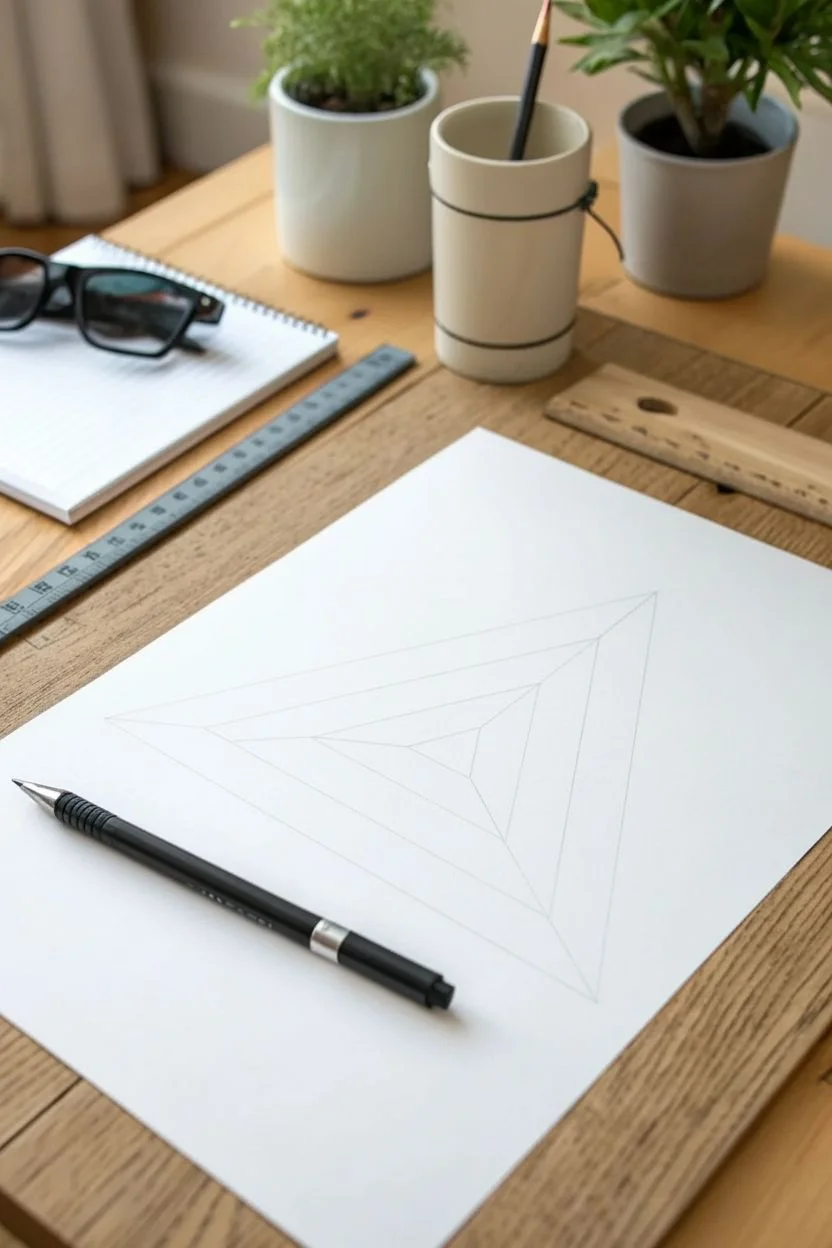
Anamorphic Floating Triangle Illusion
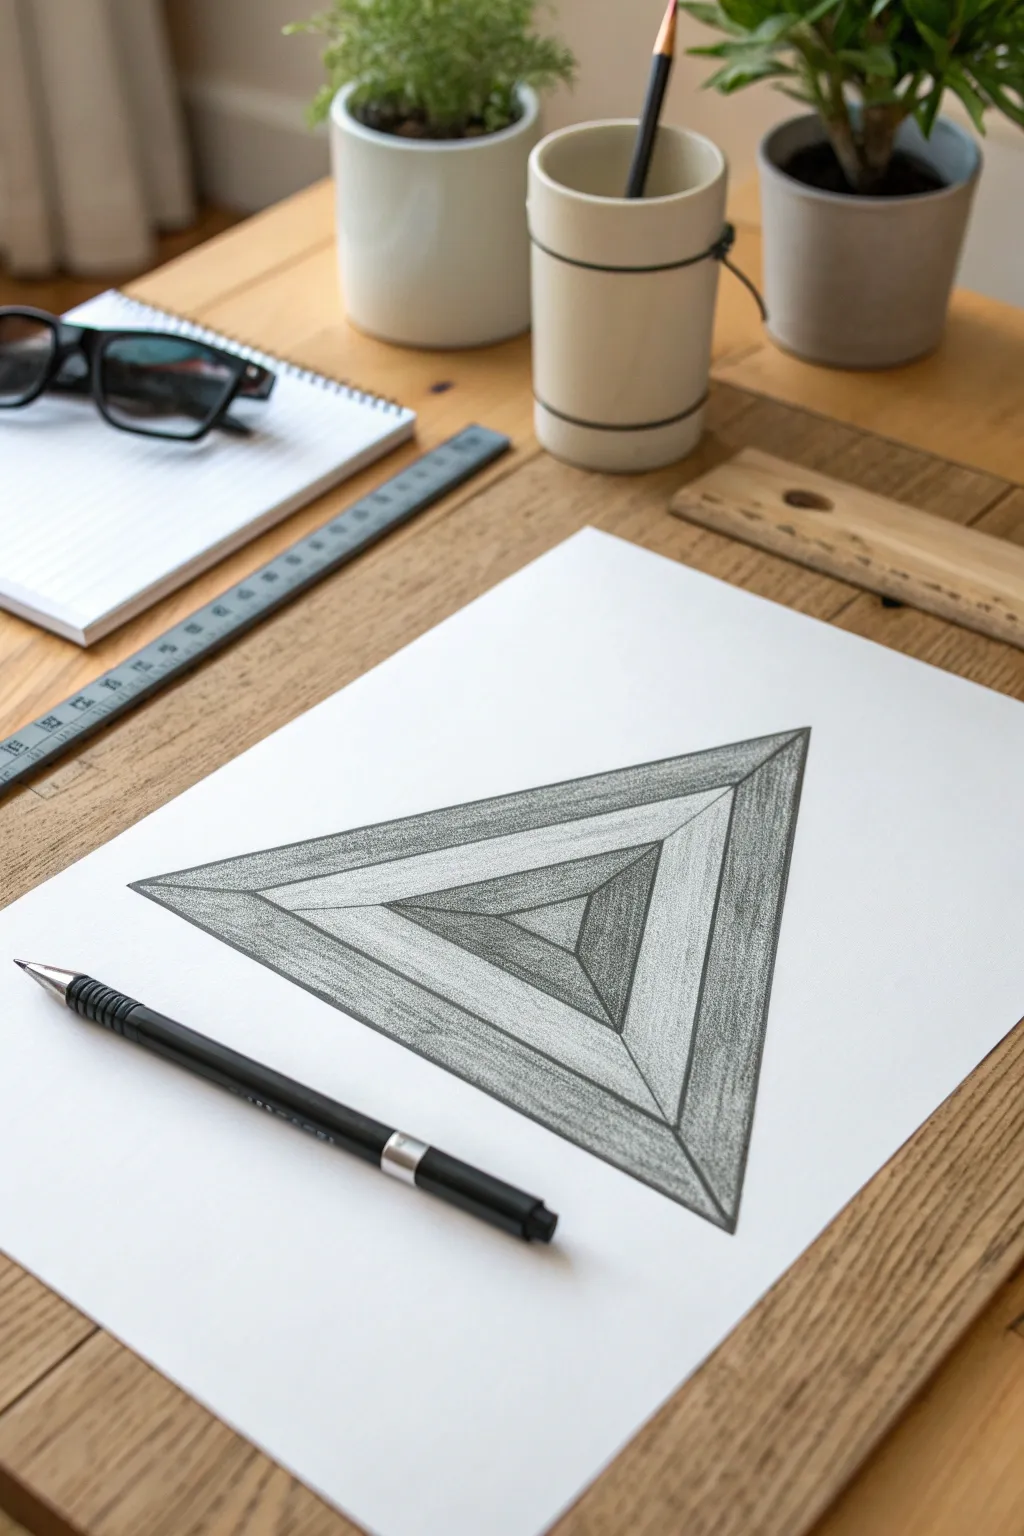
This striking optical illusion creates a three-dimensional, tunnel-like effect through simple geometric drawing and careful shading. The result is a mesmerizing ‘floating’ triangle composed of nested layers that appear to recede into the page.
Step-by-Step Guide
Materials
- White drawing paper (A4 or similar)
- Graphite pencils (HB for outlining, 2B and 4B for shading)
- Ruler
- Eraser
- Pencil sharpener
Step 1: Drafting the Framework
-
Establish the base:
Begin by drawing a large equilateral triangle in the center of your paper using your ruler and an HB pencil. Keep your lines very light at this stage so they can be easily erased or adjusted later. -
Mark the center:
Locate the approximate visual center of your triangle. You don’t need to be mathematically perfect, but finding a balanced central point is key for the concentric effect. -
Draw the inner triangle:
Draw a much smaller equilateral triangle around that central point. Orient it in the same direction as the large outer triangle. -
Connect the corners:
Use your ruler to draw a straight line connecting each corner of the small inner triangle to the corresponding corner of the large outer triangle. This creates three distinct trapezoidal sections. -
Divide the sections:
Within each of the three trapezoidal sections, lightly draw two more lines parallel to the inner triangle’s sides. These lines should divide the space between the inner and outer triangles into three roughly equal bands.
Step 2: Creating Depth
-
Define the path:
You now have a series of nested triangles. Go over the lines that will remain visible with a slightly firmer pressure to define the ‘frames’ or layers of your tunnel. -
Start shading the outer band:
Switch to a 2B pencil. We will shade the outermost band first. Apply an even, medium-grey tone to the outer frame, keeping your pencil strokes consistent and following the direction of the triangle’s arm. -
Leave the middle band:
Leave the second band (the middle one) completely white for now. This high contrast is crucial for the 3D ‘step’ effect. -
Shade the inner band:
Move to the third band (closest to the center). Shade this area with a darker tone than the first band, pressing a bit harder with your 2B or switching to a 4B pencil. The darkness helps push this layer further ‘back’ into the tunnel. -
Fill the center:
Finally, shade the very central small triangle. I prefer to make this the darkest point of the drawing to simulate a deep hole or the bottom of the tunnel.
Uneven Shading?
Graphite smudges easily. Place a piece of scrap paper under your drawing hand to protect finished areas while you shade the rest prevents muddy textures.
Step 3: Refining and Polishing
-
Add corner shadows:
To make the layers look like specific separate blocks, add a slight gradient shading at the corners where the trapezoid sections meet. Darken these diagonal seams slightly. -
Enhance texturing:
Use the side of your pencil lead to add a subtle wood-grain or stone texture to the shaded grey bands. Keep the strokes linear, following the length of each segment. -
Sharpen the edges:
Go back with your ruler and a sharp pencil to re-line the edges of every band. Crisp, clean lines are essential for the optical illusion to work convincingly. -
Brighten the highlights:
Use a clean eraser to lift any smudges from the white middle bands. They need to be pristine white to pop against the grey graphite. -
Deepen the contrasts:
Do a final pass with your 4B pencil, darkening the innermost areas and the central triangle one last time to maximize the depth perception.
Go Infinite
Add more internal subdivision lines to create a ‘deeper’ tunnel with five or six layers instead of three for a more intense vertigo effect.
Step back and admire how flat lines on paper have transformed into a deep, geometric tunnel


Have a question or want to share your own experience? I'd love to hear from you in the comments below!