Nothing makes a backyard feel more magical than a wooden playhouse that’s painted like a tiny home with big personality. I pulled together my favorite wooden playhouse paint ideas—from classic curb-appeal palettes to playful, artsy details you can add one brushstroke at a time.
Two-Tone Siding and Crisp Trim
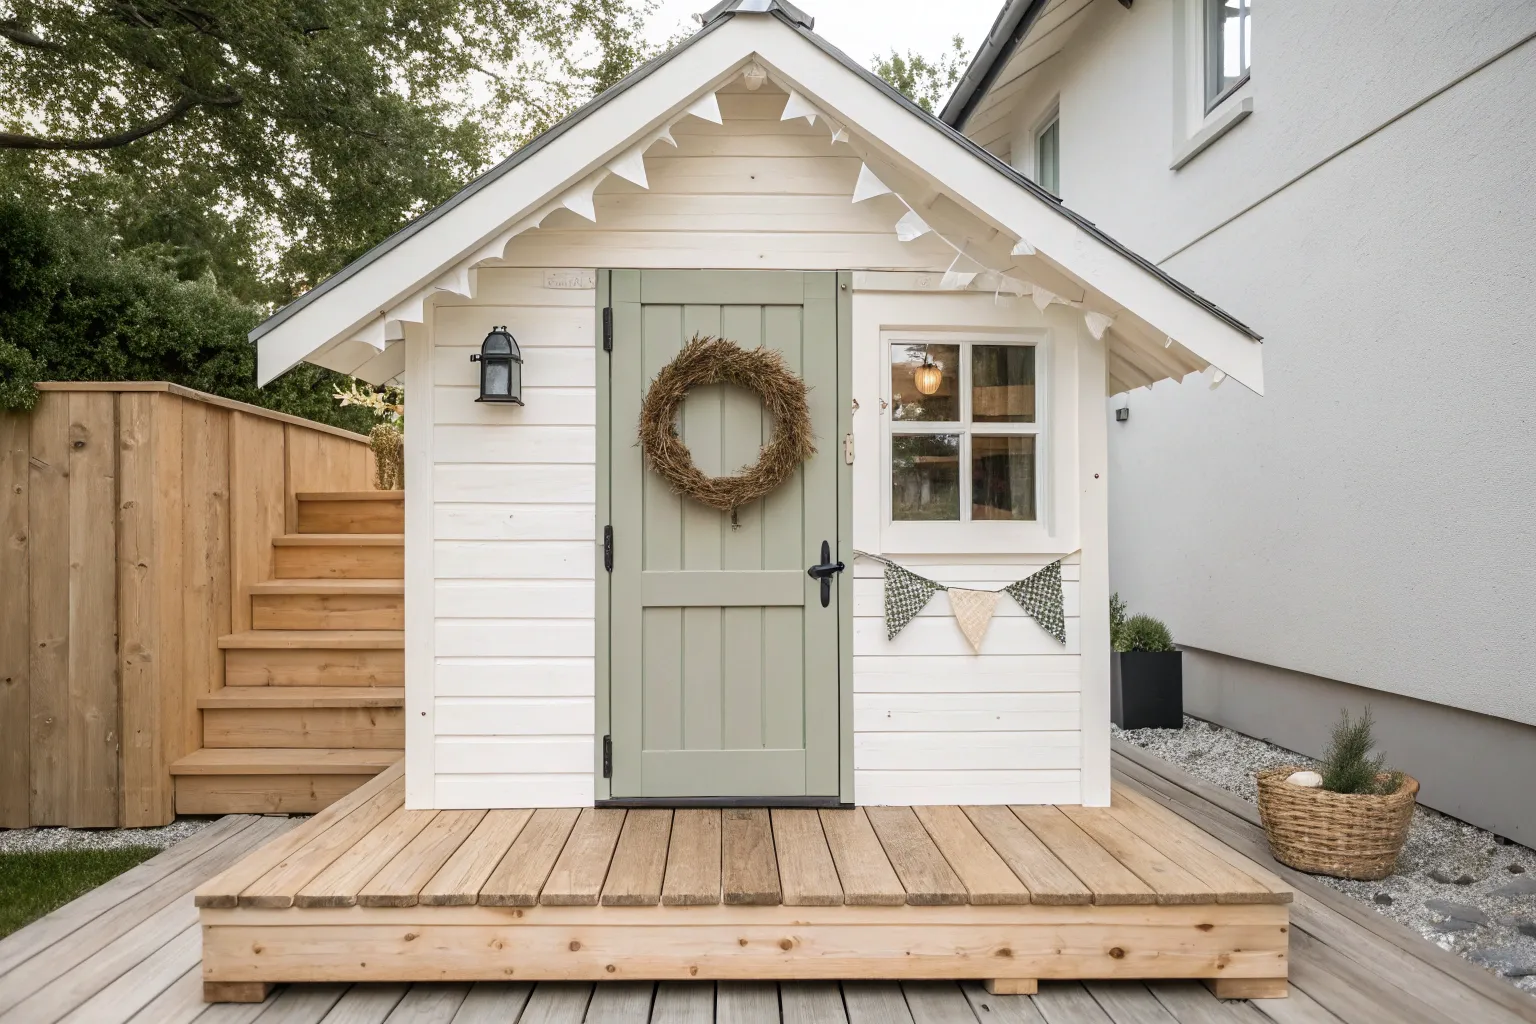
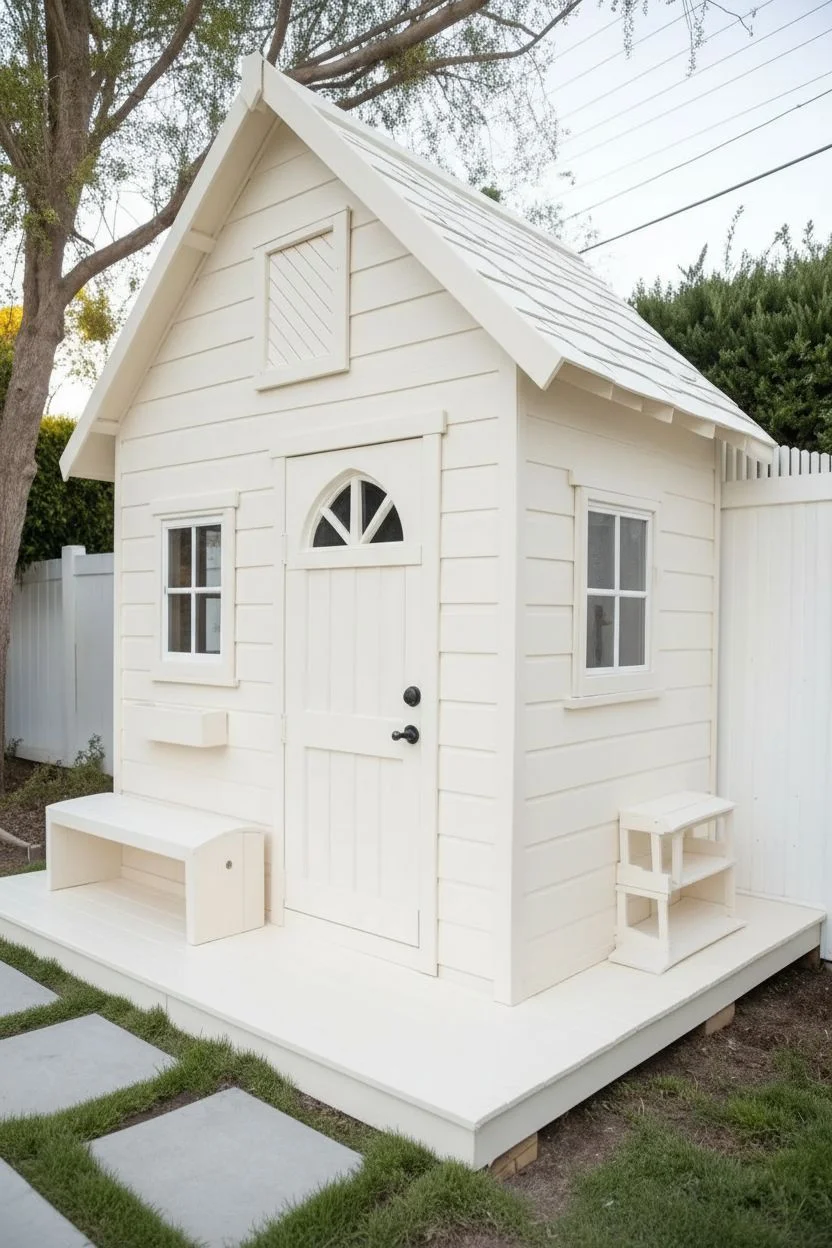
Transform a plain wooden playhouse into a sophisticated backyard cottage with this subtle two-tone paint scheme. By pairing a soft, buttery cream siding with deep hunter green accents and crisp white trim, you create a timeless look that feels like a miniature home.
Detailed Instructions
Materials
- Exterior-grade primer (oil-based or high-quality latex)
- Exterior satin or semi-gloss paint: Soft Butter Cream
- Exterior satin or semi-gloss paint: Crisp Pure White
- Exterior semi-gloss paint: Hunter Green
- Sanding block or sandpaper (120-grit)
- Painter’s tape (high adhesion for exteriors)
- Drop cloths
- 2-inch angled sash brush
- 4-inch foam roller or mini roller
- Small artist brush for touch-ups
- Caulk and caulking gun (exterior grade)
- Clean rags
Step 1: Preparation
-
Clean and Inspect:
Start by thoroughly cleaning the entire playhouse exterior. Use a mild detergent and water to remove dirt, mildew, or cobwebs. Let the wood dry completely for at least 24 hours. -
Sand Rough Areas:
Run a sanding block over any rough patches or splinters on the siding and trim. You want a smooth surface for the paint to adhere to, but you don’t need to strip it down to bare wood if it’s new. -
Caulk Gaps:
Apply exterior caulk to any gaps around the window frames, door frame, or corner trim where water might seep in. Smooth the bead with a wet finger and let it cure according to the manufacturer’s instructions. -
Prime the Surface:
Apply a coat of high-quality exterior primer to the entire structure—siding, trim, door, and window frames. This step is crucial for blocking tannins and ensuring true color payoff.
Step 2: Painting the Main Body
-
Cut In the Siding:
Open your Soft Butter Cream paint. Using your angled sash brush, carefully cut in around the edges of the siding where it meets the trim. Don’t worry if you get a little on the trim, as you’ll paint that later. -
Roll the Siding:
Use the mini foam roller to apply the cream paint to the flat surfaces of the siding boards. Roll in the direction of the wood grain for a seamless finish. I find two thin coats cover much better than one thick one. -
Second Coat:
Allow the first coat to dry (usually 2-4 hours). Apply a second coat of the cream paint to ensure a rich, consistent color that hides the primer completely.
Sticky Situation?
If paint bleeds under your tape, don’t panic. Wait for it to dry completely, then use a small, stiff brush with a tiny amount of the correct color to ‘erase’ the mistake.
Step 3: Detailing the Trim
-
Tape Off Siding:
Once the cream siding is fully cured (give it overnight if possible), use painter’s tape to mask off the siding right up against the trim edges. This guarantees those sharp, professional lines. -
Paint the Vertical Trim:
Dip your angled brush into the Crisp Pure White paint. Start painting the corner boards, door frame, and window casings. Maintain a wet edge to avoid brush marks. -
Paint Fascia and Soffits:
Continue with the white paint up to the roofline, painting the fascia boards and the underside of the overhangs. This brightens the roof transition significantly. -
Remove Tape:
Carefully peel back the painter’s tape while the trim paint is still slightly tacky to prevent peeling dry paint chips.
Flower Power
Install a simple wooden flower box under the window painted in the same trim white. Add faux or real greenery to mimic the cozy garden feel of the original inspiration photo.
Step 4: The Green Accents
-
Mask for Accents:
Now for the dramatic contrast. Tape off the glass panes on the windows and the white trim surrounding the door and window sashes. -
Paint Window Sashes:
Using a smaller brush, carefully paint the actual window sashes (the movable parts holding the glass) in Hunter Green. Take your time here; precision is key. -
Paint the Door:
Paint the main door in Hunter Green. Start with the recessed panels if your door has them, using a brush to get into corners, then roll the flat surfaces for a smooth finish. -
Hardware Check:
If you painted over hinges or handles, wipe them clean immediately. Ideally, paint around them or remove them before starting. -
Final Touch-Ups:
After everything is dry, walk around with a small artist brush. Fix any bleeds or missed spots where the colors meet to perfect your crisp lines.
Enjoy watching the kids play in their freshly painted, storybook-style cottage getaway


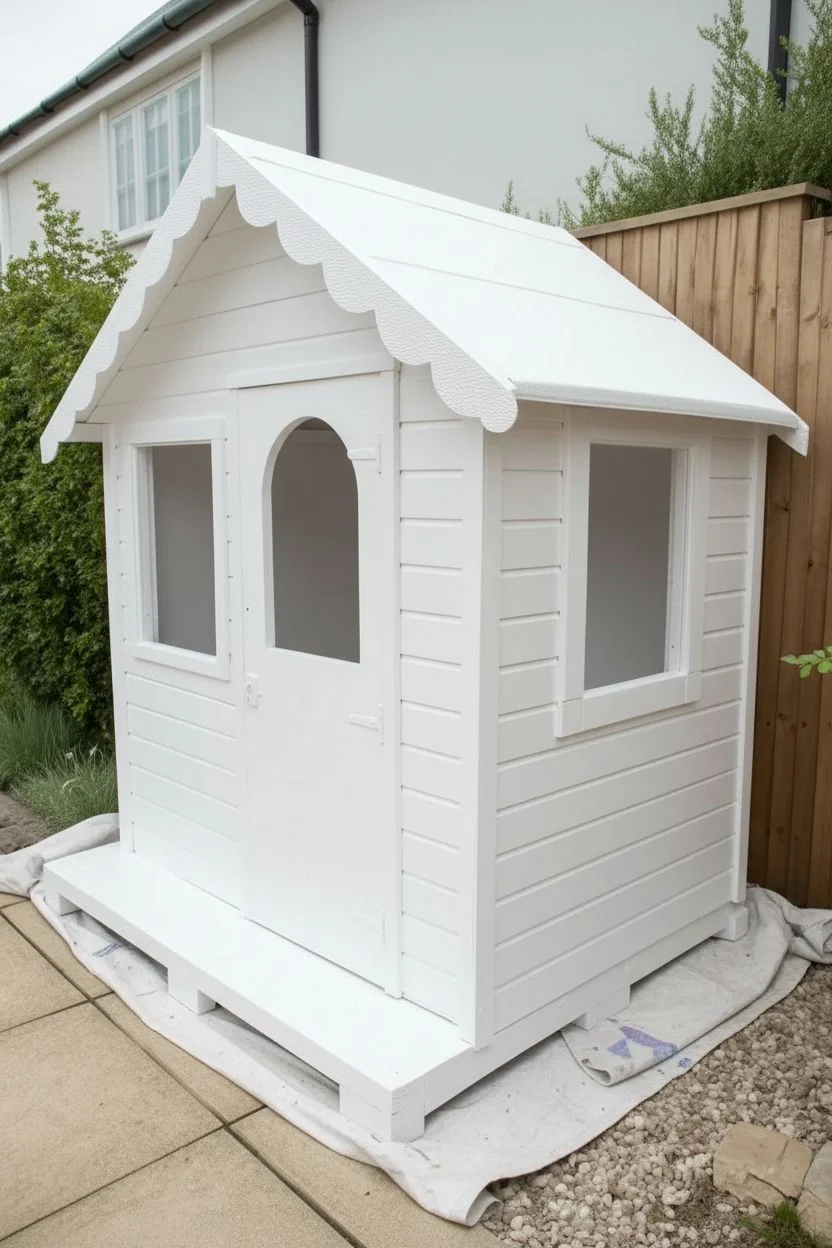
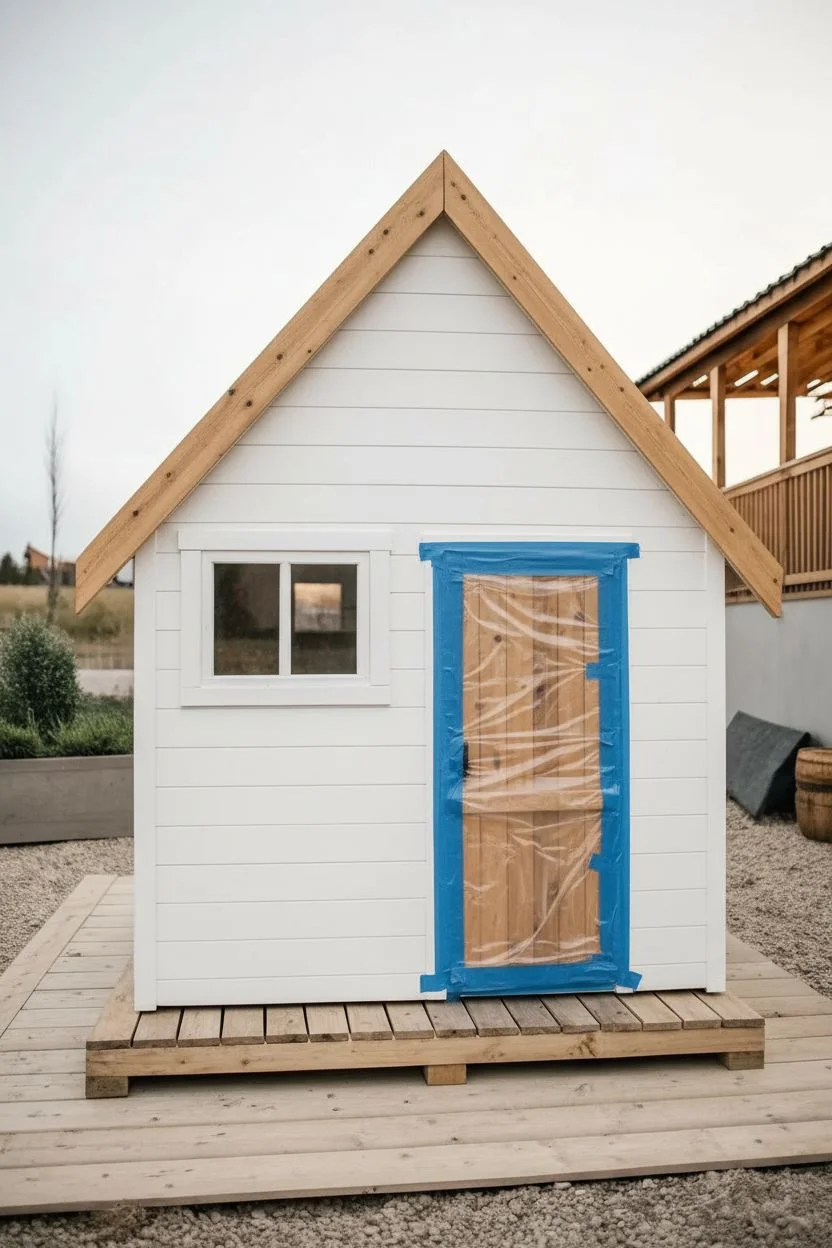
White Cottage With a Color-Pop Door
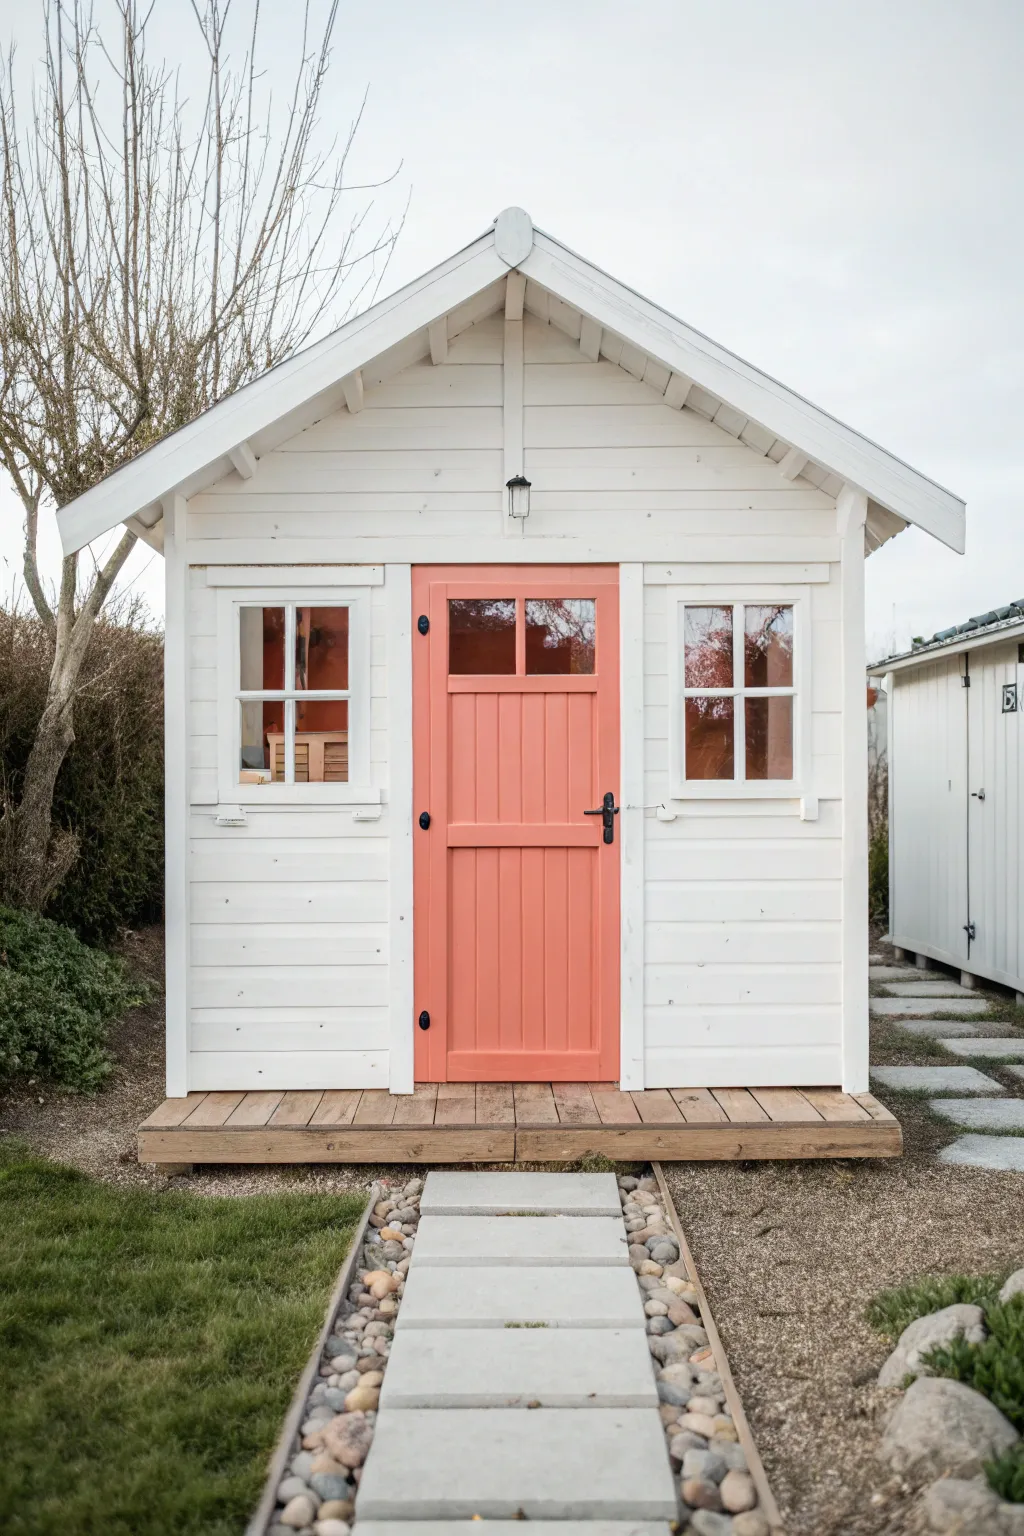
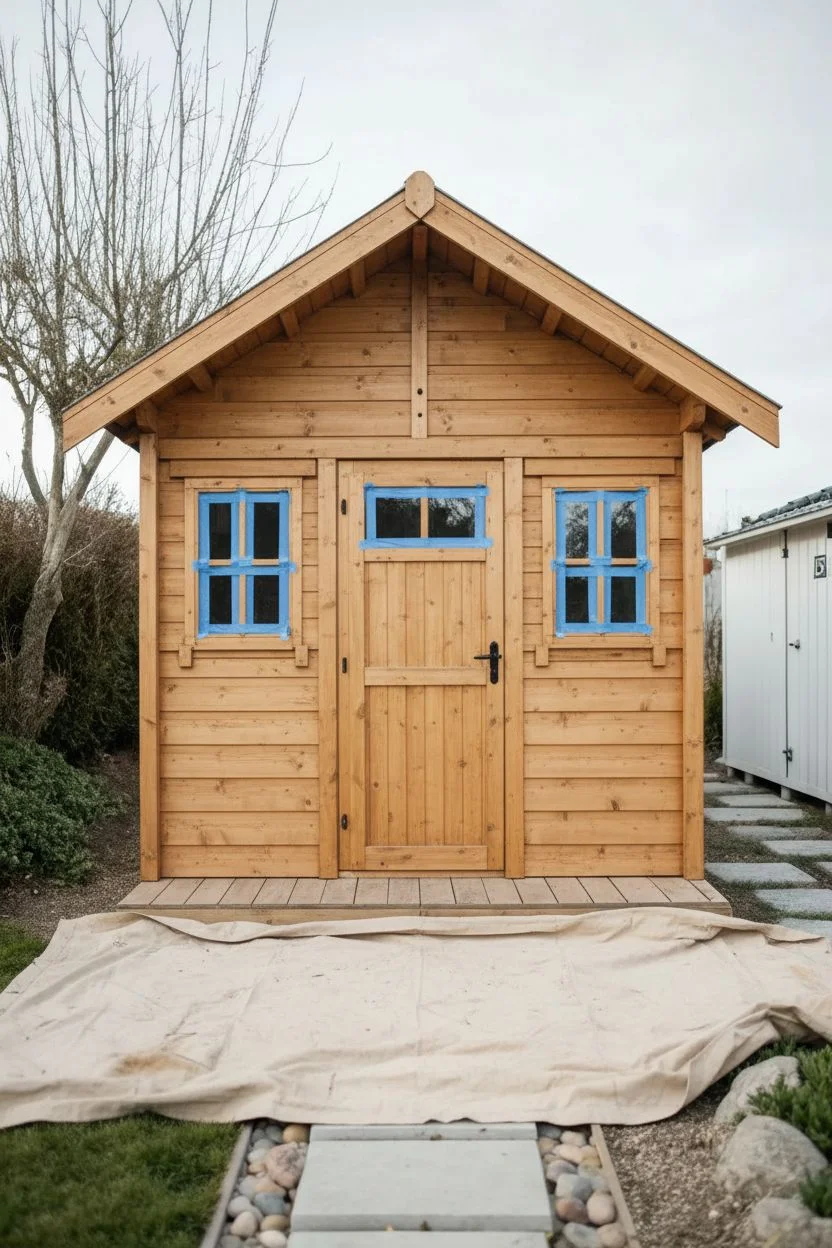
Transform a standard wooden playhouse into a charming miniature cottage with this crisp, high-contrast look. The combination of bright white siding and a warm coral-pink door creates an inviting focal point for any backyard garden.
Step-by-Step
Materials
- Wooden playhouse (pre-assembled or kit)
- Exterior wood primer (white)
- Exterior satin or semi-gloss paint (Pure White)
- Exterior satin or semi-gloss paint (Coral/Salmon Pink)
- Medium-grit sandpaper sponge (120-grit)
- Painter’s tape (exterior grade)
- Drop cloths
- 2-inch angled sash brush (for trim)
- 4-inch foam roller or mini roller (for siding)
- Small artist brush (for touch-ups)
- Screwdriver (to remove hardware)
- Wood filler (if needed for gaps)
Step 1: Prep Work
-
Assess the Surface:
Examine your playhouse for any rough spots or splinters. If the wood is raw, give the entire exterior a light sanding with a 120-grit sponge to ensure a smooth canvas for your paint. -
Remove Hardware:
Using a screwdriver, take off the door handle, hinges (if possible), and any decorative light fixtures. Label small bags for the screws so you don’t lose them. -
Clean the Wood:
Wipe down all surfaces with a damp cloth or a mixture of water and mild detergent. Let the wood dry completely; painting over damp wood can trap moisture and cause peeling later. -
Protect Surrounding Areas:
Since we are painting the main body white, lay down drop cloths underneath the structure. Use painter’s tape to mask off the window glass panes entirely.
Sticky Door Fix
If the door sticks after painting, sand the edges slightly where it meets the frame. Paint adds thickness, so you may need to create a slightly larger clearance gap.
Step 2: Priming and Base Coat
-
Prime the Surface:
Apply a coat of high-quality exterior wood primer over the entire house, including the door and trim. This step is crucial for preventing tannins in the wood from bleeding through your white finish. -
Check for Gaps:
Once the primer is dry, inspect the cladding. If you spot any unsightly knots or gaps, fill them with exterior wood filler, let dry, and sand flush. -
Cut In the Edges:
Open your Pure White exterior paint. Use the 2-inch angled sash brush to carefully paint the corners, under the eaves, and around the window frames where a roller won’t reach. -
Roll the Siding:
Use the 4-inch mini roller to apply the white paint to the main shiplap or siding boards. Roll with the grain of the wood for the smoothest finish. -
Apply Second Coat:
Allow the first coat to dry according to the can’s instructions (usually 2-4 hours). Apply a second coat of white to ensure full, opaque coverage.
Step 3: The Coral Door
-
Isolate the Door:
If you couldn’t remove the door, open it wide and secure it so it doesn’t swing while painting. Tape around the door jamb to protect your fresh white paint. -
First Coat of Color:
Dip your sash brush into the Coral/Salmon paint. Start by painting the recessed panels or detailing in the middle of the door first, then move to the vertical rails and horizontal stiles. -
Smooth the Finish:
Watch for drips in the corners of the door molding. I like to keep a lightly damp rag nearby to quickly wipe away mistakes before they set. -
Deepen the Color:
Pink and coral shades can sometimes look streaky on the first pass. Apply a second—and possibly third—coat to get that rich, saturated pop of color.
Add a Pathway
Enhance the cottage vibe by laying simple concrete pavers leading to the entrance. Fill the gaps with river rocks or creeping thyme for a textured, landscaped look.
Step 4: Final Details
-
Remove Tape:
Carefully peel away the painter’s tape from the window panes and door jambs while the final coat is still slightly tacky to prevent pulling up dried paint chips. -
Clean Windows:
If any paint seeped onto the glass, use a razor scraper to gently remove it once it has dried completely. -
Reattach Hardware:
Screw the black iron door handle, hinges, and the small lantern light back into place. The black hardware provides a stunning contrast against the white and coral. -
Touch Ups:
Do a final walk-around with your small artist brush. fix any spots where the coral might have touched the white frame or vice versa.
Enjoy watching the little ones make memories in their freshly updated, picture-perfect garden retreat


Classic Red Barn Playhouse Style
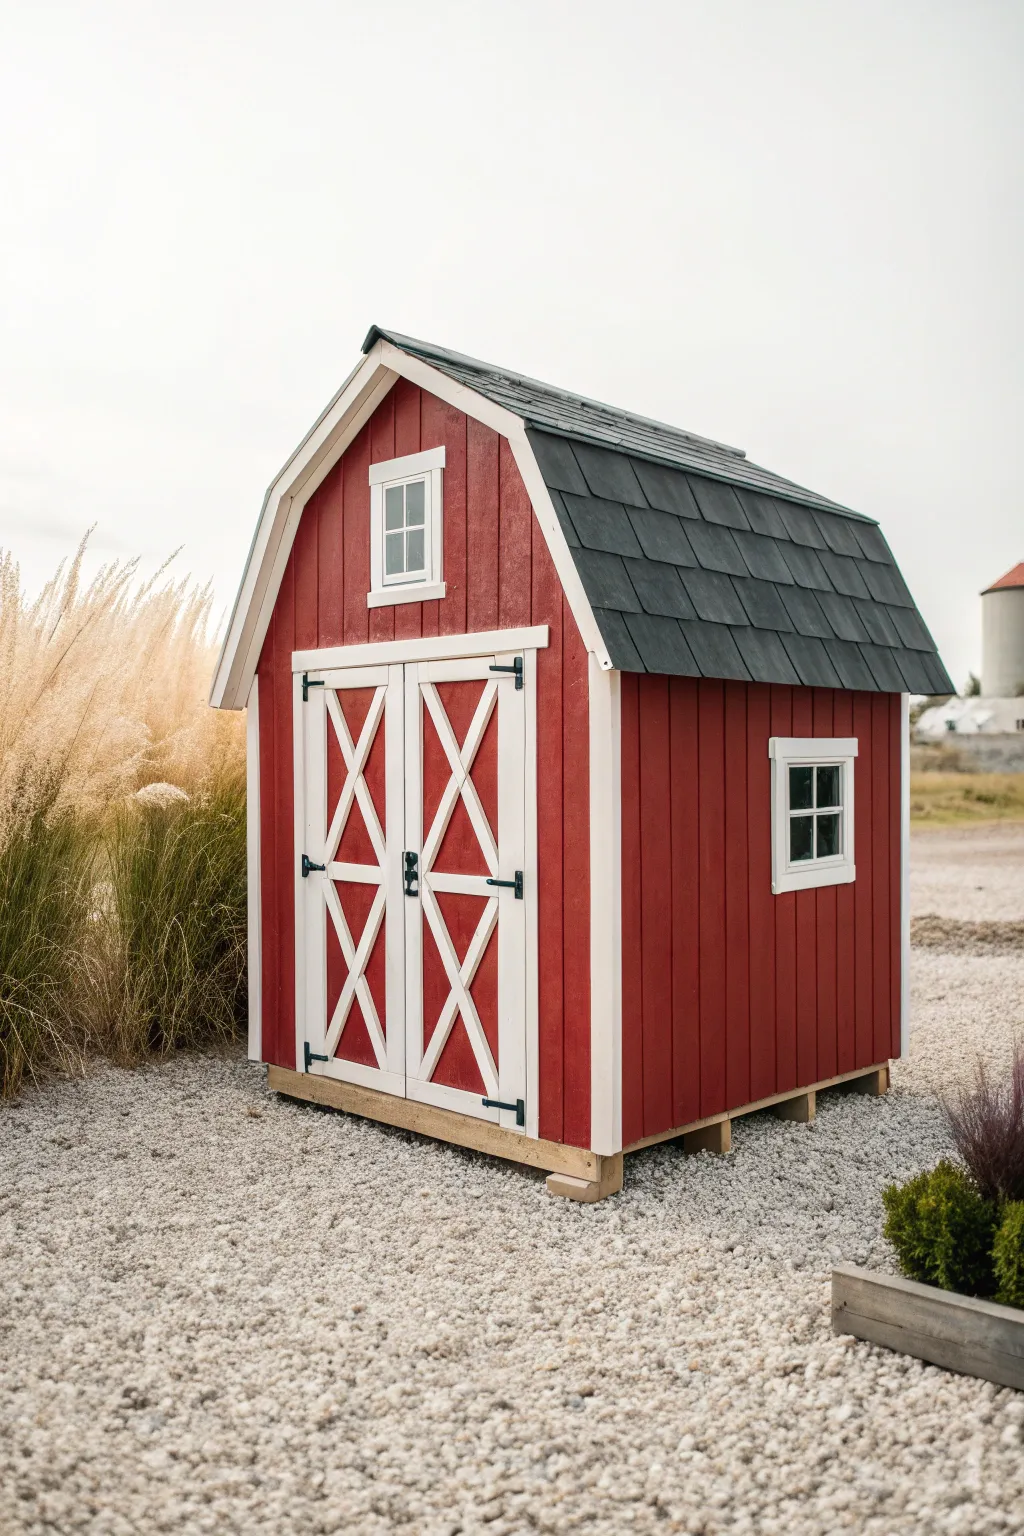
Give your wooden playhouse a timeless, rustic charm by transforming it into a miniature classic red barn. This iconic look features bold red siding, crisp white trim, and contrasting dark roof shingles that pop against any backyard backdrop.
Step-by-Step Guide
Materials
- Exterior wood primer
- Barn Red exterior paint (semi-gloss or satin)
- Bright White exterior trim paint
- Charcoal Grey or Slate exterior paint (for roof)
- Black hardware paint or spray paint (optional)
- 2-inch angled sash brush
- 4-inch foam roller and tray
- Painter’s tape (multi-surface)
- Drop cloths
- Sandpaper (120-grit)
- Wood filler (if repairing old holes)
Step 1: Preparation and Priming
-
Clean the surface:
Before dipping a brush, ensure the playhouse wood is free of dirt, cobwebs, and mildew. A gentle scrub with soapy water and a stiff brush works wonders; let it dry completely for 24 hours. -
Protect the hardware:
Use painter’s tape to carefully mask off any door hinges, handles, or latches you don’t want painted. If possible, removing the hardware entirely is always the cleanest option. -
Sand rough spots:
Lightly sand any splinters or rough patches on the siding and trim using 120-grit sandpaper to ensure a smooth finish for little hands. -
Apply primer:
Coat the entire exterior—siding, trim, and doors—with a high-quality exterior wood primer. This step is crucial for that deep red to look true and not soak unevenly into the wood.
Clean Lines Pro-Tip
When painting the white cross-bucks on the door, remove the tape while the paint is still slightly tacky (wet). This prevents the dry paint film from ripping off with the tape.
Step 2: Applying the Colors
-
Tape off the trim:
Once the primer is fully dry, apply painter’s tape around the edges of the window frames, door frames, and corner boards to protect them from the red paint. -
Paint the siding red:
Using a 4-inch roller for speed and a brush for the grooves, apply your Barn Red paint to the main siding panels. Work in vertical sections to maintain a wet edge. -
Cut in the edges:
Use the angled sash brush to carefully paint the red siding where it meets the roofline and the taped-off trim areas. -
Apply a second coat:
Red pigment can sometimes be translucent. I find that a second coat is almost always necessary to get that rich, deep barn color. Let the first coat dry for at least 4 hours before reapplying. -
Paint the roof:
While the siding dries, tackle the roof shingles. Paint them with the Charcoal Grey or Slate paint using a brush to get into the texture of the shingles or wood slats. -
Remove tape and prep trim:
Peel off the tape from the trim. If you have a steady hand, you can skip re-taping, but for crisp lines, you may want to tape the now-dry red siding before painting the white trim.
Add Farmhouse Flair
Install a simple gooseneck outdoor light fixture above the double doors (even a non-functioning solar one) to really sell that authentic farmhouse aesthetic.
Step 3: Detail Work
-
Paint the trim white:
Using the sash brush, apply Bright White paint to the window casings, door frames, cornice boards, and the fascia board under the roofline. -
Detail the barn doors:
The X-bracing on the doors is the signature of this style. Paint the background panels of the door red first, referring back to your siding color. -
Highlight the cross-bucks:
Carefully paint the raised ‘X’ trim and the door borders in white. Use a smaller artist’s brush if you need to get into tight corners without smudging red onto the white. -
Paint the window muttons:
Don’t forget the small grid lines (muttons) inside the windows. A steady hand and a small flat brush are key here to keeping the glass clean. -
Refinish hardware:
If your hinges and handles look worn, give them a quick coat of black spray paint or brush-on enamel to mimic the look of wrought iron. -
Touch up:
Walk around the playhouse with a small brush and check for any drips or spots where the white and red meet imperfectly. A quick touch-up now makes a huge difference.
Now your backyard has a classic centerpiece that invites hours of imaginative play in a perfect country setting


Pastel Enchanted Cottage Palette
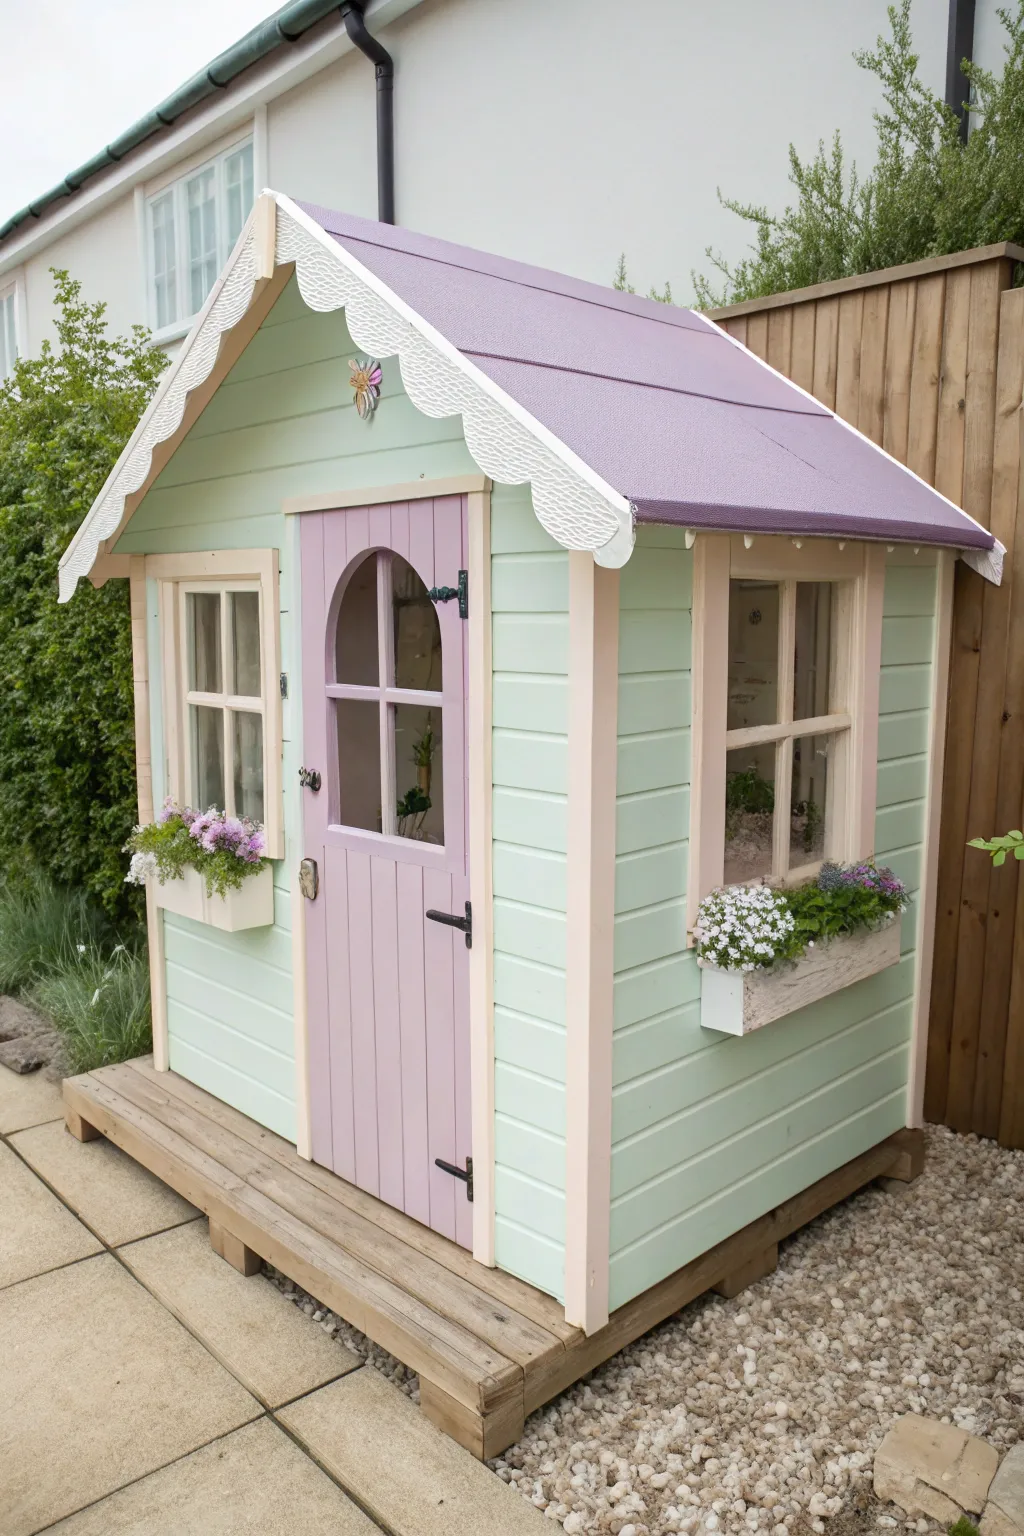
Transform a standard wooden cubby into a storybook dream with this soft, enchanted cottage palette. Using soothing mint greens and playful lilacs, you will create a backyard haven that feels straight out of a fairy tale.
Step-by-Step Tutorial
Materials
- Exterior wood primer
- Exterior wood paint (Satin or Semi-Gloss finish): Mint Green
- Exterior wood paint: Lilac/Lavender
- Exterior wood paint: Creamy White
- Exterior wood paint: Pale Peach or Blush
- Sandpaper (120 and 220 grit)
- Painter’s tape
- Paint rollers (foam or microfiber)
- Angled sash brush (2-inch)
- Detail brush (small)
- Drop cloths
- Wood filler (if needed)
- Screwdriver (for hardware removal)
Step 1: Preparation & Priming
-
Clear the area:
Remove any flower boxes, door hardware, hinges, and decorative items from the playhouse. Lay down drop cloths around the base to protect your patio or grass from drips. -
Sand the surfaces:
Give the entire structure a good sanding with 120-grit paper to remove rough splinters and help the paint adhere. Follow up with 220-grit for a smoother finish on the trim and door. -
Clean the wood:
Wipe down all surfaces with a damp cloth or a tack cloth to remove every speck of sawdust. Paint needs a clean surface to grip properly. -
Prime the wood:
Apply a high-quality exterior wood primer to the entire house, including the roof, door, and window frames. This step is crucial for preventing tannins from bleeding through your beautiful pastel colors. -
Let it cure:
Allow the primer to dry completely according to the manufacturer’s instructions, usually overnight, before moving on to color.
Clean Lines Secret
Use ‘frog tape’ specifically for delicate surfaces if you are taping over freshly painted areas. Run a damp rag over the tape edge before painting to seal it perfectly preventing bleed-through.
Step 2: Painting the Main Structure
-
Paint the siding:
Stir your Mint Green paint thoroughly. Using a roller or wide brush, apply the first coat to the main horizontal siding boards. Don’t worry about full coverage yet; thin, even coats are key. -
Apply the second coat:
Once dry, apply a second coat of Mint Green to ensure a rich, consistent color that hides the primer completely. -
Paint the roof:
While the siding dries, tackle the roof panels with your Lilac paint. Use a roller for the broad sections to get a smooth, texture-free finish. -
Roof touch-ups:
Check the roof for any missed spots or roller marks and apply a second coat of Lilac if necessary for a solid purple hue.
Step 3: Detailed Trim Work
-
Paint the door:
Use the Angled sash brush to paint the door in the same Lilac shade as the roof. Be careful to get into the grooves of the paneling without letting paint pool in the corners. -
Highlight the window frames:
Carefully paint the inner window sashes and vertical frames with your Pale Peach or Blush color. This soft contrast warms up the cool mint tones. -
Outline the door frame:
Paint the frame surrounding the door in the same Pale Peach/Blush tone to create a cohesive look with the windows. -
Add the scalloped trim:
Paint the decorative scalloped fascia boards (bargeboards) in Creamy White. I find a smaller brush gives me better control on these curved edges. -
Paint corner trims:
Finish the vertical corner posts of the playhouse in the Pale Peach/Blush color. Use painter’s tape along the mint siding if you don’t have a steady hand.
Sticky Door Fix
If playhouse doors stick after painting, it’s usually due to paint buildup. Sand the edges of the door frame lightly where it meets the jamb to create a tiny gap for clearance.
Step 4: Finishing Touches
-
Paint flower boxes:
Paint the wooden flower boxes in Creamy White to match the roof trim. Distressing them slightly with sandpaper after they dry can add a nice rustic touch. -
Reattach hardware:
Once the paint has cured for at least 24 hours, screw the black hinges, door handle, and latches back into place. The black hardware provides a grounding contrast to the pastels. -
Install accessories:
Reattach the flower boxes under the windows and stick the small butterfly decoration above the door for that final enchanted detail. -
Style the scene:
Fill the boxes with pink and white flowers like petunias or alyssum to perfectly complement the new color scheme.
Now you have a charming backyard retreat ready for hours of imaginative play
BRUSH GUIDE
The Right Brush for Every Stroke
From clean lines to bold texture — master brush choice, stroke control, and essential techniques.
Explore the Full Guide
Forest Green Garden Hideaway
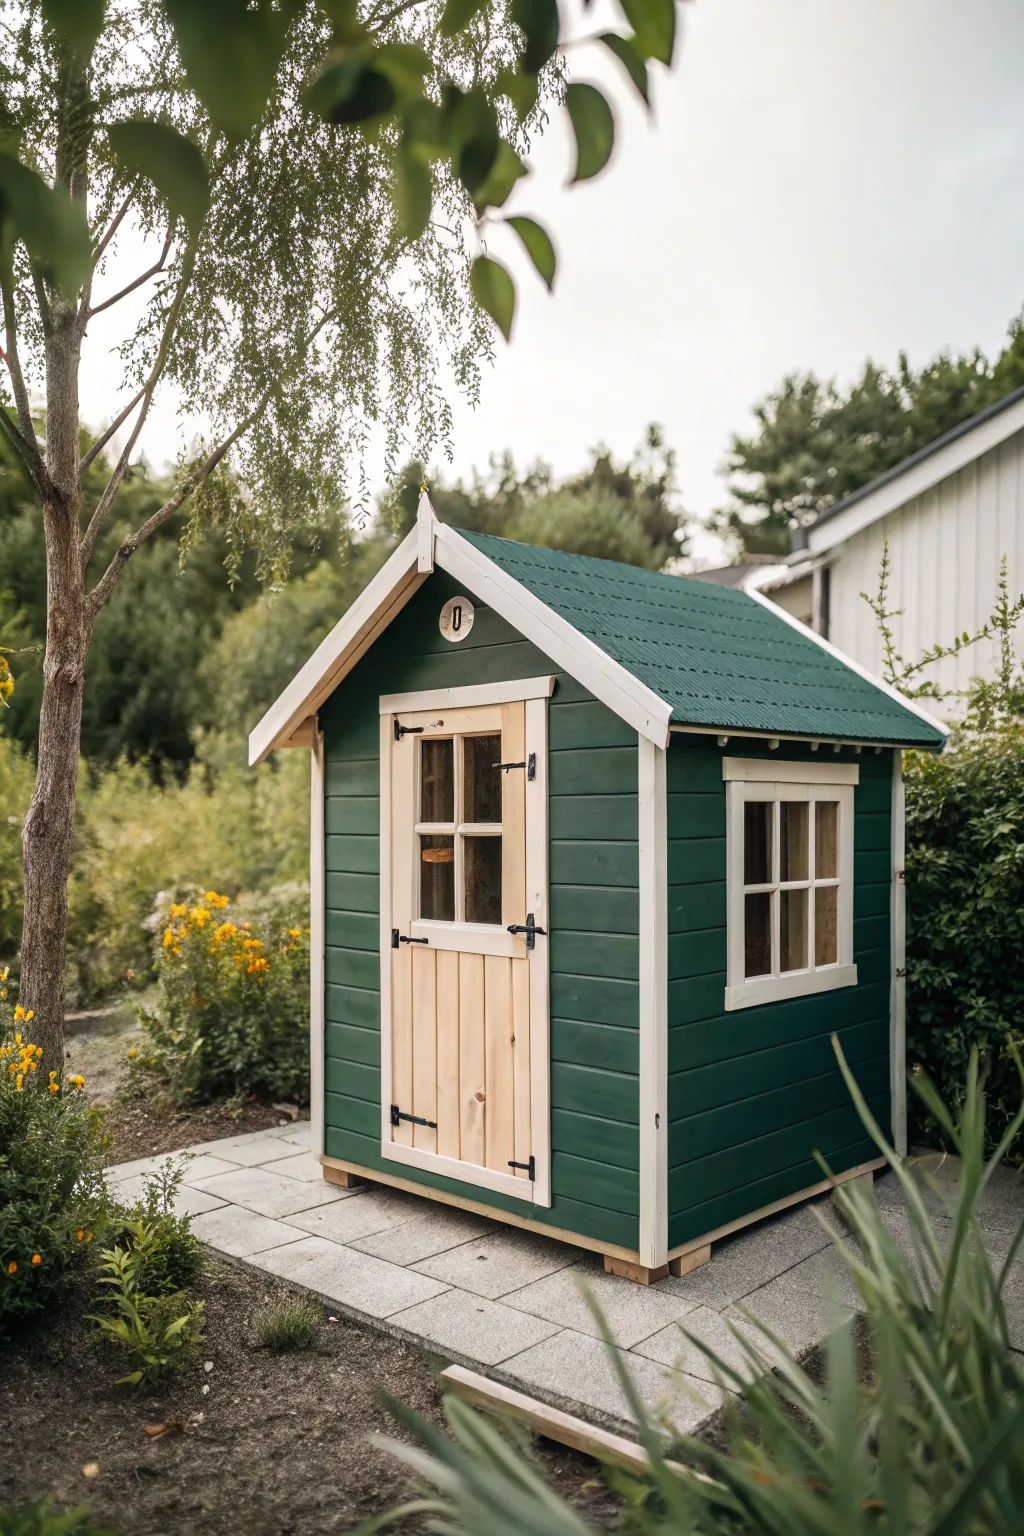
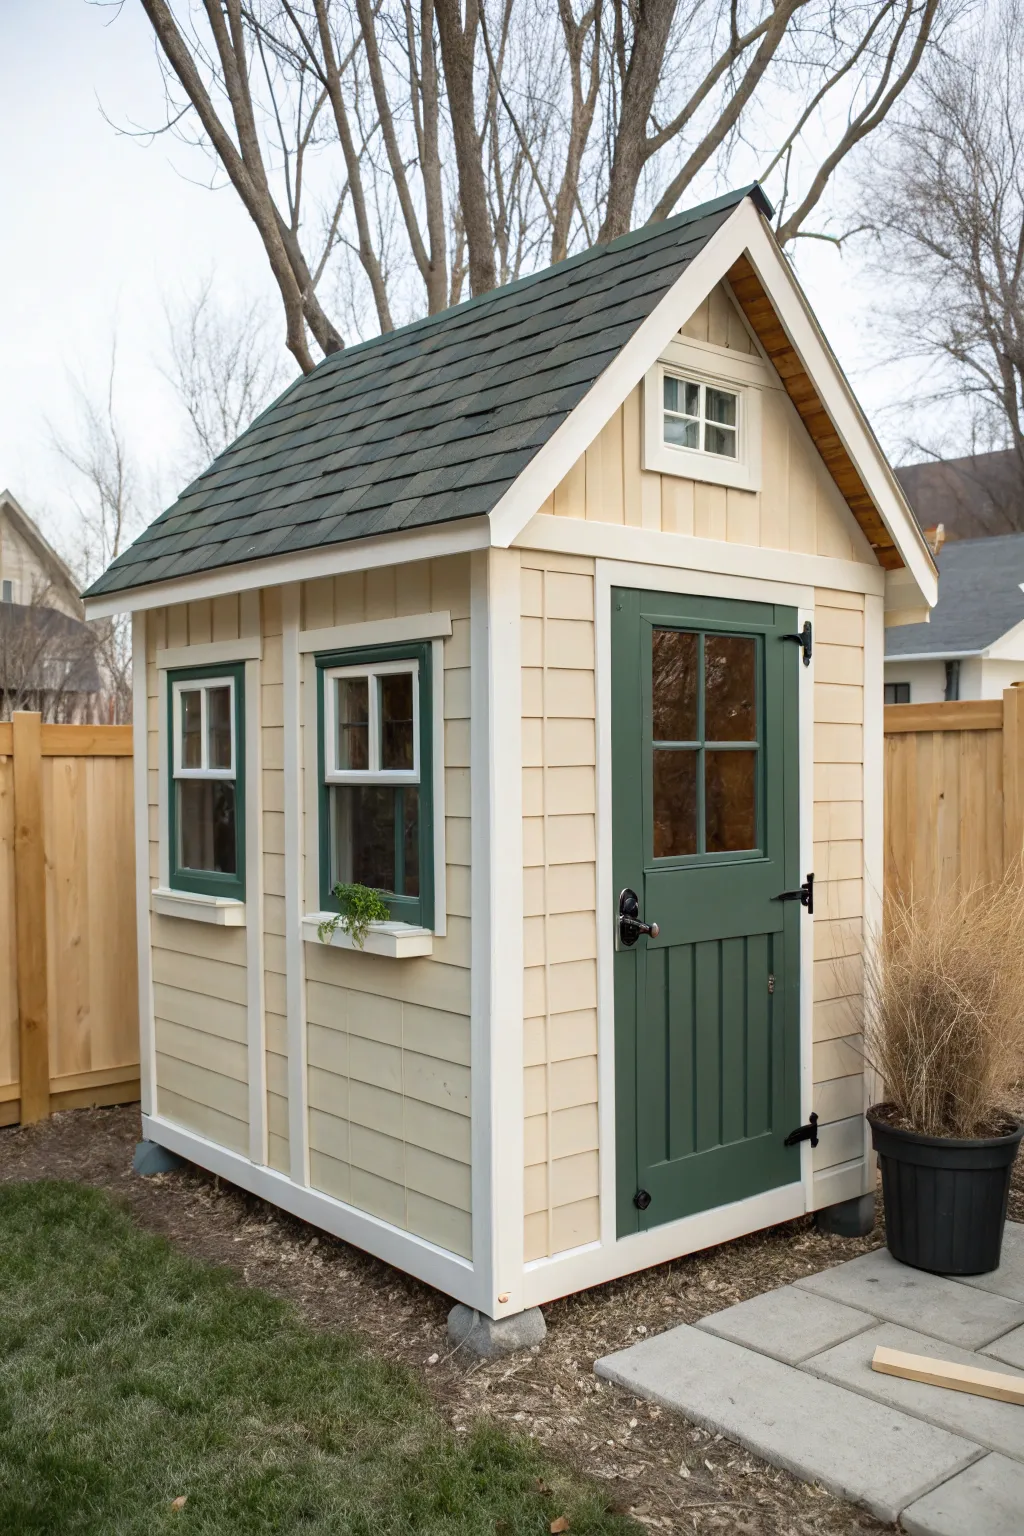
Transform a basic wooden structure into an enchanting woodland retreat with this deep green and crisp white color scheme. This project balances the natural beauty of raw wood with a protective, pigmented finish that blends seamlessly into garden surroundings.
Detailed Instructions
Materials
- Wooden playhouse kit or existing structure
- Exterior wood primer (white based)
- Exterior wood paint: Forest Green (satin or semi-gloss)
- Exterior wood paint: Bright White (semi-gloss)
- Painter’s tape (multi-surface)
- Sandpaper (120 and 220 grit)
- Tack cloth
- Synthetic bristle brushes (2-inch angled, 1-inch flat)
- Small foam roller and tray
- Drop cloths
- Wood sealant (clear, exterior grade)
Step 1: Preparation
-
Clear the area:
Before you begin, ensure there is ample space around the playhouse. Lay down drop cloths to protect patio pavers or grass from paint drips. -
Sand the surfaces:
Lightly sand all exterior wood surfaces using 120-grit sandpaper to remove rough spots or splinters. Follow up with 220-grit for a smoother finish on the trim and door areas. -
Clean the wood:
Wipe down the entire structure with a tack cloth to remove sawdust. A clean surface is crucial for paint adhesion. -
Masking off:
Use painter’s tape to carefully mask off the window glass (if installed) and the metal hinges and handles on the door. If you want keep the door natural like the example, mask the door frame where it meets the siding.
Clean Corner Lines
Use a wide putty knife as a paint shield when cutting in corners between the green siding and white trim. Wipe it clean after every stroke to keep lines sharp.
Step 2: Painting the Main Body
-
Prime the siding:
Apply a coat of exterior wood primer to the main siding panels. I prefer using a foam roller for the broad areas to get even coverage quickly. -
Cut in edges:
While the primer is drying on the flat surfaces, use a 2-inch angled brush to prime the grooves between the siding planks and corners. -
Apply the first green coat:
Once the primer is fully dry, stir your Forest Green paint thoroughly. Apply the first coat to the siding, working from the top down to catch any drips. -
Detail work:
Use the brush to ensure paint gets into the tongue-and-groove gaps. Don’t overload the brush to prevent paint from pooling in the seams. -
Second green coat:
Allow the first coat to dry according to the manufacturer’s instructions (usually 4-6 hours). Apply a second coat of Forest Green for a rich, opaque finish.
Add a Number Plate
Install a small, custom house number or nameplate on the gable peak above the door to give the hideaway a personalized cottage feel.
Step 3: Trim and Roof
-
Paint the fascia and trim:
Switch to the Bright White paint. Carefully paint the roof fascia boards (the decorative edge along the roofline) and the corner vertical trim pieces. -
Window frames:
Use the 1-inch flat brush to paint the window frames white. Take your time here; crisp lines make the project look professional. -
Painting the roof:
If your playhouse has a wooden roof, apply the Forest Green paint here as well to create a cohesive look. A roller works best for expansive roof sections. -
Touch up lines:
Remove the painter’s tape while the final coat is still slightly tacky to avoid peeling. Use a small artist’s brush to touch up any green that might have strayed onto the white trim.
Step 4: Finishing the Door
-
Sand the door:
Ensure the door is sanded very smooth since it will stay natural. Remove any previous pencil marks or dirt. -
Apply clear sealant:
Brush on a coat of clear exterior wood sealant to the door panels. This protects the wood from UV rays and rain without hiding the grain. -
Sealant second coat:
Lightly sand the first coat of sealant once dry with 220-grit paper, wipe clean, and apply a second coat for durability. -
Black hardware accent:
If your hinges or handles got any paint on them, clean them off. The black hardware provides a classic contrast against the natural wood and green paint. -
Final inspection:
Walk around the playhouse and check for any missed spots or uneven coverage, touching up as needed before calling it done.
Now you have a charming backyard retreat that looks like it grew right out of the garden landscape
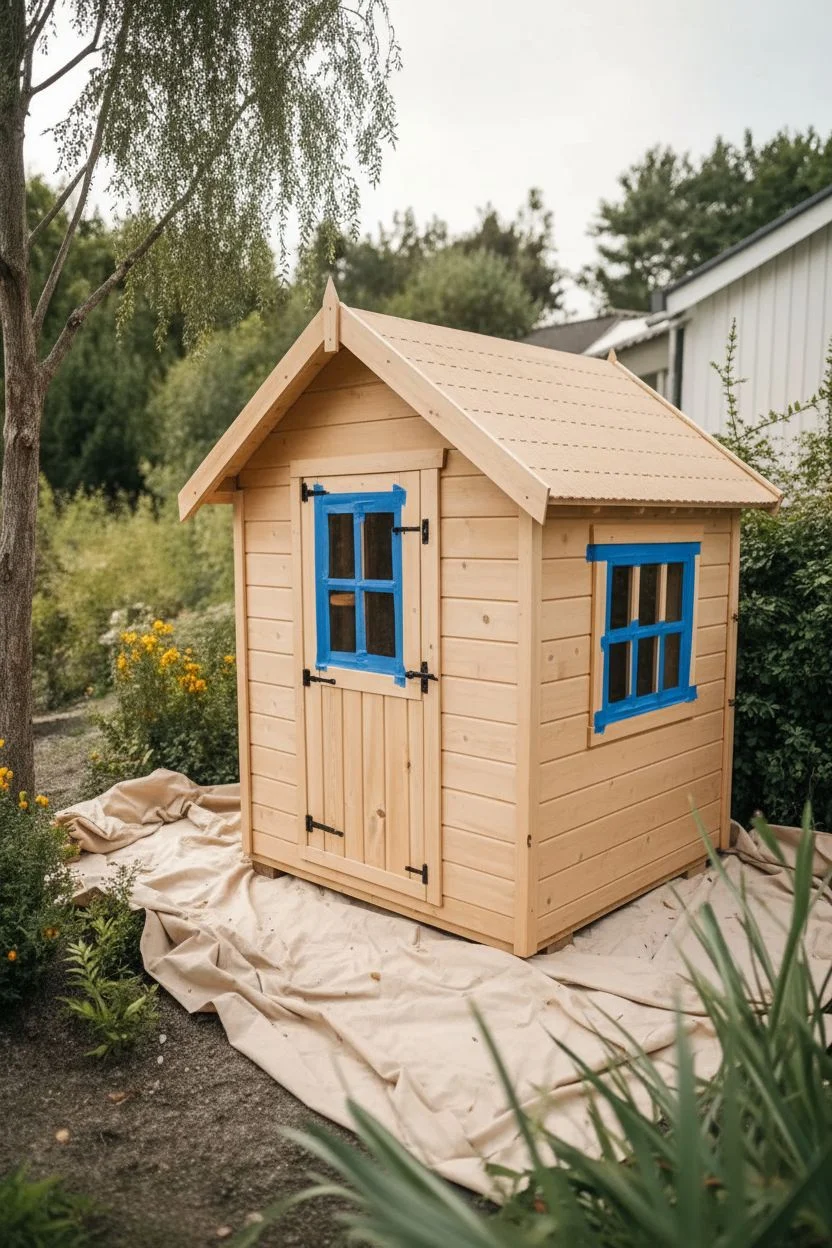
Sunny Yellow Mini House That Shines
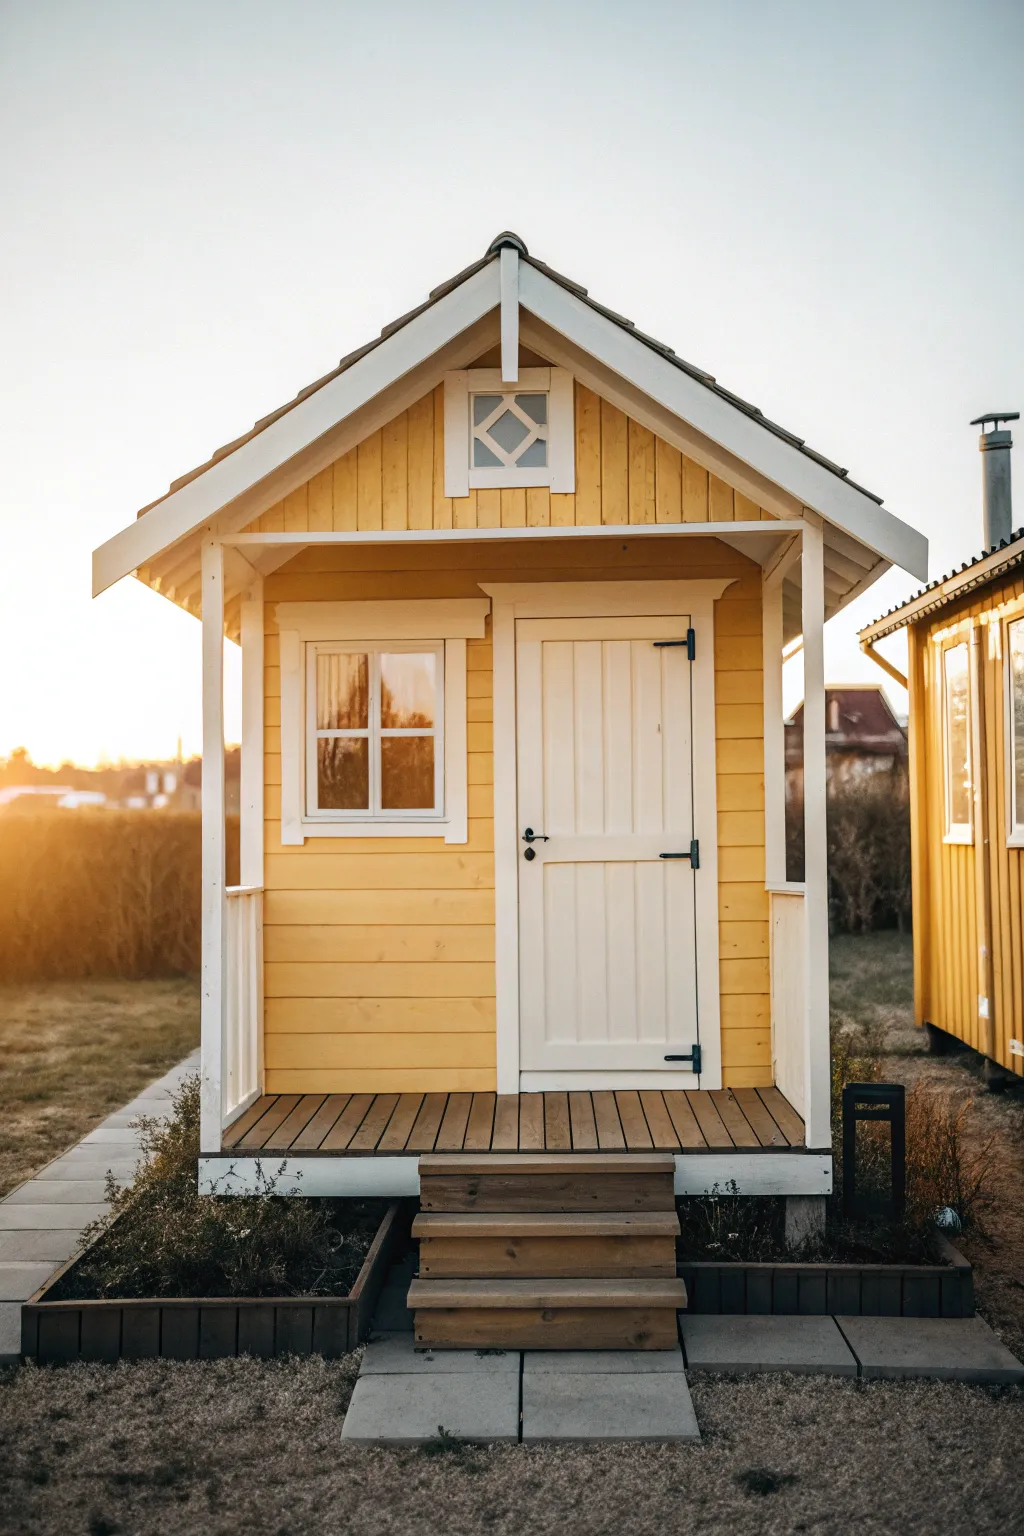
Transform a plain wooden structure into a beaming focal point for your garden with this cheerful paint scheme. The combination of warm, sunny yellow siding and crisp white trim creates an inviting, cottage-like feel that captures the light beautifully.
Step-by-Step Tutorial
Materials
- Exterior wood primer (high quality)
- Exterior semi-gloss paint (Sunny Yellow/Mustard tone)
- Exterior semi-gloss paint (Bright White)
- Exterior wood stain (Walnut or Dark Oak for decking)
- Exterior wood stain (Weathered/Driftwood for steps)
- Paint rollers (medium nap)
- Angled sash brushes (2-inch and 1-inch)
- Drop cloths
- Painter’s tape
- Sandpaper (120 and 220 grit)
- Wood filler
- Screwdriver (for removing hardware)
- Mild detergent and scrub brush
Step 1: Preparation & Priming
-
Clear the area:
Before you begin, lay down drop cloths around the entire perimeter of the playhouse to protect the ground and any surrounding pavers. -
Remove hardware:
Use a screwdriver to carefully take off the door handle, hinges, and any light fixtures. Label them in ziplock bags so reassembly is easy later. -
Clean surface:
Scrub the entire wooden surface with mild detergent and water to remove dirt, mold, or mildew. Let the wood dry completely for at least 24 hours. -
Smooth it out:
Sand any rough patches or peeling old paint with 120-grit sandpaper. Fill distinct holes or cracks with exterior wood filler, let dry, then sand smooth with 220-grit paper. -
Apply primer:
Coat all bare wood surfaces—siding, trim, and door—with a high-quality exterior primer. This step is crucial for ensuring that bold yellow color pops without looking streaky.
Step 2: Painting the Siding
-
Tape the trim:
Once the primer is fully cured, carefully apply painter’s tape along the edges of the white trim areas to keep the yellow paint strictly on the siding. -
Cut in the edges:
Using a 2-inch angled brush, ‘cut in’ the yellow paint around the corners, under the eaves, and next to the taped trim areas. -
Roll the siding:
Switch to a medium nap roller to apply the Sunny Yellow paint to the larger flat board sections. Work in the direction of the wood grain for a smooth finish. -
Second coat:
Allow the first coat to dry according to the manufacturer’s instructions (usually 4-6 hours). Apply a second coat to deepen the color and ensure full coverage.
Sticky Situation?
If paint seeps under your tape, don’t panic. Wait for it to dry completely, then use a small, stiff artist’s brush to carefully touch up the line with the original base color.
Step 3: Refining the Trim
-
Reverse tape:
Remove the initial tape. Once the yellow paint is rock hard (give it a day if possible), tape over the yellow siding right where it meets the trim. -
Paint window frames:
Use a smaller 1-inch sash brush to paint the window mullions and frames in Bright White. I find it helpful to keep a damp rag nearby to quickly wipe any drips off the glass. -
Door and eaves:
Paint the entire door (except the hardware areas), the door frame, the vertical corner posts, and the fascia boards under the roofline with the Bright White paint. Two coats will likely be needed for a crisp look. -
Gable accent:
Don’t forget the small decorative gable vent or window at the very top—paint the frame white to match the rest of the trim.
Add Some Charm
Install a small, solar-powered lantern next to the door or add a window box filled with purple flowers to contrast beautifully against the yellow siding.
Step 4: Decking and Steps
-
Stain the porch floor:
Apply the Walnut or Dark Oak stain to the porch floorboards using a wide brush or stain pad. Wipe off excess stain with a rag to let the grain show through. -
Treat the steps:
For the stairs leading up to the porch, use a slightly lighter ‘Weathered’ or ‘Driftwood’ stain to create a subtle contrast with the darker porch floor. -
Reinstall hardware:
Once all paint and stain have cured for at least 24-48 hours, screw the black hinges and handles back onto the door. -
Final touch-ups:
Walk around the house with a small brush and do tiny touch-ups where white might have bled onto yellow or vice versa.
Step back and enjoy the warm glow of your newly painted garden escape, ready for years of backyard fun

PENCIL GUIDE
Understanding Pencil Grades from H to B
From first sketch to finished drawing — learn pencil grades, line control, and shading techniques.
Explore the Full Guide
Soft Gray With a Dark Roof Contrast


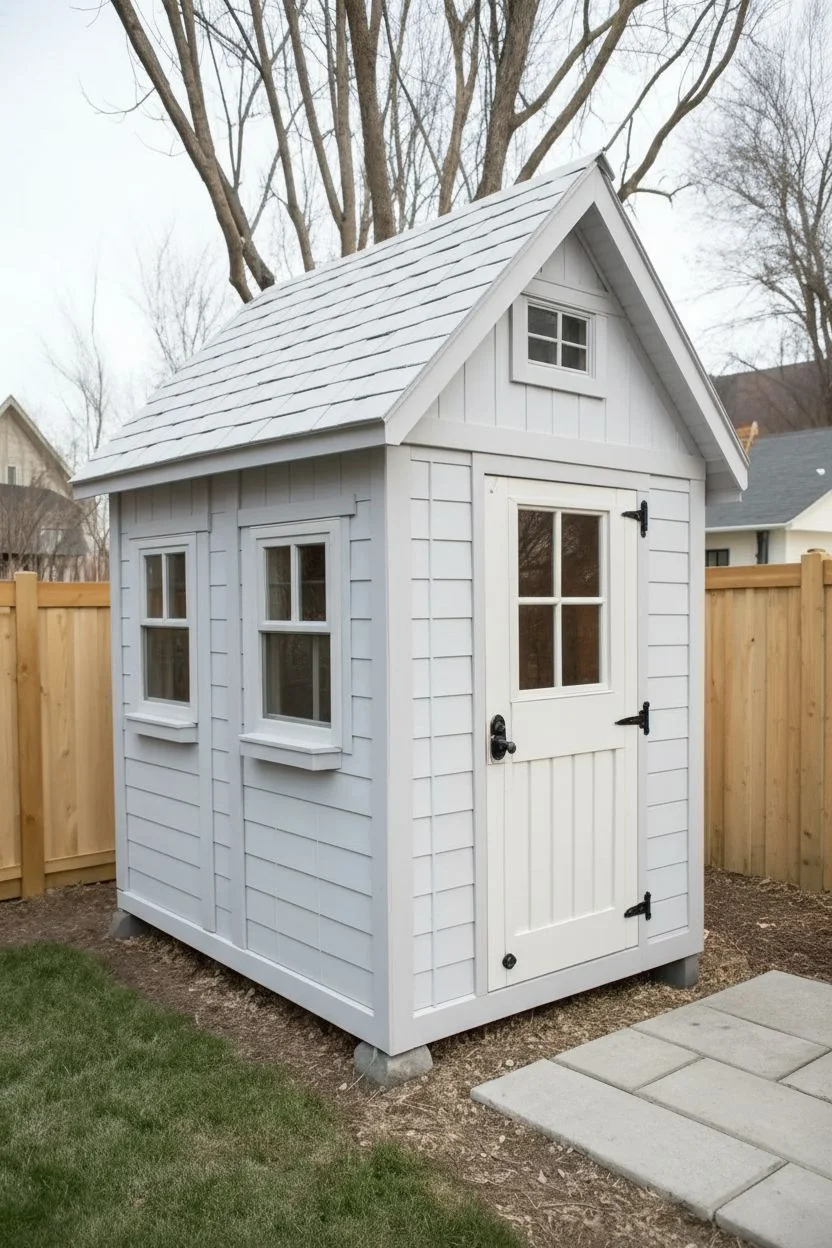
Achieve a sophisticated, modern cottage look by pairing cool gray siding with the warmth of natural wood accents. This painting project transforms a standard wooden playhouse into a stylish garden feature, using contrast to highlight architectural details.
Step-by-Step Guide
Materials
- Exterior wood primer (if painting bare wood)
- High-quality exterior wood paint (Soft Cool Gray/Blue-Gray)
- Clear exterior wood varnish or sealant (Matte or Satin)
- Black metal paint (for hinges and hardware)
- Painter’s tape (multi-surface)
- Drop cloths
- Sanding block (medium 120-grit)
- Stiff bristle brush (for cleaning)
- 2-inch synthetic angled sash brush
- 4-inch flat brush or small roller (for siding)
- Detail brush (for hardware)
Step 1: Preparation & Cleaning
-
Clear and clean:
Begin by removing any loose debris, cobwebs, or dirt from the playhouse surface using a stiff bristle brush. If the wood is old or previously treated, give it a good wash with a mild detergent and water, then let it dry completely for at least 24 hours. -
Sand for adhesion:
Lightly scuff the surfaces you plan to paint using a medium-grit sanding block. This is crucial for opening up the wood grain or roughening previous finishes so the new paint adheres properly. Wipe away the dust with a tack cloth or damp rag. -
Protect the hardware:
If possible, unscrew and remove the black metal hardware (hinges and handles) to make painting easier. If the screws are rusted or stuck, carefully mask them off with painter’s tape to avoid getting gray paint on them. -
Mask the natural wood:
This design relies on keeping the trim and door natural. Use high-quality painter’s tape to meticulously mask off the door frame, the corner trim boards, the eaves, and the window frames. Press the tape edges down firmly to prevent paint bleed.
Uneven Coverage?
If the gray paint looks patchy after drying, it’s likely the wood was very thirsty. A third thin coat usually solves this and unifies the sheen.
Step 2: Painting the Siding
-
Prime the surface:
If you are working with raw, untreated wood, apply a coat of exterior wood primer to the siding areas. This prevents tannins from bleeding through and ensures the gray color stays true. Allow the primer to dry according to the manufacturer’s instructions. -
Cut in the edges:
Open your soft gray exterior paint. Using a 2-inch angled sash brush, carefully ‘cut in’ along the taped edges where the siding meets the natural wood trim and up under the roofline. I find taking your time here saves cleanup later. -
Paint the first coat:
Switch to a 4-inch flat brush or a small roller to cover the main slat areas. Work horizontally, following the direction of the wood grain. Apply the paint in thin, even layers to avoid drips. -
Check for gaps:
Wooden siding often has small gaps or tongue-and-groove joints. Use the tip of your brush to work paint into these crevices so no raw wood peeks through the gray field. -
Apply the second coat:
Once the first coat is dry to the touch (usually 2-4 hours), apply a second coat of gray. This deepens the color and provides the necessary weather protection for outdoor use. -
Remove tape promptly:
While the second coat is still slightly tacky (not fully cured), carefully peel away the painter’s tape at a 45-degree angle. Pulling it while the paint is slightly wet helps keep a crisp, clean line.
Nordic Numbering
Add a small, modern house number plate in matte black next to the door to mimic real Scandinavian cottage styling and add a personalized touch.
Step 3: Treating the Natural Wood
-
Inspect the trim:
Check the now-exposed natural wood areas (door, corners, window trim). If any gray paint seeped under the tape, carefully sand it away with a sanding sponge. -
Apply the sealant:
To protect that beautiful raw wood color from turning gray or rotting, apply a clear exterior varnish or sealant. Use a clean brush and apply it to the door, door frame, window trim, and corner posts. -
Seal the door edges:
Don’t forget the top and bottom edges of the door. Sealing these hidden areas prevents moisture from wicking up into the wood and causing swelling. -
Double coat for durability:
Let the first coat of varnish dry completely, then give it a very light sanding with fine sandpaper. Wipe off the dust and apply a second coat of clear sealant for maximum longevity.
Step 4: Finishing Touches
-
Refresh the hardware:
While the wood dries, tackle the metal hardware. If you removed it, lay the pieces on a drop cloth and spray or brush them with matte black metal paint. If left attached, use a tiny artist’s brush to touch up the black paint carefully. -
Reinstall hardware:
Once everything is fully dry, screw the hinges and handles back onto the door. The fresh black contrast against the natural wood is a key part of this look. -
Clean the glass:
If your playhouse has glazed windows like the one shown, use a razor blade scraper to remove any errant paint spots, then polish the glass with cleaner for a sparkling finish.
Step back and admire how the crisp gray siding makes the natural wood tones pop, creating a garden retreat that feels custom-built.
Painted Window Mullions for Real-Home Detail
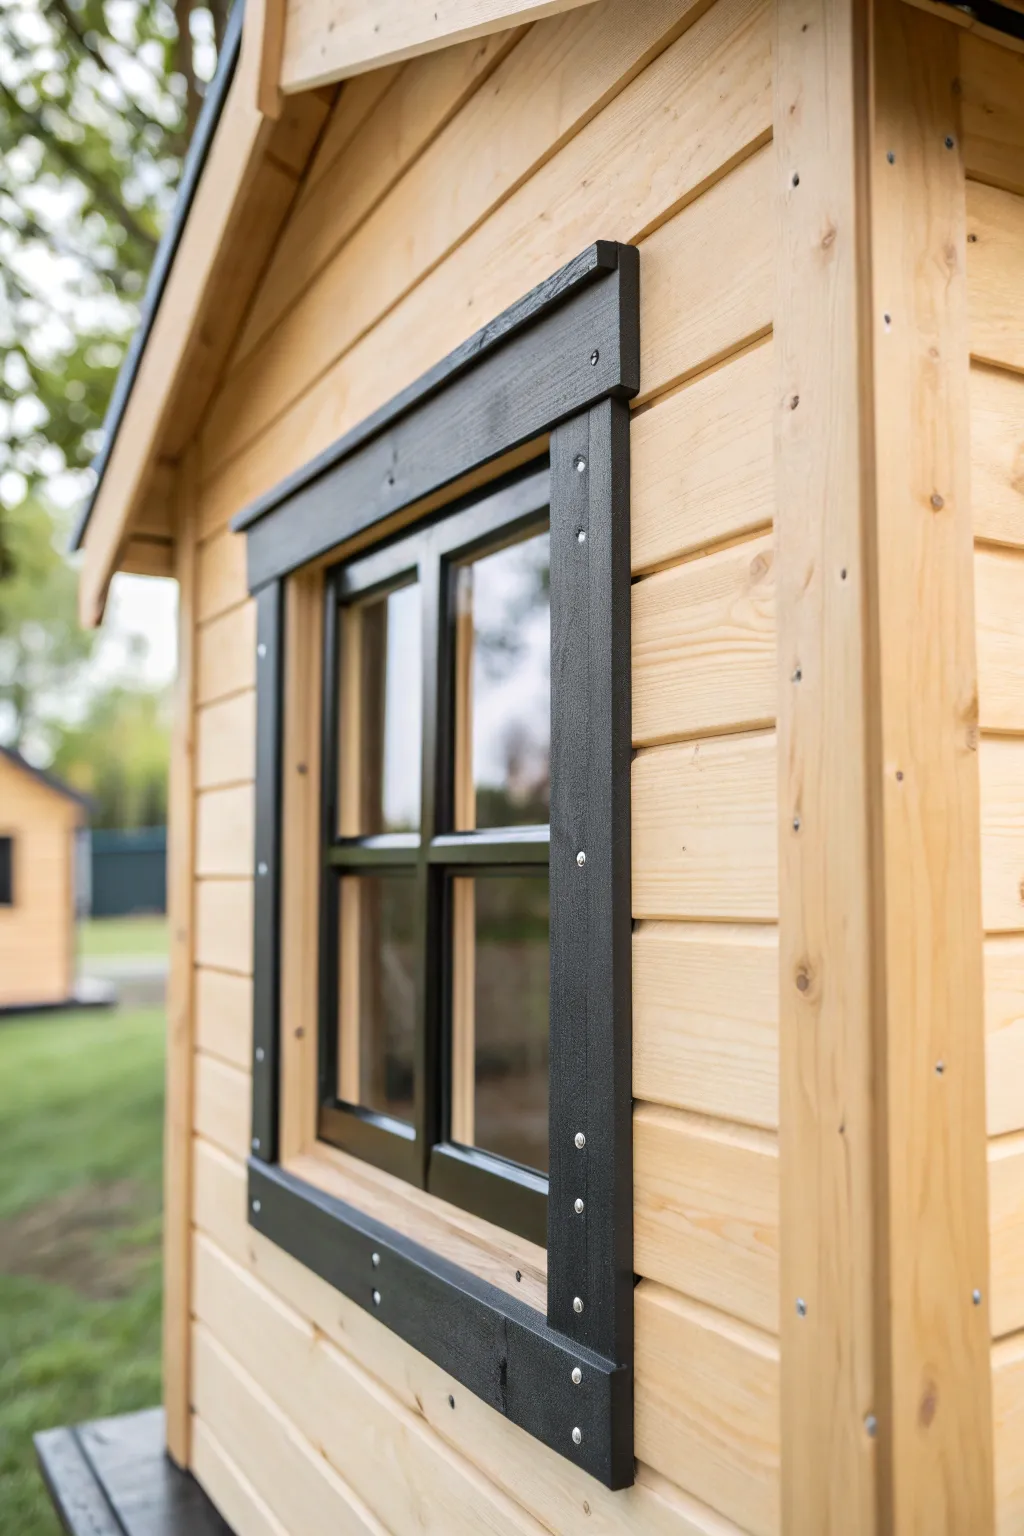
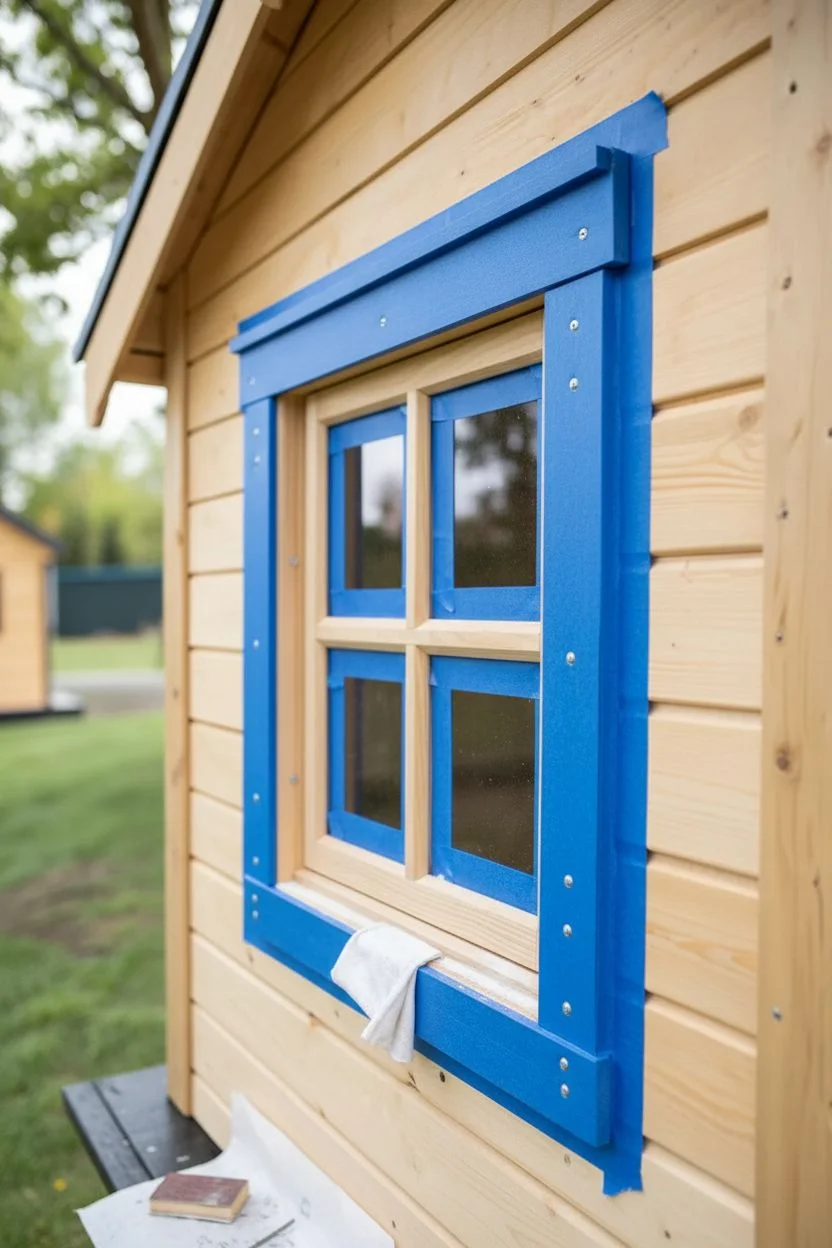
Elevate a simple wooden playhouse by adding a striking, modern farmhouse touch with distinctively painted window mullions and trim. This high-contrast look mimics real architectural details, transforming a plain backyard structure into a stylish mini-home.
Step-by-Step Guide
Materials
- Semi-gloss exterior paint (black or charcoal)
- Wide painter’s tape (1.5 or 2 inch)
- Small angled sash brush (1.5 inch)
- Fine-grit sandpaper (220-grit)
- Tack cloth
- Small foam roller (optional for trim)
- Drop cloth or masking paper
- Screwdriver (if removing hardware)
- Outdoor wood primer (if wood is raw)
Step 1: Preparation & Masking
-
Clean surface:
Begin by wiping down the entire window area with a damp cloth to remove any sawdust, dirt, or spiderwebs that have accumulated on the natural wood. -
Light sanding:
Scuff the surfaces you intend to paint—specifically the trim boards and the inner window grid—with 220-grit sandpaper to help the paint adhere properly. -
Remove dust:
Wipe away the sanding residue thoroughly using a tack cloth; any leftover dust will create a gritty finish in your black paint. -
Protect the siding:
Apply wide painter’s tape directly onto the natural pine siding around the exterior trim boards. Press the edges down firmly to prevent paint bleed. -
Protect the glass:
Tape off the window panes (glazing) carefully. I find it easiest to let the tape overlap the corners slightly and then slice the excess with a utility knife for a sharp corner.
Clean Corner Pro-Tip
For perfect corners on the window panes, use a razor blade to guide your tape cutter. Don’t tear the tape; cut it for a sharp 90-degree angle.
Step 2: Painting the Mullions
-
Prime raw wood:
If your playhouse is brand new, apply a thin coat of outdoor wood primer to the mullions and trim first to seal the porous pine. -
First coat on grid:
Using the angled sash brush, apply your black exterior paint to the inner grid (mullions) of the window. Keep the brush relatively dry to avoid drips running down the glass. -
Reach the corners:
Use the very tip of the angled brush to push paint into the tight corners where the horizontal and vertical bars meet. -
Check angles:
Don’t forget to paint the inside edges of the mullions that face the glass, not just the front-facing flat surfaces, for a truly finished look. -
Dry time:
Allow this initial coat to dry completely according to the manufacturer’s instructions—usually about 2-4 hours.
Level Up: Faux Hardware
Add small black metal L-brackets or rustic decorative nail heads to the corners of the exterior trim frame to enhance the farmhouse aesthetic.
Step 3: Exterior Trim & Finishing
-
Paint exterior frame:
Move onto the wider boards framing the window. You can use a small foam roller here for a smoother finish, or stick with your brush for a wood-grain texture. -
Handle screw heads:
Dab paint deliberately over the exposed screw heads or nails to camouflage them into the black trim, ensuring they don’t shine through. -
Second coat:
Apply a second coat of black paint to both the inner grid and outer trim to ensure deep, opaque coverage without streaks. -
Remove tape (wet):
Peel off the painter’s tape while the second coat is still slightly tacky. Pull at a 45-degree angle away from the painted edge for the crispest line. -
Clean up glass:
If any paint seeped under the tape onto the window panes, wait for it to fully dry and then gently scrape it off with a razor blade. -
Inspect edges:
Check the perimeter where the black trim meets the natural wood siding and use a tiny artist’s brush to touch up any uneven spots.
Step back and admire how this simple contrast adds architectural depth to the playhouse structure


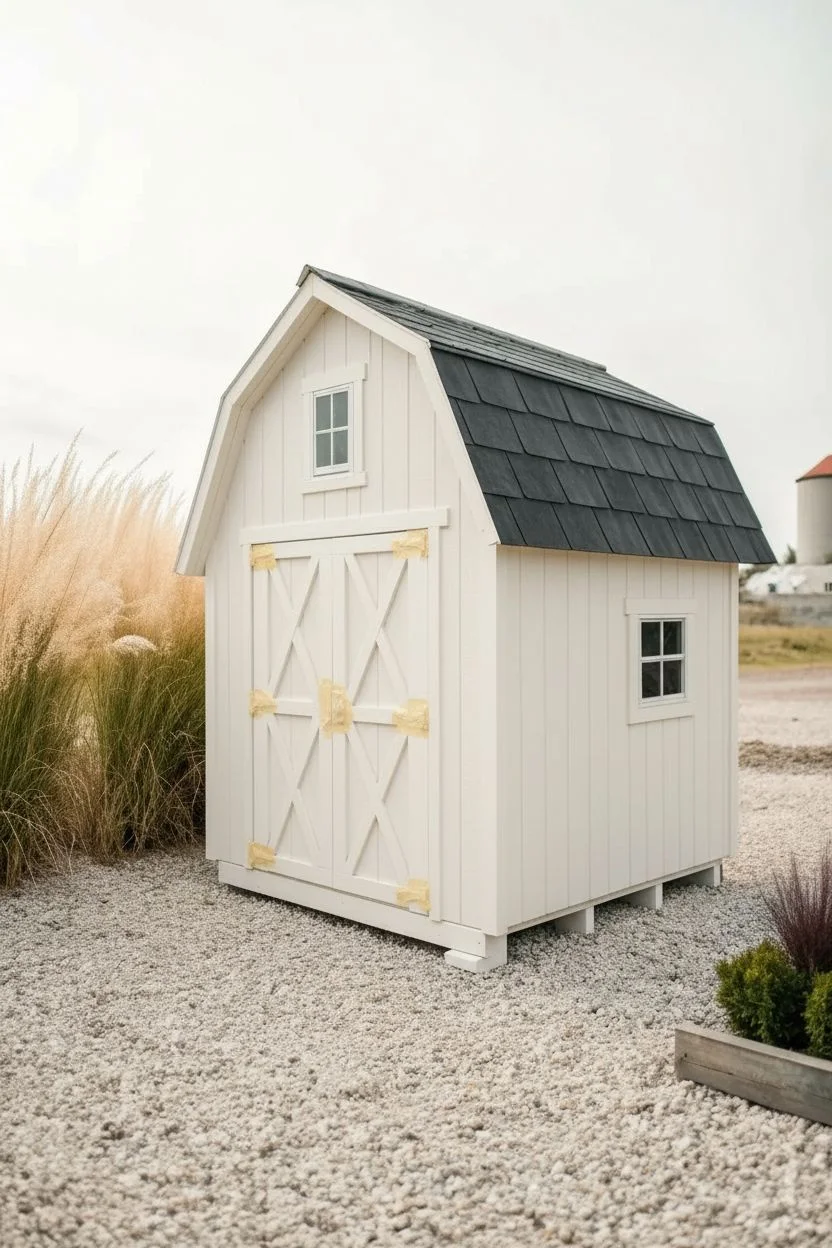
Matching Accessories for a Finished Look
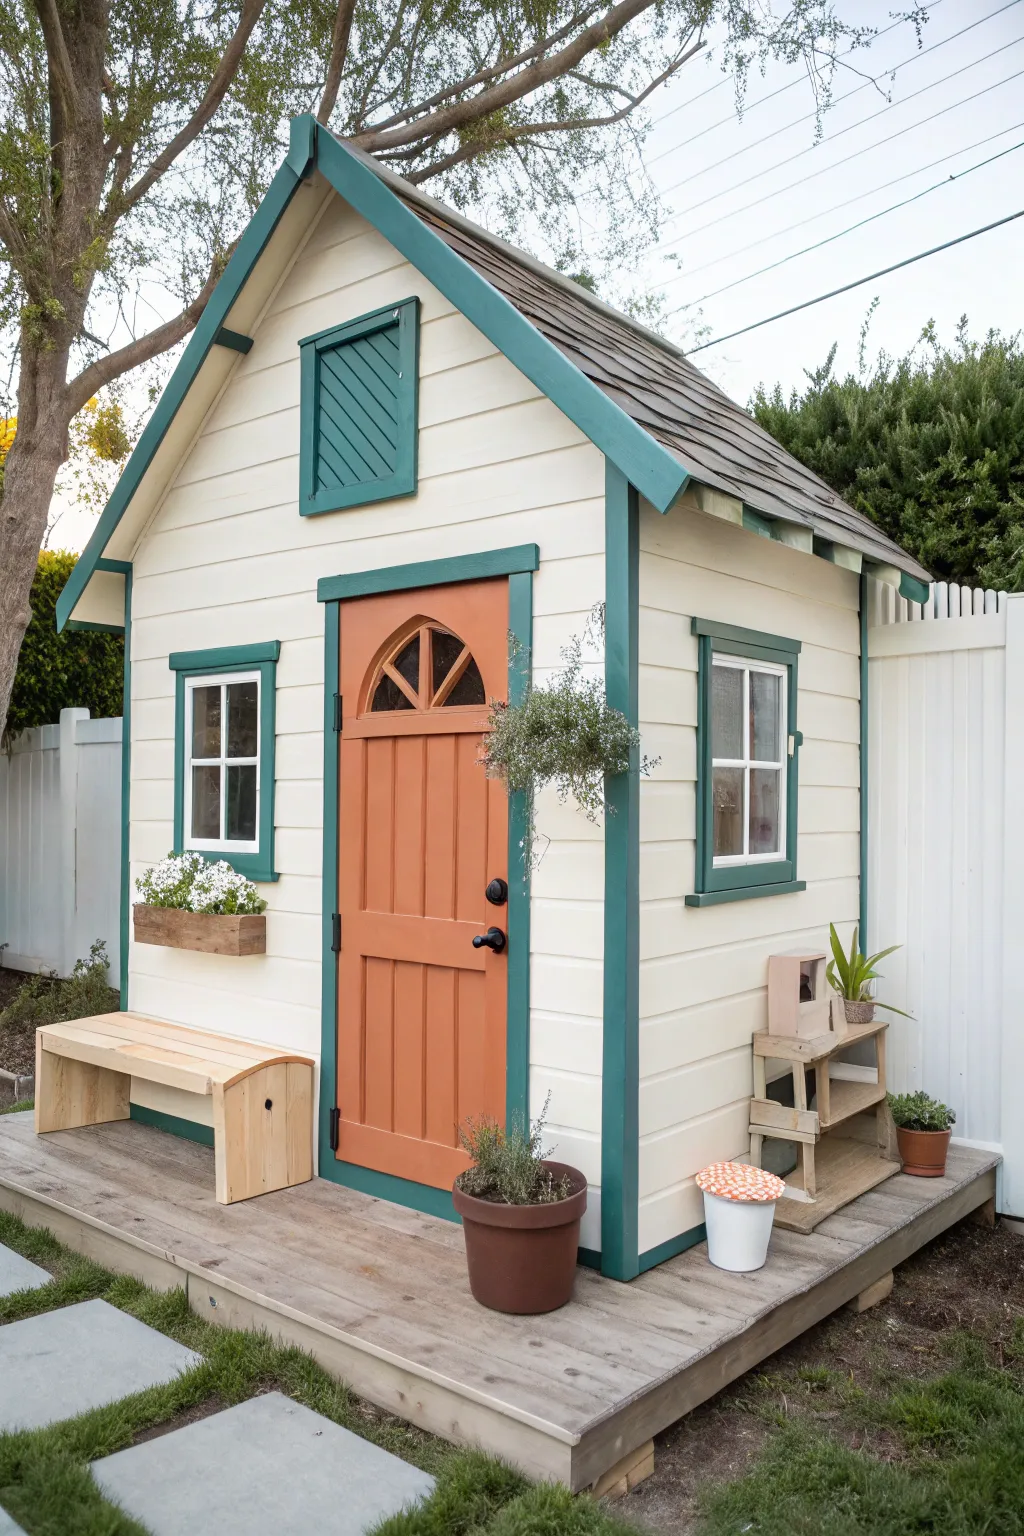
Transform a standard wooden playhouse into a charming country cottage with a carefully curated color palette and thoughtful accessories. This project focuses on high-contrast trim work and natural wood accents to achieve a cozy, customized look perfect for creative play.
Step-by-Step Guide
Materials
- Outdoor wood primer
- Exterior semi-gloss paint (Creamy White)
- Exterior semi-gloss paint (Deep Teal/Green)
- Exterior semi-gloss paint (Terracotta Orange)
- Sandpaper (120 and 220 grit)
- Painter’s tape (multi-surface)
- 2-inch angled sash brush
- 4-inch foam roller and tray
- Small artist brush for touch-ups
- Wood stain (optional specifically for accessories)
- Drop cloths
Step 1: Preparation & Base Coat
-
Clean the surface:
Begin by thoroughly cleaning the exterior wood of the playhouse to remove any dust, dirt, or mildew. A mild detergent and water solution works well. Let it dry completely before moving on. -
Sand the wood:
Lightly sand all exterior surfaces with 120-grit sandpaper to smooth out rough patches and open the wood grain for better paint adhesion. Wipe away the dust with a tack cloth. -
Prime the exterior:
Apply a coat of high-quality outdoor wood primer to the entire house, including the trim and door. This ensures your paint colors will be true and durable against the elements. -
Apply the main body color:
Using a 4-inch foam roller, apply the Creamy White exterior paint to the siding boards. I like to work from top to bottom to catch any drips. Use a brush to get into the grooves between the lap siding. -
Second coat:
Once the first coat is dry (usually 2-4 hours depending on your paint), apply a second coat of the Creamy White for full, opaque coverage.
Clean Lines Secret
For ultra-crisp lines on textured wood siding, seal your painter’s tape edge with a tiny bit of the base (white) paint before applying the trim color.
Step 2: Trim & Accent Painting
-
Tape off the trim:
Apply painter’s tape carefully along the edges of the siding where it meets the door frame, window frames, and roof fascia. Press the tape edges down firmly to prevent bleed-through. -
Paint the window frames:
Use the Deep Teal/Green paint and a 2-inch angled sash brush to carefully paint the window frames. Take your time around the mullions (the vertical and horizontal bars on the window). -
Outline the structure:
Continue using the Deep Teal/Green to paint the corner trim, the roof fascia boards, and the decorative faux vent above the door. This framing color really defines the cottage shape. -
Paint the door:
Paint the main door in Terracotta Orange. Use a brush to get deep into the recessed panels first, then smooth out the flat surfaces. This warm tone provides a welcoming pop of contrast. -
Detail the door trim:
Paint the frame surrounding the door in the Deep Teal/Green color to tie it in with the windows. A steady hand is key here, or you can re-tape if needed. -
Remove tape:
Peel off the painter’s tape while the paint is still slightly tacky to achieve crisp, clean lines without pulling up dried paint chips.
Sticky Door?
If the door sticks after painting, sand the edges lightly once fully cured. Paint adds thickness, so you might need a slightly larger gap for clearance.
Step 3: Styling Accessories
-
Prepare the flower box:
Stain or leave the wooden flower box natural. Attach it securely under the left window using exterior screws. Fill it with a liner and bright white flowers like petunias or impatiens. -
Install hardware:
Install the black door handle and lock hardware. The dark metal contrasts beautifully against the Terracotta Orange. -
Add nature elements:
Place a small potted herb or trailing plant on the deck or hang a small basket near the door to soften the straight lines of the wood. -
Furnish the porch:
Add a simple wooden bench to the deck. Leaving it in a natural wood tone complements the flower box and warms up the cool white siding. -
Final touches:
Set up the ‘backyard’ area with small accessories like a tiny gardening shelf or potted plants to complete the lived-in cottage vibe.
This charming makeover creates a backyard destination that invites hours of imaginative play
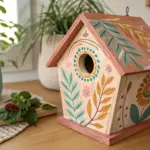
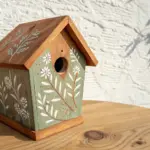
Storybook Mural Around the Doorway
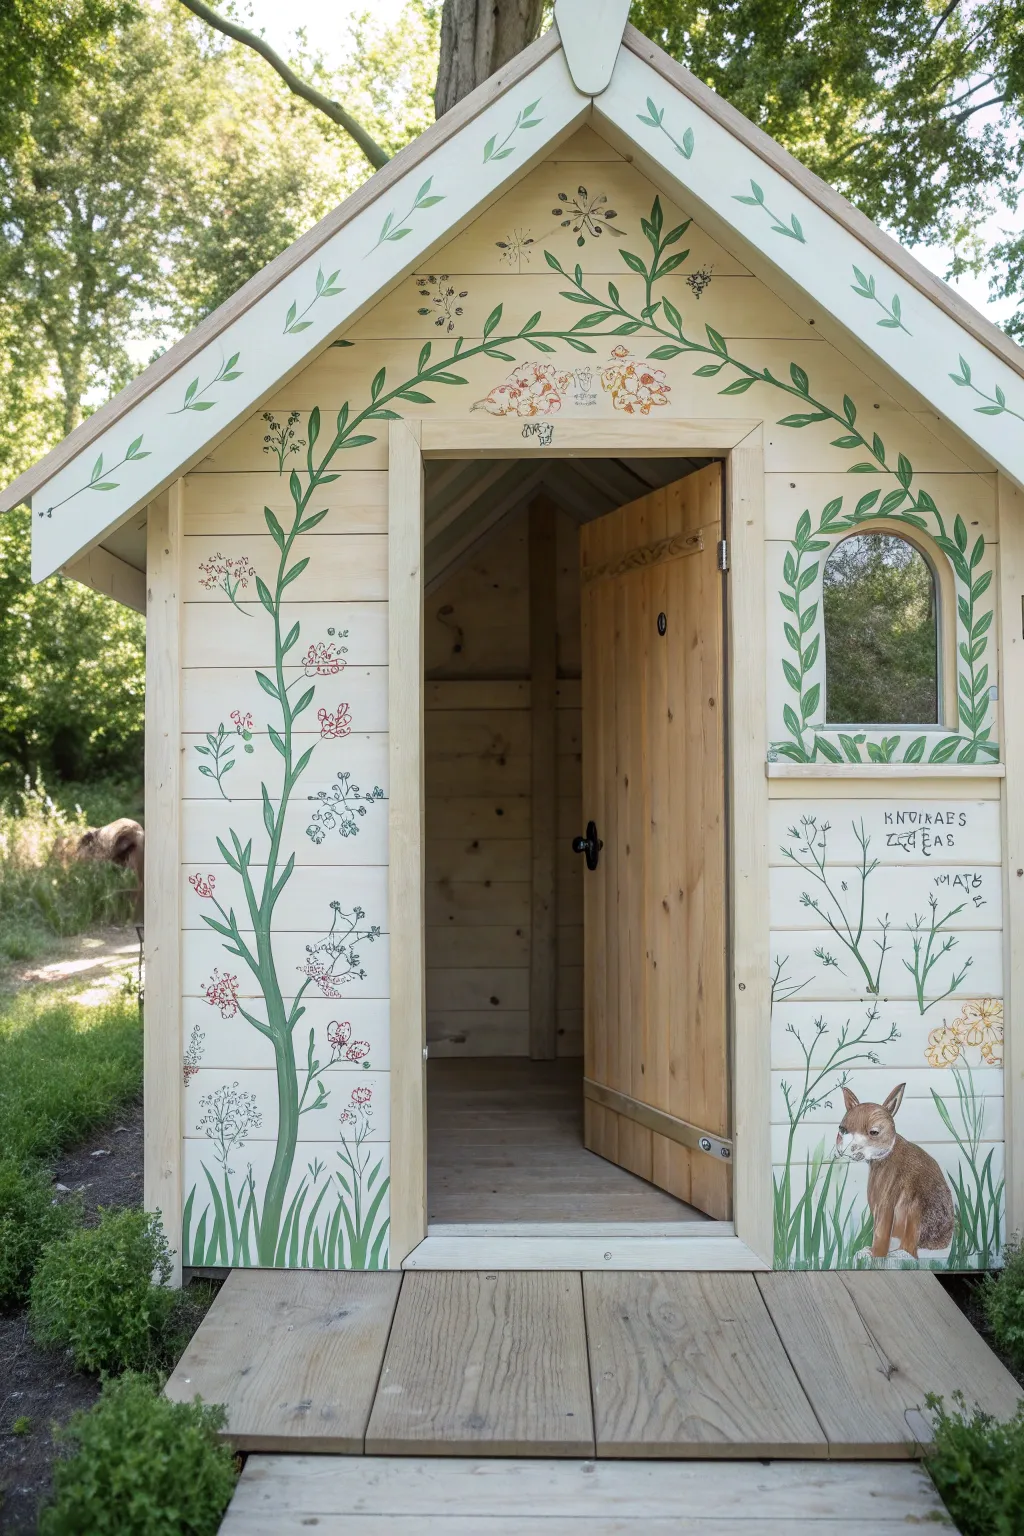
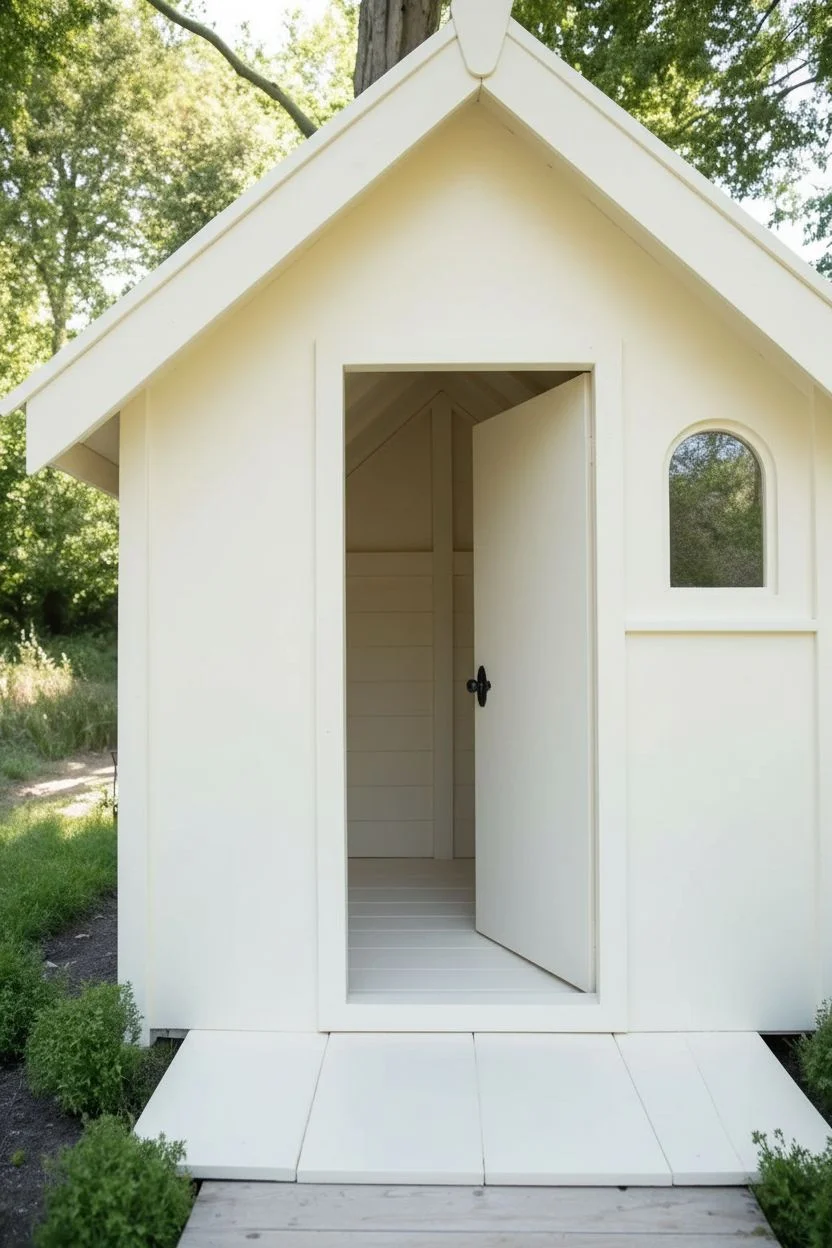
Transform a plain wooden playhouse into an enchanted cottage with this charming hand-painted design. Featuring trailing vines, delicate wildflowers, and a curious rabbit friend, this mural adds a touch of whimsical storytelling to your garden structure.
Step-by-Step
Materials
- Exterior wood primer
- Exterior acrylic paints (cream/off-white base)
- Acrylic craft paints (various greens, browns, muted pinks/reds, white)
- Pencil and eraser
- Painter’s tape
- Assorted brushes: 1-inch flat brush, #4 round brush, #0 or #1 liner brush
- Clear exterior matte or satin varnish
- Sea sponge (optional)
- Mixing palette or paper plate
Step 1: Preparation & Base Coat
-
Clean surface:
Ensure the wooden siding is completely clean and dry. Remove any dirt, moss, or cobwebs with a stiff brush and mild soapy water, then let it dry for at least 24 hours. -
Apply base color:
Paint the entire face of the playhouse with your cream or soft off-white exterior paint. Use the 1-inch flat brush to work the paint into the grain. Two coats provide the best coverage; let the first coat dry for 2-4 hours before applying the second. -
Paint the trim:
While the siding dries, paint the fascia boards (the roof trim) and window frame in a slightly lighter or contrasting shade if desired, or keep it uniform with the base color for a seamless look.
Step 2: Sketching the Design
-
Outline the main vine:
Using a pencil, lightly sketch a meandering vine starting from the bottom left corner, curving up the side, and arching over the doorway. Repeat this process on the roof trim, drawing vines that drape downward from the apex. -
Frame the window:
Sketch a separate vine border around the arch of the window to create a cozy, framed effect. -
Add leaf placement:
Mark small notches along your vine lines where leaves will sprout. Vary the angles to make it look organic rather than perfectly symmetrical. -
Sketch the rabbit:
In the bottom right corner, lightly draw the outline of a sitting rabbit. Focus on the simple shapes first: an oval for the body and a smaller circle for the head, then refine the ears and paws.
Troubleshooting: Shaky Lines?
If your vine stems look jittery, try diluting your acrylic paint with a tiny drop of water. Inky consistency paint flows smoother from a liner brush than thick paint.
Step 3: Painting the Foliage
-
Paint the stems:
Mix a medium olive green. Using your #4 round brush, paint over your pencil lines for the main vines. Keep your pressure consistent to create smooth, flowing lines rather than jagged ones. -
Add the leaves:
Using the same green, press the belly of the round brush down and lift up sharply to create pointed leaf shapes attached to your vines. I find it helpful to rotate the brush slightly as I lift to get a sharper point. -
Layer intricate greenery:
Switch to a darker forest green and your liner brush. Paint thin, wispy stems shooting up from the bottom edge (the grassy area) and interspersed among the main vines. These will be stalks for the wildflowers. -
Highlight the leaves:
Once the base green is dry to the touch, mix a little white into your green to create a sage color. Add a single stroke to one side of each leaf to suggest light hitting the foliage.
Level Up: 3D Elements
Screw small wooden knobs or hooks into the center of the painted flowers. You can use these to hang real dried flower wreaths or string lights for extra magic.
Step 4: The Details & Character
-
Paint the flowers:
Dip a small round brush into muted pink or coral paint. Create small clusters of dots or tiny petal shapes at the ends of your wispy stems. Don’t overthink these; loose, impressionistic dabs look best. -
Add detail to roof apex:
Under the peak of the roof, paint a small decorative motif or a cluster of larger blooms using orange and cream tones to act as a focal point. -
Base coat the rabbit:
Fill in the rabbit sketch with a warm medium brown. Let this layer dry completely. -
Texture the fur:
Using a dry liner brush with very little paint (a mix of dark brown and white), add short, quick strokes over the brown base to simulate fur texture. -
Define rabbit features:
Use a tiny dot of black for the eye (with a white speck for reflection) and pale pink for the nose. Add thin white lines for whiskers. -
Hand-lettering (optional):
If you wish to add a whimsical nursery rhyme or name, lightly pencil it onto the siding. Go over it with a liner brush and dark grey or black paint, keeping the lines thin and delicate. -
Seal the work:
Once the entire mural has cured for at least 24 hours (or per your paint manufacturer’s instructions), apply two coats of clear exterior varnish to protect your artwork from rain and UV fading.
Your whimsical garden cottage is now ready for years of imaginative play
Geometric Color Blocking for a Mini Modern
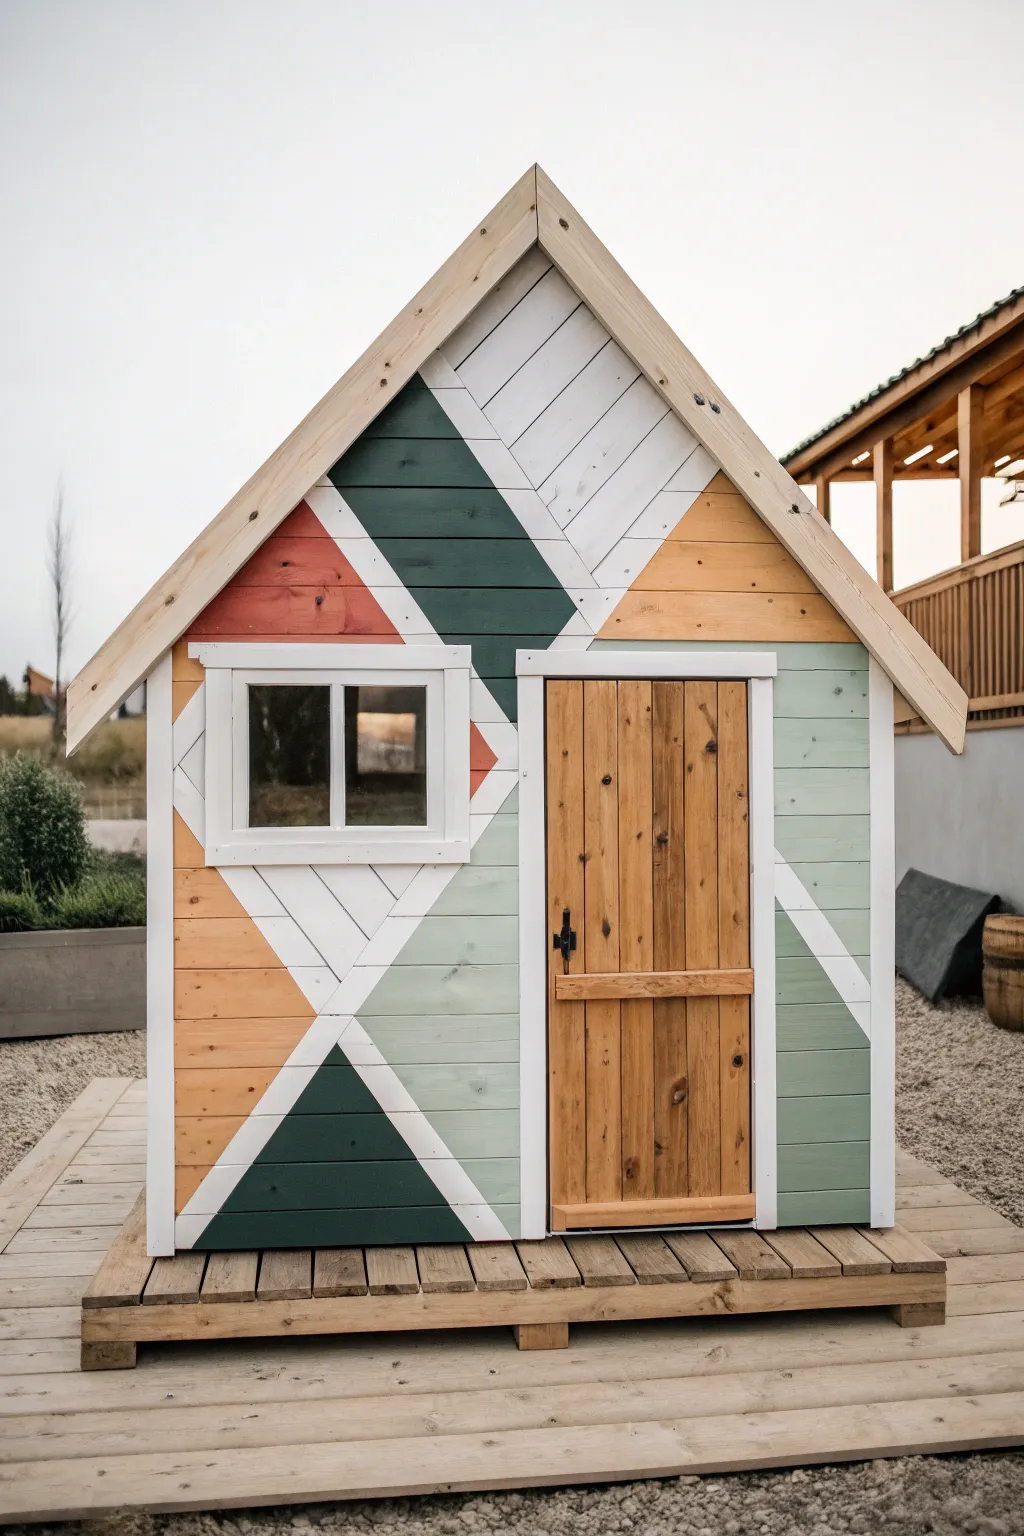
Transform a plain wooden structure into a modern art piece with this bold geometric paint design. By using painter’s tape and a palette of muted, earthy tones, you can achieve crisp lines and a custom look that feels both playful and sophisticated.
How-To Guide
Materials
- Wooden playhouse (assembled or in panels)
- Exterior wood primer
- Exterior acrylic latex paint (White/Off-white)
- Exterior acrylic latex paint (Forest Green)
- Exterior acrylic latex paint (Sage/Mint Green)
- Exterior acrylic latex paint (Terracotta/Rust)
- Exterior acrylic latex paint (Mustard/Ochre)
- High-quality painter’s tape (1-inch and 2-inch)
- Sandpaper (120-grit and 220-grit)
- Tack cloth
- Paint rollers (mini foam rollers work best)
- Angled sash brush (2-inch)
- Long straight edge or ruler
- Pencil
- Clear exterior sealant (optional for the door)
Step 1: Preparation & Base Coat
-
Surface Prep:
Begin by sanding the entire exterior of the playhouse with 120-grit sandpaper to remove any rough splinters or existing finish. Wipe away the dust thoroughly with a tack cloth. -
Protect the Natural Wood:
If you want to keep the door and roof trim natural wood as shown in the photo, cover these areas carefully with painter’s tape and plastic sheeting now. -
Prime the Surface:
Apply a coat of high-quality exterior wood primer to the main body of the house. This ensures your colors will pop and adhere correctly to the wood grain. -
Base Color Application:
Once the primer is dry, paint the entire house with your base white or off-white color. It’s much easier to paint the whole thing white first and add colors on top than to try and paint white triangles later. -
Second Coat:
Apply a second coat of the white base paint to ensure solid coverage. Let this cure for at least 24 hours before applying tape; if the paint is even slightly tacky, the tape will pull it up later.
Step 2: Mapping the Geometry
-
Visualize the Diagonal:
The design relies on a dominant diagonal flow. Use a long straight edge and a pencil to lightly mark your main diagonal lines, starting from the roof peak down towards the opposite corner. -
Drafting Triangles:
Sketch out the large triangles. Notice how the dark green triangle anchors the bottom left, and a similar shape mirrors it on the top left roofline. -
Taping the Lines:
Apply your painter’s tape firmly along your pencil lines. Run your fingernail or a credit card along the edge of the tape to seal it tightly against the wood to prevent bleeding. -
The Sealing Trick:
Here I prefer to brush a tiny amount of the *base white paint* over the edge of the tape first. This seals the tape edge so if any paint bleeds under, it’s just the white, keeping your colored lines razor sharp.
Bleed-Through Blues?
If paint bleeds under the tape, wait for it to dry fully. Then, re-tape precisely over the line and paint the correction color over the mistake. Do not wipe wet smudges!
Step 3: Adding Color
-
Painting Dark Accents:
Start with the darkest color, the Forest Green. Paint the large triangle on the bottom left and the corresponding section on the upper roofline. Use a mini foam roller for a smooth finish. -
Adding Warmth:
Move on to the Terracotta/Rust color. This is used sparingly for a pop of heat, specifically on the small triangle near the window and a section on the upper left roof. -
The Mustard Tone:
Paint the large right-side roof triangle in the Mustard/Ochre hue. Be careful near the roof eaves; an angled brush helps get into those tight corners. -
Soft Green Sections:
Fill in the remaining geometric sections with the Sage/Mint Green. This color covers a large portion of the right wall, so apply two thin coats to avoid drips. -
Remove Tape While Wet:
Carefully peel off the painter’s tape while the paint is still slightly wet. Pull the tape away from the painted edge at a 45-degree angle. This prevents the paint skin from ripping. -
Touch Ups:
Once the tape is off, inspect your lines. Use a small artist’s brush to carefully touch up any spots where the wood grain might have caused slight bleeding.
Playful Texture
Add a house number or the child’s initial on the door using a stencil and the dark forest green paint to tie the natural wood element back into the geometric color scheme.
Step 4: Finishing Details
-
Window Trim:
Paint the window trim a crisp white to frame the glass and separate it from the colorful geometric background. -
Initial Wood Treatment:
Remove the protection from the door and roof trim. Sand the door lightly with 220-grit sandpaper to ensure it’s smooth to the touch. -
Staining the Door:
If you want a richer tone, apply a light coat of transparent exterior wood stain to the door, or simply seal it with a clear UV-resistant varnish to keep that raw look. -
Hardware Installation:
Reattach or clean up the black hardware (hinges and handles). The black metal contrasts beautifully with the pale wood and pastel greens. -
Final Cure:
Let the entire project cure for a few days before exposing it to heavy rain or play, ensuring the paint hardens completely.
Step back and admire clean lines and fresh colors that turn a backyard structure into a modern design statement.
Night Sky Roof With Tiny Star Dots
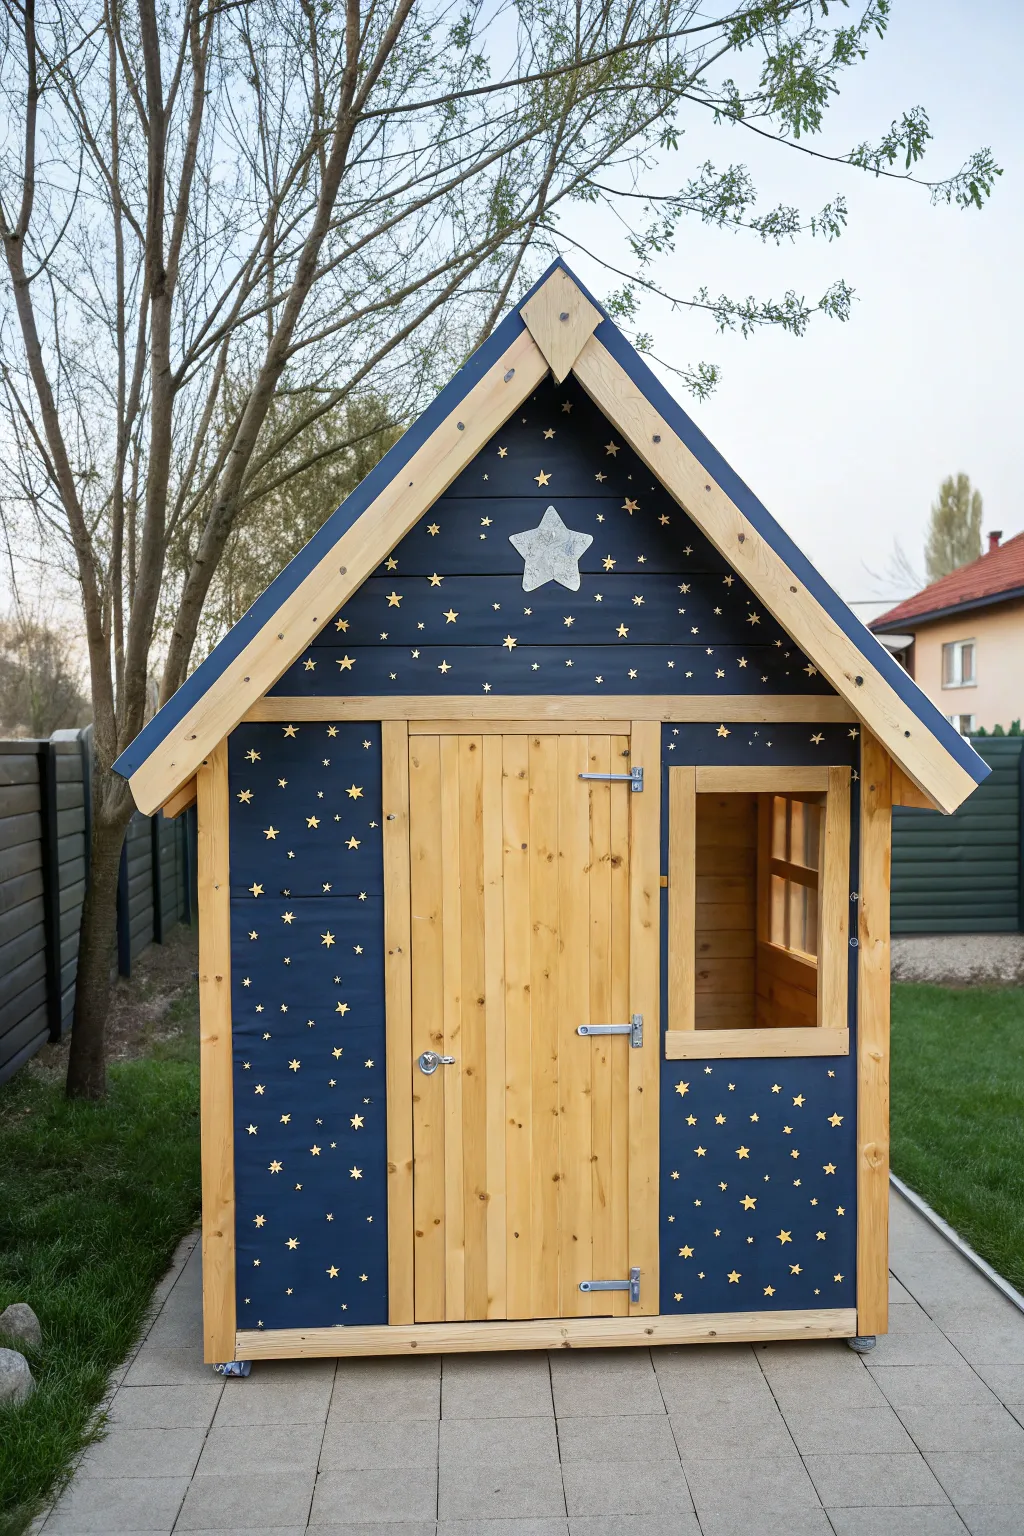
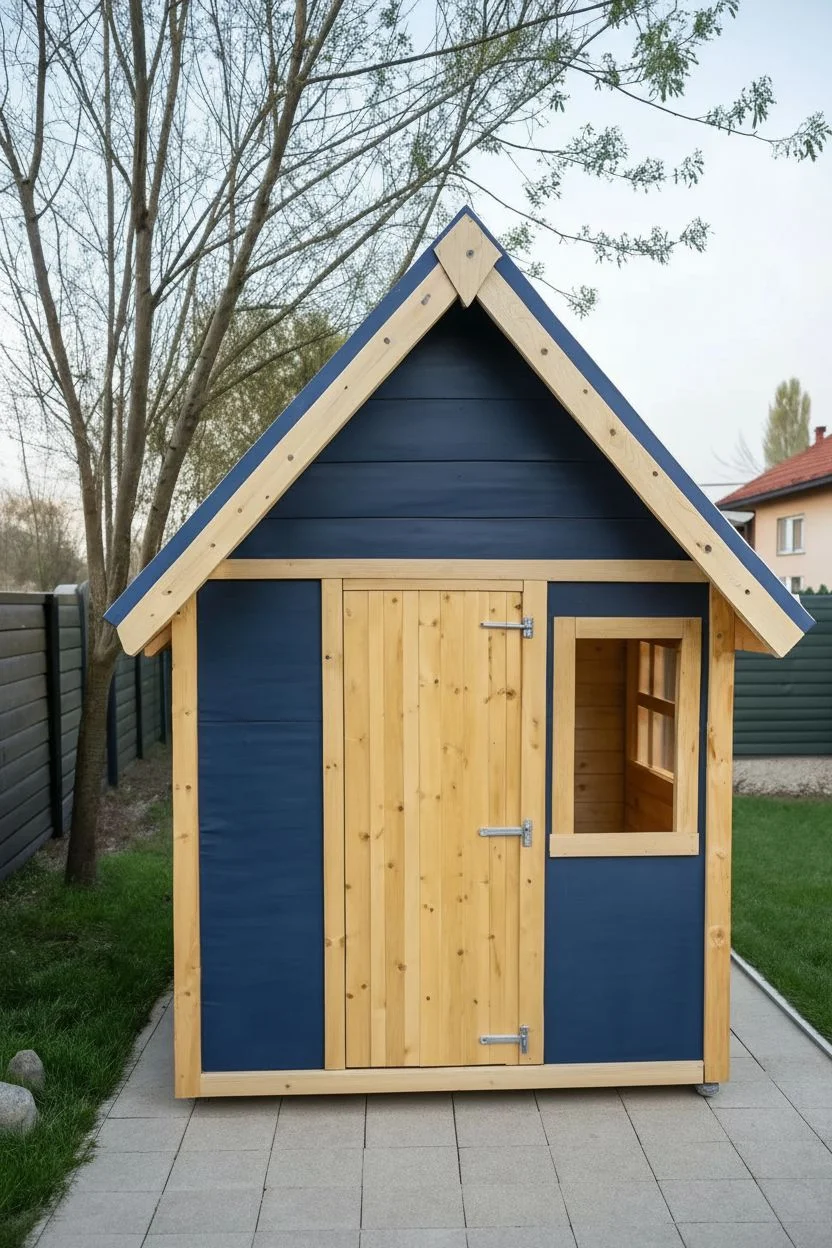
Transform a standard wooden playhouse into a magical midnight escape with this celestial theme. Deep navy paint provides the perfect backdrop for shimmering gold constellations, while natural wood accents keep the look grounded and rustic.
Step-by-Step Guide
Materials
- Outdoor wood primer suitable for playhouses
- Deep navy blue exterior paint (satin or semi-gloss finish)
- Clear exterior polyurethane or varnish
- Metallic gold paint for exterior use
- Metallic silver paint
- Painter’s tape (multi-surface)
- Small star stencils (1-inch and 2-inch sizes)
- Large star stencil or template (approx. 6-8 inches)
- Assorted paintbrushes (medium sash brush, small detail brushes)
- Small foam pouncers or stencil brushes
- Sandpaper (120 and 220 grit)
- Clean tack cloths
Step 1: Preparation & Base Painting
-
Disassemble hardware:
Begin by removing any non-essential hardware like the door latch and hinges if possible. If they can’t be removed, carefully mask them off with painter’s tape to keep them paint-free. -
Sand the surfaces:
Lightly efficient sand all smooth wood surfaces with 120-grit sandpaper to open the grain. This helps the paint adhere better. Wipe away all sawdust with a damp cloth or tack cloth. -
Mask natural wood areas:
Use painter’s tape to cover the door frame, the door itself, the window frame, and the roof trim. Press the tape edges down firmly to prevent paint bleed, as these areas will remain natural wood. -
Prime the painted zones:
Apply a coat of outdoor wood primer to the siding panels (front and sides) and the triangular gable area under the roof. Read the primer can for drying times and let it cure completely. -
Apply the midnight blue:
Using a medium brush or mini roller, paint the primed siding and gable area with your deep navy blue exterior paint. Work in the direction of the wood grain for a smooth finish. -
Second coat coverage:
Once the first coat is dry to the touch, apply a second coat of blue to ensure a rich, opaque night-sky background. I find checking this in different lighting helps spot any thin patches. -
Seal the natural wood:
While the blue paint cures, turn your attention to the unpainted wood. Brush a coat of clear exterior varnish onto the door, frames, and roof trim to protect them from the elements without changing their color.
Step 2: Creating the Celestial Details
-
Plan your constellations:
Before painting, visualize where your stars will go. You want a random, scattered effect rather than perfect rows. You can mark positions lightly with chalk if you’re nervous about spacing. -
Stencil the small stars:
Place your small star stencil against the blue siding. Using a foam pouncer dipped sparsely in gold paint, dab straight up and down. Less paint is better here to prevent seepage under the stencil. -
Add varying sizes:
Rotate between using different sizes of small stars to creative depth. Place them across the front panels, avoiding the door area, and scatter them up into the gable triangle. -
Hand-paint tiny dots:
To make the ‘sky’ feel full, use the wrong end of a small paintbrush dipped in gold paint to dot tiny ‘distant stars’ in the empty spaces between your stenciled stars. -
Create the center star:
Position your large star template in the center of the gable triangle, above the door. Secure it with tape. -
Paint the silver accent:
Fill in the large star using metallic silver paint. Because silver can sometimes be sheer, you might need two or three light layers to get a solid, reflective finish. -
Remove masking tape:
Carefully peel away all painter’s tape from the natural wood trims. Pull the tape at a 45-degree angle away from the painted edge to ensure a crisp line. -
Reinstall hardware:
Once the paint has cured for at least 24 hours, screw the latches, hinges, and handles back into place. -
Final protective coat:
For longevity, especially over the stenciled areas, apply a final layer of clear exterior sealer over the entire painted surface to lock in those stars.
Bleeding edges?
If blue paint seeped onto the natural wood trim, let it dry completely, then gently scrape it off with a razor blade or sand that specific spot lightly before sealing.
Make it glow
Mix glow-in-the-dark powder into your clear sealer just for the stars. During the day it looks normal, but at night the constellation will faintly glow for the kids.
Enjoy watching your little ones explore their own personal observatory right in the backyard


Have a question or want to share your own experience? I'd love to hear from you in the comments below!