When I paint on window glass, the light does half the work, turning simple color into a little glow show. Here are my favorite window glass painting ideas—starting with the classics and easing into some delightfully quirky, studio-style experiments.
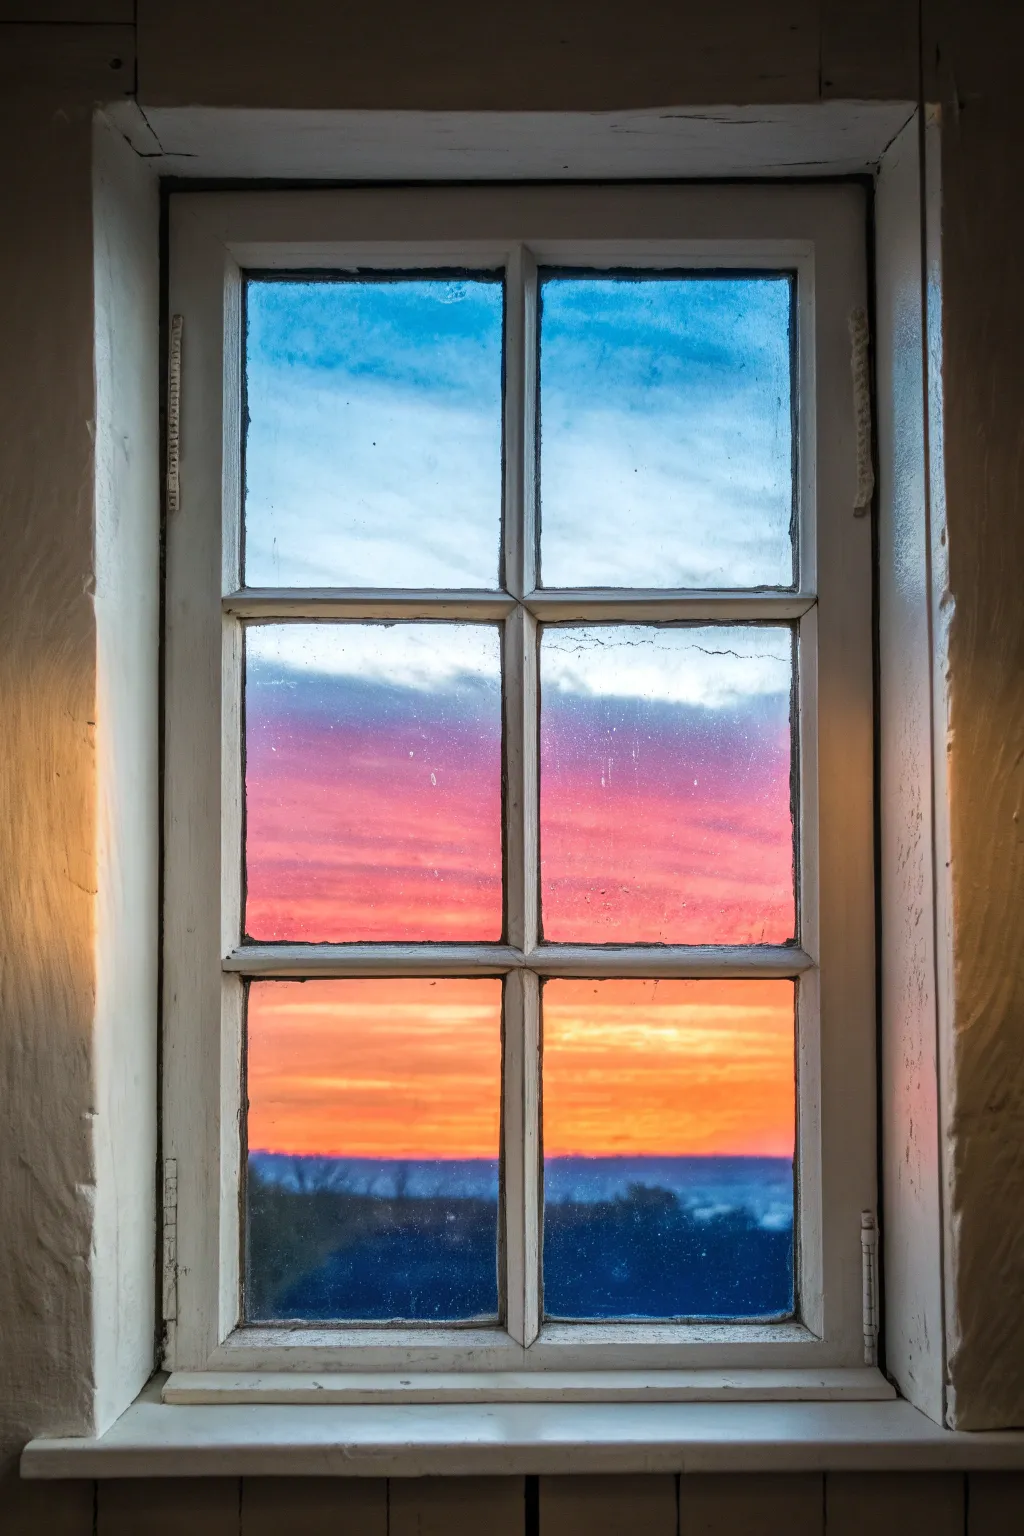
Rainbow Arches on Window Panes
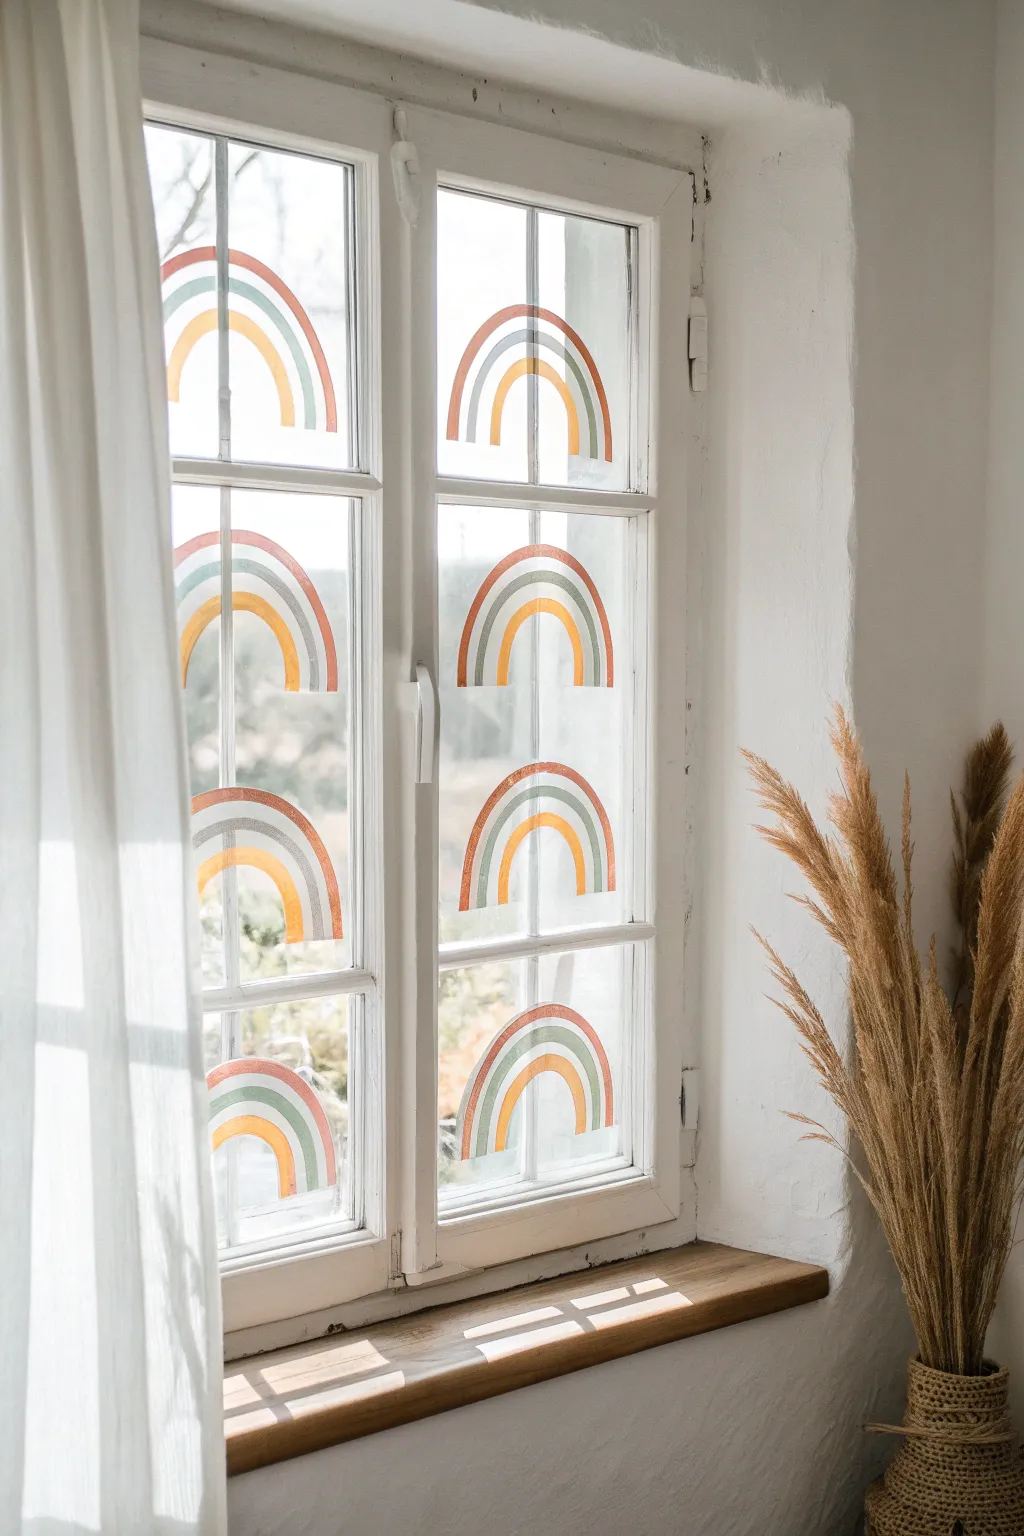
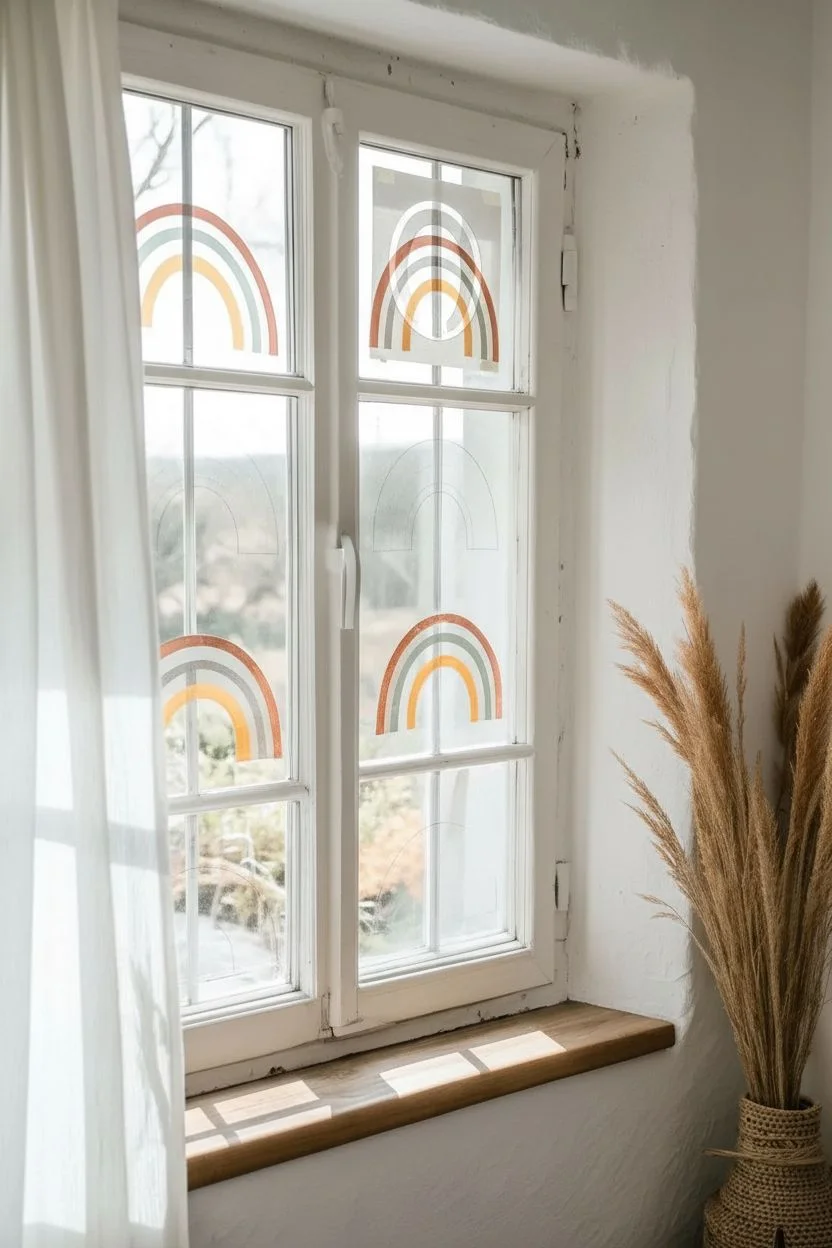
Bring a cozy, bohemian vibe to your room with these repeating rainbow arches painted in muted earth tones directly onto your window panes. The translucent nature of the paint allows sunlight to filter through, casting warm, colorful shadows into your living space.
Step-by-Step
Materials
- Glass paint markers (broad tip) or acrylic paint mixed with glass medium
- Colors: Terracotta/Rust, Sage Green, Mustard Yellow
- Flat artist brush (approx. 1/2 inch) if using liquid paint
- Rubbing alcohol
- Paper towels or lint-free cloth
- Cardstock or paper
- Scissors
Step 1: Preparation
-
Clean surface:
Begin by thoroughly cleaning the window panes. Use rubbing alcohol on a lint-free cloth to remove any oils, fingerprints, or dust, as these prevent paint adhesion. -
Create a template:
To ensure your rainbows are uniform across all panes, cut a piece of cardstock to the exact width of one window pane. -
Draft the guide:
On your cardstock, draw your ideal rainbow shape. Start with the largest outer arch, ensuring it is centered. I find it helpful to fold the paper in half to get a perfectly symmetrical curve. -
Cut the stencils:
Cut out the rainbow shape. You actually want the negative space (the hole left behind) or the positive shape to trace around lightly. Alternatively, simply tape this template to the *outside* of the glass facing in, so you can trace it directly.
Uneven Arches?
If your curves look wonky, rest your pinky finger against the window frame or glass as a stabilizer while you guide the brush or marker.
Step 2: Painting the Arches
-
Start with the outer arch:
Using your Terracotta or Rust color, paint the largest, outermost arch first. If using a marker, press the nib down to get a good flow before touching the glass. -
Apply the first stroke:
Draw the curve in one continuous motion if possible. If using a brush, keep it loaded with paint to avoid streaking. -
Thicken the line:
Go back over the line to create a band about half an inch thick. The goal is a solid stripe, not just a thin outline. -
Spacing gap:
Leave a small clear gap of about 1/4 inch between your first arch and where the second one will begin. This negative space is crucial for the definition of the design. -
Paint the middle arch:
Switch to your Sage Green color. Follow the curve of the first arch, maintaining that consistent gap. Paint this band with the same thickness as the first. -
Inner arch application:
Finally, use the Mustard Yellow for the smallest, innermost arch. Keep the strokes smooth and confident. -
Clean up edges:
While the paint is still wet, use a damp cotton swab or a clean, stiff brush dipped in water to wipe away any ragged edges or slips.
Add Texture
Use a dry bristle brush to drag through wet paint for a streaky, vintage textural look rather than a solid blocks of color.
Step 3: Repetition and Finish
-
Move the template:
If you taped your template to the outside of the window, move it to the adjacent pane. -
Repeat process:
Replicate the painting process on the next pane. Try to keep the top of the arches at the same height across the row for a cohesive look. -
Handle the second row:
For the lower window panes, align the tops of these new rainbows with the bottom frame of the upper pane, or center them within their own glass square depending on your preference. -
Opacity check:
Once the first layer is dry to the touch (usually 15-20 minutes), check the opacity. If the sun washes out the color too much, apply a second coat directly over the first. -
Final drying:
Allow the entire project to cure for at least 24 hours before cleaning around it or touching the glass excessively.
Now you can enjoy the beautiful play of colored light entering your room every morning


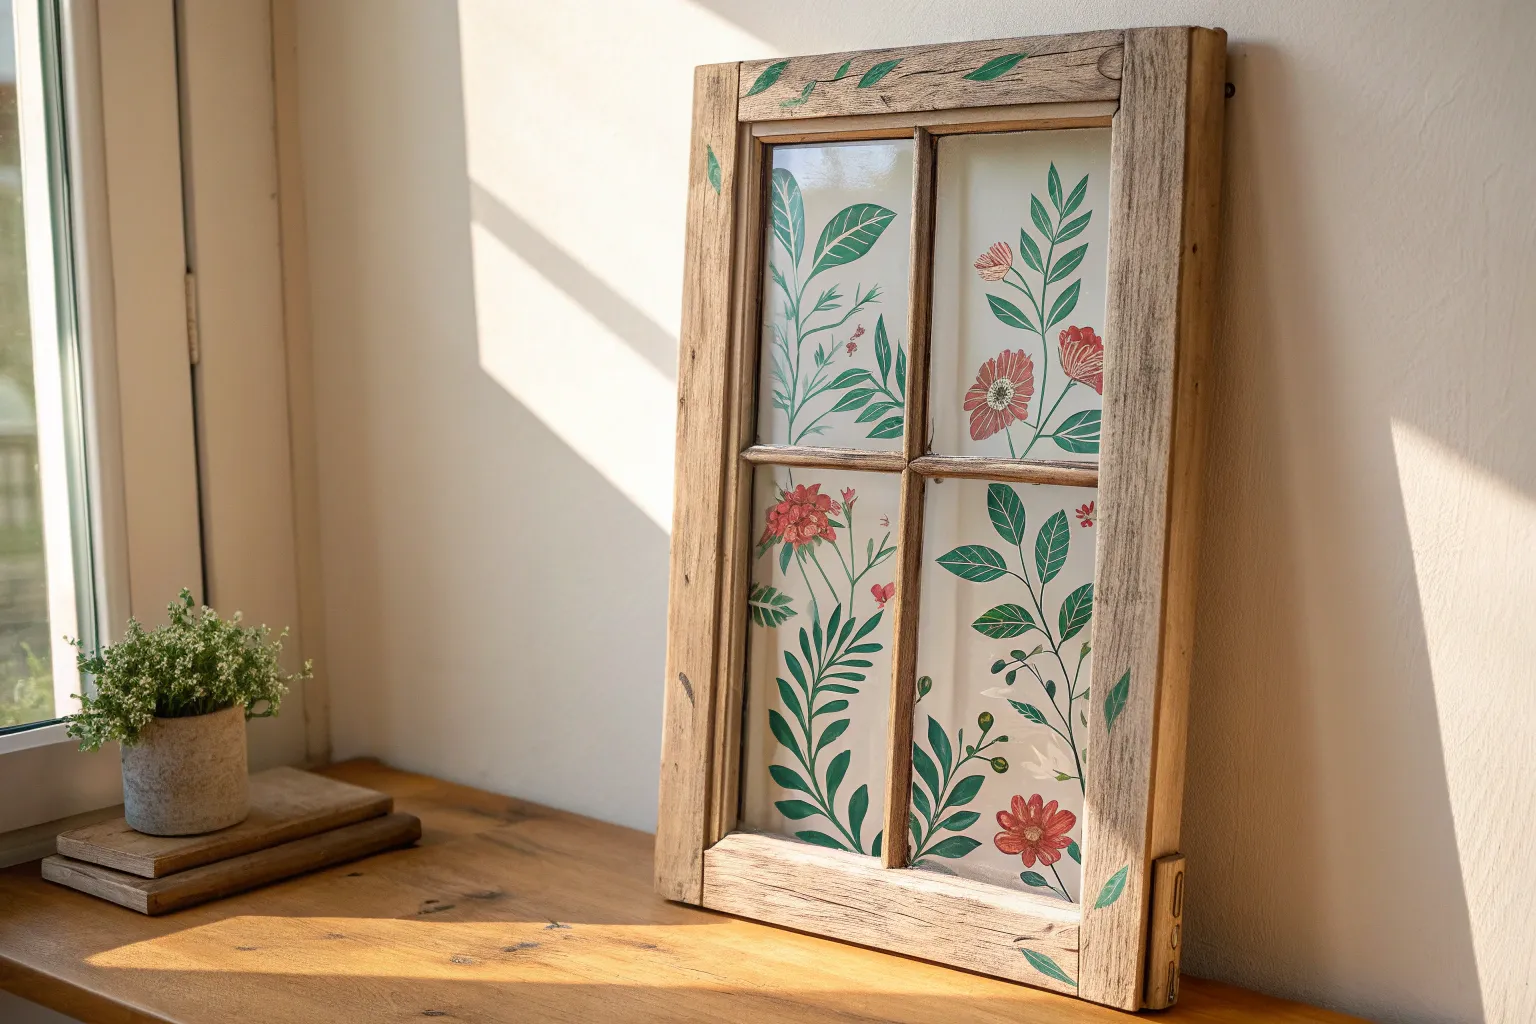
Botanical Faux Stained Glass Florals
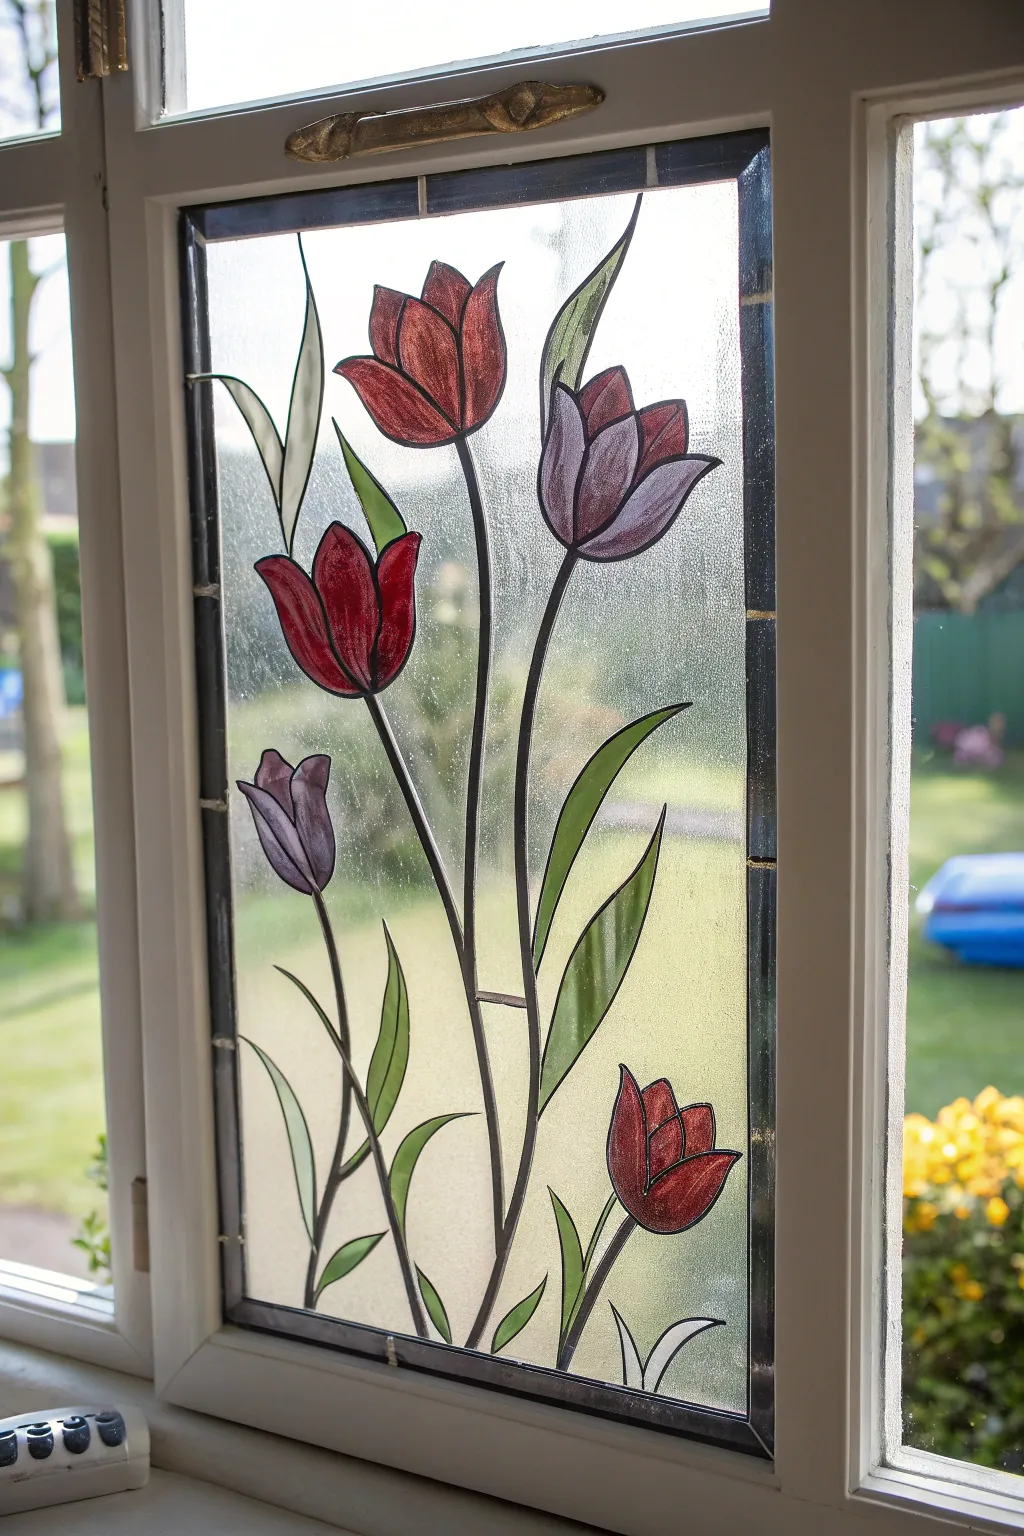
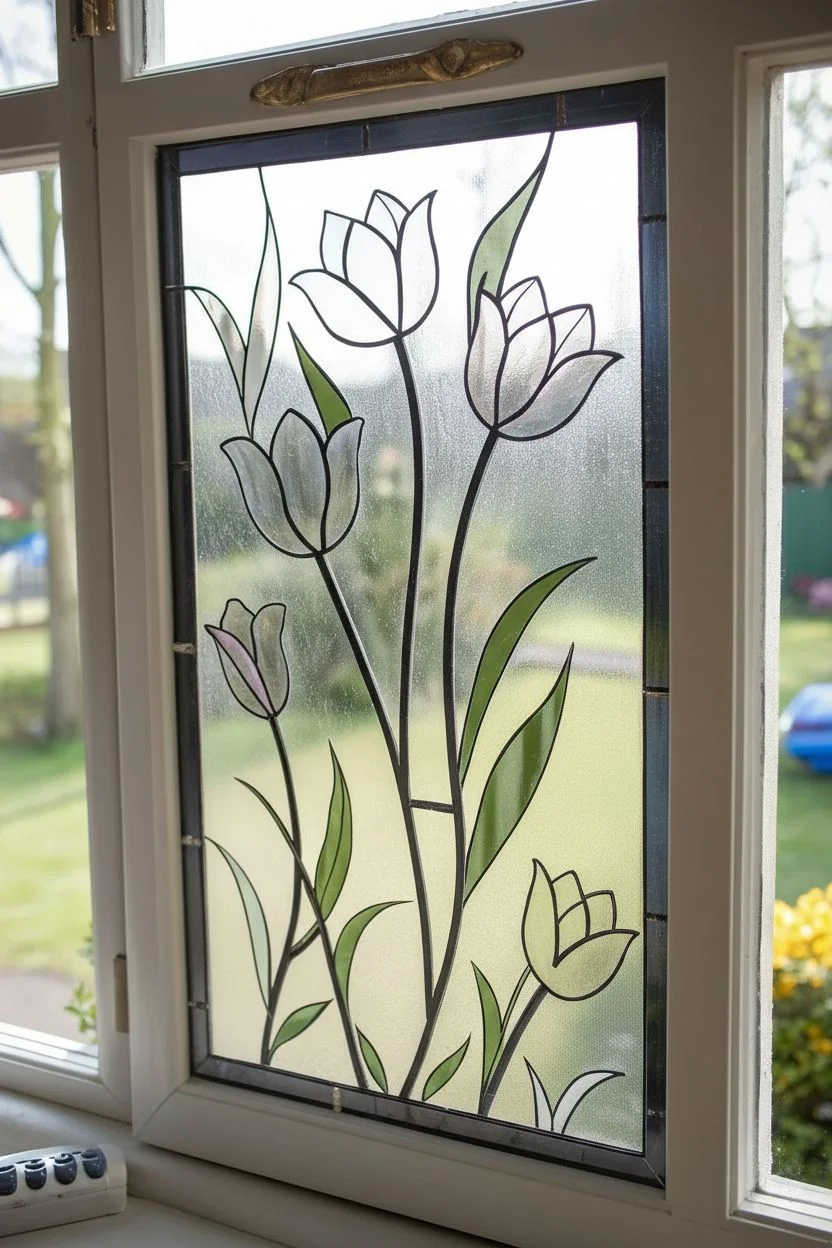
Transform a plain window pane into a stunning work of botanical art featuring graceful, long-stemmed tulips. This project uses translucent glass paints and liquid leading to mimic the texture and color variation of traditional soldered leadlights without the complex tools.
Step-by-Step Tutorial
Materials
- Clean window pane or cut glass panel
- Rubbing alcohol and lint-free cloth
- Gallery Glass Liquid Leading (Black)
- Gallery Glass Window Color paints (Ruby Red, Amethyst, Ivy Green, Lime Green, Crystal Clear)
- Toothpicks or a specialized combing tool
- Printed tulip pattern (sized to your window)
- Masking tape
- Cotton swabs for mistakes
Step 1: Preparation & Mapping
-
Clean surface:
Begin by thoroughly cleaning your glass surface with rubbing alcohol and a lint-free cloth. Any dust or fingerprints left behind will prevent the leading from adhering properly. -
Secure pattern:
Tape your tulip design pattern to the backside of the glass. If you were working on an installed window, you would tape it to the outside facing in; for a loose pane, simply tape it underneath. -
Plan your order:
Mentally map out your leading path. It’s best to start from the top of the design and work your way down to avoid smudging wet lines with your hand.
Fixing Shaky Lines
Leading line crooked? Don’t wipe it! Let it dry completely, then use a craft knife or razor blade to slice the mistake off the glass cleanly.
Step 2: Creating the Lead Lines
-
Outline the border:
Start by piping a thick, steady line of liquid leading around the inner perimeter of the window pane to create the frame. Keep the nozzle specific distance from the glass for a smooth bead. -
Trace the stems:
Trace the long, curved stems of the tulips. Apply steady pressure to the bottle to ensure the line width remains consistent, mimicking real lead strips. -
Detail the blossoms:
Outline the tulip flower heads. Pay special attention to where petals overlap; create closed shapes for each petal section so the different paint colors won’t bleed into each other later. -
Add leaves:
Pipe the long, sweeping outlines of the leaves. Ensure every line connects fully to a stem or the border frame to maintain the ‘stained glass’ structural illusion. -
Check connections:
Inspect all your intersections. If there are any gaps in the lines, fill them with a tiny dot of leading. This prevents paint from leaking out of its designated area. -
Allow to cure:
Let the leading dry completely. This usually takes 8 to 12 hours depending on humidity; the lines should feel firm and matte black before you proceed to painting.
Step 3: Painting the Glass
-
Fill the red tulips:
Start with the Ruby Red paint for the primary tulip heads. Apply the paint generously near the lead lines first, then push it toward the center using the bottle tip. -
Create texture:
While the paint is wet, use a toothpick to tap out any air bubbles and to swirl the pigment slightly. This creates the uneven, handmade look of real stained glass. -
Paint purple accents:
For the secondary blooms, use Amethyst paint. I prefer to add a drop of Crystal Clear to the purple on a palette first to make these flowers slightly more translucent than the red ones. -
Add shading:
To give the flowers depth, squeeze a tiny dot of a darker shade (or minute amount of black) at the base of the petals and swirl it upward into the main color with a toothpick. -
Paint the leaves:
Fill the leaf shapes with Ivy Green. For localized variation, streak in small amounts of Lime Green while the Ivy paint is still wet to mimic light hitting the foliage. -
Texture the background:
Apply Crystal Clear paint to the entire empty background area. Instead of smoothing it out, tap the surface repeatedly with the nozzle tip or a stiff brush to create a ‘pebbled’ texture. -
Verify coverage:
Hold the glass up to a light source (or use a flashlight) to check for pinholes of light where the paint didn’t meet the leading. Fill these gaps immediately. -
Final cure:
Allow the project to dry undisturbed on a flat surface for at least 24 to 48 hours. The paint will look milky at first but will dry to a beautiful transparent finish.
Dual-Tone Petals
For realistic depth, load your brush with red paint but dip the very tip in white. One stroke creates a stunning variegated tulip petal effect.
Once fully cured, your window will glow with colorful light that brightens any room


Buzzing Bees With Dotted Flight Trails
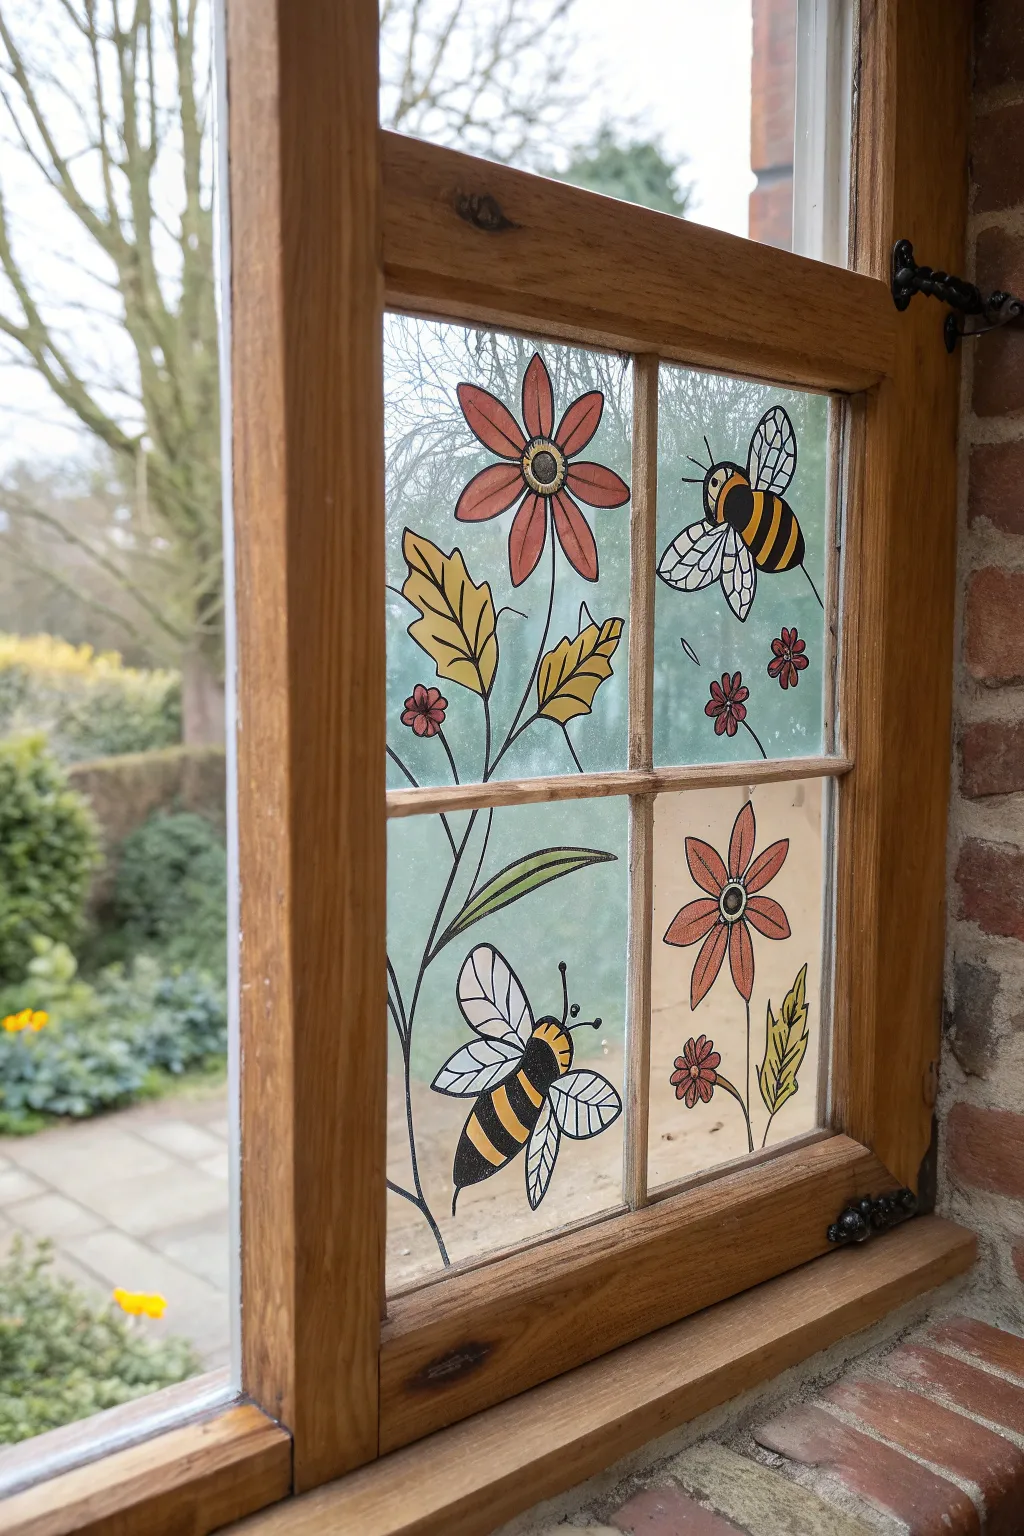
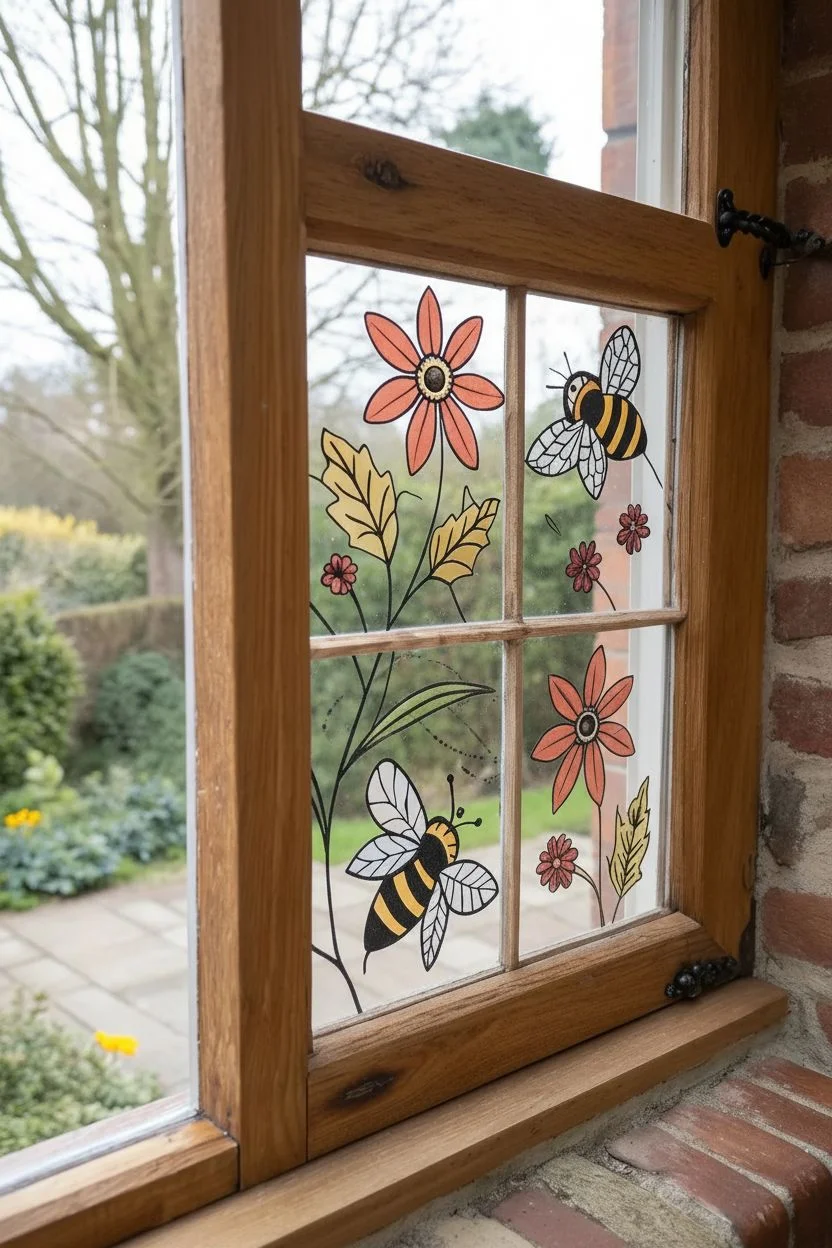
Transform an ordinary window pane into a buzzing garden scene with this charming faux stained glass project. Featuring cheerful bumblebees and stylized florals, the design uses bold black outlines and translucent glass paints to catch the natural light beautifully.
Detailed Instructions
Materials
- Glass surface (window pane or glass sheet)
- Black liquid leading or glass outliner paint (tube with fine nozzle)
- Glass paints (colours: yellow, black, pink/coral, muted purple/red, green)
- Small round paintbrushes (sizes 0 and 2)
- Paper towels
- Rubbing alcohol
- Cotton pads
- Paper and pencil for drafting pattern
- Tape
Step 1: Preparation & Pattern
-
Clean the surface:
Before starting, thoroughly clean your window pane with rubbing alcohol and a cotton pad. This step removes invisible oils and dirt that prevent the paint from adhering properly. -
Draft your design:
Sketch the design on a piece of paper sized to fit your window pane. Draw two large bees (one flying upward, one downward), two large six-petaled flowers, smaller accent flowers, and several serrated leaves on stems. -
Position the template:
Tape your paper sketch on the outside of the window facing in. This allows you to trace the lines comfortably from the inside without the paper moving.
Fixing Bubbles
Bubbles in wet paint ruin transparency. Pop them instantly by touching them with a sewing needle or playing a lighter flame briefly near the surface.
Step 2: Outlining the Design
-
Outline the bees:
Using the bottle of black liquid leading, carefully squeeze a steady line to trace the bees’ bodies, separating the stripes, wings, and head. Keep an even pressure on the bottle for consistent line thickness. -
Trace the florals:
Continue outlining the flower petals, centers, stems, and leaves. Ensure all your shapes are ‘closed’ loops so the liquid paint you add later won’t leak out. -
Add detail lines:
Don’t forget the small internal details, like the veins inside the leaves and the wing segments on the bees. These fine lines add character to the finished piece. -
Creating the flight trails:
For the dotted flight trails mentioned in the title, gently squeeze small dots of leading in a curving path following the bees. In this specific example, the artist focused on solid stems, but dotted lines can be added now for extra movement. -
Correcting mistakes:
If you smudge a line or create a blob, wait for it to dry completely, then use a craft knife or razor blade to simply lift it off the glass before trying again. -
Initial drying time:
Let the black outlines dry completely. This usually takes 12 to 24 hours depending on the brand, but reading the manufacturer’s label is always best. The lines must be hard to the touch.
Textured Wings
Before the clear or white wing paint dries, sprinkle a tiny pinch of iridescent glitter into the wet paint to mimic the shimmer of real insect wings.
Step 3: Adding Color
-
Painting the bee stripes:
Load a small brush with yellow glass paint. Fill in the yellow stripes on the bee’s body, dabbling the paint on thickly rather than brushing it out thin, which helps create that stained-glass texture. -
Filling the black sections:
Fill the alternate stripes and the bee heads with black glass paint. Be careful not to go over your dried outline barriers. -
Coloring the large flowers:
Use a coral or salmon-pink shade for the petals of the two main flowers. I like to drop the paint in the center of the petal and push it gently toward the edges with the brush tip. -
Painting the leaves:
The leaves in this design have an autumnal feel; paint them with a golden-yellow or mustard tone. If you want variety, paint the stems in a deep green. -
Detailing the small blooms:
For the tiny accent flowers, use a muted reddish-purple or burgundy color. These small pops of darker color help balance the lighter yellows. -
Painting the wings:
Leave the bee wings clear if you prefer total transparency, or apply a very thin wash of white or pearlescent glass paint to make them stand out against the background scenery. -
Check for pinholes:
Hold a piece of white paper behind the glass to check for any tiny gaps where the paint didn’t meet the outline. Fill these in with the tip of your brush. -
Final cure:
Allow the entire piece to cure undisturbed. Most solvent-based glass paints need about 24-48 hours to fully harden and become scratch-resistant.
Now enjoy how the sunlight illuminates your vibrant garden scene every time you look out the window


Birds on Branches That Match the View
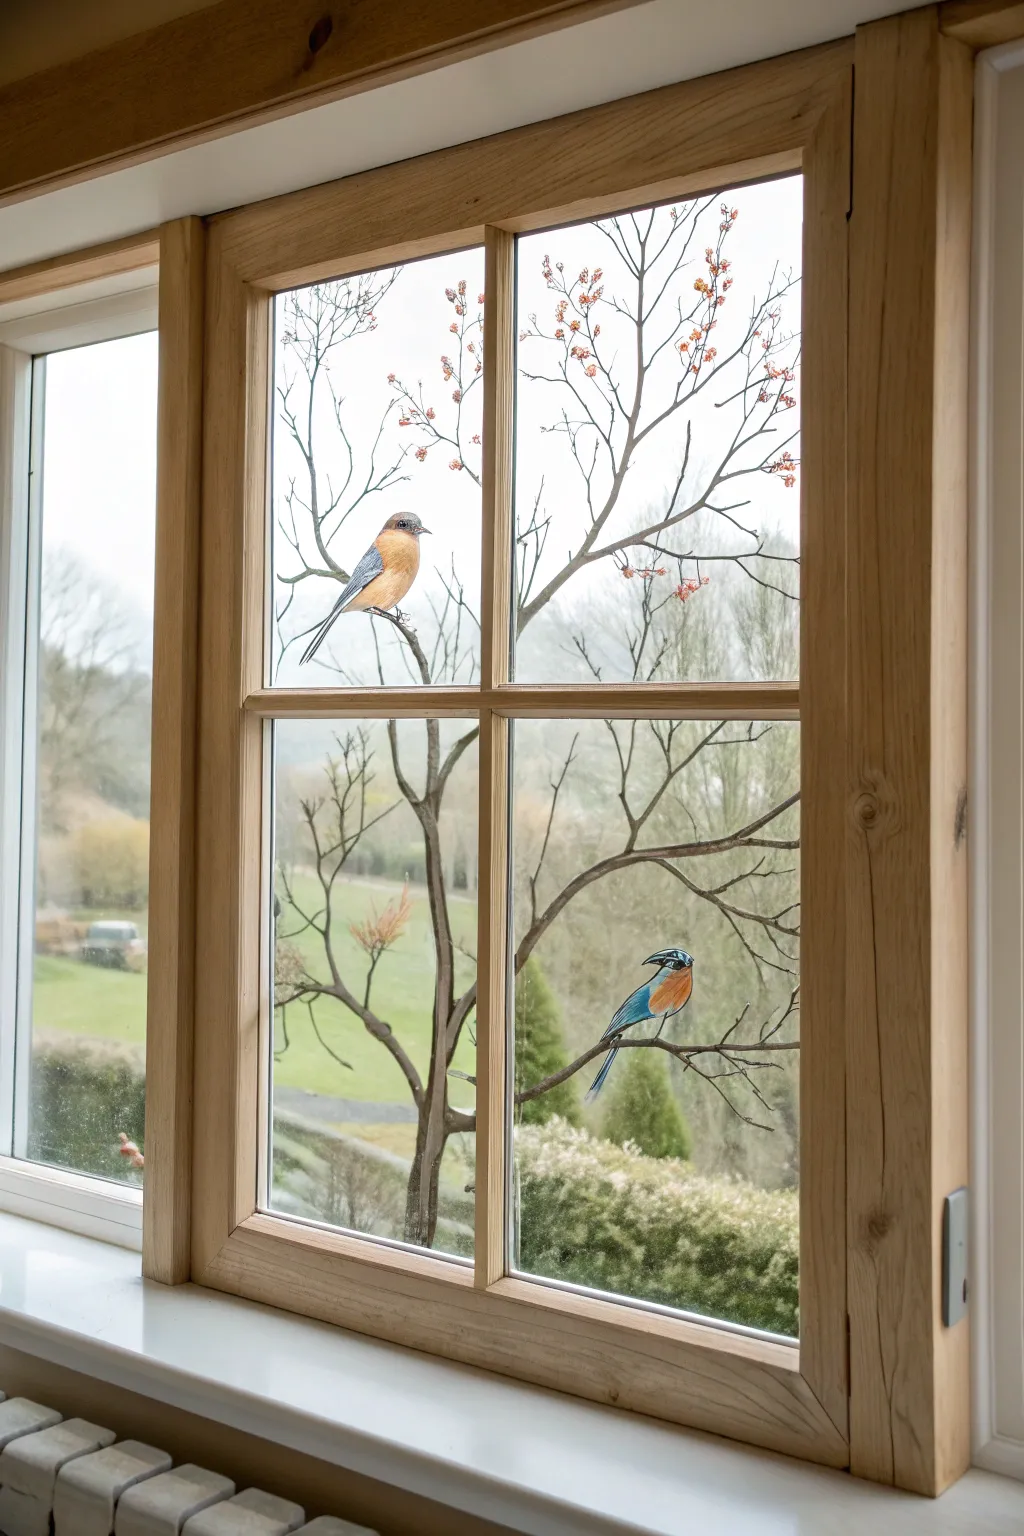
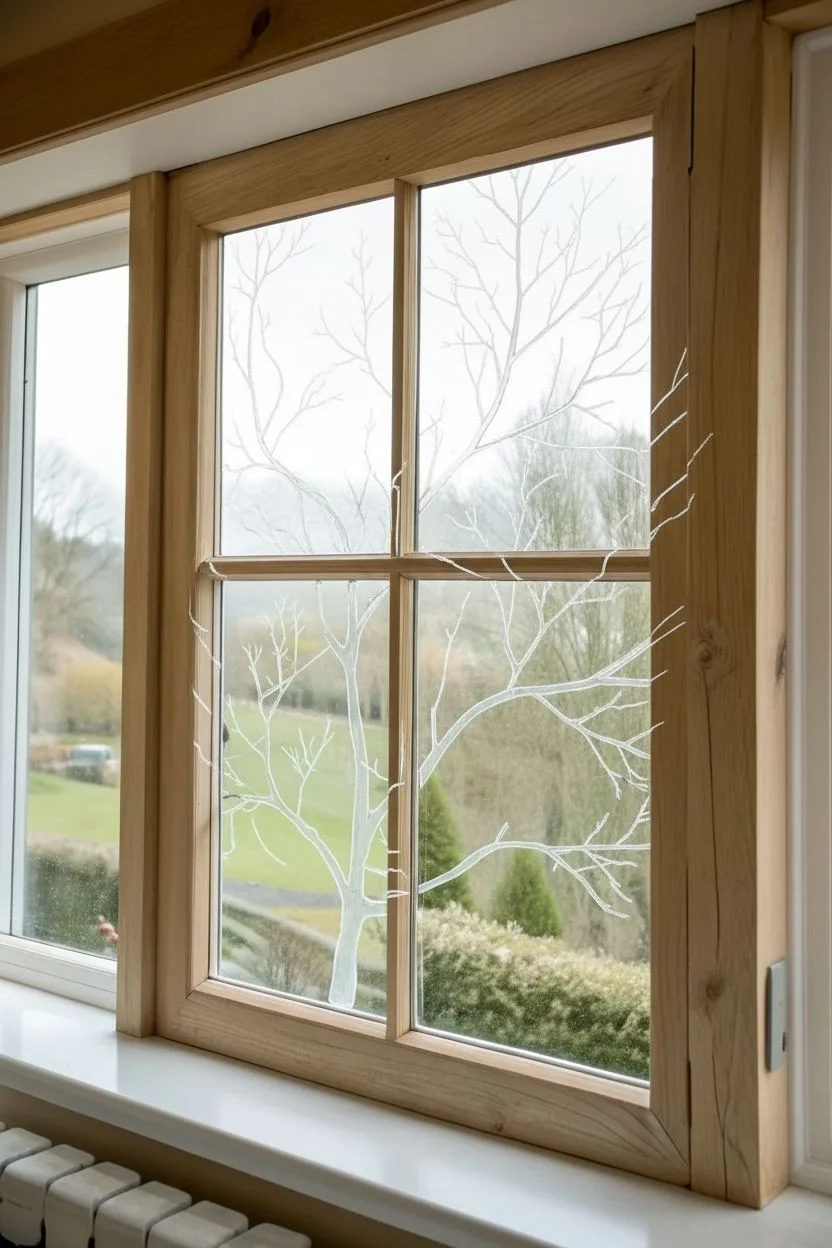
Transform your view by painting delicate birds and branches directly onto the glass, cleverly aligning the painted limbs with the real trees outside. This project creates a whimsical illusion where colorful feathered friends seem to be perched right in your garden, regardless of the season.
Step-by-Step Tutorial
Materials
- Acrylic enamel paints (folk art or multisurface glass paint)
- Rubbing alcohol
- Lint-free cloth
- Fine liner brushes (size 00 or 000)
- Small round brushes (size 2 and 4)
- Painter’s palette or small dish
- Dry erase marker (erasable)
- Reference photos of birds
- Glass cleaner
- Paper towels
Step 1: Setting the Scene
-
Clean the surface:
Begin by thoroughly cleaning the inside of your window pane with glass cleaner to remove dust and grime. Follow up by wiping the specific area you plan to paint with rubbing alcohol on a lint-free cloth to ensure perfect paint adhesion. -
Choose your perspective:
Sit or stand in the spot where the window is most often viewed. This alignment is crucial for the illusion to work, as the painted branches need to line up visually with the real tree limbs outside. -
Sketch the alignment:
While maintaining your viewing angle, close one eye and use a dry erase marker to lightly trace the main lines of the outdoor branches directly onto the glass. You don’t need every twig, just the major pathways where your birds will eventually perch.
Step 2: Painting the Branches
-
Mix branch colors:
Mix a dark brown and a touch of grey acrylic enamel to match the silhouetted color of the winter trees outside. The paint should be fluid but opaque enough to cover in one or two coats. -
Lay the foundation:
Using a size 2 round brush, paint over your dry erase marker lines. Extend the painted branch slightly ‘closer’ (making it a bit thicker in the foreground) than the real branch to enhance the depth perception. -
Add fine twigs:
Switch to a liner brush to add delicate, spindly twigs branching off your main limb. Keep your hand loose and let the lines taper off naturally to mimic organic growth. -
Clean up edges:
If any lines look too thick or messy, use a damp cotton swab or a toothpick to gently scrape away excess paint while it is still semi-wet.
Paint Lifting?
If the brush slides and wipes off the previous layer, the paint isn’t dry enough. Glass is non-porous and needs longer drying times. Wait 20 mins between layers or use a hair dryer on cool.
Step 3: Creating the Birds
-
Block in the shapes:
Select a spot on your painted branch for the first bird. Using a diluted white or light grey, sketch the basic oval shape of the body and the smaller circle for the head to establish the scale. -
Apply base colors:
Starting with the top bird (the orange-breasted one), use a size 2 brush to fill in the chest with a warm ochre or soft orange. Paint the wings and back with a slate blue-grey. -
Repeat for the second bird:
For the lower bird, block in the bright blue wings and head first, followed by the rusty orange chest patches. Let these base layers dry for about 15-20 minutes. -
Detail the feathers:
Once the base is dry to the touch, use your finest liner brush to add texture. I find that short, directional strokes mimicking the direction of feather growth work best here. -
Add facial features:
Carefully paint the beak using black or dark grey. Use the tip of the liner brush to add the eye—a tiny black dot with an even tinier white speck for the highlight brings it to life. -
Highlight the form:
Mix a lighter version of your wing color and add highlights to the top of the head and the curve of the wing to suggest sunlight hitting the bird. -
Add shadows:
Use a darker wash of grey or brown underneath the belly and where the wing meets the body to create rounded, three-dimensional volume.
Backlighting Pro-Tip
Since light comes through the glass, colors can look washed out. Paint a layer of white behind the bird figure first to make the top colors pop, or simply apply two coats of color for opacity.
Step 4: Final Touches
-
Connect to the perch:
Paint the bird’s feet wrapping around your painted branch. Use a dark grey and keep the toes thin and gripping. -
Add seasonal flair:
If desired, dab tiny spots of red or orange on the tips of your painted twigs to simulate berries or buds, mirroring the vegetation seen in the upper window panes. -
Clean the guidelines:
Once the paint is fully cured (usually 24 hours), gently wipe away any remaining dry erase marker lines that weren’t covered by paint.
Now you can enjoy birdwatching from the comfort of your home, regardless of whether the real feathery visitors decide to stop by
BRUSH GUIDE
The Right Brush for Every Stroke
From clean lines to bold texture — master brush choice, stroke control, and essential techniques.
Explore the Full Guide
Sunset Gradient Wash Across the Glass
Transform an ordinary window into a permanent golden hour with this stunning gradient wash technique. By layering translucent glass paints, you’ll recreate the magical transition from twilight blue to fiery orange right on your windowpane.
Step-by-Step
Materials
- Clean window pane (or glass sheet in frame)
- Rubbing alcohol and lint-free cloth
- Painter’s tape
- Gallery Glass or translucent glass paint (Royal Blue, Amethyst, Magenta, Tangerine, Golden Yellow)
- Black glass paint or lead leading (optional for horizon)
- Wide flat synthetic brush (1-2 inch)
- Fan brush (for blending)
- Sea sponge (optional for texture)
- Palette or paper plate
- Paper towels
Step 1: Preparation
-
Clean surface:
Begin by thoroughly cleaning the glass surface with rubbing alcohol and a lint-free cloth to remove any grease, dust, or fingerprints that could repel the paint. -
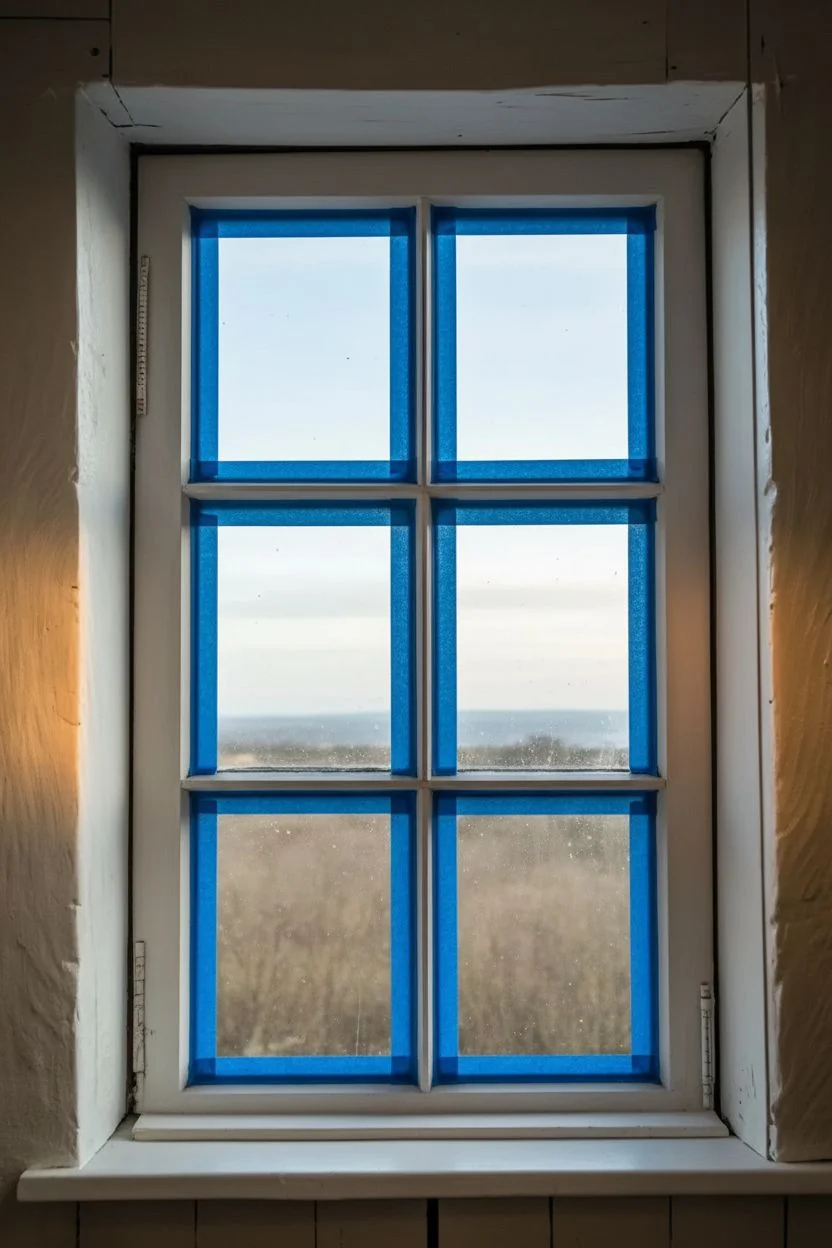
Tape the edges:
Apply painter’s tape carefully around the sash or muntins (the wooden strips separating the panes) to protect the frame from errant brushstrokes.
Smoother Blends
Work quickly! Glass paint skins over fast. Keep a spray bottle of water handy to lightly mist the glass if the paint drags.
Step 2: Sky Gradient – Upper Section
-
Mix the twilight blue:
On your palette, prepare your Royal Blue translucent paint. If it feels too thick, mix in a tiny drop of clear blending medium to increase transparency. -
Apply the top layer:
Using the wide flat brush, apply the blue paint to the very top section of the window panes, using long, horizontal strokes. Keep the layer thin so light can pass through. -
Fade downward:
As you move down towards the middle of the top panes, stop adding fresh paint to your brush and let the blue fade out naturally into a clear glass area. -
Introduce purple:
Load a clean brush with Amethyst or a deep purple shade. Apply this directly below the strongest blue section, slightly overlapping the fading blue edge. -
Blend the transition:
While both paints are still wet, use a soft fan brush to gently sweep back and forth over the line where blue meets purple to create a seamless blur.
Step 3: Sunset Core – Middle Section
-
Add the pink layer:
In the middle set of panes (or the center of a larger sheet), brush on Magenta paint using horizontal strokes. -
Create wispy clouds:
Before the pink dries, I like to use the corner of a dry sponge to dab away tiny patches of paint, creating the illusion of soft, illuminated clouds drifting through. -
Transition to orange:
Below the magenta, start applying Tangerine orange. Allow the orange to mix slightly with the wet pink edge above it to form a warm coral hue. -
Intensify the glow:
Mix a little Golden Yellow into your Tangerine paint and apply it near the bottom of the middle section to simulate the brightest part of the sunset.
Streaky Finish?
If you see brush marks, don’t panic. Gently stipple (tap) the wet paint with a soft makeup sponge to even out the texture.
Step 4: Horizon and Foreground – Bottom Section
-
Paint the deep orange:
For the bottom set of panes, apply your richest orange tones. This area represents the sky closest to the horizon, so keep the color saturated. -
Feather the horizon line:
Approximately 3-4 inches from the bottom sill, stop the orange paint abruptly. You want a distinct line where the sky meets the earth. -
Create the landscape:
Using dark blue or a mix of black and blue, paint the silhouette of the landscape at the very bottom. Use uneven dabs to mimic distant trees or hills. -
Detail the treeline:
With a smaller brush, pull tiny vertical strokes upward from the dark mass into the orange sky to create individual treetops or bushes. -
Add atmospheric haze:
Dry brush a very faint, watered-down layer of grey-blue carelessly over the landscape section to give it that hazy, distant evening look. -
Final cure:
Remove the painter’s tape while the paint is tacky (not fully dry) to ensure clean lines. Let the project cure according to the bottle instructions, usually 24-48 hours.
Enjoy the peaceful glow of twilight in your room any time of day
Mandalas That Radiate From the Center
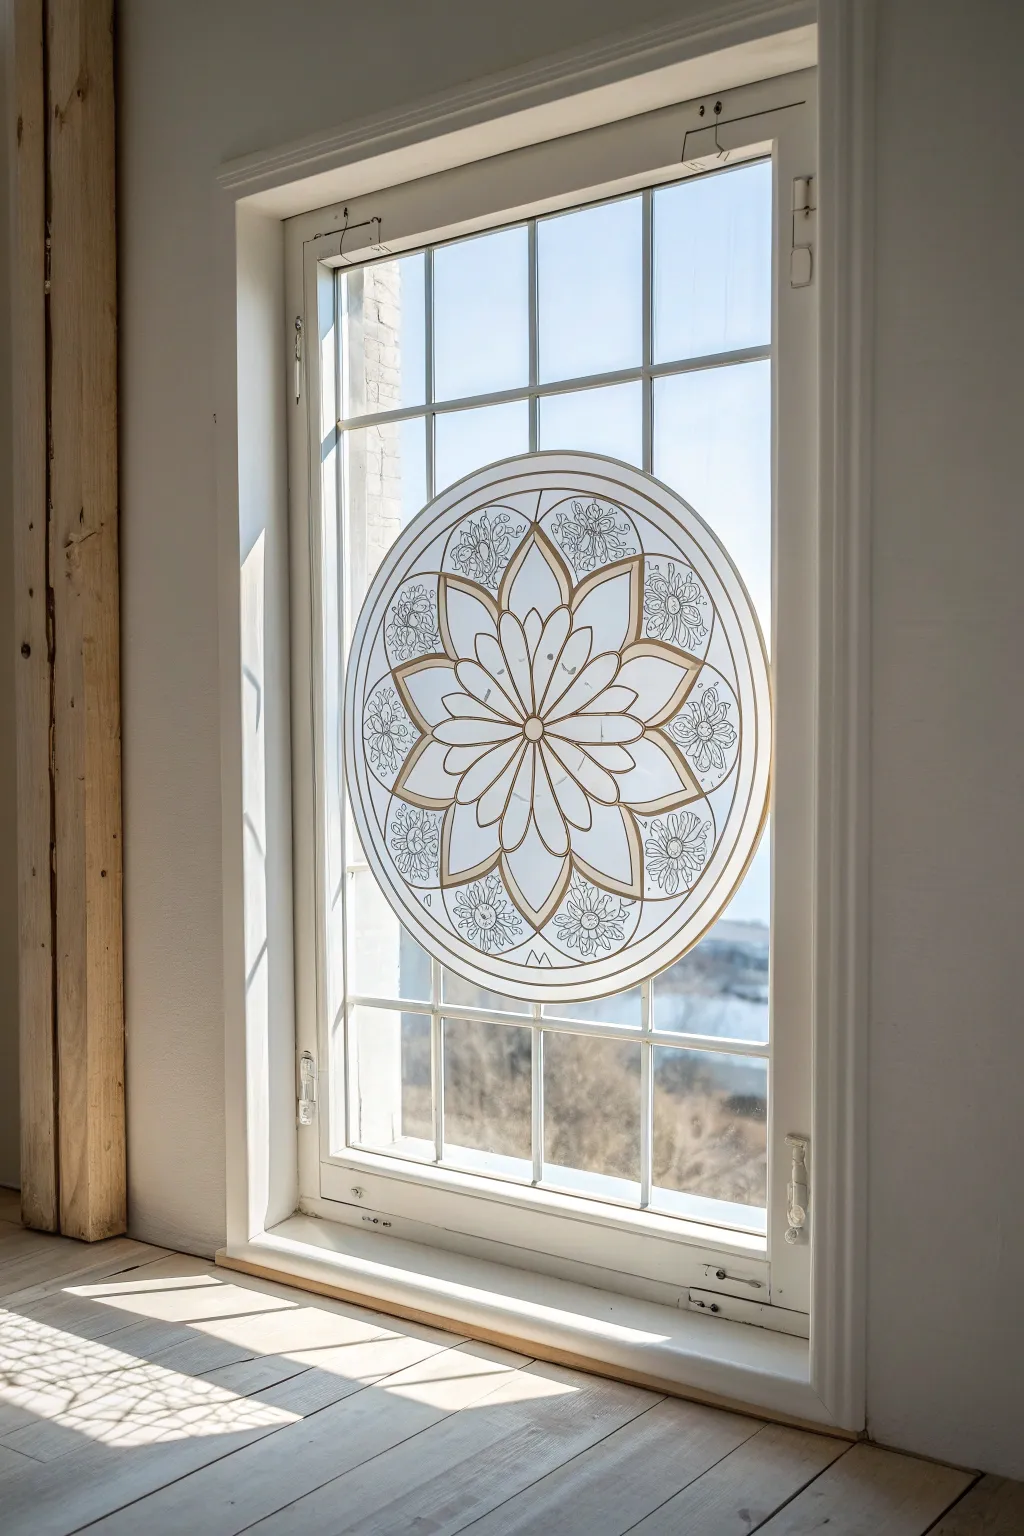
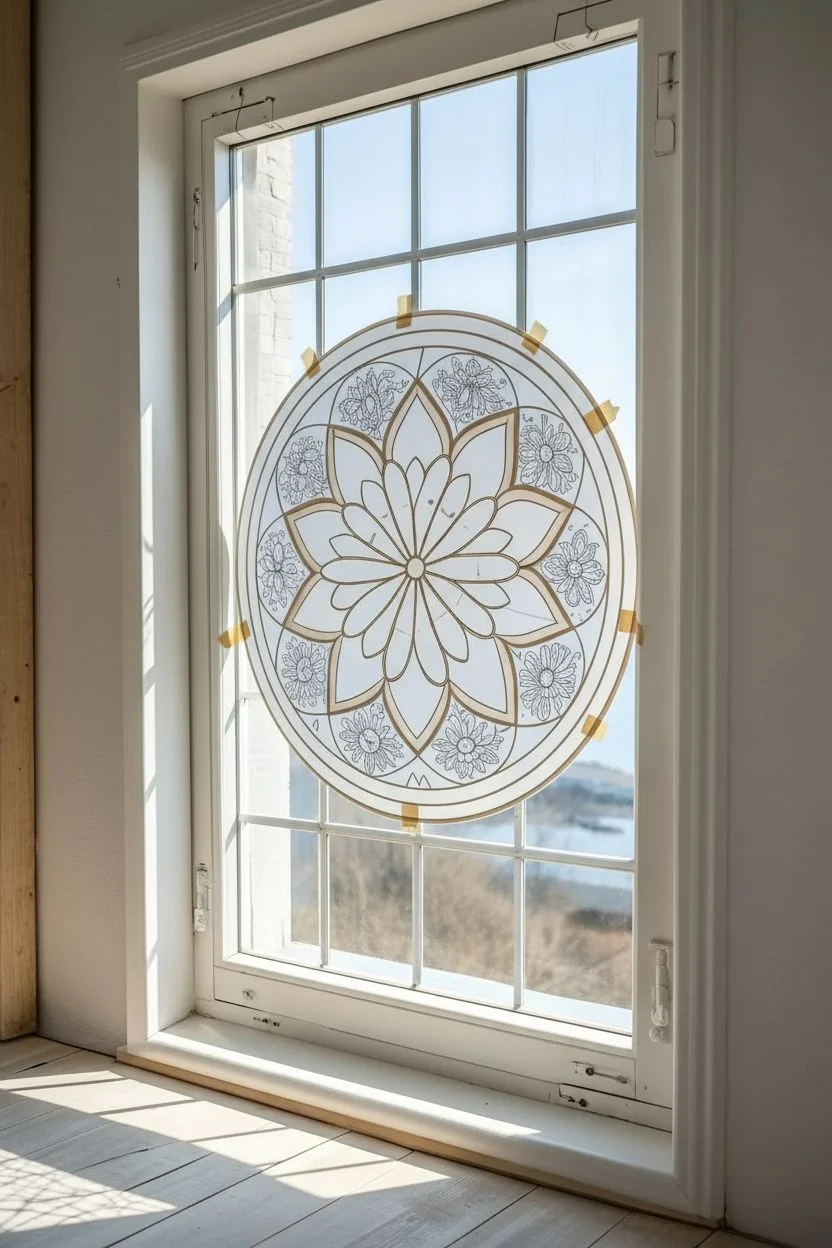
Transform a plain window pane into a stunning focal point with this elegant mandala design that mimics the look of etched glass. Featuring delicate gold contour lines and a soft, frosted fill, this faux-stained glass project captures the light beautifully while adding a touch of privacy.
Step-by-Step Guide
Materials
- Clean window pane or large glass sheet
- Rubbing alcohol and lint-free cloth
- Paper template of the mandala design (printed to scale)
- Masking tape
- Gallery Glass Liquid Leading (Gold or Bronze)
- Gallery Glass Window Color (Crystal Clear or Frost White)
- Toothpicks or a fine needle tool
- Small craft knife (optional)
- Glass cleaner
Step 1: Preparation and Templating
-
Clean surface:
Begin by thoroughly cleaning the window glass with glass cleaner. Follow up with rubbing alcohol on a lint-free cloth to remove any remaining grease or residue, ensuring the paint adheres perfectly. -
Print pattern:
Print your mandala design on several sheets of paper if necessary, taping them together to create the full-scale circle. The design should feature a central multi-layered flower surrounded by an outer ring of smaller floral motifs. -
Secure template:
Tape the paper template securely to the *outside* of the window facing in. If you are working on a flat piece of glass on a table, place the pattern underneath the glass.
Broken Lines?
If a gap appears in your dried gold loading, clean the spot with alcohol, apply a tiny dot of fresh leading to bridge the gap, and let it dry before painting.
Step 2: Creating the Outline
-
Test the flow:
Before touching the glass, squeeze a small line of gold Liquid Leading onto a scrap paper to ensure smooth flow and remove any air bubbles. -
Trace center flower:
Starting from the absolute center, carefully trace the innermost petals of the flower. Hold the bottle tip slightly above the glass, letting the line fall onto the surface rather than dragging the tip. -
Expand outward:
Continue tracing the larger, expanding petal layers. Maintain steady pressure to keep the line width consistent. Clean the nozzle tip frequently with a paper towel to prevent clumps. -
Trace outer borders:
Draw the concentric circles that form the border of the mandala. Move your arm, not just your wrist, to get smoother curves. -
Detail the outer ring:
Fill in the outer ring section with the smaller, intricate floral designs. These lines can be slightly finer than the main structural lines. -
Check connections:
Inspect your work to ensure all lines connect fully, creating closed shapes. This is crucial for holding the fill paint later. -
Dry the leading:
Allow the gold outlines to dry completely for at least 8 hours or overnight. They should feel firm and rubbery to the touch.
Add Sparkle
While the white fill paint is still wet, sprinkle a tiny pinch of iridescent ultra-fine glitter into the center of the flowers for a magical morning light effect.
Step 3: Filling and Finishing
-
Prepare the fill:
Shake the Frost White or Clear paint bottle gently to mix, but avoid vigorous shaking which creates bubbles. -
Apply fill paint:
Start applying the paint into the center petals. Apply enough paint so it mounds up slightly against the gold leading; don’t brush it on thinly like acrylics. -
Distribute even coat:
Use a toothpick to encourage the paint into tight corners and all the way to the edges of the gold lines. I like to tap the glass gently (if moveable) to verify the paint is settled. -
Create texture:
For the specific etched look in the photo, swirl the wet paint slightly with your toothpick to create a non-uniform opacity, or use a sponge texturing tool for a more frosted appearance. -
Pop bubbles:
Keep a sharp needle tool handy to instantly pop any air bubbles that rise to the surface of the wet paint. -
Fill background areas:
Continue filling the designated negative spaces and petals, alternating between highly opaque and slightly more translucent applications to create depth. -
Final drying time:
Let the project dry undisturbed for 24 to 48 hours. The paint will look milky when wet but will dry to that beautiful, semi-translucent frosted finish. -
Remove template:
Once fully cured, carefully peel the paper template off the back of the window.
Enjoy the peaceful atmosphere your new etched mandala brings to your sunlit room

PENCIL GUIDE
Understanding Pencil Grades from H to B
From first sketch to finished drawing — learn pencil grades, line control, and shading techniques.
Explore the Full Guide
Simple Line Art With Transparent Color Fills
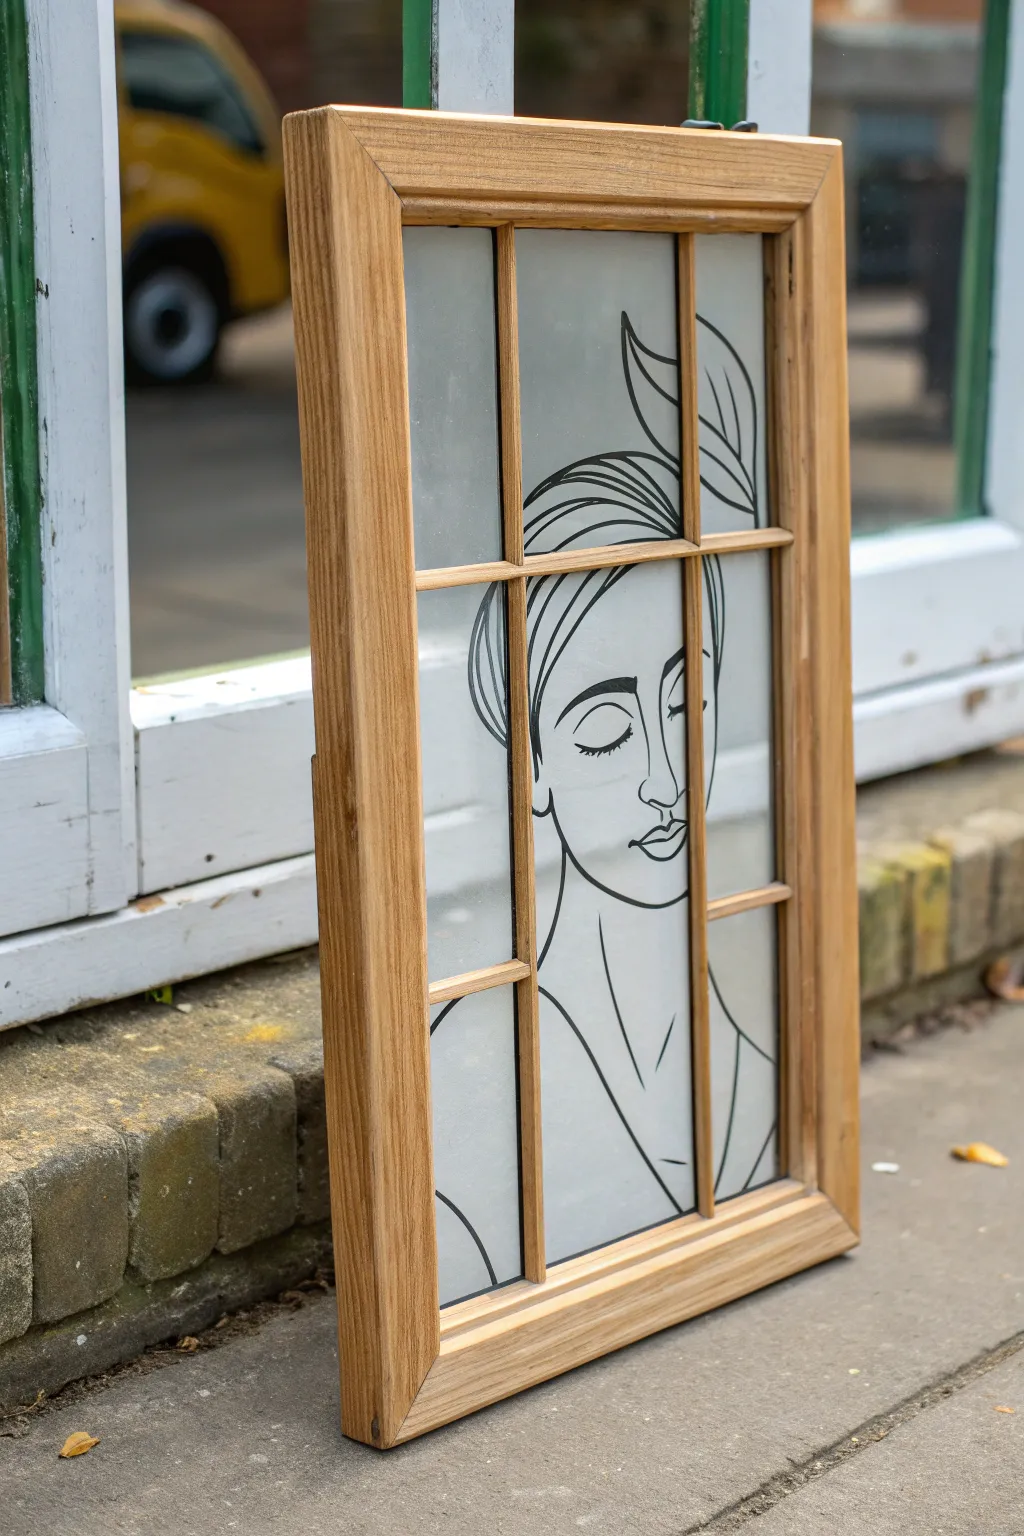
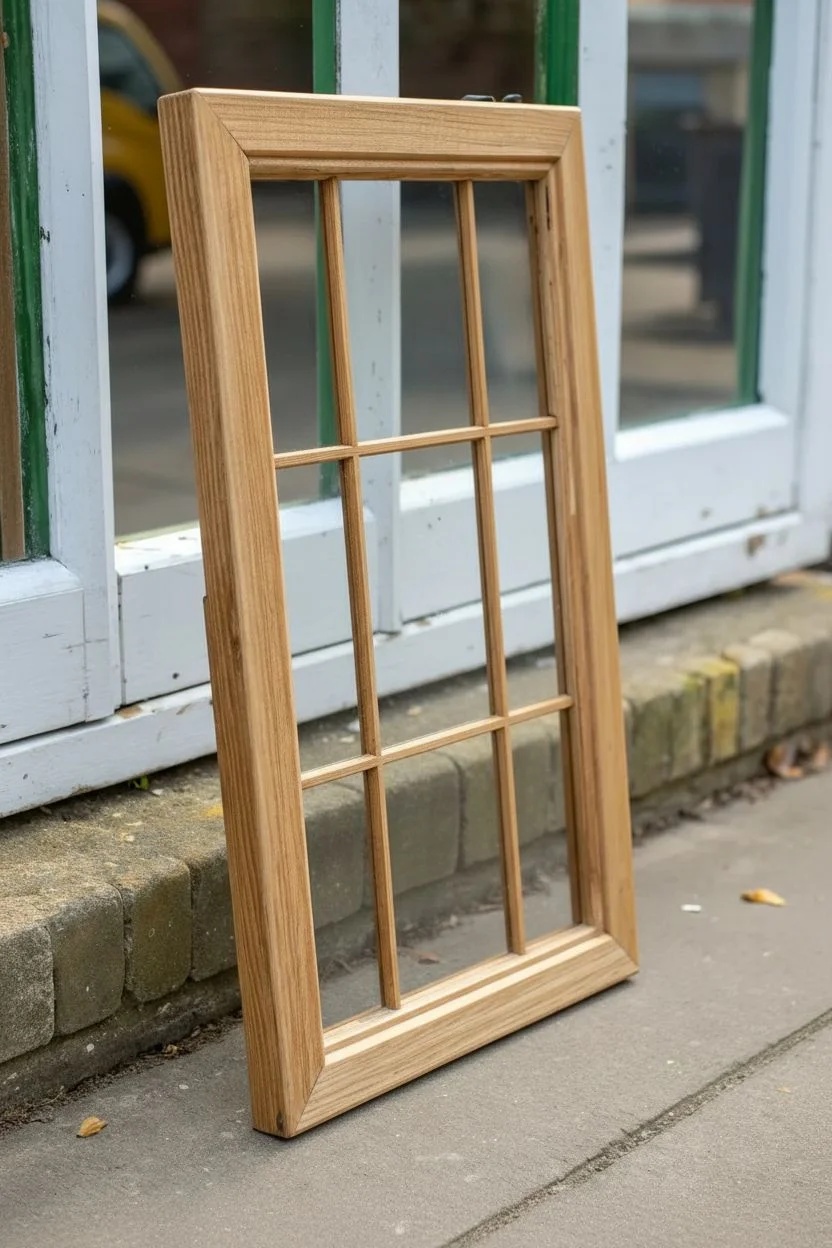
Transform an old wooden window frame into a stunning piece of modern decor with this elegant line art project. By combining the rustic charm of natural wood with crisp black lines on a frosted background, you create a captivating floating artwork that plays with light and shadow.
Step-by-Step Guide
Materials
- Recycled wooden window frame
- Glass cleaner and microfiber cloth
- Frosted glass spray paint
- Black oil-based paint marker (medium tip)
- Black oil-based paint marker (fine tip)
- Paper template of your design
- Masking tape
- Sandpaper (120 and 220 grit)
- Wood stain or clear varnish (optional)
- Clean rag or tack cloth
Step 1: Preparing the Frame
-
Clean the frame:
Begin by giving the entire wooden frame a thorough wipe down to remove years of dust and grime. Use a damp cloth and mild soap if necessary, ensuring the wood is dry before moving on. -
Sand the wood:
Using 120-grit sandpaper, sanding down the wooden frame to smooth out rough patches or old finishes. Follow up with 220-grit for a silky smooth feel. -
Seal or stain:
If you want to enhance the wood grain like in the example, apply a coat of clear varnish or a light wood stain with a rag. Let this dry completely according to the manufacturer’s instructions. -
Clean the glass:
Thoroughly clean both sides of the glass panes using glass cleaner and a microfiber cloth. Any fingerprints or oils left behind will interfere with the frosting spray and paint adhesion.
Reverse Tip
Draw on the smooth side, not the frosted side! The texture of the frost spray can ruin marker tips and cause ink to bleed.
Step 2: Applying the Frosted Effect
-
Mask the wood:
Carefully apply masking tape around the inner edges of the wooden frame where it meets the glass. This protects the wood from the frosting spray. -
Shake the can:
Shake your can of frosted glass spray paint vigorously for at least one minute to mix the particles evenly. -
Apply the first coat:
Holding the can about 10-12 inches away, spray a light, even mist over the back side of the glass. Use sweeping motions to avoid drips. -
Layer up:
Let the first coat dry for about 10 minutes. I usually apply 2-3 light coats total to get a solid, even matte finish without making it too opaque. -
Remove tape:
Once the final coat is dry to the touch, carefully peel away the masking tape to reveal clean edges.
Step 3: Creating the Line Art
-
Prepare the template:
Print or draw your line art design on paper. Ideally, the design should be sized to fit the overall dimensions of your window panes. -
Position the template:
Tape your paper template to the *back* side of the window (the side you just frosted). The design should be visible through the glass from the front. -
Start the outline:
Working on the *front* (smooth, unfrosted) side of the glass, lay down the main contours of the face and hair using the medium-tip black oil-based marker. -
Bridge the gaps:
When your design crosses a wooden muntin (the dividers between panes), simply stop the line and continue it perfectly aligned on the next pane, creating a visual continuity. -
Refine the details:
Switch to the fine-tip marker for delicate areas like the eyelashes, lips, and individual strands of hair. -
Thicken key lines:
Go back over the major structural lines—like the jawline or neck—to add slight variations in line weight. This makes the drawing feel more organic and artistic. -
Let it cure:
Allow the paint marker to cure for at least 24 hours. Don’t touch the lines during this time to avoid smudging. -
Remove template:
Once dry, un-tape and remove the paper template from the back of the window. -
Final polish:
Gently clean any smudges on the front glass around your drawing with a cotton swab dipped in rubbing alcohol, being careful not to touch your painted lines.
Oops, a Smudge?
If you make a mistake with the oil marker, use a Q-tip dipped in acetone or nail polish remover to erase it instantly.
Place your finished piece near a light source to enjoy the beautiful glow through the frosted glass
Snowflakes in Negative Space Resist Style
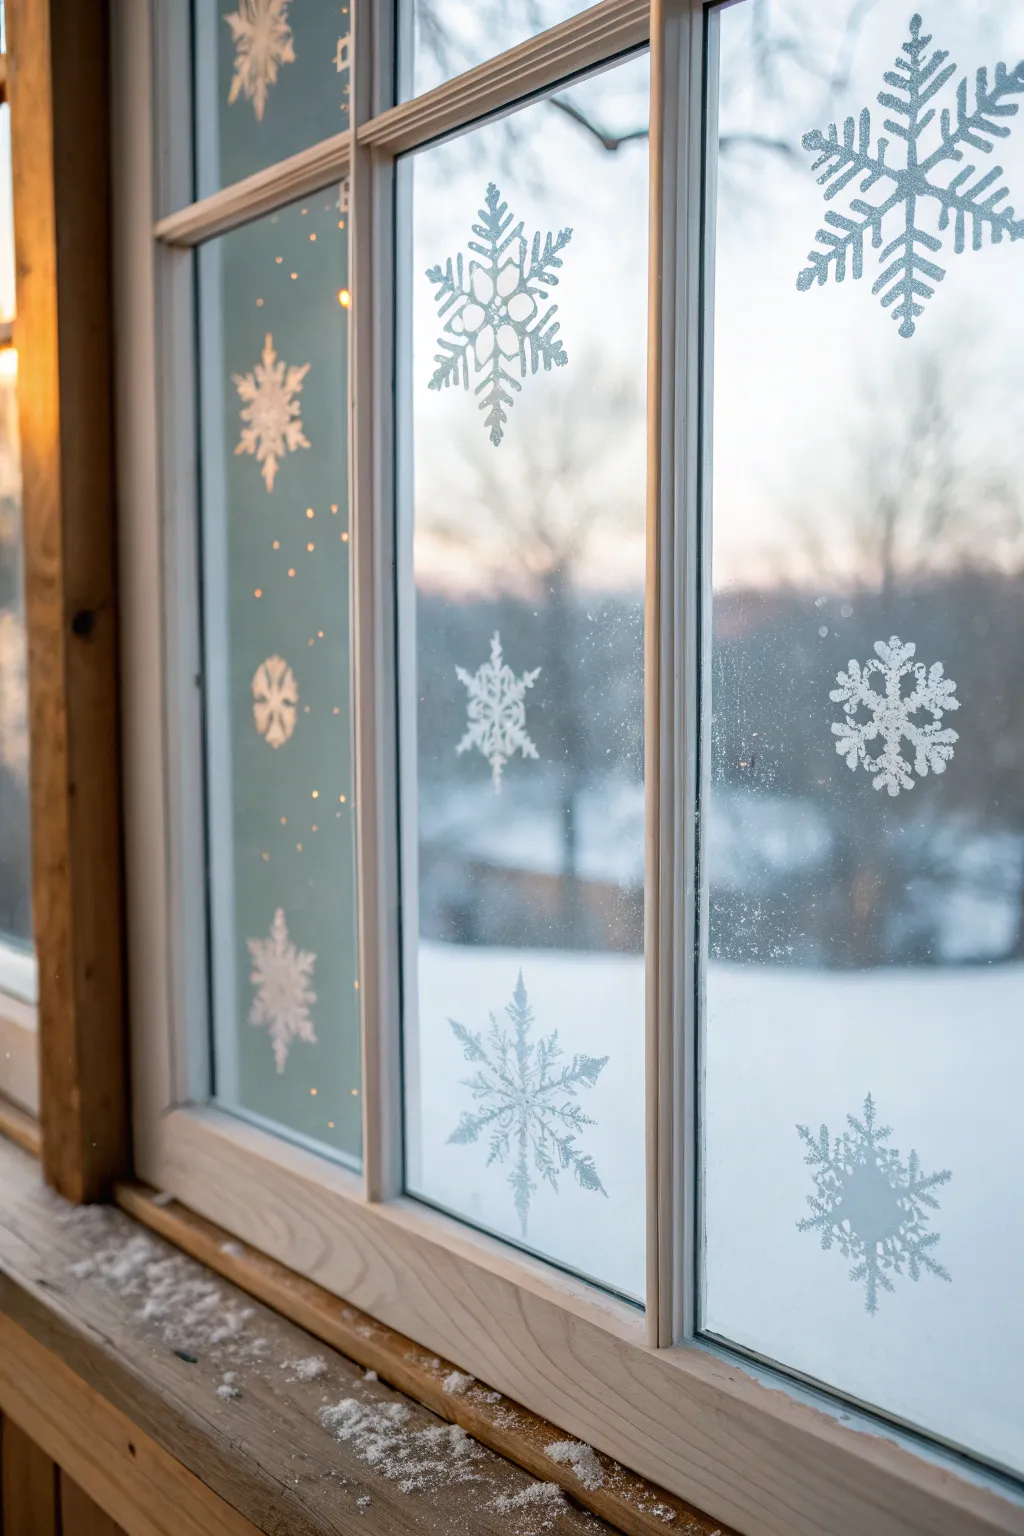
Transform your view into a winter wonderland with these delicate, crystalline snowflake designs painted directly onto your window panes. This project uses a clever resist technique to create crisp, intricate patterns that look like natural frost but won’t melt away when the sun comes out.
Detailed Instructions
Materials
- Glass cleaner (windex or vinegar solution)
- Lint-free paper towels or microfiber cloth
- Self-adhesive vinyl sheets or wide painter’s tape
- Craft knife (X-Acto) or precision scissors
- Cutting mat
- Snowflake stencils (printed or hand-drawn)
- Frost effect spray paint (for glass) OR white acrylic paint dabbed with a sponge
- Tweezers
- Drop cloth or old newspapers
- Painter’s tape (for masking edges)
Step 1: Preparation & Design
-
Clean the Surface:
Begin by thoroughly cleaning the window pane where you plan to work. Any dust, grease, or fingerprints will prevent the stencil material from adhering properly and can ruin the crisp lines later. -
Dry Completely:
Ensure the glass is 100% dry before proceeding. I find that even a hint of moisture can cause the adhesive to lift during painting. -
Select Snowflake Patterns:
Choose 3-4 distinct snowflake designs. Vary the complexity—some should have thick, bold arms, while others can be more intricate and feathery to mimic nature’s variety. -
Transfer to Vinyl:
Trace or print your chosen snowflake shapes onto the backing paper of your adhesive vinyl sheets. If you are drawing freehand, sketch directly onto the backing paper.
Fuzzy Edges?
If paint bleeds under the stencil, utilize a toothpick dipped in rubbing alcohol to gently erase the error while the paint is still semi-fresh.
Step 2: Creating the Stencils
-
Cut the Outlines:
Using a sharp craft knife on a cutting mat, carefully cut out the snowflake shapes. Remember, for a positive image (white snowflake), you want to keep the ‘hole’ or the negative space stencil. Discard the actual snowflake shape. -
Weed the Details:
Carefully remove the inner shape of the snowflake so you are left with a rectangular piece of vinyl with a snowflake-shaped hole in the center. -
Apply Transfer Tape (Optional):
If your snowflake design is very intricate with floating pieces, apply a layer of transfer tape over the vinyl to keep everything aligned while moving it to the window.
Step 3: Application & Painting
-
Position the Stencils:
Peel the backing off your vinyl stencil and place it onto the glass. Press down firmly, especially around the delicate interior edges of the snowflake design. -
Seal the Edges:
Run your fingernail or a credit card edge along the intricate cuts of the stencil to burnish them down. This prevents paint from bleeding under the sticker. -
Protect Surrounding Areas:
Use painter’s tape and newspapers to mask off the window frame and any glass areas you want to keep perfectly clear. -
Prepare the Frost Spray:
Shake your can of frost effect spray paint vigorously for at least a minute. If using acrylic paint instead, pour a small amount onto a palette and load a cosmetic sponge lightly. -
Apply the First Coat:
Spray a light, even mist over the stencil from about 8-10 inches away. If sponging, dab gently straight up and down—do not brush side-to-side. -
Let it Set:
Allow this initial layer to dry for about 5-10 minutes. It doesn’t need to be fully cured, but it should be tacky so the next layer adheres well. -
Apply Second Coat:
Apply a second light layer to increase opacity. Two thin coats are always better than one heavy, dripping coat.
Add Sparkle
While the frost paint is still wet, gently blow a small pinch of iridescent ultrafine glitter onto the snowflakes for a magical shimmer in the sunlight.
Step 4: The Big Reveal
-
Wait briefly:
Wait until the paint is dry to the touch but not fully hardened (usually 15-20 minutes). If the paint is too hard, peeling the stencil might chip the design. -
Peel the Vinyl:
Starting at one corner, slowly peel the vinyl stencil away from the glass at a sharp 45-degree angle. -
Remove Small Bits:
Use tweezers to carefully lift any small, isolated pieces of vinyl that were part of the stencil design inside the snowflake arms. -
Clean Up Edges:
If there was any minor bleed-through, use a damp cotton swab or the tip of your craft knife to gently scrape away the excess paint for a sharp look.
Enjoy the cozy view through your new permanent frost that brings winter charm without the cold draft


Night Sky Constellations in Ink and Dots
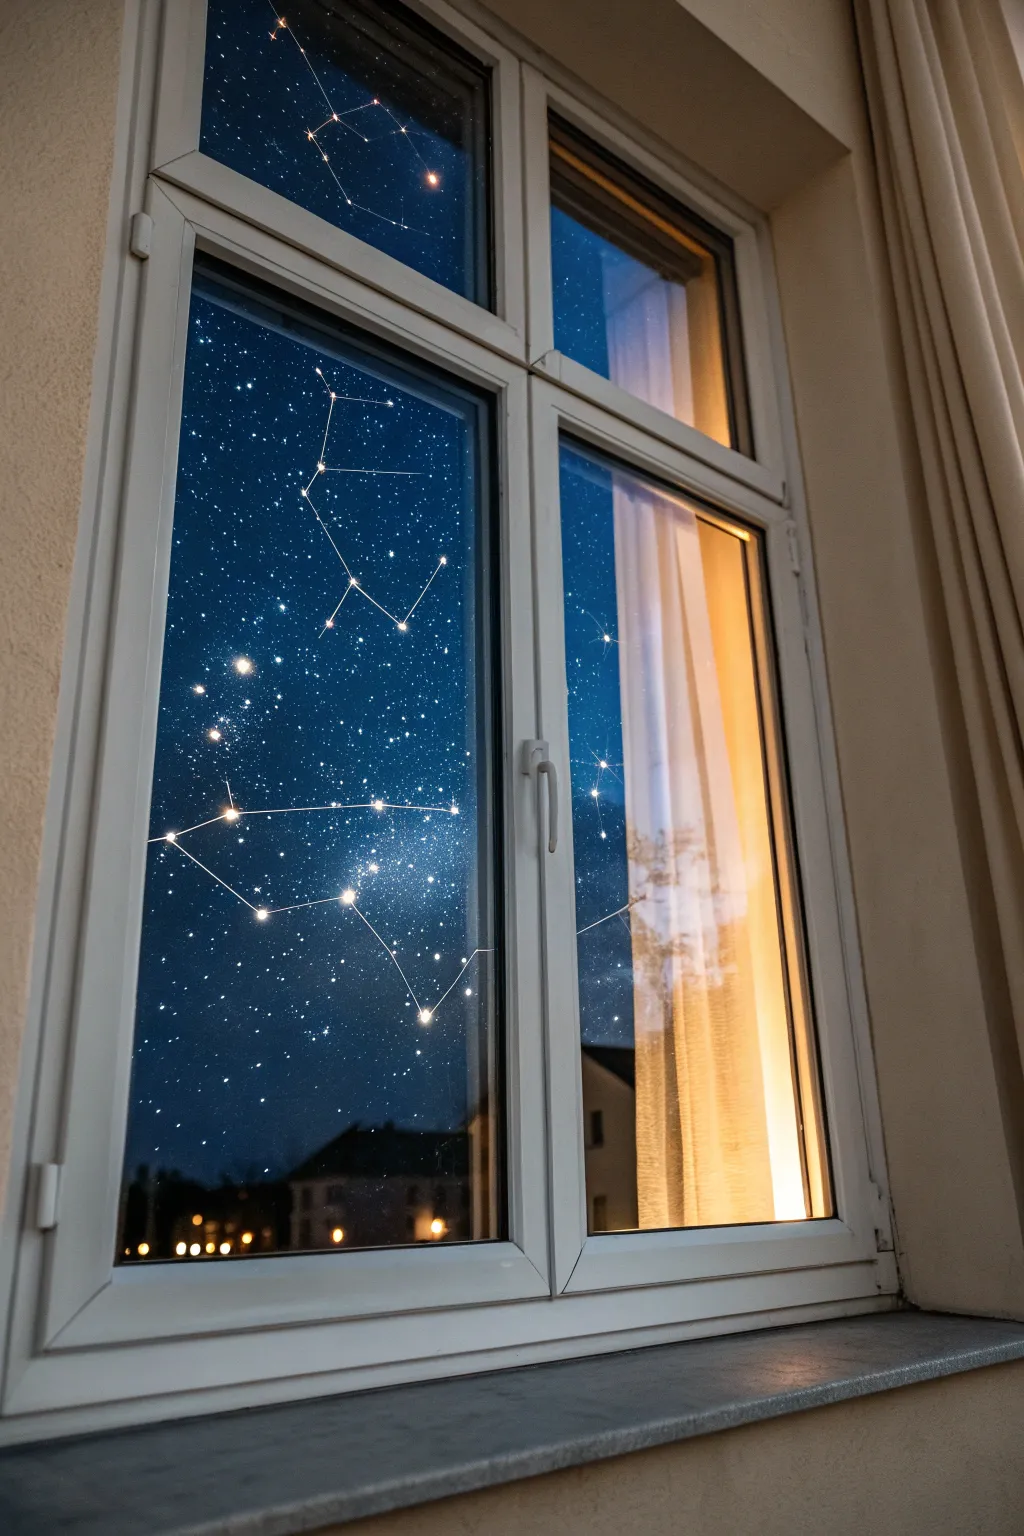
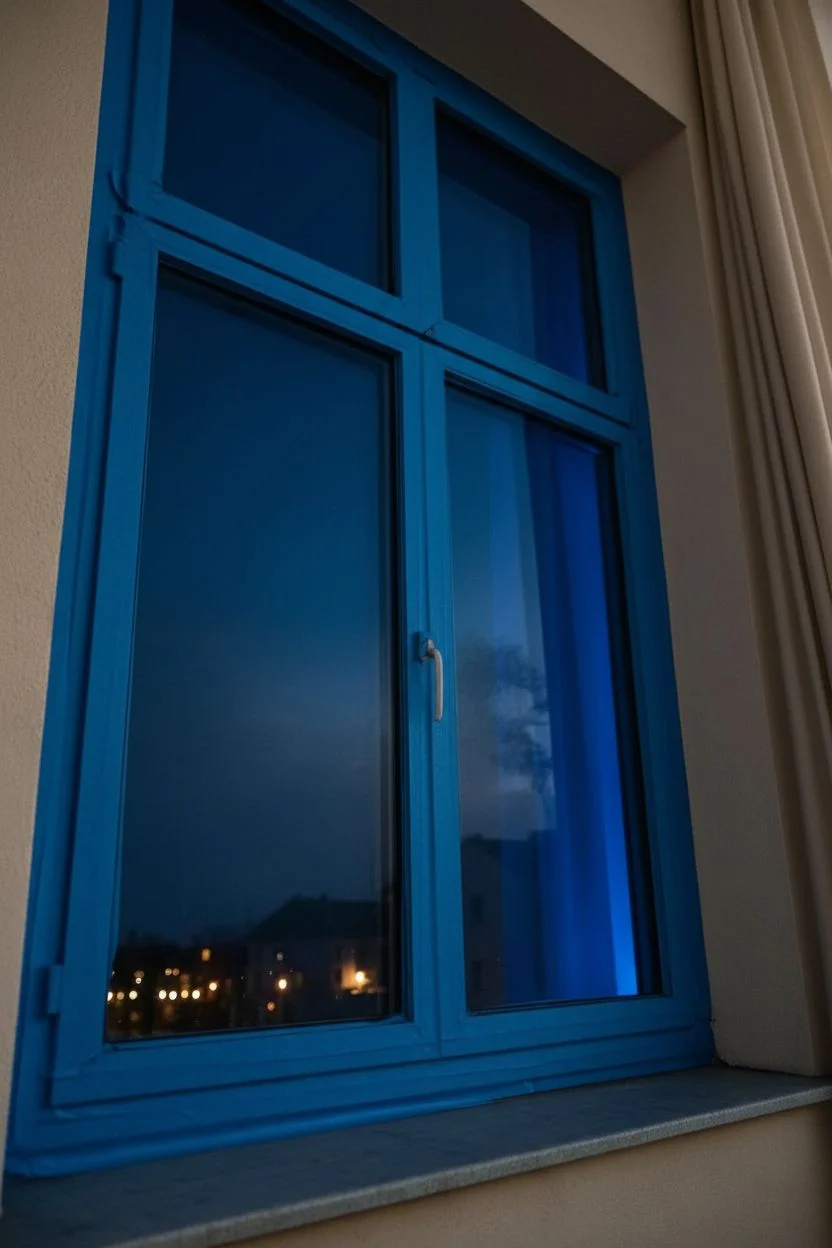
Transform an ordinary window into a portal to the cosmos with this stunning glass painting technique. You’ll layer translucent blues and crisp white details directly onto the pane to create a depth-filled night sky that glows with the ambient light.
Detailed Instructions
Materials
- Glass cleaner and microfiber cloth
- Rubbing alcohol
- Glass paints (transparent dark blue, indigo, black)
- Wide flat synthetic brush or foam dauber
- White oil-based paint marker (fine tip)
- White glass paint or acrylic enamel
- Small round detail brush (size 0 or 00)
- Reference images of constellations
- Ruler or straight edge (optional)
- Painter’s tape
Step 1: Preparation and Background
-
Clean surface:
Begin by thoroughly cleaning the inside of your window pane with glass cleaner. Follow up with a wipe of rubbing alcohol to remove any oily residues that might prevent the paint from adhering. -
Tape edges:
Apply painter’s tape to the window frame edges to protect them from stray brushstrokes. Run your fingernail along the tape edge to ensure a tight seal against the glass. -
Mix the night sky:
On a palette, mix your transparent blue glass paint with a touch of indigo. You want a deep, rich color that is still see-through. -
Apply base layer:
Using a wide flat brush or foam dauber, apply the blue mixture to the entire glass pane. Use long, vertical strokes or a stippling motion for texture. -
Create gradients:
While the first layer is still wet, introduce a tiny amount of black or darker indigo at the top corners and edges to create a vignette effect. -
Dry completely:
Let this background layer dry fully according to the manufacturer’s instructions. This usually takes at least an hour, but overnight is safer.
Streaky Background?
If brushstrokes are too visible in the blue layer, use a sponge dauber to tap over the wet paint. This creates a uniform, frosted texture that diffuses light beautifully.
Step 2: Drafting the Stars
-
Plan placement:
Look at your reference images. Decide where your major constellations will sit. If you are nervous, you can tape a printout on the *outside* of the glass to trace. -
Mark main stars:
Using your white oil-based paint marker, gently dot the locations of the primary stars in your chosen constellations. Keep these dots small for now. -
Connect the dots:
With a steady hand and the fine-tip marker, draw the connecting lines between your star points. Use a ruler if you want geometric precision, or freehand it for a vintage map look. -
Add variance:
Go back to your main star points. Use the marker to make some slightly larger than others, indicating brightness magnitude.
Step 3: Adding Luminosity
-
Paint bright stars:
Switch to your white glass paint and the fine detail brush. I find that dipping the very tip into the paint allows for a perfect, raised dot. -
Highlight key points:
carefully dab a drop of white paint directly over the largest marker dots. This adds texture and makes the ‘brightest’ stars catch the light. -
Create the Milky Way:
Dip an old toothbrush or stiff bristle brush into thinned white paint. Test on paper first, then gently flick a splatter of tiny mist-like stars across the darker areas of the sky. -
Add distant stars:
Use your smallest brush to add tiny, singular dots randomly throughout the background to fill the empty space without overcrowding it. -
Create focus flares:
For the 3-4 brightest stars, paint small cross-shapes or four-pointed flares using the very tip of your brush to mimic the diffraction spikes seen in photography. -
Clean up:
Once the paint is dry to the touch, slowly peel away the painter’s tape at a 45-degree angle. Use a razor blade to gently scrape away any paint that bled under the tape.
Glow in the Dark
Mix phosphorescent pigment powder into your white star paint. The artwork will look crisp during the day but will softly glow with constellations when the lights go out at night.
Enjoy gazing at your permanent starry night regardless of the weather outside
Koi Fish Swimming Up the Side Pane
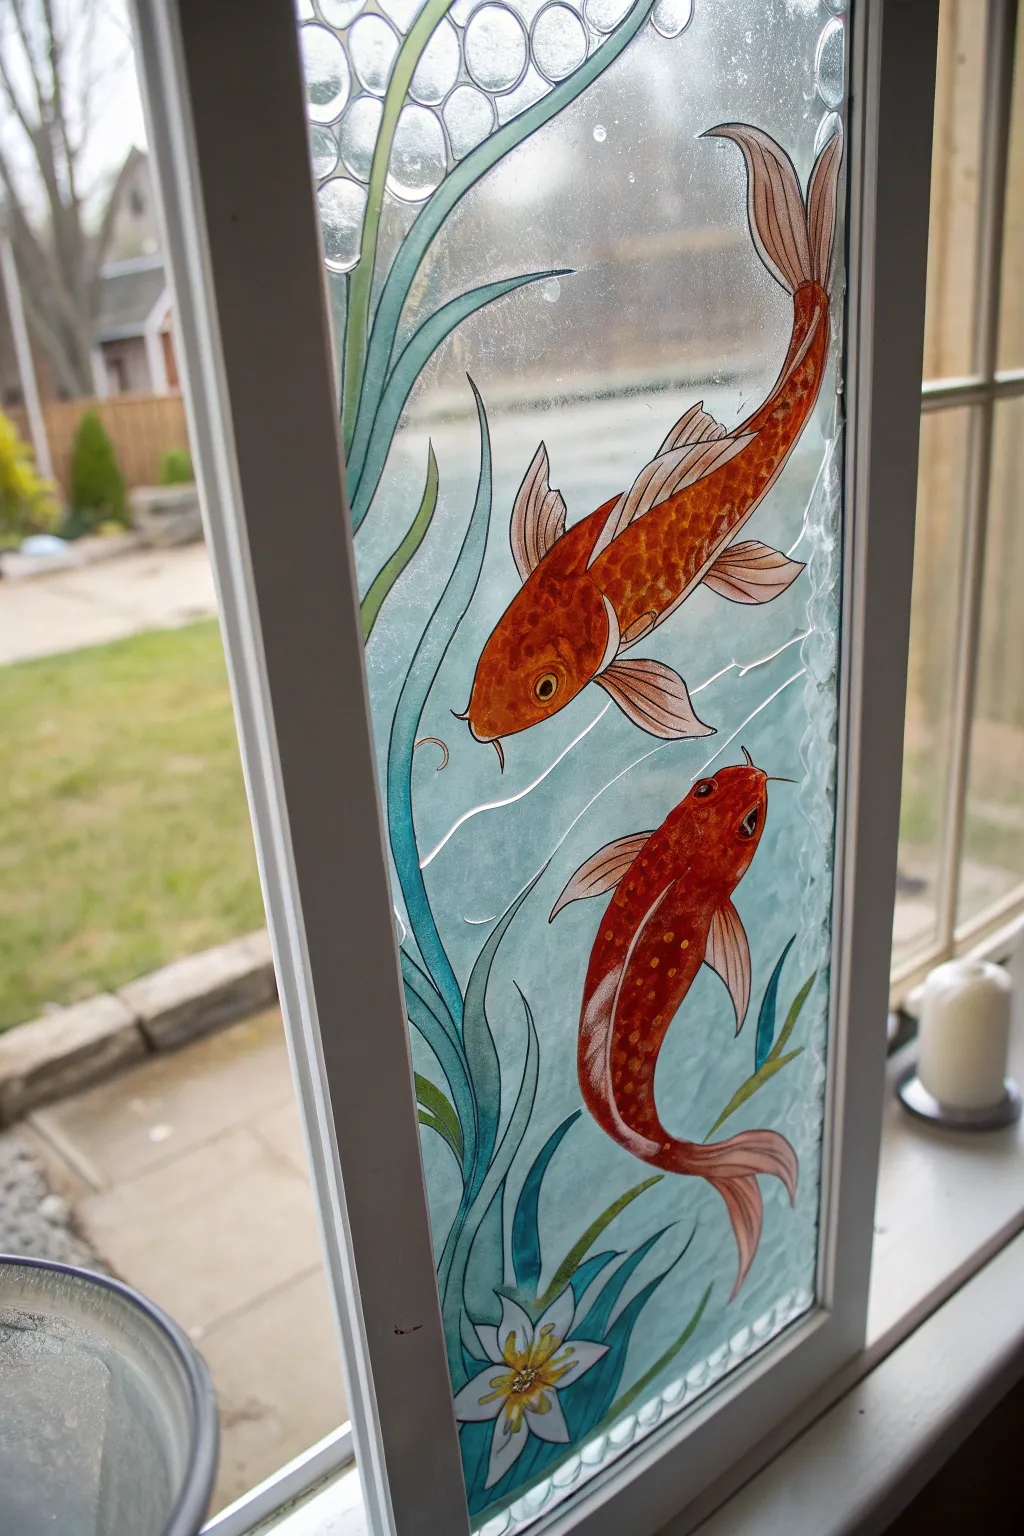
Transform a plain vertical window into a serene aquatic scene with this faux stained glass project. The vibrant orange koi fish and translucent reeds catch the daylight beautifully, creating a peaceful focal point without blocking the view.
Step-by-Step
Materials
- Clean vertical window pane
- Rubbing alcohol and lint-free cloth
- Liquid leading (black or pewter)
- Glass paints (transparent orange, red, deep green, light teal, white, yellow)
- Fine detail paintbrush (size 0 or 1)
- Medium round paintbrush
- Printed pattern template (resized to window dimensions)
- Painter’s tape
- Toothpicks
- Cotton swabs for cleanup
Step 1: Preparation & Designing
-
Prepare the surface:
Thoroughly clean the window pane with rubbing alcohol and a lint-free cloth. Any oil or dust will prevent the leading and paint from adhering properly. -
Create the template:
Scale your design to fit the specific window pane. Print out the pattern of two koi fish swimming upward, surrounded by long flowing reeds and a lotus flower at the bottom. -
Secure the pattern:
Tape the printed pattern securely to the *outside* of the window (facing in). This allows you to trace the lines from the inside while looking through the glass.
Step 2: Creating the Outline
-
Start the leading:
Using a bottle of liquid leading, carefully trace the main outlines of the design. Start from the top (the upper fish) and work your way down to avoid smudging your fresh lines. -
Detail the fish:
Outline the scales on the fish bodies with finer lines if possible, or leave them open to accept paint texture later. Ensure all shapes are ‘closed’ loops so the paint doesn’t leak out. -
Outline the flora:
Trace the long, sweeping curves of the water reeds and the lotus flower at the very bottom corner. Keep your hand steady and apply even pressure to the bottle. -
Add floating bubbles:
Draw circles at the very top of the pane to represent surface bubbles. Vary the sizes for a natural look. -
Let the lines cure:
Allow the leading to dry completely. This usually takes 6 to 8 hours, but I like to leave it overnight just to be safe. It should feel firm and rubbery.
Fixing Wobbly Lines
Make a mistake with the leading? Don’t wipe it while wet! Let it dry completely, then use a razor blade or craft knife to simply slice and peel the mistake off the glass.
Step 3: Painting the Koi
-
Base coat the fish:
Starting with the top fish, apply a transparent orange glass paint. Fill the body sections, pushing the paint gently towards the lead lines with your brush. -
Add depth and shading:
While the orange is still wet, drop in small amounts of red paint near the spine and tail. Swirl it gently with a toothpick to create a gradient effect. -
Highlight the fins:
Use a lighter touch or dilute the orange slightly for the fins and tail to make them appear more translucent. Leave the eye area clear for now. -
Detail the eyes:
Once the body paint is tacky, use a fine tip brush to paint the eye: a black dot surrounded by a small ring of gold or yellow. -
Repeat for the second fish:
Paint the lower koi using the same technique, perhaps using slightly more red tones to distinguish it from the upper fish.
Add Crystal Texture
Sprinkle clear glass microbeads onto the wet paint of the bubbles or water sections. When dry, they create a sparkling, fizzy texture that catches sunlight.
Step 4: Background & Finishing Touches
-
Paint the reeds:
Fill in the long plant shapes with transparent green and teal paints. Blend the two colors directly on the glass to create shadows where the leaves overlap. -
Color the lotus:
Paint the bottom flower petals with opaque white, adding a tiny dot of yellow in the center for the stamen. -
Fill the water bubbles:
Use a heavily diluted white or a ‘clear frost’ medium for the bubbles at the top. You want them to look airy, not solid. -
Create the water:
For the background water, apply a very thin layer of light blue or clear medium with a textured finish. You can stipple it with a brush to mimic water movement. -
Final cure:
Allow the entire piece to cure for several days before cleaning the window again. Avoid harsh chemicals directly on the painted areas.
Step back and enjoy the way the sunlight illuminates your swimming koi throughout the day
Removable Seasonal Doodles on the Glass
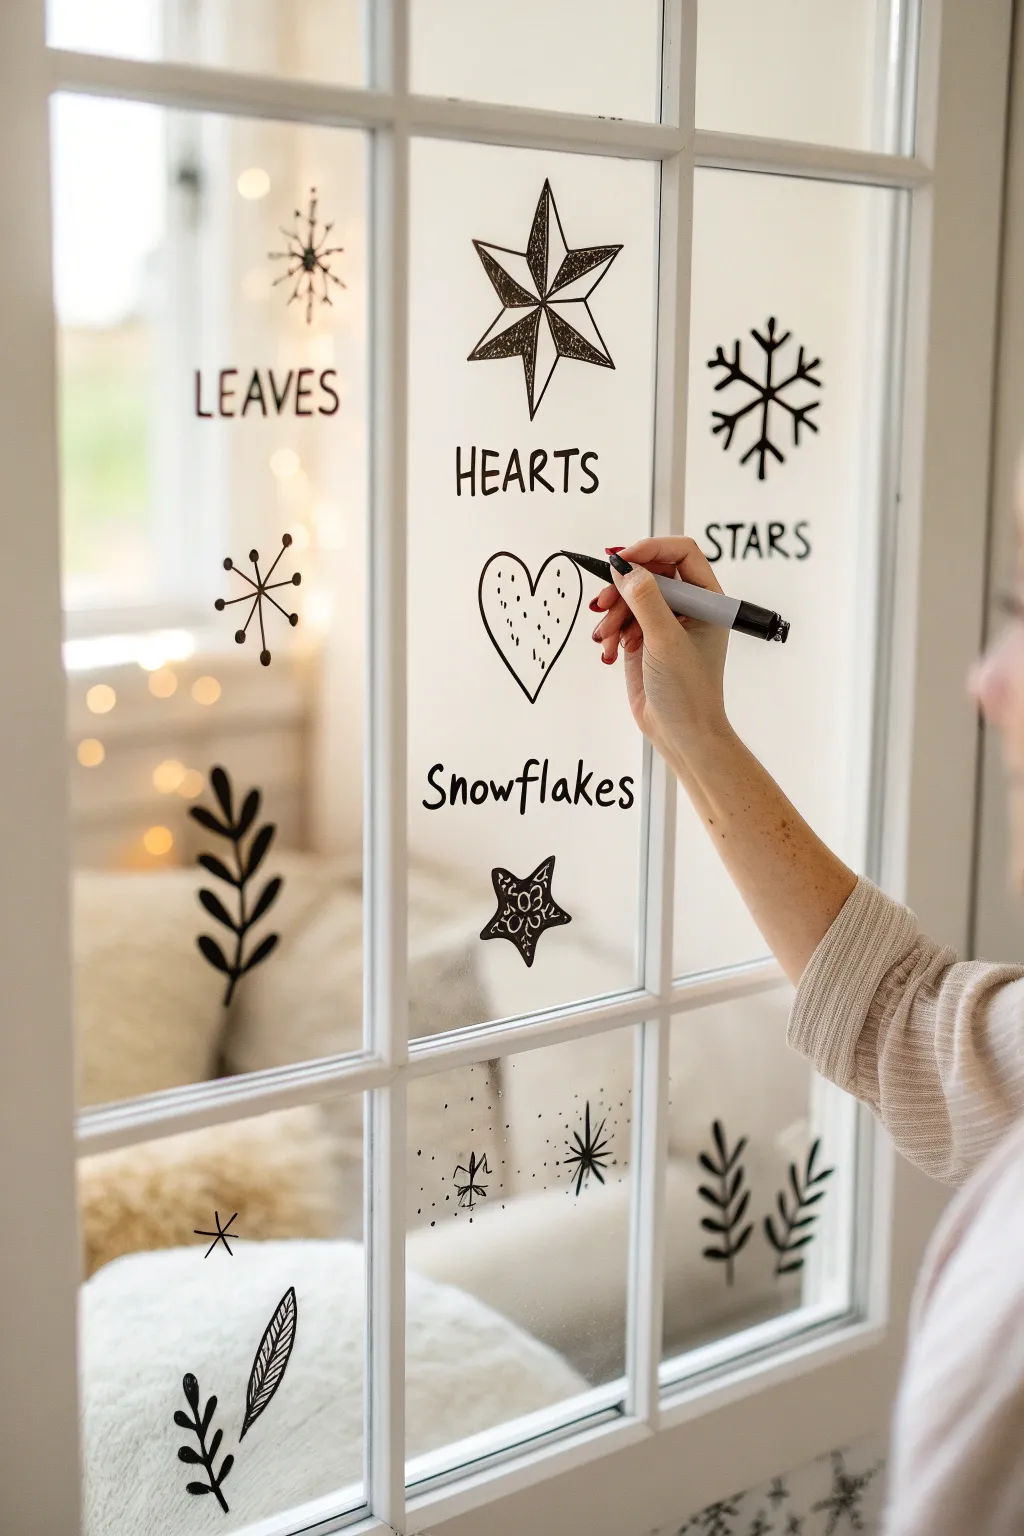
Transform a plain window pane into a charming sketchbook page using nothing but a marker and your imagination. This playful project organizes hand-drawn motifs like hearts, stars, and leaves into labelled sections, creating a cozy and whimsical display perfect for seasonal decor.
How-To Guide
Materials
- Glass window pane (clean and dry)
- Black chalk marker or oil-based paint marker (medium tip)
- Glass cleaner
- Lint-free cloth or microfiber towel
- Paper towels
- Ruler (optional, for spacing)
- Cotton swabs (for cleanup)
Step 1: Preparation and Planning
-
Clean the surface:
Begin by thoroughly cleaning the window pane with glass cleaner and a lint-free cloth. Any dust or grease will prevent the marker from adhering smoothly, so take your time here. -
Dry completely:
Ensure the glass is absolutely bone dry before touching it with the marker. Moisture can cause the ink to bleed or run. -
Visual mapping:
Mentally divide your window pane into vertical columns or sections. In this design, we are working with the natural grid of the window muntins to frame each category of doodles.
Wobbly Lines?
Don’t stress about perfection. Rest your pinky finger on the glass (use a dry paper towel under it to avoid smudges) to stabilize your hand while drawing.
Step 2: Creating the Text Labels
-
Lettering style:
Choose a simple, all-caps sans-serif font for a clean look. The goal is to act as a ‘header’ for the drawings below. -
Write ‘LEAVES’:
In the upper left section, carefully print the word ‘LEAVES’. Keep the letters evenly spaced and roughly 1-2 inches high. -
Write ‘HEARTS’ and ‘STARS’:
Move to the central and right sections. Print ‘HEARTS’ in the center pane and ‘STARS’ in the right pane, trying to keep them aligned horizontally with your first label. -
Add ‘Snowflakes’:
Lower down on the pane, switch to a cursive or lowercase script for variety. Write ‘Snowflakes’ in the center, positioning it below where your heart drawings will go.
Step 3: Drawing the Motifs
-
Draw the main Star:
Above the ‘HEARTS’ text, draw a large, five-pointed star. To give it dimension, draw lines from the center point to each inner corner, creating a faceted 3D effect. Shade in every other facet with scribble lines. -
Create the main Snowflake:
In the right pane, above ‘STARS’, draw a classic six-pointed snowflake. Start with a simple cross, add a horizontal line through the center, and add small ‘V’ shapes at the end of each line. -
Sketch the Heart:
Below the ‘HEARTS’ text, draw a simple outline of a heart. Fill the inside with small, scattered dots or short dashes to add texture without coloring it in completely. -
Add the Leaf Sprig:
In the left pane below ‘LEAVES’, draw a vertical stem. Add pairs of simple oval leaves extending upwards from the stem. Darken the stem slightly for contrast.
Pro Tip: Contrast
Vary your line weight. Press harder on the marker for the main outline of shapes, and use a very light touch for internal details like veins or dots.
Step 4: Adding Filler Details
-
Burst accents:
Fill empty spaces with small ‘atomic’ starbursts—a central dot with lines radiating outward, capped with small circles. -
Mini star doodle:
Below the ‘Snowflakes’ text, draw a smaller, chunky five-pointed star. Fill the inside with tiny circles or flower patterns for a whimsical touch. -
Lower detailed leaves:
At the very bottom left, draw another leaf variation. Create a stem with three distinctive leaves featuring detailed vein lines inside them. -
Bottom border accents:
Finish the bottom of the window with scattered botanical sprigs and small geometric starbursts to balance the composition. -
Correct mistakes:
If a line goes rogue, use a damp cotton swab to quickly erase the specific error while the ink is still wet. I find this much easier than wiping the whole section.
Step back and enjoy the cozy, hand-drawn charm your new window art brings to the room
Upcycled Window Frame as a Painted Glass Artwork
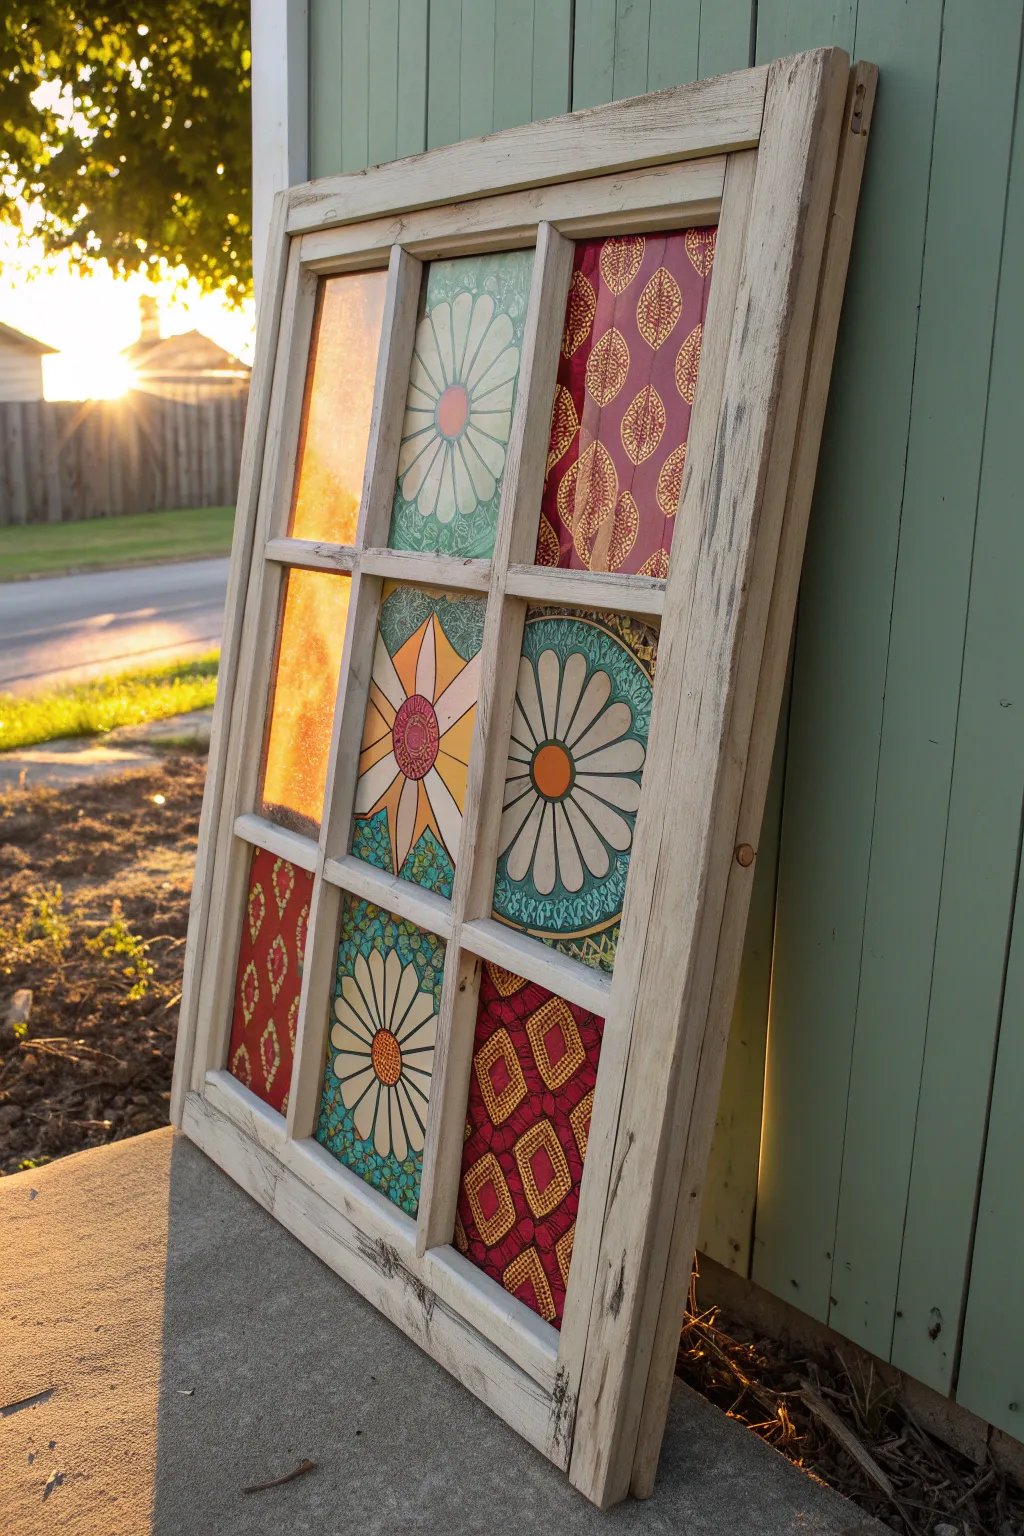
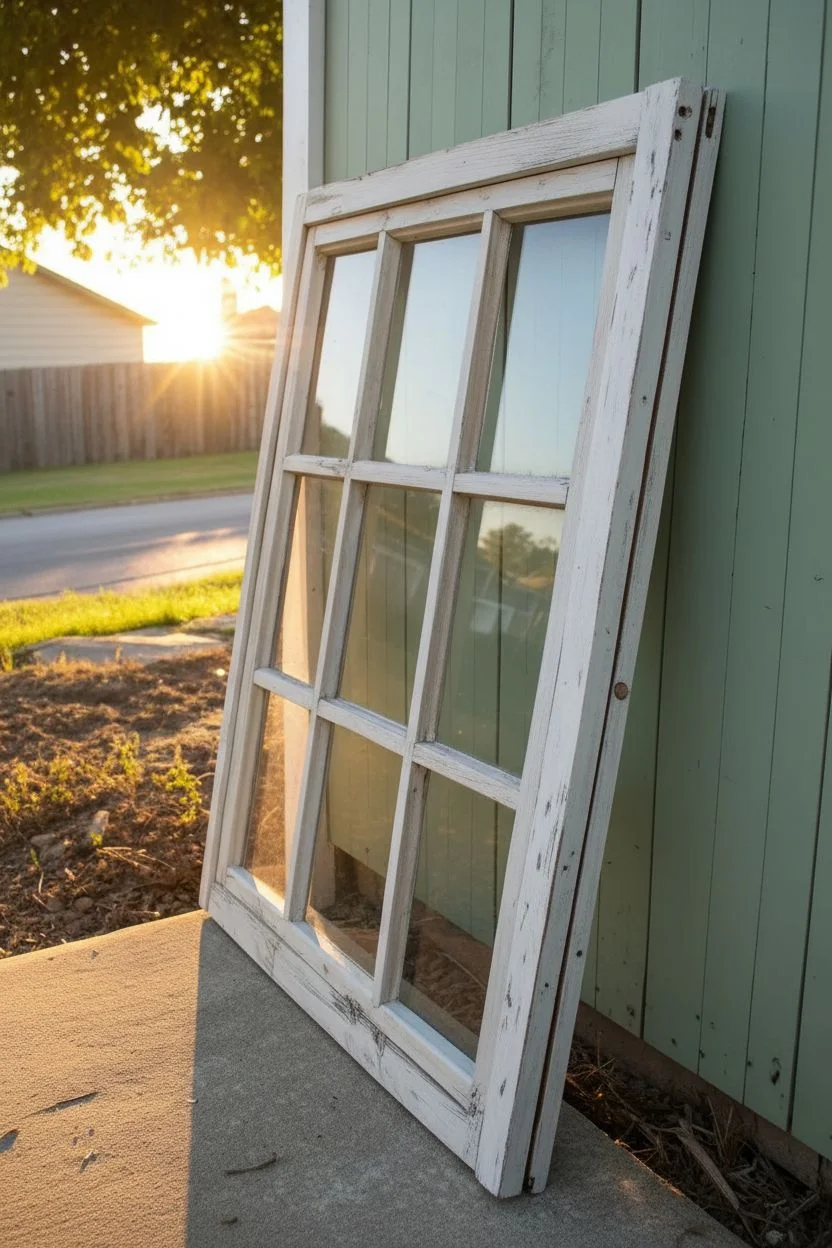
Transform a discarded window sash into a glowing gallery of vibrant patterns and warm light. By applying patterned paper or fabric directly to the glass panes, you create a faux stained-glass effect that radiates charm when the sun hits it.
Detailed Instructions
Materials
- Old wooden window frame (9-pane preferred)
- Sandpaper (medium and fine grit)
- White chalk paint or acrylic paint
- Paintbrush (2-inch sash brush)
- Decorative scrapbook paper, tissue paper, or thin fabric (various patterns)
- Mod Podge (gloss or matte finish)
- Foam brush applicator
- Scissors or craft knife
- Ruler
- Glass cleaner and lint-free cloth
- Clear acrylic sealer spray (optional)
Step 1: Preparing the Frame
-
Clean the find:
Begin by thoroughly cleaning the entire wooden frame. Remove any loose dirt, cobwebs, or peeling paint chips with a stiff brush. -
Sand for texture:
Lightly sand the wooden surfaces. You aren’t trying to strip it completely, but rather knocking down rough splinters and creating a ‘tooth’ for the new paint to adhere to if the old finish is too glossy. -
Wash the glass:
Clean both sides of the glass panes meticulously using glass cleaner and a lint-free cloth. Any grime left behind will be trapped under your artwork forever. -
Apply the base coat:
Paint the wooden frame with a coat of white chalk paint. I like to keep the brushstrokes loose to maintain a rustic feel. -
Distress the finish:
Once the paint is dry, use sandpaper to gently scuff the edges and corners, revealing some of the original wood underneath for that vintage, time-worn look shown in the photo.
Stubborn Bubbles?
If an air bubble persists under the paper after smoothing, use a sewing needle to prick a tiny hole in the center of the bubble, then press the air out through the hole.
Step 2: Creating the Patterned Panes
-
Measure the panes:
Measure the exact dimensions of each individual glass pane. Old windows are rarely perfectly square, so measure each one separately rather than assuming they are identical. -
Select your palette:
Choose your papers or fabrics. The example uses a mix of warm ambers, teals, and reds with floral and geometric motifs. Aim for variety but keep a cohesive color story. -
Cut the material:
Cut your decorative paper or fabric to size. It is best to cut them slightly smaller (about 1/16th of an inch) than the glass pane measurement to ensure they lay flat without bunching at the glazing points. -
Arrangement check:
Lay out your cut pieces on a table in the 3×3 grid pattern to finalize the placement before you start gluing. Ensure you balance the busy patterns with simpler ones. -
Apply the adhesive:
Working one pane at a time, apply a thin, even layer of Mod Podge directly onto the back side of the glass pane (the side that will be the back of the artwork). -
Place the pattern:
Carefully press the patterned paper or fabric onto the wet adhesive, with the printed side facing the glass. This ensures the pattern is visible from the front. -
Smooth it out:
Use a brayer tool or an old credit card to gently smooth the paper from the center outward to remove air bubbles. Be gentle with wet paper to avoid tearing. -
Seal the back:
Once the paper is in place, brush another coat of Mod Podge over the back of the paper to seal it fully.
Glow Up
Install a small strip of warm white LED fairy lights behind the frame deep inside the window sash recess. This turns your art piece into a cozy ambient lamp at night.
Step 3: Finishing Touches
-
Repeat the process:
Continue this method for all remaining panes, wiping away any excess glue that gets on the wooden frame immediately with a damp rag. -
Let it cure:
Allow the entire project to dry completely for at least 24 hours. The adhesive will dry clear, leaving only the vibrant patterns behind. -
Clean the front:
Do a final polish of the front-facing glass (the un-papered side) to remove any fingerprints or dust from the process. -
Protective spray:
If this piece will be near moisture or direct relentless sun, spray the papered back side with a clear acrylic sealer for extra durability.
Now you have a stunning, light-catching statement piece ready to lean against a wall or hang in a sunny corner


Have a question or want to share your own experience? I'd love to hear from you in the comments below!