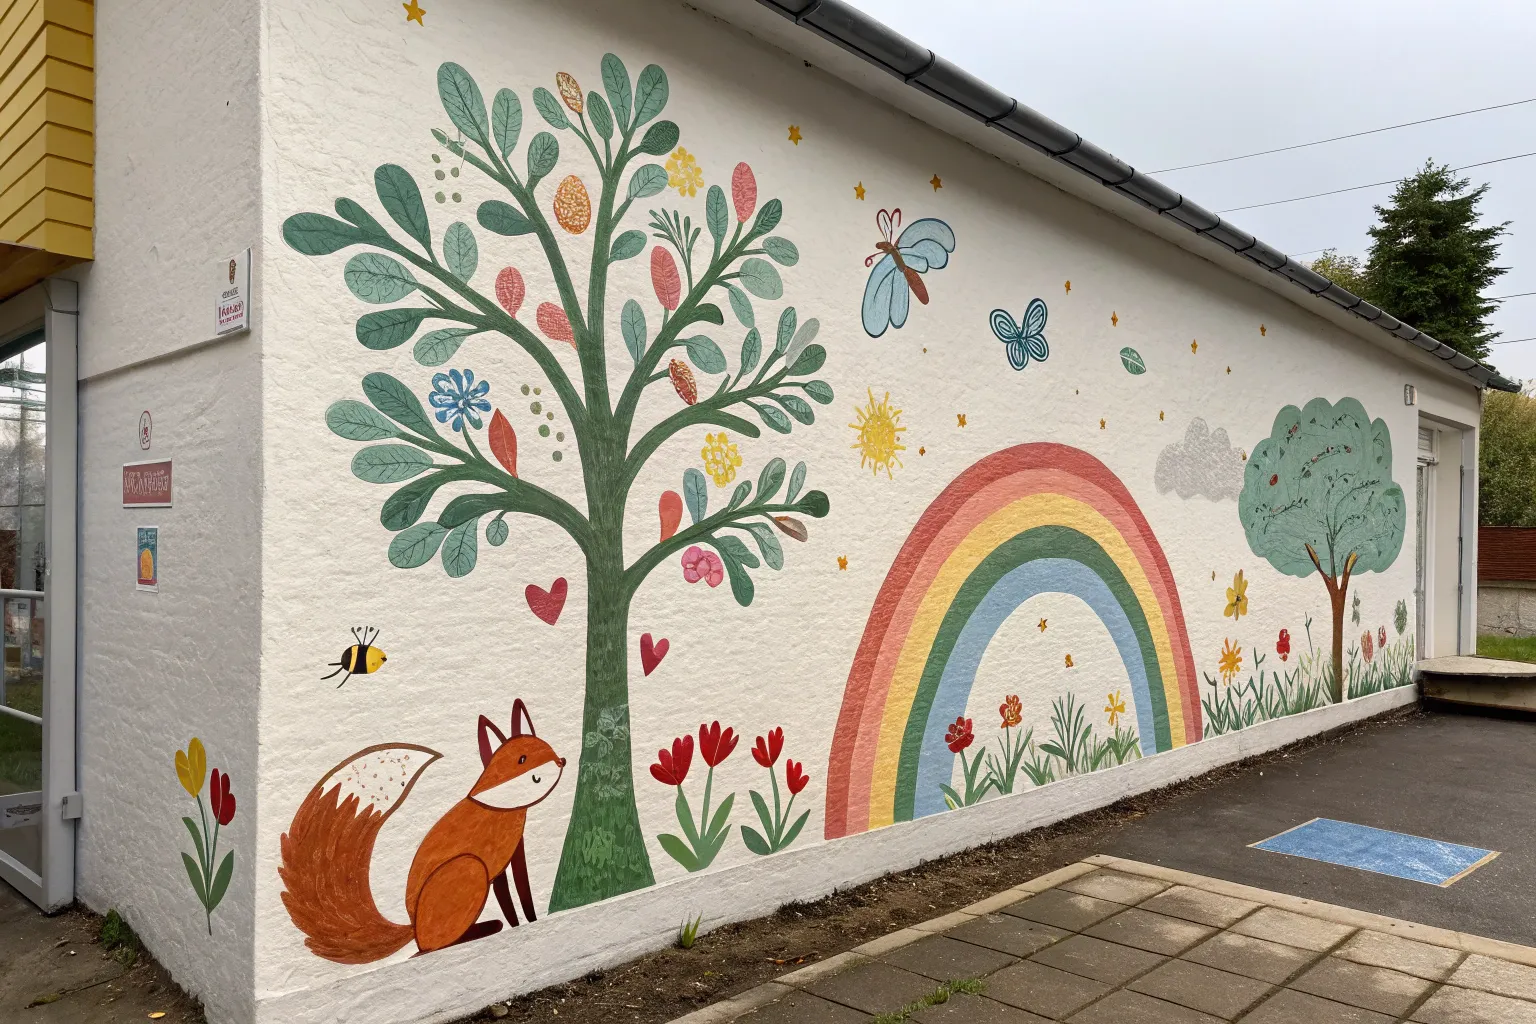
When I sketch out a preschool mural, I’m always chasing that cozy, curious vibe that makes kids want to explore the room. Here are my favorite classroom wall ideas—classic crowd-pleasers first, then a few playful twists you can adapt to hallways, nooks, and outdoor spaces.
Rainbow Over Rolling Hills
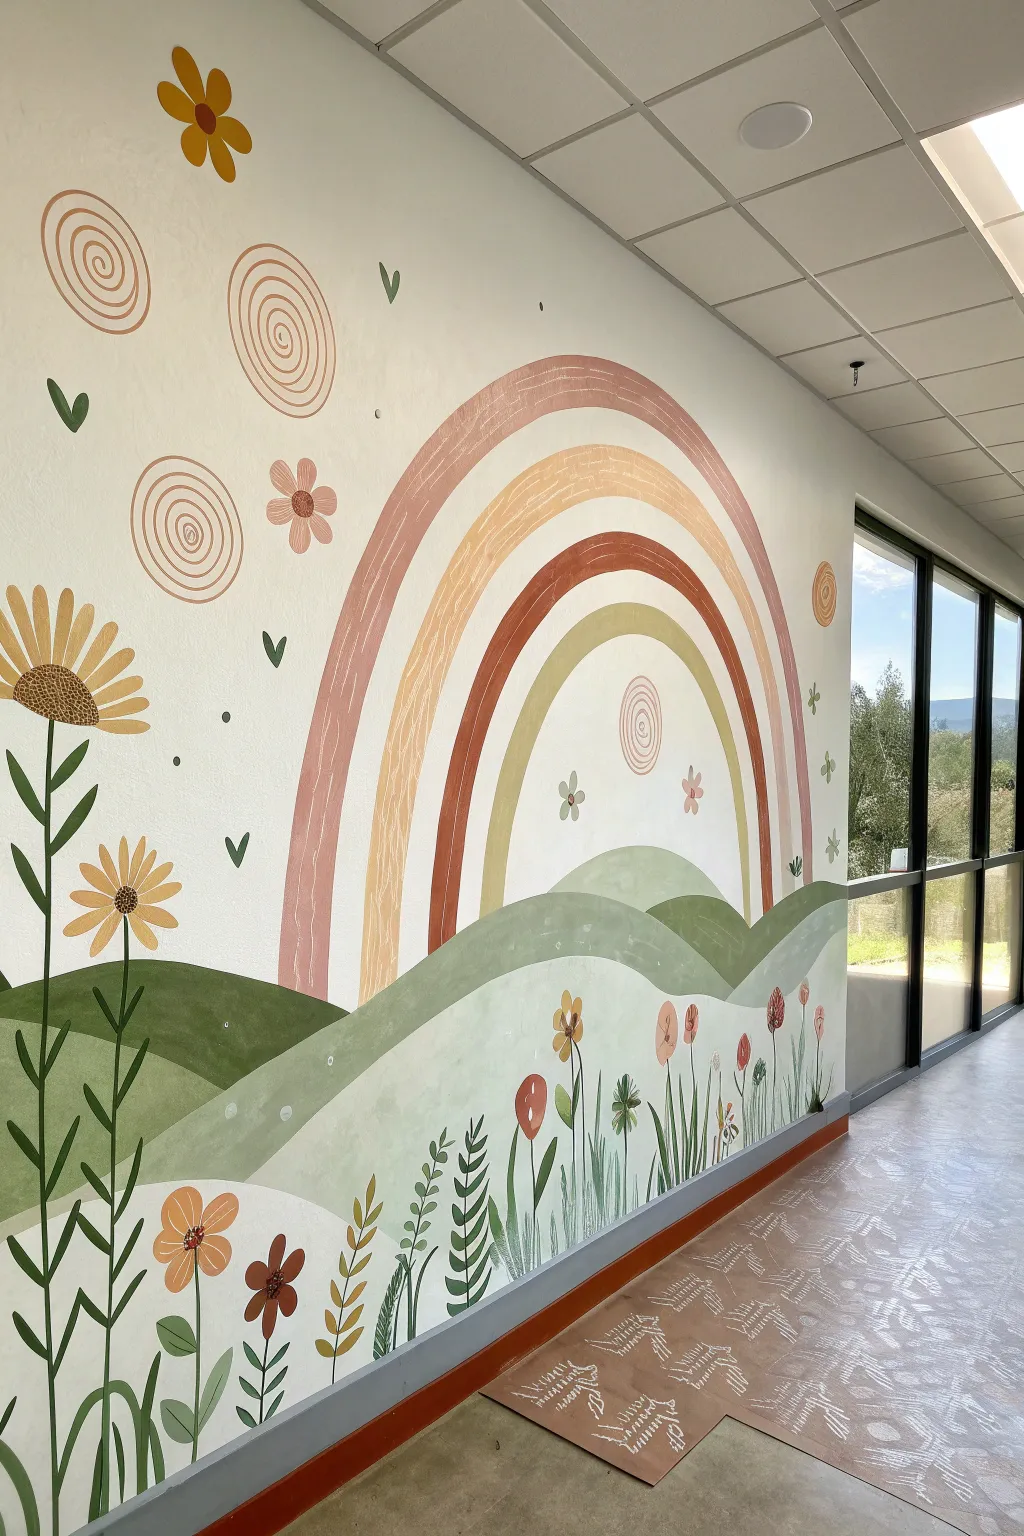

Transform a blank hallway or classroom wall into a soothing, nature-inspired landscape featuring a large, muted rainbow arching over gentle green hills. The soft, earthy color palette and playful floral details make this mural a calming yet stimulating visual for young children.
Step-by-Step Guide
Materials
- Latex interior wall paint (White base)
- Acrylic or latex sample pots (Earthy terracotta, warm beige, muted coral, sage green, olive green, cream, mustard yellow)
- Large foam roller and tray
- Pencil and eraser
- Long level or chalk line
- String and pushpin/nail (for compass technique)
- Painter’s tape
- Assorted brushes: 2-inch angled sash brush, 1-inch flat brush, round detail brushes (#4 and #8)
- Drop cloth
- Ladder or sturdy step stool
Step 1: Preparation & Base
-
Clear and clean:
Begin by clearing the wall area completely. Wipe the surface down with a damp cloth to remove any dust or fingerprints, ensuring the paint adheres properly. Lay down your drop cloth to protect the floor. -
Prime the wall:
If the wall isn’t already a clean white, roll on a fresh coat of white interior latex paint. This provides a neutral background that makes the muted colors pop and ensures even coverage. -
Establish the horizon:
Using a pencil, lightly sketch the rolling hills. Aim for three distinct layers: a foreground, a middle ground, and a background hill. Keep the lines curvy and organic rather than perfect slopes.
Clean Curves Secret
If you struggle with steady hands for the rainbow arches, use flexible painter’s tape to mask off the curves. It takes longer to prep, but guarantees crisp edges.
Step 2: Painting the Landscape
-
Paint the background hill:
Mix your lightest sage green tone. Using a 2-inch angled brush for the top edge and a roller for the fill, paint the undulating shape of the farthest back hill. I find it easiest to cut in the curve first, then fill below. -
Layer the middle ground:
Once the first hill is dry to the touch, mix a slightly deeper, olive-green tone. Paint the middle hill shape, overlapping the bottom of the first hill to create depth. -
Finish the foreground:
For the closest hill at the bottom, use your darkest, richest green. This anchors the mural. Paint this section similarly, ensuring the bottom edge meets the baseboard neatly. -
Add texture:
While the green paint is drying, you can optionally scumble a bit of lighter green or white wash over the hills using a dry brush technique to give it that soft, watercolor-like texture seen in the reference.
Interactive Wall
Turn the mural into a sensory station by attaching tactile elements like textured fabric leaves or wooden flower knobs securely to the wall within the painted garden.
Step 3: Constructing the Rainbow
-
Find the center:
Locate the center point where you want your rainbow to originate. This should be roughly in the middle of your hills. -
Draw the arches:
Create a makeshift compass by tying a string to a pencil. Pin the other end of the string to your center point. Adjust the string length to draw four concentric arches, spacing them about 4-6 inches apart. -
Paint the outer arch:
Using a 1-inch flat brush, fill in the largest, outermost arch with a muted coral or dusty pink color. Work slowly along the pencil line to keep the curve smooth. -
Paint the middle arch:
Switch to a warm beige or sand color for the second arch. Leave a small gap of white space (about an inch) between this arch and the first one to create breathing room in the design. -
Paint the inner arches:
Continue painting inward. Use a deep terracotta or rust color for the third arch, followed by a muted ochre or mustard for the innermost arch. Let the bottom of the rainbow disappear naturally behind the painted hills.
Step 4: Floral Details & Finishing Touches
-
Sketch the large flowers:
On the left side, lightly pencil in two or three large daisies with long stems growing out of the foreground hill. Vary their heights to keep the composition dynamic. -
Paint flower centers:
Use a round brush and dark brown or bronze paint to fill the centers of your large flowers. Create a stippled texture by dabbing the brush tip repeatedly. -
Petal painting:
Mix a soft yellow-orange. Using a flat brush, press and pull to create the long, simple petal shapes radiating from the centers. Don’t worry about perfect symmetry; the boho style embraces imperfection. -
Add grassy elements:
Along the bottom foreground, use a thin round brush (#4) and dark green paint to flick upward strokes, creating stylized grass blades and fern-like leaves. -
Incorporate small blooms:
Scatter smaller flowers—tulips, posies, and simple circles—throughout the grass and the white sky space. Use a mix of your leftover terracotta, pink, and yellow paints for variety. -
Add floating shapes:
Fill empty sky areas with whimsical elements like spirals, small hearts, and simple dots. I like using the muted terracotta for the spirals to echo the rainbow. -
Final inspection:
Step back to view the whole wall. Use a small brush with white paint to touch up any messy edges on the rainbow or hills, and erase any visible pencil lines once the paint is fully cured.
Now you have a serene, welcoming feature wall that brings a touch of the outdoors inside.


Smiling Sun and Puffy Cloud Sky

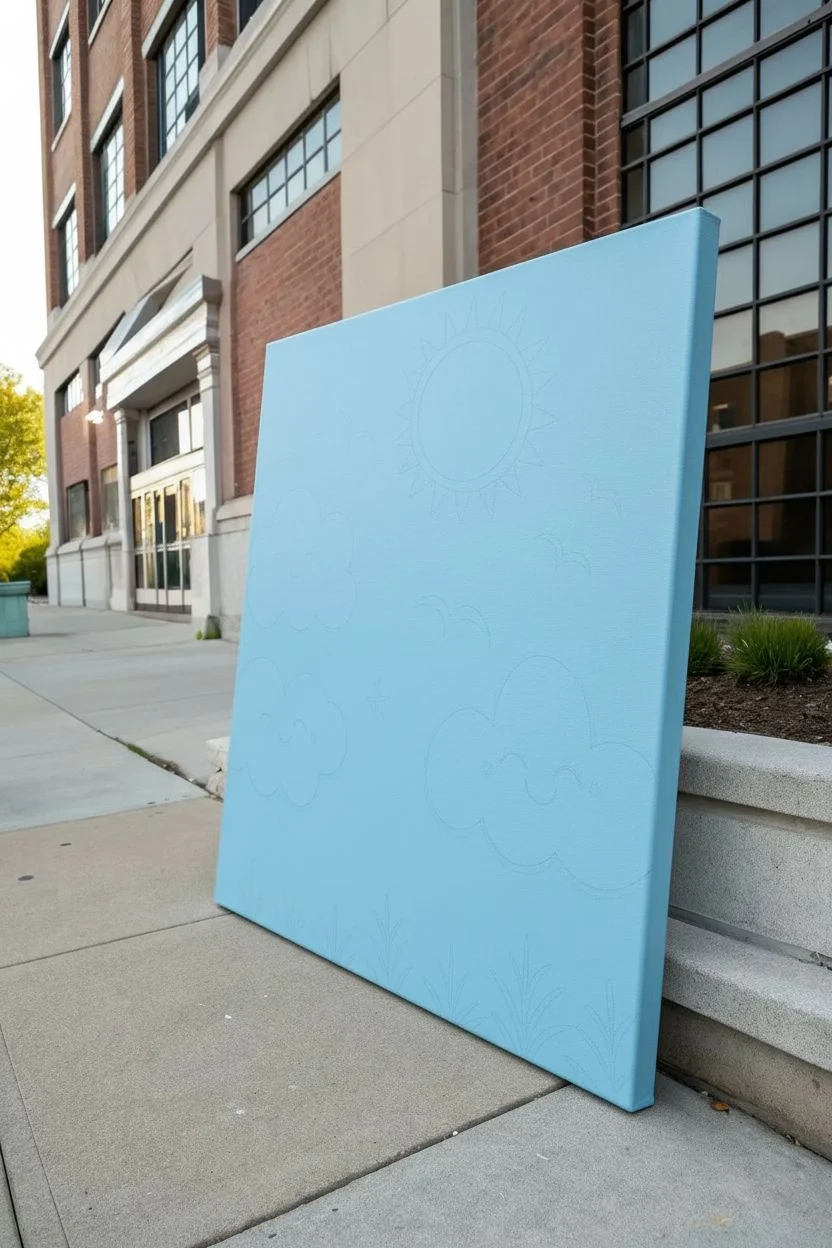
Brighten up any playroom or classroom with this cheerful canvas painting featuring a smiling sun and friendly clouds. The soft pastel blue background and cartoon-style faces create a welcoming, gentle atmosphere perfect for little ones.
Step-by-Step Tutorial
Materials
- Large square canvas (approx. 24×24 or 30×30 inches)
- Acrylic paints: light blue, titanium white, bright yellow, golden yellow/orange, black, teal/green
- Large flat brush (2-3 inch) for background
- Medium round brush
- Small liner brush for details
- Pencil for sketching
- Water cup and paper towels
- Palette or paper plate
Step 1: Setting the Scene
-
Prepare the Background:
Start by mixing a large amount of light blue paint. Use your wide flat brush to cover the entire canvas with smooth, horizontal strokes. Ensure you paint the sides of the canvas as well for a polished, finished look. -
Let it Dry:
Allow the blue background to dry completely. This usually takes about 20-30 minutes, depending on the thickness of your paint application. The surface should be dry to the touch before sketching. -
Sketch the Layout:
Lightly use a pencil to map out your composition. draw a large circle for the sun in the upper center, three puffy cloud shapes scattered around, and indicate where the grass line will be at the bottom.
Uneven Lines?
If your black outlines or bird shapes feel shaky, try thinning the black paint slightly with a drop of water. This helps the liner brush glide more smoothly across the canvas texture.
Step 2: Painting the Sun and Clouds
-
Base Coat the Sun:
Fill in the sun’s circle with bright yellow paint using a medium round brush. You may need two coats to get a solid, opaque coverage over the blue background. -
Add Sun Rays:
Mix a golden yellow or light orange shade. Paint triangular rays radiating outward from the sun circle. I like to keep the edges slightly soft but distinct enough to pop against the blue. -
Fill the Clouds:
Using titanium white, paint the three cloud shapes. Use dabbing motions with your brush to give them a slightly fluffy texture rather than painting them perfectly flat. -
Repeat for Opacity:
White paint is often translucent, so once the first layer is dry, add a second coat to the clouds to make them bright and crisp. -
Cloud Shadows:
If desired, mix a tiny drop of blue into your white to create a very faint shadow color. Paint a thin line along the bottom curves of the clouds for subtle dimension.
Cloud Texture Tip
Use a round sponge or stencil brush to dab on the white cloud paint. This creates a naturally puffy, soft texture that looks more realistic than simple brush strokes.
Step 3: Adding Faces and Details
-
Paint the Birds:
Using black paint and a small liner brush or a medium brush, paint V-shaped birds flying in the sky. Vary their sizes and angles to make the movement look natural. -
Sun Face:
With the liner brush and black paint, carefully draw two arched eyes and a wide, U-shaped smile on the yellow sun center. -
Cloud Faces:
Paint similar happy faces on each cloud. Give them curved, sleeping eyes (inverted U-shapes) and small smiles. Keep your hand steady and use only the tip of the brush. -
Rosy Cheeks:
Dip a small brush into orange or pink paint, wipe most of it off, and gently dry-brush small circles or flower-like shapes onto the cheeks of the clouds for a blush effect.
Step 4: Finishing Touches
-
Paint the Grass:
Mix a teal or muted green color. Along the very bottom edge of the canvas, paint upward strokes that taper at the top to resemble simplified grass blades. -
Layer the Grass:
Add a few smaller grass clumps slightly higher up than the bottom edge to create depth, interlocking them with the lower blades. -
Stray Details:
Check for any small details like the small dragonfly or bug shape near the center cloud, painting it with simple black strokes. -
Seal the Artwork:
Once all paint is thoroughly dry (give it a few hours or overnight), apply a coat of clear acrylic varnish to protect your mural and give it a uniform sheen.
Hang your new masterpiece low on the wall so the little ones can enjoy the friendly faces up close


Garden Meadow With Big Flowers and Bugs
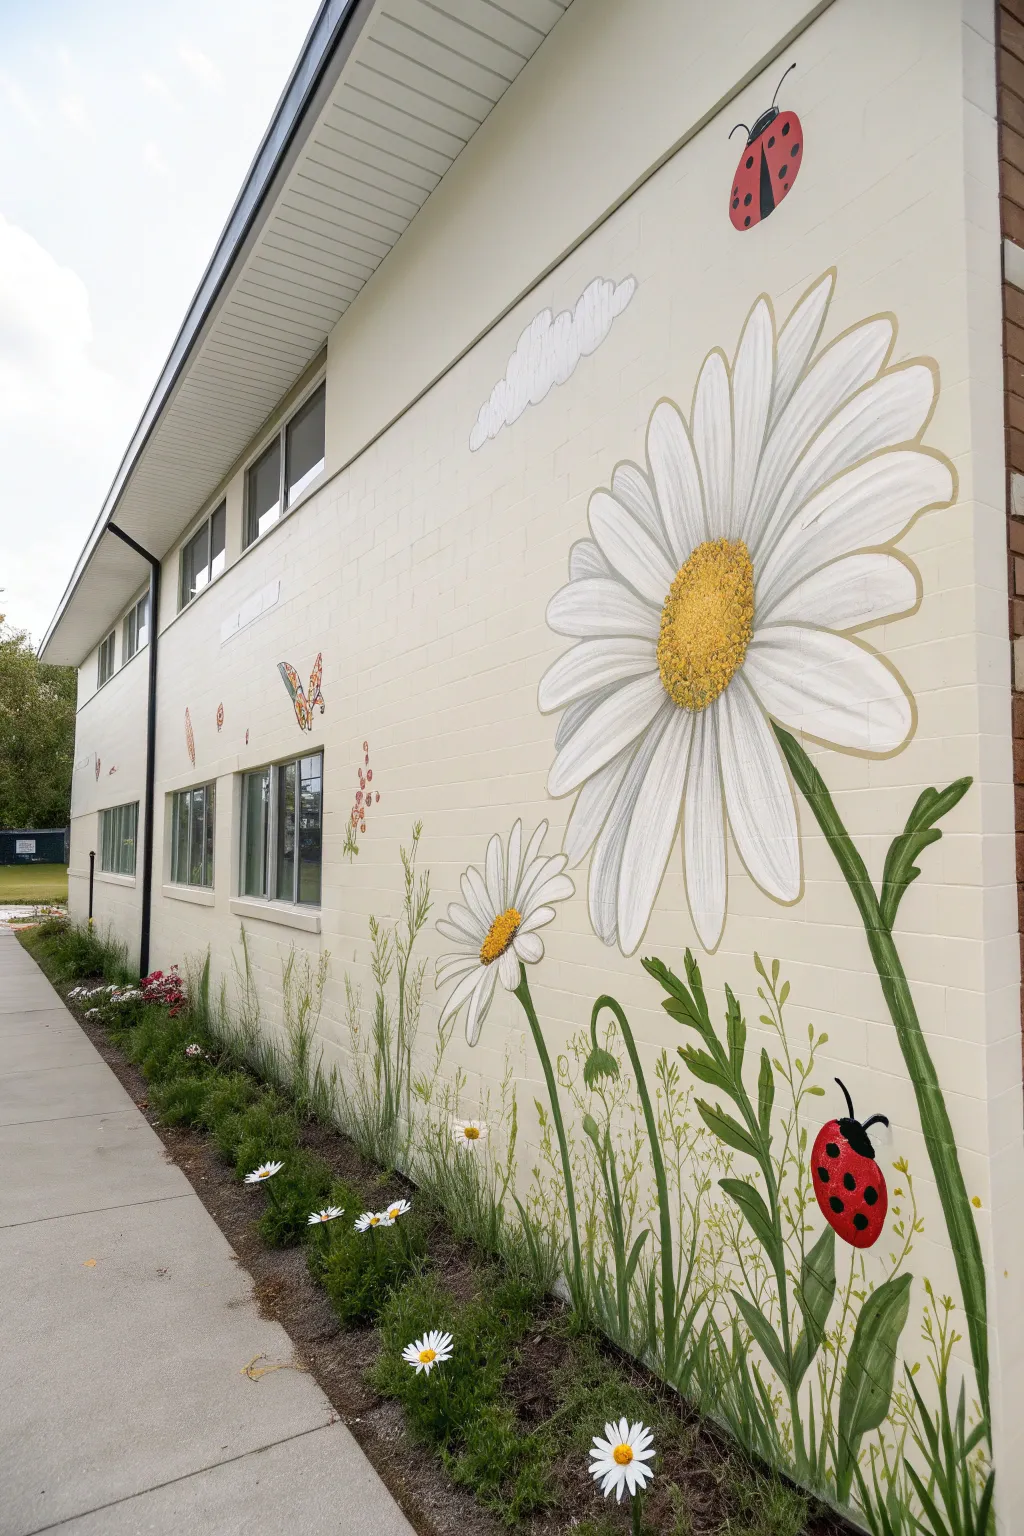
Transform a plain exterior brick or block wall into a whimsical garden scene that greets visitors with cheer. This mural features colossal daisies, fluttering butterflies, and charming ladybugs set against a soft, creamy background that brightens up any preschool entryway.
How-To Guide
Materials
- Exterior primer (white)
- Exterior latex acrylic masonry paint (various colors)
- Chalk or charcoal pencils for sketching
- Painter’s tape
- Drop cloths
- Paint rollers (medium nap for block walls)
- Extension pole for rollers
- Assorted paintbrushes (large scenery brushes and small detail brushes)
- Clear exterior sealant (UV resistant)
- Ladder or scaffolding
- Small plastic cups for mixing
Step 1: Preparation and Background
-
Clean the surface:
Begin by thoroughly cleaning the brick or cinder block wall. Use a pressure washer or a stiff scrub brush with soapy water to remove dirt, mold, or existing peeling paint. Allow this to dry completely for at least 24 hours. -
Protect the area:
Lay down drop cloths along the base of the wall to protect the concrete walkway and any nearby landscaping. Use painter’s tape to mask off window frames, downspouts, and the roofline trim. -
Apply the base coat:
Using a roller with a nap thick enough to get into the mortar grooves (usually 1/2 inch to 3/4 inch), apply a coat of high-quality exterior primer. Once dry, roll on two coats of your background color—a soft, warm cream or off-white works beautifully here to make the flowers pop.
Use A Projector At Night
For perfect proportions on a huge wall, project your line drawing onto the surface at night and trace the lines with chalk before painting.
Step 2: Drafting the Design
-
Sketch the layout:
Once the background is fully cured, use chalk or charcoal pencils to sketch the outline of your large daisies. Place the largest flower prominently on the right side, reaching nearly to the top, and stagger smaller blooms and grass blades towards the bottom and left. -
Outline the bugs:
Don’t forget the critters. Sketch a large ladybug high near the roofline, another crawling among the grass stems near the bottom, and a few butterflies fluttering near the windows. -
Add cloud details:
Lightly sketch a few fluffy, whimsical cloud shapes near the top center of the wall to balance the composition.
Add Real Plants
Plant actual ornamental grasses, daisies, or Shasta daisies in the soil bed right at the base of the wall to blur the line between art and reality.
Step 3: Painting the Daisies
-
Fill the petals:
Using a brighter, cleaner white paint than your background, fill in the daisy petals. You might need two layers to ensure opacity over the cream base. -
Paint the centers:
Mix a sunny yellow with a touch of ochre. Paint the large textured centers of the daisies. Use a stippling motion (dabbing the brush up and down) to create the fuzzy, seed-like texture found in the flower’s eye. -
Add petal definition:
Mix a very light grey or diluted beige. With a thin brush, paint subtle lines following the curve of each petal to give them dimension and separate them visually from one another. -
Outline the shapes:
For a stylized illustration look, I find it helpful to outline the petals and centers with a thin, defining line. Use a neutral taupe or soft brown rather than harsh black for a gentler appearance.
Step 4: Painting the Greenery
-
Block in stems:
Using a vibrant meadow green, paint the thick, sturdy stems for your main daisies. Ensure the lines have a natural curve rather than being stick-straight. -
Add grass layers:
Mix a few shades of lighter and darker greens. Use a long, flat brush to flick paint upward from the sidewalk level, creating tall, wispy grasses and leafy weeds that overlap the bottom of the wall. -
Detail the leaves:
Paint the jagged, distinct leaves of the daisy plants attached to the main stems. Add lighter green veins to these leaves for depth.
Step 5: Adding Life and Details
-
Paint the ladybugs:
Fill the ladybug shapes with a bold red. Once dry, use black to paint their heads, legs, and signature spots. Add a tiny white dot on the shell as a highlight to make them look shiny. -
Detail the butterflies:
Paint the butterflies using oranges, yellows, and blacks. Simple patterns work best for viewing from a distance. -
Fill the clouds:
Paint the sketched clouds with a semi-transparent white wash, or use the same white as the petals for a bolder look, outlining them softly in grey. -
Seal the artwork:
After the mural has dried for at least 48 hours (or according to paint manufacturer instructions), apply a clear, non-yellowing UV-resistant sealer to protect your hard work from the elements.
Now you have a blooming masterpiece that keeps spring alive all year round.


Storytime Tree for a Reading Corner
Transform an awkward corner into a magical reading nook with this expansive tree mural that spans two walls. Featuring stylized branches, friendly woodland creatures, and scattered leaves, this painting technique uses the room’s architecture to add depth and immersion.
Detailed Instructions
Materials
- Latex wall paint (brown, multiple greens, orange, red)
- Pencil and eraser
- Painter’s tape
- Chalk (optional, for sketching)
- Projector (optional)
- Large angled sash brush (2-3 inch)
- Round detail brushes (sizes 4, 8, and 12)
- Drop cloths
- Step ladder
- Small roller and tray
Step 1: Preparation and Mapping
-
Prepare the workspace:
Clear the corner completely and lay down drop cloths to protect the flooring. If your wall isn’t already a creamy neutral color, apply a base coat of off-white or light beige latex paint and let it dry completely. -
Sketch the trunk skeleton:
Using a pencil or a piece of chalk, lightly sketch the outline of the tree trunk directly into the corner where the walls meet. The corner seam will act as the center of your trunk, helping to anchor the design. -
Extend the branches:
Draw the main branches radiating outward from the corner trunk, ensuring they reach high up toward the ceiling tiles. Variation is key here; make some branches thick and structural, while others should be thin and spindly. -
Add character details:
Sketch placement circles or light outlines for where your woodland creatures—like the fox, owl, and birds—will sit. Don’t worry about perfect details yet; just mark their positions.
Corner Perspective Tip
Stand in the middle of the room when sketching the tree. The image should look continuous across the corner, so check your angles frequently to ensure the branches connect logically.
Step 2: Painting the Tree Structure
-
Fill the trunk base:
Load a large angled sash brush with medium-brown latex paint. Start filling in the trunk at the floor level, painting with long vertical strokes that mimic wood grain. -
Paint the main branches:
Continuing with the sash brush, paint the thicker branches. As you move away from the trunk, twist your wrist slightly to create organic, non-linear edges that feel more natural than straight lines. -
Detail the twigs:
Switch to a size 12 round brush to paint the thinner twigs and upper extremities of the tree. Let these lines taper off delicately at the ends. -
Add bark texture:
While the brown paint is still slightly tacky or just after drying, use a slightly lighter brown or tan shade mixed with a little water. Use a smaller brush to add vertical striations and swirls—particularly around knots—to create a bark-like texture.
Interactive 3D Elements
Glue small wooden birdhouses or artificial silk leaves directly onto the wall among the painted branches to add a tactile, sensory element for the children to explore.
Step 3: Adding Foliage and Flora
-
Paint base leaves:
Using a leaf-shaped stencil or freehanding with a round brush, paint the primary layer of leaves using a muted sage green. Scatter them along the branches, but leave plenty of open space. -
Layer secondary leaves:
Once the sage leaves are dry, switch to a brighter spring green. Add a second set of leaves, sometimes overlapping the first set to create density and visual interest. -
Create the ground cover:
At the base of the trunk along the floorboard, paint vertical blades of grass using two shades of green. Use quick, upward flicking motions with your brush to get a tapered grass blade effect. -
Add ground flowers:
intersperse simple red and orange flowers among the grass blades. Simple shapes works best here, like tulips or poppies, to match the stylized look of the tree.
Step 4: Creatures and Finishing Touches
-
Paint the fox:
Using a rusty orange paint, fill in the fox shape sitting on the lower branch. Use white for the chest and tip of the tail, and add facial features with a fine detail brush once the orange allows. -
Add the owl and birds:
Block in the shapes of the owl and smaller birds with their respective base colors. Give the owl a textured look by using short, dabbing brushstrokes to simulate feathers. -
Include playful accents:
Paint a few hearts near the branches or floating in the air to add warmth to the scene. You can also paint a simple wooden sign shape on the wall if you plan to attach a real plaque later. -
Review and touch up:
Step back to view the corner as a whole. Use your wall base color to clean up any accidental smudges on the edges of the branches, sharpening the silhouette. -
Seal the mural (optional):
For high-traffic areas like a classroom reading corner, I often recommend applying a clear, water-based matte sealer over the lower half of the mural to protect it from little hands.
Now you have a cozy, immersive backdrop ready for years of storytime adventures
BRUSH GUIDE
The Right Brush for Every Stroke
From clean lines to bold texture — master brush choice, stroke control, and essential techniques.
Explore the Full Guide
Under-the-Sea Friends Wall
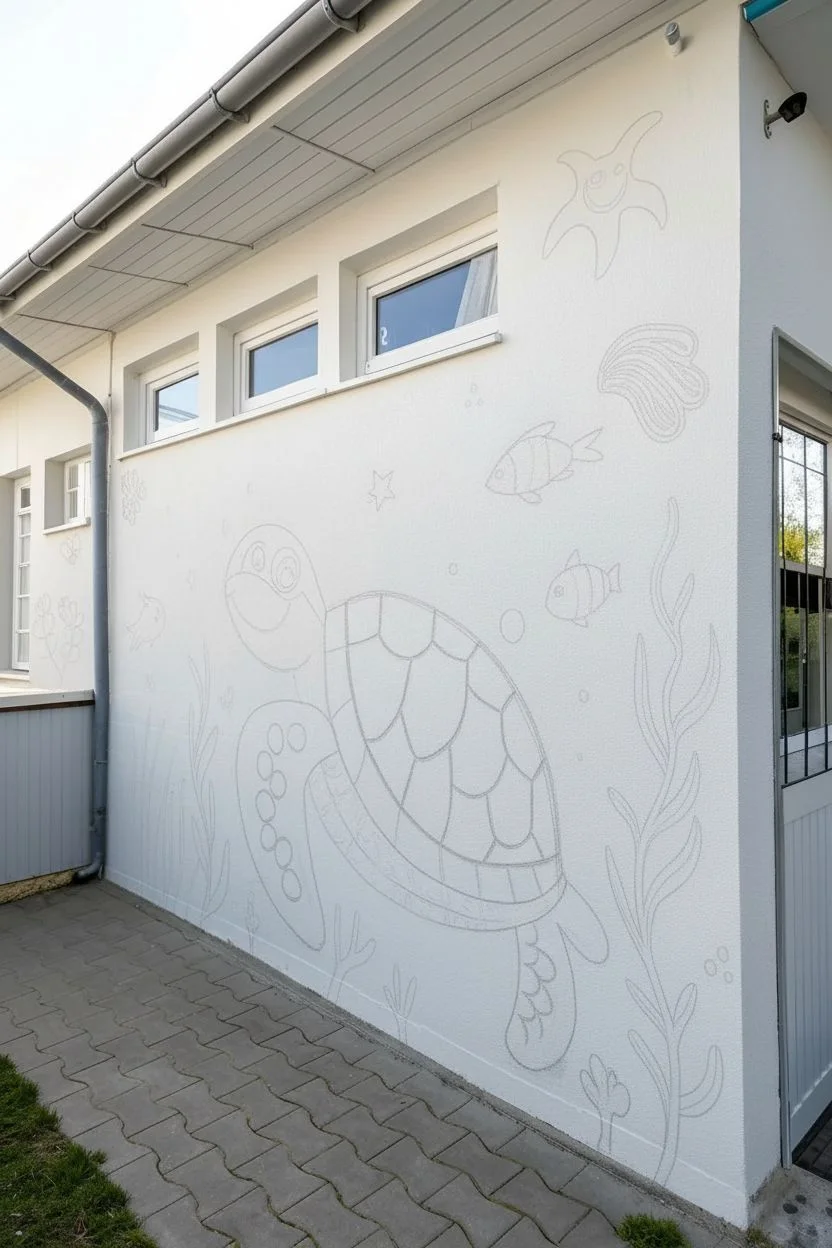
Transform a plain exterior wall into an underwater wonderland with this cheerful mural featuring a smiling sea turtle and friends. This adorable scene uses simple shapes and vibrant colors, making it a perfect project to brighten up a preschool courtyard or playground area.
Step-by-Step
Materials
- Exterior masonry paint (White primer/base)
- Exterior acrylic latex paints (Teal, Navy Blue, Yellow, Orange, Red, Light Blue)
- Assorted paintbrushes (2-inch flat for filling, angled sash brush for curves, small round brush for details)
- Chalk or pastel pencil (light blue or gray)
- Painter’s tape
- Drop cloth
- Ladder or step stool
- Damp rag for mistakes
- Clear exterior sealant (optional)
Step 1: Preparation & Base shapes
-
Clean the surface:
Begin by thoroughly cleaning the exterior wall to remove dirt and dust. If the stucco is gritty, use a stiff bristle brush. Ensure the wall is completely dry before starting. -
Prime the canvas:
If your wall isn’t already fresh white, apply a coat of white exterior masonry paint to create a clean, bright background that will make your colors pop. -
Sketch the turtle:
Use chalk to lightly sketch the large turtle shape first, positioning it centrally but slightly low. Draw a large oval for the shell, a smaller oval for the head, and four distinct flipper shapes. -
Sketch background elements:
Around the turtle, sketch the supporting characters: a five-pointed starfish in the upper right, a swirly seashell, two fish shapes, and wavy lines for the tall seaweed on the sides.
Rough Wall Pro-Tip
On textured stucco, don’t drag the brush. Dab or stipple the paint into the crevices to ensure full coverage without destroying your brush bristles.
Step 2: Painting the Turtle
-
Block in the shell:
Mix a deep teal color and fill in the main shell area. Don’t worry about the pattern yet; just get a solid, opaque coat of green down. -
Paint the skin:
Use a warm yellow-ochre tone for the turtle’s underside (plastron), neck, and face. Blend a little white into the yellow near the top of the head for a subtle highlight. -
Fill the flippers:
Paint the flippers using the same deep teal as the shell, perhaps darkening it slightly with a drop of blue for the rear flipper to create depth. -
Detail the shell pattern:
Once the green base is dry, use a thin round brush with light blue or white paint to draw the geometric scute patterns on the shell. Think of these as rounded pentagons and hexagons fitting together. -
Add flipper textures:
Using a lighter teal or cyan, paint scalloped ‘scale’ shapes on the flippers. This adds that crucial illustrative texture seen in the reference. -
Create the face:
Paint a large white circle for the eye, followed by a brown iris and black pupil. Add a small white dot for sparkle. Use a thin black or dark brown line to paint the smiling mouth.
Drip Prevention
Paint consistency is key outdoors. If your paint is too thin it will run down the wall; too thick and it won’t stick. Aim for the texture of heavy cream.
Step 3: Bringing the Ocean to Life
-
Paint the starfish:
Fill the starfish shape with a terracotta reddish-orange. Once dry, add a simple smiling face with white eyes and black pupils to give it personality. -
Color the fish:
Paint the top fish orange with yellow fins. Paint the smaller fish navy blue with a yellow stripe. I find angled brushes help keep these small shapes crisp against the rough wall texture. -
Paint the seashell:
Use a yellow-orange hue for the large shell above the turtle. Once the base is dry, use white lines to define the spiral ridges. -
Grow the seaweed:
Using a dark teal or forest green, paint the tall, wavy seaweed on the right side. Use a single long stroke from bottom to top for each frond to keep the lines fluid. -
Add floor vegetation:
Add smaller seaweed bunches at the bottom left and bottom center using lighter blue and orange tones to balance the composition.
Step 4: Final Touches
-
Add bubbles and stars:
Dip a round sponge dabber or a round brush into light blue paint to create scattered bubbles. Add a few small star shapes for whimsy. -
Refine outlines:
If any edges look messy, step back and touch them up with the white background paint to ‘erase’ splatters or shaky lines. -
Seal the work:
Once the paint has cured (usually 24 hours), apply a clear exterior UV-resistant sealer to protect your colorful friends from the weather.
Now you have a charming underwater scene that greets everyone with a smile every day
Alphabet Border With Picture Clues
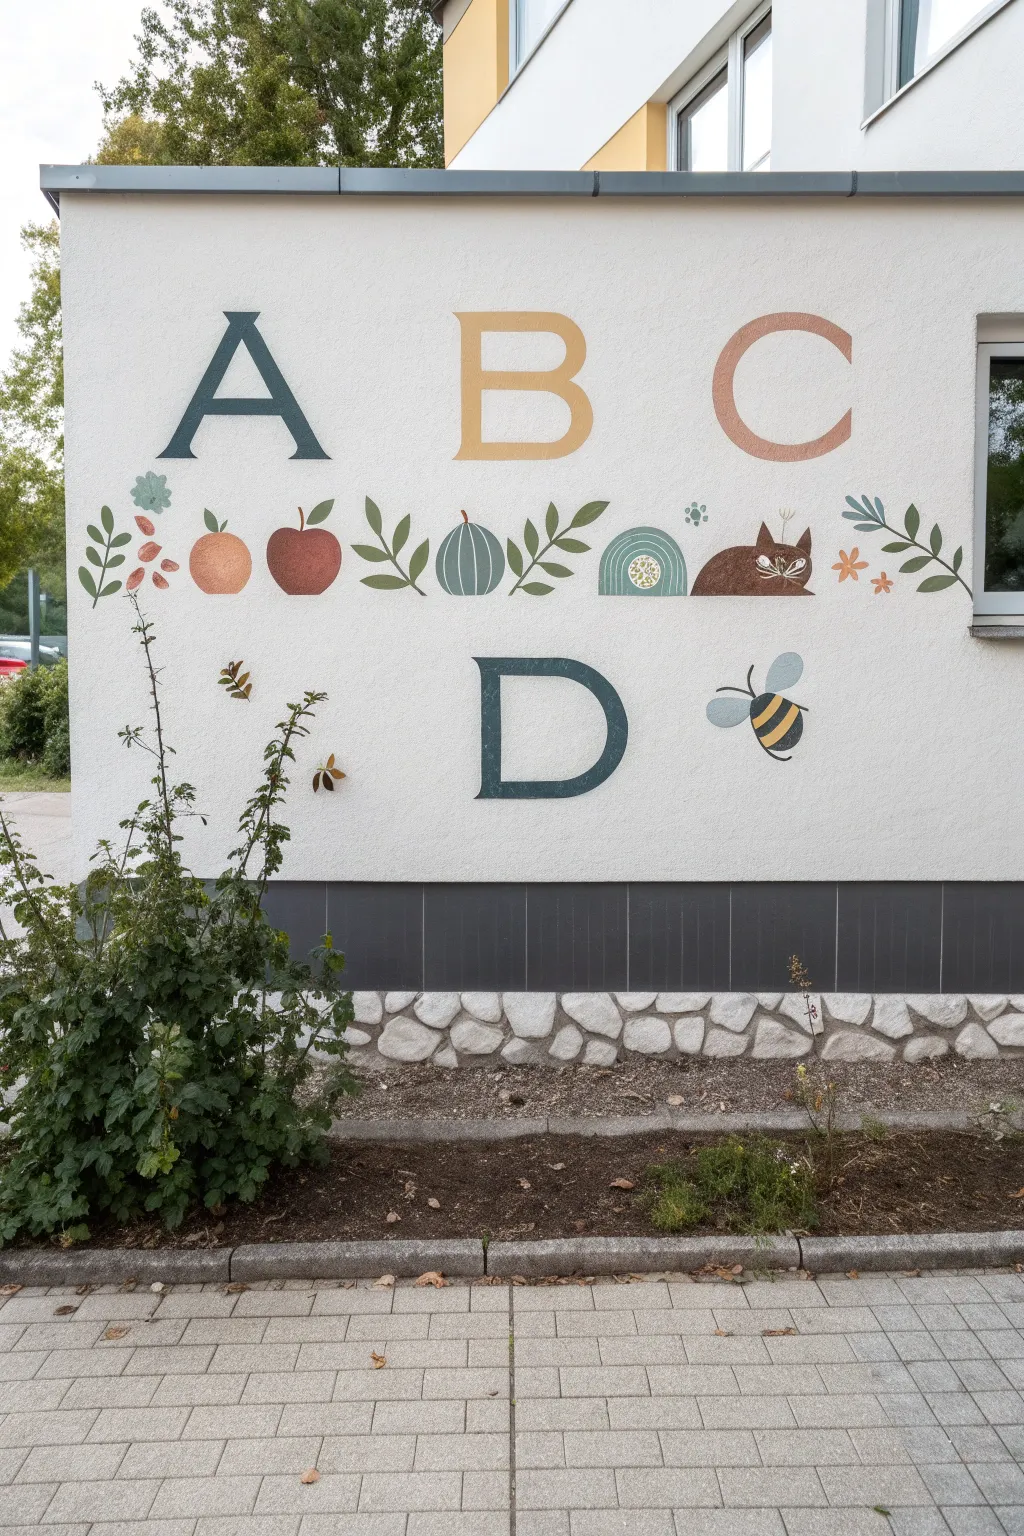
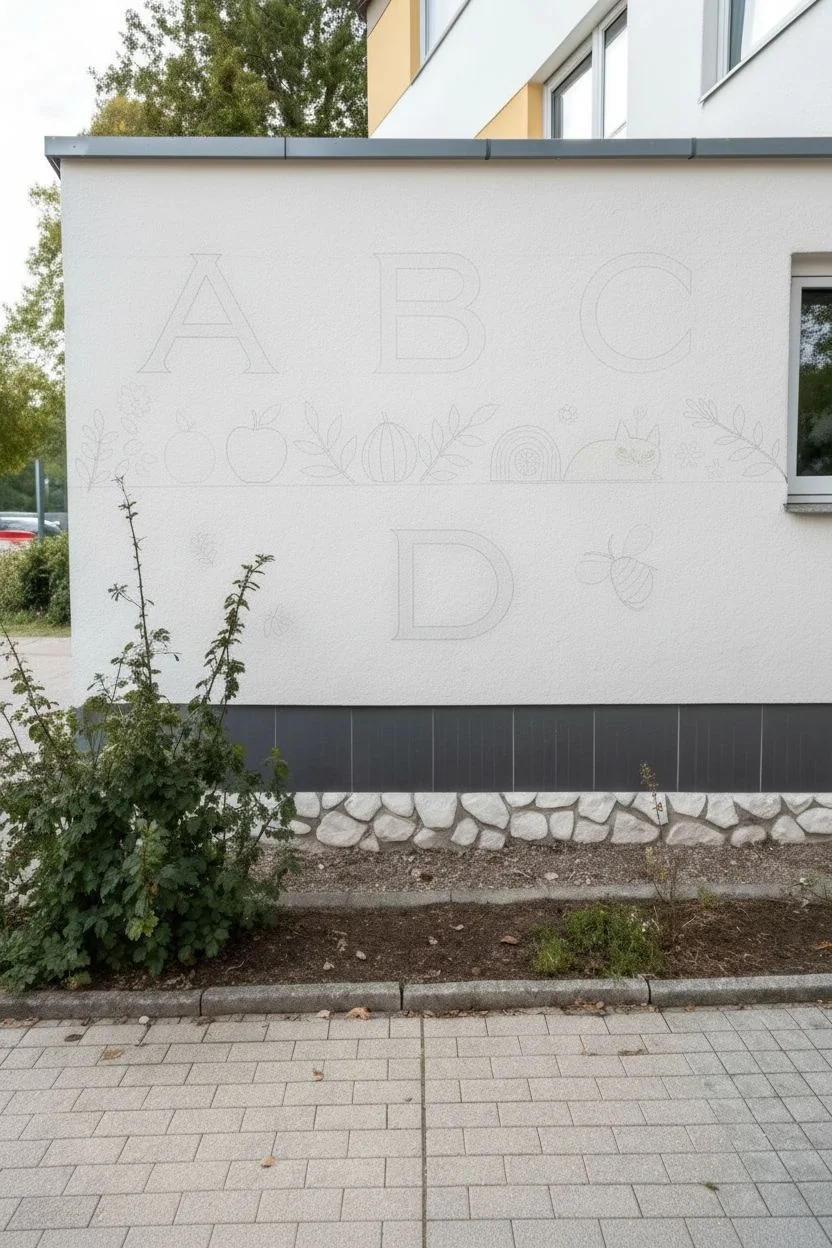
Transform a plain exterior wall into a charming learning corner with this nature-inspired alphabet mural. Featuring classic serif typography paired with stylized flora and fauna, the muted, earthy color palette creates a calm and inviting educational space.
How-To Guide
Materials
- Exterior masonry primer
- Exterior acrylic latex paint (matte or satin finish)
- Pencil and large eraser
- Bubble level or laser level
- Measuring tape
- Grid paper or projector
- High-quality angled sash brushes (1.5-2 inch)
- Small round detail brushes (sizes 4-8)
- Painter’s tape
- Cardboard for stencils (optional)
- Drop cloth
Step 1: Preparation & Layout
-
Clean the surface:
Begin by thoroughly cleaning the exterior wall to remove dust, dirt, or loose stucco using mild soap and water or a pressure washer on a low setting. Allow the wall to dry completely before proceeding. -
Prime the area:
If the wall hasn’t been painted recently, apply a coat of exterior masonry primer to ensure your artwork adheres properly and the colors stay true. -
Establish the baseline:
Use a laser level or a long bubble level to mark a faint horizontal line with your pencil where the bottom of your illustrations will sit. Create another parallel line above it for the letter baseline. -
Map out the spacing:
Measure the total width of your available space. Mark the center point, then calculate equal spacing for the letters A, B, and C on the top row, and center the D below them.
Step 2: Sketching
-
Draft the letters:
Lightly sketch the large serif letters ‘A’, ‘B’, ‘C’, and ‘D’ using a pencil. If you aren’t confident in freehanding typography, project the letters onto the wall or cut simple cardboard templates to trace. -
Sketch the ‘A’ motifs:
To the left of the ‘A’, sketch a small branch with leaves and a cluster of red berries. -
Sketch the ‘B’ motifs:
Draw an orange and a red apple between the ‘A’ and ‘B’, keeping shapes simple and rounded. -
Sketch the ‘C’ motifs:
Between ‘B’ and ‘C’, outline a pumpkin shape and a leafy branch. Next to these, draw a stylized snail with a spiral shell. -
Sketch the ‘D’ motifs:
Beside the snail, sketch a sleeping cat. Finally, place a flying bee near the letter ‘D’ on the second row.
Use Stencils for Serifs
Crisp serif fonts are tricky to freehand. Print the letters on large paper, cut them out, and use the negative space as a stencil for perfect edges.
Step 3: Painting the Letters
-
Paint ‘A’ and ‘D’:
Using a dark slate blue paint and an angled sash brush, carefully fill in the ‘A’ and ‘D’. Use the sharp edge of the brush to keep the serifs crisp. -
Paint ‘B’:
Switch to a muted mustard yellow or ochre tone for the letter ‘B’. I like to apply two thin coats rather than one thick one to avoid drips on the vertical surface. -
Paint ‘C’:
Fill in the letter ‘C’ with a soft terracotta or dusty rose color. Ensure the curves are smooth and consistent.
Uneven Stucco Texture?
If the wall is very bumpy, skip the pencil sketch. Project images instead and use a ‘stippling’ motion (dabbing) with your brush rather than long strokes.
Step 4: Painting Illustrations
-
Base colors for fruits:
Paint the orange with a soft peach tone and the apple with a deep reddish-brown. Let these base shapes dry completely. -
Pumpkin and leaves:
Use a sage green for the pumpkin body and the various leaves scattered across the mural. Use a slightly different shade of olive green for stems to add subtle depth. -
Animals and insects:
Paint the snail’s shell in blue with white spiral details. Paint the cat in a solid brown, and the bee with alternating yellow and black stripes with light blue wings. -
Adding fine details:
Switch to your small round brushes. Add vertical white stripes to the pumpkin, whiskers to the cat, and veins to the leaves. -
Touch-ups:
Stand back about ten feet to view the whole composition. Correct any uneven edges with the wall’s background color or the specific object color.
Step back and admire how this simple, artistic addition transforms the building into a welcoming space for learning

PENCIL GUIDE
Understanding Pencil Grades from H to B
From first sketch to finished drawing — learn pencil grades, line control, and shading techniques.
Explore the Full Guide
Counting Wall With Easy Objects
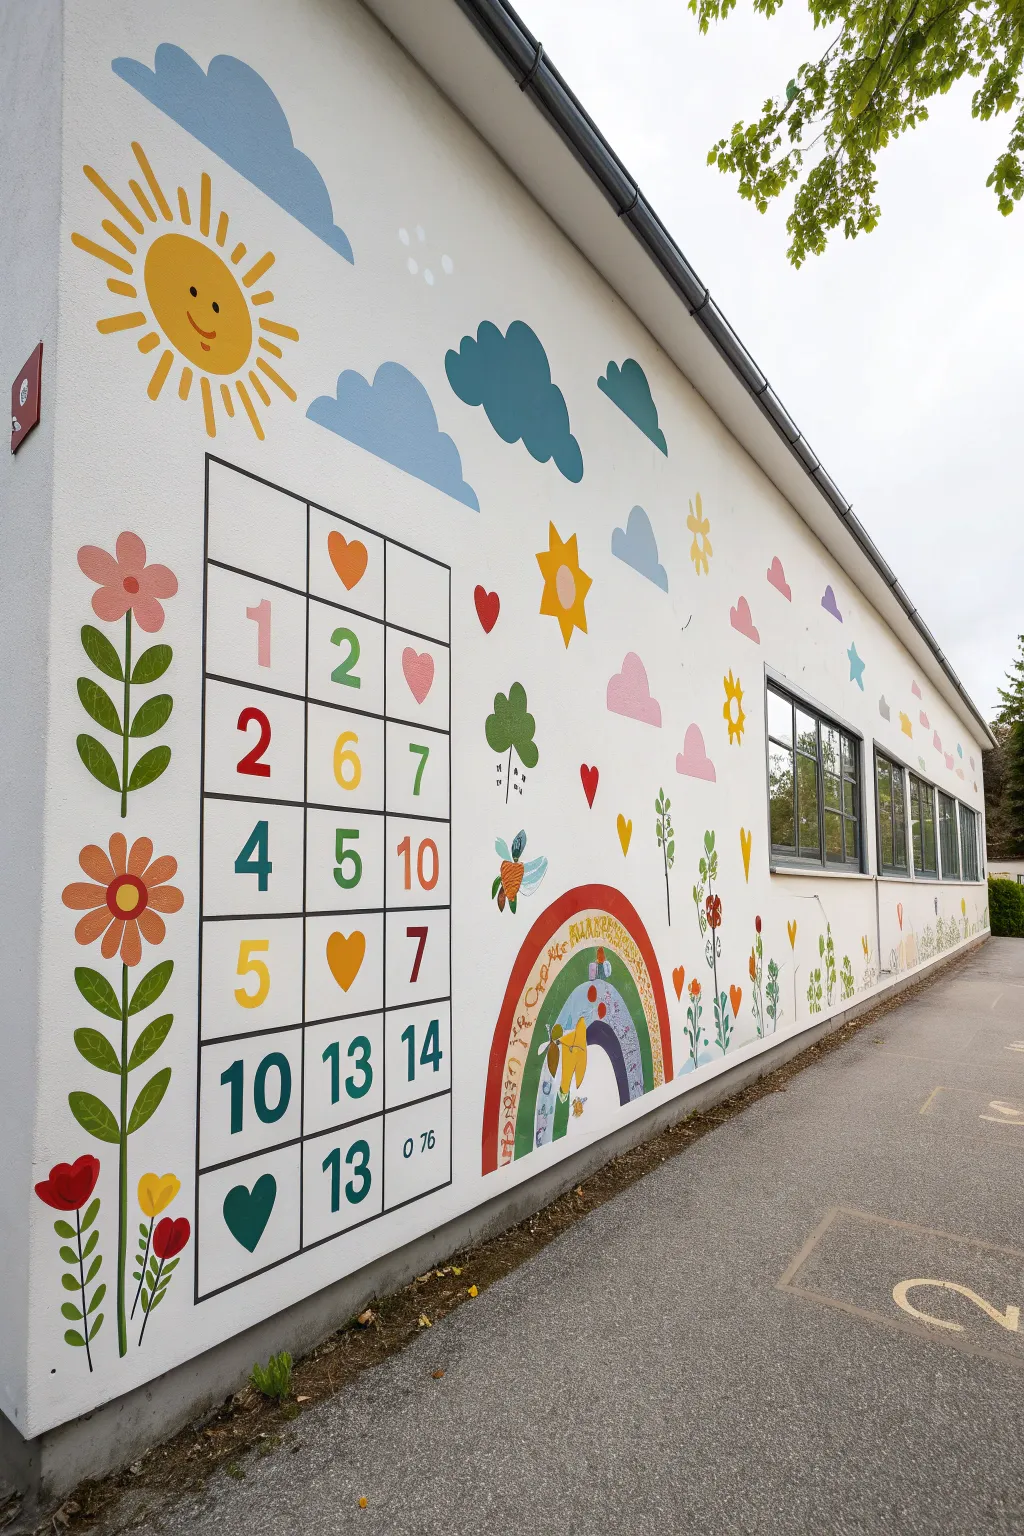
Transform a plain exterior wall into an interactive learning station with this vibrant, weather-resistant mural. Featuring a clear numbering grid, cheerful floral motifs, and a bright rainbow, this project combines educational utility with playful playground art.
Step-by-Step
Materials
- Exterior masonry primer (white)
- Exterior acrylic latex paints (various bright colors: yellow, orange, red, pink, blue, green)
- Black exterior paint (for grid and numbers)
- Painter’s tape (1-inch and 2-inch widths)
- Chalk line or laser level
- Pencil and large eraser
- Assorted paintbrushes (1-inch flat, medium round, detail liner)
- Small paint rollers and trays
- Ladder or step stool
- Stencils for numbers (optional)
- Clear outdoor sealant (optional)
Step 1: Preparation and Grid Layout
-
Clean and prime:
Begin by thoroughly cleaning the wall surface to remove dirt and debris. Once dry, apply a solid coat of white exterior masonry primer to create a smooth, neutral canvas that will make your colors pop. -
Measure the grid:
Determine the placement of your main counting chart. Use a chalk line or a laser level to mark out a large vertical rectangle. Divide this rectangle into a grid—aim for 4 columns and roughly 6 rows of equal-sized squares. -
Tape the lines:
Apply painter’s tape along your chalk lines to define the grid. Press the edges of the tape down firmly to prevent paint bleed. This will ensure your black grid lines are crisp and professional-looking later. -
Paint the grid lines:
Using a small brush or roller, paint over the open spaces between your tape lines with black exterior paint. I find that doing two thin coats is better than one thick coat to avoid drips. -
Remove tape:
Carefully peel away the painter’s tape while the paint is still slightly tacky to reveal sharp, clean grid lines. Let this dry completely before moving on to the numbers.
Step 2: Numbers and Shapes
-
Sketch the content:
Lightly sketch the numbers and symbols into the grid squares using a pencil. Follow the pattern: numbers like ‘1’, ‘2’, ‘4’, ’10’ mixed with heart shapes. Notice the variation in color for each number to keep it engaging. -
Fill in the numbers:
Using a flat brush and your assorted bright colors, paint the numbers. Use red for ‘2’ and ’10’, green for ‘5’ and ’12’, and yellow for others. You may need a second coat for lighter colors like yellow. -
Add grid icons:
Paint the decorative hearts inside the grid squares. Use a warm orange or red tone. Keep the shapes simple and bold so they are easily recognizable from a distance.
Drip Disaster?
If paint bleeds under tape, wait for it to dry fully. Then, use the background wall color (white) to carefully paint over the bleed and sharpen the line.
Step 3: Decorative Surroundings
-
Paint standard flowers:
To the left of the grid, paint tall, vertical flowers. Start with a long green stem, add symmetrical oval leaves, and top with a simple specialized bloom—one pink with round petals, one orange daisy-style. -
Create the sun:
Above the grid, paint a large yellow sun. Add a smiling face with simple black dots and a curve. Radiate orange and yellow rays outward, alternating lengths for a dynamic look. -
Add the rainbow:
To the right of the grid, sketch a semi-circle arch. Paint concentric bands of red, orange, yellow, green, and blue. Inside the rainbow arch, you can add small details or text if desired, mimicking the texture seen in the inspiration image. -
Scatter clouds and sky elements:
Fill the upper empty spaces with stylized clouds. Paint some in light blue and others in a darker teal-blue. Keep the edges rounded and fluffy. -
Add whimsical details:
Sprinkle smaller motifs across the wall to the right: flying insects, small hearts, floating flowers, and simple stars. These fill the negative space and tie the mural together. -
Paint the windows:
If your wall has windows, frame them with painted vines or small flowers growing up from the bottom edge to integrate the architectural features into the art. -
Final touches:
Use a fine liner brush to clean up any edges or add tiny details like the eyes on the sun or veins on the leaves. Once the entire mural is cured (follow paint manufacturer instructions), consider applying a clear UV-resistant sealant to protect your work from fading.
Pro Tip: Snap Lines
For the long vertical flower stems, use a chalk line to snap a straight guide on the wall first. It makes painting long, straight stems much easier than freehanding.
Step back and admire your colorful educational masterpiece that will brighten the playground for years to come
Four Seasons in One Preschool Mural
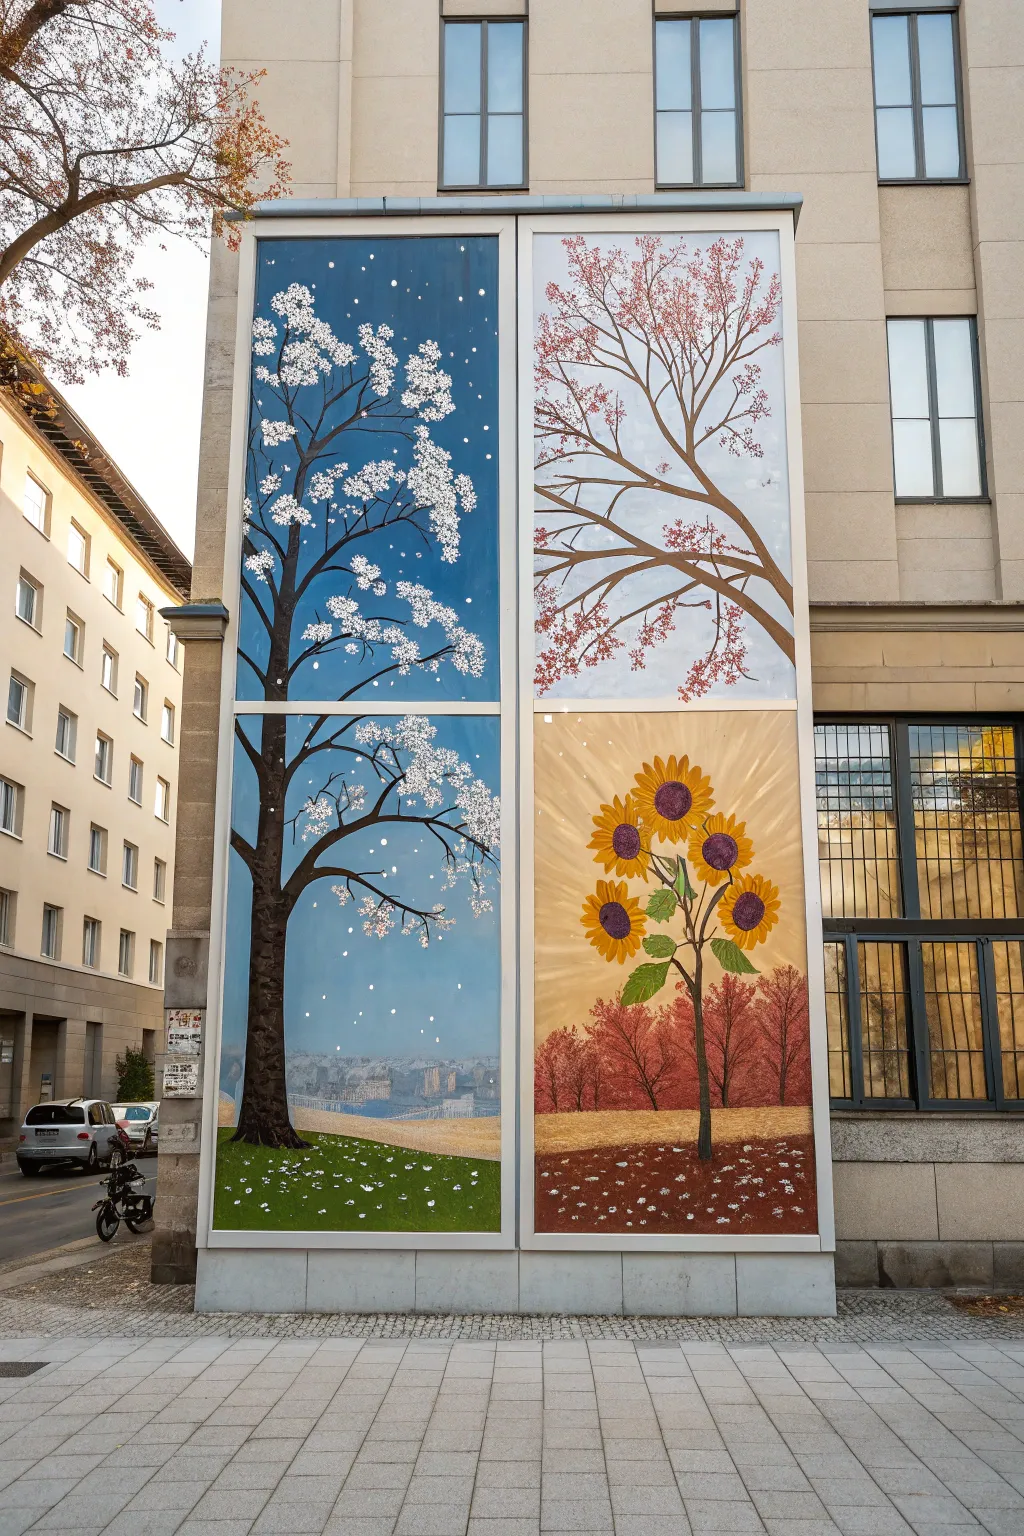
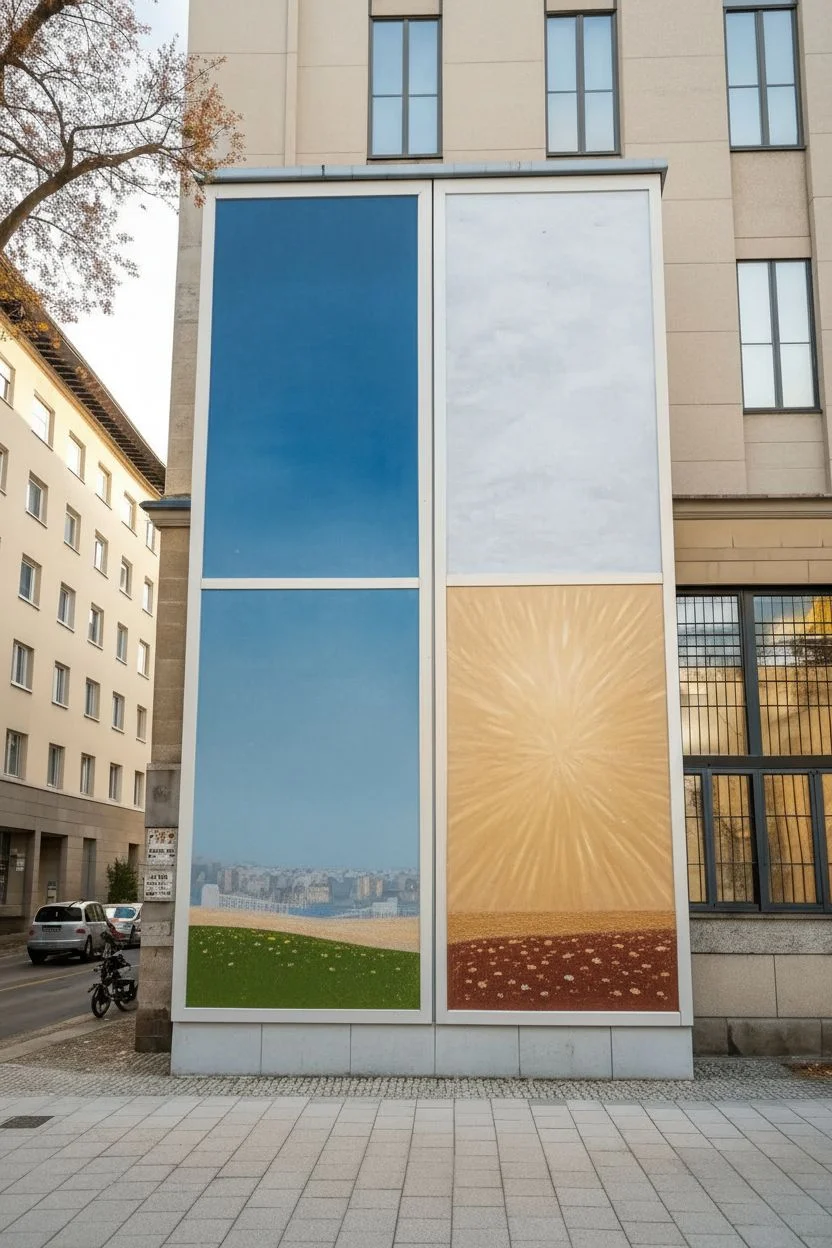
Transform a tall vertical space into a breathtaking journey through the seasons with this split-panel mural design. Featuring a unified tree structure spanning two distinct worlds—a snowy winter night and a golden autumn harvest—this project balances cool blues and warm ambers to create a stunning visual centerpiece.
Step-by-Step Tutorial
Materials
- Large wooden panels or heavy-duty canvas (sized to fit your space)
- Acrylic exterior paints (Titanium White, Phthalo Blue, Burnt Umber, Cadmium Yellow, Orange, Red Oxide, Sap Green)
- Wide flat brushes (2-3 inch) for backgrounds
- Round brushes (sizes 4, 8, and 12) for details
- Painter’s tape or masking tape
- Chalk or pastel pencil for sketching
- Small sea sponge
- Sealant or varnish (matte or satin finish)
Step 1: Planning and Backgrounds
-
Prepare the Surface:
Begin by cleaning and priming your surface. If you are working on separate panels, lay them out side-by-side to ensure the composition flows continuously. For a single large surface, use painter’s tape to divide the space into four quadrants: distinct top and bottom squares, split vertically down the middle. -
Paint the Left Sky:
On the entire left vertical panel (both top and bottom sections), paint a gradient sky. Start with a deep Phthalo Blue at the top and blend slowly into a lighter cornflower blue as you move downward. Let the blue fade almost to white near the horizon line. -
Paint the Right Sky:
For the top right quadrant, paint a pale, cloudy white-grey background to represent a winter overcast sky. For the bottom right quadrant, use a radiant gold or ochre, emanating from the center to create a ‘sunburst’ effect with lighter streaks of yellow and white. -
Establish the Ground:
Paint the ground layers at the very bottom. On the left side, create a rolling green hill using Sap Green mixed with a touch of yellow. On the right, paint a warm, textured brown earth for the autumn scene, adding dabs of red and orange to suggest fallen leaves. -
Create the Horizon:
Across the bottom of the left panel, just above the green hill, paint a faint, blurry cityscape or tree line in muted greys and blues to create atmospheric depth.
Windowpane Illusion
Use thick grey or silver tape to create the borders between the four sections. This mimics the aluminum frame of a real window and hides any uneven paint edges.
Step 2: The Central Tree Structure
-
Sketch the Trunk and Branches:
Using white chalk, lightly sketch the main tree structure. The trunk should anchor firmly on the left side, reaching up through the top panel. Extend large branches across into the right-hand panels, ensuring the limbs connect visually across the vertical divider. -
Paint the Dark Silhouette:
Fill in the trunk and left-side branches with dark Burnt Umber mixed with a tiny bit of blue to create a cool, shadowed bark. Keep the edges relatively smooth but add slight bumps for realism. -
Paint the Right Branches:
For the branches extending into the top right quadrant, switch to a lighter brown or reddish-brown hue. These branches should look thinner and more skeletal, mimicking winter or early spring growth. -
Add Highlights:
Once the brown paint is dry, dry-brush a lighter tan color on the right side of the trunk and the top of the main branches to give the tree volume and dimension.
Step 3: Seasonal Details
-
Blossoming Snow (Left Side):
On the left panels, use a small round brush to dab clusters of pure Titanium White on the dark branches. These represent heavy, snowy blossoms. Group them tightly on the upper sides of the branches. -
Falling Flakes:
Scatter single dots of white paint throughout the blue sky on the left to create a gentle snowfall effect. Vary the size of the dots slightly—some tiny, some larger—to create depth. -
Winter Berries (Top Right):
In the top right quadrant, use a small brush to paint delicate, intricate branch tips in reddish-brown. Add tiny dots of red or pink to suggest winter berries or emerging buds against the pale background. -
Autumn Sunflowers (Bottom Right):
Paint large, bold sunflowers in the bottom right section. Use Cadmium Yellow for the petals, layering with orange near the center. Paint the centers dark brown or purple. -
Add Stems and Leaves:
Connect the sunflowers with green stems and large leaves. I find that adding a little yellow to the green paint helps the leaves catch the light of the golden background. -
Textured Background Trees:
In the bottom right background, paint a row of distinctively autumnal trees using rusty reds and oranges. Use a sea sponge to dab on the foliage for a fluffy, distant texture. -
Ground Details:
Finish by adding small white flowers to the green grass on the left, and scattered white or pale blue petals on the brown earth on the right to simulate frost or fallen seeds. -
Protective Sealant:
Allow the entire mural to cure for at least 24 hours. Apply two coats of a clear, non-yellowing polyacrylic varnish to protect the artwork from curious little hands and sunlight.
3D Texture Pop
Glue artificial moss on the green hill or small faux sunflowers on the right panel. This adds a tactile sensory element that preschoolers absolutely love.
This vibrant mural will serve as a beautiful daily reminder of nature’s changing cycles for your classroom


Big Barnyard Scene at Kid Eye Level
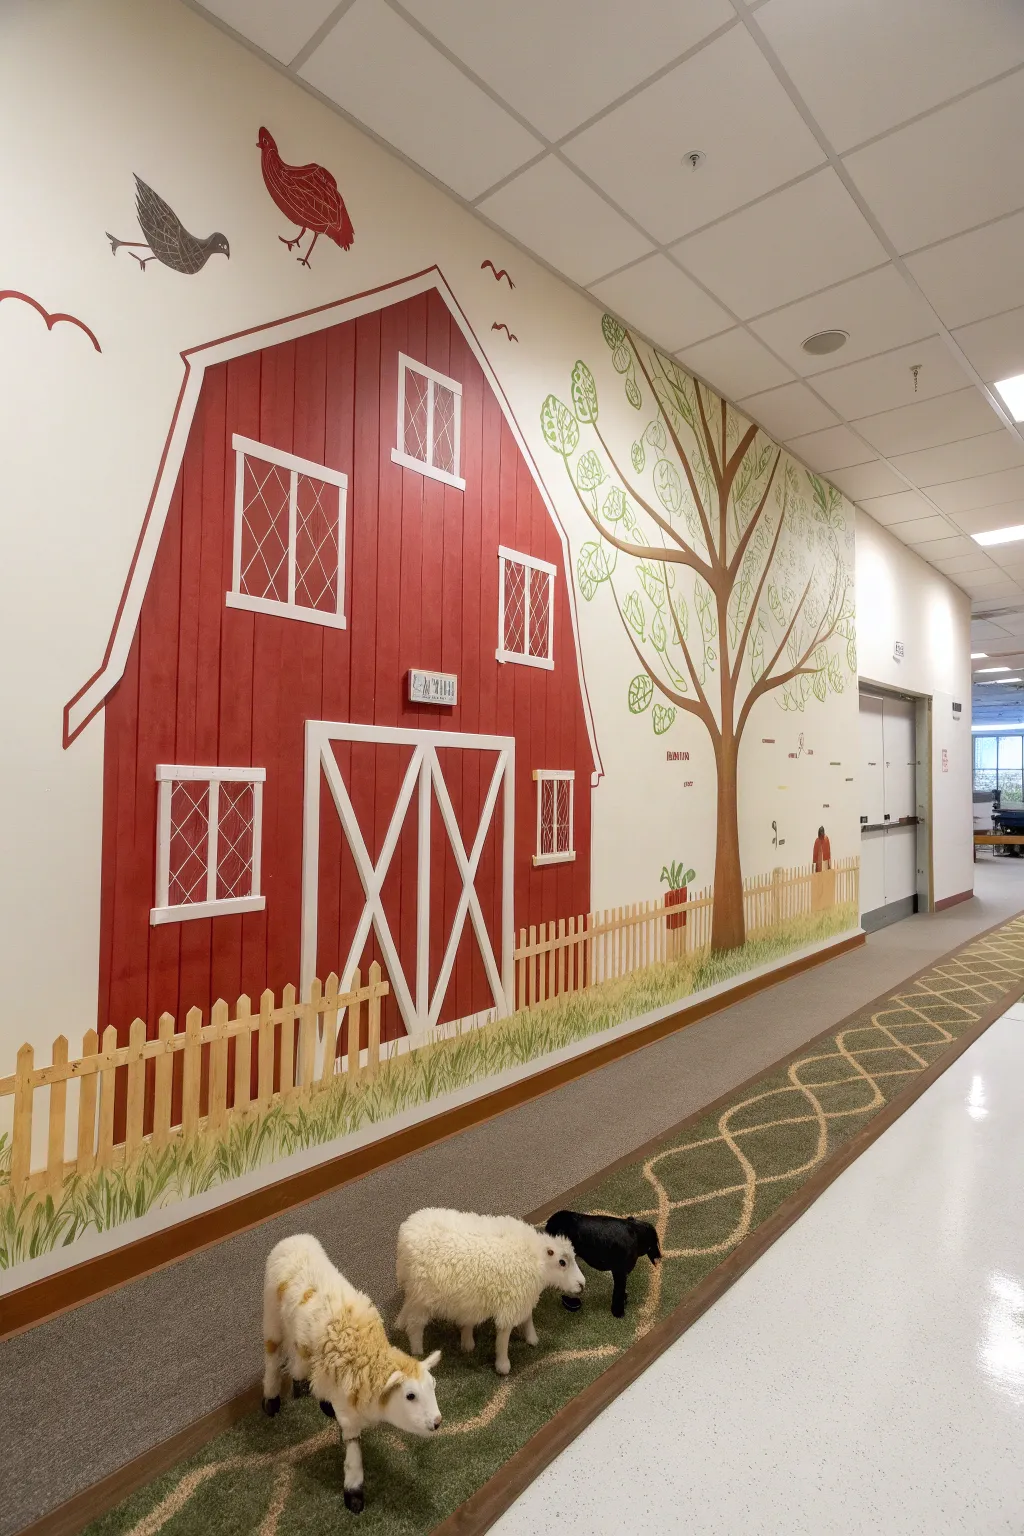

Transform a plain hallway into an engaging agricultural adventure with this expansive mural featuring a classic red barn and playful stylized trees. The scene is brought to life with clean lines and bold colors, perfectly positioned at a child’s eye level for maximum impact.
How-To Guide
Materials
- Interior semi-gloss latex paint (barn red, white, brown, beige)
- Acrylic paints (black, various greens, light grey)
- Painter’s tape (1-inch and 2-inch widths)
- Large foam rollers and tray
- Angled sash brushes (2-inch and 1-inch)
- Fine liner brushes or paint pens (black, green)
- Pencil and large eraser
- Measuring tape and 4-foot level
- Overhead projector (optional)
- Drop cloths
Step 1: Planning and Outlining
-
Prepare the Surface:
Begin by cleaning the wall surface thoroughly to remove any scuffs or dust. If the base wall color isn’t already a warm white or cream, apply a fresh coat of base paint and let it cure for at least 24 hours. -
Sketch the Layout:
Using a pencil, lightly sketch the large shapes of the barn and the tree. The barn should dominate the left side, with a high peaked roof. If you aren’t confident freehanding, project a barn clipart image onto the wall to trace the main structural lines. -
Draft Architectural Details:
Measure and draw the specific details of the barn: the large central double doors with ‘X’ bracing, the smaller loft window, and the side windows with white trim. Use your level to ensure all vertical lines are perfectly straight.
Step 2: Painting the Barn
-
Tape the Barn Outline:
Apply painter’s tape along the outside edges of your pencil lines for the barn’s main body. Press the edges of the tape down firmly with a putty knife or credit card to prevent paint bleed. -
Block in the Red:
Using a foam roller, fill in the main body of the barn with the barn red latex paint. You will likely need two coats for full opacity, allowing 2-4 hours of drying time between applications. -
Tape the Trim:
Once the red paint is fully cured (I prefer to wait overnight just to be safe), tape off the areas that will be white: the roof edges, the window frames, and the large ‘X’ bracing on the doors. -
Paint White Accents:
Paint the taped-off trim areas with white semi-gloss paint. Use a smaller angled sash brush for control. Apply two coats to ensure the red doesn’t show through. -
Add Texture:
To give the barn a wood-panel look, mix a slightly darker shade of red (or add a drop of black to your red). Use a dry brush technique to drag faint vertical lines down the red siding.
Clean Lines Secret
Before painting your red barn color, paint a layer of the *base wall color* over the tape edge first. This seals the tape so any bleed is invisible, leaving a razor-sharp line for the red later.
Step 3: Creating the Scenery
-
Paint the Tree Trunk:
Mix a warm brown acrylic or latex paint. Freehand paint the tree trunk and branches to the right of the barn, keeping the style somewhat illustrative rather than hyper-realistic. The branches should extend high up the wall. -
Draw the Foliage:
This mural uses a unique line-drawing style for the leaves. Using a green paint pen or a fine liner brush with green acrylic, draw loose, oval leaf shapes filled with simple vein patterns directly onto the wall around the branches. -
Add Flying Birds:
Using black or dark grey paint and a small detail brush, paint the silhouettes and details of chickens or birds flying above the barn roof. Keep the shapes graphic and simple. -
Paint the Fence:
along the bottom perimeter, measure out a picket fence. Use beige or light wood-tone paint to create the vertical slats and horizontal rails. Vary the height slightly for a whimsical feel. -
Ground the Scene:
Paint wispy blades of grass along the very bottom of the wall, overlapping the base of the fence and the barn, using varied shades of green to create depth.
Interactive Twist
Paint the lower fence area with magnetic primer before the topcoat. This allows kids to attach magnetic farm animals or letters to the ‘pasture’ area of the mural.
Step back and admire how this vibrant country scene completely changes the atmosphere of the corridor
Jungle Vines With Friendly Safari Animals
Transform a plain corner into a playful jungle scene featuring a towering giraffe and a bubbly elephant friend. This large-scale mural uses simple shapes and bold vines to wrap around architectural features, creating an immersive environment for little learners.
Step-by-Step
Materials
- Exterior or interior latex paint (White, Light Green, Dark Green, Yellow-Ochre, Brown, Grey, Pink, Light Blue, Black)
- Assorted paintbrushes (2-inch sash brush, 1-inch flat brush, various round detail brushes)
- Pencil and eraser
- Painter’s tape
- Drop cloth
- Ladder or step stool
- Chalk (optional, for sketching)
- Clear sealant (if painting outdoors)
Step 1: Preparation & Base Layout
-
Prepare the surface:
Clean the wall surface thoroughly to remove dirt and dust. If the existing paint is old or dark, prime the entire area with a fresh coat of white exterior paint to ensure your colors pop. -
Draft the composition:
Using a pencil or light chalk, sketch the main elements. Start with the twisting vines climbing up the corner and across the top. Then, outline the large giraffe on the right wall and the small elephant at the bottom. -
Map out the smaller details:
Don’t forget the smaller details like the cheetah near the window, the tufts of grass along the baseboard, and the floating bubbles above the elephant’s trunk.
Step 2: Painting the Vines & Vegetation
-
Paint the main vines:
Load a 2-inch brush with medium green paint. Follow your sketched lines to create the thick, twisting vines. I find that varying the pressure on the brush helps create a more organic, uneven width that looks natural. -
Add the leaves:
Using a lighter shade of green, paint large, teardrop-shaped leaves attached to the vines. Make them big and bold to fill the negative space. -
Detail the greenery:
Once the leaves are dry, use a thin round brush and white or very light green paint to add simple vein lines down the center of each leaf for definition. -
Create the grass border:
Along the bottom connection of the wall and floor, paint jagged, uneven blades of grass using your darker green. This anchors the characters to the ground.
Chalk It Up
Use chalk instead of pencil for your initial sketch. It wipes away easily with a damp cloth if you make a mistake and won’t leave permanent graphite marks under light paint colors.
Step 3: Bringing the Characters to Life
-
Base coat the giraffe:
Fill in the giraffe’s body shape with a yellow-ochre or warm tan paint. Use a flat brush for the long neck and body, ensuring smooth, even coverage. -
Paint the giraffe’s spots:
Switch to a medium brown color. Paint irregular geometric shapes all over the giraffe’s neck and body to create the classic reticulated pattern. Leave narrow channels of the yellow base showing between the spots. -
Detail the giraffe face:
Use a darker brown for the nose and horns (ossicones). Add white for the eyes and a touch of light pink for the cheek. Use a fine liner brush with black paint to add the eyelashes, pupils, and smiling mouth. -
Paint the elephant:
Block in the elephant’s shape with a medium grey. While the paint is still wet, you can blend in a slightly lighter grey on the trunk or ears to add subtle dimension. -
Add elephant details:
Paint the inner ear pink. Use white and black to create large, circular eyes looking upward. Add a few tufts of hair on top of the head using thin black strokes. -
Paint the cheetah:
On the adjacent wall, fill in the small cheetah shape with a light tan. Once dry, use a small round brush to dab on black spots and detail the face and tail.
Interactive Height Chart
Turn the giraffe’s long neck into a functional growth chart by adding measurement tick marks along the side. It’s a perfect interactive element for a school setting.
Step 4: Final Flourishes
-
Add the bubbles:
Above the elephant’s trunk, paint fine, circular outlines in light blue to represent bubbles floating upward. Don’t fill them in solid; just a thin loop is enough. -
Paint fluttering friends:
Add a few small butterflies or hearts in scattered spots around the giraffe using blue, yellow, or pink to balance the color palette. -
Seal the deal:
If this mural is outdoors or in a high-traffic hallway, apply a clear, water-based sealant over the finished painting to protect it from weather and sticky fingers.
Step back and admire how this cheerful scene brightens the entire walkway
Roadway Mural for Toy-Car Play
Transform a plain exterior wall into an imaginative landscape with this warm, earth-toned mural. Featuring stylized trees, rolling paths, and gentle arches, this design extends the play area vertically and creates a charming backdrop for young adventurers.
Step-by-Step Tutorial
Materials
- Exterior masonry paint (base color: warm beige)
- Exterior acrylic play paints (dark brown, terracotta, cream white)
- Wide painters tape (2-inch)
- Standard painters tape (1-inch)
- Large nap rollers and roller tray
- Extension pole for rollers
- Assorted sash brushes (2-inch and 3-inch)
- Detail brushes (round and flat)
- Chalk or pastel crayons for sketching
- Drop cloths
- Ladder
Step 1: Preparation and Base Coat
-
Clean the surface:
Begin by thoroughly cleaning the wall surface to remove dust, dirt, and loose debris. A pressure washer is ideal for exterior masonry, but a stiff scrub brush and water will work for smaller areas. Allow it to dry completely. -
Tape the edges:
Protect the adjacent sidewalk, ground, and any nearby fixtures (like the electrical box) with drop cloths and painters tape. Ensure you have a crisp line where the wall meets the ground. -
Apply the base color:
Roll on the warm beige base coat over the entire wall surface. Use a thick nap roller to get into the texture of the masonry. You’ll likely need two coats for solid, opaque coverage.
Step 2: Sketching the Layout
-
Outline the winding road:
Using chalk, sketch a large, winding path that starts high on the right and curves down toward the left, mimicking a hill. Keep the lines fluid and organic. -
Draw the archway:
Near the bottom center, sketch a large, semi-circular arch shape. This acts as a ‘tunnel’ or rainbow element in the landscape. -
Place the trees:
Sketch vertical lines for tree trunks and simple rounded or leafy shapes for the canopies. Vary the heights to create depth, placing some ‘closer’ and some ‘further’ away. -
Add background elements:
Lightly sketch in cloud shapes and smaller botanical details like grass tufts or falling leaves.
Chalk It Up
Step back frequently while sketching with chalk. Since chalk washes off easily with water, you can redraw lines as many times as needed until the composition is perfect.
Step 3: Painting the Main Features
-
Paint the road:
Fill in the winding road shape with the dark brown paint. Use a steady hand and a sash brush to cut in the edges first, then fill the center with a mini roller. -
Create the arch:
Paint the thick archway shape using the dark brown or a slightly lighter terracotta shade. Ensure the curve is smooth and symmetrical. -
Start the foliage:
Use the terracotta and brown paints to fill in the tree trunks and branches. For the leaves, use simple brush strokes rather than trying to paint individual leaves. -
Paint the brick pattern:
On the left side, where the design mimics a wall or structure, use a flat brush and white or cream paint to create a faux brick pattern. Keep the lines loose and illustrative.
Interactive Play
Paint the road specifically at the height of the children so they can ‘drive’ their toy cars directly on the wall. Add stop signs or traffic lights for extra fun.
Step 4: Adding Details and Highlights
-
Add road markings:
Once the dark road paint is dry, use cream or white paint to add the dashed center lines. A flat 1-inch brush works perfectly for these uniform dashes. -
Detail the arch:
Paint a dashed pattern inside the archway using white paint, following the curve of the rainbow shape to give it texture. -
Highlight the trees:
Add white or cream accents to the trees. You can paint simple leaf shapes or outline parts of the branches to make them pop against the beige background. -
Paint the clouds:
Fill in your cloud sketches with solid white or cream paint. Simple, organic blobs work best for this stylized look. -
Incorporate small flora:
Use a detail brush to add small tufts of grass along the bottom edge and near the ‘road’ to ground the scene. -
Final touches:
Step back and look for any areas that need a second coat or a touch-up. I like to check these from a distance to ensure the proportions feel right. -
Remove tape:
Carefully peel away all painters tape while the final touches are still slightly tacky to prevent peeling the dry paint film.
Now you have a durable, engaging mural that invites imaginative play and brightens up the outdoor space
Neighborhood Map With Familiar Places
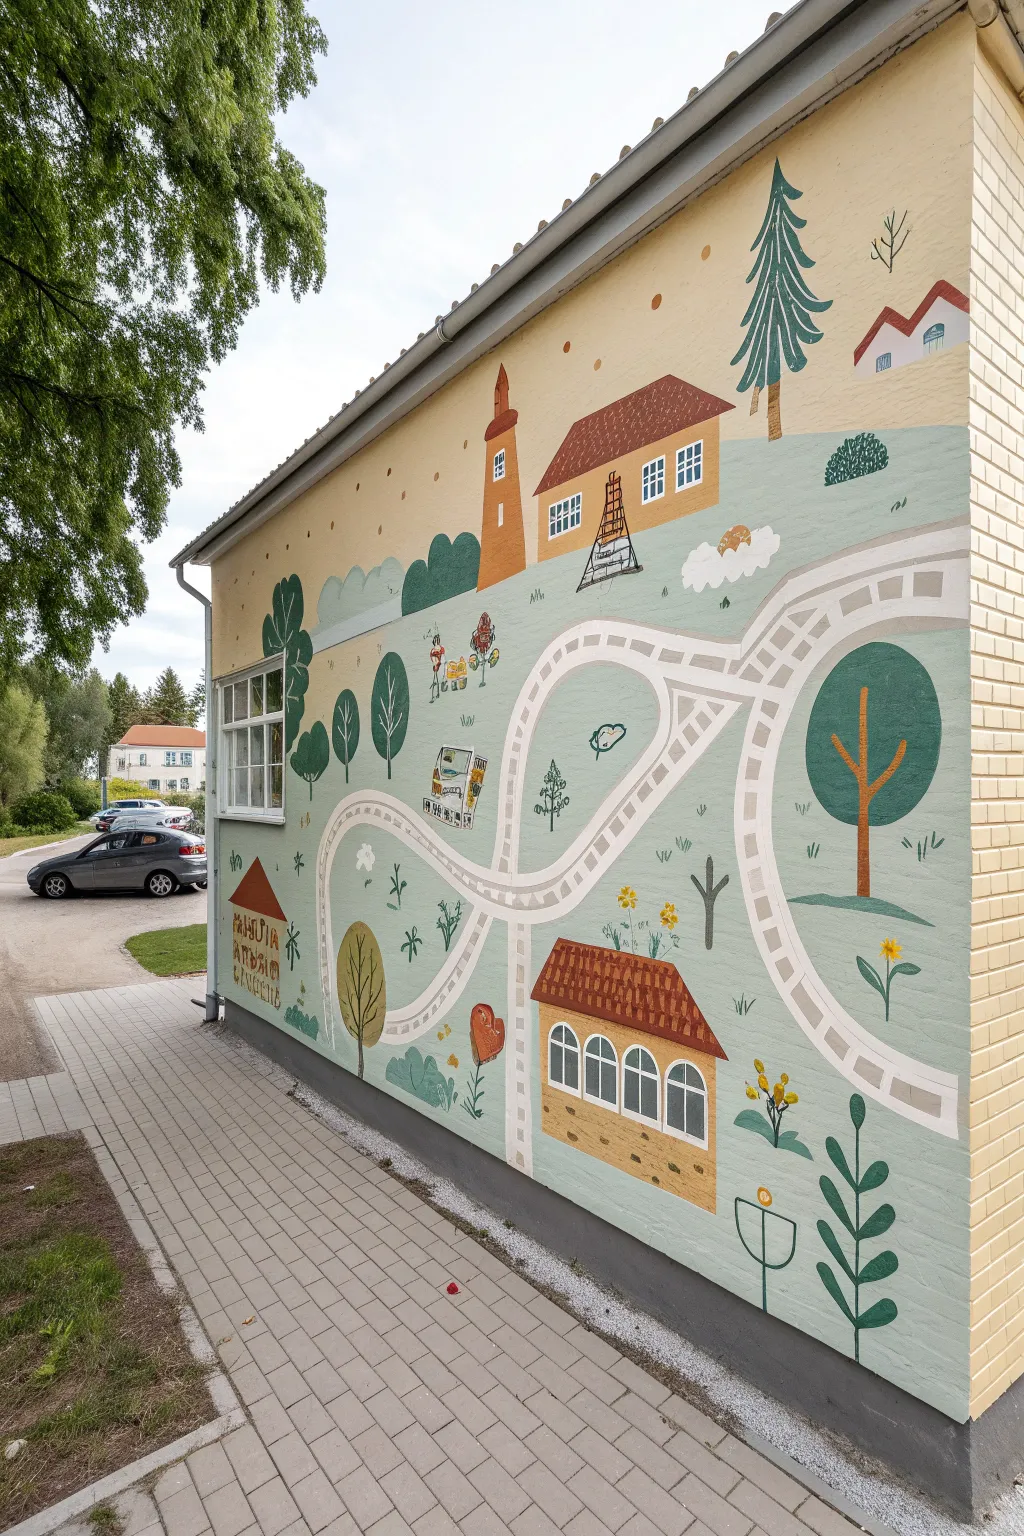
Transform a plain exterior wall into a navigable storybook world with this charming neighborhood map mural. Featuring playful roads, simplified buildings, and stylized nature elements, this large-scale painting invites children to trace paths and spot familiar local landmarks.
How-To Guide
Materials
- Exterior masonry primer
- Exterior acrylic latex house paints (Soft yellow, sage green, terra cotta, charcoal grey, white)
- Assorted brushes (2-inch angled sash brush, 1-inch flat brush, round detail brushes)
- Painter’s tape (various widths)
- Chalk or pastel crayons for sketching
- Paint rollers and trays
- Drop cloths
- Ladder or step stool
- Clear exterior sealant (optional)
Step 1: Prepping and Priming
-
Clean the surface:
Begin by thoroughly cleaning the brick or masonry wall with a pressure washer or stiff bristle brush and soapy water to remove dirt and cobwebs. -
Prime the wall:
Once dry, apply a high-quality masonry primer to the entire area you plan to paint to ensure the topcoats adhere properly to the textured brick. -
Apply the background color:
Roll on a base coat of soft, warm yellow paint across the entire mural area. This creates a sunny, cheerful backdrop. Let this dry completely, preferably overnight.
Bleeding Lines?
Textured brick makes crisp lines hard. Use a stiff brush and ‘dab’ paint into crevices rather than dragging. For really sharp edges, press masking tape deep into mortar joints before painting.
Step 2: Mapping the Scene
-
Block out the grass:
Using chalk, sketch a rolling horizon line about halfway up the wall. Paint the area below this line with a muted sage green to represent the grassy ground, allowing the yellow sky to show above. -
Sketch the roadways:
With chalk, draw large, winding roads that loop across the green landscape also extending slightly into the ‘sky’ area for a whimsical perspective. -
Paint the road base:
Fill in your road outlines with white paint. Use an angled brush to cut in sharp edges against the green and yellow backgrounds. -
Add track details:
Load a smaller flat brush with light grey or beige paint. Paint a series of dashed lines inside the white roads to mimic railroad tracks or lane markers, following the curves carefully.
Step 3: Constructing Buildings
-
Outline main structures:
Sketch simple geometric shapes for houses—squares and rectangles—scattered around the loops of the road. Don’t worry about perfect perspective; a flat, 2D look adds charm. -
Fill in facades:
Paint the bodies of the houses using varied warm tones like tan, cream, or light orange. I find it helps to do two thin coats rather than one thick one on brick texture. -
Add the roofs:
Top each building with a terra cotta or deep red roof. Use triangular shapes for gables or simple trapezoids for slanted roofs. -
Paint windows and doors:
Once the house colors are dry, use a small flat brush and dark grey or navy paint to add simple rectangular windows and arched doorways. Add white frames around them for contrast.
Make it Interactive
Paint the roads at a height where toddlers can ‘drive’ toy cars along the wall. You can also mix magnetic additive into the paint for certain spots to attach weather symbols.
Step 4: Planting Details
-
Paint large trees:
Add several large trees using deep green paint for oval or circular canopies. Paint simple brown trunks extending down to the grass line. -
Add variety with pines:
Include a few pine trees using jagged, triangular strokes to create a coniferous texture, placing some ‘behind’ the houses for depth. -
Detail the foliage:
Use a liner brush to add simple branch lines inside the tree canopies in a lighter complementary color, like ochre or light green. -
Sprinkle in flowers:
Dot small clusters of flowers near the bottom edge using yellow and white paint. Add simple green stems and leaves. -
Draw stylized plants:
In the open green spaces, paint decorative, fern-like botanical shapes using a darker green to break up the flat color.
Step 5: Final Touches
-
Include playful elements:
Paint small, specific details that children might recognize, like a lighthouse, a swing set, or a climbing frame. -
Refine the lines:
Step back and check your edges. Use a small brush to touch up any spots where the brick texture made the paint bleed or skip. -
Seal the work:
Protect your hard work from the elements by applying a clear, non-yellowing exterior sealant over the entire mural once the paint has cured for at least 48 hours.
Now you have a vibrant, durable landscape ready for imaginative play
Feelings Faces Wall for Daily Check-Ins

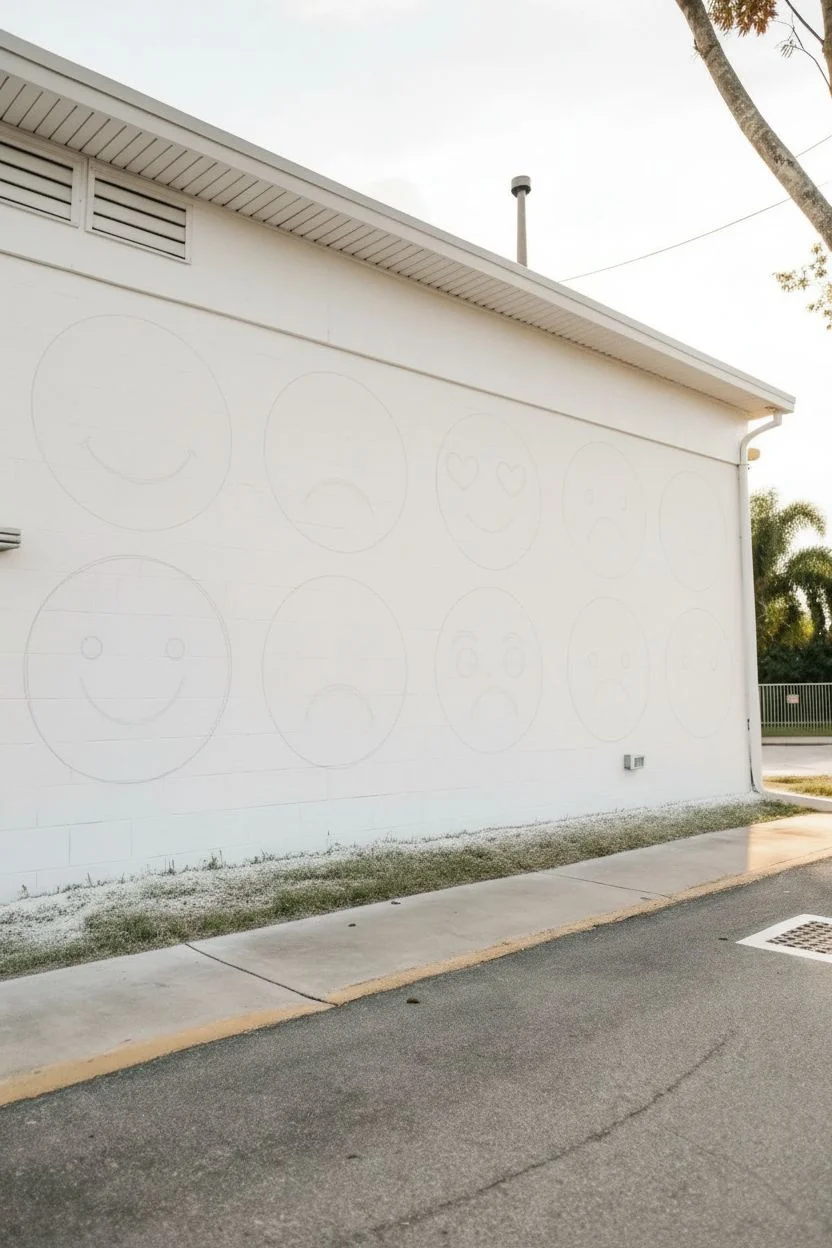
Transform a plain exterior wall into an interactive emotional literacy tool with this oversized face chart. The soft, muted palette and simple line drawings make these expressive characters approachable and clear for young children to identify.
Detailed Instructions
Materials
- Exterior masonry primer (white)
- Exterior latex semigloss paint (white base)
- Exterior latex paints (samples/quarts): Dusty Rose, Terracotta, Sage Green, Mustard Yellow, Pale Pink, Butter Yellow
- Carbon paper or projector (optional)
- Chalk snap line
- Large compass tool (string and chalk method)
- Painters tape
- Assorted paintbrushes (2-inch sash brush for cutting in, roller for filling)
- Black acrylic paint or exterior paint pen for details
- UV-resistant clear topcoat (optional for longevity)
Step 1: Wall Prep & Layout
-
Clean surface:
Begin by thoroughly cleaning the brick wall with a pressure washer or stiff scrub brush and soapy water to remove dirt, moss, and loose debris. Let the masonry dry completely, preferably for 24-48 hours. -
Prime the base:
Roll on a coat of high-quality masonry primer to ensure your colorful circles don’t soak into the porous brick. Once dry, apply a fresh coat of white exterior paint if the existing wall needs brightening. -
Grid lines:
Measure the total wall space and decide on a grid arrangement. This mural features two rows of five circles each. Use a chalk snap line to create faint horizontal guidelines to keep the rows straight and level. -
Mark centers:
Along your horizontal chalk lines, measure and mark the center point for each circle, ensuring equal spacing between them. -
Draw circles:
Using a string-and-chalk compass (tie a piece of chalk to a string, hold the string at the center point, and pivot to draw), sketch your large circles directly onto the wall. Aim for a diameter between 24-30 inches depending on your wall height.
Bleeding Lines?
If paint bleeds into the brick texture, wait for it to dry, then touch it up with your white base color using a tiny detail brush to sharpen the edge.
Step 2: Painting the Faces
-
Tape edges (optional):
If you struggle with freehand curves, you can apply flexible painter’s tape along the outside of your chalk circles, though hand-painting creates a softer, more organic feel. -
Fill the circles:
Using a 2-inch sash brush, carefully cut in the edges of each circle with your chosen muted colors. Alternate colors so two of the same shade aren’t next to each other. -
Roll the centers:
Switch to a glowing mini-roller to fill in the centers of the circles for a smooth, even texture. You may need two coats for full opacity, especially on textured brick. -
Dry thoroughly:
Allow the base circles to cure completely—usually overnight—before attempting to paint the facial features, or the black lines might bleed.
Step 3: Adding Expressions
-
Sketch features:
Lightly sketch the facial expressions onto the dried circles with white chalk. Include a mix of emotions: happy, sad, angry, surprised, loving, and neutral. -
Paint outlines:
Use a small round brush and black exterior paint to trace over your chalk lines. Focus on simple, bold lines for mouths and eyes. -
Thicken lines:
Go back over your initial black lines to thicken them slightly, ensuring they are visible from a distance. Vary the line weight—thicker in the middle of a smile, thinner at the ends. -
Add blush details:
For the worried or shy faces, use a contrasting color (like terracotta on sage green) to dab small circles on the cheeks for blush. -
Paint hair (selective):
Select 2-3 faces to have simple hair features. Paint curved swoops at the top of the circle using black or a dark contrasting gray, keeping the style graphic and minimal. -
Clean up:
Once the black paint is dry, use a damp cloth to wipe away any remaining visible chalk guidelines. -
Seal it:
Apply a clear UV-resistant topcoat over each face to protect the colors from fading in the sun and make the wall easier to wipe down later.
Smoother Circles
Make a circle template out of cardboard or sturdy poster board. Trace around it with a pencil for perfectly uniform shapes every time.
Now you have a colorful, engaging wall ready for daily emotional check-ins with the kids
Handprint Garden Collaboration Mural
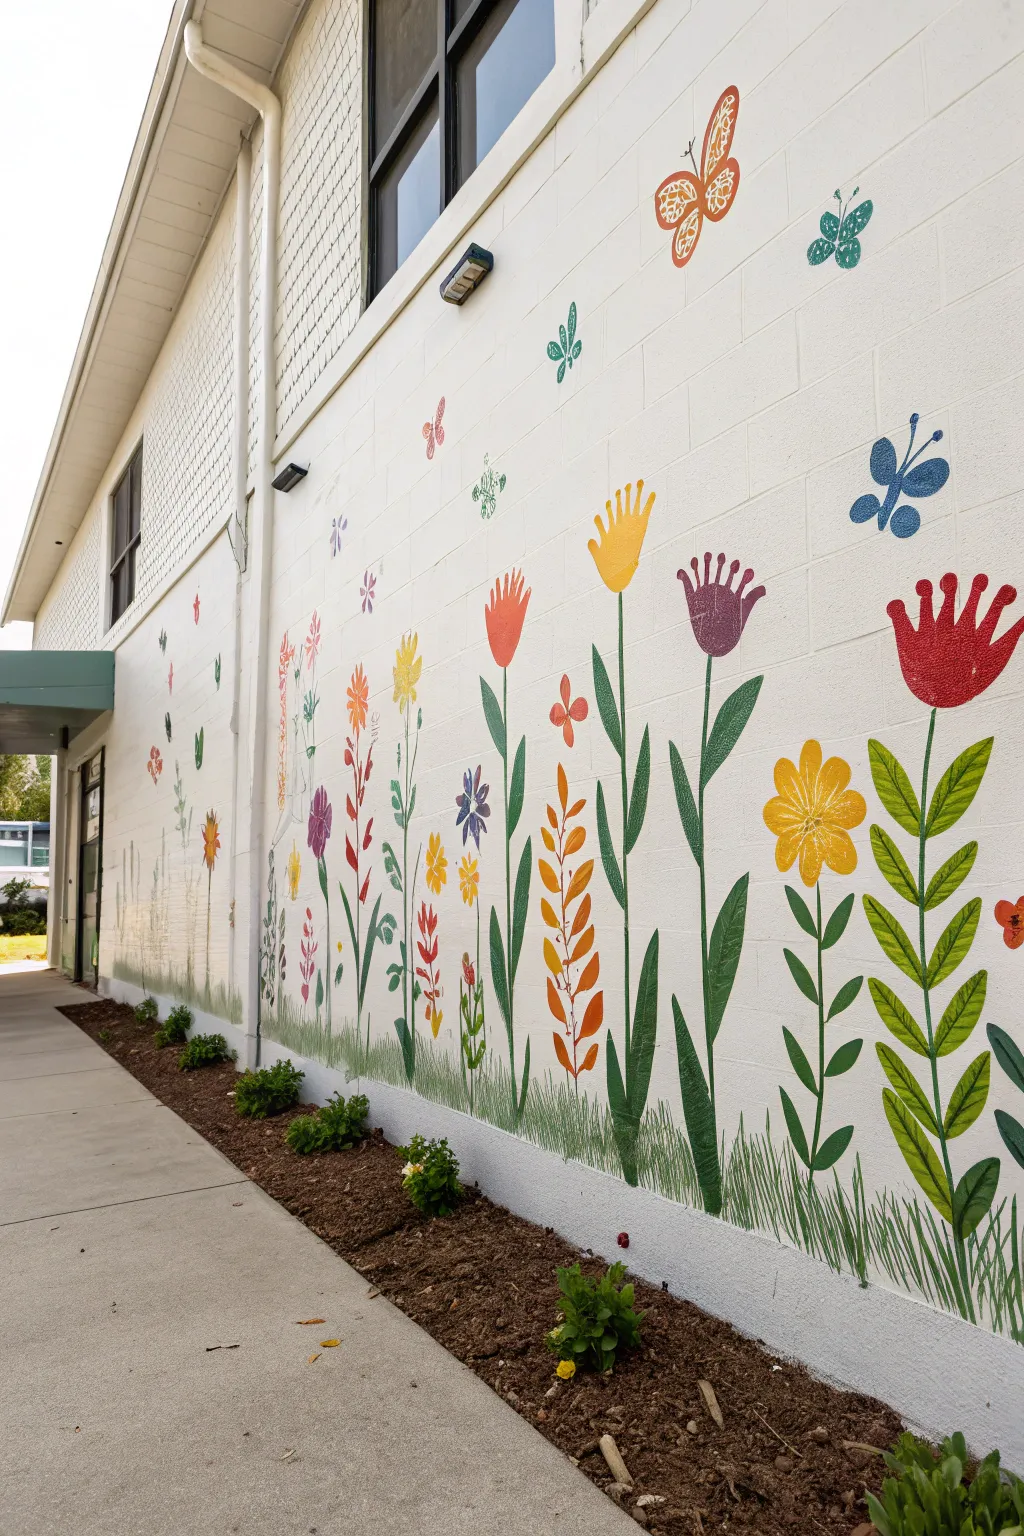
Transform a plain exterior wall into a vibrant, everlasting garden where each flower bloom is uniquely crafted from handprints. This collaborative mural style combines simple painted stems with playful hand-shaped petals, creating a cheerful display that feels both personal and artistic.
Step-by-Step
Materials
- Exterior masonry primer (white)
- Exterior acrylic latex paints (various bright colors: red, yellow, purple, orange, green, blue)
- Wide painter’s tape
- Chalk or watercolor pencils for sketching
- Assorted paintbrushes (large rollers for base, medium flats for leaves, small rounds for details)
- Paper plates or palettes
- Drop cloths
- Ladder or step stool (if necessary)
- Baby wipes or a wash station nearby
Step 1: Preparation & Base Coat
-
Clean the Surface:
Begin by thoroughly cleaning the brick or cinder block wall to remove dirt, mildew, and loose debris. A pressure washer serves best here, but a stiff scrub brush with soapy water works well too. Allow the wall to dry completely for at least 24 hours. -
Protect the Area:
Lay down drop cloths along the base of the wall to protect the sidewalk and soil. Use high-quality painter’s tape to mask off any window frames, electrical boxes, or architectural trim you want to keep paint-free. -
Prime the Wall:
Apply a coat of high-quality exterior masonry primer using a large roller. This step is crucial for ensuring your colors pop against the white background and adhere properly to the textured surface. -
Apply the Base Layer:
Roll on two coats of white exterior paint to create a clean, crisp canvas. Let the first coat dry for about 2-4 hours before applying the second to ensure solid coverage.
Step 2: Planting the Stems
-
Everything Starts with Chalk:
Lightly sketch the flower placement using sidewalk chalk or a watercolor pencil. Draw vertical lines of varying heights for the stems, ensuring they are spaced out enough to accommodate large flower heads later. -
Paint the Stems:
Using a dark green exterior paint and a medium-width flat brush, paint over your chalk lines. Don’t worry about making them perfectly straight; a little natural curve adds character. -
Add Leave Variety:
Paint leaves attached to the stems. Vary the shapes, painting some as simple ovals, others as long, thin blades of grass, and some with jagged edges. I find that mixing a lighter green with the dark green adds nice depth to the foliage. -
Create the Grass Line:
Along the very bottom of the wall, use quick, upward brush strokes with different shades of green to create a grassy texture that anchors the stems to the ground.
Clean Hands Fast
Keep a bucket of warm soapy water and a roll of paper towels right next to the painting zone. Cleaning hands immediately prevents accidental transfers to the white wall.
Step 3: The Handprint Blooms
-
Plan the Flowers:
Decide on the flower shapes. The image shows tulips, daisies, and abstract blooms. Lightly mark the center of where each flower head will go at the top of the green stems. -
Prepare the Paint Stations:
Set up paper plates with bright, contrasting colors like red, yellow, purple, and orange. Ensure the paint is shallow enough to dip a hand or sponge but thick enough to cover well. -
The Solid Handprint Method:
For the tulip-style flowers (like the red one on the right), paint the child’s entire hand (palm and fingers) and press it firmly onto the wall, fingers pointing upward. Repeat this adjacent to the first print, overlapping slightly at the palms, to fan them out creating a wide blossom. -
The Finger-Ray Method:
For flowers like the yellow daisy, paint only the fingers and the top of the palm. Have the participant press their hand multiple times in a circle, with the fingers pointing outward like sun rays. -
Solid Brush Shapes:
Mix in some traditionally painted shapes. Use a brush to paint simple U-shapes or ovals for standard tulip heads (like the purple flower) to add variety among the handprints. -
Add Butterflies:
To fill empty white space, create butterflies. Paint two hands in a contrasting color and press them flat against the wall, thumbs touching or overlapping, to form the wings. Add a simple painted body and antennae in black afterwards.
Uneven Texture?
If the cinder blocks are very rough and the handprints aren’t covering fully, use a brush to fill in the ‘valleys’ of the block texture inside the print area while the paint is wet.
Step 4: Details & Finish
-
Refine Edges:
Once the handprints are dry, use a small round brush to touch up any undefined edges or smears. This helps the flowers look deliberate rather than messy. -
Add Flower Centers:
For the circular ray flowers, paint a solid contrasting center dot or use white strokes to create texture in the middle of the bloom. -
Highlighting Details:
Using a thin detail brush and white paint, add tiny decorative lines, dots, or veins inside the painted leaves and flower petals to give them a finished, illustrative look. -
Seal (Optional):
If your mural faces harsh weather, consider applying a clear, water-based exterior sealer over the entire wall once the paint has cured for at least 48 hours.
Step back and enjoy the colorful, permanent garden that celebrates the community’s creativity.
Outdoor Fence Mural With Hop-and-Step Path
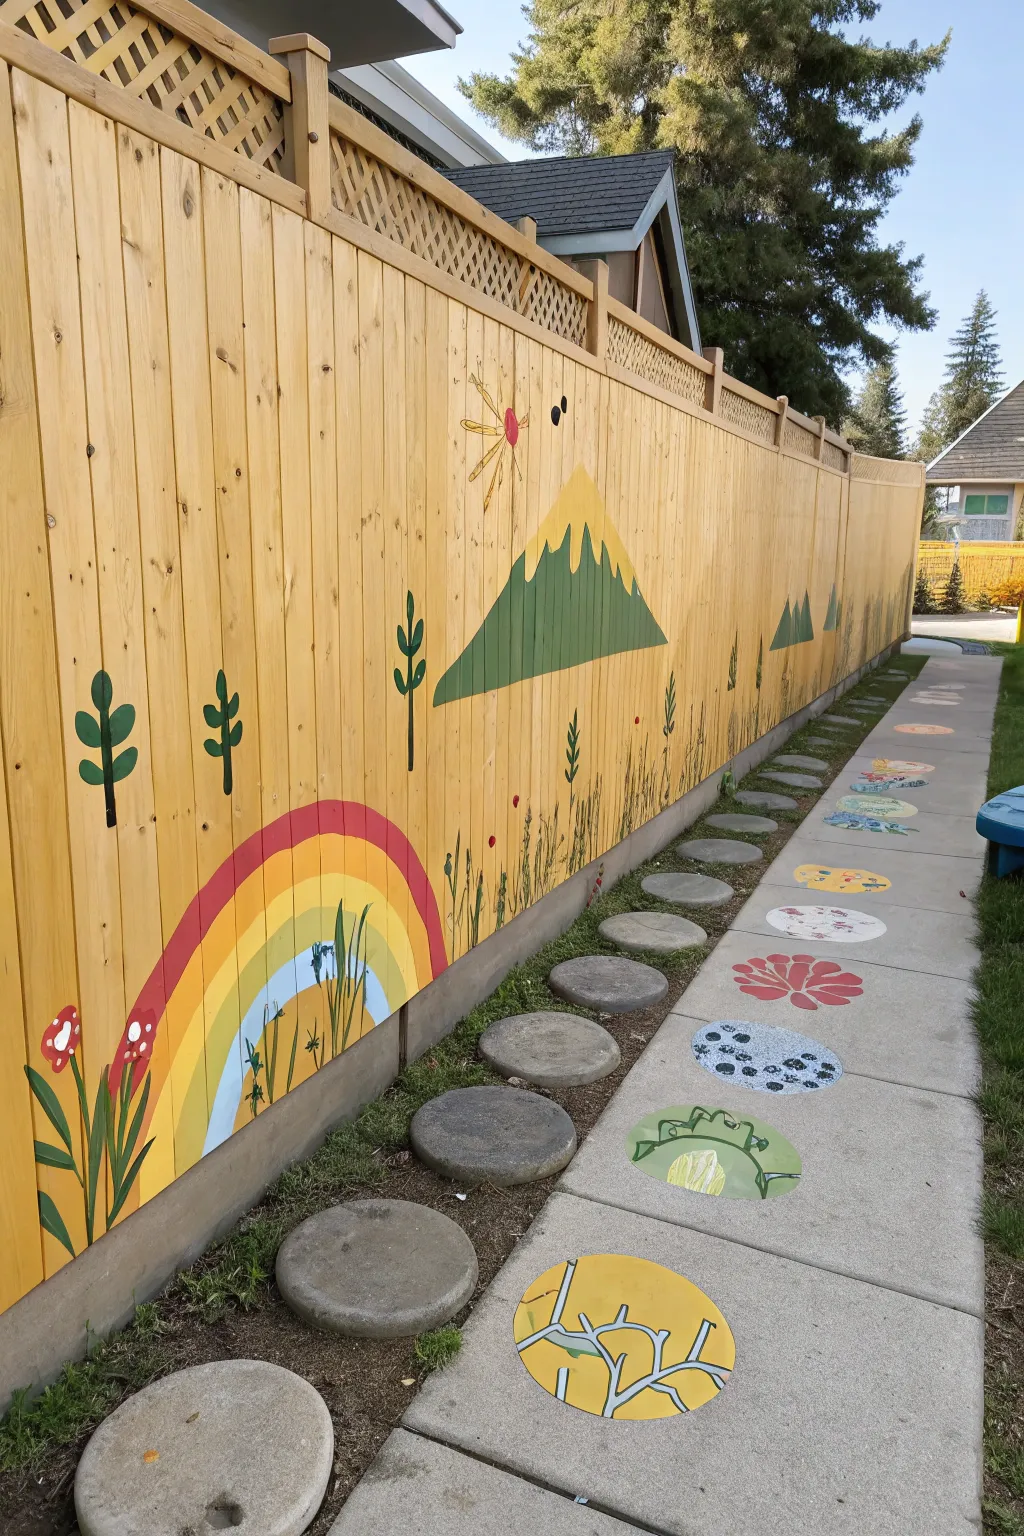
Brighten up a plain wooden fence with this cheerful collection of nature motifs, paired perfectly with an interactive sidewalk path. This project combines vertical storytelling with ground-level play, creating an immersive garden walk for little ones.
How-To Guide
Materials
- Exterior wood stain (clear or light honey)
- Exterior acrylic latex paints (red, yellow, orange, green varieties, blue, white, black)
- Assorted paintbrushes (2-inch flat, 1-inch angled, detail rounds)
- Painter’s tape
- Sidewalk chalk (for sketching)
- Circular stencils or large round lids (approx. 12-inch diameter)
- Clear outdoor concrete sealer
- Pressure washer or stiff scrub brush
- Drop cloths
Step 1: Prepping the Canvas
-
Clean the surfaces:
Before painting, ensure both the fence and the concrete path are spotless. Use a pressure washer or a stiff brush with soapy water to remove dirt, moss, and loose debris. Let everything dry completely for at least 24 hours. -
Stain the fence:
Apply a coat of clear or light honey-toned exterior wood stain to the fence. This seals the wood and provides a warm, uniform background that allows the grain to show through while making your paint colors pop. -
Draft the layout:
Using sidewalk chalk, lightly sketch your main design elements onto the fence. Draw a large arc for the rainbow in the bottom left corner and outline the triangular mountains further down the fence line.
Step 2: Painting the Fence Mural
-
Create the rainbow base:
Start with the outermost band of the rainbow using a bold red exterior paint. Follow the curve of your chalk sketch carefully. -
Fill the rainbow arches:
Work inward with orange, yellow, and light blue bands. Since the fence boards have gaps, dab the brush gently into the crevices to ensure the color reads continuously from a distance. -
Block in the mountains:
Paint the large triangular mountain shapes using a deep forest green. Allow the peaks to be slightly irregular for a natural look. -
Add snow caps:
Once the green is dry to the touch, mix a pale yellow or cream color. Paint the jagged ‘snow’ caps on top of the mountains, letting the paint drip down slightly for effect. -
Plant the trees:
Using a dark green and a round brush, paint simple vertical lines for tree trunks. Add stylized oval leaves or pine branches coming off the sides. Scatter these at varying heights across the expanse of the fence. -
Add floral details:
Near the base of the rainbow, paint tall green stems. Top them with whimsical red mushroom caps containing white dots, or simple tulip shapes. I find that grouping these in clusters of three creates a nice visual balance. -
Paint the sun and sky bugs:
Above the mountain, paint a simple yellow sunburst with thin red rays. Add small black dots with wings to represent buzzing insects flying near the top of the fence.
Paint Bleeding?
If paint bleeds into the wood grain, switch to a thicker acrylic gel medium or let the paint thicken slightly on the palette before applying. Use a stiff brush for cleaner edges.
Step 3: Creating the Sidewalk Hop-Path
-
Outline the stepping stones:
On the dry concrete path parallel to the fence, place your circular stencil or lid. Trace circles with chalk, spacing them distinctively apart to encourage jumping or long steps. -
Prime the circles:
Paint the interior of each traced circle with a coat of white exterior primer. This step is crucial for making the final colors bright against the gray concrete. -
Paint base colors:
Fill each circle with a different base color—yellow, white, or light blue—drawing from the palette you used on the fence to tie the two areas together. -
Design the motifs:
Once the base coats are dry, add simple nature designs to each circle. Paint a red flower, a cluster of blueberries, a green turtle shell pattern, or yellow branches. Keep the designs flat and graphic. -
Seal the path:
After the sidewalk paint has cured for roughly 24 hours, roll a clear, non-slip outdoor concrete sealer over the painted circles to protect them from foot traffic and weather.
Level Up: Sensory Station
Make the fence mural interactive by screwing in textured elements like artificial turf scraps for grass or smooth river stones glued onto the mountain base.
Now you have a vibrant, coordinated play space that encourages movement and imagination all year round
Twilight Sky With Silvery Stars
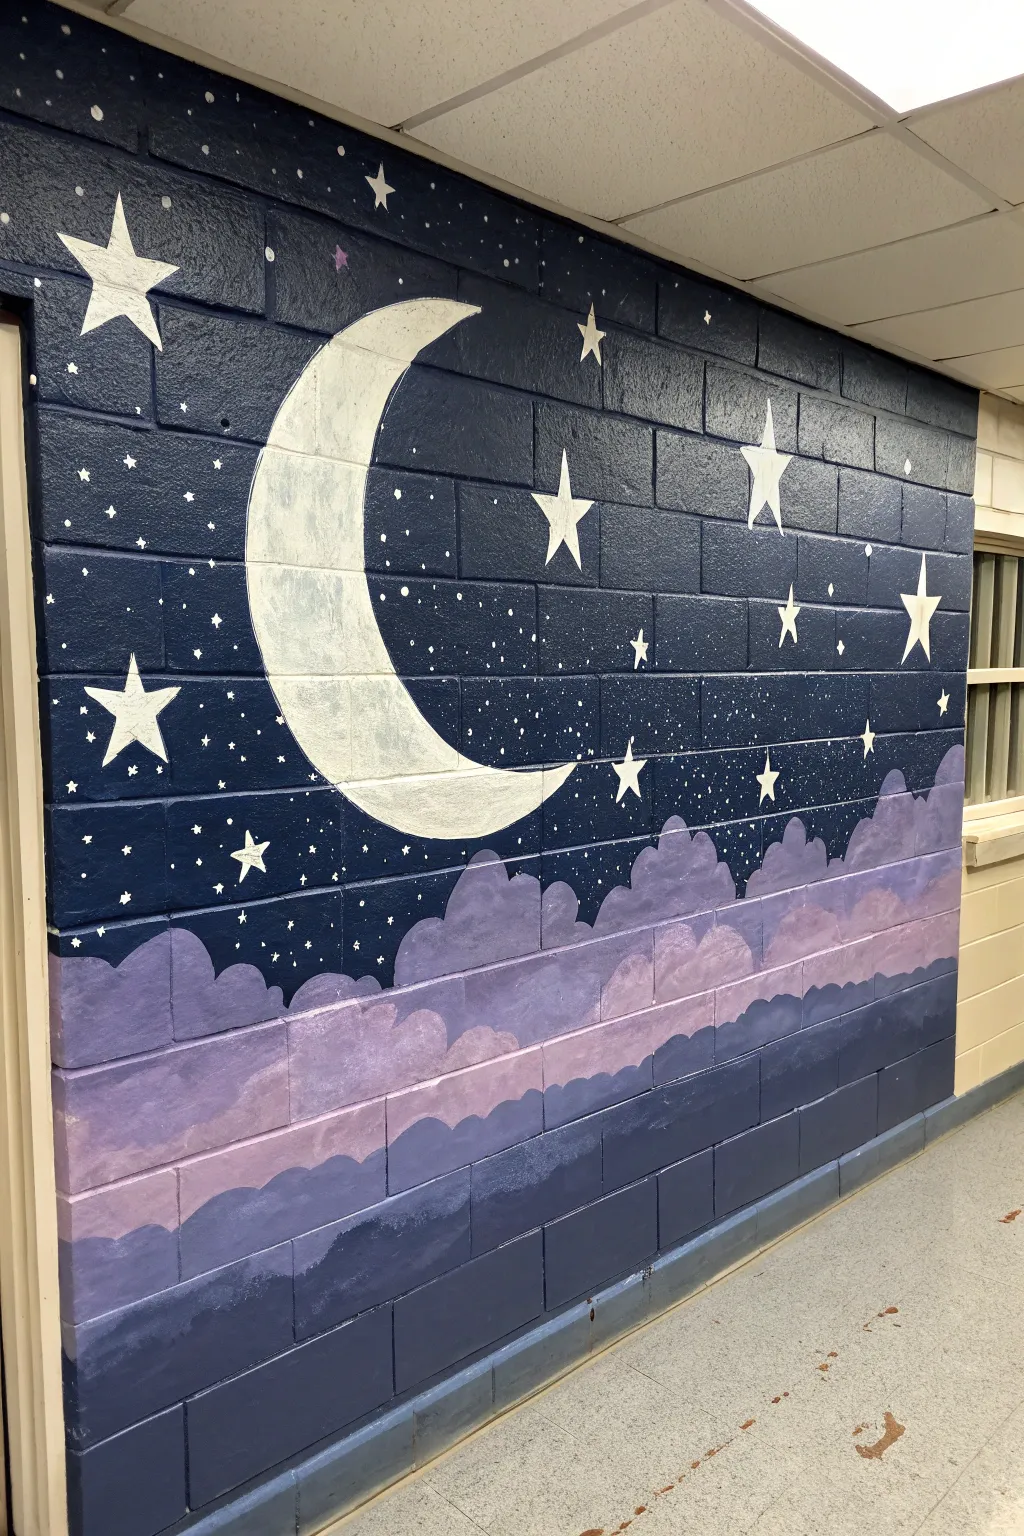
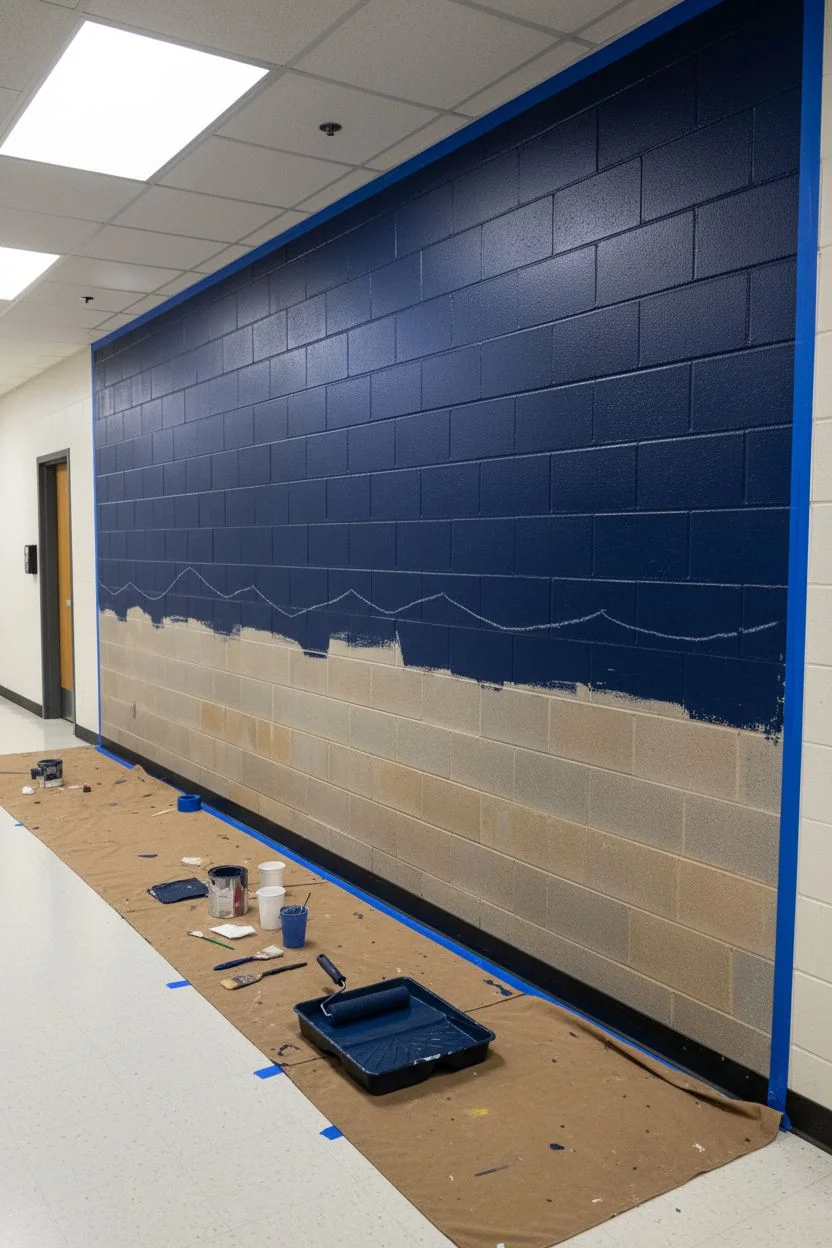
Transform a plain brick wall into a soothing evening scene featuring a luminous crescent moon and gentle, rolling clouds. This large-scale mural uses deep blues and soft purples to create a calming atmosphere perfect for a quiet corner or nap area.
Step-by-Step Guide
Materials
- Latex or acrylic wall paint (Deep Navy Blue)
- Latex or acrylic wall paint (White)
- Latex or acrylic wall paint (Lavender/Light Purple)
- Latex or acrylic wall paint (Medium Purple/Periwinkle)
- Painter’s tape (2-inch width)
- Large paint roller and tray
- Various paintbrushes (2-inch flat brush, 1-inch angled brush, small round detail brush)
- Chalk (white)
- Drop cloth
- Mixing cups or paper plates
Step 1: Setting the Midnight Stage
-
Protect the area:
Begin by laying down a drop cloth along the base of the wall to catch any drips. Use painter’s tape to frame the edges of your mural area if you aren’t painting the entire wall. -
Establish the horizon line:
Decide how high your cloud layer will go—aim for about the bottom third of the wall. Mark this line lightly with chalk, but keep it organic and wavy rather than straight. -
Paint the background:
Use a large roller to fill in the upper two-thirds of the wall with your Deep Navy Blue paint. Ensure you push the paint into the mortar grooves of the cinder blocks for solid coverage. -
Apply a second coat:
Once the first layer of blue is dry to the touch, apply a second coat to ensure a rich, opaque night sky.
Step 2: Sculpting the Clouds
-
Block in the darkest clouds:
Mix a small amount of black or extra navy into your Medium Purple paint to create a deep shadow color. Paint the bottom-most layer of wavy cloud shapes along the floor. -
Layer the middle clouds:
Using the plain Medium Purple, paint a second row of fluffy, rounded cloud shapes just above the dark bottom layer. Overlap them slightly to create depth. -
Paint the top clouds:
Mix your Lavender paint with a touch of white to make it pale and airy. Paint the highest layer of clouds, letting the tops of the shapes embrace the navy blue sky. -
Blend the transitions:
While the paint is still slightly tacky, use a dry brush to gently feather the edges where the different purple layers meet, softening the lines between the cloud banks.
Paint Seeping?
Cinder blocks are porous. If lines bleed, wait for the paint to dry completely, then touch up the edges with the background color using a small detail brush.
Step 3: Celestial Details
-
Sketch the moon:
Using white chalk, draw a large crescent moon shape in the upper left quadrant of the sky. Step back frequently to ensure the curve looks natural and balanced. -
Fill the moon:
Use a 1-inch flat brush and white paint to fill in your moon outline. You may need two to three coats to get a bright, solid white against the dark blue background. -
Add texture to the moon:
I like to mix a tiny drop of grey or light blue into some white paint and dry-brush subtle craters or shadows onto the inner curve of the moon for dimension. -
Outline the main stars:
Sketch several large, five-pointed stars scattered across the sky using your chalk. Vary their sizes and orientation to keep the composition dynamic. -
Paint the large stars:
Carefully fill in your star sketches with white paint using a smaller angled brush. Sharp points make the stars look crisper. -
Add medium stars:
Using a small round brush, paint smaller four-pointed stars or simple diamond shapes in the empty spaces between the large stars. -
Create distant stardust:
Dip the handle end of a paintbrush into white paint and dot it onto the wall to create tiny, circular distant stars. Cluster some together near the moon for a ‘glow’ effect. -
Clean up:
Once all paint is fully dry, use a damp cloth to wipe away any visible chalk lines remaining on the moon or stars.
Glow in the Dark
Mix glow-in-the-dark additive into your final coat of white paint for the stars and moon. The mural will reveal a magical secret whenever the lights go out.
Enjoy the peaceful ambiance created by your new starry masterpiece


Have a question or want to share your own experience? I'd love to hear from you in the comments below!