A dino mask is such a fun blank canvas because it’s already got built-in attitude—especially when the jaw moves. Here are some of my favorite paint-and-build directions to help you turn that dinosaur base into a full-on character you’ll actually want to wear and show off.
Classic Dino Mask Repaint
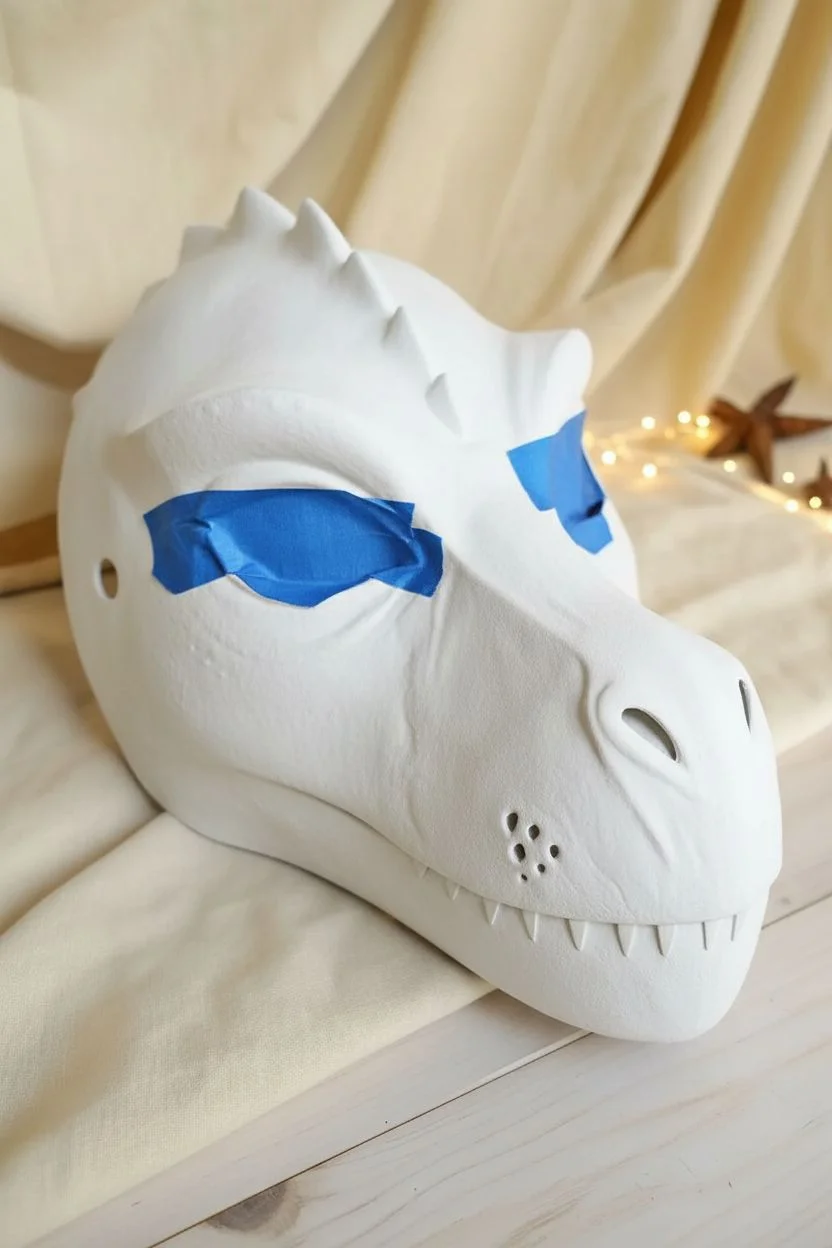
Transform a plain white dinosaur mask base into a lifelike creature with deep green scales and ancient weathering. This project focuses on building layers of color to simulate organic skin texture and depth.
Step-by-Step Tutorial
Materials
- White dinosaur mask base (plastic or resin)
- Acrylic paints (olive green, dark hunter green, brown, tan, cream, red, pink)
- Matte sealant spray or brush-on varnish
- Gloss varnish
- Assorted paintbrushes (large flat, medium round, fine detail)
- Small sponge or stippling brush
- Water cup and paper towels
- Sandpaper (fine grit)
- Masking tape
Step 1: Preparation and Base Coat
-
Surface Prep:
Begin by lightly sanding the entire surface of the white mask with fine-grit sandpaper. This helps break the smooth manufacturing sheen and gives the paint something to grip onto. Wipe away any dust with a damp cloth. -
Protect Key Areas:
Use masking tape to carefully cover the eyes if they are already installed. If the teeth and tongue are part of the main mold, you can mask them now or carefully paint around them later; I prefer to mask the eyes but paint around the teeth for better control. -
Apply the Base Layer:
Mix a pale, desaturated olive green using your green, tan, and a touch of white. Apply this color over the entire skin area of the mask. Don’t worry if it looks flat right now; this is just the canvas for your details. -
Block in Secondary Colors:
While the base is drying, mix a slightly darker, muted green. Paint the bridge of the nose and the top of the head with this shade to start establishing where the darker camouflage patterns will go.
Uneven Wash?
If your dark wash is pooling too much in one spot or looks like coffee stains, simply use a clean, wet brush to blend out the edges while the paint is still damp to soften the transition.
Step 2: Adding Depth and Texture
-
The Wash Technique:
Create a watery wash using dark brown and hunter green paint (about 70% water, 30% paint). Brush this liberally over the scales, ensuring it seeps into all the cracks and crevices. -
Wipe Back:
Before the wash dries completely, take a paper towel or a slightly damp sponge and gently wipe the surface of the raised scales. This leaves the dark paint in the recesses while revealing the lighter base color on top, instantly creating texture. -
Dry Brushing Highlights:
Load a flat brush with a very light sage or cream color, then wipe almost all of the paint off onto a paper towel. Lightly dust the brush over the highest points of the scales, eyebrows, and nose ridges to make the texture pop. -
Stippling Variation:
Use a sponge or a stippling brush with a reddish-brown tone to dab random, faint blotches around the cheeks and jaw. This adds organic realism, as real reptile skin isn’t perfectly uniform. -
Defining the Cracks:
For the deep cracks around the mouth and eyes that the wash might have missed, use a fine detail brush with thinned dark grey or black paint to manually trace and deepen those lines.
Scale Up Your Texture
Before priming, glue small bits of tissue paper or sand with Mod Podge onto specific areas like the nose bridge. When painted over, this adds a rough, scaly physical texture.
Step 3: Mouth and Details
-
Painting the Gums:
Mix a fleshy pink tone and carefully paint the gums and the interior of the mouth. You may need two coats here to cover any green overspill. -
Coloring the Tongue:
Paint the tongue with a deeper red or maroon shade. Add a darker wash down the center line of the tongue to give it shape and volume. -
Teeth Base:
Paint the teeth with an off-white or bone color. pure white looks too artificial, so blending in a tiny drop of brown or yellow creates a more natural fossil look. -
Aging the Teeth:
Apply a very thin brown wash at the base of the teeth near the gum line. This simulates plaque and dirt, making the dinosaur look like a living animal rather than a toy. -
Eye Detailing:
Peel off the masking tape from the eyes. If you painted any accidental smudges on the eye lens, gently scratch it off with a toothpick or wipe with a damp q-tip immediately. -
Eyelid Shading:
Take a small brush with dark brown paint and carefully outline the rim of the eyelids. This acts like eyeliner and makes the yellow eyes stand out intensely against the green skin.
Step 4: Finishing Touches
-
Sealing the Paint:
Once all paint is visibly dry, spray the entire mask with a clear matte sealant. This protects your paint job from scratching or chipping during wear. -
Wet Look Effect:
For the final touch of realism, brush a high-gloss varnish specifically onto the eyes, the teeth, the tongue, and the nostrils. This creates a permanent ‘wet’ look that brings the character to life.
Now your prehistoric predator is ready to roar with a finish that looks like it walked right out of the jungle.


Big Expressive Mesh Eyes
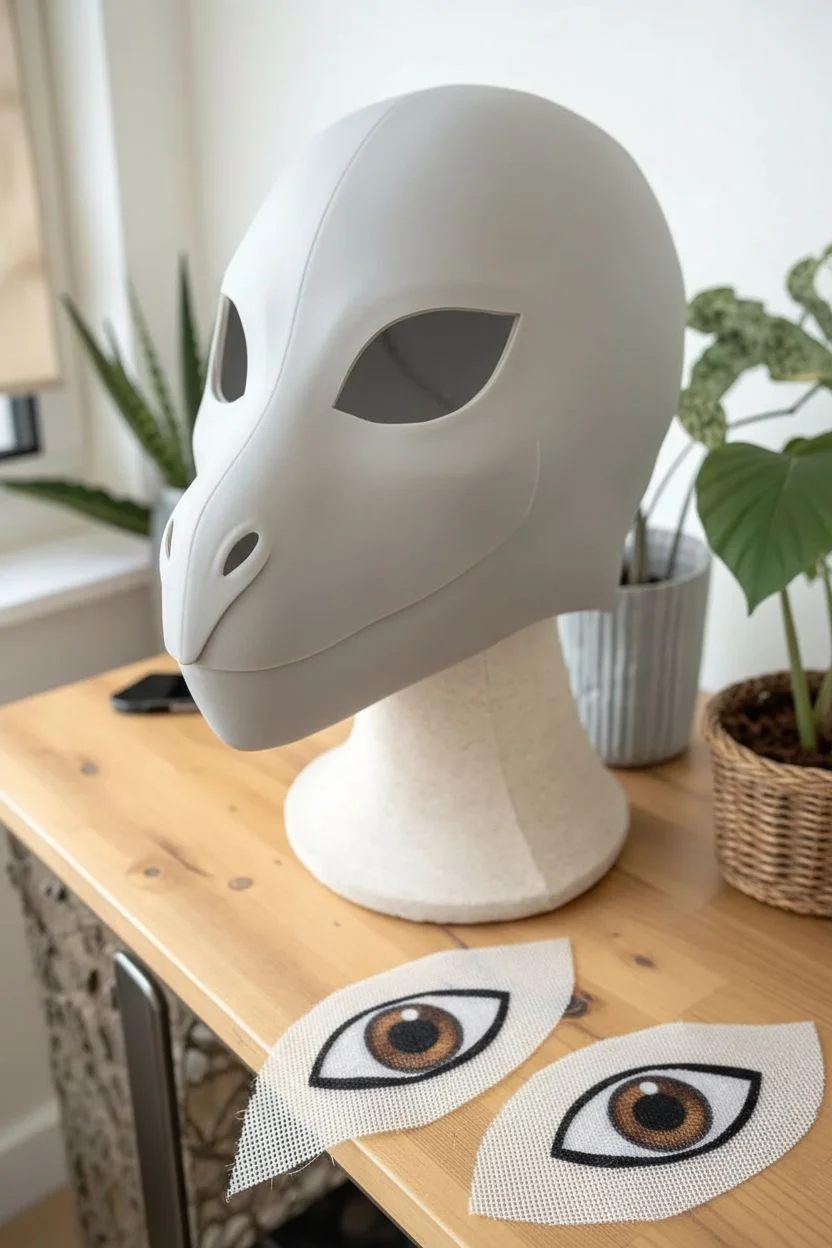
Transform yourself into a whimsical prehistoric creature with this stunning faux-leather dinosaur mask. Featuring a rich teal texture, cosmic star accents, and large expressive eyes, this project balances fierce dragon energy with a touch of magic.
Detailed Instructions
Materials
- Dinosaur or dragon mask base (plastic or resin)
- Teal textured faux leather or upholstery vinyl
- Cognac/tan faux leather (for accents)
- EVA foam (2mm and 5mm)
- Contact cement or strong fabric glue
- Buckram mesh or vinyl mesh (for eyes)
- Acrylic paints (black, white, teal, brown)
- Leather hole punch or rotary tool
- Waxed thread and heavy-duty needle
- Heat gun
- Precision craft knife
- Scissors
Step 1: Prepping the Base
-
Prepare the shell:
Start by removing the stock straps and any jaw hardware from your plastic dino mask base. Sand the surface lightly with sandpaper to help the glue adhere better later on. -
Create the eye blanks:
Trace the eye socket shape onto your mesh material. Cut the mesh slightly larger than the opening so you have room to glue it from the inside. -
Paint the eyes:
Sketch a large iris and pupil onto the mesh. Using acrylics, paint the pupil black and the iris a realistic hazel or brown, adding a small white highlight for life. Keep the paint thin so you can still see through the mesh.
Step 2: Skinning the Mask
-
Pattern the skin:
Cover one half of the mask base in masking tape to create a pattern. Draw seam lines where the fabric naturally wants to fold, specifically down the center nose ridge and around the eye sockets. -
Cut the teal fabric:
Transfer your tape pattern to the teal faux leather. Remember to flip the pattern for the other side and leave a small seam allowance. -
Apply the main skin:
Apply contact cement to both the mask base and the back of your fabric pieces. Once tacky, carefully smooth the teal material onto the mask, working from the center outward to avoid air bubbles.
Leather Look Hack
If using real leather is too pricey, use EVA foam! Heat it up and press a ball of crumpled aluminum foil into the surface to create a realistic hide texture before painting.
Step 3: Adding Details & Texture
-
Create the eye patches:
Cut two almond-shaped pieces from the cognac faux leather to frame the eyes. Punch small holes around the perimeter of these pieces to mimic decorative leather tooling. -
Attach eye details:
Glue the cognac eye patches over the teal skin around the eye sockets. I like to press the edges down firmly with a modeling tool to create a clean transition. -
Simulate stitching:
Using a thick needle and waxed thread, add decorative saddle stitching along the seams of the teal fabric and around the eye patches for that authentic hand-crafted look. -
Craft the jaw:
Cut a large U-shape from the cognac leather for the upper jaw/snout area. Add simple line details with a burnishing tool or brown marker to simulate definition.
Glow Up
Paint the stars with phosphorescent or UV-reactive paint so your dragon glows in the dark or under blacklight at parties.
Step 4: Spikes, Stars & Finishing
-
Fabricate the spikes:
Cut triangular spike shapes from 5mm EVA foam. Cover them with the cognac leather, ensuring the edges are wrapped neatly. -
Mount the spine:
Glue the spikes in a row running from the forehead down to the back of the head. Ensure they are centered perfectly along the ridge. -
Cut the stars:
Cut several five-pointed stars from the cognac leather or foam scraps covered in leather. Vary the sizes slightly for visual interest. -
Apply star accents:
Arrange and glue the stars randomly across the forehead and cheeks of the mask. -
Add the teeth:
Cut small, sharp triangles from white thermoplastic or stiff foam. Glue them to the underside of the upper jaw, spacing them evenly. -
Install the eyes:
Glue your painted mesh eyes into the sockets from the inside of the mask using hot glue or contact cement. -
Final weathering:
Dry brush a little dark brown paint into the seams and around the stars to add depth and make the mask look weathered.
Now you have a mythical, hand-crafted creature mask ready for your next convention or costume event


Follow-Me Eye Illusion
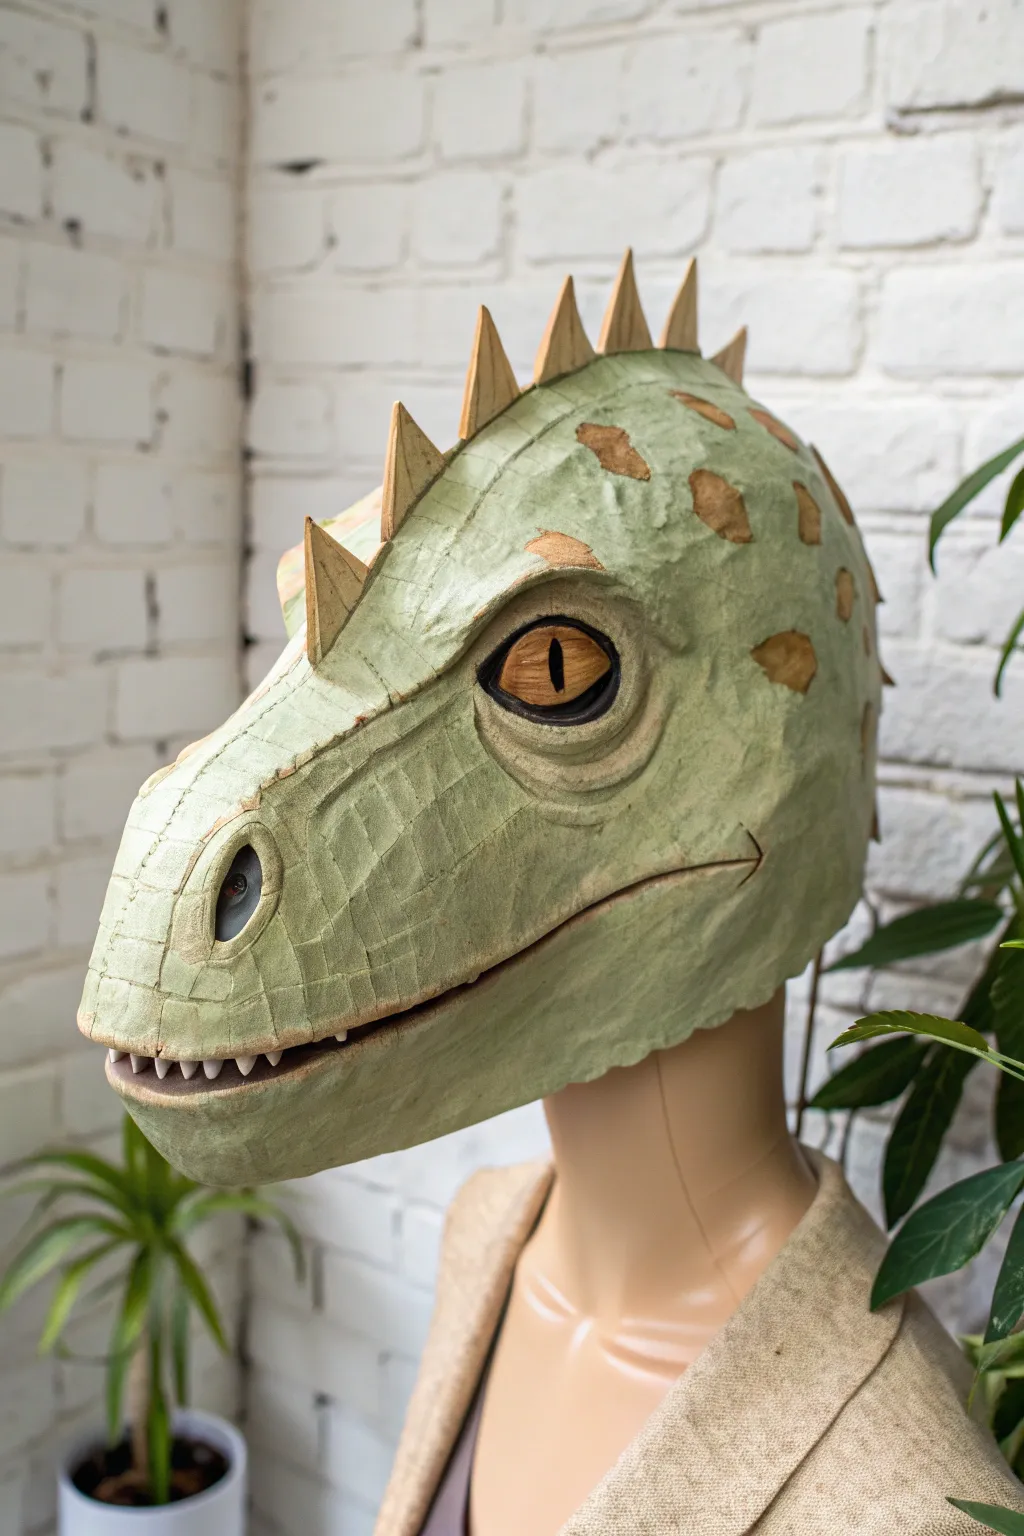
Transform simple materials into a prehistoric predator with this textured dinosaur mask featuring a mesmerizing follow-me eye illusion. The distinctive light green finish and deep-set eyes give this creature a captivating, lifelike gaze that seems to track observers around the room.
How-To Guide
Materials
- Large balloon or mannequin head form
- Paper clay or homemade papier-mâché pulp (toilet paper, PVA glue, joint compound)
- Cardboard or EVA foam (for structural spines and jaw)
- Acrylic paints (Mint Green, Olive Green, Burnt Sienna, Black, Yellow Ochre, White)
- Clear plastic half-ornament sphere (approx. 2-3 inches)
- White craft foam or cardstock (for the eye sclera)
- PVA glue
- Hot glue gun and glue sticks
- Sculpting tools (or plastic cutlery)
- Medium and fine grit sandpaper
- Matte sealant spray
Step 1: Base Structure & Sculpting
-
Form the armature:
Begin by inflating a large balloon to the size of a human head or use a mannequin head covered in plastic wrap. Build up the snout and jaw shape using crumpled newspaper or cardboard secured with masking tape to create that elongated raptor profile. -
Establish the dorsal spines:
Cut triangular fin shapes from sturdy cardboard or thick EVA foam. Hot glue these in a central ridge running from the forehead down to the back of the neck, ensuring they graduate in size for a natural look. -
Apply the paper clay layer:
Mix your paper clay or mash and apply a consistent shimmering layer about 1/4 inch thick over the entire form. Smooth it out with wet fingers to integrate the cardboard snout and spines seamlessly into the skull. -
Sculpt the eye sockets:
While the clay is wet, build up significant ridges around the eye area. You need deep, cavernous sockets to make the follow-me illusion work later, so don’t be shy about adding extra bulk here. -
Add skin texture:
Use a sculpting tool or a stiff brush to press gentle wrinkles and scale patterns into the wet clay. Focus on the snout and around the mouth for that leathery reptile skin effect. -
Create the spots:
Mold small, flat, irregular patches of clay and press them onto the cheeks and crown to create slightly raised ‘scutes’ or armored spots. -
Refine the mouth:
Carve a defined line for the mouth, curving it slightly upward at the corner. Sculpt small, triangular teeth from clay or foam and embed them into the upper jawline before the clay fully hardens. -
Dry completely:
Allow the sculpture to dry thoroughly. This is crucial; heavy paper clay can take 2-4 days depending on humidity. A fan helps speed this process up.
Depth Trick
For the follow-me effect to track perfectly, the eye must be recessed at least 1-1.5 inches deep into the socket. The deeper the set, the wider the tracking angle.
Step 2: The Follow-Me Eye & Painting
-
Sand and smooth:
Once bone-dry, use sandpaper to knock down any unwanted sharp peaks or rough patches, leaving the intentional texture intact. -
Construct the eye insert:
Cut a circle of white craft foam slightly larger than your plastic dome. I find drawing the pupil and iris directly onto the *center* of this concave backing—not the clear dome itself—is the secret to the illusion. -
Paint the eye:
Paint a vibrant yellow/orange iris with a sharp vertical slit pupil on the foam. Add subtle shading around the edges of the iris to create depth. -
Install the dome:
Place the clear plastic half-sphere over the painted foam eye and glue it in place. Then, inset this entire assembly deep into the mask’s socket so the brow ridge hangs over it. -
Base coat the skin:
Cover the entire mask with a mint green acrylic base color. Ensure you get the paint into all the textured cracks and crevices. -
Dry brushing texture:
Mix a lighter, pale green shade. Dip a dry brush into the paint, wipe most of it off, and lightly sweep it over the raised textures to highlight the wrinkles. -
Detail the spots:
Paint the raised scute spots on the head with a warm Burnt Sienna or brown. Keep the edges ragged to make them look organic rather than painted on. -
Darken the recesses:
Use a watered-down black or dark olive wash (black paint mixed with water) to darken the deep areas around the eye socket, nostrils, and mouth line for dramatic contrast. -
Final touches:
Highlight the spines with a touch of unbleached titanium or bone color and coat the eye dome with a gloss varnish if needed to restore shine.
Cracking Clay?
If your paper clay develops cracks while drying, don’t restart. Mix a slurry of PVA glue and joint compound to fill the cracks, then smooth over with a damp finger.
Mount your finished creation on a stand or wear it to watch the room react to that eerie, tracking gaze


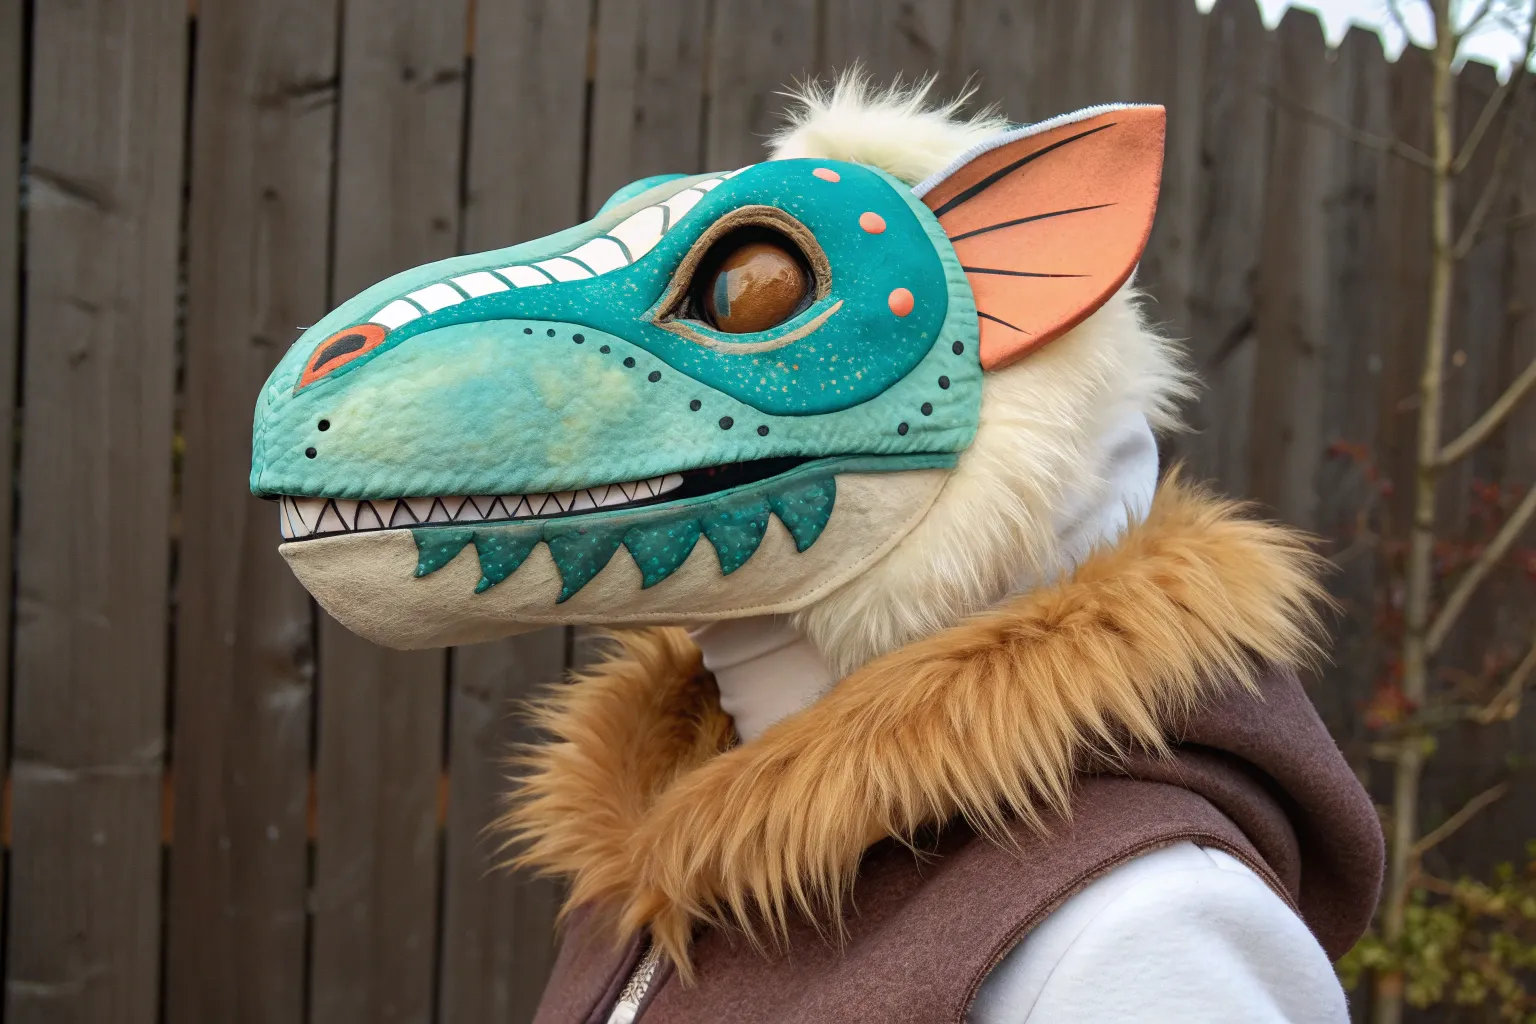
Faux Fur Hood Upgrade
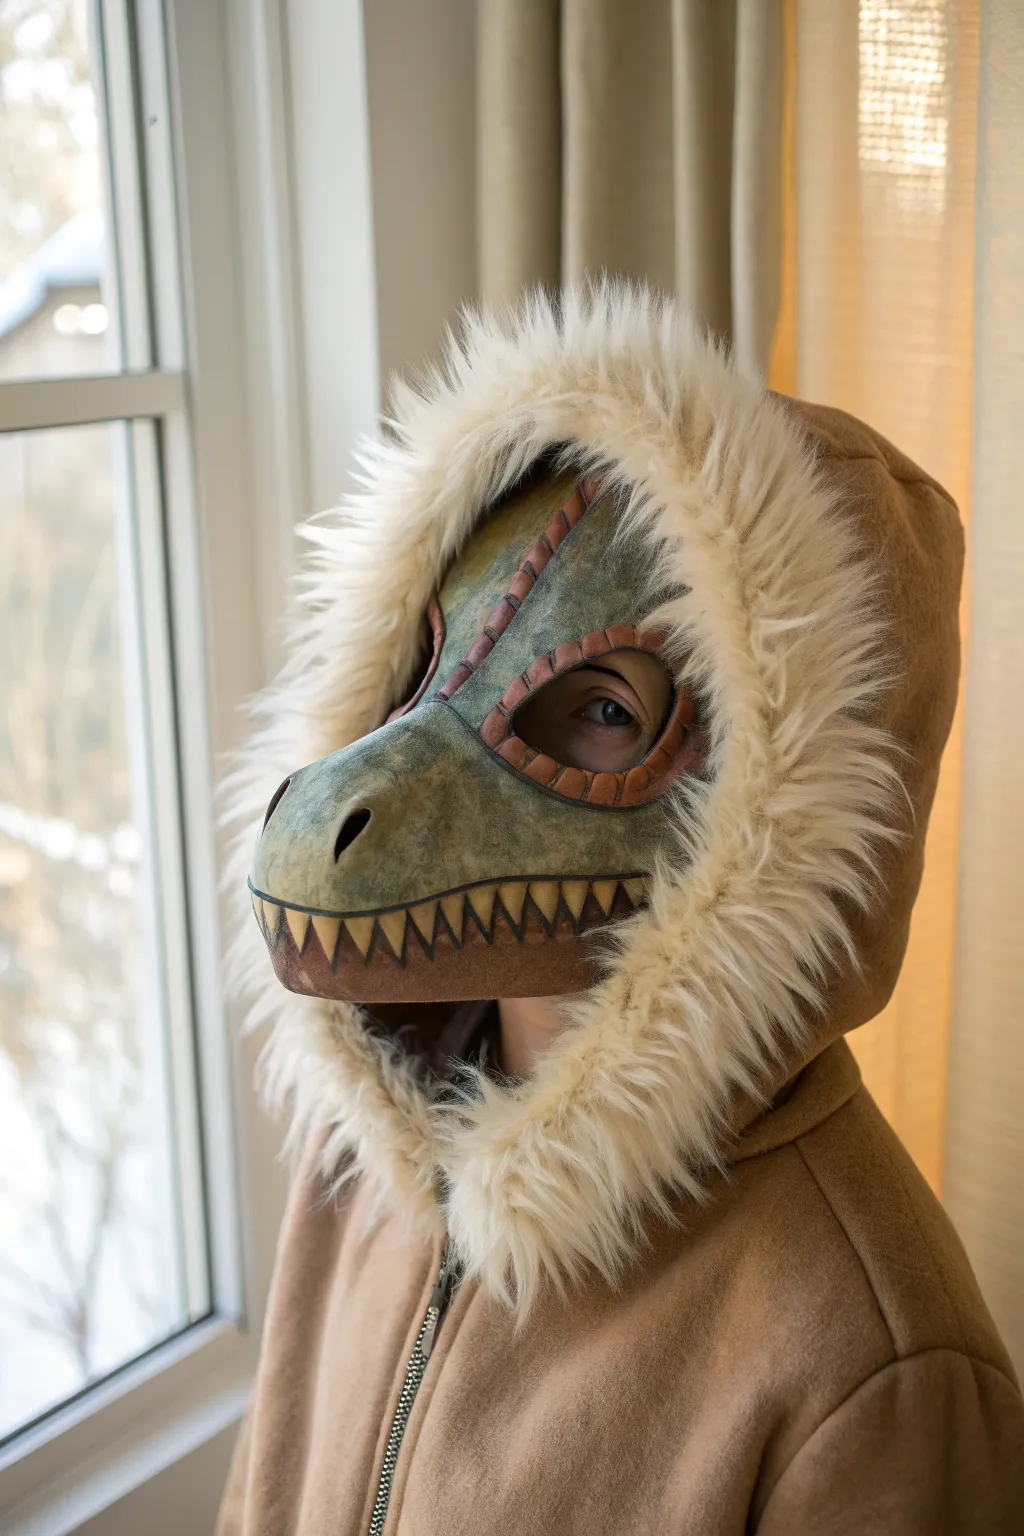

Transform a standard dinosaur mask into a cozy, creature-feature masterpiece by integrating a plush faux fur hood. This project combines mask painting with sewing to create a seamless headpiece perfect for cold weather costuming or imaginative play.
Step-by-Step Guide
Materials
- Plastic dinosaur mask base (e.g., Jurassic World Raptor)
- Medium-pile faux fur fabric (white/cream)
- Tan/fawn fleece or microsuede fabric (for hood shell)
- Acrylic paints (olive green, moss green, brown, cream)
- Paintbrushes (flat shader, fine detail)
- Matte sealant or varnish
- Sandpaper (fine grit)
- Measuring tape
- Sewing machine (or needle and strong thread)
- Hot glue gun and glue sticks
- Scissors and fabric pins
- Pattern paper or newspaper
Step 1: Mask Preparation & Painting
-
Prep the surface:
Begin by removing any existing straps from the plastic mask. Lightly sand the entire surface with fine-grit sandpaper to remove the factory gloss, which helps the new paint adhere better. -
Base coat application:
Apply a base coat of olive green acrylic paint to the upper face and snout areas. You may need two to three thin layers for opaque coverage, allowing each to dry completely. -
Add mottled texture:
Sponge or stipple on a lighter moss green color over the olive base to create a realistic, reptilian skin texture. Focus the lighter color on the top of the nose and brow ridges. -
Detail the markings:
Using a fine brush and brown paint, carefully outline the eye sockets and draw the stripe running up the center of the forehead. Add small perpendicular hash marks along the stripe for a stitched or scaled look. -
Paint the jaw and teeth:
Paint the lower jaw area in a solid brown tone. For the teeth, use a cream or off-white color, and outline them with thin black or dark brown lines to make them pop against the jaw. -
Seal the paint:
Once you are happy with the paint job, apply a clear matte varnish or sealant spray to protect your artwork from chipping during wear.
Step 2: Drafting & Sewing the Hood
-
Measure the wearer:
Measure from the top of the mask (where it sits on the forehead) over the back of the head to the nape of the neck. Also measure the circumference of the mask’s edge. -
Draft the hood pattern:
Sketch a simple hood shape on pattern paper using your measurements. The front opening should match the curvature of the mask’s outer edge. -
Cut the fabric:
Cut two mirrored pieces of the tan fleece (or microsuede) for the outer shell. I usually cut slightly larger than measured to allow for seam allowance. -
Sew the center seam:
Pin the two fabric pieces right-sides together and sew along the curved back seam (from top of head to neck), leaving the front face opening and bottom neck opening unsewn. -
Install the zipper (optional):
If you want a snug fit like the reference, install a separating zipper along the front center chest seam, or leave it open as a pullover style.
Pro Tip: Eye Mesh
To hide your human eyes while maintaining visibility, glue black buckram or vinyl mesh inside the eye sockets. Paint your own iris on the mesh for a complete illusion.
Step 3: Fur Trim & Assembly
-
Cut fur strips:
Cut a long strip of cream faux fur, approximately 4 inches wide. IMPORTANT: Cut only the backing of the fur with a razor blade or sharp scissors to avoid chopping the long fibers. -
Attach fur to hood:
Pin the fur strip along the edge of the hood face opening, facing inward (right sides together). Sew it in place, then flip the fur outward so it frames the face. -
Position the mask:
Place the painted mask inside the hood opening. The edge of the mask should tuck just under the fur trim. -
Glue tacking:
Use hot glue to tack the fabric edge (under the fur) to the plastic rim of the mask. Work in small 2-inch sections to ensure it stays aligned symmetrically. -
Reinforce the bond:
For extra durability, you can hand-sew through the fabric and loop around the existing strap holes or ventilation slots on the mask edge if accessible. -
Brush it out:
Use a slicker brush or old comb to fluff up the faux fur around the face, pulling trapped fibers out of the seam for maximum volume.
Level Up: Articulated Jaw
If using a base mask with a moving jaw, ensure your fabric glue-up leaves enough slack near the hinges so the mouth can still open freely when you speak.
Put on your new dino hood and roar with pride at your craftsmanship
BRUSH GUIDE
The Right Brush for Every Stroke
From clean lines to bold texture — master brush choice, stroke control, and essential techniques.
Explore the Full Guide
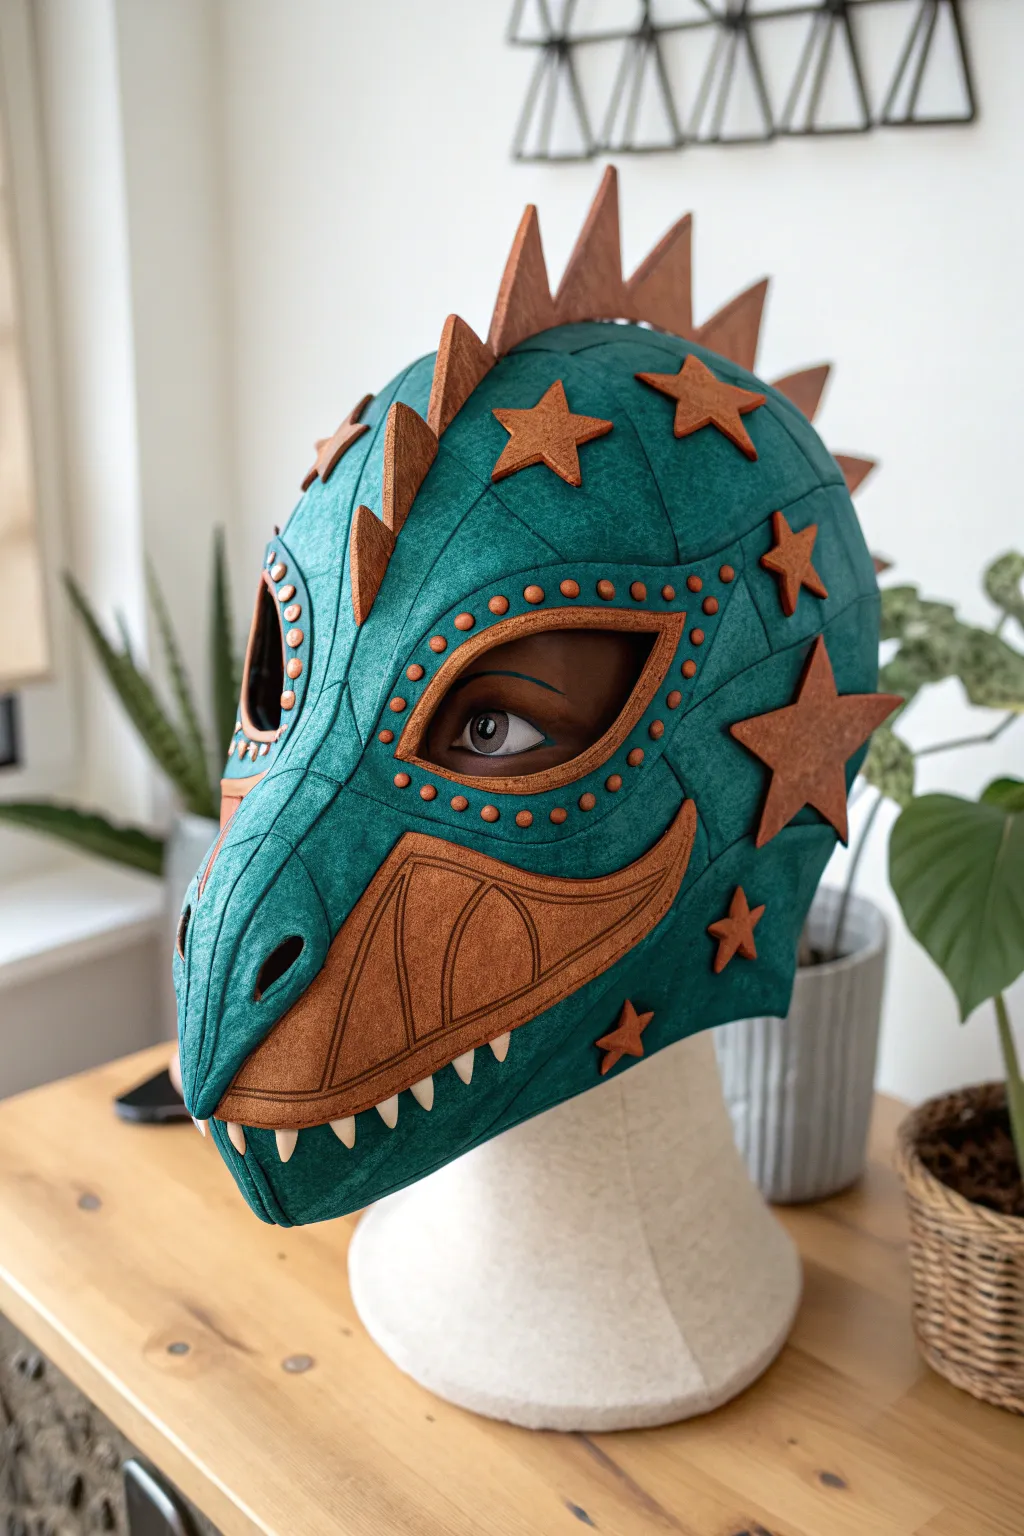
Oversized Foam-and-Fur Ears
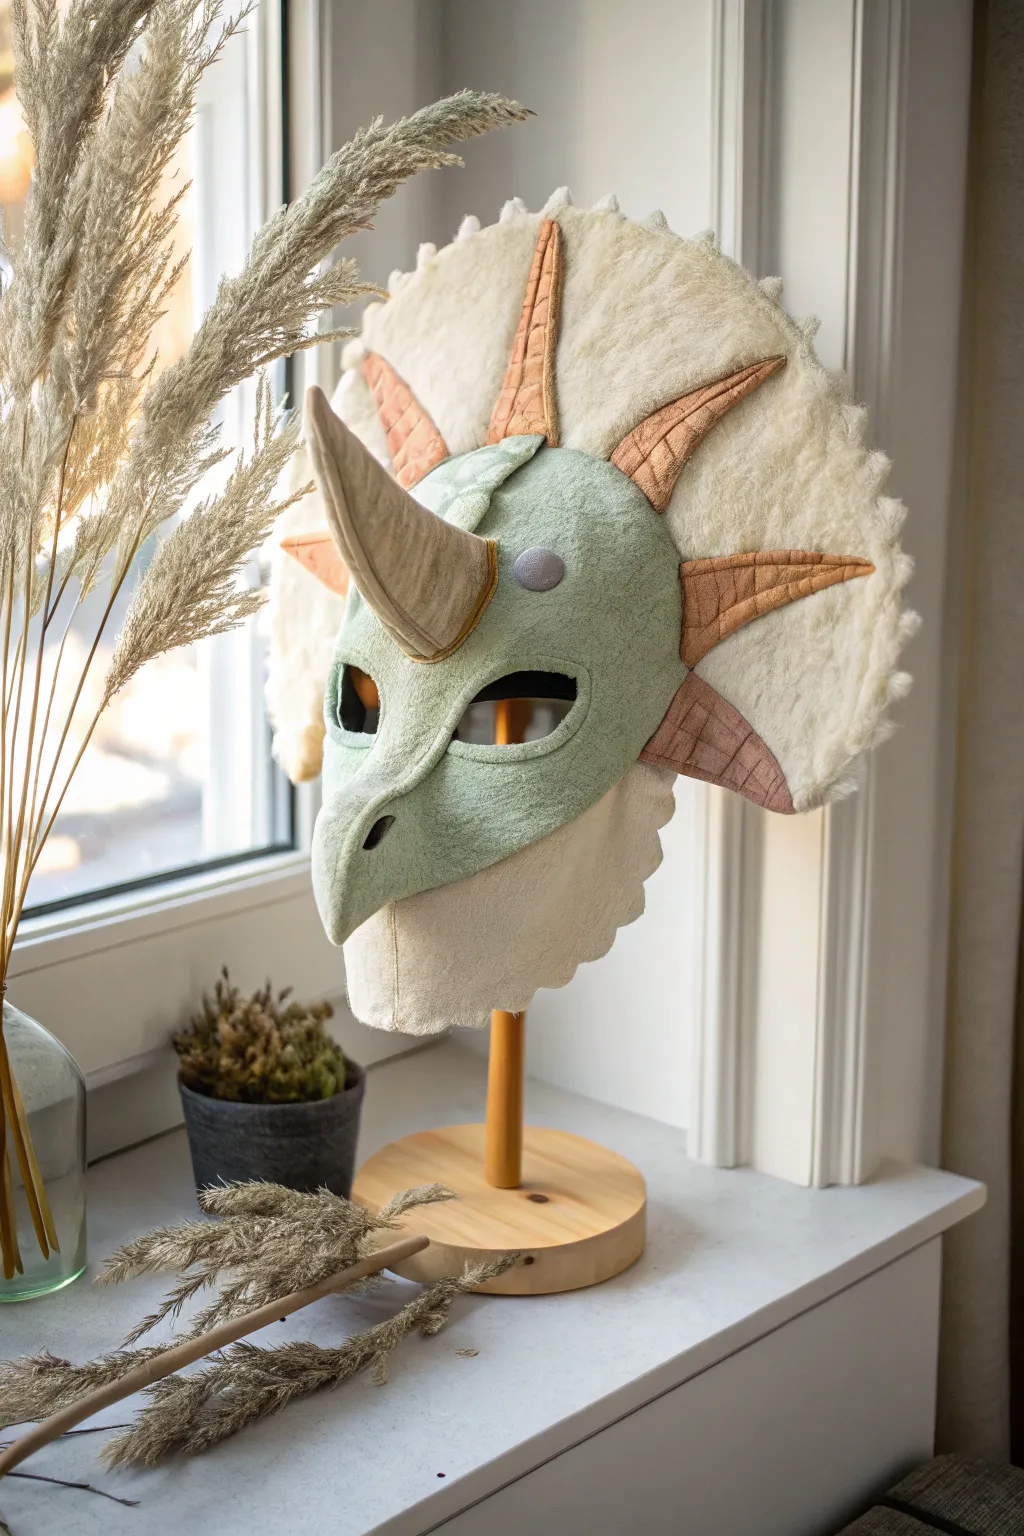
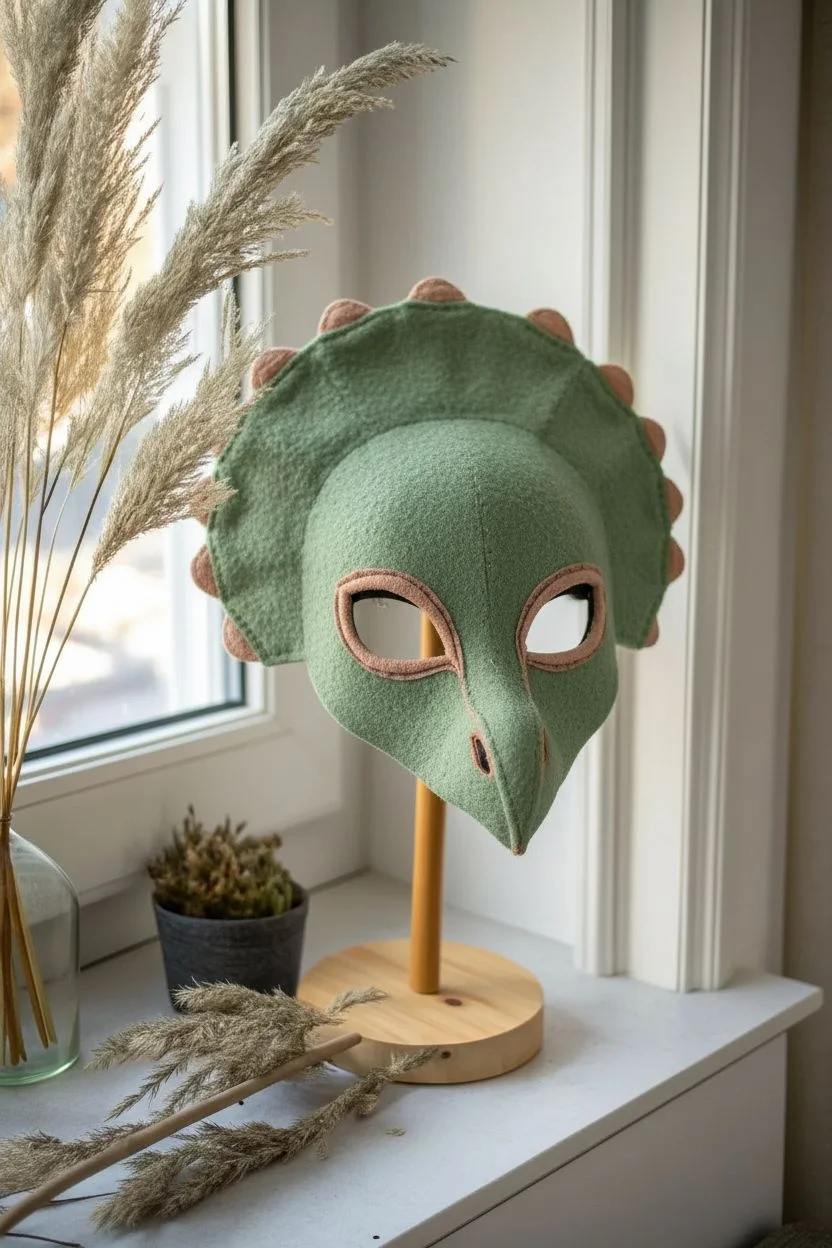
Transform soft materials into a prehistoric masterpiece with this elegant felt and foam triceratops mask. Featuring a muted sage green face, structural spikes, and a magnificent fluffy frill, this project balances costume play with sophisticated textile art.
Step-by-Step Tutorial
Materials
- Sage green wool felt (thick, 3mm)
- White faux Sherpa or bouclé fabric (for the frill)
- Peach/Terra-cotta colored cotton or felt (for spikes)
- EVA foam sheets (2mm and 5mm thickness)
- Conical craft foam shape (for the main horn)
- Elastic cord
- Hot glue gun and glue sticks
- Sewing machine (optional, hand sewing works too)
- Needle and thread (matching colors)
- Scissors and X-ACTO knife
- Cardboard or cardstock for templates
- Polyester fiberfill stuffing
Step 1: Constructing the Core Mask
-
Draft the face template:
Sketch a face mask shape on cardstock that covers from the forehead to the nose tip. Leave wider sections at the cheeks and draft two almond-shaped eye holes. -
Cut the foam base:
Trace your template onto 2mm EVA foam and cut it out. This acts as the stiffener so the felt doesn’t flop over your face. -
Cut and shape the felt layer:
Cut the same shape from your sage green thick felt, adding a 1/2 inch seam allowance all around. I like to dampen the felt slightly and mold it over a curved surface (like a bowl) to give the nose some lift as it dries. -
Create the eye sockets:
Glue the felt to the foam base. Carefully cut out the eye holes through both layers. For a polished look, glue a small strip of felt around the inner rim of the eye holes to hide the foam edge. -
Sculpt the beak:
Cut a separate, triangular piece of green felt for the beak tip. pinch the center seam to create a ridge and glue it to the bottom center of the mask, creating a slight overhang.
Floppy Frill Fix
If the back frill is too heavy and flops backward, glue a rigid ‘spine’ made of a popsicle stick or wire vertically up the back center.
Step 2: The Magnificent Frill
-
Prepare the frill structure:
Cut a large semi-circle fan shape from stiff interfacing or thin 2mm regular cardboard. This needs to be slightly wider than the wearer’s head. -
Apply the sherpa texture:
Spray adhesive on your frill base and press the white Sherpa or bouclé fabric onto it. Wrap the fabric edges around to the back and secure with hot glue for a clean edge. -
Attach the frill to the mask:
Securely glue the straight edge of the semi-circle frill to the top edge and sides of your green mask base. Reinforce this connection on the back with a strip of heavy-duty fabric. -
Make the decorative spikes:
Cut long, narrow triangles from the peach fabric. Sew two triangles together for each spike, turn them right-side out, and lightly stuff them with fiberfill. -
Add detail stitching:
Before attaching, run horizontal straight stitches across the stuffed spikes to create the ribbed, horn-like texture seen in the photo. -
Mount the spikes:
Glue the spikes in a radial pattern onto the frill, starting from the mask edge and pointing outward. Ensure they are spaced evenly.
Step 3: The Horn and Finishing Touches
-
Prepare the main horn:
Take your foam cone and wrap it tightly in leftover beige or light grey fabric. Use a spiral wrapping technique or simple vertical glue lines. -
Mount the horn:
Glue the base of the wrapped horn firmly to the center of the forehead on the green felt mask. Hold it in place until the glue completely cools. -
Add the horn base detail:
Cut a small ring of peach felt and glue it around the base of the horn to conceal the connection point. -
Create cheek accents:
Cut two small circles of grey or lavender felt. Glue these to the ‘cheeks’ of the mask for a whimsical, lizard-like detail. -
Secure the strap:
Punch small holes on the sides of the mask (through both felt and foam). Thread your elastic cord through and knot it securely on the inside.
Level Up: Articulation
Make the jaw articulate! Create a separate lower jaw piece and attach it to the main mask with brass brads or hidden fabric hinges.
Now your dino mask is ready for prehistoric adventures or a stunning display on your shelf
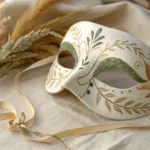
Forest Creature Dino Mask
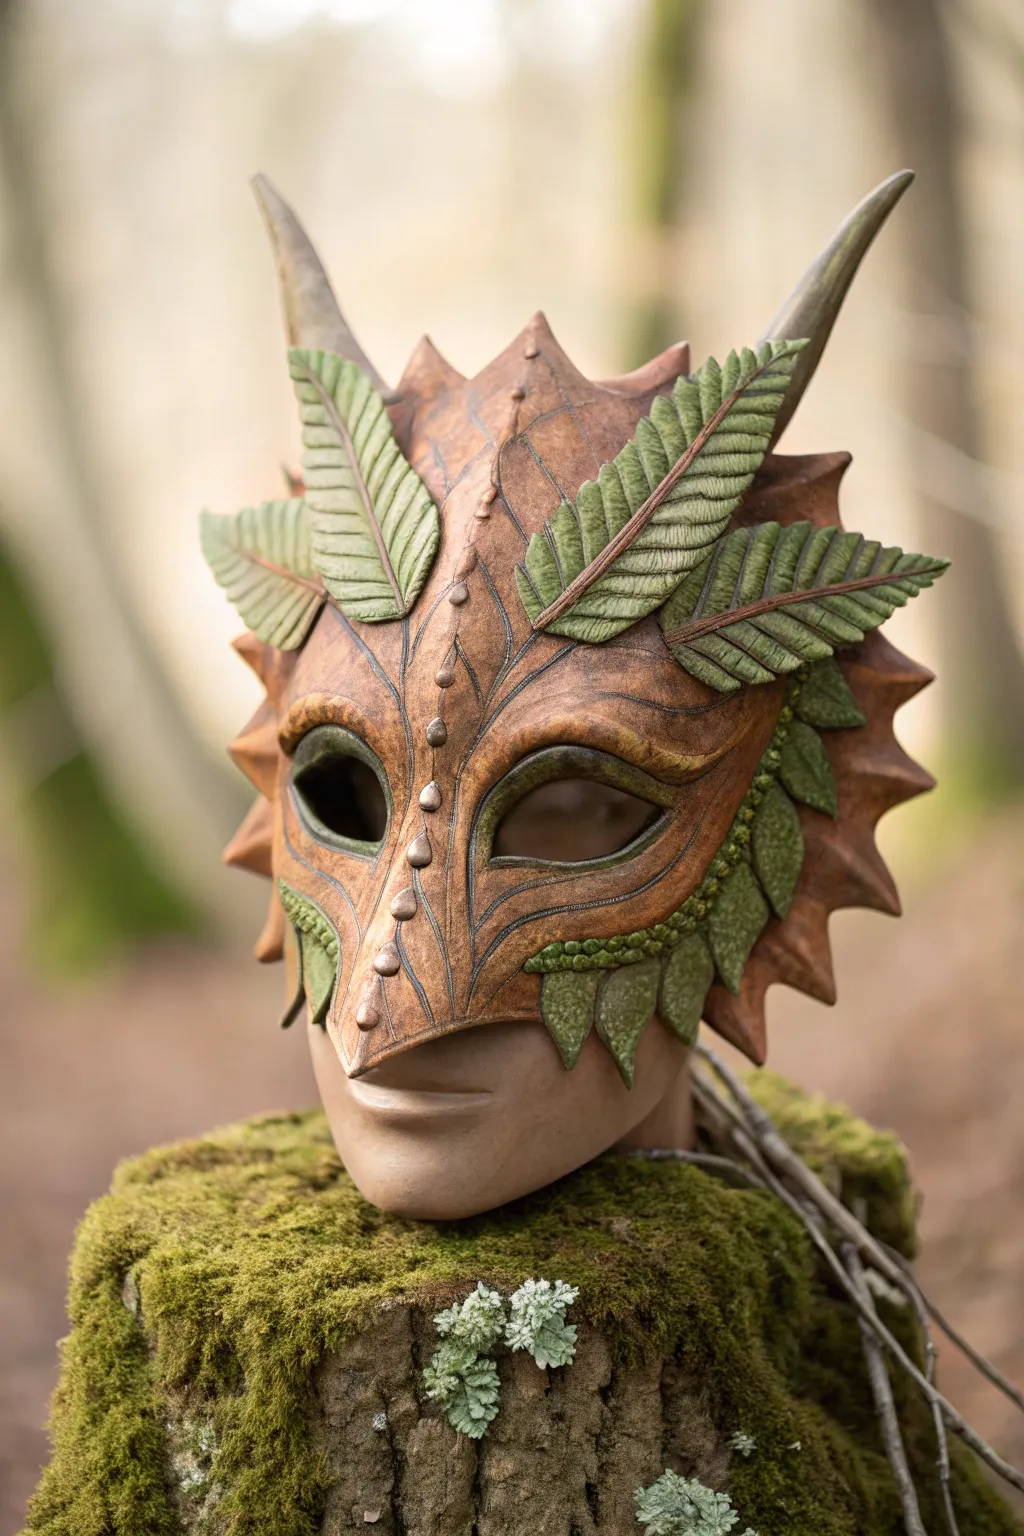

Transform a basic mask form into a mythical forest spirit using leather crafting techniques or high-density foam. This project features intricate leaf layering, organic horn sculpting, and rich earth-tone staining to create a guardian that looks ancient and alive.
Step-by-Step Guide
Materials
- Vegetable-tanned leather (4-5oz thickness) or high-density EVA foam
- Paper mache base mask or plastic mask shell (for forming)
- Leather shears or heavy-duty craft knife
- Leather swivel knife (for tooling details)
- Beveling stamps and modeling spoon
- Leather dye (medium brown, dark brown, forest green)
- Leather finish (acrylic resolene or satin sheen)
- Contact cement or leather weld glue
- Water spray bottle
- Two-part epoxy putty (for horn tips)
- Sponge or dauber for dyeing
- Rivets (small size) and setter
Step 1: Base Construction & Patterning
-
Draft the template:
Begin by covering your base mask form with masking tape. Draw the main face shape, focusing on the large eye openings and the central nose bridge that comes to a slight point. Sketch out the placement for the spiked edges along the jawline. -
Create pattern pieces:
Carefully cut the tape off the form and lay it flat on cardstock. Trace the outline to create your main mask pattern. Draw separate leaf shapes in three sizes for the decorative elements. -
Cut the base material:
Transfer your main mask pattern onto the leather (or foam) and cut it out cleanly. If using leather, I find that casing it (dampening with water) slightly before cutting helps the knife glide smoother. -
Shape the foundation:
While the leather is damp and pliable, press it over your mask form. Use your thumbs to mold the curves around the eye sockets and nose. If using foam, use a heat gun to achieve this curvature. -
Add structural spikes:
Cut triangular pieces for the jawline and cheek spikes. Glue these beneath the edge of the main face piece so they protrude outward, creating that jagged, dragon-like silhouette.
Step 2: Detailing & Tooling
-
Engrave organic veins:
With the leather still damp, use a swivel knife to carve branching vein lines radiating from the center of the nose outward across the cheeks. These lines should mimic the structure of a dried leaf. -
Bevel the edges:
Use a beveling tool to hammer down the leather on one side of your cut lines. This creates depth and makes the veins pop visually. -
Add texture spots:
Down the central ridge of the nose, use a small seeder tool or a modeling spoon to press in a vertical row of small, raised bumps or divots. -
Craft the leaf embellishments:
Cut out your leaf shapes from thinner scrap leather. Use the swivel knife to carve detailed veins into each one toward a central spine. Curl the edges slightly with your fingers while damp to give them a natural, wind-blown look. -
Sculpt the horns:
Roll a cone shape from a triangular piece of leather or carve it from high-density foam. Attach these to the top corners of the mask.
Fixing Stiffness
If the leather dries too hard and won’t shape to your face, dampen the back slightly with a sponge. Gently flex the mask in your hands until it softens, then reseal the back.
Step 3: Assembly & Finishing
-
Mount the foliage:
Using contact cement, attach the prepared leather leaves. Place large fern-like leaves over the eyebrows, angling them back like ears. Add smaller overlapping leaves along the cheekbones. -
Blend the seams:
Where the horns meet the mask, use a small amount of epoxy putty to smooth the transition, or cover the joint with another strategically placed leaf. -
Apply base color:
Sponge a medium tan or cognac dye over the entire face of the mask. Do not worry about perfect coverage; mottling adds a natural texture. -
Add depth and shadow:
Use a darker brown antique gel or dye in the recessed areas—specifically the carved veins, the edges of the spikes, and around the eye sockets. Wipe away the excess raised areas quickly to create contrast. -
Paint the greenery:
Carefully paint the attached leaves and the leaf-like structures on the cheeks with forest green acrylic leather paint or dye. Dry brush a lighter green on the raised veins for highlights. -
Seal the project:
Once fully dry, apply a satin or matte finisher to protect the leather and lock in the dye. This ensures your mask can withstand wear.
Adding Realism
Glue actual dried moss bits or lichen into the deep crevices between the leather leaves. This mixed-media approach blurs the line between costume and nature.
Now you have a stunning, nature-inspired mask ready for your next renaissance faire or forest photoshoot

PENCIL GUIDE
Understanding Pencil Grades from H to B
From first sketch to finished drawing — learn pencil grades, line control, and shading techniques.
Explore the Full Guide
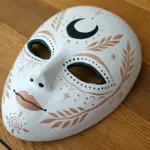
Pastel Cottage Dino Mask


Step into a prehistoric fairytale with this enchanting pastel dinosaur mask, featuring geometric facets and delicate floral details. This low-poly papercraft project combines sturdy construction with a soft cottagecore aesthetic, perfect for costume parties or nursery decor.
Detailed Instructions
Materials
- Digital Triceratops mask template (low-poly PDF)
- Cardstock (160-200 GSM) in Pastel Pink, Cream, and Sage Green
- Metallic Gold cardstock or paint
- PVA glue or strong tacky glue
- Craft knife or scalpel
- Self-healing cutting mat
- Metal ruler
- Bone folder or scoring tool
- Small artificial flowers and leaves
- Hot glue gun and glue sticks
Step 1: Preparation & Cutting
-
Print the templates:
Load your printer with the specific cardstock colors for each section. Typically, the frill and snout tip are pink, the main face is cream, and the eye mask and central horn area are sage green. -
Score the fold lines:
Before cutting anything out, use your bone folder and ruler to score all the internal dashed lines. This is crucial for crisp geometric angles later. -
Identify fold types:
Review your template guide to distinguish between ‘mountain folds’ (folding upward like a peak) and ‘valley folds’ (folding downward like a V). Mark them lightly if needed. -
Cut out the pieces:
Using your craft knife and a fresh blade, carefully cut along the solid outer outlines of each shape. A sharp blade ensures clean edges without damaging the paper fibers.
Glue Application
Use a toothpick or a small paintbrush to apply PVA glue to the tabs. This prevents overflowing glue marks that can ruin the matte finish of the pastel cardstock.
Step 2: Assembly
-
Pre-crease the folds:
Go through every cutout piece and firmly fold along all your scored lines. Getting these creases sharp now makes assembly much smoother. -
Start with the snout:
Begin assembling the nose and beak area. Apply a thin layer of PVA glue to the tabs and hold them in place for 10-15 seconds until they grab. -
Construct the eye mask:
Assemble the sage green eye sections separately. I find it easier to build these sub-assemblies first before attaching them to the main face structure. -
Join the face sections:
Connect the cream face panels to the green eye mask and pink snout. Work symmetrically, attaching the left side, then the right, to keep the mask balanced. -
Build the frill:
Construct the large pink spikes for the back frill. These are usually pyramid shapes; ensure the tips are sharp and closed tightly. -
Attach the frill to the head:
Glue the assembled frill ring to the back of the main head piece. This is a larger connection point, so give the glue extra time to dry completely.
Sparkle & Shine
For a fairy-tale touch, brush a thin layer of Mod Podge on the pink snout tip and sprinkle with ultra-fine iridescent glitter before the sealer dries.
Step 3: Horns & Details
-
Form the horns:
Assemble the three main horn structures—two above the eyes and one central nose horn. Use the sage green or metallic gold cardstock for these. -
Mount the horns:
Secure the horns onto their designated spots on the mask. Apply glue to the tabs and press from the inside of the mask to ensure a flush fit. -
Design the floral crown:
Select a mix of small artificial roses, baby’s breath, and tiny leaves. Trim the stems short so they can lay flat against the paper. -
Attach the flowers:
Using a hot glue gun, carefully arrange the flowers along the ridge between the eyes and the frill. Layer them slightly to hide any paper seams. -
Add gold accents:
If you used plain paper for the horns, you can now lightly brush the tips or edges with metallic gold paint for a magical shimmer. -
Final structural check:
Examine the inside of the mask. Reinforce any loose tabs with a dab of extra glue or masking tape for durability.
Now your gentle giant is ready to bring a touch of prehistoric magic to your costume collection
Punk Pierced Dino Mask
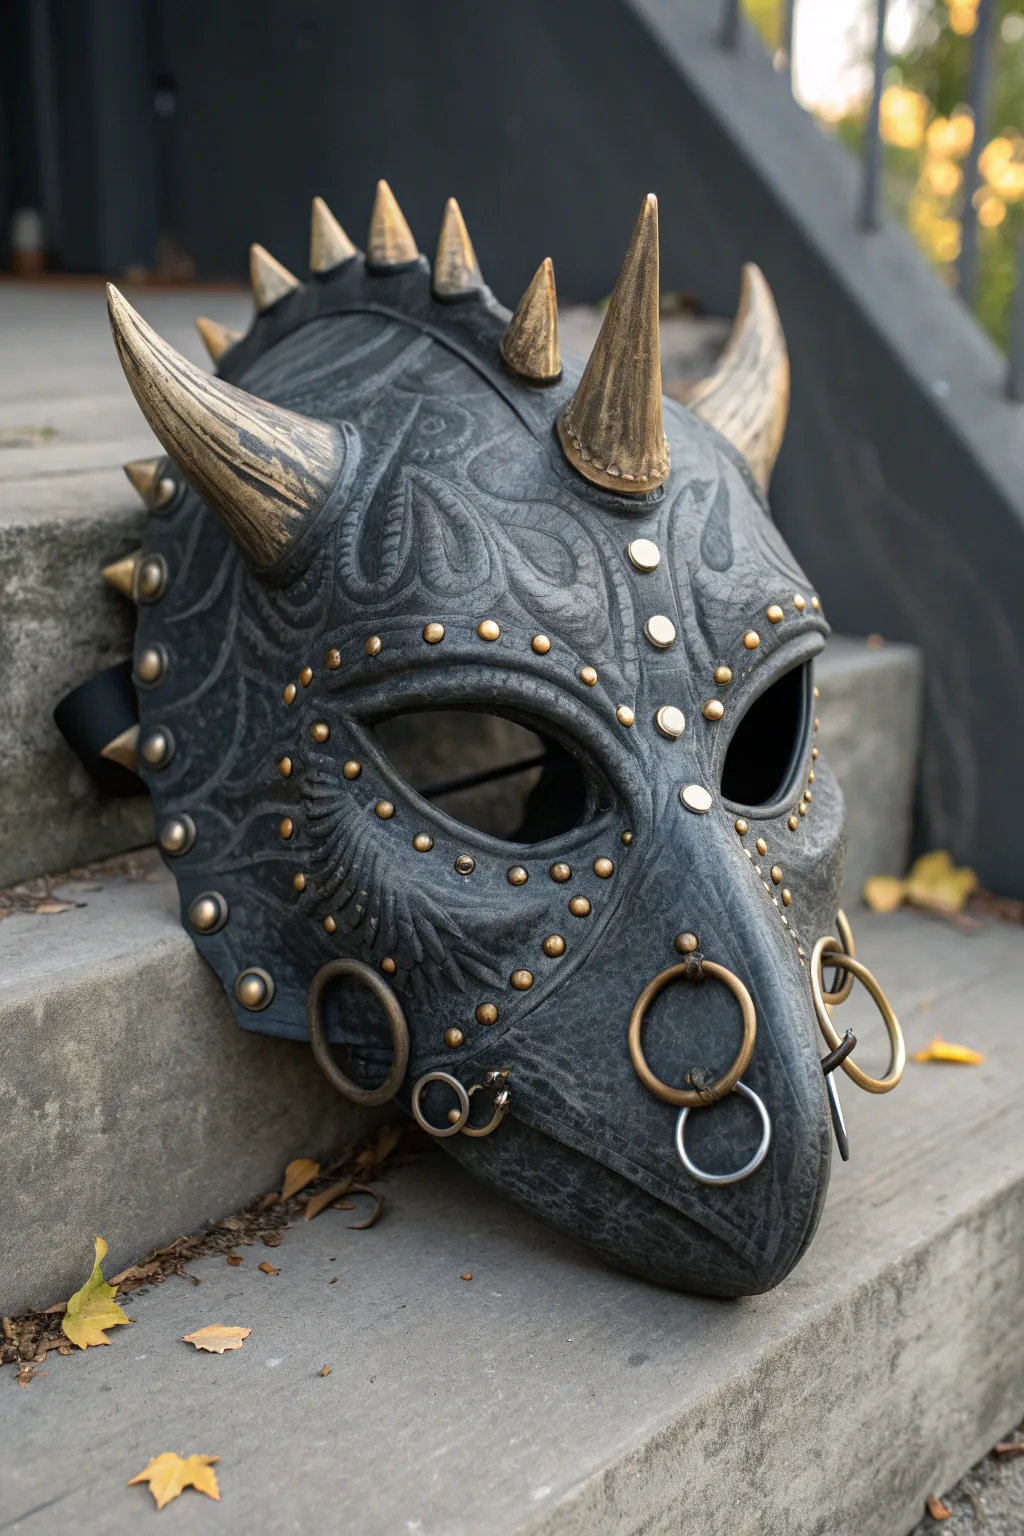

Transform a standard plastic dino mask into an edgy, punk-rock masterpiece featuring a weathered leather look and aggressive hardware. This project combines faux finishing techniques with jewelry modification to create a tough, rebellious aesthetic that stands out in any furmeet or costume crowd.
How-To Guide
Materials
- Plastic Raptor/Dino Mask (base)
- Apoxie Sculpt or air-dry modeling clay
- Acrylic paints (Mars Black, Dark Grey, Metallic Bronze, Antiquing medium)
- Matte spray sealer
- Gold/Bronze cone spikes (screw-back or glue-on)
- Gold/Bronze dome studs
- Various metal rings/hoops (curtain rings or large jump rings)
- Small metal piercing rings (septum/lip styles)
- Power drill with small bits or a hot nail tool
- E6000 or heavy-duty super glue
- Sandpaper (fine grit)
- Paintbrushes (sponge brush, fine detail brush, stiff dry-brush)
- Pencil
Step 1: Preparation and Sculpting
-
Prepare the surface:
Begin by removing the stock straps and sanding the entire plastic surface of the mask with fine-grit sandpaper. This roughs up the factory finish, giving your primer and clay unmatched adhesion. -
Prime the base:
Apply a coat of black primer or heavy-body black acrylic paint to the entire mask. Let this dry completely to establish a dark undertone for the project. -
Sculpt textured details:
Mix a small batch of Apoxie Sculpt. Roll thin ‘snakes’ of clay and lay them onto the mask to create raised leather-like tooling patterns, swirls, or vein details around the eyes and forehead. -
Blend the edges:
Use a little water on your finger or a sculpting tool to smooth the edges of your clay snakes down into the plastic, making the raised designs look like they are embossed into the ‘skin’ rather than just sitting on top. -
Add horn extensions (optional):
If you want the prominent spikes on the nose or forehead to have a smooth transition, mold a small ring of clay around the base of where your large spikes will sit to simulate skin pushing up around the growth.
Step 2: Painting and Weathering
-
Base coat the skin:
Paint the entire mask, including your new clay details, with a dark charcoal grey acrylic. You want full, opaque coverage here, so apply two coats if necessary. -
Apply a black wash:
Mix black acrylic paint with water (about 50/50). Generously brush this into all the cracks, crevices, and sculpting details, then immediately wipe the high points off with a paper towel. This darkness remains in the recesses to create depth. -
Dry brush highlights:
Dip a stiff, dry brush into a lighter grey paint and wipe almost all of it off on a paper towel. Lightly flick the brush over the raised textures and edges to catch the details and simulate worn leather. -
Paint the spikes:
Paint the large horns and spikes with a metallic bronze or antique gold. I like to let the first coat dry, then add a very thin black wash over them to make the metal look aged and tarnished rather than shiny and new. -
Seal the paint:
Once you are happy with the paint job, spray the entire mask with a matte clear coat. This protects your work from chipping during the hardware installation phase.
Hardware Hack
Use actual septum clickers or ear gauges for the smaller piercings. They are easier to install than jump rings and look incredibly realistic.
Step 3: Hardware and Piercings
-
Mark drilling spots:
Using a pencil, mark exactly where you want your nose rings, lip piercings, and decorative studs to go. Symmetry is key here, so measure carefully. -
Drill pilot holes:
Carefully drill small holes at your marked spots. If you don’t have a drill, heating a nail with a lighter and melting through the plastic works, but be careful of fumes and work in a ventilated area. -
Install studs:
Place a dab of E6000 glue on the back of your gold dome studs and press them into place along the brow line and cheeks. If they are screw-back studs, insert them through your pre-drilled holes. -
Attach the heavy spikes:
Secure the large cone spikes onto the nose and head. For maximum durability, screw-back spikes are best, tightened from the inside of the mask. -
Insert the nose rings:
Open your large metal jump rings (or curtain rings) with pliers. Loop them through the nostril holes you drilled and pinch them closed securely. -
Add lip and decorative piercings:
Install the smaller rings along the jawline or cheek ridges. Varying the size of the rings adds visual interest and enhances the chaotic punk aesthetic. -
Final weathering touch-up:
If the shiny new metal hardware looks too clean, lightly dab a tiny bit of brown or black paint onto the rings and wipe it off to dull the shine and match the mask’s grunge vibe.
Chain Reaction
Connect the nose ring to a cheek stud using a thin, draped jewelry chain for an extra layer of industrial gothic style.
Now your prehistoric punk is ready to rock the scene with a custom look that is as fierce as it is fashionable


Steampunk Gadget Dino Mask
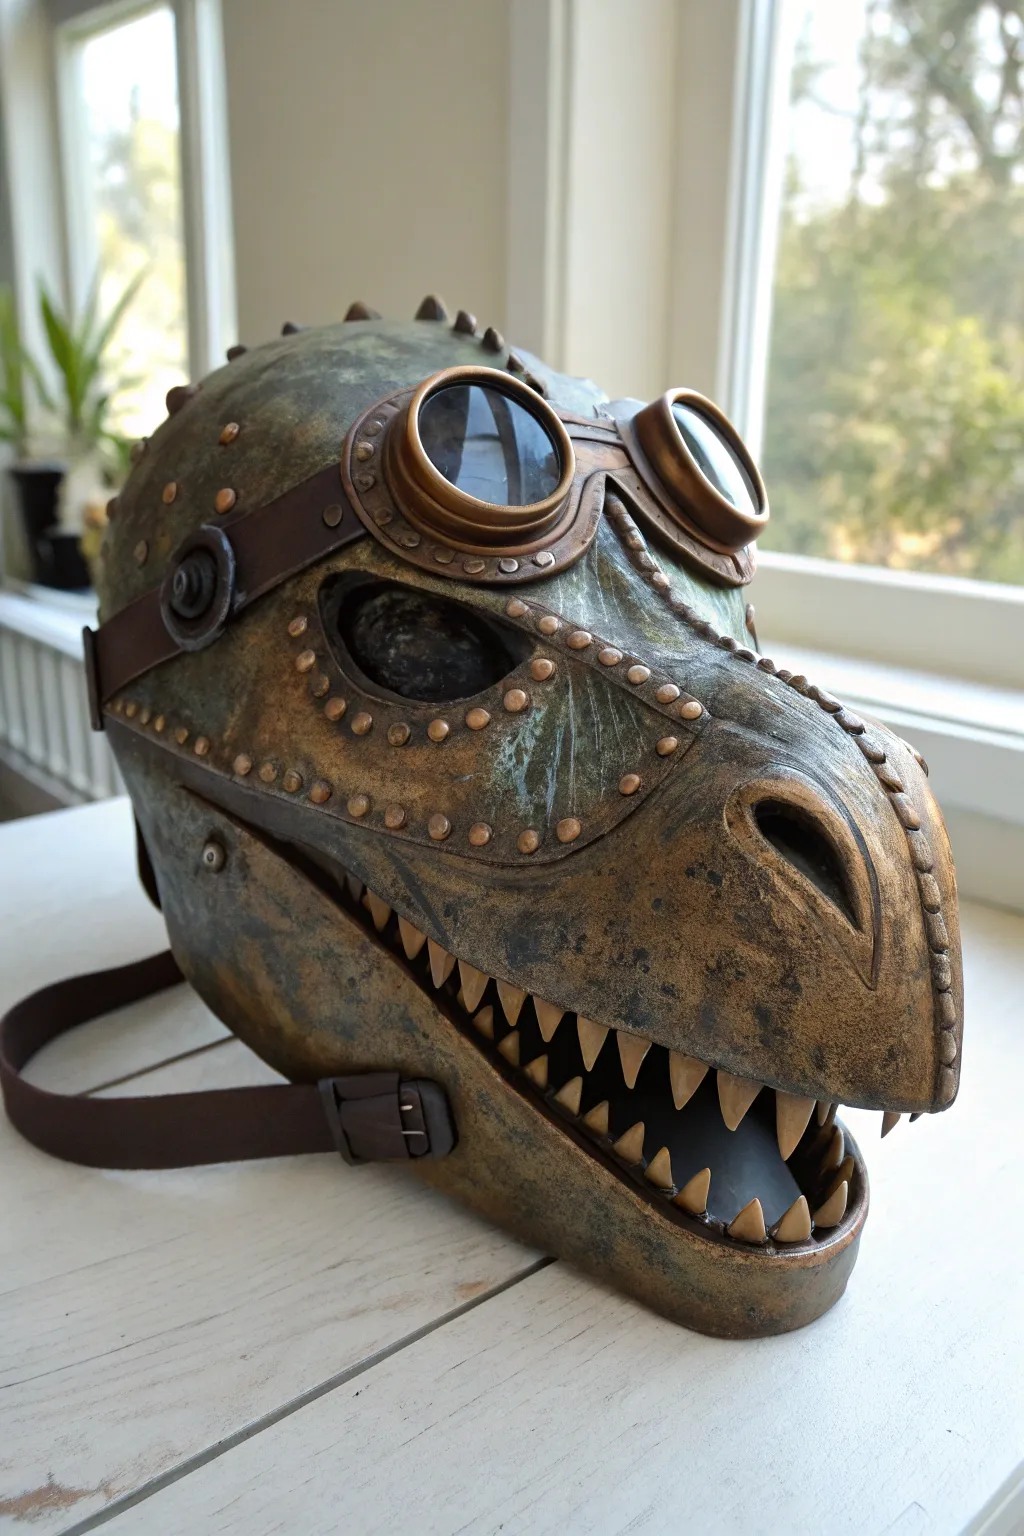
Transform a standard plastic dinosaur mask into a Victorian-era mechanical marvel with this weathered bronze finish. By layering metallic paints and adding industrial details like rivets and leather, you’ll create a heavy metal look on a lightweight base.
Step-by-Step Guide
Materials
- Plastic articulated raptor mask (base)
- Sandpaper (fine and medium grit)
- Primer spray paint (black or dark grey)
- Metallic acrylic paints (Bronze, Copper, Brass, Gunmetal)
- Sea sponge or texture sponge
- Googly eyes or half-pearl stickers (variety of sizes)
- Steampunk goggles (costume or welding)
- Faux leather strips or dark brown vinyl
- detail brushes
- Hot glue gun and glue sticks
- Black and dark brown acrylic wash
- Matte or satin clear coat spray
Step 1: Preparation and Hardware
-
Prep the Surface:
Begin by sanding the entire plastic mask with medium grit sandpaper. You want to remove the factory shine and create a rough texture for the primer to grip onto. Wipe away all dust with a damp cloth. -
Add Rivet Details:
Before priming, glue small googly eyes or half-pearl stickers along the seams of the mask to simulate rivets. Place them around the eye sockets, along the jawline, and following the natural ridges of the sculpt. -
Prime the Base:
Spray the entire mask, including your new rivet details, with a matte black primer. Apply thin, even coats to avoid drips and ensure full coverage—this dark base is crucial for the metallic effect.
Glue Not Sticking?
Does the hot glue peel off the smooth plastic? Rough up the gluing area heavily with sandpaper or score it with a hobby knife before applying glue to create a mechanical bond.
Step 2: Creating the Metal Finish
-
Base Metal Layer:
Using a sponge, dab a dark bronze acrylic paint over the majority of the mask. Don’t aim for perfect opacity; leaving some black showing through in the deepest crevices adds instant depth. -
Stippling Texture:
Take a lighter brass color and stipple it randomly over the high points—the nose bridge, brow ridges, and cheekbones. This simulates where the ‘metal’ would catch the light. -
Painting the Rivets:
With a fine detail brush, paint each individual rivet with a bright copper or gold metallic paint to make them pop against the darker bronze background. -
Applying Patina:
Mix a small amount of turquoise or verdigris paint with water to create a thin wash. Dab this selectively into cracks and crevices, wiping away the excess with a paper towel, to mimic oxidized copper. -
Aging Wash:
Create a watery wash using black and dark brown acrylics. Brush this over the entire mask and immediately wipe most of it off. The dark pigment will settle around the rivets and in the texture, making the piece look grimy and used.
Gear Up
Glue real brass clock gears, watch parts, or small springs onto the cheek or temple areas before priming to add authentic mechanical complexity to the sculpture.
Step 3: Accessories and Assembly
-
Prepare the Goggles:
If your goggles look too new, dry brush them with the same bronze and brass paints used on the mask to match the aesthetic. Once dry, position them on the forehead ridge. -
Attach the Goggles:
Secure the goggles using hot glue or E6000 adhesive. Ensure the strap creates a nice visual line across the temples of the mask. -
Leather Accents:
Cut strips of faux leather to create side straps. Glue these from the edge of the goggles down towards the jaw hinge to simulate a harness system holding the ‘metal’ plates together. -
Painting the Teeth:
Paint the teeth a bone color, then apply a heavy brown wash at the gumline. I like to make them look stained and old rather than pearly white, fitting the industrial theme. -
Darkening the Eyes:
Paint the mesh of the eye sockets black from the outside (if applicable) to hide your own eyes, or install dark mesh fabric inside the mask for a hollow, robotic look. -
Sealing the Work:
Once all paint is completely dry, spray the entire project with a satin or matte clear coat to protect the paint job from scratches and handling.
Now you have a rugged, prehistoric helmet ready for your next convention or display shelf
Neon Rave Dino Mask
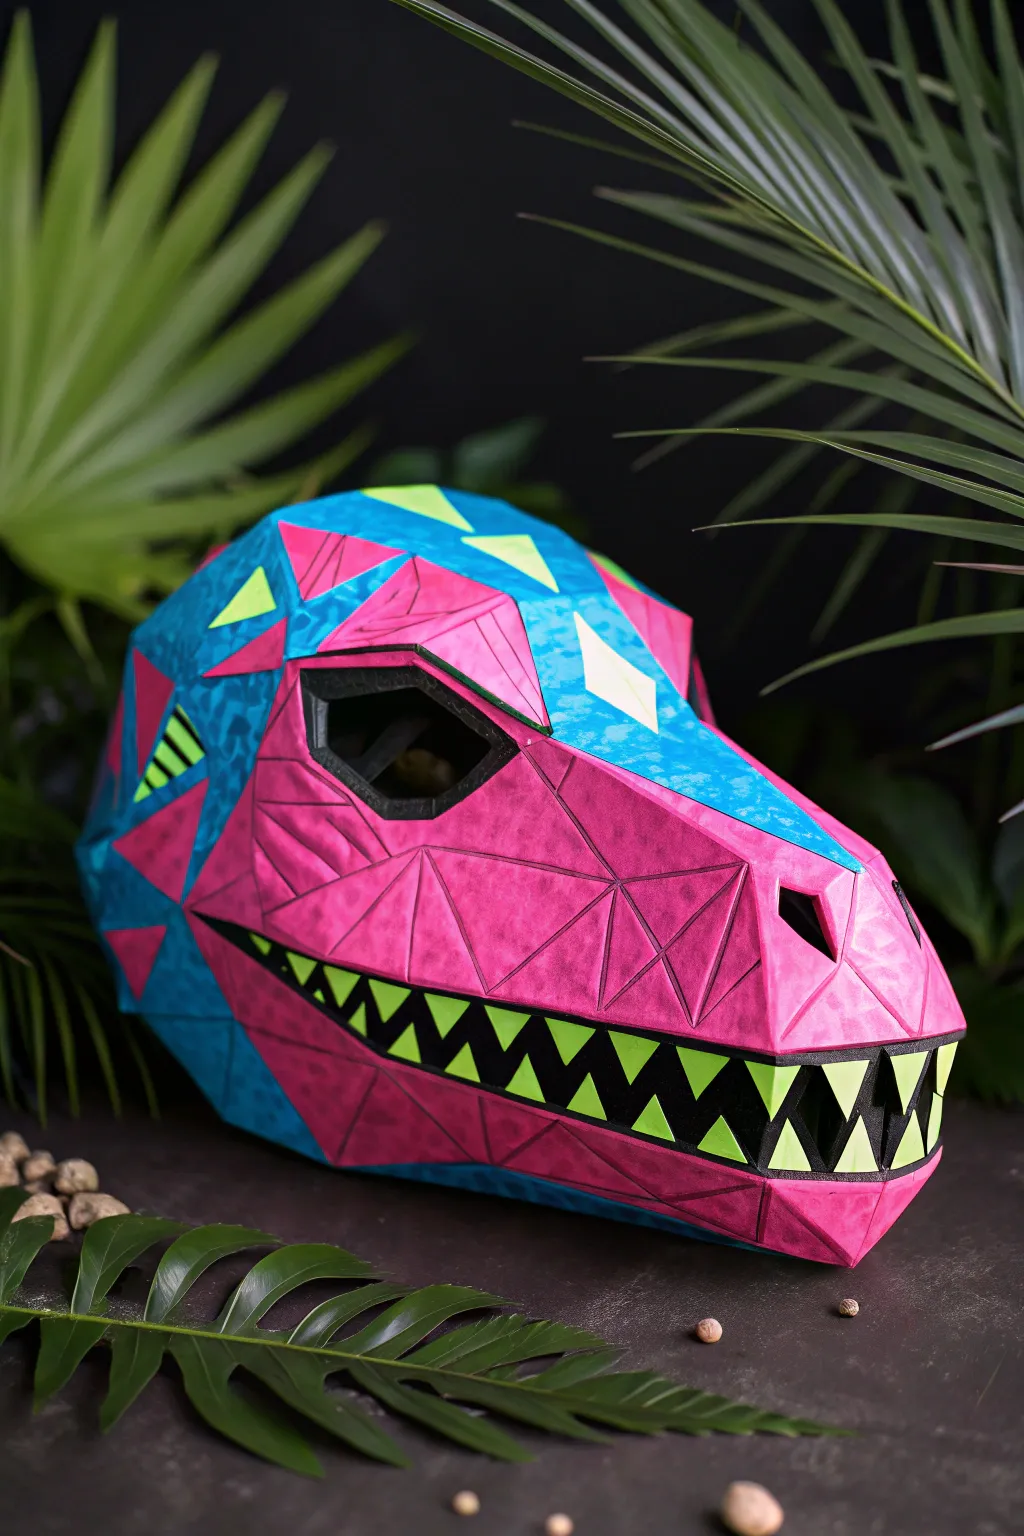
Transform ordinary cardstock into a prehistoric party starter with this vibrant low-poly T-Rex mask. Featuring a striking geometric design in hot pink, cyan, and neon green, this project combines precision papercraft with bold, rave-ready aesthetics.
Step-by-Step
Materials
- Digital PDF pattern for low-poly T-Rex mask
- Thick cardstock (160-200gsm) or colored construction paper
- Hot pink textured or shimmer paper
- Cyan blue textured or pattern paper
- Neon green/yellow cardstock
- Black cardstock
- Craft knife or scalpel
- Self-healing cutting mat
- Metal ruler
- Strong craft glue or double-sided tape
- Scoring tool or dried-up ballpoint pen
- Bone folder
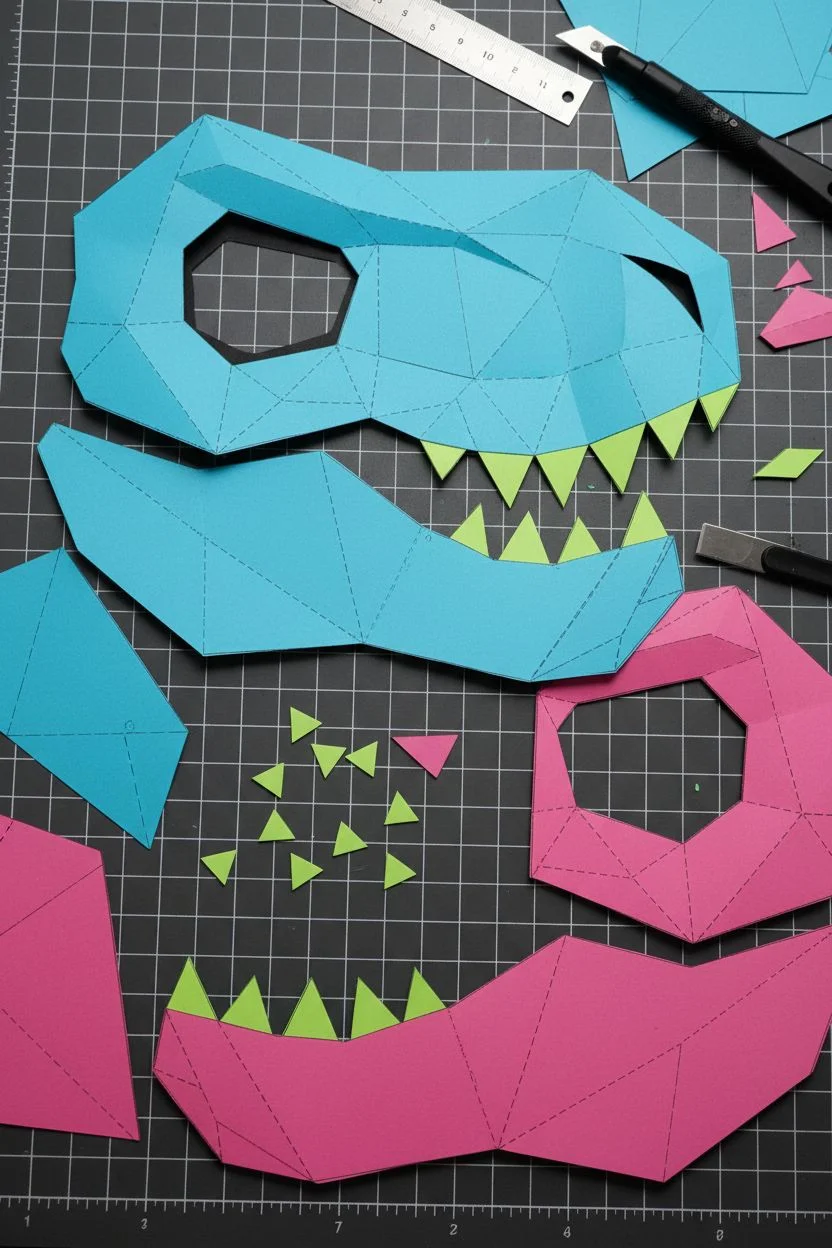
Step 1: Preparing the Pattern
-
Print and plan:
Begin by printing your low-poly mask pattern. For this multi-colored look, you’ll need to identify which pattern pieces belong to the jaw (pink), the upper skull (cyan), and the accent spines (green/yellow). Group them accordingly before printing directly onto your colored cardstock. -
Create a color map:
If your printer doesn’t handle thick cardstock well, print the pattern on standard paper first to use as a stencil. It helps to lightly mark the back of your colored cardstock with the corresponding piece numbers so you don’t lose track of where they fit. -
Cut with precision:
Place your cardstock on the self-healing mat. Using your metal ruler and craft knife, carefully cut along the solid exterior lines of each shape. Ensure your blade is sharp to avoid tearing the paper fibers, especially on the intricate teeth sections.
Step 2: Scoring and Folding
-
Score the fold lines:
To get those sharp, geometric angles, scoring is crucial. Use a ruler and a scoring tool to trace over all internal dotted and dashed lines. Press firmly enough to indent the paper but not cut through it. -
Identify fold types:
Differentiate your folds: usually, dashed lines indicate ‘mountain folds’ (pointing up) and dotted lines indicate ‘valley folds’ (pointing down). Verify this against your pattern’s specific instructions. -
Pre-fold everything:
Go through every single piece and pre-crease the folds along your scored lines. I like to use a bone folder here to make the creases extremely crisp, which really helps the final mask look rigid and professional.
Use Textured Paper
For a true high-quality look, avoid plain flat colors. Use paper with a slight canvas texture or metallic shimmer to catch the light and enhance the 3D polygon effect.
Step 3: Assembly: The Jaw and Teeth
-
Construct the teeth:
Start with the teeth strip. Cut the triangular teeth from the neon green cardstock and the backing strip from black cardstock. Glue the green triangles onto the black strip so they stand out boldly against the dark background. -
Assemble the lower jaw:
Take your pink cardstock pieces for the lower jaw. Apply glue to the tabs and join the corresponding numbers. Hold each tab for a few seconds until the glue tacks up. Build the left and right sides of the jaw separately, then join them at the chin. -
Attach the teeth:
Secure the teeth strip into the mouth opening of the pink jaw assembly. Ensure the black background sits flush behind the pink lip line so the neon green teeth appear to be emerging from the darkness of the mouth.
UV Reactive Paint
Trace the polygon edges with a clear UV-reactive marker or paint. In daylight it looks normal, but under blacklight, the geometry will glow vividly.
Step 4: Assembly: The Cranium
-
Build the upper head:
Using the cyan blue pieces, begin assembling the nose and moving backward toward the back of the head. This section often has the most complex geometry, so take your time matching the tabs. -
Add the eye sockets:
Construct the deep eye sockets using black cardstock to give the mask depth. Glue these into the eye openings on your cyan skull assembly before closing up the head completely. -
Incorporate accents:
As you build the top of the head/spine area, intersperse the neon green/yellow diamond shapes and pink triangular accents where the pattern dictates. These contrasting colors create that ‘rave’ aesthetic.
Step 5: Final Construction
-
Join top and bottom:
Carefully align the finished cyan upper skull with the pink lower jaw. Apply strong glue to the connecting tabs along the cheek and back of the jaw. This is the main structural connection, so ensure it is secure. -
Reinforce the inside:
Once fully assembled and dry, you might want to reinforce the inside seams with regular clear tape for extra durability during wear. -
Comfort adjustments:
I prefer to cut small foam pads and glue them inside where the mask touches your forehead and nose. This makes it much more comfortable to wear for long periods.
Now your prehistoric creation is ready to dominate the dance floor with its fierce neon style
Cosmic Galaxy Dino Mask
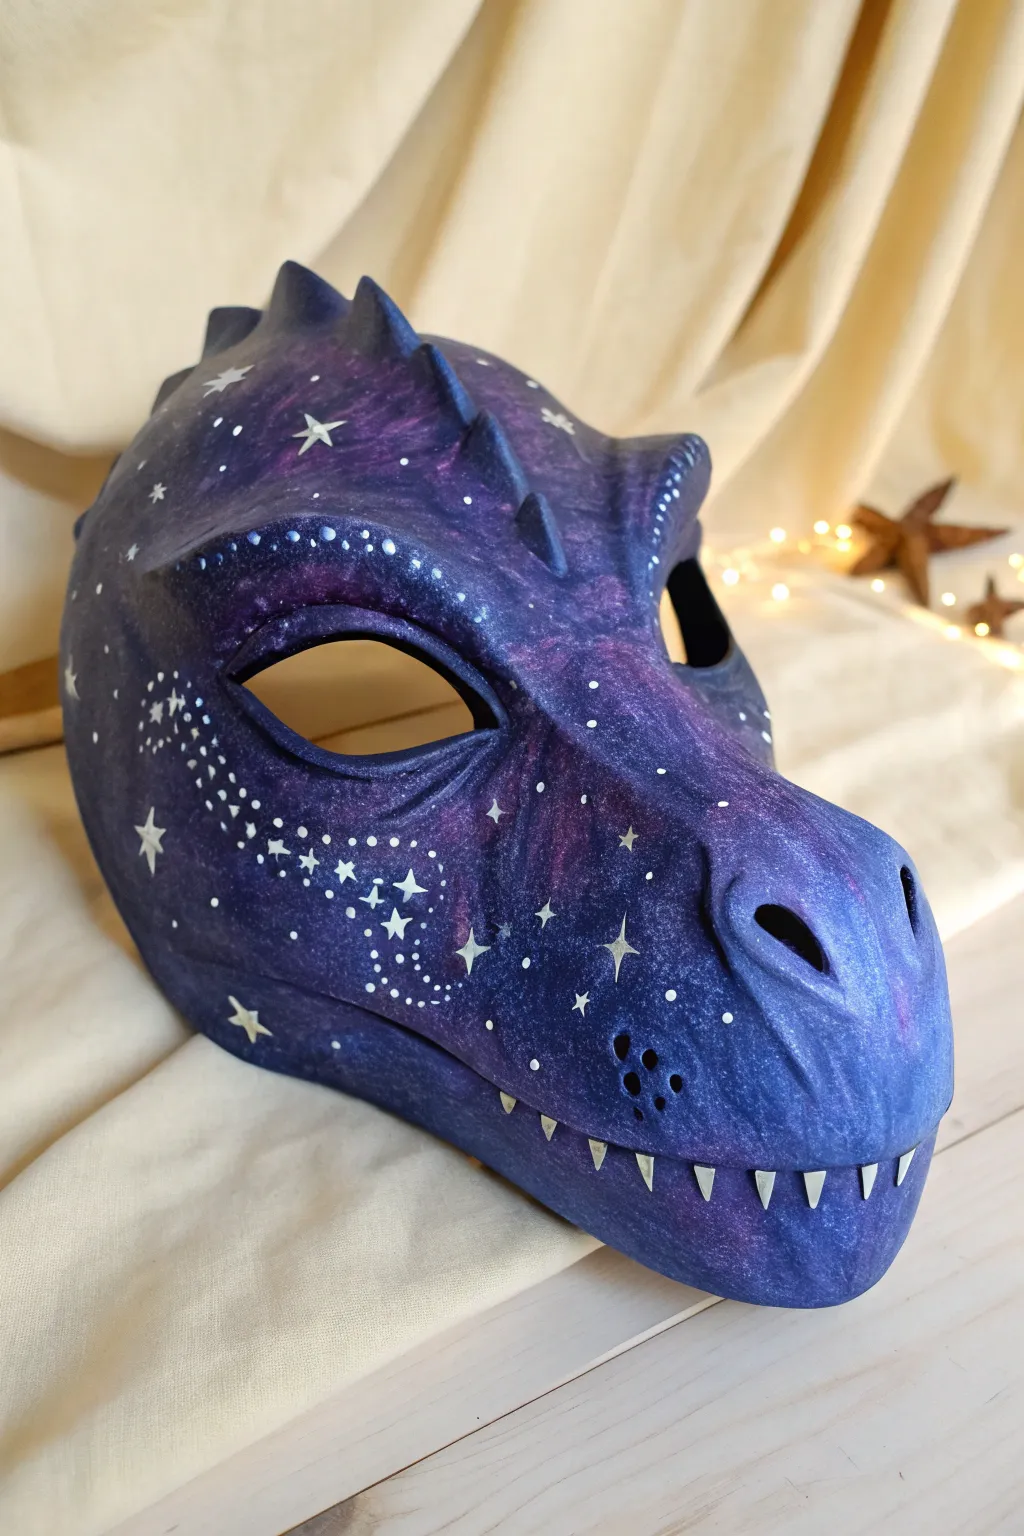
Transform a standard dinosaur mask into a breathtaking piece of celestial art with deep nebulae swirls and sparkling constellations. This intermediate-level repaint uses layering techniques to achieve that signature galaxy depth and glow.
Step-by-Step Tutorial
Materials
- Plastic articulated dinosaur mask (like a Jurassic World Raptor mask)
- Sandpaper (medium and fine grit)
- White primer spray paint
- Acrylic paints: Black, Titanium White, Phthalo Blue, Dioxazine Purple, Magenta
- Makeup sponges or sea sponges
- Detail brushes (sizes 0/0 and 1)
- Flat shader brush
- Toothbrush (for spattering)
- Matte or satin spray varnish/sealer
- Painter’s tape
Step 1: Preparation & Base Coat
-
Sand the surface:
Begin by thoroughly sanding the entire mask with medium-grit sandpaper to remove the factory sheen. Follow up with fine-grit sandpaper to smooth out scratches. This step is crucial because acrylic paint won’t stick well to the slick plastic without it. -
Clean the mask:
Wash the mask with warm soapy water to remove all plastic dust and oils from your hands. Dry it completely with a lint-free cloth. -
Mask off areas:
If you want to keep the inside of the eyes or the strap attachments clean, cover them carefully with painter’s tape now. -
Apply primer:
Spray the entire mask with a white primer. Use short, sweeping bursts to avoid drips. Two thin coats are better than one thick one. Let this dry fully according to the can’s instructions, usually about an hour.
Muddy Galaxy Fix
If colors are mixing into a brown mess, stop blending wet-on-wet. Let the bottom layer dry completely, then dry-brush the new color on top for a cleaner separation.
Step 2: Painting the Galaxy Gradient
-
Apply the dark base:
Using a sponge, dab a mixture of Phthalo Blue and Black over the majority of the mask. You don’t need solid black; a very dark navy creates a richer night sky effect. -
Start the nebula clouds:
While the base is dry, take a clean sponge and load it with Dioxazine Purple. Dab this onto random areas—the cheeks, the snout bridge, and above the eyes—blending the edges gently into the dark background. -
Layering lighter colors:
Working while the purple is tacky, sponge on smaller patches of Magenta within the purple areas. This creates the ‘hot’ centers of the nebula clouds. -
Adding blue highlights:
Use a fresh sponge edge with a bright Phthalo Blue or even a touch of teal to accent other areas of the mask, creating contrast against the purple sections. -
Blending the transitions:
If the colors look too separate, go back with your dark navy sponge and lightly dab over the edges where colors meet to soften the transition. The goal is a cloudy, smoky look, not distinct shapes.
Step 3: Adding the Stars and Details
-
Create background stars:
Dilute a small amount of white acrylic paint with water until it’s milky. Dip an old toothbrush into it, and running your thumb over the bristles, flick a fine mist of specks across the mask. -
Paint larger stars:
Using a size 0/0 detail brush and pure Titanium White paint, hand-paint specific four-pointed stars and larger dots on the most prominent areas, like the cheeks and forehead. -
Add constellations:
Connect some of your larger dots with very thin lines to create constellation patterns or swirling milky way distinct lines, as seen on the cheek of the example. -
Highlight the eyes:
Outline the rim of the eye sockets with a series of small, deliberate white dots to frame the eyes and make them pop against the dark galaxy background. -
Paint the nostril detail:
Add small white dots around the nostril openings to integrate them into the design. -
Refine the teeth:
Paint the teeth with solid Titanium White. I like to apply two or three thin coats here to ensure they are opaque and bright against the dark jawline.
UV Glow Upgrade
Mix UV-reactive neon pink or blue powder into your acrylic paints, or use glow-in-the-dark paint for the white stars so your mask lights up under blacklight.
Step 4: Sealing the Work
-
Dry time:
Allow the paint to cure for at least 24 hours. Acrylics dry to the touch quickly but take longer to fully harden. -
Seal the mask:
Take the mask to a well-ventilated area and apply two coats of matte or satin spray varnish. This protects your hard work from chipping during wear or transport.
Once the sealer is dry, your cosmic guardian is ready to explore the universe at your next convention or event
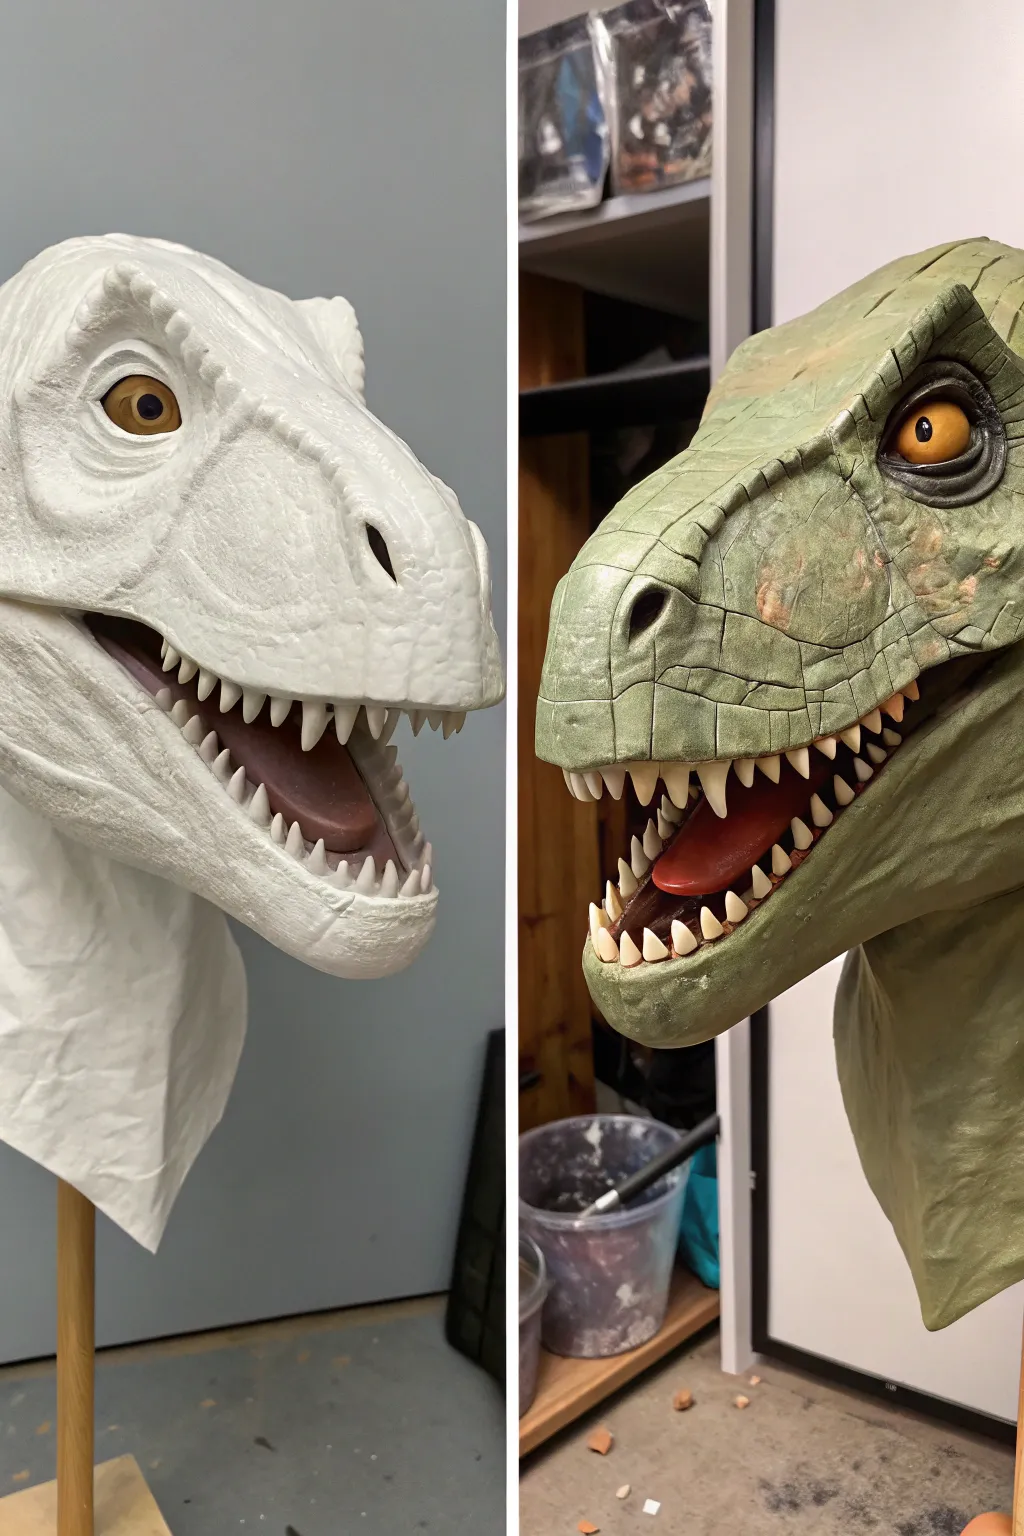
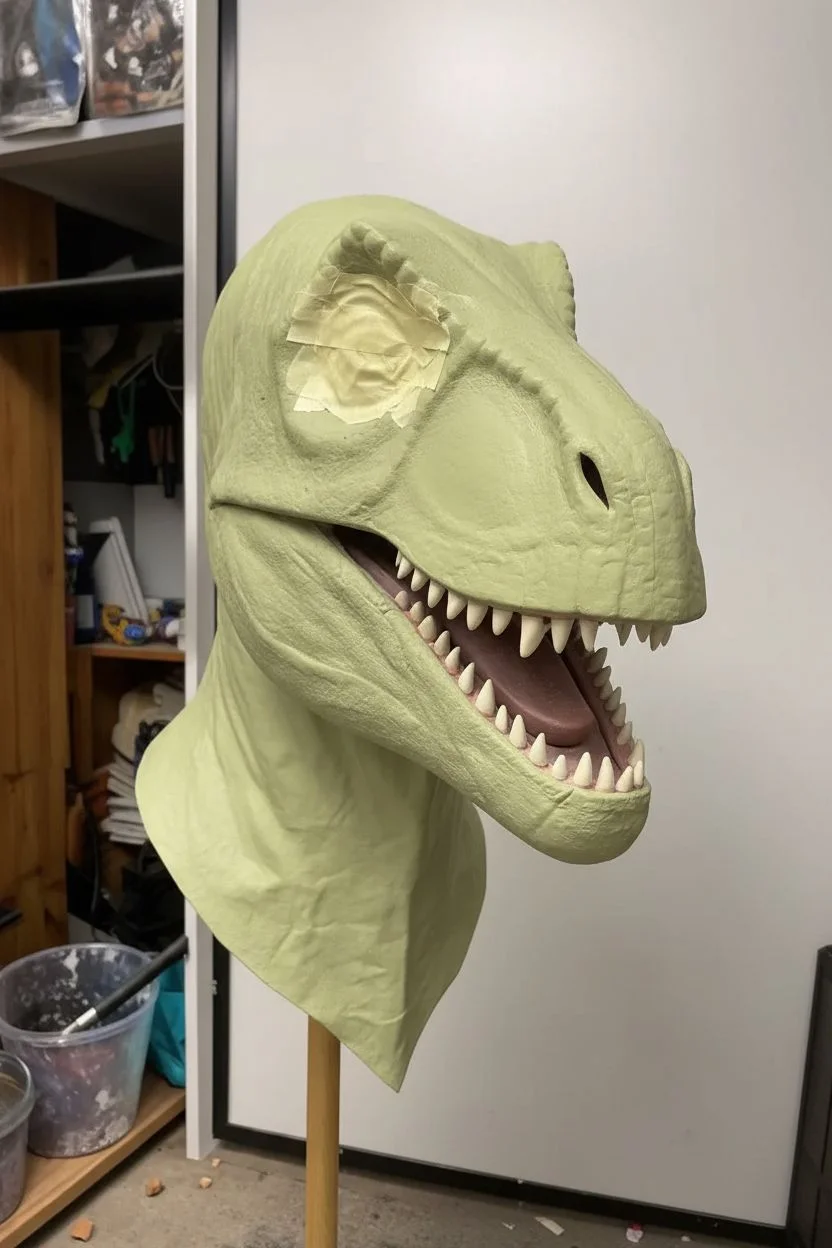
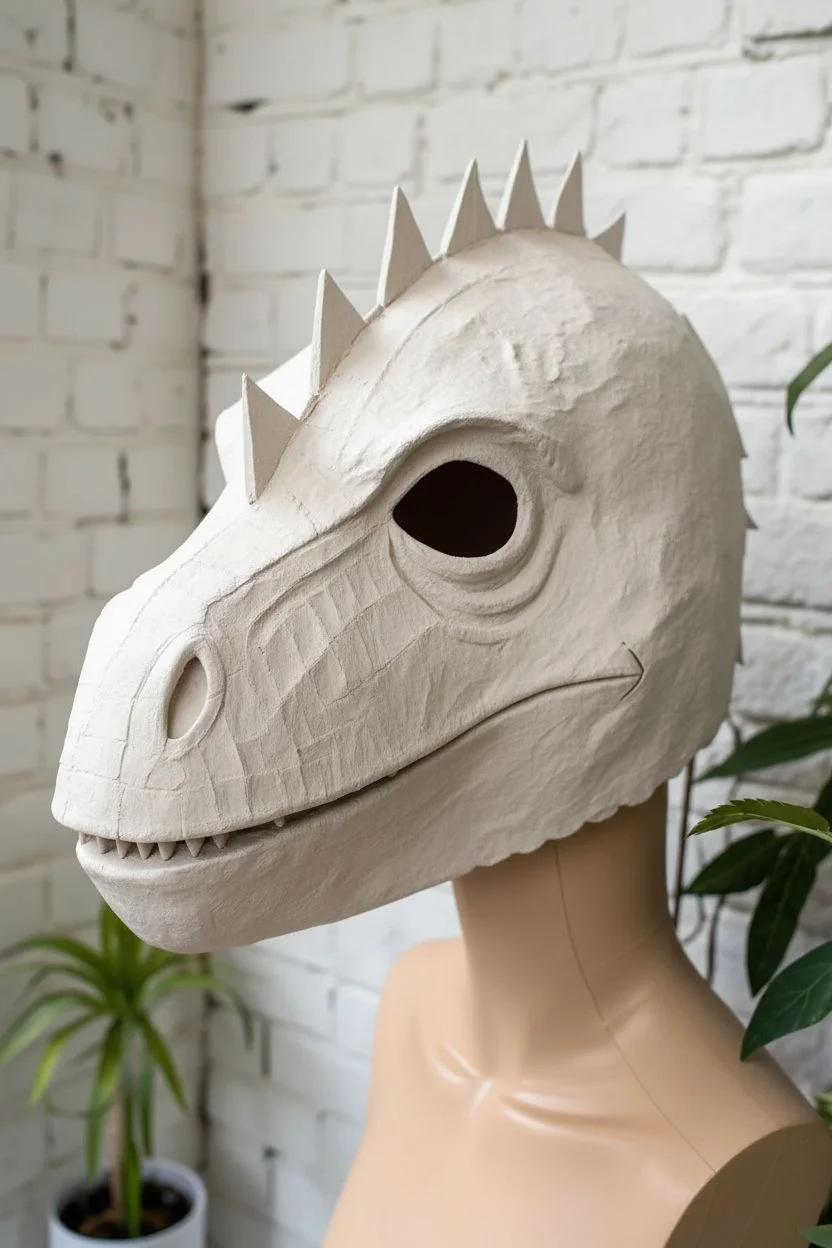
Glow-in-the-Dark Markings

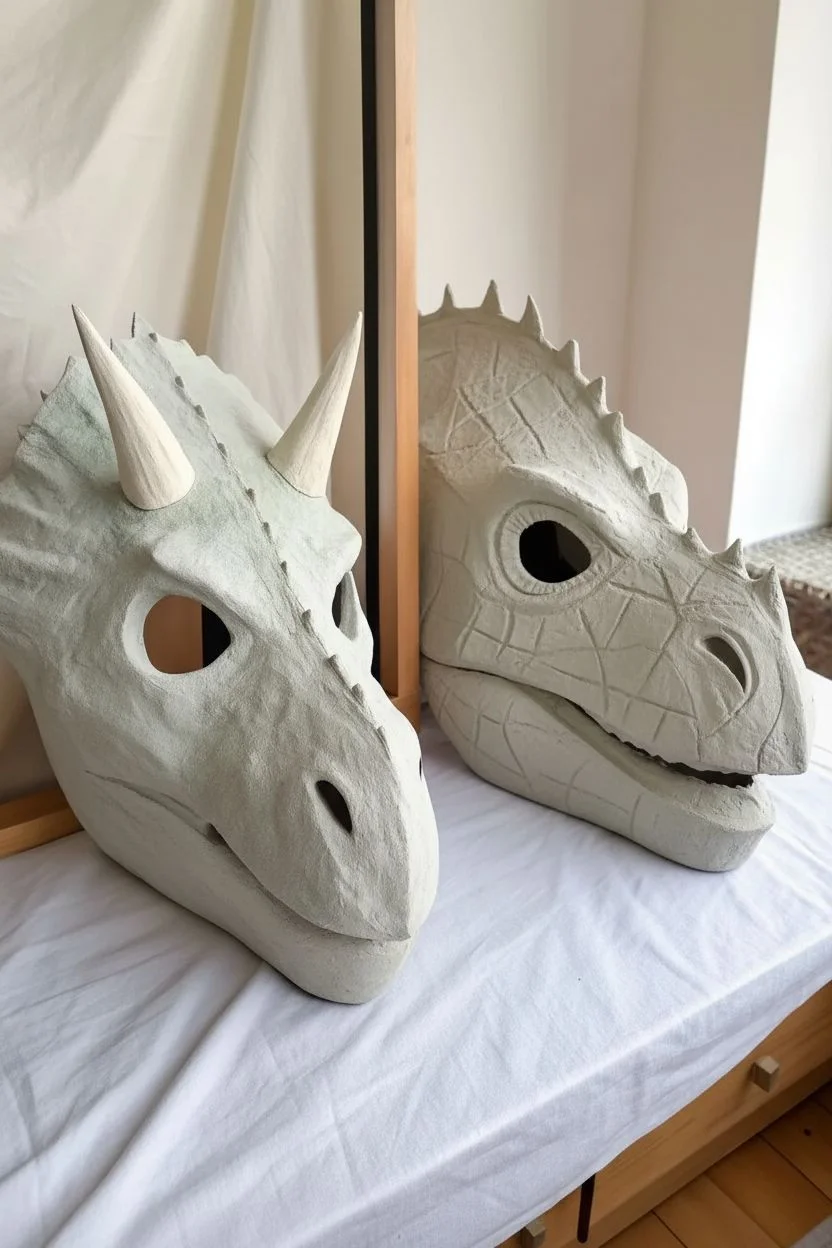
These detailed dinosaur masks bring prehistoric creatures to life with distinct color palettes and rich surface textures. The project focuses on transforming a basic mask base into a realistic reptile visage using paper mache, sculpting clay, and careful painting techniques.
Detailed Instructions
Materials
- Rigid paper mache mask base or heavy cardstock form
- Paper clay or air-dry sculpting clay
- Acrylic paints (pale sage, olive green, cream, bone white, dark brown, black)
- Matte sealant spray
- Fine-grit sandpaper
- Sculpting tools (or modeling tools)
- Black mesh fabric (for eyes)
- High-gloss varnish (optional, for eyes)
- Hot glue gun and glue sticks
Step 1: Structural Base & Features
-
Prepare the base form:
Begin with a sturdy mask base. If you are starting from scratch, build a form using foil and masking tape to create the snout and brow ridges, then cover it with 3-4 layers of paper mache strips. Allow this to dry completely until rigid. -
Define the brow and snout:
Use hot glue to attach crumpled foil or cardboard shapes to build up the prominent brow ridges and the nasal area. This creates the underlying bone structure for your dinosaur. -
Apply the sculpting layer:
Cover the entire mask with a thin, even layer of paper clay. Smooth it out with a little water on your fingers. This hides the seams of your base and provides a surface for detailing. -
Sculpt the horns:
Form two conical horns from solid paper clay for the paler mask. Alternatively, for the green mask, pinch up a series of jagged spikes along the center ridge. Let these dry separately if they are large, or sculpt them directly onto the wet clay surface. -
Refine the surface:
Once the foundational clay layer is semi-dry, use your sculpting tools to carve gentle grooves and ridges. For the green mask, press in irregular grid lines to mimic large reptilian scales.
Smooth Seams
When joining clay pieces like horns to the head, use a wet finger or tool to drag clay from the horn down onto the skull, smoothing the joint until invisible.
Step 2: Texturing & Teeth
-
Create skin texture:
For a rough, organic look, dab the wet clay surface with a stiff-bristled brush or a crumpled ball of aluminum foil. This tiny pitting makes the ‘skin’ look weathered rather than perfectly smooth. -
Shape the teeth:
Roll small, tapered cones of clay for the teeth. Attach them to the upper jaw line (and lower, if applicable) by scoring the contact points and blending the clay at the roots to ensure a strong bond. -
Add spinal details:
If making the green mask, add a ridge of smaller triangular spikes running down the back of the head. Ensure the transitions are smooth so they look like organic growths. -
Sand and smooth:
Allow the mask to dry for at least 24-48 hours. Once rock hard, gently sand the horns and teeth with fine-grit sandpaper to make them appear polished and sharp, contrasting with the rough skin.
Step 3: Painting & Finishing
-
Apply the base coat:
Prime the entire mask with a solid layer of paint. Use a pale sage grey for the horned mask or a deep olive drab for the scaled mask. Let this opaque layer dry fully. -
Wash for depth:
Mix a very watery dark brown or black acrylic paint. Brush this ‘wash’ heavily over the textured areas, letting it sink into the sculpted cracks and scales. -
Wipe back:
Immediately wipe the high points of the mask with a damp rag or paper towel. The dark paint will remain in the recesses, instantly popping the texture details. -
Dry brush highlights:
Load a dry, stiff brush with a lighter shade (cream for the pale mask, yellow-green for the dark one). Lightly whisk it over the raised areas—brows, nose bridge, and scale centers—to catch the light. -
Paint the horns and teeth:
Paint the horns and teeth with a bone-white color. Once dry, add a tiny bit of brown wash near the base of the horns/teeth to simulate aging and dirt accumulation. -
Install the eyes:
Cut pieces of black mesh fabric slightly larger than the eye sockets. Glue them securely from the inside of the mask. This hides your own eyes while still allowing you to see out. -
Seal the work:
Spray the entire piece with a matte sealant to protect the paint. If you want a wet look for the eyes or tongue, brush on high-gloss varnish just in those specific areas.
Glow Up
Mix glow-in-the-dark powder into your final dry-brush highlight color. The scales will faintly glowing green in the dark for a spooky radioactive effect.
Now you have a durable, prehistoric disguise ready for your next costume event or display shelf
Ocean Reef Dino Mask
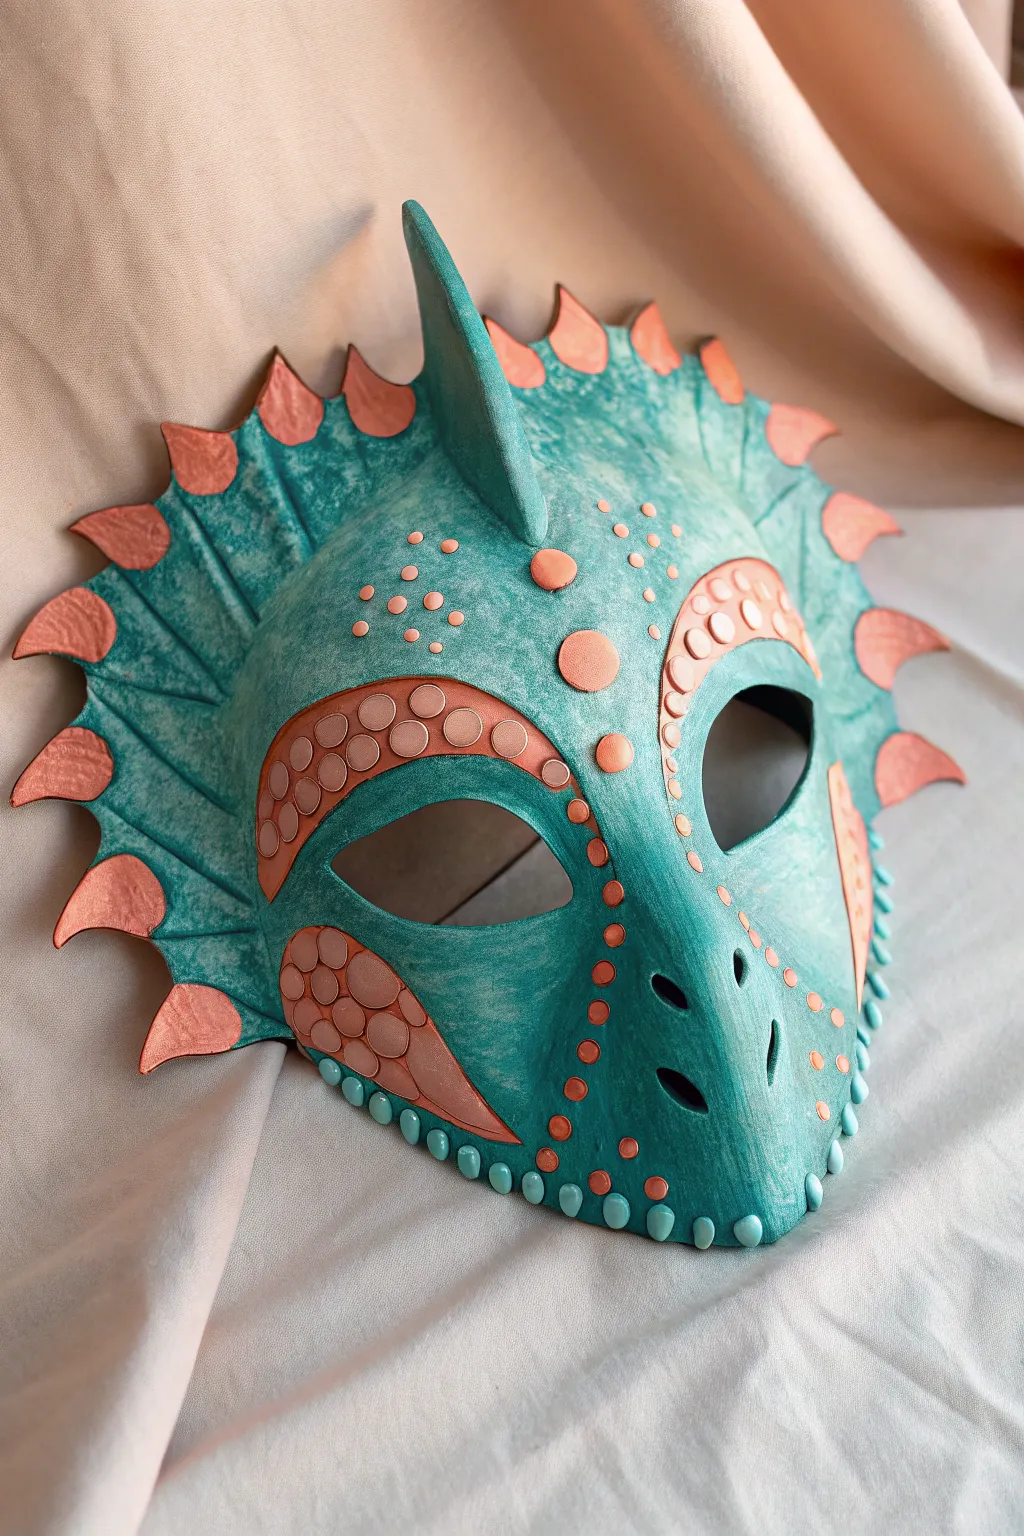
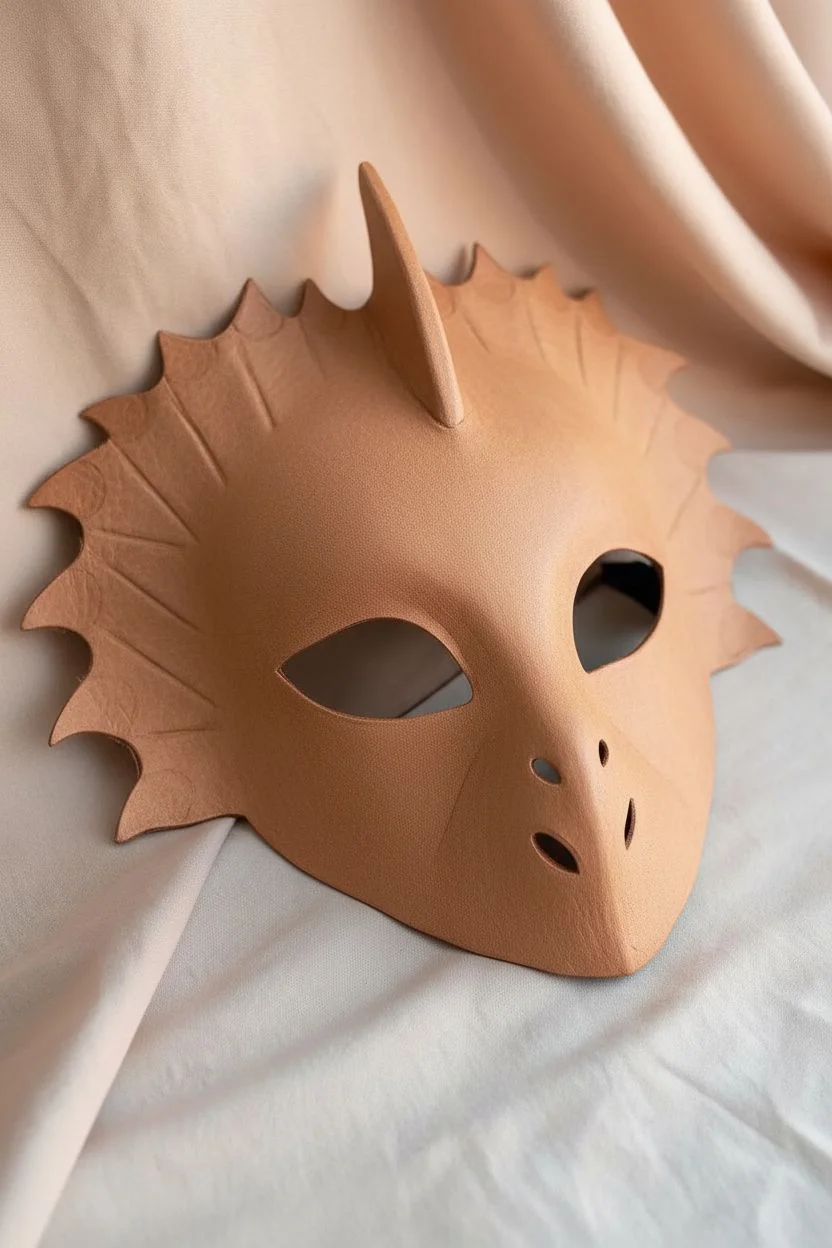
Dive deep into creativity with this stunning aquatic-themed dinosaur mask. Using wet molding techniques and iridescent paints, you will craft a piece that features a mottled turquoise texture reminiscent of ancient sea reefs.
Step-by-Step Guide
Materials
- Vegetable-tanned tooling leather (4-5 oz)
- Leather shears and craft knife
- Leather tooling stamps (pebble/scale texture)
- Swivel knife
- Leather hole punch
- Acrylic leather paints (Turquoise, metallic copper, white, black)
- Water spray bottle
- Small sponges or daubers
- Fine detail paintbrushes
- Matte leather finish/sealer
- Strong leather glue (cement)
- Small teal beads or half-pearls
- Elastic cord for wearing
Step 1: Shaping the Foundation
-
Pattern Transfer:
Begin by sketching your mask shape on cardstock, ensuring you have a central fin, cheek fins, and eye openings. Transfer this design onto your vegetable-tanned leather using a stylus or dull pencil. -
Cutting the Leather:
Carefully cut out the main mask body and the separate fin pieces using leather shears for the curves and a craft knife for tighter corners like the eye holes. -
Wet Molding the Snout:
Thoroughly case (wet) the leather with a spray bottle until it feels cool to the touch. Gently press and mold the nose area over a makeshift form, like a smooth stone or a ball of foil, to create a raised, 3D snout. -
Sculpting the Ridge:
While the leather is still damp, pinch the center forehead area to form a slight ridge where the main fin will eventually sit, giving the mask a more organic, skeletal structure. -
Drying Time:
Allow the leather to dry completely in its molded shape. This is crucial; if you move on too soon, the shape will collapse.
Step 2: Tooling and Texture
-
Beveling Edges:
Once dry, re-dampen just the surface slightly and use a beveler tool along the eye openings and mask edges to create a professional, rounded border. -
Carving Details:
Use your swivel knife to cut the decorative lines and scale patches around the eyes and cheeks. Do not cut all the way through; you just want to break the surface grain. -
Adding Scales:
Stamp or emboss circular scale patterns inside the patches found under the eyes. If you don’t have a specific stamp, the end of a small metallic cap can work surprisingly well.
Fixing “Flat” Molding
If the snout loses shape while drying, re-wet just that area and stuff it tightly with paper towels from behind. Let it dry again completely before painting.
Step 3: Bringing in Color
-
Base Coat Application:
Sponge on a base layer of metallic copper paint over the entire mask. Let this dry thoroughly; it will act as the glowing undertone. -
Creating the Mottled Effect:
Using a sea sponge, dab turquoise paint over the copper base. I find applying it somewhat randomly creates that natural, oceanic look, leaving peeks of copper showing through. -
Highlighting Texture:
Dry brush a lighter mix of turquoise and white over the raised areas—specifically the nose bridge and forehead—to enhance the molded dimension. -
Painting the Accents:
Use a fine brush to paint the circular scales and the recessed eye patches in a solid, bright copper to make them pop against the blue-green skin. -
Finishing the Spines:
Paint the separate fin pieces (the mohawk and cheek spines) with the same solid copper. Glue these firmly to the back of the mask edges so they protrude outward.
Add Bioluminescence
Mix glow-in-the-dark powder into your final matte sealer coat or the teal paint. Under UV light, your ocean reef dino will glow like deep-sea coral.
Step 4: Final Assembly
-
Sealing the Paint:
Apply a coat of matte leather finisher to protect your paint job and prevent cracking. This also unifies the sheen of the different paints. -
Adding the Beading:
Along the bottom jawline of the mask, carefully glue a row of small teal beads or half-pearls to simulate small aquatic bumps or water droplets. -
Attaching the Strap:
Punch small holes on the far edges of the mask near the temples. Thread your elastic cord through and knot it securely on the inside.
Wear your creation with pride and get ready to make waves at your next costume event
Fuzzy Rainbow Worm-Inspired Texture
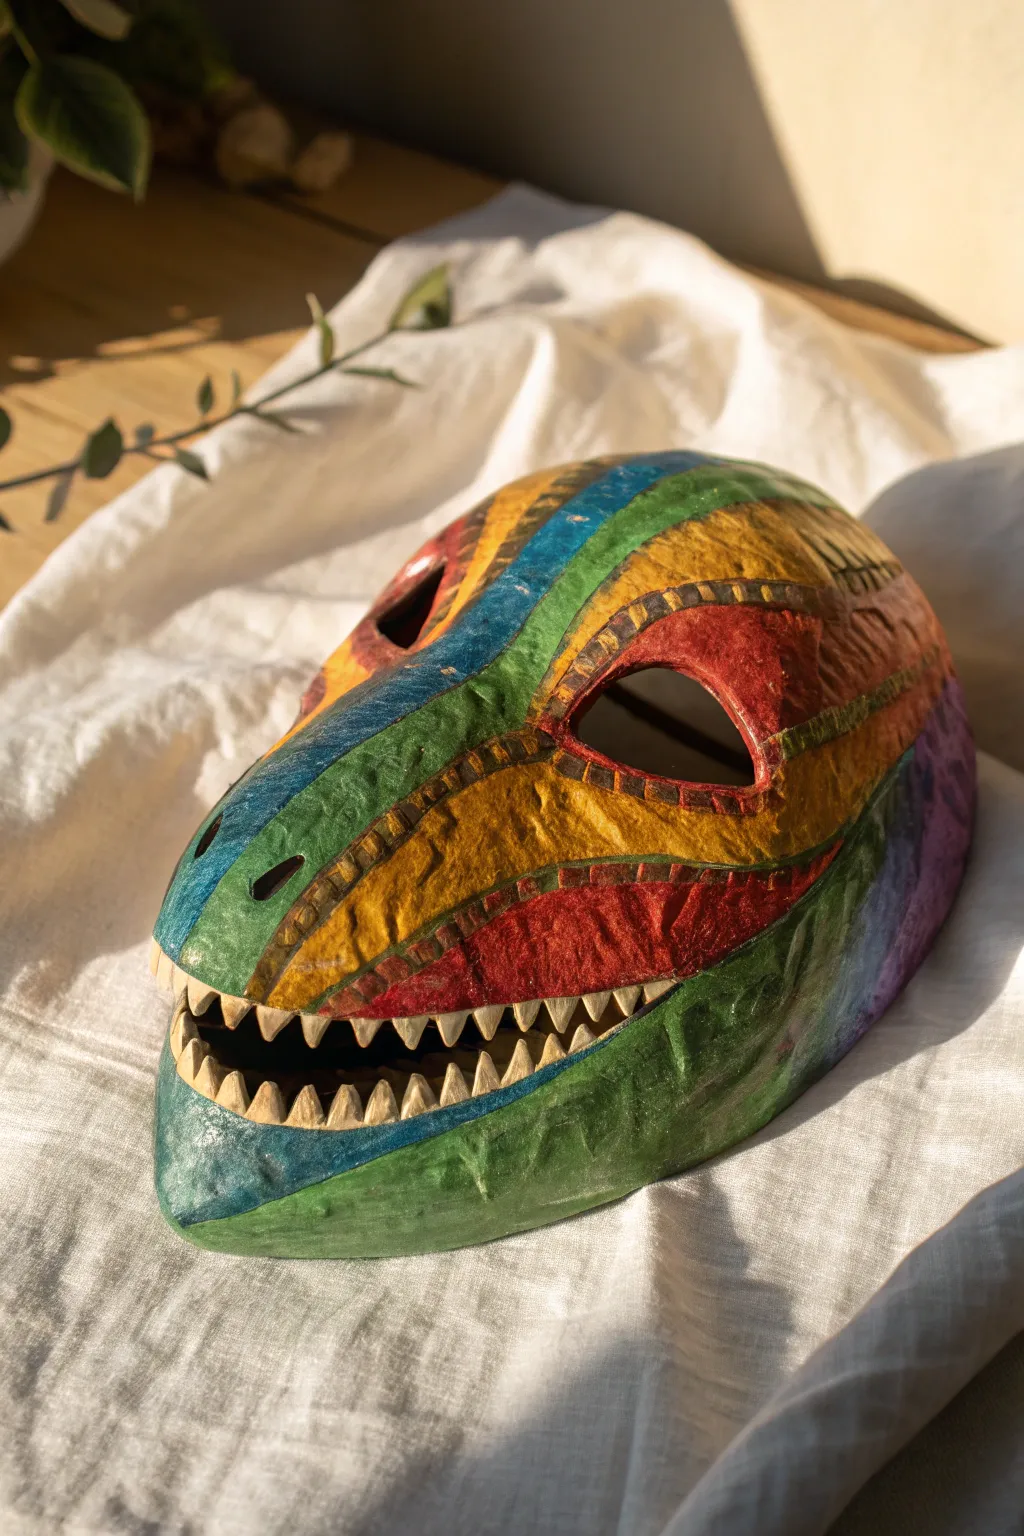
This vibrant dino mask combines bold, primary stripes with a textured, durable paper mache finish. Its distinct shape features an elongated snout and jagged teeth, making it perfect for creative play or costume parties.
How-To Guide
Materials
- Plastic dino mask base (or balloon and cardboard)
- Newspaper stripes
- Paper mache paste (flour and water or white glue and water)
- White acrylic gesso or primer
- Acrylic paints (Yellow, Red, Green, Blue, Purple, White)
- Medium flat brush
- Fine detail brush
- Gloss varnish or sealant
- Sandpaper (fine grit)
- Scissors
Step 1: Building the Form
-
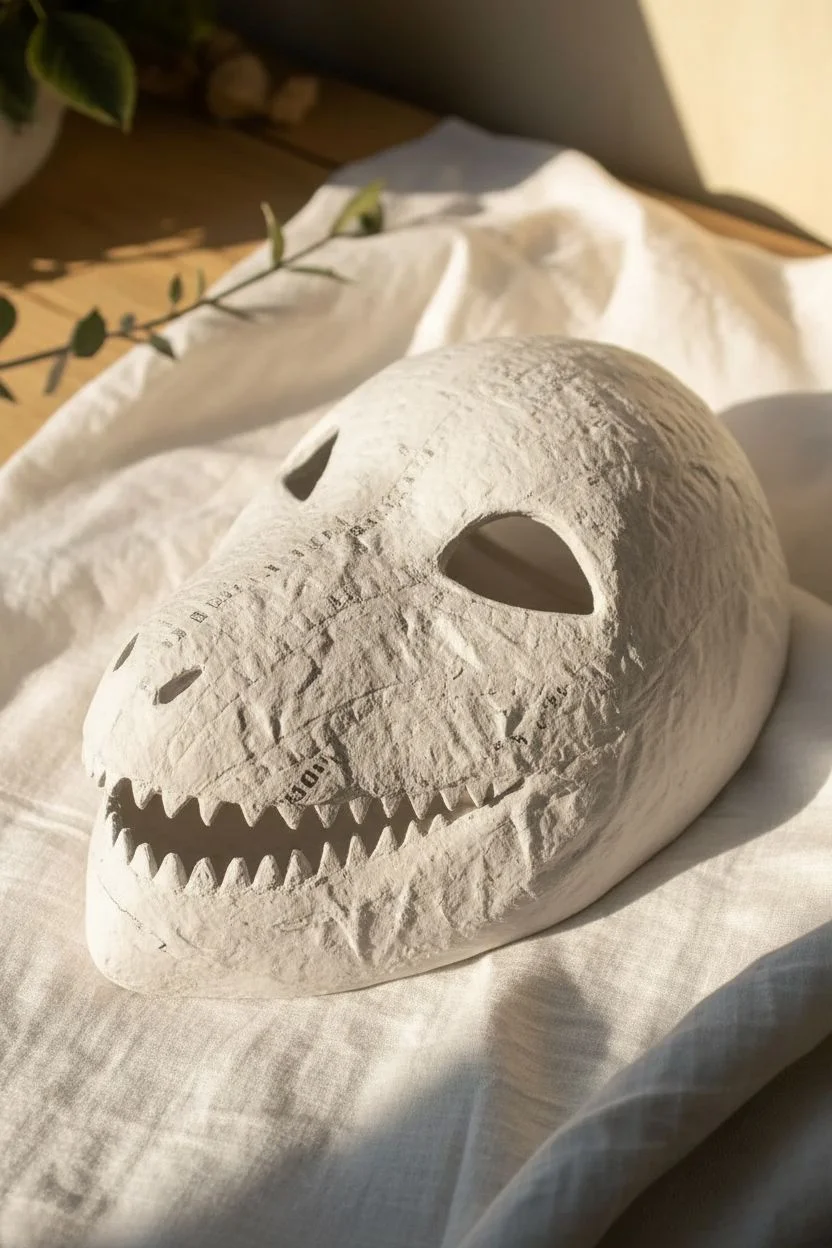
Prepare the base:
Start with a plastic dinosaur mask base if you have one. If building from scratch, use a balloon for the head and taped cardboard to form the elongated snout and jaw structure. -
Mix the paste:
Create a paper mache paste by mixing one part flour with two parts water until smooth, looking for a consistency similar to pancake batter. -
Apply first layer:
Dip strips of torn newspaper into the paste, squeegee off the excess between your fingers, and lay them smoothly over your form. -
Define the features:
Pay special attention to the eye holes and nostril openings, wrapping small strips of paper around the edges to create a smooth, reinforced rim. -
Build thickness:
Apply 3-4 layers of paper mache, allowing the mask to dry completely between layers so it becomes hard and durable. -
Sculpt the teeth:
For the teeth, you can either build them up with folded cardboard triangles attached before the final paper layer, or sculpt them directly using paper pulp (mache clay) for a more organic, jagged look. -
Final dry and prep:
Let the entire mask dry for at least 24 hours. Once solid, lightly sand any rough patches or sharp paper edges with fine-grit sandpaper. -
Prime the surface:
Coat the entire mask, inside and out, with white gesso or primer. This ensures your bright colors will pop and not be dulled by the newsprint underneath.
Smooth Operator
To get a smoother finish before painting, apply a thin layer of wood filler or drywall joint compound over the dry mache, then sand it down.
Step 2: Painting the Design
-
Sketch the stripes:
Using a pencil, lightly draw the curved stripe patterns that flow from the snout back towards the ears. Make sure to mark out the thick ridge above the eye. -
Base coat the yellow:
Start by painting the prominent yellow sections on the snout and around the eye socket using a medium flat brush. -
Add red accents:
Fill in the red stripes, specifically the area just under the eye and the lower jaw section. You may need two coats for full opacity. -
Apply green and blue:
Paint the nose ridge blue and the lower jaw and cheek areas in green. I prefer to slightly wet the brush to help the paint flow over the textured paper surface. -
Detail the divides:
To create the segmented look seen in the reference, use a darker shade (like a raw umber or dark gold) to paint thin lines separating the color blocks. -
Add texture lines:
Within the divider lines, use a small detail brush to add tiny vertical hatch marks, simulating scales or leather stitching. -
Paint the teeth:
Carefully paint the teeth an off-white or bone color. Adding a tiny bit of brown wash near the gum line creates a realistic, weathered effect. -
Darken the interior:
Paint the inside of the mouth and the varying visible interior edges black to give the mask depth and make the teeth stand out. -
Seal the work:
Finish by applying a coat of gloss varnish. This gives the mask a wet, reptilian sheen and protects your paint job from chipping.
Glow Up
Mix a small amount of glow-in-the-dark medium into the yellow or green paint to make your dinosaur mask illuminated during nighttime events.
Enjoy bringing this colorful prehistoric creature to life with your own hands
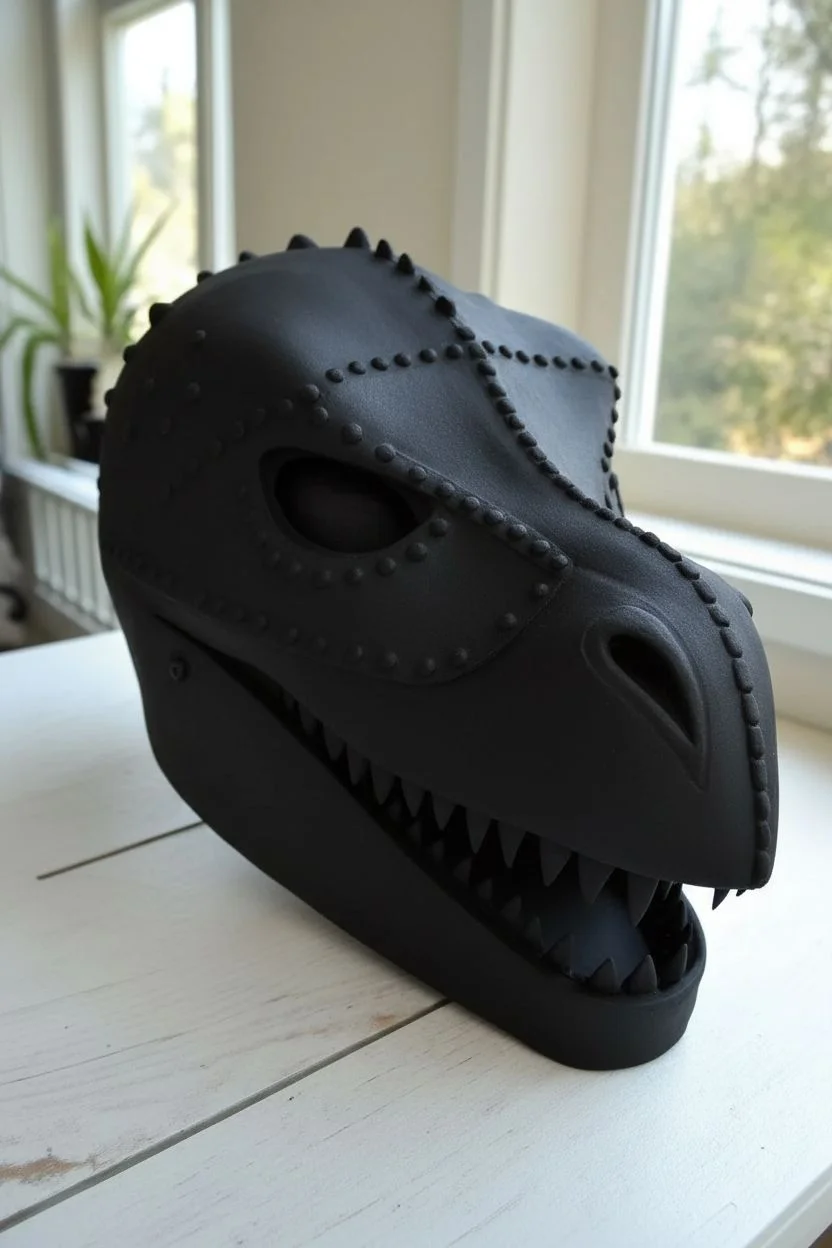
Crystal Horns and Mixed Media Details
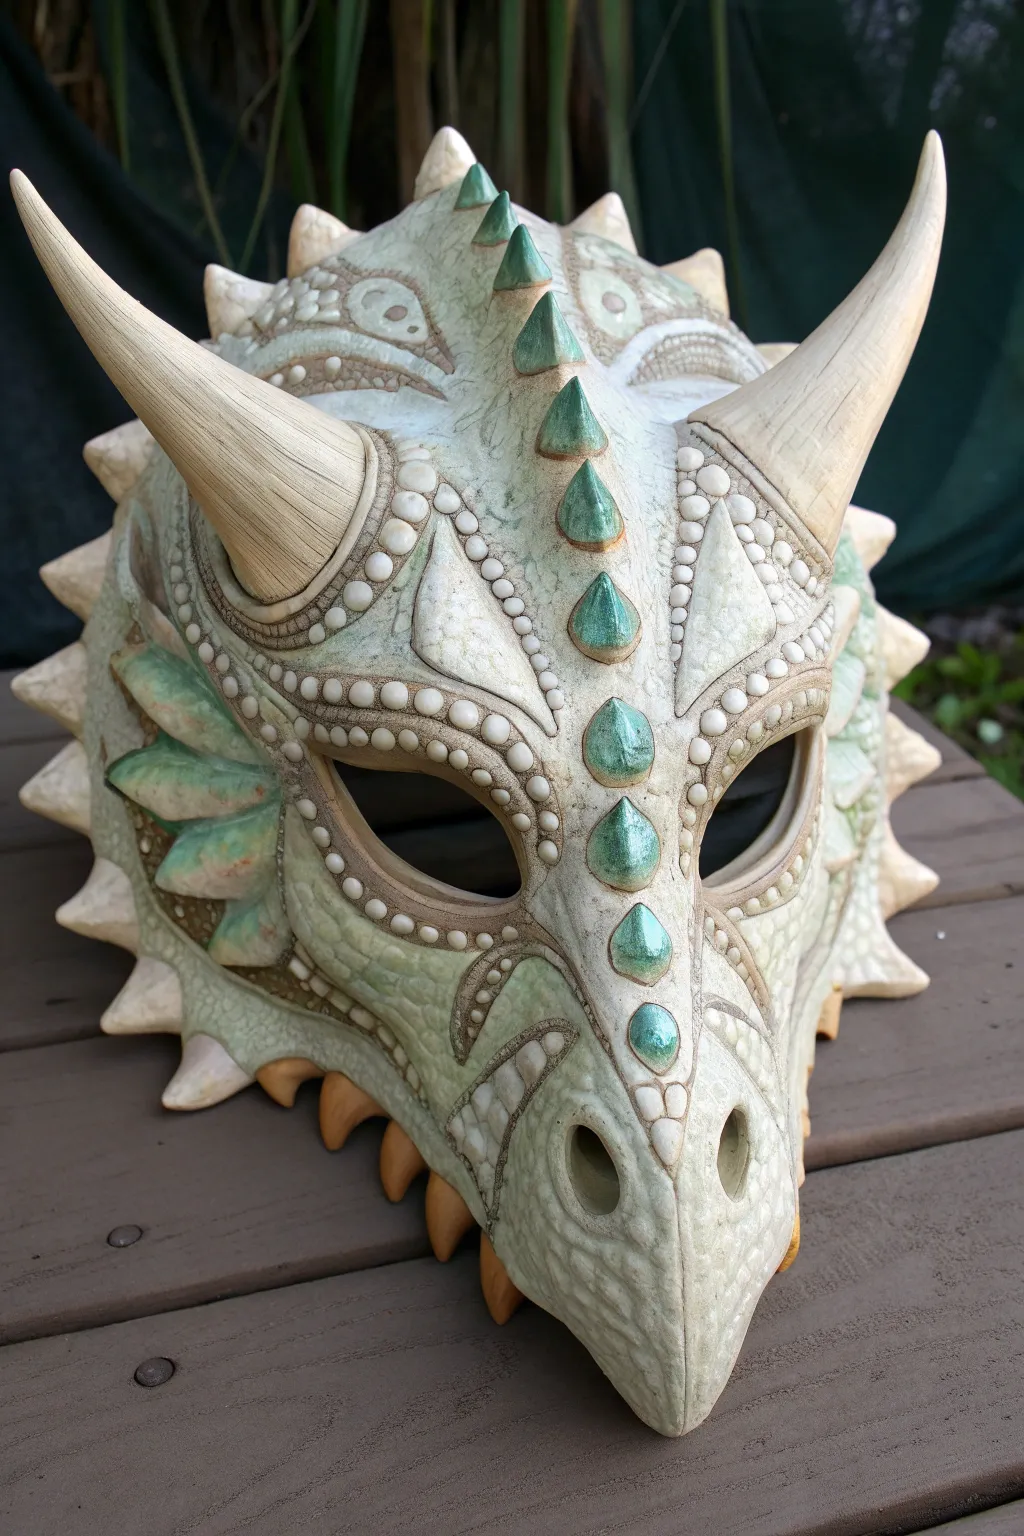
Transform a basic base into a stunning, earthy dragon visage that resembles carved bone and weathered ceramic. This project focuses on building intricate relief details using clay and achieving a realistic, multi-tonal aged finish.
Detailed Instructions
Materials
- Base mask (hard plastic dinosaur or dragon mask)
- Apoxie Sculpt or air-dry modeling clay
- Aluminum foil
- Sculpting tools (ball styluses, wire loop tool)
- Mod Podge or PVA glue
- Sandpaper (fine and medium grit)
- Acrylic paints (bone white, cream, sage green, dark brown/umber)
- Teal or turquoise metallic paint
- Matte spray sealant
- Gloss varnish
- Hot glue gun
Step 1: Sculpting the Base Structure
-
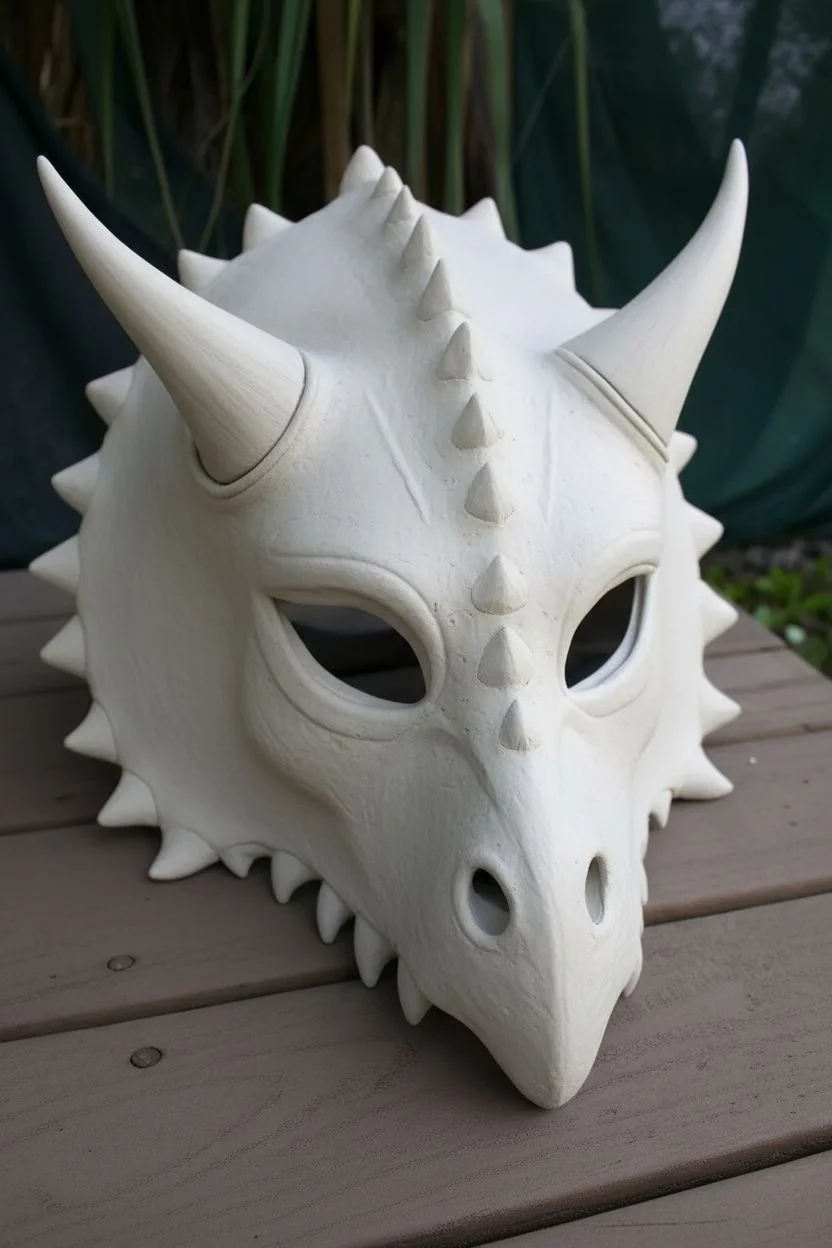
Prepare the armature:
Begin by sanding the hard plastic mask surface lightly to help the clay adhere. If you want larger horns than the base provides, create armatures using crumpled aluminum foil taped securely onto the mask’s existing horn nubs. -
Cover with clay:
Mix your Apoxie Sculpt or knead your air-dry clay and cover the foil horns first. Aim for a smooth, tapered cone shape that curves gently backward. -
Build the central ridge:
Add a thick strip of clay running from the forehead down to the nose. Shape this into a triangular crest, pinching the top to form the base for your central spikes. -
Define the eye sockets:
Roll thin snakes of clay and outline the eye holes. Flatten the outer edges to blend them into the mask, but keep the inner edge raised to create a distinct, bony rim.
Smoother Sculpts
Keep a small dish of water (for clay) or safety solvent (for epoxy) nearby. Dipping your tools or fingers keeps the material from sticking and helps blend seams invisibly.
Step 2: Detailing the Scales
-
Carve the horn texture:
While the clay on the horns is still workable, use a wire loop tool or a needle tool to scratch subtle vertical lines along the length of the horns, mimicking the growth grain of natural horn. -
Emboss the pebbled skin:
For the areas around the eyes and snout, press a small ball stylus tool repeatedly into the clay to create a bumpy, pebbled skin texture. Vary the pressure to create different sized indentations. -
Create the nose ridge spikes:
Mold small, sharp cones of clay and attach them in a single file line down the central nose ridge. Blend the bottoms seamlessly into the ridge so they look like organic outgrowths. -
Add flanking spikes:
Sculpt flat, triangular spike shapes for the cheeks and sides of the jaw. Layer them slightly, pointing backward, to simulate overlapping armored plating. -
Decorative beadwork:
Roll tiny spheres of clay and press them in uniform lines along the ridges of the eye sockets and the main forehead crest. This creates a decorative, almost ceremonial beaded look. -
Final texture check:
Use a sponge or stiff brush to dab any remaining smooth areas of clay, giving the entire mask a porous, bone-like surface texture. Allow everything to cure or dry completely according to your clay’s instructions.
Step 3: Painting and Finishing
-
Base coat:
Paint the entire mask with a solid coat of bone white or light cream acrylic paint. You may need two coats to fully cover the underlying plastic and dried clay. -
Apply the wash:
Mix dark brown or raw umber paint with water to create a thin wash. Brush this over the whole mask, ensuring it gets into every crack and crevice. -
Wipe away excess:
Before the wash dries, wipe the raised surfaces with a damp paper towel or sponge. The dark paint will remain in the recesses, instantly revealing your sculpted details. -
Add sage accents:
Dry brush a soft sage green color onto the cheek scales and the sides of the nose. Keep this subtle to suggest mossy discoloration or natural pigmentation. -
Paint the gem spikes:
Paint the central row of spikes with a metallic teal or turquoise. I like to layer a slightly lighter teal on the very tips for a highlighting effect. -
Highlight the horns:
Leigh lightness back into the horns by dry brushing the original bone white color along the raised grain lines, increasing contrast against the dark wash. -
Seal the work:
Spray the entire mask with a matte sealant to protect the paint job and unify the sheen. -
Gloss the gems:
Finally, apply a high-gloss varnish specifically to the teal spikes and the tips of the larger horns to make them look like polished crystal or fresh bone.
Ancient Artifact Look
Mix fine sand or baking soda into your base coat paint. This creates a rough, stony grit that makes the mask feel like an excavated relic rather than plastic.
Once the varnish cures, your prehistoric creation is ready for display or your next costume event


Have a question or want to share your own experience? I'd love to hear from you in the comments below!