
When I want instant, feel-good texture, I reach for puffy paint—it turns simple shapes into little 3D artworks you can actually see and feel. If you’re craving easy projects with big payoff, these raised, tactile ideas will keep your hands happily busy.
Puffy Heart Cards
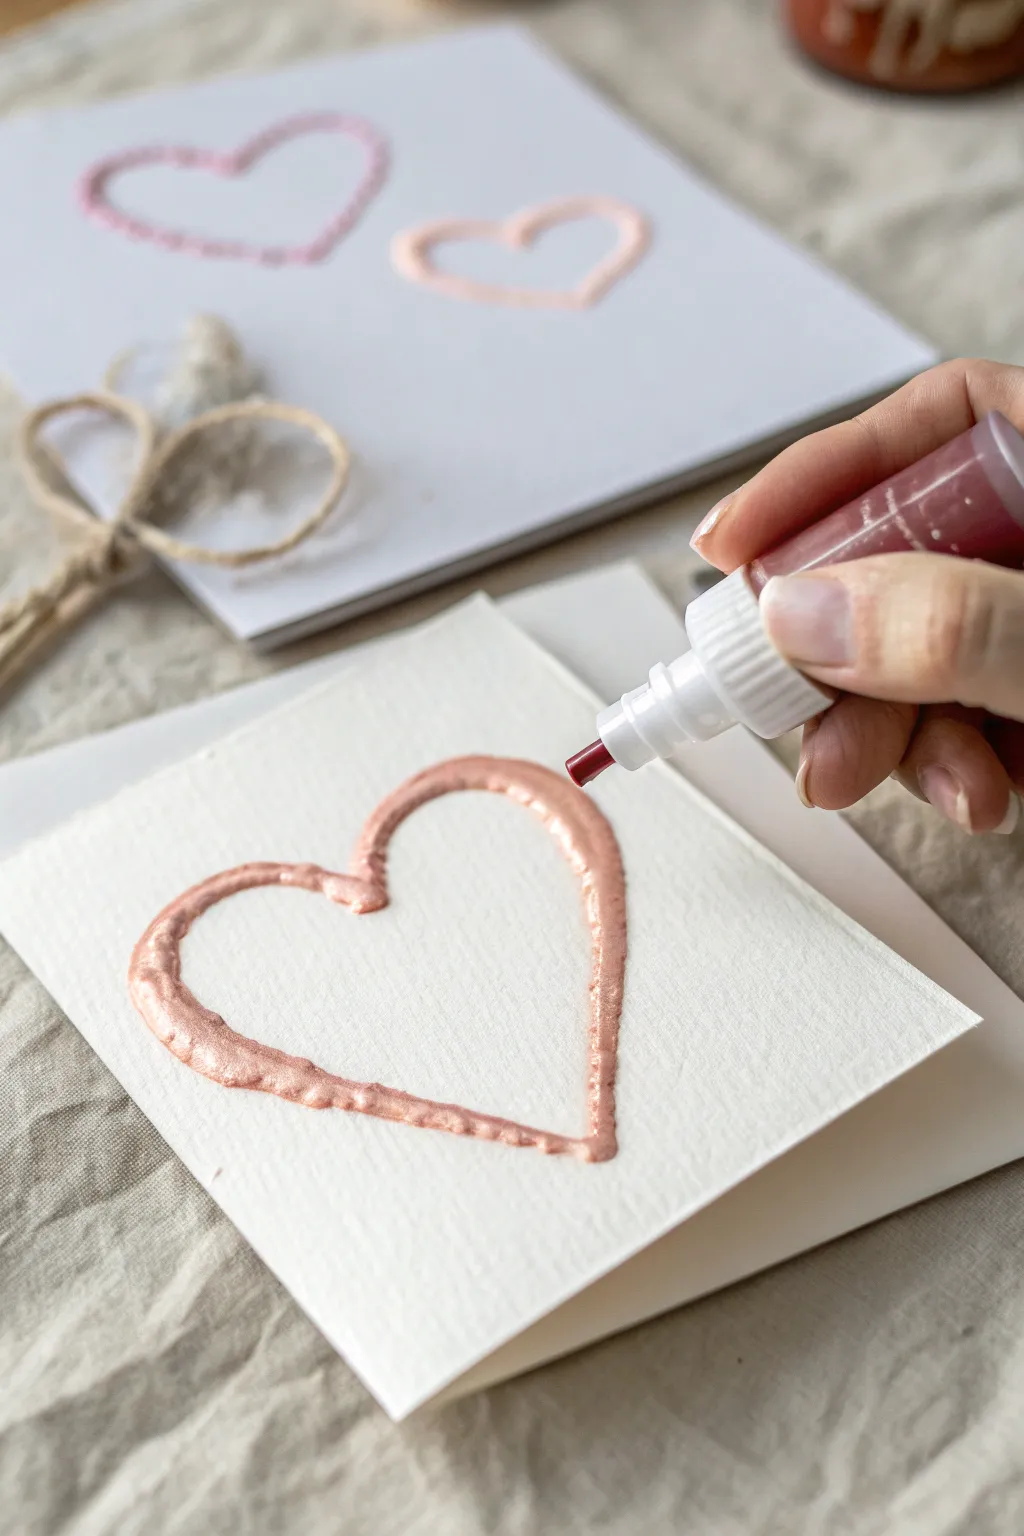
Create simple yet stunning greeting cards with the unique texture and shine of metallic puffy paint. The raised, embossed effect of the paint adds a lovely tactile quality that elevates a plain card into something special.
Detailed Instructions
Materials
- Blank white folded cardstock or watercolor cards
- Metallic rose gold or copper puffy paint (squeeze bottle)
- Pencil (optional)
- Eraser (optional)
- Scrap paper for testing
- Jute twine for decoration (optional)
- Hairdryer (optional, to speed up drying)
Step 1: Preparation
-
Prepare your workspace:
Lay down a protective surface on your table, as puffy paint can be tricky to clean up once dry. Since the bottle needs to be held vertically, ensure you have plenty of elbow room. -
Test the flow:
Before touching your final cardstock, shake the puffy paint bottle well to mix the medium. Remove the cap and squeeze a small amount onto a piece of scrap paper. -
Check consistency:
Drawing a few practice lines on the scrap paper helps you get a feel for the pressure needed. You want a steady, even bead of paint without air bubbles.
Clean Nozzle Tip
Keep a paper towel nearby. If the paint flow stops or sputters, wipe the nozzle tip immediately to prevent dried clumps from ruining your smooth lines.
Step 2: Designing the Heart
-
Sketch the outline (optional):
If you aren’t confident drawing a heart freehand, very lightly sketch the shape onto the front of the folded card using a pencil. -
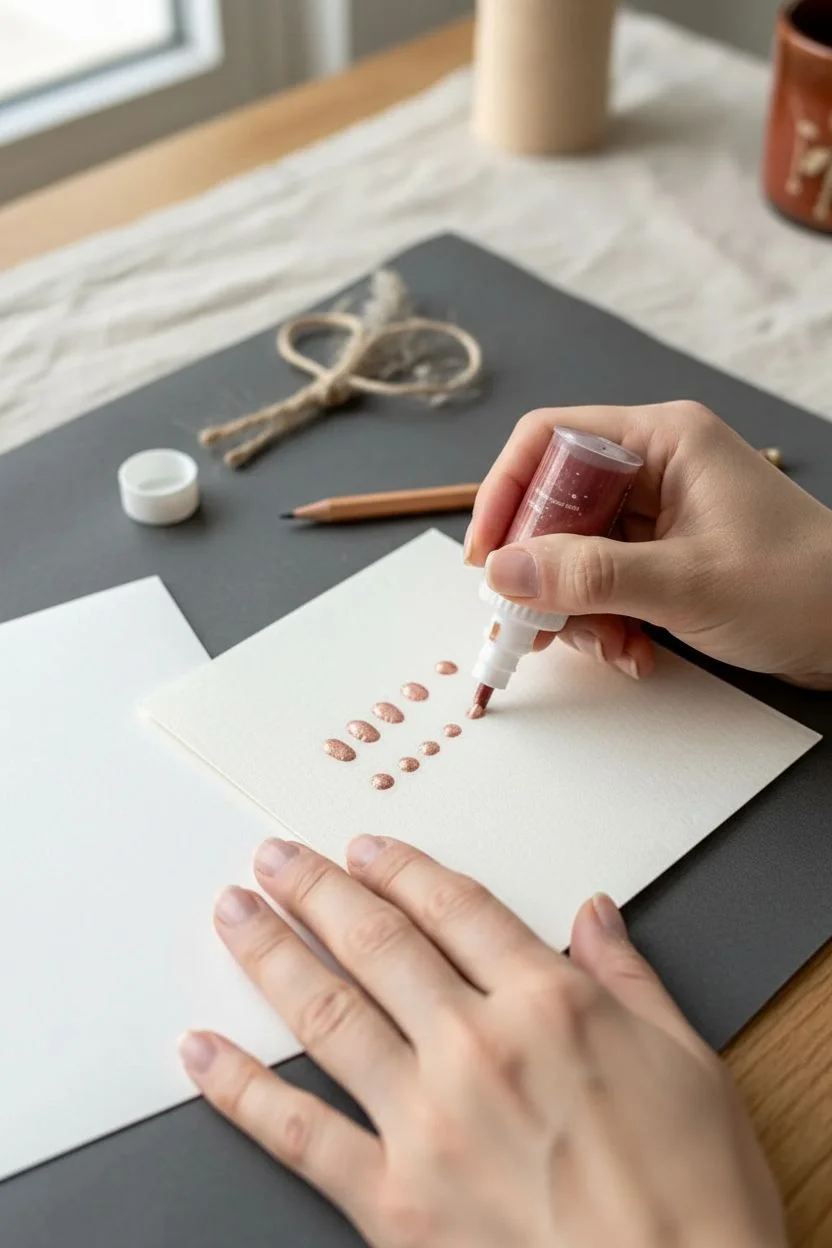
Keep lines faint:
Ensure the pencil lines are extremely faint so they won’t show through if the paint doesn’t cover them perfectly. I prefer to sketch just a few guide dots rather than a solid line. -
Position the card:
Place the card flat on the table in front of you. It’s much easier to control the paint flow on a horizontal surface than on an angled one.
Add Dimension
Once the outline is dry, fill the inside of the heart with a different color of puffy paint or watercolor for a mixed-media look.
Step 3: Applying the Paint
-
Start at the top center:
Hold the bottle like a pen, but slightly more upright. Position the nozzle at the top indentation of the heart shape, commonly called the cusp. -
Begin the first curve:
Gently squeeze the bottle to start the flow. Move slowly to the left, tracing the upper curve of the heart. Maintain consistent pressure to keep the line width uniform. -
Trace down to the point:
Continue the line down the left side, gradually tapering the curve until you reach the bottom point of the heart. Stop squeezing just before you lift the nozzle. -
Start the second side:
Return to the top center cusp. Overlap your starting point slightly to ensure the connection is seamless. -
Complete the shape:
Trace the right curve, mirroring your first side. Move slowly down towards the bottom point. -
Join at the bottom:
Connect this line to the bottom point of the first side. A tiny extra squeeze here can help merge the two lines into a sharp, defined tip.
Step 4: Finishing Touches
-
Inspect the line quality:
Look closely at your painted heart. The paint should look wet and slightly raised, creating that dimensional ‘puffy’ look. -
Fix imperfections:
If there is a gap in the line, very carefully add a tiny dot of paint to bridge it. Use a toothpick to drag wet paint into gaps if adding more paint seems too risky. -
Let it settle:
Allow the card to sit undisturbed for a few minutes. Some metallic puffy paints will self-level slightly, smoothing out minor bumps. -
Dry completely:
Puffy paint takes significantly longer to dry than standard acrylics. Leave the card flat in a safe, dust-free area for at least 4 hours, or overnight for best results. -
Add embellishments (optional):
Once fully dry, you can pair the card with a simple jute twine bow or dried flowers for a rustic aesthetic, as seen in the background of our inspiration.
Once the paint has fully cured, you will have a beautiful, minimalist card ready to share with someone special


Rainbow Arc Stripes
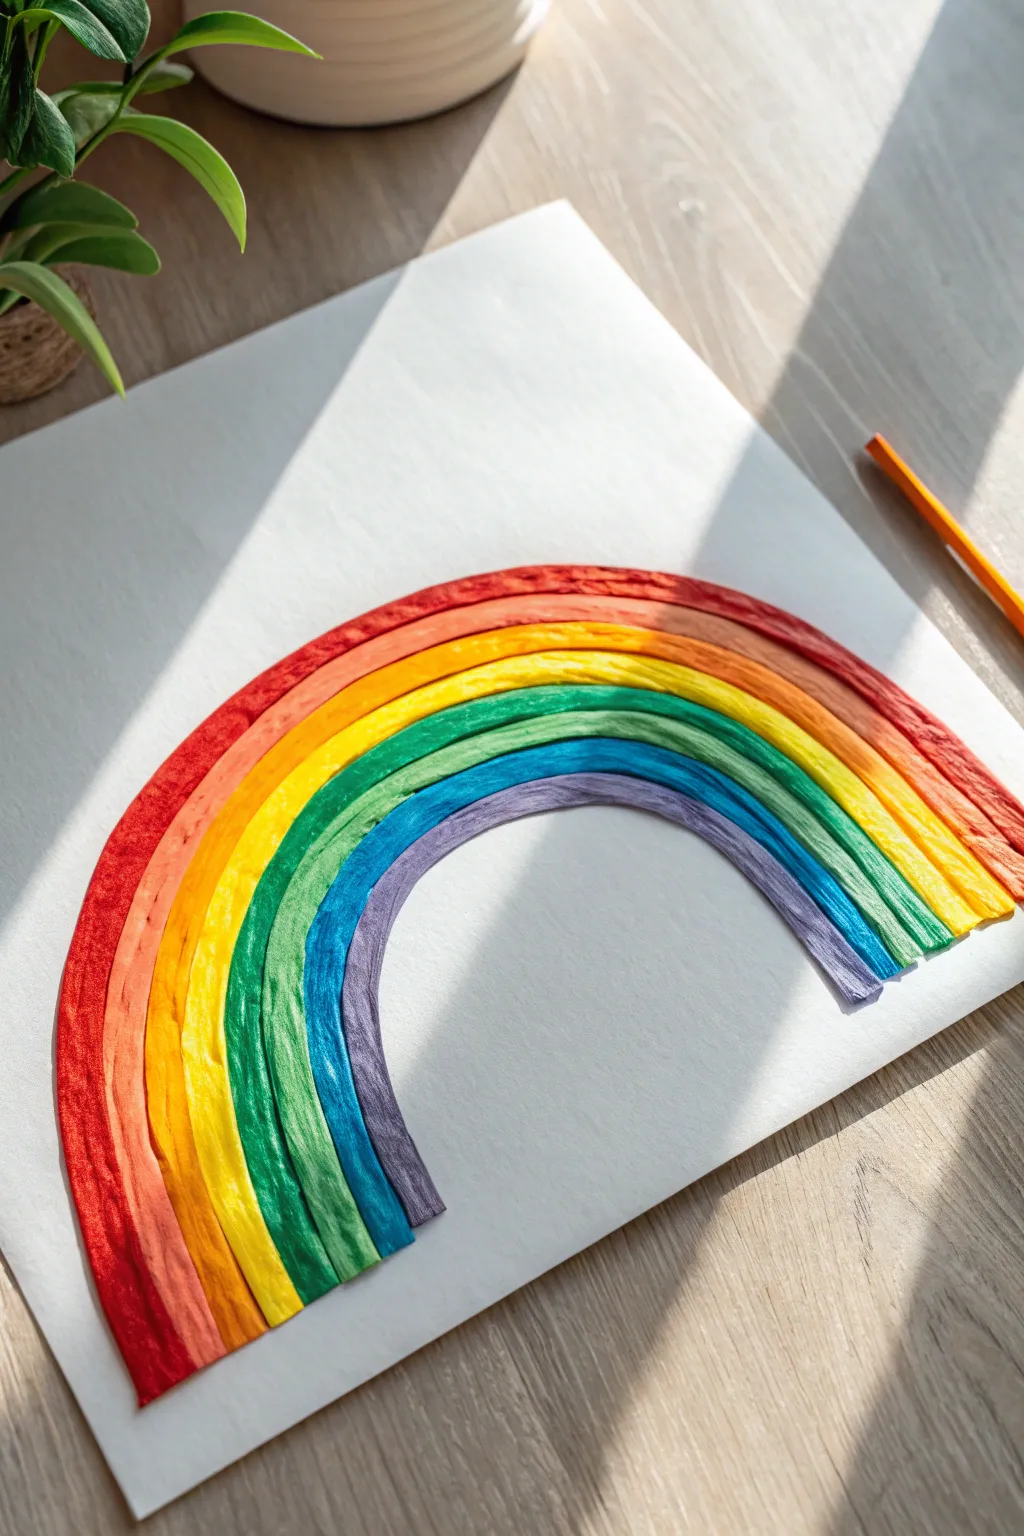
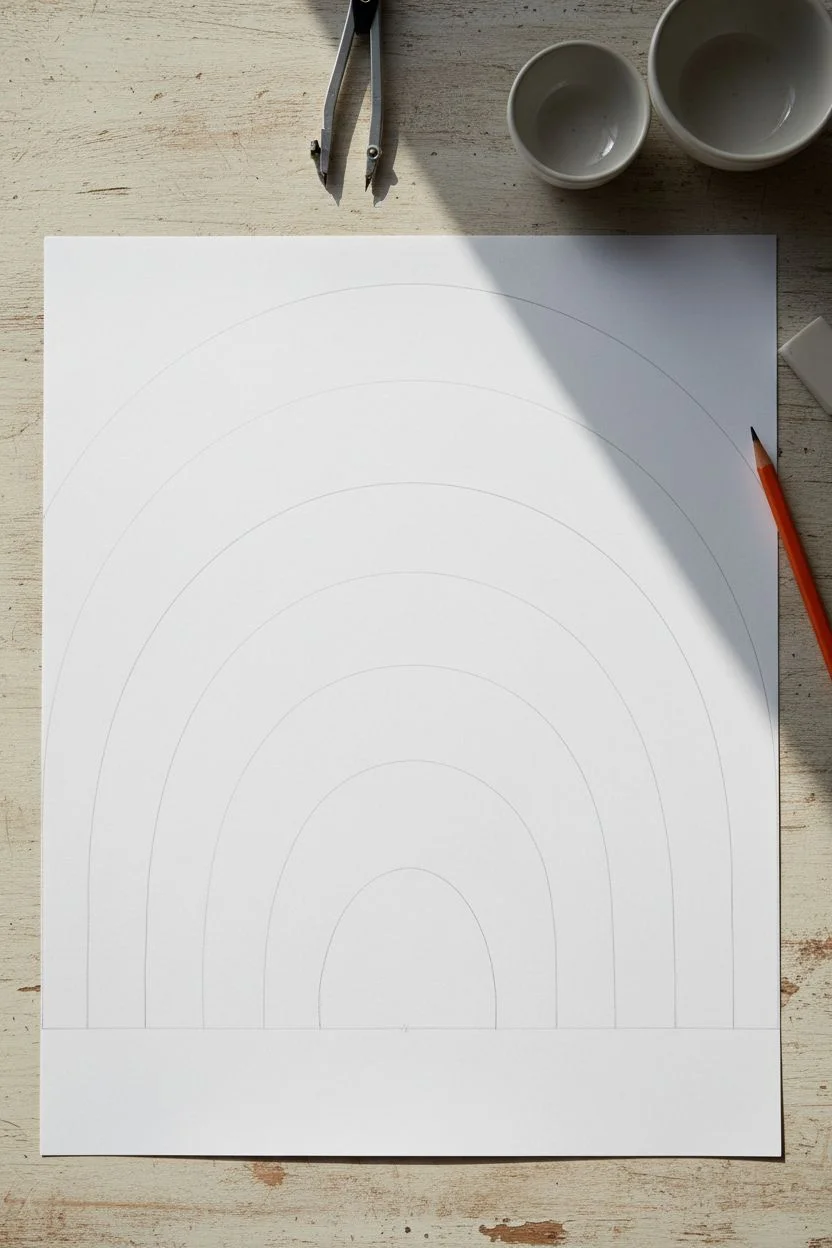
Brighten up your workspace with this bold, dimensional rainbow, featuring thick, sculpted stripes that practically pop off the page. The unique texture mimics the look of clay or ribbon, creating a wonderfully tactile piece of art that catches the light beautifully.
Step-by-Step Tutorial
Materials
- Thick white cardstock or watercolor paper
- Puffy paint (squeeze bottles) in rainbow colors: Red, Orange, Yellow, Green, Blue, Indigo/Purple
- Soft graphite pencil (HB or 2B)
- Clean eraser
- Palette knife, craft stick, or the angled tip of a paintbrush handle
- Compass or two round objects of different sizes (like bowls) to trace
- Paper towels for wiping tools
Step 1: Planning the Arcs
-
Set up your guide:
Begin by placing your paper on a flat, stable surface. To ensure your rainbow is symmetrical, lightly mark the center point at the bottom of the page where you want the arches to begin. -
Draw the inner curve:
Using a compass set to a small radius (or tracing a small bowl), draw the first, smallest semi-circle lightly in pencil. This will form the empty space under the bottom purple stripe. -
Mark the outer limit:
Now, use your compass (or a larger bowl) to draw the largest, outermost semi-circle where the red stripe will end. This defines the total width of your rainbow. -
Sketch the stripe guides:
Between your inner and outer lines, lightly sketch five more evenly spaced arcs. You need a total of seven curved lines to create the six distinct channels for your rainbow colors. -
Inspect the spacing:
Take a moment to check that your sketched channels are relatively even in width. If one looks too skinny, gently erase and adjust the line now before any paint touches the paper.
Step 2: Applying the Colors
-
Start with red:
Begin at the top arch. Squeeze a generous bead of red puffy paint directly onto the paper, following the curve of your top channel. Don’t worry about smoothing it yet; just get the volume down. -
Add texture to red:
Immediately use your palette knife or a flat craft stick to spread the red paint. Instead of smoothing it perfectly flat, drag your tool lengthwise along the arc to leave subtle ridges and valleys. -
Apply the orange:
Move to the second channel. Squeeze a thick line of orange paint right next to the red, making sure they touch slightly to create a cohesive unit without huge gaps. -
Sculpt the orange stripe:
Texturize the orange paint using the same lengthwise dragging motion. I find wiping the tool clean between colors is crucial here to keep the hues vibrant. -
Continue with yellow:
Fill the third channel with yellow puffy paint. Because yellow is lighter, you may need a slightly thicker application to ensure the white paper doesn’t show through too much. -
Create the green layer:
Apply the green paint to the fourth channel. Use the edge of your tool to gently push the green paint against the yellow border, ensuring a seamless transition. -
Fill the blue arc:
Squeeze the blue paint into the fifth channel. As you texturize this layer, try to mimic the direction of the previous curves so the visual flow remains consistent. -
Finish with purple:
Apply the final purple or indigo stripe in the smallest, innermost channel. Be careful near the bottom edge of the paper to keep a clean, sharp line.
Texturing Tip
For deeper ridges like the photo, wait 5-10 minutes after applying paint before creating the texture. The paint will be slightly stiffer and hold the shape better.
Step 3: Refining and Drying
-
Clean up the edges:
Inspect the two bottom ends of the rainbow where the arches hit the paper. Use your clean palette knife to slice downward vertically, creating a straight, uniform finish for all the stripes. -
Check for gaps:
Look closely between the colors. If you see any white paper peeking through the seams, use the tip of a toothpick to gently nudge the wet paints together until the gap disappears. -
Enhance texturing:
If any stripes have settled and become too smooth, lightly run your tool over them again to re-establish those lovely, light-catching ridges visible in the example. -
Initial dry time:
Let the artwork sit undisturbed on a flat surface. Puffy paint is thick, so the outer skin will dry first, but the inside will remain wet for quite some time. -
Full cure:
Allow the project to dry for at least 24 hours. Do not touch the surface to test it, as you might leave a permanent fingerprint in the soft paint.
Make It Sparkle
While the paint is still wet, lightly dust ultrafine clear glitter over the top of the arc. It will catch the light and emphasize the 3D texture once dry.
Once fully cured, you can frame your textured masterpiece in a shadow box to protect the dimensional surface


Puffy Flower Petal Blooms
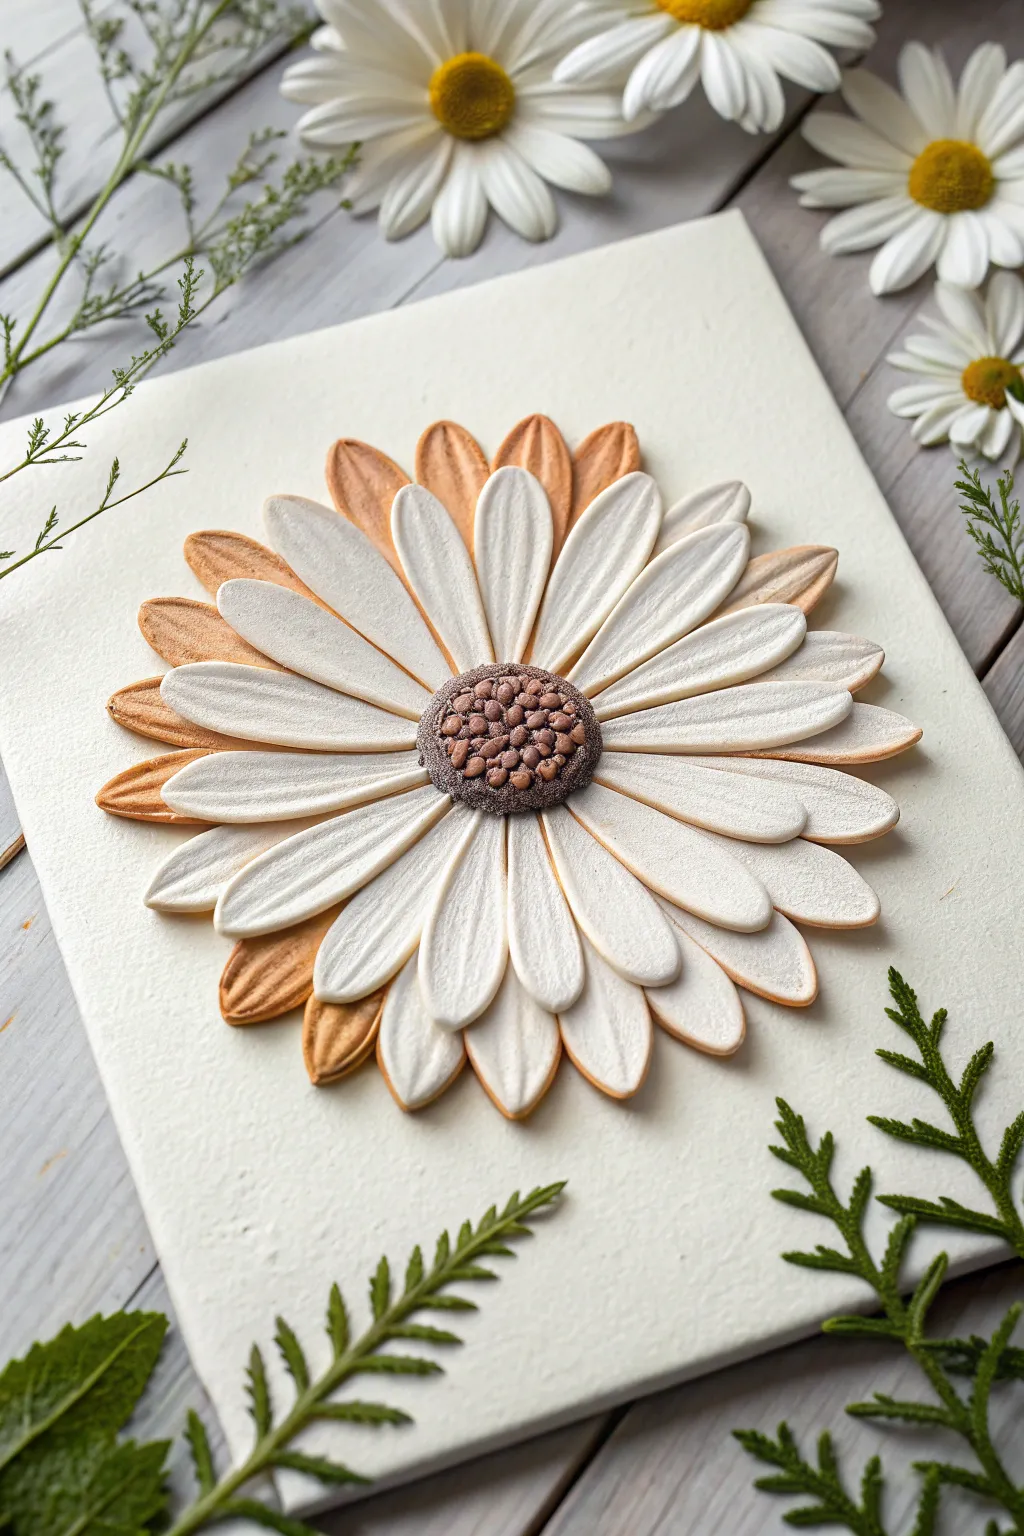
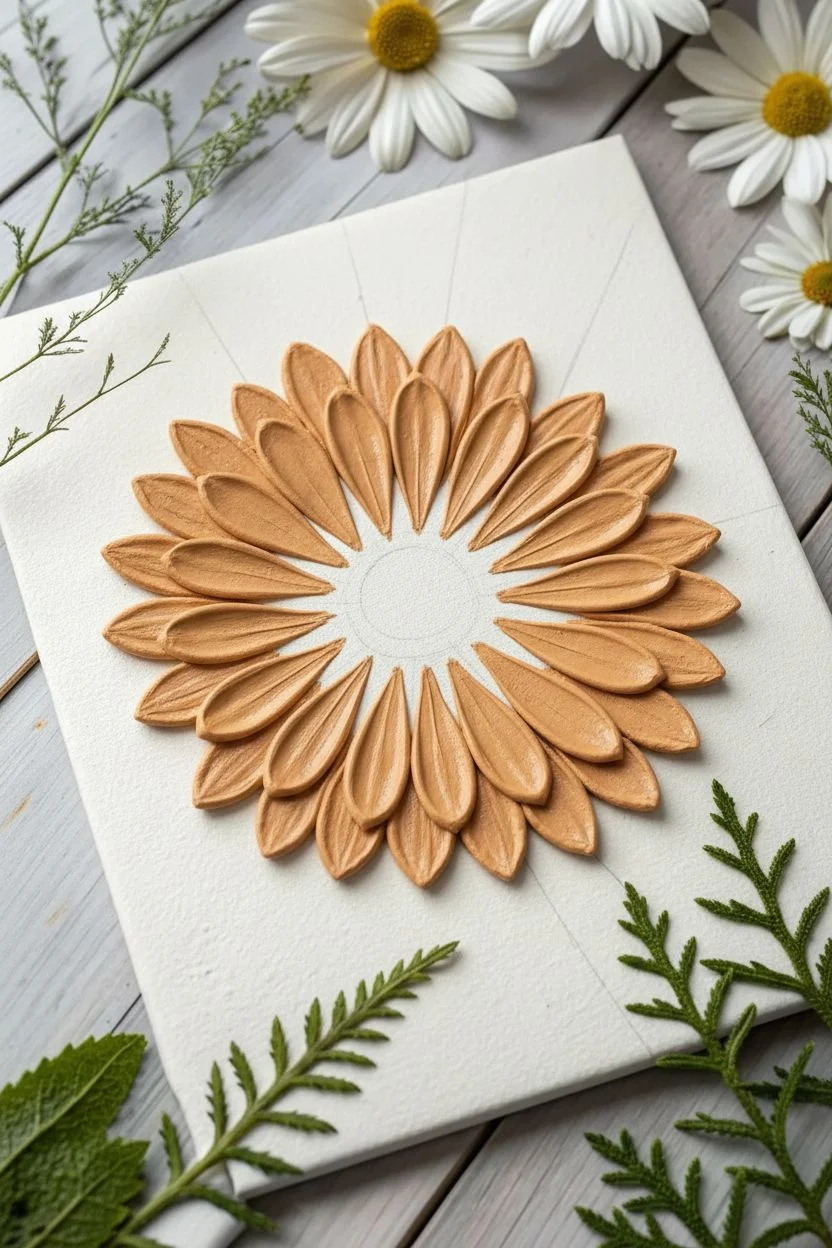
Create a stunning bloom that literally pops off the canvas using layers of dimensional puffy paint. This project creates a beautiful, tactile daisy-like flower with realistic petals that cast actual shadows.
Detailed Instructions
Materials
- Small white canvas (5×7 or 8×10)
- Pencil for sketching
- White puffy paint (squeeze bottle)
- Light toffee or tan puffy paint
- Dark brown puffy paint
- Fine-point toothpick or sculpting tool
- Palette knife (optional, for shaping)
- Clear matte sealer spray (optional)
Step 1: Base Preparation
-
Sketch the center:
Begin by lightly sketching a small oval or circle in the direct center of your white canvas with a pencil to serve as your flower’s heart. -
Guide the petals:
Draw faint lines radiating outward from the center circle to map the direction for your petals, ensuring they are evenly spaced. -
Establish the background layer:
Select your light toffee or tan puffy paint. Working on the outer perimeter first, squeeze out teardrop shapes that extend furthest from the center. -
Shape the base petals:
While the paint is wet, use a toothpick to drag the tip of the teardrop outward to a fine point and slightly flatten the body of the petal for a more organic look. -
Add texture:
Gently run the toothpick down the center of each tan petal to create a subtle central vein depression. -
Primary drying phase:
This bottom layer must dry slightly to hold its shape. Let it sit for about 30-45 minutes until a ‘skin’ forms on the paint.
Paint Flattening out?
If your petals are losing height, your paint might be too warm or thin. Pop the bottle in the fridge for 15 mins to thicken it up before squeezing.
Step 2: Layering the Bloom
-
Begin the white layer:
Using the white puffy paint, squeeze a second ring of petals slightly inside the tan layer, overlapping the gaps between the first set. -
Build volume:
Apply more pressure to the bottle here to make these white petals thicker and more voluminous than the base layer. -
Refine the shape:
I like to use a clean toothpick to sharpen the tips and smooth any air bubbles that might have popped up during squeezing. -
Create the inner ring:
Squeeze a final, shorter ring of white petals directly around the central circle, overlapping the middle layer significantly to create depth. -
Detail the veins:
Repeat the texturing process by dragging your tool gently from the base of the petal toward the tip to create ridges. -
Rest period:
Allow these white layers to set for at least an hour. They don’t need to be fully cured, but they should be firm enough not to collapse.
Step 3: The Center & Finish
-
Fill the heart:
Fill the central circle with a generous mound of dark brown puffy paint. -
Texturize the center:
Immediately stipple the wet brown paint with a toothpick, creating small dots and divots to mimic seeds. -
Add color variation:
while the brown is wet, add a tiny dot of the tan paint here and there and swirl it slightly for a realistic, sun-baked look. -
Final drying time:
Puffy paint is thick and takes time to cure. Leave the canvas flat in a safe, dust-free area for at least 24 hours. -
Clean up edges:
Once fully dry, check for any stray strings of paint and snip them off with small scissors if necessary.
Add a Dew Drop
Once the flower is 100% dry, add a single drop of clear glossy dimensional glaze or clear glue to a petal to look like fresh morning dew.
Now you have a permanent blossom that adds a lovely touch of nature to your wall


Ice Cream Scoop Cones
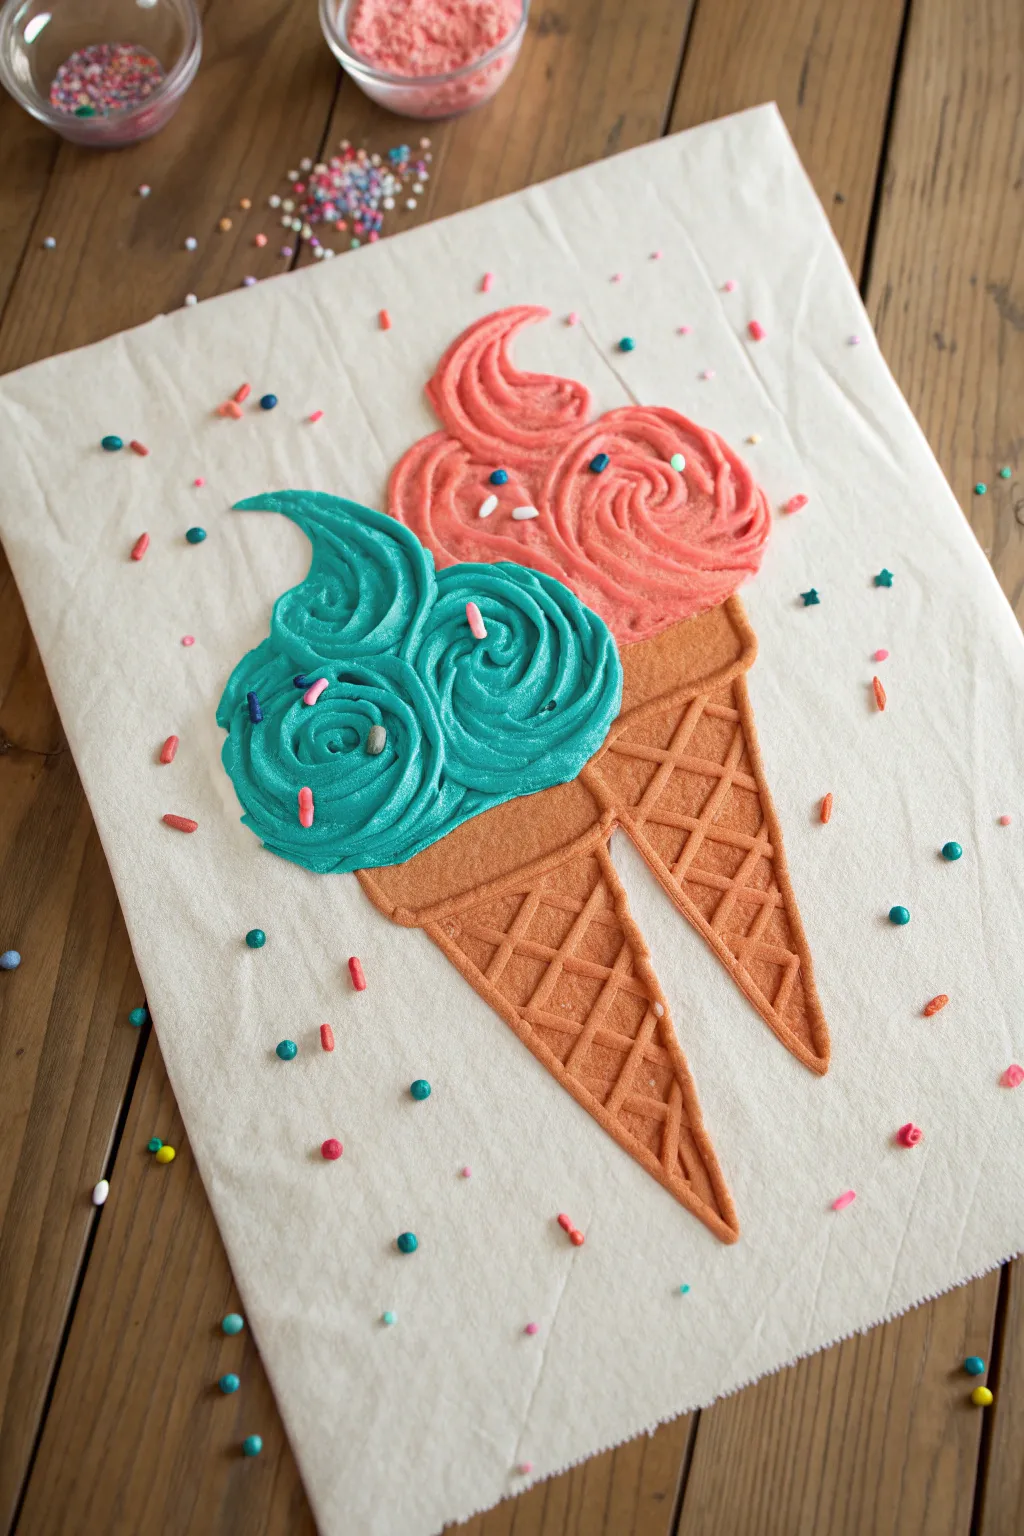

Transform a simple canvas into a sweet, sensory delight with this raised-relief ice cream art. By piping puffy paint to mimic soft-serve swirls and waffle textures, you create a dimensional masterpiece that looks good enough to eat.
Step-by-Step
Materials
- Small white art canvas or thick canvas board
- Pencil for sketching
- Dimensional fabric paint (Puffy Paint) in tan/light brown
- Puffy Paint in teal/turquoise and coral/pink
- Real rainbow sprinkles (nonpareils and jimmies)
- Small loose beads or glitter (optional)
- Paper towels
- Small spatula or palette knife (optional for texture)
Step 1: Sketching the Base
-
Outline the scoop:
Start by lightly sketching the outline of your ice cream shapes directly onto the canvas with a pencil. Draw two distinct scoop sections first, positioning them slightly offset so one looks like it’s behind the other. -
Add the cones:
Below each scoop outline, draw a narrow, inverted triangle for the cones. Make sure the top of the cone is slightly wider than the bottom of the ice cream scoop to create a realistic rim. -
Detail the waffle pattern:
Lightly sketch a cross-hatch or diamond grid pattern inside the cone shapes. This will serve as your guide for piping the waffle texture later.
Step 2: Piping the Cones
-
Outline the cone shape:
Take your tan or light brown puffy paint bottle. Squeeze firmly and trace the outer perimeter of the first cone triangle with a steady, thick line. -
Fill the waffle grid:
Carefully trace over your pencil grid lines inside the cone. Try to keep the pressure consistent so all the grid lines have the same height and thickness. -
Create the texture:
For the spaces between the grid lines, fill them in with a slightly thinner layer of the same tan paint. Alternatively, you can leave the canvas showing through for a different look, but filling it creates a richer texture. -
Let it set:
Before moving on to the ice cream, let the cone section dry for about 15-20 minutes so you don’t accidentally smudge the wet brown paint while working on the scoops.
Anti-Clog Tip
Keep a sewing pin or paperclip nearby while working. If the puffy paint nozzle clogs mid-swirl, quickly clear the tip with the pin to maintain smooth, consistent lines without sputtering.
Step 3: Swirling the Scoops
-
Start the teal scoop:
Using your teal puffy paint, start at the center of one of the defined swirls on your sketch. Squeeze the bottle generously while moving in a circular ‘rosette’ motion. -
Build the volume:
Continue spiraling outward from the center rosette until you reach the edge of that specific swirl section. The paint should be thick and raised to mimic real soft serve. -
Connect the swirls:
Repeat this rosette technique for the other sections of the teal scoop, ensuring the wet paint touches the previous sections so it dries as one cohesive mass. -
Pipe the coral scoop:
Switch to your coral or pink paint and repeat the swirling process for the second cone. Overlap slightly with the teal scoop where they meet to create depth. -
Refine the edges:
Check the perimeter of your ice cream shapes. If lines look too thin, go back over the outer edge with a final pass to smooth out the silhouette. -
Add texture lines:
I sometimes like to use the tip of the paint nozzle to gently drag through the wet paint, emphasizing the ridges of the swirl.
Paint Flattening out?
If your swirls are flattening too much, your paint might be too warm or thin. Pop the bottle in the fridge for 10 minutes to stiffen it slightly before piping for better 3D retention.
Step 4: Sprinkles and Finishing
-
Embed the sprinkles:
While the colorful paint is still completely wet, carefully drop real rainbow sprinkles onto the ice cream sections. They will sink slightly into the paint, which acts like glue. -
Add background details:
Scatter a few loose sprinkles on the white canvas surrounding the cones. Use tiny dots of clear glue or white puffy paint to secure these ‘fallen’ sprinkles in place. -
Incorporate beads:
If you are using small plastic beads or glitter to simulate candies, press them gently into the wet paint now using tweezers for precision. -
Check for gaps:
Look closely at the junction where the ice cream meets the cone. If there is a visible gap, pipe a small ‘skirt’ of ice cream color to cover the top edge of the cone. -
Initial drying phase:
Lay the canvas absolutely flat in a safe, dust-free area. Puffy paint applied this thickly creates a skin quickly but stays wet underneath for a long time. -
Final cure:
Allow the project to dry undisturbed for at least 24 to 48 hours. Do not touch the surface to test it until the full time has passed to avoid denting the ‘icing’.
Once fully dry, you can display this dimensional artwork on a mini easel or hang it on the wall for a cheerful pop of color
BRUSH GUIDE
The Right Brush for Every Stroke
From clean lines to bold texture — master brush choice, stroke control, and essential techniques.
Explore the Full Guide
Clouds and Raindrop Weather Art
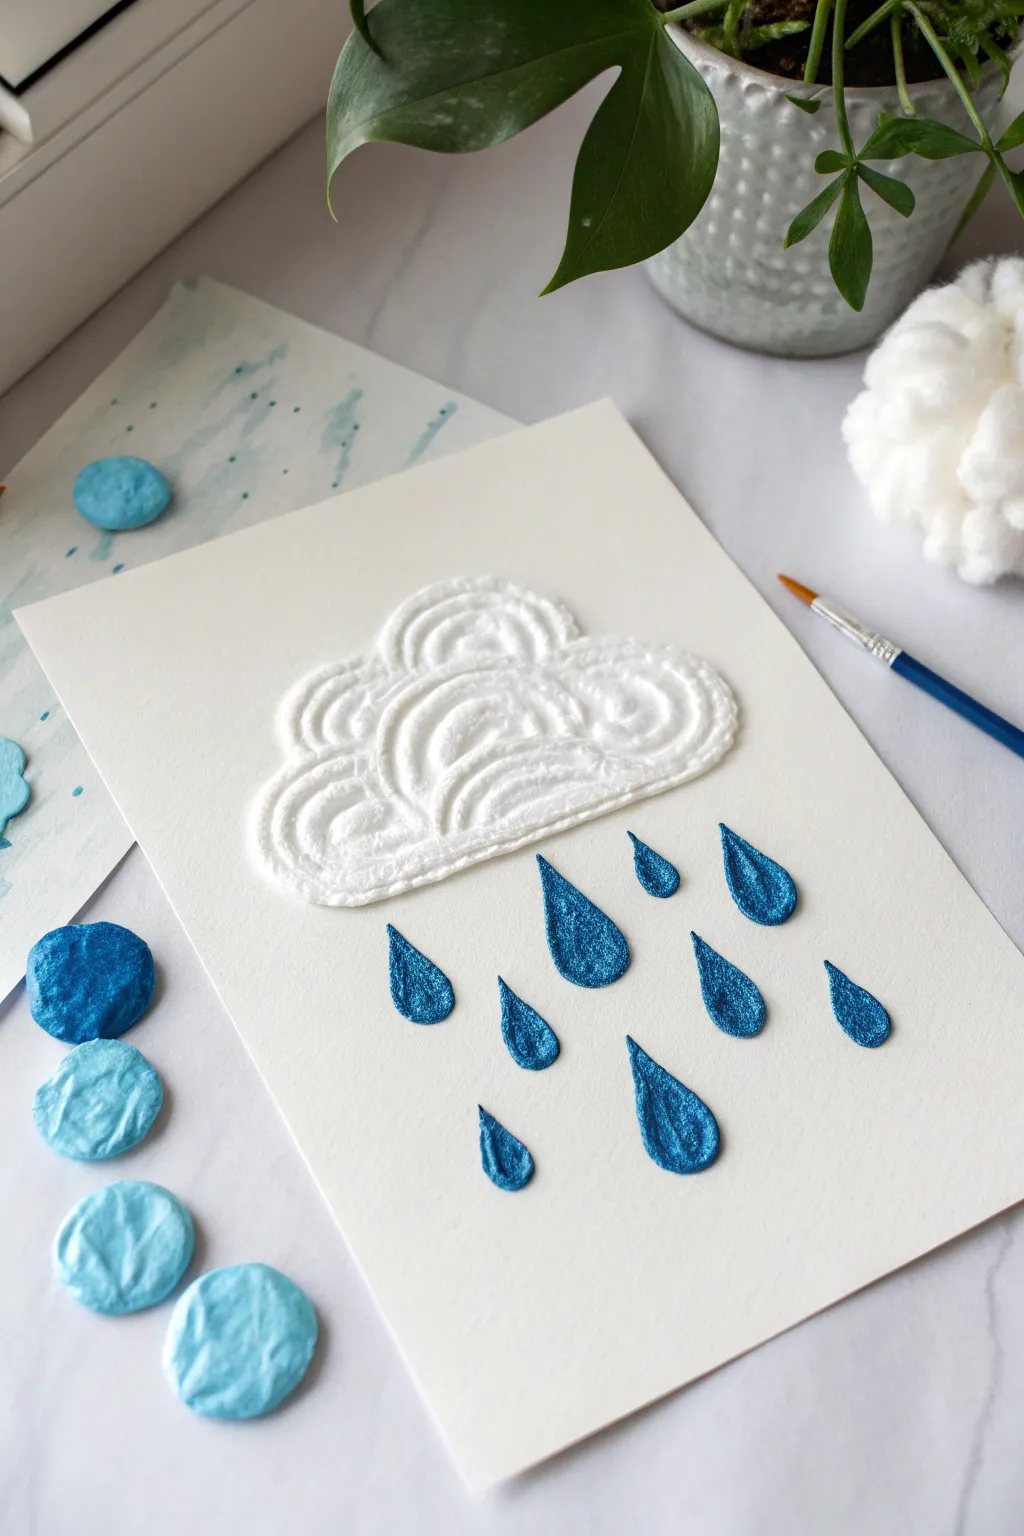
Capture the beauty of a rainy day without getting wet with this textured puffy paint project. The 3D cloud features soothing swirls, while the glittering blue raindrops add a magical touch to the final composition.
How-To Guide
Materials
- Heavyweight white cardstock or watercolor paper
- Puffy paint recipe (shaving cream + white glue + flour)
- White acrylic paint
- Blue acrylic paint (preferably metallic or glitter)
- Fine glitter (optional, blue and white)
- Piping bag or plastic sandwich bag
- Small round paintbrush
- Pencil for sketching
- Palette for mixing
Step 1: Preparation and Base
-
Mix your puffy base:
Begin by creating your homemade puffy paint mixture. Combine equal parts shaving cream and white school glue in a bowl. Gently fold them together so you don’t deflate the shaving cream too much. -
Thicken slightly:
Add a small tablespoon of flour to the mixture. This helps the paint hold its shape and stiff peaks better once it is piped onto the paper. -
Whiten the mixture:
Stir in a dollop of white acrylic paint to ensure the mixture dries opaque and bright white rather than drying clear or slightly yellow. -
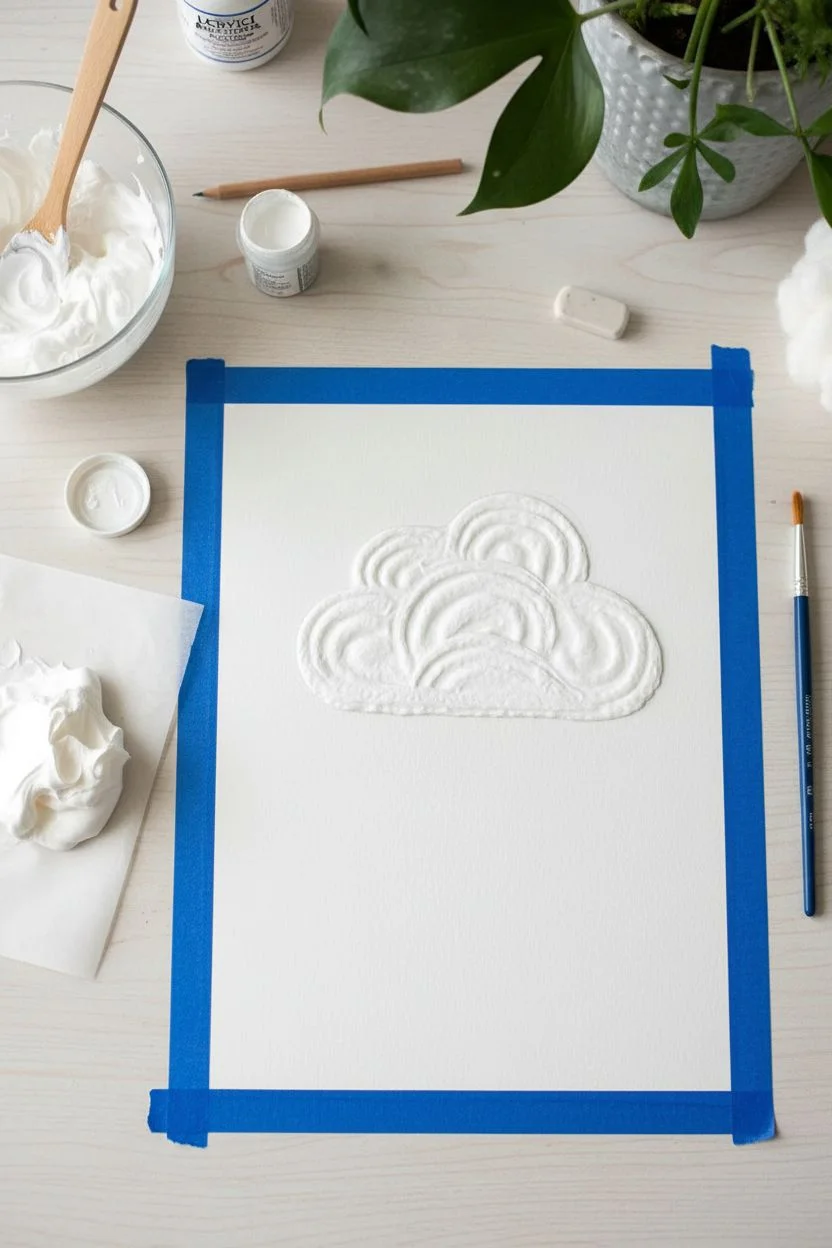
Prepare the workspace:
Lay down your heavyweight paper. Since the paint will be heavy and wet, taping the corners to your table can prevent the paper from curling as you work. -
Sketch the outline:
Lightly draw a fluffy cloud shape in the center of the paper using a pencil. Keep the lines faint so they don’t show through later.
Piping Perfection
If you don’t have a piping bag, an empty glue bottle works wonders! The nozzle tip allows for precise control over the swirls.
Step 2: Creating the Cloud
-
Fill the piping bag:
Transfer your white puffy paint mixture into a piping bag or a sturdy plastic sandwich bag. Snip a small corner off the bag—start small, about the width of a pencil lead. -
Pipe the outline:
Applying steady pressure, trace the outline of your cloud shape first. This creates a barrier so you can fill the inside without crossing the edges. -
Create the swirls:
Starting from the bottom edge of the cloud, pipe a series of concentric arches or rainbow shapes. Fill each ‘hump’ of the cloud with these nested arches to create that stylized, textured look. -
Fill the gaps:
If there are small gaps between your piped lines, gently squeeze a tiny dot of paint in to fill them, but try to maintain the definition of the swirls. -
Add texture:
While the paint is wet, you can create extra dimension. I like to use a toothpick or dry brush end to slightly separate the ridges if they blend together too much. -
Let the cloud set:
Allow the white cloud to dry significantly before moving on to the rain. Depending on thickness, this can take several hours or overnight. It needs to form a ‘skin’ so you don’t accidentally smudge it.
Step 3: Painting the Rain
-
Sketch drop positions:
Once the cloud is safe to work around, lightly mark positions for your raindrops. Stagger them in a random pattern falling beneath the cloud. -
Mix the blue paint:
Prepare your blue paint. For the look in the photo, use a metallic blue acrylic or mix a standard blue with a bit of silver or pearl medium. -
Thicken the blue:
To give the raindrops a similar 3D texture to the cloud, mix a small amount of your leftover plain puffy base into the blue paint. -
Paint the drops:
using a small round brush or the piping bag again, apply the blue mix to your drop shapes. Make them teardrop-shaped—narrow at the top and rounded at the bottom. -
Build the volume:
Don’t just paint them flat; apply a generous blob of paint to give them a raised, domed surface that catches the light. -
Add the sparkle:
While the blue paint is still very wet, sprinkle fine blue glitter over the raindrops. This creates that shimmering, wet look shown in the image. -
Shake off excess:
Wait about 15 minutes for the glitter to adhere to the surface layer, then gently tap the paper vertically to knock off loose glitter onto a scrap paper. -
Final dry time:
Let the entire piece dry completely undisturbed for at least 24 hours. The puffy paint needs air circulation to harden fully.
Level Up: Stormy Grey
For a moodier storm cloud, mix a tiny drop of black paint into a portion of your white mix and pipe grey shadows at the bottom of the cloud.
Display your textured weather art on a shelf or frame it in a shadow box to protect the delicate 3D elements
Butterfly Wings With Raised Dots
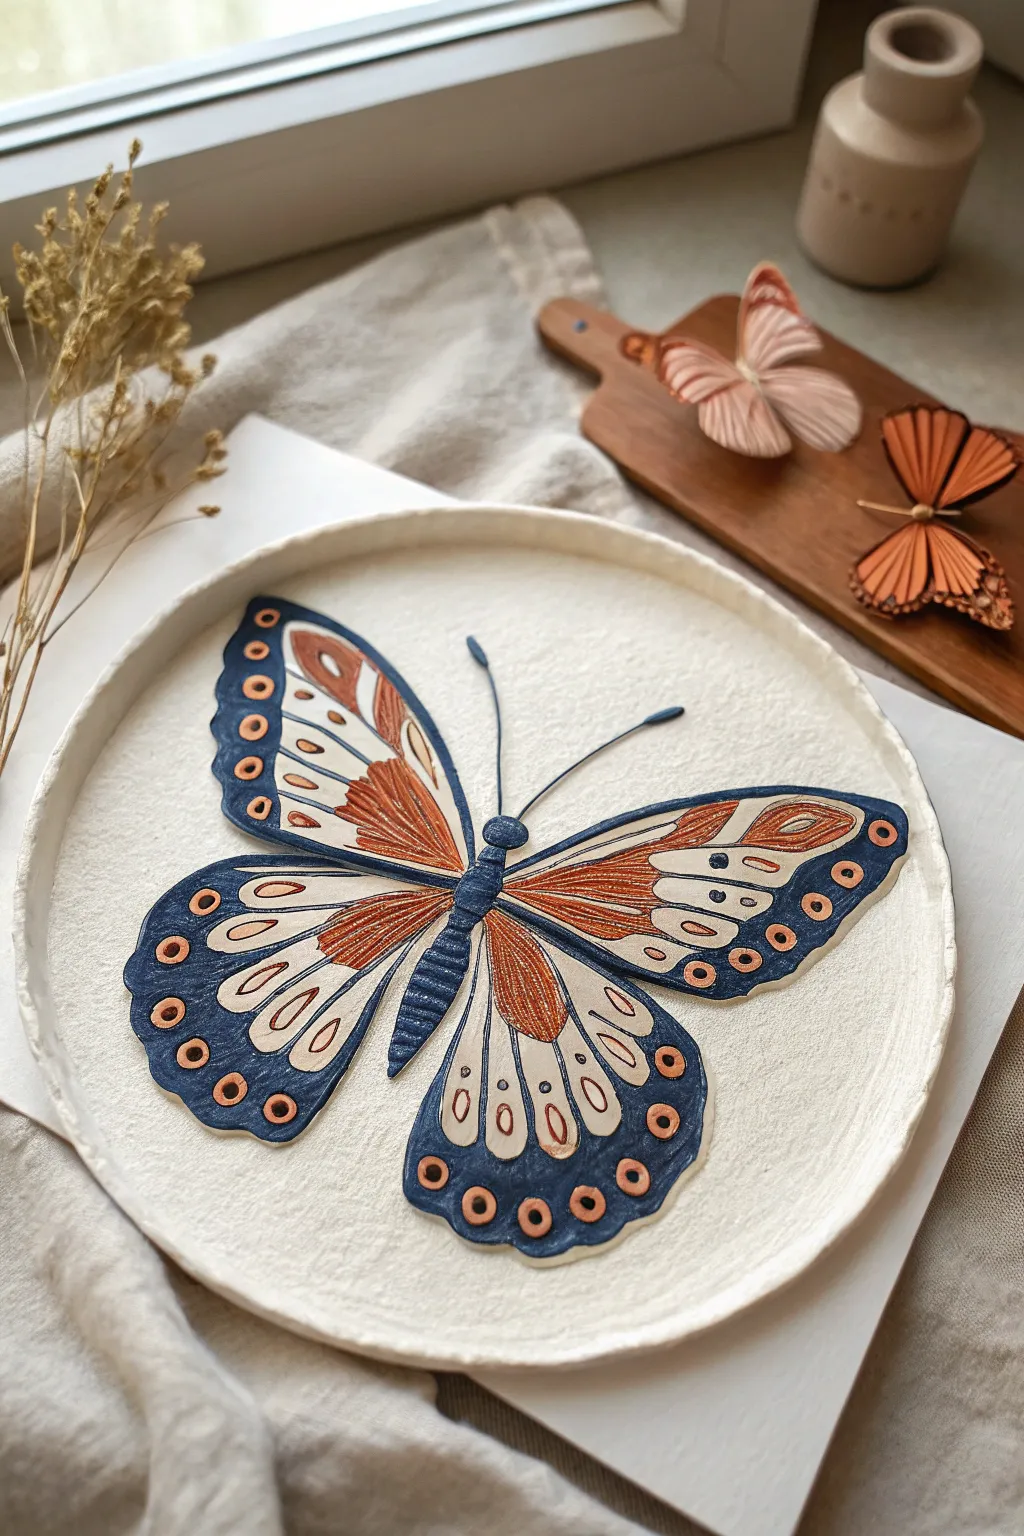
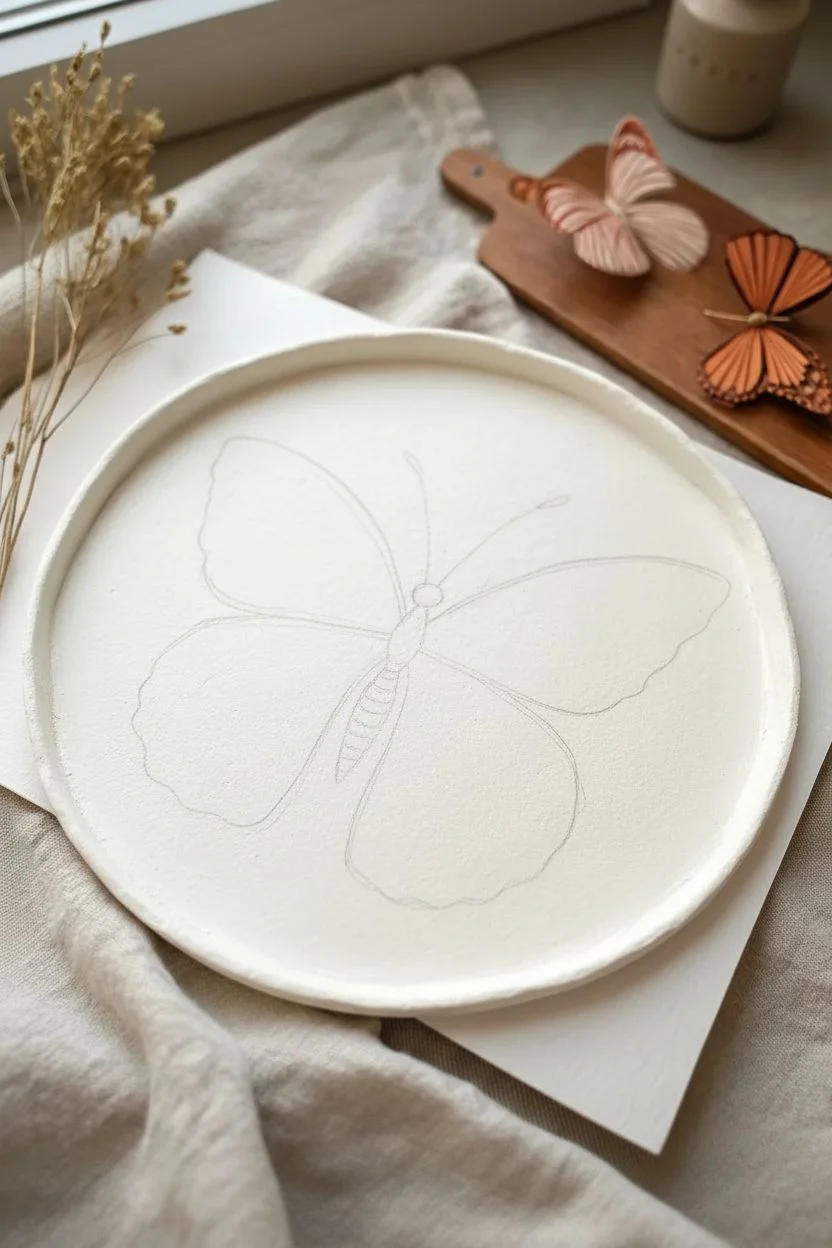
This elegant project transforms a simple clay or paper dish into a stunning specimen display inspired by vintage scientific illustrations. Using a combination of flat washes and puffy paint, you’ll create textured wings that seem to lift right off the surface.
Step-by-Step Guide
Materials
- Shallow round paper mache or air-dry clay dish (approx. 8 inches)
- White acrylic gesso or matte white craft paint
- Pencil (HB or lighter)
- Fine-tip black permanent marker
- Deep indigo or navy blue acrylic paint
- Rust/burnt orange acrylic paint
- Cream or off-white acrylic paint
- Dimensional fabric paint (Puffy Paint) in Black, White, and Orange
- Small round brushes (sizes 0 and 2)
- Matte clear sealant spray
Step 1: Preparing the Base
-
Prime the Surface:
Begin by coating your shallow dish with two layers of white gesso or matte white acrylic paint. This creates a crisp, clean background that makes the butterfly colors pop. Let it dry completely between coats to ensure a smooth texture. -
Find the Center:
Lightly mark a tiny dot in the absolute center of the dish. This will be the anchor point for the butterfly body, ensuring your symmetrical wings don’t end up lopsided. -
Sketch the Outline:
Using a very light touch with your pencil, sketch the butterfly’s body and wings. Focus on getting the symmetry of the four wing sections correct. Don’t worry about the intricate interior patterns yet; just get the main shapes down.
Paint Blobbing?
If your dimensional paint bottle ‘burps’ onto your work, don’t wipe it! Let it dry completely, then slice the mistake off with a craft knife and repaint that spot.
Step 2: Blocking in Color
-
Paint the Deep Blue Margins:
Mix a deep indigo or navy blue acrylic paint. Carefully fill in the outer edges of the wings, following the scalloped shape. I like to dilute the paint slightly so it flows smoothly into the paper texture without being too thick. -
Add the Rust Sections:
Using your rust or burnt orange paint, fill in the elongated teardrop shapes near the body. Leave a thin gap of white space between these orange sections and the blue borders to keep the design clean. -
Fill the Cream Areas:
Paint the remaining interior wing sections with a cream or off-white acrylic. This subtle difference from the bright white background adds a lovely vintage depth to the piece. -
Paint the Body:
Fill in the segmented abdomen, thorax, and head using the same deep indigo blue used for the wing margins. Let all paint layers dry completely before moving to the detail phase.
Super Smooth Lines
Test your puffy paint flow on scrap paper first. If the nozzle is too thick, replace it with a fine metal applicator tip for those delicate wing veins.
Step 3: Adding Texture and Detail
-
Outline the Wings:
Take your black dimensional (puffy) paint bottle. Gently squeeze a consistent line along the outer edges of the blue margins. This creates a raised barrier that defines the butterfly shape. -
Define the Veins:
Draw thin lines of black puffy paint to create the veins separating the orange and cream sections. Keep your hand steady and move relatively quickly to prevent wobbles. -
Create the Segmented Body:
Add horizontal ridges of black or dark blue puffy paint across the abdomen to mimic the segmented texture of an insect’s body. -
Detail the Antennae:
Draw the two long antennae extending from the head. I find it helpful to start at the head and sweep outward, lifting pressure at the end to create a tapered look.
Step 4: The Dotted Details
-
Add Orange Eye-Spots:
Inside the deep blue wing margins, place small dots of orange dimensional paint. These should follow the curve of the wing edge. -
Layer the Rings:
Once the orange dots are slightly set, carefully pipe a tiny circle of cream or white puffy paint around each orange dot to create a ‘ringed’ effect. -
Interior Wing Dots:
Add very fine dots of black puffy paint within the cream wing sections for extra detail. Vary the sizes slightly for a more organic feel. -
Texture the Orange patches:
Use a toothpick or a very fine brush to drag fine lines of wet orange paint within the rust-colored sections, simulating the fibrous texture of butterfly scales. -
Final White Highlights:
Add tiny pin-prick dots of white puffy paint on the body and along the outermost edge of the wings to simulate light catching the insect.
Allow the plate to dry flat for at least 24 hours to ensure the raised details harden perfectly before displaying

PENCIL GUIDE
Understanding Pencil Grades from H to B
From first sketch to finished drawing — learn pencil grades, line control, and shading techniques.
Explore the Full Guide
Dinosaur Plates and Spikes
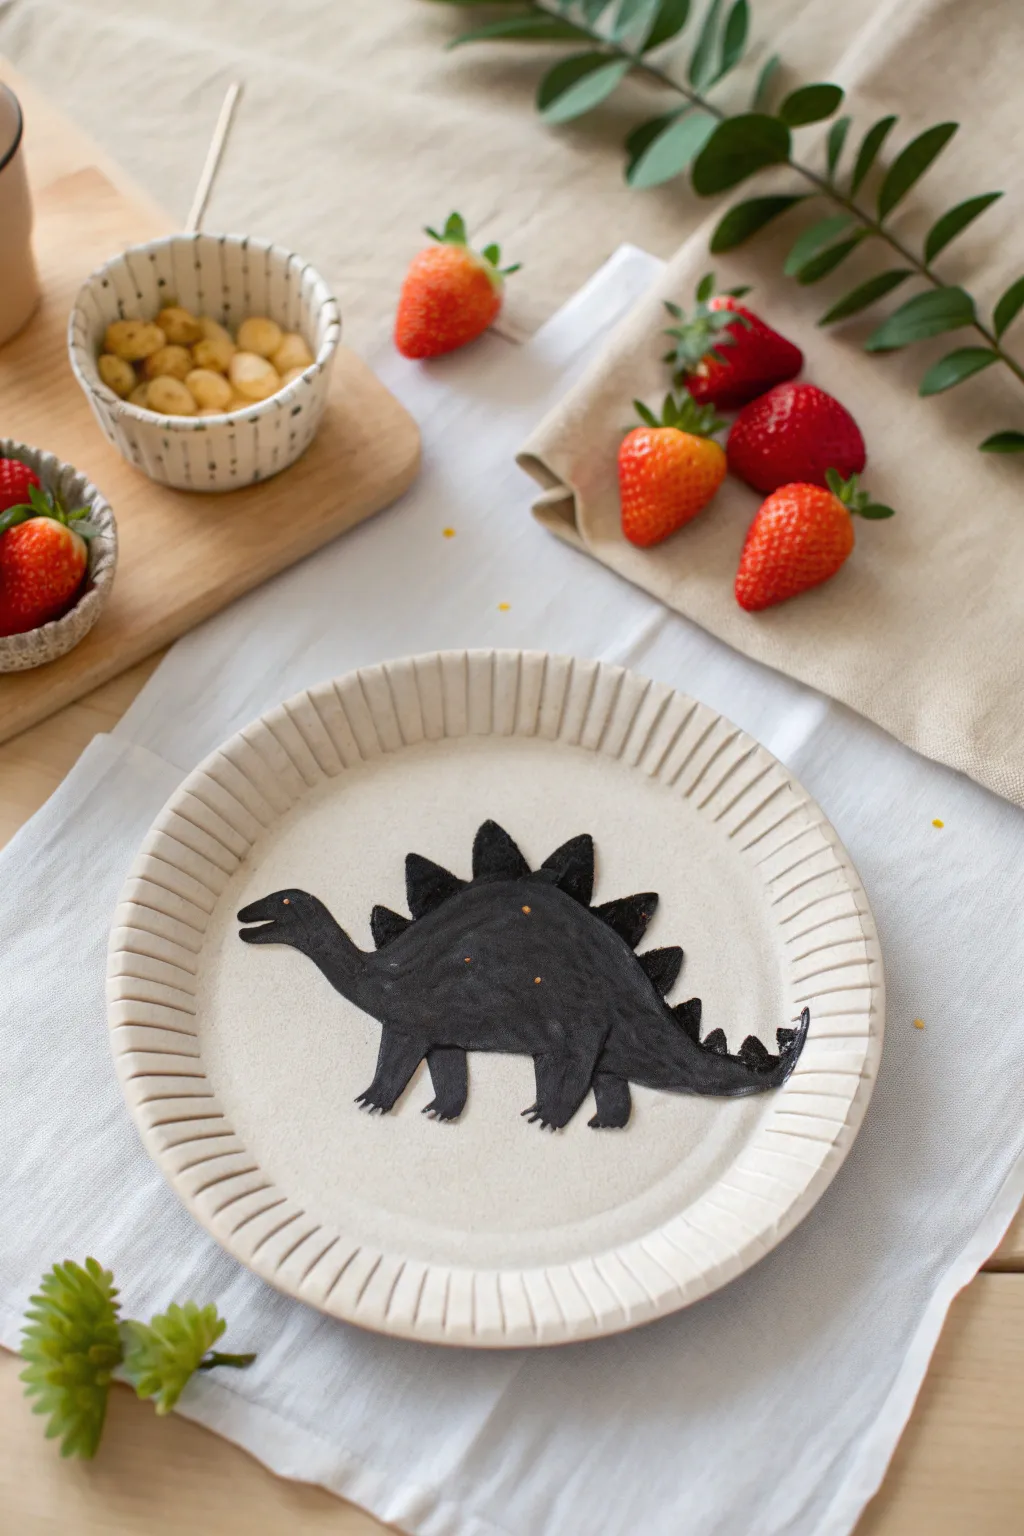

Transform a simple paper plate into a fossil-inspired masterpiece with this easy dimensional art project. The matte black dinosaur silhouette pops beautifully against the textured beige background, giving it a cool, modern look perfect for parties or room decor.
Step-by-Step
Materials
- Sturdy paper or sugarcane plates (beige/natural color)
- Black puffy paint (dimensional fabric paint)
- Pencil
- Small paintbrush (optional)
- Toothpick
- Scrap paper for practice
Step 1: Preparation & Outline
-
Select your canvas:
Choose a sturdy plate with a natural, unbleached finish. Sugarcane or bamboo plates work best because they have a lovely texture that mimics stone or earth. -
Draft the design:
Lightly sketch your dinosaur shape in the center of the plate using a pencil. I recommend a Stegosaurus shape because the spikes look fantastic in puffy paint, but a T-Rex or Brontosaurus works too. -
Test the flow:
Before touching the plate, squeeze a little puffy paint onto a scrap piece of paper. This clears any air bubbles and helps you get a feel for how much pressure is needed for a smooth line.
Paint Splattered?
If you smudge paint outside the lines, don’t wipe it! Wait for it to dry completely, then carefully peel the mistake off the plate with tweezers.
Step 2: Creating the Dinosaur
-
Outline the body:
Start by tracing your pencil outline with a steady stream of black puffy paint. Keep the nozzle close to the plate surface for better control. -
Fill the interior:
Once the outline is complete, work your way inward. Squeeze generous amounts of paint to fill the body cavity. Don’t worry if it looks messy initially; we will smooth it out. -
Smooth and texture:
Use the tip of the paint bottle or a small paintbrush to gently spread the paint into any empty gaps. You want a thick, even layer that looks slightly raised. -
Add the spikes:
For the Stegosaurus plates, add triangles along the back. Squeeze a larger dollop for the base of the spike and pull the nozzle upward quickly to create a sharp point. -
Tail details:
Repeat the spike technique on a smaller scale for the tail thagomizer (the spikes at the end of the tail). -
Define the legs:
Ensure the legs are clearly separated from the body. I like to use a toothpick here to pull the paint downwards to create distinct foot shapes and claws.
Step 3: Finishing Touches
-
Clean up edges:
Inspect the silhouette. If any edges look wobbly, use your toothpick to gently nudge the wet paint back into a smooth line. -
Add the eye:
Take a tiny bit of white paint or leave a negative space dot for the eye. Alternatively, wait for the black to dry and add a tiny dot of orange or white later. -
Create texture:
While the paint is still wet, you can tap it lightly with a stiff brush to give it a rough, leathery skin texture, or leave it smooth for a sleek look. -
Check for bubbles:
Look closely for any air bubbles trapped in the thick paint. Pop them immediately with a pin so they don’t dry into holes. -
Dry flat:
Place the plate on a completely flat surface where it won’t be disturbed. Puffy paint is thick and can take 24 hours to fully cure. -
Final inspection:
Once dry, the paint should look matte and feel rubbery to the touch. Display your prehistoric art proudly on a shelf or wall.
Level Up
Before the black paint dries, sprinkle ultra-fine glitter over just the spikes to make them shimmer, or press tiny beads into the body for spots.
Now you have a dynamic piece of dinosaur art that adds a playful touch to any space
Under-the-Sea Shell Textures
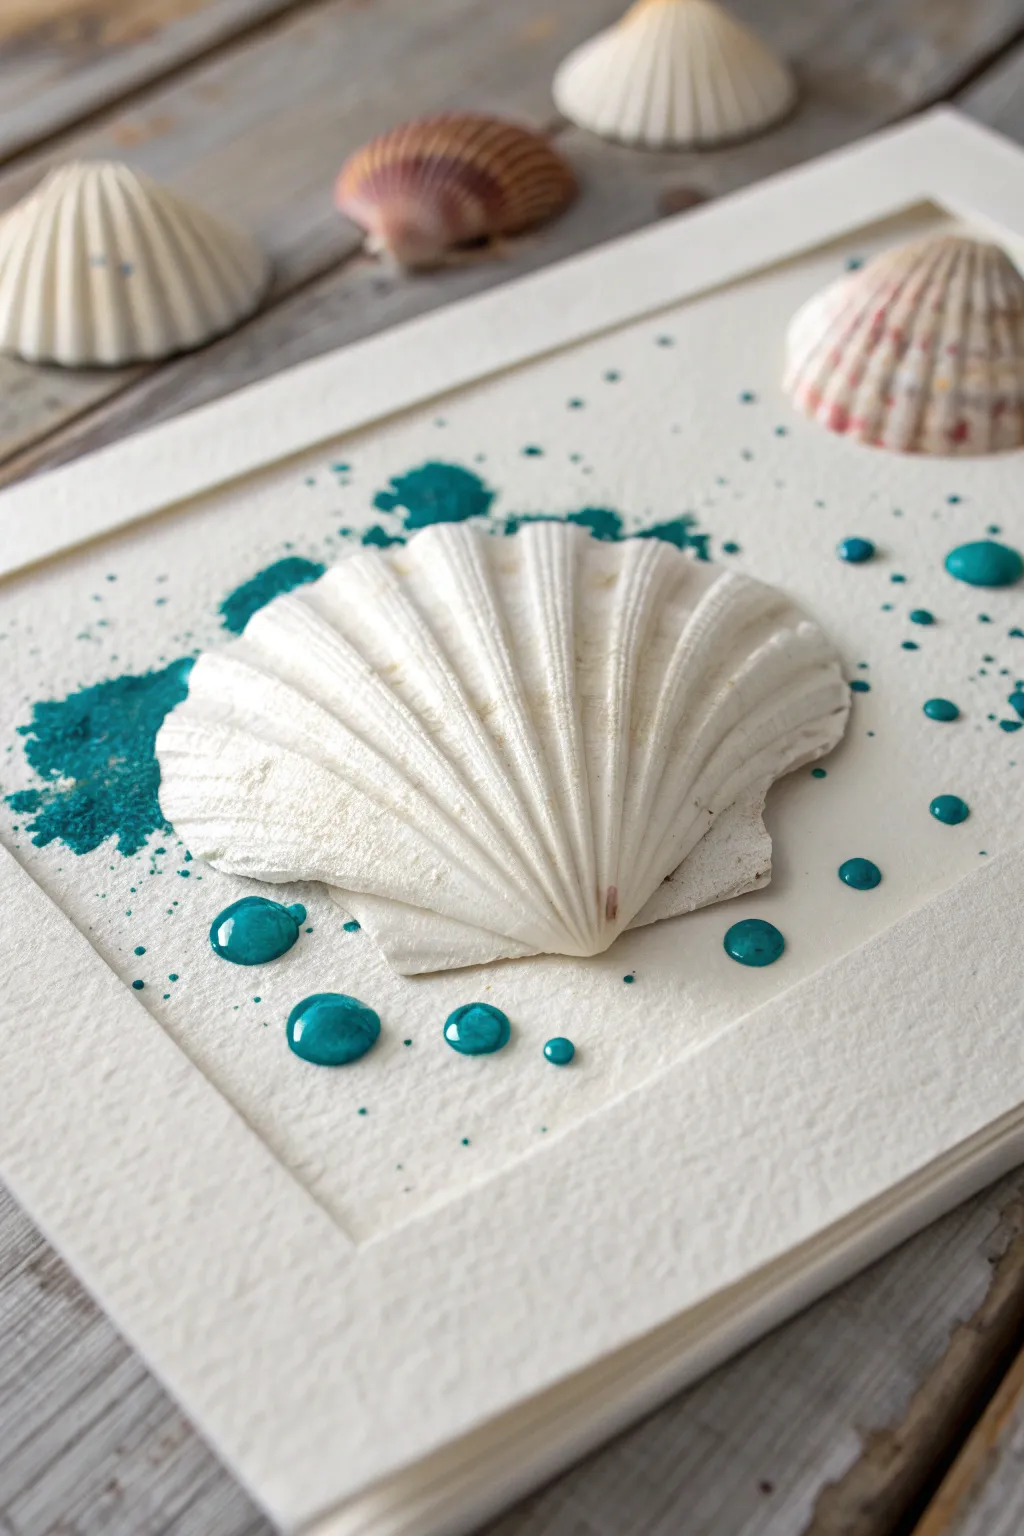
Capture the essence of the ocean with this elegant mixed-media piece that combines the organic beauty of a seashell with vibrant pops of teal. The textured paper and glossy, dimensional paint droplets create a sophisticated coastal look perfect for framing.
Step-by-Step Guide
Materials
- Heavyweight cold-press watercolor paper (300 gsm or higher)
- Large white scallop seashell (clean and dry)
- Teal or turquoise puffy paint (dimensional fabric paint)
- Teal watercolor paint
- Small round watercolor brush
- Old toothbrush (for splattering)
- Strong craft adhesive (E6000 or heavy-duty hot glue)
- Ruler and bone folder (or dull butter knife)
- Pencil
- Paper towels
- Two blocks of wood or thick books (for weighting)
Step 1: Preparing the Base
-
Measure and mask:
Begin by cutting your watercolor paper to your desired frame size (e.g., 5×7 or 8×10 inches). Lightly mark a central rectangle where the shell will sit, leaving a wide border around the edge. -
Create the debossed frame:
To mimic the indented border look shown in the image, use a ruler and a bone folder to score a rectangle about 1.5 inches from the edge. Press firmly to create a visible groove without tearing the paper. -
Position the shell:
Place your large scallop shell in the center to visualize the composition. Lightly trace the bottom curve of the shell with a pencil so you know where your ‘splash zone’ needs to be, then remove the shell.
Step 2: Creating the Splash
-
Mix watercolor base:
Dilute a small amount of teal watercolor paint with water. You want a semi-transparent wash, not a thick opaque layer. -
Apply the background wash:
Using your round brush, dab the watercolor wash onto the paper in the area where the shell will sit, extending slightly outward. This creates the soft, stained look beneath the puffy paint. -
Add texture with salt (optional):
If you want extra texture in the flat color, sprinkle a pinch of salt on the wet watercolor and let it dry, then brush it off. -
Create fine splatters:
Dip an old toothbrush into slightly thicker teal watercolor (or watered-down puffy paint). Hold it over the paper and flick the bristles with your thumb to create a spray of tiny fine dots around the central area. -
Dry completely:
Let the watercolor and splatter layers dry fully before moving on. The paper must be bone dry, or the adhesive won’t hold the shell properly.
Fixing Peaked Dots
If your puffy paint leaves sharp ‘Hershey Kiss’ peaks, wet your finger slightly and gently tap the peak down immediately after applying to smooth it out.
Step 3: Adding Dimension
-
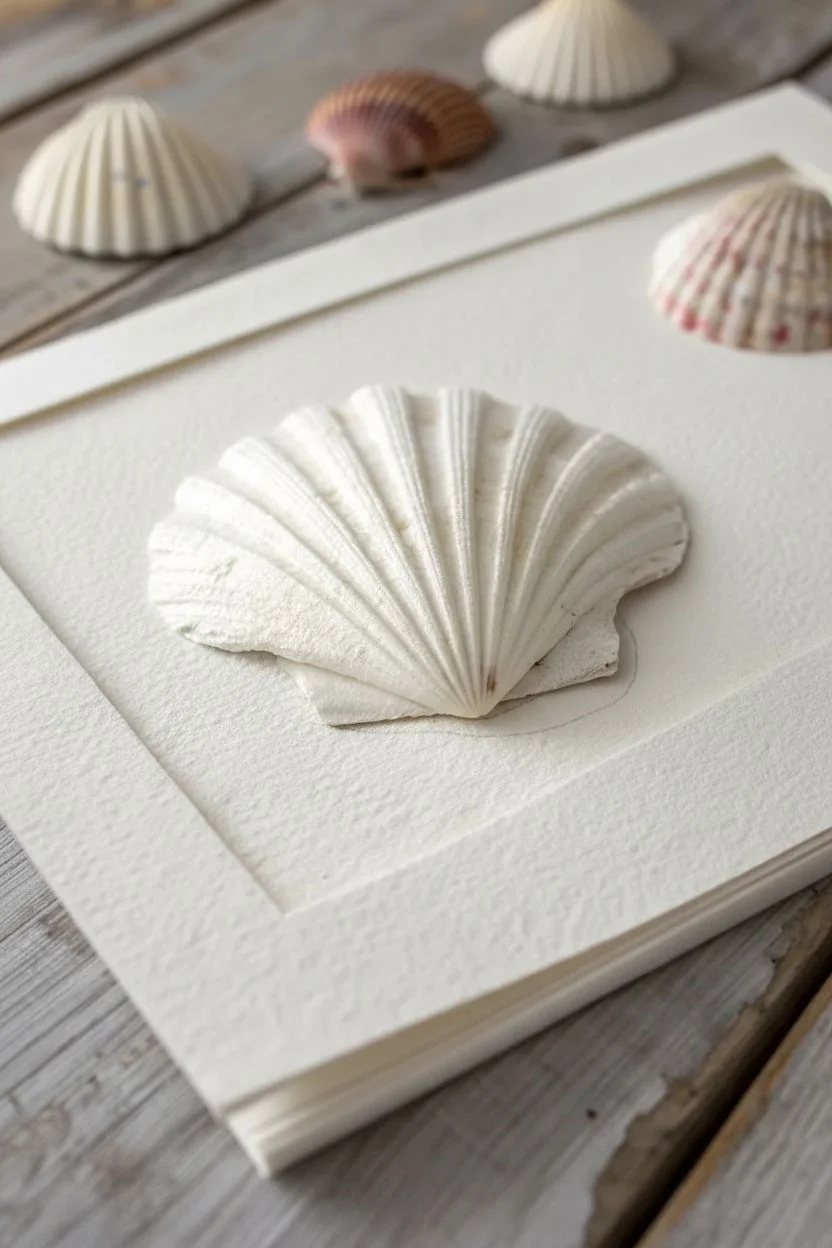
Secure the shell:
Apply a generous amount of strong craft adhesive to the back rim of your scallop shell. Press it firmly into the center of the paper, aligning it with your previous marks. -
Weight it down:
Place a paper towel over the shell to protect it, then balance a heavy book or weight on top to ensure a tight bond while the glue sets. Wait at least 30 minutes. -
Prime the puffy paint:
Shake your bottle of teal puffy paint downward to remove air bubbles. Test a few drops on a scrap piece of paper to ensure the flow is smooth. -
Add large droplets:
Squeeze the puffy paint bottle gently to create large, distinct domes of paint. Place these randomly around the shell, focusing on the areas where the watercolor splash extends. -
Vary the sizes:
Create visual interest by making some dots substantial (about the size of a pea) and others tiny (pinhead size). I like to group a large dot with two smaller ones for a natural look. -
Create the ‘splash’ effect:
Near the edges of the watercolor wash, squeeze the bottle while moving your hand slightly to create irregular, organic shapes that look like splashing water rather than perfect circles. -
Inspect the droplets:
Look closely at your dots. If any have sharp peaks from pulling the bottle away, tap the underside of the paper gently to help them settle into smooth domes. -
Final drying time:
Puffy paint takes a long time to cure, especially thick droplets. lay the artwork flat in a safe, dust-free place and let it dry for at least 24 hours.
Pearl Finish Level Up
Once the teal puffy paint is fully dry, brush a thin layer of iridescent medium or pearl glaze over the dots to make them look like real water droplets.
Now you have a serene piece of ocean art ready to bring a calming vibe to your space


Puffy Pumpkin Segments

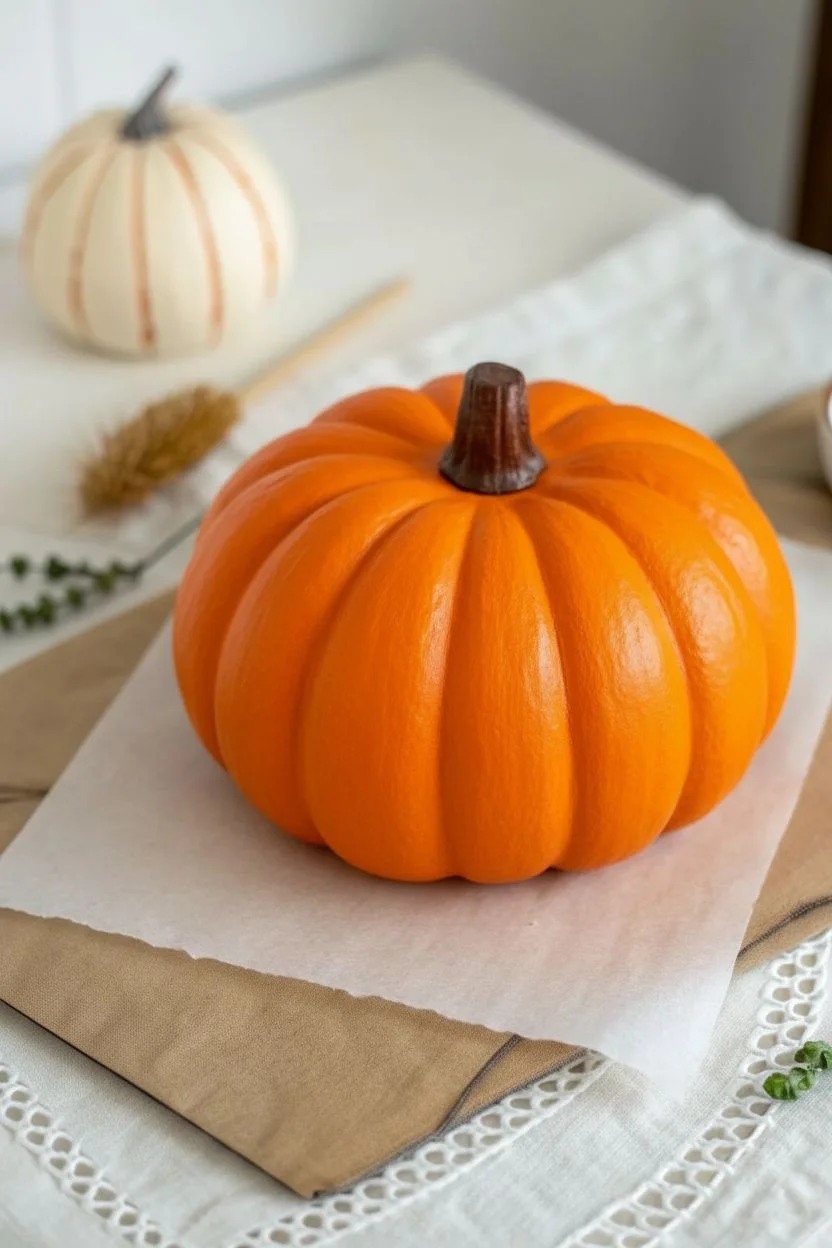
Transform a simple craft pumpkin into a textured masterpiece by enhancing its natural segments with dimensional paint. This project uses the raised nature of puffy paint not just for decoration, but to create realistic, architectural ribbing that gives the gourd a unique, illustrative quality.
Detailed Instructions
Materials
- Medium-sized faux craft pumpkin (smooth surface works best)
- Bright orange acrylic paint (satin finish)
- Beige or biscuit-colored 3D puffy paint (squeeze bottle)
- Dark chocolate brown acrylic paint
- Paintbrushes (flat and fine round)
- Palette or paper plate
- Pencil (optional)
- Matte or satin spray sealer (optional)
- Paper towels
Step 1: Preparation and Base Coat
-
Clean surface:
Wipe down your faux pumpkin with a slightly damp paper towel to remove any dust or manufacturing oils. -
Prime the base:
If your pumpkin isn’t already the perfect shade of orange, apply an even coat of bright orange acrylic paint. -
Let it dry:
Allow the base coat to dry completely before handling; this usually takes about 30 minutes depending on paint thickness. -
Second coat:
For a deeper, more vibrant color that matches the reference, apply a second coat of orange paint. -
Texture check:
Ideally, you want a slight sheen, so using a satin finish paint really helps mimic the skin of a fresh pumpkin.
Uneven Lines?
If a line goes crooked or blobs, don’t wipe it! Let it dry completely, then peel it off like a rubber band and try again. Wiping wet puffy paint smears badly.
Step 2: Painting the Stem
-
Base brown:
Using a smaller flat brush, paint the stem with dark chocolate brown acrylic paint. -
Dry brush detail:
While the brown is nearly dry, you can lightly drag a dry brush over the raised ridges of the stem for extra dimension, though a solid coat works fine too. -
Clean up edges:
Carefully wipe away any brown paint that accidentally smeared onto the orange skin near the base of the stem.
Spicing It Up
Before the beige paint dries, lightly sprinkle fine cinnamon or nutmeg powder over the wet lines for a scented, textured ‘baked goods’ appearance.
Step 3: Creating the Puffy Ridges
-
Test the flow:
Squeeze a line of your beige puffy paint onto a scrap piece of paper to ensure no air bubbles sputter out and to get a feel for the flow rate. -
Locate natural ribs:
Identify the natural indentations or vertical lines on your pumpkin; these will be your guides. If needed, sketch faint lines with a pencil first. -
Start at the top:
Place the nozzle of the puffy paint bottle right at the base of the stem where a groove begins. -
Draw the first line:
Apply steady pressure and drag the bottle downward, creating a thick, uniform line of beige paint all the way to the bottom center. -
Rotate and repeat:
Carefully rotate the pumpkin and repeat this process for every vertical indentation. -
Watch your hands:
Be incredibly careful where you place your supporting hand so you don’t smudge the wet dimensional paint. -
Create double ridges:
For the look seen in the image, many segments have two parallel lines closely spaced; draw a second line right next to the first one within the same groove if space allows. -
Clean connections:
Ensure the lines connect cleanly to the stem area without globbing up too much paint in one spot.
Step 4: Finishing Touches
-
Long drying time:
Puffy paint is thick and takes much longer to dry than acrylics; leave the pumpkin undisturbed for at least 4-6 hours, or ideally overnight. -
Check for shrinking:
As puffy paint dries, it sometimes flattens; if you want more height, you can carefully trace over the dry lines with a second layer. -
Seal (optional):
Once fully cured, a light mist of satin sealer can help protect the paint from chipping during storage.
Place your finished pumpkin on a sheet of parchment paper or a linen cloth to complete the autumnal vignette
Spooky Ghost Shapes
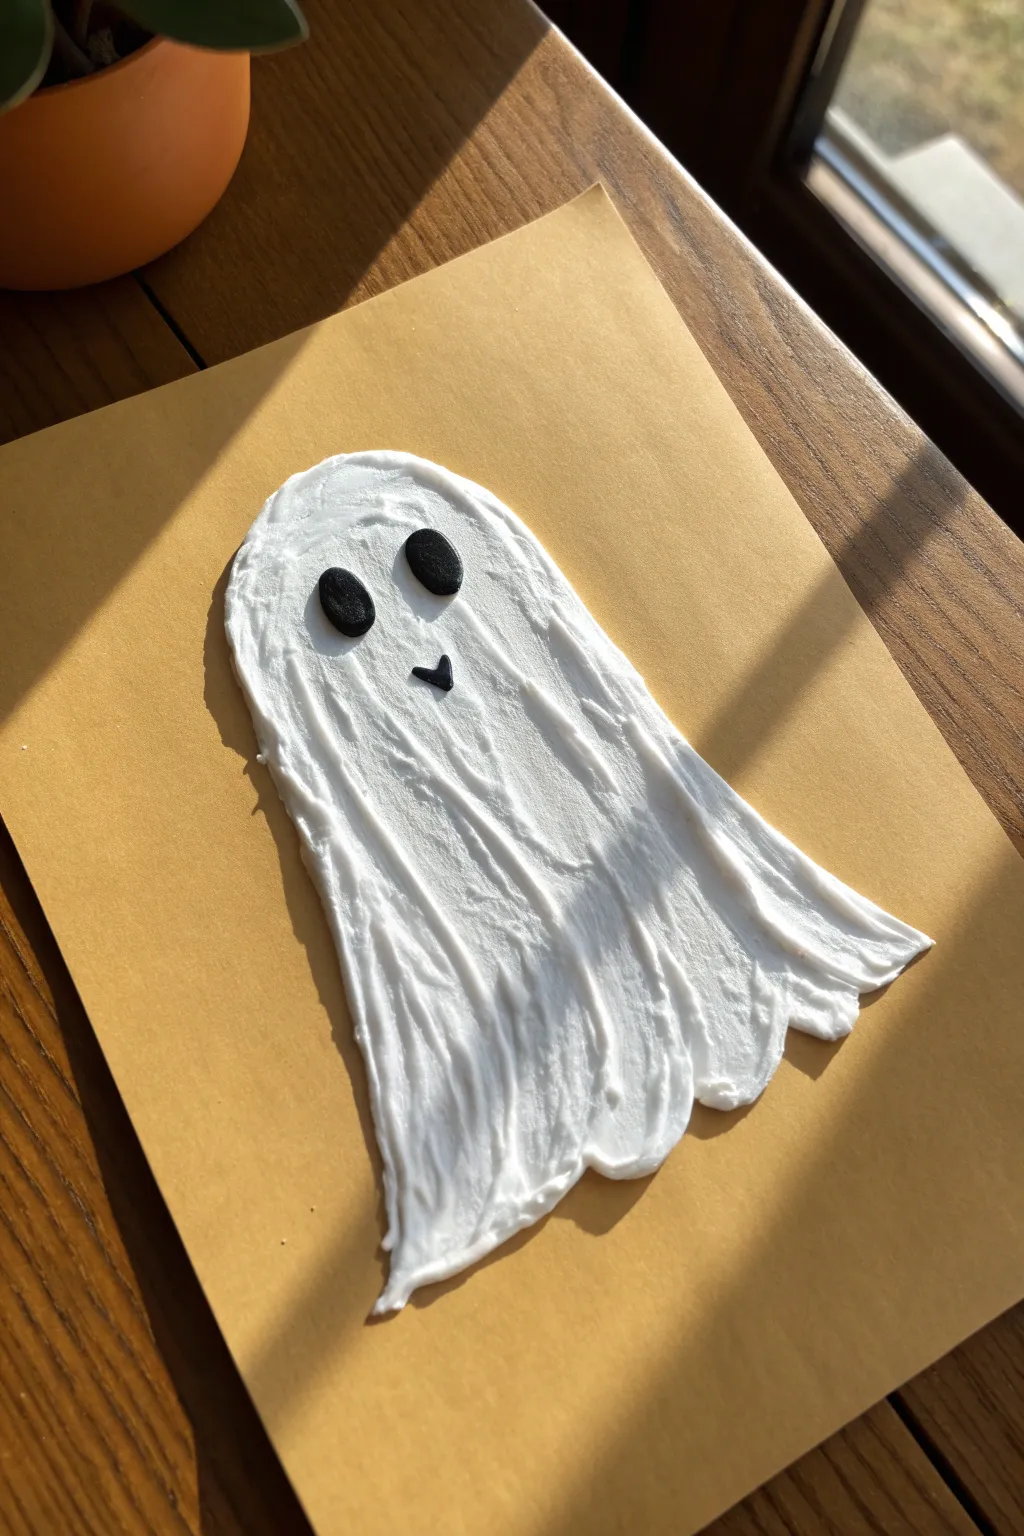
Capture the spirit of Halloween with this delightfully textured ghost art project that pops right off the page. The unique puffy paint mixture creates realistic folds and dimension, giving your friendly phantom a tactile, three-dimensional look that is perfect for seasonal decor.
Step-by-Step Tutorial
Materials
- White school glue (PVA glue)
- Shaving cream (foam, not gel)
- White flour
- Heavy cardstock or construction paper (mustard yellow or tan)
- Black construction paper or craft foam
- Small mixing bowl
- Popsicle stick or plastic spoon
- Scissors
- Pencil
Step 1: Preparation and Outline
-
Select your background:
Choose a sturdy piece of cardstock for your base. A mustard yellow or kraft paper brown works perfectly to provide a warm, autumnal contrast against the bright white ghost. -
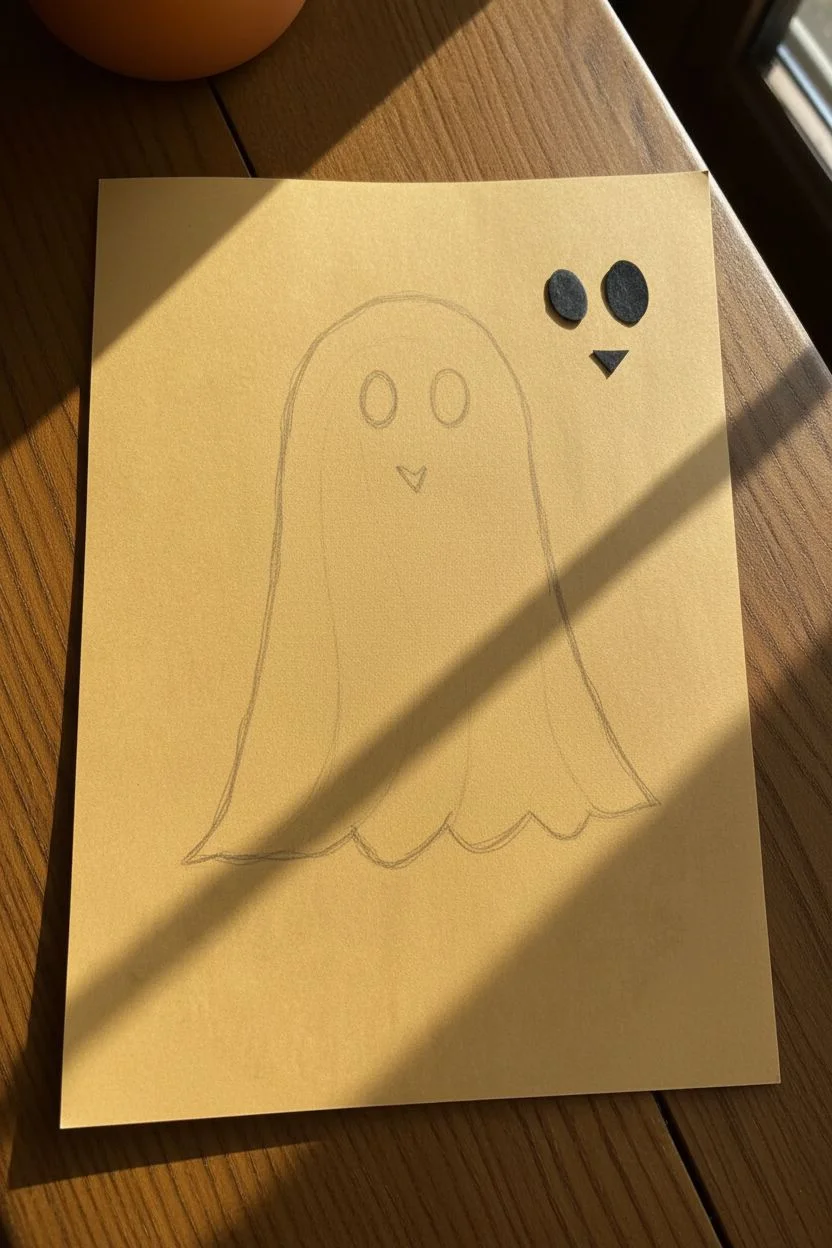
Sketch the silhouette:
Using a pencil, lightly draw a simple ghost shape in the center of your paper. Aim for a classic rounded head that widens slightly at the bottom into a wavy hem. -
Prepare the details:
Cut two small ovals for eyes and a small triangle or crescent shape for the mouth out of black construction paper or craft foam. -
Set details aside:
Keep these black facial features nearby, as you will need to place them while the paint is still wet.
Paint Flattening Out?
If your mix is runny, add more flour one teaspoon at a time. The flour acts as a stabilizer to keep those peaks high.
Step 2: Mixing the Puffy Paint
-
Combine wet ingredients:
In your mixing bowl, combine equal parts white school glue and shaving cream. Start with about half a cup of each. -
Mix gently:
Stir the glue and shaving cream together carefully. You want to combine them without deflating all the fluffy air bubbles from the shaving foam. -
Add structure:
Sprinkle in about one tablespoon of white flour. This helps the mixture hold its shape and prevents it from flattening completely as it dries. -
Check consistency:
Stir until the mixture is thick and peaked, similar to stiff whipped cream. It should hold its form when you lift the spoon.
Step 3: Application and Texturing
-
Apply the base layer:
Scoop a generous amount of the mixture onto the center of your pencil outline using your popsicle stick or spoon. -
Spread to edges:
Gently push the foamy paint out toward your pencil lines. Don’t smooth it flat; thickness is key here. -
Create vertical drag lines:
To mimic the look of a flowing sheet, use the tip of your stick to drag lines from the top of the head down toward the bottom hem. -
Refine the folds:
Go back over distinct areas to create deeper ridges. I find that inconsistent pressure here actually helps it look more like rippled fabric. -
Shape the hem:
Ensure the bottom edge has a wavy, irregular border. Build up extra paint at the ‘points’ of the waves to make them look like gathered cloth. -
Create facial hollows:
Using the very tip of your tool, gently tap two small indentations where the eyes will go, and one for the mouth.
Add Some Sparkle
For a magical touch, lightly dust fine iridescent glitter over the wet paint before placing the eyes to make a shimmering phantom.
Step 4: Finishing Touches
-
Place the eyes:
Carefully drop your black paper ovals into the textured paint where you made the indentations. -
Add the mouth:
Place the small black mouth shape below the eyes. Press it just slightly so the paint hugs the edges of the paper. -
Check the edges:
Look around the perimeter of your ghost. If any pencil lines are showing, dab a tiny bit more paint over them to conceal the sketch. -
Clean up stray drips:
If any paint dripped onto the background, wait for it to dry slightly and lift it off with a toothpick so it doesn’t smear. -
Allow to cure:
Set the artwork in a safe, flat place to dry. Because of the thickness, this will take overnight—usually 12 to 24 hours—to fully harden.
Once fully dry, your ghost will remain puffy to the touch and add a wonderful tactile element to your Halloween collection
Snowman With Puffy Snow
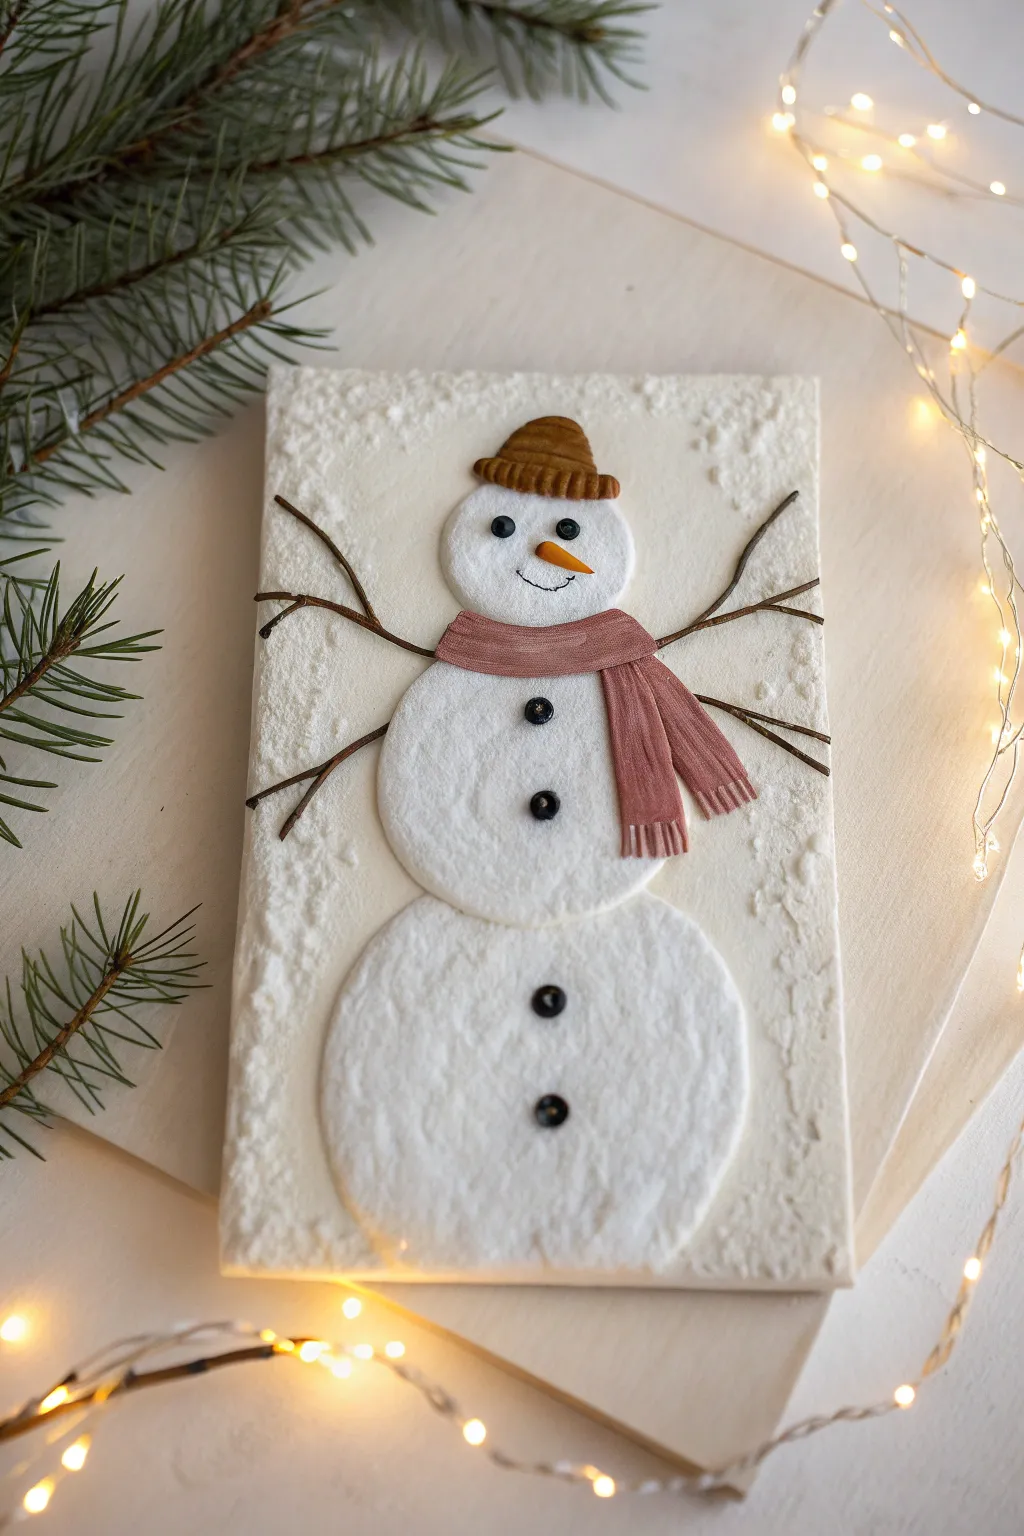
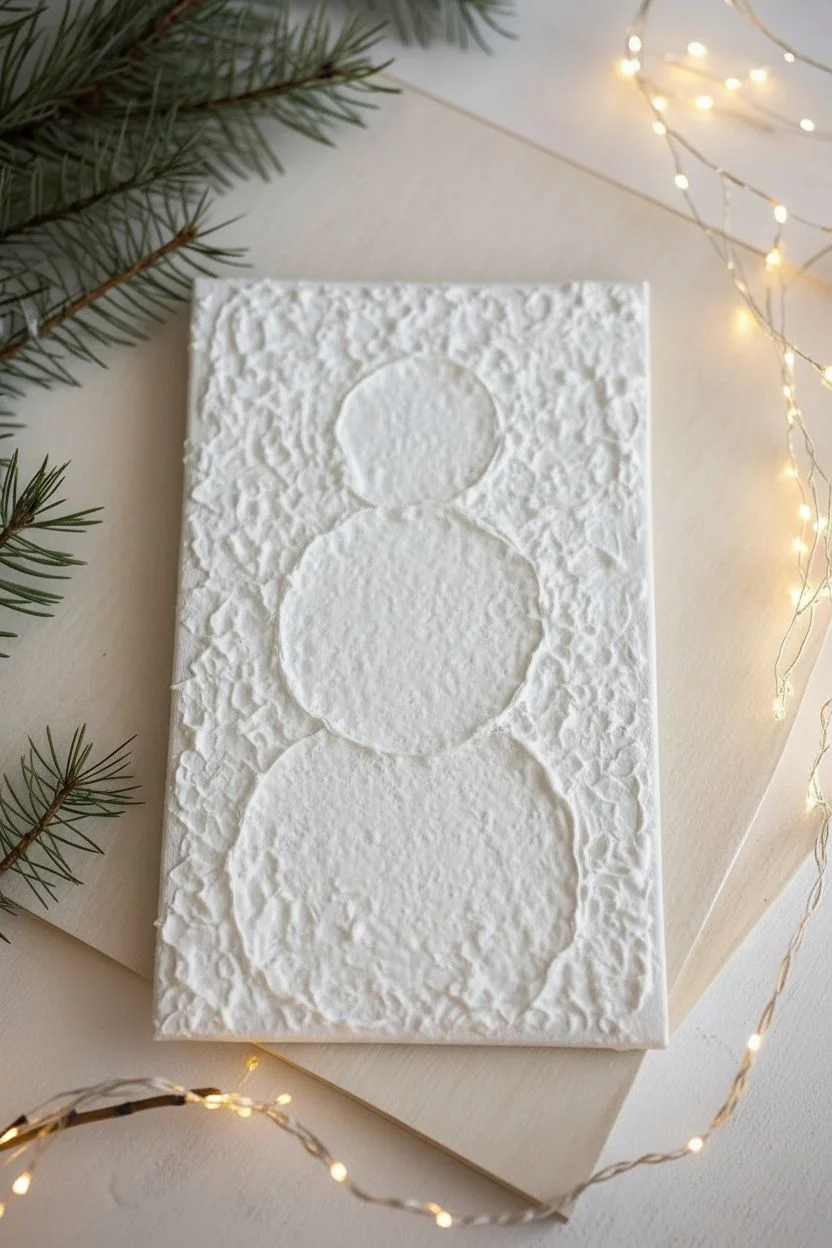
Capture the magic of a fresh snowfall with this delightful snowman art piece, featuring a wonderfully textured, puffy finish that practically pops off the page. The combination of tactile snow material and woodland-inspired details creates a cozy, rustic winter decoration.
Step-by-Step Guide
Materials
- Sturdy white cardstock or small canvas panel (5×7 inches)
- White craft glue (PVA)
- Shaving cream (foam, not gel)
- White acrylic paint (optional, for opacity)
- Small bowl and mixing spoon
- Twig-like brown cardstock or real tiny dried twigs
- Brown polymer clay or brown textured fabric/felt
- Pink or mauve fabric scrap or felt
- Small black beads or sequins
- Orange polymer clay or orange paper
- Scissors and craft knife
- Fine-tip paintbrush
Step 1: Creating the Puffy Snow Mixture
-
Mix the Base:
Begin by combining equal parts white craft glue and white shaving cream in a small bowl. The shaving cream is the secret ingredient that gives the paint its lofty, cloud-like texture. -
Whisk Gently:
Stir the mixture gently with a spoon. You want to combine the ingredients thoroughly without deflating all the air bubbles from the foam. -
Boost Opacity:
If the mixture looks too airy or translucent, fold in a small squeeze of white acrylic paint to ensure the finished snowman is a bright, solid white.
Paint Deflating?
If your mixture flattens as it dries, you used too much glue. Add more shaving cream next time, or paint a second layer over the first once dry to rebuild height.
Step 2: Building the Snowman Body
-
Outline the Shapes:
Lightly sketch three stacked circles onto your cardstock or canvas panel to guide your snowman’s body shape. -
Apply the Base Layer:
Using a spoon or a large brush, scoop the puffy paint mixture onto the bottom circle. Dab it on thickly rather than painting it smooth; the texture is key here. -
Build the Middle:
Repeat the process for the middle circle, making it slightly smaller than the base. Ensure the edges meet but keep the distinct round shape visible. -
Add the Head:
Apply the final dollop for the head. I like to make this one slightly more rounded and prominent. -
Create the Snowy Border:
Take the remaining puffy mixture and dab it unevenly around the outer edges of the card frame to simulate a frosted, snowy windowpane effect. -
Let it Set:
Allow the puffy paint to dry completely. This takes patience—depending on humidity, it might need several hours or even overnight to become firm to the touch.
Step 3: Adding the Details
-
Form the Nose:
While the paint dries, shape a tiny cone from orange polymer clay for the carrot nose. Alternatively, cut a small triangle from stiff orange paper. -
Make the Hat:
Fashion a small beanie hat shape from brown polymer clay, adding texture with a toothpick to mimic knitting. You can bake these clay pieces according to package instructions or use felt cutouts instead. -
Prepare the Scarf:
Cut a strip of pink or mauve fabric. Fringe the ends with scissors to create the scarf tails. -
Attach the Scarf:
Once the white paint is dry, glue the fabric scarf around the neck area where the top and middle circles meet. Let the fringed ends hang naturally. -
Place the Arms:
Glue two small dried twigs (or twig-shaped paper cutouts) onto the middle section, tucking the ends slightly under the scarf or pressing them into the very surface if the paint has a little give. -
Add the Face:
Glue two small black beads for the eyes and press your prepared orange nose into the center of the face. -
Detail the Smile:
Use a very fine brush with diluted black paint or a fine-tip marker to draw a delicate, dotted smile line. -
Secure the Buttons:
Glue three black beads or sequins down the center of the body for the classic coal button look. -
Top It Off:
Finally, glue the brown hat onto the top of the snowman’s head, slightly tilted for a charming personality.
Sparkle Finish
While the puffy paint is still wet, lightly dust the entire snowman and the border with iridescent white glitter to mimic the shimmer of fresh ice crystals.
Display your frosty creation on a mantle or gift it to bring a little winter joy indoors
Puffy Tree With Layered Leaves
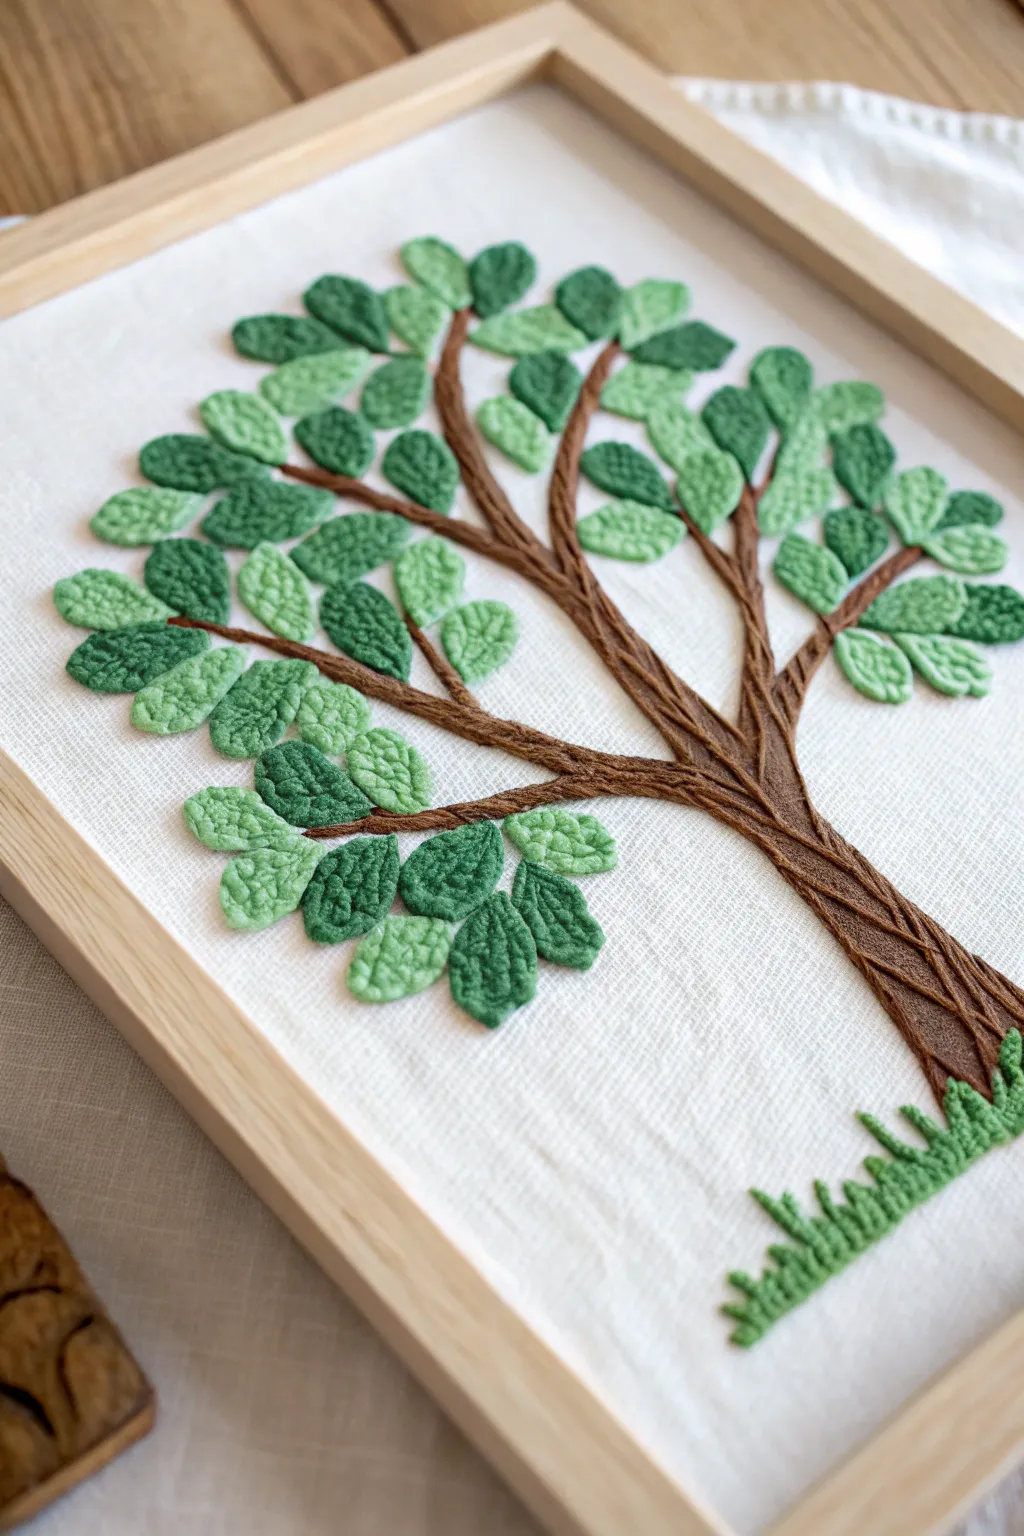
Bring nature indoors with this wonderfully tactile tree artwork that pops right off the canvas. Using puffy paint in a clever way creates realistic leaf textures and a bark-like trunk that looks like intricate embroidery, but is much easier to achieve.
How-To Guide
Materials
- White cotton or linen fabric (cut to frame size)
- Wooden embroidery hoop or picture frame
- Fabric puffy paint (dark green, light green, brown, grass green)
- Fine-tip applicator nozzles for paint bottles
- Pencil or disappearing ink fabric marker
- Toothpick or embroidery needle (for texture)
- Small flat brush (optional)
- Iron or hairdryer (for puffing the paint)
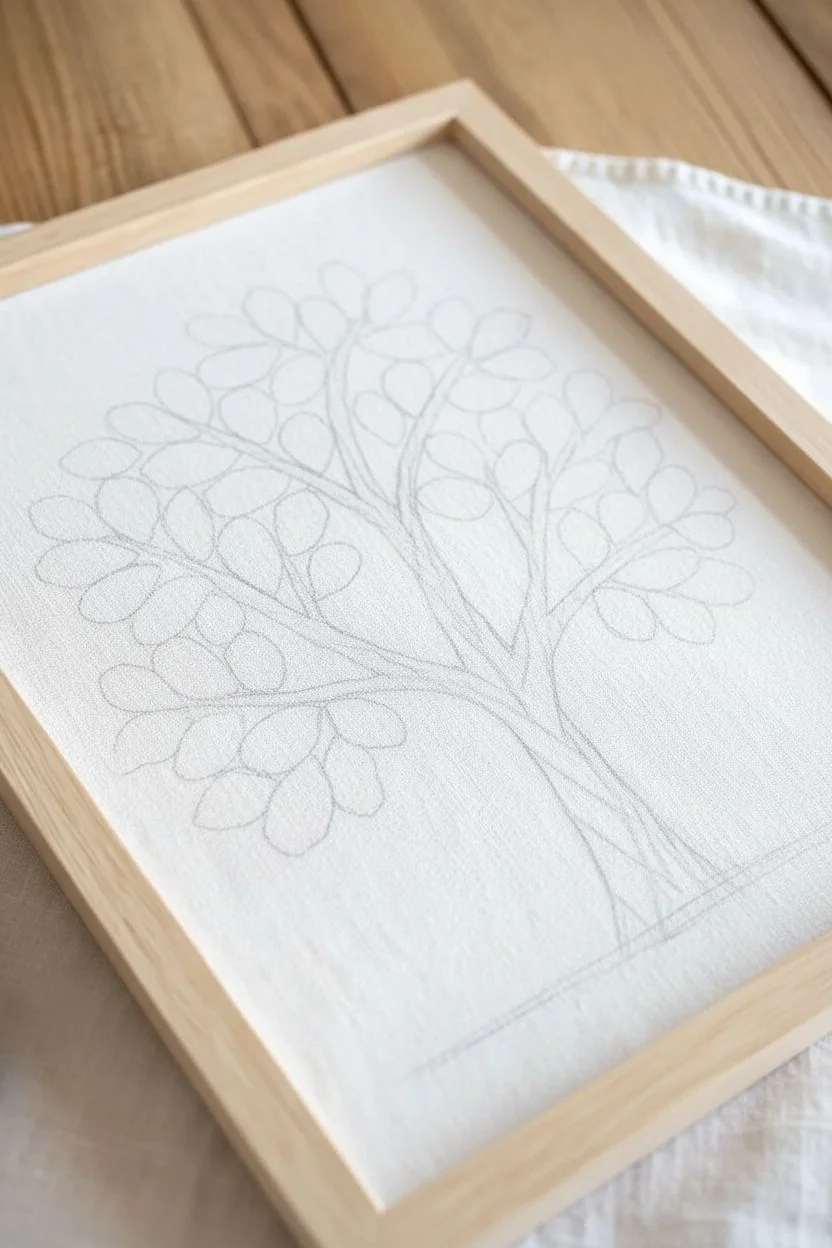
Step 1: Preparation & Sketching
-
Prepare the canvas:
Stretch your white fabric tightly. If you are using a picture frame backer board, wrap the fabric around it and secure it with tape or glue on the back. Alternatively, stretch it in an embroidery hoop for easier handling while painting. -
Outline the trunk:
Using a pencil or disappearing ink marker, lightly sketch the main tree trunk. Start wide at the bottom and branch out into thinner limbs towards the top. Keep the lines natural and slightly wavy. -
Plan the foliage:
Lightly mark circular or oval areas where the clusters of leaves will sit. You don’t need to draw every individual leaf, just the general zones for placement.
Step 2: Creating the Trunk
-
Outline in brown:
Take your brown puffy paint with a fine tip and trace the outline of your trunk and main branches. Squeeze gently to get a consistent line. -
Fill and texture:
Fill in the trunk area with lines of brown paint that follow the direction of growth (vertical lines). Don’t just flood it with color; use individual striped strokes to mimic bark texture. -
Add detail:
While the paint is wet, use a toothpick to drag through the brown paint slightly, creating knots or rougher bark textures. I find this creates a surprisingly realistic wood grain effect once it puffs up. -
Initial dry:
Let the trunk dry for about 30-60 minutes so you don’t accidentally smudge it while working on the leaves.
Needle Tip Trick
For ultra-fine leaf veins, let the paint sit for 5 minutes to form a ‘skin’ before dragging a needle through it. This holds the texture shape better than wet paint.
Step 3: Layering the Leaves
-
Start with dark leaves:
Using the dark green puffy paint, squeeze out small, tear-drop or oval shapes at the ends of your branches. These will be the shadowed leaves in the background. -
Create leaf veins:
Before the green paint dries, immediately use a clean toothpick or needle to draw a line down the center of each leaf, or gently stipple the surface to simulate a leafy texture. -
Apply light leaves:
Switch to your lighter green paint. Squeeze new leaf shapes that slightly overlap the darker ones or sit at the very tips of the branches. This color variation adds depth to the canopy. -
Texture the light leaves:
Repeat the texturing process on these lighter leaves. Small dots or tiny swirls with a needle can make them look distinct from the darker ones. -
Fill the gaps:
Step back and look for empty spots. Add a few tiny leaves directly onto the brown branches to make the tree look lush and full.
Uneven Puffing?
If some areas aren’t puffing, your heat source might be too far away. Move closer, but keep the heat moving constantly to avoid scorching the fabric.
Step 4: Ground & Finishing
-
Add grass:
At the base of the trunk, use the grass green paint to create short, upward strokes. Make them varied in height to look like natural tufts of grass growing around the roots. -
Dry completely:
Allow the entire artwork to dry flat for at least 6-12 hours, or up to 24 hours depending on humidity. The paint must be completely solid before the next step. -
Activate the puff:
Here is the magic moment: Use a heat gun or a hair dryer on the hottest setting. Hold it a few inches from the surface and move it around. Watch as the paint swells and puffs up, creating that beautiful 3D texture. -
Frame it:
Once cooled, place your artwork into its frame. Remove the glass from the frame so the texturing isn’t squashed.
Now you have a stunning, tactile piece of botanical art ready to hang to bring a touch of the outdoors into your home
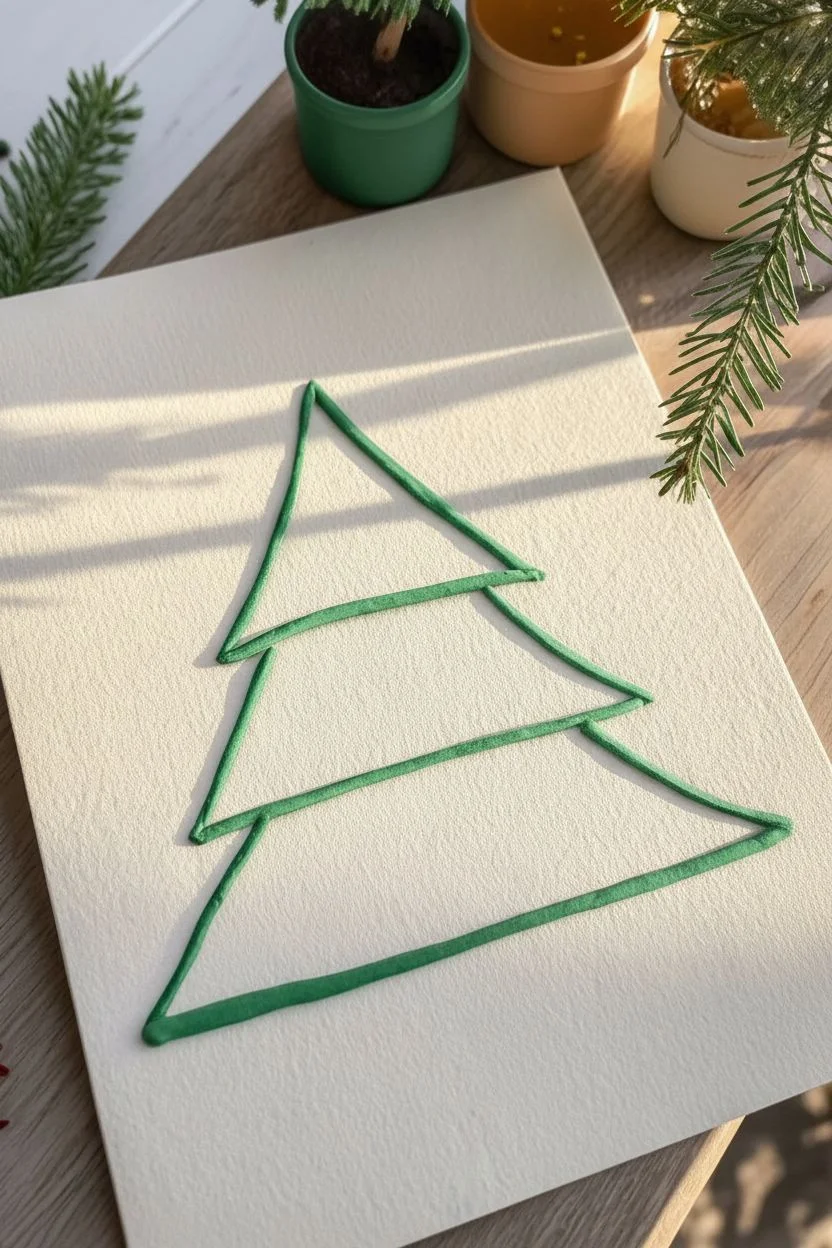
Holiday Tree With Raised Ornaments
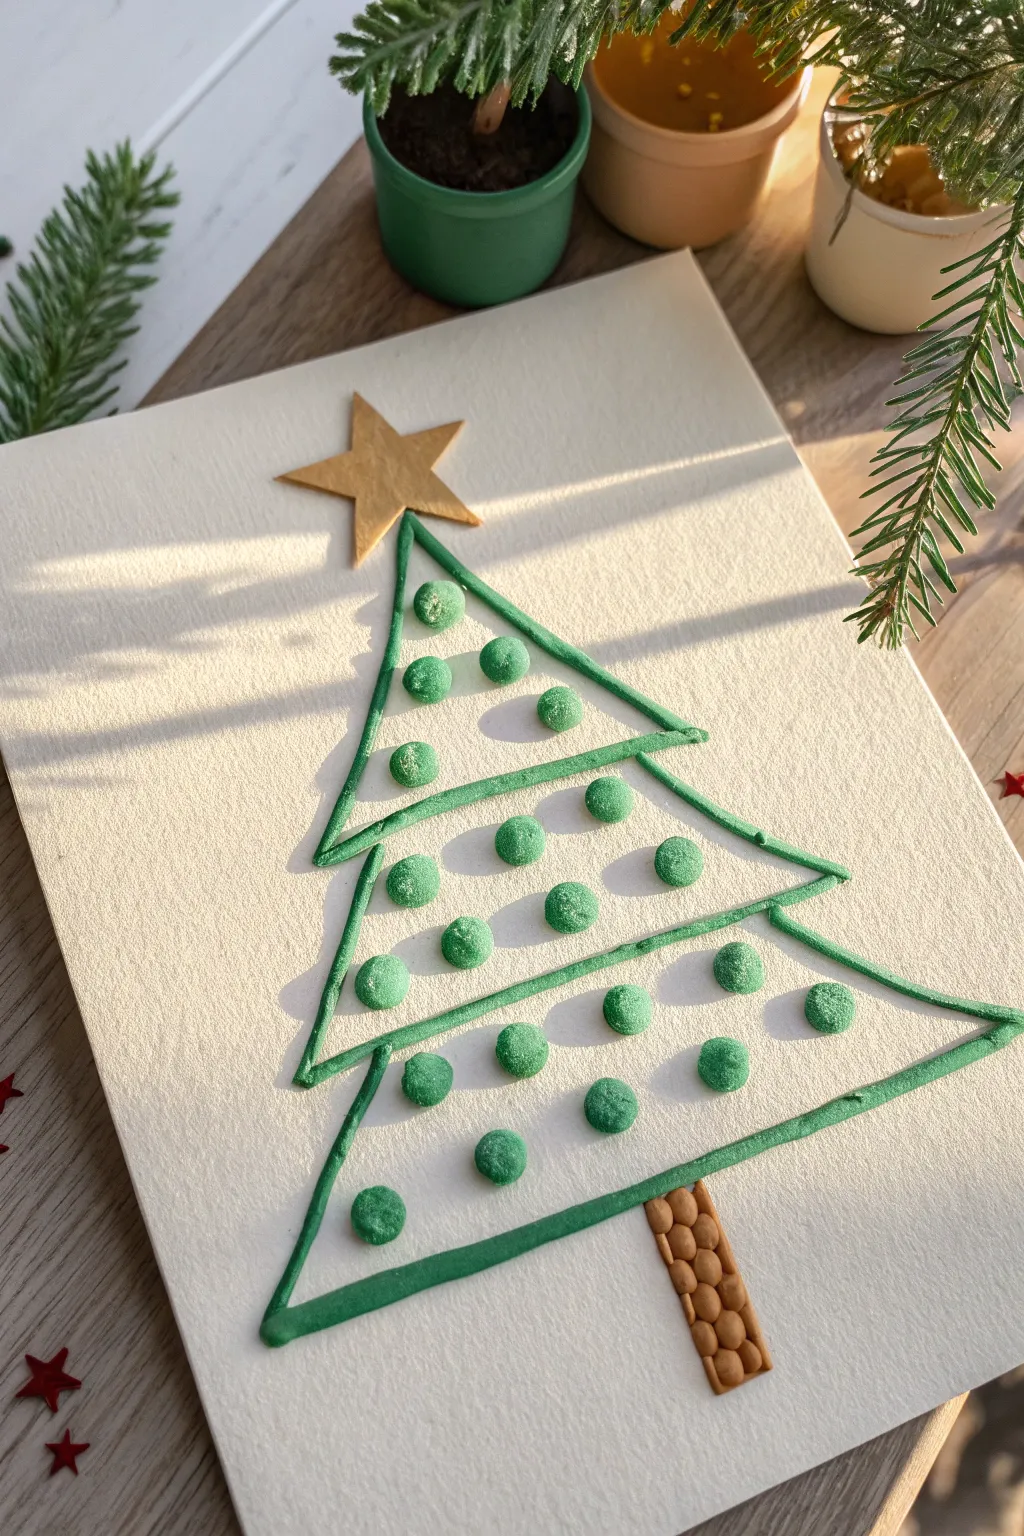
This minimalist holiday project adds delightful texture to your cardstock with a raised, tiered tree design. The simple green outline gets a playful upgrade with dimensional dots that cast real shadows, creating a satisfying 3D effect without any complex drawing skills.
Detailed Instructions
Materials
- Heavyweight white cardstock or watercolor paper (textured works best)
- Green puffy paint (writer bottle)
- Gold or yellow puffy paint (writer bottle) OR gold cardstock
- Brown puffy paint (writer bottle)
- Pencil and ruler
- Scissors and glue (if using cardstock for the star)
Step 1: Preparation and Outline
-
Draft the triangle:
Begin by lightly sketching a large isosceles triangle in the center of your cardstock using a pencil and ruler. This will serve as your main guide for the tree’s shape. -
Mark the tiers:
Divide your triangle into three horizontal sections. Draw two slightly curved lines across the triangle to separate the top, middle, and bottom tiers. These lines should curve slightly downward to mimic drooping branches. -
Trace the top tier:
Using your green puffy paint bottle, trace over the pencil lines for the top triangle section. Keep the nozzle close to the paper and squeeze with consistent pressure to get a smooth, raised line. -
Trace the middle tier:
Continue tracing the outline of the middle section. Extend the bottom corners slighty past the width of the top tier to create that layered evergreen look. -
Trace the bottom tier:
Finish the outline by tracing the largest bottom section. Ensure the bottom corners flare out wider than the middle tier. Don’t close the very bottom of the triangle with a straight line yet. -
Close the shape:
Draw the final horizontal line connecting the bottom corners to complete the tree shape.
Step 2: Adding the Ornaments
-
Start the top dots:
Inside the top tier, squeeze out small, uniform dots of green puffy paint. I find that holding the bottle purely vertical helps create perfect circles rather than teardrops. -
Fill the middle tier:
Move to the middle section and add slightly larger dots. Space them out randomly but evenly, leaving plenty of white space between them to keep the design airy. -
Fill the bottom tier:
Complete the dot work in the bottom tier. Aim for about 10-12 dots here, maintaining that same spacing so the tree doesn’t look cluttered. -
Create the texture:
If your paint flattens too much, you can wait for the first dot layer to dry slightly and add a second tiny drop on top to build height.
Air bubble trouble?
If a paint dot sputters or gets an air bubble, don’t wipe it! Pop the bubble gently with a sewing pin or toothpick while the paint is still wet.
Step 3: Trunk and Topper
-
Draw the trunk outline:
At the center of the tree’s base, draw a small rectangle for the tree trunk using brown puffy paint. -
Texture the trunk:
Instead of filling the trunk solidly, fill the rectangle with two vertical rows of small brown dots. This pebbled texture mimics bark nicely. -
Create the star:
You have two options here. For a mixed-media look like the example, cut a simple five-point star from gold cardstock or heavy gold paper. -
Attach the star:
Glue the paper star to the very top peak of the tree. Alternatively, if drawing, use gold puffy paint to draw a star directly onto the paper. -
Wait for the magic:
Set the artwork on a completely flat surface to dry. This is crucial—puffy paint can run if tilted before it sets. Allow 4-6 hours for the surface to dry, or overnight for it to cure completely hard.
Pro Tip: Test first
Always squeeze a test line on a scrap paper first. Puffy paint bottles often release a clear liquid or a sudden burst of air when first opened.
Now you have a charming, textured holiday design perfect for framing or gifting
Lucky Clover Dot Clusters
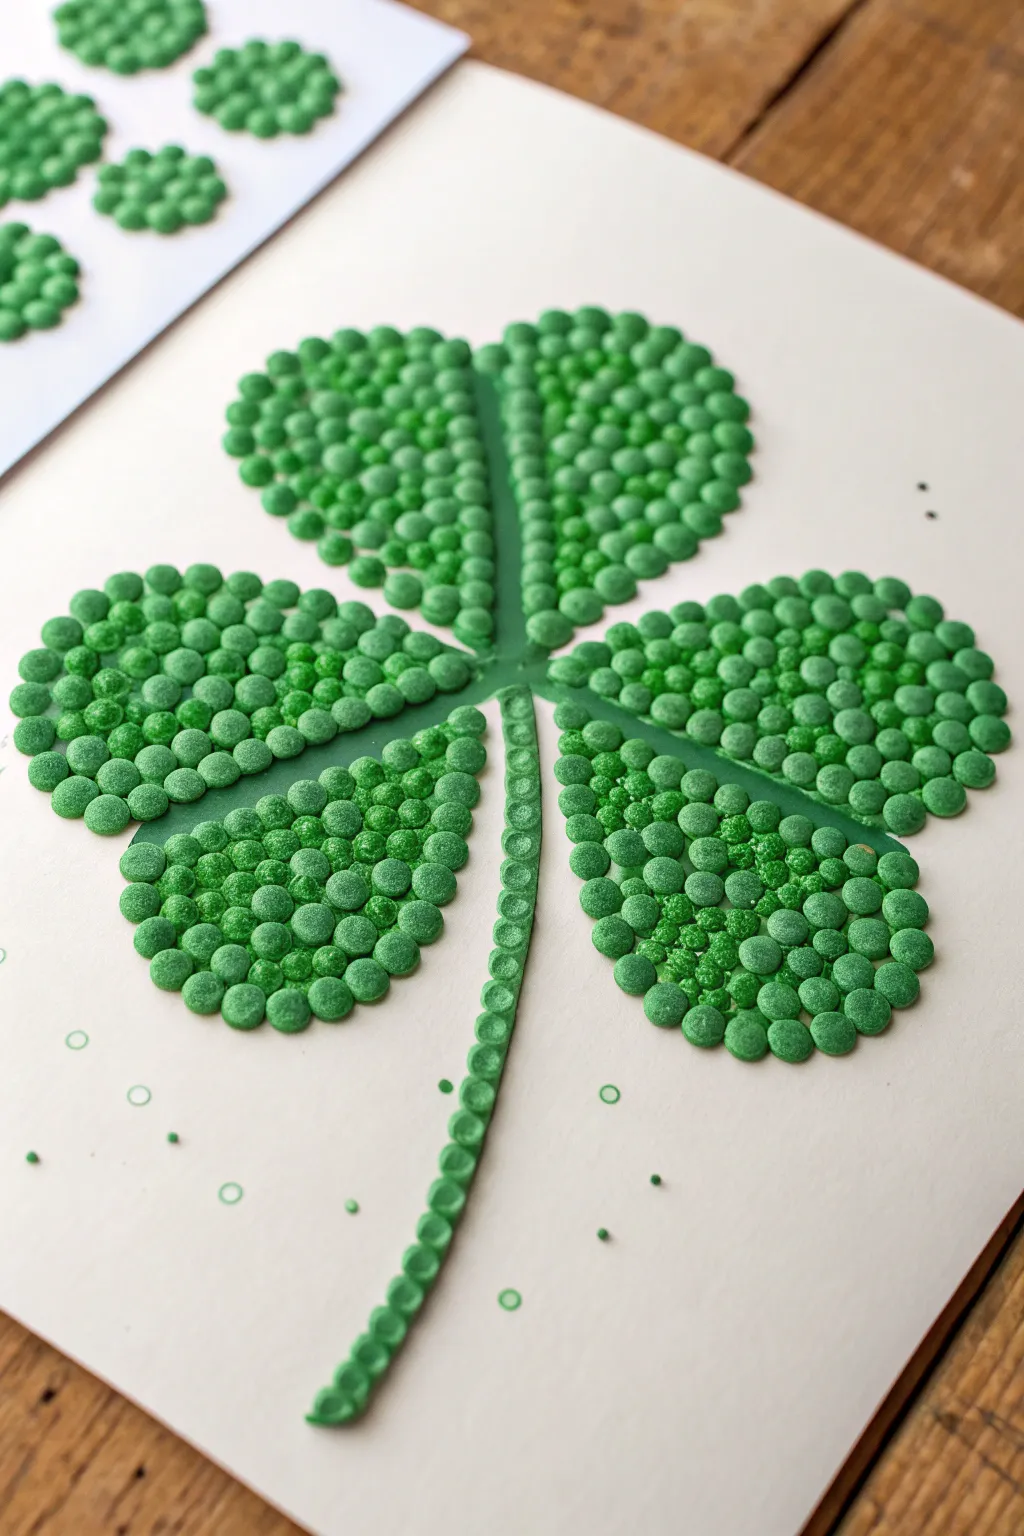
Celebrate luck and nature with this textured four-leaf clover created entirely from dimensional paint dots. The raised, tactile finish gives the artwork a satisfying bubbly effect that pops right off the page.
Step-by-Step Tutorial
Materials
- Heavyweight white cardstock or watercolor paper
- Green dimensional puffy paint (squeeze bottle with fine tip)
- Pencil
- Eraser
- Scrap paper (for practice)
- Toothpick (for corrections)
Step 1: Preparation & Sketching
-
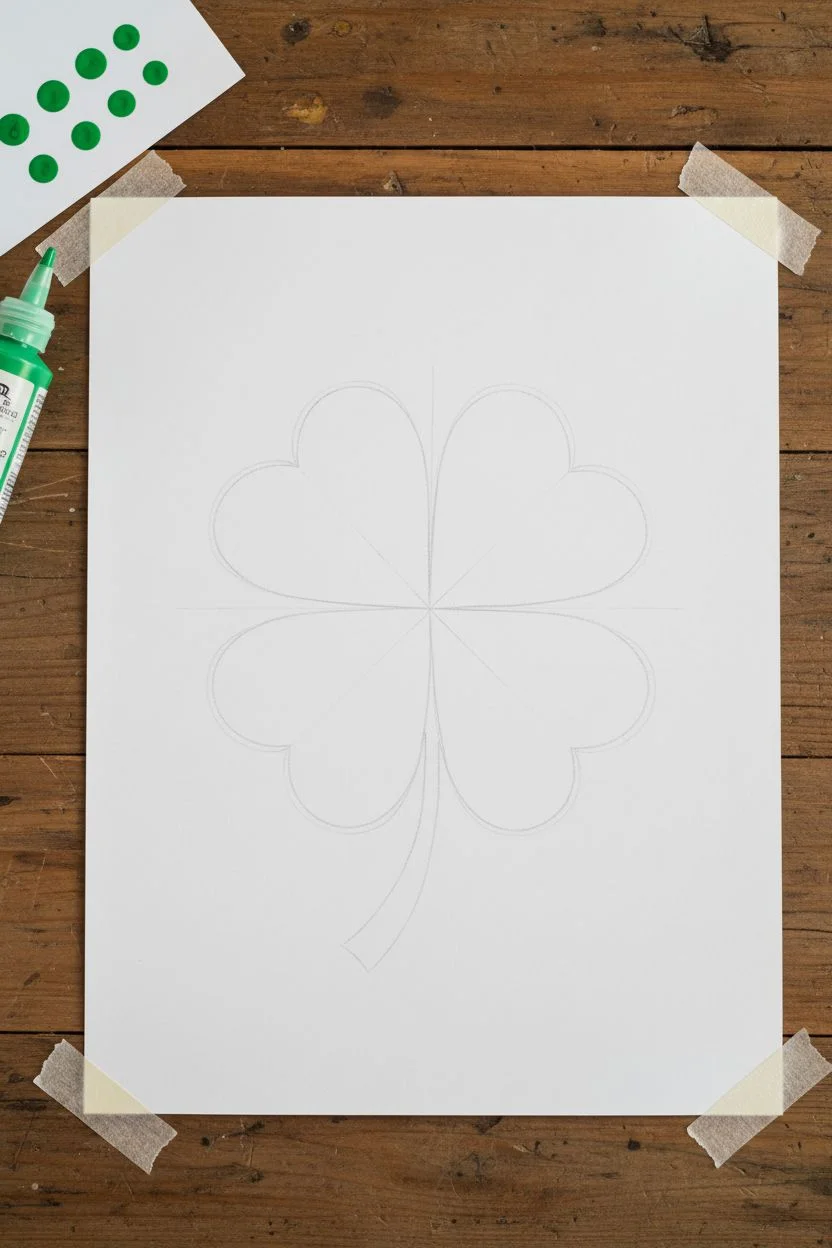
Prepare your surface:
Lay down your white cardstock on a completely flat surface. Tape the corners down if necessary to prevent the paper from warping while the paint dries. -
Sketch the clover shape:
Lightly draw a large four-leaf clover in the center of your paper. Draw four heart-shaped leaves meeting at a central point. -
Add the stem:
Draw a slightly curved line extending downwards from the center point to create the stem. Keep your pencil lines very faint so they won’t show through the finished dots. -
Practice your dots:
On a piece of scrap paper, squeeze out several test dots to get a feel for the paint flow. You want consistent, round droplets about the size of a peppercorn.
Step 2: Creating the Leaves
-
Outline the first leaf:
Select the top left leaf to start. Squeeze small dots of green puffy paint along the pencil outline, keeping them close together but not touching yet. -
Fill in the outer edges:
Continue adding dots around the perimeter of the other three leaves. Try to maintain a consistent size for your perimeter dots to define the shape clearly. -
Start the inner fill:
Beginning with the top leaf again, start filling the inside space with rows of dots. Work from the outside edge moving inward toward the center vein. -
Vary the density:
In the image, you’ll notice slight darker shading near the center. You can achieve this visually by packing the dots slightly tighter near the center of the artwork, or using a second, slightly darker shade of green paint if you have it. -
Build the texture:
As you fill the leaves, allow some dots to be slightly larger than others to create organic texture, but keep them generally uniform. -
Create the central crease:
For each heart-shaped leaf, leave a very thin line of negative space (no dots) running down the middle to suggest the vein of the leaf. -
Complete the leaf fill:
Finish filling all four leaves with dots. I find it helpful to rotate the paper carefully as I work to avoid dragging my hand through wet paint.
Oops! Blobs merging?
If two wet dots accidentally touch and merge into a blob, use a clean toothpick to separate them immediately, or let it dry and embrace the organic look.
Step 3: Stem & Finishing Touches
-
Dot the stem:
Follow your sketched stem line with a single row of slightly larger, uniform dots. They should connect seamlessly to the center of the clover. -
Add stray details:
To make the piece feel artistic and loose, add a few tiny, random dots floating around the main clover and near the stem, like pollen or scattered energy. -
Check for gaps:
Look over the clover for any uneven white spaces. Fill these tiny gaps with micro-dots of paint to make the cluster look dense and lush. -
Flatten peaks:
If your puffy paint leaves sharp peaks when you pull the bottle away, gently tap the bottom of the paper on the table to help them settle into rounded domes. -
Let it cure:
This is crucial: allow the artwork to dry flat for at least 24 hours. Puffy paint takes a long time to harden completely, and moving it too soon can ruin the perfect round shapes. -
Erase guidelines:
Once the paint is 100% dry and hard to the touch, gently erase any visible pencil marks around the edges.
Make it Sparkle
Before the green puffy paint dries, sprinkle a tiny pinch of fine translucent glitter over the wet dots. It gives the clover a magical, morning-dew appearance.
Display your textured masterpiece in a shadow box frame to protect the raised surface
Firework Bursts in Puffy Lines
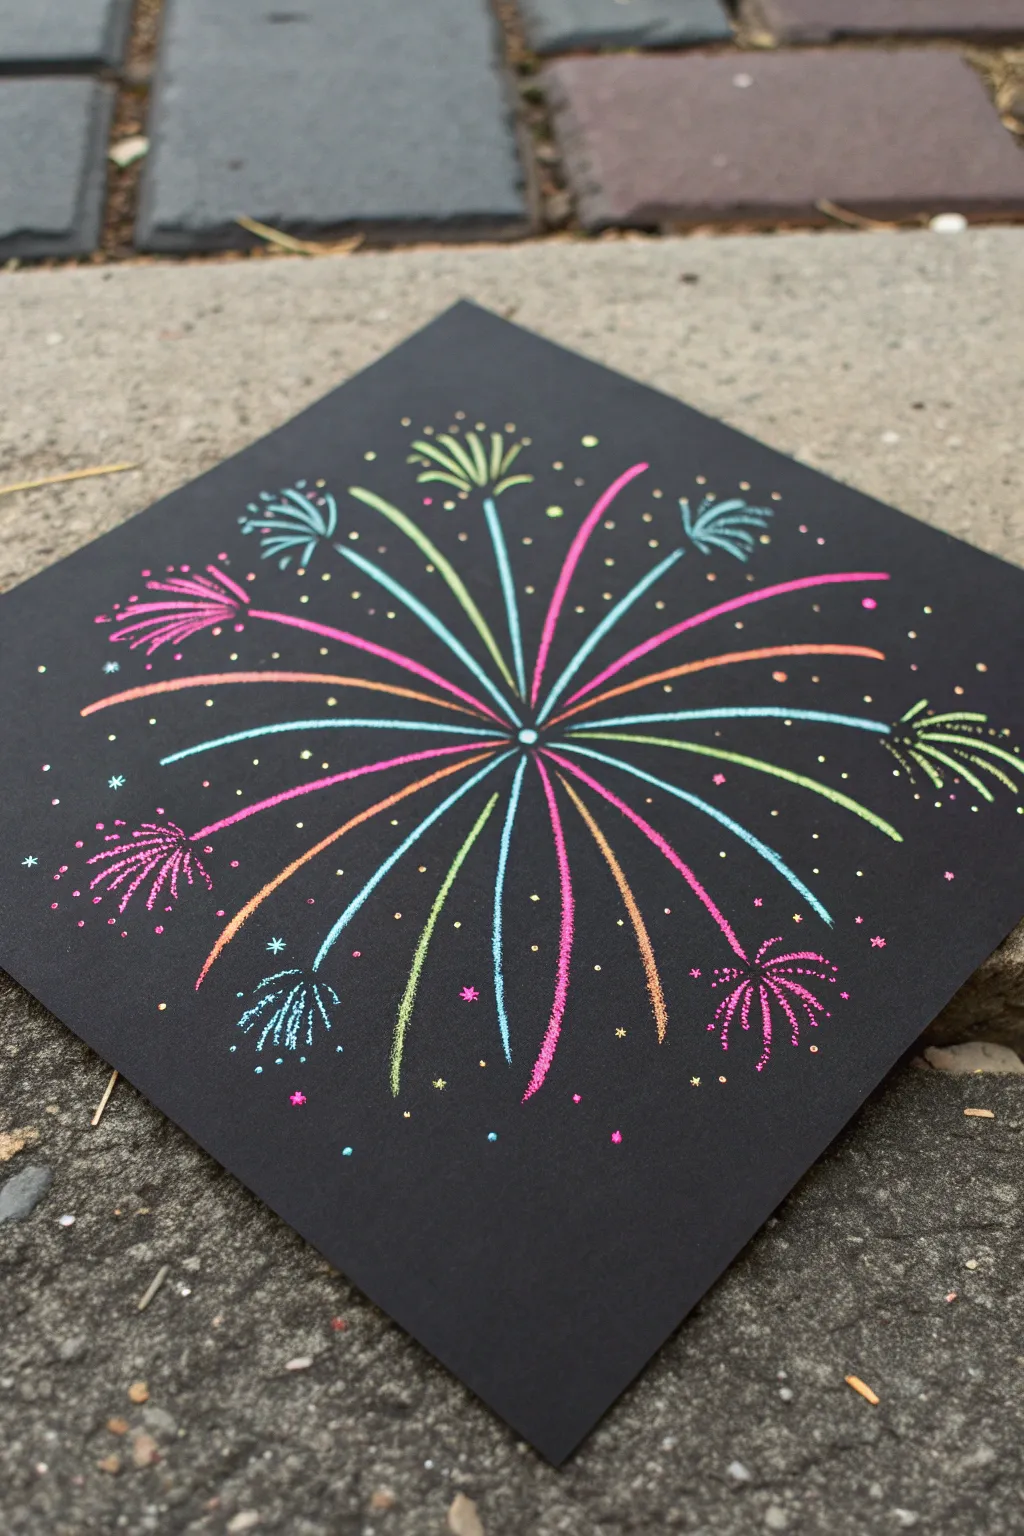
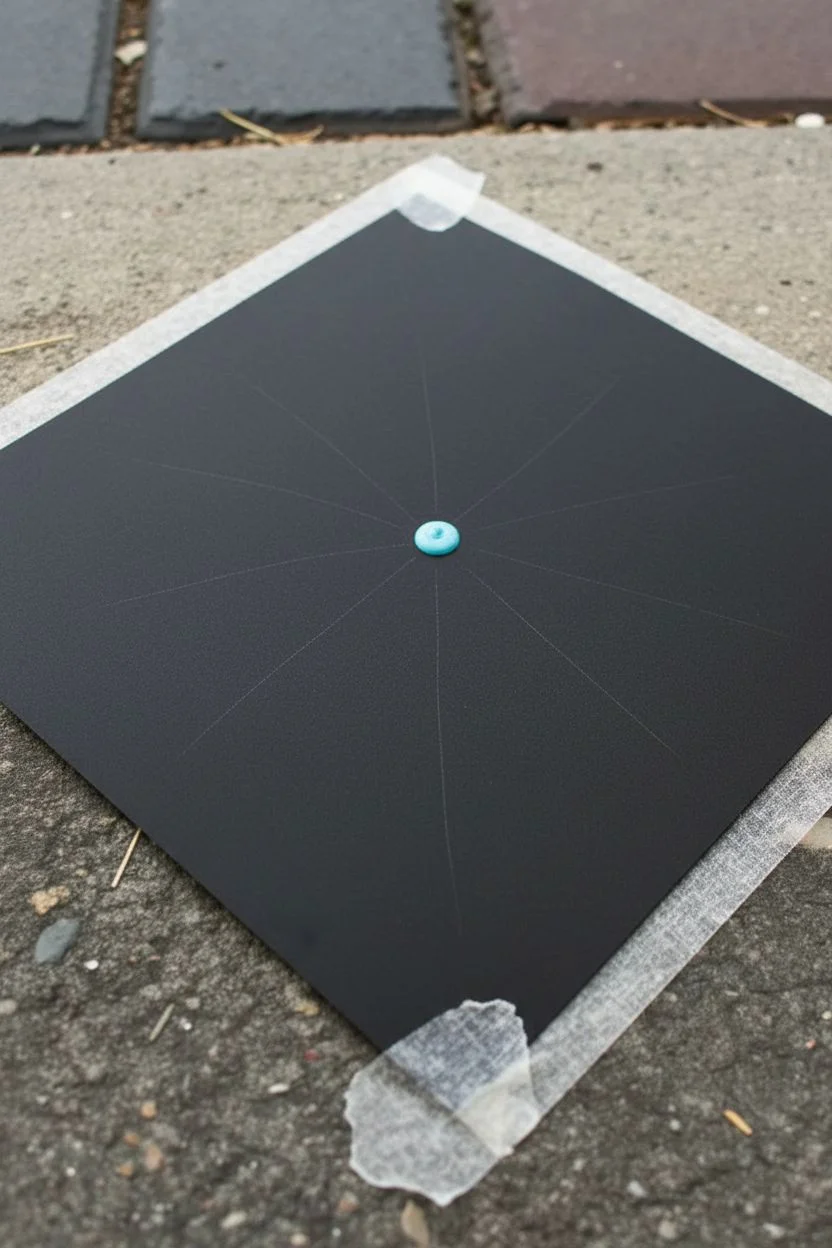
Exploding with color against a stark black background, this firework design captures the excitement of a night sky celebration. Using fine-tip puffy paints creates a delightful tactile texture, making the bright neon lines literally pop off the page.
Detailed Instructions
Materials
- Black cardstock (square usually works best)
- Dimensional/Puffy paint in neon colors (Pink, Blue, Green, Orange)
- Pencil (optional for sketching)
- Scrap paper (for testing flow)
Step 1: Planning and Center
-
Prepare your canvas:
Cut a sheet of black cardstock into a square. Since puffy paint is wet, tape the corners of your paper down to your work surface to prevent warping while you work. -
Optional sketching:
If you are nervous about freehanding, use a pencil to very lightly mark a center dot and faint radiating lines as guides. Don’t press hard, or the graphite will shine. -
Start at the center:
Choose a light blue or white puffy paint for the very center. Squeeze a small, neat dot right in the middle of the paper.
Step 2: Creating the Primary Bursts
-
First radiating layer:
Select your first color, perhaps a bright neon pink. Place the nozzle near the center dot and draw a long, curved line extending outward toward the edge. -
Repeat the curve:
Draw three or four more long pink lines radiating from the center, spacing them out evenly around the circle like the spokes of a wheel. -
Add secondary colors:
Switch to a neon blue. Draw similar long, curved lines in the spaces between your pink lines. Try to make them roughly the same length but vary the curve slightly for a natural look. -
Complete the inner burst:
Continue filling the gaps with green and orange lines. You want a dense starburst effect originating from that single center dot. -
Check the flow:
I always keep a scrap paper nearby to wipe the nozzle tip if a paint globs up; clean lines are key for this effect.
Tip: Nozzle Control
Hold the paint bottle vertically just above the paper. Don’t drag the tip on the paper; let the paint fall onto the surface for smoother lines.
Step 3: Adding Details and Sparkle
-
Create the outer explosions:
At the end of several long lines, draw small fan shapes. Use a contrasting color (like green on a pink line) to create three or four short dashes fanning out from the tip. -
Vary the tips:
Don’t put a fan on every single line. Some ends can be left plain, while others get these mini-bursts to create depth and variety. -
Add shorter inner lines:
Go back to the center and add shorter lines in different colors between the long main spokes. This makes the core of the firework look brighter and more intense. -
Sprinkle the stars:
Using various colors, gently squeeze tiny dots all over the empty black spaces. These represent distant stars or fading embers. -
Draw tiny asterisks:
In the wider open spaces, draw very small asterisk shapes (*) with the finest tip you have to look like twinkling stars. -
Review balance:
Step back and look at the composition. If one side looks empty, add a few more floating dots or a small stray firework tendril.
Level Up: Glitter Bomb
While the paint is still wet, gently sprinkle loose iridescent glitter over the firework tips. Shake off excess once dry for extra sparkle.
Step 4: Drying
-
Let it set:
Carefully move the artwork to a safe, flat place. Puffy paint takes significantly longer to dry than markers—usually several hours or overnight. -
Heat activation (optional):
If your specific brand of paint requires heat to puff fully, wait until the paint is dry to the touch, then use a hair dryer on a low setting to expand the texture.
Once fully dry, you will have a vibrant, tactile celebration captured on paper
Name Art With Puffy Lettering
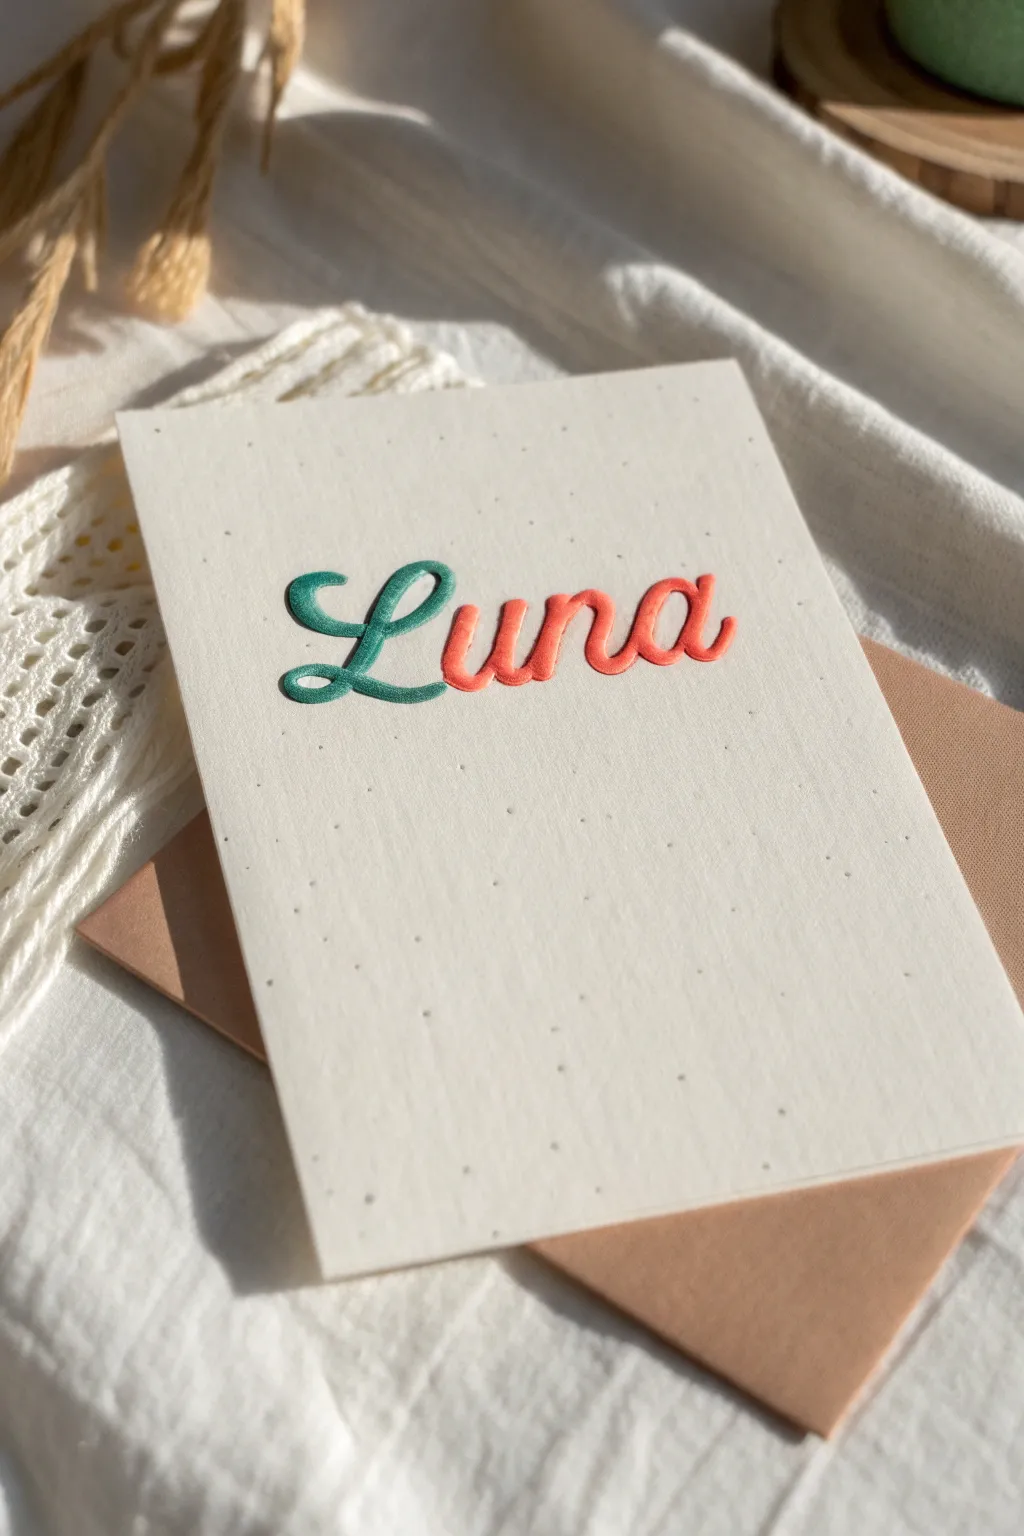
Elevate simple name art into a tactile experience with this puffy lettering project. By combining elegant calligraphy with the unique texture of puffy paint, you can create a card that feels just as special as it looks, featuring a lovely matte, raised finish.
Step-by-Step Tutorial
Materials
- High-quality cardstock (white or cream)
- Puffy paint (fine tip bottles in teal and coral)
- Pencil (H or HB for light lines)
- Soft white eraser
- Heat tool or hair dryer
- Scrap paper for practice
- Ruler
Step 1: Planning Your Design
-
Center the layout:
Use a ruler to find the visual center of your cardstock. Lightly mark a baseline where you want the name to sit. -
Draft the name:
With a very light hand, pencil in the name ‘Luna’ (or your chosen name) in cursive. Focus on creating open loops and generous spacing to key the puffy paint from merging later. -
Thicken the downstrokes:
Go back over your pencil sketch and lightly double the lines on the downstrokes (the parts where your pen would move downwards). This creates a guide for where the paint needs to be thicker to mimic calligraphy. -
Observe the connections:
Ensure distinct separation between letters where possible, especially between the capital letter and the lowercase rest.
Uneven Puffing?
If the paint puffs unevenly, your heat source was likely too close to one spot. Keep the dryer moving constantly in circles to distribute heat.
Step 2: Applying the Teal
-
Test the flow:
Squeeze a small amount of teal puffy paint onto scrap paper to clear any air bubbles and ensure a smooth, consistent line width. -
Trace the capital letter:
Begin tracing your pencil outline for the ‘L’. Keep the nozzle tip slightly above the paper, letting the paint drape down rather than dragging the tip against the card. -
Fill the thick areas:
For the downstrokes of the ‘L’, gently squeeze more paint to fill the wider penciled area. The paint should look wet and slightly domed. -
Taper the ends:
As you reach the tail of the ‘L’ or the thin upstrokes, release pressure on the bottle to taper the line into a delicate, thin finish.
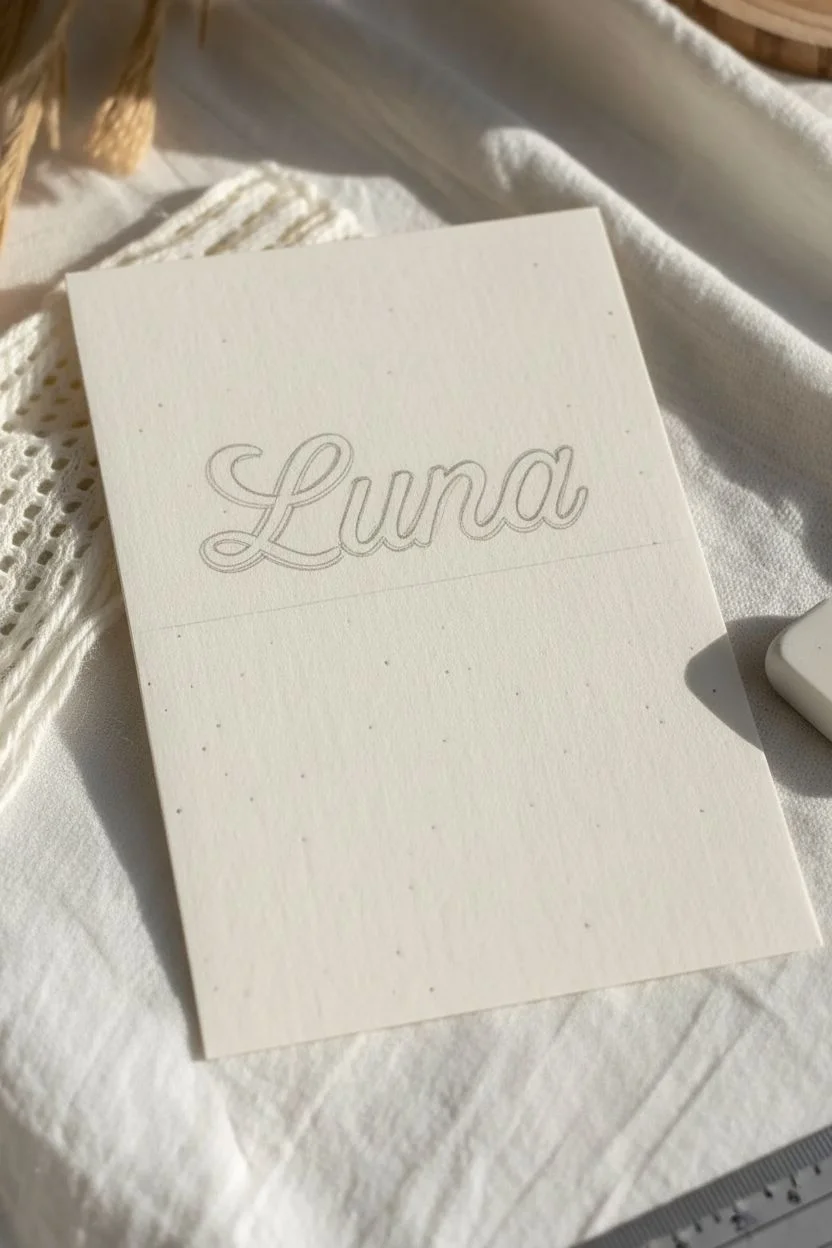
Level Up: Envelope Liner
Make a matching envelope liner using regular paper. Draw simple polka dots using the same puffy paint colors, but don’t heat them—let them dry flat and glossy.
Step 3: Adding the Coral
-
Switch colors:
Pick up your coral or salmon-pink puffy paint. Do a quick flow test on your scrap paper. -
Start the lowercase:
Begin the ‘u’ slightly separated from the ‘L’. Unlike ink, we don’t want the wet teal and coral paints to touch and bleed into each other, so leave a hairline gap. -
Continue the flow:
Trace the ‘u’, ‘n’, and ‘a’ in one continuous mental flow, lifting the nozzle only between distinct strokes. Remember to squeeze harder on downstrokes for that faux-calligraphy look. -
Refine the edges:
If you have any jagged peaks of paint where you lifted the nozzle, use a clean toothpick to gently tap them down while the paint is still wet.
Step 4: Heating and Finishing
-
Initial air dry:
Let the design sit undisturbed for about 4-6 hours. I like to be patient here because premature heating can cause cracking. -
Apply heat:
Once the paint has a ‘skin’ on top, use a heat tool or hair dryer on a low setting. Hold it a few inches away and move it constantly over the letters. -
Watch it puff:
You will see the paint transform from a glossy wet look to a matte, raised finish. Continue until the entire name has a uniform puffy texture. -
Cool down:
Allow the card to cool completely flat. This ensures the paper doesn’t warp from the heat. -
Erase guidelines:
Once fully cool and set, very gently erase any visible pencil marks around the edges of the letters. -
Optional texture:
If you want the speckled paper look shown in the image but used plain white cardstock, you can now lightly flick a toothbrush with diluted gray paint across the background.
Now you have a beautifully tactile card ready to brighten someone’s mailbox
Stencil-Filled Puffy Shapes
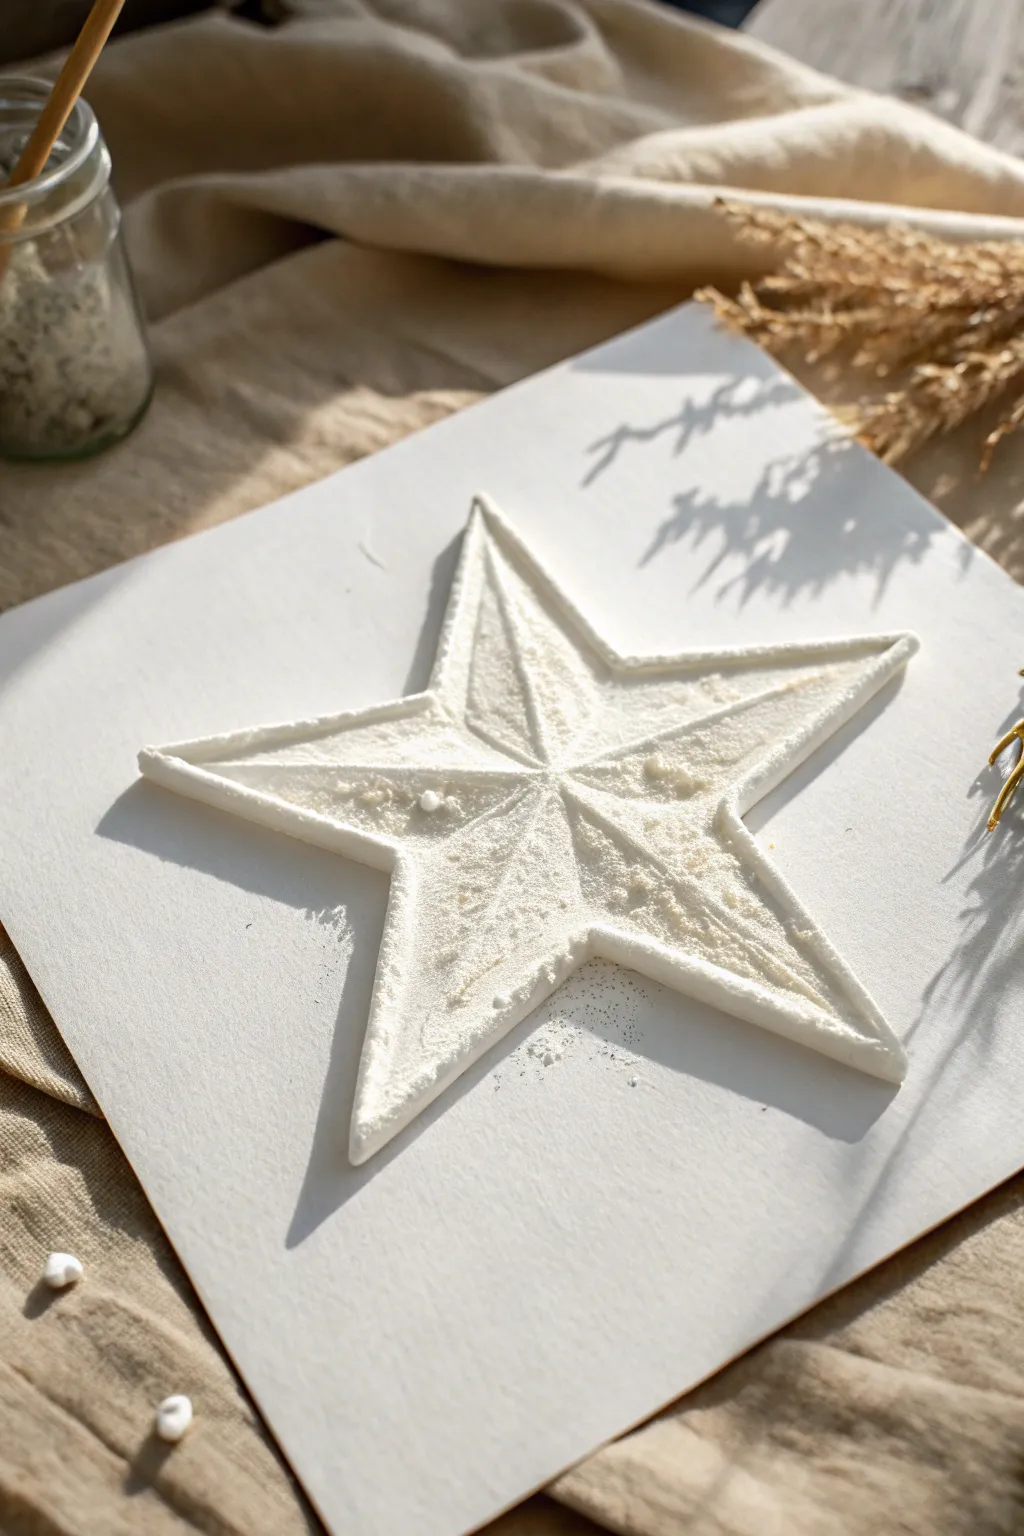
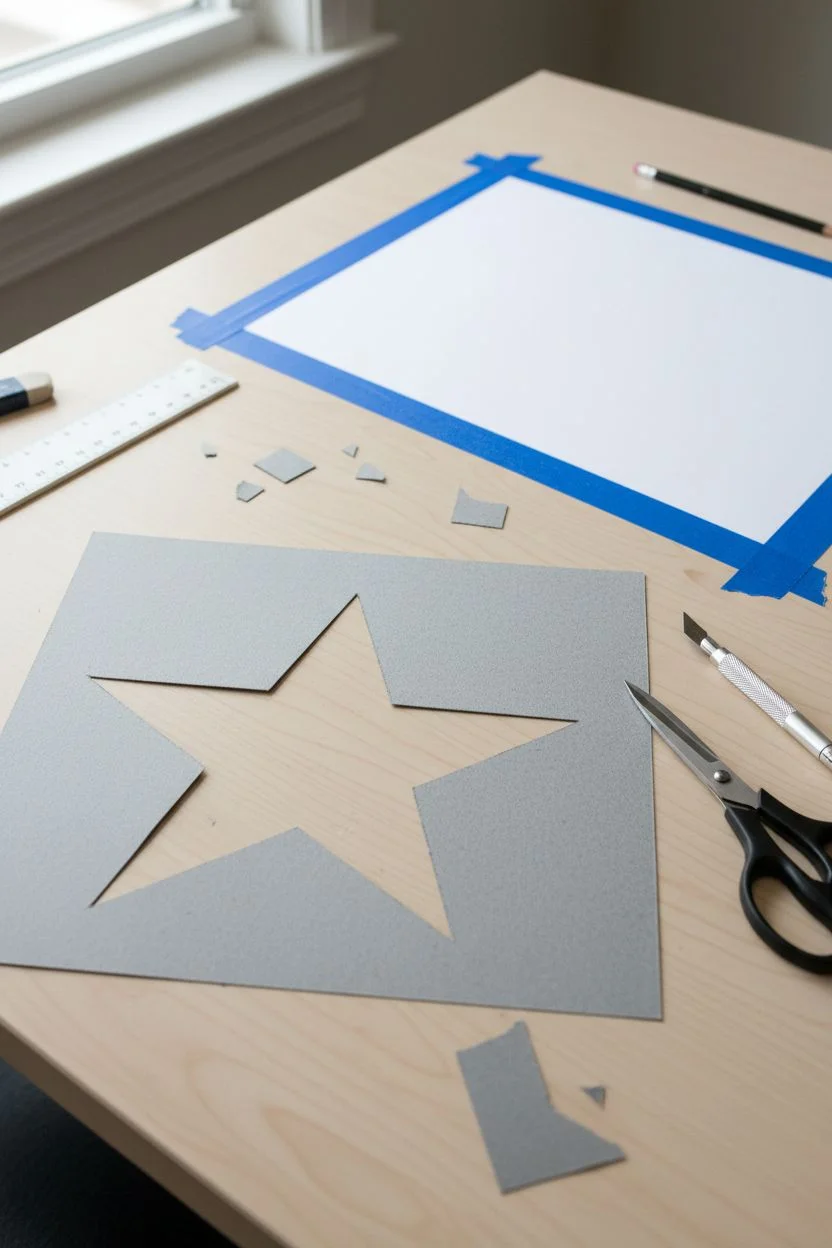
Bring texture and elegance to your paper crafting with this minimalist puffy paint star. This project uses a negative space stenciling technique to create crisp, raised edges and a beautiful, snowy relief effect.
Step-by-Step
Materials
- Puffy paint (white) or DIY puffy paint mix (white glue, shaving cream, flour)
- Thick cardstock or watercolor paper (white)
- Pencil
- Ruler
- Scissors or craft knife
- Masking tape or painter’s tape
- Small palette knife or old credit card
- Fine glitter or coarse salt (optional for texture)
- Scrap paper or cardstock for creating the stencil
Step 1: Creating the Stencil
-
Measure your guides:
Begin by deciding how large you want your star to be. On your scrap paper, mark a central point and lightly draw a circle as a guide for the star’s points to ensure symmetry. -
Draw the star:
Using your ruler, connect five points along the circle’s edge to the center to form a classic five-pointed star. Alternatively, print out a star template from your computer. -
Cut the negative space:
Carefully cut out the *inside* of the star shape using scissors or a craft knife. You want to keep the surrounding paper intact as this will be your stencil frame. -
Refine the edges:
Check the inner edges of your stencil for any jagged bits. Smooth cuts are crucial here because the puffy paint will mimic every tiny imperfection in the paper’s edge.
Bleeding Edges?
If paint seeps under the stencil, your paint might be too runny or the stencil wasn’t flush. Try using temporary spray adhesive on the back of the stencil next time for a tighter seal.
Step 2: Preparing the Base
-
Secure the paper:
Place your final piece of thick cardstock on a flat workspace. I like to tape the corners down lightly so the paper doesn’t buckle when the wet medium is applied. -
Position the stencil:
Lay your star stencil over the cardstock in your desired position. Press it down flat. -
Adhere tightly:
Use small pieces of masking tape to secure the stencil to the cardstock. Make sure the inner points of the star are pressing flush against the bottom paper so paint doesn’t seep underneath.
Step 3: Applying the Paint
-
Prepare the mix:
If using store-bought puffy paint, squeeze a generous amount onto a palette. If making DIY paint, mix equal parts white glue and shaving cream in a bowl until stiff peaks form. -
Fill the shape:
Scoop up a dollop of the puffy mixture with a palette knife. Plop it into the center of the star stencil. -
Spread outward:
Gently spread the mixture from the center toward the points of the star. Moving outward helps prevent forcing paint under the stencil edges. -
Create ridges:
To achieve the faceted look seen in the photo, use the edge of your palette knife to score lines from the center of the star out to each tip and each inner crease. This mimics a 3D metal star. -
Add texture:
While the paint is still wet, sprinkle a tiny pinch of white glitter or coarse salt over the surface. This catches the light and adds to that frosty, magical appearance.
Glow Up
Mix a tiny drop of luminescent paint into your white puffy mixture. The star will look white in daylight but will glow softly in the dark, perfect for a shimmering night sky theme.
Step 4: The Reveal
-
Lift carefully:
This is the most critical step. Do not wait for it to dry completely. Gently lift the stencil straight up—avoid dragging it sideways—to reveal the crisp, raised edges. -
Clean up edges:
If any paint bled through the stencil, quickly use a damp cotton swab or the tip of a toothpick to wipe it away or reshape the line before it sets. -
Microwave puff (optional):
If you are using heat-activated puffy paint, follow the bottle’s instructions now (usually microwaving for a few seconds) to make it rise. If using DIY shaving cream paint, skip this step. -
Final drying:
Let the artwork sit undisturbed in a safe place. Puffy paint often takes longer to dry than standard acrylics, usually needing overnight to fully harden without deflating.
Once fully dry, display your textured star art proudly or frame it in a shadow box to protect the relief.
Puffy Paint Resist Background Wash
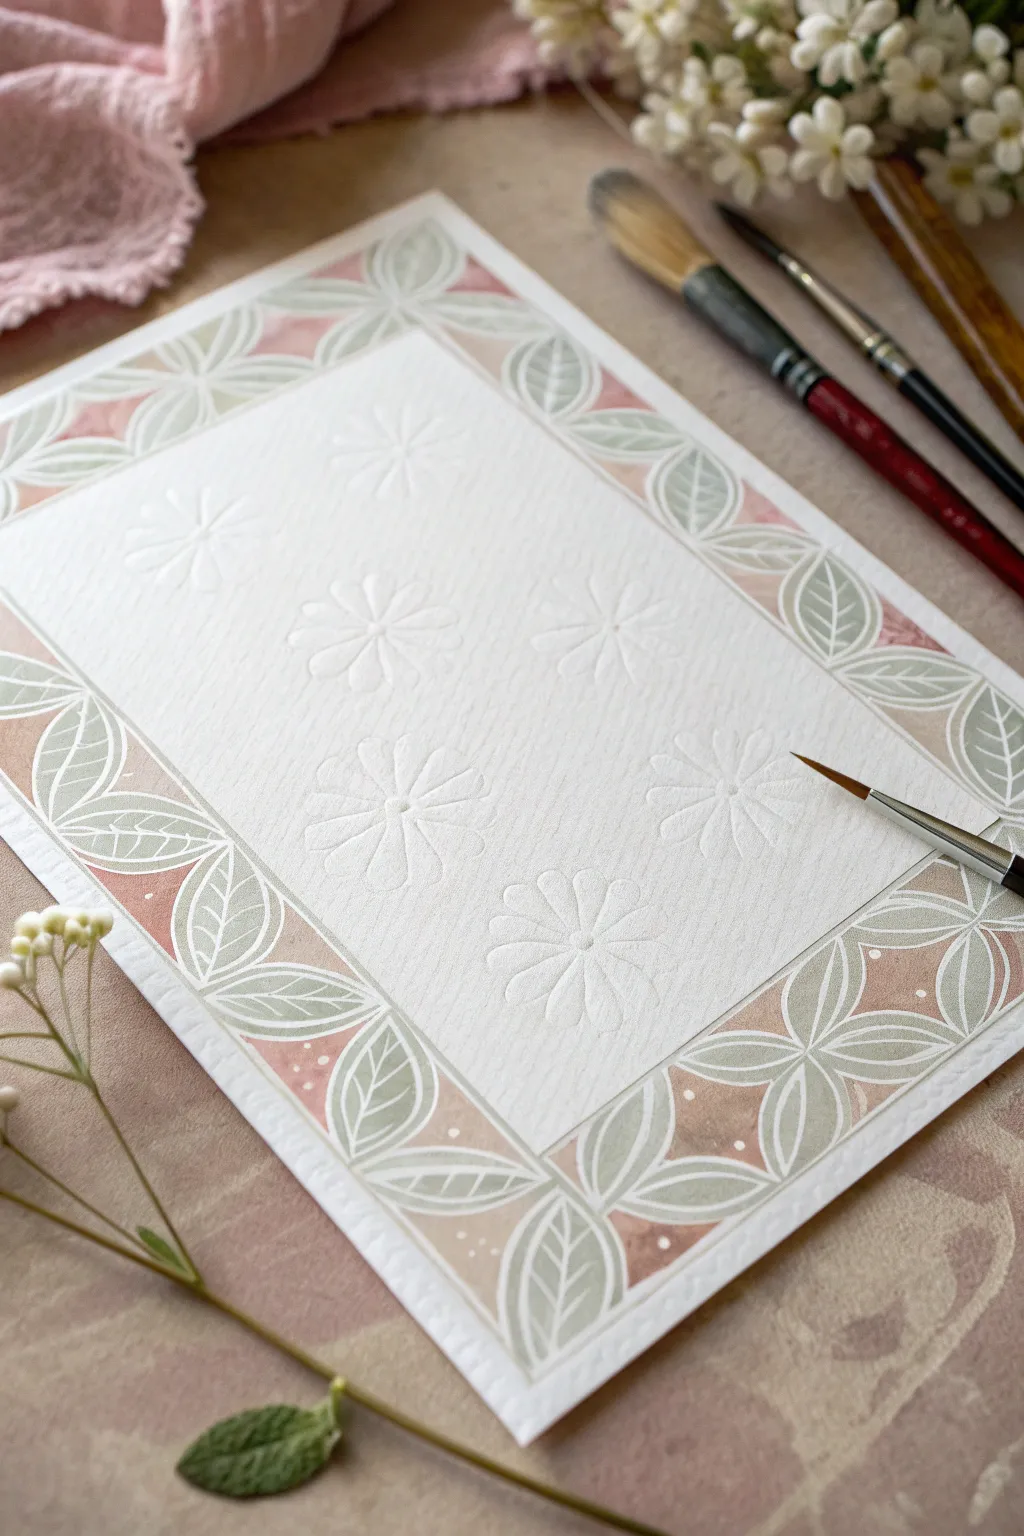
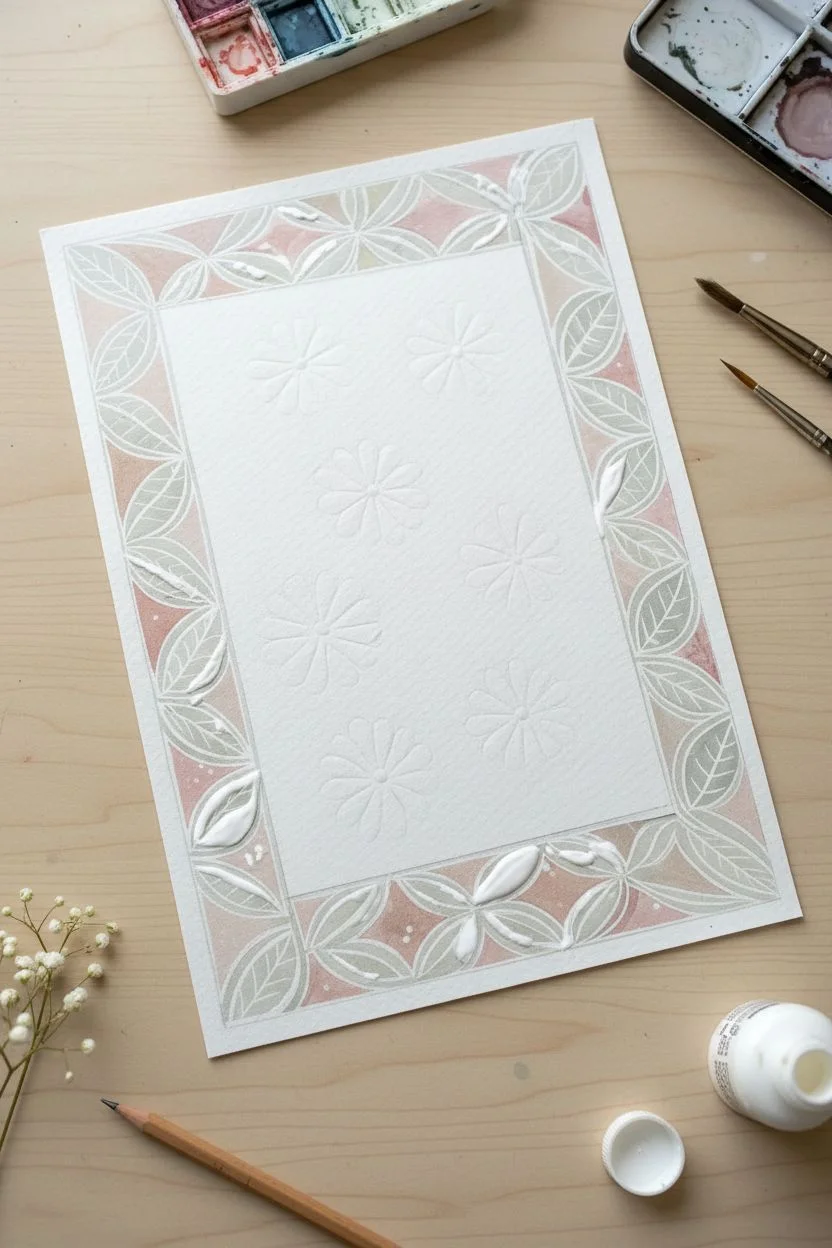
This elegant project combines the tactile lift of puffy paint with the delicate transparency of watercolor for a sophisticated stationery look. By using white puffy paint as a resist, you can create subtle, embossed floral patterns that reveal the paper’s texture underneath.
Detailed Instructions
Materials
- Heavyweight cold-press watercolor paper
- White puffy paint (fine tip applicator)
- Watercolor paint set
- Round watercolor brushes (sizes 2 and 4)
- Pencil and ruler
- Water cups
- Paper towels
- Masking tape (optional)
Step 1: Planning and Resist Application
-
Prepare your paper:
Cut your watercolor paper to your desired size. If you want crisp edges later, tape the paper down to your work surface. -
Sketch the border guide:
Using a ruler and a very light pencil touch, draw a rectangle about 1.5 inches in from the edge of the paper to define where your border will be. Sketch diagonal guidelines intersecting the corners to help align your leaf pattern. -
Pencil the leaf pattern:
Lightly sketch a repeating leaf motif within the border area. This design features sets of four leaves radiating from corner points, creating diamond shapes between them. -
Sketch center florals:
In the central white space, lightly map out the positions for your simple daisy-like flowers. You don’t need details, just faint circles or center points. -
Apply puffy paint to center:
Using a fine-tip applicator bottle, carefully draw the daisy shapes in the center of the paper with white puffy paint. Keep the lines thin and consistent. -
Apply puffy paint to border:
Trace over your pencil lines for the leaf border with the same white puffy paint. These raised lines will act as barriers (resists) for your watercolor later. -
Allow to dry completely:
This is crucial: Let the puffy paint dry fully. It usually takes at least 4 hours, but overnight is safer. The paint must be hard to the touch so it doesn’t smear when wet.
Step 2: Watercolor Painting
-
Prepare your palette:
Mix a muted, earthy color palette. I like to use a soft sage green for the leaves and a dusty rose or terracotta for the background spaces. -
Start with the leaves:
Load your smaller size 2 brush with the sage green mixture. Carefully paint inside the puffy paint leaf outlines. -
Create variation:
While the green paint is still wet, drop in a tiny bit of darker green or water to create natural gradients within each leaf. -
Paint the border background:
Using your size 4 brush, fill in the diamond shapes and negative spaces between the leaves with your dusty rose color. -
Control the flow:
Let the puffy paint value acts as a dam, keeping your two paint colors separated. If you accidentally go over the white line, quickly dab it with a clean, damp brush. -
Add detail dots:
If you wish, use white gouache or very concentrated white watercolor to add tiny dots inside the pink diamond sections for extra texture once dry. -
Dry the artwork:
Allow the entire piece to dry flat. The watercolor paper might buckle slightly, which adds to the handmade charm.
Clean Lines Tip
To keep your puffy paint lines razor-thin and consistent, wipe the nozzle tip on a paper towel after every few strokes to prevent globs from forming.
Step 3: Finishing Touches
-
Erase pencil lines:
Once the paint is bone dry, use a kneaded eraser to gently lift any visible pencil sketches that weren’t covered by paint. -
Final inspection:
Check for any uneven edges and clean them up with a damp brush if necessary.
Level Up: Hidden Messages
Use the white puffy paint to write a secret message or name in the center area instead of flowers. It will remain subtle white-on-white until inspected closely.
You now have a beautiful, textured piece of art that looks like professional letterpress stationery
Cardboard Cutout Puffy Mini Signs

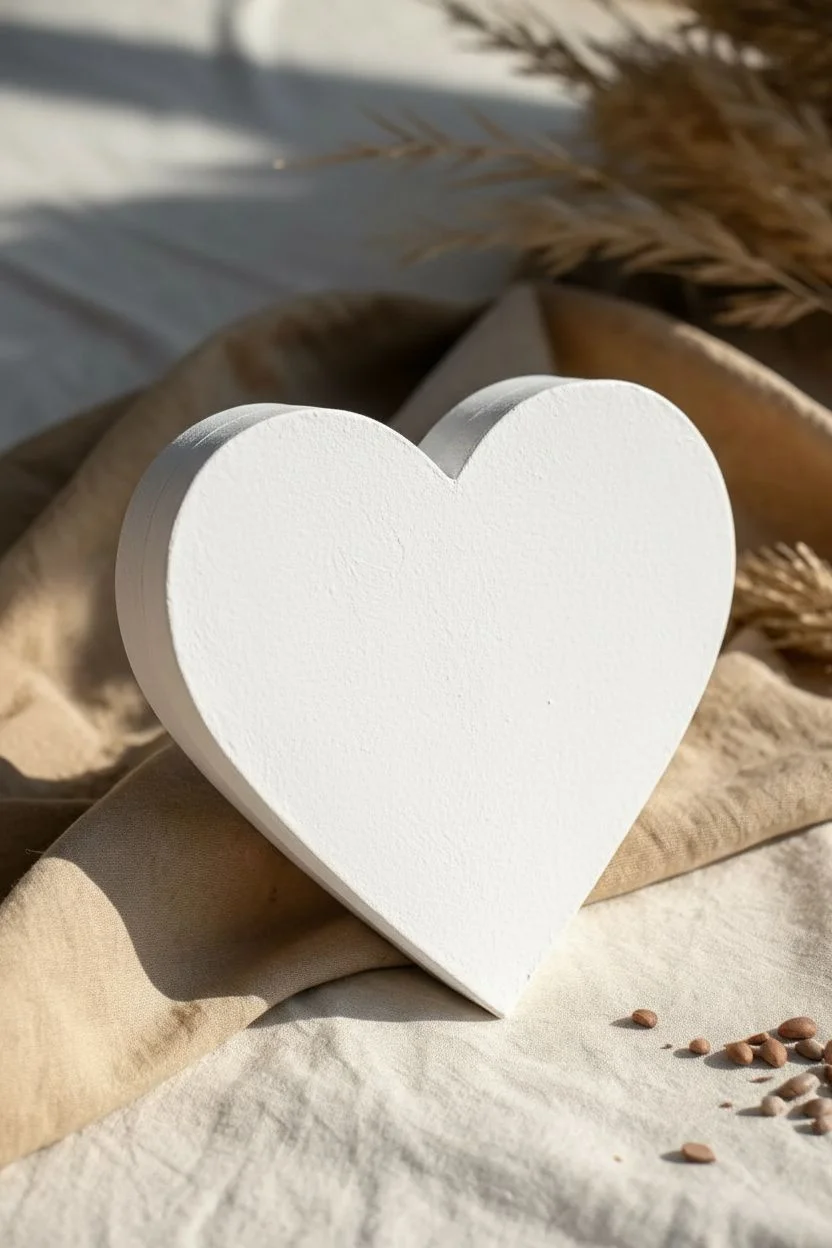
Create a charming, rustic piece of decor with this heart-shaped mini sign that brings a warm, bohemian touch to any shelf. Using simple cardboard and dimensional paint, you’ll craft a textured piece featuring delicate botanical motifs and a distinctive beaded border.
How-To Guide
Materials
- Thick corrugated cardboard (two pieces)
- Pencil
- Scissors or craft knife
- Hot glue gun and glue sticks
- Strip of thin cardstock or kraft paper (approx. 1 inch wide)
- White matte acrylic paint
- Terracotta or burnt orange acrylic paint
- Metallic bronze or gold paint pen (fine tip)
- Dimensional fabric paint (puffy paint) in pearl or light beige
- Small flat paintbrush
- Fine detail paintbrush
- Sandpaper (optional)
Step 1: Building the Base
-
Trace and Cut:
Begin by drawing a symmetrical heart shape on your corrugated cardboard. Once you are happy with the shape, cut it out. Trace this cutout onto a second piece of cardboard and cut it out as well so you have two identical hearts. -
Create the Walls:
Cut a long strip of thin cardstock or flexible kraft paper about 1 inch wide. This will be the side wall of your sign. -
Assemble the Structure:
Use hot glue to attach the cardstock strip along the edge of one cardboard heart, following the curve closely. Glue the second cardboard heart on top to close the structure, creating a thick, 3D heart block. -
Smooth the Edges:
Inspect the edges where the cardstock meets the cardboard. If there are any rough overhangs or glue bumps, gently sand them down or trim them for a unified look. -
Base Coat:
Paint the entire heart—front, back, and sides—with white matte acrylic paint. You may need two or three coats to completely hide the brown cardboard color. Let it dry completely between coats.
Step 2: Adding the Design
-
Sketch the Composition:
Lightly sketch your botanical design on the front face of the heart with a pencil. Draw two stems originating from the bottom point—one curving left and one curving right. -
Paint the Filled Leaves:
For the right-side branch, mix a warm terracotta shade. Using your fine detail brush, paint the leaves solid, tapering them to sharp points. I prefer to paint the stem first and add the leaves one by one. -
Outline the Second Branch:
On the left side, use a metallic bronze or gold paint pen to carefully trace the stem and leaf outlines. Keep the lines thin and steady, leaving the inside of these leaves the white background color. -
Refine the Details:
Check for any uneven edges on your painted leaves and tidy them up with a tiny bit of white paint if needed.
Dap & Drag Fix
If a puffy paint dot loses its round shape or smears, let it dry completely, slice it off carefully with a craft knife, and re-apply a fresh dot.
Step 3: The Puffy Border
-
Prep the Puffy Paint:
Shake your dimensional paint bottle well. Test the flow on a scrap piece of paper to ensure the ‘beads’ come out round and consistent without air bubbles. -
Apply the Beaded Edge:
Starting at the top dip of the heart, squeeze small, uniform dots of puffy paint along the very edge of the front face. Space them evenly, about a few millimeters apart. -
Color the Dots (Optional):
If your puffy paint is white and you want it to match the terracotta theme, let the dots dry fully (usually 4-6 hours), then gently dab each dot with a tiny amount of diluted terracotta or beige paint. -
Final Drying:
Set the heart horizontally in a safe place to dry overnight. The puffy paint takes significantly longer to cure than standard acrylics.
Two-Tone Dimensions
After the puffy dots dry, lightly brush their tops with gold metallic paint for a glamorous, highlighting effect that catches the light.
Now you have a lovely dimensional accent piece perfect for gifting or styling your own vignette


Have a question or want to share your own experience? I'd love to hear from you in the comments below!