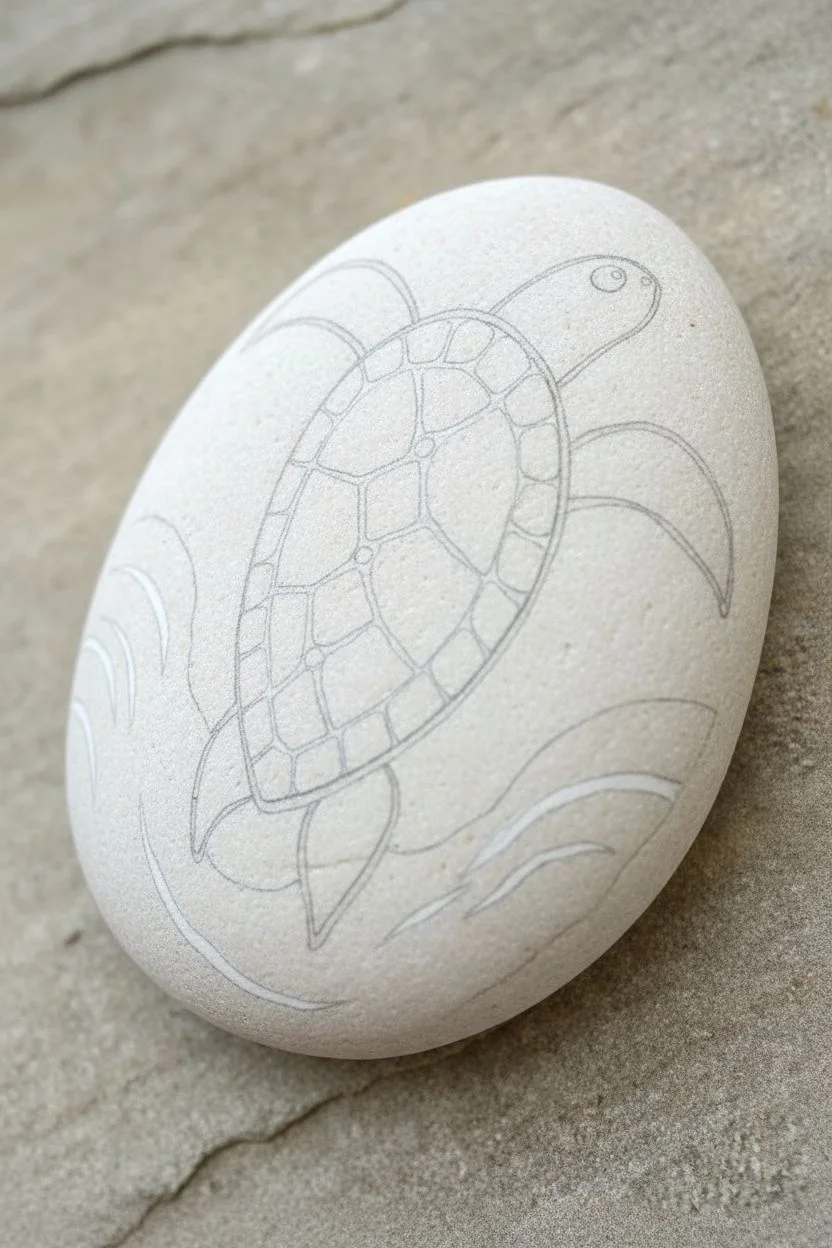
If you’ve got an oval rock, you’ve basically got a turtle waiting to happen. Here are my favorite turtle rock painting ideas—starting with the classic, instantly-recognizable looks and moving into more playful, artsy twists.
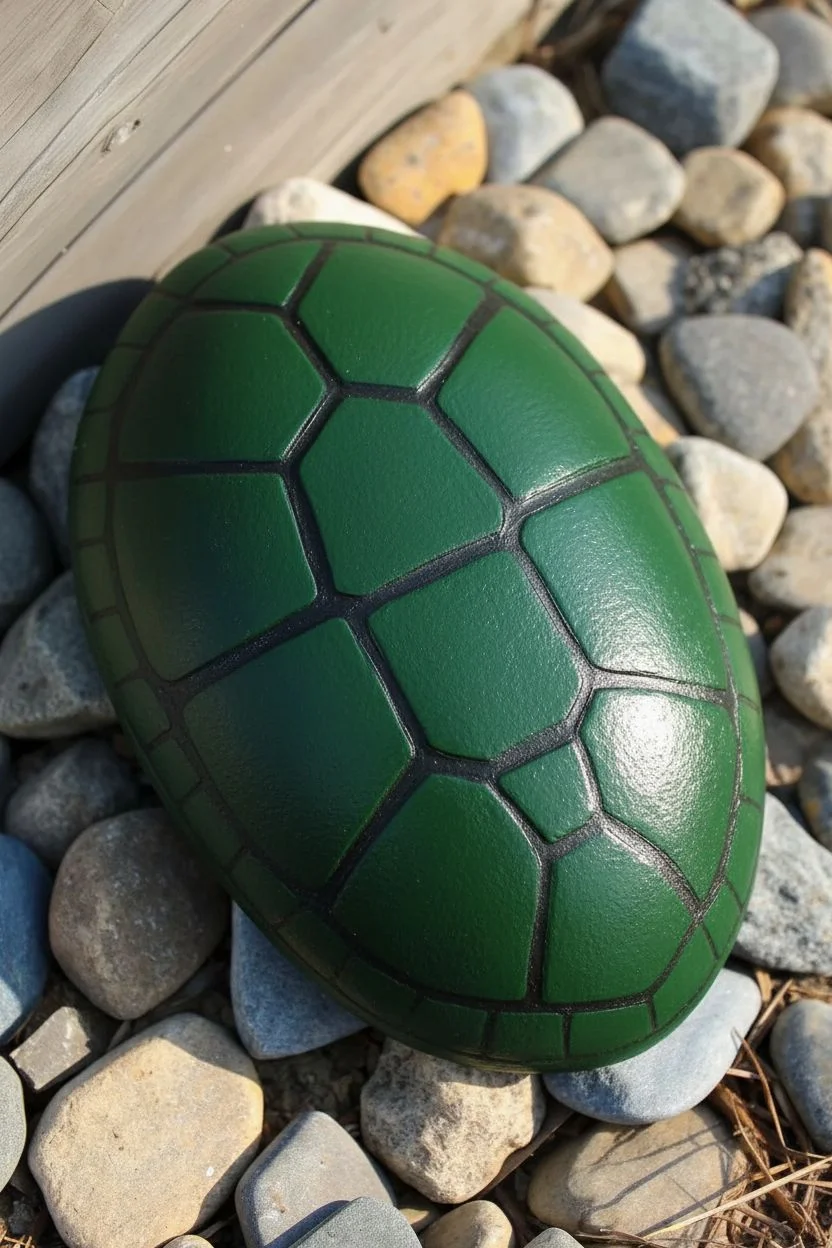
Classic Green Turtle With Scute Lines
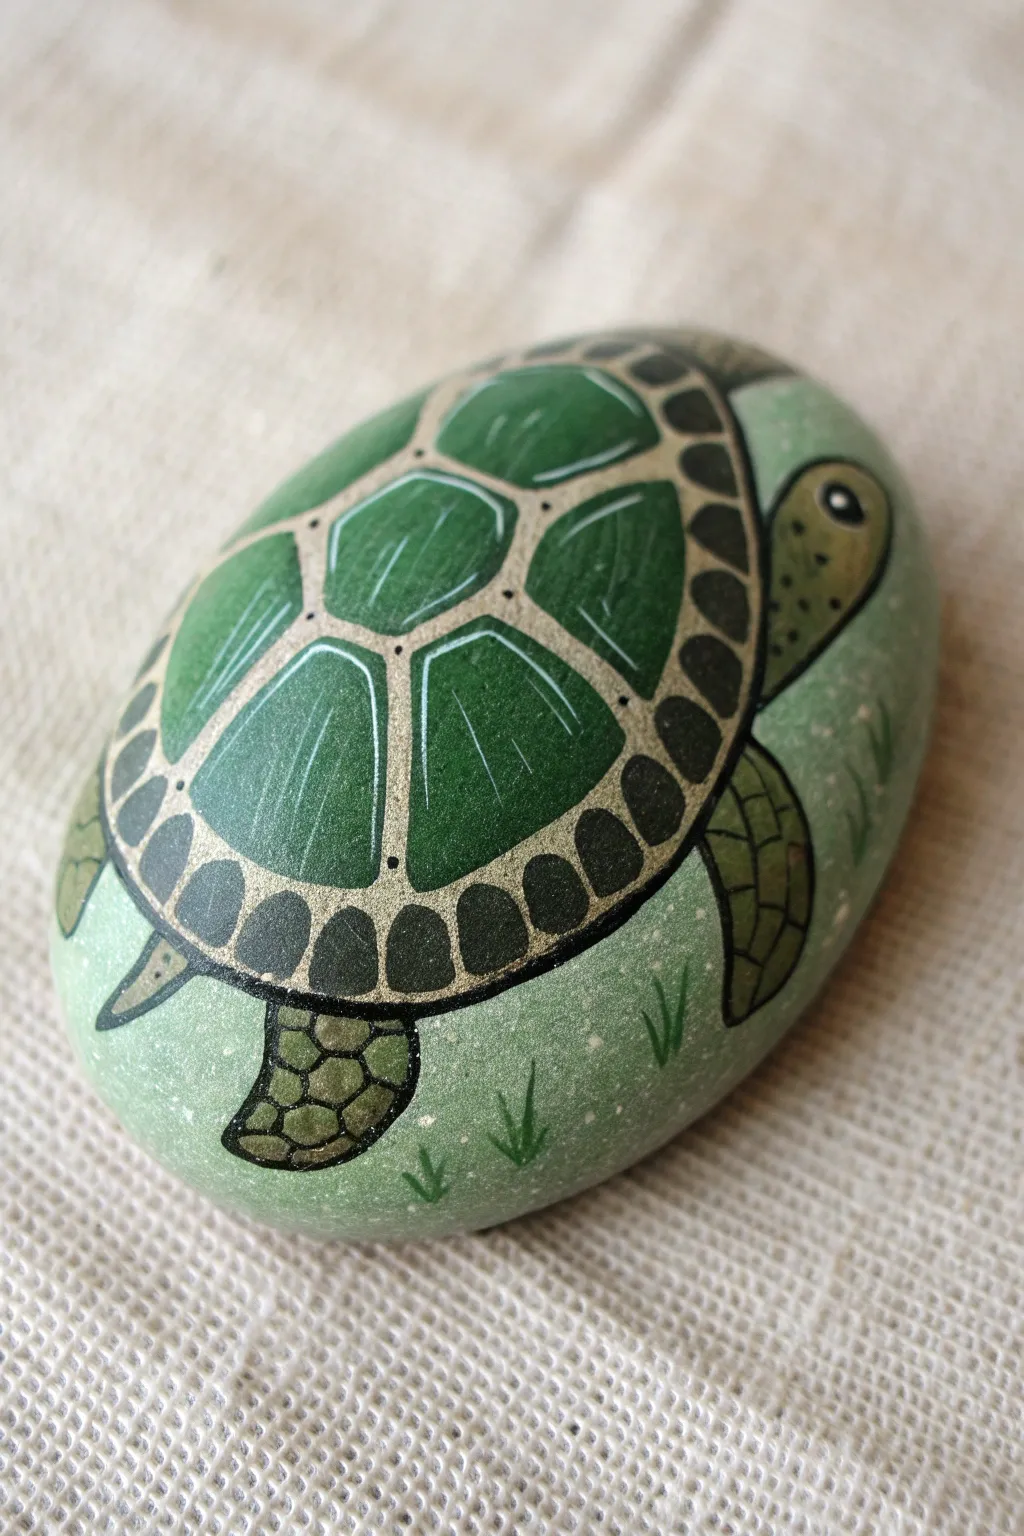
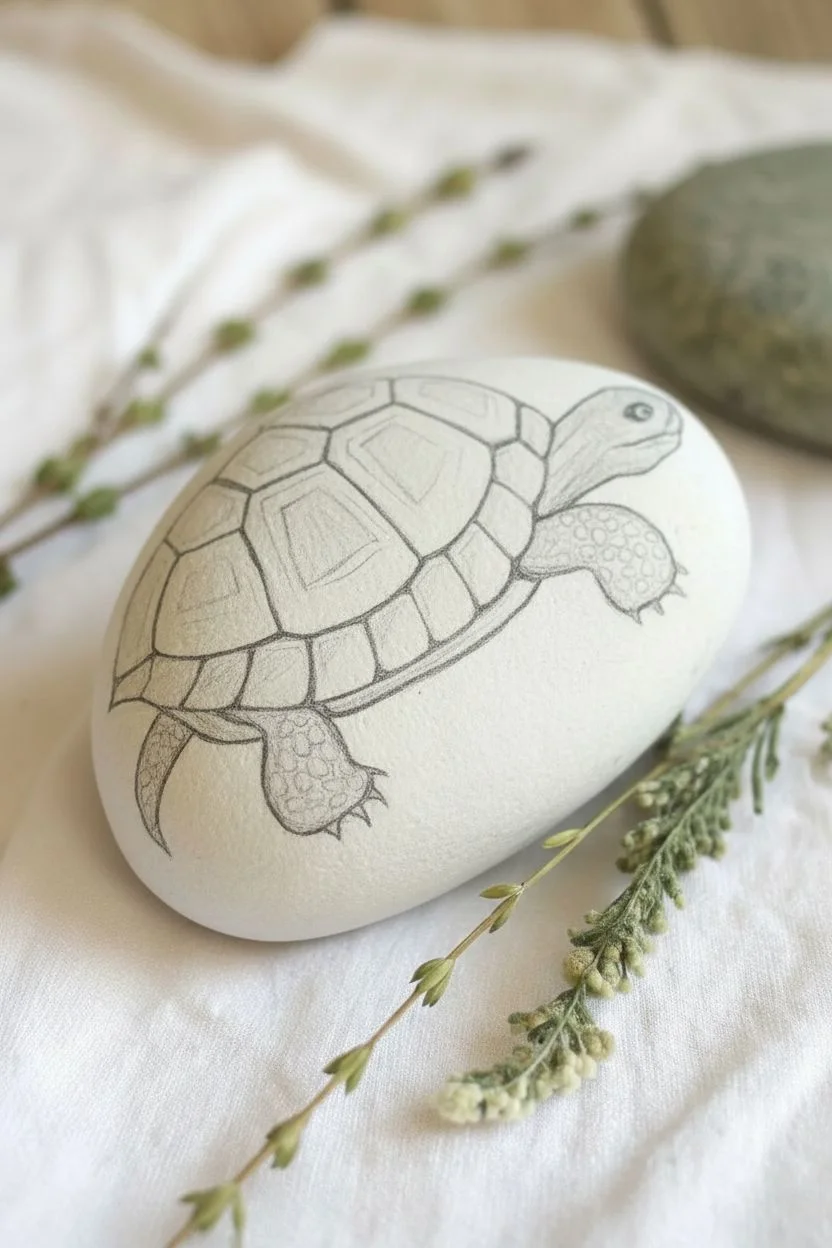
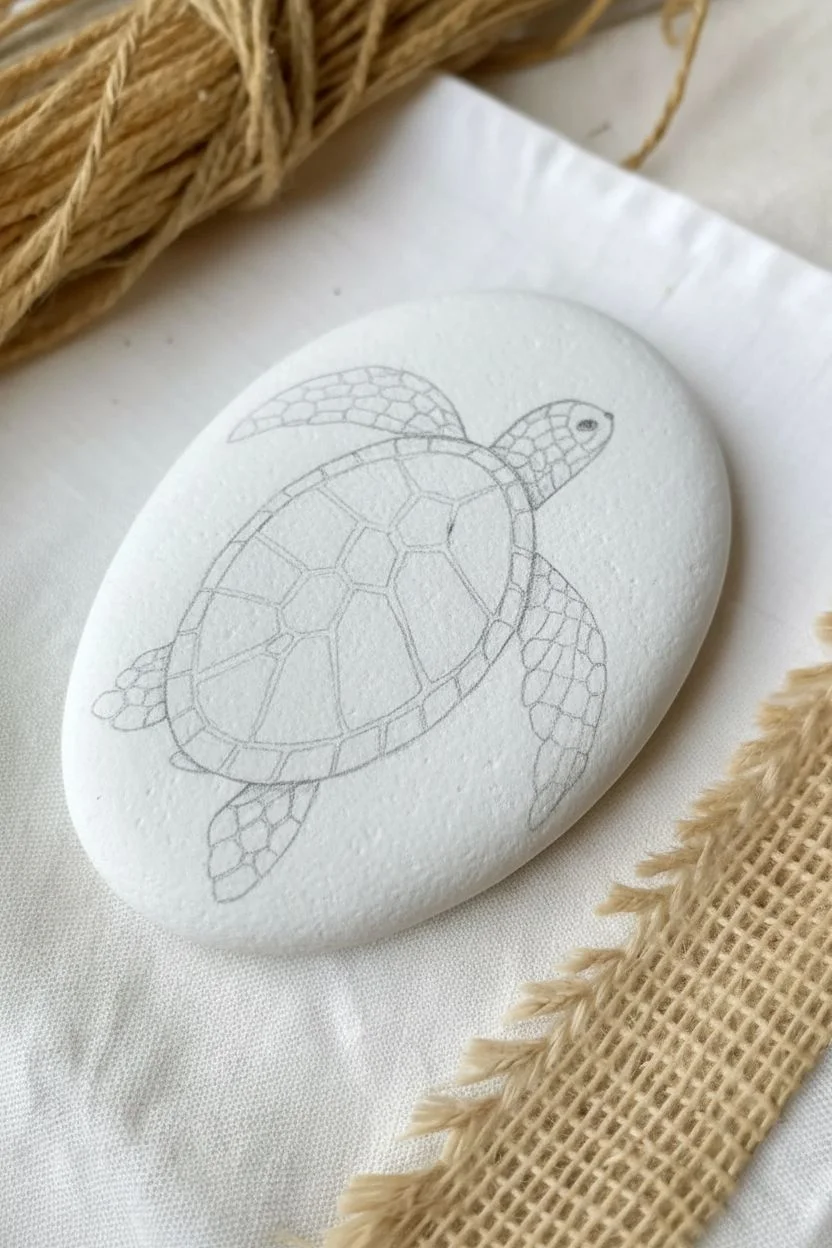
Transform a smooth, oval stone into a charming sea turtle featuring a beautifully structured shell. This project focuses on clean lines and natural greens to create a realistic yet stylized look that captures the peaceful nature of these ocean drifters.
Step-by-Step
Materials
- Smooth, oval river rock (palm-sized is ideal)
- Acrylic paints: Light sage green, deep forest green, black, white, bronze or gold metallic (optional)
- Flat shader brush (size 4 or 6)
- Fine liner brush (size 00 or 0)
- Pencil and eraser
- Palette or paper plate
- Clear acrylic sealant (spray or brush-on)
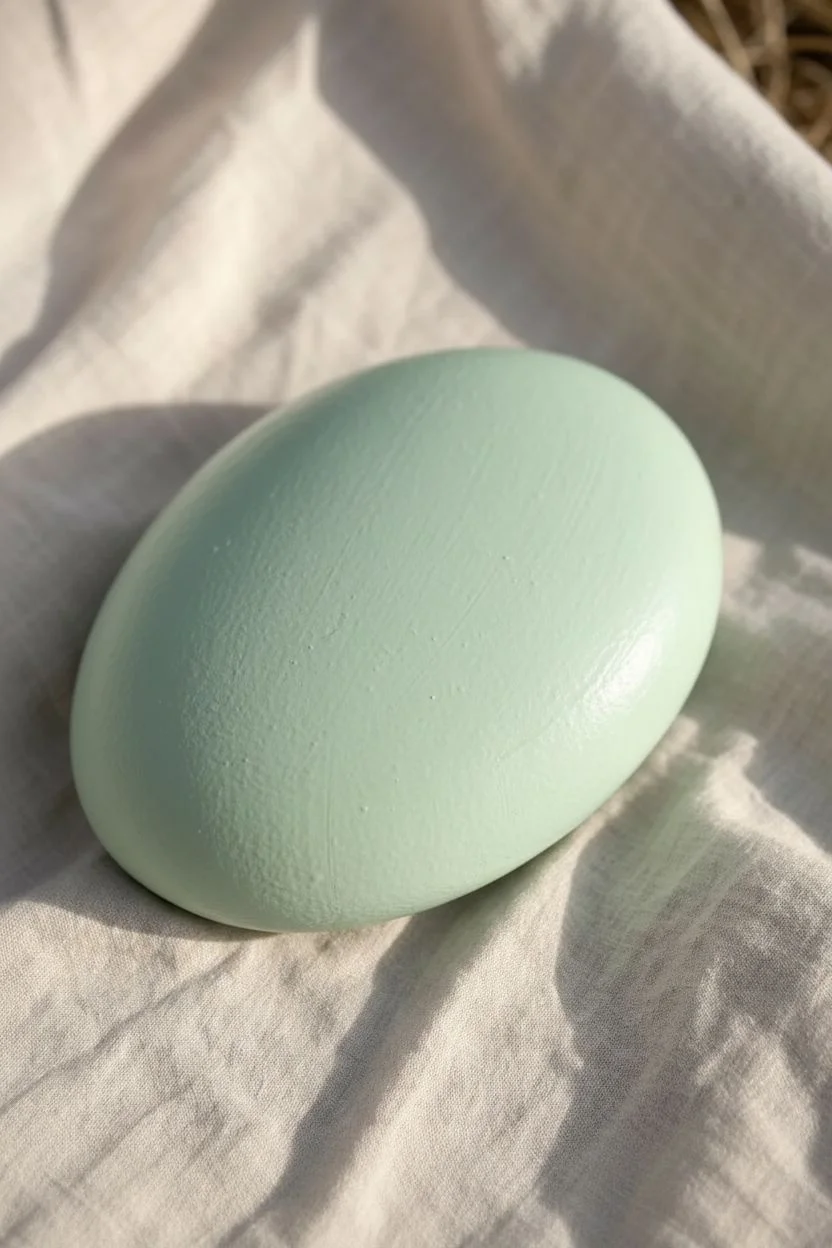
Step 1: Base and Sketch
-
Clean your canvas:
Begin by scrubbing your rock with soap and water to remove any dirt or oils. Let it dry completely. A clean surface ensures your paint adheres properly and lasts longer. -
Base coat application:
Mix white with a touch of sage green to create a very pale, milky green distinct from the final design colors. Paint the entire top surface of the stone with this mixture. You might need two coats for opaque coverage. -
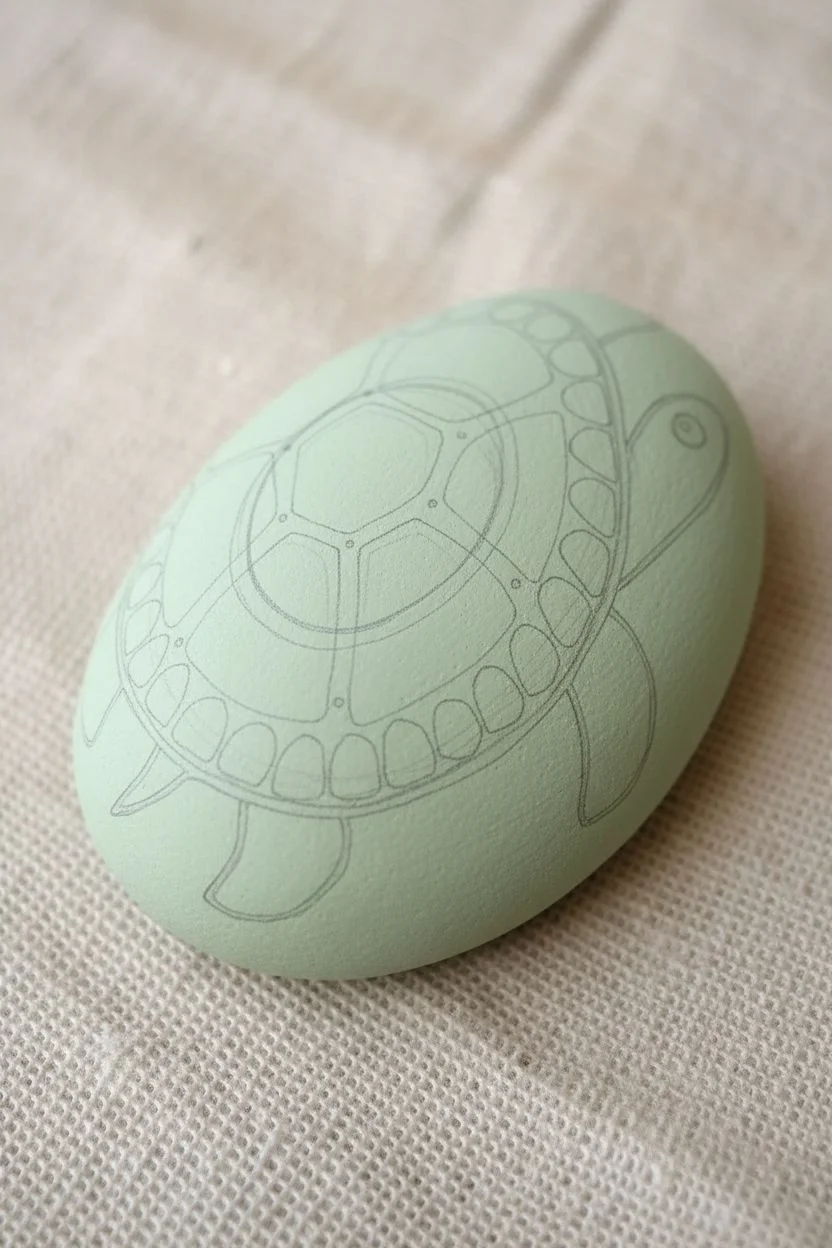
Outline the turtle:
Once the base is dry, use a pencil to lightly sketch the large oval of the shell, leaving room at one end for the head. Sketch the head shape, four fins, and a small pointed tail. -
Map the shell:
Inside the shell oval, sketch a smaller inner oval. Draw faint lines connecting the inner and outer ovals to create the border scutes. Finally, draw the hexagonal plates inside the center oval to complete the classic turtle shell pattern.
Shaky Hands?
If you struggle with the long liner strokes for the shell grid, use a white or beige paint pen instead of a brush. The felt tip offers much more control for straight lines.
Step 2: Filling with Color
-
Paint the appendages:
Using a medium olive or sage green, fill in the head, flippers, and tail. Keep your paint consistency creamy to avoid brushstrokes showing through. -
Darken the center scutes:
Switch to your deep forest green. carefully fill in the central hexagonal shapes of the shell. I like to leave a tiny hairline gap between the paint and your pencil lines to serve as a guide for later outlining. -
Paint the border scutes:
Mix a small amount of black into your forest green to create a slightly darker, shadowed shade. Use this color to fill in the ring of smaller scutes that border the main shell. -
Add shell highlights:
Take a very dry flat brush with a tiny amount of white or light green paint. Gently dry-brush the center of each dark green scute to give the shell a slightly domed, three-dimensional appearance. -
Detail the head:
Using a dotting tool or the back of a brush, place a solid black circle for the eye. Once dry, add a tiny white reflection dot to bring the turtle to life.
Pro Tip: Highlight Placement
Ensure all your thin white highlight lines on the shell follow the same curve direction. This uniform lighting makes the shell look consistently round and domed.
Step 3: Line Work and Texture
-
Create the shell dividers:
Load a liner brush with a creamy beige or metallic bronze paint. Carefully trace over the spaces between the shell sections. Thick, consistent lines here mimic the natural separation of the keratin plates. -
Outline the body:
Switch to thinned black paint and your finest liner brush. Outline the entire turtle body, including the head and flippers. Keep your hand steady and rest your pinky on the table for stability. -
Define the shell border:
Use the black liner to outline the entire outer rim of the shell, separating it from the fins and head. This heavy outline adds a nice graphic punch to the design. -
Add scute detailing:
Inside each large green shell plate, paint two or three very thin white lines. These should curve slightly to follow the shape of the shell, suggesting light reflection and texture. -
Texture the skin:
On the flippers and head, paint a mosaic pattern resembling cobblestones using the black liner. In the center of the larger skin scales on the flippers, add tiny dots of light green. -
Connect the shell points:
Add small black dots at the intersections where the beige divider lines meet. This subtle detail makes the shell look more structural and finished.
Step 4: Finishing Touches
-
Ground the turtle:
Using a mix of the base green and a little white, dry-brush the area surrounding the turtle to soften it. Add a few simple V-shaped grass tufts around the edges using dark green. -
Seal the artwork:
Allow the rock to cure for at least 24 hours. Apply a layer of glossy or satin varnish to protect the paint and give the turtle a ‘wet’ look, as if it just emerged from the ocean.
Place your finished turtle in a garden pot or on a desk where its calm demeanor can be enjoyed daily


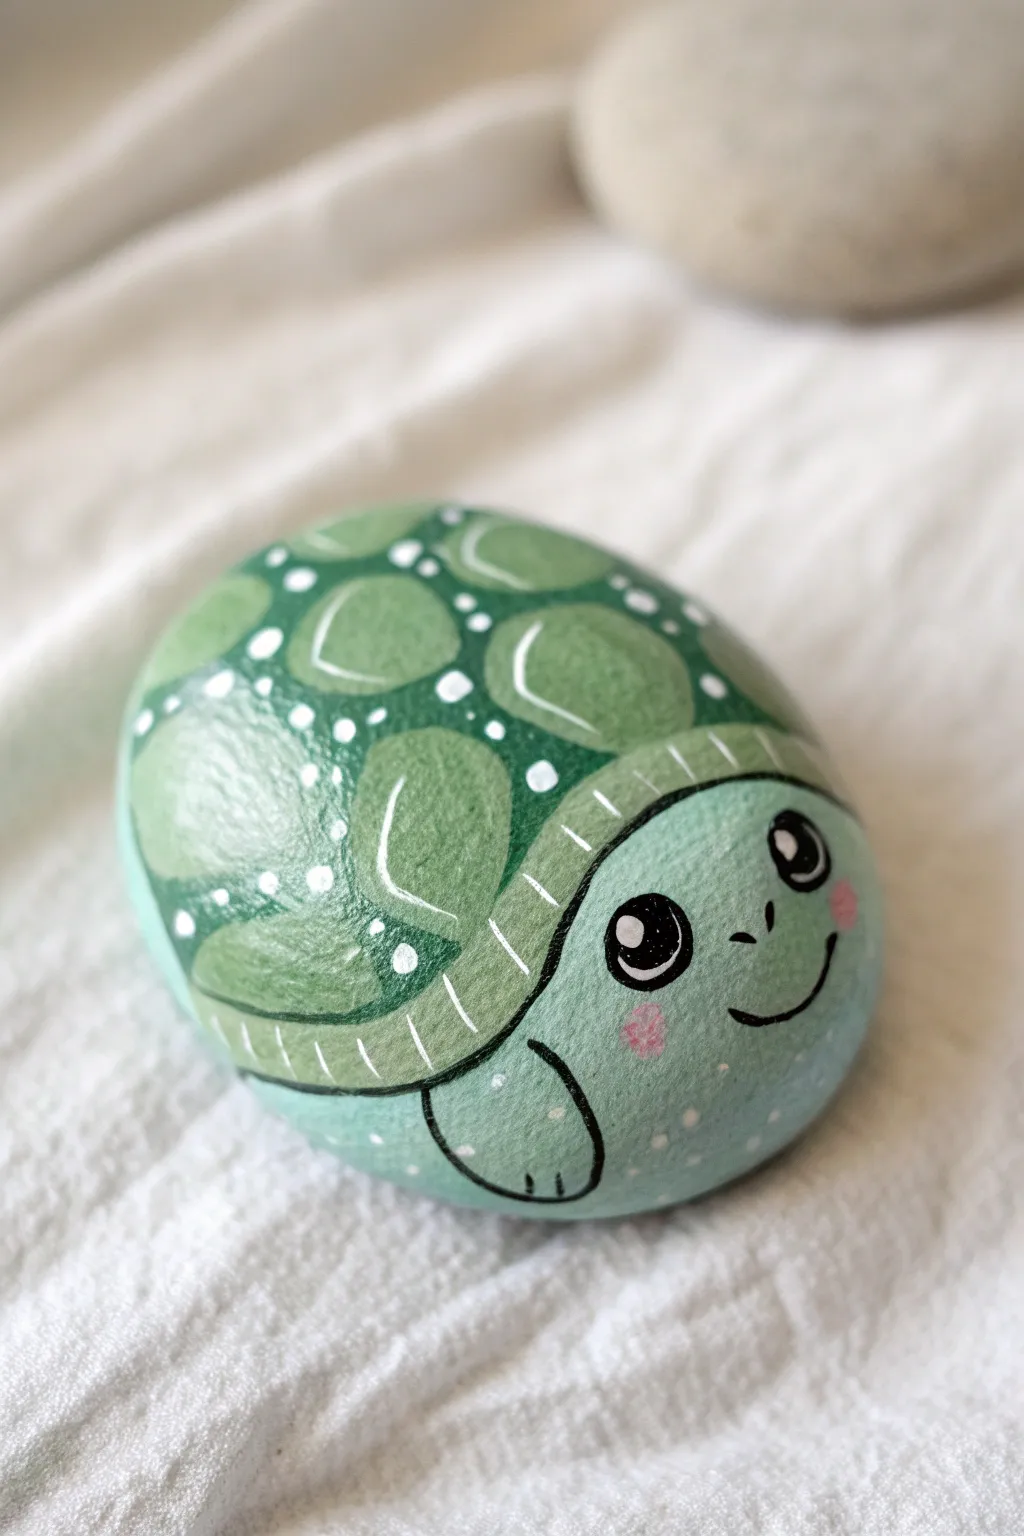
Easy Cartoon Turtle Face

Transform a simple oval stone into an adorable cartoon turtle with expressive eyes and a patterned shell. This easy project focuses on clean lines and soft colors to create a friendly little desk companion.
Detailed Instructions
Materials
- Smooth, oval-shaped river rock (palm-sized)
- Acrylic paints (light green, olive green, cream/off-white, black, orange/amber, white)
- Fine liner detail brush (size 00 or 0)
- Small flat brush
- Pencil and eraser
- Acrylic clear coat/sealer (matte or glossy)
Step 1: Preparation & Base shapes
-
Clean the canvas:
Wash your rock thoroughly with soap and water to remove any dirt or oils, then let it dry completely to ensure the paint adheres well. -
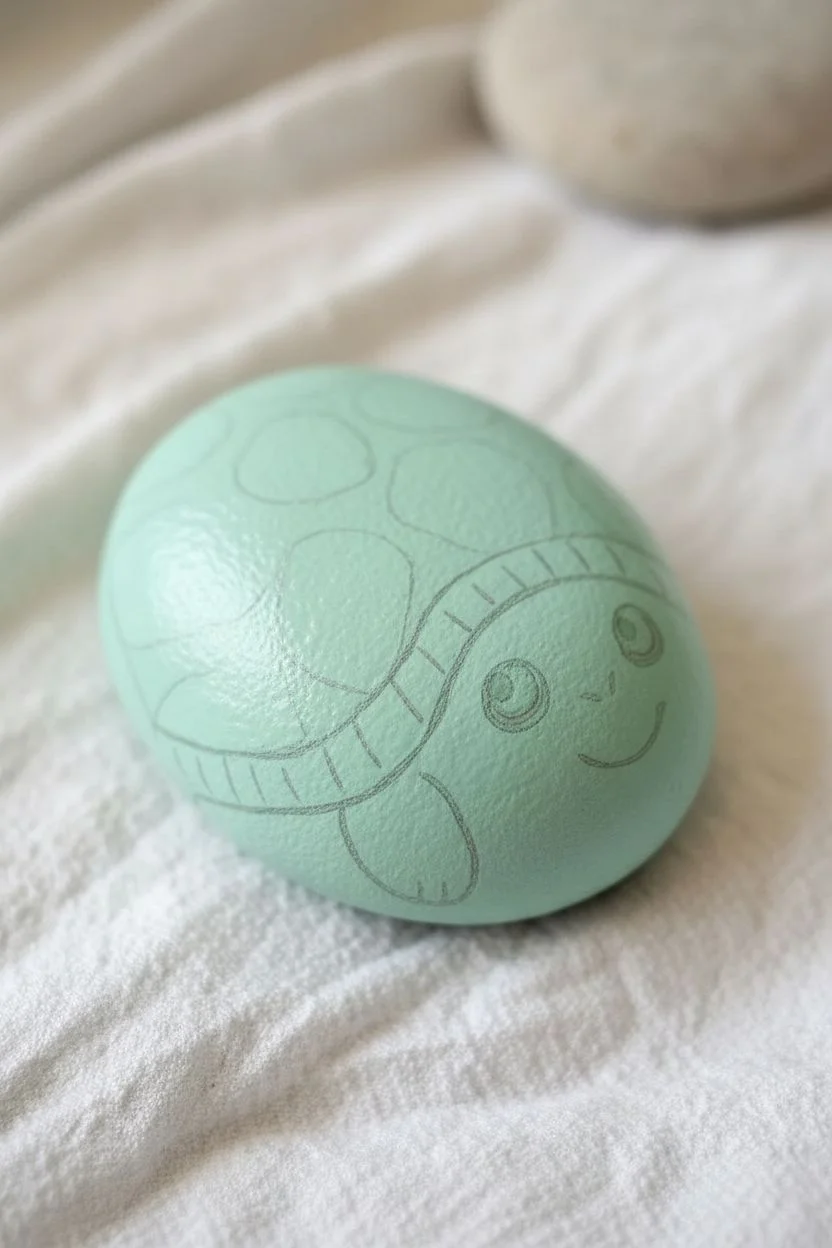
Sketch the outline:
Lightly sketch a curved line separating the front third of the rock from the rest. This front section will be the face, and the larger back section will become the shell. -
Base coat the face:
Using a small flat brush, paint the front face section with a creamy off-white color. You may need two thin coats for opaque coverage, allowing the first to dry before adding the second. -
Base coat the shell:
Paint the remaining back section of the rock with a soft, light green acrylic paint. Be careful to keep a clean edge where it meets the cream face section.
Steady Hand Trick
Rest your pinky finger on a dry part of the rock while painting fine lines to stabilize your hand and prevent shaky strokes.
Step 2: Adding the Shell Details
-
Sketch the shell pattern:
Once the green paint is fully dry, lightly pencil in a hexagon-like pattern for the shell scutes (scales) on top, and smaller curved segments along the sides. -
Outline the segments:
Load your fine liner brush with thinned black paint or use a black acrylic paint marker. Carefully trace over your pencil lines to define the shell segments. -
Add separation details:
Draw the main separation line between the head and the shell with a slightly thicker black line. Add small tick marks along the top edge of this line to suggest texture. -
Paint the accents:
Using a tiny detail brush, fill the small triangular spaces between the shell segments on the sides with an amber or orange paint to add warmth and contrast.
Level Up: 3D Texture
Use ‘puffy paint’ or dimensional fabric paint for the black outlines to give the shell sections a raised, tactile texture.
Step 3: Creating the Face
-
Draft the features:
With a pencil, lightly draw two large ovals for eyes, two tiny nostrils, and a wide, curved smile toward the bottom of the cream section. -
Paint the eye whites:
Fill in the large eye ovals with bright white paint. I find it helpful to start from the center and push the paint outward to the sketched edge. -
Add the pupils:
Paint large black circles inside the white ovals, leaving them slightly cross-eyed or looking upward for a cuter expression. -
Add reflection highlights:
Dip the handle end of a paintbrush into white paint and dot a small highlight into the upper right area of each black pupil. -
Outline the eyes:
Using your finest brush and black paint, carefully outline the white part of the eyes. Make the line slightly thicker at the top to simulate an eyelid shadow. -
Draw the nose and mouth:
Paint two small teardrop shapes for nostrils. Then, paint a long, thin black line for the smile, adding small perpendicular tick marks at the ends for cheeks. -
Define the chin:
Continue the black outline under the chin area to separate the face clearly from the bottom of the rock.
Step 4: Finishing Touches
-
Check your lines:
Look over the black outlines on the shell and face. If any look patchy, go over them once more for a crisp, comic-book style look. -
Seal the artwork:
Once the paint is completely cured (wait at least an hour), apply a coat of clear acrylic sealer to protect your turtle from scratches and weather.
Now you have a charming little stone friend ready to brighten up a garden pot or windowsill


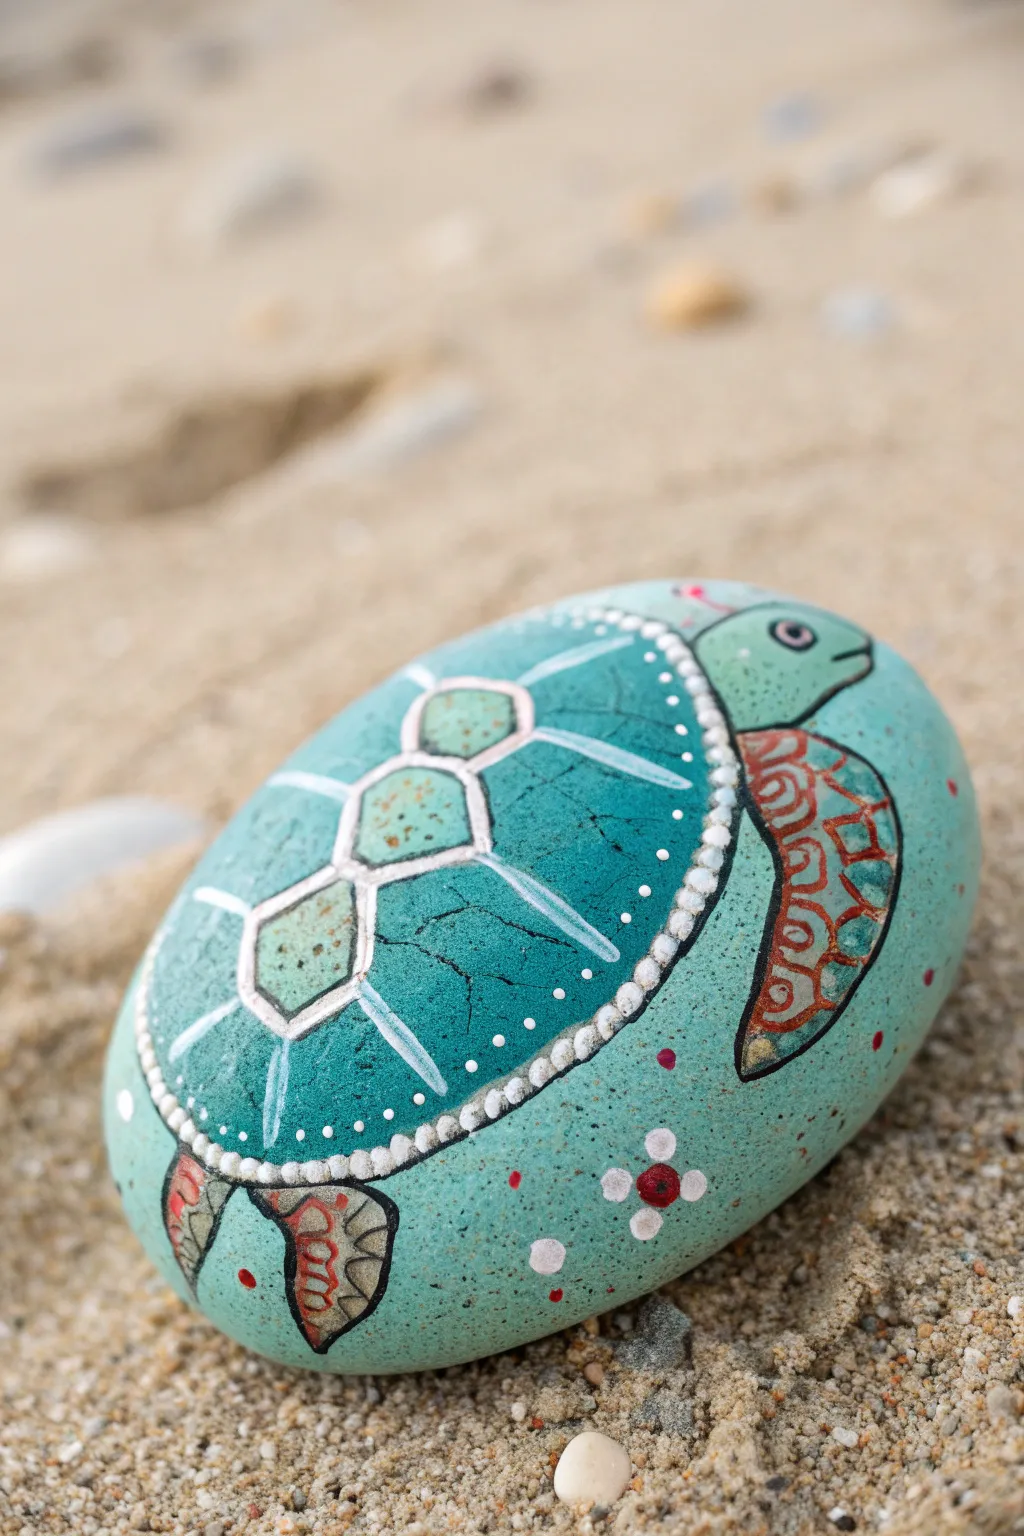
Sea Turtle With Painted Flippers
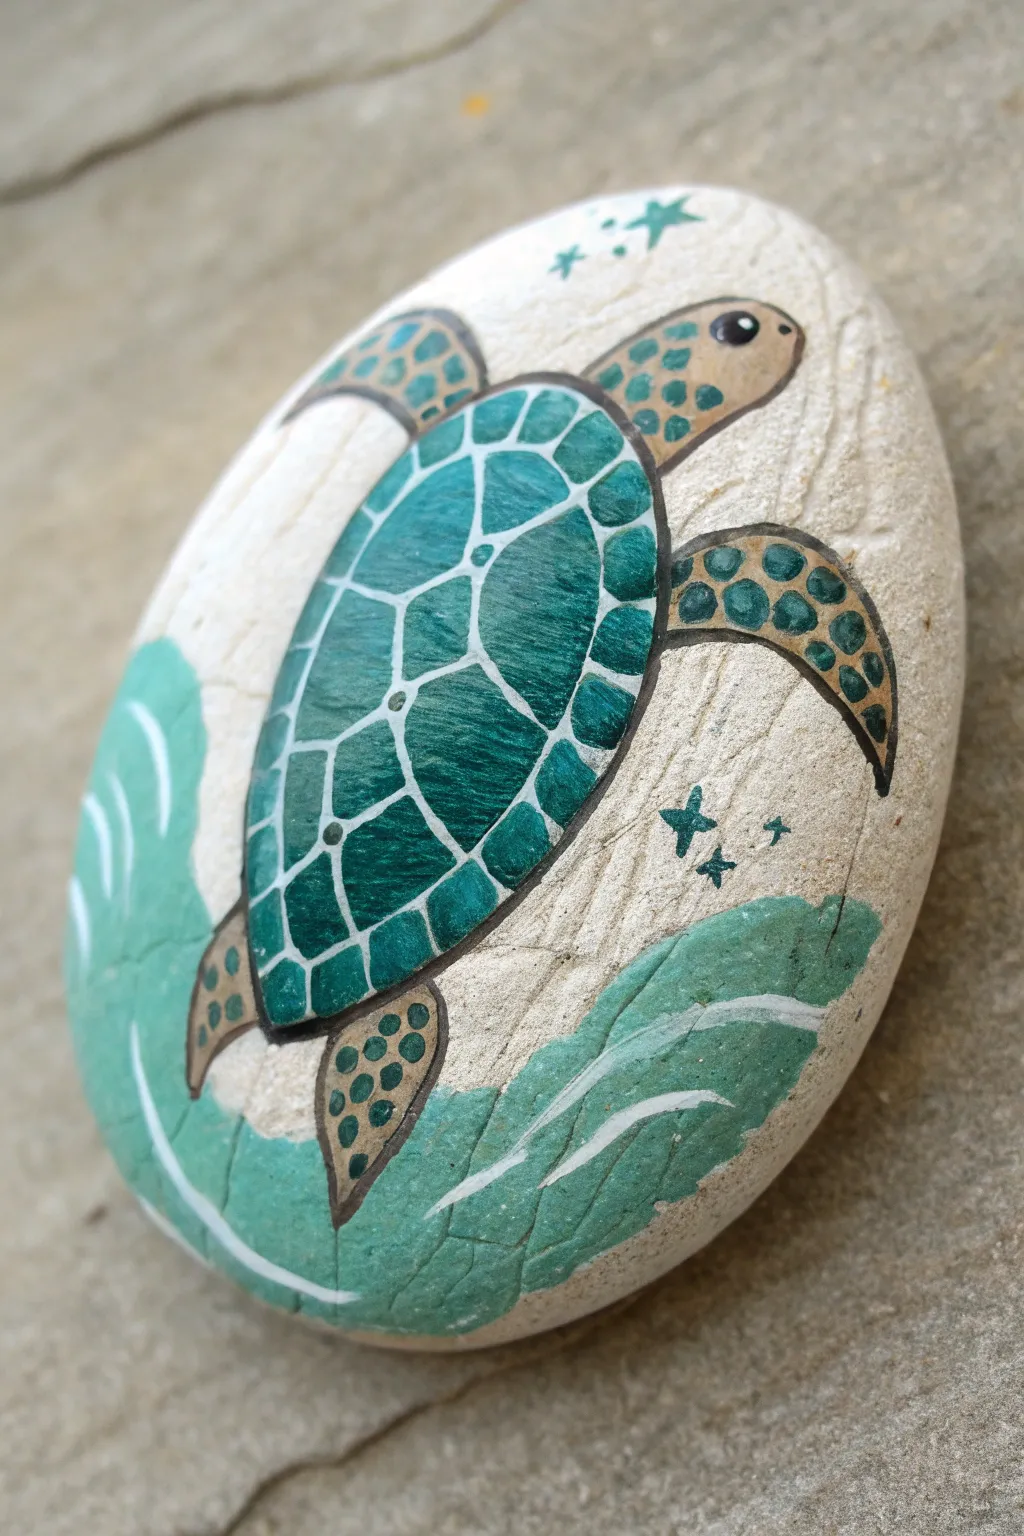
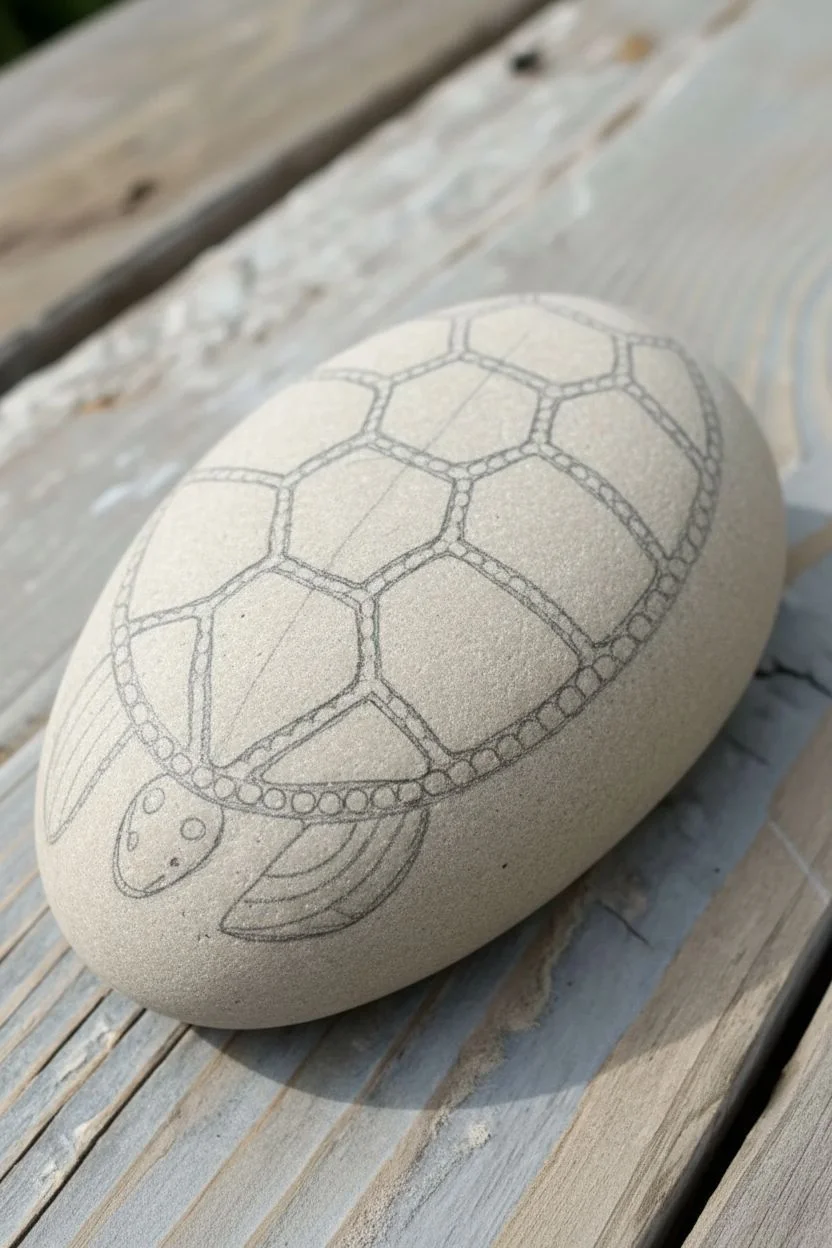
This peaceful sea turtle design transforms a smooth oval rock into a little pocket of the ocean. With its vibrant teal shell and flowing water accents, it captures the serene movement of sea life perfectly.
How-To Guide
Materials
- Smooth, oval river rock (cleaned and dried)
- Acrylic paints: Teal/Emerald Green, Light Tan/Beige, White, Black, Dark Brown
- Fine detail paintbrush (size 0 or 00)
- Small flat paintbrush
- Pencil and eraser
- Water cup and palette
- Clear spray sealant or varnish
Step 1: Planning the Turtle
-
Prepare the surface:
Ensure your rock is completely clean and dry. If the natural stone color is too dark, you can paint a very thin wash of white or beige over the center area where the turtle will go, but leaving the natural texture visible is nice too. -
Sketch the outline:
Use a light pencil to draw the turtle’s oval body in the center of the rock. It should be slightly tilted diagonally. -
Add appendages:
Sketch a rounded head at the top right. Add the front flippers—make the right one curving down and the left one curving up. Then add the smaller back flippers near the bottom. -
Sketch the wave:
Lightly outline a curving wave shape at the bottom left of the rock, sweeping up behind the turtle.
Step 2: Base Colors
-
Paint the shell base:
Fill in the main oval body shape with your teal or emerald green paint. Apply this smoothly; if it looks streaky, let the first coat dry and apply a second one. -
Paint the skin:
Mix a light tan or beige color. Fill in the head and all four flippers with this shade. Let this dry completely before moving on. -
Paint the water:
Using a lighter shade of seafoam or mint green, fill in the wave section at the bottom. The coverage doesn’t need to be perfectly opaque; a slightly translucent look mimics water well.
Wobbly Lines?
If painting thin white lines on the shell is too difficult with a brush, use a fine-tip white acrylic paint pen or a white gel pen for better control.
Step 3: Shell and Skin Details
-
Outline the shell:
Switch to your finest detail brush and black paint. Carefully outline the green oval shell. Make the line slightly thicker on the outer edges. -
Shell segments:
Using white paint and a very steady hand (or a white paint pen), draw the pattern on the shell. Start with a central row of geometric shapes, then add the outer ring of smaller segments. -
Outline the body:
Outline the head and flippers with a thin black line. Add a small black dot for the eye on the head, with a tiny white highlight speck. -
Flipper spots:
Dip the tip of your small brush or a toothpick into dark green or brown paint. Add dots to the flippers and head to create skin texture.
Add Dimension
After the teal shell base dries, dry-brush a tiny bit of lighter green in the center of each shell segment before adding the white lines for a 3D effect.
Step 4: The Ocean Environment
-
Add wave highlights:
Load your fine brush with white paint. Add sweeping, curved lines over the light green water area to represent ripples and wave crests. -
Draw stars:
Using teal or dark green paint, draw small simple stars or sparkles in the empty ‘sand’ areas around the turtle to fill the negative space. -
Final touches:
Check your black outlines. If the white shell lines covered any black edges, re-trace them carefully to make the shell pop. -
Seal the work:
Once the paint is completely cured (give it at least a few hours), spray the rock with a clear sealant to protect your artwork from chipping.
Place your finished turtle rock in a garden pot or on a desk where it can swim peacefully through your day


Tortoise With Chunky Legs
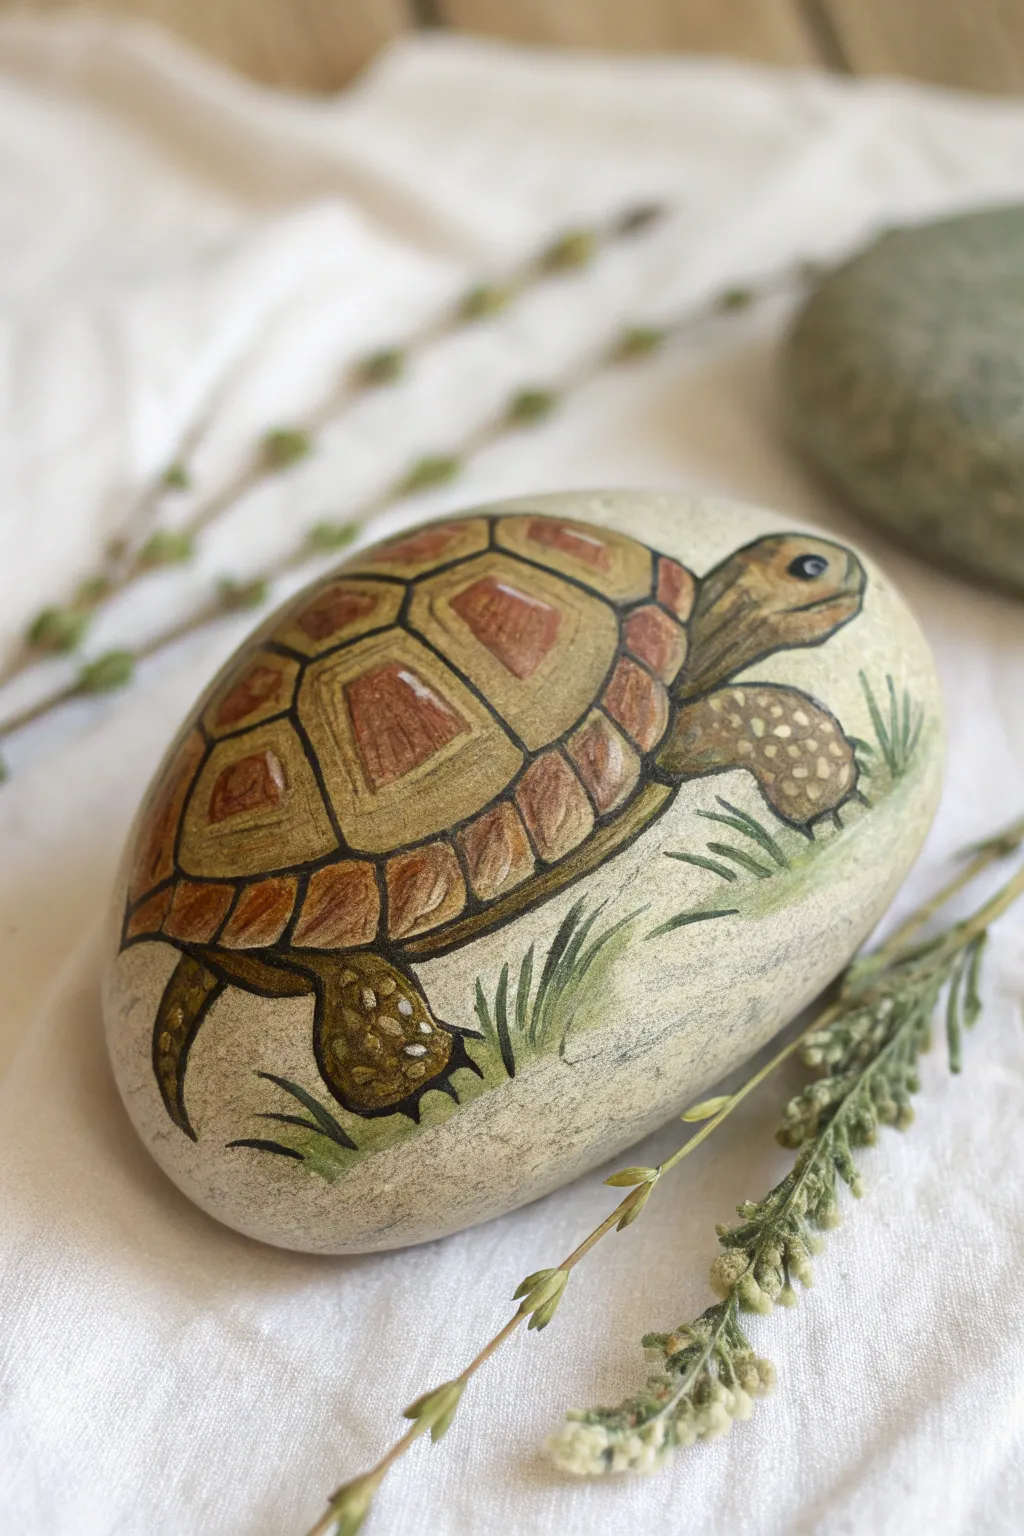
Transform a smooth, rounded stone into a charming garden companion with this detailed tortoise painting tutorial. The natural shape of the rock perfectly mimics a tortoise shell, while the warm brown tones and sketchy outlines give it a classic storybook illustration feel.
Step-by-Step
Materials
- Smooth, oval-shaped river rock (cleaned and dried)
- Pencil and eraser
- Acrylic paints: White, Yellow Ochre, Burnt Sienna, Dark Brown, Olive Green
- Fine liner brushes (sizes 0 and 00)
- Small flat brush
- Water cup and palette
- Black acrylic paint or fine tip paint marker (Posca)
- Spray varnish (matte or satin finish)
Step 1: Sketching the Shape
-
Prime surface:
If your rock is dark, start by painting a thin, watered-down layer of white or cream acrylic over the surface to make the subsequent colors pop. Let this dry completely. -
Outline the shell:
Using a pencil, lightly sketch a large dome shape that takes up the majority of the rock’s surface. This will be the carapace. -
Add head and limbs:
Draw the head extending from the right side, slightly raised. Sketch thick, sturdy legs—one reaching forward and the back leg pushing off the ground. Don’t forget a tiny tail at the rear. -
Detail the scutes:
Inside the shell, sketch the geometric plates (scutes). Start with a row of hexagons down the center spine, then add pentagons surrounding them on the sides.
Step 2: Applying Base Colors
-
Paint the shell base:
Mix Yellow Ochre with a touch of White to create a sandy tan color. Fill in the entire shell area with this warm base tone. -
Color the skin:
Use a slightly darker version of your tan mix (add a tiny dot of Burnt Sienna) to paint the head, legs, and tail. The skin should look slightly distinct from the shell. -
Add shell dimensions:
Once the base is dry, take Burnt Sienna and paint the center of each scute. Don’t fill the whole shape; leave a thick border of the lighter tan visible around the edges. -
Deepen the centers:
Add a second, smaller layer of Dark Brown right in the middle of the Burnt Sienna patches you just painted. This creates a 3D, tiered effect on the shell plates. -
Highlighting:
Using your finest brush and a creamy off-white, add tiny highlights to the top edges of the shell centers to suggest light hitting the raised areas.
Uneven surface?
If your rock has pits or bumps, don’t fight them. Use the bumps as the center of the shell scutes to create natural 3D texture.
Step 3: Refining Details
-
Texture the skin:
With a diluted brown paint, add small dots and scales to the front legs and the top of the head. Keep these subtle so they don’t overpower the face. -
Paint the eye:
Place a small black dot for the eye on the head. Once dry, add a microscopic speck of white as a reflection highlight to bring it to life. -
Outline work:
This is the most crucial step. Use a black paint pen or a size 00 brush with thinned black paint to outline the entire tortoise. Outline each individual scute on the shell. -
Line weight variation:
Try to vary your line thickness. I find making the bottom outline of the shell slightly thicker adds a nice sense of weight and shadow. -
Add the mouth and nose:
Draw a simple line for the mouth and a small dot for the nostril near the beak-like front of the face.
Level Up: Hidden Gems
Paint a tiny ladybug or snail on one of the blades of grass to add a whimsical narrative element to your finished piece.
Step 4: Grounding the Scene
-
Paint grass tufts:
Using Olive Green, paint short, upward strokes around the feet to create grass. Keep the strokes loose and flick the brush at the end. -
Add grass variety:
Mix a little white into your green and add a few lighter blades of grass among the dark ones for depth. -
Gentle shadows:
Water down a tiny bit of grey or brown paint to a wash consistency. Glaze this lightly under the tortoise’s belly and legs to anchor it to the ground. -
Seal:
Allow the rock to dry overnight, then seal with a spray varnish to protect your artwork from chipping.
Now you have a steady little friend that requires no feeding and looks great on a bookshelf or in a flower pot
BRUSH GUIDE
The Right Brush for Every Stroke
From clean lines to bold texture — master brush choice, stroke control, and essential techniques.
Explore the Full Guide
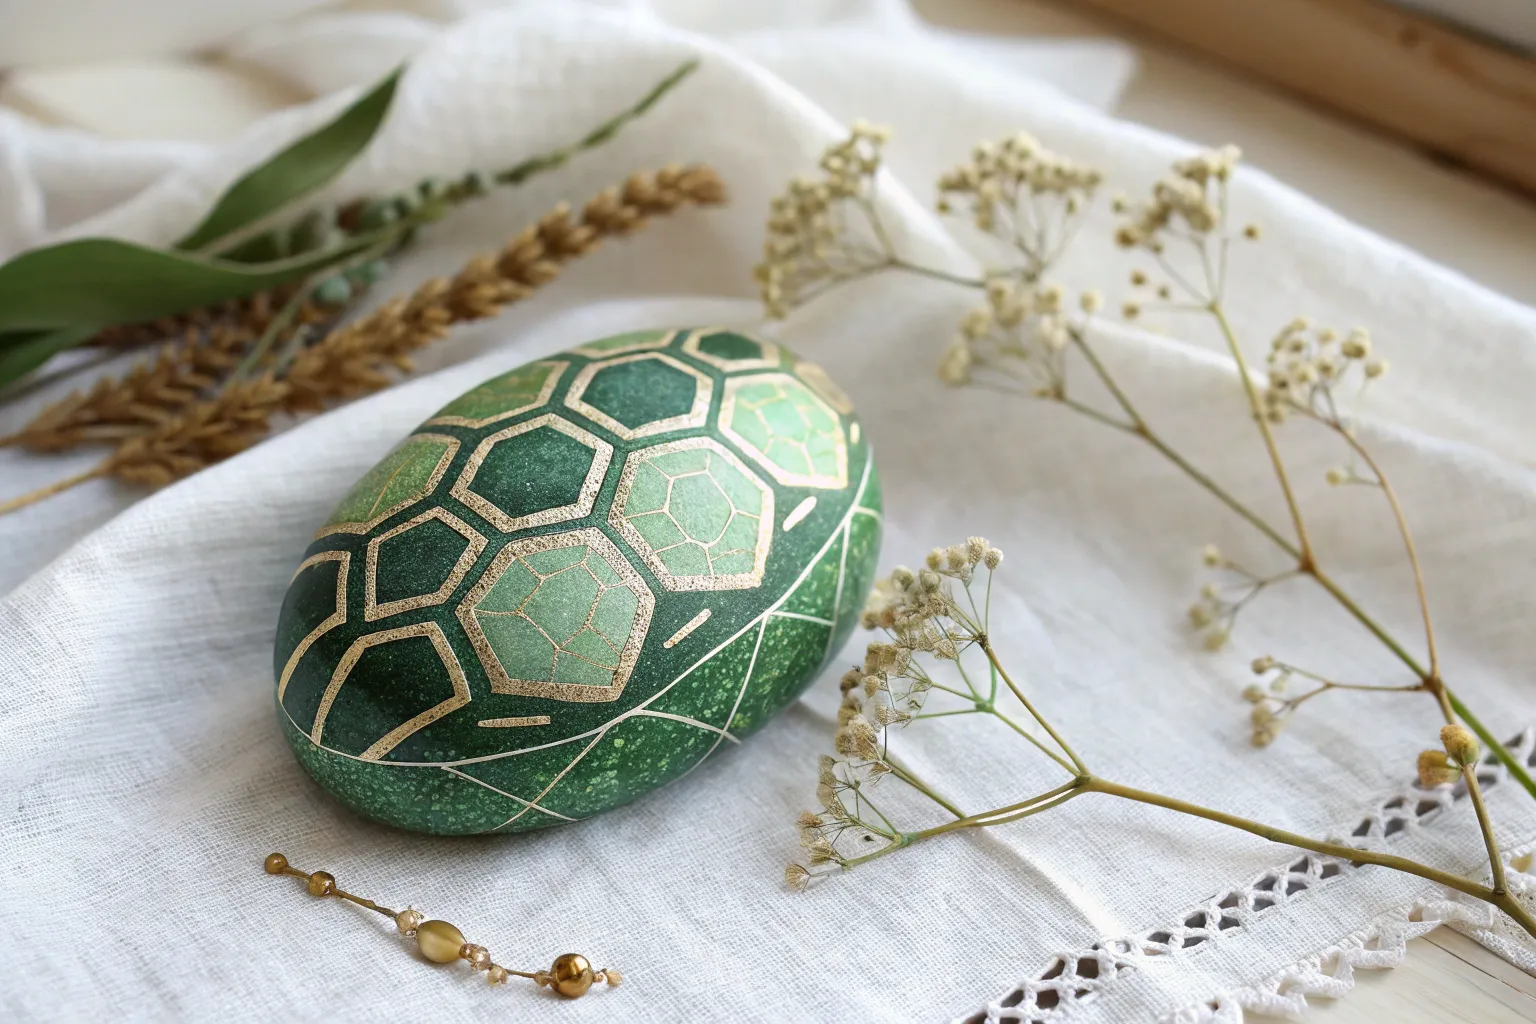
Metallic-Outlined Shell Segments
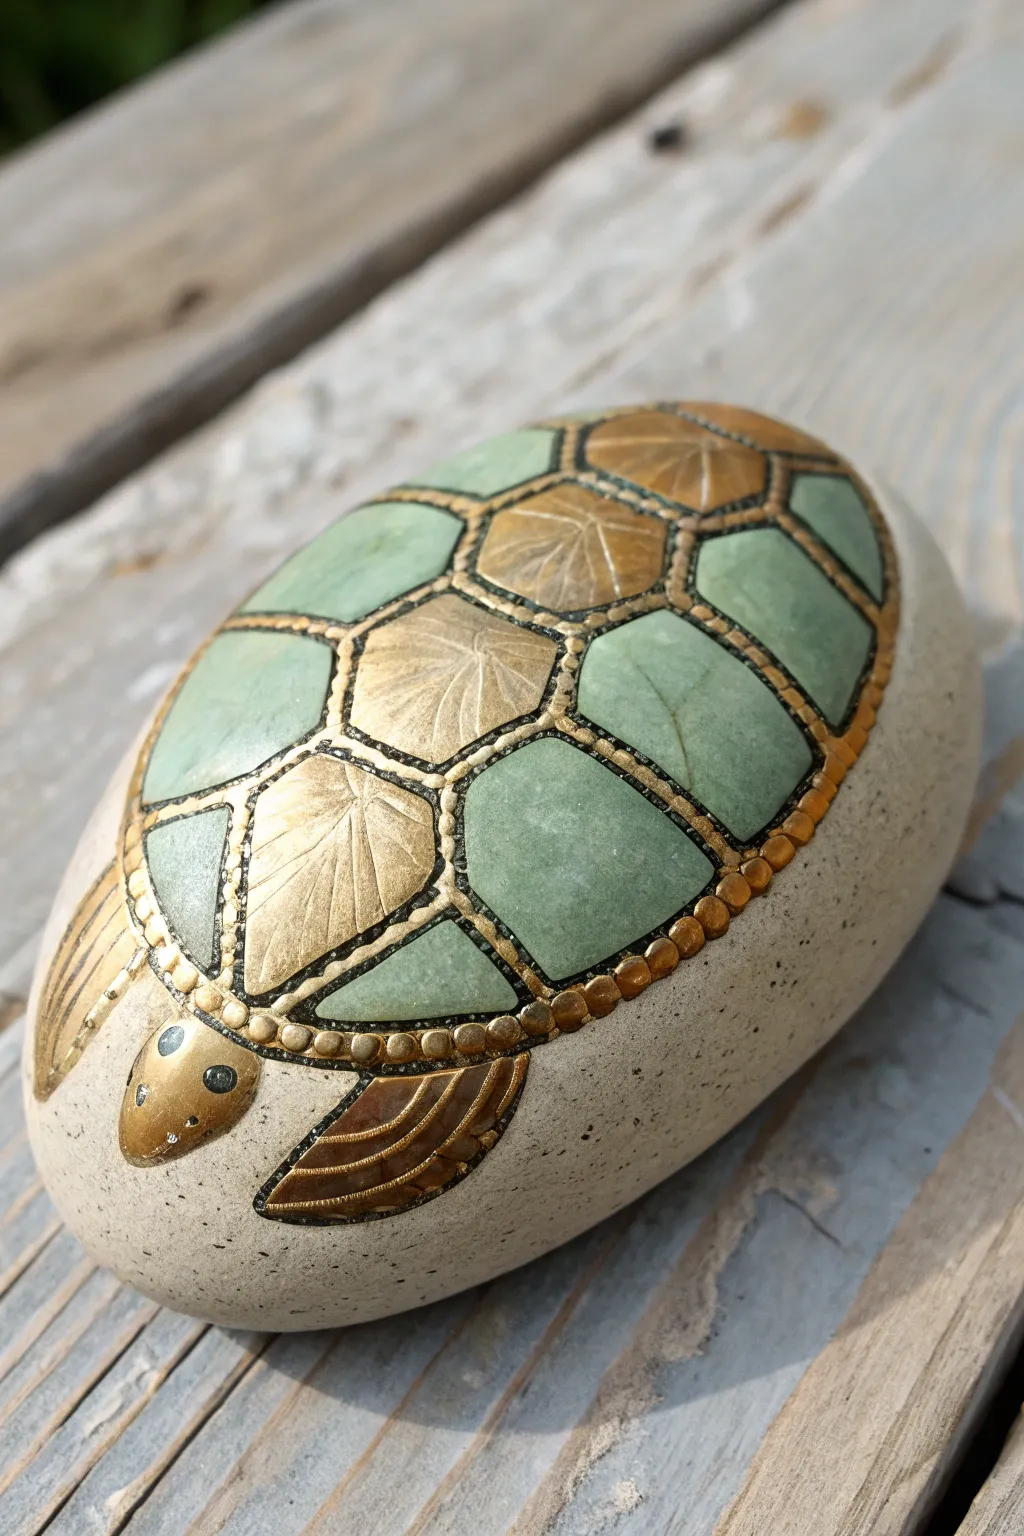
Transform a simple smooth stone into an elegant reptile using a stunning combination of matte sage green and metallic gold. This design relies on precise geometric shapes and raised relief outlines to give the shell a sophisticated, almost jewelry-like appearance.
Step-by-Step Guide
Materials
- Smooth, oval-shaped river rock (cleaned and dried)
- Pencil and eraser
- Acrylic paint: Sage Green (or Jade)
- Acrylic paint: Metallic Gold
- Fine detail paintbrush (size 0 or 00)
- 3D metallic gold puffy paint or liner (fine tip)
- Dotting tool or toothpick
- Black fine-point paint pen or marker (for eyes)
- White paint pen or tiny brush (for eye highlights)
- Gloss varnish or clear sealant
Step 1: Planning the Shell Structure
-
Grid the center:
Begin by sketching a central column of three hexagonal shapes down the middle of the rock’s highest point with your pencil. These will form the spine of the shell. -
Add flanking segments:
Draw corresponding pentagon-like shapes on either side of the central column. These should fit snugly against the central hexagons like a puzzle. -
Create the border:
Sketch a final ring of smaller, curved trapezoids around the perimeter of the shell design to create the edge scutes. -
Sketch appendages:
Lightly draw a small oval head at the front end and two flipper shapes angling backward on the sides. Make sure they are proportional to the ‘shell’ you just created.
Keep it Steady
Rest your wrist on the table while piping the 3D lines. If the bottle sputters, test the flow on a scrap paper first to avoid blobs on your rock.
Step 2: Applying Base Colors
-
Paint the green scutes:
Using your sage green acrylic and a small flat brush, fill in the flanking segments and the outer border ring. Leave the central column unpainted for now. -
Paint the gold scutes:
Fill the three central hexagonal shapes with metallic gold paint. I find that gold often needs two thin coats to become truly opaque. -
Detail the gold texture:
Once the gold base is dry, use a slightly darker gold or bronze tone to paint thin, fanned lines inside the central hexagons, mimicking the texture of a leaf or shell ridges. -
Paint head and flippers:
Fill in the head and flipper sketches with the solid metallic gold paint.
Step 3: Adding Dimension and Detail
-
Outline the segments:
This is the crucial step for that ’embossed’ look. Take your 3D metallic gold puffy paint (or a liner) and carefully trace over all your pencil lines between the shell segments. -
Create the beaded border:
Along the very bottom edge of the shell design, instead of a solid line, create a row of small, uniform dots using the puffy paint or a dotting tool dipped in heavy body gold paint. -
Detail the flippers:
Use the liner paint to draw curved lines down the length of the gold flippers to give them texture and separate the individual digits. -
Add stippled texture:
Inside the black ‘gaps’ between the green and gold segments, add tiny micro-dots of gold liner. This creates a textured, jewelry-setting effect.
Fixing Wobbly Lines
If a 3D line goes astray, don’t wipe it! Wait for it to dry completely, then gently scrape it off with a craft knife or fingernail and try again.
Step 4: Finishing Touches
-
Paint the eyes:
On the gold head, place two small dots of black paint for the eyes. Let them dry completely. -
Add the spark:
Use your finest tool to place a tiny white speck inside the black eye dots to bring the turtle to life. -
Erase guidelines:
Check for any visible pencil marks on the bare stone sections and gently erase them once all paint is 100% dry. -
Seal the artwork:
Apply a coat of gloss varnish over the painted areas. This will make the gold shimmer and the green look like polished jade.
Now you have a sophisticated, jewel-toned turtle that looks beautiful displayed in a garden or on a desk
Bold Black Outline Turtle
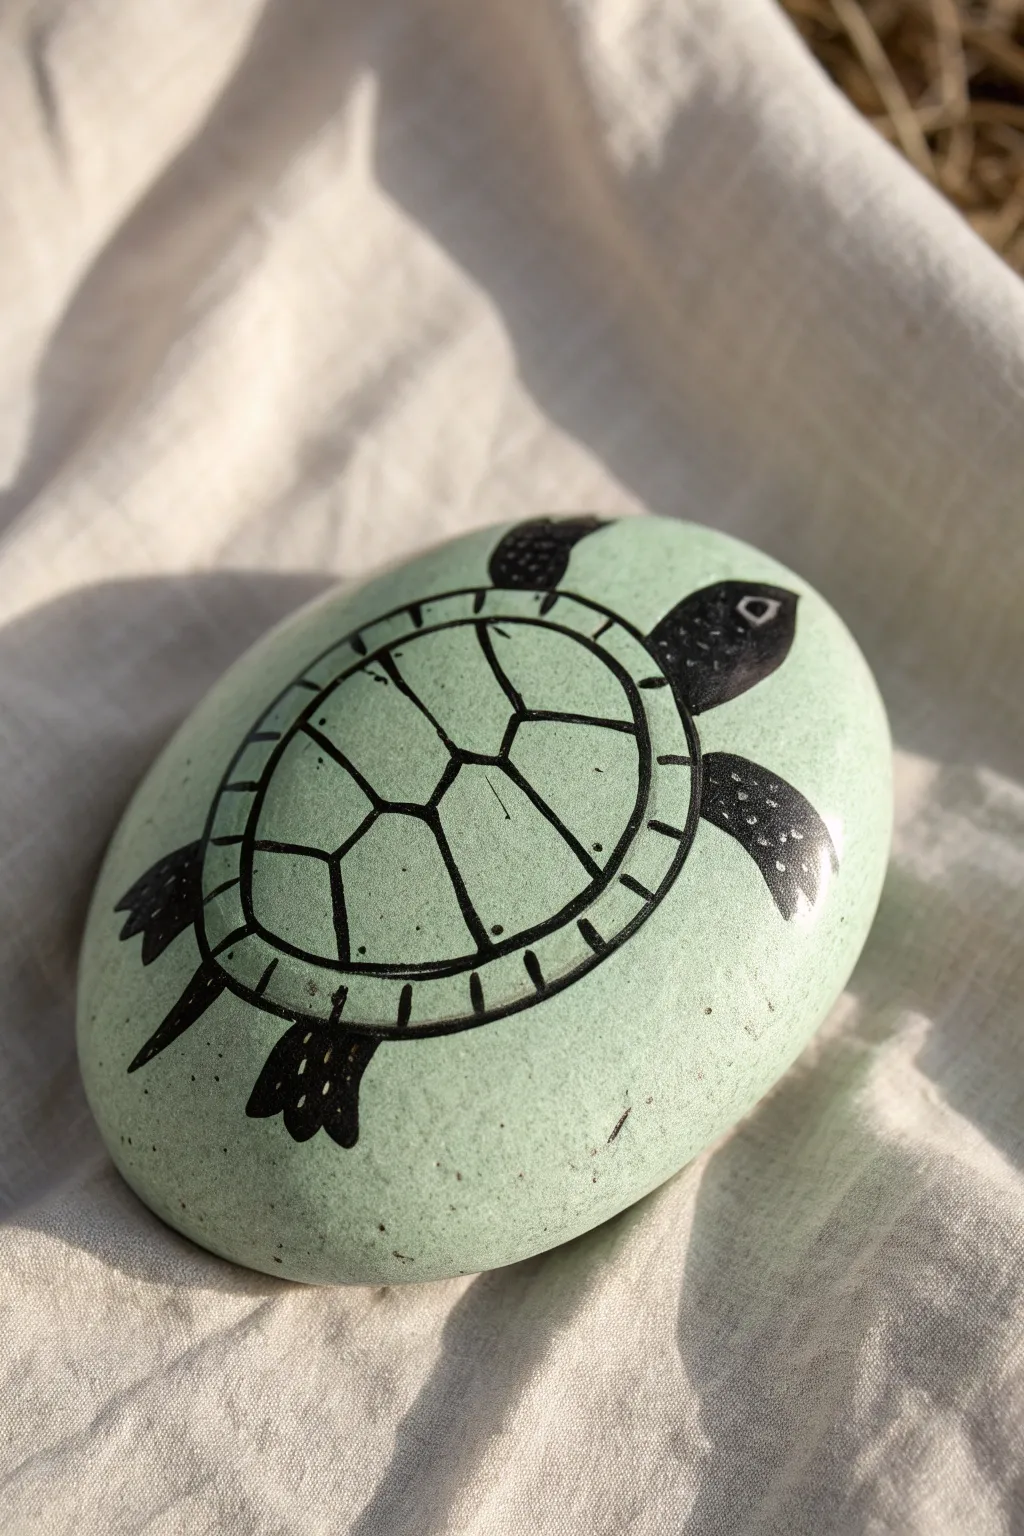
This design transforms a smooth, river-worn stone into a striking piece of decor using a simple yet effective contrast of pale green and bold black ink. The result is a clean, graphic illustration that captures the essence of a sea turtle with minimalist charm.
How-To Guide
Materials
- Smooth, oval-shaped river rock (palm-sized)
- Acrylic paint (pale mint green or seafoam)
- Wide flat paintbrush
- Pencil (HB or lighter)
- Black permanent marker or paint pen (fine tip)
- Black permanent marker or paint pen (medium/bold tip)
- White or metallic silver gel pen (optional)
- Matte finish spray sealant
Step 1: Base Preparation
-
Clean the surface:
Before you begin, scrub the rock thoroughly with warm soapy water to remove any dirt or oils. Let it dry completely in the sun or with a paper towel. -
Mix your base color:
If you don’t have a pre-mixed mint green, blend white acrylic paint with a tiny drop of green and a touch of blue. You want a very pale, opaque pastel shade. -
Apply the first coat:
Using a wide flat brush, paint the entire top surface of the stone. Use long, smooth strokes to minimize brush marks. -
Let it dry:
Allow the first layer to dry for about 15-20 minutes. It should be dry to the touch before proceeding. -
Second coat:
Apply a second layer of mint paint to ensure full opacity. If the rock is dark, you might even need a third coat. Let this base cure completely for at least an hour to prevent the marker from scratching the paint later.
Marker Choice Matters
Use oil-based paint pens for the black outlines if possible. Standard permanent markers can sometimes turn purple or bleed when sealed with spray varnish.
Step 2: Sketching the Outline
-
Draw the central shell:
Lightly sketch a large oval in the center of the rock with your pencil. This will be the main body of the turtle. -
Add the appendages:
Sketch a rounded head at the top right. Add two front flippers curving backward, two smaller back flippers, and a tiny pointed tail at the bottom left. -
Draft the shell segments:
Inside your main oval, draw a smaller oval (the scutes). Connect the inner oval to the outer edge with short perpendicular lines to create the shell’s border. -
Detail the center shell:
Draw the geometric pattern inside the central oval. Start with a pentagon or hexagon shape in the middle and draw lines radiating outward to the inner oval border.
Uneven Lines?
If your black oval isn’t perfectly round, thicken the line slightly on the uneven side to smooth out the curve rather than trying to erase it.
Step 3: Inking the Design
-
Trace main lines:
Using your medium/bold tip black marker or paint pen, carefully trace over the main oval of the shell. Keep your hand steady to create a smooth, continuous curve. -
Fill the flippers:
Outline the head and flippers. Fill them in completely with solid black ink. I find it helpful to outline the shape first and then color inwards to keep edges crisp. -
Add shell details:
Switch to a finer tip marker if needed. Draw the inner oval and the dividing lines on the shell. Make the lines thick and deliberate. -
Connecting lines:
Draw the short lines connecting the inner shell design to the outer rim. Space them somewhat evenly, but they don’t have to be mathematically perfect. -
Refine the fill:
Go back over the solid black areas (flippers and head) to ensure deep, consistent coverage without streaks.
Step 4: Final Details
-
Create the eye:
If you left a negative space for the eye, refine the shape now. If you painted it solid black, use a white paint pen or gel pen to add a small diamond or circle for the eye. -
Texture the flippers:
Using a white gel pen or by carefully leaving negative space (as shown in the reference), add tiny dots or speckles to the black flippers to suggest skin texture. -
Clean up sketch lines:
Once the ink is 100% dry, gently erase any visible pencil marks. Be gentle so you don’t rub off the acrylic paint layer. -
Seal the work:
Finish with a light coat of matte spray sealant. Isolate the rock in a well-ventilated area and spray from 12 inches away to prevent the ink from running.
Place your finished turtle in a garden pot or on a sunny windowsill to enjoy its calm vibe

PENCIL GUIDE
Understanding Pencil Grades from H to B
From first sketch to finished drawing — learn pencil grades, line control, and shading techniques.
Explore the Full Guide
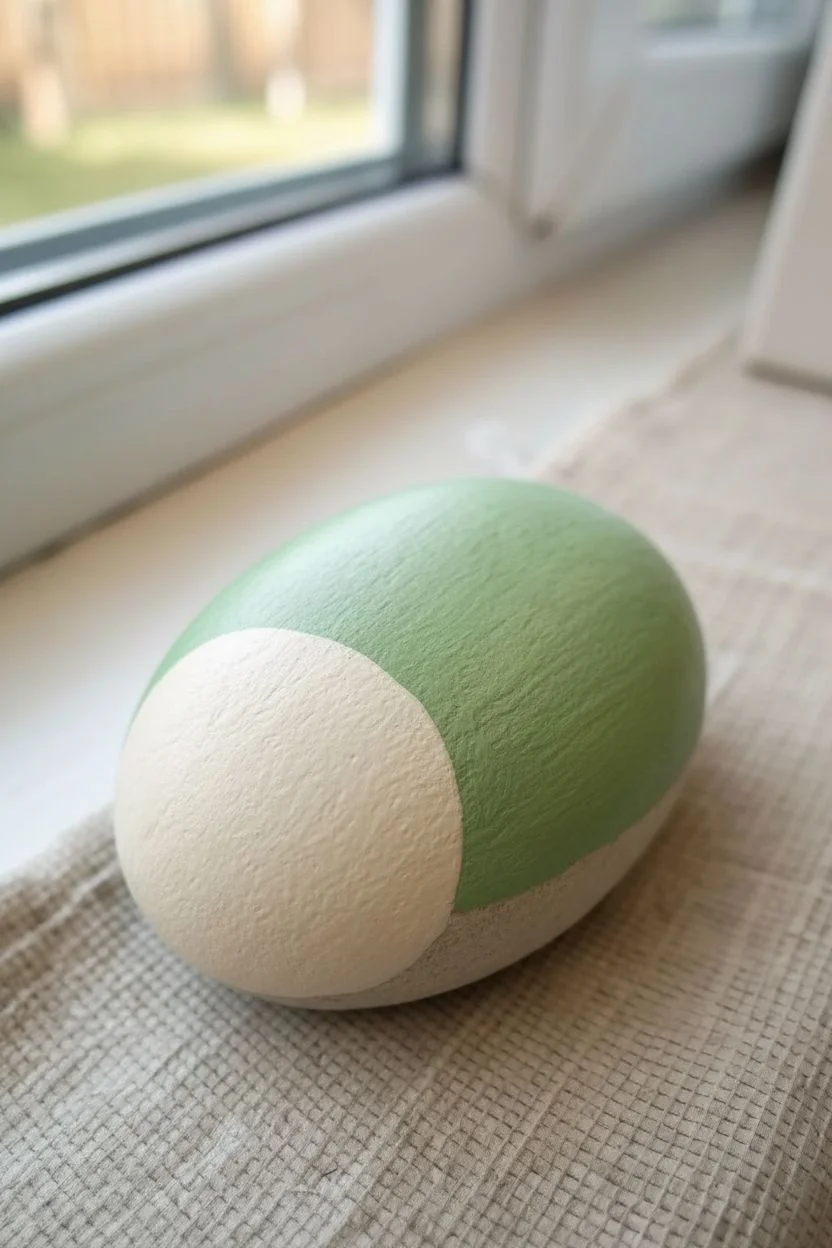
Soft Pastel Baby Turtle
Turn a smooth, oval stone into an impossibly cute baby turtle with this soft and approachable design. Using gentle pastel greens and clean lines, you’ll create a charming little character that fits perfectly in the palm of your hand.
Step-by-Step Guide
Materials
- Smooth, oval river rock (palm-sized)
- Acrylic paints (Mint green, dark forest green, white, black, pale pink)
- Pencil for sketching
- Posca paint pens or fine liner brushes (Black, White)
- Flat shader brush (size 6 or 8)
- Fine detail brush (size 0 or 00)
- Dotting tool or toothpick
- Gloss or matte varnish spray
Step 1: Base Coating and Sketching
-
Clean the canvas:
Start by scrubbing your rock with warm soapy water and letting it dry completely to ensure the paint adheres properly. -
Apply the base coat:
Paint the entire surface of the rock with a soft mint green acrylic. You will likely need two or three coats to get a solid, opaque coverage; let each layer dry before adding the next. -
Outline the shape:
Once the base is visibly dry, lightly sketch the turtle’s main features with a pencil. Draw a curved line across the front third to separate the head from the shell, and outline the oval shape of the back. -
Define the shell border:
Sketch a thick band separating the head area from the main shell body. This will become the rim of the shell.
Smooth Operator
If your mint base coat looks streaky, sand it very lightly with fine-grit sandpaper after drying, then apply one final thin coat for a porcelain-like finish.
Step 2: Painting the Shell
-
Block in the shell color:
Using a dark forest green, paint the main body of the shell behind the rim. Follow the curve of your rock carefully. -
Paint the shell rim:
For the band separating the head and body, mix a little white into your forest green to create a medium sage color. Paint this strip carefully. -
Create the scutes:
Take your original mint green base color and paint large, rounded shapes onto the dark green shell area. These are the turtle’s scutes (shell plates). -
Refine the scutes:
Don’t worry about making them perfect circles; organic, slightly irregular ovals look more natural. Leave gaps of the dark green showing between them. -
Add highlights:
Mix a tiny amount of white into the mint green and paint thin, curved highlights on the top-left curve of each scute to give them a 3D bubble effect. -
Decorate the rim:
Using a very fine brush or white paint pen, draw small, evenly spaced tick marks along the medium green shell rim.
Make It Sparkle
Add a layer of iridescent glitter paint over just the light green scutes on the shell. It adds a magical shimmer that catches the sunlight beautifully.
Step 3: Face and Details
-
Outline the limb:
On the side of the body, just under the shell, use a fine black liner or paint pen to draw a curved flipper shape. Add two small lines inside for toes. -
Draw the main outlines:
Outline the bottom edge of the shell rim and the curve of the main shell with your fine black liner to make the segments pop. -
Paint the eyes:
Using black paint, create two large, solid black circles on the face area. Space them widely apart for that cute baby look. -
Add facial features:
Draw tiny, curved eyebrows above the eyes, two small dots for nostrils, and a wide, simple u-shaped smile. -
Bring the eyes to life:
Once the black eye paint is dry, use a dotting tool or the back of a brush to add one large white dot in the upper corner and a smaller white dot below it for sparkles. -
Rosy cheeks:
Dilute a bit of pale pink paint with water or use a dry brush technique to dab soft, translucent rosy circles under the eyes. -
Final stippling:
Dip a toothpick or small dotting tool into white paint. Add tiny dot clusters around the shell and scattered on the darker green background to mimic texture. -
Seal the deal:
Allow the rock to cure for at least 24 hours. I usually finish with a spray varnish to protect the paint from scratching and giving it a unified sheen.
Place your little reptile friend in a garden pot or on a sunny windowsill to brighten up the space
Realistic Shell Shading in Greens
Transform a simple garden stone into a convincing turtle shell using careful shading and layering techniques. This project focuses on achieving a textured, mottled green appearance that mimics the depth of a real shell.
Detailed Instructions
Materials
- Smooth, oval-shaped river rock (approx. 4-6 inches)
- Acrylic paints (Dark hunter green, kelly green, leaf green, warm yellow, black)
- Wide flat brush (for base coating)
- Small round detail brush (size 0 or 1)
- Small flat brush (for shading)
- Pencil
- Spray sealer (matte or satin finish)
- Palette or paper plate
- Water cup
Step 1: Preparation and Base Coat
-
Clean the stone:
Scrub your rock thoroughly with soap and water to remove any dirt or oils. Let it dry completely, ideally in the sun, to ensure the paint adheres properly. -
Apply the dark base:
Mix a small amount of black into your dark hunter green to create a deep, shadowy forest green. Use your wide flat brush to coat the entire top surface of the rock. Allow this to dry and apply a second coat if the stone’s original color shows through. -
Sketch the shell pattern:
Once the base is fully dry, lightly sketch the shell segments (scutes) with a pencil. Start with a row of three to four hexagons down the center back, then draw pentagons surrounding them, finishing with smaller rectangular segments around the rim.
Step 2: Developing the Green Texture
-
Mix the mid-tone green:
Prepare a kelly green on your palette. If it feels too bright, tone it down with a tiny touch of the dark base color you used earlier. -
Dry brush the first layer:
Load a small flat brush with the mid-tone green, then wipe most of the paint off onto a paper towel. Lightly sweep the brush over the center of each shell segment, leaving the edges dark. This creates the first illusion of curve and dimension. -
Add a lighter green layer:
Mix a leaf green shade. Using the same dry-brush technique, apply this color closer to the center of each scute, covering a smaller area than the previous layer. I find using a vertical brushing motion mimics the natural growth lines of a shell. -
Create the highlight color:
Mix a small amount of warm yellow into your leaf green to create a soft, lime-green highlight color. -
Apply final highlights:
Very lightly dry brush this lightest color onto the absolute center or highest point of each segment. This concentrates the light and makes the shell look rounded. -
Texture check:
Step back and look at the rock. If the transition between greens looks too stark, use a barely-damp brush to gently soften the edges of the lighter paint while it’s still tacky.
Brushstroke Direction
When dry-brushing the green layers, brush in the same direction for every segment (e.g., top to bottom). This creates a consistent grain texture that looks organic.
Step 3: Refining Contours
-
Prepare the liner paint:
Thin your black paint slightly with a drop of water. It should have an ink-like consistency that flows smoothly from the brush without dripping. -
Outline the segments:
Using your smallest round detail brush, verify your original pencil lines. Paint thin, consistent black lines between every green segment. The space between the scutes should be clearly defined. -
Thicken slightly at junctions:
Where three lines meet at a corner, you can make the black line just a fraction thicker. This subtle detail adds structural realism to the shell pattern. -
Refine the rim:
Paint a clean black line separating the main top shell scutes from the smaller border rim segments. -
Final outer rim:
Paint the very bottom edge of the rock black (or dark green) to “tuck” the shell underneath, giving it a finished look from all angles.
Add Organic Texture
Before the sealer, use an old toothbrush to lightly spatter tiny specs of brown or dark green paint over the shell. This creates a weathered, natural look.
Step 4: Protection
-
Let it cure:
Allow the painted rock to dry for at least 24 hours to ensure all layers are hardened. -
Seal the artwork:
Spray the rock with a weather-resistant sealer. A satin finish gives it a slight sheen like a healthy turtle shell, while matte looks more like an old, dry shell.
Place your painted shell in the garden among low-lying plants for a delightful hidden surprise


Tropical Reef Color Palette Turtle

Capture the serene beauty of the ocean with this vibrant teal sea turtle painted on a smooth river stone. The design features crisp white linework and stylized flipper patterns that pop against a tropical turquoise background.
How-To Guide
Materials
- Smooth, oval-shaped river rock
- Acrylic paints: Teal/Turquoise, White, Dark Red/Burnt Sienna, Black
- Medium flat paintbrush
- Fine detail liner brush (size 0 or 00)
- Dotting tools (various sizes)
- Pencil and eraser
- Clear acrylic sealant (gloss or matte)
Step 1: Base Coat and Sketch
-
Clean surface:
Begin by thoroughly washing your rock with soap and water to remove any dirt or oils. Let it dry completely before starting. -
Apply base color:
Using the medium flat brush, paint the entire rock with a solid coat of teal or turquoise acrylic paint. This tropical hue sets the underwater mood. -
Second coat:
Allow the first layer to dry fully, then apply a second coat of teal to ensure an opaque, even finish without streaks. -
Trace the outline:
Once the base is bone-dry, lightly sketch the turtle’s shape with a pencil. Draw a large oval for the shell, a smaller rounded head, and the front and back flippers extending outward. -
Design the shell:
Inside the shell oval, sketch three hexagons down the center back, flanked by partial shapes on the sides to create the scute pattern. Don’t worry about perfection; organic shapes look natural.
Clean Lines Pro-Tip
Improve your line work by thinning the white acrylic paint with a tiny drop of water until it has an ink-like consistency for smoother flow.
Step 2: Painting the Turtle Details
-
Outline the shell:
Load your fine liner brush with white paint. Carefully trace over your pencil lines for the shell’s central pattern, creating a bold, geometric look. -
Add radiating lines:
Paint clean white lines extending from the central hexagons outward toward the edge of the shell, simulating the turtle’s structural ridges. -
Create the shell border:
Using a small dotting tool dipped in white paint, create a chain of small dots along the outer rim of the shell to define its edge. -
Paint the flippers:
Outline the head and flippers with a very fine black line. I find it helpful to anchor my pinky on the table for stability here. -
Fill flipper patterns:
Inside the front flippers, paint abstract, irregular shapes using a burnt sienna or dark red color. These should look like mosaic tiles or cells. -
Whiten the flipper gaps:
Once the red shapes are dry, use your liner brush to carefully paint white lines in the spaces between the red cells to make them pop. -
Face details:
Paint a small white circle for the eye, and once dry, add a black pupil in the center. Add a tiny curved line for the mouth.
Fixing Smudges
If you make a mistake on the teal background, don’t panic. Let the error dry completely, then paint over it with your base teal color to erase it.
Step 3: Embellishments and Finish
-
Decorative dotting:
Using different sized dotting tools, add decorative white dots along the spine of the shell and framing the turtle’s body. -
Add floral accents:
Create a simple flower near the bottom by placing four white dots in a circle and adding a red dot in the center. -
Scattered bubbles:
Add a few random white and red dots around the turtle to represent bubbles or floating sea particles, giving the piece movement. -
Final dry:
Let the entire painting cure for at least 24 hours to ensure all layers are hardened. -
Seal the artwork:
Finish by applying a clear acrylic sealer. This protects the paint from chipping and gives the teal color a beautiful ‘wet’ look.
Place your finished turtle in a garden or on a shelf to bring a splash of tropical peace to your day
Minimal Turtle Icon on a Rock
Embrace simplicity with this elegant project that transforms a smooth grey stone into a striking piece of art using only white ink. The high contrast of the bright line work against the natural dark slate creates a modern, clean look perfect for garden decor or a paperweight.
Step-by-Step
Materials
- Smooth, dark grey river rock (flat surface preferred)
- White acrylic paint pen (extra fine tip, 0.7mm)
- White acrylic paint pen (fine tip, 1mm-3mm) for filling
- Soap and water
- Pencil (HB or lighter)
- Kneaded eraser
- Spray varnish (matte or satin finish)
Step 1: Preparation & Sketching
-
Clean the canvas:
Begin by scrubbing your rock thoroughly with soap and warm water to remove any dirt or oils. Let it dry completely, as moisture will prevent the paint from adhering properly. -
Rough placement:
Using a light pencil, mark the center of the stone. Sketch a large oval shape for the turtle’s body, angling it slightly diagonally across the rock’s face for a dynamic composition. -
Add appendages:
Lightly sketch the head at the top left of the oval. Add the two large front flippers curving backward and two smaller rear flippers near the bottom. -
Refine the outline:
Go over your sketch to solidify the shapes. The head should be rounded, and the flippers should have a sweeping, organic curve. Don’t worry about the internal patterns yet.
Ink Flow Issues?
If the pen stops flowing, don’t press harder on the rock. Press the tip onto a scrap piece of paper or cardboard to pump fresh paint into the nib.
Step 2: Inking the Outline
-
Trace the shell:
Shake your white acrylic paint pen well. Start by tracing the main oval of the shell. Keep your hand steady and pull the pen towards you for smoother lines. -
Create the border:
Draw a second, slightly smaller oval inside the first one to create the rim of the shell. This gap should be about 3-4mm wide. -
Outline the body:
Trace the head and the four flippers. Connect the neck to the outer rim of the shell seamlessly. -
Section the borders:
Inside the double-oval rim you created, draw small perpendicular lines all the way around. This creates the segmented look of the turtle’s shell margin.
Pro Design Tip
For sharper lines, pull the pen toward your body rather than pushing it away. This gives you better control over curves and consistent line width.
Step 3: Detailing the Shell
-
Central spine:
Draw a straight line down the center of the inner oval. This will guide the symmetry of the shell pattern. -
Draw the scutes:
Sketch a central column of three shapes—roughly hexagonal or rounded rectangles—down that spine line. These obtain the primary ‘vertebrae’ look. -
Side panels:
On either side of the central column, draw three corresponding shapes that fan out toward the shell’s rim. Think of these like slices of a pie or petals. -
Thicken the gaps:
The white lines define the shapes, but the stone underneath creates the definition. Use your pen to thicken the white boundaries between the shell segments so the grey gaps are uniform.
Step 4: Final Flourishes
-
Flipper patterns:
Inside the front flippers, draw a grid pattern or small scales. You can achieve this by drawing two curved lines down the length of the flipper and crossing them with short horizontal lines. -
Rear flipper details:
Repeat a simpler version of the grid pattern on the small back flippers and the tiny tail. -
Face details:
Draw a simple curved line across the neck to separate the head. Add two small dots for eyes or keep it abstract with a simple band. -
Cleanup:
Once the ink is fully dry (give it at least 15 minutes), gently use the kneaded eraser to lift any visible pencil marks from the stone. -
Second coat:
Go over any lines that look transparent or streaky with a second layer of white ink to ensure a solid, bright opacity. -
Sealing:
Finish by applying a light coat of spray varnish. This protects the line work from scratching and deepens the natural color of the grey stone.
Place your finished monochrome turtle in a sunny spot and enjoy the peaceful vibe it brings to your space
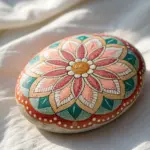
Mandala Shell Turtle Design
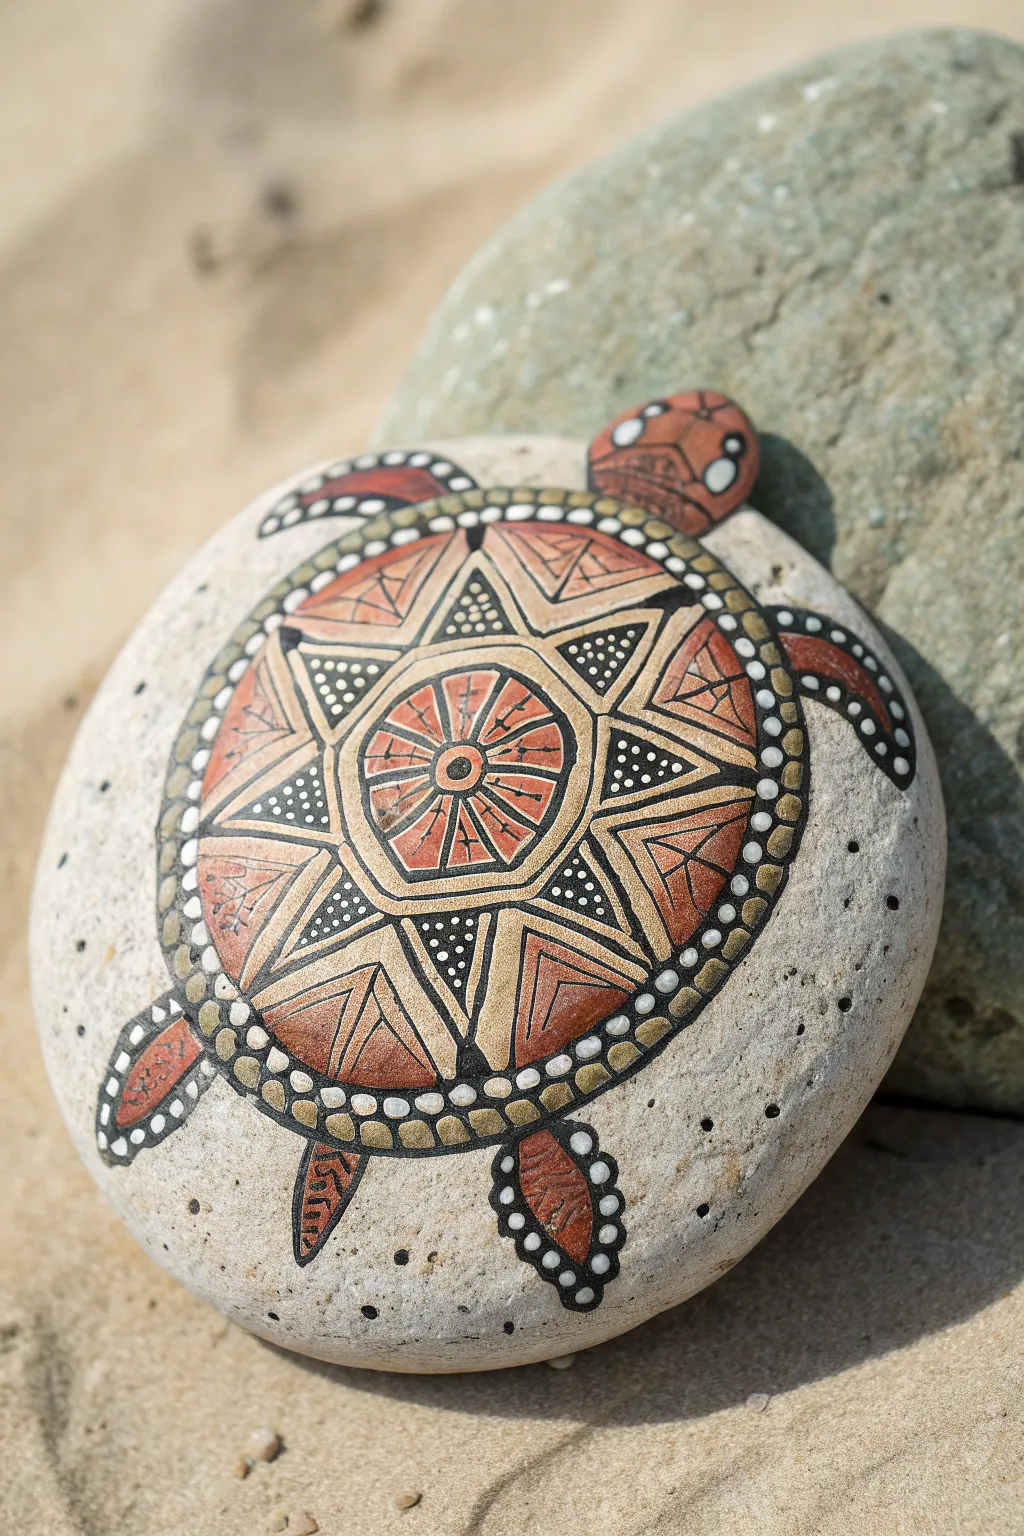
Transform a simple round stone into a stunning piece of art with this intricate mandala turtle design. Featuring warm terracotta tones, metallic gold accents, and crisp black outlines, this project balances geometric precision with organic texture.
Detailed Instructions
Materials
- Smooth, round river rock (approx. 4-5 inches wide)
- Acrylic paints: Terracotta/Rust Orange, Metallic Gold/Bronze, Black, White
- Fine liner brushes (sizes 0 and 00)
- Small flat brush
- Dotting tools (various sizes)
- Pencil and eraser
- Compass (optional but helpful)
- Clear matte or gloss spray sealer
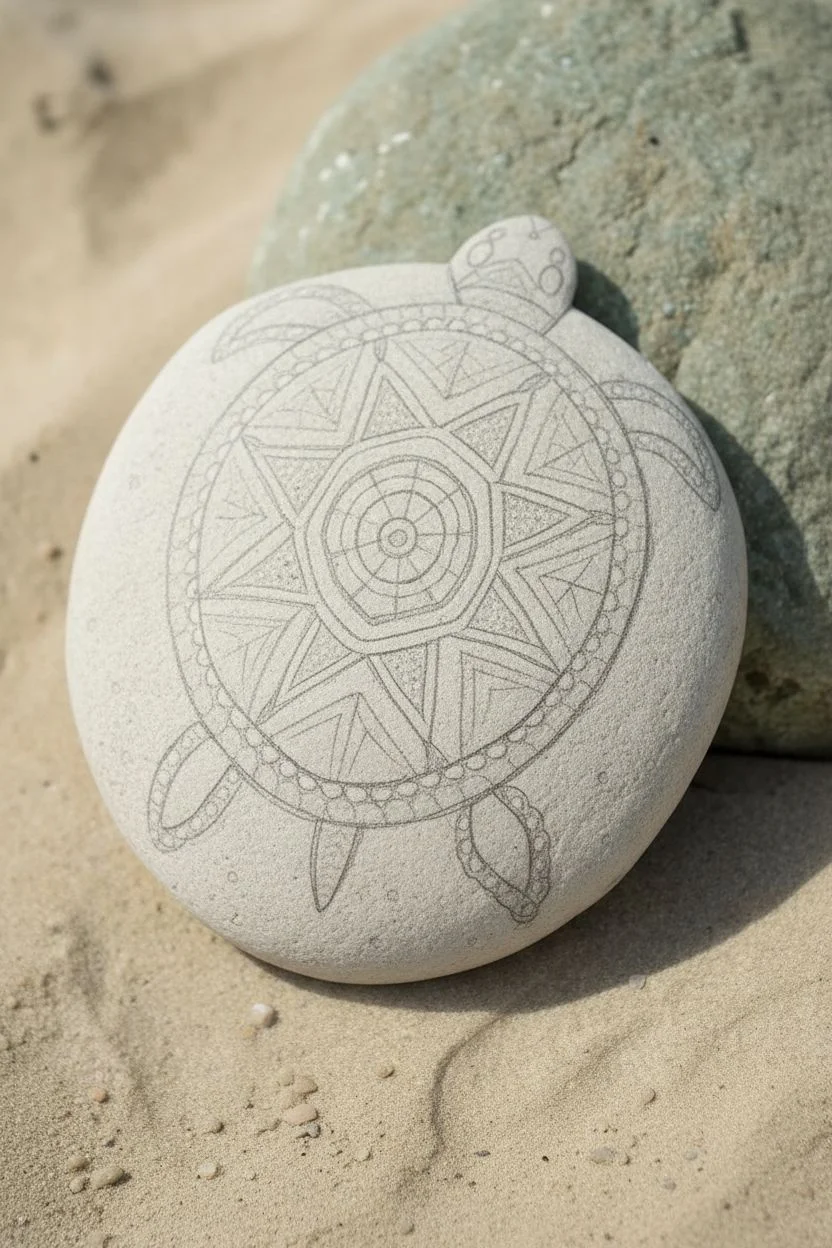
Step 1: Preparation & Base Sketch
-
Select and prep the stone:
Choose a stone that is naturally round or oval to mimic a turtle’s shape. Wash it thoroughly with soap and water to remove any dirt or oils, and let it dry completely before starting. -
Map out the turtle:
Using a pencil, lightly sketch the large central oval for the shell. Then, add a small oval at the top for the head and four flag-like shapes for the flippers extending from the sides. -
Draft the mandala structure:
Find the center of your shell oval. Draw a small central circle, then a larger concentric circle around it. Divide the outer ring of the shell into eight equal triangular sections radiating from the center, creating a star-like pattern.
Wobbly Lines?
If your hand shakes while painting thin black lines, rest your pinky finger on the dry part of the rock for stability, or use a permanent fine-tip marker instead of a brush.
Step 2: Painting the Shell Basics
-
Base coat the segments:
Using your terracotta or rust orange paint and a small flat brush, fill in the central circle and alternating triangular segments of the star pattern. Leave the other segments bare for now. -
Add metallic contrast:
Fill the remaining empty triangular segments with metallic gold or bronze paint. This alternating color scheme creates the depth needed for the mandala effect. -
Paint the appendages:
Base coat the head and the limb shapes with the rust orange color. Don’t worry about the details yet; just get a solid, opaque layer down. -
Define the borders:
Once the base colors are dry to the touch, use a size 0 brush and black paint to outline every major shape: the shell perimeter, the internal geometric triangles, the head, and the flippers.
Level Up: 3D effect
Mix a tiny drop of white into your rust paint and add a highlight line on the upper left of each shell segment to make the shell look domed and three-dimensional.
Step 3: Intricate Detailing
-
Detail the center hub:
Inside the central rust-colored circle, paint thin black spokes radiating outward like a wheel. Place a small black dot in the very center. -
Line the starburst:
Inside the gold triangular sections, paint a smaller black triangle. Inside the rust sections, paint thin black lines that mimic the veining of a leaf or shell scutes. -
Create the shell border:
Around the main shell oval, paint a thick black band. While the black is still drying, I sometimes like to clean my brush to prepare for the dotting phase. -
Dot the perimeter:
Dip a medium-sized dotting tool into gold paint. Press dots into the black border band you just painted, spacing them evenly all the way around the shell.
Step 4: Flippers and Head
-
Decorate the flippers:
Outline the orange flippers in thick black. Use a small dotting tool and white paint to add a row of dots along the outer edge of the black outline. -
Add limb texture:
Inside the orange area of the flippers, use your finest liner brush and black paint to create squiggly, organic lines that look like wrinkled turtle skin. -
Characterize the head:
Paint two white ovals for eyes on the head section. Once dry, add tiny black pupils. Use fine black lines to draw a mouth and some scale patterns on the top of the head. -
Refine the gold sections:
Go back to the black triangles inside the gold shell sections. Use a very small dotting tool to add tiny white dots inside the black areas for high contrast.
Step 5: Final Touches
-
Clean up lines:
Check your black outlines. If any color bled over, touch it up now with your fine liner brush to ensure the geometry looks sharp and intentional. -
Add final highlights:
Place a single tiny white dot on the center black hub of the shell to make it pop. -
Seal the artwork:
Allow the stone to dry overnight. Spray with a clear sealer to protect the paint from chipping and to give the stone a finished, unified look.
Now you have a serene, durable little companion to decorate your garden or desk
Galaxy Shell Turtle
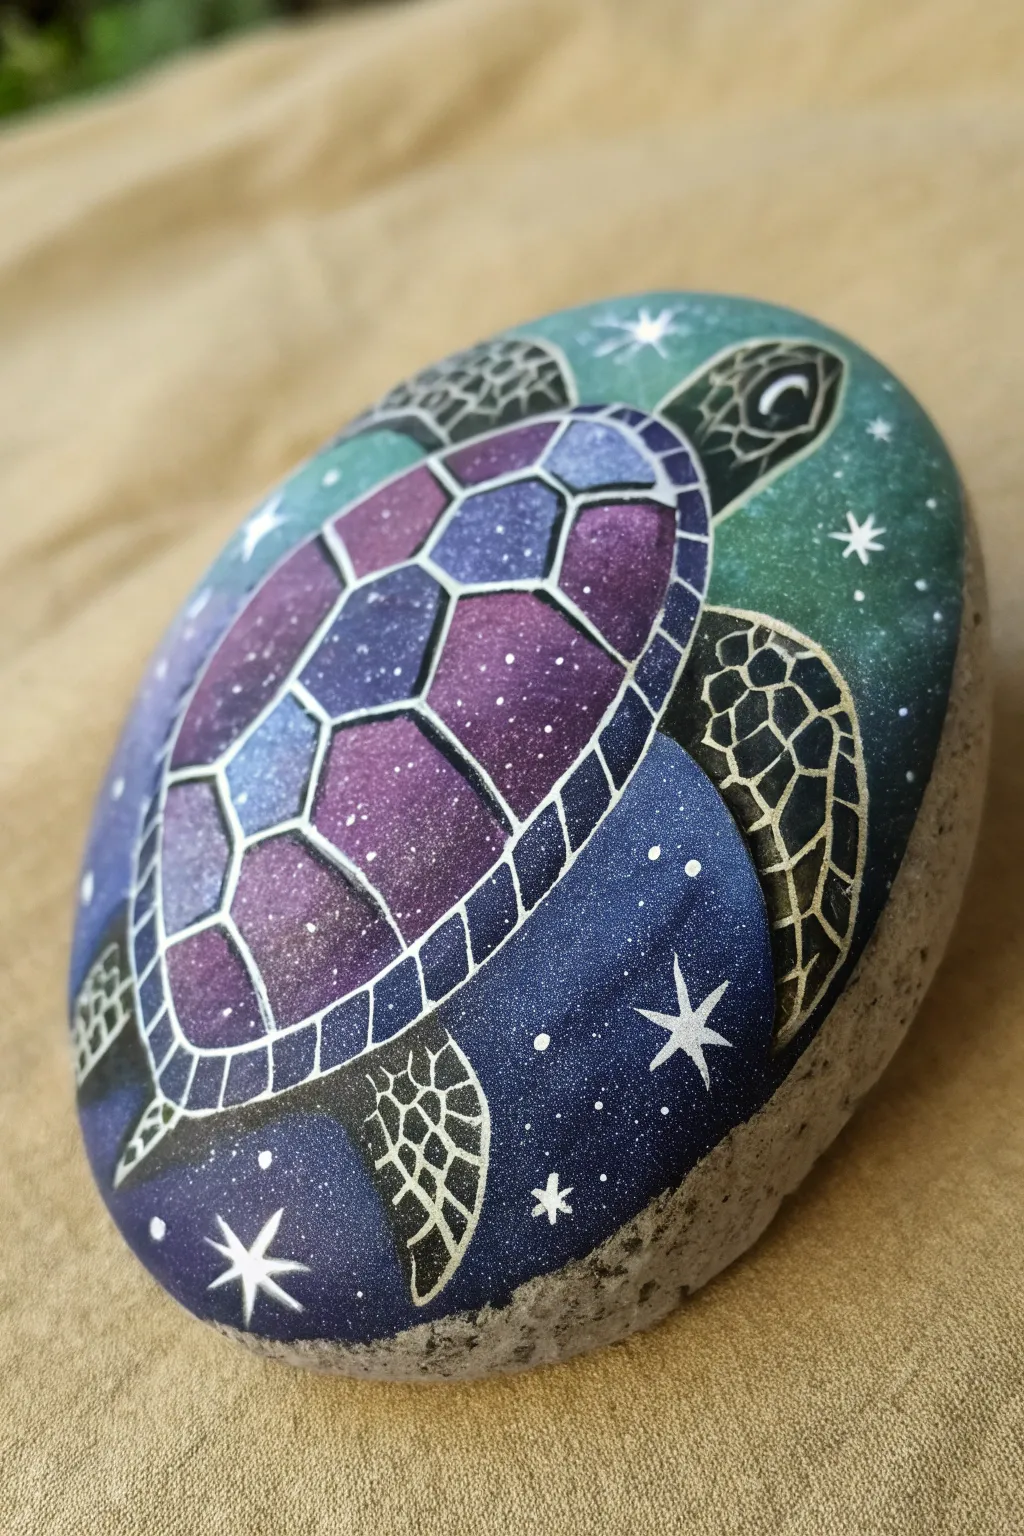

Transform an ordinary river rock into a celestial journey with this stunning galaxy turtle design. The smooth blend of purples and teal inside the shell creates a mesmerizing deep-space effect that contrasts beautifully with the stark white starlight.
How-To Guide
Materials
- Smooth, round river rock (fist-sized)
- Acrylic paints (black, white, deep violet, phthalo blue, teal/turquoise, metallic silver)
- Small flat brush (size 2 or 4)
- Fine liner brush (size 00 or 000)
- White or silver gel pen (optional)
- Pencil and eraser
- Spray varnish or clear sealer (glossy)
Step 1: Preparation & Sketching
-
Clean Your Canvas:
Scrub your rock with warm soapy water to remove any dirt or grease. Let it dry completely in the sun or with a hairdryer before starting. -
Outline the Shape:
Using a pencil, lightly sketch a large oval for the turtle’s shell in the center of the rock. It should take up most of the surface. -
Add the Details:
Sketch the head at the top right, two large front flippers curving backward, and two smaller back flippers. Inside the shell, draw a hexagonal grid pattern for the scutes (the shell segments).
Star Power Tip
For the brightest stars, put a tiny dot of pure white in the center of your larger four-pointed stars. It creates a glowing core effect.
Step 2: Base Layers
-
Create the Background:
Paint the area surrounding the turtle with a deep, cosmic blue or black. This makes the turtle pop and provides a base for the outer galaxy stars. Let this dry thoroughly. -
Base the Flippers and Head:
Paint the head and flippers in a solid black. You may need two thin coats for full opacity. -
Base the Shell:
Paint the entire oval of the shell with a coat of dark purple or black. This dark underpainting will give depth to your galaxy colors later.
Step 3: The Galaxy Effect
-
Start the Gradient:
Load your flat brush with deep violet. Sponge or stipple it gently onto the center left of the shell and parts of the background, keeping the edges soft. -
Blend the Blues:
While the violet is still slightly tacky, blend in some phthalo blue on the right side of the shell, smoothing the transition between the colors. -
Add Teal Highlights:
Using a clean brush, add touches of teal or turquoise to the upper right corner of the background and the top edge of the shell for a glowing nebula effect. -
Stipple for Texture:
Go back over your gradients with a dry brush or sponge using very small amounts of lighter purple and blue to create a misty, cloud-like texture. -
Starry Speckles:
Dilute a tiny amount of white paint with water. Dip a stiff brush (or toothbrush) into it and flick the bristles to spray fine white dots over the painted areas to create distant stars.
Shaky Lines?
If your white lines are uneven, thicken them slightly or wait for them to dry and tidy up the edges with the background color paint.
Step 4: Defining the Turtle
-
Line the Shell:
Using your fine liner brush and slightly thinned white paint (or a white gel pen), carefully trace over your pencil lines on the shell. Make the lines crisp and distinct to separate the galaxy segments. -
Double the Border:
Paint a second, slightly thinner line just inside the outer edge of the shell to create a rim effect, connecting it with short perpendicular lines to look like the edge scutes. -
Detail the Flippers:
On the black flippers and head, paint a mosaic pattern using jagged, irregular shapes in a light creamy grey or muted gold color. Leave thin black channels between the shapes. -
The Eye:
Paint a small white circle for the eye on the head, adding a tiny black pupil for focus.
Step 5: Final Touches
-
Add Major Stars:
Paint a few larger, four-pointed stars using the fine liner brush. Place them strategically in the darker areas of the background or on the shell for balance. -
Brighten the Nebula:
If any galaxy colors look dull after drying, add a very thin glaze of bright purple or neon blue over the top to revive the intensity. -
Seal the Rock:
Once absolutely everything is dry (give it a few hours), spray the rock with a glossy clear sealer. This not only protects the paint but makes the galaxy colors look wet and vibrant.
Place your galactic turtle in the garden or on your desk to enjoy a little piece of the universe
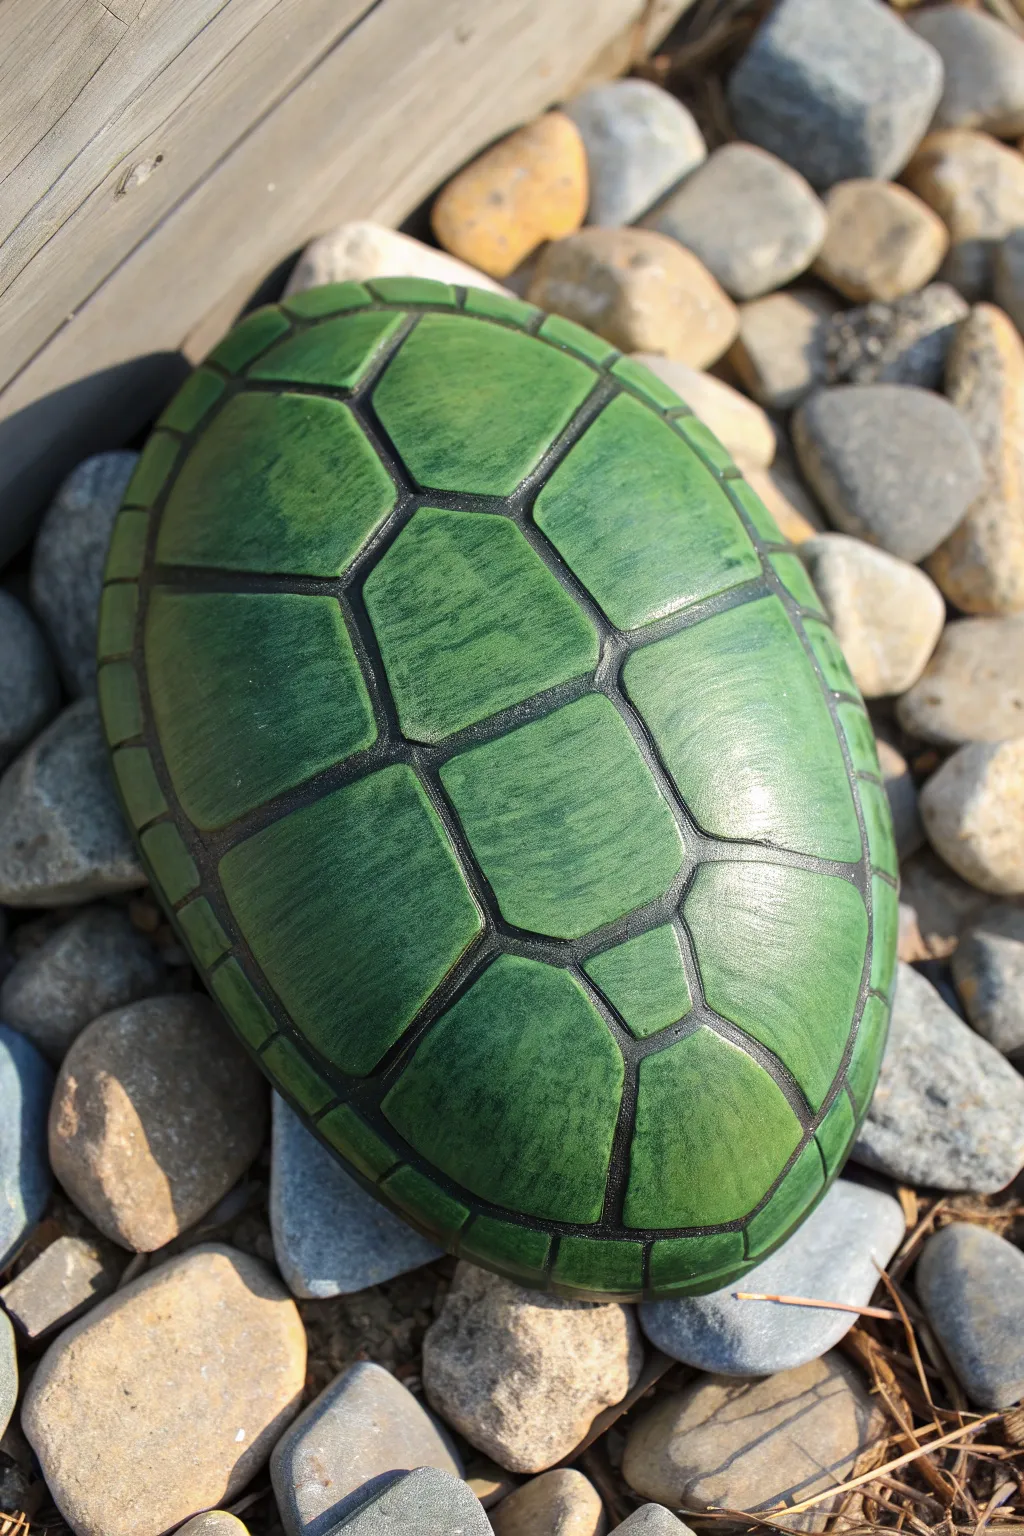
Geometric Hexagon Shell Turtle
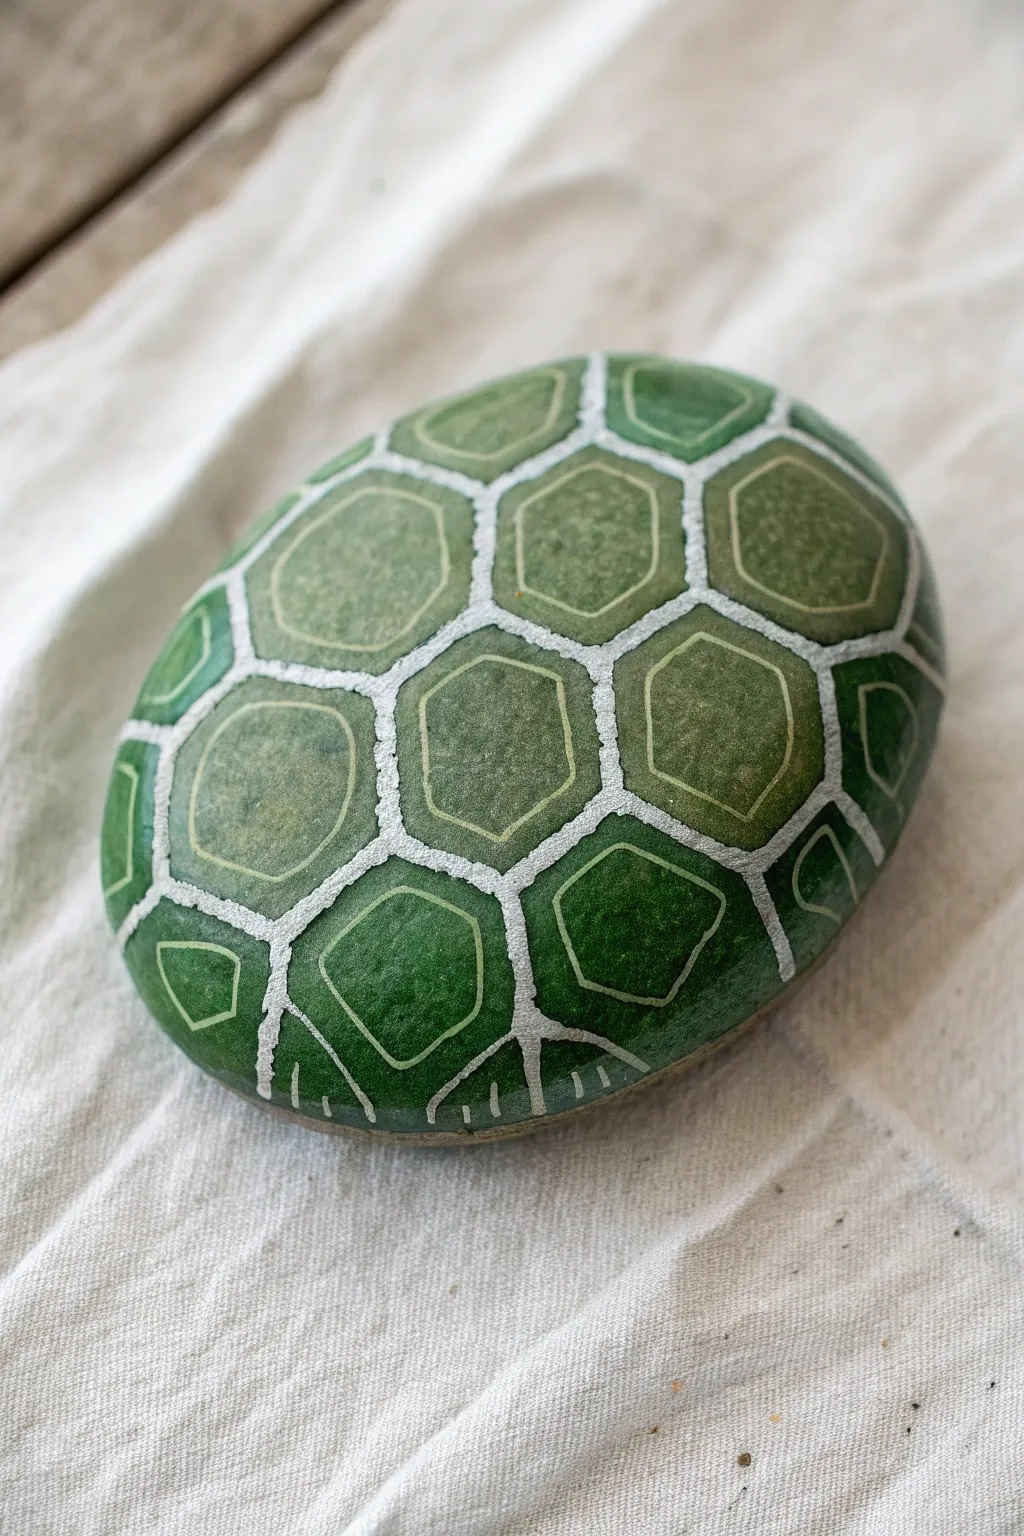
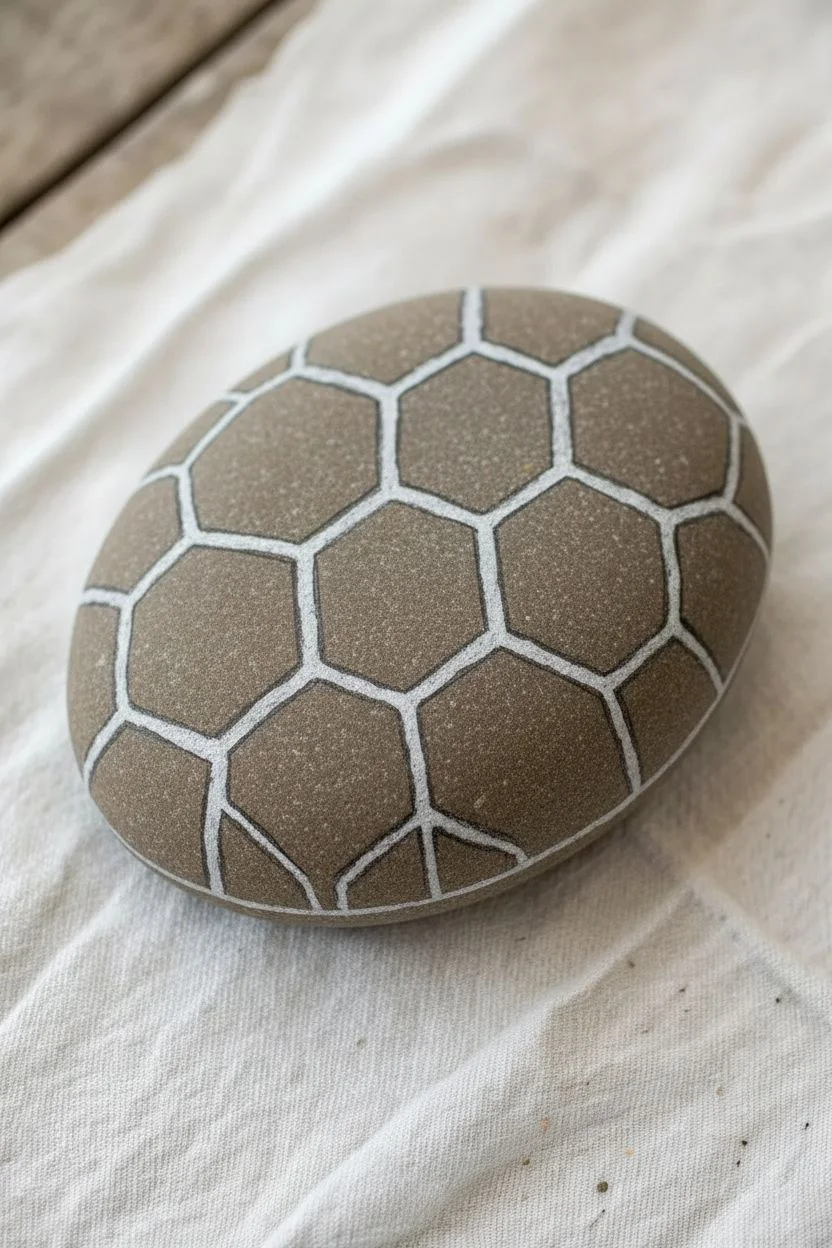
Transform a smooth river stone into a stylish turtle shell using a modern geometric pattern. This design relies on crisp hexagons and a monochromatic green palette to create depth and texture without needing complex shading skills.
How-To Guide
Materials
- Smooth oval river rock (palm-sized or larger)
- Acrylic paints: Dark forest green, moss green, light olive green, white
- Silver or metallic white acrylic paint (or paint pen)
- Fine detail brush (size 0 or 00)
- Flat shader brush (size 4 or 6)
- Pencil
- Eraser
- Palette or mixing plate
- Gloss varnish or sealant
Step 1: Preparation & Sketching
-
Rock Selection:
Choose a rock that is naturally oval and relatively flat on top, mimicking the shape of a turtle’s carapace. Wash and dry it thoroughly to remove any dirt or oils. -
Base Patterning:
Using a pencil, lightly sketch a central row of three hexagons running down the length of the rock. These don’t have to be mathematically perfect, but try to keep them roughly the same size. -
Expanding the Grid:
Sketch a second ring of partial hexagons around the central three. These shapes should look like they wrap around the curvature of the stone, becoming trapezoids or irregular polygons near the edges. -
Refining Lines:
Go back over your sketch and thicken the space between the shapes. You want a clear ‘grout line’ or gap between each shell segment, which will later become the silver outline.
Wobbly Lines?
If painting the thick silver lines with a brush is too difficult, switch to a silver acrylic paint marker. It offers much better control for geometric grids.
Step 2: Painting the Shell Segments
-
Mixing Greens:
Prepare three shades of green on your palette. You’ll need a deep forest green for the outer edges, a standard moss green for the main body, and a lighter olive tone for the central scutes. -
Painting Center Scutes:
Start with the central row of hexagons. Use your flat brush to fill them in with your middle-tone moss green. Apply two thin coats if needed for opacity. -
Painting Outer Scutes:
Move to the surrounding ring of shapes. Paint these with the darker forest green. This subtle gradient helps emphasize the roundness of the shell. -
Creating Texture:
While the green paint is still wet, you can dab it gently with a dry brush or sponge to give it a slightly organic, leathery texture rather than a flat plastic look. -
Drying Time:
Let the green base layers dry completely. This is crucial before adding the intricate line work to prevent smudging.
Step 3: Detailing & Outlining
-
Thick Outlines:
Using a size 0 brush and silver or metallic white paint, carefully fill in the ‘grout lines’ between all your green shapes. I find that pulling the brush towards me creates steadier lines than pushing it away. -
Inner Geometry:
Mix a very light green (or use a pale yellowish-green). inside each dark green hexagon, paint a thin geometric outline that mimics the shape of that specific segment. -
Line Placement:
Keep this inner thin line about 2-3 millimeters away from the thick silver edge. This creates a framed effect that adds dimension to each scute. -
Adding Edge Details:
along the very bottom edge of the shell (the skirt), paint small vertical tick marks or tiny rectangles in the silver color to suggest the marginal scutes of a turtle. -
Clean Up:
If any silver paint accidentally crossed onto the green, wait for it to dry and touch it up with the appropriate green shade.
Add Some Age
Lightly sponge a bit of brown or gold paint over the green scutes before sealing to give the shell an aged, weathered appearance.
Step 4: Finishing Touches
-
Final Inspection:
Check for any patchy areas in the large green sections. A third coat on just the centers of the hexagons can make them pop visually. -
Sealing:
Once the paint is fully cured (give it at least an hour), apply a coat of gloss varnish. This mimics the wet look of a turtle emerging from a pond and protects your hard work.
Place your new geometric turtle in a garden pot or on a windowsill to enjoy its calming symmetry
Watercolor-Style Wash Turtle
Transform a smooth river rock into a serene ocean scene with this delicate sea turtle design. Using diluted acrylics or watercolors mimics a soft, washed effect that perfectly captures the translucency of marine life.
Step-by-Step Guide
Materials
- Smooth, oval-shaped river rock (cleaned and dried)
- White Gesso or white acrylic paint (optional, for priming)
- Acrylic paints (Phthalo Green, Turquoise, Burnt Sienna, White, Paynes Grey)
- Watercolors (alternative to acrylics)
- Small round brushes (size 0, 1, and 2)
- Fine liner brush (size 00 or 000)
- Water cup and palette
- Pencil (HB or lighter)
- Spray matte varnish or sealant
Step 1: Preparation and Sketching
-
Surface Prep:
Begin with a meticulously clean stone. If your rock is very dark, apply a thin, washed-out layer of white acrylic or gesso to the center area where the turtle will go, fading the edges outward so the paint colors will show up brightly. -
Basic Oval Shape:
Using a light pencil touch, sketch the large oval of the turtle’s shell (carapace) in the center of the rock. Aim for a slightly tilted angle to give the turtle movement. -
Head and Flippers:
Add the head shape at the top right, resembling a rounded bullet. Sketch two large front flippers sweeping backward and two smaller rear flippers tucking in near the bottom. -
Shell Details:
Draw the scutes (shell plates) lightly. Start with a central column of hexagons, then add the surrounding shapes that fit together like a puzzle. Keep lines faint so they don’t show through the translucent paint.
Transparency Trick
To get that watercolor look with acrylics, use glazing medium instead of just water. It keeps the paint binder strong while making the color transparent.
Step 2: Painting the Shell
-
Base Green Wash:
Mix Phthalo Green with a touch of White and plenty of water to create a glaze. Fill in the shell area, treating it like watercolor. Let the paint pool slightly in some areas for texture. -
Deepening the Tones:
Before the first layer fully dries, drop in a slightly darker turquoise mix into the center of the shell scutes or near the edges of the shell for a soft, wet-on-wet blend. -
Defining the Scutes:
Once the green base is dry, use a very fine liner brush and thinned white paint to outline the separation lines between the shell plates. Keep the lines thin and delicate. -
Adding Highlights:
Mix a faint minty green (White + tiny bit of Green). Paint subtle highlights on the top curves of the shell segments to make them look domed and three-dimensional.
Add Subtle Shimmer
Mix a tiny amount of iridescent medium or pearl white paint into your final blue water wash for a magical, sun-dappled ocean effect.
Step 3: Body and Features
-
Skin Base Coat:
For the flippers and head, mix a watery wash of Burnt Sienna with a touch of Orange. Apply this wash over the sketched limbs, keeping it lighter near the connection to the body. -
Scale Texture:
Instead of painting every single scale, suggest texture by using the liner brush to paint a darker terracotta ‘netting’ pattern over the flippers and head. The cells should get smaller near the tips of the fins. -
The Eye:
Paint a tiny black dot for the eye on the head. Once dry, add a microscopic dot of white as a reflection to bring the turtle to life. -
Soft Background:
Mix a very watery pale blue. Carefully paint around the turtle to create the water effect. Fade this blue outward into the raw stone, so there is no harsh edge where the paint stops.
Step 4: Final Flourishes
-
Seaweed Fronds:
Using your thinnest liner brush and a diluted olive green, paint wispy lines curving upward from the bottom and sides to resemble seagrass. Keep the strokes quick and fluid. -
Floral Accents:
Add tiny pink dots at the ends of some plant stems to suggest underwater flora. These small pops of color balance the heavy greens and browns of the turtle. -
Contrast Check:
Step back and look at your rock. If the shell needs more definition, darken the outer rim of the shell with a deep teal mix. -
Sealing the Art:
Because this style relies on delicate washes, protection is vital. Once the stone is bone dry (give it a few hours), spray it lightly with a matte varnish to seal the pigment without ruining the soft, natural finish.
Place your finished stone on a desk or shelf as a peaceful reminder of the slow and steady rhythms of nature
Multi-Rock 3D Turtle Sculpture
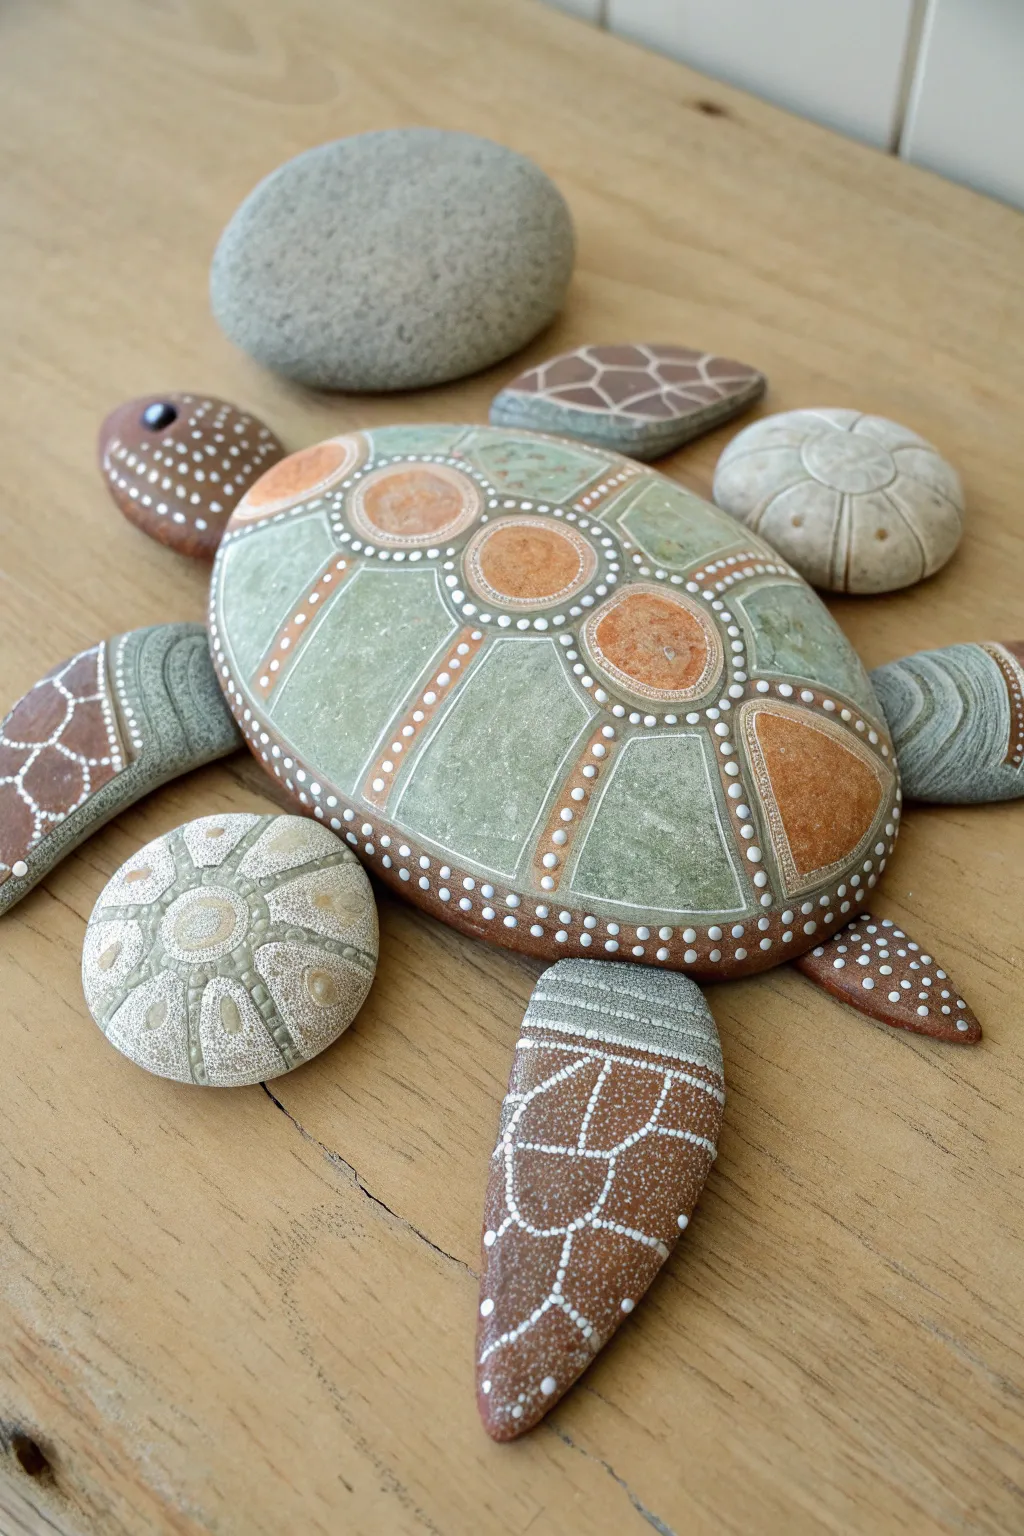
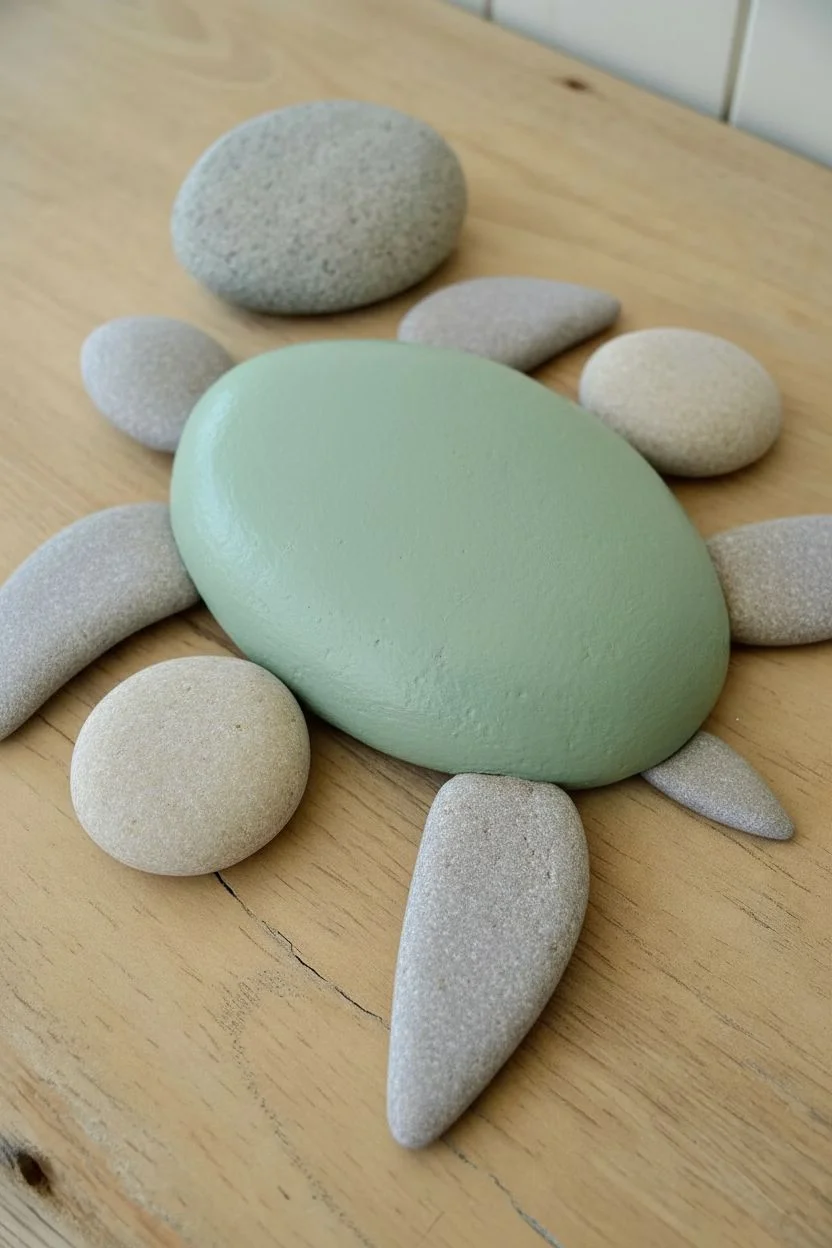
This clever 3D project transforms a collection of smooth beach stones into a stunning sea turtle sculpture. By arranging and painting specialized patterns onto individual rocks, you create a cohesive, textured piece that looks like it just crawled up from the ocean floor.
How-To Guide
Materials
- One large oval stone (carapace)
- Four medium elongated stones (flippers)
- One small round stone (head)
- One tiny triangular stone (tail)
- Small round stones for decoration (optional)
- Acrylic paints (sage green, terra cotta/rust, brown, white, cream, grey)
- Fine detail brushes (sizes 0, 00, and 1)
- Dotting tools (various sizes)
- Strong craft glue or stone adhesive (optional, for permanent assembly)
- Matte or satin varnish
Step 1: Stone Selection & Preparation
-
Gather your stones:
Begin by searching for smooth, flat river rocks or beach pebbles. You need one large central oval for the shell, four flipper-shaped stones, a distinct head stone, and a tiny pointed tail. -
Test the layout:
Arrange the unpainted stones on your work surface to ensure the proportions look right. The flippers should angle outward naturally from the central shell. -
Clean surface:
Wash all stones thoroughly with soap and water to remove any dirt or oils, then let them dry completely so the paint adheres properly. -
Base coat the shell:
Paint the large central stone with a soft sage green. You may need two thin coats for opaque coverage, letting the first dry before applying the second.
Step 2: Painting the Shell Pattern
-
Draft the scutes:
Lightly sketch the shell pattern with a pencil. Draw a central column of three circles, flanked by larger smooth shapes on the sides. Don’t worry about perfection; natural asymmetry adds charm. -
Paint the central circles:
Fill the three central circles with a terra cotta or rust color paint. I like to sponge this layer slightly to give it a speckled, organic texture. -
Add side details:
On the side panels of the shell, paint decorative triangular or trapezoidal shapes using the same rust color, leaving sage borders around them. -
Outline with dots:
Using a small dotting tool and white paint, carefully create dotted lines separating the different sections of the shell. Follow the contours of your painted shapes. -
Add inner details:
Inside the rust-colored circles and shapes, add a second, smaller ring of tiny white dots to create depth and intricacy.
Uneven Dotted Lines?
If your dots are running together, your paint is likely too thin or your tool is overloaded. Use thicker heavy-body acrylics and wipe the tool often.
Step 3: Detailed Flipper Work
-
Base coat the flippers:
Paint the bottom half of each flipper stone a solid rust brown. Paint the upper section (where it connects to the body) a soft grey-green. -
Create the scale texture:
On the rust-colored sections, use a fine brush with white paint to draw a cracked-earth or mosaic pattern. These irregular polygons mimic the scaly skin of a turtle’s flipper. -
Add wrinkly details:
On the grey-green upper sections of the flippers, use a darker grey paint to paint thin, curved lines. These represent the wrinkles in the skin. -
Refine the tail:
Paint the tiny tail stone with the same rust base and white mosaic pattern as the flippers, keeping the lines very fine.
Add Depth
Mix a tiny drop of water into a darker shade of paint (like burnt umber) and apply it as a wash over the dried texture to settle into the cracks for an antique look.
Step 4: The Head & Final Assembly
-
Paint the head base:
Coat the head stone in a dark brown. Let it dry completely. -
Add facial spots:
Using a dotting tool, cover most of the head with white dots of varying sizes, leaving two empty spaces for the eyes. -
Paint the eye:
Paint a simple black oval for the eye. Add a tiny white reflection dot near the top to bring the turtle to life. -
Decorate accent stones:
If you have extra round stones (like the sand dollar designs shown), paint them cream and add radial lines and dots in grey or beige to mimic sea urchins or fossils. -
Seal the artwork:
Once all paint is fully cured, apply a coat of matte or satin varnish to protect the designs from chipping. -
Assemble the sculpture:
Reassemble your turtle on a table or in your garden. For a permanent display, you can glue the pieces together using strong stone adhesive.
Now you have a serene, permanent pet that requires no feeding and adds coastal charm to any space
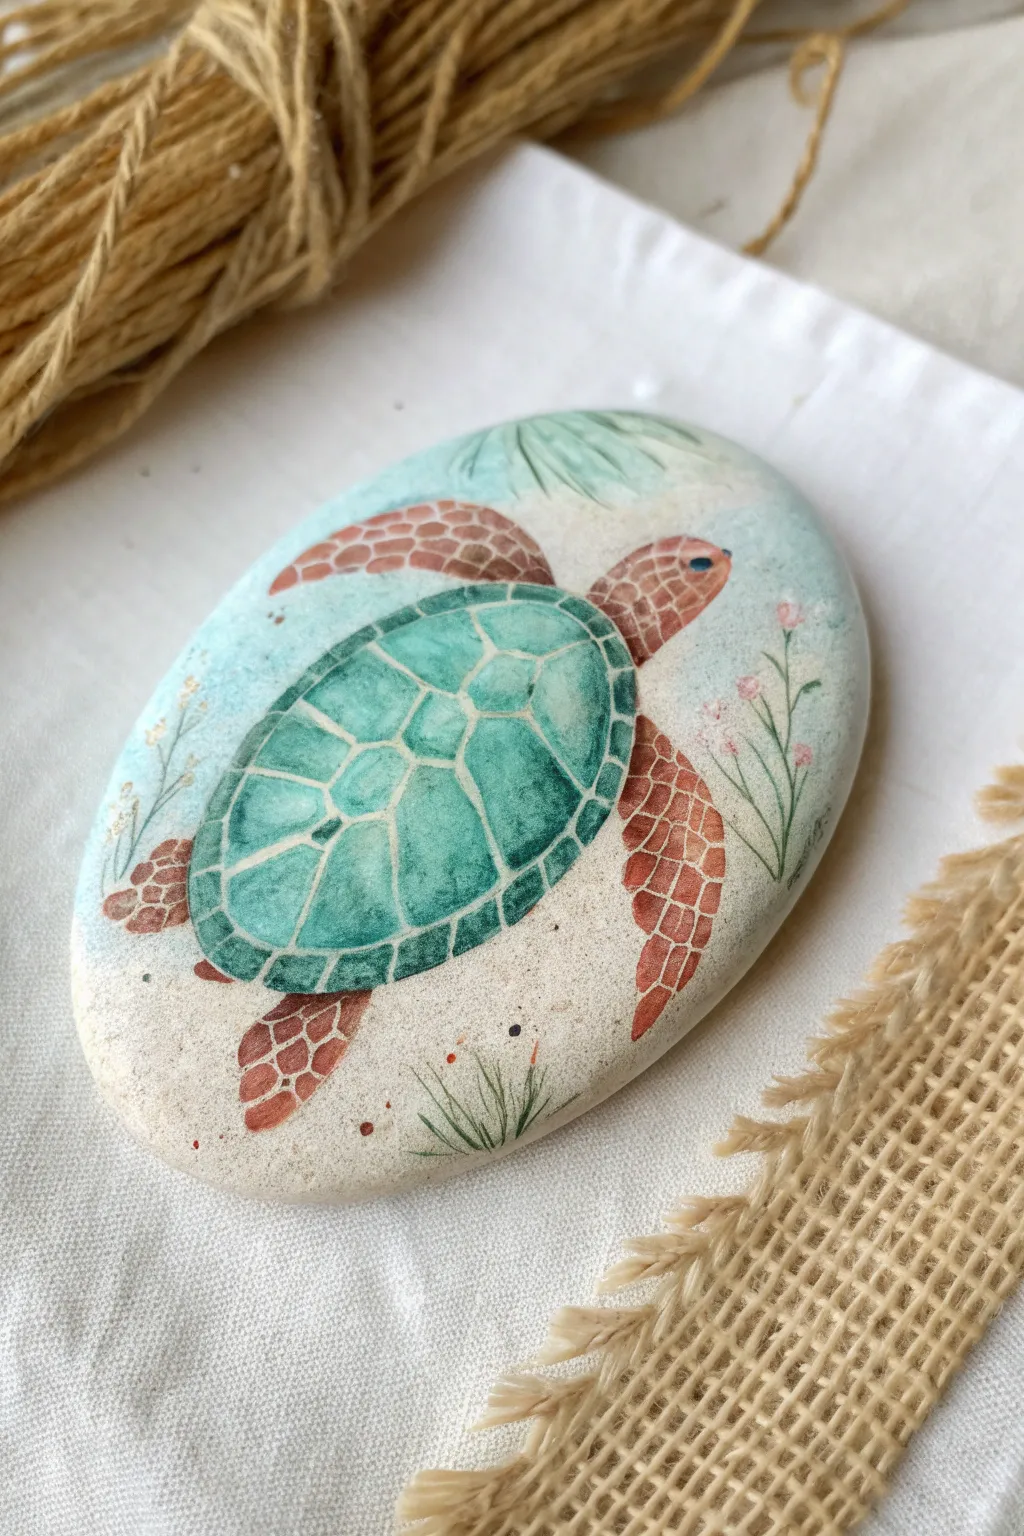
Textured Sand-And-Sea Turtle Rock
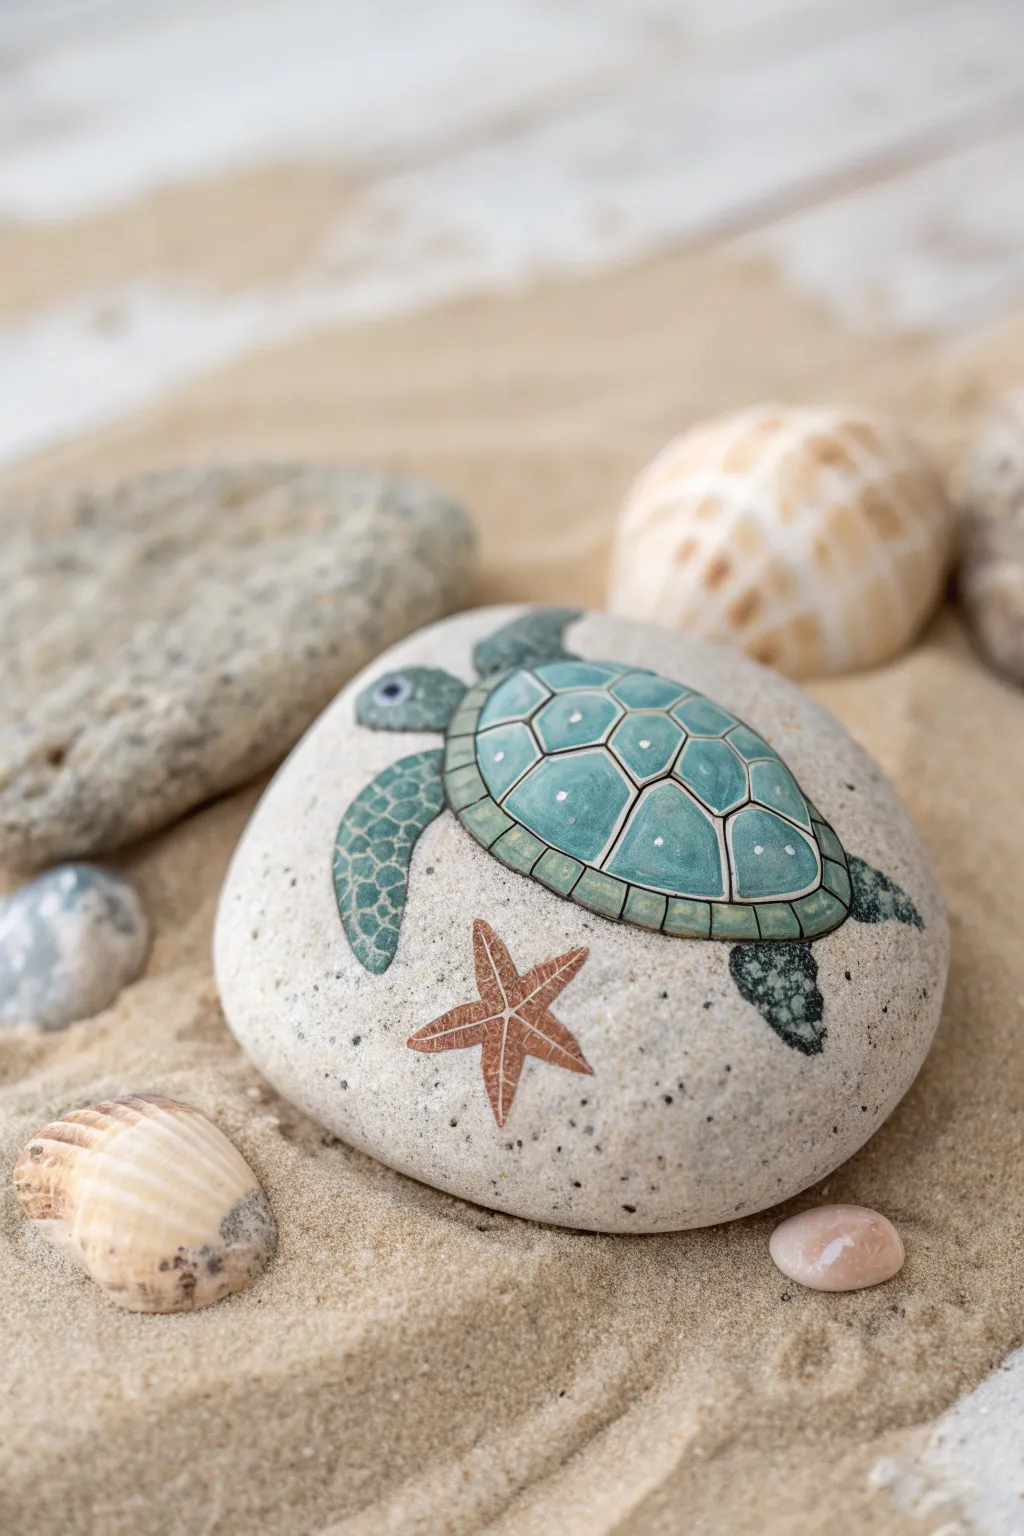
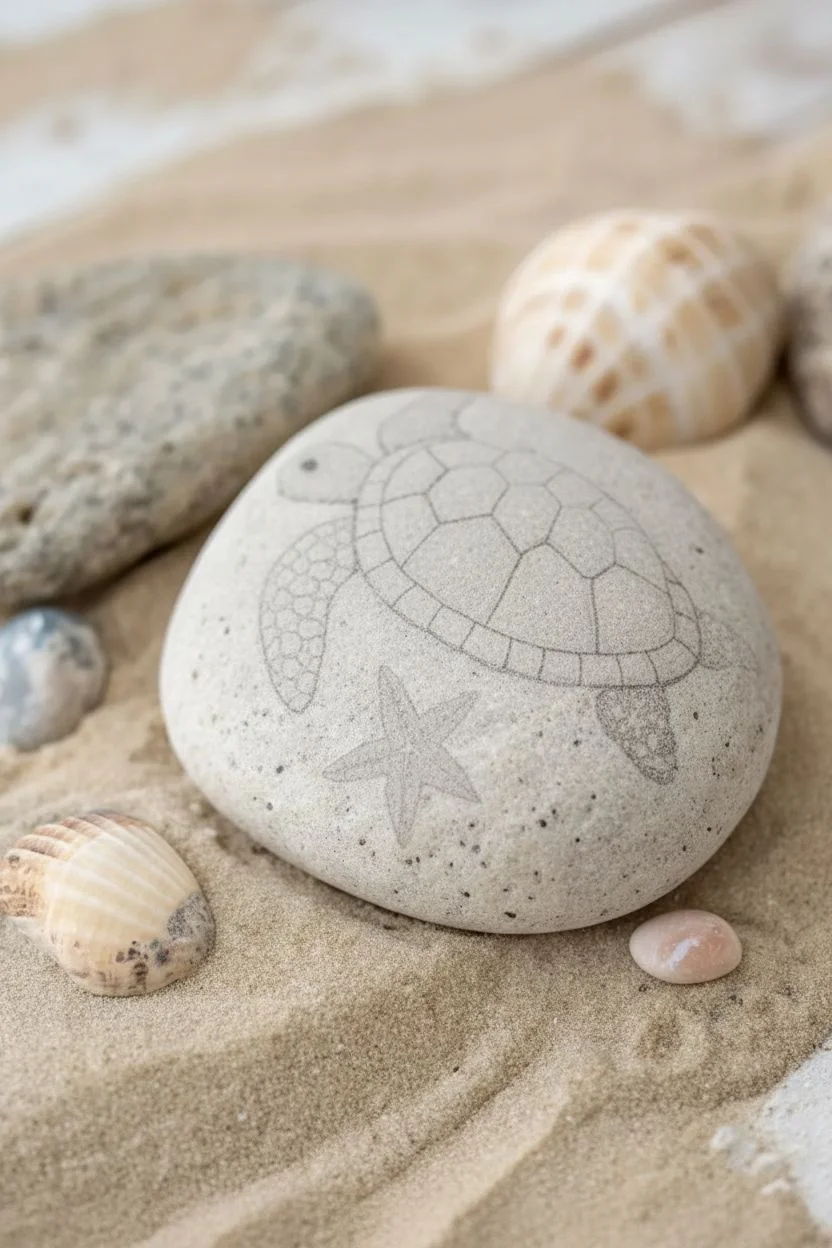
Capture the calm of the ocean floor with this beautifully detailed turtle rock painting. Using a smooth, light-colored stone as your canvas, you’ll learn to layer ocean blues and earthy browns to create a realistic sea turtle gliding over a sandy starfish companion.
Step-by-Step Guide
Materials
- Smooth, rounded river rock (approx. palm-sized, light grey or beige)
- Acrylic paints: Teal, Turquoise, Deep Green, Light Blue, White, Black, Terracotta (Red-Brown), Dark Brown
- Fine detail brushes (size 000 and 00)
- Small flat brush (size 2)
- Stylus tool or toothpick (for dots)
- Graphite transfer paper (optional)
- Pencil and eraser
- Matte varnish or sealant
Step 1: Preparation & Sketching
-
Clean Your Canvas:
Begin by thoroughly washing your stone with warm soapy water to remove any dirt or oils. Let it dry completely before starting; a clean surface ensures the paint adheres properly. -
Outline the Shapes:
Using a light pencil, sketch the oval shape of the turtle’s shell in the center of the rock. Add the flippers extending outward and the small rounded head at the front. Don’t press too hard, as graphite can be tricky to erase from porous stone. -
The Starfish Companion:
Below the turtle, sketch a simple five-pointed starfish. Keep the lines slightly curved to give it an organic, resting appearance.
Step 2: Painting the Turtle Shell
-
Base Color for Segments:
Mix a soft teal color using turquoise and a touch of white. With your fine brush, carefully fill in the central hexagonal scutes (segments) of the shell. Leave a very thin gap between them where the rock shows through or where you will outline later. -
Outer Shell Ring:
Paint the smaller, rectangular segments around the rim of the shell using the same teal mixture. I like to keep the paint consistency slightly fluid here to get crisp edges. -
Adding Highlights:
While the teal is dry, mix a lighter version of the color (add more white). Gently paint a small highlight in the uper center of each shell segment to create a domed, 3D effect. -
Defining the Lines:
Using a size 000 liner brush and chaotic black (or very dark grey) paint, carefully outline each shell segment. Keep your hand steady to create thin, consistent dividers. -
Enhancing the Rim:
Paint a second, thinner line just inside the black outline on the rim segments using a very pale blue-white. This subtle reflected light makes the shell look glossy. -
Decorative Dots:
Dip a toothpick or fine stylus into white paint. Place tiny, delicate dots inside the shell segments—usually one or two per segment—to mimic natural shell textures.
Pro Tip: Natural Texture
Don’t paint the background! Leaving the natural speckled surface of the rock visible acts as the perfect sandy ocean floor, saving you time and adding realism.
Step 3: Flippers & Features
-
Base Flipper Coat:
Fill in the head and flippers with a darker, muted teal-green. Let this base layer dry completely. -
Scale Texture:
Mix a lighter seafoam green. Using your smallest brush, paint tiny, irregular pebble shapes (scales) on top of the dark flipper base. Leave the dark green showing between these shapes to create the pattern. -
The Eye:
Paint a small black circle on the head for the eye. Once dry, add a tiny white speck for the highlight, bringing the turtle to life.
Troubleshooting: Shaky Lines
If you struggle with the thin black outlines on the shell, try using an ultra-fine tip black permanent marker or drawing pen instead of a paint brush.
Step 4: The Starfish & Shadows
-
Starfish Base:
Paint the starfish using a terracotta or reddish-brown shade. Apply it somewhat thinly so it looks like part of the ‘sand’. -
Starfish Details:
Use a lighter beige or cream color to paint fine lines radiating from the center of the starfish down each arm. This adds dimension without needing heavy shading. -
Grounding Shadow:
To make the turtle look like it’s swimming just above the ‘sand,’ create a wash of diluted grey-brown paint. Apply this very faintly underneath the flippers and body.
Step 5: Finishing Touches
-
Clean Up:
Check the edges of your painting. If you smudged any paint onto the raw stone, you can sometimes gently scrape it off with a damp toothpick or cover it with a paint color that matches the rock. -
Sealing:
Since this rock relies on the natural stone texture for the ‘sand,’ use a matte varnish rather than a gloss. Brush a thin layer over the entire stone to protect the paint and deepen the colors slightly.
Now you have a serene piece of ocean art that looks right at home nestled in the sand
Storybook Turtle Character Rock
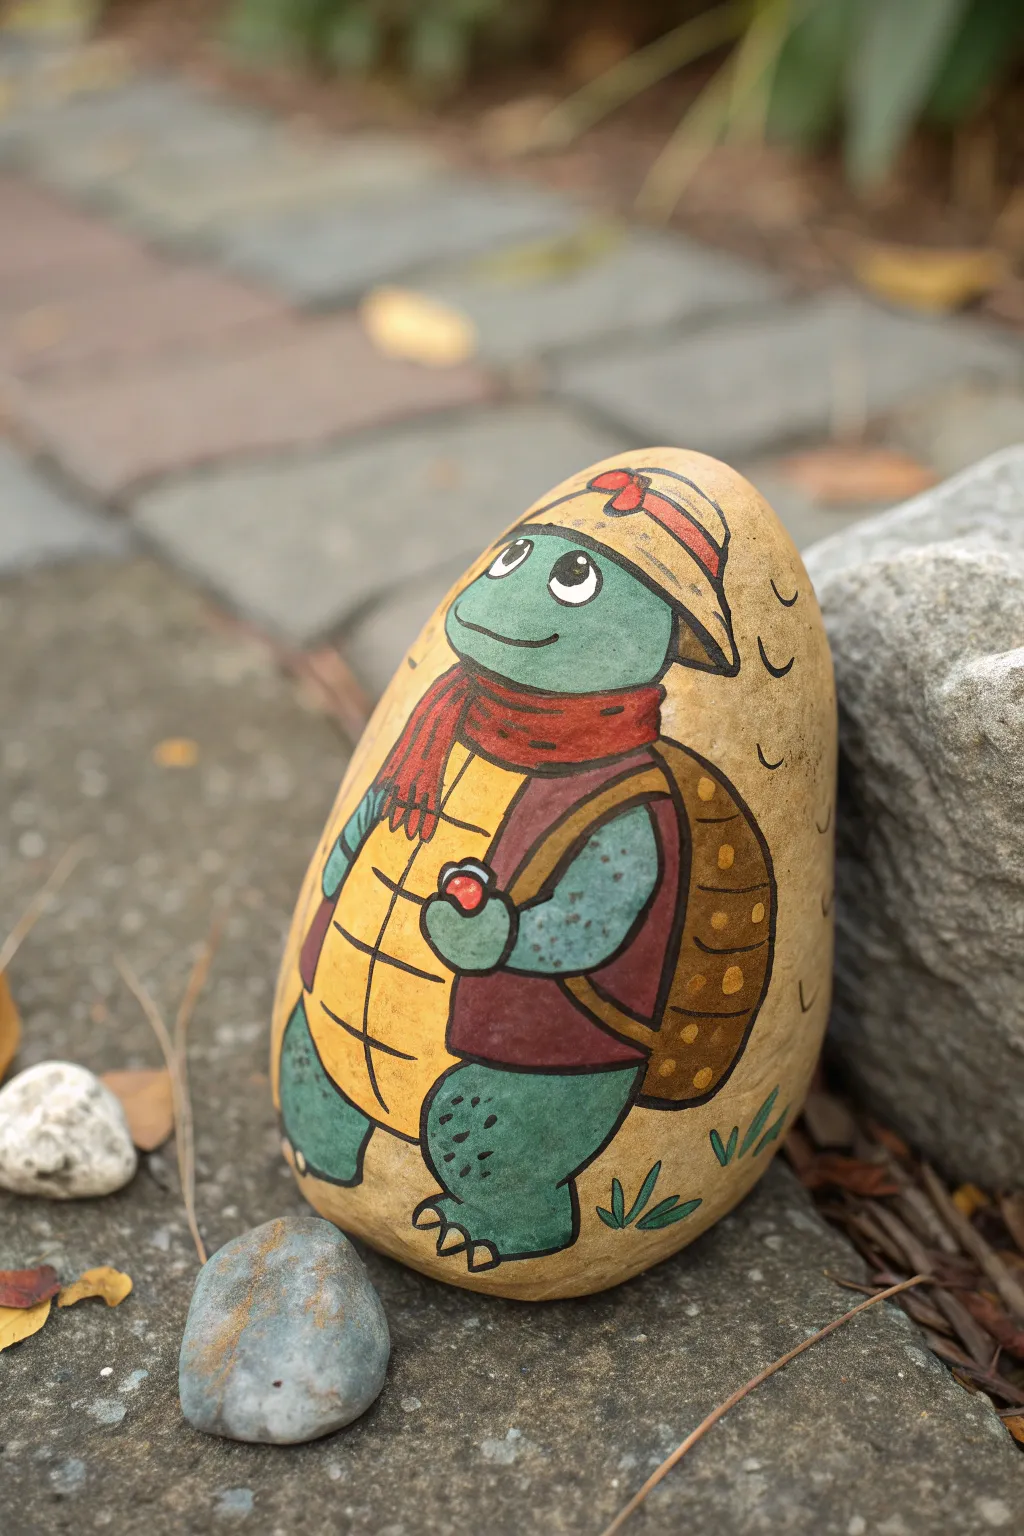
Bring a charming storybook character to life on a simple garden stone with this delightful painting tutorial. This project features a friendly turtle hiker, complete with a cozy scarf and hat, rendered in gentle, earthy tones that look perfect in an outdoor setting.
How-To Guide
Materials
- Smooth, oval-shaped river rock (medium to large size)
- Acrylic paints (Titanium White, Sage Green, Forest Green, Cadmium Yellow, Burnt Sienna, Primary Red, Black)
- Fine liner brushes (size 00 or 000)
- Flat shader brush (size 4 or 6)
- Pencil for sketching
- Posca paint pens (optional, for outlining)
- Matte or satin spray sealant
Step 1: Preparation & Base Sketch
-
Select and prep the stone:
Choose a smooth, oval rock that stands upright if possible, as this suits the character’s posture best. Scrub it clean with soap and water to remove any dirt or oils, then let it dry completely. -
Prime the surface:
Using your flat brush, coat the entire front face of the rock with a mix of Titanium White and a tiny drop of Yellow or Brown to create a warm, creamy off-white background color. This mimics the look of old paper. -
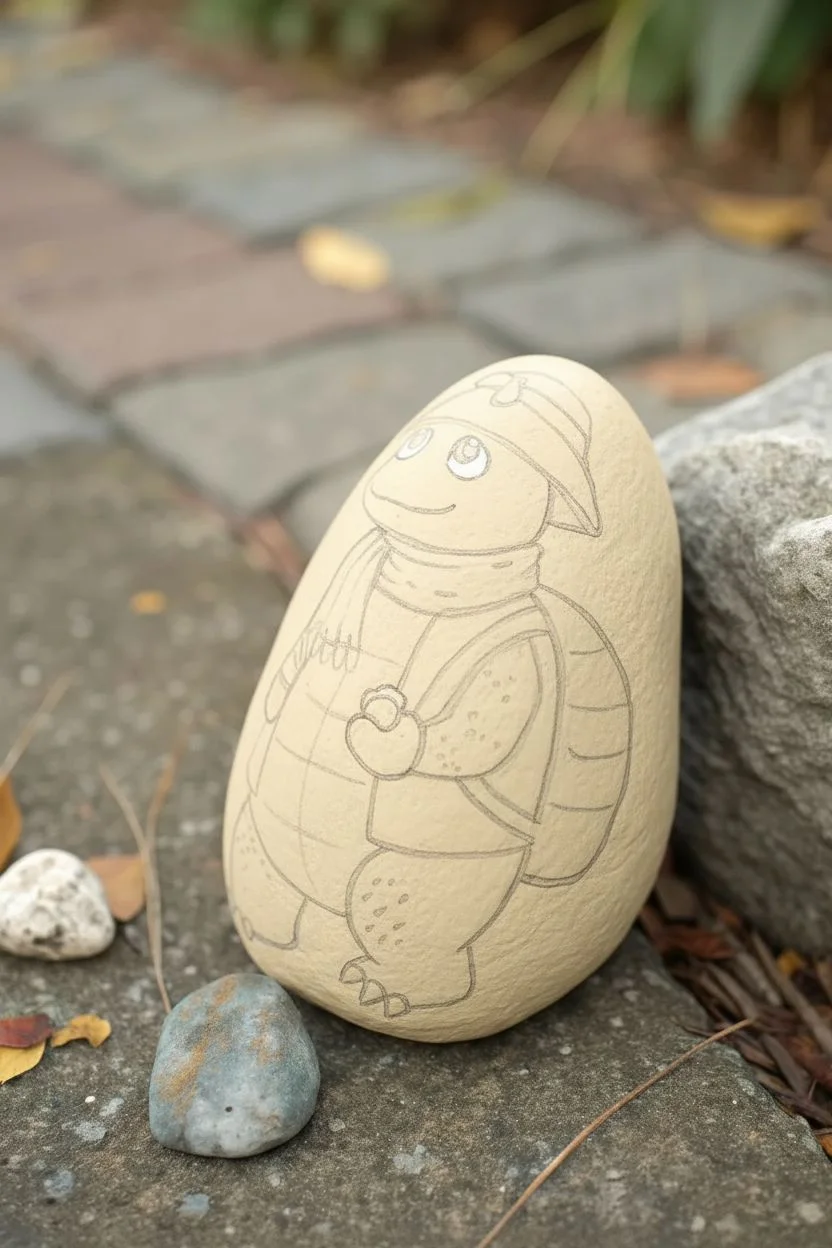
Sketch the outline:
Once the base is dry, lightly sketch your turtle character with a pencil. Start with a large oval for the body, a smaller circle for the head, and add the shapes for the hat, shell, and limbs. -
Refine the details:
Draw in the specific accessories: the brimmed hat, the wrapped scarf around the neck, the vest on the chest, and the shell peaking out from behind. Don’t forget the facial features like the large eyes and smile.
Steady Hand Pro Tip
If your hands shake during outlining, try bracing your pinky finger against the dry part of the rock while you hold the brush. This acts as an anchor for cleaner lines.
Step 2: Color Blocking
-
Paint the skin:
Mix Sage Green with a touch of White to create a soft, minty green. Fill in the head, arms, and legs. You may need two thin coats for solid coverage. -
Fill the belly:
Paint the turtle’s front plastron (belly) with a bright Cadmium Yellow. It’s okay if it looks flat for now; we will add texture later. -
Color the clothing:
Use Burnt Sienna mixed with a little Red for the vest to give it a maroon hue. Paint the scarf and the hat band with a brighter Primary Red. I usually dampen my brush slightly here to help the paint flow into tight corners. -
Paint the hat and shell:
Use a sandy yellow or beige for the hat itself. For the shell on the back, use a solid Burnt Sienna or dark brown.
Step 3: Detailed Line Work
-
Outline the character:
Using a very fine liner brush and thinned black paint (or a black extra-fine Posca pen), carefully outline every part of your character. Keep your hand steady and rest your wrist on the table for stability. -
Add facial expression:
Carefully outline the large oval eyes. Fill the pupils with black, leaving a tiny white dot in each for a sparkle. Draw a simple curved line for the smile and small dashes for eyebrows. -
Detail the shell and belly:
Draw the grid lines on the yellow belly. On the brown shell, paint small, lighter brown or yellow spots to suggest texture. -
Texture the skin:
Add tiny black stippling dots or small ‘u’ shapes on the knees and elbows of the turtle to simulate scales or rough skin texture. -
Refine clothing details:
Add vertical lines to the scarf to show the fringe and folds. Outline the vest edges clearly so it looks like a separate layer.
Fixing Wobbly Lines
Did an outline go astray? Wait for the black line to dry completely, then paint over the mistake with the colored paint (like the green skin) to ‘erase’ it.
Step 4: Finishing Touches
-
Add background elements:
Near the bottom of the rock, paint a few simple blades of grass using your green paint. Outline them in black to match the illustrative style. -
Create movement lines:
Add a few small curved lines in the background space behind the turtle’s head to suggest motion or just to fill the negative space artistically. -
Clean up:
Check your background color. If any paint smudged onto the creamy base, carefully touch it up with your original base mix. -
Seal the artwork:
Let the paint cure for at least 24 hours. Finish by applying a matte or satin spray varnish to protect the rock from weather and scratches.
Place your finished hiking turtle in a flower pot or along a garden path to greet visitors with a smile


Have a question or want to share your own experience? I'd love to hear from you in the comments below!