
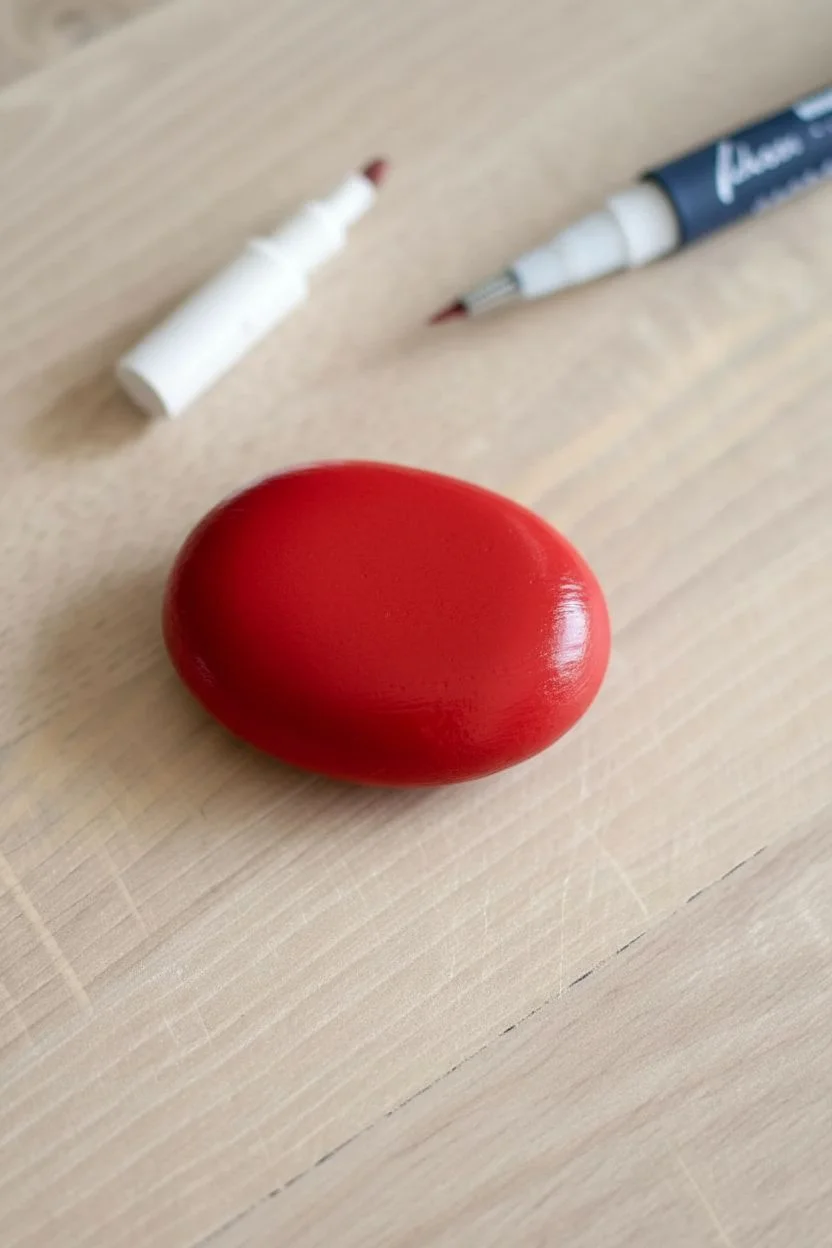
If you’re in the mood to paint something bold, cheerful, and instantly recognizable, patriotic rock painting is such a satisfying little project. I love how a tiny stone can carry big energy with red, white, and blue patterns, symbols, and heartfelt words.
Classic Stars and Stripes Wrap

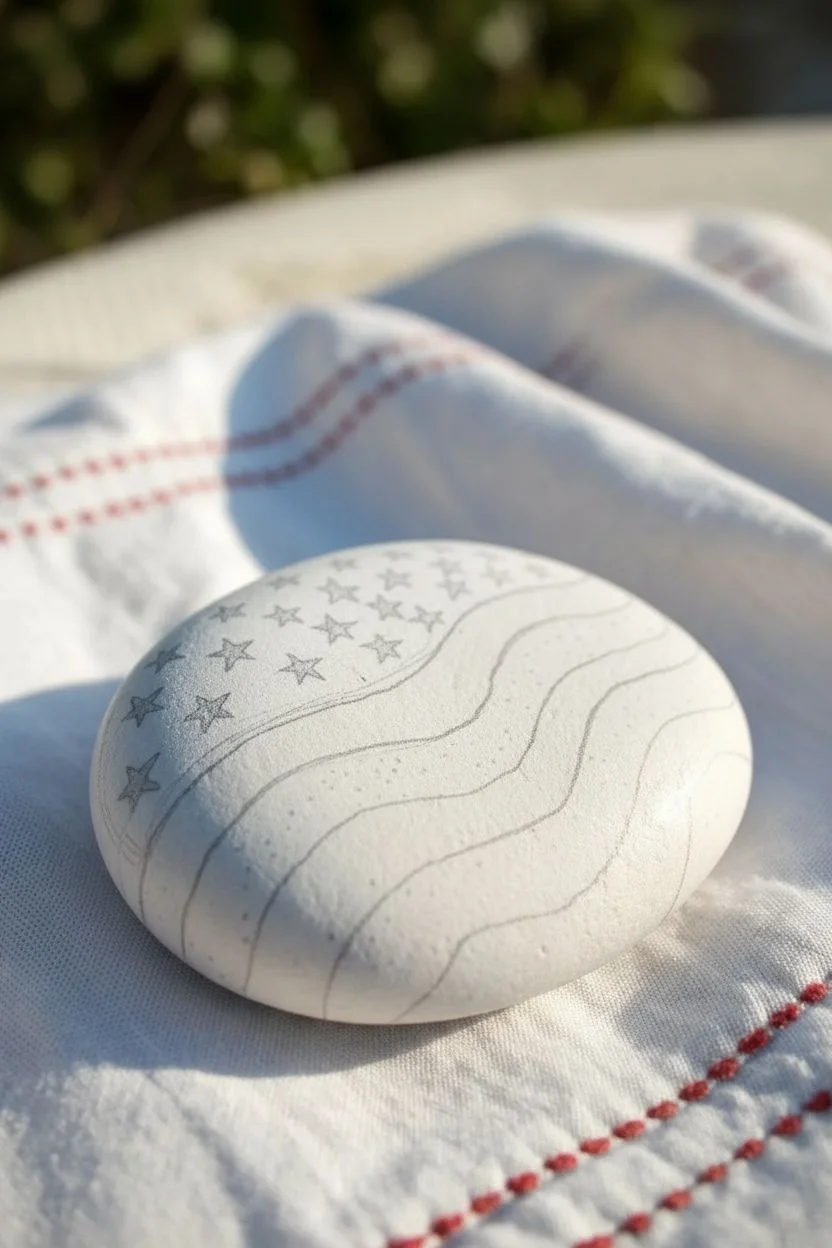
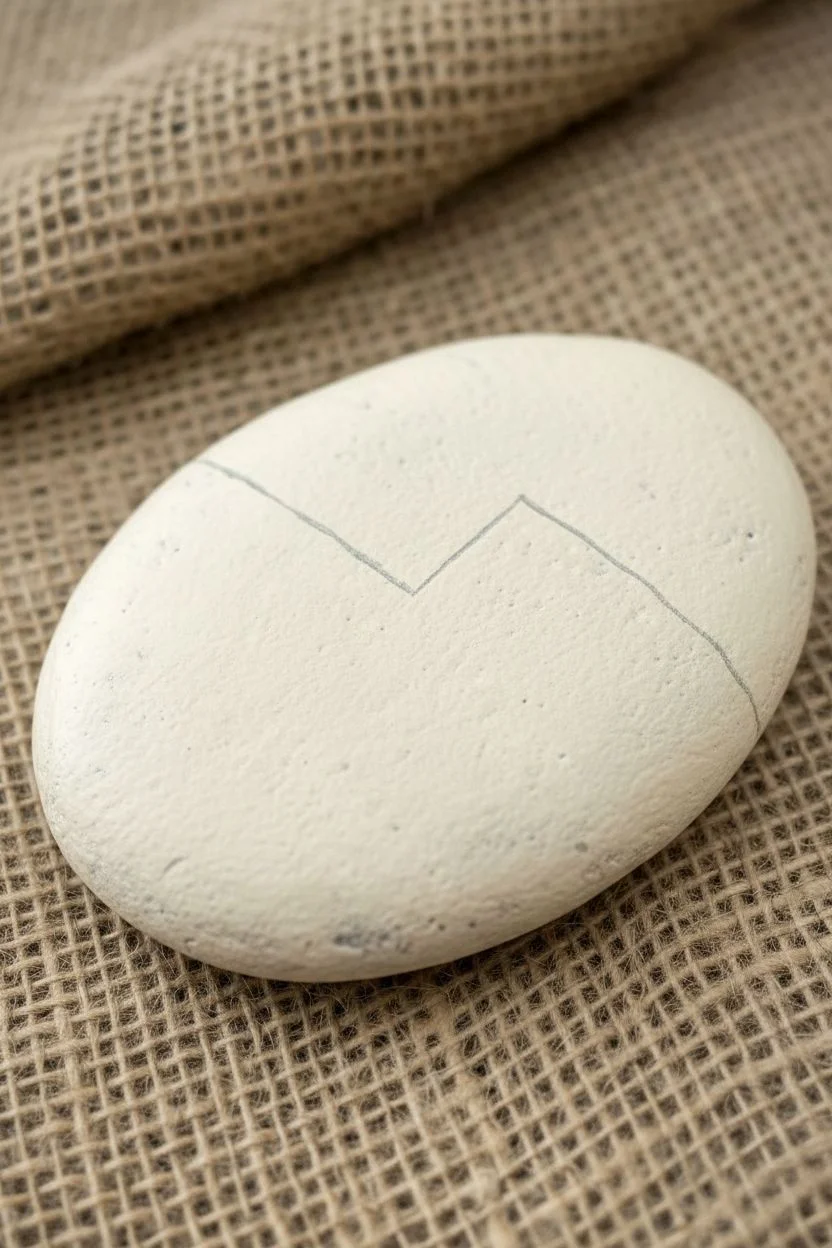
Capture the movement of a flag rippling in the breeze with this dynamic rock painting design. By curving the lines of the stripes and the union field, you create a beautiful optical illusion that transforms a simple stone into a patriotic keepsake.
How-To Guide
Materials
- Smooth, oval river rock (approx. 3-4 inches wide)
- White acrylic paint (high opacity)
- Navy blue acrylic paint
- Bright red acrylic paint
- Flat shader brush (size 6 or 8)
- Small round detail brush (size 0 or 1)
- Pencil for sketching
- Dotting tool or toothpick
- Matte or satin sealant spray
Step 1: Base and Sketch
-
Clean surface:
Begin by washing your rock with warm, soapy water to remove any dirt or oils, then let it dry completely. A clean surface ensures your paint adheres properly and lasts longer. -
Prime with white:
Paint the entire top surface of the rock with white acrylic paint. This acts as a primer and will serve as your white stripes later. You might need two coats to get a solid, opaque coverage; let each coat dry fully. -
Sketch the union:
Using a pencil very lightly, draw a curved line on the left side of the rock to define the blue ‘union’ area. Instead of a straight box, give it a gentle ‘S’ curve to mimic fabric waving. -
Sketch the stripes:
Draw wavy lines extending from the union area to the right edge of the rock. Keep the width of the stripes relatively consistent, even as they curve up and down.
Wobbly Lines?
If your hand shakes while painting stripes, try resting your wrist heavily on the table. Move the rock slowly with your other hand underneath the brush rather than moving the brush itself.
Step 2: Blocking Colors
-
Paint the union:
Load your flat shader brush with navy blue paint. Carefully fill in the curved section you marked on the left side. -
Refine the edge:
Use the edge of your brush to make the border between the blue and white crisp and clean. I usually rotate the rock as I paint to get the best angle for these curves. -
Paint red stripes:
Switch to your red paint. Start filling in alternating stripes, leaving the white base coat visible for the white stripes. Follow your pencil guides carefully. -
Second coats:
Red paint can be translucent. Apply a second coat to the red stripes once the first is dry to ensure a bold, consistent color that matches the intensity of the blue. -
Touch up white:
If any red or blue paint smudged into your white stripes, use a small brush with white paint to clean up those edges now.
Level Up: Distress It
Once the paint is fully dry, very lightly rub a piece of fine-grit sandpaper over the raised surface. This reveals bits of the stone underneath for a vintage, antique Americana look.
Step 3: Stars and Details
-
Plan star placement:
Visualize faint diagonal lines across the blue field. This helps in staggering the stars naturally rather than placing them in a rigid grid. -
Paint the stars:
Using your smallest detail brush (size 0) and white paint, carefully dab small five-pointed stars onto the blue field. If painting points is too difficult, small asterisks work well too. -
Vary the star sizes:
Allow some stars near the edges to be partial or slightly smaller to enhance the illusion that the flag is wrapping around the rock’s curve. -
Add texture (optional):
For a bit of rustic flair, you can lightly stipple tiny white dots over the red stripes using a toothpick, giving it a fabric-like or weathered texture, though solid red works perfectly too. -
Final cure:
Let the entire rock dry for at least 24 hours to ensure the thick layers of paint are fully hardened. -
Seal the artwork:
Finish with a clear matte or satin spray sealant. This protects your patriotic creation from weather if you choose to display it outdoors.
This simple yet striking piece is now ready to add a splash of color to your garden or porch


Liberty Script Lettering
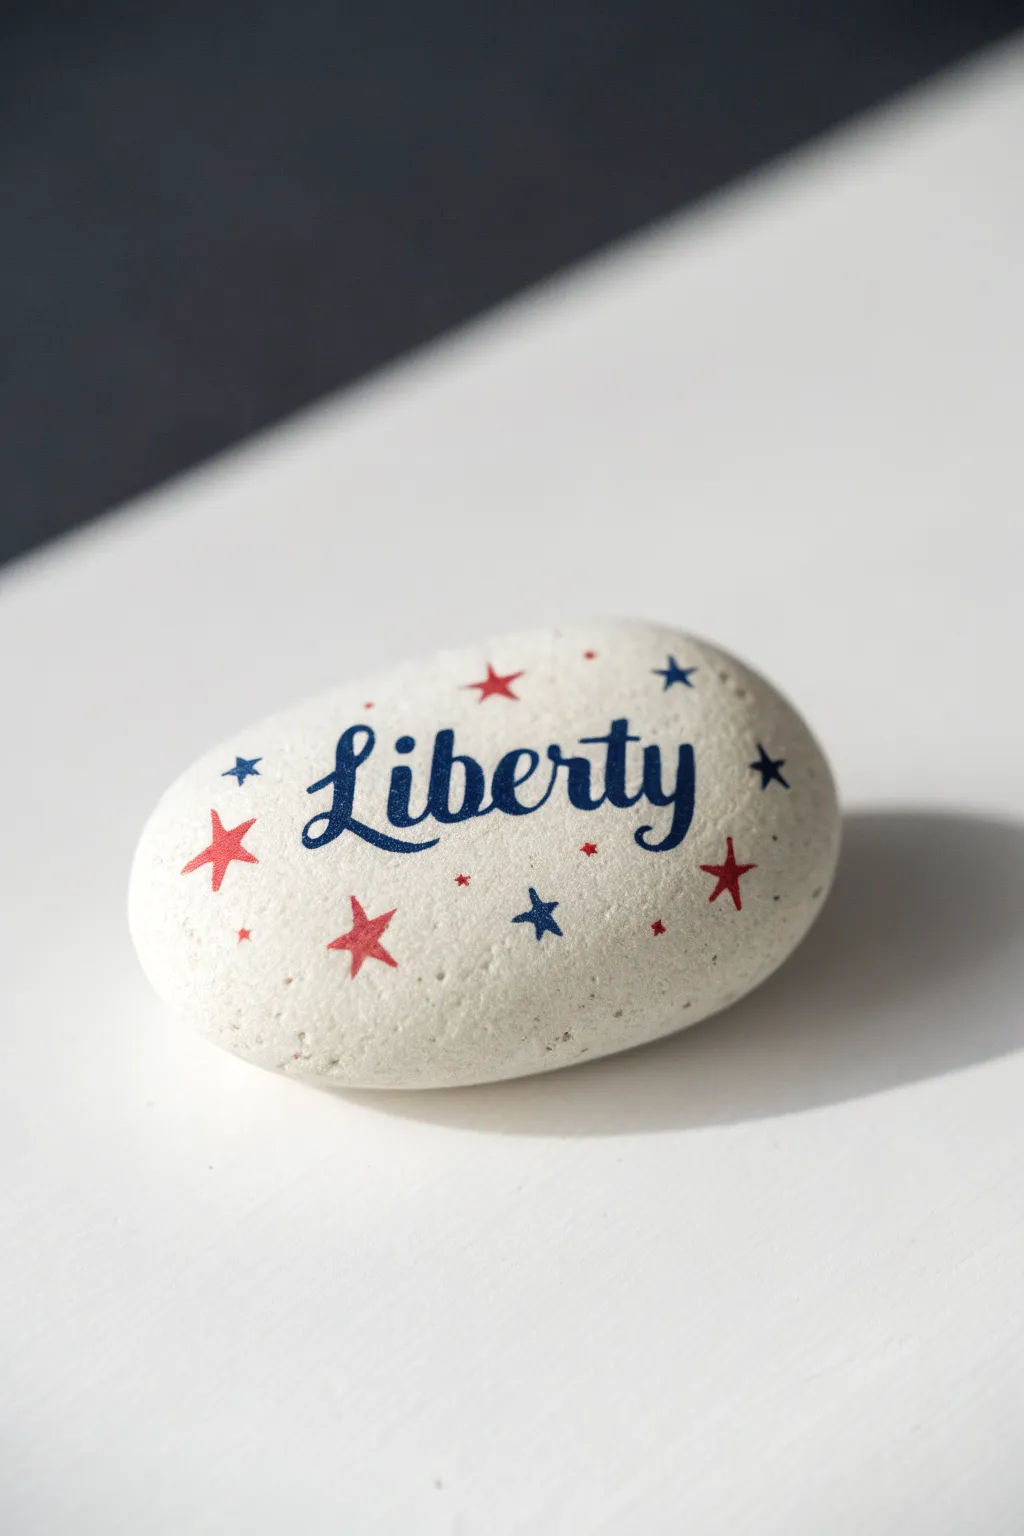
This elegant yet simple design centers on beautiful script lettering to create a patriotic keepsake perfect for the holiday. The combination of deep blue cursive and scattered red and blue stars gives this smooth white stone a classic, timeless Americana feel.
Step-by-Step Guide
Materials
- Smooth, flat river rock (rounded oval shape)
- White acrylic paint (matte finish)
- Titanium White heavy body acrylic paint (optional, for base)
- Midnight Blue acrylic paint or paint pen
- Bright Red acrylic paint or paint pen
- Fine liner detail brush (size 0 or 00)
- Extra-fine tip paintbrush (size 000)
- Pencil with a soft lead (like 2B)
- Kneadable eraser
- Clear matte sealant spray
Step 1: Base Preparation
-
Clean the Stone:
Begin by scrubbing your rock with warm, soapy water to remove any dirt or oils. Let it dry completely in the sun or with a cloth. -
Prime the Surface:
Apply a base coat of white acrylic paint. Since natural rocks can be porous, you might need two or three thin coats to get a solid, opaque white finish. -
Smooth the Color:
I like to lightly sand the surface between coats with very fine sandpaper if any brush strokes are visible, ensuring the smoothest possible canvas for the lettering. -
Allow to Cure:
Let the final coat of white paint dry for at least an hour. It must be bone dry so your pencil sketch doesn’t dig into the paint.
Step 2: Drafting the Design
-
Sketch Guidelines:
Using a soft pencil, barely graze the surface to draw a straight horizontal line across the center of the rock where your word will sit. -
Draft the Word:
Lightly sketch the word ‘Liberty’ in a cursive font. Focus on the flow; the ‘L’ should have a decorative loop, and the ‘t’ crossbar can extend elegantly. -
Thicken the Downstrokes:
Go back over your pencil script and indicate where the lines should be thicker. Any time your imaginary pen would move downward, that stroke is thick; upward strokes remain thin. -
Mark Star Placement:
Lightly mark small ‘x’ spots around the word where you want your stars to go, ensuring a balanced distribution around the text.
Brush Control Trick
To get super sharp points on your stars, support your painting hand with your pinky finger resting on the table or a dry part of the rock for stability.
Step 3: Painting the Lettering
-
Outline the Text:
Using your fine liner brush and Midnight Blue paint (or a fine tip paint pen), carefully trace the outline of your letters. -
Fill the Script:
Fill in the thickened downstrokes of the letters with the blue paint. Take your time here to keep the edges crisp and sharp. -
Refine the Edges:
Use the very tip of your smallest brush to taper the ends of the letters, like the tail of the ‘y’ and the swoop of the ‘L’, so they don’t look blunt. -
Dry the Text:
Allow the blue lettering to dry completely before starting the stars to avoid smudging the main focal point.
Sparkle Finish
Mix a tiny amount of glitter medium or shimmer dust into the white base coat before you start painting for a stone that sparkles in the sunlight.
Step 4: Adding Patriotic Details
-
Paint Blue Stars:
Using the same Midnight Blue, paint small five-pointed stars on the right side of the rock. Use the 000 brush for the sharp points. -
Paint Red Stars:
Switch to Bright Red and paint a slightly larger star on the bottom left and a smaller one near the top. Varying the sizes adds visual interest. -
Add Tiny Accents:
Dip the very tip of a toothpick or a dotting tool into both red and blue paints. Add tiny micro-dots in the empty white spaces for a festive confetti look. -
Clean Up:
Once all paint is perfectly dry, gently tap a kneadable eraser over the design to lift any remaining visible pencil lines. -
Seal the Work:
Finish by applying a clear matte sealant spray. Do this in light bursts from 12 inches away to prevent the ink or paint from running.
Now you have a piece of patriotic decor that looks professionally hand-lettered


Freedom in Hand-Lettered Caps
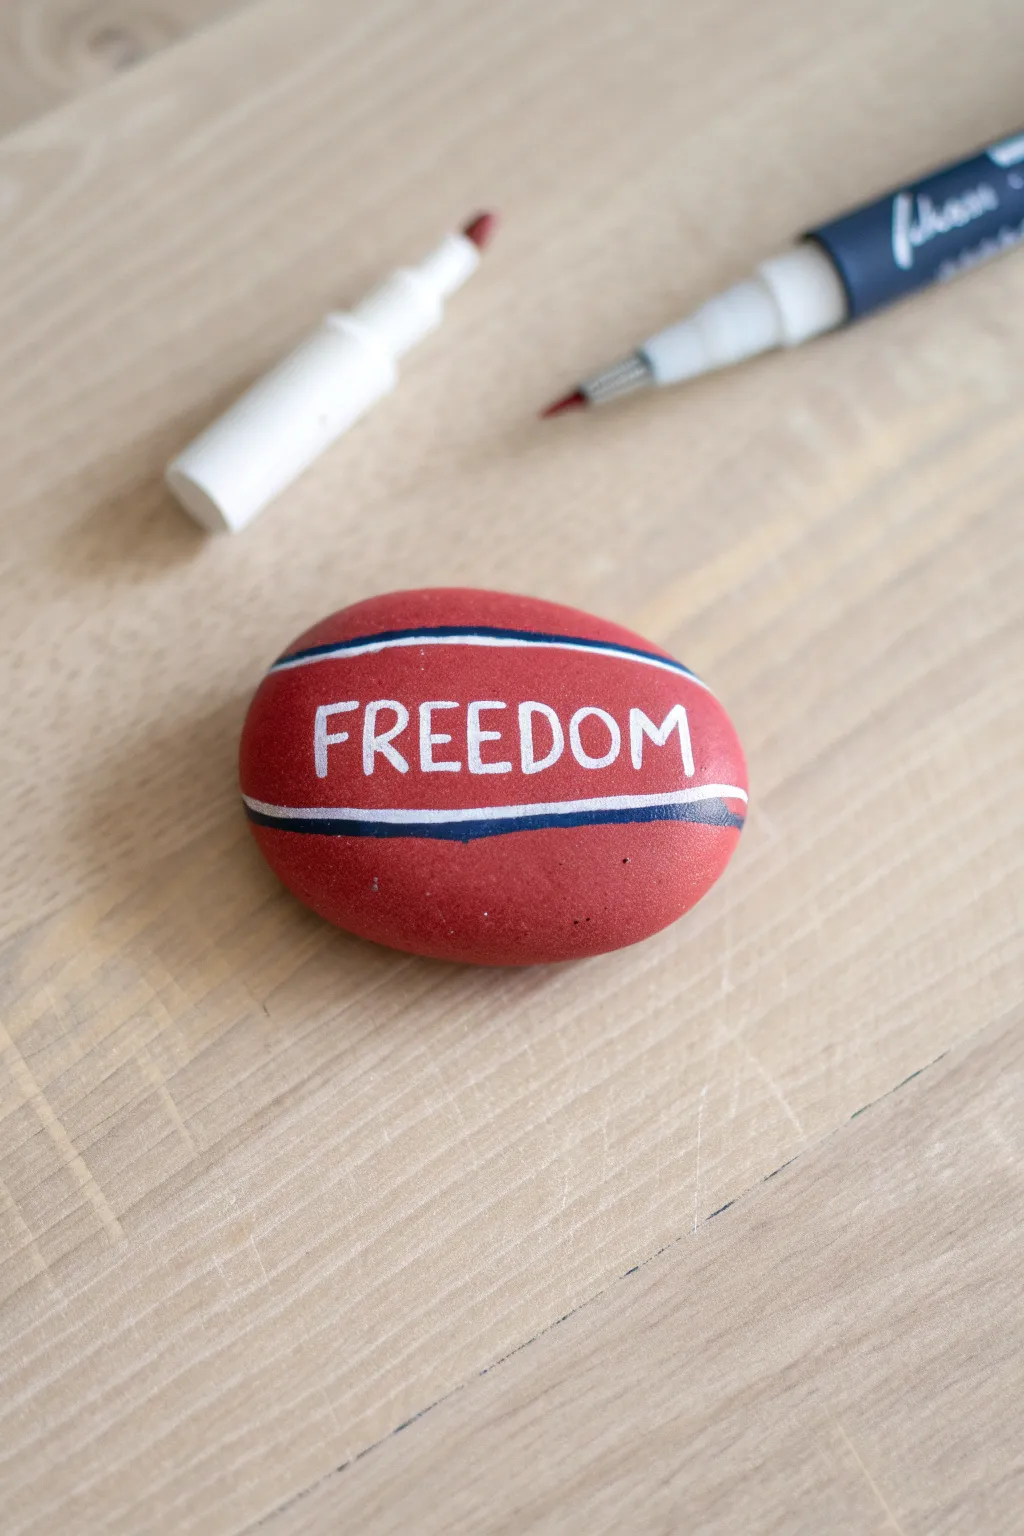
Capture a bold patriotic sentiment with this striking typographic rock design. It features a bright red base layered with sporty racing stripes and a crisp, hand-lettered message that makes a simple yet powerful statement.
How-To Guide
Materials
- Smooth, oval river rock
- Red acrylic paint or paint pen
- White extra-fine point paint pen (e.g., Posca 1MR)
- Navy blue fine or extra-fine point paint pen
- Clear acrylic sealer (matte or gloss)
- Pencil (optional)
- Wide flat paintbrush (if using bottle paint)
Step 1: Base Preparation
-
Clean the surface:
Before you begin, wash your rock with warm, soapy water to remove any dirt or oils. Let it dry completely in the sun or with a paper towel. -
Apply the red base coat:
Using a wide flat brush or a thick red paint pen, cover the entire top surface of the rock with a solid layer of red paint. -
Dry and repeat:
Allow the first layer to dry to the touch. If the rock’s natural color is showing through, apply a second coat for a vibrant, opaque finish. -
Check for smoothness:
Ensure the red background is perfectly smooth and free of brushstrokes before moving on to the details.
Straight Line Hack
Wrap a rubber band around the rock to act as a stencil or guide. It helps create perfectly curved parallel lines effortlessly.
Step 2: Drafting the Design
-
Visualize the spacing:
Mentally divide the rock horizontally. You will need space in the center for the lettering, with stripes bordering it above and below. -
Sketch guidelines (optional):
If you are worried about straight lines, lightly sketch two horizontal bands with a pencil where the stripes will go. -
Outline the letters:
Lightly pencil in the word ‘FREEDOM’ in the center channel. Use all capital letters and try to keep the spacing even between characters.
Step 3: Painting the Details
-
Lettering the text:
Take your white extra-fine paint pen and carefully trace over your penciled letters. Press lightly to keep the ink flow consistent. -
Thicken the strokes:
Go back over the letters a second time to thicken the lines slightly, giving the text a bolder, sans-serif appearance. -
Let the text set:
Give the white lettering a few minutes to dry completely so your hand doesn’t smudge it while working on stripes. -
Draw the top white stripe:
Using the white paint pen, draw a thin, curved line above the text, following the natural curvature of the rock. -
Draw the bottom white stripe:
Mirror the top line by drawing a similar thin white curve below the text. -
Add the blue accent:
Switch to your navy blue paint pen. Draw a line directly adjacent to the white stripe on the side closest to the text. -
Refine the blue lines:
Repeat the blue line process for the bottom stripe, ensuring the blue is on the inner side (closest to the word) for both bands. -
Clean up edges:
I find it helpful to look closely at the edges where the blue meets the white. Use the white pen to neaten up any spots where the blue might have bled slightly.
Add Some Sparkle
Use a metallic silver pen or glitter glue for the white stripes to give the rock a festive Fourth of July shimmer.
Step 4: Finishing Touches
-
Final drying time:
Let the entire design sit undisturbed for at least 15-20 minutes to ensure every layer of paint is cured. -
Apply sealer:
Spray the rock with a clear acrylic sealer. Use light misting coats rather than one heavy coat to prevent paint pens from running. -
Flip and sign:
Once the top is sealed and dry, flip the rock over to sign your name or date the bottom.
Place this little stone near your doorway or garden path for a daily reminder of freedom


Star-Spangled Heart
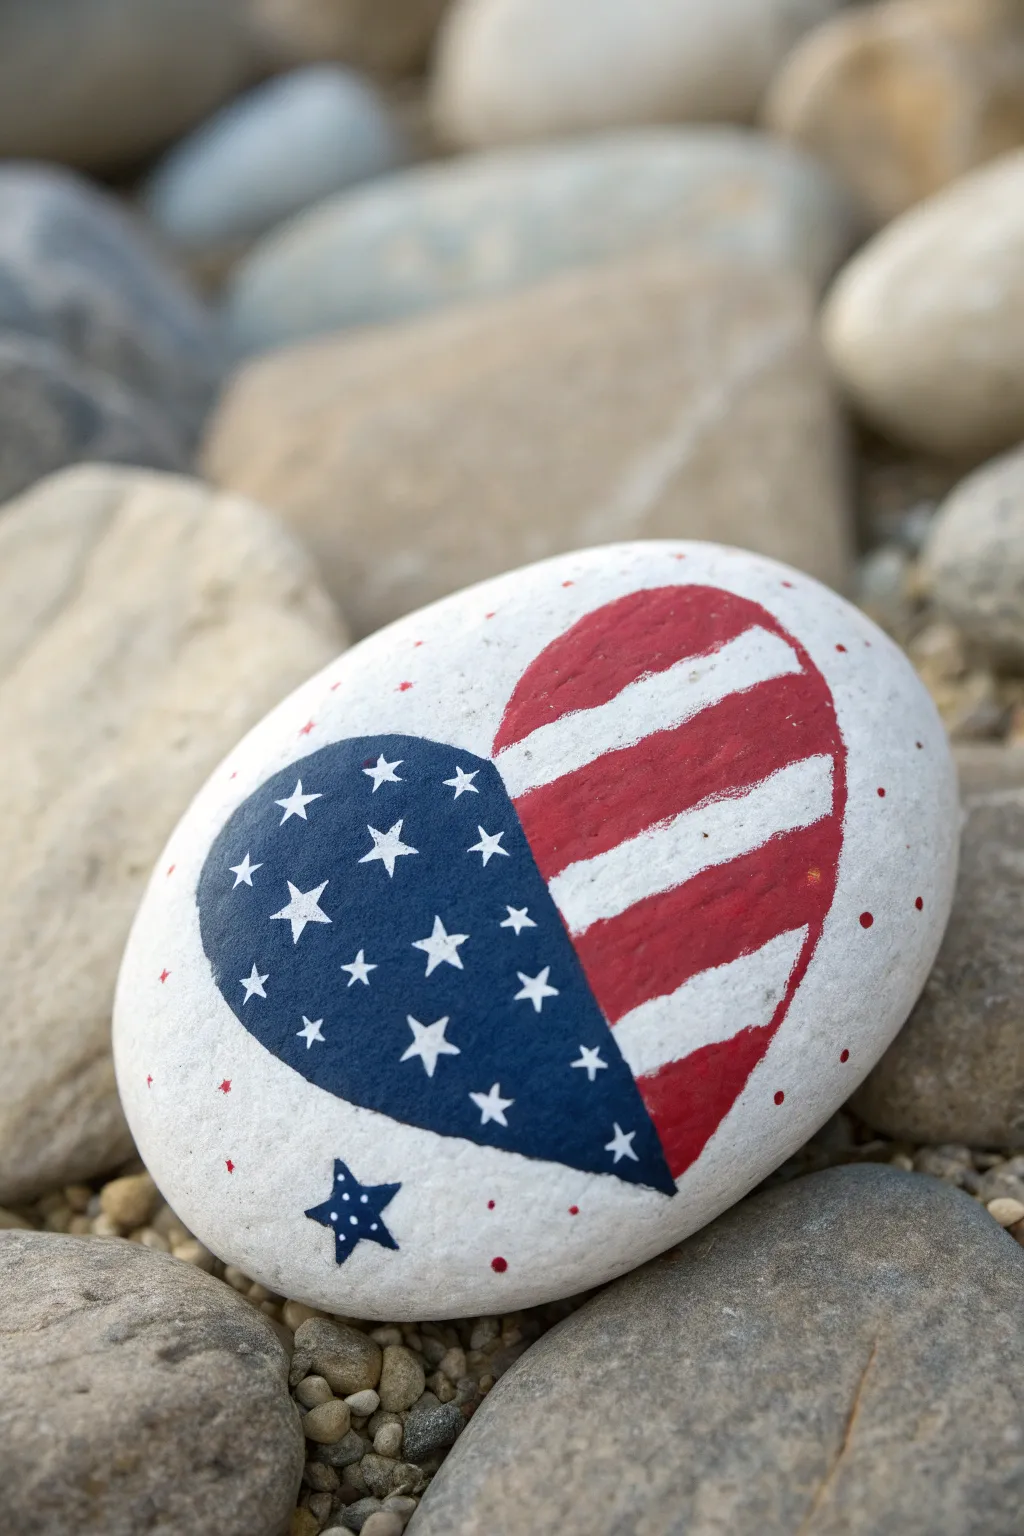
This simple yet striking design transforms a smooth river rock into a symbol of pride, featuring a bold heart split into stars and stripes. The crisp white background makes the classic red and blue colors pop, creating a perfect piece for garden decor or a thoughtful gift.
Step-by-Step
Materials
- Smooth, round or oval river rock (approx. palm-sized)
- White acrylic paint (base coat)
- Navy blue acrylic paint
- Bright red acrylic paint
- Pencil specifically for sketching on rocks (or a plain #2 pencil)
- Fine-point paintbrush (size 0 or 00 for details)
- Medium flat paintbrush (for base coat)
- Dotting tool or toothpick
- Clear acrylic sealer (spray or brush-on)
Step 1: Preparing the Canvas
-
Clean the Stone:
Begin by scrubbing your rock with warm soapy water to remove any dirt or oils, then let it dry completely to ensure the paint adheres properly. -
Apply Base Coat:
Using your medium flat brush, paint the entire top surface of the rock with white acrylic paint. You may need two to three coats to get a solid, opaque coverage. -
Dry Thoroughly:
Allow the white base to dry fully between coats. I like to let the final coat sit for an extra 15 minutes to ensure a hard surface for sketching.
Step 2: Sketching the Design
-
Draw the Heart:
Lightly sketch a large, slightly tilted heart shape in the center of the rock using your pencil. Keep your lines faint so they are easily covered by paint later. -
Divide the Sections:
Draw a curved line down the middle of the heart, effectively splitting it into a left lobe and a right lobe. -
Map the Stripes:
On the right side of the heart, sketch curvy horizontal lines to mark out where your red stripes will go. -
Add the Lower Star:
Below the bottom point of the heart, sketch a small, five-pointed star slightly to the left.
Star Shape Shortcut
Struggling to paint tiny stars? Use a white gel pen or an extra-fine paint marker instead of a brush. It gives you much more control over the pointy shapes.
Step 3: Painting the Colors
-
Paint the Blue Field:
Fill in the entire left section of the heart with navy blue paint using a smaller brush. Be careful to stay inside your pencil lines for a crisp edge. -
Paint the Stripes:
Using a small round brush, carefully fill in the alternate stripe sections on the right side with bright red paint, leaving white stripes in between. -
Fill the Lone Star:
Paint the small star below the heart with the same navy blue used for the main heart section. -
Touch Up White Areas:
If any red or blue paint smudged into the white areas, use a tiny brush with white paint to clean up the edges once the colors are dry.
Add Some Sparkle
Before sealing, brush a thin layer of glitter glue over the red stripes or the blue field. It adds a festive shimmer perfect for Independence Day decor.
Step 4: Adding Details
-
Paint the Stars:
Dip your finest detail brush into white paint. Paint small five-pointed stars scattered across the navy blue section of the heart. Varying their rotation slightly adds a nice natural touch. -
Detail the Small Star:
Add tiny white dots to the points and center of the small blue star at the bottom using a toothpick or the very tip of your brush. -
Add Decorative Dots:
Dip a toothpick or a small dotting tool into red paint. Gently touch the white background around the heart to create tiny, scattered polka dots for extra flair. -
Final Cleanup:
Check the painting for any stray marks. If your pencil lines are still visible around the edges of the heart, you can gently erase them or cover them with a thin line of white paint.
Step 5: Finishing Up
-
Let it Cure:
Allow the artwork to dry completely, ideally overnight, to ensure the thick layers of paint are solid all the way through. -
Seal the Rock:
Apply a clear acrylic sealer over the entire rock. This protects your patriotic design from weather and chipping if you choose to display it outdoors.
Place your finished stone on a porch step or near the entryway to welcome guests with a touch of patriotic spirit
BRUSH GUIDE
The Right Brush for Every Stroke
From clean lines to bold texture — master brush choice, stroke control, and essential techniques.
Explore the Full Guide
Bald Eagle Silhouette
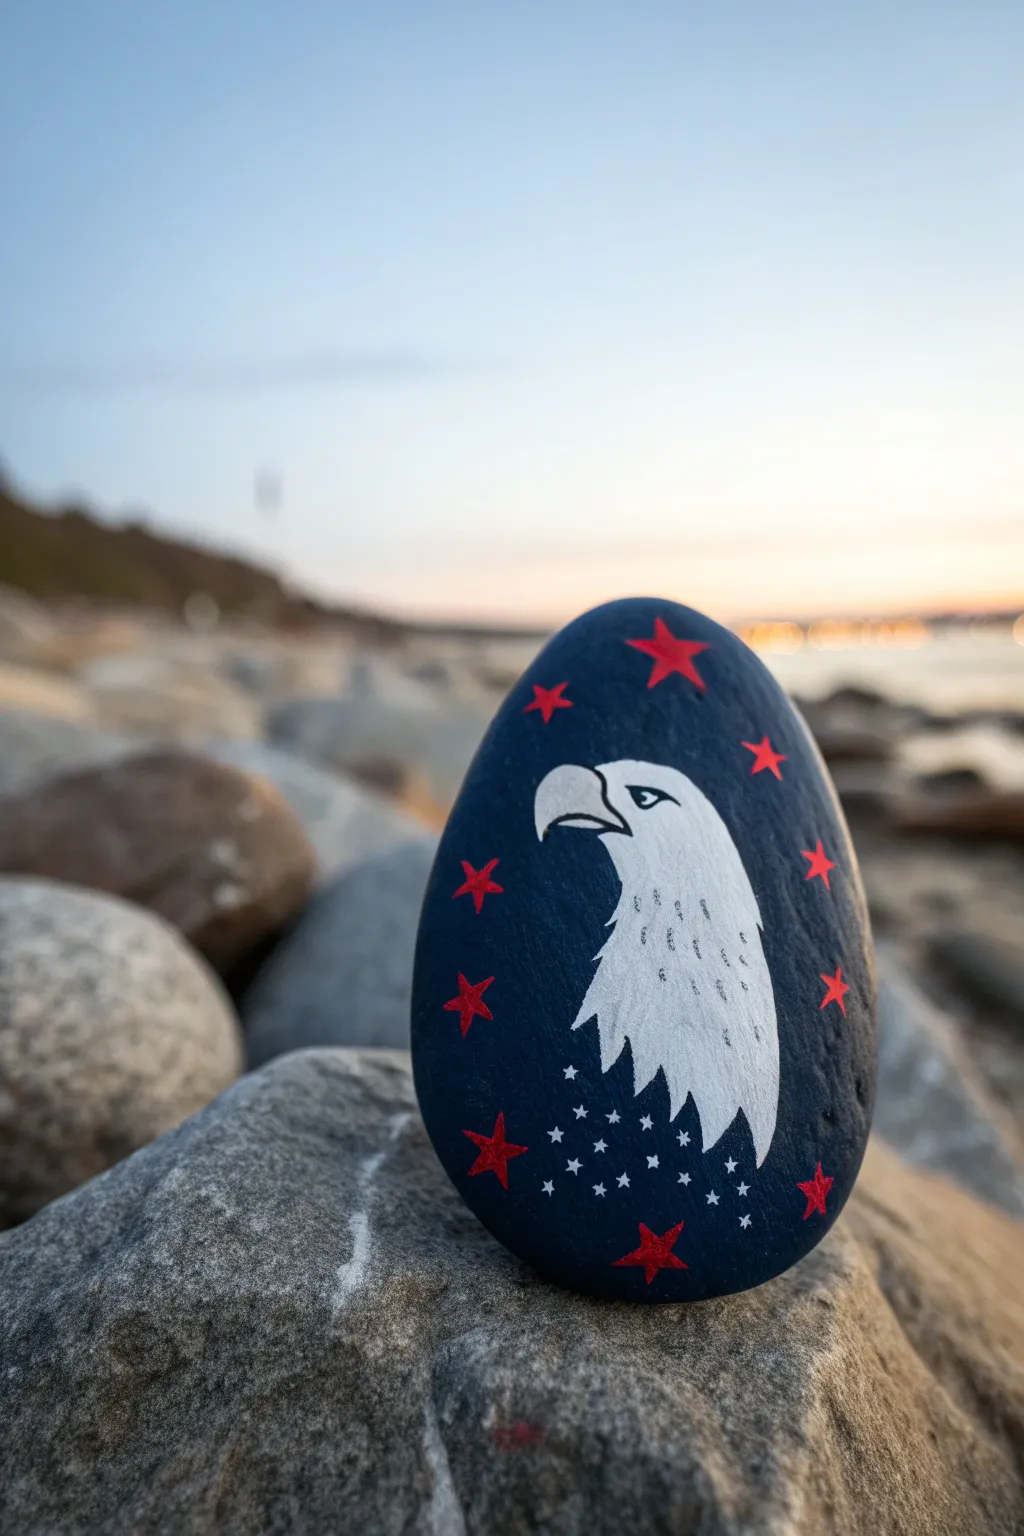
Capture the spirit of freedom with this striking, high-contrast rock design. Featuring a distinct bald eagle profile against a deep navy background, surrounded by festive stars, this piece makes a bold statement on any porch or garden path.
Step-by-Step Tutorial
Materials
- Smooth, oval-shaped river rock (palm-sized or larger)
- Deep navy blue acrylic paint
- Titanium white acrylic paint
- Bright red acrylic paint
- Fine liner detail brush
- Flat shader brush (medium size)
- Posca paint pens (White and Red, optional but helpful)
- Graphite transfer paper or light-colored chalk pencil
- Clear spray sealer (gloss or matte)
- Small cup of water
- Paper towels
Step 1: Preparing the Canvas
-
Clean surface:
Begin by washing your rock with warm, soapy water to remove any dirt or oils. Let it dry completely in the sun or use a hairdryer to speed things up. -
Base coat application:
Using your flat shader brush, apply a layer of deep navy blue paint over the entire top surface of the rock. Don’t worry about the bottom yet. -
Second coat:
Once the first layer is dry to the touch, apply a second coat of navy blue to ensure an opaque, rich background without streaks. Let this cure fully before moving on.
Step 2: Drafting the Eagle
-
Outline the head:
Using a chalk pencil or very light pencil pressure, sketch the outline of the eagle’s head. Focus on the curve of the neck and the hooked shape of the beak. -
Refine the beak:
Draw the separation between the white feathers and the beak. The beak should look like a hooked extension coming off the face. -
Mark the eye:
Place a small almond shape for the eye. Getting the placement right is key—it should sit high and slightly forward to give that focused eagle glare.
Wobbly Lines?
If brush control is tough, use paint pens for the stars and outlines! They act like markers but dry permanent like paint, making sharp points much easier.
Step 3: Painting the Eagle
-
Fill the feathers:
Load a small round brush with titanium white paint. Fill in the head and neck area, being careful to stay within your sketched lines. You will likely need two coats for bright, solid coverage against the dark blue. -
Paint the beak:
Mix a tiny touch of black into your white to create a very light grey (or use a dedicated light grey paint). Carefully paint the beak area, keeping a sharp edge where it meets the feathers. -
Detail the beak line:
Using your fine liner brush and black paint (or a fine black paint pen), draw the thin line that separates the upper and lower beak. -
Paint the eye:
Paint the eye shape white first. Once dry, add a small black pupil and outline the eye shape with a thin black line to define it. -
Feather simulation:
To give the white area texture, use your fine liner with a slightly thinned grey paint (or a very fine pen) to make tiny, dashed tick marks on the neck. This mimics the look of layered feathers. -
Jagged neckline:
At the bottom of the white neck area, ensure the edge isn’t a straight line. Paint small points or jagged edges pointing downward to look like feather tips resting on the dark background.
Make It 3D
Add a tiny dot of gloss varnish specifically to the eagle’s eye after sealing. It gives the eye a realistic, wet gleam that catches the sunlight.
Step 4: Adding the Stars
-
Large red stars:
Dip a small brush into bright red paint. Paint 5-point stars scattered around the perimeter of the eagle. I find it easiest to paint an upside-down ‘V’ first, then cross the arms. -
Refine star shape:
Go back over the red stars to sharpen figures. If painting stars is tricky, a red paint marker offers excellent control here. -
Star field placement:
Near the bottom of the eagle’s neck, plan out a cluster of tiny white stars. These represent the field of stars on the flag. -
Dotting the stars:
Using a very fine tool or the tip of a white paint pen, add the small white stars at the base. These can be simple 5-point stars or even small asterisks depending on the size of your rock.
Step 5: Finishing Touches
-
Clean up edges:
Check the edges of your rock. If any white or red spilled over where it shouldn’t, touch it up with the navy blue paint. -
Seal the rock:
Take the rock strictly outside or into a well-ventilated area. Apply a light coat of clear spray sealer to protect your artwork from weather and chipping.
Place your patriotic masterpiece in a spot where the sun can highlight that proud eagle profile
United States Outline Fill
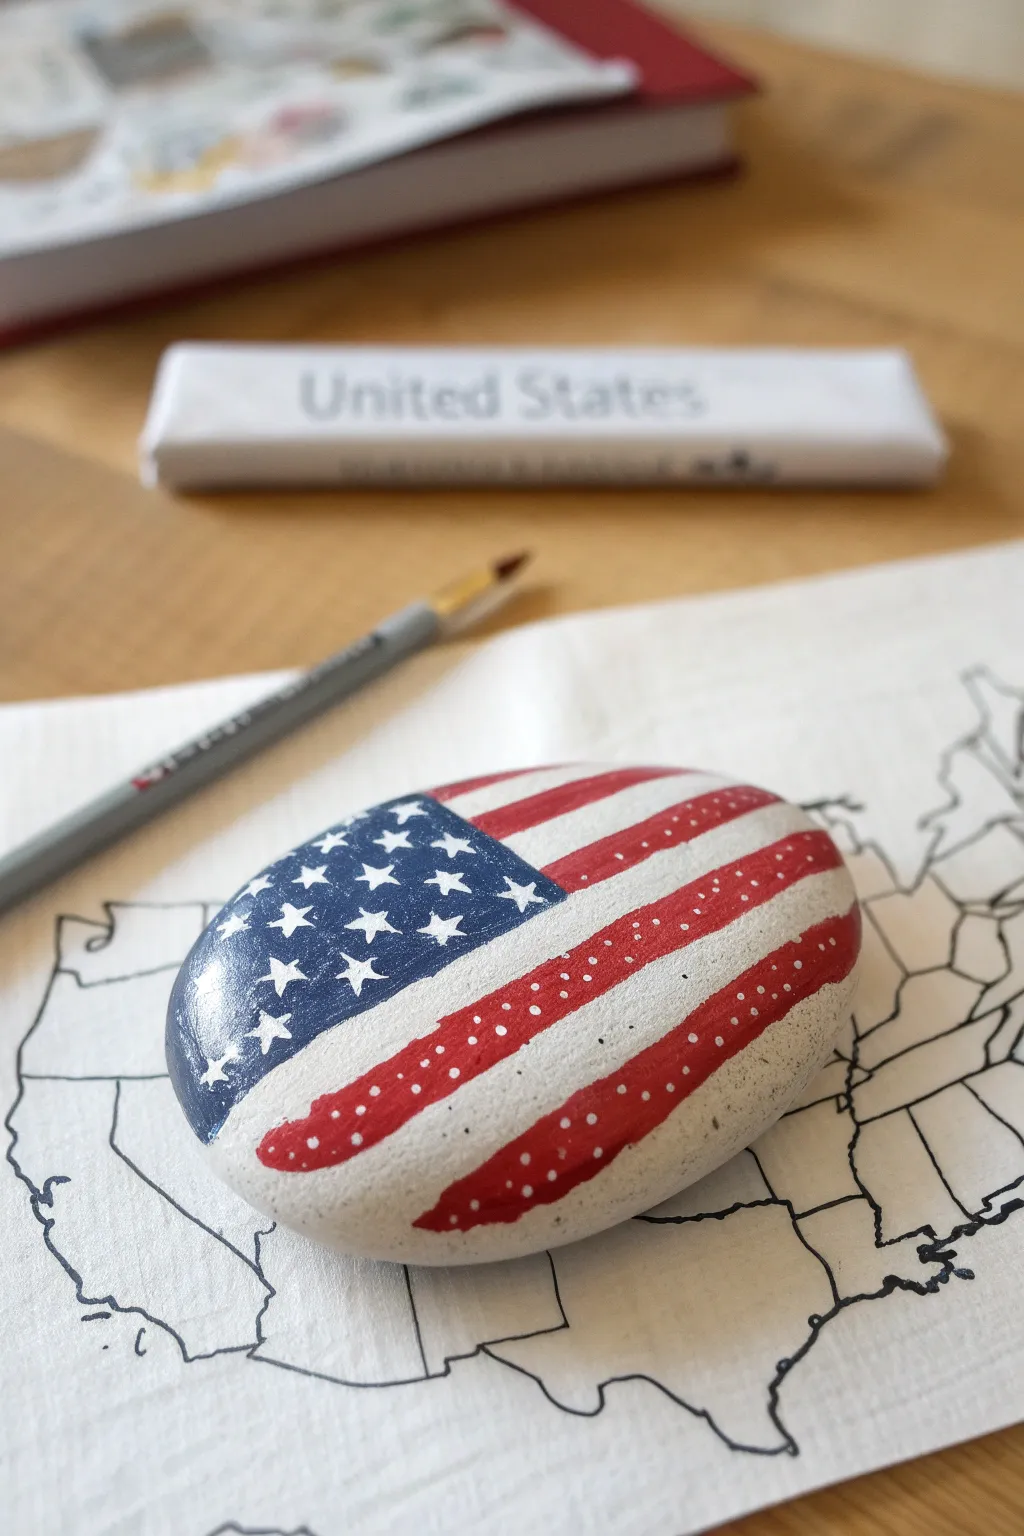
Transform a simple smooth stone into a patriotic statement piece with this classic American flag design. This project combines bold stripes and delicate stars for a hand-held tribute to the USA that looks great on a desk or tucked into a garden.
Step-by-Step
Materials
- Smooth, oval-shaped river rock (palm-sized)
- White acrylic paint (base coat and stars)
- Red acrylic paint (stripes)
- Navy blue acrylic paint (canton)
- Small flat paintbrush (for stripes)
- Fine detail liner brush (OO or OOO size for stars)
- Pencil (optional for sketching)
- Clear acrylic sealer (spray or brush-on)
- Water cup and paper towels
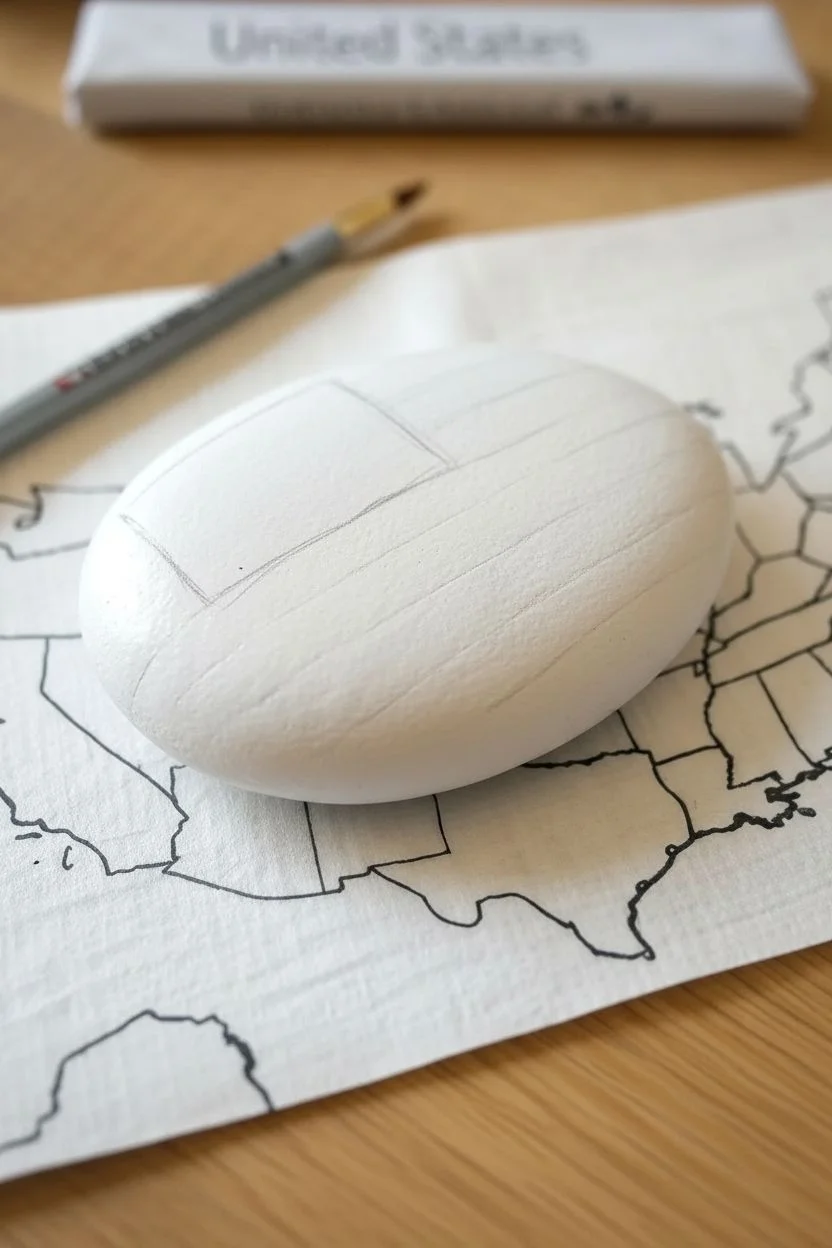
Step 1: Base Coat and Mapping
-
Clean the surface:
Begin by washing your rock with warm water and soap to remove any dirt or oils. Let it dry completely before starting. -
Apply the white foundation:
Using a flat brush, paint the entire top surface of the rock with white acrylic paint. This serves as your primer and ensures the red and blue colors will pop. -
Dry and repeat:
Check for any streaks in your white base. If the stone’s natural color shows through, apply a second coat of white and allow it to dry fully. -
Visualizing the layout:
Mentally divide the rock. The upper left quadrant will be the blue field (the canton), and the rest will be horizontal stripes. You can lightly sketch a curved rectangle for the blue section with a pencil if you need a guide.
Step 2: Painting the Colors
-
Painting the canton:
Load a medium brush with navy blue paint. Fill in the upper left curved section of the rock. -
Following the curve:
When painting the blue edge, try to mimic the natural curve of the stone rather than painting a harsh straight box. This makes the flag look like it is wrapping around the rock. -
Let the blue set:
Allow the blue area to dry to the touch so you don’t accidentally smudge red paint into it during the next steps. -
Starting the stripes:
Switch to your flat brush and red paint. Start with the top red stripe, which sits just to the right of the blue field. -
Continuing the pattern:
Paint alternating red stripes down the length of the rock. Remember to leave a white gap of equal width between each red stripe. -
Curving the lines:
Just like the blue field, curve your red stripes slightly to follow the contour of the rock. This creates a more organic, flowing appearance. -
Refining edges:
If your red paint bleeds into the white stripes, wait for it to dry, then use a clean brush with a tiny bit of white paint to tidy up the edges.
Star Trick
Struggling to paint tiny stars? Use a white gel pen instead of paint and a brush. It offers much better control for such miniature details on a bumpy surface.
Step 3: Stars and Details
-
Prepping the stars tool:
For the stars, you will need your finest detail brush or even a toothpick. Ensure your white paint is creamy but not too watery. -
Placing the stars:
Dip just the tip of your tool into the white paint. Carefully dab small five-pointed stars onto the dry navy blue field. -
Staggering the pattern:
Try to arrange the stars in offset rows if space permits, though on a small rock, a random scattering often looks just as artistic. -
Adding texture detail:
To give the flag a weathered or textured look as seen in the example, add tiny white dots along the red stripes using the very tip of your smallest brush. -
Scattering the dots:
Place these dots randomly along the red bands; they shouldn’t be perfectly aligned. This creates a charming, hand-painted fabric effect. -
Sealing the artwork:
Once the entire rock is bone dry—I usually wait at least an hour—apply a coat of clear acrylic sealer to protect the paint from chipping or fading.
Wobbly Stripes?
If you can’t get straight lines freehand, lay down thin strips of washi tape or painter’s tape over the dry white base coat to mask off perfect stripes before painting red.
Place your finished patriotic stone on a map or use it as a festive paperweight for your next holiday picnic

PENCIL GUIDE
Understanding Pencil Grades from H to B
From first sketch to finished drawing — learn pencil grades, line control, and shading techniques.
Explore the Full Guide
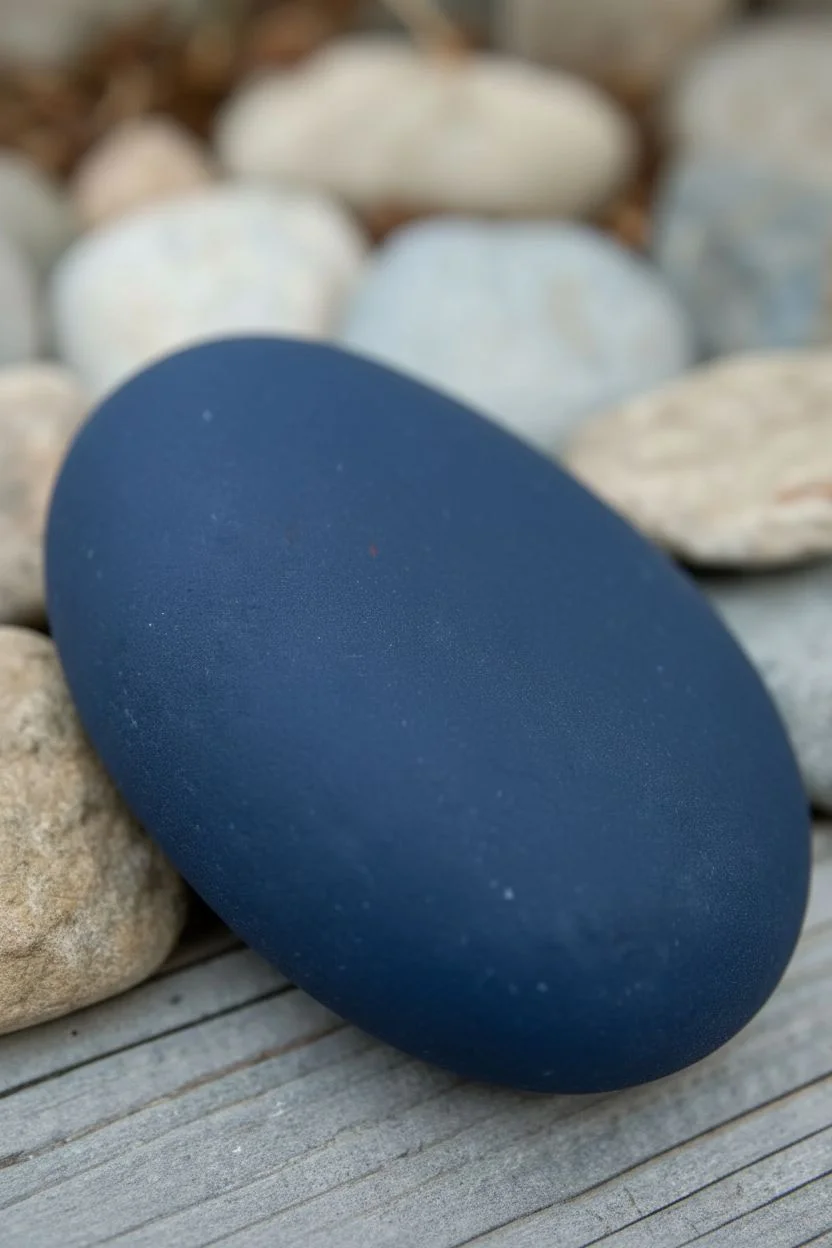
Red White Blue Starburst
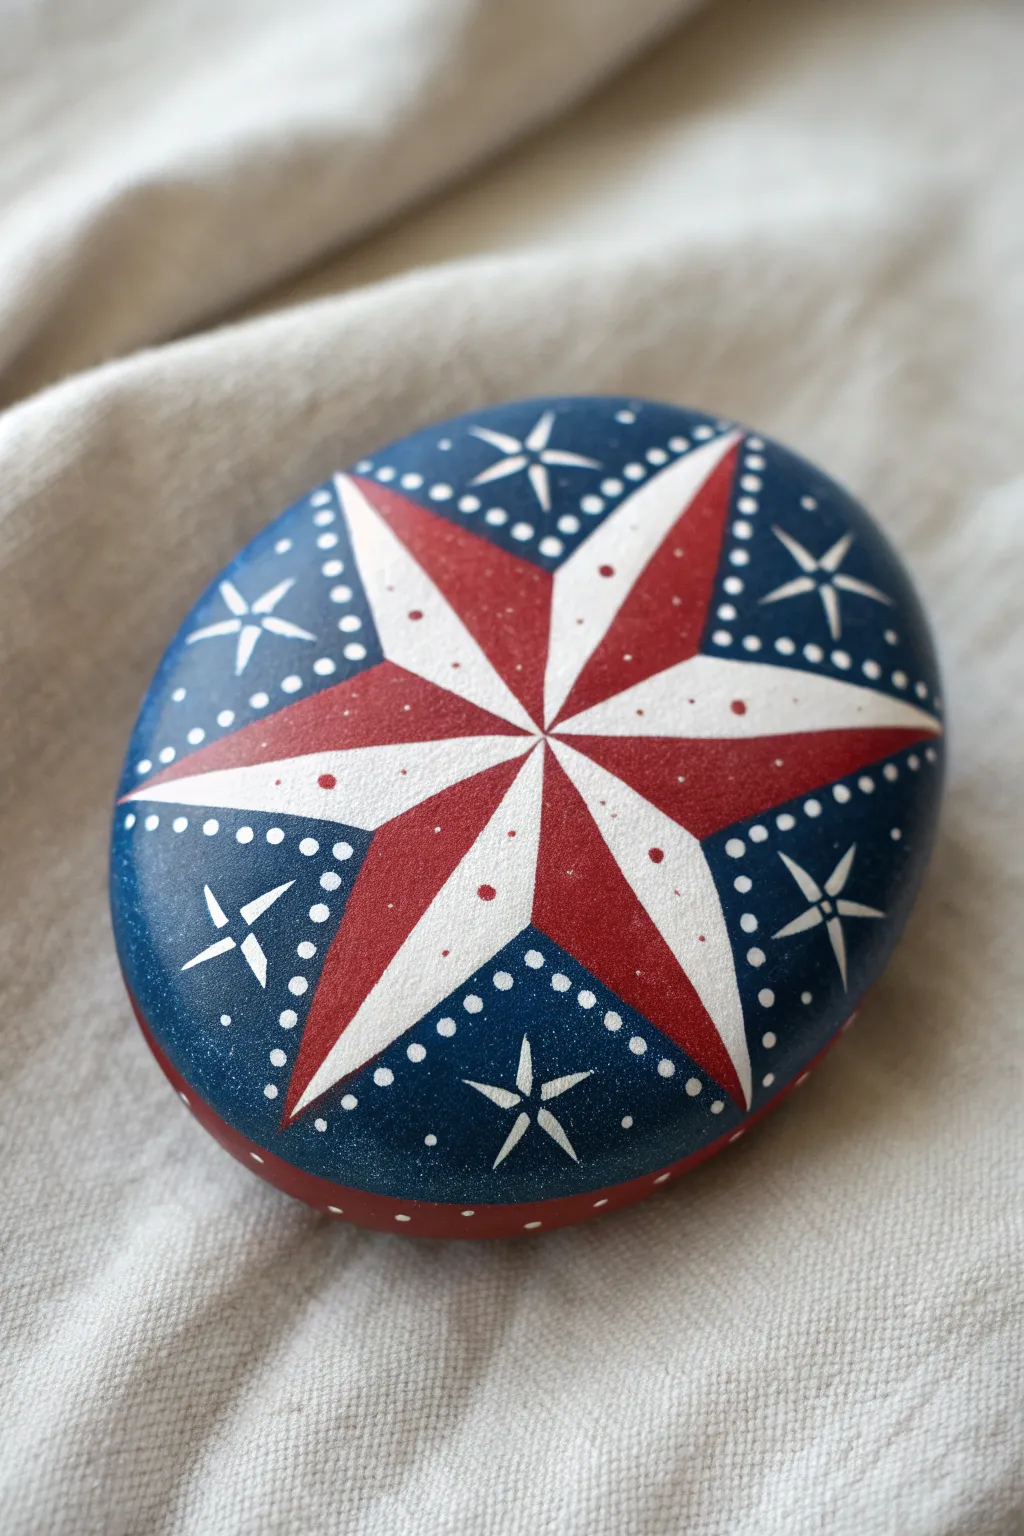
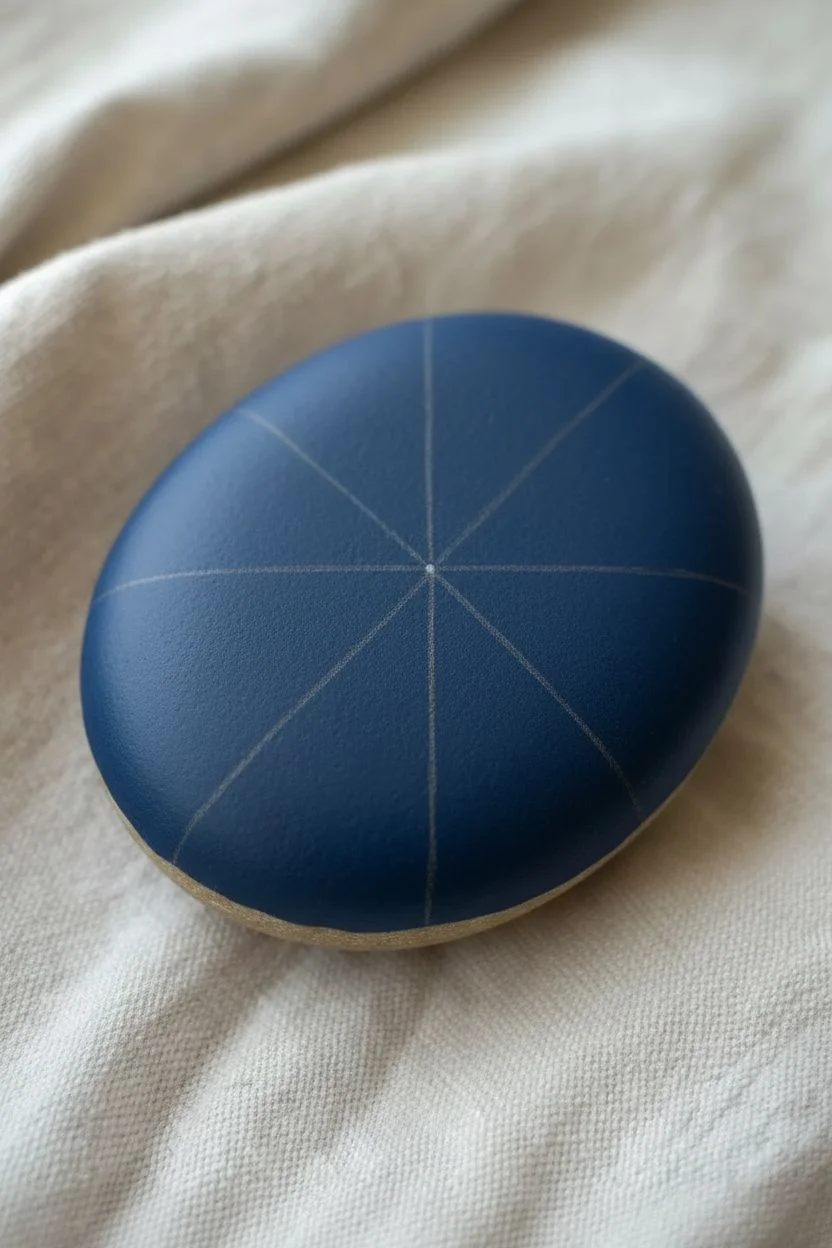
This striking rock painting project transforms a simple smooth stone into a patriotic centerpiece featuring an eight-pointed starburst in classic red, white, and blue. The design combines bold geometric lines with delicate stippling details for a polished, folk-art inspired finish.
Step-by-Step Guide
Materials
- Smooth, oval river rock (approx. palm size)
- Acrylic paints: Navy Blue, Bright Red, Titanium White
- Flat brush (medium)
- Fine detail liner brush (0 or 00 size)
- Dotting tool or toothpick
- Pencil and eraser
- Ruler or straight edge
- Clear acrylic sealer (gloss or matte)
Step 1: Base and Sketching
-
Prepare the Base:
Begin by washing and drying your rock thoroughly to remove any dirt or oils. Paint the entire top surface with a coat of navy blue acrylic paint. Let this dry completely, then add a second coat for solid, opaque coverage. -
Mark the Center:
Once the blue base is bone dry, use a pencil to lightly mark the visual center of the rock. This doesn’t have to be mathematically perfect, but it will anchor your entire design. -
Draft the Primary Cross:
Using a ruler or straight edge, lightly draw a vertical line and a horizontal line through your center point, extending near the edges of the rock. You now have a cross shape. -
Draft the Diagonal Cross:
Draw two diagonal lines through the center point, cutting the existing quadrants in half. You should now have an eight-spoked asterisk shape drawn on the rock. -
Form the Star Points:
To create the star shape, decide how long you want the points to be. Mark a spot on each line equidistant from the center. Connect these tips back toward the center by drawing lines to the *midpoints* between the spokes near the center, forming a geometric 8-pointed star.
Sharper Lines
For the crispest edges on your central star, use thin strips of washi tape or painter’s tape to mask off the sections. Paint one color, let it dry, remove tape, then re-tape for the next color.
Step 2: Filling the Star
-
Section the Star:
Draw a straight line from the tip of each star point down to the center. This splits each star point in half, creating 16 total triangular segments radiating from the middle. -
Paint White Segments:
Using your fine detail brush and white paint, fill in every other triangular segment. You want to alternate them so that one side of a star point is white and the other will be red. Paint carefully along your pencil lines. -
Apply Second White Coat:
White acrylic often needs help covering dark blue. Let the first layer dry, then apply a second coat to ensure the white segments are bright and crisp. -
Paint Red Segments:
Switch to your bright red paint. Fill in the remaining empty triangular segments. The red and white segments should meet cleanly in the middle of each star point, creating a beveled 3D effect. -
Clean Up Edges:
If your lines got a little wobbly, use a very fine brush with the navy blue background color to touch up the outer edges of the star points.
Add Some Sparkle
Mix a tiny amount of silver glitter medium into your white paint for the smaller decorative stars. It adds a subtle shimmer that catches the sunlight without overpowering the main design.
Step 3: Detailing and Embellishment
-
Dot the Outlines:
Dip a small dotting tool or the tip of a toothpick into white paint. Carefully place a line of tiny, evenly spaced dots in the blue background, following the V-shape between each star point. Keep these dots close to the star but not touching it. -
Add Secondary Stars:
In the larger navy blue spaces between the main star points, paint small, simple 4-pointed stars using your liner brush. Start with a tiny cross, then thicken the center slightly. -
Add Texture to the Star:
For a bit of visual interest, add a few tiny random specks of red paint onto the white segments, and white specks onto the red segments. This creates a subtle distressed or speckled texture. -
Paint the Lower Rim:
Paint the bottom edge or underside of the rock with a band of red to frame the design. I like to add a few widely spaced white dots along this red rim for continuity. -
Seal the Design:
Allow the rock to dry for at least 24 hours to ensure all layers are set. Apply a coat of clear acrylic sealer to protect the paint from chipping and to make the colors pop.
Display your new patriotic stone on a porch rail or in a garden bed to share a bit of star-spangled spirit.
All-Over Tiny Stars Pattern
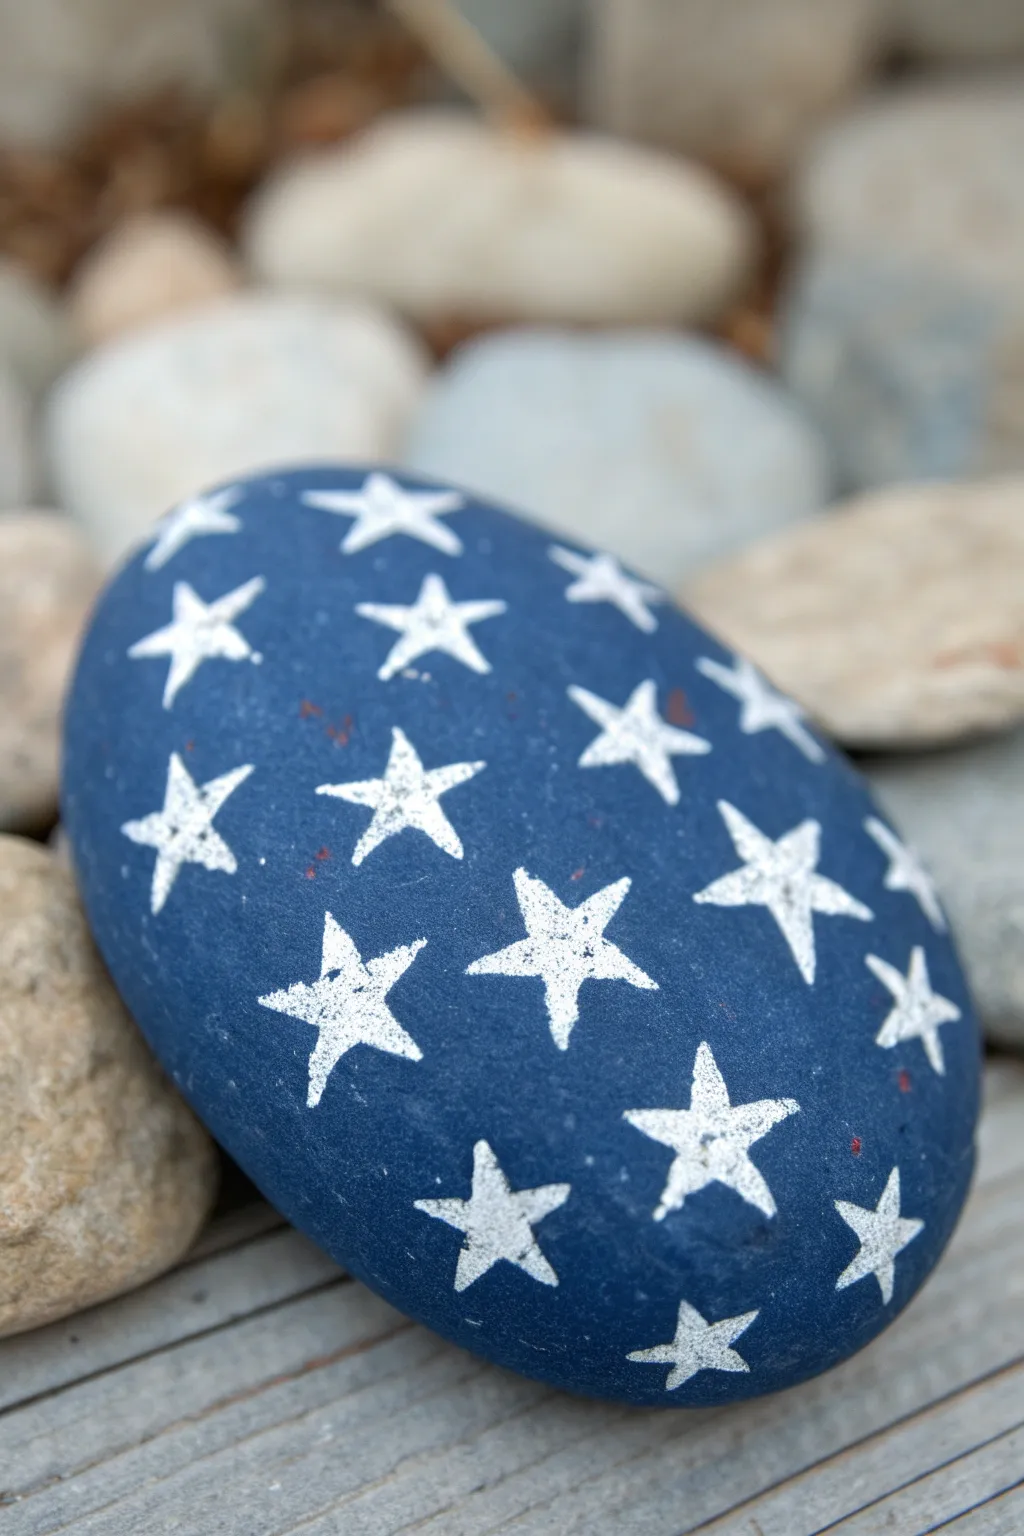
Transform a smooth river rock into a handheld piece of patriotism with this simple yet striking design. By covering a deep blue base with a galaxy of tiny white stars, you can create a timeless decoration perfect for Fourth of July or Memorial Day displays.
Detailed Instructions
Materials
- Smooth oval river rock (palm-sized)
- Acrylic paint (Deep Navy Blue)
- Acrylic paint (Titanium White)
- Flat paintbrush (medium size for base coat)
- Fine liner brush (size 0 or 00)
- Dotting tool or toothpick (optional)
- Matte or satin spray sealer
- Small cup of water
- Paper towels
Step 1: Preparing the Canvas
-
Clean Your Stone:
Before you begin, wash your rock thoroughly with warm soapy water to remove any dirt or oils. Use an old toothbrush to scrub into any tiny crevices if necessary. -
Dry Completely:
Let the stone dry completely in the sun or use a hairdryer for a few minutes. Paint won’t adhere properly if moisture is trapped in the porous surface. -
Base Coat Application:
Dip your medium flat brush into the Deep Navy Blue acrylic paint. Apply a smooth, even coat across the top and sides of the rock. -
Check Coverage:
Once the first layer is dry to the touch, hold it up to the light to check for thin spots. Add a second coat of blue if you can still see the greyness of the stone underneath. -
Full Cure:
Allow the blue base to dry completely before moving on to the stars. This prevents the blue from bleeding into your crisp white stars later.
Use a Stencil Helper
Struggling with star shapes? Cut a tiny star out of a piece of cardstock to use as a quick tracing guide, or use a star-shaped rubber stamp with white ink.
Step 2: Painting the Stars
-
Load the Fine Brush:
Take your fine liner brush and dampen it slightly, then load just the tip with Titanium White paint. The paint should be fluid but not runny. -
Start Center Stage:
Paint your first star near the center of the rock to anchor your pattern. Draw a small inverted ‘V’ shape first for the top point. -
Complete the Shape:
From that ‘V’, draw two lines crossing outward to form the arms, and connect them at the bottom. Fill in the center carefully. -
Establish the Grid:
Visualize a loose grid pattern. Paint a few more stars spaced evenly apart around that central star, keeping them roughly the same size. -
Fill the Gaps:
Continue painting stars in the open blue spaces. I find it helpful to rotate the rock as I work to ensure the stars look good from all angles. -
Vary the Angles:
Don’t worry about keeping every star perfectly upright. Letting them tilt slightly gives the pattern a more natural, fabric-like appearance. -
Edge Work:
Paint partial stars near the edges of the rock where the surface curves away. This creates the illusion that the pattern continues infinitely. -
Refine the Points:
Go back over your stars with a very small amount of white paint to sharpen any dull points or fix symmetrical issues. -
Second Layer:
White paint can be translucent over dark blue. Once the first layer of stars is dry, dab a second coat of white on them to make them pop brightly.
Step 3: Protecting Your Work
-
Final Dry Time:
Let the rock sit undisturbed for at least an hour to ensure the thickest parts of the white paint are fully hardened. -
Seal It Up:
Take your rock to a well-ventilated area and apply a light coat of matte or satin spray sealer. This protects the paint from chipping and weather damage.
Add a Little Sparkle
Mix a tiny pinch of silver holographic glitter into your white paint or the final sealer coat to make the stars shimmer in the sunlight.
Place your finished starry rock in a garden bed or keep it on your desk as a solid reminder of creative inspiration


Distressed Vintage Flag Texture
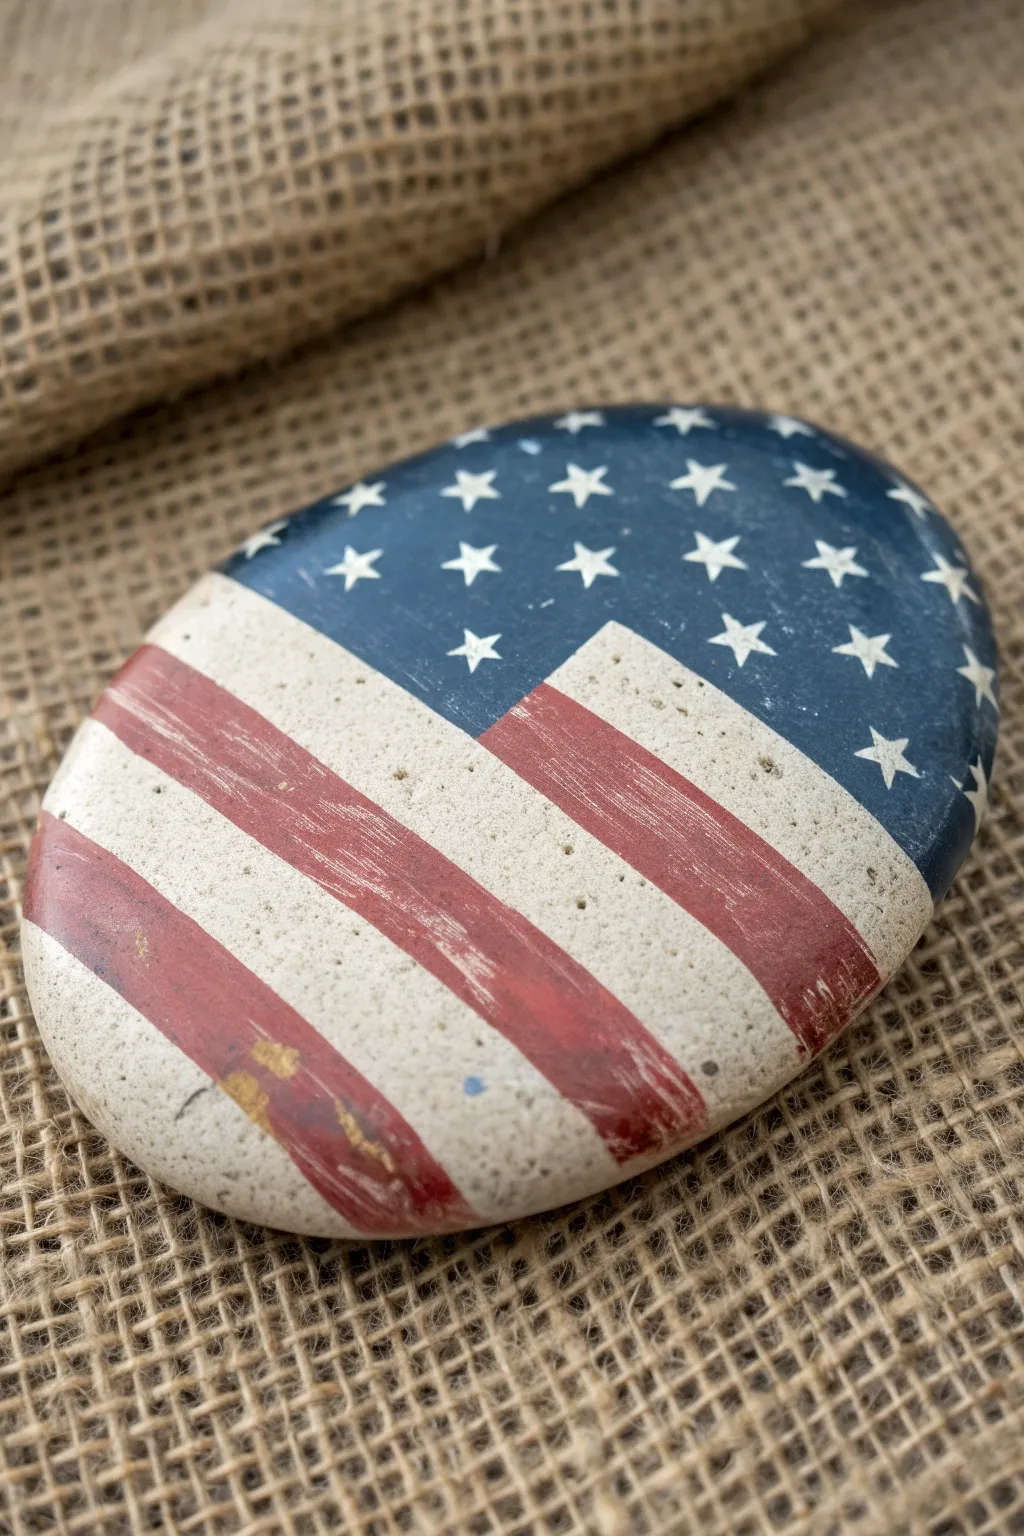
Capture the spirit of Independence Day with a rustic twist by painting this distressed American flag on a smooth river stone. The weathered edges and muted colors give it a charming, antique feel perfect for farmhouse decor or a patriotic garden accent.
Detailed Instructions
Materials
- Smooth, oval river rock (approx. 3-4 inches wide)
- Acrylic craft paint: Navy Blue, Barn Red (or Deep Burgundy), and Antique White (or Cream)
- Flat paintbrushes (medium and small sizes)
- Fine grit sandpaper or sanding block
- Painter’s tape or masking tape (1/4 inch width is ideal)
- Pencil
- Small detail brush or toothpick
- Matte sealer or varnish spray
- Paper towel or old cloth
Step 1: Preparation and Base Coat
-
Clean the stone:
Begin by scrubbing your rock with warm, soapy water to remove any dirt or oils. Let it dry completely before starting, as moisture will prevent the paint from adhering properly. -
Apply the base color:
Load a medium flat brush with Antique White or Cream paint. Coat the entire top surface of the rock. You don’t need opaque perfection here; a slightly uneven coat adds to the vintage vibe. -
Let it dry:
Allow the base coat to dry fully to the touch. If the rock is very dark, you might want a second thin coat of cream, but keep it light. -
Mark the design:
Lightly sketch a curved line roughly one-third down from the top right to separate the canton (the blue field) from the stripes. The line doesn’t need to be perfectly straight; following the rock’s slight curve looks more organic.
Dry Brushing Secret
For the best vintage texture, use a stiff-bristled brush rather than a soft one. The stiff bristles leave distinct streak marks which look like aged wood grain.
Step 2: Creating the Stripes and Field
-
Tape off the stripes:
Place strips of painter’s tape diagonally across the lower section of the rock to create your red stripes. Press the edges down firmly to minimize bleeding, leaving gaps where the red paint will go. -
Paint the red stripes:
Using the Barn Red paint, fill in the exposed areas between the tape. Use a dry-brush technique here—dip your brush, wipe most of the paint off on a paper towel, and drag it lightly. This creates a streaky, worn look instantly. -
Remove tape immediately:
Carefully peel back the tape while the red paint is still slightly wet. This helps prevent the paint from pulling up in chunks. -
Paint the blue field:
Fill in the upper left section (the canton) with your Navy Blue paint. Like the red, don’t aim for a solid, plastic-looking coat. Let some brush strokes showing the underlying texture remain visible. -
Dry completely:
Set the rock aside for 15-20 minutes until all paint is totally dry to the touch.
Tape Peeling paint?
If your blue tape pulls up the base coat, stick the tape to your pants or shirt first to reduce its tackiness before applying it to the painted rock.
Step 3: Distressing and Details
-
Sand for texture:
Take your fine grit sandpaper and gently scuff the surface of the dried paint. Focus on the edges of the rock and the high points of the stone to mimic natural wear. -
Reveal the cream:
Continue sanding until bits of the cream base coat or even the raw stone peek through the blue and red sections. This is the key step for that ‘antique store find’ appearance. -
Add the stars:
Using a very fine detail brush or a toothpick, dip into the Antique White paint. Dot small stars onto the blue field. They don’t need to be perfect five-pointed shapes; rough star bursts or even simple crosses work well for this scale. -
Soften the stars:
Once the stars are dry, lightly sand over them just once or twice to knock back their brightness so they blend into the vintage texture. -
Simulate age:
Mix a tiny drop of brown or dark grey paint with a lot of water to create a wash. Lightly brush this over random spots, especially near the edges, to simulate dirt and age. -
Wipe back:
I prefer to immediately wipe the wash away with a paper towel, leaving just a hint of grime in the crevices of the rock. -
Seal the deal:
Finish by spraying the rock with a matte sealer. Avoid glossy finishes, as they will ruin the old-fashioned, weathered effect you’ve worked so hard faithfully recreate.
Place your finished vintage flag rock on a porch rail or in a flower pot to enjoy a touch of handcrafted history


Have a question or want to share your own experience? I'd love to hear from you in the comments below!