When I plan a Day of the Dead piece, I always aim for that signature mix of celebration and remembrance—bold color, warm candlelight, and meaningful symbols. Here are my go-to Día de Muertos painting ideas you can make totally your own, whether you’re a beginner or you love going full detail-obsessed.
Classic Sugar Skull With Symmetry
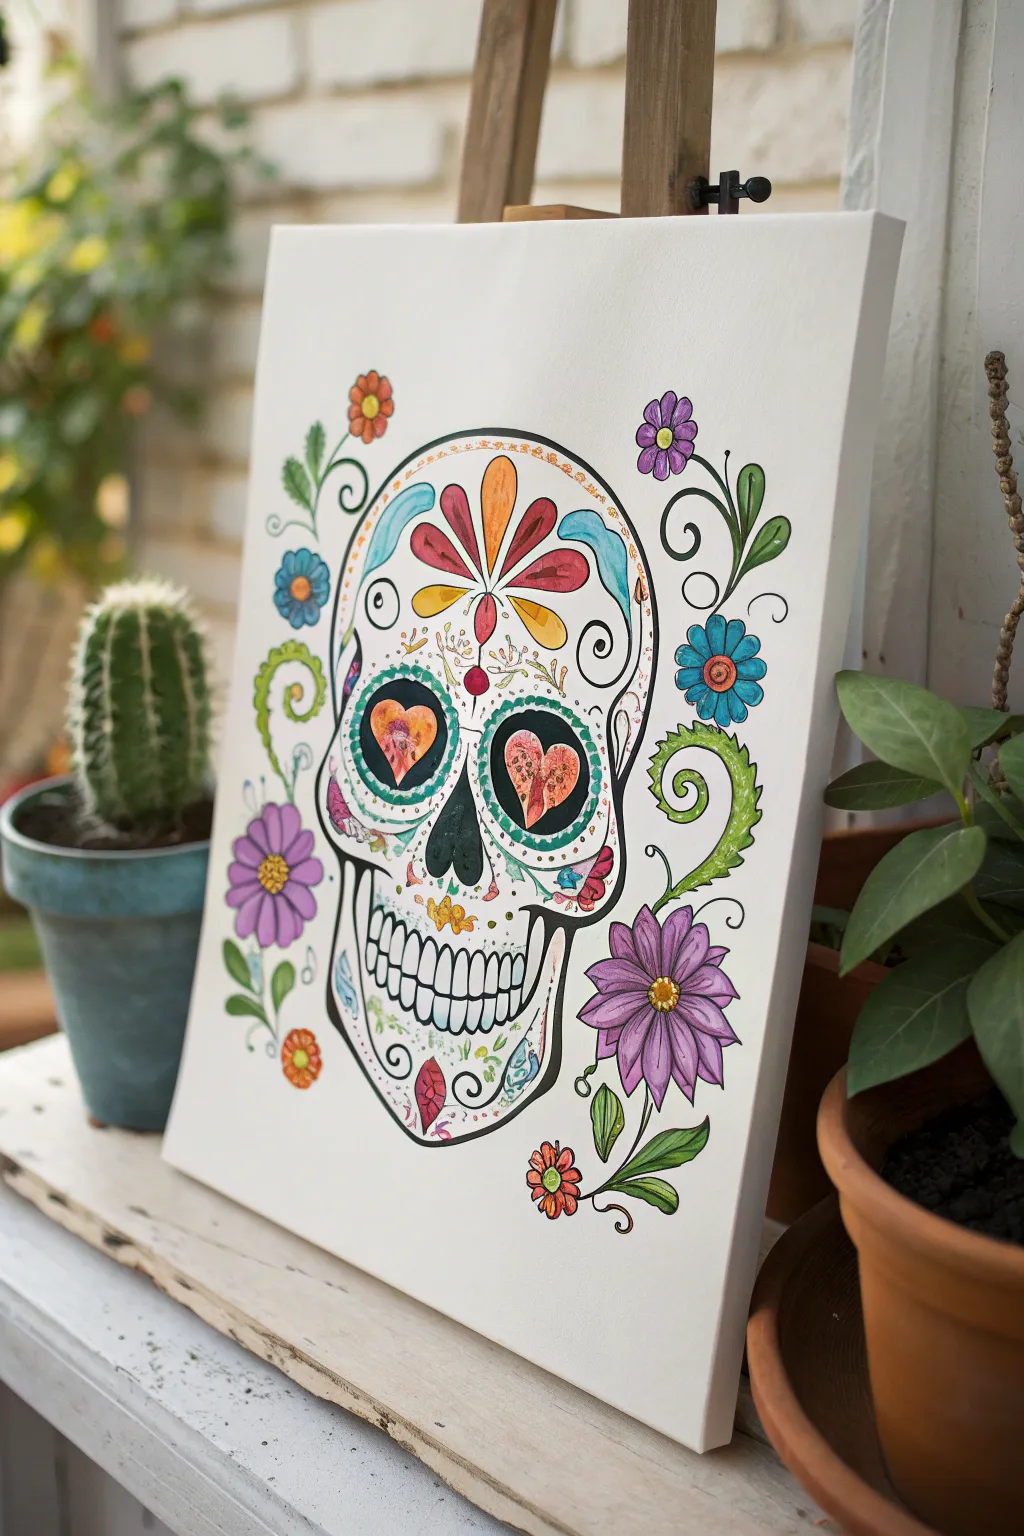
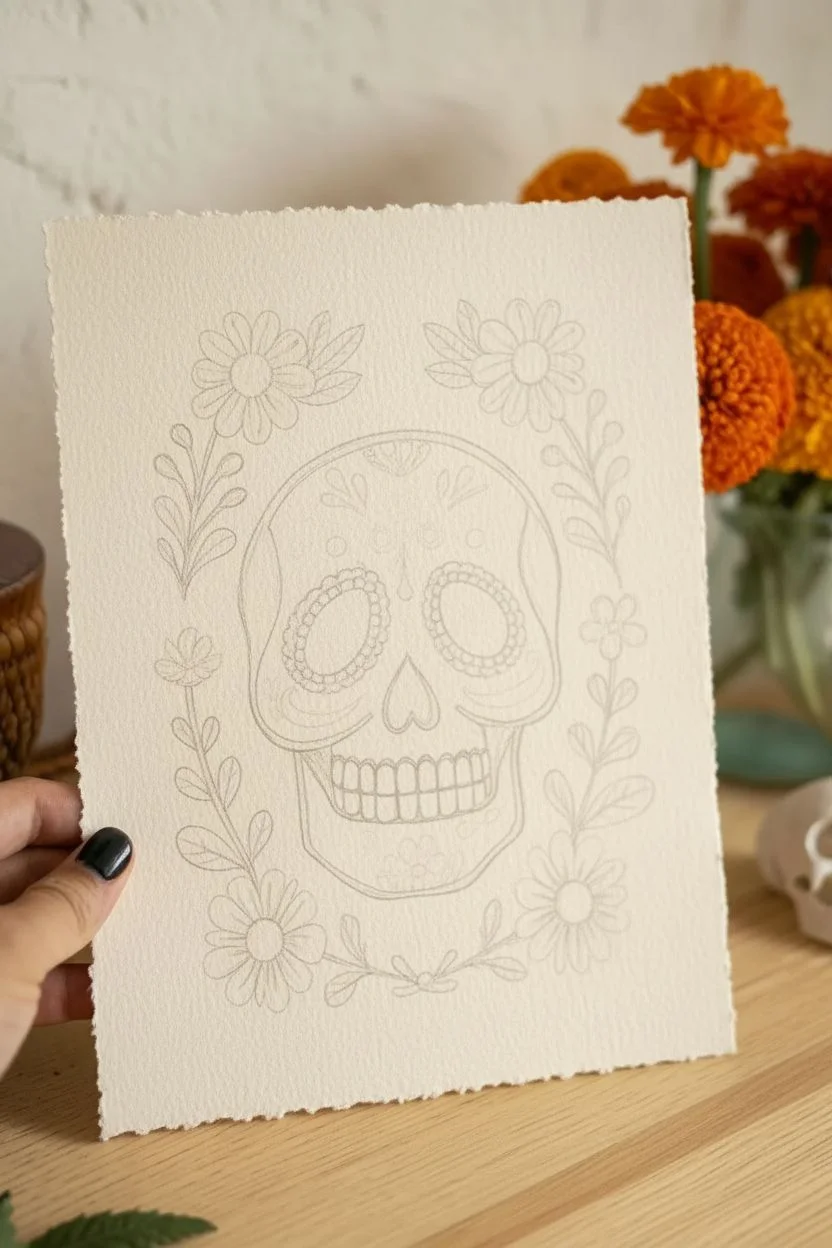
This colorful acrylic canvas project captures the festive spirit of Día de los Muertos with a beautifully symmetrical sugar skull surrounded by whimsical florals. The design balances bold black lines with soft, watercolor-like washes of teal, purple, and orange for a striking yet elegant finish.
Step-by-Step Tutorial
Materials
- Stretched canvas (e.g., 11×14 or similar)
- Pencil and eraser
- Acrylic paints (black, white, teal, orange, purple, yellow, red, light green, dark green)
- Fine liner brushes (sizes 0 and 00)
- Small round brushes (sizes 2 and 4)
- Symmetry ruler or large straight edge
- Water cup and paper towels
- Palette
- Black acrylic paint pen (optional but recommended for outlining)
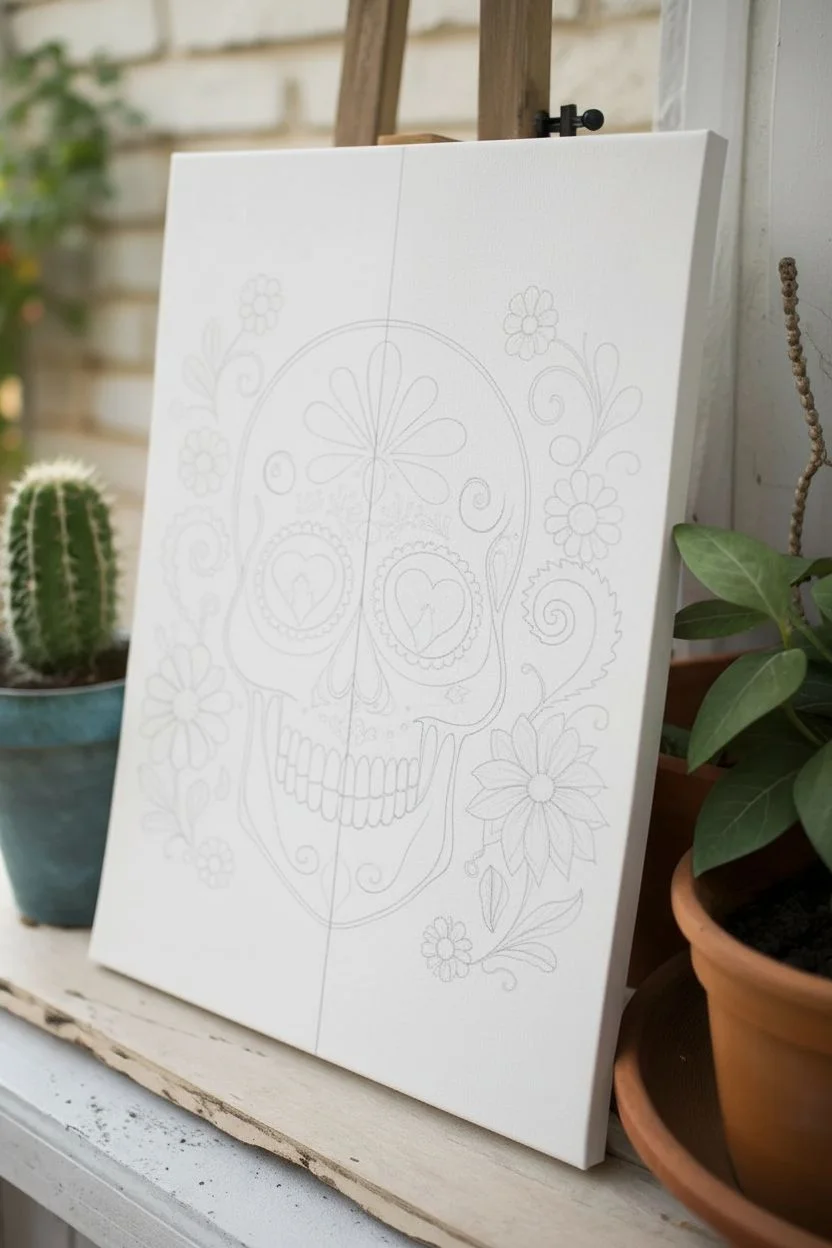
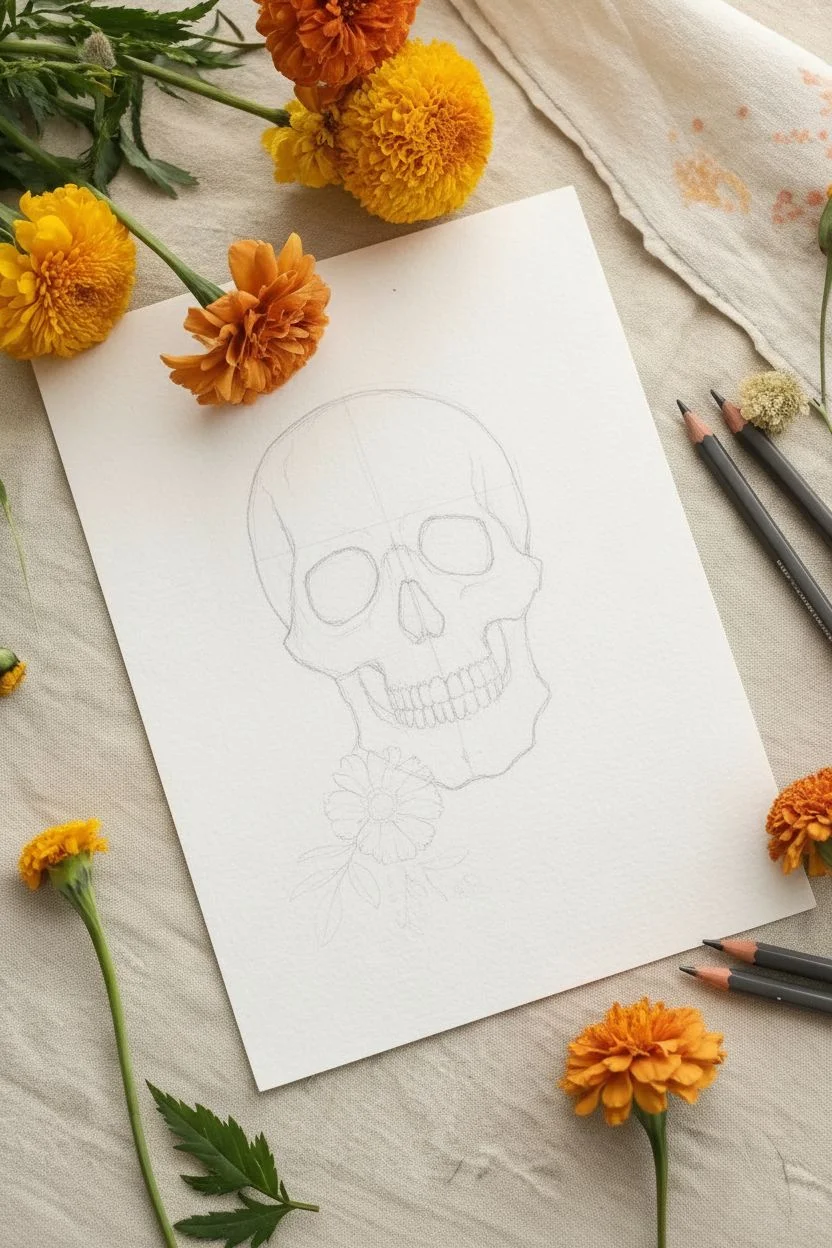
Step 1: Sketching the Skeleton
-
Establish the centerline:
Using a ruler, lightly draw a vertical line down the exact center of your canvas. This guide is crucial for maintaining the symmetry characteristic of sugar skulls. -
Outline the skull shape:
Sketch the main contour of the skull. Start with a large, rounded dome for the cranium and taper it down into the narrower jaw area. Ensure the left and right sides mirror each other across your centerline. -
Position facial features:
Draw two large, upside-down heart shapes or rounded triangles for the nose cavity right on the center line. Above that, sketch two large circles for the eye sockets. -
Detail the eyes:
Inside the eye sockets, draw a smaller scalloped edge (like flower petals) around the inner rim. In the very center of each eye, sketch a heart shape. -
Sketch the mouth:
Draw a horizontal line for the mouth opening. Sketch vertical, rectangular shapes for the teeth, making them smaller as they move toward the jaw hinges. Add the jawline definition around the teeth. -
Add floral elements:
Surround the skull with your floral designs. Sketch a large daisy-like flower on the bottom right and a smaller one on the left. Add swirling vines and leaves that curve toward the skull, filling the negative space.
Step 2: Bringing in Color
-
Paint the eye hearts:
Mix a warm orange with a touch of red. Carefully paint the hearts inside the eye sockets. You can dab a little lighter orange in the center while wet to create a glowing effect. -
Fill the eye sockets:
Using a teal or turquoise paint thinned slightly with water, fill the area surrounding the hearts inside the eye sockets. The thinned paint gives it a softer, stained look. -
Decorate the forehead:
Paint the large central flower motif on the forehead. Use alternate petals of orange and magenta. Add the small teal swirls on either side of this central flower. -
Color the cheek details:
Add the colorful swirl details on the cheekbones using pink and light blue. Keep your brush strokes smooth to follow the curve of the bone. -
Paint the surrounding flora:
Move to the background flowers. Use a vibrant purple for the petals of the large bottom flower and the smaller top flowers. Use orange for the center points. -
Greenery and vines:
Using a light lime green, paint the swirling vine on the right side. Use a darker forest green for the leaves on the bottom right and top left. I find mixing a tiny bit of yellow into the green helps it pop against the white canvas. -
Secondary flowers:
Fill in the smaller blue daisy shapes on the left and right sides. Add bright orange centers to these flowers as well.
Pro Tip: Paint Consistency
Add a few drops of water or flow medium to your black paint for lining. Ink-like consistency flows smoother than heavy body paint for crisp lines.
Step 3: Defining the Lines
-
Prepare for outlining:
Ensure all your colorful base layers are completely dry. If the paint is even slightly wet, the black lines will bleed or muddy the colors. -
Outline the skull:
Using a size 0 liner brush and fluid black acrylic (or a black paint pen), trace the main outer shape of the skull. Vary the line thickness slightly—thicker on the outer edge, thinner for interior details. -
Define the features:
Outline the eye sockets, the nose cavity, and the individual teeth. Add the small scalloped edges inside the eyes with precision. -
Detail the forehead design:
Trace the flower petals on the forehead. Add small dots and tiny teardrop shapes around the design to mimic traditional embroidery or icing patterns. -
Outline the flora:
Trace your purple and blue flowers. Add a central black dot to the flower centers and small lines radiating outward on the petals for texture. -
Add final flourishes:
Draw the delicate black swirls and tendrils that connect the flowers to the skull. These fine lines add movement and tie the composition together. -
Erase guidelines:
Once the black paint is fully cured (give it at least an hour), gently erase any visible pencil marks, especially your initial center line.
Troubleshooting: Shaky Lines?
If brush lining is too difficult, swap the liner brush for a waterproof black acrylic marker or even a permanent marker for better control.
Hang your masterpiece on the wall to celebrate color and life with a festive touch


Dancing Skeletons Celebration Scene
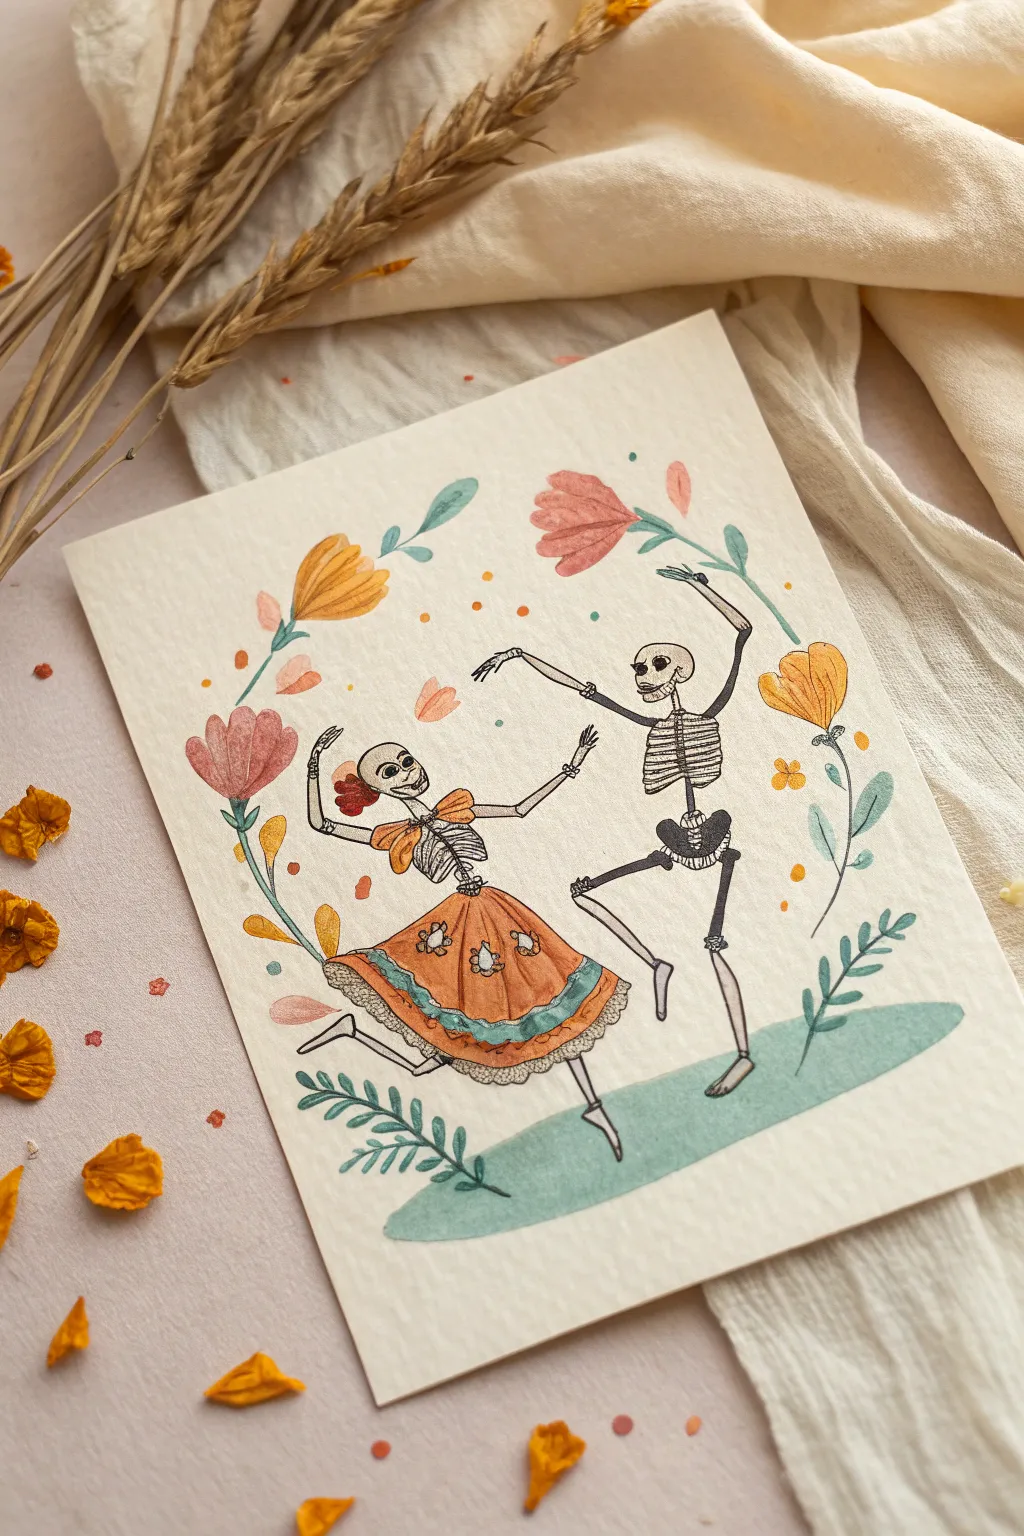
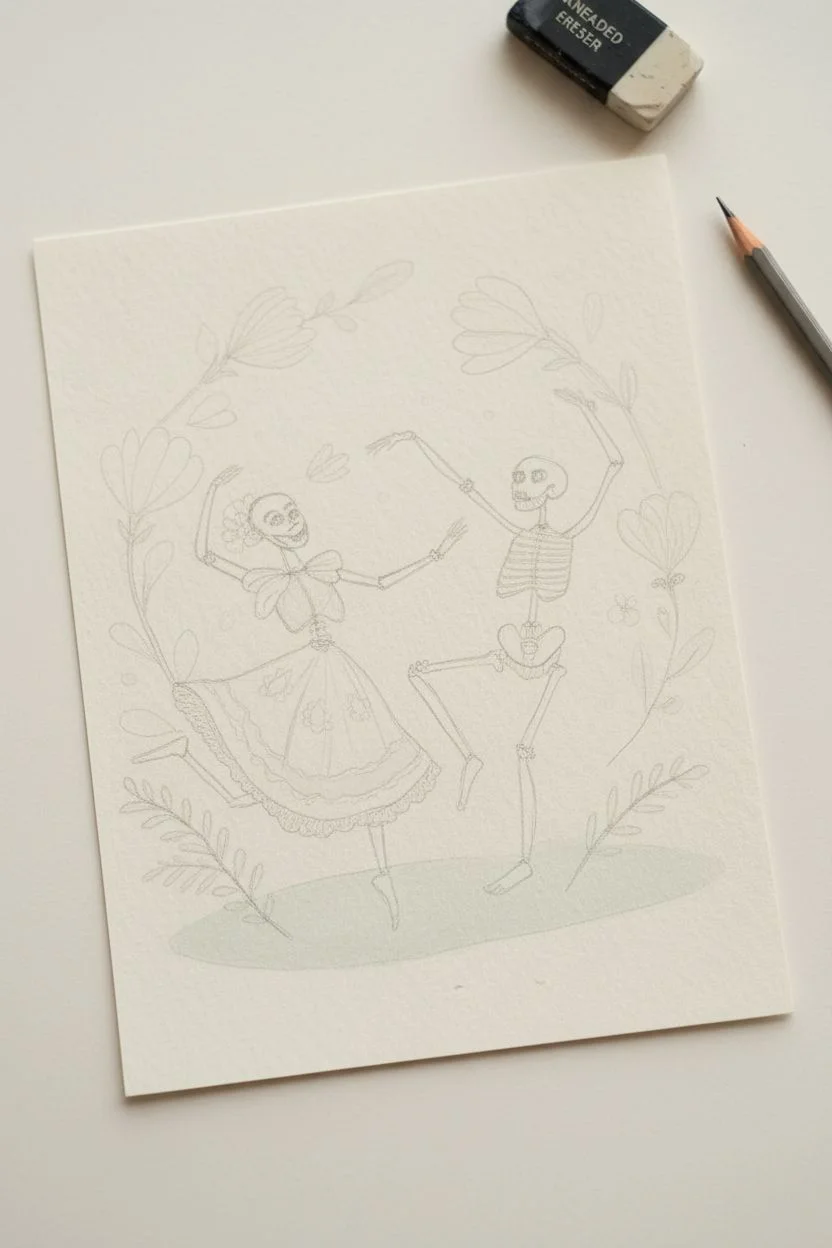
Capture the joyful spirit of Día de los Muertos with this charming illustration of two dancing skeletons surrounded by floating florals. The combination of delicate ink linework and soft watercolor washes creates a beautiful folk-art aesthetic perfect for greeting cards or framed holiday decor.
Step-by-Step Tutorial
Materials
- Cold press watercolor paper (300 gsm)
- HB pencil and kneaded eraser
- Fine liner pens (0.1mm and 0.3mm, waterproof archival black ink)
- Watercolor paints (Vermilion, Yellow Ochre, Burnt Sienna, Teal/Turquoise, Sap Green, Payne’s Grey or Black)
- Round watercolor brushes (Size 2 and Size 4)
- Jar of clean water
- Paper towels
- Palette for mixing
Step 1: Sketching the Composition
-
Map out the figures:
Begin by lightly sketching the basic stick-figure gestures of the two skeletons. Place the female figure on the left, turning her head back, and the male figure on the right with arms raised high. Keep the lines incredibly faint so they don’t show through later. -
Flesh out the bones:
Add volume to the bones. Draw simple oval shapes for the ribcages and rounded rectangular shapes for the pelvises. Sketch the skulls with friendly, smiling expressions—think large eye sockets and a wide toothy grin. -
Dress the dancer:
On the left skeleton, sketch a full, flowing skirt that flares out as if in motion. Add a ruffled hem at the bottom and a simple bodice. Give her a little bun hairstyle with a flower tucked in. -
Add floral border elements:
Draw loose, floating flowers around the couple to create a framing effect. Sketch tulips and simple five-petal blooms, connecting them with swaying stems and leaves that follow the circular motion of the dance. -
Define the ground:
Sketch a soft, organic oval shape beneath their feet to ground the composition, ensuring it stretches just wide enough to catch their poses.
Smudge Stopper
If your waterproof pen still smudges when you paint, it might not be fully dry. Blast it with a hair dryer on cool for 60 seconds before erasing or wetting the page.
Step 2: Inking the Details
-
Outline the bones:
Using your 0.1mm fine liner, carefully trace over your pencil lines for the skeletons. Use short, slightly jittery lines for the ribs and spine to give them an organic, bone-like texture rather than perfect geometric lines. -
Detail the skirt:
Ink the skirt with the 0.3mm pen for a slightly bolder line. Add the internal details: the scalloped lace at the hem, the decorative band in the middle, and small flower motifs scattered on the fabric. -
Ink the florals:
Trace the surrounding flowers and leaves. Don’t worry about closing every shape perfectly; a few broken lines add to the illustrative charm. -
Erase pencil marks:
Wait at least ten minutes for the ink to dry completely to avoid smudging. Then, gently erase all visible pencil sketches with a kneaded eraser.
Metallic Magic
Add subtle shimmer by painting over the flower centers or the skirt’s lace details with a gold watercolor paint or a gold gel pen after everything is dry.
Step 3: Painting with Watercolor
-
Paint the skirt base:
Mix a warm, muted orange using Vermilion and a touch of Yellow Ochre. Apply a flat wash to the main body of the skirt. Leave the lace hem and the middle band unpainted for now. -
Add skirt details:
Once the orange is dry to the touch, paint the decorative band and the bodice bows with a vibrant teal. This contrast is key to the folk art look. I like to keep the paint slightly watery here for transparency. -
Wash the flowers:
Paint the surrounding flowers using diluted washes of pink (watered-down Vermilion) and yellow ochre. Keep the color loose—it’s okay if it doesn’t fill the ink lines perfectly. -
Greenery and ground:
Mix a soft, sage-like green using Sap Green and a tiny dot of black. Paint the leaves and stems. Then, use a very watery wash of a bluish-green (Teal mixed with plenty of water) for the oval ground patch beneath them. -
Shading the bones:
Instead of leaving the bones stark white, mix a very pale grey wash (lots of water with a dash of Payne’s Grey). Add tiny shadows anywhere bones overlap or under the ribcage to give them dimension. -
Final festive touches:
Dip a small brush into your orange mix and add tiny dots and speckles around the skeletons to represent falling marigold petals or confetti.
Now your spirited skeletal couple is ready to dance their way onto your wall or into a frame.


Skeleton Musician Serenade
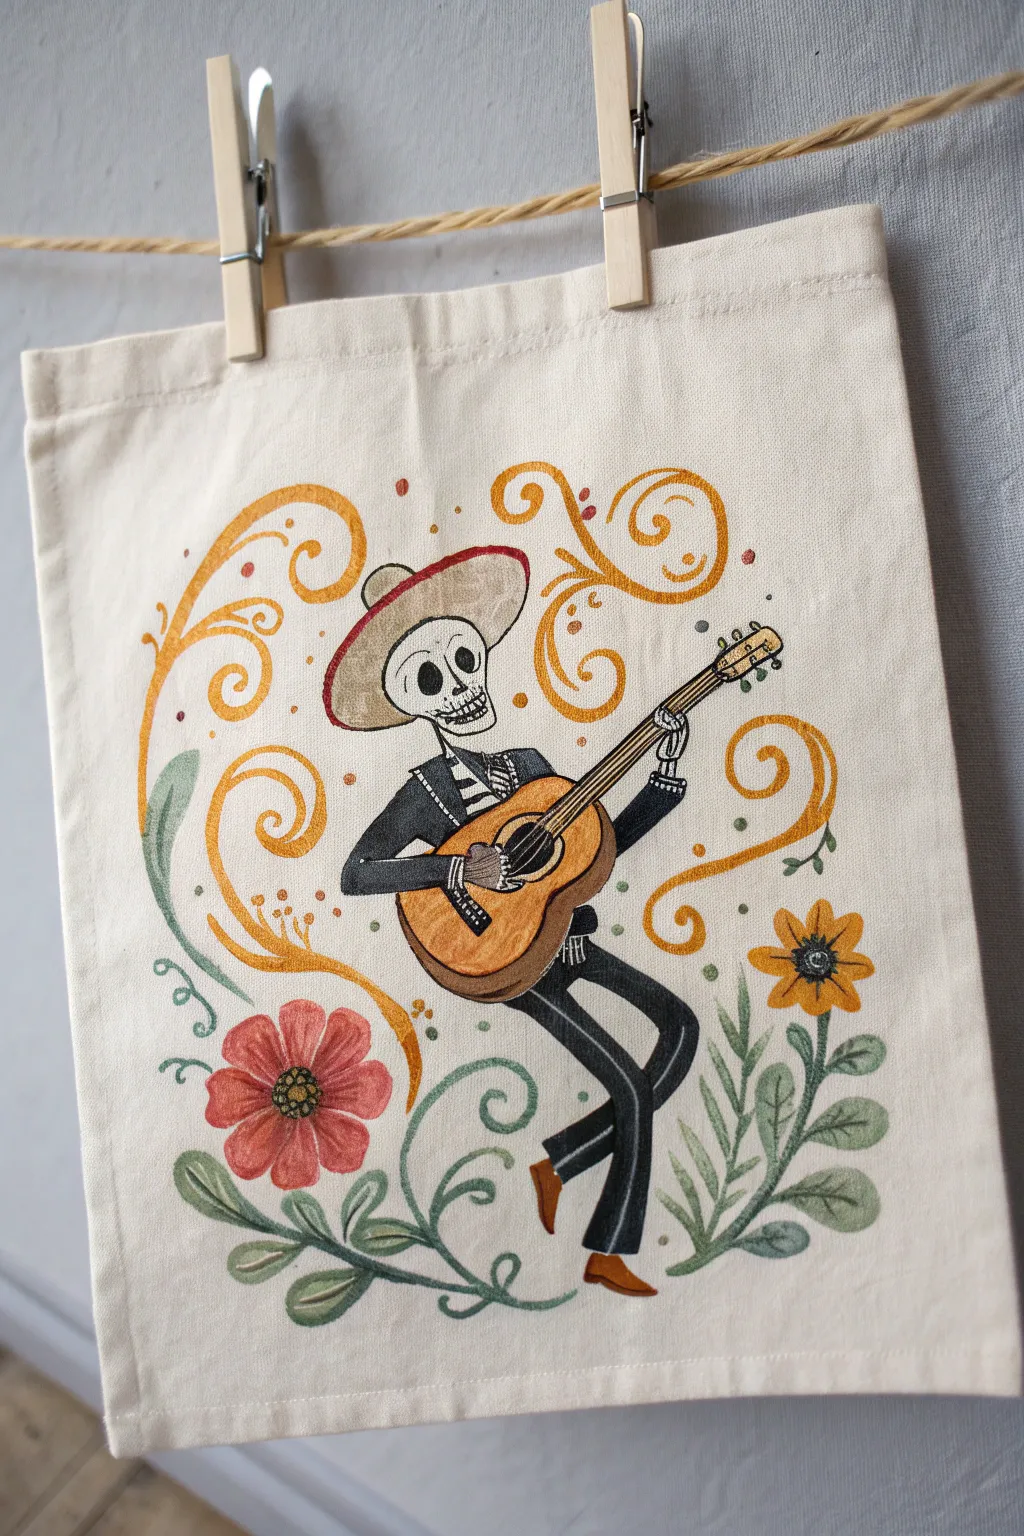

Bring a festive serenade to your everyday accessories with this charming painted tote bag featuring a skeletal musician. The design blends whimsy with tradition, showcasing lively swirling flourishes and folk-art florals surrounding a joyful mariachi skeleton.
Detailed Instructions
Materials
- Cotton canvas tote bag (natural or off-white)
- Fabric medium
- Acrylic craft paints (black, white, burnt orange, golden yellow, sage green, deep red, brown)
- Detailed brush set (fine liner, small round, and small flat)
- Pencil or disappearing ink fabric marker
- Carbon transfer paper (optional)
- Cardboard insert
- Iron and ironing board
Step 1: Preparation & Sketching
-
Prepare the canvas:
Wash, dry, and iron your tote bag to remove any sizing chemicals, which ensures the paint adheres properly. Once smooth, slide a piece of cardboard inside the bag to prevent paint from bleeding through to the back layer. -
Map out the composition:
Using a pencil or disappearing ink pen, lightly sketch the central skeleton figure first. Draw the tilted head with the sombrero, the spinal column, the ribs, and the bent legs in a dancing pose. Position the guitar diagonally across the chest. -
Add decorative elements:
Sketch large, sweeping swirl motifs emanating from the top and left sides. Add the two large flowers at the bottom corners and the leafy vines connecting them. This framework balances the central character.
Pro Tip: Smooth Transitions
To get the soft, shaded look on the guitar and sombrero, work wet-on-wet. Apply the base color and immediately blend a darker shade along the edge before it dries.
Step 2: Painting the Skeleton & Guitar
-
Mix your paint:
Mix your acrylic paints with fabric medium according to the bottle instructions (usually a 2:1 or 1:1 ratio). This crucial step keeps the paint flexible so it won’t crack when the bag bends. -
Paint the bones:
Using a small round brush, fill in the skull, neck, hands, and spine with white paint. You may need two coats for opaque coverage against the canvas color. Leave the eye sockets and nose cavity unpainted for now. -
Add the Mariachi outfit:
Paint the jacket and trousers with black paint. Be careful to paint around the white ribcage area if you sketched it, or paint the black first and layer white ribs on top once dry. Add the boots in a warm brown tone. -
Detail the guitar:
Fill the guitar body with a golden yellow or light ochre. Once dry, add a wash of burnt orange around the edges to create a wooden dimension. Use black for the fretboard and bridge. -
Refine the face:
With a fine liner brush and black paint, fill in the large eye sockets and the inverted heart nose. Carefully paint the teeth by drawing vertical lines across the mouth area.
Troubleshooting: Rough Texture
If the canvas texture makes it hard to paint fine details like the teeth or strings, lightly sand the specific painting area with fine-grit sandpaper before starting.
Step 3: Floral flourishes & Details
-
Paint the swirls:
Load a round brush with golden yellow paint. Follow your sketched lines for the upper swirls, varying the pressure to make the lines thick and thin. Add small dots around the swirls for extra texture. -
Create the red flower:
For the bottom left flower, paint simple, rounded petals using a watered-down deep red or coral color to get that watercolor-like transparency. Add a dark center with stippled dots. -
Paint the yellow flower:
On the right side, paint the pointed petals with a mix of yellow and orange. Use a dark brown or black for the center distinct eye of the bloom. -
Add greenery:
Using sage green, paint the leaves at the bottom. I like to keep these strokes loose and organic rather than perfectly rigid. Add the vine stems that connect the leaves to the main composition. -
Highlight the skeleton:
Add thin white lines to the sombrero rim and pants to suggest movement and fabric folds. Paint the guitar strings with your finest brush using white or very light gray.
Step 4: Finishing Touches
-
Outline and define:
Using a very fine liner brush and black paint (or a fine-tip fabric marker), loosely outline the guitar, the sombrero, and parts of the clothing to make them pop against the canvas. -
Heat set the design:
Allow the painted bag to dry for at least 24 hours. Once fully dry, place a pressing cloth over the design and iron on a high heat setting (no steam) to permanently seal the paint into the fabric fibers.
Now you have a lively piece of wearable art ready to carry your essentials with musical flair


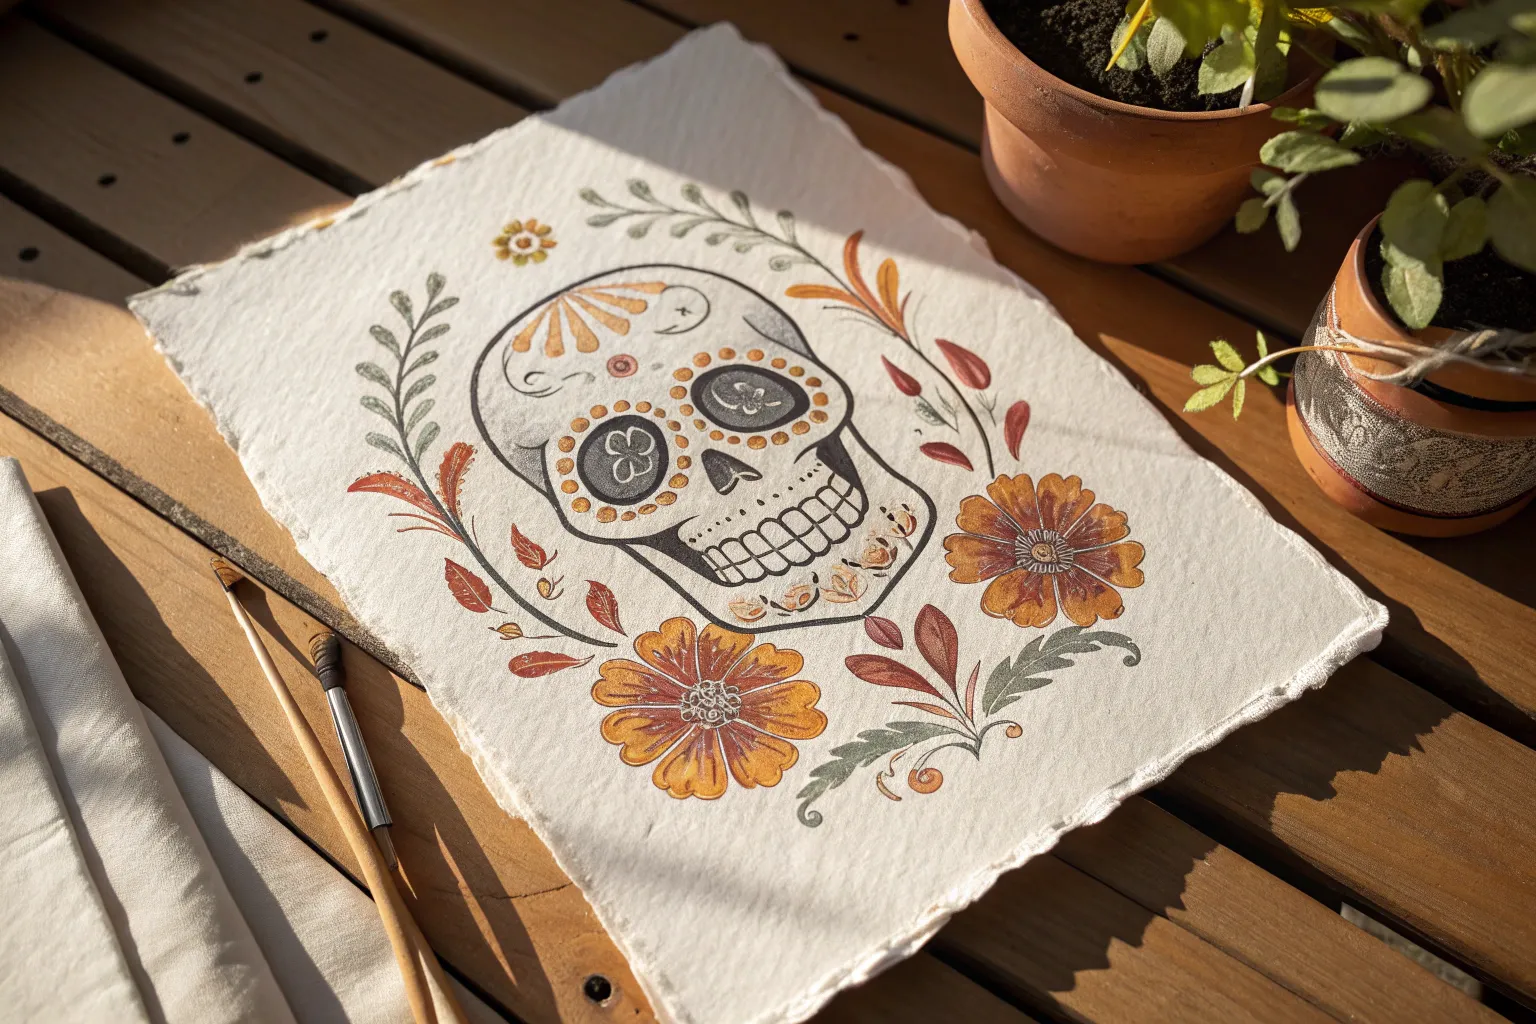
Folk Art Calavera Floral Frame
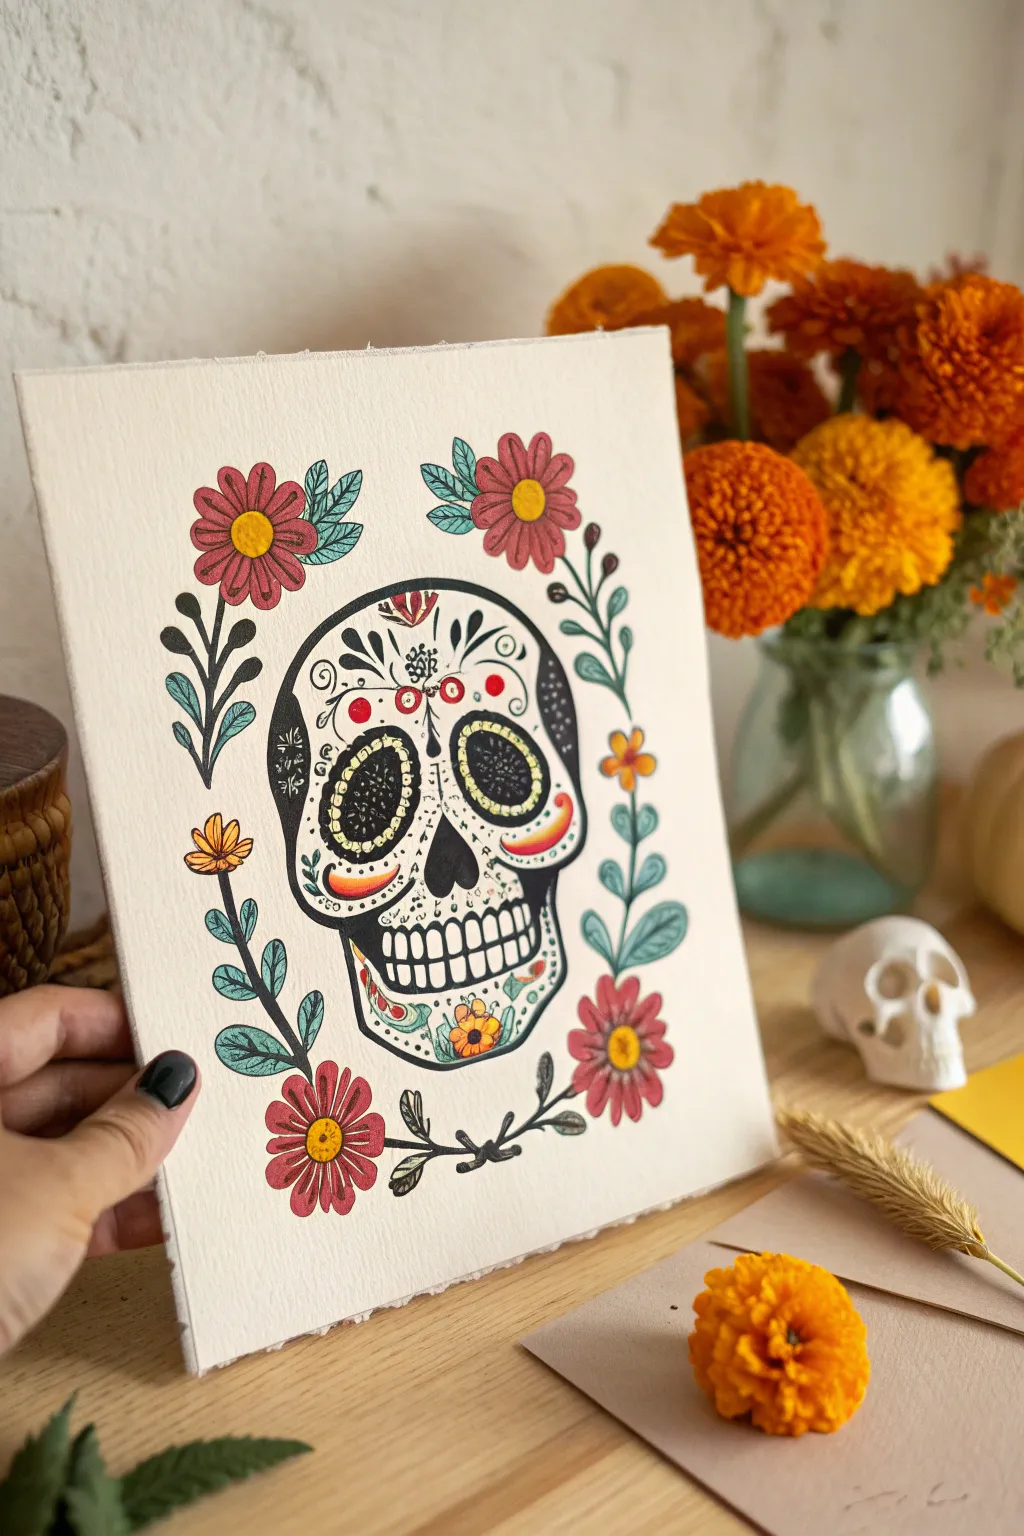
Celebrate Dia de los Muertos with this vibrant folk art-inspired painting features a detailed sugar skull surrounded by a whimsical border of blooms and vines. The opaque colors and crisp black lines create a striking contrast on textured paper, perfect for festive seasonal decor.
Step-by-Step Guide
Materials
- Cold press watercolor paper (approx. 8×10 inches)
- Pencil and eraser
- Gouache or acrylic paints (white, black, red, yellow, teal, orange)
- Small round paintbrushes (sizes 0, 2, and 4)
- Fine liner brush or black waterproof ink pen
- Palette for mixing
- Water cup and paper towels
Step 1: Sketching the Layout
-
Outline the skull shape:
Begin in the center of your paper by lightly sketching the outline of the skull. Start with a large rounded top for the cranium and taper it down into the jawline and cheekbones. Keep your pencil lines faint so they are easy to erase later. -
Add facial features:
Draw two large, slightly irregular circles for the eye sockets. Add an upside-down heart shape for the nose cavity. Sketch the mouth area with a horizontal line and small vertical teeth markings. -
Sketch the floral border:
Around the skull, lightly draw the positions of the flowers. Place a large daisy-like flower at each of the four corners. Connect them with flowing, curved vine lines that mirror each other on the left and right sides. -
Detail the leaves and buds:
Along the vine lines, sketch small almond-shaped leaves and tinier flower buds to fill in the gaps. Aim for symmetry, but don’t worry if it’s not perfectly identical on both sides; folk art embraces a hand-drawn feel.
Pro Tip: Steady Hands
For the finest lines on the teeth and vines, rest your pinky finger on a dry part of the paper to stabilize your hand while painting.
Step 2: Blocking in Color
-
Paint the skull base:
Using white gouache or acrylic, fill in the main shape of the skull. You may need two coats to ensure it is fully opaque against the off-white paper. Leave the eye sockets and nose cavity unpainted for now. -
Fill the eye sockets:
Mix a dark charcoal or use pure black to fill in the eye sockets and the nose cavity. This deep contrast will make the skull pop. -
Paint the corner flowers:
Use a warm red or deep pink to paint the petals of the large corner flowers. Use a size 4 brush for these larger shapes to get smooth strokes. -
Add the centers:
Once the red petals are dry, paint a bright yellow circle in the center of each flower. I like to let this dry briefly before adding any details on top. -
Color the leaves:
Mix a muted teal or turquoise shade. Paint the leaves surrounding the flowers and the vine sections. The cool tone balances the warmth of the red flowers beautifully. -
Add accent buds:
Use orange and yellow to fill in the smaller flower buds scattered along the vines.
Step 3: Adding Decorative Details
-
Decorate the eyes:
around the black eye sockets, paint a ring of small white dots or a scalloped edge using a very fine brush. Inside the black socket, add a yellow or orange scalloped design to create depth. -
Embellish the forehead:
Paint a central floral motif on the forehead using red and teal. Add swirls and teardrop shapes radiating outward. -
Detail the cheeks and chin:
add curved colored accents on the cheekbones in orange and yellow gradients. Paint a small flower on the chin. -
Define the teeth:
Outline the teeth carefully with thin black lines. You can round edges slightly to make them look more organic.
Troubleshooting: Blotchy White
If your white skull paint looks streaky, let the first layer dry completely and apply a second coat moving in the opposite direction.
Step 4: Final Linework
-
Outline the vines:
Using your finest liner brush or a black ink pen, carefully trace the stems of the vines. Keep the line weight consistent. -
Add leaf veins:
Draw simple central veins on the teal leaves with black ink. This sharp detail gives the folk art look its characteristic definition. -
Outline the flowers:
Go over the outer edges of the red flower petals with black. Add small lines radiating from the yellow centers to give the flowers texture. -
Refine the skull outline:
Finally, re-trace the main outer shape of the skull with a steady black line to clearly separate it from the background.
Allow your painting to dry fully before framing or displaying it alongside marigolds for a complete look
BRUSH GUIDE
The Right Brush for Every Stroke
From clean lines to bold texture — master brush choice, stroke control, and essential techniques.
Explore the Full Guide
Neon Calavera on Black Background
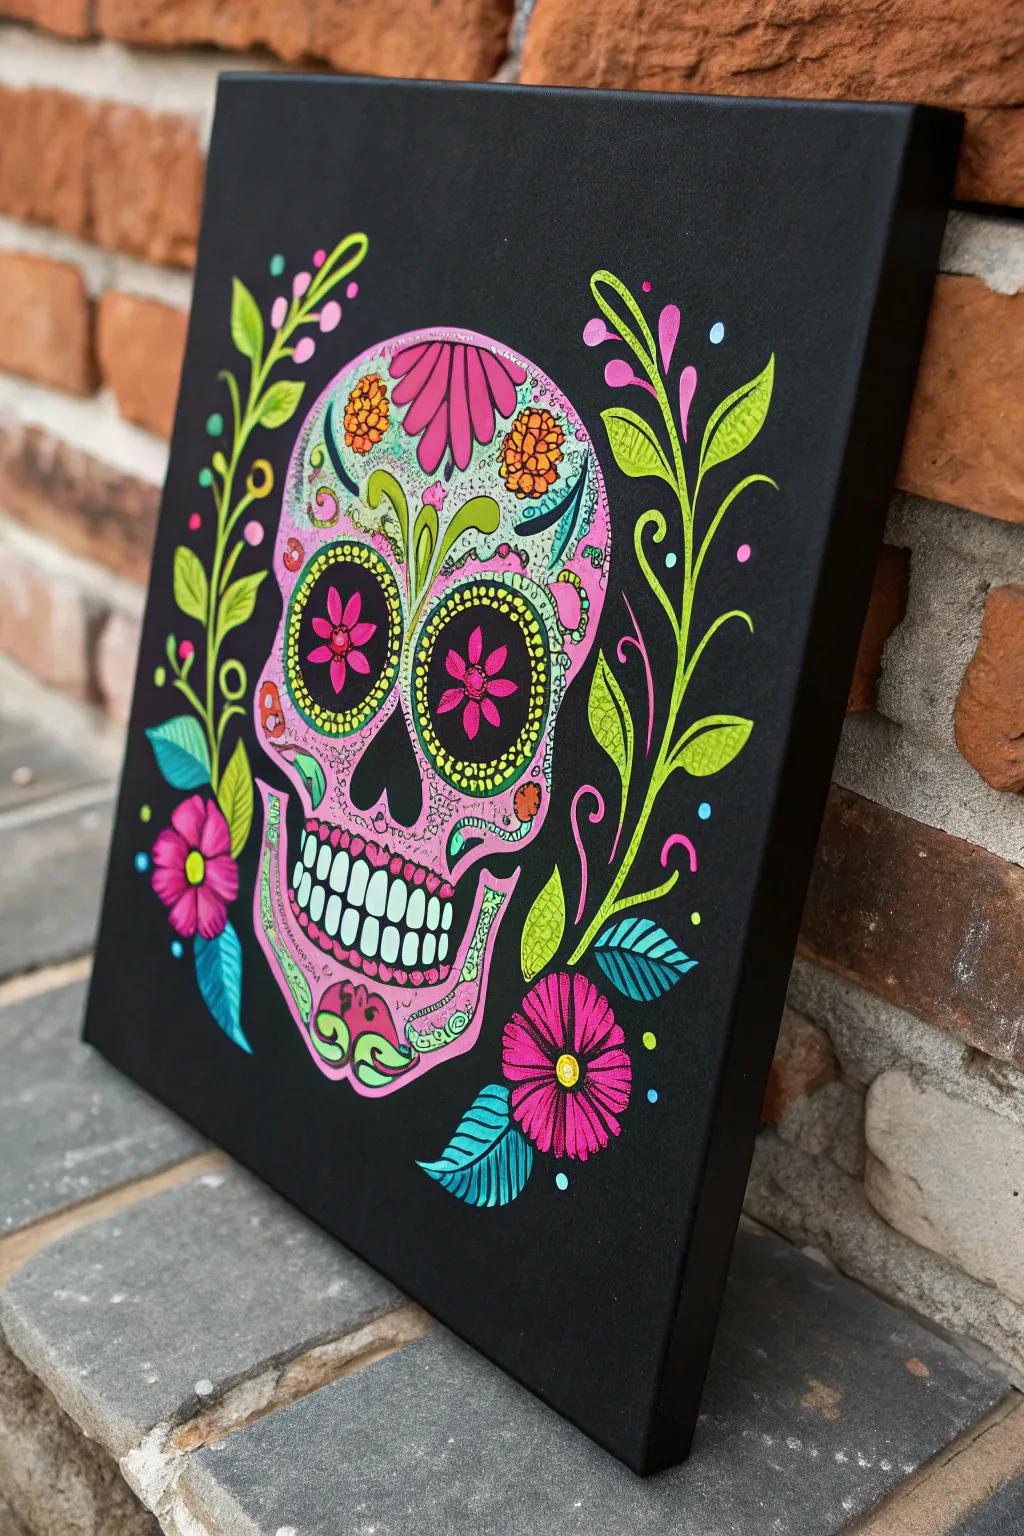
Embrace the vibrant spirit of Dia de los Muertos with this striking neon skull painting set against a stark black background. The high-contrast colors make the intricate floral designs pop, creating a modern and eye-catching piece of wall art.
Step-by-Step Guide
Materials
- Square stretched canvas (e.g., 12×12 or 16×16 inches)
- Black acrylic paint (matte or satin finish)
- Wide flat brush for background
- Neon/fluorescent acrylic paints (pink, green, yellow, orange, blue)
- White acrylic paint (for base layers)
- Pencil and eraser
- Tracing paper (optional)
- Fine liner brushes (sizes 0 and 00)
- Small round brushes (sizes 2 and 4)
- POSCA paint markers (fine tip) in neon colors and black (optional but helpful for detailing)
- Palette and water cup
Step 1: Preparation and Base
-
Prime the canvas:
Start by coating your entire canvas with black acrylic paint. Use a wide flat brush to ensure smooth, even coverage, painting the edges as well for a finished look. -
Second coat:
Once the first layer is completely dry, apply a second coat of black to ensure total opacity. I find that holding it up to the light helps reveal any thin spots. -
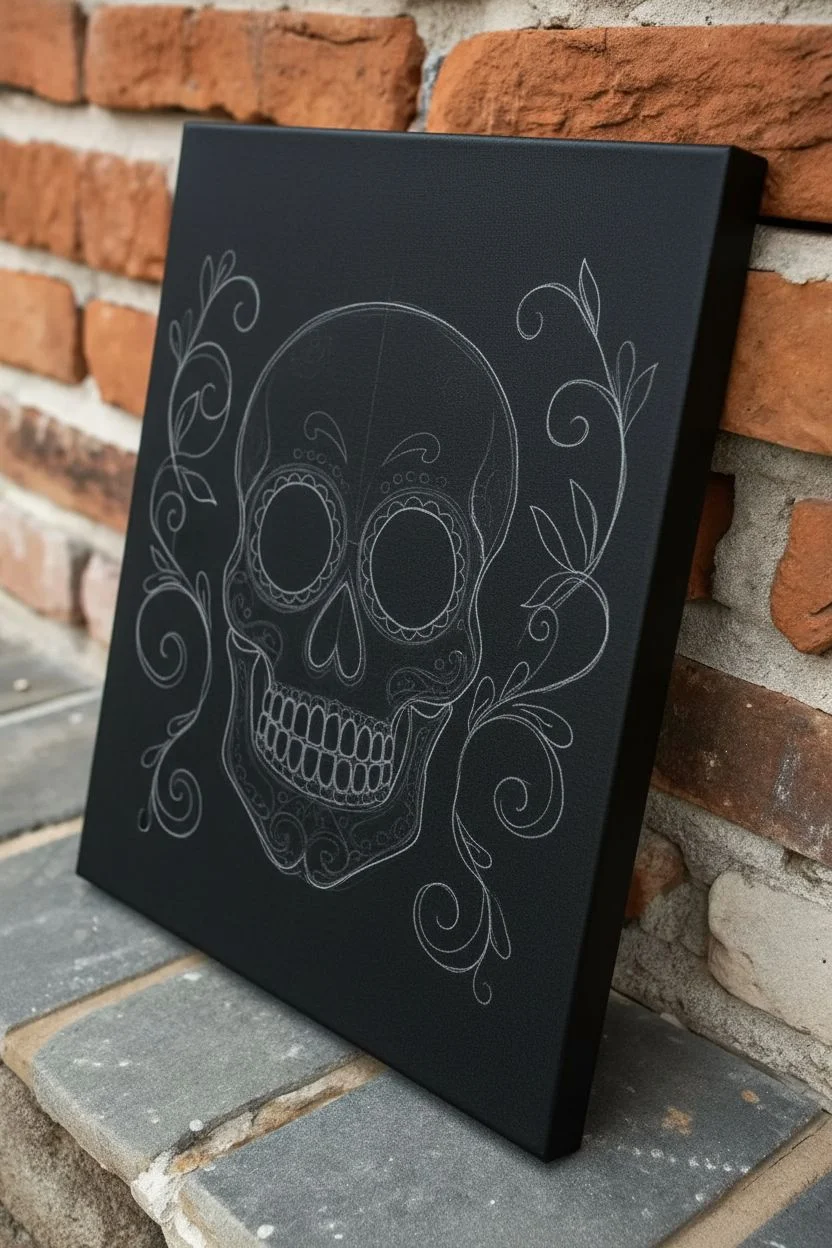
Sketching the outline:
Using a white charcoal pencil or regular pencil, lightly sketch the large central skull shape in the middle of the canvas. Keep the lines faint so they are easy to cover later. -
Adding main features:
Sketch the large eye sockets, the upside-down heart for the nose, and the grin with teeth. Add the two large swirling vines flanking the skull on the left and right.
Step 2: Painting the Skull Foundation
-
Base layer for the skull:
Mix a small amount of white into your neon pink paint to create an opaque light pink. -
Fill in the skull:
Paint the entire skull shape with this pink mixture, carefully avoiding the eye sockets, nose cavity, and the negative space between the teeth. You may need two thin coats. -
Black out the voids:
If you accidentally painted into the eyes or nose, use your small brush and black paint to tidy up those dark interior shapes, ensuring crisp edges. -
Painting the teeth:
Use white paint with a tiny drop of pale blue or mint green to fill in the teeth. This slight tint makes them stand out against any pure white details you add later.
Make Colors Pop
Neon acrylics are often transparent. Paint a layer of pure white under your neon areas first. It acts like a primer and makes the top color exceptionally bright.
Step 3: Floral Details and Vines
-
Primary vines:
Load a round brush with neon lime green. Paint the long, sweeping vines on either side of the skull, starting thick at the base and lifting pressure to taper the ends. -
Leaves and flourishes:
Add leaf shapes along the green vines. For variety, paint some leaves in teal or mint green, particularly the ones near the bottom corners. -
Corner flowers:
Paint the simplified flower shapes in the bottom corners using neon magenta. A yellow center dot adds immediate focus to these blooms. -
Forehead floral:
On the skull’s forehead, paint the large central flower using a darker pink or magenta, flanked by two orange marigold shapes.
Shaky Lines?
If brush detailing is frustrating, swap to Posca paint markers for the intricate vines and outlines. They offer much more control than a brush for beginners.
Step 4: Intricate Detailing
-
Eye details:
Around the black eye sockets, paint a ring of small yellow or green dots. Inside the black socket, paint a simple pink flower shape to simulate depth. -
Facial filigree:
Using your finest liner brush or a paint pen, add the swirling green designs on the cheeks and chin. These should look like delicate vines growing on the bone. -
Outline work:
This is where the image really sharpens up. Use a fine liner brush with black paint (or a black paint pen) to outline the teeth, the forehead flower, and separate the jawline. -
Stippling texture:
Dip the handle end of a brush into different paint colors to stamp perfect dots around the eyes, on the chin, and floating in the black background. -
Chin designs:
Paint the small scrollwork on the chin using green and yellow. Keep your hand steady and rest your pinky on a dry part of the canvas for stability. -
Final highlights:
Add tiny dashes of white or very pale yellow on the leaves and the highest points of the skull to give the illustration a ‘shiny’ or dimensional look. -
Clean up:
Check the black background one last time. If any neon paint splattered, cover it with a quick touch of black paint.
Hang your vibrant masterpiece in a well-lit spot to watch those neon colors truly shine
Minimal Line Calavera With Watercolor Blooms
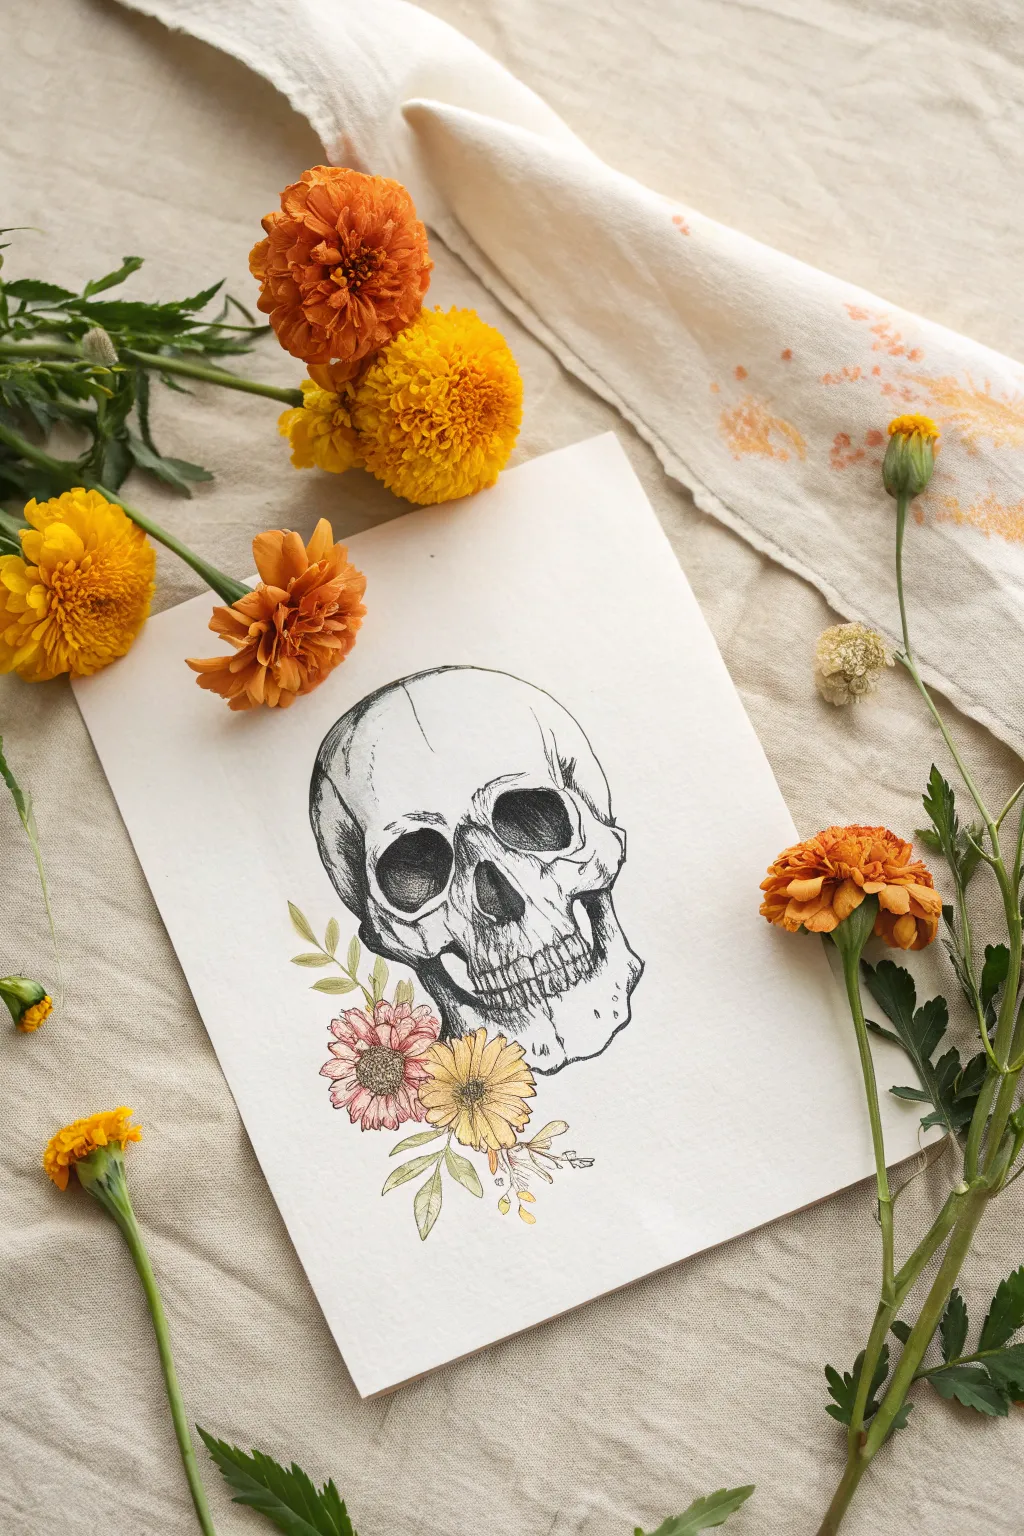
This elegant project combines the stark contrast of black ink with the softness of warm floral tones. By focusing on fine linework and delicate shading, you’ll create a sophisticated Calavera that feels both classic and modern.
How-To Guide
Materials
- Heavyweight watercolor paper or mixed media paper (smooth texture preferred)
- Pencil (HB or H for light sketching)
- Kneaded eraser
- Fine liner pens (sizes 0.1, 0.3, and 0.5)
- Black ink brush pen (opional, for deeper shadows)
- Watercolor paints (muted pink, yellow ochre, olive green)
- Small round paintbrush (size 2 or 4)
- Water cup and paper towels
Step 1: Sketching the Structure
-
Establish the Basic Shape:
Start lightly with your pencil. Draw an oval shape for the cranium and a smaller irregular square shape below it for the jaw area. Position the skull slightly angled to the left for a three-quarter view. -
Map Facial Features:
Draw faint guidelines to place the eye sockets. The left socket will appear narrower due to the angle. Mark the nasal cavity as an upside-down heart shape and sketch the horizontal line where the teeth will sit. -
Refine the Contours:
Define the cheekbones (zygomatic arches) by creating a curve that connects the eye socket to the jaw. Round out the cranium top and sketch the jagged suture lines lightly near the forehead. -
Detail the Jaw and Teeth:
Sketch the individual teeth, keeping them relatively uniform but slightly imperfect for realism. Don’t press too hard, as you want these lines to be subtle guides for your ink later. -
Add Floral Elements:
At the base of the jaw, lightly sketch two main flower heads—one resting near the chin and another slightly behind it—along with a few flowing leaves and stems extending downwards.
Ink Confidence
Don’t worry if your hand shakes slightly while drawing the skull—wobbly lines actually make the bone texture look more realistic and aged than perfectly straight lines.
Step 2: Inking the Skull
-
Outline Major Forms:
Switch to your 0.3 or 0.5 fine liner. Trace the main outline of the skull, using a slightly broken or jittery line to simulate the organic texture of bone rather than a perfect smooth curve. -
Darken the Cavities:
Fill in the eye sockets and nasal cavity. I like to use a brush pen here for solid blacks, but you can also cross-hatch densely with a fine liner. Leave tiny slivers of white paper for depth. -
Define the Teeth:
Use your finest pen (0.1) for the teeth. Instead of drawing complete outlines for every tooth, suggest their shapes with small vertical lines and gaps near the gums. -
Add Texture and Shading:
Using the 0.1 pen, use stippling (dots) and short hatching marks to shade the rounded areas of the skull, particularly under the cheekbone, temples, and jawline. -
Draw Suture Lines:
Trace over the squiggly suture lines on the forehead with a fine, shaky hand to mimic the natural cracks in the bone.
Step 3: Adding Color & Final Touches
-
Ink the Flowers:
Outline your floral sketch at the bottom. Use very delicate, loose strokes for the petals to contrast with the harder bone texture of the skull. -
Erase Pencil Guidelines:
Once the ink is completely distinct and dry to the touch, gently roll your kneaded eraser over the entire drawing to lift the graphite. -
Wash the First Bloom:
Dip your brush in water and pick up a small amount of muted pink paint. Apply a transparent wash to the left flower, concentrating the pigment slightly in the center. -
Paint the Second Bloom:
Clean your brush and switch to yellow ochre. Paint the second flower, blending the color outward from the center so the tips of the petals are nearly white. -
Tint the Leaves:
Use a diluted olive green for the leaves. Keep the wash loose; it doesn’t need to stay perfectly inside the lines, as this adds an artistic, painterly feel. -
Add Tiny Details:
For a finishing touch, add tiny yellow buds or dots on the fine stems extending from the bouquet using the tip of your brush.
Coffee Stain Effect
For a vintage look, lightly brush a very diluted wash of brown watercolor or actual brewed coffee over the skull’s shaded areas once the ink is waterproof.
Display your artwork alongside some fresh marigolds to complete the festive atmosphere

PENCIL GUIDE
Understanding Pencil Grades from H to B
From first sketch to finished drawing — learn pencil grades, line control, and shading techniques.
Explore the Full Guide
Abstract Color-Block Sugar Skull
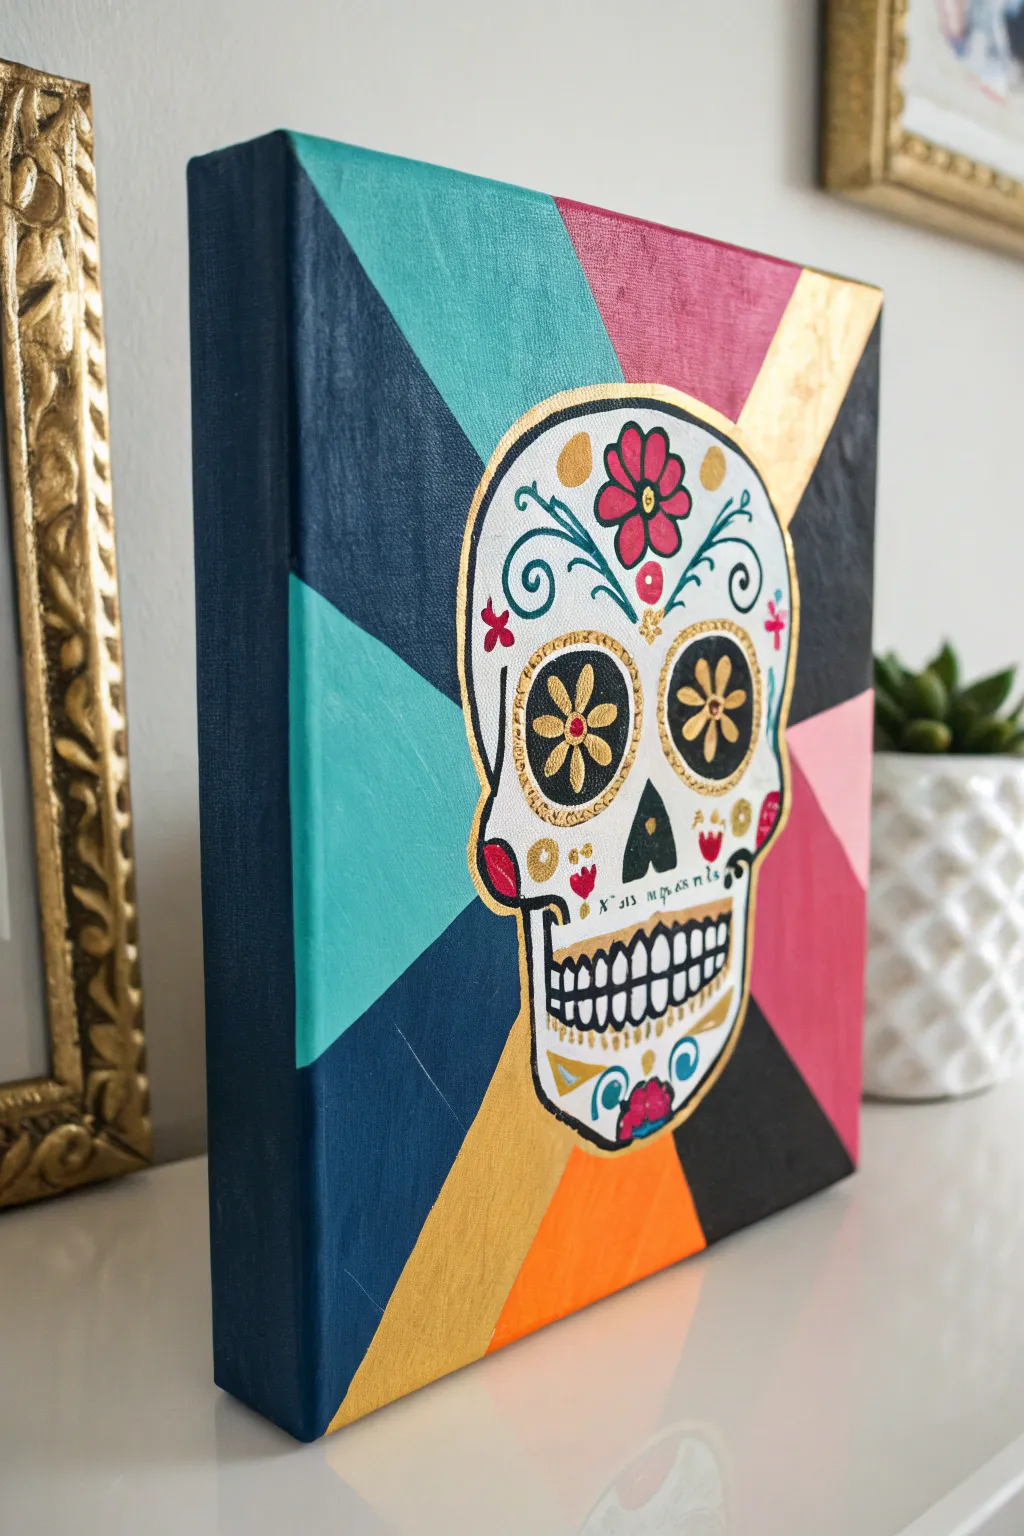
Blend modern geometric art with traditional Día de los Muertos imagery in this vibrant acrylic canvas project. The bold, radiating background makes the intricate sugar skull details pop, creating a striking piece of wall decor.
Step-by-Step Guide
Materials
- Square stretched canvas (e.g., 8×8 or 10×10 inches)
- Acrylic paints (Teal, Dark Blue, Hot Pink, Light Pink, Orange, Black, White, Metallic Gold)
- Pencil and eraser
- Ruler
- Painter’s tape (optional but helpful)
- Flat shader brushes (medium and small)
- Fine liner brush or gold paint pen
- Round detail brush (size 0 or 1)
- Water cup and palette
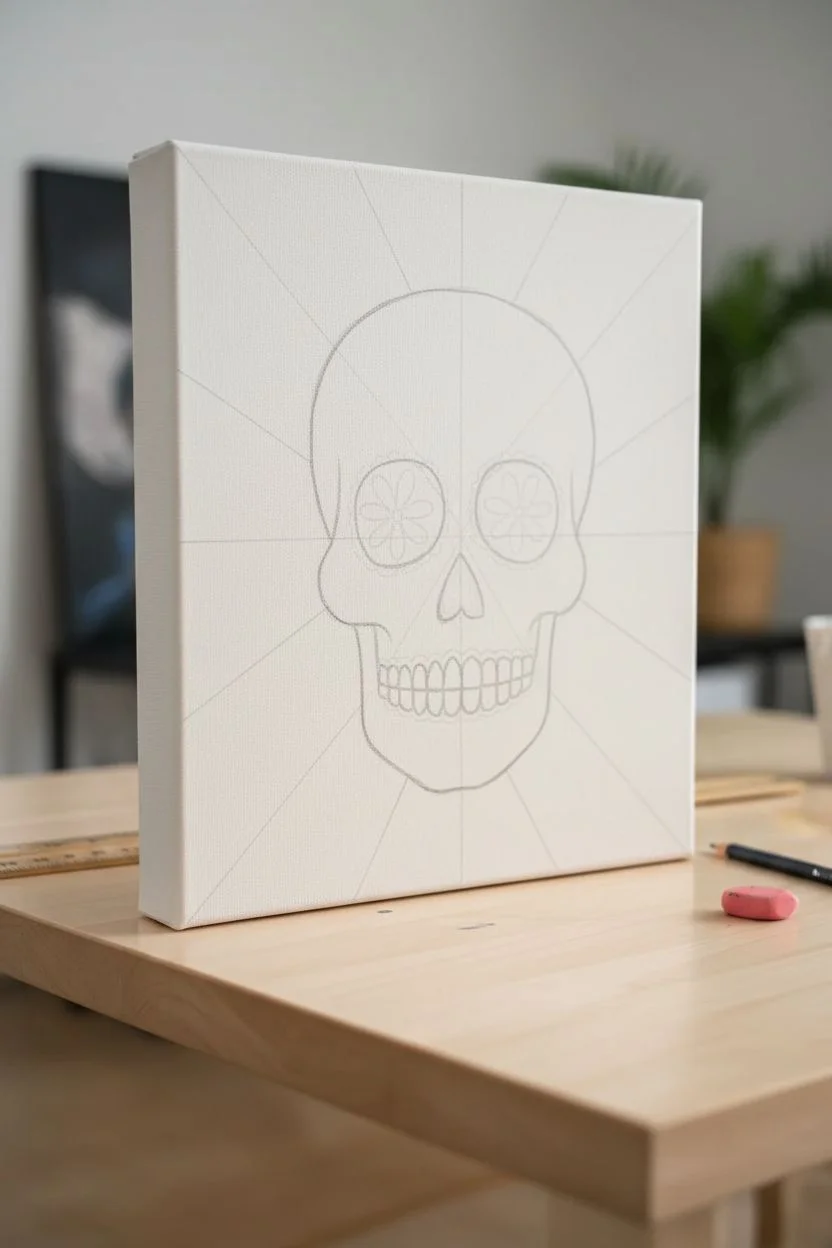
Step 1: Drafting the Design
-
Center the skull shape:
Begin by lightly sketching the outline of a skull in the center of your canvas. Keep the shape simple: a rounded cranium that tapers down into a jawbone. Don’t worry about the face details yet, just get the silhouette right. -
Map the background rays:
Using a ruler, find the approximate center point of the skull. Draw straight lines radiating outward from behind the skull to the edges of the canvas. Imagine these lines coming from a central point inside the skull’s forehead. -
Extend to the sides:
Continue these radiating lines all the way to the sides of the canvas depth. This gallery-wrap effect ensures the painting looks finished from every angle when hung on the wall.
Step 2: Painting the Background
-
Block in the colors:
Select your palette of bold colors—teal, dark blue, hot pink, light pink, orange, black, and gold. Paint each section of the ‘rays’ with a different flat color. Use a medium flat brush for crisp edges. -
Create distinct separation:
Avoid putting two very similar colors right next to each other. Alternating darks (like navy and black) with brights (like gold and pink) creates the most dynamic contrast. -
Paint the canvas edges:
As you fill in a color section on the face of the canvas, immediately carry that same color around the side edge. This is much easier to do now while the paint is wet and on your brush. -
Add a second coat:
Acrylics can sometimes look streaky after just one pass. Once the first layer is dry to the touch, add a second coat to ensure the colors are solid and opaque.
Clean Lines
If you struggle with shaky hands, use painter’s tape for the background rays. Press edges down firmly to prevent bleed-under.
Step 3: Detailing the Skull
-
Base coat the skull:
Fill in the skull silhouette with opaque white paint. Use a flat brush to carefully cut in around the edges where the skull meets the colorful background. You may need 2-3 coats for pure white. -
Outline the skull:
Once the white is completely dry, use a fine liner brush and metallic gold paint to outline the entire skull shape. This creates a bold separation between the subject and the background. -
Draw eye sockets and nose:
Lightly sketch large circles for eyes and an upside-down heart shape for the nose. Paint the eye sockets black and the nose dark green or black. -
Add floral eye details:
Inside the black eye sockets, paint a gold flower outline with a red center. I find using a very fine brush or even a gold paint pen gives the sharpest control here. -
Paint the forehead rose:
At the top center of the forehead, paint a simple five-petal flower in hot pink with a yellow center. Flank this with green swirls or vines using your liner brush. -
Construct the mouth:
Paint a horizontal black line for the mouth, then add vertical teeth shapes in white. Outline the teeth carefully with black to define them. -
Decorate the cheeks and chin:
Add extra embellishments like small hearts on the cheeks, gold scrolls on the jawline, and patterns on the chin. Symmetry is key here—whatever you paint on the left, mirror on the right. -
Final gold touches:
Review your work and add tiny gold dots, highlights, or accents around the eyes and flowers to tie the metallic theme together.
Level Up
Use actual gold leaf instead of metallic paint for the gold background ray and skull details to add serious shimmer.
Now hang your vibrant masterpiece and enjoy the modern splash of color it adds to your room


Have a question or want to share your own experience? I'd love to hear from you in the comments below!