If you want easy Easter face painting that still looks adorable in photos, you’re in the right place. I’m sharing my go-to designs that stay simple, use small areas like cheeks and foreheads, and still scream Easter in the sweetest way.
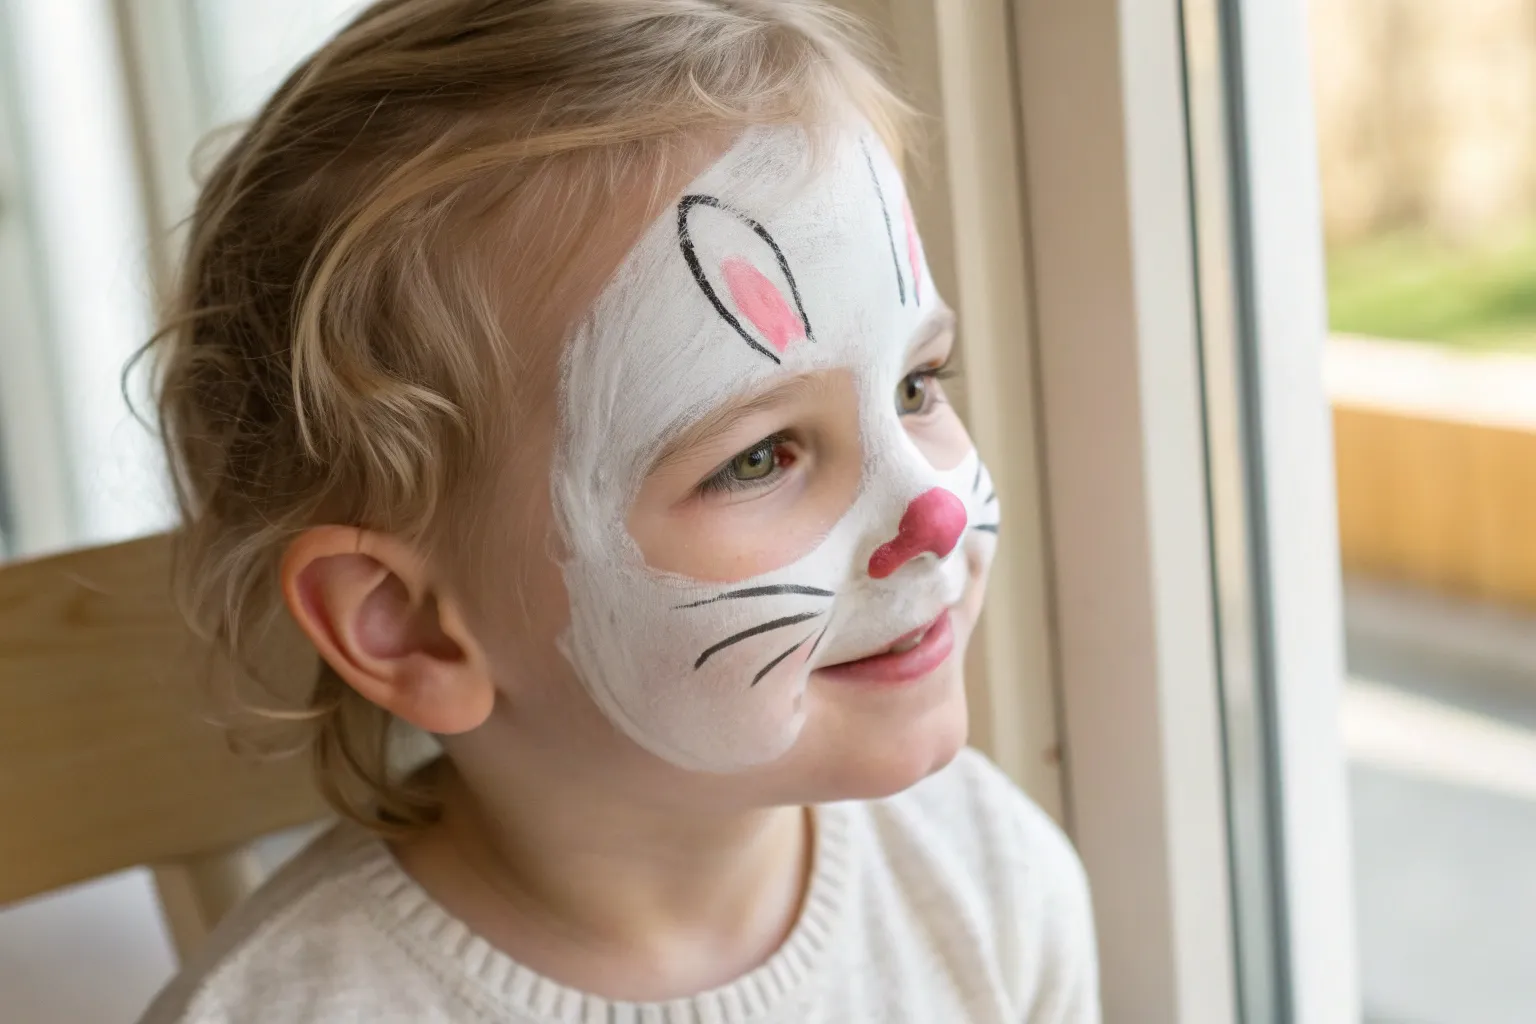
Pink Bunny Nose and Whiskers
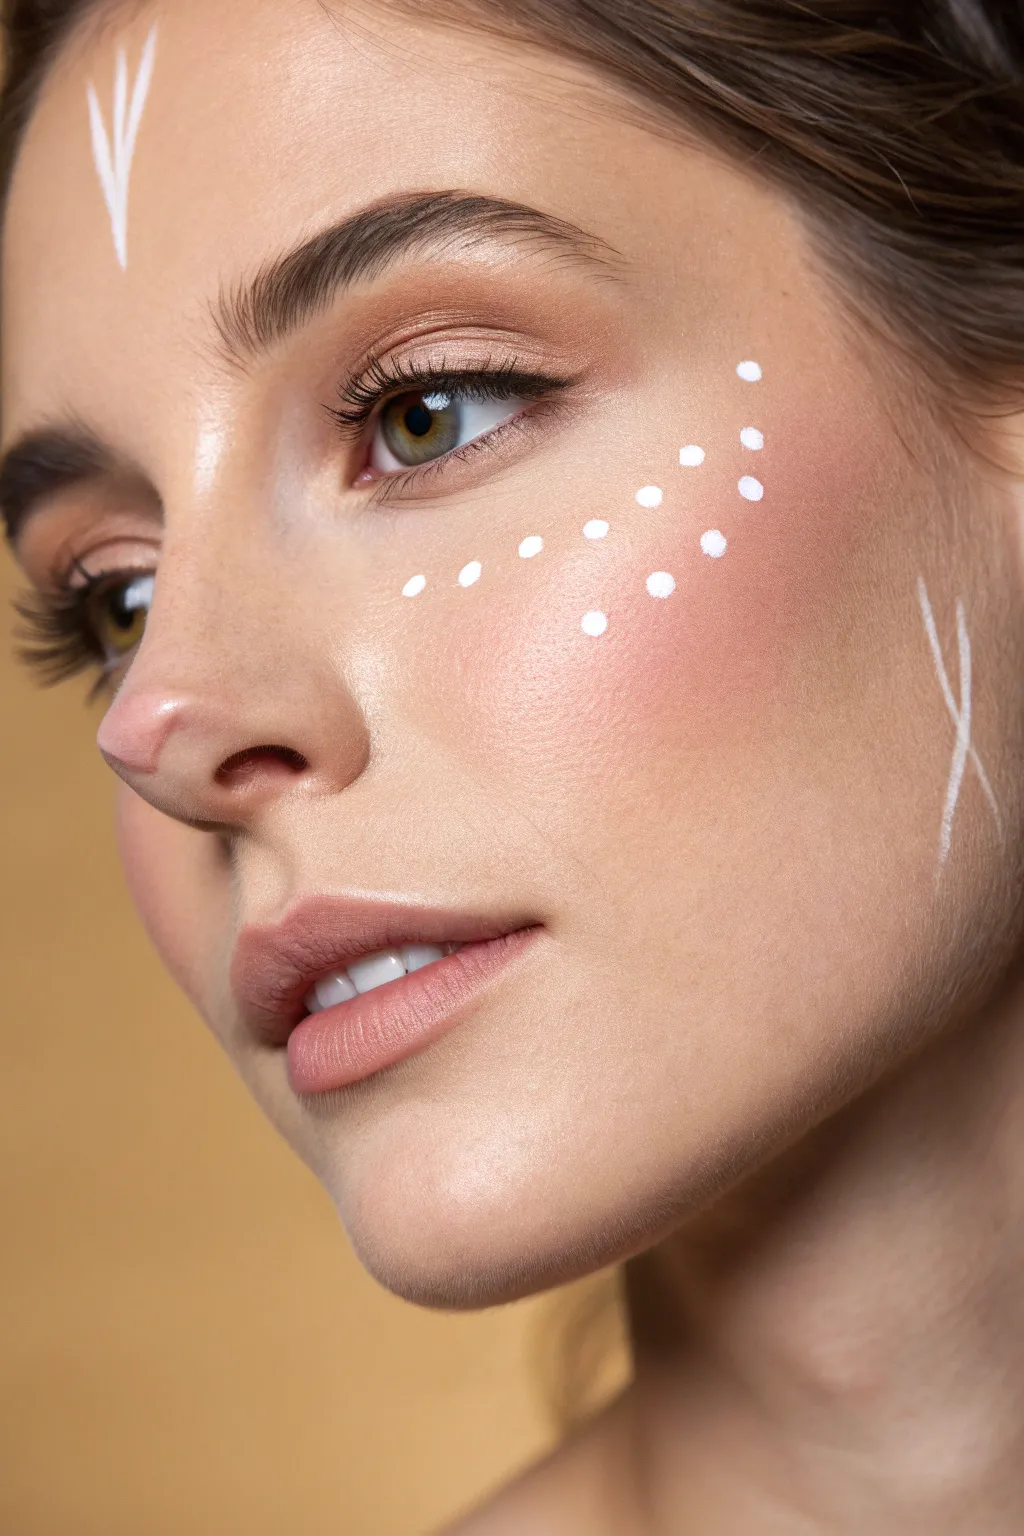
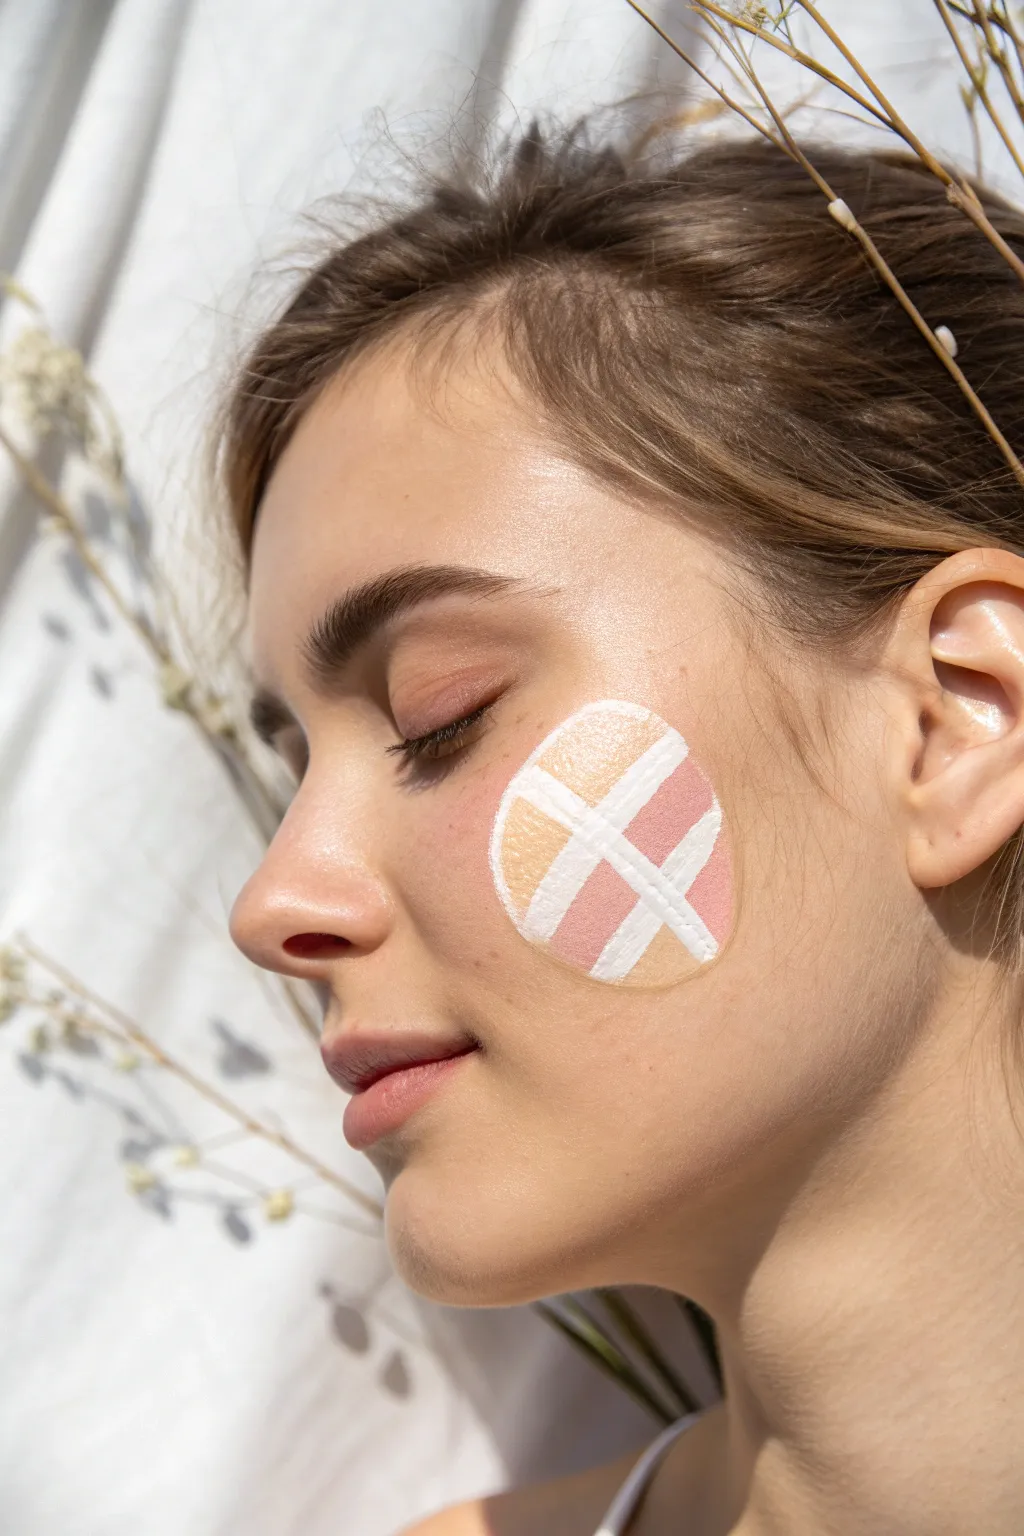
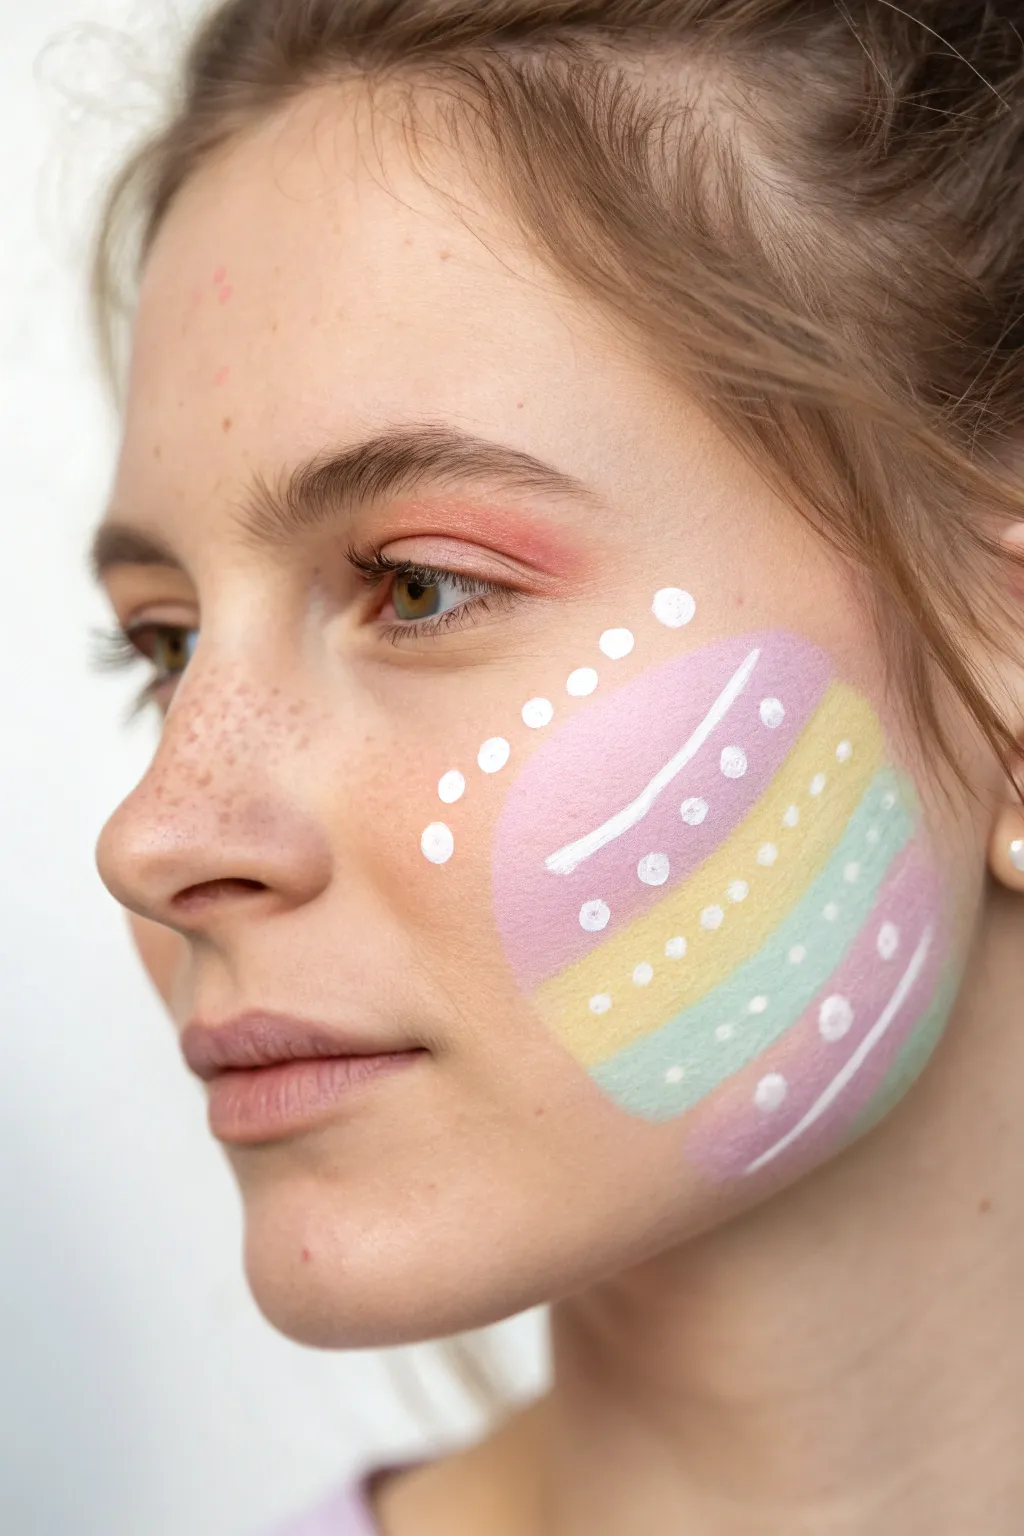
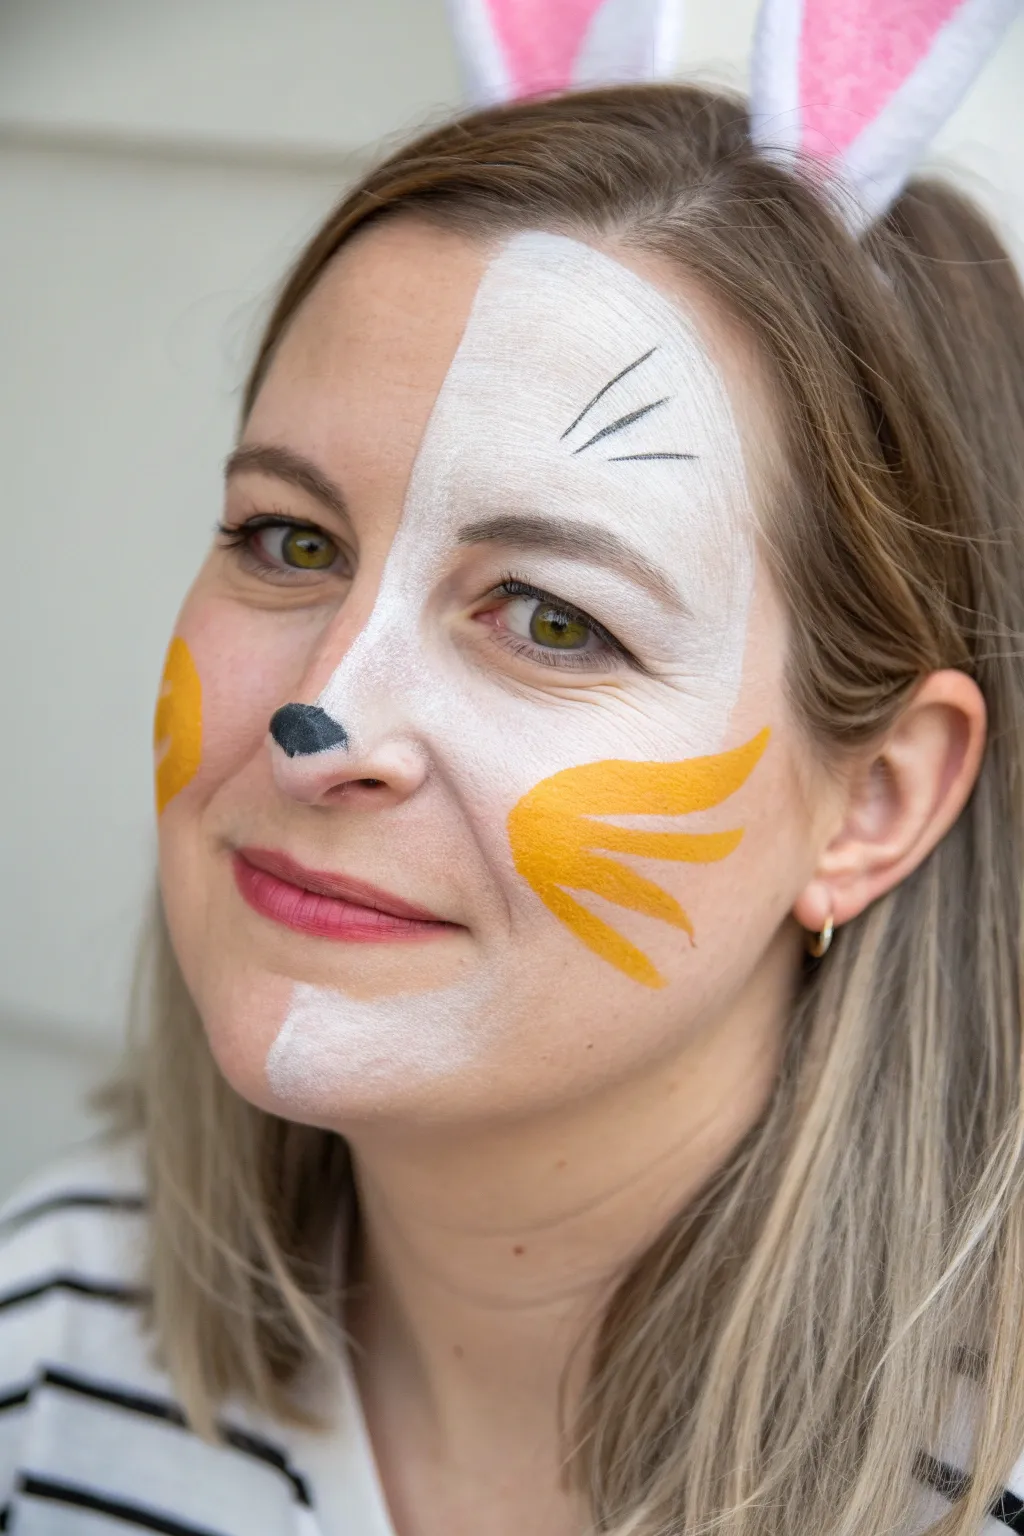
For a sophisticated yet playful festival look, try this delicate white tribal design that enhances natural beauty. This style combines crisp geometric lines with soft, scattered dots for an ethereal finish that works beautifully for outdoor gatherings.
Step-by-Step Guide
Materials
- White face paint (water-activated or cream)
- Fine liner brush (size 0 or 00)
- Medium round brush
- Setting spray
- Moisturizer or primer
- Micellar water and cotton swabs (for cleanup)
Step 1: Preparation and Base
-
Prep the Skin:
Begin with a clean, moisturized canvas. Apply a light primer if you plan to wear this for several hours to help the paint grip the skin better. -
Optional Base Makeup:
If you desire, apply your regular foundation and brow makeup now. Keep the cheeks relatively bare or use a very soft blush, as the white markings will sit directly on this area.
Clean Lines Pro Tip
For sharper dots, use the back end of your brush handle. Dip it in paint and stamp it onto the skin for perfect circles every time.
Step 2: Forehead Markings
-
Load the Brush:
Activate your white face paint with a small amount of water until it reaches a milky, ink-like consistency. Load your fine liner brush, ensuring the tip is sharp. -
Center Line:
Starting just above the space between your eyebrows, paint a single vertical line extending upward towards the hairline. Keep the stroke tapered at the top. -
Side Accents:
Paint two slightly shorter, curved lines on either side of the center line. These should angle outwards like the leaves of a plant or feathers of an arrow.
Glow Up
Add a tiny dab of iridescent glitter gel to the center of the forehead markings or over a few cheek dots for a magical, shimmering effect.
Step 3: Cheek Detail
-
Map the Curve:
Ideally, visualize a curved line sweeping from under the outer corner of your eye down towards the apple of your cheek. -
Start the Dots:
Reload your brush or use a dotting tool if you have one. Place the first white dot high on the cheekbone, roughly in line with the tail of your eyebrow. -
Create the Formation:
Continue placing dots in a scatter pattern, moving diagonally downwards towards the nose. Vary the spacing slightly to keep it organic rather than rigid. -
Adjust Dot Size:
I usually try to keep the dots relatively uniform, but letting the ones near the edges be slightly smaller creates a nice fading effect. -
Check Symmetry:
Step back from the mirror. While this look doesn’t need to be perfectly symmetrical, the density of dots should feel balanced on the face.
Step 4: Jawline Accents
-
Outline the Cross:
Locate a spot on your lower jaw, closer to the ear. Using the fine liner brush again, paint a thin diagonal line moving downwards. -
Complete the Shape:
Paint a second intersecting diagonal line to create a tall, thin ‘X’ shape. Keep the lines crisp and delicate. -
Refine Edges:
If your lines look a bit shaky, use a cotton swab dipped in micellar water to gently tidy up the edges, then re-apply a thin layer of paint if needed.
Step 5: Finishing Touches
-
Let it Dry:
Allow the white paint to dry completely. This should only take a minute or so if your layers were thin. -
Set the Design:
Close your eyes and mist a setting spray over your face. This seals the water-based paint and prevents it from cracking or smudging too quickly.
Now you have a stunning, minimalistic design perfect for celebrating the season with style


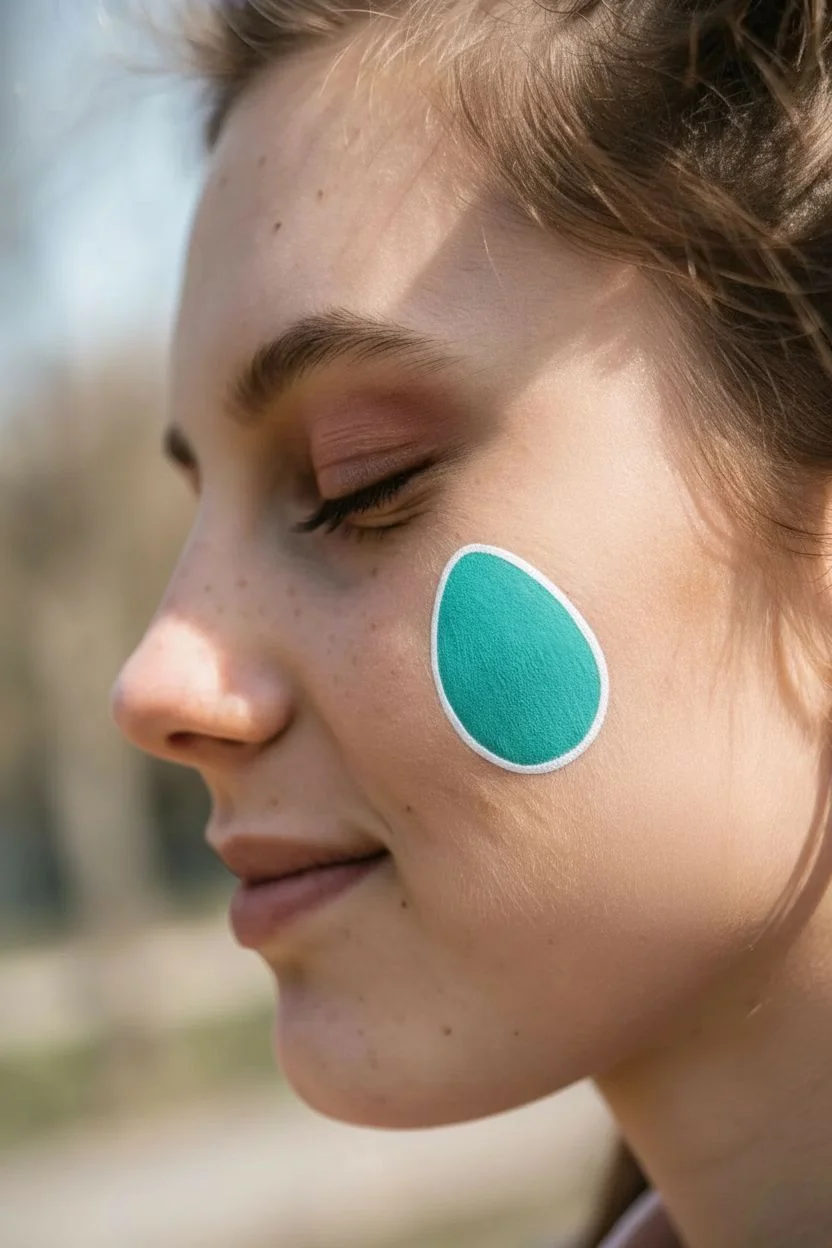
Single Easter Egg Cheek Icon
This minimal and sweet face painting design features a single decorated egg resting perfectly on the cheekbone. It’s a subtle nod to the holiday that pairs beautifully with a fresh, natural makeup look.
How-To Guide
Materials
- White face paint (water-activated or cream)
- Pastel yellow face paint
- Pastel blue or teal face paint
- Small round brush (size 2 or 3)
- Fine detail brush (size 0 or 1)
- Cup of water
- Paper towel or sponge
- Setting spray (optional)
Step 1: Base Shape
-
Positioning:
Visualize where the egg will sit. The ideal spot is high on the cheekbone, slightly angled towards the hairline, following the natural contour of the face. -
Outline the egg:
Load your small round brush with white face paint. Ensure the consistency is creamy, not too watery. Gently sketch the outline of an oval egg shape on the cheek. -
Fill the shape:
Using the same brush, fill in the oval completely with white paint. Use smooth strokes to create an opaque, solid base. -
Smooth the edges:
While the paint is still damp, carefully refine the edges of the oval to make them as crisp and curved as possible. Let this white base dry completely before adding colors to prevent smearing.
Smudged edges?
If the egg shape gets messy, dip a flat, angled makeup brush in a tiny bit of micellar water (or water) and use it like an eraser to carve out a clean edge along the outside.
Step 2: Decorative Stripes
-
First yellow stripe:
Load a clean detail brush with pastel yellow paint. Paint a thick, diagonal band across the upper-middle section of the white egg. -
Second yellow stripe:
Paint a second, parallel diagonal band just below the first one. Leave a small gap of white space between the two yellow stripes. -
Check opacity:
If the yellow looks sheer over the white, wait a moment for it to dry and dab on a second layer to brighten the color.
Make it shimmer
While the white base paint is partly wet, tap a small amount of cosmetic-grade iridescent glitter over the egg. It catches the sun beautifully.
Step 3: Dot Details
-
Top polka dots:
Switch to your fine detail brush and the pastel blue paint. Add three to four tiny dots in the white space at the very top of the egg. -
Middle dots:
Place a row of small blue dots in the white gap between your two yellow stripes. -
Bottom dots:
Finish the egg pattern by adding a few more scattered blue dots in the bottom white section of the oval. -
Scattered accents:
Moving outside the egg shape, gently dot three blue spots and one yellow spot directly onto the skin below the egg design for a confetti effect.
Step 4: Finishing Touches
-
The faint flower:
This step is optional for a softer look. Mix a very watery, translucent wash of white or pale pink paint. Dab a rough circle shape near the nose bridge. -
Flower center:
Add a tiny yellow dot in the center of your translucent flower shape. -
Clean up:
Use a damp cotton swab to clean up any stray paint marks or to sharpen the outer edge of the main egg if needed. -
Set the design:
If you want this to last all day, close your eyes and mist lightly with a makeup setting spray.
Enjoy your fresh, spring-inspired face art at your next Easter gathering


Two Tiny Eggs on One Cheek
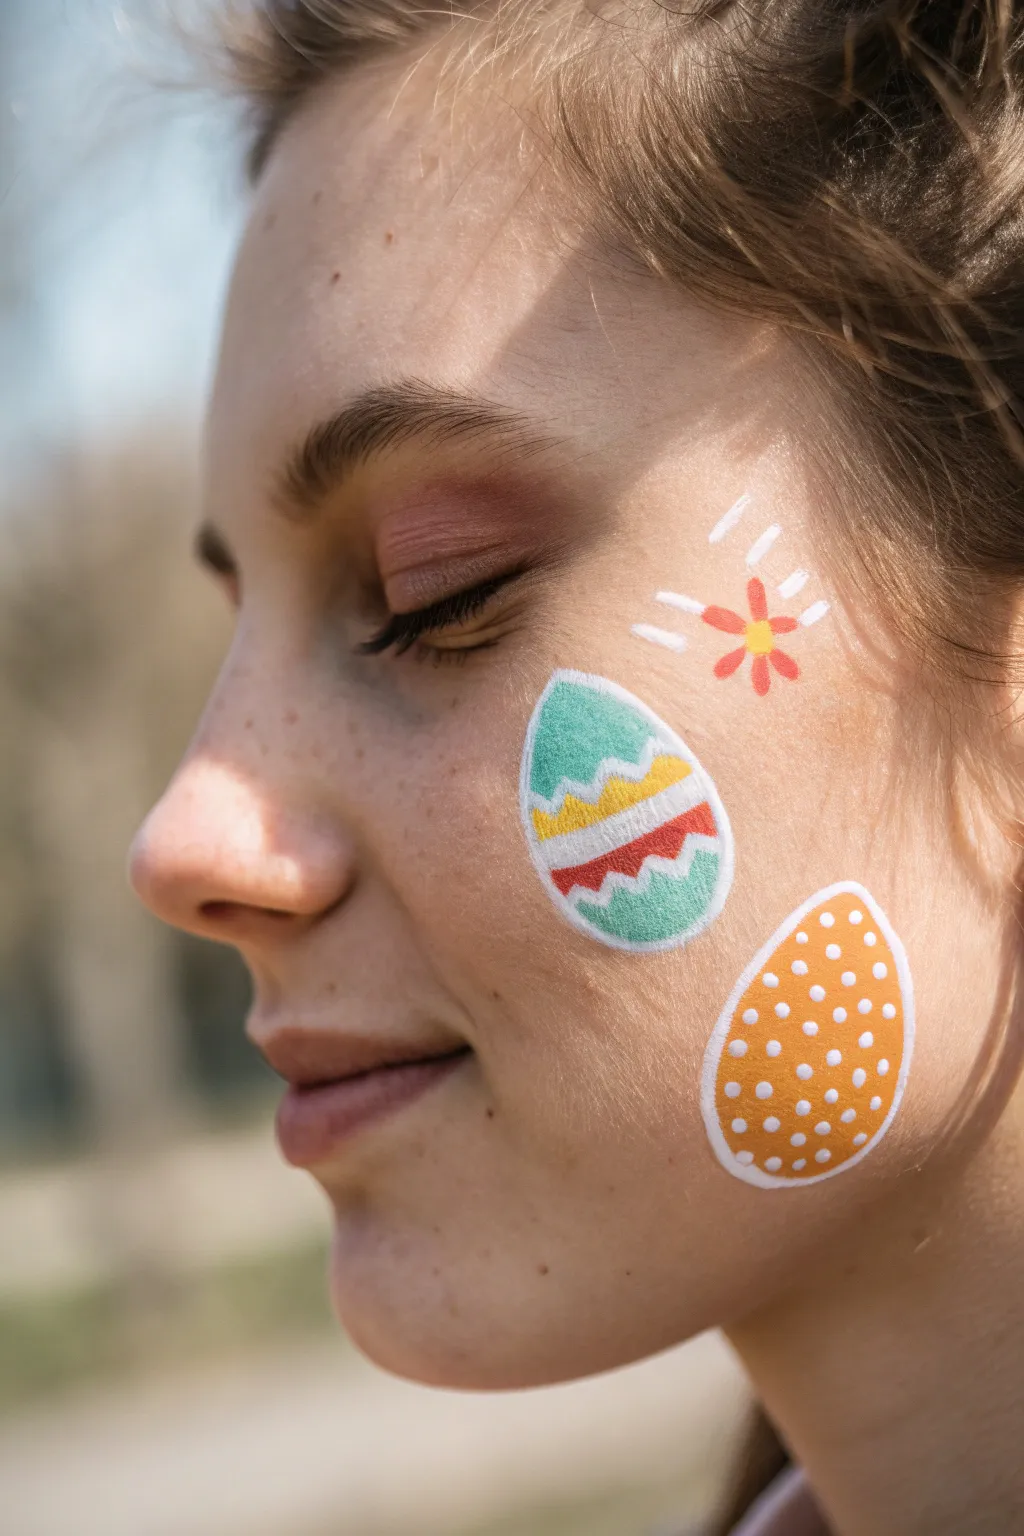
This sweet and simple design brings a festive touch to any Easter celebration without overwhelming the face, featuring two charmingly decorated eggs nestled on the cheek. The clean white outlines make the colors pop against the skin, creating a sticker-like effect that looks professional yet is surprisingly easy to achieve.
Detailed Instructions
Materials
- High-quality face paints (Teal, Orange, Bright Yellow, Red, White)
- Small round brush (size 1 or 2)
- Medium round brush (size 4)
- Cup of water
- Paper towels for blotting
- Cosmetic sponge (optional, for base shapes)
- Setting spray (optional)
Step 1: Painting the Teal Egg Base
-
Positioning the First Egg:
Visualize where you want the first egg to sit; aim for the upper part of the cheekbone, slightly below the outer corner of the eye. This will be our teal egg. -
Drafting the Clean Outline:
Using your small round brush loaded with creamy white paint, carefully draw a precise egg shape outline. Keep your hand steady to ensure a smooth, sticker-like border. -
Filling the Color:
Switch to your medium brush and pick up the teal face paint. Fill in the entire interior of your white outline, leaving just the white border visible. Ensure the coverage is opaque and even. -
Drying Time:
Allow this teal base layer to dry completely before adding details on top. If the paint is wet, your stripes will smudge and muddy the colors.
Step 2: Decorating the Teal Egg
-
The Zig-Zag Stripe:
Once dry, take a clean small brush with white paint. Paint a horizontal zig-zag line across the middle of the teal egg. -
Adding the Yellow Band:
Directly above your white zig-zag, paint a straight, thick yellow band. I find that dabbing the yellow on gently helps keep the teal from showing through. -
Painting the Red Stripe:
Below the white zig-zag, add a corresponding red stripe. Make it slightly curved to follow the contour of the egg shape, which adds dimension. -
Highlighting the Stripes:
Reinforce the white zig-zag linework if needed to make sure it separates the colors distinctly.
Smudged lines?
If colors bleed into your white border, wait for it to fully dry. Then, use a damp cotton swab to lift the mistake before re-painting the white line.
Step 3: Creating the Polka Dot Egg
-
Positioning the Second Egg:
Locate the spot for your second egg lower down on the cheek, towards the jawline. It should look like it’s tumbling slightly below the first one. -
Outlining the Second Shape:
Just as before, use the small brush and white paint to draw your second egg outline. Make this one slightly tilted for a playful look. -
Filling with Orange:
Load your medium brush with bright orange paint. Fill the interior of this second outline completely, achieving a solid, warm base color. -
Letting it Set:
Pause for a moment to let the orange paint dry to the touch. This step is crucial for crisp polka dots later.
Make it sparkle
While the paint is still slightly tacky, lightly press cosmetic-grade glitter onto the colored sections for a shimmering, festive finish.
Step 4: Final Details and Flourishes
-
Dotting the Orange Egg:
Dip the handle end of a brush or a very small detailing brush into thick, creamy white paint. Dot the orange egg evenly to create a classic polka dot pattern. -
Creating the Flower Burst:
Above the teal egg, near the temple, paint a small stylized flower. Start with a yellow dot for the center. -
Adding Petals:
Using a small brush with red paint, draw simple teardrop shapes radiating from the yellow center to form petals. -
Radiant Lines:
Using white paint, add a few short, straight lines radiating outward from the flower to suggest shining light or energy. -
Final Cleanup:
Check your white outlines one last time. If any color has spilled over, touch up the white borders to maintain that crisp sticker effect.
You now have a delightful spring look perfect for any egg hunt or party


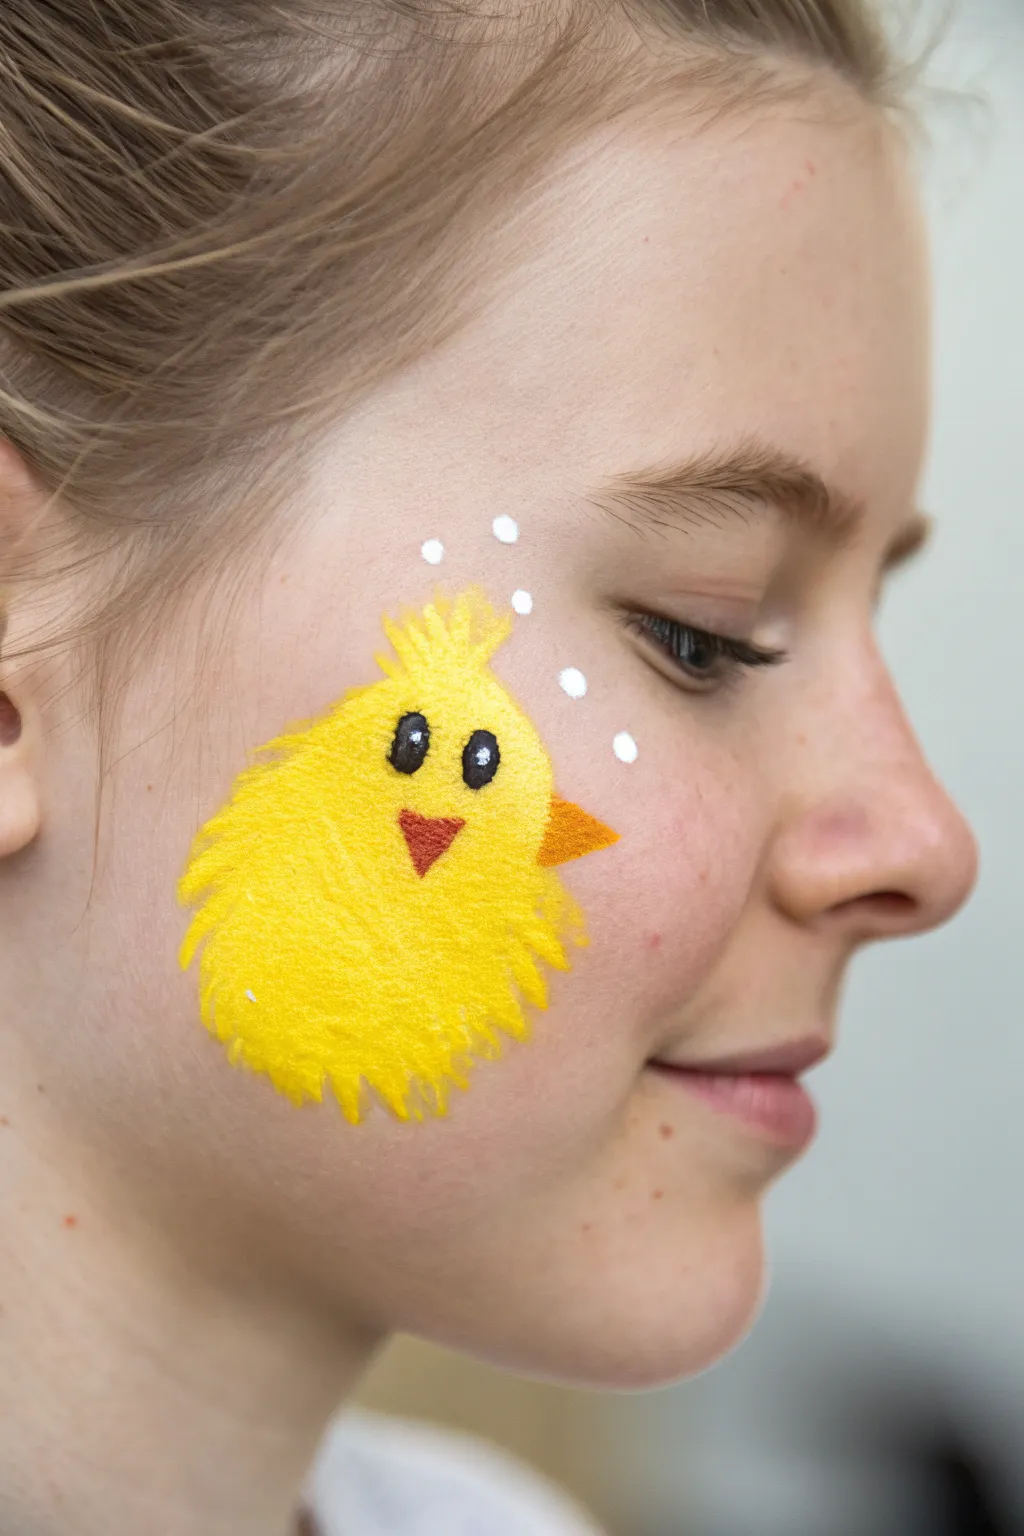
Baby Chick Nose Pop
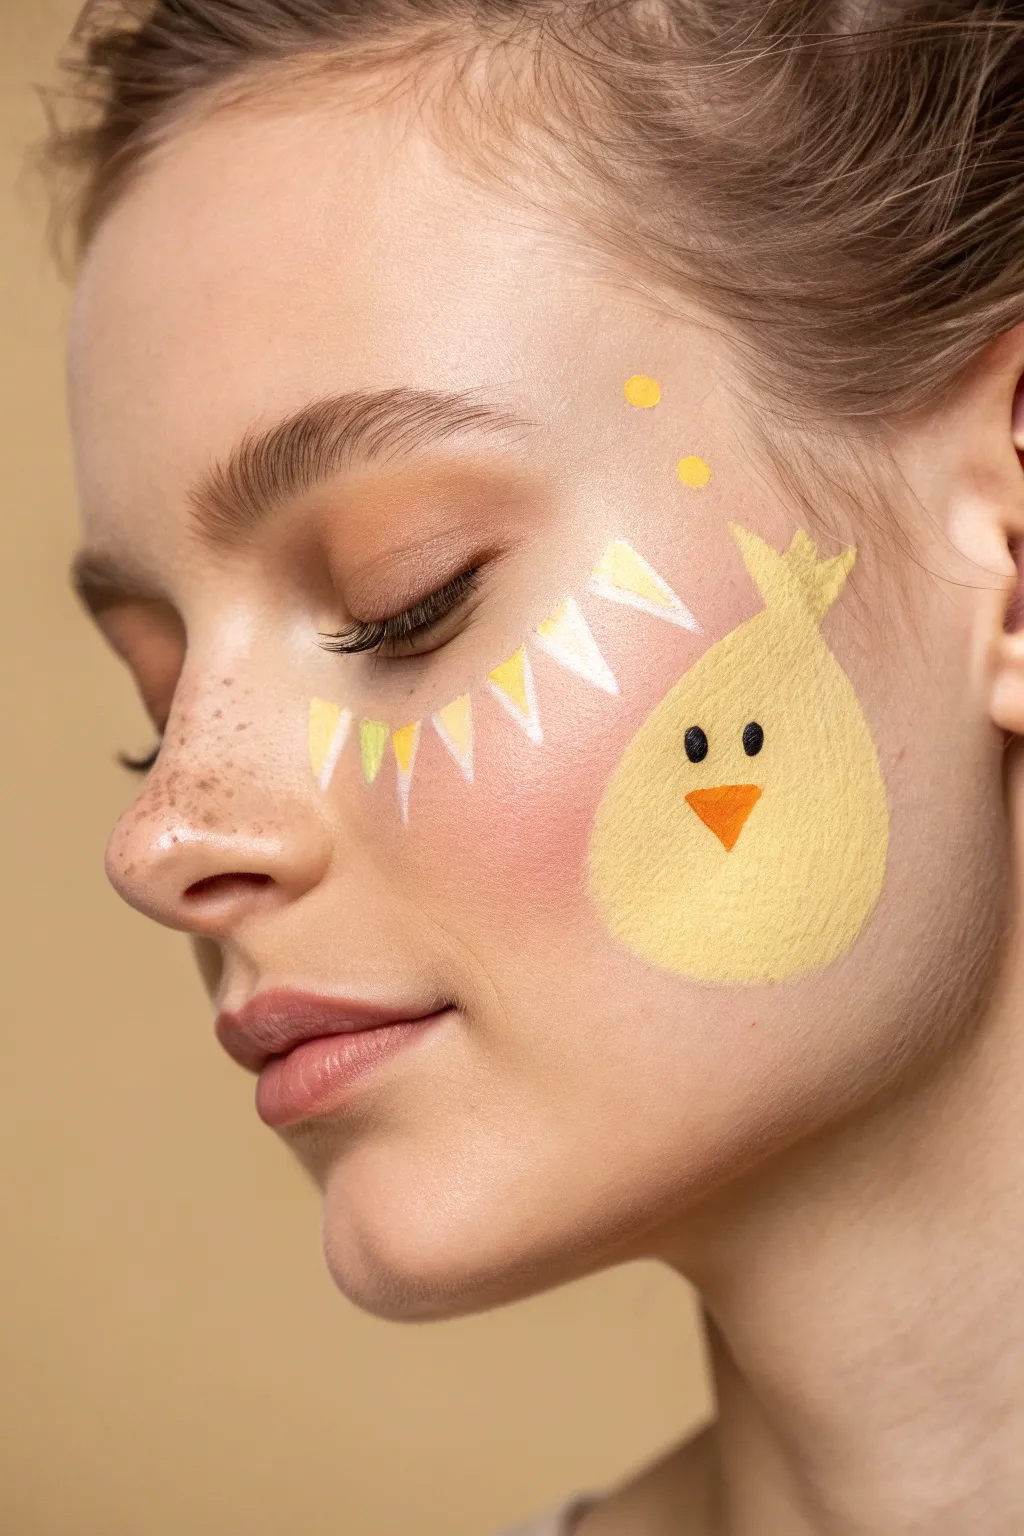

This adorable face painting design features a fluffy yellow chick sitting perfectly on the cheek, topped with festive party bunting for a celebratory Easter look. It’s a sweet, minimalist design that pairs beautifully with natural grooming and faux freckles.
Step-by-Step Guide
Materials
- Matte yellow face paint
- White face paint
- Orange face paint
- Black face paint
- Pastel green face paint (optional)
- Medium round brush
- Fine detail brush (liner brush)
- Flat brush (optional)
- Makeup sponge
- Brown eyeliner or brow pencil (for freckles)
Step 1: Prepping the Canvas
-
Clean and moisturize:
Start with a clean, dry face. If the skin is dry, apply a very light moisturizer and let it fully absorb so the paint adheres smoothly. -
Groom brows:
Brush the eyebrows upward with a spoolie or brow gel to create that feathery, natural look found in the reference image. -
Add faux freckles:
Using a brown eyeliner or brow pencil, gently dot faux freckles across the nose and upper cheeks. Tap them lightly with your finger to soften the edges so they look part of the skin. -
Apply blush base:
Sweep a warm peach or soft pink blush across the cheekbones to create a rosy, healthy glow underneath where your painting will go.
Sponge Technique
For a fluffier texture on the chick, use a small piece of sponge to dab the yellow paint on rather than brushing it. This prevents streaks.
Step 2: Painting the Baby Chick
-
Load the yellow paint:
Load a medium round brush with creamy yellow face paint. Ensure the consistency is creamy but not too watery to get opaque coverage. -
Outline the body shape:
On the apple of the cheek, draw a teardrop shape with a rounded bottom. This will form the main body of the chick. -
Fill in the body:
Fill the shape completely with the yellow paint. I prefer stippling the paint slightly with a sponge or the brush tip as it dries to give it a darker, textured ‘fluffy’ appearance. -
Create the head tuft:
At the very top of the teardrop shape, use the tip of your brush to flick three small spikes upwards, creating the chick’s little feather tuft. -
Paint the beak:
Switch to a small detail brush loaded with bright orange paint. In the center of the yellow shape, paint a small inverted triangle for the beak. -
Add the eyes:
Using the back of a thin brush handle or a very fine detail brush with black paint, place two small, solid black dots just above the beak for the eyes. -
Add floating accents:
Dip a round brush handle or small brush into yellow paint and add two or three small dots floating above the chick’s head for a whimsical touch.
Add Sparkle
While the yellow paint is still slightly tacky, tap a tiny bit of cosmetic-grade iridescent glitter onto the bunting flags for extra magic.
Step 3: Adding the Bunting
-
Plan the curve:
Visualize a gentle curve sweeping from the outer corner of the eye down towards the cheekbone, hovering above the chick. -
Paint white triangles:
Load a small flat brush or round brush with white face paint. Paint small triangles pointing downward along your imaginary curve. -
Paint yellow triangles:
Rinse your brush and load it with the same yellow used for the chick. Paint alternating triangles in between the white ones. -
Add pastel variation:
If you have a pastel green or a lighter yellow, you can mix in a third color for the bunting flags to add variety, though keeping it two-tone works perfectly too. -
Connect the flags:
Using a very fine liner brush with thin white paint, draw a delicate line across the top of the triangles to connect them like a string. -
Add highlights:
Add tiny white highlights to the top corner of the orange beak to make it look shiny.
Now you have a sweet, festive look that is perfect for any spring celebration
BRUSH GUIDE
The Right Brush for Every Stroke
From clean lines to bold texture — master brush choice, stroke control, and essential techniques.
Explore the Full Guide
Chick Cheeks With Simple Beak
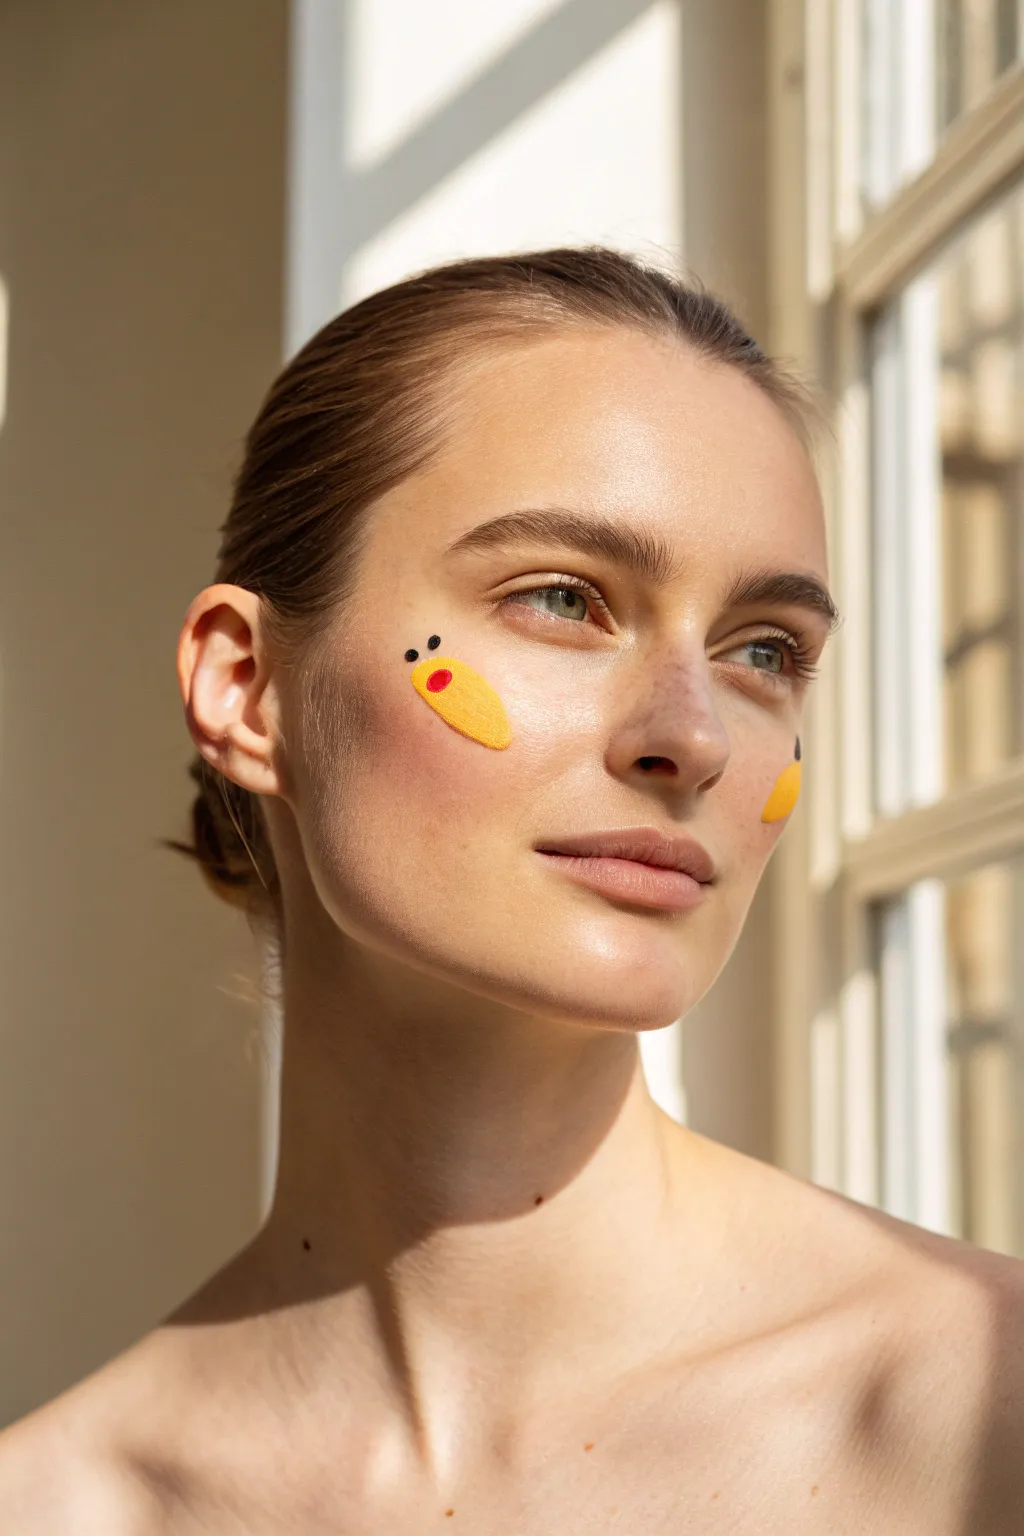
This minimalist face paint design adds a subtle nod to Easter without overwhelming the face. It features delicate yellow abstract chick shapes perched high on the cheekbones, accented with tiny details for a chic and playful look.
Step-by-Step
Materials
- Yellow water-activated face paint
- Orange water-activated face paint
- Black water-activated face paint
- Medium round brush (size 4 or 6)
- Fine detail brush (size 0 or 1)
- Small cup of water
- Paper towels
- Light moisturizer (optional base)
Step 1: Base Preparation
-
Cleanse the canvas:
Begin with a clean, dry face to ensure the paint adheres smoothly over the skin’s natural texture. -
Moisturize lightly:
Apply a very light layer of daily moisturizer if the skin feels dry, but let it absorb fully so the paint doesn’t slide. -
Natural complexion:
Since this design is minimalist, you can leave the skin bare or apply a very light BB cream, keeping the focus on the fresh skin texture.
Step 2: Painting the Body
-
Load the yellow:
Dip your medium round brush into water and swirl it into the yellow face paint until you have a creamy, opaque consistency. -
Test opacity:
Swipe a little paint on the back of your hand; you want a solid color that isn’t too drippy or transparent. -
Position the shape:
Identify the high point of the cheekbone, angling upwards towards the temple. Ideally, the shape sits right where you would place highlighter. -
Create the first stroke:
Using the medium brush, press down gently to create the wider ‘head’ part of the chick near the center of the cheek. -
Taper the tail:
Drag the brush upwards and outwards toward the hairline, lifting pressure gradually to create a tapered, teardrop-like tail. -
Refine the edges:
If the edges look rough, re-load your brush slightly and smooth out the perimeter of the yellow shape, keeping it elongated and elegant. -
Repeat on the other side:
Paint a symmetrical (or asymmetrical, if you prefer) yellow shape on the opposite cheekbone. -
Allow to dry:
Let the yellow base dry completely for about a minute. Touching wet paint with other colors will make them muddy.
Clean Lines Tip
Keep your yellow paint creamy, not watery. If it’s too thin, the edges will bleed into the skin texture instead of staying crisp.
Step 3: Adding Details
-
Prepare the orange:
Clean your medium brush or switch to the fine detail brush. Load it with orange paint, aiming for a slightly thicker consistency than the yellow. -
Paint the beak/cheek:
Place a single, small round dot of orange inside the wider part of the yellow shape. This represents the beak or a rosy cheek. -
Load the black:
Using your cleanest fine detail brush, pick up a tiny amount of black face paint. You need very little water here for sharp lines. -
Add the first eye:
Touch the tip of the brush very gently just above the orange dot, slightly outside the yellow boundary, to create a tiny black speck. -
Add the second eye:
Place a second tiny black dot right next to the first one. Spacing them slightly apart adds a whimsical character. -
Final check:
Step back and check your symmetry. Use a slightly damp cotton swab to clean up any stray specks or sharpen the tail of the yellow shape if needed.
Add Some Sparkle
While the yellow paint is still slightly tacky, tap a tiny amount of cosmetic biodegradable glitter onto the ‘tail’ for a festive shimmer.
You now have a fresh, modern Easter look that is perfect for spring festivities
Bunny and Egg Side Pair
For a more artistic take on Easter face painting, try this delicate side-profile design featuring a realistic bunny head nestled next to pastel eggs. This sweet cheek art is perfect for older children or adults who want something festive but elegant, avoiding a full-face mask.
Step-by-Step Guide
Materials
- Face paint palette (white, brown, black, grey, pink, light blue, light green)
- Small round brush (size 1 or 2)
- Medium round brush (size 4)
- Fine liner brush (size 0 or 00)
- Cup of clean water
- Paper towels or sponge
Step 1: Painting the Bunny Base
-
Outline the head shape:
Using a small round brush loaded with light brown or taupe paint, lightly sketch the outline of the bunny’s head on the fleshy part of the cheek. Start with a rounded shape for the cheek and muzzle area, positioned near the corner of the mouth. -
Add the ears:
EXTEND two long, almond-shaped ears upwards from the top of the head towards the temple. Angle them slightly back and vary their lengths to give a natural, perked-up look. -
Fill the base color:
Mix a watery light brown or beige and gently fill in the bunny’s face and ears. Don’t worry about perfect coverage; a slightly translucent wash looks softer and more like fur. -
Whiten the muzzle and chest:
Clean your brush and pick up white paint. carefully fill in the lower muzzle area and trace a fluffy patch of fur on the chest area below the chin. -
Add pink ear details:
With a damp brush and soft pink paint, fill the inner section of the bunny’s longer ear to show the skin inside the fur.
Fur Texture Tip
For realistic fur, ensure your paint is inky, not thick. Use just the very tip of a liner brush and flick your wrist quickly outward rather than dragging the brush slowly.
Step 2: Adding the Easter Eggs
-
Paint the pink egg:
Load a medium round brush with pastel pink paint. Create an oval egg shape tucked slightly behind the bunny’s back/neck area. -
Paint the blue egg:
Switch to pastel blue paint. Paint a second egg shape slightly overlapping the bottom of the bunny and nestling below the pink egg. -
Spot the eggs:
Once the egg bases are dry to the touch, use the back of a brush handle or a small dotting tool dipped in white paint to stamp polka dots across both colored eggs.
Step 3: Detailed Fur and Features
-
Layer fur texture:
Switch to your fine liner brush with a darker brown shade. Use quick, short, flicking strokes to create fur texture over the face and ears, following the natural direction the hair would grow. -
Darken the ear tips:
Add deeper brown or charcoal grey flicks to the very tips of the ears and the edges of the neck ruff to add dimension. -
Paint the eye:
Using black and a very steady hand, paint a dark almond-shaped eye. Leave a tiny speck of unpainted skin or add a white dot later for the catchlight to bring the bunny to life. -
Define the nose:
With a tiny dab of bright pink on the liner brush, place a small triangle on the tip of the snout for the nose. -
Sketch the whiskers:
Dilute your black or dark grey paint slightly so it flows well. With your finest brush, pull three or four very thin, long whiskers extending from the muzzle.
Glitter Upgrade
While the paint is still slightly tacky, tap cosmetic-grade iridescent glitter over the polka-dot eggs to make them sparkle under the light.
Step 4: Final Flourishes
-
Highlight the fur:
Reload your fine brush with pure white. specifically target the edges of the ears and the cheekbone area with tiny white flicks to make the fur look soft and highlighted. -
Add grass blades:
Mix a fresh light green. Flick quick, upward strokes around the base of the eggs and near the bunny’s chest to simulate grass blades grounding the design. -
Sprinkle magic dots:
Dip the handle of your brush in white paint again. Add a few scattered white dots floating around the ears and eggs to fill negative space and add whimsy.
Now you have a charming piece of cheek art that captures the stillness of spring perfectly

PENCIL GUIDE
Understanding Pencil Grades from H to B
From first sketch to finished drawing — learn pencil grades, line control, and shading techniques.
Explore the Full Guide
Flower Crown Bunny Nose

Transform a simpler bunny look into something magical with these delicate details and soft colors. This design combines classic whiskers with a floral twist, perfect for an Easter celebration or spring garden party.
Step-by-Step Tutorial
Materials
- Light pink face paint
- White face paint
- Black face paint (or dark grey)
- High-density face painting sponge
- Medium round brush (size 4 or 6)
- Fine liner brush (size 1 or 2)
- Spray bottle with water
- Cotton swabs and makeup remover (for cleanups)
- Flower crown headband with bunny ears (pre-made or DIY)
Step 1: Soft Pink Base
-
Load the sponge:
Begin by dampening your high-density sponge with a fine mist of water. Rub it circularly into the light pink face paint until you get a creamy consistency, not too watery. -
Create cheek patches:
Gently stipple the pink paint onto the apples of the cheeks. Don’t worry about perfect circles; an organic, soft oval shape works best here. -
Blend the edges:
While the paint is still slightly damp, turn the sponge to a clean section and softly dab around the edges of the pink patches to fade them out into the skin tone. -
Paint the nose:
Using a small corner of your sponge or a round brush, paint the tip of the nose pink. Shape the top edge slightly like a heart for an extra cute detail.
Step 2: Adding the Whiskers
-
Load the fine brush:
Wet your fine liner brush and load it with black or dark grey paint. Roll the brush tip on your palette to ensure it comes to a sharp point. -
Draw the muzzle line:
Starting from the center base of the nose, draw a very short, thin line downwards towards the lip. -
Outline the nose (optional):
If you want more definition, you can trace the bottom curve of the pink nose, but leaving it soft is also lovely. -
First whisker strokes:
On the left cheek, place your brush tip near the laugh line area and flick outward quickly. The line should start slightly thicker and taper off to nothing. -
Complete the whisker set:
Add two more whiskers below the first one on the left side, slightly varying their angles so they fan out. -
Repeat on the right:
Mirror your actions on the right cheek. Try to keep the pressure light; heavy black lines can look harsh on a soft design like this.
Clean Lines Pro-Tip
For the sharpest whiskers, hold your breath for a second just as you make the quick flicking motion. This stabilizes your hand and prevents shaky lines.
Step 3: Fur Details & Highlights
-
Prepare white paint:
Clean your medium round brush thoroughly or grab a fresh one. Load it well with white face paint until it has an inky, smooth texture. -
Forehead fur center:
Starting between the eyebrows, press the brush down and flick upward towards the hairline to create a teardrop shape. This is your central fur tuft. -
Fan out the fur:
Add two more strokes on either side of the center stroke, fanning them outwards slightly. These should look like stylized tufts of white fur. -
Add nose highlights:
Using the very tip of the fine brush and white paint, add a tiny dot or comma stroke to the pink nose to make it look shiny.
Troubleshooting Sheer Paint
If your white fur strokes look transparent, your paint is too watery. Let it dry, then apply a second layer with a creamier, drier paint consistency.
Step 4: The Crowning Touch
-
Place the crown:
Once the forehead paint is fully dry, gently position the flower crown with bunny ears on the head. -
Adjust position:
Ensure the flowers sit just above the white forehead strokes without covering them completely. I like to fluff the hair around the band to integrate it naturally.
Now you have an adorable, garden-ready bunny look that is sure to charm everyone this Easter
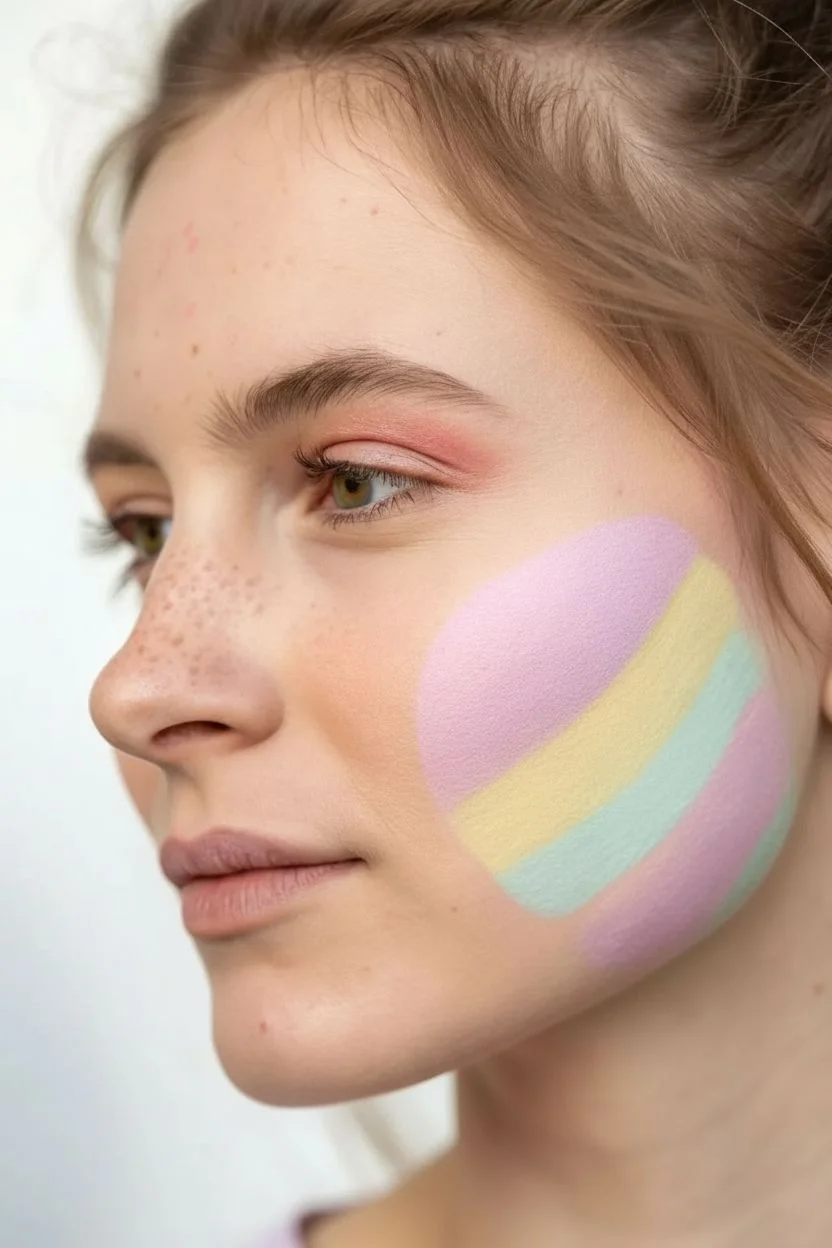
Pastel Rainbow to an Easter Egg
This delicate and dreamy face paint design adds a soft splash of color perfect for Easter festivities without overwhelming the face. It features a gentle, pastel-toned rainbow arching across the cheekbone, dusted with sparkling white dots for a magical finish.
Detailed Instructions
Materials
- Water-activated face paints (white, pastel pink, pastel green/teal)
- Flat brush (approx. 1/2 inch or 1 cm)
- Round brush (size 2 or 3)
- Cup of clean water
- Paper towels or a clean cloth
- Optional: Cosmetic glitter gel
Step 1: Painting the Rainbow Base
-
Prepare the White Stripe:
Load your flat brush with white face paint. Ensure the paint is creamy but not dripping; too much water will make it transparent. -
Paint the Inner Arch:
Starting just below the cheekbone, paint a smooth, curved line arching upwards and back towards the hairline. This creates the lowest band of your rainbow. -
Clean and Switch Colors:
Rinse your flat brush thoroughly in the water cup and dry it on your paper towel. Load it fresh with a soft pastel pink shade. -
Add the Middle Stripe:
Paint a second curved line directly above and hugging the white stripe. Try to keep the gap between them minimal so they touch slightly without muddying the colors. -
Load the Green:
Clean your brush again. Pick up a pastel green or teal color. If you don’t have pastel green, I like to mix a tiny dot of white into regular green on the palette. -
Complete the Arch:
Paint the third and final stripe above the pink one, following the same curve to finish the main rainbow shape.
Paint looks streaky?
Streaky paint usually means too much water. Blot your brush on a paper towel and reload with more pigment until the consistency resembles melted ice cream.
Step 2: Blending and Softening
-
Soften the Edges:
While the paint is still slightly damp, you can gently tap the ends of the rainbow with a clean, dry finger to fade them out so they don’t look like harsh blocks. -
Correct Any Gaps:
If there are unintentional gaps between your stripes, you can use a clean, slightly damp round brush to gently pull the colors together.
Step 3: Adding the Sparkles
-
Switch to Round Brush:
Pick up your small round brush (size 2 or 3) and load it with a generous amount of creamy white paint. -
Start the Dot Pattern:
Begin placing small dots around the top arch of the rainbow. Vary the pressure slightly to create dots of different sizes. -
Create the Cloud Cluster:
Concentrate a few more dots near the top-center of the green arch, mimicking a scattered cloud effect. -
Extend the Design:
Add a few stray dots slightly further out towards the eye and temple to give the design an airy, floating quality. -
Check Symmetry:
Step back and look at the overall balance. Add a final few tiny dots near the bottom end of the rainbow for continuity. -
Optional Glitter:
If you want extra shine, dab a tiny bit of cosmetic glitter gel over the white dots once the paint is fully dry.
Smoother Arches
For a steadier hand when painting curves, rest your pinky finger gently on the model’s chin or jawline to anchor your hand as you sweep the brush.
Enjoy showing off this sweet and subtle splash of color at your Easter gathering


Tulip and Egg Cheek Swirl
Embrace the freshness of spring with this elegant yet simple tulip design that blooms right on your cheek. Delicate white and pink petals sit atop sweeping green stems for a look that is both artistic and wearable for Easter festivities.
Step-by-Step Tutorial
Materials
- Face paint cake: White
- Face paint cake: Light pink
- Face paint cake: Sage green or Leaf green
- Face paint cake: Darker green (optional for shading)
- Round brush (size 2 or 3)
- Flat brush or Filbert brush (small, approx. 1/4 inch)
- Cup of water
- Paper towels
- Makeup sponge (optional for blush base)
- Rosy blush powder
Step 1: Base Prep
-
Clean canvas:
Start with clean, dry skin. If the subject is wearing foundation, ensure it is set with powder so the water-activated paints don’t cause it to slide. -
Apply blush:
Before painting, apply a soft wash of rosy blush to the apple of the cheek and sweeping upward toward the temple. This creates a warm, healthy backdrop for the flowers.
Petal Perfection
Use a ‘filbert’ brush (a flat brush with a curved tip) to paint the petals. The shape of the brush does the work for you, creating perfect rounded bottoms and tapered tops instantly.
Step 2: Painting the Petals
-
Load the brush:
Take your small filbert or round brush and load it thoroughly with white face paint. Ensure the consistency is creamy, not too watery, to get opaque coverage. -
First central petal:
Locate the center point of the cheekbone. Press the brush down gently and pull upward while lifting to create a teardrop shape that tapers at the top. This is the main body of the first tulip. -
Side petals:
Reload the white if necessary. Paint two curved strokes hugging the sides of the central teardrop, curving inward slightly at the top to form a closed tulip cup shape. -
Position the trio:
Repeat this process to create two more flower heads. Place one smaller tulip slightly lower and to the left (towards the nose), and another slanted diagonally upward toward the temple. -
Pink accents:
Clean your brush and load a small amount of light pink paint. You want this paint slightly wetter for blending. -
Blend the color:
Gently stroke the pink into the base of the white petals while they are still slightly tacky, or overlay softly if dry. Focus the pink at the bottom of the flower cup, fading upward into the white.
Level Up: Easter Eggs
Turn this into the ‘Egg Swirl’ design mentioned in the section title by painting small colorful ovals floating between the flower stems using pastel blues and yellows.
Step 3: Stems and Leaves
-
Prepare the green:
Load a size 2 round brush with sage green paint. I find a lighter, more muted green looks more natural for this soft floral style. -
Main stem:
Starting from the base of the central tulip, pull a long, thin stroke downward along the jawline. Ease up on the pressure as you flick the end to make it disappear naturally. -
Connecting stems:
Draw shorter, delicate curved lines connecting the bottom of the left and right tulips to the main central stem. Think of them like branches merging into a trunk. -
Add a leaf:
From the main stem area, press the brush down to widen the bristles and pull diagonally outward toward the ear to create a long, tapered leaf shape. -
Detailing the greenery:
If you have a slightly darker green, add a tiny thin line along the bottom edge of the leaf and stems to add dimension and shadow. -
Refining edges:
Check the edges of your white petals. If the pink blending muddied the crispness, take a tiny bit of fresh white on the very tip of your brush and re-define the top points of the tulips.
Now you have a blooming garden on your cheek ready for any spring celebration
Basket Weave Egg Patch
For a subtle yet festive Easter look, try this delicate egg design on the cheek. It uses soft pastels in a simple geometric arrangement to mimic a woven basket or a decorated egg, perfect for older children or adults wanting a touch of holiday spirit.
Detailed Instructions
Materials
- White face paint
- Pale yellow or cream face paint
- Soft pink face paint
- Peach or coral face paint
- Medium flat brush (approx. size 4 or 6)
- Small round detail brush (size 1 or 2)
- Water cup
- Paper towels
Step 1: Painting the Base Shape
-
Outline the Egg:
Load your small round brush with white face paint. On the apple of the cheek, carefully paint a thin outline of an oval egg shape. It doesn’t need to be perfect, as you’ll fill it in. -
Create the Grid:
Visualize dividing the egg into four main quadrants. Using the same white brush, draw a vertical line slightly curved to the right, following the contour of the egg. -
Cross Section:
Paint a horizontal line crossing the vertical one, curving it slightly upward to give the egg some dimension and roundness. -
Clean Up Lines:
Thicken these dividing lines just a bit so they are clearly visible; these crisp white ‘grout’ lines are key to the final look.
Clean Lines
Keep a slightly damp Q-tip nearby. It’s the perfect eraser for sharpening the edges of your oval if your hand slips while outlining.
Step 2: Filling the Quadrants
-
First Block: Pale Yellow:
Switch to your flat brush. Load it with the pale yellow or cream paint. Fill in the top-left section of the egg, being careful not to paint over your white dividing lines. -
Diagonal Balance:
To create a balanced pattern, I like to mirror this color. Paint the bottom-right section with the same yellow/cream shade. -
Clean Your Brush:
Rinse your flat brush thoroughly and dab it on a paper towel until no yellow pigment remains. -
Second Block: Soft Peach:
Load the clean flat brush with the peach or coral paint. Fill in the bottom-left section completely. -
Third Block: Dusty Pink:
Rinse again. Load the brush with soft pink paint and fill in the final top-right quadrant.
Glitter It Up
Before the paint fully dries, tap a small amount of cosmetic-grade iridescent glitter over the pastel sections for a sparkling sugar-egg effect.
Step 3: Adding the Weave Details
-
Prep for Stripes:
Clean your small round brush or the edge of your flat brush thoroughly. You will need white paint again, and it must be opaque and creamy for this step. -
Vertical Stripes:
In the pink (top right) and peach (bottom left) sections, paint a thick white vertical stripe down the center of each colored block. -
Horizontal Stripes:
Now move to the yellow sections (top left and bottom right). Paint a thick white horizontal stripe across the center of these blocks. -
Refining Edges:
Go back around the outer perimeter of the egg with the small round brush and white paint to sharpen the edge if any color spilled over. -
Highlighting:
If you want extra dimension, add a tiny dot of white on the upper corner of the pink and yellow sections to make them look glossy.
Now you have a charming, sophisticated Easter design that pairs beautifully with a spring outfit
Fluffy Chick With Soft Edges
Capture the essence of spring with this delightfully fuzzy chick design that sits comfortably on one cheek. The soft, textured edges make it forgiving for beginners while capturing that classic Easter charm.
Step-by-Step Tutorial
Materials
- Bright yellow face paint (high pigment)
- White liquid face paint
- Black liquid face paint
- Orange face paint
- Medium round brush
- Small liner brush or detail brush
- Sponge or textured stippling sponge (optional)
- Cup of water
- Spray bottle (for activating paints)
Step 1: Creating the Base Shape
-
Activate the yellow:
Spray a small amount of water onto your bright yellow face paint cake to create a creamy consistency. -
Initial outline:
Using a medium round brush, paint a rough circle in the middle of the cheek to act as the body. -
Add the head:
Paint a slightly smaller, rounded shape directly on top of the body circle, merging them together so they form a seamless pear-like blob. -
Fill it in:
Fill the entire shape with the yellow paint, ensuring solid, opaque coverage without streaks.
Uneven Coverage?
If the yellow looks streaky, let the first layer dry completely before dabbing a second layer on top. Don’t drag the brush, or you’ll lift the paint.
Step 2: Adding the Fluffy Texture
-
Charge the brush:
Reload your round brush with more creamy yellow paint so the bristles are fully saturated but not dripping. -
Flick the edges:
Starting from the edge of your painted shape, use quick, short flicks moving outward to simulate feathers. -
Vary direction:
Work your way around the entire perimeter, varying the direction of the flicks slightly to look more natural. -
Top tuft:
At the very top of the head, add three to four longer, upright flicks to create the cute crest feathers. -
Bottom fluff:
Make the flicks at the bottom of the chick slightly shaggier and less uniform to give it a nesting look. -
Internal texture:
I like to add a few tiny flicks inside the yellow body as well, just to break up the flat color and add dimension.
Make it Sparkle
While the yellow paint is still slightly damp, poof a tiny amount of cosmetic-grade iridescent glitter over the body for a magical Easter shimmering effect.
Step 3: Facial Features
-
Paint the beak:
Rinse your brush thoroughly and pick up orange paint. Paint a small triangle in the center for the beak, and another triangle facing right for the open mouth. -
Add eyes:
Switch to a thin liner brush with black paint. Paint two small, vertical ovals just above the beak. -
Eye shine:
Using the tip of a clean liner brush or the back end of a brush handle, dot a tiny speck of white paint into the top corner of each black eye.
Step 4: Finishing Touches
-
Beak highlight:
Add a barely-there line of lighter orange or yellow on the top of the beak to suggest volume. -
Create floating dots:
Load a round brush with white paint. Dab several random dots floating above the chick’s head towards the temple. -
Vary dot size:
Press harder for larger dots and lighter for the smaller ones to create a whimsical, drifting effect. -
Final check:
Step back and see if any yellow edges need extra feathering to look softer.
This little chick is sure to be a crowd-pleaser for any springtime celebration
Watercolor-Wash Easter Egg
Achieve a soft, dreamy look this holiday with a watercolor-style Easter egg design that blends gently into the skin. This tutorial uses diluted face paints to mimic the translucent, delicate appearance of watercolor on paper, perfect for a subtle festive touch.
Detailed Instructions
Materials
- Water-activated face paints (pastel violet, pastel yellow, seafoam green, white)
- Wide flat brush (approx. 1/2 inch)
- Small round detail brush (size 1 or 2)
- Soft blending sponge or dense makeup brush
- Cup of clean water
- Spray bottle with water (optional)
- Matte pink or coral eyeshadow (optional)
Step 1: Creating the Soft Base
-
Prep the eyelid:
Before starting the cheek design, apply a soft wash of coral or matte pink eyeshadow to the eyelid, blending it upward toward the brow bone to complement the face paint colors. -
Mix your watercolor wash:
Load your wide flat brush with water and a small amount of pastel violet paint. You want a very watery consistency, more like tinted water than thick paint, to achieve that translucent effect. -
Paint the top section:
With the diluted violet, paint a curved, rounded hump shape high on the cheekbone. This forms the top of your egg. -
Add the yellow stripe:
Rinse your brush thoroughly. Load it with diluted pastel yellow paint. Paint a wide, straight band directly below the violet curve. -
Blend the transition:
While the paint is still damp, gently dab where the yellow meets the violet with a barely-damp sponge to soften the line without muddying the colors. -
Paint the green stripe:
Clean your brush again. Mix a watery wash of seafoam green and paint the next band below the yellow, following the same slight curve of the cheek. -
Finish the egg shape:
Return to your diluted violet paint. Create the bottom curve of the egg shape below the green stripe, tapering it slightly inward to complete the oval. -
Final blend:
Take a moment to ensure all the stripes touch. If there are gaps, gently drag a distinctively clean, damp brush over the seams to fuse them together softly.
Step 2: Adding Delicate Details
-
Prepare the opaque white:
For the details, you need a different consistency. Load your small round detail brush with white face paint, keeping it creamy and opaque rather than watery. -
Dot the perimeter:
Start at the top outer edge of the egg. Paint a curved line of white dots that floates just outside the painted egg shape, framing the upper left curve. -
Vary the dot size:
I like to make the dots slightly larger at the beginning of the curve and smaller as they trail down towards the nose for a whimsical feel. -
Add the top swoosh:
Inside the top purple section, paint a long, thin white curved line. Make it slightly thicker at the start and lift pressure as you end the stroke. -
Decorate the violet section:
Underneath the white swoosh, add a row of small, evenly spaced white dots sitting on the violet paint. -
Detail the yellow band:
Move down to the yellow stripe. Add a simple row of medium-sized white dots right through the center of the yellow band. -
Detail the green band:
For the green section, paint tiny, clustered dots or a very fine dotted line to verify texture difference. -
Finish the bottom:
On the bottom violet section, paint another long white swoosh, curving it in the opposite direction of the top one to cup the bottom of the egg. -
Add final highlights:
Place a few final, larger white dots on the bottom violet section near the swoosh to balance the design.
Water Control is Key
If the paint runs, dab it instantly with a dry tissue. The “wash” look relies on thin layers, not heavy drips. Test opacity on your hand first.
Add Little Flowers
For a spring upgrade, replace the white dots in the yellow band with tiny five-petal daisy shapes using the tip of your round brush.
Now you have a whimsical, artistic face paint design perfect for any Easter celebration
Negative Space Bunny Silhouette
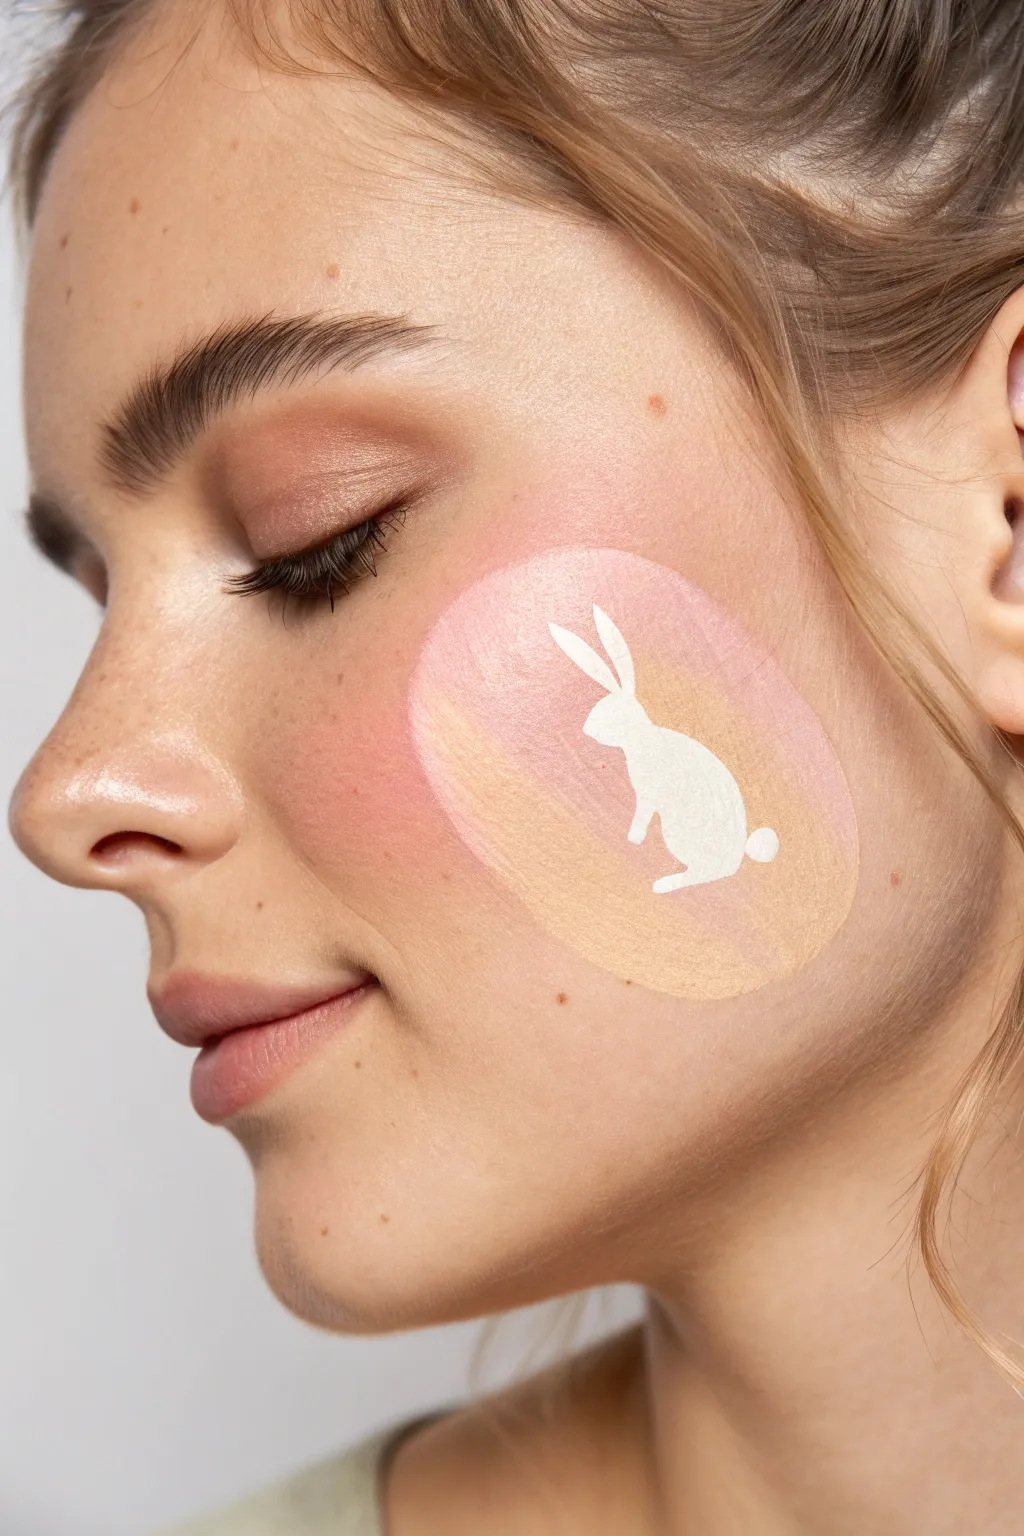
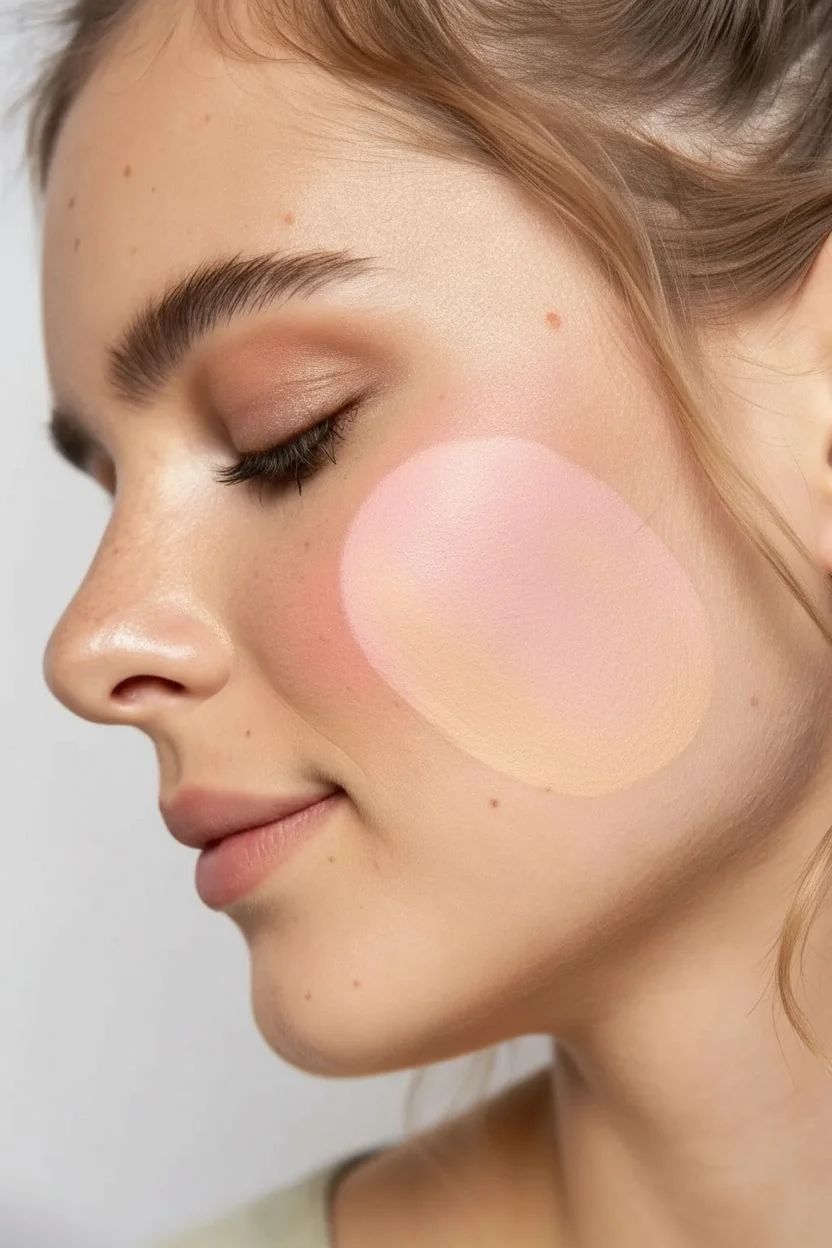
This ethereal design flips traditional face painting on its head by creating a stunning negative space silhouette. Using soft, blended tones as a backdrop, the crisp white bunny emerges like a gentle cloud against a sunset sky.
Step-by-Step Guide
Materials
- White cream face paint or face paint stick
- Pink cream blush or face paint
- Beige or light bronze cream face paint
- Small flat synthetic brush
- Medium round fluffy brush (for blending)
- Bunny stencil (optional, hand-drawn preferred)
- Micellar water or makeup remover
- Cotton swabs
- Translucent setting powder (optional)
Step 1: Creating the Canvas
-
Prep the cheek area:
Start with clean, moisturized skin. Ensure the cheek area is free of heavy oils so the paint adheres smoothly. -
Apply the pink base:
Using your pink cream makeup, dab a generous amount onto the upper cheekbone area. You want this to be the top half of your background oval. -
Add the warm tones:
Directly below the pink, apply the beige or light bronze color. This creates a sunset-like gradient base. -
Blend the edges:
Take your fluffy round brush and gently buff the two colors together where they meet to create a seamless transition. -
Create the oval shape:
Continue using the fluffy brush to soften the outer edges of your patch. You don’t want harsh lines; aim for a soft, diffused oval that covers the main part of the cheek. -
Check opacity:
Step back and look at the coverage. The color should be opaque enough to contrast with the silhouette, but soft enough to look artistic.
Sticky Situation
Use a sticker stencil! Place a bunny sticker on bare skin, paint the colored background over the top, then carefully peel the sticker away to reveal perfect skin-toned negative space.
Step 2: Painting the Silhouette
-
Outline the bunnyears:
Load a small flat brush with white face paint. Start by painting two tall, slightly curved ear shapes near the top center of your colored patch. -
Form the head:
Below the ears, paint a small circle for the head, connecting it fluidly to the base of the ears. -
Draw the body curve:
Extend a curved line down from the head to create the bunny’s arched back. I find it easiest to do this in one confident stroke. -
Fill the body shape:
Bring the line around to form the rounded bottom and front legs. Fill in the entire body shape with solid white paint. -
Add the tail:
Dab a tiny circle of white at the back of the bunny for a fluffy tail. -
Refine the edges:
Use the edge of your flat brush to sharpen any blurry lines on the silhouette so the bunny looks crisp against the soft background. -
Clean up mistakes:
If any white paint went outside the lines, dip a cotton swab in micellar water and carefully clean it up. -
Set the look:
If using cream products that stay wet, lightly dust the area with translucent setting powder to prevent smudging.
Add Some sparkle
While the paint is still tacky, press loose biodegradable glitter onto the pink and beige background (avoiding the white bunny) for a magical shimmering effect.
Now you have a gentle, artistic easter look that feels more like high-fashion makeup than a costume
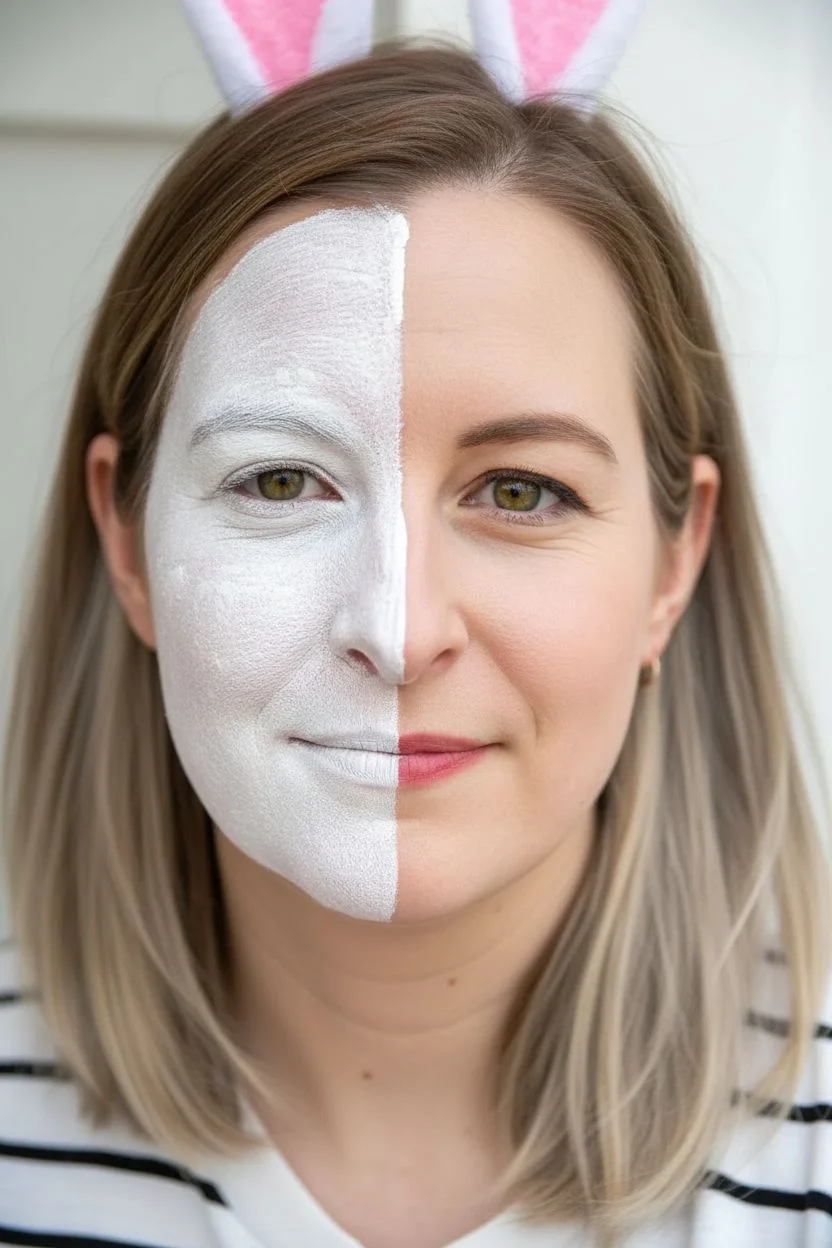
Split Look: Bunny and Chick Duo
Why choose just one Easter character when you can be both? This clever split-face design combines a fluffy white bunny on one side with a bright yellow chick on the other, creating a playful and unified look that’s perfect for egg hunts.
Step-by-Step
Materials
- High-quality white face paint (water-activated or cream)
- Bright yellow face paint
- Orange face paint
- Black face paint or fine brush liner
- Flat brush (medium size)
- Fine detail brush (round #1 or #2)
- Small makeup sponge
- Small cup of water
- Bunny ears headband (optional accessory)
Step 1: Setting the Base
-
Clean and Prep:
Start with a clean, dry face free of thick moisturizers. Tie back any loose hair to keep your canvas clear. -
Divide the Face:
Visualize a line running straight down the center of the nose. We will be working primarily on the ‘Bunny’ half first, which covers the forehead, eye, and down to the jawline on the left side (your right). -
Apply White Base:
Load a slightly damp sponge with white face paint. Pat it gently over the forehead, eyelid, nose bridge, cheek, and chin on just one half of the face. -
Soften the Edge:
As you reach the center of the face, use the edge of the sponge to create a fairly sharp line down the nose, but don’t worry if it’s not ruler-straight; organic shapes work well here. -
Create Texture:
Instead of smoothing the paint perfectly, use a stippling motion (rapid up-and-down patting) with your sponge to mimic the texture of soft fur.
Patchy White Paint?
If the white looks streaky, let the first layer dry completely before patting on a second coat. Don’t drag the sponge; dab it.
Step 2: Bunny Details
-
Paint the Nose:
Using a small round brush loaded with black paint, draw a small, rounded triangle on the tip of the nose. Fill it in completely. -
Add Whiskers:
With a fine detail brush and a thin consistency of black paint, flick three quick lines starting from the white forehead area, angling them slightly upward. -
Define the Mouth:
On the bunny side, paint the top lip white to blend with the muzzle area. If you like, add a small vertical black line connecting the nose to the lip.
Make it Sparkle
While the paint is still slightly tacky, gently press cosmetic-grade iridescent glitter onto the white bunny fur for a magical shimmer.
Step 3: Chick Component
-
Yellow Cheeks:
Switch to your yellow or orange-yellow paint. On the bare side of the face (the ‘Chick’ side), locate the apple of the cheek. -
Feather Shapes:
Using a flat brush, paint three curved strokes radiating outward from the cheekbone towards the ear. These represent the chick’s wings or feathers. -
Refining the Feathers:
Layer a slightly darker orange on the bottom edge of these yellow strokes to give them dimension and make them pop against the skin. -
Mirror the Cheek:
Add a small, solid circle or oval of yellow/orange on the ‘Bunny’ side cheek as well, creating a visual balance between the two characters.
Step 4: Finishing Touches
-
Lip Color:
Apply a soft pink or berry lipstick or face paint to the lips to ground the look and add a pop of natural color. -
Cleanup:
Use a cotton swab dipped in micellar water or makeup remover to sharpen any edges where the paint may have smudged. -
Accessorize:
Top off the look with a pair of bunny ears to emphasize the character transformation.
You are now ready to hop and chirp your way through the holiday festivities
Tiny Egg Hunt Freckle Trail
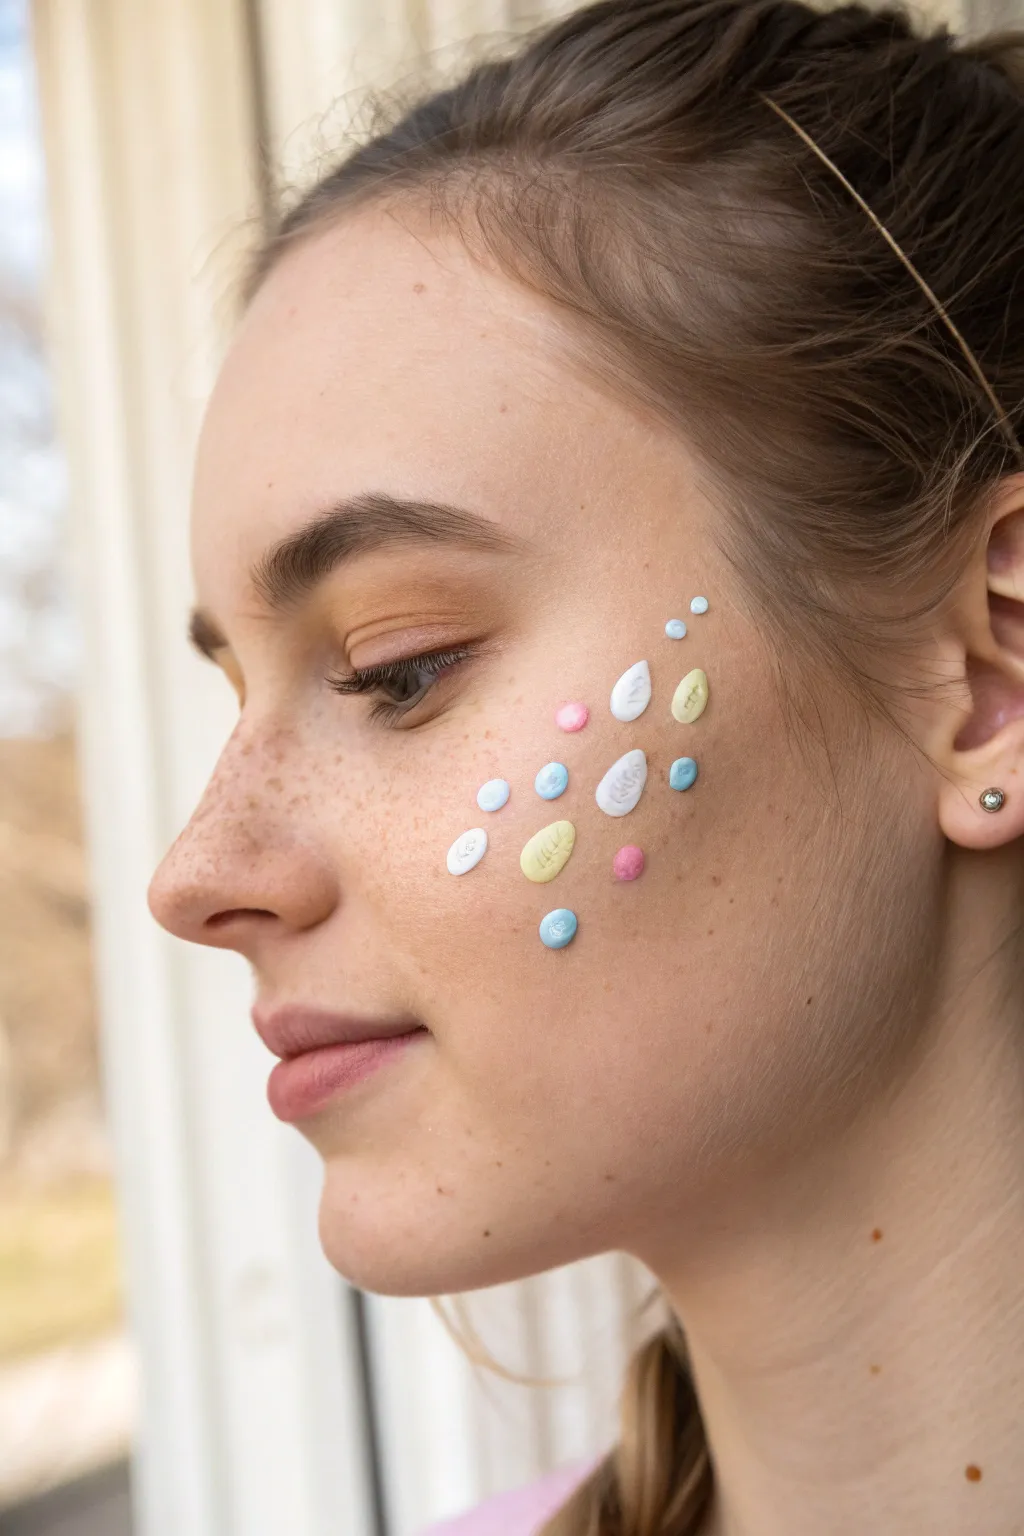
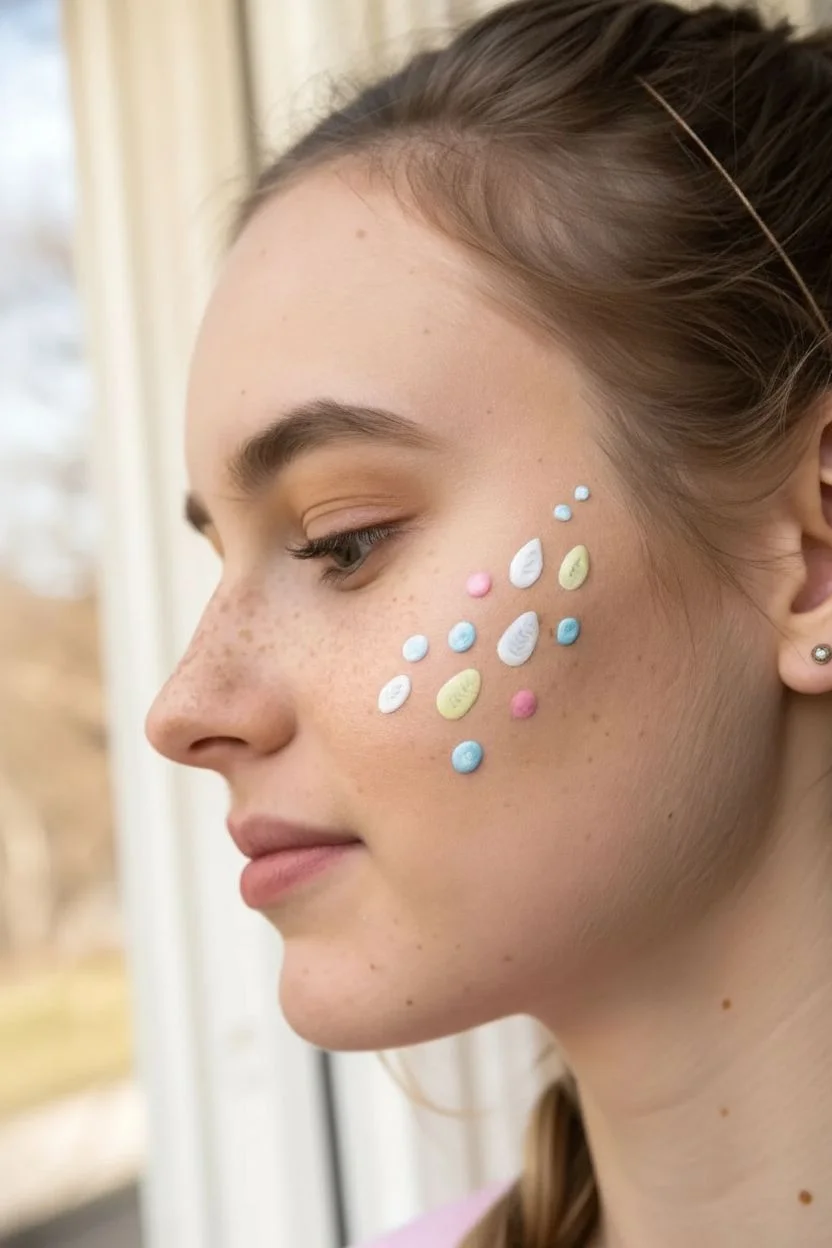
Turn your cheekbone into a miniature canvas with this delicate and charming scattering of pastel Easter eggs. Mimicking the placement of freckles, these tiny designs create a soft, whimsical look perfect for spring celebrations.
Step-by-Step Tutorial
Materials
- Water-activated face paints (white, pastel pink, baby blue, lemon yellow)
- Round brush (size 1 or 2)
- Fine liner brush (size 00 or 000)
- Cup of clean water
- Paper towel or cloth
- Setting spray (optional)
Step 1: Preparation
-
Clean the canvas:
Start with clean, dry skin. If the model has moisturizer or foundation on, ensure it is fully set so the water-based paint doesn’t slide around. -
Analyze placement:
Visualize a diagonal sweeping motion across the high point of the cheekbone, similar to where you might apply highlighter. This is where your ‘freckles’ will live.
Smudgy Edges?
If your ovals look messy, your paint was likely too watery. Let it dry, then use a clean, slightly damp cotton swab to erase the edge and repaint with a creamier mix
Step 2: Painting the Base Eggs
-
Load the white paint:
Activate your white face paint with a little water until it has a creamy consistency. Load your size 2 round brush fully. -
Create white eggs:
Press the belly of the brush gently against the skin to create oval shapes. Start with three main white eggs: two larger ones in the center and a tiny dot-like one near the top. -
Switch to yellow:
Rinse your brush thoroughly. Create a soft pastel yellow mix and paint two medium-sized ovals, one near the center and one slightly higher up. -
Add blue accents:
Using a baby blue shade, press the brush down to create three or four small blue ovals scattered around the main cluster to fill gaps. -
Paint pink pops:
Finish the base shapes with pastel pink. Add a tiny dot near the nose and a slightly larger oval towards the bottom of the cluster. -
Vary sizes:
Ensure you have a mix of sizes—some should be distinct ovals, while others can be simple dots to mimic natural freckle variance. -
Let it dry:
Wait about 30-60 seconds for the base colors to dry completely to the touch. This prevents the next layer from muddying.
Level Up
Add a touch of cosmetic glitter gel to the center of the ‘eggs’ for sparkle, or use a tiny bit of metallic gold paint for the decorative stripes instead of white
Step 3: Adding Details
-
Prepare the liner brush:
Switch to your ultra-fine liner brush (size 00 or 000). Load it with a very thin, inky consistency of white paint. -
Decorate the yellow egg:
On the largest yellow egg, paint tiny vertical zig-zag lines or little hash marks to resemble grass or a classic pattern. -
Detail the white eggs:
Since you can’t paint white on white, leave the white eggs plain, or if you prefer, use a very diluted grey to add faint contouring (though plain is often cleaner). -
Detail the blue eggs:
On the largest blue oval, add a tiny white swirl or a simple horizontal stripe across the middle. -
Texture the pink egg:
I like to add just a single tiny white dot or speckle to the pink shapes to give them a bit of dimension. -
Review the balance:
Step back and check the spacing. If there are large empty spaces, add a tiny dot of blue or white to balance the composition. -
Set the look:
Once everything is fully dry, you can lightly mist with a setting spray to help the design last through the egg hunt.
Enjoy showing off this delightful and minimal springtime look


Have a question or want to share your own experience? I'd love to hear from you in the comments below!