A plain bird feeder is basically a tiny outdoor canvas just waiting for your favorite colors and patterns. Here are my go-to bird feeder painting ideas, starting with the classics and moving into the fun, unexpected designs that make your yard feel like an art show.
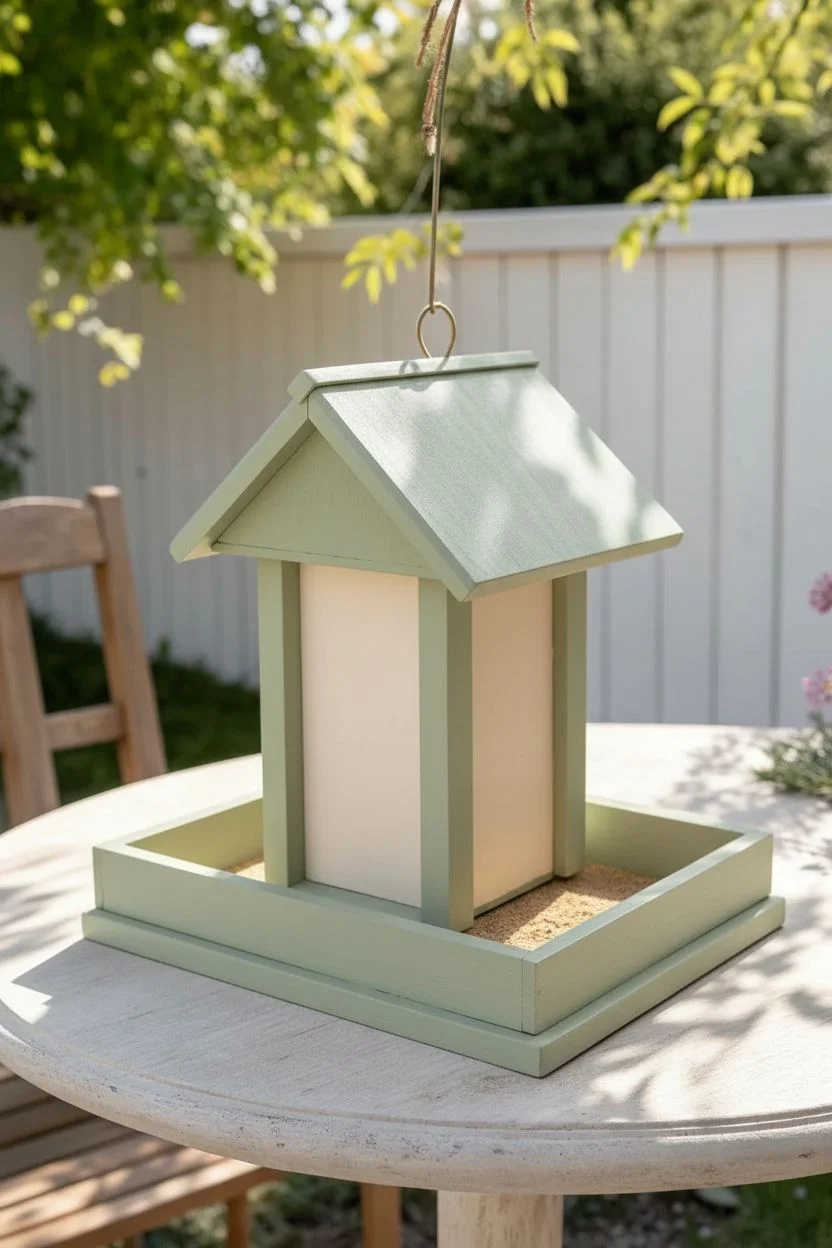
Cottage-Style Mini House Feeder
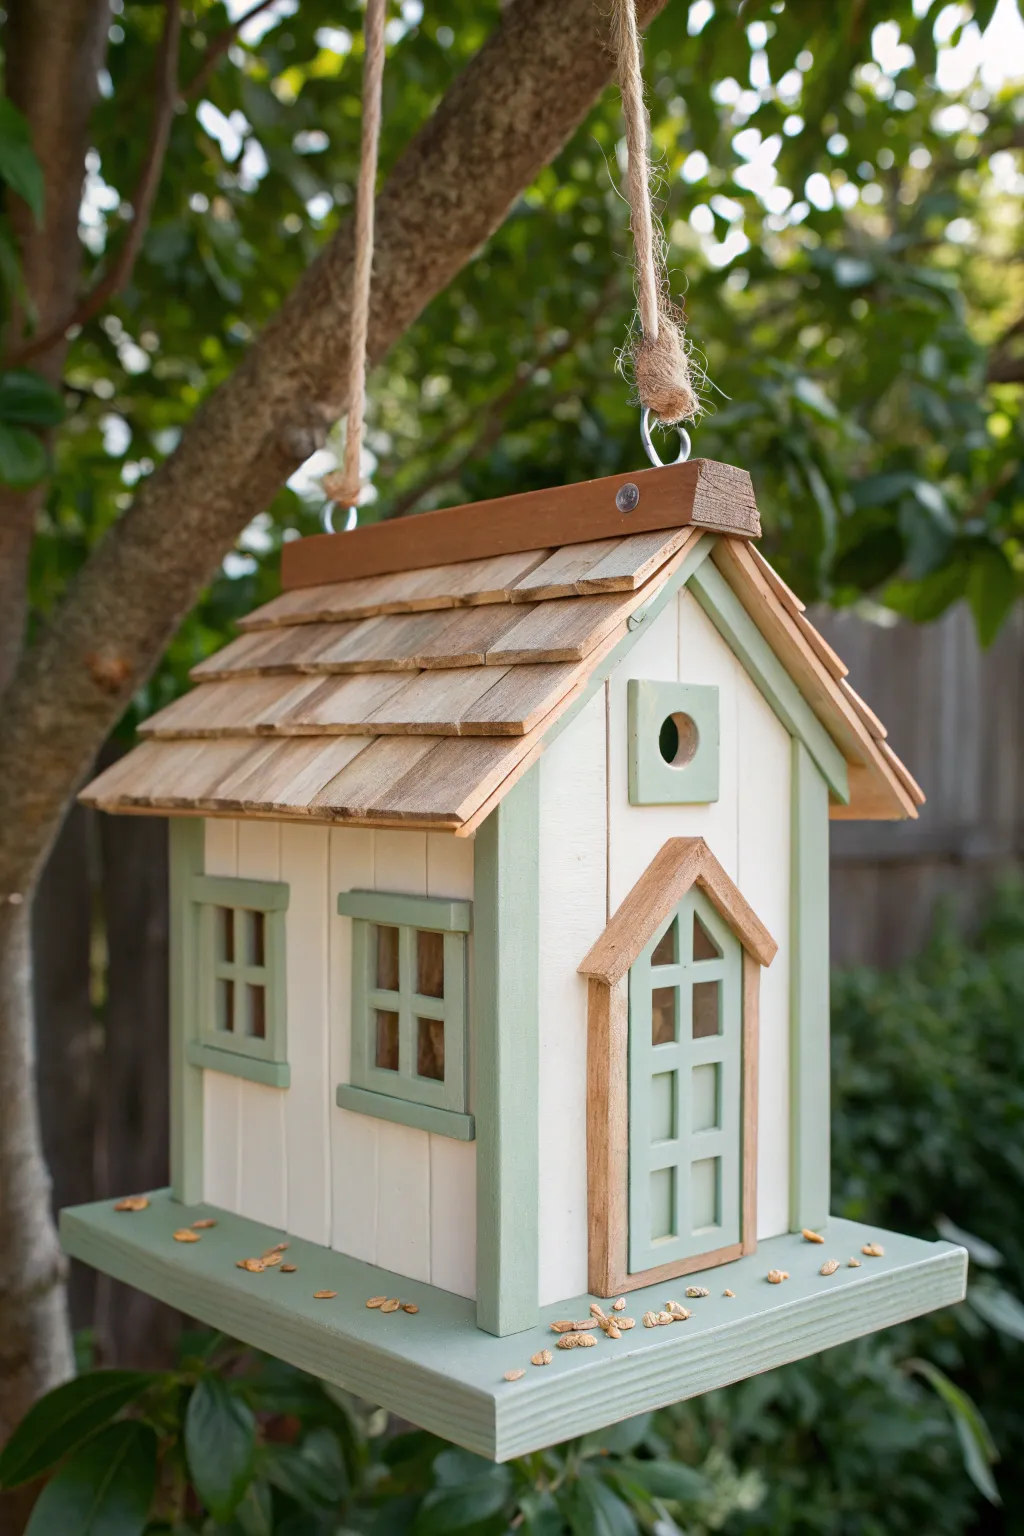
Transform a plain wooden birdhouse into a charming country retreat with this soft, two-tone color scheme. The combination of sage green trim and creamy white walls creates a sophisticated look that blends beautifully with garden greenery.
Step-by-Step Tutorial
Materials
- Unfinished wooden birdhouse (cottage style with front porch/base)
- Exterior acrylic craft paint (Creamy White)
- Exterior acrylic craft paint (Sage Green)
- Wood stain (Light Walnut or Pecan)
- Small flat paintbrushes (various sizes)
- Fine detail brush
- Painter’s tape
- Sandpaper (medium grit)
- Clear exterior matte varnish/sealer
- Jute twine for hanging
- Paper towels or rag
- Screw hooks (if not included)
Step 1: Preparation and Roof
-
Surface prep:
Begin by lightly sanding the entire birdhouse to remove any rough splinters or fuzz. Wipe it down with a damp cloth to ensure a clean painting surface. -
Protect the trim:
Use painter’s tape to carefully mask off the vertical corner trim, window frames, and the door frame if you want super crisp lines later, though a steady hand works well too. -
Stain the roof:
Apply a light walnut or pecan wood stain to the roof shingles using a brush or rag. Work the stain into the crevices but wipe away excess quickly to keep the wood grain visible. -
Roof ridge detail:
Don’t forget to stain the solid wooden ridge cap at the very peak of the roof to match the shingles. -
Accent staining:
While you have the stain out, carefully apply it to the door frame trim (the ‘wood’ surround) to give it a natural timber look.
Step 2: Painting the Structure
-
Base coat walls:
Paint the main siding walls with your creamy white exterior paint. Use a flat brush and apply two thin coats for opaque coverage, letting the first coat dry completely before adding the second. -
Paint the base:
Flip the birdhouse over or tilt it back to paint the entire flat base platform with the sage green paint. This creates a grounded ‘grass’ effect for the house to sit on. -
Corner accents:
Using a smaller flat brush, carefully paint the vertical corner trim pieces in sage green. Take your time here to keep the line between the green trim and white wall clean. -
Window frames:
Paint the exterior frames of the side windows and the small square accent near the roof peak in the same sage green shade. -
Door detailing:
Paint the door itself sage green. I find a very small flat brush helps navigate around the small window pane dividers without making a mess.
Clean Lines
If you struggle with shaky hands on the trim, use the edge of a credit card or a palette knife as a movable shield while you paint.
Step 3: Finishing Touches
-
Window panes:
For the window ‘glass’ areas (inside the frames), you can either leave them raw wood for depth or paint them a dark grey to simulate an interior. -
Touch-ups:
Once mainly dry, inspect your edges. Use a fine detail brush and the appropriate color to fix any smudges where the green met the white. -
Seal the project:
Apply two coats of clear exterior matte varnish over the entire house, including the stained roof. This protects the wood from rain and UV damage. -
Install hardware:
If your birdhouse didn’t come with hardware, screw two small eye hooks into the roof ridge, spacing them about 3-4 inches apart. -
Add the hanger:
Thread a length of thick jute twine through the eye hooks. Tie secure knots at the hooks and form a large loop at the top for hanging. -
Ready for guests:
Scatter a pinch of birdseed on the green base platform to immediately welcome feathered friends to their new home.
Welcome Home
Glue a tiny wreath made of dried moss or a miniature twigs to the front door for an extra dose of adorable cottage curb appeal.
Hang your new cottage in a sheltered spot and creative a lovely focal point in your garden


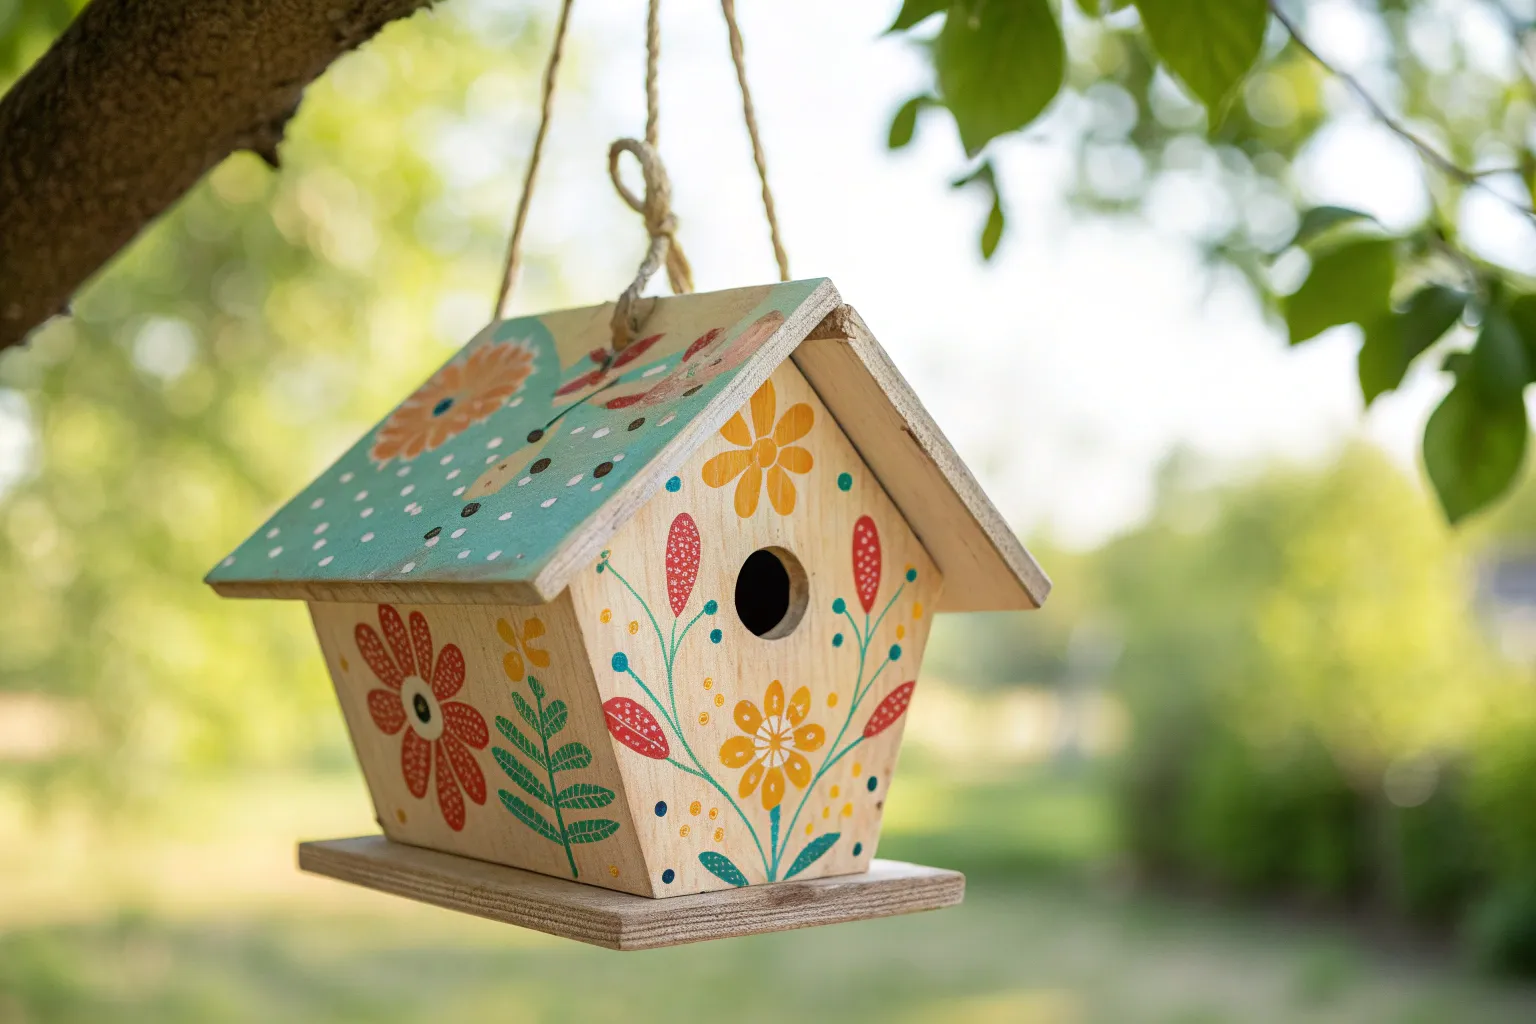
Classic Floral Garden Feeder
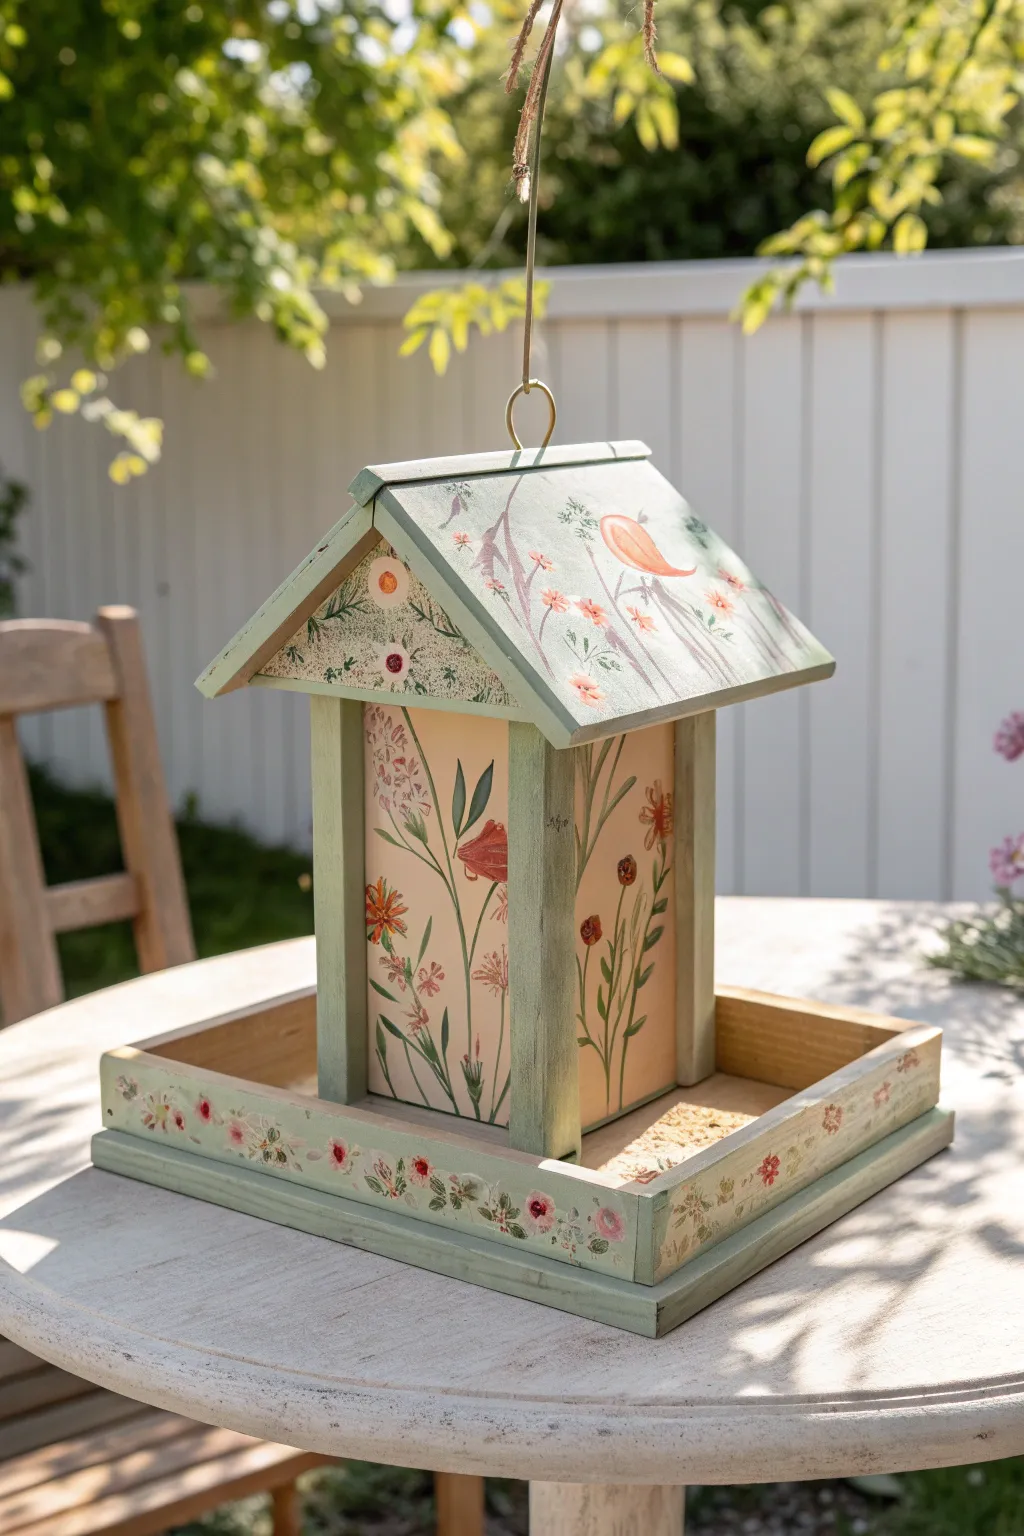
Bring the charm of an English cottage garden to your backyard with this delicately hand-painted bird feeder. Featuring soft sage frames, a creamy canvas for wild flora, and a whimsical painted bird, this project turns a basic wooden structure into a functional piece of art.
Step-by-Step
Materials
- Unfinished wooden hopper-style bird feeder
- Sandpaper (220-grit)
- Clean cloth or tact cloth
- Exterior acrylic craft paints (Sage Green, Cream/Off-White, Salmon Pink, Deep Red, Golden Yellow, Olive Green, Brown)
- Wide flat brush (1 inch)
- Small flat brush (1/4 inch)
- Fine round detail brushes (sizes 0 and 1)
- Painter’s tape
- Clear outdoor spar urethane or exterior varnish (satin finish)
- Palette or paper plate
- Cup of water and paper towels
Step 1: Preparation & Base Coat
-
Smooth the Surface:
Begin by lightly sanding the entire wooden feeder with 220-grit sandpaper to remove any rough splinters or fuzz, ensuring a smooth painting surface. Wipe away all dust with a clean, dry cloth. -
Prime the Main Panels:
Using the 1-inch flat brush, paint the main vertical walls of the feeder with your Cream or Off-White paint. Apply thin, even coats, letting the first dry completely before adding a second to ensure solid coverage without drips. -
Paint the Trim and Tray:
Switch to the Sage Green paint. Carefully paint all the structural pillars, the roof edges, the base tray’s outer rim, and the bottom trim. Use the 1/4 inch flat brush for tighter areas to keep lines crisp against the cream panels. -
Roof Base:
Paint the main slope of the roof with a very light wash of the Sage Green. I like to water the paint down slightly here (about 1 part water to 3 parts paint) so some of the wood grain shows through, creating a weathered texture. -
Triangle Gables:
Paint the triangular gable sections under the roof peak with the Cream color to match the side panels. Let all base coats dry for at least one hour.
Loose Brushwork Tip
Don’t overthink the flowers! Keep your wrist loose and hold the brush further back on the handle. This creates organic, flowing stems rather than stiff lines.
Step 2: Painting the Artwork
-
Plan the Stems:
On the cream side panels, use a size 1 round brush and watered-down Olive Green to sketch long, flowing vertical stems. Vary the heights, making some reach nearly to the roof and others stay lower. -
Add Leaves:
Paint slender, lance-shaped leaves coming off the stems using the Olive Green. Use a ‘press and lift’ motion: press the brush down at the base of the leaf and lift as you pull away to create a sharp point. -
Create the Poppies:
With the Salmon Pink and Deep Red paints, add flower heads to the tops of your tallest stems. Paint simple cup shapes or loose, overlapping petals. Don’t worry about perfection; a loose, impressionistic style works best here. -
Add Detailed Florals:
Using the smallest detail brush (size 0), dab small clusters of Golden Yellow and Deep Red near the bottom of the stems to create the look of wildflowers or seeded grasses. -
Decorate the Gable:
Repeat a smaller version of this floral pattern on the triangular gables under the roof, framing the center with curving stems that follow the roofline. -
Tray Border:
Along the Sage Green edge of the bottom tray, paint tiny, simple pink rosettes and green leaves in a repeating pattern. Space them about an inch apart for a delicate border effect. -
Roof Bird Silhouette:
On the roof slope, paint a stylized bird using the Salmon Pink or a soft orange. Start with a teardrop shape for the body and add a curved tail. Add faint grey or brown branches underneath the bird so it appears to be perched.
Uneven Paint Coverage?
If the cream paint looks streaky over the wood, sand it very lightly between coats. Three thin coats are always better than one thick, gloppy coat.
Step 3: Finishing touches
-
Add Texture:
Once the main flowers are dry, use a dry brush with a tiny amount of Brown paint to lightly distress the edges of the Sage Green timber. This simulates a vintage, weathered look. -
Seal for Outdoors:
This step is crucial for longevity. Apply a coat of clear exterior spar urethane over the entire feeder, including the painted artwork. Ensure you cover all painted surfaces to protect against rain and sun. -
Second Seal Texture:
After the first coat of sealer creates a barrier, lightly sand with very fine sandpaper if needed to knock down any raised grain, then apply a second final coat of urethane for maximum durability. -
Install Hardware:
If you removed the hanging loop or hook before painting to keep it clean, screw it back into the top ridge of the roof now that the sealant is touch-dry.
Hang your finished masterpiece in a visible spot and wait for your first feathered visitors to admire the view


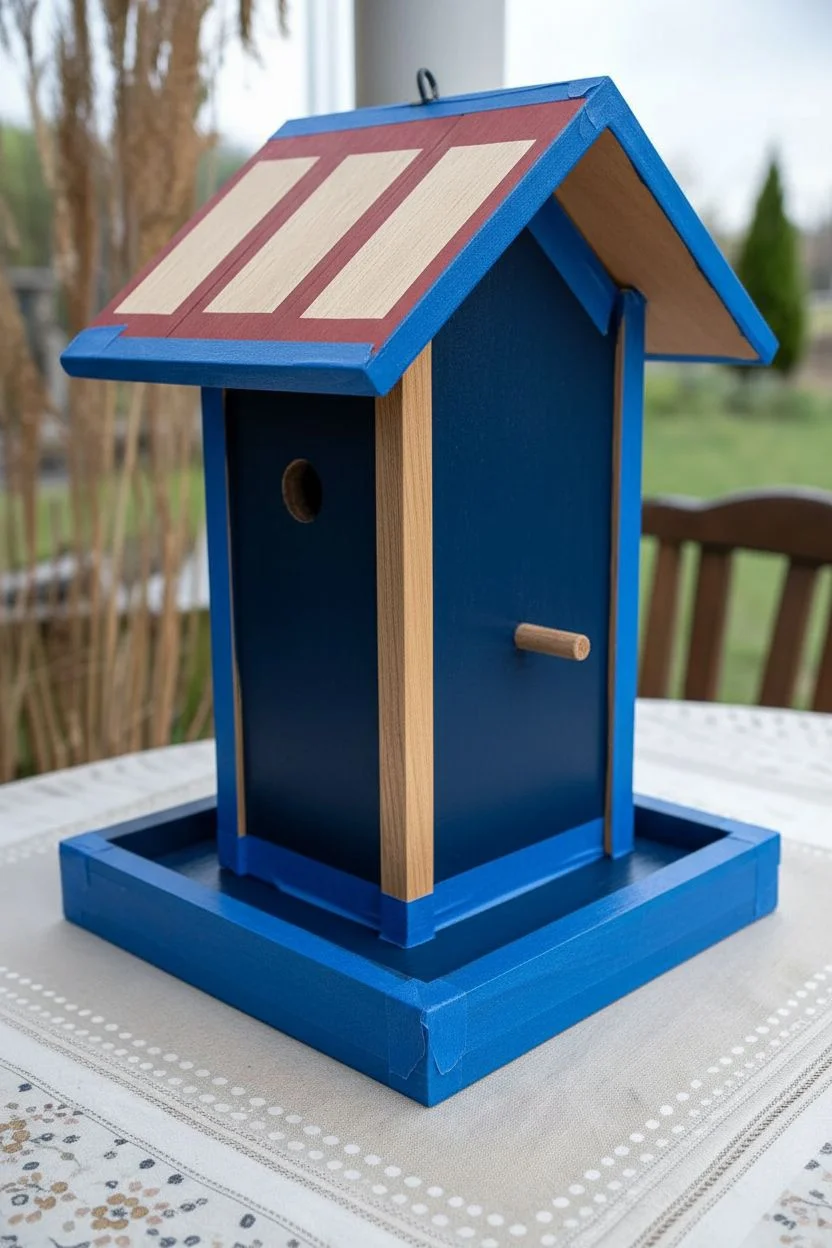
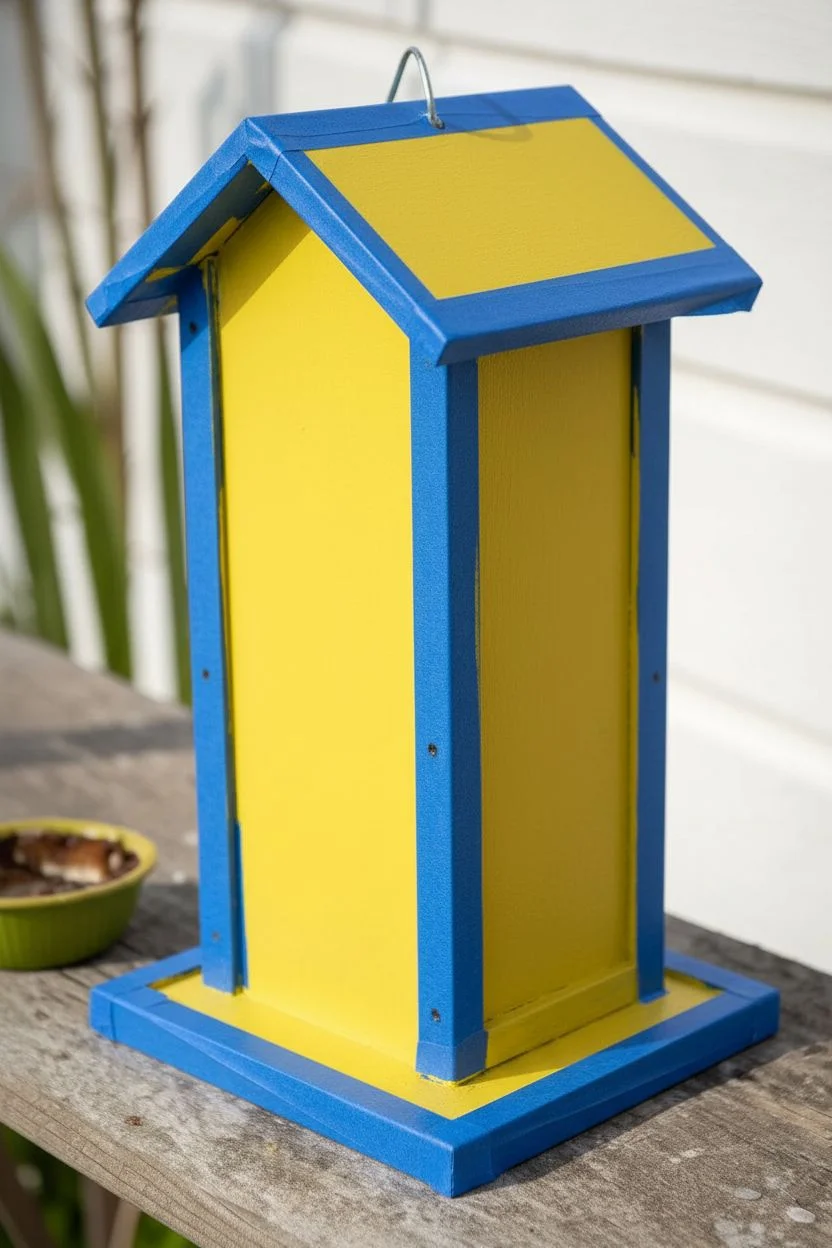
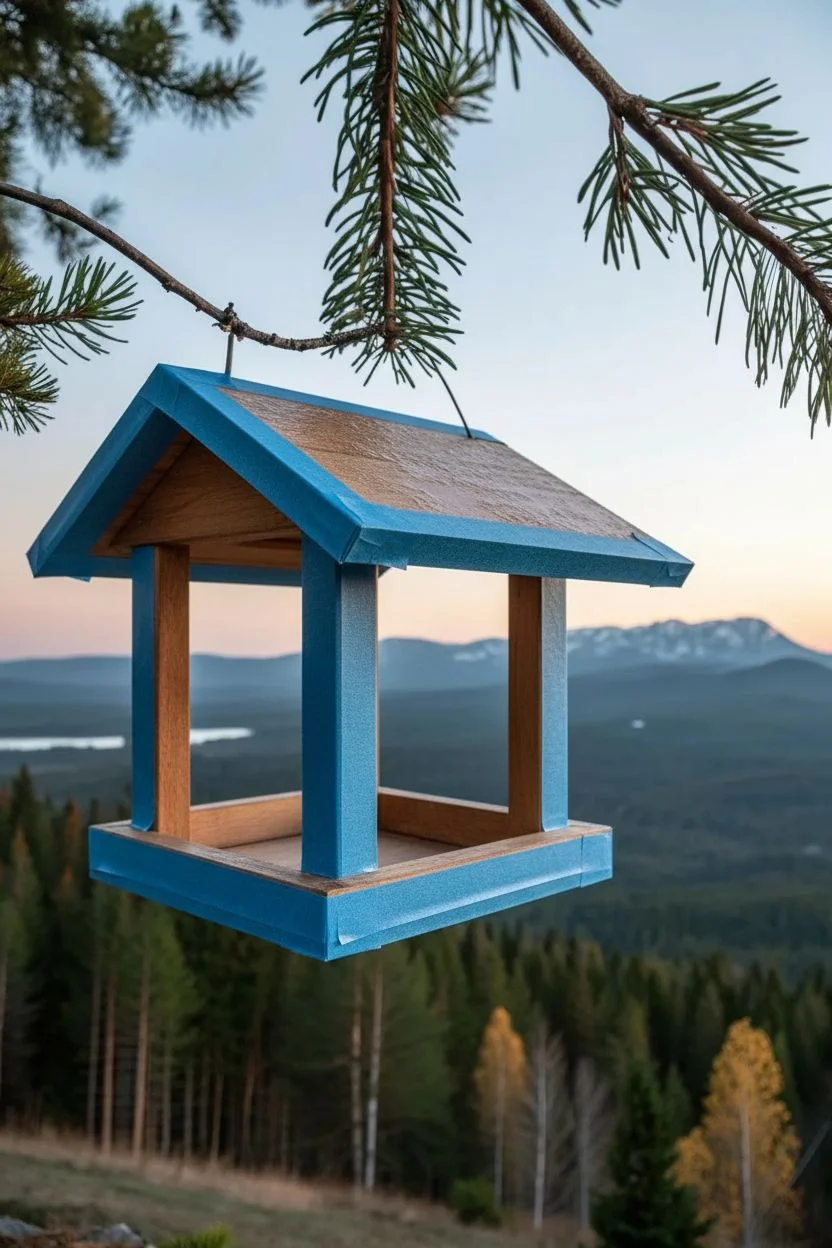
Rainbow Stripe Feeder
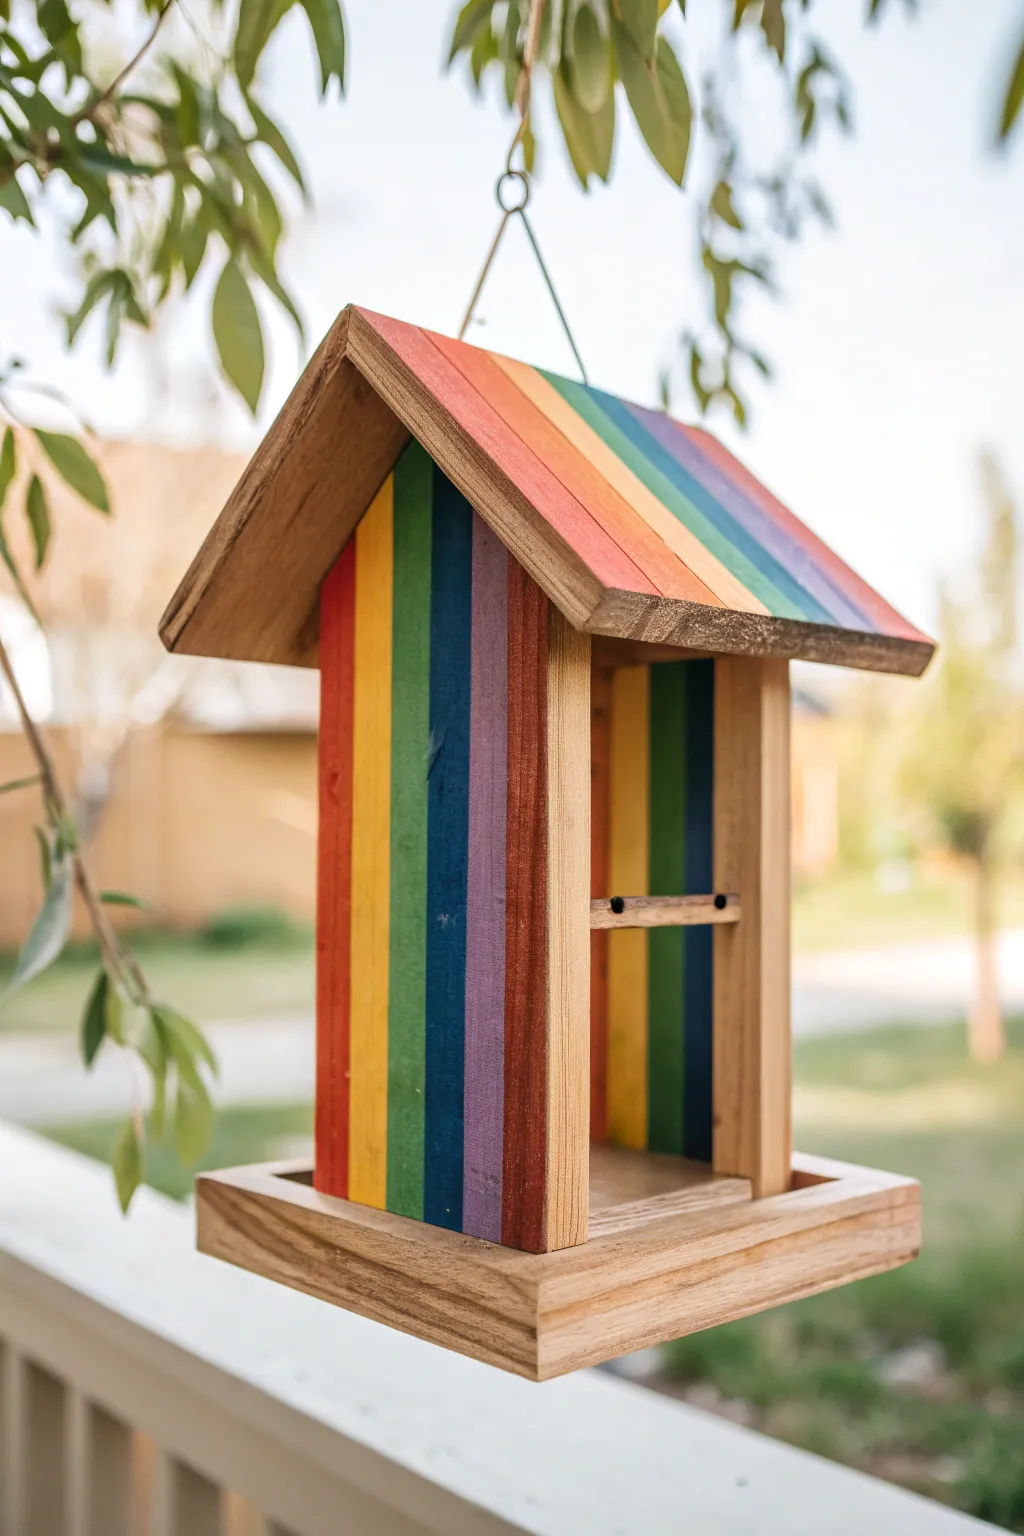
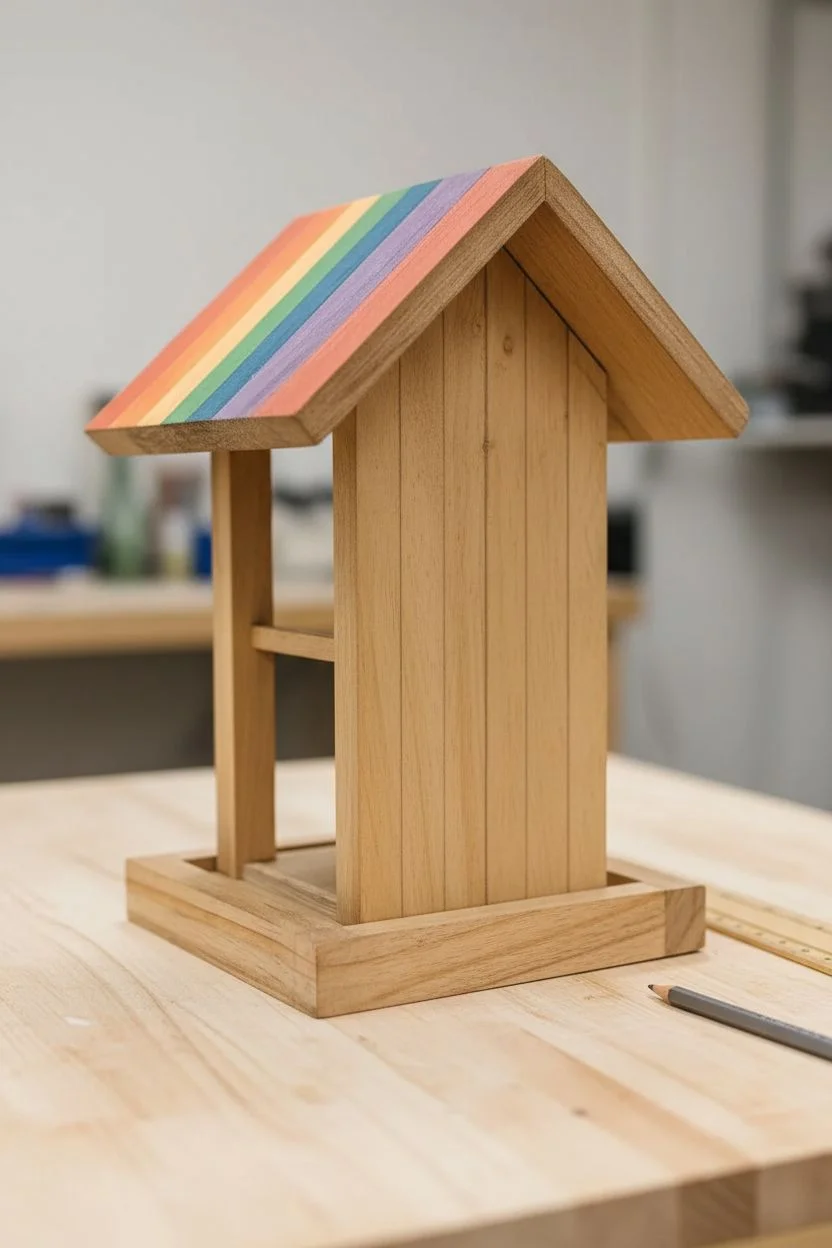
Brighten up your garden with this cheerful bird feeder that combines the rustic charm of natural wood with vibrant, modern stripes. The clean vertical lines and matching roof create a cohesive, playful look that stands out beautifully against green foliage.
Step-by-Step Guide
Materials
- Unfinished wooden bird feeder (hopper style with roof overhang)
- Painter’s tape (0.5 inch or similar narrow width)
- Acrylic outdoor craft paints (Red, Orange, Yellow, Green, Blue, Indigo, Violet)
- Small flat brush (size 4 or 6)
- Fine detail brush
- Clear outdoor sealant spray (matte or satin finish)
- Ruler or straight edge
- Pencil
- Sandpaper (fine grit)
Step 1: Preparation and Planning
-
Smooth the surface:
Begin by lightly sanding the entire wooden bird feeder with fine-grit sandpaper. This removes any splinters and creates a better surface for the paint to adhere to, which is crucial for outdoor projects. -
Wipe it down:
Use a damp cloth or tack cloth to wipe away all the sawdust. Ensure the wood is completely dry before moving to the next step. -
Measure the stripes:
Measure the width of the side panel. Divide this number by the number of colors you plan to use (usually six or seven for a rainbow) to determine how wide each stripe needs to be. -
Mark the guide lines:
Using your pencil and ruler, lightly draw vertical lines down the face of the feeder to mark where each color stripe will go. Continue these lines onto the roof panels so the stripes align perfectly from top to bottom.
Clean Lines Secret
Before painting a new color, paint a thin layer of clear sealant or matte medium over the tape edge. This seals the tape so no color bleeds underneath.
Step 2: Painting the Vertical Stripes
-
Isolate the first color:
To get crisp lines, I like to apply painter’s tape along the pencil lines for the first set of non-adjacent colors (e.g., Red, Yellow, Blue). Press the tape down firmly to prevent bleeding. -
Paint the first set:
Fill in the exposed wood sections with your first set of colors using the flat brush. Apply thin, even coats. Allow this layer to dry to the touch, usually about 20 minutes. -
Remove and tape again:
Carefully peel off the tape. Once the paint is fully dry, apply fresh tape over the painted edges to protect them while you paint the remaining colors (Orange, Green, Indigo/Violet). -
Fill in the gaps:
Paint the remaining stripes. Be careful near the edges where the wood meets the trim; a steady hand is better than tape here to avoid gaps. -
Connect the roof:
Repeat the painting process on the roof slopes. Ensure the color order matches the vertical stripes below it perfectly, creating the illusion of a continuous band of color going up and over the house.
Ombré Upgrade
Instead of distinct stripes, blend the wet paint edges on the wood to create a soft, gradient rainbow transition from one hue to the next.
Step 3: Finishing Touches
-
Clean up the edges:
Once all stripes are painted and tape is removed, inspect the edges. Use a fine detail brush to touch up any uneven lines or spots where paint might have seeped under the tape. -
Leave natural accents:
Notice how the base tray, the vertical corner trims, and the thick edge of the roof remain unpainted in the example. Leave these natural to frame the vibrant colors. -
Protect your work:
After the paint has cured for at least 24 hours, take the feeder continuously outside or to a well-ventilated area. -
Apply sealant:
Spray the entire feeder, including the unpainted wood sections, with a clear outdoor sealant. This prevents the wood from rotting and keeps the rainbow colors from fading in the sun. -
Install the hanger:
If your feeder didn’t come with hardware, screw a small eye hook into the center peak of the roof and attach a sturdy wire or twine loop.
Hang your new creation in a spot visible from your window and wait for the birds to arrive


Rustic Barn Red Feeder
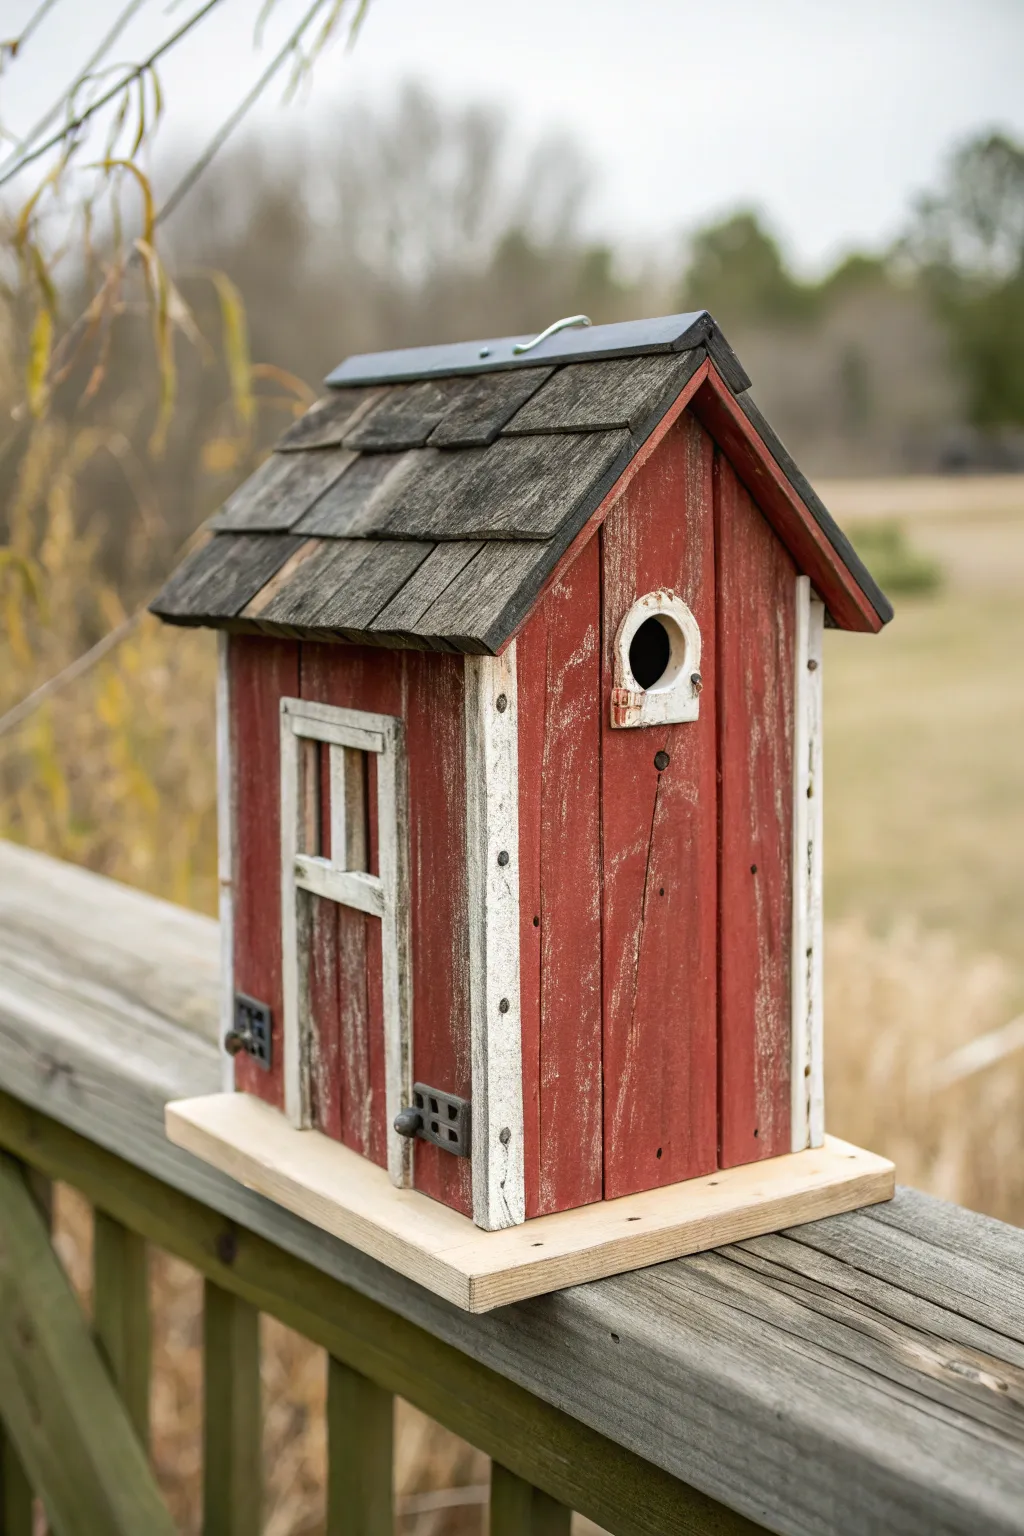

Capture the charm of an old country farm with this beautifully weathered barn birdhouse. The key to this project is layering distress techniques to make brand-new wood feel like it has been standing in a field for decades.
Step-by-Step Tutorial
Materials
- Unfinished wooden birdhouse (barn style)
- Cedar shingles or thin balsa wood strips
- Acrylic exterior paint: Barn Red, Antique White/Cream, Slate Grey
- Dark walnut wood stain or antiquing wax
- Sandpaper (medium and coarse grit)
- Small craft paintbrush
- Medium flat paintbrush
- Wood glue
- Square dowels (for door trim)
- Small metal hinges (decorative)
- Rags or paper towels
Step 1: Structural Prep
-
Prepare the Surface:
Begin by lightly sanding the entire birdhouse exterior to remove any splinters and help the paint adhere. Wipe away all dust with a tack cloth. -
Add Roof Shingles:
If your base birdhouse has a plain roof, cut small rectangles of cedar or balsa wood. Glue them in overlapping rows starting from the bottom edge and working upward to mimic a shingled roof. -
Construct the Door Frame:
Measure the side panel where you want the faux door. Cut thin balsa strips or square dowels to create a rectangle frame and a central crossbar, then glue them securely in place. -
Add Corner Trim:
Glue thin strips of wood vertically along the four main corners of the house. This adds depth and simulates the corner boards found on real barns.
Natural Greying
Soak a piece of steel wool in white vinegar overnight. Brush this solution onto raw wood shingles before painting to create an authentic, silvery-grey weathered effect rapidly.
Step 2: The Painting Process
-
Base Coat the Walls:
Paint the main body of the house with a deep Barn Red exterior acrylic. Don’t worry about perfect coverage; a little unevenness adds to the rustic look. -
Paint the Trim:
Using a smaller brush, carefully paint the corner strips, the door frame, and the small frame around the entry hole with Antique White or Cream. You may need two coats here for brightness. -
Roof Coloring:
Paint the roof shingles with a Slate Grey. If you used real cedar, a heavily watered-down black or grey wash works beautifully to let the wood grain show through. -
Dry Time:
Allow the entire house to dry completely. This is crucial before moving on to the distressing phase to prevent the colors from muddying.
Level Up: Functional Door
Instead of gluing the faux door trim, cut a cleaning hatch separate from the wall. Using real miniature hinges instead of glue-ons allows you to open it for seasonal cleaning.
Step 3: Distressing & Details
-
Heavy Sanding:
Take your coarse sandpaper and aggressively sand the red walls and white trim. Focus on edges, corners, and the centers of panels where paint would naturally peel over time. -
Expose the Grain:
Continue sanding until you see raw wood peeking through the red paint in vertical streaks. I like to sand in the direction of the wood grain for the most natural effect. -
Apply Antiquing Wash:
Mix a small amount of dark walnut stain or brown paint with water. Brush this wash over the entire house, heavily concentrating on the sanding marks and crevices. -
Wipe Back:
Immediately wipe the wash off with a rag. The dark color will remain in the sanded grooves and corners, instantly aging the wood. -
Attaching Hardware:
Glue small decorative black hinges near the bottom of the faux door frame to simulate a functional barn door. -
Final Seal:
If this will live outdoors, protect your hard work with a clear, matte outdoor polyurethane spray. Avoid glossy finishes to maintain the aged aesthetic.
Hang your new miniature barn in the garden and watch the birds enjoy their charming country home
BRUSH GUIDE
The Right Brush for Every Stroke
From clean lines to bold texture — master brush choice, stroke control, and essential techniques.
Explore the Full Guide
Coastal Blue-and-Sand Feeder
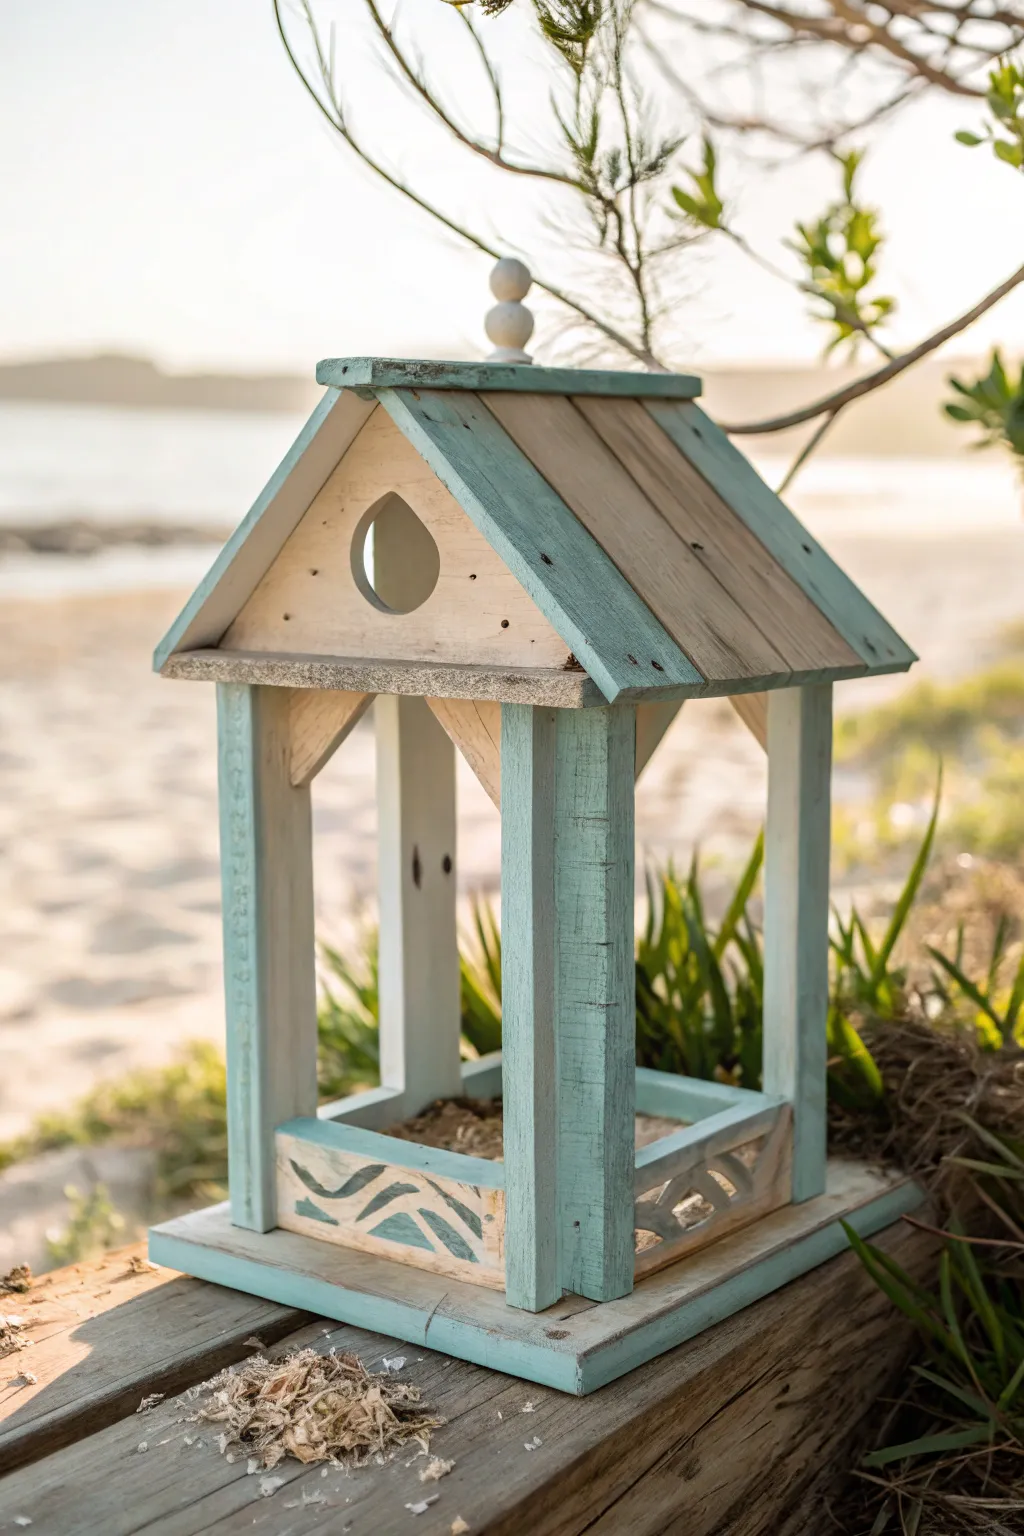
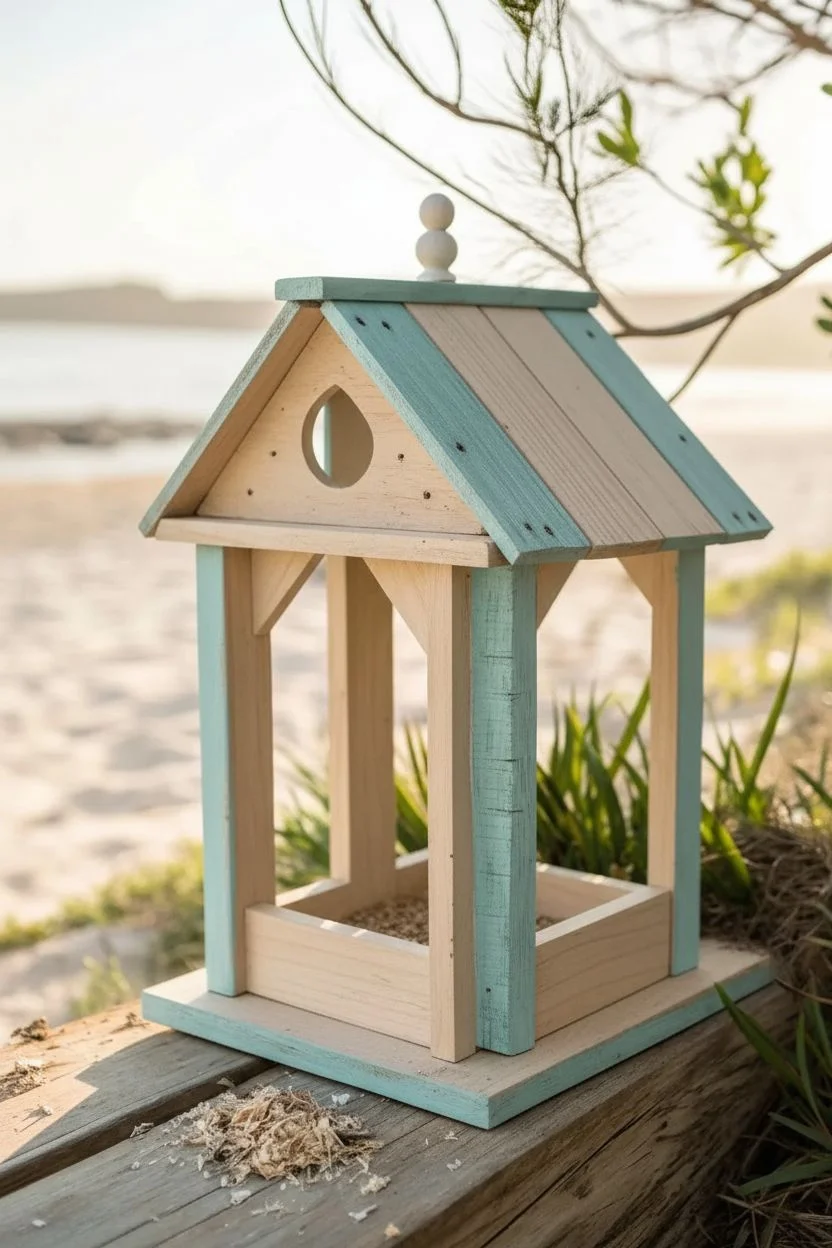
Bring the serene vibes of the shoreline to your backyard with this wonderfully weathered bird feeder. The design features a distressed turquoise and raw wood finish that perfectly captures the look of driftwood baking in the sun.
How-To Guide
Materials
- Unfinished wooden bird feeder
- Medium and fine-grit sandpaper (120 and 220 grit)
- Chalky finish paint (turquoise or seafoam green)
- White cream wax or white-tinted stain
- Clean cotton rags
- Small foam brush
- Detailed paintbrush
- Natural bristle dry brush
- Wood glue (for repairs if needed)
- Top coat sealer (matte finish)
Step 1: Prepping and Base Coat
-
Sand the surface:
Begin by giving the entire wooden feeder a thorough sanding. Use the 120-grit paper to smooth out any rough splinters, especially around the roof edges and the feeding tray base. -
Dust off debris:
Wipe the wood down with a clean, slightly damp cloth or a tack cloth to remove all sawdust. A clean surface is crucial for the distressed paint to adhere correctly. -
Water down the paint:
Pour a small amount of your turquoise chalk paint into a container and mix it with water (about a 1:1 ratio) to create a color wash. We want transparency here, not solid coverage. -
Apply the roof wash:
Isolate the alternating slats on the roof. Paint every other slat with your turquoise wash, letting the wood grain show through. Leave the remaining slats raw for now. -
Paint the uprights:
Apply the same turquoise wash to the four main corner posts and the base trim. Brush with the grain of the wood for a natural, seeped-in look.
Uneven Wash?
If your paint wash looks blotchy, wipe the wood with a damp rag first to open the pores, ensuring the color absorbs smoothly and evenly.
Step 2: Creating the Driftwood Effect
-
Whitewash the raw wood:
Take your white cream wax or a very diluted white stain. Apply this to the unpainted wooden slats on the roof and the interior support beams. -
Wipe back immediately:
Before the white layer dries, wipe it back vigorously with a clean rag. This should leave a bleached, sun-faded appearance rather than a painted white look. -
Add heavy distressing:
Once the turquoise sections are fully dry, take your 120-grit sandpaper again. Sand edges, corners, and random spots on the flat surfaces to reveal the raw wood underneath. -
Detail the eaves:
On the flat triangular face under the roof, use the sandpaper to create a very rough texture. You can even use a rasp if you have one to mimic salt corrosion.
Step 3: The Wave Motif and Finishing
-
Sketch the wave pattern:
On the side panels of the feeding tray base, lightly pencil in a simple, flowing wave design. -
Paint the waves:
Using a small detail brush and undiluted turquoise paint, fill in the wave shapes. Keep your hand loose; imperfections add to the rustic charm. -
Sand the motif:
I like to let this dry briefly, then gently scuff the painted waves with fine-grit sandpaper so they look worn and integrated into the wood. -
Dry brush highlights:
Dip a dry, stiff-bristle brush into a tiny amount of off-white or cream paint. Blot almost all of it off on a paper towel. -
Highlight the edges:
Lightly drag the dry brush over the raised grain and corners of the turquoise posts. This ‘frosting’ mimics salt spray accumulation. -
Seal the project:
To protect your work from actual weather, apply a clear, matte outdoor sealer. Avoid shiny varnishes, as they ruin the driftwood aesthetic.
Add Texture
Before painting, beat the wood with a heavy chain or hammer lightly to create dents and dings for an authentic aged, reclaimed timber look.
Hang your new coastal creation in a sunny spot and watch the birds enjoy their beachside retreat
Sunflower Roof Accent Feeder
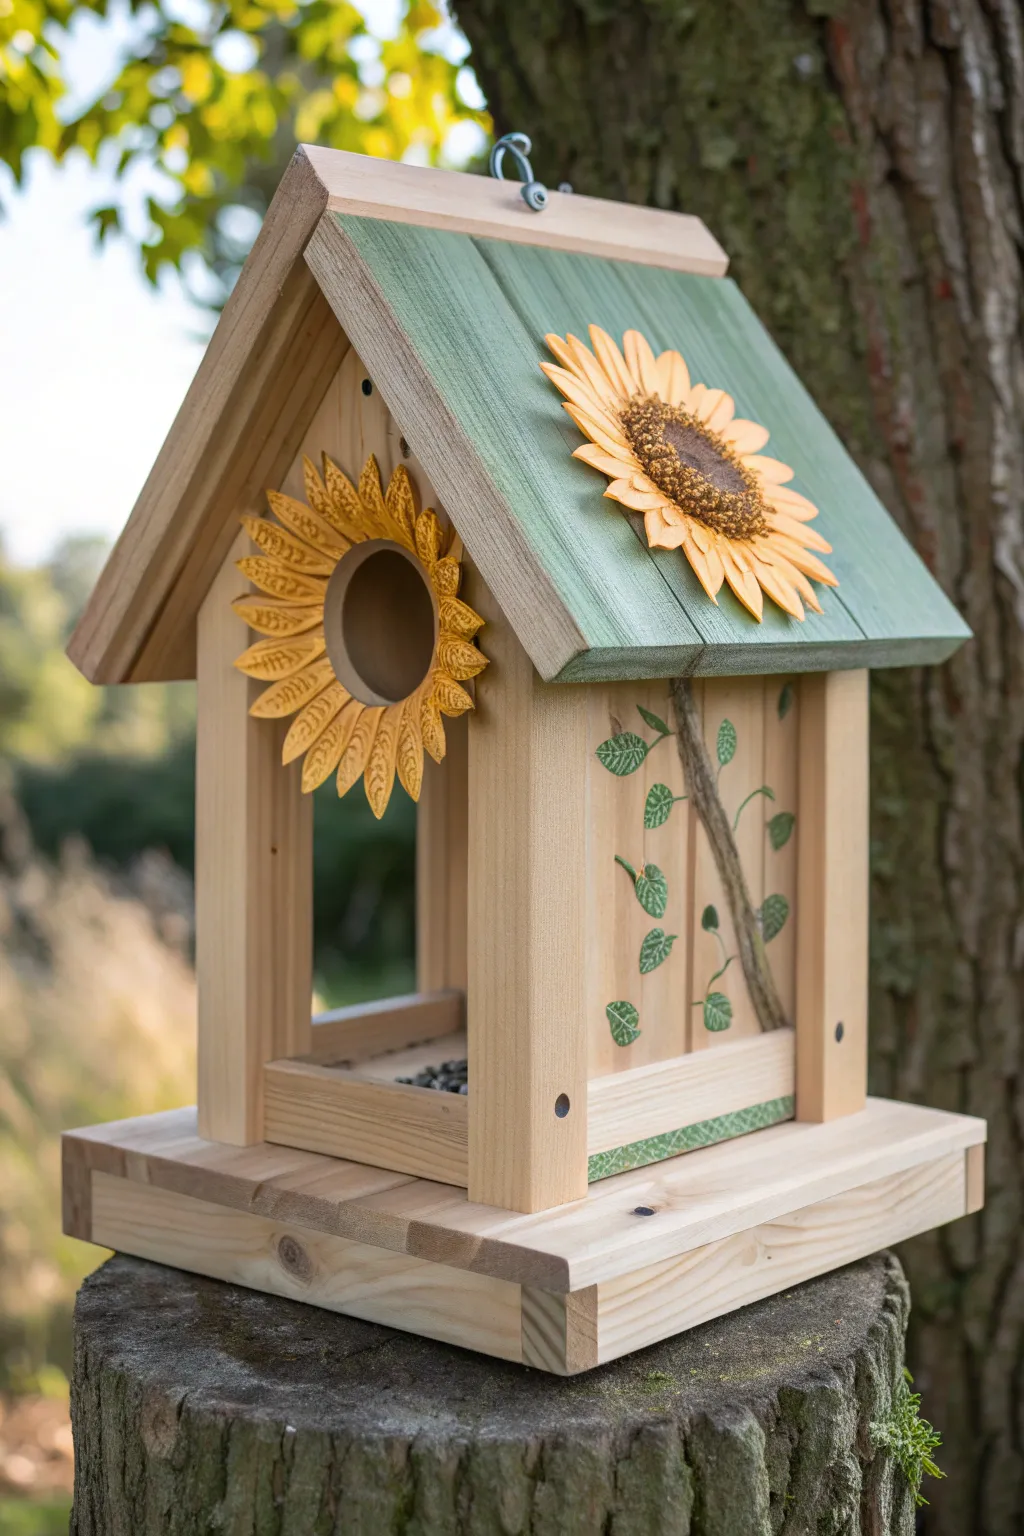
Bring a burst of sunshine to your garden with this cheerful wooden bird feeder project. Featuring a sage green roof and vibrant sunflowers—both painted and attached—it combines rustic charm with bright floral accents.
Step-by-Step Tutorial
Materials
- Unfinished wooden bird feeder (with entrance hole and roof)
- Sage or moss green acrylic outdoor paint
- Yellow ochre and bright yellow acrylic paint
- Dark brown and medium brown acrylic paint
- Green leaf acrylic paint
- Large artificial sunflower head (fabric or plastic)
- Small artificial sunflower petals or separate sunflower head
- Hot glue gun and outdoor-grade glue sticks
- Medium flat paintbrush
- Small round detail paintbrush
- Sandpaper (medium grit)
- Small metal hook (optional)
Step 1: Preparation & Roof
-
Surface Prep:
Begin by lightly sanding the entire wooden bird feeder to remove any rough splinters or dirt. Wipe it down with a damp cloth to ensure a clean painting surface. -
Paint the Roof Base:
Using your medium flat brush, apply a coat of sage green paint to the roof slats. Depending on the wood’s absorbency, you might need a second coat for solid coverage. Let this dry completely. -
Add Roof Texture:
To give the roof a weathered look, lightly dry-brush a very small amount of white or lighter green paint over the raised edges of the roof slats.
Adhesion Issues?
If the artificial flowers aren’t sticking to the wood, scuff the back of the plastic flower base with sandpaper before gluing to give the adhesive more grip.
Step 2: Entryway Sunflower
-
Position the Petals:
Around the main circular entry hole needed for the flower center, you’ll be creating a sunflower bloom. You can paint these directly, but for the textured look in the photo, detach petals from a small artificial sunflower. -
Attach Petals:
Glue the individual artificial petals in a radial pattern around the hole. Overlap them slightly so the wood underneath doesn’t show through. -
Paint the Petals (Optional):
If your artificial petals are too bright, tone them down with a wash of yellow ochre paint to match the rustic aesthetic. Add tiny brown streaks near the center of the petals for realism. -
Define the Center:
Use dark brown paint to carefully outline the inner rim of the hole, creating the illusion of the sunflower’s seed center leading into the feeder.
Make it Last
Swap standard hot glue for a heavy-duty construction adhesive like E6000 for the roof flower. It takes longer to cure but withstands heat and rain much better.
Step 3: Vine Detailing
-
Sketch the Vine:
On the side panel of the feeder, lightly sketch a winding vine shape with a pencil. It should look like it’s growing upward. -
Paint the Stem:
Using a small round brush and brown paint, trace your pencil line. I like to mix a little grey into the brown to make the wood look aged like a real vine. -
Add Texture to Stem:
Dab a slightly darker brown along one side of the vine to create a shadow, giving the painted stem a 3D appearance. -
Paint Leaves:
paint small, teardrop-shaped leaves coming off the vine using green paint. Vary the angles so they look natural. -
Detail the Leaves:
Once the green is dry, use a very fine brush (or a white paint pen) to draw tiny veins on the leaves for added definition.
Step 4: Final Assembly
-
Prepare the Main Accent:
Take your large artificial sunflower head. If the back has a plastic stem nub, trim it off so the flower lies flat. -
Attach Roof Flower:
Apply a generous amount of hot glue to the back of the large sunflower and press it firmly onto the center of the green roof slope. Hold it for 30 seconds to ensure a strong bond. -
Seal the Project:
Since this will be outdoors, apply a coat of clear matte outdoor sealer over all painted areas (avoiding the bird seed tray itself) to protect against rain and sun. -
Install Hook:
If not already attached, screw a small metal eye hook into the peak of the roof for hanging.
Hang your masterpiece in a visible spot and watch as the birds enjoy their new floral dining cottage

PENCIL GUIDE
Understanding Pencil Grades from H to B
From first sketch to finished drawing — learn pencil grades, line control, and shading techniques.
Explore the Full Guide
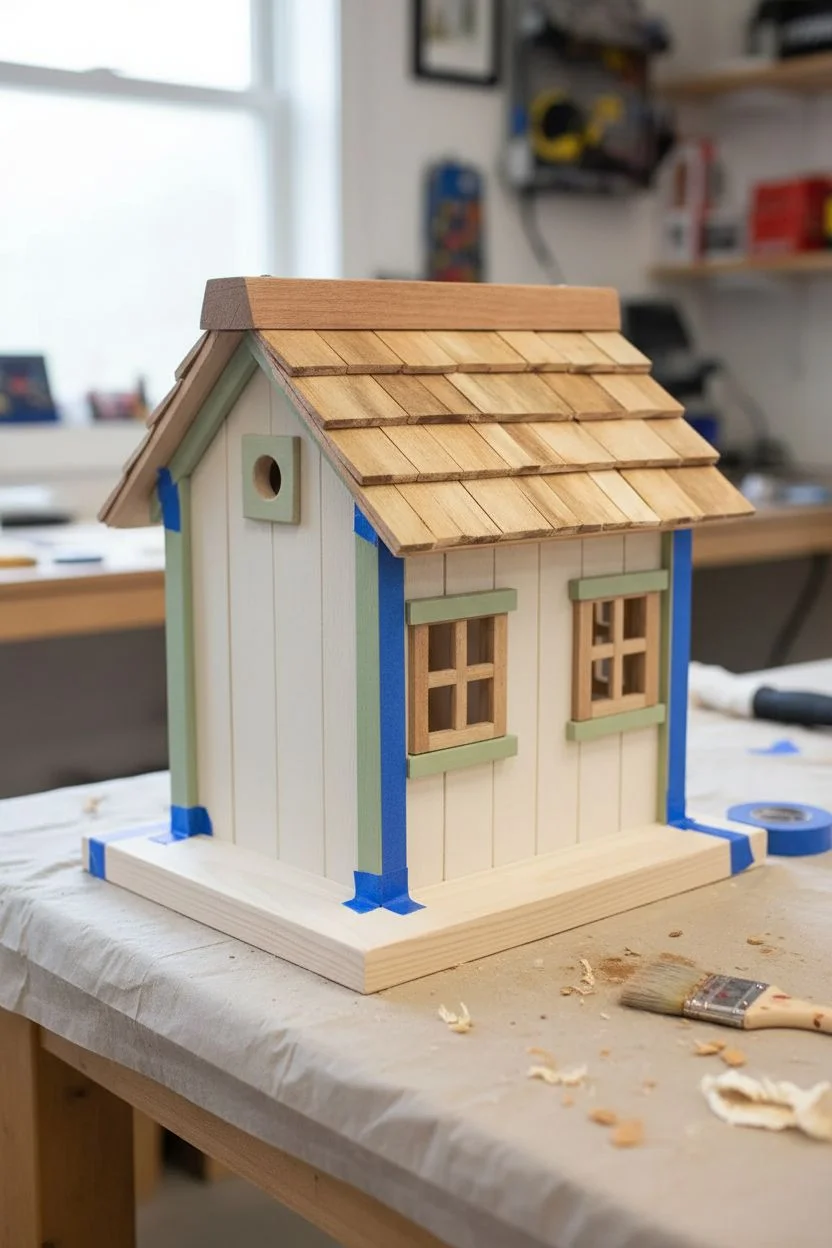
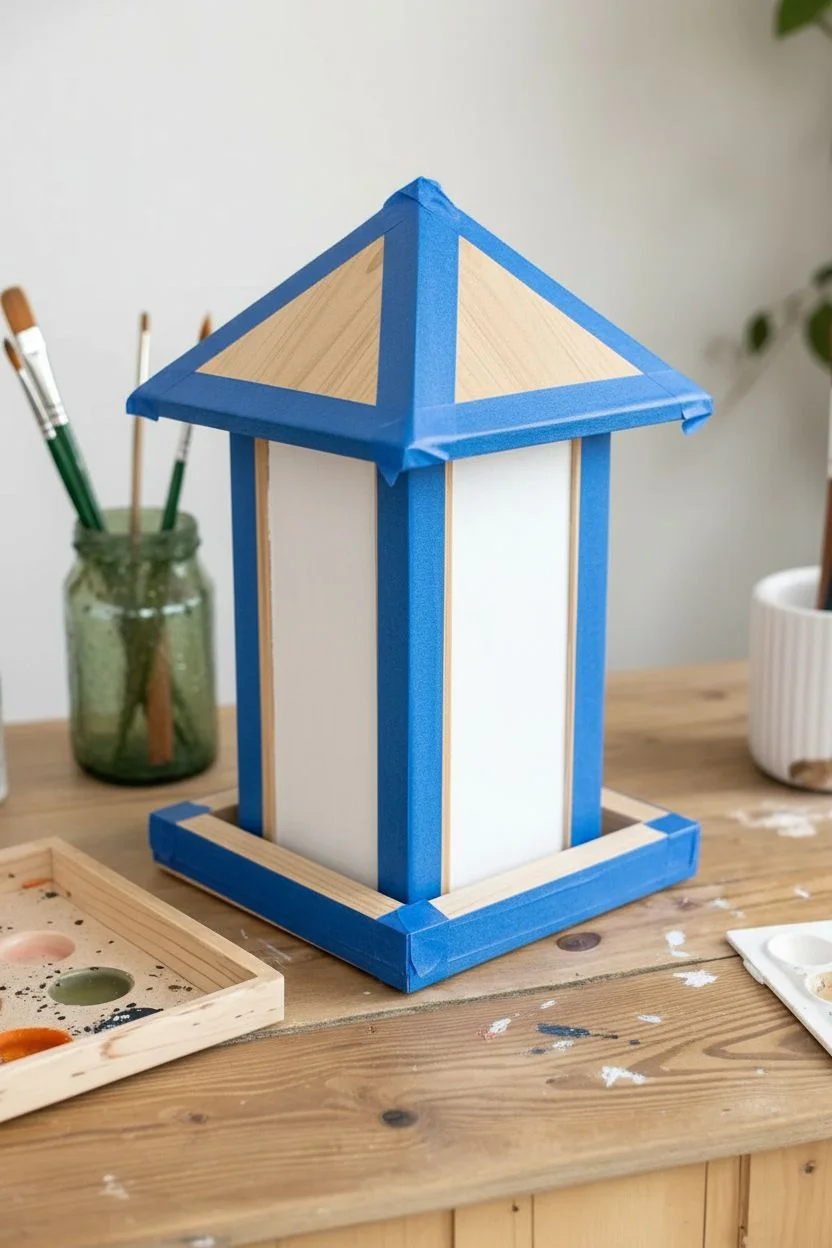
Faux Shingle Roof Detail
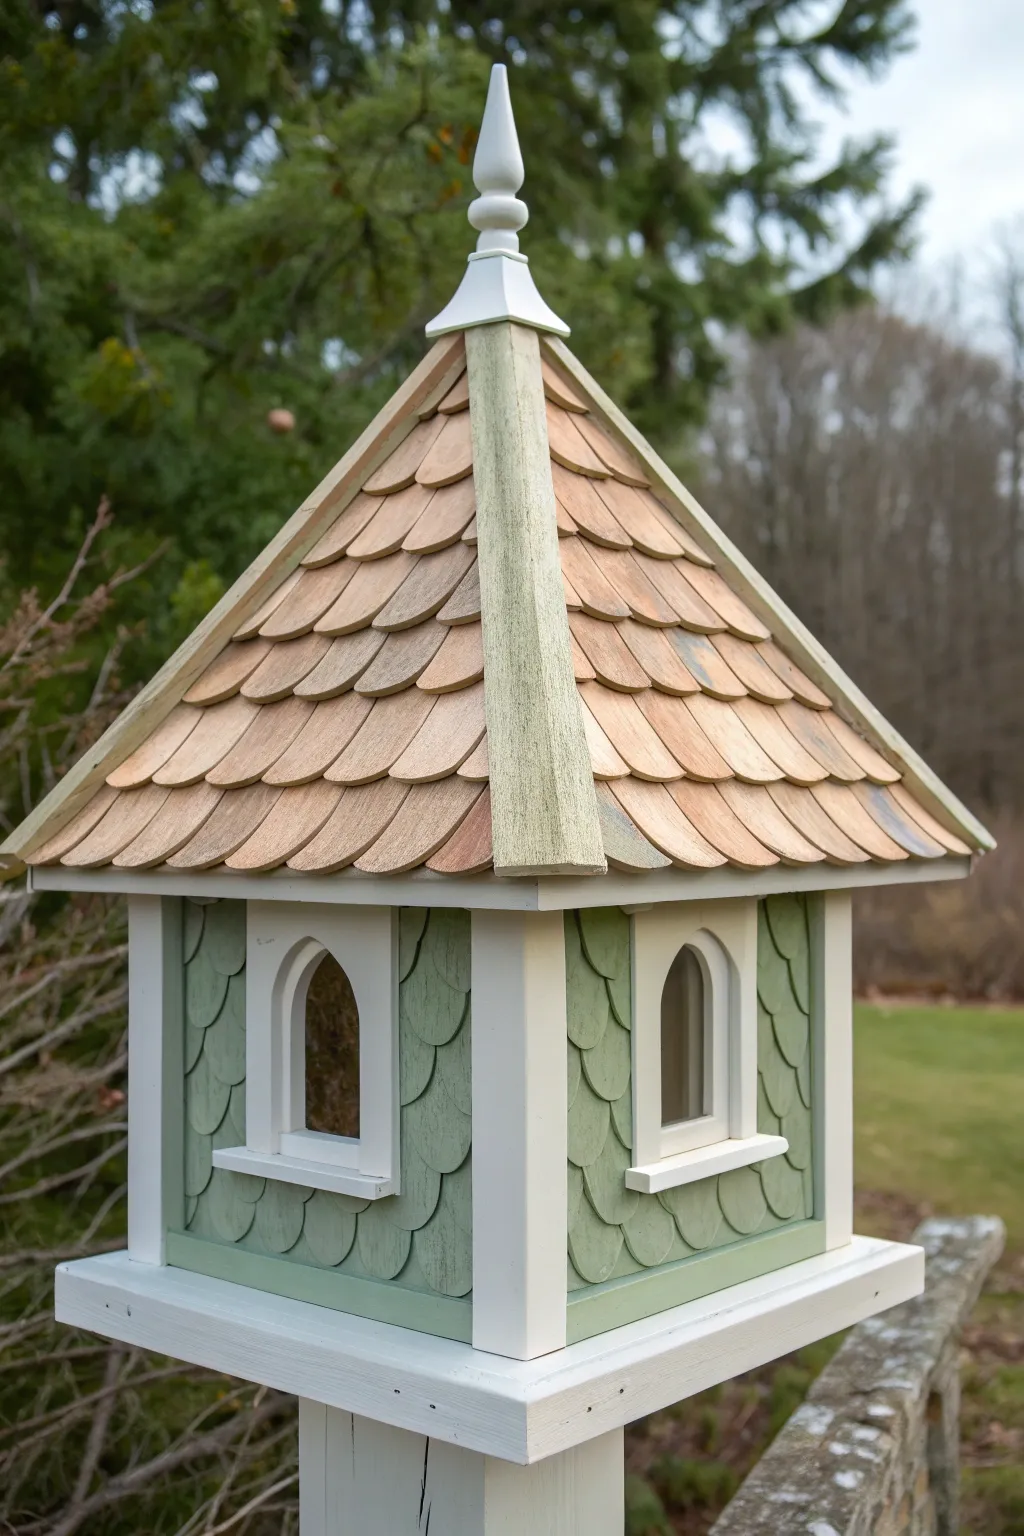
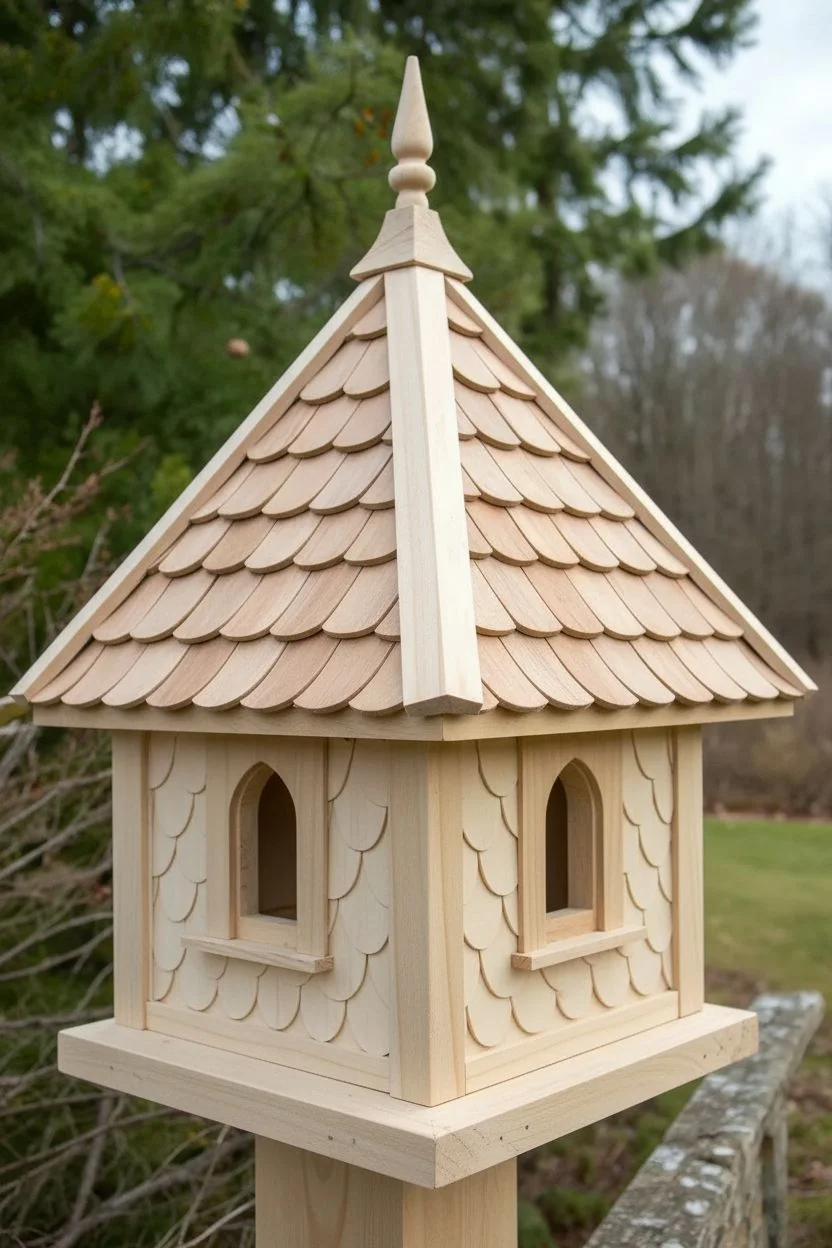
Give your bird feeder a classic, cottage-style upgrade by building and finishing a textured shingle roof. This project combines actual wood layering with a subtle weathering wash to create a functional, charming topper that looks like it belongs in an English garden.
Step-by-Step Guide
Materials
- Unfinished wooden birdhouse base (with pyramidal roof)
- Small cedar shim shingles or thin veneer strips (1-inch width)
- Waterproof wood glue
- Small coping saw or heavy-duty shears
- Sandpaper (medium grit)
- Exterior acrylic paint (Sage Green)
- Exterior acrylic paint (White)
- Raw Umber or burnt sienna acrylic paint (for weathering)
- Matte exterior varnish or polyurethane
- Flat shader brush (1/2 inch)
- Small detail brush
- Finial (optional wood turning for the top)
Step 1: Creating the Shingle Structure
-
Prep the Surface:
Start by lightly sanding the existing roof of your birdhouse to ensure a rough surface for adhesion. Wipe away any dust with a tack cloth so your glue holds firm. -
Cut the First Row:
Measure the bottom edge of one roof panel. Cut small rectangles from your cedar shims or veneer to fit across this bottom edge. I like to round the bottom corners of each piece slightly with sandpaper for a softer, scalloped look. -
Attach the Starter Row:
Apply a bead of waterproof wood glue to the back of each shingle. Press them along the bottom edge of the roof, leaving a tiny overhang to protect the trim below. -
Layering Upwards:
Cut the next row of shingles. Glue them slightly higher than the first row, overlapping the seams of the row below by about half an inch. This staggering is crucial for shedding water effectively. -
Complete the Slope:
Continue gluing rows upward until you reach the peak. You will need to trim the side edges of the shingles at an angle as the roof narrows toward the top. -
Finish All Sides:
Repeat this process for all four sides of the roof. Don’t worry if the corners aren’t perfect; we will cover them with trim later. -
Install Corner Trim:
Cut long, thin strips of wood to cover the four hip seams where the roof sides meet. Glue these over the jagged shingle edges to create a clean corner ridge. -
Top It Off:
Drill a small hole at the very peak if needed, and glue your wooden finial into place to cap the junction of the four roof sides.
Step 2: Painting and Weathering
-
Seal the Wood:
Apply a clear sanding sealer to the raw cedar shingles. This prevents them from soaking up too much paint and becoming warped. -
Siding Base Coat:
While the roof dries, paint the main body of the birdhouse with your Sage Green exterior paint. Use two coats for full coverage, letting it dry completely between applications. -
Trim Work:
Using a steady hand and a smaller flat brush, paint the window arches, base molding, corner posts, and the new roof corner ridges in crisp White. -
Roof Wash Mix:
Mix a small amount of Raw Umber paint with water (about a 1:4 ratio) to create a semi-transparent wash. You want a dirty water consistency, not thick paint. -
Applying the Wash:
Brush the wash over the cedar roof shingles. The wood will absorb the color unevenly, highlighting the natural grain and texture. Wipe off excess immediately with a rag for a sun-bleached driftwood effect. -
Finial Detail:
Paint the decorative finial white to match the trim, which ties the peak visually to the base of the structure. -
Protective Coat:
Once all paint and washes are bone dry (wait at least 24 hours), apply two coats of exterior matte varnish to the entire structure, paying special attention to the roof seams.
Natural Texture
Use cedar shake shims from a hardware store instead of craft sticks. Their uneven thickness and rough grain grab the wash beautifully.
Gapping Issues
If you have large gaps at the roof corners before adding trim, fill them with exterior wood putty before gluing on the corner ridges to keep moisture out.
Now you have a charming, weather-resistant focal point for your backyard that looks professionally crafted
Scandinavian Folk Floral Feeder
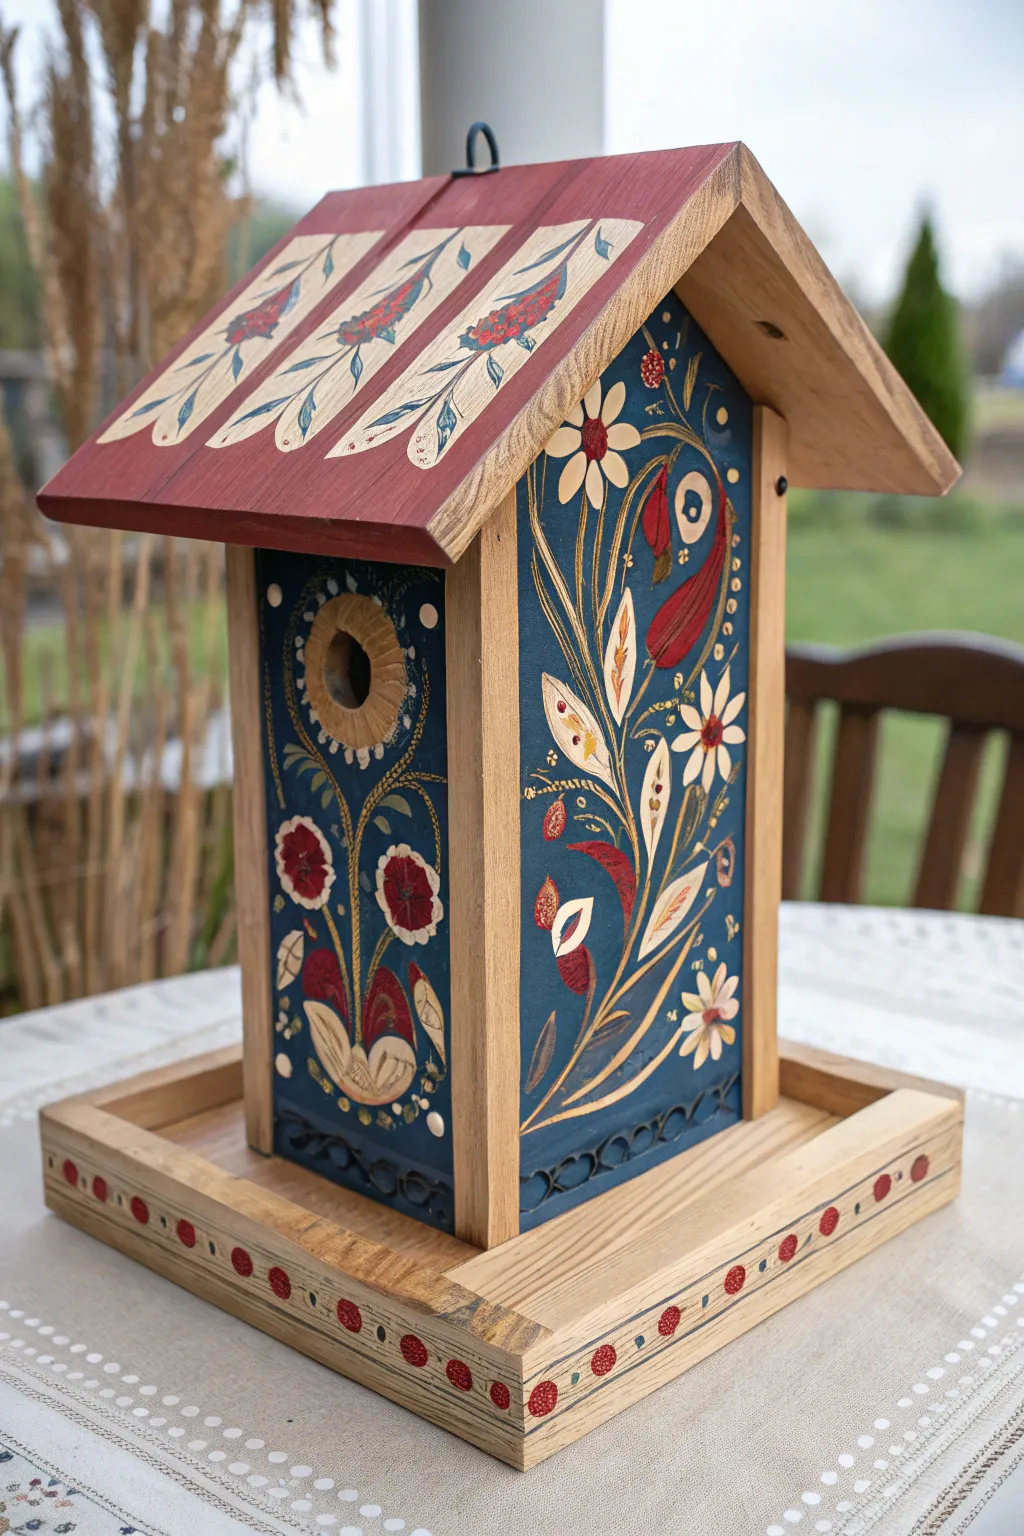
Transform a plain wooden bird feeder into a stunning piece of Scandinavian folk art with deep blues, rich reds, and delicate floral motifs. This project combines rustic woodwork with intricate rosemaling-inspired details to create a cozy, whimsical garden accent.
Step-by-Step Tutorial
Materials
- Unfinished wooden bird feeder (house style with tray)
- Painter’s tape
- Deep midnight blue acrylic paint
- Cream or off-white acrylic paint
- Barn red or burgundy acrylic paint
- Ochre or muted gold acrylic paint
- Flat paintbrushes (medium and small)
- Fine liner brush (for details)
- Pencil
- Outdoor matte decor varnish or sealant
- Sandpaper (fine grit)
- Small dotting tool or toothpick
Step 1: Preparation & Base Coats
-
Prepare the surface:
Start by lightly sanding the entire bird feeder to ensure a smooth painting surface. Wipe away any dust with a damp cloth or tack cloth. -
Mask the wood accents:
Using painter’s tape, carefully mask off the vertical corner timbers, the roof edges, the perch dowel, and the base tray. We want to keep the natural wood grain visible in these structural areas. -
Paint the background:
Apply the deep midnight blue paint to the main walls of the house. You will likely need two coats to get that rich, opaque finish seen in the image. -
Base coat the roof:
While the blue dries, paint the main panels of the roof with your barn red shade. Leave the very edge of the roof unpainted or masked to maintain that natural wood trim. -
Create the roof stripe panels:
Once the red roof is dry, mix a lighter cream shade. Paint three wide vertical stripes or panels on each side of the roof slope, leaving red gaps between them. These will serve as the canvas for the roof florals.
Step 2: Floral Folk Art Detailing
-
Sketch the design:
Lightly sketch your floral patterns onto the dry blue walls with a pencil. Focus on a central stem that curves upwards, with teardrop-shaped leaves and circular blooms radiating out. -
Paint main stems and leaves:
Using a fine liner brush and cream paint, trace your stems. Fill in large leaf shapes with long, sweeping strokes. For the Scandinavian look, keep the stroke distinctive—wider at the base and tapering to a point. -
Add primary flowers:
Paint the large, daisy-like flowers using the cream paint for petals. Add smaller circular accents and teardrop buds near the top of the stems. -
Layer with red accents:
Once the cream layer is dry, go back in with your barn red paint. Add red centers to the daisies and fill in some of the larger teardrop leaf shapes to create contrast against the blue. -
Highlight with gold:
I particularly enjoy adding small touches of ochre or gold paint at this stage. Add tiny dots around flower centers or thin veins inside the cream leaves to add depth. -
Decorate the entrance:
Paint a decorative ring around the bird entrance hole. Use small scalloped strokes or dots in cream and gold to frame the opening. -
Detail the roof panels:
On the cream roof stripes, paint simple red floral sprigs with blue leaves. The design should mimic the vine-like quality of the side panels but on a smaller scale.
Brush Control Secret
To get those tapered Scandinavian leaves, press down firmly at the start of the stroke and lift the brush gradually as you pull away.
Step 3: Tray Border & Finishing
-
Paint the tray trim:
Moving to the bottom tray, paint a thin wavy line or straight border in dark blue along the face of the wooden rim. -
Add berry dots:
Using the back of a paintbrush or a dotting tool, stamp alternating red dots along the tray border. Vary the sizes slightly for a hand-painted, folk feel. -
Remove tape and touch up:
Carefully peel away all painter’s tape. If any paint bled onto the natural wood areas, gently scrape it off with a craft knife or sand it lightly. -
Paint bottom scrolling:
At the very bottom of the blue house walls, paint a small, recurring loop or scallop pattern in black or dark grey as a grounding border. -
Seal for protection:
Once all paint is completely cured (wait at least 24 hours), apply two coats of outdoor matte varnish. This creates a durable barrier against rain and sun so your artwork lasts.
Paint Bleeding?
If paint bleeds under your tape onto the wood, wait for it to dry completely, then gently scrape it away with an X-Acto knife or sandpaper.
Hang your beautiful new feeder in a quiet spot and enjoy watching the birds visit their colorful new home


Stenciled Daisies and Dots
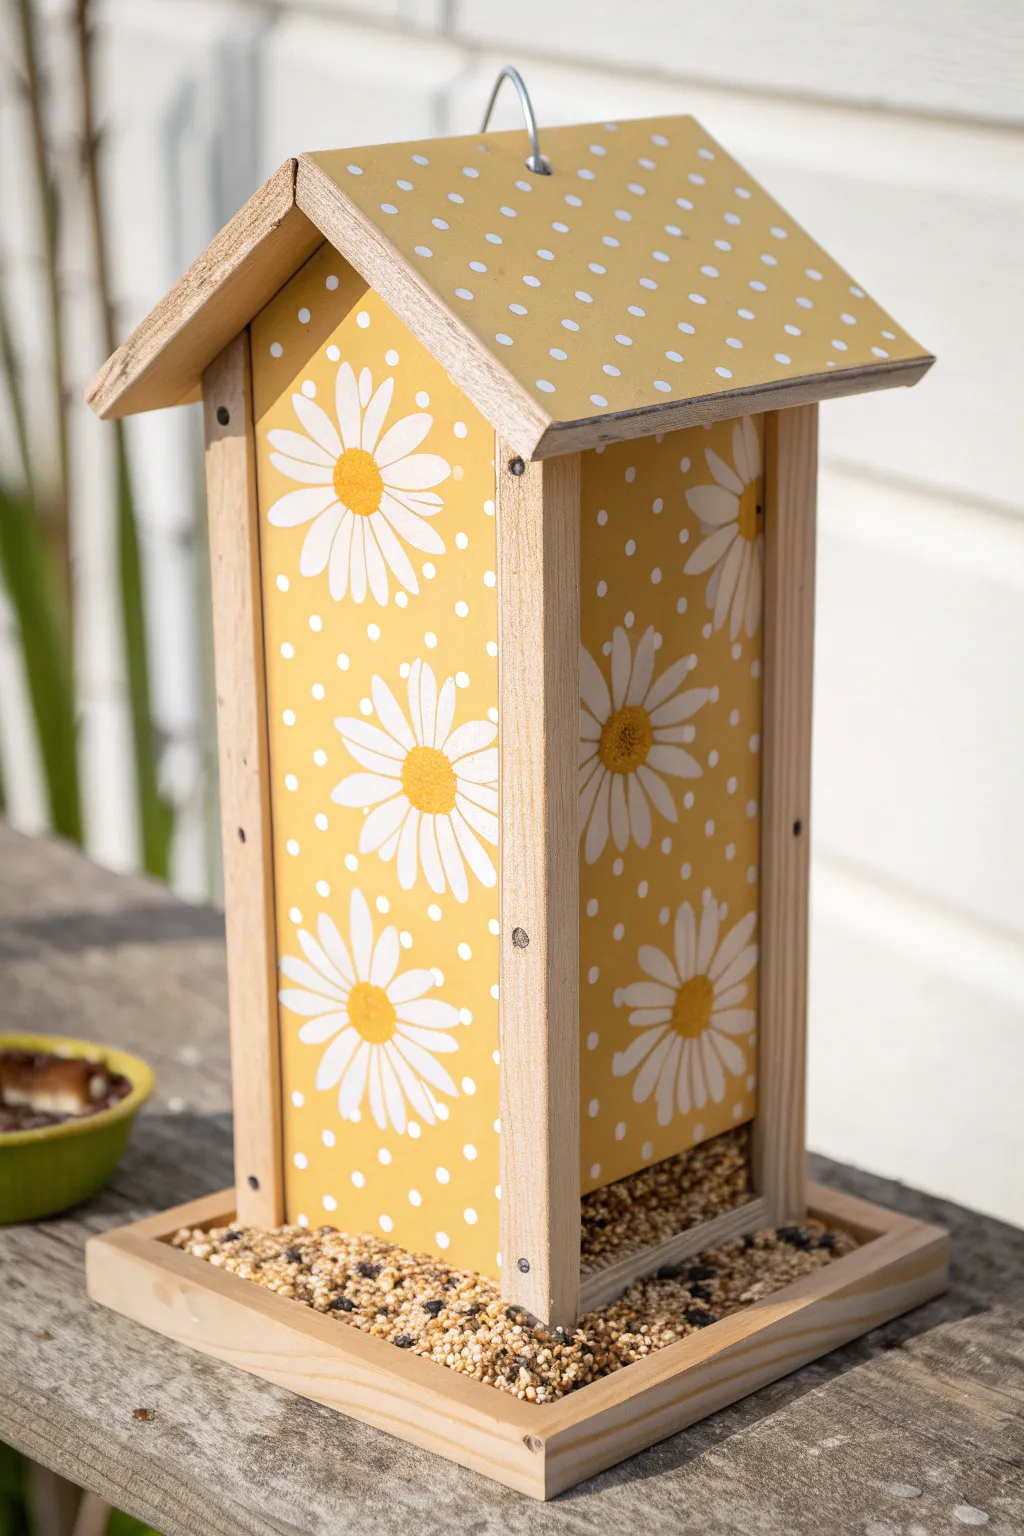
Bring a burst of sunshine to your garden with this cheerful bird feeder featuring bright daisies and whimsical polka dots. The warm yellow background and crisp white floral pattern create a welcoming spot for your feathered friends.
Detailed Instructions
Materials
- Unfinished wooden bird feeder (hopper style)
- Sandpaper (medium and fine grit)
- Painter’s tape
- Yellow outdoor acrylic craft paint (primary)
- White outdoor acrylic craft paint
- Golden yellow or ochre acrylic paint (for flower centers)
- Daisy stencil (or cardstock to make one)
- Small round sponge pouncer or stencil brush
- Small detail paintbrush
- Clear outdoor sealant spray (matte or satin)
- Paper plate or palette
- Pencil (optional)
Step 1: Preparation and Base Coat
-
Sand the surface:
Start by lightly sanding the entire wooden feeder to remove any rough edges or splinters. Wipe away the dust with a damp cloth or tack cloth to ensure a smooth painting surface. -
Protect the trim:
If you want to keep the frame and base in their natural wood tone like the example, use painter’s tape to carefully mask off the vertical corner posts and the bottom tray. Press down firmly on the edges to prevent paint bleed. -
Paint the background:
Apply a coat of bright yellow outdoor acrylic paint to the main side panels and the roof panels. Use smooth, even strokes. -
Apply a second coat:
Let the first coat dry completely, then add a second layer of yellow to ensure solid coverage without streaks. I like to let this dry for at least an hour before touching it again.
Step 2: Stenciling the Details
-
Prepare your stencil:
If you don’t have a pre-made daisy stencil, you can easily cut a simple flower shape out of cardstock or mylar. -
Position the flowers:
Start with the main side panels. Place your daisy stencil randomly on the yellow surface. It looks best if some flowers hang off the edge slightly for a natural, printed fabric look. -
Apply the white petals:
Dip your sponge pouncer or stencil brush into white paint, then dab most of it off onto a paper plate until the brush is almost dry. Gently tap over the stencil to create the white petals. This ‘dry brush’ technique prevents paint from leaking under the stencil. -
Repeat the pattern:
Lift the stencil carefully and repeat the process to cover the side panels with flowers, leaving some yellow space between them. -
Add the centers:
Once the white petals are dry, use a small round brush or a clean pouncer dipped in golden yellow (or ochre) paint to add the round centers to each daisy. Use a stippling motion to give the centers a bit of texture. -
Dot the background:
Dip the handle end of a paintbrush into the white paint. Dot it onto the yellow background in the spaces between the flowers to create the polka dots. -
Decorate the roof:
Instead of flowers, the roof features a simple polka dot pattern. Use the same paintbrush-handle technique to add rows of white dots across the yellow roof panels.
Bleeding Stencils?
If paint bleeds under your stencil, wait for it to dry completely. Then use a small detail brush and the background yellow color to carefully paint over and “erase” the blurry edges.
Step 3: Finishing Touches
-
Remove the tape:
Carefully peel away the painter’s tape while the paint is dry but not fully cured to avoid peeling up any edges. Reveal the clean natural wood lines. -
Touch up edges:
If any paint bled onto the natural wood areas, use a tiny piece of sandpaper to gently scrap it away. -
Seal the feeder:
To protect your artwork from rain and sun, spray the entire feeder with a clear outdoor sealant. Apply two light coats rather than one heavy one to avoid drips. -
Add the hanger:
Ensure the screw eye hook or wire hanger at the top is secure and ready for installation. -
Fill and hang:
Once the sealant has cured (check the can for cure times, usually 24 hours), fill the hopper with bird seed and find the perfect branch.
Level Up: Bee Friends
Add tiny painted bumblebees buzzing around the daisies using black and yellow paint. Use a fine liner brush for their flight trails to create a sense of movement
Now you have a charming garden accent that is ready to welcome birds with style
Soft Watercolor Wash Feeder
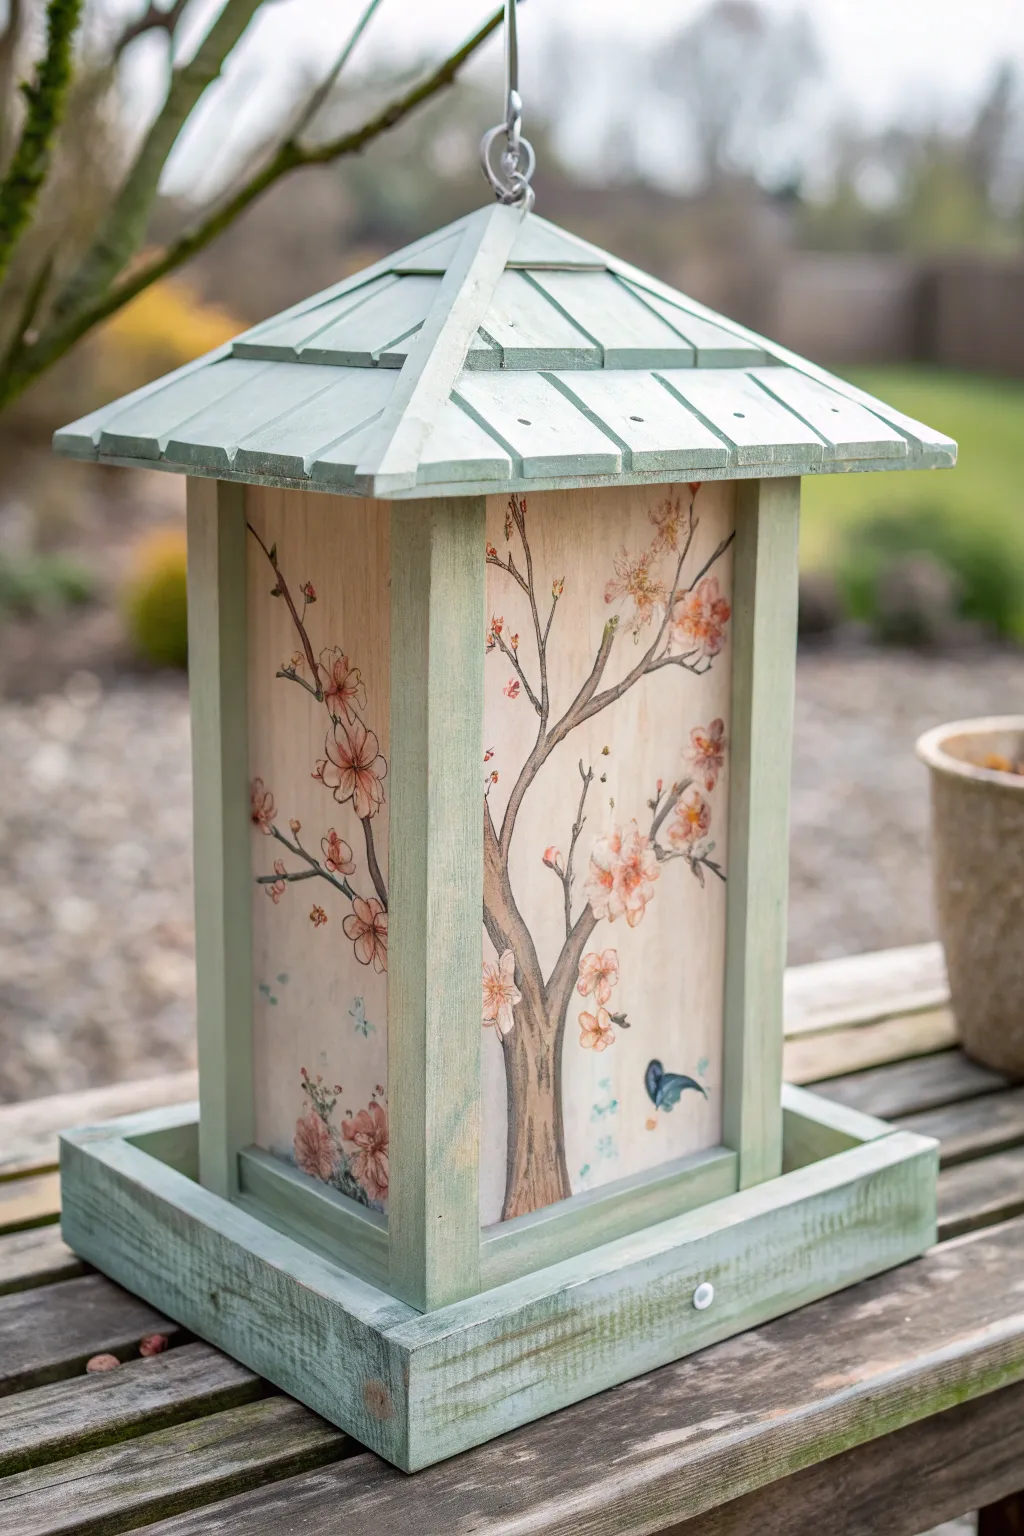
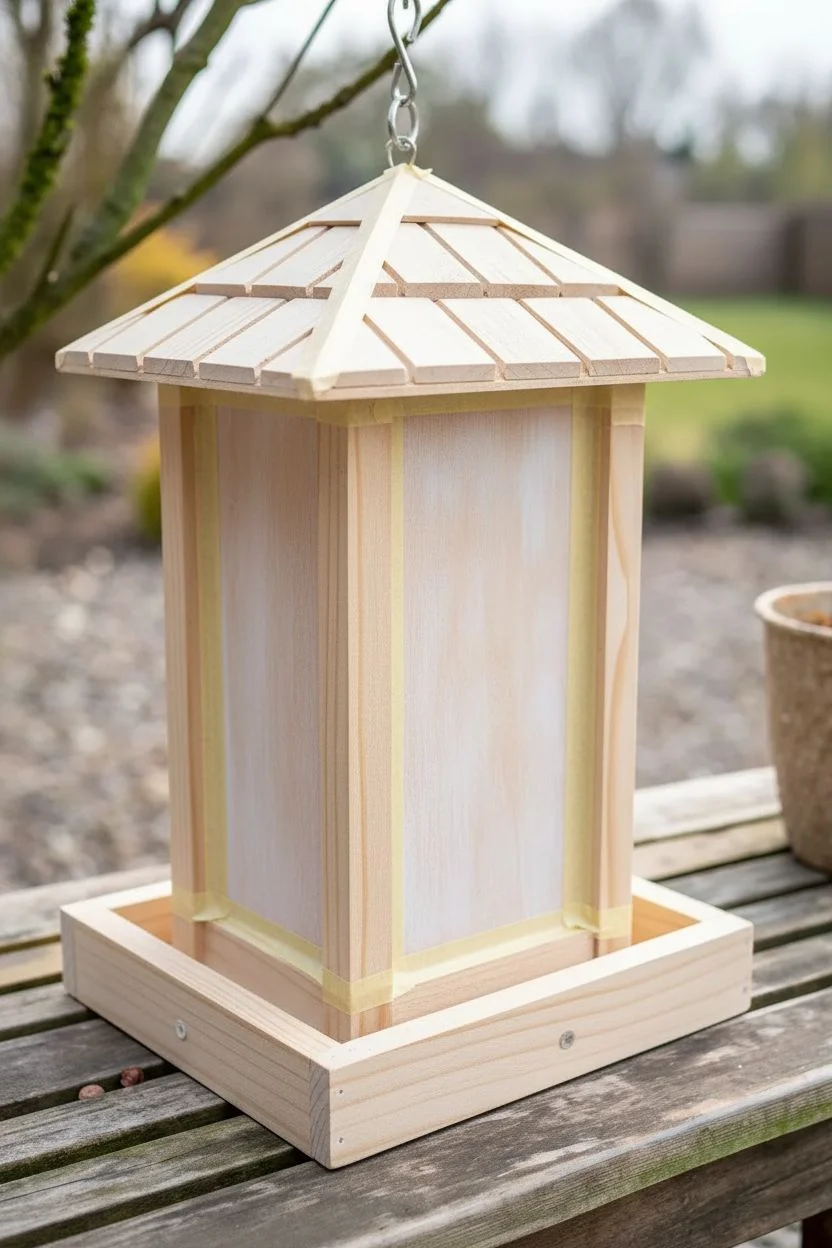
Transform a plain wooden bird feeder into a tranquil garden accent featuring delicate cherry blossom branches. Using a soft watercolor-style technique on wood, this project captures the ethereal beauty of spring blooms against a natural backdrop, framed by sage green accents.
How-To Guide
Materials
- Unfinished wooden bird feeder (lantern style)
- Sandpaper (220-grit)
- Sage Green acrylic paint (chalk paint works well for a matte finish)
- White acrylic paint
- Brown acrylic paint (Burnt Umber or similar)
- Pink acrylic paint (Soft Rose and a deeper Magenta)
- Blue acrylic paint (for the butterfly)
- Acrylic glazing medium or water
- Soft synthetic brushes (flat brush for frame, fine liner for branches, small round for petals)
- Spray-on outdoor sealant (matte or satin finish)
- Painter’s tape
- Palette or paper plate
Step 1: Preparation & Base Coat
-
Sand the surface:
Begin by lightly sanding the entire bird feeder with 220-grit sandpaper. You want to smooth out any rough grain, especially on the panels where you will be painting the detailed artwork. Wipe away all dust with a tack cloth or damp rag. -
Protect the panels:
Use painter’s tape to carefully mask off the edges of the central wooden panels where the artwork will go. Alternatively, if your feeder disassembles, remove the clear plastic or glass panes to access the back wood wall more easily. -
Prime the background:
Mix a tiny drop of white paint with plenty of water or glazing medium to create a very sheer whitewash. Apply this to the central panels. You don’t want opaque white; you just want to lighten the wood tone slightly so the flowers standout while keeping the natural grain visible.
Step 2: Painting the Structure
-
Paint the roof and base:
Dip a flat brush into your sage green paint. Apply a solid coat to the roof, the upright corner posts, and the bottom tray. This earthy green frames the delicate artwork beautifully. -
Distress for character (optional):
If you prefer a rustic look, wait for the green paint to dry completely, then lightly sand the edges of the roof slats and corners to reveal a bit of wood underneath. I find this gives it a lovely weathered garden charm.
Paint Bleeding?
If paint bleeds into the wood grain, switch to a slightly thicker paint consistency or seal the wood first with a clear matte sealer before starting the design.
Step 3: Creating the Artwork
-
Draft the branches:
Using a very diluted light brown paint and a fine liner brush, faintly sketch the main shape of your tree trunk rising from the bottom and branching upward. Keep the lines wavy and organic. -
Darken the trunk:
Load your liner brush with darker burnt umber paint. Go over your draft lines, thickening the trunk at the base and tapering off into thin, wispy twigs at the ends. Add small ‘v’ shapes or knots on the trunk for texture. -
Start the petals:
Mix your soft pink paint with a little glazing medium to make it translucent. Press the belly of a small round brush onto the wood to create petal shapes at the ends of the twigs. Group them in clusters of five to form flowers. -
Layer the blossoms:
Once the first layer of pink is dry, mix a slightly darker magenta. Add small dabs near the centers of the flowers to create depth and shadow, mimicking the look of real cherry blossoms. -
Add floral details:
Use your finest brush and a mix of dark brown and magenta to add tiny stamens radiating from the flower centers. You can also add very small unattached petals floating in the ‘air’ around the branches. -
Paint a focal point:
Near the bottom right, paint a small blue butterfly resting on a lower branch or hovering. Use a dark blue for the wings and outline them simply with black or deep brown. -
Add subtle greenery:
Mix a tiny amount of your sage green with water. Add the tiniest hints of leaves here and there on the branches, keeping them sparse so the pink remains the dominant color.
Add Dimension
For a 3D effect, mix a little baking soda into your pink paint for the flower centers. This creates a textured, raised stamen that adds tactile interest.
Step 4: Finishing Touches
-
Remove tape:
Carefully peel away any painter’s tape you applied earlier. Check the edges where the green frame meets the artwork panel and touch up any bleed-through with a small brush. -
Let it cure:
Allow the entire bird feeder to dry for at least 24 hours. The paint needs to fully cure before the next step to ensure longevity. -
Seal for outdoors:
Apply two to three light coats of clear outdoor spray sealant. A matte finish looks most natural, but satin works if you want a slight sheen. Ensure you cover all painted surfaces to protect them from rain and sun. -
Install hardware:
Reattach any hanging loops or screws you removed. Your art piece is now ready to withstand the elements and welcome the birds.
Hang your masterpiece in a spot visible from a window to enjoy your handiwork alongside nature
Splatter Paint Play Feeder
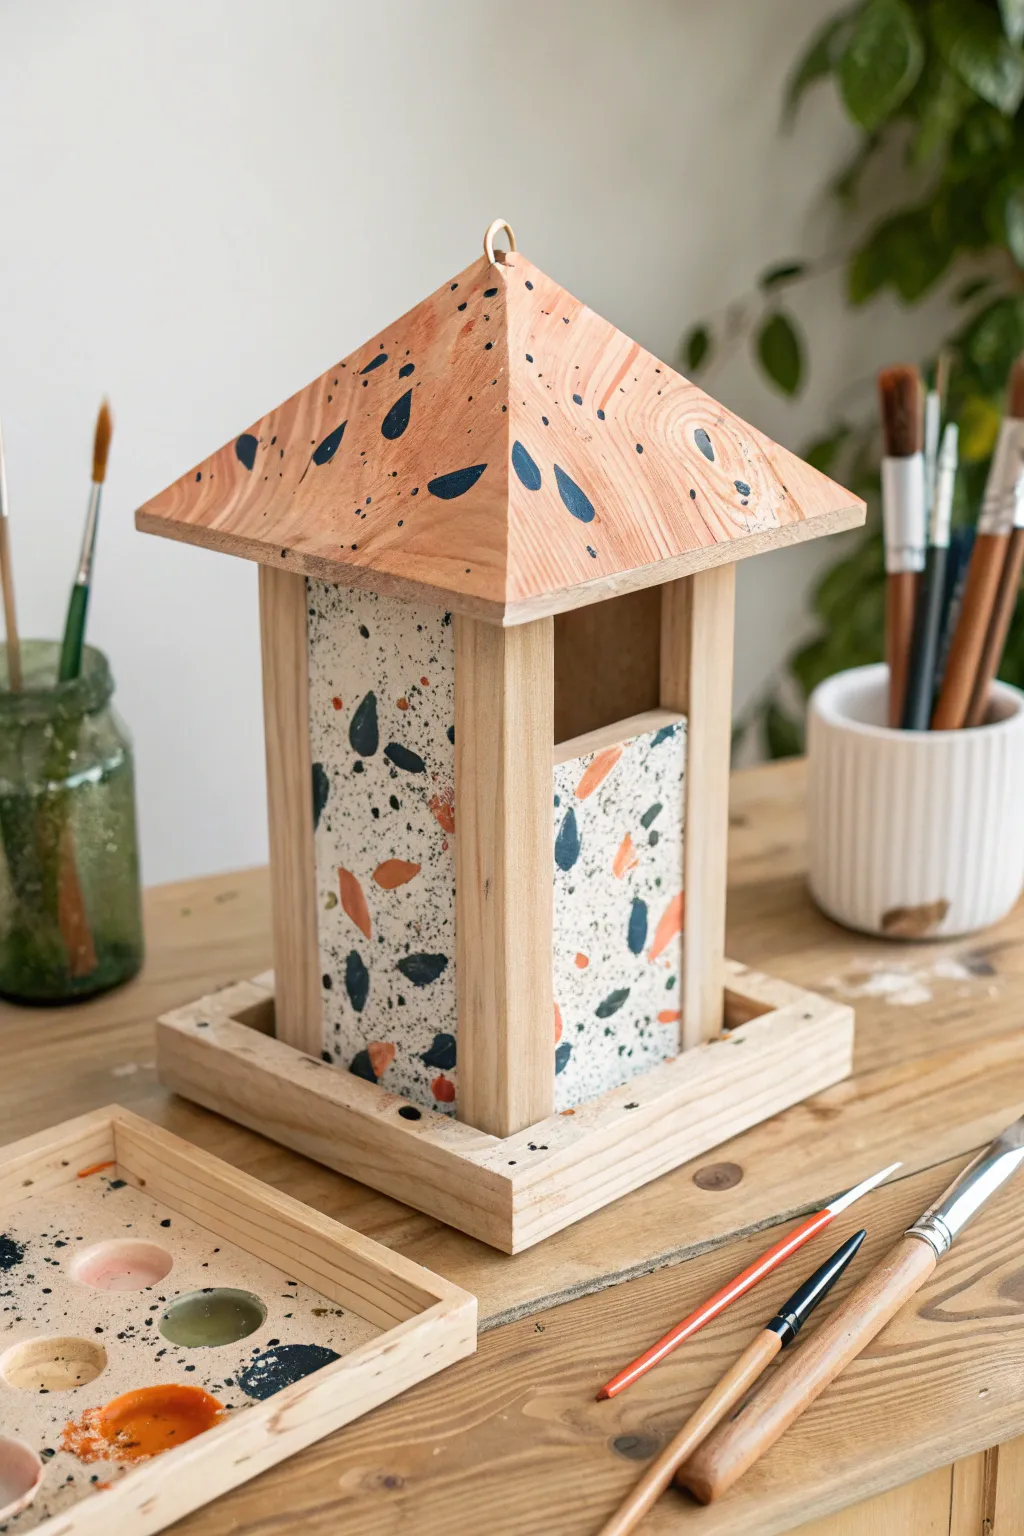
Transform a plain wooden bird feeder into a modern art piece with this playful terrazzo-inspired design. Utilizing a mix of sharp, varied shapes and fine splatters, you’ll create a lively texture that looks high-end but is delightfully messy to make.
Detailed Instructions
Materials
- Unfinished wooden bird feeder
- Sandpaper (medium grit and fine grit)
- Painter’s tape
- Flat white acrylic paint (outdoor safe)
- Acrylic paints in accent colors (e.g., navy blue, burnt orange, black)
- Small flat tip paintbrush
- Old toothbrush or stiff bristle brush
- Clear outdoor sealant spray (matte or satin)
- Palette or small dishes for mixing
- Drop cloth or newspapers
Step 1: Preparation & Base Coating
-
Sanding the surface:
Begin by sanding the entire bird feeder to remove any splinters or rough patches. Start with medium grit sandpaper for the heavy work and finish with fine grit for a smooth painting surface. Wipe away all dust with a damp cloth. -
Masking the frame:
Since we want to keep the frame and roof beams natural wood, use painter’s tape to carefully mask off the vertical posts, the base tray, and the underside of the roof eaves. Ensure the tape edges are pressed down firmly to prevent paint bleed. -
Priming the walls:
Apply a coat of flat white acrylic paint to the recessed wall panels of the feeder. Use smooth, vertical strokes. -
Adding a second coat:
Let the first coat dry completely, then add a second coat of white to ensure full opacity. The grain of the wood shouldn’t show through on these panels.
Clean Edges Trick
Before painting your white base coat, run a fingernail or credit card heavily over the edge of the painter’s tape. This seals the bond and prevents paint from creeping under onto the natural wood.
Step 2: Creating the Terrazzo Effect
-
Planning the palette:
Pour small amounts of your accent colors onto a palette. For this look, I like to use a deep navy, a warm geometric orange, and classic black. -
Painting large shapes:
Dip a small flat brush into the navy paint first. Paint random, jagged shapes onto the white walls. Think of these as broken tile shards—triangles, trapezoids, and irregular polygons work best. -
Adding secondary colors:
Rinse your brush and repeat the process with the orange paint. Place these shapes in the empty spaces between the blue ones, keeping them randomly distributed but balanced. -
Incorporating black accents:
Add the black shapes last. Keep these slightly smaller than the colored ones to create visual variety and depth. -
Creating the fine speckles:
This is the fun part. Dip an old toothbrush or a stiff bristled brush into black paint thinned slightly with water. Hold it near the walls and flick the bristles with your thumb to create a fine mist of black speckles over the white background and colored shapes. -
Drying the walls:
Allow the wall panels to dry completely before touching the feeder again. The thick acrylic shapes may take longer to dry than the base coat.
Step 3: Roof Decoration & Finishing
-
Removing the tape:
Carefully peel away the painter’s tape to reveal the crisp lines between your painted walls and natural wood frame. -
Roof shape painting:
On the bare wooden roof, paint freehand teardrop or petal shapes using the navy blue paint. I usually scatter them casually, angling them in different directions to mimic falling rain or leaves. -
Roof splatter technique:
Using the same toothbrush flicking technique from earlier, add a light dusting of black splatters across the roof. This ties the natural wood roof visually to the painted walls below. -
Checking for touch-ups:
Inspect the feeder for any smudges or areas of the natural wood that got unplanned paint on them. Use a small piece of sandpaper to gently buff away any mistakes. -
Applying sealant:
To protect your work from the elements, spray the entire bird feeder with a clear outdoor sealant. Apply two thin coats rather than one heavy one to avoid drips. -
Final cure:
Let the detailed sealer cure for at least 24 hours outdoors before filling it with seed, ensuring no fumes remain that could bother the birds.
Make It 3D
Instead of just painting the shapes, glue small, colorful pieces of sea glass or mosaic tile onto the walls for an authentic, textured terrazzo feel that catches the sunlight beautifully.
Now your garden has a trendy, handcrafted focal point ready for your feathered visitors to enjoy
Painted Bird Portrait Panels
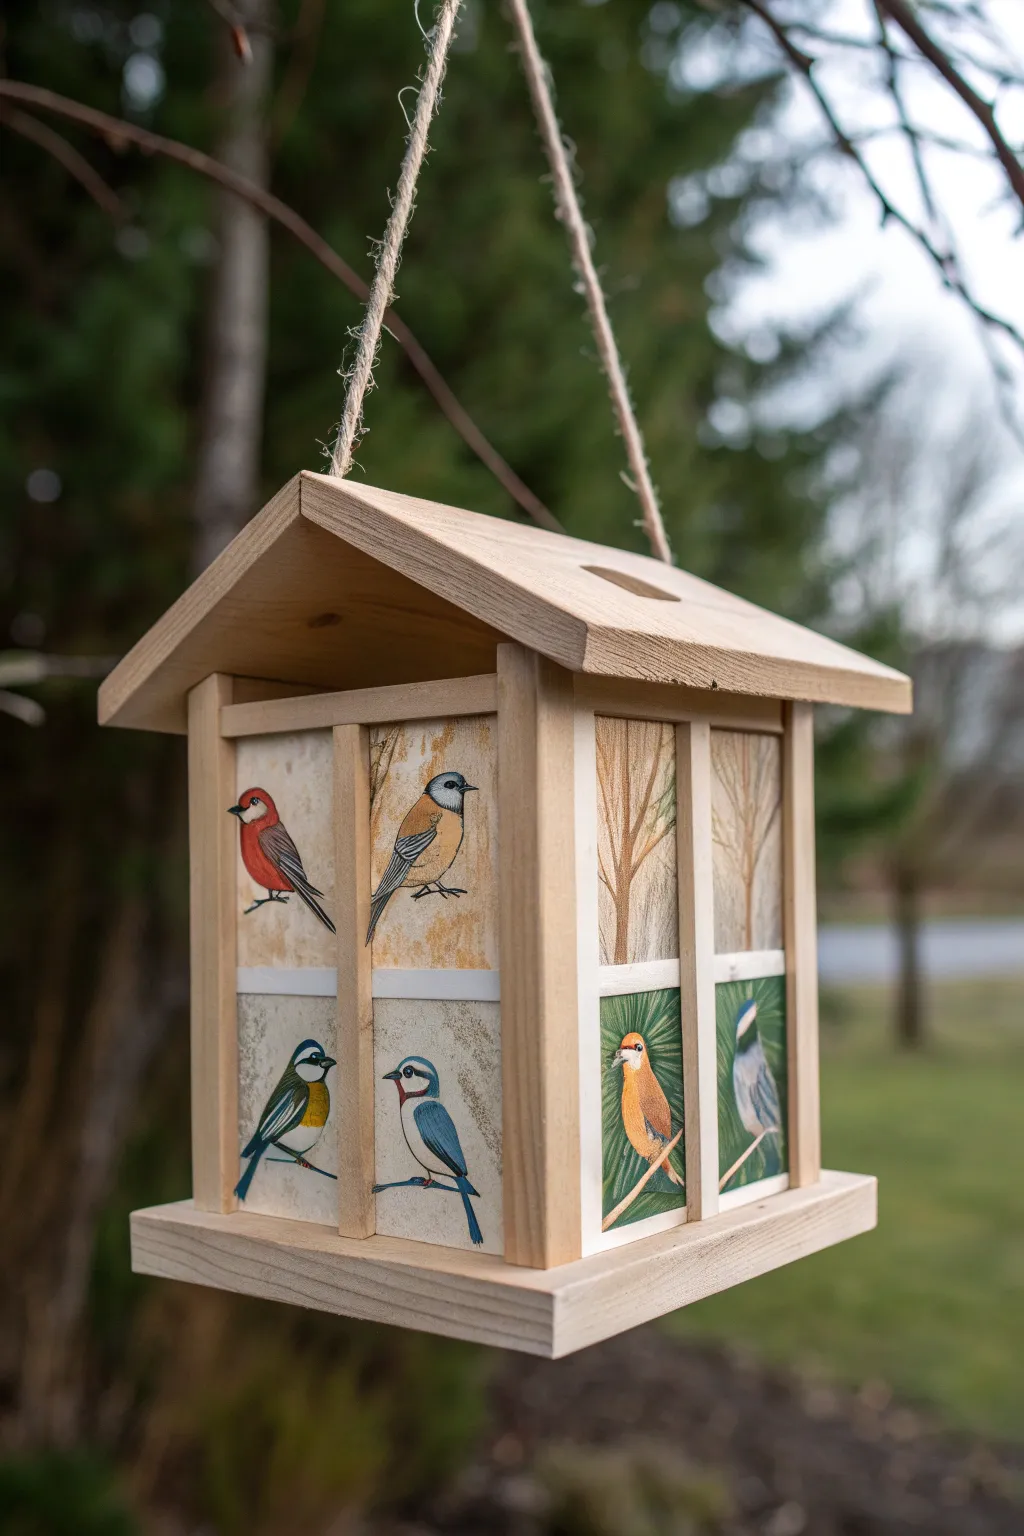

Transform a plain wooden bird feeder into an aviary art gallery with these delicate, illustrative painted panels. By sketching individual bird portraits in framed sections, you create a charming focal point that celebrates the very visitors you hope to attract.
Step-by-Step Guide
Materials
- Unfinished wooden bird feeder with recessed panels
- Sandpaper (220-grit)
- White acrylic gesso or primer
- Acrylic paints (Titanium White, Burnt Sienna, Yellow Ochre, Ultramarine Blue, Cadmium Red, Black)
- Fine detail brushes (sizes 00, 0, and 2)
- Pencil and eraser
- Clear matte outdoor varnish
- Masking tape
- Palette for mixing
Step 1: Preparation & Priming
-
Prep the surface:
Begin by lightly sanding the recessed panels of your bird feeder where the paintings will go. This smooths out the grain and helps the paint adhere better. -
Mask the frame:
Use masking tape to carefully cover the wooden frame borders surrounding the panels. This protects the raw wood look, which contrasts beautifully with the artwork. -
Prime the background:
Paint the panels with a coat of white acrylic gesso or primer. If you want a more parchment-like look seen in the photo, mix a tiny drop of Yellow Ochre into your white primer. -
Create texture (Optional):
I like to dab the primer slightly with a dry sponge while wet to create a subtle, mottled eggshell texture rather than a perfectly flat surface.
Bleeding Lines?
If paint bleeds under the tape, let it dry completely. Then, gently scrape the excess paint off the raw wood using an X-Acto knife or the edge of a credit card.
Step 2: Drafting the Composition
-
Sketch the branches:
Lightly sketch vertical tree trunks and diagonal branches in each panel. Vary the thickness and direction to make it look like a natural forest scene across the windows. -
Place the birds:
Sketch the outlines of different birds perched on these branches. Focus on simple shapes first—ovals for bodies and circles for heads—before adding beaks and tails. -
Refine the details:
Go back over your bird sketches to define wing positions and eye placement. Keep your pencil lines very light so they don’t show through the paint later.
Personalize It
Research birds native to your specific region and paint those accurate species. It acts as a field guide for visitors watching the feeder.
Step 3: Painting the Birds
-
Block in base colors:
Start by filling in the main body colors of each bird. Use flat washes of color—rusty red for a finch, yellow and blue for a titmouse—without worrying about feathers yet. -
Paint the trees:
Mix Burnt Sienna with a touch of White to create a soft brown for the branches and trunks. Paint these carefully, ensuring they go ‘behind’ the birds visually. -
Add background greenery:
For the lower panels, mix a deep green using Blue and Yellow Ochre. Paint pine needle strokes or blurred leafy backgrounds behind the branches to add depth. -
Detail the feathers:
Using your smallest brush (00), add texture to the birds. Use short, flicking strokes in darker shades to mimic layered feathers on wings and tails. -
Highlight the eyes:
Paint the eyes black, then add a tiny dot of pure white to each eye. This ‘catchlight’ is crucial for bringing the birds to life. -
Define beaks and feet:
Use a mix of dark grey or black to carefully outline beaks and paint the tiny stick-like feet gripping the branches.
Step 4: Finishing Touches
-
Add shadows:
Mix a diluted grey-brown glaze and apply it lightly under the bellies of the birds and where branches overlap to create subtle volume. -
Remove the tape:
Once the paint is completely dry to the touch, slowly peel away the masking tape to reveal the crisp edges between your art and the wood. -
Seal the artwork:
Apply two to three thin coats of clear matte outdoor varnish over the painted areas. This protects your miniature masterpieces from rain and sun damage.
Now you have a functional garden feature that doubles as a delightful outdoor art installation
Woodland Landscape Wraparound Feeder
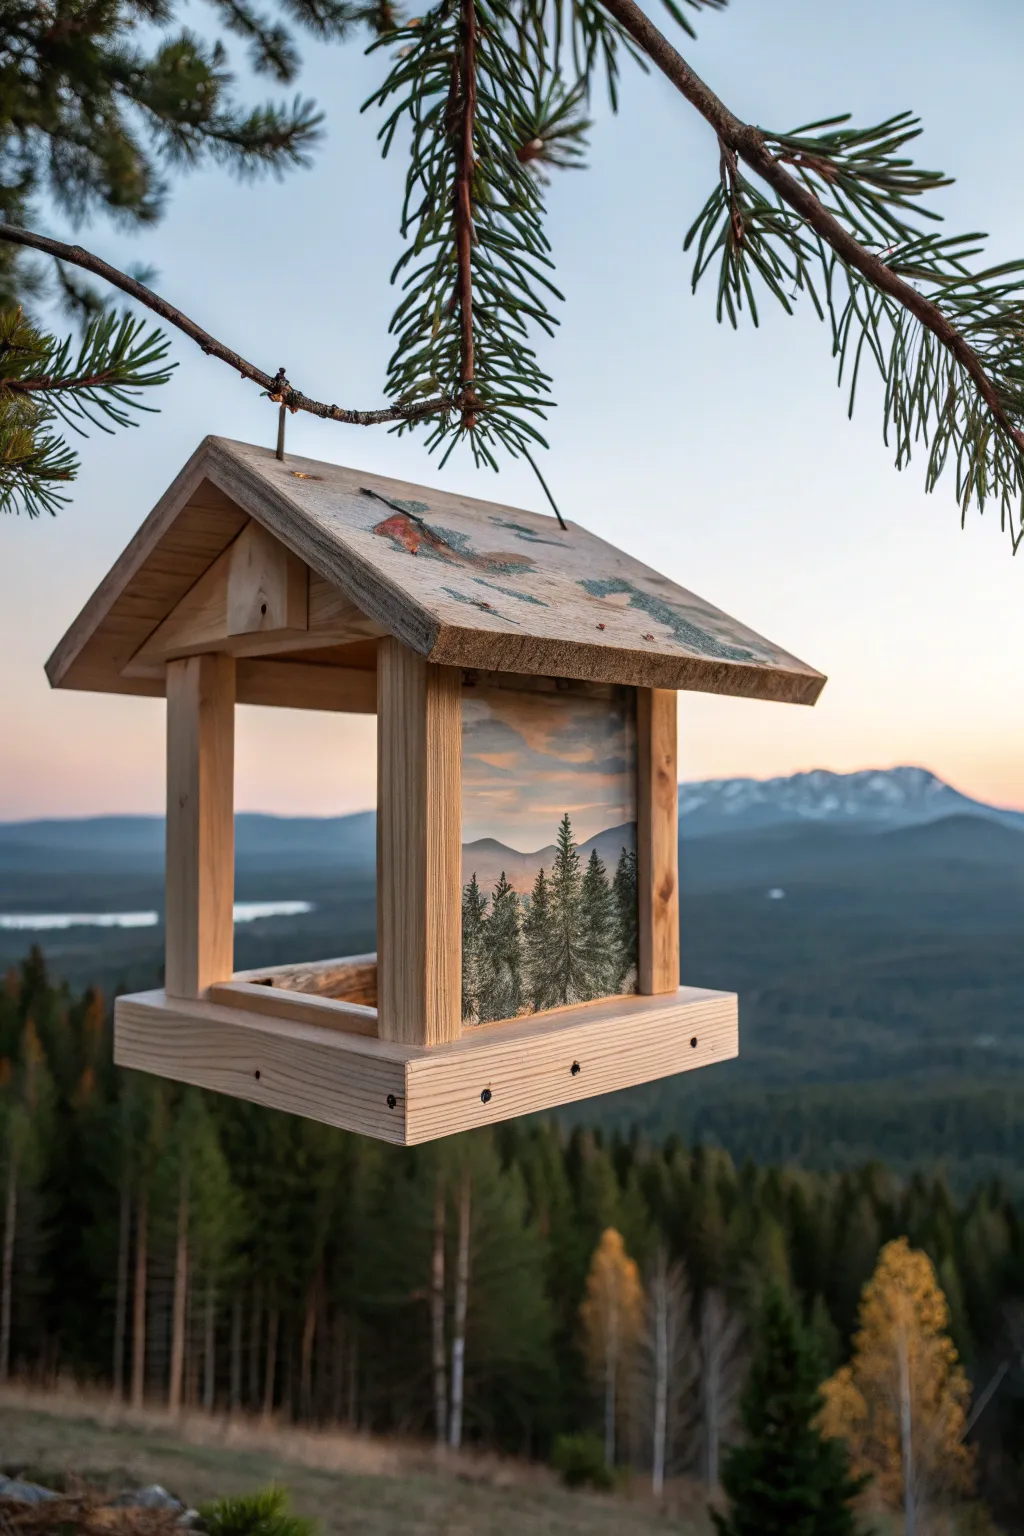
Bring the grandeur of the wilderness to your backyard with this stunning painted feeder. By capturing a hazy mountain range behind crisp pine silhouettes, you’ll create a miniature window into nature that local birds will love to visit.
Step-by-Step
Materials
- Unfinished wooden bird feeder (hopper style)
- Sandpaper (220 grit)
- Acrylic paints (Titanium White, Payne’s Grey, Hooker’s Green, Burnt Umber, Ultramarine Blue, Yellow Ochre)
- Flat shader brushes (sizes 6 and 10)
- Fine liner brush (size 0 or 00)
- Clear gesso or wood primer
- Exterior spar urethane or water-based polycrylic sealant
- Palette and water cup
- Painter’s tape
Step 1: Preparation & Base
-
Prepare the surface:
Before laying down any color, lightly sand the interior back panel and the roof of the feeder. This removes any rough grain that might interfere with your painting. -
Protect the frame:
Apply painter’s tape to the wooden pillars and the base of the feeder. You want crisp edges where the painted scene meets the natural wood frame. -
Prime the wood:
Apply a thin layer of clear gesso to the back panel. I prefer clear gesso here because it seals the wood without hiding the grain completely if you want a rustic look, though white gesso works if you want brighter colors.
Step 2: Painting the Backdrop
-
Mix the sky gradient:
On your palette, mix Titanium White with a tiny dot of Burnt Umber and a whisper of Yellow Ochre to create a warm, creamy sunset color. -
Paint the sky:
Using the larger flat brush, paint the upper third of the back panel. Use horizontal strokes to mimic the calm atmosphere of dawn or dusk. -
Create distant mountains:
Mix a light blue-grey using Ultramarine Blue, White, and a touch of Payne’s Grey. While the sky is dry, paint a soft, undulating mountain ridge just below the sky line. -
Add the middle ground:
Darken your mountain mix with a bit more Payne’s Grey and Green. Paint a second, lower range of hills in front of the distant mountains. Keep the edges slightly soft to suggest distance and mist. -
Blend the transitions:
While the paint is still slightly tacky, use a clean, slightly damp brush to soften the bottom edge of the mountains into a misty white fog towards the bottom of the panel.
Uneven Tree Texture?
If your pine trees look too blobby, switch to a fan brush turned vertically. Tap lightly using just the corner bristles to create natural, needle-like textures.
Step 3: The Pine Forest
-
Mix the forest green:
Combine Hooker’s Green with Payne’s Grey and a small amount of Burnt Umber. You want a deep, almost black-green for the silhouetted trees. -
Draft the tree lines:
Using your fine liner brush and the dark green mix, paint vertical lines of varying heights. Place the tallest ones off-center for a better composition. -
Stipple the foliage:
Switch to a small flat brush or the side of your liner brush. Use a stippling motion (tapping gently) to add branches, starting narrow at the top and widening as you move down the trunk. -
Layer the trees:
Paint the background trees first with a slightly lighter green mix, then overlay the foreground trees with your darkest mix to create depth. -
Detail the roof:
For the roof, dilute some of your green and brown paints with water to create a wash. Loosely paint organic patches to simulate moss or weathering on the wooden shingles.
Pro Tip: Atmospheric Depth
Add a tiny drop of white to your green mix for trees that are ‘further away.’ Values get lighter as objects recede, making your tiny landscape feel vast.
Step 4: Sealing & Finishing
-
Remove the tape:
Carefully peel away the painter’s tape while the paint is fully dry to reveal your crisp edges. -
Apply the first coat of sealer:
Using a clean wide brush, apply a coat of exterior spar urethane or polycrylic over the entire feeder, especially the painted areas. -
Let it cure:
Allow the first coat to dry according to the manufacturer’s instructions. Do not rush this step, as tackiness can ruin the finish. -
Final weatherproofing:
Apply two more thin coats of sealer. This is crucial for protecting your artwork from rain, snow, and bird activity.
Once fully cured, fill with seed and hang it up to enjoy your functional art piece in the wild
Winter Pine Scene Feeder
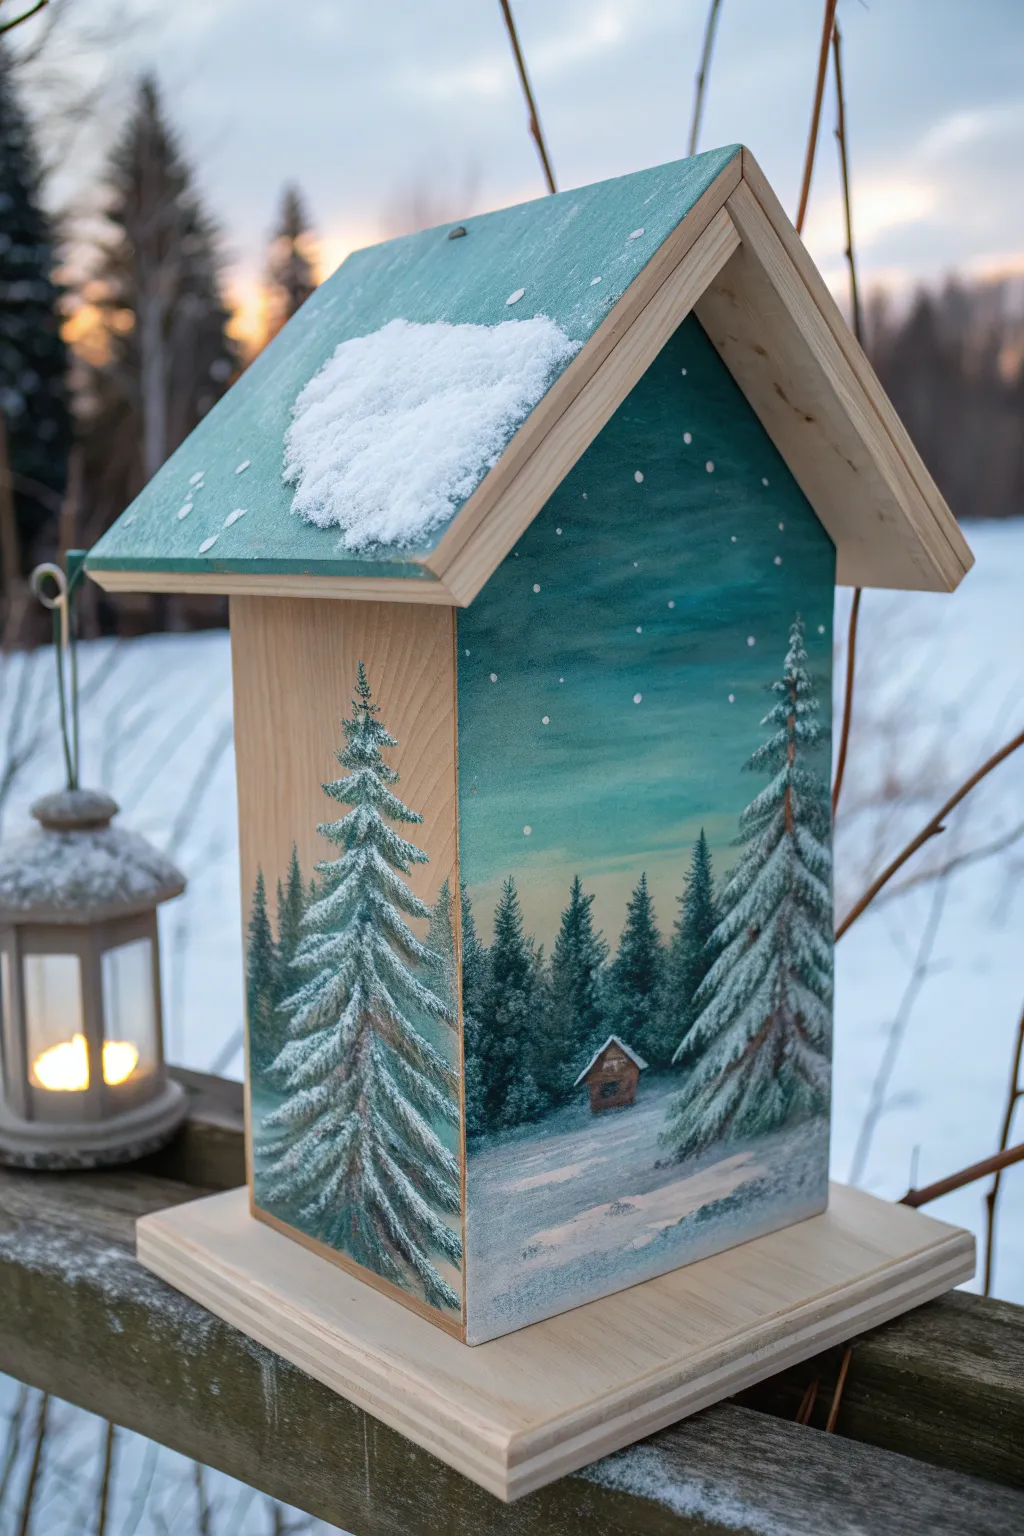
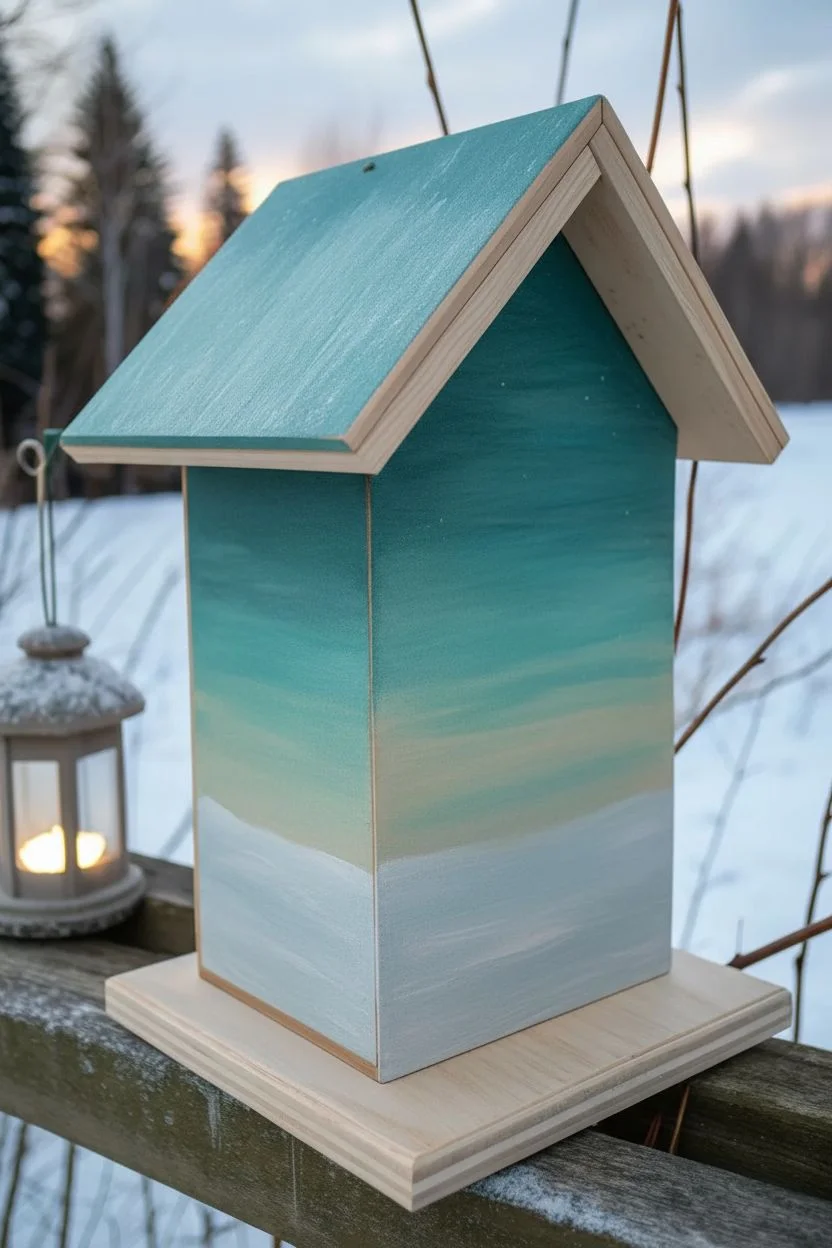
Transform a plain wooden bird feeder into a serene winter landscape featuring snow-dusted pine trees and a teal, twilight sky. This project combines simple gradient blending with easy tree-painting techniques to create a cozy, decorative piece for your garden.
How-To Guide
Materials
- Unfinished wooden bird feeder
- Sandpaper (220 grit)
- Acrylic paints: Titanium White, Teal/Turquoise, Phthalo Blue (or Navy), Burnt Umber, Black
- Wide flat brush (for gradients)
- Fan brush or filbert brush (for trees)
- Small round detail brush
- Palette for mixing
- Water cup and paper towels
- Structure paste or thick white acrylic paint (optional for roof snow)
- Exterior spray spar varnish or sealant
Step 1: Preparation & Sky Gradient
-
Prepare the surface:
Begin by lightly sanding the wooden bird feeder to remove any splinters or rough patches. Wipe away the dust with a slightly damp cloth to ensure a smooth painting surface. -
Start the sky base:
On the front and side panels, identifying where the sky will go. You want to leave the bottom third or quarter unpainted for the snowy ground later, or paint it a very pale greyish-white. -
Mix your twilight colors:
Squeeze out your Teal, Phthalo Blue, and White. I like to keep a little pile of unmixed Teal ready for the brightest part of the sky. -
Paint the gradient:
Using a wide flat brush, paint the top portion of the walls with the darker Phthalo Blue. While it’s still wet, blend in the Teal as you move downwards. Finally, blend a very pale, whitish-teal near the horizon line to create a glowing twilight effect. -
Add the roof color:
While your sky dries, paint the roof panels. Mix a soft, frosty teal by combining your Teal paint with a significant amount of White. Apply an even coat, letting the wood grain show slightly if you prefer a rustic look.
Blending Woes?
If acrylics dry too fast while blending the sky gradient, mist the wood lightly with water or add a slow-drying medium to keep the paint workable longer.
Step 2: Painting the Forest
-
Background trees:
Mix a dark green using Teal, a touch of Black, and Burnt Umber. Using a small brush, dab in a line of distant, smaller trees along the horizon line. These should be less detailed and slightly hazy to create depth. -
Sketch the foreground pines:
Identify where your large feature trees will stand—like the prominent ones on the corners in the reference photo. Use a thin wash of dark paint to mark their central vertical trunks. -
Block in pine branches:
Using a fan brush or an old filbert brush turned on its side, tap in the dark under-layers of the pine branches. Start narrow at the top and widen the strokes as you move down the trunk. -
Paint the tiny cabin:
With your smallest detail brush and Burnt Umber, paint a tiny square house shape nestled among the background trees. Add a tiny triangle for the roof using a mix of White and Umber. -
Add snow to the ground:
Paint the bottom section of the feeder white. Use messy, horizontal strokes to blend the white slightly up into the bottom of the tree line, creating the look of uneven snowdrifts.
Level Up: 3D Texture
Mix equal parts white paint and baking soda for the roof snow. It creates a gritty, realistic drift texture that looks amazing when dry.
Step 3: Snowy Details & Finish
-
Highlight the trees:
Load your brush with pure Titanium White. Gently tap the top edges of your dried pine branches to simulate heavy, gathered snow. Focus the white on the tips of the branches. -
Create falling snow:
Dip the handle end of a small paintbrush or a toothpick into white paint. Dot the sky area randomly to create falling snowflakes. Vary the pressure to make some dots larger and some smaller. -
Roof texture:
To mimic the accumulated snow on the roof shown in the image, dab thick white acrylic paint (or texture paste) onto the center of the roof panels. Stipple it with a stiff brush to give it a fluffy texture. -
Clean up edges:
Use sandpaper or a clean damp cloth to wipe away any stray paint from the wooden trim pieces or the base, keeping that natural wood contrast sharp. -
Seal the project:
Once the paint is completely cured (wait at least 4 hours), apply 2-3 coats of an exterior-grade clear spray varnish to protect your artwork from the elements.
Hang your masterpiece near a window so you can enjoy the art and the visiting birds simultaneously
Vintage Map Collage Look Feeder
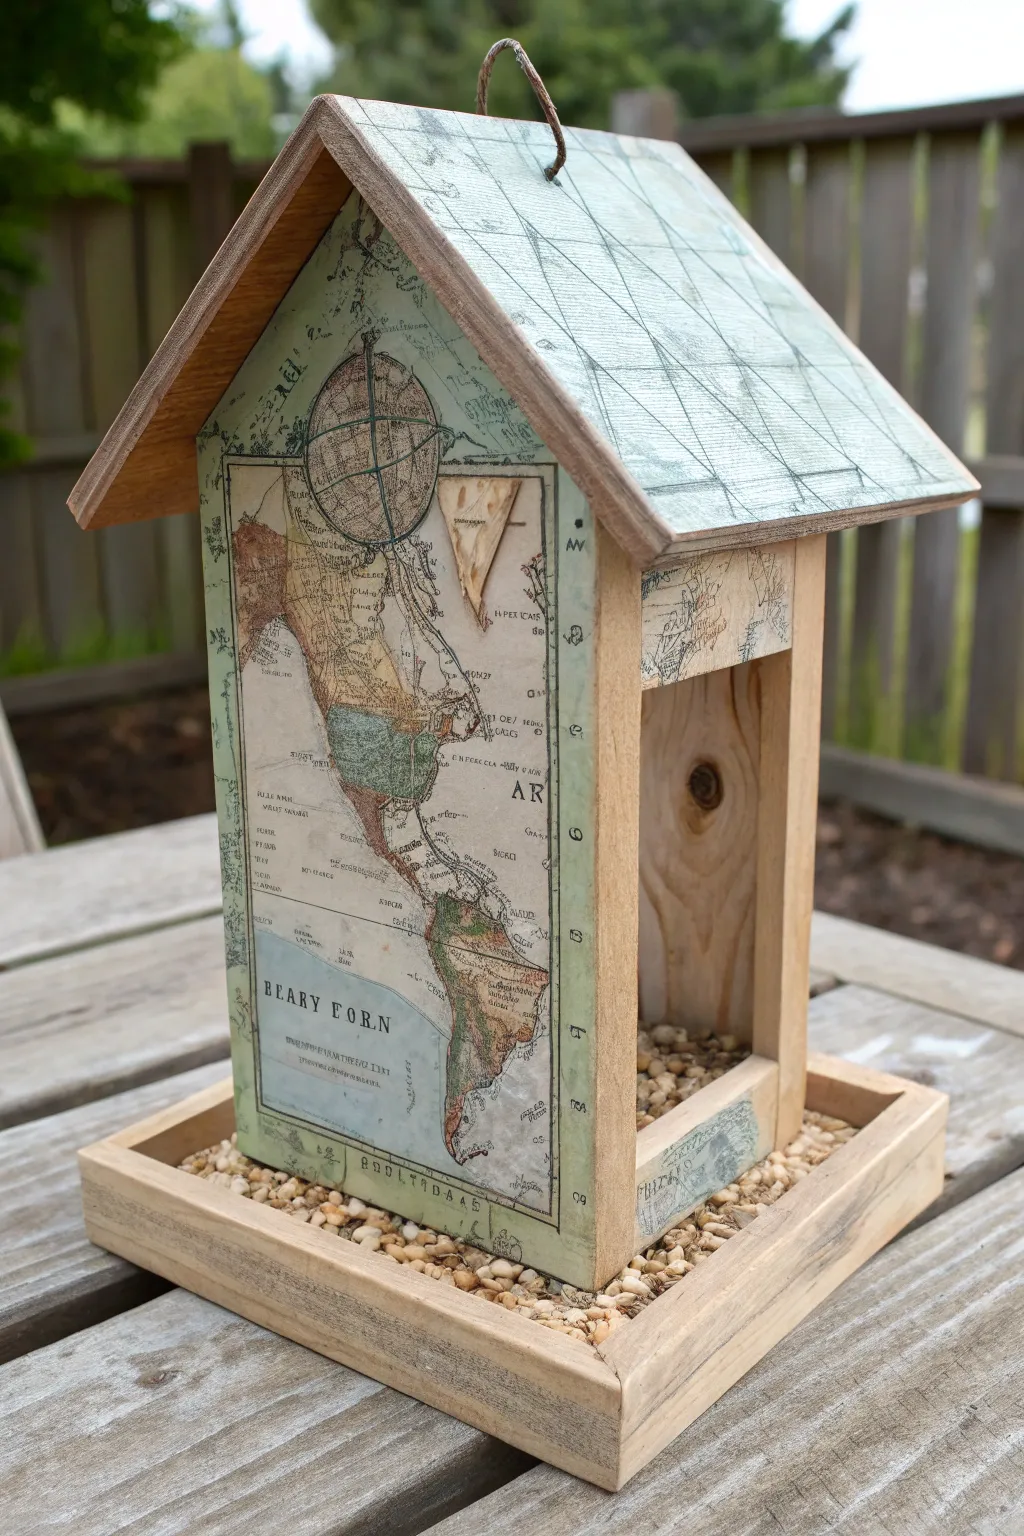
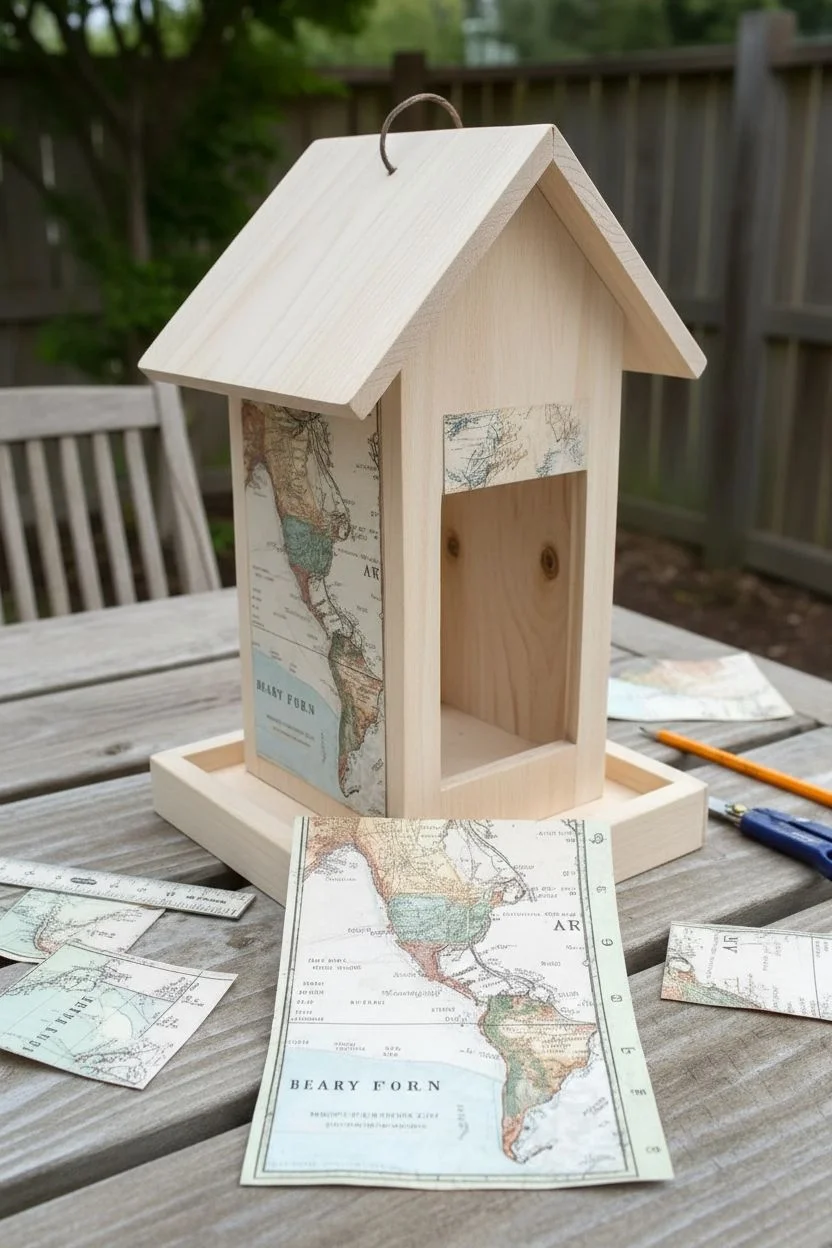
Transform a plain wooden bird feeder into a charming piece of travel history with this decoupage project. Using vintage map prints and a little patience, you’ll create a weathered, worldly look that brings an adventurous spirit to your backyard.
Step-by-Step Tutorial
Materials
- Unfinished wooden bird feeder (hopper style)
- Vintage map scrapbook paper or high-quality map printouts (thick weight)
- Mod Podge (Outdoor or Hard Coat formula recommended)
- Foam brushes
- Small craft scissors or X-Acto knife
- Measuring tape and ruler
- Pencil
- Depressed wooden stylus or bone folder
- Water-based polyurethane sealant (satin or matte)
- Small pebbles or crushed gravel (for the tray)
- Twine or jute for hanging
Step 1: Preparation & Mapping
-
Prep the surface:
Begin by sanding your unfinished bird feeder lightly to remove any rough splinters or barriers that might prevent adhesion. Wipe it down with a tacky cloth to remove all dust. -
Measure the panels:
Carefully measure the dimensions of the front panel, the two side strips, and the roof panels. Transfer these measurements onto the back of your map paper with a pencil. -
Plan the geography:
Before cutting, decide which part of the map you want featured. I like to center a recognizable continent, like North or South America, on the main front panel for a focal point. -
Cut the paper sections:
Using sharp scissors or an X-Acto knife against a ruler, cut out your map sections. Cut them slightly larger than the wood surface (about 1/8 inch) to allow for trimming later, or cut exact if you are confident.
Aged to Perfection
For an antique look, lightly sponge brown distress ink on the paper edges before sealing. It mimics old, yellowed parchment.
Step 2: The Decoupage Process
-
Apply the base coat:
Working one section at a time, apply a moderate layer of Mod Podge directly onto the wood surface using a foam brush. Don’t make it too thick or the paper might bubble. -
Position the front map:
Align your main map piece (the one with the continent) onto the front panel. Press down gently from the center moving outward to push out air. -
Smooth the surface:
Use a bone folder or a clean, dry cloth to firmly smooth the paper down. This step is crucial to ensure good contact and eliminate air pockets that cause wrinkles. -
Address the roof:
Repeat the gluing process for the roof panels. If using a repeating pattern or grid lines (like latitude/longitude lines often found on vintage maps), try to align them so they look continuous over the peak. -
Trim the overhang:
Once the glue has set slightly (give it 15-20 minutes), use sandpaper or a sharp craft knife to trim any excess paper hanging off the edges for a flush, professional finish. -
Wrap the sides:
Apply the smaller strips of map paper to the vertical side beams and the bottom tray edges if desired. These details tie the whole look together.
Step 3: Sealing & Finishing
-
Apply the first seal:
Brush a coat of Mod Podge over the top of all the paper surfaces. It will look milky white when wet but dries clear. Let this dry for at least 30 minutes. -
Weatherproofing:
Since this will be outdoors, Mod Podge alone isn’t enough. Apply 2-3 coats of an outdoor-rated, water-based polyurethane sealant to every surface, including the bare wood inside where seed goes. -
Dry thoroughly:
Allow the feeder to cure for at least 24 hours in a dry, room-temperature area. This hardness ensures the finish won’t get tacky in the sun. -
Attach the hanger:
Thread a sturdy piece of jute or twine through the screw eye or loop at the top of the roof. Knot it securely to handle the weight of the seed. -
Add drainage filler:
Fill the bottom tray area with a layer of small clean pebbles or gravel. This not only looks rustic but helps keep the birdseed slightly elevated and dry if water gets in.
Local Geography
Make it special by using a map of your actual town or state. Print local topography maps for a personalized touch.
Hang your new creation in a quiet garden spot and watch the birds explore the world
Faux Mosaic Tile Pattern Feeder
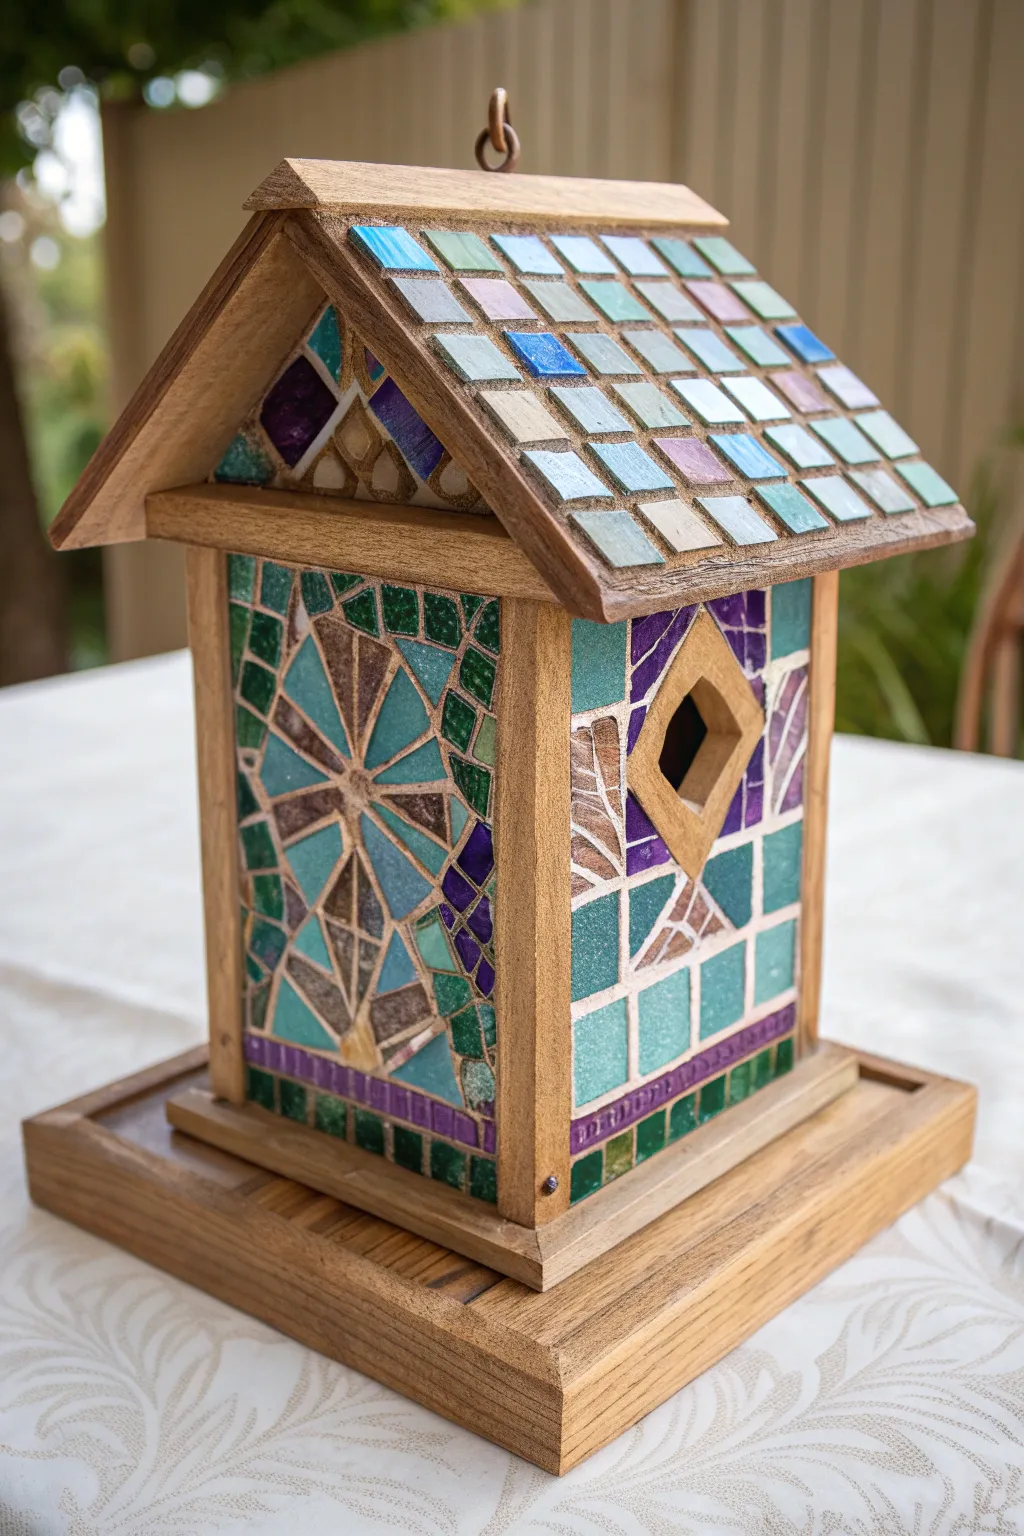
Transform a plain wooden bird feeder into a radiant garden masterpiece using real glass mosaic tiles and grout. This project features geometric patterns in soothing teals, purples, and browns, topped with a glimmering tiled roof that catches the sunlight beautifully.
Step-by-Step Guide
Materials
- Unfinished wooden bird feeder (chalet style with diamond opening)
- Glass mosaic tiles (approximately 1cm square) in teal, turquoise, mint green, and iridescent finish
- Purple and brown/bronze stained glass (to be cut custom shapes)
- Tile nippers or wheeled glass cutters
- Water-resistant wood glue or Weldbond adhesive
- Sanded grout (light beige or off-white)
- Safety glasses and gloves
- Small rubber spatula or grout float
- Sponge and bucket of water
- Outdoor sparring varnish or clear sealant
- Painter’s tape
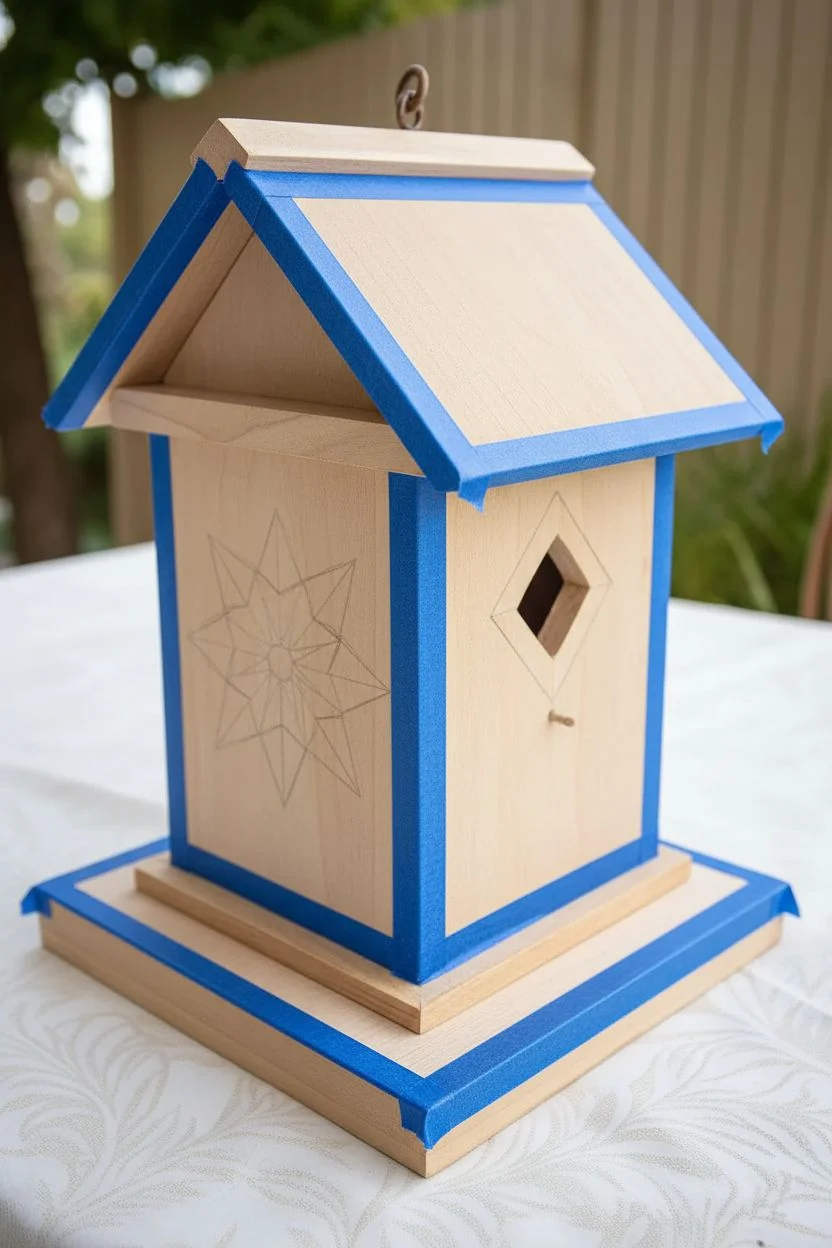
Step 1: Preparation and Planning
-
Prepare the Surface:
Begin by lightly sanding the wooden bird feeder to ensure a smooth surface for adhesion, then wipe away any dust with a damp cloth. -
Protect the Edges:
Apply painter’s tape to the wooden trim, roof edges, and the base platform. This is crucial because we want to keep the natural wood accents visible and clean while we tile the inset panels. -
Sketch the Design:
Lightly sketch your geometric pattern directly onto the wood panels with a pencil. For the side panel shown, mark out a large starburst or flower shape centered on the panel, and outline the diamond window on the front.
Uneven Grout Lines?
If you notice a pinhole or gap in the grout while it’s drying, just dab a little bit of fresh grout into the hole with your finger and smooth it over immediately.
Step 2: Applying the Roof Tiles
-
Select Roof Palette:
Choose a mix of square tiles in soft mint, iridescent white, and pale teal. I find that mixing matte and shiny tiles creates a lovely texture that mimics morning dew. -
Adhere the First Row:
Starting at the bottom edge of the roof slope, apply a dab of adhesive to the back of each tile and press them firmly into place, leaving a small gap (about 2-3mm) between each for grout. -
Complete the Roof Rows:
Continue working your way up the roof in straight horizontal rows. Stagger the colors randomly for that scrappy, charming look visible in the photo. -
Top Ridge Adjustment:
If your tiles don’t fit perfectly at the very top ridge, use your tile nippers to trim them down so they sit flush against the top wood beam.
Step 3: Creating the Mosaic Walls
-
Cut Custom Shapes:
For the intricate starburst pattern on the side walls, use wheel nippers to cut triangles and trapezoids from your brown and teal glass pieces. -
Set the Focal Point:
Glue the central starburst pieces first. Place the brown/bronze triangles in the center, radiating outward, and fill the spaces between them with teal glass shapes. -
Outline the Diamond Window:
On the front panel, use small purple triangular shards to frame the diamond-shaped wooden opening, creating a high-contrast border. -
Fill the Background:
Fill the remaining background space around your designs with square teal and mint tiles. You may need to nip these in half to fit tight corners. -
Add the Base Border:
Create a visual foundation by gluing a horizontal row of dark purple tiles followed by a row of dark green tiles along the very bottom edge of the walls. -
Dry Time:
Let the adhesive cure completely for at least 24 hours. The tiles must be immovable before you begin grouting.
Pro Tip: Sharp Edges
After nipping glass, run a rubbing stone or a piece of fine sandpaper over the cut edges. This prevents sharp points from injuring birds or your fingers later.
Step 4: Grouting and Finishing
-
Mix the Grout:
Mix your sanded grout with water until it reaches the consistency of peanut butter. Let it slake (rest) for 10 minutes, then mix briefly again. -
Apply Grout:
Spread the grout liberally over the tiled surfaces using a rubber spatula or gloved hands, pushing it deep into all the crevices. Don’t worry about covering the tiles; we will clean them later. -
Remove Excess:
Wait about 15-20 minutes for the grout to set slightly. Using a damp (not soaking wet) sponge, gently wipe across the tiles to remove the excess grout haze. -
Detail Cleaning:
Rinse your sponge frequently and continue wiping until the tiles are clean and the grout lines are smooth. Use a dry cloth for a final buff to make the glass shine. -
Seal the Project:
Once the grout has cured for 48 hours, remove the painter’s tape. Apply a clear outdoor sealant or sparring varnish over the entire birdhouse (wood and mosaic) to protect it from the elements.
Hang your new mosaic feeder securely and wait for your feathered neighbors to discover their sparkling new dining spot
Textured Clay Pot Finish Feeder
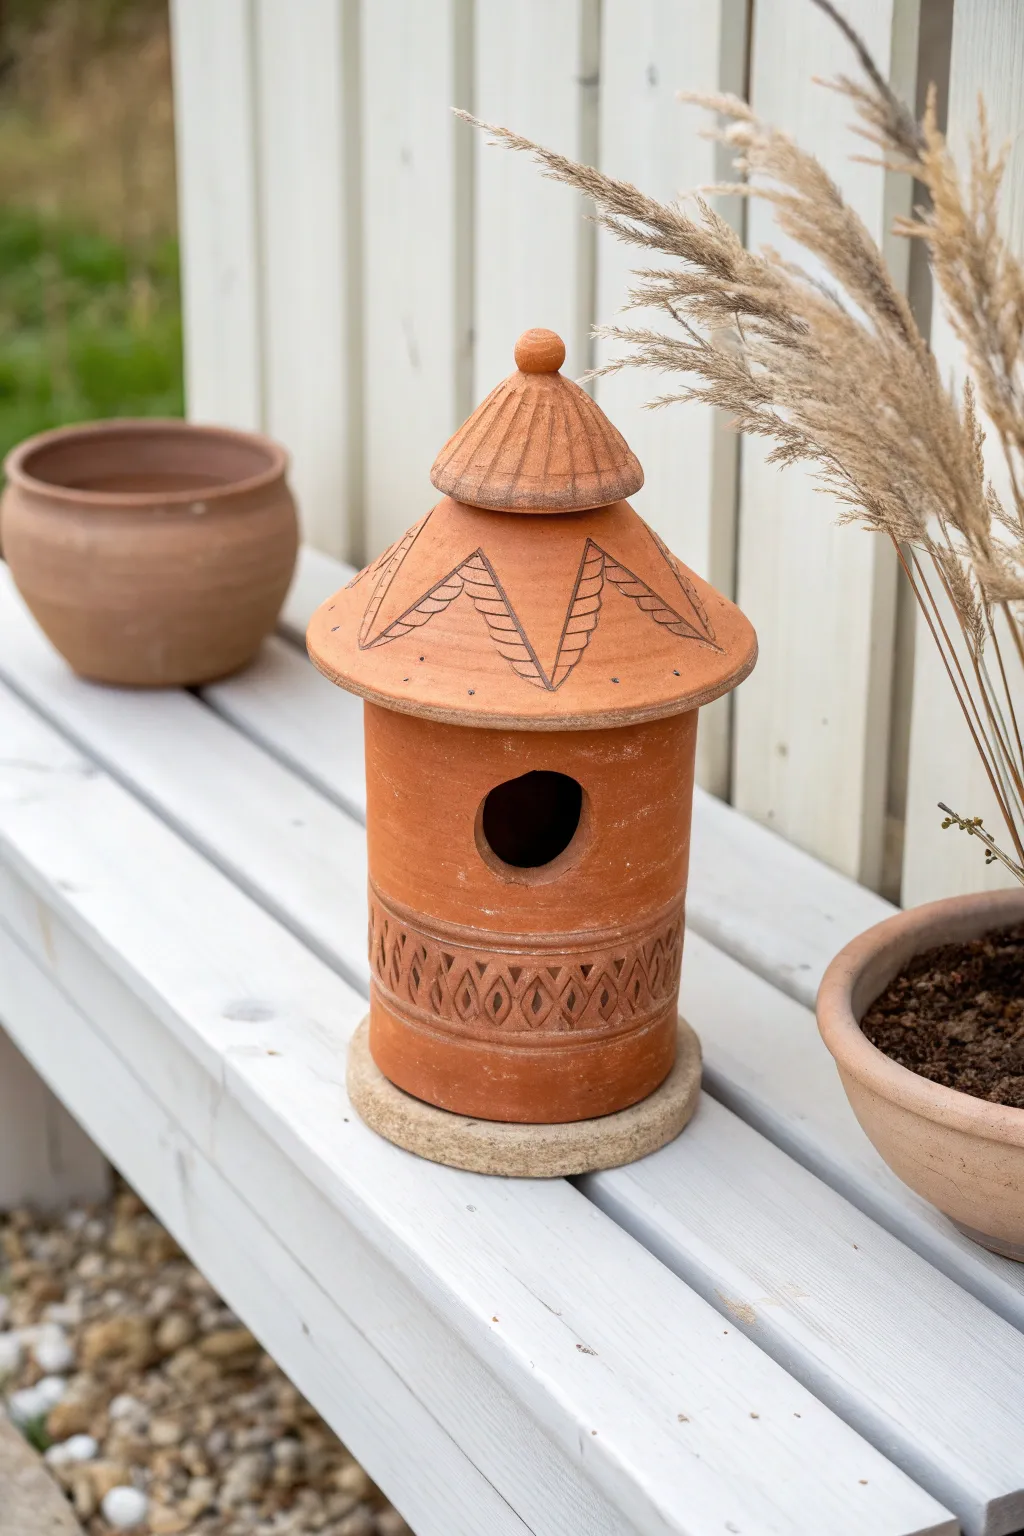
Embrace the natural warmth of fired earth with this charming architectural bird feeder project. By combining simple pots and saucers with precise etching techniques, you will create a textured, tiered sanctuary that looks like it came straight from a pottery wheel.
Step-by-Step
Materials
- One medium terra cotta cylinder pot (straight sides)
- Two terra cotta saucers (one slightly wider than the pot, one smaller for the very top)
- One small terra cotta bowl or spherical knob (to invert for the finial)
- Small round wooden or stone base (optional, for feet)
- Heavy-duty ceramic adhesive or outdoor construction adhesive
- Power drill with ceramic/glass drill bits (diamond coated hole saw)
- pencil
- Carving tool or Dremel with engraving tip
- Fine-grit sandpaper
- Waterproofing masonry sealer (matte finish)
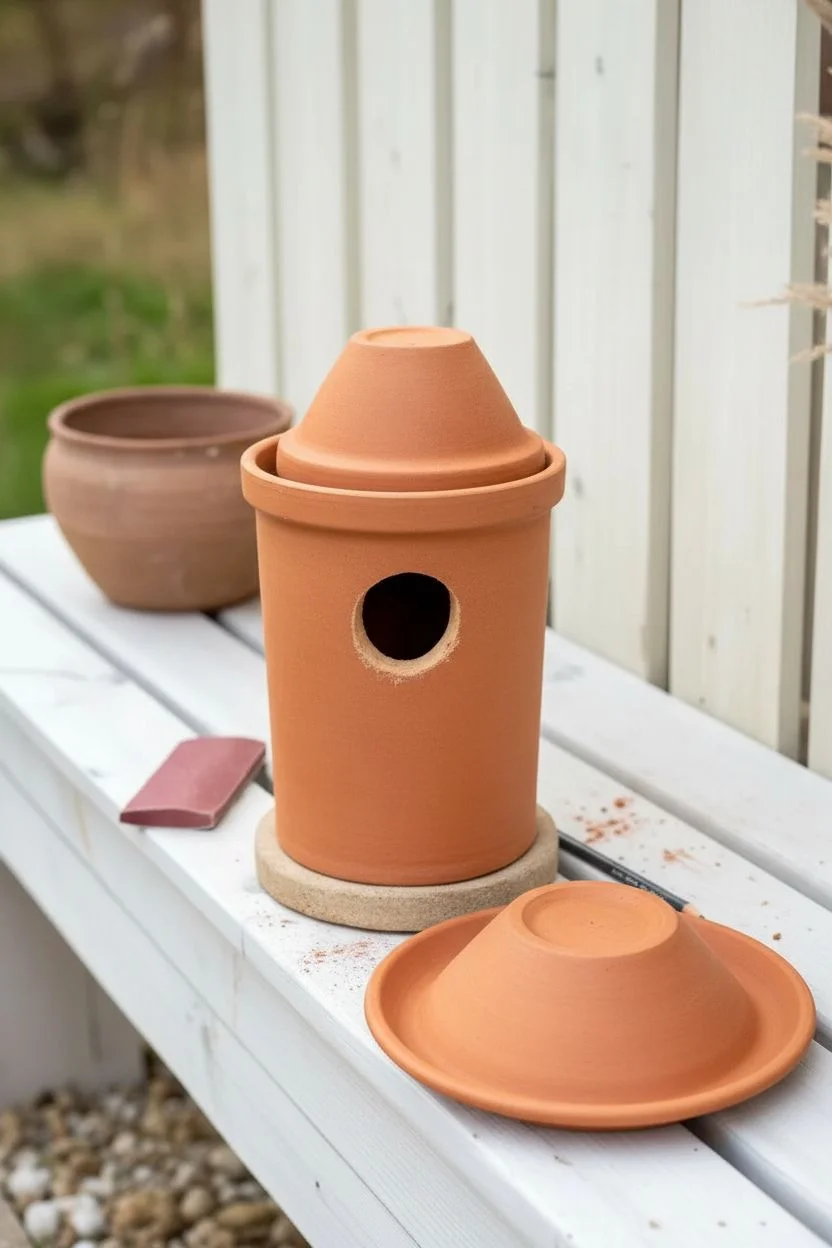
Step 1: Structural Preparation
-
Sourcing the shapes:
Select your pieces carefully to match the silhouette. You need a tall, straight-sided cylinder for the body and a saucer that serves as the main roof overhang. The uppermost peak is created by layering a smaller upturned bowl or a specialized cone shape if you can find one. -
Marking the entrance:
On the side of your cylinder pot, measure about two-thirds of the way up from the bottom rim. Use a pencil to trace a circle about 1.5 to 2 inches in diameter; this will be the entryway for your feathered guests. -
Drilling the access hole:
Using a diamond-coated hole saw bit on your drill, carefully bore out the entrance circle. Keep the pot wet with water while drilling to prevent cracking and minimize dust. -
Smoothing edges:
Once the hole is cut, take a piece of sandpaper or a sanding sponge to gently soften the sharp edges of the new opening so birds won’t snag their feathers.
Step 2: Creating the Texture
-
Penciling the patterns:
Lightly sketch your design onto the ‘roof’ saucer and the base of the cylinder. The image shows a chevron leaf pattern on the roof and a geometric lattice band around the bottom. -
Etching the roof details:
Using a rotary tool with an engraving tip (or a sharp scribing tool if the clay is soft enough), carve triangular leaf motifs radiating from the center of the upturned saucer. Make the central spine of the leaf deepest, with lighter scratches for the veins. -
Carving the base band:
Focused on the bottom third of the cylinder, carve two horizontal parallel lines wrapping around the entire circumference. -
The lattice effect:
Between your parallel lines, carve a series of repeating ‘X’ shapes or diamonds. Deepen the spaces between the lines to create a relief look, mimicking the stamped clay texture seen in the photo. -
Adding texture to the finial:
If using a small inverted bowl for the top, carve vertical ridges running from the apex down to the rim, giving it a ribbed, umbrella-like appearance.
Drilling Success
When drilling the entry hole, place a block of wood inside the pot to support the wall. This absorbs vibration and drastically reduces the chance of the clay shattering.
Step 3: Assembly and Finish
-
First test fit:
Stack your pieces dry to ensure everything sits level. The large saucer goes upside down on top of the cylinder; the smaller shaped piece goes on top of that saucer. -
Gluing the body:
Apply a strong bead of outdoor construction adhesive to the top rim of the cylinder. Center the large upturned saucer on top and press firmly. -
Attaching the finial:
Apply adhesive to the bottom rim of your top finial piece and press it securely onto the center of the main roof saucer. -
Adding the cap:
Glue a small wooden bead or tiny clay ball to the very peak of the structure to seal the drainage hole of the top pot and complete the silhouette. -
Sealing the surface:
Terra cotta is porous and can wick moisture away from birdseed. Brush the entire exterior with a matte masonry sealer. I prefer doing two thin coats to ensure it can withstand rain without darkening unevenly. -
Mounting the base:
For stability, glue the entire assembly onto a heavy stone or concrete disk base, as shown in the photo. This prevents tipping during windy days.
Patina Effect
Dilute white acrylic paint with water (1:1 ratio) and brush it over the carvings, then wipe it off quickly with a rag. The white will settle in the etched grooves.
Set your new architectural feeder in the garden and watch as the local birds investigate their sturdy new dining hall
Night Sky Constellation Feeder
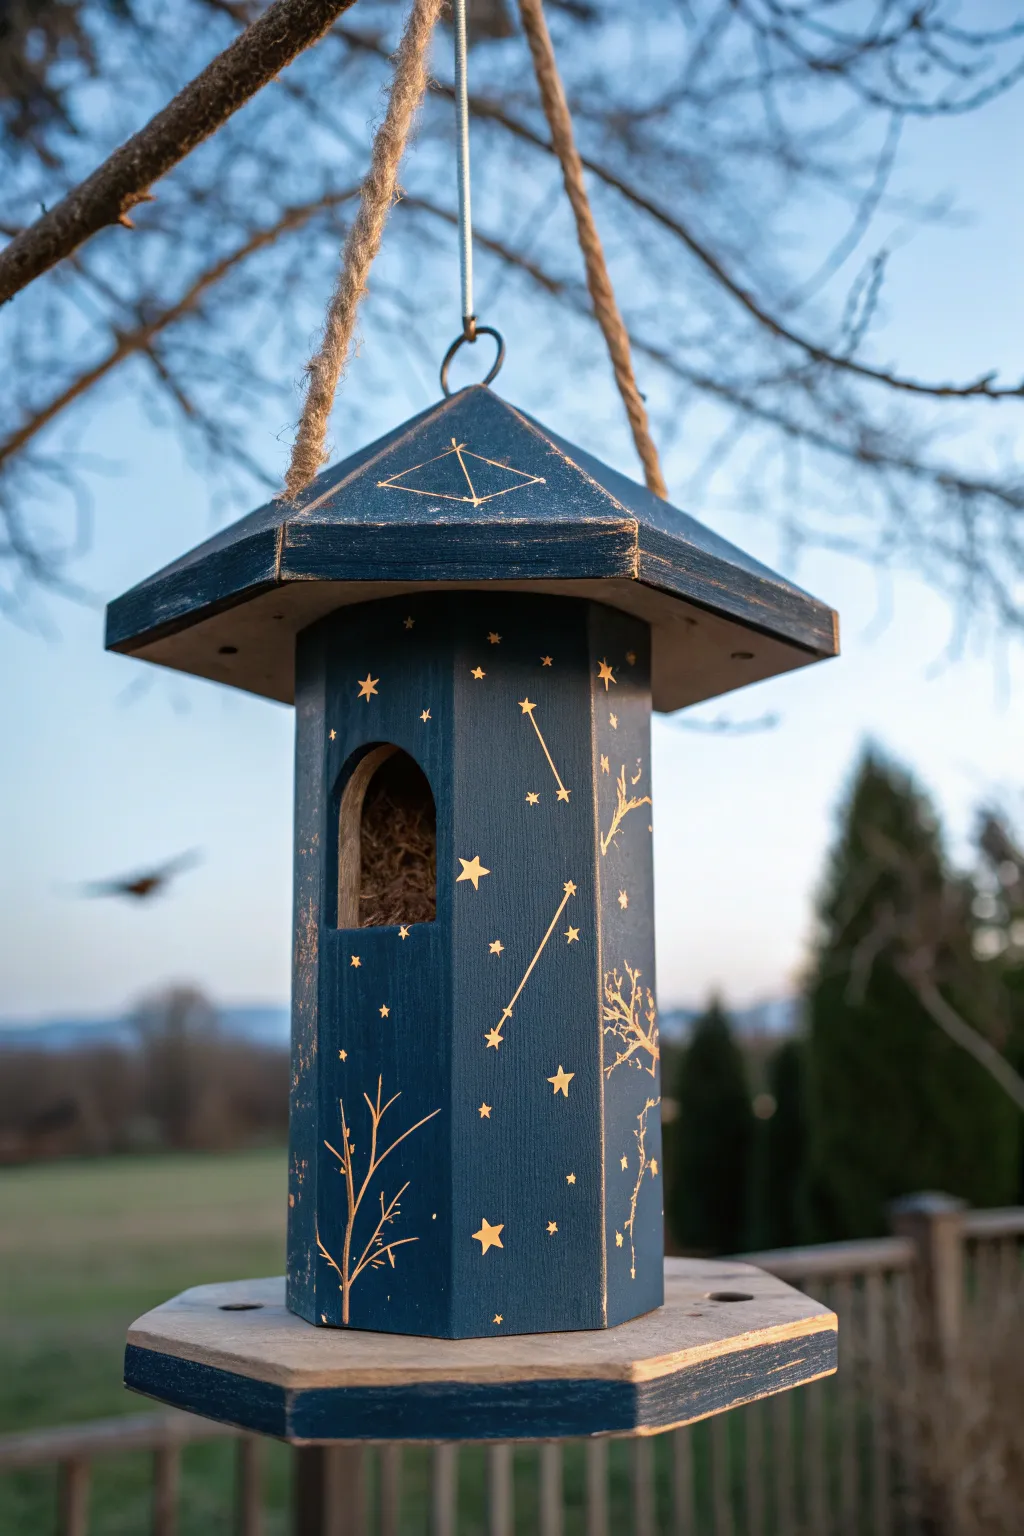
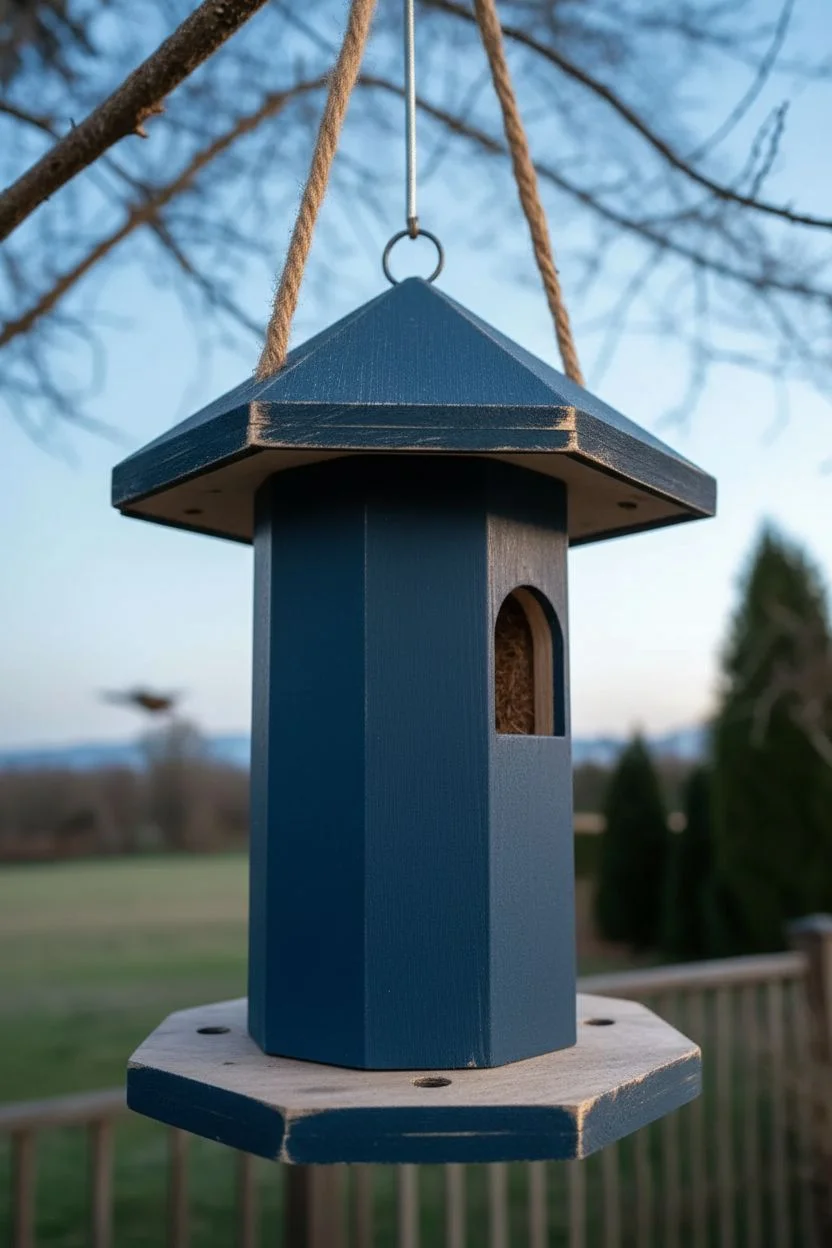
Transform a plain wooden bird feeder into a stunning piece of outdoor art with this deep indigo and gold celestial theme. The dark matte background makes the delicate gold constellations and bare branches pop, giving your feathered friends a magical place to dine under the stars.
Step-by-Step Tutorial
Materials
- Unfinished wooden bird feeder (hexagon shape preferred for optimal panel space)
- Sandpaper (120 and 220 grit)
- Deep indigo/midnight blue slightly chalky acrylic paint
- Metallic gold paint pen (fine tip)
- Metallic gold paint pen (medium tip)
- Small flat paint brush
- Graphite transfer paper (optional)
- Pencil
- Exterior matte varnish or spray sealer
- Rope or jute twine for hanging
- Painter’s tape (optional)
Step 1: Preparation and Base Coat
-
Prepare the surface:
Begin by lightly sanding the entire wooden feeder with 120-grit sandpaper to remove any rough splinters. Follow up with 220-grit for a smooth finish that will accept paint evenly. Wipe away all dust with a tack cloth or slightly damp rag. -
Apply the midnight hue:
Using a small flat brush, paint the entire exterior of the feeder with your deep indigo paint. Depending on the wood’s absorbency, you may need two coats for full, opaque coverage. Let the first coat dry for about 20 minutes before applying the second. -
Create a rustic edge:
Once the base colour is completely dry, take a small piece of sandpaper and gently distress the edges. Lightly sand the corners of the roof and the vertical edges of the feeder body to reveal just a hint of raw wood beneath the blue. This adds that charming, weathered character seen in the photo.
Gold Ink Not Flowing?
If the gold pen skips on the textured wood, press the tip firmly onto a piece of scrap paper to re-saturate the nib before returning to your feeder.
Step 2: Painting the Constellations
-
Plan your sky:
Before committing with paint, lightly sketch your constellation designs onto the panels using a pencil. You can look up real constellations like Cassiopeia, Orion, or the Big Dipper, or simply create geometric star patterns that please the eye. -
Draft the branches:
Near the bottom of the feeder panels, sketch faint lines for bare tree branches reaching upward. Keep the lines organic and asymmetrical, allowing them to stretch up about one-third of the way up the feeder body. -
Ink the lines:
Using the fine-tip gold paint pen, trace over your pencil lines for the constellations. Use a straight edge or ruler if you want the connections between stars to be perfectly crisp, or freehand it for a softer look. -
Add the stars:
Switch to the medium-tip gold marker or a small brush to create the stars. Draw five-pointed stars at the major intersections of your constellations. Vary the sizes slightly to create depth. -
Sprinkle the stardust:
Fill in the empty negative space between the major constellations with tiny dots and smaller four-pointed stars using the fine tip pen. This creates the effect of a dense, glittering galaxy.
Step 3: Adding Organic Details
-
Draw the branches:
Go back to the bottom of the panels where you sketched the trees. Use the fine-tip gold pen to draw the branches, starting thicker at the base and letting the lines taper off into delicate twigs as they reach upward. -
Roof details:
Don’t forget the roof! Add a simple geometric design, like a triangle or a solitary large star, on the front-facing slope of the roof to tie the design together. -
Clean up:
Check for any pencil marks that are still visible and gently erase them, being careful not to rub off your gold paint.
Glow in the Dark
Mix glow-in-the-dark powder into clear varnish and dab it over the gold stars. By day it looks metallic; by night, your constellations will softly glow.
Step 4: Sealing and Assembly
-
Weatherproofing:
Since this will live outdoors, protection is key. Apply at least two coats of exterior matte varnish. I prefer a spray sealer here to avoid smearing the gold marker, but a brush-on varnish works if you are very gentle. -
Wait for curing:
Let the feeder cure in a dry, well-ventilated area for at least 24 hours. The varnish needs to harden completely before facing the elements. -
Prepare the hanging mechanism:
While the feeder cures, cut a length of sturdy jute twine or rope. Double it over to create a loop at the top for hanging. -
Attach the rope:
Thread the rope through the eyelet or hook at the top of your feeder. Ensure the knot is secure and can support the weight of the feeder when filled with seed. -
Final inspection:
Give everything one last look. Ensure the roof is secure and the drainage holes (if present) are clear of paint or varnish so water won’t pool inside.
Fill your new celestial feeder with seeds and watch as the birds bring life to your tiny galaxy
Tiny Shopfront Illusion Feeder
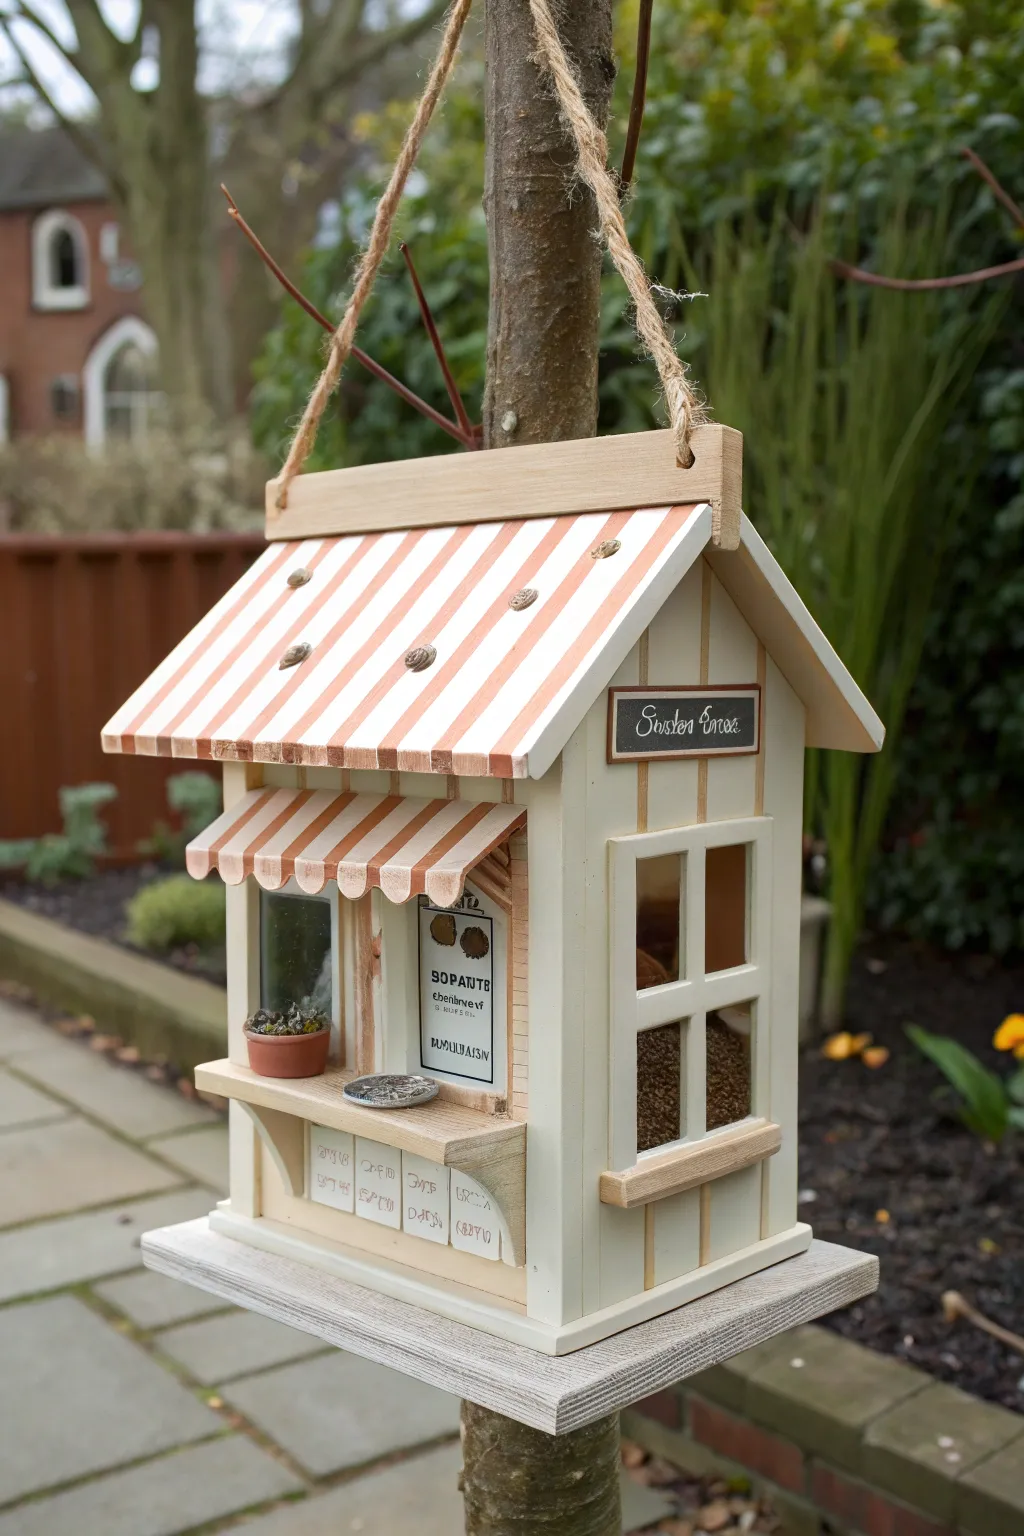
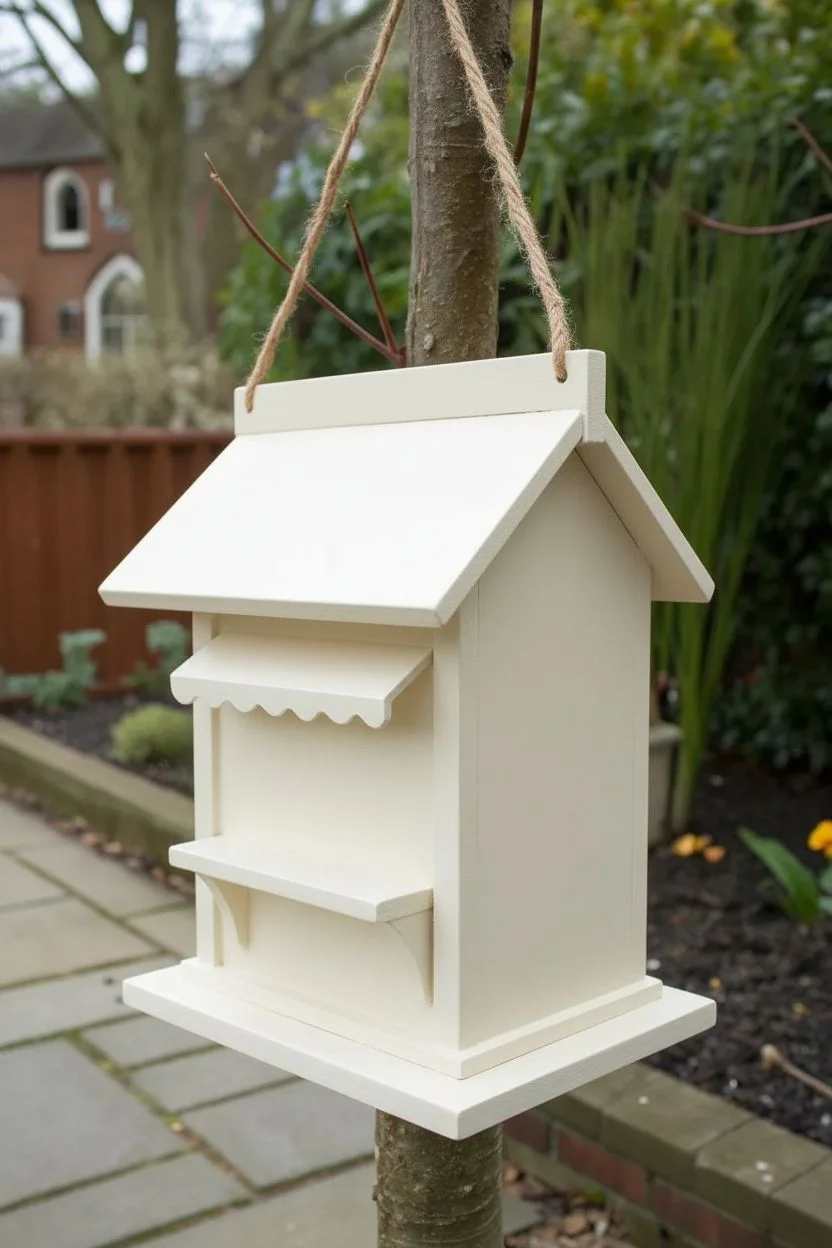
Transform a plain wooden bird feeder into an adorable miniature storefront with nautical charm. This project uses clever painting techniques and miniature accessories to create a hanging café that the garden birds will flock to.
Step-by-Step
Materials
- Unfinished wooden bird feeder (cottage style)
- Outdoor acrylic paints (Cream, Coral/Salmon, Dark Brown, Slate Grey)
- Small flat brush (1/2 inch) for base coats
- Fine detail brush (size 0 or 1)
- Painter’s tape or masking tape
- Waterproof wood glue
- Miniature terracotta pot (dollhouse scale)
- Faux succulents or moss
- Small wooden rectangle (for the sign)
- Black chalkboard paint or black acrylic
- White paint pen (fine tip)
- Clear outdoor waterproof varnish (spray or brush-on)
- Jute twine for hanging
Step 1: Base Painting
-
Prep the surface:
Begin by lightly sanding your wooden bird feeder to remove any splinters or rough patches. Wipe it clean with a dry cloth to ensure the paint adheres smoothly. -
Apply the main color:
Coat the entire body of the house (walls and window frames) with a creamy off-white outdoor acrylic paint. This usually takes two coats for opaque coverage; let the first coat dry completely before applying the second. -
Paint the roof base:
Paint the entire roof surface with a solid coat of white paint. While you’re at it, paint the small awning over the front window white as well. Let this dry thoroughly, as you’ll be applying tape over it next.
Uneven Stripes?
If paint bleeds under the tape, wait for it to dry fully. Then, use a small flat brush and your base white color to touch up the edges for a crisp line.
Step 2: Stripes and Details
-
Tape the stripes:
To get those crisp awning stripes, apply strips of painter’s tape vertically down the roof and the small awning attached to the front. Space them evenly to create the white gaps. -
Paint the accent color:
Using a coral or soft salmon color, paint the exposed areas between the tape strips. Use a dry brush technique—removing most paint on a paper towel first—if you want a slightly weathered, rustic look. -
Removing the tape:
Carefully peel off the painter’s tape while the paint is still slightly tacky to reveal your sharp candy-cane stripes. -
Highlight the screws:
Notice the small screws or tacks on the roof? Dab a tiny bit of dark brown or metallic bronze paint onto these heads to make them stand out as rustic hardware.
Level Up: Night Mode
Glue a tiny solar-powered fairy light inside the main chamber. At night, the shop windows will glow invitingly, though the birds will only visit during the day.
Step 3: Miniature Signage
-
Create the shop sign:
Paint a small rectangle of wood or cardstock with black chalkboard paint. Once dry, use a fine white paint pen to write a shop name like ‘Garden Eves’ or ‘Seeds & Treats’ in a cursive script. -
Glue the sign:
Using waterproof wood glue, attach your painted sign above the side window. Frame it with thin strips of wood painted brown if your bird feeder kit includes trim, or simply paint a brown border directly onto the wall. -
Add the menu board:
On the front wall under the awning, paint a rectangle in white to mimic a poster. Use a fine liner brush or pen to scribble faux text like ‘Daily Specials’ or ‘Seed Mix’ to simulate a menu.
Step 4: Final Flourishes
-
Install the planter:
Take a tiny dollhouse-sized terracotta pot and glue it securely to the front ledge or counter of the feeder. I like to use a strong epoxy here so the birds don’t knock it over. -
Add greenery:
Tuck a small piece of faux moss or a plastic succulent snipping into the pot. Secure it with a dab of glue so it stays put in windy weather. -
Simulate storage drawers:
Beneath the front counter, use a fine brush and grey paint to outline rectangular shapes, mimicking storage drawers or bins. Add tiny arched lines for handles. -
Weatherproof everything:
This is crucial: seal the entire project with two coats of clear, outdoor-rated polyurethane varnish. Ensure you get into all the nooks and crannies to protect your artwork from rain and UV rays. -
String it up:
Once the varnish is cured (usually 24 hours), thread sturdy jute twine through the hanging loops. Tie secure knots and find the perfect tree branch to display your work.
Fill the feeder with seeds and watch your local birds enjoy their new favorite hangout spot


Have a question or want to share your own experience? I'd love to hear from you in the comments below!