Cars are basically rolling sculpture, and painting them on canvas is such a satisfying mix of sleek design and juicy color. Here are my favorite car canvas painting ideas—from classic compositions to playful, unexpected styles you can totally make your own.
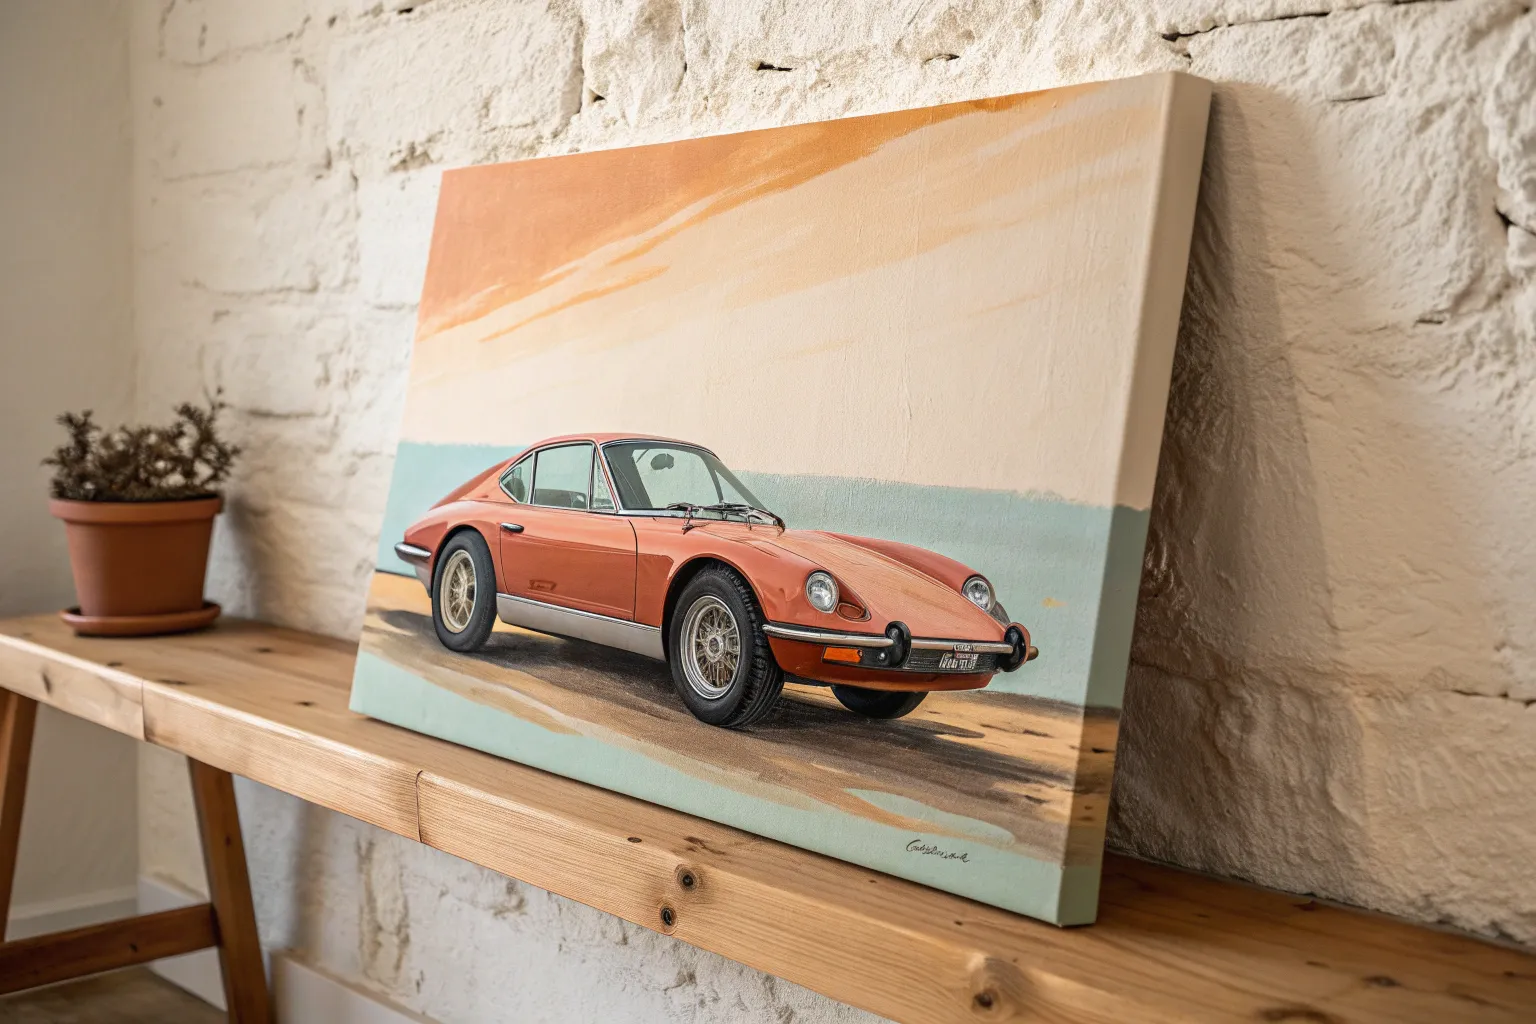
Classic Side-Profile Car Portrait

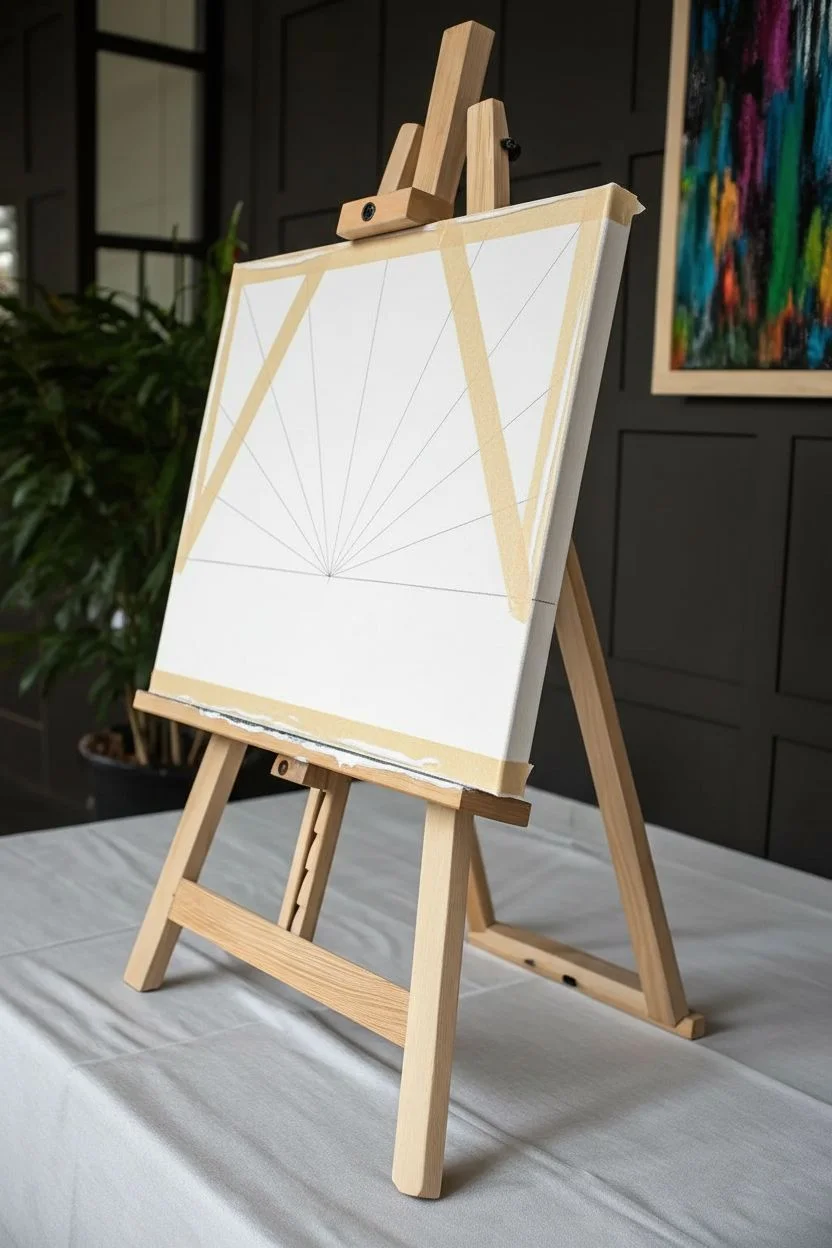
Capture the sleek lines and sophisticated aura of mid-century automotive design with this stunning classic car portrait. Using acrylics on a large canvas, you will create a photorealistic study of a vintage black sedan, focusing on chrome details and dramatic lighting against a minimalist background.
Step-by-Step Guide
Materials
- Large stretched canvas (approx. 30×40 inches)
- Acrylic paints (Mars Black, Titanium White, Burnt Umber, Ultramarine Blue, Yellow Ochre)
- Wide flat brushes (for ground)
- Medium filbert brushes (for bodywork)
- Fine liner brushes (00 and 0 sizes for details)
- Graphite pencil and eraser
- Reference photo of a classic car side profile
- Ruler or grid tool
- Slow-drying medium (optional for blending)
- Palette knife
Step 1: Preparation and Sketching
-
Prime the Surface:
Even if your canvas is pre-primed, adding a fresh coat of gesso creates a smoother surface for fine details. Lightly sand it once dry to remove any canvas texture that might interfere with sleek metal lines. -
Establish the Grid:
Drawing a car requires precise proportions. Lightly draw a 2-inch grid over your reference photo and a corresponding scaled-up grid on your canvas to ensure accuracy. -
Map the Outline:
Sketch the car’s silhouette carefully. Pay close attention to the wheelbase and roofline curve, as these define the car’s character. Don’t press too hard with your pencil; you want lines that disappear easily later. -
Detail the Features:
Sketch in the essential details: the windows, wheel rims, bumpers, and the distinct front grille. Mark out where the major reflections and highlights fall on the body.
Step 2: Painting the Bodywork
-
Mix Your Blacks:
Straight black can look flat. Mix Mars Black with a touch of Ultramarine Blue for cool shadows and Burnt Umber for warmer, reflected light areas. This creates a rich, chromatic black. -
Block in Dark Tones:
Using a medium filbert brush, paint the darkest sections of the car body. Leave the areas intended for highlights and chrome unpainted for now to keep them crisp. -
Create the Gradient:
While the black paint is still slightly wet, blend in lighter grey tones (black mixed with white) along the curved panels to simulate the reflection of the sky and horizon. -
Define the Windows:
Paint the glass areas using a mix of light blue-grey and white. Keep the strokes vertical or slightly angled to mimic glass reflections, rather than solid color. -
Construct the Wheels:
Start the tires with a dark charcoal grey, not pure black. Add the tread texture with darker strokes, and ensure the bottom of the tire looks slightly flattened where it meets the ground for weight.
Wobbly Lines?
If you struggle to paint straight chrome trim lines, use painter’s tape to mask the area. Ensure the base layer is 100% dry before taping to avoid peeling paint.
Step 3: Chrome and Highlights
-
Base the Chrome:
Chrome reflects the environment. Paint the bumpers and trim with a medium grey first. Then, add a dark horizon line running through the metal parts. -
Add High Contrast:
This is where the magic happens. Use your finest liner brush and pure Titanium White to add the sharpest highlights on the top edges of the chrome, door handles, and window trim. -
Detail the Grille:
Paint the intricate front grille. I find it easiest to paint the dark vertical gaps first, then carefully drag thin lines of white or light grey over the ridges. -
Refine the Headlights:
Paint the headlight lenses with concentric circles of white and pale yellow to suggest glass refraction. Add a strong highlight dot to make them gleam.
Vintage Vibe
For an aged look, mix a tiny amount of raw sienna into your white highlights. This warms the painting and mimics the look of an old photograph or classic illustration.
Step 4: Grounding and Finishing
-
Paint the Shadow:
Mix a transparent wash of Burnt Umber and Black. Paint the shadow directly under the car, making it darkest where the tires touch the ground and fading it out softly. -
Add Ground Texture:
Scumble (dry brush) some Yellow Ochre and Sienna tones horizontally beneath the shadow to hint at a dirt road or pavement without drawing attention away from the car. -
Clean Up Edges:
Use Titanium White or a very light cream to paint the background negative space. Carefully cut in around the car’s silhouette to sharpen any fuzzy edges. -
Final Polish:
Step back and check your values. If the black looks too dull when dry, adding a layer of gloss varnish over just the car body (not the background) will make the paint pop like real automotive lacquer.
Before you know it, you will have a sophisticated piece of automotive art ready to hang in your study or living room


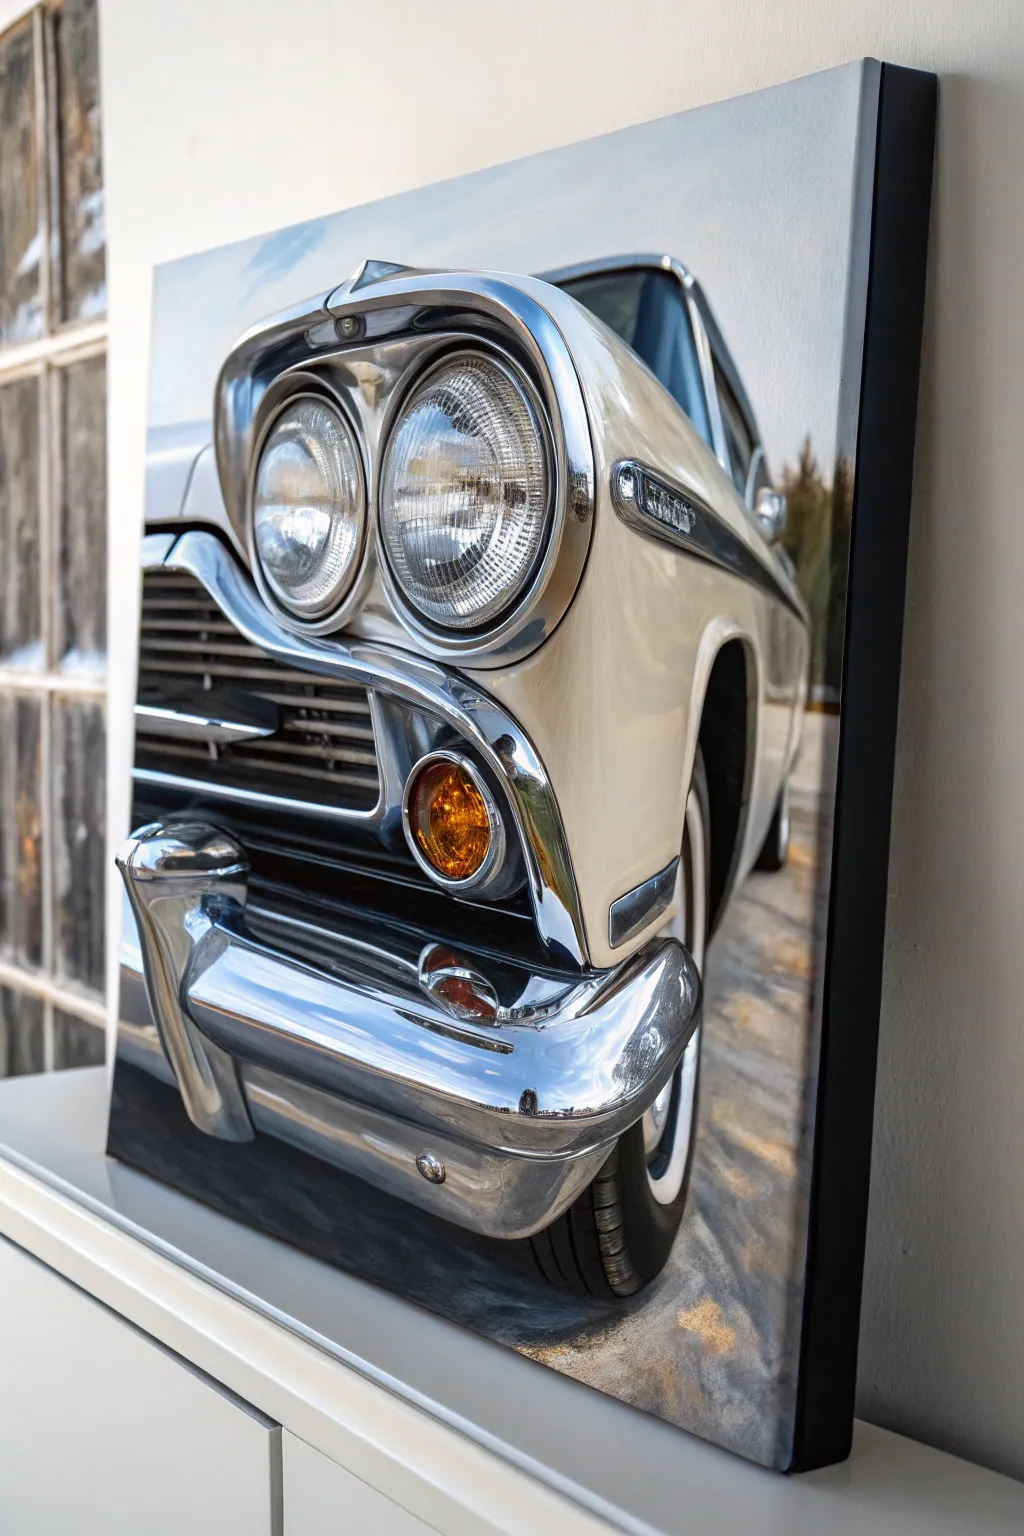
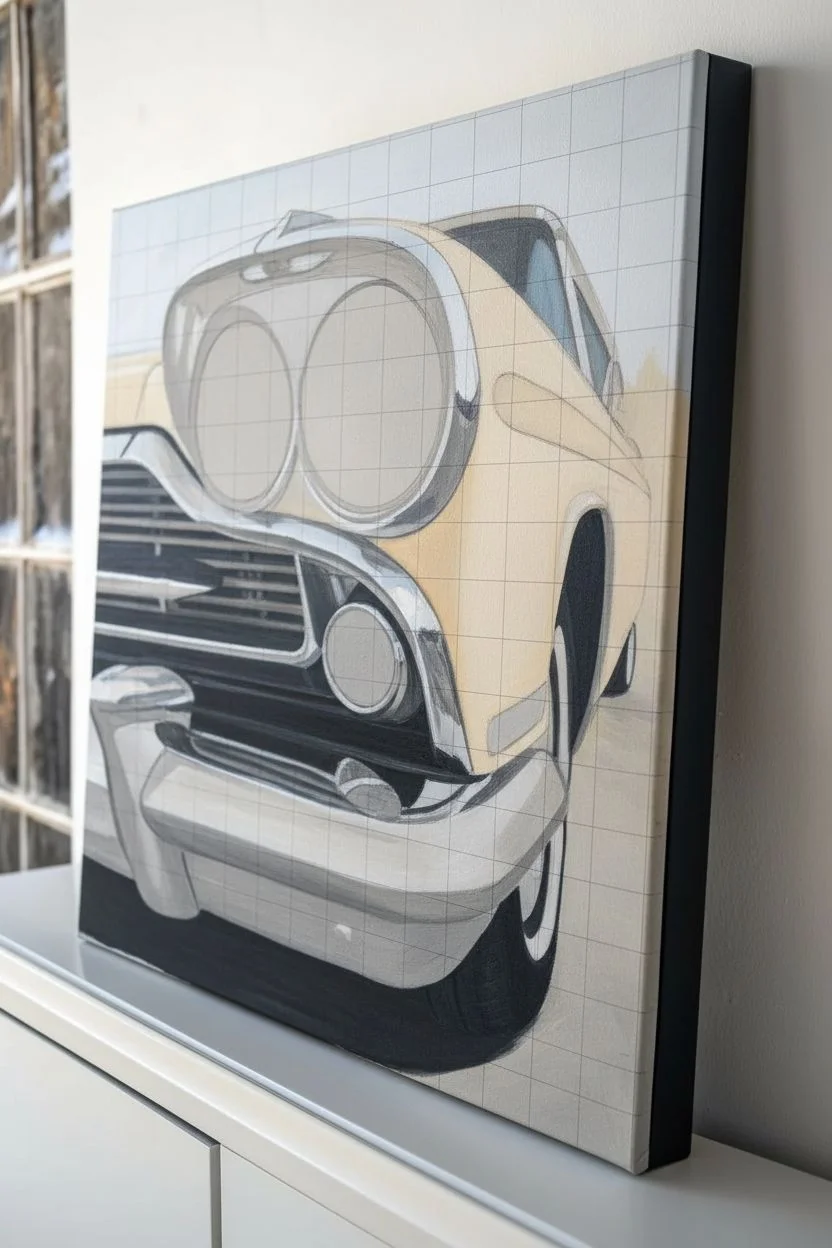
Low-Angle Front View Drama
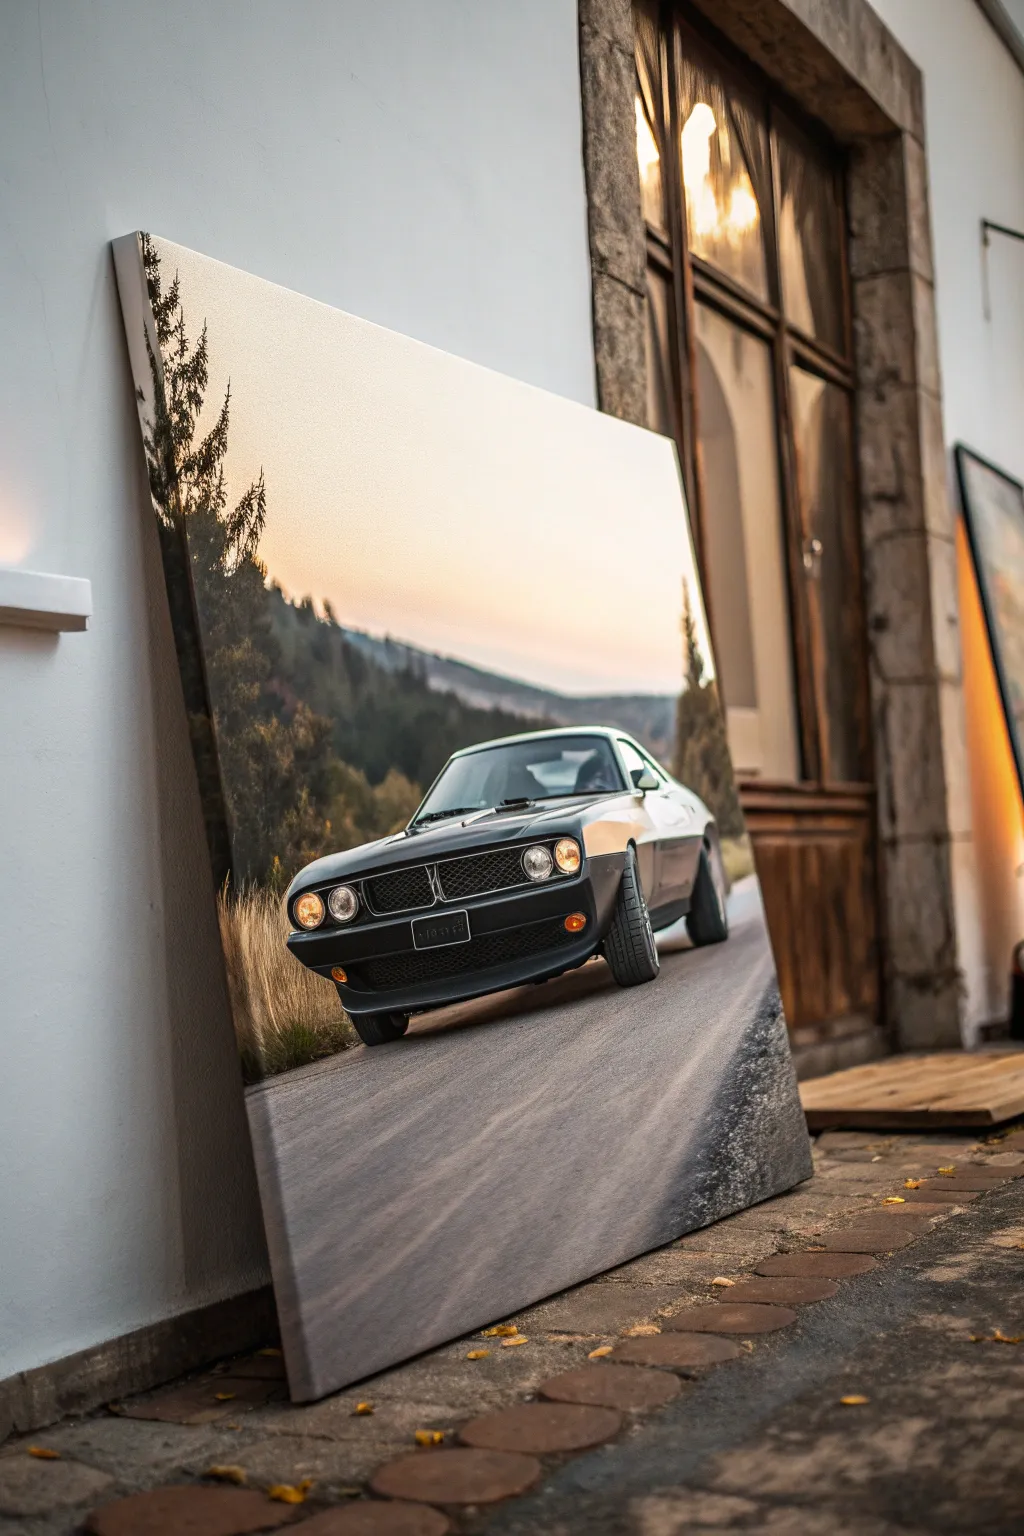

Capture the raw power and brooding elegance of a vintage muscle car with this large-scale acrylic painting project. The low angle emphasizes the car’s aggressive stance while the warm sunset palette creates a stunning contrast against the cool shadows.
How-To Guide
Materials
- Large stretched canvas (24×36 inches or larger)
- Heavy body acrylic paints (Mars Black, Titanium White, Burnt Umber, Cadmium Yellow, Cadmium Orange, Phthalo Blue)
- Set of flat synthetic brushes (sizes 1-inch, 1/2-inch, and #4)
- Fine detail liner brush (size 0 or 00)
- Reference photo of muscle car (low angle)
- Graphite transfer paper (optional)
- Masking tape
- Slow-drying medium or retarder
- Palette knife for mixing
- Easel or sturdy wall mount
Step 1: Setting the Scene
-
Prime the Surface:
Begin by applying a smooth coat of gesso to your large canvas if it isn’t pre-primed. Sanding it lightly once dry ensures your brushstrokes glide effortlessly, particularly for the car’s smooth bodywork. -
Map the Horizon:
Lightly sketch a low horizon line about one-third up from the bottom. Mark the vanishing point in the center to establish the road’s perspective. -
Draft the Car Outline:
Sketch the car’s outline, focusing on the forceful perspective. The front bumper should be large and dominant. If freehand drawing feels daunting, tape your reference photo over transfer paper and trace the key lines directly onto the canvas. -
Establish the Sky Gradient:
Mix Titanium White with a touch of Cadmium Yellow and Orange. Start painting the sky from the horizon up, blending into a very pale, almost white hue at the horizon line. -
Blend the Upper Sky:
As you move higher up the canvas, slowly introduce trace amounts of Phthalo Blue into your white mix to create a soft, desaturated transition. Use a large, damp brush to smooth out brushstrokes for a seamless atmosphere.
Chrome Effect Secret
To painting realistic chrome, don’t use grey. Instead, paint a distorted reflection of the ground (dark) and the sky (light/blue) meeting in a sharp line.
Step 2: Constructing the Environment
-
Paint the Distant Hills:
Mix a dark, cool grey using Phthalo Blue and Burnt Umber. Paint the treeline and hills in the background, keeping the edges slightly soft to push them into the distance. -
Layer the Road Surface:
For the asphalt, mix Mars Black and Titanium White to create a mid-tone grey. Apply this with long, sweeping horizontal strokes that follow the perspective lines toward the vanishing point. -
Add Road Texture:
While the road paint is still tacky, drag a dry brush with darker grey through it to simulate tire marks and asphalt grain. -
Define the Grass:
Use a fan brush or an old, splayed flat brush with a mix of Burnt Umber and Yellow Ochre to stipple in the dry grass along the road’s edge. Flick the brush upward to mimic tall blades.
Level Up: Motion Blur
Create a sense of speed by blurring the road edges and background trees horizontally with a dry brush while the paint is wet to mimic camera motion.
Step 3: The Main Event: Painting the Car
-
Block in Dark Values:
Using pure Mars Black mixed with a tiny bit of Blue (to make it richer), fill in the darkest shadow areas of the car: the grille, the underside, and the tires. -
Paint the Body Panels:
Mix a dark charcoal grey for the car’s body. Paint the hood and side panels, leaving negative space where the brightest reflections will go. -
Create the Metallic Shin:
Now, mix the sky colors (pale orange and white) to paint the reflections on the hood and fender. Apply these boldly; metal reflects the environment sharply, so don’t over-blend the edges. -
Detail the Grille:
Switch to your fine liner brush. With a light grey, carefully paint the honeycomb pattern of the grille and the chrome trim around the headlights. -
Illuminate the Headlights:
Paint the headlight circles with white first. Once dry, glaze over them with a thin wash of Cadmium Yellow and Orange to make them glow warm against the dark grille. -
Refine the Wheels:
Paint the tires with a dark grey, not black, so you can add black shadows underneath them later. Use the liner brush to suggest tread patterns on the front tire, which is turned toward the viewer. -
Final Contrast Check:
Stand back from the canvas. Strengthen the darkest shadows under the car to firmly ‘plant’ it on the road, and add pure white highlights to the sharpest edges of the chrome bumper.
Hang your finished masterpiece low on the wall to enhance that dramatic, ground-level perspective you worked so hard to achieve


Vintage Car With Nostalgic Colors
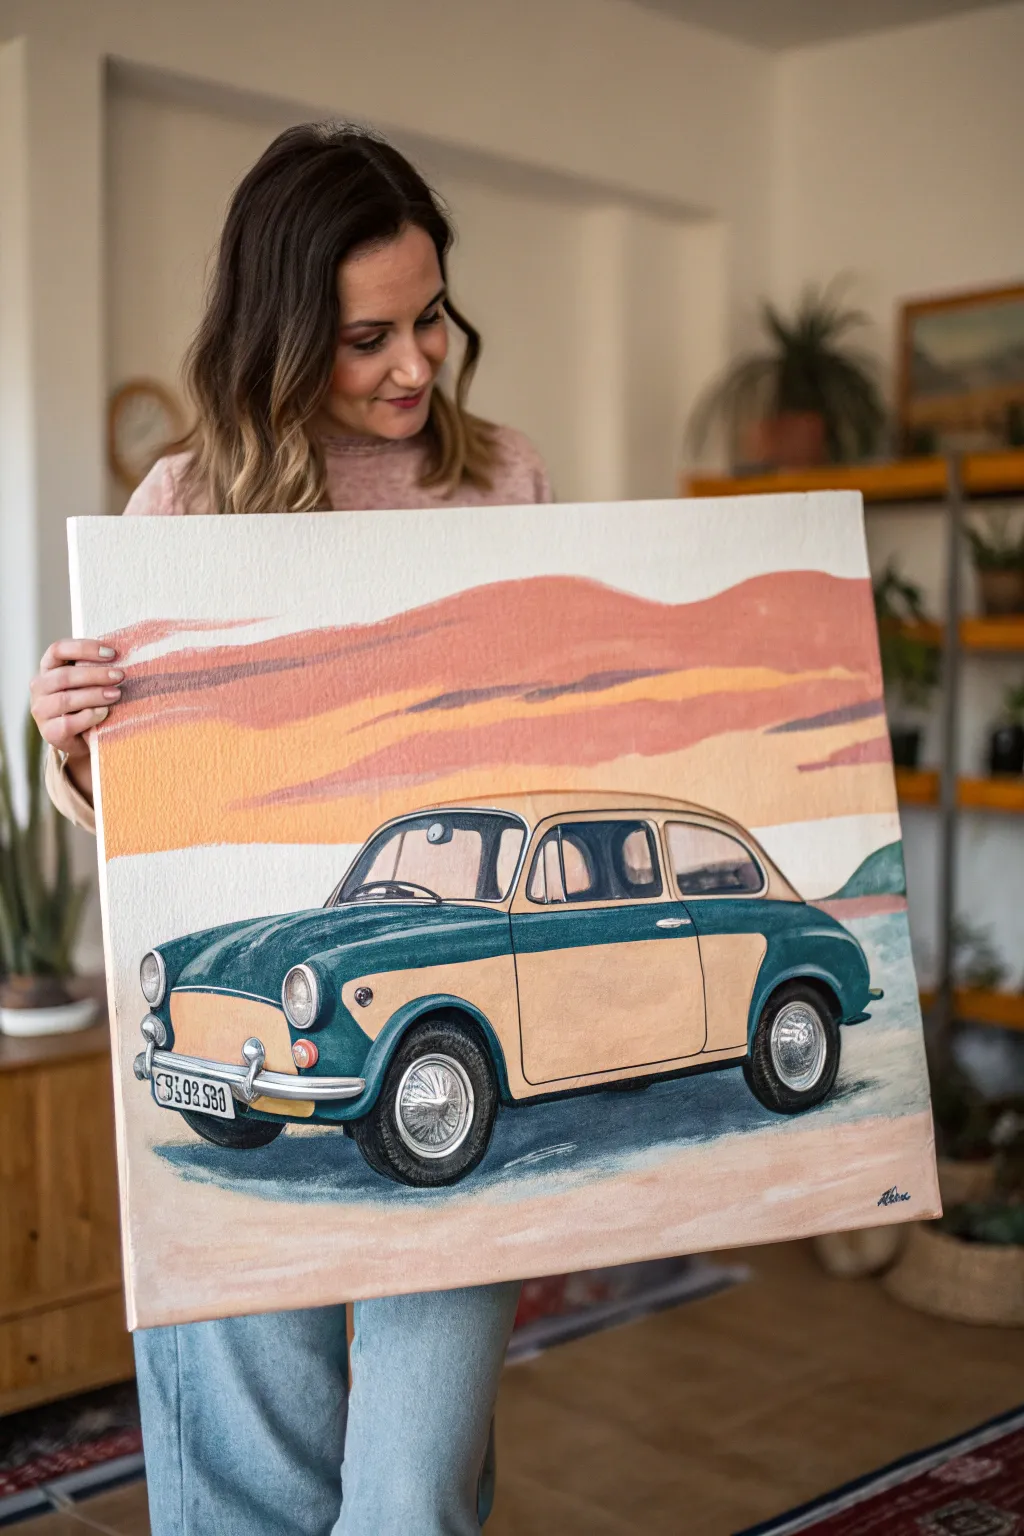

Capture the charm of classic motoring with this stylized acrylic painting featuring a vintage car in a nostalgic, dusty landscape. Using a palette of muted teals, creams, and terracotta pinks, you’ll create an artwork that feels like a treasured postcard from the past.
Step-by-Step
Materials
- Stretched canvas (approx. 16×20 inches or square)
- Acrylic paints (Phthalo Green, Burnt Sienna, Yellow Ochre, Titanium White, Mars Black, Unbleached Titanium)
- Set of synthetic brushes (flat shader #8, round #4, fine liner #1)
- Graphite transfer paper or soft pencil for sketching
- Palette knife for mixing
- Water cup and paper towels
- Easel or flat work surface
- Reference photo of a vintage hatchback (Fiat 600/500 style)
Step 1: Planning and Sketching
-
Establish the horizon:
Begin by lightly penciling a horizontal line about one-third of the way up from the bottom of your canvas to separate the ground from the background landscape. -
Sketch the car outline:
Center your vintage car in the composition. Focus on the rounded, bubbly shape typical of 600-style models. Draw the roofline, the distinct separation between the hood and the fenders, and the wheel wells large enough to accommodate the tires later. -
Detail the features:
Add the specific details: round headlights, the front bumper, the side trim that separates the two-tone paint job, and the door handle. Don’t worry about shading yet, just get the hard lines in place. -
Block in the background hills:
Above the car, sketch gentle, rolling shapes for the distant hills. Keep these lines organic and flowing to contrast with the mechanical structure of the car.
Wobbly Lines?
If painting straight lines for chrome trim is difficult, use low-tack painter’s tape to mask off the areas. Ensure the base layer is 100% dry before taping to avoid peeling paint.
Step 2: Painting the Background
-
Mix the sky tones:
Create a pale, creamy off-white using Titanium White and a tiny dot of Yellow Ochre. Paint the top sky section, keeping your brushstrokes horizontal. -
Paint the hills:
Mix Burnt Sienna with White and a touch of Red (if needed) to get a dusty terracotta pink. Fill in the hill shapes. I like to let this dry briefly and then add a slightly darker strip of the same color right at the bottom edge of the hills for depth. -
Create the sunset bands:
Using a mix of Yellow Ochre and White, paint a horizontal band below the hills. Blend the edges slightly into the pink hills while the paint is still tacky for a soft, hazy look. -
Paint the ground:
For the foreground, mix a sandy beige using White, Unbleached Titanium, and a speck of Burnt Sienna. Apply this loosely below the car, leaving the area directly under the tires blank for shadows later.
Step 3: Coloring the Car
-
Base coat the dark panels:
Mix Phthalo Green with a small amount of Mars Black and White to create a muted, deep teal. Apply this to the fenders, the roof section just above the windows, and the lower rocker panels. -
Fill the light panels:
Mix a creamy beige using White and Yellow Ochre (aiming for a ‘coffee with milk’ shade). Paint the door panel, the front hood area, and the roof. You might need two coats here to cover the canvas texture fully. -
Paint the windows:
Mix a light grey-blue. Fill the windshield and side windows. While wet, streak in some white diagonal lines to suggest glass reflections. -
detail the interior:
Use a darker grey to paint vague shapes inside the car—headrests and a steering wheel silhouette—so the car doesn’t look empty.
Make it Personal
Customize the license plate with a special date, name, or location. You can also change the car’s teal sections to your favorite color, like cherry red or navy blue.
Step 4: Details and Definition
-
Outline the body:
Using your fine liner brush and thinned black paint (ink consistency), carefully outline the major seams of the car: the door frame, the window edges, and the separation between the teal and cream colors. -
Paint the tires:
Use Mars Black for the tires. Paint the donut shape, then mix a dark grey to add a highlight on the top curve of the tire to show volume. -
Add the chrome:
Use pure Titanium White mixed with the tiniest bit of blue for the hubcaps, bumpers, and headlight rims. Paint these with high contrast—bright whites next to dark grey lines—to mimic the reflection of metal. -
Create the cast shadow:
Mix a dark, cool grey (Black + Blue + White). Paint a harsh shadow directly under the car, stretching slighting to the left, grounding the vehicle so it doesn’t look like it’s floating. -
Final highlights:
Add pure white ‘sparkles’ or lines on the chrome bumper, the top of the headlights, and the curve of the fender to make the car pop against the matte background. -
License plate:
Paint a small white rectangle on the front bumper. Once dry, use your finest brush or a black paint marker to script a fictional license plate number.
Step back and admire your nostalgic masterpiece, ready to bring a touch of retro wanderlust to any wall


Watercolor Splash Car Silhouette
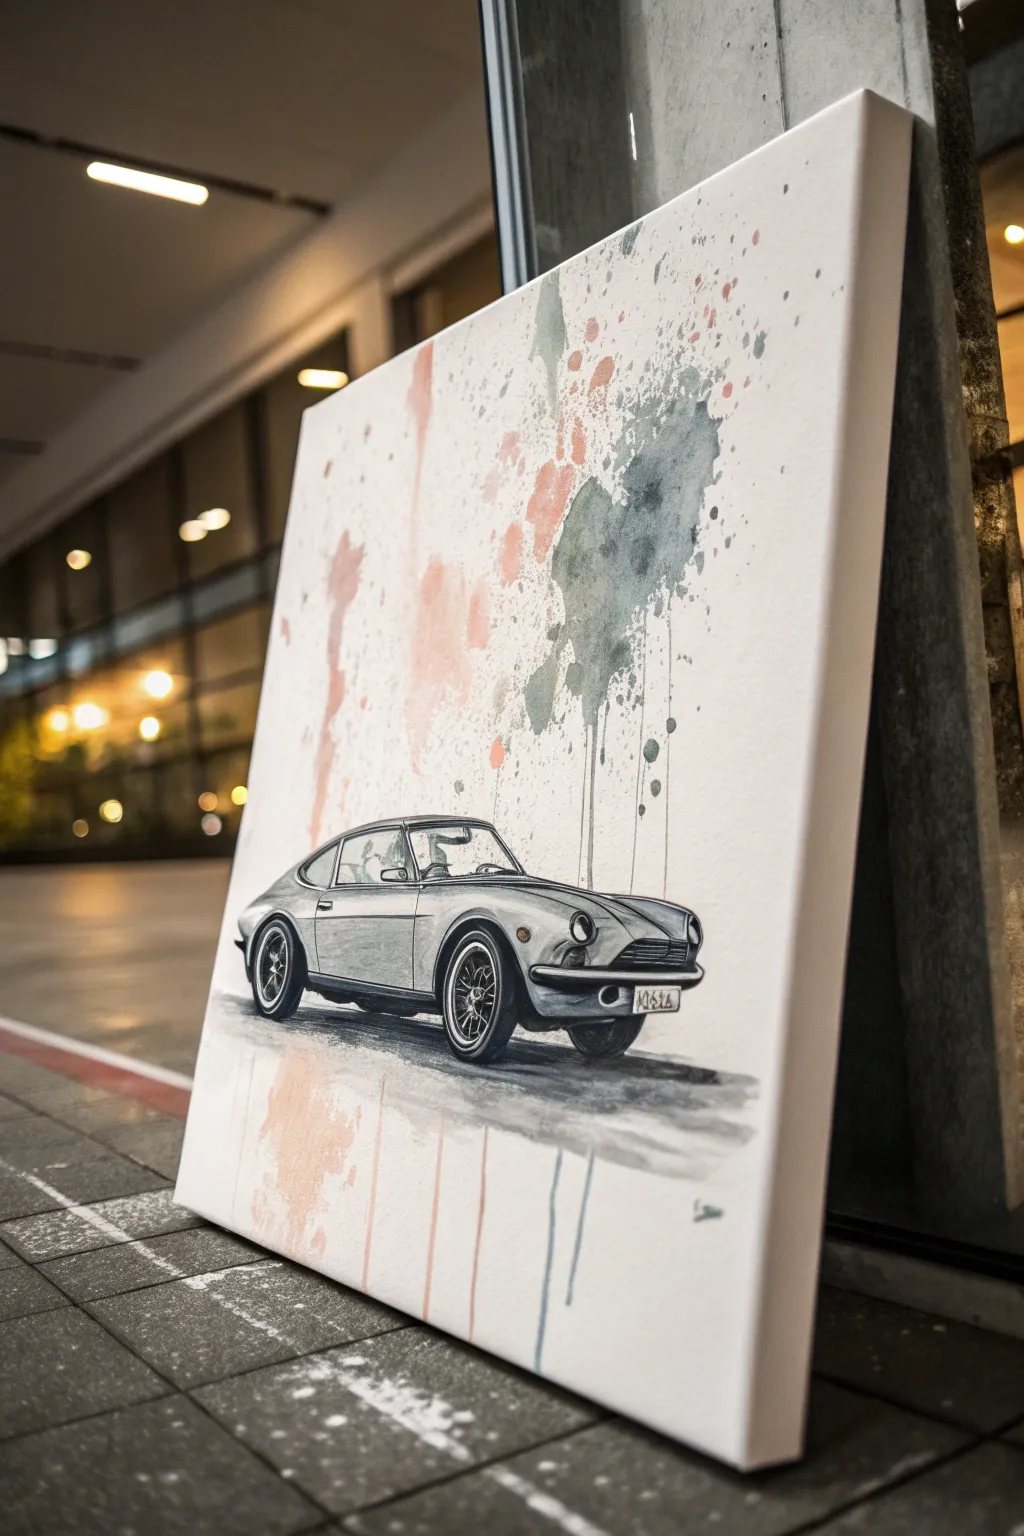
This project combines the precision of a classic car sketch with the spontaneous energy of watercolor-style splashes. The result is a striking mixed-media piece that balances detailed monochrome line work against loose, vibrant washes of coral and slate blue.
Detailed Instructions
Materials
- Large stretched canvas (square or portrait orientation)
- Acrylic paints (Black, White, Titanium White, Paynes Grey, Coral/Salmon Pink)
- Acrylic fluid medium or flow improver
- Charcoal pencils or soft graphite pencils (2B, 4B, 6B)
- Workable fixative spray
- Various paintbrushes: Fine liner (0 or 00), Round wash (size 8 or 10), and a large splatter brush
- Carbon paper and a printed reference image of a Datsun 240Z (or car of choice)
- Masking fluid or liquid frisket (optional)
- Palette knife
- Water spray bottle
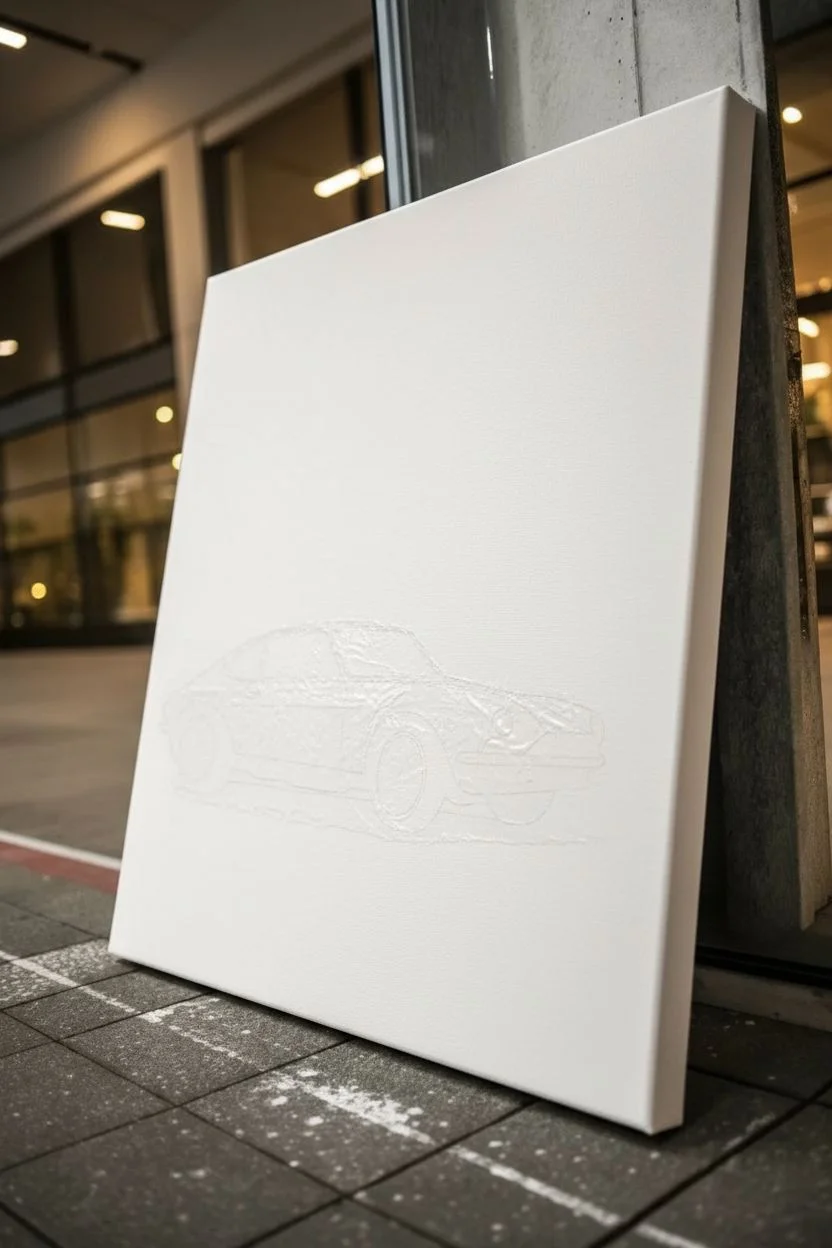
Step 1: Planning and Establishing the Car
-
Prepare the canvas:
Start with a clean, stretched canvas. If your canvas feels too rough, apply a thin coat of gesso and sand it lightly once dry to create a smoother surface for detailed drawing. -
Transfer the outline:
Print your reference image of the car to fit the lower third of the canvas. Place a sheet of carbon paper face down on the canvas, tape your reference image over it, and carefully trace the main contours of the vehicle with a pencil. -
Refine the sketch:
Remove the carbon paper. Using a sharp H or HB pencil, go over the faint transferred lines to solidify the shape. Pay special attention to the windows, wheels, and the front grill details. -
Mask the vehicle:
To keep the car drawing crisp while we apply the background splashes, carefully paint a layer of masking fluid over the entire car shape. Let this dry completely until it is tacky and clear.
Paint Too Control?
If acrylics are drying too fast for drips, mix in a retarder medium. This keeps the paint open longer, allowing gravity to do the work for those natural, long streaks.
Step 2: The Abstract Splash Background
-
Mix the splatter effect colors:
In your palette, mix a Coral Pink with plenty of water and flow improver until it has an ink-like consistency. Do the same for a Slate Grey (mix Paynes Grey with a touch of white). -
Apply the grey wash:
Load a round wash brush with the watery grey mixture. Dab it loosely in the upper right quadrant of the canvas, allowing the bristles to puddle the paint slightly. -
Create the drip effect:
While the paint is wet, hold the canvas upright. If gravity doesn’t pull the paint down enough, mist the bottom edge of the wet patch with your water spray bottle to encourage long, thin drips. -
Add the coral accents:
Repeat the process with your Coral Pink mixture, focusing on the left side of the composition. Allow these shapes to be irregular and float above where the car will sit. -
Splatter texture:
Dip a stiff bristle brush or toothbrush into the thinned paint. Pull your thumb across the bristles to flick tiny specks of paint around the main color patches for an energetic, messy look. -
Foreground washes:
Add faint, vertical streaks of diluted coral and grey at the very bottom of the canvas, below the masked car area, to ground the composition. Let the entire background dry for at least an hour.
Step 3: Detailing the Car
-
Reveal the car:
Gently rub away the rubbery masking fluid to reveal the pristine white canvas shape of the car underneath. -
Base shadows:
Mix a light grey acrylic wash. Paint the darker areas of the car body—the side panels, the interior visible through the windows, and the wheel wells—to establish volume. -
Deepen the blacks:
Switch to pure black acrylic and a fine liner brush. Fill in the darkest elements: the tires, the grill mesh, the window frames, and the deep shadow underneath the chassis. -
Render the wheels:
I find painting wire wheels requires steadiness; use your finest brush to paint the spokes in silver or light grey, letting the black background peek through for depth. -
Charcoal shading:
Once the acrylic base layer is dry, use charcoal pencils to add soft gradients to the grey bodywork. Smudge the charcoal gently with a paper stump to create the metallic sheen of the curves. -
Highlights:
Use Titanium White paint or a white gel pen to add sharp reflections on the bumpers, headlights, and the roofline. These high-contrast specs make the metal look shiny. -
Ground shadow:
Paint a dark, horizontal shadow directly under the tires using watered-down black acrylic. Blend the edges out so it looks like a soft cast shadow on pavement. -
Final protection:
Because we used charcoal over acrylic, spray the finished piece with a workable fixative to prevent the drawing from smudging over time.
Metallic Upgrade
Swap the grey paint for metallic silver acrylic on the car’s bumpers and rims. It catches the light beautifully and adds a realistic chrome finish to the vintage vehicle.
Hang your masterpiece in a well-lit spot to let those metallic details really shine alongside the modern abstract background
BRUSH GUIDE
The Right Brush for Every Stroke
From clean lines to bold texture — master brush choice, stroke control, and essential techniques.
Explore the Full Guide
Neon Pop Color Car Painting

Bring the energy of the racetrack into your living room with this vibrant pop art canvas. By combining crisp, radiating geometric stripes with a detailed car focal point, you’ll create a piece that feels both retro and fiercely modern.
Step-by-Step
Materials
- Square stretched canvas (approx. 20×20 inches)
- Acrylic paints (hot pink, magenta, lemon yellow, cyan, emerald green, lime green, bright orange)
- Painter’s tape or masking tape (1-inch width)
- Acrylic matte medium or white gesso
- High-resolution print of a car (laser print on paper) or transfer paper
- Mod Podge or heavy gel medium (for decoupage)
- Dark grey and black acrylic paint
- Flat shader brushes (various sizes)
- Fine detail liner brush
- Ruler and pencil
- White paint pen or fine brush
Step 1: Setting the Stage
-
Map the horizon:
Start by drawing a faint horizontal line across the canvas, about one-third of the way up from the bottom. This will separate your colorful sky from the asphalt road. -
Find the vanishing point:
Mark a single focal point on that horizon line, slightly off-center to the left. This is where all your colorful background rays will originate from. -
Draw the rays:
Using your ruler, draw straight lines radiating outward from that single focal point to the top and side edges of the canvas. Vary the width of these sections slightly to keep the composition dynamic. -
Tape the first stripes:
Apply painter’s tape along the outside edges of every *other* ray section. Press the edges of the tape down firmly with your fingernail or a credit card to prevent paint bleed. -
Seal the tape:
I always like to brush a very thin layer of matte medium or white gesso over the tape edges before adding color. This ensures a razor-sharp line when you peel the tape later.
Clean Lines Hack
If you don’t have matte medium to seal your tape, use the base color of your canvas (usually white). Paint it over the tape edge first to block any leaks.
Step 2: Applying the Neon Color
-
Paint the first batch:
Fill in the exposed ray sections with your vibrant acrylics—hot pink, lemon yellow, cyan, and lime green. Use opaque layers; you might need two coats for the yellow and neon green to really pop. -
Peel and reveal:
Carefully peel back the tape while the paint is still slightly tacky to avoid chipping. Let these painted sections dry completely before moving on. -
Tape the remaining sections:
Once dry, tape over the edges of the freshly painted stripes to protect them, exposing the remaining white canvas rays. -
Complete the spectrum:
Paint the remaining sections with your alternate colors like emerald green, magenta, and bright orange. Remove the tape and let the entire background cure fully.
Go 3D
For a mixed-media twist, instead of painting the asphalt, glue down fine-grit black sandpaper. It mimics the texture of a real road perfectly.
Step 3: The Road and The Ride
-
Pave the road:
Paint the bottom third of the canvas (below your initial horizon line) with a dark charcoal grey. While wet, stipple it with a dry brush or sponge to create an asphalt texture. -
Prepare your car image:
Carefully cut out your high-resolution car print. To get that hyper-realistic look shown in the example without being a master painter, we are using a decoupage technique. -
Adhere the car:
Apply a layer of Mod Podge or gel medium to the back of the cutout car. Place it centrally on the road section, slightly overlapping the colorful background to ground it. -
Smooth it out:
Gently smooth the paper from the center outward to remove air bubbles. Wipe away any excess glue immediately. -
Anchor with shadow:
Using watered-down black acrylic, paint a soft shadow directly underneath the car tires. This is crucial for making the car look like it’s sitting *on* the road, not floating. -
Blend the edges:
If the paper edges look too distinct, use a tiny bit of paint that matches the car’s body color to blend the cutout onto the canvas, softening the transition. -
Add high-contrast details:
With a fine liner brush and black paint, deepen the darkest parts of the grill and tires to match the painting’s contrast. -
Final highlights:
Use a white paint pen or fine brush to add crisp highlights to the car’s chrome and windshield, and perhaps a signature white detail on the asphalt like a finish line.
Step back and admire how the striking background lines draw the eye straight to your high-performance centerpiece
Black-and-White Car With One Accent Color
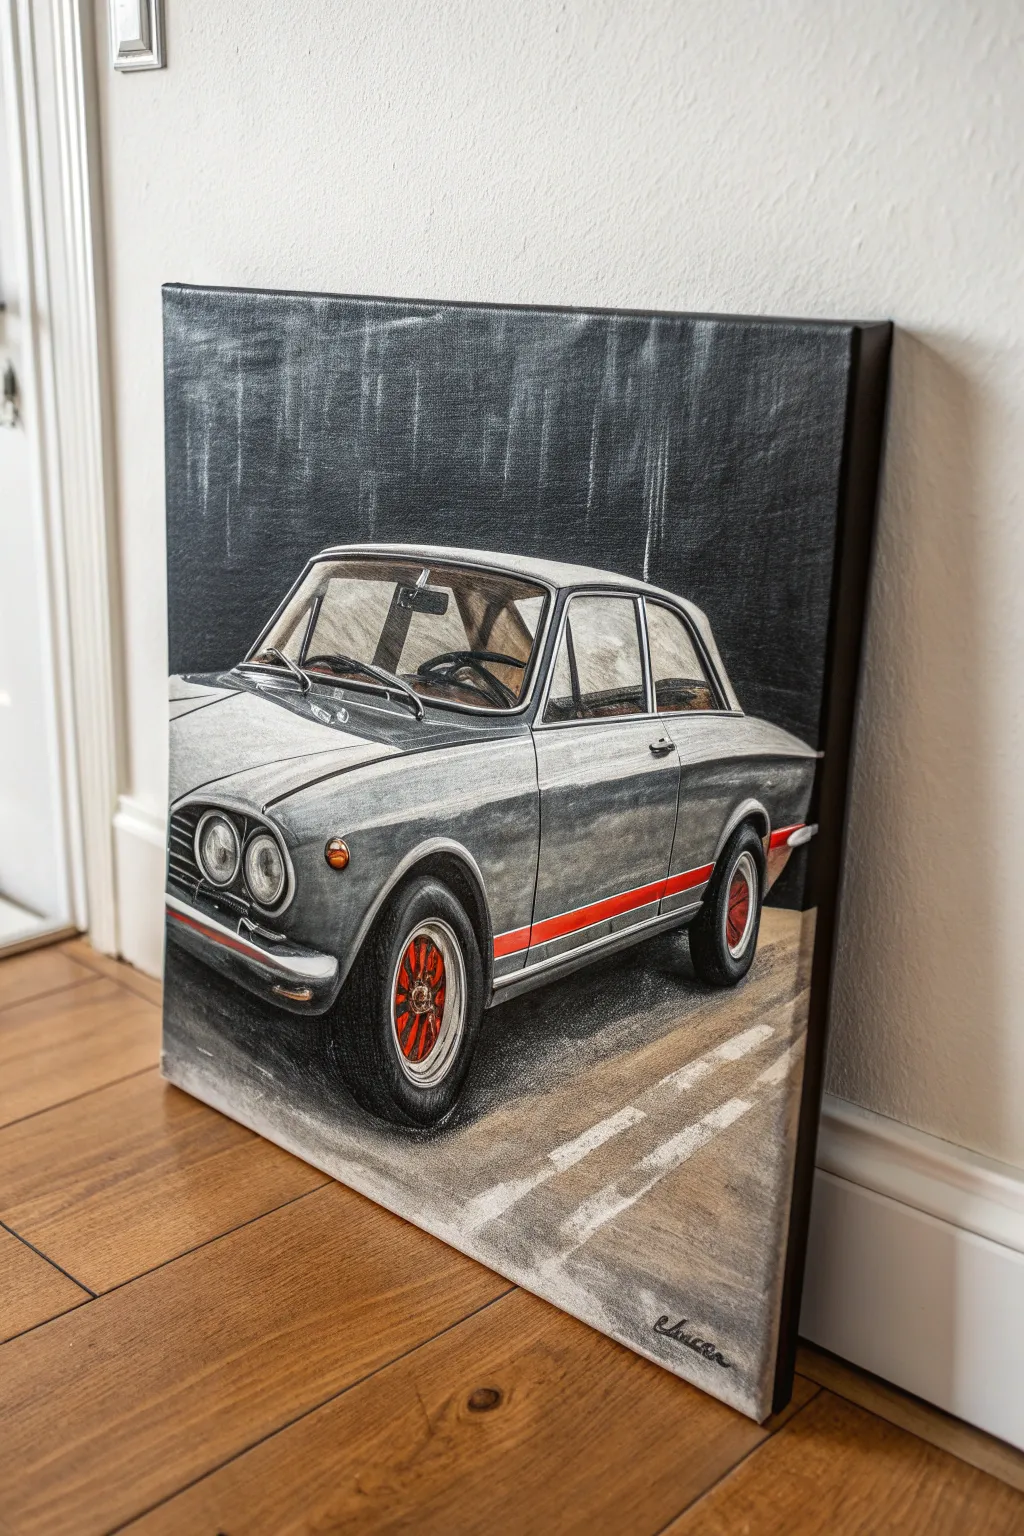
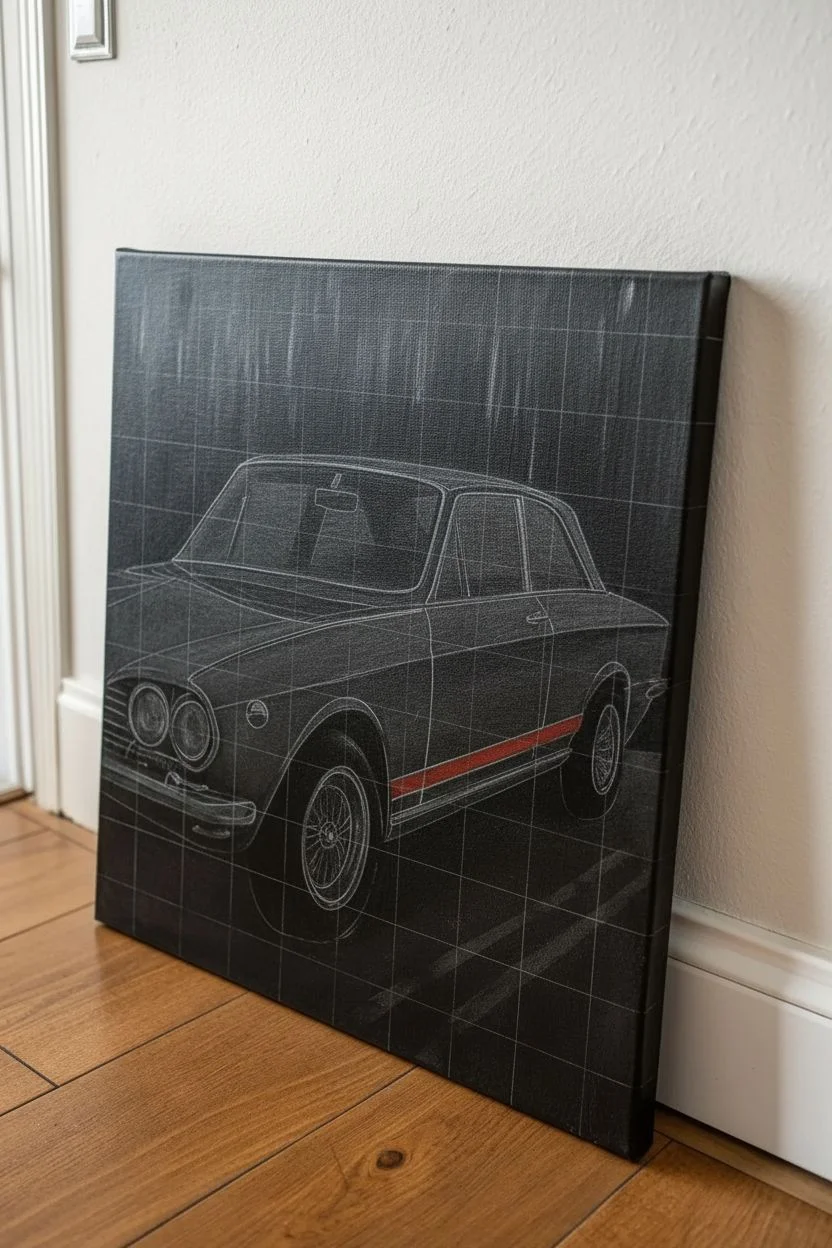
Capture the timeless elegance of classic automotive design with this striking canvas project. By rendering the vehicle primarily in greyscale and reserving bold red paint for specific accents, you create a dramatic focal point that brings the painting to life.
Step-by-Step Tutorial
Materials
- Stretched canvas (square or portrait orientation)
- Acrylic paints (Titanium White, Mars Black, Payne’s Grey, Cadmium Red, Metallic Silver/Grey)
- Graphite pencil (HB or B) and eraser
- Ruler or straight edge
- Assorted brushes (1-inch flat, medium filbert, fine liner)
- Palette for mixing
- Reference photo of a classic car
- Water cup and paper towels
Step 1: Drafting the Design
-
Establish the background:
Begin by painting your entire canvas a dark, muddy charcoal. Mix Mars Black with a touch of Payne’s Grey and water it down slightly to create a wash. Apply this unevenly with a large brush, using vertical strokes to create a subtle, rainy texture, and let it dry completely. -
Grid the composition:
Lightly sketch a simple grid on your reference photo and a matching scaled-up grid on your dry canvas using a graphite pencil. This ensures your car’s proportions—specifically the roofline and wheel placement—are accurate. -
Sketch the outline:
Using your grid as a guide, draw the basic contour of the car. Focus on the sharp angles of the hood and the roundness of the headlights. Don’t press too hard; you want the lines to be visible but easily paintable over. -
Mark the accent areas:
Clearly outline the areas that will remain colored—in this case, the side racing stripe and the inner wheel hubs. Putting a small ‘x’ in these zones reminds you to keep them clean of grey paint later.
Dry Brush for Texture
For the road and background, wipe most of the paint off your brush before applying. This ‘dry brush’ technique lets the canvas texture show, creating a gritty look.
Step 2: Painting the Monochrome Body
-
Block in the mid-tones:
Mix a medium grey using White and Black. Using a flat brush, fill in the main body panels of the car. I like to use confident, horizontal strokes to mimic the flow of the metalwork. -
Deepen the shadows:
While the mid-tone is still slightly tacky, mix a darker grey and apply it to the underside of the car, the wheel wells, and the interior visible through the windows. Blend the edges slightly for a smooth transition. -
Add metallic highlights:
Using pure Titanium White or a Metallic Silver mix, paint the highlights on the hood, the chrome bumpers, and the headlight rims. Look at your reference to see where the light hits hardest. -
Detail the grill and lights:
Switch to a fine liner brush. carefully paint the grill mesh and the dark circles of the headlights. Leave small white circles within the headlights to represent glossy reflections. -
Refine the windows:
Paint the window glass using a very pale, watered-down grey. Add sharp, diagonal white streaks to suggest light reflection on the glass surface.
Make it Metallic
Swap standard grey paint for metallic acrylics solely on the bumper and trim. This adds a literal shine that contrasts beautifully with the matte tires and road.
Step 3: Adding the Accents and Ground
-
Paint the racing stripe:
Load a small flat brush with pure Cadmium Red. painting carefully between your guide lines, fill in the side stripe. You may need two coats to ensure the red pops against the grey background. -
Color the wheels:
Use a fine liner brush to paint the intricate red details within the wheel spokes. This pop of color draws the eye down to the tires. -
Define the tires:
Paint the tires with a nearly-black grey. Don’t use pure black; mixing in a little blue or brown gives rubber a more realistic, weathered look. -
Lay down the asphalt:
Mix a warm, sandy grey for the road surface. Apply this below the car using textured, horizontal dry-brush strokes to mimic rigid asphalt. -
Add road markings:
Paint two diagonal white lane stripes on the ground. Use a ruler if needed, but soften the edges with a dry brush so they look worn and painted on the pavement. -
Cast the shadow:
Mix a transparent black glaze (water, glazing medium, and a drop of black). Paint a soft shadow directly underneath the car to ground it, fading it out as you move away from the tires. -
Final touches:
Step back and assess your contrast. Reinforce the darkest blacks in the grill and under the chassis, and brighten the brightest chrome highlights with a final dab of thick white paint.
Sign your name in the corner and hang your masterpiece for a drive down memory lane

PENCIL GUIDE
Understanding Pencil Grades from H to B
From first sketch to finished drawing — learn pencil grades, line control, and shading techniques.
Explore the Full Guide
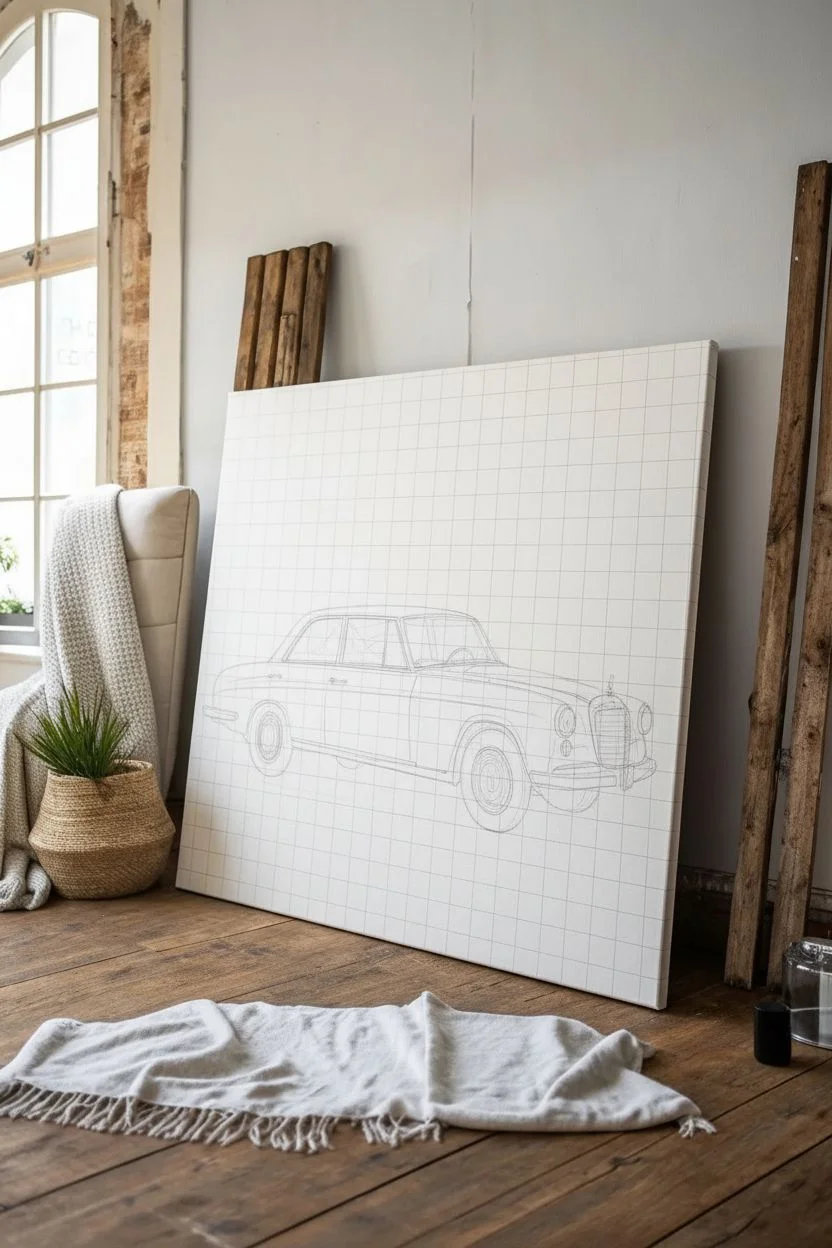
Blueprint-Style Car Sketch on Canvas
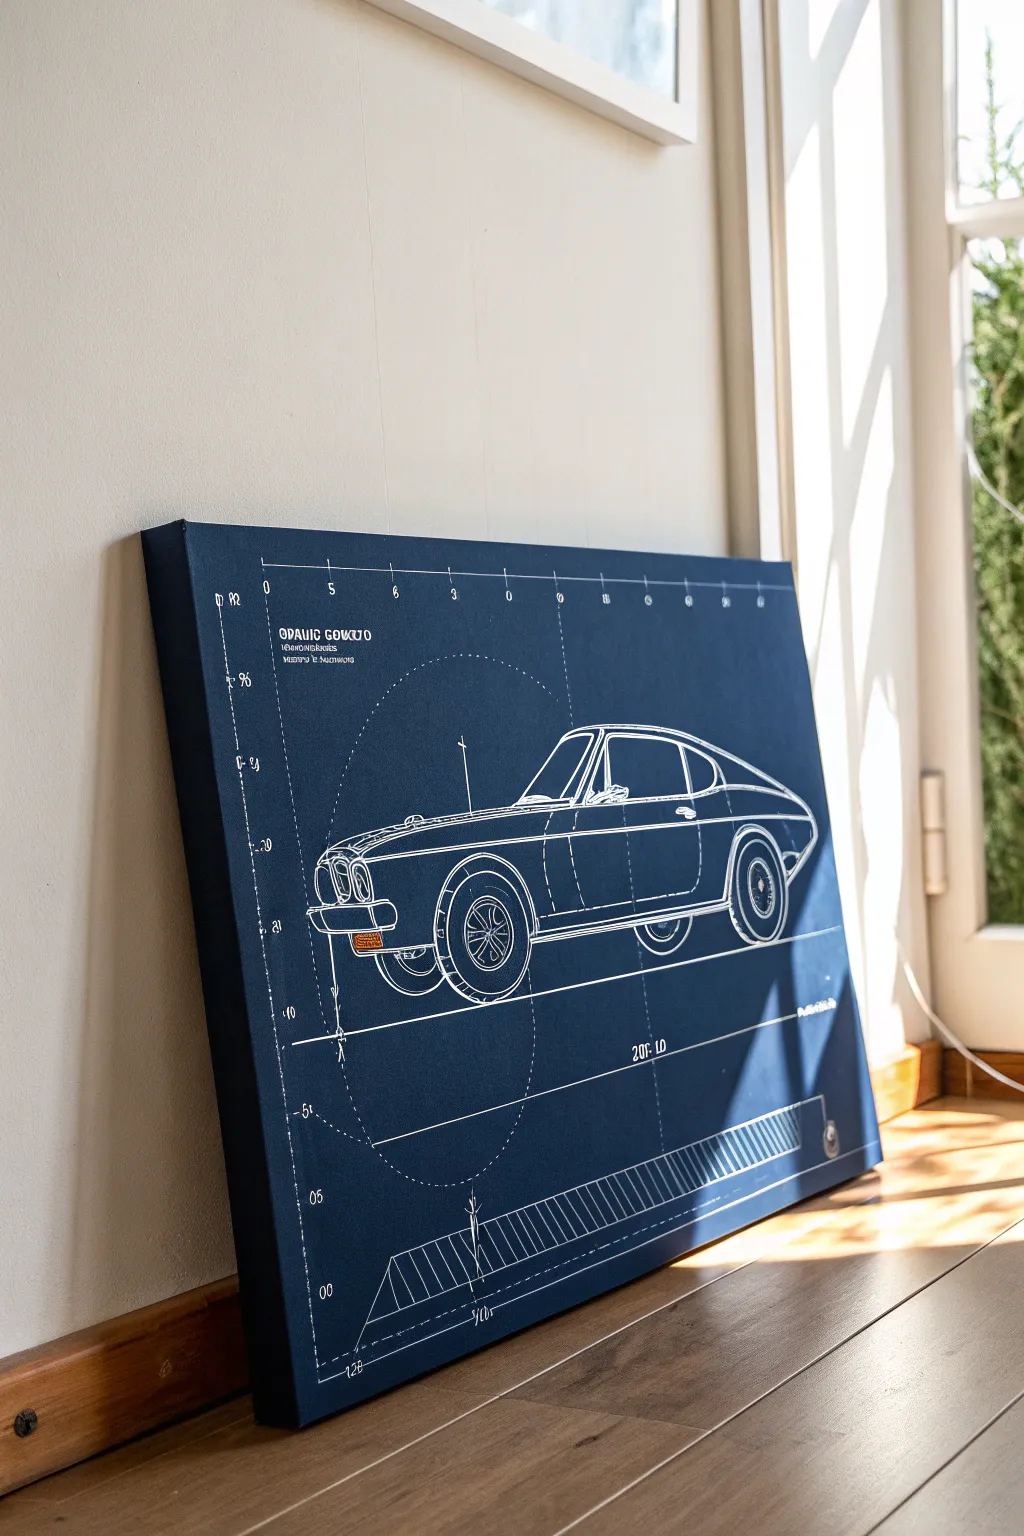
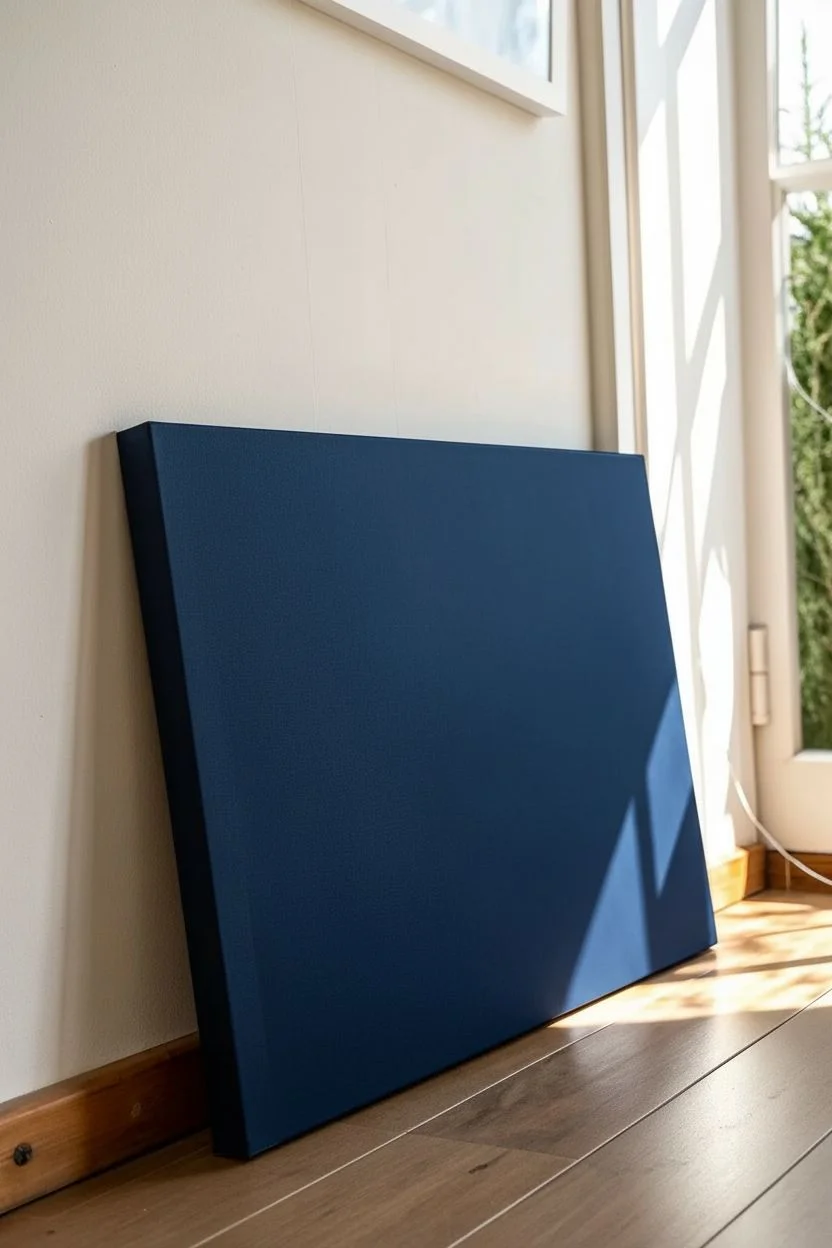
Transform a plain canvas into a sophisticated piece of technical art that celebrates automotive design. This project replicates the classic cyanotype aesthetic with crisp white lines on a deep blue background, perfect for a garage, office, or modern living space.
Step-by-Step
Materials
- Stretched canvas (rectangular, e.g., 24×36 inches)
- Acrylic paint: Navy Blue or Phthalo Blue
- Acrylic paint: Black
- White paint marker (fine and extra-fine tips)
- White acrylic paint (for touch-ups)
- Wide flat paintbrush or foam roller
- Graphite transfer paper
- Printed blueprint of desired car model
- Masking tape
- Ruler or T-square
- Lead pencil
- Clear matte varnish spray
Step 1: Preparing the Base
-
Mix your blueprint blue:
Create that iconic deep blueprint color by mixing navy blue acrylic paint with a small drop of black. You aim for a rich, dark indigo that isn’t quite midnight blue but has depth. -
Apply the first coat:
Using a wide flat brush or a foam roller, cover the entire canvas. A roller works best here to avoid visible brushstrokes, giving you a smooth, paper-like finish. -
Paint the edges:
Don’t forget the sides of the canvas. Painting the edges provides a finished, gallery-wrapped look so you won’t need a frame later. -
Let it cure:
Allow the first layer to dry completely. This dark background is unforgiving, so if you see any white spots, apply a second coat for full opacity.
Clean Lines Hack
For ultra-straight grid lines, run strips of masking tape across the canvas. Paint the edge with white acrylic rather than using a marker for a razor-sharp finish.
Step 2: Drafting the Design
-
Prepare your reference:
Find a high-quality line drawing or blueprint of your chosen car online. Print it to scale using a large-format printer, or print it in tiled sections on standard paper and tape them together. -
Set up the transfer:
Place sheets of white or grey graphite transfer paper graphite-side down onto the dry blue canvas. Tape the corners securely so they don’t shift. -
Position the blueprint:
Lay your printed car design on top of the transfer paper. Use a ruler to ensure the wheels are level and the car is centered perfectly. -
Trace the main lines:
With a slightly dull pencil, firmly trace over the major outlines of the car body. Press hard enough to transfer the design but not so hard that you dent the canvas. -
Check your progress:
Lift one corner gently to ensure the lines are transferring clearly before removing the template entirely.
Step 3: Inking the Details
-
Start with the main body:
Use a fine-tip white paint marker to go over the main body lines you traced. Shake the pen well first to ensure opaque, solid white lines. -
Draw the grid lines:
Blueprints technically need measurement lines. Using a long ruler and a thinner paint marker, draw horizontal floor lines and vertical axis lines. Make these lines thinner than the car body to push them into the background. -
Add technical circles:
If you have a large compass or circle templates, add the geometric construction circles often seen in architectural drawings. I find lightly ghosting these lines makes the drawing look more technical. -
Lettering and numbers:
Add text elements like model names, numbers, or dimensions. Use a stenciled font style or very neat block lettering to mimic engineering handwriting. -
Sketch aesthetic hatching:
Add diagonal hatching lines to the tires and shadowed areas of the car. Don’t color them in solid; use cross-hatching to maintain that wireframe sketch look. -
Create the bottom scale:
Draw the measurement scale at the bottom of the canvas. This usually consists of a long horizontal line with evenly spaced ticks and diagonal shading blocks. -
Add dash lines:
Go back over your vertical and horizontal grid lines. Break them up into long dashes or dot-dash patterns typical of drafting conventions.
Level Up: Aged Look
Mix a tiny drop of burnt umber into a watery glaze and sponge the edges of the canvas. This creates a stained, vintage paper effect on the blue background.
Step 4: Finishing Touches
-
Clean up errors:
If you made a wobble with the white marker, let it dry completely. Then, use a small brush with your original blue background color to paint over the mistake. -
Highlight key features:
Use an extra-bold white marker or white acrylic paint on a detail brush to thicken the outer silhouette of the car, making it pop forward from the grid lines. -
Seal the artwork:
Once the markers are fully set (give them a few hours), spray the entire canvas with a clear matte varnish. This protects the white ink from yellowing and unifies the sheen.
Hang your technical masterpiece where the light can catch the stark contrast of the white lines against the deep blue.
Impasto Texture for Chrome and Metal
Bring the weight and shine of classic steel to life by combining hyper-realistic details with the tactile depth of heavy body acrylics. This project focuses on building up layers of thick paint to mimic the curved, reflective surfaces of vintage car bumpers and headlights.
Step-by-Step Tutorial
Materials
- Stretched canvas (18×24 inches or similar)
- Heavy body acrylic paints (Titanium White, Mars Black, Phthalo Blue, Burnt Umber, Cadmium Yellow, Orange)
- Impasto gel medium or modeling paste
- Palette knives (assorted sizes, including a trowel and detailed diamond shape)
- Synthetic bright and filbert brushes (sizes 2, 6, and 10)
- Detail liner brush (size 00)
- Pencil for sketching
- Reference photo of a classic car headlight/bumper
Step 1: Preparation and Base Structure
-
Grid and Sketch:
Start by lightly drawing a grid on both your reference photo and canvas to ensure accurate proportions, especially for the elliptical shapes of headlights. Sketch the main contours of the car, paying close attention to the perspective lines of the bumper and the circular housing of the lights. -
Block in Darks:
Mix Mars Black with a touch of Phthalo Blue to create a rich, cool dark tone. Using a size 10 filbert brush, paint the deepest shadow areas—specifically the grille vents, the tire well, and the heavy shadows underneath the bumper. Keep these layers thin and flat for now. -
Establish Midtones:
Create a warm off-white using Titanium White with a tiny speck of Burnt Umber for the car’s body. Apply this freely to the paneling, keeping your brushstrokes visible to suggest the car’s sculpted metal form.
Knife Control
Wipe your palette knife clean after every single stroke when doing chrome. Any muddy residue will ruin the illusion of highly polished, reflective metal.
Step 2: Building the Impasto Chrome
-
Prepare the Mixture:
For the bumper and trim, mix Titanium White with a generous amount of impasto gel medium (about a 50/50 ratio). This mixture needs to hold peak and texture. -
Sky Reflections:
Chrome reflects its environment. Mix a pale sky blue using White and Phthalo Blue. Apply this to the upper-facing curves of the bumper and headlight rims. Use a palette knife to lay the paint on thickly, smoothing it slightly to mimic the slick surface of metal. -
Ground Reflections:
Mix a darker, brownish-grey for the downward-facing chrome surfaces that reflect the road. Apply this below the sky blue sections on the bumper, letting the edges meet but not fully blend. -
Sculpting the Highlight:
Load a clean palette knife with pure Titanium White mixed with gel. Identify the brightest gleam on the bumper’s curve. Lay this down in a single, confident stroke, letting the texture of the paint physically protrude from the canvas to catch real light. -
Defining Edges:
Use a small, diamond-shaped palette knife with grey paint to sharpen the edges between the chrome trim and the car body. This physical ridge of paint separates the materials.
Metallic Glaze
For extra shimmer, mix a tiny amount of iridescent pearl medium into your white paint for the final highlights on the bumper’s highest points.
Step 3: The Headlight Details
-
Internal Structure:
Switch to a size 6 brush. Paint the interior of the headlight circles with a complex grey, swirling your strokes to mimic the fluted glass pattern found in vintage sealed beams. -
Glass Texture:
I like to use a small amount of glazing liquid mixed with white here. Paint thin, concentric circles and cross-hatching over the dried grey base to create the look of refracted glass. -
The Fluted Pop:
Using your liner brush and pure white, add tiny, distinct dots and dashes along the fluted ridges of the headlight glass. These high-contrast marks create the sparkly, gem-like quality of the lens.
Step 4: Color Accents and Refining
-
Turn Signal Glow:
Mix Cadmium Yellow and Orange. Paint the turn signal lens, keeping the center lighter and the edges darker to simulate a convex shape. While wet, drop in a tiny speck of white for the highlight. -
Shadow Depth:
Return to your darkest black-blue mix. Glaze over the grille area again to ensure it is pitch black, which will make the adjacent chrome pop intensely. -
Pavement Reflections:
On the bottom of the bumper, paint jagged, abstract reflections of the pavement using warm greys and tans. Keep these strokes loose to suggest the distortion of the curved metal. -
Final Polish:
Check the contrast throughout the piece. If the chrome looks dull, add more pure white highlights with the palette knife on top of the dry layers to increase the gloss effect.
Step back and admire how the physical texture of the paint enhances the illusion of solid, heavy steel


Abstract Color-Streak Speed Effect
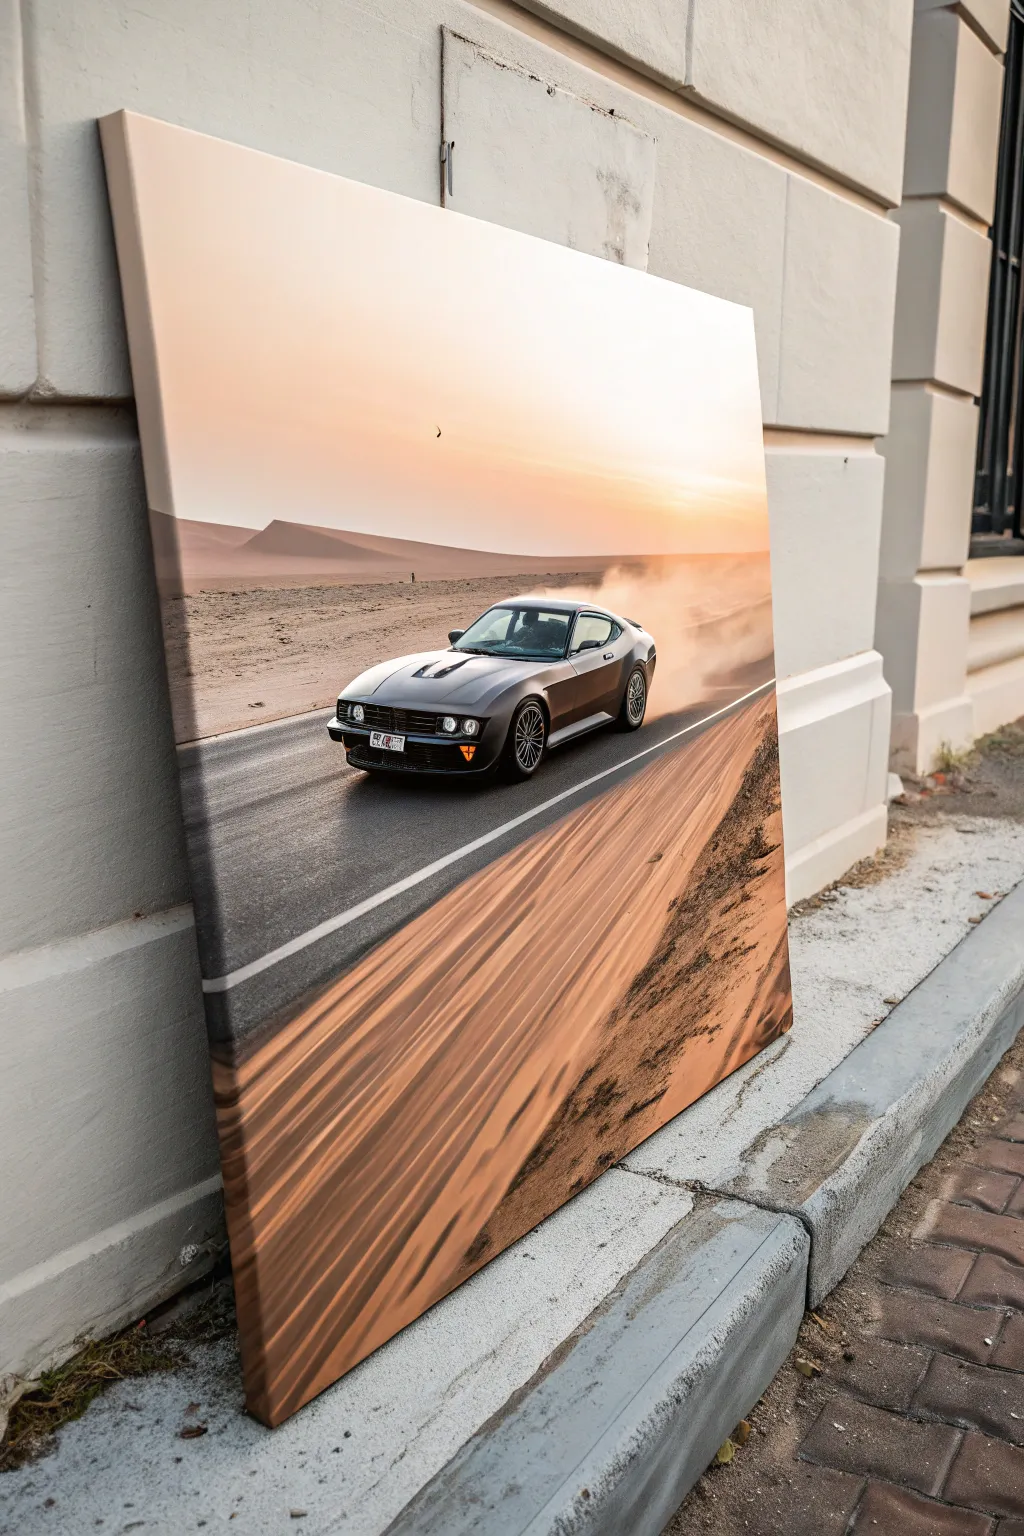
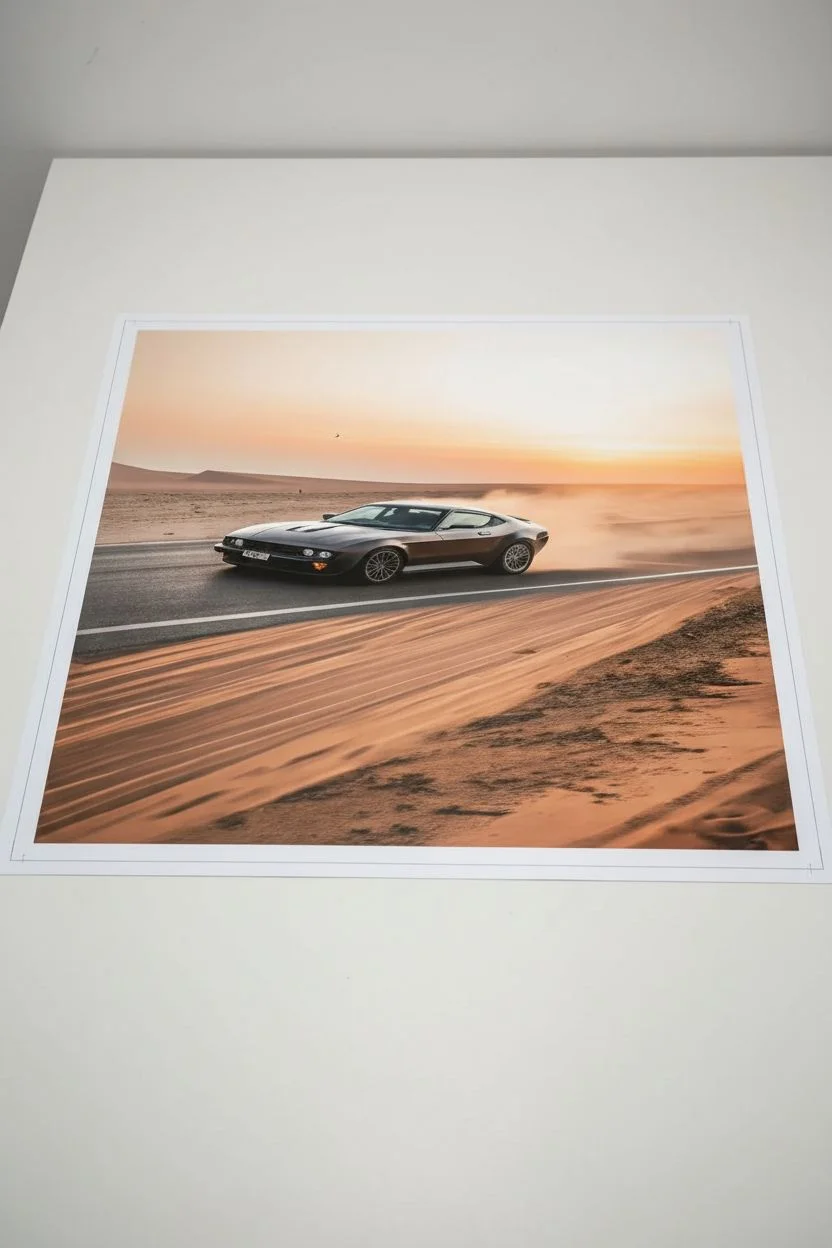
Capture the thrill of the open road with this dynamic photo-to-canvas project. By combining a crisp car focal point with abstract, motion-blurred surroundings, you’ll create a striking piece of wall art that feels like it’s moving right off the frame.
Detailed Instructions
Materials
- High-resolution photograph of a car on a road
- Photo editing software (Photoshop, GIMP, or mobile apps like Snapseed)
- Large stretched canvas (24×36 inches recommended)
- Matte gel medium
- Foam brushes
- Smoothing tool or credit card
- Acrylic paint (burnt sienna, orange, white) for touch-ups
- Satin varnish spray
- Wide flat paintbrush (2-inch)
Step 1: Digital Preparation & Blur Effect
-
Select your source image:
Choose a photo where the car is clearly defined. An angled shot showing the side and front works best for creating a sense of movement. -
Isolate the vehicle:
Using your photo editing software, use the selection tool to carefully outline the car. Copy it to a new layer so it remains sharp and untouched. -
Apply motion blur:
Select the background layer. Apply a ‘Motion Blur’ filter, setting the angle to match the direction of the road (usually diagonal). Increase the distance until the road and landscape become abstract streaks of color. -
Enhance sunset tones:
Adjust the color balance to warm up the sky. I like to boost the oranges and soft pinks to mimic that golden hour glow seen in the example. -
Print the artwork:
Have your finalized image printed on heavy art paper or lightweight canvas texture paper. Ensure the print dimensions slightly exceed your stretched canvas size to wrap around the edges.
Selection Pro-Tip
When cutting out the car digitally, feather the selection edge by 2-3 pixels. This prevents the car from looking like a hard sticker and helps it sit naturally.
Step 2: Mounting the Image
-
Prepare the canvas surface:
Wipe down your stretched canvas to ensure it is free of dust. Apply a thin, even coat of matte gel medium over the entire front surface. -
Align the print:
Carefully lay your print face up on the wet gel medium. Start from the center and work your way out to avoid trapping large air pockets. -
Smooth out bubbles:
Place a sheet of parchment paper over the print to protect it. Use a smoothing tool or sturdy credit card to firmly press the paper down, pushing air bubbles toward the edges. -
Wrap the edges:
Apply gel medium to the sides of the canvas frame. Fold the excess paper over the edges neatly, like wrapping a present, and secure them. Let this dry completely, usually overnight.
Level Up: Dust Trails
Use a very dry brush with translucent white paint behind the rear wheels. lightly stipple and smudge it to create a realistic kick-up of road dust.
Step 3: Painted Motion Enhancements
-
Mix your streak colors:
On a palette, mix burnt sienna with a touch of orange and white acrylic paint. You want a color that matches the blurred sand tones in your print. -
Dry brush technique:
Dip your wide flat brush into the paint, then wipe most of it off on a paper towel. The brush should be nearly dry. -
Accentuate the foreground:
Lightly drag the dry brush diagonally across the bottom corners of the canvas, following the printed blur lines. This adds physical texture to the visual speed effect. -
Soften the transition:
Use a clean, dry foam brush to feather the edges of your painted strokes so they blend seamlessly into the printed image. -
Seal the artwork:
Once the acrylic accents are fully dry, take the canvas to a well-ventilated area. Apply a coat of satin varnish spray to protect the surface and unify the sheen of the print and paint.
Hang your new high-speed masterpiece in a spot with good lighting to really make the motion blur pop
Multi-Canvas Car Series Wall Set
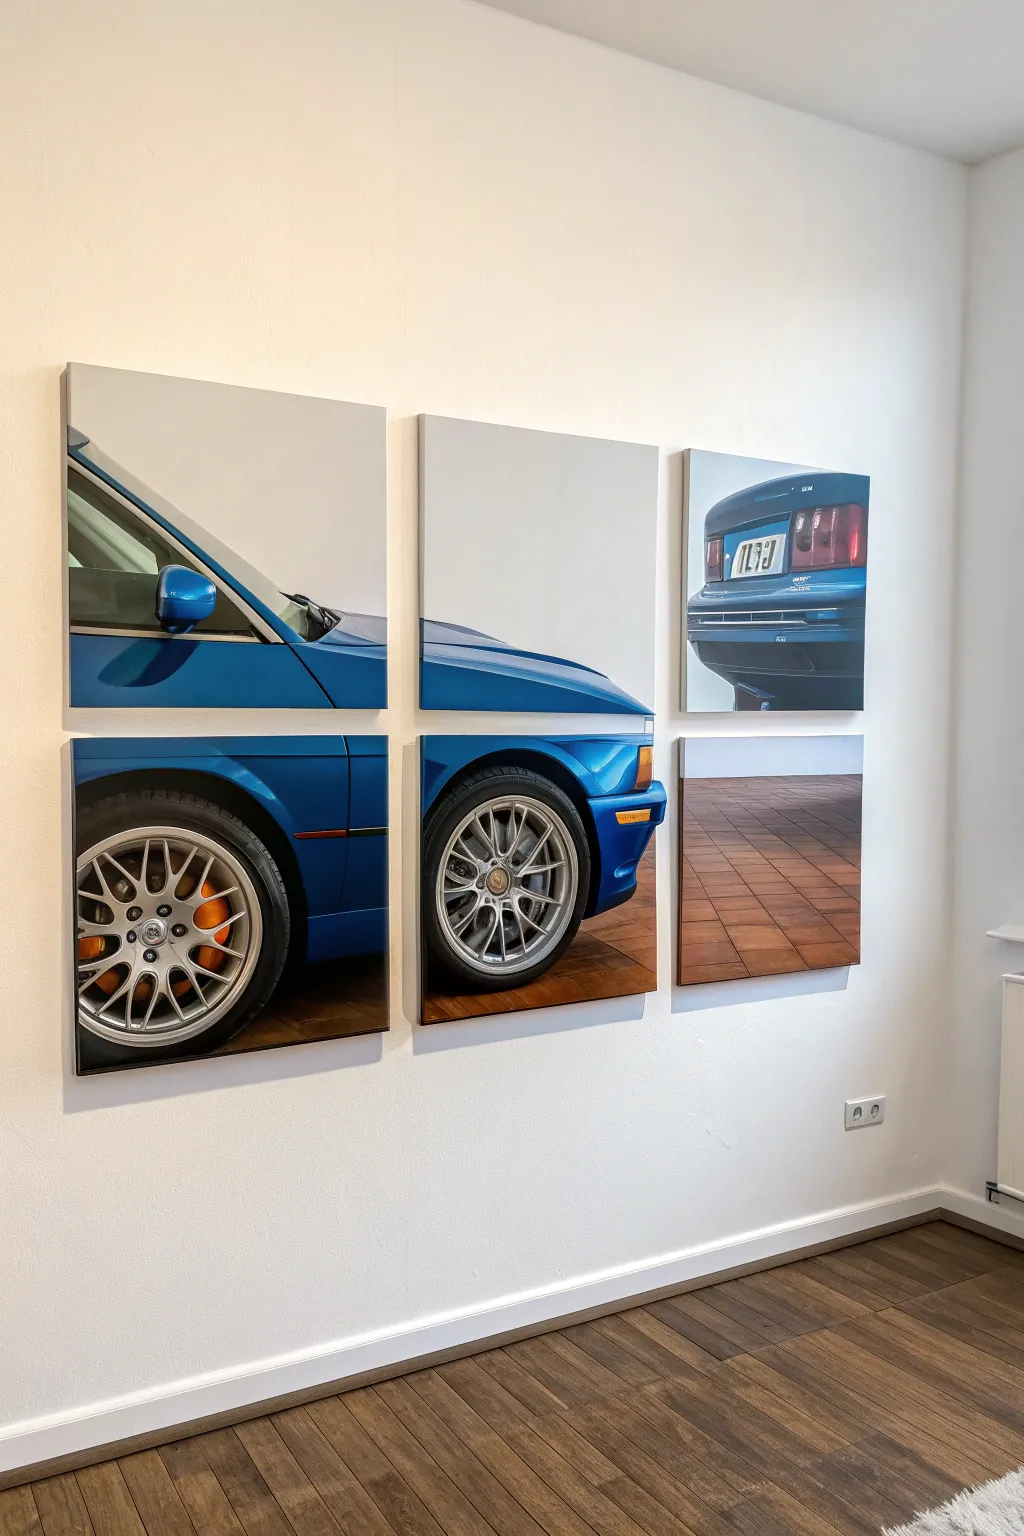
Transform a single stunning photograph of a classic car into a modern, gallery-worthy installation using the split-canvas technique. This six-panel layout creates a dynamic, fragmented view that adds visual interest and scale to any automotive enthusiast’s wall.
How-To Guide
Materials
- High-resolution digital photo of a car (blue sports car recommended)
- 6 square stretched canvases (12×12 or 16×16 inches)
- Photo editing software (Photoshop, Canva, or online splitter)
- Large format printer or professional printing service
- High-quality matte or satin photo paper
- Spray adhesive (heavy duty)
- Craft knife or rotary cutter
- Metal ruler
- Self-healing cutting mat
- Acrylic sealant spray (clear)
- Command strips or canvas hangers
- Level and measuring tape
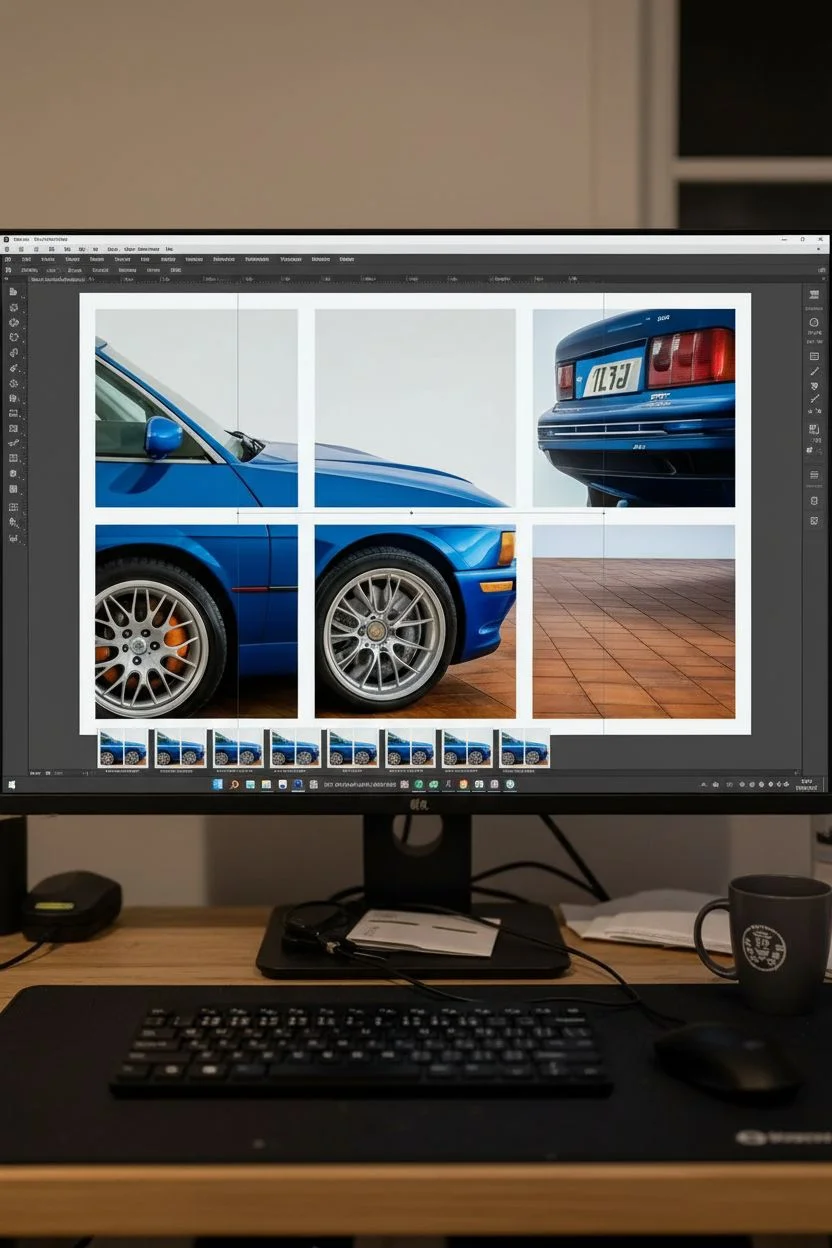
Step 1: Digital Preparation
-
Select the perfect image:
Choose a high-resolution photo of a car profile or 3/4 view. The image needs to be crisp enough to be blown up significantly. A side profile works best for this linear 2×3 grid layout. -
Crop and size:
In your photo editing software, crop your image to a 3:2 aspect ratio. This matches the overall shape of your grid (3 wide by 2 high). Ensure the car is positioned so key elements like wheels and windows fall nicely within the potential grid squares. -
Create the grid lines:
Overlay a grid on your image to visualize the cuts. You need 3 columns and 2 rows. Adjust the image placement so the gap between canvases won’t slice through a crucial detail awkwardly, like an emblem or badge. -
Account for the wrap:
This is crucial: if you want a gallery wrap effect where the image continues over the sides, you need to add bleed. Add 1.5 to 2 inches (depending on your canvas depth) to *every side* of *each* of the 6 squares. Essentially, you are slicing the image and then extending the edges of each slice. -
Export individual files:
Save each of the six sections as a separate high-quality JPEG or PNG file.
Alignment Drift
If the image lines don’t match up across gaps, your wall measurements might be off. Use a physical wood spacer block rather than a tape measure for consistent gaps.
Step 2: Printing and Mounting
-
Print your panels:
Send your six files to a printing service or print them on a large-format home printer. Use high-quality matte or satin paper to minimize glare on the finished piece. -
Trim the prints:
Using a metal ruler and craft knife on a cutting mat, trim your prints. If you included bleed for wrapping, ensure you cut precisely to the outer bleed line, not the image face line. -
Apply adhesive:
Working with one canvas at a time, take your substrate outdoors or to a ventilated area. Shake the spray adhesive vigorously and apply an even coat to the face of the canvas. -
Position the print:
Carefully align your print over the canvas. I find it easiest to stand directly over the table to eyeball the centering. Press the center down first. -
Smooth the surface:
Work outwards from the center, smoothing the paper with a clean, soft cloth or a brayer roller to eliminate any air bubbles.
Step 3: Wrapping and Finishing
-
Cut the corners:
To wrap the edges cleanly, you’ll need to notch the corners of the paper. Cut a square out of each paper corner, leaving a tiny margin right at the canvas point to ensure the corner is fully covered. -
Spray the edges:
Apply spray adhesive to the sides of the canvas frame. -
Fold the sides:
Pull the paper tight and fold it over the edges. Use firm pressure to ensure it bonds with the canvas texture. Repeat for all four sides. -
Secure the back:
For extra longevity, you can staple the excess paper to the back of the wood frame, though strong adhesive usually holds fine. -
Seal the artwork:
Once all six canvases are mounted and dry, spray the entire surface with a clear acrylic sealant. This protects the ink from UV fading and moisture.
Pro Tip: Edge Mirroring
Instead of cropping the main image for the sides (wrap), use Photoshop’s ‘Content-Aware Scale’ or mirror the edge pixels. This keeps more of the car visible on the face.
Step 4: Installation
-
Measure the wall space:
Decide on the spacing between canvases. A gap of 1 to 1.5 inches usually looks best to maintain image continuity. Mark your center point on the wall. -
Hang the bottom row:
Start with the bottom middle canvas. Use a level to ensure it is perfectly straight. Then, measure and hang the left and right bottom canvases, using a spacer block to keep the gaps identical. -
Hang the top row:
Place the top middle canvas directly above the bottom middle one, using your spacer block for the vertical gap. Install the remaining two top corners, double-checking alignment with the panels below them.
Step back and admire how the split view gives your favorite car a dynamic sense of motion and size


Have a question or want to share your own experience? I'd love to hear from you in the comments below!