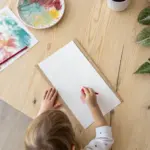
If you’ve got a toddler and some washable paint, you’ve already got everything you need for the sweetest little masterpieces. These hand painting ideas start with simple handprints and fingerprints, then turn them into recognizable animals and objects that feel messy-fun in the moment and totally keepsake-worthy later.
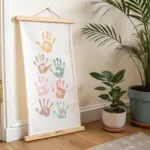
Handprint Flower Bouquet
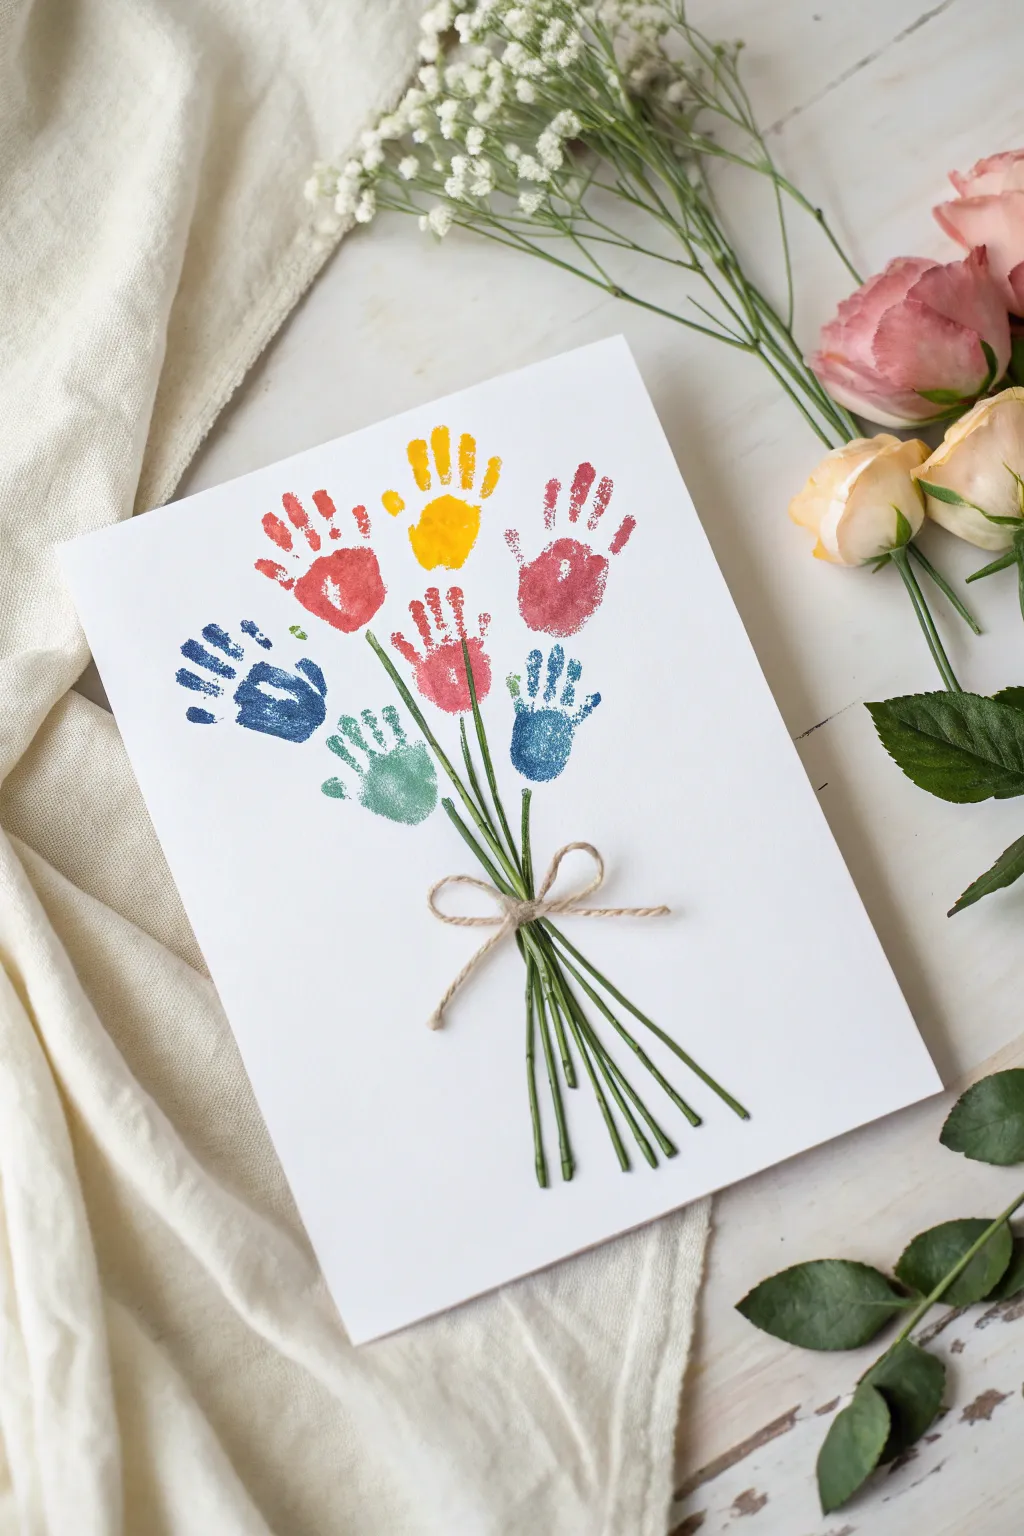
Create a vibrant keepsake with this delightful bouquet where tiny colorful handprints transform into blossoming flowers. This project captures the size of little hands perfectly and arranges them into a charming bunch tied together with real stems and string.
How-To Guide
Materials
- White heavyweight cardstock or watercolor paper (A4 or letter size)
- Non-toxic washable craft paints (red, yellow, orange, blue, green, pink)
- Small paintbrush
- Real or artificial flower stems (thin, green wire or plastic stems)
- Natural jute twine or thin rope
- Hot glue gun and glue sticks (adult use only)
- Scissors
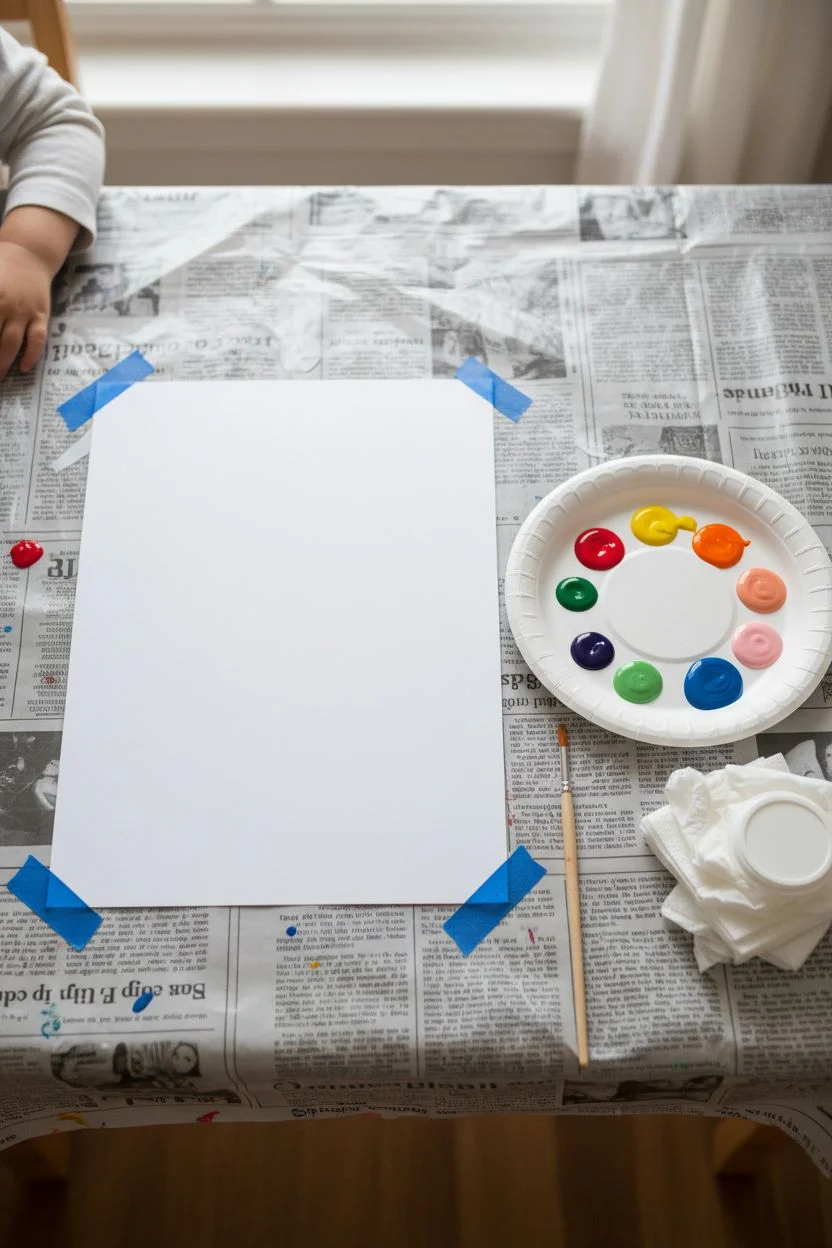
Step 1: Preparation
-
Set up the workspace:
Cover your table with newspaper or a plastic tablecloth to catch any accidental drips. Lay out your white cardstock in a portrait orientation, making sure it is flat and secure. -
Prepare the paints:
Squeeze dime-sized amounts of your various paint colors—red, yellow, orange, blue, green, and pink—onto a paper plate or palette. Keeping them separate prevents muddy colors. -
Prep the hands:
Make sure the toddler’s hands are clean and dry. Roll up any long sleeves to avoid stained cuffs during the stamping process.
Smudged Print Rescue
If a handprint smudges, don’t scrap it! When dry, use a marker to turn the smudge into a ‘bud’ or a falling petal. It adds character to the piece.
Step 2: Creating the Handprint Blooms
-
First color application:
Start with your first color, perhaps a bright red. Use the paintbrush to apply an even coat of paint to the toddler’s palm and fingers. Painting is often less messy than dipping and ensures better coverage. -
First stamp:
Guide the hand to the upper left area of the paper. Press firmly down on the palm and each finger to ensure a clear print, then lift the hand straight up to avoid smearing. -
Clean in between:
Immediately wipe the hand clean with a wet wipe or wash it at the sink before switching to the next hue. This keeps your bouquet colors crisp and distinct. -
Yellow bright spot:
Paint the hand with yellow paint next. Position this stamp slightly higher and toward the center, creating the top bloom of the bouquet. -
Adding pinks and reds:
Continue the process with pink and darker red shades. Arrange these prints in a loose semi-circle shape, slightly overlapping the imaginary stems, filling the upper middle section of the page. -
Cool tones:
Incorporate a blue handprint on the left side and a green one lower down. Varying the angle/rotation of the hand slightly makes the flowers look more natural and dynamic. -
Fill the bouquet:
Add any final handprints to fill gaps, aiming for about 6 to 8 prints total depending on the hand size. Ensure there is open white space at the bottom for the stems. -
Drying time:
Set the artwork aside and let the paint dry completely. This usually takes about 20-30 minutes depending on how thick the paint application was.
Step 3: Assembling the Stems
-
Cut the stems:
Take your artificial green stems and cut them into various lengths, roughly 4 to 6 inches long. You will need one stem for each handprint flower. -
Arrange the bundle:
Gather the stems in your hand to form a tight bunch. The tops can fan out slightly, but the bottoms should be gathered closely together. -
Tie the bow:
Cut a piece of natural jute twine. Tie it securely around the gathered point of the stems, creating a neat little bow. I find double-knotting before making the loops helps keep it tight. -
Dry fit placement:
Place the tied stem bundle onto the dried paper. Position the top of the stems so they point towards the base of the handprints, making it look like the hands are growing from them. -
Secure the stems:
Using a hot glue gun (adult step), apply a line of glue along the back of the stem bundle. Carefully press it onto the paper. -
Secure loose ends:
If individual stems are flapping loose at the top, add a tiny dot of hot glue behind them to anchor them flat against the paper, pointing towards their respective handprints. -
Final check:
Trim any excess twine tails if they are too long, and ensure all glue strands are removed for a clean finish.
Level Up: Texture
Glue small buttons, sequins, or pom-poms into the center of each palm print to create 3D flower centers that pop off the page.
Now you have a blooming masterpiece that captures a moment in time forever


Handprint Sunshine Burst
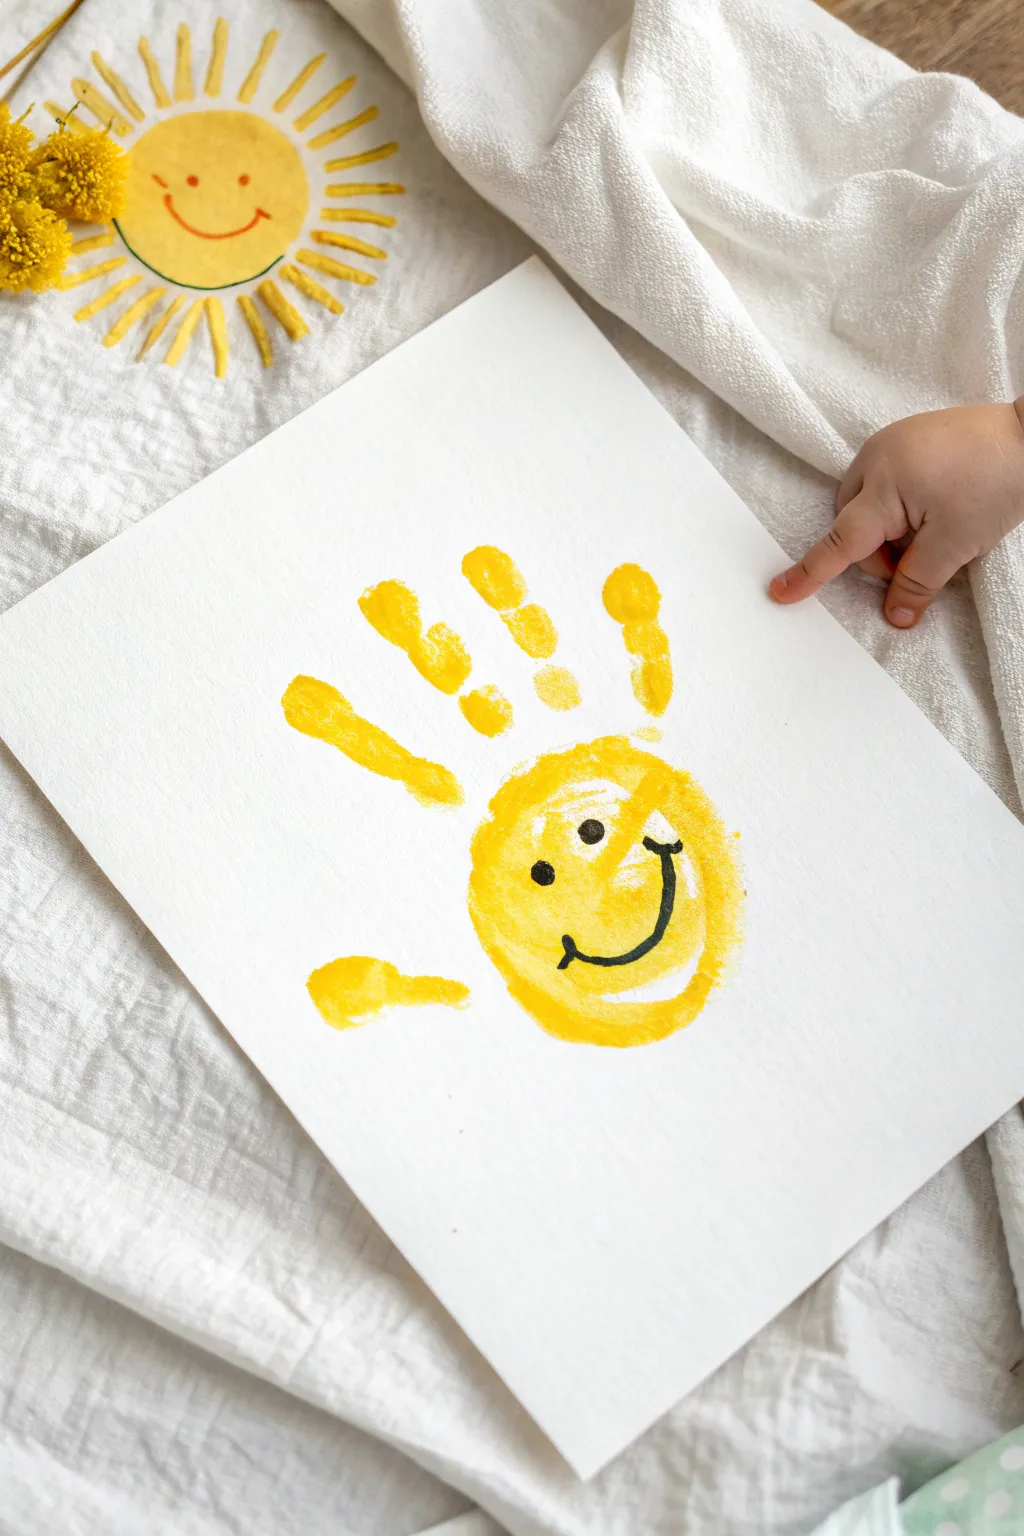
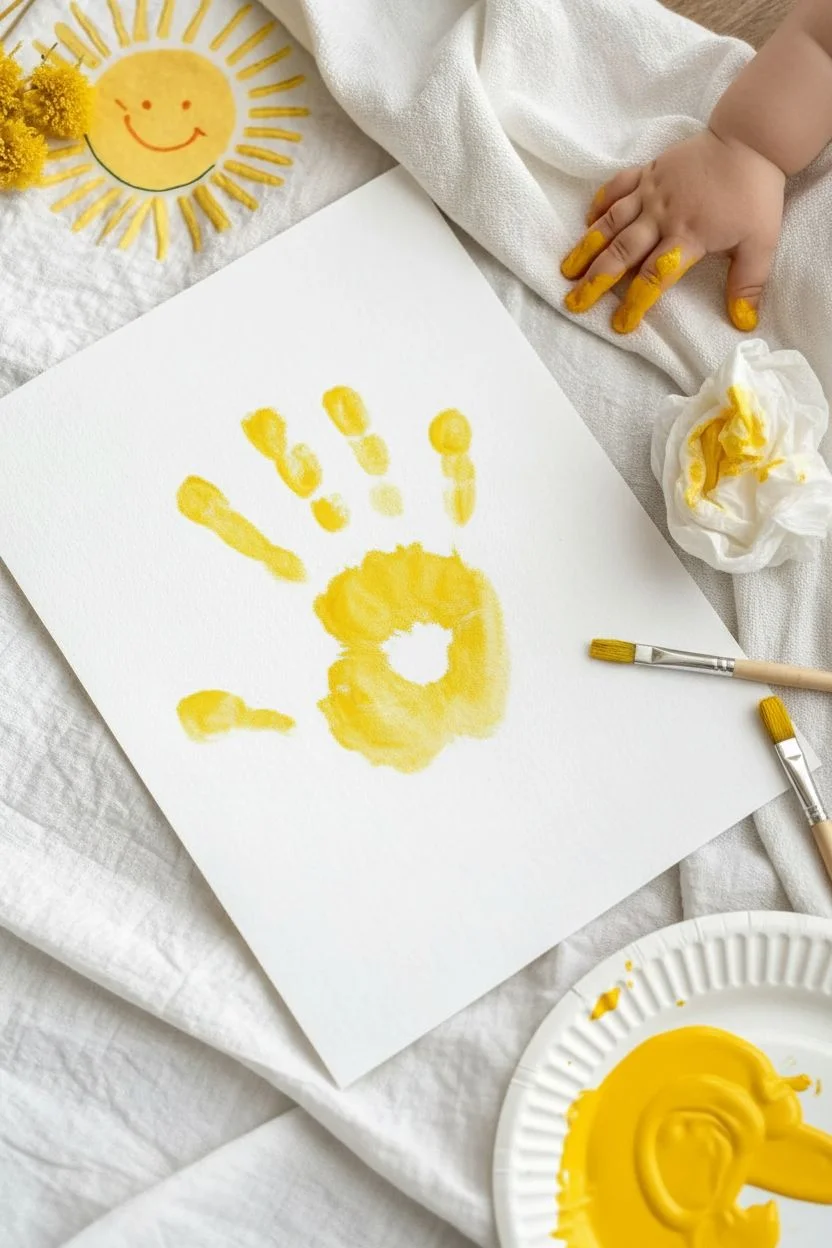
Brighten up any room with this delightfully simple piece of art that transforms a tiny handprint into a radiant sun. Using just a few dashes of bright yellow paint, you can capture your little one’s playful spirit in a sunny keepsake.
Step-by-Step
Materials
- Heavyweight white cardstock or watercolor paper
- Non-toxic yellow washable tempera or acrylic paint
- Paintbrush (medium flat brush)
- Black fine-point marker or permanent marker
- Paper plate or palette
- Baby wipes or damp cloth (for quick cleanups)
Step 1: Preparing the Sun
-
Set up your station:
Lay down your white cardstock on a flat, stable surface. Have the wipes nearby, because working with toddlers always means a little unexpected mess. -
Pour the paint:
Squeeze a generous dollop of bright yellow paint onto your paper plate. -
Coat the hand:
Using the paintbrush, cover the palm and fingers of your toddler’s hand with the yellow paint. You want a nice, even coat that isn’t too drippy but still wet enough to transfer well. -
Position the hand:
Gently guide your child’s hand over the center of the cardstock. Make sure their fingers are spread slightly apart to create the sun’s rays. -
Press down:
Press their hand firmly onto the paper. Apply gentle pressure to each finger and the center of the palm to ensure good contact. -
Lift carefully:
Lift the hand straight up to avoid smudging the print. I find a quick, confident motion works best here to keep the edges crisp. -
Clean the hand:
Immediately wipe off your little artist’s hand with a baby wipe before the paint dries on their skin.
Smudged Print?
If the hand slides, don’t scrap it! Turn the smudge into a cloud or simply paint over the mistake with white acrylic, let it dry, and stamp again.
Step 2: Shaping the Sun
-
Initial check:
Look at the print you just made. The palm acts as the sun’s body, and the fingers are the rays. -
Add paint to the palm:
Dip your brush back into the yellow paint. You are going to fill out the palm area to make it look rounder, like a proper sun shape. -
Round out the edges:
Paint along the bottom and sides of the palm print, rounding it out into a more circular form. Don’t worry about being perfect; the texture makes it charming. -
Enhance the coverage:
If the palm print was patchy, dab a little more paint in the center to make the yellow color solid and bright. -
Check the rays:
If any fingers didn’t print clearly, you can lightly standard touch them up with the brush, but try to keep the original finger texture visible. -
Let it dry completely:
Set the artwork aside to dry. This is crucial before adding the face details so the black marker doesn’t bleed into wet paint.
Step 3: Adding Personality
-
Test for dryness:
Lightly touch the painted area. If it’s cool to the touch or tacky, give it a few more minutes. -
Draw the left eye:
Using your black marker, draw a small, filled-in circle on the left side of the yellow sun face. -
Draw the right eye:
Draw a matching filled-in circle on the right side. Placing them slightly wide apart gives it a cute, innocent look. -
Create the smile:
Draw a wide, U-shaped curve underneath the eyes for a big, happy smile. -
Add cheek dimples:
Add tiny little tick marks at the ends of the smile curve to create adorable cheek dimples. -
Final check:
Step back and admire the cheerful face peeking out from the sunshine rays.
Make it Sparkle
While the yellow paint is still wet, sprinkle a pinch of gold or iridescent glitter over the rays for a sunshine that truly shimmers.
Now you have a permanent reminder of those sunny little days to hang on your wall
Handprint Elephants With Curly Trunks
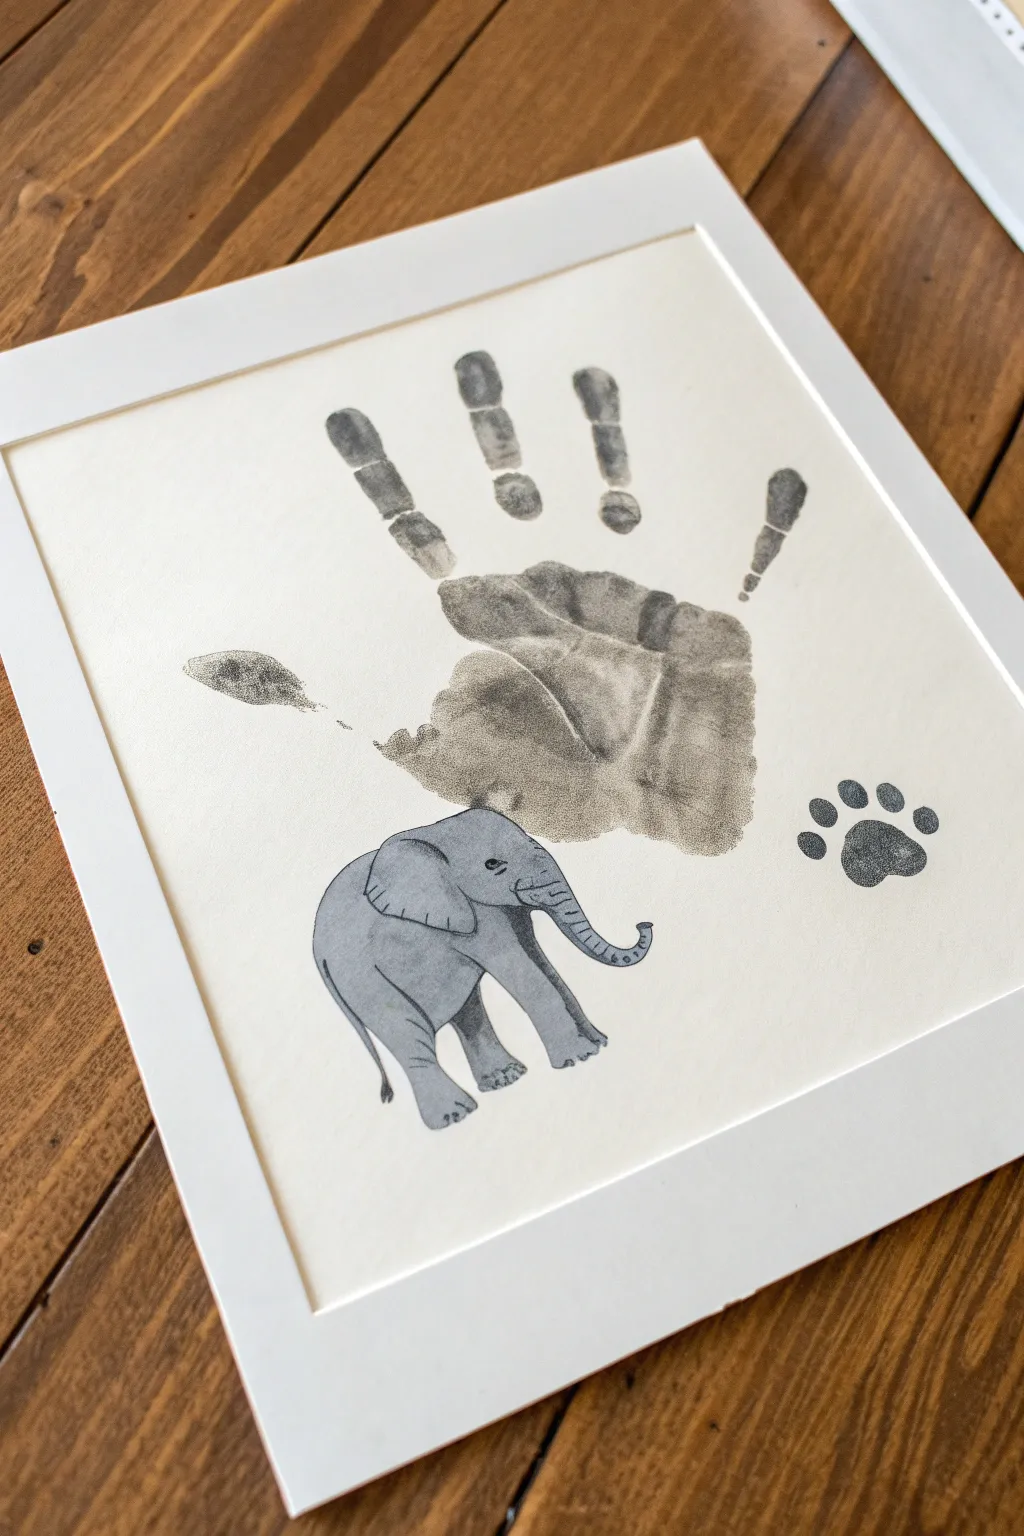
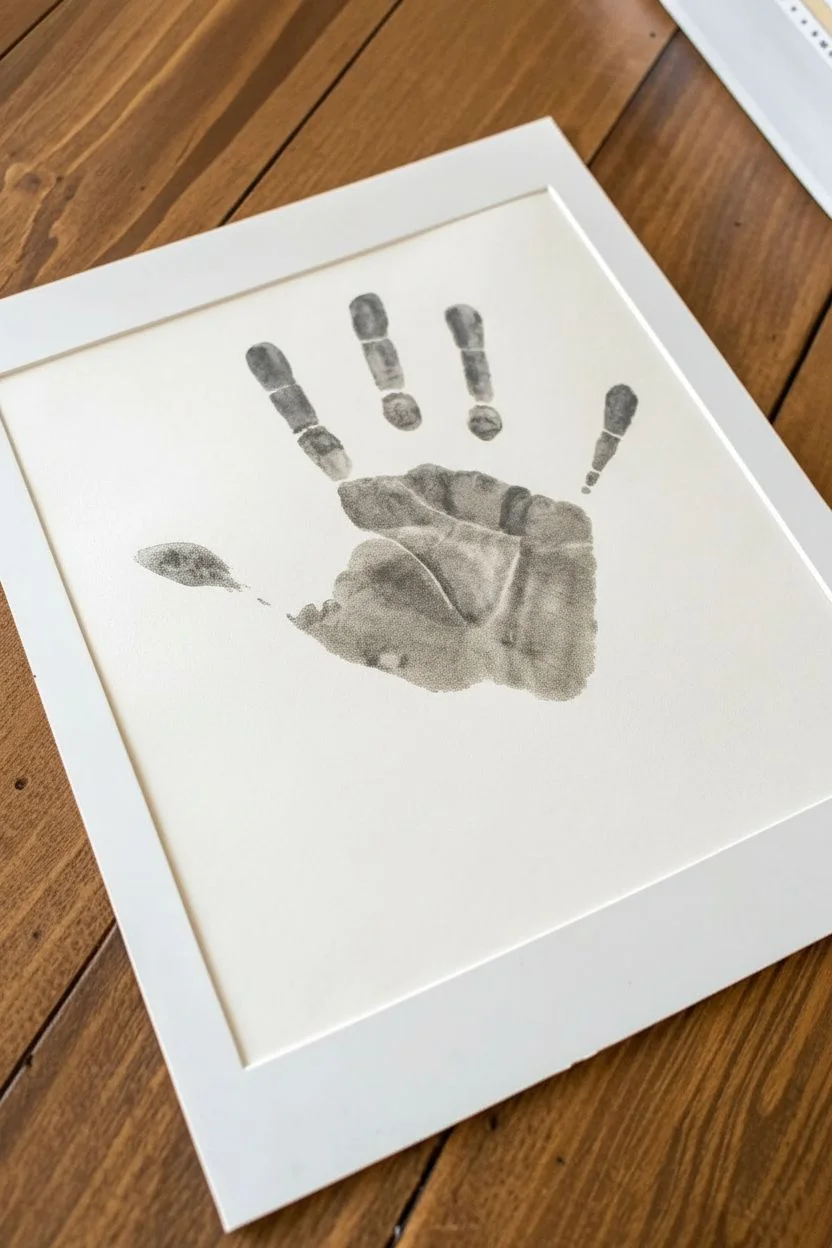
This minimalist keepsake captures a moment in time using your toddler’s handprint as a backdrop for a charming elephant illustration. The soft grey tones and clean lines make it a sophisticated addition to a nursery gallery wall.
Step-by-Step Guide
Materials
- Heavyweight art paper or cardstock (white or cream)
- Grey washable paint or ink pad
- Fine-tip black ink pen or micron pen
- Grey watercolor paint or diluted acrylic
- Small round paintbrush
- Pencil and eraser
- Black ink stamp pad (optional, for paw print)
- Paw print stamp (optional)
Step 1: Capture the Print
-
Prepare the workspace:
Lay down newspaper or a protective mat on a low table where your toddler can easily reach. Tape down your heavyweight art paper so it doesn’t slide around during the printing process. -
Ink the hand:
Apply a generous, even layer of grey washable paint to your child’s hand using a sponge brush, or press their hand firmly onto a large grey ink pad. Ensure the entire palm and fingers are covered but not dripping. -
Place the handprint:
Guide your child’s hand to the center-top area of the paper. Press down firmly on the palm and each finger to ensure good contact with the paper, keeping the fingers spread slightly apart. -
Lift carefully:
Lift the hand straight up in one quick motion to avoid smudging the edges. Allow the print to dry completely before moving on to the drawing phase.
Clean Edges Trick
If the handprint smudges, don’t restart! Use a white colored pencil or opaque white paint to mask small imperfections around the fingers.
Step 2: Sketching the Elephant
-
Position the sketch:
Using a light pencil, lightly sketch the outline of a small elephant underneath the palm area of the dried handprint. You want it positioned so the handprint looks like a towering tree or abstract background. -
Draw the basic shapes:
Start with a large oval for the body and a rounded shape for the head. Add the trunk curling upward and four sturdy legs. -
Refine the details:
Sketch in the large, floppy ear on the side of the head. Add small details like the tail, the toes on the feet, and the eye. -
Ink the outline:
Once you are happy with the pencil sketch, trace over your lines with a fine-tip black ink pen. Use smooth, confident strokes for the main outline. -
Add texture lines:
Add small, curved hatching marks on the trunk, knees, and ear to suggest wrinkles and skin texture. Erase any visible pencil marks gently.
Wobbly Lines?
If your ink lines feel shaky, thicken the outline slightly to hide the wobbles. A variation in line weight actually adds character to the drawing.
Step 3: Painting and Finishing
-
Mix your grey wash:
Dilute a small amount of grey watercolor paint with water. You want a transparency that is lighter than the handprint but dark enough to show volume. -
Paint the elephant body:
Wash the grey color over the elephant’s body, avoiding the eye. I like to keep the paint slightly darker near the bottom of the belly and legs to create a shadow effect. -
Add shading:
While the first layer is still slightly damp, drop a tiny bit of darker grey into the inner ear and under the chin for depth. -
Recreate the paw print (optional):
To the right of the elephant, stamp a small paw print using a black ink pad. If you don’t have a stamp, you can easily draw one with a large circle and four smaller toe circles, filling them in with black marker. -
Final touches:
Use a white gel pen to add a tiny highlight to the elephant’s eye if it got too dark. Let the artwork dry completely. -
Mat and frame:
Once fully dry, place a white mat board over the artwork to frame it professionally and place it into your chosen frame.
Hang this sweet piece in a child’s room as a reminder of how small their hands once were


Handprint Caterpillar Parade
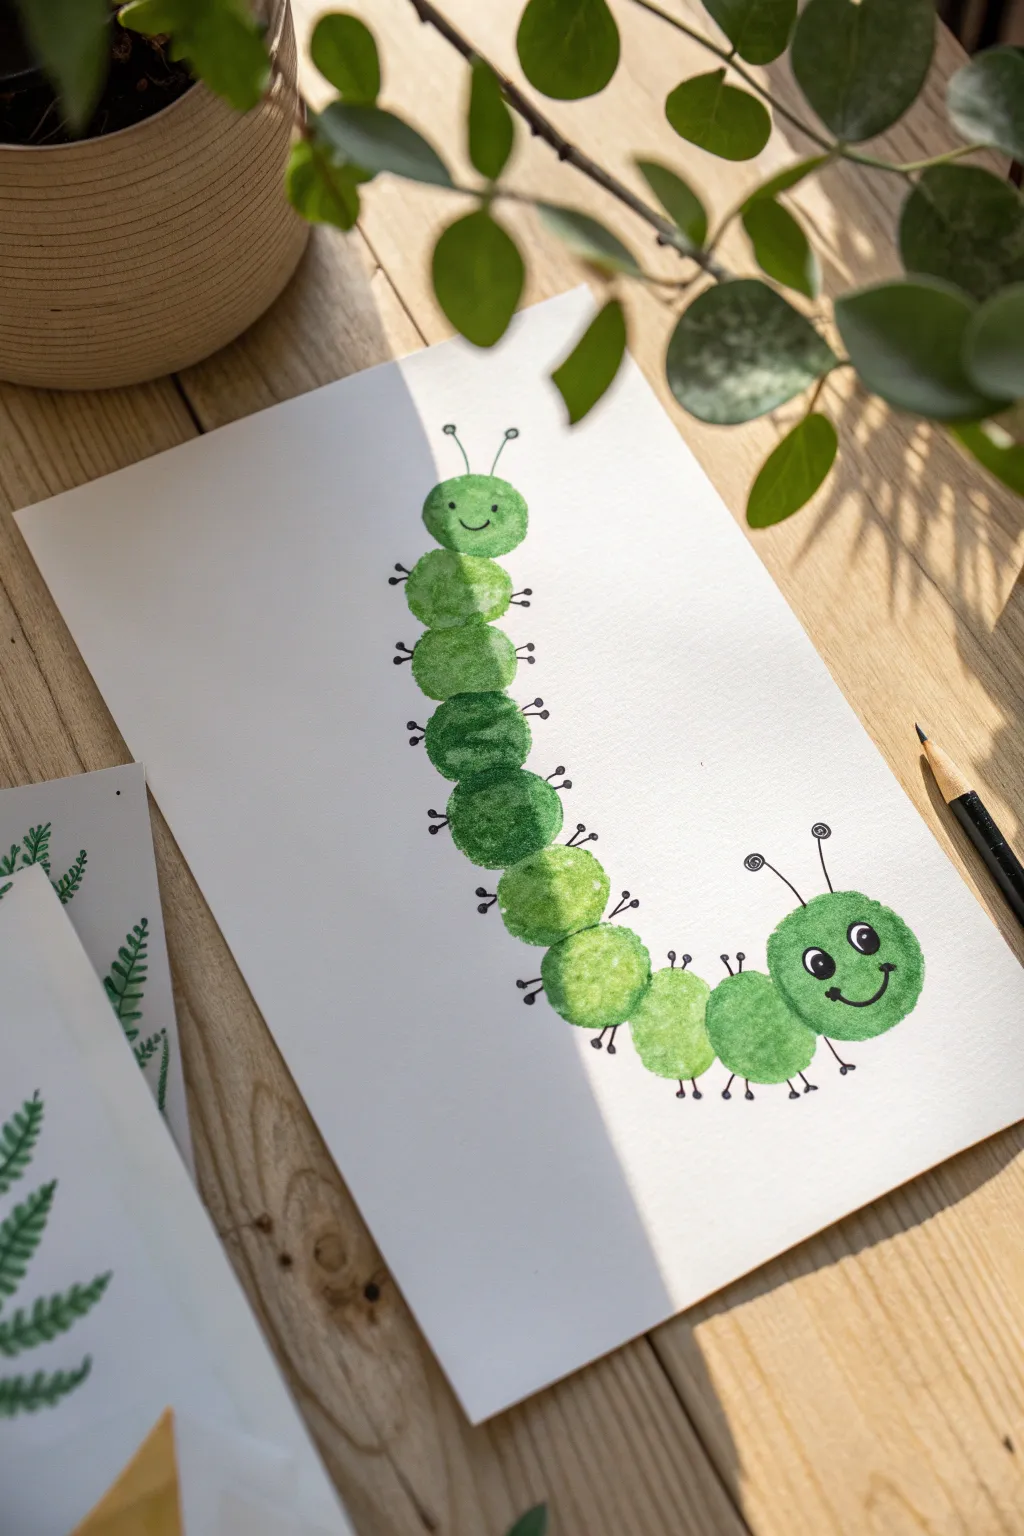
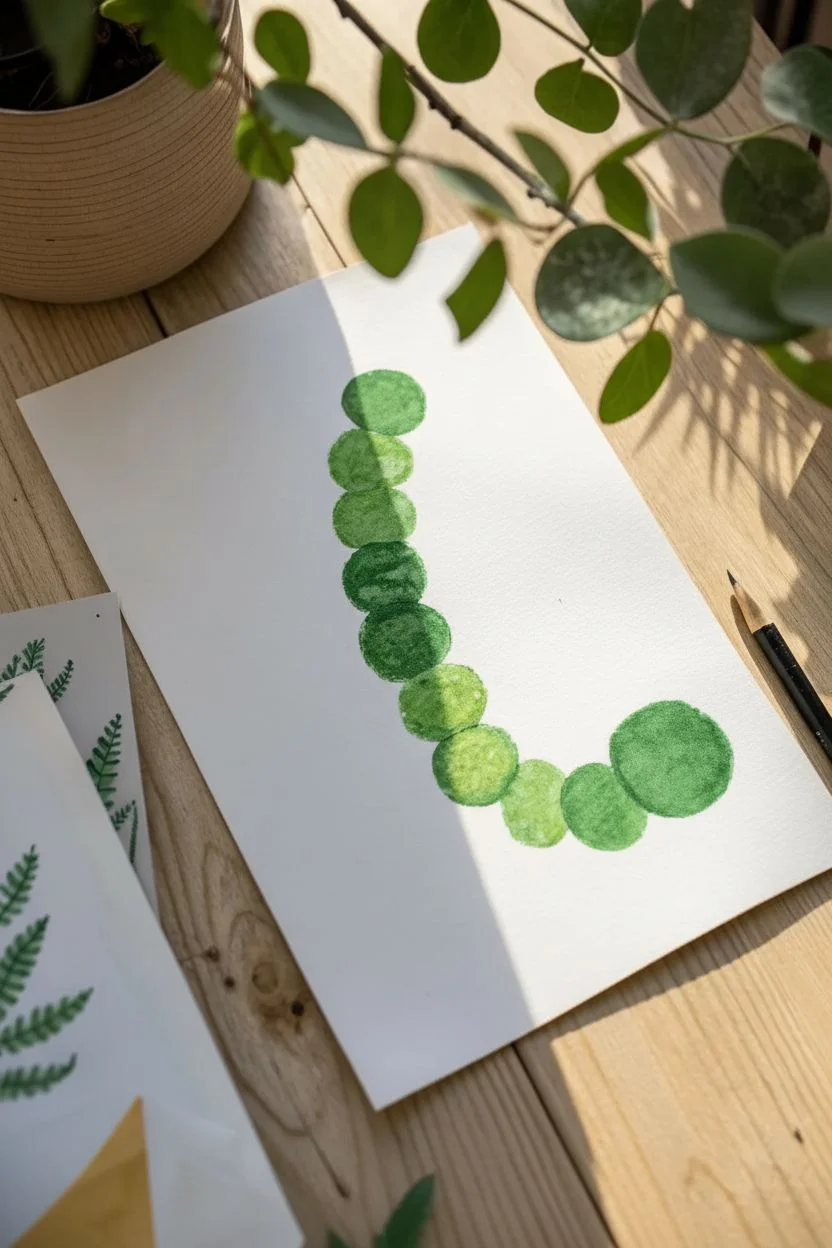
Create a cheerful, winding caterpillar using nothing but green paint and your little one’s thumbs. This project results in a vibrant, textured character that crawls across the page with a friendly smile, perfect for practicing fine motor skills.
Step-by-Step Tutorial
Materials
- White cardstock or heavy art paper
- Green washable paint (two shades: light and dark)
- Black fine-point marker or pen
- Paper plate or palette
- Wet wipes or paper towels
Step 1: Creating the Body
-
Prepare the palette:
Squeeze out small amounts of both light green and dark green paint onto your paper plate. Keep them separate at first, but allow a little overlap in the middle for variation. -
Test prints:
Before committing to the final paper, do a few practice thumbprints on a scrap sheet to get the right amount of paint on the thumb—you want a clear texture, not a slippery blob. -
Start the tail:
Dip a thumb into the lighter green paint. Press it firmly onto the paper near the top middle to start the tail end of your caterpillar. -
Build the curve:
Continue adding thumbprints downwards in a gentle ‘S’ or ‘C’ curve. Overlap each new print slightly with the previous one so the body segments connect seamlessly. -
Mix up shades:
Alternate between dipping into the dark green and light green paint. I like to encourage mixing them slightly on the thumb to create depth and interesting textures within each segment. -
Create the mid-section:
As you reach the middle of the curve, ensure the prints are aligned to suggest movement. The caterpillar should look like it’s inching along. -
Form the head:
For the final segment at the bottom right, pick a nice solid green shade. Press the thumb down firmly to make a slightly larger, distinct circle for the head. -
Top detail:
If you want a smaller caterpillar friend at the top (like in the example image), repeat the process starting from the top with just 3-4 darker green prints to make a tiny head and body segment. -
Let it dry:
Set the artwork aside for 10-15 minutes until the paint is completely dry to the touch. This prevents smudging when you add the details later.
Little Thumb Tip
Rotate the paper as you stamp to make it easier for small wrists to follow a curve without smudging previous prints.
Step 2: Adding Personality
-
Draw the legs:
Using the fine-point black marker, draw two small pairs of legs extending from the bottom of each body segment. Keep them simple—just short, straight lines. -
Add tiny feet:
At the end of each leg line, draw a tiny dot or a small oval to represent feet. -
Give it antennae:
On the head segment, draw two curving lines pointing upwards. Add a small spiral or loop at the tip of each antenna for a whimsical touch. -
Draw the eyes area:
For the face, you can draw two large white circles with black pupils directly over the dry paint, or stick on googly eyes if you prefer a 3D effect. In our painted version, bold black outlines work well. -
Add the smile:
Draw a wide, U-shaped mouth curve under the eyes. Add small cheek marks at the ends of the smile to make it look extra happy. -
Detail the small friend:
Don’t forget the little caterpillar at the top! Give it tiny antennae and a simple smiley face with two dots for eyes and a small curve for the mouth. -
Final touches:
Check for any gaps in the legs or antennae. You can add extra details like little grass blades near the feet if you want to ground the character.
Leafy Lunch
Before the paint dries, stamp a few thumbprints sideways in yellow or brown near the mouth to create ‘leaves’ for snacks.
Now you have a wiggly, giggly caterpillar friend ready to explore the garden
BRUSH GUIDE
The Right Brush for Every Stroke
From clean lines to bold texture — master brush choice, stroke control, and essential techniques.
Explore the Full Guide
Handprint Bunnies With Floppy Ears
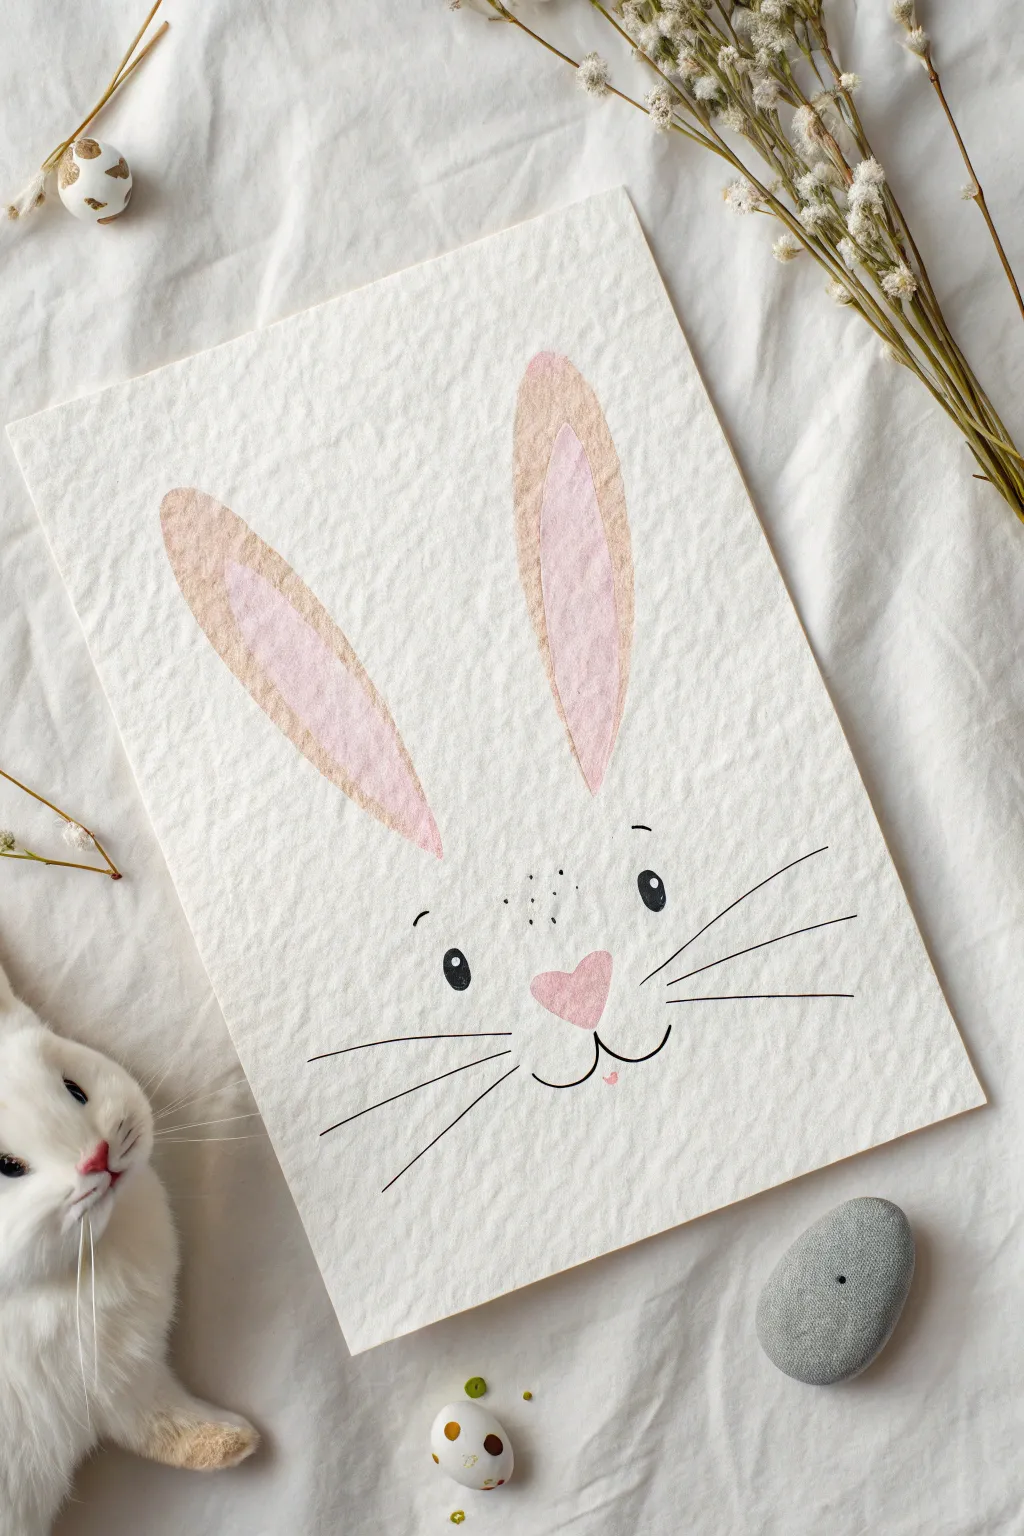
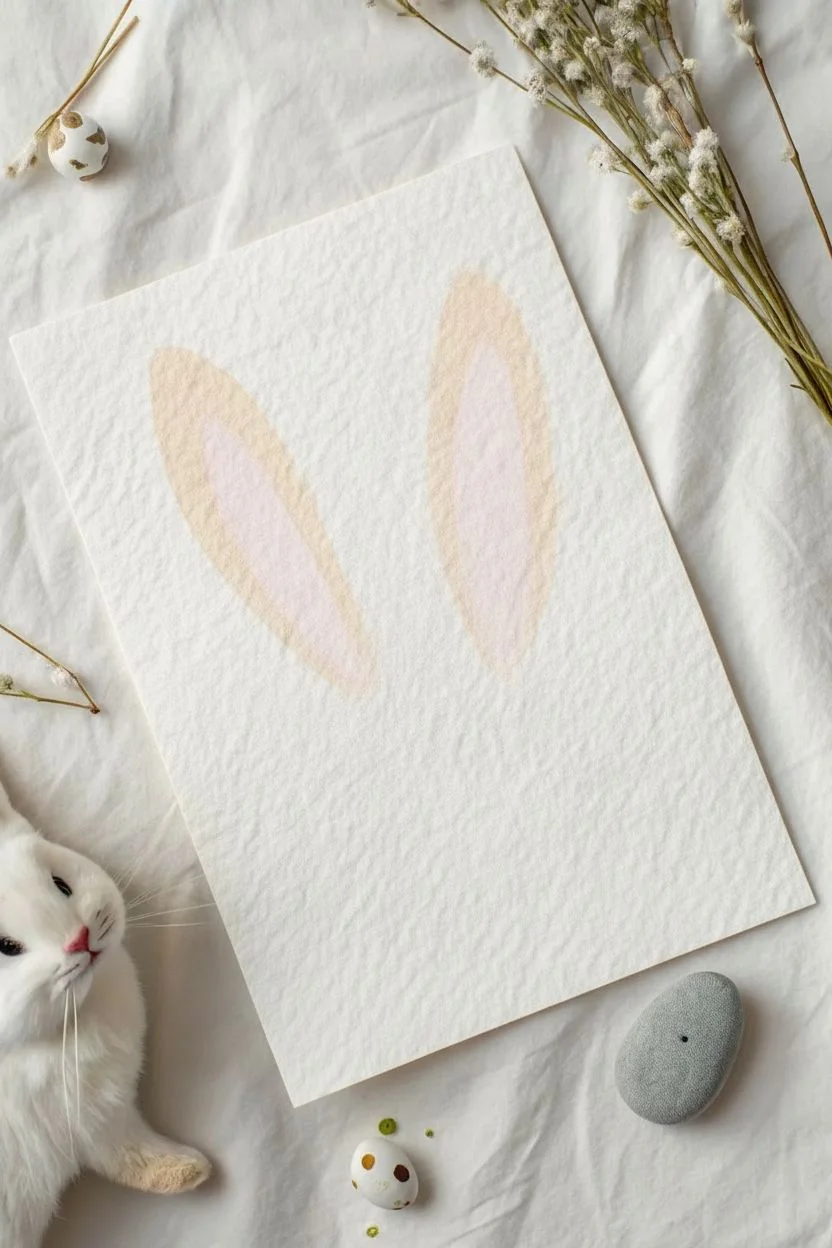
This adorable bunny portrait uses soft watercolors and simple linework to capture a sweet, gentle expression. The textured paper adds a lovely organic feel, making this a perfect keepsake for Easter or a spring-themed nursery decoration.
Step-by-Step Guide
Materials
- Textured watercolor paper (cold press or rough grain)
- Watercolor paints (warm beige/brown and soft pink)
- Medium soft round watercolor brush
- Fine liner pen or small detail brush with black ink
- Pencil (H or HB)
- Eraser
- Cup of water
- Paper towels
Step 1: Painting the Bunny Ears
-
Prepare your colors:
Mix a very dilute, warm beige color on your palette. You want it to be quite watery to achieve that translucent look. Also, mix a soft, pastel pink for the inner ear. -
Draft the shapes:
Lightly sketch two tall, elongated oval shapes for the ears using your pencil. Keep the lines incredibly faint so they won’t show through the paint later. -
Paint the outer ears:
Dip your round brush into the diluted beige wash. Gently fill in the larger ear shapes. The textured paper will likely leave some small white speckles, which adds to the charm. -
Create the inner ear:
While the beige paint is still slightly damp (but not puddling), clean your brush and pick up the soft pink. Paint a smaller, inner oval inside the beige shape. -
Blend naturally:
Let the pink and beige touch slightly. This wet-on-wet technique allows the edges to bleed together just enough to look soft and furry, rather than having harsh outlines. -
Let it dry completely:
This is crucial. Walk away for 10-15 minutes. The paper needs to be bone dry before you add the facial details, or the ink will bleed into the paper fibers.
Use Textured Paper
Using ‘Rough’ or ‘Cold Press’ watercolor paper is essential here. The texture grabs the pigment unevenly, creating that vintage, organic look shown in the photo.
Step 2: Adding the Facial Features
-
Position the nose:
visualize where the center of the face is, well below the ears. With the pink watercolor, paint a soft, upside-down heart shape for the nose. I like to keep this quite pale. -
Draw the eyes:
Once the paper is dry again, switch to your black fine liner or detail brush. Draw two small, solid black ovals for eyes on either side of the nose area. -
Add highlights:
Leave a tiny pinprick of white paper showing in each eye for a ‘sparkle,’ or add a dot of white acrylic/gouache afterwards if you filled it in completely. -
Create expression lines:
Above the eyes, draw tiny, short curved lines for eyebrows. This gives the bunny a surprised or attentive expression. -
Draw the mouth:
Starting from the bottom point of the pink heart nose, draw a sleek vertical line down, then curve it outward to the left and right to make the classic bunny smile. -
Add the freckles:
Using the very tip of your pen, dot several freckles on the muzzle area between the nose and eyes. Vary the pressure slightly so some are darker than others. -
Draft the whiskers:
For the whiskers, confidence is key. Place your pen near the cheek area and pull outward in quick, sweeping motions. Aim for three long whiskers on each side. -
Finish small details:
Add a tiny, subtle pink mark below the mouth to suggest a lower lip or tongue. -
Final assessment:
Step back and look at your bunny. If any pencil lines are still visible around the ears, gently erase them now that the paint is fully cured.
Uneven Whiskers?
Don’t stress if the whiskers aren’t symmetrical! Practice the flicking motion on a scrap paper first. Move your whole arm, not just your wrist, for smoother lines.
Now you have a sweet, textured bunny portrait ready to frame or gift to a loved one
Handprint Owls on Branches
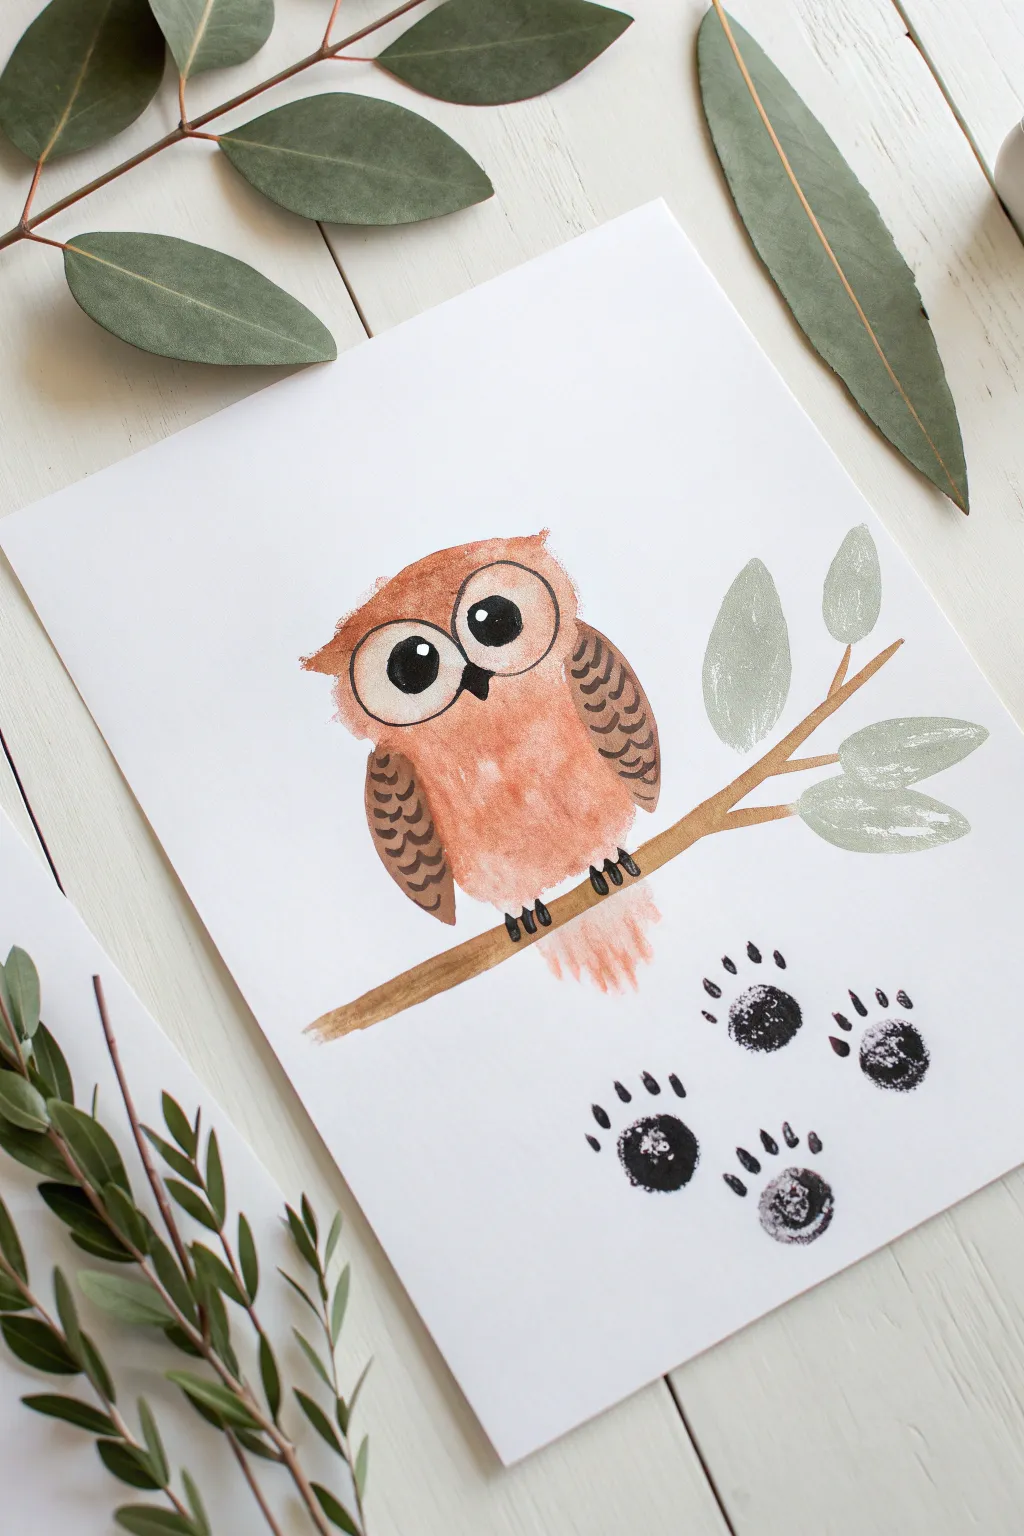
This charming art project transforms a simple handprint into a fluffy owl perched on a leafy branch. With soft watercolors and a few clever stamped details, you can preserve those tiny fingers as feathers forever.
Step-by-Step
Materials
- White cardstock or heavy watercolor paper
- Brown watercolor paint or water-based tempera (burnt sienna/rust shade)
- Black fine-liner pen or thin marker
- Light brown and greyish-green acrylic or watercolor paint
- Flat paintbrush (medium size)
- Round paintbrush (small size)
- Small black ink pad
- Potato or sponge (for stamping leaves)
- Paper towels
- Cup of water
Step 1: Creating the Handprint Body
-
Prepare the workspace:
Lay down some newspaper or a protective mat, as toddlers and paint can get messy quickly. Have your cardstock ready on a flat surface. -
Mix the owl color:
Mix a warm, rusty brown watercolor paint. You want it to be somewhat watery to achieve that soft, textured look seen in the wings, but pigmented enough to show up well. -
Paint the hand:
Coat your toddler’s palm and fingers with the brown paint. Ensure the thumb is painted, as this will become a wing, while the fingers create the tail feathers. -
Make the print:
Guide their hand onto the center of the paper. Press the palm down firmly, but keep the fingers slightly close together pointing downwards. The thumb should stick out slightly to the side to resemble a folded wing. -
Dry completely:
This is crucial. Let the handprint dry fully before adding details so the marker lines won’t bleed. I usually use this break for snack time.
Step 2: Drawing the Branch and Leaves
-
Paint the main branch:
Using a medium flat brush and light brown paint, create a diagonal line crossing under the owl’s ‘feet’. Make the branch slightly thicker at the bottom left and thinner as it reaches up to the right. -
Add smaller twigs:
Paint two or three smaller off-shoot branches extending from the main stem, providing spots for the leaves to attach. -
Prepare the leaf stamp:
Cut a small potato or sponge into a simple oval leaf shape. This ensures uniformity and mimics the texture shown in the original image. -
Stamp the leaves:
Dip your stamp into a muted sage or grey-green paint. Press it gently onto the ends of your painted twigs. The texture of the stamp creates lovely natural veins.
Smudged Print?
If the handprint smudges or lacks detail, don’t discard it! Use a slightly darker shade of brown paint and a thin brush to paint over the specific smudge, turning it into extra ‘fluffy’ feather texture.
Step 3: Adding Owl Details
-
Outline the body:
Once the handprint is dry, use a fine black marker or paint pen to lightly trace the outer shape of the owl, giving definition to the head and wings. -
Add the wing texture:
Draw small, scalloped ‘U’ shapes on the thumb area (the wing) and on the opposite side of the body to suggest layered feathers. -
Draw the big eyes:
Draw two large circles touching each other in the center of the palm area. Inside, draw smaller black circles for pupils, leaving a tiny white dot in each for a sparkle. -
Draw the beak:
Right between the eyes, draw a small, sharp triangular beak pointing downward. -
Connect the owl to the branch:
Paint three tiny, dark oval claws extending from the bottom of the owl’s body to grip the branch.
Make It Wintery
Turn this into a snowy scene by lightly dabbing white acrylic paint on top of the brown branches and the owl’s head to look like freshly fallen snow.
Step 4: The Paw Print Trail
-
Ink the fingertips:
For the paw prints at the bottom, press your child’s thumb onto a black ink pad creates the main pad of the paw. -
Add the toes:
Use their pinky finger dipped in black ink or paint to make four small dots arched above the thumbprint. Repeat this to make a trail of footprints walking up the page. -
Final touches:
If needed, add tiny tick marks above the paw toes for claws using your fine-liner pen. Let the whole artwork dry completely before displaying.
Now you have a sweet keepsake that captures the size of your little one’s hand in a creative woodland scene

PENCIL GUIDE
Understanding Pencil Grades from H to B
From first sketch to finished drawing — learn pencil grades, line control, and shading techniques.
Explore the Full Guide
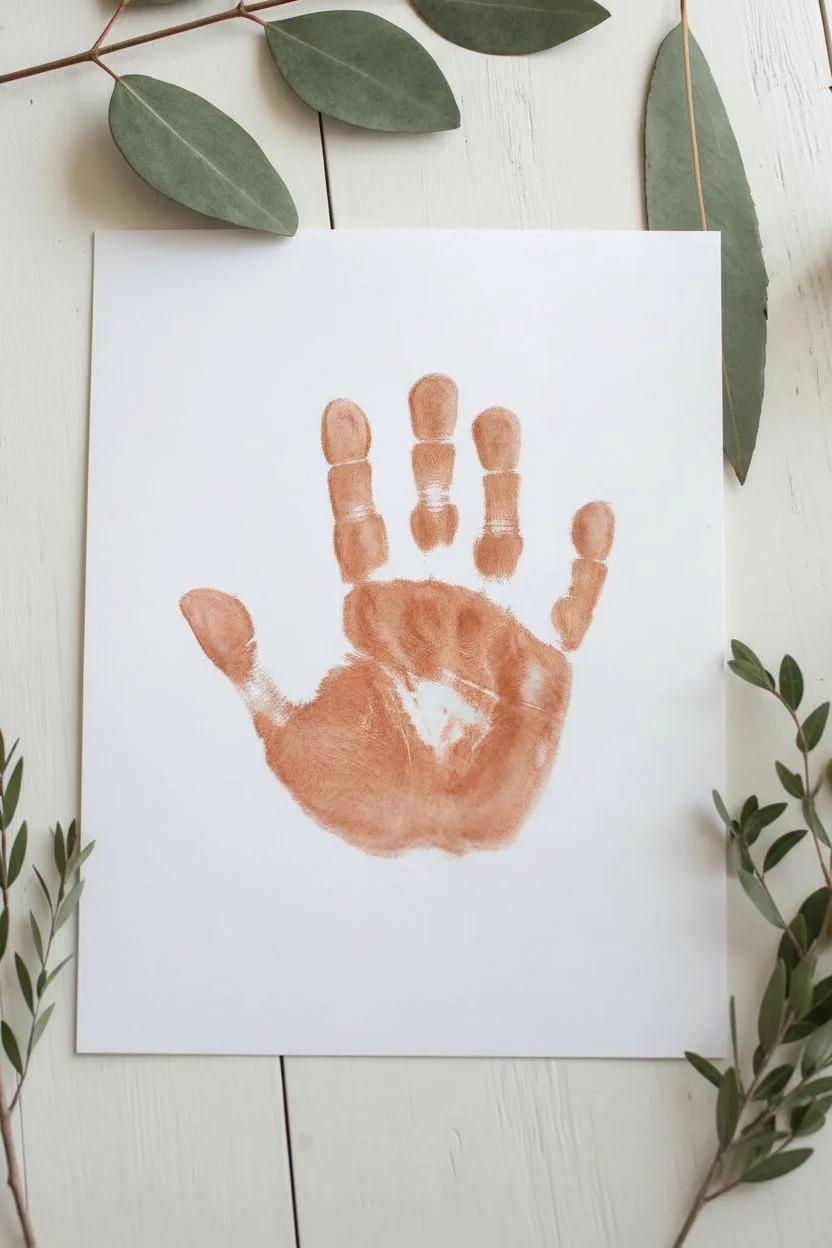
Tape-Resist Handprint Frames
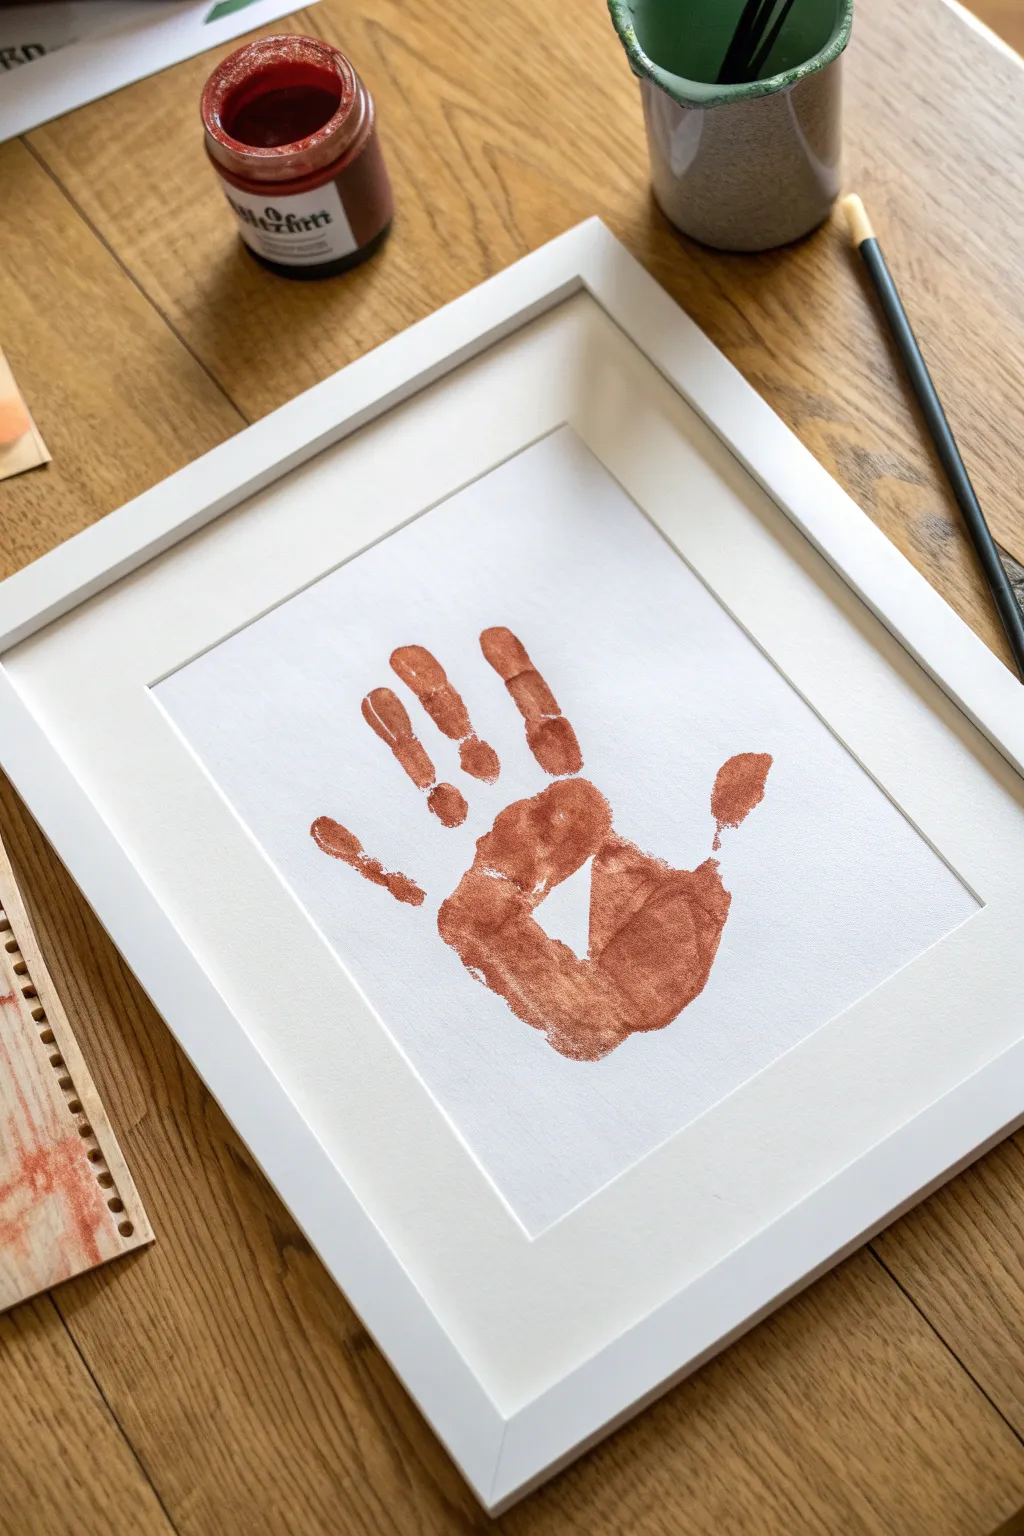
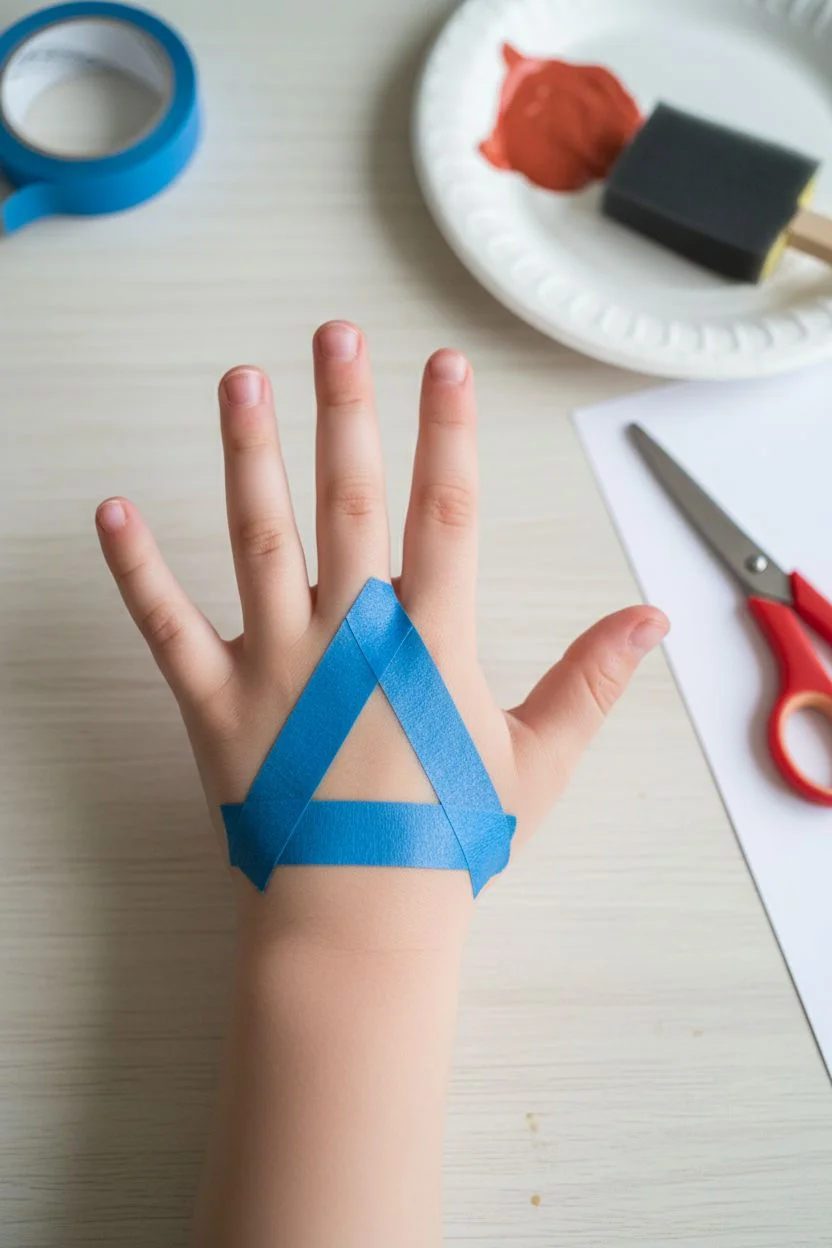
This elegant keepsake uses simple tape-resist techniques to create a striking negative-space geometric shape right in the center of a classic handprint. The warm terracotta tone against crisp white paper gives it a sophisticated, gallery-ready look that captures a moment in time wonderfully.
Step-by-Step Guide
Materials
- Heavyweight white cardstock or watercolor paper
- Painter’s tape or washi tape
- Terracotta or rust-colored acrylic paint
- Foam sponge brush or soft paintbrush
- Scissors
- Paper plate or palette
- White picture frame with matting
Step 1: Preparation
-
Prepare the resist shape:
Cut three small strips of painter’s tape or washi tape. Arrange them into a triangle shape. -
Apply the tape:
Place the tape triangle directly onto the center of your toddler’s palm. Make sure the child’s hand is clean and dry first so the tape adheres well. -
Secure the edges:
Press down firmly on all three strips of the tape triangle. You want a tight seal against the skin to prevent paint from seeping underneath and ruining the crisp lines.
Smudged Edges?
If the print slides and smears, the paint might barely be too thick or
Step 2: Painting
-
Load the paint:
Squeeze a dollop of terracotta acrylic paint onto your paper plate. These earth tones look especially lovely for this project. -
Coat the hand:
Using a foam brush, apply a generous, even layer of paint over the child’s entire palm and fingers. -
Cover the tape:
Paint directly over the tape triangle on the palm as well. Don’t avoid it; painting over it ensures the surrounding shape is perfectly defined. -
Check for gaps:
Inspect the hand quickly to ensure there are no dry spots, but work efficiently so the paint doesn’t begin to dry on the skin before printing.
Pro Tip: Washi Works Best
Use low-tack washi tape for the resist shape. It releases from sensitive skin much easier than standard masking tape and creates sharper lines.
Step 3: Printing
-
Position the hand:
Guide the child’s hand over the center of the heavy white cardstock. Hover briefly to ensure the placement is centered. -
Press down firmly:
Press the hand onto the paper. Apply gentle pressure to each finger and the center of the palm where the tape is located to ensure good contact. -
Lift carefully:
Hold the paper down with one hand and lift the child’s hand straight up with the other to avoid smearing the print. -
Remove the tape:
Immediately peel the tape triangle off the child’s hand and discard it. Wash the paint off their hand right away.
Step 4: Finishing Touches
-
Let it dry:
Allow the handprint to dry completely flat. Depending on the thickness of the paint, this usually takes about 30 to 60 minutes. -
Inspect the negative space:
Notice the white triangle left behind in the center of the print. If any tiny paint bleeds occurred, you can touch them up carefully with a white gel pen, though subtle imperfections add charm. -
Prepare the frame:
Clean the glass of your white frame to ensure there are no fingerprints or dust specks. -
Mount the artwork:
Center your dried artwork behind the matting. Use a small piece of tape on the back of the paper to secure it to the mat board. -
Assemble the frame:
Place the matted artwork into the frame and secure the backing clips.
Before you know it, you’ll have a modern, geometric keepsake hanging on your wall
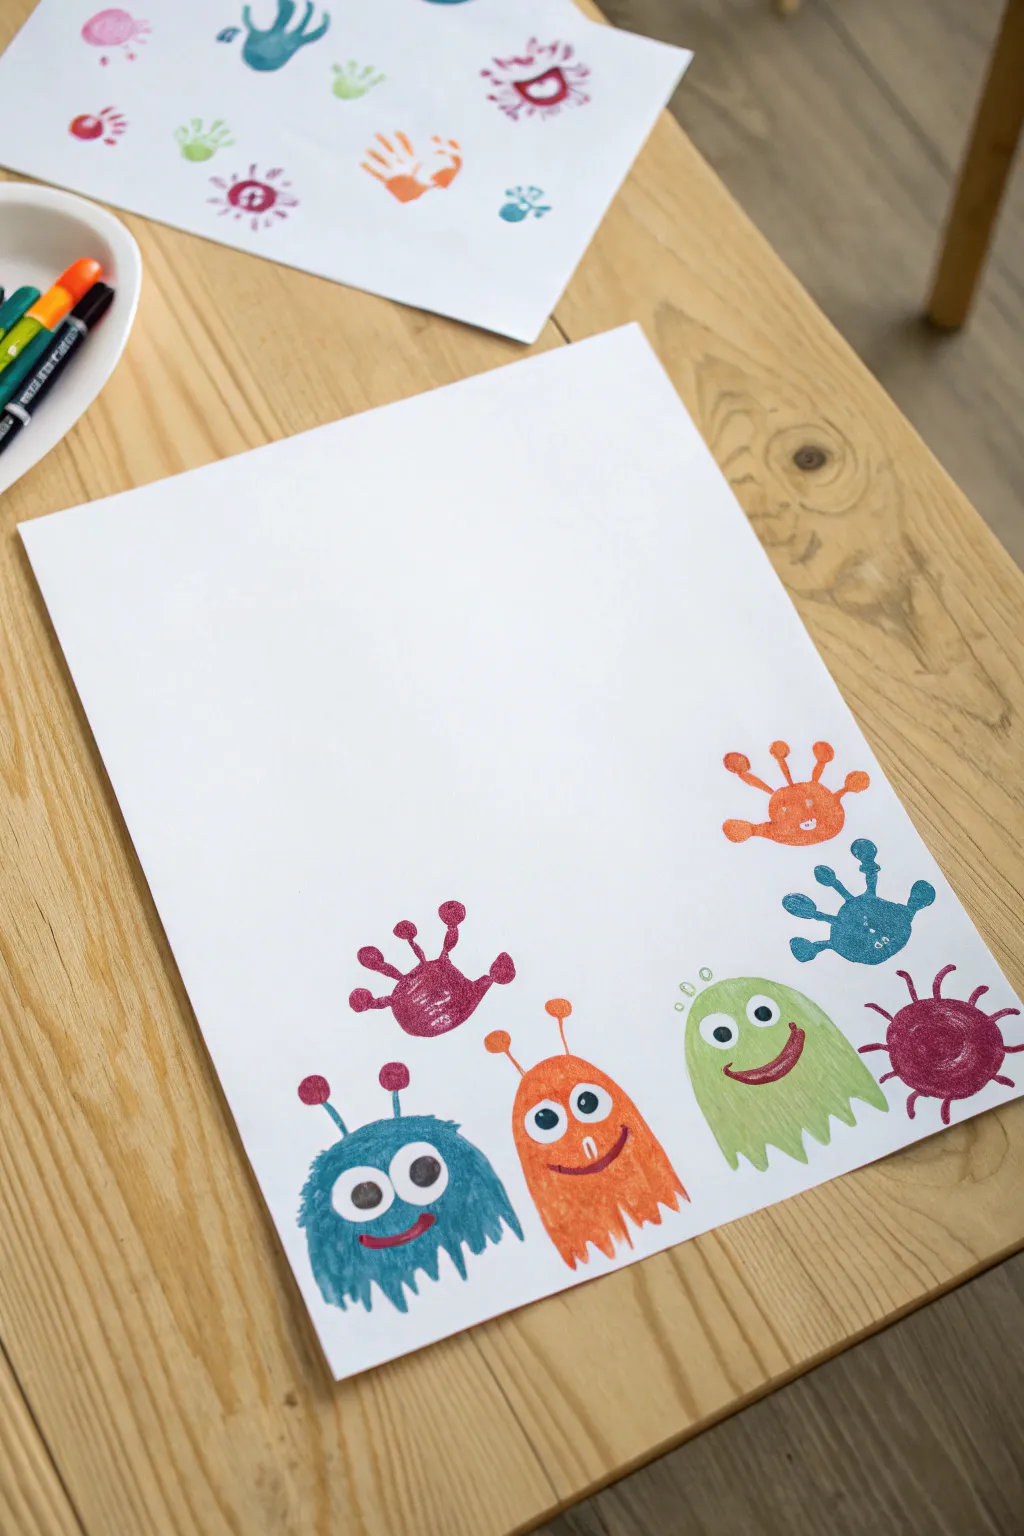
Silly Handprint Monsters With Paper Eyes

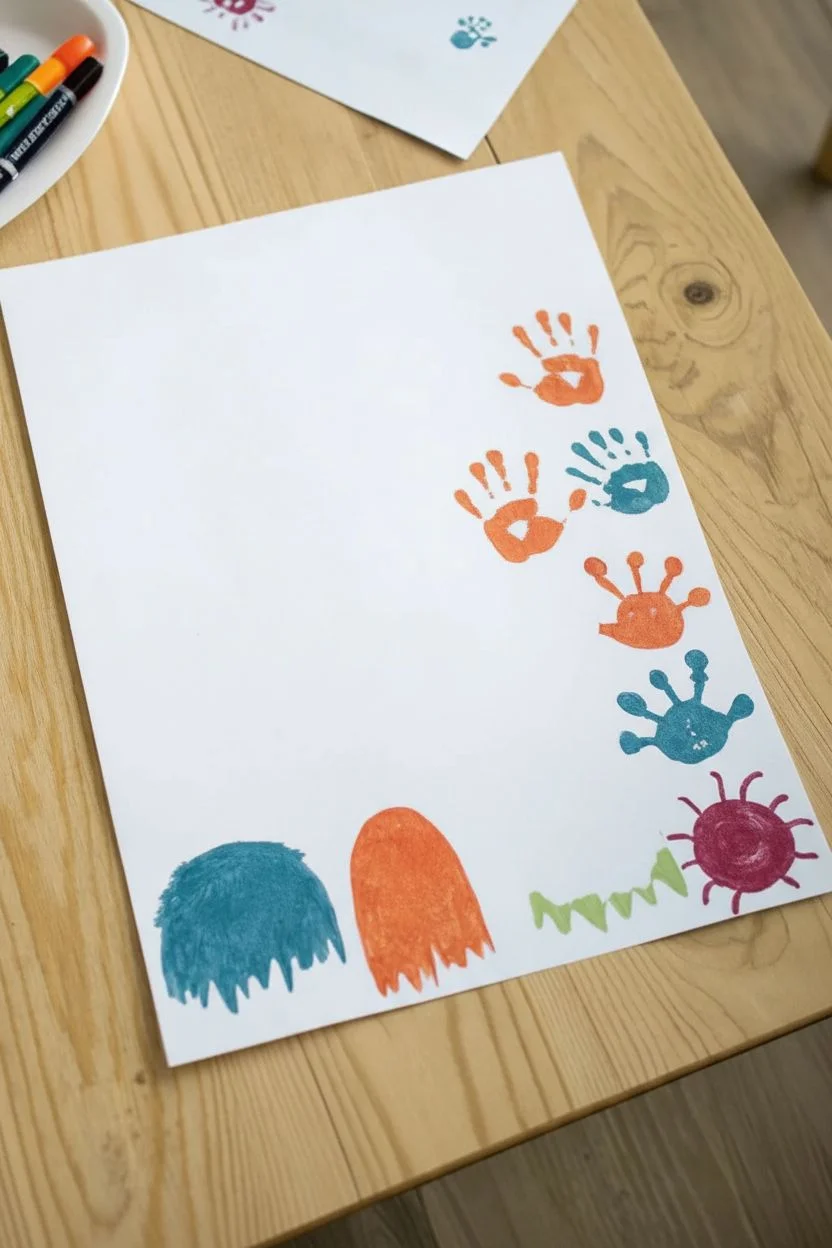
Transform little hands into a colorful gang of goofy monsters with this simple stamping project. By turning handprints upside down and adding paper eyes, you create characters that are full of personality and charm.
How-To Guide
Materials
- Washable craft paint (teal, orange, lime green, magenta/purple)
- White cardstock or heavy drawing paper
- Paintbrushes (medium flat brush for hands, fine brush for details)
- Small white paper circles or googly eyes (optional)
- Black marker or fine-tip pen
- Glue stick (if using paper eyes)
- Paper plate or palette
- Wet wipes or paper towels
Step 1: Stamping the Monsters
-
Prepare the paint:
Squeeze dime-sized amounts of teal, bright orange, lime green, and magenta paint onto your paper plate palette. Ensure the colors are distinct and ready for dipping. -
Paint the first hand:
Start with the teal monster on the bottom left. Paint the child’s palm and fingers thoroughly with teal paint. For this monster, you want the fingers pointing down to look like tentacle legs. -
Stamp the teal monster:
Press the painted hand firmly onto the bottom left corner of the paper with fingers pointing downward. Lift straight up to avoid smudging. -
Clean and switch colors:
Wipe the hand clean immediately with a wet wipe. Next, paint the hand orange for the second monster. -
Stamp the orange monster:
Place the orange print right next to the teal one, again with fingers pointing down. This creates a ghost-like shape. -
Create the green ghost:
Repeat the process with lime green paint. Stamp this one next to the orange monster, keeping the orientation the same so the fingers act as the bottom fringe of the body. -
Add the waving floaters:
For the monsters on the right side, switch the orientation. Paint the hand orange and stamp it higher up with fingers pointing upward to look like hair or spikes. -
Add a teal buddy:
Stamp a blue/teal handprint below the floating orange one, orienting it sideways or angled slightly upwards to create variety in the group. -
Stamp the small splats:
Using the magenta paint, create smaller abstract shapes. You can use just the palm or a fist stamp to make the rounder, spiky creatures near the teal and green monsters. -
Dry completely:
Set the paper aside and let the paint dry fully. This is crucial before adding facial features so the marker doesn’t bleed.
Smudge Rescue
If a handprint smudges or looks messy, don’t scrap it! Turn the smudge into a monster’s wild hair or add extra eyes to that spot to make it intentional
Step 2: Bringing Them to Life
-
Prepare the eyes:
While the paint dries, cut small circles out of white paper for the eyes. You can make some large, some small, and even keep some joined together for a funny look. -
Glue the eyes:
Using a glue stick, attach the white paper circles to the dried paint bodies. Give the teal monster two big connected eyes and the orange one two separate eyes. -
Draw pupils:
Use a black marker to draw pupils inside the white circles. I like to have them looking in different directions to make them look sillier. -
Add antennas:
Use a fine paintbrush dipped in the monster’s body color (or a matching marker) to draw thin lines sticking out of their heads. Add a small dot at the end of each line. -
Paint the mouths:
With a fine brush and contrasting paint color (like red or dark blue), paint simple curved smiles on each monster. The green monster looks great with a big, wide grin. -
Add final details:
For the magenta splat creature, draw thin lines radiating outward to look like little legs or spikes.
Glow High-Five
Swap standard paints for glow-in-the-dark acrylics. After charging under a lamp, your monster crew will magically appear when you turn off the lights
Hang this masterpiece low on the wall so your little artist can admire their colorful crew


Have a question or want to share your own experience? I'd love to hear from you in the comments below!