
If you’ve been craving that cozy, hand-crafted look, wood burning is such a satisfying way to turn plain wood into something that feels personal. I pulled together these wood burning ideas I’d actually make in my own studio—starting simple, then working up to the real show-stoppers.
Botanical Line Art on Coasters
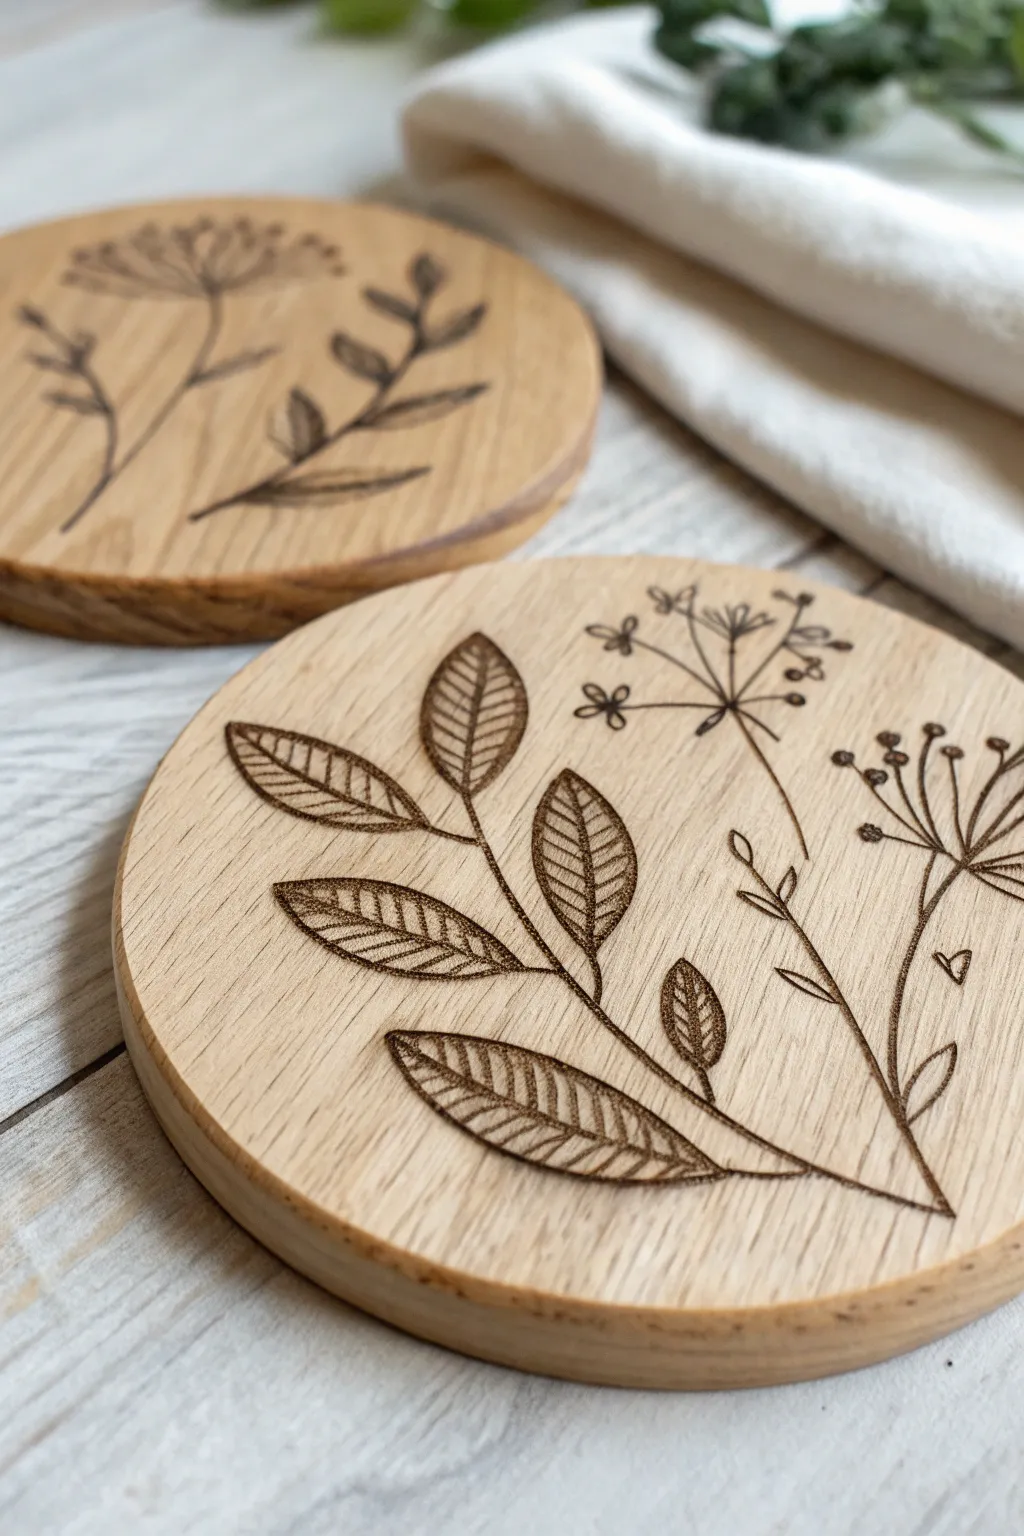
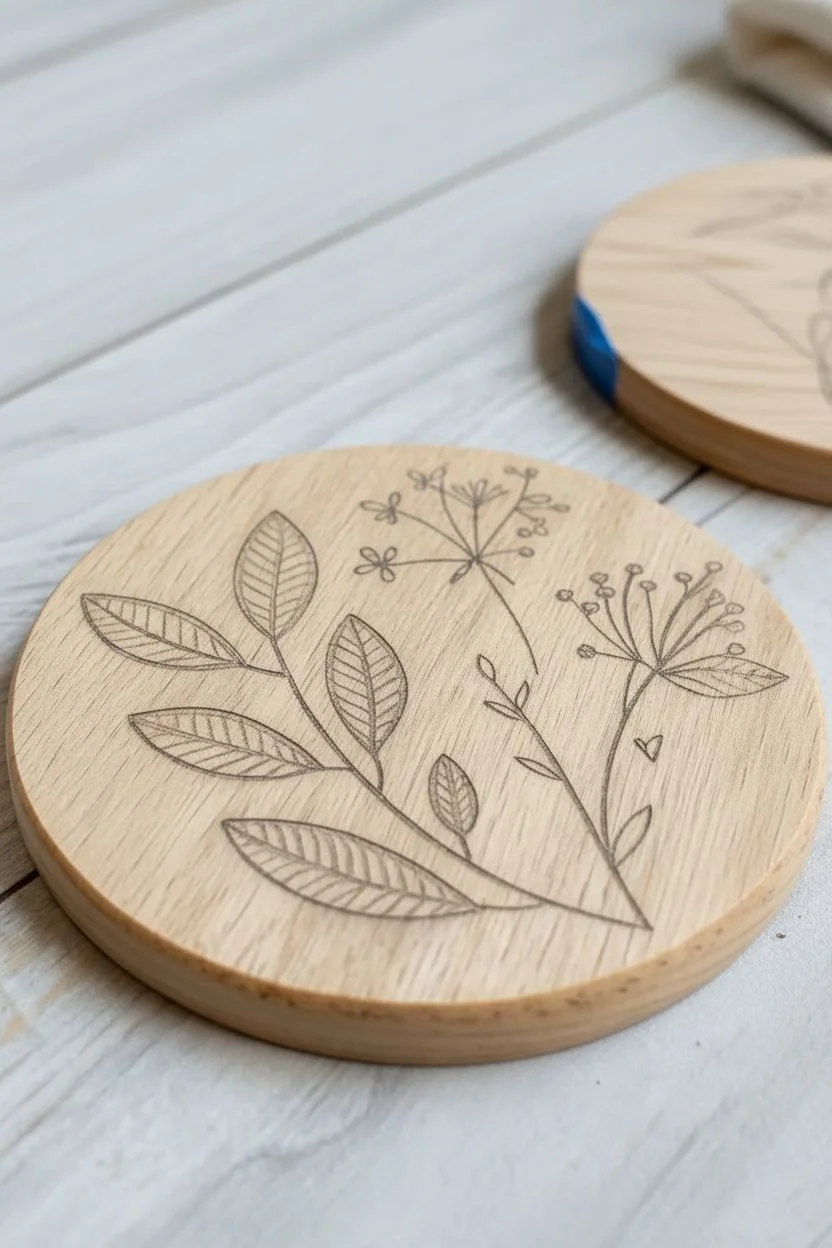
Capture the delicate beauty of nature with these pyrography coasters, featuring detailed botanical line art on smooth wood rounds. The contrast between the rich, toasted wood tones and the pale grain creates a sophisticated set of functional art.
Step-by-Step
Materials
- Unfinished round wood coasters (birch or basswood recommended)
- Wood burning tool with multiple nibs (universal and shading points)
- Sandpaper (220-grit and 400-grit)
- Graphite transfer paper
- Pencil and eraser
- Botanical line drawing templates or freehand reference
- Painter’s tape
- Clear wood finish (polyurethane or wood oil)
- Small lint-free rag or brush for sealing
Step 1: Preparation & Design
-
Prepare the surface:
Start by sanding your wood coaster with 220-grit sandpaper to remove any rough fibers. Follow up with 400-grit to create an ultra-smooth surface, which is crucial for clean burn lines. -
Clean the wood:
Wipe away all sanding dust thoroughly using a dry cloth or a tack cloth. Any leftover sawdust can carbonize under your pen and ruin the clean look. -
Plan your composition:
Visualize two main elements: a bold, leafy branch dominating the left side and delicate wildflower stems on the right. Keeping the design off-center adds a modern aesthetic. -
Transfer the design:
Place graphite paper darker-side down on the wood. Tape your botanical sketch over it. Trace the outlines firmly with a pencil, but don’t worry about shading details yet—just get the skeleton of the leaves and stems.
Heat Control Pro-Tip
Keep a scrap piece of wood next to you to test your pen’s heat. If the excessive carbon builds up on the tip, wipe it on the scrap wood or a brass sponge to keep your lines crisp.
Step 2: Burning the Outline
-
Select your nib:
Attach a fine writing or universal point to your wood burning tool. Let it heat up completely to a medium-high setting. -
Outline the stems:
Begin with the central stem of the large leafy branch. Use light pressure and a steady, slow hand to pull the pen toward you, creating a solid, dark line. -
Outline the leaves:
Burn the perimeter of each leaf attached to the main stem. Ensure the lines connect crisply at the points. -
Burn the wildflowers:
Switch to a lighter touch for the wildflower section. These stems should be thinner than the main branch leaves. Use short, quick strokes for the tiny seed heads or petals at the ends of the stems. -
Add detail elements:
Carefully burn the tiny heart shape near the base of the wildflower stem if you wish to include that sweet detail.
Step 3: Shading & Texturing
-
Define the veins:
Inside each large leaf, draw a central vein line. Then, add the diagonal ribs branching off from the center. Keep these lines slightly thinner than the outline. -
Switch to a shader:
Change your tip to a shading point (or turn your universal tip on its flat side) and lower the heat slightly. -
Add depth to leaves:
Gently shade the inner half of each leaf section, creating a gradient that gets lighter toward the edge. I find that building up layers of heat slowly looks better than trying to burn it dark instantly. -
Texture the seeds:
For the wildflower tops, use the very tip of the pen to stipple small dots or tiny circles, giving them a textured, pollen-like appearance. -
Clean up:
Once the wood is completely cool, use a clean eraser to gently remove any visible graphite lines that weren’t burned over.
Make it a Set
Create a pack of four by drawing different stages of the plant’s life cycle on each coaster—start with a seedling, then a bud, a full bloom, and finally a seed pod.
Step 4: Finishing Touches
-
Final sanding:
Lightly pass over the surface with 400-grit sandpaper one last time to knock down any raised grain from the heat, being careful not to sand off your lighter shadings. -
Apply finish:
Dip a lint-free rag into your wood oil or sealer. rub it into the wood in circular motions. -
Dry and cure:
Allow the first coat to dry according to the manufacturer’s instructions. -
Second coat:
Apply a second thin coat of sealer to ensure the coaster is water-resistant and durable for daily use.
Enjoy using your custom botanical coasters or wrap them up as a thoughtful handmade gift


Personalized Cutting Board Border Design

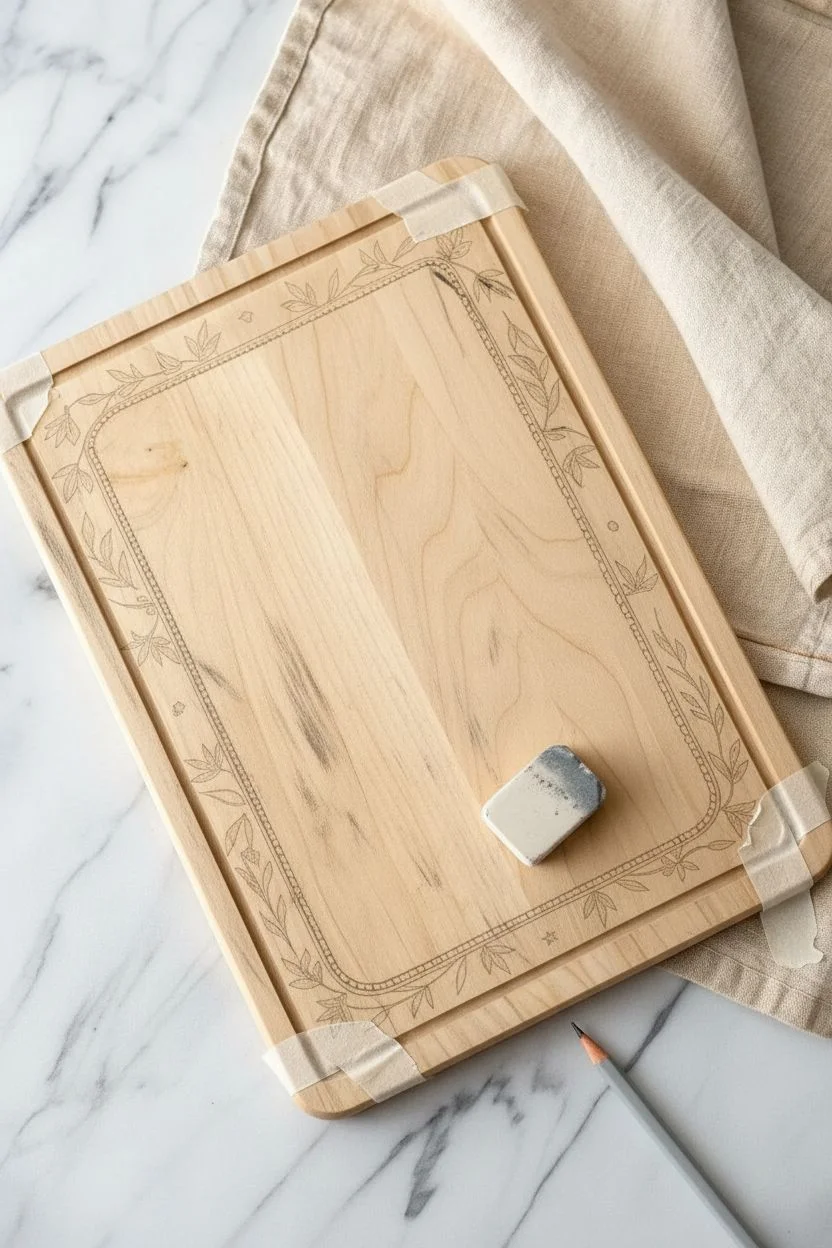
Transform a plain wooden cutting board into a charming kitchen centerpiece with this delicate leafy border design. The intricate trail of vines and leaves creates a sophisticated frame that looks professional yet feels wonderfully handmade.
Detailed Instructions
Materials
- Unfinished maple or beech cutting board (with juice groove)
- Wood burning tool (pyrography pen)
- Wire nib tip (for fine lines)
- Rounded shader tip (optional)
- Carbon transfer paper
- Pencil and eraser
- Painter’s tape
- Fine-grit sandpaper (220 and 400 grit)
- Food-safe mineral oil or board conditioner
- Clean intricate leaf border stencil or printout
Step 1: Preparation & Design Transfer
-
Surface Prep:
Begin by sanding your cutting board with 220-grit sandpaper. You want the surface to be buttery smooth, as any roughness will snag your hot pen tip and create shaky lines. Wipe away all dust with a tack cloth or slightly damp rag. -
Map Out the Border:
Measure the space between the juice groove (the indented channel around the edge) and the outer edge of the board. This specific design sits snugly inside the juice groove, on the flat central surface. Lightly mark your boundaries with a pencil. -
Arranging the Pattern:
If you are using a printed pattern, cut it into strips. Arrange the vine motif so it flows continuously around the inner perimeter of the juice groove. Tape these strips in place once you are happy with the spacing. -
Transfer the Design:
Slide a sheet of carbon paper dark-side down under your pattern. Trace over the vines, leaves, and small berries firmly with a pencil. Lift a corner to check that the lines are transferring clearly before removing the paper entirely.
Keep it flowing
When burning long curves, rotate the cutting board frequently so you are always pulling the pen toward your body. This stabilizes your hand and prevents jerky, uneven lines.
Step 2: Burning the Outline
-
Test Your Heat:
Use a scrap piece of similar wood (or the back of the board) to test your pen temperature. You want the nib hot enough to burn a rich brown line instantly without dragging, but not so hot that it scorches the surrounding wood. -
Define the Inner Frame:
Start by burning the double line that acts as the ‘stem’ or frame running parallel to the juice groove. This creates the trellis for your leaves. Use a steady hand and pull the pen toward you for the smoothest control. -
Fill the Frame Detail:
Inside that double-line stem, add small, repetitive tick marks or tiny dots. This texture, visible in the image, gives the vine a rope-like or stitched appearance and adds wonderful depth. -
Outline the Leaves:
Switch to a fine point tip if needed. Carefully outline each leaf shape branching off the main stem. Keep your pressure light; you can always darken a line, but sanding out a deep burn requires significant effort. -
Add Decorative Elements:
Burn the small circular berries, stars, or tiny geometric diamonds scattered among the leaves. These filler elements balance the design and prevent empty spots from looking accidental.
Step 3: Shading & Finishing
-
Shade the Leaves:
Turn down the heat slightly or switch to a shading tip. Gently shade the base of each leaf where it meets the stem, fading out toward the tip. This gradient effect makes the foliage look three-dimensional rather than flat. -
Darken Key Accents:
Go back over the tips of the leaves and the darkest parts of the berries. Adding high-contrast dark points makes the design pop against the light maple wood. -
Clean Up:
Once the wood is completely cool to the touch, use a standard eraser to remove any remaining carbon or graphite lines. Inspect the design for any spots that need a quick touch-up. -
Final Sanding:
Very lightly pass over the burned area with 400-grit sandpaper. This knocks down any raised char or ridges created by the burning process, leaving the board smooth for food preparation. -
Seal the Wood:
Pour a generous amount of food-safe mineral oil onto the board. Use a clean cloth to buff it into the wood, focusing on the burned areas to protect the art. The oil will instantly darken the wood and make your burned design rich and warm.
Uneven burn depth?
If your lines are looking patchy (some deep, some light), your tip might have carbon buildup. Gently wipe the hot tip on a wire brush or leather strop to clean it for consistent heat transfer.
Now you have a stunning, food-safe serving platter ready for your next dinner party.


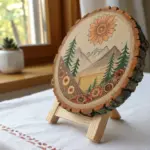
Rustic Mountain Silhouette Scene

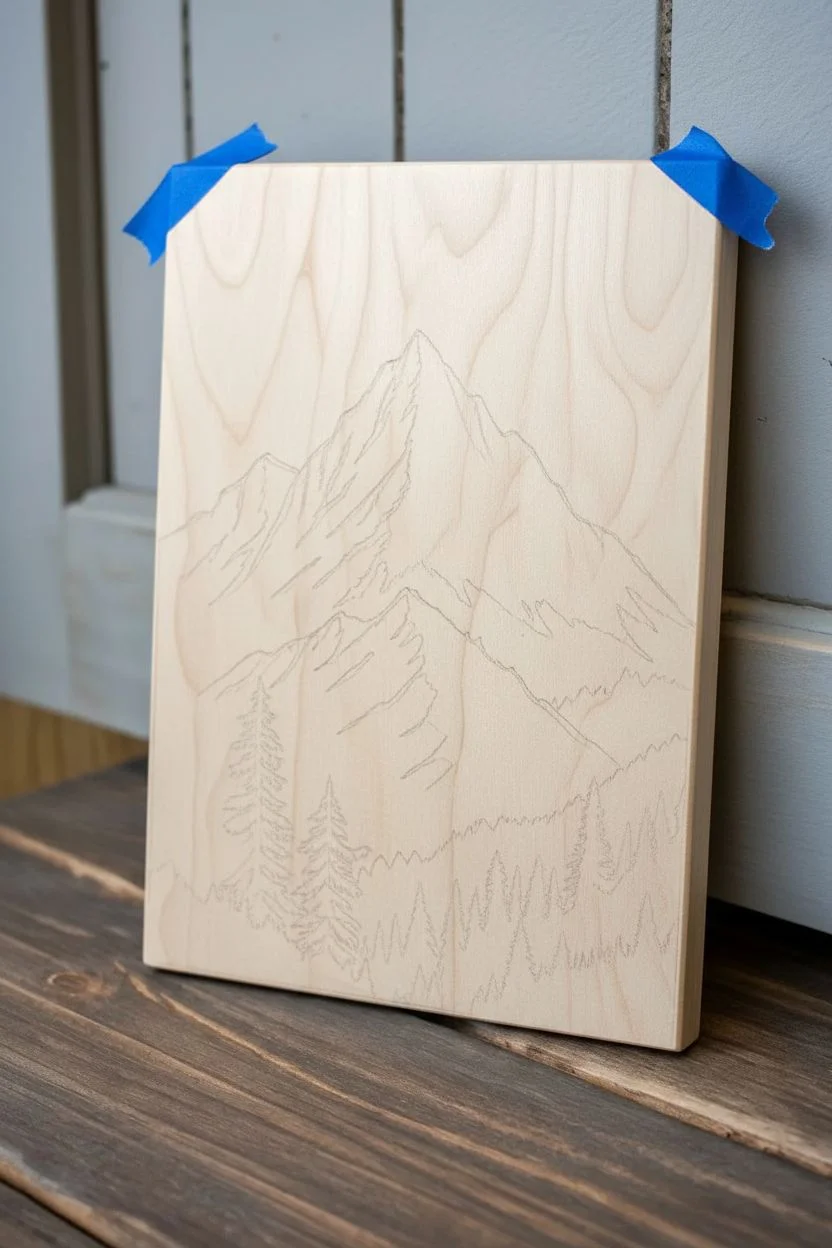
Capture the serenity of the high country with this striking wood-burned landscape, featuring towering mountain peaks and a dense pine forest. By playing with negative space and heavy burn textures, you’ll create a dramatic sense of depth on a simple wooden canvas.
Step-by-Step Guide
Materials
- Rectangular wood panel (Basswood or Birch recommended)
- Pyrography pen with interchangeable nibs
- Universal or Shader point nib
- Writing or Skew point nib
- Graphite paper
- Pencil and eraser
- Fine-grit sandpaper (220-400 grit)
- Painter’s tape
- Reference photo or sketch of mountains
- Clear wood finish (spray or brush-on varnish)
Step 1: Preparation & Transfer
-
Surface Prep:
Begin by sanding your wood panel thoroughly with fine-grit sandpaper. You want the surface to be buttery smooth; any rough grain will catch your burning tip and disrupt your lines. Wipe away all dust with a tack cloth or clean rag. -
Design Sketch:
Sketch your mountain composition on a piece of paper first. Focus on two main peaks for the background and a varied mid-ground range, leaving the bottom third open for the forest. -
Transfer:
Tape your sketch onto the wood with graphite paper underneath. Trace the main outlines of the mountains, the jagged snow lines, and the general shape of the tree line. Don’t worry about drawing every single tree branch yet.
Step 2: Burning the Mountains
-
Outline the Peaks:
Using a skew or writing nib at a low-to-medium heat setting, gently burn the outline of the mountain peaks. Keep the hand light; these lines define the separation between the sky and the stone. -
Define the Snow Line:
Inside the mountain shape, outline the jagged, irregular paths where the rock meets the snow. The areas you leave unburned (the negative space) will act as the snow caps. -
Shade the Rock Face:
Switch to a shading tip. Start filling in the exposed rock areas of the highest peak. Use a medium heat setting to create a consistent tan-to-brown tone. -
Add Texture:
Layer darker burn strokes over your base shading to mimic rough stone texture. I like to use a stippling or small circular motion here to make the rock look weathered and natural. -
Create Contrast:
Deepen the shading on the shadowed side of the mountain (e.g., the right slope). This contrast against the untouched ‘snow’ wood is what gives the piece its 3D volume. -
Lower Peaks:
Move to the secondary, lower mountain range. Burn these with slightly less intensity than the main peak to suggest atmospheric perspective, pushing them visually behind the foreground.
Grain Direction Matters
Always pull your pen *with* the wood grain when shading the mountain slopes. Burning against the grain creates bumpy resistance and uneven tones.
Step 3: Forest Foreground
-
Distant Trees:
For the furthest layer of trees (right at the mountain base), use a lower heat. Create light, hazy silhouettes that look misty and far away. Just simple vertical strokes with slight jagged edges work perfectly here. -
Mid-Ground Pines:
Turn up the heat slightly. Burn the next row of trees darker. Start defining individual tree shapes: a central trunk line with downward-sloping branches. -
Foreground Giants:
Now for the largest trees on the left and right edges. Crank your pen to a high heat setting. You want a deep, rich black char for these silhouettes. -
Detailing Branches:
Using a fine point or the edge of your shader, draw the specific branches of the foreground pines. Make them dense and jagged. Their darkness will frame the lighter mountains beautifully. -
Fill the Density:
Fill in the bottom edge of the panel completely with dark burns to represent the thick forest floor. Ensure there are no unintentional gaps of light wood showing through the base of the trees.
Add a Moon
Before sealing, dry-brush a tiny amount of diluted white acrylic paint into the sky area or add a faint white moon for a mixed-media artistic pop.
Step 4: Finishing Touches
-
Clean Up:
Once the wood has cooled completely, use an eraser to gently remove any visible graphite lines that weren’t burned over. -
Protect:
Apply a clear finish to seal the wood. A matte or satin spray lacquer works best to preserve the natural look without adding too much distracting glare.
Hang your new mountain scene on the wall and enjoy the rugged, rustic view you’ve created from scratch


Keepsake Box With Wrapped Florals
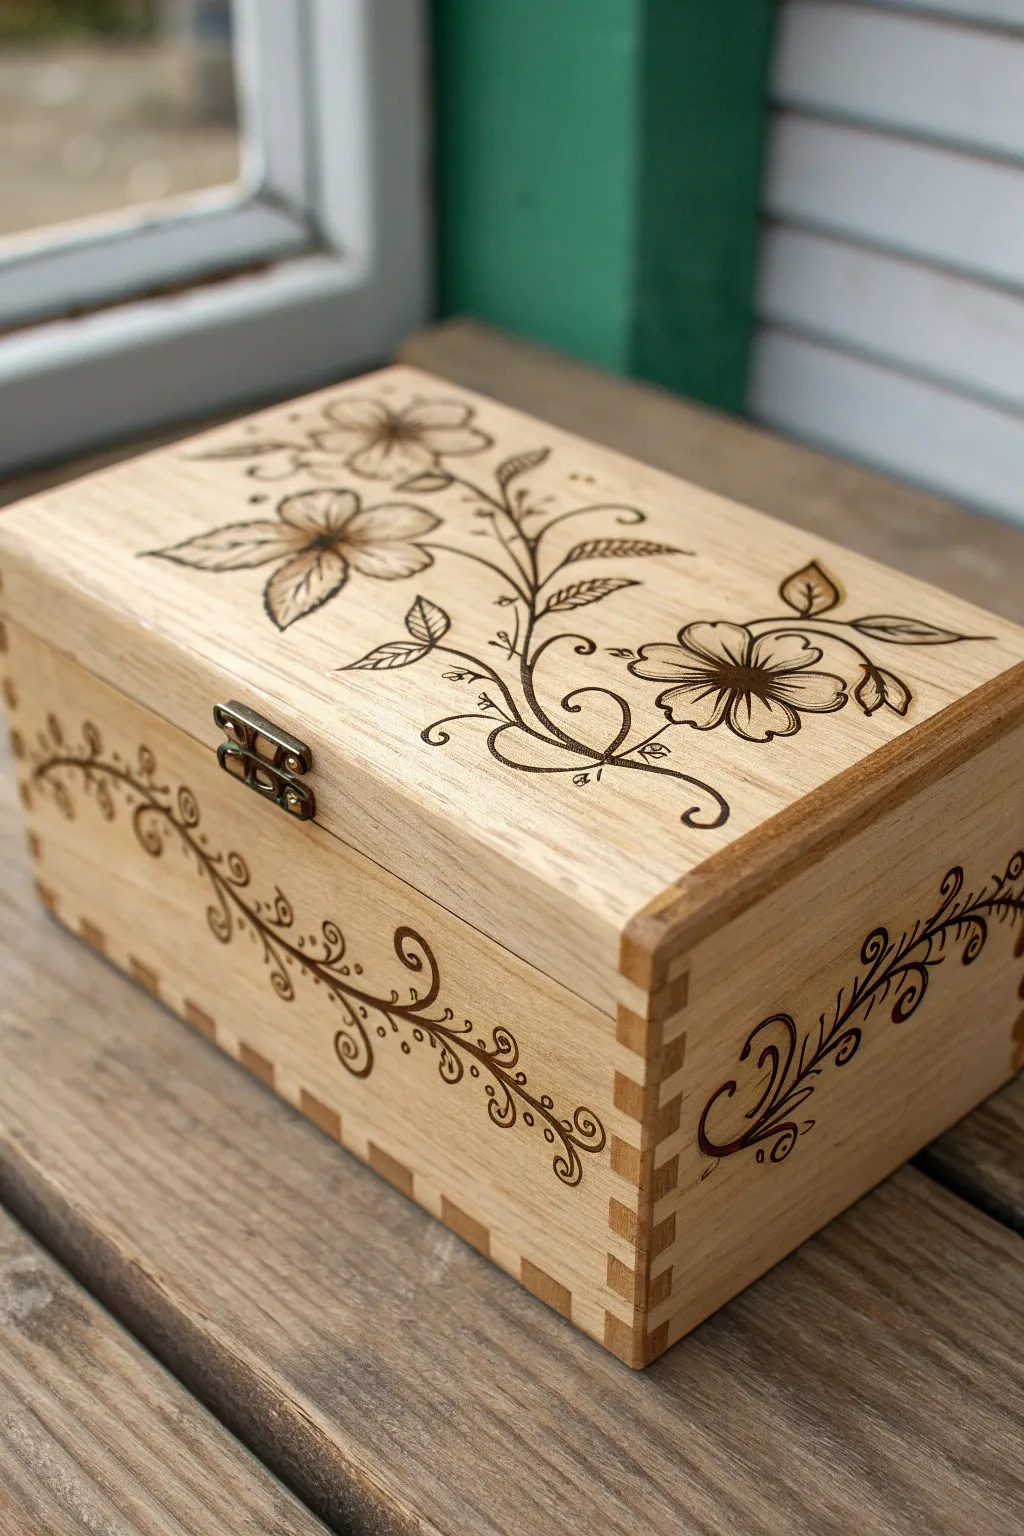
Transform a plain wooden box into a cherished heirloom with this elegant floral pyrography design. The flowing vines wrap seamlessly around the lid and sides, creating a cohesive and organic look that celebrates the natural grain of the wood.
Step-by-Step Guide
Materials
- Unfinished wooden box with clasp (approx. 8x5x4 inches)
- Wood burning tool with multiple nibs (universal, ball point, and shader)
- Fine-grit sandpaper (220 and 400 grit)
- Graphite transfer paper
- Pencil and eraser
- Painter’s tape
- Floral vine pattern (printed or hand-drawn)
- Clear wood finish (polycrylic or tung oil)
- Small brush or clean rag
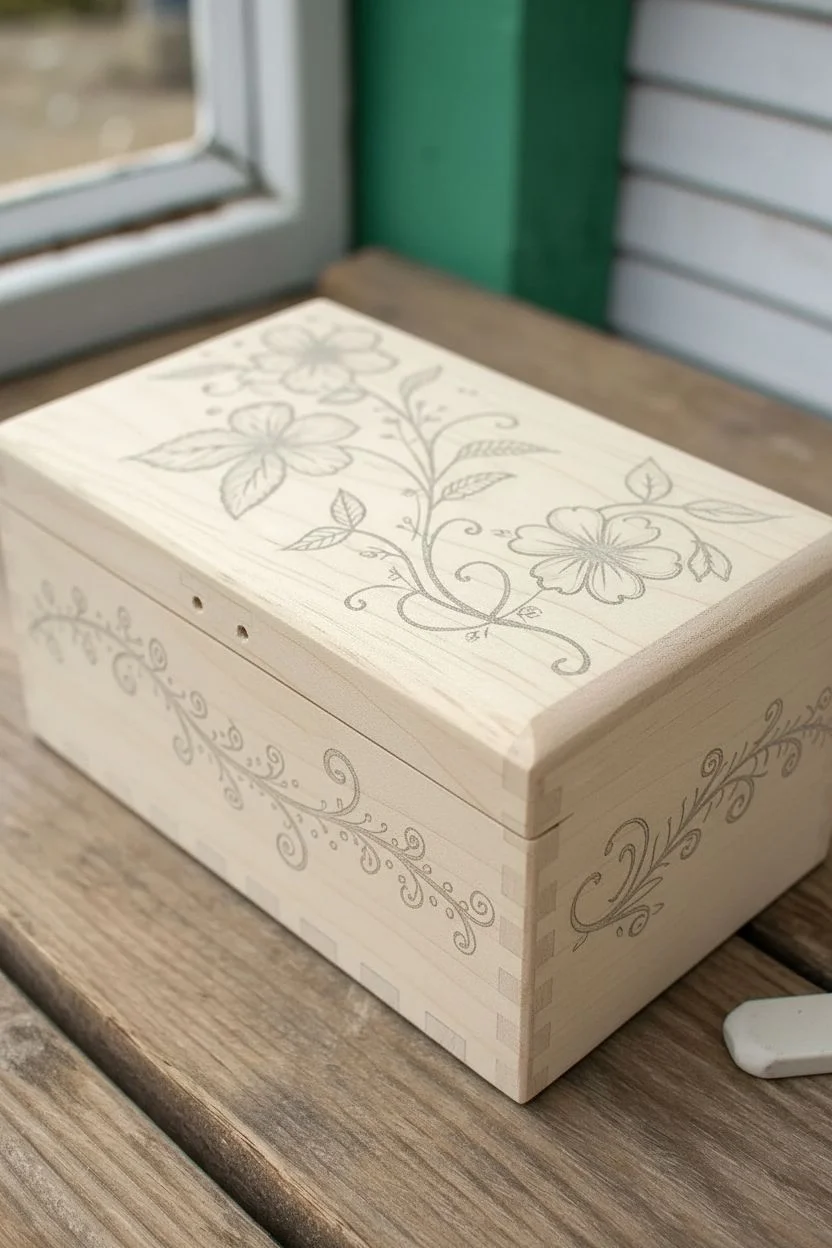
Step 1: Preparation & Design Transfer
-
Sand the surface:
Begin by sanding the entire exterior of the box with 220-grit sandpaper. Wood burning works best on a buttery-smooth surface, so take your time here to remove any factory roughness. -
Remove hardware:
Carefully unscrew and remove the front metal clasp. Store the tiny screws in a safe place or a magnetic dish so they don’t get lost; burning is much easier without hardware in the way. -
Finish sanding:
Give the wood a final pass with 400-grit sandpaper until it feels polished to the touch, then wipe away all dust with a tack cloth or slightly damp rag. -
Position the main design:
Place your main floral vine pattern on the lid. Angle it diagonally so the flowers flow from the bottom right corner toward the top left, filling the space dynamically. -
Transfer the lid pattern:
Slide a sheet of graphite paper under the pattern and tape it down. Trace over your design firmly with a pencil, ensuring you catch every petal, leaf, and vine tendril. -
Map out the borders:
For the front and side panels, sketch or trace a simpler, repeating vine border. I like to draw a light guideline first to ensure the vine stays level as it wraps around the corners.
Burner Heat Check
Test your heat setting on the bottom of the box first. Pine and basswood burn differently, and finding the sweet spot prevents scorching.
Step 2: Burning the Design
-
Outline the lid flowers:
Using a thin universal tip or a fine ballpoint nib on your burner, carefully trace the outlines of the main flowers on the lid. Keep your hand steady and move at a consistent pace to avoid dark burn blobs. -
Outline the vines:
Switch to a slightly thicker setting or press slightly harder to outline the main stems and leaves. The contrast between the delicate flower petals and the sturdy stems adds visual interest. -
Burn the side borders:
Rotate the box and burn the repeating vine pattern on the front and side faces. Be extra careful near the finger joints (the interlocking corners) to ensure the design flows visually even if the wood grain changes. -
Shade the petals:
Change your tip to a shading point (often spoon-shaped). gently shade the inner parts of the flower petals, starting from the center and pulling outward to create depth. Leave the tips of the petals lighter. -
Detail the leaves:
Add small veins to the leaves using a fine point. You can also add light shading to one side of each leaf to make them look like they are catching the light. -
Enhance the centers:
Darken the very center of the flowers significantly. Stippling (creating many small dots) is a great technique here to create a pollen-like texture. -
Clean up stray marks:
Once the burning is complete and the wood has cooled, use a clean eraser to gently remove any remaining graphite lines.
Add Watercolor
After burning but before sealing, use watercolor pencils to tint the flower petals soft pink or yellow for a vintage tinted look.
Step 3: Finishing Touches
-
Final light sand:
Very lightly run the 400-grit sandpaper over the burnt areas. This removes any raised carbon from the burning process without erasing your hard work. -
Apply the finish:
Apply a coat of clear polycrylic or tung oil using a brush or rag. This will seal the wood and make the burn marks pop with a rich, dark contrast. -
Let it cure:
Allow the first coat to dry completely according to the manufacturer’s instructions. If the grain raises, sand lightly and add a second coat for extra protection. -
Reattach hardware:
Screw the metal clasp back into its original holes on the front of the box.
Now you have a beautifully personalized box ready to hold your most precious keepsakes
BRUSH GUIDE
The Right Brush for Every Stroke
From clean lines to bold texture — master brush choice, stroke control, and essential techniques.
Explore the Full Guide
Set of Mini Charms for Technique Practice
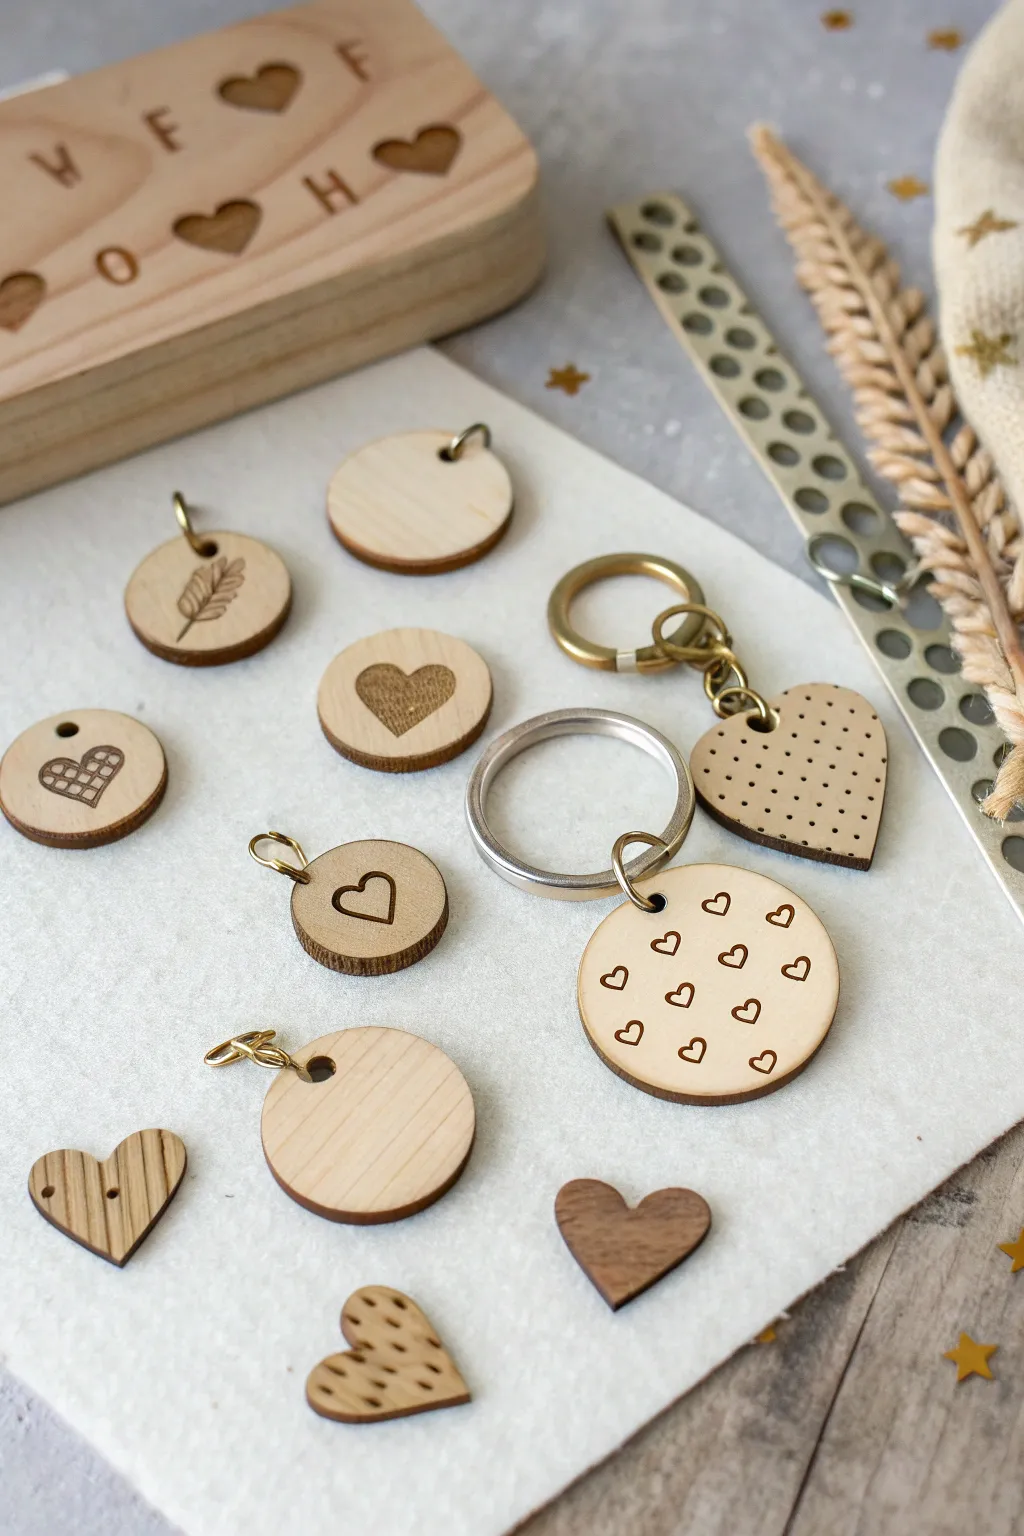

Experiment with different textures and tiny details on this delightful set of wooden charms and keychains. This project is a fantastic low-pressure way to practice your pyrography skills on small surfaces while creating functional accessories.
Step-by-Step
Materials
- Small pre-cut wooden shapes (circles and hearts)
- Wood burning tool with interchangeable nibs (universal, shading, and ball points)
- Fine-grit sandpaper (220 grit or higher)
- Pencil and eraser
- Metal jump rings (gold or brass finish)
- Keychain hardware (split rings and clasps)
- Needle-nose jewelry pliers
- Carbon paper (optional)
- Small drill with fine bit (if wood pieces aren’t pre-drilled)
Step 1: Preparation and Design
-
Select your canvas:
Gather a variety of small wooden blanks. The image uses simple circles and hearts, which are perfect for beginners because the grain is usually straightforward. -
Sand the surface:
Before heating your tool, sand each wooden piece thoroughly with fine-grit sandpaper. A super-smooth surface ensures your pen glides easily without catching on grain lines. -
Plan the leaf design:
Take one circular charm and lightly sketch a simple wheat stalk or fern leaf in the center. Keep the lines minimal as guideposts. -
Sketch the geometric heart:
On another circle, draw a heart shape. Inside the heart, sketch a grid pattern to prepare for the texture practice. -
Draw the outline heart:
For a minimalist look, sketch a small, slightly off-center heart on a third circle. This will test your ability to make clean, continuous curves.
Step 2: Burning the Charms
-
Burn the wheat stalk:
Using a universal or thin liner nib, burn the central stem of your leaf design first. Use quick, gentle strokes pulling away from the stem to create the feathery leaves. -
Create the grid texture:
Switch to a fine point tip. Outline the heart shape first, then carefully burn the cross-hatching inside. Keep your pressure light to avoid creating deep craters where the lines intersect. -
Shade the solid heart:
On a fresh circle, outline a heart shape. Switch to a shading point (or turn your universal tip flat) and fill the interior with overlapping circular motions for a solid, darkened effect. -
Execute the minimalist outline:
Using your finest tip on a low heat setting, trace your simple heart outline. Move your hand at a steady pace to prevent blotches at the start and stop points. -
Burn the repeating pattern:
For the large keychain circle, pencil in a grid of tiny hearts. Burn each one carefully with a fine tip, rotating the wood piece as needed so you are always pulling the pen toward you comfortably.
Uneven Lines?
If your pen sinks into the wood grain creating bumpy lines, your heat might be too high or your hand too heavy. Lower the temperature and glide over the surface rather than pressing into it.
Step 3: Detailed Keychain Assembly
-
Stipple the heart keychain:
Take a large wooden heart shape. Instead of drawing lines, use a ball tip or a blunt point to burn a grid of dots. Press straight down and lift straight up for crisp, round dots. -
Clean up the wood:
Once all burning is complete and the wood has cooled, gently erase any visible pencil marks. I like to do a very light pass with worn sandpaper to remove graphite smudges without fading the burn. -
Drill the holes:
If your wooden blanks didn’t come with holes, use a small drill bit to create an opening near the top edge of each charm. -
Open the jump rings:
Using two pairs of pliers, twist your metal jump rings open sideways (never pull them apart outward) to preserve their circular shape. -
Attach the hardware:
Thread the open jump ring through the hole in your wooden charm. Before closing it, hook on your larger keychain ring or clasp. -
Final closure:
Twist the jump ring back into a closed position using your pliers, ensuring the two ends meet perfectly flush so the wood doesn’t slip out.
Add a Splash of Color
After burning, use watercolor pencils or diluted acrylic paint to tint specific areas, like the inside of the hearts, before sealing with a clear matte varnish.
You now have a charming collection of accessories that showcase your growing variety of pyrography techniques
Seasonal Ornaments You Can Batch Make
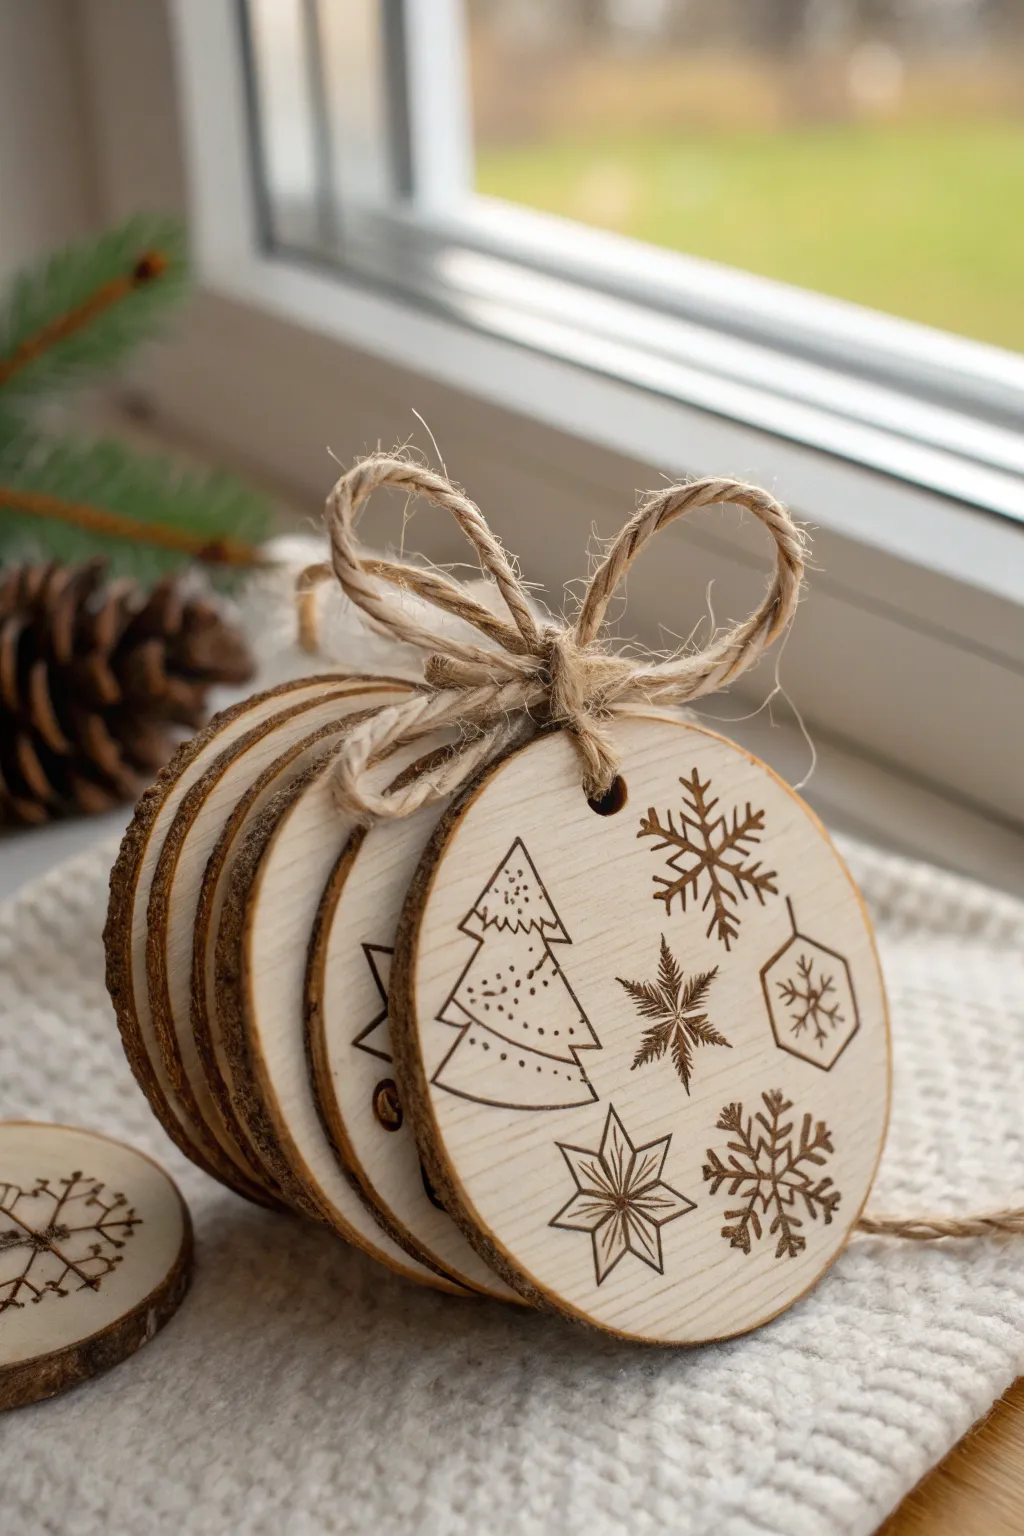
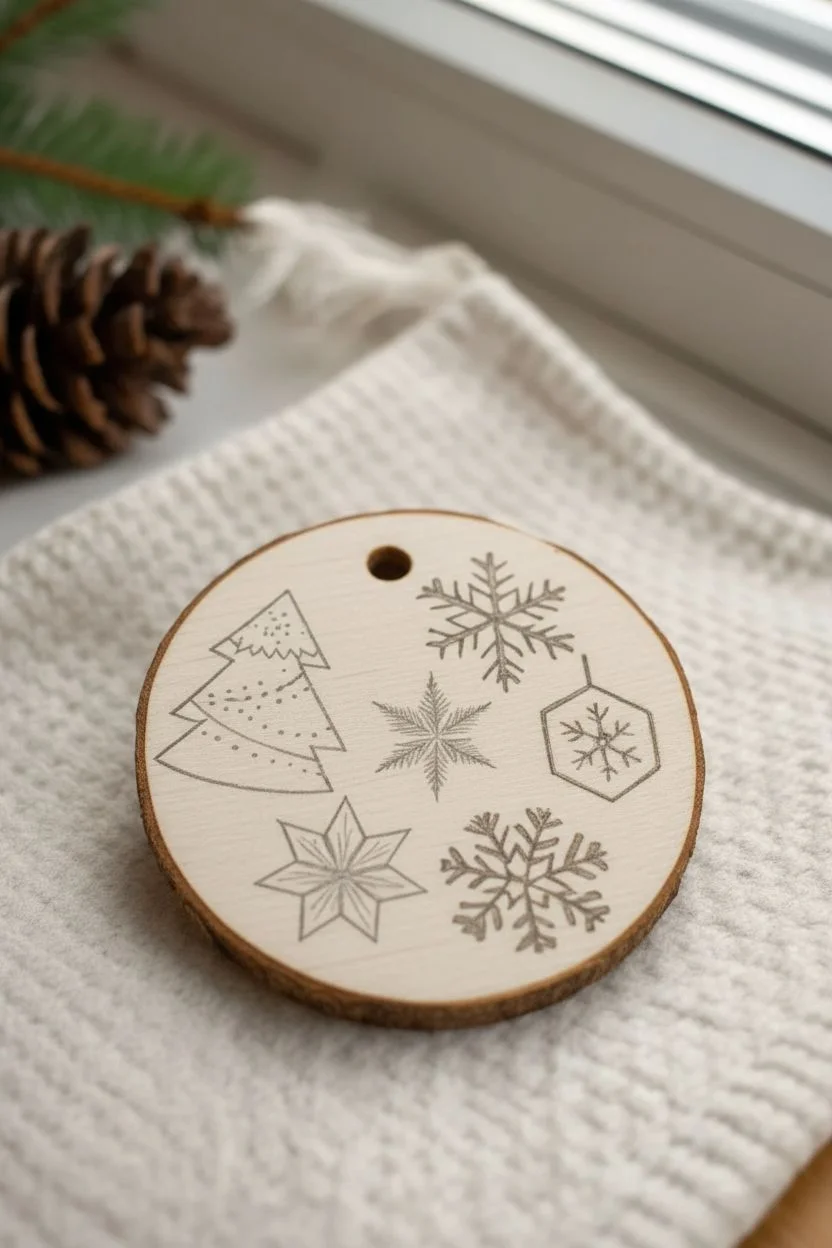
These charming rustic ornaments feature delicate winter motifs burned onto natural wood slices, creating a cozy and festive aesthetic. Perfect for batch-making, the designs combine classic snowflakes, geometric stars, and simple pines for a varied but cohesive set.
How-To Guide
Materials
- Pre-cut round wood slices with bark edge (approx. 3-4 inch diameter)
- Wood burning tool (pyrography pen) with fine point and shader tips
- Pencil for sketching
- Sandpaper (220 grit or finer)
- Natural jute twine
- Drill with small bit (if slices aren’t pre-drilled)
- Small printed winter icons (optional, for tracing)
- Carbon paper (optional)
Step 1: Preparation & Design
-
Surface Prep:
Begin by lightly sanding the smooth face of each wood slice. You want the surface as smooth as possible so your burning tip glides effortlessly without snagging on grain. -
Clean Up:
Wipe away any sawdust with a dry cloth or tack cloth. Dust particles can carbonize under the heat and create unwanted specks in your design. -
Drill Holes:
If your wood slices didn’t come with holes, carefully drill a small hole near the top edge of each slice, centered within the bark ring. -
Sketch the Layout:
Lightly sketch your designs onto the wood using a pencil. For the focal ornament shown, draw a stylized Christmas tree on the left, a large eight-pointed star at the bottom center, and scatter 2-3 different snowflake variations across the right side. -
Refine Details:
Add small internal details to your sketch, like the zigzag garland on the tree or the hexagon shape enclosing one of the snowflakes.
Step 2: Burning the Motifs
-
Outline the Tree:
Using a fine rounded tip or distinct writing tip on your wood burner, trace the outer triangle tiers of the Christmas tree with a steady, medium-pressure stroke. -
Add Tree Details:
Switch to a slightly lower heat setting if needed and stipple small dots inside the tree tiers to represent texture or snow. Burn the small zigzag lines separating the sections. -
Burn the Snowflakes:
Move on to the snowflakes. Start with the central cross bars of each flake using straight, confident lines. Don’t worry if they aren’t mechanically perfect; the hand-drawn look adds charm. -
Snowflake Details:
Add the ‘V’ shapes or small branches to the ends of the snowflake arms. For the geometric flake, burn the hexagon outline first, then fill the interior with the star pattern. -
Burn the Star:
For the eight-pointed star at the bottom, outline the main star shape first. Then, draw lines from the center to the tip of each point to give it a faceted, 3D appearance. -
Erase Guidelines:
Once the wood has cooled completely, use a high-quality eraser to gently remove any visible pencil lines. Be careful not to smudge graphitic dust into the wood grain.
Clean Lines Tip
To get crisp lines on soft wood, pull the pen toward you rather than pushing it away. This prevents the tip from digging into the grain and creating uneven burns.
Step 3: Assembly & Finishing
-
Repeat for Batching:
Since this is a batch project, repeat the burning process for 4-5 other wood slices. You can vary the patterns on these slightly, perhaps featuring just a large flake or a single tree on the ones that will be stacked underneath. -
Stacking:
Align your finished ornaments in a neat stack, placing your most detailed or favorite design on top. -
Cut the Twine:
Cut a long length of jute twine, approximately 24 inches. This needs to be long enough to go through all the slices and tie a generous bow. -
The Threading Trick:
Thread the twine through the hole of the bottom slice first, then the next, working your way up to the top slice. This keeps the stack orderly. -
Secure the Bundle:
Tie a simple overhand knot tightly against the top slice to hold the stack together firmly. -
Create the Bow:
Tie a classic shoelace bow with the remaining twine ends. Pull the loops out wide and fluffy as shown in the image to balance the rustic look. -
Final Trim:
Trim the tails of the bow so they drape nicely over the top ornament without obscuring the artwork.
Add Some sparkle
After burning, use a white gel pen or a tiny dot of white acrylic paint in the center of the snowflakes to make the design pop against the raw wood.
Now you have a beautiful set of rustic ornaments ready to hang or gift as a thoughtful handmade bundle

PENCIL GUIDE
Understanding Pencil Grades from H to B
From first sketch to finished drawing — learn pencil grades, line control, and shading techniques.
Explore the Full Guide
Burned Clock Face With Minimal Markers
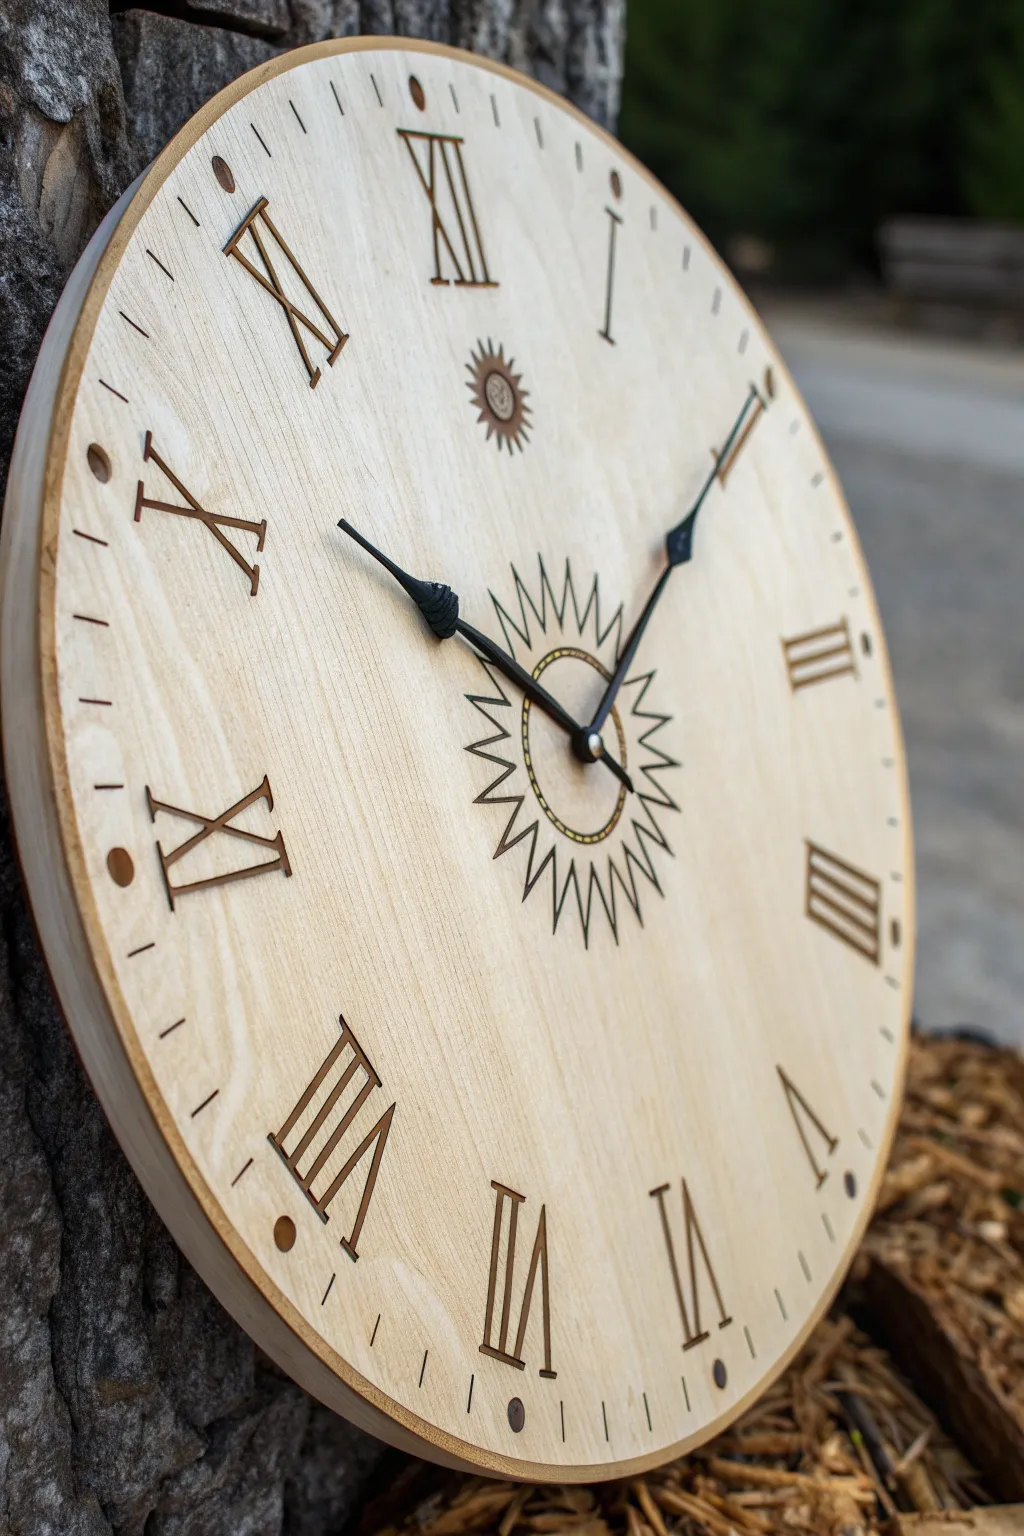
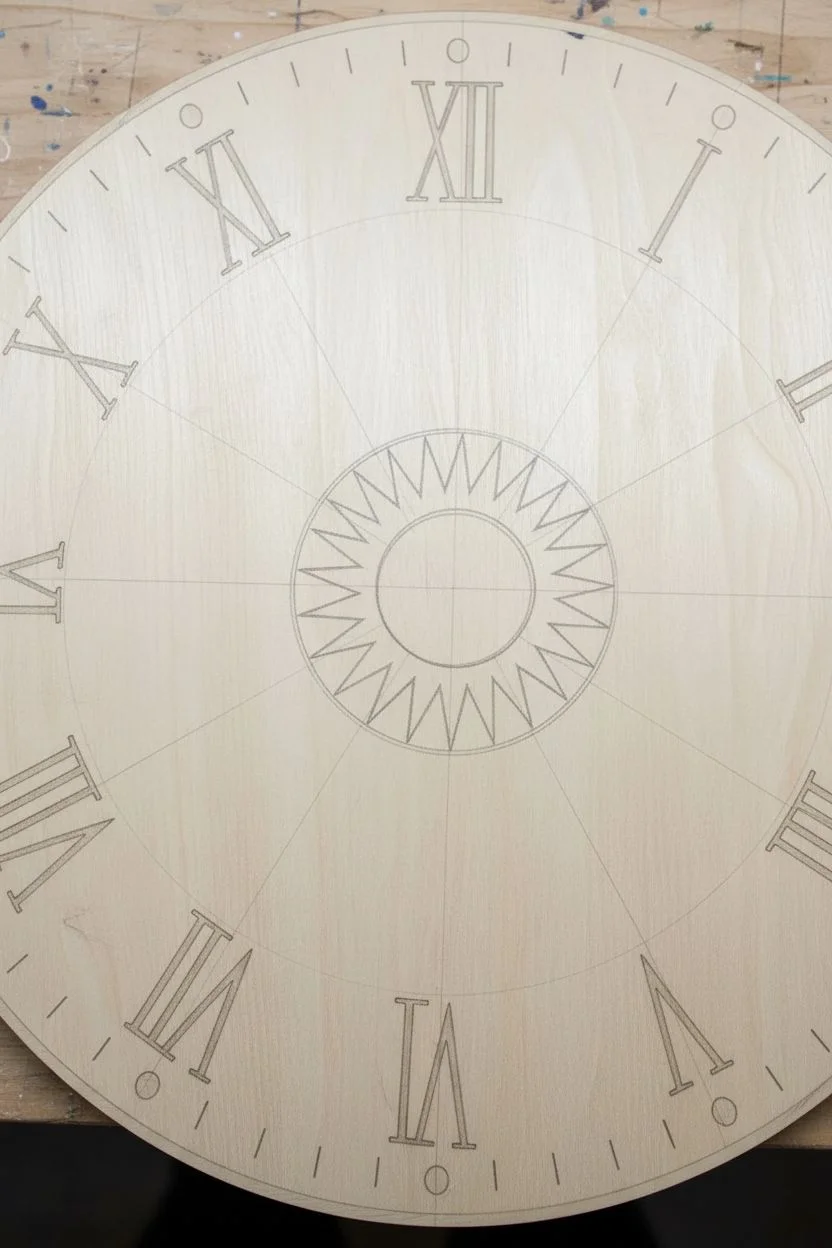
This elegant clock combines the classic charm of Roman numerals with a striking central sunburst motif. The varying line weights and subtle textures create a sophisticated piece that looks fantastic mounted on a wall or propped on a shelf.
Step-by-Step
Materials
- Round wooden clock face (birch or plywood)
- Pyrography pen with shading and writing tips
- Pencil and eraser
- Ruler and compass
- Clock mechanism kit with black hands
- Carbon paper (optional)
- Fine-grit sandpaper (220 grit)
- Drafting tape
- Wood finish (clear spray sealant or oil)
Step 1: Planning and Layout
-
Prepare the Surface:
Before heating your pen, ensure the wood round is perfectly smooth. Sand the entire surface with 220-grit sandpaper, moving with the grain, then wipe away all dust with a tack cloth or clean rag. -
Establish the Center:
Locate the exact center of your wood round. If your blank didn’t come with a pre-drilled hole, measure and mark the center point carefully for later drilling. -
Draw Guidelines:
Using a compass, lightly draw two concentric circles: one large outer circle where the numerals will sit, and a smaller inner circle for the sunburst design. I also suggest drawing very faint radial lines to serve as guides for the twelve hour positions. -
Sketch the Numerals:
Lightly sketch the Roman numerals (I through XII) around the perimeter. Keep the taller numerals (X, XI, XII) consistent in height. For accuracy, you can print a template and transfer it using carbon paper.
Steady Hands
For straight numeral lines, use a metal ruler as a guide for your burning tip, but be careful not to touch the hot tip to the metal for too long to avoid heat sink issues.
Step 2: Burning the Details
-
Outline the Outer Numbers:
Equip your pyrography pen with a writing tip or fine point. Set the heat to a medium setting and carefully burn the outlines of each Roman numeral. Keep your hand steady and maintain a consistent speed to ensure even line thickness. -
Shade the Numerals:
Switch to a shading tip. Instead of filling the Roman numerals with solid black, create a textured look by burning lines or a light stipple pattern inside the outlines. This adds depth without overwhelming the design. -
Create the Minute Markers:
Between the large numerals, mark the minute increments. Use a simple straight line for the small dashes and create solid, dark circles for the 5-minute intervals using a ball tip or a high-heat stamp. -
Outline the Sunburst:
Move to the center. Outline the central circle that surrounds the spindle hole. Then, draw the triangular rays extending outward. Notice in the example how the rays are thin spikes; replicate this by pulling your stroke away from the center ring. -
Inner Detail Work:
Add the decorative ring inside the sunburst using a small pattern brush or fine detailing tip. A series of tiny dots or small hash marks creates the ‘stitched’ look seen in the reference image. -
Add Secondary Star:
If desired, burn a small secondary star or logo near the top (under the XII position) to balance the visual weight of the clock face. This mimics the branding often seen on vintage timepieces.
Add Color
Before sealing, use watercolor pencils or diluted acrylics to add faint washes of color to the sunburst rays or the interior of the numerals for a subtle pop.
Step 3: Assembly and Finishing
-
Erase Guidelines:
Once the wood has cooled completely, take a high-quality eraser and gently remove any remaining pencil or carbon lines. Be careful not to smudge any ash. -
Drill the Center:
If your clock face isn’t pre-drilled, select a drill bit that matches the shaft diameter of your clock mechanism. Drill straight through the center mark you established earlier. -
Seal the Wood:
Protect your artwork with a clear finish. A spray sealant works best to avoid smearing the burn marks, though a carefully applied wood oil can deepen the color nicely. Let it dry according to the manufacturer’s instructions. -
Install the Mechanism:
Insert the clock movement through the back of the wood piece. Secure it with the washer and nut provided in your kit. -
Attach the Hands:
Press the hour hand onto the shaft first, followed by the minute hand, and finally the second hand or cap nut. Ensure they are parallel so they don’t catch on each other as they rotate.
Now you have a timeless, handcrafted clock ready to track the hours in style


Have a question or want to share your own experience? I'd love to hear from you in the comments below!