Collaborative murals are my favorite kind of big art because everyone gets to leave a real mark without feeling pressured to “carry” the whole wall. With the right structure, a group of totally different styles can click together into one cohesive, gorgeous piece.
Grid Of Painted Tiles
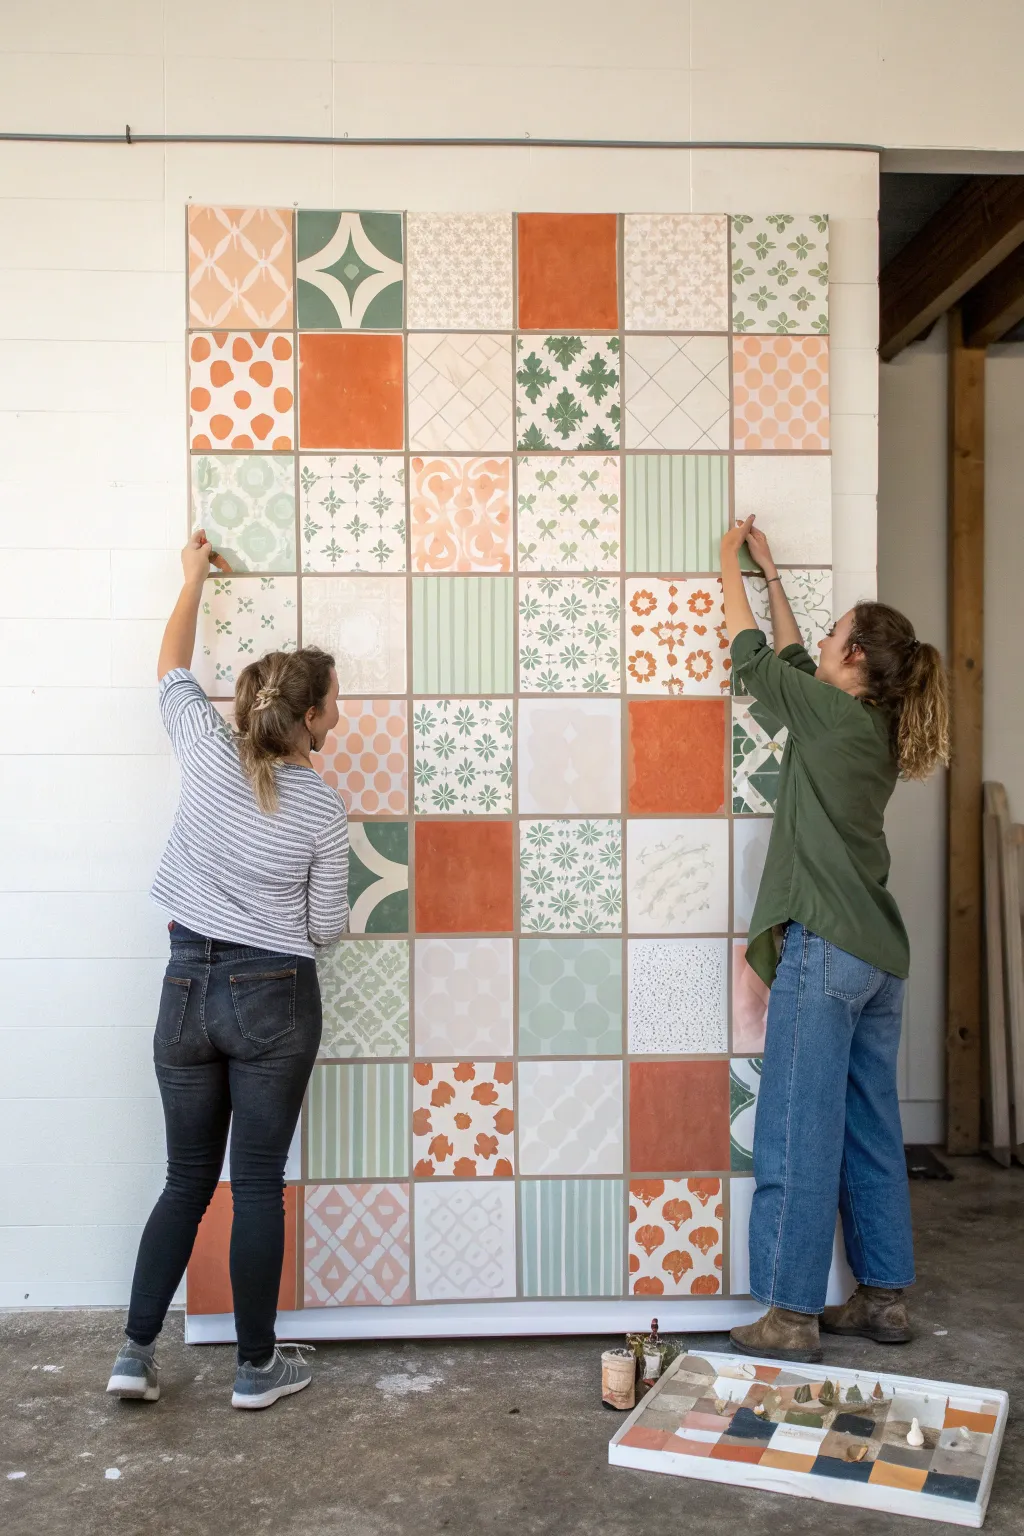
Transform a blank wall into a stunning mosaic of creativity with this grid-based mural project. Featuring an array of earthy tones and intricate patterns, this cohesive yet diverse installation allows multiple artists to contribute individual squares to a unified whole.
Detailed Instructions
Materials
- Square tiles (ceramic bisque or 6×6 inch MDF panels)
- Acrylic paints (terracotta, sage green, cream, white)
- Assorted paintbrushes (flat brushes for backgrounds, fine liners for details)
- Stencils (geometric, floral, abstract)
- Pencil and eraser
- Painter’s tape
- Ruler or T-square
- Mounting adhesive or tile grout (depending on base material)
- Clear matte sealant or varnish
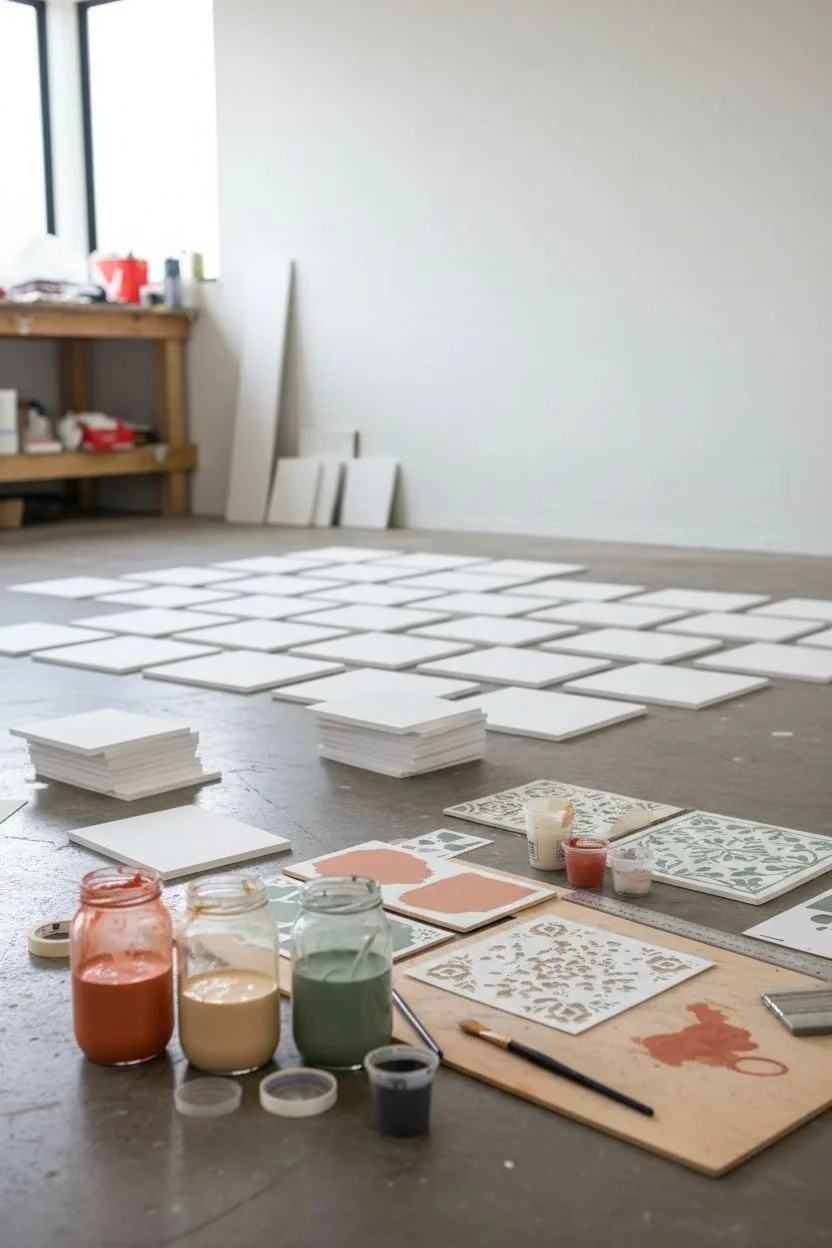
Step 1: Planning and Preparation
-
Define the grid:
Before touching a brush, determine the total size of your mural. Measure your wall space and decide on a grid layout—for example, 6 tiles wide by 9 tiles high as seen here. Calculate exactly how many square panels you will need. -
Select a color palette:
To ensure the final piece looks cohesive despite having many different patterns, limit your color choices. Stick to a specific family of colors like terracotta, sage green, dusty pink, and cream. Pre-mix these shades in larger batches so everyone uses the exact same tones. -
Distribute panels:
Hand out the blank square panels to your collaborators. If you are using MDF or wood, ensure they are primed white first to help the colors pop.
Step 2: Painting the Tiles
-
Draft the designs:
Encourage each participant to sketch their design lightly in pencil first. Aim for a mix of styles: some solid blocks of color, some with geometric stripes using painter’s tape, and others with organic floral or leaf motifs. -
Paint base layers:
Start by painting the background colors. For pattern-heavy tiles, a solid cream or white background works best. For simpler tiles, block in the entire square with terracotta or green. -
Apply stencils:
For repeated geometric patterns, like the quatrefoils or starbursts, secure a stencil over the dry base layer. Use a stenciling brush with very little paint (a dry brush technique) to dab color on, preventing bleed-under. -
Add hand-painted details:
Using a fine liner brush, add delicate details like the veins on leaves or thin grid lines. I find that freehanding these organic shapes adds a lovely human touch that contrasts well with the rigid stenciled patterns. -
Create variation:
Ensure variety by painting some tiles with negative space designs—painting the background around a shape rather than the shape itself. Include a few ‘quiet’ tiles that are just simple stripes or solids to give the eye a place to rest. -
Dry and seal:
Allow all tiles to dry completely for at least 24 hours. Once dry, apply a coat of clear matte sealant or varnish to protect the paint and unify the finish across all tiles.
Pattern Balance Pro-Tip
Aim for a ratio of 30% solid colors, 40% simple geometric patterns (stripes/grids), and 30% complex organic patterns (florals) to keep the mural from feeling chaotic.
Step 3: Installation
-
Prepare the surface:
Clean the wall area where the mural will be installed. If you are mounting onto a portable backboard instead of directly on a wall, lay that board flat on the floor first. -
Dry layout:
Arrange all the finished tiles on the floor to find the best composition. Move them around until you balance the colors and patterns—try not to cluster all the orange tiles or all the busy patterns in one spot. -
Mark vertical guides:
Using a level and a pencil, draw a vertical line on the wall to act as a guide for your first column of tiles. This ensures your entire grid stays straight as you build upwards. -
Install the first row:
Apply your mounting adhesive (such as heavy-duty double-sided mounting tape or construction adhesive) to the back of the bottom-center tile. Press it firmly into place. Continue installing the bottom row first, using a level to check alignment frequently. -
Build the grid:
Work your way up the wall, row by row. Use tile spacers if you want a gap between them, or butt them tightly together for a seamless look. Step back periodically to ensure the rows aren’t drifting. -
Final touches:
Once all tiles are secured, gently erase any visible pencil guide lines on the wall. If you used real ceramic tiles and spacers, now is the time to apply grout; otherwise, simply wipe down the surface with a dry cloth.
Level Up: Texture
Mix a little baking soda or fine sand into your terracotta paint for the solid tiles. This adds a gritty, realistic clay texture that contrasts beautifully with the smooth patterned tiles.
Step back and admire how individual expressions of creativity have come together to form a warm and inviting feature wall


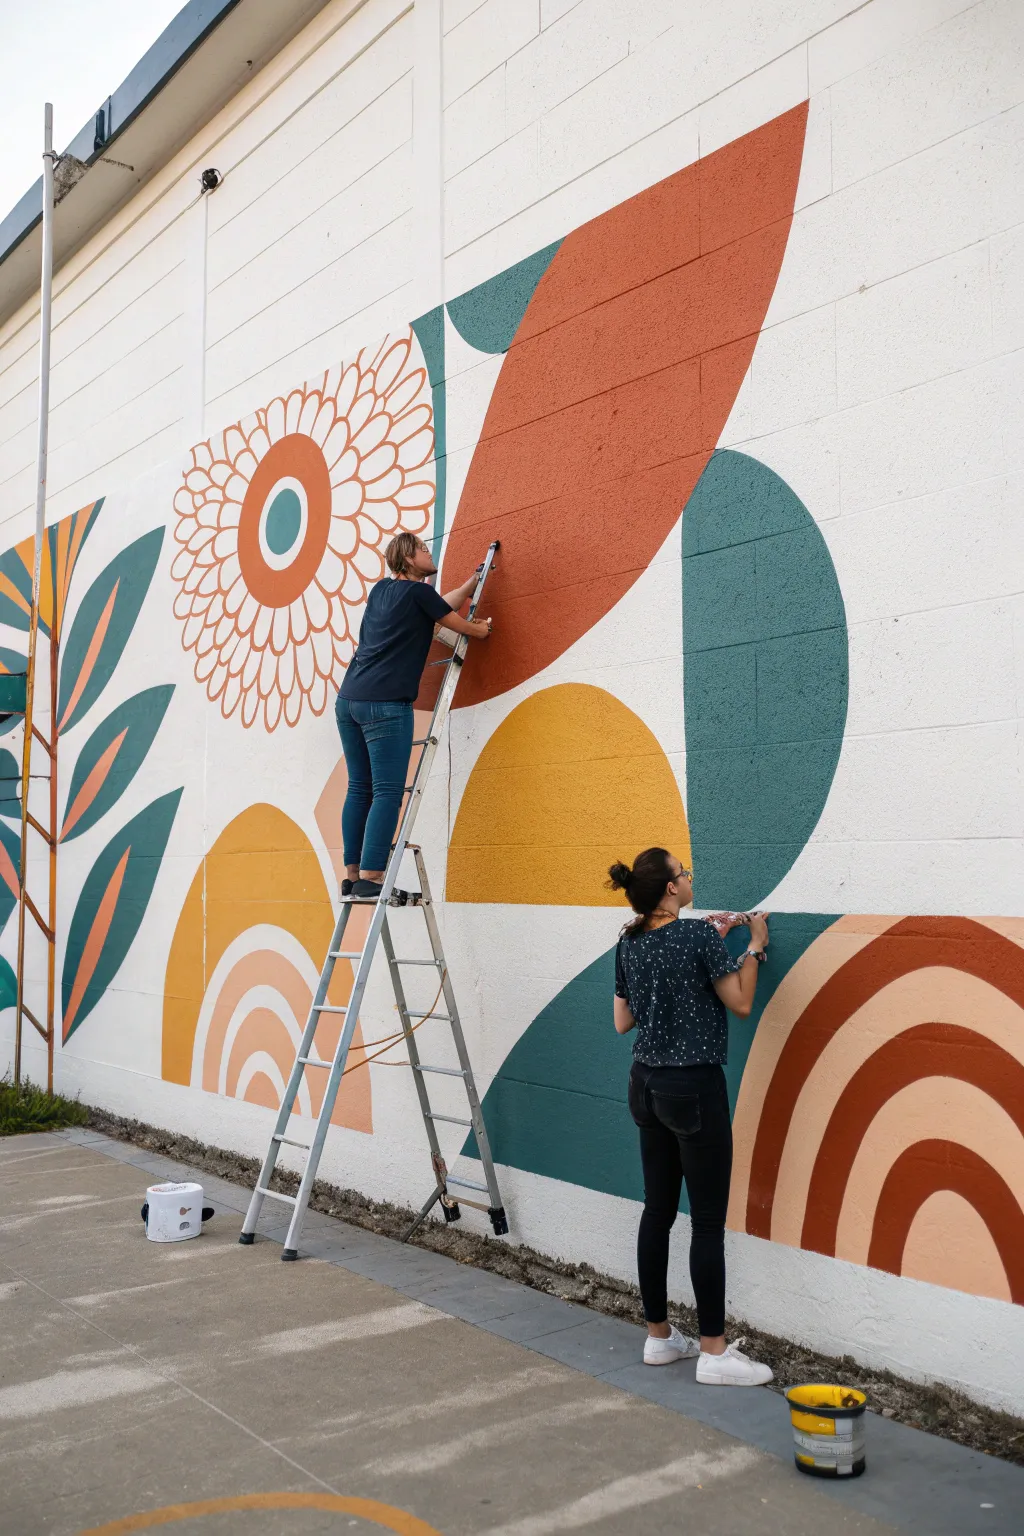
One Giant Outline, Many Fill Styles
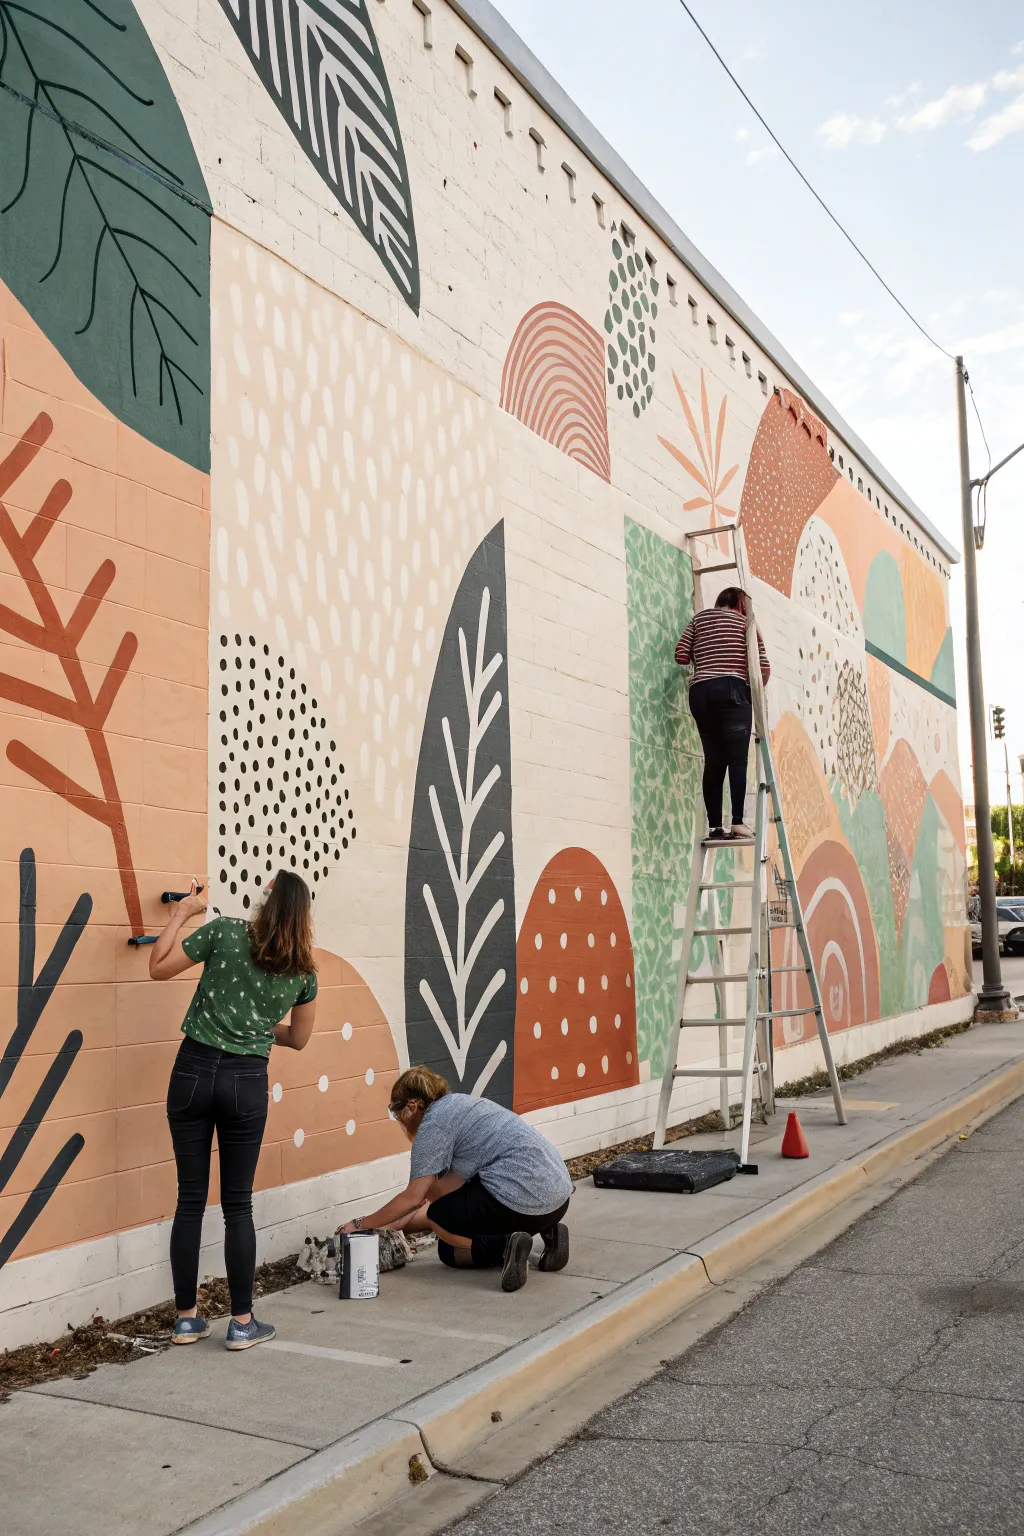
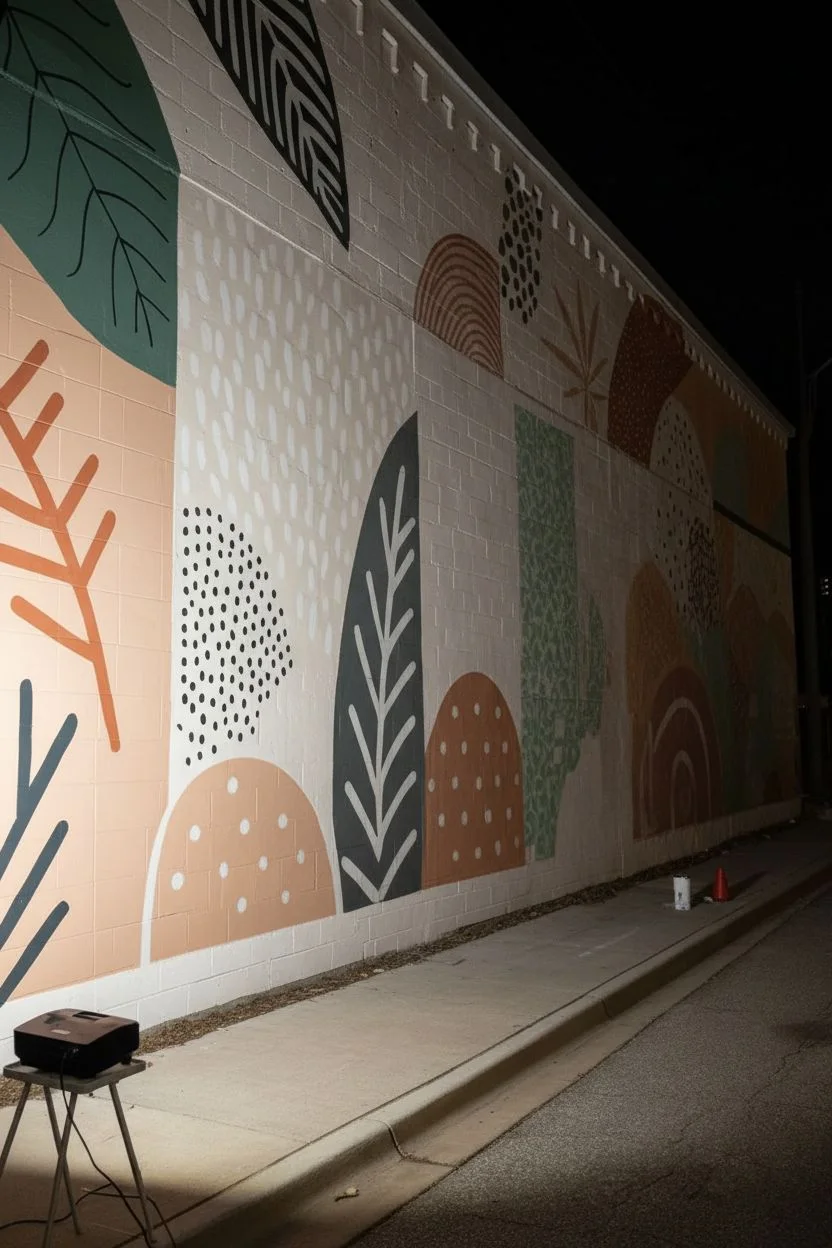
Transform a plain exterior wall into a vibrant community canvas using earthy tones and organic shapes. This collaborative mural style relies on a cohesive color palette and a clever ‘paint-by-number’ approach where different volunteers can fill distinctive shapes with their own unique patterns.
Step-by-Step Tutorial
Materials
- Exterior acrylic latex paint (eggshell or satin finish)
- Primary colors: Terracotta, sage green, cream, peach, mustard, charcoal grey
- Paint rollers (9-inch for large areas, 4-inch for details)
- Extension poles for rollers
- Assorted paintbrushes (angled sash brushes for cutting in)
- Small craft brushes for pattern details
- Chalk or charcoal stick for sketching
- Primer (masonry specific)
- Painters tape
- Ladders
- Drop cloths
- Paint trays and liners
- Projector (optional but recommended)
Step 1: Planning and Prep
-
Design your composition:
Create a digital or paper mock-up featuring large, overlapping organic shapes like leaves, arches, and hills. Focus on balancing solid colored blocks with areas intended for pattern work. -
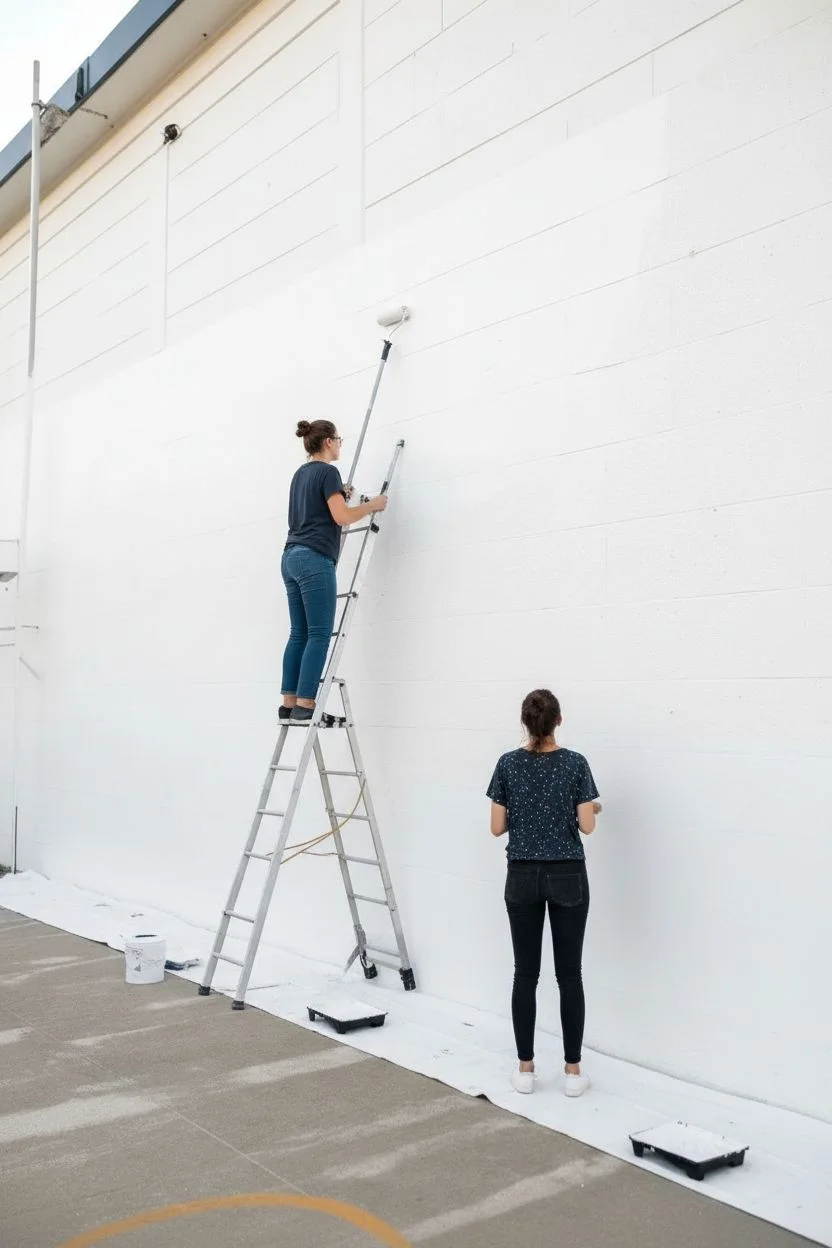
Prepare the surface:
Power wash the brick wall to remove dirt and loose debris. Allow it to dry completely for at least 24 hours before applying any product. -
Prime the canvas:
Roll a solid coat of masonry primer over the entire working area. This ensures your colors pop and the paint adheres properly to the porous brick. -
Transfer the outline:
Wait for nightfall and use a projector to cast your design onto the wall. Trace the outlines of your major shapes using chalk or a charcoal stick. -
Code the sections:
Mark each shape with a small letter or number corresponding to a specific paint color bucket so volunteers know exactly which hue goes where.
Clean Lines on Brick
Brick texture makes straight lines tricky. Dab—don’t wipe—paint into the grout lines first to seal the edge, then paint the full line to prevent bleeding.
Step 2: Blocking in Color
-
Cut in the edges:
Use angled sash brushes to carefully paint the outline of a specific shape. This creates a barrier for the roller and keeps edges crisp. -
Roll the large fills:
Using a 9-inch roller, fill in the center of the large shapes like the background arches and oversized leaves. You will likely need two coats for full opacity. -
Create distinct zones:
Ensure adjacent shapes are painted different colors to maintain visual separation. If two wet colors touch, they might bleed, so work on non-touching sections first. -
Let the base coats dry:
Allow the solid blocks of color to dry completely before adding any decorative layers on top. This usually takes 2-4 hours depending on humidity.
Step 3: Adding Patterns & Details
-
Plan your patterns:
Decide which shapes will receive texture. Aim for variety: polka dots on a cream shape, thin stripes on a terracotta arch, or dashes on a peach blob. -
Paint freehand dots:
For the polka-dot sections, use a small round brush. Dip it in contrasting paint (like charcoal on cream) and press firmly against the wall, twisting slightly to create a messy, organic circle. -
Create dash textures:
On the lighter peach sections, paint vertical dashes using white or cream paint to mimic rain or grass texture. Keep the spacing roughly consistent but not perfect. -
Add botanical lines:
Use a darker color (charcoal or deep green) to paint the veins on the large leaf shapes. Use a thin liner brush for sharp, tapering ends. -
Stipple the foliage:
For textured green areas, use a dry brush technique or a sponge to dab lighter green highlights over a darker base, giving the impression of dense leaves. -
Overlay distinct leaves:
Paint crisp, solid-colored botanical silhouettes, like fern fronds or branches, directly over dried background shapes to add depth and layering.
Use Stencils
Cut cardboard stencils for repetitive shapes like arches or large leaves. It speeds up the outlining process and helps maintain consistent sizing across the wall.
Step back and admire how the different patterns and colors come together to create a unified masterpiece


Handprint Canopy Tree Wall

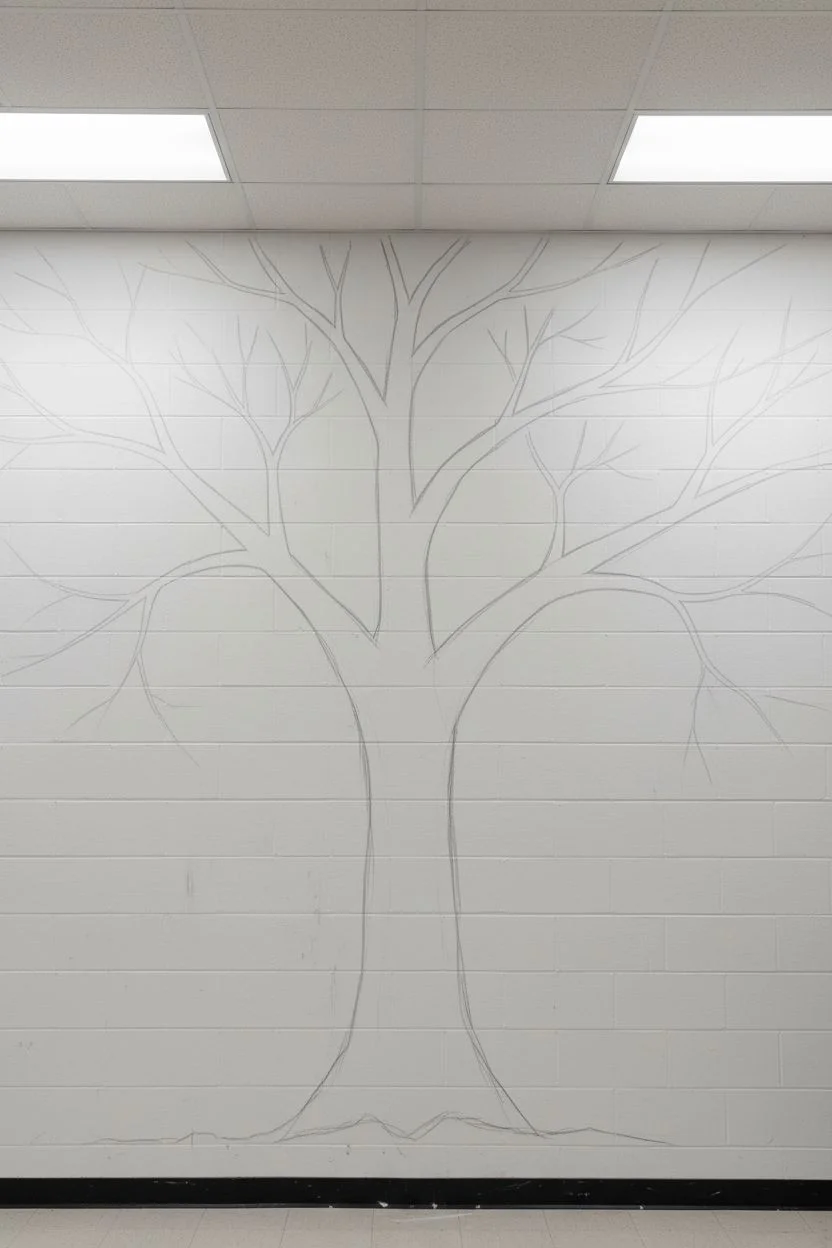
Transform a blank cinder block wall into a symbol of community and growth with this vibrant painted tree. Featuring a sturdy, grounding trunk and a canopy bursting with hand-stamped ‘leaves’, this collaborative mural allows contributors to literally leave their mark on the space.
How-To Guide
Materials
- Cinder block wall (cleaned and primed)
- Brown acrylic latex paint (interior/mid-sheen)
- Green acrylic latex paint (2-3 shades: dark, medium, light)
- Accent acrylic latex paints (yellow, red, orange)
- Wide paintbrushes (3-4 inch) for the trunk
- Smaller flat brushes (1 inch) for branches
- Leaf-shaped large rubber stamps
- Ink pads or foam rollers for paint application
- Painter’s tape
- Drop cloths
- Chalk or pencil for sketching
- Step stool or small ladder
- Paper plates (for paint palettes)
- Cleaning wipes for hands
Step 1: Planning and Sketching
-
Clean the Surface:
Begin by thoroughly wiping down the cinder block wall to remove any dust or grime. If the wall hasn’t been painted recently, a coat of white primer provides the best base for bright colors. -
Outline the Trunk:
Using a light pencil or chalk, sketch the basic outline of your tree trunk. Start wide at the base, flaring it out slightly like roots entering the ground, and narrow it as you reach eye level. -
Branch Out:
Extend your sketch upwards, dividing the trunk into two or three main large limbs. From there, sketch smaller secondary branches reaching out towards the top corners of your mural space. -
Review Proportion:
Step back and look at your outline from a distance. The trunk should feel substantial enough to support the canopy, occupying roughly the central third of the wall’s width at the bottom.
Clean Stamp Trick
Instead of dipping stamps directly into puddles of paint, use a small foam roller to apply a thin, even layer of paint to the stamp face. This prevents globs and drips.
Step 2: Painting the Structure
-
Fill the Trunk:
Load a wide brush with your brown latex paint. working from the bottom up, fill in the sketched trunk area. The texture of the cinder blocks requires a bit of pressure to get paint into the grooves. -
Refine the Edges:
Use the edge of your brush to create sharp, clean lines along the outside of the trunk. I find it helpful to pull the brush smoothly in long strokes to minimize patchiness. -
Paint the Main Limbs:
Continue the brown paint up into the main branches. As the branches get thinner, switch to a smaller 1-inch brush for better control. -
Add Fine Details:
add the smallest twig-like endings to your branches with a fine brush. These will serve as the anchor points for your leaves later.
Step 3: Creating the Canopy
-
Prepare the Leaf Station:
Set up a station with your green and accent paints poured onto paper plates. Place your large leaf stamps nearby. Using stamps ensures a uniform look that mimics the specific style in the reference photo. -
Stamp the Greenery:
Dip the rubber stamp into green paint (or apply paint to the stamp with a foam roller for cleaner results) and press it firmly onto the wall near the branch tips. -
Vary the Shades:
Alternate between your dark, medium, and light green shades. Try to cluster the darker leaves near the center of the canopy and lighter ones toward the outer edges for depth. -
Add Seasonal Color:
Interperse yellow and red leaf stamps sporadically throughout the green canopy. These accents make the tree feel dynamic and alive. -
Incorporate Handprints:
This is the collaborative part. Coat a participant’s hand in red, orange, or yellow paint. Have them press their hand firmly onto the wall, integrating it among the stamped leaves. -
Placement Strategy:
Aim to place handprints where they look like unique leaves or blooms. Some can float freely in the ‘air’ below the branches, while others should connect near the stamped leaves. -
Include Floating Elements:
Don’t forget the bottom of the wall. Add a few handprints or leaf stamps lower down, near the trunk base, to represent falling leaves.
Hidden Names
Have participants sign their names or write a tiny inspiring word inside their dried handprint or leaf using a fine-point permanent marker.
Step 4: Final Touches
-
Touch Up Gaps:
Inspect the trunk for any missed spots in the cinder block pores. Dab a little extra brown paint into these crevices to ensure solid coverage. -
Sign the Work:
If desired, create a small ‘plaque’ area (either painted or a paper sign adhered later) where the creation date or a dedication can be written. -
Clean Edges:
If any paint dripped or smudged outside your design area, use a small brush with your wall’s base color (usually white) to cover the mistake once it’s dry. -
Seal (Optional):
For high-traffic hallways, apply a clear water-based sealer over the handprints once fully dry to prevent oils from hands degrading the paint over time.
Step back and enjoy the forest you’ve grown together, celebrating the unique mark every individual has left on the wall


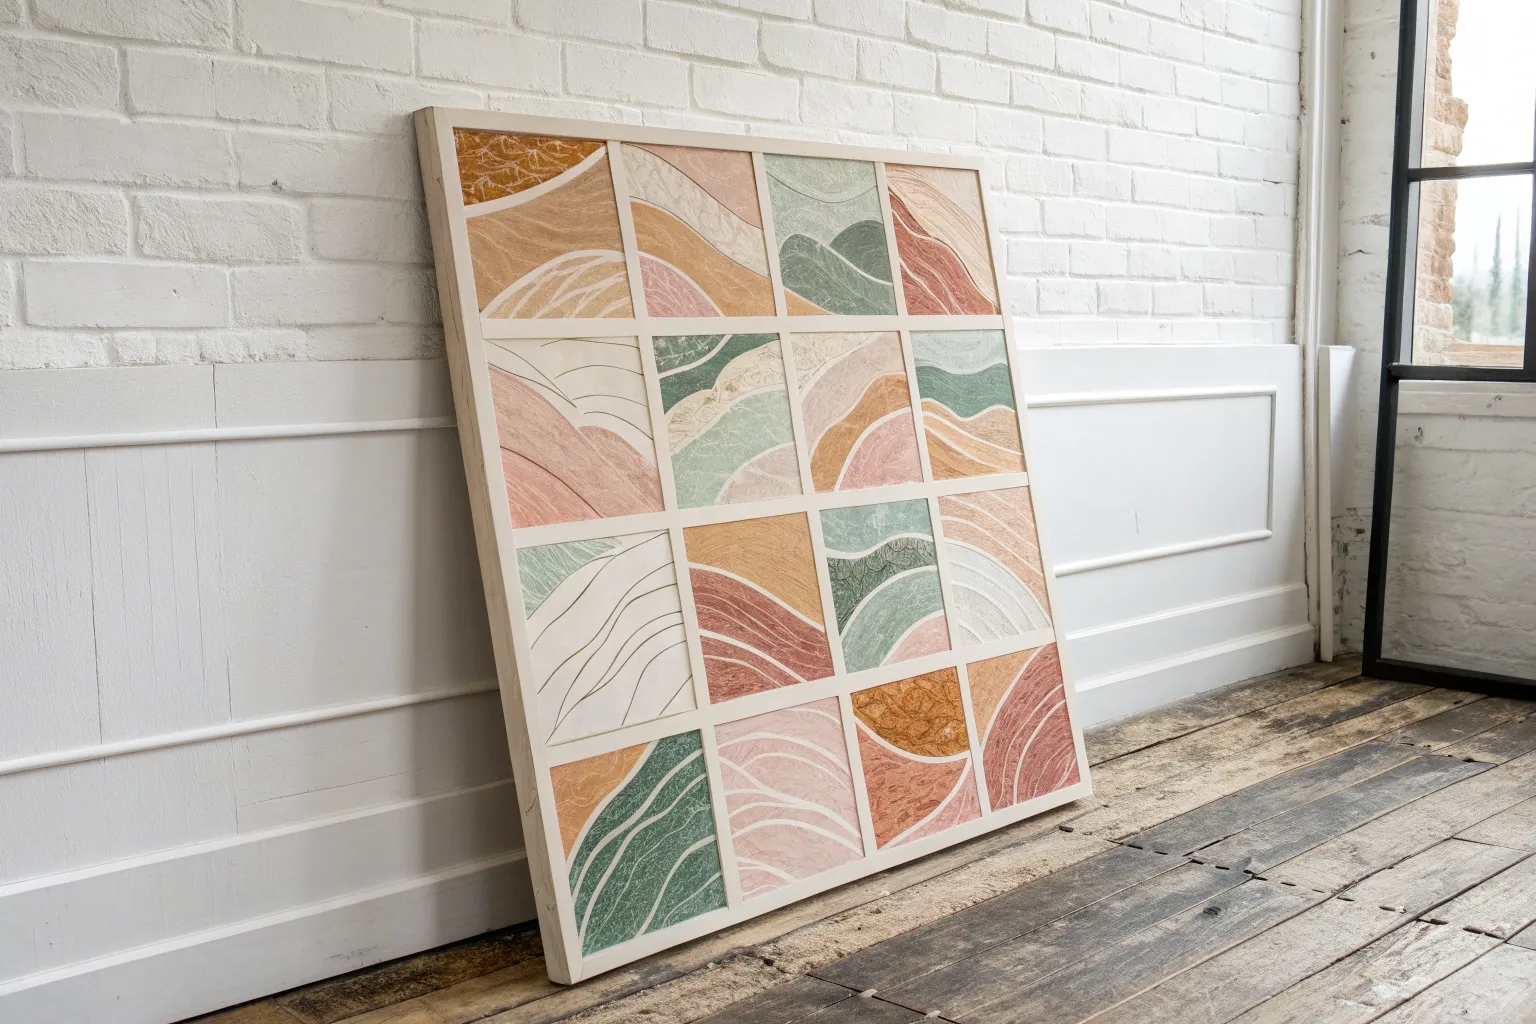
Patchwork Landscape Panorama
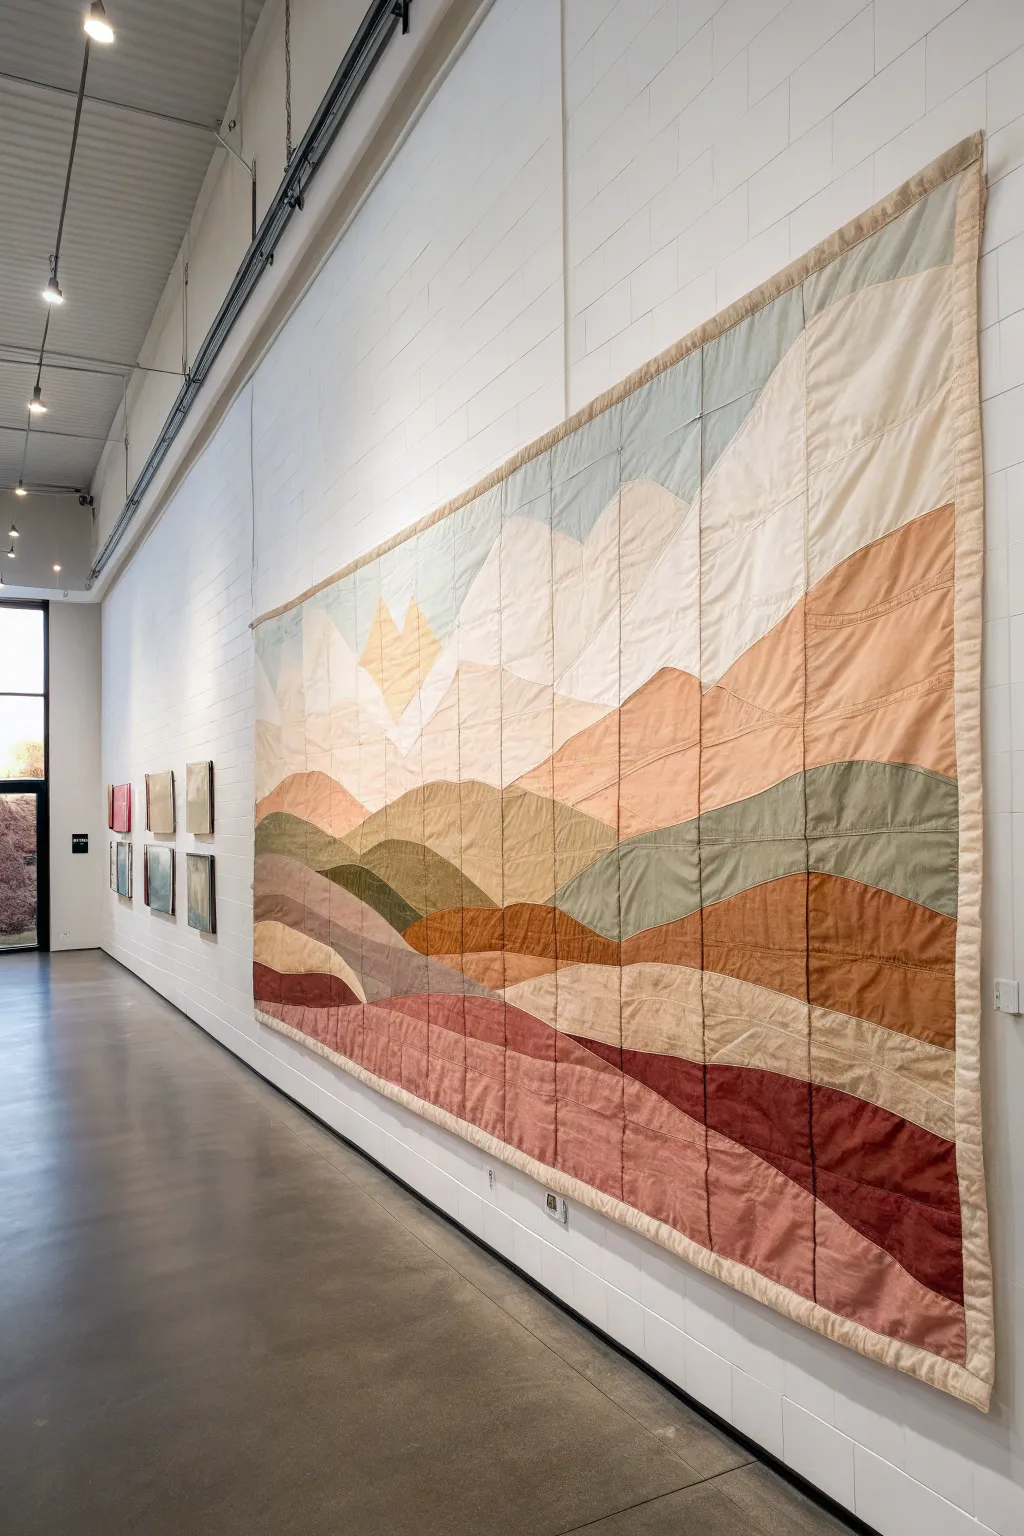
Bring the sweeping beauty of rolling hills indoors with this large-scale fabric mural, perfect for a community or classroom collaboration. By dividing a cohesive landscape design into manageable vertical strips, multiple makers can sew individual sections that come together to form a stunning, soft-textured vista.
Step-by-Step
Materials
- Cotton or linen fabric in assorted earth tones (terracotta, sage, sand, cream, pale blue, mustard)
- Large roll of butcher paper or pattern paper
- Cotton quilt batting (low loft)
- Backing fabric (muslin or wide-width cotton)
- Rotary cutter and self-healing mat
- Sewing machine
- Thread in neutral tones (creams and tans)
- Fabric scissors
- Iron and ironing board
- Long quilting ruler
- Straight pins or quilting clips
- Pencil and sharpie
Step 1: Design & Planning
-
Map the landscape:
Begin by sketching your full landscape design on a small piece of paper to establish the flow of hills and mountains. Aim for gentle, waving lines rather than jagged peaks to make the sewing easier. -
Scale up the pattern:
Roll out your butcher paper to the actual size of the finished mural. Using a pencil first, then a marker, draw the full-scale landscape lines based on your sketch. -
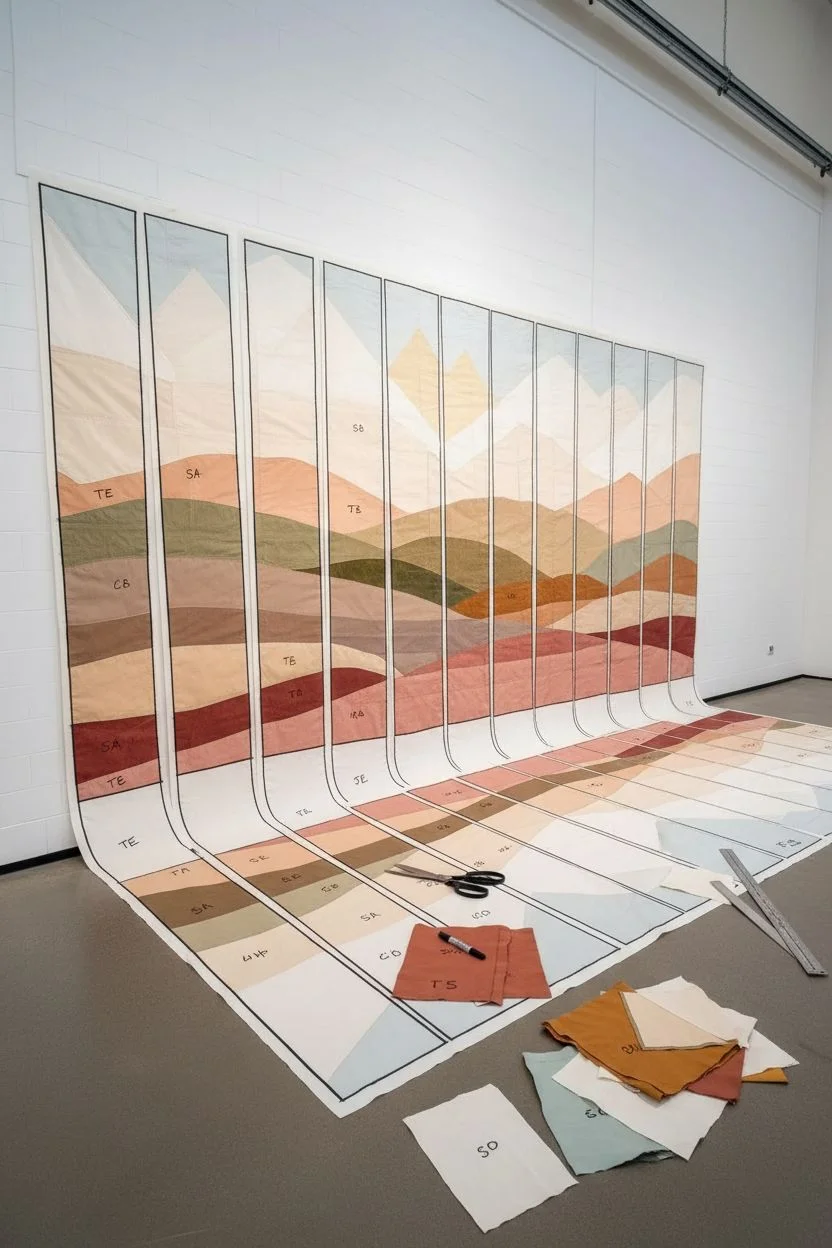
Create vertical zones:
Draw vertical lines down the entire length of the paper mural, spacing them evenly (e.g., every 12-18 inches). These columns represent the individual panels that different participants can work on. -
Label everything:
Number the columns from left to right. Then, within each column, label every specific shape with its intended color code so nothing gets confused once cut apart. -
Cut the master pattern:
Cut the paper diagram apart along the vertical column lines first. I find it helpful to keep these distinct strips separate to avoid mixing up the ‘hills’ from column 1 with column 5.
Step 2: Piecing the Panels
-
Cut fabric shapes:
For a single column, cut the paper templates apart along the landscape lines. Pin these paper pieces to your chosen fabrics and cut them out, adding a 1/4-inch seam allowance to every side of the fabric shape. -
Assemble the strip:
Arranging the fabric pieces in order from top to bottom, sew the shapes together using a standard straight stitch. Press seams open or to the side after each connection to reduce bulk. -
Square the edges:
Once a full vertical strip is pieced, press it flat. Use your rotary cutter and long ruler to trim the left and right sides so the strip is perfectly straight and matches the original column width. -
Repeat for all columns:
Continue this process until all vertical strips are pieced, pressed, and trimmed. Lay them out on the floor to ensure the landscape lines flow continuously across the seams.
Mismatched Hills?
If horizontal landscape lines don’t match perfectly between vertical strips, don’t unstitch! Gently steam and stretch the shorter fabric section before sewing to ease the alignment.
Step 3: Assembly & Finishing
-
Connect the columns:
Sew the long vertical strips together, matching up the landscape intersections as closely as possible. Pinning at every color change is crucial here to keep the horizon lines continuous. -
Prepare the quilt sandwich:
Lay your backing fabric face down, tape it to the floor, then layer the batting, and finally your pieced range top. Smooth carefully to remove any wrinkles. -
Baste the layers:
Pin or spray baste the three layers together securely. With a project this large, adding a few extra pins in the center prevents shifting during the final sewing. -
Quilt the landscape:
Stitch horizontal wavy lines across the entire width of the mural. Follow the general contours of your hills, spacing the lines about 1-2 inches apart to add texture without overpowering the design. -
Square the final piece:
Trim the outer edges of the entire quilt to ensure a crisp rectangle. Double-check your corners with a square ruler. -
Bind the edges:
Cut long strips of binding fabric (2.5 inches wide). Sew them around the perimeter using a mitered corner technique for a professional finish. -
Add hanging hardware:
Sew a sturdy fabric sleeve along the top back edge of the quilt. Insert a wooden dowel or metal rod through the sleeve to suspend your textile landscape on the wall.
Fabric Selection Tip
Mix fabrics with slightly different textures—like combining smooth cotton with rougher linen—to give the mountains and hills distinct, tactile depth.
Step back and admire how your individual strips transform into a harmonious, soft-textured horizon.
BRUSH GUIDE
The Right Brush for Every Stroke
From clean lines to bold texture — master brush choice, stroke control, and essential techniques.
Explore the Full Guide
Neighborhood Skyline Built By Teams
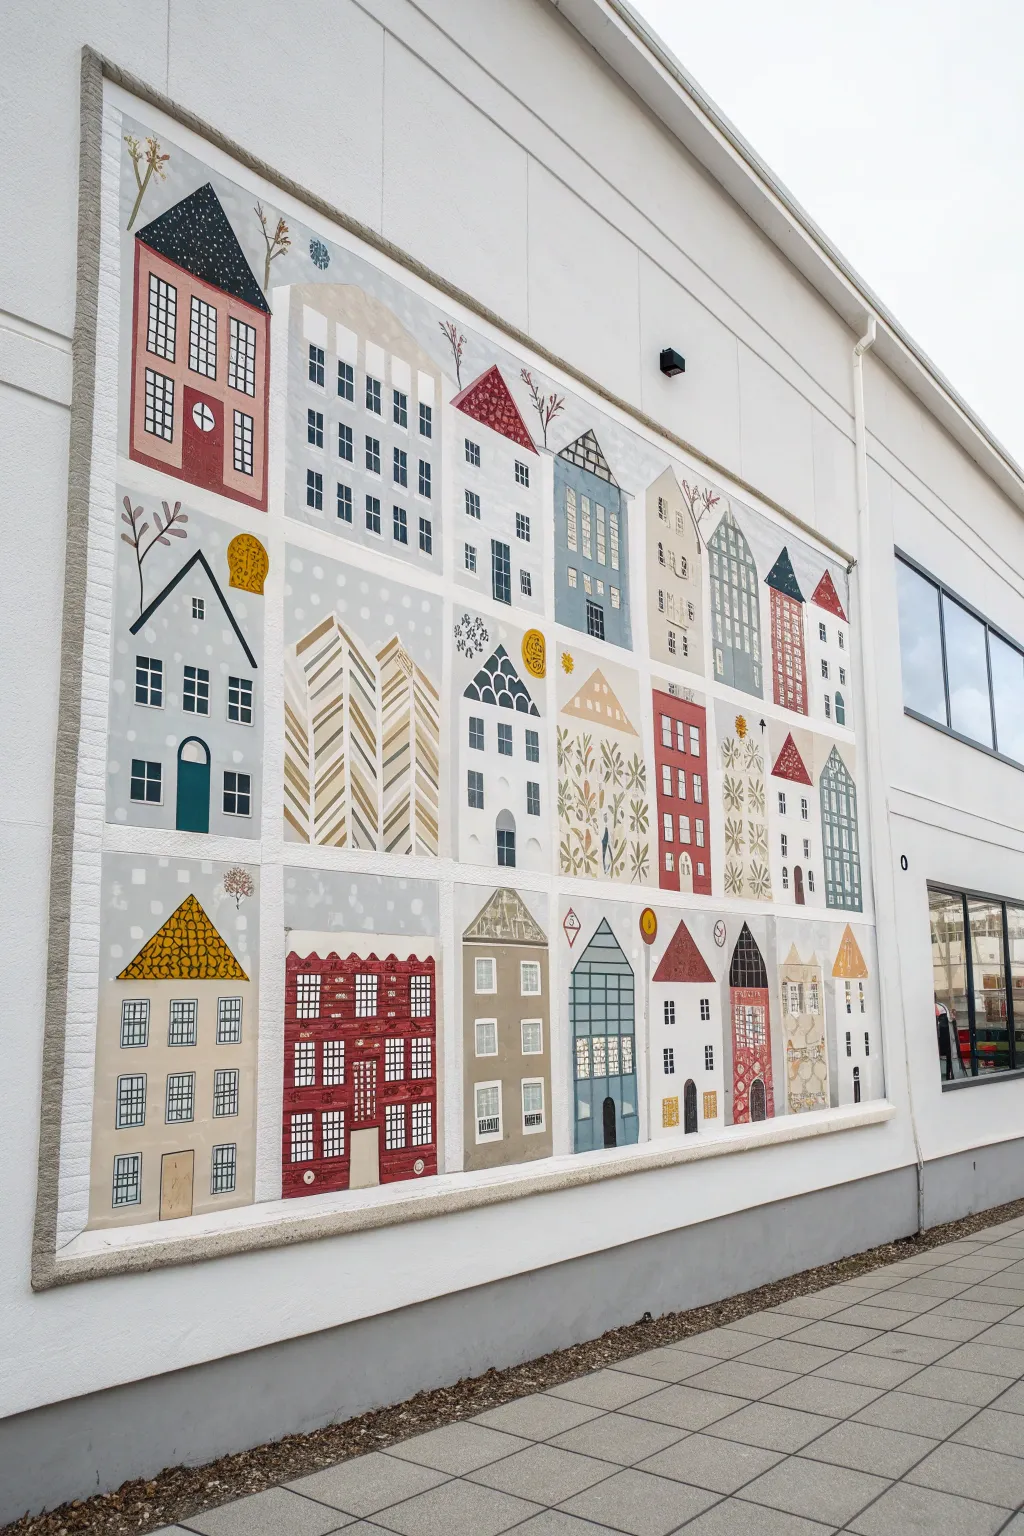

Transform a large exterior or interior wall into a charming village with this grid-based mural project. The design uses segmented blocks to create a cohesive neighborhood scene that is perfect for collaborative painting among teams or community groups.
Detailed Instructions
Materials
- External masonry paint (white primer/base)
- Acrylic latex exterior paints (various distinct colors: terra cotta, grey-blue, mustard yellow, sage green)
- Painter’s tape (1-inch width)
- Chalk line tool
- Measuring tape
- Assorted flat brushes (2-inch for filling, angled sash brushes for edges)
- Detail brushes (round #4 and #6)
- Graph paper and pencil for planning
- Ladder or scaffolding (depending on wall height)
- Clear exterior matte sealer (optional)
Step 1: Planning and Surface Prep
-
Design the grid:
Before touching the wall, map out your grid on graph paper. Divide your total wall space into three horizontal rows and roughly six to seven columns. The beauty of this design is that the ‘houses’ don’t need to be perfectly identical in width. -
Prepare the wall:
Clean the wall surface thoroughly to remove dirt and debris. If the wall is unpainted brick or concrete, apply a coat of high-quality masonry primer to ensure your colors pop. -
Snap the grid lines:
Using a measuring tape and a chalk line tool, snap horizontal lines to define the three main rows. Then, snap vertical lines to create the individual house ‘plots,’ leaving a roughly 2-inch gap between each section to act as a white frame. -
Tape the borders:
Apply painter’s tape along the outside of your chalk lines to preserve the crisp white grid structure between the painted blocks. Press the edges of the tape down firmly to prevent bleed-under.
Step 2: Painting the Houses
-
Block in base colors:
Assign a base color to each rectangle in your grid. Alternating between light greys, whites, and muted tones creates a nice rhythm. Use a 2-inch flat brush to fill in the background sky or building color for each block. -
Draft the rooflines:
Once the base background is dry, use a lighter pencil or chalk to sketch the basic geometric shape of each house within its block. vary the roof styles—some triangular, some flat, some stepped. -
Paint main structures:
Fill in the main body of the houses using your varied palette of terra cottas, blues, and yellows. I find it helpful to jump around the mural to let one color dry while working on another section to avoid smudging. -
Add architectural patterns:
This is where the whimsy comes in. Instead of just solid walls, paint patterns on some buildings. Create zig-zags (chevron), vertical stripes, or leafy vine patterns on the façades to add texture. -
Detail the roofs:
Paint the roofs in contrasting colors. Add texture by painting small scallops, dots, or cross-hatching to simulate shingles or tiles.
Grid Consistency
Use a level when applying your tape for the grid lines. Even if the house drawings are whimsical and crooked, a straight, level grid makes the whole mural look professional.
Step 3: Fine Details and Finishing
-
Create windows and doors:
Using a smaller flat brush, paint rectangles for windows and arches for doors. Keep them simple and graphic. Dark charcoal or deep navy works better than harsh black for the window panes. -
Add window panes:
Switch to a #4 round brush to paint the thin grid lines inside the windows (muntins). This instantly makes the colored rectangles look like proper windows. -
Incorporate playful elements:
Paint small trees, stylized branches, or simple circular suns in the negative space around the rooflines. These small details connect the individual blocks into a cohesive scene. -
Remove the tape:
Carefully peel away the painter’s tape while the paint is still slightly tacky or completely dry. Pull at a 45-degree angle to ensure a sharp edge. -
Touch up the grid:
Inspect the white grid lines between the houses. If any paint bled through, use a small angled brush and white paint to clean up the edges and restore the crisp grid look. -
Seal the work:
If the mural is fully exposed to the elements, apply a coat of clear UV-resistant exterior matte sealer to protect your vibrant colors from fading.
Paint Bleed Fix
If paint bleeds under the tape onto your white grid, wait for it to dry completely. Then, simply paint over the mistake with your opaque white masonry paint or primer.
Step back and enjoy the colorful community you have built together on your wall
Connected Mandala Rings

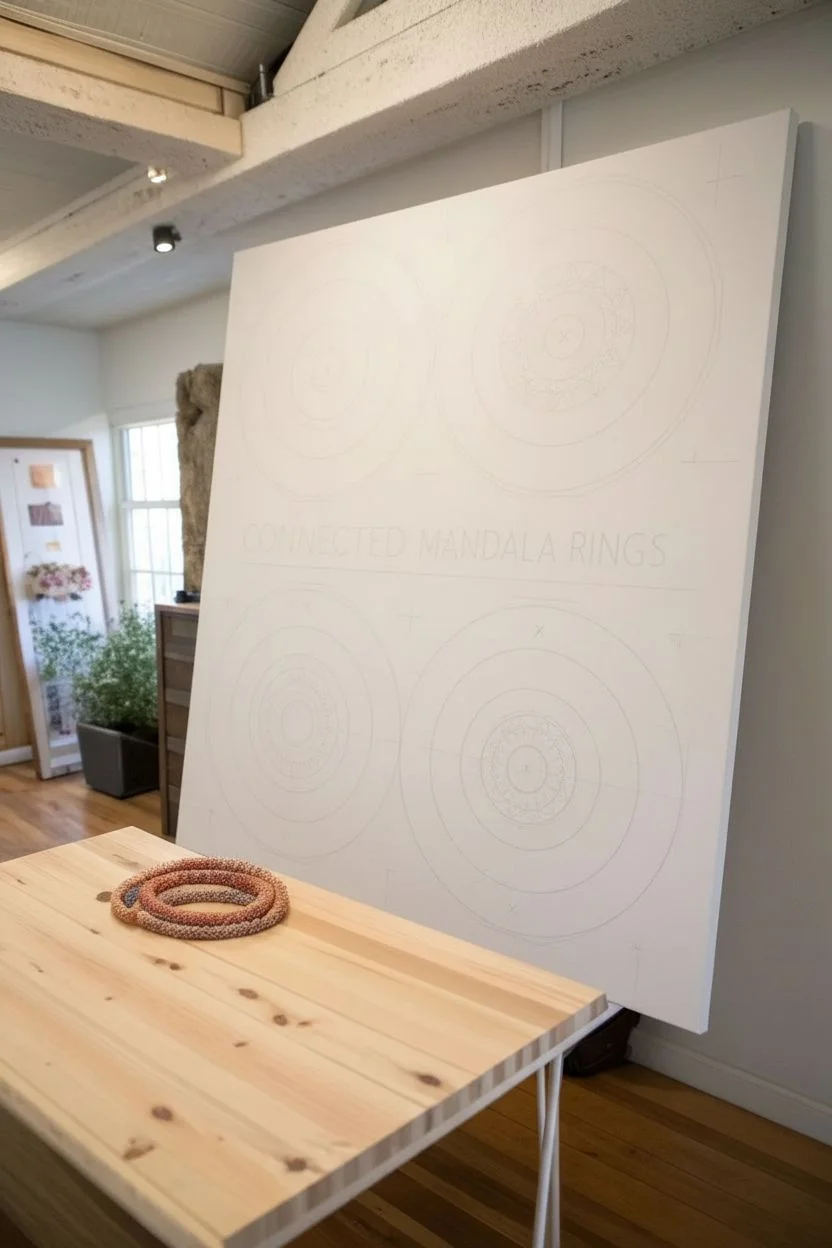
This collaborative project centers on unity and interconnectedness, featuring four overlapping, intricate mandala designs in earthy tones. The result is a striking, large-scale piece perfect for a community space, blending individual patterns into a harmonious whole.
Step-by-Step Tutorial
Materials
- Large canvas panel (approx. 4ft x 6ft) or wall space
- Acrylic paints (Teal, Mustard Yellow, Rust Red, Off-White)
- Wide painter’s tape or stencil adhesive
- Large circular stencils (optional)
- Medium and fine round paintbrushes
- Pencil and large compass (or string and pushpin)
- Black or dark blue stencil font lettering stencils (optional)
- Mixing palette
- Drop cloth
Step 1: Preparation & Layout
-
Prepare the surface:
Begin by priming your large canvas or designated wall section with a coat of crisp white or off-white acrylic paint. This provides a neutral background that makes the earth tones pop. -
Mark the centers:
Lightly mark four center points for your mandalas with a pencil. Arrange them in a loose grid—two upper, two lower—checking that they are close enough to eventually overlap. -
Draw base circles:
Using a large compass or the string-and-pushpin method, draw the large outer circumference for each of the four main circles. Aim for diameter sizes that are roughly equal. -
Sketch the rings:
Within each large circle, lightly sketch concentric rings. These guidelines will define the different bands of patterns within each mandala. -
Plan the overlaps:
Identify exactly where the circles intersect. Decide which circle will appear ‘on top’ or if the colors will blend in the overlapping sections.
Uneven Circles?
If your freehand circles look wobbly, use a plate, wastebasket lid, or hula hoop as a tracing guide. Tracing real objects ensures perfect geometry every time.
Step 2: Painting the Mandalas
-
Start the Teal Mandala:
Begin with the top-left circle using your teal paint. Paint the solid outer rim first to define the shape, keeping your edges clean. -
Detail the Teal interior:
Using a finer brush, fill in the concentric bands with repetitive petal shapes, dots, and lines. Leave the background white showing through to create the lace-like effect. -
Paint the Mustard Mandalas:
Move to the top-right and bottom-left circles, using the mustard yellow paint. Create distinct patterns in each; for instance, make one floral heavy with large petals and the other more geometric with small dots. -
Execute the Rust Mandala:
Paint the final bottom-right circle in rust red. Focusing on sharp, triangular points or sunburst rays can give this one a unique energy compared to the softer shapes of the others. -
Handle the intersections:
Where the circles overlap, carefully decide how to treat the junction. I find painting the ‘top’ design right over the edge of the adjacent circle creates a nice sense of depth. -
Add subtle background texture:
In the white negative space around the colored circles, add tiny, sparse geometric marks or dashes in a very light grey or faded version of your main colors to reduce the starkness.
Step 3: Finishing Touches
-
Lettering placement:
Measure the horizontal center of the canvas between the upper and lower sets of rings. Mark a straight baseline for your text. -
Stenciling the text:
Using dark blue or black paint and 2-inch letter stencils, carefully dab on the title ‘CONNECTED MANDALA RINGS’. Use a dry brush technique to prevent paint bleeding under the stencil. -
Refining edges:
Step back to view the whole piece. Use a small brush with your background white paint to touch up any wobbly lines on the outer edges of the circles. -
Adding final details:
Enhance the intricate centers of the mandalas with a very fine brush, adding tiny dots of contrasting color or reinforcing the central bullseyes. -
Sealing the work:
Once fully dry (allow at least 24 hours), apply a clear matte varnish over the entire canvas to protect the paint and unify the sheen.
Depth Through Shading
Mix a tiny drop of black into your main color and paint a thin shadow line where one ring overlaps another. It instantly adds 3D dimension.
Hang your collaborative masterpiece in a well-lit area where the interwoven rings can symbolize community connection

PENCIL GUIDE
Understanding Pencil Grades from H to B
From first sketch to finished drawing — learn pencil grades, line control, and shading techniques.
Explore the Full Guide
Silhouette Portraits On A Shared Background
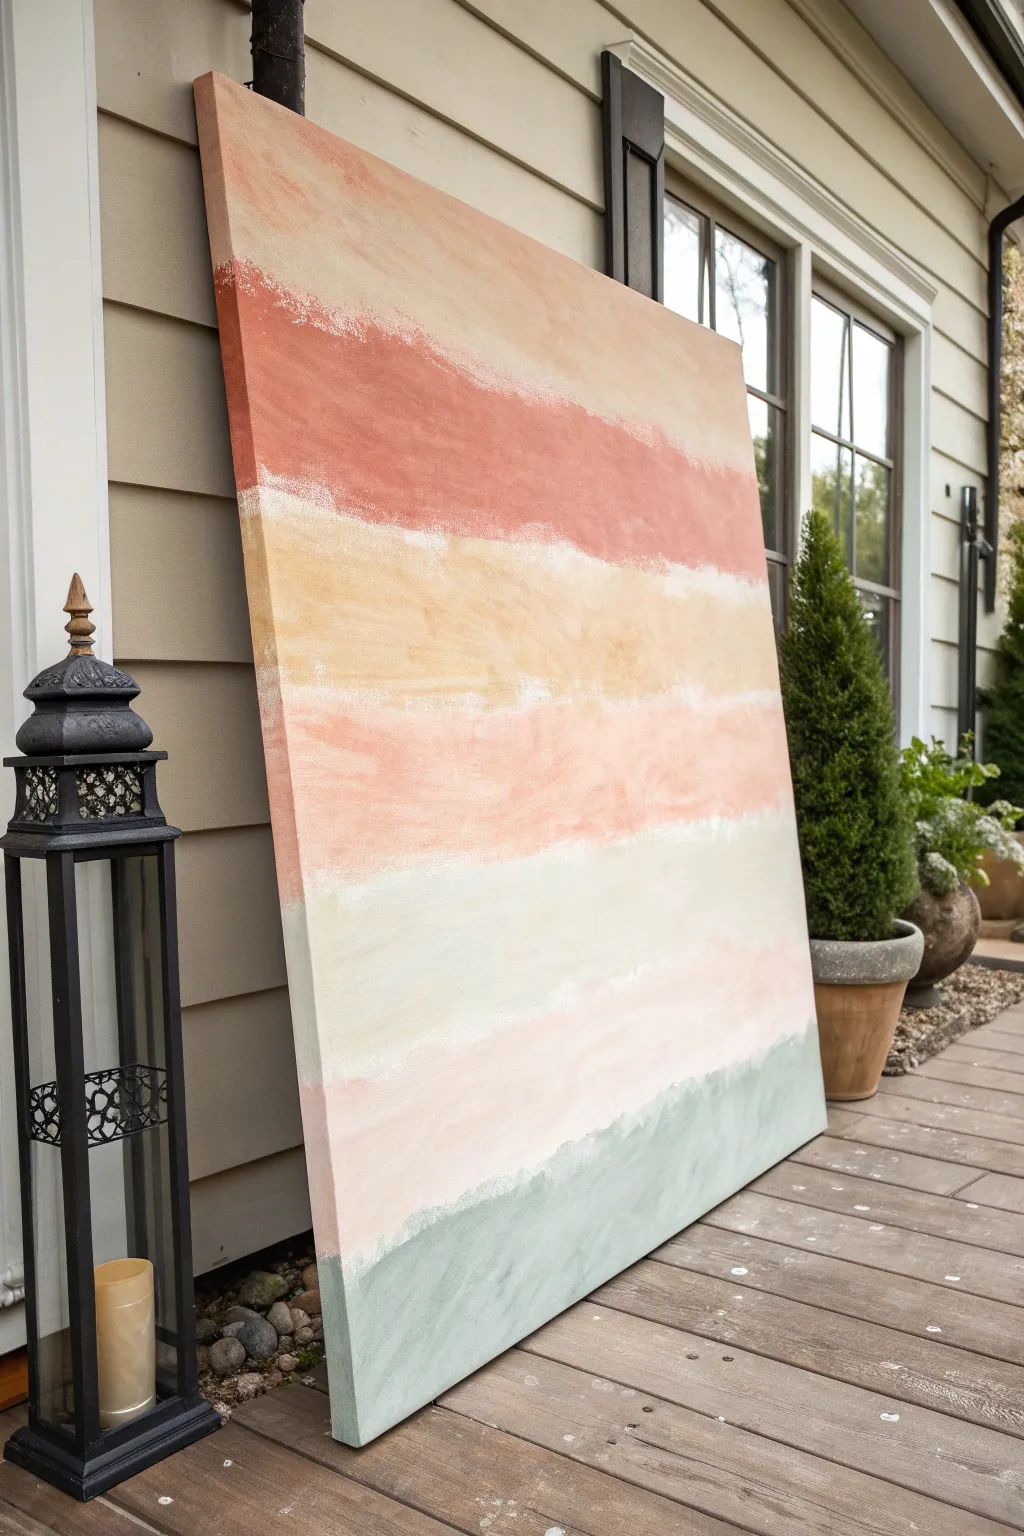
Create a soothing, minimalistic statement piece with this large-scale abstract painting, featuring soft horizontal bands of earthy terracotta, ochre, peach, and sage green. The textured, layered application gives it an organic, windswept feel perfect for warming up any space.
Step-by-Step Guide
Materials
- Large stretched canvas (at least 36×48 inches)
- Acrylic paints (Titanium White, Burnt Sienna, Yellow Ochre, Rose Madder, Sage Green)
- Wide flat paintbrushes (3-4 inch)
- Large palette or paper plates for mixing
- Spray bottle with water
- Drop cloth or tarp
- Easel or sturdy wall to lean against
- Rags or paper towels
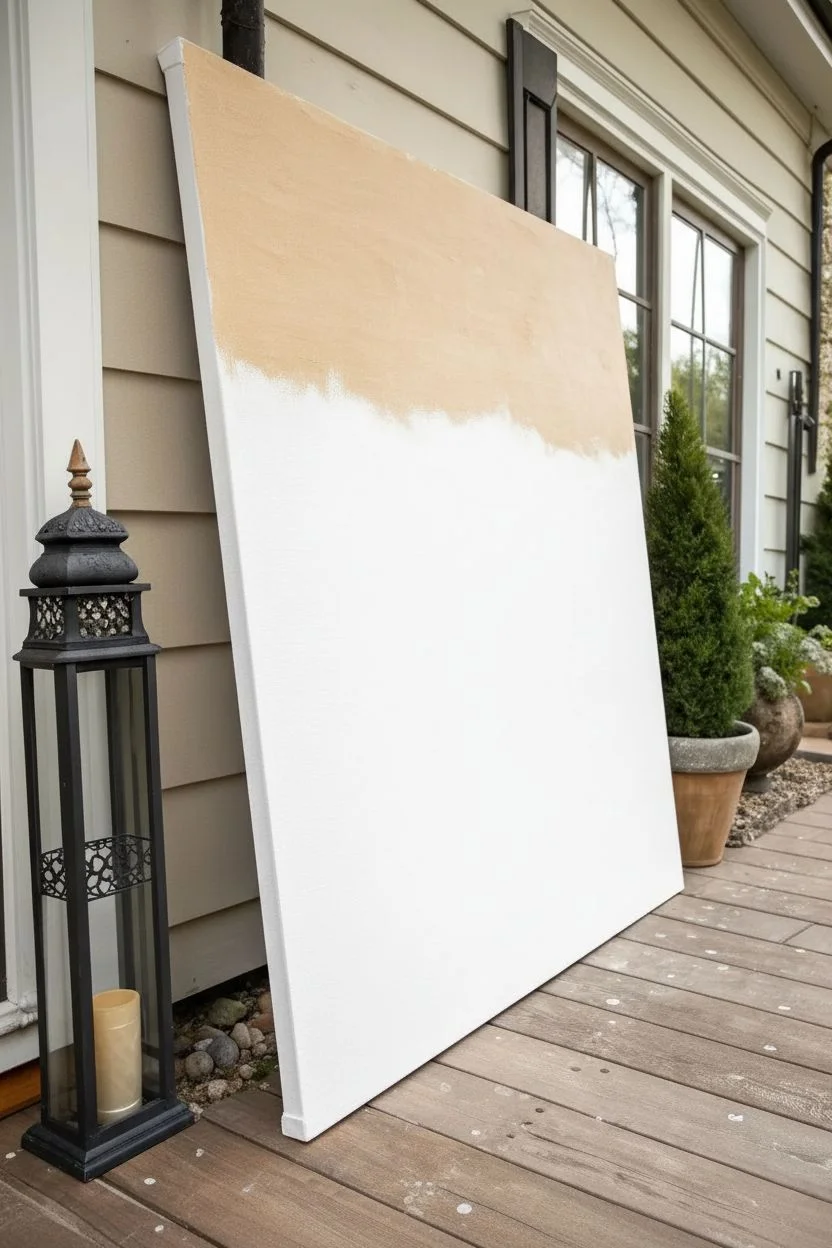
Step 1: Preparation and Base Layer
-
Set up your workspace:
Lay down your drop cloth in a well-ventilated area, preferably outdoors or in a garage if you’re working on a very large canvas. Prop the canvas vertically against a sturdy wall or easel. -
Mix the top color:
On your palette, create a warm beige by mixing a large amount of Titanium White with a tiny dab of Burnt Sienna and Yellow Ochre. You want a creamy, sandy tone. -
Apply the first band:
Load your wide brush and paint the top 20% of the canvas with the beige mixture. Use long, horizontal strokes, allowing the edges to be uneven and textured rather than perfectly straight. -
Feather the bottom edge:
While the paint is still wet, lightly mist the bottom edge of this beige section with water. Use a dry brush or rag to feather the paint downward slightly, preparing it for the next color transition.
Blend Like a Pro
Keep a spray bottle of water handy. A quick mist over the canvas keeps acrylics wet longer, allowing for smoother, dreamier blends between color bands.
Step 2: Building the Warm Middle Tones
-
Mix the terracotta hue:
Create a rusty orange shade by mixing Burnt Sienna with a touch of Rose Madder and a little White to soften it. It should be rich but earthy. -
Paint the second distinct band:
Apply this terracotta color directly below the beige, covering the next distinct section. Don’t worry about complete coverage; little peeks of canvas add character. -
Blend the transition:
Use a slightly damp brush to work the top edge of the terracotta into the bottom of the beige. You aren’t looking for a perfect gradient, but rather a soft, painterly collision of colors. -
Create the golden ochre layer:
Mix Yellow Ochre with plenty of White to get a soft, golden wheat color. Apply this as the third band, creating a stripe similar in height to the others. -
Add texture with a dry brush:
I like to take a clean, dry brush over the wet ochre layer, dragging it horizontally to lift slight bits of paint and create that weathered look.
Add Metallic Shimmer
Mix a small amount of metallic gold or bronze paint into the ochre or terracotta bands for a subtle sheen that catches the light beautifully at sunset.
Step 3: Applying Soft Pastels and Base
-
Mix the pale peach tone:
Combine a small amount of Rose Madder with a large amount of White and a tiny dot of Yellow Ochre. This should be a very whisper-light peach color. -
Paint the fourth band:
Apply this peach tone below the yellow ochre. Keep your strokes loose and horizontal, allowing the brush bristles to leave visible texture. -
Create the creamy white band:
For the fifth band, use Titanium White with just the tiniest hint of the beige mix from earlier to warm it up. This creates a breathing space in the composition. -
Layer the bottom sage green:
Mix Sage Green with White to create a muted, dusty mint color. Apply this to the bottom section of the canvas, anchoring the composition. -
Create the final blend line:
Working quickly, brush the top edge of the green upward into the white band just slightly to soften the horizon line.
Step 4: Finishing Touches
-
Review and refine edges:
Step back about ten feet to view the whole piece. If any horizontal line looks too sharp or artificial, mist it lightly with water and soften it with a clean brush. -
Add highlights:
Dip a dry brush into pure White and lightly drag it horizontally across the transition points between color bands. This ‘scumbling’ technique adds depth and simulates light reflection. -
Paint the canvas sides:
Don’t forget the edges! Extend each color band around the sides of the canvas for a professional, gallery-wrapped finish without needing a frame. -
Allow to cure:
Let the painting dry completely in a dust-free area for at least 24 hours before moving or hanging it.
Hang your new abstract masterpiece in a well-lit room to let the natural light play off the textured layers
Doodle Wall With “Pass-The-Section” Rules
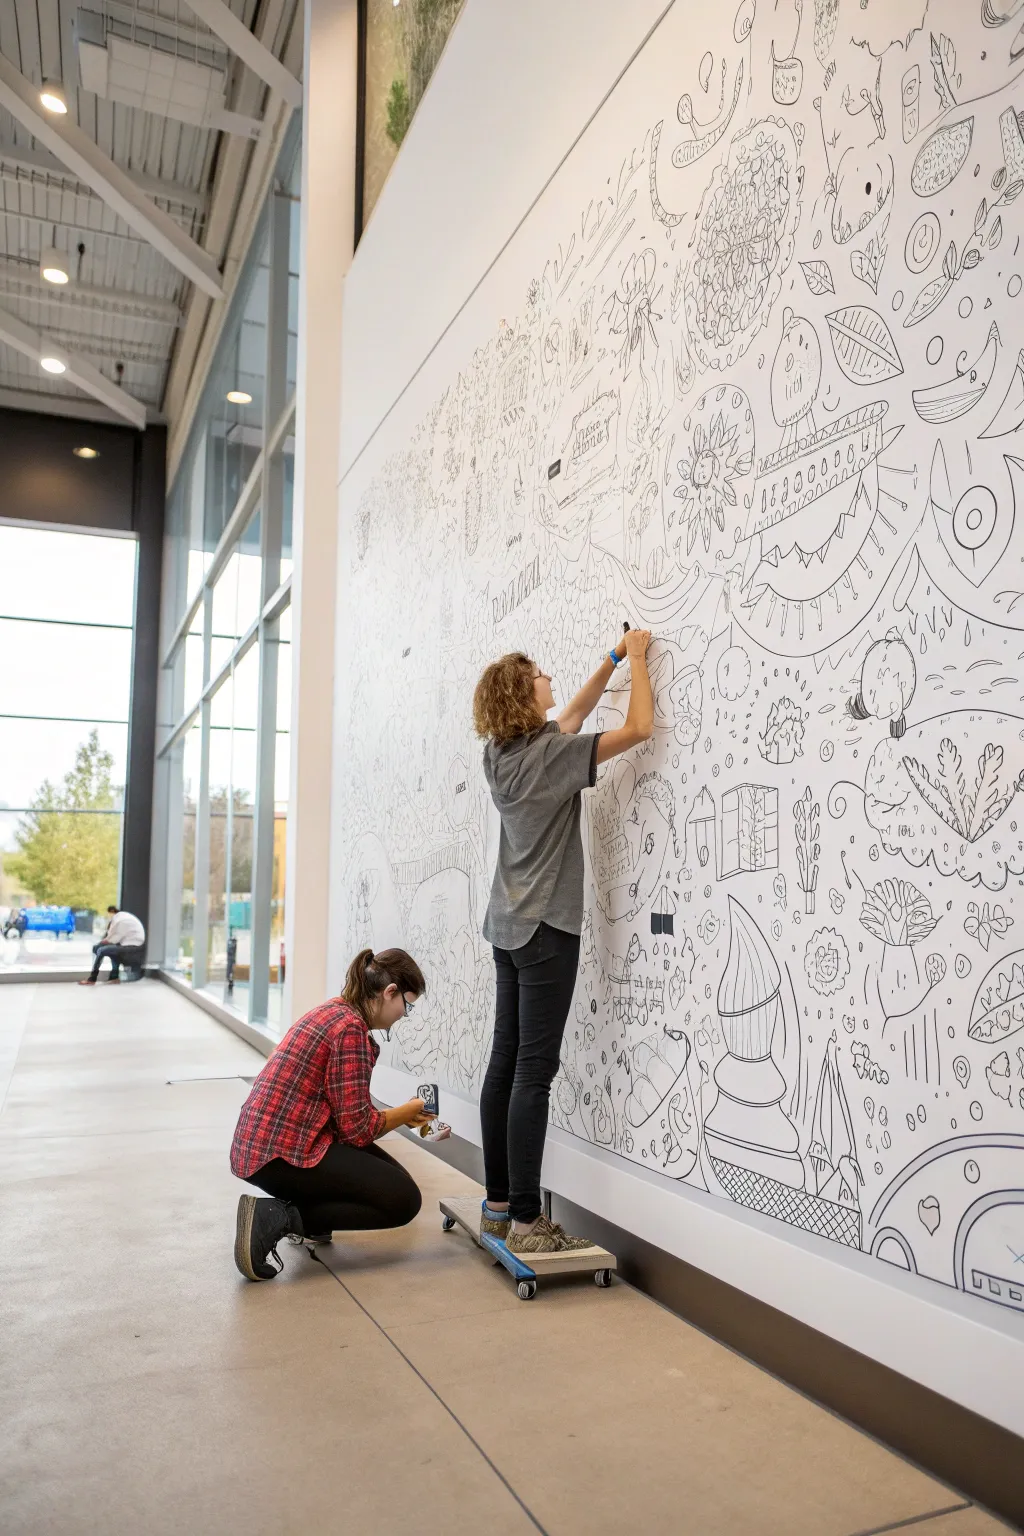
Transform a blank hallway or large canvas into a sprawling, interactive gallery of whimsy with this large-scale line art project. Using bold black markers on a white background, this mural grows organically through collaborative doodling, resulting in a cohesive yet incredibly detailed masterpiece.
Detailed Instructions
Materials
- Large white wall space (indoor, smooth finish)
- Painter’s tape or masking tape
- Pencil (HB or H)
- Eraser (large white polymer)
- Wide-tip black permanent markers (chisel tip)
- Fine-tip black permanent markers
- Variable width paint markers (black)
- Small rolling step stool or sturdy cart (optional, for height)
- Cleaning cloth
- Wall primer (if needed)
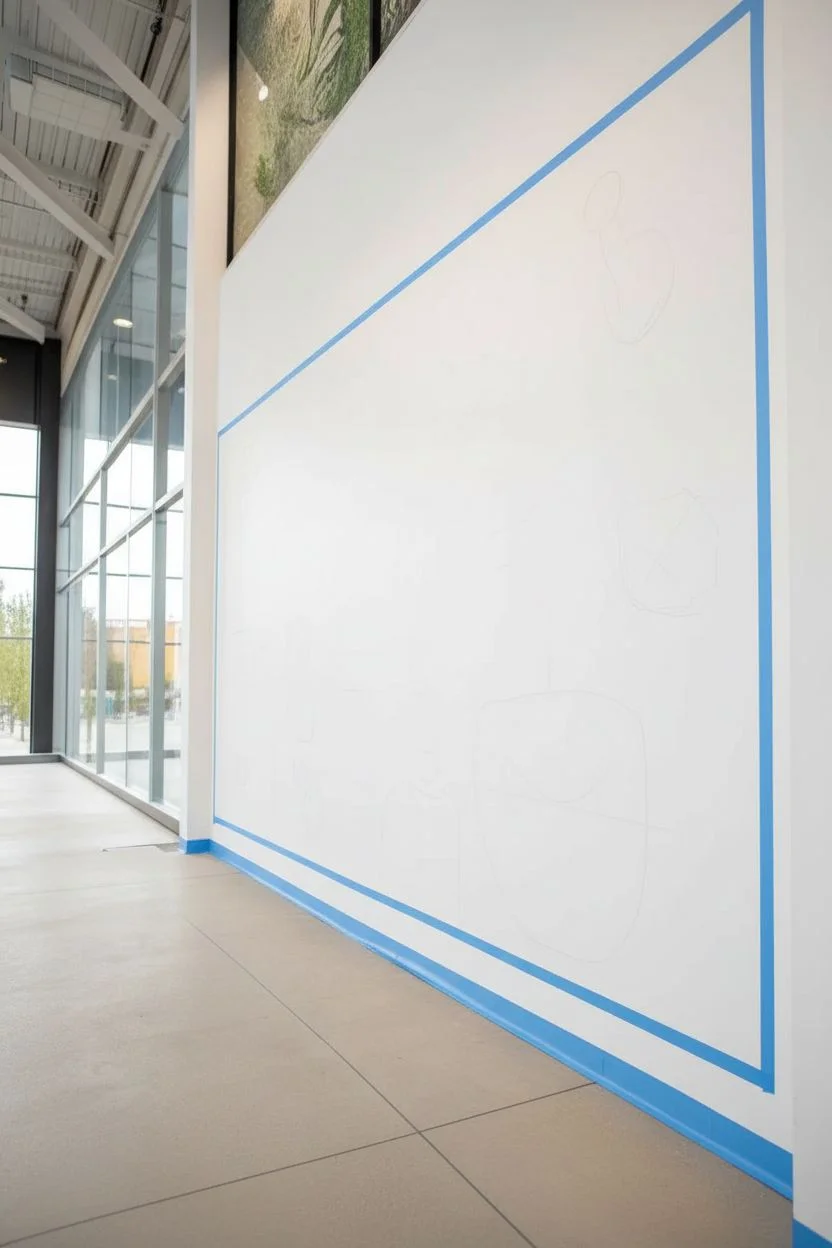
Step 1: Preparation and Zoning
-
Prepare the surface:
Ensure your wall is clean, dry, and smooth. If the wall has a texture or a dark color, apply a fresh coat of high-quality white primer or flat white paint to create a pristine drawing surface. -
Define boundaries:
Use painter’s tape to mark off the top, bottom, and side edges of your mural area. This creates a crisp frame for the chaos of the doodles later on. -
Rough sketching:
Lightly sketch a few large ‘anchor’ shapes with a pencil. These don’t need to be detailed but will serve as the main focal points to distribute visual weight across the wall. -
Divide the work:
If working with a partner as shown, mentally divide the wall into zones—high and low—so you can work simultaneously without bumping elbows.
Smudge Prevention
Working left-to-right (if right-handed) helps, but on a large wall, accidental contact happens. Tape a piece of tracing paper under your drawing hand to glide over ink without smearing it.
Step 2: Drafting the Content
-
Anchor the design:
Start by inking the largest elements first using your widest chisel-tip marker. These might be giant fruit slices, large abstract blobs, or architectural elements that ground the scene. -
Connect the anchors:
Begin drawing connecting lines between your large shapes. Think of these as vines, roads, or energetic swoops that guide the viewer’s eye from one section to another. -
Fill the mid-ground:
Switch to a standard bullet-tip permanent marker to add medium-sized objects like leaves, smaller food items, quirky characters, or geometric patterns. -
Vary lines:
I find it helpful to alternate between thick outlines and thinner internal details to keep the drawing from looking too heavy or cluttered.
Interactive Color
Only draw the black outlines and leave the unmistakable ‘coloring book’ feel. Place baskets of washable markers nearby so guests or passerby can fill in the shapes over time.
Step 3: Detailing and Refining
-
Micro-doodling:
Use fine-tip markers or pens to fill the negative spaces. This is where the ‘doodle’ aesthetic truly comes to life—add tiny circles, hatching, dots, and squiggles into the gaps. -
Manage the verticality:
To reach higher sections comfortably, use a low rolling cart or step stool. This allows for stable lines without straining your arm. -
Low-level details:
Sit or kneel to give the bottom section equal attention. Often the most interesting details for kids or seated viewers are placed right at the floor level. -
Step back and assess:
Frequently step back about 10 feet to view the overall balance. Look for areas that seem too white and open compared to more dense sections. -
Balance the density:
Go back into the ’empty’ spots and add density with textures like fish scales, bricks, or rain drops to match the rest of the mural’s intensity.
Step 4: Final Touches
-
Line weight correction:
Revisit your main anchor shapes and thicken the outer perimeter lines significantly. This helps pop the main subjects forward against the background noise. -
Erase guidelines:
Wait at least an hour for all ink to fully cure, then gently erase any visible pencil sketch marks with a clean white eraser. -
Clean up edges:
Peel away the painter’s tape slowly at a 45-degree angle to reveal the sharp, straight edges of your mural.
Now you have a dynamic piece of public art that invites viewers to get lost in the details


Tape-Resist Geometry Collaboration
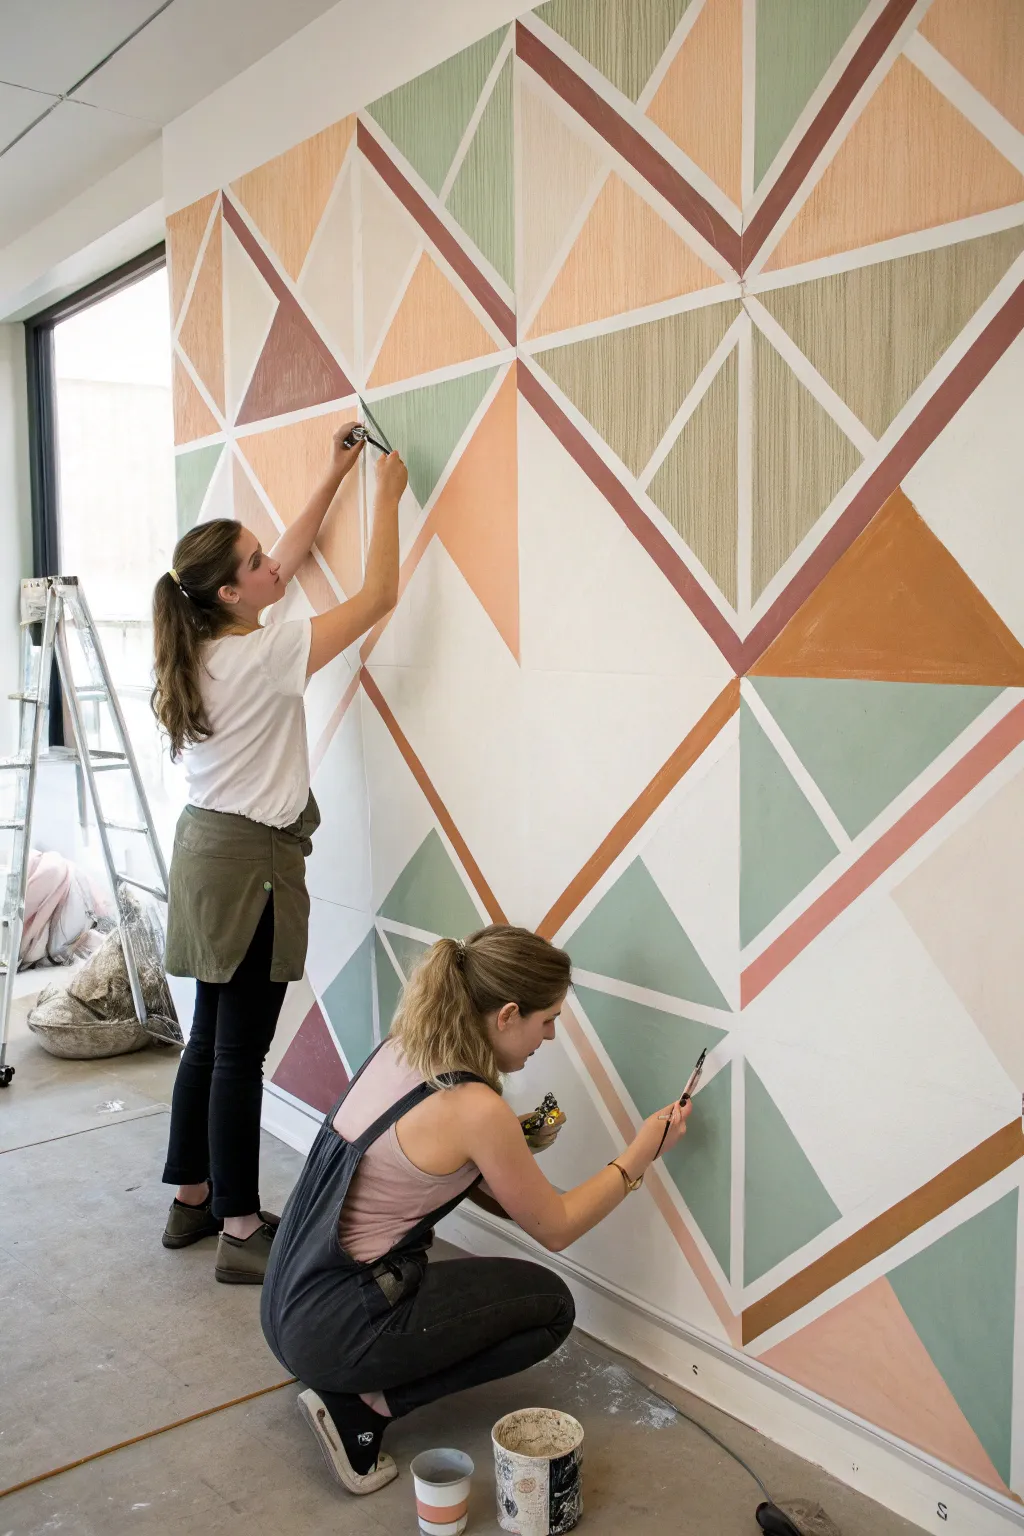
Transform a blank collaborative space into a stunning mosaic of color using sharp lines and soft, earthy tones. This tape-resist technique allows multiple artists to work simultaneously, creating complex geometric patterns with crisp edges and a cohesive, modern aesthetic.
Step-by-Step Tutorial
Materials
- Interior latex wall paint (various colors: sage green, terracotta, peach, white, tan, deep brown)
- Painter’s tape (1-inch width works best, specific for delicate surfaces if needed)
- Drop cloths
- Small to medium angled sash brushes (1.5 to 2 inch)
- Small foam or microfiber rollers (4-inch size)
- Paint texture additive (optional, for a stucco look)
- Putty knife or credit card
- Pencil and eraser
- Level and straight edge (yardstick)
- Paint trays and liners
- Rags for cleanup
Step 1: Planning and Taping
-
Prepare the workspace:
Clear the area against the wall and lay down drop cloths to protect the flooring. Wipe down the wall with a damp cloth to remove dust, ensuring a clean surface for tape adhesion wait for it to dry completely. -
Base coat application:
If the existing wall color isn’t suitable for your ‘white space’ lines, paint the entire wall white or a light neutral first. Let this base coat cure for at least 24 hours so the tape doesn’t peel it off later. -
Sketch the primary lines:
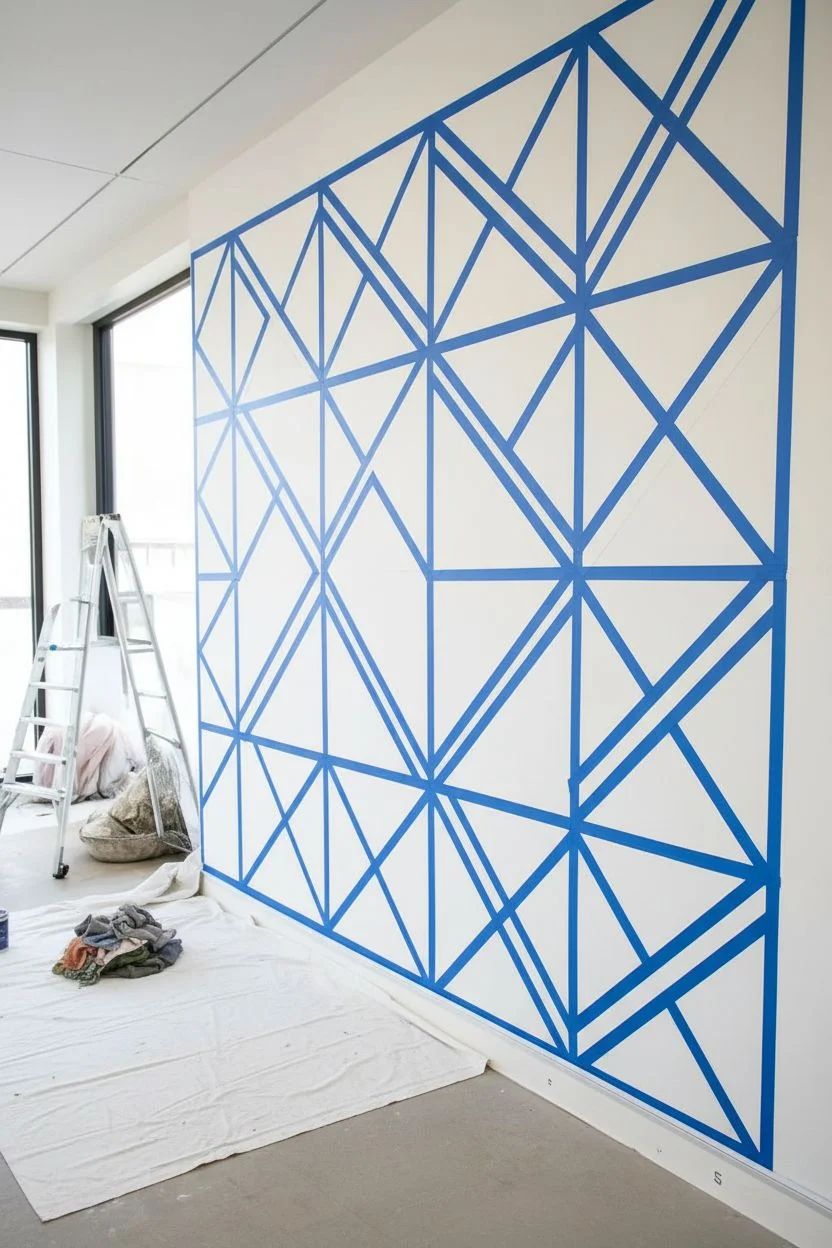
Lightly sketch your largest geometric shapes using a pencil and a long straight edge. Aim for large intersecting triangles and diagonals to create dynamic energy. You don’t need to fill every inch yet; just establish the main flow. -
Apply the tape grid:
Apply painter’s tape directly over your pencil lines. Press the tape down firmly as you go, ensuring straight, long lines that span across the wall. Intersect the tape lines to create smaller triangular and quadrilateral zones. -
Seal the tape edges:
This is crucial for crisp lines: Run a putty knife or the edge of a credit card firmly along every edge of the tape to prevent paint bleed. I like to paint a very thin layer of the *base wall color* over the tape edges first; this seals any tiny gaps.
Bleed-Through Blues?
If paint bleeds under the tape, let it dry completely. Then, place a new piece of tape precisely over the colored shape and paint the white line color over the error to cover it.
Step 2: Painting the Geometry
-
Color mapping:
Before opening paint cans, stick small pieces of colored post-it notes or dab tiny dots of paint into each taped-off section to plan your color balance. Ensure high-contrast colors (like deep brown) are distributed evenly and don’t clump together. -
Mixing texture (optional):
If you want the subtle, fabric-like texture seen in some sections of the photo, mix a small amount of texture additive into specific paint colors, or use a dry-brush technique later. -
Cutting in the corners:
Using an angled sash brush, carefully paint the corners and edges of a specific geometric shape. Don’t worry about getting paint on the tape itself—that’s what it’s there for—but stay within the specific ‘zone’ you are working on. -
Filling the centers:
Use a small 4-inch roller to fill in the larger center areas of the triangles to smooth out specific brush strokes. Rolled paint generally dries more evenly than brushed paint for larger sections. -
Applying texture strokes:
For sections requiring vertical texture (like the tan triangles in the image), apply the final coat using vertical brush strokes exclusively. Drag the brush from the top tape line to the bottom to create a striated look. -
Multiple coats:
Most colors, especially lighter pastels like the peach and sage, will need a second coat. Wait for the first coat to be dry to the touch (usually 1 hour) before applying the second to ensure solid opacity.
Step 3: The Reveal
-
Timing the removal:
Do not wait for the paint to fully cure. The best time to remove tape is when the final coat is slightly tacky but not wet—usually about an hour after painting. -
Peeling technique:
Slowly peel the tape away at a 45-degree angle back onto itself. Pulling too fast or straight out can rip the paint film. Keep a steady, slow pace. -
Touch-ups:
Once all tape is removed, inspect your white lines. If any paint bled through, use a tiny artist’s brush and your original base wall color to carefully clean up the edges. -
Erase guidelines:
Gently erase any visible pencil marks that might be showing in the unpainted ‘grout’ lines where the tape used to be.
Variation: Metallic Pop
Add a thin metallic gold or copper stripe parallel to one of the main diagonal lines to catch the light and add a modern, luxurious element to the matte finish.
Step back and admire how the simple act of taping and painting creates a sophisticated, structured mural perfect for a shared creative environment.
Limited-Palette Harmony Challenge
Bring vibrant energy to a large exterior wall with this modern, abstract floral mural that uses a cohesive limited palette of teal, rust, mustard, and peach. The design balances organic flower shapes with bold geometric arches and swooping leaves, creating a harmonious large-scale artwork perfect for collaborative painting.
Step-by-Step
Materials
- Exterior masonry primer (white)
- Exterior acrylic latex paint (white, deep teal, rust orange, mustard yellow, peach/cream)
- Small roller (4-inch) with semi-rough nap
- Large roller (9-inch) and extension pole
- Assortment of angled sash brushes (1.5 to 2.5 inch)
- Ladder (tall enough for your wall height)
- Painter’s tape
- Chalk or charcoal stick for sketching
- Projector (optional for layout)
- Drop cloths
- Paint trays and liners
- Rags for cleanup
- Stir sticks
Step 1: Wall Preparation & Base Coat
-
Clean the surface:
Before any paint touches the wall, thoroughly sweep down the cinder block or brick surface to remove loose dirt, dust, and cobwebs. If the wall is particularly grimy, give it a power wash and let it dry completely for at least 24 hours. -
Protect the area:
Lay down heavy-duty drop cloths along the base of the wall to catch drips. Secure them with tape if it’s a windy day. -
Apply primer:
Using a large roller with a thick nap suitable for masonry, roll a coat of high-quality exterior primer over the entire surface. This ensures your colors will pop later. -
Create the white background:
Once the primer is dry, apply two coats of your base white exterior paint. This crisp backdrop is essential for the ‘negative space’ look of this design.
Uneven Texture?
Cinder blocks are porous. If your straight lines look jagged, use a stiff, flat artist brush to push paint into the tiny pits along your outline for a razor-sharp edge.
Step 2: Design Transfer
-
Plan your layout:
Sketch your design on paper first. The key elements are large, sweeping leaf shapes, a stylized flower with radiating petals, and grounding geometric semi-circles or arches at the bottom. -
Sketch onto the wall:
Using chalk or a charcoal stick, draw the outlines directly onto the white wall. I find it helpful to start with the largest shapes—like the giant rust-colored leaf—to anchor the composition. -
Refine the floral details:
Draw the detailed flower on the left side. Sketch a central circle, then add the looped petals radiating outward. Don’t worry about perfect symmetry here; the organic feel is part of the charm. -
Add geometric balance:
Sketch the large semi-circles and rainbow-style arches along the bottom third of the wall. These heavy shapes will visually support the lighter floral elements above. -
Step back and check:
Frequently step away from the wall to view the sketch from a distance. Adjust any proportions now before you start painting with color.
Dimension Boost
Mix a tiny drop of white into your rust or teal paint to create a slightly lighter shade. Use this to paint a thin highlight line on one side of your shapes for a 3D effect.
Step 3: Color Application
-
Start with the rust tones:
Begin painting the largest focal point—the giant upper leaf—using your rust orange paint. Use a cutting-in brush for the edges and a small roller to fill the center for consistent coverage. -
Paint the teal elements:
Move on to the deep teal shade. Fill in the large semi-circle on the right and the lower leaf shapes on the left side of the mural. -
Fill the mustard shapes:
Apply the mustard yellow to the central semi-circle shape. This color might need two coats to achieve full opacity over the white base. -
Detail the flower petals:
Carefully paint the outlines of the flower petals using a smaller angled brush and the rust orange paint. Leave the inside of the petals white (negative space) for a lighter, airy look. -
Add peach accents:
Use the soft peach or cream color for the secondary details, such as the smaller arches inside the bottom geometric shapes or accent leaves. -
Create the rainbow arches:
On the far right, paint the alternating bands of the rainbow arch using rust and peach, leaving white bands in between for separation.
Step 4: Finishing Touches
-
Clean up edges:
Once the main colors are dry to the touch, use a small artist’s brush and your background white paint to touch up any wobbly lines or drips where the colors meet the background. -
Final inspection:
Check for any holiday spots (missed areas) in the texture of the cinder blocks. Dab a little extra paint into deep crevices if the roller missed them. -
Clear site:
Wait for the paint to be dry to the touch before removing drop cloths and tape to ensure no wet paint smears onto the pavement.
Step back and admire how these warm, earthy heavy shapes transform a plain industrial wall into a welcoming work of art
Layered Mixed-Media Texture Mural
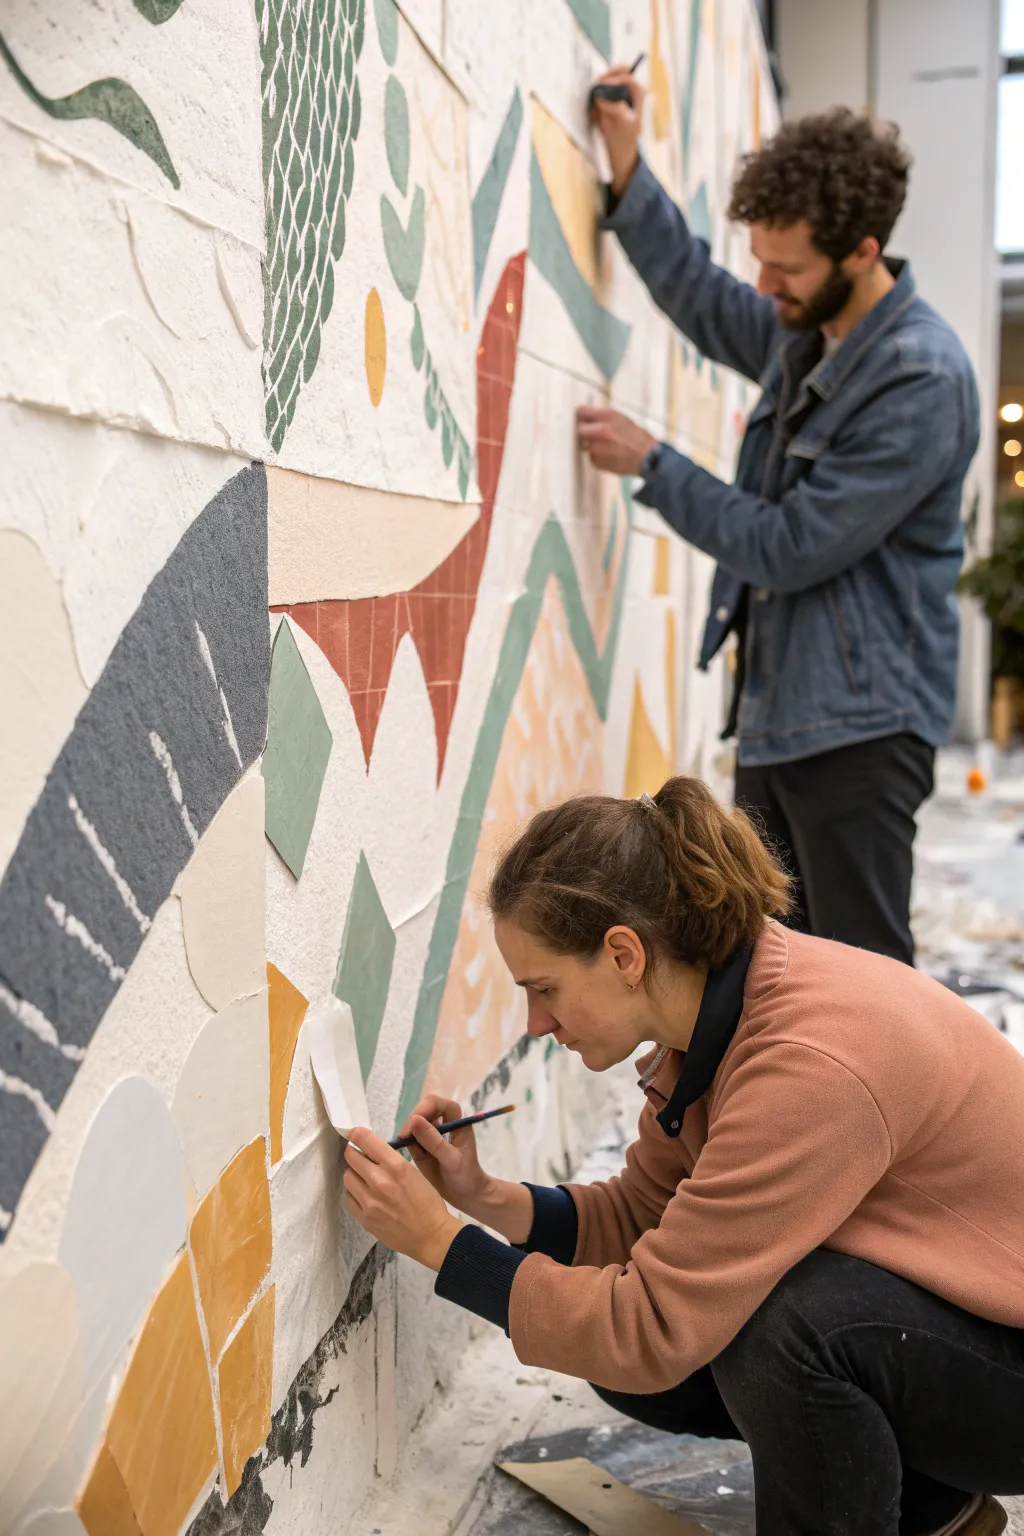
Bring tactile depth to your walls with this ambitious mixed-media mural that combines rough stucco textures with clean, geometric cutouts. This project merges the feel of a fresco with modern abstract shapes for a truly stunning, large-scale feature wall.
Step-by-Step Tutorial
Materials
- Large wooden panels or MDF sheets (for the base)
- Joint compound or texture paste
- Trowel and palette knives
- Pencil and large ruler/straightedge
- Acrylic paints (earth tones: terracotta, sage, ochre, slate blue)
- Rigid material for cutouts (thin plywood, linoleum flooring scraps, or heavy cardstock)
- Utility knife or jigsaw (depending on cutout material)
- Heavy-duty construction adhesive or wood glue
- Detail brushes
- Sandpaper (various grits)
- Painter’s tape
Step 1: Planning and Base Preparation
-
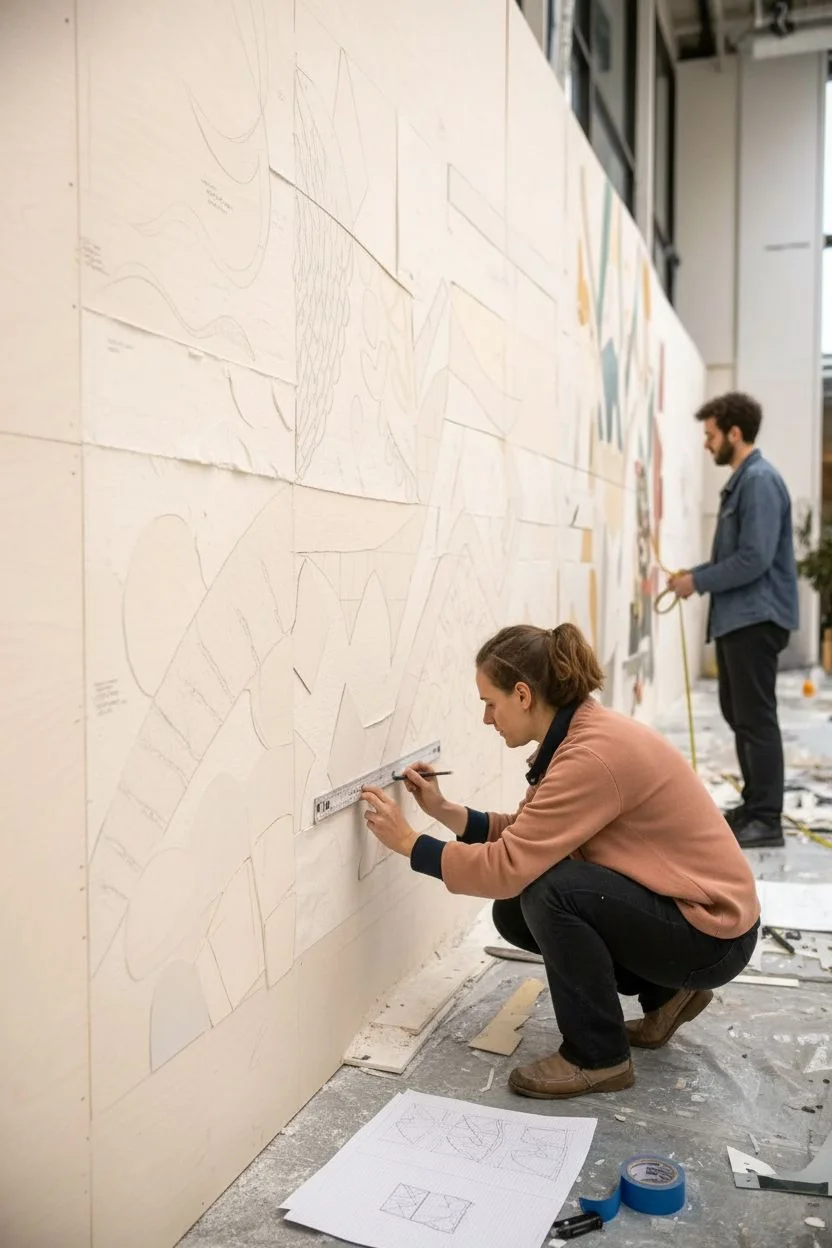
Map out your design:
Sketch a large-scale abstract design on paper first. This mural relies on the interplay between organic wave shapes and sharp geometric blocks, so balance your composition carefully. -
Prepare the substrate:
If you are working directly on a wall, ensure it is clean. For a movable installation like the one shown, mount large wooden panels or MDF sheets side-by-side to create your canvas. -
Transfer the sketch:
Lightly draw your design onto the panels using a pencil. Mark which areas will be painted directly on the texture and which areas will receive the raised ‘cutout’ pieces.
Step 2: Creating the Stucco Texture
-
Apply the base texture:
Using a trowel, spread a layer of joint compound or texture paste over the areas that will be the ‘background.’ Don’t aim for perfection; keeping the surface slightly uneven adds to the fresco look. -
add specialized textures:
While the compound is wet, use tools to create specific patterns in certain zones. You might use a comb to create ridges or a sponge for a pitted look. -
Define the edges:
Carefully clean up the edges where your cutouts will go. The texture should stop right at the line where the overlay pieces will sit, or lie flat beneath them depending on your chosen depth. -
Let it cure:
Allow the texture paste to dry completely, which usually takes 24 hours depending on thickness. I usually let this dry overnight to be safe.
Clean Seams Trick
Use masking tape on your cutouts before adhering them. If texture paste or glue squeezes out during installation, peel the tape for a perfect edge.
Step 3: Preparing the Cutouts
-
Trace shapes onto rigid material:
Take your chosen cutout material—thin plywood or linoleum works great for that tile-like effect—and trace the geometric shapes from your design. -
Cut the shapes:
Using a utility knife for thinner materials or a jigsaw for wood, carefully cut out your shapes. Sand the edges so they are clean and sharp. -
Prime the cutouts:
Apply a coat of primer to your cutout shapes to ensure the colored paint adheres evenly and looks vibrant. -
Paint the geometric pieces:
Paint these shapes in your solid block colors—mustard yellow, terracotta red, and slate grey. Use multiple thin coats for an opaque, flat finish.
Level Up: Mosaic Inlay
Replace some painted plywood shapes with actual ceramic tile shards or colored glass pieces to create true mosaic sections within the mural.
Step 4: Assembly and Detail Painting
-
Install the cutouts:
Apply heavy-duty construction adhesive to the back of your painted shapes and press them firmly into their designated spots on the wall. -
Paint the textured background:
Now paint the textured stucco areas. Use a brush to work the paint into the nooks and crannies of the plaster. Off-whites and pale creams work best here to highlight the shadows. -
Add painted details:
Some sections of the mural (like green foliage or wavy lines) can be painted directly onto the textured surface rather than being a separate cutout. -
Refine the edges:
Use a small detail brush to clean up the seams where the raised cutouts meet the textured background. A precise line here makes the work look professional. -
Touch up texture:
If any gaps remain between the cutouts and the wall, you can carefully pipe in a little more joint compound to fill the seam, then paint over it once dry. -
Final inspection:
Step back and check for any spots you missed. Ensure the adhesive is fully cured before handling or moving the panels.
Step back and admire how the light plays across the different levels of your new masterpiece
Stenciled Motifs With Personal Variations
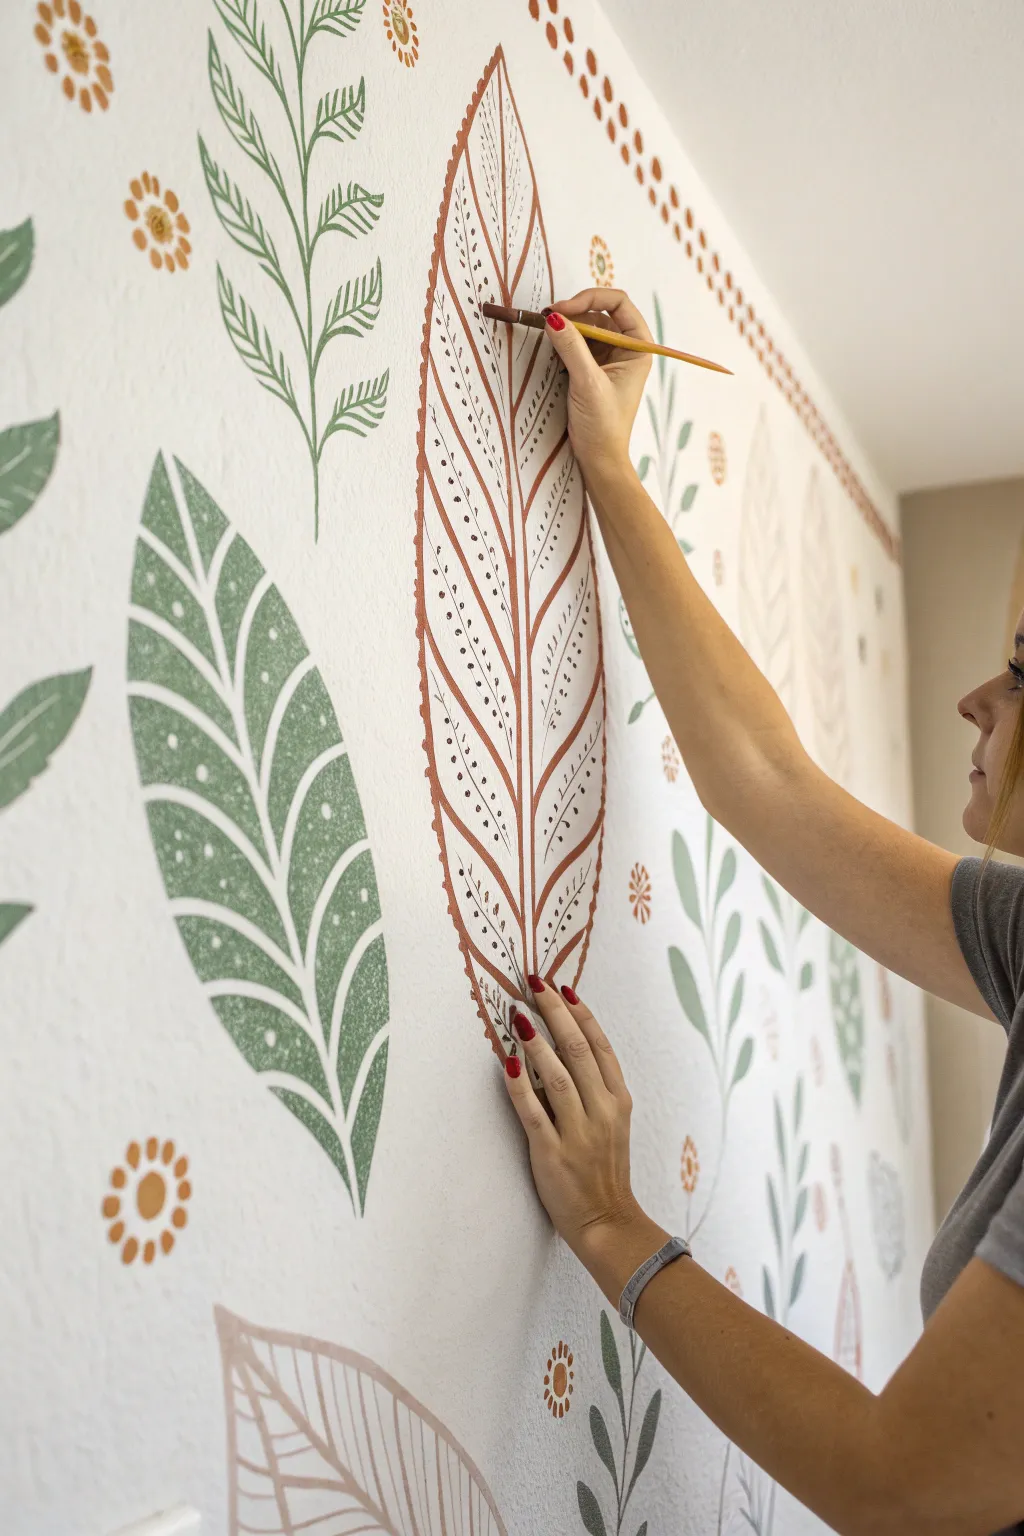
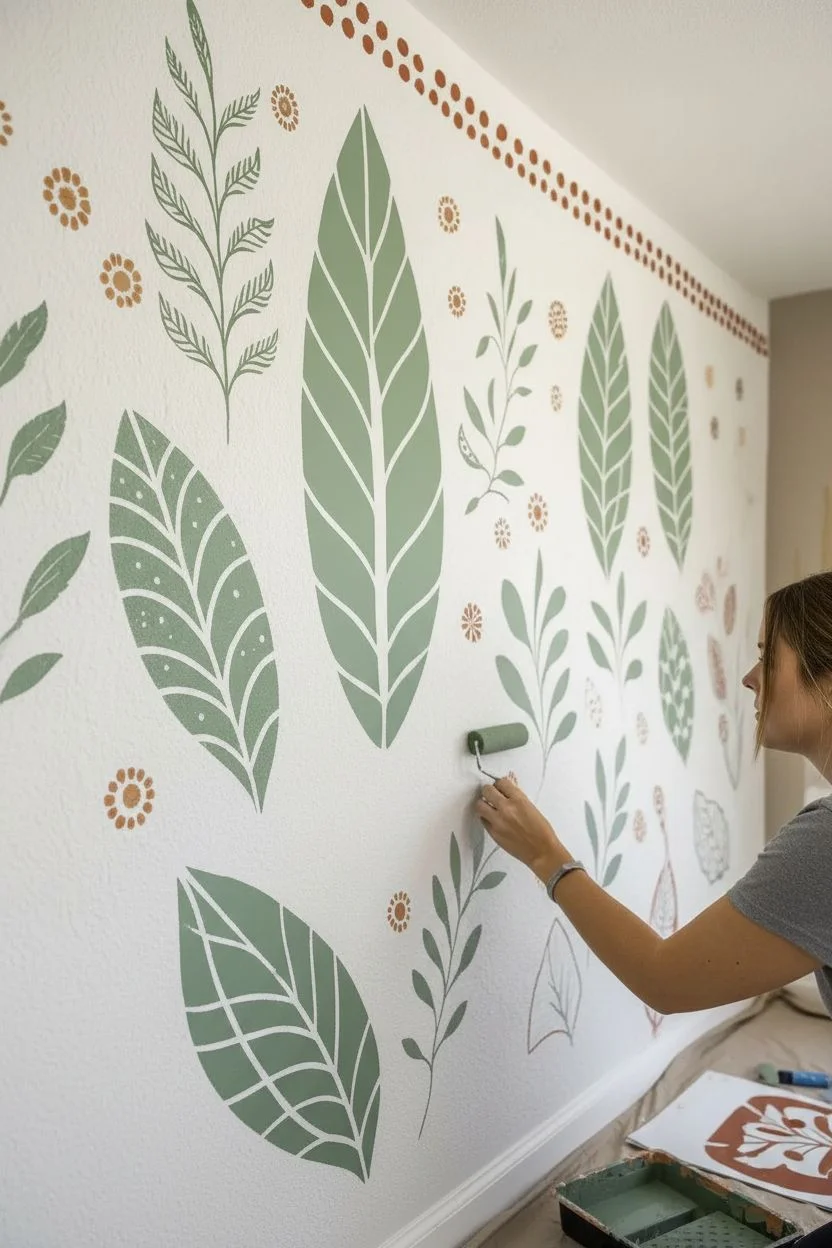
Transform a plain wall into an organic masterpiece by combining uniform stencil patterns with unique hand-painted flourishes. This technique creates a cohesive yet artisanal look, featuring large botanical leaves in earth tones and soft greens accented by delicate floral bursts.
Step-by-Step
Materials
- Wall stencils (large leaf shapes, fern fronds, small floral motifs)
- Painter’s tape or stencil adhesive spray
- Latex interior paint (white base, sage green, terracotta/rust brown, mustard yellow)
- Small foam roller and tray
- Detail brushes (round size 2 or 4)
- Pencil
- Clean rags or paper towels
- Drop cloth
Step 1: Planning and Base Stenciling
-
Prepare the surface:
Ensure your wall is clean, dry, and free of dust. If necessary, apply a fresh coat of white or off-white base paint to create a high-contrast background for your botanical shapes. -
Plan your layout:
Before painting, hold your stencils up to the wall to visualize the spacing. Mark light registration points with a pencil to ensure a balanced distribution of large leaves and smaller filler elements. -
Secure the primary stencil:
Start with the largest leaf motif. Spray the back of the stencil lightly with adhesive or use painter’s tape to secure it firmly against the wall to prevent bleed-under. -
Roll the first color:
Load a foam roller with sage green paint, then offload most of it onto the tray until the roller feels almost dry. This ‘dry rolling’ technique is critical for crisp edges. -
Apply paint to the stencil:
Gently roll over the stencil using light to medium pressure. Multiple thin coats are better than one thick coat. -
Repeat with variation:
Move the large leaf stencil to a new position. Rotate it slightly or flip it over to create natural variation in the pattern. -
Switch colors and shapes:
Clean your roller or grab a fresh one. Switch to the terracotta/rust paint and apply the other large leaf shapes using the same dry-rolling method.
Less is More on the Roller
The #1 cause of messy stencils is too much paint. Roll your tool on a paper towel before hitting the wall; it should feel almost dry to the touch to prevent bleeding.
Step 2: Adding Secondary Motifs
-
Position foliage fillers:
Select a fern or vine stencil. Place these between the large leaves to fill negative space, using a darker green or sticking with the sage tone for continuity. -
Add floral accents:
Using a small floral stencil and mustard yellow or rust paint, add small flower clusters. These act as confetti-like accents that tie the color palette together. -
Create borders:
If desiring a framed look like in the photo, use a pattern stencil or freehand a simple dotted line near the ceiling using the rust color.
Fixing Smudged Edges
If paint bleeds under the stencil, don’t wipe it while wet. Let it dry completely, then use a small artist brush and your wall’s background color to ‘erase’ the mistake.
Step 3: Personalizing with Hand-Painted Details
-
Prepare detail brushes:
Once the base stencil layers are completely dry, switch to a small round paint brush (size 2 or 4). This step transforms the flat stencil design into something unique. -
Add central veins:
On the large rust-colored leaves, paint a thin, steady line down the center to define the stem. It doesn’t need to be perfectly straight; a little waiver looks organic. -
Paint varying texture:
On one side of the leaf vein, paint diagonal stripes following the leaf’s natural ribbing. On the other side, try stippling small dots or dashes to create visual interest. -
Highlight the green leaves:
For the green leaves, use white paint or a lighter shade of green to add dots or simple line contours inside the leaf shape, giving it depth. -
Refine the border:
Use your brush to touch up the ceiling border, adding small dots or specific pattern repeats that stencils might miss in tight corners. -
Review and touch up:
Step back to view the mural as a whole. Use a tiny brush with the wall’s base color to clean up any stencil bleeds or smudges for a professional finish.
Enjoy the rhythmic process of adding those final hand-painted details for a truly custom wall
Storybook Timeline Across The Wall
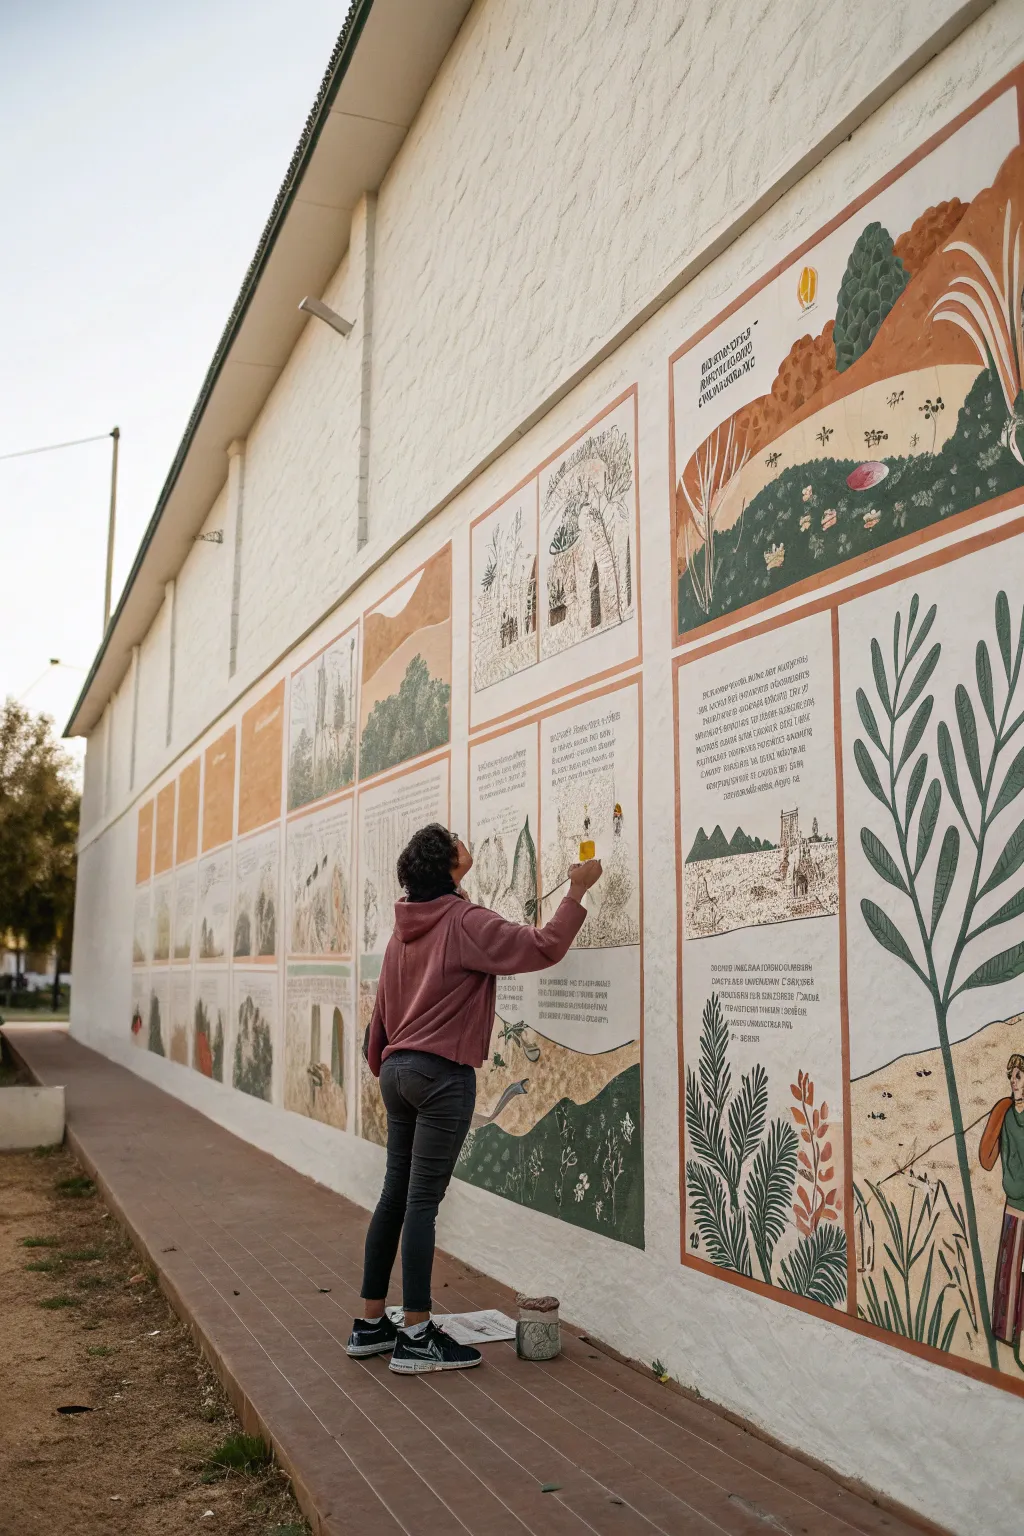
Transform a blank exterior wall into a captivating narrative with this panel-style mural that mimics the look of an illustrated manuscript. Featuring earthy tones, framed vignettes, and scripted text blocks, this project creates a timeless, storybook feel perfect for community storytelling.
How-To Guide
Materials
- Exterior masonry primer
- Exterior latex paints (white, cream, terracotta, sage green, forest green, deep brown)
- Wide painter’s tape (2-inch)
- Chalk line tool
- Assorted paintbrushes (large rollers, 2-inch angled sash, fine liner brushes for detail)
- Stencils for text (optional)
- Graph paper and pencil for planning
- Projector (for transferring sketches)
- UV-resistant clear sealant
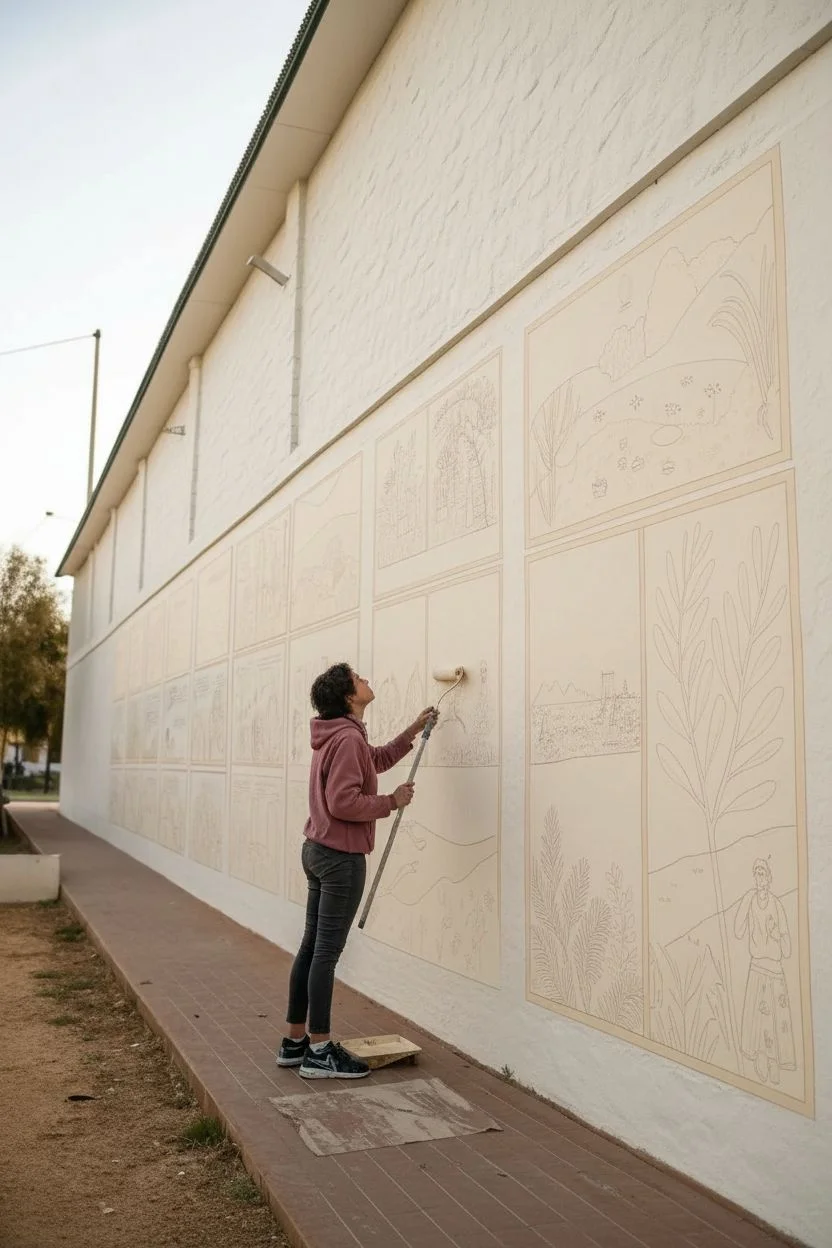
Step 1: Planning and Surface Prep
-
Map the Narrative:
Begin by sketching your ‘pages’ on graph paper. Decide on the sequence of images and text blocks. The aesthetic here relies on a grid layout, so plan for distinct rectangular panels separated by wide gutters (white space). -
Clean and Prime:
Power wash the wall to remove dirt and loose debris. Once fully dry, apply a high-quality masonry primer to ensure your colors stay vibrant and adhere properly to the texture. -
Establish the Base Color:
Roll a coat of warm white or cream paint across the entire wall. This acts as the ‘paper’ background for your storybook pages and provides a unified look behind the panels.
Step 2: Creating the Grid Structure
-
Snap the Lines:
Using a chalk line and a measuring tape, mark out the horizontal and vertical boundaries of your panels. Ensure the spacing between them is consistent. -
Tape the Borders:
Apply wide painter’s tape along the outside of your chalk lines. This masks off the ‘gutters’ (the space between panels) to keep them crisp and white. -
Paint the Frames:
Within your taped sections, paint thick borders for each panel. Use a terracotta or muted brown shade to resemble the illustrated borders found in vintage manuscripts.
Grid Precision
Use a laser level at twilight to check your horizontal chalk lines. Masonry walls often have uneven ground, so relying on the ground level can result in a crooked grid.
Step 3: Adding Illustrations
-
Transfer the Sketches:
Wait for the border paint to dry. In the evening, project your planned illustrations into the empty panel spaces and trace the outlines with a pencil or light chalk. -
Block in Background Colors:
Paint the larger color fields first—sky blues, hill greens, or sepia tones. Keep the palette limited to earthy, natural hues to maintain the antique aesthetic. -
Add Botanical Details:
Using smaller round brushes, paint the specific elements like trees, plants, and figures. I like to keep these slightly stylized and two-dimensional, mimicking older printing styles. -
Outline for Definition:
Once the colors are dry, use a fine liner brush and dark brown or charcoal paint to add outlines to your shapes. This separation creates that classic ‘illustration’ look.
Community Story
Invite community members to write short local histories or poems. Incorporate these real stories into the text blocks to make the mural a true public archive.
Step 4: Typesetting and Finishing
-
Paint text blocks:
Identify where the text will go. Paint a very subtle, light beige box in that area if you want it to stand out from the background illustration. -
Lettering:
For the text, use stencils or project the font to trace. Use a steady hand and a fine liner brush with dark paint. Keep the font style consistent—something resembling a serif or handwritten script works best. -
Final Touches:
Review the mural for any uneven edges. Use the original wall color to touch up the gutters and remove any stray paint marks. -
Seal the Work:
Apply a clear, UV-resistant exterior sealant over the entire mural. This is crucial for protecting the colors from sun fading and weather damage over time.
Step back and admire how your series of panels transforms a simple wall into a rich, unfolding tapestry of local stories
Glow-Style Night Mural Under Blacklight
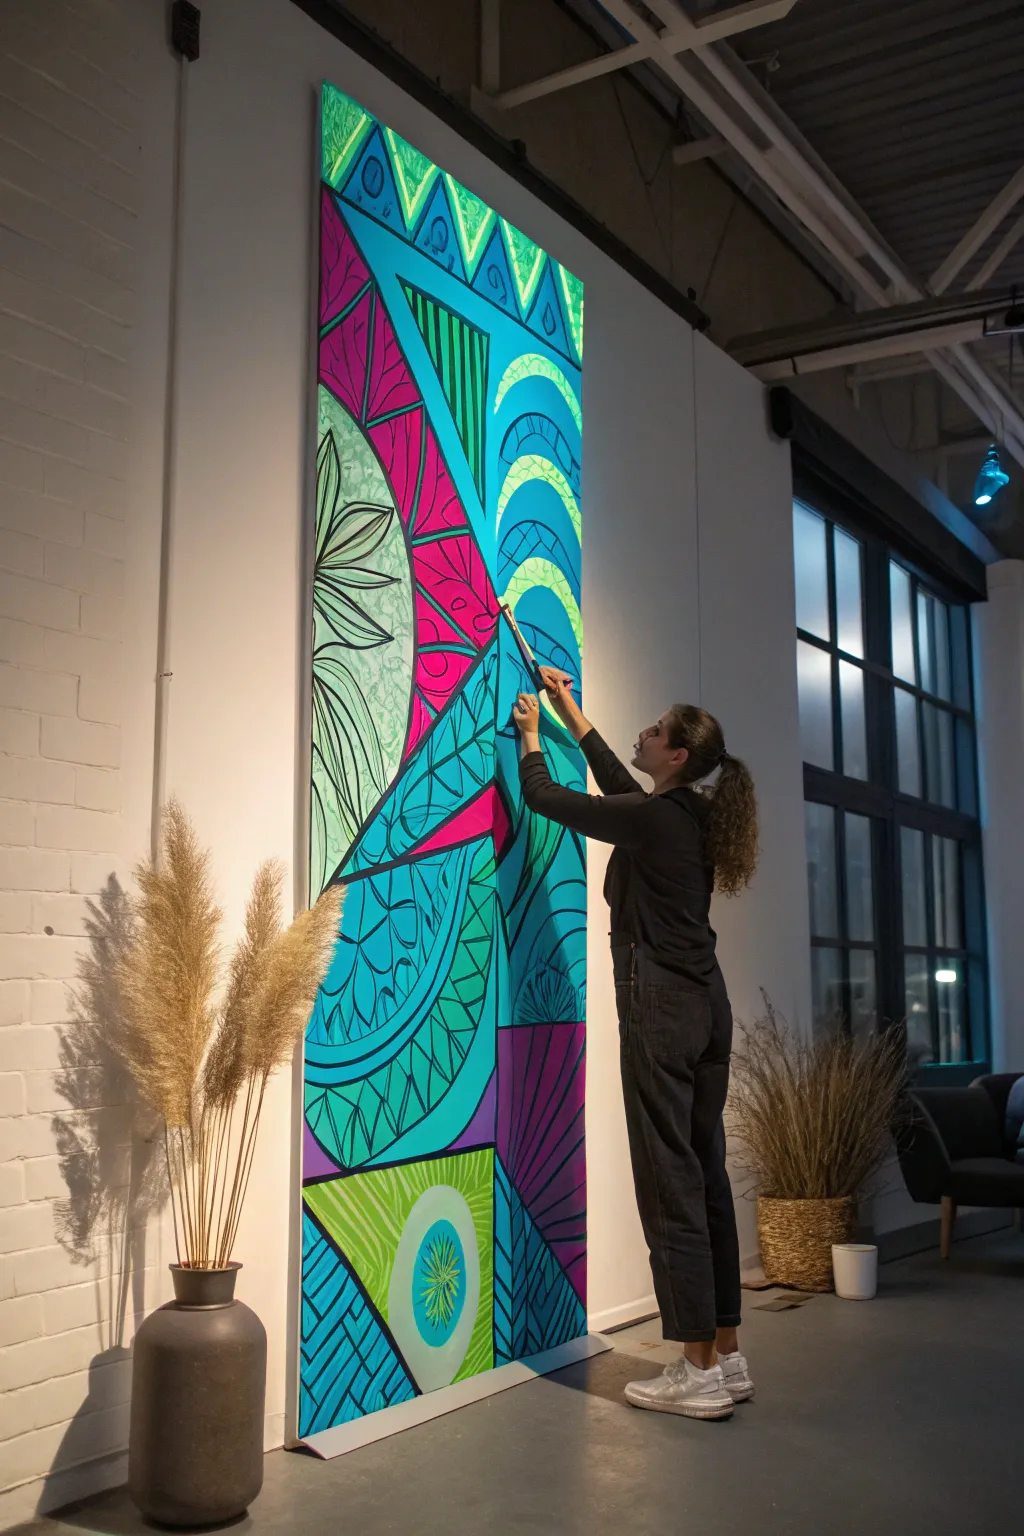
Transform a tall, vertical panel into a luminous statement piece that comes alive under blacklight. This project combines bold geometric structure with organic motifs, using fluorescent paints to create an electrifying visual experience.
Step-by-Step Guide
Materials
- Large vertical MDF or canvas panel (approx. 8ft tall)
- White acrylic gesso primer
- High-quality neon/fluorescent acrylic paints (pink, green, blue, yellow, purple)
- Black acrylic paint or bold black paint marker
- Wide flat brushes (2-3 inch) for base coats
- Medium and fine round brushes for detailing
- Painter’s tape or masking tape
- Pencil and eraser
- Ruler or long straight edge
- UV/Blacklight fixture (for testing colors)
- Drop cloth
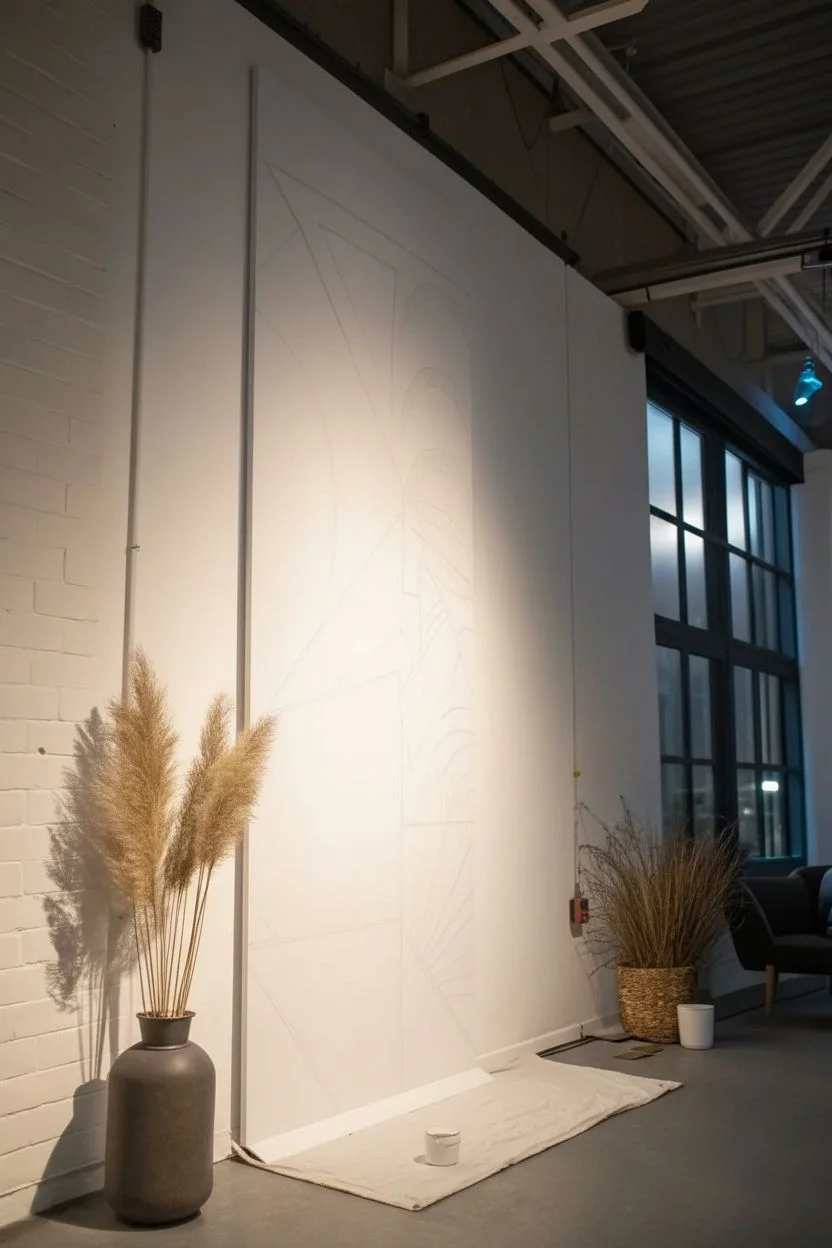
Step 1: Preparation & Design
-
Prepare the surface:
Lay down your drop cloth and position your vertical panel securely against a wall. Apply two even coats of white gesso primer to the entire surface. The white base is crucial because it makes neon pigments pop significantly more than a raw or dark background. -
Let it dry:
Allow the primer to dry completely, usually for about 2-3 hours depending on humidity, until it feels chalky and room temperature to the touch. -
Sketch the major zones:
Using a pencil and your long straight edge, lightly break the canvas into large, non-uniform triangles and angled sections. Create a dynamic composition by ignoring symmetry; let some shapes dominate the top while others anchor the bottom. -
Add organic curves:
Identify a few large geometric sections to contrast with curves. Sketch in sweeping arcs, semi-circles, or large leaf-like shapes within these boundaries to soften the rigid lines.
Patchy Glow?
If neon paint looks streaky under UV light even after drying, apply a thin coat of clear UV-reactive medium or white neon paint mixed with the color to boost opacity.
Step 2: Color Blocking
-
Tape off sections:
Select the first set of geometric shapes you want to paint—perhaps the large triangles. Use painter’s tape to mask off the edges to ensure razor-sharp lines. -
Apply the cyan base:
Start with your neon cyan or electric blue. Fill in the large, curved sections and triangular backgrounds. You’ll likely need two or three thin layers to get opaque coverage without streakiness. -
Introduce neon pink:
Move to the contrasting sections. Paint the bold angular shapes with neon pink. I find that pink often needs an extra coat compared to darker colors to look solid. -
Fill remaining zones:
Use neon green and yellow for the smaller accent shapes and remaining negative spaces. Ensure every part of the white primer is covered with color. -
Remove tape:
Carefully peel back the painter’s tape while the paint is still slightly tacky to prevent it from chipping the dried edge.
Step 3: Detailing & Linework
-
Draft the inner patterns:
Once the base colors are totally dry, lightly pencil in your detailed patterns. Plan for scales, leaf veins, or smaller triangles inside your larger blocks of color. -
Paint secondary patterns:
Using a smaller brush, paint patterns inside the color blocks. For example, add lighter green curves inside a dark green section, or yellow triangles inside a teal block. -
Outline organic shapes:
Switch to your black paint or a thick black paint marker. outline the large leaf motift and organic curves with a confident, consistent line weight. -
Define the geometry:
Use the straight edge to help guide your brush as you paint thick black borders between the major color zones. This ‘stained glass’ effect separates the neon colors and prevents visual vibration. -
Add texture marks:
Inside the smaller shapes, use fine black lines to create texture—cross-hatching, parallel lines, or small dots. -
Refine edges:
Walk back from the mural to check for any wobbly lines. Use your small brush to sharpen the black outlines where needed. -
Check under UV light:
Turn off the main lights and switch on your blacklight. Inspect the panel for any spots where the coverage is thin and add a final touch-up layer of neon paint to ensure a uniform glow.
Invisible Secrets
Use ‘invisible’ blue or UV-white UV paint to add secret messages or patterns over the dried colors. They will disappear in daylight but magically appear under blacklight.
Step back and flip the switch to see your towering geometric creation illuminate the room with vibrant energy


Have a question or want to share your own experience? I'd love to hear from you in the comments below!