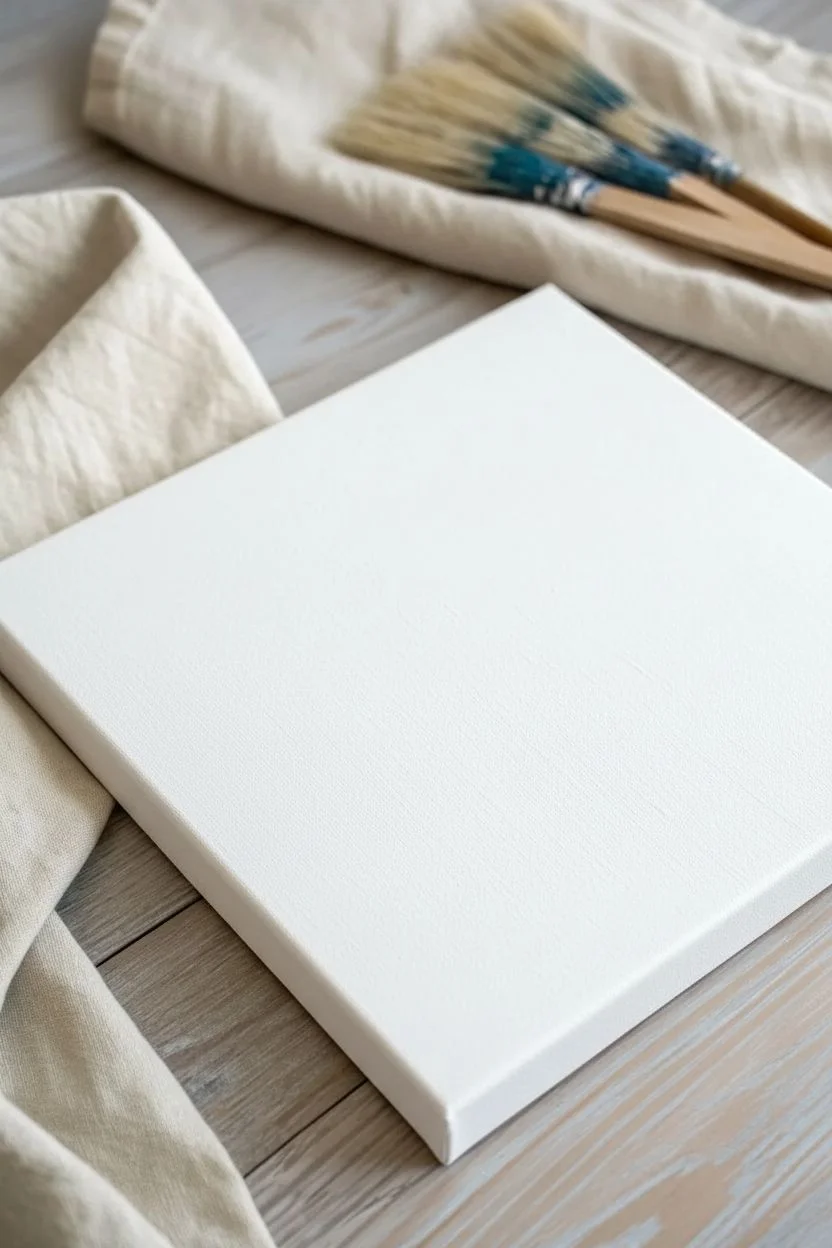
Painting on canvas makes kids feel like real artists, because their work instantly looks display-worthy and special. These canvas ideas for kids are my go-to projects when you want bold color, simple steps, and that happy “I made this!” moment.
Rainbow Ombre Stripes
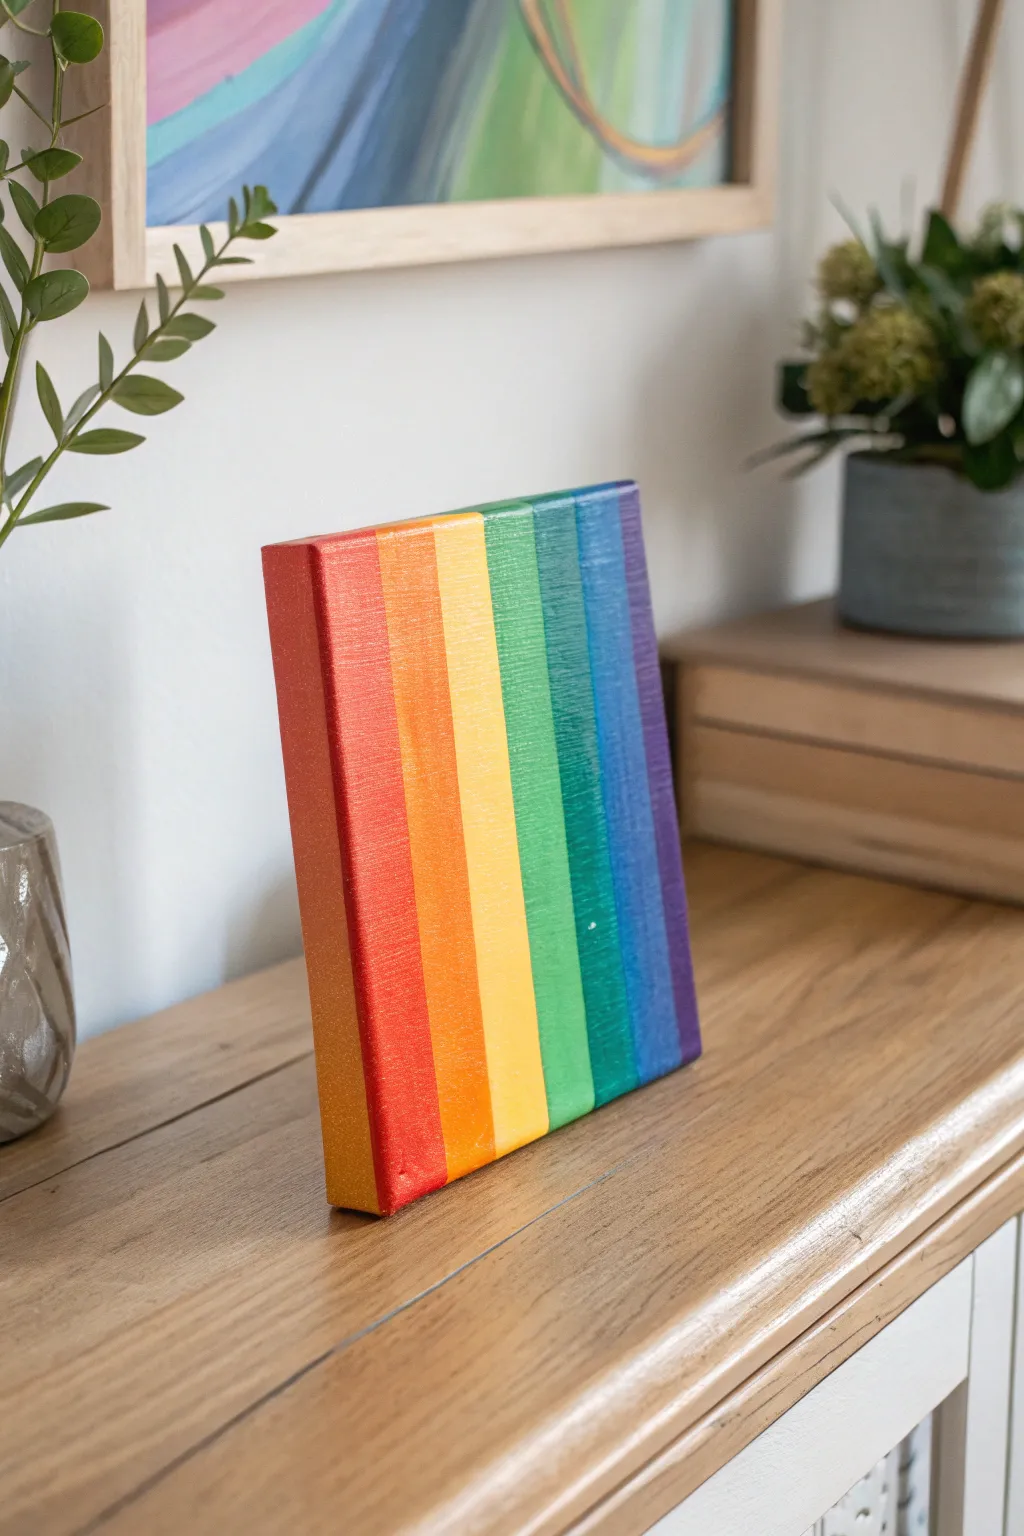
Brighten up any corner of a room with this vibrant canvas project that celebrates the full spectrum of color. Using metallic or glitter paints adds a subtle, magical shimmer that catches the light beautifully, making it a perfect weekend craft for kids.
Detailed Instructions
Materials
- Small rectangular stretched canvas (e.g., 5×7 or 8×10 inches)
- Painter’s tape or masking tape (1 inch width is ideal)
- Acrylic paints in rainbow colors (Red, Orange, Yellow, Green, Blue, Purple)
- Metallic mixing medium or clear glitter topcoat
- Flat shader paintbrush (around 1 inch wide)
- Palette or paper plate
- Ruler
- Pencil
- Cup of water and paper towels
Step 1: Preparation
-
Prepare your workspace:
Lay down newspaper or a plastic tablecloth to protect your surface. Set out your canvas and ensure it is free of dust or lint. -
Measure the stripes:
Using a ruler, measure the total width of your canvas. Divide this number by six (for the six rainbow colors) to determine how wide each stripe needs to be. -
Mark the guides:
Lightly mark these intervals with a pencil at the top and bottom edge of the canvas. These small tick marks will guide your painting so your stripes stay even. -
Mix the magic:
Squeeze out your six acrylic colors onto your palette. If your paints aren’t already metallic, mix a drop of metallic medium into each color now to achieve that lovely sheen seeing in the photo.
Wobbly Lines?
If freehand painting is tricky, let each stripe dry completely, then apply painter’s tape over the dry stripe to shield it while you paint the neighbor color.
Step 2: Painting the Warm Tones
-
Start with Red:
Dip your flat brush into the red paint. Paint the first vertical stripe on the far left edge. Be sure to paint around the side edge of the canvas as well for a polished, finished look. -
Clean the lines:
Use the flat edge of your brush to create a straight vertical line where the red will meet the orange. If you have a steady hand, freehand is great; otherwise, you can use painter’s tape to mask off the neighbor area. -
Wash the brush:
Thoroughly rinse your brush in water and dry it on a paper towel. You don’t want any red mixing into your bright orange. -
Paint the Orange:
Paint the second stripe with orange, carefully meeting the edge of the red stripe. I find it helps to slightly overlap the wet edges just a hair to avoid any white canvas showing through. -
Apply Yellow:
Rinse again and apply the yellow stripe next. Yellow can be translucent, so you might need a second coat after the first one dries slightly to make it pop.
Make It 3D
After the paint is dry, outline the separation between each color with a thin line of white puffy paint or gold leaf pen for extra definition.
Step 3: Painting the Cool Tones
-
Switch to Green:
Move on to the green stripe right next to the yellow. Keep your brush strokes vertical, moving from the top of the canvas all the way to the bottom in one smooth motion if possible. -
Add the Blue:
Paint the blue stripe. Remember to check that you are sticking to your pencil guide marks so the last stripe doesn’t end up too skinny or too wide. -
Finish with Purple:
Paint the final stripe in purple on the far right edge. Just like you did with the red, wrap this color around the side of the canvas to completely cover the white edge. -
Top and bottom edges:
Inspect the top and bottom edges of the canvas. Extend each color stripe over these edges so the rainbow pattern continues seamlessly around the whole block.
Step 4: Finishing Touches
-
Let it dry:
Allow the paint to make completely dry to the touch. This usually takes about 20 to 30 minutes for acrylics. -
Second coat check:
Look at your artwork in bright light. If the canvas texture is showing through too much, apply a quick second coat to any patchy stripes. -
Optional sparkle:
If you didn’t use metallic paint, now is the time to brush on a layer of clear glitter topcoat over the entire piece to create that unified, shimmering finish.
Place your colorful creation on a shelf or desk for a daily dose of cheer


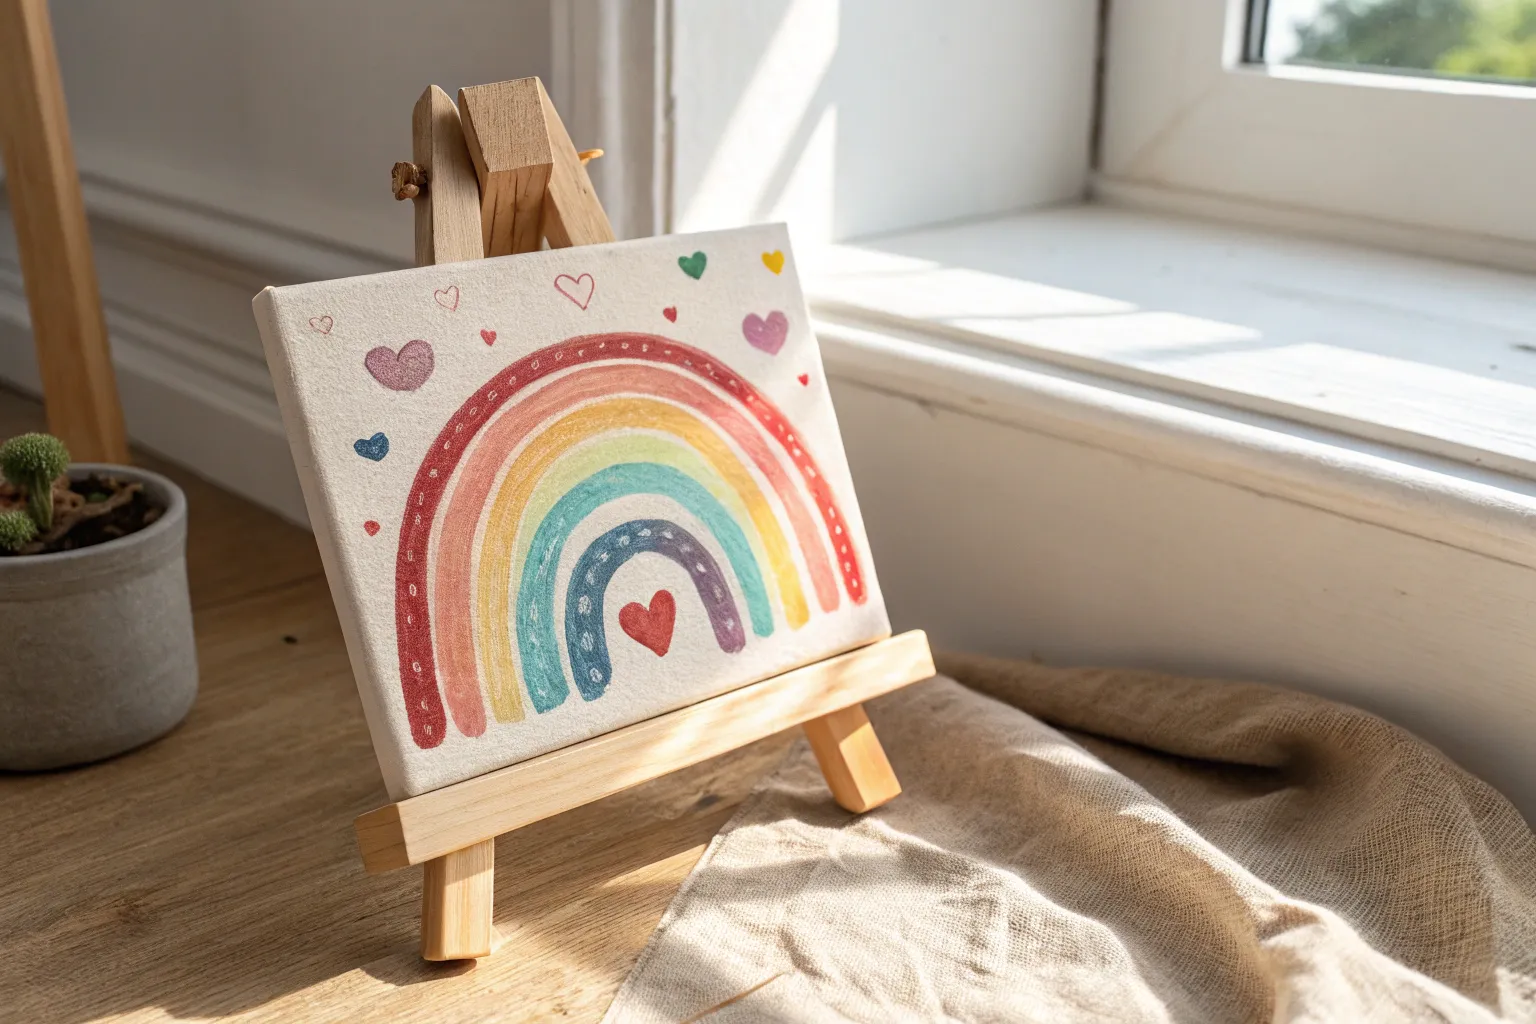
Handprint Rainbow Heart
This heartwarming project combines the classic charm of a childs handprint with vibrant rainbow colors in a unique heart shape. The finished canvas serves as a beautiful keepsake, capturing a moment in time alongside a cheerful splash of color that brightens any room.
Step-by-Step Guide
Materials
- Square canvas (approx. 8×8 or 10×10 inches)
- Acrylic craft paints (red, orange, yellow, green, blue, indigo, violet)
- Medium flat paintbrush
- Small round paintbrush (for details and signing)
- Paper plate or palette
- Pencil
- Baby wipes or damp paper towels
- Washi tape or low-tack painter’s tape (optional)
Step 1: Preparation & First Prints
-
Prepare the canvas:
Start with a clean, dry pre-primed canvas. If you want a more finished look, you can paint the background white or a very light pastel color first, but leaving it plain white works perfectly for high contrast. -
Plan the placement:
Lightly visualize where the heart will go. It should be centered, but leave enough room at the bottom corners for the two handprints. You can make tiny pencil marks to guide you if needed. -
Apply yellow paint for the first handprint:
Squeeze some bright yellow acrylic paint onto your palette. Using the flat brush, coat the child’s left hand thoroughly. A thin, even coat is better than a thick globby one to preserve the skin details. -
Stamp the left handprint:
Guide the child’s yellow hand to the bottom left corner of the canvas. Press down firmly on the palm and each finger to ensure a good transfer, then lift straight up. Wipe the hand clean immediately. -
Apply red paint for the second handprint:
Repeat the process with the right hand, this time using bright red paint. Make sure to cover the palm and fingers evenly. -
Stamp the right handprint:
Press the red hand into the bottom right corner of the canvas. Orient it slightly angled outward, mirroring the yellow handprint. Lift carefully and clean hands thoroughly.
Clearer Prints
For sharper handprints, practice on scrap paper first. Use a sponge brush to apply paint to the hand rather than dipping it. This ensures an even, thin layer that won’t slide.
Step 2: Painting the Rainbow Heart
-
Outline the heart shape:
Using a pencil, very lightly sketch a large heart shape in the center of the canvas above the handprints. This will serve as your guide for the outermost rainbow band. -
Paint the red arch:
Start with the red paint. Using your flat brush, paint the left side of the heart’s outer curve. Stop at the bottom point of the heart. -
Complete the red outline:
Continue with red paint on the right side of the heart, connecting at the top dip and meeting the other line at the bottom point. Don’t worry about the inside edge being perfect, but keep the outside edge crisp. -
Add the orange layer:
Clean your brush. Pick up orange paint and paint a band directly inside the red line. It’s okay if the colors touch or slightly blend; it adds a nice painterly effect. -
Add the yellow layer:
Continuing inward, paint a yellow stripe next to the orange one. By now, the heart shape is getting smaller as you move toward the center. -
Paint the green layer:
Switch to green paint. Carefully follow the curve of the yellow line. As the heart gets smaller, you might need to switch to a slightly smaller brush if you have trouble with tight curves. -
Layer the blue band:
Add the blue stripe inside the green. I find that steadying my hand on the table helps with these smaller inner curves to keep the trembling lines to a minimum. -
Finish with purple paint:
Fill the remaining center space with a purple or violet heart outline. Depending on how much room you have left, this might just be a small solid heart or a final thick line.
Step 3: Finishing Touches
-
Let the paint set:
Allow the main rainbow heart to dry for about 10-15 minutes so you don’t accidentally smudge wet paint while signing. -
Sign the masterpiece:
Using a very thin round brush or a fine-tip permanent marker (once the paint is fully dry), have the child sign their name. In the image, the name is written in small blue letters near the yellow handprint. -
Touch ups:
Inspect the canvas for any stray smudges. If you find white spots in the rainbow where the canvas shows through too much, you can gently dab a little extra paint to fill the gaps. -
Final dry time:
Set the canvas in a safe, dust-free area to dry completely, preferably overnight, before displaying.
Wobbly Lines?
If painting curved rainbow stripes is tricky, lightly sketch all the concentric heart lines with a pencil first. This gives you a ‘coloring book’ style guide to follow with your brush.
Now you have a colorful, personalized piece of art that freezes a moment of childhood in time

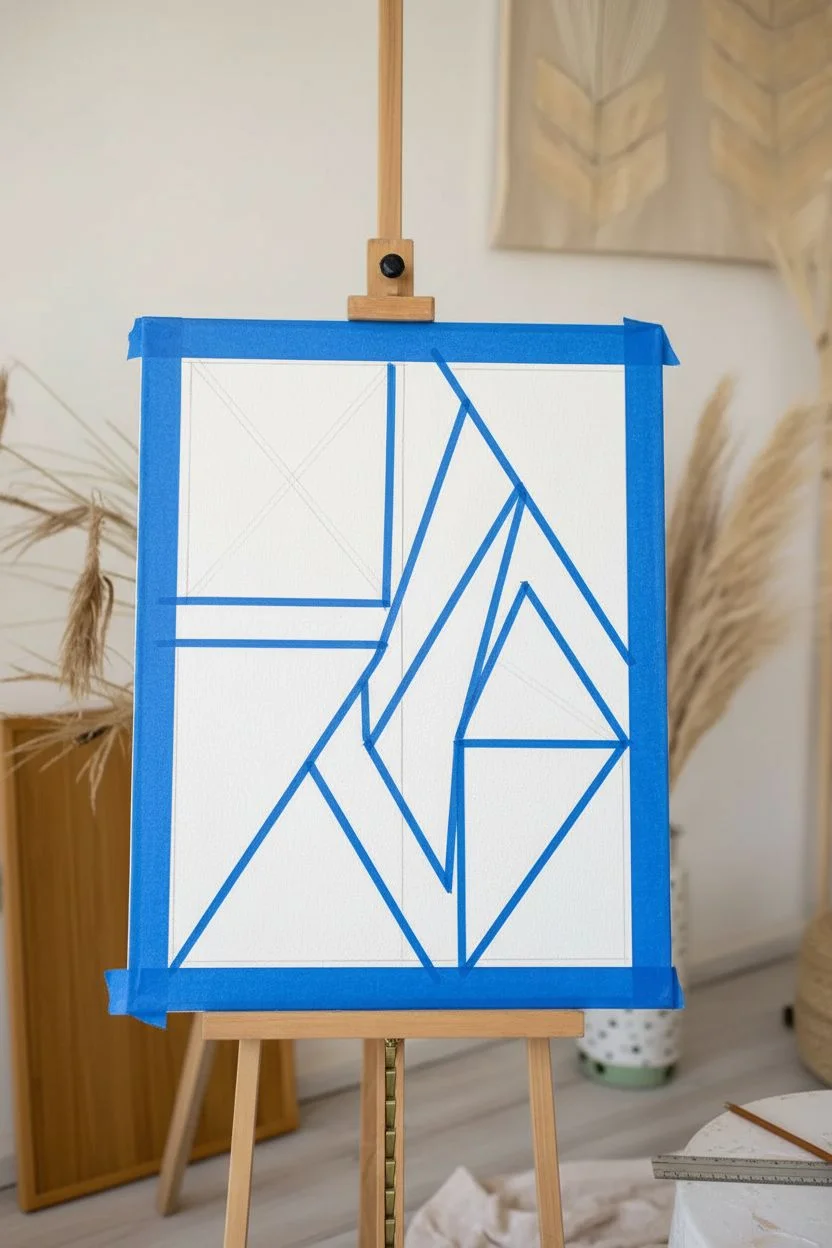
Tape-Resist Geometric Blocks
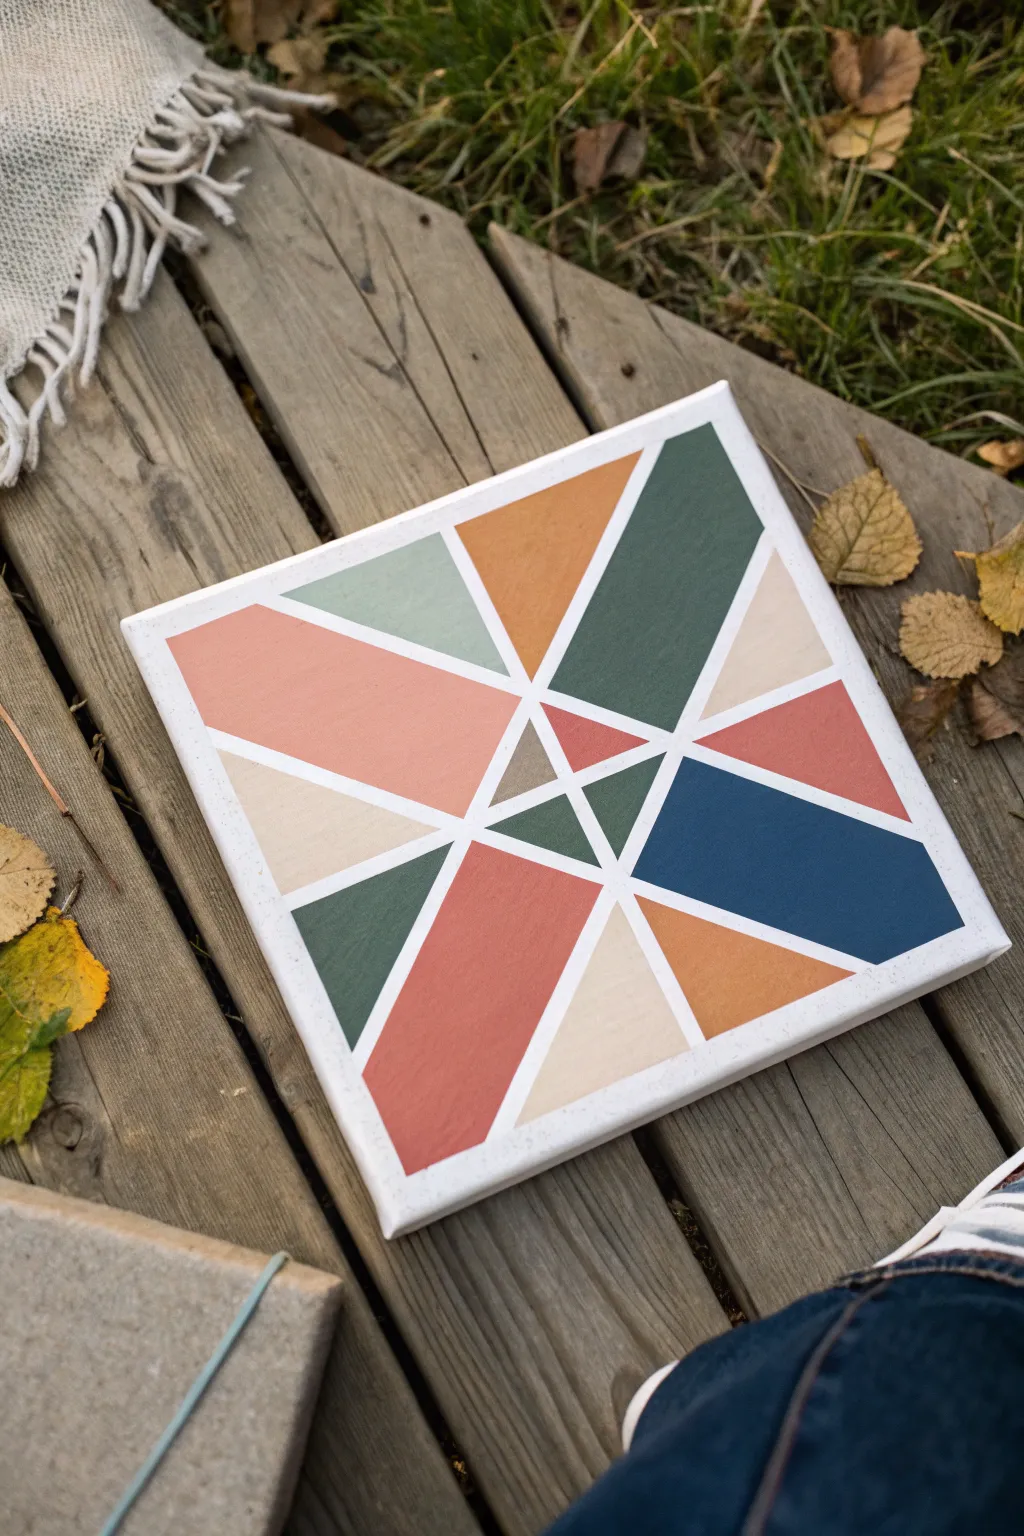
This trendy geometric art project uses the magic of painter’s tape to create crisp, clean lines and a striking starburst pattern. With its warm, earthy palette of rusts, greens, and blues, this piece looks sophisticated enough for a gallery wall but is simple enough for kids to master.
Step-by-Step
Materials
- Square stretched canvas (8×8 or 10×10 inches works well)
- Painter’s tape (1/4 inch or 1/2 inch width recommended)
- Acrylic paints (rust, dark green, navy blue, ochre/mustard, light sage, beige, rose)
- Medium flat paintbrush
- Small flat paintbrush
- Palette or paper plate
- Ruler
- Pencil
- Scissors
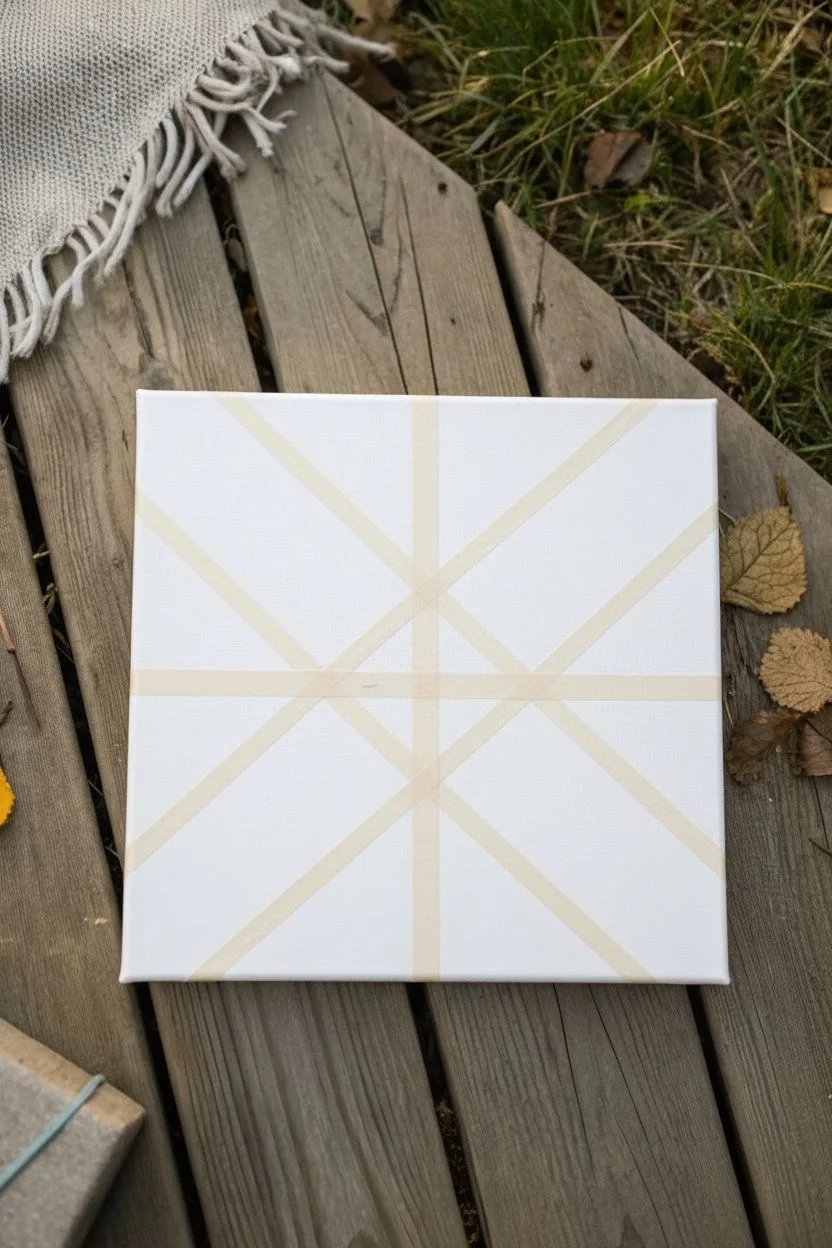
Step 1: Planning the Pattern
-
Base prep:
Start with a clean, white canvas. If your canvas isn’t already primed white, give it a quick coat of white acrylic paint and let it dry completely to ensure your lines stay bright. -
Mark the center:
Use your ruler to find the exact center of the canvas. Make a tiny, light pencil mark at this center point. -
Create the main cross:
Cut two long strips of painter’s tape. Place one vertically and one horizontally, intersecting exactly over your center mark to create a large cross. -
Add diagonals:
Place two more long strips of tape diagonally from corner to corner, also crossing through the center point. You should now have a star-like shape made of tape. -
Form the star points:
Now, create the inner star shape. Cut shorter pieces of tape to connect the lines you’ve already made. Place a strip connecting a horizontal line to a diagonal line about halfway out from the center. -
Complete the geometry:
Continue this process around the canvas, connecting adjacent main lines to form triangles and diamond shapes. Feel free to follow the pattern in the photo or invent your own geometric layout. -
Seal the deal:
Run your finger or a credit card firmly over all the tape edges. This is crucial to prevent paint from bleeding underneath and ensures those super crisp lines later.
Step 2: Painting the Shapes
-
Color selection:
Squeeze your paint colors onto the palette. For this earthy look, you’ll need a rust red, a deep forest green, a mustard yellow, a dusty rose, a beige, and a muted navy blue. -
First section:
Dip your medium flat brush into the rust color. Paint one of the large diamond shapes, brushing away from the tape edges to minimize seepage. -
Distribute color:
To balance the composition, paint another section on the opposite side of the canvas with that same rust color. I usually try not to have two shapes of the same color touching. -
Add the greens:
Switch to your forest green. Fill in a few of the elongated triangles, ensuring the paint coverage is opaque and smooth. -
Apply the blues:
Use the navy blue for one or two focal points. The dark color draws the eye, so place these thoughtfully within your design. -
Fill with neutrals:
Paint the smaller triangles and remaining sections with your lighter colors—the beige, sage, and dusty rose. -
Touch ups:
Look closely at your work. If any darker colors look streak, wait for them to dry to the touch and add a second coat for solid coverage.
Bleed Blocker
Before adding color, paint a thin layer of white over the tape edges. This seals gaps so any bleeding is white-on-white, keeping colored lines perfect.
Step 3: The Reveal
-
Wait for it:
Let the painting dry until it is tacky but not fully hardened. If the paint is too dry, it might peel up with the tape; if it’s too wet, it might smear. -
Peel carefully:
Start peeling the tape off slowly at a 45-degree angle. Remove the last pieces you applied first, working backward toward the first pieces you laid down. -
Clean edges:
Once all tape is removed, check your white lines. If there are any small bleeds, use a tiny brush and white paint to tidy them up.
Metallic Accent
Swap the beige paint for metallic gold or copper acrylic. The shimmer adds a glamorous touch against the matte earth tones.
Now you have a stunning piece of geometric art ready to brighten up any shelf or wall


Fingerprint Balloon Bunch
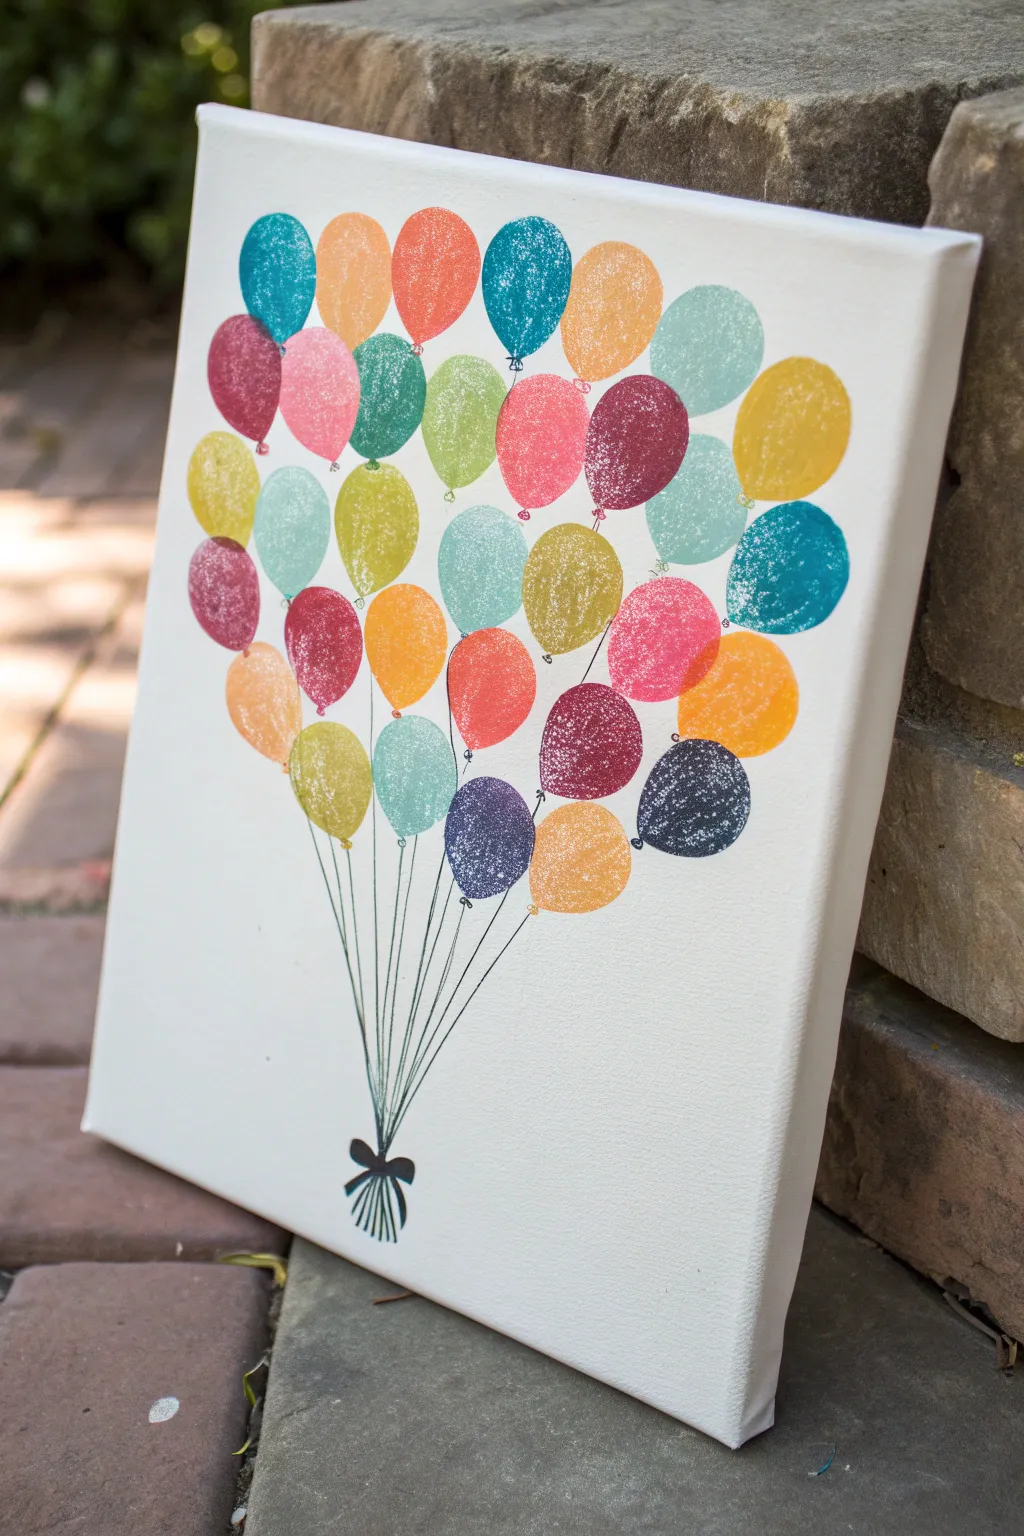
Create a vibrant keepsake that captures a moment in time using just paint and your fingertips. This cheerful canvas art turns simple thumbprints into a soaring bunch of balloons, perfect for brightening up a playroom or preserving little prints.
Detailed Instructions
Materials
- Stretched white canvas (8×10 or 11×14 inches)
- Acrylic paints in various bright colors (red, orange, yellow, greens, blues, purple, pink)
- Disposable plate or palette
- Fine-point black permanent marker or archival ink pen
- Paper towels or baby wipes
- Ruler (optional)
- Pencil (optional)
Step 1: Creating the Balloons
-
Prepare your palette:
Squeeze dime-sized amounts of your acrylic paint onto your paper plate. You want a nice rainbow assortment, so try to have at least 6-8 distinct colors ready. -
Plan the arrangement:
Visualize an inverted triangle shape or a large oval in the upper two-thirds of your canvas. This is where your balloon cluster will live. -
Start at the top:
Press a thumb (or index finger for smaller balloons) firmly into one paint color. Blot it once on a scrap piece of paper to remove excess globby paint. -
Print the first layer:
Press your painted finger onto the top area of the canvas. Rock it slightly to get a full oval shape, then lift straight up to avoid smearing. -
Build the bunch:
Continue adding prints, working your way down. Switch fingers or wipe your thumb clean between colors to keep the hues bright and distinct. -
Layer for depth:
Allow the first few prints to dry for a minute or two. Then, place new balloons slightly overlapping the ones behind them to create a sense of volume and depth in the bunch. -
Fill the gaps:
Look for empty white spaces within your main cluster. Fill these with contrasting colors, ensuring the overall shape tapers down towards a single point at the bottom. -
Create the bottom tier:
As you reach the bottom of the balloon group, use fewer prints to create a ‘V’ shape, simulating how balloons gather near the strings. -
Let it dry completely:
This is crucial. Wait about 15-20 minutes for the paint to fully set. The ink strings will smudge if the paint is even slightly tacky.
Step 2: Adding the Details
-
Draw the knots:
Using your fine-point black marker, draw a tiny triangle or small ‘v’ at the very bottom center of each balloon print to represent the tied knot. -
Start the strings:
Select a focal point near the bottom center of the canvas where all strings will meet. You can mark this lightly with a pencil if it helps. -
Connect the outer balloons:
Draw straight lines from the knots of the outermost balloons down to your focal point. Use a ruler if you want perfectly straight lines, though freehand adds charm. -
Fill in the inner strings:
Draw lines from the inner balloons down to the same gathering point. I find it helpful to stop the line when it hits another balloon, continuing it on the other side, so it looks like the string passes behind. -
Create the gathering knot:
Where all the lines converge, draw a small, thick black loop or knot to show them being tied together. -
Add a bow:
Sketch a simple bow shape horizontally across the gathering point. Fill it in with black ink to make it bold and distinct. -
Finish the tails:
Draw several short, flaring lines coming out from the bottom of the bow to represent the ends of the strings hanging loose. -
Final touches:
Check for any gaps in your lines or faint spots in your marker work and touch them up for a crisp, finished look.
Smudge Prevention
If the marker tip gets clogged with paint while drawing over the balloons, scribble on a scrap paper to clear the ink flow immediately.
Personalize It
Write a name, date, or short phrase like ‘Happy Birthday’ inside the largest balloons using a white gel pen once the paint is fully dry.
Hang your masterpiece on the wall and enjoy the colorful, personal touch it brings to the room
BRUSH GUIDE
The Right Brush for Every Stroke
From clean lines to bold texture — master brush choice, stroke control, and essential techniques.
Explore the Full Guide
Simple Animal Silhouette Sunset
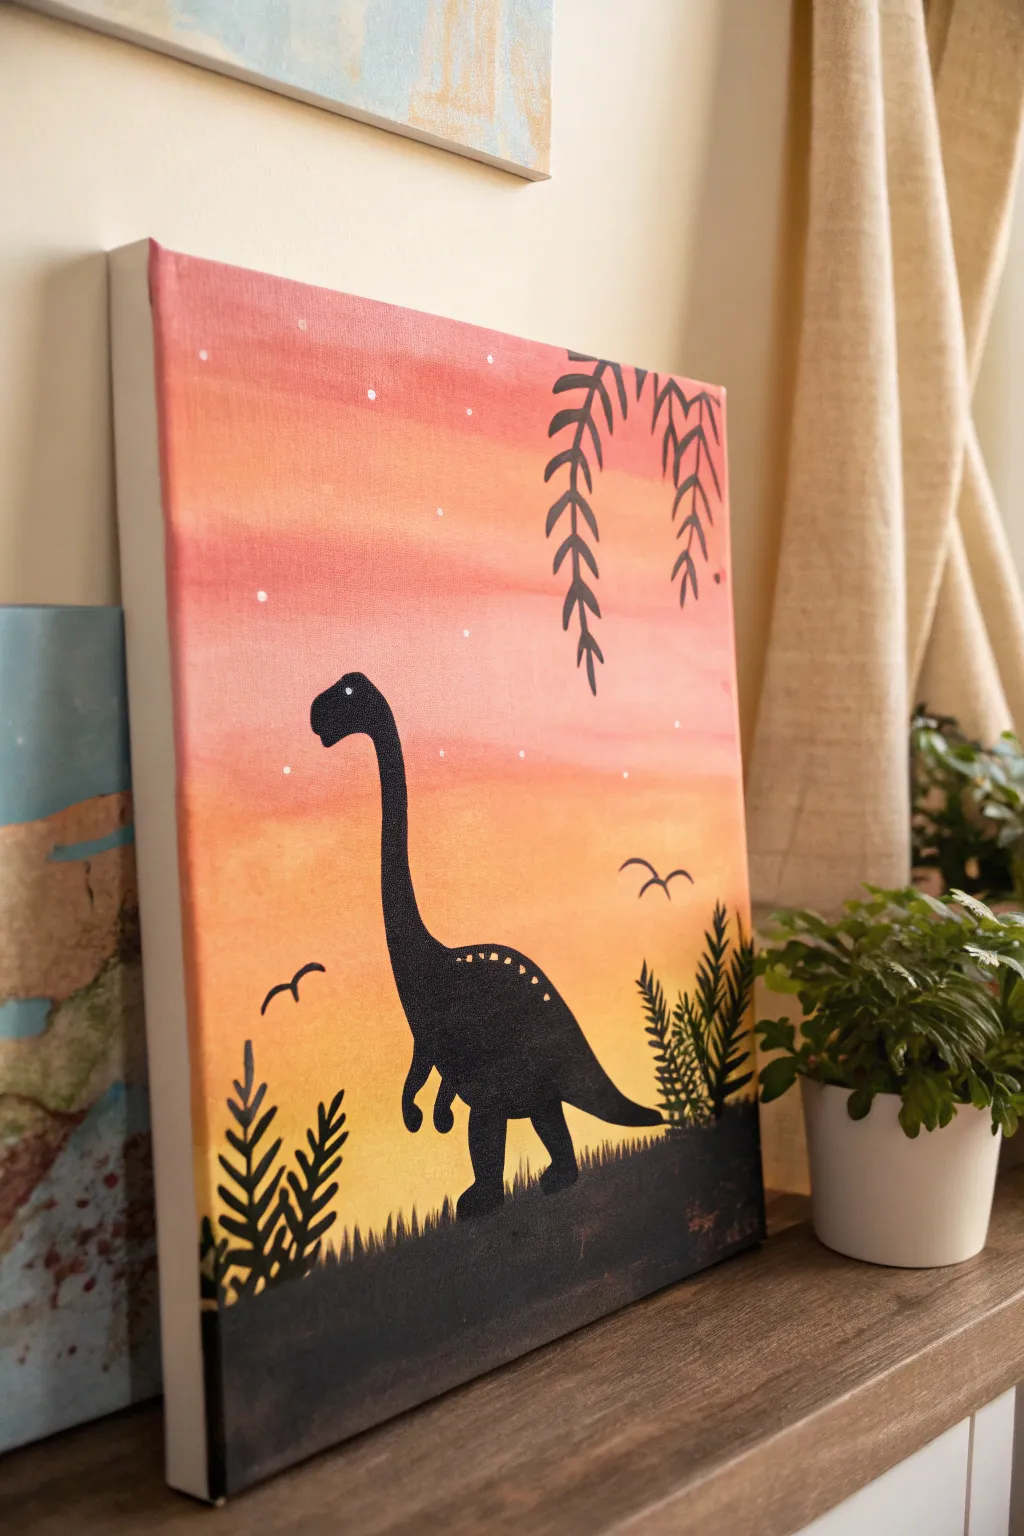
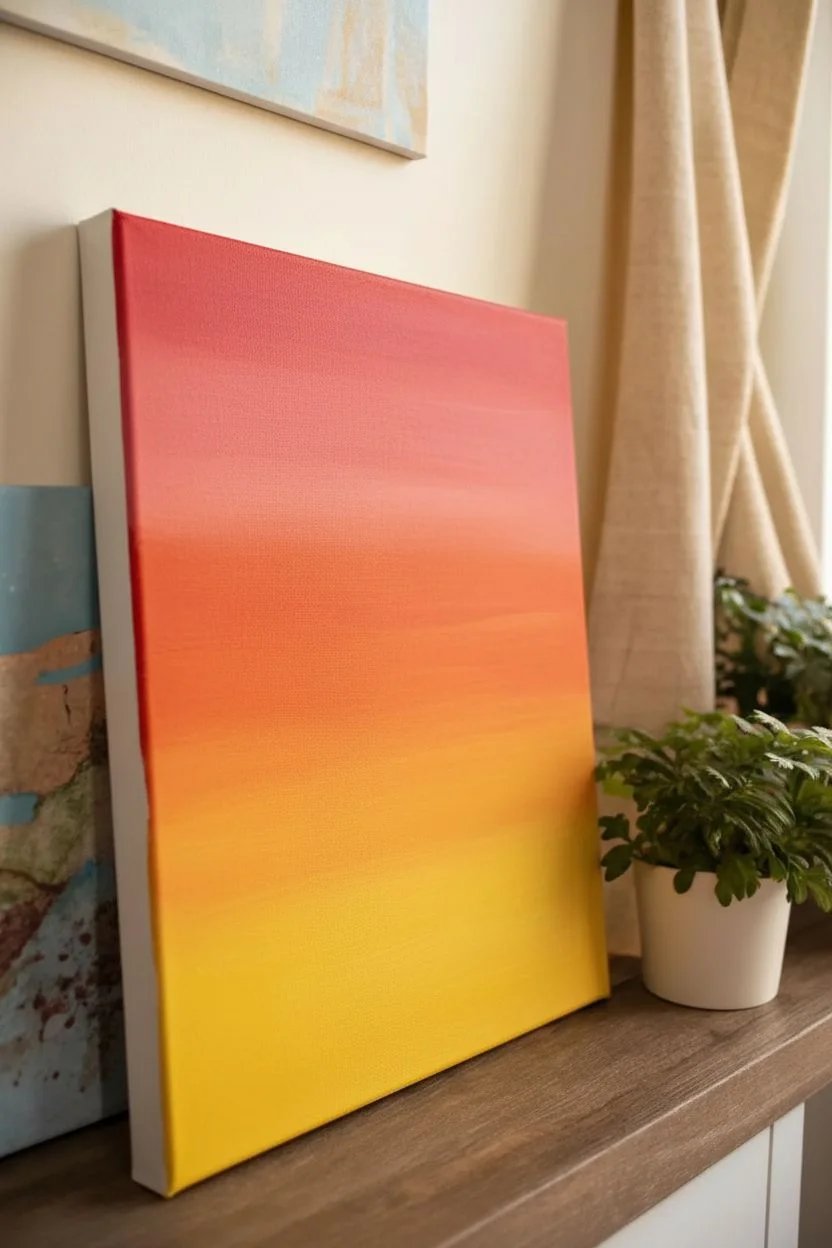
Transport your room back to the Jurassic era with this glowing sunset scene featuring a gentle dinosaur silhouette. The warm gradient background creates a perfect backdrop for the stark black shapes, making this an impressive but achievable project for young artists.
Step-by-Step
Materials
- Square canvas (10×10 or 12×12 inch)
- Acrylic paints: Titanium White, Yellow Medium, Orange, Red, Black
- Wide flat brush (for background)
- Medium round brush
- Small liner brush (for details)
- Pencil
- Water cup and paper towels
- Palette or paper plate
Step 1: Painting the Sunset Gradient
-
Prepare your palette:
Squeeze out generous amounts of yellow, orange, red, and white paint onto your palette. You will need plenty of paint to blend the background smoothly while it’s still wet. -
Start at the bottom:
Using your wide flat brush, load up bright yellow paint. Paint horizontal strokes across the bottom third of the canvas, ensuring full coverage. -
Begin the transition:
Without washing your brush, dip into the orange paint. Start applying this just above the yellow section, brushing back and forth where the colors meet to create a soft, blended transition. -
Deepen the sky:
Move higher up the canvas, adding more orange and a touch of red as you go. The color should become a deeper, richer sunset hue as you reach the middle. -
Finish the top:
For the top third, mix red with a tiny bit of white to create a soft pinkish-red. Blend this into the orange section below, smoothing out brushstrokes until the gradient looks seamless from yellow to pink. -
Paint the edges:
Don’t forget to wrap your colors around the sides of the canvas so the artwork looks finished from every angle. -
Let it dry completely:
This is crucial! The background must be bone dry before you start the silhouette. I usually wait about 20-30 minutes or use a hairdryer on a cool setting to speed things up.
Step 2: Sketching and Blocking the Dinosaur
-
Sketch the outline:
Lightly use a pencil to draw the outline of the ground and your dinosaur. Draw a long neck curving upwards and a rounded body. Keep the pencil pressure very light so it doesn’t dent the canvas. -
Paint the ground:
Switch to black paint and your medium round brush. Fill in the ground area at the very bottom, creating a solid black base for your dinosaur to stand on. -
Outline the body:
Carefully trace over your pencil lines for the dinosaur’s body and neck using the black paint. A steady hand works best here. -
Fill the silhouette:
Once outlined, fill in the entire shape of the dinosaur with solid black paint. You might need two coats to make sure no sunset color shows through. -
Add the eye:
Dip the handle end of a paintbrush into white paint. Gently dot a small eye onto the dinosaur’s head to give it character. -
Add back spots:
Using your smallest brush or a toothpick, add tiny dots of white along the curve of the dinosaur’s back for added texture and detail.
Uneven Coverage?
If your black silhouette looks streaky or gray after drying, simply apply a second coat of black paint. Two thin layers are always smoother than one thick, gloopy layer.
Step 3: Adding Plant Life and Atmosphere
-
Paint hanging vines:
In the upper right corner, use the small liner brush to paint delicate, curving black lines drooping down like willow branches. -
Add vine leaves:
Paint small teardrop shapes along these hanging vines to look like leaves. Vary their direction slightly to make them look natural. -
Create ground foliage:
On the bottom left and right, paint fern-like plants. Start with a central stem and use quick, flickering strokes outward to create the leaves. -
Detail the grass:
Along the flat black ground, use the tip of your small brush to flick tiny upward strokes. This creates the illusion of grass growing around the dinosaur’s feet. -
Paint soaring birds:
In the distance, paint two simple ‘M’ or ‘V’ shapes to represent birds flying in the sunset sky. -
Final starry touches:
Dip a clean brush in water, then white paint. Flick the bristles or gently tap nearly-dry white dots across the sky to create faint stars emerging in the twilight.
Glow Up
Mix a tiny bit of gold metallic paint into your yellow background layer before it dries. It will give the sunset a magical shimmer when the light hits it just right.
Hang your prehistoric masterpiece on the wall and enjoy the warm glow of your handmade sunset
Cotton-Ball Cherry Blossoms
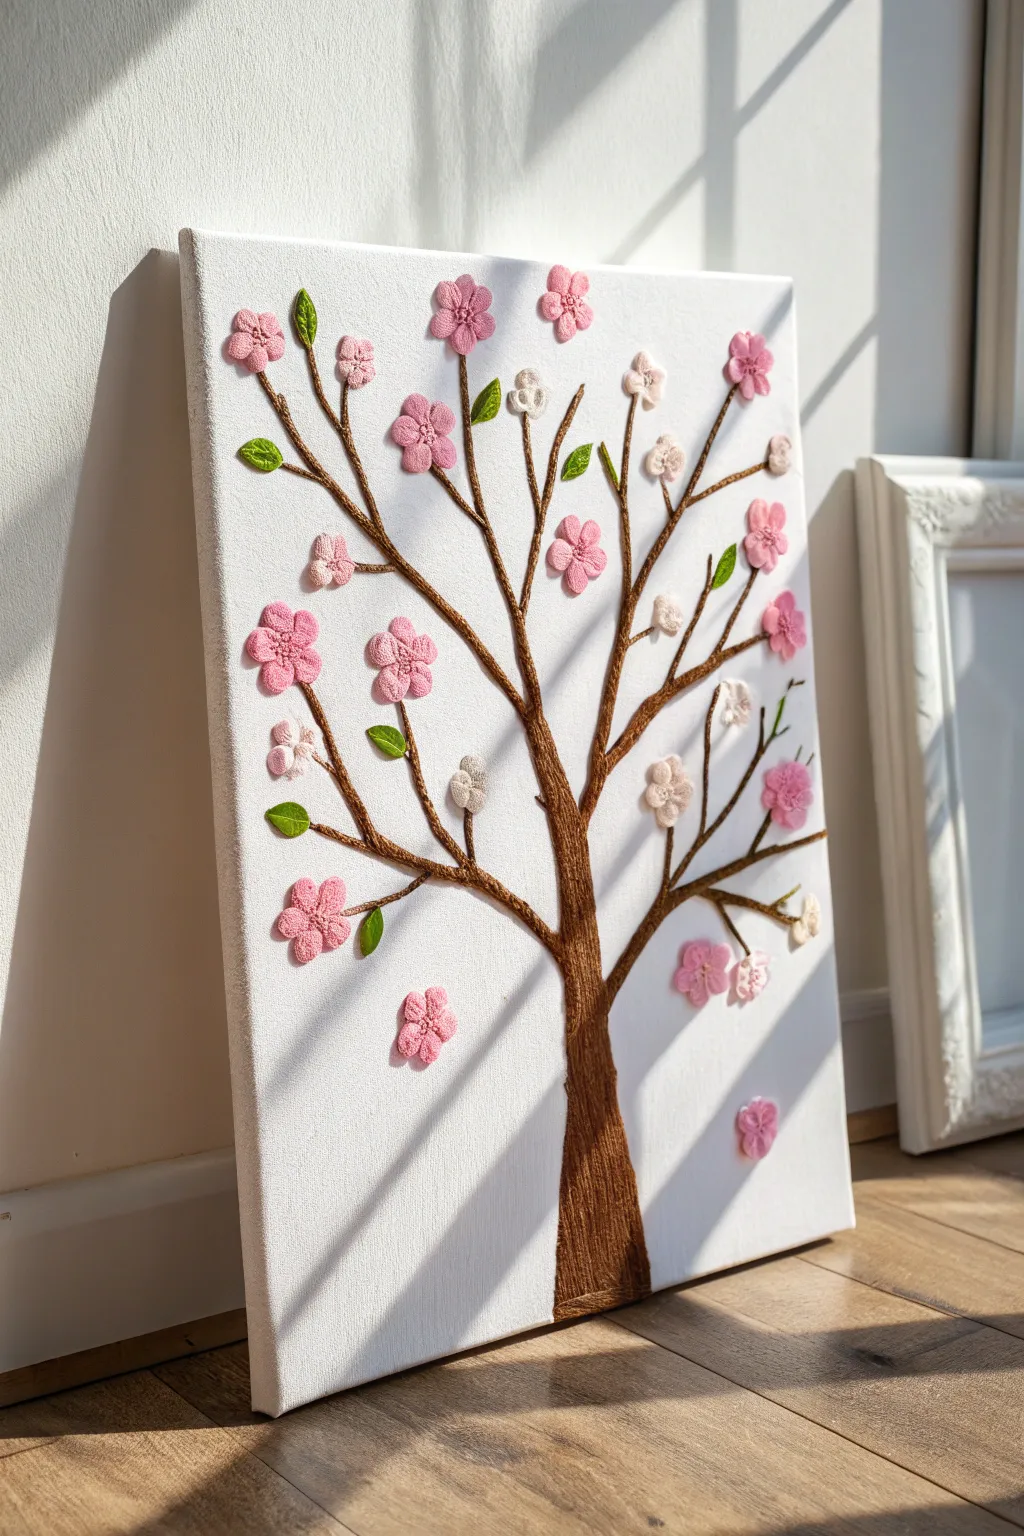
Create a stunning tactile masterpiece using simple string and tufted yarn flowers. This project combines the texture of string art with soft, 3-dimensional blooms for a beautiful spring-inspired canvas that’s surprisingly easy to assemble.
How-To Guide
Materials
- White stretched canvas (e.g., 16 x 20 inch)
- Brown yarn or embroidery floss (for trunk/branches)
- Pink yarn (various shades for flowers)
- Cream/white yarn (for accent flowers)
- Small scraps of green felt or green embroidery floss
- PVA craft glue or hot glue gun (low temp for kids)
- Scissors
- Pencil
- Cardboard scrap (for making mini-poms or tufts)
Step 1: Creating the Skeleton
-
Sketch the Outline:
Lightly draw a tree silhouette on your canvas using a pencil. Start with a wide trunk at the bottom center and branch out into thinner limbs reaching towards the top corners. -
Prepare the Trunk Glue:
Apply a generous layer of craft glue to the main trunk area of your sketch. Work in small sections so the glue doesn’t dry out before you place the yarn. -
Wrap the Trunk:
Take your brown yarn and lay strands vertically, side-by-side, to fill in the trunk. Ensure the strands are packed tightly together so no white canvas shows through. -
Form the Branches:
For the thinner branches, twist two or three strands of brown yarn together to create a rope-like texture. Glue these along your pencil lines, letting them taper off at the ends. -
Connect the Limbs:
Make sure the transition from the thick vertical trunk to the angled branches looks natural by overlaying a few strands of yarn at the ‘V’ joints where branches split.
Step 2: blooming the Tree
-
Create Yarn Tufts:
To make the flat, flower-like tufts, wrap pink yarn around two fingers (or a small piece of cardboard) about 10-15 times. -
Tie and Cut:
Slide the yarn loop off and tie a tight knot around the center with a separate piece of string, creating a bow-tie shape. Snip the loops on both ends. -
Shape the Flowers:
Instead of fluffing them into a round pom-pom, press them flat. Trim the edges with scissors to create a neat, rounded flower shape. -
Make Variety:
Repeat this process using different shades of pink and cream yarn. Make some slightly smaller than others to add depth to your artwork. -
Plan the Placement:
Before gluing, lay your yarn flowers onto the canvas to test the arrangement. I prefer grouping a few tightly together and leaving others solo on tips of branches. -
Attach the Blooms:
Using a dab of hot glue or strong craft glue, secure each flower onto the canvas. Press down firmly in the center of the flower for a few seconds. -
Add Falling Petals:
Glue one or two flowers near the bottom of the canvas, detached from the tree, to create the illusion of falling blossoms.
Sticky Situation?
If the brown yarn keeps sliding around on the wet glue, wait 2-3 minutes for the glue to become tacky before placing the string, or use pin pricks to hold it in place while drying.
Step 3: Final Details
-
Add Greenery:
Cut tiny leaf shapes out of green felt, or create small loops using green embroidery floss. -
Place the Leaves:
Glue these green accents sparingly near the flower clusters. Don’t overdo it—just a few pops of green bring the whole tree to life. -
Clean Up:
Check the canvas for any stray glue strings (spiderwebs) or loose yarn bits and gently snip them away. -
Secure Loose Ends:
If any branch tips are peeling up, use a toothpick to slip a tiny dot of glue underneath and press them back down.
Add a Sparkle
Make the flowers pop by gluing a tiny seed bead, pearl, or rhinestone into the precise center of each yarn tuft for a bit of magical shimmer.
Now you have a permanent piece of springtime art to brighten up your wall

PENCIL GUIDE
Understanding Pencil Grades from H to B
From first sketch to finished drawing — learn pencil grades, line control, and shading techniques.
Explore the Full Guide
Big Initial Letter Canvas
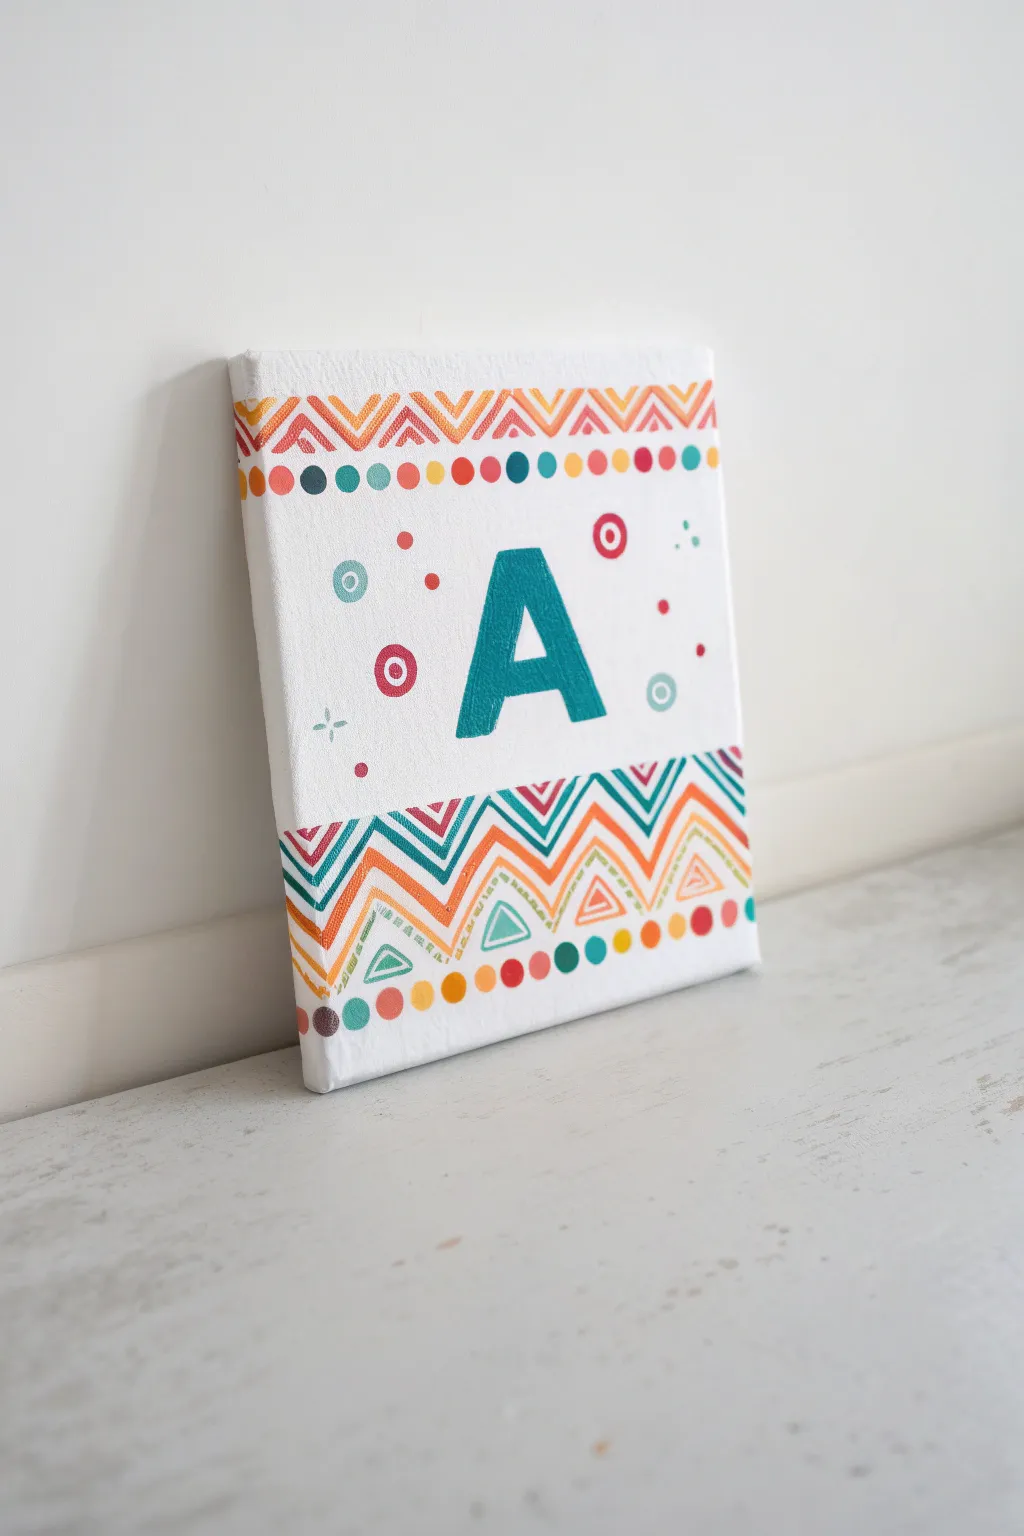
Personalize a child’s space with this vibrant monogram canvas featuring fun geometric patterns and bright pops of color. The bold central initial is surrounded by playful zig-zags and dots, making it a perfect beginner-friendly project that looks professionally designed.
Detailed Instructions
Materials
- Small square canvas (8×8 or 10×10 inches)
- Acrylic paints (turquoise, orange, yellow, maroon/red-brown, white)
- Wide flat brush
- Small round detail brush (size 2 or 3)
- Pencil
- Ruler
- Painter’s tape or masking tape
- Letter stencil (optional)
- Dotting tool or pencil eraser
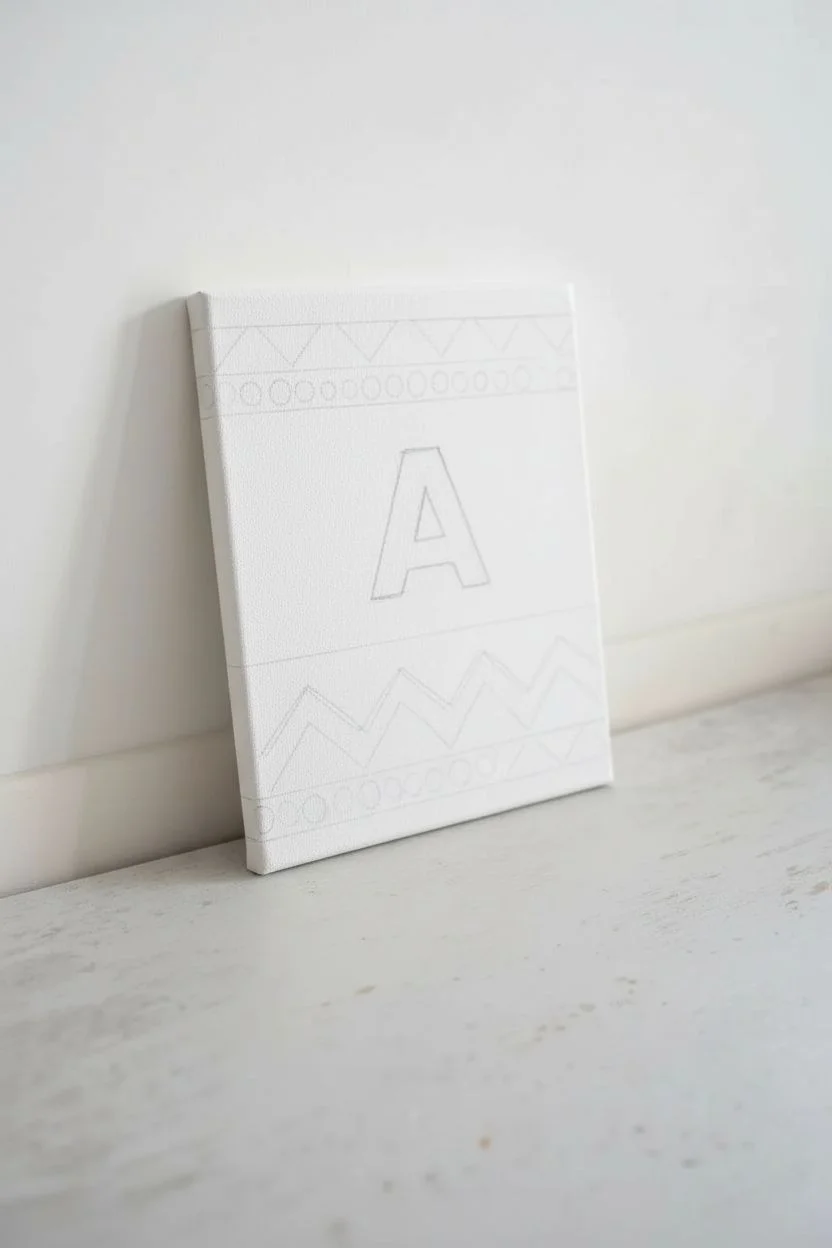
Step 1: Planning and Base
-
Prepare the canvas:
Ensure your canvas is clean and dust-free. If the canvas texture is very rough, you can apply a coat of white gesso or acrylic point to smooth it out, though the raw canvas works fine for this rustic look. -
Sketch the layout:
Using a ruler and a pencil, lightly mark horizontal lines to define the top and bottom border areas. Leave a generous amount of white space in the center for the letter. -
Draw the zig-zags:
Within the top and bottom border areas you marked, sketch your zig-zag or chevron patterns. Don’t worry about perfect symmetry; a hand-drawn look adds charm. -
Outline the letter:
In the exact center of the canvas, draw a large, bold block letter. You can use a stencil if you want perfection, but sketching it freehand allows you to adjust the size perfectly to your canvas.
Stamp perfect circles
For perfectly round decorations, dip a pencil eraser or the end of a chopstick into paint and stamp it onto the canvas.
Step 2: Painting the Borders
-
Start with the orange zig-zags:
Using your small round brush, paint the primary chevron lines at the top and bottom in a bright orange. Keep the paint relatively thin so the texture of the canvas shows through slightly. -
Add the teal accents:
Once the orange is dry to the touch, paint a parallel zig-zag line in teal or turquoise. This creates a nice cool-toned contrast against the warm orange. -
Fill in the triangles:
Look for the small triangular spaces created by your zig-zag lines. Fill some of these in with solid shapes; notice how the bottom border has solid teal and orange triangles nestled inside larger outlines. -
Paint the straight line borders:
At the very top and very bottom edges of your patterned section, paint a continuous row of small circles or dots. I like to alternate colors here—blue, pink, orange, yellow—to create a bead-like effect. -
Add detail lines:
Using the very tip of your brush or a tiny liner brush, add thin accent lines inside the larger zig-zags using yellow or a lighter orange to add depth to the pattern.
Make it glitter
Mix a tiny amount of iridescent medium into your teal paint, or add a layer of glitter glue over the zig-zags once dry for extra sparkle.
Step 3: The Centerpiece
-
Paint the initial:
Fill in your central letter sketch with the teal paint. Use a flat brush for the straight edges of the letter to get crisp lines, and fill in the center solidly. -
Apply a second coat:
Teal can be semi-transparent. Let the first coat dry completely, then apply a second layer to ensure the letter stands out boldly against the white background.
Step 4: Finishing Touches
-
Create scattered circles:
Dip a dotting tool or the handle end of a paintbrush into your paints. press varied sizes of dots around the central letter to fill the empty white space. -
Add ring details:
For a few of the larger dots, use your small brush to paint a ring around them in a contrasting color, like a red ring around a pink dot. -
Paint tiny accent stars:
With your smallest brush, paint a few tiny four-pointed stars or ‘plus’ signs in light blue or mint green to add a bit of sparkle to the background. -
Wait for everything to dry:
Allow the entire canvas to dry completely undisturbed for at least an hour to prevent smudging any of the detailed dots. -
Erase guidelines:
Check closely for any visible pencil marks from your initial sketch. If the paint is fully cured, gently erase them.
Hang this cheerful canvas on a gallery wall or place it on a shelf to bring a personalized burst of color to the room
Polka-Dot Pointillism Canvas
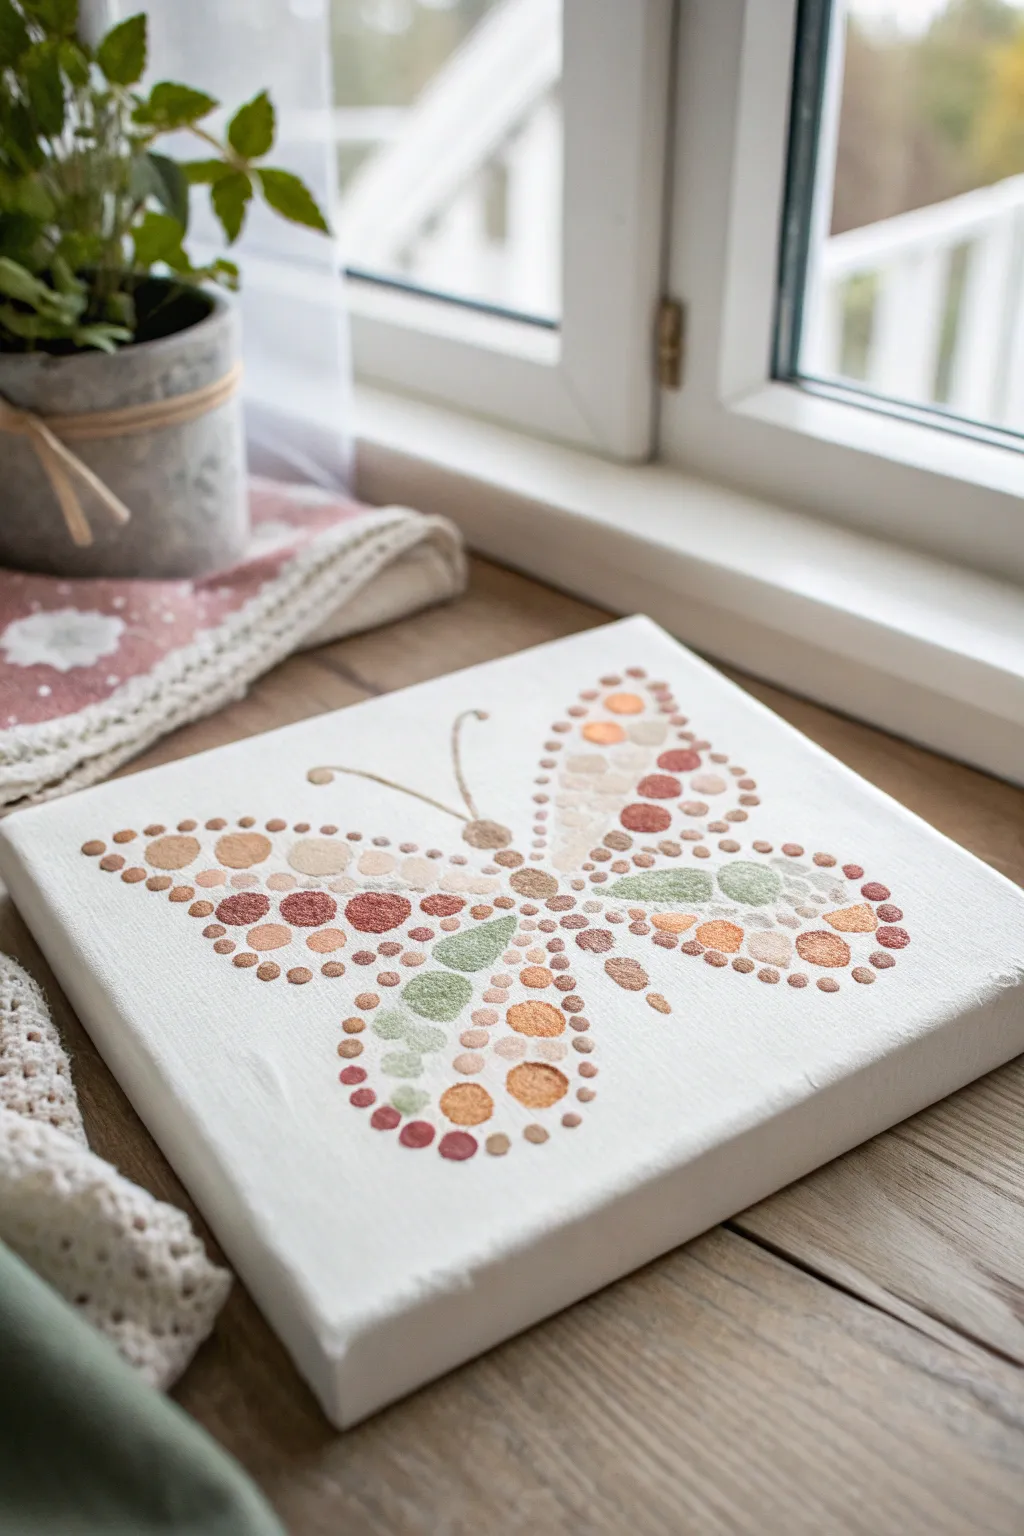
Embrace a calming, nature-inspired palette with this gentle butterfly project that introduces kids to the art of pointillism. Using dots of various sizes creates a lovely texture and depth without requiring advanced brush skills, resulting in a sophisticated, minimalist piece.
How-To Guide
Materials
- Small square canvas (approx. 8×8 or 10×10 inches)
- Acrylic paints (terracotta, light ochre, sage green, cream, beige, light brown)
- Pencil and eraser
- Paint palette or paper plate
- Dotting tools in various sizes (or ends of paintbrushes, Q-tips)
- Fine liner brush (for antennae)
- Paper towels
- Water cup
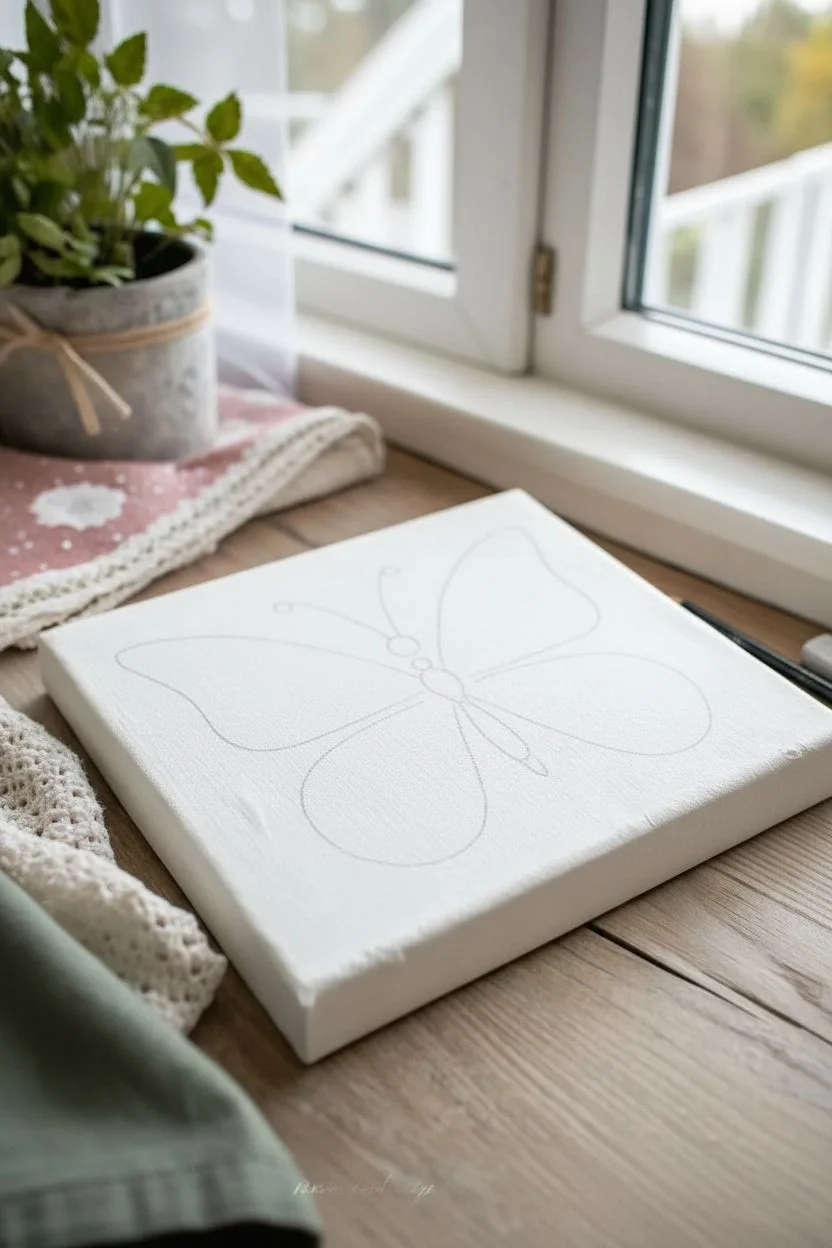
Step 1: Sketching the Outline
-
Find the center:
Begin by lightly marking the center of your canvas with a pencil to ensure your butterfly is positioned symmetrically. -
Draw the body:
Sketch a very light, thin vertical oval for the butterfly’s body in the center. -
Outline the wings:
Lightly draw the shape of the upper and lower wings extending from the body. Don’t worry about perfect lines; these are just guides for where your dots will go and will mostly be covered or erased later. -
Add antennae:
Draw two gentle curves extending from the top of the body for the antennae, curling slightly at the ends.
Uneven Dots?
If your paint is too thick, dots can form sharp peaks. Mix in a tiny drop of water to smooth the paint consistency.
Step 2: Preparing the Palette
-
Squeeze out colors:
Place small amounts of your earth-toned paints onto your palette: terracotta, sage green, ochre, soft brown, and cream. -
Mix mid-tones:
Create variation by mixing a little white or cream into your terracotta and sage green to get softer pastel versions of your main colors. I like to have about 5-6 distinct shades ready before I start dotting.
Tool Hack
Use household items for different dot sizes: pencil erasers for large dots, chopstick ends for medium, and toothpicks for tiny ones.
Step 3: Dotting the Wings
-
Select your tools:
Gather your dotting tools. If you don’t have specialized tools, the handle end of different-sized paintbrushes works perfectly for this technique. -
Start with large dots:
Dip a larger tool into your terracotta or ochre paint and place a few prominent dots near the center of the wings. These will be your focal points. -
Create the wing edges:
Using a medium-sized tool and a darker color like terracotta or brown, create a line of dots along the outer edge of your pencil sketch to define the wing shape. -
Fill the upper wings:
Working inside your outline, fill the upper wings with a mix of cream, beige, and light orange dots. Try to keep the dots close together but not touching. -
Add green accents:
Switch to your sage green paint and add distinct patches of green dots, primarily in the lower wings, to mimic the patterns seen in nature. -
Fill the lower wings:
Flesh out the rest of the lower wings with a variety of dot sizes in ochre and cream, filling in the empty spaces. -
Vary the sizes:
Go back in with a very small tool (or a toothpick) and fill tiny gaps with small dots of cream or light beige, which adds intricate detail to the pattern.
Step 4: Finishing Touches
-
Dot the body:
Use a medium brown color to fill the body oval with tightly packed, medium-sized dots. -
Paint the antennae:
Using a fine liner brush and thinned brown paint, carefully trace over your pencil lines for the antennae with a smooth, solid stroke. -
Add antenna tips:
Place one small dot at the very tip of each antenna for a cute finish. -
Erase pencil lines:
Once the paint is completely 100% dry, gently erase any visible pencil marks from your initial sketch.
Allow your beautiful pointillism butterfly to dry flat overnight before displaying it on a shelf or wall


Sticker Masking Surprise Shapes

Create sophisticated looking geometric art with this surprisingly simple masking technique that is perfect for kids and adults alike. By using stickers or tape as resist masks, you can achieve crisp, clean lines and beautiful negative space designs.
Step-by-Step
Materials
- Small square canvas panels or wooden creative boards
- Painter’s tape or geometric shape stickers (triangles, squares)
- White acrylic paint (or a color of your choice)
- Gold or metallic paint markers (optional)
- Flat paintbrush or foam sponge brush
- Scissors
Step 1: Preparing the Mask
-
Choose your base:
Select either a plain white canvas for a colorful overlay or a raw wooden panel if you want the natural wood grain to be part of your design. -
Plan the layout:
Before sticking anything down, lay your stickers or tape pieces loosely on the surface to visualize your pattern. You can go for a random confetti look or a structured grid. -
Cut masking shapes:
If you don’t have pre-made shape stickers, cut strips of painter’s tape into triangles, squares, and diamonds. I find that cutting on a cutting mat with a ruler helps keep the lines straight. -
Apply the mask:
Press your tape pieces or stickers firmly onto the canvas or wood. This is the most crucial step—ensure every edge is sealed tight so paint doesn’t seep underneath. -
Burnish the edges:
Use your fingernail or the back of a spoon to rub over the edges of the stickers one last time to ensure a perfect seal.
Paint Bleeding?
If paint seeps under the tape, it wasn’t pressed down enough. Fix it by painting over the bleed with the base color (or wood color) using a tiny brush.
Step 2: Painting and Revealing
-
Apply the first coat:
Using a flat brush or sponge, dab paint gently over the entire surface. Painting inward from the sticker edge toward the center of the sticker helps prevent bleeding. -
Let it dry:
Allow the first layer to dry completely. If the coverage looks thin, apply a second coat for a seamless, opaque finish. -
Variation: The Reverse Method:
For the white canvas look shown in the photo, stick your shapes down, paint the *entire* canvas white (or a very light grey), and let dry. This creates a subtle texture difference. -
Peel carefully:
Once the paint is dry to the touch but not fully cured (usually about 20-30 minutes), slowly peel off the stickers or tape at a 45-degree angle. -
Clean up edges:
If any tiny bits of paint bled through, you can gently scrape them away with a toothpick or touch them up with a small detail brush.
Natural Wood Look
Use unfinished birch panels instead of canvas. The white geometric shapes pop beautifully against the warm wood grain for a modern Scandi style.
Step 3: Adding Detail
-
Outline with metallics:
To recreate the look of the canvas on the bottom right, use a gold or bronze paint marker to draw geometric outlines. -
Mix solid and outline:
Combine painted solid shapes (like the grey triangles) with open outlines (the gold squares) for visual balance. -
Add small accents:
Use the back of a paintbrush handle dipped in paint to add small dots or circles to potential empty spots in your composition. -
Seal the work:
If you used a wooden board, applying a clear matte varnish over the top will protect the exposed wood grain and keep the white paint brisk. -
Final inspection:
Check your artwork for any stray pencil marks or smudges and gently erase them before displaying your piece.
Now you have a set of modern, geometric art pieces ready to display on a shelf or wall
Four Seasons Mini Canvas Set
Capture the changing beauty of nature with this charming set of four mini canvases, each depicting a tree in a different season. Displayed together on a miniature easel, this project creates a lovely cyclical narrative that teaches color theory and changing landscapes in a simple, approachable way.
How-To Guide
Materials
- 4 mini stretched canvases (approx. 4×4 or 5×5 inches)
- Acrylic paints (brown/umber, white, sky blue, light green, dark green, pink, red, orange, yellow)
- Small round brushes (including a liner brush for branches)
- Miniature wooden tabletop easel
- Palette for mixing
- Cup of water and paper towels
- Pencil (optional for sketching)
Step 1: Prepping the Backgrounds
-
Mix the winter sky:
Start with the first canvas. Mix a very large amount of white with a tiny dot of brown and perhaps a hint of yellow to create a pale, creamy parchment color. Paint the entire background evenly. -
Create the spring atmosphere:
For the second canvas, mix white with a touch of light green to create a soft, pastel minty background. Apply this wash over the whole canvas for a fresh, new-growth feel. -
Paint the summer and autumn skies:
For the bottom two canvases (summer and autumn), paint the upper two-thirds with a gradient of light blue fading into white near the horizon line. This represents a clear, bright day. -
Add grassy ground:
On the summer and autumn canvases, paint the bottom third with green. Use a lighter, yellowish-green for the summer panel and mix in a bit of brown or dark green for the autumn ground to show distinct separation.
Branch Precision
Add a drop of water to your brown acrylic paint until it has an ink-like consistency. This helps the paint flow smoothly off a liner brush for crisp, thin twigs.
Step 2: Building the Trees
-
Outline the trunk structure:
Using a liner brush and thinned brown paint, paint a central trunk on each canvas. Ideally, try to keep the trunk placement similar on all four so they look like the same tree over time. -
Extend the main branches:
Paint two main branches extending outward in a ‘Y’ shape from the trunk. Keep your strokes loose and slightly uneven to mimic natural wood growth. -
Add twig details:
For the winter canvas specifically, add many fine, smaller twigs branching off the main limbs. Since this tree will be bare, the branch structure needs to be the star. -
Standardize the branches:
Repeat the branch structure on the other three canvases. They don’t need to be identical copies, but the general ‘skeleton’ of the tree should feel consistent across the set.
Step 3: Adding Seasonal Foliage
-
Dapple the spring leaves:
On the spring canvas (top right), dip a small round brush or even a Q-tip into shades of light and medium green. Dot the paint loosely around the branches to represent budding leaves. -
Bloom the summer tree:
On the bottom left canvas, focus on a flowering tree look. Stipple pinks, whites, and light greens around the branches. I like to concentrate the color near the ends of the branches to make the tree look full and heavy with blossoms. -
Create autumn warmth:
For the bottom right canvas, mix reds, oranges, and warm browns. Use a stippling motion to fill the canopy with rich fall colors, allowing some sky to peek through the leaves. -
Add falling leaves:
On the autumn canvas, paint a few small dots of red and orange ‘falling’ through the air and landing on the green grass below to suggest the changing season.
Texture Twist
Instead of a brush, use a small piece of scrunched-up aluminum foil or a natural sea sponge to dab on the foliage for a more organic, leafy texture.
Step 4: Finishing Touches
-
Define the grass texture:
Go back to the summer and autumn panels. Use short, vertical flicking motions with green paint along the horizon line where the grass meets the sky to create a textured, grassy edge. -
Highlight the trunks:
Mix a little white into your brown paint to create a highlight color. Paint a thin line down the left side of each trunk and main branch to give the trees dimension and imply a light source. -
Final inspection:
Check all four canvases for consistency. Ensure the horizon lines on the bottom two canvases align if they are sitting next to each other. -
Display setup:
Once fully dry, arrange the canvases on the mini easel. Place Winter and Spring on the top tier (if your easel allows) or arrange them in a 2×2 grid to complete the cycle.
Step back and enjoy how your quartet of canvases captures the passing of time in a beautiful, miniature display
Squeegee Swipe Abstracts
Create a sophisticated piece of modern art using a surprisingly simple tool: a squeegee. This beginner-friendly project features bold, textured sweeps of terra cotta, navy, and teal across a crisp white canvas.
Step-by-Step
Materials
- Square stretched canvas (12×12 inches suggested)
- Acrylic paints (Terra cotta, navy blue, teal, pale yellow/ochre, white)
- Small squeegee or old plastic gift card
- Palette or paper plate
- Paper towels
- Drop cloth or newspapers
Step 1: Preparation and Base
-
Prepare the workspace:
Cover your work surface completely with newspapers or a drop cloth, as the squeegee technique can push paint off the edges. -
Prime the canvas:
Even if your canvas is pre-primed, apply a fresh coat of white acrylic paint over the entire surface to ensure a bright, clean background. -
Paint the edges:
Don’t forget to paint the sides of the canvas white as well for a professional gallery-wrapped look. -
Let it dry completely:
Wait until the white base coat is fully dry to the touch so your colored stripes don’t mix and become muddy.
Uneven Streaks?
If the paint isn’t spreading, add a tiny drop of water or pouring medium to your acrylics to improve flow without losing opacity.
Step 2: The Squeegee Technique
-
Load the first color:
Squeeze a generous amount of pale yellow or ochre paint directly onto the top right edge of your squeegee or gift card. -
The first swipe:
Position the squeegee near the top-right corner of the canvas. Pull it firmly across towards the left in a slight diagonal, creating a textured, imperfect streak. -
Clean the tool:
Wipe your squeegee or card completely clean with a paper towel before moving to the next color. -
Apply the teal stripe:
Load teal paint onto your tool. Place it slightly below and to the left of your yellow stripe. -
Swipe the teal:
Drag the tool across the canvas, allowing the paint to skip and break naturally for that distressed texture. -
Apply the navy stripe:
Clean the tool again. Load it with navy blue paint and position it below the teal stripe. -
Create the darkest layer:
Swipe firmly. Apply slightly more pressure here to get the deep, solid coverage seen in the navy section. -
Add the terra cotta:
For the final stripe, load terra cotta or rust-colored paint. This will be the lowest colored stripe. -
Final swipe:
Drag this color across, leaving the bottom third of the canvas completely white for negative space balance.
Go Metallic
Swap the yellow ochre stripe for metallic gold paint. The shimmer adds a glamorous contrast against the matte navy and terra cotta.
Step 3: Finishing Touches
-
Check for drips:
Inspect the sides of the canvas immediately. If any colorful paint dripped over the edge, wipe it away gently create a clean border. -
Refine textures:
I like to leave the natural ridges alone, but if a blob is too thick, you can lightly swipe over it again while wet. -
Dry flat:
Leave the canvas lying flat to dry for at least 24 hours, as the thicker ridges of paint take longer to cure. -
Touch up whites:
Once fully dry, use a small brush and white paint to clean up any stray marks on the bottom section. -
Seal:
Apply a clear matte varnish spray to protect the colors and unify the sheen.
Hang your new abstract masterpiece in a well-lit spot to show off the texture
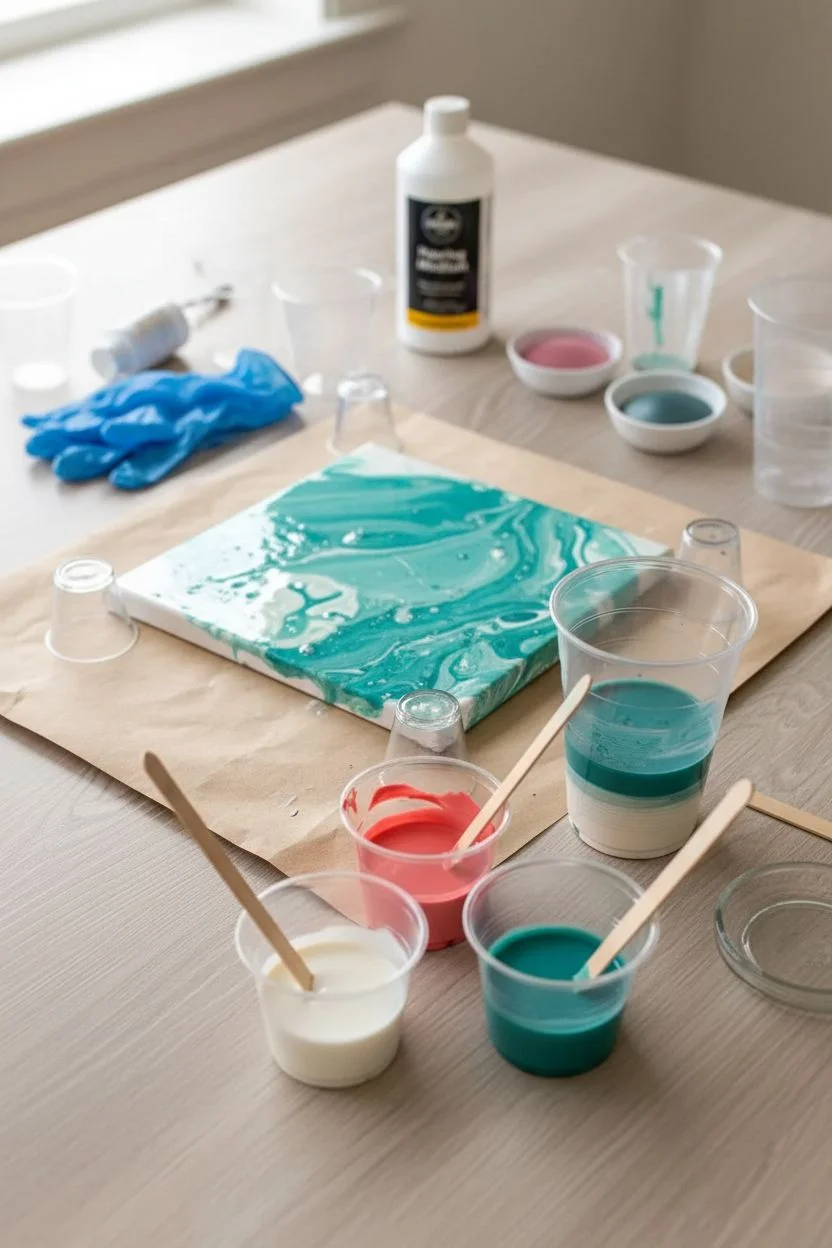
Pour-and-Tilt Marble Canvas
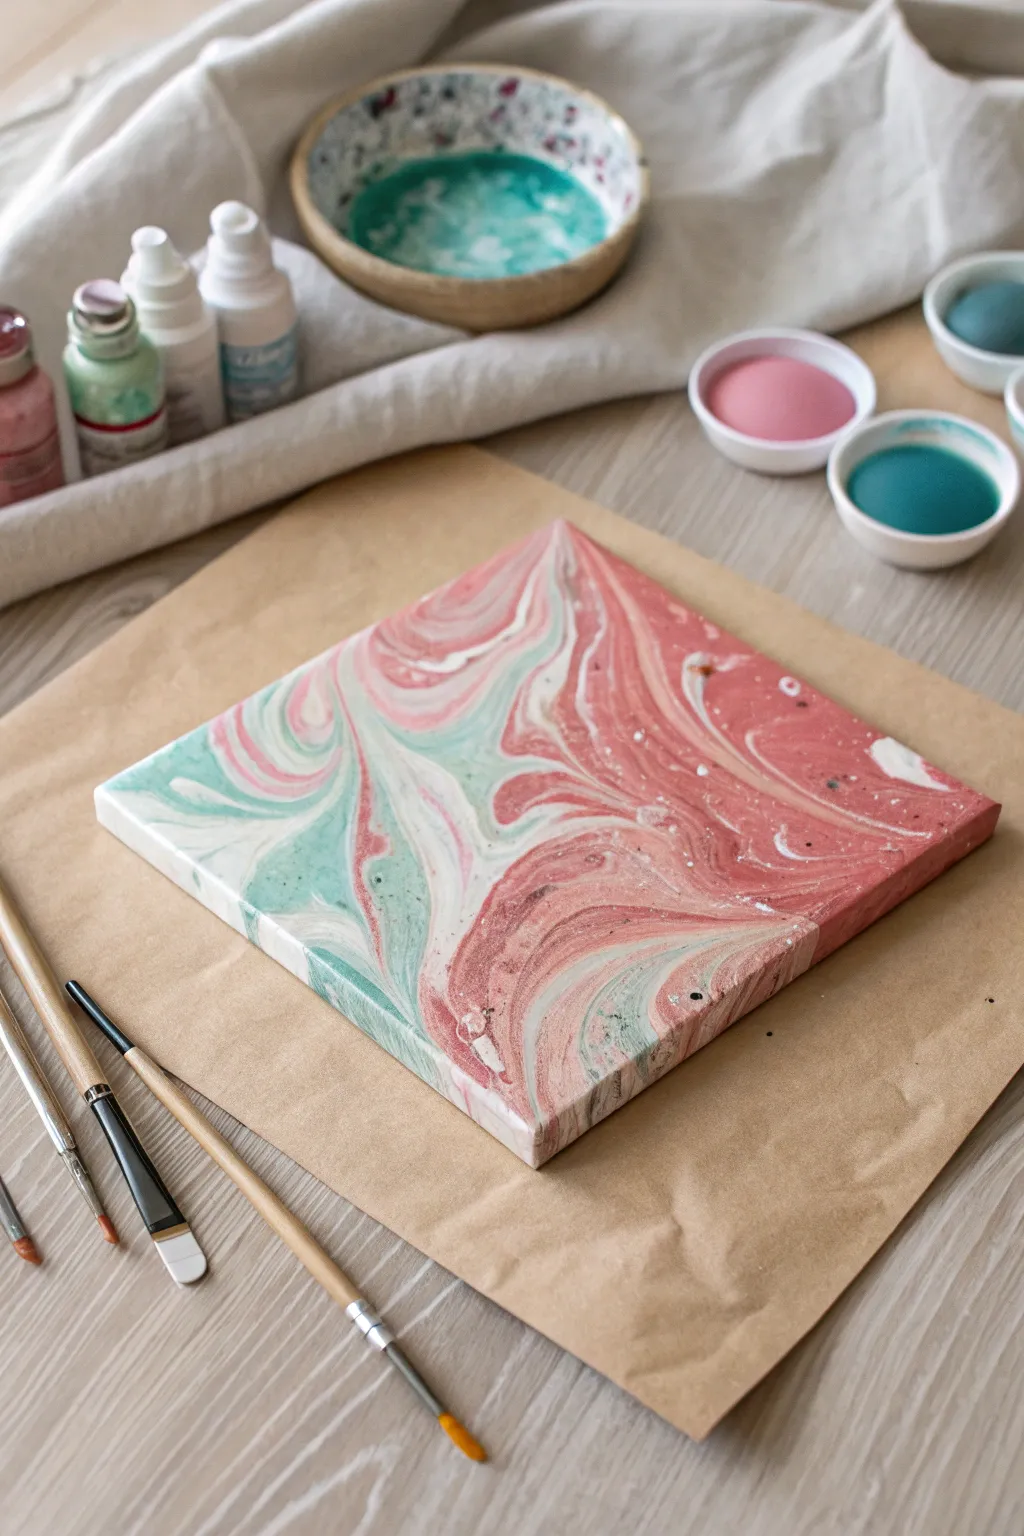
Create a mesmerizing abstract masterpiece that looks straight out of a professional studio using a simple pour-and-tilt technique. This project features soft swirls of coral pink, creamy white, and teal that blend together organically to form a stunning marbled effect.
Step-by-Step Guide
Materials
- Small square stretched canvas (e.g., 8×8 or 10×10 inches)
- Acrylic pouring paints (pre-mixed) or Acrylic paints + Pouring Medium
- Colors needed: Coral Pink, Turquoise/Teal, White
- Small plastic cups or squeeze bottles for mixing
- A large shallow tray or cardboard box (to catch drips)
- Popsicle sticks for stirring
- Plastic drop cloth or craft paper for surface protection
- Gloves (optional but recommended)
Step 1: Preparation and Mixing
-
Prepare your workspace:
Lay down a large sheet of craft paper or a plastic drop cloth to protect your table. Place your canvas on top of four upside-down cups or directly onto a sheet of cardboard to elevate it slightly, allowing paint to drip off edges freely. -
Mix your paints:
If you aren’t using pre-mixed pouring paints, combine your standard acrylics with a pouring medium. A common ratio is 1 part paint to 2 parts medium, but check your bottle’s instructions. -
Check consistency:
Stir each color thoroughly with a popsicle stick. The consistency should be like warm honey or heavy cream—flowing smoothly off the stick without breaking, but not watery. -
Adjust the flow:
If I find the paint is too thick, I add a few drops of water at a time until it flows correctly. If it’s too thin, add a bit more paint. -
Prepare the dirty pour cup:
Take a clean empty cup. Pour a generous amount of white paint into the bottom as your base layer. -
Layer the colors:
Gently pour the coral pink on top of the white, followed by the teal. Do not stir. Continue layering the colors one by one until the cup is about half to three-quarters full.
Muddy colors?
If your beautiful swirls are turning brown or gray, you are likely over-tilting. Stop moving the canvas as soon as the surface is covered to keep the colors distinct.
Step 2: The Pour and Tilt
-
Pour the paint:
Position your layered cup over the center of the canvas. You can either flip the cup quickly onto the canvas and lift it, or simply pour the paint out slowly in a circular motion or a straight line across the middle. -
Let it settle:
Allow the puddle of paint to sit for just a moment to start settling on the canvas surface. -
Begin tilting:
Pick up the canvas with both hands. Slowly tilt it to one corner, letting the paint flow almost to the edge. -
Move to the opposite side:
Bring the paint back towards the center and then tilt it toward the opposite corner. The goal is to stretch the cells and swirls without muddying the colors. -
Cover the edges:
Continue tilting until the entire face of the canvas is covered. Don’t worry if paint runs off the sides; in fact, the sides should be fully coated for a professional look. -
Use your fingers:
Inspect the corners. If a spot is bare, dip your finger into the runoff on the table and gently tap it onto the corner to cover the white canvas.
Make it shimmer
Mix a small amount of metallic gold or silver paint into your pouring cup. It will create elegant shimmering veins that catch the light once dry.
Step 3: Finishing Touches
-
Check for bubbles:
Look closely at the surface for air bubbles. If you see tiny bubbles, you can pop them gently with a toothpick. -
Add detail splatters (optional):
For a bit of extra texture like in the example, you can take a small brush with white paint and flick tiny droplets onto the wet surface. -
Clean the underside:
Run a popsicle stick or your finger along the underside edge of the canvas frame to remove the dripping paint, preventing bumps as it dries. -
Level drying:
Place the canvas back onto the elevated cups or drying rack. Ensure it is perfectly level so the design doesn’t slide off while drying. -
Patience is key:
Let the artwork dry undisturbed for at least 24 hours. Thicker areas may take up to 48 hours to cure completely.
Once fully dry, you will have a beautiful, glossy piece of abstract art ready to brighten up any wall
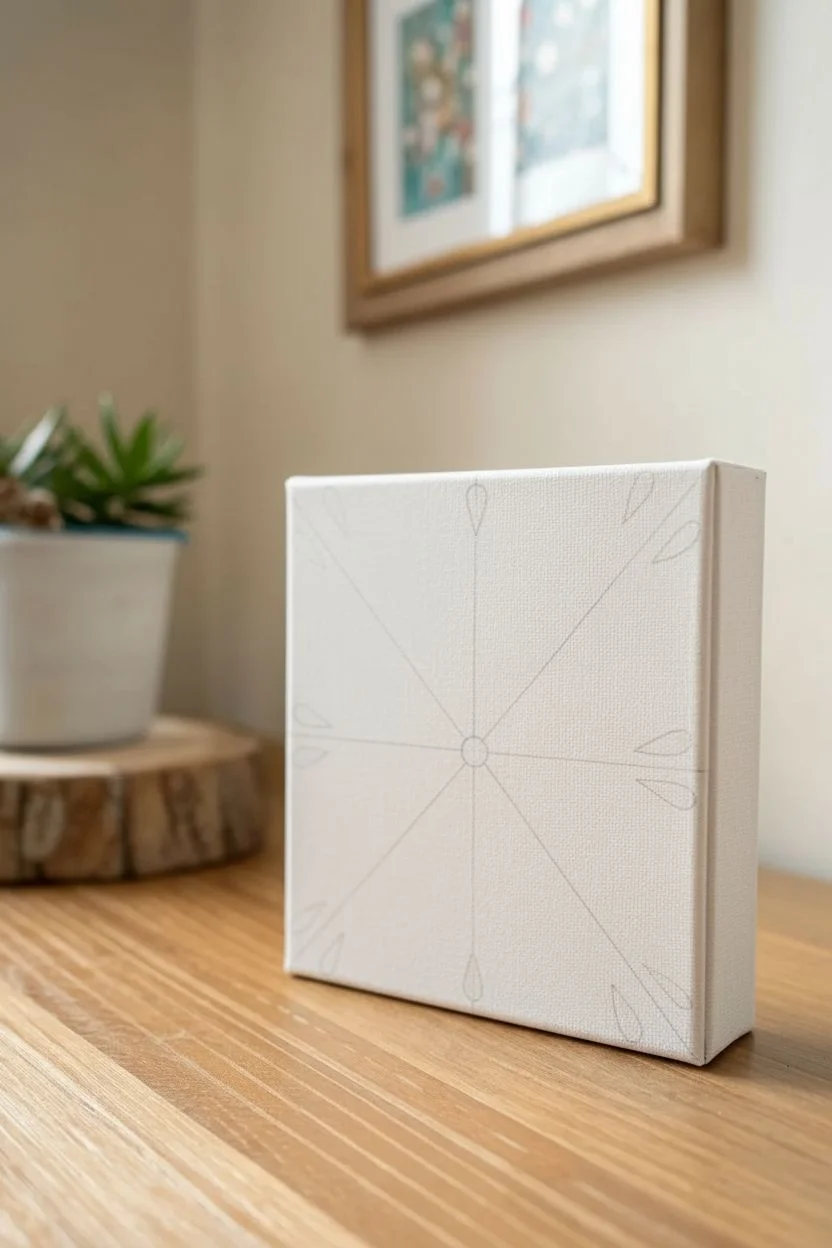
Spin Art Mini Canvas
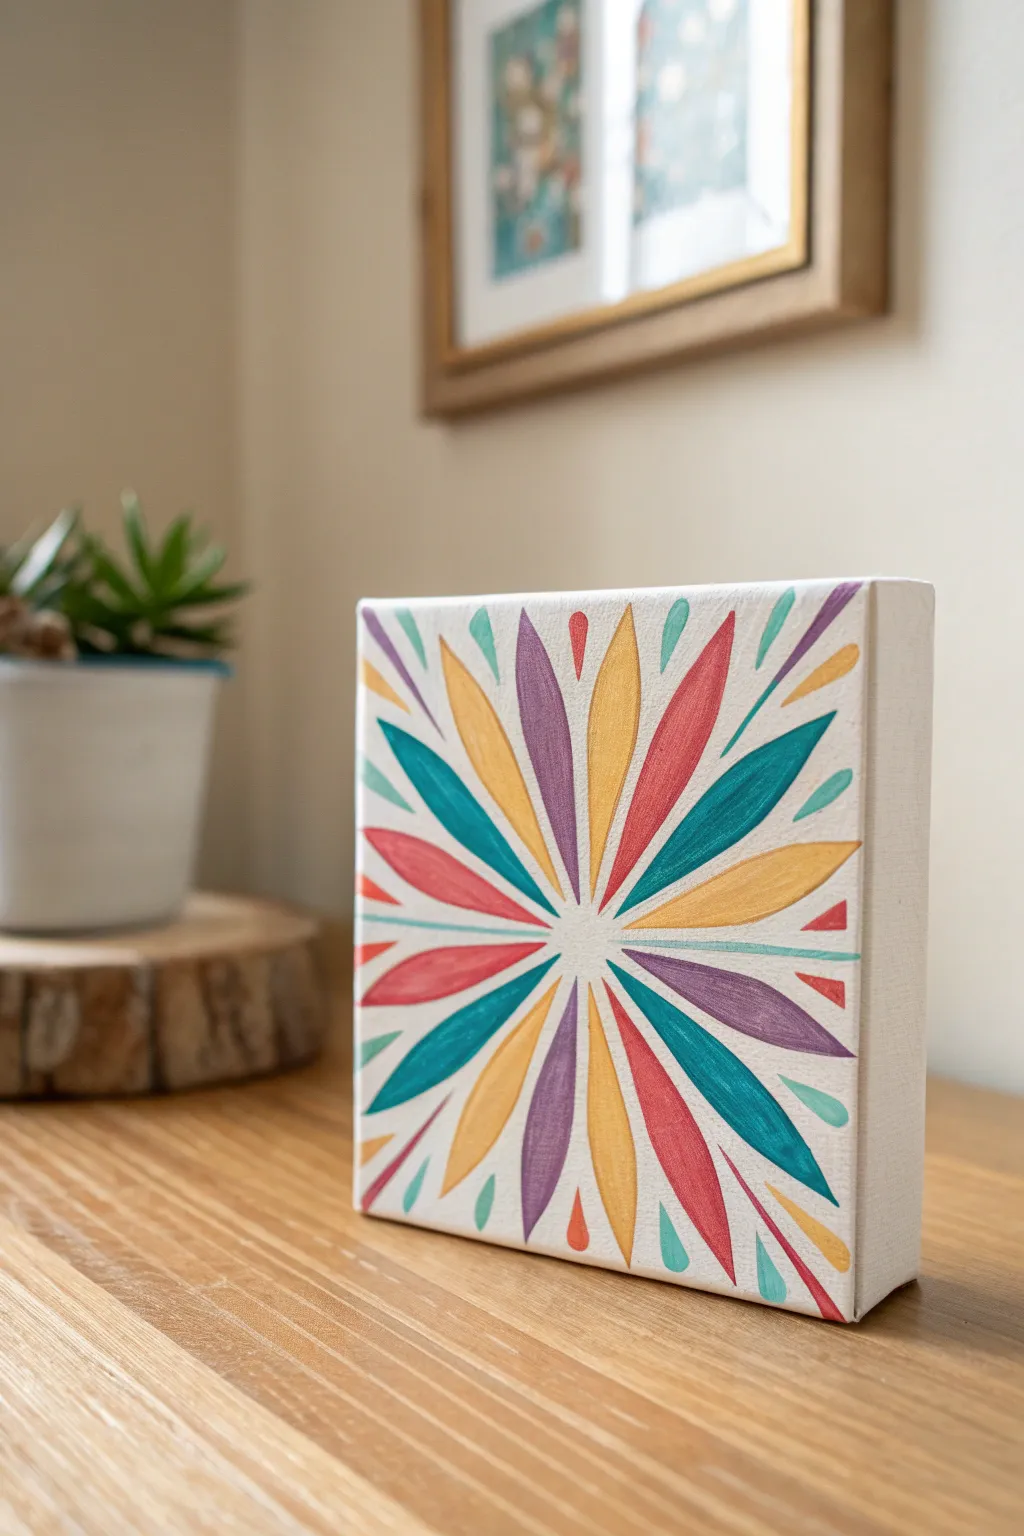
This project creates a vibrant, eye-catching focal point using radiating teardrop shapes in a kaleidoscope of colors. The clean lines and repeating patterns make it a relaxing, meditative painting exercise perfect for beginners and kids alike.
Detailed Instructions
Materials
- Small square stretched canvas (e.g., 6×6 inches)
- Acrylic paints (teal, golden yellow, purple, coral pink)
- Round synthetic brushes (sizes 2 and 4)
- Pencil
- Ruler
- Eraser
- Palette or paper plate
- Cup of water
- Paper towels
Step 1: Planning the Grid
-
Find the center:
Begin by laying your ruler diagonally across the canvas from corner to corner. Make a tiny, light mark in the middle, then do the same with the opposite corners to find the exact center point. -
Draw guide lines:
Lightly sketch a vertical line and a horizontal line through that center point, dividing the canvas into four equal quadrants. -
Add diagonal guides:
Draw two diagonal lines through the center as well, creating an ‘X’ shape. You should now have eight pie-slice sections radiating from the middle. -
Sketch the main petals:
Starting from the center point, sketch a large, elongated teardrop shape along each of the eight guide lines. The points should meet in the center, and the rounded ends should stop about an inch from the edge. -
Add secondary shapes:
In the spaces between the main eight petals, draw a second, slightly smaller teardrop shape floating further out towards the corners. Add tiny teardrop accents near the edges if space allows.
Wobbly Lines?
Steady your hand by resting your pinky finger on a dry part of the canvas while you paint. Using a flat brush turned on its side can also help create sharper straight lines.
Step 2: Painting the Design
-
Prepare your colors:
Squeeze out small amounts of teal, golden yellow, purple, and coral pink onto your palette. I find adding a tiny drop of water helps the paint flow smoother for crisp edges. -
Paint the teal petals:
Select two opposite main petals and fill them in carefully with teal using the size 4 brush. Use the brush tip to get sharp points. -
Add the yellow petals:
Rotate your canvas and paint the two petals perpendicular to the teal ones with your golden yellow paint. -
Fill the diagonal petals top-left:
Move to the diagonal lines. Paint one diagonal petal purple. -
Fill the diagonal petals bottom-right:
Paint the petal directly opposite the purple one with the same purple shade to keep the symmetry balanced. -
Complete the main star:
Fill the remaining two diagonal petals with coral pink. Your central starburst is now complete. -
Start the outer layer:
Switch to your smaller size 2 brush for better control on the floating shapes. -
Paint outer accents:
Paint the floating teardrops between the main petals. Choose colors that contrast with the neighbors—for example, place a yellow accent between a purple and teal petal. -
Add corner details:
Use the very tip of your small brush to add the tiniest teardrops near the corners and edges, using leftover colors to balance the composition.
Step 3: Finishing Touches
-
Touch up edges:
Once the first coat is dry to the touch, check for any streaky areas. Add a second coat to any petals that look transparent. -
Clean up lines:
If paint went outside the lines, use a clean, damp brush or a bit of white paint to tidy up the raw canvas background. -
Erase visible guides:
Wait until the paint is 100% bone dry. Gently erase any visible pencil marks remaining in the white spaces between the petals.
Pro Tip: Custom Colors
Limit your palette to just 4 colors plus white. Mixing a tiny bit of white into every color unifies the design and gives the paint an opaque, matte finish.
Enjoy the calming rhythm of your new geometric art piece on your desk or shelf
Yarn Pull Firework Bursts
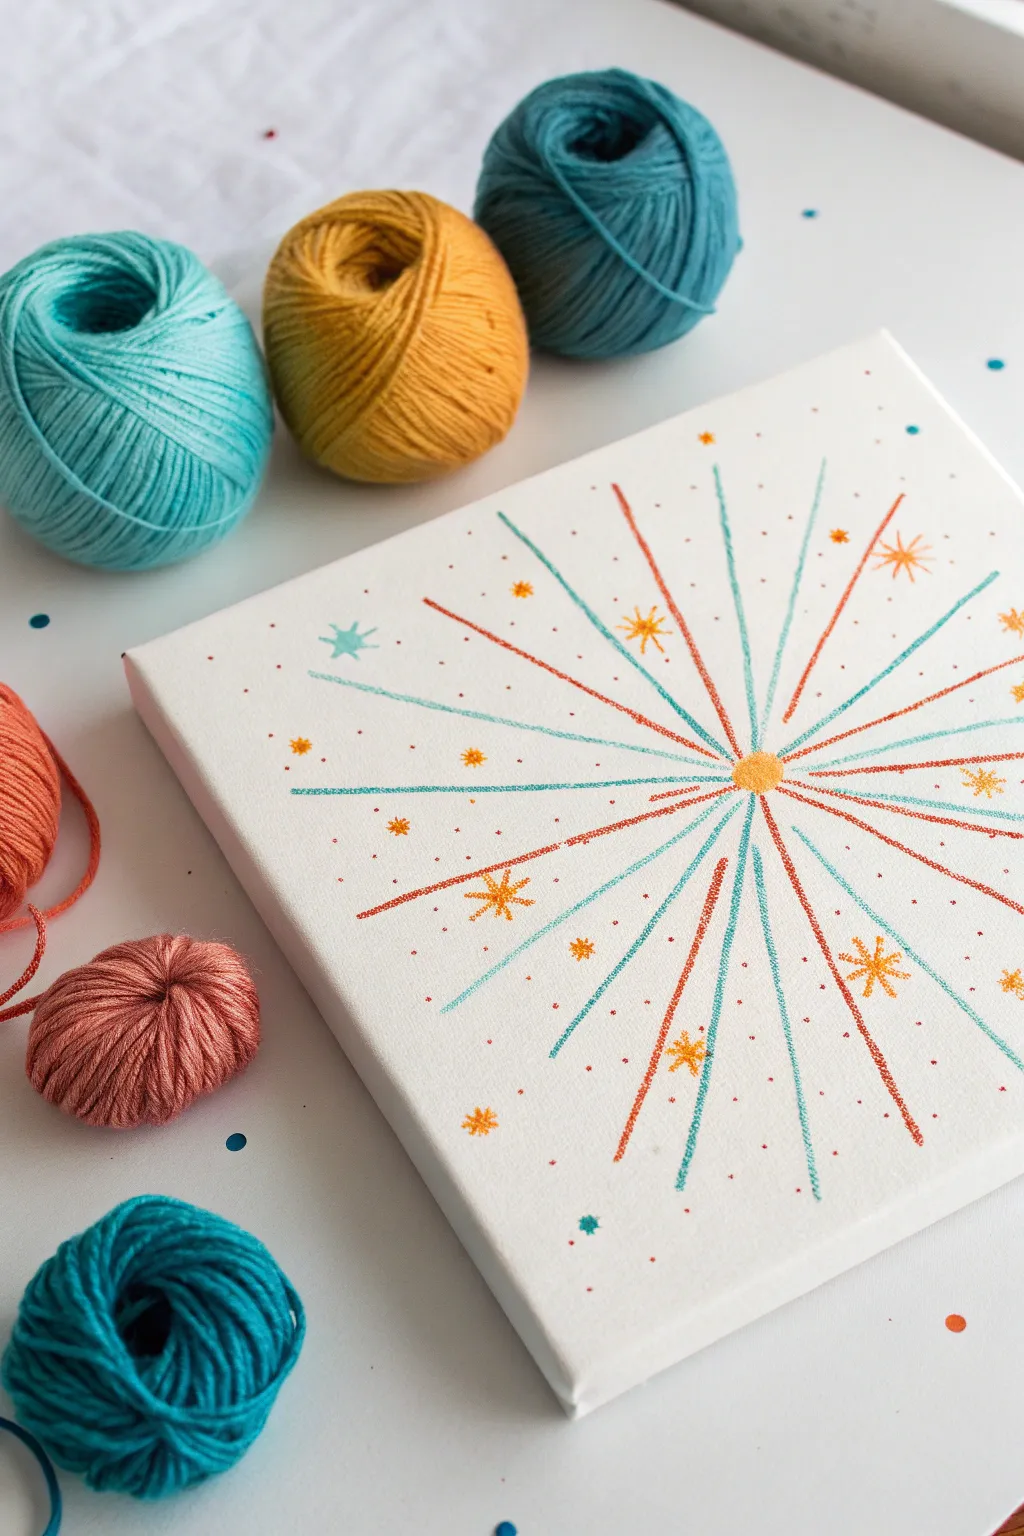
Using colorful yarn as your paintbrush, this project creates a vibrant, textured firework explosion on canvas. It’s a tactile and satisfying craft that results in a striking piece of wall art perfect for brightening any corner.
Step-by-Step
Materials
- Small square artist canvas (e.g., 8×8 or 10×10)
- Yarn skeins in teal, turquoise, amber, and coral/rust
- Tacky glue or clear-drying craft glue
- Pencil
- Ruler
- Scissors
- Tweezers (optional but helpful)
- Yellow or gold craft paint
- Small round paintbrush
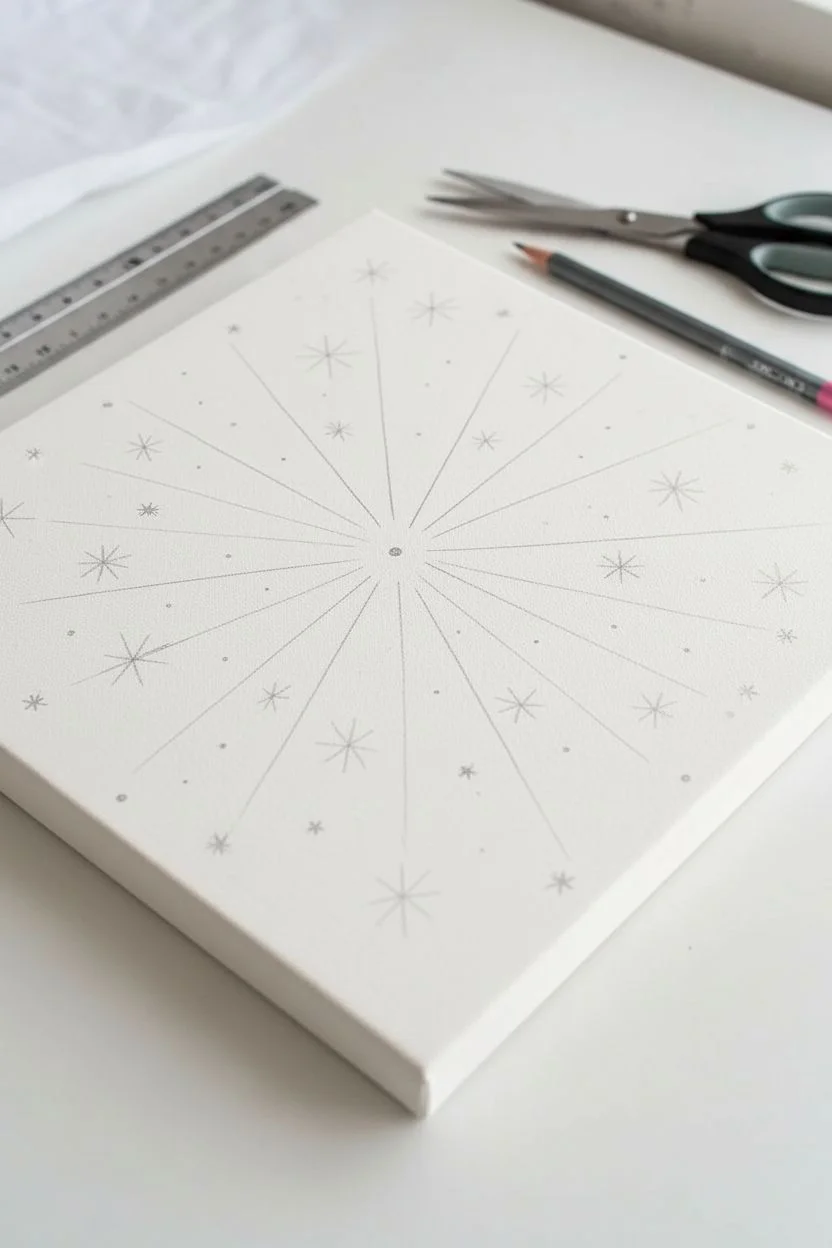
Step 1: Planning the Explosion
-
Find the center:
Begin by placing your canvas on a flat surface. Use a ruler to find the approximate center of the canvas and mark it lightly with a pencil dot. -
Draft the rays:
Lightly sketch lines radiating outward from that center dot like the spokes of a wheel. Draw about 12 to 16 main lines of varying lengths, extending some almost to the edge and keeping others shorter. -
Add detail elements:
In the spaces between your main lines, sketch small asterisks or stars. Plan for a mix of larger six-point stars and tiny dots scattered around the outer edges to represent flying sparks.
Taming Frayed Ends
If your yarn ends look messy or frayed after cutting, dab a tiny amount of clear glue on your fingertip and twist the yarn end to seal it into a sharp point.
Step 2: Creating the Yarn Lines
-
Cut your yarn:
Unspool your teal, turquoise, amber, and coral yarn. Cut several lengths of each color, matching them roughly to the lengths of the lines you drew on the canvas. -
Apply the first glue line:
Choose one of your longest pencil lines to start. Squeeze a thin, steady bead of tacky glue directly over the pencil mark, starting from the center and moving outward. -
Place the yarn:
Immediately lay a piece of colored yarn onto the glue bead. I find it easiest to anchor the yarn at the center point first, then gently guide it down the line with your finger. -
Trim the excess:
Once the yarn is pressed into the glue, use sharp scissors to snip the yarn exactly where the glue line ends for a crisp finish. -
Alternate colors:
Repeat this process for all the main radial lines, alternating between your teal, coral, and blue yarns to create a balanced, colorful burst pattern. -
Let the glue set:
Allow the main yarn spokes to dry for about 15 minutes so they don’t shift while you work on the smaller details.
Step 3: Adding Starts and Sparkles
-
Embroider or glue stars:
For the star shapes, you have two options. You can glue very short snippets of yarn in a crisscross pattern, or use a needle to stitch actual embroidery stars through the canvas if you are comfortable piercing it. -
Glue technique for stars:
If gluing, apply a tiny ‘X’ or asterisk of glue first. Use tweezers to place tiny 1/4-inch snippets of amber yarn into the glue to form the stars. -
Create the center sun:
At the very center where all lines converge, paint a small, solid circle using yellow or gold craft paint to hide the messy yarn ends and create a focal point. -
Add painted dots:
Dip the handle end of your paintbrush into teal, red, or gold paint. Dot the canvas randomly in the empty white spaces to create confetti-like specks. -
Final clean up:
Check for any visible pencil marks. If the glue is fully dry, you can gently erase any stray sketch lines that peek out from under the yarn.
Add Some sparkle
Mix loose glitter into your craft paint before adding the center sun and the surrounding dots. This gives the firework burst a genuine shimmer when the light hits it.
Hang your textured masterpiece on the wall and enjoy the burst of color you’ve created
Bubble Wrap Stamp Patterns
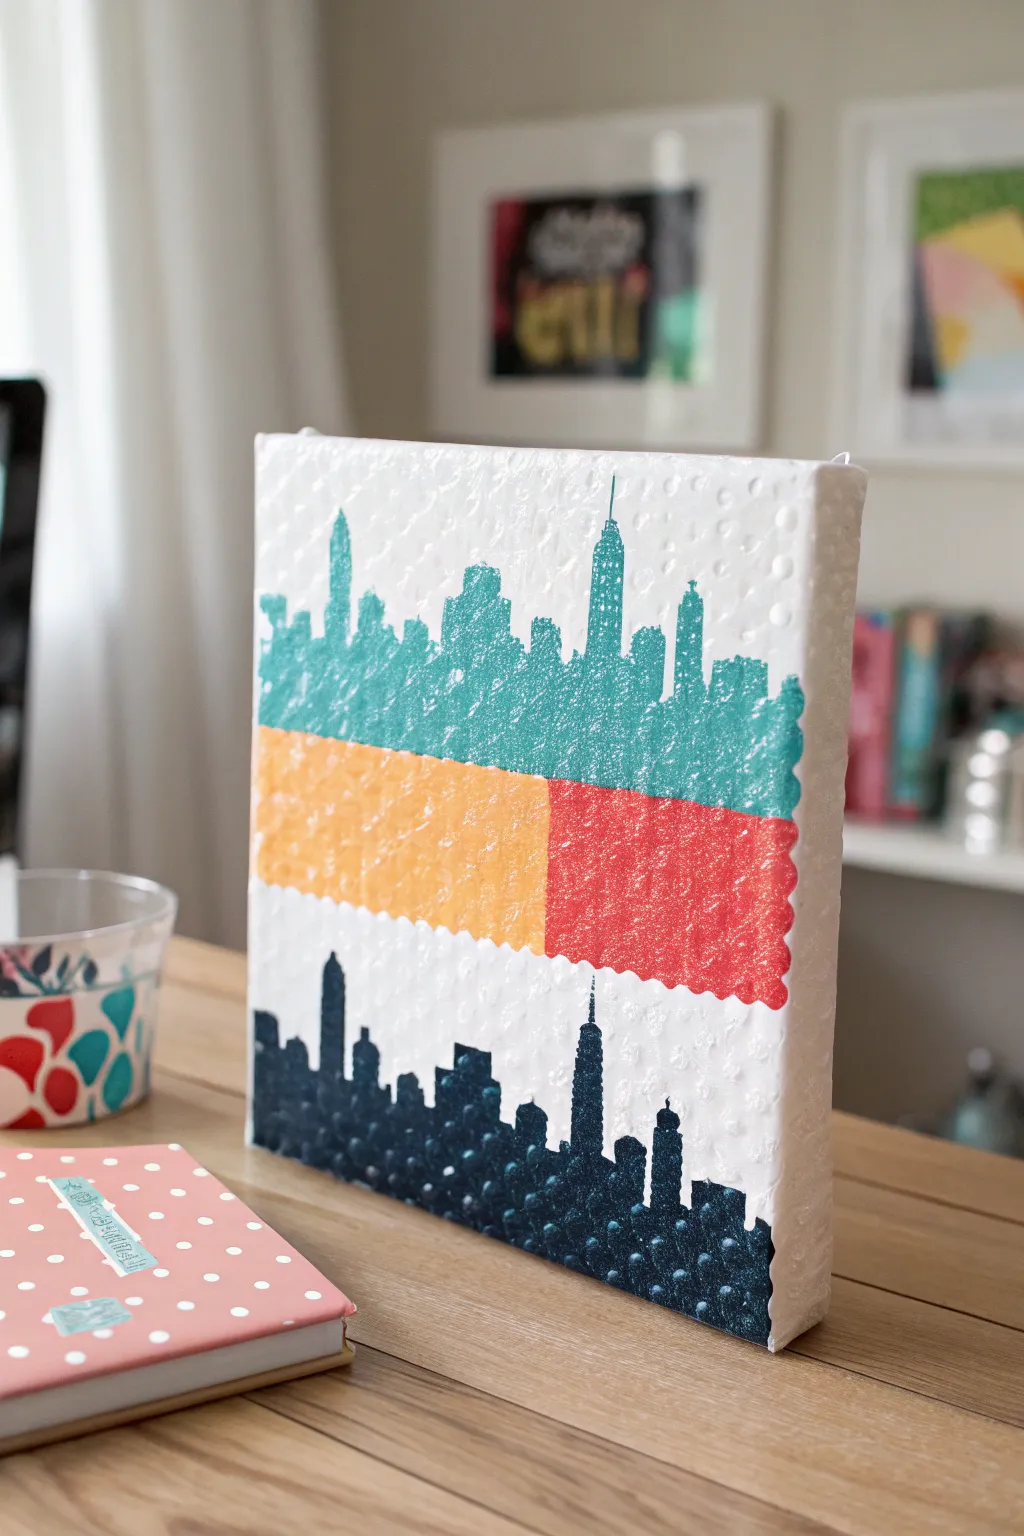
Transform everyday packing material into an artistic tool with this textured cityscape project. The unique bubble wrap surface creates a pixelated, modern look that brings a surprising amount of detail to a simple skyline silhouette.
Step-by-Step Tutorial
Materials
- Square artist canvas (approximately 12×12 inches)
- Sheet of bubble wrap (small bubbles)
- Acrylic craft paints (Teal, Orange, Red, Dark Navy/Black)
- Foam brush or brayer
- Cardstock or thick paper/cardboard
- Scissors or craft knife
- Pencil
- Masking tape or painter’s tape
- Double-sided tape or spray adhesive
Step 1: Prepare the Texture Base
-
Measure the wrap:
Lay your bubble wrap over the canvas to size it up. You want a piece that is slightly larger than the canvas face so it can wrap around the edges later. -
Cut to size:
Cut the bubble wrap sheet. Make sure the bubbles are facing outward (away from the canvas fabric). -
Secure the wrap:
Flip the bubble wrap over so the flat side is facing up. Apply a thin layer of spray adhesive to the flat side, or use strips of double-sided tape along the edges and center. -
Mount to canvas:
Carefully press the bubble wrap onto the canvas front, ensuring the bubbles are facing up towards you. Wrap the excess edges around the back of the canvas and tape them down securely for a clean edge.
Step 2: Creating the Stencils
-
Sketch the skyline:
On a piece of cardstock or thin cardboard equal to the width of your canvas, draw a city skyline. Include details like skyscrapers, spires, and varied building heights. -
Cut the positive shape:
Carefully cut out your skyline effectively creating two stencils: the buildings themselves (positive) and the sky above them (negative). For this project, we are essentially making specific blocking shields. -
Protect the middle:
We need to create the distinct color bands. Use painter’s tape to mask off a horizontal strip through the middle of the canvas where the orange and red blocks will go.
Don’t press too hard!
When applying paint, use a very light touch. If you press down, paint will squish between the bubbles and ruin the crisp, dot-matrix effect.
Step 3: Painting the Texture
-
Paint the top sky:
Starting at the top, paint the entire upper section white (or leave the bubble wrap clear if the canvas is white) to serve as the background. -
Apply teal paint:
Load a foam brush with teal acrylic paint. Gently dab or roll the paint onto the bubble tips on the top half of the canvas. -
Create the top skyline:
To get the skyline shape, you can either paint freehand using the bubble grid as a guide, or lightly tape your cardstock stencil over the bubbles and paint only the exposed bubble tops to create the teal cityscape shape. -
Paint the middle band:
Remove the middle masking tape. Use a clean foam brush to stamp orange paint on the left center section and red paint on the right center section. I like to let the edges of these colors touch without blending too much. -
Paint the bottom skyline:
For the bottom section, paint the bubble tips with your dark navy or black paint. Create a mirror image of a skyline here, making sure the buildings rise up from the bottom edge. -
Refine the edges:
Use a smaller brush to touch up any specific bubbles along the building edges to make the silhouette more distinct.
Try a gradient sky
Instead of solid blocks of color, blend your paints slightly on the palette first to create an ombre sunset effect across the middle strip.
Step 4: Finishing Touches
-
Check coverage:
Look at the canvas from different angles. If any bubble tops in the colored areas were missed, give them a quick dab of paint. -
Let it dry:
Place the canvas in a safe, flat spot to dry completely. Because the paint is sitting on plastic plastic bubbles, it might take a bit longer than usual to cure.
Hang your textured masterpiece on the wall and enjoy the cool tactile effect every time you walk by
Leaf Stamp Nature Canvas
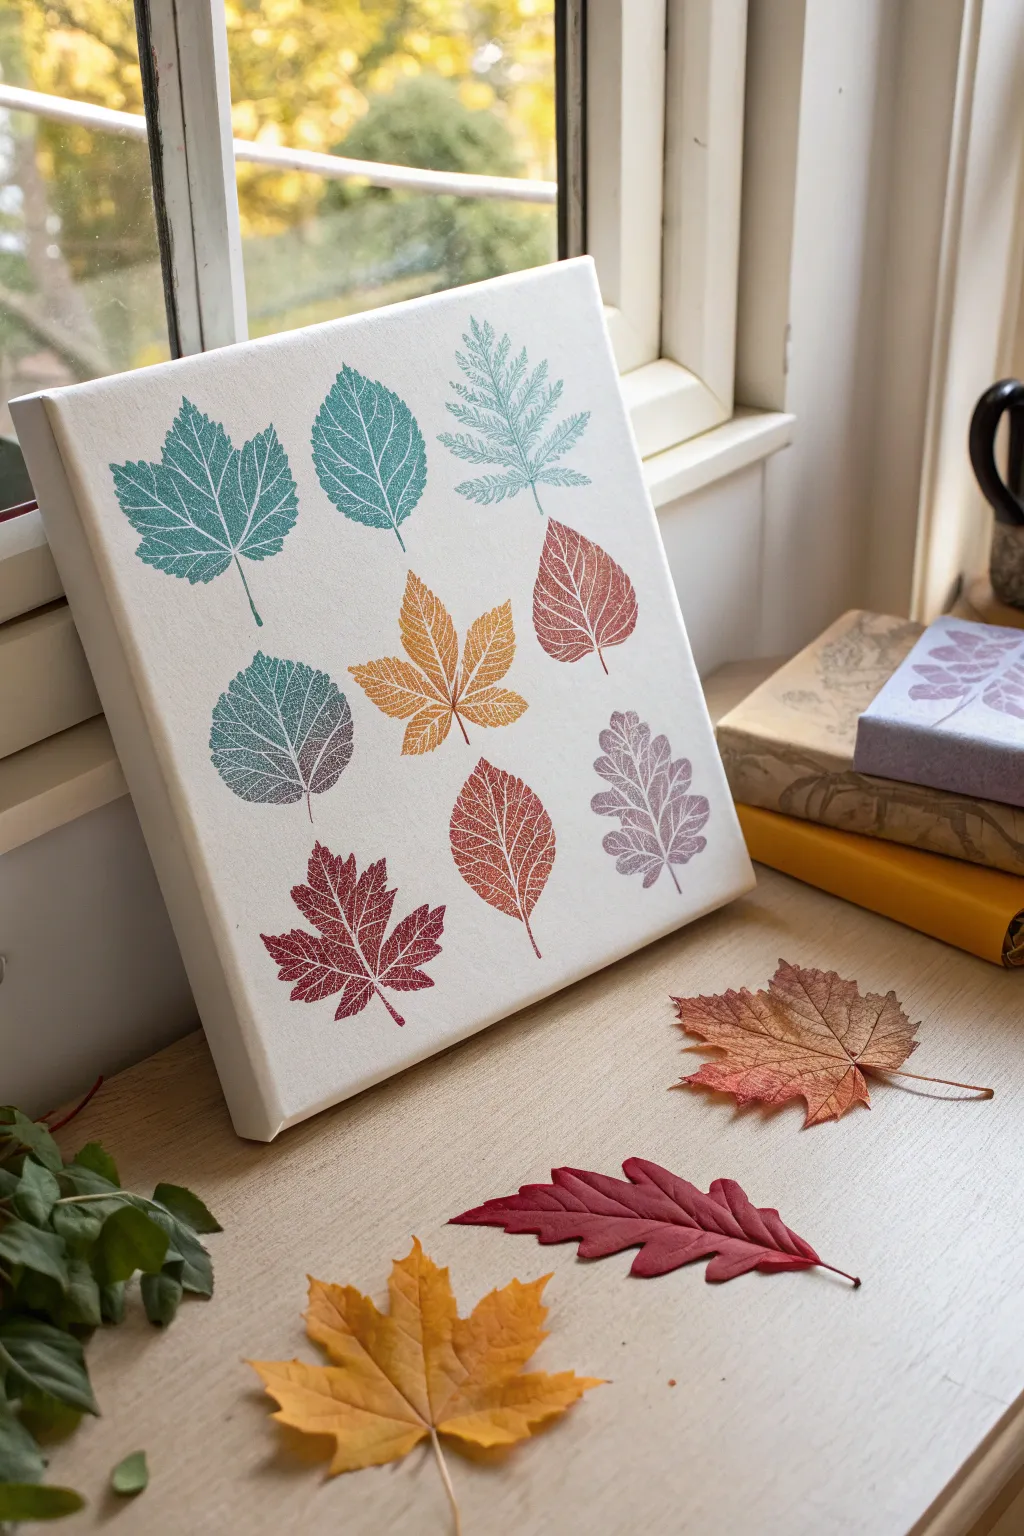
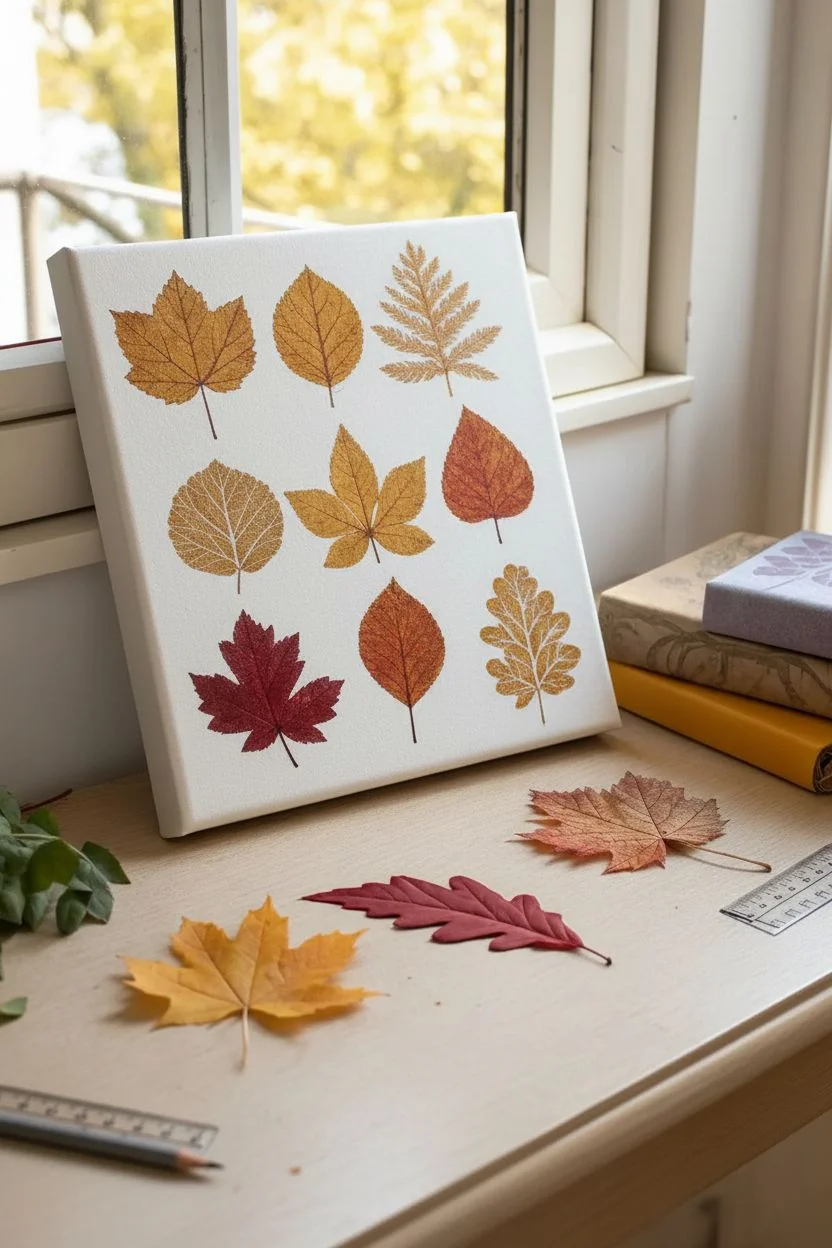
Capture the delicate beauty of autumn with this sophisticated yet simple stamping project. By turning fallen leaves into natural stamps, you create a grid of vibrant, veined impressions that bring the outdoors straight onto your wall.
Detailed Instructions
Materials
- Small square canvas (e.g., 10×10 or 12×12 inches)
- Fresh, flexible leaves (various shapes like maple, oak, birch)
- Acrylic craft paints (teal, golden yellow, burgundy, muted purple)
- Foam brushes or sponges
- Paper towels
- Scrap paper for testing
- Heavy books (for pressing)
- Tweezers (optional)
- Ruler and pencil (light touches)
Step 1: Preparation & Foraging
-
Collect your leaves:
Go for a nature walk and gather a variety of leaves. Look for distinct shapes and prominent vein structures on the underside. -
Check leaf condition:
Avoid dry, crunchy leaves as they will crumble. You want leaves that are still flexible but not wet. If they are dirty, gently wipe them with a damp cloth and let them dry completely. -
Flatten the specimens:
If your leaves are curling, press them under a heavy book for about an hour. You don’t need them fully dried, just flat enough to make good contact with the canvas. -
Plan your layout:
Lay your dry leaves onto the canvas without paint. Arrange them in a 3×3 grid or a random scatter to see what fits best. I prefer taking a quick photo on my phone here so I don’t forget the arrangement. -
Mark the spots:
Using a ruler and a very light pencil touch, make tiny tick marks where the center or stem of each leaf should go to help keep your grid straight.
Smudge Savior
If you smudge paint outside the leaf shape, dip a Q-tip in water (or rubbing alcohol for dried paint) and gently lift the mistake off the canvas.
Step 2: Painting & Stamping
-
Select your palette:
Pour small amounts of your acrylic paints onto a palette or paper plate. Aim for a mix of cool tones (teals) and warm autumn hues (golds, reds). -
Apply paint to the leaf:
Place a leaf vein-side up on a scrap piece of paper. Use a foam brush to dab a thin, even layer of paint over the entire surface. Don’t overload it, or the veins will fill in and disappear. -
Test the print:
Press the painted leaf onto scrap paper first. This helps remove excess globby paint and ensures you know how much pressure creates the best vein details. -
Position on canvas:
Carefully pick up the leaf—tweezers can keep messy fingers away from the canvas—and hover over your first marked spot. Place it down gently. -
Press and rub:
Place a clean paper towel over the leaf to protect your hands. Press firmly all over the leaf area, ensuring you rub over the stem and edges without shifting the leaf. -
The reveal:
Lift the leaf straight up by the stem to reveal the print. The negative space where the veins are should visually pop against the color. -
Clean or switch:
Wipe the leaf gently if you plan to reuse it for another color, or simply switch to a fresh leaf of the same species. -
Continue the grid:
Repeat the process for the remaining spots. Try alternating colors so that similar shades aren’t right next to each other.
Glitzy Veins
After the main colors dry, use a fine gold paint pen to trace the major veins of the leaves for a metallic, high-end finish.
Step 3: Finishing Touches
-
Check for gaps:
If a print is too faint, you can try to restamp exactly over it, but often the imperfect, faded look adds to the organic charm. -
Enhance stems:
If a stem didn’t print clearly, use a distinctive fine liner brush and a tiny bit of matching paint to carefully extend the line. -
Let it cure:
Allow the canvas to dry completely undisturbed for at least 2-3 hours. -
Optional sealing:
For longevity, you can apply a clear matte varnish spray over the artwork once the paint is fully cured.
Hang your botanical masterpiece near a window to let natural light highlight the organic textures you created
Collage-and-Paint Texture Canvas
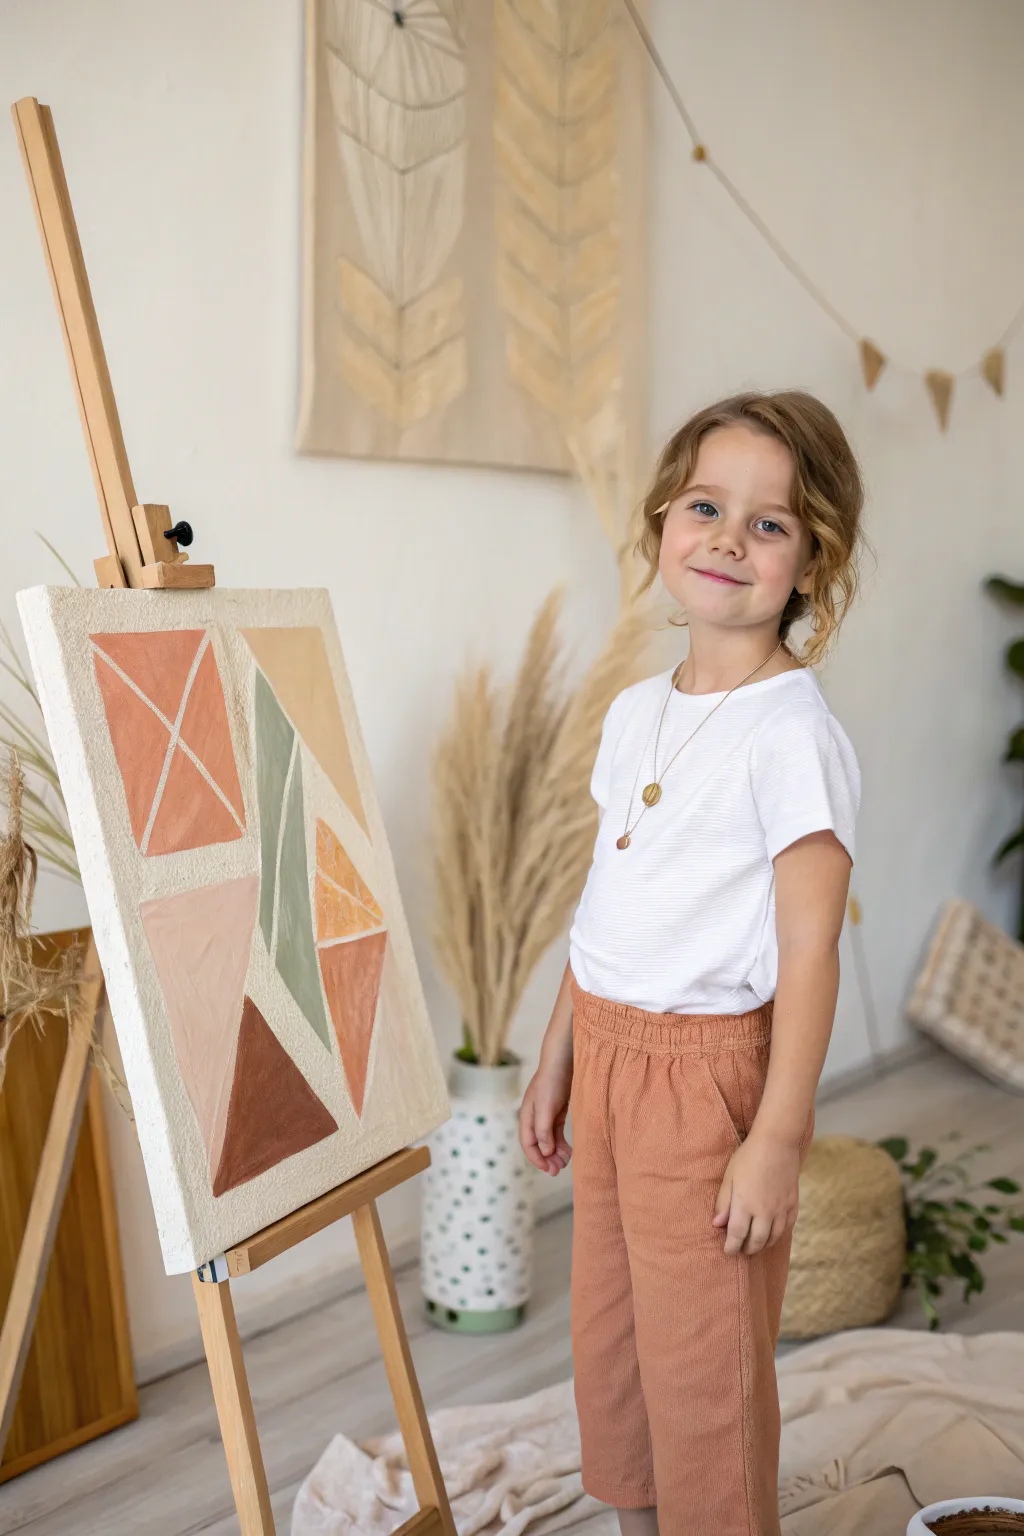
This trendy, earth-toned project introduces young artists to geometric abstraction and mixed-media texture. By combining simple shapes with a thick, textured base, kids can create a sophisticated piece of decor that fits perfectly in a modern room.
Step-by-Step
Materials
- Square canvas (12×12 or similar)
- Texture paste, modeling paste, or thick gesso
- Palette knife
- Painter’s tape or masking tape (various widths)
- Acrylic paints (terracotta, sage green, mustard yellow, brown, peach)
- Flat paintbrushes (medium size)
- White acrylic paint (for mixing)
- Pencil
- Ruler
Step 1: Planning the Geometry
-
Prime the Surface:
Start with a clean, dry canvas. If you want a smoother background before adding texture, apply a thin coat of white gesso and let it dry completely. -
Map Out the Design:
Using a ruler and pencil, lightly sketch large geometric shapes across the canvas. Focus on triangles, rectangles, and trapezoids that intersect or touch corners. -
Create the Divisions:
Aim for a balanced composition, like the one shown, where a large central vertical line divides two main sections, with smaller shapes branching off. -
Tape the Lines:
Apply painter’s tape along your pencil lines to mask off the borders between shapes. This tape will act as a barrier to keep your colors and textures crisp. -
Check Adhesion:
Run your finger firmly along the edges of the tape to ensure it is sealed tight against the canvas so no paint bleeds underneath.
Step 2: Adding Texture and Color
-
Mix the Texture:
For that tactile, plaster-like look, mix your acrylic paints with a dollop of texture paste or modeling paste. Aim for a frosting-like consistency. -
The Terracotta Square:
Start with the top-left square. Mix a terracotta orange with paste and apply it within the taped area using a palette knife or brush. -
Scrape the Details:
While the terracotta paste is still wet, use the edge of your palette knife or a skewer to scrape an ‘X’ shape through the paint, revealing the white canvas beneath. -
Sage Green and Yellow:
Move to the adjacent shapes. Fill the thin vertical triangle with a sage green texture mix, and the top right corner with a muted mustard yellow mix. -
Adding the Peach Tone:
For the larger bottom-left triangle, mix a soft peach color. Apply it fairly smoothly, but leave some visible brushstrokes for character. -
Deep Brown Accent:
Anchor the bottom of the design by painting the lowest triangle in a deep, rich brown. This adds weight and contrast to the lighter pastels. -
Textured Orange Triangle:
For the triangle on the middle right, use a lighter orange mix. Use your tool to scratch random lines or a leaf-like pattern into the wet paste for extra interest. -
Let It Set:
Allow the paint and paste mixture to dry until it feels firm to the touch. This usually takes about 20 to 30 minutes depending on thickness.
Bleeding Lines?
If paint bleeds under the tape, wait for it to dry fully. Then, use a white paint marker or a small brush with heavy body white paint to clean up the edges.
Step 3: The Big Reveal
-
Peel the Tape:
Carefully peel away the painter’s tape. Pull it slowly at a 45-degree angle away from the painted area to ensure clean, sharp lines. -
Fixing Edges:
If any paint bled under the tape, use a small detail brush with white paint to touch up the geometric borders and define the gaps between shapes. -
Adding White Texture:
To finish the unpainted background areas (the ‘grout’ lines), apply a thin layer of plain white texture paste using a small palette knife. -
Roughing the White:
Tap the white paste with a stiff brush to give the border lines a rough, stucco-like appearance that contrasts with the smooth geometric shapes. -
Final Dry:
Let the entire canvas cure overnight to ensure the thick texture paste hardens completely before displaying.
Go 3D
Embed small beads, sand, or dried flower petals into the wet texture paste of specific shapes for an even more tactile sensory experience.
Hang this modern masterpiece on the wall to add a splash of color and calm to any room


Have a question or want to share your own experience? I'd love to hear from you in the comments below!