If you’ve got a girl dresser that’s feeling a little blah, paint is the fastest way to turn it into something dreamy and totally personal. Here are my favorite girl dresser paint ideas—starting with the sweet classics and sliding into the more playful, artsy showstoppers.
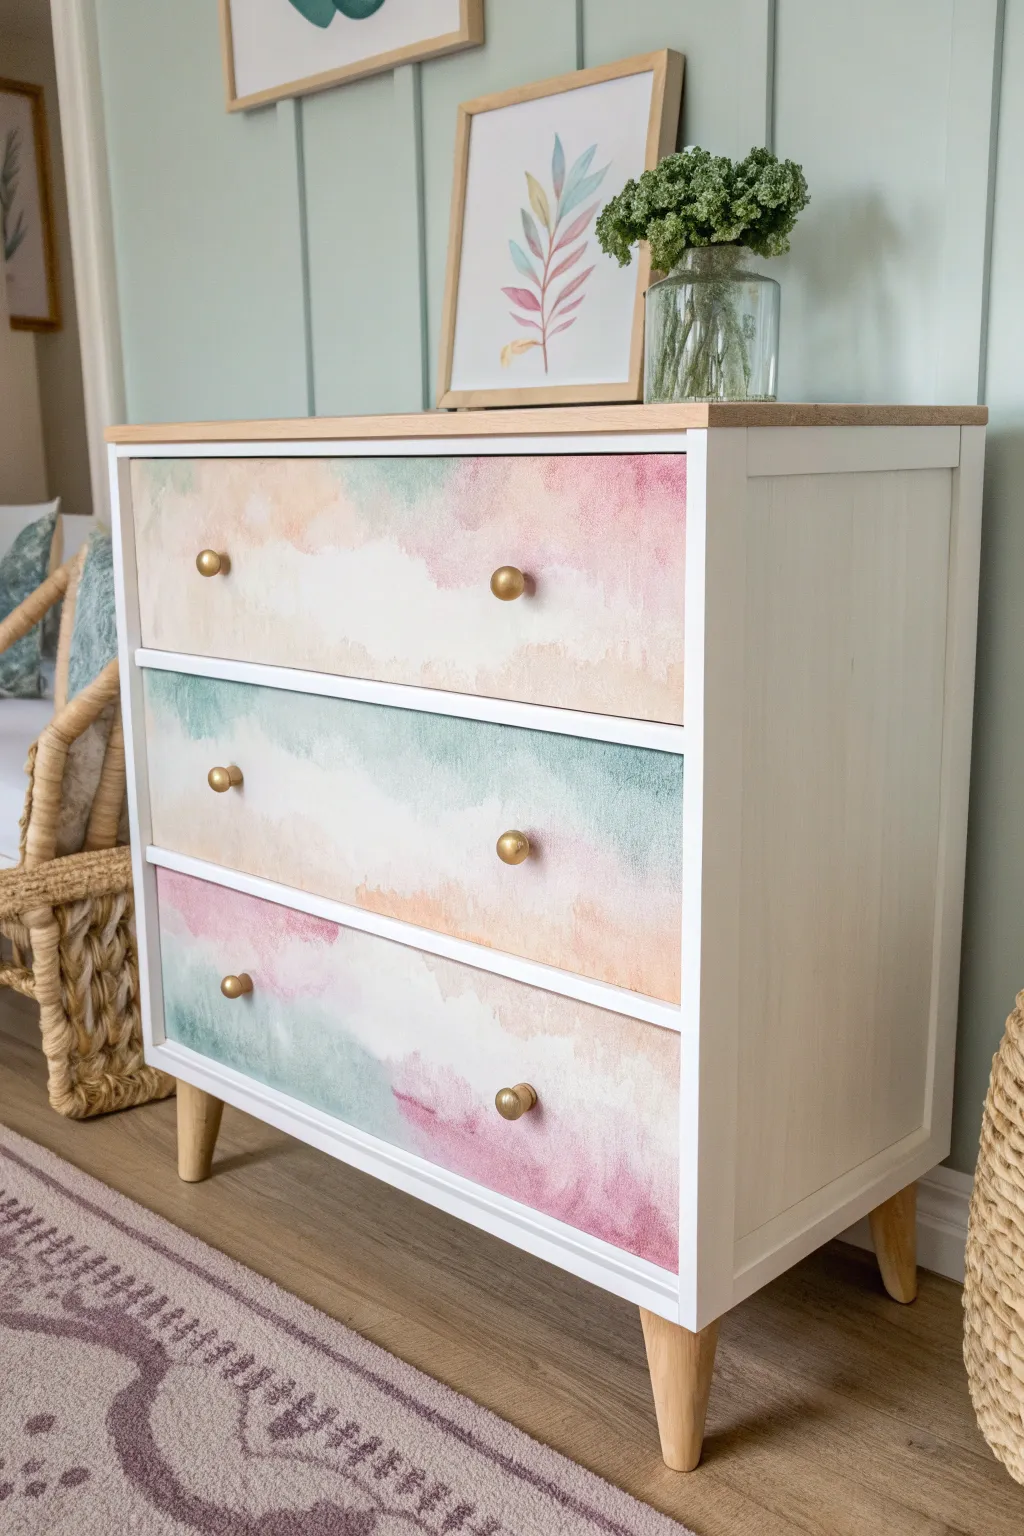
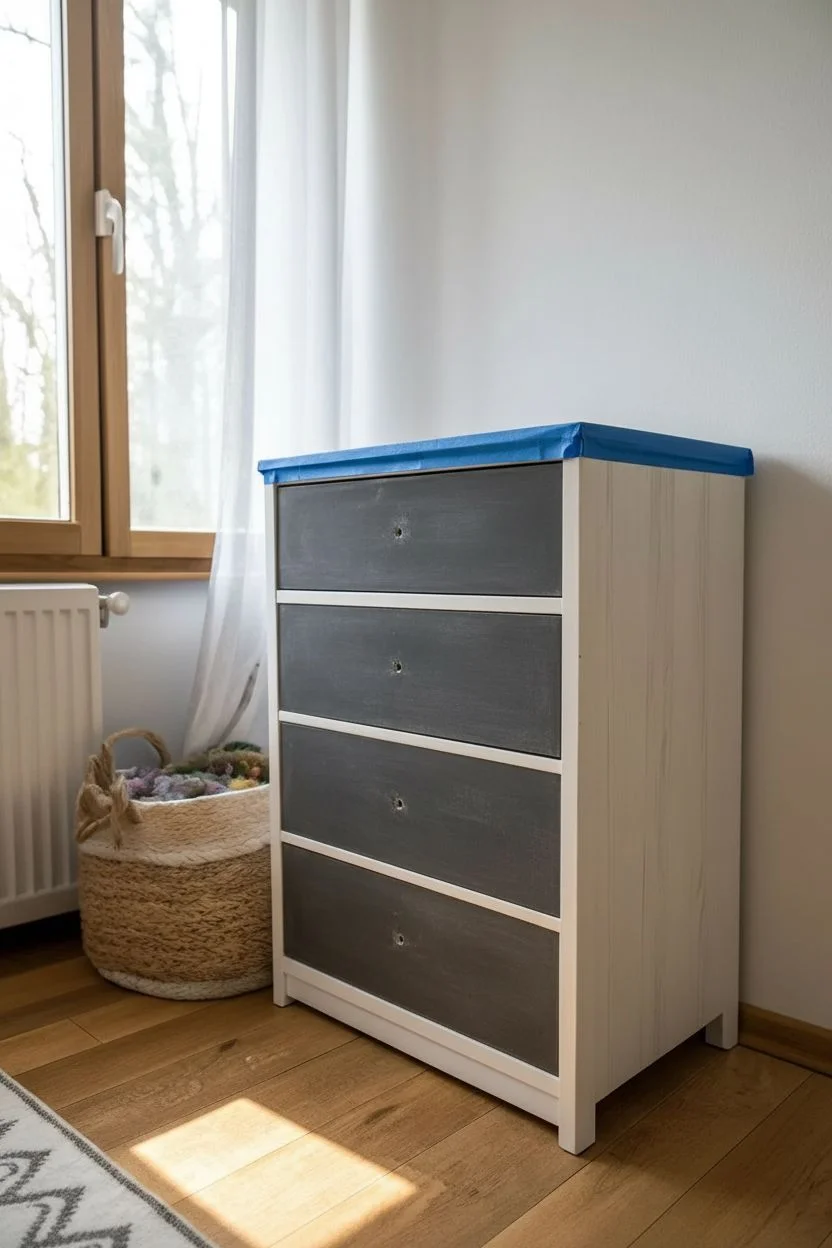
Classic Blush Pink Girl Dresser
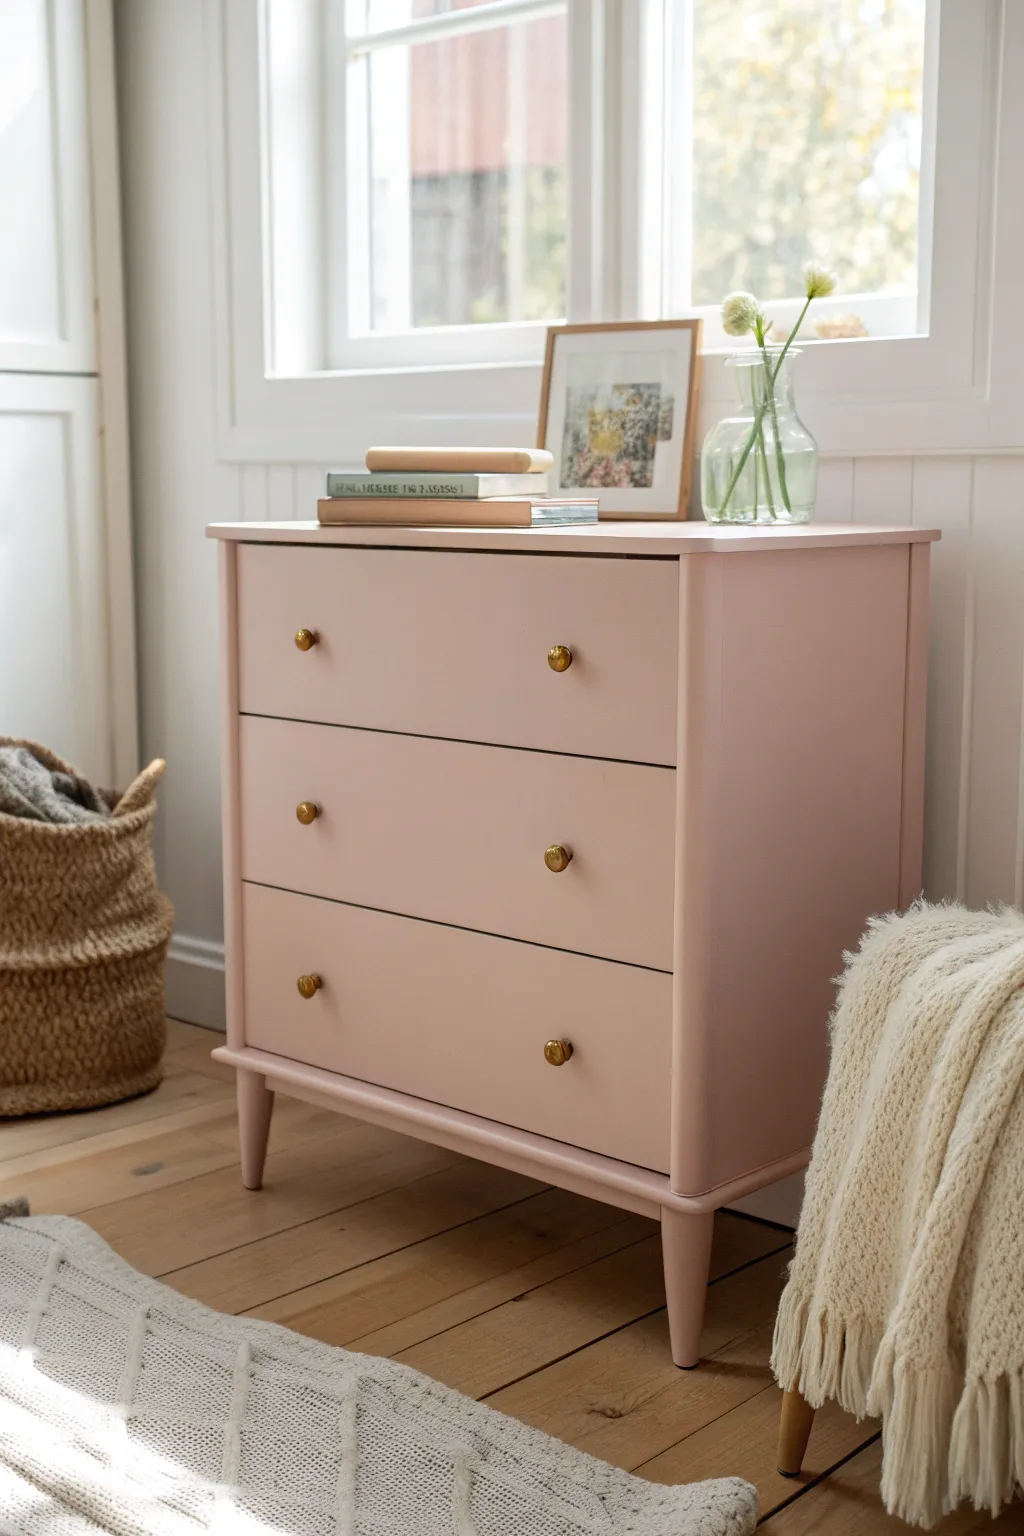
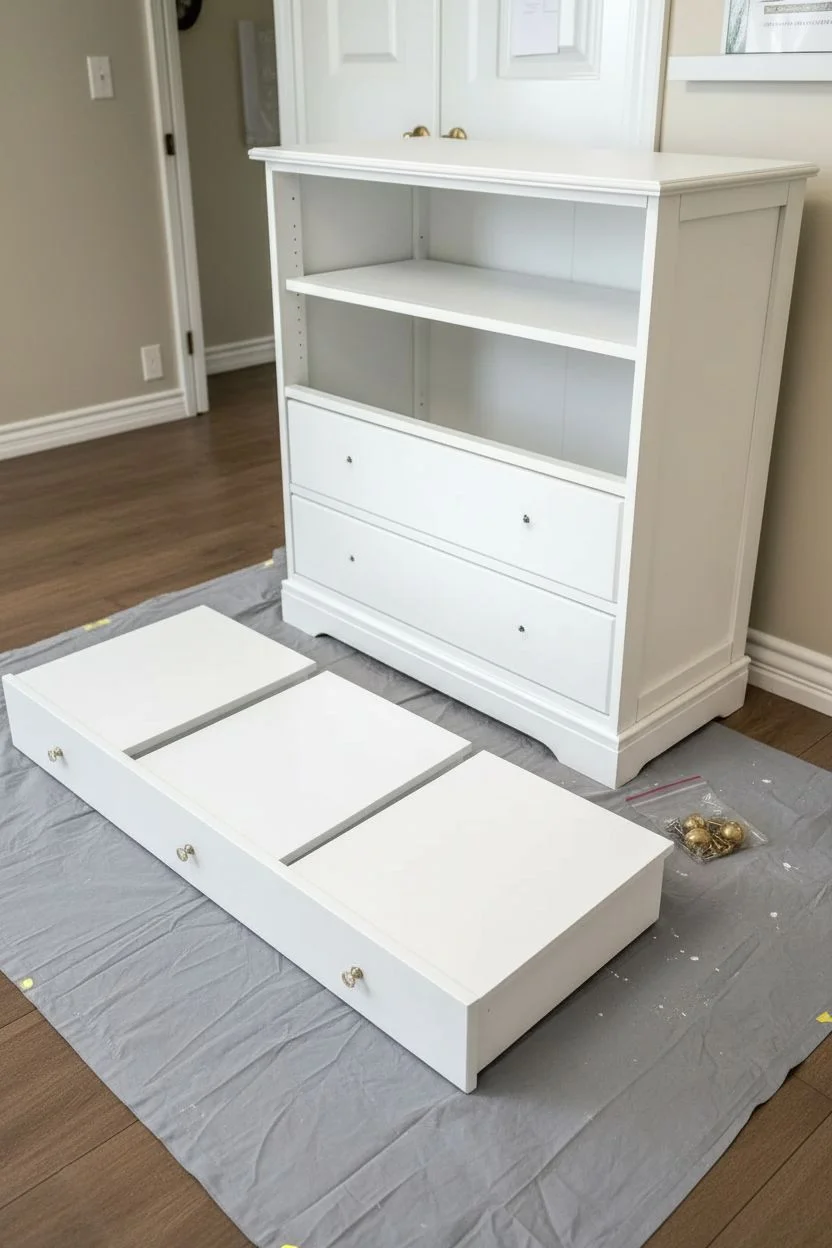
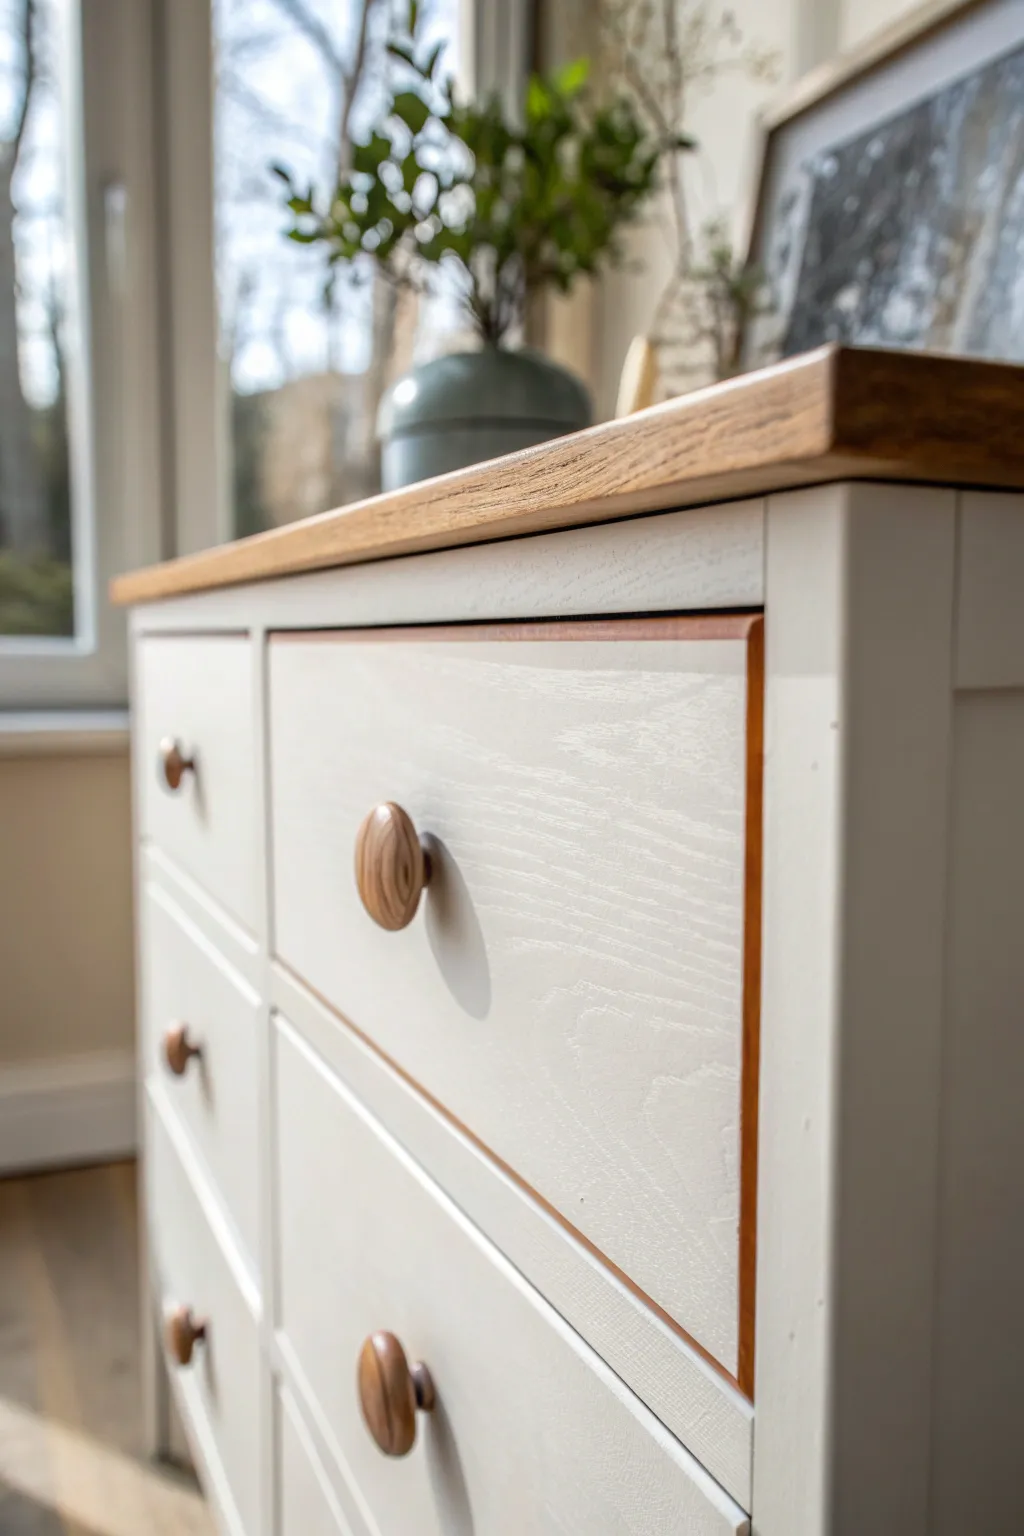
Transform a tired wooden chest into a vision of serenity with a classic blush pink finish and delicate gold hardware. This project revives a standard three-drawer dresser into a timeless, feminine piece perfect for a dreamy bedroom.
Step-by-Step Guide
Materials
- Wooden 3-drawer dresser (preferably with tapered legs)
- Medium-grit sandpaper (120-grit)
- Fine-grit sandpaper (220-grit)
- Tack cloth
- Wood filler (if repairing old hardware holes)
- High-quality bonding primer (stain-blocking)
- Satin or eggshell finish paint (color match: Farrow & Ball’s ‘Pink Ground’ or Behr’s ‘My Sweetheart’)
- 2-inch angled sash brush (synthetic bristles)
- 4-inch foam roller
- Small round brass knobs (6 total)
- Screwdriver
- Painter’s tape
- Polycrylic topcoat (matte or satin finish)
Step 1: Preparation & Repair
-
Remove Hardware:
Begin by removing all the drawers from the frame. Use your screwdriver to take off any existing knobs or pulls. If your new gold knobs don’t align with the old holes, now is the time to fill them with wood filler. -
Clean Thoroughly:
Wipe down the entire piece with a degreaser or a mix of warm water and mild dish soap to remove years of dust and furniture polish residue. -
Initial Sanding:
Using the 120-grit sandpaper, sand the drawer fronts, the top surface, and the sides. You don’t need to strip it to bare wood, but you must scuff up the shiny clear coat so the new paint will grip. -
Dust Removal:
Vacuum up the sanding dust, then wipe every nook and cranny with a sticky tack cloth to ensure a perfectly smooth base. -
Tape edges:
If your drawers don’t slide out completely or if you want to protect the inner glides, apply painter’s tape to the inside edges of the drawer cavity.
Sticky Drawers?
If painted drawers stick, rub a plain candle or beeswax along the wooden runners and side glides to help them slide effortlessly again.
Step 2: Priming & Painting
-
Apply Primer:
Roll a thin coat of bonding primer over the flat surfaces and use your angled brush to get into the corners and legs. A stain-blocking primer is essential here to prevent old wood tannins from bleeding through your light pink paint later. -
Sand the Primer:
Once the primer is fully dry (check the can, usually 1-2 hours), lightly run your 220-grit sandpaper over it to knock down any texture. Wipe away the dust. -
First Coat of Pink:
Stir your blush pink paint well. Use the angled brush to cut in around the legs and detailed edges first. -
Rolling the Flats:
Immediately follow the brush work by using the foam roller on the large flat surfaces (sides, top, drawer fronts) to smooth out brush strokes. I like to keep a wet edge to avoid lap marks. -
Let Dry:
Allow this first coat to dry overnight if possible, or at least 4-6 hours until it is not tacky to the touch. -
Second Coat:
Apply the second coat of pink using the same method: brush the details, roll the flats. This coat provides the true depth of color. -
Inspect Coverage:
Check for any patchy areas. Blush is a light color, so a thin third coat might be necessary on the drawer fronts for perfect opacity.
Step 3: Finishing Touches
-
Seal the Surface:
Apply two thin coats of water-based Polycrylic specifically to the top surface, as this area sees the most wear. The vertical sides often don’t need a heavy topcoat if you used a durable paint. -
Reinstall Drawers:
Once the paint has cured for at least 24 hours, carefully slide the drawers back into their tracks. -
Drill New Holes (Optional):
If you filled old holes in step 1, mark and drill new holes for your centered knob placement. -
Attach Gold Hardware:
Screw the round brass knobs into place. The contrast of the gold against the blush is what really gives this piece that classic charm.
Drawer Surprise
Line the inside of the drawers with a floral or vintage-patterned contact paper for a delightful pop of pattern every time you get dressed.
Your soft pink dresser is now ready to bring a gentle warmth to the room


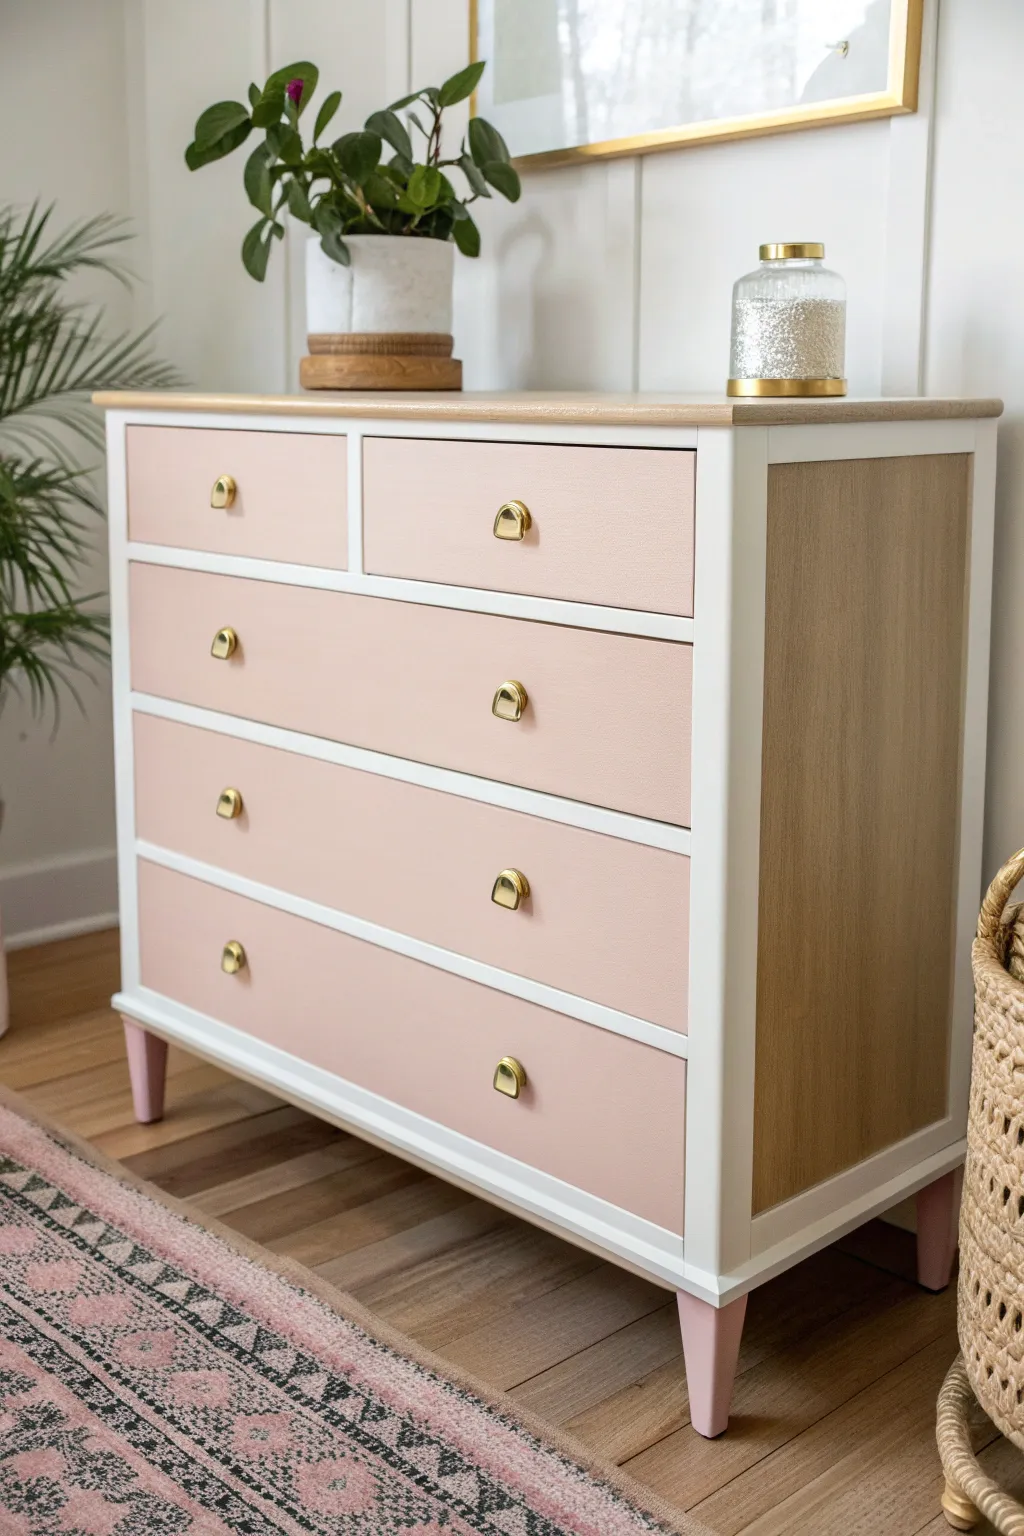
White and Pastel Two-Tone Girl Dresser
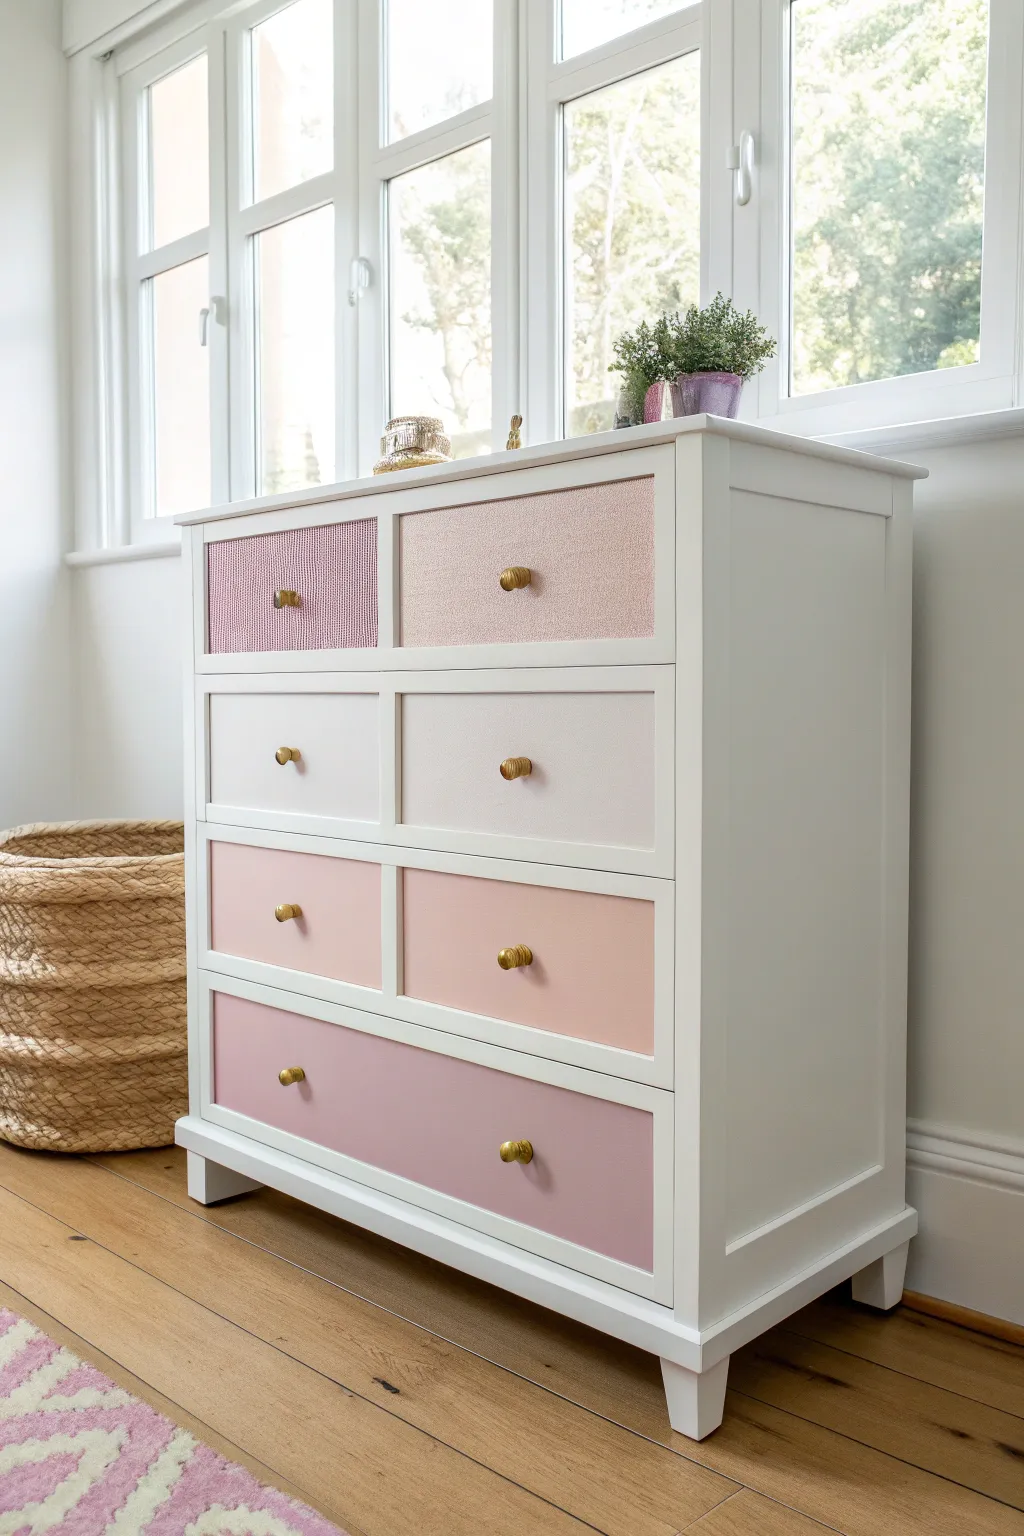
Transform a plain white dresser into a sweet, customized piece using varying shades of pink and texture. This project combines smooth painted finishes with distinct textural elements on the top drawer for a playful yet sophisticated gradient effect.
How-To Guide
Materials
- Wooden dresser (white or primed)
- Sandpaper (120 and 220 grit)
- Painter’s tape
- Primer (if dresser isn’t white)
- White furniture paint (satin or semi-gloss)
- Four shades of pink paint (lightest to darkest)
- Gold drawer knobs
- Cane webbing or textured wallpaper (for top left drawer)
- Fabric or textured paper (for top right drawer)
- Strong craft adhesive or spray glue
- Paint rollers (foam)
- Small paintbrush
- Screwdriver
- Clear matte polyurethane sealer
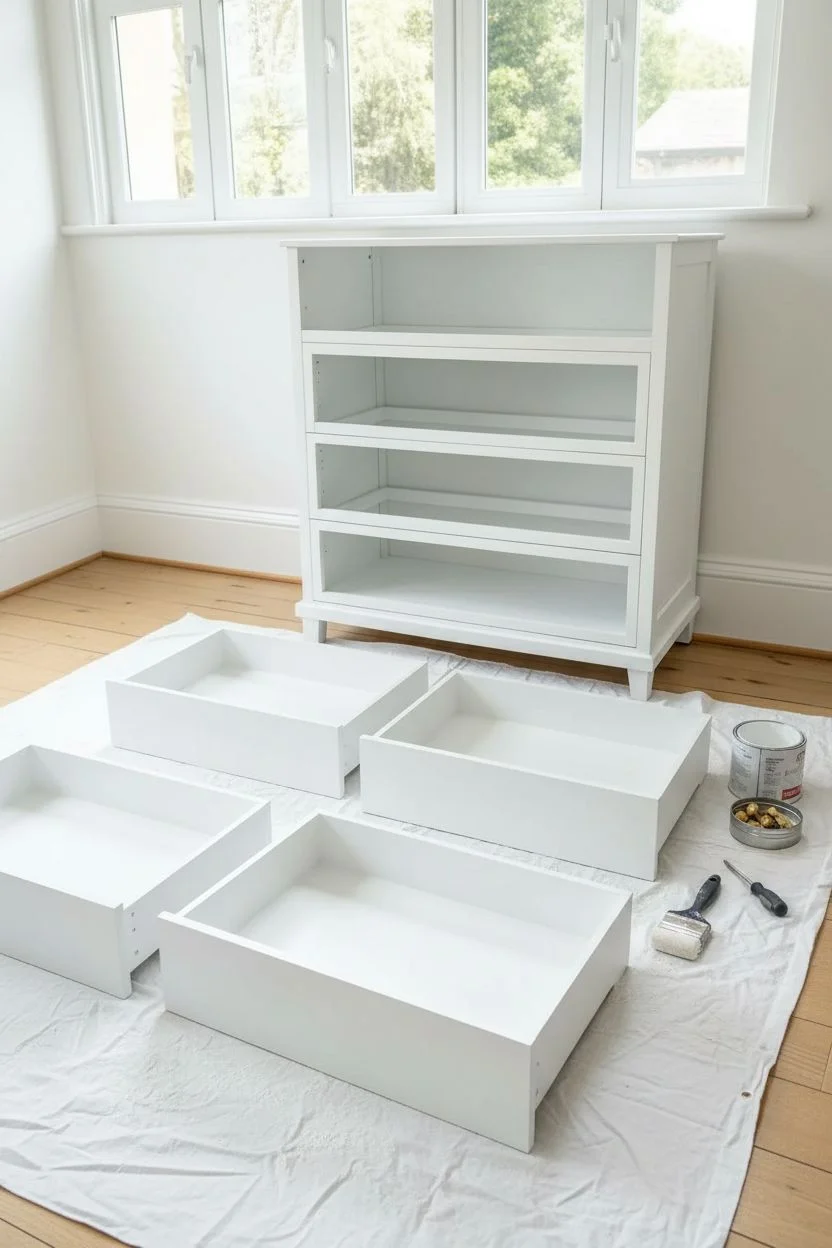
Step 1: Preparation & Base Coat
-
Disassemble the dresser:
Start by removing all drawers from the dresser frame. Use a screwdriver to take off the existing knobs or handles and set the hardware aside if you plan to reuse the screws. -
Clean and sand:
Wipe down all surfaces with a mild degreaser to remove dust and oils. Lightly scuff the entire dresser frame and the drawer fronts with 120-grit sandpaper to help the new paint adhere better. -
Wipe away dust:
Use a damp tack cloth or microfiber towel to completely remove all sanding dust before you open any paint cans. -
Paint the frame white:
If your dresser isn’t already white, apply a high-quality white furniture paint to the main outer frame and legs. I like to use a small foam roller for the flat sides to get a smooth, brush-stroke-free finish. -
Paint drawer edges:
For a cohesive look, paint the outer edges (the parts that touch the frame) of all drawers white as well. Let everything dry completely according to the paint manufacturer’s instructions.
Sticky Drawers?
If painted drawers stick, rub a plain candle or beeswax along the wooden runners. This lubricates the friction points without damaging paint.
Step 2: Creating the Gradient
-
Sort your paint colors:
Arrange your pink paint samples from lightest to darkest. You will apply these from top to bottom to create the ombre waterfall effect. -
Paint the second row:
Skip the top row for now. On the second row of drawers, apply your very lightest, almost-white pink shade using a clean foam roller. Apply two thin coats for best coverage. -
Paint the third row:
Move down to the third row and apply the medium-light pink shade. Ensure you are getting full coverage on the drawer fronts without letting paint drip over the edges. -
Paint the bottom drawer:
Apply your darkest, most saturated pink shade to the bottom large drawer. This grounds the piece visually. -
Let paint cure:
Allow all the painted drawers to dry for at least 24 hours so the finish hardens before you add hardware.
Step 3: Texturing the Top Row
-
Prepare the texture materials:
Measure the recessed panels of the top two drawers precisely. Cut your cane webbing (or textured wallpaper) for the left drawer and your fabric (or glitter paper) for the right drawer to fit these dimensions. -
Paint the top drawer frames:
Paint the borders of the top drawers white to match the main dresser frame, leaving the center panels bare if possible for better glue adhesion. -
Apply the left texture:
Apply a strong craft adhesive or spray glue to the back of your pink cane webbing or textured mesh. Press it firmly into the recessed panel of the top left drawer, smoothing out any bubbles. -
Apply the right texture:
Repeat the process for the top right drawer using your second textured material, such as a subtle pink glitter paper or fabric. Ensure the edges are tucked in neatly. -
Seal the surfaces:
Once dry, apply a clear matte polyurethane sealer over the painted drawer fronts (avoiding the textured inserts) to protect against scuffs and scratches.
Level Up: Hardware
Swap the standard round knobs for gold T-bars or crystal pulls on the textured top drawers to accentuate the mixed-media design.
Step 4: Final Assembly
-
Install new hardware:
Mark the center of each drawer front. Drill holes if necessary, then screw in the gold knobs. The gold contrasts beautifully with the pinks and adds a touch of luxury. -
Reassemble:
Slide the drawers back into their tracks, ensuring the color gradient flows correctly from the textured top to the dark bottom.
Step back and admire your custom creation, which now combines color and texture for a truly unique look.


Soft Ombré Gradient Girl Dresser
This project transforms a standard white dresser into a dreamy, custom piece perfect for a girl’s room. By combining a soft pink ombré cascade with a unique “sunrise on the beach” accent drawer, you’ll create furniture that feels both modern and magical.
Step-by-Step Tutorial
Materials
- Wooden dresser (pre-sanded and cleaned)
- White chalk paint or latex furniture paint (satin finish)
- Acrylic craft paints: Deep magenta, soft pink, peach/creamsicle, light teal/aqua, sandy beige
- Paint brushes: Large flat brush (for base coats), medium flat brushes (for colors)
- Blending brushes or soft sponges
- Crystal or glass faceted knobs (gold hardware)
- Painter’s tape
- Clear topcoat (polyurethane or wax)
- Drop cloth
- Screwdriver
- Spray bottle with water (mister)
Step 1: Preparation & Base Coat
-
Hardware removal:
Begin by removing all existing knobs or handles from the drawers using a screwdriver. Place the screws and hardware in a baggie so they don’t get lost. -
Remove drawers:
Pull all the drawers out of the dresser frame. Lay them flat on a drop cloth in a well-ventilated workspace. This is crucial for painting the faces without drips. -
Tape edges:
If you want the sides of the drawers to remain unpainted, apply painter’s tape along the side edges of the drawer fronts for a crisp line. -
Paint the frame:
Paint the entire exterior frame of the dresser with your white furniture paint. Apply two to three thin, even coats, allowing sufficient drying time between each. I like to lightly sand between these coats for an ultra-smooth finish. -
Base coat the drawers:
Paint the faces of all the drawers with the same white base paint. The second drawer from the top will remain solid white, but the others need a white base to make the ombré colors pop.
Blending Trouble?
If acrylic paint dries too fast while blending, use a customized “glazing liquid” or simply keep a fine mist spray bottle handy to re-wet the paint on the drawer surface instantly.
Step 2: Creating the Triple-Pink Ombré
-
Mix your gradients:
Prepare your pink palette. You need a gradient ranging from deep magenta to very pale pink. You can achieve this by mixing your deep magenta with increasing amounts of white paint in separate cups. -
Paint the bottom drawer:
On the bottom drawer, apply the darkest magenta shade to the bottom half. While the paint is still wet, apply a slightly lighter pink to the top half. -
Blend the bottom drawer:
Use a damp blending brush or a mist of water to blend the line where the two pinks meet. Use horizontal strokes back and forth until the transition is seamless. -
Paint the middle drawer:
The third drawer down (second from bottom) continues the fade. Paint its bottom half with the same tone used on the top of the bottom drawer. Paint its top half an even paler pink. -
Blend the middle drawer:
Repeat the horizontal wet-blending technique. The goal is for the drawers to look like a continuous color fade when stacked. -
Top right drawer:
For the small top-right drawer, create a gentle sunset effect. Paint the top half a very soft pink and the bottom half a warm peach tone. Blend them gently in the middle for a soft glow.
Step 3: The Beachy Accent Drawer
-
Apply aqua sky:
Moving to the top-left drawer, apply your light teal or aqua paint to the top third of the drawer face. -
Apply sandy bottom:
Apply the sandy beige color to the bottom third of the drawer face. -
Create the horizon:
In the middle third, mix a tiny bit of white with the beige. Use a clean, damp brush to blur the teal down into the white/beige mix, creating a soft horizon line that looks like a misty seascape.
Smoother Gradients
Don’t use a regular paintbrush for the final blending pass. A soft, dry makeup brush or a specialized mop brush usually creates the softest, cloud-like transitions without brushstrokes.
Step 4: Finishing Touches
-
Dry and cure:
Let all paint dry completely for at least 24 hours. Acrylic gradients can be fragile until fully cured. -
Seal the work:
Apply two coats of a clear, non-yellowing topcoat (like water-based polyurethane) to protect your artwork. Use light strokes to avoid smearing the gradients. -
Install hardware:
Once the sealer is rock hard, reinstall the drawers into the frame. Attach the new crystal knobs to complete the elegant look.
Step back and admire your stunning new furniture piece that brings a vibrant splash of color to the room


Pastel Rainbow Drawers Girl Dresser
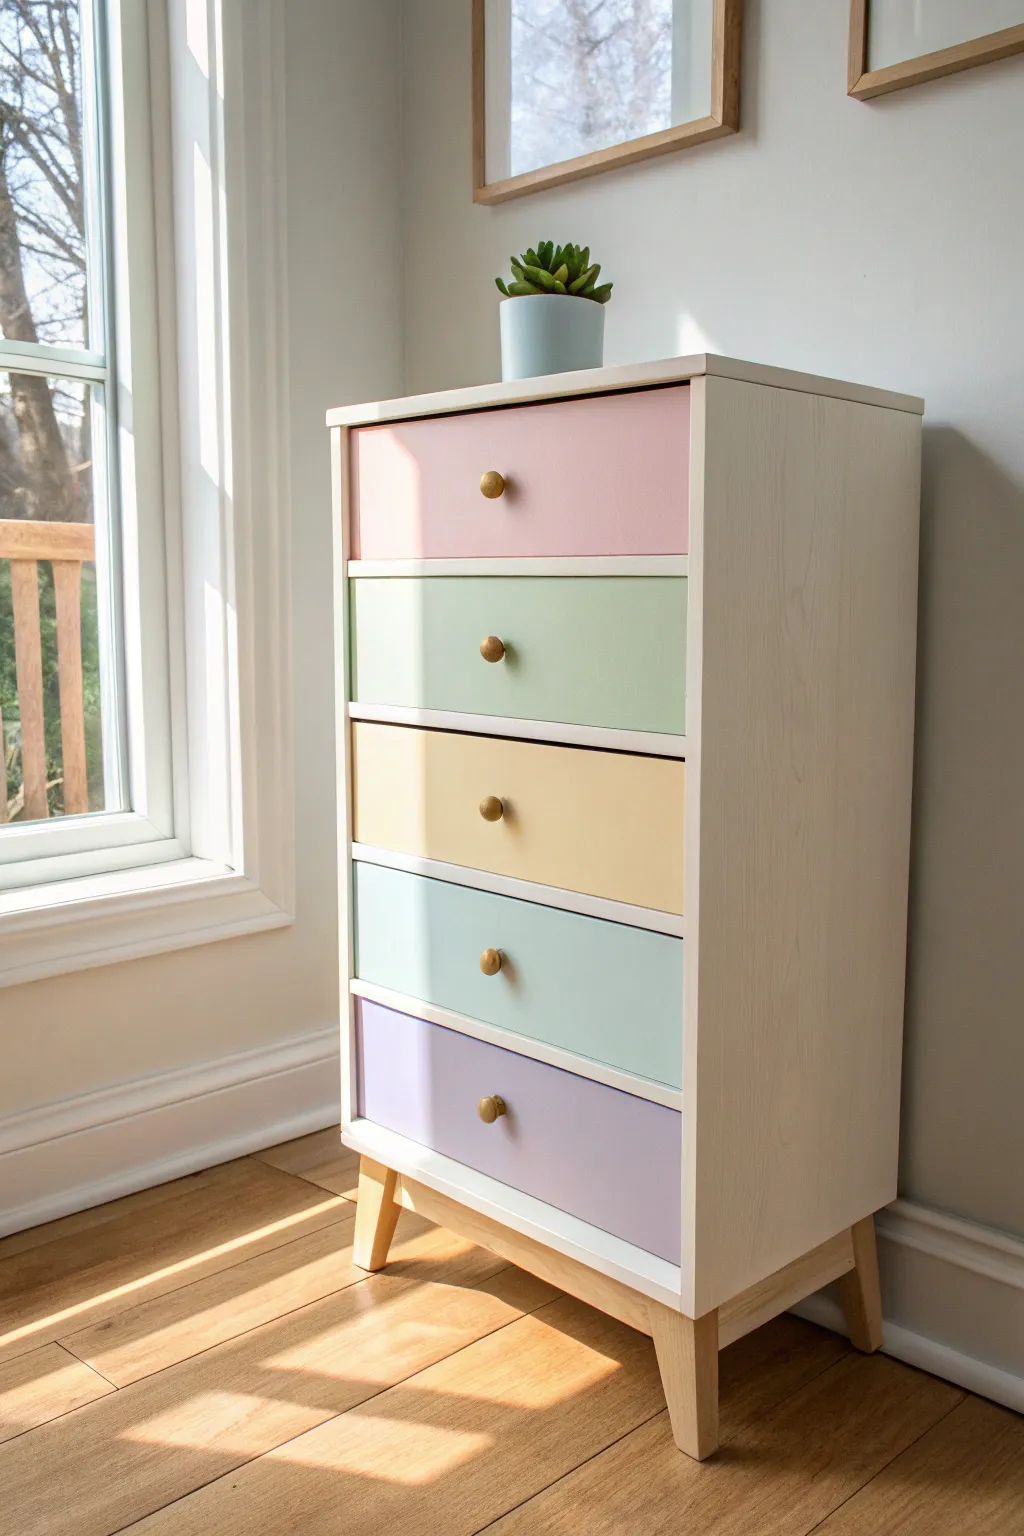
Transform a plain chest of drawers into a soft, whimsical statement piece with this pastel color-blocking technique. The gentle gradient of rainbow hues paired with a crisp white frame and natural wood legs creates a look that is both playful and sophisticated.
Step-by-Step Guide
Materials
- 5-drawer wooden dresser (unfinished or prepped)
- Sandpaper (120 and 220 grit)
- White or cream semi-gloss furniture paint (frame)
- Pastel chalk or milk paints (Soft Pink, Sage Green, Butter Yellow, Sky Blue, Lavender)
- High-quality primer
- Polycrylic topcoat or furniture wax
- Gold or brass round knobs (5)
- Painter’s tape
- Small foam rollers
- Angled sash brush (2 inch)
- Drill and screwdriver
- Tack cloth
- Drop cloth
Step 1: Preparation
-
Disassemble the Dresser:
Begin by removing all drawers from the dresser frame. Unscrew and remove the old hardware. If your dresser has legs you want to keep natural, unscrew them if possible, or tape them off securely later. -
Clean Surfaces:
Wipe down the entire piece with a degreaser or mild soap and water solution to remove dust, oils, and grime. Let it dry completely. -
Sand the Frame and Drawers:
Scuff sand all surfaces you intend to paint using 120-grit sandpaper. You don’t need to strip it to bare wood, just rough up the finish so the primer adheres. -
Remove Dust:
Wipe away all sanding dust with a tacky cloth. This step is crucial for a smooth final finish, so be thorough. -
Protect the Legs:
If you are keeping the wooden legs natural like in the photo, wrap them carefully with painter’s tape right up to the base of the frame.
Sticky Drawer Fix
If drawers feel tight after painting, rub a plain candle or a bar of soap along the wooden runners and tracks to help them glide smoothly.
Step 2: Painting the Frame
-
Prime the Frame:
Apply a coat of high-quality primer to the main body of the dresser. Use a roller for flat sides and a brush for corners. -
Light Sanding:
Once the primer is dry, lightly sand with 220-grit paper to smooth out any brush strokes, then wipe clean again. -
Apply Base Color:
Paint the dresser frame in your chosen white or cream semi-gloss paint. I prefer using a foam roller here for a flawless, modern finish. -
Second Coat:
Allow the first coat to dry according to the manufacturer’s instructions, then apply a second coat for full opacity.
Pro Tip: Custom Hues
Can’t find exact pastels? Buy a quart of white paint and sample pots of bright colors. Mix small amounts of brights into the white to create custom tints.
Step 3: Creating the Rainbow
-
Organize Your Palette:
Lay out your five drawers on a drop cloth. Arrange your paint pots in the rainbow order: Pink, Green, Yellow, Blue, Purple (or customize the order to your preference). -
Prime the Drawer Fronts:
Apply primer to the front face of each drawer. Avoid getting thick paint on the sides, as this can make the drawers stick later. -
Paint the Top Drawer:
Start with the top drawer front using the soft pink paint. Use a small roller for the flat surface and a small brush for the edges. -
Paint the Middle Drawers:
Move through your colors—green, then yellow—painting one drawer at a time. Wash your brush thoroughly between colors or use a fresh foam roller head for each hue. -
Paint the Bottom Drawers:
Finish with the blue and lavender paints on the final two drawers. Check for drips on the edges before the paint sets. -
Apply Second Coats:
Pastels can sometimes be streaky, so a second (or even third) light coat is often necessary for rich, even color coverage.
Step 4: Assembly and Finishing
-
Seal the Paint:
Once all paint is cured (wait at least 24 hours), apply a clear Polycrylic topcoat or furniture wax to protect the finish from scratches. -
Reattach Legs:
Remove the painter’s tape from the legs. If they look dry, you can rub a little hemp oil or wood conditioner on them to revive the grain. -
Install Hardware:
Place your new gold or brass knobs. If the original holes don’t fit your new hardware, you might need to have filled and re-drilled during the prep phase, but usually, a standard center hole works fine. -
Reassemble:
Slide the drawers back into their tracks, ensuring the color order creates that lovely cascading effect.
Enjoy the gentle pop of color this beautiful piece adds to the room
BRUSH GUIDE
The Right Brush for Every Stroke
From clean lines to bold texture — master brush choice, stroke control, and essential techniques.
Explore the Full Guide
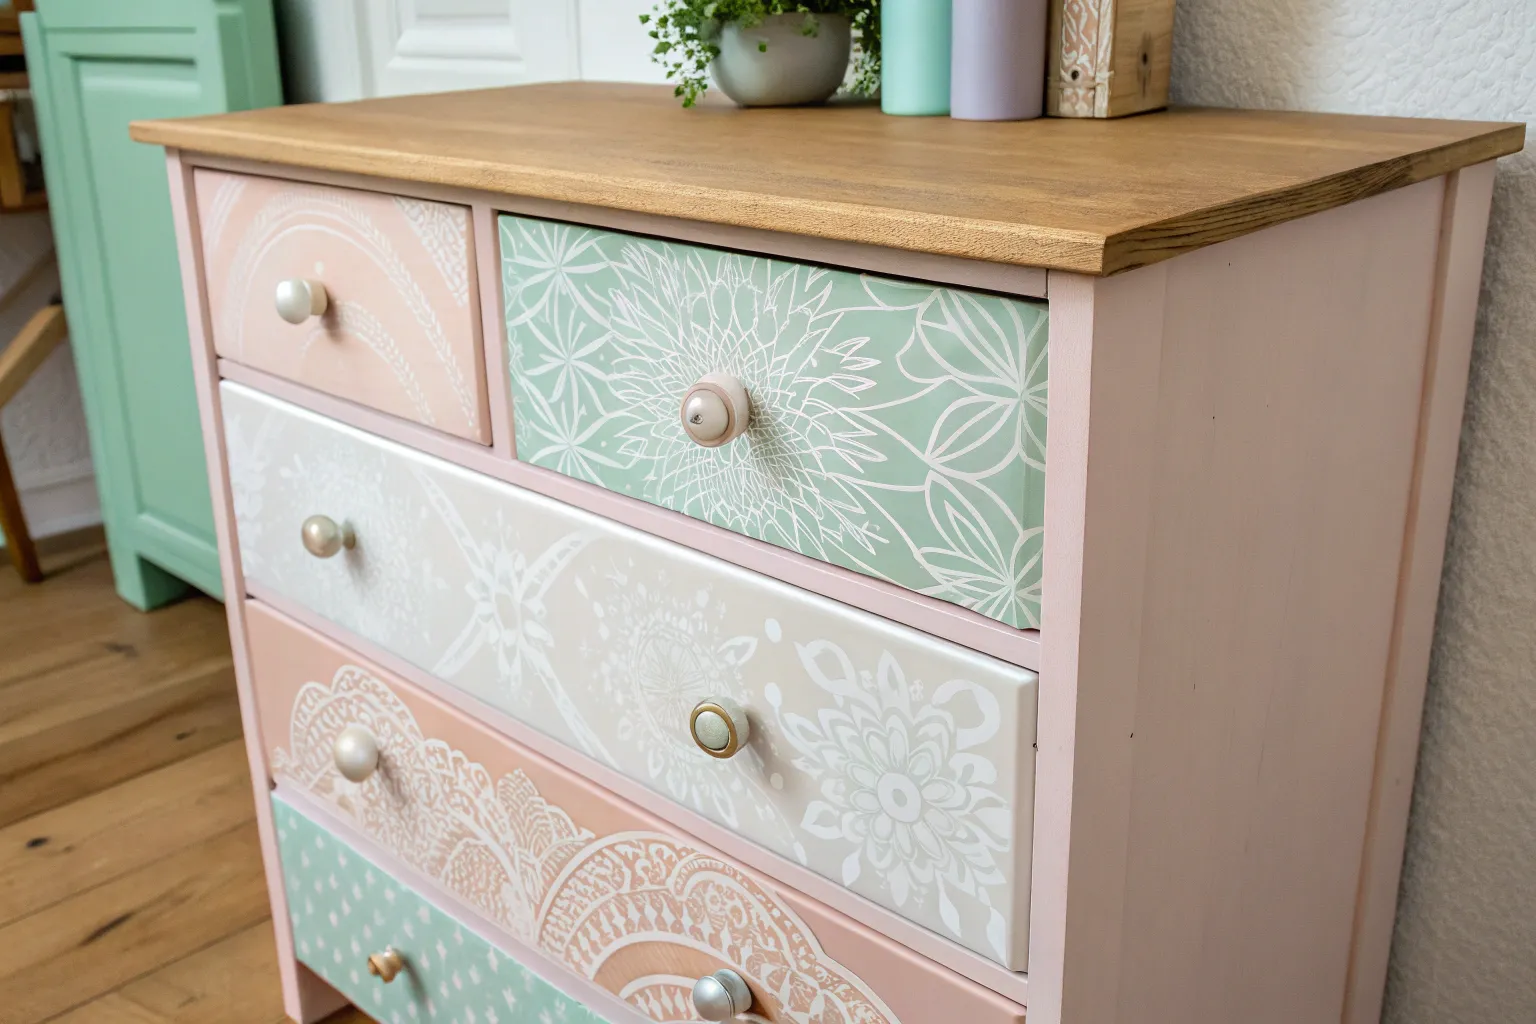
Sweet Floral Stencil Girl Dresser
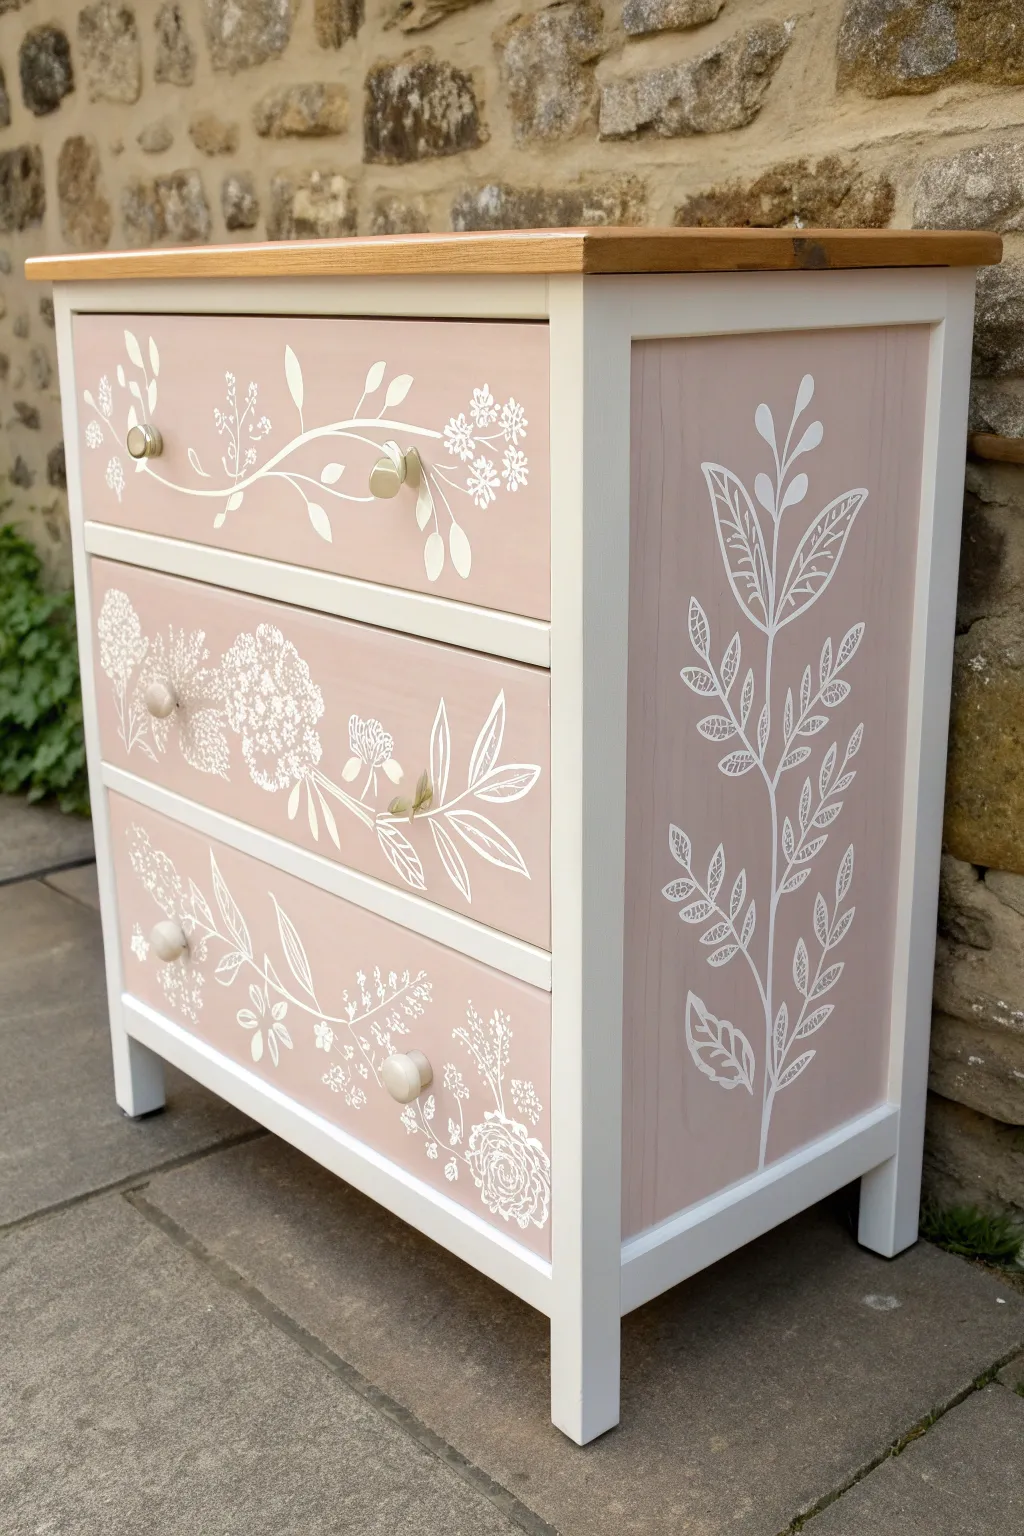
Transform a plain chest of drawers into a soft, romantic statement piece with this delightful floral makeover. Featuring a crisp white frame, dusty pink panels, and delicate white botanical stencils, this design brings a fresh meadow feel into any bedroom.
Detailed Instructions
Materials
- Wooden chest of drawers
- Sander and sanding pads (120 and 220 grit)
- Wood primer (white)
- Furniture paint (Pure White)
- Furniture paint (Dusty Pink or Muted Mauve)
- Clear matte varnish or wax
- Floral stencils (various botanical sprigs)
- Stencil brush or foam pouncer
- White acrylic paint or stencil crème
- Painter’s tape
- Drawer knobs (white wood or ceramic)
- Lint-free cloth
- Small artist brush
Step 1: Preparation & Base Coat
-
Disassemble the Furniture:
Remove all drawers and unscrew the existing knobs. If the top of your dresser is nice wood like the one shown, tape it off carefully to protect the natural finish, or sand it back to raw wood if it needs refreshing. -
Surface Preparation:
Lightly sand the entire piece—frame, side panels, and drawer fronts—using 120-grit sandpaper. You don’t need to strip it completely, just scuff the surface to help the paint adhere. -
Clean and Dust:
Wipe away all sanding dust with a damp lint-free cloth. Ensure the surface is completely dry and free of grease before moving on to priming. -
Apply Primer:
Apply a coat of wood primer to the frame, side panels, and drawer fronts. This step is crucial for preventing bleed-through and ensuring your pink and white colors stay true.
Bleeding Paint?
If paint bleeds under the stencil, don’t panic. Wait for it to dry completely, then use a small brush and your base pink color to carefully ‘erase’ the white smudge.
Step 2: Painting the Frame & Panels
-
Paint the Frame White:
Using a high-quality furniture brush, paint the main structural frame and legs in ‘Pure White’. Use long, smooth strokes to minimize brush marks. -
Second Frame Coat:
Allow the first coat to dry according to the can’s instructions, then apply a second coat of white for full, opaque coverage. -
Paint the Inset Panels:
Carefully paint the side recessed panels and the flat fronts of the drawers in your chosen ‘Dusty Pink’. Use painter’s tape along the edges where the pink meets the white frame to get that crisp, professional line. -
Layering Colour:
Apply 2-3 coats of the pink paint, sanding very lightly with 220-grit paper between coats for a buttery smooth finish. Let the final coat cure overnight.
Go 3D
For a textured effect, mix your white stencil paint with a texture powder or plaster. The flowers will contain a slight raised relief that feels amazing to the touch.
Step 3: Applying the Floral Designs
-
Plan Your Layout:
Lay your drawers flat on the ground. Position your floral stencils tentatively to see how the vines will flow across the front. The goal is an organic look, so avoid perfectly centering every flower. -
Secure the Side Stencil:
Start with the large vertical design on the side panel. Tape the stencil firmly in place so it doesn’t shift while you work. -
Load the Brush:
Dip your stencil brush or foam pouncer into the white paint, then offload almost all of it onto a paper towel. This ‘dry brush’ technique is the secret to preventing paint from bleeding under the stencil edges. -
Stenciling Technique:
Apply the paint using a straight up-and-down dabbing motion. Build up the white opacity gradually rather than trying to get it bright white in one go. -
Horizontal Drawer Designs:
Move to the drawer fronts. Position horizontal vine stencils that look like they are growing across the surface. I prefer to have the stems ‘enter’ from the left or right edges for movement. -
Connect the Designs:
If your stencils are shorter than the drawer, carefully move the stencil and overlap the last leaf slightly to extend the vine seamlessly across the front. -
Touch-Ups:
Once the paint is dry, lift the stencils. Use a tiny artist brush to fill in the ‘bridges’ (the small connecting gaps stencils leave) to make the painting look hand-illustrated rather than stenciled.
Step 4: Finishing Touches
-
Seal the Work:
Protect your beautiful handywork with a coat of clear matte varnish or furniture wax. This is especially important for the painted stencils to prevent them from chipping. -
Top Treatment:
If you left the wood top natural, apply a fresh coat of wood oil or wax to enhance the grain and match the warmth of the pink paint. -
Reassembly:
Screw the knobs back onto the drawers. Contrast is key, so white knobs look fantastic against the pink background.
Step back and admire how a simple coat of paint and some strategic stenciling have turned a basic dresser into a boutique-worthy treasure
Playful Polka Dot Girl Dresser
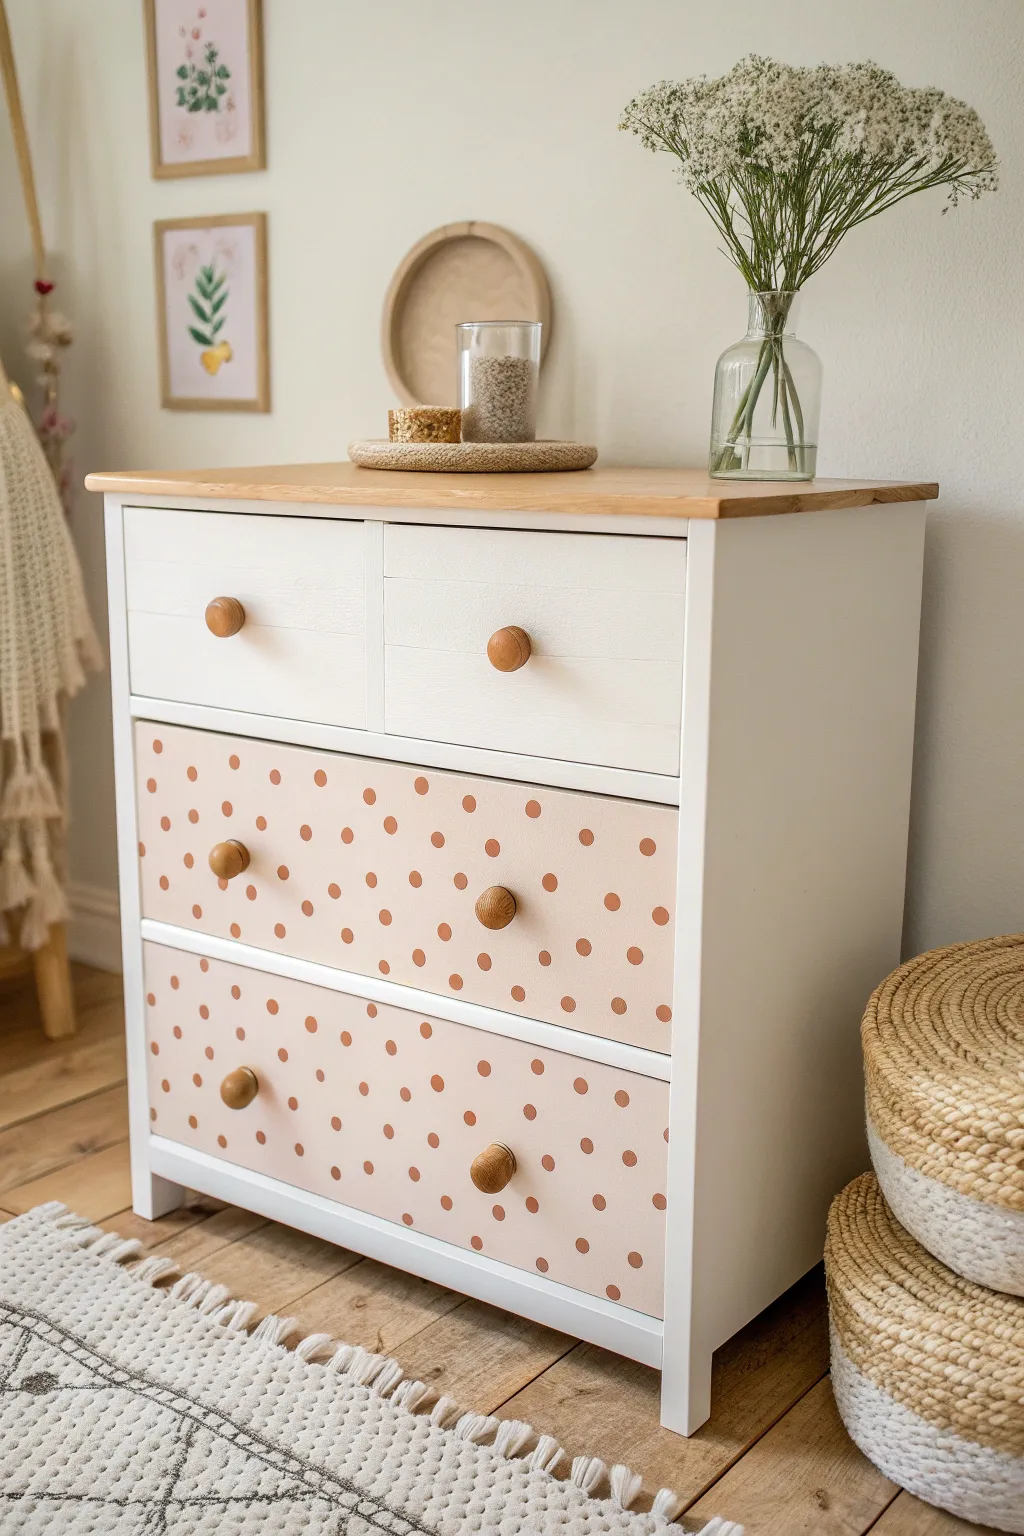
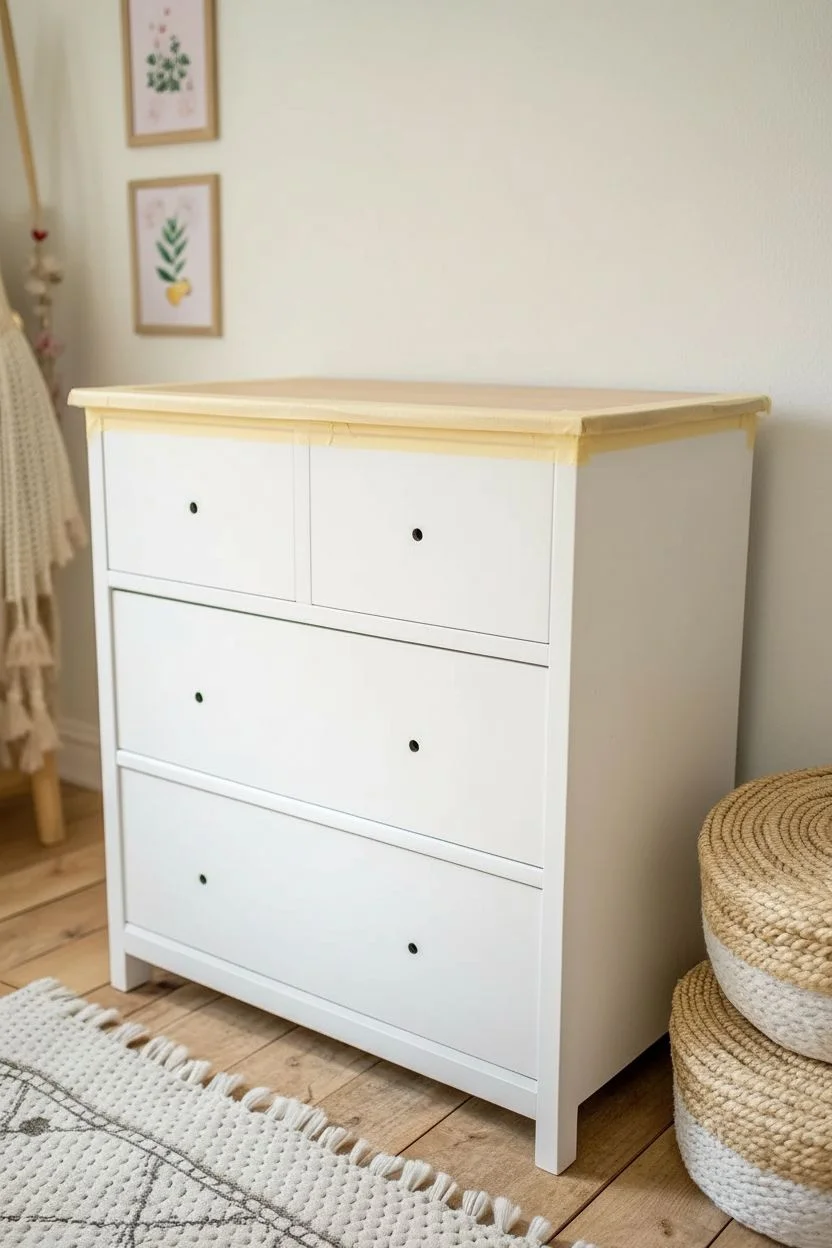
Transform a plain wooden dresser into a whimsical nursery centerpiece with soft blush tones and playful polka dots. This project combines natural wood elements with hand-painted details for a unique, Scandinavian-inspired look.
How-To Guide
Materials
- Wooden dresser (raw or previously finished)
- Sandpaper (120 and 220 grit)
- Orbital sander (optional but recommended)
- Painter’s tape
- Primer suitable for wood
- White satin or semi-gloss furniture paint
- Blush pink chalk or mineral paint
- Terracotta or copper acrylic paint (for dots)
- Round foam pouncer (approx. 1-inch diameter)
- Small artist brush
- Clear matte or satin polycrylic sealer
- Wooden knobs (natural finish)
- Tack cloth
- Paint rollers and brushes
Step 1: Prep and Prime
-
Disassemble the Dresser:
Begin by removing all the drawers from the dresser frame. Unscrew and set aside the existing hardware. If you plan to reuse the knobs, keep the screws safe in a small bag. -
Sand the Surfaces:
Using an orbital sander or sanding block with 120-grit paper, scuff sand the entire dresser to remove old glossy finishes. Pay special attention to the top if you want to reveal the natural wood grain. -
Smooth the Grain:
Switch to 220-grit sandpaper for a final pass. This ensures a buttery smooth surface for painting. Wipe away all dust using a tack cloth. -
Protect the Top:
Since we want to keep the top natural wood, carefully apply painter’s tape along the edges where the wood top meets the frame to protect it from primer. -
Apply Primer:
Roll a coat of high-quality wood primer onto the dresser frame and the drawer fronts. Let it dry completely according to the can’s instructions.
Step 2: Base Painting
-
Paint the Frame White:
Apply your white furniture paint to the main outer frame of the dresser. Use a foam roller for flat areas and a brush for corners to avoid brushstrokes. -
Paint Top Drawers:
Paint the fronts of the top two smaller drawers with the same white paint. You will likely need two coats for opaque coverage, sanding lightly between coats. -
Base Coat Lower Drawers:
Apply the blush pink paint to the fronts of the larger bottom drawers. Two coats are usually best here as well to get that rich, creamy color. -
Seal the Natural Top:
While the paint dries, apply a clear matte sealer to the sanded natural wood top to protect it from water rings and scratches.
Clean Circles Pro-Tip
Twist the foam pouncer slightly as you lift it off the surface. This breaks the suction and helps create a crisp, perfect circle edge without globs of paint.
Step 3: The Polka Dot Detail
-
Plan the Pattern:
Before painting on the dresser, practice your polka dot spacing on a piece of cardboard. A staggered or ‘brick’ pattern tends to look more organic than a grid. -
Load the Pouncer:
Pour a small amount of terracotta or copper paint onto a paper plate. Dip your round foam pouncer in, then blot it slightly on a clean part of the plate to remove excess paint. -
Stamp the Dots:
Press the foam pouncer firmly onto the pink drawer fronts. Lift straight up to avoid smearing. I like to start in the center and work my way out to keep things balanced. -
Touch Up Edges:
If any dots look bubbly or uneven, use a small artist brush to smooth them out or fill in gaps while the paint is still wet. -
Handle the Edges:
For dots that fall on the edge of the drawer, simply let the pouncer go off the edge onto a piece of scrap paper held underneath.
Level Up: Metallic Pop
Use a metallic copper or gold paint for the dots instead of a flat color. It catches the light beautifully and adds a touch of glam to the matte finish.
Step 4: Assembly
-
Seal Everything:
Once the dots are fully dry (give them at least a few hours), apply a clear polycrylic topcoat over all painted surfaces to prevent chipping. -
Install Knobs:
Attach the round natural wood knobs to the drawers. If you bought new unfinished knobs, you might want to seal them with a little wax or oil first. -
Reassemble:
Slide the drawers back into their tracks, stepping back to ensure your polka dot pattern looks cohesive across the different levels.
Now you have a charming, personalized piece of furniture ready for organizing tiny clothes

PENCIL GUIDE
Understanding Pencil Grades from H to B
From first sketch to finished drawing — learn pencil grades, line control, and shading techniques.
Explore the Full Guide
Cute Stripe Pattern Girl Dresser
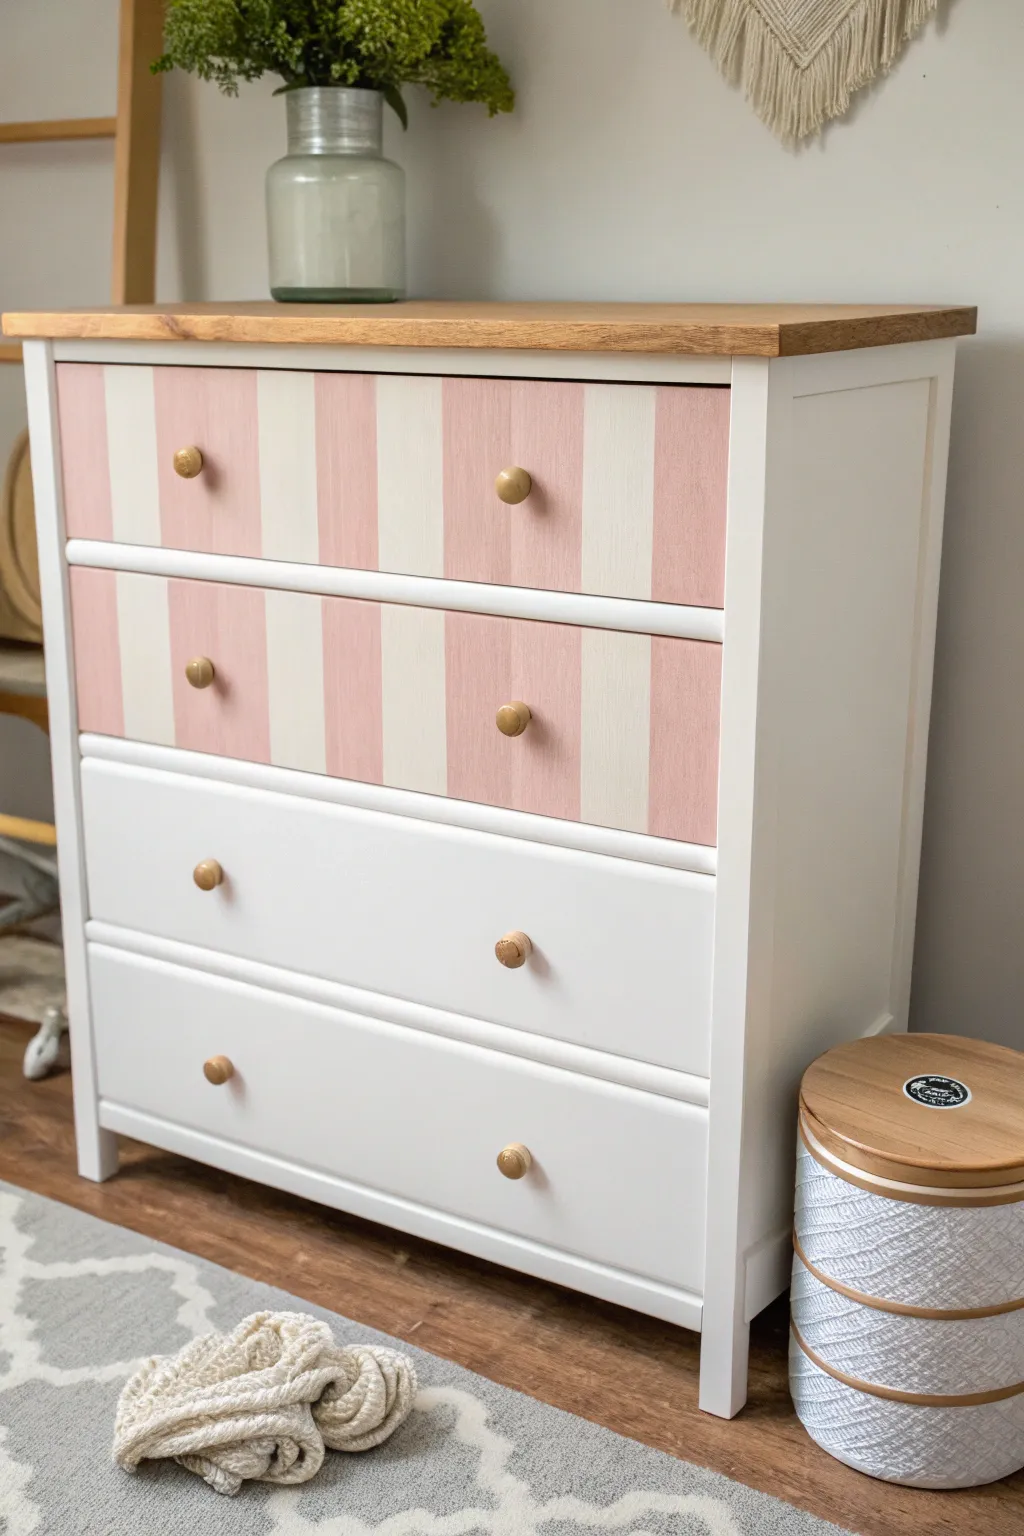
Transform a plain chest of drawers into a sweet, custom piece with this lovely striped design. The combination of soft pink and white stripes on the upper drawers creates a playful yet sophisticated look perfect for a girl’s bedroom.
Detailed Instructions
Materials
- Wooden dresser
- Sandpaper (120 and 220 grit)
- Painter’s tape (1-inch width)
- Soft pink chalk or furniture paint
- Crisp white chalk or furniture paint
- Measuring tape
- Pencil
- Paint rollers (foam high-density)
- Small angled paintbrush
- Clear matte polyurethane or wax topcoat
- Screwdriver
- Wood stain (optional for top)
- Clean tack cloth
Step 1: Preparation
-
Disassemble the hardware:
Begin by removing all the drawer knobs using your screwdriver. Set these aside in a safe baggie since you’ll be reusing the original wooden knobs to maintain that cohesive look. -
Remove drawers:
Pull all the drawers out of the main dresser body. Place them on a drop cloth or workbench where you have plenty of room to maneuver around them. -
Clean surfaces:
Wipe down the entire dresser and drawer fronts with a degreasing cleaner to remove oils and dust. This step is crucial for paint adhesion. -
Sand the finish:
Lightly scuff sand the entire piece with 120-grit sandpaper. You aren’t trying to strip it to bare wood, just removing the shine to give the paint some ‘tooth’ to grip onto. -
Clean dust:
Use a tack cloth to meticulously wipe away all sanding dust. Even tiny specks can ruin your smooth finish.
Bleed-Proof Lines
Always paint a thin layer of your BASE color over the tape edge before applying the stripe color. This seals the tape and guarantees perfect precision.
Step 2: Base Painting
-
Refinish the top (Optional):
If you want the natural wood look shown in the photo, sand the top surface completely down to bare wood. Apply a light wood stain and let it dry according to the can’s instructions. -
Paint the body and bottom drawers:
Using a foam roller, paint the main frame of the dresser and the fronts of the bottom two drawers with your crisp white paint. I like to apply thin, even coats to avoid drips. -
Paint the striped drawer base:
For the top two drawers (where the stripes will go), paint the entire drawer front in the lighter color first—in this case, the off-white or cream tone. -
Apply second coats:
Allow the first coat to dry fully (usually 2-4 hours). Lightly sand with 220-grit paper for smoothness, wipe clean, and apply a second coat of white/cream to all surfaces.
Step 3: Creating the Stripes
-
Measure the width:
Once the top drawers are fully dry (cure time is key here), measure the total width of the drawer front. Divide by the number of desired stripes to determine how wide each stripe needs to be. -
Mark the lines:
Make small tick marks with a pencil along the top and bottom edges of the drawer front to guide your tape placement. -
Apply painter’s tape:
Place your painter’s tape vertically, connecting your top and bottom tick marks. Remember to place the tape on the *outside* of the area you want to paint pink. -
Seal the edges:
Firmly press down the edges of the tape with a credit card or your thumbnail. This prevents the pink paint from bleeding underneath. -
The sealing trick:
Brush a very light layer of your *base color* (the white) over the tape edges. This seals the gap with the base color so your pink lines will be razor sharp. -
Paint the pink stripes:
Using a small roller or brush, paint the exposed stripe areas with your soft pink color. You likely won’t need much paint for this step.
Mix & Match Fun
Try alternating knob styles for a playful twist! Use the wooden knobs on the white drawers and install glass or gold knobs on the striped ones.
Step 4: Finishing Touches
-
Remove tape:
Peel off the painter’s tape while the pink paint is still slightly tacky—don’t wait for it to dry completely, or it might pull up chips of paint. -
Seal the project:
Once all paint is cured (wait 24 hours ideally), apply a clear matte polyurethane topcoat or furniture wax over the entire dresser to protect your hard work from scratches. -
Reattach hardware:
If your original wooden knobs need refreshing, sand them lightly to match the top. Screw them back onto the drawers once the sealer is dry. -
Reassemble:
Slide the drawers back into their tracks, ensuring the striped drawers are at the top.
Step back and admire your fresh, customized piece that adds just the right amount of pattern to the room
Soft Scallop Edge Girl Dresser
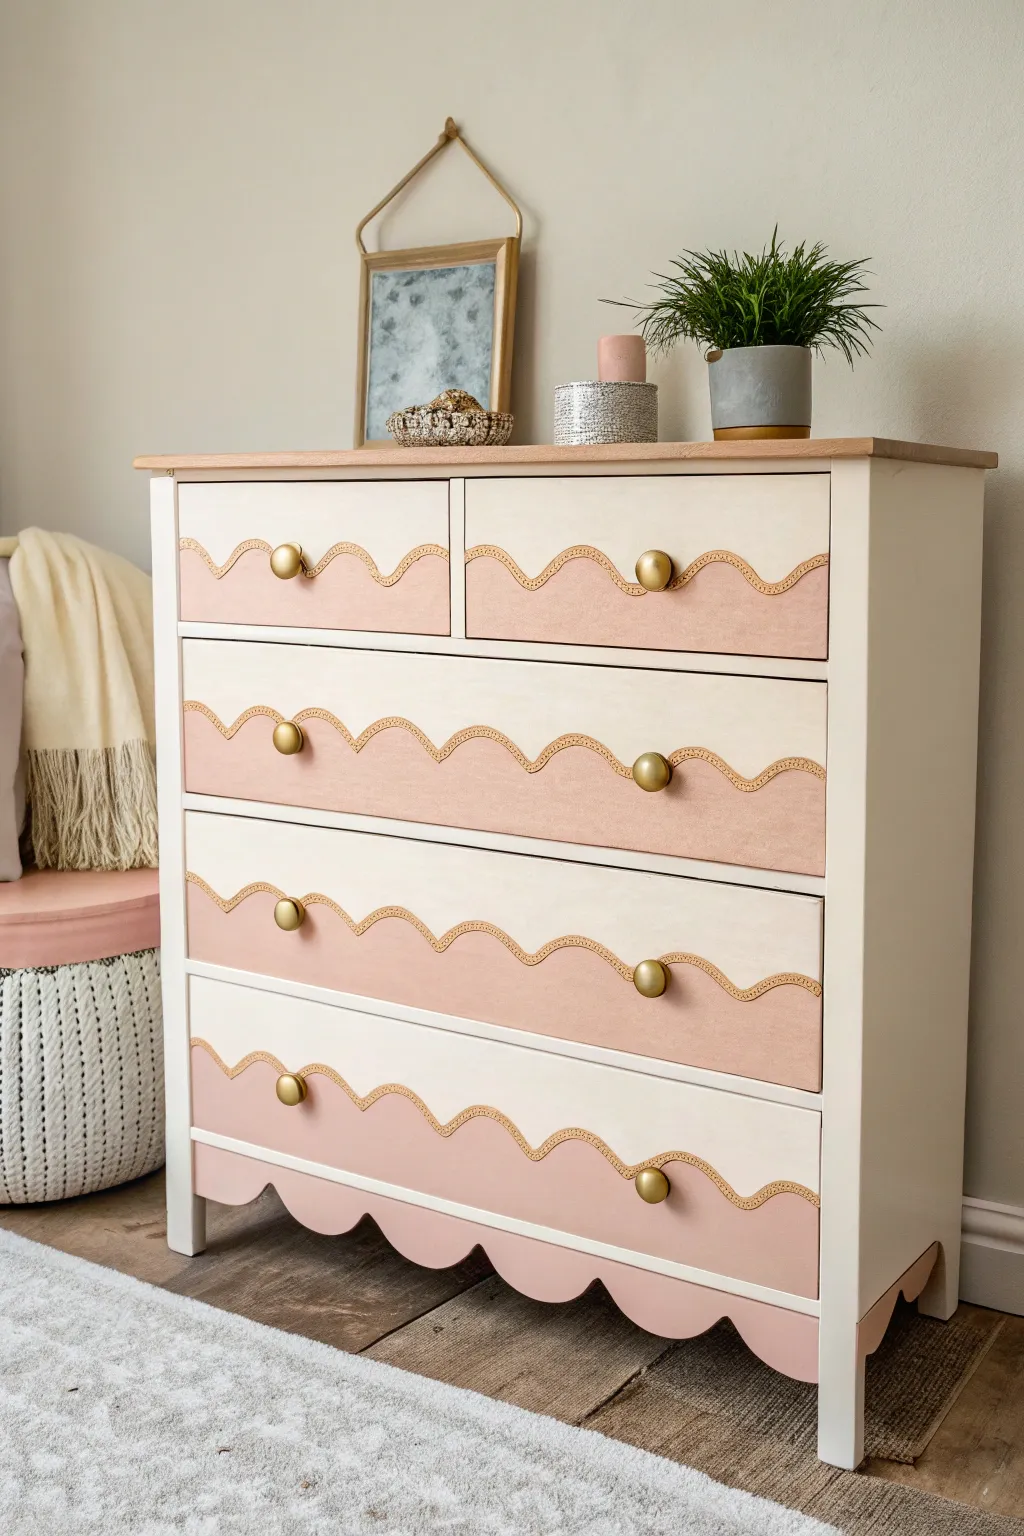
Transform a plain dresser into a playful, elegant piece with soft pink hues and charming scalloped details. The unique wavy design creates a custom, high-end look that adds sweetness to any room without feeling overly childish.
Step-by-Step
Materials
- Wooden dresser (raw or sanded)
- Sandpaper (120 and 220 grit)
- Primer suitable for wood furniture
- Creamy white furniture paint (satin finish)
- Soft blush pink furniture paint (chalk or matte finish)
- Gold puff paint or thin wooden trim molding
- Cardstock or thick paper (for the stencil)
- Pencil
- Painter’s tape
- Small foam roller
- Fine-tip artist brush
- Gold spray paint (if using trim)
- Gold cabinet knobs
- Clear matte polyurethane topcoat
- Jigsaw (if cutting the bottom apron)
Step 1: Preparation and Base Coat
-
Prep the surface:
Begin by removing all the old hardware and drawers from the dresser frame. Lightly scuff sand the entire piece with 120-grit sandpaper to remove any glossy finish, ensuring the new paint will adhere properly. Wipe away all dust with a damp tack cloth. -
Apply primer:
Roll on a coat of high-quality bonding primer over the frame and drawer fronts. This step is crucial for preventing bleed-through and creating a smooth base. Let it dry completely according to the manufacturer’s instructions. -
Paint the base color:
Using a small foam roller, apply your creamy white base paint to the dresser frame and the upper portion of the drawer fronts. You’ll need at least two coats for full, opaque coverage. Allow ample drying time between coats.
Clean Lines
For the sharpest scallop edges, lightly score your pencil line with an X-Acto knife before painting. This creates a tiny barrier that physically stops paint from bleeding over the curved line.
Step 2: Creating the Scallop Design
-
Make a stencil:
Create your scallop template by tracing a circular object (like a bowl or jar lid) onto a piece of cardstock. Cut out a strip of these connected semi-circles to match the width of your drawers. This ensures every wave is uniform. -
Trace the pattern:
Place your stencil across the middle of each drawer front. Use a pencil to lightly trace the wave pattern. Measure carefully to ensure the line is centered and level on every drawer. -
Modify the bottom apron:
If your dresser has a straight bottom edge, trace a larger scallop pattern along the bottom apron. Carefully cut along this line using a jigsaw to create the whimsical shaped hem seen in the inspiration photo. Sand the cut edges smooth with 220-grit sandpaper. -
Paint the pink section:
Using a steady hand and an angled artist brush, paint the area below your pencil line with the soft blush pink paint. Fill in the rest of the bottom section with a roller or larger brush. -
Refine the edges:
I usually go back with a very fine artist brush to tidy up the scallop line where the cream meets the pink, ensuring the curves are crisp and clean. You may need two coats of pink for a solid finish.
Level Up
Line the inside of the drawers with a floral or geometric wallpaper that matches your pink and cream color palette for a fun surprise when you open them.
Step 3: Adding the Gold Detail
-
Plan the trim:
To recreate the textured gold border seen in the image, you can use either gold puff paint for a 3D effect or extremely flexible thin molding. If using molding, pre-paint it gold before attaching it. -
Apply the gold accent:
Carefully trace over the border where the two paint colors meet. If using puff paint, squeeze a consistent, thin bead along the wave. If using flexible trim, glue it precisely along the seam. -
Add texture:
For that specific dotted look shown in the inspiration, use a gold paint pen or small dots of puff paint directly on top of your gold line to create a braided or beaded texture.
Step 4: Finishing Touches
-
Seal the piece:
Once all paint and detailed work is completely dry (give it at least 24 hours), apply a clear matte polyurethane topcoat. This protects that beautiful hand-painted scallop design from scratches and wear. -
Drill for hardware:
If your original holes don’t match your new layout, or if you filled them earlier, drill new holes centered in the scallop peaks or valleys depending on your visual preference. -
Install hardware:
Screw in the round gold cabinet knobs. The gold finish will tie in perfectly with your scalloped trim detail. -
Reassemble:
Slide the drawers back into the frame and step back to admire your new statement piece.
This delightful painted piece brings a bespoke, boutique charm to your home that no store-bought furniture can match


Tiny Gold Stars Girl Dresser
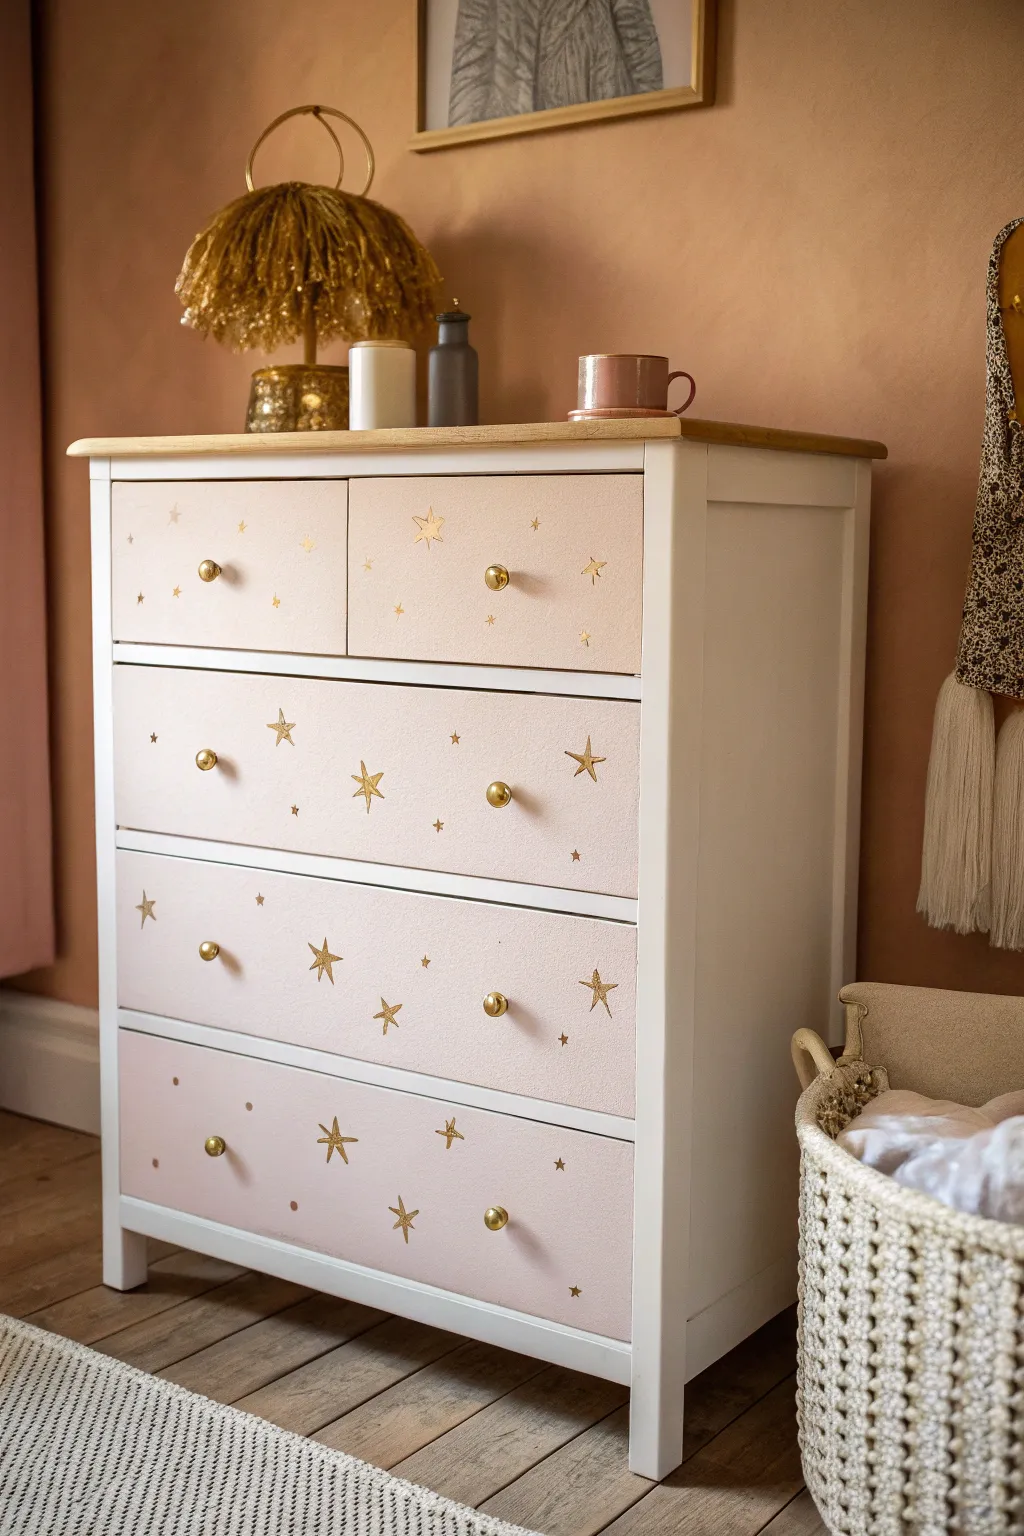
Transform a plain chest of drawers into a magical night-sky wonder with soft blush tones and gleaming gold accents. The subtle gradient of star sizes creates a dreamy effect perfect for a child’s bedroom or a whimsical nursery.
Step-by-Step Guide
Materials
- Wooden dresser (pre-assembled)
- Sandpaper (120-grit and 220-grit)
- Tack cloth
- Primer (bonding primer recommended)
- White semi-gloss paint (for the frame)
- Pale blush pink chalk or matte paint (for drawer fronts)
- Gold adhesive vinyl sheets
- Electronic cutting machine (Cricut/Silhouette) or star punch
- Transfer tape
- Gold spray paint (metallic finish)
- Clear matte polyurethane topcoat
- Screwdriver
- Lint-free rags
Step 1: Preparation & Hardware Update
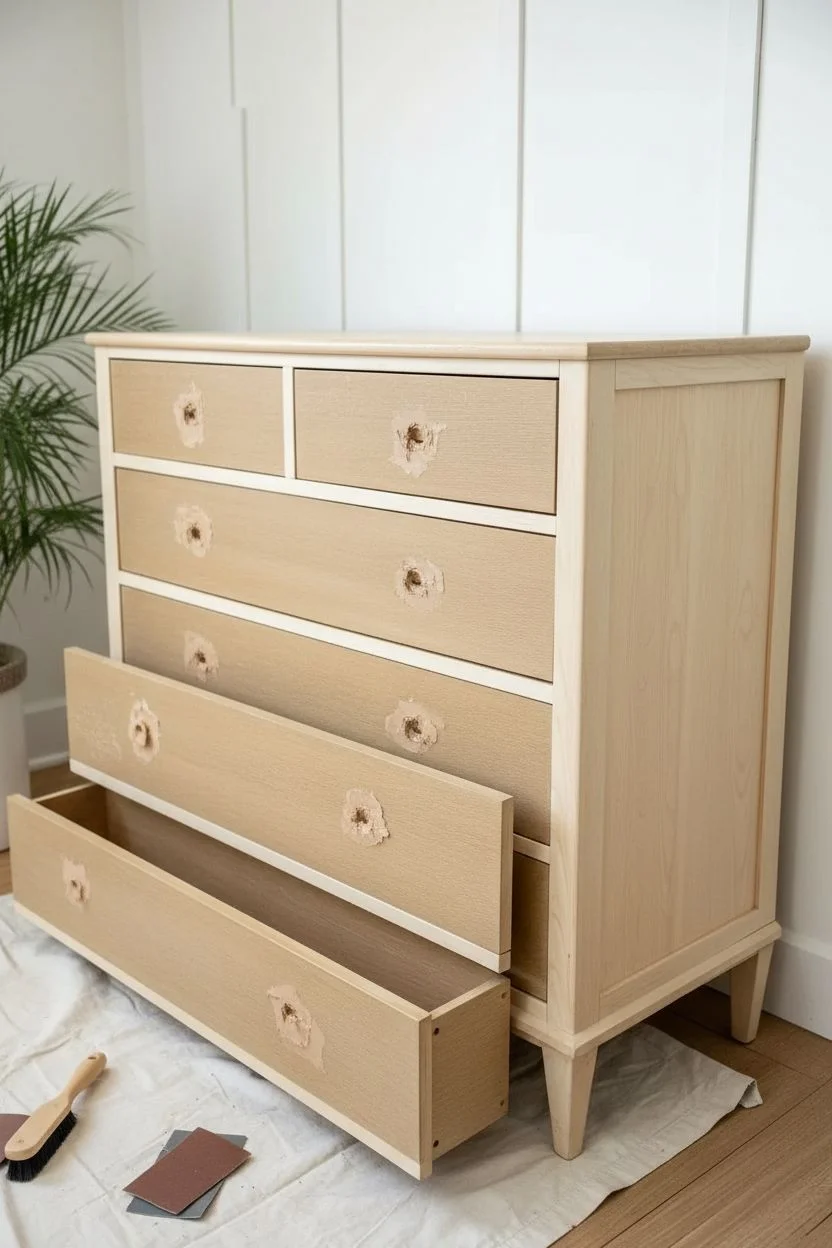
-
Disassemble the drawers:
Begin by removing all the drawers from the dresser frame. Use your screwdriver to carefully detach the existing knobs and set the hardware aside if you plan to reuse it, or discard if replacing. -
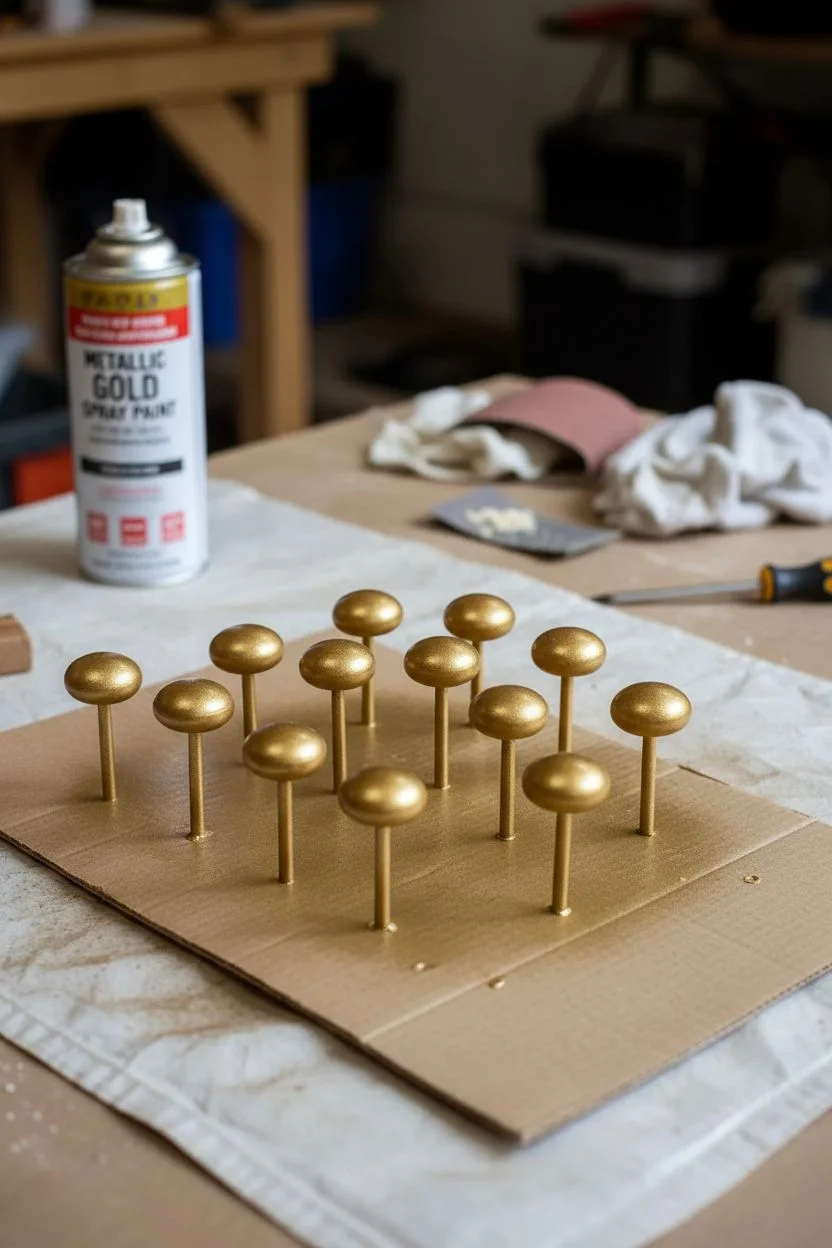
Prep the hardware:
If you are keeping the original knobs, clean them thoroughly with soapy water to remove oils. Once dry, push them into a piece of cardboard so they stand upright. -
Gild the knobs:
In a well-ventilated area, spray the knobs with metallic gold spray paint. Apply two light coats rather than one heavy one to avoid drips, letting them dry for 30 minutes between coats. -
Initial sanding:
Lightly sand all exterior surfaces of the dresser frame and the drawer fronts using 120-grit sandpaper. You don’t need to strip the paint entirely, just scuff up the glossy finish so the new paint adheres. -
Clean surface:
Wipe away every speck of sanding dust with a tack cloth or a damp lint-free rag. Any leftover dust will create a bumpy finish.
Vinyl Not Sticking?
If vinyl stars peel up immediately, the paint may be too fresh. Let paint cure for 48 hours to stop off-gassing, then try reapplying new stickers.
Step 2: Painting the Base
-
Prime the frame:
Apply a coat of bonding primer to the main frame of the dresser. If the original dresser was dark wood or laminate, a second coat of primer might be necessary for full coverage. -
Paint the frame white:
Once the primer is fully dry, paint the dresser frame with the white semi-gloss paint. Use a high-quality foam roller for the large flat sides to get a smooth factory-like finish, and a small angled brush for corners. -
A second coat for the frame:
After the recommended drying time (usually 2-4 hours), lightly sand with 220-grit paper, wipe clean, and apply a final coat of white paint. -
Paint the drawer fronts:
Lay the drawers flat on a drop cloth. Paint the front faces with the pale blush pink chalk or matte paint. I find chalk paint offers a lovely velvet texture that contrasts nicely with the shiny stars. -
Two coats of blush:
Let the first pink coat dry completely before applying a second coat. Ensure smooth, long brush strokes or roller passes to minimize visible texture.
Pro Tip: Custom Mix
Mix a tiny drop of warm beige into your pink paint. Pure pink can look too ‘bubblegum,’ but a warmer blush tone looks much more sophisticated.
Step 3: Applying the Starry Details
-
Create the stars:
While the paint cures, use your electronic cutting machine or a star-shaped paper punch to cut stars from the gold adhesive vinyl. create three different sizes ranging from 0.5 inches to 1.5 inches for a varied look. -
Plan the random pattern:
Before sticking anything down, lay the stars gently on the dry drawer fronts to test the spacing. Aim for an organic grouping—cluster a few together and leave some open space, rather than making a rigid grid. -
Apply the vinyl stars:
Peel the backing off the vinyl stars and press them firmly onto the pink drawer fronts. If using intricate star shapes, use transfer tape to move them from the backing paper to the drawer without bending the points. -
Seal the drawers:
To prevent the vinyl edges from peeling up over time, apply a thin coat of clear matte polyurethane over the entire drawer front, painting right over the stickers. This seals the design in place. -
Reassembly:
Once the topcoat has cured for at least 24 hours, screw the newly gold-painted knobs back onto the drawer centers. -
Final touches:
Slide the drawers back into the white frame. Wipe down the surface one last time to remove any fingerprints from assembly.
Step back and enjoy the sparkling charm your new custom dresser adds to the room
Painted Trim Highlights Girl Dresser
Transform a standard wooden dresser into a charming statement piece for a girl’s room with this soft, two-toned design. The combination of creamy white frames, blush pink drawer fronts, and natural wood grain sides created a fresh, balanced look that feels both playful and sophisticated.
How-To Guide
Materials
- Wooden dresser
- Sander (power sander preferable) and sandpaper (80, 120, and 220 grit)
- Wood filler
- Painter’s tape (high quality)
- Primer (stain-blocking)
- White satin enamel paint
- Blush pink chalk or mineral paint
- Polycrylic topcoat or furniture wax
- Half-moon cup pulls (brass/gold finish)
- Knob pulls (brass/gold finish)
- Drill and bits
- Paintbrushes (good quality sash brush and flat brush)
- Foam roller
- Tack cloth
- Screwdriver
Step 1: Prep & Sanding
-
Dissassemble the Dresser:
Remove all drawers from the dresser shell. Use a screwdriver to detach the existing hardware from the drawer fronts. If the current holes don’t match your new cup pulls, this is the time to prepare for patching. -
Patch Old Hardware Holes:
If swapping knob styles requires new spacing, fill the old holes with wood filler. Overfill slightly as it shrinks when drying, then sand flush once completely hard. -
Scuff Sand the Frame:
Thoroughly scuff sand the entire face frame and the trim areas that will be painted white. You don’t need to strip it to bare wood, but the glossy finish needs to be dulled for adhesion. -
Reveal the Wood Grain:
For the side panels and top surface, sand aggressively to remove the old finish completely. Start with 80 grit to strip, move to 120, and finish with 220 for a buttery smooth raw wood surface. -
Clean Surfaces:
Vacuum up all the dust, paying attention to corners. Wipe everything down with a tack cloth or a damp rag to ensure no debris remains.
Bleeding Lines?
If paint bleeds under the tape onto the wood, lightly scrape it away with a razor blade or use fine-grit sandpaper wrapped around a block to touch up the edge strictly.
Step 2: Painting the Framework
-
Tape Off Wood Areas:
Apply painter’s tape to the edges of the freshly sanded side panels and top. Press the edges down firmly with a credit card to prevent paint bleed onto your beautiful natural wood. -
Prime the Frame:
Apply a coat of stain-blocking primer to the dresser frame and legs. This prevents tannins from bleeding through your crisp white finish later. -
Paint the Trim White:
Once the primer is dry and lightly sanded, apply your white satin enamel. Use a small foam roller for flat areas and a brush for corners. I usually do two to three thin coats for the best durability. -
Paint the Legs Blush:
Notice the dip-dyed effect on the legs? Paint the legs entirely in your blush pink shade to create a fun, grounded accent that matches the drawers.
Pro Tip: Smoother Finish
Between coats of paint (once fully dry), lightly run a brown paper bag over the surface. It acts like ultra-fine sandpaper to buf out nibs without removing color.
Step 3: Drawer Design
-
Prep Drawer Fronts:
Lightly sand the drawer fronts. If the original finish is very slick, a quick coat of primer will help the pink paint stick. -
Apply Blush Paint:
Paint the drawer fronts in your chosen blush pink color. Chalk paint works beautifully here for a matte, velvety texture. Using a high-quality synthetic brush helps minimize brush strokes. -
Drill New Holes:
Measure carefully to center your new hardware. For the cup pulls, create a template to ensure the two screw holes are perfectly level before drilling into your freshly painted drawers.
Step 4: Assembly & Finishing
-
Seal the Wood:
Protect the raw wood sides and top. Apply a clear matte Polycrylic or a natural furniture wax to seal the grain without darkening it too much or making it yellow. -
Seal the Paint:
Apply a topcoat over the white frame and pink drawers. Specifically for the pink chalk paint, wax offers a classic finish, but a water-based poly is more durable for a kid’s room. -
Remove Tape:
Carefully peel off the painter’s tape. Pull it away from the paint edge at a 45-degree angle while the final clear coat is still slightly tacky to get a crisp line. -
Install Hardware:
Attach the gold half-moon cup pulls to the larger drawers and the single knobs to the smaller top drawers. Hand-tighten with a screwdriver to avoid stripping the screws. -
Reassemble:
Slide the drawers back into their tracks. Step back and check that the reveals (the gaps around the drawers) look even and the white frame highlights the pink fronts perfectly.
With the hardware gleaming against the soft pink and the natural wood sides adding warmth, you have a custom piece ready for styling
Hand-Painted Gingham Girl Dresser
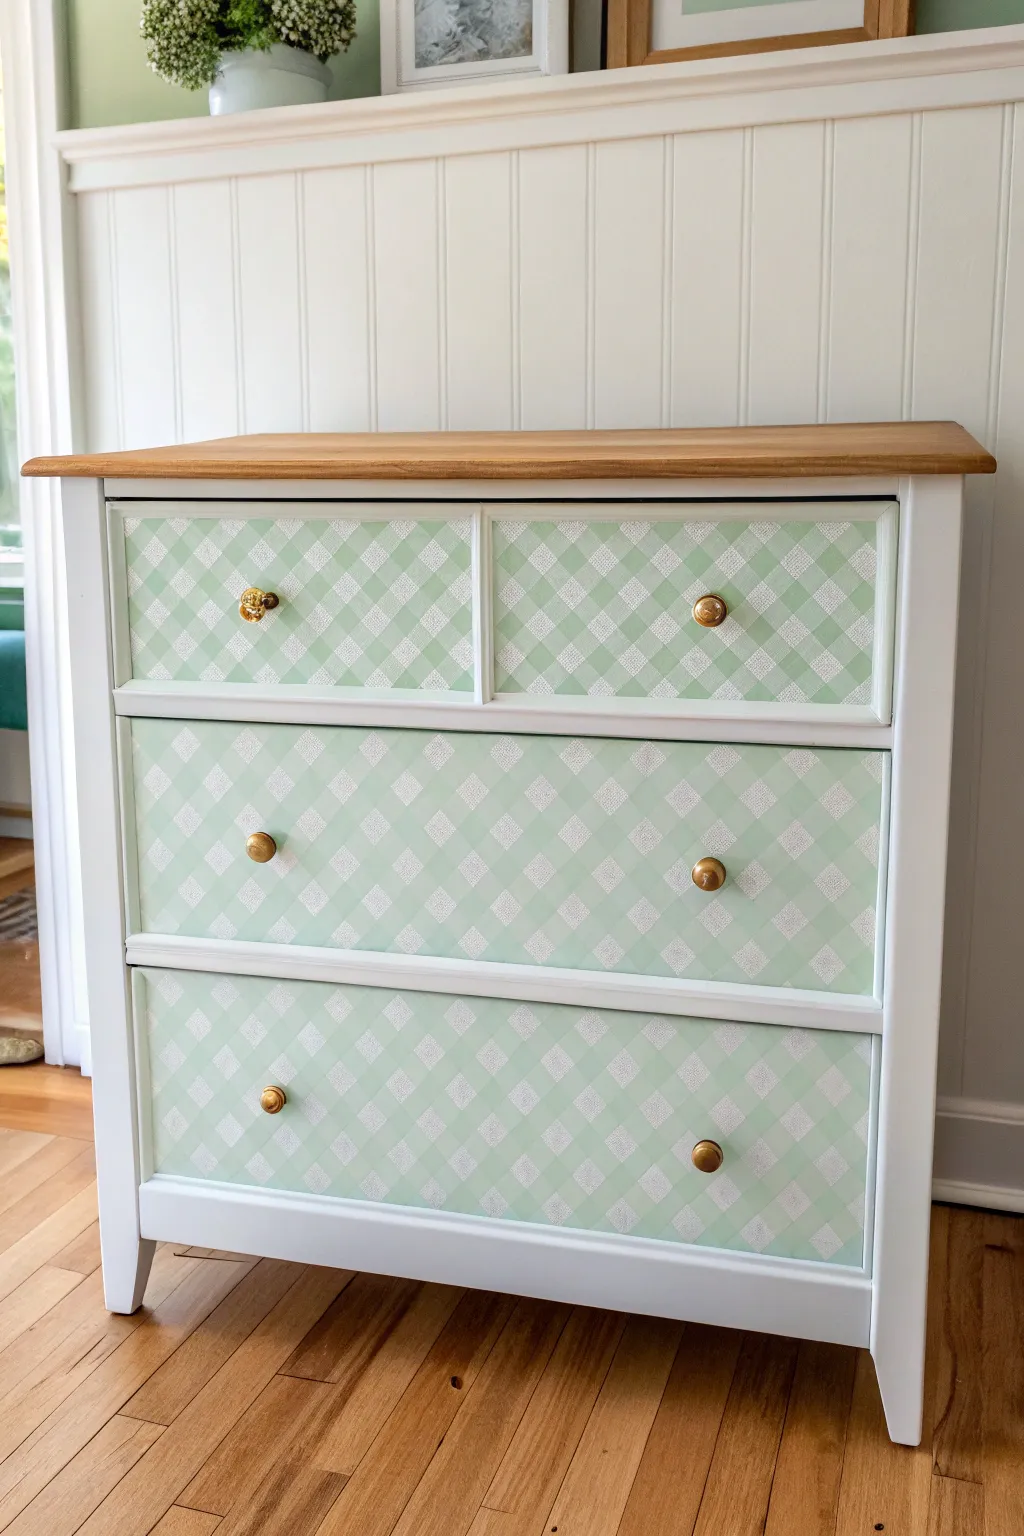
Transform a plain dresser into a charming statement piece with this sweet sage green gingham pattern. The combination of crisp white framing, natural wood tones, and a hand-painted plaid design creates a look that is both classic and playfully modern.
Step-by-Step
Materials
- Dresser (prepped and sanded)
- White chalk or mineral paint (for the body)
- Pale sage green paint (for the gingham)
- White or cream paint (for the contrasting stripe)
- Clear matte polyurethane topcoat
- Painter’s tape (various widths recommended)
- High-quality synthetic paint brushes
- Small foam roller
- Gold drawer knobs
- Ruler or measuring tape
- Pencil
- Fine-grit sandpaper (220-grit)
- Wood stain (optional, for the top)
Step 1: Preparation & Base Coat
-
Prep the surface:
Begin by removing all hardware and cleaning the dresser thoroughly with a degreaser. Give the entire piece a light scuff sand with 220-grit sandpaper to help the paint adhere. -
Protect the wood top:
If you are keeping the natural wood top like the example, tape off the edge where the top meets the base to protect it from white paint. If the top needs refreshing, sand it down to bare wood now. -
Paint the frame:
Apply two coats of crisp white paint to the body of the dresser and the frame surrounding the drawers. Allow the first coat to dry completely before applying the second for a smooth, solid finish. -
Base coat the drawers:
Paint the drawer fronts with a solid coat of your white or very pale cream base color. This will serve as the background for your gingham pattern.
Clean Lines Secret
Always peel your tape away at a 45-degree angle while the paint is still slightly wet. If the paint dries fully on the tape, it can lift and ruin your crisp edge.
Step 2: Creating the Vertical Stripes
-
Measure and mark:
Using a ruler and pencil, lightly mark vertical intervals across the drawer fronts. For a standard gingham look, the intricate painted stripes should be the same width as the spaces between them. -
Tape vertical lines:
Apply painter’s tape vertically based on your marks. Press the edges of the tape down firmly with your fingernail or a credit card to prevent paint bleed-under. -
Seal the tape:
Lightly brush a tiny amount of your base white paint over the tape edges. This clever trick seals the tape so any bleeding is just the base color, keeping your later colors crisp. -
Paint vertical stripes:
Mix your sage green paint with value. For the ‘light’ intersection blocks, you want a semi-translucent look, but for this method, simply paint the exposed vertical stripes with your sage green paint. Use a foam roller for the smoothest application. -
Remove tape:
Carefully peel off the tape while the paint is still slightly tacky to avoid pulling up dried paint chips. Let this layer dry completely—patience is key here.
Level Up: Faux Texture
For a true linen look, drag a dry, stiff-bristle brush through the wet paint both vertically and horizontally. This subtle scratching mimics woven threads.
Step 3: Painting the Horizontal Stripes
-
Tape horizontal lines:
Once the vertical stripes are fully cured, measure and tape off horizontal stripes across the drawers, using the same width spacing as before. The tape will go directly over your dried green stripes. -
Paint horizontal stripes:
Apply the sage green paint to the exposed horizontal areas. Where the horizontal green stripe crosses the vertical green stripe, the color will naturally appear darker or more opaque, creating that signature plaid depth. -
Add texture (optional):
I like to use a dry brush with a tiny bit of white paint to drag very faint cross-hatching texture over the green stripes before removing the tape, mimicking the weave of fabric. -
Reveal the pattern:
Remove the horizontal tape carefully. You should now see a grid of white squares, sage squares, and darker intersection squares where the two layers overlap.
Step 4: Finishing Touches
-
Stain the top:
If you sanded the top earlier, apply your chosen wood stain now. A warm honey or oak tone contrasts beautifully with the cool sage green. -
Seal the dresser:
Apply two or three coats of clear matte polyurethane over the entire piece, including the drawer fronts. This protects your hand-painted pattern from scratches and wear. -
Install hardware:
Once the topcoat is fully cured, attach the gold knobs. The metallic accent adds a sophisticated finish to the rustic gingham pattern. -
Reassemble:
Slide the drawers back into the frame and step back to admire your new custom furniture piece.
This delightful painted gingham finish brings a custom, cozy charm to any nursery or bedroom.
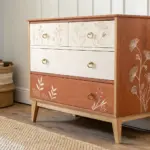
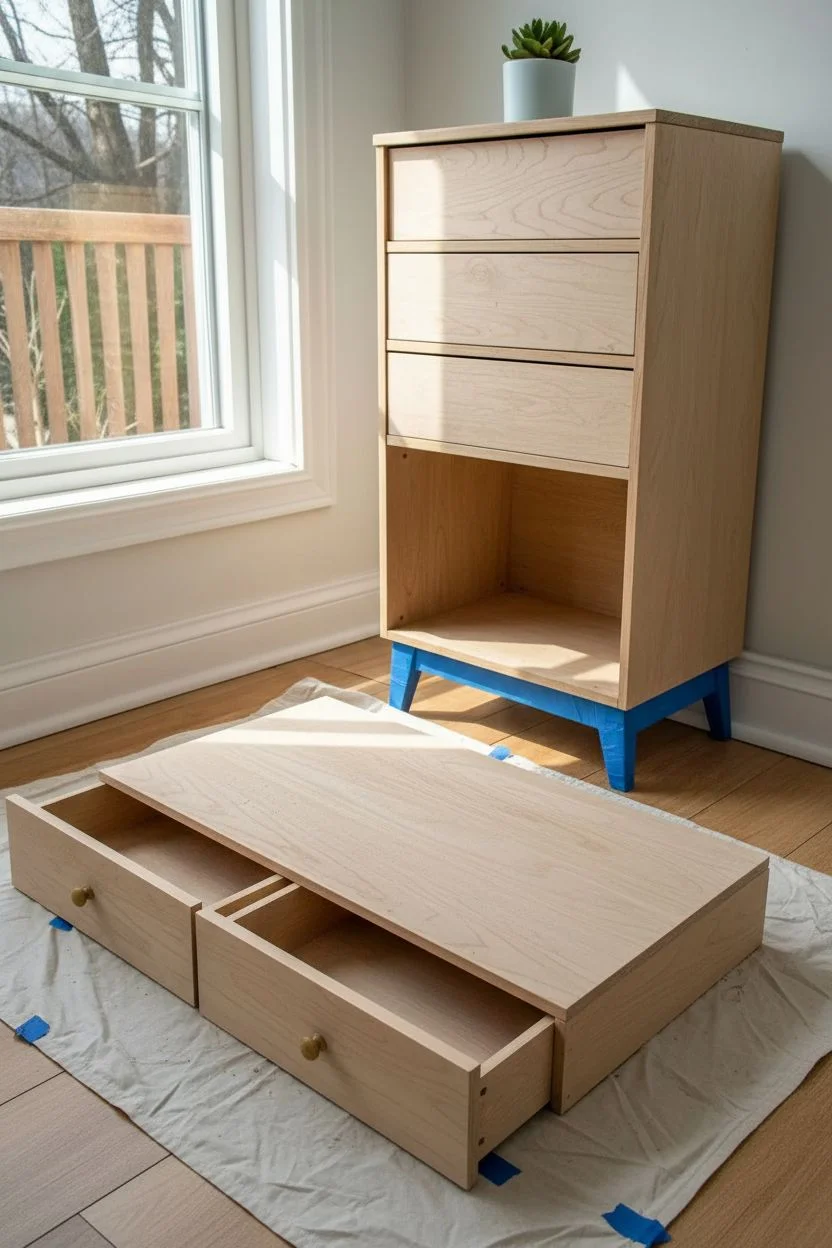
Surprise Bright Drawer Interiors Girl Dresser
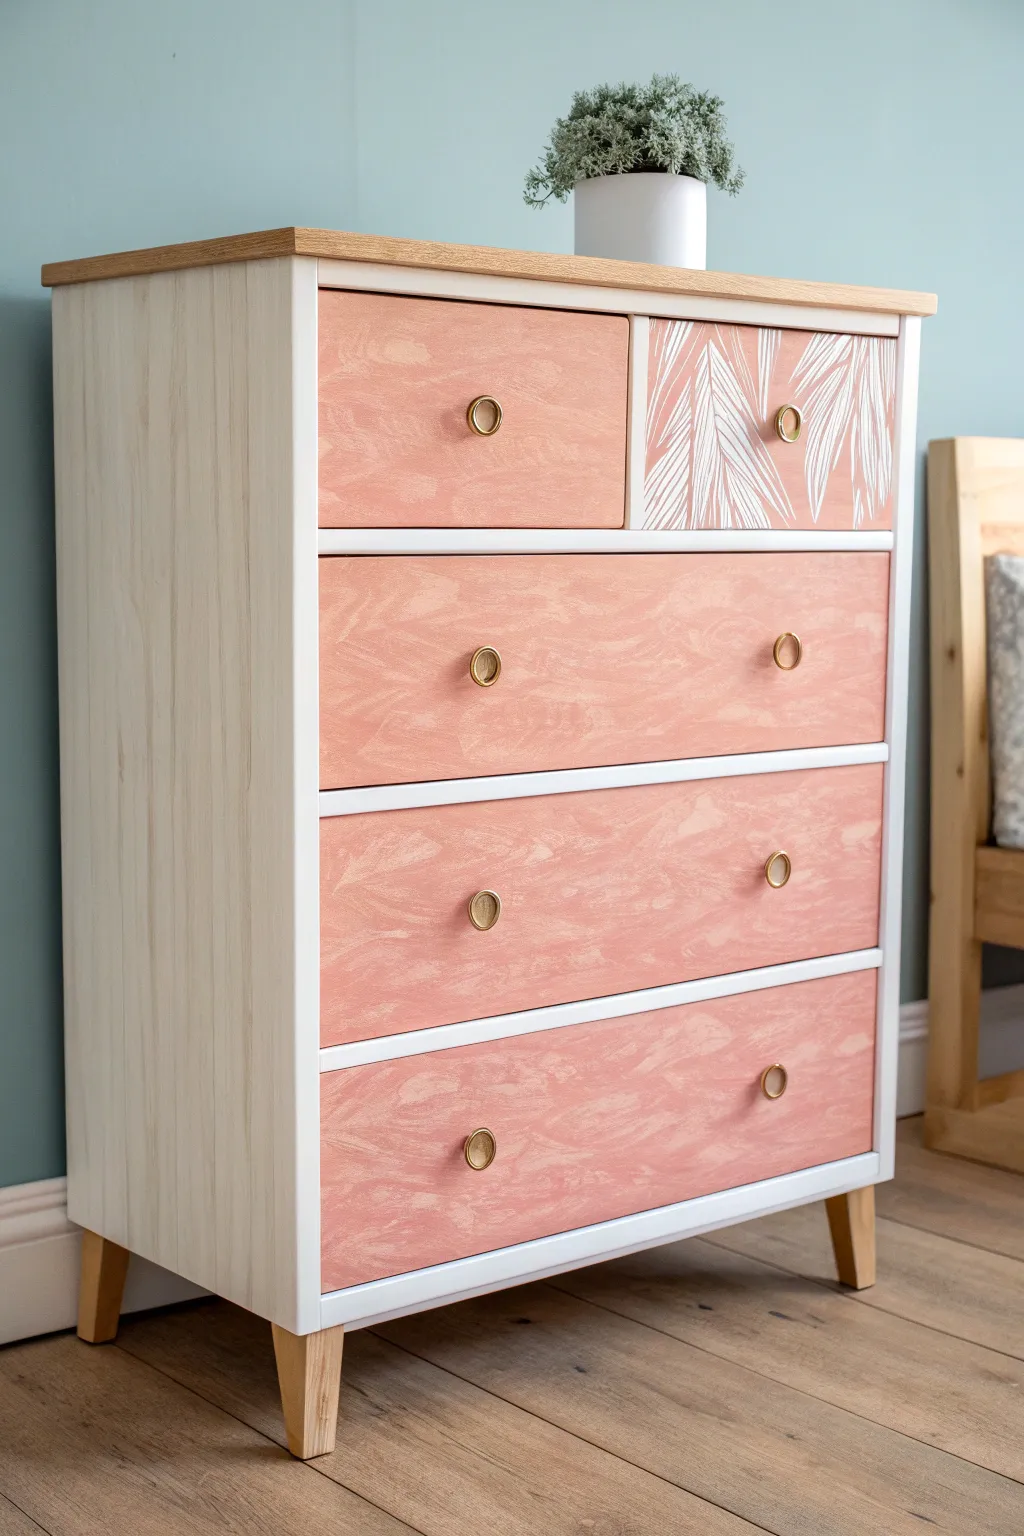
Transform a plain dresser into a soft, bohemian statement piece using a textured paint technique and a singular patterned accent drawer. This project combines a light, natural wood finish with a dreamy salmon-pink hue for a fresh, modern look.
Step-by-Step Tutorial
Materials
- Wooden dresser
- Orbital sander with 120 and 220 grit sandpaper
- White chalk paint or primer/paint duo
- Salmon or terracotta pink chalk paint
- Stiff bristle round wax brush
- Small artist detail brush or fine leaf stencil
- White acrylic paint (for the leaves)
- Gold ring pull hardware and matching knobs
- Clear matte polyurethane or furniture wax
- Painter’s tape
- Clean rags
Step 1: Preparation & Sanding
-
Remove Hardware:
Begin by removing all drawers from the dresser shell. Unscrew all existing knobs or handles and set them aside if you plan to reuse them, though fresh hardware often makes the biggest difference. -
Clean Surfaces:
Wipe down the entire piece with a damp cloth and mild degreaser to remove dust, oils, and grime. A clean surface is crucial for paint adhesion. -
Sand the Top and Legs:
Use an orbital sander with 120-grit paper to strip the finish off the top surface and the legs, revealing the raw wood underneath. Follow up with 220-grit for a smooth finish. -
Scuff Sand the Body:
For the sides and drawer fronts that will be painted, lightly scuff sand the existing finish to give the paint something to grip. You don’t need to strip this to bare wood.
Step 2: Painting the Body
-
Tape Off Edges:
Apply painter’s tape carefully around the edges of the freshly sanded wood top and legs to protect them from paint splatter. -
Paint the Frame White:
Apply two coats of white chalk paint to the sides of the dresser and the thin framing strips between the drawers. Allow full drying time between coats. -
Base Coat the Drawers:
Paint the drawer fronts with your salmon pink color. Apply a solid, even coat first to establish the base color and let it dry completely. -
Create Texture:
For the second coat on the drawer fronts, use a stiff round brush. Dip just the tip into the paint and dab off the excess. Use a cross-hatch or swirling motion to create a subtle, cloud-like texture rather than smooth straight lines.
Dry Brushing Tip
To get that cloudy texture on the pink drawers, keep your brush very dry. Dip into paint, then offload 80% onto a paper towel before hitting the wood.
Step 3: The Accent Drawer
-
Select the Accent Drawer:
Identify the top right drawer (or your preferred drawer) for the pattern work. Ensure the pink base coat is fully cured before starting the design. -
Outline the Leaves:
Using a thin detail brush and white acrylic paint, lightly sketch the spine of large palm leaves or fronds. Start from the bottom edge and curve upward. -
Fill the Pattern:
Paint the individual leaflets extending from the spine. Keep your brush touches light and feathery to mimic the natural texture found in the reference image. I like to vary the pressure to make the tips sharper. -
Refine the Design:
Add a few smaller, partial leaves entering from the sides to make the pattern feel organic and continuous, rather than centered.
Make it Pop
Line the interior of the drawers with a contact paper that features a tropical or botanical print to match the leaf detail on the front.
Step 4: Assembly & Finishing
-
Seal the Paint:
Once all paint is dry, apply a clear matte polyurethane or furniture wax over the painted surfaces to protect them from scratches and wear. -
Seal the Wood:
Apply a clear sealant to the raw wood top and legs. This preserves the natural light color while preventing water rings or stains. -
Install New Hardware:
Attach the gold ring pulls to the larger drawers. If your previous holes don’t align, you may need to have filled and drilled new ones during the prep phase. -
Attach Knobs:
Screw the matching gold knob onto the smaller top-left drawer. -
Reassemble:
Slide the drawers back into their tracks, step back, and enjoy your custom creation.
This lovely dresser brings a touch of warmth and personality to any bedroom space
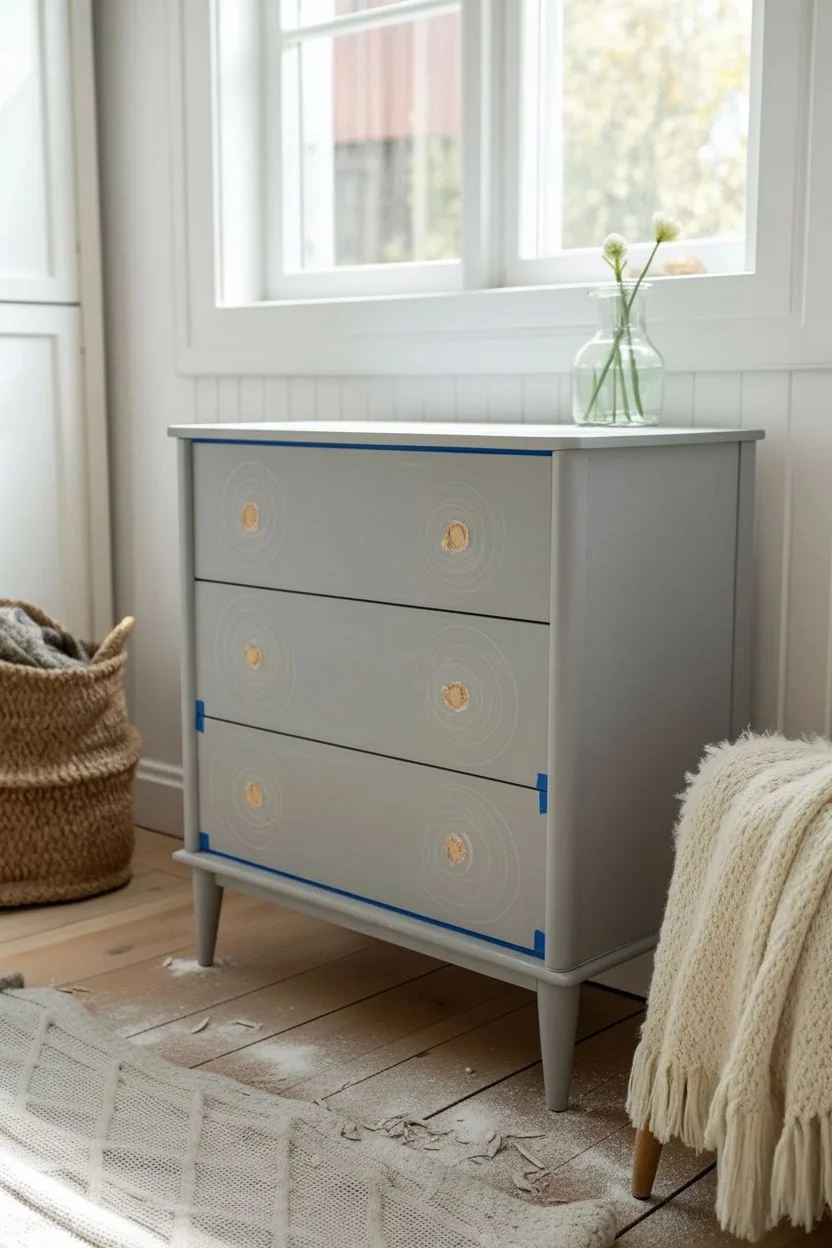
Color-Dipped Hardware Girl Dresser
This project transforms a standard dresser by celebrating negative space, contrasting crisp white paint against the warmth of natural wood. The secret lies in leaving a precise, exposed wood border around each drawer face and matching it with wooden knobs for a clean, organic modern look.
How-To Guide
Materials
- Wooden dresser (preferably with solid wood drawer fronts)
- Sandpaper (120, 180, and 220 grit)
- Orbital sander (optional but recommended)
- Painter’s tape (high quality, delicate surface)
- Primer (stain-blocking)
- White furniture paint (satin or semi-gloss finish)
- Natural wood finish knobs (round)
- Polyurethane (matte or satin water-based)
- Tack cloth
- Small angled paintbrush
- Foam roller
- Wood filler (if needed for repairs)
- Screwdriver
Step 1: Prep and Reveal
-
Remove Hardware:
Begin by taking out all the drawers and unscrewing the old knobs or handles. Keep the screws in a ziplock bag so they don’t get lost, though we will be replacing the knobs later. -
Sand the Top:
Using an orbital sander or a sanding block with 80-grit paper, sand the top surface of the dresser down to bare wood. Work your way up to 120 and then 180-grit until the grain is silky smooth and free of old varnish. -
Sand the Drawer Edges:
This is the critical design step. Sand the front faces of the drawers completely. Pay special attention to the outer 1-inch perimeter of each drawer front, ensuring this area is perfectly raw wood, as this will be your exposed border. -
Clean Surfaces:
Wipe down the entire piece with a tack cloth or a damp rag to remove every speck of dust. Paint needs a pristine surface to stick properly. -
Seal the Wood Accents:
Before painting, apply a clear matte or satin polyurethane to the freshly sanded top and the drawer fronts. I find sealing the drawer fronts now prevents the paint tape from pulling up wood fibers later. Let this cure fully according to the can’s instructions.
Bleeding Lines?
If paint bled under the tape onto your wood border, don’t panic. Wait for it to dry fully, then gently scrape the excess away with a razor blade or use a small piece of sandpaper wrapped around a block.
Step 2: The Precision Border
-
Tape the Frame:
Once the clear coat is fully cured, apply high-quality painter’s tape to the drawer fronts. You want to tape off a consistent border (about 1/4 to 1/2 inch) around the outer edge. Use a ruler to ensure the width is exactly the same on all sides. -
Seal the Tape Edge:
Press the tape down firmly with a credit card or putty knife. To get that razor-sharp line, brush a tiny amount of your clear polyurethane over the edge of the tape where the paint will go. This fills any microscopic gaps so the white paint can’t bleed under. -
Identify Repairs:
Check the main body of the dresser. If there are dings or deep scratches in areas you plan to paint white, fill them with wood filler, let dry, and sand smooth.
Pro Tip: Consistency
Use a ‘spacer block’ (a small piece of wood cut to your desired border width) to guide your tape placement. Run it along the edge while applying tape for a perfect width without constant measuring.
Step 3: Painting and Assembly
-
Prime the Body:
Apply a coat of stain-blocking primer to the body of the dresser and the inner rectangular area of the drawer fronts (inside your tape lines). Don’t skip this if your wood has heavy knots that might bleed through. -
First Coat of White:
Using a small foam roller for smoothness and a brush for corners, apply your first coat of white furniture paint. Keep the layers thin to avoid drips. -
Second Coat:
After the first coat dries, lightly sand with fine 220-grit paper if there are rough spots, wipe clean, and apply your second coat of white paint for solid, opaque coverage. -
The Reveal:
While the final coat of paint is still slightly tacky (not fully dry), carefully peel back the painter’s tape at a 45-degree angle. Pulling while wet helps prevent the paint film from ripping. -
Protect the Paint:
Once the white paint has cured for at least 24 hours, apply a final protective topcoat over the painted sections if your paint requires it. Many modern furniture paints have built-in topcoats, so check your label. -
Install New Knobs:
Attach the new natural wood knobs. Their tone should tie in perfectly with the exposed wood border and the dresser top. -
Reassemble:
Slide the drawers back into their tracks. Step back and check that the wood borders align visually across the front of the piece.
Now you have a piece that balances rustic warmth with modern cleanliness, ready to brighten up any bedroom
Gentle Distressed Vintage Girl Dresser
This tutorial guides you through transforming a plain wooden dresser into a charming, vintage-inspired piece perfect for a girl’s room. By layering chalk paints and distressing strategically, you’ll achieve a soft, time-worn texture that feels effortlessly elegant.
Detailed Instructions
Materials
- Wooden dresser (preferably with raised edges)
- Medium-grit sandpaper (120-150 grit)
- Fine-grit sandpaper (220 grit)
- Clean tack cloths
- Premier stain-blocking primer
- Soft blush pink chalk paint (base color)
- Creamy white chalk paint (top coat)
- Assorted paintbrushes (medium sash brush and chip brushes)
- Clear furniture wax
- Dark antique wax (optional for corners)
- Lint-free wax cloths
- Vintage brass pull hardware
Step 1: Preparation & Priming
-
Remove Hardware:
Begin by unscrewing all existing knobs and pulls from the drawers. Store them safely in a baggie if you plan to reuse them, or set them aside if you are replacing them with vintage brass pulls like in the photo. -
Clean the Surface:
Wipe the entire dresser down with a degreasing cleaner or a mixture of vinegar and water. Removing old oils and dust is crucial for paint adhesion. -
Scuff Sanding:
Lightly sand the existing finish with 120-grit sandpaper. You don’t need to strip it to bare wood; just create enough ‘tooth’ for the primer to stick. -
Wipe Down:
Use a tack cloth to remove every speck of sanding dust. Any leftover dust will create bumps in your final finish. -
Apply Primer:
Brush on a coat of stain-blocking primer. This prevents tannins from the old wood bleeding through your light pink paint later. Let it dry completely according to the can’s instructions.
Too Much Distressing?
If you sanded off too much paint and exposed too much bare wood, simply dap a little pink paint back over the spot, let it dry, and lightly re-distress with finer sandpaper.
Step 2: Layering the Colors
-
First Pink Coat:
Apply your soft blush pink chalk paint. Use a sash brush to get into the corners and grooves of the side panels. Don’t worry about perfect opacity yet; chalk paint is forgiving. -
Second Pink Coat:
Once the first coat is dry to the touch, apply a second layer of pink to ensure solid coverage. Let this dry thoroughly, ideally overnight. -
Dry Brushing White:
Dip the tip of a dry chip brush into a small amount of creamy white paint. Offload most of the paint onto a paper towel until the brush is almost dry. -
Apply Texture:
Lightly drag the dry brush vertically and horizontally across the drawer fronts and side panels. I find this cross-hatching technique creates that linen-like, textured look seen in the reference image. -
Focus on Edges:
Add a slightly heavier application of the white dry-brushing along the raised trim and edges of the drawers to highlight the architectural details.
Add Age with Dark Wax
For a grungier antique look, mix a tiny amount of dark aesthetic wax into your clear wax and apply it only into the deep corners and recessed panel lines.
Step 3: Distressing & Finishing
-
Heavy Distressing:
Using 150-grit sandpaper, sanding aggressively along the high points: drawer edges, corners, and the rim of the changing top. You want to sand through the white and pink layers down to the wood or primer underneath. -
Surface Scuffing:
Do a lighter sanding pass over the flat surfaces of the drawers. This blends the white dry-brushing into the pink, softening the brush strokes for a naturally aged appearance. -
Dust Removal:
Wipe the entire piece down with a fresh tack cloth to remove all sanding powder. -
Clear Wax Application:
Apply a coat of clear furniture wax using a lint-free cloth or wax brush. Work in sections, massaging the wax into the porous chalk paint to seal it. -
Buffing:
Wait 15-20 minutes for the wax to set, then buff energetically with a clean cloth to achieve a soft, satin sheen. -
Hardware Installation:
Install the vintage brass pulls. If your original hardware wasn’t brass, you can use ‘Rub ‘n Buff’ in Antique Gold to update them before reattaching.
Now you have a beautifully softened centerpiece that brings vintage warmth to any room
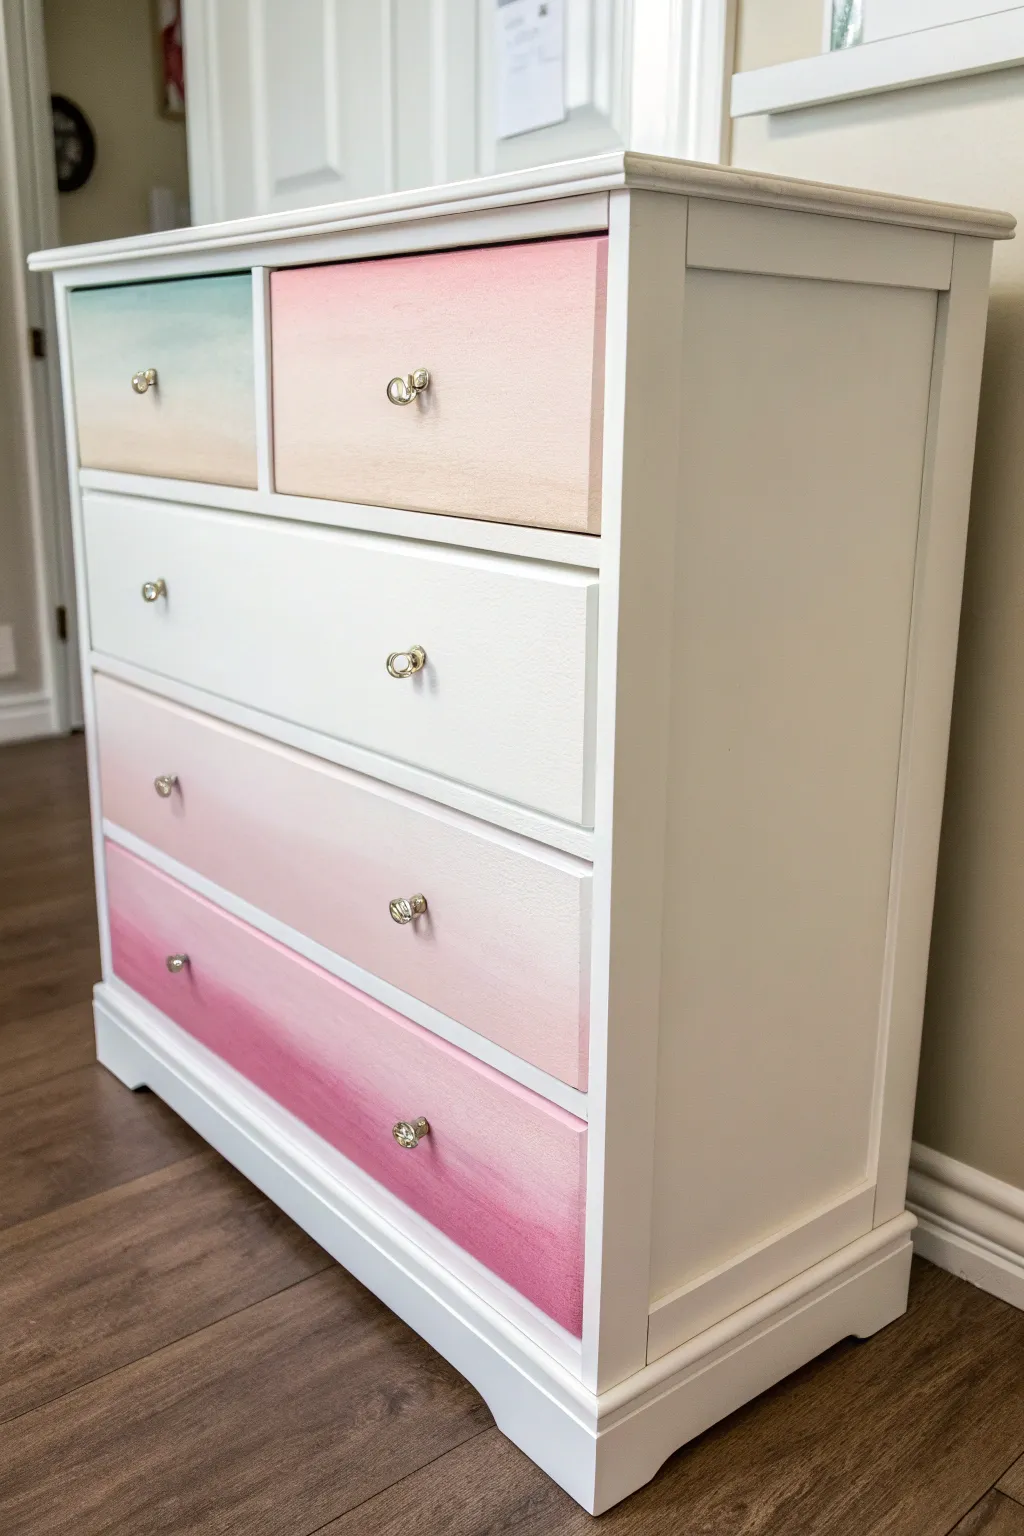
Dreamy Watercolor Wash Girl Dresser
Transform a plain dresser into a piece of cloud-like art with this gentle, dreamy paint technique. By layering diluted acrylics or chalk paints, you can create a soft, ethereal finish that perfectly captures the magic of a sunrise and adds a whimsical touch to any bedroom.
Step-by-Step Tutorial
Materials
- Wooden dresser (raw or sanded)
- White chalk paint or flat acrylic paint (base coat)
- Acrylic paints (pink, teal/mint, peach/orange, blush)
- Water spray bottle (mister)
- Wide flat synthetic paintbrush
- Several small mixing cups or jars
- Soft lint-free blending cloth
- Sanding sponge (220 grit)
- Painter’s tape
- Matte clear coat sealer (polycrylic)
- Gold knob hardware
- Wood stain (for legs/top, if applicable)
Step 1: Preparation & Base Coat
-
Remove hardware:
Start by unscrewing all knobs or handles from the drawers and setting them aside in a safe place. -
Clean and sand:
Wipe down the entire dresser to remove dust and grease. Lightly sand the drawer fronts with a 220-grit sponge to ensure the paint adheres well. -
Tape off edges:
Use painter’s tape to protect the inside edges of the drawers and the outer frame if you want to keep the frame solid white while painting the faces. -
Apply the white base:
Paint a solid, opaque coat of white chalk paint or flat white acrylic on the drawer fronts. This acts as your canvas. Let it dry completely.
Too much water?
If the paint is running too fast or colors are becoming muddy gray mixes, stop misting water. Dab excess moisture with a dry paper towel and let it sit for ten minutes before continuing.
Step 2: Creating the Watercolor Effect
-
Dilute your colors:
In separate cups, mix your pink, teal, peach, and blush paints with water. You want a consistency similar to heavy cream or slightly thinner creating a ‘glaze’ rather than thick paint. -
Mist the surface:
Take one drawer at a time. Lightly mist the white painted surface with your spray bottle. The water helps the colors bleed and move naturally. -
Apply the first color wash:
Dip your brush into the teal mixture and gently drag it across sections of the drawer—perhaps a patch on the left and a streak on the right. Keep the strokes organic and uneven. -
Add warmth with peach:
While the surface is still slightly damp, introduce the peach glaze near the teal edges. Don’t overwork it; let the water pull the pigments together. -
Layer in the pinks:
Add patches of pink and blush to the remaining white spaces. I like to overlap the pink slightly with the peach to create new, subtle orange hues. -
Soften harsh lines:
If a line looks too distinct, mist it lightly with water again or dab it gently with your damp lint-free cloth to blur the transition. -
Create horizontal flow:
Ensure the general direction of your clouds or washes moves horizontally across the drawer, mimicking a horizon line or strata. -
Check for drips:
Watch the bottom edges of the drawers. Since the paint is watery, catch any drips immediately with your cloth before they dry. -
Repeat for all drawers:
Process the other two drawers. Try to vary the placement of colors so they don’t look like identical stamps, but clearly belong to the same color family. -
Let it dry fully:
Allow the drawers to dry completely. This might take longer than standard paint because of the added water content.
Pro Tip: Depth Control
Work in sheer layers. It’s better to do three very faint, watery layers to build up color intensity than one thick coat, which will look like stripes instead of watercolor clouds.
Step 3: Assembly & Finishing
-
Paint the frame:
While drawers dry, paint the dresser frame a crisp, solid white to contrast with the dreamy drawers. -
Stain accent parts:
If your dresser has a wood top or legs like the inspiration photo, sand them back to raw wood and apply a light natural stain or wax. -
Seal the artwork:
Once the watercolor layers are bone dry, apply two thin coats of matte polycrylic sealer to protect the finish without adding shine. -
Reattach hardware:
Screw in new gold knobs to complement the warm tones in the pink and peach paint. -
Reassemble:
Slide the drawers back into the frame and step back to admire your handiwork.
Now you have a stunning, one-of-a-kind statement piece that brings a serene, artistic vibe to the room
Galaxy Night Sky Girl Dresser
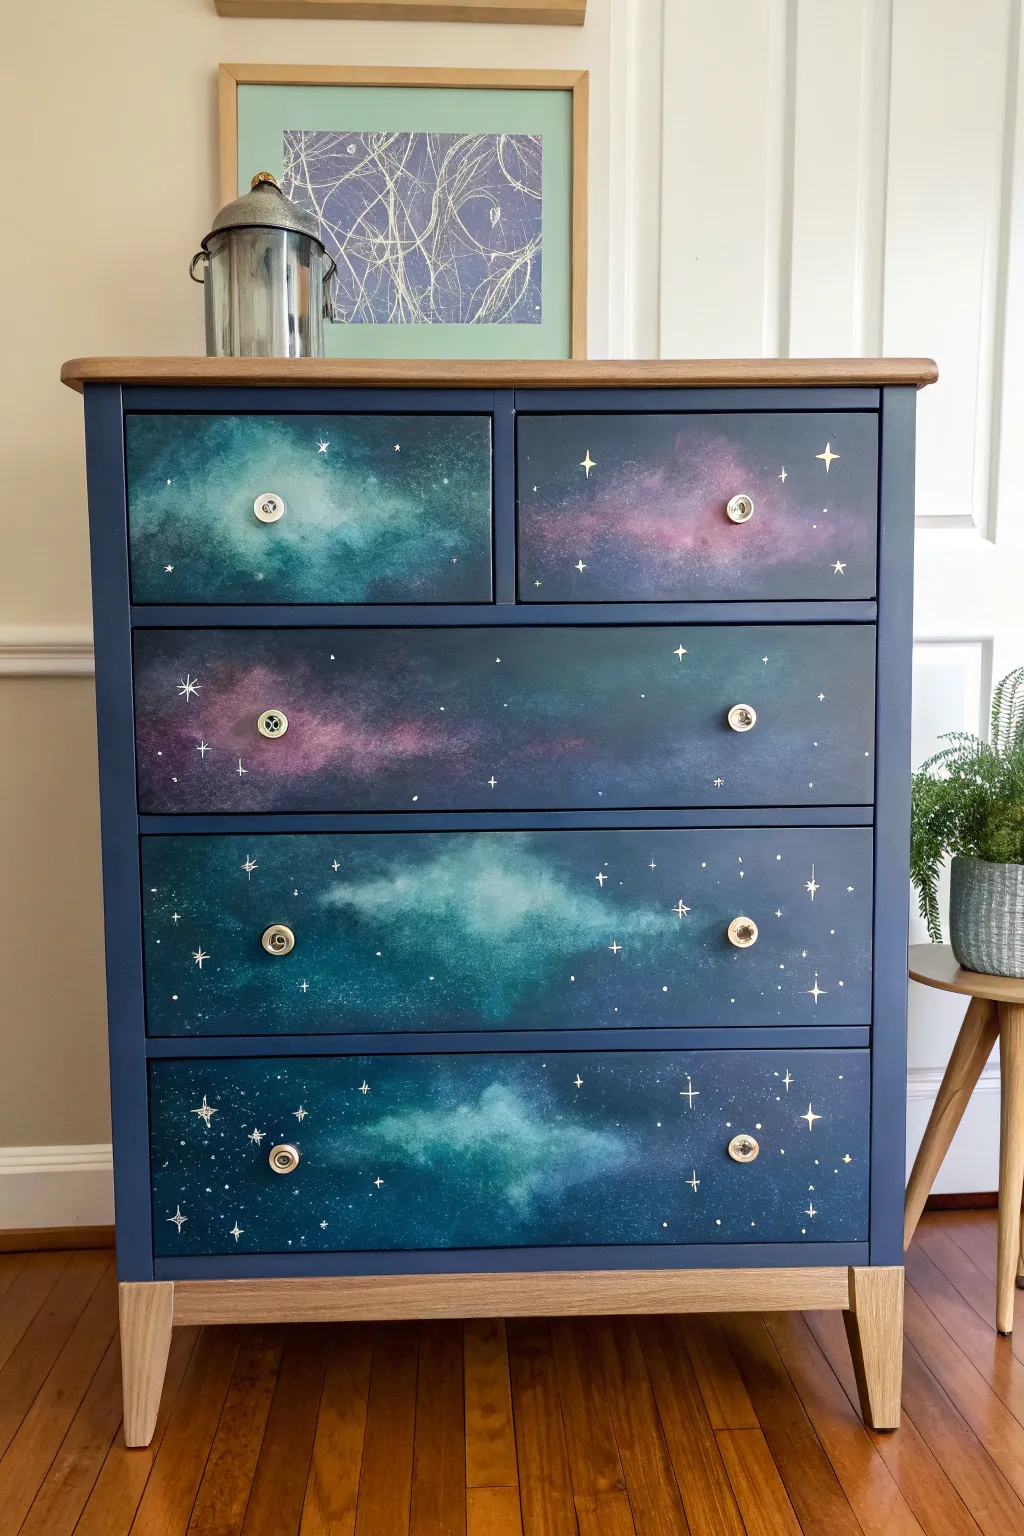
Transform a plain dresser into a dreamy portal to the cosmos with this stunning galaxy paint finish. Featuring deep midnight blues, swirling nebulas, and delicate starlight, this piece brings the wonder of the night sky right into any bedroom.
Step-by-Step Guide
Materials
- Wooden dresser (prepped and sanded)
- Painter’s tape
- Deep navy blue furniture paint (base coat)
- Acrylic paints (teal, purple, pink, white, black)
- Metallic silver or gold paint pen (fine tip)
- Assorted brushes (flat brush for base, round brushes for blending)
- Sea sponge or clean kitchen sponge
- Old toothbrush
- Water spray bottle
- Clean lint-free rags
- Polyurethane topcoat (matte or satin finish)
- Gold or crystal knobs
Step 1: Preparation & Base Coat
-
Protect the wood accents:
Before you even open a paint can, carefully tape off the wooden top edge and the legs using high-quality painter’s tape. This project relies on the contrast between the natural wood and the painted galaxy, so crisp lines are essential. -
Apply the midnight base:
Paint the entire body of the dresser and the drawer fronts with your deep navy blue furniture paint. Use smooth, long strokes to minimize brush marks. Ensure you paint the frames between the drawers as well. -
Apply a second coat:
Once the first coat is completely dry, apply a second coat of the navy blue. This ensures a rich, opaque background that represents the depth of space. Let this cure fully according to the paint manufacturer’s instructions.
Nebula Shape Troubleshooting
If your sponge marks look too blotchy or shaped like squares, rip pieces off your sponge to create a ragged, organic surface before dipping it in paint.
Step 2: Creating the Nebulas
-
Map out your clouds:
Decide where you want your star clusters and nebulas. On this dresser, notice how the teal and purple clouds flow horizontally across the drawer fronts. You don’t need to be precise; organic shapes work best. -
Sponge on the first color:
Dampen your sea sponge slightly and dip it into the teal acrylic paint. Dab off the excess onto a paper towel—you want a dry-brush effect, not a glob of paint. -
Build the celestial clouds:
Gently pounce the sponge onto the drawer fronts in a drifting cloud shape. Concentrate the color in the center of the nebula and let it fade out towards the edges. -
Layer in purple accents:
Repeat the sponge process with your purple/magenta acrylic paint. I like to overlap the teal slightly to create interesting new blended hues, but also leave some areas of pure teal and navy visible. -
Add depth with black:
To make the colors pop, lightly sponge a tiny amount of black paint around the very edges of your nebulas to deepen the surrounding space. -
Highlight the centers:
Mix a tiny drop of white into your teal or purple paint to create a lighter shade. Sponge this sparingly into the very center of your brightest nebulas to give them a glowing core. -
Blend edges softly:
If any sponge marks look too harsh, use a clean, slightly damp brush to gently feather the edges while the paint is still tacky.
Level Up: Glow in the Dark
Mix phosphorescent powder into your white paint for the stars, or use a clear glow-in-the-dark topcoat over specific constellations so the galaxy truly comes alive at night.
Step 3: Stars & Details
-
Create the distant stars:
Dilute some white acrylic paint with a little water until it’s the consistency of heavy cream. Dip an old toothbrush into this mixture. -
Splatter paint technique:
Hold the toothbrush about 6-10 inches away from the drawer front and run your thumb across the bristles to flick a fine mist of white dots onto the surface. Test this on a piece of cardboard first to gauge the spray. -
Hand-paint larger stars:
Once the splatter is dry, use a fine-tip brush or a paint pen to add distinct, larger stars. Place dots of varying sizes randomly, concentrating some near the nebula clusters. -
Draw the sparkles:
Use your metallic paint pen or a very fine detail brush with white paint to draw four-pointed stars (cross shapes) or diamond sparkles. Vary the size of these ”hero” stars for visual interest. -
Add constellations (optional):
If you wish, connect some of the larger stars with very faint lines to create constellations, or keep it random like the example shown.
Step 4: Finishing Touches
-
Seal the galaxy:
Once all artwork is bone dry (wait at least 24 hours), apply a clear polyurethane topcoat. A satin finish works beautifully to give a slight sheen without being too glossy. -
Apply a second topcoat:
Lightly sand with high-grit sandpaper if needed, wipe clean, and apply a second layer of sealant for durability. -
Remove tape and reassemble:
Carefully peel off the painter’s tape from the wood legs and top. Install your gold or metallic hardware to complement the starry theme.
Step back and admire your handiwork, as you now have a functional piece of art that captures the mysteries of the universe
Chalkboard Panel Girl Dresser for Doodles

Transform a plain dresser into an interactive canvas for creativity with this clever chalkboard paint makeover. The deep charcoal drawer fronts provide a stark, modern contrast to the white frame while giving little artists a designated spot to express themselves.
How-To Guide
Materials
- Wooden dresser (pre-assembled)
- Sandpaper (120 and 220 grit)
- Painter’s tape
- Primer (suitable for furniture)
- Chalkboard paint (black or charcoal)
- White furniture paint (satin or semi-gloss)
- Small foam roller and tray
- Paintbrush (angled sash brush)
- Wooden knobs (natural finish)
- White chalkboard marker or traditional chalk
- Screwdriver
- Clean cloth or tact cloth
Step 1: Preparation
-
Remove Hardware:
Begin by unscrewing and removing all the knobs from the drawer fronts. Store them safely if you plan to reuse them, though this project looks great with fresh, natural wood knobs. -
Clean and Sand:
Wipe down the entire dresser to remove dust and grime. Using 120-grit sandpaper, lightly scuff all surfaces you intend to paint. This helps the primer adhere better. -
Masking Off:
If you want to keep the top of the dresser natural wood like in the photo, carefully apply painter’s tape along the edges where the top meets the frame. Press down firmly to prevent bleed-through.
Uneven Chalk Finish?
If the chalkboard paint feels too rough or bumpy, lightly sand with 220-grit paper between the final two coats. Wipe perfectly clean before the last layer.
Step 2: Painting the Frame
-
Prime the Frame:
Remove the drawers and set them aside. Apply a coat of primer to the main body (frame) of the dresser using a foam roller for flat areas and a brush for corners. -
First White Coat:
Once the primer is dry, apply your first coat of white furniture paint. Maintain long, smooth strokes to avoid brush marks. -
Sand Between Coats:
I like to do a very quick pass with 220-grit sandpaper after the paint dries to knock down any bumps. Wipe away the dust before continuing. -
Finish Frame:
Apply a second or third coat of white paint until you have solid, opaque coverage. Let the frame cure fully while you work on the drawers.
Drawing Like a Pro
Use ‘wet wipe’ liquid chalk markers. They create opaque, sharp white lines like the photo but wipe away cleanly with a damp cloth when you want a new design.
Step 3: Creating Chalkboard Drawers
-
Prime Drawer Fronts:
Apply a coat of primer specifically to the front faces of the drawers. Don’t worry about the sides, as they won’t be seen when closed. -
Apply Chalkboard Paint:
Stir your chalkboard paint remarkably well, as the gritty particles tend to settle. Using a fresh foam roller, apply the first coat to the drawer fronts. -
Layering:
Chalkboard paint often requires more coats than standard latex. Apply 2-3 coats, allowing ample drying time (usually 2-4 hours) between each layer for a durable finish. -
Curing Time:
This is crucial: allow the chalkboard paint to cure for at least 3 days before writing on it. If you write too soon, you might scratch the finish permanently. -
Conditioning the Surface:
Once cured, take a piece of traditional chalk turned sideways and rub it over the entire painted surface. Wipe it off with a dry cloth. This ‘seasons’ the surface so your first drawing doesn’t leave a permanent ghost image.
Step 4: Assembly and Art
-
Install Knobs:
Attach the natural wood knobs to the center of each drawer. Their light color ties perfectly into the unpainted wood top. -
Insert Drawers:
Slide the drawers back into the white frame. -
Adding Doodles:
Using a white chalk marker for crisp lines (or regular chalk for a softer look), draw whimsical designs. Stars, suns, hearts, and flowers work beautifully. -
Create Matching Decor:
For the accessory shown on top, paint the insert of a simple wooden picture frame with the same chalkboard paint and lean it against the wall to complete the vignette.
Now you have a functional furniture piece that encourages daily imagination and changes as often as your child’s mood


Have a question or want to share your own experience? I'd love to hear from you in the comments below!