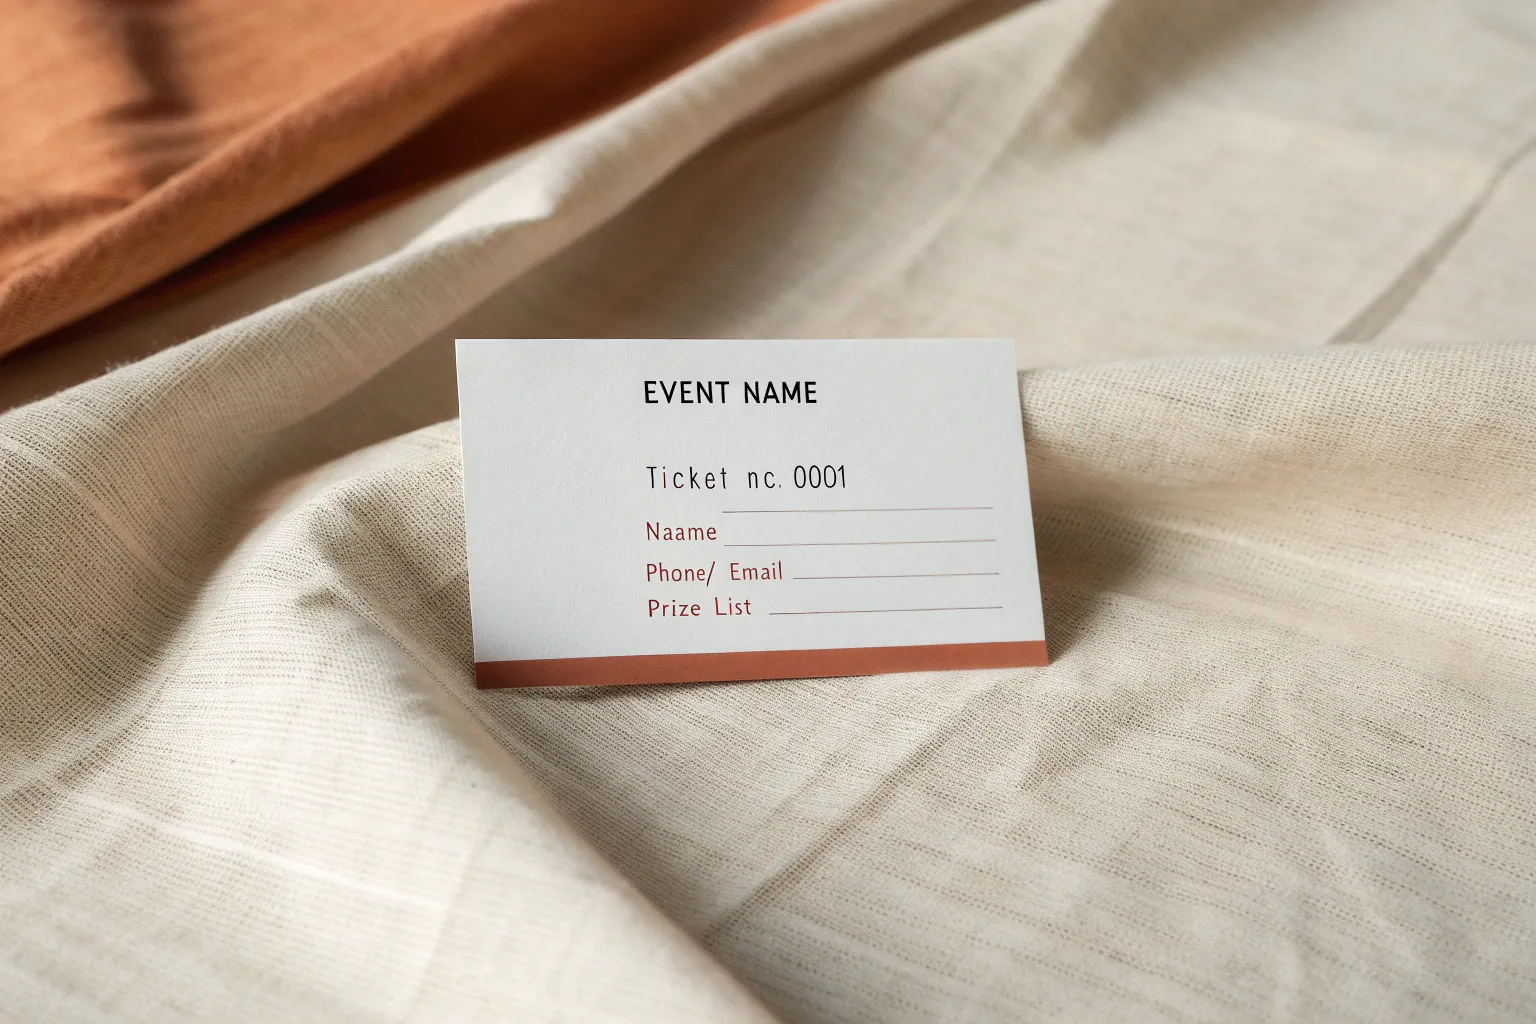
If you’re putting together a raffle drawing, the visuals and the format do a ton of heavy lifting for you. Here are my favorite raffle drawing ideas—from classic ticket setups to creative twists—so your event looks polished and feels exciting.
Classic Numbered Ticket Drawing

Bring an old-world charm to your raffle with these custom-designed tickets that mimic the look of classic admission stubs. Printed on textured kraft paper and distinctively perforated, they feel substantial and authentic in the hand.
Detailed Instructions
Materials
- Heavyweight kraft cardstock (65lb or higher)
- Inkjet or laser printer
- Computer with design software (Canva, Illustrator, or Word)
- Ruler
- Craft knife or scissors
- Tracing wheel or sewing needle (for perforation effect)
- Pinking shears (optional, for decorative edges)
- Bone folder
Step 1: Digital Design
-
Set up the canvas:
Open your design software and create a new project. A standard ticket size is approximately 2 inches by 5 inches, but you can adjust this to fit your needs. Set up multiple tickets on a single letter-sized page to maximize paper usage. -
Select vintage typography:
Choose a bold, serif font for the main word ‘TICKET.’ Fonts like ‘Playbill,’ ‘Courier prime,’ or ‘Bodoni’ work well. Center this text horizontally on the main body of the ticket. -
Add decorative borders:
Create a double-line border around the main text block. I like to use a thick outer line and a slightly thinner inner line to replicate the classic letterpress style seen in the reference image. -
Incorporate details:
Add smaller text fields above and below the main title. Include details like ‘Date,’ ‘Price,’ or meaningless serial codes (like ‘GRCO 2001’) to add visual density and authenticity. -
Create the stub section:
Dedicate the right-hand side of the rectangle (about 1.5 inches wide) for the tear-away stub. Add a large bold number, like ’58,’ and repeat crucial info here. -
Draw the perforation line:
In your software, insert a dashed line separating the main ticket body from the stub. This acts as a visual guide for cutting later.
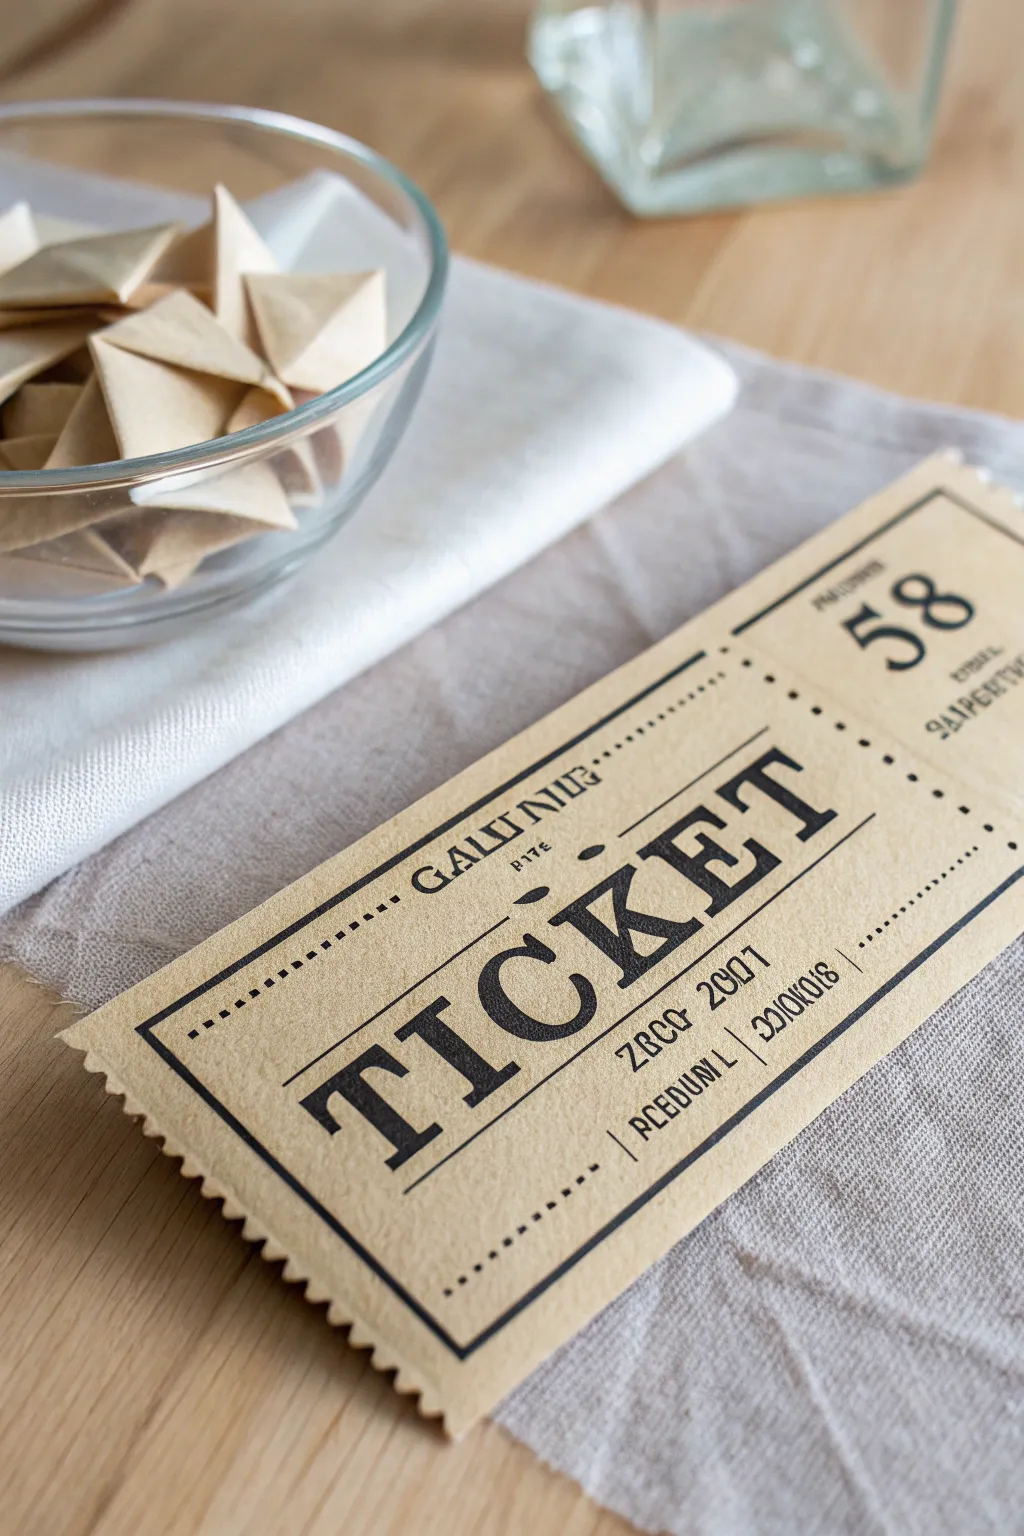
Aged Paper Hack
If you can’t find kraft paper, print on white cardstock and lightly sponge the edges with ‘Tea Dye’ or ‘Vintage Photo’ distress ink.
Step 2: Printing and Texturing
-
Print the sheet:
Load your kraft cardstock into the printer. Set the print quality to ‘High’ or ‘Best’ to ensure the black ink lays down dark and crisp against the brown paper background. -
Cut the strips:
Once the ink is fully dry, use a metal ruler and a sharp craft knife to cut out the long horizontal strips of tickets first. -
Detail the edges:
For the short vertical edges (the left and right sides of the ticket), use pinking shears or decorative edging scissors to create that jagged, torn-ticket look shown in the image.
Step 3: Finishing Touches
-
Create the perforation:
Place the ticket on a cutting mat. Run a tracing wheel firmly along the printed dashed line between the ticket body and the stub. If you don’t have a tracing wheel, you can painstakingly poke holes with a needle or run a dry ballpoint pen firmly to score the paper. -
Fold the crease:
Gently fold the stub back and forth along the perforation line you just created. Use a bone folder to sharpen the crease, ensuring it tears away cleanly during the raffle. -
Separate individual tickets:
If you printed tickets in a connected strip, cut them apart now using the pinking shears for the vertical cuts and straight scissors for the horizontal borders. -
Add numbering (optional):
If you didn’t digitally print the numbers, use a rubber number stamp and black ink pad to manually stamp unique numbers on both the main body and the stub for a true hand-finished feel. -
Final inspection:
Check the tear-ability of your perforation. The stub should detach easily without ripping the main design.
Make it a Keepsake
Add a magnetic strip to the back of the torn-off portion so guests can stick their ‘winning’ number on the fridge.
Now you have a set of charming, rustic tickets ready for your big drawing.


Perforated Ticket Stub Layout
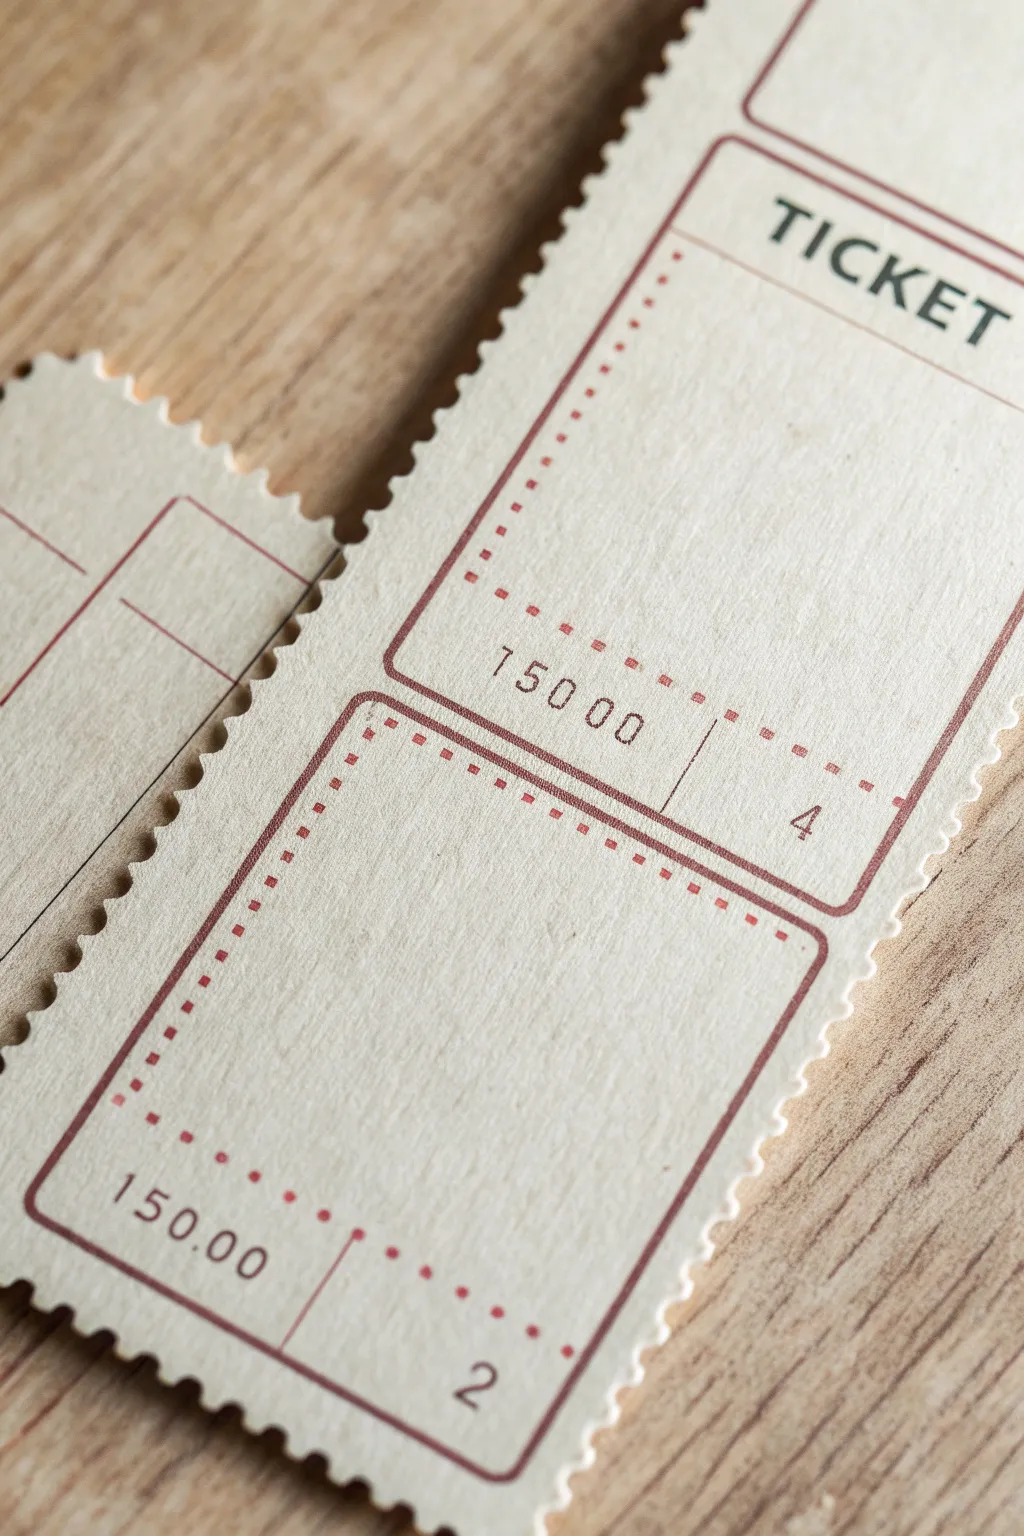
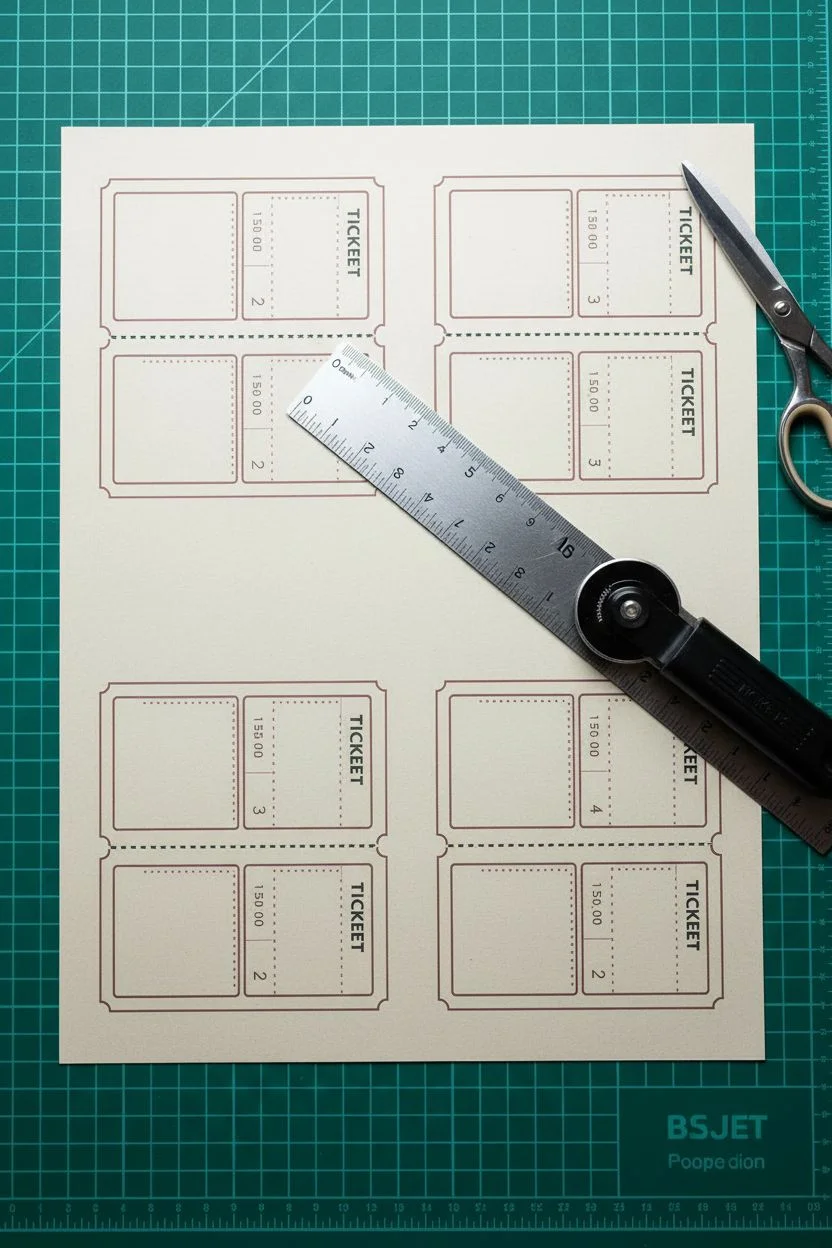
Create your own customized raffle tickets featuring that classic, satisfying tear-off stub and a charming vintage aesthetic. This project replicates the look of old-school event tickets using heavy cardstock and simple print methods for a professional yet handmade feel.
Detailed Instructions
Materials
- Cream or off-white textured cardstock (80lb or heavier)
- Computer and printer (inkjet or laser)
- Graphic design software (Canva, Illustrator, or Word)
- Rotary cutter with perforation blade
- Metal ruler
- Self-healing cutting mat
- Paper trimmer or X-Acto knife
- Corner rounder punch (optional)
Step 1: Designing the Ticket Layout
-
Set up your canvas:
Open your design software and create a canvas size that matches your cardstock, usually 8.5×11 inches. Set your guidelines to divide the page into even rows. -
Create the outer border:
Draw a large rectangle for the main ticket body. Inside this, create a smaller inner rectangle with a thin stroke weight (approx 1-2 pt) in a dark red or maroon color to mimic vintage ink. -
Add the stub section:
Duplicate your rectangle grouping and place it directly below or to the side of the main ticket, depending on your preferred orientation. This smaller section will become the tear-off stub. -
Add typography:
Select a clean, sans-serif font for the word ‘TICKET’ at the top. For the pricing mechanism (e.g., ‘150 00’), use a monospaced font to replicate old typewriter or stamped numbering styles. -
Insert decorative elements:
Create the dotted lines for the inner sections. Instead of a solid line, use a dashed stroke setting with small square or round dots to frame the price and numbering areas, keeping the color consistent with your borders. -
Number your tickets:
Add sequential numbers (like ‘2’ and ‘4’ seen in the example) to both the main ticket and the corresponding stub so they can be matched later. -
Duplicate the design:
Group all your elements for a single ticket and duplicate them to fill your entire page layout, leaving at least 1/8 inch of space between each ticket for cutting.
Step 2: Printing and Construction
-
Test print:
Print a single copy on regular copy paper first to check alignment and font sizes before committing to your good cardstock. -
Final printing:
Load your textured cream cardstock into the printer. I prefer using the rear feed tray if available to prevent the heavy paper from curling during printing. -
Let the ink set:
Allow the prints to dry completely for about 10-15 minutes, especially if using an inkjet printer, to avoid smudging the red ink during handling. -
Prepare for perforation:
Place the cardstock on your self-healing cutting mat. Align your metal ruler exactly where the ticket separates from the stub. -
Create the perforation:
Install the perforation blade into your rotary cutter. Firmly press against the ruler and roll the blade across the paper in a single, confident motion to create the tear line. -
Separate the strips:
Using a standard straight blade or paper trimmer, cut the long vertical strips of tickets apart first. -
Cut individual tickets:
Cross-cut the strips to separate the individual ticket units. Ensure you are cutting just outside your printed red borders. -
Create the decorative edge:
For that authentic ‘stamp-like’ edge shown in the photo, you can use specialized pinking shears or a decorative edge scissor. Carefully trim the outer perimeter of the ticket stack.
Perforation Too Deep?
If your tickets are falling apart too easily, try applying slightly less pressure on the rotary cutter or place a sheet of copy paper underneath your cardstock to soften the cut depth.
Add a Watermark
For a security feature that looks high-end, print a very faint, light grey logo or pattern in the background of the ticket center before adding your text layers.
Now you have a stack of professional-looking tickets ready for your next event


Printable Ticket Sheets for Easy Cutting
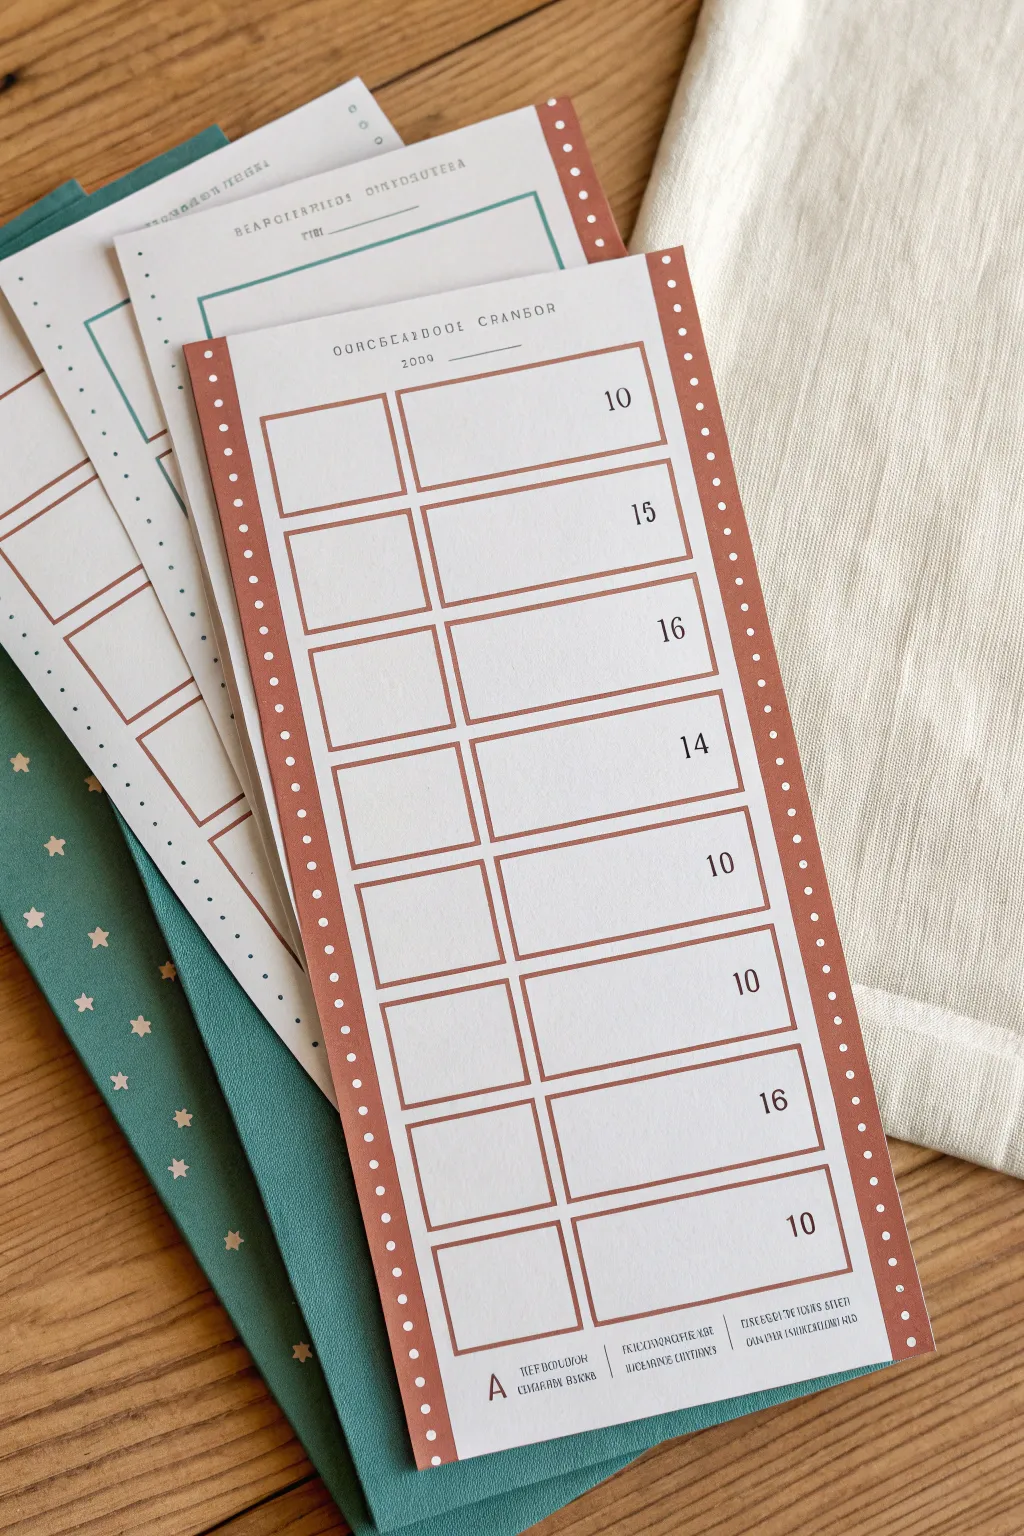
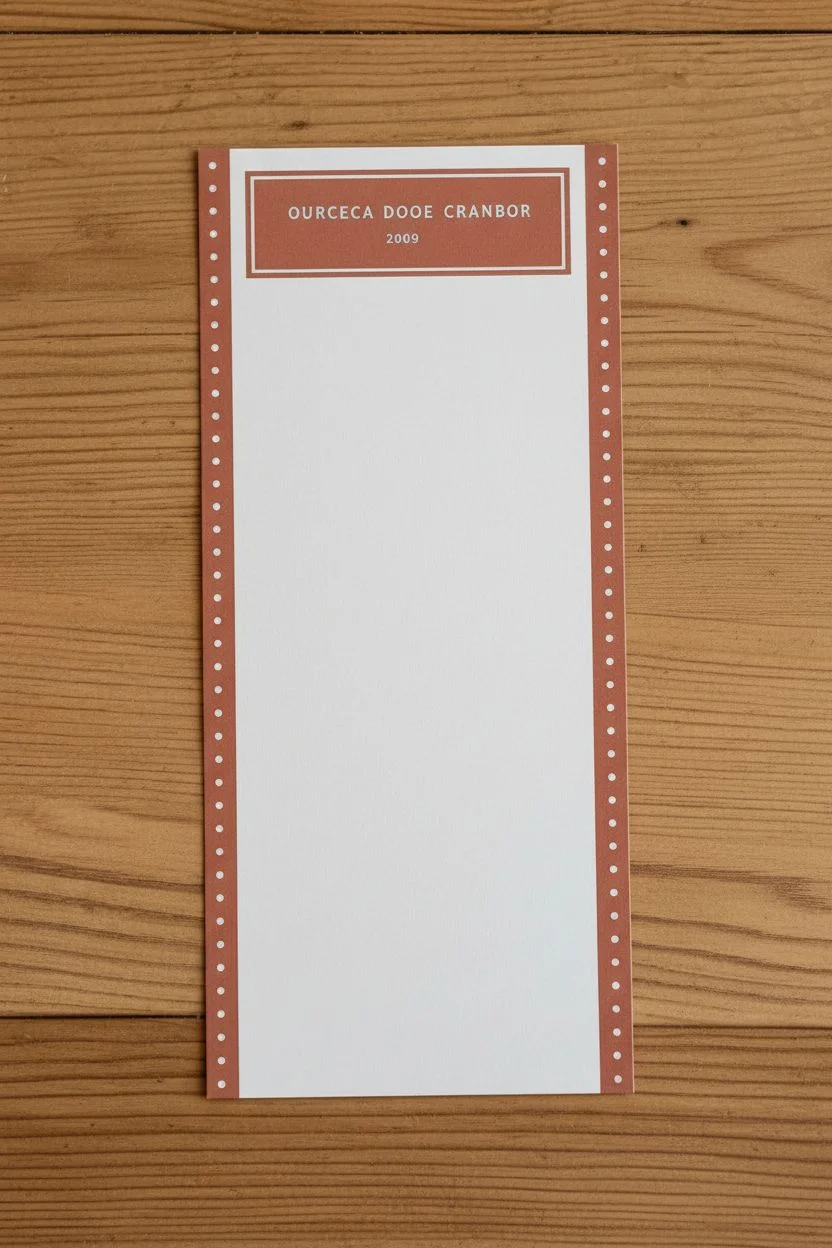
These charming, vertical raffle sheets combine a retro aesthetic with practical functionality, featuring a clean layout for easy tracking. The burnt orange borders with white polka dots add a nostalgic touch, making them perfect for classic prize drawings or event organization.
Step-by-Step Guide
Materials
- Computer with design software (Canva, Illustrator, or Publisher)
- Heavyweight matte cardstock (80lb or 100lb)
- Color printer (inkjet or laser)
- Paper trimmer or guillotine cutter
- Ruler
- Pencil (optional for marking cut lines)
Step 1: Digital Design Setup
-
Set Dimensions:
Open your design software and create a custom canvas. A standard long ticket size works well here, so set your dimensions to approximately 3.5 inches wide by 8.5 inches tall. -
Create the Sidebar Borders:
Draw two long, thin rectangles running the full height of the left and right edges. Color them a warm burnt orange or terracotta tone. -
Add Decorative Dots:
Inside the orange borders, create a vertical line of small, white circles. Use the ‘distribute vertically’ tool in your software to ensure the spacing between dots is perfectly even. -
Header Design:
At the very top, add a title block. Use a vintage-style serif font for text like ‘RAFFLE SHEET’ or your event name, keeping the font size small and understated.
Step 2: Creating the Grid
-
Draw the First Row:
Create a rectangular outline using a thin stroke in the same orange color as your border. Divide this rectangle into two sections: a smaller square on the left (for a checkmark or initial) and a wider rectangle on the right (for a name). -
Add numbering:
Place a number inside the wider rectangle, aligning it to the right side. Use a classic serif font like Times New Roman or Garamond for that timeless look. -
Duplicate the Rows:
Copy and paste your first row setup 8 to 10 times to fill the vertical space. Ensure there is a small, consistent gap between each row. -
Number the Rows:
Go through each duplicated row and update the numbers sequentially (e.g., 10, 15, 16, 14, etc., or standard 1-10 depending on your needs). -
Footer Text:
At the bottom, add a small section with three columns for administrative text or fine print, using a very small, legible sans-serif font.
Ink Smearing?
If using an inkjet printer on glossy or coated cardstock, let the sheets sit for at least 15 minutes before cutting to prevent the ruler from smudging the wet ink.
Step 3: Printing and Finishing
-
Layout for Print:
Create a new document sized to standard letter paper (8.5 x 11 inches). Copy your entire ticket design and paste it onto this sheet. You can usually fit two or three strips side-by-side. -
Print Specifications:
Load your heavy matte cardstock into the printer. Set your printer settings to ‘High Quality’ or ‘Photo Printing’ to ensure the orange ink looks rich and solid. -
Initial Cuts:
Once printed, place the sheet on your paper trimmer. Align the blade with the outer edges of your design to trim away the excess white margin of the letter paper. -
Separate the Strips:
I usually double-check my alignment here before the final cut. Slice vertically between the ticket designs to separate them into individual strips. -
Final Inspection:
Check the edges for any remaining white slivers and trim them off for a truly professional finish.
Perforated Tear-Offs
Run a sewing tracing wheel (unthreaded) along the vertical line between the checkbox and name box. This creates easy-to-tear perforations for verifying tickets.
Now you have a set of professional-looking raffle sheets ready for your next event


One Prize, One Clean Hero Image

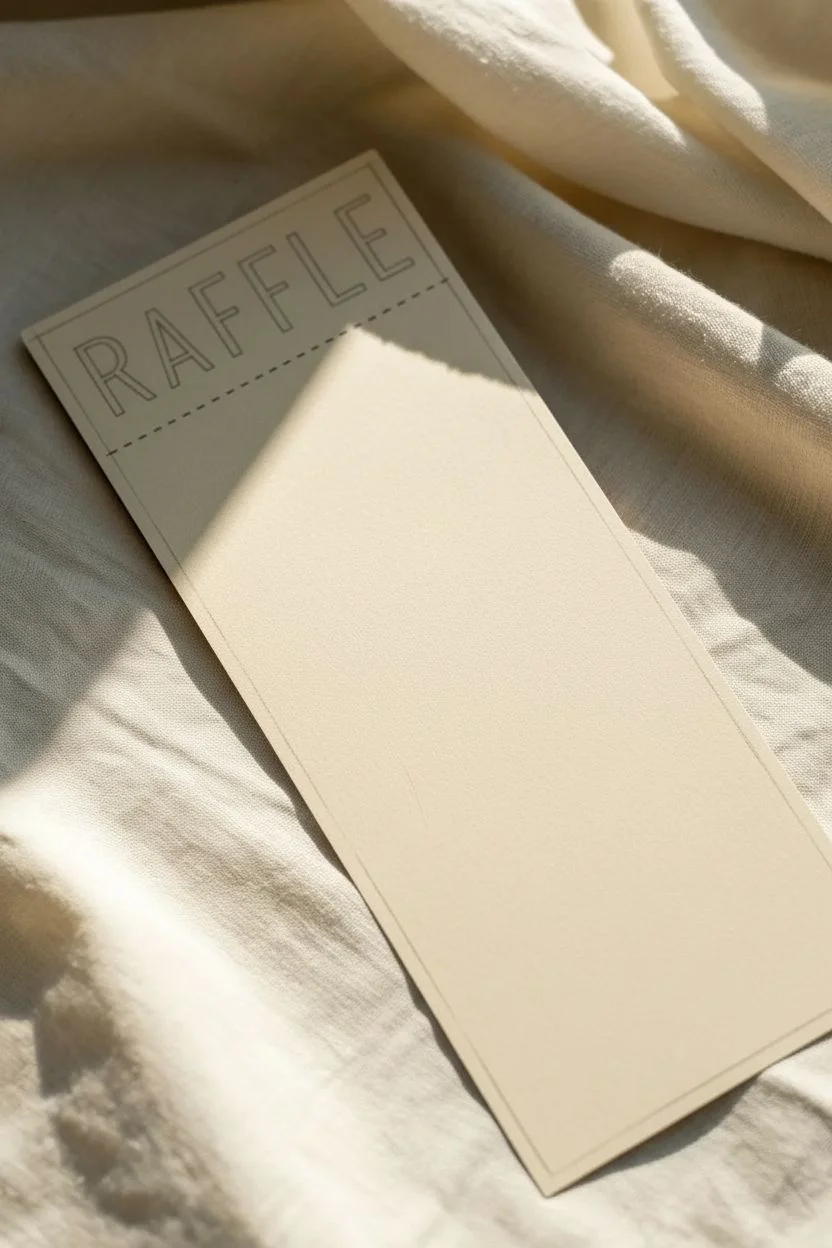
This elegant, minimalist raffle ticket design combines bold typography with clean line art for a sophisticated look. It features a central gift box illustration and easy-to-read entry fields, perfect for upscale events or boutique giveaways.
Step-by-Step
Materials
- Cream or off-white cardstock (80lb or heavier)
- Black fine-liner pens (0.3mm and 0.8mm)
- Ruler
- Pencil
- Eraser
- Computer and printer (optional for text)
- Black marker or brush pen (for bold title)
- Circle stencil or compass
Step 1: Layout and Basic Structure
-
Cut the paper:
Start by cutting your cream cardstock into a tall, rectangular strip. A size around 4 inches wide by 8 or 9 inches tall works well for this elongated ticket format. -
Establish the margins:
Using your ruler and pencil, lightly mark a margin about half an inch from the top edge. This is where your main header will go. -
Draft the header:
Near the top, pencil in the word ‘RAFFLE’ in large, uppercase block letters. Leave plenty of space between the letters for an airy, modern feel. -
Draw the separator line:
About an inch below your text, use the ruler to draw a dashed line across the width of the card. This acts as a visual break.
Step 2: The Central Graphic
-
Create the circle badge:
Centered below the dashed line, draw a circle using a stencil or compass. Inside this, draw a smaller dotted circle. Write the word ‘GIFT’ in uppercase sans-serif letters in the center. -
Frame the illustration:
Below the circle, lightly pencil a large square box. This will frame your gift box drawing. -
Sketch the gift box shape:
Inside the square frame, sketch a vertical rectangle for the gift box. Add a ‘T’ shape to represent the ribbon wrapping around the box. -
Add the bow:
Draw two loops at the top of the box for the bow. Keep the lines simple and smooth. -
Fill the gift box:
Using a fine-liner or stippling technique, fill in the darker parts of the box, leaving the ribbon ‘T’ shape empty (the color of the paper). This creates a negative space effect. -
Ink the frame:
Use your ruler and a 0.5mm pen to ink the square border around the gift box illustration.
Clean Lines Tip
Use a clear acrylic ruler when inking your lines. This lets you see exactly where you are drawing relative to your pencil marks underneath.
Step 3: Text and Details
-
Ink the main title:
Go back to the top and carefully ink the ‘RAFFLE’ text. I prefer using a thicker marker here to make the letters stand out boldly against the fine lines below. -
Add entry fields:
In the bottom third of the card, draw two small checkboxes on the left side, aligned vertically. -
Write the labels:
Next to the top checkbox, write your first category (e.g., ‘Name’ or ‘Phone’). Next to the second, write the next category. The example uses placeholder text like ‘Loae giumm luce’, but you should use real labels. -
Draw the input lines:
To the right of your text labels, draw straight horizontal lines for people to write on. -
Add the footer:
At the very bottom, add a final field or signature line. Draw a line spanning most of the width and add a small label like ‘Ref #’ or ‘Date’ underneath or to the side. -
Erase pencil marks:
Wait until the ink is completely dry—give it a few minutes to be safe—then gently erase all pencil guidelines for a clean finish.
Perforation Effect
Use a perforation cutter tool on the dashed line under ‘RAFFLE’ to make the stub actually tearable for a real functional ticket.
You now have a chic, professional-looking raffle card ready for your next event
BRUSH GUIDE
The Right Brush for Every Stroke
From clean lines to bold texture — master brush choice, stroke control, and essential techniques.
Explore the Full Guide
Prize Basket Raffle Display Cards

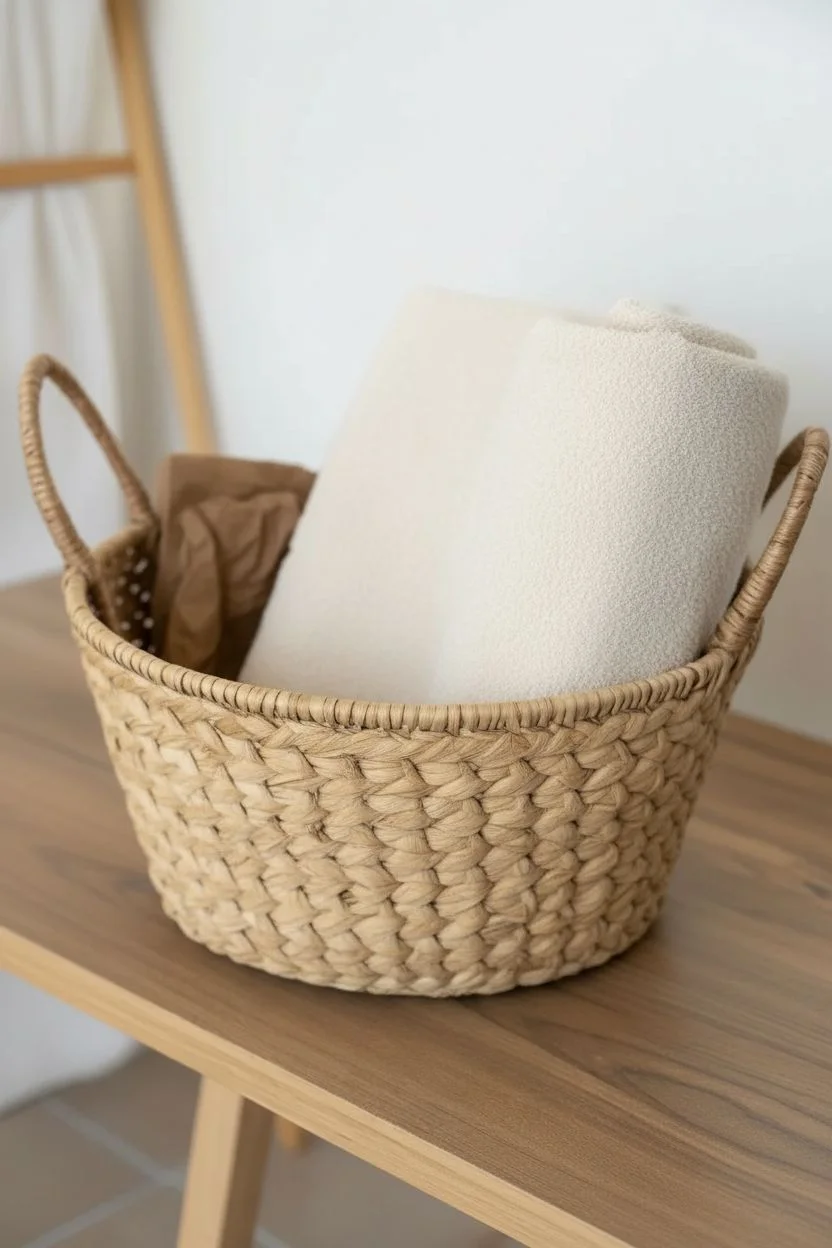
Create an inviting and cohesive display for your raffle prize that highlights the spa day theme with natural textures and simple elegance. This tutorial guides you through assembling the basket, arranging the contents for maximum visual appeal, and creating a professional signage card to draw attention to your raffle item.
Detailed Instructions
Materials
- Woven seagrass or rope basket (round with handles)
- Beige rolled towels (2-3 small/medium)
- Large folded cream towel or blanket
- Amber glass pump bottle with custom label
- Bar of handmade soap
- Small wooden serving board or coaster
- Dried pampas grass or wheat stems
- Dried baby’s breath or white floral sprigs
- Twine or jute string
- White cardstock paper
- Printer (for label and card)
- Scissors
Step 1: Preparing the Base
-
Select the basket:
Choose a round woven basket made of natural seagrass or thick rope. The texture is key here, so look for something with a chunky weave that feels organic. -
Add height at the back:
To make sure all items are visible, place a filler item like crumpled kraft paper or a small box at the bottom rear of the basket. This props up the back items so they aren’t hidden. -
Fold the backdrop textile:
Take your largest cream towel or a small knit blanket. Fold it neatly so it fits standing up at the back of the basket, acting as a soft, neutral backdrop for the other items.
Step 2: Arranging the Contents
-
Position the main bottle:
Place the amber glass pump bottle slightly off-center towards the left. Ensure the label is facing forward and clearly legible. -
Create a rolled towel accent:
Roll one of the beige hand towels tightly into a spiral. Place this ‘snail shell’ shape on the left side of the bottle, tucking it securely so the spiral faces the viewer. -
Add the vertical towel:
Fold another beige towel or washcloth and stand it upright on the right side of the bottle, leaning it slightly against the back blanket for support. -
Insert dried botanicals:
Tuck stems of dried pampas grass or wheat behind the items on the right side to add height and feathery texture. -
Add floral softness:
Place a small bunch of dried baby’s breath or white flowers on the left side, poking out from behind the handle or the rolled towel to balance the composition.
Pro Tip: Invisible Height
If items sink too deep into the basket, use crumpled newspaper or bubble wrap at the very bottom to lift everything up. No one will see the filler!
Step 3: Styling the Foreground
-
Prepare the soap bar:
Wrap a bar of handmade soap in a strip of parchment or white paper. Secure it with a piece of jute twine tied in a simple bow for a rustic touch. -
Set the stage:
Place the small wooden board on the table or surface directly in front of the basket. This extends the display outside the basket itself. -
Arrange the soap:
Set the wrapped soap bar onto the wooden board. -
Create a mini bouquet:
Tie two small dried flower buds or garlic bulbs together with a bit of twine. Place this tiny accent next to the soap on the board.
Troubleshooting: Floppy Card
If your cardstock is too thin and won’t stand, tape a small triangular wedge of cardboard to the back to act as a hidden easel support.
Step 4: Creating the Signage
-
Design the card:
Using a simple word processor or design tool, create a vertical card layout. Use a clean, serif font for the header ‘BODY’ (or your theme name). -
Add descriptive text:
Below the header, add 4-5 lines of smaller text describing the prize contents or raffle details. Keep the alignment centered or justified for a tidy look. -
Insert a graphic element:
Add a simple line art illustration of a branch or leaf at the bottom of the card in a gold or mustard color to match the natural tones. -
Print and fold:
Print the design onto sturdy white cardstock. Cut it to size and fold it in half to create a tent card that stands on its own. -
Final placement:
Position the display card to the right of the wooden board, angled slightly towards the viewer so it’s easy to read without blocking the basket.
Now your spa basket is beautifully staged and ready to attract enthusiastic raffle entries with its calm and coherent presentation
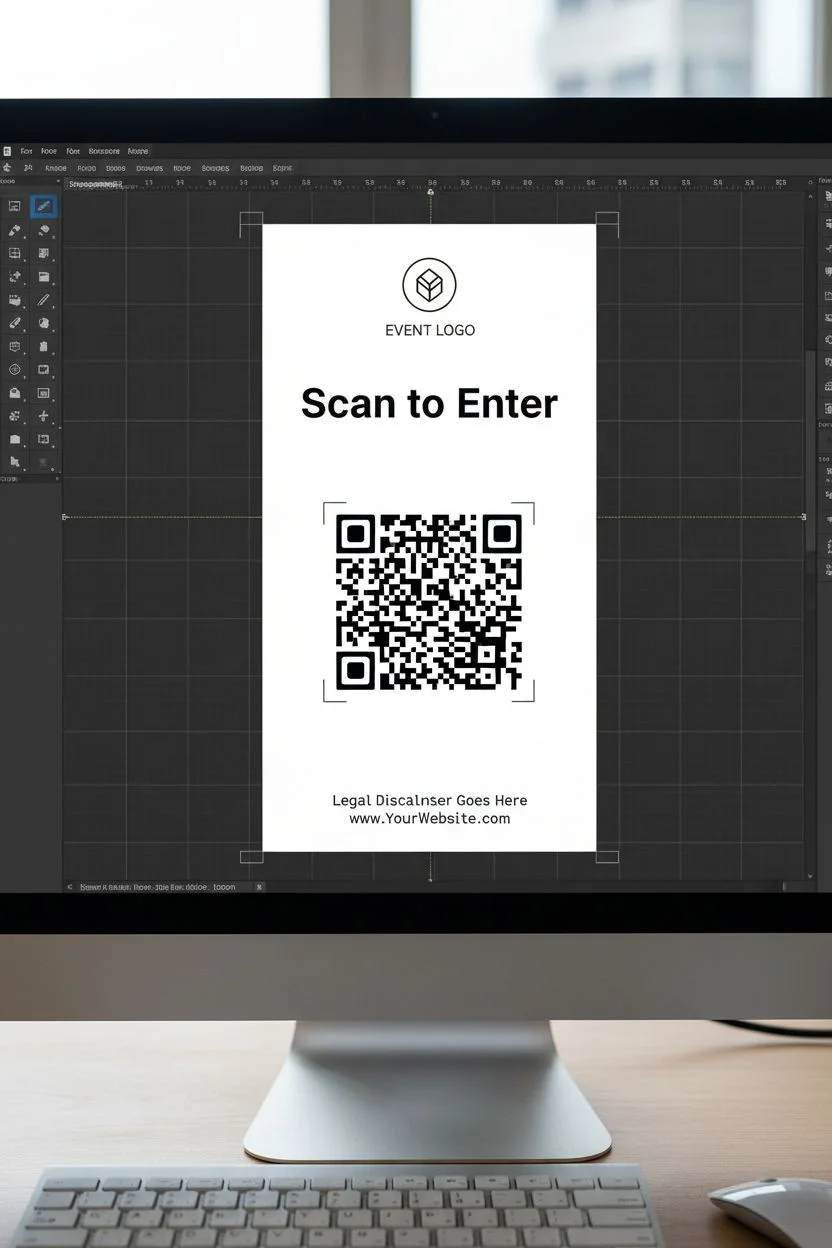
Online Entry With a Big QR Code Block
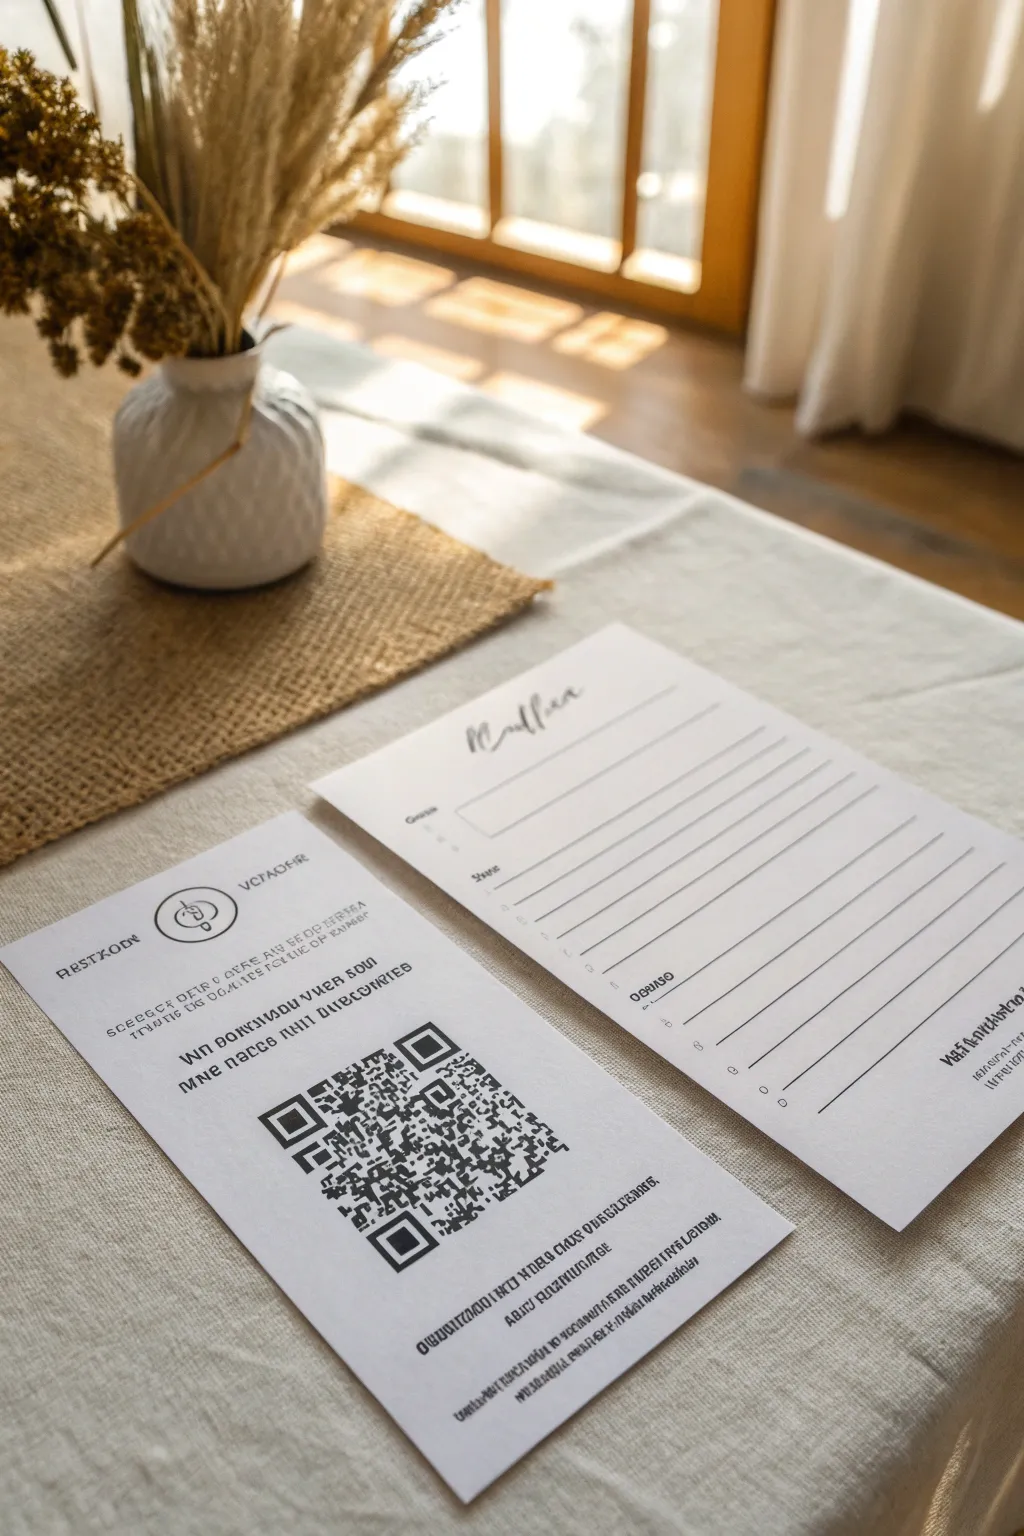
This elegant hybrid entry system combines a tactile signup form with a modern digital entry point, perfect for capturing every guest’s preference. The clean, minimalist layout paired with a prominent QR code ensures your raffle feels professional, accessible, and high-end.
Detailed Instructions
Materials
- High-quality cardstock (white or soft cream, 80lb+ weight)
- Desktop processing software (Canva, InDesign, or Word)
- A working QR code generator (online tool)
- Inkjet or laser printer
- Paper trimmer or guillotine cutter
- Ruler
- Pencil (optional)
- Small textured jar or vase for styling (optional)
- Dried florals or pampas grass (optional)
Step 1: Designing the QR Information Card
-
Set up your document:
Begin by opening your design software and setting your canvas to a standard DL flyer size (roughly 4×8 inches) or a half-letter size, depending on your preferred scale. This tall, slender format looks elegant on a table. -
Generate the QR code:
Use a reliable online QR generator to create a code that links directly to your digital raffle entry form. -
Download the code:
Download the high-resolution PNG or SVG version of the code to ensure it prints crisply without pixelation. -
Place the header logo:
At the very top of your design canvas, insert your event or company logo. Keep it centered and allow plenty of whitespace around it for a breathable, airy feel. -
Add instructional text:
Immediately below the logo, type a brief headline using a clean sans-serif font. Something like ‘Scan to Enter’ or ‘Digital Raffle Entry’ works well. -
Insert the QR block:
Place your downloaded QR code prominently in the lower center of the page. It needs to be the main focal point, so don’t be afraid to make it large—at least 2-3 inches wide. -
Include footer details:
At the bottom, add a few lines of smaller text in a decorative or monospaced font. This can be legal disclaimers, the website URL for manual entry, or a simple ‘Thank you for visiting’ message.
Clean Scan Pro Tip
Leave a white border around the QR code itself. If the background or design is too busy near the code edges, phone cameras might struggle to focus.
Step 2: Designing the Manual Entry Form
-
Create a matching layout:
Open a new canvas with roughly the same dimensions as your QR card, or slightly wider (like an A5 or 5×7 inch format). -
Select a script font:
For the header (e.g., ‘Raffle’ or ‘Winner’), choose a flowing, elegant script font. Place this title at the top left or center to designate the purpose of the sheet. -
Draw the entry fields:
Using the line tool, create a series of horizontal lines for attendee information. Ensure the spacing is generous enough for handwriting—about 0.3 to 0.4 inches apart. -
Label the fields:
Add small text labels under or next to the lines (such as Name, Email, Phone Number). Keep the font size small (around 8-9pt) so it doesn’t compete with the handwriting. -
Review alignment:
Ensure all your lines are left-aligned and evenly distributed. I typically group these elements and use the ‘distribute vertically’ tool to get perfect spacing instantly.
Level Up: Texture
Print the manual entry form on a slightly different paper tone (like oatmeal or grey) than the QR card to create subtle visual contrast between the two.
Step 3: Printing and Finishing
-
Select your paper:
Load your printer with high-quality cardstock. A slight texture or a ‘linen’ finish adds a lovely tactile quality that elevates the simple black-and-white design. -
Run a test print:
Print one copy of the QR card first. Test it with your own phone camera to guarantee the code is readable and leads to the correct destination before mass printing. -
Print the final batch:
Print your desired number of QR cards and entry forms. If printing multiple designs on one standard sheet, ensure you have crop marks enabled. -
Trim to size:
Using a paper trimmer or a metal ruler and craft knife, carefully cut along the edges. Clean, straight cuts are essential for that professional look. -
Stage the display:
Arrange the cards on your table. Place the QR card slightly forward or raised (perhaps in a small holder) and the entry forms nearby with pens. -
Add decorative elements:
To mimic the aesthetic in the image, place a small ceramic vase with dried grasses or botanicals next to the paperwork. This softens the look and draws the eye to the station.
Now your raffle station is ready to welcome guests with both style and efficiency

PENCIL GUIDE
Understanding Pencil Grades from H to B
From first sketch to finished drawing — learn pencil grades, line control, and shading techniques.
Explore the Full Guide
Hybrid Raffle: Digital Sales, Physical Stubs
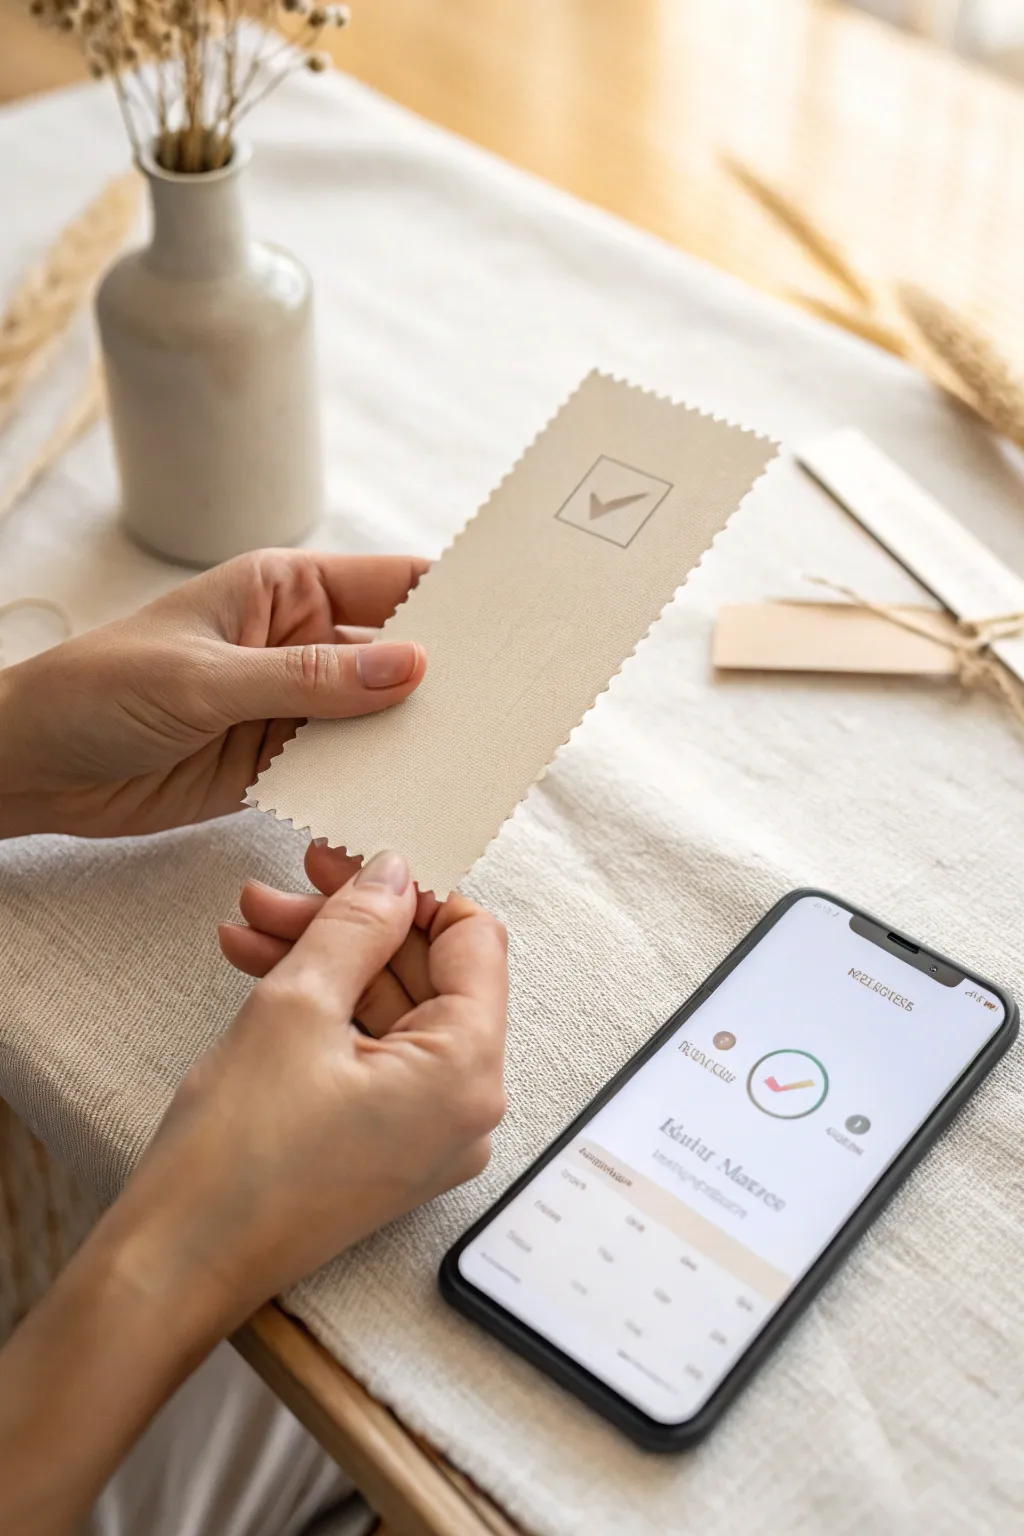
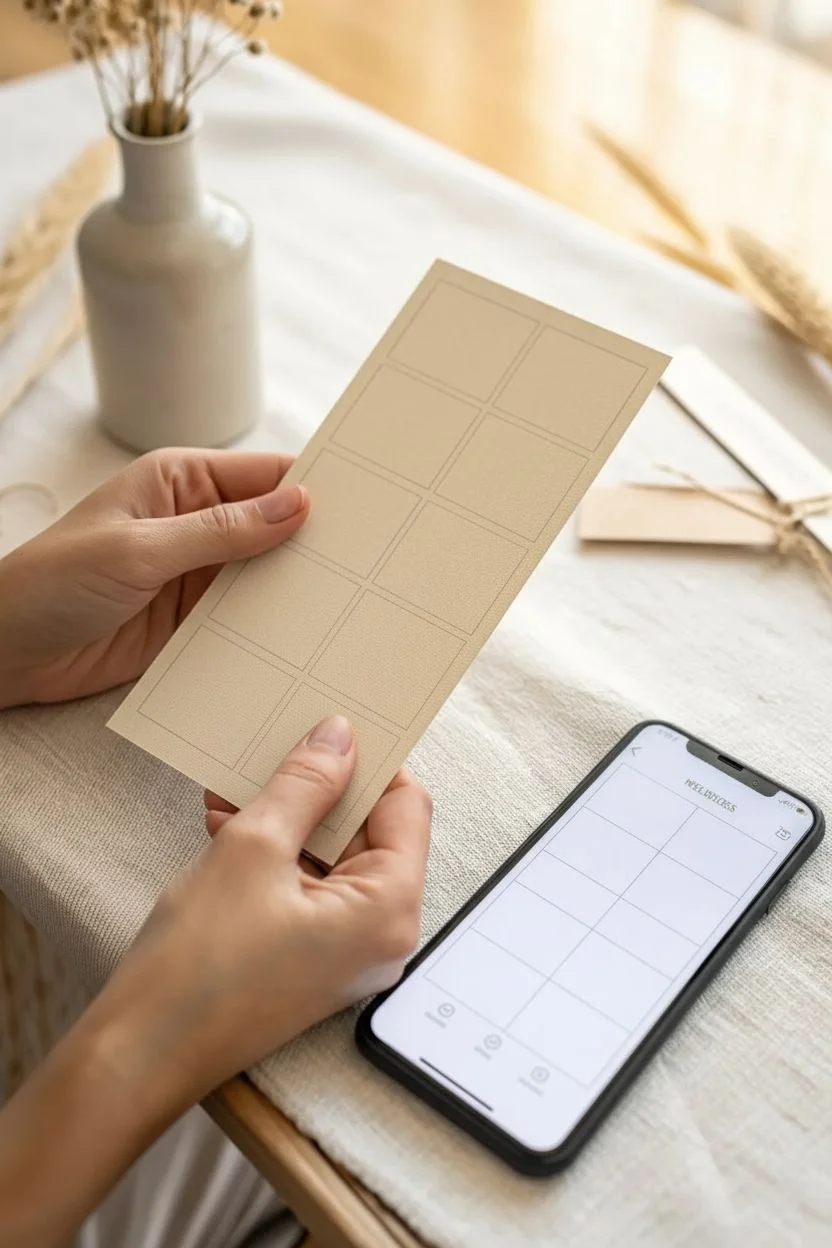
Bridge the digital and physical worlds with these elegantly textured raffle stubs that pair perfectly with online tracking. This project creates a tactile, high-quality ticket that feels significant in the hand while maintaining a clean, modern aesthetic.
Step-by-Step Tutorial
Materials
- Heavyweight textured cardstock (cream or oatmeal, approx. 300gsm)
- Pinking shears (decorative edge scissors)
- Rubber stamp with a minimalist check mark design
- Archival ink pad (taupe or soft grey)
- Ruler
- Pencil
- Bone folder
- Printer (inkjet or laser) for unique QR codes or IDs (optional)
- Fine-grit sandpaper (optional for distressing)
Step 1: Designing the Layout
-
Determine dimensions:
Decide on the size of your ticket. For the elegant, elongated look seen here, aim for approximately 2.5 inches wide by 6 inches long. -
Create a template:
Using a ruler and pencil, lightly mark out a grid on your cardstock sheet to maximize the number of tickets per page. -
Digital prep (optional):
If you are incorporating a unique serial number or QR code that links to your digital sales platform, set this up in a word processing document to align with your pencil grid before cutting.
Uneven Zigzags?
If your pinking shear cuts drift, draw a faint pencil guide line *before* cutting. Erase gently afterward. Using long-bladed fabric shears helps keep lines straighter than short paper scissors.
Step 2: Creating the Physical Stub
-
Cutting the strips:
Using your pinking shears, carefully cut along the long vertical lines first. -
Mastering the shear:
For a continuous zigzag pattern, I find it helpful to line up the last ‘tooth’ of the scissors with the previous cut before clamping down again. -
Cutting to length:
Cut the horizontal lines with the pinking shears to separate the individual tickets, creating that distinctive serrated ‘stamp-like’ edge on all four sides. -
Refining the shape:
Check the corners. If they look too sharp or disjointed, use the shears to snip a tiny angle, softening the transition between the vertical and horizontal cuts.
Step 3: Adding the Mark
-
Inking the stamp:
Take your rubber stamp with the check mark (or square box) design and tap it gently onto your archival ink pad. Using a taupe or grey ink keeps the look soft and organic. -
Test prints:
Stamp a scrap piece of the same cardstock first to ensure you have the right amount of ink coverage without bleeding. -
Stamping the ticket:
Place the stamp on the upper third of the ticket. press down firmly but do not rock the stamp, as this can smudge the fine lines. -
Drying time:
Set the tickets aside on a flat surface. Archival ink dries relatively quickly, but give it at least 10 minutes to prevent smearing during handling.
Make it Interactive
Print a unique QR code on the back of each stub. When scanned, it can take users to a live webpage showing the current specific odds of winning or the total jackpot amount.
Step 4: Finishing Touches
-
Surface texture:
If your cardstock is too smooth, lightly run a piece of fine-grit sandpaper over the surface to create a worn, fabric-like finish. -
Flattening:
Sometimes pinking shears can slightly curl the edges. Run a bone folder gently over the center of the ticket (avoiding the fresh ink) to ensure it lays perfectly flat. -
Digital pairing:
Finally, scan your physical ticket into your raffle app or take a stylized photo like the reference image to use as a digital confirmation for online buyers.
Now you have a set of beautiful hybrid tickets that make the raffle experience feel special and grounded
Calendar Drawing for Ongoing Winners
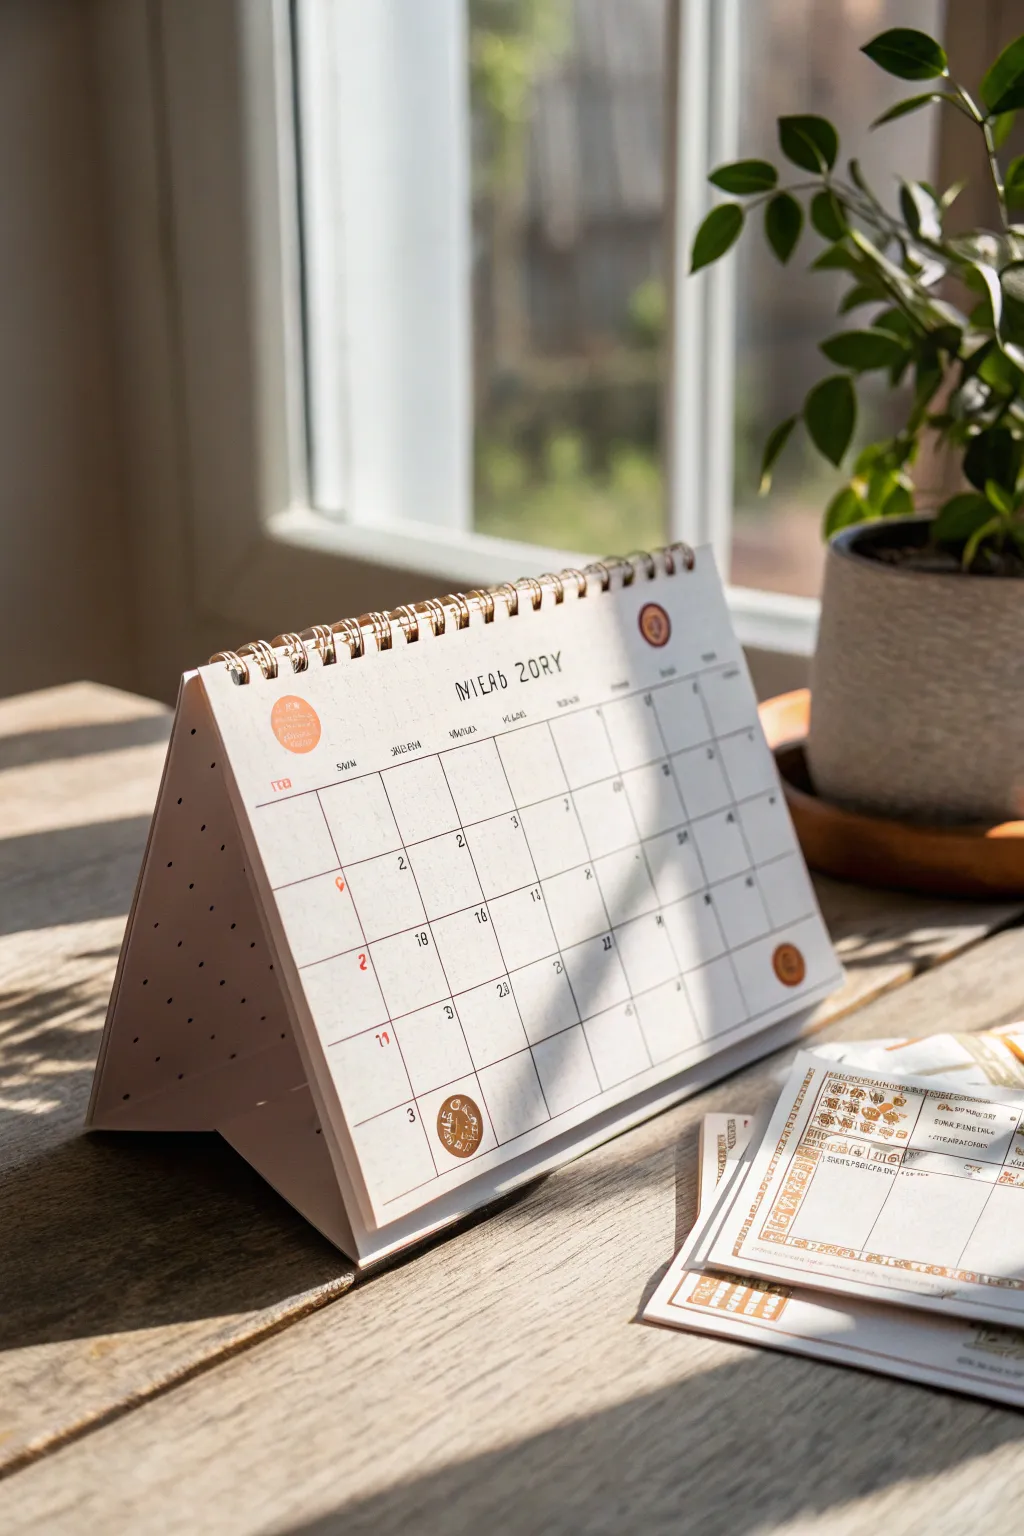
This custom-made desk calendar functions as a charming, interactive tracker for ongoing raffle drawings. With its clean grid layout and vintage aesthetic, it provides a stylish way to mark daily winners or upcoming drawing dates on a sturdy, self-standing base.
Step-by-Step Guide
Materials
- Heavyweight cardstock (cream or off-white)
- Thick illustration board or chipboard (for the stand)
- Wire binding coil (bronze or gold)
- Binding machine (or manual hole punch)
- Fine-point black drawing pen (0.3mm)
- Ruler and pencil
- Small circle stickers (orange/terracotta)
- Red fine-liner pen
- Paper trimmer or craft knife
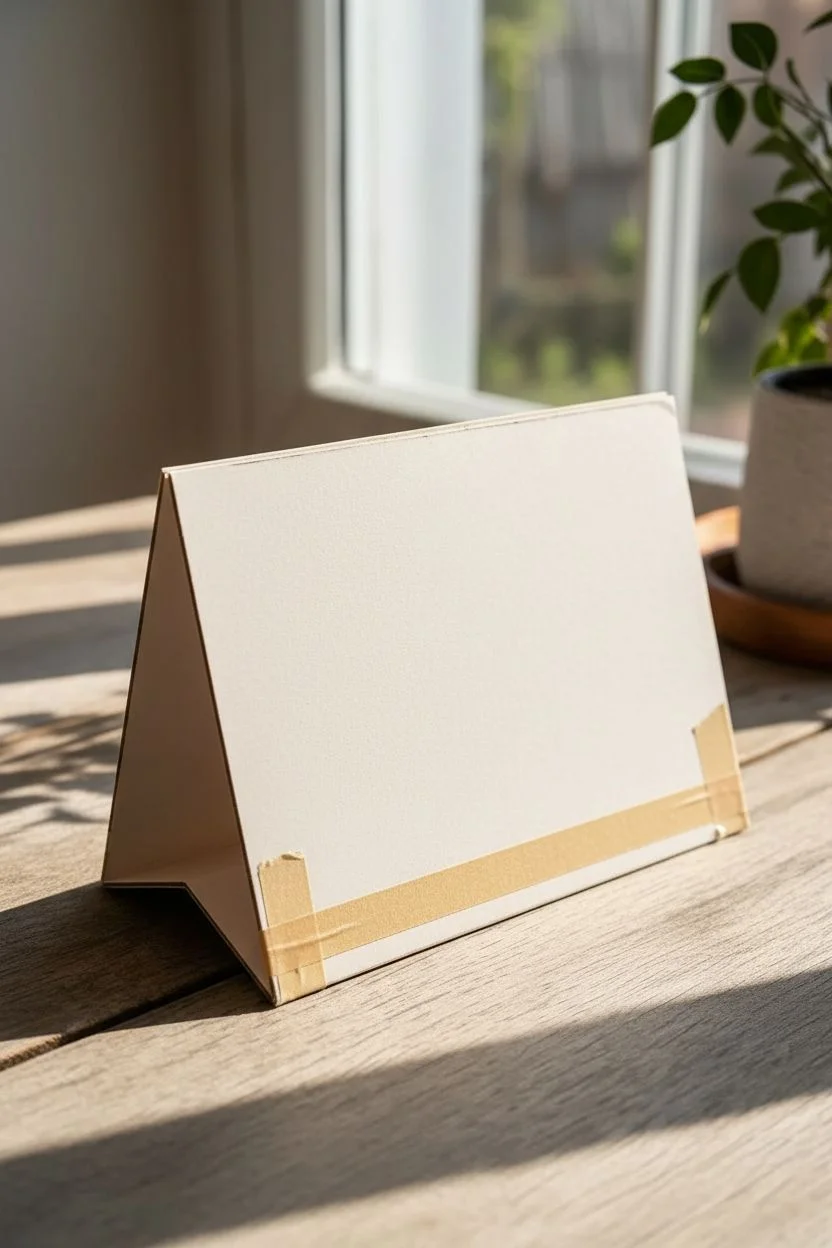
Step 1: Constructing the Base
-
Cut the support boards:
Begin by cutting two pieces of illustration board to your desired calendar size (e.g., 6×8 inches). These will form the front and back of the tent stand. -
Create the base pleat:
Cut a third strip of board about 3 inches wide and the same length as your main boards. Score it down the center to create a folding ‘V’ shape. -
Assemble the tent:
Tape or glue the scored base strip to the bottom edges of your front and back boards. This creates the triangular ‘tent’ mechanism that allows the calendar to stand upright. -
Connect the top edge:
Leave the top edges of the front and back boards unconnected for now, as we will bind them together with the pages later.
Clean Lines Pro Tip
If you struggle with hand-lettering, lightly print your grid and dates using a laser printer first, then trace over them with a pen for that handcrafted look.
Step 2: Designing the Monthly Pages
-
Prepare the cardstock:
Trim your cream cardstock sheets to match the dimensions of your front board. You will need one sheet for each month you plan to display. -
Draft the grid layout:
Using a light pencil and ruler, measure a grid for the days. A standard month needs a 7-column by 5 or 6-row layout. Leave generous margins at the top for the month name. -
Ink the grid lines:
Trace over your pencil lines with a fine-point black pen. I find that freehanding these lines slightly, rather than strictly using a ruler, gives the calendar a warmer, hand-drawn aesthetic. -
Add the header:
At the top center, hand-letter the month and year. Use a slightly taller, narrow font style to mimic the look in the reference. -
Number the days:
Write the dates in the top-right corner of each box using a very small, neat print. Keep the numbers consistent in size.
Level Up: Interactive Elements
Make the raffle interactive by gluing a small envelope to the back board to hold the actual raffle tickets or names of the monthly winners.
Step 3: Adding Raffle Details
-
Mark special drawing dates:
Identify the days when raffle winners will be drawn. Use a red fine-liner to write small numbers or symbols in the center-left of these boxes to make them pop. -
Apply decorative stickers:
Place small terracotta or orange circle stickers on key dates, such as the start or end of a drawing period. You can add small icons or stamps on top of these stickers later for flair. -
Add vintage accents:
If you have vintage-style rubber stamps, add a small circular stamp logo in the bottom corner or top header area to enhance the raffle ticket theme.
Step 4: Binding the Calendar
-
Punch the holes:
Align your cardstock pages with the front and back cover boards. Use your binding machine or hole punch to create a row of evenly spaced holes along the top edge of the entire stack. -
Insert the wire coil:
Thread the bronze wire binding coil through the holes. Rotate the coil until it has passed through all layers. -
Crimp the wire:
Use wire crimpers or pliers to gently bend the ends of the wire coil inward, securing the pages so they don’t slip out as you flip them. -
Test the stand:
Set the calendar upright on a flat surface. Adjust the base fold if necessary to ensure it sits stable and the pages flip smoothly over the top.
Now you have a functional and stylish centerpiece to keep your raffle excitement building all month long


Referral Bonus Entry Coupons
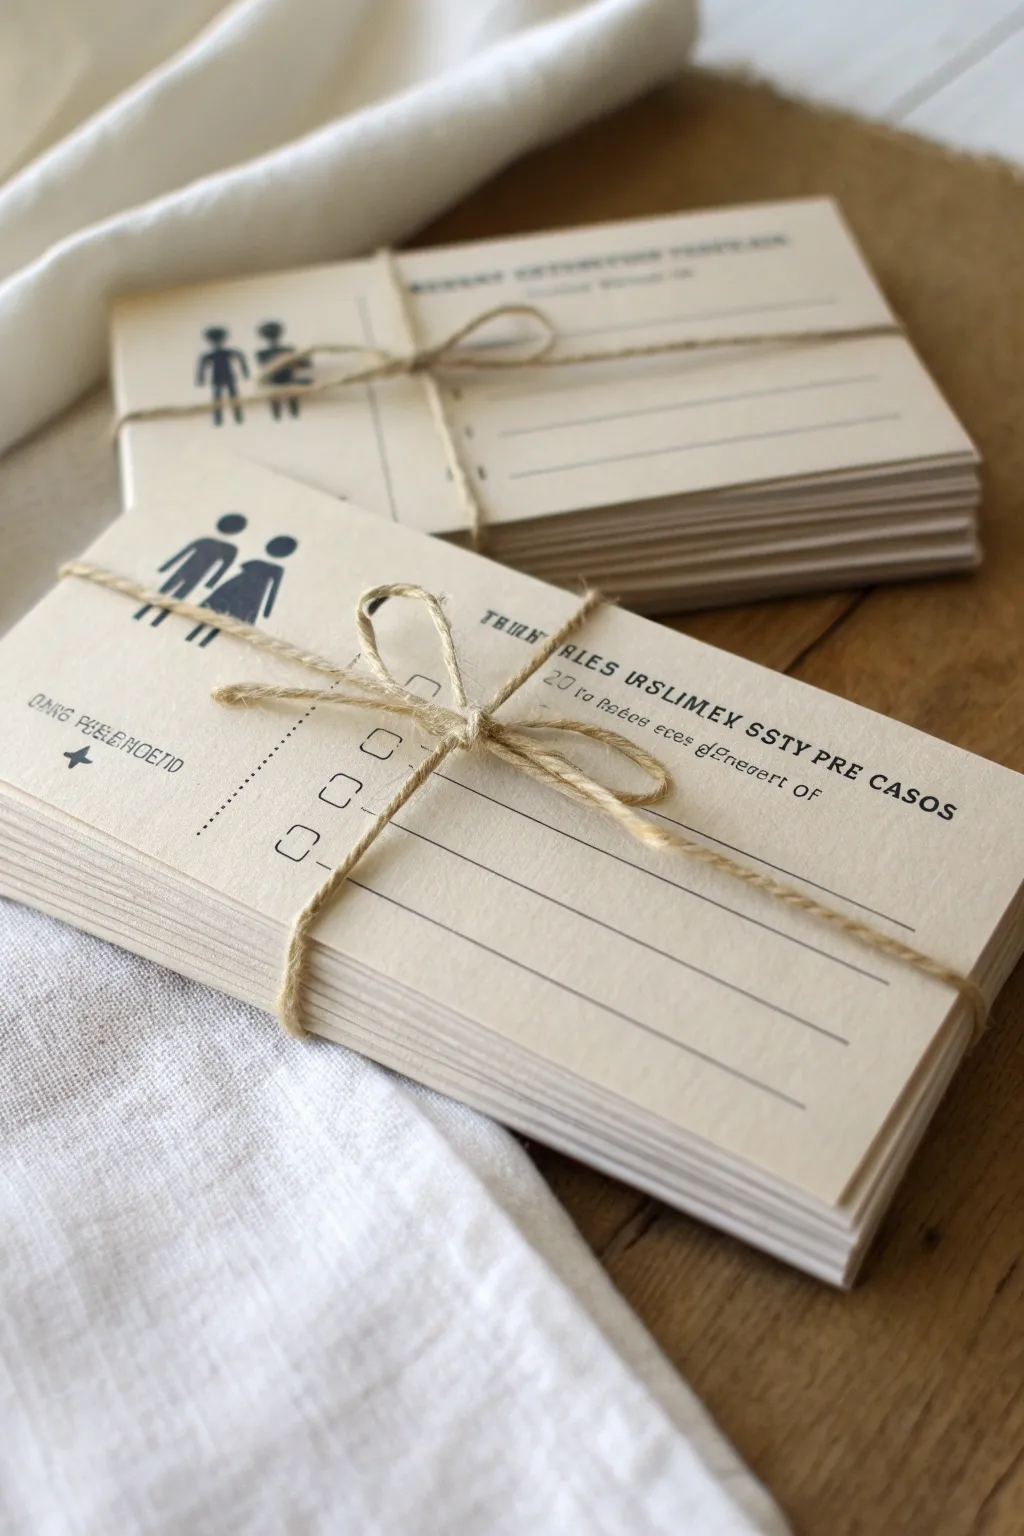
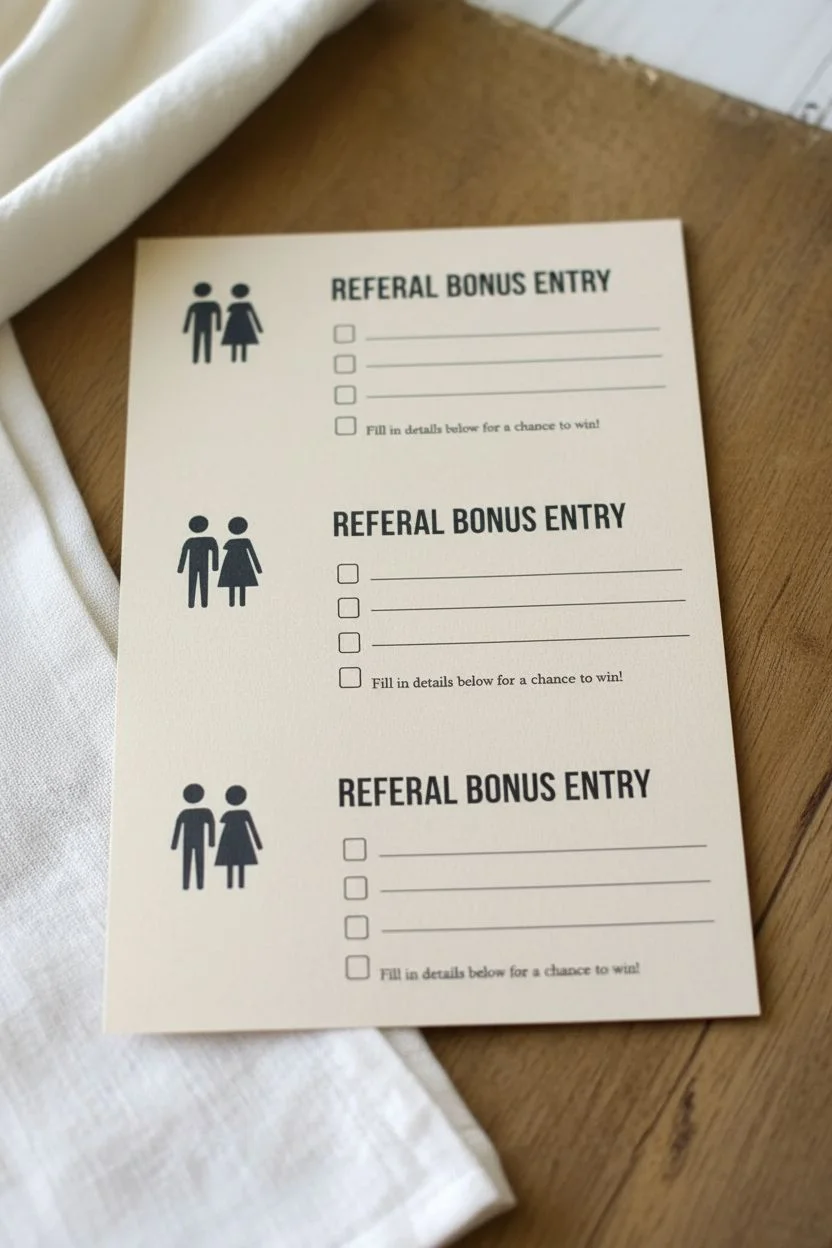
Create these charming, vintage-inspired referral coupons to add a tactile and personal touch to your next raffle drawing. Using cream cardstock and simple black typography, these bundles evoke a classic, hand-crafted aesthetic perfect for encouraging word-of-mouth entries.
Step-by-Step Tutorial
Materials
- Cream or off-white cardstock (80lb or heavier)
- Black ink printer (laser or inkjet)
- Natural jute twine (thin)
- Paper trimmer or metal ruler and craft knife
- Digital design software (Canva, Word, or similar)
- Scissors
Step 1: Designing the Coupon
-
Set up your canvas:
Open your preferred design software and create a new document. Set the dimensions for a standard postcard size, roughly 4 x 6 inches, or smaller like 3 x 5 inches for a compact feel. -
Add the icon:
Place a simple black silhouette icon in the upper left corner. The example uses a stylized drawing of a couple, but you can swap this for a ‘refer-a-friend’ handshake icon or a simple ticket stub graphic. -
Format the header text:
On the right side, type your header text in a bold, serif font. Something like ‘REFERRAL BONUS ENTRY’ works well. Keep it all caps for a vintage bureaucratic look. -
Create the form fields:
Below the header, add lines for the entrant’s details. Use the underscore key or the line tool created with a thin stroke weight (around 0.5pt to 1pt). Create 3-4 distinct lines. -
Add checkboxes:
To the left of the lines, create a vertical column of small squares or circles to serve as checkboxes. This mimics the look of an official form. -
Include fine print:
Add a small sub-header or instruction text beneath the main title using a smaller, typewriter-style font to enhance the old-school aesthetic. -
Replicate for printing:
Once satisfied with the single design, duplicate it across an 8.5 x 11-inch page layout. You should be able to fit 4 cards per standard letter-sized sheet.
Uneven Edges?
If your stacks look ragged after cutting, lightly sand the sides of the stacked bundle with a fine-grit sanding block to smooth everything out.
Step 2: Printing and Assembly
-
Print the sheets:
Load your printer with the cream cardstock. I recommend doing a test print on regular plain paper first to ensure your margins are correct before using the good paper. -
Check ink density:
If your printer settings allow, choose ‘High Quality’ or ‘Best’ to ensure the black text is crisp and dark against the cream background. -
Cut the cards:
Using a paper trimmer or a sharp craft knife and ruler, carefully cut out each card. Ensure the edges are straight for a professional stack. -
Stack and align:
Group your cards into bundles of 10 or 20. Tap the edges of the stack on a flat table to align them perfectly. -
Prepare the twine:
Cut a length of natural jute twine, approximately 24 inches long per bundle. -
Wrap the bundle:
Lay the twine horizontally on your table. Place the stack of cards in the center on top of the twine. -
Tie the knot:
Bring the ends of the twine up and cross them over the center of the card stack. Pull tight enough to hold the cards but not so tight that it warps the paper. -
Form the bow:
Tie a simple shoelace bow on top. Adjust the loops so they are relatively small and neat, contrasting nicely with the width of the cards. -
Trim the ends:
Snip the excess tails of the twine at an angle to prevent fraying, leaving about an inch or two hanging for a relaxed look.
Stamp for Authenticity
Use a rubber date stamp with black ink on the corner of each card before bundling them. It adds an authentic, vintage office vibe.
Place these tidy bundles at your checkout counter or event table to intrigue guests and boost your referrals
Complete Raffle Visual Kit in One Theme
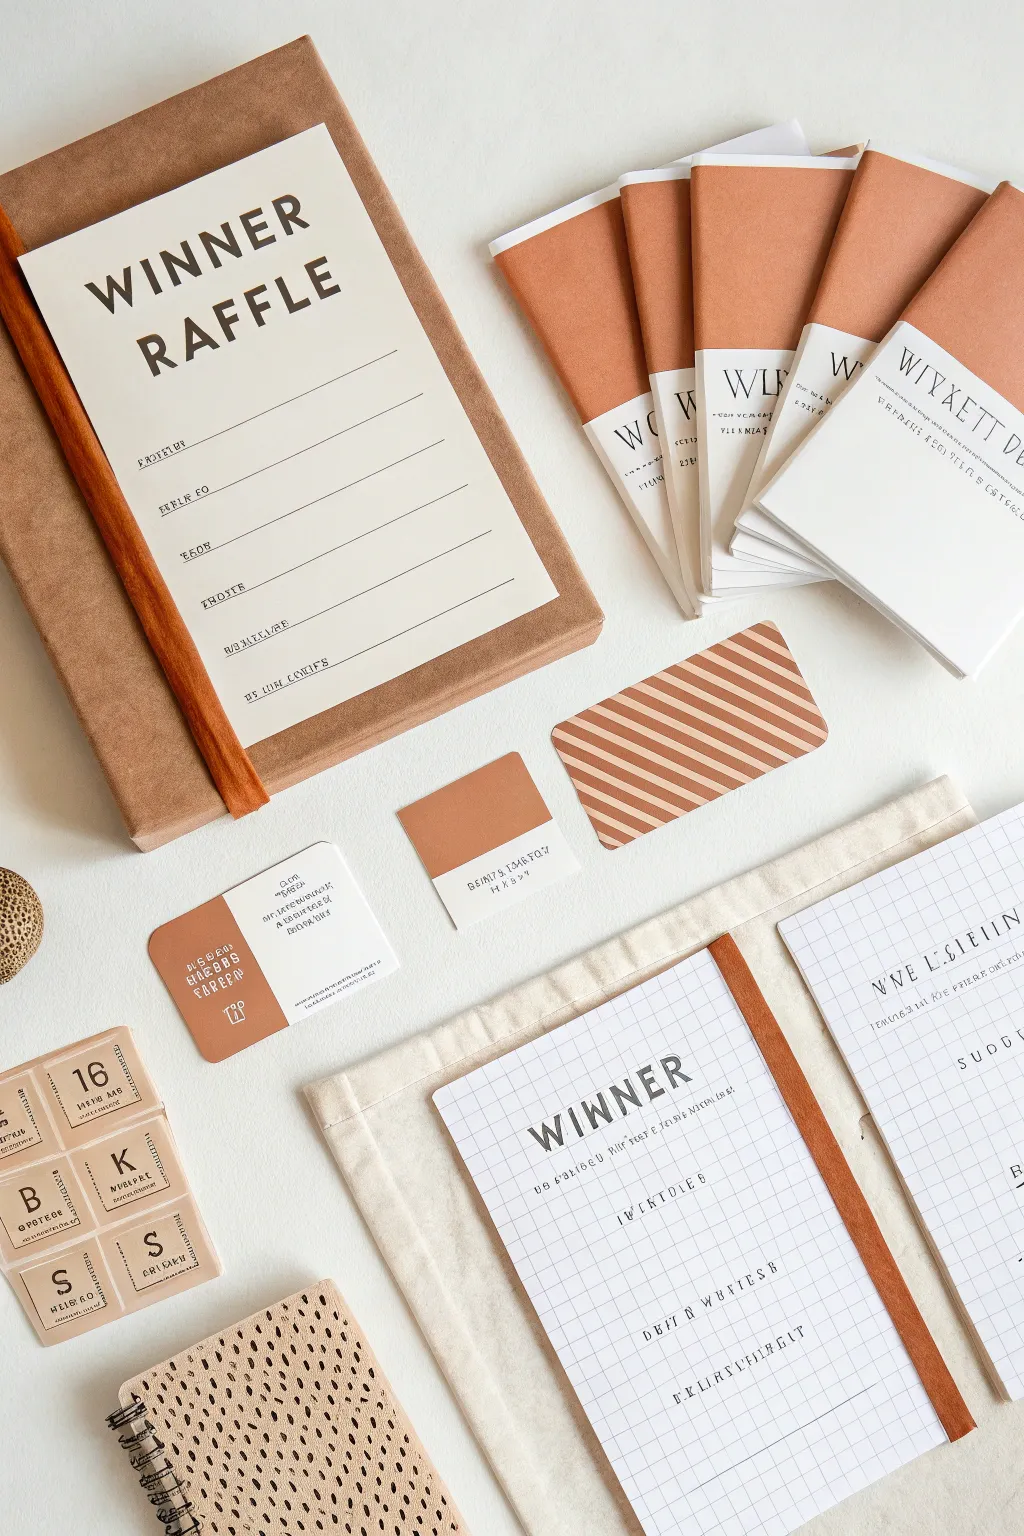
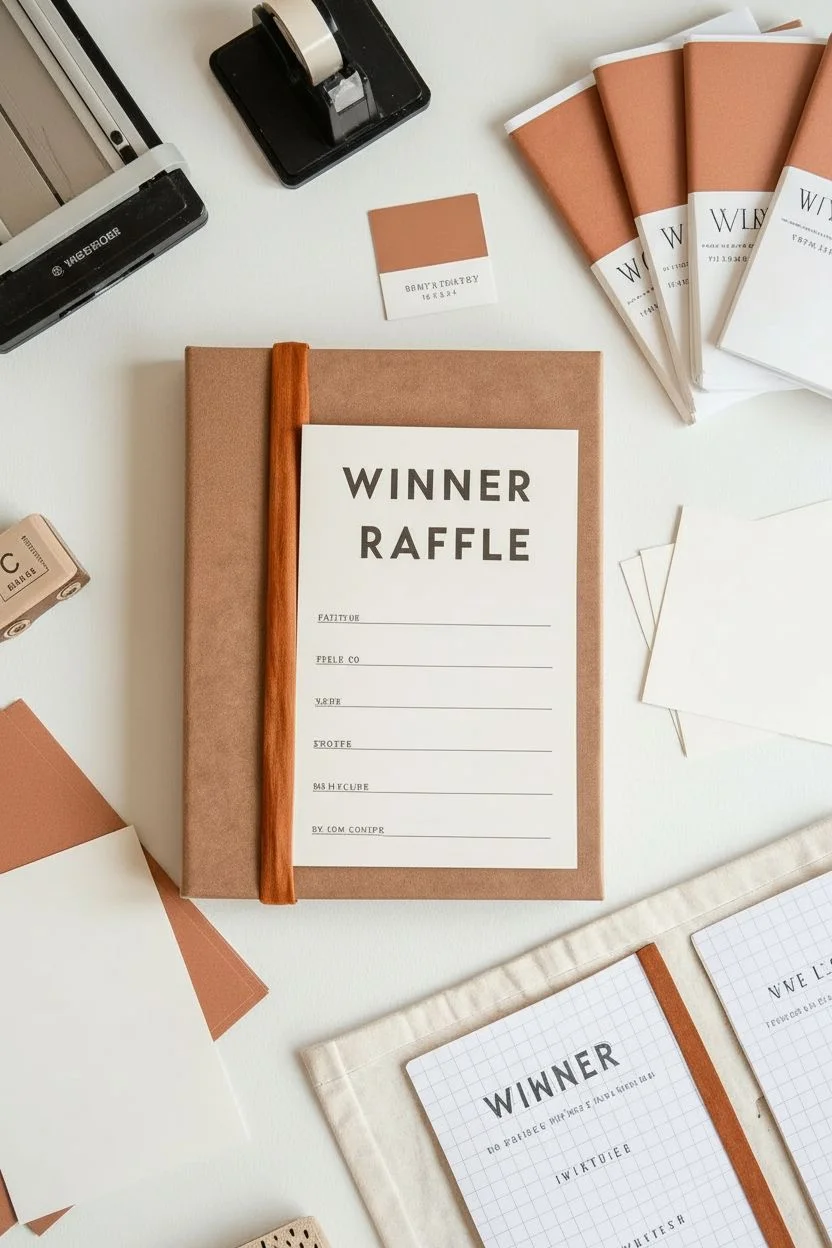
Bring a cohesive, professional aesthetic to your next fundraising event with this handcrafted raffle kit featuring warm rust tones and clean typography. This project unifies all your organizational needs—from a main ledger to individual ticket booklets—into one beautifully coordinated set.
Step-by-Step
Materials
- Hardcover sketchbook or notebook (A4 size)
- White or cream cardstock (8.5×11 inches)
- Terra-cotta or rust-colored construction paper or cardstock
- Terra-cotta colored fabric tape or bookbinding tape
- Wooden dowel (flat or half-round) or balsa wood strip
- Wood stain (teak or cherry)
- Graph paper notebook (A5 size)
- Printer (laser or inkjet)
- Scoring board and bone folder
- Paper trimmer or X-Acto knife
- Double-sided tape or glue stick
- Rubber stamps (alphabet) and black ink pad
- Computer with design software (Canva, Word, or Illustrator)
- Small perforated cardstock sheets (for raffle tickets)
- Stapler (long-reach preferred)
Step 1: Crafting the Main Ledger
-
Prepare the Cover:
Begin with a plain hardcover notebook. Measure a piece of terra-cotta cardstock to fit exactly over the front cover, leaving a narrow margin near the spine for the binding detail. -
Create the Label:
Design a large label on your computer. Use a bold, sans-serif font for ‘WINNER RAFFLE’ at the top and add four to five horizontal lines below for writing details. Print this onto cream cardstock. -
Attach the Layers:
Cut out your printed label. Using double-sided tape, center it onto your terra-cotta cover sheet, then adhere the entire assembly to the front of your notebook. -
Prepare the Wooden Spine:
Cut a strip of balsa wood or a flat wooden dowel to match the vertical length of your notebook. Lightly sand the edges for a smooth finish. -
Stain and Attach Spine:
Apply a coat of wood stain to the wooden strip to give it a rich, warm tone. Once fully dry, glue this strip along the spine edge of the front cover to mimic a classic library binding.
Consistent Colors
To ensure your rust color matches across paper and tape, bring a swatch of your paper to the store when buying the fabric tape.
Step 2: Assembling the Ticket Booklets
-
Design the Booklets:
Fold several sheets of cream paper in half to create booklet signatures. For the covers, cut your rust-colored paper to the size of the open booklet. -
Add Belly Bands:
Cut strips of white paper about 2 inches wide. Type or stamp ‘WINNER’ or ‘RAFFLE’ vertically or horizontally on these strips to serve as wrappers. -
Bind the Booklets:
Wrap the rust cover around your folded interior pages. Use a long-reach stapler to secure the spine, or hand-stitch with white thread for a more artisanal look. -
Seal the Design:
Wrap the white paper belly bands around the bottom third of each booklet and secure them in the back with a piece of tape.
Step 3: Creating Accessories and Forms
-
Customize the Graph Pad:
Take your graph paper notebook and apply a strip of rust-colored fabric tape along the spine. This ties it visually to the rest of the kit. -
Stamp the Header:
Open the graph notebook or create a cover sheet. Use alphabet stamps to press ‘WINNER’ in black ink at the top center, followed by lines for tracking numbers. -
Make Patterned Cards:
Design a simple diagonal stripe pattern on your computer using the rust color code. Print this onto cardstock and cut into business-card or postcard sizes for decorative inserts or flashy ticket vouchers. -
Create Number Tokens:
Cut small squares from heavy cream cardstock. Stamp numbers (1-50) and single letters onto them to create reusable lottery-style tokens. -
Assemble the Storage Bag:
Use a simple canvas drawstring bag or folded cloth to hold the loose items. Lay the graph pad and tokens on top to complete the presentation.
Fixing Bubbles
If paper wrinkles when gluing the large cover label, use a brayer or the edge of a credit card to smooth it out from the center.
You now have a complete, professional-looking kit ready to make your next raffle event a stylish success


Have a question or want to share your own experience? I'd love to hear from you in the comments below!