If you’ve been craving fresh line art inspiration, you’re in the right headspace—lines can say so much with so little. In my studio, I lean on line weight, rhythm, and texture tricks to turn simple strokes into designs that feel polished and personal.
Line Pattern Sampler Grid
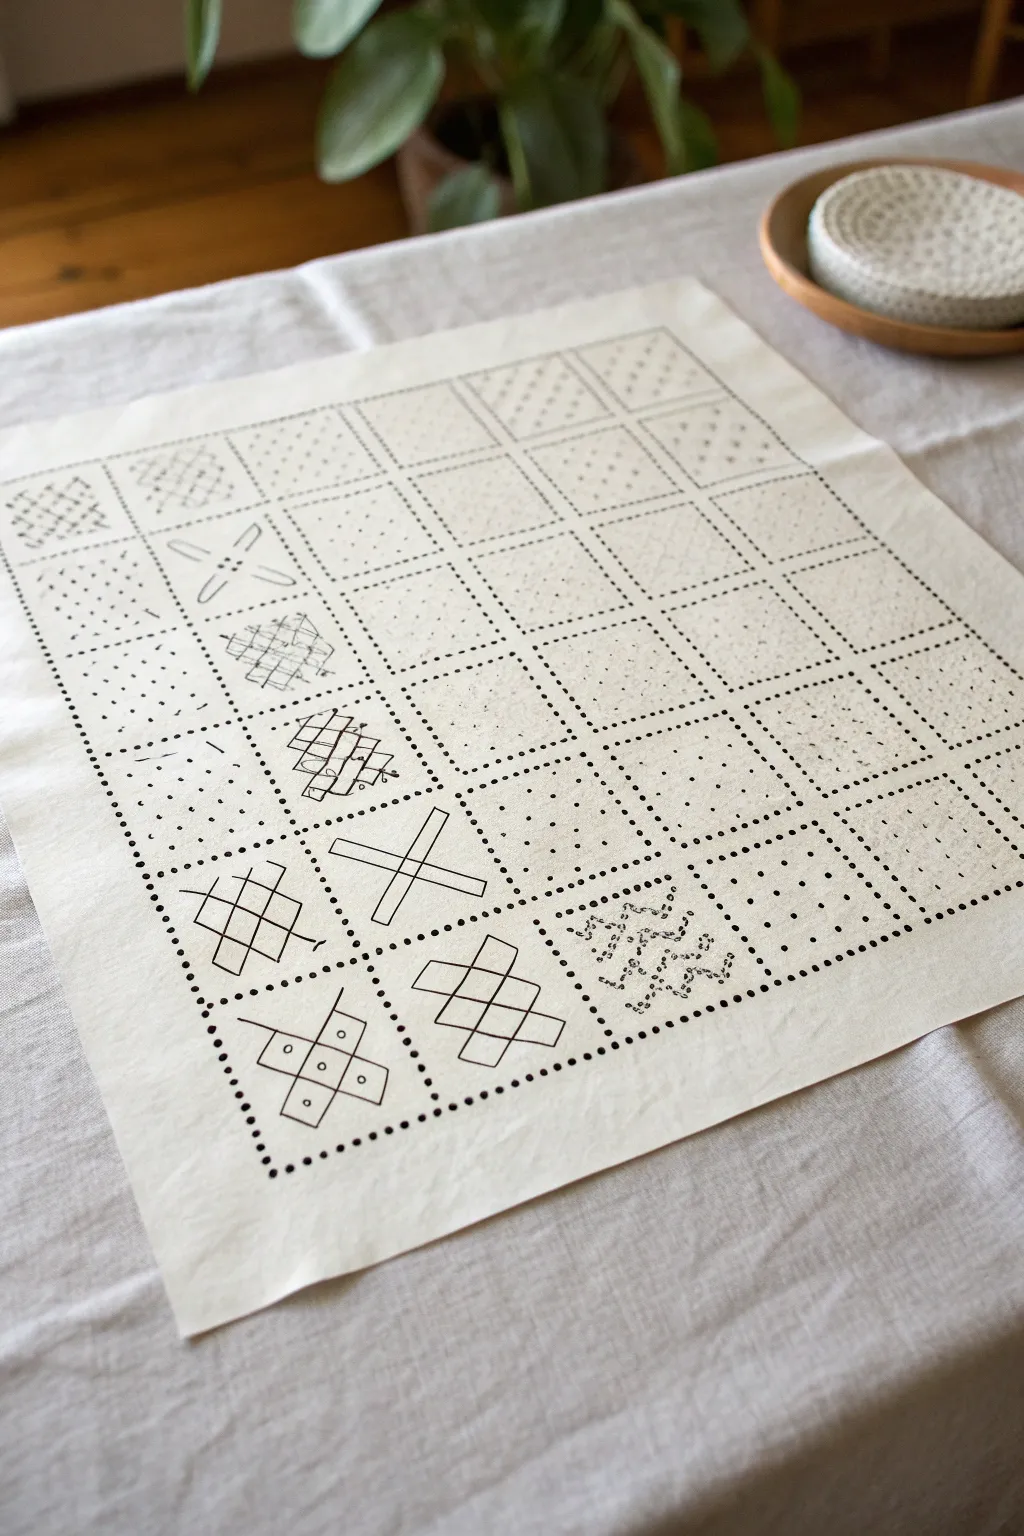
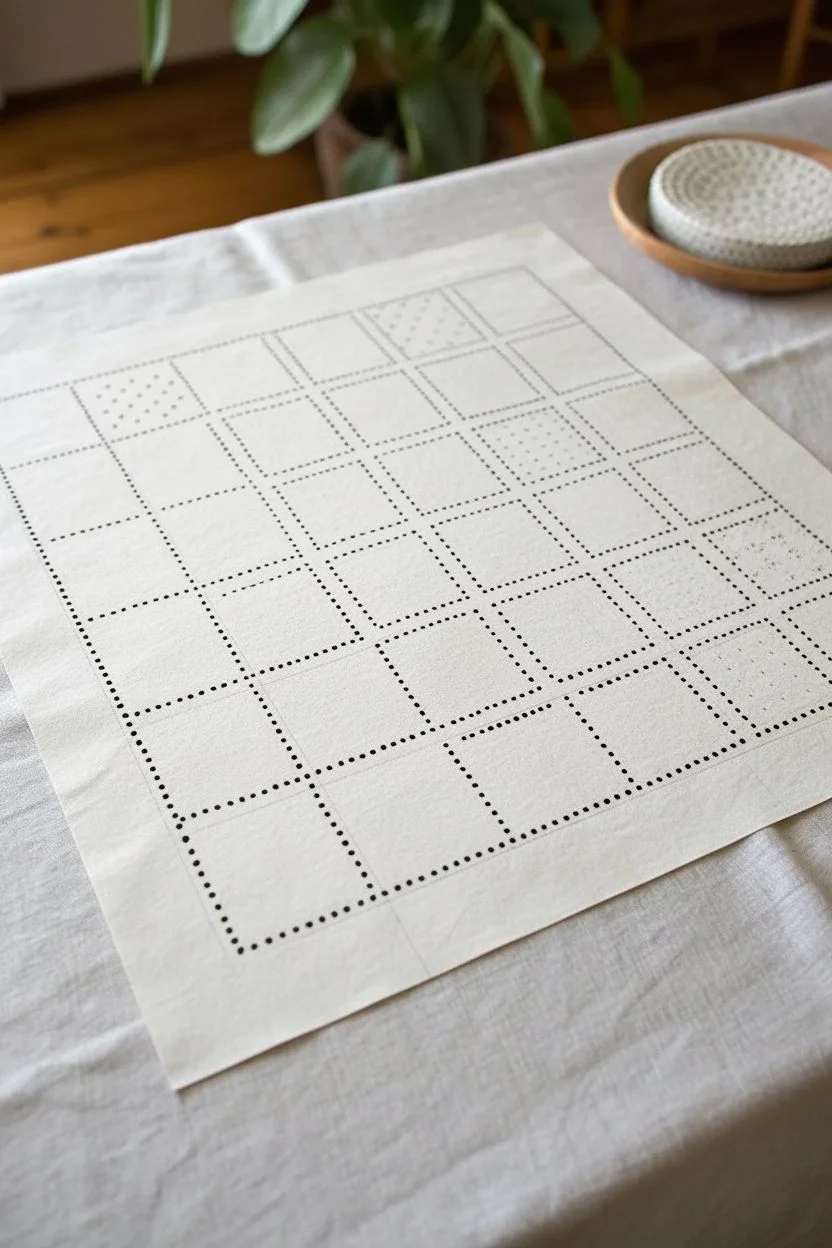
This minimalist project creates a calming grid of diverse geometric patterns, perfect for practicing line work or preparing a base for Sashiko embroidery. The stark contrast of black ink on natural fabric highlights the rhythm and repetition of each unique square design.
How-To Guide
Materials
- Light-colored linen or cotton fabric (approx. 18×18 inches)
- Permanent fabric marker (fine tip, black)
- Ruler or quilting square
- Heat-erasable fabric pen or pencil
- Work surface or cutting mat
- Iron and ironing board
Step 1: Setting the Grid
-
Prepare the Fabric:
Start by ironing your fabric piece until it is perfectly smooth. Wrinkles will distort your straight lines later, so take your time here to get a crisp surface. -
Define the Outer Border:
Using your ruler and the heat-erasable pen, lightly mark a large square in the center of your fabric, leaving a generous margin of empty space around the edges. -
Mark the Grid Lines:
Divide your large square into a 6×6 grid. Measure carefully to ensure each inner square is identical in size, marking the dividing lines lightly with your erasable pen. -
Ink the Dotted Border:
Now, take your permanent black fabric marker. Go over your main grid lines, but instead of drawing solid lines, create a consistent dotted line pattern. I find a purely dotted aesthetic keeps the grid feeling light and airy.
Step 2: Creating the Base Textures
-
Stippling the Background:
Select specific squares to fill with a simple dot pattern. In the image, these are often alternating squares. Draw rows of evenly spaced dots inside these selected boxes to create a ‘seed’ stitch look. -
Drawing the ‘Empty’ Texture:
For the squares that don’t have a bold geometric motif, add a very faint, sparse texture. You can achieve this by making tiny, random specks or widely spaced dots, giving them a subtle visual weight different from the plain fabric. -
Refining the Dot spacing:
Check your density. The background squares shouldn’t be too crowded; aim for a uniform appearance where the white space is just as important as the ink marks.
Clean Lines
To prevent the fabric marker from bleeding, ensure your fabric is tightly woven. You can also lightly starch the fabric before drawing to create a stiffer surface that holds ink better.
Step 3: Drawing the Geometric Motifs
-
Sketching the Crosses:
In the lower section, locate the squares for the large cross designs. Use your ruler to sketch a simple ‘X’ or plus sign, then double the lines to create a thick, open shape. -
Interlocking Squares:
Draw the diamond shapes. Start with a central diamond, then draw interlocking rectangular shapes that pass through it. Think of it like drawing a woven basket pattern. -
Adding Details to Motifs:
For the cross designs, draw small circles at the ends of the arms or in the center intersections to add interest and break up the straight lines. -
The Complex Weave:
For the more intricate woven box designs (like the second one up from the bottom left), lightly sketch the over-under pattern first with pencil to ensure the visual logic works before committing with ink. -
Curved and Floral Elements:
Include a few organic shapes for contrast. In the upper left, draw the four-petal flower shape using simple curved lines that radiate from a center point. -
Filling the Remaining Squares:
Balance the composition by leaving some squares with just the simple dot matrix pattern. This negative space prevents the sampler from looking too cluttered.
Stitch It Up
Transform this drawing into a Sashiko project! Use the inked lines as a pattern guide and stitch over them with thick white or indigo cotton thread for a tactile, raised texture.
Step 4: Finishing Touches
-
Inking the Motifs:
Go over all your pencil sketches within the squares with the fine-tip permanent marker. Use steady, deliberate strokes, lifting the pen fully between lines to avoid muddy corners. -
Set the Ink:
Allow the ink to dry completely for at least 30 minutes to prevent smudging. -
Remove Guide Lines:
Once the ink is dry, use your iron (or a hairdryer) to apply heat to the fabric. This will make the initial heat-erasable grid lines disappear, leaving only your crisp black artwork. -
Final Press:
Give the entire piece one last press to smooth it out, ready for display or framing.
Now you have a stunning piece of geometric art that celebrates the beauty of simplicity and repetition


Geometric Line Tessellations
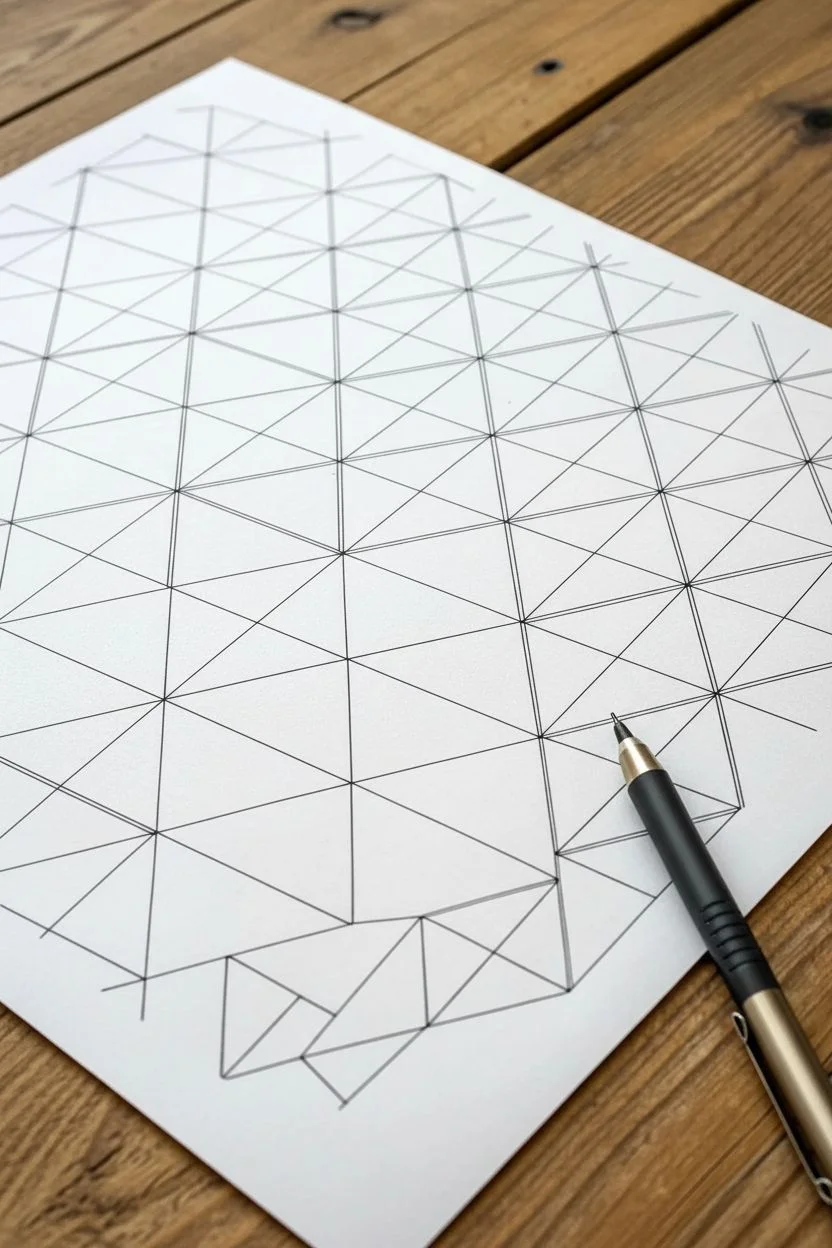
This satisfying geometric drawing uses simple straight lines to build a complex, crystalline grid pattern that pops off the page. The result is a sharp, architectural tessellation that looks incredibly intricate but is built on a basic foundation of triangles.
Step-by-Step
Materials
- High-quality white drawing paper (A4 or similar)
- Ruler (preferably clear plastic)
- Pencil (HB or similar for initial grid)
- Fine-point black technical pen or fineliner
- Eraser
Step 1: Setting the Foundation
-
Anchor the Baseline:
Begin by drawing a straight horizontal line across the bottom section of your paper lightly with a pencil. This will serve as the base for your initial row of triangles. -
Mark Intervals:
Along this baseline, use your ruler to mark points at equal intervals. A spacing of about 1.5 to 2 inches works well for a pattern of this scale. -
Create the Isometric Grid:
From each marked point, draw angled lines upwards at 60 degrees to the left and 60 degrees to the right. If you don’t have a protractor, you can estimate this to create equilateral triangles. -
Cross-Intersections:
Continue these diagonal lines across the entire page until they intersect, forming a consistent lattice of diamond shapes or equilateral triangles across your working area. -
Horizontal Connectors:
Draw horizontal lines through every intersection point where the diagonals meet. You should now have a grid composed entirely of small, uniform triangles.
Smudge Prevention
Using a ruler with a pen often causes smears. Tape a penny to the underside of your ruler to lift the edge slightly off the paper, preventing ink drag.
Step 2: Inking the Structure
-
Switch to Ink:
Pick up your black technical pen. From this point on, I prefer to work directly with ink to keep lines crisp, relying on the pencil guide. -
Outline the Major Triangles:
Trace over your pencil grid, bolding the main structural triangles. Ensure your ruler is clean before dragging it across the paper to avoid smudging the fresh ink. -
Find the Centroid:
Identify the center point of each individual triangle in your grid. You can find this visually or by lightly marking the midpoint of each side and tracing inwards. -
Draw the Starbursts:
From the center point of a triangle, draw straight lines extending to each of the triangle’s three corners. -
Bisect sides:
Now, from that same center point, draw lines extending to the midpoint of each of the triangle’s three sides. -
Complete the Unit:
Repeat this internal starburst pattern for every single triangle in your grid. This subdivides the larger shapes into six smaller right-angled triangles.
Level Up: Shading
Add 3D depth by shading one side of every internal triangle with stippling or hatching. Pick a consistent ‘light source’ direction for a pop-out effect.
Step 3: Adding Depth
-
Create the ‘Double Line’ Effect:
To achieve the specific look in the image, you need to double certain lines. Choose one set of diagonal lines (e.g., those sloping up to the right) to emphasize. -
Offset Drawing:
Place your ruler just slightly parallel to these chosen lines—about 1mm away—and draw a second, thinner line next to the original. -
Repeat for Structure:
Apply this same double-line technique to the vertical bisecting lines within the triangles if you want to create the separation visible in the reference. -
Check Intersections:
Pay close attention to where multiple lines meet at a vertex. These ‘hubs’ should look dense and intricate but not messy. -
Let it Dry:
Give the ink plenty of time to set completely. Drawing intersecting lines can leave wet pools of ink at the junctions. -
Erase Formatting:
Once the ink is bone dry, gently erase the underlying pencil grid. Use a soft eraser and hold the paper taut to prevent wrinkling.
Step back and admire the hypnotic rhythm of your precise geometric creation


Hatching Value Swatches

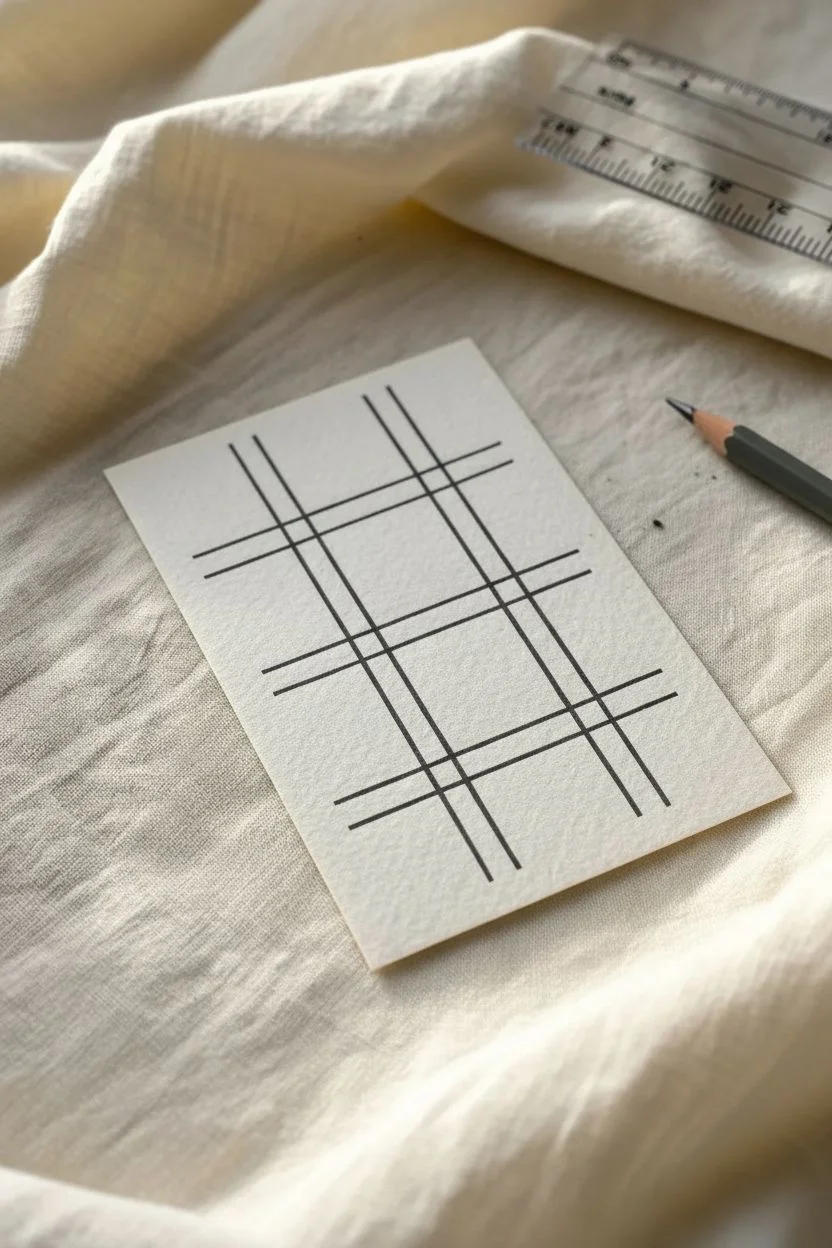
This elegant line art project focuses on precision and the beauty of negative space, featuring a double-line grid pattern on quality cardstock. The resulting artwork feels calm and structured, making it a perfect exercise in steady linework or a sophisticated base for a greeting card.
How-To Guide
Materials
- High-quality textured cardstock (cream or off-white)
- Fine liner pen (black, 0.3mm or 0.5mm)
- Ruler (preferably clear plastic or metal)
- Pencil (HB or H)
- Soft eraser
- Cutting mat (optional but helpful)
Step 1: Preparation & Layout
-
Paper Selection:
Begin by selecting a piece of heavy, textured cardstock. An off-white or cream color adds warmth that contrasts beautifully with black ink. -
Sizing the Card:
Trim your paper to your desired size. A standard 4×6 inch or 5×7 inch rectangle works perfectly for this centered design. -
Drafting Guidelines:
Using your pencil and ruler, very lightly mark out the positions for the vertical lines. You want two sets of double lines, spaced evenly across the card. -
Horizontal Guides:
Mark the positions for the horizontal lines. Similar to the vertical ones, you’ll need three sets of double lines running across the paper. -
Spacing Check:
Before inking, double-check that the gaps between the parallel lines are consistent. This small gap is crucial for the double-line aesthetic.
Smudged Ink?
If your ruler drags ink across the paper, stick three small pieces of masking tape to the underside of the ruler. This raises the edge slightly off the paper surface.
Step 2: Inking the Grid
-
First Vertical Stroke:
Take your fine liner pen and align your ruler with the leftmost vertical pencil guide. Draw a confident, straight line from top to bottom. -
Parallel Partner:
Shift the ruler slightly to trace the second line of the first pair. Keep your pen angle consistent to ensure the line weight matches exactly. -
Completing Verticals:
Move to the right side of the paper and draw the second pair of vertical lines. I find it helpful to look at the end point of the line rather than the pen tip to keep it straight. -
Starting Horizontals:
Rotate your paper if it makes drawing easier. Align your ruler for the top set of horizontal lines. -
Crossing Lines:
Draw the top horizontal pair, letting the ink cross strictly over the vertical lines you just created. -
Middle Section:
Proceed to the middle set of horizontal lines. Ensure your ruler doesn’t smudge the ink from previous lines—wipe the ruler edge if needed. -
Bottom Lines:
Ink the final bottom pair of horizontal lines to close out the grid structure.
Step 3: Finishing Touches
-
Drying Time:
Let the ink sit for at least 15-20 minutes. Fine liner ink can smear easily if erased too soon. -
Erasing:
Gently erase any visible pencil marks. Hold the paper taut with one hand to prevent it from wrinkling under the eraser. -
Detail Inspection:
Examine the intersections. If any lines didn’t quite cross or stopped short, carefully touch them up with the very tip of your pen. -
Final Presentation:
Brush away all eraser crumbs to reveal your crisp, finished linear design.
Pro Tip: Line Weight
For a subtle depth effect, use a slightly thicker pen tip (0.5mm) for the vertical lines and a thinner tip (0.3mm) for horizontal ones to create hierarchy.
Enjoy the satisfying simplicity of your new geometric artwork


Topographic Map Line Designs
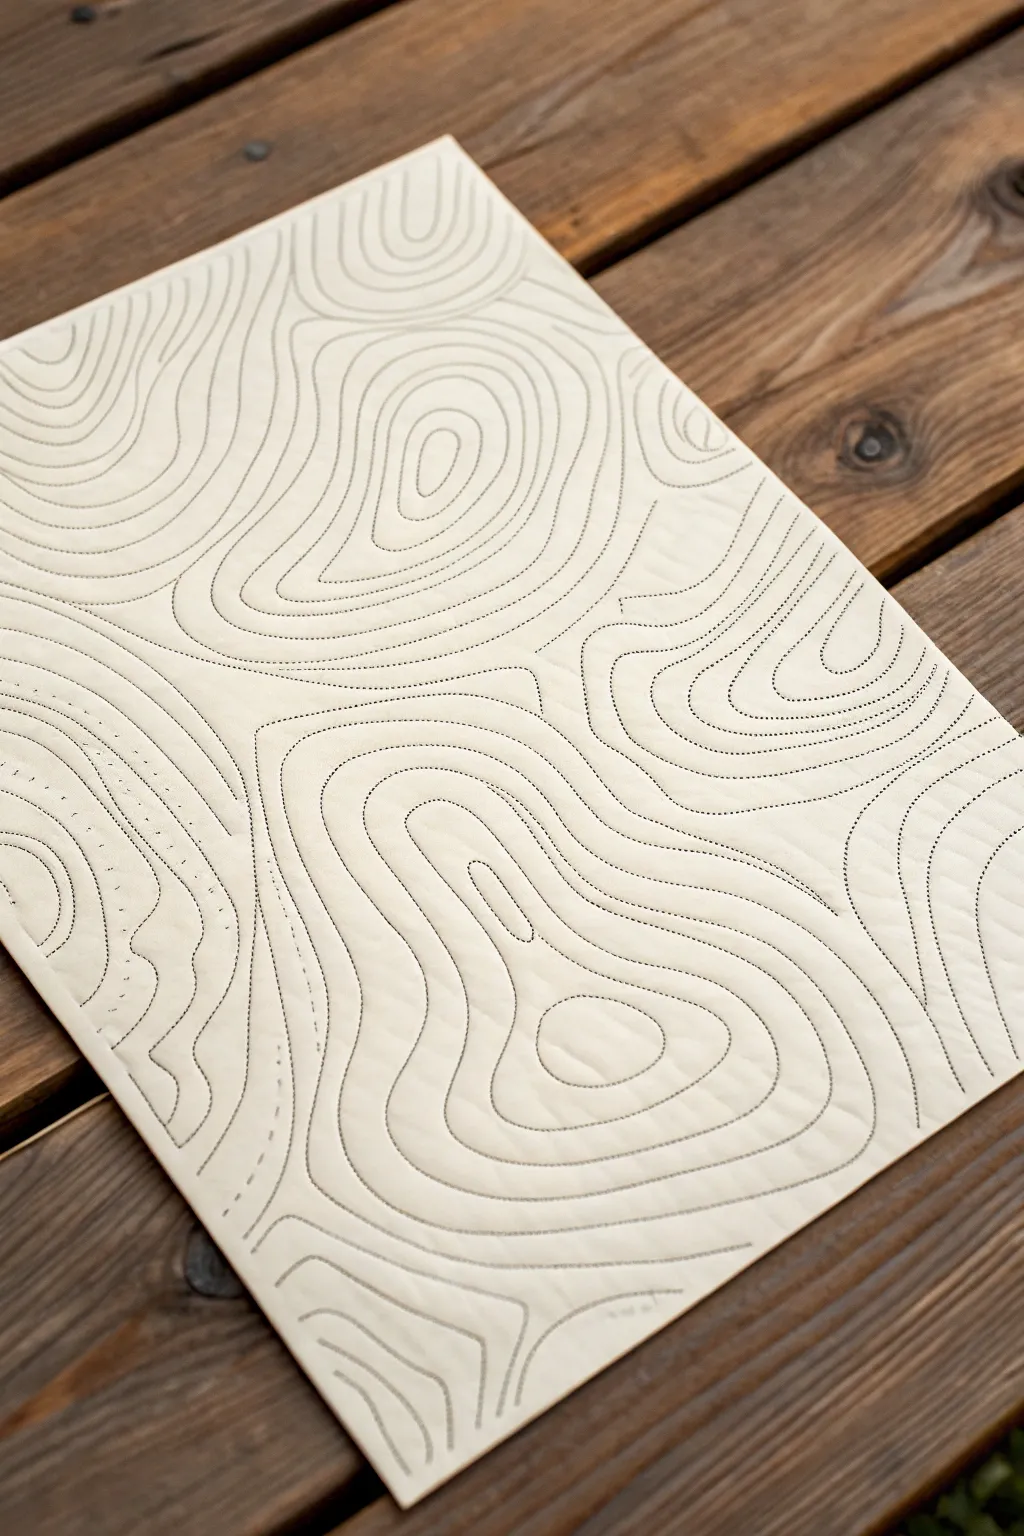

This project transforms a simple sheet of heavy cardstock or watercolor paper into a tactile piece of art inspired by topographic maps. By using a sewing machine to create the contour lines, you achieve a unique, debossed texture that ink alone cannot replicate.
Detailed Instructions
Materials
- Heavyweight cold-press watercolor paper (300gsm or heavier) or thick cardstock
- Pencil (H or HB)
- Black thread (polyester or cotton)
- Sewing machine
- Standard sewing needle (comparable to size 80/12 or 90/14)
- Eraser (kneaded or high-quality white vinyl)
- Masking tape or painter’s tape
- Scissors
Step 1: Planning the Terrain
-
Drafting the Base:
Begin by lightly sketching your topographic design directly onto the paper using an H or HB pencil. These harder leads leave lighter marks that are easier to erase later. -
Creating the Peaks:
Start by drawing small, irregular circles or ovals scattered across the page. These will serve as the ‘peaks’ or highest points of your varied terrain. -
Drawing Contour Lines:
Working outward from your peaks, draw concentric rings around each one. Keep the lines organic and wavy rather than perfect geometric ovals. -
Merging Shapes:
As the rings expand, let them merge. When two ring systems meet, draw a larger line that encases both of them, creating a saddle between the peaks. -
Filling the Space:
Continue expanding your wobbly contour lines until the entire page is filled. Vary the spacing—closer lines suggest steep cliffs, while wider gaps indicate gentle slopes.
Needle Knowledge
Use an old needle for this project! Paper dulls sewing needles instantly, ruining them for fabric. Dedicate a specific needle just for your paper crafts.
Step 2: The Stitching Process
-
Machine Setup:
Thread your sewing machine with black thread in both the top spool and the bobbin. Set the stitch length to a medium-long setting (around 3.0 or 3.5mm) to mimic the dashed look in the image. -
Test Run:
I always grab a scrap piece of the same paper to test the tension first. You want the thread to lie flat without tearing the paper or bunching up underneath. -
Starting the Stitch:
Place your paper under the presser foot. Do not backstitch at the start, as this can tear the paper. Simply leave a long tail of thread and begin sewing along your pencil lines. -
Navigating Curves:
Sew slowly. For tight curves, stop with the needle down in the paper, lift the presser foot, slightly pivot the paper, lower the foot, and continue. -
Handling the Paper:
Gently guide the paper with your hands flat on either side. Unlike fabric, you cannot bunch or fold the paper to get it through the machine, so ensure you have plenty of desk space. -
Ending a Line:
When you reach the end of a closed loop or the edge of the paper, lift the needle and pull the paper out, leaving a generous thread tail before cutting. -
Continuing the Pattern:
Work systematically across the page. I find it easiest to stitch all the inner ‘peak’ circles first, then work my way outward to the larger, more complex merging lines.
Tangled Threads?
If the thread bunches or the paper tears, your thread tension is likely too high. Lower the tension dial significantly and re-test on a scrap scrap until smooth.
Step 3: Finishing Touches
-
Securing Threads:
Once all lines are stitched, flip the artwork over to the back. Gently pull the top threads through to the back side using a pin or by tugging the bobbin thread. -
Knots and Tape:
Tie the top and bobbin threads together in a small double knot to secure them. For extra security, you can place a small piece of masking tape over the knots on the back. -
Erasing Guides:
Take your eraser and carefully remove any visible pencil marks. Be gentle around the stitch holes to avoid fuzzing the paper or snagging the thread. -
Flattening:
The stitching process might slightly curl the paper. Place the finished piece under a heavy stack of books overnight to flatten it perfectly.
Display your topographic artwork in a shadow box frame to highlight the beautiful texture created by the stitching

PENCIL GUIDE
Understanding Pencil Grades from H to B
From first sketch to finished drawing — learn pencil grades, line control, and shading techniques.
Explore the Full Guide
Optical Illusion Ripple Lines
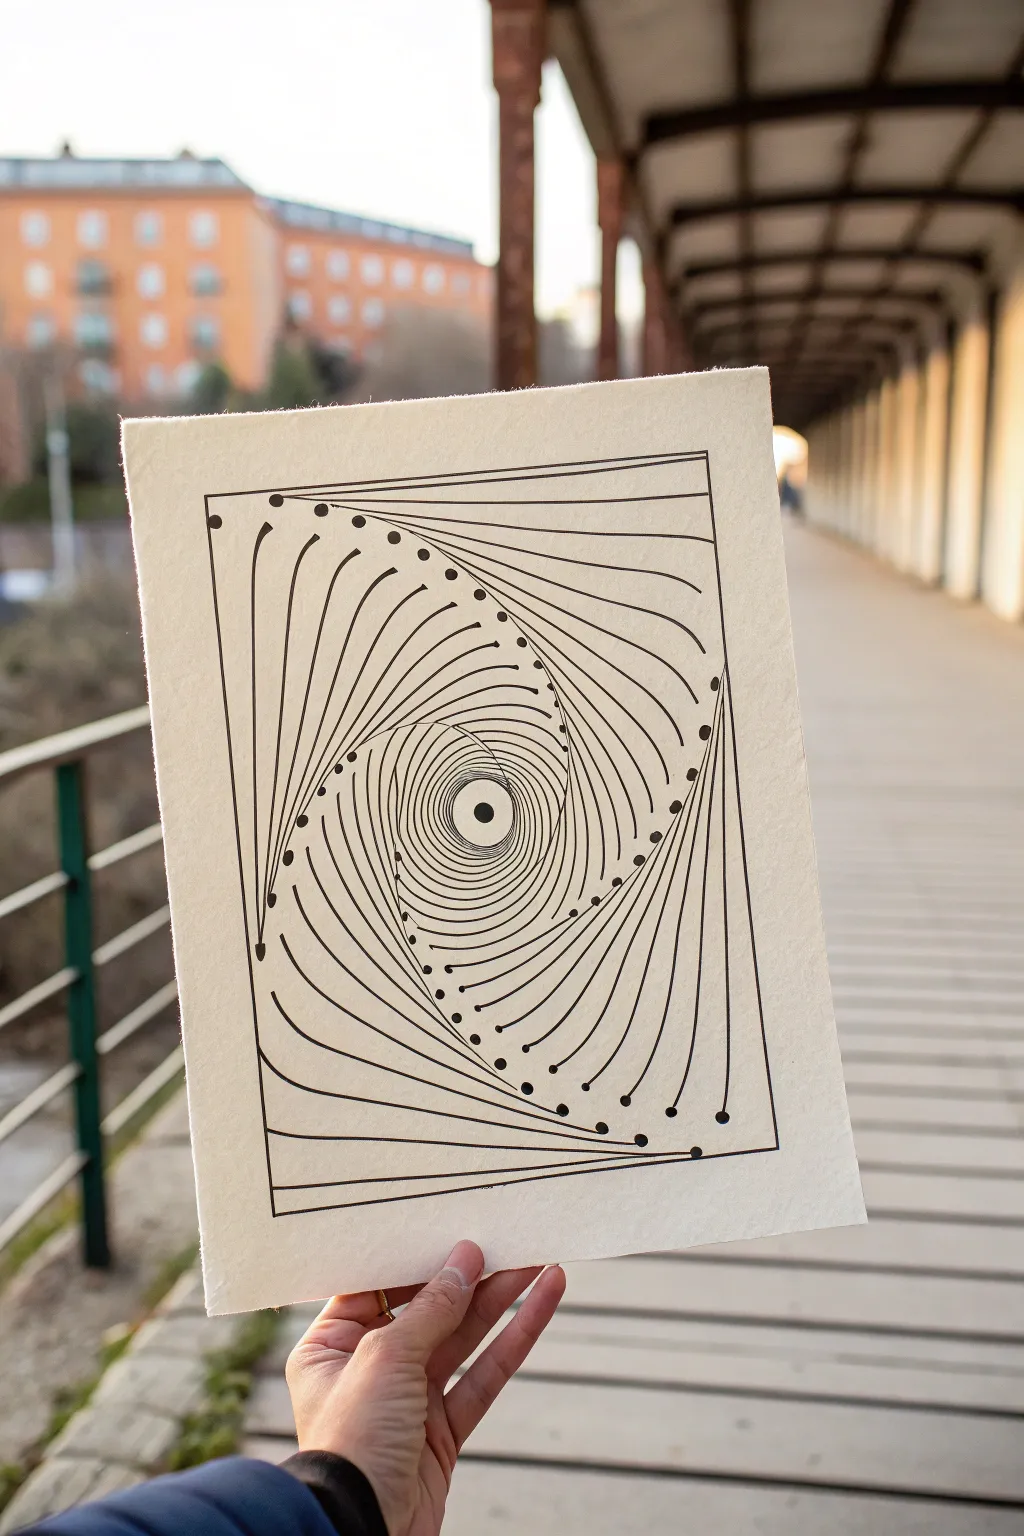
Dive into the mesmerizing world of optical art with this precise yet surprisingly simple line drawing. By connecting a strategic sequence of dots with sweeping curves, you will create a sense of depth and motion that pulls the viewer’s eye straight to the center.
How-To Guide
Materials
- High-quality heavy drawing paper or cardstock (smooth finish)
- Fine liner pen (specifically size 05 or 08 for bold lines)
- Ruler
- Pencil (HB or similar for light guides)
- Eraser
- Compass (optional but helpful for the center circle)
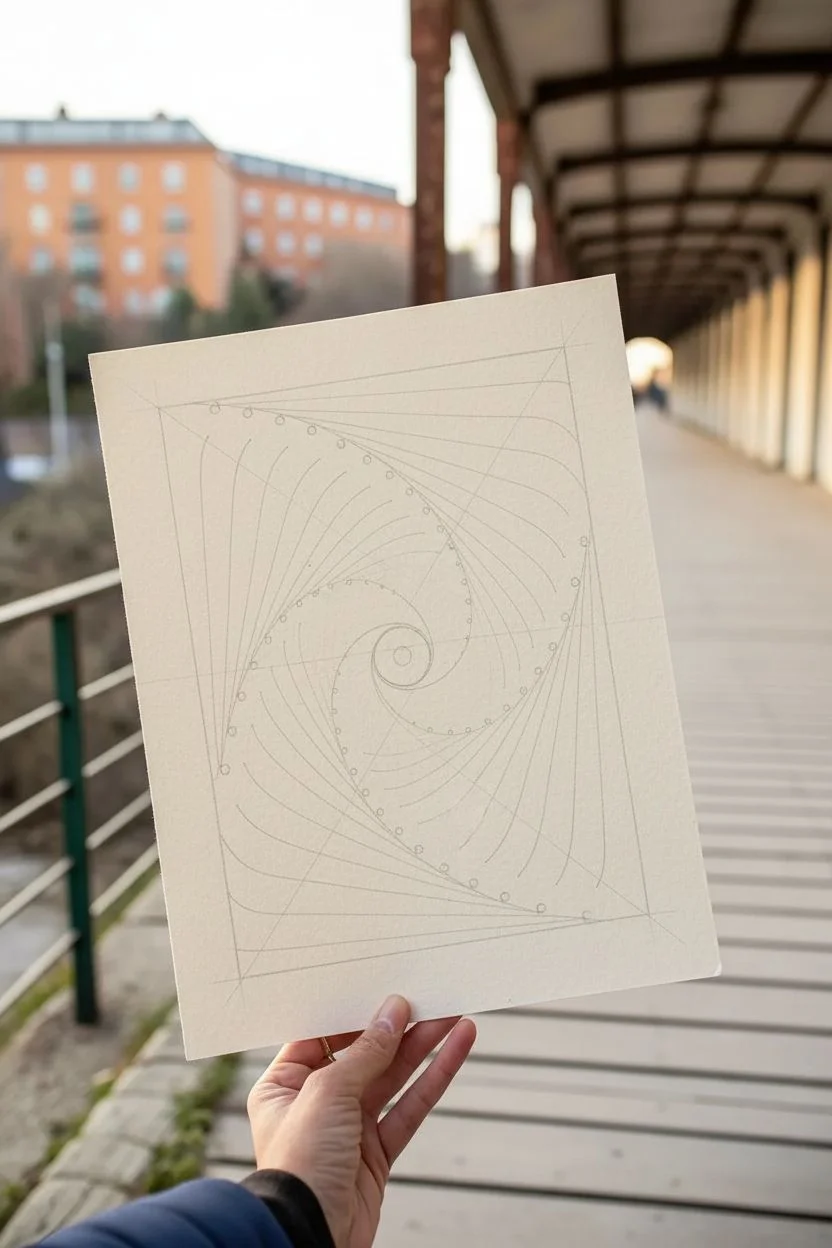
Step 1: Setting the Framework
-
Define the boundary:
Begin by using your ruler and pencil to draw a large, perfect rectangle centered on your paper. This will serve as the outer boundary for your design. -
Mark the center:
Find the sheer center of your rectangle by lightly drawing diagonal lines from corner to corner. Where they cross is your exact center point. -
Draw the central eye:
Using a compass or a steady hand, draw a small circle around that center point. Fill in a smaller solid dot right in the middle to create the ‘pupil’ of the vortex. -
Establish the spiral points:
The illusion relies on four main spiral arms. Lightly sketch four curved lines starting from the four corners of your rectangle and spiraling inward until they touch the central circle. These don’t need to be perfect; they act as the backbone for your dot placement.
Step 2: Placing the Anchors
-
Start the dot sequence:
Switch to your fine liner pen. Place a distinct, solid black dot in the top-left corner of your rectangle frame. -
Follow the curve:
Moving along the first pencil curve you drew from that corner, place a new dot every centimeter or so. As the curve spirals inward and gets tighter, you can decrease the spacing between dots slightly to intensify the effect. -
Repeat for all arms:
Repeat this dot-placement process for the other three corners. You should end up with four chains of dots spiraling toward the center eye. -
Add perimeter dots:
Along the straight edges of your outer rectangle, place a few dots near the corners to help transition the lines later. Look closely at the reference image; notice how the dots ‘march’ inward from the edge.
Curve Control
Draw lines by moving your whole arm, not just your wrist. This creates smoother, more confident curves essential for the flow of the optical illusion.
Step 3: Connecting the Illusion
-
The first connection:
This is the most crucial step. Place your pen nib on the very first dot in the top-left corner. Draw a smooth, slightly curved line connecting it to the *second* dot on the *adjacent* spiral arm to the right. -
Continue the pattern:
Move to the second dot on your starting arm and connect it to the third dot on the adjacent arm. You are essentially ‘miss-matching’ the dots to create a twisting effect. -
Rotate the paper:
I find it much easier to rotate the paper physically as I work. Do this for the first few connections on all four sides to establish the outer layer of the vortex. -
Work inward:
Continue this pattern, moving one dot inward each time. Draw a line from the current dot to the next available dot on the neighboring spiral arm. -
Mind the curvature:
As you get closer to the center, your lines will need to curve more dramatically to bridge the gap. Keep your wrist loose to ensure fluid, non-jaggy strokes. -
Closing the gap:
When you reach the central circle, the lines will become very short. Connect the final dots directly to the outline of the central circle you drew earlier.
Color Pop
Instead of black ink, try alternating two contrasting colors for each spiral arm (e.g., blue and orange) to create a vibrating visual effect.
Step 4: Final Touches
-
Ink the border:
Use your ruler and fine liner to trace over the initial pencil rectangle boundary, giving the artwork a crisp, finished frame. -
Thicken the dots:
Go back over your anchor dots. Making them slightly larger and perfectly round adds a polished, graphic quality to the piece. -
Erase guidelines:
Wait at least 15 minutes for the ink to fully cure. This patience prevents smudging. Once dry, gently erase all pencil guidelines and the initial spiral sketches.
Step back and watch your static drawing appear to twist and deepen right before your eyes
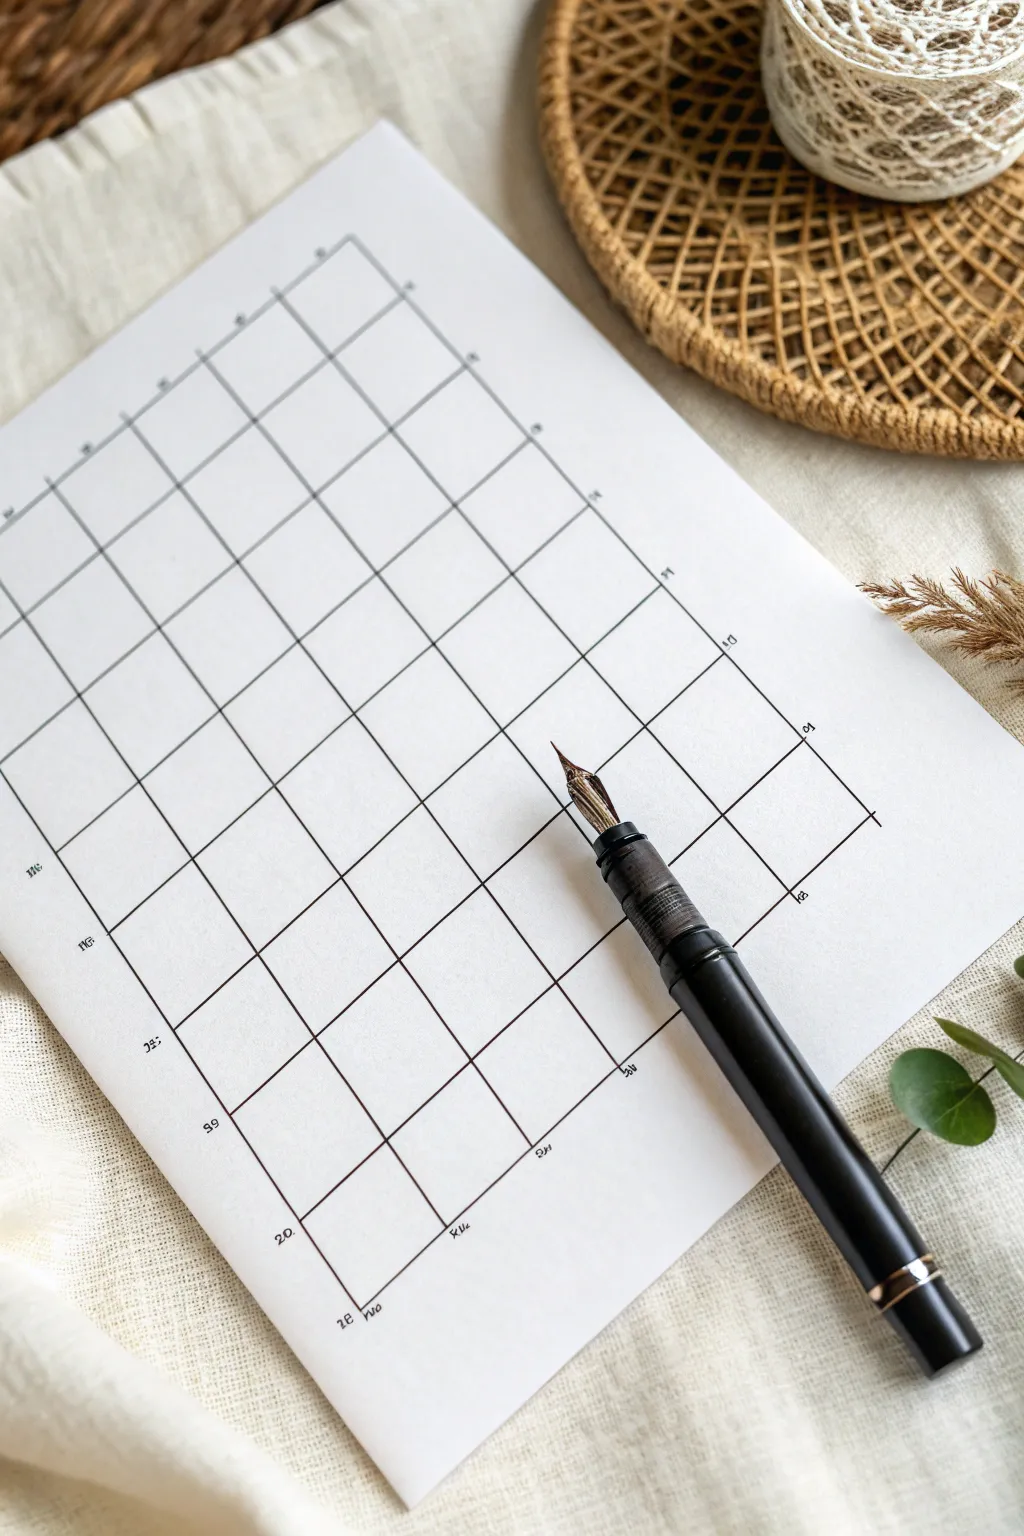
Warped Grid Line Illusions

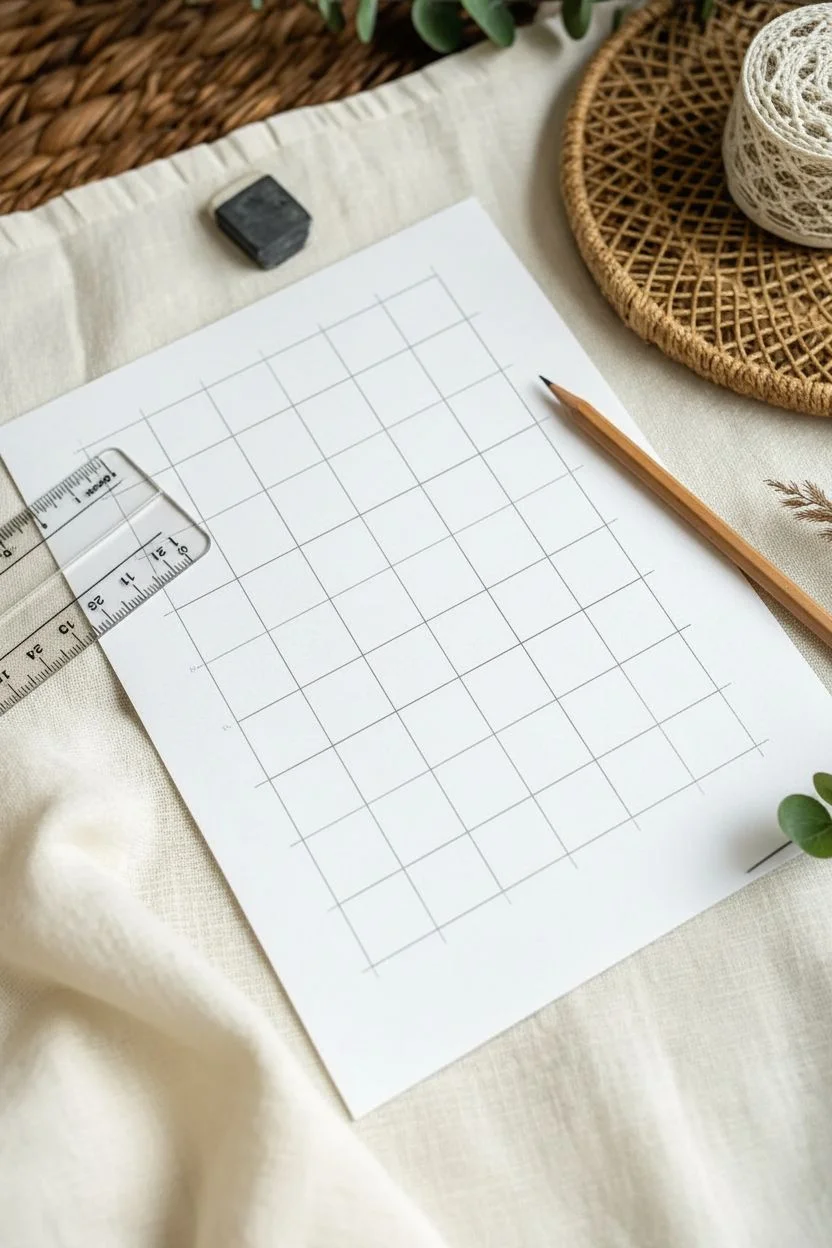
Embrace the beauty of imperfection with this minimalist hand-drawn grid design. This meditative practice creates a structured yet organic foundation that can be framed as modern art or used as a unique layout for bullet journaling.
Step-by-Step Tutorial
Materials
- High-quality white paper (A4 or A5 size)
- Black ink fountain pen or fine-liner marker (0.5mm)
- Ruler (preferably clear acrylic)
- Pencil (HB or H)
- Eraser
Step 1: Planning the Layout
-
Define the margins:
Begin by leaving a generous border around your page. Measure about 1 inch (2.5 cm) from each edge and make light tick marks with your pencil to establish your working area. -
Establish the grid size:
Decide on the size of your squares. For this spacious look, aim for squares that are approximately 1.5 inches (3-4 cm) wide. Mark these intervals along the top and bottom of your defined area. -
Mark horizontal guides:
Repeat the process for the vertical spacing. Mark intervals down the left and right sides of your margin, keeping the spacing consistent with your width measurements. -
Lightly pencil the initial grid:
Using your ruler, very lightly connect your tick marks with a pencil. This doesn’t need to be perfect; it’s just a faint skeleton to guide your ink lines later.
Ink Flow Pro Tip
Tape a penny to the underside of your ruler. This lifts the edge slightly off the paper, preventing the worst enemy of line art: ink bleeding underneath the ruler.
Step 2: Inking the Vertical Lines
-
Prepare your pen:
Ensure your fountain pen is filled with fresh black ink or uncaps your fine-liner. Test the flow on a scrap piece of paper to avoid blots on your first stroke. -
Start the first vertical line:
Place your pen tip at the top left mark. I prefer to align the ruler slightly away from the pencil line so the ink doesn’t bleed under the ruler edge. -
Draw with confidence:
Pull the pen down the page in a single, steady motion. Don’t worry if the line wavers slightly; that organic wobble adds character to the piece. -
Cross the page:
Continue drawing all vertical lines across the page. Focus on keeping consistent pressure rather than geometric perfection. -
Let the vertical lines dry:
Pause for a moment. Fountain pen ink can take a minute to set, and you don’t want to smudge your work when you rotate the page or ruler for the next step.
Step 3: Completing the Structure
-
Position for horizontal lines:
Reorient your paper or your hand position so you can comfortably draw lines going across. Align your ruler with the top set of horizontal pencil guides. -
Ink the horizontals:
Draw your horizontal lines, crossing over the dried vertical ones. Watch the intersections closely; letting the ink pool slightly where lines meet creates a lovely, authentic look. -
Add subtle numbering:
Looking at the reference, you’ll see tiny numbers at specific intersections. Use your finest pen tip to add small digits (like 10, 20, 30) or dates near the grid intersections for a functional aesthetic. -
Extend certain lines:
For a stylized finish, allow a few of your lines to extend slightly past the main grid box, giving the illusion of an architectural draft or uncropped plan.
Level Up: Warped Grid
Make it an optical illusion by gently curving the vertical lines inward and the horizontal lines downward to create a ‘pinched’ paper effect.
Step 4: Finishing Touches
-
The final dry:
Let the artwork sit undisturbed for at least 10 to 15 minutes. The ink needs to be bone dry before you touch it again. -
Erase pencil guides:
Gently run your eraser over the entire grid to remove the initial pencil skeleton. Be careful near the inked lines to ensure no smudging occurs. -
Inspect the contrast:
Check your lines. If any areas look too faint, you can carefully re-trace them, but usually, the variation in line weight is desirable.
Once the pencil marks are gone, you have a strikingly simple piece of art ready for display


Have a question or want to share your own experience? I'd love to hear from you in the comments below!