
When I’m craving color, movement, and that deep-breath feeling, I always drift back to ocean art—it’s basically an endless idea generator. Here are my favorite ocean art ideas you can try with simple supplies, whether you’re creating with kids, teaching a class, or just making something for yourself.
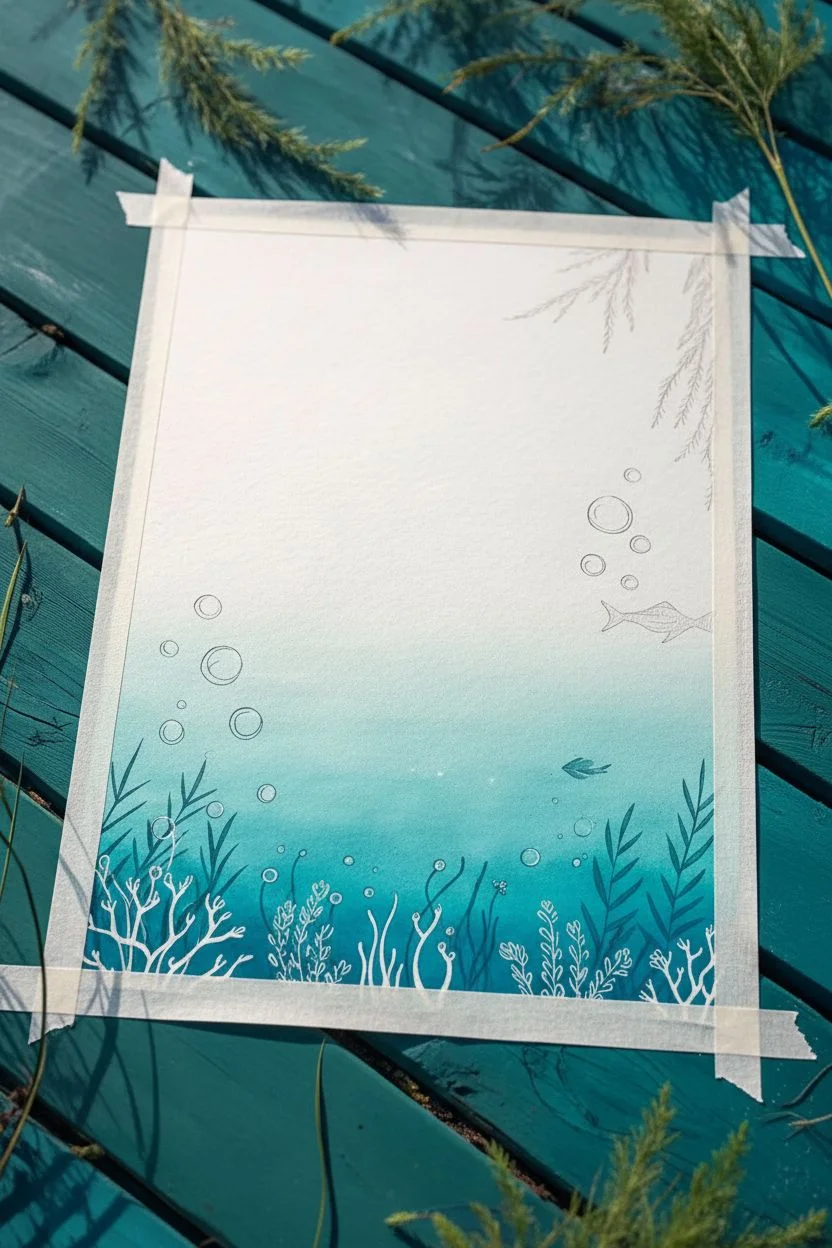
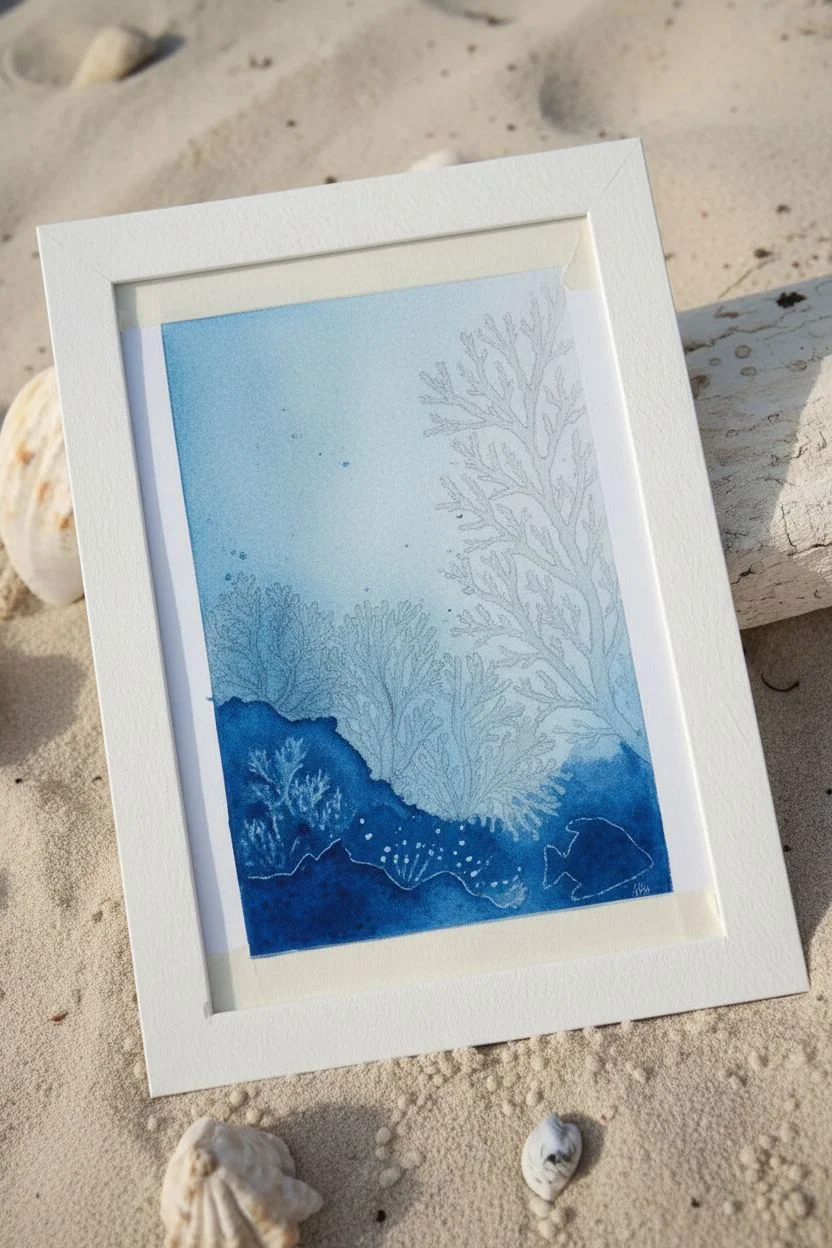
Watercolor Ocean Wash With Salt Texture
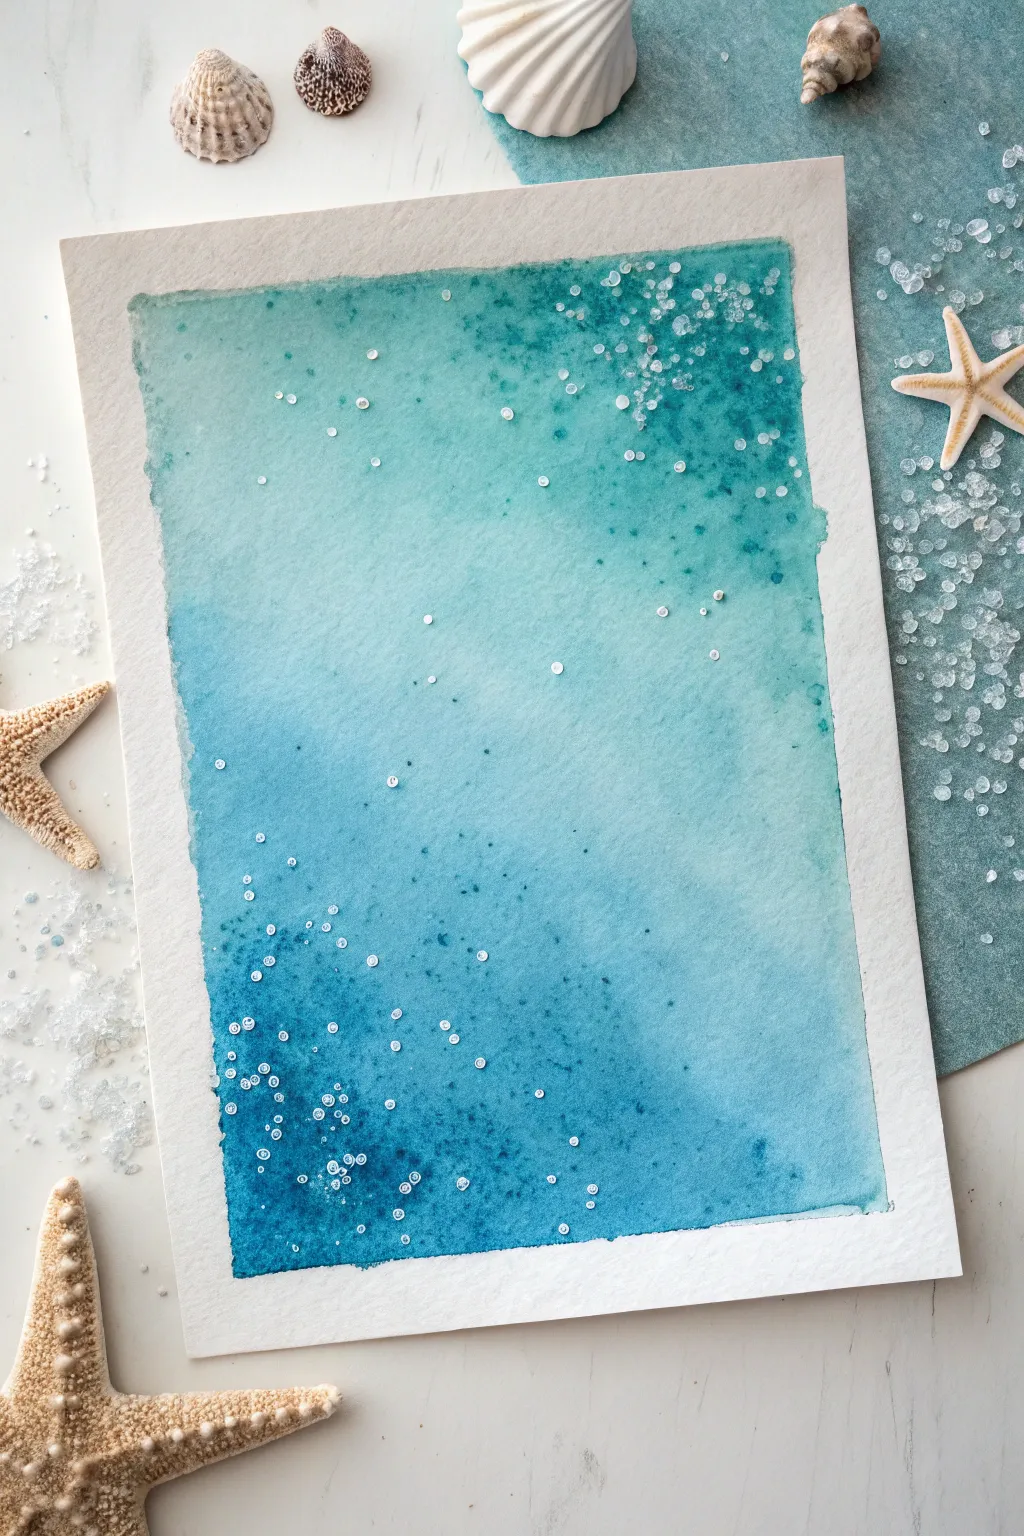
Capture the magic of the deep sea with this simple yet stunning watercolor technique. By combining a wet-on-wet gradient wash with everyday table salt, you’ll create organic, bubbly textures that mimic ocean foam and light refraction.
Detailed Instructions
Materials
- Cold press watercolor paper (300 gsm)
- Painter’s tape or masking tape
- Watercolor paints: Turquoise, Cerulean Blue, Prussian Blue (or Indigo)
- Wide flat wash brush (1-inch)
- Round brush (size 6 or 8)
- Jar of clean water
- Coarse sea salt or kosher salt
- Table salt (finer grain)
- Paper towels
- Rigid board for taping down paper
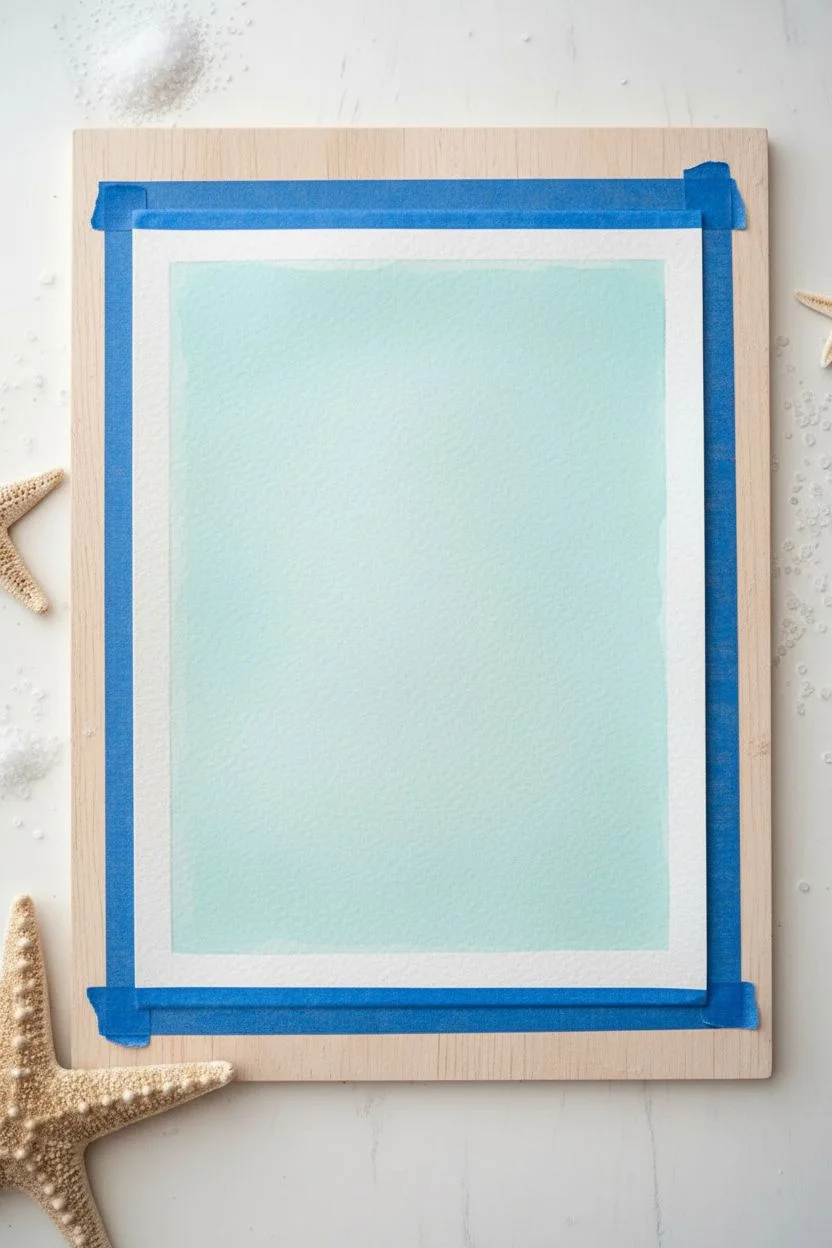
Step 1: Preparation and Base Layer
-
Secure the paper:
Start by taping your watercolor paper down firmly to a rigid board or your work surface. Use painter’s tape along all four edges to create a clean white border and prevent buckling when the paper gets wet. -
Pre-wet the paper:
Dip your wide flat brush into clean water and apply an even coat across the entire area inside the tape. You want the paper to be glistening and damp, but not holding puddles of water. -
Mix your lightest teal:
On your palette, dilute some Turquoise paint with plenty of water. You want a very pale, transparent wash for the upper section of the ocean. -
Apply the first wash:
Using the flat brush, stroke the pale Turquoise across the top third of the paper. Let the wet paper help diffuse the edges of the paint downwards.
Timing Is Key
For the crispest white specks, wait until the shine on the paper just starts to dull before dropping salt. Too early creates soft blobs; too late yields no effect.
Step 2: Creating the Gradient
-
Deepen the color:
Mix a slightly more saturated version of Cerulean Blue. Apply this to the middle section of the paper, slightly overlapping with the pale Turquoise above to encourage blending. -
Tilt for flow:
If the colors aren’t merging naturally, gently tilt your board a few degrees to let gravity pull the lighter paint into the mid-tone. -
Add the depths:
Load your brush with a strong concentration of Prussian Blue or Indigo. Apply this to the bottom third of the paper. -
Intensify the corners:
Drop extra pigment of the darkest blue into the bottom left and right corners while the paper is still wet to create a vignetted, deep-sea effect. -
Smooth the transition:
Clean and dampen your brush slightly, then run it horizontally across the meeting points of the colors if hard lines have formed, smoothing the gradient from light to dark.
Make It Sparkle
Mix a tiny amount of iridescent or pearl watercolor medium into your blue paint or splatter a little metallic silver ink over the top once dry for extra shimmer.
Step 3: Adding Salt Texture
-
Check moisture level:
Wait about a minute or two. The paper needs to be shiny but not soaking wet. If it’s too wet, the salt dissolves; if too dry, nothing happens. I look for a ‘satin’ sheen before proceeding. -
Sprinkle coarse salt:
Take a pinch of coarse sea salt and drop it randomly over the upper right corner and the darker bottom left corner. The larger grains create big, blooming starbursts. -
Sprinkle fine salt:
Follow up with a pinch of finer table salt scattered more densely in the top right area. These smaller grains create tiny, distinct speckles that look like bubbles. -
Cluster the salt:
Focus the salt density in diagonal patches rather than covering the whole page evenly. This creates a sense of movement and current in the water. -
Let it work its magic:
Do not touch the paper now. As the paint dries, the salt will absorb the water and push the pigment away, creating the texture.
Step 4: Finishing Up
-
Allow complete drying:
Let the painting dry completely. This takes longer than usual because of the salt—often several hours or overnight is best to avoid smearing. -
Remove the salt:
Once bone dry, gently rub your hand or a dry cloth over the surface to brush away the dried salt crystals, revealing the white textures underneath. -
Peel the tape:
Slowly peel the masking tape away from the paper at a 45-degree angle. This ensures you get that crisp, professional white edge bordering your ocean scene.
Frame your finished piece alongside some seashells for a beautiful coastal display in your home


Easy Rolling Waves in Layered Blues
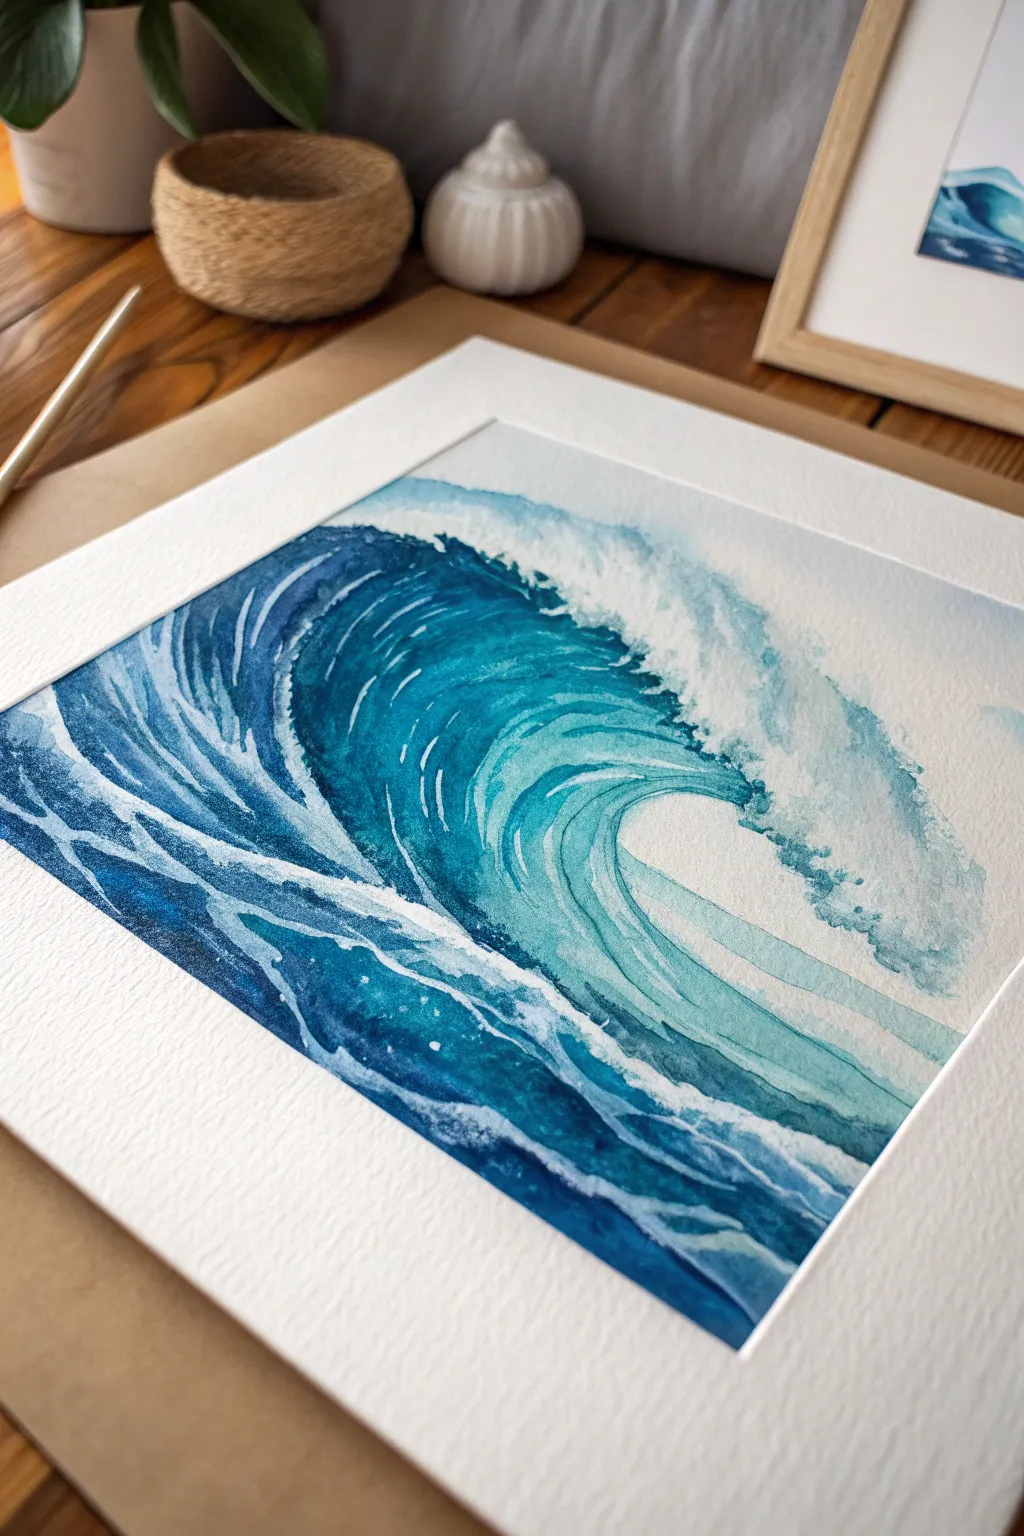
Capture the dynamic energy of the ocean with this layered watercolor project that focuses on movement and depth. By building up transparency from light washes to deep indigos, you’ll create a stunning barrel wave that feels both powerful and serene.
Detailed Instructions
Materials
- Cold press watercolor paper (A4 or square format)
- Watercolor paints (Phthalo Blue, Indigo, Turquoise, Prussian Blue)
- White gouache or white ink (optional for highlights)
- Round brushes (sizes 4, 8, and 12)
- Painter’s tape or masking tape
- Pencil and eraser
- Paper towels
- Jar of clean water
- Drawing board or hard surface
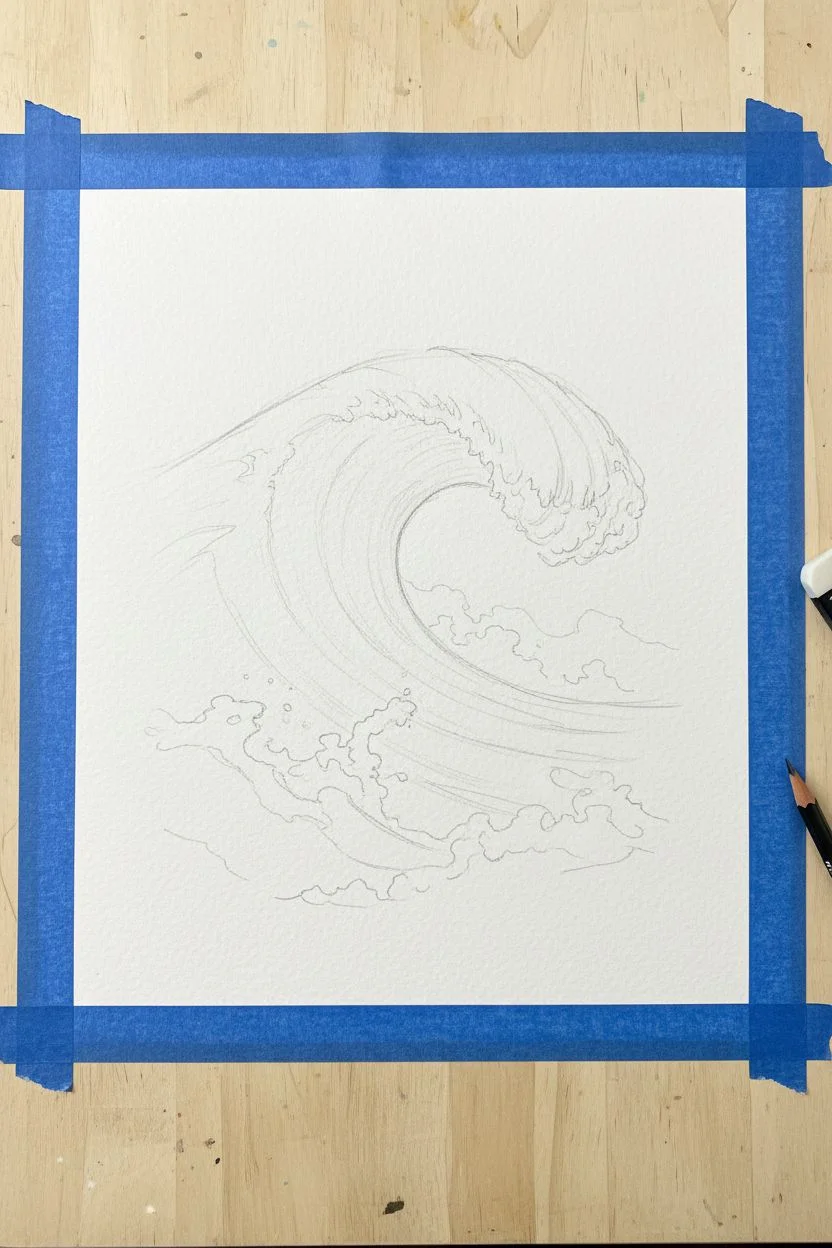
Step 1: Preparation and Sketching
-
Secure the paper:
Tape your watercolor paper down firmly on all four sides to your drawing board. This creates the crisp white border seen in the example and prevents the paper from buckling when wet. -
Sketch the wave shape:
Using a light hand and a pencil, draw the basic outline of a curling barrel wave. Mark the lip of the wave where the foam crashes and sketch the swooping C-shape of the inner barrel. -
Define foam areas:
Lightly outline the areas that will remain white, specifically the foamy crest at the top right and the splashing water at the bottom left. These areas will be left unpainted (negative space).
Bleeding Edges?
If paint seeps under your tape, use a slightly damp, stiff brush (bordering on dry) to gently scrub and lift the unwanted paint, then blot with a clean tissue immediately.
Step 2: Layering the Blues
-
Establish the light wash:
Mix a very watery, pale turquoise. Apply this wash to the inner curve of the wave (the ‘tube’) and the foreground water, keeping your strokes fluid and following the curve of the ocean. -
Build the mid-tones:
While the first layer is damp but not soaking, mix a Phthalo Blue. Paint distinct stripes inside the curve of the wave, leaving gaps of the lighter turquoise showing through to suggest moving water volume. -
Create the wave lip:
Using the tip of your size 8 brush, dab a mix of turquoise and light blue near the top edge where the water meets the foam. Keep the edges ragged to look like spray. -
Darken the depths:
Let the paper dry completely. Now, mix a strong Indigo or Prussian Blue. Apply this to the top left section behind the wave crest and the deepest shadow part of the barrel to create dramatic contrast. -
Paint the foreground movement:
In the bottom left corner, paint sweeping diagonal strokes of medium blue that angle upward toward the wave. Leave thin slivers of white paper between these strokes to represent sea foam patterns on the surface.
Add Sparkle
Sprinkle a tiny pinch of salt onto the wet indigo paint in the deepest shadows before it dries. The salt pushes pigment away, creating a unique, bubbly texture.
Step 3: Refining Details
-
Enhance the barrel detail:
Using your smallest brush and a concentrated dark blue, add thin, crisp lines inside the wave’s curve. Follow the C-shape contour meticulously to emphasize the rolling motion. -
Soften the spray:
Where the blue paint meets the white foam area on the right, use a mostly clean, damp brush to gently soften some edges, making the transition from water to mist look more natural. -
Add texture to the foam:
Mix a very faint, watery grey-blue. Dab this sparingly into the large white foam area on the right side to give the white water some form and shadow, so it doesn’t look flat. -
Deepen the foreground contrast:
I like to go back into the bottom left section with my darkest Indigo. Paint into the negative spaces between the white foam lines to make the white paper pop. -
Optional white highlights:
If you lost too much white paper, use a tiny amount of white gouache or ink to restore bright highlights on the very crest of the wave or for flying droplets. -
Final assessment:
Step back and check your values. Ensure there is a strong logic of light to dark—the deepest darkness should be under the curling lip, and the lightest area is the foam. -
Reveal the border:
Wait until the painting is 100% bone dry. Slowly peel away the painter’s tape at a 45-degree angle to reveal your crisp, professional white frame.
mount your finished wave in a simple wooden frame to complete the coastal aesthetic


Crayon Resist Underwater Background

Capture the serene beauty of the ocean depths with this striking watercolor resist project. By combining white crayon or oil pastel with a beautiful watercolor wash, you’ll create a magical underwater scene where delicate sea life appears to glow against the blue.
How-To Guide
Materials
- High-quality watercolor paper (cold press recommended)
- White wax crayon or white oil pastel
- Watercolor paints (phthalo blue, turquoise, teal)
- Large flat wash brush or sponge brush
- Water cups
- Paper towels
- Pencil (optional for light sketching)
- Masking tape
Step 1: Preparation and Sketching
-
Secure the paper:
Begin by taping down your watercolor paper to a hard, flat board or your work surface. This prevents the paper from buckling when we add the water later and creates a clean, professional border around the edge. -
Plan the composition:
Visualize where you want your underwater elements. The design features foliage hanging from the top right and a dense coral reef scene at the bottom left, leaving the center relatively open for the gradient. -
Lightly sketch (optional):
If you aren’t confident drawing directly with the white crayon, use a pencil to very faintly sketch the main shapes of the seaweed, coral, bubbles, and fish. Keep these lines incredibly light so you can erase them or cover them completely.
Visibility Trick
Drawing white on white is tough! Shine a desk lamp sideways across your paper (raking light) to reveal the shiny wax texture so you can see exactly where you’ve drawn.
Step 2: Creating the Resist Layer
-
Draw top foliage:
Take your white crayon or oil pastel. Pressing firmly, draw the hanging seaweed strands coming down from the top right corner. You need a thick, heavy application of wax for the resist to work effectively. -
Add detail to the top:
Add small, feathery strokes to your hanging seaweed to give it texture. Since you are drawing white on white, tilt your head occasionally to catch the light and see where you have already drawn. -
Draw the fish:
Sketch a simple fish silhouette near the upper right-middle area. You can fill it in with a light texture or scales using the crayon, or leave it as a simple outline. -
Create the bottom reef:
Move to the bottom third of the paper. Draw various types of seaweed—some tall and wavy, others short and grassy. Press hard to ensure a good seal against the water. -
Add white coral shapes:
Draw branching coral structures among the seaweed at the bottom. The white crayon will preserve the white paper underneath, making these look like bleached coral or glowing sea life. -
Scatter the bubbles:
Draw circles of various sizes floating up from the bottom reef towards the surface. Draw some as simple rings and others with little reflection marks to make them look spherical. -
Double-check your lines:
I always take a moment here to look at the paper from an angle in the light. Ensure all your lines are solid and continuous; any gaps in the wax will let the blue paint seep through later.
Step 3: Applying the Watercolor Gradient
-
Prepare your palette:
Mix a generous amount of watery blue paint. You’ll need a range of concentration: very watery, pale blue for the top, and a richer, saturated turquoise or deep teal for the bottom. -
Start the wash:
Dip your large brush into clean water and lightly dampen the bottom half of the paper. Load your brush with the deepest teal color and apply it to the very bottom edge of the paper, painting right over your crayon drawings. -
Watch the magic happen:
As you paint over the bottom area, you will see the white crayon drawings ‘pop’ out as they repel the water-based paint. This is the most satisfying part of the process. -
Start the gradient:
Work your way up the paper. Do not add more paint to your brush; instead, dip it into water to dilute the color already on the brush. This naturally lightens the blue as you move upward. -
Blend upward:
Continue painting upward, adding more water to fade the color out. By the time you reach the middle of the paper, the color should be a very pale, transparent blue. -
Fade to white:
Stop painting before you reach the very top. Use a clean, damp brush to soften the top edge of the blue so it fades seamlessly into the white of the paper, leaving the top seaweed mostly against a white background. -
Add depth (optional):
While the bottom is still wet, you can drop in a little more concentrated teal or dark blue paint into the seaweed area at the very bottom to create more contrast and depth. -
Let it dry:
Allow the painting to dry completely flat. Do not remove the tape until the paper is bone dry, or it might rip.
Paint Not Resisting?
If the paint covers your drawing, the wax layer was too thin or the paint too thick. Gently dab the wet paint with a tissue to lift it off the wax lines.
Step 4: Finishing Touches
-
Enhance with pen (optional):
Once fully dry, you may notice some sketched areas need definition. You can carefully use a blue fine-liner or gel pen to add small details, like the fins on the fish or texture on the seaweed, similar to the reference image. -
Remove tape:
Peel the masking tape away slowly at a 45-degree angle to reveal your crisp, clean edges.
Display your beautiful underwater gradient art and enjoy the peaceful vibe it brings to the room


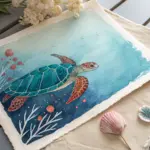
Sea Turtle With Patterned Shell
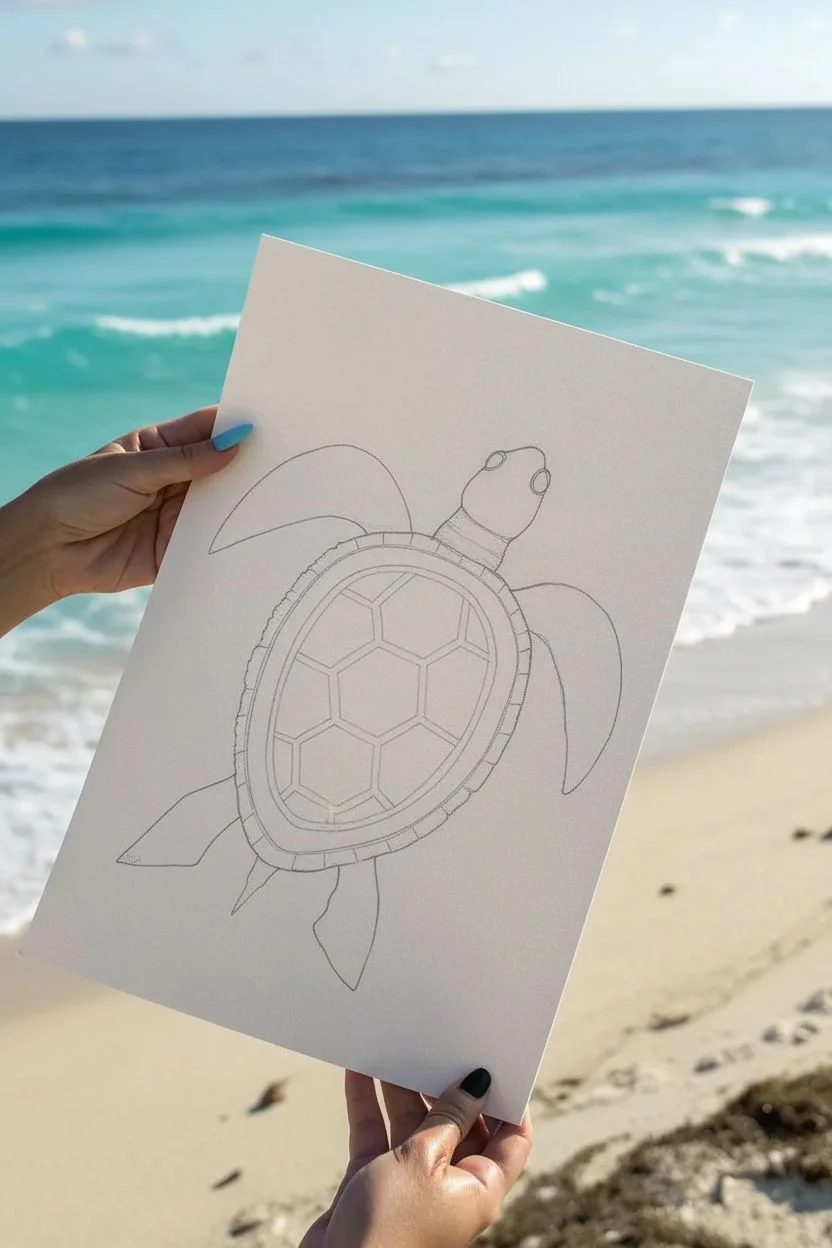
Capture the serene beauty of marine life with this intricate sea turtle illustration, featuring patterned details and soft aquatic hues. This project combines precise linework with gentle washes of color to create a meditative piece perfect for framing.
Step-by-Step
Materials
- Heavyweight drawing paper or mixed media paper (smooth texture preferred)
- Fine liner pens (sizes 0.1, 0.3, and 0.5) in black
- Pencil and eraser for sketching
- Colored pencils or alcohol markers (teal, mint green, sage green, cool gray, purple)
- Metallic gel pens (optional, for subtle shimmer)
- Ruler
Step 1: Drafting the Outline
-
Basic Shapes:
Start by sketching a large oval in the center of your page for the shell. Unlike a perfect circle, slightly taper the oval at the bottom to create a subtle teardrop shape. -
Adding Limbs:
Sketch two long, curved flippers extending from the top corners of the shell. Add two shorter, wider rear flippers at the bottom. Position a rounded head at the top center, connecting it to the shell with a short neck area. -
Defining Sectors:
Inside the main shell oval, draw a smaller, concentric oval. Connect the two ovals with small perpendicular lines to create the shell’s border rim. -
Shell Grid:
Lightly sketch a central vertical column of three hexagons down the middle of the shell. Surround these with partial geometric shapes that fit like puzzle pieces to fill the rest of the inner shell area.
Step 2: Inking the Structure
-
Outline Tracing:
Using your 0.5 fine liner, carefully trace over your pencil outlines for the shell, head, and flippers. I prefer to use a slightly thicker line weight for the outer contour to make the turtle pop. -
Shell Details:
Switch to a 0.3 pen to ink the internal shell patterns, drawing the hexagons and the border rim segments cleanly. -
Drawing the Face:
Ink the eyes as solid black ovals with tiny white highlights left uncolored. Add a small curve for the mouth and define the nostril area. -
Erase Sketches:
Once the ink is completely dry—give it a few minutes to avoid smudging—gently erase all underlying pencil lines.
Smudge Alert
Fine liners can smudge easily on smooth paper. Place a scrap piece of paper under your drawing hand to protect your work from oils and accidental ink smears.
Step 3: Patterning and Filling
-
Flipper Textures:
Using your 0.1 pen, fill the flippers with organic, cell-like shapes. Think of them like irregular bubbles or soft stones packed together. -
Intricate Fills:
Inside each of those ‘cells’ on the flippers, draw tiny concentric circles, spirals, or stippling (dots) to add depth and texture. -
Shell Motifs:
This is the fun part: fill each hexagon on the shell’s back with a unique doodle. Try drawing a starfish, a tiny flower, swirls, or a mini-landscape in each section. -
Border Design:
Fill the rim of the shell with repetitive linear patterns, such as closely spaced hatch marks or tiny repeating triangles.
Pattern Variety
Stuck on fill patterns? Look at microscopic images of plant cells, lace fabric, or coral textures for unique, organic inspiration for the shell segments.
Step 4: Color and Atmosphere
-
Base Color:
Using a mint green or pale teal pencil, lightly shade the background of the flippers, leaving the patterned doodles mostly white or very faintly colored. -
Accenting the Shell:
Color the central hexagons with alternating shades of sage and teal. Keep the pressure light to maintain a translucent, watery feel. -
Adding Bubbles:
Draw several circles varying in size floating around the turtle to represent bubbles. Ink them with a thin line. -
Bubble Color:
gently shade the bubbles with a touch of purple or cool gray, focusing the color on the bottom right curve of each bubble to suggest volume. -
Decorative Elements:
Add a few stylized ‘sea flowers’ or urchin shapes in the background using your finest pen. These look like spiky suns or gears. -
Final Touches:
If you have metallic pens, add tiny dots of silver or gold along the shell ridges for a bit of sun-catching shimmer.
Now you have a tranquil piece of ocean art ready to display or gift to a beach lover
BRUSH GUIDE
The Right Brush for Every Stroke
From clean lines to bold texture — master brush choice, stroke control, and essential techniques.
Explore the Full Guide
Whale Spout Collage With Paper Shapes
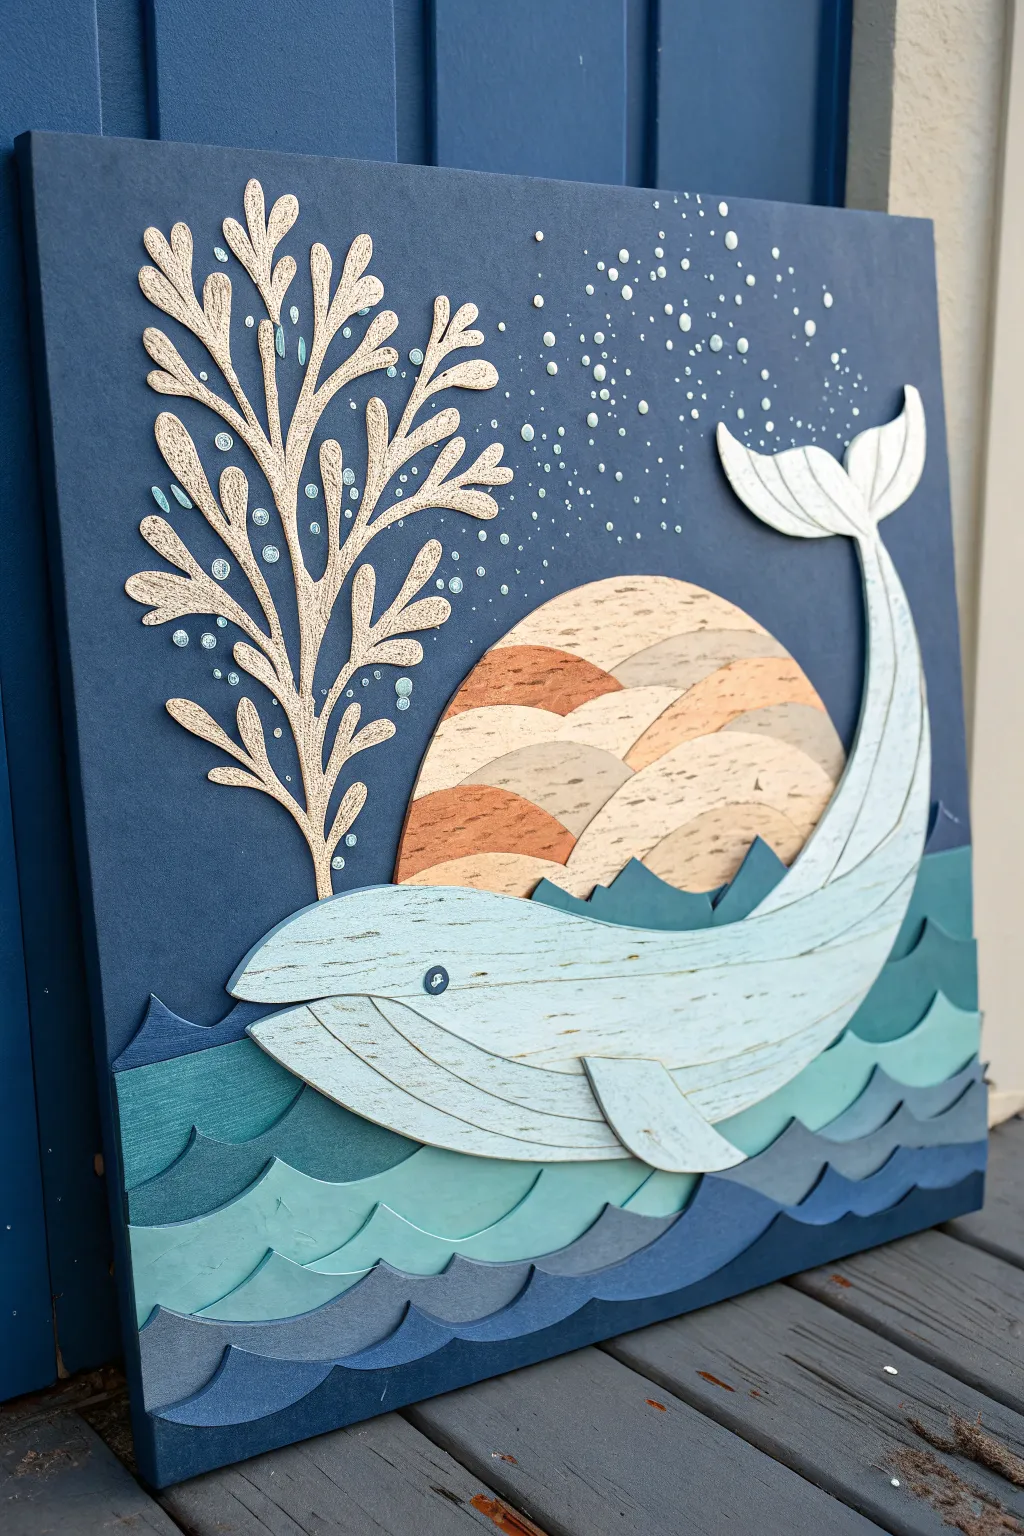
This stunning mixed-media collage captures the majesty of a whale breaching against a stylized sunset, using textured materials to create depth and warmth. By layering cork, textured papers, and cardstock, you’ll build a dimensional seascape that feels both organic and modern.
Detailed Instructions
Materials
- Large square canvas or wood panel (navy blue)
- Cork sheets (thin adhesive-backed or plain)
- Heavy cardstock (shades of teal, navy, white, and cream)
- Patterned or textured scrapbook paper (white woodgrain or similar)
- Cutting mat
- Precision craft knife (X-Acto)
- Scissors
- Mod Podge or craft glue
- Small faux pearl stickers, silver sequins, or liquid pearls
- Pencil and eraser
- Tracing paper
Step 1: Planning and Background
-
Prepare the base:
Begin with a solid square base. If using a wood panel or canvas, paint it a deep, matte navy blue to serve as your ocean sky. Allow it to fully dry before attaching any layers. -
Sketch the design:
Sketch your main elements on tracing paper first. Draw a large half-circle for the sun, a curving whale shape, a branching coral-like spout, and wavy ocean lines at the bottom. This template will ensure all your pieces fit together perfectly.
Clean Cuts Matter
When cutting intricate curves like the coral spout, use a fresh blade in your craft knife. Rotate the paper, not your hand, for smoother lines.
Step 2: Creating the Sunset
-
Template transfer:
Cut out your sun shape from the tracing paper template. Divide this semi-circle into rolling hill-like sections. -
Cutting cork layers:
Trace these hill sections onto thin cork sheets. For visual interest, I like to use cork with slightly different grain densities or varied shades if available. -
Assemble the sun:
Glue the cork pieces onto a backing sheet of paper to reassemble the semi-circle. Overlap the edges slightly so there are no gaps between the ‘hills’. -
Mount the sun:
Adhere the assembled cork sun to the center-right of your navy background.
Step 3: Crafting the Waves
-
Select ocean colors:
Choose 4-5 shades of teal, blue, and navy cardstock. The darkest shades will be at the bottom, graduating to lighter teals near the whale. -
Cut wave strips:
Cut long, wavy strips that span the width of your canvas. Vary the wave peaks—some sharp and choppy, others rolling and smooth. -
Layering the sea:
Start gluing the waves from the bottom edge of the canvas upwards. Overlap each strip significantly over the one below it to build physical thickness and shadow. -
Adding texture:
For the top-most wave layers, consider using a textured paper with a subtle woodgrain or linen finish to mimic the churning water surface.
Shadow Play
Use squares of foam tape instead of glue for the whale and the top waves. This lifts them off the canvas, creating real shadows.
Step 4: Designing the Whale
-
Body construction:
Using your template, cut the main whale body from a light blue or white woodgrain-patterned paper. If your paper is thin, glue it to a piece of cardboard first for stability. -
Adding details:
Cut separate pieces for the belly grooves, the flipper, and the tail fluke details. Adhere these on top of the main body piece to give the whale a 3D effect. -
Dark accents:
Use a dark blue button or a circle of dark cardstock for the whale’s eye. -
Positioning:
Glue the whale onto the background, effectively ‘sandwiching’ it. The tail should overlap the sky, while the body should appear to be emerging from behind the top wave layer.
Step 5: The Spout and Bubbles
-
Cutting the spout:
Cut a branching, coral-like shape from a textured cream or light beige paper. This represents the whale’s spout in an artistic, stylized way. -
Attaching the spout:
Glue this piece coming from the whale’s blowhole, extending upwards and to the left. -
Bubble placement:
Using liquid pearls, small sequins, or hole-punched shiny paper, create clusters of ‘bubbles’ rising from the spout and scattering into the dark sky. -
Final flourish:
Add a few tiny dots of white paint or extra pearls around the bubble stream to simulate sea spray.
Hang your textured masterpiece in a well-lit spot to let the shadows play across the layers throughout the day
Octopus Tentacles With Spiral Printing
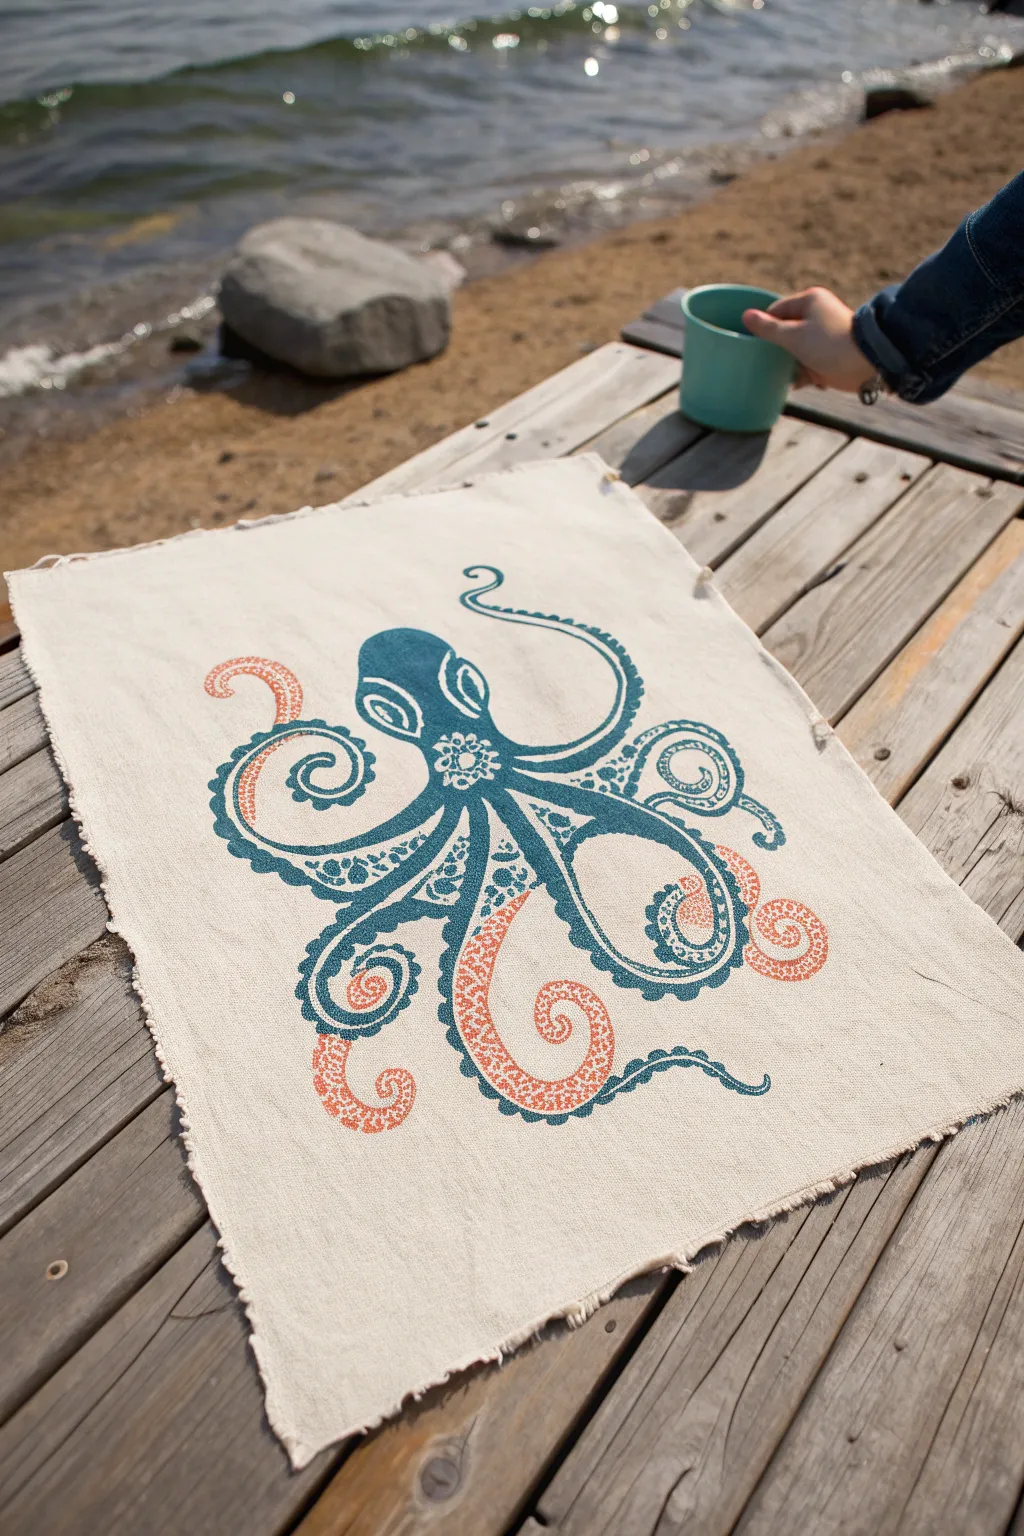
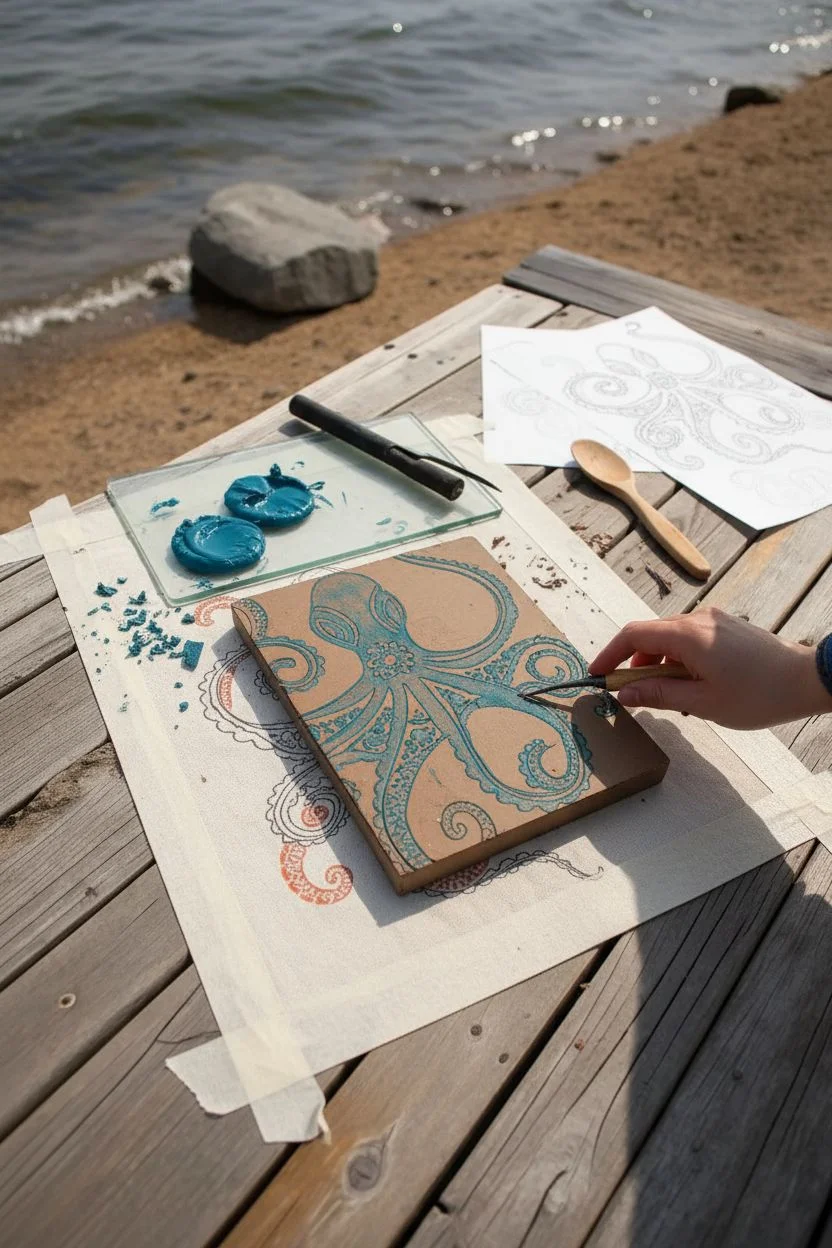
Bring the mysteries of the deep to your kitchen or dining table with this handcrafted octopus print. Using a simple canvas cloth and dual-tone block printing, you can create a piece of functional art that features intricate, spiral-curled tentacles in teal and coral.
Detailed Instructions
Materials
- heavyweight cotton canvas or linen fabric (cut to approx 18×24 inches)
- linoleum block for carving (soft-cut works best)
- lino carving tools (V-gouge and U-gouge)
- fabric screen printing ink (teal blue and coral orange)
- two rubber brayers (rollers)
- inking plate or piece of glass
- barren or wooden spoon for burnishing
- pencil and tracing paper
- iron (for heat setting)
- masking tape
Step 1: Design & Carving
-
Prepare your fabric:
Cut your canvas or linen to your desired size, leaving the edges raw for a rustic look. To prevent excessive unraveling during the process, run a straight stitch about an half-inch from the edge, or simply pull a few threads to create a deliberate fringe now. -
Draft the octopus:
Sketch your octopus design on paper first. Focus on the spiraling motion of the tentacles. The design needs two distinct areas: the main body/outline which will be teal, and the sucker details which will be coral. -
Transfer to block:
Use tracing paper to transfer your design onto the linoleum block. Remember that the printed image will be a mirror reflection of your carving, so flip the design if orientation matters. -
Carve the negative space:
Using a V-gouge, carefully carve away everything that isn’t the octopus. Outline the tentacles first to establish clear boundaries. -
Detail the interior:
Switch to a finer gouge to carve the intricate patterns inside the head and the texture of the tentacles. This is a patience game; take your time to ensure clean lines. -
Separate color zones:
For a two-color print like this, you have two options: carve two separate blocks (one for teal, one for coral) or use a ‘reduction’ method. I recommend carving two separate jigsaw pieces if possible, or masking areas off with tape during inking.
Clean Lines Pro Tip
Before printing on the final fabric, do a test print on a paper scrap. This highlights any ‘chatter’ (unwanted stray marks) in the background that need to be carved deeper.
Step 2: Inking & Printing
-
Prepare the workspace:
Lay your fabric flat on a smooth, hard surface. Tape the corners down so it doesn’t shift when you apply pressure. -
Roll the teal ink:
Squeeze a line of teal fabric ink onto your inking plate. Roll your brayer back and forth until the ink sounds ‘sticky’ and has a velvety texture on the roller. -
Ink the main body:
Apply the teal ink to the main body portions of your block. If you are doing a single block method, carefully use a small brayer or brush to apply ink only to the head and outer tentacle lines. -
Apply coral accents:
Clean your brayer or use a second one to roll out the coral ink. Apply this to the sucker sections of the tentacles. If you carved separate blocks, you will print the teal layer first, let it dry, and then register the coral block on top. -
Position the block:
Carefully lift your inked block and hover it over the center of your fabric. Once you are aligned, press it straight down. Do not wiggle it. -
Burnish the print:
Using a baron or the back of a sturdy wooden spoon, rub the back of the block firmly in circular motions. Ensure you press down on all edges and the center to transfer the ink evenly into the fabric weave. -
The reveal:
Hold one corner of the fabric down with your hand and slowly peel the block up from the opposite corner. Check the transfer as you lift; if it looks too light, lay it back down and burnish more.
Uneven Ink Fix
If your print looks patchy, your fabric might have too much texture. Mist the fabric very lightly with water before printing to help the fibers accept the ink more readily.
Step 3: Finishing Touches
-
Dry the print:
Fabric ink takes time to cure. Hang your printed cloth or lay it flat in a safe area for at least 24 hours until completely dry to the touch. -
Heat fix the ink:
To make the textile washable, iron the reverse side of the fabric on a high cotton setting (without steam) for 3-5 minutes. This seals the pigment into the fibers. -
Fray the edges:
Finish the rustic aesthetic by manually pulling loose horizontal and vertical threads from the edges of the fabric until you have a nice, even fringe about 1/4 inch deep.
Now you have a stunning, nautical-inspired textile art piece ready to display or gift

PENCIL GUIDE
Understanding Pencil Grades from H to B
From first sketch to finished drawing — learn pencil grades, line control, and shading techniques.
Explore the Full Guide
Color-Pop Coral Reef Layering
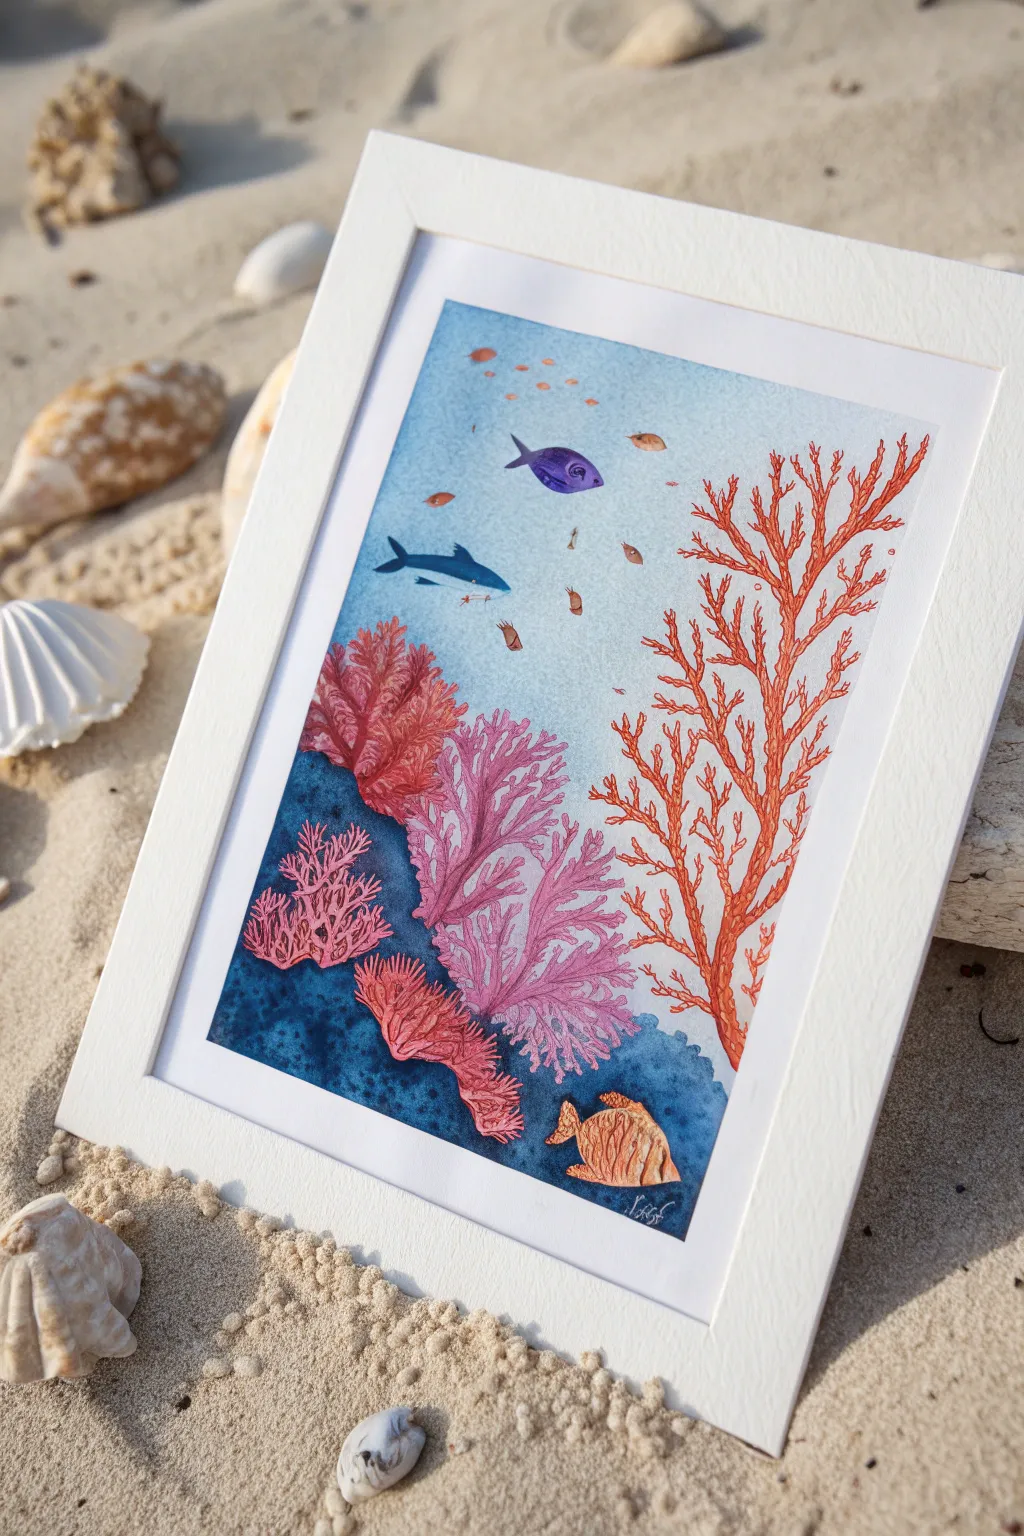
Capture the delicate beauty of a vibrant underwater ecosystem with this layered watercolor project that emphasizes organic shapes and translucent color washes. You’ll build up depth from the deep blue sea floor to the sun-dappled surface, populated by drifting sea life and intricate coral structures.
How-To Guide
Materials
- Cold press watercolor paper (300 gsm)
- Watercolor paints (Indigo, ultramarine, coral red, opera pink, bright orange, purple)
- Round watercolor brushes (sizes 2, 6, and a fine liner)
- White gouache or white gel pen
- Pencil and eraser
- Masking tape
- Two jars of water
- Paper towels
- White mat frame for display
Step 1: Setting the Scene
-
Paper Prep:
Cut your watercolor paper to fit your frame size. Tape the edges down securely to a board with masking tape to create a crisp white border and prevent buckling when wet. -
Initial Sketch:
Lightly sketch the main coral shapes. Focus on the large branching structure on the right, the bushy fan corals in the center, and the rocky bottom. Keep pencil lines faint so they disappear under the paint. -
The Deep Blue Wash:
Mix a concentrated wash of Indigo and Ultramarine. Apply this to the bottom third of the paper, carefully painting around your sketched coral shapes to leave them white for now. While still wet, dab in a little extra pigment in the corners for depth. -
Fading Upwards:
Dilute your blue mix significantly with water. Continue painting upwards to create the water column, getting lighter and lighter as you reach the top edge to simulate sunlight filtering down.
Step 2: Painting the Coral
-
Base Layers for Fans:
Using a size 6 brush, fill in the central fan corals with a watery wash of Opera Pink mixed with a touch of purple. Let the shapes be somewhat organic and loose. -
The Giant Branch:
For the large coral structure on the right, mix a vibrant Coral Red with a hint of orange. With a smaller brush (size 2), paint the main trunk and primary branches, tapering them as they extend upward. -
Adding Detailed Branches:
Switch to a fine liner brush. Extend the red coral with many delicate, twig-like offshoots. The key is to keep your hand shaky and organic—nature rarely make straight lines. -
Texturing the Pink Fans:
Once the pink base layer is bone dry, use a slightly darker, less watered-down pink mix to paint vein-like structures over the top. This layering creates the ‘fan’ effect. -
Foreground Corals:
Paint the bottom-most coral clusters using a deep red or maroon. Use short, stippling strokes to suggest a rough, velvety texture distinct from the smooth branches above.
Bleeding Lines?
If your coral colors are bleeding into the blue, ensure each section is 100% dry before painting an adjacent area. Use a hair dryer on low heat to speed this up.
Step 3: Bringing in Sea Life
-
The Purple Swimmer:
Paint a small, almond-shaped fish in the upper center using a rich purple. Add a tiny fin and tail. -
The Shadowy Shark:
To the left, paint a sleek shark silhouette using a mix of Indigo and Phthalo Blue. Keep the edges sharp to show movement. -
Bottom Dweller:
Add the textured orange fish near the bottom right corner. I like to use a ‘dry brush’ technique here—wiping most paint off the brush first—to give the fish a scaly, rough look. -
Tiny Fish School:
Using the tip of your smallest brush and orange paint, dab tiny flecks and triangles near the surface to represent a distant school of small fry.
Salt Texture Magic
Sprinkle table salt into the wet blue wash at the very beginning. When dry, brush it off to create amazing natural ‘bubble’ textures in the water.
Step 4: Final Details
-
Defining the Eyes:
Once the fish are dry, use a tiny dot of black paint or a fine pen to add eyes to the purple fish and the bottom dweller. -
White Highlights:
Use white gouache or a gel pen to add tiny highlights to the fish eyes and subtle highlights on the tips of the red coral branches for dimension. -
Ocean Floor Texture:
If the deep blue bottom looks too flat, glaze over it with a very watery layer of dark blue and drop in tiny sprinkles of salt while wet to create a sandy texture. -
Reveal:
Wait for the entire piece to be completely dry. Carefully peel away the masking tape at a 45-degree angle to reveal your clean white border.
Place your finished piece in its frame and enjoy the calm, aquatic atmosphere it brings to your space
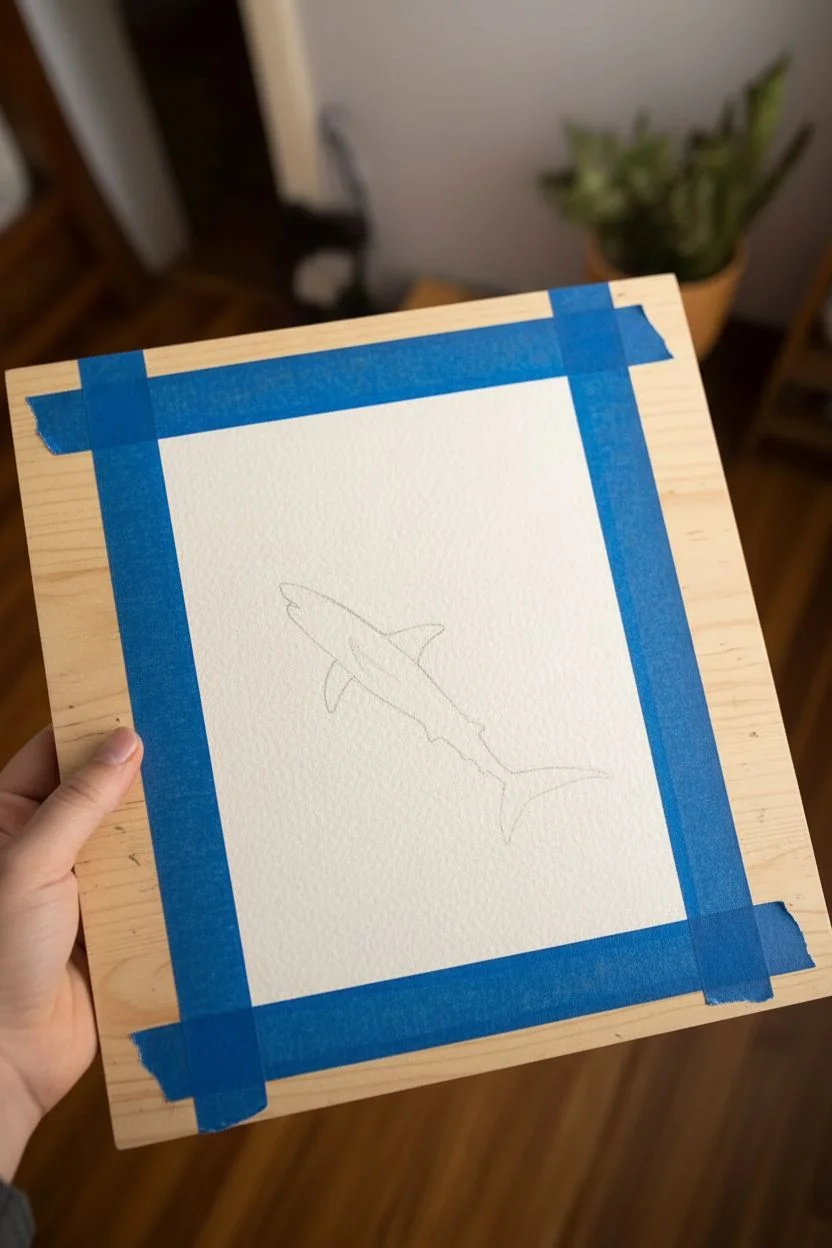
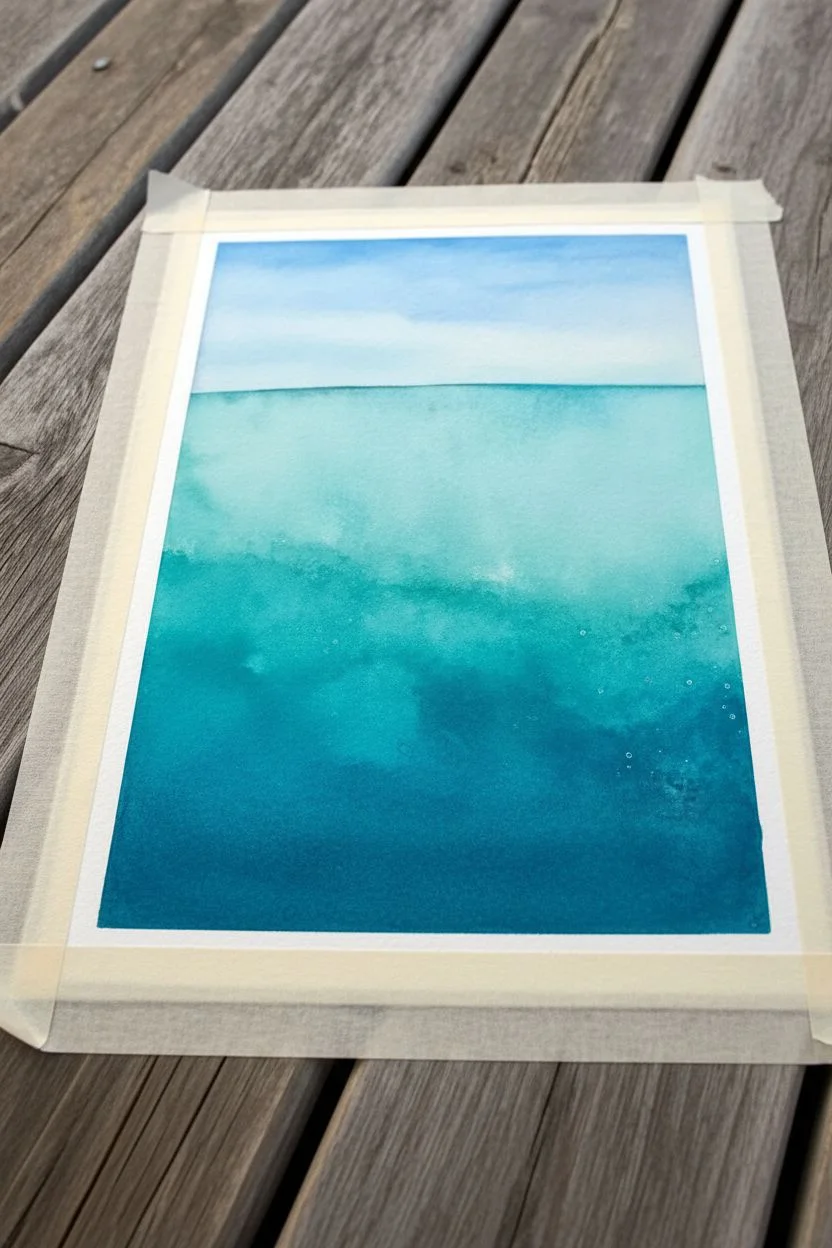
Ocean Animal Silhouettes in Deep Blue
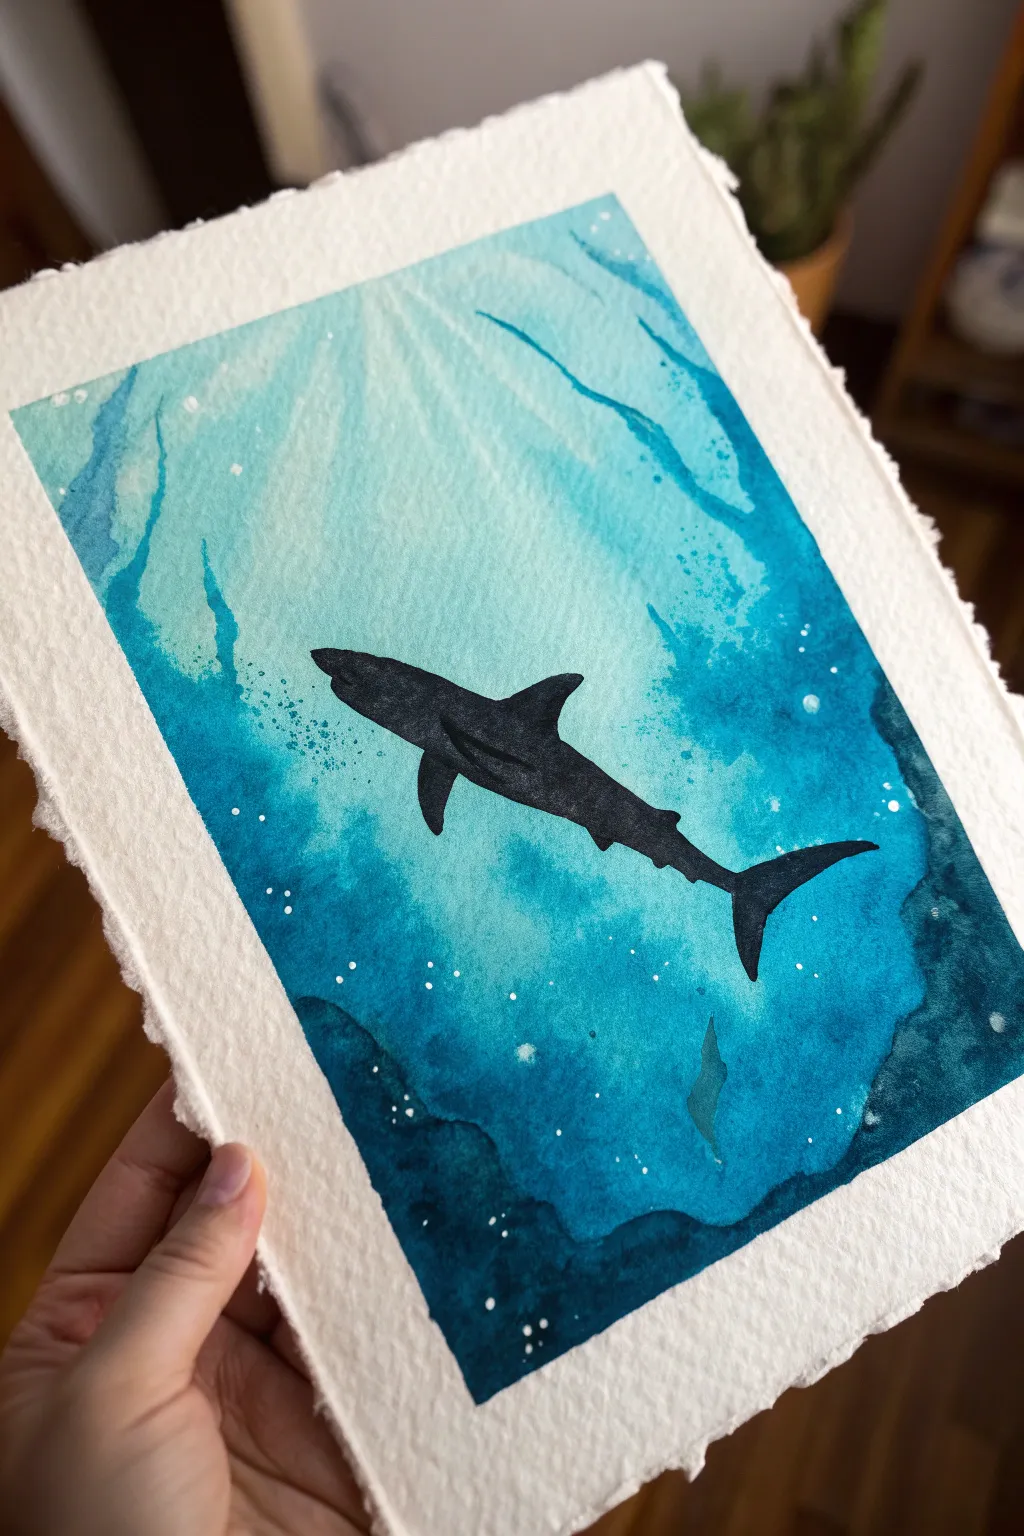
Capture the mysterious beauty of the deep sea with this striking watercolor painting featuring a lone shark silhouette. By using a monochromatic palette of blues and teals, you’ll create atmospheric underwater light rays that frame the crisp, dark subject perfectly.
Step-by-Step Guide
Materials
- Cold press watercolor paper (300 gsm or heavier, preferably with deckled edges)
- Masking tape or painter’s tape
- Watercolor paints (Phthalo Blue, Turquoise, Indigo, Prussian Blue)
- Black watercolor paint or black gouache (for the silhouette)
- Large flat brush or wash brush
- Medium round brush (size 6 or 8)
- Small detail brush (size 0 or 1)
- Jar of clean water
- Paper towels
- White gouache or white gel pen (for bubbles)
- Pencil and eraser
Step 1: Setting the Scene
-
Prepare the paper:
If your paper doesn’t have deckled edges, you can gently tear the edges against a ruler to create that rough, organic look. Tape the paper down to a board, leaving a border of about half an inch inside the deckled edge to keep the painting centered. -
Sketch the silhouette:
Lightly sketch the outline of the shark in the center of the paper using a hard pencil (H or HB). Focus on the distinct dorsal fin and the curve of the tail. Keep your lines very faint so they don’t show through later. -
Pre-wet the background:
Using your large wash brush and clean water, wet the entire area around the shark sketch. Be careful not to get water inside the shark outline; this dry area will act as a resist for now.
Clean Lines Pro-Tip
For a razor-sharp silhouette, use liquid masking fluid on the shark shape before painting the background. Rub it off only after the ocean wash is 100% dry.
Step 2: Creating the Ocean Gradient
-
Establish the light source:
While the paper is wet, drop dilute Turquoise or a light Aqua wash near the top center of the paper. This lighter area represents the sun filtering through the water surface. -
Build the mid-tones:
Switch to a Phthalo Blue or bright blue. Start painting in sweeping, diagonal strokes radiating downward from the top light source. Allow the paint to bleed naturally into the wet paper. -
Deepen the depths:
Mix Indigo or Prussian Blue to create a dark, deep blue. Apply this to the bottom corners and the lower third of the painting. Let the dark blue flow upward slightly to blend with the mid-tones, suggesting the abyss below. -
Create light rays:
While everything is still damp, rinse your flat brush and dry it slightly so it’s ‘thirsty.’ Gently lift out pigment in diagonal streaks radiating from the top, creating soft beams of light cutting through the water. -
Add texture:
While the darkest bottom areas are semi-dry, drop in a few pinches of clear water or salt if you want extra texture on the ‘ocean floor’ area, though a smooth wash works well too for a misty look. -
Dry completely:
Let this background layer dry thoroughly. If the paper feels cool to the touch, it’s still damp. I usually wait at least 30 minutes or use a hairdryer on a low setting.
Step 3: Painting the Silhouette
-
Fill the shark shape:
Once the background is bone-dry, load your medium round brush with highly pigmented black watercolor or black gouache. Carefully fill in the shark outline you sketched earlier. -
Refine the edges:
Switch to your small detail brush to sharpen the tips of the fins and the tail. Crisp edges are crucial here to make the silhouette pop against the soft background. -
Check opacity:
If the black looks patchy once it starts drying, apply a second coat to ensure a solid, matte silhouette with no light showing through.
Level Up: Bioluminescence
Add a magical touch by painting faint, glowing dots along the shark’s side or in the deep water using neon or fluorescent blue paint.
Step 4: Atmospheric Details
-
Add floating particles:
Mix a small amount of white gouache with water until it’s milky. Tap your brush over the paper to splatter tiny white droplets, primarily clustered near the shark and the darker bottom areas. -
Paint specific bubbles:
Use your detail brush and pure white gouache (or a gel pen) to add a few deliberate, larger bubbles trailing behind the shark or fins to suggest movement. -
Layer rocky shadows:
If you want to frame the scene, use a transparent dark blue wash to paint faint, rocky shapes in the bottom corners over the dried background, adding depth without distraction. -
Final assessment:
Step back and look at your composition. If the light rays have faded too much, you can gently scrub them with a damp stiff brush to lift a little more pigment, but be gentle. -
Remove tape:
Peel the tape away slowly at a 45-degree angle to reveal the crisp border against the deckled edge.
Frame your underwater scene in a floating frame to show off those beautiful paper edges


Above-and-Below Split Ocean View

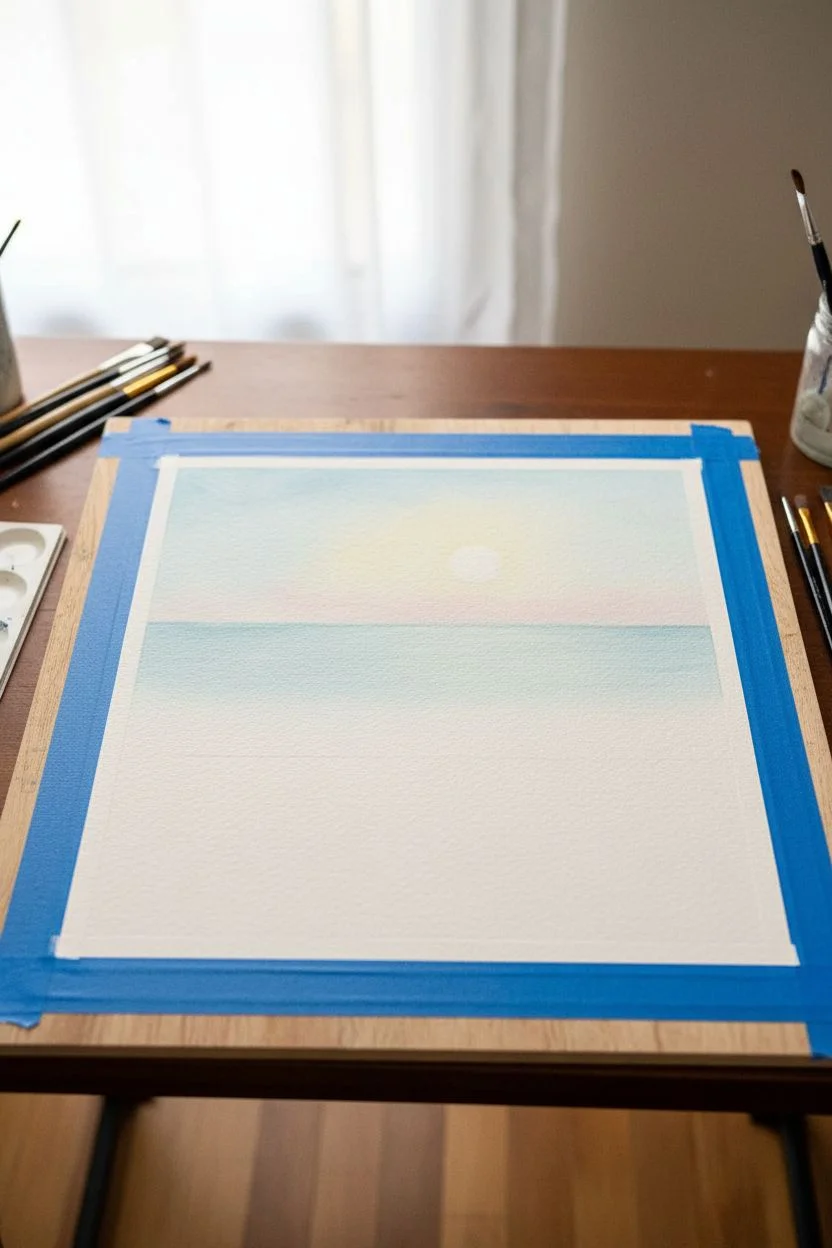
Capture the serene beauty of morning light reflecting on calm waters with this soft watercolor-style acrylic painting. You’ll layer gentle gradients to create a glowing sun and a peaceful lone boat bobbing on the waves.
Step-by-Step
Materials
- Heavyweight watercolor paper or mixed media board (minimum 300gsm)
- Painter’s tape or masking tape
- Acrylic paints: Titanium White, Phthalo Blue (Green Shade), Cobalt Blue, Cadmium Yellow Light, Alizarin Crimson, Burnt Umber
- Matte medium or glazing liquid
- Flat wash brushes (1 inch)
- Small round brushes (size 2 and 4)
- Palette for mixing
- Paper towels
- Jar of clean water
Step 1: Preparation and Sky
-
Secure the Borders:
Begin by taping down your paper to a sturdy board using painter’s tape. Create a generous border, perhaps two inches wide, to mimic the clean white frame seen in the example. Press the tape edges firmly to prevent paint seepage. -
Prime the Surface:
Depending on your paper’s texture, apply a very thin wash of clear water or diluted matte medium over the designated painting area. This helps the subsequent layers of paint flow smoothly without soaking in too quickly. -
Map the Horizon:
Using a pencil very lightly, draw a straight horizontal line about two-thirds of the way down the paper. This will separate your sky from the sea. Lightly sketch a small circle for the sun just above this line. -
Paint the Upper Sky:
Mix a large amount of Titanium White with a tiny dot of Cobalt Blue. Start at the very top of the sky area and paint downwards using a flat brush, adding more white as you descend to fade the blue out almost completely. -
Create the Setting Glow:
While the lower sky is still slightly damp, mix Titanium White with a whisper of Cadmium Yellow. Paint around the sun circle, blending outwards into the pale blue. Add a tiny touch of Alizarin Crimson to the white for a soft pinkish haze right along the horizon line. -
Define the Sun:
Paint the sun circle with pure Titanium White. For a softer look, you can gently scumble the edges with a dry brush so it appears to glow rather than being a hard sticker shape.
Bleeding Tape?
If paint bleeds under tape, wait for it to dry fully. Then, apply a thick white acrylic or gouache over the mistake to restore the clean border edge.
Step 2: Painting the Ocean
-
Mix the Sea Base Color:
Combine Phthalo Blue, a touch of Cadmium Yellow (to make teal), and plenty of Titanium White. You want a bright, crisp turquoise. Test the color on a scrap, aiming for a shade slightly darker than the sky. -
Establish the Horizon Line:
Using your flat brush, paint a clean, straight line right against the bottom of the sky. The color here should be your deepest teal mix to create contrast against the pale horizon light. -
Create the Sun Path:
As you paint the water downwards, leave a vertical column directly under the sun unpainted or very lightly washed. This negative space will be the sun’s reflection. I like to keep this area rough and jagged to mimic shimmering water. -
Layering the Waves:
Mix a slightly darker version of your teal using less white. With a smaller flat brush, create horizontal strokes across the water, skipping over the lighter areas. Keep strokes smaller and closer together near the horizon to suggest distance. -
Foreground Texture:
In the bottom third of the painting, use larger, looser strokes. Mix a deeper blue-green by adding a dot of Burnt Umber or Alizarin Crimson to your teal mix to desaturate it slightly. Paint distinct wave shapes here, showing the movement of the water. -
Refining the Reflection:
Using a small round brush and watery white paint, add thin, broken horizontal lines across the sun path column you left earlier. These are the crests of small waves catching the light.
Step 3: The Boat and Details
-
Sketch the Boat:
Once the sea layer is completely dry, mix Titanium White with a tiny bit of blue-grey. Paint a simple, curved hull shape in the lower middle section. It should look like a small crescent floating on the water. -
Shadow the Hull:
Mix a dark grey-blue. Paint the bottom edge of the boat and a small cast shadow on the water directly beneath it to anchor the vessel in the scene. -
Add the Figure:
With a very small round brush (size 2), paint a tiny silhouette inside the boat. A simple deep red or maroon shape works well to contrast with the blue water. -
Paint the Oar:
Using a thin, dark line (dark brown or grey), paint a single oar extending from the boat into the water. Add a tiny white highlight on the oar where the sun hits it. -
Final Highlights:
Take pure white on your smallest brush and add tiny sparkles on the water around the boat and nearest to the viewer. This makes the water look wet and lively. -
The Reveal:
Wait until the painting is 100% dry to the touch. Carefully peel away the painter’s tape at a 45-degree angle to reveal your crisp, clean white border.
Golden Hour Glow
Glaze the finished sun path with a very transparent washes of watered-down yellow or orange to warm up the reflection and make the light feel more intense.
Step back and admire the calm atmosphere you have created with just a few simple layers of color
Bubble Print Sea With a Fish School

Capture the serene depths of the ocean with this mixed-media project that combines traditional watercolor techniques with a playful bubble printing method. The result is a stunning underwater scene featuring sleek fish silhouettes gliding above effervescent foam.
Step-by-Step Guide
Materials
- High-quality watercolor paper (cold press, 300lb recommended)
- Watercolor paints (Turquoise, Phthalo Blue, Cerulean Blue)
- White gouache or acrylic ink
- Liquid dish soap
- Drinking straw
- Small cup or bowl for bubble mixing
- Fine liner brush (size 0 or 00)
- Flat wash brush (1 inch)
- Black waterproof ink or fine tip black micron pen
- Masking tape
- Palette for mixing
- Paper towels
Step 1: Setting the Scene
-
Tape the Edges:
Begin by securing your watercolor paper to a sturdy board using masking tape. This creates that crisp, clean white collection border seen in the final piece and prevents the paper from buckling when wet. -
Prepare the Gradient:
Mix three shades of blue on your palette: a very pale watery blue for the sky/surface, a vibrant turquoise for the shallow water, and a deeper teal or phthalo blue for the depths. -
Paint the Sky and Horizon:
Using your flat wash brush, apply a clean water glaze to the top third of the paper. Gently wash in your palest blue, letting it fade almost to white at the top. While still damp, define a straight horizon line about a quarter of the way down using a slightly stronger blue mix. -
Deepen the Waters:
Moving downwards from the horizon, switch to your turquoise paint. Apply it in horizontal strokes, gradually blending into the deeper teal as you reach the bottom half of the paper. Keep the wash fluid to avoid harsh lines. -
Dry Completely:
Let the background wash dry fully before proceeding. Is is crucial that the paper is bone dry so the next layers sit on top rather than bleeding into the background.
Step 2: Creating the Bubble Texture
-
Mix the Bubble Solution:
In a small cup, mix a squirt of liquid dish soap with a small amount of turquoise and deep blue watercolor paint and a splash of water. The mixture should be liquid but vibrant. -
Create the Foam:
Insert a straw into the cup and blow gently until bubbles rise above the rim of the cup, forming a mound of colored foam. -
Print the Bubbles:
Gently press a piece of scrap paper onto the bubbles first to test the consistency. Once confident, gently touch the bubble mound to the bottom section of your artwork, allowing the bubbles to pop and leave ring-like impressions on the paper. -
Refining the Bubbles:
Repeat the printing process, layering different shades of blue bubbles. I find outlining a few of the dried bubble prints with white gouache or a white gel pen really helps them pop and look like sea foam. -
Adding Solid Rounds:
To mimic the look in the reference, paint a few solid circles using diluted white gouache or pale blue within the bubble field to create depth and variation.
Bubble Trouble?
If your bubbles are popping too fast or not leaving a mark, add a tiny drop of glycerin or corn syrup to your soap mixture to make the walls of the bubbles stronger.
Step 3: Adding the Life
-
Sketch the School:
Lightly sketch the outline of the fish swimming in a uniform direction using a very hard pencil (like 4H) so the lines disappear easily later. -
Paint the Fish Bodies:
Using a dark blue-grey mix (indigo works well), fill in the bodies of the fish. These should look like silhouettes against the bright water. -
Define the Details:
Switch to your fine liner brush or a black waterproof pen. Carefully draw the outlines, fins, and tails of the fish. Add a sharp line through the center of each fish to suggest lateral lines and dimension. -
Small Fish in the Distance:
Add tiny, simple silhouettes of fish higher up in the background and further away. Make these lighter in color and less detailed to create atmospheric perspective. -
Final White Highlights:
Using your smallest brush and white gouache, add tiny rising air bubbles above the printed foam area and a small highlight on the backs of the larger fish to show light hitting them from above. -
The Reveal:
Once everything is completely dry, slowly peel away the masking tape at a 45-degree angle to reveal your clean, crisp edges.
Go deeper
Add a few vertical streaks of white gouache fading downwards from the surface line to create ‘god rays’ of sunlight piercing through the water.
Hang your finished piece in a sunny spot to let those blue hues really shine
Shoebox Ocean Ecosystem Diorama
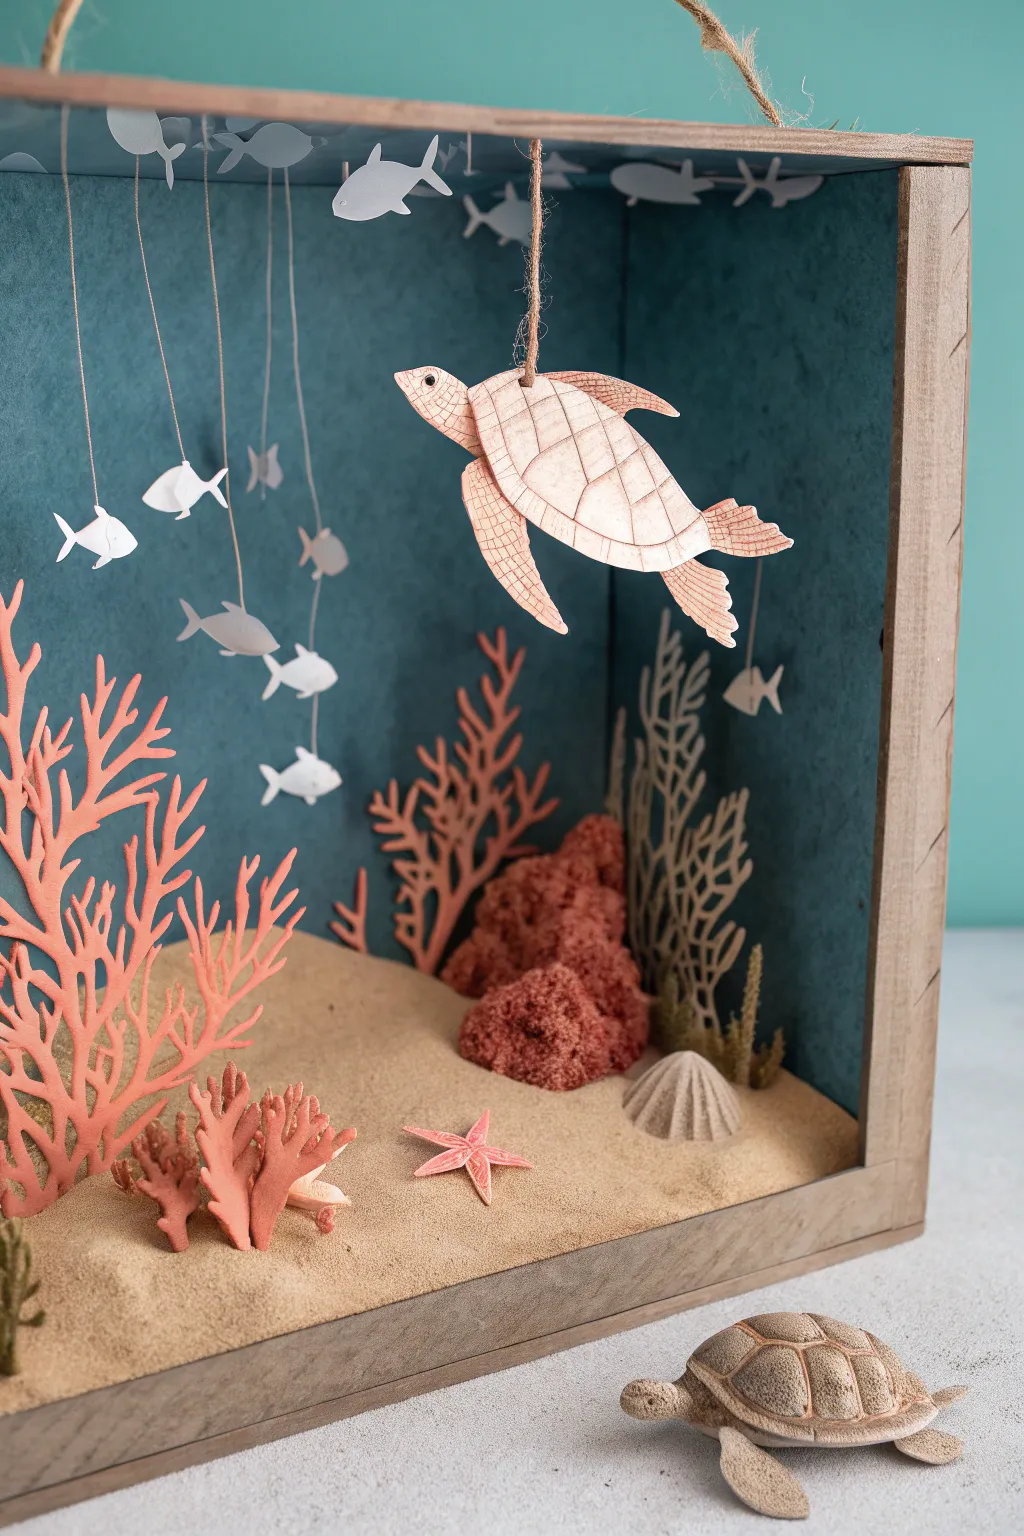
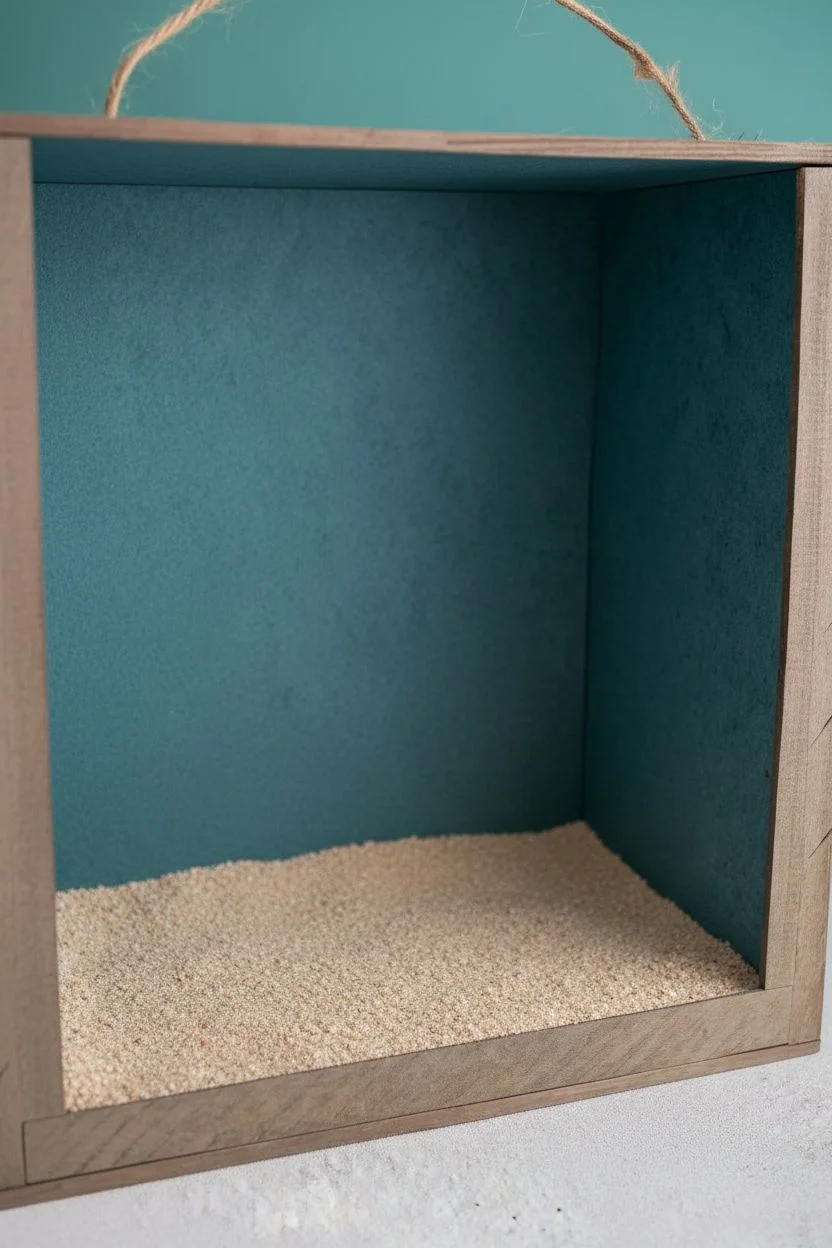
Transform a simple wooden crate or shoebox into a tranquil underwater world using suspended paper elements and natural textures. This diorama captures the depth of the ocean with layered cutouts and a sandy floor, creating a mesmerizing 3D ecosystem.
Step-by-Step
Materials
- Wooden craft crate or sturdy shoebox
- Deep teal or navy blue construction paper/cardstock
- Light pink or coral cardstock
- White or light grey cardstock
- Fine craft sand
- Natural jute twine
- Small dried moss clumps (dyed coral/pink and natural)
- Small seashell
- Pink modeling clay or polymer clay
- Scissors and X-acto knife
- Craft glue or hot glue gun
- Black fine-tip pen
- Pencil
Step 1: Preparing the Habitat
-
Line the background:
Measure the inside back panel and side panels of your wooden crate. Cut sheets of the deep teal construction paper to fit these dimensions exactly. -
Secure the backdrop:
Glue the teal paper firmly to the inside back and sides of the box. Smooth out any air bubbles to ensure a seamless underwater void. -
Create the ocean floor:
Apply a generous layer of craft glue to the bottom surface of the box. While the glue is wet, pour a thick layer of fine craft sand over it, pressing down gently to adhere. -
Remove excess sand:
Allow the glue to dry completely—refer to your glue’s instructions—then gently tip the box to shake out any loose sand that didn’t stick.
Twisting Turtle?
If your suspended turtle keeps spinning around, glue a second piece of twine to its tail and anchor it to the back wall. This stabilizes the figure so it always faces forward.
Step 2: Crafting the Coral Reef
-
Sketch coral shapes:
On your coral-colored cardstock, draw organic, branching shapes to resemble staghorn coral. Make some large and tal, and others shorter and wider for variety. -
Cut out the coral:
Carefully cut out these intricate shapes. Using a craft knife for the inner branches often gives cleaner edges than scissors. -
Prepare the moss:
Take your dried moss clumps. If they aren’t already colored, you can lightly dust them with pink chalk or spray paint, or simply use darker natural moss to represent rocky formations. -
Arranging the reef:
Glue the paper coral cutouts to the background paper, positioning them towards the bottom left. I find that layering them slightly creates a nice sense of density. -
Adding texture:
Glue the moss clumps and the small seashell onto the sandy floor near the paper coral to create a mixed-media 3D reef base. -
Sculpt small coral:
Using pink modeling clay, form small, tube-like coral structures. Nestle these into the sand in the foreground for added depth.
Lighting Magic
Add a small, battery-operated LED tea light or fairy lights behind the coral reef or tucked into the ceiling corners. This creates a magical, shimmering underwater glow.
Step 3: Adding Marine Life
-
Draw the sea turtle:
On light pink or beige cardstock, sketch a side-profile of a sea turtle. Include details like the shell segments (scutes) and flipper texture. -
Detail the turtle:
Go over your pencil lines with a fine-tip pen to define the shell pattern and add a small eye. Cut the turtle out carefully. -
Create a fish school:
Cut several small, simple fish silhouettes from white or light grey cardstock. Make them vary slightly in size to mimic natural perspective. -
Creating the starfish:
Cut a small five-pointed star shape from pink paper. Draw a faint line down the center of each arm and gently crease the paper along these lines to give it a 3D effect. -
Place the starfish:
Glue the starfish directly onto the sand in the center foreground.
Step 4: Suspension and Assembly
-
Prepare suspension lines:
Cut varying lengths of jute twine. You will need one thicker piece for the turtle and thinner strands (or white thread) for the fish. -
Attach the turtle:
Poke a tiny hole in the top center of the turtle’s shell. Thread the jute twine through and knot it securely. -
Hang the turtle:
Drill a small hole or use strong tape to secure the other end of the turtle’s twine to the ‘ceiling’ of the box, positioning it centrally. -
Hang the fish:
Glue the tails or backs of your small paper fish to the ends of the thinner strings. Tape or glue these strings to the ceiling of the box at various depths—some near the back, some closer to the front. -
Making the top handle:
If using a wooden crate, attach a loop of thick jute rope to the top exterior to act as a handle or hanger. -
Optional: sculpted turtle:
If you have extra clay, sculpt a second, larger turtle to sit outside the box as a companion piece to your diorama.
Now you have a captured piece of the ocean to display on your shelf
Tissue Paper Light Rays Underwater
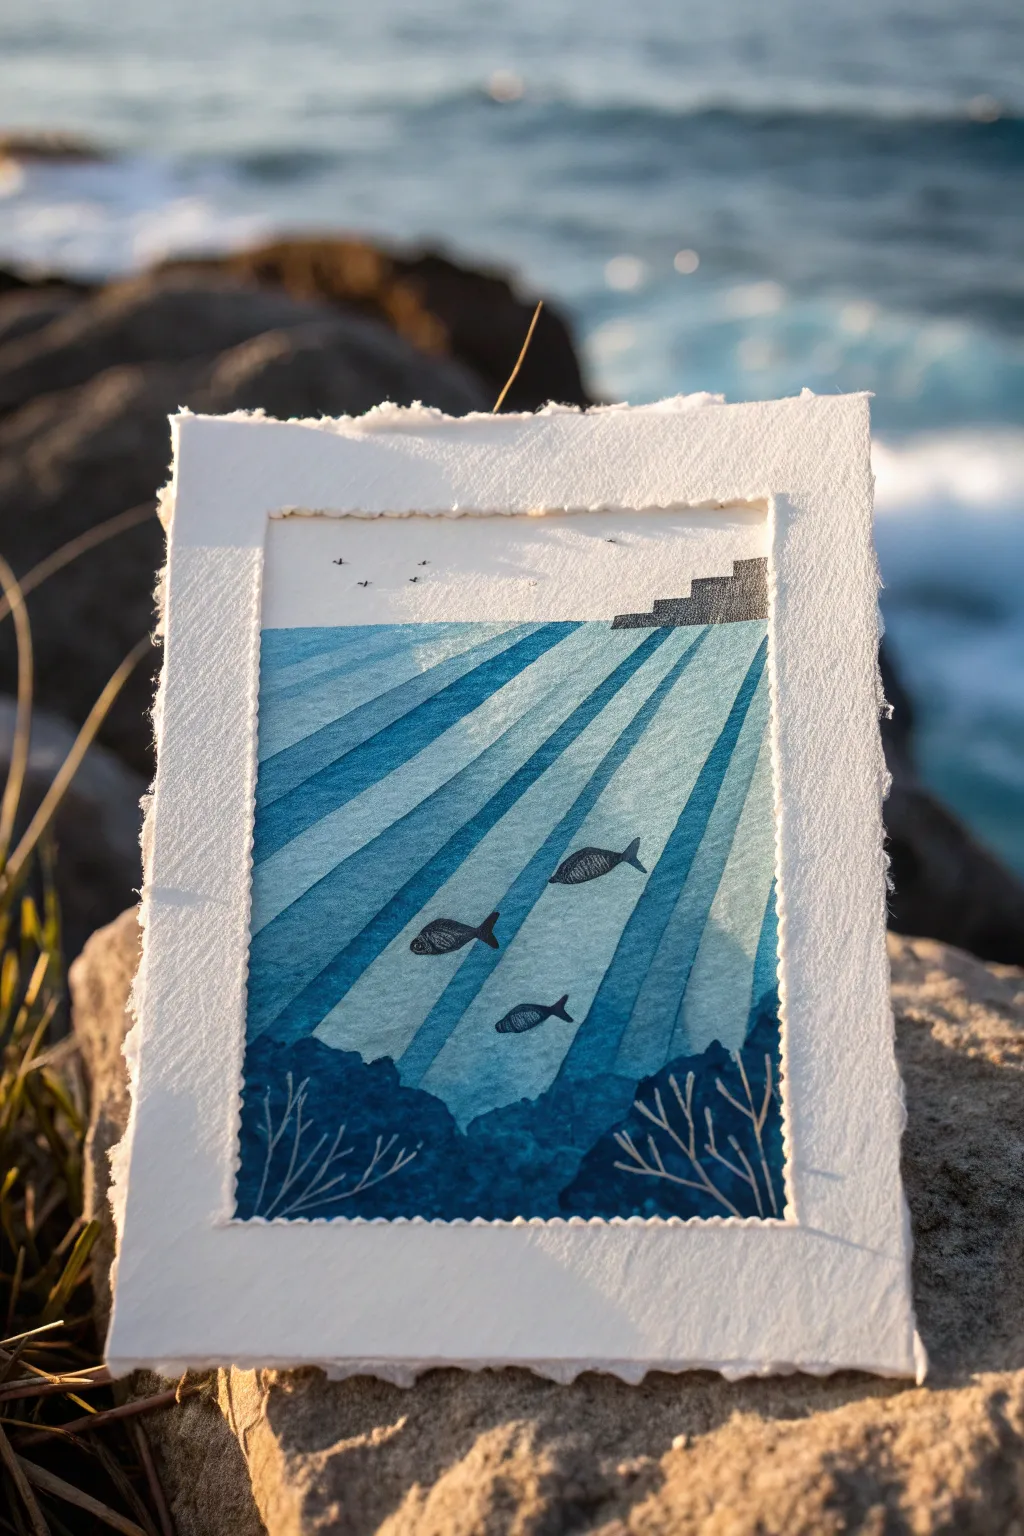
Capture the magic of sunlight piercing through ocean depths using the translucent qualities of tissue paper. This mixed-media project combines layering techniques with simple silhouettes to create a serene, three-dimensional underwater window.
Step-by-Step Tutorial
Materials
- Heavyweight watercolor paper or cardstock (white)
- Blue tissue paper (bleeding or non-bleeding work, but tonal variety is key)
- Teal or light blue tissue paper
- Mod Podge or diluted PVA glue
- Soft flat brush (for gluing)
- Black fine liner pen or black ink
- Black construction paper or cardstock
- White gel pen
- Scissors and X-Acto knife
- pencil
- Ruler
Step 1: Setting the Scene
-
Prepare the base:
Cut a rectangular piece of heavy white watercolor paper to serve as your background canvas. A size like 5×7 inches works well for this level of detail. -
Draft the horizon:
Lightly draw a horizontal line about one-third down from the top of your paper. This marks the surface of the water. -
Create the sun rays:
Cut long, tapered strips of blue and teal tissue paper. These should be wider at the bottom and come to a point at a specific spot on the water’s surface line, mimicking perspective. -
Plan the layout:
Dry fit your tissue paper strips on the white paper. Arrange them so they radiate from a single point or area on the horizon line, creating a fan-like effect of light beams.
Wrinkled Tissue?
Don’t panic if the tissue wrinkles while gluing! These imperfections actually enhance the watery effect, adding texture that looks like ripples in the current.
Step 2: Layering the Light
-
Apply the first layer:
Brush a thin layer of Mod Podge or glue onto the paper below the horizon line. Gently place your lightest blue tissue strips down first. -
Deepen the blues:
Layer darker blue tissue strips over the lighter ones, leaving gaps so the lighter colors show through. This overlapping creates instant depth and the illusion of water density. -
Seal the water:
Applying a very gentle top coat of glue over the tissue paper seals it down. Be careful not to tear the wet tissue; I find a soft dabbing motion works better than dragging. -
Create the horizon structure:
While the water dries, cut a small, jagged shape from black paper or draw directly with ink to represent a pier, steps, or rocky outcrop on the right side of the horizon line. -
Add gentle details:
Use a fine liner to add tiny birds in the sky area above the water. Keep them minimal—just small ‘m’ shapes or specks.
Go Deeper
Use a gradation of blue tints for the light rays. Start with very pale blue/white for the top rays and transition to deep indigo at the bottom for more realism.
Step 3: Inhabiting the Deep
-
Design the fish:
Sketch three simple fish shapes on a separate piece of black paper or directly onto the dried blue background if you are confident with ink. Vary their sizes slightly for visual interest. -
Place the marine life:
Glue the fish cutouts into the ‘beams’ of light. Positioning them diagonally helps simulate movement through the current. -
Form the seabed:
Tear or cut a piece of dark blue or black paper to create a rocky, uneven bottom border. Glue this across the very bottom of your scene. -
Add coral silhouettes:
Using a white gel pen, draw delicate, branching coral structures on top of the dark seabed. The white ink will pop against the dark bottom, looking like light catching the reef.
Step 4: Framing the View
-
Create the deckle frame:
Take a larger piece of heavy watercolor paper. Measure a window in the center slightly smaller than your artwork. -
Cut the aperture:
Use a craft knife to cut out the center window. To get the specific look in the image, try tearing the paper against a ruler instead of cutting, or use deckle-edge scissors for a rough, organic border. -
Mount the artwork:
Apply glue to the back of your frame (or the edges of your artwork) and press them together firmly. The frame should overlap the edges of your painting, hiding any messy tissue ends. -
Final texture check:
Let everything dry completely under a heavy book to ensure the paper stays flat and doesn’t buckle from the glue moisture.
Display your framed ocean window where natural light can catch the texture of the paper layers
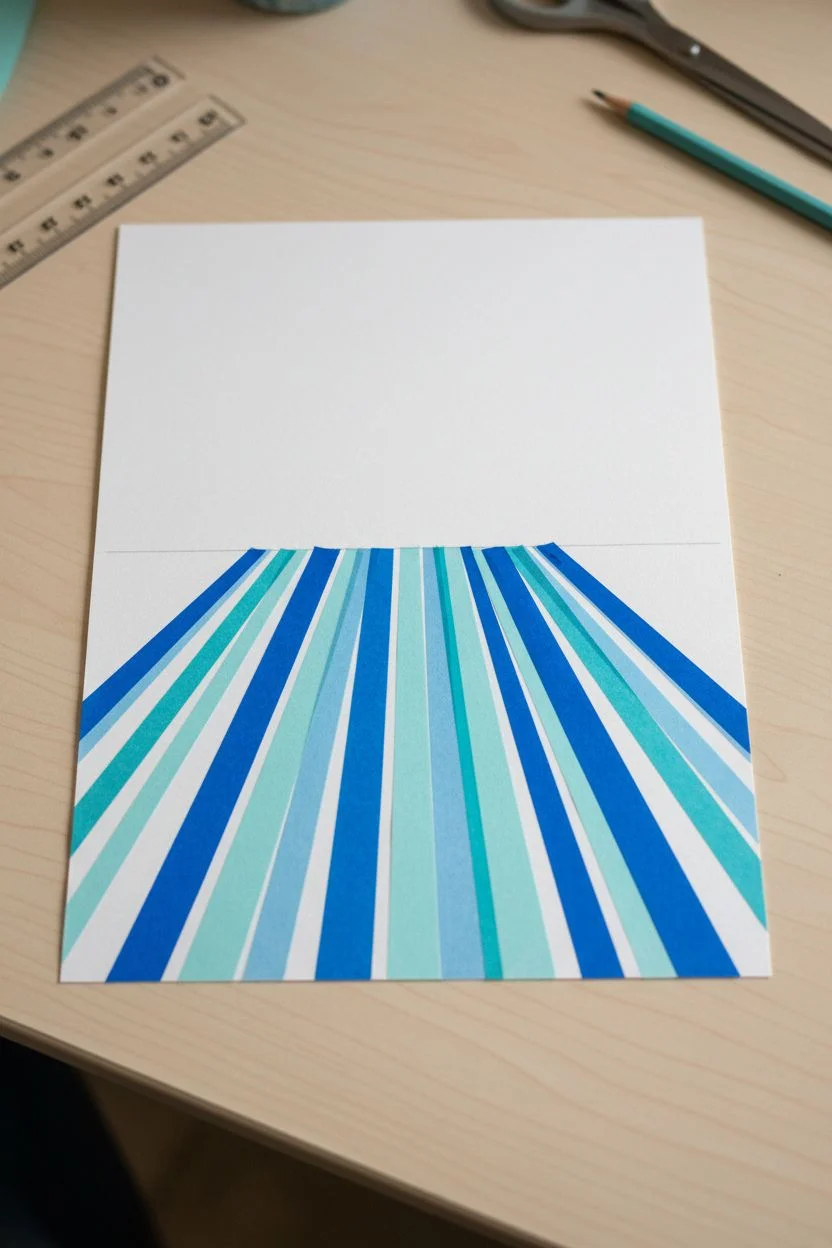
Abstract Ocean Currents With Pour-and-Drag
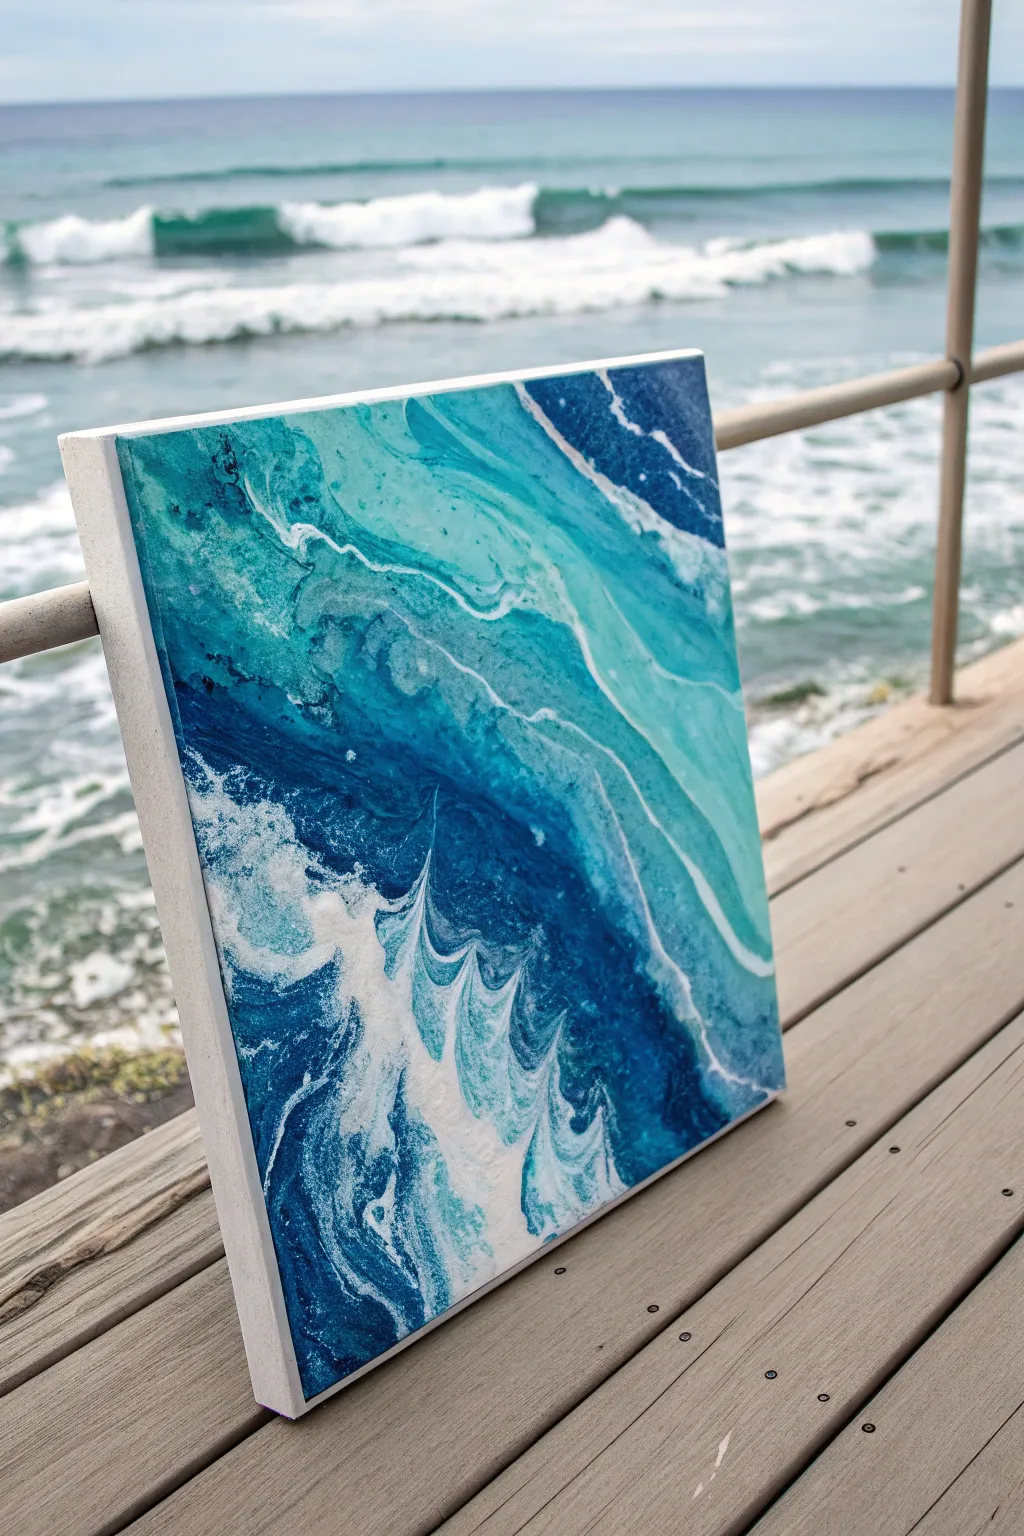
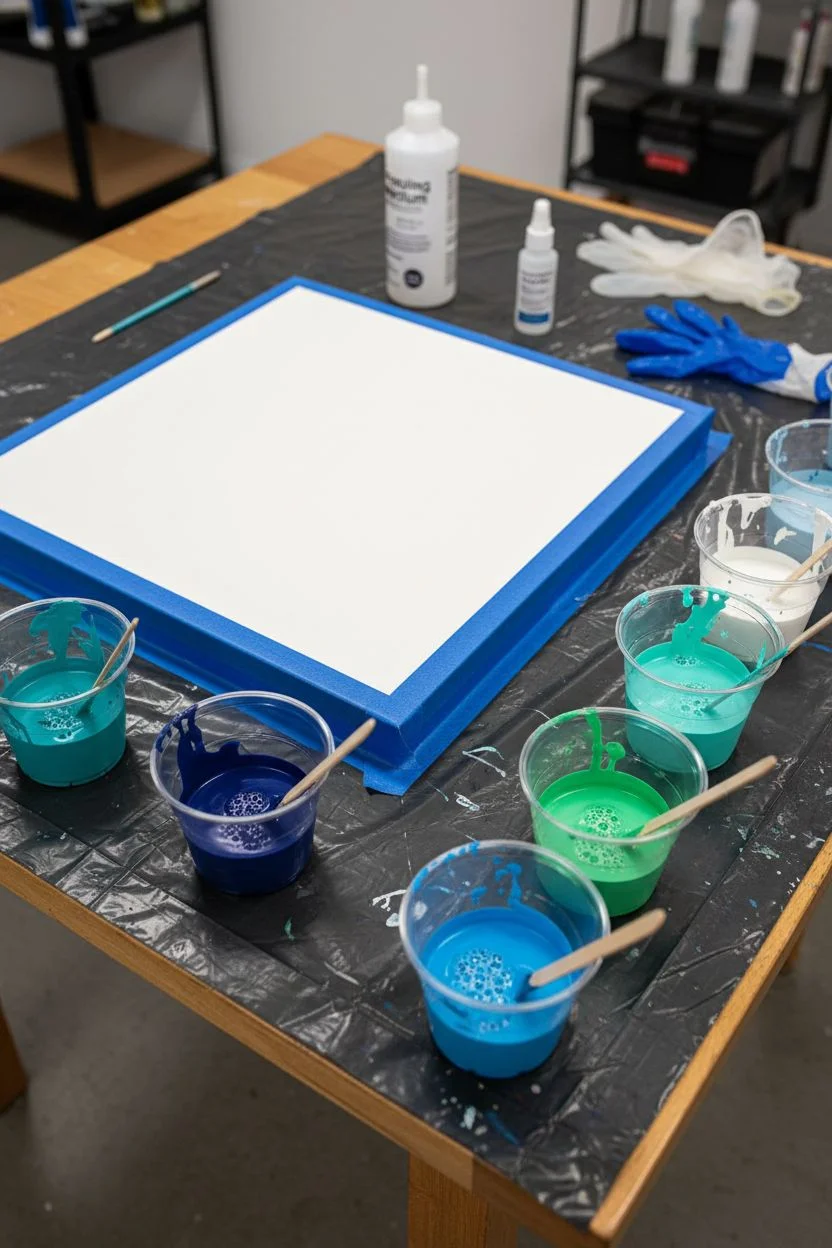
Capture the raw energy of rolling tides and deep sea currents with this stunning fluid art project. By combining the Dutch pour technique with strategic swiping, you’ll create organic whitecaps and sweeping turquoise channels that look just like an aerial view of the ocean.
How-To Guide
Materials
- Square stretched canvas (12×12 or similar)
- White gesso (optional for priming)
- Acrylic paints (Titanium White, Phthalo Blue, Turquoise Deep, Aqua Green, Navy Blue)
- Pouring medium (Floetrol or Liquitex)
- Silicone oil (treadmill lubricant works well)
- Plastic cups for mixing
- Wooden stir sticks
- Hair dryer with a concentrator nozzle
- Plastic drop cloth
- Painter’s tape (for canvas back)
- Paper towels
- Torch (kitchen butane torch)
- Disposable gloves
Step 1: Preparation and Mixing
-
Protect your workspace:
Begin by covering your entire table with a plastic drop cloth. Acrylic pouring is inherently messy, and you’ll want to catch all the drips. -
Tape the canvas back:
Flip your canvas over and apply painter’s tape to the underside edges and the wooden frame. This keeps the back professional and clean once the paint dries. -
Prime the surface:
If your canvas isn’t already primed, apply a coat of white gesso and let it dry completely. This ensures the paint flows smoothly. -
Mix your paints:
In separate cups, mix each acrylic color with your pouring medium. A standard ratio is 1 part paint to 2 parts medium, but adjust until the consistency resembles warm honey. -
Add water if needed:
If your mixture is too thick, add water a few drops at a time. The paint should flow off the stick in a continuous stream without breaking immediately. -
Add silicone for cells:
Add 2-3 drops of silicone oil specifically to the Titanium White and the Turquoise Deep mixtures. Stir just enough to incorporate it, but don’t over-mix or the cells will be small.
Step 2: Creating the Composition
-
Lay the base layer:
Pour a generous amount of plain white paint (mixed with medium but no silicone) over the entire canvas. Spread it with a spatula or tilt the canvas until the surface is fully coated and wet. -
Pour the diagonal ribbon:
Starting from the top left corner moving diagonally towards the bottom right, pour ribbons of your colors. Layer them: Navy Blue first, then Phthalo Blue, followed by Aqua Green and Turquoise. -
Add white highlights:
Pour a thin stream of your silicone-infused White alongside and slightly on top of the blue ribbons. This interaction is crucial for creating the frothy wave effect. -
Negative space management:
Ensure you leave some areas of the base white visible, particularly at the very top right and bottom left corners, to create depth and contrast.
Pro Tip: Consistency is Key
For large, soft waves like those in the top right, keep your paint slightly thinner. Thicker paint holds its shape better for the jagged, white-capped areas at the bottom.
Step 3: Blowing and Tilting
-
Blow out the white:
Using your hair dryer on the ‘low’ cool setting, push the white base paint slightly over the colored ribbons first to submerge them just a bit. -
Expand the colors:
Now, blow the paint back outwards across the canvas. Aim the airflow to stretch the colors into wave-like shapes. The goal is to feather the edges where the blue meets the white. -
Create lacing:
I find that quickly moving the dryer back and forth over the white sections triggers the silicone, creating those beautiful web-like lacing effects that mimic sea foam. -
Tilt for composition:
Pick up the canvas and gently tilt it. Let the paint run off the edges slightly to stretch the composition and remove excess paint, which prevents cracking during drying. -
Refine the details:
If there are large blobs of color you don’t like, you can use a straw to blow them out manually for more precise control over small eddies and swirls.
Troubleshooting: Muddy Colors
If your blues turn gray or brown, you likely over-torched or over-manipulated the paint while wet. Stop while the colors are distinct; you can’t undo mixing on the canvas.
Step 4: Finishing Touches
-
Torch surface bubbles:
Quickly pass your butane torch over the surface. This pops air bubbles and encourages more silicone cells to rise to the surface, enhancing the texture. -
Clean the drips:
Run a finger or a craft stick along the underside edge of the canvas to wipe away dripping paint. Do this every 10 minutes for the first hour. -
Let it cure:
Place the artwork in a dust-free area on raised cups (so it doesn’t stick to the table) and let it dry undisturbed for at least 24-48 hours.
Once fully cured and varnished, you’ll have a permanent slice of the ocean to hang on your wall


Have a question or want to share your own experience? I'd love to hear from you in the comments below!