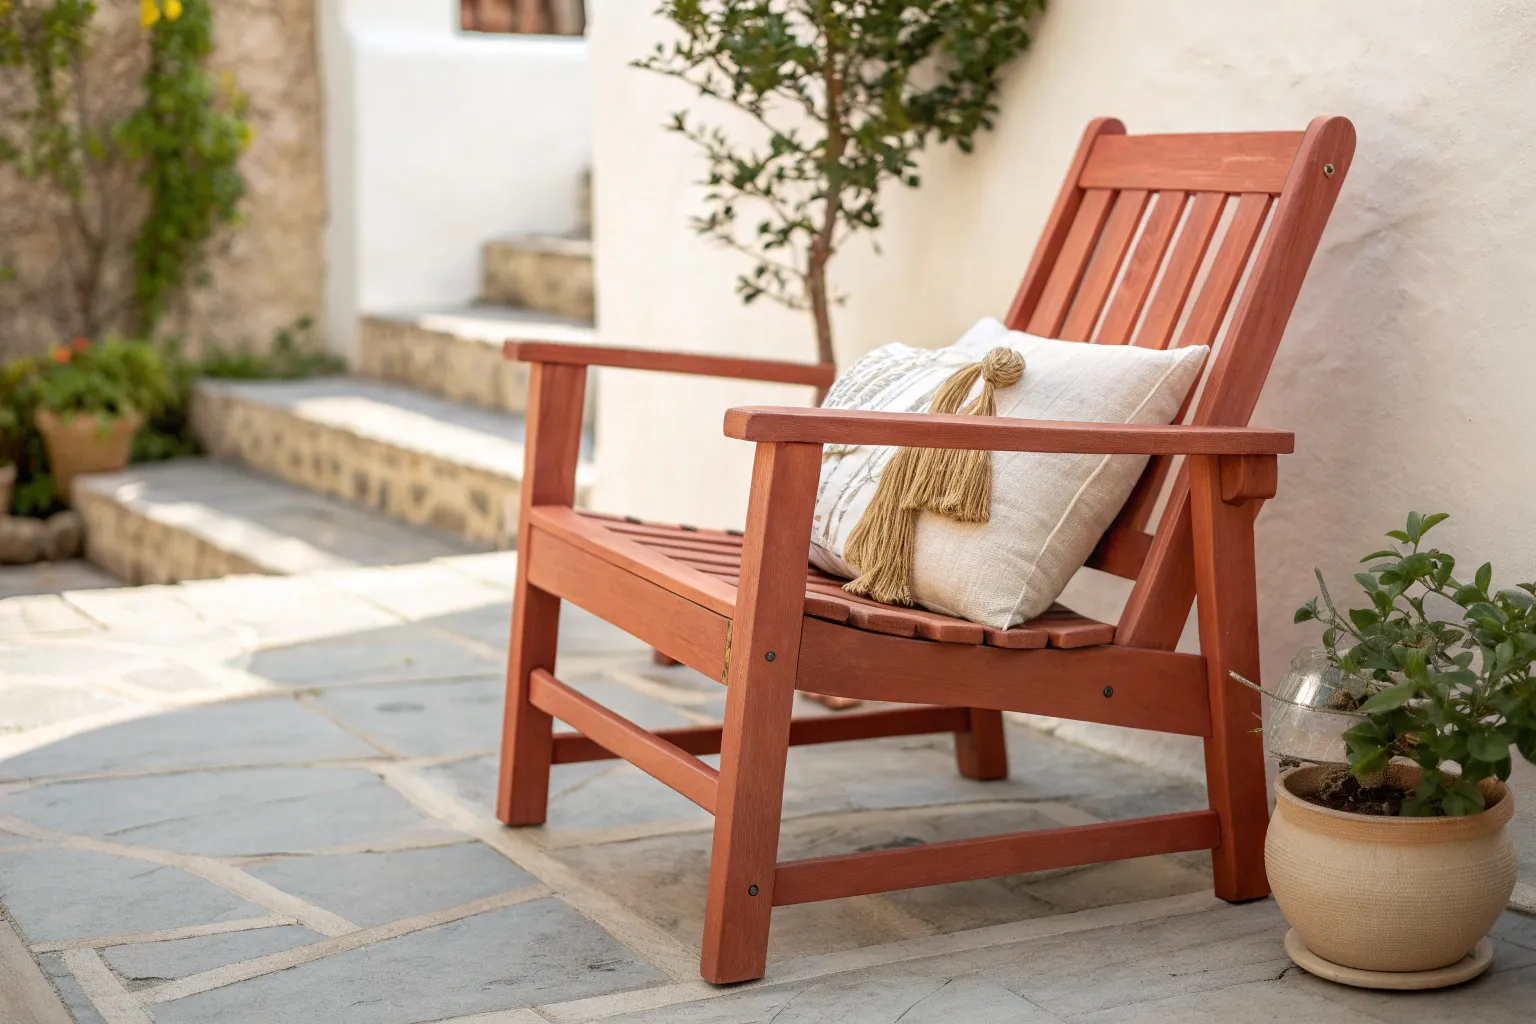
There’s something wildly satisfying about taking tired patio pieces and giving them a fresh, artsy second life with outdoor paint. Here are my favorite painted outdoor furniture ideas—from classic makeovers to the fun, “did you really paint that?” kind of details.
Classic Solid-Color Chair Refresh
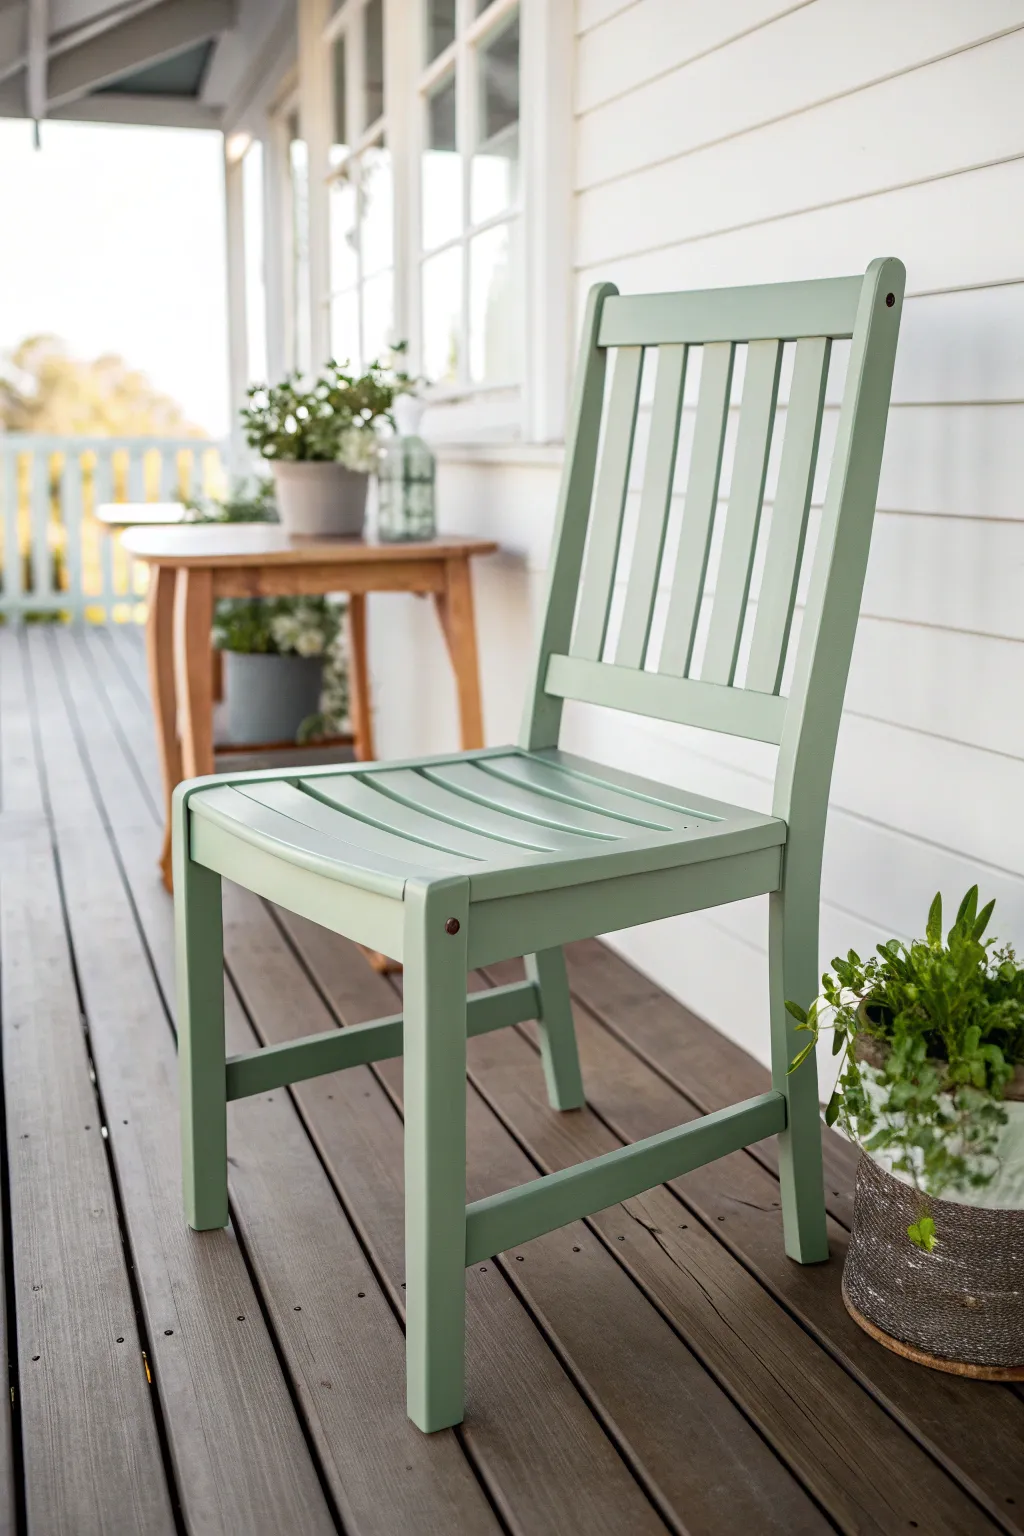

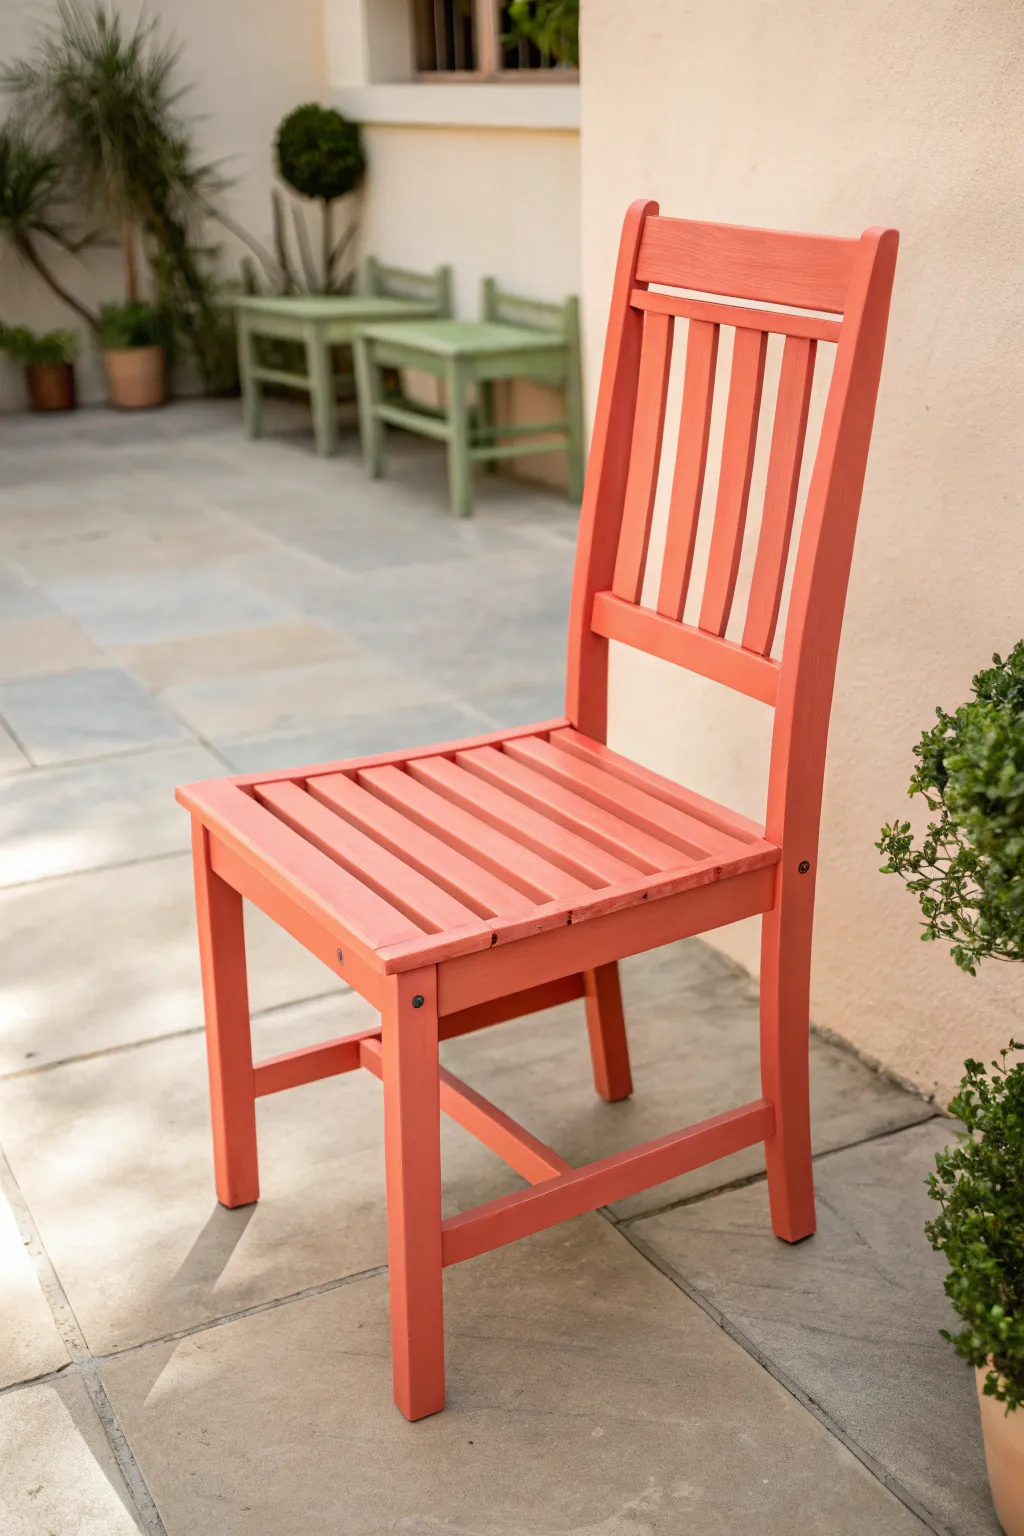
Give a tired wooden chair a fresh lease on life with this serene, nature-inspired update. The soft sage green finish adds a touch of classic elegance that blends perfectly with outdoor surroundings.
Step-by-Step
Materials
- Wooden slat-back chair (vintage or new unfinished)
- Medium-grit sandpaper (120-grit)
- Fine-grit sandpaper (220-grit)
- Tack cloth
- Wood filler (if repairing cracks)
- Painter’s tape
- High-quality exterior primer
- Exterior latex or enamel paint (Sage Green)
- 2-inch angled sash brush
- Small artist brush for tight corners
- Clear matte polyurethane sealer (optional)
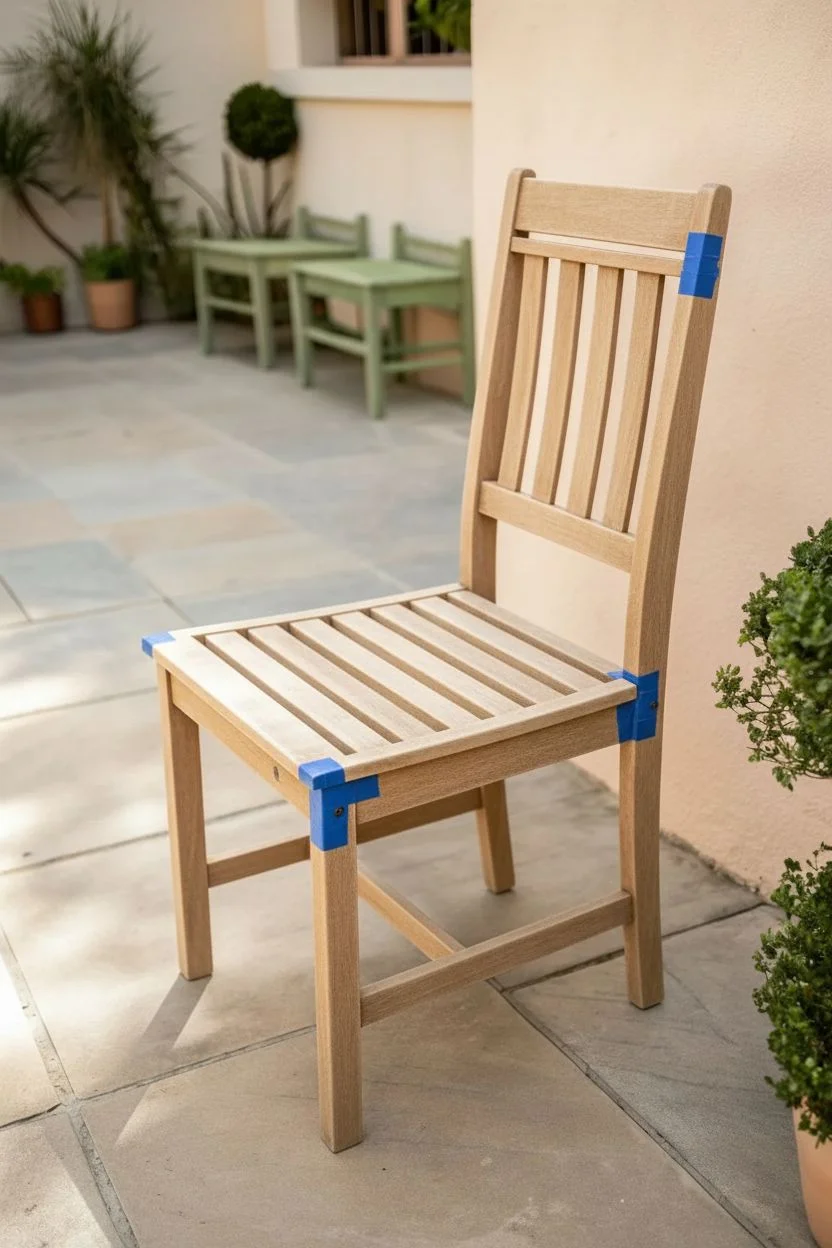
Step 1: Preparation
-
Inspection:
Begin by thoroughly inspecting your chair for any loose joints or rough patches. Tighten any loose screws with a screwdriver to ensure the frame is sturdy before you start working. -
Repairing Imperfections:
If you find deep gouges or cracks, fill them with a dab of wood filler. Smooth it over with a putty knife and let it dry completely according to the package instructions. -
Initial Sanding:
Using 120-grit sandpaper, sanding the entire chair to remove the old finish or rough up the existing surface. This creates ‘teeth’ for the new paint to adhere to. -
Fine Sanding:
Go over the chair once more with 220-grit sandpaper. This ensures an ultra-smooth base, which is the secret to a professional-looking finish. -
Cleaning:
Wipe down the entire piece with a tack cloth to remove every speck of dust. Even tiny dust particles can ruin the smoothness of your final coat. -
Taping (Optional):
If there are any metal hardware elements or glides on the feet you want to protect, mask them off carefully with painter’s tape.
Brush Maintenance Tip
Wrap your wet brush tightly in plastic wrap or a plastic bag between coats. This keeps the paint moist so you don’t have to wash the brush fully until the project is done.
Step 2: Priming
-
Flipping the Chair:
Turn the chair upside down and place it on a drop cloth. I find it much easier to start painting the hard-to-reach undersides first so you don’t miss any spots. -
Applying Primer:
Apply a thin, even coat of high-quality exterior primer using the angled sash brush. Focus on getting into the crevices between the slats. -
Drying Time:
Let the primer dry completely. Depending on humidity, this usually takes about 1-2 hours, but check your can for specifics. -
Light Sanding:
Once dry, lightly sand the primed surface with the fine-grit paper to knock down any raised grain or brush strokes.
Level Up: Dipped Legs
For a modern twist, leave the bottom 3 inches of the legs unpainted (taped off beforehand) to show natural wood, or paint them in a gold metallic finish for contrast.
Step 3: Painting
-
First Coat Application:
Stir your sage green paint thoroughly. Begin painting the underside of the chair while it is still flipped over. Use long, smooth strokes along the grain of the wood. -
Right-Side Up:
Flip the chair onto its feet. Paint the back slats, moving from top to bottom to catch any drips. Then move to the seat and legs. -
Detail Work:
Use the small artist brush to get full coverage in the tight corners where the slats meet the frame or where the legs join the seat. -
Drying:
Allow the first coat to dry for at least 4-6 hours. Don’t rush this step; tacky paint can drag and create texture issues. -
Second Coat:
Apply a second coat of paint for full opacity and depth of color. This coat usually goes on smoother and faster than the first. -
Sealing (Optional):
For extra durability in harsh weather, apply a clear matte polyurethane topcoat once the paint has cured for 24 hours.
Enjoy your beautifully refreshed chair as the perfect new addition to your porch or garden


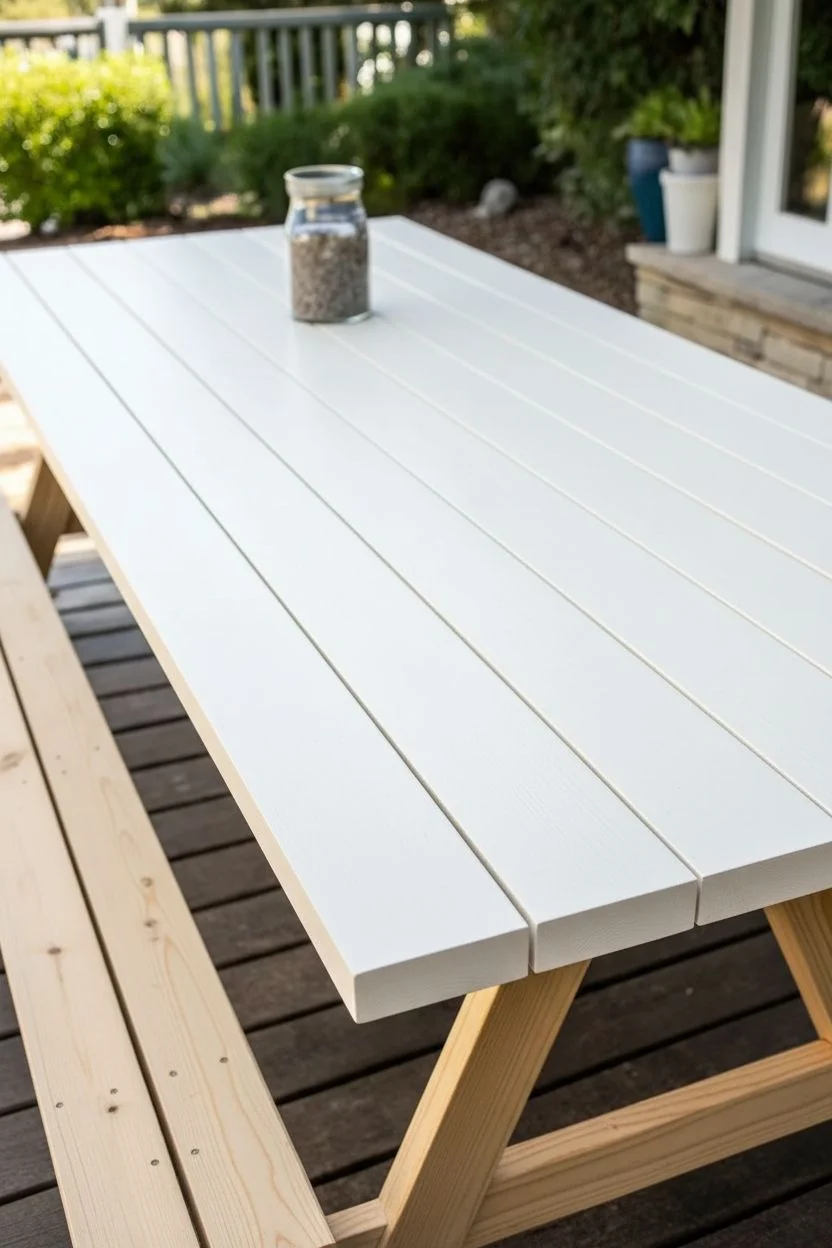
Crisp White Picnic Table Makeover

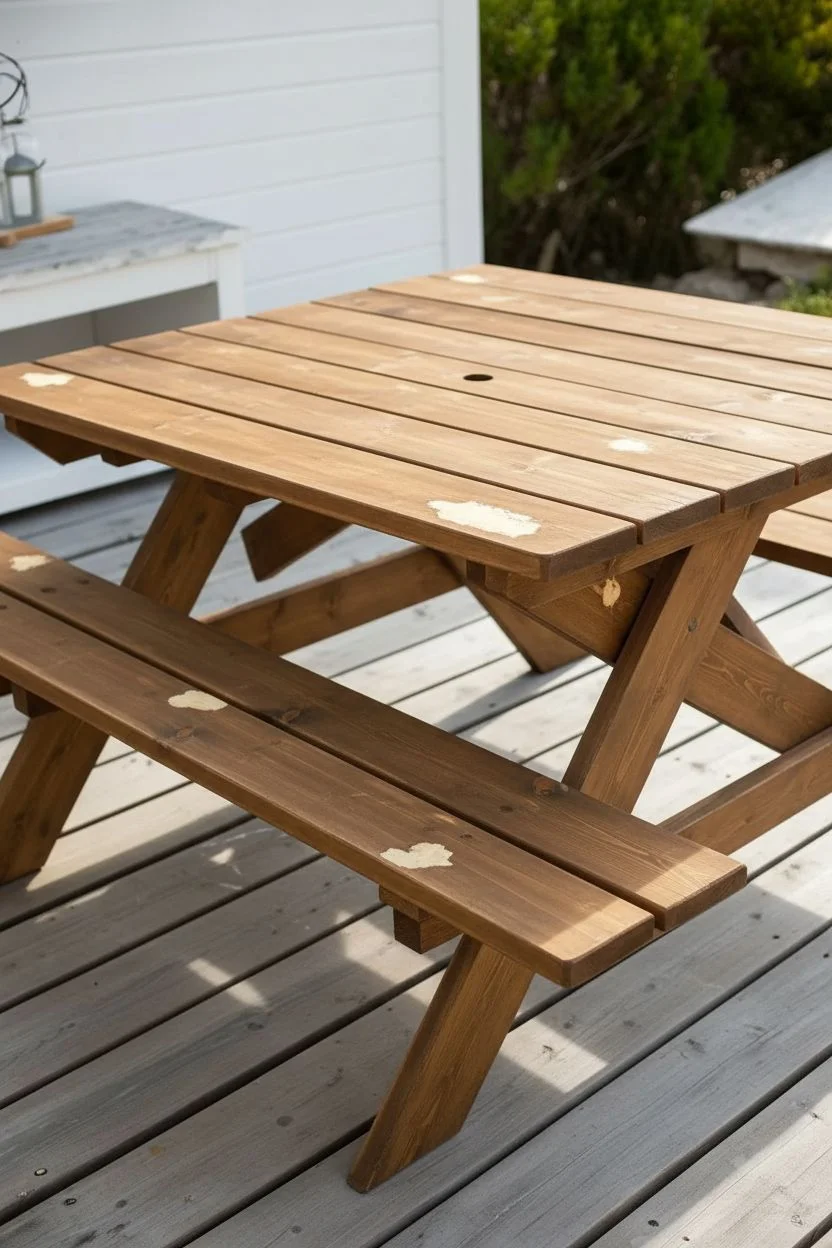
Transform a weathered or plain wood picnic table into a bright, coastal-inspired centerpiece for your patio. This project captures a clean, monochromatic look that brightens up outdoor spaces while remaining durable enough for family gatherings.
Step-by-Step Guide
Materials
- Wooden picnic table (new or existing)
- Exterior wood cleaner or degreaser
- Medium grit sandpaper (80-100 grit)
- Fine grit sandpaper (150-180 grit)
- White exterior primer (oil-based recommended for stain blocking)
- High-quality exterior paint (pure white, satin or semi-gloss finish)
- Synthetic bristle paint brush (2-3 inch)
- Small foam roller (optional for flat surfaces)
- Tack cloth
- Drop cloths
- Wood filler (exterior grade)
- Putty knife
Step 1: Preparation & Cleaning
-
Assess the wood:
Begin by inspecting your picnic table for any loose boards, protruding nails, or significant rot. Tighten any loose screws or hammer in nails to ensure a stable base. -
Deep clean:
Scrub the entire table down with an exterior wood cleaner or a mixture of TSP substitute and water. This removes dirt, mildew, and oils that could prevent paint adhesion. -
Rinse and dry:
Rinse thoroughly with a hose to remove all cleaning residue. Allow the wood to dry completely—usually 24 to 48 hours depending on humidity—before moving to the next step. -
Fill imperfections:
Use exterior wood filler and a putty knife to fill any deep gouges, cracks, or knot holes you want to hide. Overfill slightly as the filler may shrink when drying. -
Initial sand:
Once the filler acts dry, sand the entire table with medium-grit sandpaper (80-100). Focus on smoothing out rough edges, splinters, and the solidified filler.
Sticky Situation?
If the weather is humid, paint may stay tacky longer. Wait an extra 24 hours before use, or lightly dust with talcum powder if it feels sticky after fully curing.
Step 2: Priming for Durability
-
Dust removal:
Wipe down every nook and cranny with a tack cloth to remove all sanding dust. Dust is the enemy of a smooth finish. -
Spot prime knots:
If working with raw wood, dab a little oil-based primer specifically on dark knots. This prevents tannins from bleeding through your bright white finish later. -
Apply full prime coat:
Apply a coat of high-quality exterior primer to the entire table. Start with the underside and legs so you can flip it over (with help!) to do the top without marring wet paint. -
Smooth the grain:
Priming often raises the wood grain, making it feel fuzzy. Once dry, lightly run fine-grit sandpaper over the surfaces to knock down this texture. -
Clean again:
Do a final quick pass with your tack cloth to ensure the surface is perfectly clean for the topcoat.
Step 3: Painting & Finishing
-
Paint the difficult spots:
Using your brush, paint the gaps between the slats, the undersides, and the intricate angles of the legs first. It’s easier to smooth out drips on flat surfaces later than to dig paint out of cracks. -
Roll or brush the flats:
Apply your pure white exterior paint to the large bench seats and tabletop. I find a small foam roller speeds this up, but tip it off with a brush for a traditional hand-painted look. -
Let it cure:
Allow the first coat to dry according to the manufacturer’s instructions. Do not rush this, as a tacky base can ruin the second coat. -
Second coat application:
Apply a second coat for full, opaque coverage. This ensures that crisp white look that really pops against outdoor greenery. -
Check for drips:
Do a final inspection while the paint is still wet, looking specifically at the bottom edges of the table top and benches where drips tend to collect. -
Final cure time:
Though it may be dry to the touch in hours, let the table cure for several days before placing heavy objects or tableware on it to prevent sticking.
Coast-ify It
To enhance the beachy vibe, lightly distress the edges with sanding sponges after the final coat dries to reveal a hint of wood, then seal with clear matte exterior poly.
Enjoy your fresh, bright gathering spot for many summers to come


Coastal Blues on Benches and Tables
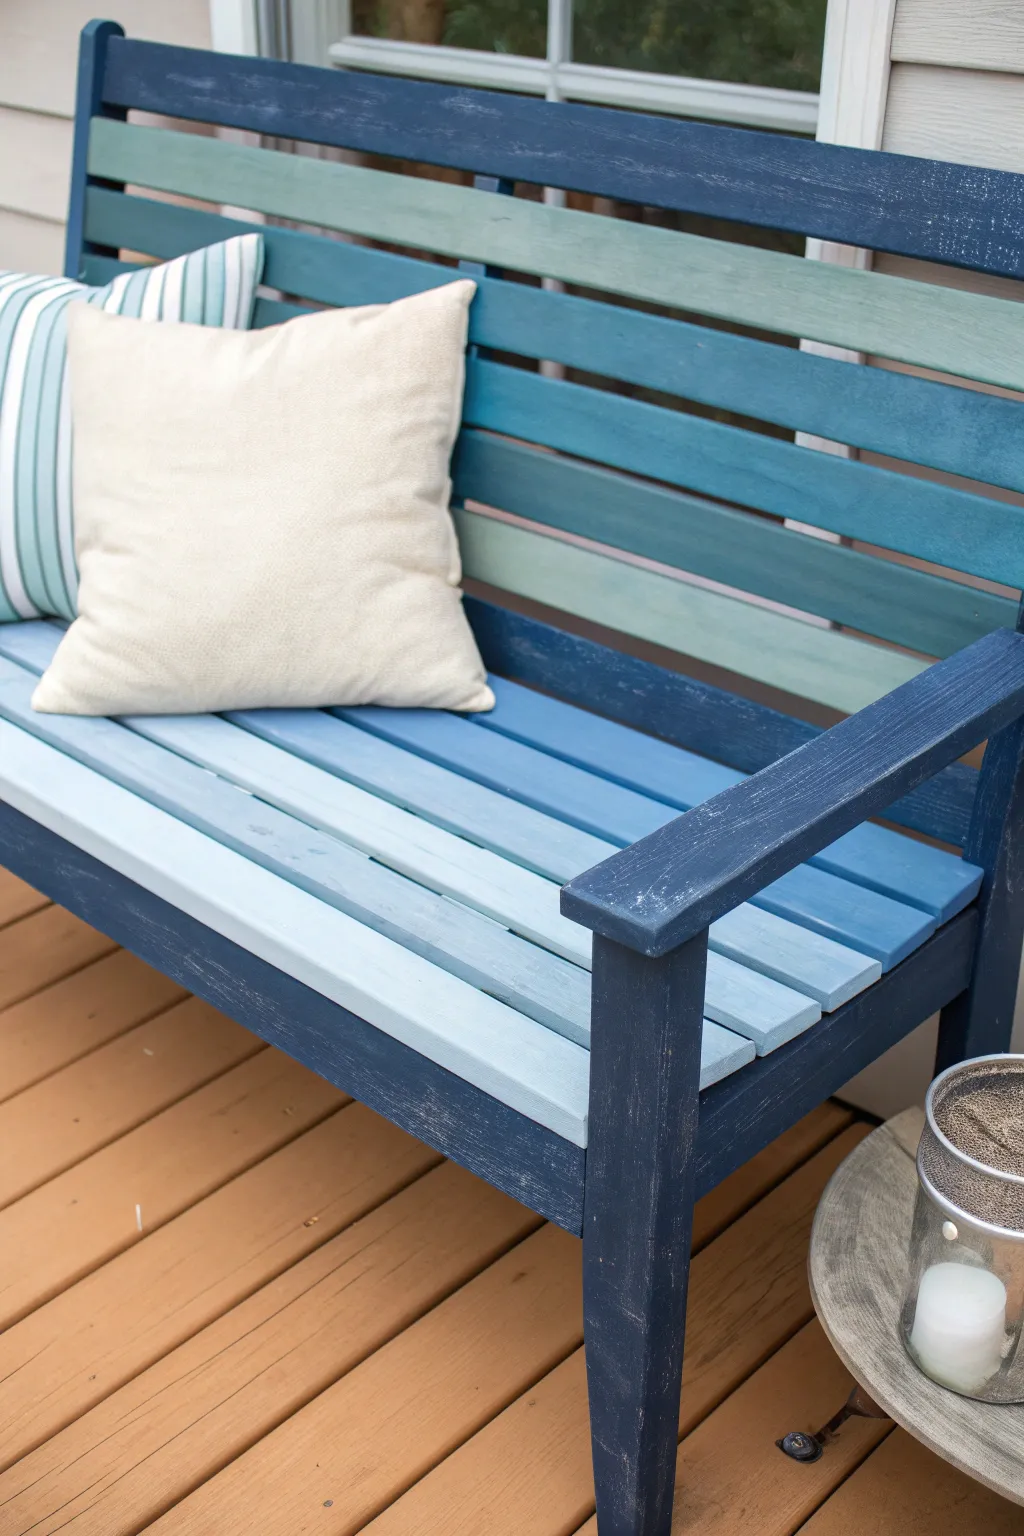
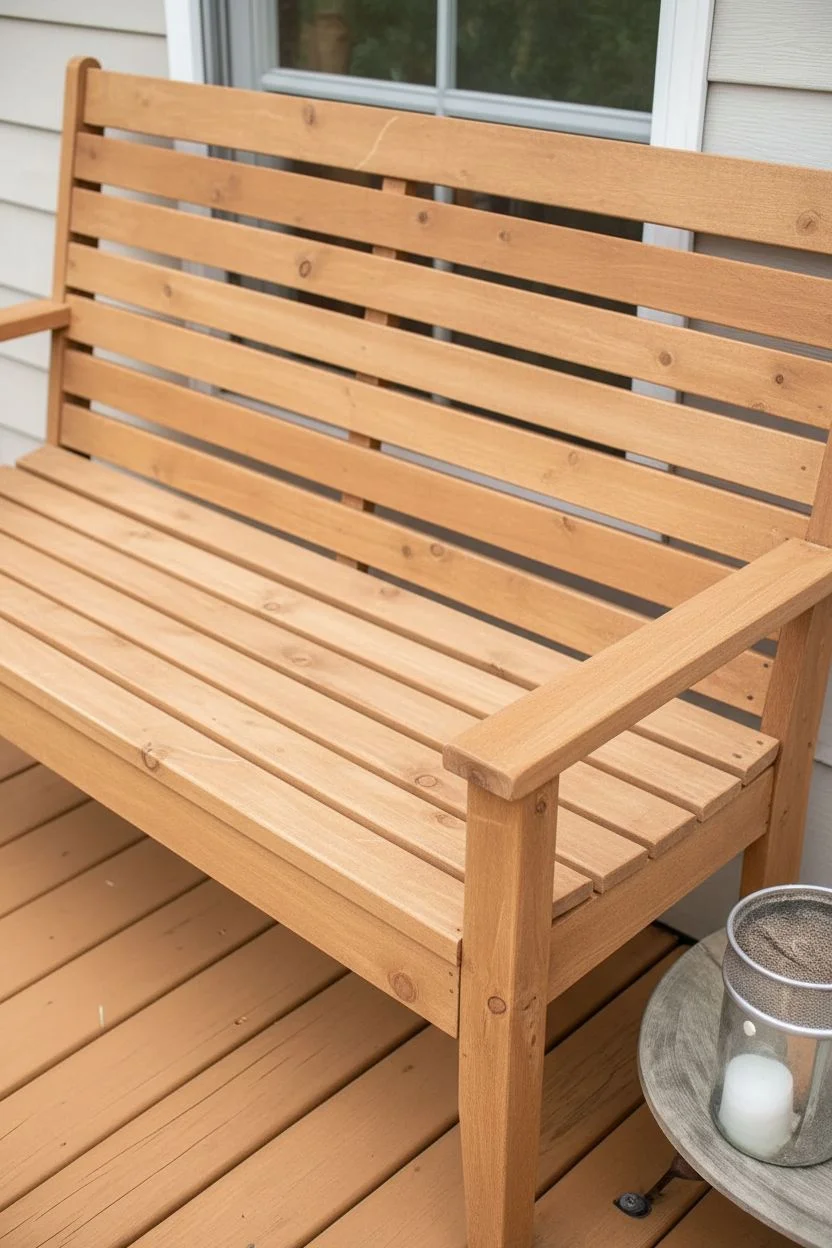
Bring the serene colors of the sea to your patio with this stunning gradient-painted bench project. By mixing varying shades of blue, from deep navy to soft sky, you can turn plain wooden furniture into a breezy, ocean-inspired focal point.
How-To Guide
Materials
- Wooden garden bench (unfinished or sanded)
- Exterior chalk or mineral paint: Dark Navy
- Exterior chalk or mineral paint: Medium Teal/Turquoise
- Exterior chalk or mineral paint: Light Sky Blue
- Exterior chalk or mineral paint: White (for mixing)
- Medium-grit sandpaper (120-150 grit)
- Fine-grit sandpaper (220 grit)
- Clean rags or tack cloth
- Painter’s tape
- 2-inch synthetic paintbrush
- Small angled brush (for crevices)
- Clear outdoor matte polyurethane or wax sealer
- Drop cloths
Step 1: Preparation
-
Clean and inspect:
Begin by thoroughly cleaning your bench to remove dust, dirt, or spiderwebs. If the wood has mold or mildew, scrub it with a wood cleaner and let it dry completely in the sun. -
Sand the surface:
Use medium-grit sandpaper to scuff up the entire surface. You don’t need to strip it to bare wood, but you do need to remove any flaky old finish and create a ‘tooth’ for the new paint to adhere to. -
Wipe away dust:
Once sanding is complete, use a tack cloth or a damp rag to wipe away every speck of sanding dust. A clean surface is crucial for a smooth finish. -
Tighten hardware:
Take a moment to check all screws and bolts. Tighten any loose joints now so your painting process isn’t interrupted by a wobbly bench leg later.
Uneven Coverage?
If the lighter blue looks streaky over dark wood, don’t overwork wet paint. Let it dry completely, then apply a third thin coat rather than one thick, gloopy one.
Step 2: Painting the Frame
-
Apply the base navy coat:
Start with your darkest navy blue paint. Using the 2-inch brush, paint the entire structural frame of the bench—the legs, the armrests, and the side supports. -
Paint the difficult spots:
Switch to your small angled brush to get into the tricky corners under the armrests and between the slats where they join the frame. Ensure full coverage here. -
Let the frame dry:
Allows the frame coat to dry according to the paint manufacturer’s instructions, usually about 2-4 hours before re-coating or moving on.
Level Up: Custom Cushions
Sew custom pillows using outdoor fabric that matches your paint swatches. A striped ticking fabric perfectly complements the linear slats of the bench.
Step 3: Creating the Interior Gradient
-
Plan your pattern:
Look at the seat and back slats. Decide on your alternating pattern. For this look, we are swapping between dark navy, the medium teal, and a very light mixed blue. -
Paint the dark slats:
Paint specific slats with the same Dark Navy used on the frame. I like to do the very top back slat and the front-most seat slat in this dark color to anchor the design. -
Apply the medium tone:
Using a clean brush, paint the next set of slats with your Medium Teal color. Be careful not to drip onto the dark dried paint; keep a damp rag handy for quick cleanups. -
Mix custom light shades:
On a paper plate or palette, mix your Light Sky Blue with a generous amount of White paint to create a very pale, almost white-blue tone. -
Paint the lightest slats:
Apply this custom pale mix to the remaining unpainted slats. This high contrast against the navy frame is what gives the piece its coastal charm. -
Add a second coat:
Once the first layer is dry to the touch, assess coverage. Blues can be translucent, so apply a second coat to all slats and the frame to ensure a rich, solid color.
Step 4: Distressing and Sealing
-
Lightly distress edges:
Once the paint is fully cured (preferably overnight), take your fine-grit sandpaper and gently rub the straight edges of the armrests and slats. Reveal just a hint of wood underneath for a weathered look. -
Dust off again:
Wipe down the bench one last time to remove the fine dust created by the distressing process. -
Apply sealer:
Using a clean brush, apply a clear outdoor water-based polyacrylic or wax. This protects the finish from UV rays and rain. -
Final cure:
Let the bench cure for at least 24 to 48 hours before placing cushions on it or sitting down, to prevent tackiness.
Now you have a refreshing spot to relax that captures the easy-going spirit of the coast


Modern Matte Black Bistro Set
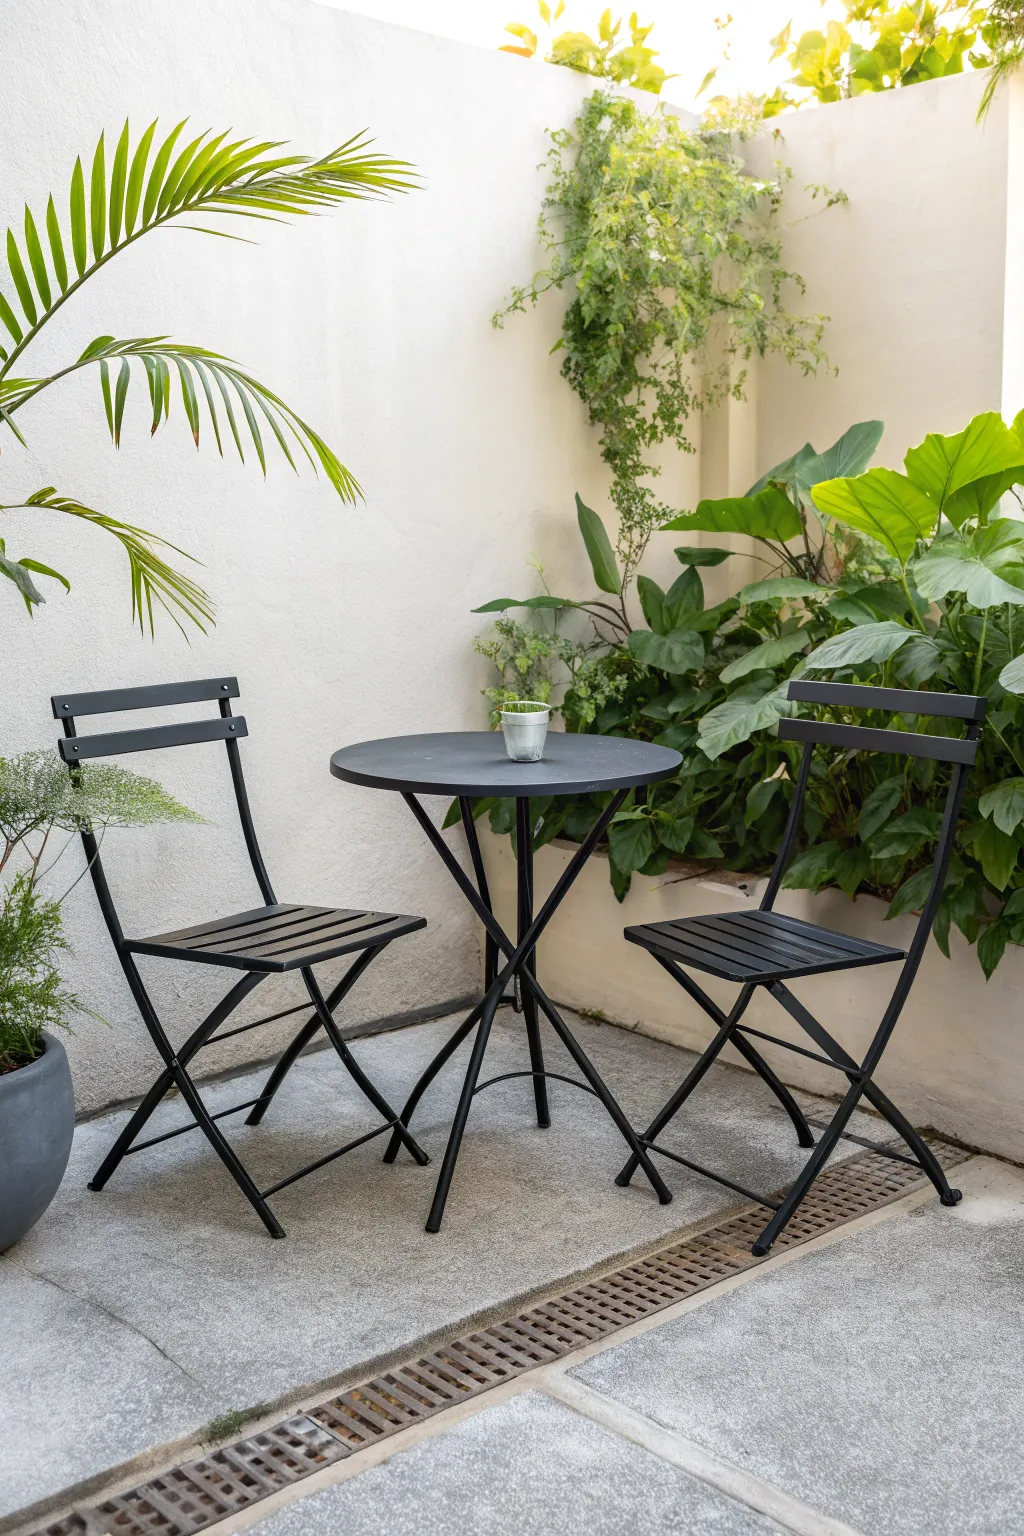
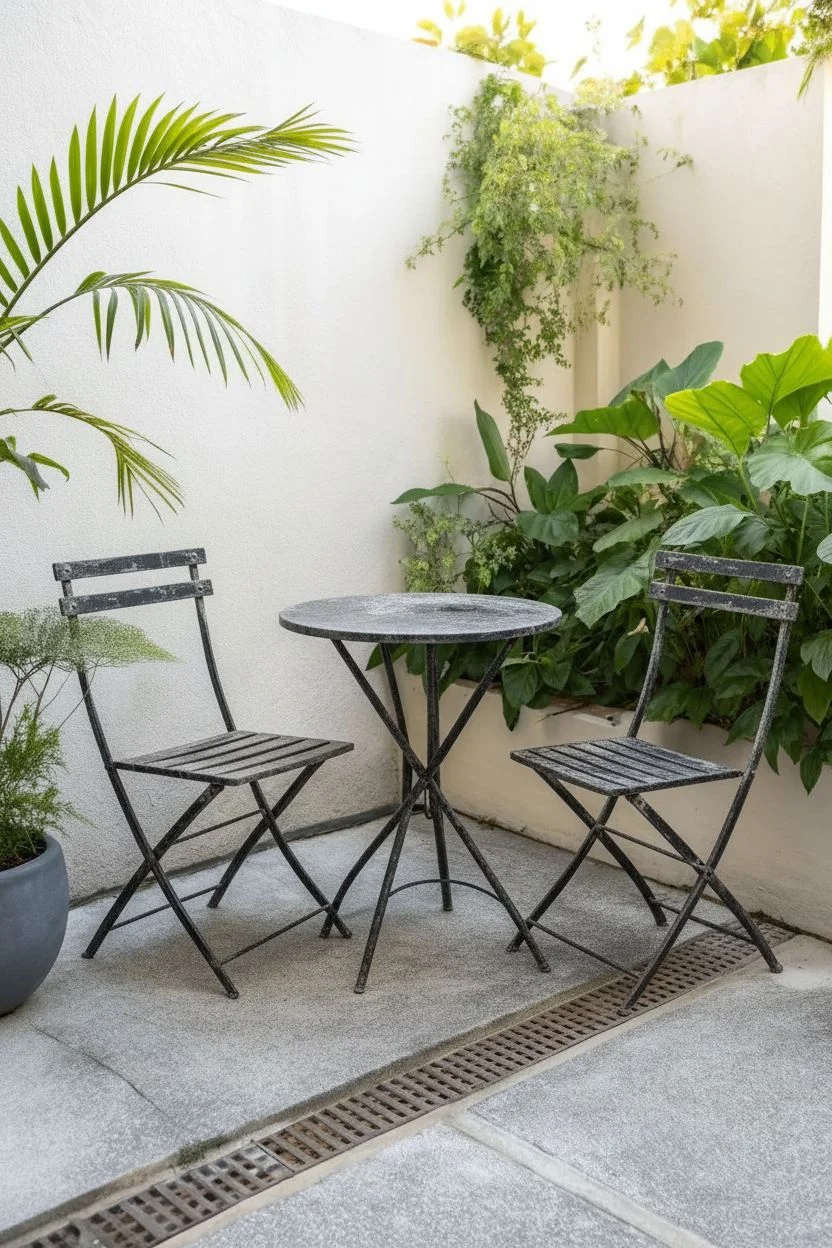
Transform a tired or mismatched metal bistro set into a sleek, contemporary focal point for your patio. The matte black finish not only hides imperfections but also creates a striking contrast against lush garden greenery, instantly modernizing your outdoor space.
Step-by-Step
Materials
- Metal bistro set (table and two chairs)
- Wire brush or coarse sandpaper (80-grit)
- Fine sandpaper (220-grit)
- Degreasing cleaner (like TSP or dish soap)
- Microfiber cloths
- Painter’s tape
- Drop cloths or cardboard
- Rust-inhibiting metal primer (spray preferred)
- Matte black outdoor spray paint designed for metal (3-4 cans)
- Protective mask and gloves
Step 1: Preparation & Cleaning
-
Assess the surface:
Begin by inspecting your furniture for any loose paint or rust spots. This step is crucial because painting over flaking material will just lead to peeling later on. -
Scrub the frame:
Use a wire brush to vigorously remove any loose rust or chipping paint. Focus on the joints and underneath the seat slats where moisture tends to hide. -
Sand for adhesion:
Take your coarse 80-grit sandpaper and scuff the entire surface of the table and chairs. You aren’t trying to strip it to bare metal, just creating enough texture for the new paint to grip. -
Smooth it out:
Follow up with fine 220-grit sandpaper to smooth out any rough edges underneath the previous sanding marks, ensuring a sleek final texture. -
Wash thoroughly:
Clean the entire set with a degreasing cleaner or warm soapy water. I find that using a scrub sponge here helps remove that fine resizing dust that can ruin a smooth finish. -
Dry completely:
Wipe everything down with a dry microfiber cloth and let it sit in the sun for at least an hour to ensure absolutely no moisture remains in the crevices.
Smooth Spraying Secret
Use a snap-on spray can trigger handle. It reduces finger fatigue and provides significantly more control for a smooth, factory-like finish without drips.
Step 2: Priming & Painting
-
Setup your workspace:
Lay down heavy cardboard or drop cloths in a well-ventilated area outdoors. If it’s windy, wait for a calmer day to prevent dust from settling on your wet paint. -
Apply primer:
Spray a thin, even coat of rust-inhibiting primer over the entire set. Keep the can moving constantly to avoid drips, focusing on welding points and feet. -
Let primer cure:
Allow the primer to dry according to the manufacturer’s instructions, usually about an hour or two. -
First coat of black:
Shake your matte black spray paint vigorously for at least one minute. Apply the first coat in light, sweeping passes, holding the can about 8-10 inches away. -
Check the angles:
Move around the furniture to hit the underside of the table rim and the back of the chair slats. Missing these hidden spots is a common mistake. -
Second coat application:
After the first coat is dry to the touch (usually 15-30 minutes), apply a second coat. This layer provides the true depth of color and covers any transparency. -
Inspect and touch up:
Look closely for any missed spots or uneven texture. A very light third coat might be necessary on high-wear areas like the seat slats and table surface. -
Final drying time:
Let the furniture cure undisturbed for at least 24 hours before using it. This allows the paint hardener to set fully, preventing scratches. -
Add protective feet:
Once fully dry, replace or add new rubber feet to the bottom of the legs to protect both the paint job and your patio flooring. -
Style the scene:
Place your sleek new set in your favorite corner, add a small potted succulent for a pop of green, and enjoy your modern oasis.
Add a Pop of Color
Before the final black coat, tape off the bottom 3 inches of the legs. Paint them gold or copper for a trendy ‘dipped’ leg look that adds luxury.
Your patio now boasts a sophisticated, modern look that feels brand new without the designer price tag
BRUSH GUIDE
The Right Brush for Every Stroke
From clean lines to bold texture — master brush choice, stroke control, and essential techniques.
Explore the Full Guide
Two-Tone Table Legs and Top
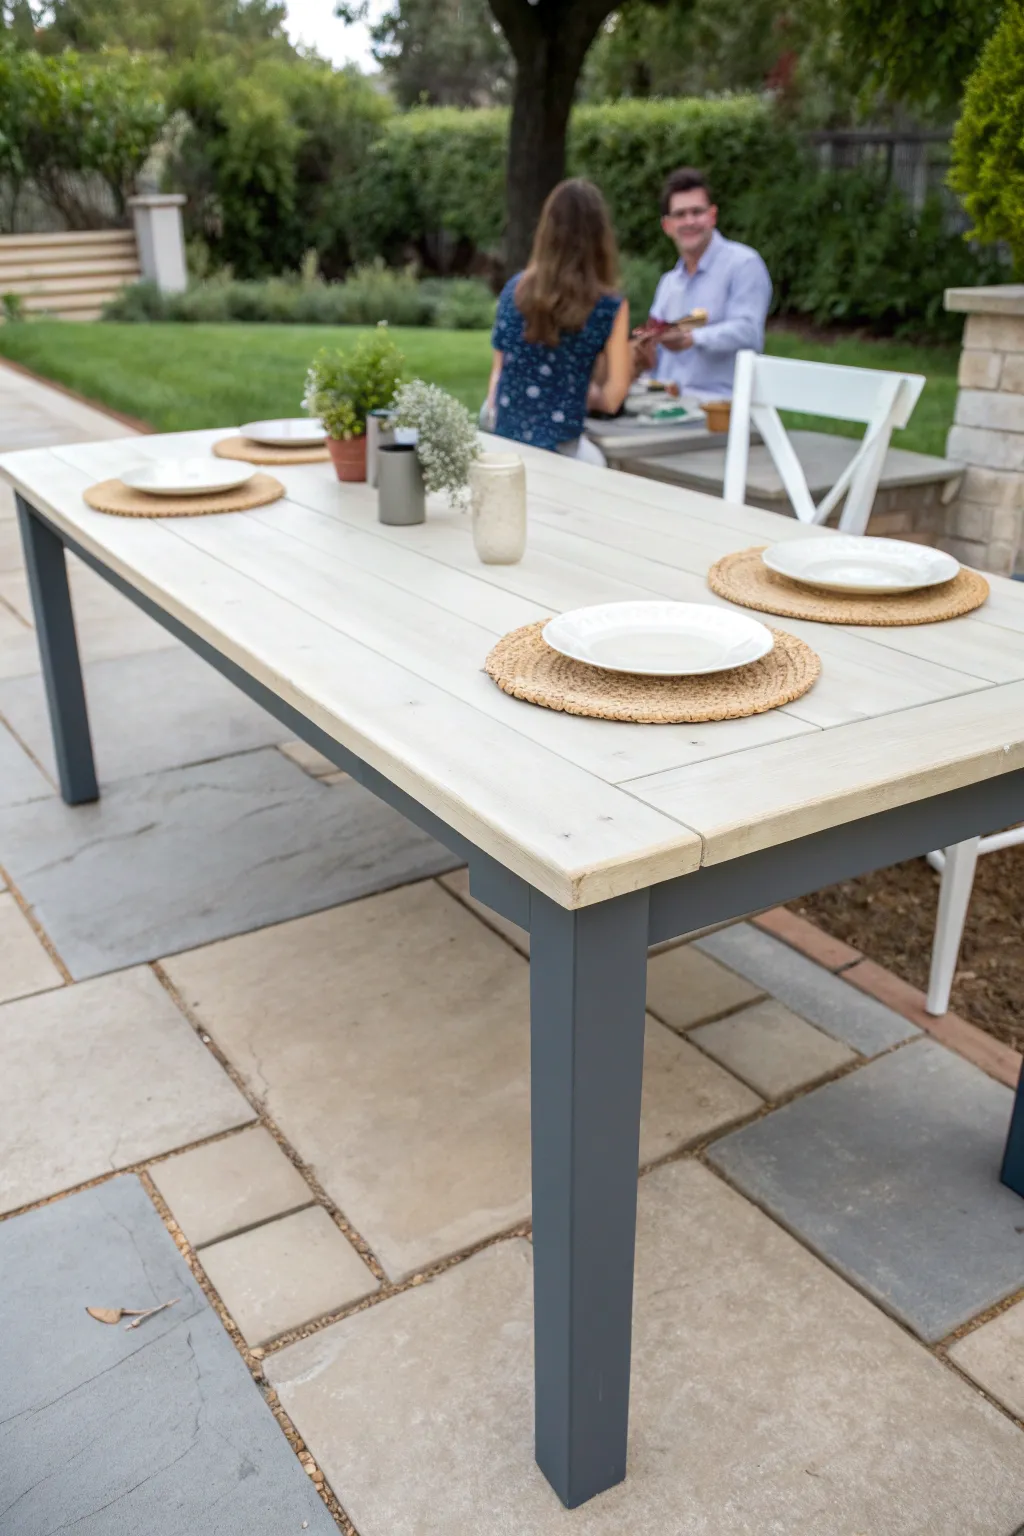
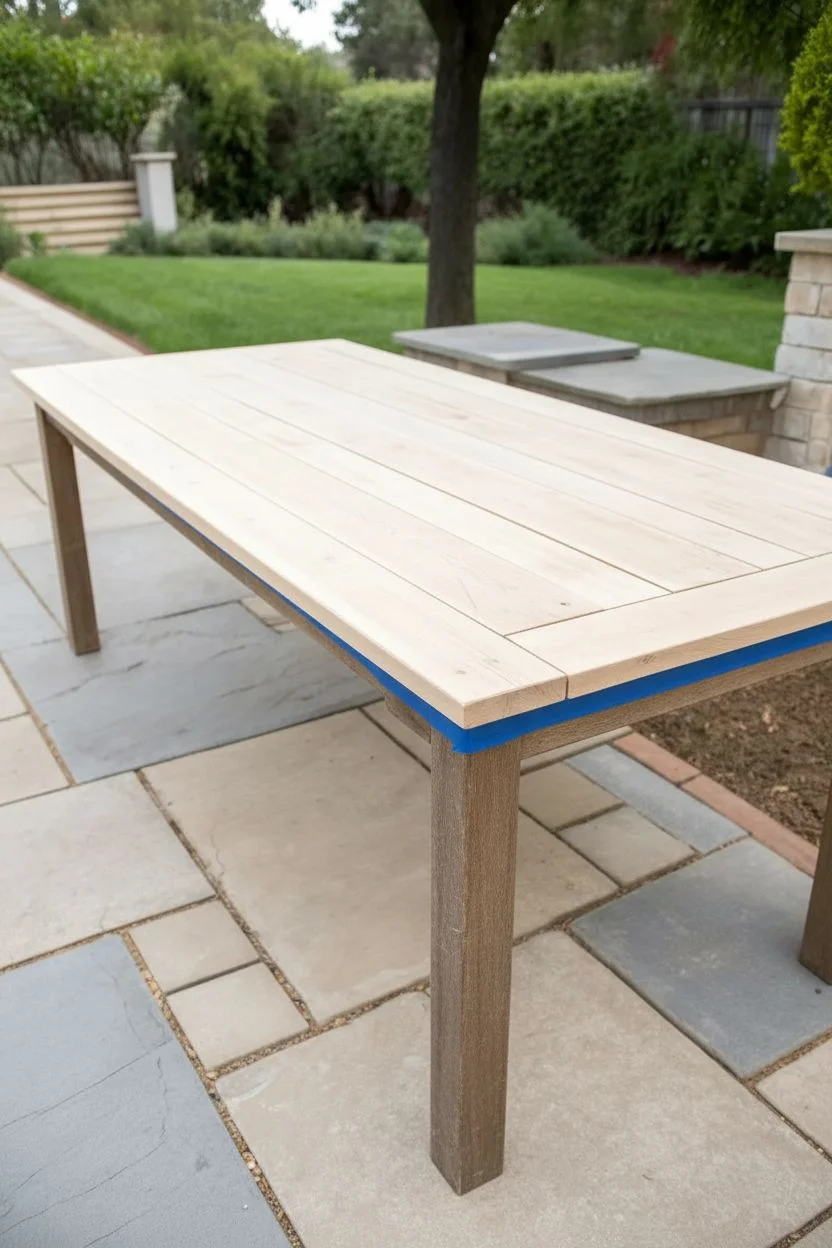
Transform a plain or weather-worn outdoor table into a sophisticated focal point by pairing specific finishes. This project combines a breezy, whitewashed top with sleek, dark slate legs for a modern coastal look that invites long summer dinners.
Step-by-Step Guide
Materials
- Wooden outdoor dining table
- Orbital sander with 80, 120, and 220-grit discs
- Tack cloth or microfiber rags
- Exterior-grade primer (gray tinted is ideal)
- Exterior latex paint in ‘Dark Slate’ or ‘Graphite’
- White exterior wood stain or watered-down latex paint
- Exterior water-based polyurethane sealer (matte finish)
- Painter’s tape
- Drop cloths
- Foam rollers
- 2-inch synthetic angled brush
- Stir sticks
Step 1: Preparation & Sanding
-
Clean everything thoroughly:
Before you even touch a piece of sandpaper, give the entire table a good scrub with mild soap and water to remove dirt, mildew, or grease. Let it dry completely in the sun. -
Initial top sanding:
Since the top will be a lighter stain, you need to strip it down to raw wood. Use an orbital sander with 80-grit paper to remove old varnish or stain. Keep the sander moving to avoid gouging the planks. -
Refining the surface:
Switch to 120-grit sandpaper on the tabletop to smooth out the grain. While you are at it, lightly scuff sand the legs and apron just enough to give the new paint something to grip; you don’t need to go down to bare wood on the base. -
Final smoothing pass:
Do one last pass on the tabletop with 220-grit sandpaper for a furniture-grade smooth finish. -
Dust removal:
Wipe every inch of the table with a tack cloth or damp microfiber rag. Any leftover dust will ruin your smooth paint finish. -
Protect the surfaces:
Flip the table upside down or lay protective plastic over the tabletop. Use painter’s tape to mask off the underside edge of the tabletop where it meets the apron, ensuring a crisp line later.
Step 2: Painting the Base
-
Prime the legs:
Apply a coat of exterior-grade primer to the legs and apron. Using a gray-tinted primer here helps the dark topcoat cover much faster than a white primer would. -
First coat of dark slate:
Once the primer is dry, apply your dark slate exterior latex paint. I prefer using a small foam roller for the flat sides of the legs to get a smooth texture and a brush for the corners. -
Dry and recoat:
Allow the first coat to dry according to the manufacturer’s instructions, then apply a second coat for full opacity and depth of color. -
Remove tape and flip:
Remove the initial painter’s tape while the paint is slightly tacky to prevent peeling. Once the legs are fully cured, carefully flip the table upright onto a clean drop cloth.
Uneven Whitewash?
If the stain blotches, the wood wasn’t sanded evenly. Re-sand the dark spots lightly to open the grain, then re-apply a small amount of wash.
Step 3: Whitewashing the Top
-
Mask the apron:
Apply fresh painter’s tape around the top edge of the newly painted apron to protect your dark finish from the white stain. -
Mix your whitewash:
If using a solid stain, stir it well. If you are using latex paint, mix one part white paint with one part water to create a translucent wash. -
Apply the wash:
Brush the whitewash mixture onto one plank at a time, working with the grain. Don’t try to do the whole table at once, or it will dry too quickly. -
Wipe back excess:
Immediately after brushing it on, use a lint-free rag to wipe off the excess wash. The harder you wipe, the more wood grain will show through. Aim for a milky, semi-transparent look. -
Check for consistency:
Continue plank by plank, ensuring the tone matches across the entire surface. If one board looks too light, add a tiny bit more wash and wipe gently.
Smooth Leg Finish
Add a paint conditioner like Floetrol to your dark latex paint. It slows drying time, allowing brush strokes to level out completely for a factory-like finish.
Step 4: Sealing and Protection
-
Apply first clear coat:
To make this weather-resistant, coat the tabletop with an exterior-grade, water-based matte polyurethane. The matte finish keeps the wood looking natural rather than like plastic. -
Light sanding:
After the first coat dries, very lightly hand-sand with 220-grit paper to knock down any raised grain fibers. -
Final seal:
Apply two more thin coats of polyurethane to the top, allowing proper drying time between each. Since the base has exterior paint, it doesn’t strictly need a topcoat, but you can add one for extra durability. -
Final cure:
Remove the tape from the apron and let the table cure for at least 48 hours before placing any heavy dishes or decor on it.
Now you have a stunning, custom-look table ready to host your next backyard gathering.
Soft Whitewash for Weathered Wood
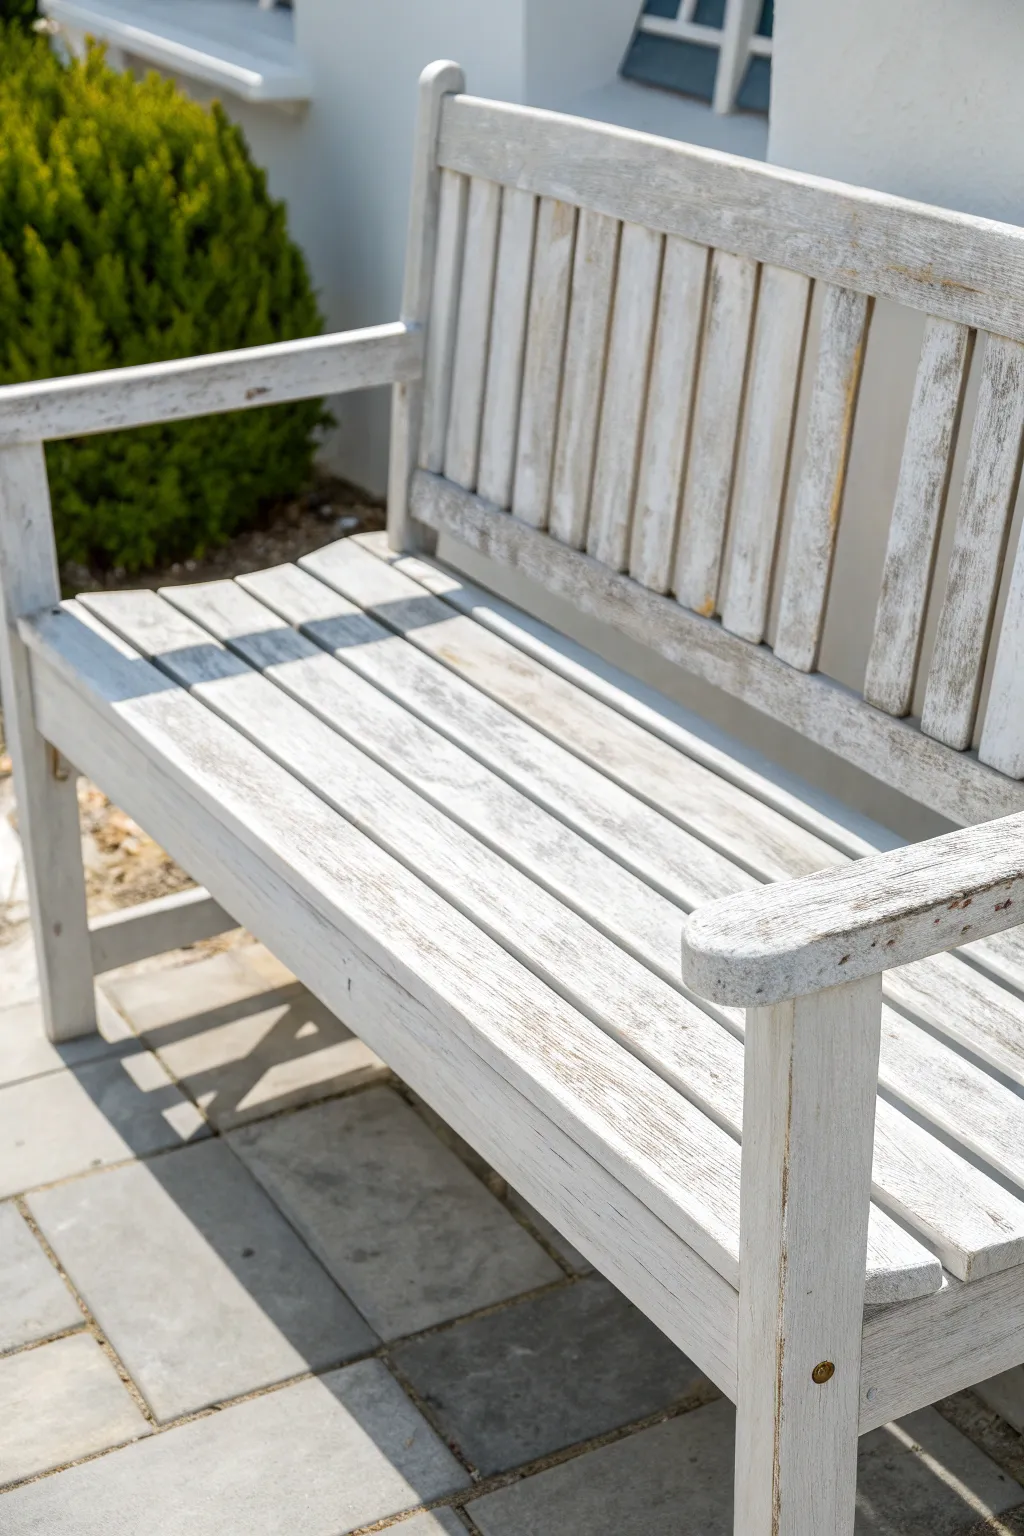
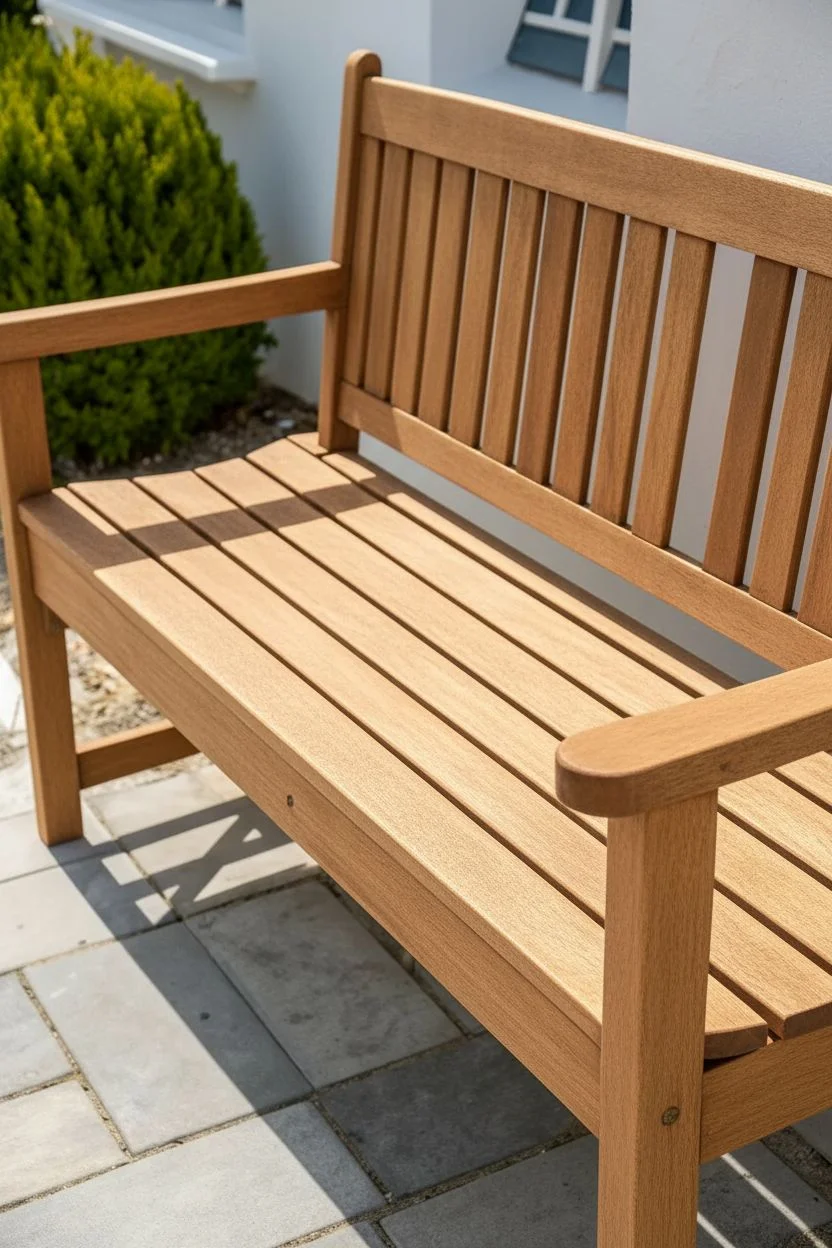
Transform tired outdoor furniture into a breezy, coastal-inspired piece with this soft whitewashing technique. This method allows the natural wood grain to peek through, creating an authentic, sun-bleached look rather than an opaque painted finish.
Step-by-Step
Materials
- Unfinished or stripped wooden bench
- Pressure washer or stiff scrub brush
- Exterior wood cleaner
- Sandpaper (80-grit and 120-grit)
- Orbital sander
- Exterior flat white latex paint or chalk paint
- Water for dilution
- Mixing bucket
- Wide synthetic bristle brush (3-4 inch)
- Clean cotton rags
- Clear matte polyurethane exterior sealer
- Protective gloves
Step 1: Preparation and Cleaning
-
Deep clean the wood:
Before sanding, you need to remove dirt, mildew, and gray oxidation. Use an exterior wood cleaner and scrub vigorously with a stiff brush. Rinse thoroughly with a hose or use a pressure washer on a low setting to avoid damaging the wood fibers. -
Allow thorough drying:
Don’t rush this step. Let the bench dry completely in the sun for at least 24 to 48 hours. Moisture trapped in the wood will ruin your finish later. -
Sand for texture:
Use an orbital sander with 80-grit sandpaper to remove any old rogue varnish or rough patches. Since we want a rustic look, you don’t need to make it perfectly smooth like interior furniture. -
Refine the surface:
Switch to 120-grit sandpaper for a quick pass to smooth out the deepest scratches from the coarse sanding. Wipe away all dust with a damp rag or tack cloth.
Natural Grain Tip
Work the rag harder on the flat surfaces and lighter in the crevices. This leaves more white pigment in the deep spots, mimicking how sea salt accumulates on wood.
Step 2: Creating the Whitewash
-
Prepare the wash mixture:
In your mixing bucket, combine your white exterior paint with water. A standard ratio is 1 part paint to 1 part water, but I prefer starting with a slightly thinner mixture to test opacity. -
Test the consistency:
Apply a small amount of the wash to the underside of the bench. Ideally, the liquid should be milky and runny, soaking into the wood pores quickly rather than sitting on top. -
Adjust your ratio:
If the test patch is too opaque, add more water. If it basically disappears, add a touch more paint until you get that hazy, semi-transparent look.
Fixing Blotchy Spots
If a section absorbs too much paint and looks solid white, immediately spray it with a little water from a misting bottle and wipe aggressively to lift the pigment.
Step 3: Application Technique
-
Brush on the wash:
Working in manageable sections (like three or four slats at a time), brush the diluted paint generously onto the wood, moving in the direction of the grain. -
Let it penetrate briefly:
Allow the wash to sit on the wood for about 10 to 20 seconds. This gives the pigment time to settle into the deeper grooves and texture of the wood. -
Wipe back immediately:
Using a clean cotton rag, wipe off the excess wash. Use long, sweeping motions following the grain. The goal is to remove the excess liquid while leaving pigment in the grain. -
Check for drips:
Inspect the areas between slats and on the legs for pooling liquid. Use a dry corner of your rag to soak up any drips before they dry into awkward spots. -
Repeat for coverage:
Continue this brush-on, wipe-off method across the entire bench. Don’t worry if some areas look slightly lighter or darker; variation adds to the authentic weathered charm. -
Evaluate opacity:
Once the first coat is dry to the touch (usually 30-60 minutes), decide if you want a whiter look. If so, simply repeat the process with a second layer of whitewash.
Step 4: Distressing and Sealing
-
Spot distress key areas:
Once completely dry, take a piece of 120-grit sandpaper and lightly scuff areas that would naturally wear over time, such as the armrests, front edge of the seat, and sharp corners. -
Clean dust again:
Wipe down the entire piece with a clean, dry cloth to remove any sanding dust created during the distressing phase. -
Apply the sealer:
Stir your clear matte exterior polyurethane gently to avoid bubbles. Apply a thin, even coat over the entire bench using a clean synthetic brush. -
Seal a second time:
Wait for the first coat to dry according to the manufacturer’s instructions, then lightly sand with fine grit paper and apply a second coat for maximum weather protection.
Now your bench has that effortless seaside elegance perfectly suited for a relaxing afternoon outdoors

PENCIL GUIDE
Understanding Pencil Grades from H to B
From first sketch to finished drawing — learn pencil grades, line control, and shading techniques.
Explore the Full Guide
One Bold Statement Chair
Transform a plain or weather-worn wooden slat chair into a vibrant focal point for your patio with this bold coral refresh. This project uses a striking monochromatic palette to give classic garden furniture a modern, cheerful energy that instantly brightens up any outdoor space.
Detailed Instructions
Materials
- Wooden slat chair (typically IKEA ÄPPLARÖ or similar style)
- Exterior wood paint satin finish (Color match: Pantone Living Coral or similar salmon-pink)
- Medium-grit sandpaper (120-150 grit)
- Fine-grit sandpaper (220 grit)
- Tack cloth or lint-free rags
- Mild degreasing cleaner (like TSP substitute)
- Wood primer (exterior grade, grey or white)
- 2-inch synthetic angled sash brush
- Small artist brush or foam brush (for tight corners)
- Drop cloth
- Painter’s tape or masking tape
- Stir stick
Step 1: Preparation & Cleaning
-
Assess the surface:
Begin by inspecting your wooden chair for any loose screws or rough splinters. Tighten any hardware now so the structure is solid before you start working. -
Clean thoroughly:
Wash the entire chair with a mild degreasing cleaner and water. Scrub well between the slats to remove dirt, mildew, or old finish buildup, then let it dry completely in the sun. -
Sand the wood:
Using 120-grit sandpaper, go over the entire chair. You don’t need to strip it to bare wood, but you must scuff up the glossy surface to give the new paint something to grip. -
Smooth the touch points:
Switch to 220-grit sandpaper for the armrests, seat edge, and backrest top—places where skin touches most often—to ensure a buttery smooth finish. -
Remove dust:
Wipe down every nook and cranny with a tack cloth. It is crucial to remove all sanding dust, as trap particles will ruin that sleek final look. -
Tape hardware:
If you cannot remove the metal bolts or screws easily, cover the heads carefully with small circles of painter’s tape to keep them paint-free.
Pro Tip: Slat Strategy
When painting slats, load less paint on your brush than usual. Excess pressure squeezes paint between the gaps, causing messy drips on the underside.
Step 2: Priming & Painting
-
Flip and prime:
Turn the chair upside down first. Apply a thin coat of exterior wood primer to the undersides of the legs and seat slats. I prefer starting here so I don’t miss hidden spots later. -
Prime the top:
flip the chair upright and prime the rest. Pay special attention to the vertical back slats; apply primer thinly to avoid drips pooling at the bottom. -
Let primer cure:
Allow the primer to dry according to the can’s instructions, usually about 2-4 hours depending on humidity. -
The first color coat:
Stir your coral paint thoroughly. Using the 2-inch synthetic brush, apply the first coat of color, moving with the grain of the wood along the long vertical legs. -
Tackle the slats:
Paint the horizontal seat slats next. Use long, even strokes across the wood to minimize brush marks, and check the gaps between slats for missed spots. -
Detail work:
Use a smaller artist brush or the tip of your sash brush to get paint deep into the corners where the backrest meets the seat, ensuring full coverage. -
Dry and lightly sand:
Let the first coat dry completely (usually 4-6 hours). Once dry, very lightly run a fine sanding sponge over the surfaces to knock down any raised grain. -
Second coat application:
Apply a second coat of the coral paint. This coat will be richer and cover any streakiness from the first pass. -
Check for drips:
Immediately after painting the second coat, scan the chair—especially under the seat rail and legs—for gravity drifts and brush them out.
Troubleshooting: Sticky Paint
If the paint feels tacky days later, humidity is likely the culprit. Move the chair to a climate-controlled room or garage with a fan to help it cure fully.
Step 3: Finishing Touches
-
Remove tape:
If you taped off any hardware, peel the tape away carefully while the paint is still slightly tacky to avoid pulling up dry chips of paint. -
Install feet protectors:
Once fully cured (wait at least 48 hours before sitting), add plastic glides or felt pads to the bottom of the legs to protect the paint from ground moisture.
Place your newly vibrant chair on the patio and enjoy the pop of color all season long
Striped Slats on a Patio Bench

Give a standard wooden bench a sophisticated, custom look by contrasting deep navy paint with natural wood tones. This project highlights the beauty of slatted furniture by painting the frame while leaving the slats natural for a striking visual rhythm.
Step-by-Step Tutorial
Materials
- Wooden garden bench (unfinished or needing refinishing)
- Exterior wood paint (navy blue)
- Exterior clear matte varnish or sealer
- Sanding block and sandpaper (80, 120, and 220 grit)
- Masking tape (painter’s tape)
- Small foam roller
- Angled sash brush (1.5 to 2 inch)
- Clean tack cloths
- Drop cloth
- Screwdriver or wrench (if disassembling)
- Wood filler (optional)
Step 1: Preparation & Sanding
-
Assess the bench:
Begin by inspecting your bench. If it is fully assembled, decide if you want to disassemble the slats from the frame. While possible to paint assembled, taking it apart makes for the cleanest lines. -
Clean everything down:
Wash the entire bench with mild soapy water and let it dry completely to remove dirt and oils. -
Initial sanding:
Start with 80-grit sandpaper to remove any old flaky varnish or rough patches. You want to strip the wood back to a raw state, especially on the slats that will remain unpainted. -
Smooth the surface:
Switch to 120-grit sandpaper for a second pass, smoothing out the grain scratches from the coarser paper. -
Final polish:
Finish with 220-grit sandpaper. Run your hand over the wood; it should feel smooth to the touch. Wipe away all dust with a tack cloth.
Clean Lines Secret
If painting an assembled bench, slip a playing card between the slat and the frame. Use it as a movable shield to paint tight crevices without getting blue on the bare wood.
Step 2: Painting the Frame
-
Masking off:
If you couldn’t disassemble the bench, use high-quality painter’s tape to meticulously wrap the ends of the slats where they meet the frame. Press the edges down firmly. -
Prime the frame:
Apply a coat of exterior wood primer to the legs, arms, and main structural supports. Let this dry according to the manufacturer’s time. -
First coat of navy:
Using your angled sash brush, cut in the corners and tricky joints of the frame with the navy paint. -
Roll the flat surfaces:
Use a small foam roller on the long, flat sections of the arms and legs. I find this helps minimize brush strokes and creates a factory-finish look. -
Let it cure:
Allow the first coat to dry completely. Don’t rush this part, or the paint might drag. -
Second coat:
Apply a second coat of navy paint to ensure full opacity and deep, rich color depth. -
Remove tape:
If you used tape, carefully peel it away while the second coat is still slightly tacky to avoid pulling up dried paint chips.
Step 3: Sealing and Assembly
-
Seal the natural wood:
For the unpainted slats, apply a clear exterior matte varnish. This protects the wood from UV rays and rain without altering the light, natural tone. -
Protect the paint:
You can also apply a clear topcoat over the navy paint for extra durability, though many exterior paints have built-in protection. -
Second seal coat:
Lightly sand the clear varnish with 220-grit paper once dry, wipe clean, and apply a second coat of varnish to the slats. -
Reassemble:
If you disassembled the bench, put it back together now. Tighten all screws and bolts securely. -
Touch ups:
Inspect for any nicks that happened during reassembly. Use a tiny artist’s brush to dab navy paint on any screw heads or accidental scratches.
Bleeding Tape?
If paint bled onto the natural slats, don’t wipe it while wet. Let it dry fully, then carefully scrape it off with a razor blade or sand that specific spot lightly.
Place your newly refreshed bench on a patio against a light wall to really make that deep blue frame pop


Geometric Color-Block Tabletop
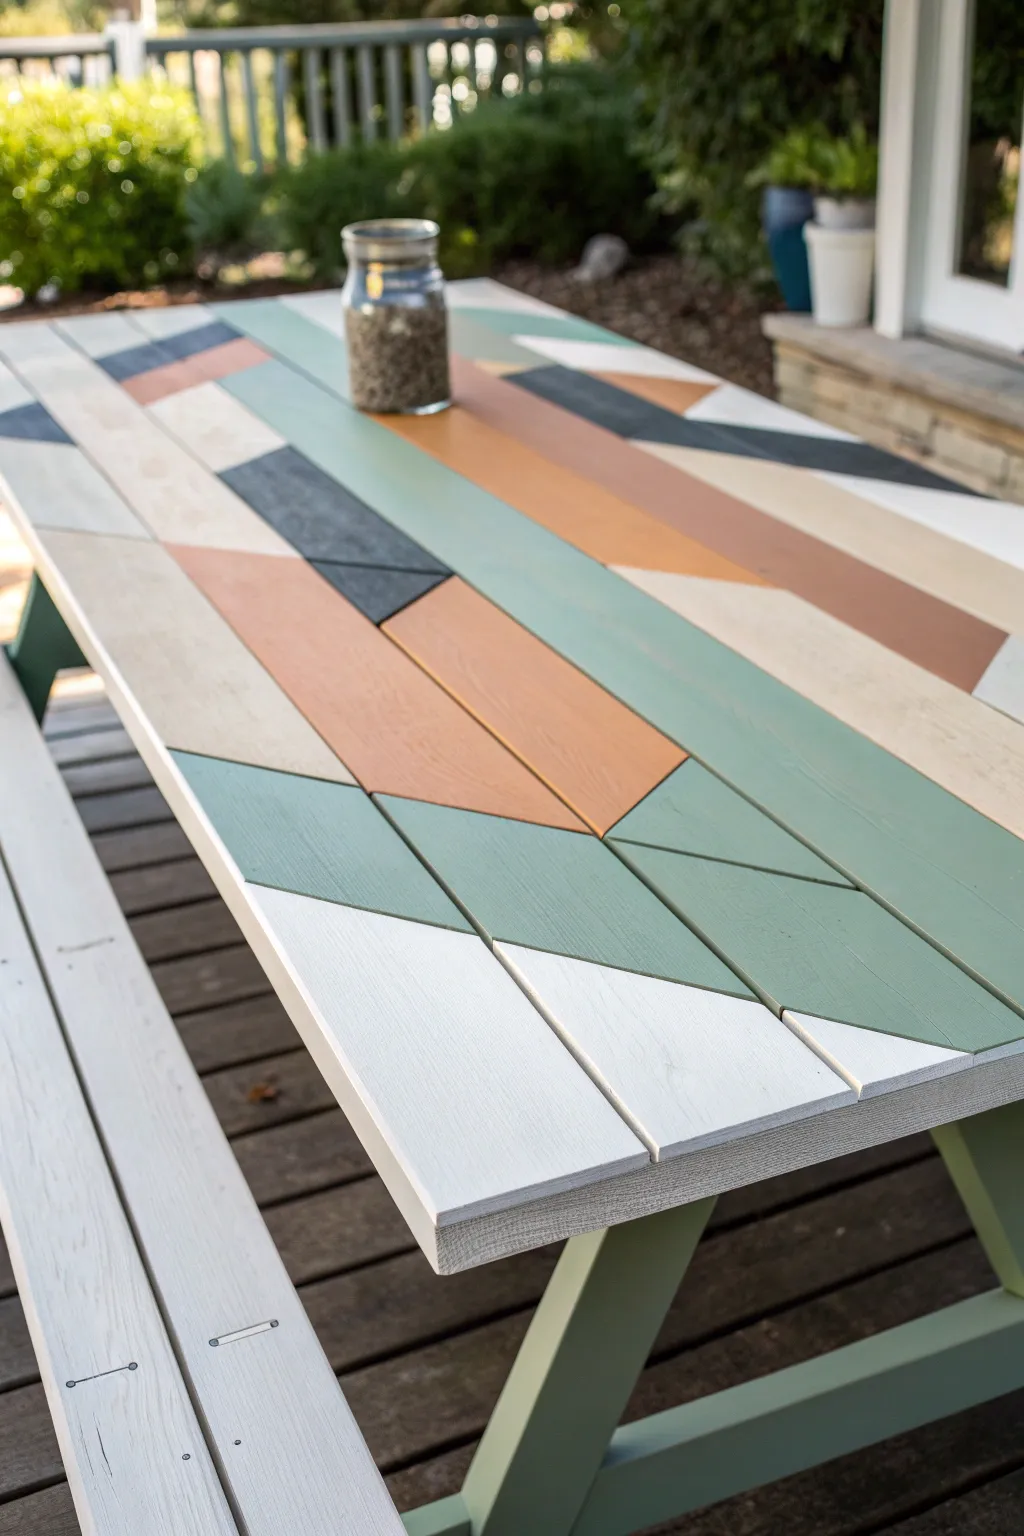
Transform a standard wooden picnic table into a modern backyard centerpiece with this eye-catching geometric design. By utilizing masking tape and a soothing palette of sage, terra cotta, and neutrals, you can create a crisp, high-end look that mimics custom marquetry.
Step-by-Step Guide
Materials
- Picnic table (new or sanded)
- Exterior latex paint or chalk paint (sage green, terra cotta/rust, dark charcoal, creamy white, beige)
- Exterior clear sealant (polycrylic or spar urethane)
- Painter’s tape (various widths, 1-inch and 2-inch recommended)
- Sanding block (medium and fine grit)
- Small foam rollers
- Assorted detail brushes
- Pencil
- Straight edge or yardstick
- Tack cloth
- Optional: Primer (if using raw wood)
Step 1: Preparation & Planning
-
Surface Prep:
Start by ensuring your table is perfectly smooth. Sand the top surface thoroughly to remove any old finish or rough spots on raw wood. Wipe away every speck of dust with a tack cloth so your tape adheres properly. -
Prime the Surface:
If you are working with bare wood, apply a high-quality exterior primer to the top boards. This ensures your colors pop and prevents the wood grain from soaking up uneven amounts of paint. Let this dry completely. -
Base Color:
Paint the entire tabletop in your lightest color—in this case, the creamy white. This acts as your background and means you won’t have to paint the white sections later. Apply two coats and let it cure for at least 24 hours before taping.
Step 2: Designing the Angles
-
Mark the Center:
Find the center point of the table lengthwise. Lightly draw a faint line down the middle of the center board with a pencil to act as your anchor point for the symmetry. -
Drafting the Chevrons:
Using a yardstick, draw your large V-shapes radiating from the center line. Don’t worry about the slat gaps; draw your design right over them as if the table were a solid canvas. -
Adding Smaller Angles:
Intersect your larger chevrons with smaller diagonal lines to create the triangles and trapezoids seen in the design. Varying the width of these sections creates visual interest.
Burnish Your Tape
Firmly press down tape edges with a credit card or spoon back. The heat from friction activates the adhesive for a tighter seal against the wood grain.
Step 3: Taping the Pattern
-
Tape Phase One:
You cannot paint touching shapes at the same time, so apply tape along the *outside* of your pencil lines for the first set of non-touching shapes (e.g., the large sage stripes and the dark charcoal triangles). -
Seal the Tape Edges:
I always run a tiny amount of the *base* color (white) over the edge of the tape. This seals the gap and prevents the next color from bleeding under, guaranteeing those razor-sharp lines. -
First Color Application:
Using small foam rollers or brushes, fill in the taped-off sections with your sage green and charcoal paints. Apply light layers to avoid ridges. -
Peel and Wait:
Remove the tape while the paint is still slightly tacky—this helps prevent peeling up dry paint. Let these sections dry completely (consult your paint can, but usually 4-6 hours).
Paint Bleeding?
If paint seeps under the tape, wait for it to fully dry. Then, gently scrape the excess away with an X-Acto knife or touch it up with a tiny artist’s brush.
Step 4: Completing the Design
-
Tape Phase Two:
Once the first shapes are dry, tape off the remaining designated areas—the terra cotta and beige sections. Your tape will now go over the dried paint of the first sections, so ensure they are fully cured. -
Painting Remaining Colors:
Fill in these new shapes with the rust/terra cotta and beige paints. Use a small angled brush to get into the gaps between the wood slats if the roller misses them. -
Final Tape Removal:
Carefully peel back all remaining tape. Use a tiny detail brush to touch up any spots where the paint might have bridged the gap between the slats messily. -
Clean the Gaps:
If paint dripped down the sides of the slats, wrap a piece of sandpaper around a putty knife and gently run it between the boards to clean up the edges.
Step 5: Protection
-
Apply Sealer:
To protect your hard work from sun and rain, apply 3-4 coats of a non-yellowing exterior sealer (like a water-based spar urethane). Smooth, thin coats are key here. -
Painting the Legs:
While the top cures, paint the legs and bench seats. The example uses a solid sage green related to the tabletop design for a cohesive look.
Allow the table to cure fully for several days before serving your first alfresco dinner on this geometric beauty
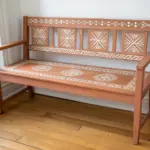
Stenciled Tile Look on a Side Table
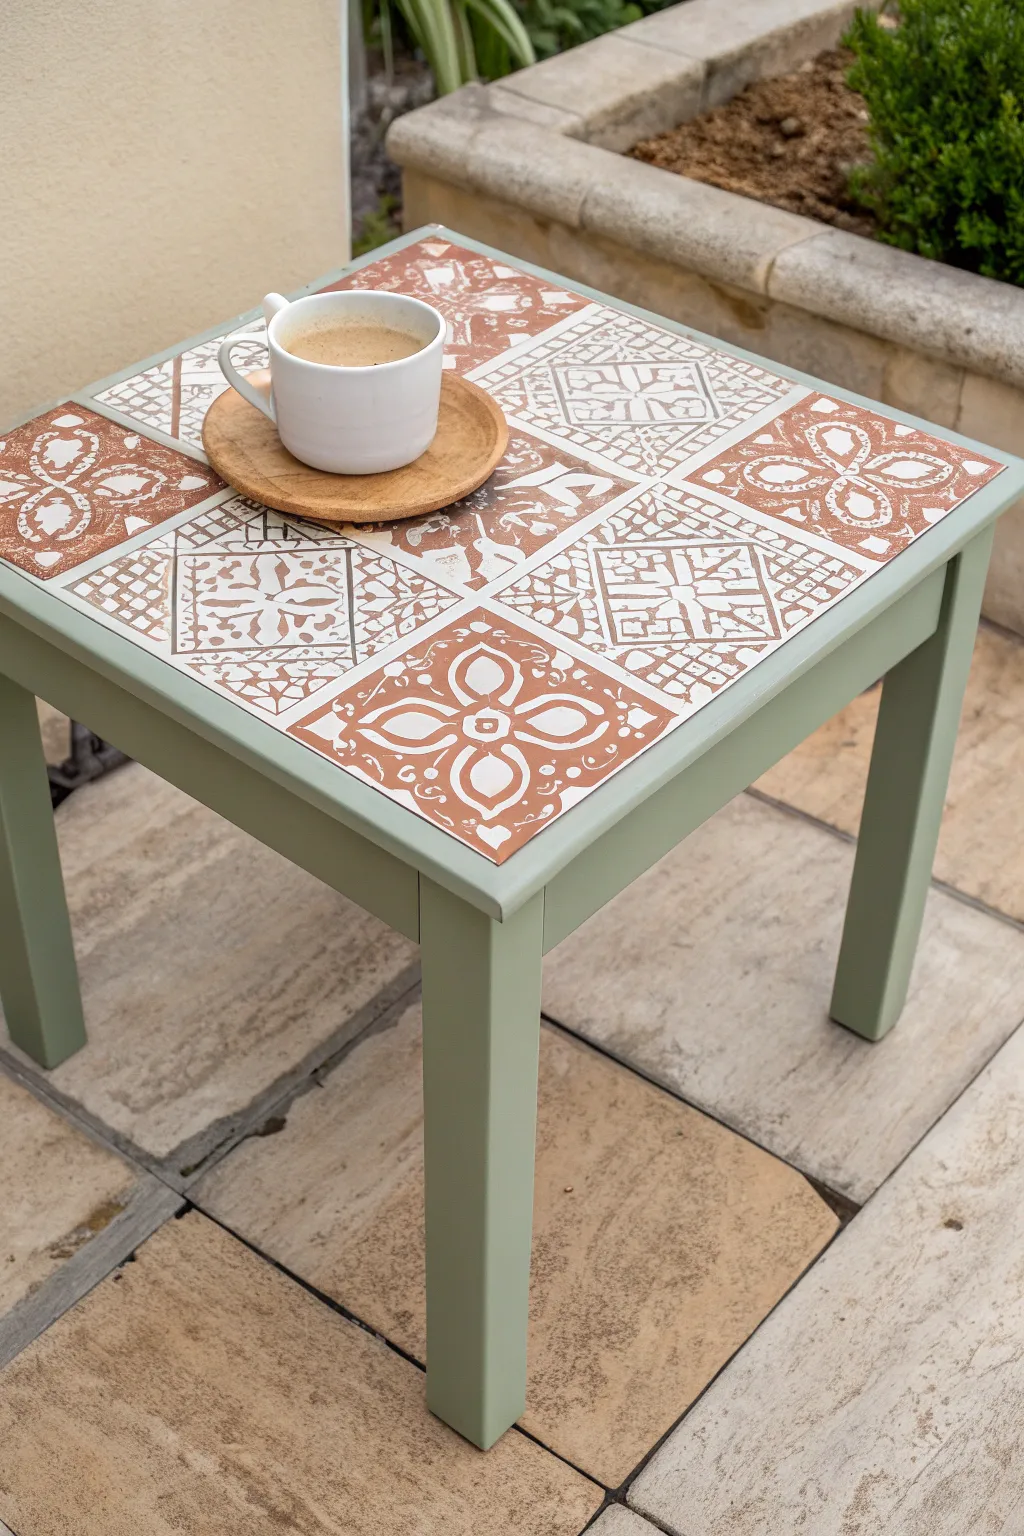
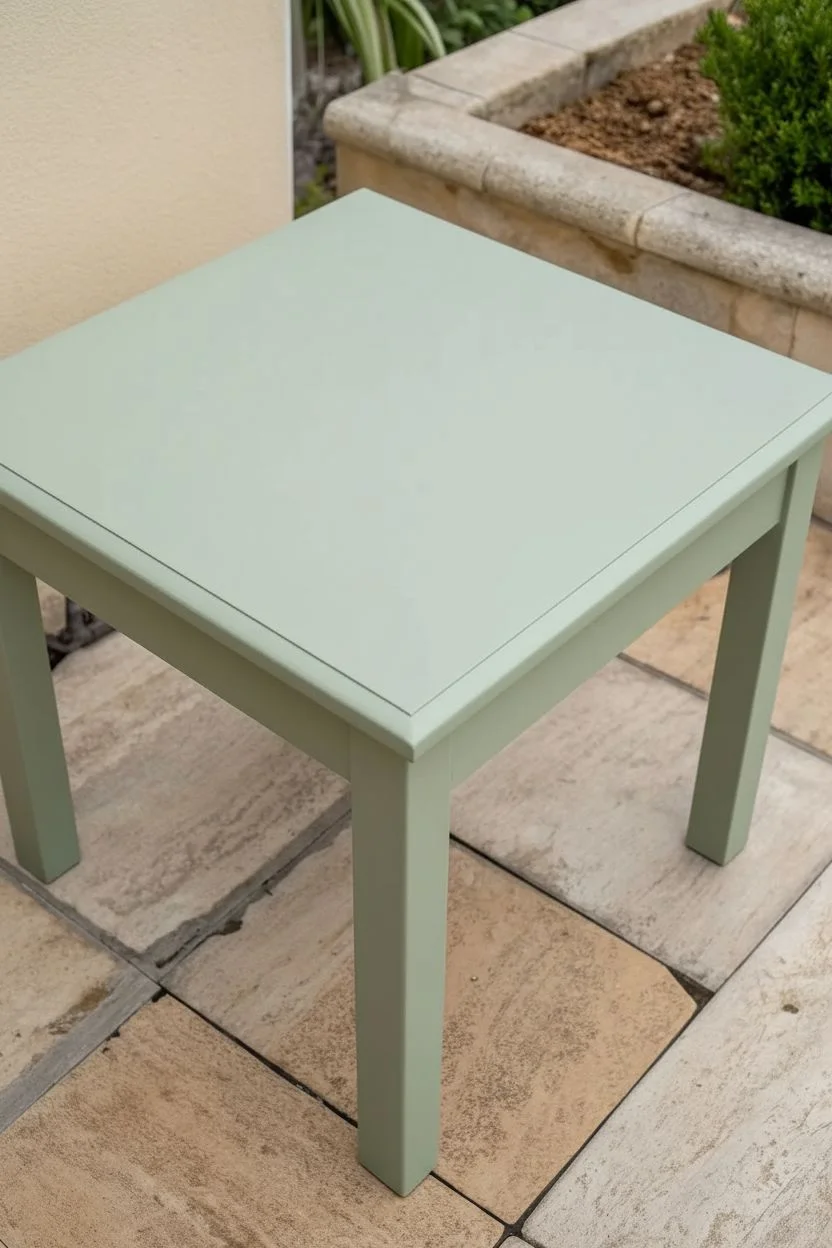
Transform a plain, old wooden side table into a Mediterranean-inspired patio piece with this faux tile painting technique. By carefully layering stencils and contrasting paint colors, you can achieve the high-end look of hand-painted ceramic tiles without any of the heavy lifting.
Detailed Instructions
Materials
- Small wooden side table
- Sandpaper (120 and 220 grit)
- Clean tack cloth
- Sage green exterior paint (satin or semi-gloss)
- Terracotta or rust-colored exterior paint
- Off-white exterior paint
- Square tile stencils (approx. 4×4 or 6×6 inches)
- Painter’s tape (narrow width)
- Stencil brushes or high-density foam rollers
- Small angled paintbrush
- Clear outdoor polyurethane sealer (matte or satin)
- Ruler and pencil
Step 1: Preparation & Base Coat
-
Clean the Surface:
Begin by thoroughly cleaning your table to remove any dirt, grease, or old spiderwebs. A simple solution of warm water and dish soap works well, but let it dry completely before moving on. -
Sand for Adhesion:
Scuff sand the entire table using 120-grit sandpaper. You don’t need to strip it to bare wood, just rough up the existing finish so the new paint adheres. -
Smooth the Top:
Since the top will be your ’tile’ surface, switch to 220-grit sandpaper and give the top face an extra smooth finish. -
Remove Dust:
Wipe down the entire piece with a tack cloth to ensure absolutely no dust remains, as this can ruin the stencil finish later. -
Apply Base Color:
Paint the entire table—legs, apron, and top—in the sage green color. Use a small angled brush for the corners and a small roller for flat areas. -
Apply Second Coat:
Allow the first coat to dry according to the can’s instructions, then apply a second coat for full, opaque coverage. Let this cure for at least 24 hours.
Bleeding Lines?
If paint bleeds under the stencil, don’t panic. Once dry, use a fine-grit sanding block to gently distress the whole top. It makes mistakes look like intentional ‘vintage’ wear.
Step 2: Creating the Grid
-
Measure the Top:
Measure the width and length of your table top to determine the best layout for your tile squares. You want them centered. -
Mark the Grid:
Use a pencil and long ruler to lightly draw a grid on the table top corresponding to the size of your stencil. Leave a small gap (about 1/8 to 1/4 inch) between squares to simulate grout lines. -
Tape the Grout Lines:
Apply narrow painter’s tape carefully over your drawn grid lines. The sage green showing underneath the tape will eventually become your ‘grout’. -
Seal the Tape Edges:
To prevent bleed, lightly brush a tiny amount of the sage green base paint over the edges of the tape. This seals the gap so your next colors stay crisp.
Step 3: Stenciling the Tiles
-
Paint the Tiles Base:
Working inside the taped squares, paint alternating squares with the off-white paint. I like to do a checkerboard pattern first. -
Paint Remaining Tiles:
Paint the remaining squares with the terracotta (rust) color. You should now have a checkerboard of blank white and rust squares separated by tape. -
Position the Stencil on White:
Once dry, place your pattern stencil over a white square. Secure it with small pieces of tape so it doesn’t shift. -
Stencil with Rust:
Dip a stencil brush into the terracotta paint, offload almost all the paint onto a paper towel until the brush is dry, and stipple over the stencil onto the white square. -
Position Pattern on Rust:
Move the stencil to a dry rust-colored square. Secure it in place. -
Stencil with White:
Using a clean stencil brush and the off-white paint, repeat the dry-brush stippling technique on the rust square. This creates the inverted color effect shown in the example. -
Complete the Pattern:
Continue until all squares are stenciled. Be careful not to smudge wet paint as you move across the grid.
Add Real Texture
Mix a teaspoon of baking soda or plaster of paris into the base paint for the ’tiles’ to give them a slightly gritty, authentic ceramic feel under the sealer.
Step 4: Finishing Touches
-
Remove Tape:
Carefully peel away the painter’s tape while the final stencil paint is still slightly tacky to prevent peeling dry paint chips. -
Touch Ups:
Use a tiny artist’s brush and the base sage green paint to fix any areas where the paint might have bled into the grout lines. -
Apply Sealer:
Once the artwork is completely cured (give it 24-48 hours), apply two thin coats of clear outdoor polyurethane to protect your faux tiles from the elements.
Enjoy your durable, custom-designed table that brings a touch of artistic flair to your garden seating area
Faux Cane Pattern on Plastic Chairs
Transform a basic, inexpensive plastic chair into a high-end designer dupe with this clever faux cane technique. By combining warm paint tones with a strategic stencil or hand-painted grid, you can mimic the airy texture of natural rattan without the hefty price tag.
How-To Guide
Materials
- Plastic chair (smooth surface preferred)
- Sandpaper (220-grit)
- Cleaner/degreaser
- Spray primer for plastic
- Cream or off-white outdoor spray paint (satin finish)
- Warm tan or caramel acrylic paint (for the cane base)
- Darker brown acrylic paint (for shading)
- Thin grid stencil or painter’s tape (1/4 inch width)
- Detailed craft brushes
- Light textured fabric or burlap (optional for seat)
- Strong spray adhesive or outdoor decoupage medium
- Clear matte outdoor sealer
Step 1: Prep & Prime
-
Clean thoroughly:
Scrub the entire chair with a degreaser to remove dirt, oils, and any factory residue that might repel paint. -
Sand for grip:
Lightly scuff the plastic surface with 220-grit sandpaper; you don’t need to remove deep scratches, just create enough tooth for the primer to stick. -
Wipe down:
Remove all sanding dust with a damp lint-free cloth or a tack cloth and let it dry completely. -
Prime the plastic:
Apply a coat of primer specifically designed for plastic surfaces, using smooth sweeping motions to avoid drips. -
Base coat application:
Spray the chair with your cream or off-white color, applying 2-3 thin coats rather than one heavy one, allowing proper drying time between each layer.
Grid Geometry
For realistic cane, ensure your stencil grid is diagonal or hexagonal, not just squares. This small detail sells the illusion.
Step 2: Creating the Faux Cane Back
-
Mask the frame:
Use painter’s tape to carefully mask off the outer rim of the chair back, leaving only the central area where the ‘cane’ will go exposed. -
Apply the base tone:
Paint the exposed back section with your warm tan acrylic paint to create the background color of the cane webbing. -
Establish the grid:
Lay your grid stencil over the tan section, or if you are feeling steady, use thin painter’s tape to grid out a pattern of vertical and horizontal lines. -
Paint the webbing:
Stipple a lighter cream color over the stencil to create the ‘front’ weave of the cane pattern. -
Add dimension:
Once the stencil is removed and paint is dry, use a fine detail brush and the dark brown paint to add tiny shadows where the ‘strands’ of cane would overlap, creating a 3D illusion. -
Soften edges:
I like to gently dry-brush a little bit of the tan color around the perimeter of the pattern to make it look like the cane is tucked into the frame naturally.
Step 3: Texturing the Seat
-
Prepare the fabric:
Cut a piece of light textured fabric or burlap to the exact shape of the chair seat. -
Apply adhesive:
Spray the seat area liberally with strong spray adhesive or brush on a thick layer of outdoor decoupage medium. -
Attach the fabric:
Press the fabric onto the seat, smoothing it from the center outward to eliminate air bubbles and wrinkles. -
Seal the fibers:
Saturate the top of the fabric with another layer of decoupage medium or clear sealer to make it hard and durable for sitting. -
Paint the seat (Optional):
If your fabric color doesn’t match perfectly, lightly paint over the textured fabric with your cream spray paint or acrylics to blend it with the chair frame.
Weather Proofing
Use marine-grade varnish instead of standard sealer if the chair will be fully exposed to rain.
Step 4: Finishing Touches
-
Remove tape:
Carefully peel away all remaining painter’s tape to reveal the crisp edges between the frame and your new faux textures. -
Inspect and touch up:
Check for any paint bleed or uneven spots and fix them with your small brush. -
Final seal:
Spray the entire chair with a clear matte outdoor sealer to protect your handiwork from UV rays and moisture.
Enjoy styling your new boutique-worthy chair on your patio for a sophisticated update
Night-Sky Constellations on Lounge Pieces
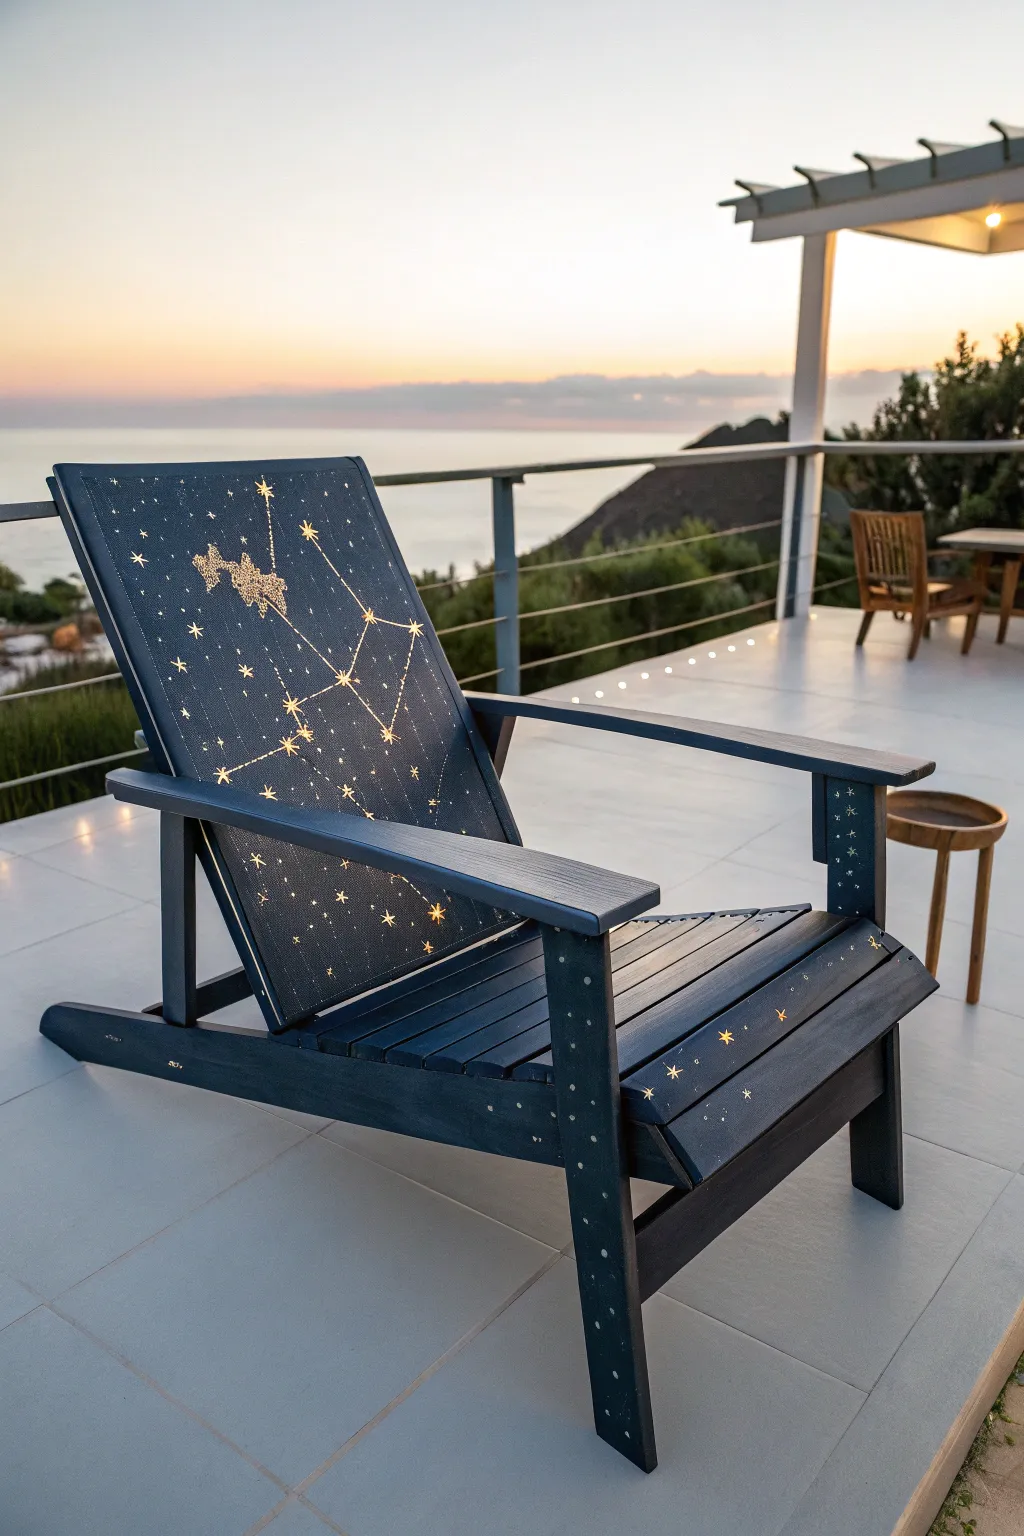
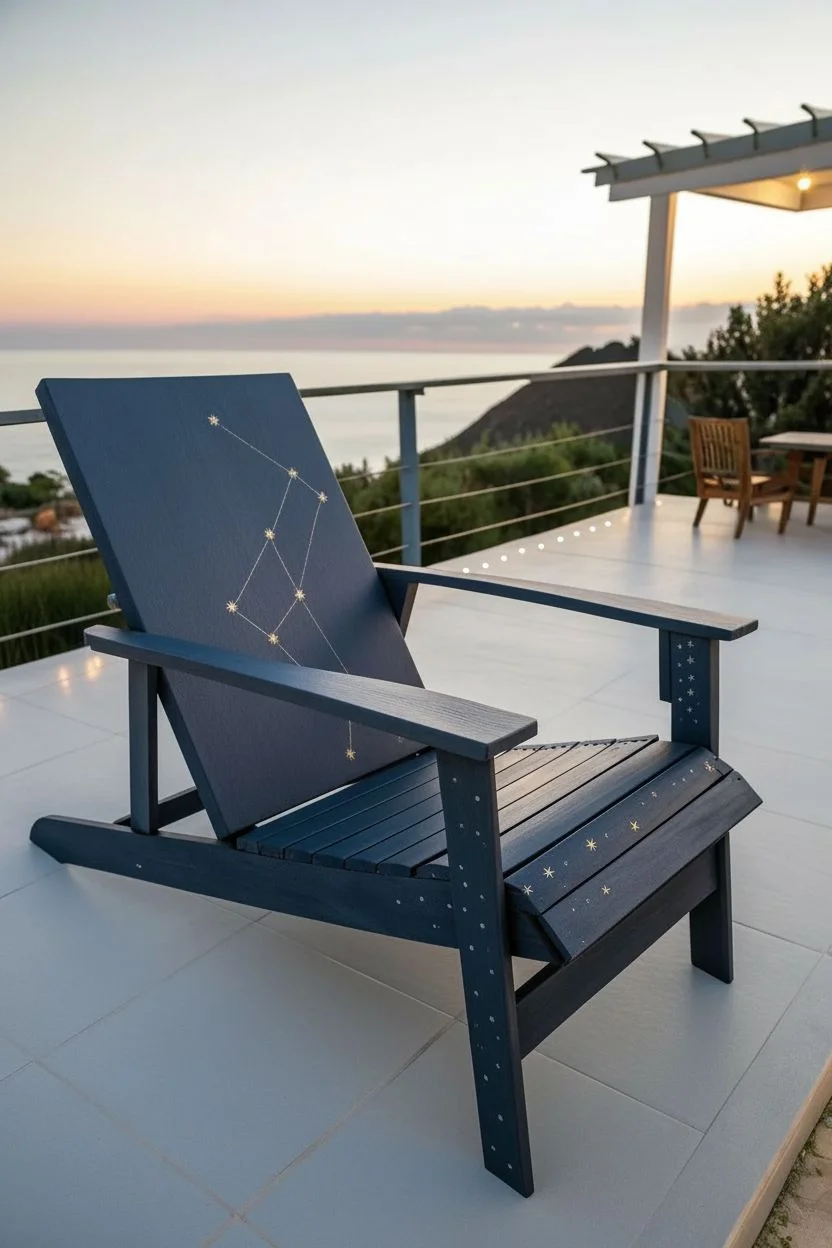
Transform a plain wooden lounge chair into a dreamy stargazing seat with this night-sky inspired design. By combining deep navy hues with delicate gold detailing, you can capture the magic of the cosmos right in your backyard.
Step-by-Step
Materials
- Wooden Adirondack chair (unfinished or stripped)
- Sandpaper (120 and 220 grit)
- Tack cloth
- Exterior wood primer (gray or tinted)
- Deep navy blue exterior latex paint (satin finish)
- Metallic gold acrylic paint (outdoor rated)
- Small detail brushes (rounds 0, 1, and 2)
- Medium flat synthetic brush (2-inch)
- White or yellow chalk pencil
- Constellation stencils or printed reference
- Ruler or straight edge
- Clear matte exterior polyurethane sealer
Step 1: Preparation & Base Coat
-
Clean surface:
Begin by giving the chair a thorough cleaning to remove any dirt or grease. If the wood is previously painted or varnished, strip it down to raw wood for the best adhesion. -
Sand the wood:
Sand the entire chair with 120-grit sandpaper to smooth out rough spots, then follow up with 220-grit for a fine finish. Wipe away all dust with a tack cloth. -
Apply primer:
Brush on a coat of exterior wood primer. A gray-tinted primer works best here as it helps the deep blue topcoat achieve full opacity faster than white primer would. -
First coat of navy:
Using your 2-inch flat brush, apply the first coat of deep navy blue exterior paint. Work in the direction of the wood grain to minimize brush strokes. -
Dry and recoat:
Let the first coat dry completely according to the manufacturer’s instructions. Apply a second coat to ensure a rich, solid midnight blue background.
Step 2: Mapping the Stars
-
Plan your constellation:
Decide on the constellation you want to feature on the backrest. I find it helpful to print out a star map to scale before marking the wood. -
Sketch the primary stars:
Using a light-colored chalk pencil, lightly mark the positions of the main stars on the chair back. The chalk wipes off easily if you need to adjust positioning. -
Connect the dots:
Use a ruler and your chalk pencil to lightly draw the geometric lines connecting the stars, creating the classic constellation framework. -
Add background stars:
Randomly mark small dots around the rest of the chair back, armrests, and the front seat slat to create a field of distant stars.
Starry Splatter
For a realistic Milky Way effect, load a toothbrush with watered-down gold paint and flick the bristles to spray a fine mist of tiny stars across the background.
Step 3: Painting the Details
-
Paint main stars:
Dip a size 2 round brush into metallic gold paint. Paint the large constellation stars first, creating five-point or eight-point star shapes over your chalk marks. -
Draw connection lines:
Switch to a size 0 or 1 liner brush. Carefully paint over your chalk lines with a steady hand to connect the constellation stars. Use a broken or dashed line technique for a whimsical look. -
Create star clusters:
For areas like nebulae (as seen near the top of the design), dab the brush tip repeatedly to create a dense cluster of tiny gold dots. -
Decorate the frame:
Moving to the armrests and front slat, paint small four-point stars and simple dots. Keep these simpler than the main design to avoid visual clutter. -
Add sparkles:
Use the tip of your smallest brush to add tiny highlight dots in white or a lighter gold hue to the center of the biggest stars for extra dimension. -
Clean up:
Once the paint is fully dry, gently wipe away any remaining chalk guidelines with a damp cloth.
Glow Up
Mix a small amount of glow-in-the-dark pigment powder into your gold paint or clear sealer so the constellations faintly illuminate when night falls.
Step 4: Sealing and Protection
-
Apply sealer:
Protect your artwork with a clear matte exterior polyurethane. Apply a thin, even coat over the entire chair, paying special attention to the painted designs. -
Final cure:
Allow the sealer to cure for at least 24 to 48 hours before exposing the furniture to heavy dew or rain.
Enjoy relaxing under the night sky in a chair that mirrors the beauty above.


Have a question or want to share your own experience? I'd love to hear from you in the comments below!