Mini pumpkins are my favorite tiny canvases—just big enough for bold shapes and simple patterns, but small enough to finish in one cozy session. Here are my go-to mini pumpkin painting ideas that look adorable solo and even better as a little pumpkin cluster.
Classic Jack-o’-Lantern Mini Pumpkin
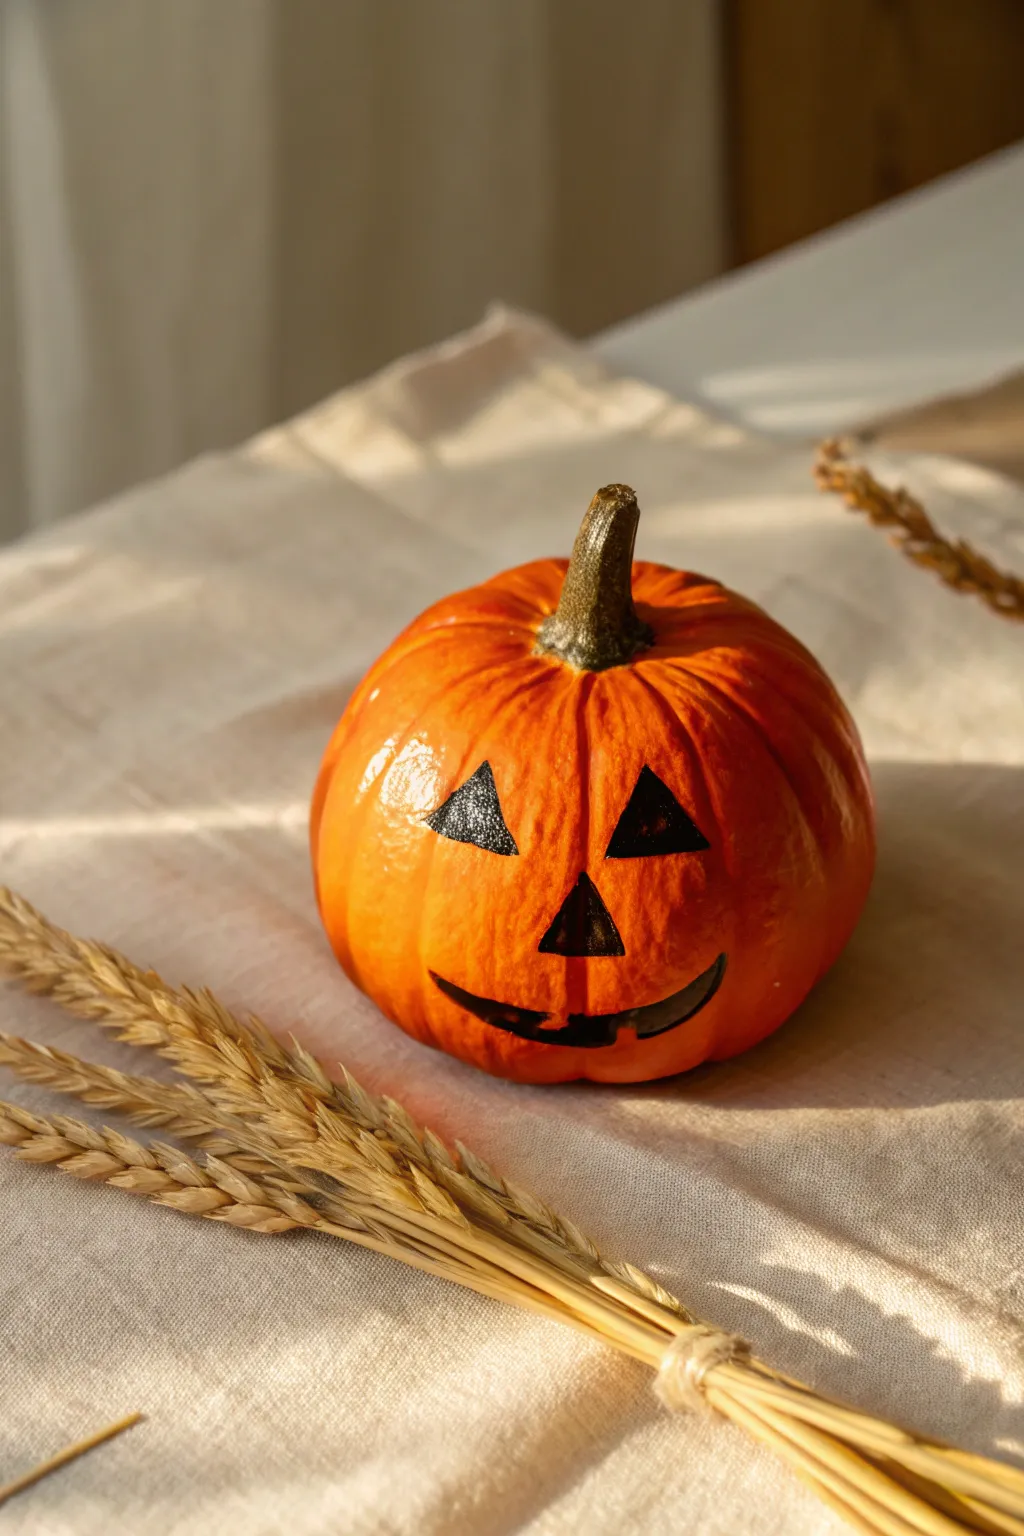
For the purists who love that classic Halloween aesthetic, this project transforms a simple miniature pumpkin into a grinning decoration without any of the messy carving. The bold, black triangles and friendly smile capture the timeless spirit of the season in just a few brushstrokes.
Step-by-Step Tutorial
Materials
- One miniature orange pumpkin (real or faux)
- Black acrylic craft paint
- Small flat shader brush (size 2 or 4)
- Fine detail liner brush (size 00 or 0)
- Graphite pencil or fine-tip washable marker
- Damp cloth or paper towel
- Matte or satin spray sealer (optional)
Step 1: Preparation and Planning
-
Clean surface:
Begin by wiping down the miniature pumpkin with a damp cloth to remove any dirt or waxy residue. Paint adheres best to a clean, dry surface, so let it air dry completely for a few minutes. -
Inspect the shape:
Rotate your pumpkin to find the ‘face.’ You want a side that is relatively smooth and round, avoiding deep blemishes or awkward dents. -
Draft the eyes:
Using a graphite pencil or a washable marker, lightly sketch two equilateral triangles for the eyes about halfway up the pumpkin’s height. Space them evenly apart, perhaps following the natural vertical ribs of the pumpkin for alignment. -
Add the nose:
Directly below the gap between the eyes, sketch a smaller triangle pointing upward for the nose. This classic positioning anchors the entire face. -
Outline the mouth:
Sketch a simple, curved crescent smile near the bottom. I like to keep the smile modest and friendly rather than jagged or scary for this particular classic look. -
Review sketch:
Step back and look at your pencil marks. If the proportions feel off, now is the time to wipe them away with a damp towel and redraw.
Fixing Smudges
Did your hand slip? Don’t panic. Use a damp Q-tip immediately to wipe away wet paint. If it dried, paint over the mistake with orange acrylic paint.
Step 2: Painting the Features
-
Load the flat brush:
Squeeze a small amount of black acrylic paint onto your palette. Dip your small flat shader brush into the paint, ensuring it’s not overloaded or drippy. -
Fill the eyes:
Carefully paint inside the sketched triangles for the eyes. The flat edge of the brush is perfect for creating the straight lines of the triangle sides. -
Sharp corners:
Use the very corner of your flat brush to push paint into the three points of each eye triangle to keep them crisp and sharp. -
Paint the nose:
Fill in the nose triangle using the same technique. Since this area is smaller, move slowly to avoid going outside your sketched lines. -
Switch brushes:
Clean your flat brush and switch to the fine detail liner brush. This tool offers much better control for the curves of the mouth. -
Line the smile:
Paint the outline of the mouth first. Use a steady hand to trace the upper and lower curves of the smile. -
Fill the smile:
Once the outline is established, fill in the center of the mouth with black paint. You may need two coats here to ensure the orange doesn’t show through. -
Tidy edges:
Examine the edges of your black shapes. If any lines look wobbly, use the liner brush with a tiny bit of fresh paint to smooth them out.
Add a Sparkle
While the black paint is still wet, sprinkle a tiny pinch of fine black glitter over the eyes and mouth. This adds a texture that catches candlelight beautifully.
Step 3: Finishing Touches
-
Clean up sketches:
Look closely for any visible pencil or marker lines that weren’t covered by paint. You can carefully dab these away with a damp Q-tip. -
Allow to cure:
Let the paint dry completely. Acrylics dry fast on porous surfaces, but give it at least 20 minutes to prevent smudging. -
Seal (optional):
If you plan to keep this pumpkin outdoors or for multiple seasons (if it’s faux), apply a light coat of matte or satin spray sealer to protect the paint.
Now you have a timeless little pumpkin friend ready to greet guests from your mantle or dining table


Cute Monster Face Mini Pumpkin
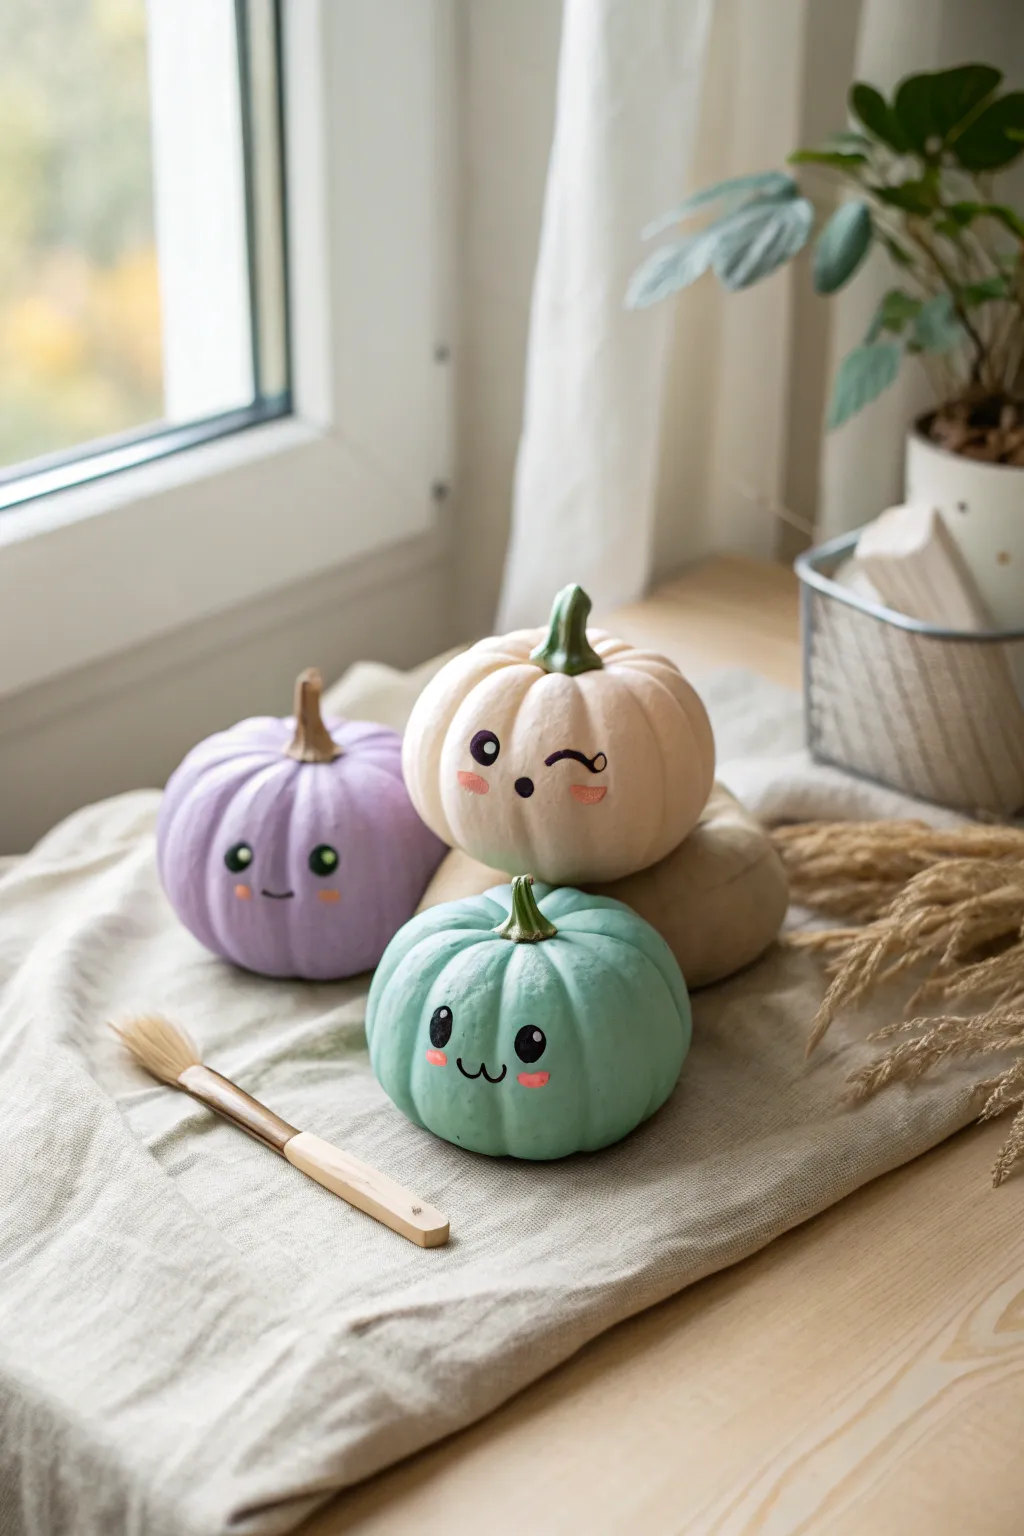
Transform ordinary mini pumpkins into an adorable trio of pastel friends with charming expressions. This project combines soft, matte candy colors with simple kawaii faces for a sweet, non-scary Halloween decoration.
How-To Guide
Materials
- 3 mini pumpkins (real or faux)
- Acrylic craft paints (lavender, mint green, cream/off-white)
- Black acrylic paint or black paint marker
- Pink acrylic paint
- White acrylic paint
- Gold or bronze metallic paint (for stems)
- Medium flat paintbrush
- Fine detail brush (size 0 or 00)
- Small round sponge applicator (optional)
- Matte spray sealer (optional)
Step 1: Base Coat Application
-
Clean and prep:
Begin by wiping down your pumpkins with a damp cloth to remove any dirt or oils. If using real pumpkins, dry them completely. -
Mix pastel shades:
Prepare your palette with your chosen pastel colors. I like to mix a little white into standard craft colors to achieve that soft, milky pastel look seen in the photo. -
First coat: Lavender:
Take your first pumpkin and apply a generous coat of lavender paint using the flat brush. Work in vertical strokes from top to bottom, following the pumpkin’s natural ribs. -
First coat: Mint:
Repeat the process with the second pumpkin using the mint green paint, ensuring you get into the crevices near the stem. -
First coat: Cream:
Paint the third pumpkin with the cream or soft off-white shade. -
Let dry and repeat:
Allow the first layer to dry completely (about 20 minutes). Apply a second or third coat until the orange skin is no longer visible and the finish is opaque. -
Detail the stems:
Once the bodies are dry, use a smaller brush to paint the stems carefully. Use a natural green for the cream pumpkin’s stem, and a metallic bronze or gold for the lavender and mint pumpkins to add a touch of elegance.
Paint Slipping?
If acrylic paint beads up on a faux pumpkin surface, lightly sand the plastic with fine-grit sandpaper first to give the paint something to grip onto.
Step 2: Painting the Faces
-
Plan the placement:
Visualize where the faces will sit. Ideally, place them on the smoothest, flattest side of the pumpkin, about halfway down. -
Drafting eyes:
Using a very fine brush and black paint, or a paint marker for easier control, draw the eyes. For the lavender pumpkin, paint two solid black circles. -
Adding winks:
For the cream pumpkin, paint one open circle eye and one curved line for a playful winking expression. -
Painting mouths:
Add the mouths using the fine liner brush. A simple small curve works for the lavender pumpkin, a tiny ‘o’ for the cream one, and a ‘w’ or cat-mouth shape for the mint pumpkin. -
Adding sparkles:
Dip the tip of a toothpick or the handle end of a brush into white paint. Add tiny white dots inside the black eyes to create a ‘sparkle’ or reflection. -
Creating rosy cheeks:
Mix a soft pink shade. Using a small dry brush or your fingertip, gently dab pink ovals under the eyes of the cream and mint pumpkins. -
Cheek variations:
For the lavender pumpkin, use a fine brush to paint two small orange or coral dashes for cheeks instead of round spots. -
Final touches:
Check for any uneven lines and touch up with the base color if needed. Let the facial features dry completely.
Make it Last
If you plan to keep these outdoors or want to reuse faux pumpkins next year, seal the finished artwork with a matte spray varnish to prevent chipping.
Group your new friends together on a windowsill or centerpiece for an instant mood booster


Minimal Ghost Mini Pumpkin
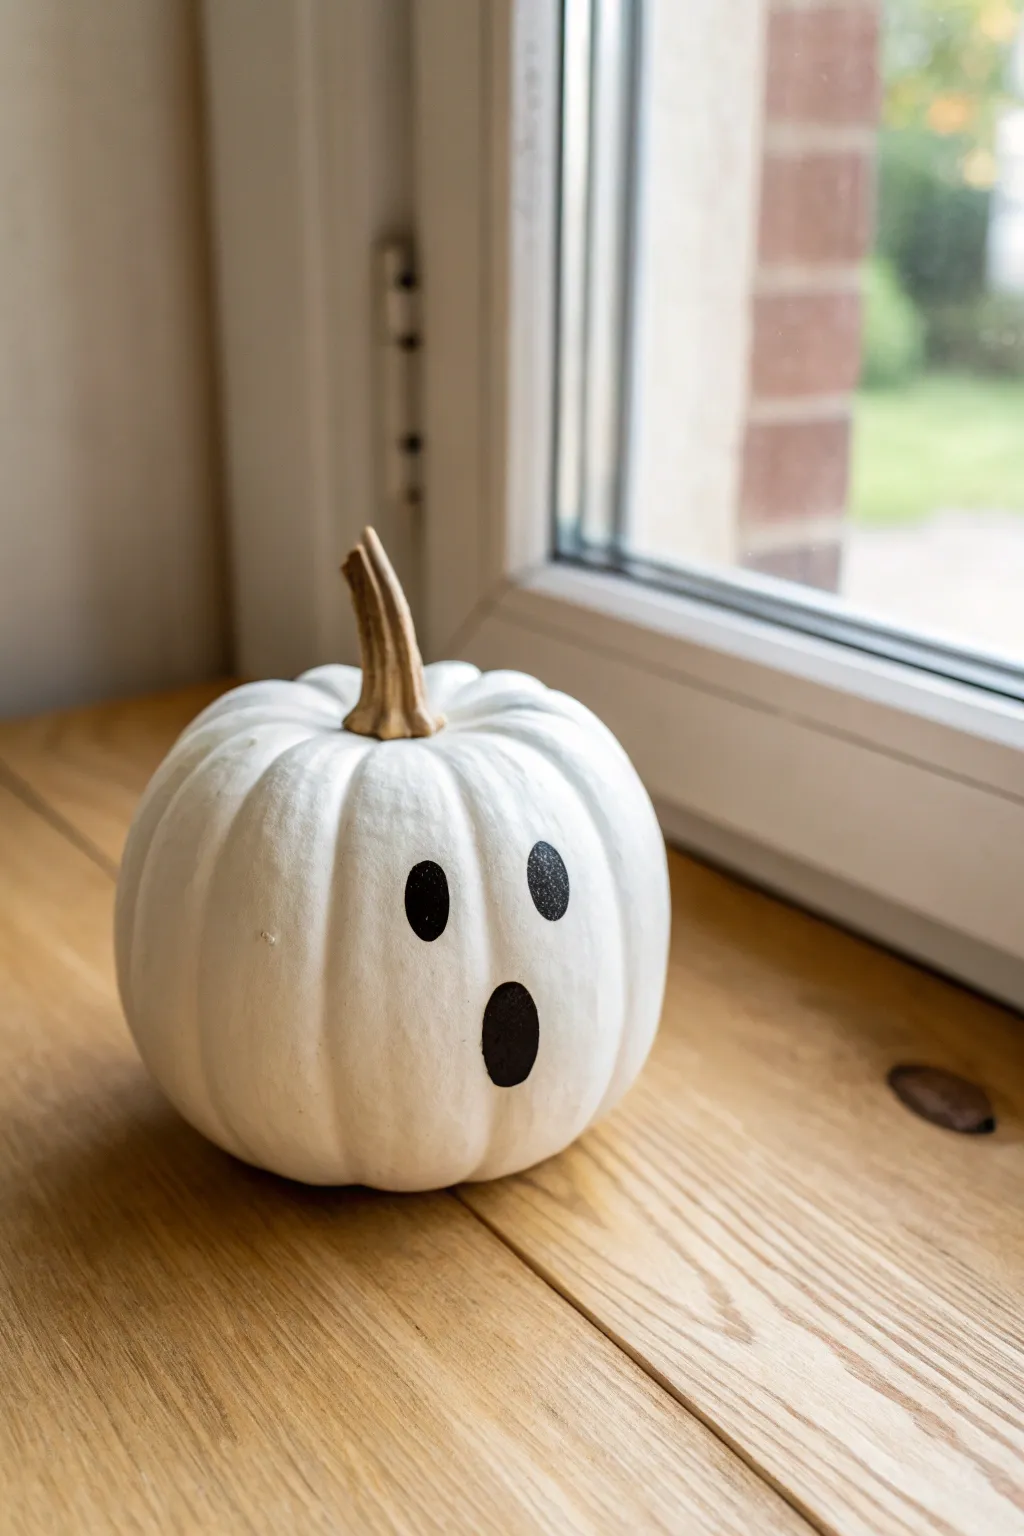
Transform a simple mini pumpkin into a charming ghostly figure with this minimalist design that proves less is often more. The clean white base and expressive black features create a modern, playful decoration perfect for a windowsill or mantle display.
Step-by-Step Guide
Materials
- Mini pumpkin (real or faux)
- White acrylic paint (matte finish)
- Black acrylic paint
- Gesso (optional but recommended for real pumpkins)
- Medium flat synthetic brush
- Small round detail brush (size 2 or 4)
- Painter’s tape or masking tape
- Sealer or clear matte varnish (optional)
- Palette or paper plate
- Water cup and paper towels
Step 1: Preparation & Base Coat
-
Clean the surface:
Begin by wiping down your mini pumpkin with a damp cloth to remove any dirt or oils. If using a real pumpkin, ensure it is completely dry before proceeding. -
Protect the stem:
Carefully wrap a small piece of painter’s tape around the existing stem. We want to keep that natural brown texture intact as a contrast to the painted body. -
Apply primer (optional):
For the best coverage, apply a thin layer of gesso. This creates a tooth mainly for real pumpkins with waxy skins, helping the white acrylic stick better. -
First coat of white:
Using your medium flat brush, apply the first coat of matte white acrylic paint. Brush vertically from top to bottom, following the natural ribs of the pumpkin. -
Painting the bottom:
Don’t forget the underside. Once the top is touch-dry, flip the pumpkin carefully and paint the bottom to ensure a seamless finish. -
Let it dry:
Allow this first layer to dry completely. This usually takes about 15 to 20 minutes depending on how thick the paint is. -
Apply second coat:
Apply a second coat of white paint. This layer should make the color opaque and hide the original orange or cream skin underneath. -
Final drying time:
Let the white base cure fully. I find waiting about an hour here ensures the black paint won’t accidentally blend or lift the white layer later.
Step 2: Adding the Ghost Face
-
Plan the face:
Look at the pumpkin’s shape and choose the smoothest ‘panel’ or side for the face. Visualize where the eyes and mouth will sit—usually slightly higher than the vertical center. -
Draft lightly:
Using a very light touch with a pencil, faintly sketch two vertical ovals for eyes and a slightly larger oval below them for the open mouth. -
Load the detail brush:
Load your small round detail brush with black acrylic paint. You want the paint to be fluid but opaque, so add a tiny drop of water if it feels too thick. -
Outline the left eye:
Start by outlining the left oval. Keep your hand steady and brace your pinky finger against the dry pumpkin surface for stability. -
Fill the left eye:
Fill in the outline solid black. If the coverage looks streaky, let it dry for a minute and add a second layer of black. -
Paint the right eye:
Repeat the process for the right eye. Try to keep them roughly the same size, but slight asymmetry adds to the spooky charm. -
Create the mouth:
Paint the mouth oval below the eyes. This oval should be slightly elongated vertically to mimic a ghostly ‘Oooo’ expression. -
Tidy up edges:
inspect the edges of your black shapes. If any lines are ragged, carefully smooth them out with the very tip of your detail brush.
Stem Contrast
If your pumpkin’s natural stem is broken or ugly, paint it metallic gold or a realistic brown/tan mix to maintain that nice earthy contrast against the white.
Step 3: Finishing Touches
-
Remove the tape:
Once the black paint is fully dry, gently peel off the painter’s tape from the stem. Be slow to avoid peeling any adjacent white paint. -
Inspect the stem:
If any white paint accidentally got onto the stem, you can gently scrape it off with a fingernail or touch it up with a bit of brown paint. -
Seal the work (optional):
To protect your ghost from scratches, apply a thin layer of matte varnish over the entire painted area, avoiding the stem.
Slippery Paint
If the white paint beads up and won’t stick to the pumpkin, the skin is too waxy. Lightly sand the surface with fine-grit sandpaper to give it grip.
Place your little ghost on a sunny windowsill or shelf to enjoy its friendly haunting vibes all season long


Witch Hat Mini Pumpkin
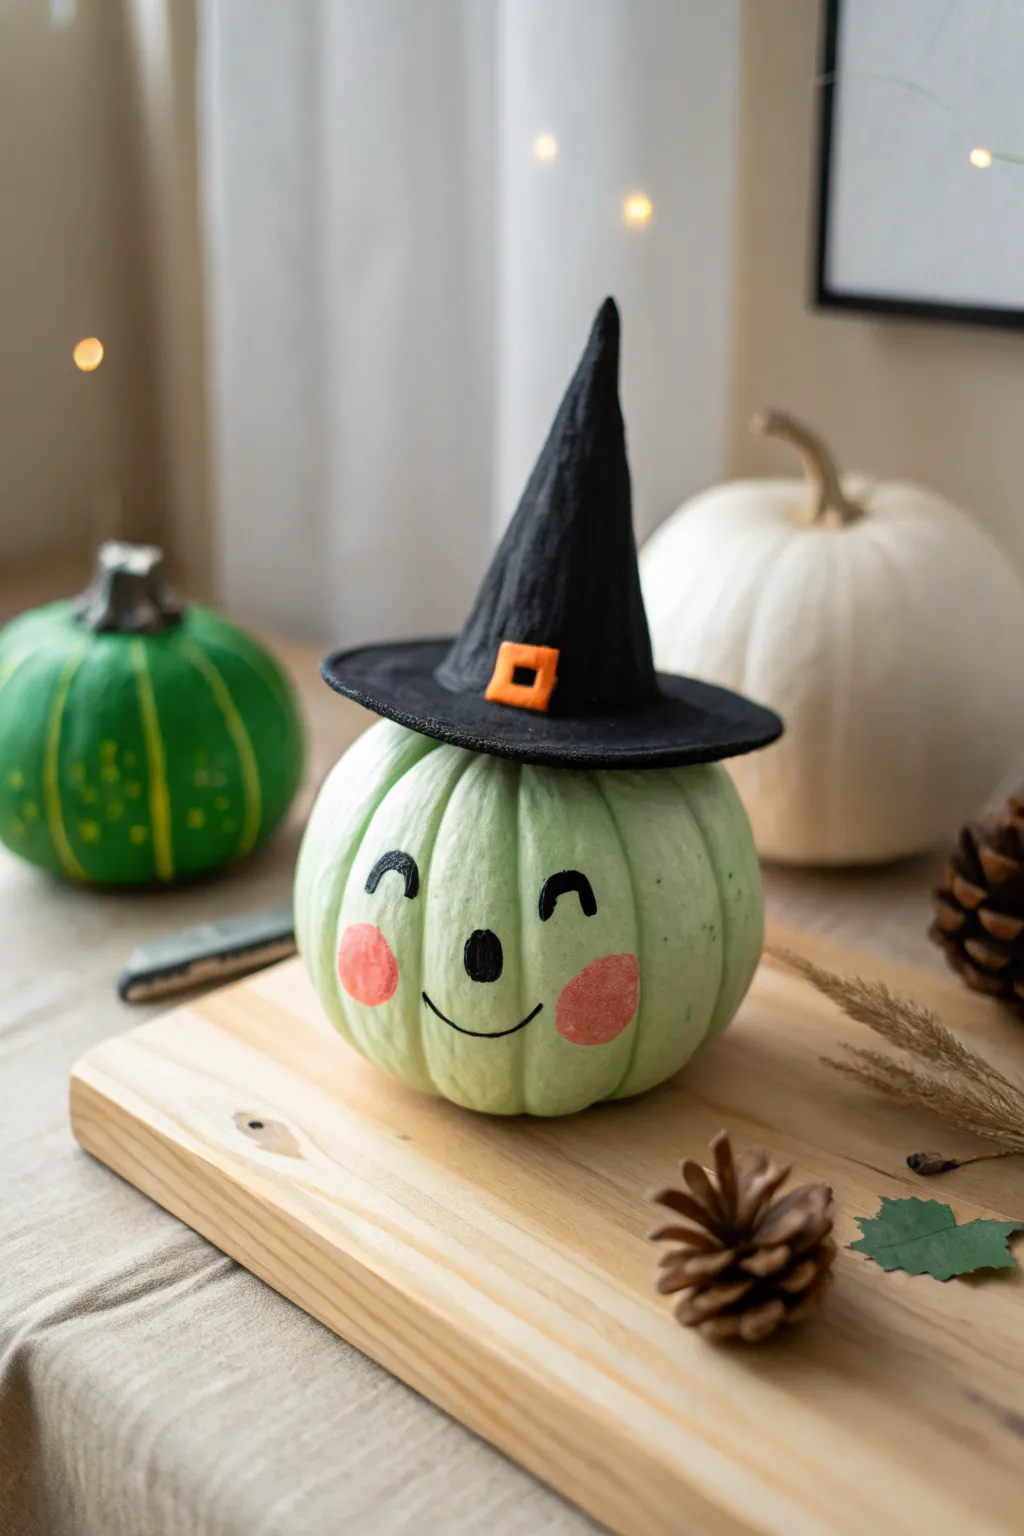
Transform a pale green pumpkin into an adorable little witch with just a few simple painted details and a custom-made hat. This charming character, complete with rosy cheeks and a happy smile, makes for a perfect non-scary Halloween decoration.
Detailed Instructions
Materials
- Small pumpkin (preferably pale green or white)
- Black air-dry clay or black stiff felt
- Orange felt or clay (small scrap)
- Black acrylic paint
- Pink or coral acrylic paint
- Fine-point round paintbrush
- Small round paintbrush or foam pouncer
- Craft glue or hot glue gun
- Pencil (optional)
Step 1: Preparing the Base
-
Clean the surface:
Start by gently wiping down your pumpkin with a damp cloth to remove any dirt or dust. A clean surface ensures the paint adheres properly and lasts longer. -
Dry completely:
Allow the pumpkin to dry fully before you begin painting. Any residual moisture can cause the acrylics to lift or smudge. -
Base coat (optional):
If you couldn’t find a naturally pale green pumpkin, you can mix a tiny bit of leafy green with white acrylic paint to achieve a pastel mint shade. Paint the entire pumpkin and let it dry completely.
Step 2: Painting the Face
-
Draft the features:
Lightly sketch the face placement with a pencil if you’re nervous about freehanding. Aim for the middle of the pumpkin’s smoothest side. -
Paint the nose:
Using a fine-point brush and black paint, create a small, solid circle right in the center for the nose. It doesn’t need to be perfectly round; a slight oval shape adds character. -
Create the eyes:
Above the nose, paint two upside-down ‘U’ shapes for lively, squinting eyes. Make the lines slightly thick so they stand out against the pale skin. -
Add the smile:
Paint a simple, thin curved line below the nose. I like to keep the smile fairly modest rather than stretching it too wide, which keeps the expression sweet. -
Rosy cheeks:
Dip a small round brush or a foam pouncer into pink or coral paint. Blot off the excess paint on a paper towel first so the application is translucent. -
Apply the blush:
Gently stamp or paint circular cheeks on either side of the smile. The texture of the pumpkin skin will naturally give it a slightly rustic, stamped look. -
Dry the face:
Set the pumpkin aside to let the facial features dry completely while you work on the accessory.
Paint Slipping?
Does the paint bead up on the pumpkin skin? The waxy coating is the culprit. Lightly buff the painting area with fine-grit sandpaper or a kitchen scrubby sponge to help the acrylic grip.
Step 3: Crafting the Hat
-
Form the brim:
If using air-dry clay, roll out a piece of black clay into a flat circle, about 3-4 inches in diameter depending on your pumpkin size. If using felt, cut a circle from black stiff felt. -
Shape the cone:
Roll a cone shape from a larger piece of clay, tapering it to a playful, slightly crooked point at the top. For felt, cut a semi-circle, roll it into a cone, and glue the seam. -
Attach brim to cone:
Press the clay cone onto the center of the clay brim and smooth the seam together with your fingers. If using felt, glue the cone to the center of the brim circle. -
Add texture (Clay only):
While the clay is still soft, gently pinch and twist the tip of the hat to give it a crumpled, worn-in witchy look. -
Create the buckle:
Cut a tiny square from orange felt (or shape orange clay). Cut a smaller square out of the center to create a buckle shape. -
Attach the detail:
Glue the orange buckle to the front base of the hat cone where it meets the brim. This pop of color ties the Halloween theme together. -
Let it set:
Allow your clay hat to dry according to package directions (usually 24 hours) or wait for the glue on your felt hat to set firmly.
Add Some Magic
For extra dimension, try gluing tiny dried grass bundles or miniature fake leaves to the brim of the hat alongside the buckle for an autumnal, cottage-core vibe.
Step 4: Assembly
-
Check fit:
Place the finished hat on top of the pumpkin stem. Adjust the angle so it looks like it’s tipped slightly backward or to the side. -
Secure the hat:
Apply a generous dab of craft glue or hot glue to the underside of the hat brim and the pumpkin stem, then press firmly into place.
Display your charming green witch on a mantle or table runner for a delightful touch of seasonal whimsy
BRUSH GUIDE
The Right Brush for Every Stroke
From clean lines to bold texture — master brush choice, stroke control, and essential techniques.
Explore the Full Guide
Vampire Hairline Mini Pumpkin
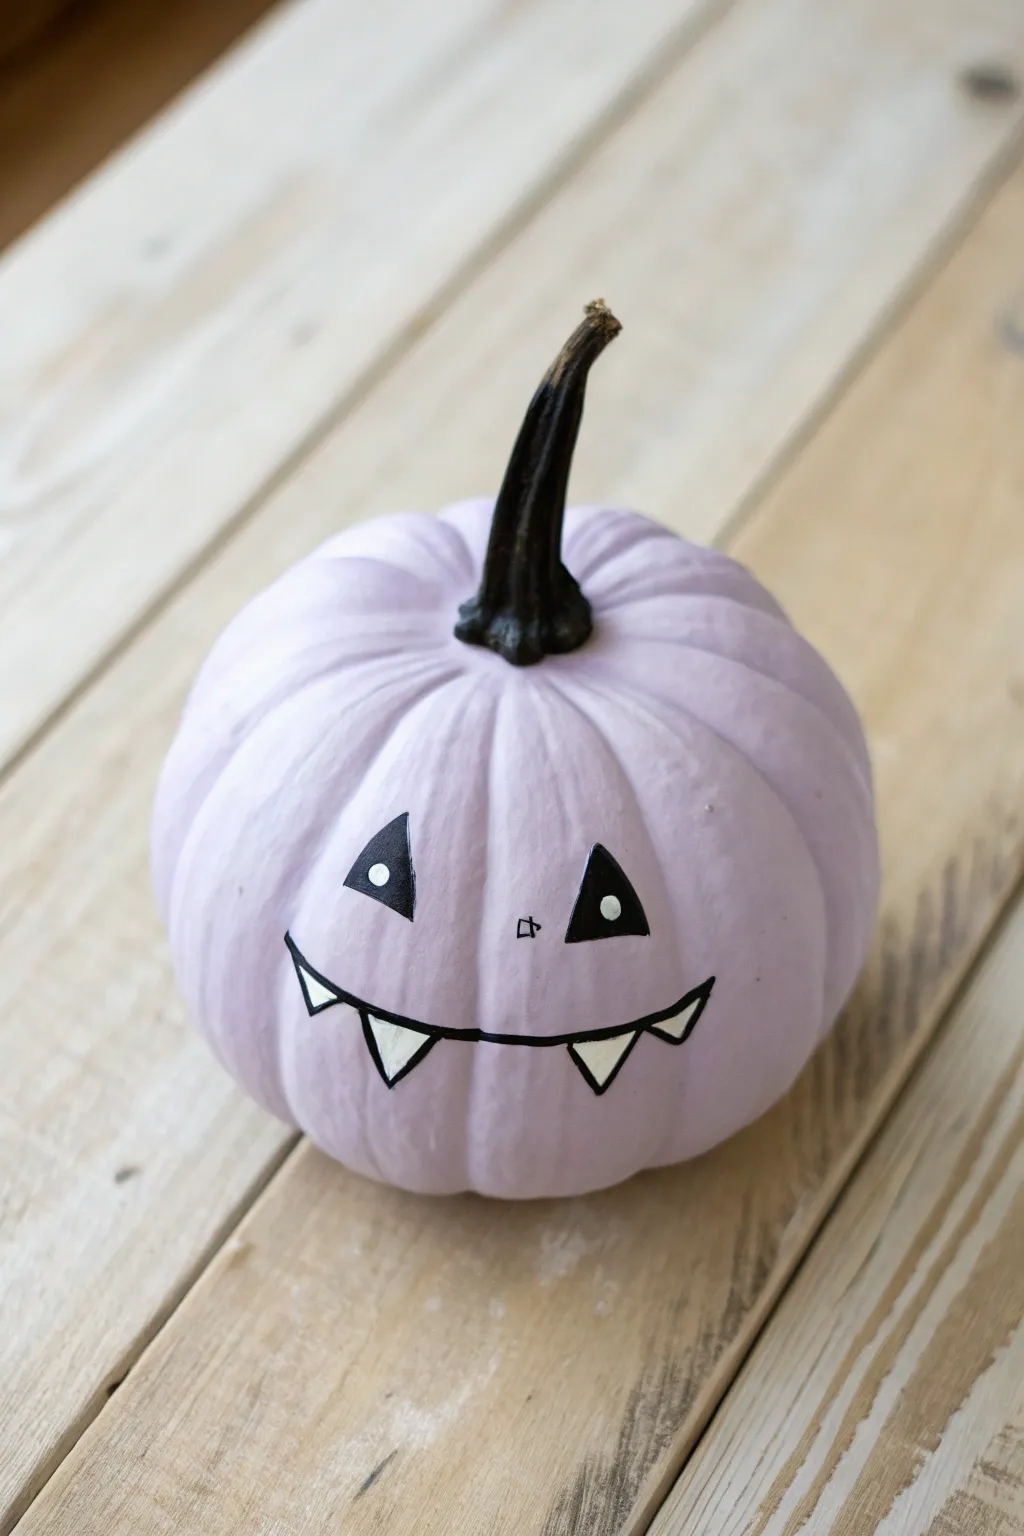
Transform a simple mini pumpkin into a friendly little vampire with a soft pastel twist. This project features a lovely pale lavender base coat paired with a stark black stem and a cute, toothy grin.
Step-by-Step
Materials
- Mini pumpkin (real or artificial)
- Light lavender or lilac acrylic paint
- Black acrylic paint
- White acrylic paint
- Paintbrush (medium flat brush for base)
- Fine detail paintbrush or black paint pen
- Small round paintbrush
- Sealer (optional, matte or satin finish)
- Paper plate or palette
- Cup of water and paper towels
Step 1: Base Coat and Stem
-
Clean the surface:
Start by wiping down your pumpkin with a damp cloth to remove any dirt or oils. Let it dry completely so the paint adheres properly. -
First coat of lavender:
Using your medium flat brush, apply a coat of light lavender paint over the entire body of the pumpkin. Don’t worry if it looks streaky; acrylics often need layers. -
Dry and repeat:
Allow the first layer to dry for about 15-20 minutes. Apply a second coats—and a third if necessary—until you have a solid, opaque pastel purple color. -
Paint the stem:
While the body dries, carefully paint the stem black using a smaller brush. Get right into the crevices where the stem meets the pumpkin for a clean look. -
Touch up the connection point:
Check the area where the black stem meets the purple skin. If you got any black on the purple, wait for it to dry and touch it up with a dab of lavender.
Uneven Coverage?
If the lavender paint looks streaky even after two coats, let it dry fully and try dabbing the paint on with a sponge instead of brushing.
Step 2: Adding the Vampire Face
-
Outline the eyes:
Once the base is fully dry, take a fine detail brush or a black paint pen. Draw two triangles for eyes about a third of the way down the pumpkin. -
Fill the eyes:
Fill in the triangles with solid black paint. Make sure the edges are crisp and sharp. -
Add the nose:
Just below the eyes, paint a tiny, slightly squared U-shape or a small dot to represent a cute button nose. -
Sketch the mouth:
Draw a wide curved line for the smile under the nose. Add slight upward ticks at the ends to emphasize the grin. -
Draw the fangs:
Along the smile line, draw two downward-pointing triangles for the vampire fangs. Leave a gap in the middle between them. -
Add side teeth:
Draw smaller, sharper triangles near the corners of the mouth to suggest the other teeth. -
Fill the mouth gaps:
Carefully fill in any space inside the mouth line that isn’t a tooth with black paint, but for this specific design, we are focusing on outlining the teeth first. -
Whiten the teeth:
Using a clean small brush and white paint, carefully fill in the triangle fangs and side teeth. You might need two layers to make the white pop against the lavender. -
Outline the teeth:
After the white paint dries, re-trace the outline of the teeth with your black detail brush or pen to make them stand out clearly. -
Add eye highlights:
Dip the non-brush end of a paintbrush into white paint. Dot it once onto the upper part of each black triangle eye to create a spark of life. -
Final check:
Look over your design. If any lines are shaky, touch them up with the background lavender color or re-define them with black.
Sharper Lines
I prefer using a black acrylic paint pen rather than a brush for the facial features. It offers way more control, especially for tiny teeth.
Place your pastel vampire on a shelf or windowsill to add a softly spooky touch to your decor
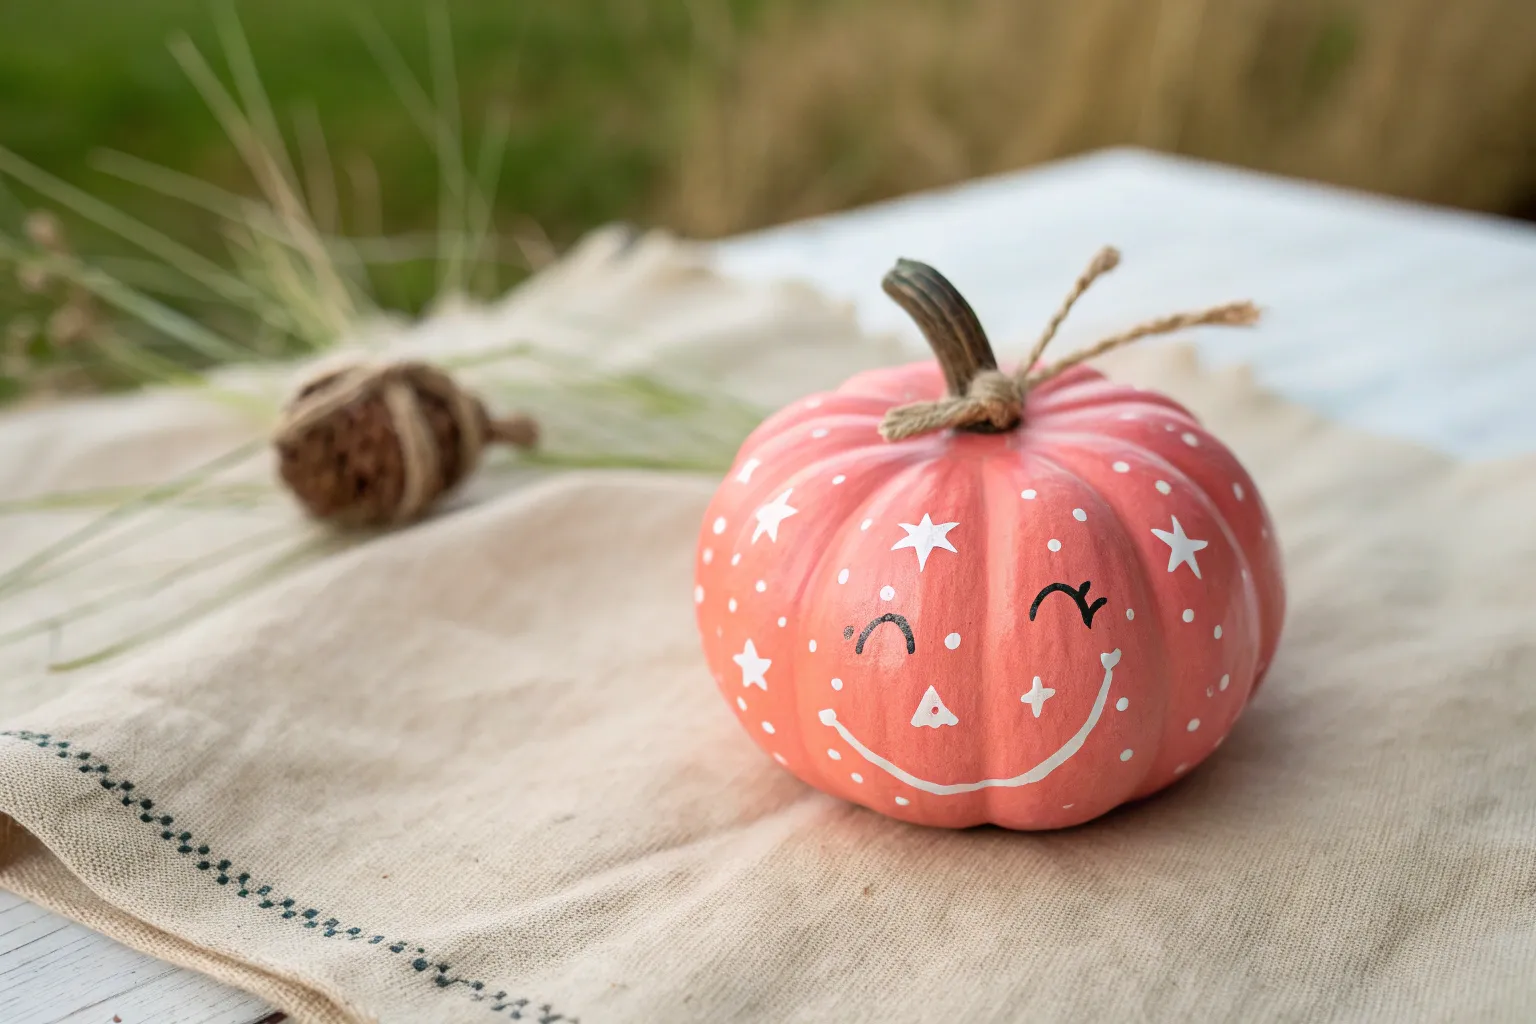
Polka Dot Party Mini Pumpkin
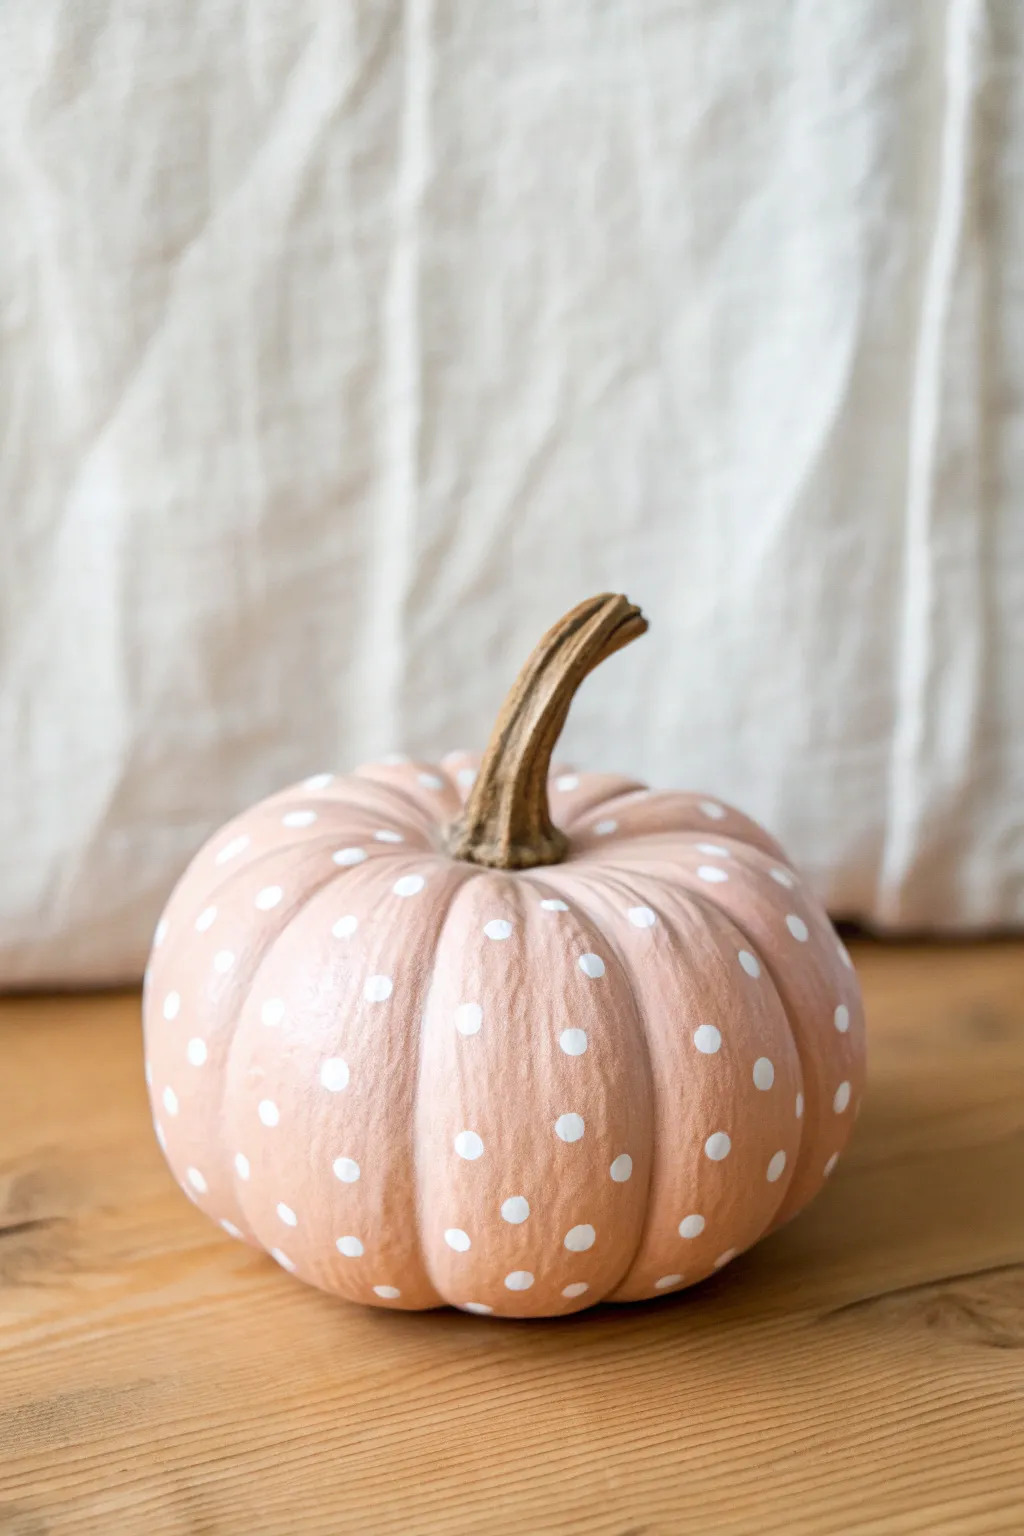
Transform a standard mini pumpkin into a piece of chic fall decor with this soft peach and white polka dot design. The gentle pastel hue combined with whimsical dots creates a sophisticated look perfect for modern bohemian or farmhouse styles.
Detailed Instructions
Materials
- Real or faux mini pumpkin (white or orange)
- Acrylic craft paint (matte finish) in ‘Soft Peach’ or ‘Blush Pink’
- White matte acrylic paint
- Medium soft-bristle flat paintbrush
- Cotton swabs (Q-tips) or a dotting tool
- Small palette or paper plate
- Paper towels
- Matte clear sealant spray (optional)
Step 1: Preparation and Base Coat
-
Clean surface:
Begin by wiping down your pumpkin with a barely damp cloth to remove any dust or dirt. If you are using a real pumpkin, ensure it is completely dry before painting so clarity is maintained. -
Protect the stem:
Tear off a small piece of painter’s tape and wrap it carefully around the base of the stem. This keeps your stem looking natural and brown while you paint the body of the pumpkin. -
Mix your base color:
Squeeze a generous amount of your peach or blush pink paint onto your palette. If the color looks too bright, I like to mix in a tiny drop of white or beige to soften it into that muted pastel tone seen in the image. -
Apply first coat:
Using your medium flat brush, apply the first layer of peach paint. Use long, vertical strokes following the natural ribs of the pumpkin for the smoothest finish. -
Let it dry:
Allow the first coat to dry for about 15-20 minutes. It should feel dry to the touch before you proceed. -
Apply second coat:
Apply a second layer of peach paint to ensure full opacity. If your pumpkin was originally bright orange, you might even need a thin third coat to completely cover the underlying color. -
Dry completely:
Let the base coats cure fully for at least 30 minutes. The paint needs to be hard enough that pressing a tool against it won’t dent the surface.
Consistent Circles
For perfectly uniform dots without special tools, use the flat end of a drill bit or the eraser end of a brand new pencil dipped in paint.
Step 2: Dotting the Design
-
Prepare white paint:
Dispense a small puddle of white acrylic paint onto your palette. It shouldn’t be too watery, as you want the dots to hold their round shape without dripping. -
Test your tool:
Dip the end of a cotton swab or a round dotting tool into the white paint. Practice making a few dots on a scrap piece of paper to gauge the size and pressure needed. -
Start the pattern:
Begin applying dots near the top of the pumpkin, working within one vertical ‘rib’ section at a time. -
Spacing the dots:
Aim for a random but balanced scatter pattern. Don’t align them in perfect rows; instead, offset them slightly so they look like falling confetti. -
Refine the shape:
Press the cotton swab straight down and lift straight up to get a clean circle. If using a dotting tool, a gentle swirl can help deposit more paint. -
Rotate and repeat:
Turn the pumpkin slowly and continue the pattern around the circumference. Try to keep the density of the dots consistent across all sides. -
Check the crevices:
Don’t forget to place a few dots deep into the crevices between the ribs. This adds dimension and makes the pattern look continuous rather than just surface-level. -
Dry the dots:
Be very careful not to smudge wet dots as you handle the pumpkin. Set it down and let the white dots dry for at least an hour, as the thicker paint takes longer to cure.
Make It 3D
Use ‘Puffy Paint’ or dimensional fabric paint for the white dots to give your pumpkin a fun, tactile texture that pops off the surface.
Step 3: Finishing Touches
-
Remove tape:
Once the paint is totally dry, gently peel away the painter’s tape from the stem. If any peach paint seeped through, you can scrape it off gently with a fingernail. -
Touch up stem:
If the natural stem looks dull, you can dry-brush a tiny amount of brown paint on it to enhance the contrast against the pastel pumpkin. -
Seal (optional):
For longevity, especially if displaying outdoors, spray a light coat of matte clear sealant over the entire pumpkin. This protects the paint from chipping.
Place your lovely polka dot pumpkin on a mantle or wooden table for an instant touch of cozy autumn charm

PENCIL GUIDE
Understanding Pencil Grades from H to B
From first sketch to finished drawing — learn pencil grades, line control, and shading techniques.
Explore the Full Guide
Striped Mini Pumpkin in the Grooves
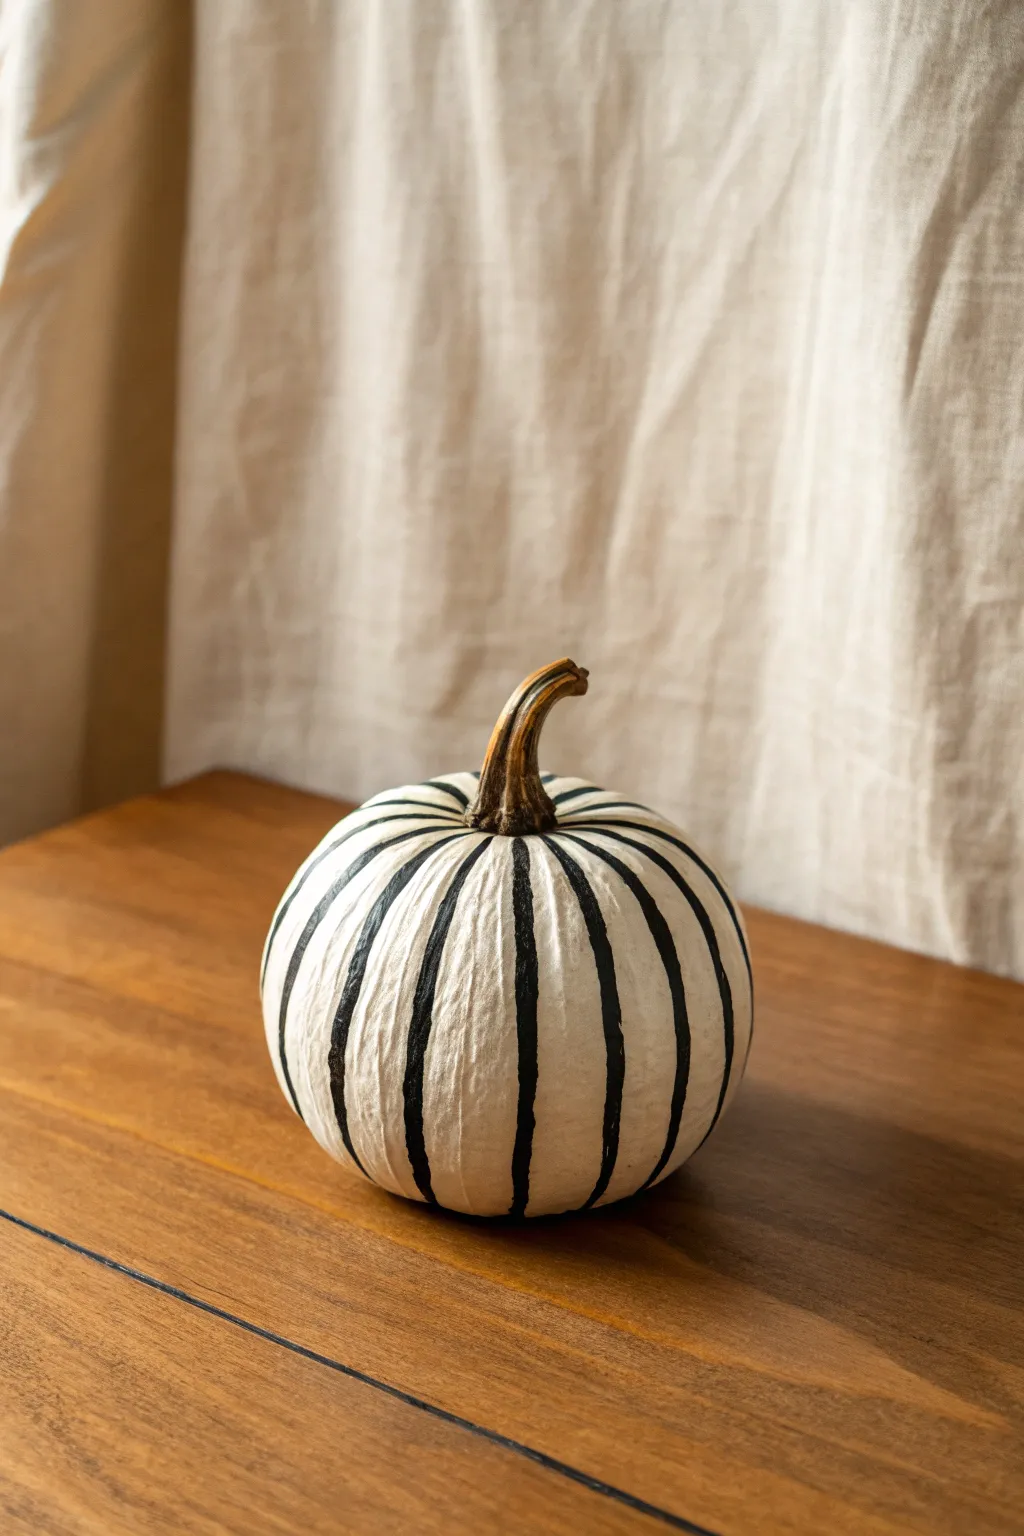
Embrace a modern, high-contrast aesthetic with this striking black and white mini pumpkin design. By following the natural contours of the gourd, you create an elegant piece that feels organic yet graphic, perfect for a sophisticated autumn display.
Step-by-Step
Materials
- Mini pumpkin (real or faux)
- White acrylic paint (matte finish recommended)
- Black acrylic paint
- Medium flat paintbrush
- Fine liner or detail brush
- Damp cloth or paper towel
- Painter’s tape (optional, for masking the stem)
- Matte spray sealer (optional)
Step 1: Base Preparation
-
Clean the surface:
Start by thoroughly wiping down your mini pumpkin with a damp cloth to remove any dirt or waxy residue, ensuring the paint adheres properly. -
Dry completely:
Let the pumpkin air dry for a few minutes; painting on a wet surface will dilute your acrylics and cause streaking. -
Mask the stem:
If you want to keep the stem completely natural without accidental smudges, wrap a small piece of painter’s tape around its base. -
First white coat:
Using your medium flat brush, apply an even coat of white acrylic paint over the entire body of the pumpkin. -
Check groove coverage:
Pay special attention to getting white paint deep into the crevices, as these will be the highlight areas next to your black stripes. -
Allow to dry:
Let the first coat dry for about 15-20 minutes until it’s dry to the touch. -
Second white coat:
Apply a second layer of white paint to ensure full opacity, covering any orange or green skin that might be showing through. -
Final dry:
Allow the base coat to cure completely, ideally for an hour, so the black paint won’t blend into the white later.
Keep it fluid
Mix a tiny drop of water into your black acrylic paint. Ink-like consistency flows much smoother into the grooves than heavy body paint.
Step 2: Painting the Stripes
-
Identify the grooves:
Examine your pumpkin to find the natural vertical indentations (these are called ribs) running from the stem to the base. -
Load the detail brush:
Dip your fine liner brush into the black acrylic paint, ensuring you have enough paint for a smooth stroke but not a dripping glob. -
Start near the stem:
Begin your first stripe at the very top of a groove, right where the stem meets the pumpkin body. -
Pull downward:
With a steady hand, drag the brush down the center of the groove; I find it helpful to anchor my pinky finger on the table for stability. -
Taper the bottom:
Continue the line until you reach the underside of the pumpkin, letting the line naturally taper off as it curves underneath. -
Repeat the process:
Rotate the pumpkin and paint a black line down every single groove, maintaining a consistent width for each stripe. -
Refine the edges:
Go back over your black lines to sharpen any ragged edges or fill in spots where the paint looks thin. -
Clean up mistakes:
If a black line goes astray, wait for it to dry completely, then carefully touch it up with a tiny dab of white paint.
Metallic modern twist
Swap the matte black paint for metallic gold or copper acrylic to give the pumpkin a glamorous, high-end look suitable for a dinner centerpiece.
Step 3: Finishing Touches
-
Remove tape:
Once the paint is fully dry, gently peel off the painter’s tape from the stem. -
Clean the stem:
If any paint got onto the stem, you can often gently scrape it away with a fingernail or a damp Q-tip to restore the natural wood look. -
Seal the work:
To protect your design from chipping, give the pumpkin a light misting of matte spray sealer in a well-ventilated area.
Place your stylishly striped pumpkin on a mantle or tablescape to enjoy the modern contrast all season long
Bold Checkerboard Mini Pumpkin
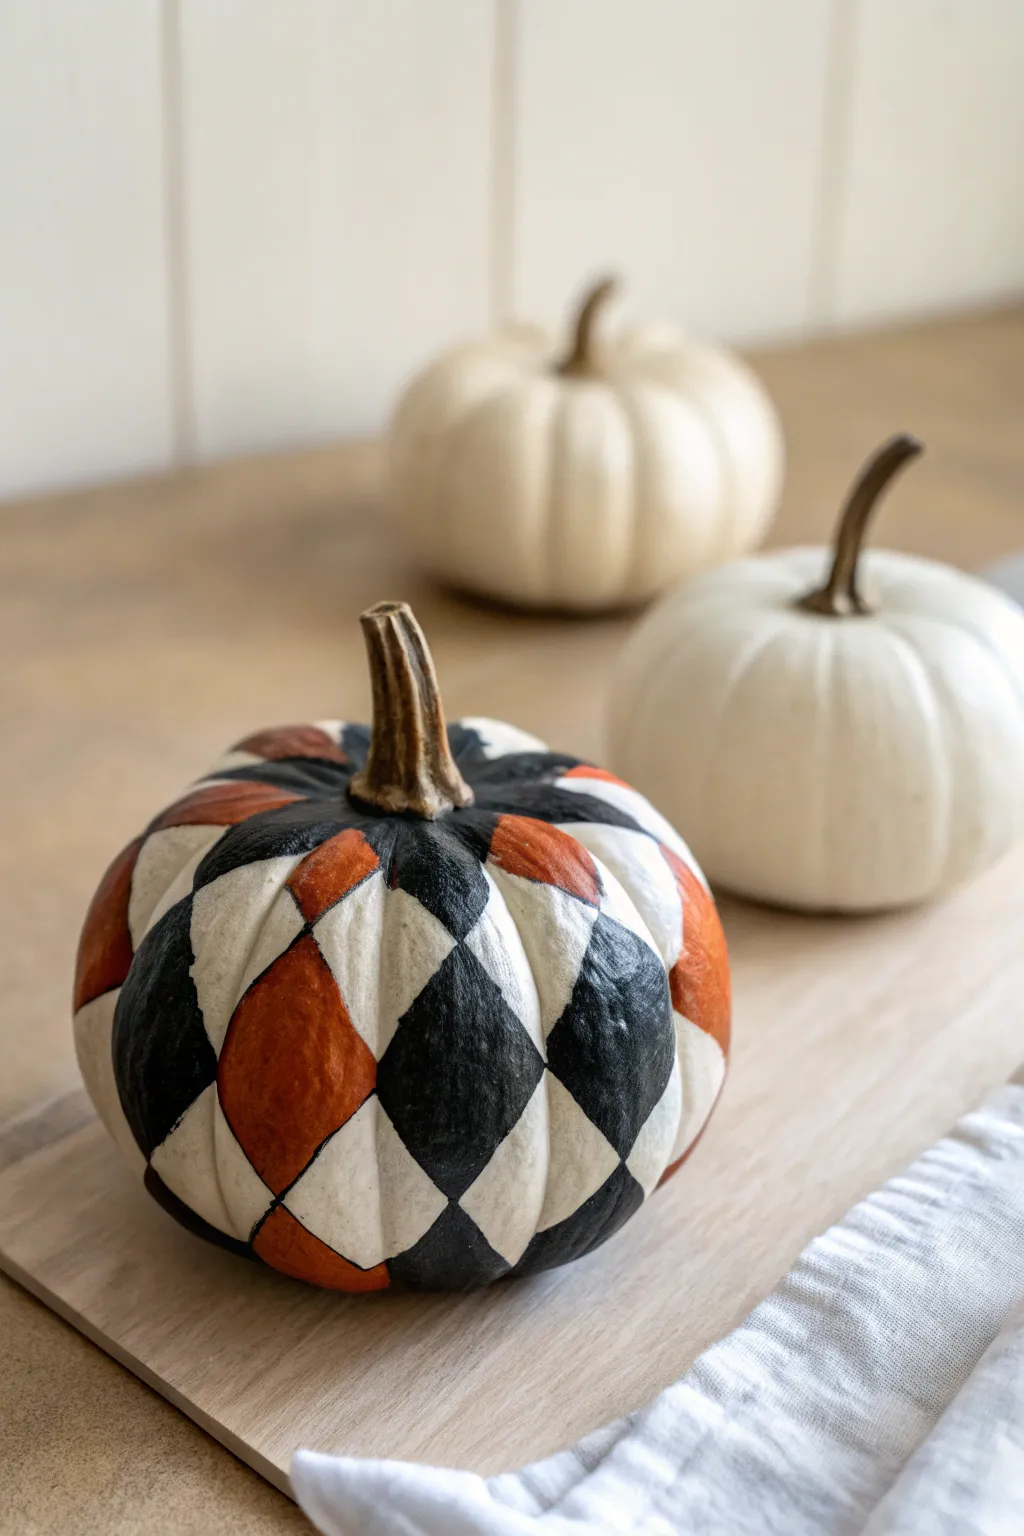
Give your mini pumpkin a sophisticated graphic makeover with this bold three-tone checkerboard design. It combines classic black and white with a pop of autumnal orange for a look that feels both spooky and elegant.
How-To Guide
Materials
- Small white pumpkin (real or faux)
- Acrylic paints: Carbon Black, Titanium White, Burnt Orange
- Pencil
- Flexible sewing measuring tape
- Small flat brush (size 2 or 4)
- Fine liner brush (size 0 or 00 for edges)
- Eraser
- Palette or paper plate
- Water cup and paper towels
- Clear matte sealer spray (optional)
Step 1: Planning the Grid
-
Clean surface:
Begin by wiping the pumpkin with a slightly damp cloth to remove any dust or oils, ensuring the paint adheres properly. -
Establish vertical lines:
Using a pencil, lightly draw vertical lines following the natural ribs of the pumpkin from the stem to the base. If your pumpkin has very deep ribs, you might want to span two ribs per section to make painting easier. -
Mark horizontal guides:
Use a flexible measuring tape to find the horizontal center of the pumpkin and mark it with small tick marks around the circumference. -
Draw the diamond grid:
Connect your vertical lines with diagonal lines to create a diamond lattice pattern. It helps to start at the center tick marks and work outward so your largest, neatest diamonds are front and center. -
Check the symmetry:
Step back and look at your sketched grid. The diamonds will naturally get smaller and slightly distorted near the stem and base, which is perfectly fine, but ensure the main face looks fairly symmetrical.
Wobbly Lines?
If your hand shakes, try resting your pinky finger on a dry part of the pumpkin for stability. You can also clean up messy edges with a white paint pen instead of a brush.
Step 2: Painting the Pattern
-
Establish the color pattern:
Before painting, lightly mark inside each diamond with a ‘B’ for black, ‘W’ for white, or ‘O’ for orange to prevent mistakes. The pattern should alternate somewhat regularly, but random placement also works for a whimsical look. -
Start with white:
Using a small flat brush, fill in the white diamonds first. Even if your pumpkin is white, this coat makes the design opaque and uniform. I find it easiest to paint all sections of one color before switching to the next. -
Refine white edges:
Use the fine liner brush to tidy up the edges of the white diamonds, ensuring sharp points where the corners meet. -
Apply the orange:
Load your flat brush with Burnt Orange acrylic. Paint the designated orange diamonds, being careful not to touch the wet white sections. -
Double down on opacity:
Orange and white paints can sometimes be translucent. Apply a second thin coat to these sections once the first layer is touch-dry for a solid, vibrant finish. -
Fill in the black:
Once the lighter colors are completely dry, switch to Carbon Black. This color is the most unforgiving, so work slowly and use the natural curve of the brush to follow the diamond lines. -
Clean the intersections:
The crucial part of this look is where the points of the diamonds meet. Use your smallest liner brush with a tiny amount of black paint to sharpen these intersections.
Add Some Glamour
For a luxe twist, swap the orange paint for metallic gold leaf or copper acrylic. The shine contrasts beautifully against the matte black.
Step 3: Finishing Touches
-
Erase guidelines:
Check for any visible pencil lines in the unpainted gaps or light sections. Gently erase them with a clean eraser, being careful not to rub off any paint. -
Touch up the stem:
If painting a faux pumpkin, the stem might look plasticky. Dry brush a little dark brown or black paint over the stem to give it a realistic, weathered texture. -
Tidy the bottom:
Flip the pumpkin over and neatly finish the painting where the diamonds converge at the base. This area doesn’t have to be perfect, but clean lines here show attention to detail. -
Seal the work:
To protect your intricate work from chipping, take the pumpkin to a well-ventilated area and apply a light coat of clear matte sealer spray.
Now step back and admire how this striking geometric piece transforms your autumn display


Cozy Gingham Plaid Mini Pumpkin
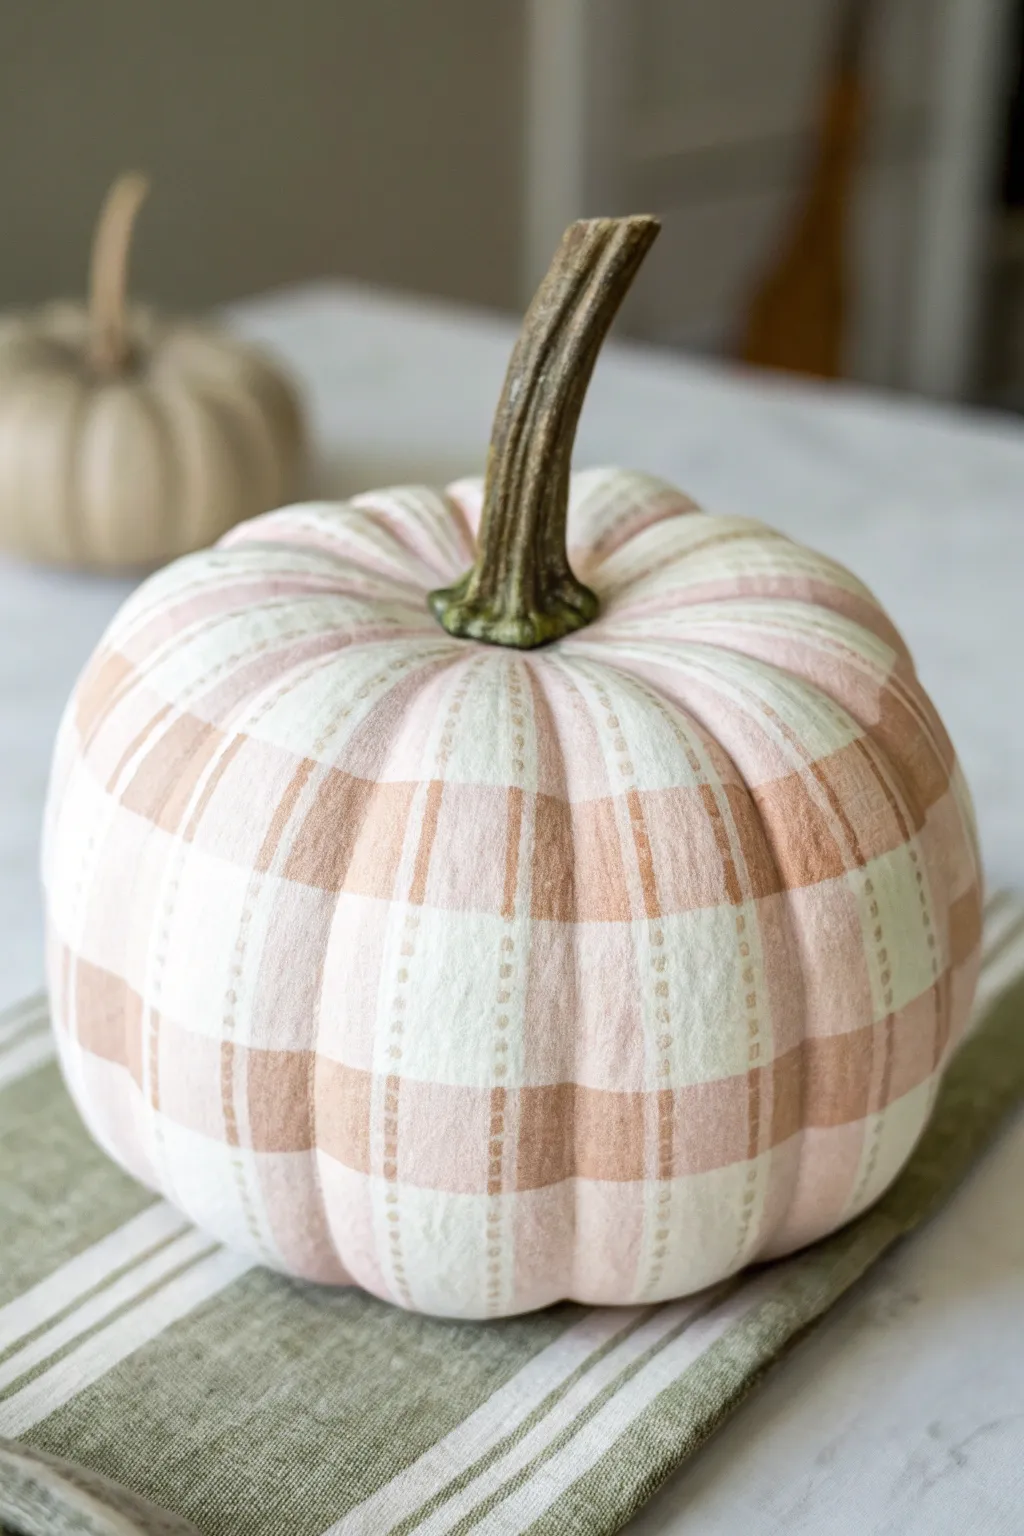
Transform a simple faux pumpkin into a cozy autumn accent with this soft, woven-look design. The layered beige and pink tones create a realistic fabric texture that mimics your favorite warm flannel shirt.
Step-by-Step Tutorial
Materials
- Small white faux pumpkin (smooth surface works best)
- Matte acrylic paint in cream or off-white
- Acrylic paint in beige or tan
- Acrylic paint in soft muted pink/blush
- Flat shader brush (approx. 1/2 inch)
- Fine liner brush or script liner brush
- Pencil for sketching (optional)
- Paper plate or palette
- Cup of water and paper towels
Step 1: Base Coat & Preparation
-
Clean surface:
Begin by wiping down your faux pumpkin with a damp cloth to remove any dust or oils, ensuring the paint adheres properly. -
Apply base color:
Using the flat shader brush, coat the entire pumpkin with the cream or off-white matte acrylic paint. This provides a uniform canvas, especially if using a pumpkin that wasn’t originally white. -
Dry completely:
Allow the base coat to dry fully. Since we will be layering precise lines over this, a bone-dry surface is crucial to prevent colors from muddying.
Wobbly Lines?
If painting straight lines on a round surface is tough, use thin washi tape or painter’s tape to mark your horizontal guides before painting.
Step 2: Painting the Vertical Bands
-
Mix the colors:
On your palette, prepare your beige and muted pink paints. You may want to thin them slightly with a tiny drop of water to help the paint flow smoothly over the curves. -
Start vertical stripes:
Using the flat shader brush, follow the natural vertical ribs of the pumpkin. Paint wide vertical stripes using the beige paint, skipping every other rib section. -
Create pink stripes:
In the alternating empty rib sections, paint similar wide vertical stripes using the soft pink acrylic. The natural grooves of the pumpkin make excellent guides for keeping lines relatively straight. -
Let it set:
Allow these vertical stripes to dry until they are touch-dry. This prevents the horizontal lines in the next step from smearing the work you’ve just done.
Bronze Accents
For a glam twist, mix a metallic bronze or gold paint into your beige color for the thin stitched lines to catch the light beautifully.
Step 3: Painting the Horizontal Bands
-
Plan horizontal position:
Visualize where your horizontal bands will go. They should ring around the pumpkin’s equator and midway between the top and bottom. -
Paint horizontal beige:
Load your flat brush with beige paint again. Carefully paint a horizontal band around the pumpkin, crossing over both the beige and pink vertical stripes. -
Add pink horizontals:
Clean your brush and switch to the pink paint. Add horizontal bands alternating with the beige ones. Where the same colors cross (e.g., pink over pink), the color will naturally appear darker, creating that authentic gingham depth. -
Feather edges:
I like to create a slightly rustic look by not making edges too sharp; a dry-brush technique at the very edges of the bands makes it look more like woven fabric.
Step 4: Detailed Stitching
-
Thin the paint:
Take a bit of your beige paint and thin it down just a little more so it flows easily from a fine liner brush. -
Paint stitch lines:
using the fine liner brush, paint thin vertical dashed lines centered within the white (unpainted) spaces between your main color bands. -
Add horizontal stitches:
Repeat this process horizontally, adding dashed ‘stitch’ lines in the spaces between your horizontal bands. -
Refine the intersection:
Where the dashed lines cross, try to make the intersection clean. These delicate details are what really sell the ‘fabric’ illusion. -
Inspect and touch up:
Rotate the pumpkin and look for any spots where the bands might be uneven. Use a small brush with the base cream color to clean up any ragged edges. -
Final dry:
Let the entire pumpkin dry overnight to ensure the layers of acrylic harden completely.
Place your finished gingham pumpkin on a mantle or table runner to add instant warmth to your seasonal display
Tiny Floral Garland Mini Pumpkin
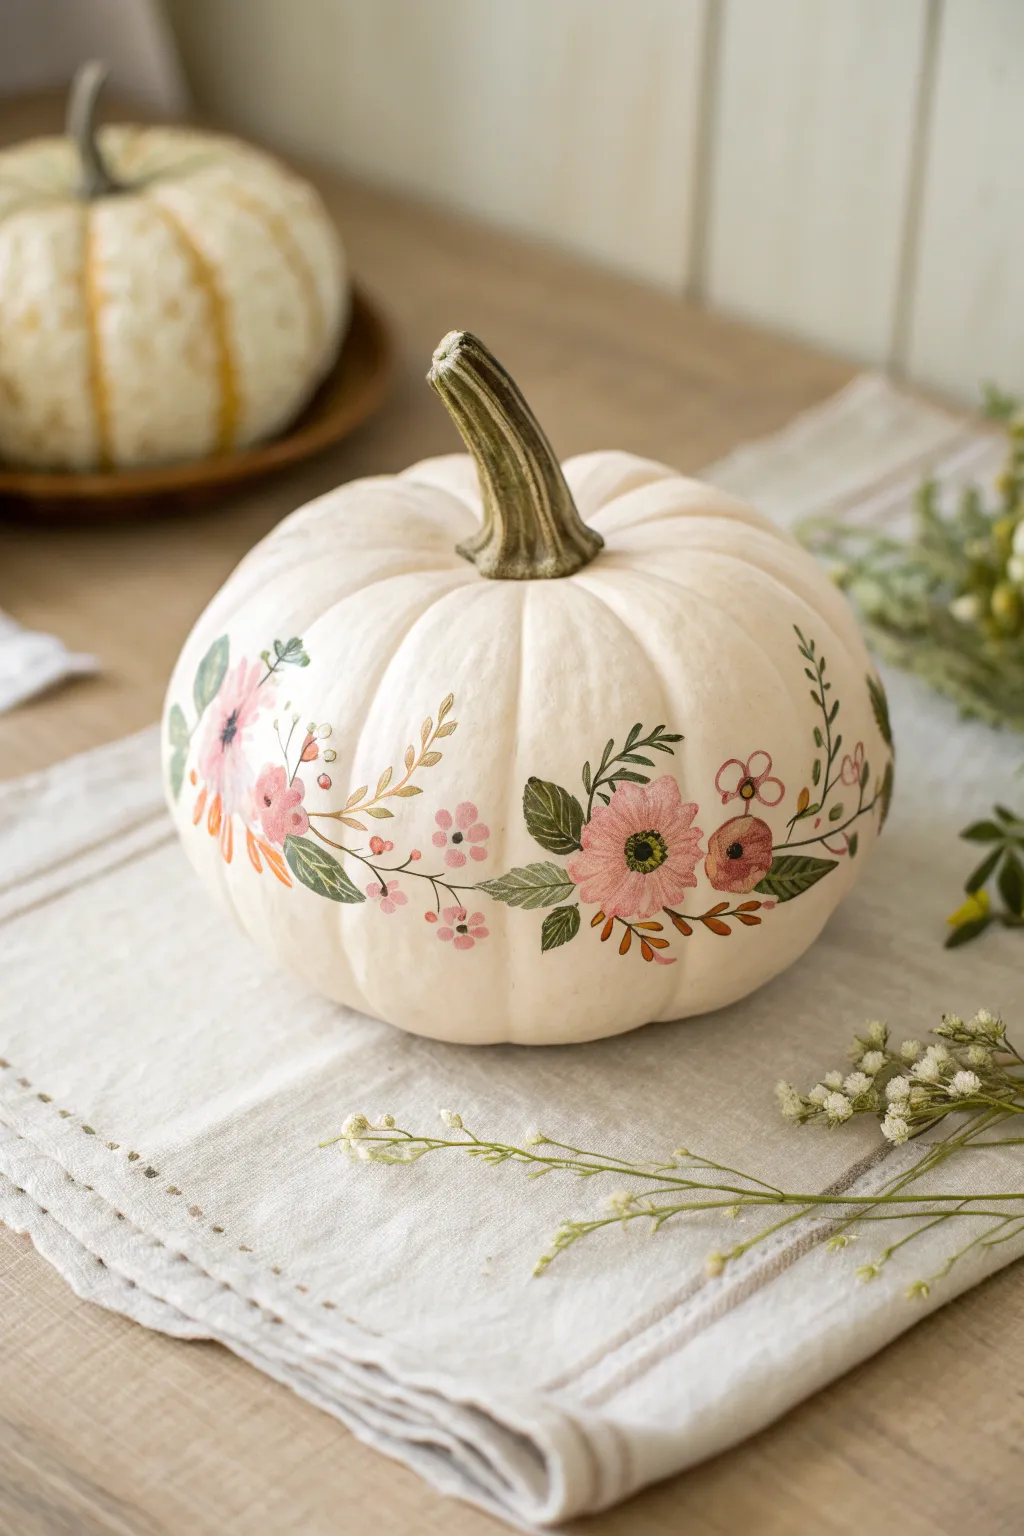
Transform a smooth white pumpkin into a cottage-core centerpiece with this refined floral painting project. The design features a gentle swag of pink cosmos-style flowers and trailing greenery that mimics dainty embroidery stitches against the pale rind.
Detailed Instructions
Materials
- Small white pumpkin (Baby Boo or Casperita variety)
- Acrylic paints (Soft Pink, Rose Madder, Sage Green, Forest Green, Burnt Orange, Mustard Yellow, White, Black)
- Round detail brushes (Size 0 and 00)
- Fine liner brush
- Small flat brush (Size 2 or 4)
- Palette or paper plate
- Paper towels and water cup
- Rubbing alcohol
- Matte spray sealer (optional)
Step 1: Preparation and Base
-
Clean the Surface:
Begin by wiping down your pumpkin with a paper towel dampened with rubbing alcohol. This removes natural oils or dirt and ensures the paint adheres smoothly to the rind without peeling later. -
Dry Completely:
Allow the pumpkin to air dry for a few minutes. Check the stem; if it’s very dark or dirty, you can lightly brush it with a diluted brown wash to unify the look, but usually, the natural stem provides great rustic contrast. -
Plan the Garland Line:
Visualize a curved line swooping across the ‘equator’ of the pumpkin. You won’t paint a solid line, but this imaginary curve will guide where you place your main floral elements so they drape naturally.
Oops! Paint Slipped?
If you make a mistake, don’t panic. Acrylic lifts easily from the waxy pumpkin skin while wet. Just use a damp Q-tip to wipe away the error instantly, dry the spot, and repaint.
Step 2: Painting the Primary Flowers
-
Mix Your Pink:
Create a soft, dusty pink by mixing White with a tiny dot of Rose Madder. I like to keep a second puddle of slightly darker pink nearby for later shading. -
Paint First Petals:
Using a size 2 flat brush or size 0 round brush, paint the petals of the largest flower first. Start from the center and pull outward with small, flat strokes to create a simple 5 or 6-petal cosmos shape. -
Add Variation:
While the paint is still wet, pick up a tiny bit of the darker pink on the very tip of your brush and stroke it from the flower center outward to create depth at the base of the petals. -
Create Smaller Blooms:
Move a few inches to the left or right along your imaginary curve and paint smaller, simpler posies. Vary the angles—some facing forward, some tilted sideways—using just 3 or 4 strokes for side-facing buds. -
Detail the Centers:
Once the pink petals are dry to the touch, use your smallest round brush to dot the centers. Use Mustard Yellow for the main center, then add tiny specks of Black or Burnt Orange around the yellow edge for realism.
Level Up: Metallic Pop
Add a touch of glam by painting the very tips of the stamens or small accent berries with metallic gold paint. It catches the light beautifully on a table setting.
Step 3: Adding Greenery and Accents
-
Paint Main Leaves:
Load your size 0 brush with Sage Green. Tuck larger, ovate leaves underneath the main pink flowers. Press the brush down firmly at the leaf base and lift as you pull away to create a tapered point. -
Veining Detail:
Mix a tiny bit of White into your Sage Green to lighten it. Use the liner brush to paint extremely thin central veins on the larger leaves for an illustrated look. -
Draw Vines:
Switch to your fine liner brush and Forest Green paint. Connect the floral clusters with thin, trailing vines that swoop gracefully along the pumpkin’s ribs. -
Add Ferns:
Along the new vine lines, paint delicate fern-like fronds. Use quick, short flicks of the brush to create the tiny leaves stemming from the main branch. -
Incorporate Orange Sprigs:
To warm up the palette, use Burnt Orange to paint small twiggy accents or little buds extending from the floral clusters. This mimics dried florals and adds an autumnal touch. -
Paint Filler Flowers:
Using the tip of a brush handle or your smallest brush, dot clusters of small pink berries or tiny 4-dot flowers along the trailing vines to fill in empty spaces.
Step 4: Finishing Touches
-
Check Balance:
Step back and look at the pumpkin from a distance. If one side looks heavy, add a light, wispy vine or a few floating petals on the opposite side to balance the composition. -
Refine Edges:
If any edges look messy, you can clean them up carefully with a damp Q-tip or paint over mistakes with White (though color-matching the rind can be tricky, so careful removal is better). -
Seal the Work:
Allow the paint to cure for at least an hour. If you want to preserve the pumpkin for longer, lightly mist it with a matte spray sealer to prevent the acrylics from chipping.
Place your finished pumpkin on a linen napkin or nestle it among some dried eucalyptus for a charming fall display
Pastel Color-Block Mini Pumpkin
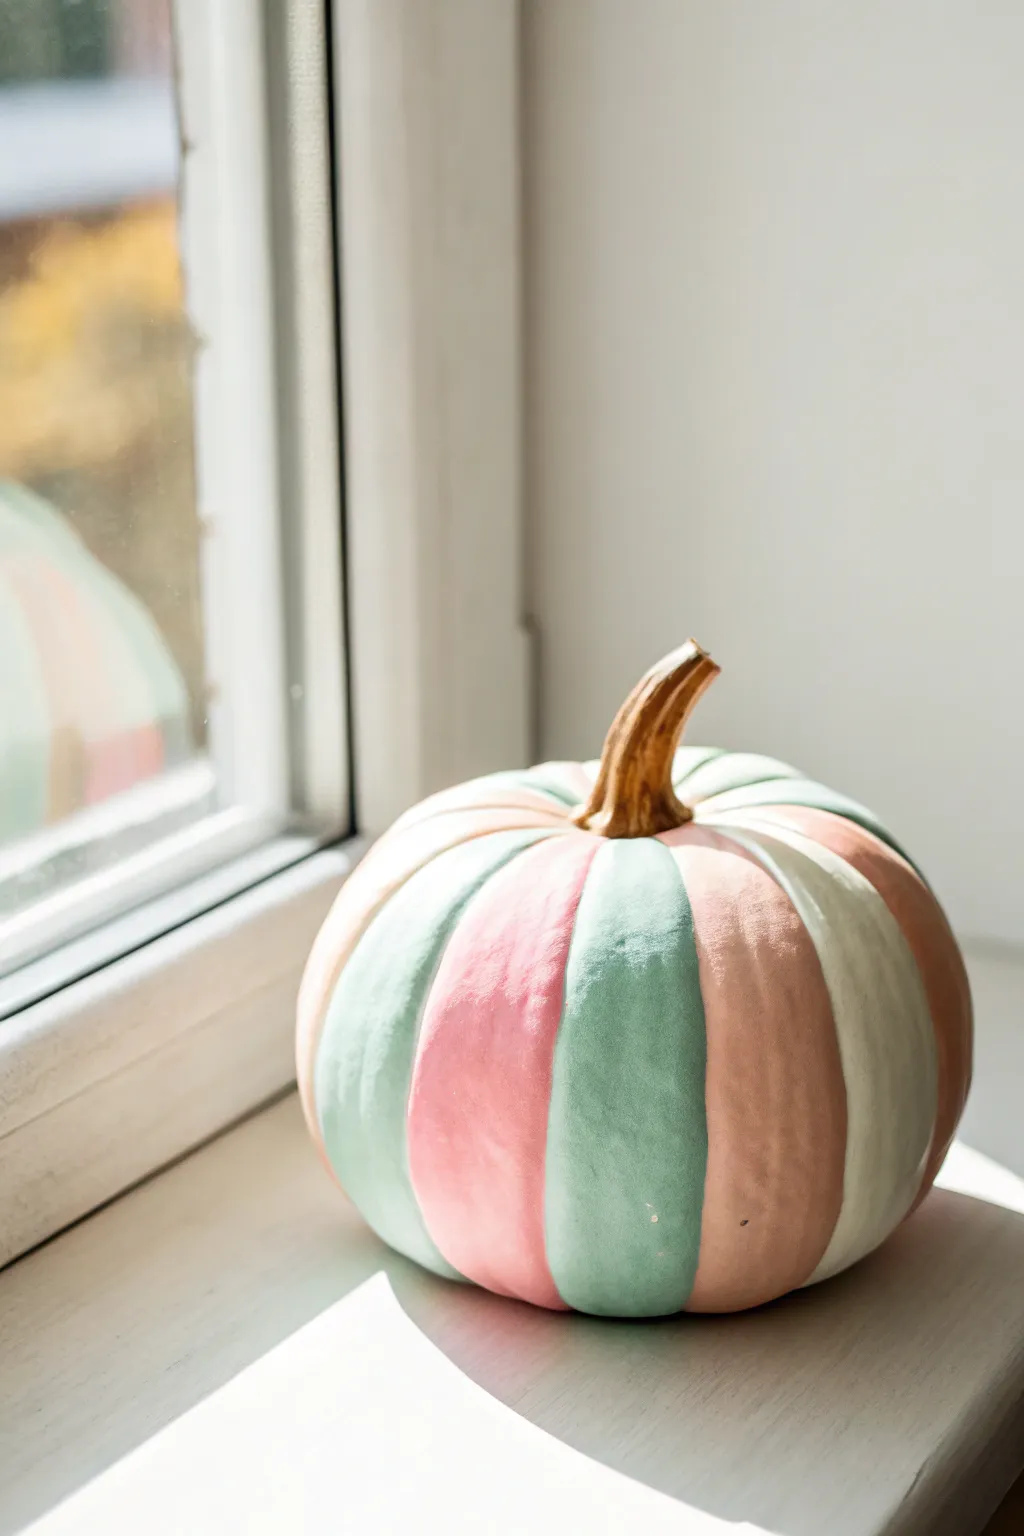
Transform a simple faux or real gourd into a modern piece of decor with this color-blocking technique. The soft pastel palette of mint, blush, and peach creates a fresh, airy look that brightens up any windowsill or centerpiece.
How-To Guide
Materials
- Small white pumpkin (real or faux)
- Acrylic craft paints (mint green, blush pink, peach/terra cotta, white)
- Small flat paintbrush (size 4 or 6)
- Small detail paintbrush (size 0 or 1)
- Palette or small cups for paint
- Paper towels
- Cup of water
- Painter’s tape (optional, but helpful)
Step 1: Preparation
-
Clean surface:
Begin by wiping down your pumpkin with a damp paper towel to remove any dust or dirt. If you are using a real pumpkin, ensure it is completely dry before you start painting. -
Prepare palette:
Squeeze a dime-sized amount of each paint color onto your palette: mint green, blush pink, peach, and white. Having your colors ready helps you visualize the pattern before applying it. -
Analyze ridges:
Look closely at the natural construction of your pumpkin. Pumpkins have natural vertical segments separated by deep grooves or ridges. These will serve as your guides for color blocking.
Clean Lines Hack
If your hand feels shaky, use thin strips of washi tape or painter’s tape along the grooves to mask off sections as you paint them.
Step 2: Painting the Base Colors
-
Start with mint:
Select a prominent segment on the pumpkin. Using your small flat brush, fill in this entire vertical section with mint green paint. -
Respect the grooves:
Paint right up to the edge of the natural groove, but try to keep the paint from pooling deep in the crevice. This helps maintain the definition of the pumpkin’s shape. -
Apply the second color:
Skip the next segment for a moment to let the green tack up, or move to the opposite side. Paint a new segment with your blush pink paint, applying it smoothly from top to bottom. -
Add peach tones:
Choose another segment and fill it with the peach or terra cotta color. I find that alternating warm and cool tones creates the most balanced visual effect. -
Paint white sections:
If your pumpkin isn’t already perfectly white, or to add texture, paint specific segments with white acrylic paint. This acts as a ‘breather’ between the other colors. -
Continue the pattern:
Work your way around the pumpkin, alternating your four colors. Avoid placing two of the same colors right next to each other unless you want a wider block of color.
Step 3: Refining and Finishing
-
Check for coverage:
Pastel colors can sometimes be sheer. once the first coat is dry to the touch (usually about 10-15 minutes), check if you can see the pumpkin skin through the paint. -
Apply second coat:
Where needed, apply a second coat of paint to make the colors opaque and vibrant. This is especially important for the light pink and mint shades. -
Clean the edges:
Swap to your small detail brush. Carefully run along the vertical grooves where colors meet to sharpen the lines. You want distinct separation rather than blended edges. -
Tidy the stem base:
Use the detail brush to carefully paint the top curve of each segment right where it meets the stem, ensuring a clean line without getting paint on the brown stem itself. -
Clean the bottom:
Flip the pumpkin gently or lift it to paint the very bottom curve of each segment so the color wraps underneath slightly. -
Dry completely:
Let the pumpkin sit undisturbed for at least an hour to ensure all layers are fully cured.
Shift the Finish
For a powdery, velvety look, mix a tiny bit of baking soda into your acrylic paints before applying them to the pumpkin surface.
Place your finished pastel pumpkin in a sunny spot to enjoy the soft, cheerful colors
Terrazzo Confetti Mini Pumpkin
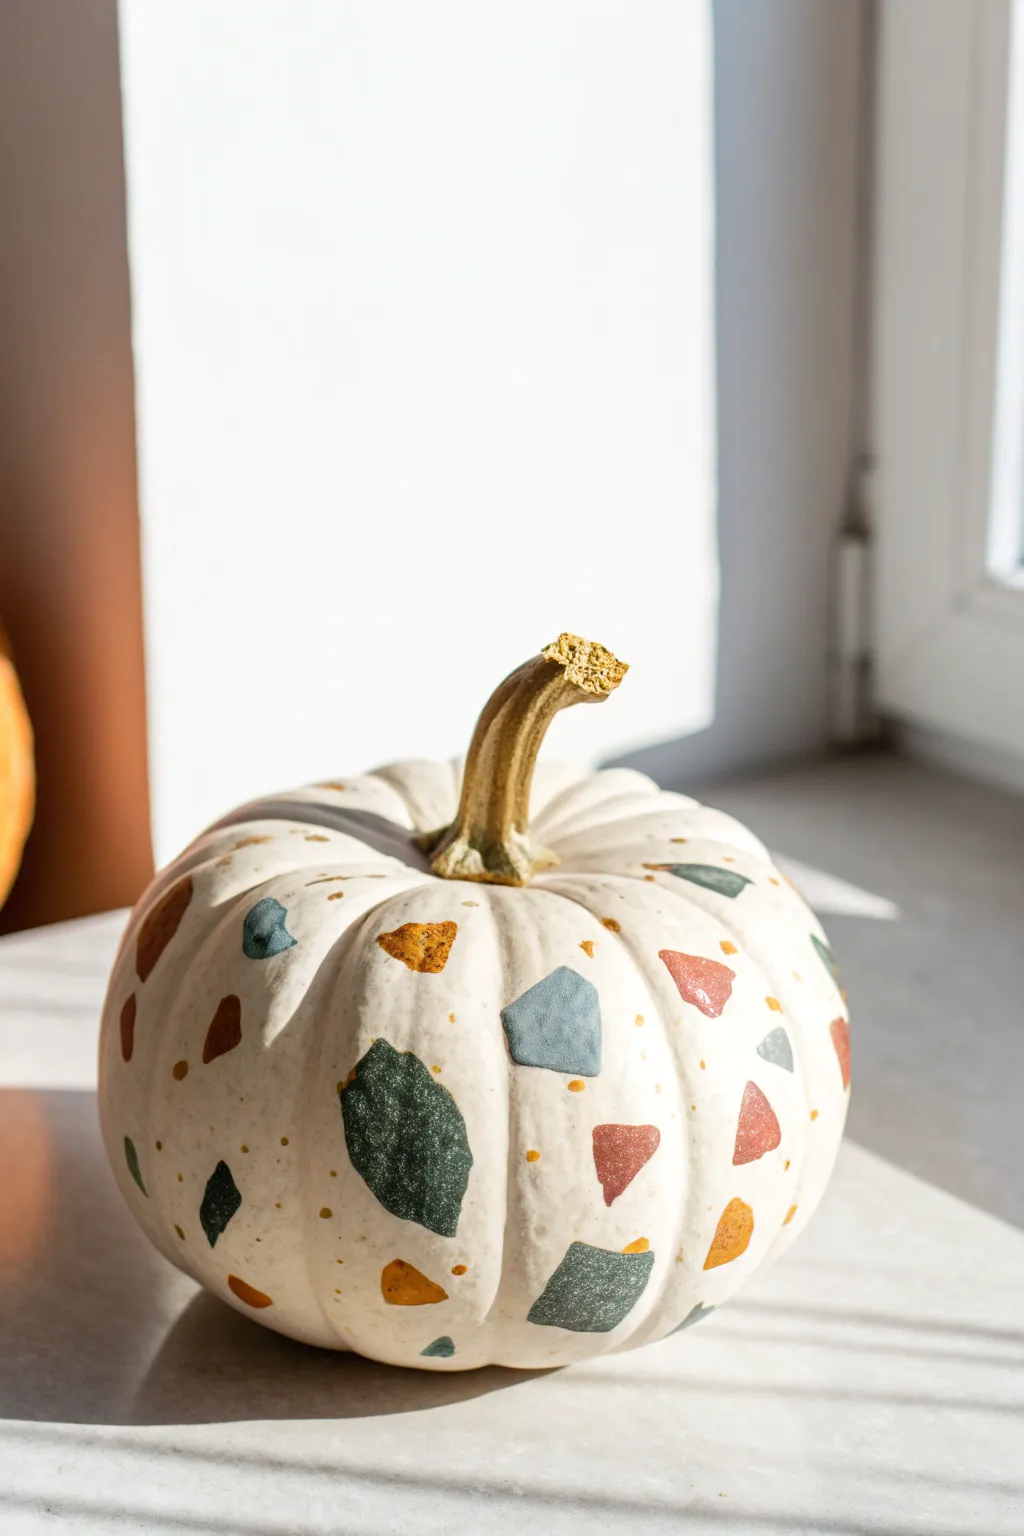
Transform a simple white pumpkin into a modern piece of decor with this trendy terrazzo design. The look mimics the speckled, fragmented patterns of polished stone tiles using simple paint strokes and earthy tones.
Step-by-Step Tutorial
Materials
- Faux mini pumpkin (white or cream)
- Acrylic paints (terracotta, slate blue, mustard yellow, forest green, deep brown)
- Small flat brush (size 2 or 4)
- Fine detail brush (size 0 or 00)
- Palette or paper plate
- Paper towels
- Water cup
- Matte spray sealer (optional)
Step 1: Preparation & Planning
-
Clean surface:
Begin by wiping down your faux pumpkin with a damp cloth to remove any dust or oils that might repel the paint. -
Dry completely:
Ensure the surface is fully dry before applying any color. -
Palette setup:
Squeeze out small amounts of your acrylic colors—slate blue, terracotta red, mustard yellow, and forest green—onto your palette. -
Reference check:
Take a moment to look at actual terrazzo patterns or the reference image; notice how the shapes are irregular, angular
Paint Slipping?
If the paint beads up on the plastic pumpkin, mix a tiny drop of dish soap into your acrylics or lightly sand the surface first.
Step 2: Painting the Large Shards
-
First color application:
Start with the slate blue paint and your small flat brush. Paint random geometric shapes around the pumpkin. -
Shape variety:
Keep these shapes angular—think triangles, trapezoids, and uneven quadrilaterals—rather than perfect circles. -
Placement strategy:
Space these blue shapes widely apart, leaving plenty of white space for the other colors. -
Adding texture:
For a more realistic stone look, lightly dab the wet paint with the brush tip to create subtle texture rather than smoothing it perfectly. -
Second color:
Switch to your terracotta paint. Fill in some of the gaps with similar angular shapes, occasionally placing one near a blue shape but not touching. -
Varying sizes:
Make some shards large and bold, and others quite small to mimic broken tile pieces. -
Third color:
Clean your brush and pick up the forest green. Add deep contrast by painting a few medium-sized shards scattered across the surface. -
Fourth color:
Incorporating mustard yellow adds warmth; paint these shapes slightly smaller than the others to act as highlights. -
Check for balance:
Rotate the pumpkin to ensure the distribution of colors feels random but balanced, filling in any large empty voids with a new shape.
Step 3: Adding Details & Sealing
-
Switch brushes:
Change to your fine detail brush for the smaller elements. -
Create speckles:
Using a dark brown or a mix of the green and brown, paint tiny dots and flecks in the white spaces between the larger shapes. -
Randomize specks:
Vary the pressure so some specks are tiny points and others are slightly larger dashes. -
Layering illusion:
I like to add one or two tiny dots of a contrasting color on top of the larger dried shapes to create depth, though this is optional. -
Stem detail:
If the stem looks too plastic, give it a quick wash with watered-down brown paint to enhance the realism. -
Final drying time:
Let the entire pumpkin sit for at least an hour until the acrylics are completely dry to the touch. -
Protective finish:
In a well-ventilated area, apply a light coat of matte spray sealer to protect the paint handling.
Natural Stone Look
Don’t paint the shapes solid! Leave inconsistent opacity or dab with a dry brush to mimic the grit of real terrazzo stone.
Now you have a sophisticated accent piece that brings a touch of artisan style to your seasonal display
Galaxy Starfield Mini Pumpkin
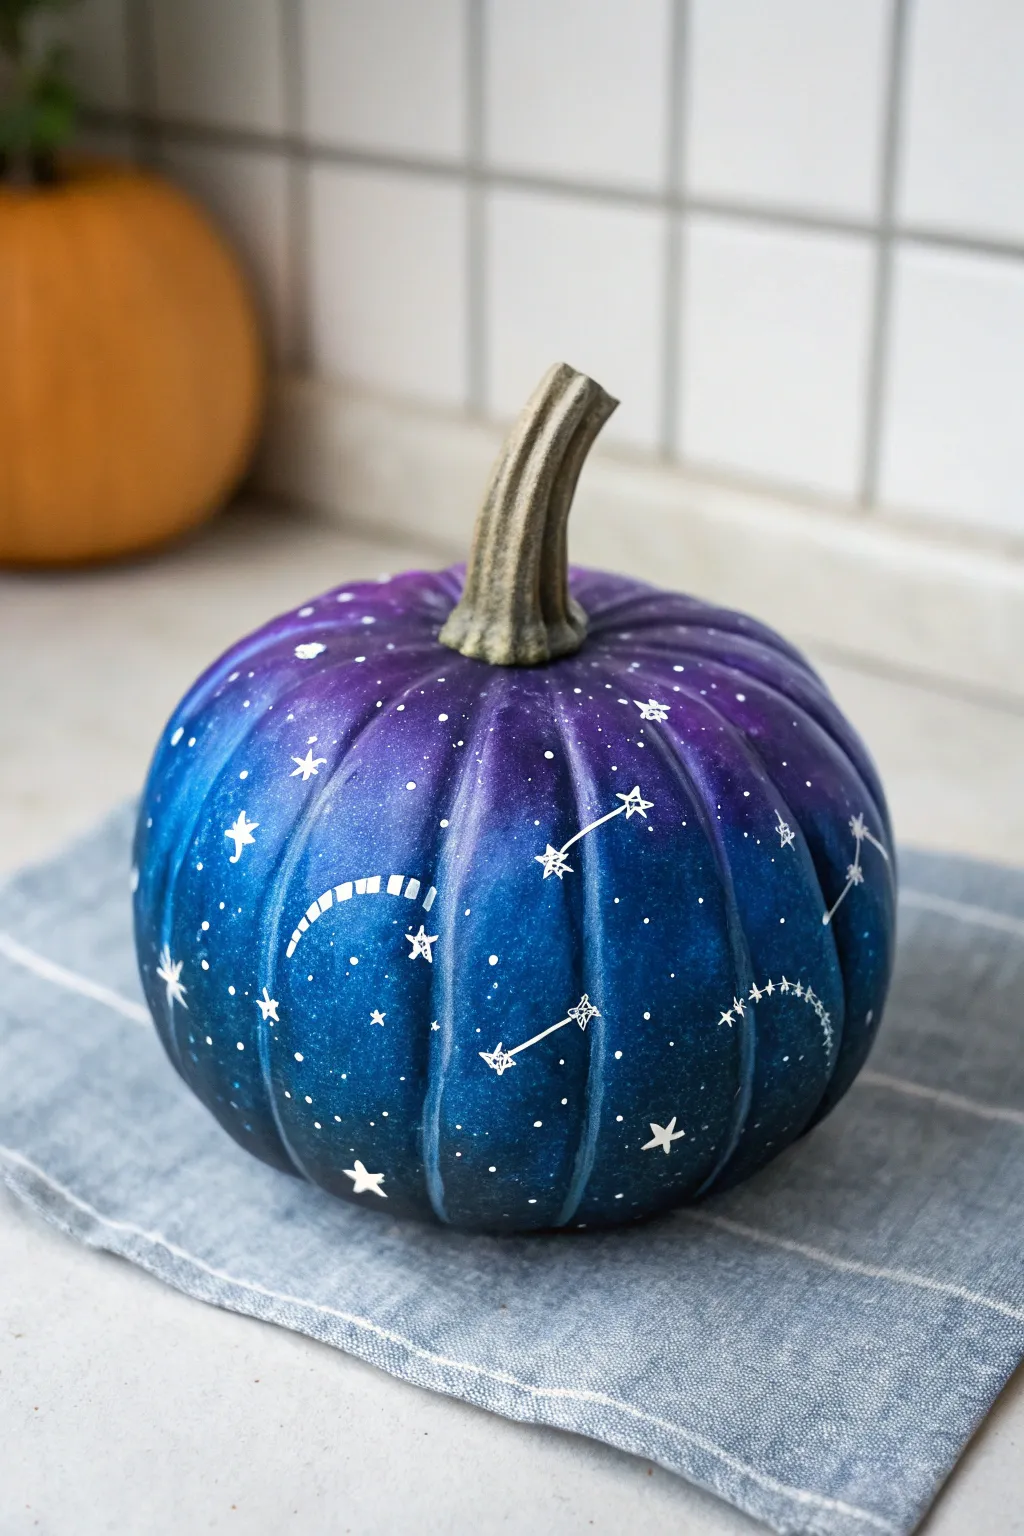
Transform an ordinary mini pumpkin into a piece of the night sky with this mesmerizing galaxy painting technique. Using layered sponge work and fine brush details, you’ll create deeply saturated nebulas highlighted by crisp white constellations.
Step-by-Step Tutorial
Materials
- Mini pumpkin (real or faux, clean and dry)
- Acrylic craft paints (Black, Navy Blue, Purple, Magenta, Teal, White)
- Makeup sponges or small kitchen sponge pieces
- Small flat paintbrush
- Fine liner paintbrush (size 0 or 00)
- White paint pen (fine tip) or white gel pen
- Palette or paper plate
- Paper towels
- Matte or glossy clear sealer spray (optional)
Step 1: Creating the Base
-
Prepare the surface:
Ensure your pumpkin is completely clean and dry. If using a real pumpkin, wash off any dirt; if faux, wipe away dust. Tape off the stem with painter’s tape if you want to keep it natural, though painting around it carefully works just as well. -
Apply the dark undercoat:
Squeeze a generous amount of black acrylic paint onto your palette. Using the small flat brush, coat the entire pumpkin in a solid layer of black. Let this base coat dry fully for about 15-20 minutes.
Step 2: Layering the Galaxy
-
Load the sponge:
Take a makeup sponge and dab it into navy blue paint. Offload the excess paint onto a paper towel until the sponge is almost dry—this is crucial for a cloudy, nebula effect rather than solid blotches. -
Sponge on the first color:
Gently dab the navy blue sponge randomly across the pumpkin surface, covering about 70% of the black. Focus on the centers of the pumpkin ribs, leaving some of the deep creases black for depth. -
Add purple tones:
Using a fresh side of the sponge or a new wedge, pick up some purple paint. Dab this over parts of the navy blue, creating soft, irregular clouds. Don’t cover all the blue; you want the colors to peek through each other. -
Introduce bright accents:
Mix a tiny bit of teal or bright blue with a touch of white to make a lighter shade. Sponge small, concentrated clusters of this lighter color into the center of your purple/blue areas to create glowing ‘hot spots’ in your galaxy. -
Blend softly:
If any edges look too harsh, go back with a sponge holding a tiny bit of black or navy and lightly tap over the edge to soften the transition. -
Let it cure:
Allow the sponge layers to dry completely. Acrylics dry fast, but thick sponging might need 10 minutes. The surface should feel chalky, not tacky.
Nebula Nuance
Don’t use water when sponging on the nebula colors. Use dry paint to create a texture that looks like cosmic dust rather than a watery wash.
Step 3: Painting the Stars
-
Create distant stars:
Load an old toothbrush or a stiff brush with watered-down white paint. Run your thumb over the bristles to flick tiny speckles of paint onto the pumpkin. Keep the spray varying in density to mimic real star clusters. -
Paint major stars:
Switch to your fine liner brush or a white paint pen. identify a few spots in the lighter nebula clouds and place specific, larger dots for prominent stars. -
Draw starbursts:
Select 3-5 of your largest dots and turn them into twinkling stars. Draw a small vertical line and a horizontal line crossing through the center dot, tapering the ends so they look sharp.
Metallic Magic
Mix a tiny drop of iridescent medium or glitter paint into your purple and teal layers for a subtle shimmer that catches the light beautifully.
Step 4: Adding Constellations
-
Plan your placement:
Look for open spaces on the pumpkin where the background is darker. Visualizing where your constellations will go prevents running out of room mid-line. -
Dot the constellation points:
Using the white paint pen or fine brush, place the key stars that make up your chosen constellation (like the Big Dipper or Cassiopeia). Make these dots slightly larger than the background stars. -
Connect the lines:
Carefully draw thin, straight lines connecting the constellation dots. I find it helps to rotate the pumpkin so you are always pulling the pen toward you for a straighter line. -
Add decorative details:
For a whimsical touch, you can add tiny dashed lines, small moons, or geometric star shapes in empty areas to balance the composition. -
Seal the artwork:
Once all white paint is absolutely dry (give it at least 30 minutes to avoid smearing), apply a light coat of clear spray sealer to protect your galaxy from scratching or peeling.
Place your celestial masterpiece in a well-lit spot to watch the galaxy glow


Have a question or want to share your own experience? I'd love to hear from you in the comments below!