When you want something that looks bold and beautiful without feeling complicated, acrylic paint is such a good friend because it builds fast and forgives a lot. These easy acrylic painting ideas lean on silhouettes, gradient skies, and simple, satisfying textures so you can get that “I made this!” feeling in one session.
Layered Mountains With Mist
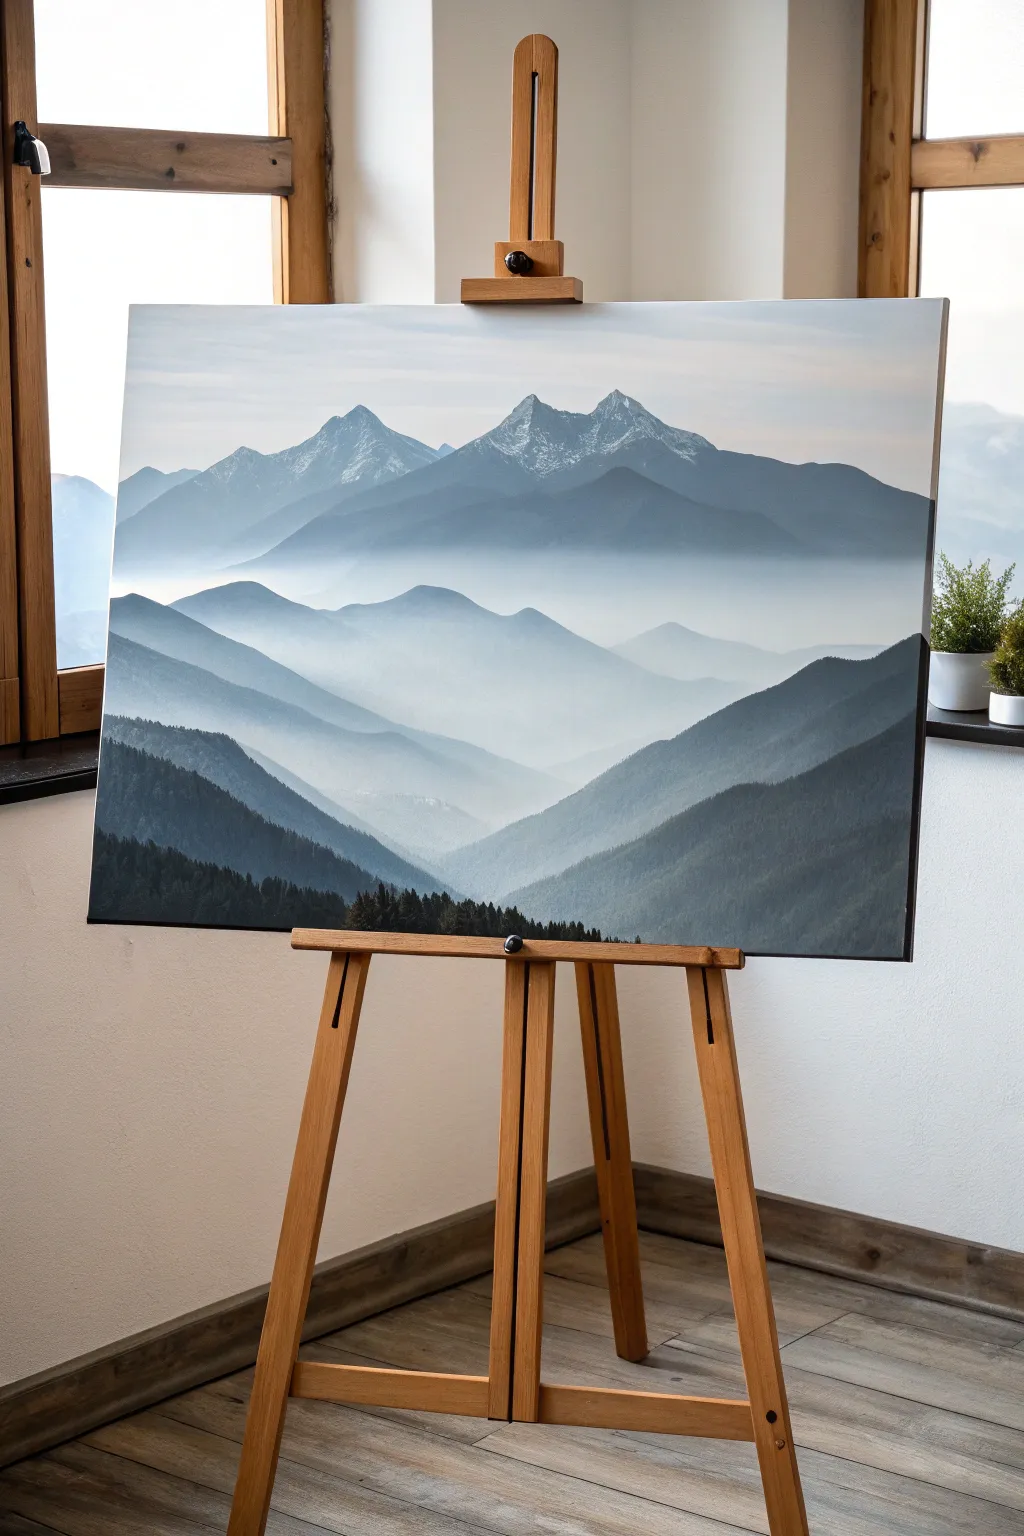
Capture the serenity of high-altitude landscapes with this atmospheric study in depth and value. By layering increasingly lighter shades of blue-grey against a misty white background, you will create a stunning illusion of distance and fog rolling through the valleys.
How-To Guide
Materials
- Large rectangular canvas (approx. 24×36 inches)
- Acrylic paints: Titanium White, Ultramarine Blue, Phthalo Blue, Mars Black, Burnt Umber
- Large flat wash brush (2-inch)
- Medium flat brush (1-inch)
- Small round brush (size 4 or 6)
- Clean water container
- Palette or mixing plate
- Paper towels
- Slow-drying medium or retarder gel (essential for mist)
Step 1: Setting the Atmosphere
-
Prime the sky:
Begin by covering the top third of your canvas with a mix of Titanium White with a tiny dot of Ultramarine Blue. Use your large wash brush to create a smooth, pale sky that feels expansive and airy. -
Create the first haze:
While the sky is still slightly damp, mix a very pale, milky blue-grey. Paint horizontal strokes just below the horizon line where your first mountains will sit, softening the transition so it looks like distant atmosphere.
Fixing “Flat” Mountains
If layers blend together, your values are too similar. Let it dry, then repaint the closer mountain with a significantly darker shade to restore depth.
Step 2: The Distant Peaks
-
outline the furthest range:
Mix a light steel blue using White, Ultramarine, and a touch of Black. Using your medium flat brush, paint the silhouette of the highest, furthest mountain peaks near the top third of the canvas. -
Fill and fade:
Fill in these distant mountains with color, but as you reach the bottom of the mountain shape, start mixing in more white and water. This creates the ‘sfumato’ effect where the base disappears into the mist. -
Add snow caps:
Before the paint fully dries, take a small amount of pure Titanium White on your small round brush. Scumble it lightly onto the peaks to suggest snow-capped summits, keeping the texture rough.
Level Up: Morning Light
Glaze a very thin, transparent layer of pale rose or peach across the top right sky and mountain tips to simulate a sunrise glow hitting the peaks.
Step 3: Mid-Ground Layers
-
Darken the mixture:
For the next layer of mountains down, prepare a slightly darker mix. Add a bit more Phthalo Blue and a tiny amount of Burnt Umber to your previous grey to cool it down and deepen the value. -
Paint a rolling ridge:
Paint a softer, rolling ridge line that overlaps the base of the first mountain range. This overlap is crucial for establishing depth. -
Blend the mist:
Using a clean, damp large brush, gently blend the bottom edge of this new mountain range downwards into nothingness. Use horizontal strokes to mimic layers of fog settling in the valley. -
Create valley separation:
Mix a purely white, semi-transparent glaze using water or glazing medium. Paint a thick horizontal band of ‘fog’ between the mid-ground layers to separate them distinctively. -
The central focal ridge:
Paint a third, lower mountain shape in the center. This one should be darker and more defined than the previous layers. I like to make the edges slightly sharper here to bring focus to the middle ground.
Step 4: The Foreground
-
Prepare the darkest value:
Mix your darkest color yet: Phthalo Blue, Mars Black, and a good amount of Burnt Umber. It should look nearly black but retain a deep, rich forest green undertone. -
Block in the foreground slopes:
On the bottom left and right sides, paint large, sloping triangular shapes converging toward the bottom center. These represent the closest hillsides framing the view. -
Detail the tree line:
Switch to your small round brush. Along the top ridge of these dark foreground slopes, dab tiny vertical strokes to create the silhouette of individual evergreens against the lighter mist behind them. -
Fill the mass:
Fill in the rest of these foreground slopes with your dark mix. Don’t worry about being perfectly smooth; a little texture here mimics the density of a forest. -
Add subtle highlights:
Mix a slightly lighter deeply green-grey. Dry brush just a hint of this color onto the tops of the foreground trees to suggest vague light hitting the canopy. -
Final mist adjustment:
Assess the painting. If the separation between the foreground and mid-ground seems too harsh, glaze a thin layer of watered-down white over the connection point to push the mid-ground back.
Step back and admire the tranquil depth you have created in your own personal mountain range


Beach Horizon With Palm Silhouette
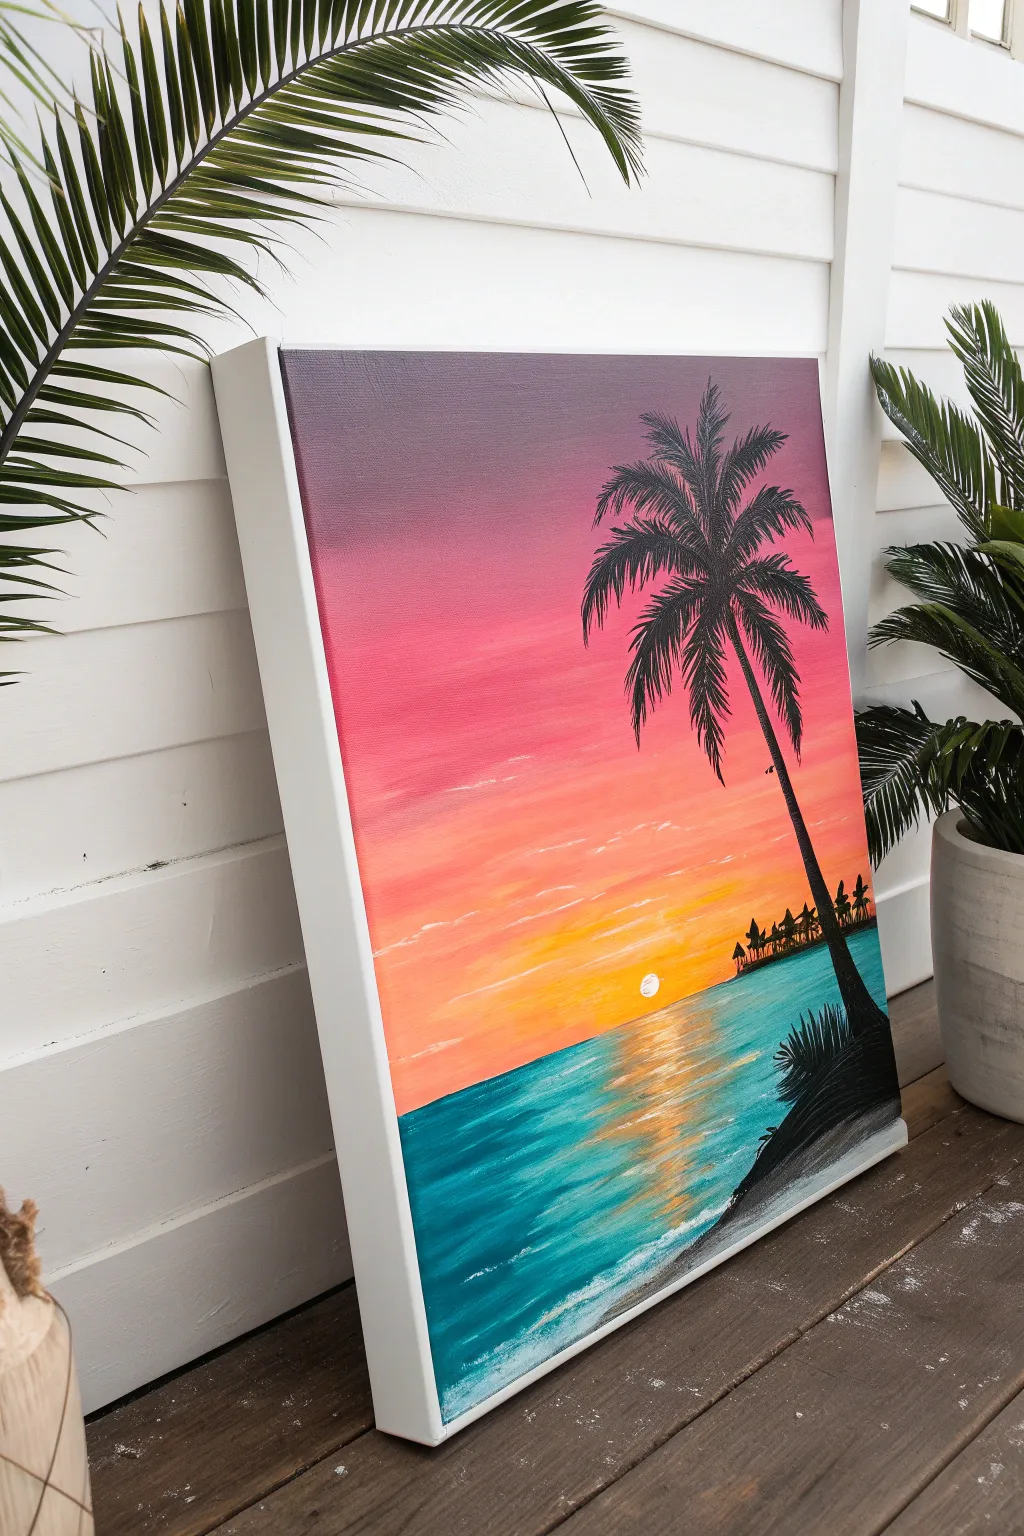
Capture the warmth of a tropical evening with this vibrant acrylic landscape featuring a stunning gradient sky. The bold silhouette of a palm tree against the setting sun creates a dramatic and relaxing focal point for any room.
Step-by-Step
Materials
- Stretched canvas (e.g., 16×20 inches)
- Acrylic paints: Purple, Magenta/Pink, Orange, Cadmium Yellow, Titanium White, Teal/Turquoise, Phthalo Blue, Black
- Large flat brush (for blending)
- Medium flat brush
- Small round or liner brush (for details)
- Palette or paper plate
- Cup of water and paper towels
Step 1: Painting the Gradient Sky
-
Define the Horizon:
Start by drawing a faint pencil line roughly one-third of the way up from the bottom of the canvas. This will be your horizon line separating the sky from the ocean. -
Apply the Base Purple:
Using your large flat brush, paint the top quarter of the canvas with a deep purple. Don’t worry about making it perfectly smooth yet; just get the color down. -
Blend in Pink:
While the purple is still wet, mix a vibrant magenta or pink on your palette. Apply this directly below the purple, brushing back and forth where the colors meet to create a smooth transition. -
Add Orange Tones:
Clean your brush slightly. Pick up your orange paint and apply it in a band below the pink. Continue the horizontal back-and-forth strokes, blending upward into the pink layer so there are no hard lines. -
Finish with Yellow:
For the area just above the horizon line, use a bright yellow. Blend this into the orange above it. Add a tiny touch of white to the yellow right at the center where the sun will be to make it glow. -
Create Clouds:
Take a small amount of white mixed with a little pink or orange on a smaller brush. Gently dry-brush thin, horizontal streaks across the sky to suggest wispy clouds catching the last light.
Blending trouble?
If acrylics dry too fast to blend smoothly, mist your canvas lightly with water or mix a slow-drying medium into your paint.
Step 2: Creating the Ocean
-
Block in the Water:
Mix a teal color using turquoise, a little blue, and white. Paint the water area below the horizon line, using horizontal strokes. -
Darken the Horizon:
Add a bit more blue to your teal mix and paint a darker straight line right against the horizon to create depth and distance. -
Add Sun Reflection:
Mix yellow with a lot of white. Using a flat brush, gently tap or drag horizontal zig-zag lines down the center of the water, directly below where your sun will be. Keep the strokes narrower near the horizon and wider as they come forward. -
Paint the Shoreline:
At the bottom right corner, angle your brush strokes to create a shoreline. Mix white with a tiny dot of blue to create a foamy wave edge crashing onto the sand.
Step 3: Adding Silhouettes and Details
-
Paint the Sun:
Using a small round brush and pure white (or very pale yellow), paint a small, clean circle just above the horizon line in the center of your yellow sky band. -
Paint Distant Islands:
Mix black with a tiny bit of purple (to make it less jarring). Using a small brush, paint a jagged landmass along the right side of the horizon line. Add tiny vertical ticks to suggest faraway trees. -
Block in the Foreground:
Using pure black, paint a mound in the bottom right corner. This is the land where your main palm tree will sit. Add some grassy strokes pointing upward. -
Paint the Palm Trunk:
With your liner brush and black paint, draw a long, slightly curved line extending from the bottom right mound up towards the top right sky. Make the base slightly thicker than the top. -
Add Palm Fronds – The Ribs:
From the top of the trunk, paint 5-7 curved lines exploding outward like fireworks. These are the central ribs of the palm leaves. -
Add Palm Fronds – The Leaves:
I like to use a quick flicking motion for this part. Using the liner brush, flick swift, downward strokes hanging off each rib line to create the leafy texture of the fronds. -
Final Highlights:
Once everything is dry, you can add a few extra touches of pure white to the brightest part of the water reflection to really make it sparkle.
Level It Up
Add a second, smaller palm tree leaning off the canvas on the left side to frame the sunset and create a balanced composition.
Step back and enjoy the warm, peaceful glow of your personal beach getaway


Starry Night With Paint Splatter
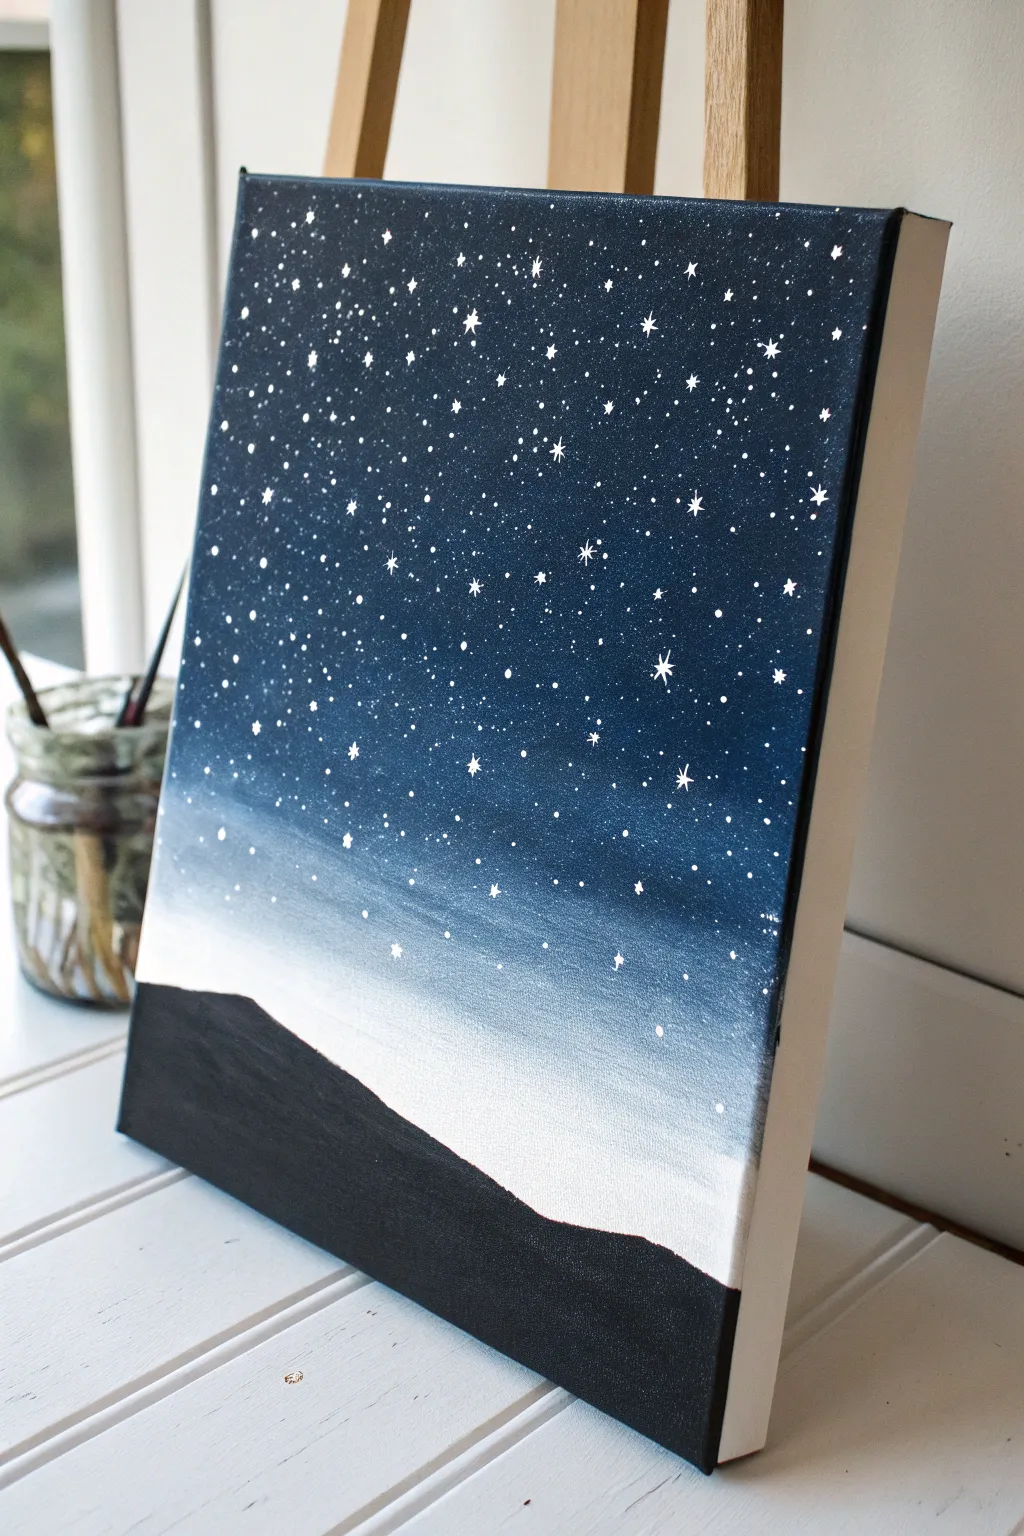
This striking artwork relies on a smooth, serene gradient that transitions from deep midnight blue to a foggy white mist. By combining simple blending techniques with a sharp silhouette and splattered stars, you can achieve a professional-looking cosmic landscape in just one sitting.
Detailed Instructions
Materials
- Stretched canvas (rectangular)
- Acrylic paints: Black, Titanium White, Phthalo Blue (or Navy Blue)
- Wide flat brush (1 inch)
- Medium round brush
- Small liner brush (size 0 or 00)
- Old toothbrush (optional for splatter)
- Palette or paper plate
- Cup of water and paper towels
Step 1: Creating the Ombré Sky
-
Prime the top:
Begin by painting the top two-thirds of your canvas with a solid coat of your dark blue paint. Ensure good coverage, but keep the paint wet for blending. -
Add the gradient transition:
While the blue is still wet, mix a little white into your blue on the palette to create a mid-tone denim shade. Apply this below the dark blue, overlapping slightly to start the blend. -
Blend downwards:
Clean your wide flat brush thoroughly. Dip it into pure white paint and apply it across the bottom section of the sky area, just above where your ground will be. -
Smoothing the mist:
Using long, horizontal strokes, brush back and forth where the white meets the mid-tone blue. The wet paints will naturally mix to create a foggy, soft transition. I like to keep my brush slightly damp to help the acrylics flow together smoothly. -
Adjusting values:
If the transition looks too harsh, add a tiny touch of water to your brush and lightly sweep over the line again. You want the bottom to be nearly pure white and the top to be very dark. -
Let it dry completely:
This step is crucial. The background must be 100% dry to the touch before moving on, or your stars will muddy into the blue paint. Use a hairdryer on a cool setting if you are impatient.
Muddy Gradient Fix
If your gradient looks streaky or muddy, let it dry completely. Then, apply a second thin layer of blended paint over the top. Layers fix almost everything in acrylics.
Step 2: Painting the Stars
-
Prepare the star paint:
Mix a small amount of white paint with a few drops of water until it reaches an ink-like consistency. It needs to be fluid enough to splatter but opaque enough to show up against the dark blue. -
Splatter technique:
Dip an old toothbrush or a stiff bristle brush into the watered-down white paint. Hold it facing the canvas and run your thumb across the bristles to flick tiny speckles onto the dark upper section. -
Control the density:
Focus the densest splatter at the very top of the canvas, letting it fade out as you get closer to the white horizon line. Wipe away any accidents with a damp cloth immediately. -
Adding feature stars:
Switch to your fine liner brush. Dip it into pure, un-thinned white paint and place specific individual dots among the splatter to create brighter, larger stars. -
Drawing diamond stars:
To make the larger twinkling stars, paint a small cross (+) shape first. Then, gently pull the paint outward from the center to taper the points, creating a four-pointed diamond shape. -
Varying star sizes:
Scatter about 10 to 15 of these larger diamond stars throughout the upper sky to create depth and visual interest.
Step 3: Grounding the Scene
-
Outline the silhouette:
Using black paint and a round brush, draw a wavy, uneven line across the bottom third of the canvas. This will be the top edge of your hill. -
Create the slope:
Slope the line downwards from left to right, creating a sense of a large hill or mountain foreground. Keep the edge slightly bumpy to mimic natural terrain. -
Fill the silhouette:
Fill in the entire area below your line with solid black paint. You may need a second coat to ensure no canvas shows through. -
Clean the edges:
If you want the clean, gallery-wrap look shown in the photo, take a small flat brush with a little white paint (or gesso) and carefully clean up any paint that smudge onto the sides of the canvas.
Glow Up
Mix a tiny drop of glow-in-the-dark medium into your white star paint. Use this for the larger diamond stars so your galaxy dimly lights up when the room goes dark.
Place your finished canvas on a desk easel or shelf to enjoy your personal window into the cosmos


Two-Color Galaxy Blend
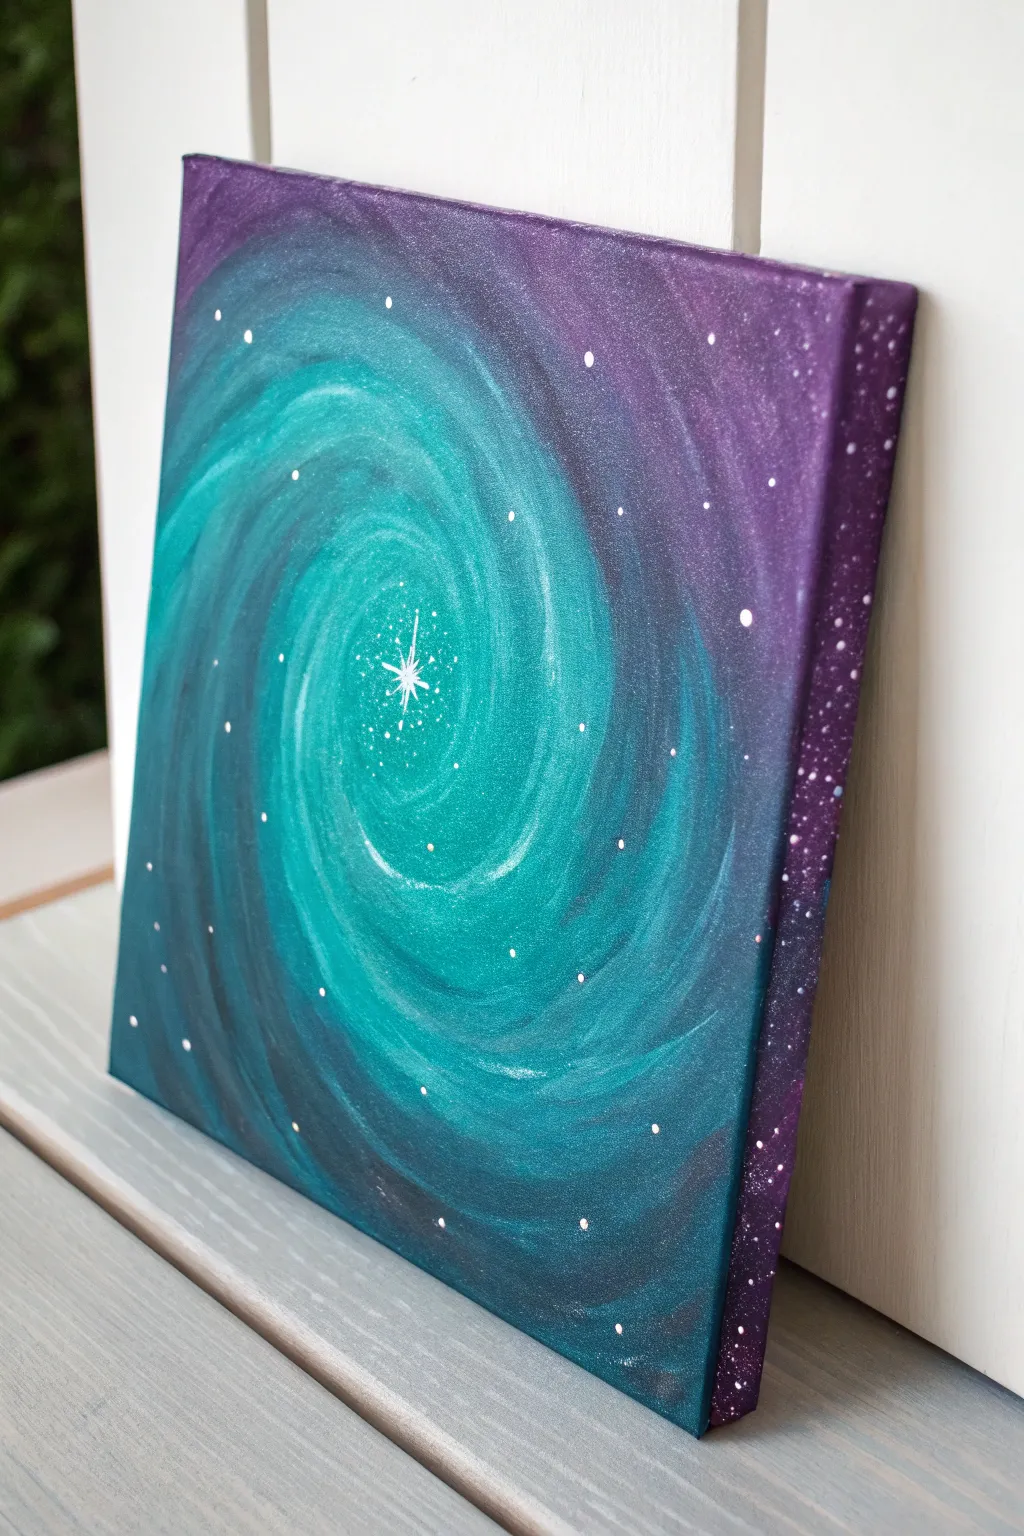
Create a mesmerizing cosmic scene using a simple spiral blending technique that mimics the swirling arms of a distant galaxy. This project focuses on the satisfying process of blending cool teal tones into deep purple edges for a dramatic, glowing effect.
How-To Guide
Materials
- Square stretched canvas (e.g., 10×10 or 12×12 inches)
- Acrylic paints: Titanium White, Teal (or Turquoise), Purple (Violet), Phthalo Blue (optional)
- Wide flat brush or wash brush
- Medium round brush
- Small liner brush or a toothpick
- Cup of water and paper towels
- Palette or paper plate
Step 1: Setting the Background
-
Prepare the canvas:
Start with a clean, dry canvas. If your canvas isn’t pre-primed, apply a quick coat of gesso and let it dry completely. -
Establish the center:
Dip your medium round brush into the Teal paint mixed with a tiny bit of Titanium White. Paint a small, messy circle right in the center of the canvas—this will be the glowing core of your galaxy. -
Add the mid-tones:
Without cleaning your brush, pick up pure Teal paint. Encircle your light center, blending the wet edges slightly so the colors transition smoothly from the pale center to the vibrant teal. -
Introduce the outer color:
Clean your brush thoroughly. Load it with your Purple paint. Start painting the corners and the very outer edges of the canvas, bringing the color inward towards the teal circle. -
Paint the canvas edges:
Don’t forget the sides! Extend that deep Purple paint around the physical edges of the canvas wrapper so the artwork looks finished from every angle.
Muddy colors?
If your teal and purple are turning brown where they meet, let the first layer dry. Then, apply a thin glaze of blue over the transition area to unify them without over-mixing.
Step 2: Creating the Spiral Blend
-
Bridge the gap:
You should now have a teal center and purple corners with a gap in between. Mix a little Teal and Purple on your palette to create a deep indigo or transition shade. -
Start the swirl:
Using your wide flat brush, start applying this transition color in the gap. Instead of painting in straight lines, use a curved, sweeping motion that mimics a C-shape or a spiral arm. -
Blend the colors wet-on-wet:
This is the most crucial step. While the paint is still wet, use the clean, slightly damp flat brush to gently sweep over the boundary where the teal meets the purple. Follow the curvature of the spiral. -
Deepen the contrast:
If the purple looks too light, add a touch of Phthalo Blue or more Purple to the outer corners. This darkens the ‘space’ around the galaxy and makes the teal center pop. -
Enhance the flow:
Add faint streaks of lighter teal into the darker purple areas, and streaks of darker purple near the teal center. Keep your brushstrokes loose and circular to maintain that spinning motion. -
Let it dry:
Step back and check your blend. Once you are happy with the smooth gradient from light center to dark edge, let the painting dry completely before adding stars.
Add some sparkle
Once the painting is fully dry, paint a thin layer of clear glitter glaze or holographic topcoat over the teal spiral sections to make your galaxy shimmer in the light.
Step 3: Adding the Stars
-
Mix watery white:
On your palette, mix a small amount of Titanium White with a few drops of water until it has the consistency of thin ink or heavy cream. -
Create the central star:
Using your smallest liner brush, paint a four-pointed cross in the very center of your teal swirl. Make the vertical line slightly longer than the horizontal one. -
Detail the main star:
Add a tiny diagonal cross over the first one (an ‘X’ over a ‘+’) to create an eight-pointed starburst effect. Dot the very center with pure, unthinned white paint for maximum brightness. -
Add larger distinct stars:
Dip the back end of a paintbrush into your white paint. Dot a few ‘planets’ or larger stars randomly around the galaxy, placing some in the dark corners and some in the celestial swirl. -
Flick the star dust:
Dip a stiff brush or an old toothbrush into your watery white mixture. Hold it over the canvas and flick the bristles to spray a fine mist of tiny stars across the entire surface. -
Refine the constellation:
If any flicked stars land in spots you don’t like, quickly wipe them away with a damp cloth or paint over them. I like to manually add a few extra bright dots near the center star to suggest a cluster.
Now you have a stunning piece of cosmic art that looks complex but was built with simple, swirling layers
BRUSH GUIDE
The Right Brush for Every Stroke
From clean lines to bold texture — master brush choice, stroke control, and essential techniques.
Explore the Full Guide
Colorful Birch Trees
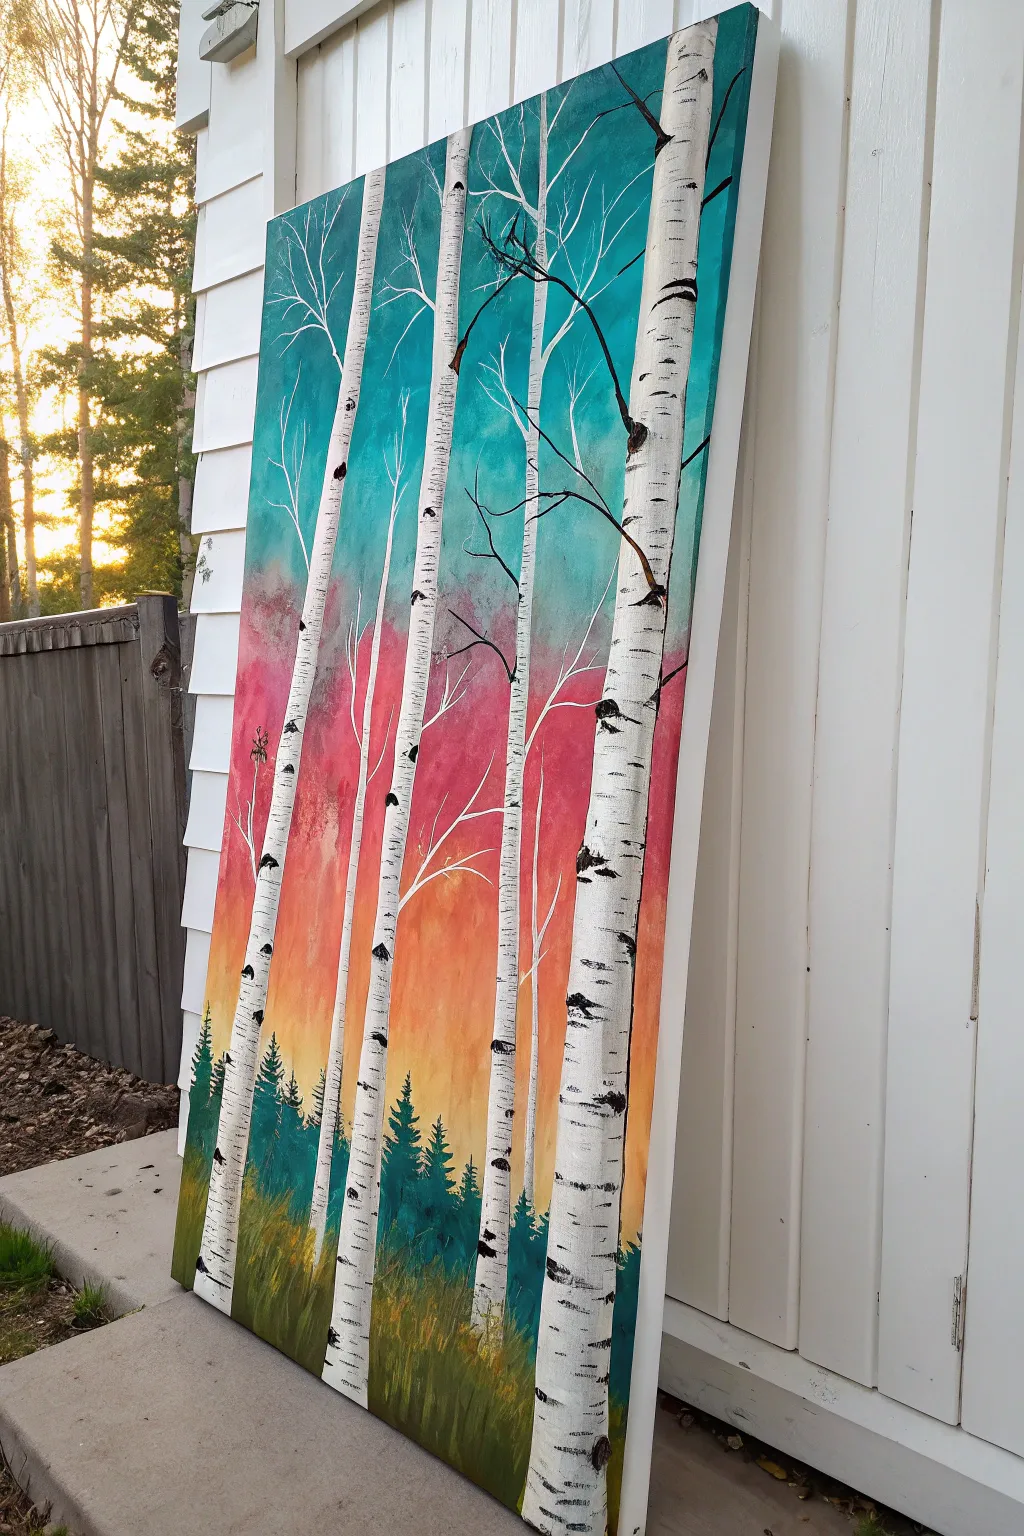
Capture the magic of twilight in a forest with this vibrant vertical landscape. You’ll create a seamless gradient sky transitioning from teal to warm sunset hues, serving as the dramatic backdrop for stark, elegant birch trees.
Step-by-Step
Materials
- Tall rectangular canvas (e.g., 10×20 or 12×24 inch)
- Acrylic paints: Teal/Turquoise, Magenta/Alizarin Crimson, Orange, Yellow, Titanium White, Carbon Black, Phthalo Green
- Large flat brush (1-2 inch) for blending
- Medium flat or filbert brush
- Small round detail brush or liner brush
- Palette
- Painter’s tape or a straight edge (optional)
- Cup of water and paper towels
Step 1: Painting the Gradient Sky
-
Prepare the cool tones:
Begin by squeezing out your teal and a touch of white onto your palette. Using your large flat brush, paint the top third of the canvas with horizontal strokes, ensuring the color is solid and reaches the edges. -
Introduce the transition:
While the teal is still slightly wet, mix a bit of magenta or crimson into your brush (wipe it slightly first if it’s too loaded). Paint the middle section, overlapping slightly with the bottom of the teal to create a soft, dusty purple transition zone. -
Add the warm glow:
Clean your brush thoroughly. Move to the lower third of the canvas using orange and yellow. Paint horizontal bands, blending the orange upwards into the pink/purple section to create a seamless sunset effect. -
Refine the blend:
If your lines look too harsh, use a clean, slightly damp large brush to stroke lightly back and forth across the transition lines between colors. This softens the edges into a smooth gradient. -
Dry completely:
Let this colorful background dry entirely before moving on. I like to use a hair dryer on a cool setting to speed this up, as the next layers require a crisp, dry surface.
Muddy Sky?
If your sky colors turn brown while blending, stop! Wash your brush completely. Orange and blue are opposites and create brown; let layers dry and glaze color over top instead of wet-blending.
Step 2: Creating the Birch Trunks
-
Outline the trunks:
Mix a small amount of water into your Titanium White to make it flow smoothly. Using a medium flat brush, paint long, vertical stripes for the birch trunks. Start near the bottom and go all the way off the top edge. -
Vary the width:
Make sure your trees aren’t all the same thickness. Paint a couple of thicker ‘hero’ trees in the foreground and a few thinner, receding trees to create depth. Don’t worry if the edges are slightly wobbly; birch trees are organic. -
Apply a second coat:
Acrylic white can be translucent. Once the first layer is dry to the touch, apply a second coat of white to the trunks to ensure they stand out brightly against the dark background. -
Add dimension:
Mix a tiny drop of black or grey into white to create a very light grey shadow color. Paint a thin line down one side (the right or left) of each trunk to give them a cylindrical, 3D appearance.
Step 3: Adding Details and Silhouette
-
Paint the forest floor:
For the bottom area, mix Phthalo Green with a little black to create a deep, dark forest green. Using a medium brush, paint an uneven, grassy horizon line at the very bottom, covering the base of your birch trunks. -
Add distant pines:
Using the same dark green mixture and a smaller brush, dab small, triangular jagged shapes rising from the grassy bottom area. These represent distant evergreen trees settled in the background behind the birch trees. -
Create birch markings:
Switch to your smallest detail brush and pure black paint. Along the sides of the white trunks, paint small horizontal notches and ‘eye’ shapes. These shouldn’t be uniform; cluster some together and leave other areas white. -
Scumble texture:
Wipe most of the black paint off your brush so it’s ‘dry.’ Lightly drag this dry brush horizontally across parts of the white bark to create that papery, peeling texture typical of birch trees. -
Branch out:
Using a liner brush with watered-down black paint (ink consistency), pull thin branches extending from the trunks. Start thick at the trunk and lift pressure as you pull away to make them taper into fine twigs. -
Add grassy details:
Finally, mix a lighter olive green or yellow-green. Use the tip of your brush to flick short, upward strokes at the very base of the painting, creating blades of grass that overlap the bottom of the tree trunks.
Use Tape for Clean Lines
For perfectly straight birch trees, run vertical strips of painter’s tape down the canvas. Paint white between the tape strips, let dry, and peel for crisp, sharp trunk edges.
Hang your new vertical landscape where it can add a splash of color to a narrow wall space
Cherry Blossom Branch With Dots
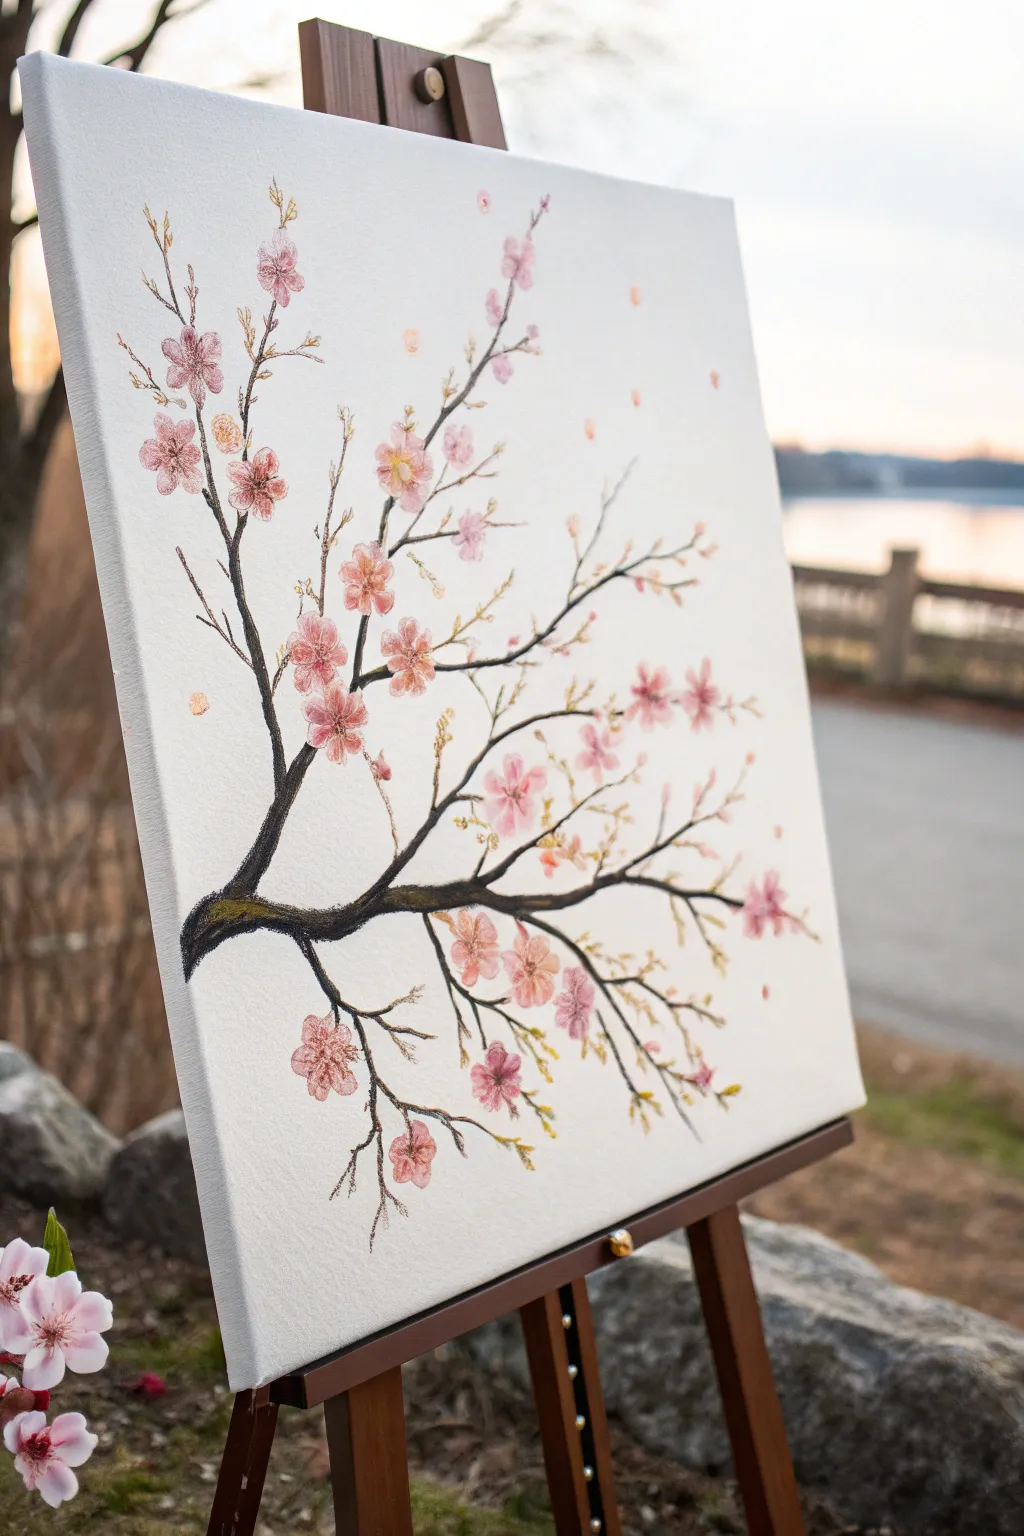
Capture the fleeting beauty of spring with this elegant cherry blossom study. Using simple acrylic techniques, you will create a graceful, dark branch adorned with soft pink blooms and drifting petals against a stark white background.
How-To Guide
Materials
- Stretched canvas (rectangular, portrait orientation)
- Acrylic paints: Carbon Black, Burnt Umber, Titanium White, Primary Red (or Magenta), Yellow Ochre
- Round brushes: small (#2 or #4) and fine liner (#0 or #00)
- Palette for mixing
- Cup of water
- Paper towels
Step 1: Painting the Structure
-
Prepare the canvas:
Start with a clean, white canvas. If your canvas isn’t pre-gessoed or looks dull, give it a fresh coat of Titanium White needed to create that crisp, bright background and let it dry completely. -
Mix the branch color:
On your palette, mix a dark, rich brown using mostly Burnt Umber with a touch of Carbon Black. You want a color that looks almost black but has earthy warmth. -
Plan the main branch:
Visualize a “Y” shape lying on its side. Starting from the middle-left edge, paint the thickest part of the branch extending towards the center. Use a small round brush and let your hand wobble slightly to create natural bark texture. -
Extend the limbs:
Split the main branch into two primary directions: one sweeping upwards towards the top left and center, and another sweeping horizontally towards the right. -
Add finer twigs:
Switch to your fine liner brush. Add delicate, spindly twigs growing off the main branches. Remember that branches generally get thinner the further they grow from the trunk. Vary the lengths and angles for a realistic organic look.
Step 2: Creating the Blooms
-
Mix your base pink:
Create a soft, medium pink by mixing Titanium White with a very small dot of Red. You want a nice, opaque bubblegum shade for the first layer of petals. -
Paint the first flowers:
Using the tip of a small round brush, press down gently to create five petal shapes in a circle. Place these main flowers at the ends of twigs and in clusters near the branch forks. -
Create variation with light pink:
Add more White to your existing pink mix to create a very pale, barely-there pink. Paint additional five-petal flowers, sometimes overlapping the darker ones or placing them behind branches to create depth. -
Add flower buds:
Using the darker pink mix, dab small, single dots or small oval shapes along the thinner twigs. These represent unpromising buds waiting to open. -
Detail the flower centers:
Mix a tiny amount of Yellow Ochre with White to make a pale yellow. Once the pink paint is dry, use the very tip of your liner brush to dot the center of each open flower. -
Outline the stamens:
Using a very watered-down red or a dark pink, paint tiny, hair-thin lines radiating from the yellow centers. This adds that crucial botanical detail.
Natural Petal Shapes
Don’t try to paint perfect circles. Press the belly of the brush down and lift up quickly to create a teardrop shape that mimics a natural petal perfectly.
Step 3: Refining and Finishing
-
Add drifting petals:
To create the feeling of a breeze, paint single pink petals floating in the empty white space around the branches. Keep them small and random. -
Highlight the branch:
Mix a little White into your dark brown branch color to make a milky brown. Lightly streak this onto the tops of the thicker branches to suggest sunlight hitting the bark. -
Add mossy touches:
Mix a tiny bit of Yellow Ochre with the dark brown. Stipple this sparingly on the thickest part of the branch to mimic moss or lichen texture. -
Final leaf accents:
Mix a light olive green (Yellow Ochre plus a tiny, tiny dot of black). Paint very small, almost microscopic leaves emerging near the flower clusters. Cherry blossoms appear before most leaves, so keep these sparse. -
Review and balance:
Step back from your canvas. If one area looks too empty, add a floating petal or a small bud. Ensure the visual weight feels balanced between the dark wood and light flowers.
Add Metallic Glimmer
Once fully dry, add tiny dots of gold acrylic paint to the center of the flowers or randomly on the petals for a shimmering, magical effect.
Hang your masterpiece in a spot where it can remind you of calm spring days all year round

PENCIL GUIDE
Understanding Pencil Grades from H to B
From first sketch to finished drawing — learn pencil grades, line control, and shading techniques.
Explore the Full Guide
Wildflower Meadow Dabs

Bring the serene beauty of a summer field indoors with this gentle, impressionistic acrylic painting. Using soft, blended backgrounds and delicate dabs of color, you’ll create depth and movement that feels like a breath of fresh air.
Step-by-Step Guide
Materials
- Square canvas (e.g., 12×12 or 16×16 inches)
- Acrylic paints: Titanium White, Sky Blue, Sap Green, Olive Green, Yellow Ochre, Magenta, Cadmium Yellow, Raw Umber
- Large flat brush (1-2 inch) for background
- Medium filbert brush for grasses
- Small round brushes (sizes 2 and 4) for flowers
- Fine liner brush for details
- Palette and water cup
- Paper towels
Step 1: Setting the Scene
-
Mix the sky gradient:
Begin by preparing a large amount of very pale blue on your palette. Mix Titanium White with just a tiny hint of Sky Blue and a touch of warm yellow or pink to soften it. The sky in this piece is dominated by space and light. -
Paint the upper sky:
Using your large flat brush, cover the top two-thirds of the canvas with your pale sky mix. Use broad, horizontal strokes. While the paint is still wet, blend in slightly more white near the center to create a glowing effect. -
Create the distant haze:
As you move down the canvas, mix a little Olive Green and white into your sky color. Paint this soft, misty green band just below the middle of the canvas to represent distant hills or trees. -
Add misty foliage:
While the background is still damp, tap in some soft, indistinct shapes on the left side using a dirty brush with hints of dark green and gray. Blur the edges so they look like distant bushes fading into the fog.
Muddy Greens?
If your grass colors are turning brown or muddy, clean your brush thoroughly between layers. Wait for the dark background layer to dry completely before painting lighter grass blades on top.
Step 2: Layering the Grasses
-
Block in the base:
For the bottom third of the canvas, mix Sap Green, Yellow Ochre, and White. Paint vertical, sweeping strokes upwards into the misty area. I like to keep this layer fairly loose and abstract. -
Deepen the foreground:
Mix a darker green using Sap Green and a touch of Raw Umber. Us the medium filbert brush to add varied vertical strokes at the very bottom, creating the dense shadows where the wildflowers will grow. -
Paint tall grass blades:
Switch to a smaller round brush. Mix a lighter, yellowish-green and paint individual blades of grass flicking upward. Vary the heights, letting some reach quite high into the sky area. -
Add dry seed heads:
Mix Raw Umber with White to make a beige ‘dried grass’ color. Use your fine liner brush to paint very tall, thin stems that rise above the green grass, topping them with tiny ticks or dots to look like wheat or oats.
Add a Bee or Butterfly
Bring the meadow to life by adding a tiny speck of black and yellow hovering above a flower. A simple two-stroke impression of a bee adds instant narrative and movement.
Step 3: Blooming the Meadow
-
Start with the daisies:
Load a small round brush with pure Titanium White. Press gently to create petal shapes in a circular pattern. Don’t worry about being perfect; simple dabs often look more natural than painted petals. -
Paint daisy centers:
Once the white petals are tacky or dry, dab a small dot of Yellow Ochre or Cadmium Yellow into the center of each daisy. -
Add pink wildflowers:
Mix Magenta with White to get various shades of pink. Dot these around the meadow, making some clusters dense and others sparse. Some can be simple blobs, while others can be painted as small cup shapes. -
Create depth with size:
Ensure the flowers at the bottom of the canvas are larger and more detailed. Make the flowers higher up—further away—smaller, using just tiny specks of paint. -
Intersperse yellow blooms:
Use the liner brush to add tiny clusters of yellow dots throughout the greenery. These act as filler flowers and add a lovely sparkle to the composition.
Step 4: Final Details
-
Connect the blooms:
Use your liner brush and a watered-down green to paint thin stems connecting your floating flower heads to the ground. It’s okay if some disappear into the grass. -
Add highlights:
Mix a very pale, almost white green. Add final highlights to a few grass blades in the foreground where the light would hit them. -
Refine the foreground:
Check the bottom edge. If it looks too uniform, add a few dark, leafy strokes or a couple of blurred pink dabs to suggest flowers very close to the viewer.
Step back and admire your peaceful slice of nature, perfect for brightening any room in your home
Birds on a Wire at Dusk
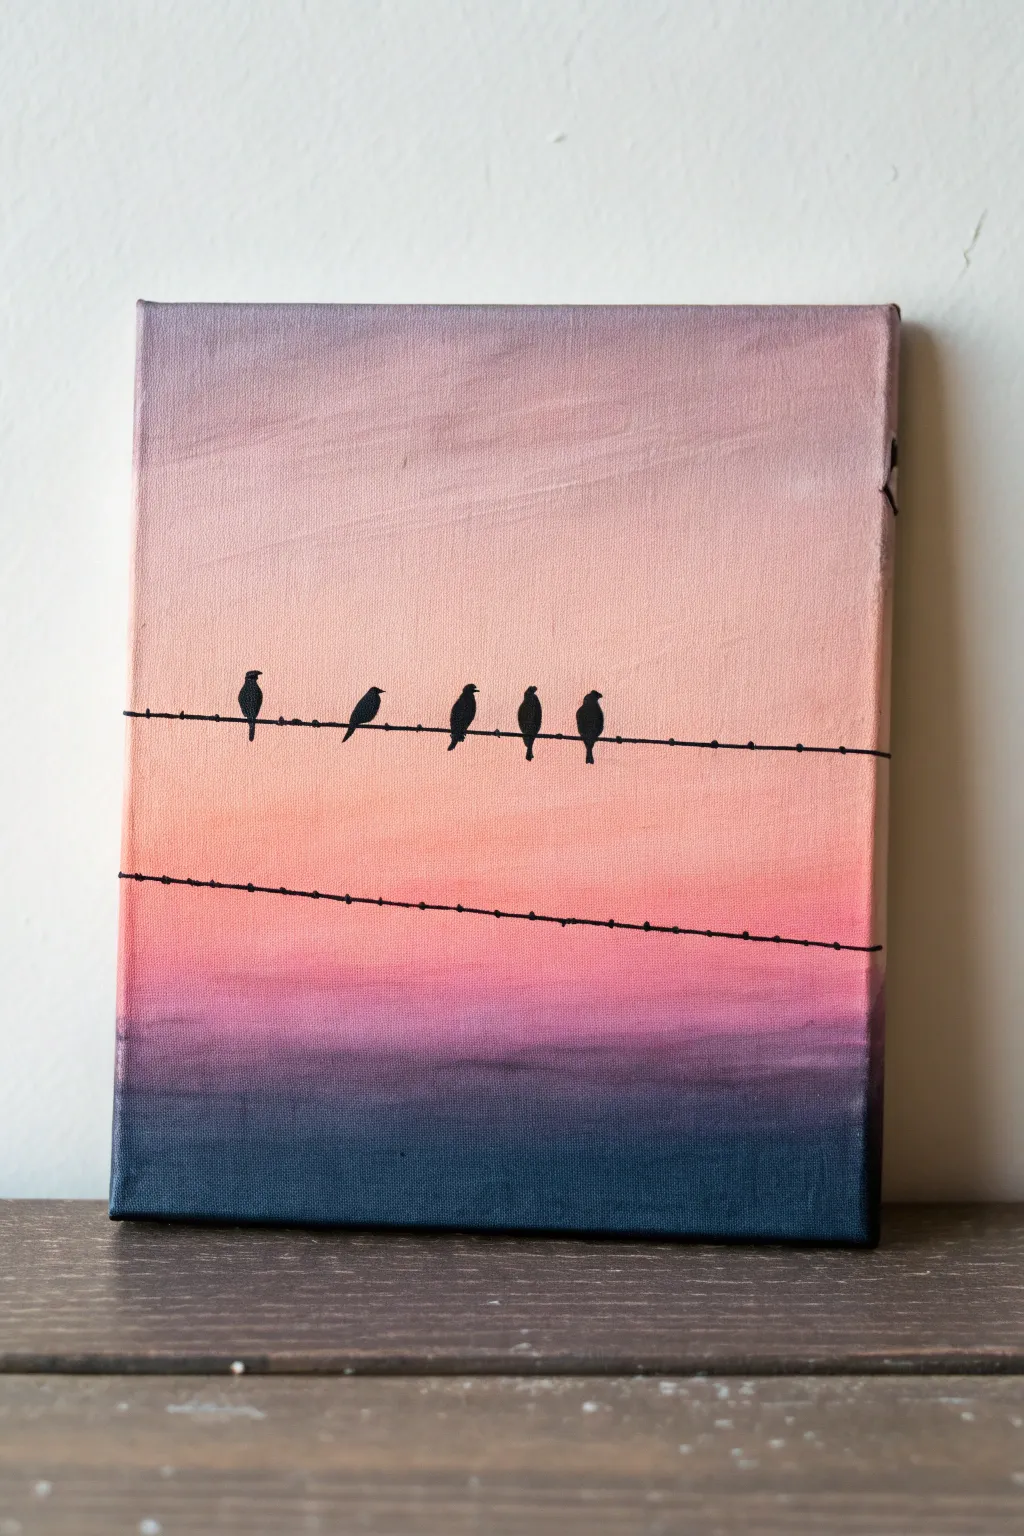
Capture the peaceful transition of day to night with this striking gradient study featuring birds resting on a wire. The effortless blend of twilight colors creates a perfect backdrop for the high-contrast silhouettes, making this an ideal project for practicing seamless ombre techniques.
How-To Guide
Materials
- Small stretched canvas (e.g., 8×10 inches)
- Acrylic paints: Titanium White, Pale Pink, Orange, Magenta, Purple, Phthalo Blue (or Navy), Black
- Flat shader brush (size 1 inch or 3/4 inch)
- Small round detail brush (size 0 or 1)
- Palette or paper plate
- Cup of water and paper towels
- Ruler or straight edge (optional)
Step 1: Creating the Dusk Gradient
-
Prepare the palette:
Squeeze out your sky colors in a row on your palette: Phthalo Blue, Purple, Magenta, Orange, Pale Pink, and White. Leave the Black aside for later. -
Paint the midnight base:
Load your large flat brush with the darkest blue. Paint a horizontal band across the bottom 2 inches of the canvas, ensuring you also paint the bottom and side edges for a finished look. -
Introduce purple tones:
Without washing your brush completely (a little mixing is good), pick up the purple paint. Apply this directly above the blue band, brushing back and forth where they meet to blend them softly. -
Transition to pink:
Wipe your brush on a paper towel to remove excess dark paint. Load it with magenta and paint the next strip up. Use long horizontal strokes to merge the bottom of the magenta into the top of the purple. -
Add the sunset glow:
Clean your brush thoroughly. Pick up the orange paint and apply a band above the magenta layer. The transition here should be soft; if the line is too harsh, use a slightly damp (but clean) brush to feather the colors together. -
Lighten the sky:
Mix a little white into your pale pink to create a soft, dusty rose color. Paint this above the orange, blending downwards gently. -
Finish the top edge:
For the very top section, use white with just a tiny touch of purple or grey to create a hazy, faded sky. Blend this down into the pale pink layer until the canvas is fully covered. -
Let it cure:
I usually let this gradient layer dry completely for at least 20 minutes. The background needs to be solid so the black silhouettes we add next remain crisp.
Smooth Blending Trick
If your acrylics are drying too fast to blend the sky, add a drop of ‘slow drying medium’ or a tiny mist of water to your brush to keep the paint workable longer.
Step 2: Painting the Silhouettes
-
Sketch the wires:
Once the sky is bone-dry, mix a little water into your black paint to make it ink-like. Using your smallest round brush, paint a thin, slightly curved line horizontally across the middle of the canvas. -
Add the second wire:
Paint a second wire a few inches below the first one. This one can be slightly angled or curved differently to create visual interest. Remember to wrap the lines around the sides of the canvas. -
Outline the bird shapes:
On the top wire, begin dabbing small oval shapes to represent the bodies of the birds. Space them out irregularly—some close together, some apart—to look natural. -
Refine the heads:
Add smaller circles on top of the ovals for heads. Vary the positions slightly so some birds look like they are facing left, right, or straight ahead. -
Add tails and beaks:
Use the very tip of your detail brush to pull a tiny stroke downwards for the tail feathers. Add microscopic triangle dabs for beaks on the profiles. -
Thicken the opacity:
If the first coat of black looks a bit streaky against the bright sunset, apply a second coat over the bird shapes to make them solid and opaque. -
Detail the wires:
Add tiny little dots or ‘barbs’ along the wires, especially the bottom one, to give it texture and the appearance of a rugged telephone wire.
Level Up: Starry Night
Before painting the black wires, dip an old toothbrush in watered-down white paint and flick it over the dark blue section to create early evening stars.
Now step back and enjoy the quiet beauty of your twilight scene


City Skyline Silhouette at Sunset
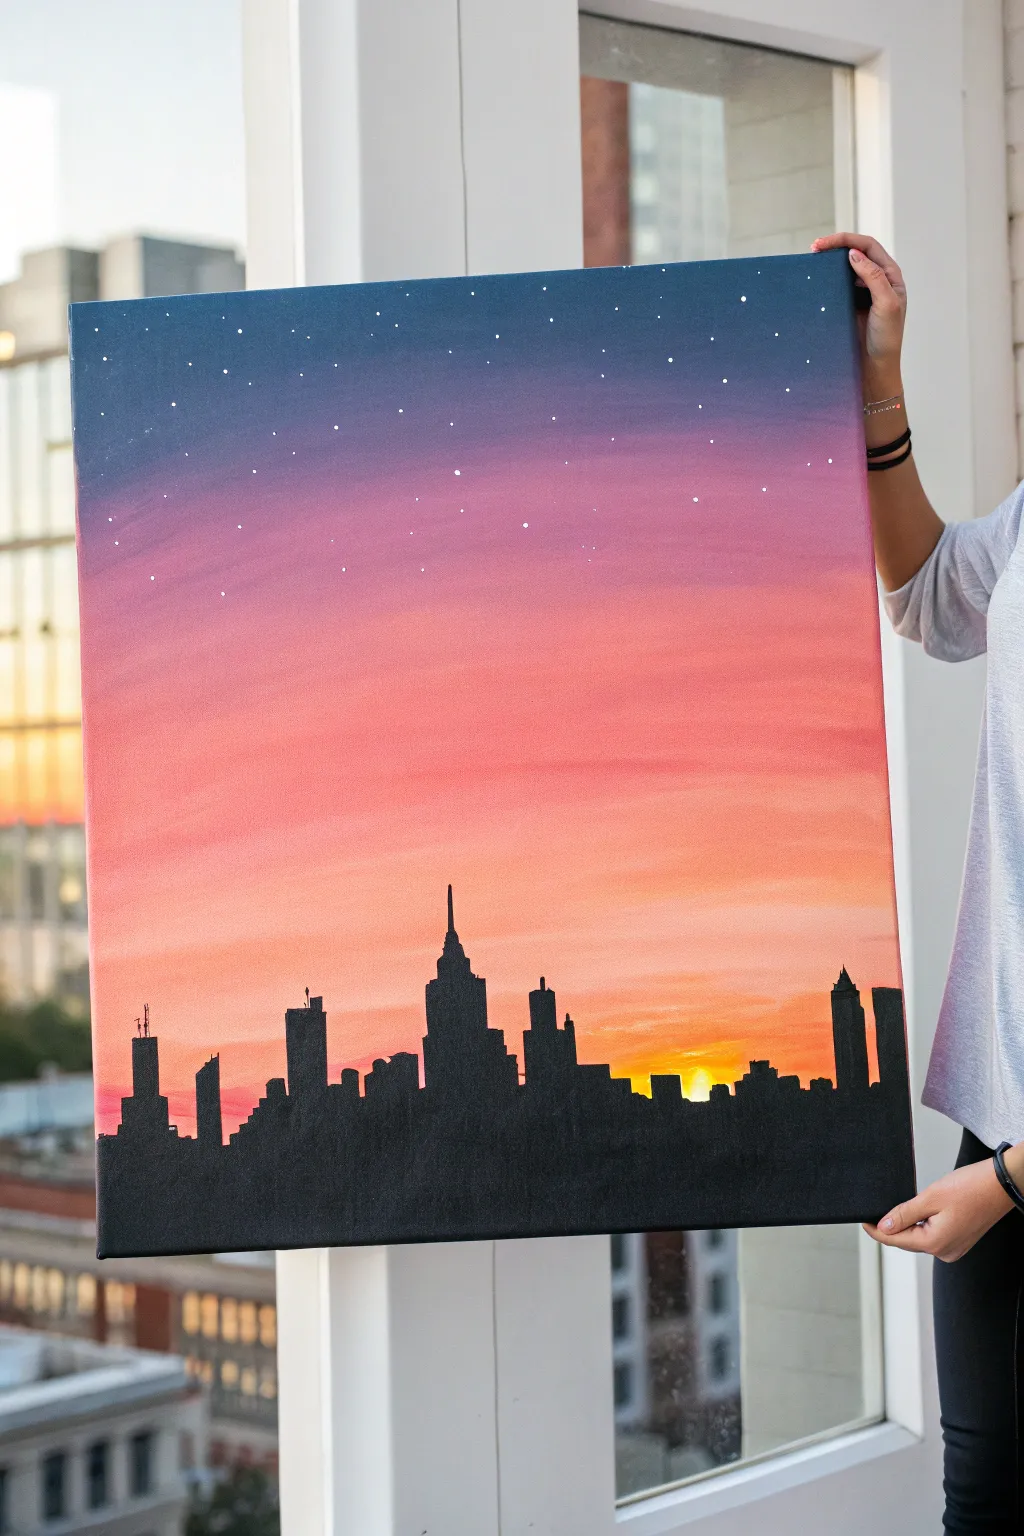
Capture the magic of twilight in the city with this vibrant sunset painting. By blending a smooth gradient sky and adding a crisp black silhouette, you’ll create a stunning high-contrast piece perfect for any modern space.
Step-by-Step
Materials
- Rectangular stretched canvas (e.g., 16×20 inch)
- Acrylic paints: Navy Blue, Purple, Magenta, Salmon Pink, Bright Orange, Yellow
- Black acrylic paint (heavy body preferred)
- Titanium White acrylic paint
- Large flat wash brush (2-inch)
- Medium flat brush
- Small round detail brush (size 0 or 1)
- Small flat brush (angle shader helps)
- Cup of water and paper towels
- Palette or paper plate
Step 1: Creating the Sunset Gradient
-
Prepare your palette:
Squeeze out generous amounts of your sky colors: Navy Blue, Purple, Magenta, Salmon Pink, Orange, and a touch of Yellow. You want them ready to go because acrylics dry fast and effective blending needs wet paint. -
Start at the top:
Using your large wash brush, apply a bold horizontal strip of Navy Blue across the very top edge of the canvas. Paint about 2-3 inches down. -
Begin the blend:
Without cleaning the brush perfectly, pick up the Purple paint. Apply it directly below the blue, slightly overlapping the wet edge. Use long, horizontal strokes to smooth the transition between the two cool tones. -
Add warmth:
Wipe your brush lightly on a paper towel. Pick up the Magenta and paint the next band downwards. Work quickly back and forth over the meeting point with the purple to create a soft, hazy merge. -
Brighten the sky:
Clean your brush thoroughly. Switch to the Salmon Pink and apply a wide band across the middle section. Blend upwards into the magenta until the hard line disappears. -
Introduce the glow:
Mix your Bright Orange with a tiny bit of Pink. Apply this below the salmon color, blending extensively. This section should cover most of the lower canvas area, leaving just the bottom 4-5 inches for the final horizon glow. -
Paint the horizon line:
At the very bottom strip where the buildings will sit, mix Orange with plenty of Yellow. Paint this horizontal area brightly. This creates the illusion of the sun just dipping below the horizon. -
Add the sun flare:
While the yellow-orange layer is still wet, take a clean medium brush with pure Yellow and just a dot of White. Paint a small, soft semicircle near the horizon line on the right side to represent the setting sun itself. -
Dry thoroughly:
Let the entire background dry completely. Since the next step involves non-transparent black paint, the canvas must be dry to the touch so colors don’t muddy up.
Unwanted Streaks?
If acrylics dry too fast while blending the sky, mist the canvas lightly with a water spray bottle. This keeps the paint workable longer for smoother gradients.
Step 2: Adding Stars and Structures
-
Add the stars:
Load a small round brush with watered-down White paint. Carefully dot the upper blue and purple sections with random stars. Vary the pressure to make some stars tiny and others slightly brighter. -
Draft the foundation:
Switch to Black paint and the medium flat brush. Paint a solid horizontal black bar across the entire bottom of the canvas, about 1-2 inches high. This grounds your city. -
Block in major skyscrapers:
Using the flat brush turned vertically, block in rectangular shapes of varying heights. Place your tallest building (like the Empire State spire shape) slightly off-center for balanced composition. -
Define iconic shapes:
I like to use a reference photo of a specific city here, but you can also improvise. Create stepped-in roofs for art deco buildings or slanted roofs for modern towers. -
Refine the edges:
Switch to your smallest round brush or an angled shader. Sharpen the corners of the buildings and add thin vertical lines for antennas or spires on the tallest rooftops. -
Create depth:
Ensure the silhouette is solid opaque black. If the sunset colors are peeking through, apply a second coat of black once the first layer dries. -
Final details:
Check your sun ‘flare’ area. Ensure the black buildings clearly overlap slightly in front of the yellow sun spot to push the light source into the distance.
Make It Glow
Mix a tiny drop of glazing medium or water into white paint and add a very faint, translucent halo around the yellow sun for extra atmospheric glow.
Hang your masterpiece near a window or light source to let those sunset colors truly pop
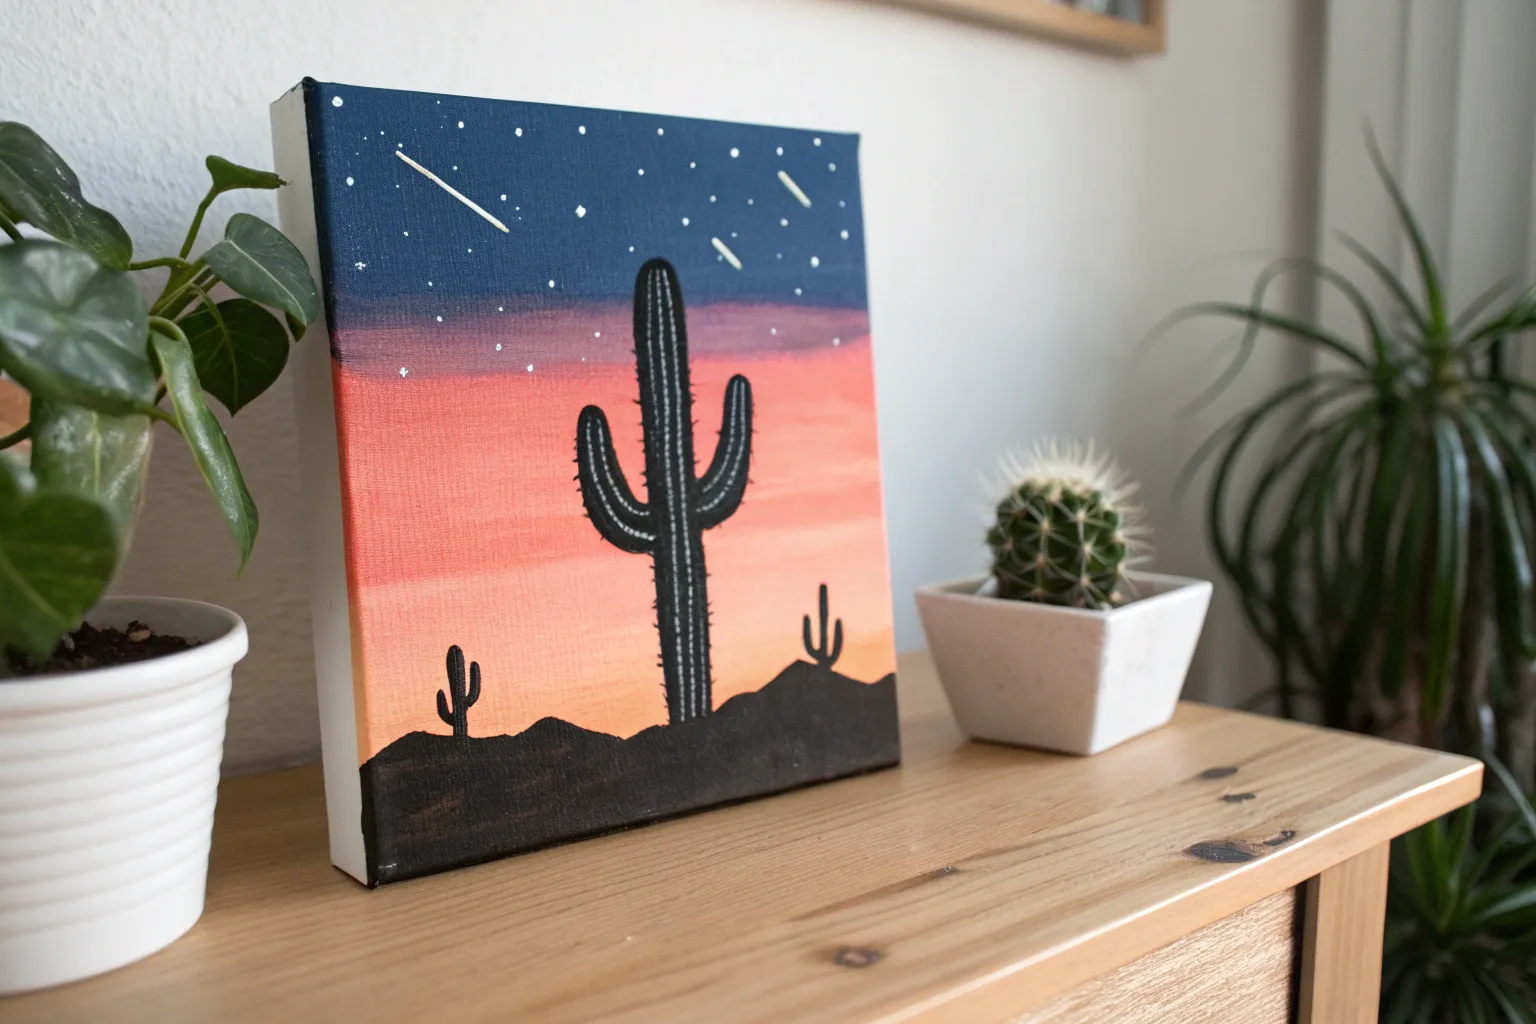
Desert Sunset With Cactus Shapes
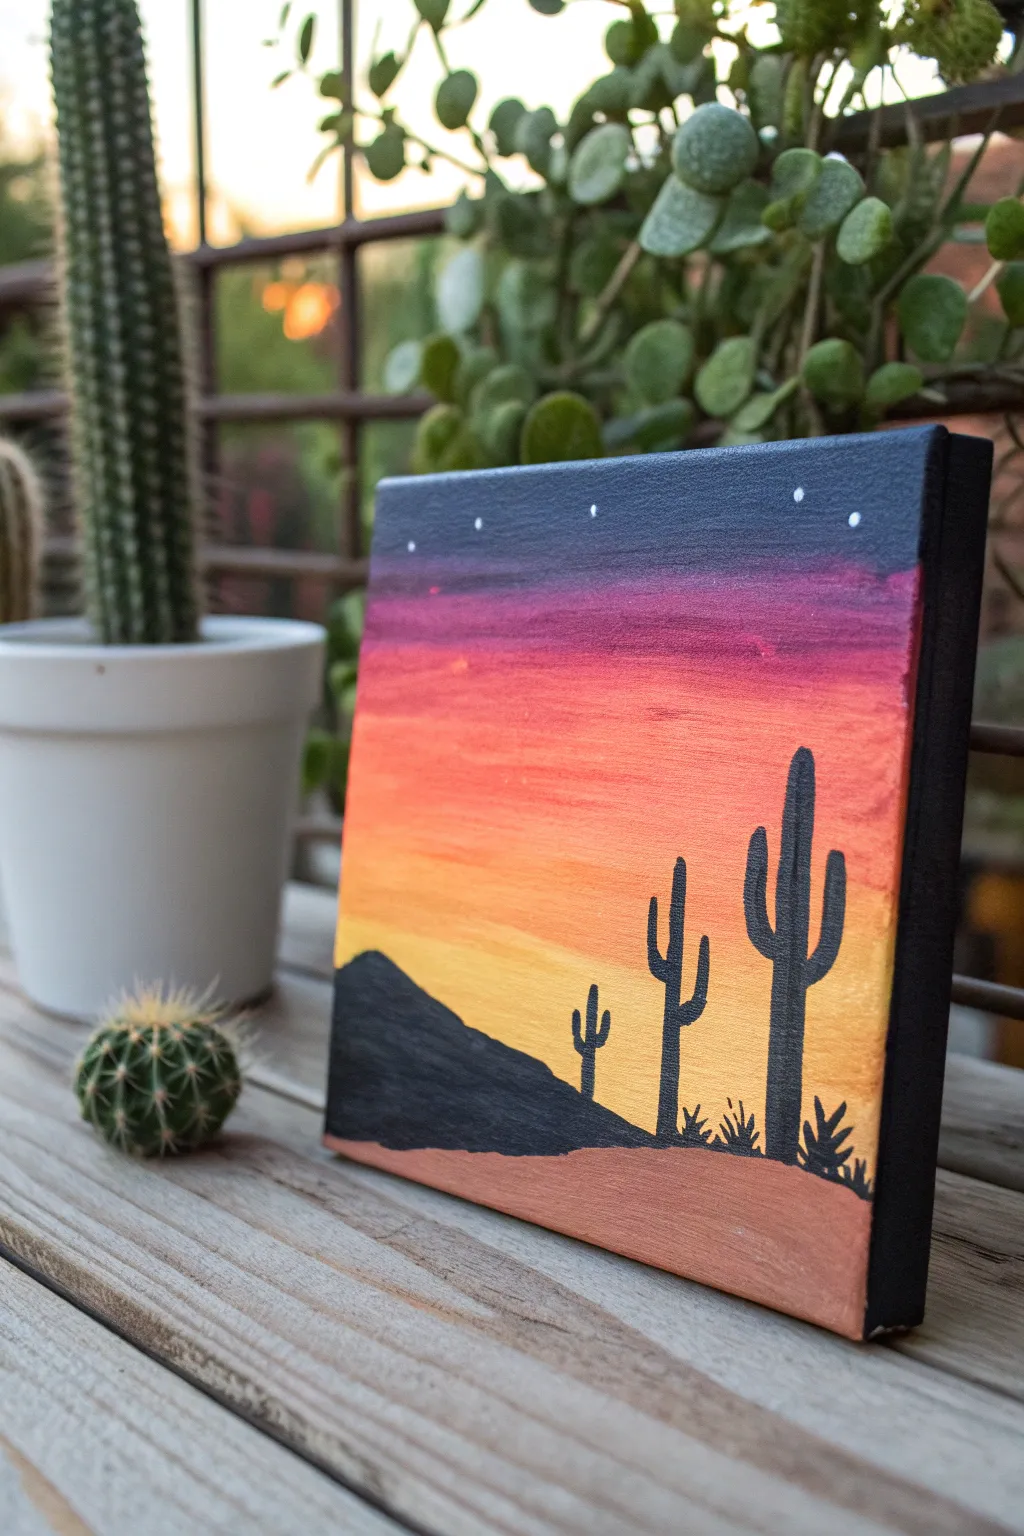
Capture the warmth of the desert evening with this vibrant gradient painting featuring classic saguaro silhouettes. The seamless transition from a starry night sky to glowing sand creates a striking, yet beginners-friendly, landscape.
Detailed Instructions
Materials
- Square canvas (e.g., 6×6 or 8×8)
- Acrylic paints: Dark Blue (Navy or Phthalo), Purple, Magenta, Bright Orange, Yellow, Black, White, Tan/Ochre
- Flat shader brush (medium size)
- Round detail brush (small)
- Cup of water
- Paper towels
- Palette or paper plate
Step 1: Creating the Sunset Gradient
-
Paint the night sky:
Start at the very top of your canvas with your darkest blue paint. Apply a solid horizontal band about an inch wide, ensuring you paint the top edge of the canvas too for a finished look. -
Transition to purple:
Mix a little purple into your blue or grab straight purple paint. Apply this directly below the blue band. While both paints are still wet, gently brush back and forth over the line where they meet to blend them seamlessly. -
Add the pink layer:
Clean your brush and pick up your magenta or bright pink. Paint the next horizontal band below the purple. Again, use long horizontal strokes to blend the wet pink into the wet purple above it. -
Introduce orange:
Move down the canvas with bright orange paint. This section should be quite dominant. Blend the top of the orange into the bottom of the pink layer until the transition looks soft. -
Finish with yellow:
Apply bright yellow for the lowest part of the sky, stopping about an inch or two from the bottom of the canvas. Blend it upwards into the orange. The sky should now look like a smooth gradient from night to day. -
Let it dry:
Wait for the entire background to feel dry to the touch. Acrylics dry quickly, so 10-15 minutes usually does the trick.
Smooth Blends
Work quickly while blending the sky gradient. If the paint dries too fast, dip your brush slightly in water or use a ‘slow-dry’ medium to keep it workable.
Step 2: Painting the Landscape
-
Block in the foreground:
Mix a tan or sandy ochre color. Paint the bottom inch or so of the canvas with this shade, giving the top edge a slight curve to mimic a dune. -
Outline the mountain:
Using black paint, draw a diagonal sloping line starting from the left side, about a third of the way up, down towards the middle of the sand dune. -
Fill the mountain silhouette:
Fill in the entire area below your diagonal line with solid black paint. This creates the dark, shadowy foreground hill. -
Start the main cactus:
Switch to your small round detail brush and black paint. To the right of the center, paint a vertical line for the trunk of the largest cactus. Make sure the base starts in the black mountain area or right on the sand line. -
Add cactus arms:
Paint two L-shaped arms on the main cactus. Typically, one arm points up on one side, and a slightly higher or lower arm points up on the other side. Round off the tips so they don’t look sharp. -
Paint the middle cactus:
To the left of the large one, paint a slightly smaller cactus. Give it a similar structure but vary the arm heights to keep it looking natural. -
Paint the small cactus:
Further left, add a tiny, distant cactus on the slope of the black mountain. This helps create depth and perspective in your scene. -
Detail the ground:
Using the very tip of your detail brush, flick small, jagged strokes upwards from the black ground line to look like desert grass or agave plants.
Add Dimension
Mix a tiny drop of white into your tan paint and add a highlight to the top edge of the sand dune to separate it from the black mountain.
Step 3: Starry Details
-
Dot the stars:
Dip the handle end of a small brush into white paint. Gently dot it onto the dark blue section at the top of the canvas. -
Apply finishing touches:
I prefer to add just 5 or 7 stars to keep it from looking cluttered. Let the painting dry completely before displaying.
Your peaceful desert scene is ready to bring a touch of warm western style to any shelf
Easy Aurora With Soft Light Bands
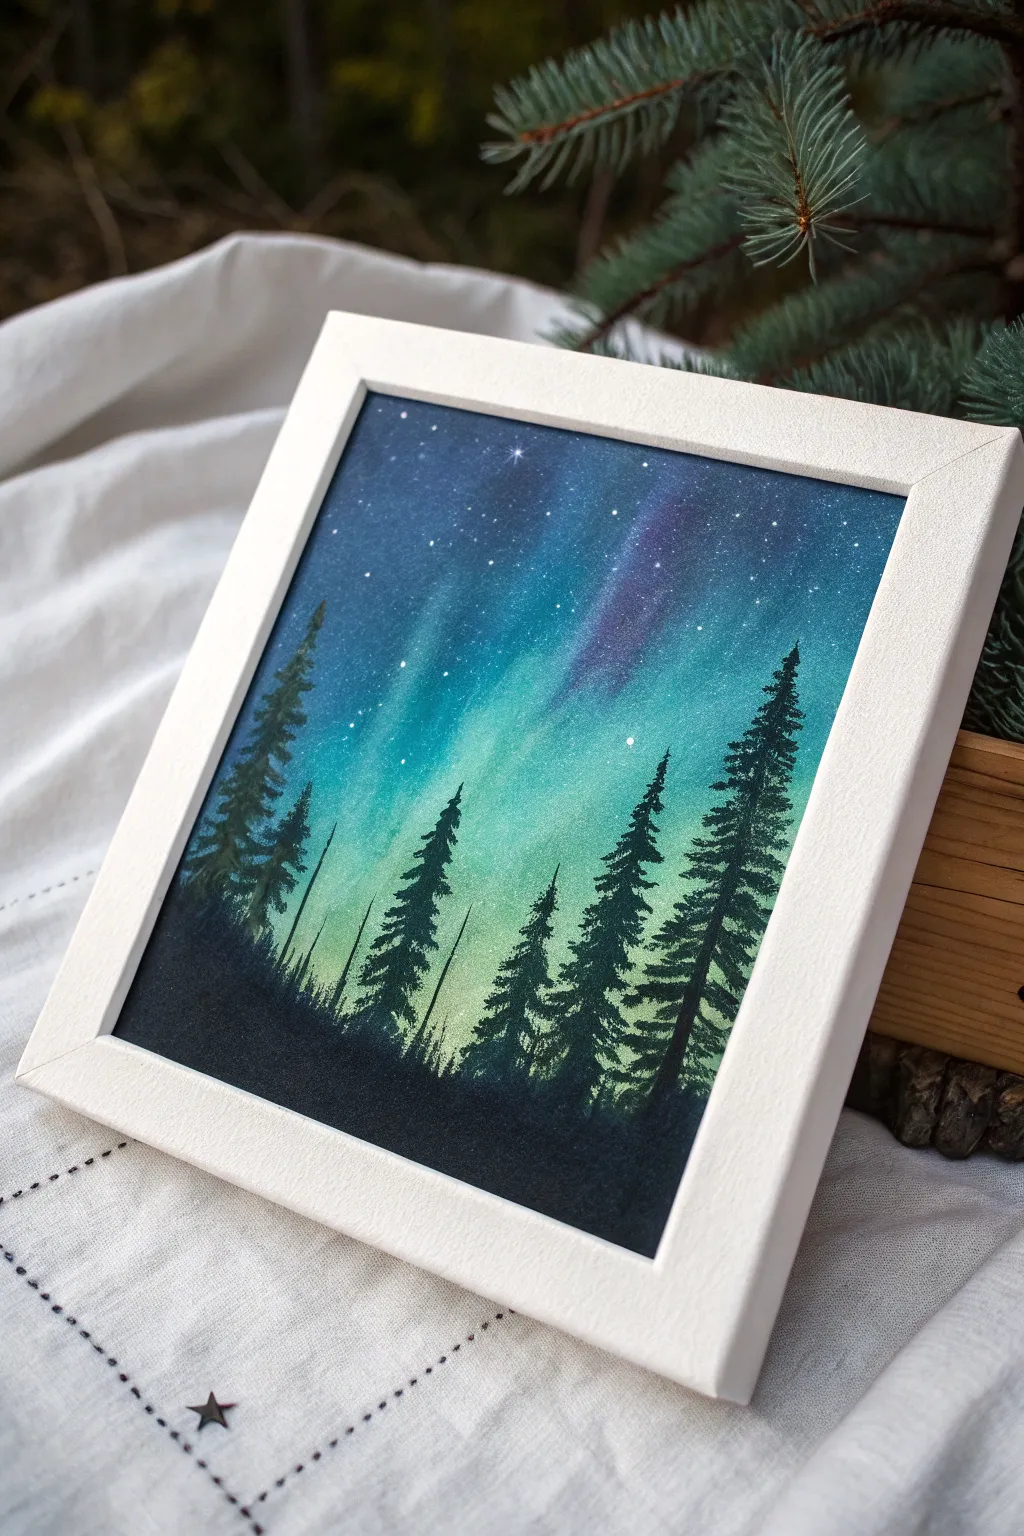
Capture the magic of the polar skies with this vibrant aurora borealis painting. Using simple blending techniques, you will create luminous curtains of teal and purple light dancing over a silent pine forest.
Detailed Instructions
Materials
- Square canvas or heavy watercolor paper (approx. 8×8 or 10×10 inches)
- Acrylic paints: Phthalo Blue, Dioxazine Purple, Teal or Turquoise, White, Black
- Soft synthetic flat brush (1 inch)
- Medium round brush (size 6 or 8)
- Small liner brush or fan brush for trees
- Old toothbrush (for spattering stars)
- Cup of water and paper towels
- Palette or paper plate
Step 1: Setting the Sky
-
Prepare the Gradient:
Start by placing your dark blue, teal, and a generous amount of white on your palette. You want a smooth transition, so keep your brush slightly damp to help the acrylics blend on the surface. -
Paint the Upper Sky:
Using the large flat brush, paint the top third of the canvas with pure Phthalo Blue. Use horizontal strokes back and forth to get solid coverage. -
Transition to Teal:
Without washing your brush completely, pick up some teal paint. Blend this into the blue about halfway down the canvas. The colors should mix on the canvas to create a deep ocean-blue mid-tone. -
Brighten the Horizon:
Mix white with your teal to create a pale, glowing mint green. Paint the bottom third of the canvas with this light color, blending it upward into the darker teal section. -
Smooth the Blend:
With a clean, slightly damp flat brush, gently sweep back and forth over the entire sky from top to bottom to smooth out brushstrokes and create a seamless ombre effect.
Muddy colors?
If your sky blending looks muddy, let the paint dry completely, then apply a fresh layer. Don’t overwork wet acrylics, as this lifts previous layers.
Step 2: Creating the Aurora
-
Ghosting the Lights:
Mix a very pale, translucent wash of white paint with a tiny drop of water. Using a round brush, paint wide, vertical sweeping curves starting from the horizon and fading out as they reach the top blue section. -
Adding Purple Accents:
While the white is still tacky, glaze a small amount of Dioxazine Purple over the upper parts of your white bands. I like to keep this subtle so it looks like it’s fading into the night. -
Intensifying the Teal:
Reinforce the glow by adding a slightly brighter teal mix right in the center of your light bands. Use a dry brush technique to feather the edges so they look soft and gaseous rather than like solid stripes. -
Let it Dry:
Allow the background layer to dry completely. If you paint the stars or trees too soon, they will bleed into the damp sky.
Step 3: Stars and Silhouette
-
Mix the Star Paint:
Create a watery mixture of white paint. It should be the consistency of heavy cream or melted ice cream. -
Spatter the Stars:
Dip an old toothbrush into the watery white paint. Point the bristles toward the canvas and run your thumb across them to spray a fine mist of stars. Concentrate more stars in the darker top section. -
Add Main Stars:
Use a liner brush or toothpick to dot in a few larger, brighter stars. Add a tiny cross shape to one or two of them to create a twinkling effect. -
Base the Landscape:
Switch to your black paint. Paint an uneven, hilly horizon line along the very bottom edge of the canvas to establish the ground. -
Start the Tree Trunks:
Using a small round brush or liner brush, paint thin vertical lines rising from the ground. Vary the heights, making some tall and some short to create depth. -
Form the Branches:
Use a small brush to tap horizontal dashes across the tree trunks. Start very narrow at the top and get wider as you move down the tree, forming a triangular shape. -
Detail the Pines:
Add texture to the trees by dabbing the brush tip to create irregular, jagged edges that mimic pine needles. Ensure the black is fully opaque against the bright horizon. -
Add Thin Trees:
Paint a few very thin, almost bare trunks between the fuller trees. These look like dead pines or distant trees and add realism to the forest density. -
Final Touches:
Fill in the ground area solidly with black again if any light spots show through. Once dry, you can frame your piece in a simple white frame to make the colors pop.
Custom Colors
Swap the teal and purple for magenta and warm yellow to create a stunning sunset version using the exact same silhouette techniques.
Hang this luminous piece near a lamp to let those bright aurora bands truly shine in the evening light
Mini Canvas Trio in One Color Theme
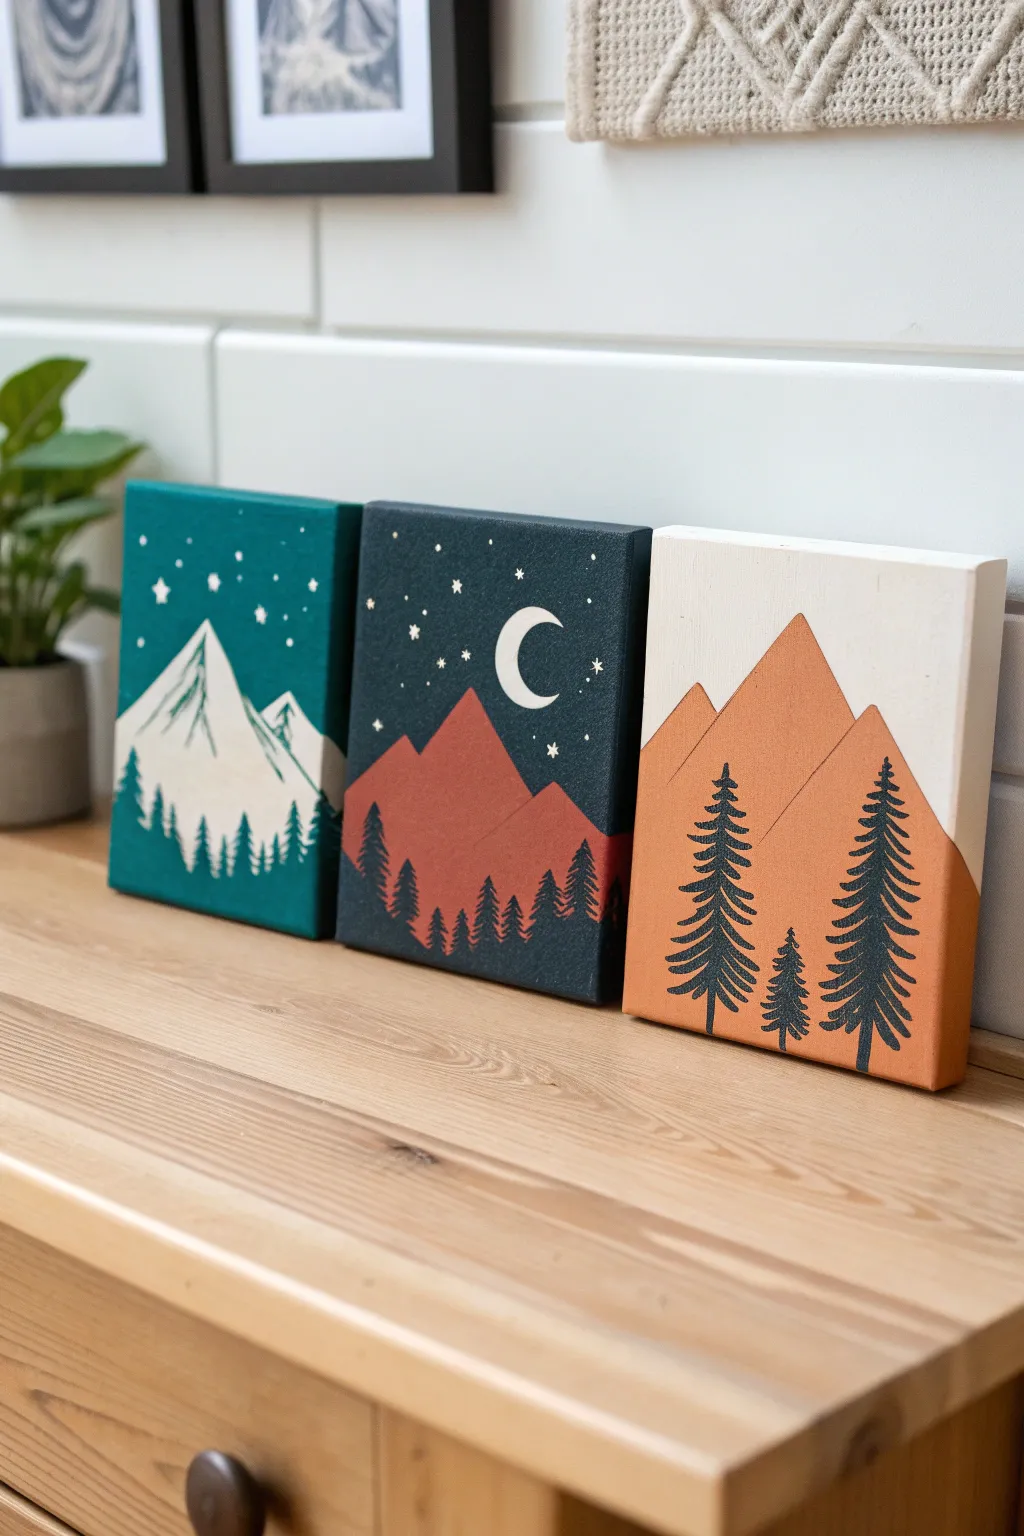
Capture the magic of the outdoors with this sophisticated set of three mini canvases featuring stylized mountain landscapes. Using a cohesive palette of deep teal, navy, rust, and cream, you’ll create a striking modern display perfect for shelving or a mantle.
Step-by-Step
Materials
- 3 mini stretched canvases (approx. 4×6 or 5×7 inches)
- Acrylic paints: Deep Teal/Emerald, Navy Blue, Terracotta/Rust, Cream/Off-White, Black
- Flat shader brushes (medium and small)
- Fine detail liner brush (size 0 or 00)
- Graphite pencil and eraser
- Palette or paper plate
- Cup of water and paper towels
- Painter’s tape (optional for crisp mountain lines)
Step 1: Planning and Base Coats
-
Sketch the outlines:
Lightly sketch your designs onto the three canvases. For the left canvas, draw two jagged mountain peaks. For the middle, draw a overlapping range of three peaks plus a crescent moon. For the right, draw two large, simple triangular peaks. -
Paint the left background:
Using a flat brush, paint the sky portion of the first canvas in a deep teal or emerald green color. Bring the paint slightly over the pencil line of the mountain peaks to ensure no gaps later. -
Paint the middle background:
Switch to your navy blue paint for the second canvas. Cover the sky area completely, carefully painting around the crescent moon shape you sketched. -
Paint the right background:
For the third canvas, paint the sky area with a soft cream or off-white color. This lighter tone creates a beautiful contrast with the other two dark scenes. -
Paint the edges:
Don’t forget the sides! Extend each background color around the edges of the canvas for a polished, gallery-wrapped took.
Shaky Lines Solution
Struggling with straight mountain edges? Use washi tape or painter’s tape to block off the mountain triangles before painting the sky. Remove while paint is slightly damp.
Step 2: Filling the Mountains
-
Paint the snow caps:
Returning to the first (teal) canvas, mix a tiny bit of teal into your white paint to create a very pale tint. Fill in the mountain shapes. It may take two coats to get solid coverage. -
Add mountain details:
While the white paint is still slightly wet or after drying, use a small brush with a greyish-teal mix to add subtle triangular shadows on the right side of the peaks for dimension. -
Paint middle mountains:
On the navy canvas, paint the mountain shapes with a rich terracotta or rust color. This warm tone pops beautifully against the cool dark blue. -
Paint right mountains:
Use the same terracotta color for the mountains on the cream canvas. I find using a flat brush held at an angle helps create those sharp, clean peaks. -
Define the layers:
For the middle canvas where mountains overlap, mix a slightly darker version of the rust color (add a speck of black) and paint the foreground mountains with his darker shade to separate the layers.
Add Metallic Flair
Once fully dry, re-paint the crescent moon and the larger stars with metallic gold or silver paint. It catches the light and adds a magical quality to the night scenes.
Step 3: Trees and Celestial Details
-
Paint the moon:
On the navy canvas, carefully fill in the crescent moon with cream or white paint. Use your smallest brush for the sharp points. -
Add the stars:
Using your fine detail brush or the handle end of a brush, dot tiny white stars onto the teal and navy skies. Vary the sizes, and add small cross-shapes for twinkling stars. -
Practice tree shapes:
Before painting on the canvas, practice your pine trees on paper. Draw a vertical line, then use quick, downward strokes that get wider as you move down. -
Add trees to the left canvas:
Mix a very dark teal (teal + black) and paint a row of small pine trees along the bottom edge of the white mountains. -
Add trees to the middle canvas:
Using black or very dark navy, paint a silhouette of classic pine trees along the bottom of the rust mountains. -
Paint the feature trees:
On the right (cream) canvas, paint two large, prominent pine trees in the foreground using black. These should be much larger and more detailed than the others, with distinct branches. -
Final touches:
Check all edges and touch up any areas where the canvas shows through. Let the trio dry completely before displaying.
Arrange your finished trio on a wooden shelf or desk to bring a breath of fresh mountain air into your home
Tape-Resist Geometric Mountains
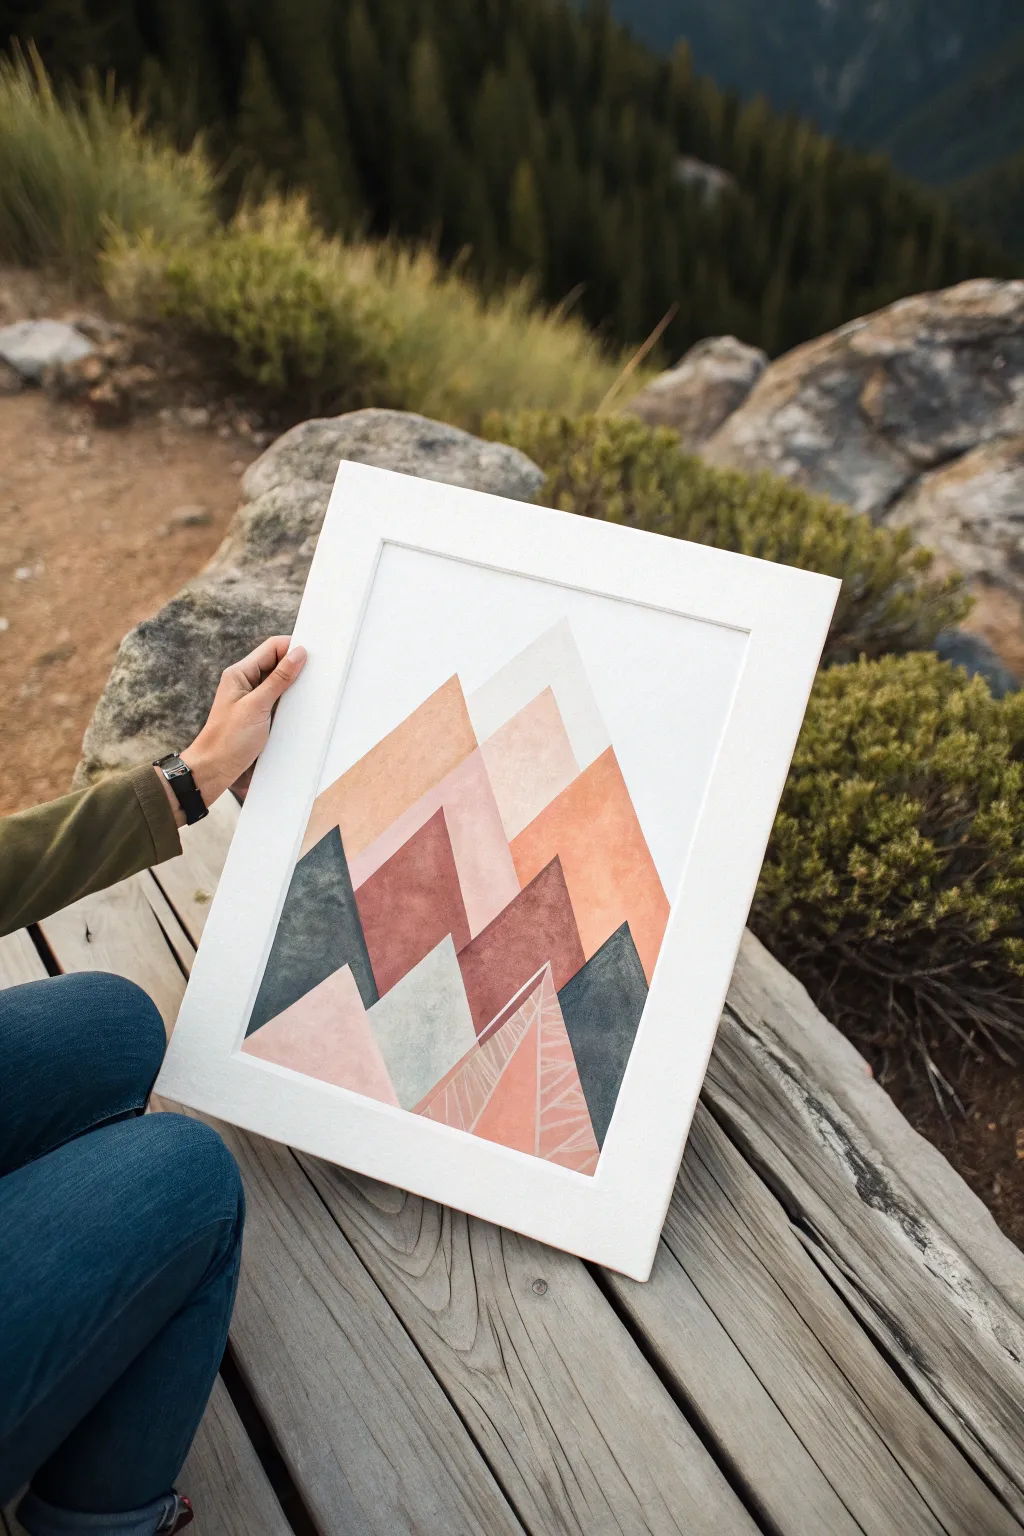
Create a stunning modern landscape using simple geometric shapes and a soft, earthy color palette. This tape-resist method creates crisp, clean lines that make the overlapping mountains look professionally designed, even if you’re a beginner.
How-To Guide
Materials
- Canvas or thick watercolor paper (11×14 or similar)
- Painter’s tape or washi tape
- Acrylic paints (muted orange, terracotta, blush pink, slate blue, white, deep grey)
- Flat paintbrushes (various sizes)
- Palette or paper plate for mixing
- White gel pen or thin white paint marker
- Exacto knife (optional but helpful)
- Ruler
Step 1: Planning the Peaks
-
Map out the design:
Start by visualizing where your mountain peaks will sit. You want a large central peak that dominates the composition, flanked by smaller foreground peaks. -
Apply the first tape lines:
Use your painter’s tape to create the outlines of your largest, furthest-back mountains first. Press the tape down firmly to seal the edges. -
Create overlapping sections:
Continue taping off triangular shapes. To create the illusion of depth seen in the photo, you’ll need to paint in stages, masking off new areas once previous layers are dry, or carefully plan the tape so lines intersect to form distinct triangles. -
Seal the tape edges:
For razor-sharp lines, I like to paint a very thin layer of white paint (or your background color) over the tape edges first. This seals the gap and prevents colored paint from bleeding underneath.
Step 2: Painting the Layers
-
Mix your palette:
Prepare your colors. Focus on a warm, desert-inspired palette: mix orange with white for a soft peach, burnt sienna for the rust tones, and a slate blue-grey for contrast. -
Paint the background peaks:
Fill in the upper, most distant mountain shapes first using your lightest colors, like the pale blush or soft white-grey at the very top. -
Add the middle ground:
Move to the middle section with medium-intensity warmth—the muted oranges and terracottas. Apply the paint smoothly with a flat brush. -
Paint the foreground:
Fill the lowest triangles with your darkest or most saturated colors, like the deep slate blue and the darker rust red, to anchor the bottom of the composition. -
Let it dry completely:
Wait until the paint is dry to the touch. If you pull the tape too early, you risk smudging the wet acrylic.
Crisp Line Secret
Before painting color, brush a clear matte medium over the tape edges. It acts as an invisible barrier, ensuring absolutely zero bleed-under.
Step 3: Adding Details
-
The big reveal:
Slowly peel off the tape at a 45-degree angle. This is the most satisfying part, revealing the crisp white channels between your colored shapes. -
Refine the edges:
If any paint bled through, use a small detail brush with white paint to clean up the lines. -
Add texture to the foreground:
Looking at the reference, one of the bottom pink triangles has a unique texture. Use a white gel pen or paint marker to draw thin, scratchy lines or geometric hatching patterns inside just one or two shapes for visual interest. -
Vary the texture density:
Keep the line work loose and organic within the rigid triangle shape to contrast with the straight paint lines.
Torn Tape Trouble?
If your tape tears the paper when removing, warm it slightly with a hair dryer first. This softens the adhesive for a smoother release.
Frame your new geometric masterpiece in simple white wood to highlight those clean, modern lines


Have a question or want to share your own experience? I'd love to hear from you in the comments below!