I love how a plain mug turns into something totally personal with just a few strokes of ceramic paint or a trusty paint pen. Here are my go-to mug painting ideas—starting with the classics you can knock out in one cozy session, then sliding into the fun, weirder stuff once you’re warmed up.
Classic Polka Dots

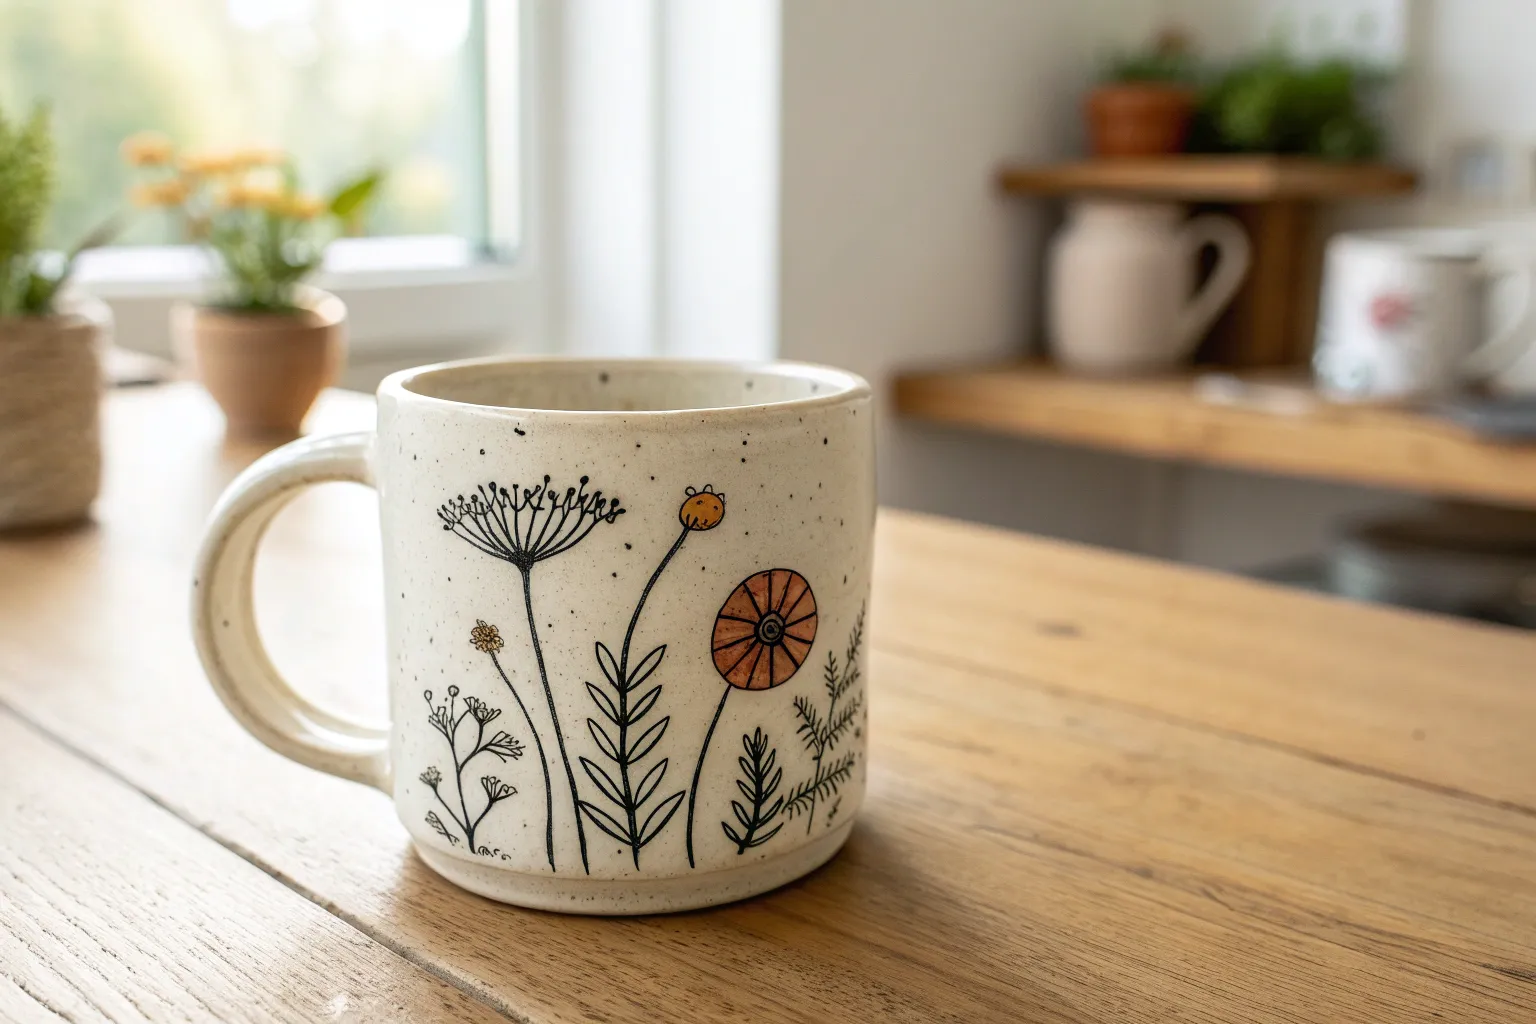
Embrace a cozy, cottage-core aesthetic with this simple yet charming polka dot mug design. Featuring a palette of muted autumn tones on a speckly white base, this project creates a piece that feels both modern and hand-crafted.
Step-by-Step Guide
Materials
- Plain white ceramic mug (smooth surface)
- Ceramic or porcelain paints (rust orange, forest green, sage green, mustard yellow, dark grey, reddish-brown)
- Rubbing alcohol
- Cotton pads or paper towel
- Round foam pouncers (small size) or round bristle brushes
- Q-tips (for cleanup)
- Oven (for curing)
Step 1: Preparation
-
Clean surface:
Before you apply any paint, it’s crucial to remove oils and fingerprints. Wipe the entire exterior of the mug thoroughly with rubbing alcohol and a cotton pad. -
Dry completely:
Let the alcohol evaporate completely so surface is bone dry and ready for adhesion. -
Prepare palette:
Squeeze out small nickel-sized amounts of your six chosen earthy colors onto a palette or paper plate: rust, forest green, sage, mustard, grey, and reddish-brown.
Perfect Circles Tip
Use the flat end of a pencil eraser or a drill bit dipped in paint as a stamp. It creates perfectly uniform circles every time compared to a brush.
Step 2: Painting the Pattern
-
Load the applicator:
Dip your round foam pouncer or round brush into the first color (let’s start with rust). Ensure the applicator is evenly coated but not dripping. -
Test spacing:
I like to mentally map out a diagonal grid before I start. Aim for about an inch of space between each dot. -
First color application:
Press the pouncer firmly onto the ceramic to create your first set of rust-colored dots scattered randomly but evenly around the mug. -
Rotate and repeat:
Continue adding rust dots, rotating the mug as you work. Leave plenty of empty white space for the other five colors. -
Clean applicator:
Wipe your pouncer clean or switch to a new brush before picking up the next color, perhaps the dark grey. -
Second color:
Apply the grey dots in some of the open spaces. Try to avoid placing two dots of the same color right next to each other. -
Add greens:
Move on to your forest green and sage green paints. These cool tones will balance out the warm rust and brown dots you’ll add later. -
Fill the gaps:
Continue the process with your mustard yellow and reddish-brown paints. Look for larger white gaps in your pattern and fill them in. -
Handle details:
Don’t forget the handle. Carefully dab three to four dots along the outer curve of the handle, alternating colors to match the body. -
Check consistency:
Step back and look at the mug from a distance. If the distribution feels uneven, add a few more dots where the white space looks too sparse. -
Refine edges:
If any dots look smeared or uneven, dip a Q-tip in rubbing alcohol and carefully clean up the distinct round edges.
Step 3: Curing
-
Initial dry:
Allow the paint to air dry for at least 24 hours. The surface must be dry to the touch before baking. -
Cold oven start:
Place your mug into a completely cold oven. Do not preheat, as the sudden temperature change can crack the ceramic. -
Bake:
Set the oven to 350°F (or the temperature specified on your paint bottle) and bake for 30 minutes. -
Cool down:
Turn the oven off and leave the mug inside until the oven cools down completely to room temperature.
Fixing Smudges
If a dot smears while wet, wipe it immediately with a damp paper towel. If it’s tacky, use a Q-tip with alcohol to precision-erase just that spot.
Now you have a charming, custom piece of drinkware perfect for your morning coffee routine


Simple Stripes With Tape
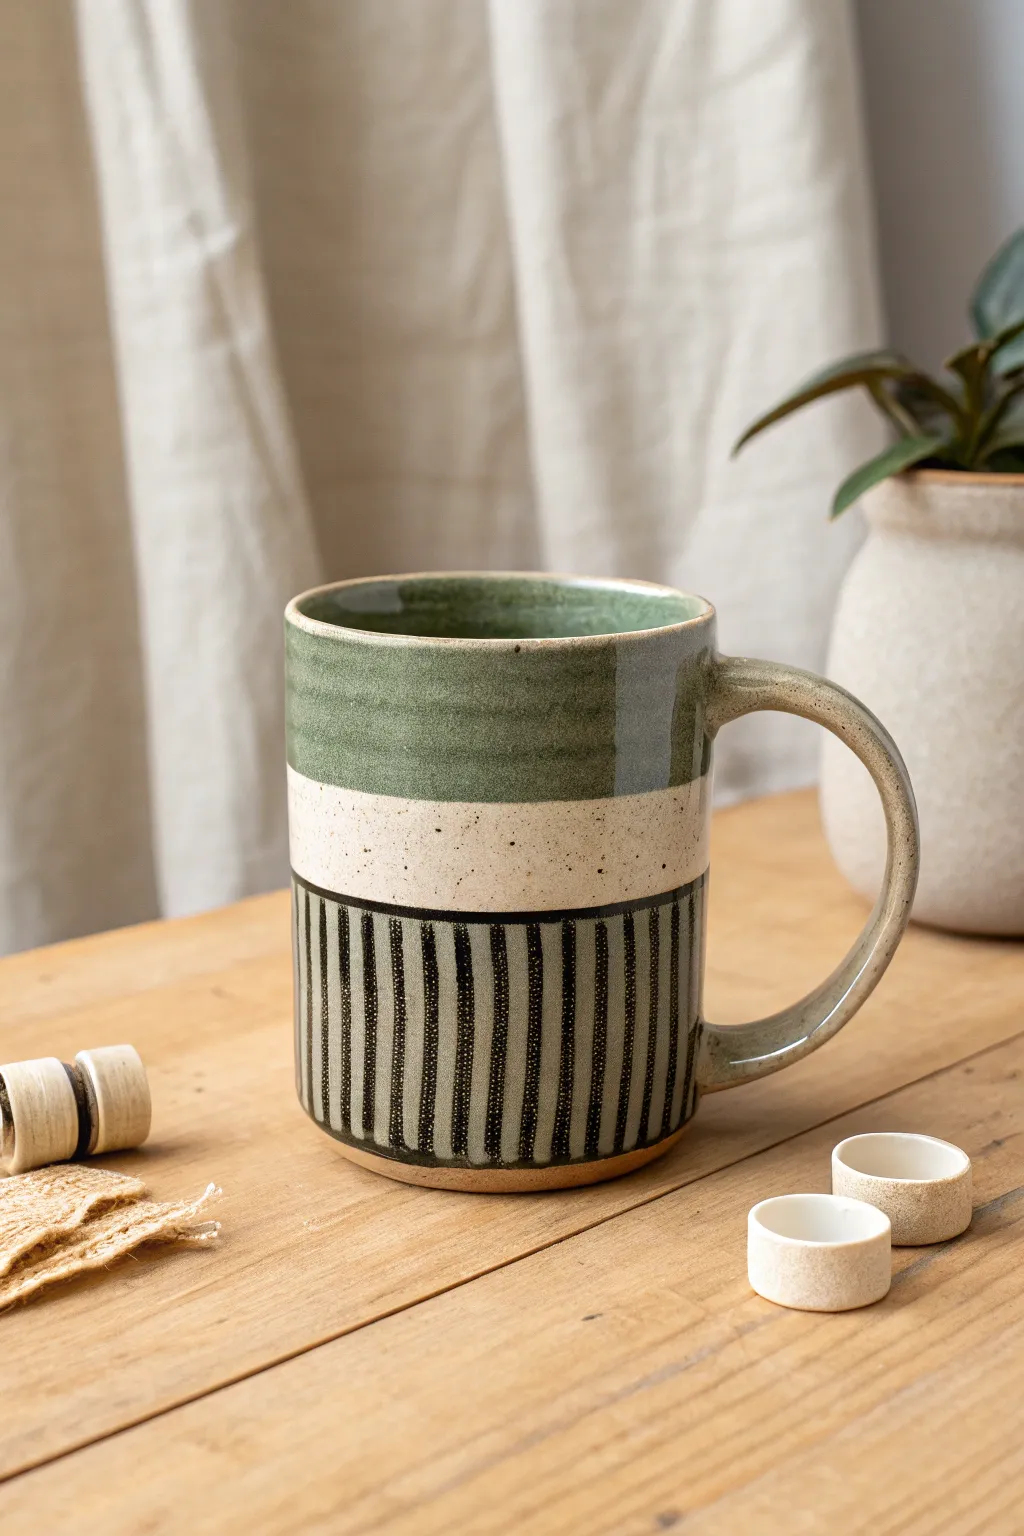
Achieve a sophisticated, studio-pottery look with clean lines and earthy tones using a simple tape-resist method. This design combines a soothing sage green glaze with stark vertical stripes, leaving a raw, speckled band in the middle for textural contrast.
Detailed Instructions
Materials
- Bisque-fired ceramic mug (preferably speckled clay)
- Sage green ceramic glaze
- Black underglaze or glaze pencil
- Painter’s tape or automotive masking tape (various widths)
- Flat shader brush (medium)
- Fine liner brush (size 0 or 1)
- Sponge
- Clear transparent glaze (optional, for the middle band)
- Wax resist (emulsion)
Step 1: Preparation & Masking
-
Clean the Bisque:
Start by wiping down your bisque-fired mug with a slightly damp sponge. This removes any kiln dust or oils from your hands that might prevent the glaze from adhering properly. -
Mark Your Bands:
Visualize the mug in thirds. Lightly mark where your top, middle, and bottom sections will be with a pencil. Don’t worry, the graphite burns off in the kiln. -
Apply the First Tape Line:
Place a distinct strip of masking tape strictly horizontally around the mug, separating the top third from the middle section. Press the edges down firmly to prevent leakage. -
Apply the Second Tape Line:
Apply a second strip of tape separating the middle section from the bottom third. The space between these two tape lines will remain unglazed (or clear glazed) to show off the raw clay speckles.
Step 2: Painting the Sage Bands
-
Load the Brush:
Dip your flat shader brush into the sage green glaze. Ensure it is mixed well so the pigment isn’t settled at the bottom. -
Glaze the Top Section:
Apply a flowing coat of sage green to the top third of the mug, brushing right over the top piece of tape. Be generous but avoid drips. -
Glaze the Handle:
Continue painting the sage green onto the handle. I like to ensure the handle matches the top rim for a cohesive look. -
Glaze the Bottom Section:
Paint the bottom third of the mug with the same sage green glaze. Ensure you cover the area completely down to the foot of the mug. -
Apply Second Coats:
Let the first layer dry until it’s chalky to the touch. Apply a second and third coat to both green sections to ensure opacity and depth of color. -
Inside the Mug:
Pour sheer sage glaze inside the mug, roll it around to coat the interior, and pour out the excess. Clean any drips on the rim immediately. -
Peel the Tape:
This is the satisfying part—carefully peel away both strips of masking tape while the glaze is barely damp. If you wait until it’s bone dry, it might chip.
Clean Lines Pro-Tip
Burnish the edges of your masking tape with the back of a spoon or your fingernail before painting. This seals the tape tightly against the textured bisque to prevent “bleeding” underneath.
Step 3: Detailing the Stripes
-
Prepare the Bottom Section:
Ensure the bottom green section is dry enough to touch without smudging. The vertical stripes will go directly over this green base. -
Plan Vertical Spacing:
Using a pencil, make small tick marks along the bottom edge of the raw clay band to space your vertical stripes evenly, about a quarter-inch apart. -
Paint the Vertical Lines:
Using your fine liner brush and black underglaze, paint vertical lines from the raw clay band down to the bottom of the mug. -
Vary Line Thickness:
Don’t stress about perfection. Slight variations in line thickness add to the handmade charm seen in the original piece. -
Clean the Edges:
If the black lines went too high into the creamy middle band, gently scrape the excess off with a crafting knife or stiff clean brush.
Fixing Smudges
Did some black underglaze drip onto the sage green? Wait for it to dry completely, then gently scratch the unwanted mark off with a needle tool or an X-Acto knife without disturbing the green layer.
Step 4: Finishing Touches
-
Glaze the Middle (Optional):
If you want the middle band shiny rather than matte raw clay, carefully brush a clear transparent glaze into that negative space now. -
Wax the Foot:
Flip the mug over and apply wax resist to the very bottom foot ring to prevent it from sticking to the kiln shelf. -
Smooth Imperfections:
gently rub any sharp glaze ridges left by the tape with your finger to smooth the transition between colors. -
Final Fire:
Load the mug into the kiln and fire according to your clay and glaze specifications (usually Cone 5 or 6 for this type of stoneware).
Once fired, fill your new mug with coffee or tea and enjoy the tactile contrast of the smooth glaze and raw clay bands


Easy Daisy Chain Florals
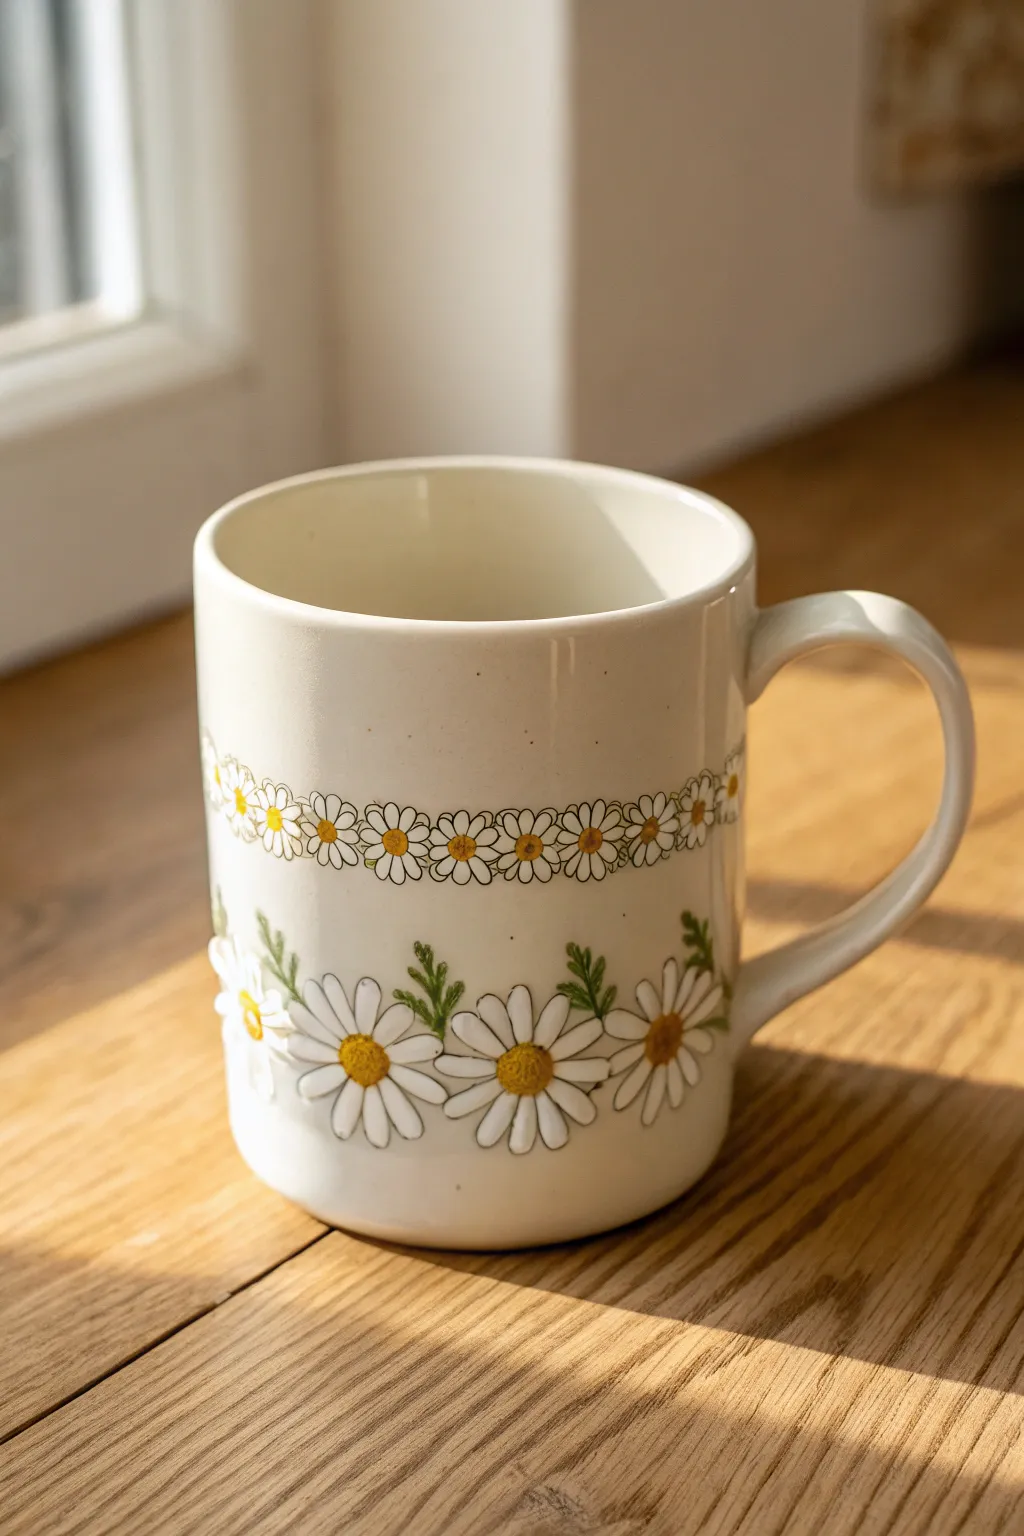
Brighten your coffee routine with this charming mug featuring two bands of cheerful floral designs. With a delicate chain of mini daisies ringing the top and lush, larger blooms anchoring the bottom, this project captures the fresh feeling of a wildflower field.
Step-by-Step
Materials
- Plain cream or off-white ceramic mug
- Ceramic or enamel paints (White, Golden Yellow, Olive Green, Dark Brown)
- Fine detail paintbrush (Size 0 or 00)
- Small round paintbrush (Size 2)
- Rubbing alcohol and cotton pads
- Palette or small plate for mixing
- Pencil (optional, for light marking)
- Oven (if using heat-set paints)
Step 1: Preparation & Planning
-
Clean surface:
Begin by thoroughly wiping down your mug with rubbing alcohol. This removes any invisible oils or fingerprints that could prevent the paint from adhering properly. -
Mark guidelines:
To keep your bands straight, you can very lightly mark a horizontal line about 1.5 inches down from the rim and another about 1 inch up from the base using a pencil. These will guide your floral placement.
Step 2: Painting the Upper Daisy Chain
-
Create centers:
Load your fine detail brush with Golden Yellow paint. Along your upper guideline, dab small, evenly spaced dots all around the circumference of the mug. These will be the hearts of your mini daisies. -
Paint petals:
Clean your brush and switch to White. Paint tiny, tear-drop shaped petals radiating from each yellow center. Aim for 5-7 petals per flower. Don’t worry if they overlap slightly; it adds to the natural look. -
Outline the chain:
Once the white is dry to the touch, mix a tiny bit of Dark Brown with Olive Green to create a deep, earthy tone. Using your finest brush, carefully outline each small petal. -
Connect the blooms:
With that same dark outline mix, draw tiny curved lines between the flowers, suggesting stems or leaves that link them into a continuous garland.
Steady Hand Trick
Rest your pinky finger on the mug surface (in a dry spot) while painting. This anchors your hand, giving you much better control for fine outlines.
Step 3: Creating the Lower Floral Band
-
Lay out large centers:
For the bottom design, paint larger Golden Yellow circles (about the size of a pea) spaced further apart than the top row. Leave about an inch between each center. -
Paint initial petals:
Switch to your Size 2 round brush and White paint. Paint long, slender petals extending from the yellow centers. I find it helpful to paint the top, bottom, left, and right petals first to establish symmetry. -
Fill in the flowers:
Fill in the gaps with more white petals until the flower looks full. Let the paint be slightly thicker here for a bit of texture. -
Add dimension:
While the yellow centers are still slightly tacky, dab a tiny dot of Dark Brown or deep Orange on the lower edge of each center to give them a rounded, 3D appearance. -
Outline larger blooms:
Using the fine detail brush and your brown-green mixture, outline the individual petals of the large daisies. Keep the lines thin and delicate. -
Define the centers:
Stipple tiny dots of the outline color into the yellow centers to mimic the texture of pollen.
Paint Slipping?
If paint beads up or slides off the ceramic, clean the spot again with rubbing alcohol. The surface must be completely free of oils for adhesion.
Step 4: Adding Foliage & Finishing
-
Paint leaves:
Mix a fresh batch of Olive Green. Paint small, fern-like leaves tucked between the large daisies. Use a flicking motion to keep the leaf tips sharp and tapered. -
Add stems:
Paint short, curved stems connecting the leaves to the imaginary baseline of the flowers. -
Clean up:
Inspect your work for any stray paint marks. Use a damp Q-tip or a toothpick to gently scrape away mistakes before the paint fully cures. -
Dry time:
Let the mug sit undisturbed for at least 24 hours to allow the paint to surface-dry completely. -
Bake to set:
Place your mug in a cool oven. Set the temperature to 350°F (175°C) and bake for 30 minutes. Turn the oven off and let the mug cool down completely inside before removing it to prevent cracking.
Enjoy sipping from your custom garden mug every morning


Minimal Leafy Sprigs
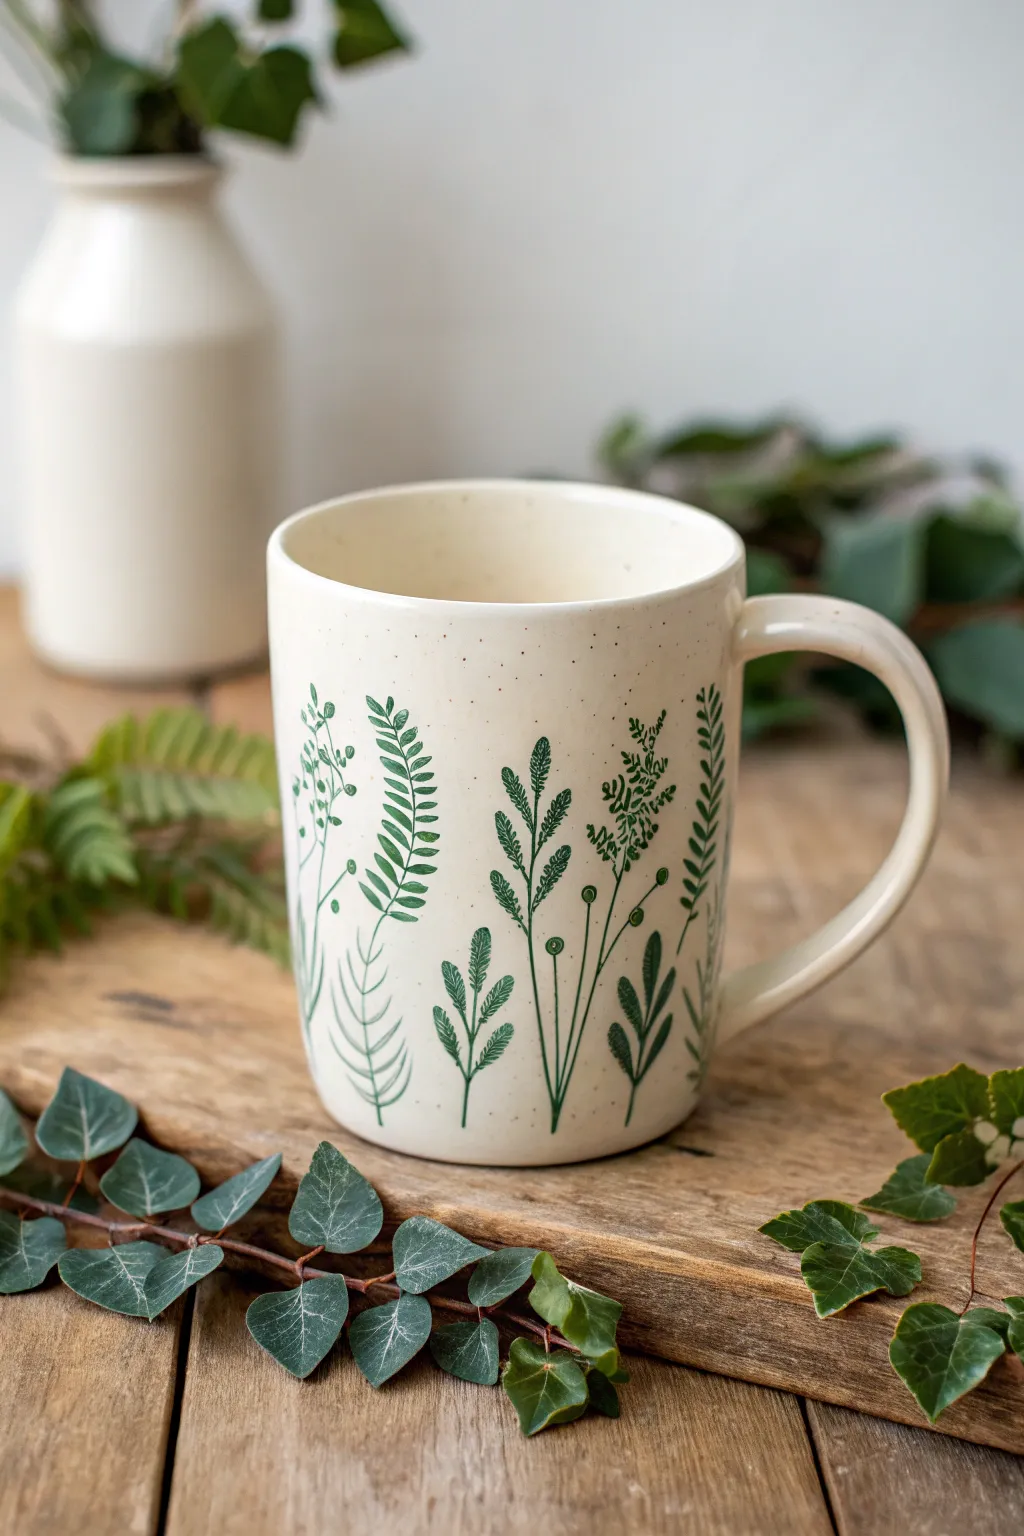
Bring the calming vibe of a woodland walk to your morning coffee with this botanical mug design. The pattern features delicate fern fronds, eucalyptus sprigs, and small seed pods painted in deep, earthy greens.
Step-by-Step Guide
Materials
- White or cream ceramic mug (clean and dry)
- Pebeo Porcelaine 150 paint (or similar ceramic paint) in Sap Green and Pine Green
- Fine liner brush (size 00 or 000)
- Small round brush (size 1)
- Rubbing alcohol and paper towel
- Palette or small plate
- Oven (for curing)
Step 1: Preparation and Planning
-
Clean surface:
Before you begin, wipe down the entire exterior of your mug with rubbing alcohol on a paper towel. This removes invisible oils and fingerprints that could prevent paint adhesion. -
Analyze the shapes:
Take a moment to look at the different plant types in the reference image. Notice there are three distinct styles: a fern-like frond with opposite leaves, a delicate sprig with tiny buds, and a broader leafy branch. -
Plan your spacing:
Visualize where the main stems will go. You want them to grow upwards from the bottom curve of the mug, spaced roughly an inch apart to allow for the leaves to spread without overlapping too much.
Steady Hand Trick
Rest your pinky finger against the mug surface as an anchor while painting intricate details. This stabilizes your hand significantly.
Step 2: Painting the Stems
-
Mix your greens:
Squeeze a small amount of Sap Green and Pine Green onto your palette. I like to keep them separate but mix a tiny transitional shade in the middle for variety. -
Draw the main axis:
Using your finest liner brush loaded with slightly thinned green paint, paint thin, vertical lines starting near the bottom of the mug and reaching about two-thirds of the way up. -
Vary the heights:
Ensure the tops of your stems end at slightly different heights. This organic irregularity makes the design feel more natural and less like a fence. -
Add gentle curves:
Don’t make the lines perfectly straight. Give some stems a slight bend to the left or right, mimicking how plants seek the light.
Step 3: Adding Foliage Details
-
Create fern fronds:
For the fern style, switch to the size 1 round brush. Start at the bottom of a stem and press down gently to create small, elongated oval leaves on opposite sides of the stem, getting smaller as you reach the top. -
Paint sprig buds:
On a different stem, use the liner brush to draw tiny, branching arms. At the end of each arm, add a minuscule dot or small circle to represent seeds or flower buds. -
Detail the leafy branches:
For the third plant type, paint teardrop shapes pointing upwards. These should be denser near the bottom and sparser at the top. -
Add base foliage:
Paint smaller, shorter sprigs in the gaps between the tall plants. These should sit low near the base of the mug to create a sense of depth and density. -
Incorporate speckles:
To mimic the speckled stoneware look, dip an old toothbrush or stiff brush into diluted brown or dark green paint and very gently flick a fine mist of speckles over the background. -
Review and refine:
Rotate the mug and look for awkward gaps. Add a stray leaf or a tiny stem to balance the composition where needed.
Speckle Variation
Try mixing a tiny drop of metallic bronze paint into your speckle mix for a subtle, earthy shimmer that catches the light.
Step 4: Curing the Artwork
-
Initial dry time:
Let the mug sit undisturbed for at least 24 hours. This air-drying period is crucial for the paint to settle before heat setting. -
Oven prep:
Place the mug into a *cold* oven. Do not preheat the oven, as the sudden temperature change could crack the ceramic. -
Bake:
Set the oven temperature according to your paint manufacturer’s instructions (usually around 300°F or 150°C) and bake for 35 minutes once it reaches temperature. -
Cool down:
Turn the oven off and leave the mug inside until it is completely cool. This gradual cooling prevents thermal shock.
Enjoy sipping from your new botanical creation
BRUSH GUIDE
The Right Brush for Every Stroke
From clean lines to bold texture — master brush choice, stroke control, and essential techniques.
Explore the Full Guide
Scattered Tiny Hearts

Transform a plain white mug into a cozy work of art with this charming scattered heart design. Featuring a mix of earthy rust tones, soft pinks, and bold black accents, this randomized pattern creates a lovely, hand-drawn aesthetic perfect for your morning coffee.
Step-by-Step Tutorial
Materials
- Plain white ceramic mug (clean and dry)
- Pebeo Porcelaine 150 paints (or similar ceramic paint)
- Colors: Anthracite Black, powdery Pink, and Rust/Terracotta
- Fine round paintbrush (size 0 or 1)
- Ultra-fine liner brush (size 00) for outlines
- Rubbing alcohol and cotton pads
- Palette or small ceramic dish for mixing
- Paper towels
- Household oven (for curing)
Step 1: Preparation & Planning
-
Clean the Surface:
Before painting, the ceramic surface must be pristine. Wipe the entire exterior of the mug with rubbing alcohol on a cotton pad to remove any oils, fingerprints, or dust that could prevent the paint from adhering properly. -
Plan the Palette:
Squeeze a small amount of your three colors onto a palette. You want a balance between the soft pink, the warm rust/brown, and the high-contrast black. -
Visualize the Placement:
Look at your mug and imagine a ‘random’ scatter. The key to this look is avoiding a rigid grid pattern; you want hearts of different sizes floating at slightly different angles.
Placement Pro Tip
To keep the pattern truly random, try painting the hearts upside down occasionally, or slightly tilted. Uniformity is the enemy of this whimsical style.
Step 2: Painting the Solid Hearts
-
Start with Rust Hearts:
Using your size 1 round brush, load it with the rust-colored paint. Paint 4-5 medium-sized solid hearts scattered around the mug. -
Shape Technique:
To form a nice heart, I find it easiest to paint two teardrop shapes that meet at the bottom point, then fill in the center. Don’t worry if they aren’t perfectly symmetrical; that adds to the charm. -
Add Black Hearts:
Rinse your brush thoroughly and switch to the black paint. Paint a few small, solid black hearts in the open spaces. Keep these slightly smaller than the rust ones to avoid overpowering the design. -
Incorporate Tiny Accents:
While you have black paint on your brush, add a few tiny micro-hearts (just simple ‘v’ shapes or dots dragged downwards) to fill small gaps. -
Paint Soft Pink Hearts:
Switch to the pink paint. Add solid pink hearts in the remaining large gaps. These act as a soft bridge between the dark black and warm rust tones.
Level Up: Hidden details
Paint a tiny heart on the very bottom of the inside of the mug, so the drinker gets a cute surprise when they finish their coffee.
Step 3: Adding Outlines & Details
-
Switch Brushes:
Change to your ultra-fine liner brush (size 00). This step requires a steady hand for delicate lines. -
Create Open Hearts:
Dip the liner brush into the black paint. Draw several open heart outlines in the empty spaces. These should look like simple line drawings, keeping the lines thin and crisp. -
Review Balance:
Rotate the mug slowly. look for any large empty white spaces. If you find a ‘bald spot,’ add a tiny solid black heart or a small pink one to balance it out. -
Clean Up Edges:
If any hearts look messy or you made a smudge, use a damp Q-tip or a toothpick to gently scrape away the wet paint and refine the edges.
Step 4: Curing the Design
-
Initial Drying:
Allow the mug to air dry for at least 24 hours. The paint needs to be completely dry to the touch before baking. -
Oven Setup:
Place the cold mug into a cold oven. Do not preheat the oven, as sudden temperature changes can crack the ceramic. -
Baking Process:
Set the oven to 300°F (150°C) – or whatever temperature your specific paint brand recommends. Once the oven reaches temperature, bake for 35 minutes. -
Cool Down:
Turn off the oven and leave the door closed. Let the mug cool down completely inside the oven. This gradual cooling is crucial for paint durability.
Now you have a cozy, custom mug ready for your favorite warm beverage
Monogram Initial With Border
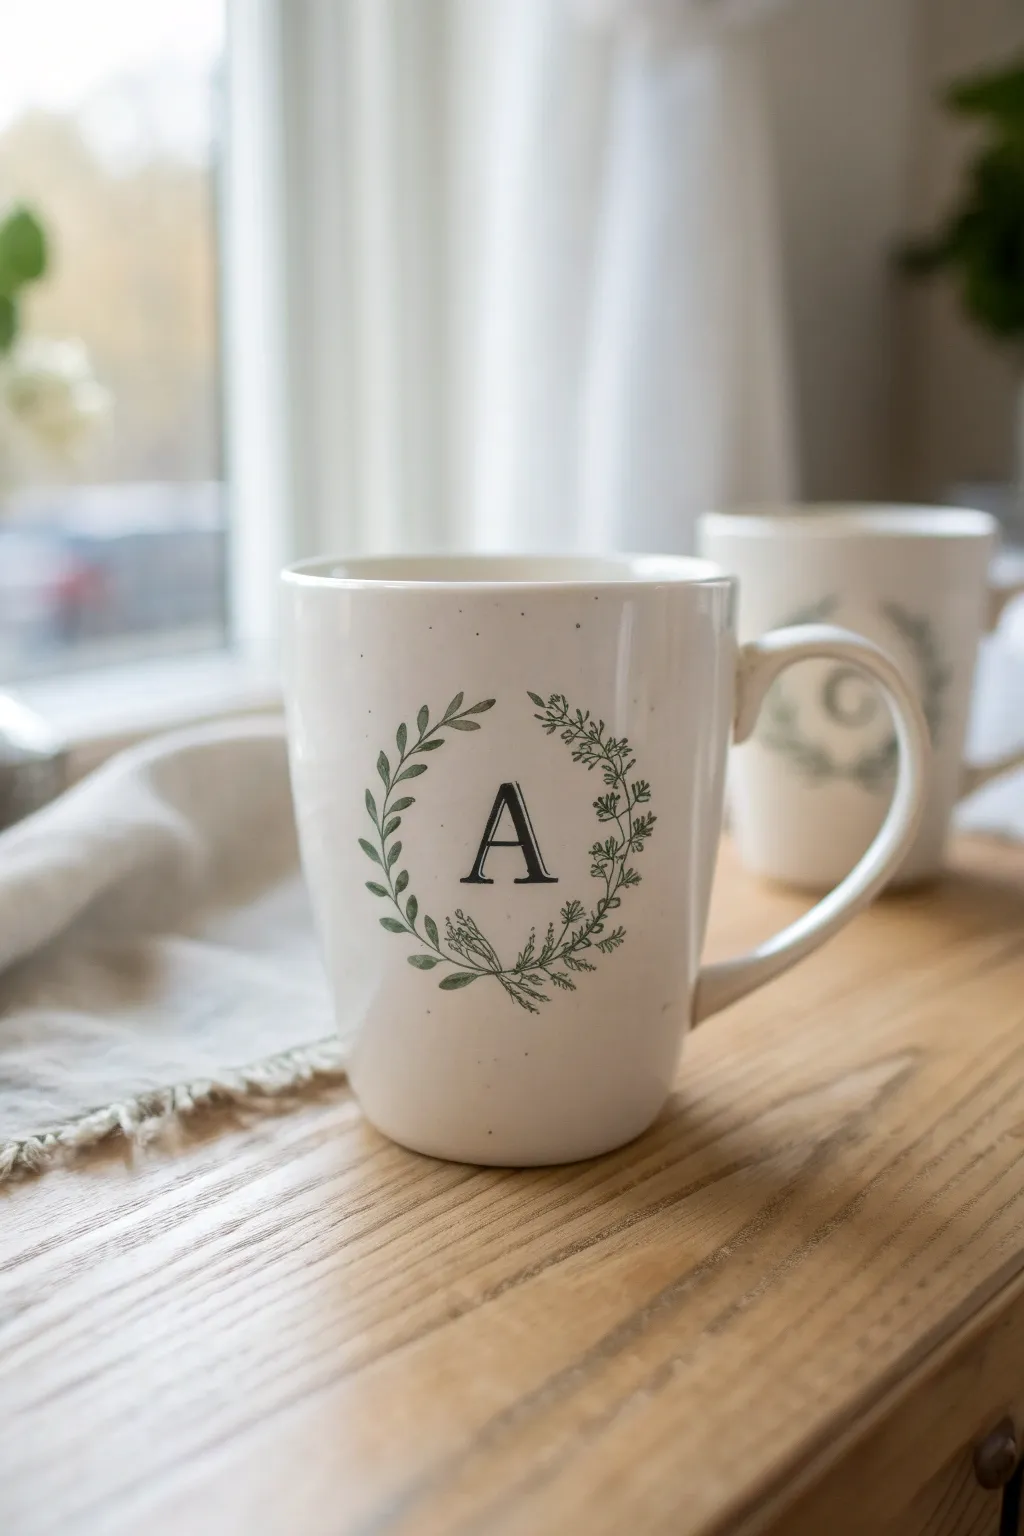
Elegance meets simplicity in this charming mug design, featuring a crisp serif initial circled by delicate greenery. The fine lines of the botanical wreath create a sophisticated farmhouse look that feels both personalized and timeless.
Step-by-Step Guide
Materials
- Plain ceramic mug (cream or off-white preferred)
- Rubbing alcohol
- Cotton pads
- Carbon transfer paper
- Printed initial and wreath design (sized to fit mug)
- Peel-off masking tape or painter’s tape
- Pencil or stylus
- Porcelain paint pens (fine tip, black)
- Porcelain paint pens (fine tip, olive green)
- Porcelain paint pens (fine tip, sage green)
- Oven (for baking/curing)
Step 1: Preparation and Transfer
-
Clean surface:
Begin by wiping the exterior of your mug thoroughly with rubbing alcohol and a cotton pad. This removes invisible oils and fingerprints that could prevent paint adhesion. -
Size your design:
Print out your chosen serif letter ‘A’ (or your preferred initial) and a circular botanical wreath design on standard paper. Ensure the scale fits comfortably on the curved face of the mug without wrapping too far around the sides. -
Layer transfer paper:
Cut a piece of carbon transfer paper slightly larger than your design. Tape the carbon paper to the mug first, dark side down. -
Secure the stencil:
Tape your printed design directly over the carbon paper. Check the alignment carefully to ensure the letter is straight relative to the mug’s rim. -
Trace the design:
Using a pencil or stylus, trace over every line of your design with firm pressure. Trace the outline of the letter and the main stems of the wreath first. -
Trace delicate details:
Don’t forget the tiny leaves and sprigs. You don’t need to fill them in yet, just get the skeletons and outlines transferred clearly. -
Reveal the guide:
Peel back one corner of the tape to check that the carbon has transferred. If the lines are visible, remove the papers completely to reveal your grey guide lines.
Uneven Ink Flow?
If the pen skips on the slick ceramic, the surface might still be oily. Wipe the nib and re-clean the spot with alcohol, letting it dry immediately before trying again.
Step 2: Painting the Design
-
Prime the pens:
Shake your porcelain paint pens well. Press the nib down on a scrap piece of paper until the paint flows smoothly but isn’t dripping. -
Letter outline:
Using the fine-tip black pen, carefully trace the outline of your monogram letter. Keep your hand steady by resting your pinky finger on the mug surface for stability. -
Fill the letter:
Gently fill in the letter with the black pen. Use long, even strokes to avoid creating a textural buildup of paint within the wide parts of the font. -
Draw stems:
Switch to your darker olive green pen. Trace the main circular stems of the wreath, letting the line taper naturally at the ends. -
Add primary leaves:
Using the same olive green, draw the larger leaves attached to the main stem. Use a quick ‘press and flick’ motion to get that pointed leaf shape. -
Layer lighter greens:
Now, take the sage green pen. Add in the secondary sprigs, thinner branches, and smaller filler leaves. I find that overlapping a few leaves slightly over the main stem adds brilliant depth. -
Add fine details:
Return to the black fine-liner for extremely subtle details, like the tiny veins in the larger leaves or small accent dots near the stem intersections. -
Clean edges:
If you made any smudges, use a damp cotton swab or a toothpick to gently scrape away or wipe off the mistake while the paint is still wet.
Faux Speckle Effect
To mimic the photographed mug’s finish, flick a stiff toothbrush dipped in diluted brown paint over the mug before baking for a rustic speckled pottery look.
Step 3: Curing
-
Dry completely:
Let the mug sit undisturbed for at least 24 hours. This allows the paint to bond initially with the glaze before baking. -
Load the oven:
Place the mug into a cold oven. Do not preheat the oven, as the sudden temperature change could crack the ceramic. -
Bake:
Set the oven to the temperature specified on your paint pen brand (usually around 300°F – 350°F) and bake for 30-40 minutes. -
Cool down:
Turn the oven off and leave the mug inside to cool down gradually with the oven door closed. Remove only when completely cool.
Your personalized mug is now ready for a cozy morning coffee or to be gifted to a grateful friend

PENCIL GUIDE
Understanding Pencil Grades from H to B
From first sketch to finished drawing — learn pencil grades, line control, and shading techniques.
Explore the Full Guide
Black-and-White Line Art Face

Bring a touch of modern art to your morning coffee with this elegant line-art mug. The design uses fluid, continuous black lines on a speckled cream background to create a serene, stylized face reminiscent of Picasso or Matisse.
How-To Guide
Materials
- Plain ceramic mug (cream or off-white, preferably speckled)
- Black oil-based paint marker (fine to medium tip)
- Rubbing alcohol
- Cotton pads
- Pencil (optional for sketching)
- Oven (for baking the design)
- Q-tips (for corrections)
Step 1: Preparation
-
Choose your canvas:
Start with a clean ceramic mug. While a plain white mug works, finding one with a subtle speckled finish like the example adds a lovely, organic pottery studio feel. -
Clean the surface:
Wipe the entire exterior of the mug with rubbing alcohol on a cotton pad. This step is crucial because it removes any oils or fingerprints that could prevent the paint from adhering properly. -
Dry completely:
Let the alcohol evaporate completely before you start drawing. Touching the surface now will transfer oils back onto it, so try to handle the mug by the rim or inside the handle.
Pro Tip: Line Variation
Press harder on the downstrokes and lighter on upstrokes with your marker. This subtle variation in line thickness makes the drawing look more professional and dynamic.
Step 2: Sketching the Design
-
Plan your layout:
Visualize the face wrapping around the mug. The nose serves as a central anchor, with eyes on either side and the hair flowing toward the handle. -
Rough sketch (optional):
If you’re nervous about freehanding, use a pencil to lightly sketch the main shapes directly onto the ceramic. The graphite won’t bake on permanently and acts as a safe guide.
Step 3: Painting the Features
-
Start with the nose:
Using your black oil-based paint marker, draw a vertical line for the nose bridge. At the bottom, create a distinctive stylized shape: a small triangle for the nose tip topped with two small open circles. -
Draw the mouth:
Directly below the nose, draw the lips. Keep them simple and geometric—a slightly curved triangle or almond shape works perfectly to mimic the abstract style. -
Create the left eye:
To the left of the nose bridge, draw a sweeping, closed eyelid. It should look like a flattened almond shape. Add short, distinct vertical strokes for the eyelashes. -
Create the right eye:
Repeat this for the right eye, positioning it slightly lower or asymmetrical to enhance the artistic, hand-drawn aesthetic. -
Add eyebrows:
Draw a high arch above the left eye for an eyebrow. For the right side, you might add a simpler curved line to balance the composition.
Troubleshooting: Paint Flaking
If paint flakes after washing, you likely didn’t clean the surface well enough beforehand. Hand wash gently right after use and avoid abrasive scrubbers to preserve the art.
Step 4: The Continuous Line Hair
-
Frame the face:
Start drawing the hairline. Use long, fluid strokes that frame the face, extending from the top rim down towards the base of the mug. -
Add swirling details:
On the right side near the handle, draw a large spiral or swirl. This abstract representation of hair adds movement and fills the negative space beautifully. -
Create the left curls:
On the left side, draw a large loop that mimics an ear or a curl of hair. Let the lines intercept and cross over the facial outline intentionally—this is characteristic of single-line art. -
Fill the bottom area:
Sketch vertical, slightly wavy lines at the bottom of the mug to represent the neck or hair flowing downwards. These should connect visually with the main face outline. -
Connect the design:
Look for any large empty spaces. Add a few more curved lines or spirals to connect the elements, ensuring the design feels like one cohesive piece rather than floating parts.
Step 5: Finishing Touches
-
Correct mistakes:
If a line went rogue, dampen a Q-tip with a tiny bit of rubbing alcohol and carefully wipe away the wet paint. Let that spot dry before re-drawing. -
Let it dry:
Allow the paint to air dry for at least 24 hours. I usually place it in a cupboard so dust doesn’t settle on the wet ink. -
Bake to set:
Place the mug in a cold oven. Turn the heat to 350°F (175°C) and bake for 30 minutes. Starting with a cold oven prevents the ceramic from cracking due to thermal shock. -
Cool down:
Turn the oven off and leave the mug inside until it cools down completely to room temperature. This gradual cooling is essential for durability.
Now you have a stunning, gallery-worthy mug ready for your favorite warm drink
Geometric Color Blocks
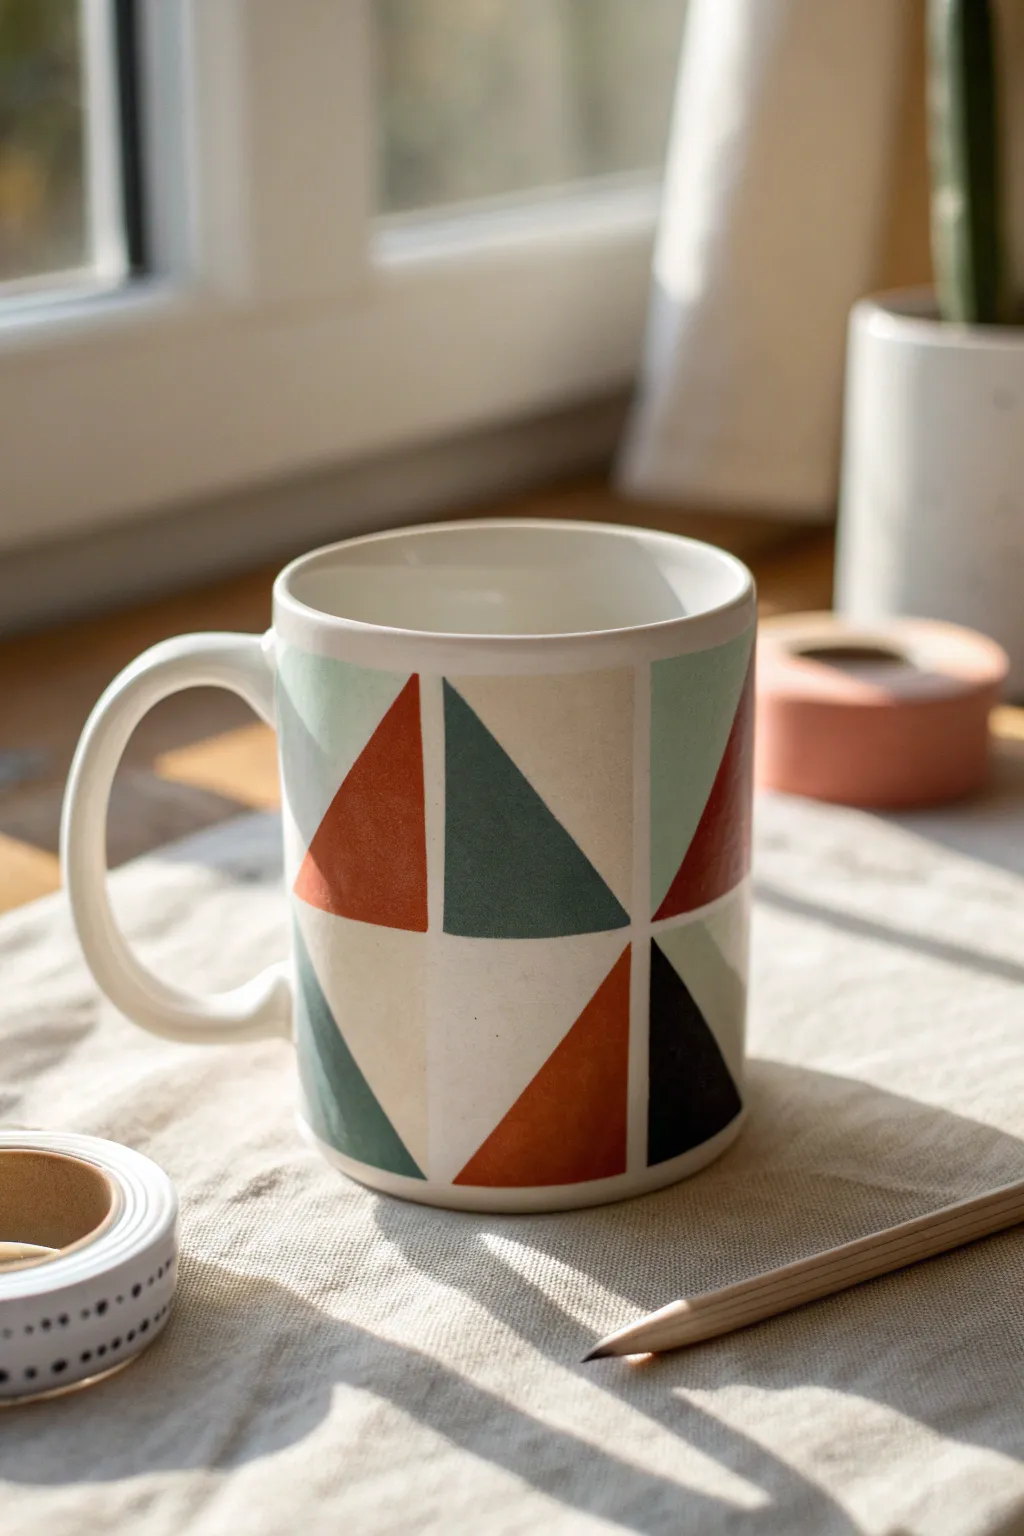
Transform a plain white mug into a piece of modern art with this geometric color-blocking technique. The design features crisp triangles in a sophisticated palette of terracotta, slate blue, black, and sage green, all separated by clean lines of negative space.
Step-by-Step
Materials
- White porcelain or ceramic mug
- Porcelain paints (terracotta, slate blue, black, sage green, beige)
- Painter’s tape or thin masking tape (washi tape works too)
- Flat shader paintbrush (small size)
- Rubbing alcohol
- Cotton pads
- X-acto knife or craft blade
- Oven (for curing)
Step 1: Preparation
-
Clean surface:
Before you begin painting, it is crucial to remove any oils or fingerprints from the mug. Wipe the entire outer surface thoroughly with a cotton pad soaked in rubbing alcohol. -
Plan the grid:
Visualize a grid on your mug. The design relies on squares that are bisected diagonally. You can use a pencil to lightly mark vertical and horizontal guidelines to keep your rows straight, though you’ll be painting over these later.
Crisp Line Secret
Paint a thin layer of the mug’s base color (white) over the tape edges first. This seals the tape, so any bleeding is invisible.
Step 2: Creating the Stencil
-
Apply vertical tape strips:
Place long strips of painter’s tape vertically down the mug. The space between the tape strips will determine the width of your painted columns. Keep these gaps consistent, roughly 1.5 to 2 inches wide. -
Apply horizontal tape strips:
Now apply horizontal strips around the mug to create a grid of open squares. The tape itself acts as the negative white space you see in the final design. -
Create diagonal divisions:
This is the most important step for the geometric look. Cut smaller pieces of tape and place them diagonally across each open square in your grid. -
Vary direction:
Don’t place all diagonals in the same direction. Alternate them—some going top-left to bottom-right, others top-right to bottom-left—to create visual interest and movement. -
Seal edges:
Run your fingernail or a burnishing tool firmly along every edge of the tape. I like to double-check the corners especially, as this prevents paint from bleeding underneath and ensures crisp lines.
Add Metallic Flair
Once the matte colors are cured, use a gold oil-based pen to outline just one side of each triangle for a luxe, modern touch.
Step 3: Painting
-
Mix your palette:
Prepare your porcelain paints on a palette. You’ll need a rust or terracotta orange, a slate blue-green, a solid black, and a lighter beige or sage tone. If your paints are very sheer, let them sit for a moment to thicken slightly. -
Paint the terracotta sections:
Select a few random triangles across the mug to paint with the terracotta color. Use the flat shader brush to apply the paint smoothly, brushing away from the tape edges to minimize seepage. -
Add slate blue tones:
Rinse your brush thoroughly and move on to the slate blue. Fill in several other triangles, trying not to put two of the same color right next to each other. -
Incorporate dark accents:
Use the black paint sparingly. It acts as an anchor for the design. Paint just a few triangles black, focusing on the lower half of the mug for a grounded look. -
Fill remaining shapes:
Use your beige or light sage green to fill in the remaining empty triangles. If you prefer a more open look, you can leave some triangles unpainted, letting the white ceramic show through. -
Apply second coat:
Porcelain paint can sometimes be streaky. Allow the first layer to dry to the touch (usually 15-20 minutes), then apply a second coat to ensure opaque, solid color coverage.
Step 4: Finishing
-
Remove tape:
Carefully peel off the tape before the paint is fully cured but after it has set slightly. Pull the tape away at a 45-degree angle to get the cleanest line. -
Clean up imperfections:
If any paint bled under the tape, use a damp cotton swab or a craft blade to gently scrape away the excess while the paint is still relatively soft. -
Dry time:
Let the mug sit undisturbed for 24 hours. This allows the paint to fully harden before baking. -
Bake to cure:
Place the mug in a cold oven. Set the temperature to the manufacturer’s recommendation (usually around 300°F or 350°F). Once it reaches temperature, bake for 30 minutes, then turn the oven off and let the mug cool down completely inside.
Enjoy sipping your morning coffee from a piece of art that looks professionally designed


Fruit Slice Garland
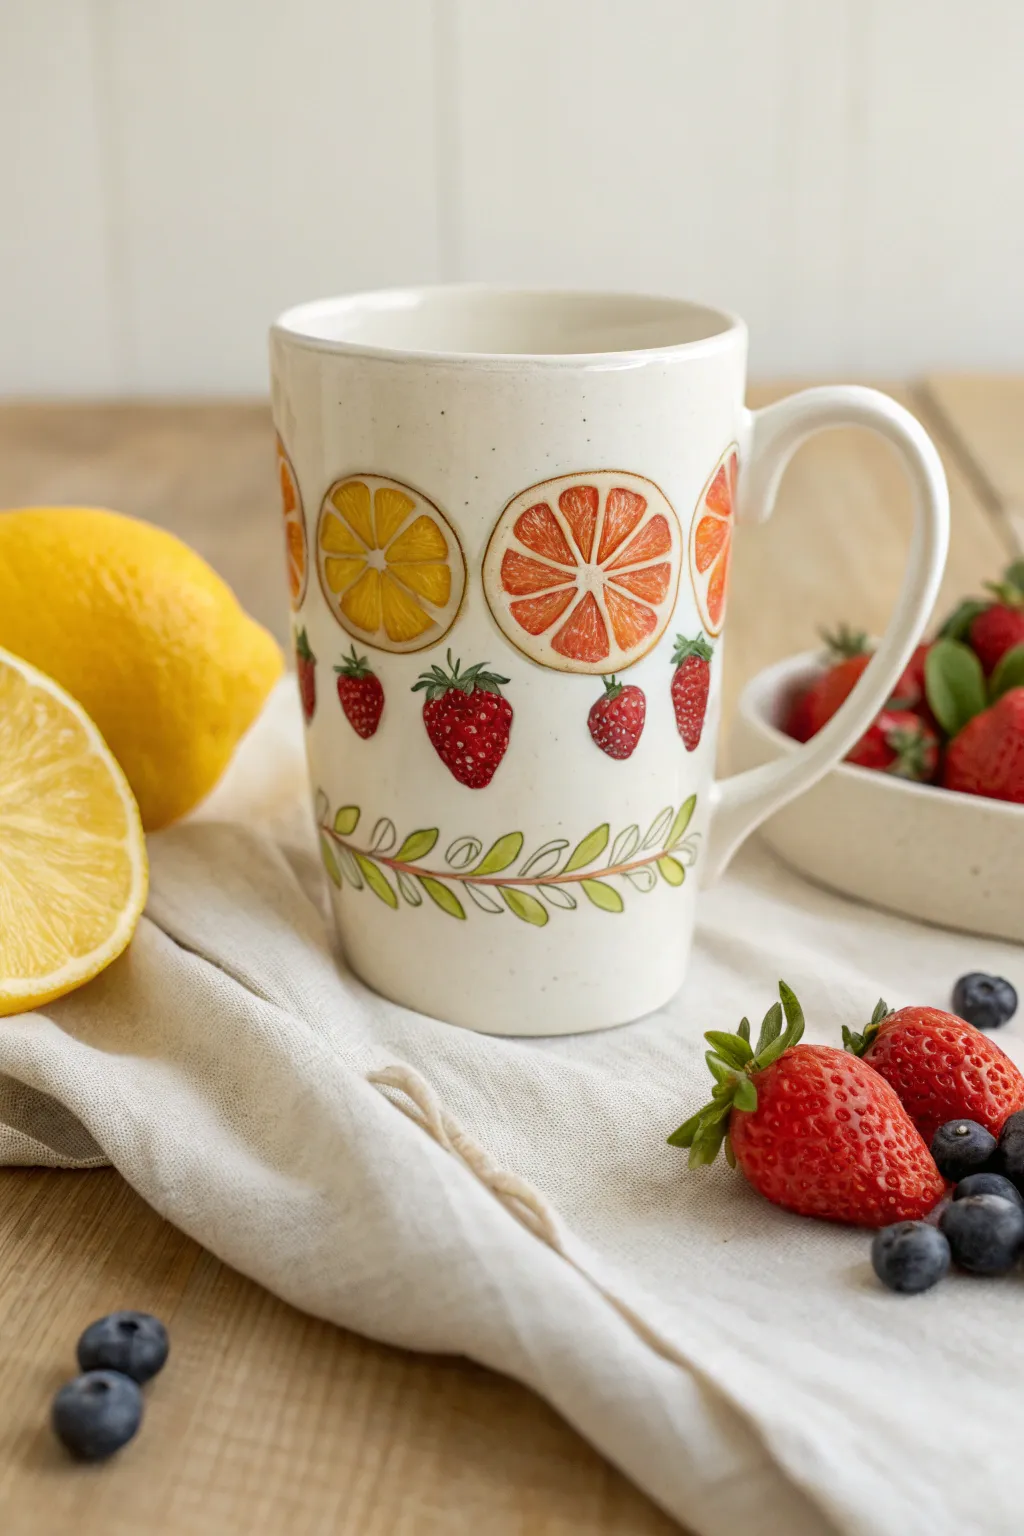
Bring the zest of a fresh morning to your coffee cup with this delightful hand-painted design featuring sunny citrus slices, sweet strawberries, and a leafy garland. The illustrations have a charming, slightly rustic look that pairs perfectly with a creamy off-white ceramic base.
How-To Guide
Materials
- Tall white ceramic mug (smooth surface)
- Porcelain paints (yellow, orange, red, green, black/brown)
- Fine detail paintbrush (size 0 or 00)
- Small round paintbrush (size 2)
- Rubbing alcohol and cotton pads
- Paper palette for mixing
- Pencil (optional)
- Oven (for baking/setting the paint)
Step 1: Preparation & Planning
-
Clean the surface:
Before laying down any color, wipe the entire exterior of the mug with rubbing alcohol on a cotton pad to remove oils and fingerprints, ensuring the paint adheres properly. -
Map out the bands:
Visualize the mug in three horizontal sections. You can lightly sketch guidelines with a pencil if you wish, but freehanding adds to the organic charm. The fruit slices will go near the top, strawberries in the middle, and leaves at the bottom.
Paint Fixes
If paint beads up on the glossy surface, let the first layer dry completely and apply a second coat, or lightly sand the area first for grip.
Step 2: Painting the Citrus Slices
-
Outline the circles:
Using your fine detail brush and a mix of brown and orange paint, draw large circles around the upper portion of the mug. Leave about an inch of space between them for a consistent pattern. -
Create the segments:
find the center point of each circle and paint radiating lines outward to the edge, creating the classic citrus wheel spokes. Aim for 8-10 segments per slice. -
First color wash – Lemon:
For the lemon slices, dilute your yellow paint slightly. Fill in the segments, leaving small gaps near the outlines to mimic the white pith. -
Second color wash – Blood Orange:
For the alternating slices, mix red and orange to create a warm grapefruit or blood orange tone. Fill in these segments using the same technique as the lemons.
Step 3: Adding the Berry Tier
-
Paint the strawberry shapes:
In the open space below the citrus wheels, paint small, inverted teardrop shapes using bright red paint. Space them so they fall roughly between the citrus slices above. -
Add leafy tops:
Once the red base is dry to the touch, use your smallest brush to dab tiny green ‘stars’ on top of each strawberry for the calyx. -
Draw the seeds:
With the finest point of your brush and creamy white or pale yellow paint, add tiny specks or dashes onto the red bodies of the strawberries.
Level Up
Try painting the inside rim with a thin coordinating color band, or personalize the handle with a tiny matching strawberry for a hidden detail.
Step 4: The Leafy Garland
-
Draw the vine stem:
Near the bottom quarter of the mug, paint a continuous, wavy line using a diluted brown or dark green. This serves as the anchor for your bottom border. -
Outline the leaves:
Along the wavy vine, paint pairs of simple almond-shaped leaf outlines. Keep the lines thin and delicate. -
Fill with color:
Mix a light, spring green color and gently fill in the leaves. I prefer doing this loosely so some of the ceramic white shows through, keeping the watercolor aesthetic.
Step 5: Detailing & Curing
-
Refine the outlines:
Go back over the main elements with a very fine brown or black outline if any definitions got lost during painting. Add texture lines to the citrus rinds for extra realism. -
Clean up:
Check for any stray smudges or drips. Use a damp cotton swab or toothpick to gently scrape away mistakes before the paint fully cures. -
Dry time:
Let the mug sit undisturbed for at least 24 hours to allow the paint to bind to the surface. -
Bake to set:
Place the mug in a cool oven, then set the temperature to 300°F (150°C). Bake for 30 minutes, then turn the oven off and let the mug cool down completely inside to prevent cracking.
Enjoy your morning brew in a custom piece that matches freshness of real fruit
Cute Mushroom Minis

Bring the charm of the forest floor to your morning coffee with this delightful hand-painted mug featuring a repeating pattern of vintage-style toadstools. The earthy palette of rusts and ochres against a creamy speckled background creates a cozy, cottagecore aesthetic that feels both nostalgic and modern.
Step-by-Step
Materials
- Plain white ceramic mug (smooth surface)
- Ceramic or porcelain paints (rust red, burnt orange, ochre, dark brown, cream/white, forest green)
- High-gloss ceramic sealant (if paints aren’t bake-on)
- Small round detail brushes (sizes 0 and 2)
- Fine liner brush (size 00 or 000)
- Clean rag or paper towel
- Rubbing alcohol
- Palette or small plate for mixing
- Pencil (optional for sketching)
Step 1: Preparation & Base Planning
-
Clean surface:
Begin by thoroughly wiping down the entire exterior and inner rim of your mug with rubbing alcohol. This removes any oils or dust that might prevent the paint from adhering properly. -
Mix your palette:
Prepare your earthy tones on a palette. You’ll want a spectrum of warm colors: a deep rust red for the toadstools, a lighter terracotta orange, and a pale ochre. Keep a dark brown ready for outlines. -
Plan placement:
Visualize the spacing of your mushrooms. They should be scattered randomly, but evenly, avoiding large empty gaps. You can lightly mark positions with a pencil if you’re nervous, but freehanding adds to the organic feel.
Steady Hand Trick
Rest your pinky finger on a dry part of the mug while painting fine details. This anchors your hand and prevents the brush from shaking while doing delicate outlines.
Step 2: Painting the Mushroom Caps
-
Paint large toadstools:
Start with the ‘hero’ mushrooms. Using a size 2 brush and rust red paint, create semi-circle or triangular cap shapes scattered around the mug. Vary the angles slightly so they don’t look like soldiers in a row. -
Add medium caps:
Switch to your burnt orange paint. Fill in the gaps with slightly smaller, rounder cap shapes. Imagine these as different species of fungi growing nearby. -
Create flat caps:
Mix a little brown into your orange to create a deeper ochre shade. Paint a few broad, flat-topped caps that look like they have fully opened up. -
Add tiny buttons:
Using just the tip of your brush, add very small, young mushroom caps in various shades of red and orange near the bases of the larger ones or in small empty spaces. -
Dry first layer:
Allow the painted caps to dry to the touch before moving on, ensuring you don’t smudge your work as you rotate the mug.
Step 3: Stems & Details
-
Paint thick stems:
Mix a very pale beige color (white with a drop of brown). Using a size 0 brush, paint thick, sturdy stalks descending from the larger red caps. Curve them slightly at the bottom. -
Paint thin stems:
For the flat-topped mushrooms, paint thinner, straighter stems. I find that making these varying lengths helps create the illusion of depth in the pattern. -
Outline work:
Once the base colors are dry, load your fine liner brush (000) with watered-down dark brown paint. Carefully outline the caps and stems with thin, delicate lines. -
Add gills:
For the flat or wide mushrooms where the underside is visible, use the liner brush to draw tiny, parallel lines radiating from the stem to the edge of the cap to represent gills. -
Detail the stems:
Add vertical striations or small lines on the stems to give them a fibrous, natural texture, rather than leaving them solid beige.
Create a Set
Make matching saucers or a bowl! Instead of mushrooms, try painting acorns or pinecones on the companion pieces using the same earthy color palette.
Step 4: Finishing Touches
-
Add white dots:
Using the back end of a paintbrush or a dotting tool dipped in white paint, gently stamp jagged or round dots onto the red mushroom caps. Vary the sizes for a realistic amanita look. -
Tiny greenery:
With forest green paint and your finest brush, paint minuscule sprigs of grass or tiny fern leaves peeking out from the bottom of a few stems. -
Speckle effect:
Dilute some light brown paint. Flick the bristles of an old toothbrush or stiff brush to create a fine spray of speckles across the entire white background of the mug. -
Inside details:
Don’t forget the inside! Paint a ring of small rust-colored dots or tiny floating spores just below the inner rim to tie the design together. -
Cure:
Follow the instructions on your specific paint brand to cure the mug. This usually involves baking it in a home oven for 30-40 minutes to make the design dishwasher safe.
Now you have a cozy, custom piece of art ready for your favorite warm beverage
Cactus and Succulent Row
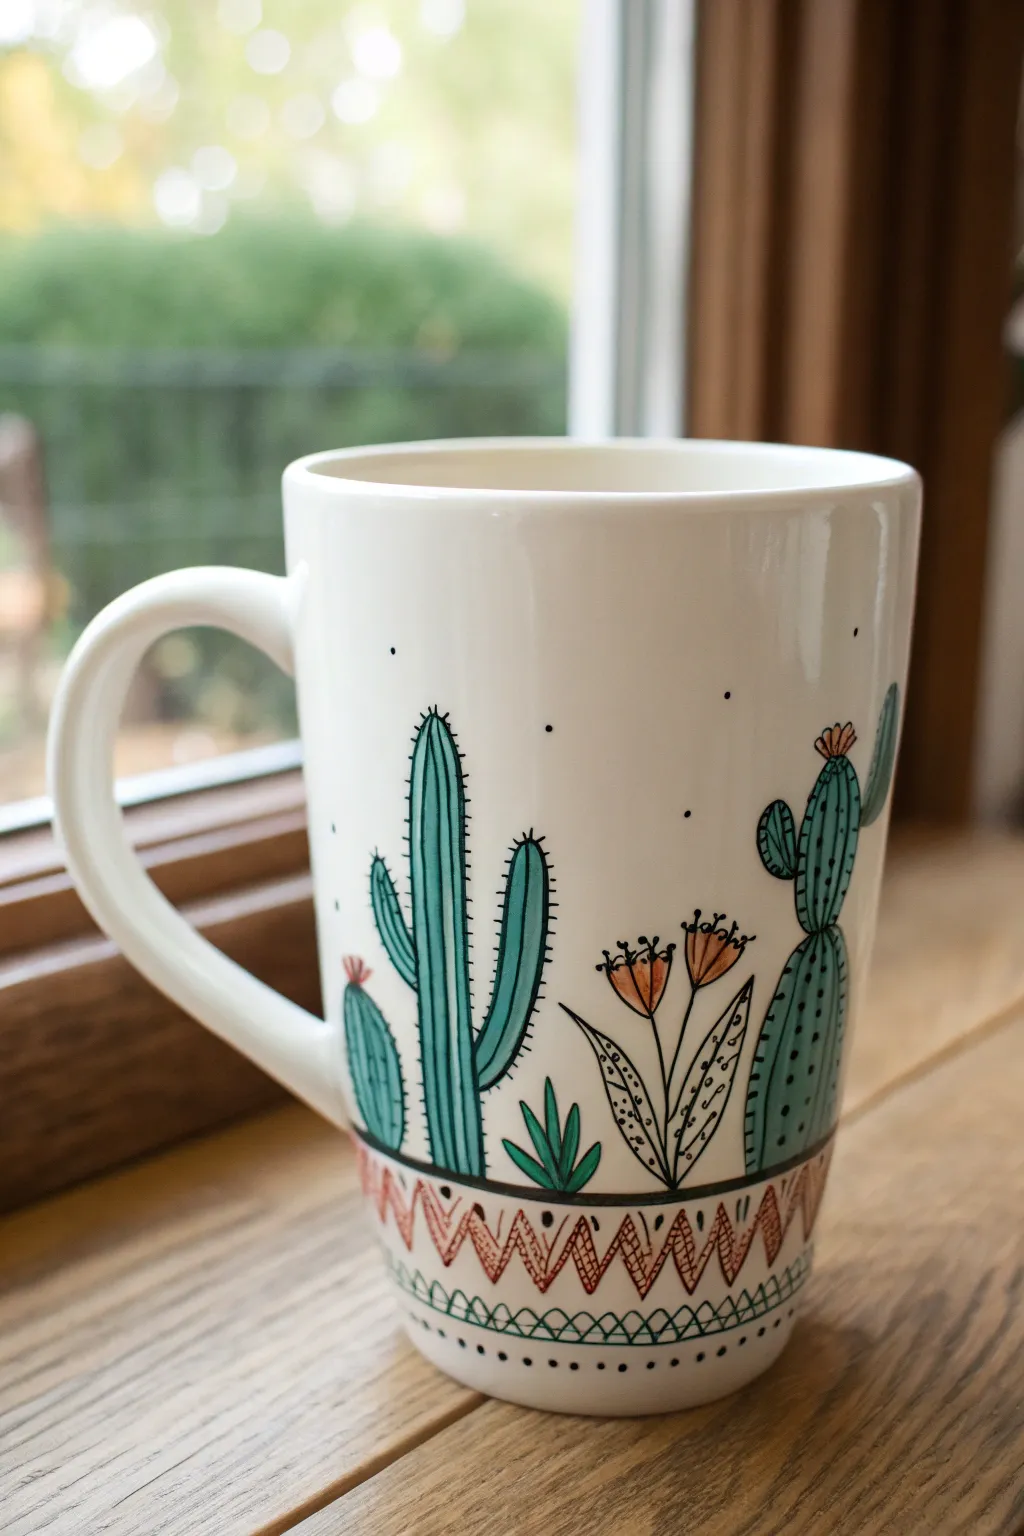
Bring a touch of the arid outdoors to your morning coffee with this delightful cactus-themed design. Featuring stylized saguaros, prickly pears, and blooming succulents in a clean line-art style with soft color washes, this mug is as relaxing to paint as it is to use.
Step-by-Step Guide
Materials
- Tall white ceramic mug (smooth glaze)
- Porcelain paint pens (fine tip: black)
- Porcelain paint (pots or pens): teal green, sage green, terracotta orange
- Fine detail paintbrush (size 0 or 00)
- Rubbing alcohol
- Cotton pads
- Oven (for baking/curing)
Step 1: Preparation & Groundwork
-
Clean the surface:
Before you begin, wipe the entire outer surface of the mug with rubbing alcohol on a cotton pad to remove any oils or fingerprints. This ensures the paint adheres perfectly to the glaze. -
Establish the baseline:
Using your fine-tip black porcelain pen, draw a horizontal line around the mug about an inch from the bottom edge. This will anchor your garden. -
Add the bottom border:
Draw a second horizontal line roughly half an inch below the first one.
Use a Bridge
Rest your painting hand on a stable object (like a stack of books) equal to the mug’s height. This stabilizes your wrist for steadier vertical lines.
Step 2: Drawing the Desert Flora
-
Outline the tall cactus:
Start with the main saguaro cactus. Draw a tall, rounded cylinder shape rising from your top baseline, adding two upward-curving arms on either side. -
Add cactus texture:
Fill the saguaro body with vertical lines to create ribs. Once drawn, add tiny perpendicular dash marks specifically along the outer edges of the cactus arms to simulate spines. -
Sketch the prickly pear:
To the right, draw a segmented cactus by creating oval shapes stacked on top of each other. Add a small flower shape on the very top segment. -
Draw the striped succulent:
Between the cacti, sketch a plant with long, thin stalks ending in tulip-shaped blooms. Draw long leaves at the base with small dots or patterns inside them. -
Fill the gaps:
Add smaller, rounder cacti or low-lying spikey aloe plants in the empty spaces along the baseline to make the garden look lush. -
Ink the details:
Go back over your prickly pear and add rows of tiny dots for texture. Add little dots or ‘spines’ to the tops of any smaller round cacti.
Wobbly Lines?
If you make a mistake with the paint pen, use a damp cotton swab or a toothpick to gently scrape away the wet paint before it dries.
Step 3: Painting & Coloring
-
Color the cacti:
Using your teal green or sage paint and a fine brush (or paint pens), fill in the bodies of the cacti. I like to keep this wash slightly translucent so the black lines show through clearly. -
Paint the blooms:
Use the terracotta orange to carefully fill in the flowers on the tall stalks and the small bud on the prickly pear. -
Decorate the base:
Return to the band at the bottom. Draw a zig-zag line between your two horizontal bands using the terracotta color. -
Detail the pattern:
Inside the triangular gaps created by the zig-zag, add vertical hatching lines using a thinner brush or pen for a woven basket look. -
Final decorative touches:
Below the bottom band, draw a row of loops or scallops in green. Add tiny black dots randomly in the white space above the plants to look like dust motes or distant stars.
Step 4: Curing
-
Dry completely:
Let the mug sit undisturbed for at least 24 hours to allow the paint to fully dry and settle on the ceramic surface. -
Bake to set:
Place the mug in a cool oven, then set the temperature to 300°F (150°C) or according to your paint manufacturer’s instructions. Bake for 30-35 minutes. -
Cool down:
Turn the oven off and leave the mug inside until it is completely cool. Removing it while hot can cause the ceramic to crack.
Enjoy your customized desert landscape with every sip of tea or coffee
Mandala Center Medallion
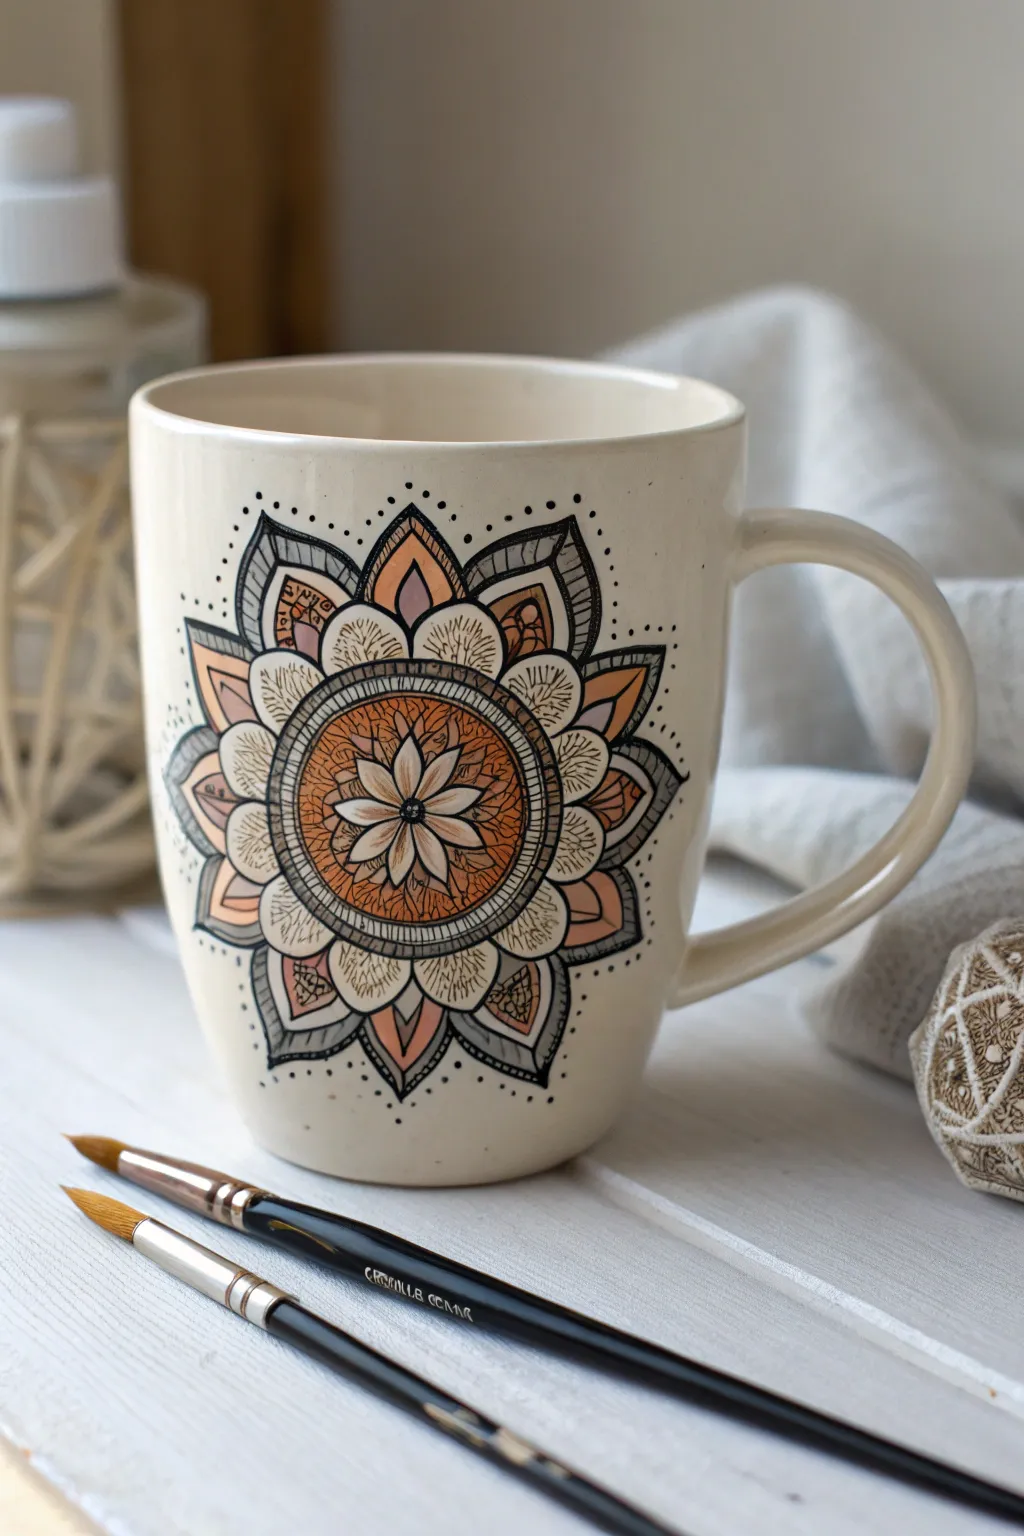
Transform a plain ceramic mug into a piece of functional art with this warm, intricate mandala design. Featuring earthy tones of burnt sienna, peach, and charcoal grey, this radiating pattern adds a cozy, handcrafted touch to your morning coffee routine.
How-To Guide
Materials
- Plain cream or off-white ceramic mug (cleaned with alcohol)
- Porcelain paints (Burnt Sienna, Peach/Light Coral, Black, White, Charcoal Grey)
- Fine liner brushes (sizes 00 and 0)
- Small round brush (size 2)
- Pencil for sketching (optional)
- Rubbing alcohol and cotton pads
- Paper palette or ceramic tile
- Oven for baking (if using heat-set paints)
Step 1: Preparation & Central Motif
-
Clean surface:
Before starting, wipe the mug surface thoroughly with rubbing alcohol. This removes any oils or fingerprints that might prevent the paint from adhering properly. -
Mark the center:
Locate the optical center of the mug’s face. You can make a tiny dot with your finest brush or a pencil to guide your symmetry. -
Paint the central flower:
Using the 00 brush and diluted black paint (or charcoal), paint an eight-petaled flower shape. Keep the petals slender and pointed. -
Fill the center:
Inside the flower petals, add a touch of white or very pale peach to highlight them, leaving the outlines crisp and dark. -
Create the first ring:
Draw two concentric circles around your central flower. Fill the space between these rings with a wash of Burnt Sienna paint to create a warm, rusty orange band. -
Add texture details:
Once the orange band is dry, use your finest liner brush with black paint to add tiny, scratch-like texture lines radiating outward within the orange ring. This gives it that sketched, organic look.
Steady Hand Trick
Rest your pinky finger against the mug surface while painting to stabilize your hand. This helps create smooth, confident lines on the curved surface.
Step 2: Building the Layers
-
Paint the scallop layer:
Painting outward, create a ring of rounded, scallop-shaped petals touching the outer edge of your orange band. -
Color blocking:
Leave these new petals mostly cream (unpainted) but add fine black shading lines at their base to create dimension. -
Define the primary points:
Sketch a larger, more geometric layer of pointed petals behind the scallops. These should act as the main ‘star’ shape of the mandala. -
Add contrasting accents:
Fill alternating sections of these pointed petals with peach and light grey. I like to keep the paint somewhat translucent here to maintain the watercolor effect. -
Detail the peach petals:
On the peach-colored sections, add small black dots or tiny geometric patterns near the tips for extra interest.
Step 3: Finishing Touches
-
Outer framing:
Create the final, largest layer of petals. Outline them in bold black, giving them a double border for emphasis. -
Shading the edges:
Use a diluted grey wash to fill the tips of this outer layer. Add hash marks or stippling with your black liner to mimic the texture of an ink drawing. -
Dot work:
Using the very tip of your brush or a dotting tool, place tiny black dots around the outermost points of the mandala. This ‘dusting’ effect softens the edge of the design. -
Final outline check:
Go back over your main structural lines with the thickest black paint to insure they pop against the cream mug. -
Cure the paint:
Allow the mug to dry for 24 hours. Follow the manufacturer’s instructions for your specific paint, which usually involves baking the mug in a home oven to make it dishwasher safe.
Metallic Accent Upgrade
Swap the grey paint for a metallic gold or copper liner. Apply it to the center flower and the outer dotted rim for a mandala that shimmers in the light.
Once baked and cooled, your custom mandala mug is ready to cradle your favorite warm beverage.
Surprise Design Inside the Rim
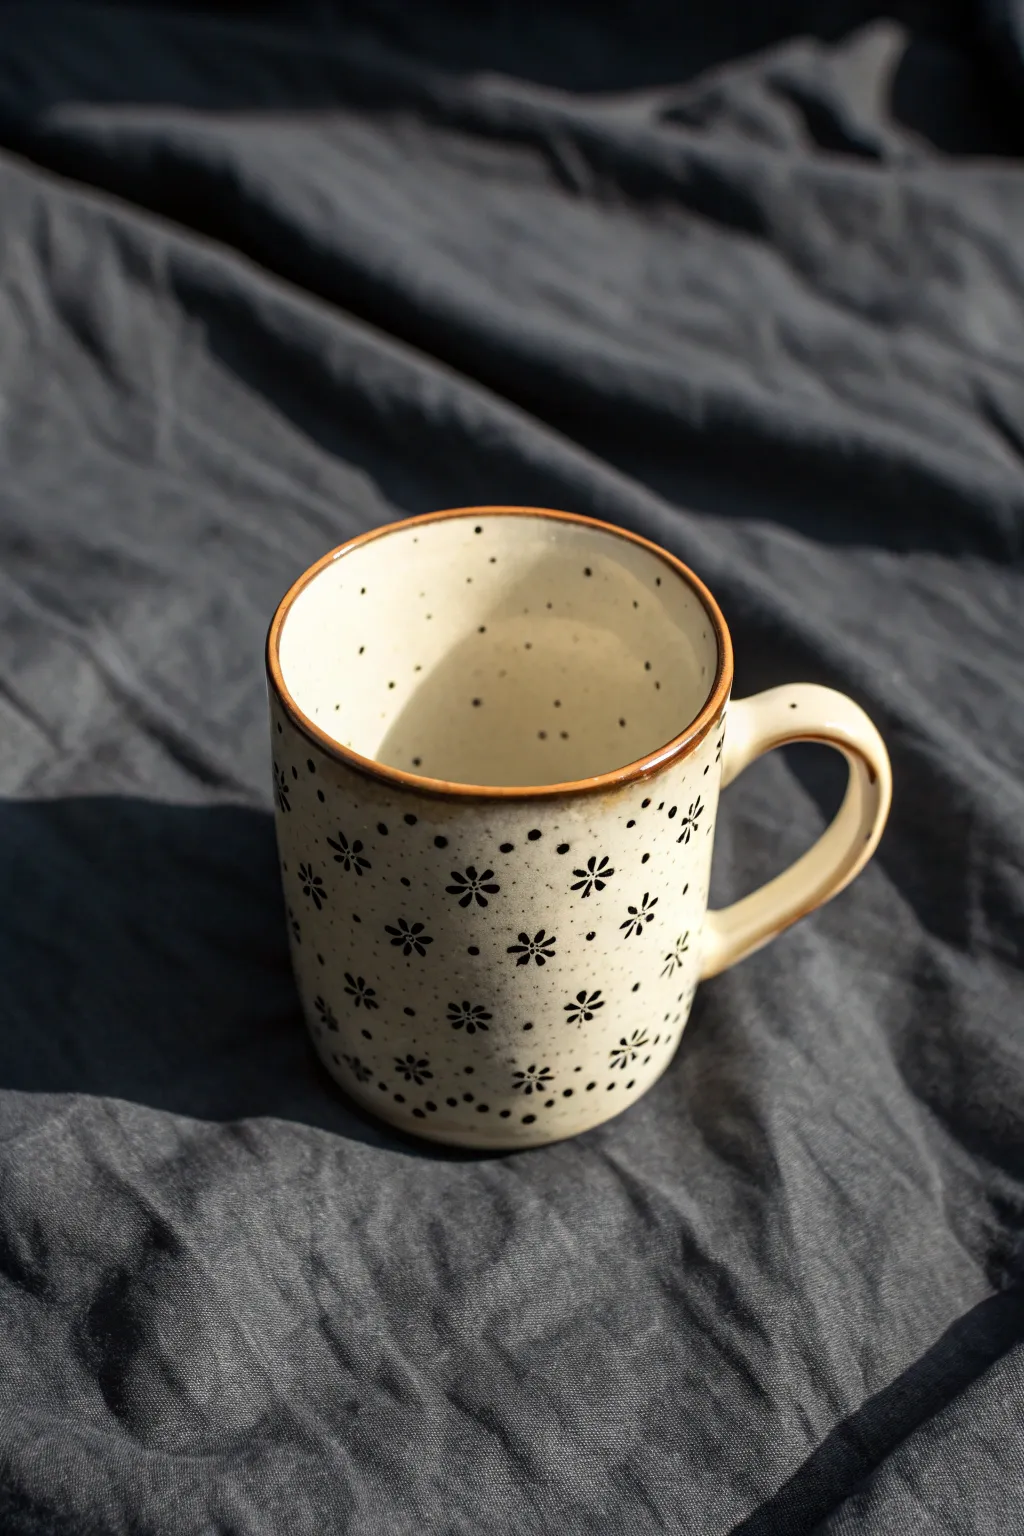
Transform a plain ceramic mug into a charming, farmhouse-style piece featuring delicate black florals and a playful speckled interior. This project focuses on simple repeating patterns and a surprising pop of detail inside the rim giving it a professional, kiln-fired look.
Step-by-Step
Materials
- Plain cream or off-white ceramic mug
- Pebeo Porcelaine 150 paint (Black)
- Pebeo Porcelaine 150 paint (Brown or Bronze)
- Fine point synthetic detail brush (size 0 or 00)
- Small flat shader brush
- Rubbing alcohol
- Cotton pads
- Oven (for curing)
- Paper palette or foil
Step 1: Preparation
-
Clean surface:
Thoroughly wipe down the entire mug, including the inside rim, using a cotton pad soaked in rubbing alcohol. This removes oils and residue that prevent paint adhesion. -
Dry completely:
Allow the alcohol to evaporate completely before you begin painting. Avoid touching the surface with your bare fingers after cleaning.
Step 2: Painting the Exterior
-
Practice flowers:
Before touching the mug, practice your flower shape on paper. Each flower consists of six small teardrop petals radiating from a center point. -
Start the pattern:
Dip your fine detail brush into the black porcelain paint. Paint your first six-petal flower near the bottom center of the mug. -
Establish spacing:
Paint a second flower about an inch away diagonally. Staggering the placement creates a more natural, fabric-like pattern than straight rows. -
Fill the surface:
Continue painting flowers around the entire exterior of the mug, maintaining that staggered spacing. Don’t worry if they aren’t identical; minor variations add charm. -
Add exterior dots:
Using the very tip of your brush, add tiny black dots in the empty spaces between the flowers to create a speckled effect. -
Refine the centers:
If the centers of your flowers closed up too much, you can carefully re-dot the very center with a tiny amount of black paint to define them.
Brush Control Trick
Rest your pinky finger on the mug surface (use a glove or cloth to avoid oils) to stabilize your hand while painting tiny details.
Step 3: The Surprise Inside
-
speckled interior:
This is the ‘surprise’ element. Dip your brush tip and touch it gently to the inside walls of the mug. -
Control density:
Concentrate these dots near the top rim, letting them get sparser as they go deeper into the mug. This mimics a reactive ceramic glaze. -
Vary dot size:
Apply different pressures to create a mix of tiny specks and slightly larger dots for a more organic look.
Smudged Paint?
If you smear a wet flower, don’t wipe it! Let it dry completely, then gently scrape it off with a craft knife or fingernail.
Step 4: Rim and Finish
-
Paint the rim:
Load a small flat shader brush with the brown or bronze paint. Carefully run the flat edge along the very top lip of the mug. -
Smooth the line:
Go over the rim line to ensure it is opaque and relatively even, though a slightly rustic, uneven edge fits the style perfectly. -
Check for errors:
Inspect your work. If you made a smudge, use a damp cotton swab or toothpick to gently scrape it away while the paint is still wet. -
Air dry:
Let the mug sit untouched for at least 24 hours. The paint needs this time to dry fully before the heat setting process. -
Bake to cure:
Place the mug in a cool oven. Set the temperature to 300°F (150°C). Once it hits temperature, bake for 35 minutes. -
Cool down:
Turn the oven off and leave the mug inside until the oven is completely cool. Removing it while hot can cause cracking.
Now you have a beautifully custom mug that looks like artisanal pottery ready for your morning coffee


Have a question or want to share your own experience? I'd love to hear from you in the comments below!