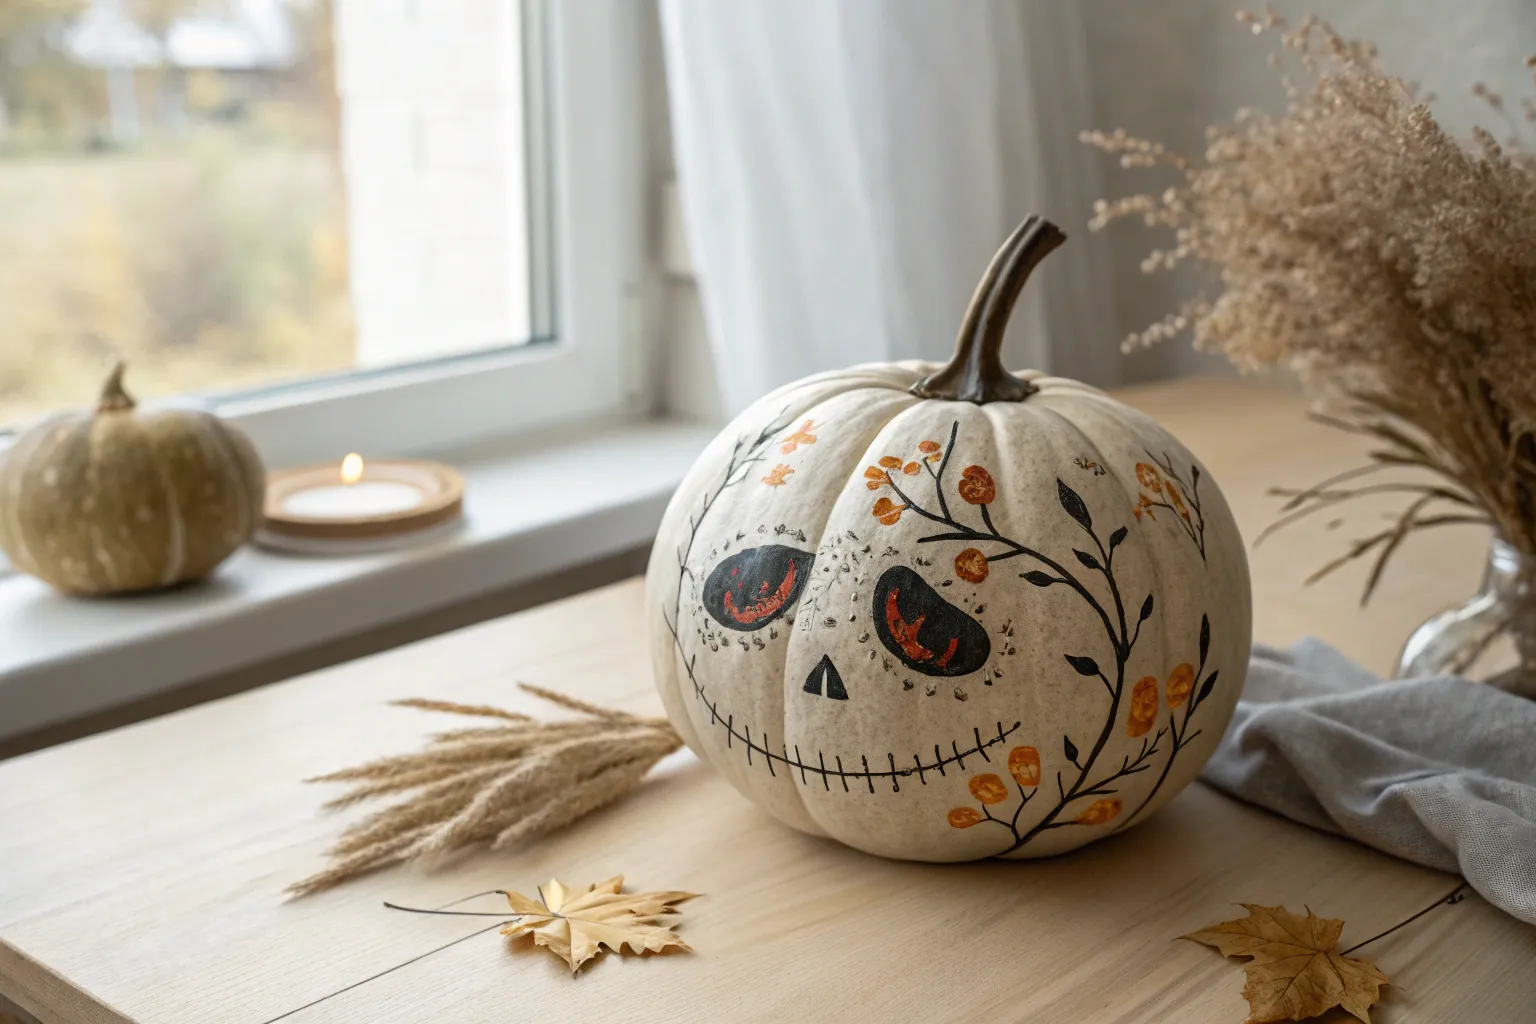
If you want your pumpkins to look genuinely unsettling (not cute), paint is where the magic happens—especially when you lean into realistic shading and bold contrast. Here are my favorite scary pumpkin painting ideas for adults that feel like little horror artworks you’d proudly set on the porch or display in your home.
Skull-Face Illusion
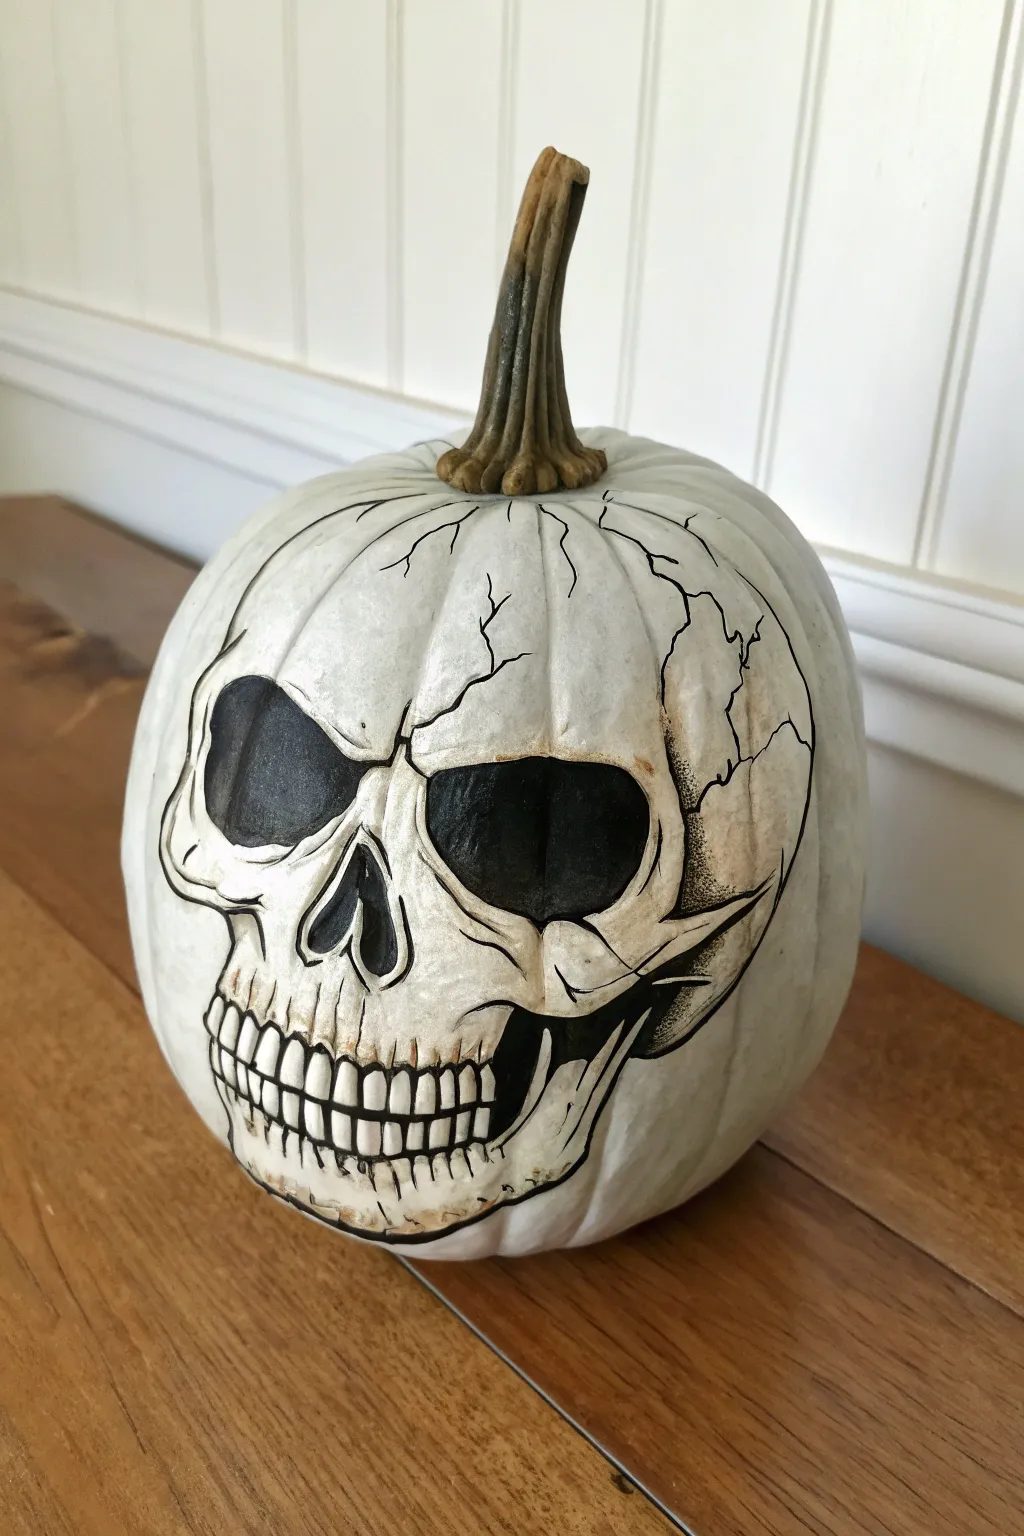
Transform a simple white pumpkin into a spooky masterpiece with this illustrative skull design. By utilizing the pumpkin’s natural ridges to enhance the skeletal structure, you’ll create a striking black-and-white decoration that looks like it jumped straight out of a comic book.
How-To Guide
Materials
- White specialized craft pumpkin (foam or faux)
- Pencil for sketching
- Black permanent marker (fine tip)
- Black permanent marker (chisel or broad tip)
- Black acrylic paint
- Small shading brush
- Water cup and paper towels
- Matte spray sealer (optional)
Step 1: Planning and Sketching
-
Analyze the Pumpkin Shape:
Before drawing, look at the natural ridges of your pumpkin. Rotate it to find a side where two vertical ridges can serve as the cheekbones, framing the eye sockets. -
Sketch the Eye Sockets:
Using a light pencil, lightly sketch two large, irregular kidney-bean shapes for the eye sockets. Place them fairly high up on the curve of the pumpkin. -
Outline the Nose Cavity:
Draw an upside-down heart shape or two teardrops meeting in the center directly below the eyes for the nasal cavity. -
Define the Zygomatic Arches:
Sketch the cheekbones (zygomatic arches) swooping out from under the eye sockets and wrapping around the side of the pumpkin. Let the pumpkin’s curve do the work for you here to create depth. -
Map the Jaw and Teeth:
Draw the lower mandible area. Instead of individual teeth just yet, draw the gum lines as curved bands. Sketch vertical guidelines where the teeth will eventually separate. -
Add Cranial Cracks:
Lightly sketch jagged lines extending from the skull outline upwards towards the stem to mimic fractures in the bone.
Step 2: Inking and Filling
-
Outline Main Features:
Take your fine-tip permanent marker and confidently trace over your pencil lines. Don’t worry about being perfectly smooth; a shaky line actually adds to the aged bone texture. -
Fill the Deep Shadows:
Switch to the broad chisel-tip marker or black acrylic paint. Fill in the entire eye sockets and the nasal cavity completely solid black with no transparency. -
Detail the Teeth:
Go back to the fine-tip marker. Round off the tops and bottoms of your tooth guidelines to create individual teeth. Add small ‘Y’ shapes between the teeth at the gum line to show recession. -
Thicken Outer Lines:
Go over the outer perimeter lines of the skull again to thicken them visually. This ‘line weight’ variation helps separate the skull from the pumpkin background. -
Create the Crackle Effect:
Trace the cranial cracks you sketched earlier. At the end of the cracks, let the line taper off into nothing rather than stopping abruptly. -
Add Stippling to Edges:
Using the very point of your fine marker, add tiny dots (stippling) along the edges of the cracks and near the temples. This creates a gritty texture.
Marker smearing?
Work from left to right (if right-handed) to avoid dragging your palm through wet ink. If using a glossy faux pumpkin, lightly sand the surface first.
Step 3: Shading and Depth
-
Prepare a Wash:
Dilute a tiny drop of black acrylic paint with water until it is very thin and transparent, almost like dirty water. -
Shade the Teeth Roots:
Dip your small brush in the wash and blot it on a paper towel. Gently paint the roots of the teeth (top and bottom) to make them look stained and aged. -
Contour the Bone Structure:
Apply faint shadows beneath the cheekbones and around the temple cracks. If the paint is too dark, quickly wipe it with a damp finger to smudge it. -
Deepen the Crevices:
Use a slightly darker wash (less water) to add deep shadows right where the jawbone connects to the rest of the skull. -
Review and Correct:
Step back and look at the skull from a distance. If any black areas look streaky, apply a second coat of solid black paint. -
Seal the Design:
Once fully dry, you can lightly mist the pumpkin with a matte sealer to prevent the marker from fading or the paint from scratching off.
Pro Tip: Bone Texture
Use a light grey watered-down acrylic paint to add random blotches on the white ‘bone’ areas. It makes the skull look ancient and weathered.
Place your menacing new creation on a bookshelf or porch to greet visitors with a stony stare


Grim Reaper Cloak
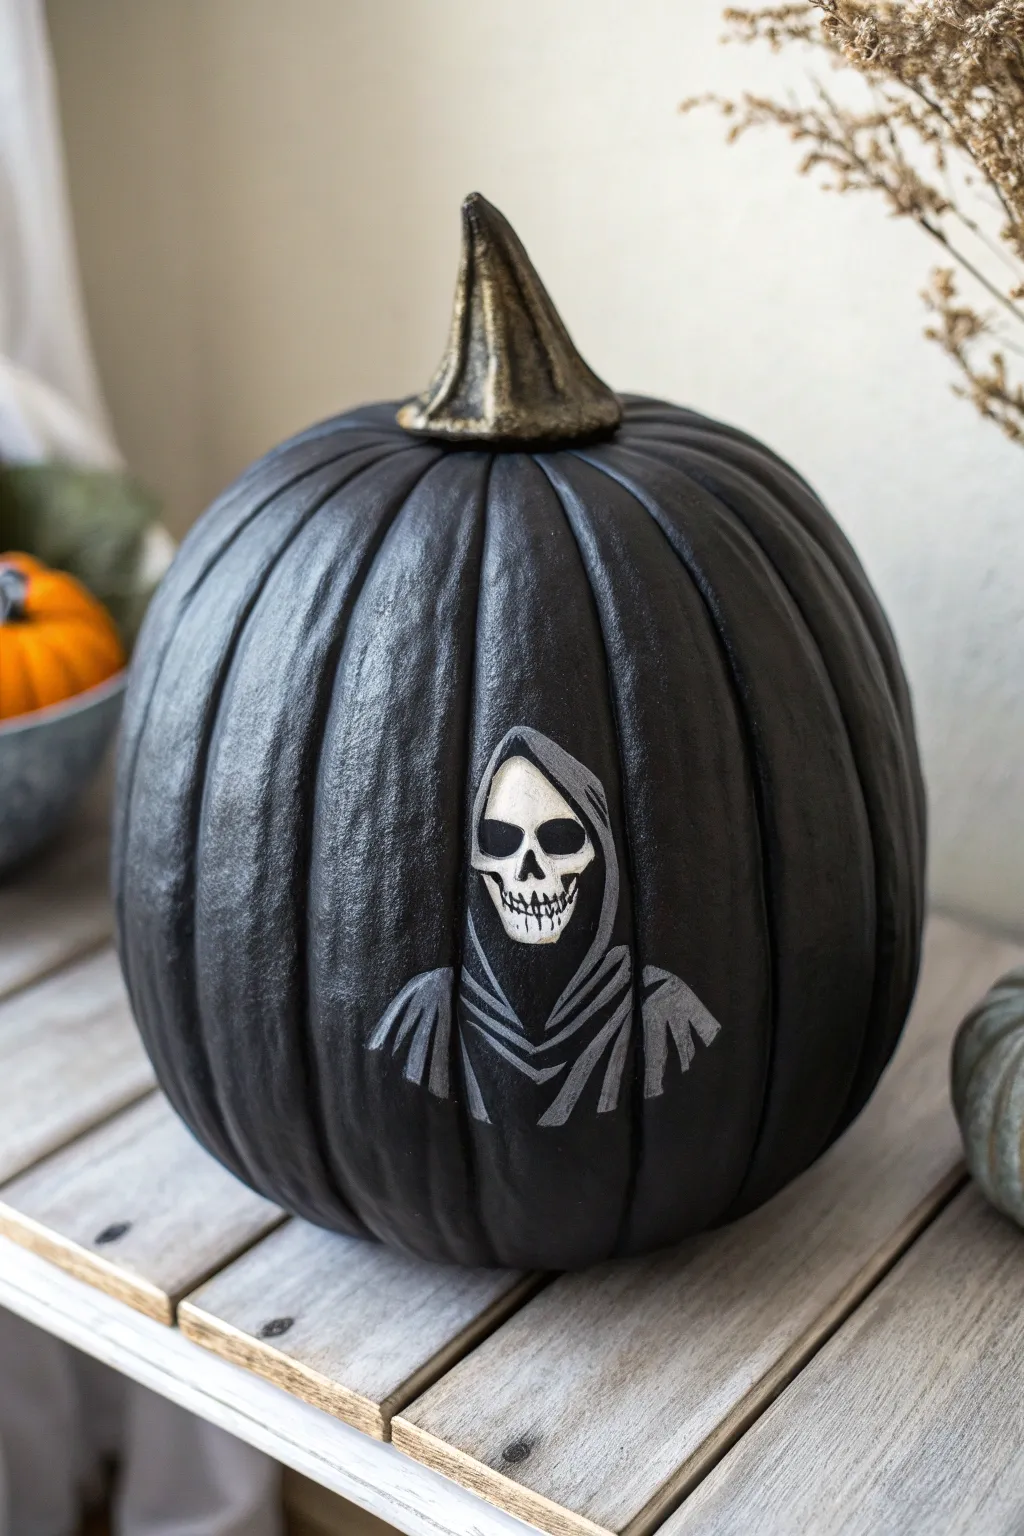
Transform a simple gourd into a brooding omen of doom with this sleek Grim Reaper design. The matte black base provides a stark, eerie canvas for the skeletal figure, whose hooded form emerges from the darkness with ghostly elegance.
Detailed Instructions
Materials
- Medium-sized faux or real pumpkin
- Matte black acrylic paint or spray paint
- Metallic gold or bronze acrylic paint
- Titanium white acrylic paint
- Dark grey acrylic paint (or black and white to mix)
- Fine detail paintbrush (size 0 or 1)
- Small flat shader brush (size 4 or 6)
- Pencil or white chalk pencil (for sketching)
- Palette or paper plate
- Water cup and paper towels
- Matte sealant spray (optional)
Step 1: Setting the Stage
-
Prepare the Surface:
Begin by wiping down your pumpkin with a damp cloth to remove any dust or dirt. If you are using a real pumpkin, ensure it is completely dry before proceeding. -
Apply the Base Coat:
Coat the entire body of the pumpkin with matte black paint. Using spray paint is the fastest method for an even finish, but brushing on acrylics works well too. You may need two coats for full opacity. -
Gild the Stem:
While the body dries, turn your attention to the stem. Paint it carefully with metallic gold or bronze acrylic paint to create a sophisticated contrast against the dark body. -
Dry Completely:
Allow the black base coat to dry fully to the touch. This step is crucial; painting on wet black paint will muddy your crisp white details later.
Uneven Coverage?
If the black paint looks streaky, use a cosmetic sponge to dab the second coat on. This stippling technique creates a great texture and hides brushstrokes.
Step 2: Summoning the Reaper
-
Sketch the Silhouette:
Using a white chalk pencil or a regular graphite pencil, lightly outline the hood shape in the center of the pumpkin. Draw a classic arch shape for the hood opening and trailing lines for the shoulders. -
Block in the Skull Base:
Inside the hood outline, sketch the basic shape of the skull face. Don’t worry about tiny details yet; just get the oval placement right. -
Paint the Skull:
Load your small flat brush with titanium white paint. Fill in the skull shape you just sketched. You might need two thin layers to get a solid, bright white against the black background. -
Outline the Hood:
Mix a medium grey tone. Using a liner brush, paint the outline of the hood around the white skull face. Make the lines slightly thicker at the top to suggest the weight of the fabric. -
Create the Cloak Folds:
Switch to your flat shader brush with the grey paint. Below the skull, paint downward, angled strokes that meet in the center to form a ‘V’ shape, mimicking the gathered fabric of a cloak. -
Add Shoulder Drapes:
Extend the grey paint outwards to the sides with loose, sweeping strokes. These should look like ragged fabric hanging over invisible shoulders. Keep the edges slightly rough for a spooky effect.
Make It Glow
Mix glow-in-the-dark medium into your white paint for the skull. When the lights go out, your reaper’s face will float eerily in the darkness.
Step 3: Deadly Details
-
Define the Eyes:
Once the white skull paint is dry, use your finest detail brush and black paint to create two large, teardrop-shaped eye sockets. They should slant slightly inwards for an angry or menacing look. -
Add the Nose Cavity:
Paint an upside-down heart or two small tear shapes in the center of the white area for the nasal cavity. -
Paint the Grin:
Draw a thin horizontal black line for the mouth. Intersect it with small vertical hatch marks to create the teeth. -
Detail the Teeth:
Thicken the gums slightly black paint above and below the teeth line to give the mouth depth and realism. -
Highlight the Hood:
Mix a lighter grey (add more white to your grey mix). Add thin highlight lines along the top edges of the hood and the fabric folds to give the cloak dimension. -
Clean Up Edges:
I always use a little fresh black paint to touch up any areas where the grey or white might have strayed outside the lines. This creates a really sharp, professional finish. -
Seal (Optional):
If you plan to display this outdoors, give the entire pumpkin a light coat of matte clear sealant spray to protect your artwork from moisture.
Now step back and admire how a few simple strokes can create such a menacing masterpiece for your porch display


Rotten Zombie Portrait
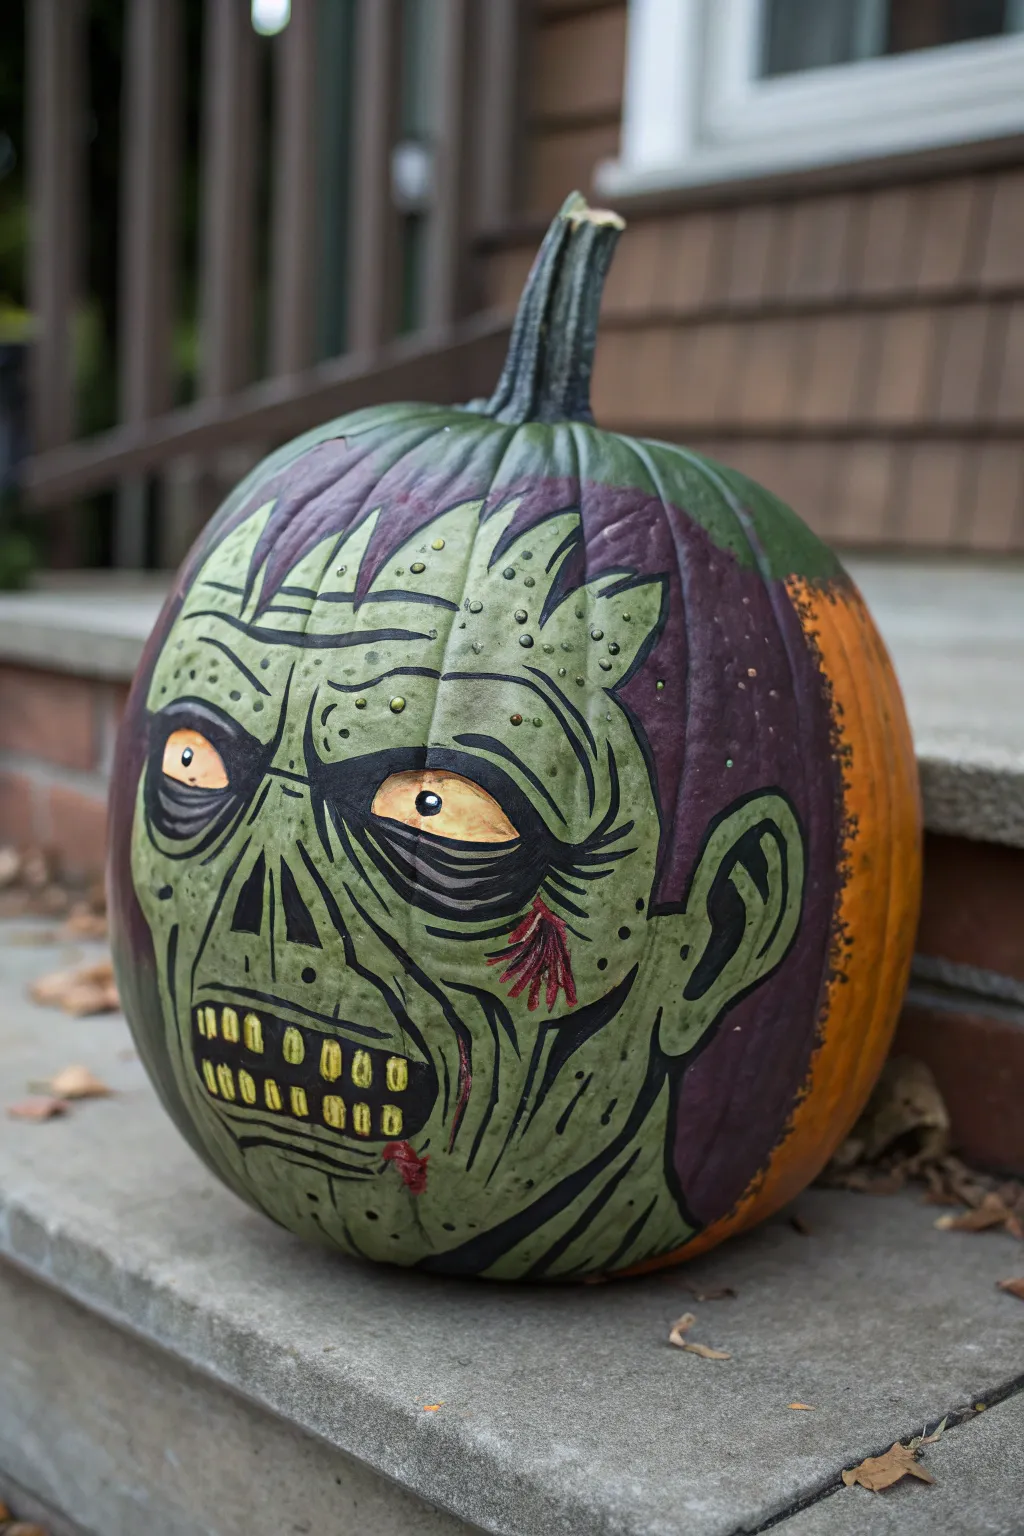
Transform a standard gourd into a gruesome work of art with this detailed zombie portrait. Featuring comic-book style shading, sickly green skin, and rotted yellow teeth, this painted pumpkin uses bold outlines to create a striking 3D effect without any carving required.
How-To Guide
Materials
- Large, smooth-skinned pumpkin
- Acrylic craft paints (lime green, forest green, dark purple, yellow, white, black, blood red)
- Pencil for sketching
- Large flat brush
- Medium round brush
- Fine liner brush
- Black paint marker (medium and thick tips)
- Clear matte sealer spray
- Water cup and paper towels
Step 1: Base Coat & Outlining
-
Clean surface:
Start by wiping down your pumpkin with a damp cloth to remove any dirt or oils, ensuring a clean canvas for your paint. -
Sketch the face:
Using a pencil, lightly sketch the zombie’s features directly onto the pumpkin skin. Focus on the large oval shape of the head, the jagged hairline, the heavy brow ridge, and the open mouth with teeth. -
Block in background color:
Identify the areas behind the head—specifically the hair and the background space. Paint the hair area with a dark purple, letting it extend slightly behind the ears. -
Apply base green:
Using a large flat brush, fill in the entire face area with a sickly lime green. You may need two coats here to fully cover the orange pumpkin skin, letting the first layer dry completely before adding the second. -
Color the eyes and teeth:
Switch to a smaller brush and paint the iris of the eyes and the individual teeth with a muted yellow. Leave the pupils blank for now.
Step 2: Details & Shading
-
Major outlining:
Once the green base is bone-dry, use a thick black paint marker or a round brush with black acrylic to outline the major contours: the jawline, the ears, and the top of the head. -
Define the features:
Go in with your black paint to define the zombie’s deep features. Paint solid black shapes for the nostrils and the dark circles around the eyes, leaving the yellow eyeballs untouched. -
Add wrinkles and expression:
Using a thinner brush or the fine tip of your paint marker, draw the worry lines on the forehead, the crow’s feet near the eyes, and the deep creases running from the nose to the mouth. -
Texture the skin:
To give the skin that rotted texture, dot small clusters of circles on the forehead and cheeks using a fine liner brush and black paint. -
Highlight the warts:
Inside those small black circles or alongside your wrinkles, add tiny dots of yellow or a lighter green to create raised ‘warts’ or pustules. -
Detail the eyes:
Paint small black pupils in the center of the yellow eyes. Adding a tiny white dot in the corner of each pupil will bring the character to life. -
Rot the teeth:
Use your fine liner brush to outline each yellow tooth in black. Add small vertical lines on the teeth to simulate cracks and grime.
Paint won’t stick?
If the acrylic paint is beading up on the pumpkin skin, try lightly buffing the surface with fine-grit sandpaper or applying a clear primer spray before starting your base coats.
Step 3: Finishing Touches
-
Deepen the shadows:
Mix a little black into your forest green paint. Use this dark olive shade to paint stylized shadow lines under the cheekbones and along the neck muscles for a comic-book depth. -
Add the gore:
With a small detail brush and blood-red paint, add scratch marks on the cheek. I like to keep these strokes quick and jagged to look like accidental wounds. -
Bloody accents:
Dab a small amount of red paint near the corner of the mouth to suggest a recent meal. -
Refine black lines:
Do a final pass with your black paint marker to crisp up any lines that got messy during the painting process, especially around the outer edge where the purple background meets the green skin. -
Seal the deal:
Once the entire portrait is completely dry, take the pumpkin outside and spray it with a clear matte sealer to protect your artwork from moisture.
Comic Book Style
To really sell the illustrative look shown in the image, vary your black outline weights. Make the outer perimeter lines thick and bold, while keeping interior wrinkle lines thin and tapered.
Set this spooky character on your porch to greet trick-or-treaters with a gruesome stare


Nightmare Carnival Clown
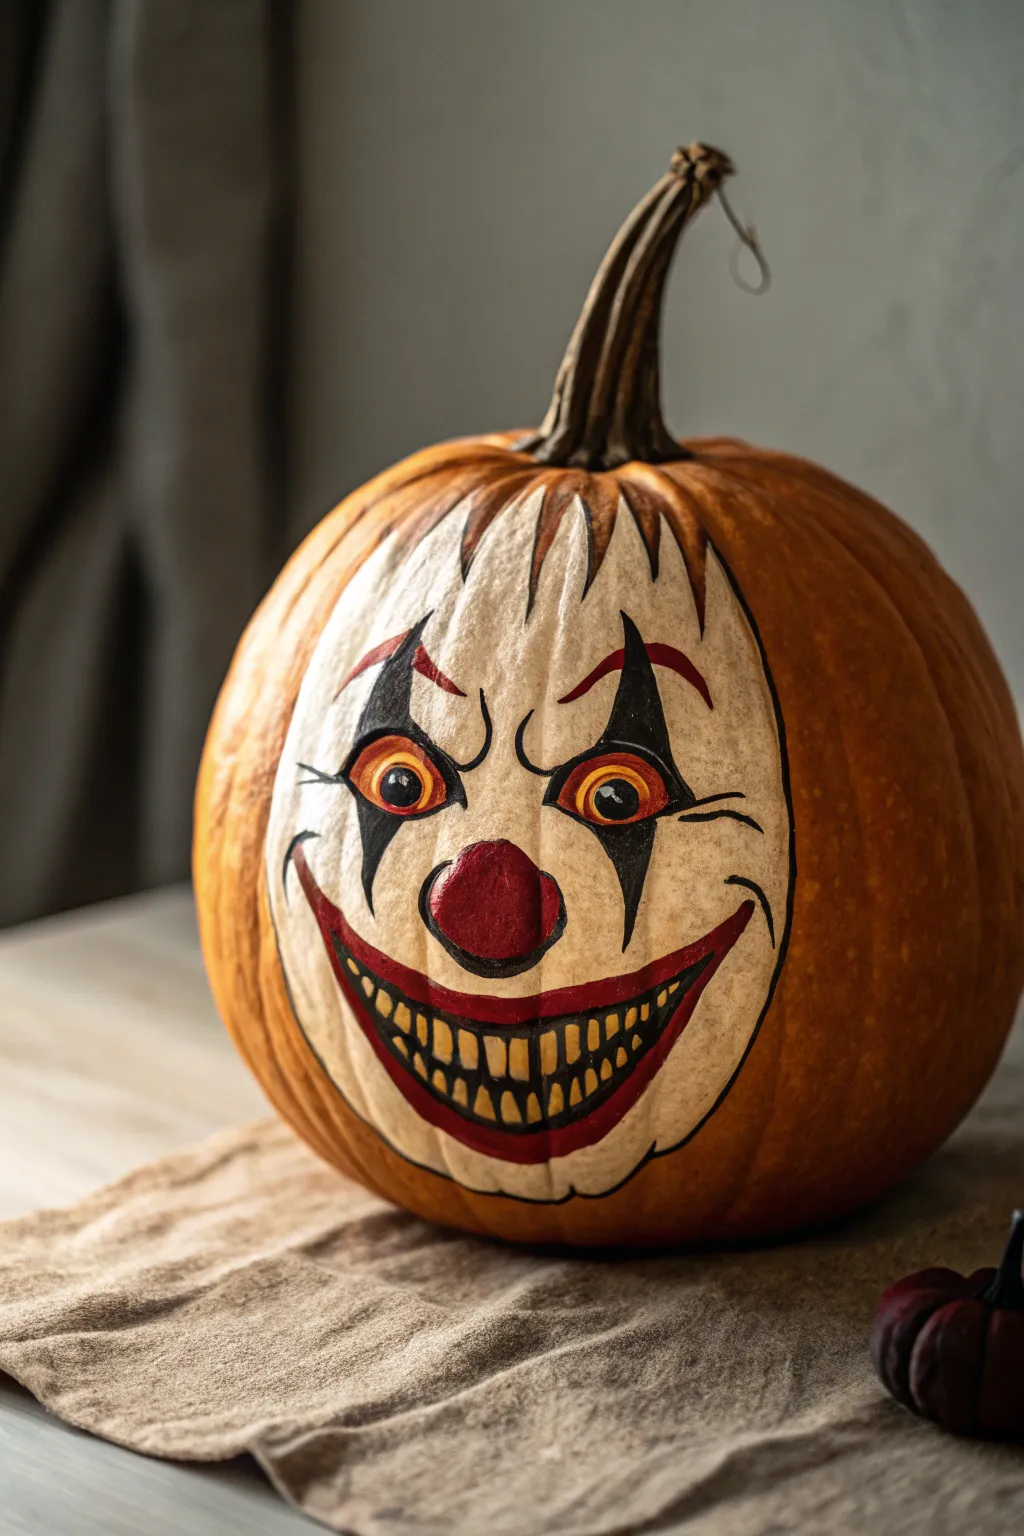
Bring the terrifying energy of a haunted circus to your porch with this detailed clown portrait. This design features sharp illustrative lines, a blood-red nose, and a menacing grin painted directly onto the pumpkin’s surface for a striking, no-carve alternative.
Step-by-Step Tutorial
Materials
- Large, smooth orange pumpkin (real or faux)
- White acrylic paint (high opacity)
- Red acrylic paint (crimson and bright red)
- Black acrylic paint
- Yellow ochre or golden yellow acrylic paint
- Set of brushes: 1-inch flat, medium round, and fine liner
- Pencil or chalk for sketching
- Matte spray sealer (optional)
- Paper towels
- Water cup
Step 1: Creating the Canvas
-
Clean the Surface:
Begin by wiping down your pumpkin with a damp cloth to remove any dirt or oils. If using a real pumpkin, dry it thoroughly before you start painting. -
Outline the Face Shape:
Using a pencil or a piece of chalk, lightly sketch a large oval shape on the front of the pumpkin. This doesn’t need to be perfectly round; give it a slightly peaked top to mimic a hairline, creating the boundary for the clown’s white face. -
Base Coat Application:
Fill in your sketched oval with white acrylic paint using a flat brush. Apply thin, even layers rather than one thick gloppy one. -
Building Opacity:
Let the first layer dry completely, then apply a second or third coat of white until the orange skin of the pumpkin no longer shows through. Ensure the edges of the white patch are crisp. -
Sealing the Base (Optional):
If you are worried about the paint scratching, give the white base a very light mist of matte sealer, but make sure it is fully dry before moving on.
Step 2: Drafting the Features
-
Sketch the Eyes:
Lightly draw two almond-shaped eyes in the upper third of the white face. Angle them slightly downward toward the nose to create an angry, intense expression. -
Mark the Nose:
Draw a round, bulbous nose shape right in the center, slightly overlapping the space between the eyes. -
Outline the Grin:
Sketch a very wide, U-shaped mouth that stretches almost to the edges of the white face paint. Draw the upper lip line and the lower lip line to define the thickness of the lips. -
Detail the Teeth:
Inside the mouth area, sketch a row of small, sharp teeth. Make them irregular sizes to add to the creepy effect. -
Add Signature Lines:
Sketch the vertical lines that run from above the eyebrows, through the eyes, and down the cheeks. These should look like sharp triangles or spears.
Keep it Clean
Keep a damp paper towel nearby to quickly wipe away pencil sketch lines once your paint is fully dry, ensuring the white face remains bright.
Step 3: Painting the Details
-
Paint the Lips:
Use a medium round brush and dark crimson red to fill in the lips. Follow the curve of the smile carefully, tapering the edges to sharp points. -
Fill the Nose:
Paint the nose with bright red paint. Once the base red is dry, I like to dab a tiny spot of darker red on the bottom edge for shading. -
Create the Eyes:
Fill the iris area with yellow ochre or gold paint. Once dry, add a small black pupil in the center of each yellow circle. -
Add Black Accents:
Switch to your fine liner brush and black paint. Carefully fill in the vertical spear-shapes above and below the eyes. -
Define the Features:
Outline the eyes, the nose, and the entire mouth with a thin black line. -
Detail the Teeth:
Paint the spaces between the teeth black. You can lightly wash the teeth with a very watered-down yellow paint to make them look stained and aged. -
Hairline Texture:
At the top of the white face shape, use a dry brush with a tiny amount of grey or brown paint to feather the edges, making it look like hair meeting the forehead. -
Expression Lines:
Use your finest brush to add thin, curved black lines around the nose and corners of the eyes to create wrinkles and a scowling expression. -
Final Highlights:
Add a tiny dot of pure white paint to each pupil and a small curved highlight on the red nose to give them a wet, glossy look.
Add Texture
Mix a little baking soda into your white base paint before applying. This creates a rough, cracked texture that makes the clown makeup look old.
Place your menacing creation in a dimly lit corner to startle your guests
BRUSH GUIDE
The Right Brush for Every Stroke
From clean lines to bold texture — master brush choice, stroke control, and essential techniques.
Explore the Full Guide
Bleeding Eyeball Stare
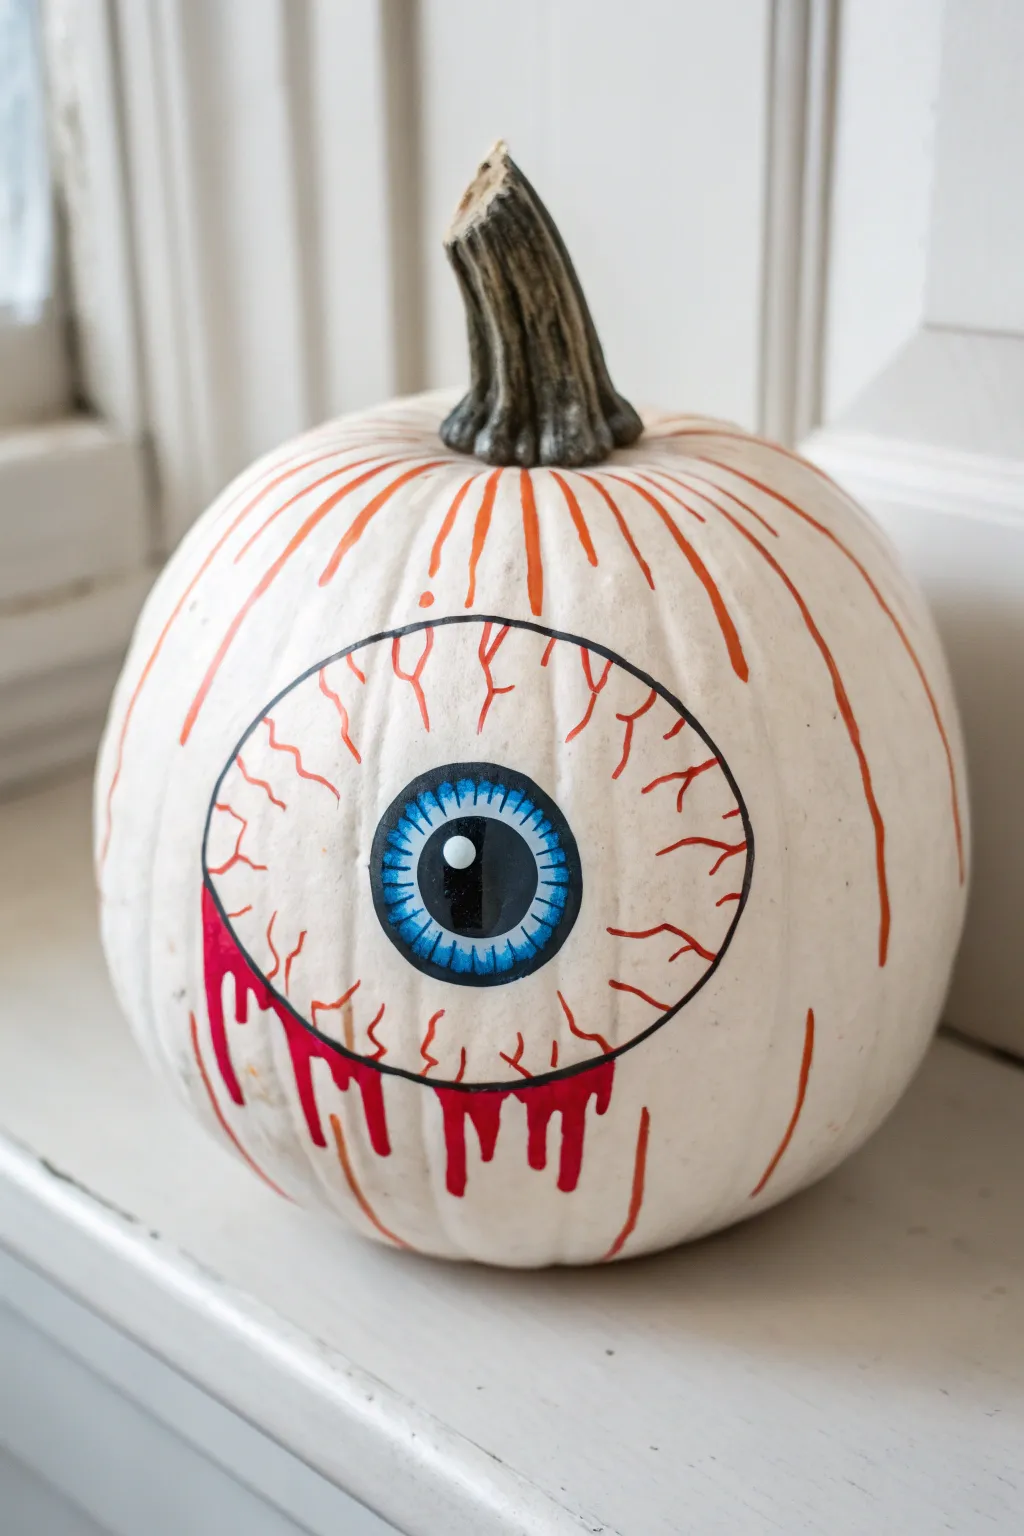
Transform a plain white pumpkin into an unnerving giant eyeball that watches your guests from every angle. This project uses simple lines and bold colors to create a comic-book style bleeding effect that is equal parts spooky and artistic.
Step-by-Step
Materials
- Small to medium white pumpkin (real or faux)
- Acrylic paint (black, bright blue, white, red, orange)
- Medium round brush
- Fine liner brush
- Pencil
- Paper plate or palette
- Water cup and paper towels
- Clear acrylic sealer spray (optional)
Step 1: Base and Outline
-
Prep the pumpkin:
Begin by wiping down your pumpkin with a damp cloth to remove any dirt or oils. If using a real pumpkin, make sure the surface is completely dry before starting. -
Draft the iris:
Using a pencil, lightly sketch a large circle in the center of the pumpkin’s smoothest face. This will be the main outline of your eyeball. -
Create the iris center:
Sketch a smaller circle directly in the center of your first circle to mark the pupil area. -
Paint the pupil:
Load your medium round brush with black acrylic paint. Carefully fill in the inner pupil circle, making it solid black. -
Add the highlight:
While the black paint is still wet, or after it dries slightly, dip the handle end of a brush into white paint. Dot it onto the upper left quadrant of the pupil to create a ‘shine’ reflection. -
Outline the eye:
Switch to your fine liner brush and black paint. Trace over your large outer pencil circle with a steady hand to define the eyeball’s edge.
Steady Hand Trick
Rest your pinky finger on the dry surface of the pumpkin while painting fine lines. It acts as an anchor to keep your hand from shaking.
Step 2: Iris Details
-
Paint the iris color:
With a clean medium brush, fill the ring between the pupil and the outer outline with bright blue paint. You might need two coats for full opacity. -
Add radial texture:
Once the blue is dry, use your fine liner brush with black paint to draw tiny lines radiating outward from the pupil toward the edge of the blue iris. -
Darken the edge:
Add a slightly thicker black line around the outer edge of the blue iris to separate it distinctly from the white of the pumpkin. -
Add white accents:
I like to take a very clean liner brush with white paint and add tiny, feathery strokes inside the blue iris to give it more depth and realism.
Step 3: Veins and Blood
-
Start the veins:
Mix a small amount of red paint with a touch of orange to create a bright, distinct blood vessel color. -
Draw squiggle lines:
Using the fine liner brush, paint jagged, squiggly lines extending from the black outline toward the center of the eye, but stop before touching the blue iris. -
Branch the veins:
Add tiny ‘Y’ shaped branches to your red lines to make them look like authentic capillaries. -
Create the drip outline:
Below the main eye circle on the left side, lightly sketch a dripping blood pattern with your pencil. -
Fill the blood drips:
Use red acrylic paint to fill in the drip shape. Make the drips rounded at the bottom for a cartoon-like liquid appearance. -
Paint vertical stripes:
Using orange paint and a medium brush, paint long, thin strokes starting from the stem and running down the pumpkin’s ribs, stopping just above the eye. -
Extend the stripes:
Continue painting orange stripes on the bottom half of the pumpkin, following the natural ridges to emphasize the spherical shape. -
Final touches:
Check your black outlines once more. If any paint overlapped, touch up the black line around the main circle for a crisp, finished look. -
Seal the work:
If you plan to display this outdoors, spray a light coat of clear acrylic sealer over the painted areas once completely dry.
Level Up: Glossy Finish
Paint over just the iris and pupil with a high-gloss Mod Podge or varnish. This makes the eye look wet and realistic against the matte pumpkin skin.
Set your spooky creation on a porch rail or windowsill to keep an eye on passersby
Haunted House Panorama
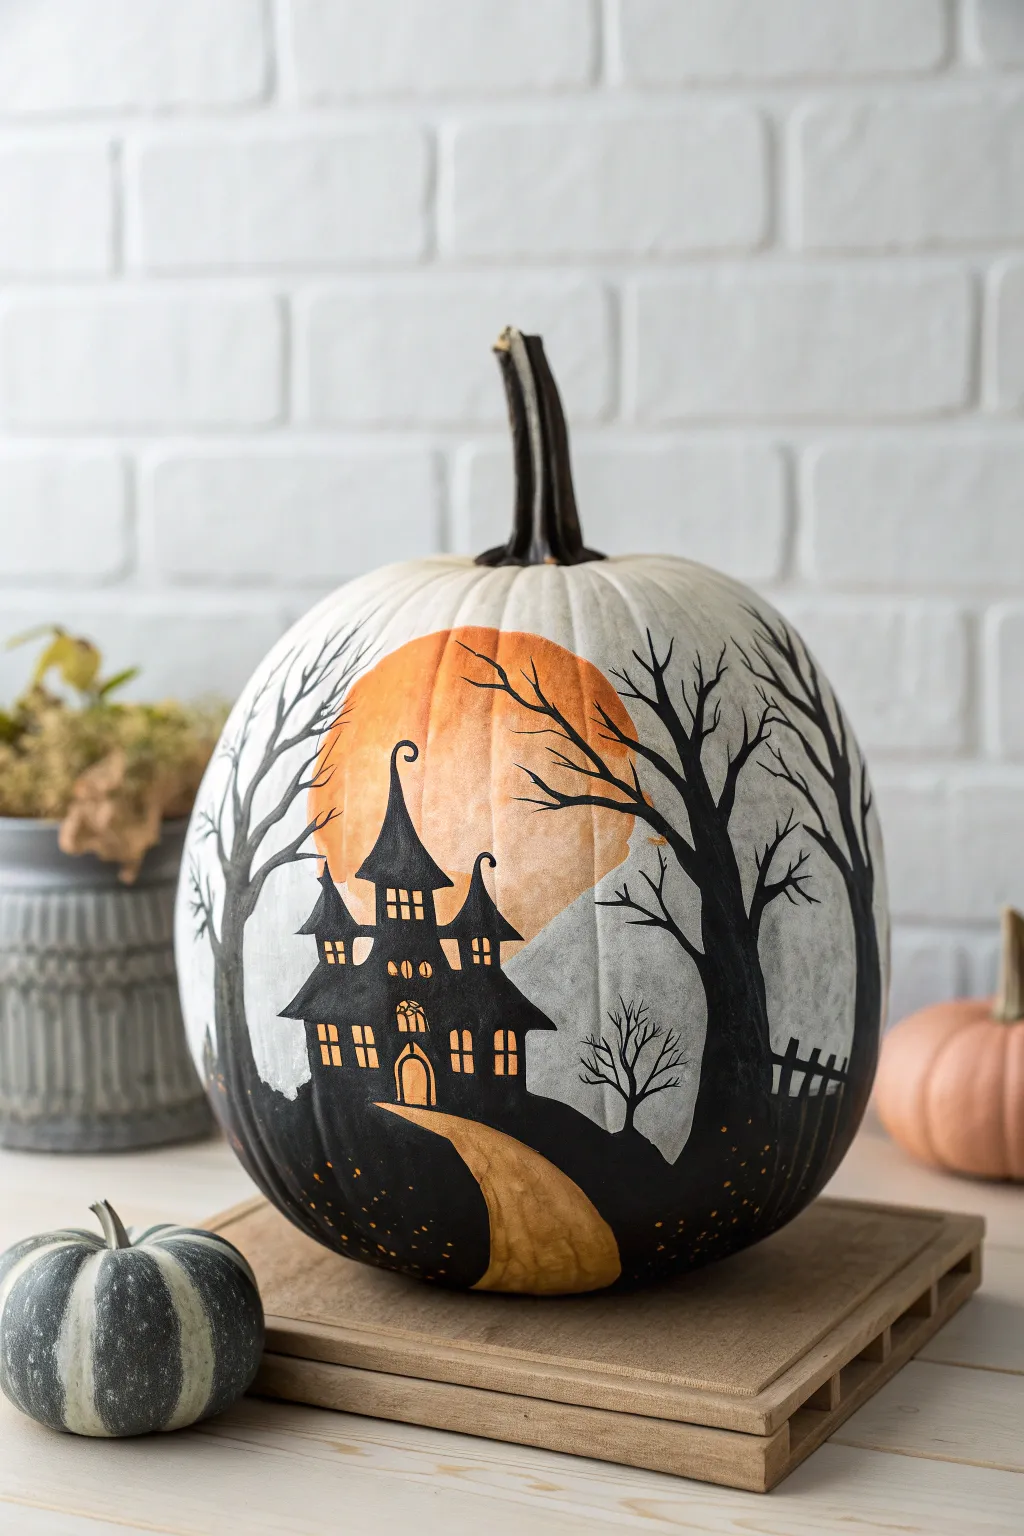
Transform a plain white pumpkin into a spooky masterpiece with this high-contrast haunted house scene. Using simple silhouette techniques against a glowing moon creates a dramatic and sophisticated Halloween decoration that looks far more complex than it actually is.
How-To Guide
Materials
- Large white artificial or real pumpkin (with a smooth surface)
- Acrylic paints: Black, Cadmium Orange, Burnt Sienna, White, Yellow Ochre
- Paintbrushes: Large flat brush, medium filbert, fine liner brush
- Pencil for sketching
- Palette or paper plate
- Cup of water and paper towels
- Matte or satin spray sealer (optional)
Step 1: Setting the Scene
-
Prep the Surface:
Ensure your pumpkin is clean and dry. If you are using a real orange pumpkin, prime it with two coats of white acrylic paint or spray paint first to create the necessary blank canvas. -
Map Out the Moon:
Visualizing the center of the pumpkin, lightly sketch a large circle for the moon. It doesn’t need to be perfectly round; a slight organic shape adds character. -
Paint the Moon Base:
Mix a small amount of White into your Cadmium Orange to soften it slightly. Fill in the moon circle completely using a flat brush. -
Add Texture to the Moon:
While the orange paint is still tacky, dip a dry brush into a tiny bit of Burnt Sienna. Lightly stipple or dab this onto parts of the moon to create shadowy craters and depth. -
Blend the Sky:
If you want a misty effect around the moon like the reference, create a very watery wash of light grey paint. Glaze this subtly around the edges of the moon and toward the bottom of the pumpkin to suggest fog, then let everything dry completely.
Paint Lifting?
If applying the black house lifts the orange moon paint underneath, the base wasn’t dry enough. Let it cure fully, or use a hairdryer on low heat to speed up the process.
Step 2: Building the Silhouette
-
Sketch the Horizon:
Using your pencil, draw a rolling hill line across the bottom third of the pumpkin. Include a winding path that starts wide at the bottom and narrows as it leads up to where the house will sit. -
Outline the House:
Sketch the outline of the haunted house directly over the dried moon. Focus on the shapes: tall triangular roofs, crooked turrets, and sharp angles. -
Paint the Ground:
Load a medium brush with Black acrylic. Fill in the hill area surrounding the path, ensuring the paint is opaque. You may need a second coat for true solid black. -
Fill the House Silhouette:
Switch to a smaller brush to carefully fill in the house shape with Black. Keep your edges sharp against the orange moon background. -
Detail the Path:
Mix Yellow Ochre with a little White and Burnt Sienna to get a sandy color. Paint the winding path, adding little horizontal strokes of darker brown to suggest uneven dirt or cobblestones.
Glow Up
Mix glow-in-the-dark medium into your yellow window paint or the moon color. When the lights go out, your haunted house will have a genuinely ghostly luminescence.
Step 3: Spooky Details
-
Draft the Trees:
On the sides of the pumpkin, framing the house, sketch tall, twisting trees. Make sure the branches reach high up and curve slightly inward over the moon. -
Points and Branches:
Using a liner brush and thinned Black paint (add a drop of water for better flow), paint the trees. Start thick at the trunk and lift pressure as you move out to create needle-thin twig ends. -
Add the Windows:
Once the black house is fully dry, use the liner brush with yellow or light orange paint to create small glowing windows. Simple squares or arched shapes work best. -
Window Panes:
If you have a steady hand, draw tiny black crosses inside the yellow windows to create panes. I prefer to use a fine-tip black paint pen for this step for better control. -
Create Depth:
Paint a few silhouette bushes or a small picket fence near the base of the trees using solid black. This adds a layer of depth to the foreground. -
Sparkle and Shine:
Dip the very tip of your brush handle (or a toothpick) into yellow-orange paint. Dot tiny specks around the base of the hill where the black meets the path to look like fallen leaves or fireflies. -
Final Touches:
Check for any patchy black areas and touch them up. Once fully dry, you can protect your work with a light mist of matte sealer.
Place your creation on a rustic wood slice or by the fireplace to set a perfectly chilling mood for the season

PENCIL GUIDE
Understanding Pencil Grades from H to B
From first sketch to finished drawing — learn pencil grades, line control, and shading techniques.
Explore the Full Guide
Moonlit Graveyard Wraparound
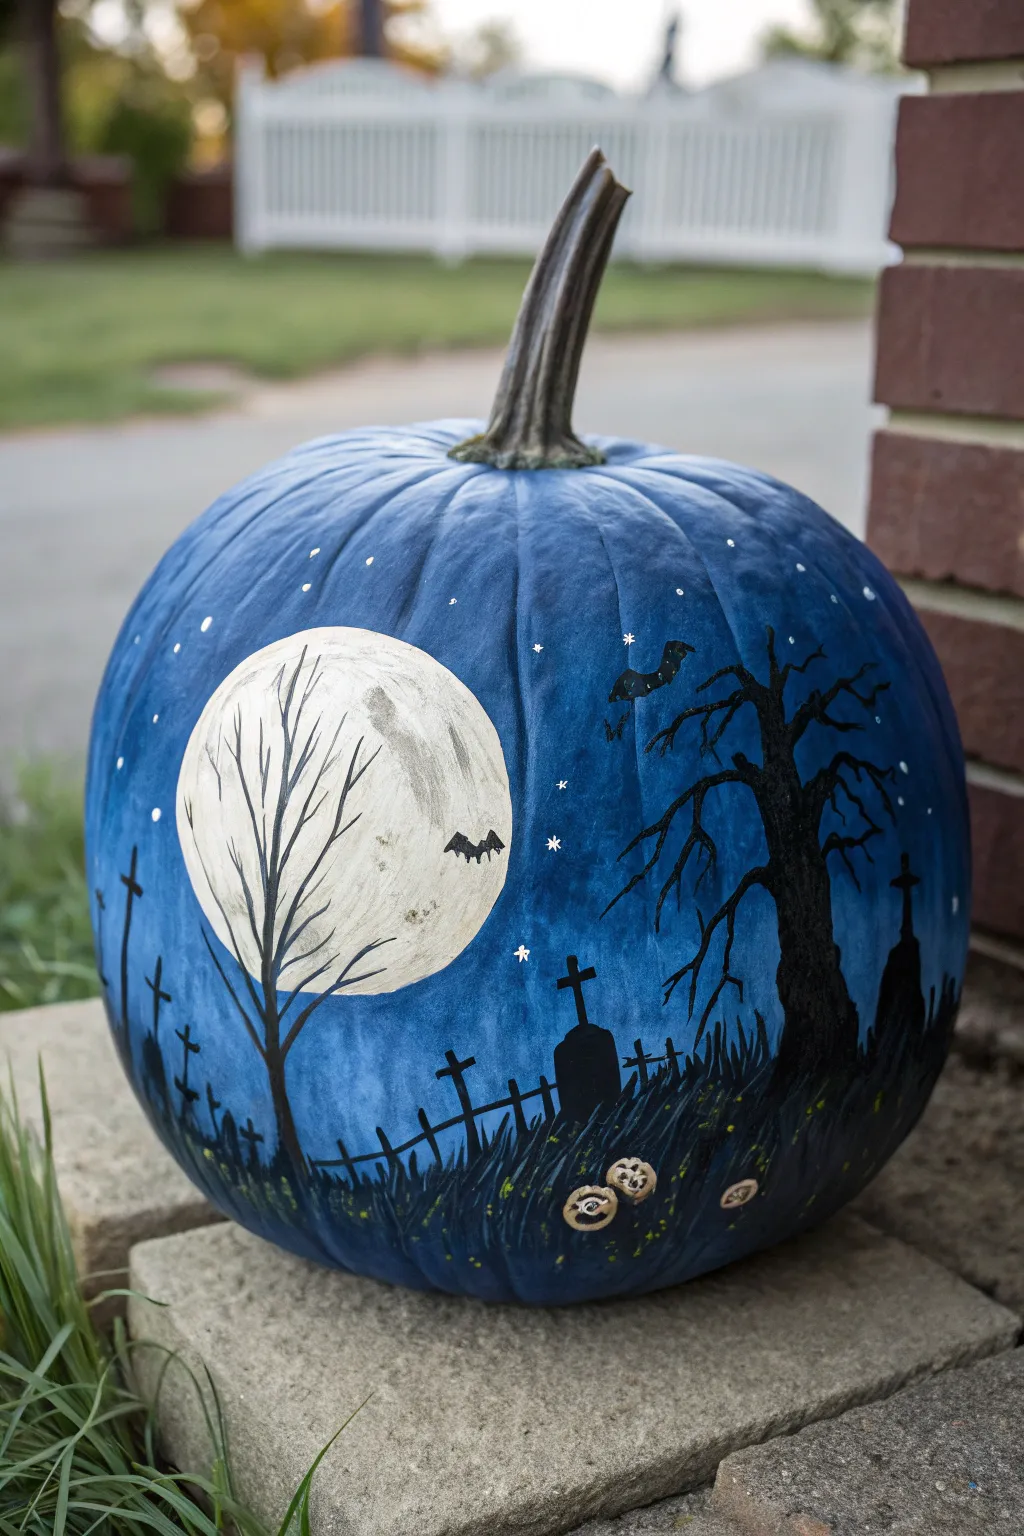
Transform an ordinary pumpkin into an eerie, atmospheric nightscape with this stunning wraparound design. Featuring a glowing full moon, stark silhouettes of skeletal trees, and a lonely cemetery, this moody blue masterpiece perfects the balance between spooky and sophisticated.
Step-by-Step Guide
Materials
- Large, smooth pumpkin (real or faux)
- Acrylic craft paints: Dark Navy Blue, Phthalo Blue (or medium blue), White, Black, Dark Green, Yellow Ochre
- Sponge brushes or large flat brush (for base coat)
- Assorted detail brushes (liner brush, small round brush, medium flat brush)
- Palette or wax paper
- Cup of water
- Paper towels
- Pencil or chalk (optional for sketching)
- Matte or satin clear sealant spray
Step 1: Setting the Night Sky
-
Base coat application:
Begin by wiping down your pumpkin surface to remove any dirt or oils. Use a sponge brush or a large flat brush to apply a solid coat of phthalo or medium blue paint over the entire pumpkin. Let this dry completely, then add a second coat for opaque coverage. -
Create the atmospheric gradient:
Start adding depth to your sky. While the blue is dry, take a slightly damp sponge or brush with dark navy blue paint. Gently stipple or brush this darker color around the top and bottom edges of the pumpkin, blending it toward the center but leaving the middle section lighter. This creates a vignetted, night-sky effect. -
Block in the moon:
Identify a large, smooth area on the side of the pumpkin for your moon. Using a medium rounded brush and white paint mixed with a tiny drop of yellow ochre (for warmth), paint a large circle. It doesn’t need to be perfectly round; a little irregularity adds character. -
Add lunar texture:
While the white circle is still tacky, mix a very light grey using white and a speck of black. Dab this lightly onto parts of the moon to create shadowy craters and texture, softening the edges with a dry brush so it looks natural rather than stamped on.
Pro Tip: Depth Perception
Make the tree overlapping the moon slightly translucent or a lighter charcoal grey rather than solid black. This atmospheric perspective makes the glowing moon look much brighter.
Step 2: Painting the Silhouettes
-
Establish the ground line:
Switch to black acrylic paint. Paint an uneven, wavy horizon line near the bottom third of the pumpkin. This doesn’t need to be straight; bumps and dips suggest hills and uneven cemetery ground. -
Paint the main tree trunk:
Choose a spot to the right of the moon for your hero tree. Using black paint and a medium brush, paint a thick, gnarled trunk rising from the ground. Widen the base where roots would grip the earth. -
Branch out:
Switch to a liner brush or small round brush for the branches. Pull paint outward from the trunk, creating jagged, twisting limbs that reach across the sky. Make them taper to fine points at the ends, letting your hand shake slightly to give them a spooky, organic feel. -
Create the tree over the moon:
On the left side, paint a thinner, lighter silhouette of a tree directly over the white moon. I like to use a dark grey or watered-down black here to make it look slightly further away, ensuring the bright moon still pops behind the bare branches. -
Add distant trees:
Fill in the background horizon with smaller, indistinct tree shapes using black. These should be much simpler than your main tree to create a sense of depth.
Step 3: Details & Atmosphere
-
Plant the graveyard:
Using deep black paint and a small flat brush, paint silhouettes of tombstones and crosses along the horizon line. Vary their shapes—some rounded, some crooked crosses—and sizes to make the graveyard look ancient and neglected. -
Add the fence:
With your liner brush, paint a rickety fence connecting the tombstones. Draw vertical posts first, then connect them with crooked horizontal rails that look like they are falling apart. -
Paint the grass:
Mix a tiny bit of dark green into your black paint. Use a small brush to flick short, upward strokes along the bottom ground area, simulating tall, overgrown grass that partially obscures the base of the tombstones and fence. -
Fly the bats:
Add life to the sky by painting small black ‘V’ or ‘M’ shapes to represent bats. Place a larger, more detailed bat silhouette near the main tree, and smaller ones flying across the face of the moon. -
Create the pumpkin patch:
Near the bottom right, paint tiny circles using a mix of yellow ochre and white. Add little black faces (just dots for eyes and mouths) to turn them into miniature jack-o’-lanterns sitting in the grass. -
Stars and sparkle:
Dip the handle end of a paintbrush or a toothpick into white paint. Dot the blue sky area randomly to create stars. For a few brighter stars, paint tiny ‘plus’ signs or four-pointed sparkles. -
Final highlights:
Add very subtle highlights to the black tree trunk and the tops of tombstones using a dark grey or blue-grey mix. This helps separate the silhouettes from the dark background. -
Seal the deal:
Once your masterpiece is completely dry (give it at least an hour), take the pumpkin outside and spray it with a light coat of matte or satin clear sealant to protect the paint from chipping.
Level Up: 3D Elements
Glue tiny bits of dried moss at the base of the painted tree trunk or attach mini craft wood tombstones to the surface for a mixed-media texture that pops off the pumpkin.
Place your finished artwork on the porch to cast a spooky shadow over the neighborhood this Halloween.
Witch Silhouette on a Pale Pumpkin
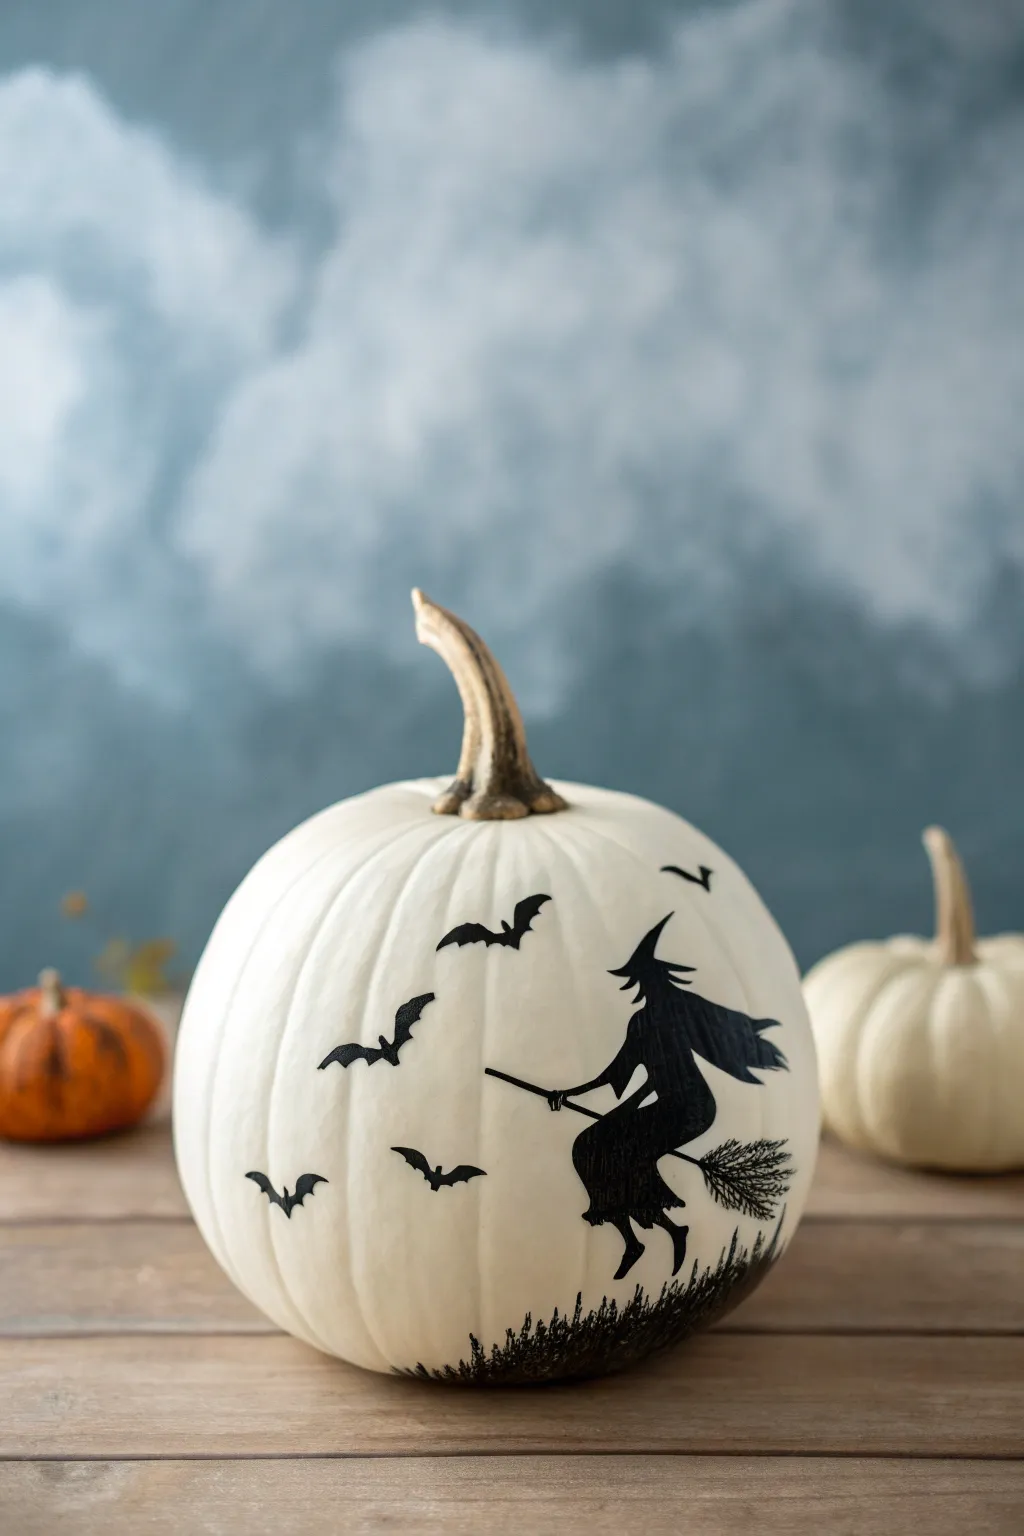
For a sophisticated yet spooky look, turn a classic white pumpkin into a canvas for a haunting silhouette scene. This high-contrast design features a witch taking flight across a pale moon-like surface, creating an elegant Halloween decoration without the mess of carving.
Step-by-Step
Materials
- Medium-sized white pumpkin (real or faux)
- Black acrylic craft paint
- Pencil
- Fine-point permanent marker (black)
- Small round paintbrush (size 1 or 2)
- Medium flat paintbrush
- Water cup
- Paper towels
- Reference image of a witch silhouette
Step 1: Preparation & Planning
-
Clean surface:
Begin by thoroughly wiping down your pumpkin with a damp cloth to remove any dirt or field dust. If using a real pumpkin, ensure it is completely dry before starting. -
Stem check:
If your pumpkin’s stem looks dull, you can lightly brush it with a touch of diluted brown or gold paint to enhance its natural texture, as seen in the photo, though this is optional. -
Locate the center:
Identify the smoothest side of the pumpkin to serve as the ‘face’ of your artwork. This area will need to accommodate the main witch figure.
Step 2: Sketching the Scene
-
Draft the witch:
Using a pencil, lightly sketch the outline of the witch riding her broomstick. Start with the pointed hat, move down to the cape flowing backward, and then draw the body shape hunched over the broom. -
Position the broom:
Draw the broomstick handle extending forward and the bristles trailing behind. Ensure the angle suggests upward movement, as if she is taking off. -
Add flying companions:
Sketch four or five bat shapes at varying distances around the witch. Place smaller ones further away and larger ones closer to create a sense of depth. -
Ground the scene:
Lightly mark a curved horizon line near the very bottom of the pumpkin where the grass silhouette will go.
Clean Lines Pro Tip
Does your hand shake? Rest your pinky finger against the pumpkin surface while painting to stabilize your brush strokes for those tiny details.
Step 3: Painting the Silhouette
-
Outline in ink:
Before painting, I find it helpful to trace over your pencil lines with a fine-point permanent marker. This creates a crisp barrier that stops the paint from bleeding into the textured pumpkin skin. -
Paint the broom:
Dip your small round brush into black acrylic paint. Carefully fill in the broomstick handle first to get a feel for the straight lines. -
Detail the bristles:
For the broom bristles, use the very tip of your brush and use quick, flickering strokes outward to mimic the scratchy texture of twigs. -
Fill the witch:
Switch to a slightly larger brush if needed to fill in the main body of the witch. Ensure the paint is opaque; you may need a second coat after the first one dries. -
Sharpen the points:
Go back with your finest brush to sharpen the tip of the witch’s hat, the nose profile, and the jagged edges of the cape and skirt.
Level Up: Moon Glow
Before painting the black silhouette, paint a large pale yellow circle behind where the witch will go to simulate a full moon backdrop.
Step 4: Adding Atmosphere
-
Paint the bats:
Fill in the bat silhouettes with solid black. Remember to keep their wings arched and pointed for that classic spooky look. -
Create the grass:
At the bottom curve of the pumpkin, stipple black paint along your horizon line. Use an up-and-down dabbing motion to create the look of wild, uneven grass. -
Feather the grass edges:
Extend some of the grass strokes upward slightly to make them look like tall weeds or wheat catching the wind. -
Final inspection:
Check the silhouette for any pinholes where the white pumpkin shows through the black paint and touch them up. -
Erase guidelines:
Once the paint is 100% dry (give it at least an hour), use a clean eraser to gently remove any visible pencil marks.
Place your finished pumpkin on a porch or mantle to let the striking contrast cast its spell


Raven Under a Cold Moon
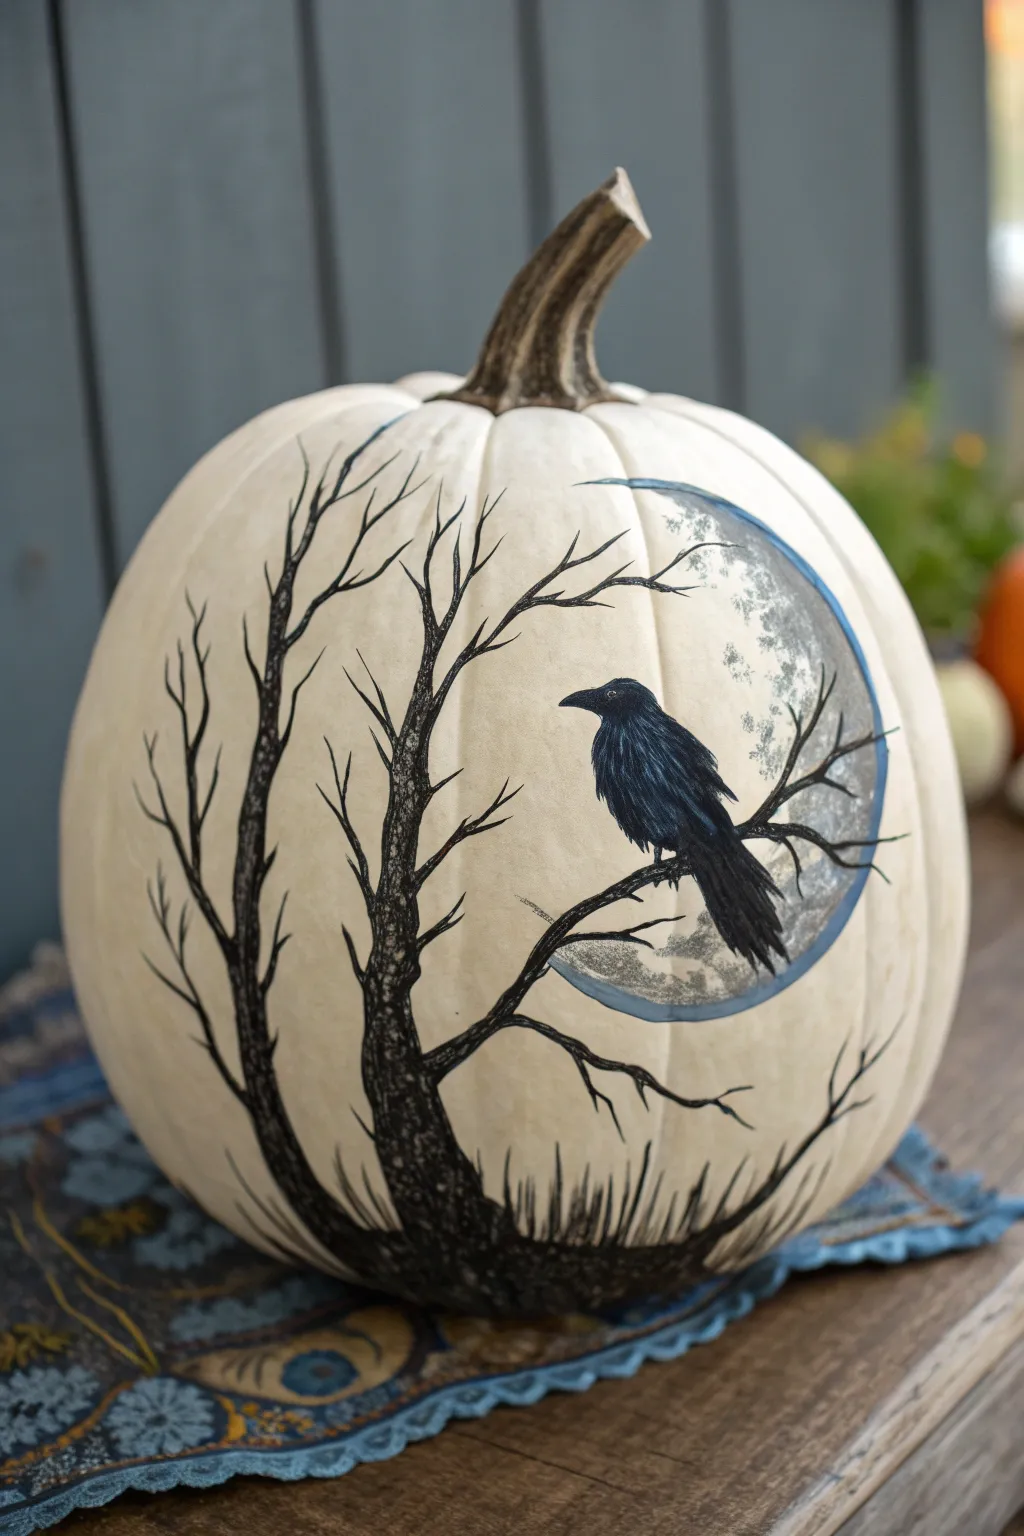
This elegant yet eerie project transforms a simple white pumpkin into a gothic masterpiece featuring a solitary raven perched against a cold, translucent crescent moon. The stark contrast of black ink against the pale pumpkin skin creates a strikingly sophisticated look that is perfect for adult Halloween decor.
Step-by-Step Tutorial
Materials
- Large white pumpkin (real or faux)
- Black acrylic paint or black paint pen (medium tip)
- Fine tip black permanent marker (e.g., Sharpie)
- Silver or pearlescent grey acrylic paint
- Light blue acrylic paint (watered down) or watercolor
- Small flat brush
- Fine detail brush
- Pencil for sketching
- Paper towel
- Bowl of water
- Matte spray sealer (optional)
Step 1: Setting the Scene
-
Prepare the surface:
Clean your white pumpkin thoroughly with a damp cloth to remove any dirt or oils that might prevent the paint from adhering. Dry it completely before starting. -
Sketch the moon:
Using a light pencil mark, sketch a large crescent or semi-circle shape on the right side of the pumpkin face. Don’t worry about making it a perfect circle; a slightly organic shape looks more illustrative. -
Draft the tree silhouette:
Lightly sketch the main trunk of the tree rising from the bottom left, curving slightly towards the center. Add the main branch that will hold the raven reaching across the moon. -
Position the bird:
Sketch the outline of the raven sitting on that main branch. Focus on the silhouette shape first—beak, head, body, and tail feathers—ensuring it sits comfortably within the curve of the moon.
Uneven Moon Surface?
Don’t panic if your pumpkin is bumpy! Use those bumps as natural craters. Dry-brushing darker grey over the raised areas accentuates the natural texture.
Step 2: Painting the Moon
-
Base coat the moon:
Mix a tiny amount of silver or grey paint with water to create a wash. Fill in the moon shape, keeping it translucent and uneven to mimic craters and lunar texture. -
Add lunar details:
While the wash is still slightly damp, dab a little undiluted silver or darker grey in random spots to create the shadowy craters of the moon. This adds depth so it doesn’t look flat. -
Outline the glow:
Take your watered-down light blue paint and carefully outline the curve of the moon. I find dragging the brush lightly creates a nice ‘halo’ effect that feels cold and atmospheric. -
Let it dry completely:
Allow the moon layers to dry entirely before painting anything over them. Impatience here leads to muddy grey trees!
Step 3: Creating the Shadowy Tree
-
Paint the trunk:
Using black acrylic paint or a thick paint pen, fill in the main trunk. Use upward strokes that follow the natural grain of bark, starting thick at the base and tapering as you go up. -
Branch out:
Extends the main branches, particularly the one crossing the moon. Switch to your smaller brush or fine liner pen as the branches get thinner toward the tips. -
Add fine twigs:
Use a fine-tip permanent marker to draw the smallest, spindly twigs reaching out from the larger branches. Let your hand shake slightly; jagged lines look more like creepy, dead wood. -
Ground the tree:
At the very bottom where the tree meets ‘ground’, create sketchy grass-like strokes using the fine marker. This anchors your tree so it doesn’t look like it’s floating.
Pro Tip: Sharp Lines
For the crispest spindly branches, use a waterproof archival ink pen (like a Micron) instead of a brush. It gives you total control over those hair-thin twigs.
Step 4: The Raven’s Detail
-
Fill the silhouette:
Paint the raven’s body solid black. Ensure the edges are crisp, especially the beak and the jagged ends of the tail feathers. -
Texture the feathers:
Once the black base is dry, use a very dry brush with a tiny amount of grey or blue to whisk light highlights onto the wing. This suggests individual feathers without needing to paint every single one. -
Draw the eye:
Add a tiny dot of white or silver paint for the raven’s eye. Place it carefully to give the bird an observant, intelligent expression. -
Refine the feet:
Use your finest pen to draw the claws gripping the branch. They should look sharp and tight around the wood.
Step 5: Final Atmosphere
-
Deepen the contrast:
Go back over the darkest parts of the tree trunk with a second coat of black if the first looks streaky. Deep, opaque black makes the illustration pop. -
Protect your work:
If you plan to display this outdoors or keep it for next year (if using faux), spray the painted area lightly with a matte sealer to prevent scratching and fading.
Place your finished pumpkin on a shadowy porch step or a candlelit table to let the moonlight scene truly shine
Gnarled Tree With Shadow Bats
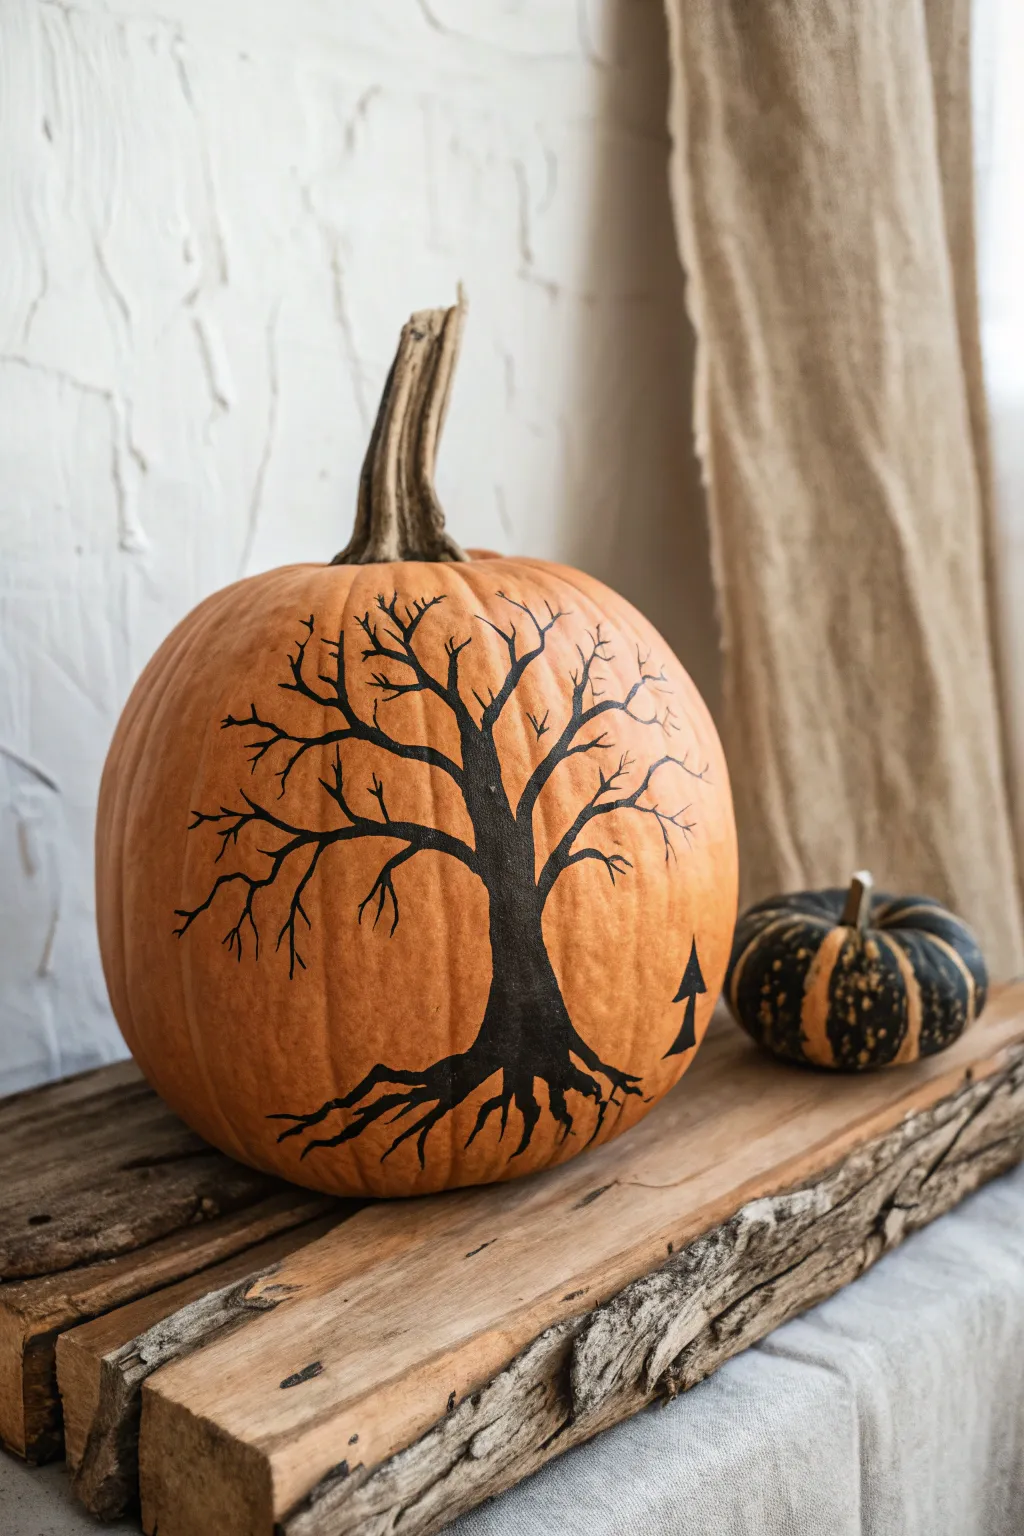
Capture the eerie stillness of an autumn night with this minimalist painted pumpkin design. Featuring a stark, branching silhouette and a lone hovering bat, this project transforms a simple orange gourd into a piece of sophisticated Halloween art.
Step-by-Step
Materials
- Large orange pumpkin with a smooth surface
- Rubbing alcohol and paper towels
- Fine-grit sandpaper (optional)
- Black acrylic paint (matte finish works best)
- Black permanent marker or paint pen (fine and medium tip)
- Small round paintbrush (size 2 or 4)
- Detail liner brush (size 0 or 00)
- Pencil for sketching
- Clear matte acrylic sealer spray
Step 1: Preparation and Sketching
-
Clean the canvas:
Start by thoroughly wiping down your pumpkin with rubbing alcohol and a paper towel. This removes oils and dirt, ensuring the paint adheres properly to the skin. -
Smooth the surface:
If your pumpkin has rough patches or warts where you plan to paint, gently sand them down with fine-grit sandpaper for a smoother painting area. -
Find the center:
Locate the most attractive side of the pumpkin to serve as the ‘face.’ Lightly mark a vertical centerline with your pencil to help balance the tree trunk. -
Sketch the trunk:
Using a pencil, lightly draw the main trunk of the tree. Start wide at the base and taper it upwards, stopping about two-thirds of the way up the pumpkin. -
Draft the roots:
Sketch gnarled roots extending from the base of the trunk. Let them curve downwards and outwards, following the natural contour of the pumpkin’s bottom. -
Outline the main branches:
Draw three to four main branches extending from the top of the trunk. Keep the lines wavy and irregular to mimic the look of an old, spooky tree.
Natural Texture
Don’t fight the pumpkin’s ridges. Let your brush skip slightly over the bumps when painting roots to give them a weathered, 3D appearance.
Step 2: Painting the Silhouette
-
Outline the trunk:
Use a medium-tip black paint pen or a small round brush with black acrylic paint to trace over your pencil lines for the trunk. Establish a solid outline before filling it in. -
Fill the core:
Paint the inside of the trunk outline with solid black acrylic paint. Apply a second coat if the orange shows through, ensuring an opaque, dark silhouette. -
Define the roots:
Switch to your medium tip marker or small brush to darken the roots. Taper the ends to sharp points so they look like they are gripping the pumpkin. -
Extend the branches:
Using the small round brush, paint the main branches you sketched earlier. Allow your hand to shake slightly; these imperfections add to the organic, creepy feel. -
Add secondary twigs:
Switch to your fine-tip paint pen or a detail liner brush. From each main branch, draw smaller twigs splitting off in V-shapes. -
Create fine details:
Add tiny, hair-like twigs at the very ends of the branches. I find that quick, flicking motions with the paint pen create the most natural-looking tips. -
Check for balance:
Step back and look at the tree. If one side feels too empty, add a few more spindly branches to fill the negative space without overcrowding it.
Step 3: Final Touches
-
Add the bat:
To the right of the trunk, about halfway down, sketch a small, simple bat silhouette. It should look like a flattened ‘M’ shape with a tiny triangle tail. -
Fill the bat:
carefully fill in the bat shape with your fine-tip black marker or liner brush. Keep the edges sharp and distinct. -
Clean up sketch lines:
Once the paint is completely dry (give it at least 20 minutes), gently erase any visible pencil marks with a soft eraser. -
Seal the design:
take the pumpkin outside and spray it lightly with a clear matte acrylic sealer. This protects the paint from chipping and moisture.
Moonlit Backdrop
Before painting the tree, sponge a large, pale yellow circle behind where the branches will go to create a glowing full moon effect.
Now you have a stunning, shadow-inspired decoration ready to haunt your porch all season long
Horned Demon Snarl
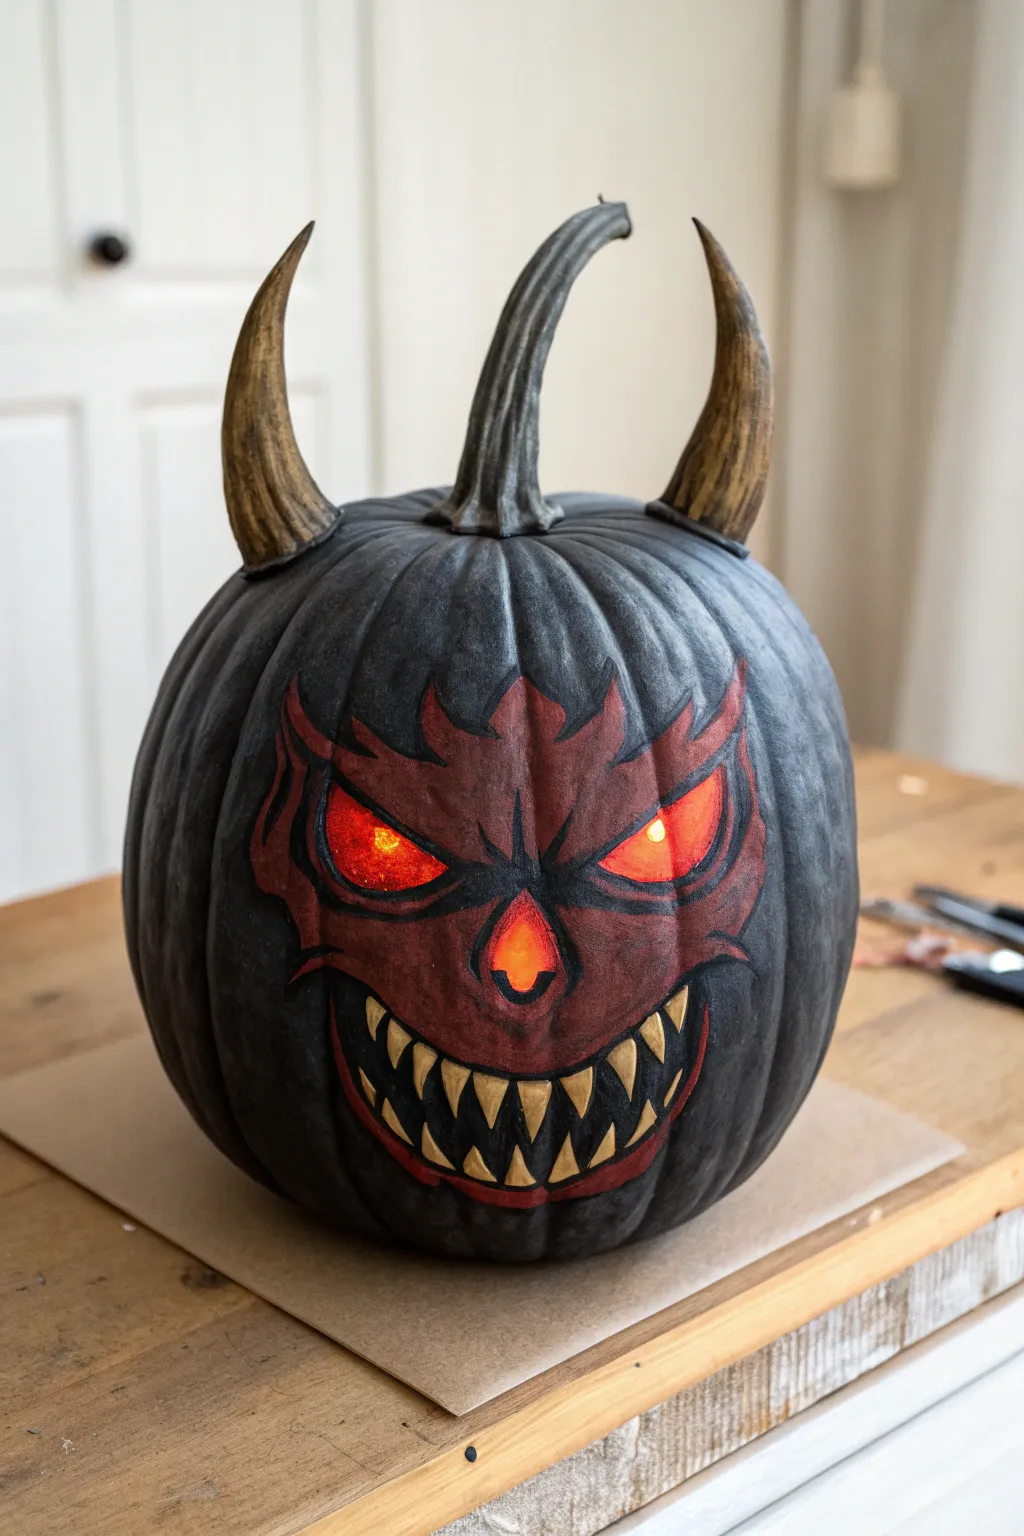
Transform a standard pumpkin into a fiendish masterpiece with this dark, textured design featuring imposing horns and a menacing grin. By combining matte black paint with glowing carved accents, you’ll create a striking contrast that looks truly sinister on any porch.
How-To Guide
Materials
- Large, round pumpkin
- Matte black spray paint
- Red and brown acrylic paint
- Gold or bone-colored acrylic paint
- Small flat brushes and fine liner brushes
- Pumpkin carving kit (including serrated saw)
- Lightweight air-dry clay or thermoplastic pellets
- Strong craft glue or E6000
- Pencil or white chalk pencil
- LED pumpkin light (warm or red)
Step 1: Base Preparation
-
Clean and Dry:
Start by thoroughly washing your pumpkin to remove any dirt or debris. Dry it completely with a towel to ensure the paint adheres properly. -
Apply the Base Coat:
Take the pumpkin outside or to a well-ventilated area. Apply two even coats of matte black spray paint, covering the entire surface, including the stem. Let the first coat dry for about 15 minutes before applying the second to avoid drips. -
Draft the Face:
Once the black paint is fully cured, use a white chalk pencil to lightly sketch the outline of the demon face. Draw jagged, flame-like shapes for the eyebrows and cheeks, and map out the large, almond-shaped eyes and nose cavity.
Step 2: Carving the Features
-
Gut the Pumpkin:
Carefully cut a lid around the stem (or cut from the bottom if you prefer). Scoop out all the seeds and pulp, scraping the inner wall behind the face area until it is about 1 inch thick. -
Carve the Eyes and Nose:
Using a small serrated pumpkin saw, carefully cut out the eye shapes and the nose hole completely. Remove these pieces to create the glowing voids. -
Surface Etching (Optional):
For the mouth area, avoid cutting all the way through initially. Instead, you can choose to shave off just the black skin to reveal the orange flesh, or simply leave it for painting in the next phase.
Clay Grip Tip
Before gluing the horns, gently sand the spray paint off the spot where they will attach. Adhesives bond much stronger to the natural pumpkin skin than they do to a layer of slick paint.
Step 3: Painting the Demon
-
Base the Facial Area:
Using a flat brush, fill in the sketched face shape (around the eyes, nose, and mouth) with a dark reddish-brown acrylic paint. You may need two coats to cover the black background solidly. -
Add Depth and Shadow:
Mix a small amount of black into your red paint. Use this darker shade to paint lowlights around the edges of the face mask and under the cheekbones to create a 3D effect. -
Outline the Features:
Take a fine liner brush with black paint and carefully outline the jagged edges of the red mask area. Add crinkle lines around the nose and between the eyes for a snarling expression. -
Paint the Mouth:
Fill the interior of the mouth shape with solid black paint. This creates the dark void necessary for the teeth to pop. -
Create the Teeth:
Using a small brush and bone or gold-colored acrylic, paint sharp, triangular teeth along the top and bottom of the mouth. Make them varied in size—some long and curved—to look more monstrous. -
Highlight the Dental Work:
Once the teeth base is dry, add a tiny sliver of lighter white or pale yellow to the tip of each tooth for sharpness.
Paint Not Sticking?
If the acrylic paint beads up on the spray-painted surface, the gloss level might be too high. Lightly buff the face area with fine-grit sandpaper to give the acrylics something to grab onto.
Step 4: Sculpting the Horns
-
Form the Horn Shape:
Roll your air-dry clay or thermoplastic into two thick cones. Curve the tips slightly backward to give them a demonic sweep. -
Add Texture:
While the material is still pliable, use a toothpick or clay tool to scratch vertical grooves up the length of the horns, mimicking natural keratin growth lines. -
Dry and Paint:
Allow the horns to harden completely according to package instructions. Paint them with a base of brown, then dry-brush with gold or tan to highlight the texture. -
Attach the Horns:
Apply a strong adhesive like E6000 to the base of each horn. Press them firmly onto the top sculpted ‘shoulders’ of the pumpkin, hold for a minute, and support them if necessary while the glue sets. -
Blend the Seams:
Paint a little black around the base where the horns meet the pumpkin to hide any glue residue and make them look like they are growing out of the shell. -
Final Light Up:
Insert your warm or red-tinted LED light inside the pumpkin. Ensure the light hits the eyes and nose directly for that fiery inner glow.
Place your creation in a dimly lit corner and watch the fiery eyes unsettle your guests


Have a question or want to share your own experience? I'd love to hear from you in the comments below!