Whenever I need quick inspiration that actually works on a real face, I think in terms of simple shapes, strong outlines, and a little sparkle where it counts. Here are my favorite face paint ideas—starting with the classic crowd-pleasers and drifting into more unexpected, artsy transformations.
Butterfly Eye Mask

Transform your gaze into a work of art with this sophisticated butterfly wing design. This look combines soft, blended eyeshadows with graphic linework for a whimsical yet refined statement.
Step-by-Step
Materials
- Matte peach eyeshadow
- Shimmering pink or rose gold eyeshadow
- Black liquid liner (fine tip)
- White liquid liner or face paint (fine tip)
- Fluffy blending brush
- Small detail brush
- Makeup setting spray
- Mascara
- Complexion base (foundation/concealer)
Step 1: Setting the Scene
-
Prepare the canvas:
Begin with a clean, moisturized face. Apply your foundation and concealer as usual to create an even skin tone, ensuring the eye area is well-primed to help the pigments pop. -
Apply base shadow:
Using a fluffy blending brush, sweep a matte peach eyeshadow across the entire eyelid, extending it high up toward the brow bone and outward past the temple. -
Deepen the crease:
Layer a darker pink or rose gold shimmer into the crease and outer corner of the eye. Blend this outward aggressively; you want a soft, diffused cloud of color that will serve as the background for the wing. -
Under-eye definition:
Run the same pink eyeshadow along the lower lash line, connecting it to the color at the outer corner to encircle the eye in warmth.
Clean Lines Pro Tip
Rest your pinky finger on your cheek while drawing the black lines. This anchors your hand and prevents shakiness, giving you much smoother curves.
Step 2: Drawing the Wings
-
Upper wing outline:
With a steady hand and black liquid liner, draw the curve of the top wing. Start from the inner corner of the eyebrow, arching up onto the forehead and curving down to meet the outer corner of the eye. -
Lower wing outline:
Create the bottom wing section by drawing a curved line from the outer corner of the eye, sweeping down onto the cheekbone and curving back up toward the hairline. -
Thicken the borders:
Go back over your main outlines to thicken them. The line should be boldest at the outer edges, tapering slightly as it moves toward the inner eye. -
Add wing veins:
Draw delicate black lines inside the pink wing blocks. Radiate them outward from the eye corner like sun rays, connecting them to the thick outer border. -
Fill the gaps:
If there are gaps between your skin showing through and the black lines, gently tap a little more pink eyeshadow into those spaces so the wing looks fully colored.
Level Up With Gems
Replace the painted white dots on the wing border with tiny adhesive rhinestones. Use eyelash glue to secure them for a 3D sparkling effect.
Step 3: Details & Decoration
-
Dot the edges:
Using white liquid liner or face paint on a fine brush, carefully place small white dots along the thick black outer border of the wings. Keep the spacing consistent for a polished look. -
Create the sparkle dust:
I like to add a magical touch here by stippling a cluster of white dots in varying sizes across the cheekbone, just under the lower wing. -
Inner corner accents:
Add a few tiny white dots climbing up from the bridge of the nose toward the forehead to balance the design. -
Lash application:
Curl your lashes and apply two generous coats of mascara to both top and bottom lashes to define the eyes against the colorful background. -
Lip color:
Finish the look with a soft, neutral pink lipstick that complements the eye makeup without competing for attention. -
Set the look:
Close your eyes and mist your face with a setting spray to lock the eyeshadow and liner in place for long-lasting wear.
You are now ready to flutter away with a look that is both artistic and beautiful


Classic Tiger Face
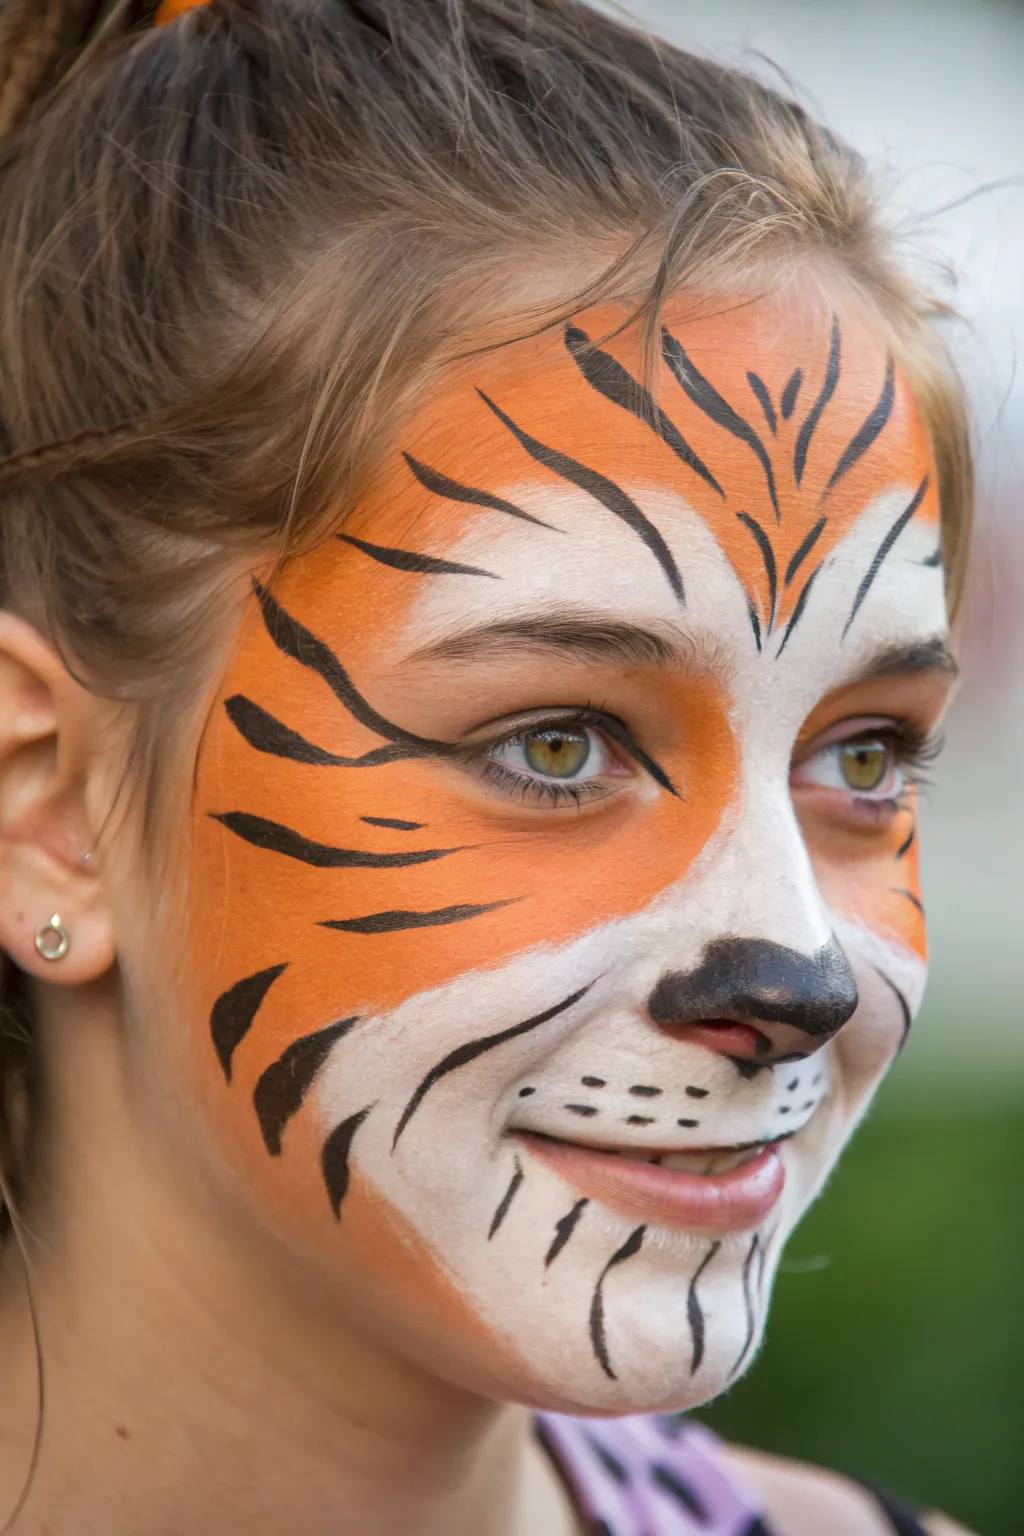
Transform a little one into a fierce roamer of the jungle with this timeless tiger design. This look combines vibrant orange with crisp black stripes and stark white highlights to create a dimensional, expressive cat face.
Step-by-Step Tutorial
Materials
- High-quality face paint (Orange, White, Black)
- Small round brush (size 2-4)
- Medium round brush (size 6)
- High-density face painting sponge
- Cup of water
- Soft towel or wipe for corrections
Step 1: Creating the Base
-
Sponge Loading:
Begin by dampening your sponge slightly and loading it generously with white face paint. You want a creamy consistency, not watery. -
White Muzzle:
Dab the white paint around the mouth area, covering the upper lip, the philtrum (area under the nose), and extending slightly onto the cheeks to form a wide muzzle shape. -
Eye Highlights:
Continuing with the white sponge, add patches of white over the eyelids and extend them upward toward the inner eyebrows. Also, create angled triangular shapes at the outer corners of the eyes. -
Orange Application:
Rinse your sponge or use a fresh side. Load it with bright orange paint. Apply this color to the rest of the face: the forehead, the nose bridge, and the cheeks. -
Blending the Boundary:
While the paint is still slightly tacky, gently dab the boundary where the orange meets the white muzzle and eye areas. This creates a soft, furry transition rather than a harsh line. -
Nose Tip:
Switch to a medium round brush loaded with black paint. Paint the very tip of the nose black, curving the lines down around the nostrils to define a cat-like nose shape. -
Philtrum Line:
Draw a small vertical line connecting the bottom of the black nose to the center of the upper lip.
Flick of the Wrist
For perfect tiger stripes that taper at the end, press down firmly at the start of the line and lift your brush gradually as you pull away, ending on the very tip of the bristles.
Step 2: Stripes and Details
-
Central Forehead:
Using a thin round brush and black paint, start at the center of the forehead. Paint thin, flickering lines that curve outward from the center, mimicking the natural growth of fur. -
Brows and Temples:
Paint bold stripes starting from the hairline above the eyebrows, curving down toward the nose bridge. Keep the ends of your strokes sharp by lifting the brush pressure as you finish the line. -
Cheek Stripes:
On the orange part of the cheeks, paint three distinguished stripes on each side. Start thick at the outer edge of the face and taper to a thin point as you move inward toward the nose. -
Eye Definition:
Carefully line underneath the lower lash line with a very thin black line. Extend the inner corner downward slightly to create a feline tear duct shape. -
Muzzle Outline:
Use your thin brush to outline the top curve of the white muzzle area. I find it helps to use quick, broken strokes here to suggest texture rather than a solid cartoony line. -
whisker Spots:
On the white muzzle area, paint three rows of small black dots on either side for the whisker spots. -
Jawline Fur:
Add some curved stripes along the jawline and chin area. These should curve upward to frame the face. -
White Accents:
Clean your thin brush thoroughly and load it with fresh white paint. Add tiny highlights inside the black nose tip to make it look wet. -
Chin Detail:
Paint a few curved black lines on the chin, pointing downward, to create the illusion of a furry chin. -
Lip Color:
Paint the lips a soft pink or a very light reddish-brown to complete the mouth area, blending slightly with the surrounding white. -
Final Touches:
Check for symmetry. If one side needs balance, add a small extra stripe or fleck of black to even out the look.
Glitter Roar
While the orange paint is still slightly damp, poof a small amount of cosmetic-grade gold glitter onto the cheeks and forehead to make the design sparkle in the sunlight.
Now step back and admire the wild jungle cat you have just created


Cute Kitty Cat Look
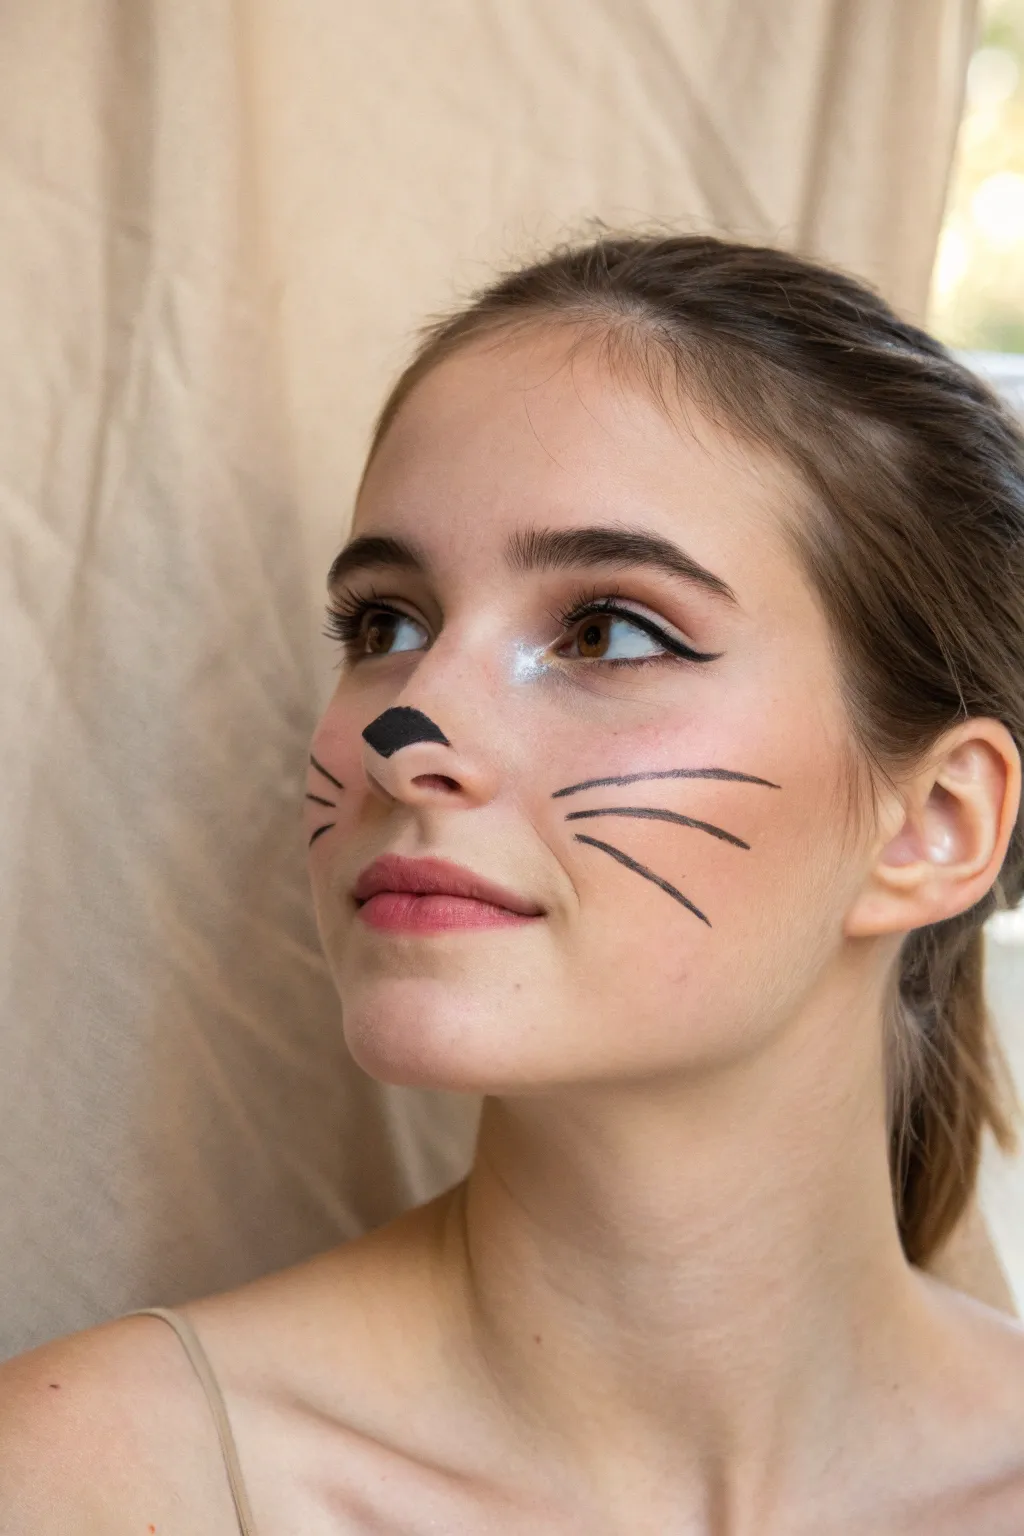
Transform into a sweet feline friend with this understated and adorable face paint idea. Focusing on clean lines and a touch of shimmer, this look is perfect for a quick costume or just for fun.
Step-by-Step
Materials
- Black face paint (water-activated) or gel eyeliner
- Fine liner brush (size 0 or 1)
- Small flat or angled brush
- Shimmery white or pearl face paint (or highlighter powder)
- Black liquid eyeliner
- Mascara
- Blush (soft pink or peach)
- Fluffy blush brush
Step 1: Base and Eyes
-
Prep the canvas:
Start with a clean, dry face. If you like, apply your usual light foundation or moisturizer, ensuring it’s fully absorbed before painting. -
Apply blush:
Using a fluffy brush, sweep a soft pink or peach blush across the apples of the cheeks. I like to bring it slightly higher up the cheekbones than usual to create a youthful, flushed look. -
Line the upper lash line:
With black liquid eyeliner, draw a thin line along the upper lashes. Start from the inner corner and work your way out. -
Create a cat-eye wing:
At the outer corner of the eye, flicker the liner upwards towards the end of the eyebrow to create a classic cat-eye wing. -
Add inner corner highlight:
Dip a small brush into shimmery white or pearl face paint. Apply a concentrated dot to the inner corner of each eye (the tear duct area) to brighten the look. -
Enhance the lashes:
Apply a coat or two of black mascara to the upper lashes to make the eyes pop.
Smudged whiskers? Don’t panic
If a line goes wonky, wait for it to dry completely. Then, use a damp cotton swab with a tiny bit of makeup remover to erase just the mistake without smearing.
Step 2: Nose and Whiskers
-
Outline the nose:
Load a small flat or angled brush with black face paint. On the tip of the nose, draw a flattish, inverted triangle shape. -
Fill in the nose:
Carefully fill in the triangle with the black paint. Keep the edges crisp and ensure the shape doesn’t extend too far down onto the nostrils. -
Check symmetry:
Step back and check that the nose shape is centered. Use a damp cotton bud to tidy up any uneven edges if needed. -
Load the liner brush:
Switch to your fine liner brush (size 0 or 1). Wet the black face paint to an ink-like consistency for smooth lines. -
Paint the first whisker:
Choose a cheek to start on. Draw a long, thin curve extending from the apple of the cheek outwards towards the ear. Start with light pressure, press down slightly, and flick up at the end feather-lightly. -
Add the middle whisker:
Draw a second whisker just below the first one, keeping it slightly shorter but following a similar curve. -
Complete the first set:
Add a third whisker below the second, angling it slightly more downwards. Try to keep the spacing between them somewhat even. -
Paint whiskers on the other side:
Repeat the process on the other cheek. Aim for symmetry, but don’t worry if they aren’t perfect mirror images—organic lines look better. -
Add subtle nose whiskers (optional):
For extra detail, you can draw two very tiny, short lines on the side of the muzzle area, just below the nose paint.
Make it glam
Add tiny self-adhesive rhinestones to the end of each whisker or along the winged eyeliner for a sparkly party version of this look.
Step 3: Finishing Touches
-
Refine the brows:
Your natural brows frame the face beautifully here. Simply brush them upwards with a spoolie or clear brow gel for a groomed appearance. -
Tint the lips:
Apply a sheer pink lip balm or a light stain to the lips to complement the blush without overpowering the cat details. -
Set the look:
If you plan to wear this for a while, a light mist of setting spray held at arm’s length can help keep everything in place.
Now you are ready with a purr-fectly sweet look for any occasion


Happy Puppy Dog Face
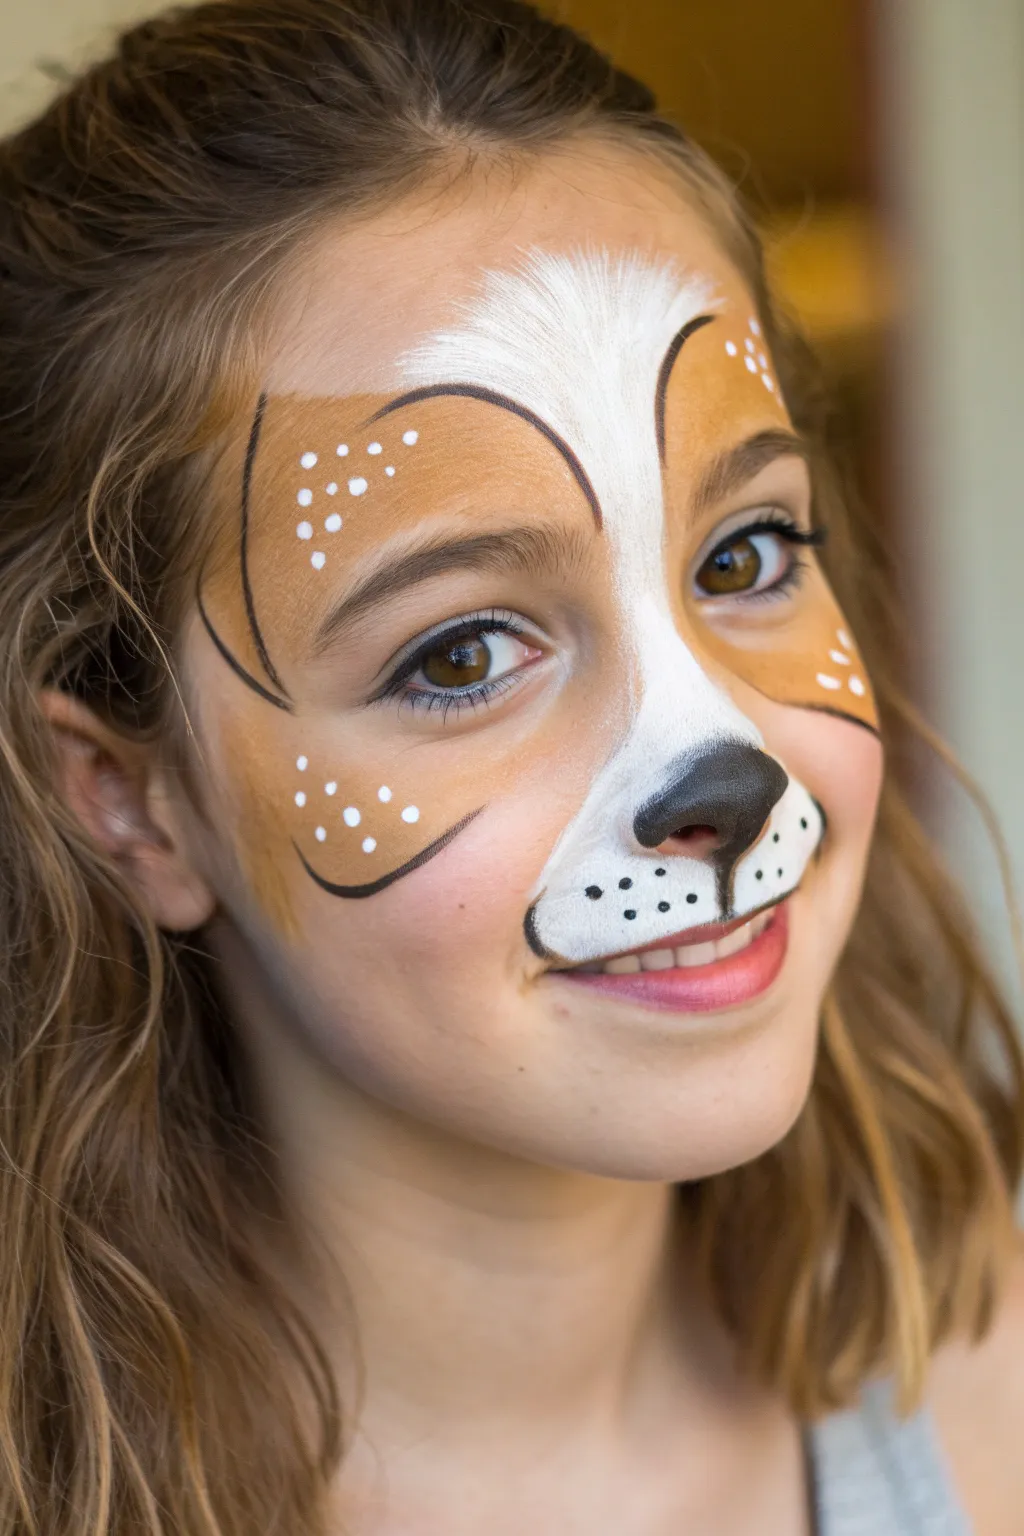
Transform your little one into an adorable puppy dog with this classic, crowd-pleasing face paint design. Featuring warm browns, bright white highlights, and cute freckle details, this look captures the sweet expression of a loyal beagle friend.
Step-by-Step Guide
Materials
- High-quality face paint (golden brown/ochre)
- High-quality face paint (white)
- High-quality face paint (black)
- Face painting sponge (high-density)
- Round brush (size 4 or 5 for outlines)
- Fine liner brush (size 1 or 2 for details)
- Clean water cup
- Paper towels
Step 1: Laying the Base Colors
-
Start with the snout:
Begin by dampening your sponge and loading it with white face paint. Paint a rounded muzzle shape strictly around the mouth and upper lip area. -
Extend the white:
Using the edge of the sponge, pull the white paint upwards from the muzzle between the eyes, creating a central stripe that fans out slightly onto the forehead. This forms the center blaze. -
Apply the golden brown:
Clean your sponge or grab a second one for the brown paint. Load it with the golden-brown or ochre color. Dab this color over the eyelids and eyebrows, creating large, rounded eye patches. -
Shape the ears:
Extend the brown paint from the outer corners of the eyes downward onto the cheeks to suggest floppy ears. I like to keep the edges slightly soft for a furry effect. -
Add detail spots:
While you have the brown color loaded, gently tap small amounts near the outer corners of the eyes and temples if you want to extend the base, but leave space near the nose for the black outlines later.
Step 2: Defining the Features
-
Outline the patches:
Switch to a size 4 round brush loaded with black paint. Carefully paint a smooth line along the top arc of the brown eye patches on the forehead. -
Define the cheeks:
Continue your black outline along the bottom curve of the cheek brown areas. Taper the line so it’s thickest in the middle and thin at the ends. -
Separate the colors:
Draw delicate curved lines separating the central white blaze from the brown eye patches. Think of these as two parentheses shapes facing each other. -
Create the nose:
Paint the tip of the nose black. Instead of a simple circle, extend the top line slightly wider and curve the bottom to mimic a dog’s actual nose shape, filling it in completely. -
Connect the mouth:
Draw a straight black line downwards from the septum (center of the nose) to the top lip. -
Paint the muzzle split:
From the center of the top lip, trace the lip line outwards on both sides, curving slightly upward at the corners to ensure a happy, smiling puppy expression.
Smudge Control
Work from the top of the forehead down to avoid smudging your work with your hand. If the black lines bleed, wait for them to dry fully before touching up with white.
Step 3: Highlights and Furry Details
-
Add whisker spots:
Using the tip of your round brush or a fine liner, add three to four distinct black dots on each side of the white muzzle area. -
Create white spots:
Clean your brush thoroughly and load it with opaque white paint. Dot clusters of small white spots on the upper brown forehead areas for texture. -
Texture the cheeks:
Add a few more scattered white dots on the lower brown cheek areas to balance the look. -
Highlight the nose:
For a wet-nose look, add a tiny horizontal white highlight on the top curve of the black nose. -
Feather the fur:
If the transition between white and brown on the forehead looks too harsh, use a mostly dry brush to feather small white strokes upwards into the brown for a realistic fur texture.
Tongue Trick
Paint a small pink U-shape hanging from the side of the bottom lip and outline it in black to make the puppy look like it’s panting playfully.
Now recreate this sweet design and watch your own little puppy come to life with a smile
BRUSH GUIDE
The Right Brush for Every Stroke
From clean lines to bold texture — master brush choice, stroke control, and essential techniques.
Explore the Full Guide
Unicorn Cheek And Forehead Combo
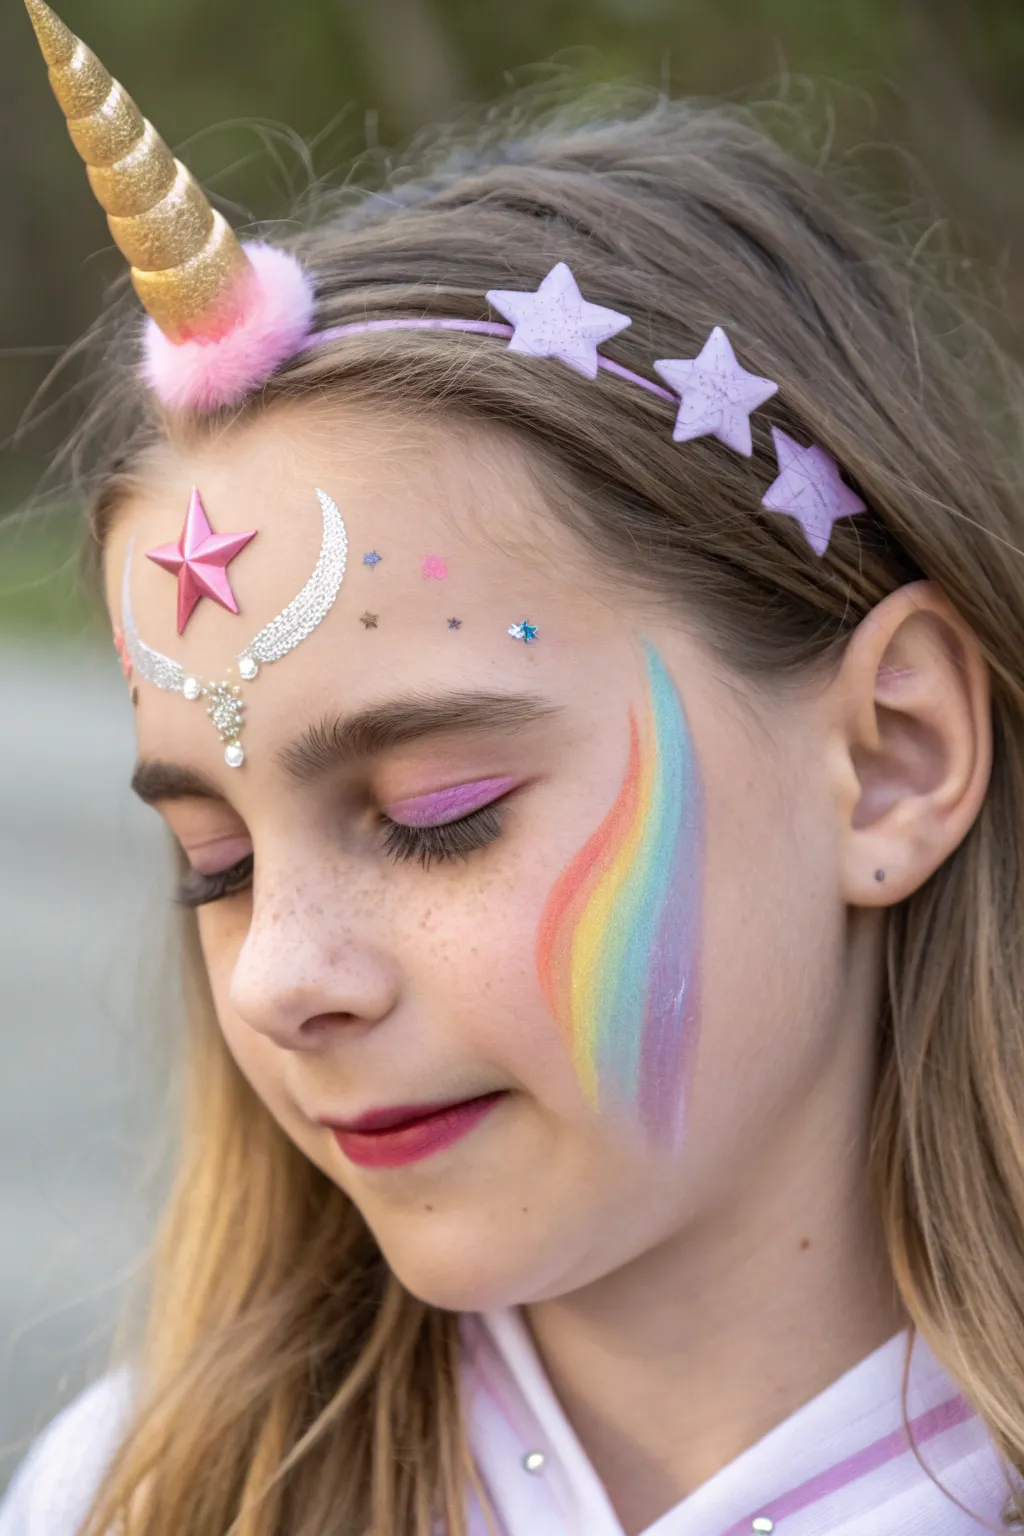
Capture the magic of a fairytale creature with this enchanting face paint design that combines a sparkling forehead centerpiece with a sweeping rainbow arc. The look is soft, dreamy, and perfect for parties, relying on gentle blending and stick-on embellishments for that extra wow factor.
Step-by-Step
Materials
- Rainbow split-cake face paint (red, orange, yellow, green, teal, purple)
- Wide flat brush (3/4 inch or 1 inch)
- Small round brush (size 1 or 2)
- Makeup adhesive (spirit gum or lash glue)
- Pink glitter star gem
- Silver diamante moon sticker or silver face paint
- Silver adhesive pearls or face gems
- Pink eyeshadow
- Makeup brush or sponge applicator
- Small star stickers (silver, blue, pink)
- Optional: Cosmetic glitter
Step 1: The Rainbow Cheek
-
Load the brush:
Start by taking your wide flat brush and dampening it slightly with water. Rub it back and forth over your rainbow split-cake until the paint has a creamy consistency. -
Position the stroke:
Place the brush near the top of the cheekbone, close to the outer corner of the eye, with the red/warm colors facing inward towards the nose and the cool colors facing the ear. -
Paint the curve:
In one smooth motion, sweep the brush down the cheek in a gentle ‘S’ curve, tapering off as you reach the jawline to create a flowing rainbow ribbon. -
Blend edges:
If the edges look too harsh, you can use a slightly damp sponge to very gently pat the outer perimeter, softening the look into the skin.
Sticky Situation
If gems won’t stick, ensure the skin is clean and dry first. Oily skin or heavy moisturizer can prevent adhesion. A tiny dab of eyelash glue creates a stronger hold than self-adhesive backing.
Step 2: Eye Polish
-
Apply eyeshadow:
Using an eyeshadow brush or sponge tip, apply a soft layer of pink eyeshadow across the entire eyelid. -
Extend the color:
Gently sweep the pink shadow slightly upward towards the brow bone and outward to blend seamlessly with the skin tone.
Glitter Upgrade
While the paint is still slightly tacky, puff a tiny amount of cosmetic-grade iridescent glitter over the rainbow cheek. This catches the light and adds a magical, ethereal texture.
Step 3: Forehead Centerpiece
-
Place the central star:
Apply a small dot of skin-safe adhesive to the back of your large pink star gem. Press it firmly onto the center of the forehead, just above the eyebrows. -
Create the moon:
If using a sticker, adhere the silver crescent moon so it curves around the left side of the star. If painting, use a fine round brush with metallic silver paint to draw this crescent shape. -
Add the drop detail:
Below the star and moon arrangement, place three vertical dots of adhesive. -
Adhere pearls:
Stick small pearl gems or silver rhinestones onto your adhesive dots, creating a dangling jewelry effect that points down toward the nose.
Step 4: Final Sparkles
-
Scatter tiny stars:
Take your small star stickers in mixed colors (blue, pink, silver) and place them randomly around the main forehead design. -
Add asymmetry:
I like to place a few star stickers on the opposite side of the forehead from the moon to balance the composition without making it symmetrical. -
Highlight the eyes:
For a little extra magic, add a single tiny star sticker near the outer corner of the eye opposite the rainbow design. -
Set the look:
Ensure all gems are secure and the paint is fully dry before the child moves around too much.
Now you have a shimmering unicorn look ready for any magical adventure
Princess Crown And Sparkles
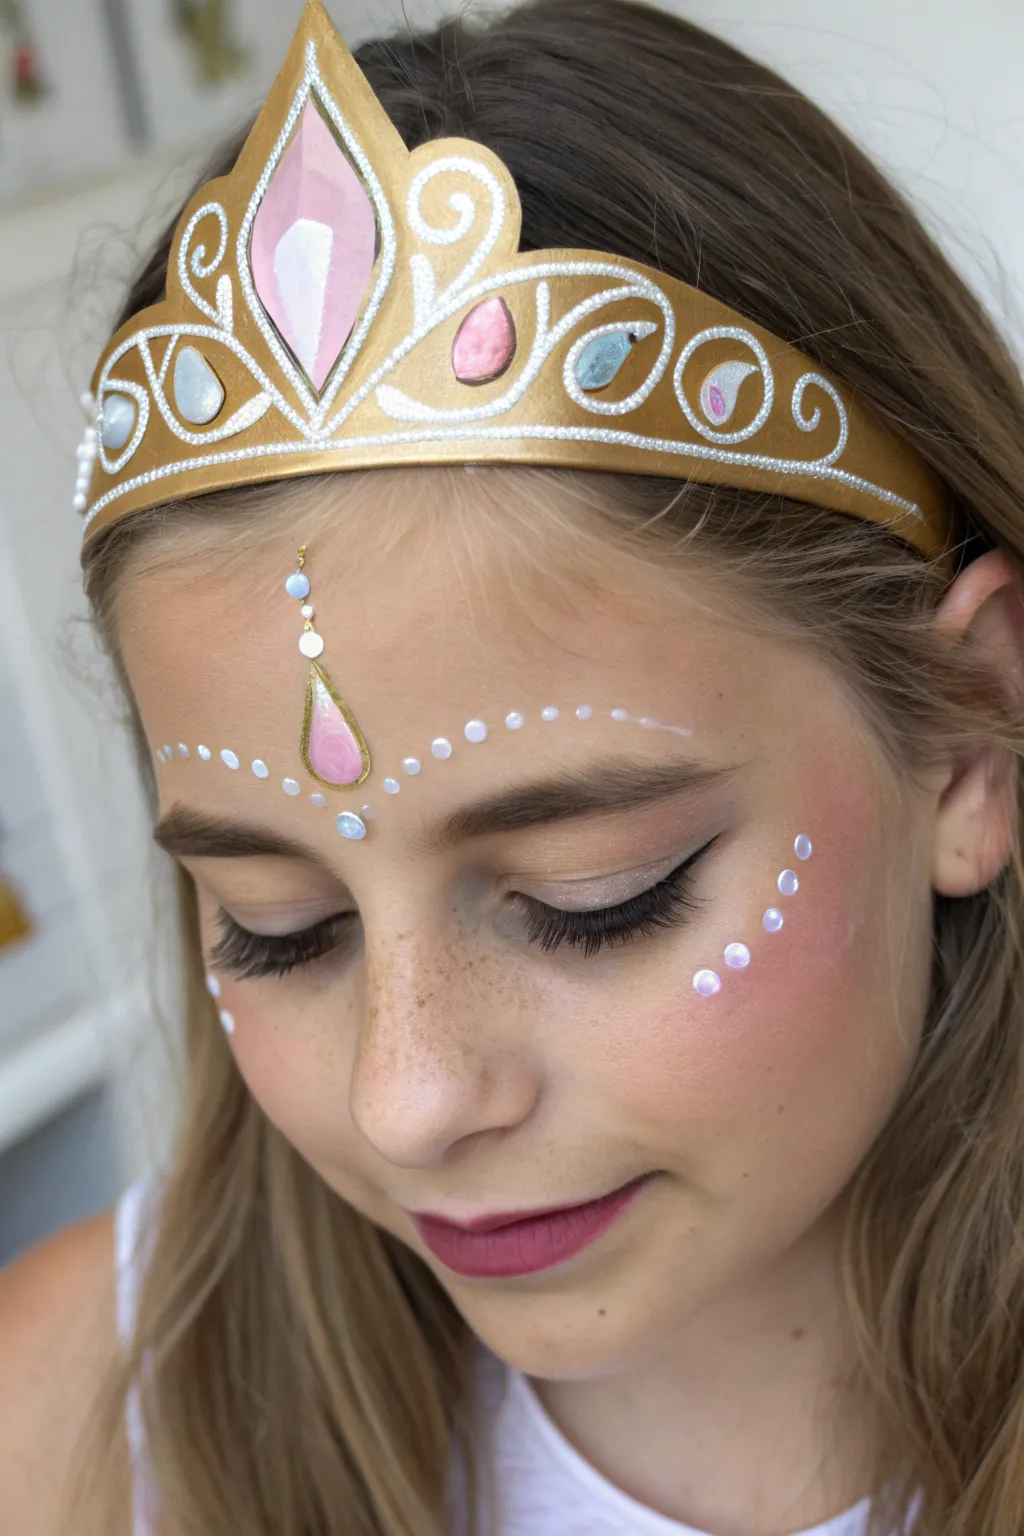
Transform into royalty with this dual-part project that combines a custom-crafted foam crown with delicate face painting details. The look features a shimmering gold headpiece adorned with faux gems and matching makeup accents for a truly magical finish.
Detailed Instructions
Materials
- Gold craft foam sheet or gold cardstock
- Puffy paint (white or silver glitter)
- Acrylic gems or faux jewels (pink, light blue)
- Craft glue or hot glue gun
- Headband base (plain plastic)
- Face paint palette (white, gold, pale pink, blue)
- Fine detail face paint brush (size 0 or 1)
- Round face paint brush (size 3)
- Setting powder
- Makeup blush (rose pink)
- Black liquid eyeliner
- Makeup sponges
- Adhesive face gems (optional)
Step 1: Crafting the Crown
-
Draft the Shape:
Begin by sketching a crown silhouette onto the back of your gold foam sheet. Aim for a central tall peak flanked by two smaller swooping curves on each side to mimic the design in the photo. -
Cut Out the Base:
Carefully cut along your traced lines with sharp scissors. Ensure the bottom edge is slightly curved to fit comfortably against the forehead. -
Add the Centerpiece:
Cut a distinct diamond or teardrop shape from pink metallic paper or use a large flat-back craft gem. Glue this securely in the center of the tallest peak. -
Decorate with Gems:
Position smaller teardrop or oval gems—alternating pink and light blue—inside the side curves of the crown. Secure them with a small dab of glue. -
Outline with Puffy Paint:
Using white or silver glitter puffy paint, carefully trace roughly 3mm insde the outer edge of the entire gold shape. This creates a defined border. -
Add Swirl Details:
Use the same puffy paint to draw decorative swirls and loops around the gems. I find steadying my hand on the table helps keep these lines smooth and fluid. -
Mount to Headband:
Once the puffy paint is completely dry (give it a few hours), glue the bottom edge of the foam crown onto a plain headband so it sits upright.
Uneven Dots?
If your painted dots aren’t round, try using the back end of a paintbrush handle like a stamp. Dip it in paint and press once for perfect circles.
Step 2: Face Painting & Makeup
-
Apply Base Blush:
Start with a clean face. Use a sponge or fluffy brush to sweep a generous amount of rose-pink blush across the cheeks, blending upwards toward the temples. -
Define the Eyes:
Apply a simple black winged liner to the upper lash line. Keep the wing subtle and slightly lifted at the outer corner. -
Paint the Forehead Drop:
With a fine brush and gold face paint, draw a teardrop outline in the center of the forehead. Fill the inside with a shimmering pale pink paint. -
Add the Connecting Chain:
Above the pink teardrop, use white face paint to make three small vertical dots, connecting the jewel design toward the hairline. -
Create the Bead Strand:
Dip a small round brush or the end of a brush handle into white face paint. Press gently to create a symmetrical row of dots arching from the center jewel outward across the forehead. -
Paint Cheek Accents:
On the left cheekbone, paint a diagonal line of four increasing-sized dots using white paint. Add a dab of iridescent glitter or pale blue to the center of each dot for sparkle. -
Highlight the Inner Corner:
Add a tiny touch of white or pearl shimmer to the inner corner of the gold forehead jewel to make it look like a reflective gemstone. -
Lip Color:
Finish the makeup with a swipe of matte berry or rose lipstick that complements the blush tone. -
Final Touches:
If desired, you can gently tap a little extra gold glitter gel over the painted forehead jewelry for extra shine.
Keep it Steady
Rest your pinky finger gently on the model’s face (use a dry sponge as a buffer) to stabilize your hand while painting fine details like the jewelry outline.
Now you have a complete princess look ready for any costume party or royal tea time

PENCIL GUIDE
Understanding Pencil Grades from H to B
From first sketch to finished drawing — learn pencil grades, line control, and shading techniques.
Explore the Full Guide
Mermaid Scales Eye Mask
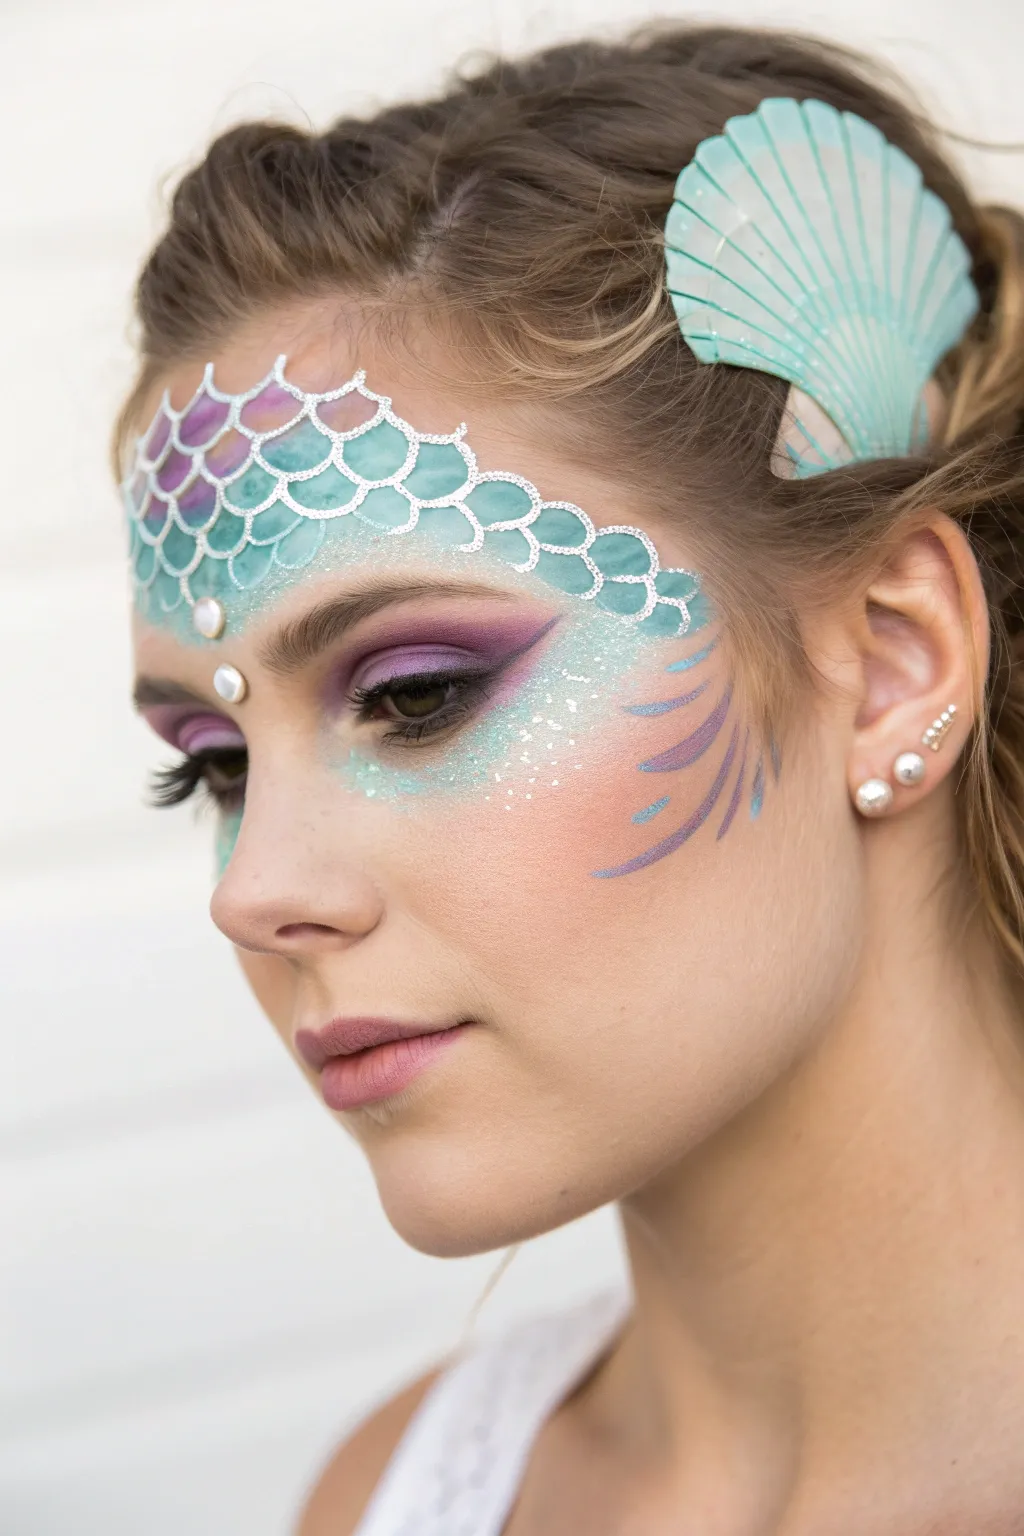
Transform into an ethereal creature of the deep with this delicate mermaid scale design. This look combines soft teal and purple gradients with crisp white detailing and sparkling gems for a magical, underwater effect.
How-To Guide
Materials
- Face paint (teal/aqua, light purple, white)
- Mermaid scale stencil
- Makeup sponge or dauber
- Fine detail brush (round #1 or #2)
- Small flat brush
- Cosmetic glitter gel or loose glitter (iridescent/silver)
- Adhesive face gems (pearls)
- Large seashell hair accessory
- Eyeshadow (purple, deep plum)
- Mascara/false lashes
Step 1: Setting the Scene: Eyes & Base
-
Prep the eyelid:
Begin with a clean face. Apply your regular foundation if desired, then sweep a light purple eyeshadow across the entire eyelid as a base. -
Deepen the crease:
Using a blending brush, work a darker plum or deep purple eyeshadow into the crease and outer corner of the eye to create depth and drama. -
Define the lash line:
Apply a thin line of black eyeliner along the upper lash line. Finish the eyes with mascara or a pair of natural-looking false lashes for fluttery definition.
Keep it Crisp
When stenciling, use a ‘dry’ sponge. Squeeze out almost all water before loading paint to prevent bleeding under the stencil lines.
Step 2: Creating the Scales
-
Position the stencil:
Hold a mermaid scale stencil firmly against the forehead. Position it so it rests just above the eyebrow and curves down toward the temple. -
Apply the first color:
Load a slightly damp sponge with teal or aqua face paint. Gently dab the sponge over the stencil, focusing on the lower and outer sections of the design. -
Blend the gradient:
Flip your sponge to a clean side or use a fresh dauber loaded with light purple paint. Dab this into the upper/center area of the stencil, blending it slightly where it meets the teal for a seamless transition. -
Reveal the scales:
Carefully lift the stencil straight up to avoid smudging the design. Let this base layer dry for a moment. -
Outline the scales:
Using a fine detail brush and white face paint (or a metallic silver liquid liner), carefully trace the outline of each scale. Connect them to create a continuous netted pattern. -
Add highlights:
I like to add tiny ‘U’ shapes or dots of white paint at the bottom curve of a few scales to make them look dimensional and wet.
Oceanic Glow
Mix a tiny bit of liquid highlighter into your teal face paint for a pearlescent finish that catches the light like real scales.
Step 3: Magical Details
-
Paint the sweeping fins:
On the cheekbone, below the outer corner of the eye, paint three to four curved, sweeping strokes using a mix of purple and blue to mimic fin spines. -
Highlight the fins:
Use your fine detail brush with a silvery-white paint to add thin highlights to these fin strokes, giving them movement. -
Apply glitter:
Tap a cosmetic glitter gel or loose iridescent glitter over the temple area and the upper cheekbone, fading it out toward the hairline for a mystical shimmer. -
Place the gems:
Apply a medium-sized pearl gem right in the center of the forehead pattern, just above the brow bone. Add a second gem slightly higher up within the scale pattern. -
Accessorize:
Clip a large, teal-painted seashell accessory into the hair on the same side as the face paint to complete the aquatic theme.
Now you are ready to make a splash at your next costume party with this elegant ocean-inspired style
Dragon Brow And Cheek Sweep
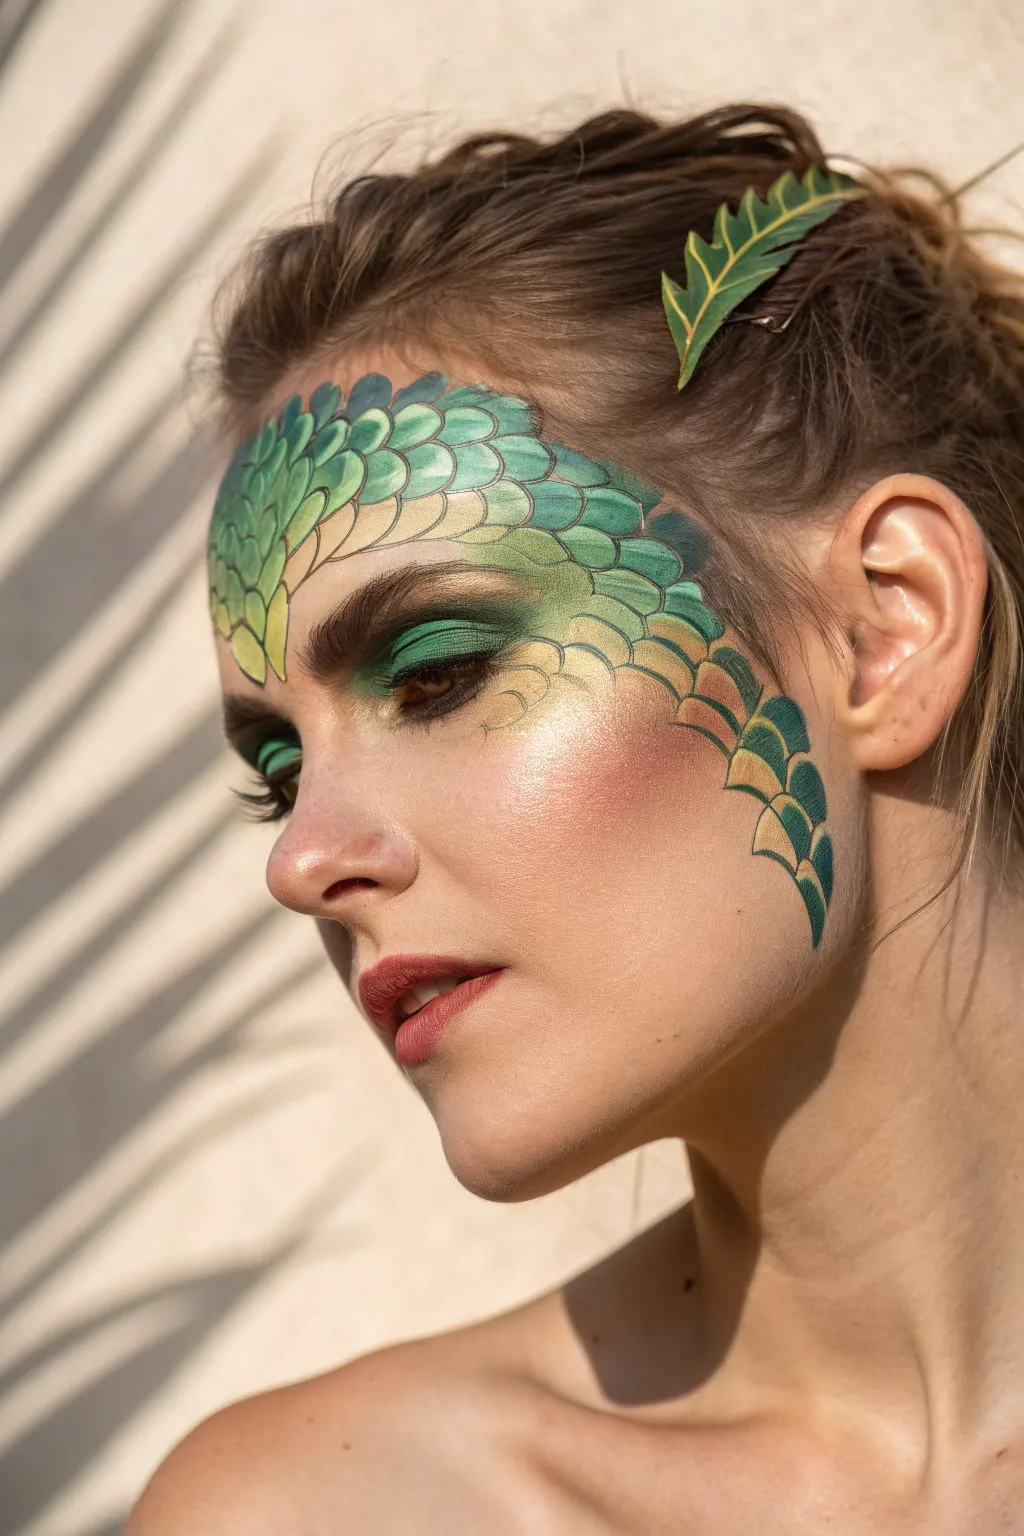
Transform into a mythical creature with this striking dragon scale face paint design that sweeps elegantly across the brow and temple. The look combines gradient greens and sharp linework for a dimensional, reptilian effect that feels both fierce and enchanting.
Step-by-Step
Materials
- Face paint palette (forest green, lime green, teal, yellow, white)
- Black face paint (liquid or cake)
- Round brushes (sizes 2 and 4)
- Fine liner brush (size 0 or 00)
- High-density sculpted sponge or petal sponge
- Matte green eyeshadow
- Shimmery gold or yellow eyeshadow
- Makeup brush (fluffy blender)
- Artificial leaves (optional hair accessory)
- Setting spray
Step 1: Base Preparation
-
Prime the canvas:
Start with a clean, dry face. If the skin is oily, a light dusting of translucent powder helps the paint adhere better. -
Apply base complexion:
Apply your regular foundation or base makeup, including concealer, highlighting and contouring the cheekbones slightly with a warm blush to complement the green tones later.
Step 2: Eye Makeup
-
Lay down the shadow:
Before painting scales, load a fluffy brush with forest green eyeshadow and pack it onto the eyelid, sweeping it slightly upward towards the brow bone. -
Add dimension:
Blend a lighter, lime green or gold shimmer into the inner corner of the eye to create a bright, glowing effect. -
Deepen the crease:
Use a darker teal or black shadow in the outer V of the eye to add depth, blending thoroughly for a seamless, smoky look.
Scale Stamping Hack
Use a fishnet stocking stretched over a sponge to create instant scale texture, or cut a makeup sponge into a perfect ‘U’ shape for uniform stamping.
Step 3: Painting the Scales
-
Map the shape:
Visualize a sweeping curve that starts high on the forehead, dips over the eyebrow, and trails down the cheekbone towards the jawline. -
Load the sponge:
Take a petal sponge or a sculpted wedge and load it with a gradient of paint—forest green at the wide end, fading into teal, lime green, and finally yellow at the tip. -
Stamp the forehead scales:
Beginning at the center of the forehead, press the sponge down to create U-shaped scale impressions. Ensure the yellow tip points downward or outward to create the highlight. -
Create the gradient sweep:
Continue stamping scales in overlapping rows, following the curve of the eyebrow and moving down toward the temple. I like to slightly rotate the sponge as I move down the face to follow the bone structure. -
Detail the cheek scales:
As you move down the cheek, switch to smaller stamps or use a brush to hand-paint the smaller scales that taper off near the jawline, keeping the yellow/green gradient consistent. -
Fill the gaps:
Use a small round brush loaded with yellow or lime green paint to fill in the centers of any scales that look too transparent or patchy.
Fixing Wobbly Lines
If your black outlines get shaky, wait for them to dry completely, then use a damp Q-tip to gently erase the mistake before reapplying.
Step 4: Outlining and Creating Depth
-
Outline the top scales:
Using a fine liner brush and black paint, carefully outline the top edge of each scale with a thin, crisp line. -
Add crisp edges:
Continue outlining the remaining scales. Use varying line pressure—press slightly harder on the curves and lift off for thinner ends to make the scales look organic. -
Define the separation:
Ensure each scale is distinct from its neighbor by darkening the V-shape where scales overlap, which mimics a shadow. -
Paint decorative veins:
Inside the larger scales on the forehead, use extremely diluted black or dark green paint to flick tiny, vein-like lines for added texture.
Step 5: Finishing Touches
-
Highlighting:
With a fine brush and white paint, add tiny specs or lines on the lightest yellow part of the scales to make them look wet or shiny. -
Mascara:
Coat the lashes with black mascara to frame the eyes against the green backdrop. -
Lip color:
Apply a matte mauve or terracotta lipstick to balance the cool tones of the green scales. -
Accessorize:
Pin two artificial green leaves into the hair near the temple to visually connect the hairstyle with the face art. -
Set the look:
Mist the entire face with a setting spray to prevent the water-activated paints from smudging throughout the day.
Step back and admire your fierce new look, ready for any fantasy event or costume party


Pirate Bandana And Scar
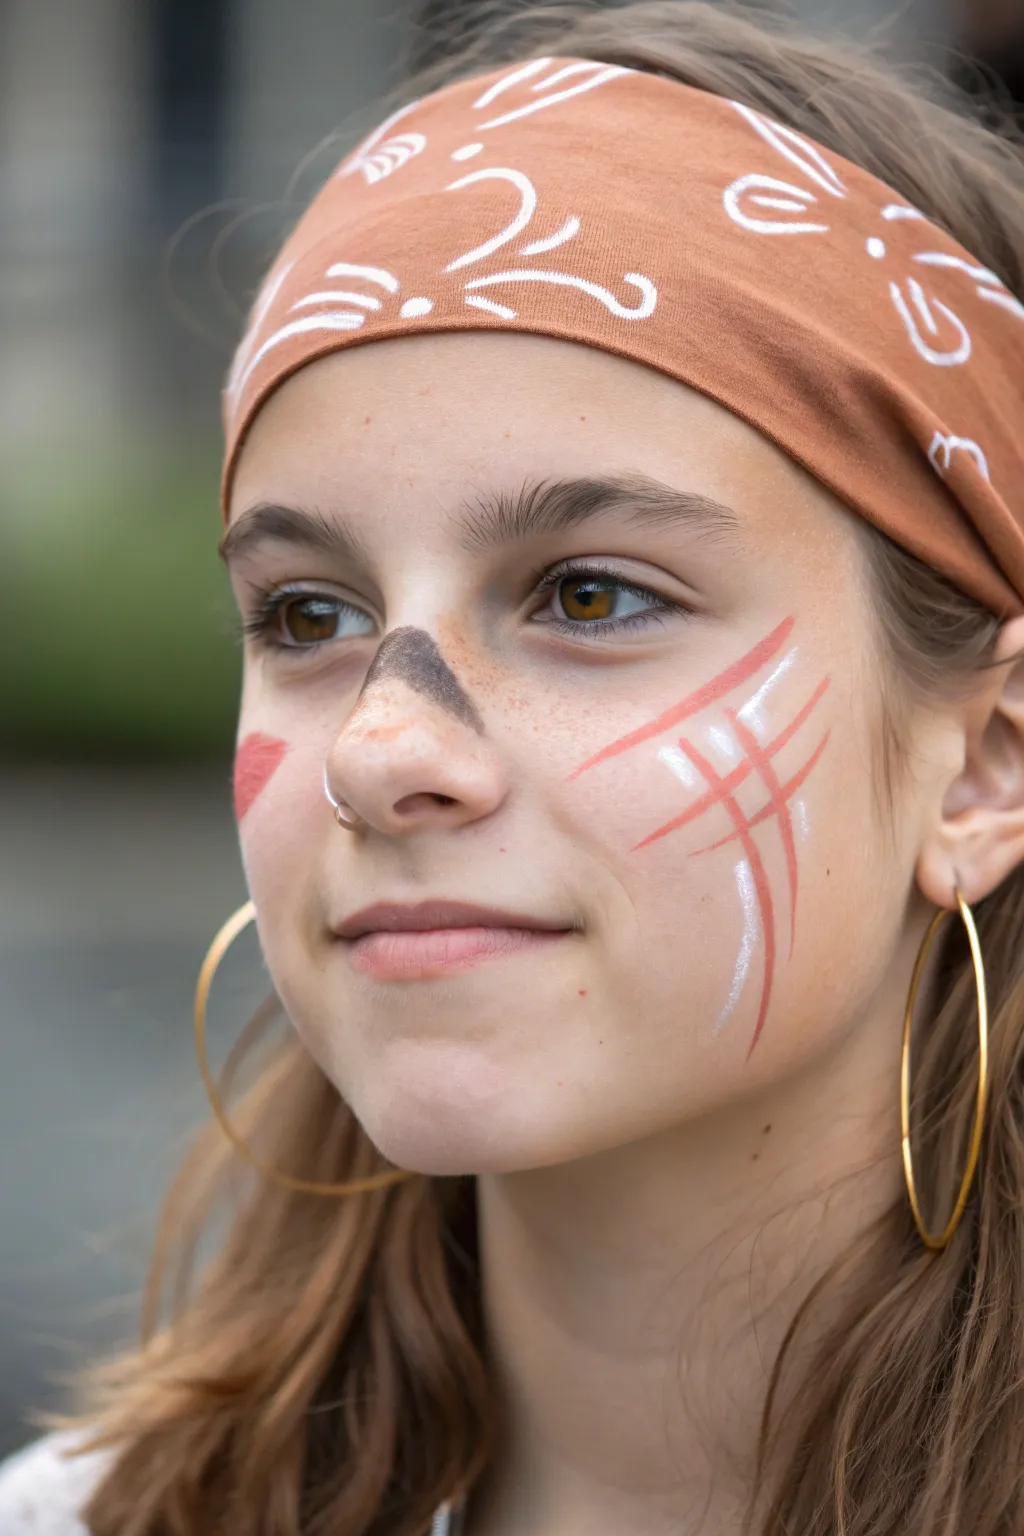
Transform into a stylish buccaneer with this subtle yet effective pirate look that combines custom accessories with precise face painting. This design features a personalized hand-painted bandana and rugged facial details like a faux scar and smudged nose.
Step-by-Step Guide
Materials
- Rust or brown colored fabric bandana
- White fabric paint or white acrylic paint
- Fine detail paintbrush
- Face paint palette (Red, White, Brown/Black)
- Face painting sponges
- Thin round face paint brush
- Cup of water
- Paper towels
Step 1: Preparing the Bandana
-
Lay It Flat:
Start by ironing your rust-colored bandana so it is perfectly smooth. Lay it flat on a protected work surface where it won’t slip. -
Plan the Design:
Visualize a series of abstract, swirling line designs. We are aiming for organic white shapes that resemble stylized leaves, whiskers, or abstract tribal marks. -
Paint the Motifs:
Using a fine detail brush and white fabric paint, carefully paint curved, sweeping lines across the fabric. Create groupings of three or four lines that fan out slightly. -
Add Details:
Intersperse small dots or tinier dashes between your larger swirls to add texture. I find that keeping the design somewhat asymmetrical makes it look more authentic. -
Let it Dry:
Allow the fabric paint to dry completely according to the bottle instructions before tying it around the head to avoid smudging.
Smudge Control
If the nose ‘dirt’ looks too solid, dab it with a clean, barely damp sponge to lift some pigment and create a more textured, worn look.
Step 2: Creating the Face Paint Look
-
Clean Canvas:
Ensure the face is clean and dry. Tie the dried bandana securely around the forehead, positioning it just above the eyebrows to frame the face. -
The Soot Nose:
Dampen a sponge slightly and pick up a small amount of brown or charcoal grey face paint. You want a ‘dry brush’ texture here, not a wet wash. -
Smudge Application:
Gently dab the sponge on the bridge and tip of the nose. Twist the sponge slightly as you press to create a natural, uneven ‘dirt’ effect rather than a perfect circle. -
Red Base for Scar:
Load a thin round brush with muted red or terracotta face paint. On one cheek, paint three distinct diagonal lines slanting downward. -
Curve the Lines:
Make the lines slightly curved to follow the contour of the cheekbone. The center line can be the longest, with the outer two slightly shorter. -
Cross-Hatch:
Paint two or three varying lines crossing perpendicularly through your diagonal lines to create a cross-hatch or ‘hashtag’ scar pattern. -
Highlighting the Scar:
Clean your thin brush thoroughly and load it with bright white face paint. This step adds dimension and makes the scar pop. -
Adding Light:
Carefully paint thin white lines right alongside the red lines. You don’t need to outline every single stroke; focusing on the intersections creates the best 3D effect. -
The Cheek Smudge:
Using the residue left on your brown/grey sponge, add a tiny, faint smudge to the opposite cheek for balance. -
Styling Accessories:
Complete the look by adding large gold hoop earrings if the person has pierced ears, or clip-ons if not.
Glitter Treasure
For a magical pirate twist, lightly tap a gold cosmetic glitter over the white highlights of the scar while the paint is still slightly tacky.
Now you are ready to set sail with a look that is equal parts rugged pirate and artistic flair
Friendly Clown Details
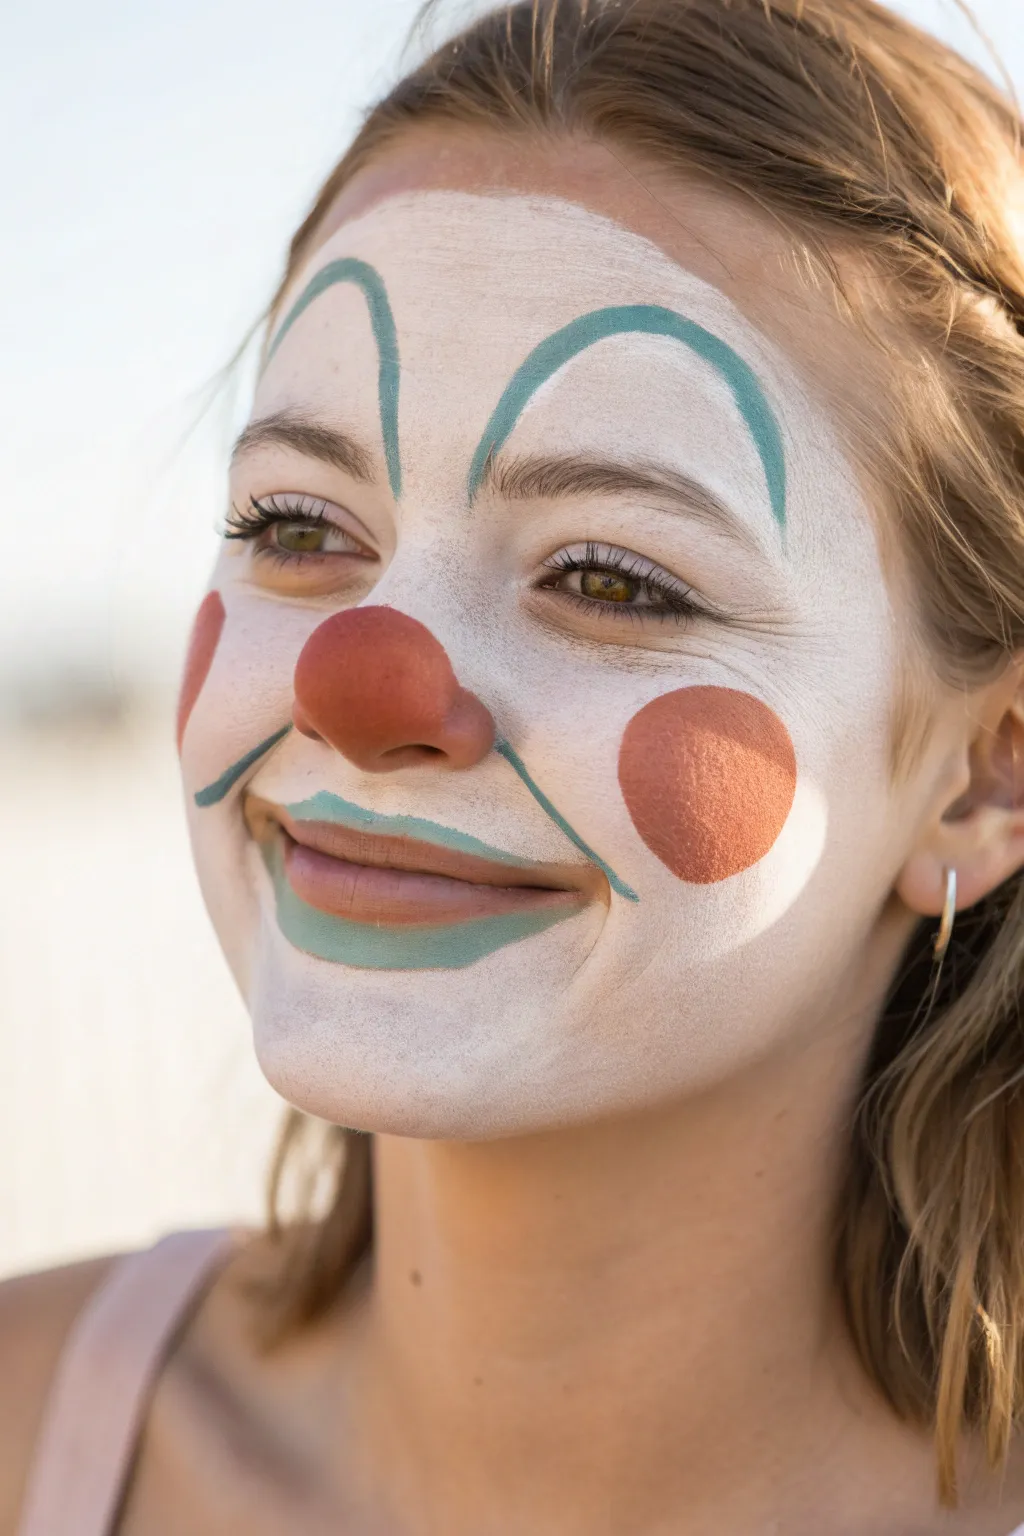
Capture the nostalgic charm of the big top with this soft and approachable clown design. Instead of harsh lines, this look relies on gentle curves and warm tones to create a playful character perfect for festivals or costume parties.
Detailed Instructions
Materials
- White cream face paint (water-based preferred)
- Red face paint (warm, dusty shade)
- Small teal or sea-foam green face paint
- High-density makeup sponge
- Medium round brush
- Small detail brush
- Translucent setting powder (optional)
- Powder brush
Step 1: Setting the Canvas
-
Cleanse and prep:
Begin with a clean, dry face. Ensure all oils or moisturizers are fully absorbed so the paint adheres evenly without streaking. -
Load the sponge:
Dampen your high-density sponge slightly and load it generously with white face paint. The consistency should be creamy, not drippy. -
Establish the base shape:
Create the classic clown mask shape by stippling the white paint onto the face. Cover the forehead, nose, cheeks, and chin, but leave the skin around the outer edges of the face natural. -
Smooth the edges:
Using the cleaner side of the sponge, fade the white edges outward slightly so they don’t look like a hard sticker. The goal is a soft, integrated boundary. -
Set the base:
If you are painting in hot weather, lightly dust the white areas with translucent powder now to prevent smudging while you work on details.
Patchy White Base?
If the white base looks streaky, your sponge might be too wet. Squeeze it out thoroughly, reload the paint, and use a ‘patting’ or stippling motion rather than dragging it across the skin.
Step 2: Adding Warmth and Character
-
Paint the nose:
Using a medium round brush loaded with warm red paint, cover the tip of the nose. Keep the shape round and bulbous rather than sharp. -
Create the cheeks:
With the same red paint and brush (or a small round sponge), paint distinct red circles on the apples of the cheeks. I find placing them high near the eye line makes the expression more cheerful. -
Draw the lip line:
Switch to a smaller brush with red paint. Outline the natural lips, but extend the corners outward and slightly upward to create a permanent smile. -
Fill the lower lip:
Fill in the bottom lip completely with the red paint, leaving the upper lip mostly natural or lightly tinted for a softer expression. -
Add corner accents:
At the very ends of your extended smile lines, add a tiny vertical tick mark to emphasize the dimples of the clown mouth.
Step 3: Teal Accents and Details
-
Start the eyebrows:
Load a medium round brush with teal or sea-foam green paint. Start well above the natural brow line, creating a high arch. -
Thicken the arches:
Trace over the teal eyebrows to thicken the line, tapering it to a thinner point at the outer ends. These high arches create that perpetually surprised and happy look. -
Add the eye creases:
Using a fine detail brush and the teal paint, draw a thin line extending from the outer corner of the eye downwards, following the natural crease. -
Under-lip highlight:
Paint a curved teal line underneath the red lower lip. This mimics the exaggerated painted mouth often seen in vintage clown makeup. -
Connect the smile:
Extend that under-lip teal line upward to meet the corners of the red smile, essentially enclosing the bottom lip in a teal cup. -
Final check:
Step back and assess symmetry. If the teal lines look too stark, you can lightly tap them with a clean finger to soften the pigment.
Pro Tip: Eye Clarity
Leave a tiny gap of unpainted skin right along the lower lash line when applying the white base. This prevents the paint from getting into the eyes and causing watering, which ruins the design.
Finish by putting on a colorful wig or hat to complete your transformation into a cheerful circus icon
Classic Zombie Grunge
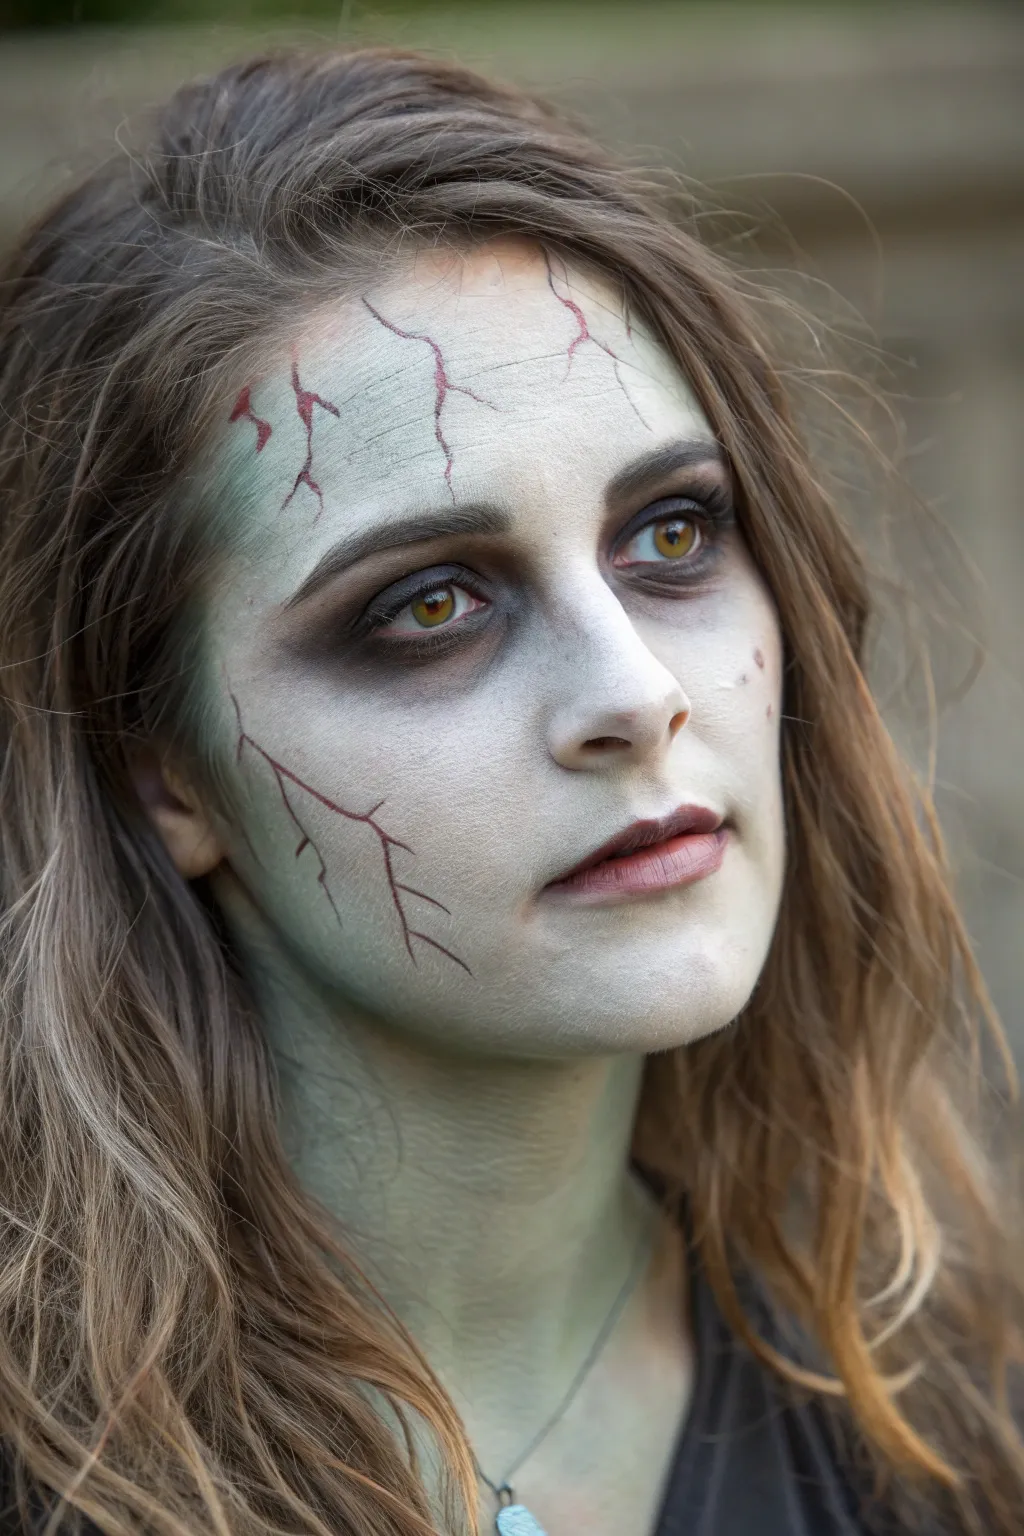
Master the art of the undead with this hauntingly realistic zombie look that balances grit with a strange, faded elegance. This design features sunken eyes, a pallid grey-green complexion, and delicate crimson veins that look like fractured porcelain.
Step-by-Step Tutorial
Materials
- White cream face paint
- Grey cream face paint
- Green cream face paint (dull olive tone)
- Black eyeshadow or cosmetic powder
- Dark red or burgundy lip liner pencil (fine tip)
- Red cream paint (for blending)
- Makeup sponges (wedges)
- Fluffy blending brush
- Fine detail brush
- Translucent setting powder
- Contact lenses (optional: yellow/hazel)
Step 1: The Pallid Base
-
Prep the canvas:
Start with a clean, dry face. Tie back hair to ensure full coverage of the forehead and jawline. -
Mix the death pallor:
On a palette or the back of your hand, mix a large amount of white cream paint with a small dab of grey and a hint of olive green. You want a sickly, desaturated minty-grey tone, not a bright cartoon green. -
Apply the base layer:
Using a damp makeup sponge, stipple the color all over your face. Don’t forget your neck and ears; stopping at the jawline ruins the illusion. -
Create texture:
Instead of smoothing the paint perfectly, keep dabbing with the sponge to create a slightly mottled, uneven texture that mimics decaying skin. -
Set the base:
Lightly dust translucent setting powder over the entire face with a large fluffy brush to lock the cream paint in place and prevent smudging during the next steps.
Fixing Muddy Colors
If your contour looks too muddy or dark, dip a clean sponge into your base white/green mix and lightly dab over the edges to blend it back out.
Step 2: Shadows and Hollows
-
Darken the sockets:
Load a fluffy blending brush with black eyeshadow. Start packing the color into the inner corners of your eyes and sweep it outward across the entire eyelid. -
Under-eye circles:
Bring the black shadow underneath the lower lash line, blending it downward into a half-moon shape. I tend to go heavier near the nose bridge to make the eyes look deeper set. -
Contour the face:
Using the same black shadow (or a dark grey), contour heavily under the cheekbones, temples, and jawline. This creates a gaunt, emaciated skeletal structure. -
Hollow the nose:
Lightly shade the sides of your nose bridge to connect the eye sockets to the rest of the face, narrowing the nose appearance. -
Add red irritation:
Take a tiny bit of red cream paint or burgundy eyeshadow and blend it softly right along the lower lash line. This makes the eyes look sore and infected.
Step 3: Veins and Details
-
Map the cracks:
Sharpen your dark red lip liner pencil to a fine point. Draw jagged, lightning-bolt shapes starting from the hairline and cheekbones, moving inward toward the center of the face. -
Variety in line width:
Press harder at the start of the vein (the ‘root’) and lift pressure as you taper the line out to a wispy end. This mimics natural capillaries. -
Branching out:
Add smaller ‘Y’ shaped branches coming off the main veins. Keep the lines shaky and organic rather than perfectly straight. -
Smudge for depth:
Use a clean detail brush or a Q-tip to very gently smudge just the thickest parts of the red lines. This makes them look like they are under the skin, not just drawn on top. -
Lip color:
Apply a brownish-red lipstick, blotting most of it off so it looks like a stain. Dab a little black shadow in the center of the lips for a dried-out effect. -
Neck detailing:
Extend the green base paint down the neck and lightly contour the collarbones with grey shadow to match the gaunt face.
Level Up: Contact Lenses
Add yellow or cloudy white contact lenses as the final touch. They instantly remove humanity from the eyes and make the red rimming pop significantly.
With your sunken eyes and fragile veins complete, you are ready to walk among the living with terrifying grace
Snowflakes And Frosty Glow
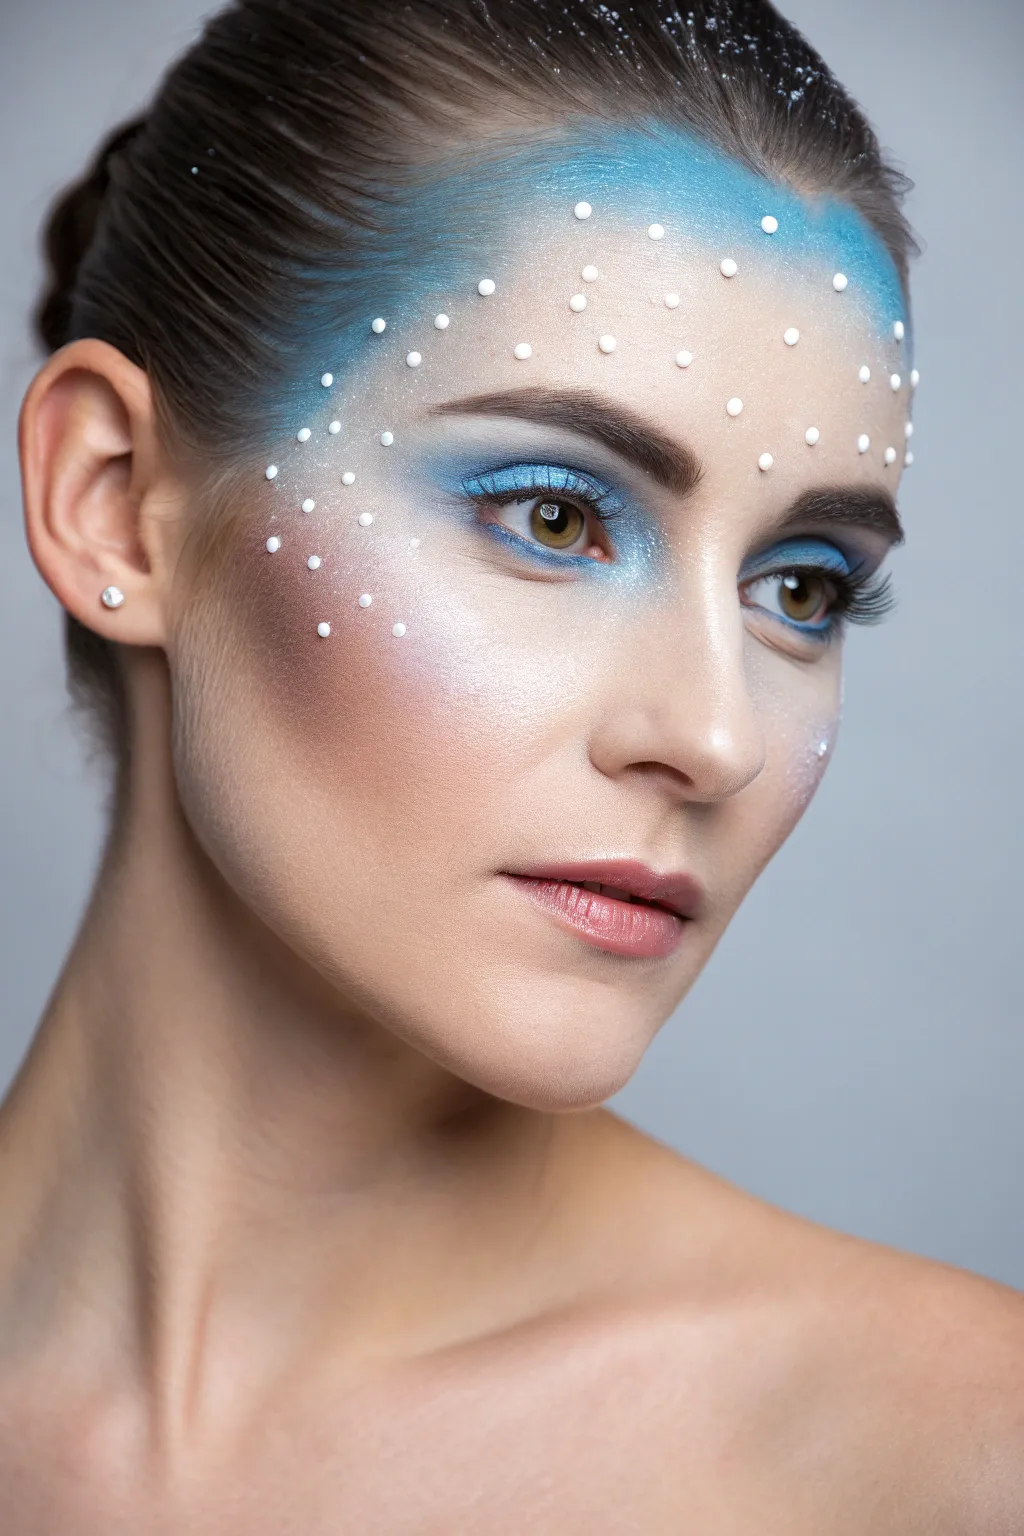
Transform into an ethereal winter spirit with this frosty, high-fashion face paint design. Combining cool blue gradients with delicate pearl embellishments, this look captures the sparkling beauty of a fresh snowfall.
Step-by-Step Guide
Materials
- Matte foundation (match to skin tone)
- Contour powder
- Turquoise or light blue face paint (water-activated)
- White shimmer face paint or liquid highlighter
- Blue eyeshadow palette (shimmery and matte)
- Flat cosmetic pearls (various sizes)
- Eyelash glue or skin-safe adhesive
- Setting spray
- Sponge applicators
- Fluffy blending brushes
- Fine detail brush
- Mascara
- False eyelashes (optional)
- Glitter spray or loose cosmetic glitter (silver/white)
Step 1: Base and Contour
-
Prep the canvas:
Start with a clean, moisturized face. Apply a matte foundation that matches your natural skin tone to create an even base. -
Sculpt the features:
Use a contour powder to define the cheekbones and jawline sharply. You want a structured look to contrast with the soft makeup that follows. -
Highlight points:
Apply a standard highlighter to the bridge of the nose and the cupid’s bow to bring light to the center of the face.
Adhesion Secret
Use clear-drying eyelash glue for the pearls. It holds well but peels off gently without hurting your skin later.
Step 2: The Frosty Gradient
-
Apply the blue base:
Using a damp sponge and turquoise face paint, stipple color onto the upper forehead, fading it down toward the eyebrows. -
Blend the temples:
Extend this blue hue down into the temples and wrap it slightly around the outer corner of the eye socket. -
Create the white frost:
Taking a clean sponge and white shimmer paint, dab over the top of the cheekbones, blending it upward to meet the blue fade. This creates that icy, frosted transition. -
Soften the edges:
Use a clean, fluffy brush to buff out any harsh lines where the paint meets your skin foundation.
Level Up: Icy Brows
Brush white concealer or face paint through your eyebrows with a spoolie to give them a frozen, frosted appearance.
Step 3: Eyes of Ice
-
Lay the shadow base:
Sweep a shimmery blue eyeshadow across the entire eyelid, extending it slightly above the crease. -
Deepen the crease:
I like to use a slightly darker matte blue in the outer corner and crease to add dimension and depth to the eyes. -
Brighten the inner corner:
Pack a bright white or silver shimmer shadow into the inner corners of the eyes to make them pop. -
Define the lower lash line:
Smudge the blue shadow gently under the lower lashes, connecting it to the outer corner wing. -
Lashes:
Apply black mascara to top and bottom lashes. For extra drama, add a pair of wispy false eyelashes.
Step 4: Embellishment
-
Plan the pearls:
Visualize a scattered pattern. You want the pearls densely packed near the forehead and more spread out as they move down the cheek. -
Adhere larger pearls:
Dip the back of your largest pearls into eyelash glue. Allow the glue to get tacky for 30 seconds, then place them randomly on the forehead and upper cheekbone. -
Fill with medium pearls:
Repeat the process with medium-sized pearls, filling in gaps around the temples and brow bone. -
Add tiny details:
Using tweezers for precision, place the smallest pearls or rhinestones at the outer edges of the design for a fading effect. -
Final glitter dust:
Sprinkle a tiny amount of cosmetic glitter into the hairline or spray a fine glitter mist over the blue painted areas for a snow-kissed finish. -
Lips:
Keep the lips neutral with a rosy nude lipstick or gloss to ensure focus remains on the eyes and forehead.
Step back and admire your cool, crystalline transformation into a winter muse
Bunny Nose And Whiskers
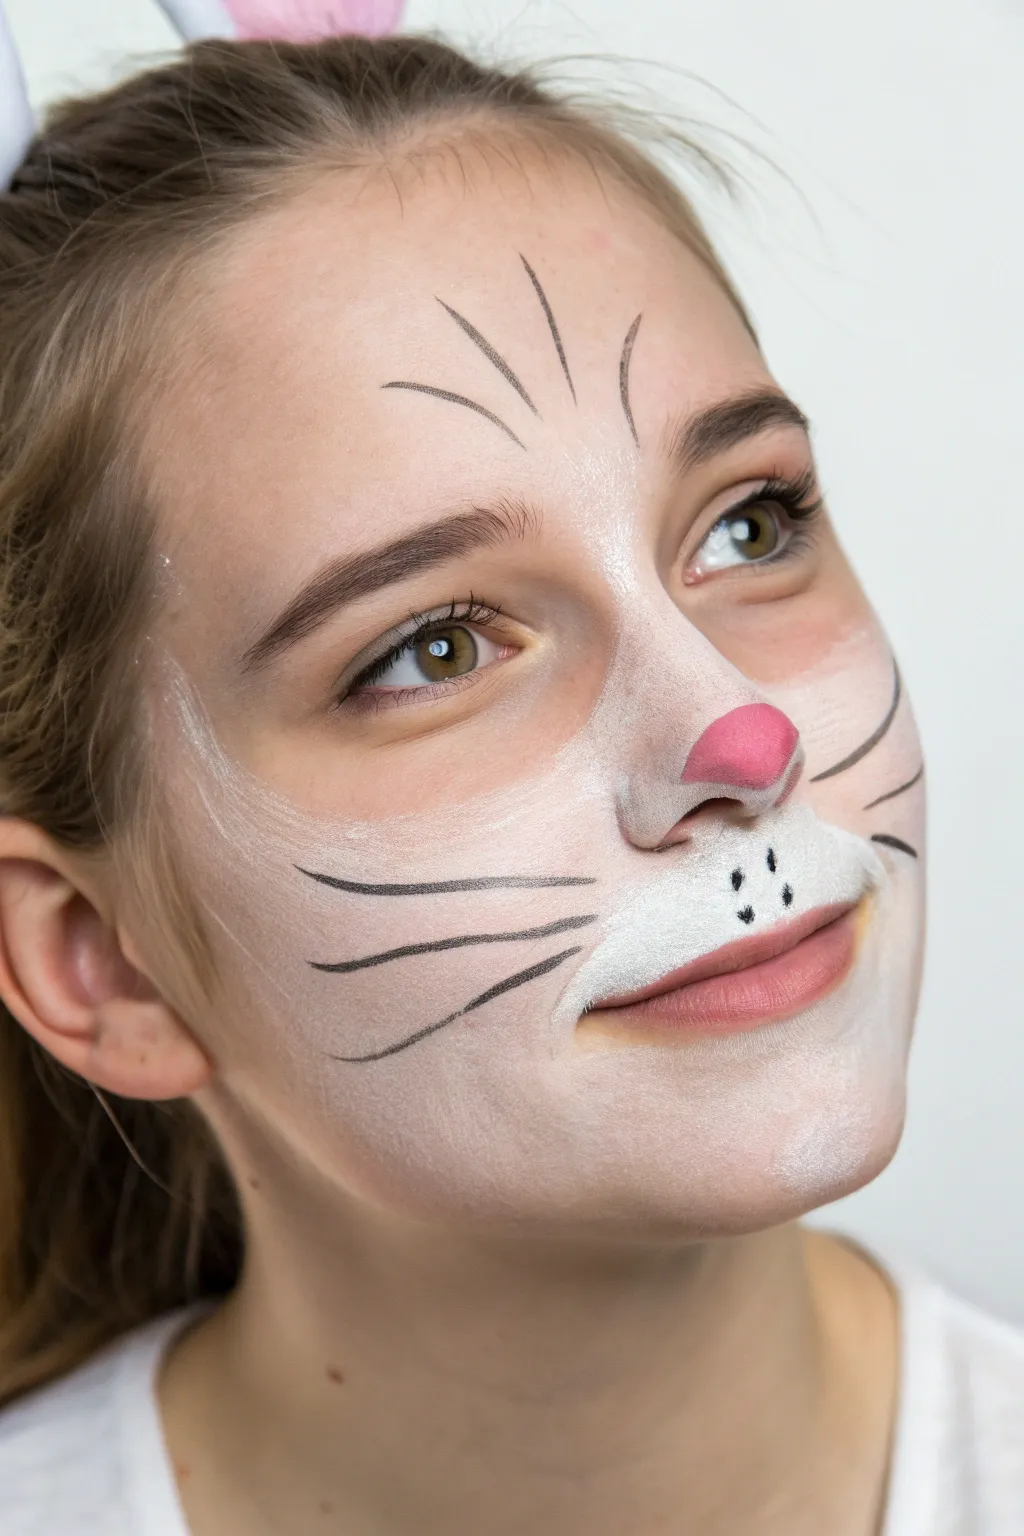
Transform into an adorable rabbit with this soft and sweet face paint design. Featuring fluffy white patches, defined whiskers, and a cute pink nose, this look is perfect for Easter or any costume party.
Step-by-Step Tutorial
Materials
- White face paint
- Light pink face paint
- Black face paint
- Makeup sponge
- Medium round brush
- Fine liner brush
- Cup of water
- Paper towels
Step 1: Creating the Fluffy Base
-
Load the sponge:
Dampen your makeup sponge slightly and rub it into the white face paint until you have a creamy consistency, ensuring it’s not too watery appropriately. -
Paint the muzzle:
Gently dab the white paint onto the upper lip area, extending it slightly past the corners of the mouth and up towards the nose to create a soft muzzle shape. -
Highlight the nose bridge:
Continue sponging the white paint up the bridge of the nose, stopping just below the eyebrows. -
Create cheek highlights:
Dab white patches onto the apples of the cheeks, blending the edges softly outward so distinct lines aren’t visible. -
Add forehead fluff:
Sponge a triangular patch of white in the center of the forehead, fanning it slightly upward. -
Blend the edges:
Use the clean side of your sponge to gently feather out the edges of all the white areas, creating a soft, fur-like transition into the natural skin tone.
Sponge Technique Tip
Don’t drag the sponge! Use a rapid up-and-down dabbing motion (stippling) to build opaque coverage without streaking the white paint.
Step 2: Adding the Pink Nose
-
Load the round brush:
Wet your medium round brush and load it thoroughly with the light pink face paint. -
Paint the nose tip:
Color in just the very tip of the nose in a rounded triangle shape. I like to keep the bottom edge straight for a neater look. -
Fill opacity:
If the pink looks streaky, wait a moment for the first layer to dry and dab on a second coat for a vibrant pop of color.
Sparkle Upgrade
While the white paint is still slightly tacky, lightly tap some cosmetic-grade iridescent glitter over the cheeks for a magical bunny shimmer.
Step 3: Defining with Details
-
Switch brushes:
Clean your brush or switch to a fine liner brush and load it with black paint. You want ink-like consistency here for sharp lines. -
Outline the nose (optional):
For extra definition, you can carefully trace the bottom edge of the pink nose, though this particular look keeps it soft and outline-free. -
Draw the muzzle dots:
Place three or four small black dots on either side of the white muzzle area on the upper lip. -
Paint the whiskers:
Starting from the cheek area just outside the muzzle, paint three long, sweeping lines outwards on each cheek. Press down at the start and lift off quickly at the end for tapered points. -
Add forehead details:
Paint three curved, vertical lines floating above the eyebrows on the forehead—one in the center and two angling outward—to mimic tufts of fur. -
Clean up:
Check for any uneven edges or smudges and gently wipe them away with a damp Q-tip or corner of a paper towel.
Now you are ready to hop off to your next springtime adventure with this sweet new look
Dinosaur Scales And Horns
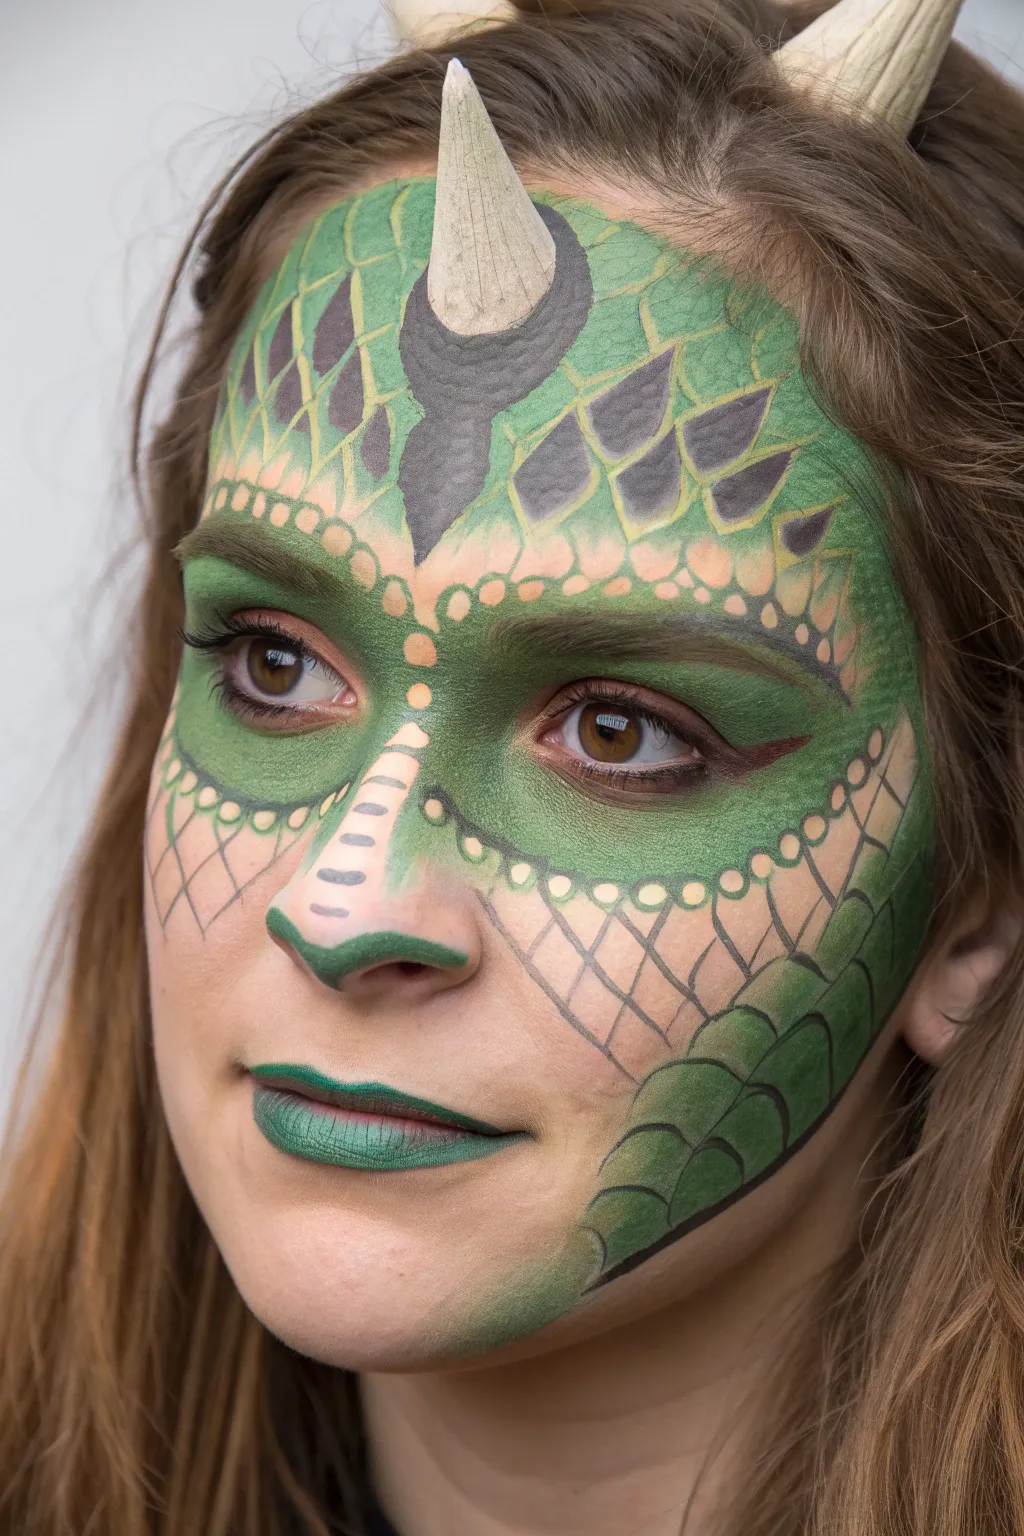
Transform yourself into a prehistoric creature or fantasy beast with this detailed green scale design, complete with realistic 3D horns. This look combines soft blending with sharp linework to create depth and texture that feels like real reptile skin.
Step-by-Step
Materials
- Light green face paint
- Medium forest green face paint
- Dark grey/black face paint
- Metallic gold or bronze shimmer powder
- Black eyeliner pencil or detail brush
- Makeup sponge wedges
- Medium round brush
- Fine liner brush
- Two lightweight cone-shaped horns (latex or foam)
- Spirit gum or prosthetic adhesive
- Liquid latex (optional, for blending horns)
- Green lipstick
Step 1: Setting the Scene
-
Attach the Horns:
Before any paint touches your skin, decide on the placement of your horns. Apply a thin layer of spirit gum to the base of the main forehead horn and the smaller side horn. Tap the adhesive until tacky, then press firmly onto the center of the forehead and upper temple area. -
Blend the Edges:
If you have liquid latex handy, dab a small amount around the base of each horn to seamless blend the prosthetic edges into your skin. Let this dry completely until clear. -
Base Green Layer:
Load a slightly damp makeup sponge with your light green face paint. Stipple this color across the forehead, around the eyes, down the bridge of the nose, and onto the upper cheekbones, creating a mask-like shape. -
Contouring:
Using the same sponge or a medium brush, pick up the medium forest green paint. Dab this around the outer edges of the face, the temples, and under the cheekbones to create a shadowed contour effect.
Scale Stencil Trick
Running out of time? Pull a pair of fishnet stockings over your head before applying the green base. Sponge over the netting to create instant scale patterns.
Step 2: Mapping the Scales
-
Painting the Eye Area:
Deepen the eye area using the forest green paint with a brush, covering the eyelids and extending slightly outward like a winged liner to intensify the gaze. -
Forehead Scale Outline:
With a fine liner brush and black paint, carefully draw a ‘V’ shape starting from the base of the center horn, extending upwards towards the hairline. Fill this central shape with dark grey paint to simulate a heavy, armored plate. -
Detailing the Horn Plate:
Around the main horn base, use black paint to create a dark border, making the horn look like it’s pushing through the skin. -
Drawing Top Scales:
On the forehead, paint rows of diamond or leaf-shaped scales radiating outward from the center. Fill the top half of these scales with dark grey or black, leaving the bottom edges green to suggest dimension. -
Creating the Ridge:
Along the brow bone and upper cheek, paint a scalloped border using small semi-circles. I like to use a lighter hand here so the green base shows through the centers of the circles.
Adhesive Issues
If the horns won’t stick because of sweat or oil, clean the skin spot thoroughly with rubbing alcohol first to maximize the grip of the spirit gum.
Step 3: Refining Texture and Lower Face
-
Nose Bridge Details:
Paint horizontal dashes down the center of the nose bridge using dark grey paint. This mimicks the ridged texture of a reptile snout. -
Cross-Hatching the Cheeks:
Below the eyes on the cheeks, switch to a very thin liner brush. Draw a delicate cross-hatch or fishnet pattern using thin black lines to represent smaller, finer skin texture. -
Highlighting:
Take a pale yellow or very light green paint on a small brush and add tiny dots or lines to the center of the scales and the nose ridge. This ‘pop’ of light makes the texture look 3D. -
Jawline Scales:
On the lower jaw and side of the chin, paint larger, overlapping semi-circle scales. Shade the top of each scale curve with dark green to make them look like overlapping plates. -
Gold Shimmer:
Dust a little metallic gold or bronze powder over the eyelids and the high points of the forehead scales for a magical, iridescent finish. -
Finishing the Lips:
Apply a coat of green lipstick. To tie it all together, outline the lips thinly with your dark green or black liner brush.
Now you are ready to roar with a prehistoric look that is bound to turn heads
Shark Mouth Illusion
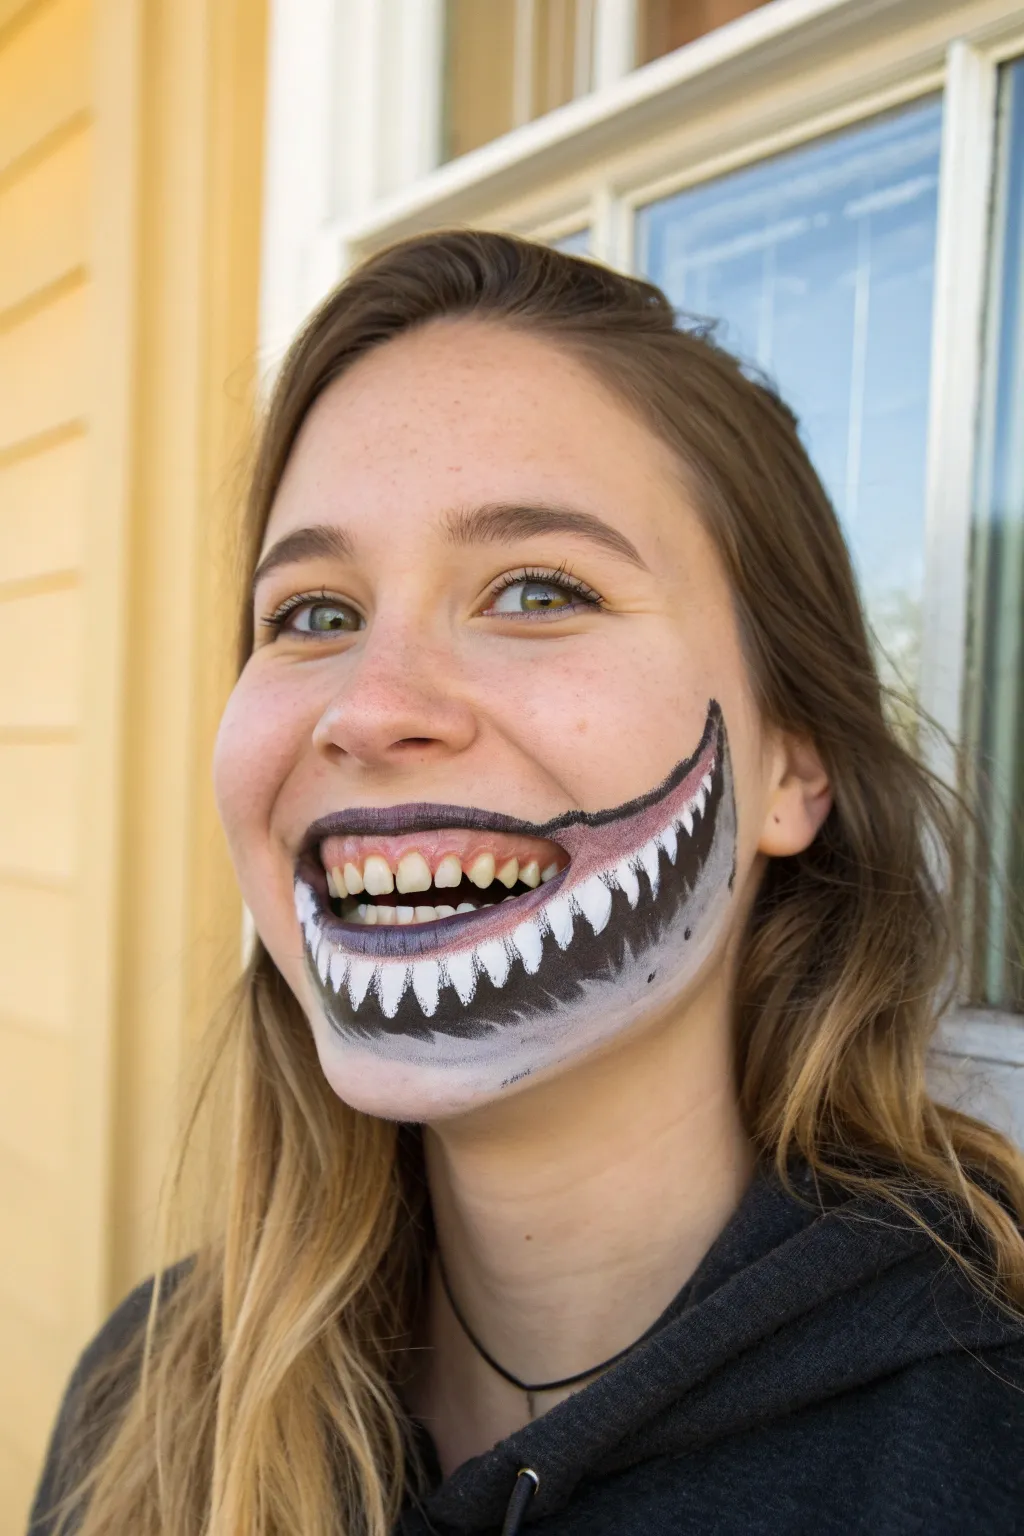
Transform your innocent smile into a fearsome predator’s bite with this clever optical illusion face paint. By using your own upper teeth as the top row, the painted bottom jaw creates an unsettling and jagged grin that extends down your chin.
How-To Guide
Materials
- White face paint
- Black face paint
- Grey face paint (or mix black and white)
- Purple or dark red face paint (for shading)
- Round detail brush (size 2 or 3)
- Flat shader brush
- Small cup of water
- Paper towels
- Cosmetic sponge
Step 1: Planning the Jawline
-
Analyze your smile:
Stand in front of a mirror and give a wide, toothy grin. Notice where your natural lip line sits; the illusion works best if you keep your real mouth slightly open throughout the painting process. -
Outline the new mouth:
Using a thin brush and light grey paint, sketch a swooping line that starts at the corners of your real mouth (the commissures). Curve this line down onto your chin, much lower than your actual bottom lip, creating a wide, U-shaped shark jaw. -
Extend the corners:
Extend the lines slightly upwards past the corners of your mouth to create that eerie, stretched Joker-like grin effect, blending it into your cheeks.
Stay Put
Use ‘lip safe’ face paint or a black lipstick for the area covering your actual bottom lip. Standard face paint wears off quickly on mucous membranes.
Step 2: Creating the Teeth
-
Outline the bottom teeth:
Switch to your white face paint and a detail brush. Along your new lower jawline, paint a row of sharp, triangular teeth pointing upward. -
Align the points:
Try to make the bottom teeth look like they would interlock with your real top teeth. The ones in the center should be the largest, getting smaller as they go back toward the corners of the mouth. -
Fill them in:
Fill in these triangles with solid white paint. While I usually do one coat, you might need two to ensure they are opaque and bright against your skin. -
Add a lip highlight:
Take a tiny bit of white paint and dab a faint highlight on your actual bottom lip if it will be visible, though mostly we will be covering the area below it with darkness.
Step 3: Painting the Void
-
Fill the inner mouth:
Using black paint and a flat brush, fill in the entire space between your real bottom lip and the new painted white teeth. This creates the ‘inside’ of the shark’s mouth. -
Cover the real lip:
Carefully paint over your actual bottom lip with the black paint as well. This is crucial for the illusion—making your real lip disappear into the dark void of the shark’s mouth. -
Refine the edges:
Use the detail brush with black paint to clean up the edges around the white teeth triangles, making them look razor-sharp against the black background.
Teeth Not Matching?
If painted teeth look too bright compared to natural teeth, mix a tiny dot of yellow or ivory into your white paint for a more realistic enamel match.
Step 4: Shading and Details
-
Create the gum line:
Mix a dark purplish-grey color. Use this to paint a rim under the painted white teeth, simulating the shark’s gum line and adding depth to the jaw. -
Outline the jaw:
Outline the very bottom edge of the painted jaw with a soft grey line to separate the shark art from your neck and chin skin. -
Smudge for realism:
Use a slightly damp sponge or your finger to gently smudge that grey outline downward, fading it into your natural skin tone so it doesn’t look like a sticker. -
Add teeth definition:
With a very fine brush and diluted black or grey paint, add tiny cracks or separation lines between the white painted teeth to make them look individual rather than a solid block. -
Final check:
Smile wide in the mirror again. Check that the black interior connects seamlessly with the corners of your mouth. -
Set the makeup:
If you have translucent setting powder, lightly dust the painting (avoiding the wet black areas until dry) to prevent smudging.
Flash your fearsome new grin and watch people do a double-take at your optical illusion
Rainbow Eye Swoop Accent

Transform a standard makeup look into a vibrant celebration with this sleek rainbow eye design. By combining bold block colors with a dynamic sweeping shape, you create a striking profile that looks professional yet is surprisingly achievable.
Step-by-Step Guide
Materials
- Face paint palette (must include red, orange, yellow, green, blue, purple)
- Small flat brush (1/4 inch or similar)
- Fine liner brush
- Medium round brush
- Water cup
- Paper towels or makeup wipe
- Setting spray (optional)
- Black liquid eyeliner
- Mascara
Step 1: Preparation and Base
-
Start fresh:
Begin with a clean, dry face. If the subject is wearing foundation, ensure it has been set with powder so the face paint doesn’t slide around or become muddy. -
Plan your trajectory:
Visualize the main swoop. It should start heavily on the eyelid, curve under the outer corner of the eye, and sweep diagonally down across the cheekbone, ending roughly in line with the corner of the mouth.
Split Cake Hack
Use a ‘split cake’ (a rainbow paint block) and a wide flat brush to paint all colors in one single stroke for identical results in seconds.
Step 2: Painting the Main Swoop
-
Load the red:
Using a small flat brush or a medium round brush, load up vibrant red paint. Make sure the consistency is creamy, not too watery or drippy. -
Apply the top arch:
Start on the eyelid just above the crease. Paint a bold red stripe that follows the natural curve of the brow bone, extends outwards, and begins the downward curve onto the cheek. -
Add orange:
Clean your brush thoroughly. Load the orange paint and apply it directly beneath the red. slightly overlap the edges while the paint is damp to create a soft transition, but keep the colors distinct. -
Layer the yellow:
Continue painting the yellow stripe right under the orange. This color is crucial for brightness, so apply a second coat if needed to ensure opacity. -
Start the lower curve with green:
Switch to green. This stripe will likely sit right at the outer corner of the eye and start guiding the swoop shape downward more sharply across the cheek. -
Paint the blue:
Apply the blue stripe beneath the green. As you move down the cheek, begin to taper the ends of your strokes slightly so they look like brush marks rather than solid blocks. -
Finish with purple:
Add the final purple stripe at the bottom. This line defines the lower edge of the swoop. Let the tail end of the purple streak fade out naturally or use a dry brush to feather the end. -
Refine the tail:
Check the ends of the rainbow on the cheek. If they look too blunt, use a slightly damp, clean brush to drag the very tips downward to create that ‘feathery’ artistic finish shown in the photo.
Step 3: The Forehead Accent
-
Position the accent:
Locate a spot on the forehead, slightly off-center on the same side as the eye design. You are creating a mini-rainbow that curves upward toward the hairline. -
Paint the curve:
I find it easiest to use a smaller round brush here. Replicate the color order—red on top, purple on bottom—painting a short, arched C-shape that mimics the larger design.
Add Sparkle
While the paint is still slightly tacky, press cosmetic-grade biodegradable glitter onto the red stripe for extra dimension.
Step 4: Details and Definition
-
Apply eyeliner:
Once the face paint on the eyelid is completely dry, apply a sharp wing of black liquid eyeliner along the upper lash line. This grounds the look and separates the eye from the paint. -
Add mascara:
Apply a coat or two of black mascara to the upper and lower lashes to open up the eye. -
White highlights:
Using a very fine liner brush and white face paint, add two or three tiny, thin scratches or lines at the very bottom tail of the cheek swoop. This adds movement and texture. -
Clean up:
Use a cotton swab with a tiny bit of makeup remover to sharpen any edges that got messy, particularly around the inner eye area. -
Set the look:
If you need this to last all day, lightly mist the painted areas with a setting spray, holding the bottle at arm’s length.
Now you have a dynamic, colorful profile that captures the joy of a rainbow with an artistic edge
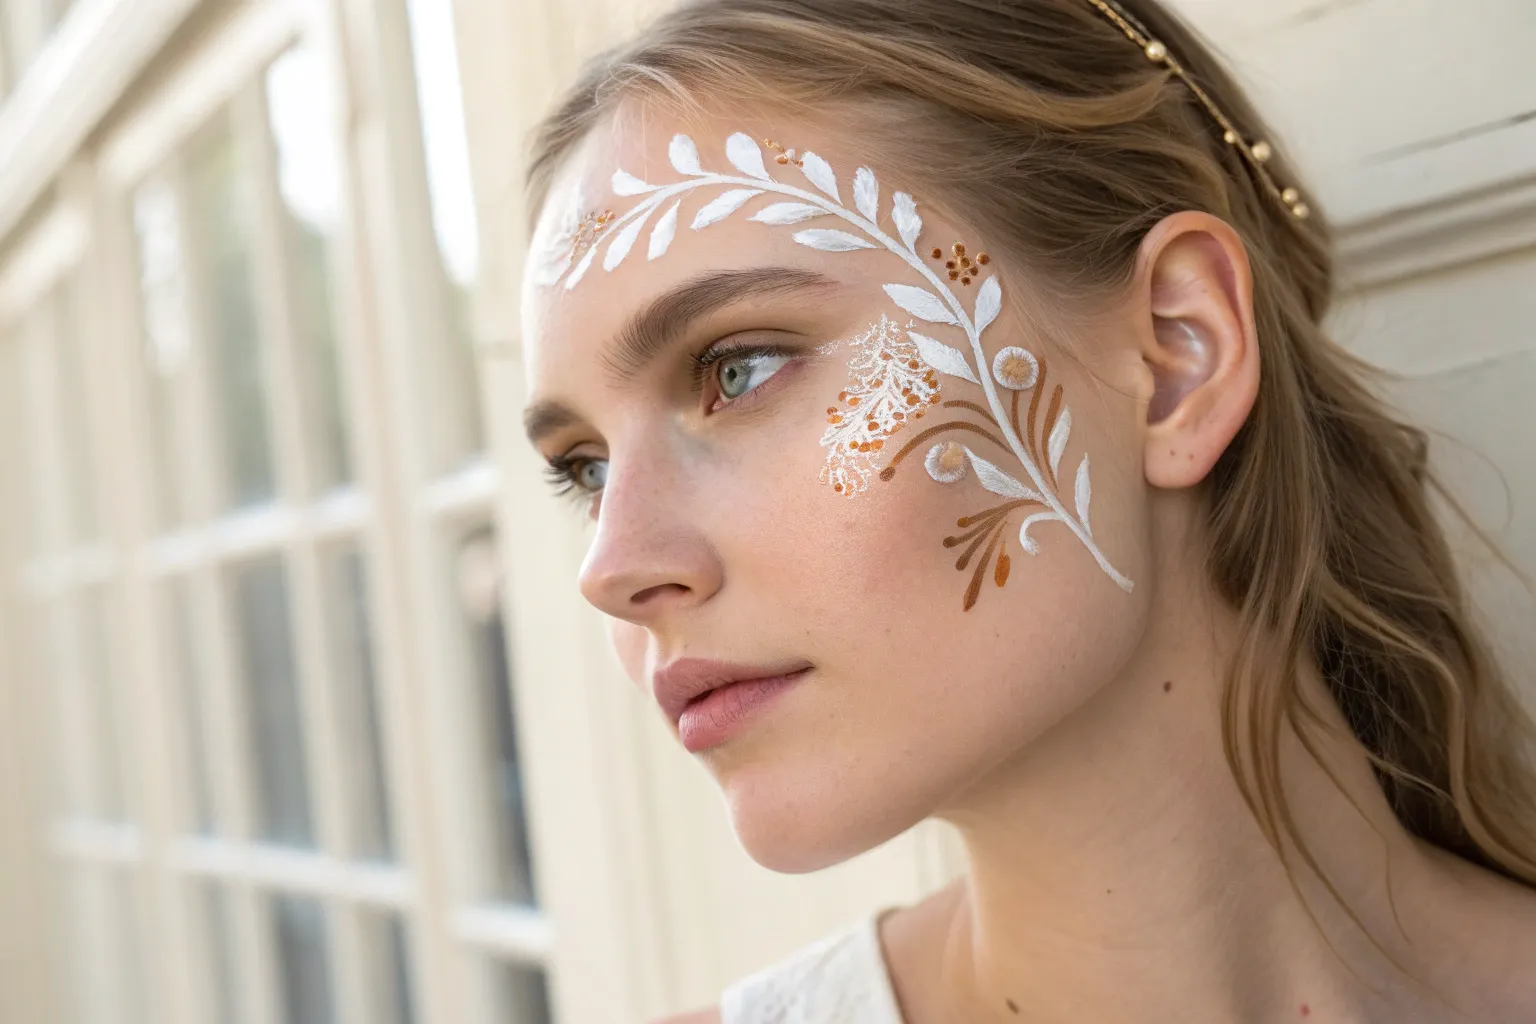
Quick Floral Forehead Garland

Transform into an ethereal forest spirit with this delicate face paint design that mimics climbing vines and soft blooms. The look combines gentle pastel washes on the eyelids with structured, leafy strokes that frame the face beautifully.
Detailed Instructions
Materials
- Water-activated face paints (Sage Green, Mint Green, Pastel Pink, Lilac, White)
- Round brush (size 2 or 3) for details
- Flat brush (small/medium) for eyeshadow area
- Small petal brush or filbert brush
- Cup of water
- Sponge or paper towels for blotting
- Setting spray (optional)
- Artificial flower crown (for styling)
Step 1: The Base Layer
-
Prep the canvas:
Begin with a clean, dry face. If you have oily skin, a light dusting of translucent powder can help the paint grip better and last longer. -
Create the pink wash:
Using a slightly damp flat brush or a small sponge, pick up the Pastel Pink face paint. Gently pat this color onto the eyelids, extending it slightly upward toward the brow bone and outward past the outer corners of the eyes. -
Blend the edges:
Before the pink paint dries completely, use a clean, slightly damp brush to soften the edges so the color fades naturally into the skin rather than having a harsh line. -
Inner corner highlight:
Dab a tiny amount of Mint Green or a pale teal near the inner corner of the eyelid and blend it softly into the pink for a subtle, iridescent transition.
Brush Technique Tip
For realistic leaves, press the belly of the round brush down fully, then slowly lift while dragging to create a sharp, tapered point.
Step 2: Vines and Leaves
-
Paint the central forehead sprig:
Load a size 2 round brush with Sage Green. Start right between your eyebrows and paint a central stem moving upward. Add two curved leaves branching out on either side, resembling a sprouting plant. -
Add pastel accents to the center:
Using the Lilac and Pastel Pink, paint elongated teardrop shapes between the green leaves on the forehead, creating a fan-like floral burst. -
Draft the cheek vine:
Reload your round brush with Sage Green. Starting from the outer corner of the left eye, paint a thin, wandering line that curves down onto the cheekbone. -
Add main leaves:
Along this vine, press down and lift your brush to create tear-shaped leaves pointing downward and outward. Vary the pressure to make some leaves thicker and others delicate. -
Layer in lighter foliage:
Switch to Mint Green on the same brush. Paint smaller, lighter leaves interspersed among the darker sage ones to add depth and dimension to the greenery.
Step 3: Floral Details & Finishing Touches
-
Paint cheek blossoms:
Using a small filbert or petal brush loaded with White and a touch of Lilac, press the brush flat against the skin near the top of the cheekbone vine to create soft, rounded flower petals. -
Detail the flowers:
Once the petals are dry, use a fine tip brush to add tiny dots or circles in the center of the flowers using a darker purple or pink for contrast. -
Add falling petals:
Paint a few stray Lilac teardrop shapes ‘falling’ below the main vine on the cheek, giving the impression of loose petals drifting in the wind. -
Create faux freckles:
Dilute a small amount of light brown face paint or use a brown eyeliner pencil. Gently dot freckles across the nose and upper cheeks, concentrating them where the sun would naturally hit. -
Set the look:
I like to mist a final layer of setting spray over the face from a distance to lock everything in place. -
Crown it:
Place your artificial flower crown on your head, positioning it so it sits just above your painted forehead design without covering your hard work.
Add Some Magic
While the paint is still slightly tacky, press cosmetic-grade glitter onto the center of the flowers or the tips of the leaves for sparkle.
Now you are ready to wander through the garden with your magical floral design
Camouflage Face Paint
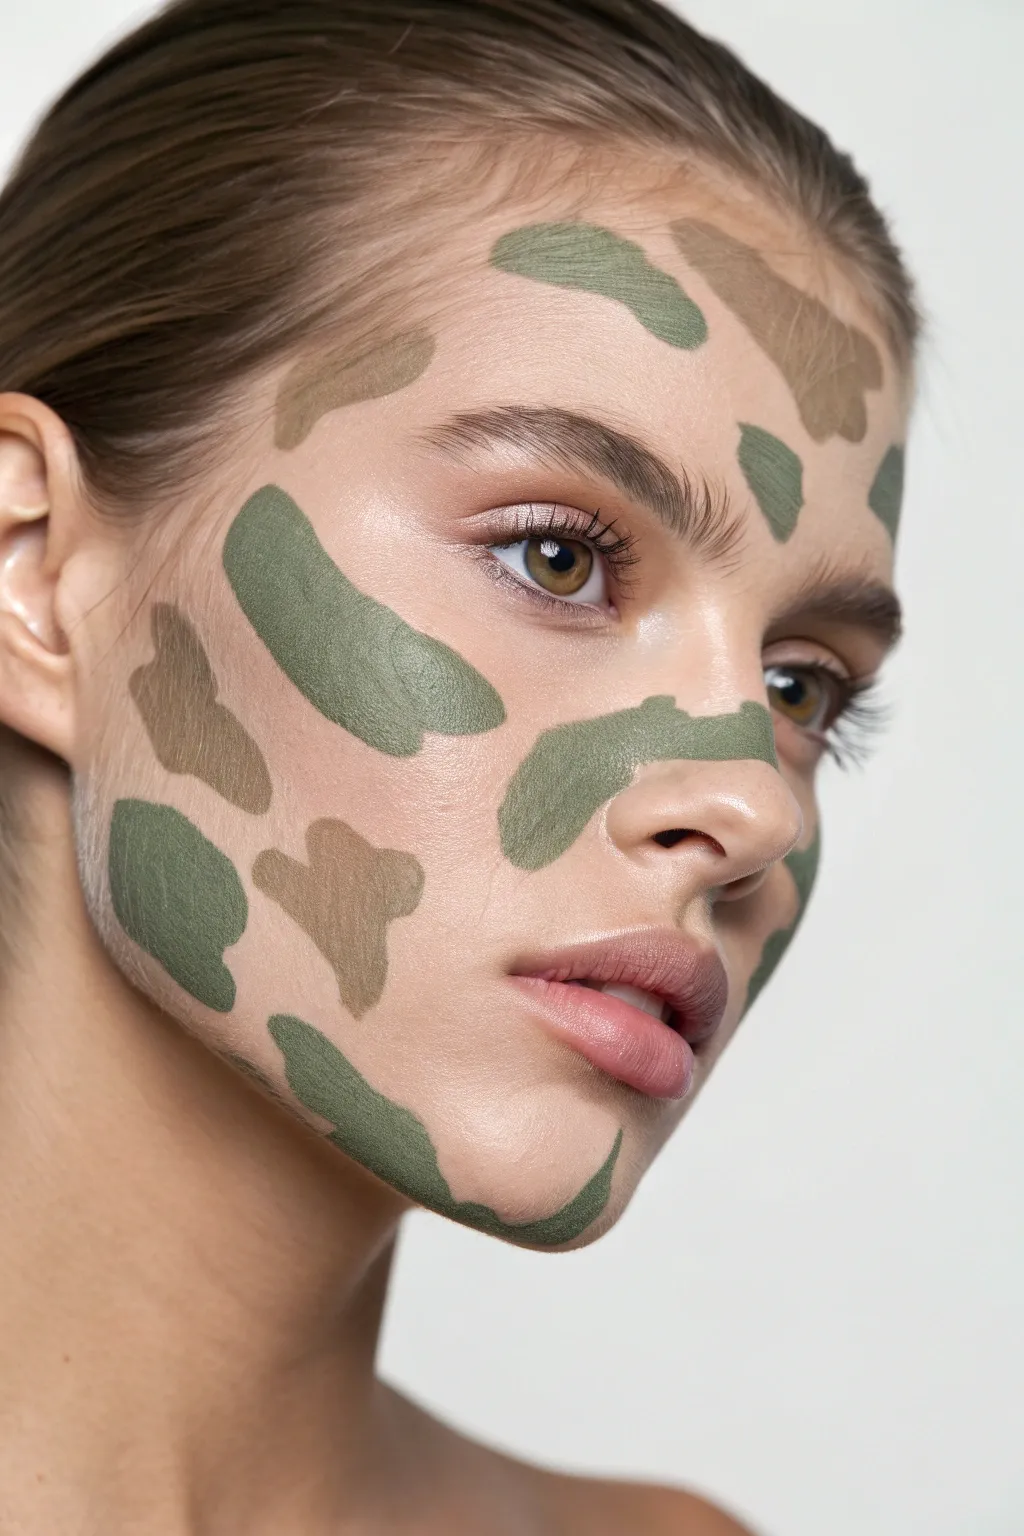
Elevate traditional camouflage into high-fashion beauty with this artistic, minimalist approach. By using muted olive and taupe tones applied in clean, organic shapes over flawless skin, you create a look that feels more like a modern art piece than tactical gear.
Step-by-Step Tutorial
Materials
- Matte cream face paint (olive green)
- Matte cream face paint (taupe or warm beige)
- Flat synthetic brush (medium size)
- Small detailed brush
- Makeup sponge or foundation brush
- Lightweight foundation or BB cream
- Setting powder
- Setting spray
- Mascara
- Brow gel
Step 1: Base Preparation
-
Cleanse and moisturize:
Start with a freshly washed and well-moisturized face. Since the paint will be applied directly to the skin, hydrating first ensures the patches won’t cling to dry spots. -
Apply a sheer base:
Using a sponge or foundation brush, apply a very light layer of foundation or BB cream. You want to even out the skin tone while keeping the natural texture visible, as seen in the photo. -
Groom the brows:
Brush your eyebrows upward using a clear brow gel to give them a fluffy, natural shape that complements the organic paint strokes. -
Set the T-zone:
Lightly dust translucent powder over your nose and forehead to prevent natural oils from breaking down the face paint later.
Cream Paint Pro Tip
Warm the cream paint on the back of your hand before applying. This melts the waxes slightly, making the strokes much smoother and less patchy.
Step 2: Painting the Camo Shapes
-
Load your brush with olive:
Take a flat synthetic brush and load it generously with the matte olive green cream paint. Ensure the bristles are coated evenly for a smooth application. -
Create the first cheek stroke:
Place a large, curved stroke starting from the apple of your cheek sweeping upwards toward the temple. Keep the edges soft but defined. -
Add nose definition:
Apply a smaller patch of olive green across the bridge of your nose, slightly extending onto the cheek area for continuity. -
Paint the jawline accent:
Sweep a bold, irregular oval shape along the jawline on one side. Don’t worry about perfect symmetry; camouflage works best when it feels random. -
Forehead placement:
Dab a medium-sized irregular blotch near the center of your forehead, avoiding the very hairline to keep the makeup looking clean. -
Switch to taupe:
Wipe your brush clean or grab a fresh one, and load it with the taupe or warm beige paint. -
Fill the negative spaces:
Identify open areas between your green shapes. Paint smaller, irregular blobs of taupe near the green patches but leave plenty of natural skin showing between them. -
Add temple details:
Place a small taupe shape high on the temple or forehead to balance the heavier green sections. -
Check the chin area:
If I feel the lower face looks too bare, I like to add a tiny taupe accent near the chin or corner of the mouth for balance.
Add Subtle Dimension
Mix a tiny drop of gold pigment into the olive green paint for a subtle, unexpected shimmer that catches the light when you turn your head.
Step 3: Refining and Setting
-
Clean the edges:
Use a small detail brush or a Q-tip with a tiny bit of makeup remover to sharpen any edges that became too messy during application. -
Enhance texture:
If you want a more lived-in texture, lightly tap your finger over the dried paint to take away the ‘perfect’ synthetic sheen. -
Apply mascara:
Coat your upper lashes with black or brown mascara to define the eyes without overpowering the face paint design. -
Keep lips neutral:
Apply a moisturizing lip balm or a very sheer nude gloss. The focus should remain entirely on the pattern. -
Final set:
Mist the entire face with a setting spray to lock the cream paints in place and remove any powdery finish.
Now you have a striking, editorial-worthy look that proves camouflage can be beautiful
Sugar Skull With Floral Eyes
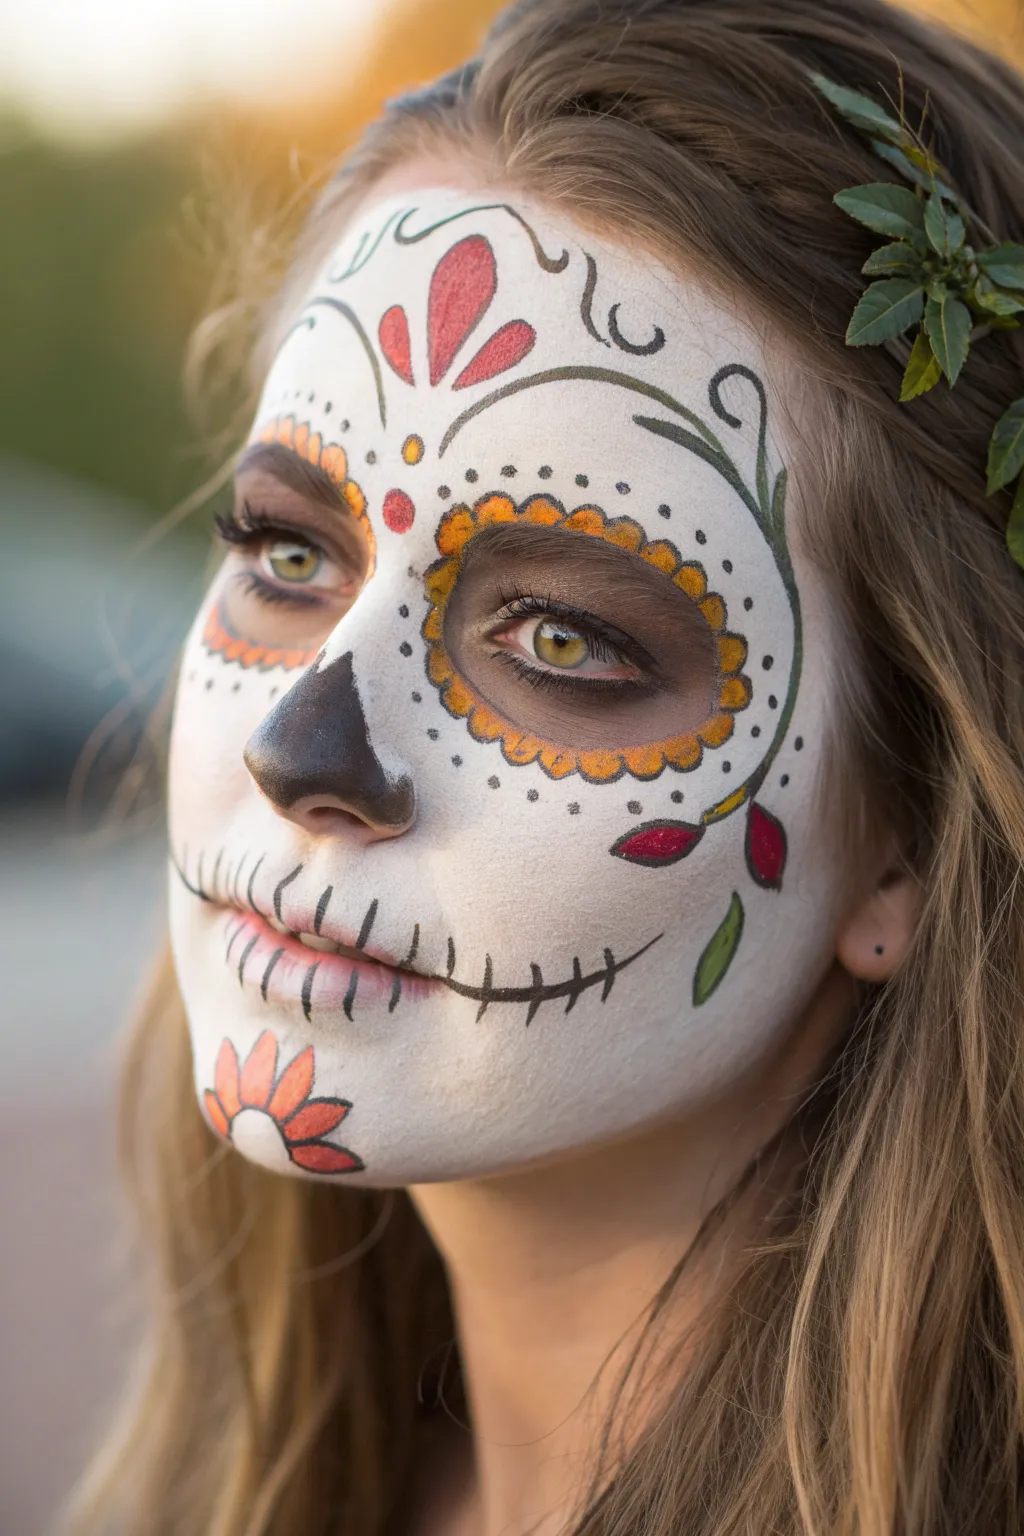
This softer take on the traditional sugar skull moves away from stark contrasts, using a creamy base and warm autumnal tones for a look that’s both haunting and lovely. The focus lies on delicate petal details around the eyes and organic vine flourishes that frame the face beautifully.
Detailed Instructions
Materials
- White or cream face paint (water-activated preferred)
- Black face paint or gel eyeliner
- Orange face paint
- Yellow face paint
- Red face paint
- Green face paint
- Makeup sponges
- Fine detail brush (size 0 or 1)
- Medium round brush (size 4)
- Small flat brush
- Setting powder
- Cotton swabs
Step 1: Base and Eyes
-
Apply the ghost white base:
Dampen a makeup sponge and load it with white face paint. Stipple it over the entire face, but keep the layer slightly translucent rather than fully opaque to achieve that porcelain doll effect. Leave the immediate eye sockets bare. -
Darken the eye sockets:
Using a blending brush or a clean sponge, apply a smoky brown or diluted black shadow inside the eye sockets. Blend it outwards towards the brow bone for a hollowed, skeletal depth. -
Outline the eye sockets:
With a fine detail brush and black paint, just lightly sketch the large circle shape around each eye socket where you plan to place your petals. This acts as a guide and won’t need to be perfect. -
Paint the eye petals:
Load a medium round brush with orange paint. Create scalloped semi-circles all along the guide line you just drew. I prefer to press the brush down and lift to create that perfect rounded petal shape. -
Add yellow highlights:
While the orange is still slightly tacky, dab a tiny bit of yellow paint into the center of each orange petal to add dimension and a warm glow. -
Define the petals:
once the petals are dry, use your fine detail brush with black paint to carefully outline the outer edge of the orange scallops, separating them from the white skin.
Step 2: Details and Flourishes
-
Create the nose cavity:
Paint a spade or upside-down heart shape on the tip of the nose using black paint. Extend two small points slightly up the bridge of the nose to mimic the nasal bone structure. -
Draw the mouth stitches:
Draw a thin black line extending from the corners of the mouth towards the jawline. Paint vertical ‘stitch’ marks across the lips and the extended line, making them slightly longer in the center and shorter at the ends. -
Decorate the forehead:
In the center of the forehead, paint a red teardrop shape pointing down, flanked by two smaller red teardrops. Make sure they fan out like a small flower arrangement. -
Add forehead swirls:
Using the fine liner brush and thin black paint, draw delicate swirls framing the red forehead petals. Keep the lines incredibly thin for elegance. -
Paint the chin flower:
Mirror the forehead design on the chin. Paint an upside-down ‘sunflower’ shape using orange petals with red tips, leaving a small negative space arch at the bottom. -
Add side vines:
On the temples and cheekbones, paint flowing green vines with small leaves using a flat or round brush. Let the vines curve naturally towards the center of the face. -
Add dot detailing:
Dip the back end of your paintbrush into black paint and dot small accents around the eye petals and along the forehead swirls for texture. -
Set the look:
Lightly dust translucent setting powder over the design, being careful not to smudge the black lines, to ensure your artwork lasts all night.
Smudge Control
If black lines smudge onto the white base, wait for it to dry completely. Then, use a damp cotton swab to lift the mistake before dabbing fresh white over the spot.
Add Sparkle
For a glamorous twist, adhere small adhesive rhinestones to the center of the forehead flower or on the tips of the eye petals using eyelash glue.
Now you are ready to celebrate with this stunningly intricate floral design that bridges the gap between spooky and sweet
Split-Face Before And After
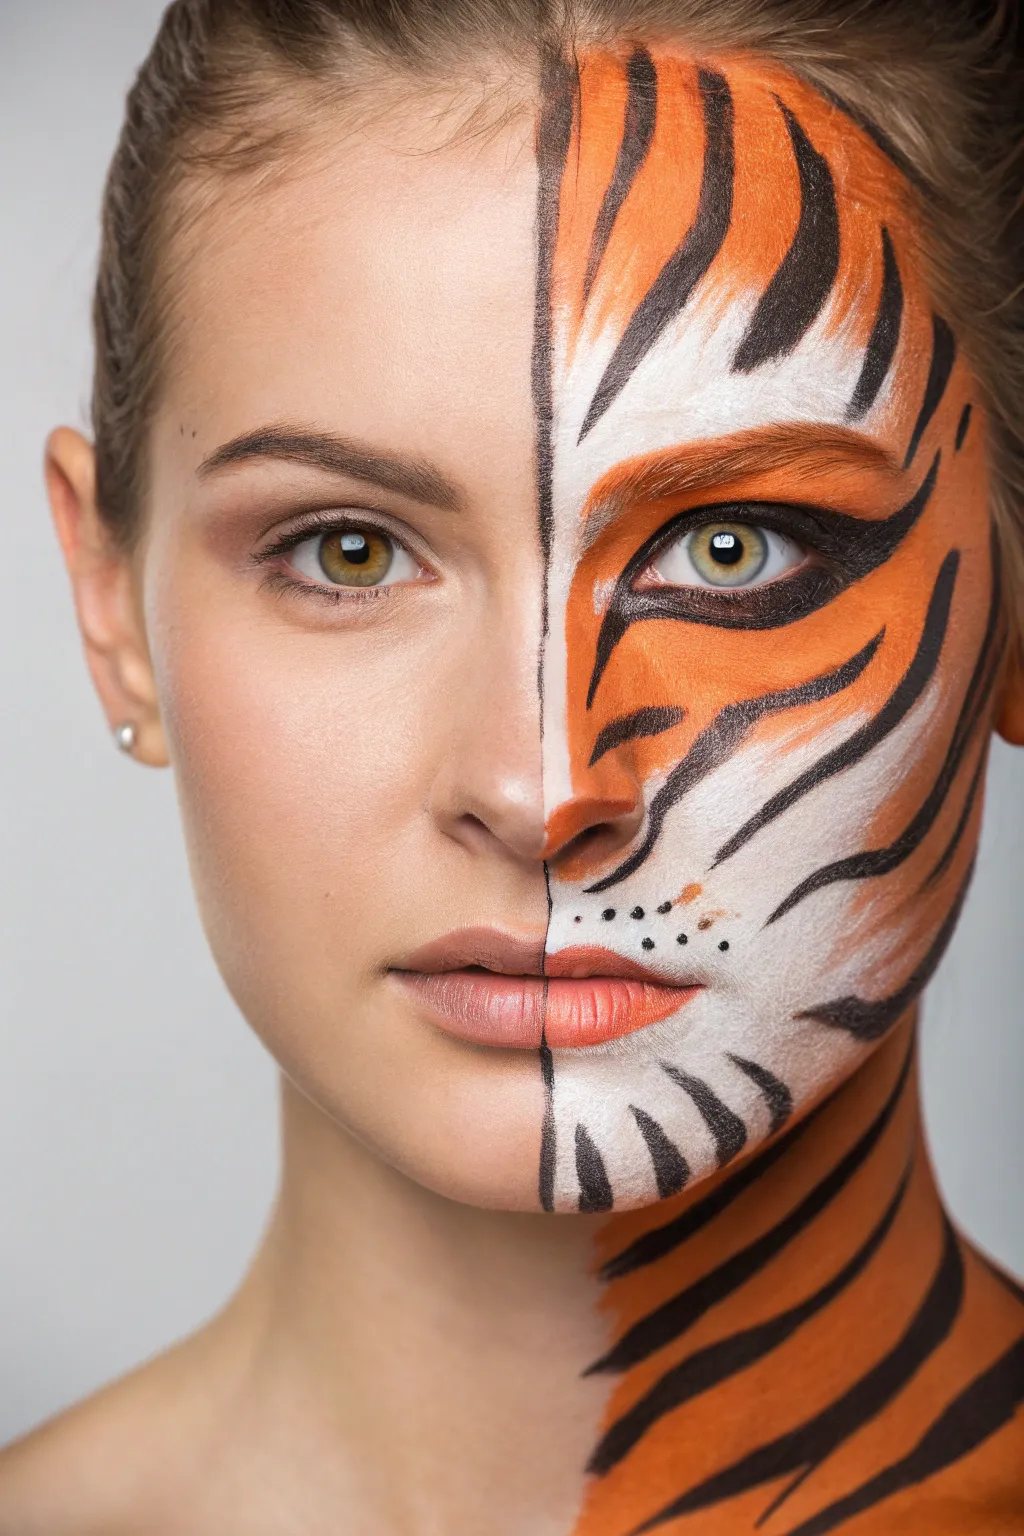
Unleash your inner feline with this striking split-face design that juxtaposes natural beauty with the raw power of a tiger. This transformative look uses bold orange, crisp white, and sharp black details to create a stunning before-and-after effect perfect for costume parties or photoshoots.
Step-by-Step Tutorial
Materials
- Face primer
- High-coverage foundation (skin tone matching)
- Water-activated face paints: bright orange, white, and black
- Flat synthetic brush (medium)
- Small round detail brush (size 1 or 2)
- Angled eyeliner brush
- Makeup sponge
- Setting spray
- Black eyeliner pencil
- Mascara
Step 1: Preparation and Base
-
Prep the canvas:
Begin with a clean, moisturized face. Apply a light layer of primer all over to ensure both your natural makeup and the face paint adhere smoothly and last longer. -
Mark the center line:
Using a light eyeliner pencil or the edge of a flat brush with faint paint, draw a very thin, straight vertical line down the exact center of your face, nose, lips, and chin. This guide is crucial for the split effect. -
Apply natural makeup:
On the left side of your face (your right), apply your standard foundation, concealer, and contour. Keep the eye makeup minimal and natural—perhaps just a bit of mascara and a groomed brow—to contrast sharply with the painted side.
Step 2: Color Blocking
-
Lay down the orange base:
On the ‘tiger’ side, use a damp sponge or large flat brush to apply bright orange face paint. Cover the forehead, cheek, nose bridge, and chin, leaving specific areas blank for the white accents: above the eyebrow, under the eye, the muzzle area, and the chin. -
Add white highlights:
With a clean sponge or a fresh brush, apply white face paint to the empty areas. Focus on a large patch above the brow, a swooping highlight under the eye extending to the cheekbone, and the upper lip/muzzle area. Don’t worry about perfect blending yet; sharp lines work well for this graphic style. -
Blend the transition:
Where the orange and white meet, use a slightly damp sponge to gently dab the boundary. I like to create a soft gradient here so the fur texture looks more natural later. -
Extend to the neck:
Don’t stop at the jawline. Continue the orange paint down the neck on the tiger side to create a complete illusion.
Hold the Line
Place a piece of masking tape down the center of your nose and forehead before painting. Peel it off at the end for a laser-sharp division line.
Step 3: Detailed Features
-
Define the tiger eye:
Using a fine brush and black paint, outline the tiger’s eye. Draw a sharp cat-eye shape on the inner corner pointing down towards the nose, and sweep the outer corner upward significantly. -
Tightline the eye:
Fill in the waterline with black eyeliner pencil to remove any skin color, intensifying the animalistic gaze. -
Paint the nose:
On the tip of the nose (half of it), paint a soft terracotta or pinkish-orange shape for the tiger’s nose leather, outlining the nostril in black. -
Shape the lips:
Paint the upper lip with a mix of orange and black to darken it, but keep the lower lip mostly orange or natural, blending it into the surrounding white muzzle.
Make It 3D
Use a dark brown eyeshadow to shade under the black stripes. This drop-shadow effect makes the stripes look like they are sitting on top of the fur.
Step 4: Stripes and Fur
-
Start the forehead stripes:
Load a thin round brush with black face paint. Starting from the center line, paint curved, tapering stripes radiating outward on the forehead. Vary the thickness—start thick and end with a fine point. -
Add cheek stripes:
Paint three to four major stripes on the cheek. These should curve gently from the outer edge of the face inward towards the nose and mouth. Keep your hand steady but fluid to mimic organic fur patterns. -
Detail the chin and neck:
Add smaller, downward-curving stripes on the chin. For the neck, paint broader, bolder stripes that follow the contour of the muscles. -
Texture with fur lines:
Using an ultra-fine detail brush or even a dry stiff brush, add tiny flicks of white paint overlapping the edges of the orange patches and black stripes. This creates a realistic furry texture. -
Add whiskers and spots:
Paint small black dots on the white muzzle area. For a finishing touch, lightly flick a few very thin white or black lines outward from these spots to suggest whiskers. -
Refine the center line:
Take a moment to clean up the central dividing line with a Q-tip and concealer if any paint crossed over. A sharp division is key to the illusion.
Now you have a fierce, dual-natured look that captures the wild spirit within
Optical Illusion Linework Face
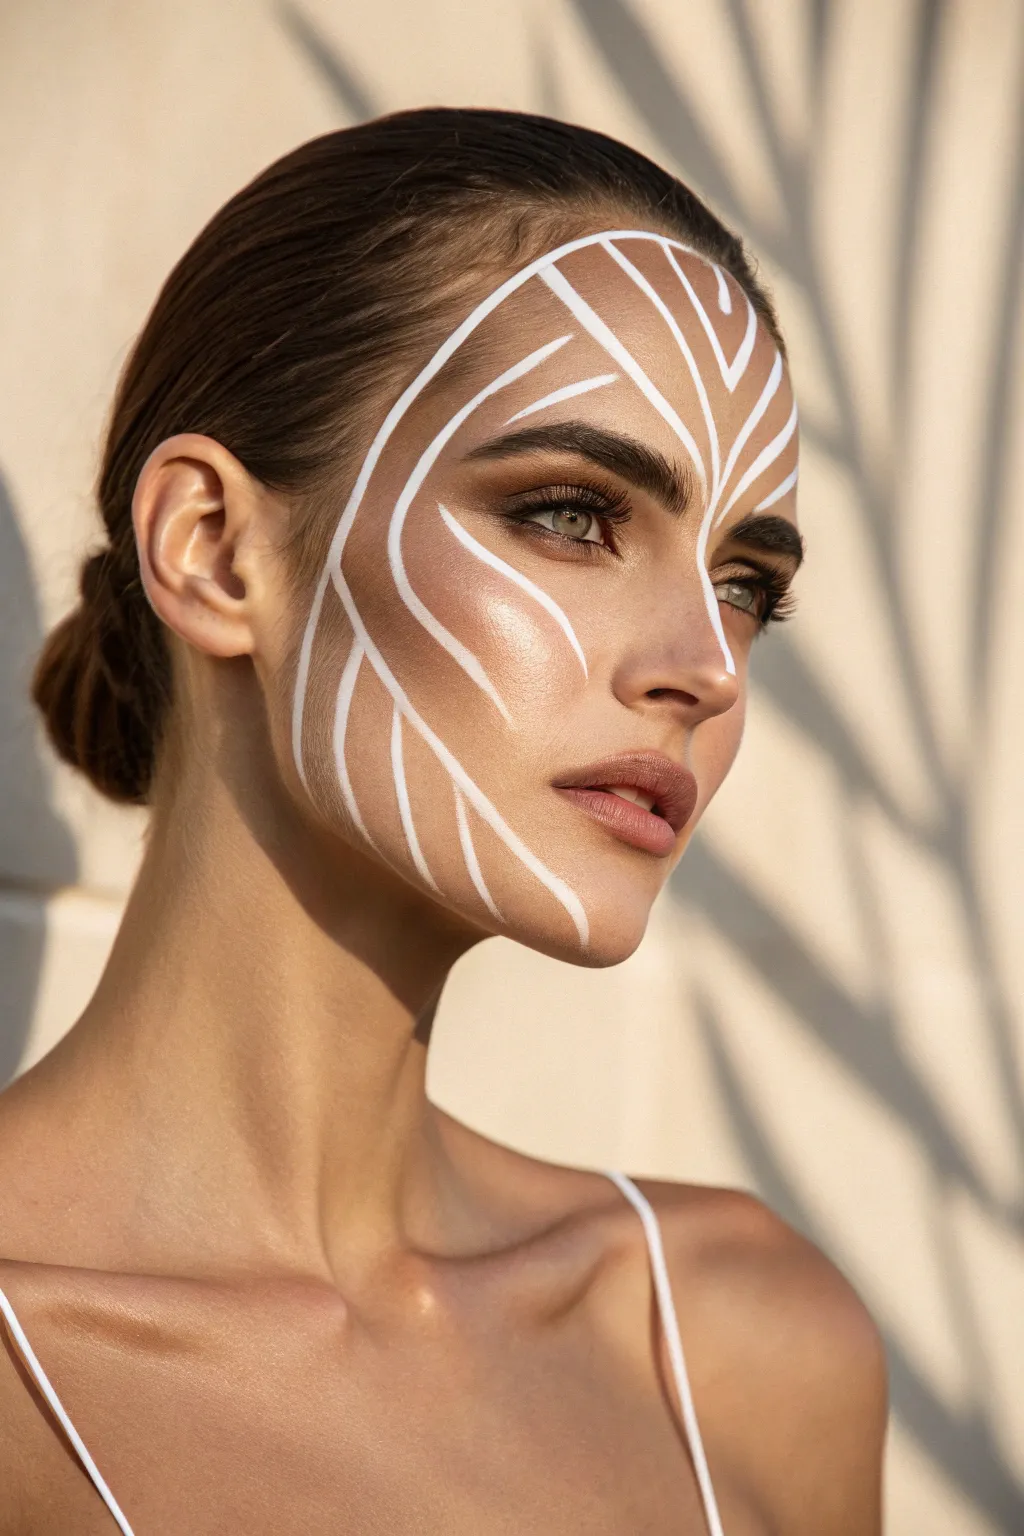
This striking optical illusion combines sharp, geometric lines with organic flow to mimic the shadows of a palm frond draped across the face. The stark white linework against sun-kissed skin creates a high-fashion, avant-garde look perfect for festivals or editorial shoots.
Detailed Instructions
Materials
- High-coverage white face paint (water-activated or cream)
- Fine liner brush (size 0 or 00)
- Flat angled brush
- Medium-coverage foundation
- Cream bronzer or contour stick
- Highlighter (champagne or gold tone)
- Neutral eyeshadow palette (browns and taupes)
- Mascara (black)
- Brow pomade or pencil
- Setting spray
- Micellar water and cotton swabs (for cleanup)
Step 1: Base and Contour
-
Prep and prime:
Start with a clean, moisturized face. Apply a primer to ensure your foundation and the subsequent face paint adhere smoothly without cracking. -
Foundation application:
Apply a medium-coverage foundation that matches your skin tone perfectly. Buff it in with a damp sponge for a skin-like finish, ensuring an even canvas. -
Heavy contouring:
This look relies on deep shadows to pop the white lines. Use a cream bronzer to carve out your cheekbones, temples, and jawline more heavily than usual. Blend upwards to lift the face. -
Highlight points:
Apply a shimmering champagne highlighter to the high points of the cheekbones, the bridge of the nose, and the brow bone. The glow will contrast beautifully with the matte white paint.
Clean Lines Hack
If you struggle with shaky hands, rest your pinky finger on your chin or cheek (use a powder puff to avoid smudges) to stabilize your hand while painting detail work.
Step 2: Eye and Brow Definition
-
Define the brows:
Fill in your eyebrows using a pomade or pencil. Aim for a bold, structured brow, brushing the hairs upward with a spoolie for a feathery effect. -
Neutral eye shadow:
Wash a soft taupe or light brown shadow across the entire eyelid. Deepen the crease slightly with a darker brown to add dimension without distracting from the main art. -
Lash application:
Apply two coats of black mascara to both upper and lower lashes. You want the eyes to look defined but not overpowering.
Glow Up
Dust a tiny amount of iridescent white glitter or shimmer powder directly over the wet white paint before it dries to give the linework a subtle, ethereal light reflection.
Step 3: Painting the Linework
-
Charge your brush:
Activate your white face paint with a little water until it reaches a creamy, ink-like consistency. Load a fine liner brush (size 0 or 00), twirling it to a sharp point. -
First central line:
Start at the bridge of the nose, slightly off-center. Draw a thin line curving upwards towards the center of the forehead. This anchors the design. -
Forehead branching:
From that central line on the forehead, paint three to four lines branching outward towards the hairline. Ideally, make these thicker at the base and taper them to a fine point at the ends. -
Cheekbone curve:
Create the main ‘spine’ line for the cheek section. Start from near the ear and curve it down towards the jawline, following the natural hollow of your cheek contour. -
Lower ribs:
Paint the downward-facing ‘ribs’ of the leaf pattern. Draw curved lines originating from your cheekbone spine down towards the jaw. Vary the thickness—press down for width and lift up for tapered ends. -
Upper ribs:
Now paint the upward-facing ribs on the cheek. Draw lines curving from the cheekbone spine up towards the eye and temple. Ensure the spacing is somewhat regular but clearly organic. -
Bridge connection:
Connect the forehead design to the cheek design by drawing a long, elegant line down the side of the nose, stopping just above the nostril. This integrates the top and bottom halves. -
Refining edges:
Go back over your lines. Where lines meet, create sharp V-shapes. The white should be opaque, so apply a second layer on center parts of the lines if the skin shows through. -
Clean up:
Dab a cotton swab in micellar water to clean up any shaky edges or smears. Sharp, crisp edges are crucial for the graphic effect. -
Lip color:
Finish with a neutral, matte pink or nude lipstick. dab it on lightly so it doesn’t look too heavy or compete with the white graphics. -
Set the look:
Mist the face with a setting spray to lock the makeup and paint in place, ensuring it lasts all day or night.
Step back and admire your fiercely graphical, modern art masterpiece.

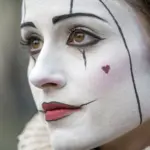
Have a question or want to share your own experience? I'd love to hear from you in the comments below!