Whenever I’m stuck, I go straight to cute drawing ideas because they’re quick, low-pressure, and basically guaranteed to make me smile. Below are my favorite prompts you can sketch in minutes—think simple shapes, big eyes, and a little sprinkle of charm.
Chibi Cats With Big Eyes
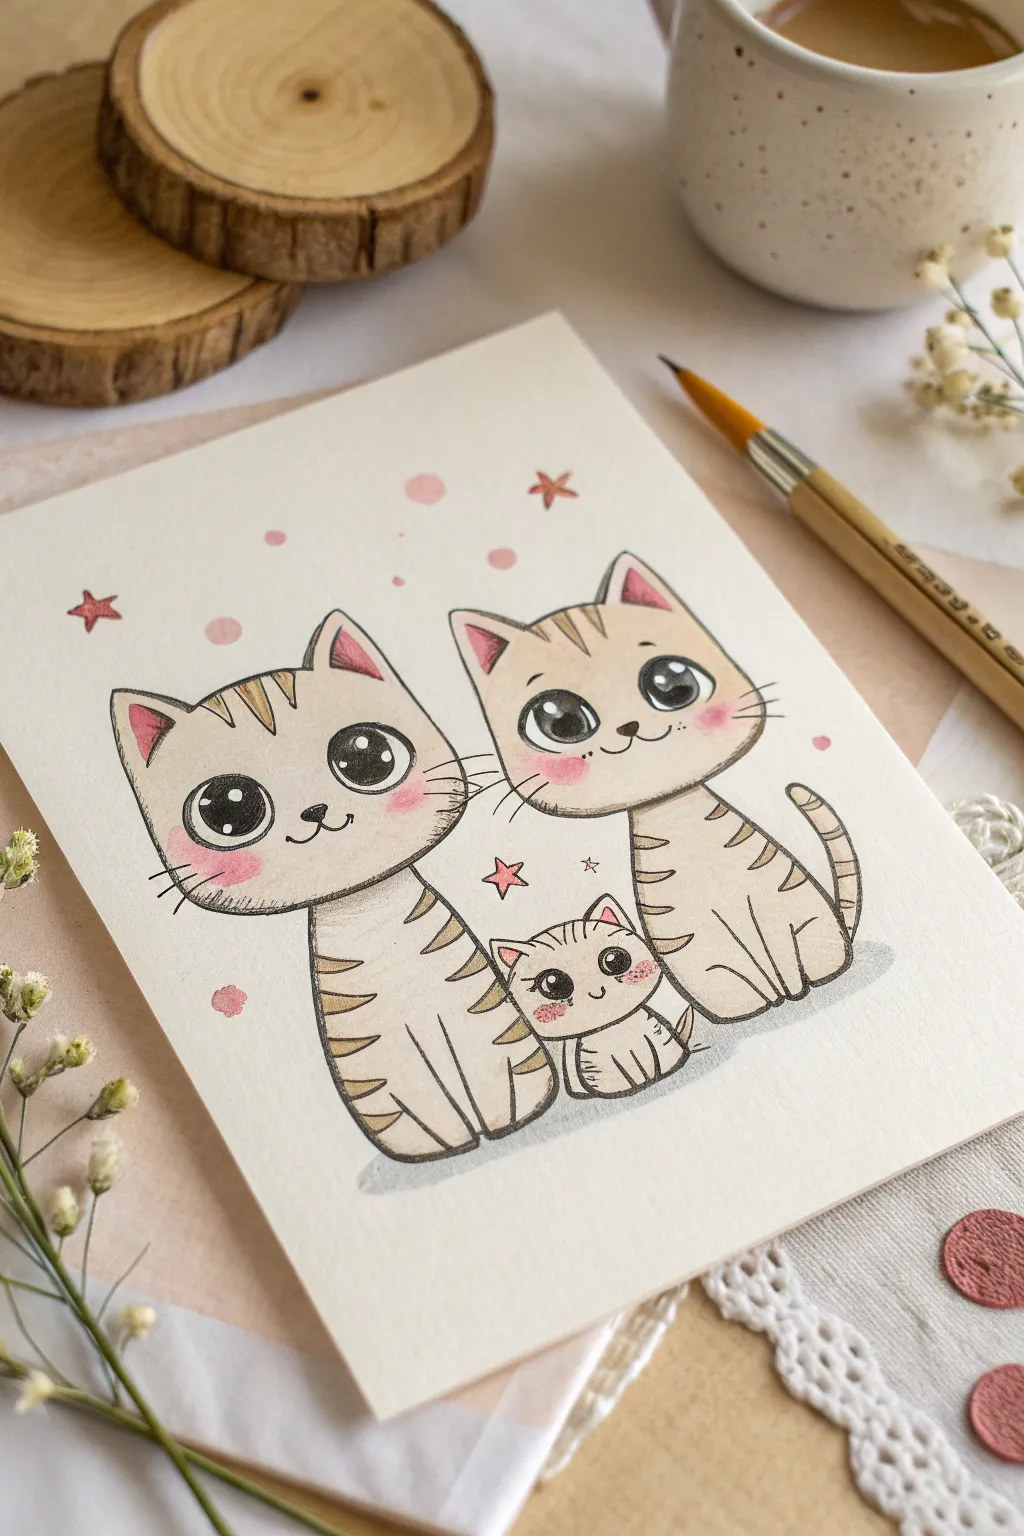
Create a heartwarming illustration featuring a trio of wide-eyed cats with this charming drawing tutorial. You’ll combine delicate ink linework with soft washes of beige and pink to capture their sweet, innocent expressions.
How-To Guide
Materials
- Heavyweight drawing paper or mixed media paper
- Pencil and eraser
- Fine liner pen (black, 0.3mm or 0.5mm)
- Watercolor paints or soft art markers (beige/tan, light pink)
- Small round paintbrush
- Water cup and paper towel
Step 1: Sketching the Shapes
-
Left Cat Head:
Begin by sketching a large, rounded rectangle shape on the left side of your paper for the first cat’s head. Keep your pencil lines very light. Add two triangle ears on top, making the inner lines slightly curved for softness. -
Right Cat Head:
Draw a similar head shape on the right side, positioned slightly higher than the first one. Tilt this head slightly inward so the cats look like they are leaning toward each other. -
Body Outlines:
Below the heads, draw small, pear-shaped bodies. The bodies should be significantly smaller than the heads to achieve that classic ‘chibi’ proportion. Extend curved lines at the bottom for their simple paws. -
The Tiny Kitten:
In the cozy space between the two larger cats, sketch a very small head and body for the kitten. It should be tucked snugly between the adults. -
Tails:
Add a curved tail on the right side of the right-hand cat, swooping upward. The tails for the other cats can be hidden behind their bodies or just slightly visible.
Step 2: Adding Details
-
Big Eyes:
Draw two large circles on each face. Position them low on the head—this is key for cuteness. Inside each eye, draw two or three smaller circles to represent light reflections. -
Facial Features:
Place a tiny, inverted triangle nose between the eyes, followed by a ‘W’ shape for the mouth. Add short whiskers coming from the cheeks. -
Stripes:
Sketch simple triangular stripes on the tops of their heads and along their sides. Keep these patterns symmetrical but organic.
Ink Smudging?
If your black pen smudges when you paint, check if it’s waterproof. If not, do the painting phase first, let it dry completely, and add the ink lines last.
Step 3: Inking and Coloring
-
Line Art:
Go over your pencil sketches with a black fine liner pen. Use quick, confident strokes for the fur texture, especially on the cheeks. Don’t trace the reflection circles inside the eyes; leave those white. -
Filling the Eyes:
Carefully fill in the pupils with black ink, ensuring the white highlight circles stay crisp and clean. This high contrast makes the eyes pop. -
Erase Sketches:
Once the ink is completely dry, gently erase all underlying pencil marks. -
Base Color:
Dilute a beige or light tan paint with plenty of water. Wash this color over the cats’ bodies and heads, leaving the muzzle area slightly lighter if desired. -
Stripes Color:
Using a slightly more concentrated brown or darker beige, paint in the stripes you drew earlier. I find that layering this while the base coat is barely damp creates a nice soft edge. -
Pink Accents:
Mix a soft pink color. Apply this to the inside of the ears and add generous circles of pink to their cheeks for a blushing effect. -
Background Elements:
Using the same pink, paint small floating circles and simple star shapes around the cats to frame the composition. -
Grounding Shadow:
Mix a very watery grey. Paint a subtle shadow heavily diluted underneath the cats so they don’t look like they are floating in space.
Sparkle Effect
Use a white gel pen to add extra highlight dots on the nose or cheeks after the paint dries. It adds an instant magical shine to the finished piece.
Step back and admire your adorable feline family painting


Puppy Faces Made of Circles
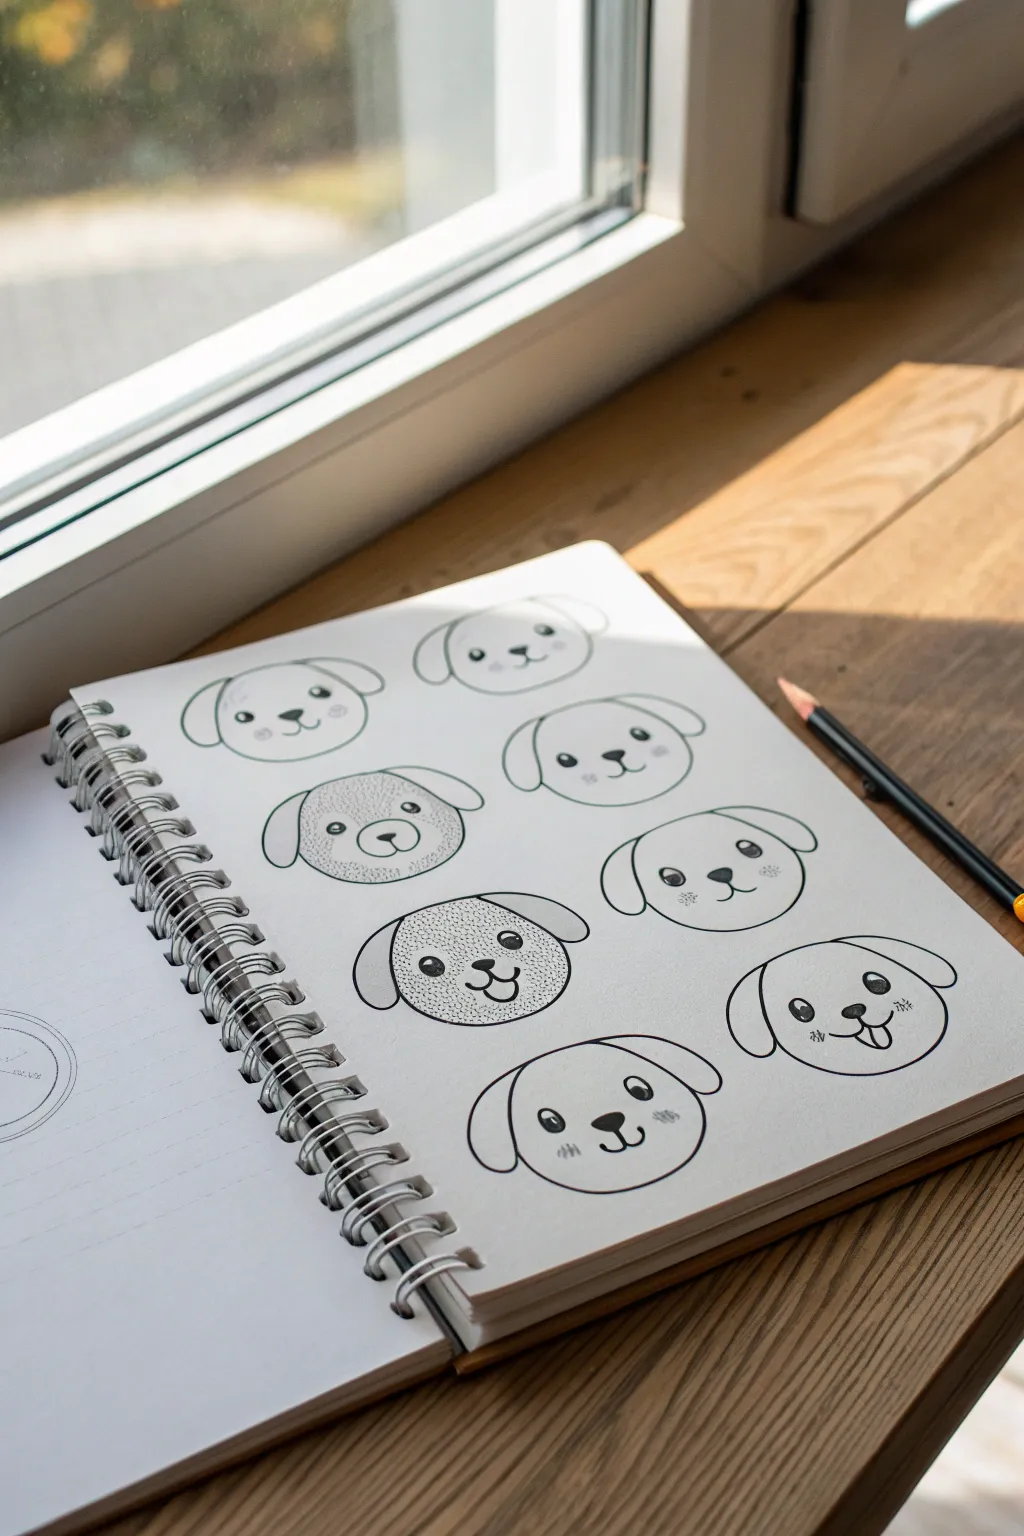
Transform simple shapes into an adorable litter of puppy personalities with this easy drawing exercise. Using basic circles as your foundation, you’ll learn to create variety through subtle changes in eyes, ears, and snouts.
Step-by-Step Tutorial
Materials
- Spiral-bound sketchbook or drawing paper
- Pencil (HB or 2B) for sketching
- Black fine liner pen (0.3mm or 0.5mm)
- Eraser
- Circle stencil (optional)
Step 1: Laying the Groundwork
-
Sketch the base circles:
Start by lightly sketching eight evenly spaced circles on your page using your pencil. These don’t need to be geometrically perfect—a little wobbliness adds charm—but try to keep them roughly the same size. -
Plan the ear placement:
For each circle, lightly sketch where the ears will go. Vary the positions: some can be floppy ears attaching at the top, others might droop from the sides. Keep these lines very faint.
Smudged Ink?
If you smear ink while erasing, pause immediately. Let it dry longer, then use a white gel pen to touch up the smear or turn it into a cute spot on the dog’s fur.
Step 2: Defining the Features
-
Draw the first face: The classic smile:
On your first circle, draw two small, filled-in oval eyes wide apart. Add a small rounded triangle nose in the center and a simple ‘w’ shape for the mouth below it. -
Add floppy ears:
Draw ‘U’ shaped ears on either side of the first head, connecting them to the top curve of the circle. -
Create a textured pup:
For the second face, pencil in a large oval muzzle area at the bottom. Fill the main head circle with tiny stippling dots for texture, but leave the muzzle area clear. Add a large nose and eyes. -
Draw the ‘curious’ face:
On the third circle, draw the eyes slightly larger and add tiny white highlights (circles) inside them before filling them in. Give this pup smaller, perkier ears. -
Sketch the ‘happy panting’ face:
Moving to the next circle, draw the mouth open with a small U-shape tongue sticking out. Add cheeks with three small dots on each side. -
Design a spotted dog:
For one of the puppies, draw a curved line over one eye to create a patch. When you ink this later, you will leave the patch white and maybe texture the rest, or vice-versa. -
Add texture variation:
Select another circle to be a ‘fuzzy’ dog. Instead of a smooth outline, sketch the top of the head with short, broken lines to suggest fur. Give this one a wide, happy grin. -
Draw the ‘sleeping’ or ‘blinking’ face:
Instead of open eyes, draw two downward curves with eyelashes. This creates a peaceful, sleepy expression. -
Finalize the sketches:
Review your eight faces. Ensure every puppy has a nose, mouth, and ears. Add distinct details like eyebrows or freckles to any that look too plain.
Step 3: Inking and Finishing
-
Outline the head shapes:
Take your black fine liner. Start by tracing the main head shapes. I prefer to rotate the sketchbook slightly as I draw curves to keep my hand comfortable. -
Ink the ears:
Go over your ear lines. Make sure the connection points between the ears and the head look natural—you usually want to stop the head circle line where the ear begins. -
Fill in the eyes:
Carefully ink the eyes. If you sketched highlights, preserve those white spots carefully. Solid black eyes give a cute, cartoonish look. -
Darken the noses:
Fill in the noses. You can leave a tiny sliver of white at the top of the nose to simulate a shine, making it look wet and healthy. -
Add texture details:
For the textured puppies, use your pen to create stippling (dots) or small hatching lines. Don’t rush this part; consistent spacing makes the texture look cleaner. -
Inking cheeks and mouths:
Trace the mouth lines. Add final touches like whisker dots or blush marks on the cheeks using a lighter touch. -
Erase pencil marks:
Wait at least five minutes for the ink to dry completely. Gently run your eraser over the entire page to remove the graphite guidelines.
Make It Pop
Use a light gray marker to add drop shadows under the ears and chin. This simple step adds instant depth and makes your doodles look professional.
Now you have a whole page of charming canine characters ready to brighten up your sketchbook


Smiling Fruit and Snack Doodles

Capture the sweetness of summer with this adorable collection of kawaii-style food illustrations. With charming little faces and a vibrant color palette, these beginner-friendly doodles are perfect for brightening up a journal page or handmade card.
How-To Guide
Materials
- Textured watercolor paper or mixed media cardstock
- Fine liner pen (black, 0.3mm or 0.5mm)
- Alcohol-based markers (red, pink, buff/beige, tan)
- Green markers or colored pencils (for leaves)
- White gel pen (for highlights)
- Pencil and eraser
Step 1: Sketching the Shapes
-
Draft the whole strawberry:
Start near the upper left by sketching a classic heart-like strawberry shape, slightly rounded at the bottom, with a cluster of leafy greens at the top. -
Outline the strawberry slice:
To the right of the first berry, draw a triangular shape with rounded corners to represent a vertical slice of strawberry. -
Form the jam jar:
Below the whole strawberry, sketch a stout little jar shape. It should be slightly wider at the bottom with a simple rectangular lid perched on top. -
Create the tart cookie:
In the bottom right, draw a flat oval shape for a jam-filled cookie. Sketch a smaller inner oval for the filling, leaving a rim for the crust. -
Add filler elements:
Fill the visual gaps with two small floating hearts near the top center and a small sprig of leaves on the right side.
Paper Texture Matters
Using cold-press watercolor paper adds that lovely bumpy texture seen in the photo. It grabs the marker pigment differently, creating a deeper, more organic look than smooth printer paper.
Step 2: Refining with Ink
-
Go over the main lines:
Using your fine liner pen, carefully trace over your pencil sketches. Keep your lines confident and smooth. -
Detail the strawberry leaves:
For the whole strawberry, draw the jagged edges of the green sepals sitting on top. -
Define the jar lid:
Give the jar lid a slightly textured look by stippling tiny dots on it to mimic fabric or cork. -
Erase pencil guides:
Wait a moment for the ink to set completely, then gently erase all visible pencil marks underneath.
Make It a Pattern
Don’t stop at one cluster! Repeat these four main elements across a whole sheet of paper, rotating them slightly each time, to create your own adorable custom wrapping paper design.
Step 3: Adding Kawaii Characters
-
Face on the jam jar:
Draw two wide-set black circles for eyes on the jar label area. Add a tiny U-shaped smile between them. -
Face on the tart:
Give the jam cookie a personality by drawing eyes and a smile directly in the center of the ‘filling’ area. -
Blush details:
Add tiny oval shapes under the eyes of both characters to create rosy cheeks. You can use your pink marker for this later, or outline them now.
Step 4: Bringing it to Life with Color
-
Color the whole strawberry:
Fill the entire body of the main strawberry with a deep, vibrant red marker. Leave the seeds blank if you want, or color over them to add white later. -
Shade the strawberry slice:
Color the top ‘crust’ area red, and use a very pale pink for the main flesh of the slice to differentiate the inside from the skin. -
Fill the jar:
Use a soft bubblegum pink for the contents of the jam jar. I like to leave the corners slightly lighter to suggest the glass curvature. -
Color the bakery items:
Use a tan or beige marker for the jar lid and the crust of the jam tart cookie. Color the tart filling a bright red. -
Paint the greens:
Using a mossy green marker or pencil, carefully fill in the strawberry crown and the loose leaf sprig.
Step 5: Final Touches
-
Add seeds:
Once the red ink is dry on the main strawberry, use a white gel pen or a fine black liner to draw small teardrop-shaped seeds scattered across the surface. -
Detail the slice:
Add tiny black seeds to the pale pink center of the strawberry slice for realism. -
Highlighting:
Use your white gel pen to add small reflections to the eyes of your characters, making them look sparkly and alive.
Now you have a charming set of strawberry-themed friends to decorate your sketchbook


Tiny Mushroom Family Cluster
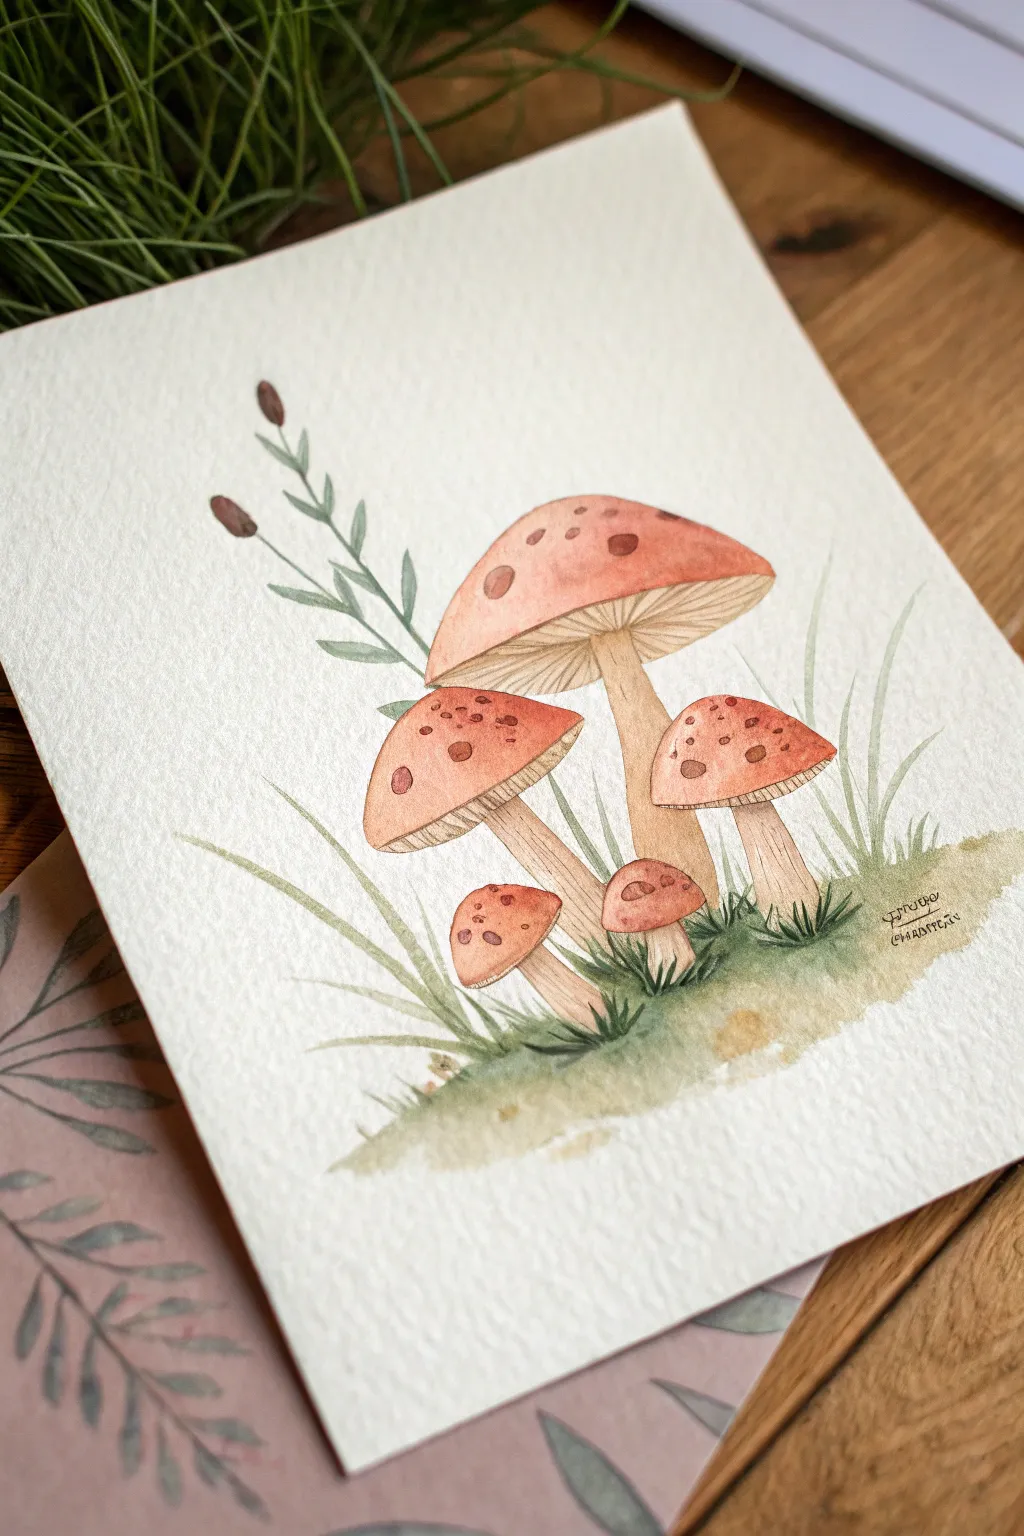
Capture the charm of the forest floor with this sweet family of mushrooms nestled in soft greenery. This project uses warm, earthy watercolors on textured paper to create a cozy, storybook illustration perfect for greeting cards or wall art.
Step-by-Step Tutorial
Materials
- Cold press watercolor paper (300 gsm)
- Watercolor paints (terracotta/burnt sienna, yellow ochre, sap green, sepia)
- Round watercolor brushes (size 2 and 4)
- Fine liner brush or rigger brush
- Pencil (HB or 2H)
- Kneadable eraser
- Jar of water
- Paper towel
Step 1: Sketching the Composition
-
Outline the caps:
Begin by lightly sketching the five mushroom caps. Draw a large, dominant cap near the top center as an anchor. Add two medium-sized caps slightly below it on either side, angling them outward. -
Add the tiny mushrooms:
Tuck two very small mushroom caps near the bottom, nestled between the stems of the larger ones. These little ones add depth and a sense of ‘family’ to the cluster. -
Construct the stems:
Draw the stems extending downwards from the center of each cap. Make them slightly thicker at the base and curved gently to show organic movement. Keep your pencil pressure very light so the graphite won’t show through the paint later. -
Sketch the foliage:
To the left of the cluster, sketch a tall, thin sprig with small, paired leaves. Add loose guidelines for the grass blades spiking up from the base.
Clean Edges Trick
Work on non-touching areas first. Let the mushroom caps dry completely before painting the stems to prevent the red and beige colors from bleeding into each other.
Step 2: Painting the Mushrooms
-
Base wash for caps:
Mix a watery terracotta or burnt sienna color. Paint the tops of the mushroom caps, leaving the very edges slightly lighter if possible. I like to lift a tiny bit of color with a dry brush while it’s wet to create a soft highlight on the curve. -
Add cap details:
While the base wash is still slightly damp (but not soaking), drop in concentrated spots of darker brown or sepia to create the varying freckles on the caps. Let the paint spread naturally for soft edges. -
Paint the stems:
Mix a pale wash of yellow ochre with a touch of brown. Paint the stems, keeping the color very translucent. Add a slightly darker shadow right underneath the cap where the stem connects. -
Detail the gills:
Once the caps are dry, use your smallest brush with a diluted sepia tone to paint fine, straight lines underneath the caps representing the gills. They should radiate from the stem outward to the cap’s edge.
Make It Magical
Once dry, use a white gel pen to add tiny highlights to the dew drops on the leaves or the very tops of the mushroom caps for an extra sparkle.
Step 3: Adding Greenery and Ground
-
Paint the tall sprig:
Using a mix of sap green and a touch of gray for a muted look, paint the stem and small leaves of the tall plant on the left. Add two tiny brown buds at the very top. -
Create the grassy base:
Mix a lively sap green. Paint swift, upward strokes at the base of the stems to create blades of grass. Vary the height and angle of the blades for realism. -
Ground the image:
Dilute your green paint significantly with water. Wash a soft, uneven patch of color underneath the mushrooms to represent mossy ground, letting it fade out into the white of the paper at the edges. -
Deepen the shadows:
Mix a dark green-brown. Carefully dab this into the crevices between the mushroom stems at the bottom to anchor the cluster and show depth in the grass.
Step 4: Final Touches
-
Refine the outlines:
Take a fine liner brush with a semi-transparent brown mix. Very delicately outline parts of the stems and caps if your edges look too lost, but keep the lines broken and organic. -
Add texture to stems:
Dry brush a little bit of texture onto the stems using a light brown. This mimics the fibrous nature of mushroom stalks. -
Highlight check:
Assess your painting. If the spots on the caps have faded too much, you can carefully re-dot them with a more pigmented terracotta mix for that classic toadstool look. -
Sign and dry:
Allow the entire piece to dry completely before erasing any stray pencil marks that might still be visible.
You have crafted a charming little glimpse into a fairy forest

PENCIL GUIDE
Understanding Pencil Grades from H to B
From first sketch to finished drawing — learn pencil grades, line control, and shading techniques.
Explore the Full Guide
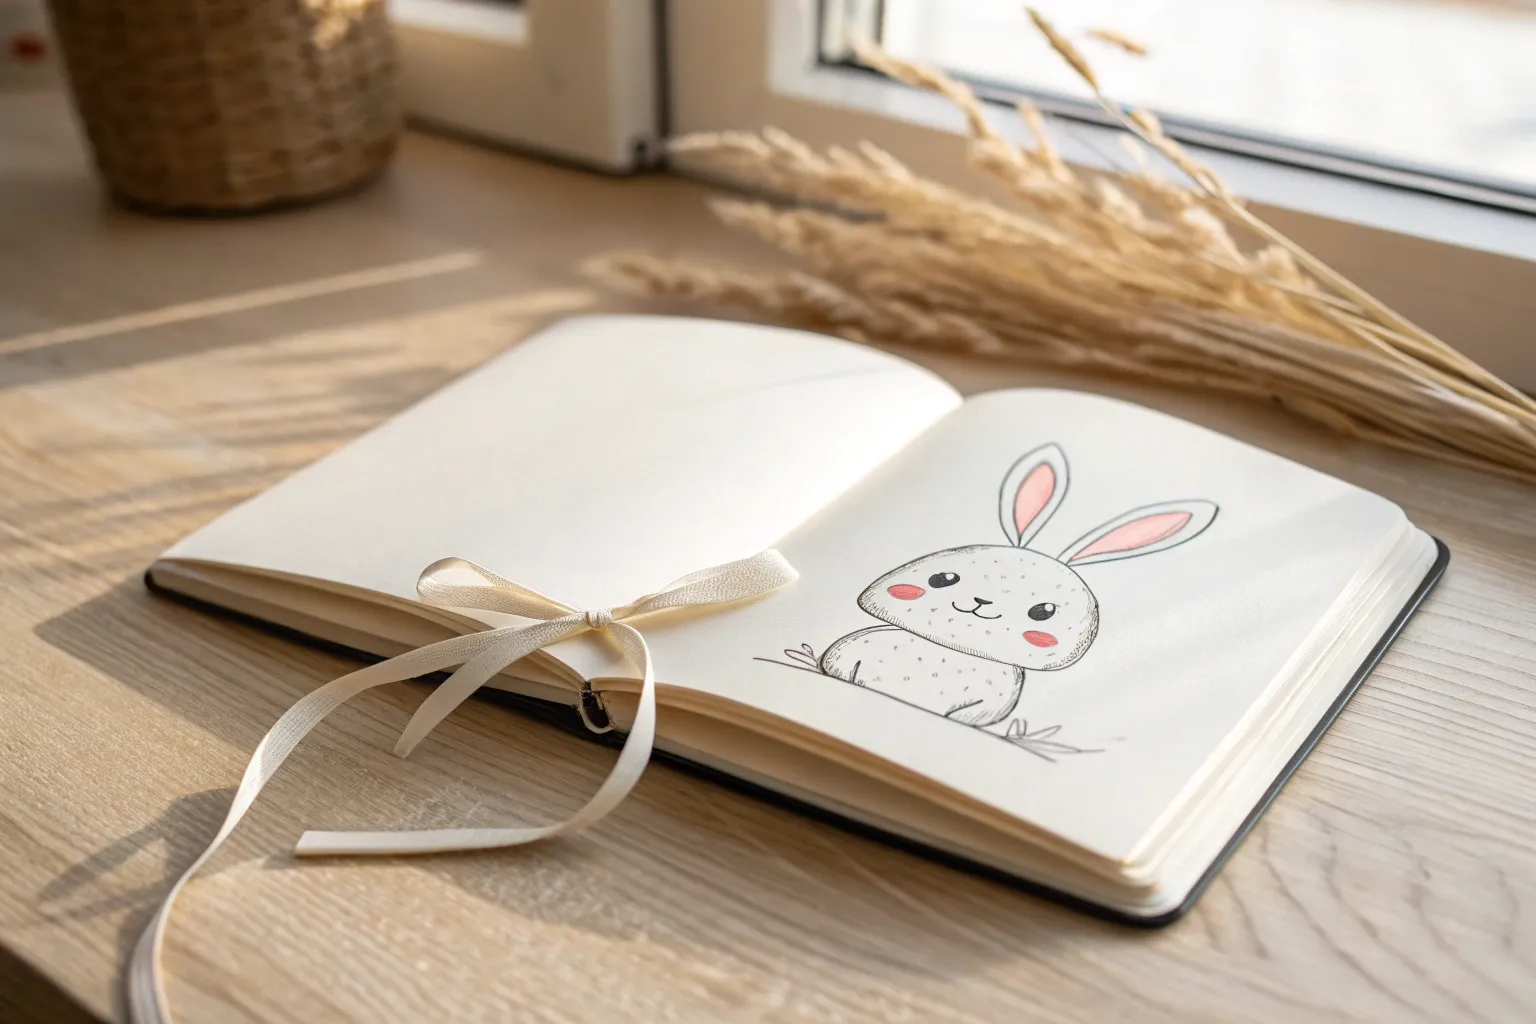
Happy Clouds With Star Sprinkles
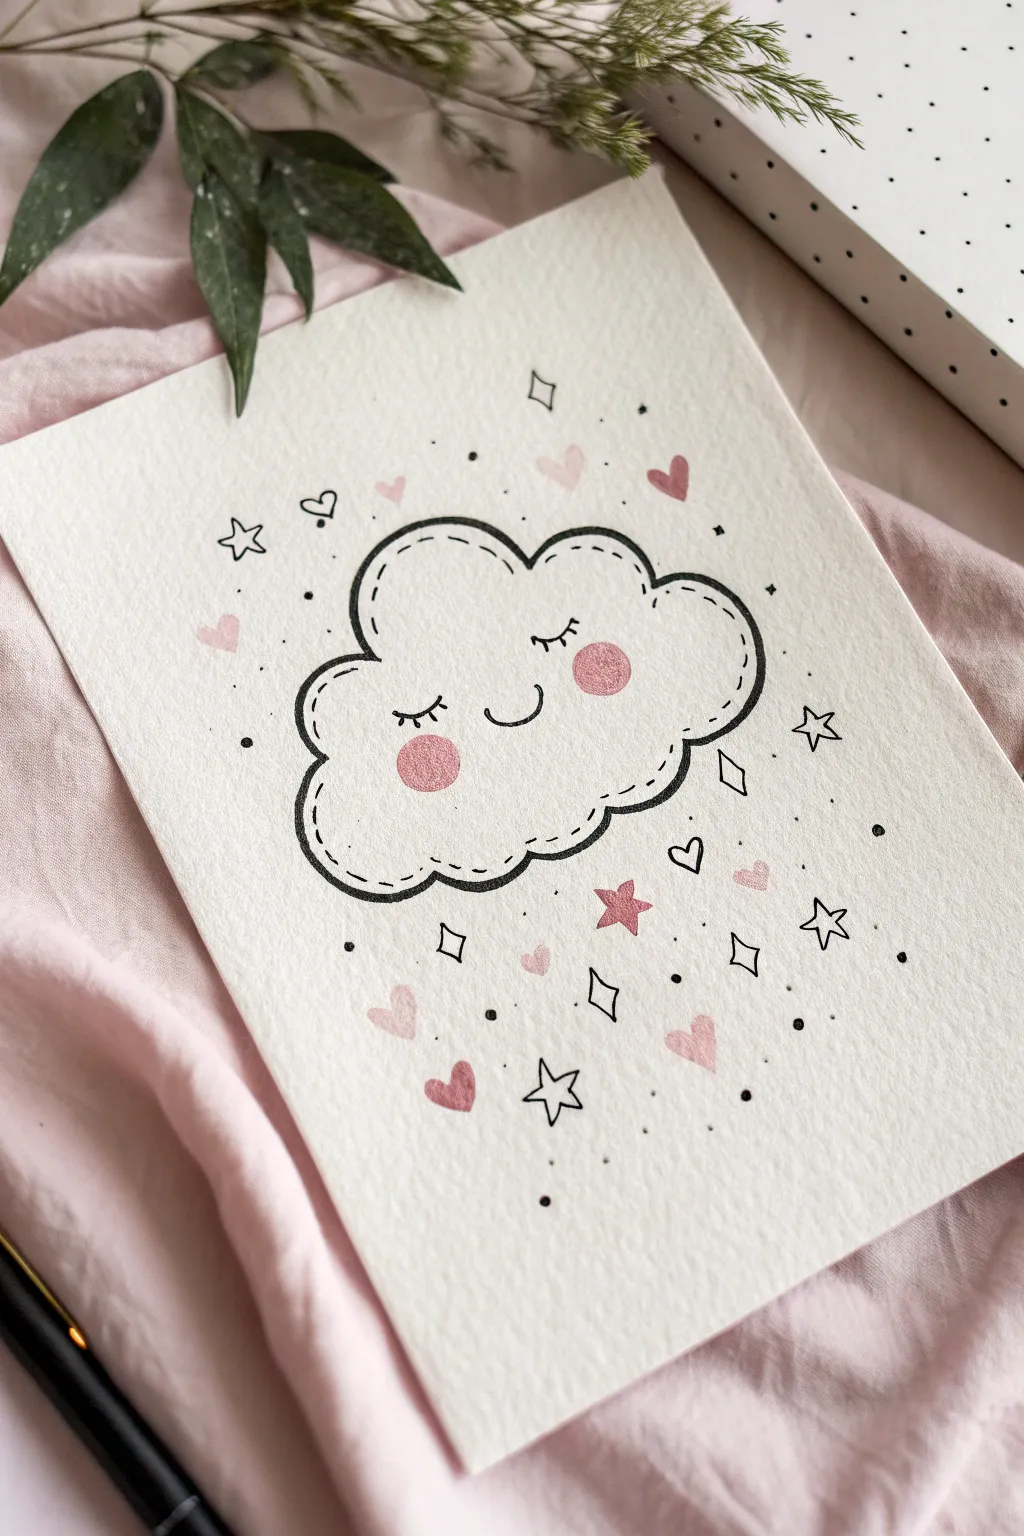
Capture the sweetness of a dreamy sky with this charming illustration of a smiling cloud surrounded by falling star sprinkles. Using simple black ink lines and soft touches of pink, you’ll create a playful character perfect for greeting cards or journal pages.
Step-by-Step Guide
Materials
- Textured watercolor paper or heavy cardstock (white or cream)
- Black fine liner pen (size 0.3 or 0.5)
- Thicker black marker or brush pen
- Pink watercolor paint or a light pink marker
- Small round paintbrush (if using watercolor)
- Pencil and eraser
Step 1: Drawing the Cloud
-
Outline the main shape:
Start by lightly sketching the fluffy cloud shape with a pencil. Aim for a slightly flattened oval composed of five to seven large, rounded bumps. Make the bottom bumps flatter and the top ones puffier to give it weight. -
Ink the perimeter:
Trace over your pencil lines with your thicker black marker or pen. Use a confident, fluid hand to create a bold outline. Don’t worry about perfect symmetry; a little wobble adds organic charm. -
Add the stitching detail:
Switch to your thinner fine liner pen. Draw a dashed line just inside the main outline, following the curves of the cloud. Leave about a 3mm gap between the solid outer line and your stitches. -
Create the face:
In the center of the cloud, use the fine liner to draw two small arcs turning downward for closed, sleepy eyes. Add three tiny eyelashes to the outer corner of each eye. -
Draw the smile:
Directly between the eyes, draw a small, simple U-shape for a happy little smile. Keep it centered and relatively small to maintain the ‘cute’ proportion.
Step 2: Adding Color & Details
-
Paint the cheeks:
Dip your brush into light pink watercolor (or use a marker) and add two distinct circles right underneath the eyes. I find that placing them slightly wider than the eyes makes the face look sweeter. -
Sketch the falling elements:
Below the cloud, use your pencil to lightly map out a variety of shapes appearing to rain down. Mix small hearts, diamonds/sparkles, and traditional five-point stars. -
Inking the sprinkles:
Once happy with the placement, outline your pencil sketches with the fine liner. Draw some as hollow shapes (like the diamonds) and leave others blank to be filled with color later. -
Color the hearts and stars:
Using your pink medium, fill in the hearts completely. For the stars, you can fill some entirely or add a pink hue while leaving the outline distinct. -
Add upper atmosphere details:
Above the cloud, draw a few floating elements to balance the composition. A couple of hollow hearts and outlined stars work beautifully here. -
Incorporate tiny dots:
Take your fine liner and gently stipple tiny black dots throughout the empty white space. Concentrate them slightly more around the cloud and the falling shapes. -
Draw accent sparkles:
Add small four-pointed star shapes (like a plus sign with long arms) and tiny circles scattered among the pink elements for extra magic. -
Final clean up:
Allow the ink and any paint to dry completely. Gently erase any visible pencil marks, being careful not to smudge your pink cheeks.
Uneven Ink Lines?
If your hand shakes while drawing the dashed stitch line, embrace it! Go over the wobbly parts again loosely to create a ‘sketched’ texture intentionally.
Level Up With Metallic
Use a gold or silver gel pen to fill the stars or add small highlights to the pink cheeks for a shimmering, magical finish.
Your adorable cloud character is now ready to brighten up anyone’s day with its happy demeanor
Chubby Frogs in Silly Poses
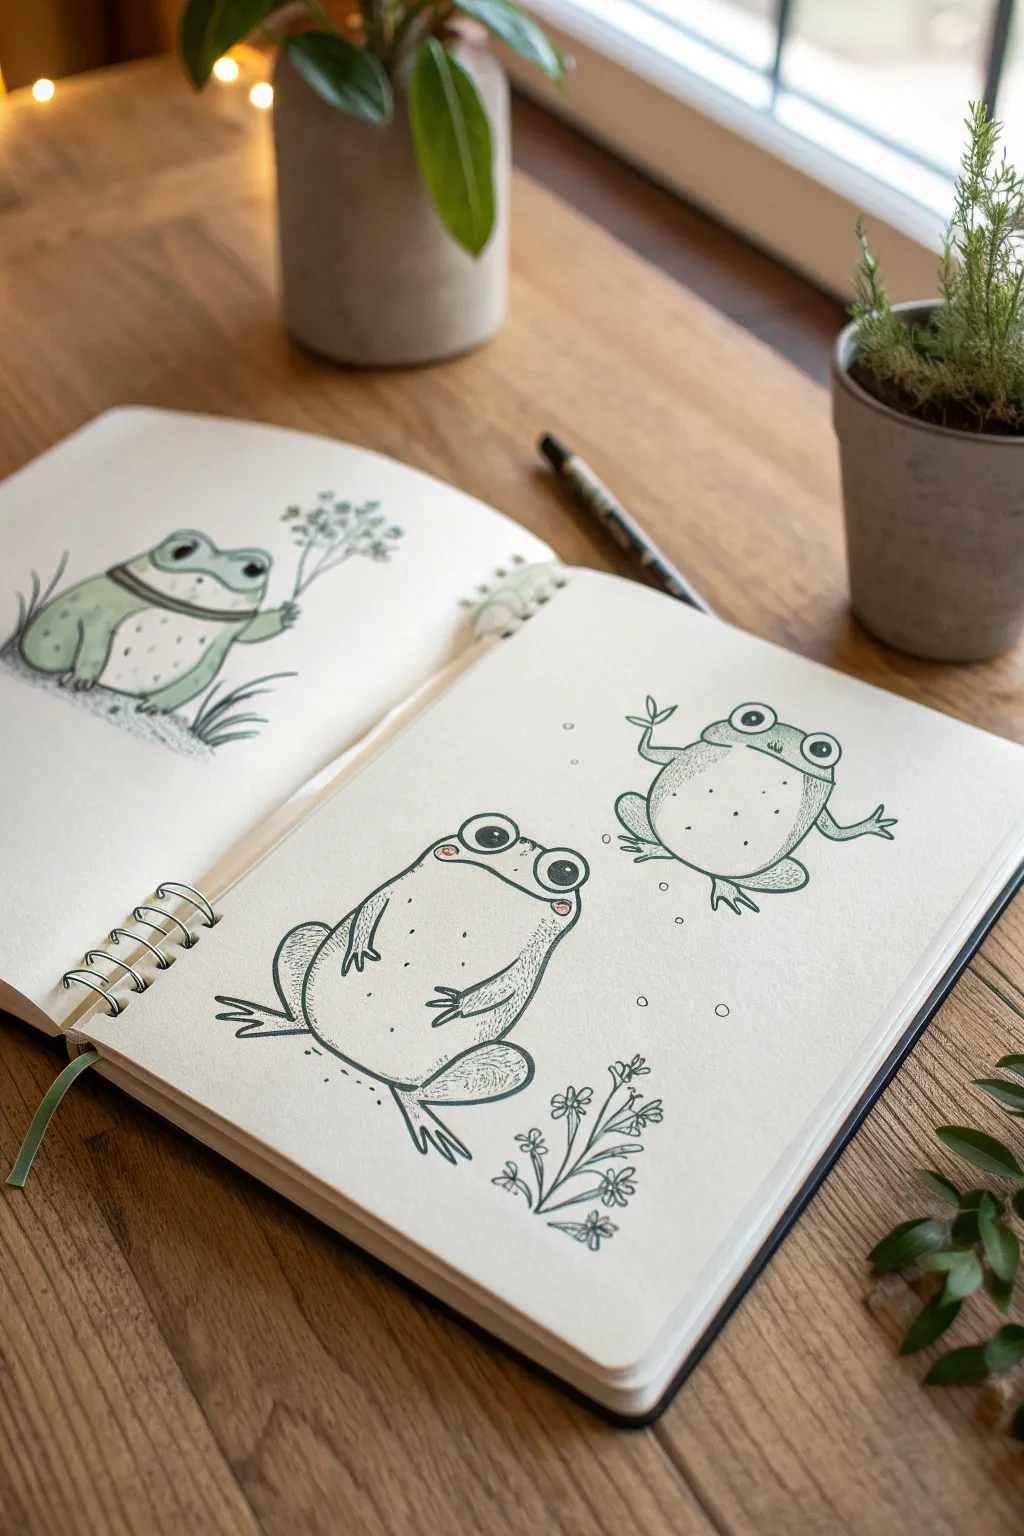
Embrace the joy of doodling with these delightfully round and expressive frogs. This simple line-art project captures three unique poses, perfect for filling a sketchbook spread with personality and minimalist charm.
Detailed Instructions
Materials
- Spiral-bound sketchbook (smooth or mixed media paper)
- Black fine liner pen (0.3mm or 0.5mm)
- Green colored pencil or weak marker (sage or muted green)
- Pink colored pencil (for cheeks)
- Pencil and eraser (for sketching)
Step 1: Setting the Scene: The Polite Sitter
-
Establish the shape:
Start on the left page. Ideally, use a light pencil first. Draw a large, squishy oval shape that is slightly wider at the bottom to give the frog a pleasant weight. -
Add the face:
Sketch two prominent bumps on top of the oval for the eyes. Inside, draw small pupils. Add a wide, simple line for the mouth that curves up slightly. -
Create the scarf detail:
Draw a curved line just under the mouth to suggest a neck roll or a collar, giving the frog distinct character. -
Draw the limbs:
Add a simple arm extending to the right, holding a small stem. Draw the back leg as a curved shape tucked against the body. -
Ink and color:
Outline your sketch with a black fine liner. Using your sage green pencil, color the body entirely, leaving the belly area white or lighter. Add a tiny sprig of flowers in its hand.
Pro Tip: Eye Expressions
Even slight changes in pupil placement alter the mood entirely. Looking up creates innocence; looking sideways creates sass. Experiment with pupil size too.
Step 2: The Big Sitter (Right Page, Bottom)
-
Form the large body:
On the bottom left of the right page, draw a large, gumdrop-shaped oval. This frog is sitting flat, so keep the base wide and grounded. -
Add giant eyes:
Draw two large circles protruding from the top of the head. Add smaller filled-in circles for pupils, looking slightly upward to the right. -
Position the arms:
Sketch two small, stick-like arms resting on the belly. The fingers should be simple points, resting casually. -
Define the legs:
Draw the back legs folded up on either side of the body. They should look like large ovals attached to the hips, with simple webbed feet pointing outward. -
Add rosy cheeks:
Draw small ovals under the eyes for cheeks. I like to lightly color these pink immediately so I don’t forget the placement. -
Ink the main lines:
Go over your pencil lines with the black pen. Use a slightly broken or sketchy line for the body to give it texture. -
Add texture dots:
Stipple tiny dots on the back and sides of the frog’s body to suggest bumpy skin without shading heavily. -
Include floral accents:
To the right of the sitting frog, draw a few simple stalks with tiny four-petaled flowers using your green pencil or pen.
Level Up: Environment
Instead of blank space, draw a faint horizon line or lily pads under them. Use a light blue wash to place them underwater or in a pond scene.
Step 3: The Leaping Friend (Right Page, Top)
-
Draft the jumping shape:
In the upper right corner, sketch a round circle for the body. This one is airborne, so tilt the axis slightly. -
Create the expression:
Add the two eye bumps on top. For this one, make the mouth a tiny, surprised ‘o’ or a flat line to show movement. -
Draw dynamic limbs:
Extend the arms outwards—one reaching up, one reaching down. Sketch the legs splayed out in a mid-jump pose with webbed toes. -
Inking the jumper:
Outline with your fine liner. Keep the lines crisp to suggest energy. -
Add movement details:
Draw a few small bubbles or circles around this frog to emphasize that it is hopping or floating in space. -
Final shading touches:
Use your sage green pencil to add very light shading to the sides of the frogs to give them volume, keeping the centers bright.
Now you have a sketchbook page filled with personality to brighten up your day
BRUSH GUIDE
The Right Brush for Every Stroke
From clean lines to bold texture — master brush choice, stroke control, and essential techniques.
Explore the Full Guide
Blushing Planets and Tiny Moons
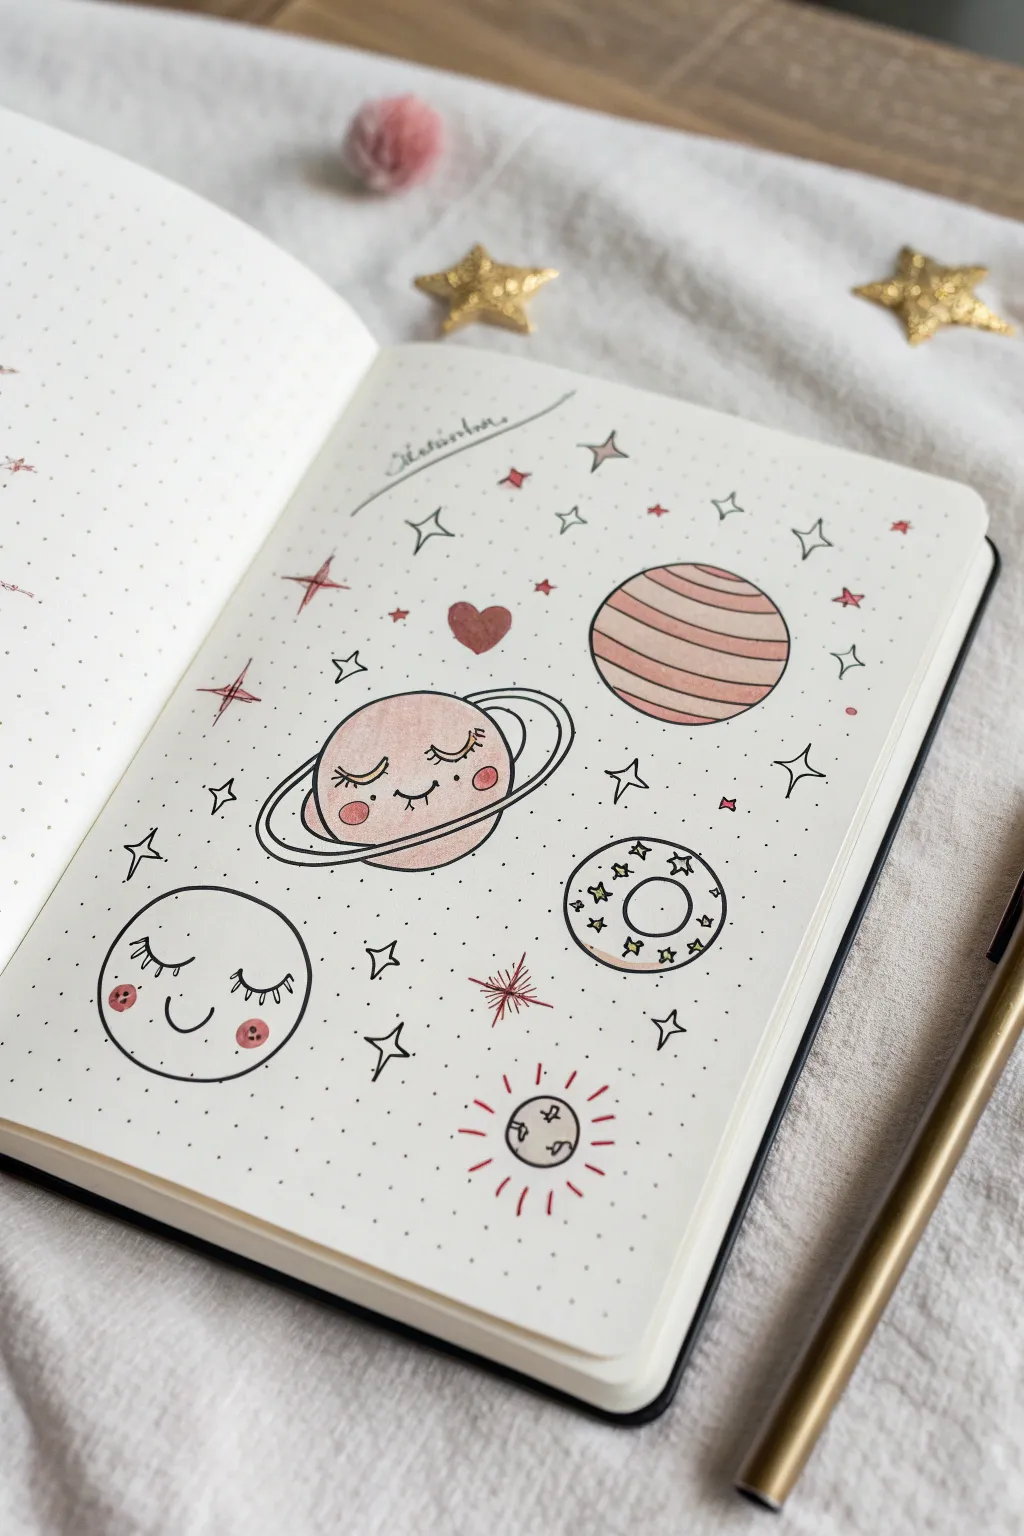
Transform your bullet journal page into a dreamy galaxy filled with sleepy planets and blushing moons using simple shapes and soft pastels. This doodle spread combines clean black outlines with gentle pink watercolor fills for a whimsical, cosmic vibe.
Step-by-Step Guide
Materials
- Dotted notebook (bullet journal)
- Black fineliner pen (0.3mm or 0.5mm)
- Pink watercolor brush pen or mildliner
- Pencil and eraser
- Gold gel pen (optional for accents)
Step 1: Sketching the Solar System
-
Set the scene:
Begin by writing a small cursive title at the top of your page. ‘September’ or ‘Galaxy’ works well, depending on your theme, underlined with a gentle swoosh. -
Draw the central Saturn:
In the middle of the page, lightly pencil a medium-sized circle. Add a ring around it by drawing a flattened oval that cuts through the center, erasing the line where the planet covers the back of the ring. -
Add the striped planet:
To the upper right of Saturn, sketch another circle of similar size. Divide this one with three or four slightly curved horizontal lines to create stripes. -
Create the sleepy moon:
In the bottom left corner, draw a large circle for the moon character. Keep your grip loose to help make the circle smoother. -
Add secondary celestial bodies:
Draw a donut-shaped asteroid ring in the lower middle area and a small sun doodle near the bottom right. Fill the empty spaces with a small heart, various four-pointed stars, and tiny five-pointed stars.
Wobbly Circles?
Don’t stress if your planets aren’t perfectly round. Go over the outline a second time loosely; the sketchy style hides imperfections and adds character.
Step 2: Adding Faces and Details
-
Give Saturn a face:
On your central ringed planet, draw two U-shaped curves for closed, sleeping eyes with long lashes. Add a tiny smile right between them. -
Give the Moon a face:
Repeat the sleeping face on the bottom-left moon: wide, sweeping U-shapes for eyes with prominent lashes and a gentle smile centered below. -
Ink the main outlines:
Using your black fineliner, trace over your pencil sketches. Keep your hand steady and confident for clean lines, especially on the circular planet shapes. -
Ink the details:
Go over the stars, the heart, and the smaller decorative elements. Remember to trace the internal stripes on the upper right planet. -
Erase guidelines:
Once the ink is completely dry—I usually wait at least two minutes to be safe—gently erase all underlying pencil marks.
Step 3: Bringing it to Life with Color
-
Color the Striped Planet:
Take your pink brush pen and color every other stripe on the top-right planet. This creates a nice patterned look without overwhelming the page. -
Fill in Saturn:
Color the entire body of the central ringed planet with a soft wash of pink. Leave the ring white for contrast. -
Add rosy cheeks:
This is the crucial cute step: draw small pink circles on the cheeks of both the Saturn and Moon characters. If your pen is translucent, you can layer a second coat here for darker blush. -
Color smaller elements:
Fill in the floating heart solid pink. Add pink centers to the flower-like star bursts and lightly color specific sections of the donut asteroid. -
Create star accents:
Use the pink pen to trace over some of the four-pointed stars or add tiny pink dots in the background to act as distant stardust. -
Add final sparkle:
Draw radiating lines from the small sun doodle at the bottom using either red or pink ink to make it shine.
Make It Shine
Use a gold gel pen to fill in the tiny five-pointed stars or to add highlights to the planet rings for an extra magical, metallic finish.
Now you have a page full of peaceful space friends ready to accompany your daily notes
Baby Octopus With Curly Arms
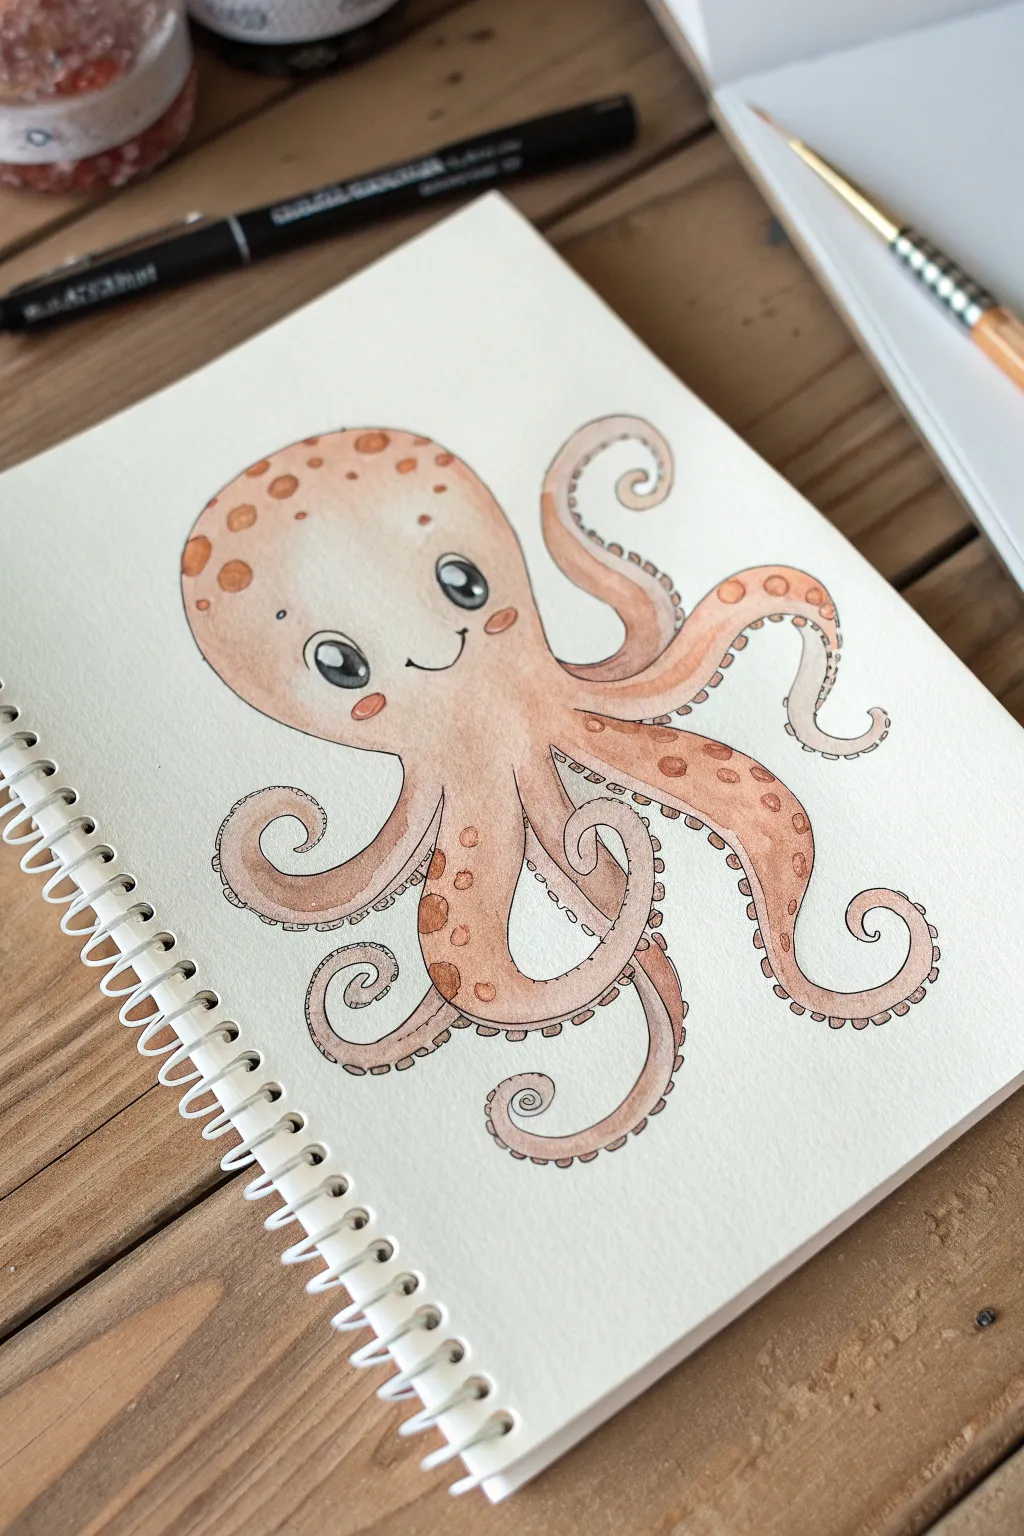
Dive into the deep blue with this adorable baby octopus sketch, featuring lively, curling tentacles and expressive eyes. This project combines gentle watercolor washes with crisp ink outlines to create a charming character that seems to wiggle right off the page.
How-To Guide
Materials
- Sketchbook with mixed media or watercolor paper
- Pencil (HB or 2B) and eraser
- Waterproof fine liner pen (black, 0.3mm or 0.5mm)
- Watercolor paints (shades of ochre, burnt sienna, and peach)
- Small round watercolor brush (size 2 or 4)
- White gel pen or white gouache
Step 1: Sketching the Outline
-
Draw the head:
Start by drawing a large, rounded egg shape for the octopus’s head. Keep the bottom slightly wider than the top to give it a chubby, cute appearance. -
Position the eyes:
Lightly sketch two large circles in the lower half of the head. Space them widely apart to maximize the ‘cute factor’ and add a small, curved smile right between them. -
Sketch the first arms:
Begin drawing the tentacles extending from the base of the head. Start with two central arms that curve inward toward each other, creating a framing effect. -
Add curly flourishes:
Draw the remaining six arms, making sure to give them distinct, spiral curls at the ends. Vary the directions—have some curling up and some curling down—to create a sense of movement.
Curly Q Tip
When drawing the curly arms, think of ‘S’ curves rather than perfect circles. This makes the tentacles look organic and flexible rather than stiff.
Step 2: Inking and Details
-
Outline the main shape:
Using your waterproof fine liner, carefully trace over your pencil lines. Creating smooth, continuous lines here works best for the flowing tentacles. -
Detail the eyes:
Inside the eye circles, draw large pupils, leaving two small white circles in each eye for highlighted reflections. Fill the pupils in solid black with the pen. -
Add suction cups:
Along the underside of each tentacle, draw a row of small, varied semi-circles or ovals to represent the suction cups. -
Spotting the head:
Draw several small oval spots on the top of the head and forehead area to give the octopus some texture. -
Erase pencil guides:
Wait for the ink to dry completely to avoid smudging, then gently erase all the underlying pencil sketch marks.
Make It Sparkle
Mix a tiny pinch of edible luster dust or iridescent medium into your watercolor wash for a magical, shimmering sea-creature effect.
Step 3: Watercolor Wash
-
Mix your base color:
Dilute a burnt sienna or warm ochre watercolor paint with plenty of water to create a pale, peachy-brown skin tone. -
Apply the first wash:
Gently paint the entire body of the octopus with this pale wash, avoiding the whites of the eyes. I like to keep this layer very light to build contrast later. -
Shade the edges:
While the paper is still slightly damp, add a slightly more concentrated mix of the same brown to the left side of the head and under the chin to create rounded volume. -
Paint the spots:
Switch to a darker, less diluted brown mixture. Carefully fill in the spots on the head and the larger spots on the upper tentacles. -
Color the cheeks:
Dilute a tiny bit of red or pink paint and dab two soft ovals right under the eyes for rosy cheeks. -
Tentacle depth:
Use a darker brown wash to paint the undersides of the tentacles (where the suction cups are), which helps separate the arms visually.
Step 4: Final Touches
-
Highlighting:
Once the paint is bone dry, use a white gel pen to add tiny dots or lines on the top right of the head to simulate wet, shiny skin. -
Reinforce shadows:
If needed, go back in with your pen to re-darken the lines between overlapping tentacles to ensure they look distinct from one another.
Now you have a wiggly, wonderful friend ready to swim through your sketchbook pages


Snail With a Swirly Shell
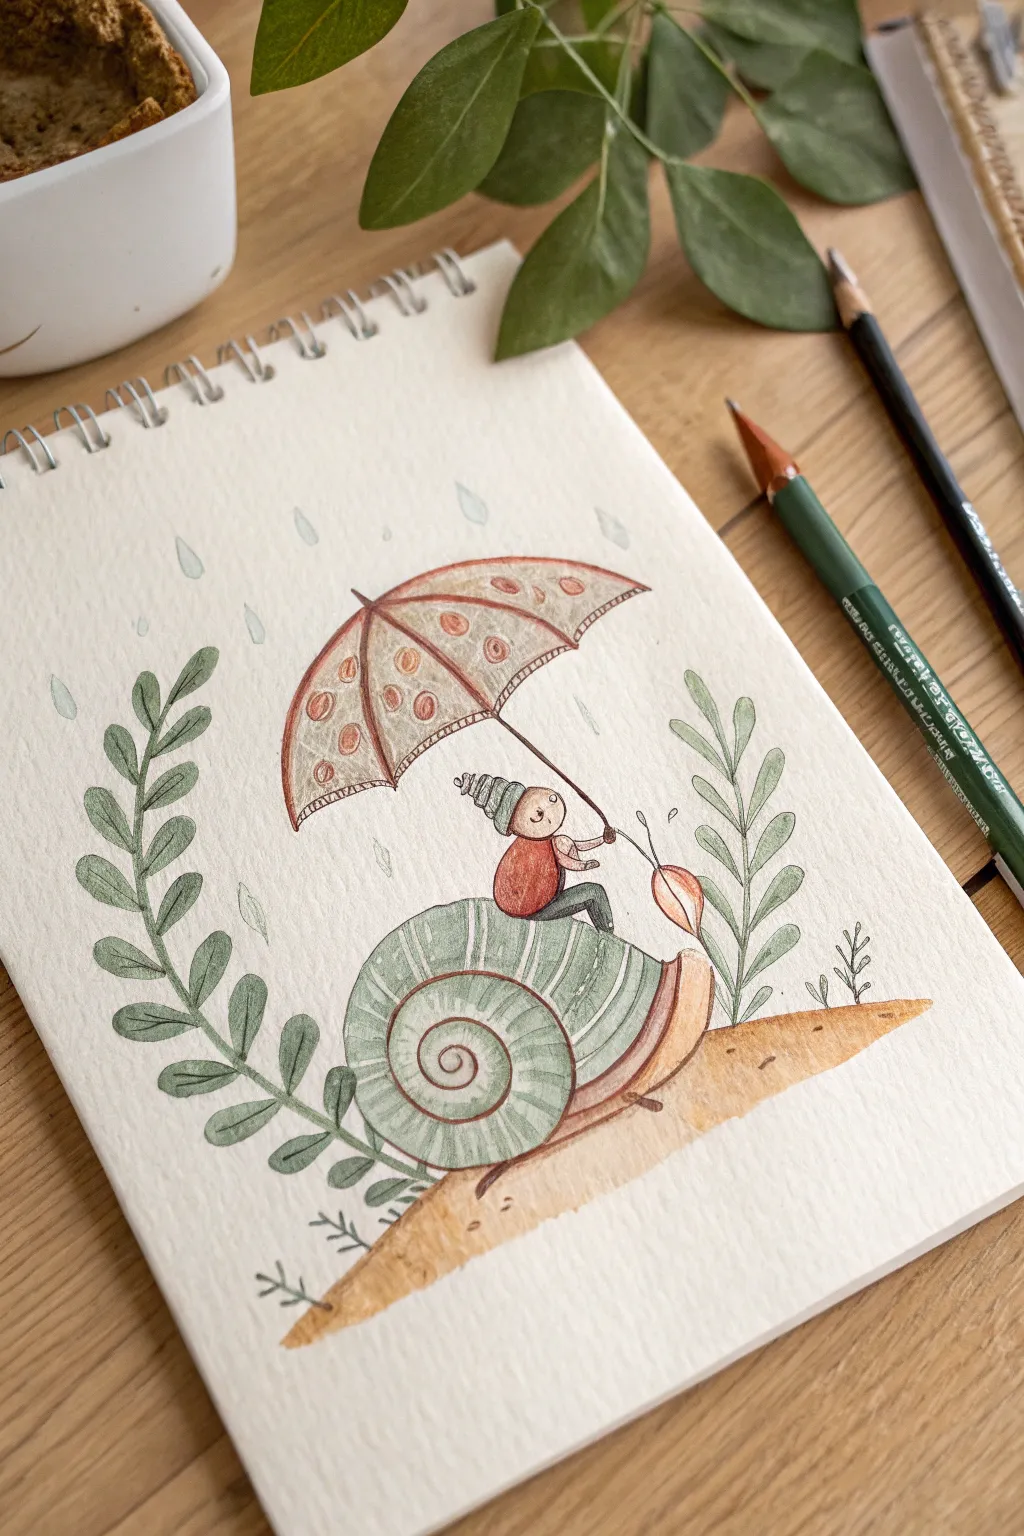
Whimsical and cozy, this illustration features a tiny character hitching a ride on a friendly snail under a patterned umbrella. Using a combination of watercolor washes and fine pencil details, you’ll bring this charming rainy scene to life on textured paper.
Step-by-Step Tutorial
Materials
- Cold press watercolor paper (A5 sketchbook)
- Watercolor paints (sage green, terracotta, light brown, grey)
- Round watercolor brushes (size 2 and 4)
- Fine liner pen (or sharp black colored pencil) for outlines
- Colored pencils (green, brown, reddish-orange) for texture
- HB Pencil for sketching
- Eraser
- Jar of water and paper towels
Step 1: Sketching the Elements
-
Draw the snail’s body:
Begin near the bottom third of the page by sketching the snail’s shell as a large spiral. Let the spiral widen as it goes outward. Add the soft body underneath, extending the head up slightly to the right. -
Add the rider:
Perch a small, round character on top of the shell. Draw a simple oval body, a round head, and thin legs dangling down. Give them a cute coiled hat. -
Position the umbrella:
Draw a large, curved umbrella shape shielding both the rider and the snail. Extend a thin handle down to the rider’s hands. Add curved lines inside the umbrella to create segments. -
Sketch the surroundings:
Lightly draw a curved ground line beneath the snail. Frame the left and right sides with simple, leafy branches curving upwards to create a wreath-like effect. Add small teardrop shapes in the sky for rain.
Uneven Watercolors?
If you get ‘blooms’ or cauliflower edges in your paint, it means you added water to drying paint. Wait for layers to be 100% dry before adding wet touches.
Step 2: Painting the Base Layers
-
Wash the shell:
Mix a diluted sage green watercolor. Paint the spiral of the shell, leaving thin white gaps between the spiral lines if possible, or paint it solid and define it later. -
Paint the snail’s body:
Use a warm, light brown or peach tone for the snail’s soft body and eye-stalks. Keep the wash sheer to maintain a delicate look. -
Color the rider and umbrella:
Paint the rider’s shirt a vibrant terracotta or reddish-orange. Use a lighter version of this same color (or a beige) for the umbrella canopy segments. I like to leave every other segment slightly lighter for variety. -
Ground and greenery:
Apply a sandy brown wash to the ground mound. Use the sage green mix again for the leafy branches, letting the color pool slightly at the base of the leaves. -
The sky:
Use a very watery grey or light blue to paint the raindrops. Keep them subtle so they don’t overpower the drawing.
Crisp Pencil Lines
Sharpen your colored pencils to a needle point before adding the texture lines on the shell. A dull point will smear and lose that delicate illustrative feel.
Step 3: Adding Texture and Details
-
Define the shell:
Once the paint is bone dry, use a dark green colored pencil to outline the spiral. Draw vertical hatch marks along the shell segments to give it a ridged texture. -
Decorate the umbrella:
With a brown or rust-colored pencil, draw small donuts or circles inside the umbrella segments for a pattern. Outline the umbrella ribs and add a fringe detail to the edge. -
Detail the rider:
Use a fine black pen or sharp pencil to draw the rider’s face—just two dots for eyes and a small smile. Outline their clothes and hat, adding simple stripes to the hat. -
Enhance the leaves:
Take a green colored pencil and outline the leaves. Add a central vein to each leaf for definition. -
Final outlines:
Lightly outline the snail’s body and the ground with a brown pencil. Add tiny grass tufts on the hill and re-emphasize the rain drops with a faint outline if they look too washed out.
Enjoy the peaceful atmosphere of your new little snail friend
Flower Faces in a Mini Bouquet
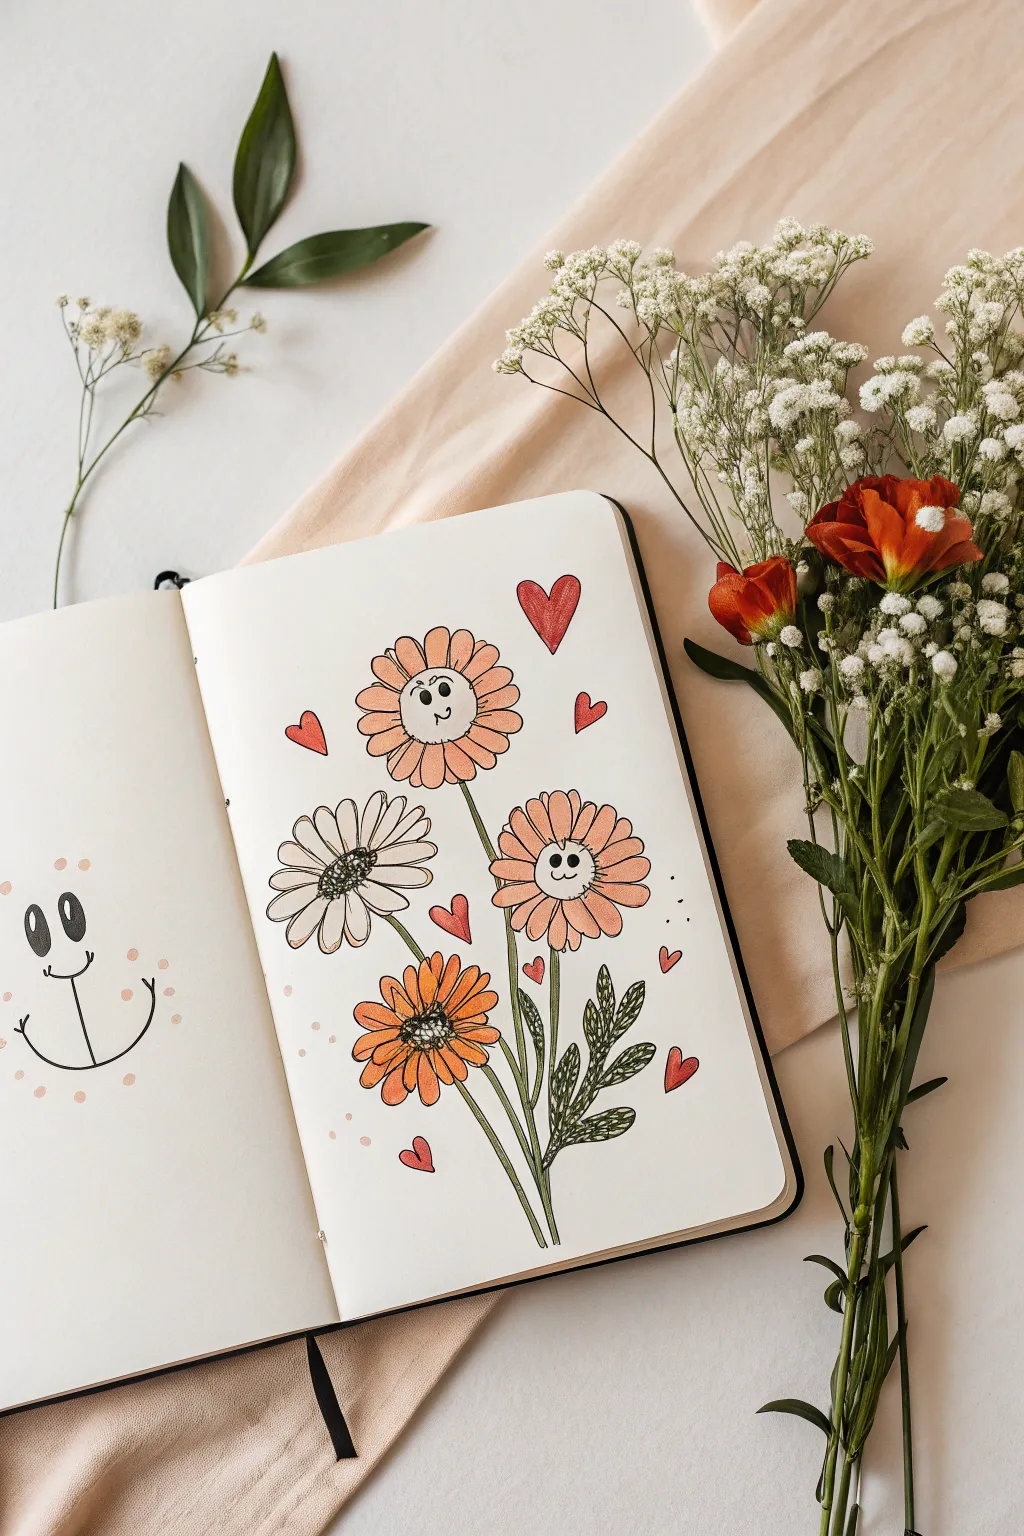
Bring your sketchbook to life with this cheerful bouquet of anthropomorphic daisies. This drawing combines simple linework with soft coloring to create a friendly, whimsical floral arrangement that is perfect for brightening up any journal page.
Detailed Instructions
Materials
- Sketchbook or drawing paper (heavyweight preferred)
- Black fine-liner pen (0.3mm or 0.5mm)
- Graphite pencil and eraser
- Colored pencils or alcohol markers (peach, orange, green, red)
- White gel pen (optional for highlights)
Step 1: Drafting the Layout
-
Sketch the center points:
Start lightly with your pencil. Draw four small circles spaced out on the page to mark where the flower heads will go. Place one high in the center, one lower right, one middle left, and one low center. -
Add the stems:
Draw faint, curved lines extending downwards from each circle, gathering them near the bottom of the page to form the bouquet shape. -
Rough in the petals:
Around each center circle, lightly sketch oval shapes for the petals. Don’t worry about perfection; just get the general size and rotation right. -
Outline the leaves:
Sketch a few elongated, pointy shapes near the stems on the right side to represent the foliage.
Character Personality
Change up the expressions! Try winking eyes, open mouths, or sleepy eyelids to give each flower a unique personality.
Step 2: Inking the Outlines
-
Draw the main flower centers:
Using your black fine-liner, trace the center circles. For the top and right-side flowers, keep the circles mostly empty for now. -
Add petal details:
Ink the petals around the centers. I like to give the petal tips slight imperfections or little notches so they look more organic and less like geometric ovals. -
Texture the non-face flowers:
For the white flower on the left and the orange flower at the bottom, draw a messy, scribbled texture in the very center to look like pollen. Add short lines radiating from the center onto the petals for depth. -
Draw the faces:
On the top and right-side flowers, draw the faces. Add two small black oval eyes and a simple curved smile. Give the top flower jaunty eyebrows for extra expression. -
Ink the stems:
Trace over your pencil stem lines. Where the stems bunch together at the bottom, ensure the lines overlap naturally. -
Detail the leaves:
Outline the leaves with a slightly jagged or wavy line. Draw a central vein down the middle of each leaf and add small diagonal veins branching off. -
Add decorative elements:
Draw several small hearts floating in the empty spaces around the flowers. Vary their sizes and angles to create a sense of movement. -
Erase pencil marks:
Wait a moment for the ink to fully set, then gently erase all your underlying graphite sketches.
Step 3: Adding Color
-
Color the happy petals:
Take a soft peach or light orange color and fill in the petals of the two flowers with faces. Leave the centers white. -
Color the bottom flower:
Use a richer, darker orange for the bottom-most flower’s petals. This adds nice contrast to the bouquet. -
Shade the white flower:
For the white daisy on the left, don’t color the petals fully. Just add a tiny bit of grey or beige shading near the center base of each petal. -
Fill the leaves:
Color the leaves and the stems with a muted olive green. Press lightly on the stems so the black outline remains crisp. -
Color the hearts:
Fill in the floating hearts with a bright red. Keep strokes consistent to avoid streakiness.
Ink Smearing?
If your black outlines smear when coloring, switch to waterproof archival ink pens or let the outline dry for at least 30 minutes.
Step 4: Final Touches
-
Add tiny dots:
Using the same red or pink from the hearts, place a few tiny dots randomly around the bouquet to act as confetti or magical dust. -
Highlight (Optional):
If you have a white gel pen, add a tiny white dot to the eyes of the flowers to give them a sparkle, or add a highlight line on the red hearts.
Now you have a page full of blooming smiles to brighten your day
Little Birds on a Wire
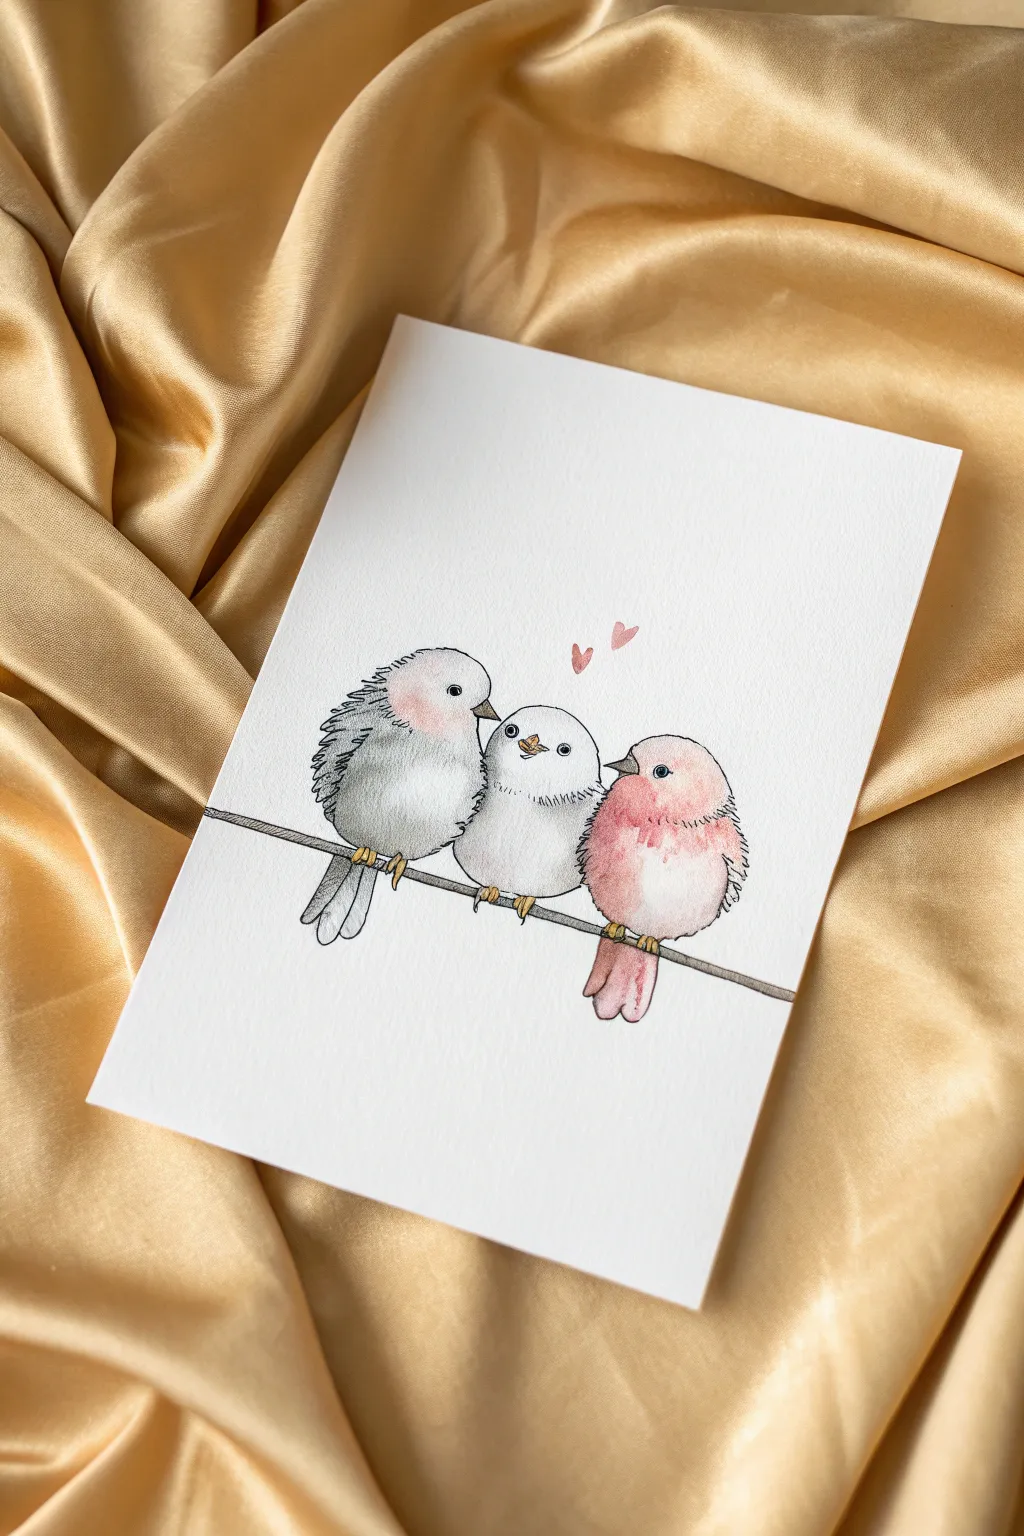
These three charming, stylized birds bring a touch of whimsy to any sketchbook or card. Using a combination of fine liner ink and soft watercolor washes, you’ll capture their fluffy textures and sweet personalities in just a few simple layers.
Step-by-Step
Materials
- Cold press watercolor paper (A5 size recommended)
- Fine liner pen (0.1mm or 0.3mm, waterproof black ink)
- Watercolor paints (Payne’s Grey/Black, Rose Madder/Pink, Yellow Ochre)
- Small round watercolor brush (size 2 or 4)
- Pencil (HB) and eraser
Step 1: Sketching the Shapes
-
Outline the bodies:
Begin by lightly drawing three overlapping oval shapes in a row. The left and right birds should be slightly larger and taller, while the middle bird is a bit squatter and tucked slightly behind the others. -
Add the wire:
Sketch a simple, slightly curved horizontal line running beneath them. Don’t use a ruler; a hand-drawn line looks more natural and organic for this style. -
Place features:
Mark the position of the beaks. The left bird faces right, the right bird faces left, and the middle one looks straight ahead. Add small dots for eyes, ensuring the side birds are looking at the middle one. -
Draw tail feathers:
Add tail shapes hanging below the wire. The left bird gets two long, rounded feathers, while the right bird’s tail is shorter and simpler.
Step 2: Inking the Details
-
Outline the wire:
Go over your wire line with the fine liner. Break the line where the birds’ feet will grip it, rather than drawing straight through. -
Ink the contours:
Trace the main body shapes. Instead of a solid continuous line, use broken, jagged strokes on the sides of the bodies to suggest fluffy feathers. -
Detail the faces:
Carefully ink the small triangular beaks and the round eyes. Leave a tiny white speck inside each eye as a highlight to bring them to life. -
Add textural markings:
Draw small ‘U’ shapes or little dashes on the wings and bellies to simulate layers of feathers. Keep these marks loose and playful. -
Draw the feet:
Add tiny claws gripping the wire. Each foot should look like three small loops wrapping around the line. -
Erase pencil guides:
Once the ink is completely dry—give it a full minute—gently erase all your pencil sketches to leave a clean black-and-white drawing.
Loose Lines
Don’t try to make your ink lines perfect. Jittering or shaking your hand slightly creates a ‘nervous line’ style that makes the feathers look much fluffier.
Step 3: Adding Watercolor
-
Paint the left bird:
Mix a very watery grey. Apply it to the body of the left bird, concentrating the pigment at the bottom and the back for shadow, fading to almost white at the chest. -
Add cheeky blush:
While the grey is still slightly damp, drop a tiny amount of diluted pink onto the cheek area. Let it bleed softly into the grey for a fuzzy look. -
Paint the middle bird:
Keep the middle bird very light. Use mostly water with just a hint of grey for shading around the bottom edges to separate it from the others. -
Paint the right bird:
Load your brush with a soft pink or rose color. Wash over the right bird, keeping the color strongest on the wing and tail, fading out toward the face. -
Color the beaks and feet:
Use a touch of yellow ochre or gold for the beaks and the tiny feet. I find a pointed brush tip helps stay inside the lines here. -
Add the hearts:
Using the same pink from the right bird, paint two small floating hearts above the gap between the middle and right bird. -
Final shadow touches:
Once the base layers are dry, add a slightly darker grey to the very bottom curves of the birds and the tails to give them weight and dimension.
Muddy Colors?
If the pink cheek turns grey, you likely painted wet-on-wet with too much mixing. Let the grey layer dry completely before glazing the pink cheek over it next time.
Step back and admire your sweet, feathery trio as they dry on the page
Finger Heart Hand Gesture Sketch
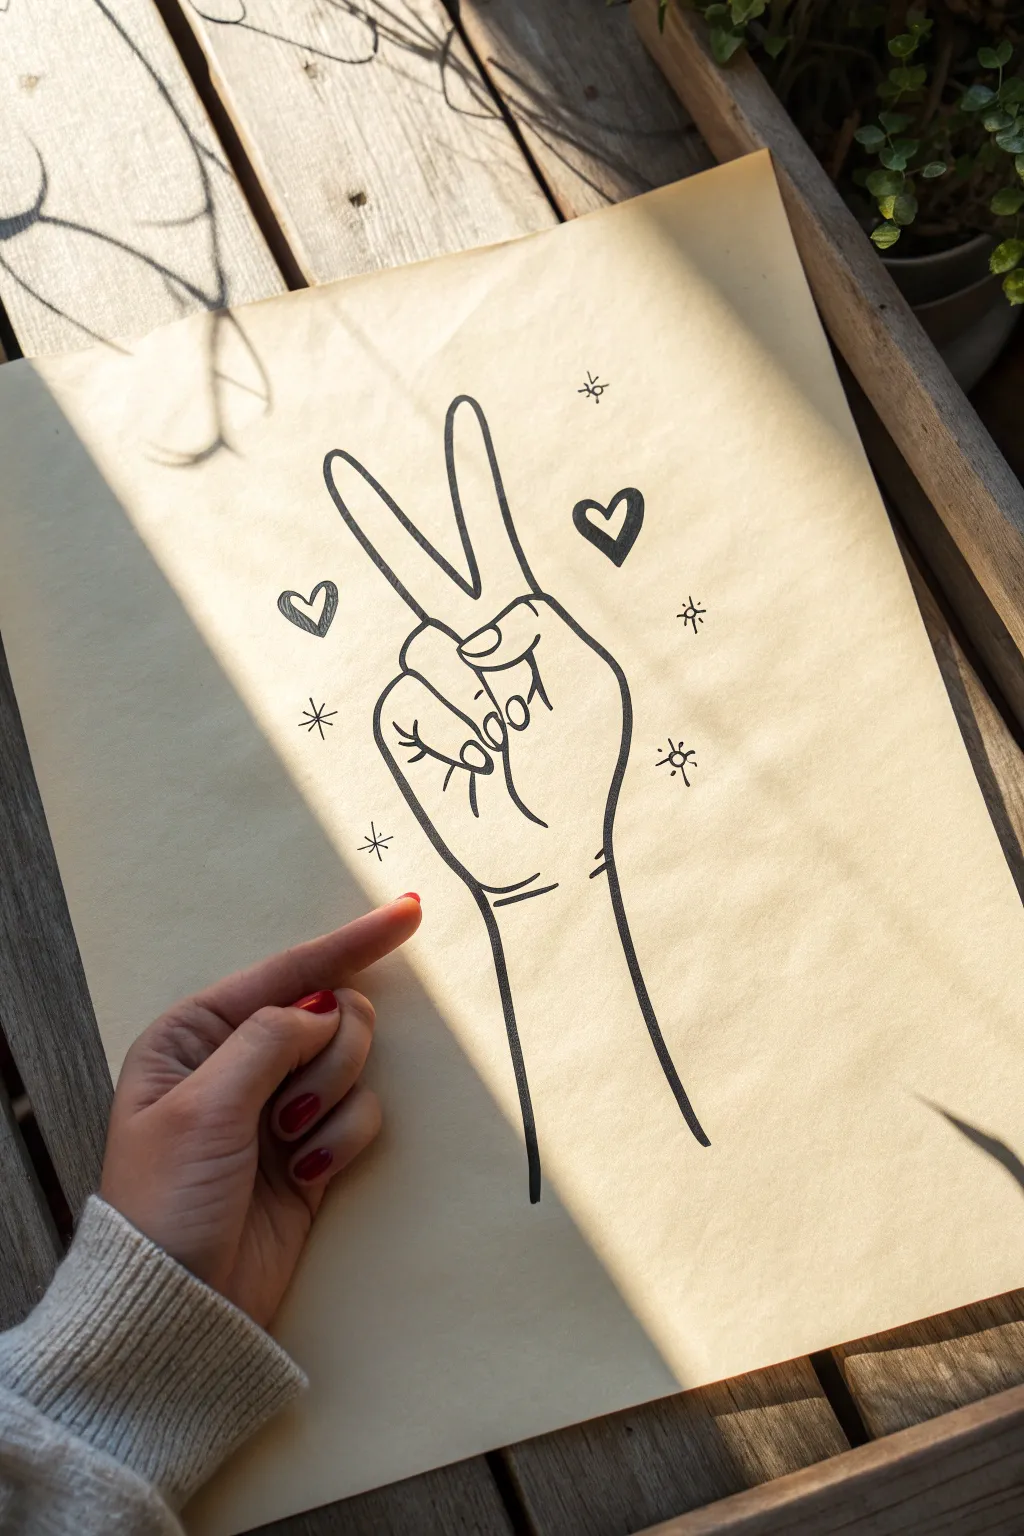
This simple yet charming line drawing captures the classic peace sign gesture with a playful, illustrative style. Using just a few clean lines and some cute embellishments, you’ll create an uplifting piece of art that looks great on tan-toned paper.
Step-by-Step Guide
Materials
- Light tan or cream drawing paper (standard A4 or letter size)
- HB pencil for sketching
- Fine-point black drawing pen (0.5mm or 0.8mm)
- Eraser (kneaded preferred)
- Ruler (optional, to center the drawing)
Step 1: Sketching the Hand Structure
-
Map out the palm:
Start lightly with your pencil. Draw a softly rounded square shape in the center of your page to represent the base of the palm. This doesn’t need to be perfect; it’s just a guide. -
Position the thumb:
On the left side of your palm square, sketch a curved shape crossing inwards. Imagine the thumb tucked across the palm, ending near the center. -
Add the folded fingers:
Draw two shorter, curved finger shapes next to the thumb. These represent the ring and pinky fingers, curled down into the palm. They should look like small, rounded mounds. -
Raise the index finger:
From the top left of your palm shape, draw a long, slightly angled finger pointing upwards and tilting to the left. Keep the tip rounded. -
Raise the middle finger:
Next to the index finger, draw the second finger pointing upwards but tilting slightly to the right to create the ‘V’ shape. The gap between them should widen as they go up. -
Sketch the wrist:
Extend two parallel lines downward from the bottom of the palm to form the wrist and forearm. Make them long enough to balance the height of the fingers.
Steady Hand Trick
If your lines are shaky, try drawing from your shoulder instead of just your wrist. Focus your eyes on where the line is going, not where your pen currently is.
Step 2: Refining the Lines
-
Define the nails:
On the tips of the folded fingers and thumb, sketch small, semi-circle nail shapes. Draw oval nail shapes on the two raised fingers. -
Add skin creases:
Draw small, curved lines at the knuckles of the raised fingers. I like to add a tiny crease where the thumb folds over the fingers to make it look more natural. -
Soften the outline:
Go over your pencil sketch and round out any sharp corners. The connection between the fingers and the palm should be smooth and flowing. -
Add the wrist crease:
Draw two small, curved horizontal lines at the base of the palm where it meets the wrist to suggest bendable skin.
Step 3: Inking and Embellishing
-
Trace the main outline:
Take your black fine-point pen and carefully trace over your final pencil lines. Use confident strokes to keep the lines smooth rather than shaky. -
Detail the hand:
Ink the smaller details, like the fingernails and the knuckle creases. Keep these lines slightly thinner or lighter if possible. -
Draw the floating hearts:
Place two hearts near the peace sign. Put one solid outline heart (black outline, white center) to the right, and a slightly smaller ‘scribbled’ heart to the left. -
Add sparkles:
Scatter four or five simple starburst shapes around the hand. Draw a small cross with a diagonal cross over it to make these twinkling stars. -
Erase pencil marks:
Wait at least five minutes for the ink to dry completely. Once safe, gently erase all the underlying pencil sketches to reveal a clean, crisp drawing. -
Final check:
Look for any lines that need thickening. You might want to make the outer ‘silhouette’ line of the hand slightly bolder than the interior detail lines for visual pop.
Make It 3D
Add a subtle shadow along one side of the hand using a gray marker or light pencil shading. This lifts the hand off the page instantly.
Now you have a trendy, minimalist illustration perfect for hanging on a mood board or gifting to a friend
Sticker-Style Cute Icons
Transform a plain notebook page into a collection of charming, sticker-like illustrations featuring a cat, cookie, mushroom, and star. These simple, bold designs use thick outlines and soft colors to mimic the playful aesthetic of die-cut vinyl stickers.
Step-by-Step Tutorial
Materials
- Smooth white paper or a sketchbook
- HB pencil
- Eraser
- Fine liner pen (0.3mm or 0.5mm, black)
- Thicker black marker or brush pen (for the outer border)
- Colored pencils, alcohol markers, or crayons (light pink, beige/light brown, dark brown)
Step 1: Planning and Sketching
-
Layout placement:
Visualize where your four distinct icons will sit on the page. Leave plenty of white space between them so each one stands out individually, just like stickers on a sheet. -
Draft the cat shape:
Start with a soft oval shape for the cat’s head. Add two triangular ears at the top. Keep the lines light so they are easy to erase later. -
Draft the cookie circle:
Draw a near-perfect circle to the right of the cat. It doesn’t need to be mathematically perfect; a slightly organic circle adds charm. -
Draft the mushroom:
Below the cat, sketch a wide, slightly flattened semi-circle for the mushroom cap. Add a chubby stalk underneath that is slightly wider at the bottom. -
Draft the star:
Next to the mushroom, lightly draw a classic five-pointed star. Rounding the tips of the points slightly makes it look friendlier and softer.
Step 2: Inking and Details
-
Refine the cat’s face:
Using your fine liner, draw two small dots for eyes and a tiny, rounded ‘w’ shape for the mouth. Add three small whiskers on each side and detail the inner ears. -
Detail the cookie:
Ink the circle outline. Inside, draw a simple smiley face with two eye dots and a curved mouth. Add several small irregular spots or asterisks to represent chocolate chips. -
Decorate the mushroom:
Draw several circles on the mushroom cap for spots. On the stalk, add a tiny face low down, consisting of two wide-set eyes and a tiny mouth. -
Enhance the star:
Ink the star outline. Give it personality by drawing a simple face in the center and two small circles for rosy cheeks. -
Erase pencil lines:
Once the fine ink lines are completely dry, gently erase all the underlying pencil sketches to clean up the workspace.
Uneven borders?
Don’t stress if your white border isn’t perfectly even. Rotate the paper as you draw tight curves. Your hand naturally pivots better in an arc than a straight line.
Step 3: Coloring
-
Color the cat:
Use a light pink marker or pencil to gently color the inner ears and add two small pink ovals for cheeks. -
Shade the mushroom:
Fill the mushroom cap with a soft pink, carefully coloring around the white circular spots. Keep the stroke direction consistent for a smooth look. -
Color the cookie:
Use a light beige or tan color to fill in the entire cookie shape. I like to go over the edge slightly if I’m using markers to blend it, but keep it neat. -
Add cookie contrast:
If your brown marker wasn’t dark enough for the chips, you can darken them now with a second layer or a darker brown pencil. -
Brighten the star:
Add just a touch of pink to the star’s cheeks, leaving the rest of the star white for a high-contrast, clean look.
Level Up: Glossy Finish
Add small white gel pen highlights to the eyes and tops of the colored areas (like the mushroom cap) to mimic the reflection of glossy vinyl stickers.
Step 4: The Boarder Effect
-
Create the sticker edge concept:
To make these drawings look like stickers, you need to create a uniform white border around each illustration. -
Draw the outline:
Take a slightly thicker pencil line and trace a generous offset path around each shape. This line should be about 2-3mm away from your drawing. -
Refine the border shape:
Smooth out any sharp corners in your offset path. The goal is a bubbling, die-cut effect, so curves should be gentle and flowing. -
Final border trace:
Use your finest pen to ink this outer border very lightly. Alternatively, you can leave it invisible and just cut it out if you are making real stickers, but for a drawing, a very faint gray line works best. -
Adding drop shadow (optional):
To make them pop off the page, add a very pale gray shadow to just one side (e.g., the bottom right) of the outer border line.
You now have a delightful page of faux-stickers ready to brighten up your journal
Collage of Smalls Grid Page
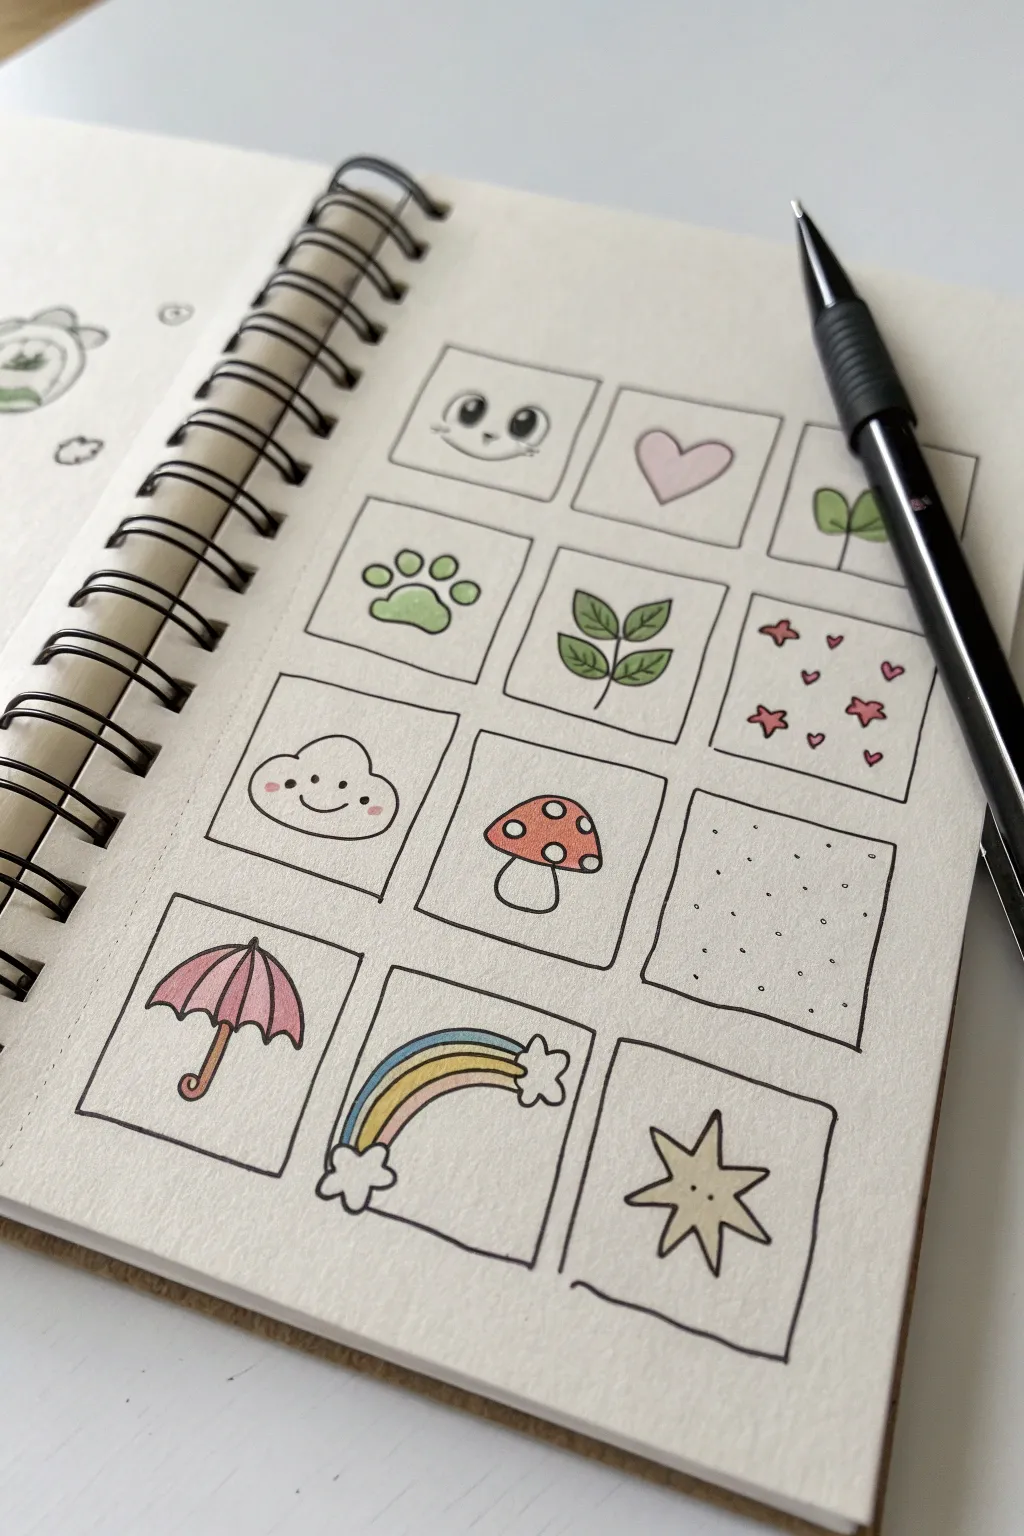
Create a charming collection of miniature drawings by organizing them into a neat grid layout on your notebook page. This project is perfect for practicing simple kawaii-style illustrations without the pressure of filling a large blank space.
Detailed Instructions
Materials
- Spiral-bound sketchbook or bullet journal
- Black fine-liner pen (0.3mm or 0.5mm)
- Ruler
- Pencil and eraser
- Colored pencils or dual-brush markers (pastel pink, green, yellow, blue, red)
Step 1: Setting the Structure
-
Plan the grid:
Start by lightly sketching a grid of distinct squares using your pencil and ruler. Aim for three columns across and four rows down, leaving a small, equal gap between each box to create a framed effect. -
Ink the outlines:
Trace over your pencil squares with a black fine-liner pen. Keep the lines crisp but don’t worry if they aren’t mechanically perfect; a slightly organic line adds hand-drawn character. Erase the pencil marks once the ink is dry.
Step 2: Top Row Doodles
-
Kawaii Face:
In the top-left box, draw a simple animal face. Place two large circles for eyes and a small, curved ‘w’ shape for the mouth. Add little notches in the eyes for highlights. -
Simple Heart:
Move to the center box and draw a classic heart shape in the middle. -
Sprout:
In the top-right box, draw a small vertical stem that splits into two rounded leaves at the top, resembling a seedling.
Uneven Squares?
If your freehand squares look too wobbly, cut a piece of cardstock to size and trace around it for every box to ensure perfect uniformity.
Step 3: Second Row Doodles
-
Paw Print:
Draw a large rounded triangle shape for the main pad, and add three or four smaller oval toes floating above it. -
Leaf Sprig:
Draw a central stem with two leaves branching out on each side. Add a central vein line to each leaf for detail. -
Confetti Pattern:
Fill the rightmost box with tiny, scattered shapes. Draw a mix of small stars and mini hearts floating randomly.
Theme It Up
Try a themed page instead of random items! Fill the grid exclusively with different fruits, weather icons, or varieties of flowers.
Step 4: Third Row Doodles
-
Happy Cloud:
Create a fluffy cloud outline with connected curved lines. Give it a face with two small dot eyes and a curved smile. -
Mushroom:
Draw a semi-circle cap on top of a rounded rectangular stem. Add circle spots onto the cap. -
Dot Texture:
Simply stipple the third box with small, scattered dots for a textured, minimal look.
Step 5: Bottom Row Doodles
-
Umbrella:
Draw a semi-circle with scalloped edges at the bottom. Add a curved ‘J’ handle coming from the center and draw lines from the top point to the scalloped ridges. -
Rainbow:
Draw an arch composed of three nested bands. Cap each end of the rainbow with a small, puffy cloud. -
Shining Star:
Draw a large, spiky star shape. I like to add a tiny face in the center with two dots and a smile.
Step 6: Adding Color
-
Touch of Pink:
Use a pastel pink marker or pencil to color the heart, the confetti hearts, the umbrella, the mushroom cap, and the cheeks on the cloud and face. -
Greens and Yellows:
Color the leaf sprig, the sprout, and the paw print green. Use yellow for one rainbow band and the large star. -
Blue and Red Accents:
Finish by coloring the rainbow’s outer band blue and the final band red (or a darker pink) to complete the vibrant look.
Now you have a neatly organized page of tiny art that brightens up your sketchbook
Tiny 3-Panel Cute Moment Comic
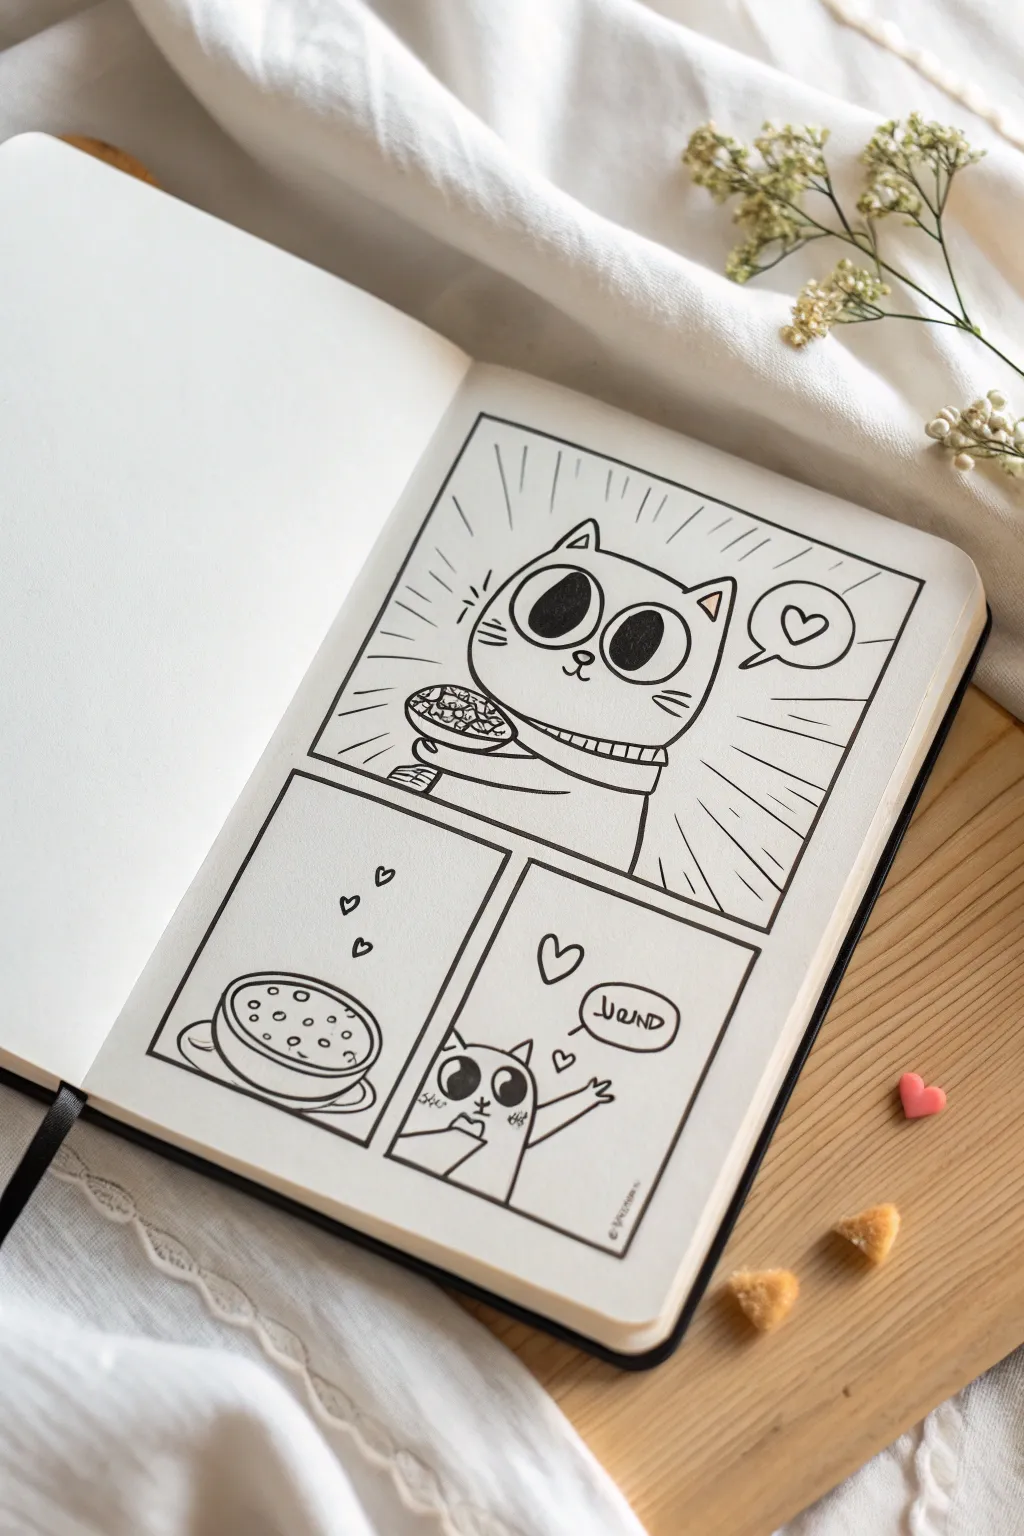
Capture a simple moment of joy with this charming, grid-style doodle featuring an excited cat and their favorite meal. Using crisp black lines and minimal shading creates a clean, classic comic book aesthetic that pops right off the page.
How-To Guide
Materials
- Sketchbook or drawing paper (smooth bristol or mixed media)
- Pencil (HB or 2H for sketching)
- Eraser (kneaded preferred)
- Fine liner pens (sizes 05, 03, and 01)
- Ruler or straight edge
Step 1: Setting the Scene
-
Planning the layout:
Start by lightly sketching a large rectangle that takes up most of your page. Leave a comfortable margin of white space around the edges to frame your art properly. -
Creating the panels:
Divide your rectangle into two main sections horizontally. Make the top section significantly larger, occupying about 60% of the vertical space. Split the bottom section into two smaller, equal-sized square panels. -
Inking the borders:
Once you’re happy with the grid, use your ruler and an 05 fine liner to trace over your pencil lines. Make these panel borders thick and bold to clearly separate the scenes.
Straight Line Secret
For the radiating ‘action lines’ in the top panel, don’t use a ruler. Quick, confident strokes made by moving your whole arm (not just your wrist) look more energetic.
Step 2: Panel 1: The Main Event
-
Sketching the cat:
In the large top panel, sketch a wide, rounded U-shape for the cat’s head. Add two large ovals for eyes and triangular ears on top. -
Adding details:
Draw the cat’s body below the head, wrapping paws around a small bowl. Add a speech bubble to the right containing a simple heart shape. -
Inking the character:
Switch to your 03 pen to ink the cat’s outline. Fill in the pupils solid black, leaving a tiny white dot in each for a highlight, giving the cat that eager, wide-eyed look. -
Drawing the food:
Use an 01 pen for the finer details, like the texture inside the food bowl and the cat’s whiskers. Draw radiating lines exploding outward from the cat to emphasize excitement.
Make It Interactive
Turn this comic into a mini greeting card! Leave the speech bubble blank and write a custom message like ‘Thinking of You’ or ‘Let’s Eat’ inside after you ink it.
Step 3: Panel 2: The Inspiration
-
Focusing on the food:
In the bottom-left panel, draw a larger, detailed version of the food bowl. Sketch an oval for the rim and a deeper curve for the bottom. -
Adding bubbles:
Inside the bowl rim, draw small circles of varying sizes to suggest bubbling soup or stew. Ink these with your 01 pen. -
Love is in the air:
Draw three tiny floating hearts rising from the bowl instead of steam lines to show how delicious it smells.
Step 4: Panel 3: The Reaction
-
A different angle:
In the final bottom-right panel, sketch the cat peeking up from the bottom corner. Crop the drawing so only the top of the head and one waving arm are visible. -
Expression work:
Give the cat the same wide eyes but add a small, happy mouth. Draw a speech bubble saying ‘yummy’ or a similar sound effect. -
Final inking:
Go over your remaining pencil lines with the 03 pen. I like to add a few small floating hearts here too to tie the visual story together.
Step 5: Finishing Touches
-
Erasing:
Wait at least 5-10 minutes to ensure the ink is completely dry. Gently erase all underlying pencil sketches so only the crisp black ink remains. -
Line weight variation:
Take your thickest pen (05) and reinforce the outer silhouette of the cat in the top panel. This subtle thickening makes the character stand out against the background lines.
Now you have a heartwarming little comic strip ready to sweeten up your sketchbook
Mix-and-Match Animal Hybrids
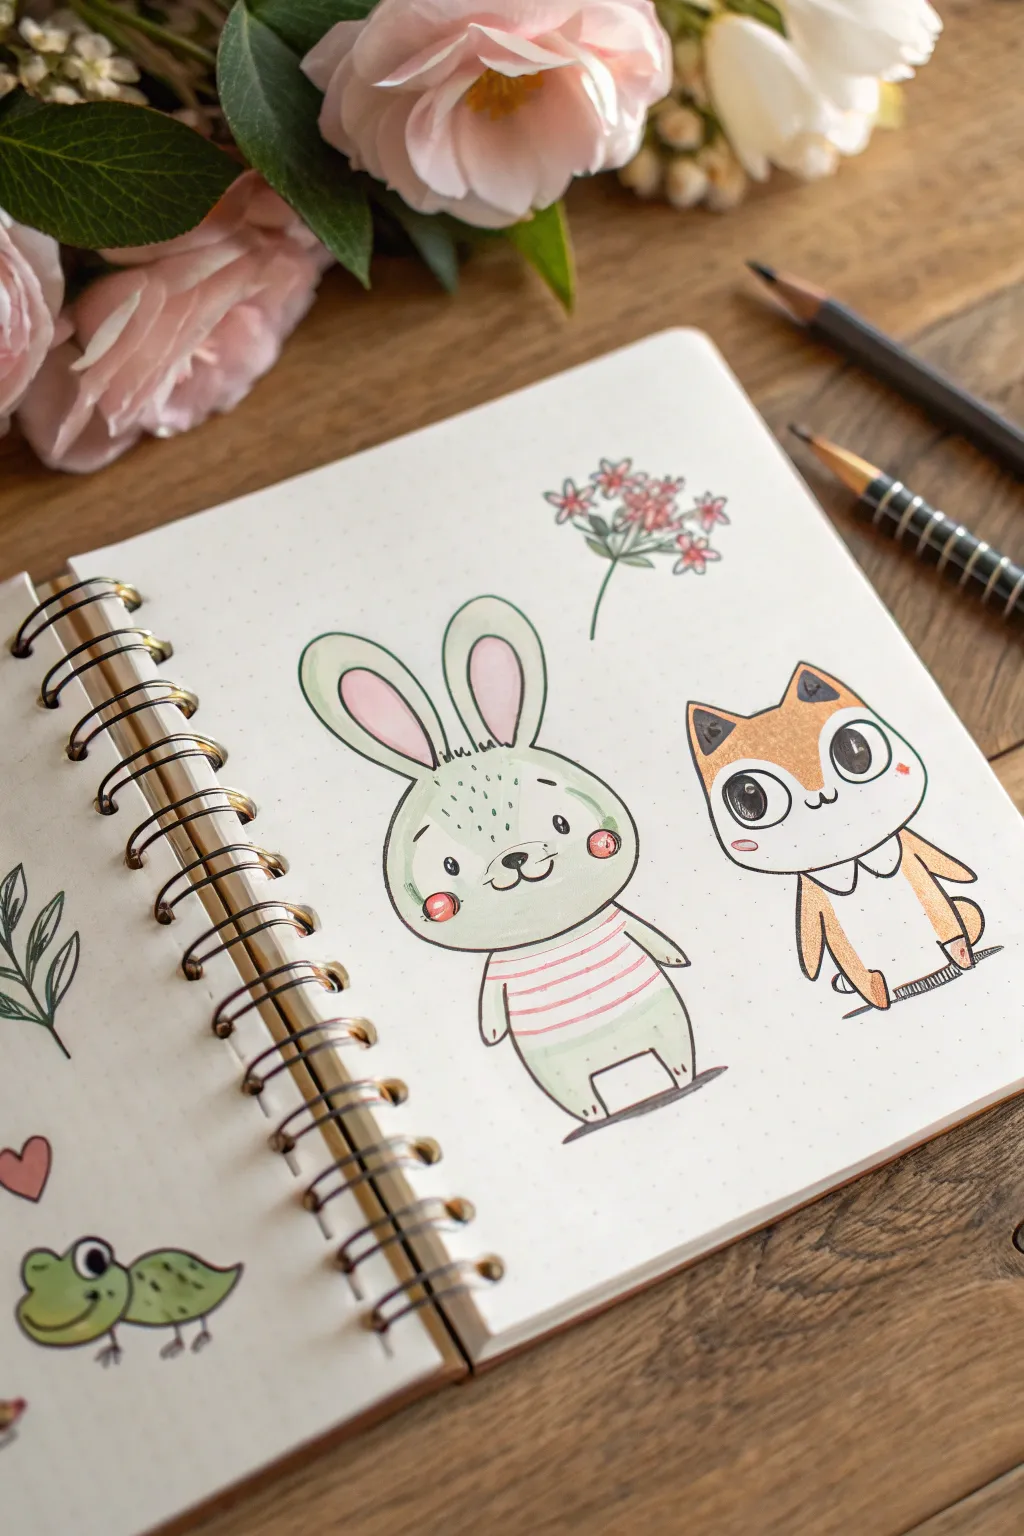
Create a charming duo of forest friends using a delightful mix of fine liners and soft coloring. This project captures a whimsical rabbit and a cheeky fox in a clean, illustrative style perfect for your sketchbook or bullet journal.
Step-by-Step
Materials
- Spiral-bound dot grid or sketchbook paper
- Fine liner pen (black, 0.3mm or 0.5mm)
- Alcohol-based markers or colored pencils (mint green, soft pink, orange, white)
- Pencil (HB for sketching)
- Eraser
- White gel pen (optional for highlights)
Step 1: Sketching the Shapes
-
Outline the bunny’s head:
Start on the left side of your page. Draw a large, slightly flattened circle for the rabbit’s head. It should be wider at the bottom than the top to give it chubby cheeks. -
Add the bunny’s body:
Directly below the head, sketch a smaller, rounded rectangle shape for the body. Keep the bottom flat where the feet will go. -
Sketch the bunny’s ears and limbs:
Draw two long, tall ovals extending from the top of the head for ears. Add small, simple U-shapes for arms near the shoulder area and small rectangular feet at the base. -
Outline the fox’s head:
Move to the right side. Draw a slightly more triangular shape for the fox’s head, with pointed corners at the top for ears and a flatter bottom. -
Add the fox’s body:
Sketch a small, pear-shaped body beneath the fox head. Add two small triangular shapes at the bottom for feet and curved lines for arms resting at its sides.
Clean Lines
When inking long curves like the bunny’s head, lock your wrist and move your entire arm. This prevents shaky lines and creates smoother arcs.
Step 2: Refining and Inking
-
Ink the bunny’s outline:
Using your fine liner, trace over your pencil lines for the rabbit. Make the lines smooth and continuous. Add inner ovals for the ears. -
Add bunny details:
Draw two wide-set dots for eyes and a small ‘Y’ shape for the nose and mouth. Add three small freckle dots on each cheek and horizontal stripes across the shirt. -
Ink the fox’s outline:
Trace the fox shape with the fine liner. Pay attention to the ears; draw a line separating the outer ear from the inner ear. -
Add fox facial features:
Draw two large circles for eyes with large pupils, leaving a small white spot for reflection. Add a small ‘w’ mouth and a curved line across the neck for a collar. -
Erase pencil lines:
Once the ink is completely dry (wait at least a minute to prevent smudging), gently erase all underlying pencil sketches.
Smudged Ink?
If your fine liner smears when erasing, switch to erasing in a circular motion rather than back and forth, and wait longer for ink to set.
Step 3: Adding Color
-
Color the bunny’s skin:
Use a mint green marker or pencil to fill in the bunny’s head, ears, and exposed legs. Leave the inner ears and shirt blank for now. -
Add pink accents to the bunny:
Fill the inner ears with a soft pink. Use a darker pink or red for the stripes on the shirt and two round circles for rosy cheeks. -
Color the fox:
Color the top half of the fox’s face, the outer ears, and the arms with a warm orange. Leave the bottom half of the face and the belly white. -
Add final details:
Color small pink cheeks on the fox. If you have a white gel pen, add tiny highlights to the bunny’s eyes and cheeks to make them pop. -
Draw the environment:
Sketch a simple floral sprig floating above the characters using the fine liner and touches of pink for petals. Add a simple shadow line under both animals to ground them.
You now have a pair of adorable illustrated critters ready to brighten up your notebook pages


Have a question or want to share your own experience? I'd love to hear from you in the comments below!