When you’re hunting for hair ideas drawing, you’re really looking for shapes, rhythm, and a plan that keeps you from getting lost in a million strands. I like to treat hair like sculpting—start with big hair volume and directional flow, then sprinkle in the texture where it counts.
Draw Straight Hair in Clean Clumps
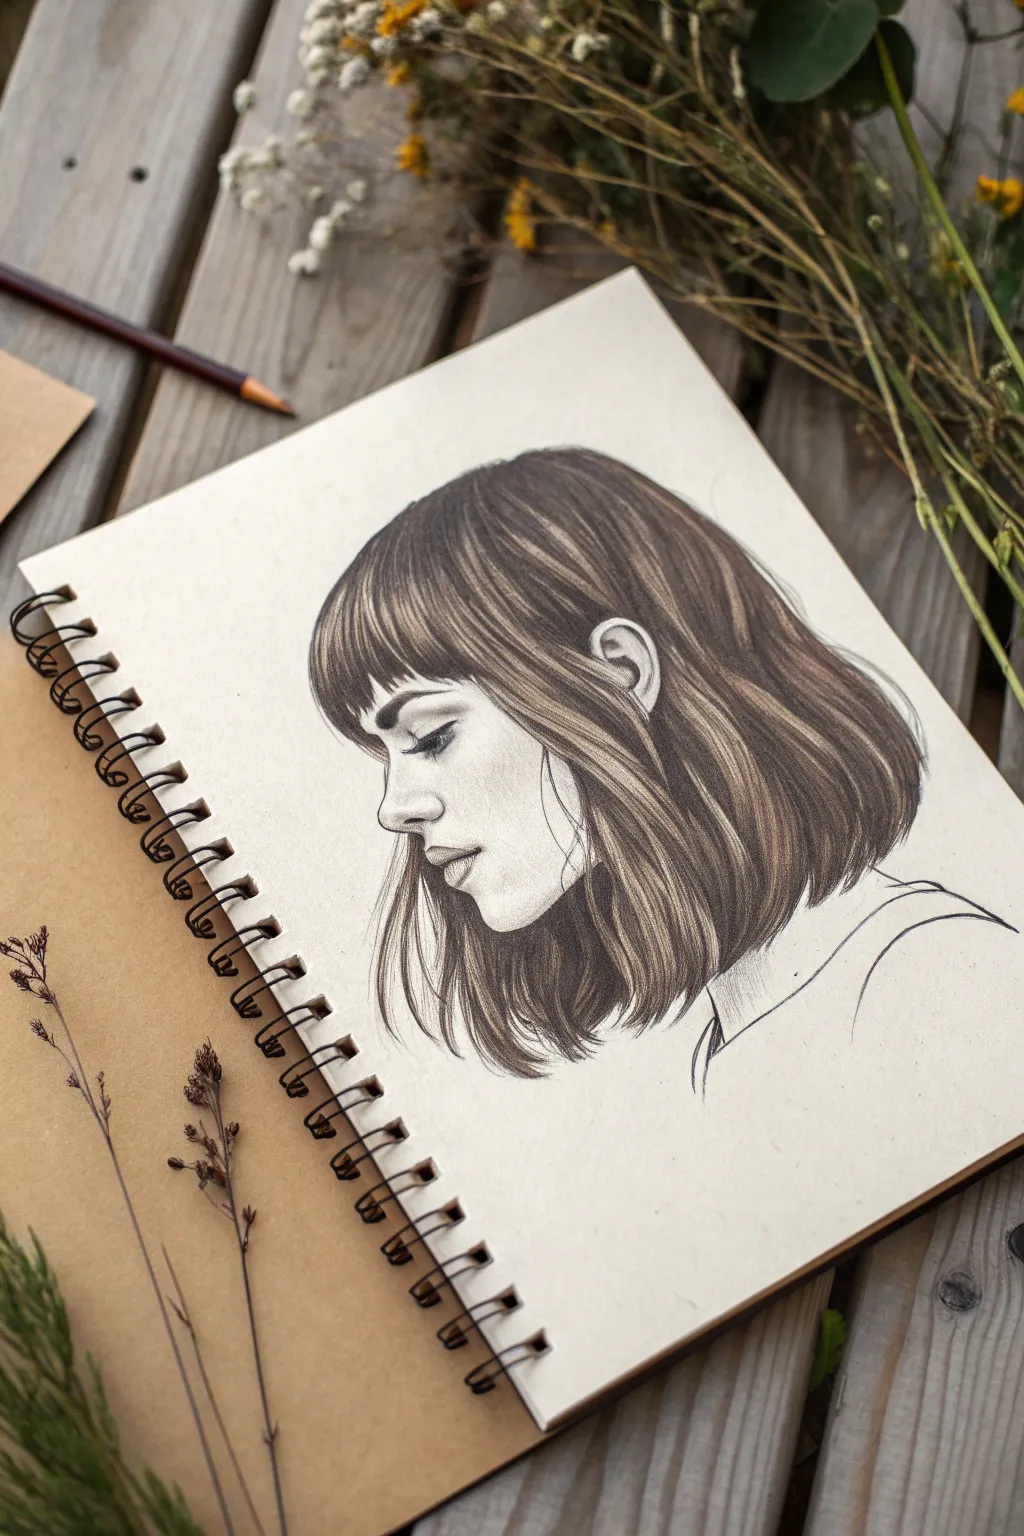
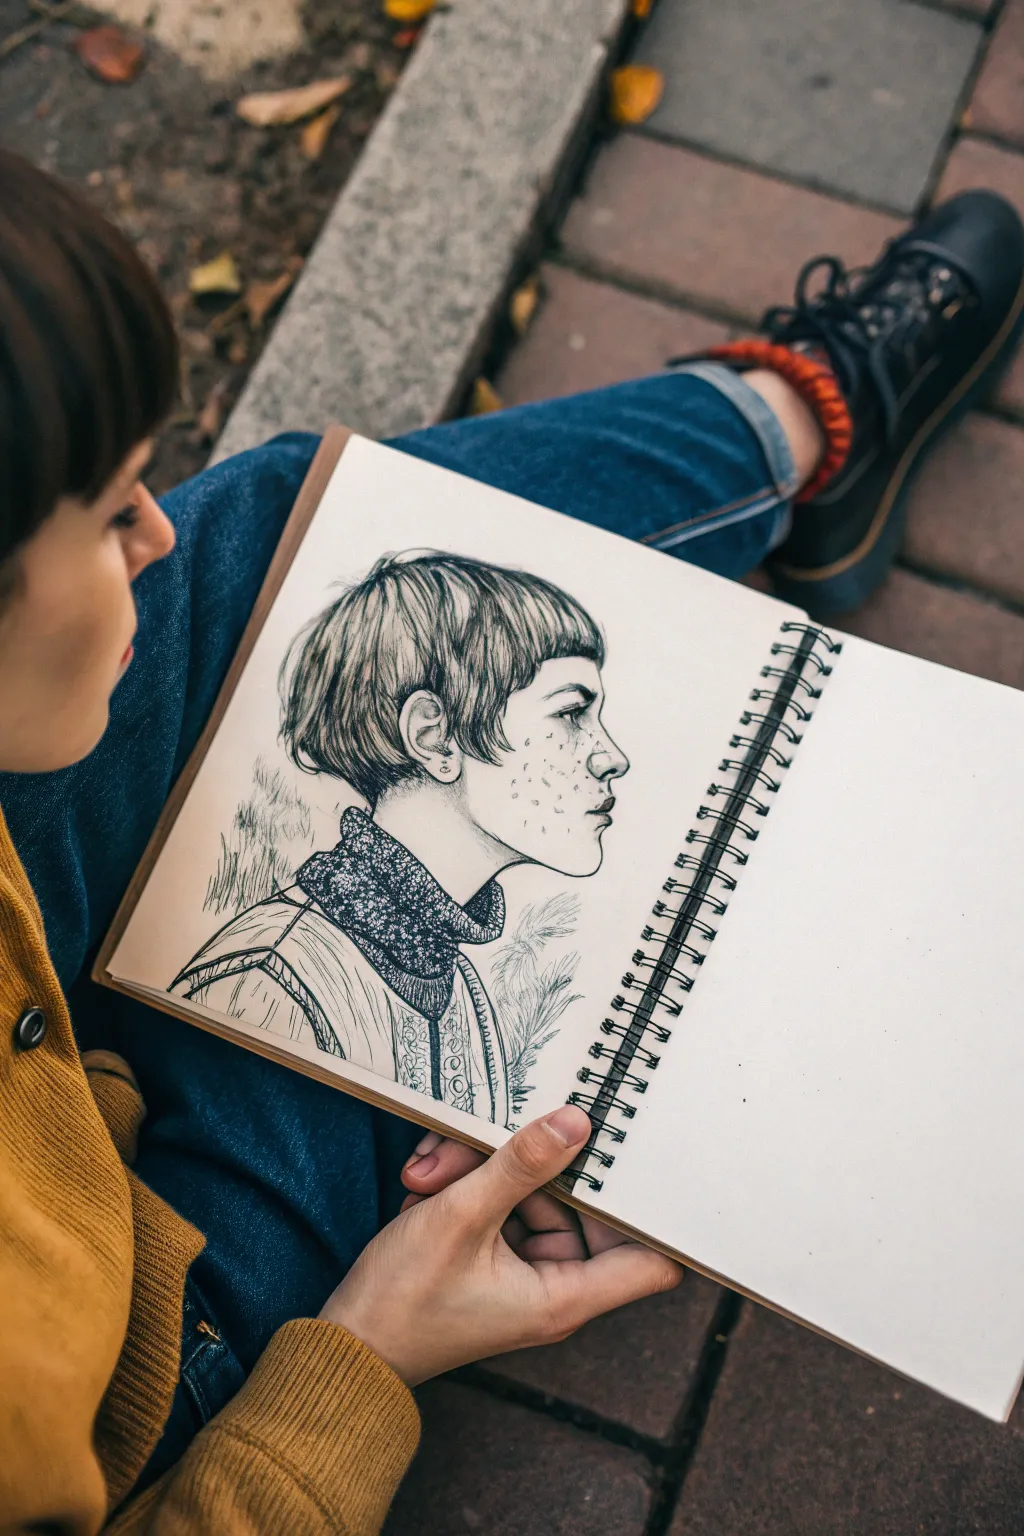
This portrait study focuses on capturing the sleek movement of a short, angled bob with fringe, emphasizing the way straight hair naturally separates into distinct clumps. Using a limited palette of pencils on cream sketchbook paper, you will learn to build volume through strategic highlights and deep shadows.
Step-by-Step Tutorial
Materials
- Cream or off-white sketchbook paper (smooth texture preferred)
- HB graphite pencil (for initial sketching)
- 2B and 4B graphite pencils
- Dark brown or sepia colored pencil
- Fine-point mechanical pencil (0.5mm)
- Kneadable eraser
- Blending stump
Step 1: Planning the Portrait
-
Establish the Profile:
Begin with a very light HB pencil sketch of the profile. Focus on the slope of the nose, the curve of the lips, and the chin line. Keep these lines faint as they are just guides. -
Map the Hairline:
Lightly outline the shape of the hair. Mark where the bangs hit the forehead (just above the eyebrows) and define the overall perimeter of the bob, making sure it curves inward slightly at the ends. -
Define the Ear:
Sketch the ear placement carefully. Since the hair is tucked behind it, the ear acts as an anchor point that disrupts the flow of the hair strands, so getting its shape right is crucial.
Stroke Direction
Always pull your pencil strokes from the root down or the tip up, lifting in the middle. The middle area should remain the lightest to create a natural “shine band” effect.
Step 2: Drawing the Face
-
Refine Facial Features:
Using a sharp 2B pencil, darken the lash line and the pupil. Add soft shading to the eyelid crease and the nostril area. -
Contour the Skin:
Lightly shade the cheekbone and jawline to give the face dimension. Use your blending stump to smooth these shadows out—you want the skin to look soft compared to the texture we will add to the hair. -
Add Lips and Chin:
Define the lips with varying line weights, keeping the upper lip slightly darker. Ensure the chin line is crisp to separate the face from the neck.
Step 3: Rendering the Hair
-
Block in Hair Sections:
Instead of drawing individual hairs immediately, separate the hair into large ‘ribbons’ or clumps. Visually divide the bangs into 4-5 major sections. -
Start the Root Shadows:
Take your 4B or dark sepia pencil and apply firm strokes starting from the crown and the part line. Lift your pencil as you move down to create a tapered, fading effect. -
Define the Bangs:
Focus on the fringe now. Draw vertical strokes that follow the curve of the forehead. Leave a horizontal band across the middle of the bangs lighter to represent the shine. -
Render the Side Hair:
For the long sections, draw long, sweeping strokes from the roots down towards the shoulders. I find it helpful to rotate the sketchbook here so my hand can follow the natural curve of the hair without obstruction. -
Darken Behind the Ear:
The area immediately behind the ear and at the nape of the neck should be the darkest. Use your darkest pencil here to create depth and push those layers into the background. -
Create the Highlights:
In the middle of the hair strands—where the light hits the curve of the head—leave the paper largely untouched or shade very lightly. This negative space is what makes the hair look glossy. -
Add Texture Details:
Switch to your fine-point mechanical pencil. Draw sharp, single lines over your shaded clumps to suggest individual strands. Ensure these lines flow in the same direction as your base shading. -
Refine the Tips:
At the bottom edge of the bob, don’t make a solid line. Instead, use short, flicking strokes to show the uneven, natural ends of the hair cut. -
Flyaways:
Add a few very loose, thin stray hairs escaping the main shape, especially near the crown and the back of the neck. This stops the drawing from looking like a stiff helmet.
Adding Color
Try using a single colored pencil, like a deep indigo or burnt sienna, instead of graphite for the hair. It adds a stylistic, monochromatic flair without complicating the values.
Step 4: Final Touches
-
Sketch the Clothing:
Use a loose, simplified line to suggest the neckline of a t-shirt. Keep this very minimal so it doesn’t distract from the detailed portrait. -
Clean Up:
Use a kneadable eraser to clean up any smudge marks on the cheek or background. Simply press and lift to remove graphite without damaging the paper tooth.
Take a moment to admire the flow and texture you’ve created in your portrait study


Coily and Afro Textures With Layered Puffs
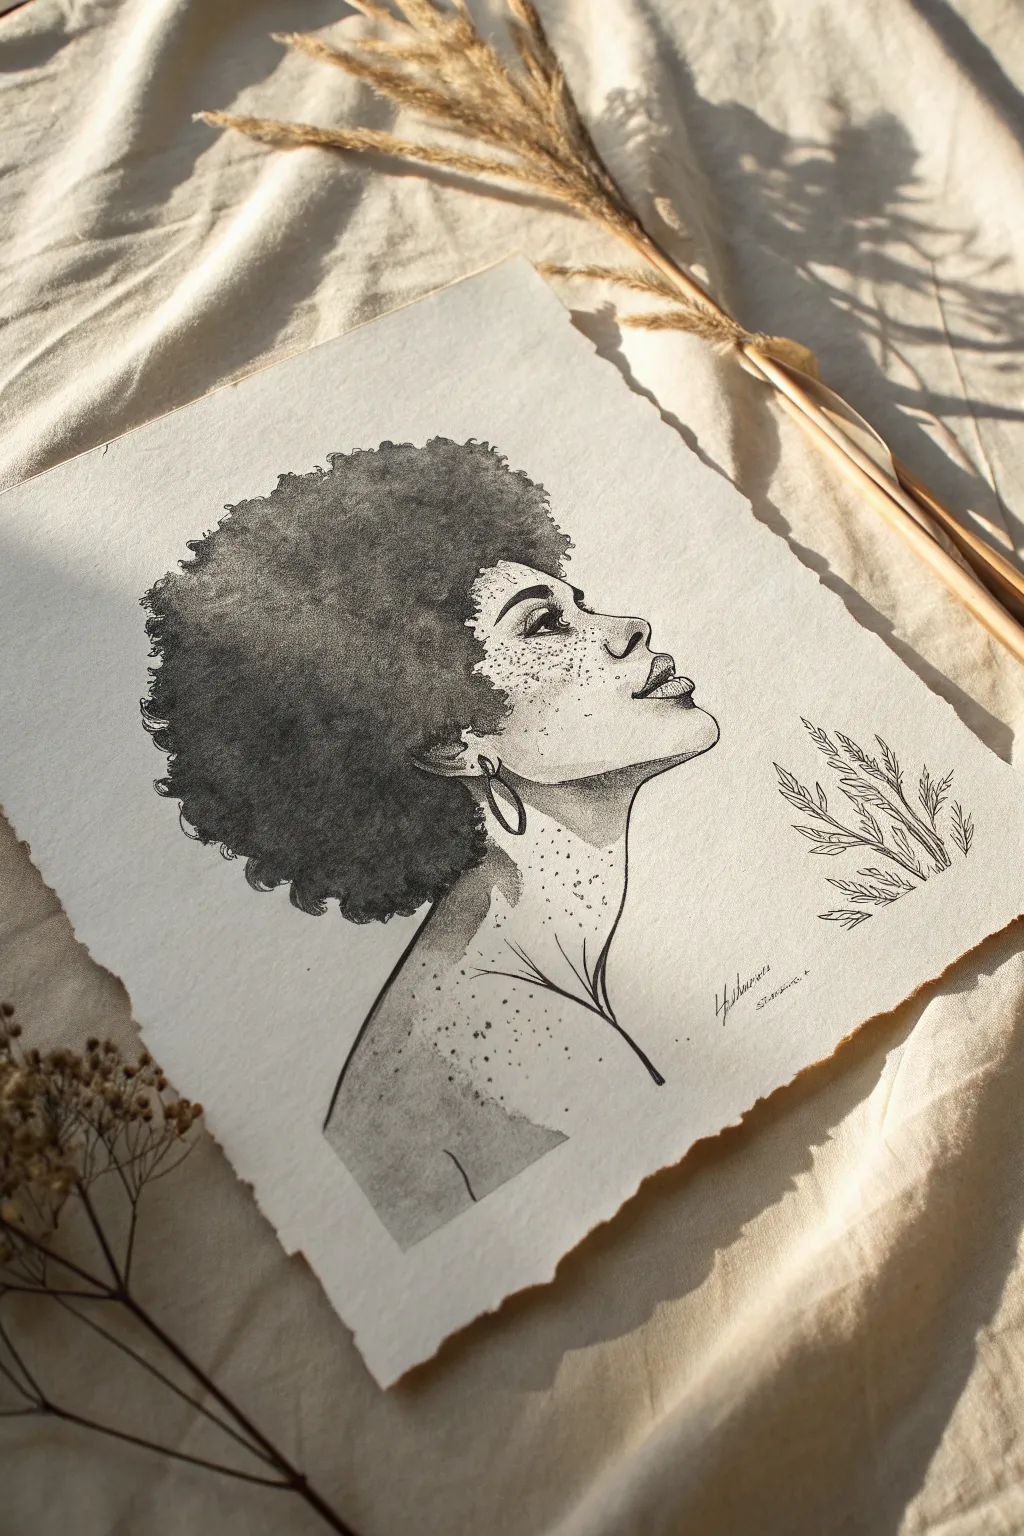
This elegant portrait combines bold silhouettes with delicate stippling to capture the texture of natural hair and skin. Using a mix of ink washes and fine liner pens on textured paper, you’ll create a striking profile that balances strong shapes with subtle, speckled details.
Step-by-Step
Materials
- Heavyweight deckle-edge watercolor paper (cold press)
- Black ink or liquid watercolor
- Fine liner pens (0.1, 0.3, and 0.5 sizes)
- Round watercolor brush (size 6 or 8)
- Small detail brush (size 0 or 2)
- HB pencil and kneaded eraser
- Paper towels for blotting
Step 1: Sketching the Silhouette
-
Establish the curve:
Begin with a very light HB pencil sketch. Draw a gentle C-curve for the spine and neck, leading up into the jawline. Ensure the chin is slightly lifted to give the subject a confident, upward gaze. -
Map the features:
Place the facial features in profile. Mark the position of the ear, the nose bridge, and the lips. Keep the lines faint so they can be easily erased later or inked over without showing graphite shine. -
Outline the afro:
Sketch a large, cloud-like shape for the hair. Instead of a smooth circle, use small, bumpy curves to suggest the texture of coily hair along the outer edge. The hair should frame the face significantly, extending well above the forehead and behind the neck.
Control Your Stippling
Hold the pen vertically for perfectly round dots. If you tilt the pen, you’ll get small dashes, which changes the texture from skin pores to short hairs.
Step 2: Inking the Hair
-
Apply the base wash:
Mix a diluted black ink wash (about 70% opacity). Using your larger round brush, fill in the main body of the hair. Keep the edges slightly uneven to match your sketch lines. -
Build density:
While the first layer is still damp, drop in concentrated, pure black ink into the center and lower back sections of the afro. This wet-in-wet technique creates soft blooming effects that mimic depth and volume. -
Define the edges:
Once the wash is dry, switch to a 0.5 fine liner. Stipple (create dots) tightly around the perimeter of the hair shape. This breaks up the solid wash and gives the hair that characteristic frizzy, soft edge. -
Add separation:
Use the brush tip to gently dry-brush some texture near the hairline where the hair meets the forehead and ear, ensuring the transition isn’t a harsh solid line.
Step 3: Detailing the Face & Body
-
Line the profile:
With a 0.3 pen, confidently trace the final profile line—forehead, nose, lips, and chin. Use a slightly thicker line weight on the underside of the jaw and chin for shadow. -
Draw the features:
Ink the eye, darkening the lash line significantly. Outline the lips, leaving the center of the bottom lip open or lighter to suggest a highlight. -
Add freckles and texture:
Using your finest 0.1 pen, add stippling across the cheekbones, nose bridge, and forehead. Vary the density of dots—closer together near the hairline for shadow, and scattered loosely on the high points of the face. -
Define the neck:
Draw the neck muscles with thin, organic lines that curve downward, fading out near the collarbone. Add a simple hoop earring shape attached to the ear lobe. -
Shade the shoulder:
Create a very light gray wash (heavily diluted ink). Apply a sweeping shape to the shoulder and upper back area. While wet, splatter tiny droplets of clear water or darker ink into it to create a reactive texture.
Botanical Frame
Instead of the simple sprig, try drawing flowers weaving directly into the hair mass or resting behind the ear to add a softer, organic connection.
Step 4: Final Touches
-
Enhance contrast:
Revisit the eye and earring. Add solid black to the pupil and the darkest crevices of the ear to make the drawing pop against the cream paper. -
Incorporate foliage:
To the right of the face, sketch a simple botanical sprig. Use the 0.3 pen to draw the stem and small, fern-like leaves. Keep this element minimal and linear to balance the heavy mass of the hair. -
Clean up:
Once you are absolutely certain all ink is dry, gently erase any visible pencil marks with your kneaded eraser. -
Sign your work:
Add a small, stylized signature near the foliage or shoulder curve to complete the composition.
Your finished piece now captures a beautiful moment of stillness and texture


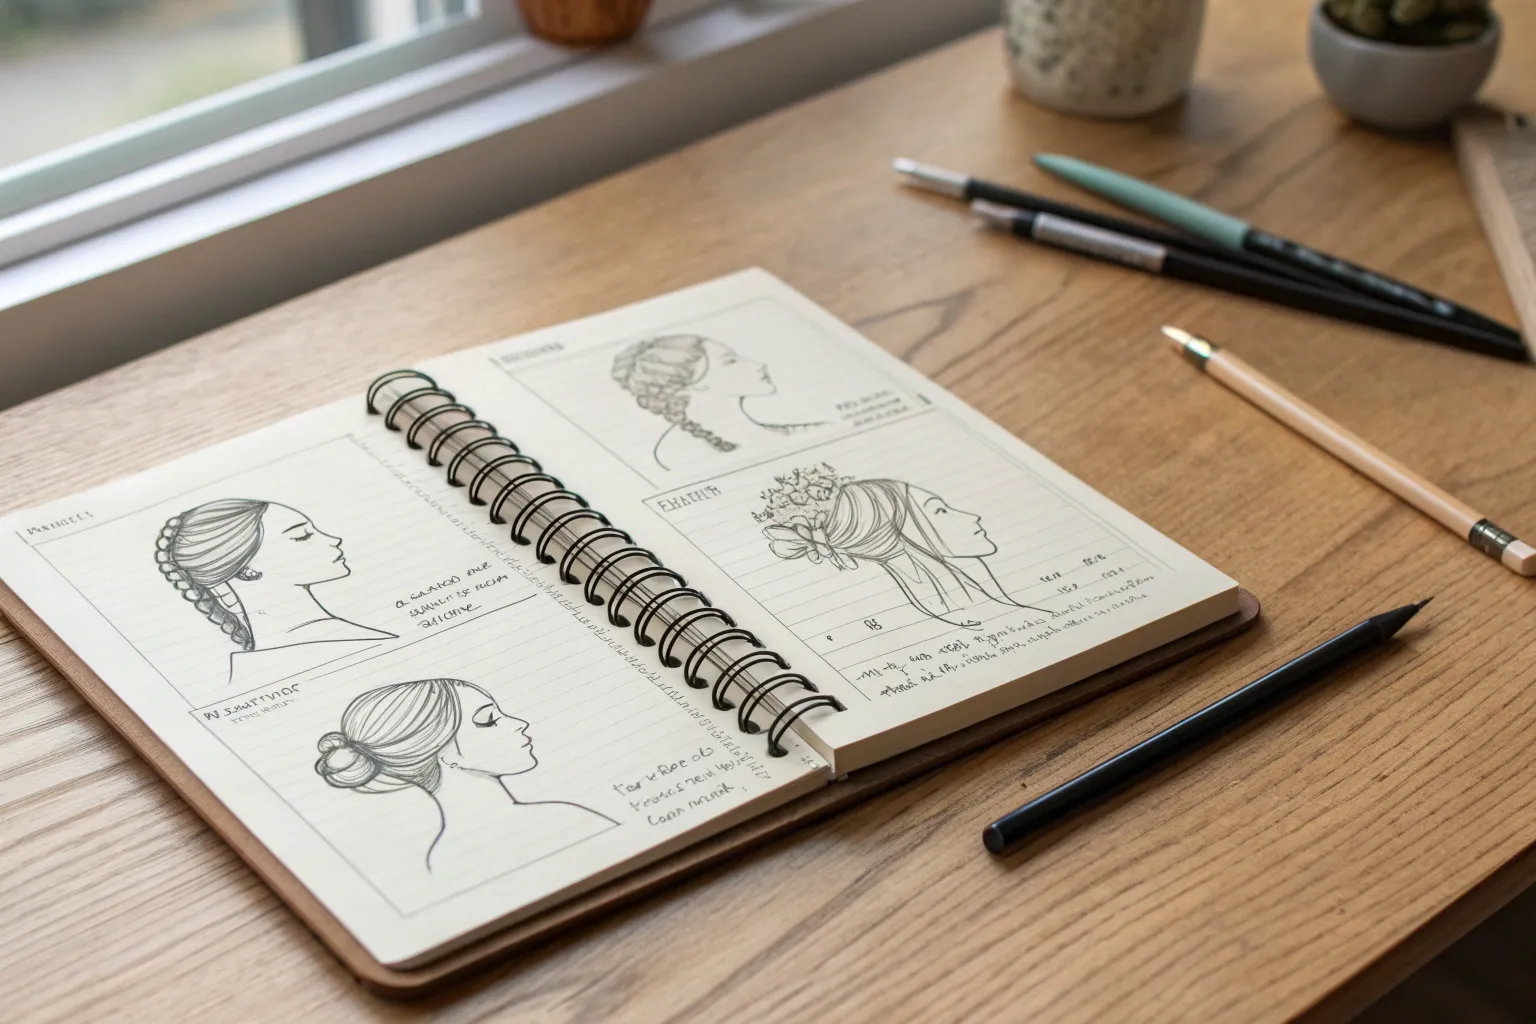
Bangs That Frame the Face
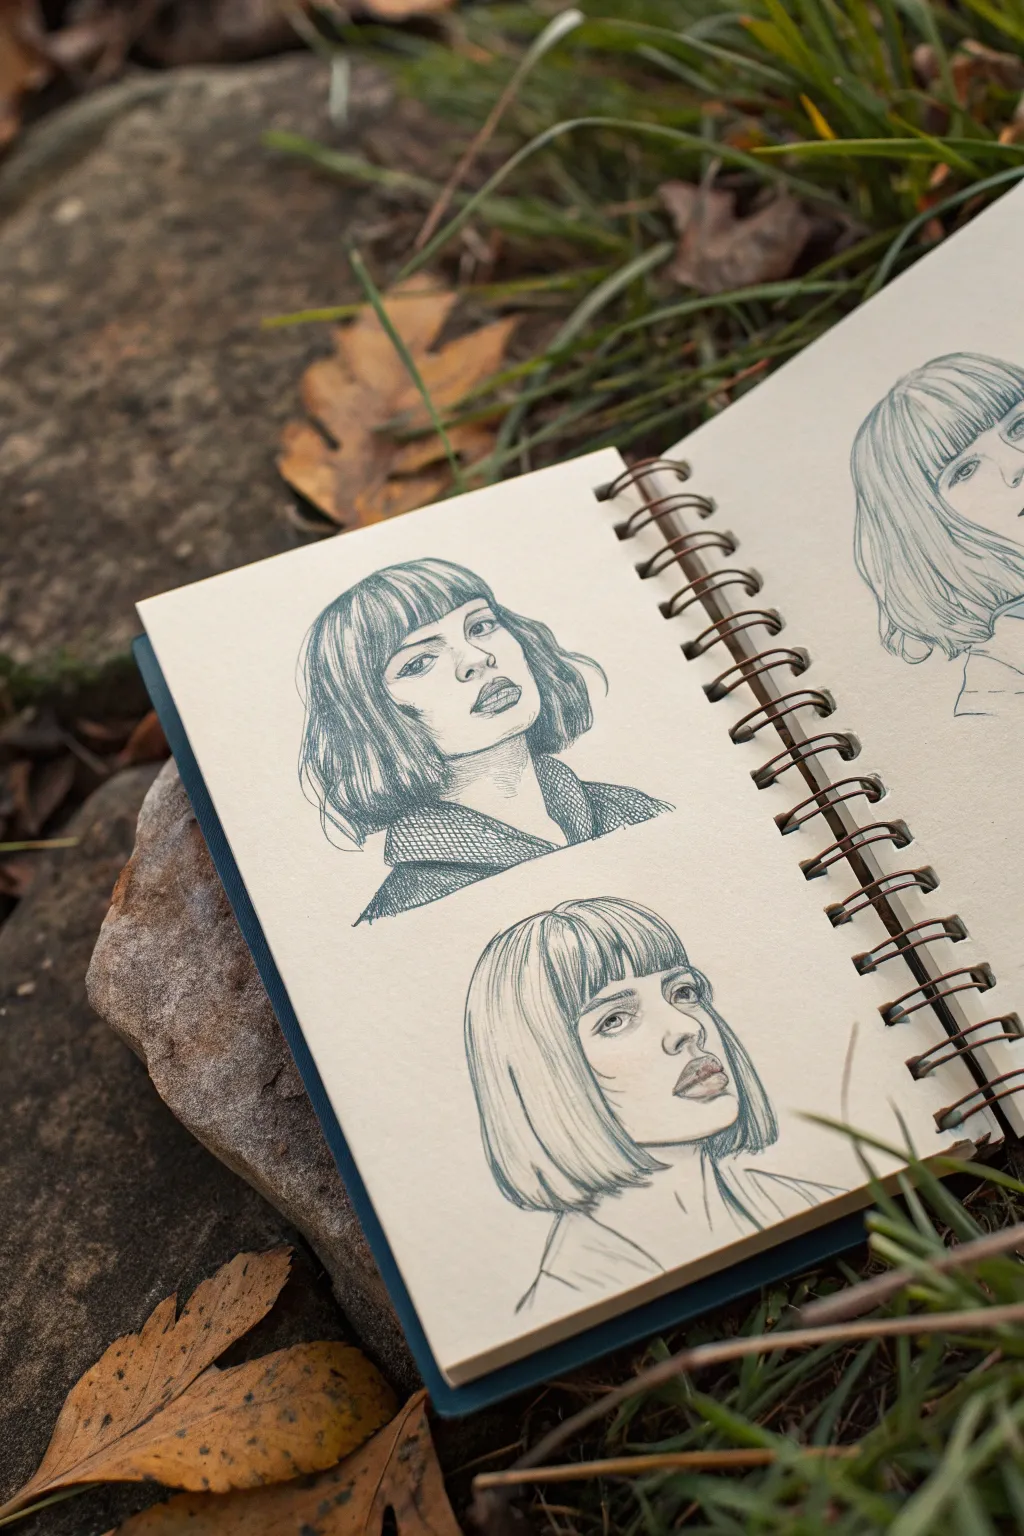
Learn to capture the modern edge of short bobbed hairstyles with heavy bangs in this portrait sketching tutorial. These two studies focus on how hair frames the face and creates distinct character through simple line work and shading.
Step-by-Step Guide
Materials
- Sketchbook with cream or off-white paper (spiral bound)
- Graphite pencils (H for outlines, HB and 2B for shading)
- Fine liner pen (0.1mm or 0.3mm in dark grey or black – optional for final lines)
- Kneaded eraser
- Blending stump or tortillon
Step 1: Planning the Portraits
-
Establish placement:
Begin by lightly marking the positions for two separate heads on your sketchbook page. Place one slightly higher and to the left, and the other lower and centered to create a pleasing composition. -
Basic head structures:
Sketch a basic oval for each face. Add a vertical centerline to determine the angle—notice the top figure is looking slightly up and to the left, while the bottom figure is in a three-quarter view looking right. -
Feature guidelines:
Draw horizontal guidelines for the eyes, nose, and mouth. Since we are focusing on bangs, mark the hairline clearly just above the eyebrows to designate where the fringe will start.
Pro Tip: Hair Direction
Always draw your pencil strokes in the direction the hair grows. For bangs, stroke downward from the root; for the bob, sweep from the part to the ends.
Step 2: Top Portrait: The Textured Bob
-
Drafting the features:
Lightly sketch the eyes, nose, and lips for the top figure. Keep the expression neutral with slightly parted lips. -
Outlining the bangs:
Draw the fringe shape. This style features slightly uneven, textured bangs that curve just above the brow line. Don’t draw every strand yet; just get the mass shape down. -
Shaping the bob:
Outline the rest of the hair. This bob is voluminous and hits right at the jawline. Add a slight wave to the ends to suggest movement. -
Detailing the hair strands:
Using your HB pencil, start adding vertical strokes to the bangs. Vary the pressure to show where the light hits. The hair should look piecey, not like a solid block. -
Shading the face:
Add gentle shading under the chin and around the eyes. I find that keeping facial shading minimal helps the hair texture stand out more. -
Neck and clothing sketch:
Sketch the neck and a suggestion of a textured collar or scarf. Use cross-hatching here to contrast with the smooth lines of the hair.
Level Up: Color Accents
Use a colored pencil in a muted tone like dusty rose or slate blue to add a single wash of color to the lips or the clothing collar.
Step 3: Bottom Portrait: The Sleek Cut
-
Defining the second face:
Move to the lower portrait. Refine the facial features, paying attention to the upturned gaze of the eyes and the structure of the nose. -
Drawing blunt bangs:
Sketch the bangs for this style, which are cut straighter and heavier than the first. They should curve gently around the forehead. -
Creating the sleek bob:
Draw the sides of the hair straight down, curbing inward slightly at the ends. This cut is smoother and less textured than the top one. -
Adding hair volume:
Use long, sweeping strokes from the crown down to the ends. Leave a small gap or lighter area on the curve of the head to represent a highlight or shine. -
Refining the line weight:
Darken the outline of the jaw and the bottom edge of the hair. This separation adds depth and makes the face pop forward.
Step 4: Finishing Touches
-
Deepening shadows:
Switch to a 2B pencil to darken the pupils, nostrils, and the darkest areas of the hair (like behind the neck or under the bangs). -
Cleaning up:
Use your kneaded eraser to lift any heavy construction lines, especially around the bridge of the nose and cheekbones. -
Final shading pass:
Lightly blend the hair shading with a stump if you want a softer look, or leave the pencil strokes visible for a more illustrative style.
Close your sketchbook knowing you’ve captured two distinct personalities simply by changing the haircut.


Short Cuts With Chunky Direction Changes
Capture the edgy sophistication of a modern short haircut with this detailed ink illustration. Focusing on direction-shifting layers and stark black-and-white contrast, this profile study masterfully balances delicate facial features with bold, chunky hair textures.
Step-by-Step Guide
Materials
- Sketchbook with smooth, heavy paper (approx 160gsm)
- HB graphite pencil
- Kneaded eraser
- Fine liner pens (sizes 0.05, 0.1, 0.3, and 0.5)
- Brush pen or bold marker (black)
Step 1: Drafting the Foundations
-
Establish the Profile:
Begin with a light HB pencil sketch to map out the side profile. Draw a gentle curve for the forehead, dipping in for the bridge of the nose, and extending out for a slightly upturned nose tip. Keep the pencil pressure extremely light so lines can be erased later. -
Map Facial Features:
Place the eye socket fairly deep, positioning the eye itself so the gaze is level. Sketch the lips with a relaxed separation, and mark the jawline leading up to the ear. The ear should sit roughly horizontally aligned with the eyes and nose. -
Outline the Hair Shape:
Lightly draw the general helmet shape of the haircut. This style is a modified bowl cut or short shag, so the hair should hug the skull shape closely but with slightly jagged edges along the nape and bangs.
Hair Stroke Technique
Don’t connect every hair line. Leaving gaps in the middle of hair strands creates a natural ‘shine’ or highlight effect without needing white ink.
Step 2: Refining the Face
-
Inking the Profile Line:
Using a 0.1 fine liner, carefully trace your pencil profile line. Use a single, continuous stroke where possible for the nose and forehead to keep it smooth. Break the line slightly at the lips to indicate texture. -
Detailed Eye Work:
Switch to a 0.05 pen for the eye details. The lashes should be delicate and varied. Add a small glint of white space in the pupil to make the gaze look alive. -
Adding Freckles:
Gently stipple freckles across the nose bridge and cheek area using your 0.05 pen. Vary the pressure and spacing—some dots should be darker, others barely there, to create a natural, sun-kissed look.
Step 3: Executing the Hair Texture
-
Segmenting the Strands:
This is the core of the project. Visualise the hair in chunks. The bangs fall straight down, while the hair near the ear curves backward. Lightly map these directional changes with your pencil before inking. -
Inking Hair Volume:
Using a 0.3 pen, start drawing individual hairs. Instead of drawing every single strand, draw clusters. Use quick, confident flick strokes that start slightly thicker at the root and taper off at the ends. -
Creating Directional Flow:
At the crown of the head, ensure your strokes curve downward. As you approach the nape, let the strokes become choppier and shorter. Around the ear, tuck the lines behind the ear curve to show weight and style. -
Adding Deep Shadows:
I like to scan for areas where hair clumps together—usually near the roots or behind the ear—and use a 0.5 pen or brush pen to fill these gaps with solid black. This negative space makes the lighter strands pop. -
Texturing the Undercut:
For the very short hair at the nape, use tiny, dense hatching marks. This suggests a buzzed or very short texture compared to the longer layers on top.
Try Sepia Ink
Swap black fineliners for sepia or dark brown ink pens. This softens the entire portrait and gives it a warm, vintage sketchbook aesthetic instantly.
Step 4: Clothing and Environment
-
Patterned Knitwear:
Sketch the high collar of the sweater. To replicate the knit texture shown, use a ‘stippling’ or tight circular scribble technique with a 0.1 pen mostly in the shadow areas of the collar. -
Garment Structure:
Outline the shoulders and clothing folds with bolder, looser lines than you used for the face. Use your 0.3 or 0.5 pen to give the clothing weight. -
Background Elements:
Suggest a natural setting by adding loose, sketchy grass blades in the foreground and background. Keep these lines rapid and imperfect to contrast with the precise facial features. -
Final Cleanup:
Once the ink is completely dry (wait at least 15 minutes to be safe), take your kneaded eraser and gently lift all initial pencil guidelines. Check for any areas that need a touch more contrast and darken if necessary.
Now you have a striking character study that perfectly captures the movement and texture of a modern short cut

PENCIL GUIDE
Understanding Pencil Grades from H to B
From first sketch to finished drawing — learn pencil grades, line control, and shading techniques.
Explore the Full Guide
Undercuts and Part Lines for Contrast
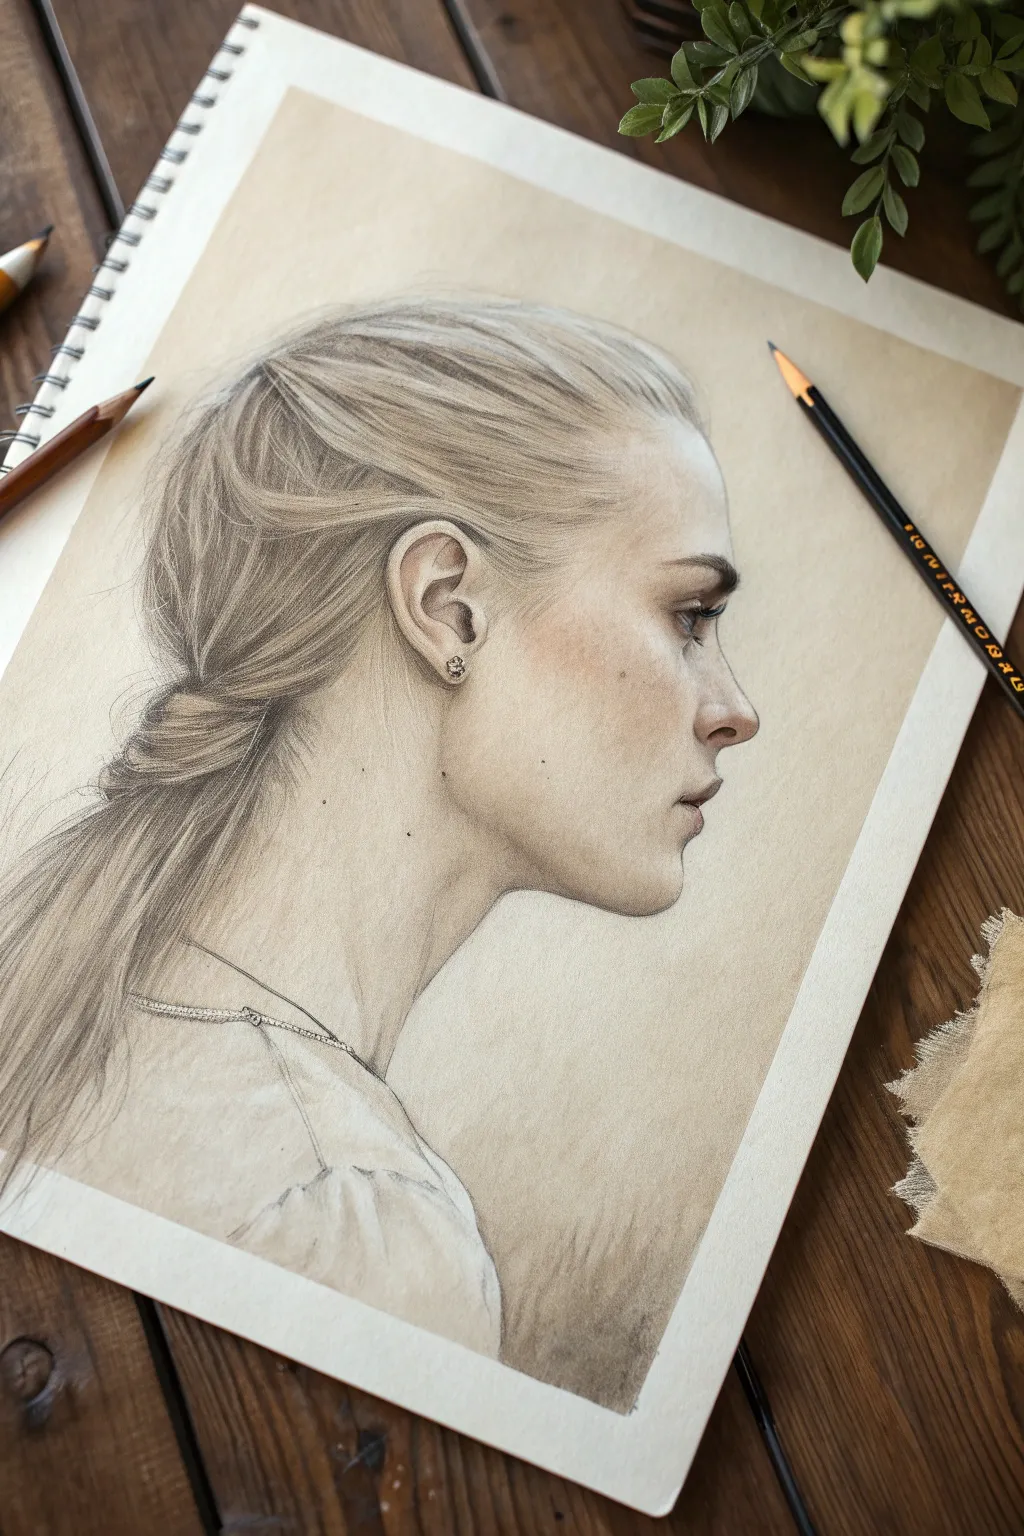
Capture the delicate interplay of light and shadow in this realistic side-profile portrait. Using toned paper allows you to build both deep shadows and striking highlights, giving the blonde hair incredible dimension and life.
Step-by-Step
Materials
- Toned tan or beige drawing paper (smooth bristol or mixed media)
- Graphite pencils (HB, 2B, 4B)
- White charcoal pencil or white pastel pencil
- Kneaded eraser
- Precision mono eraser (optional but helpful)
- Blending stump or tortillon
- Pencil sharpener
Step 1: Laying the Foundation
-
Establish the Head Shape:
Begin with an HB pencil, sketching a light oval for the cranium and a jawline extending downwards. Keep your pressure extremely light so lines can be easily erased later. -
Map Facial Features:
Draw vertical and horizontal guidelines to place the eye, nose, and lips. The ear should sit roughly between the brow line and the bottom of the nose horizontally. -
Outline the Hair Mass:
Sketch the major shapes of the hair, focusing on the flow from the forehead back to the nape of the neck where it gathers. Do not draw individual strands yet; look for the big clumps and blocking shapes. -
Refine the Profile:
Carefully refine the contour of the nose, lips, and chin. Pay close attention to the negative space in front of the face to get the proportions accurate.
Muddy Highlights?
If your white charcoal turns gray when layered over graphite, use a fixative spray first. Alternatively, erase the graphite completely in highlight zones before applying white.
Step 2: Skin Tones and Shading
-
Initial Skin Shading:
Using a 2B pencil, lightly shade the areas of recession on the face: the eye socket, under the cheekbone, under the jaw, and the side of the neck. Use the side of the lead for a softer application. -
Blend for Softness:
Use a blending stump or tissue to smooth out the graphite on the skin, creating a seamless transition into the paper tone. The paper itself will serve as the mid-tone for the skin. -
Deepen Facial Details:
Switch to a 4B pencil to add the darkest accents: the pupil, the lash line, the nostril, and the corner of the mouth. Be sparing with these darks to maintain a delicate look. -
Add Subtle Skin Texture:
Lightly stipple a few faint freckles or beauty marks on the cheek and neck using a sharp HB point, adding realism without overcrowding the skin.
Level Up: Color Accents
Introduce a subtle colored pencil warmth—like peach or sanguine—to the cheeks and lips. Just a few faint strokes can make the monochrome portrait suddenly feel alive
Step 3: Developing the Hair
-
Establish Hair Direction:
With a sharp HB pencil, start drawing long, flowing lines following the direction of hair growth. Start from the root and flick outward, lifting the pencil at the end of the stroke. -
Build Shadow Areas:
Identify where the hair tucks behind the ear and gathers at the nape. Use a 2B pencil to darken these areas, creating depth and separating the heavy mass of hair from the loose ponytail. -
Create Texture Variation:
Vary your line weight. Use thicker, darker strokes for the deep recesses between hair clumps and thinner, lighter strokes for the strands resting on the surface. -
Draw the Ponytail:
Sketch the hair cascading down the back. Keep these lines loose and slightly wavy to suggest movement and softness compared to the pulled-back hair on the scalp.
Step 4: Highlights and Finishing Touches
-
Apply White Highlights:
Using your white charcoal or pastel pencil, pick out the areas where light hits the hair: the crown of the head, the curve above the ear, and the top of the ponytail. -
Enhance Skin Highlights:
Add touches of white to the bridge of the nose, the brow bone, the top of the cheekbone, and the cupid’s bow. This pulls the features forward. -
Refine Hair Strands:
Sharp white strokes should be layered over the graphite in the hair to create individual ‘flyaway’ strands that catch the light. This is crucial for realistic blonde texture. -
earring Detail:
Draw the small stud earring with sharp detail, ensuring a high contrast highlight on the metal to make it sparkle against the softer skin tones. -
Clothing Suggestion:
Lightly sketch the clothing shape at the shoulder. Don’t over-detail this area; keep it sketchy and faint to ensure the focus remains on the portrait profile.
Step back and admire how the toned paper has done the heavy lifting to create a luminous, lifelike portrait
Highlights That Follow the Head’s Curve
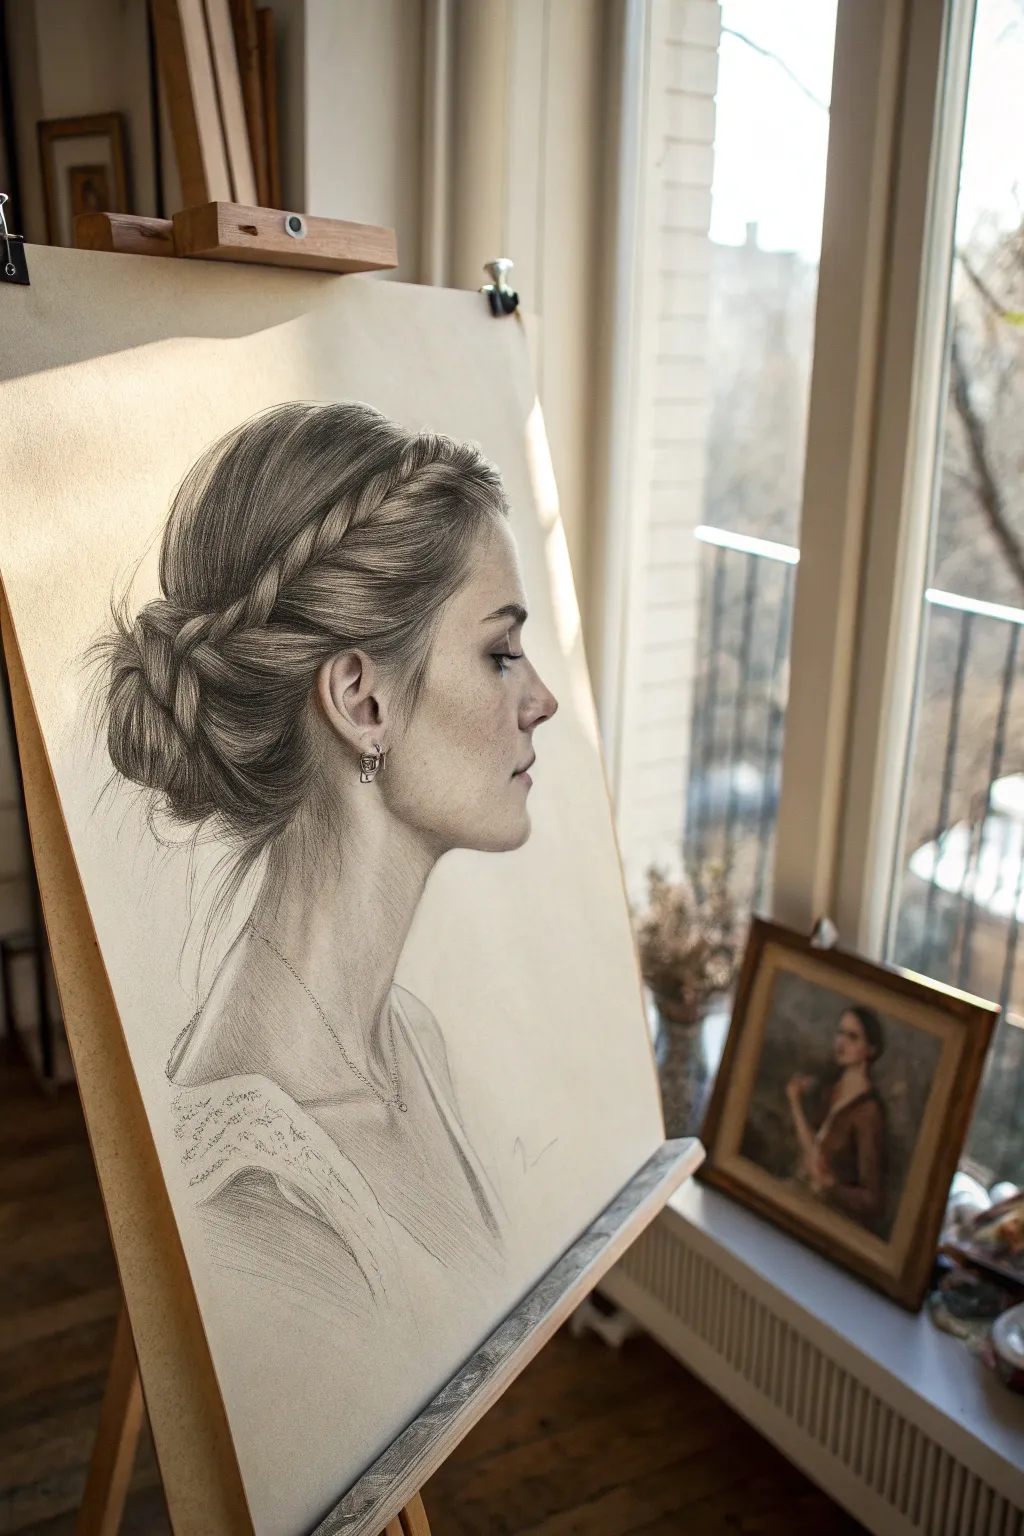
This elegant pencil study captures a serene profile with a focus on intricate braided hair textures and realistic facial features. The soft lighting and gentle shading create a timeless look perfect for practicing anatomical structure and hair volume.
Step-by-Step Tutorial
Materials
- High-quality drawing paper (smooth or vellum finish, approx. 18×24 inches)
- Graphite pencils (range from 2H to 6B)
- Kneaded eraser
- Precision eraser (for highlights)
- Blending stump or tortillon
- Sharpener or craft knife
- Soft brush (for sweeping away eraser crumbs)
- Reference photo of a profile with braided hair
Step 1: Planning the Profile Structure
-
Light scaffolding:
Begin with a very hard pencil (2H) to sketch the basic geometric shapes of the head. Draw an oval for the skull and a soft curved line extending down for the jawline, keeping your pressure extremely light so these lines can be erased later. -
Mapping features:
Mark horizontal guidelines for the eyes, nose base, and mouth. Carefully place the ear, noting that the top of the ear typically aligns with the eyebrows and the bottom with the nose base. -
Contour refinement:
Refine the profile line, focusing on the slope of the forehead, the bridge of the nose, and the curve of the chin. Pay special attention to the neck’s connection point, ensuring it doesn’t look too stiff.
Step 2: Facial Features and Shading
-
The eye and brow:
Using an HB pencil, detail the eye in profile. Draw the eyelid crease and the eyelashes extending outward. Sketch the eyebrow hairs individually, following their natural growth direction rather than drawing a solid block. -
Nose and lips:
Define the nostril wing and the soft curve of the lips. I prefer to shade the upper lip slightly darker than the lower lip to imply light hitting the bottom curve. -
Skin tone gradation:
Lay down a base layer of shading on the face using a B pencil. Focus on the shadow under the jawline, the hollow of the cheek, and the temple. Use your blending stump to smooth the graphite for a soft, skin-like texture. -
Detailed ear study:
The ear is crucial here. Darken the inner recesses of the ear with a 2B or 4B pencil to create depth, leaving the ridges lighter to bring them forward.
Fixing Flat Hair
If the hair looks like a solid helmet, you’ve likely over-blended. Reintroduce texture by drawing sharp, dark lines over the blended areas and lifting thin bright highlights with an electric eraser.
Step 3: Constructing the Braided Hair
-
Hair massing:
Outline the main shape of the hairstyle. Block in the large crown braid and the bun at the nape of the neck. Don’t draw individual strands yet; focus on the major volumes. -
Directional flow:
With an HB pencil, draw long, sweeping strokes that follow the curve of the skull. This establishes the ‘grain’ of the hair leading into the braid. -
Defining the braid:
In the braided section, draw interweaving ‘Y’ shapes or overlapping teardrops. Shade the crevices between the weaves deeply with a 4B pencil to make the braid look three-dimensional. -
Strand separation:
Switch to a sharp 2B pencil to define individual clumps of hair. Draw lines that start thick at the root, thin out, and disappear into the highlight area, and reappear at the shadow end.
Pro Tip: The Paper Grain
Allow the texture of the paper to show through in the lighter areas of the skin. This natural grain creates a realistic pore-like texture without you having to draw every single detail.
Step 4: Refining and Highlighting
-
Creating shine:
Identify the ‘halo’ of light on the crown of the head. Use your kneaded eraser to lift graphite from this area, creating soft, natural highlights that follow the curve of the head. -
Deepening contrast:
Take your darkest pencil (6B) and reinforce the deepest shadows: inside the bun, behind the ear, and at the very nape of the neck. This high contrast makes the highlights pop. -
Flyaway hairs:
For realism, draw tiny, stray hairs escaping the bun and at the hairline using a very sharp H or HB pencil. These should be quick, light flicks. -
Neck and clothing sketch:
Suggest the neck muscles (sternocleidomastoid) lightly. Sketch the clothing neckline loosely and beautifully rough, letting the drawing fade out at the bottom to keep the focus on the face. -
Final assessment:
Step back and check your values. Gently blend any areas that look too scratchy, or use a precision eraser to sharpen the edge of the profile against the background.
Now you have a stunning, classical portrait study ready to be displayed on an easel or framed
BRUSH GUIDE
The Right Brush for Every Stroke
From clean lines to bold texture — master brush choice, stroke control, and essential techniques.
Explore the Full Guide
Windblown Hair for Instant Drama
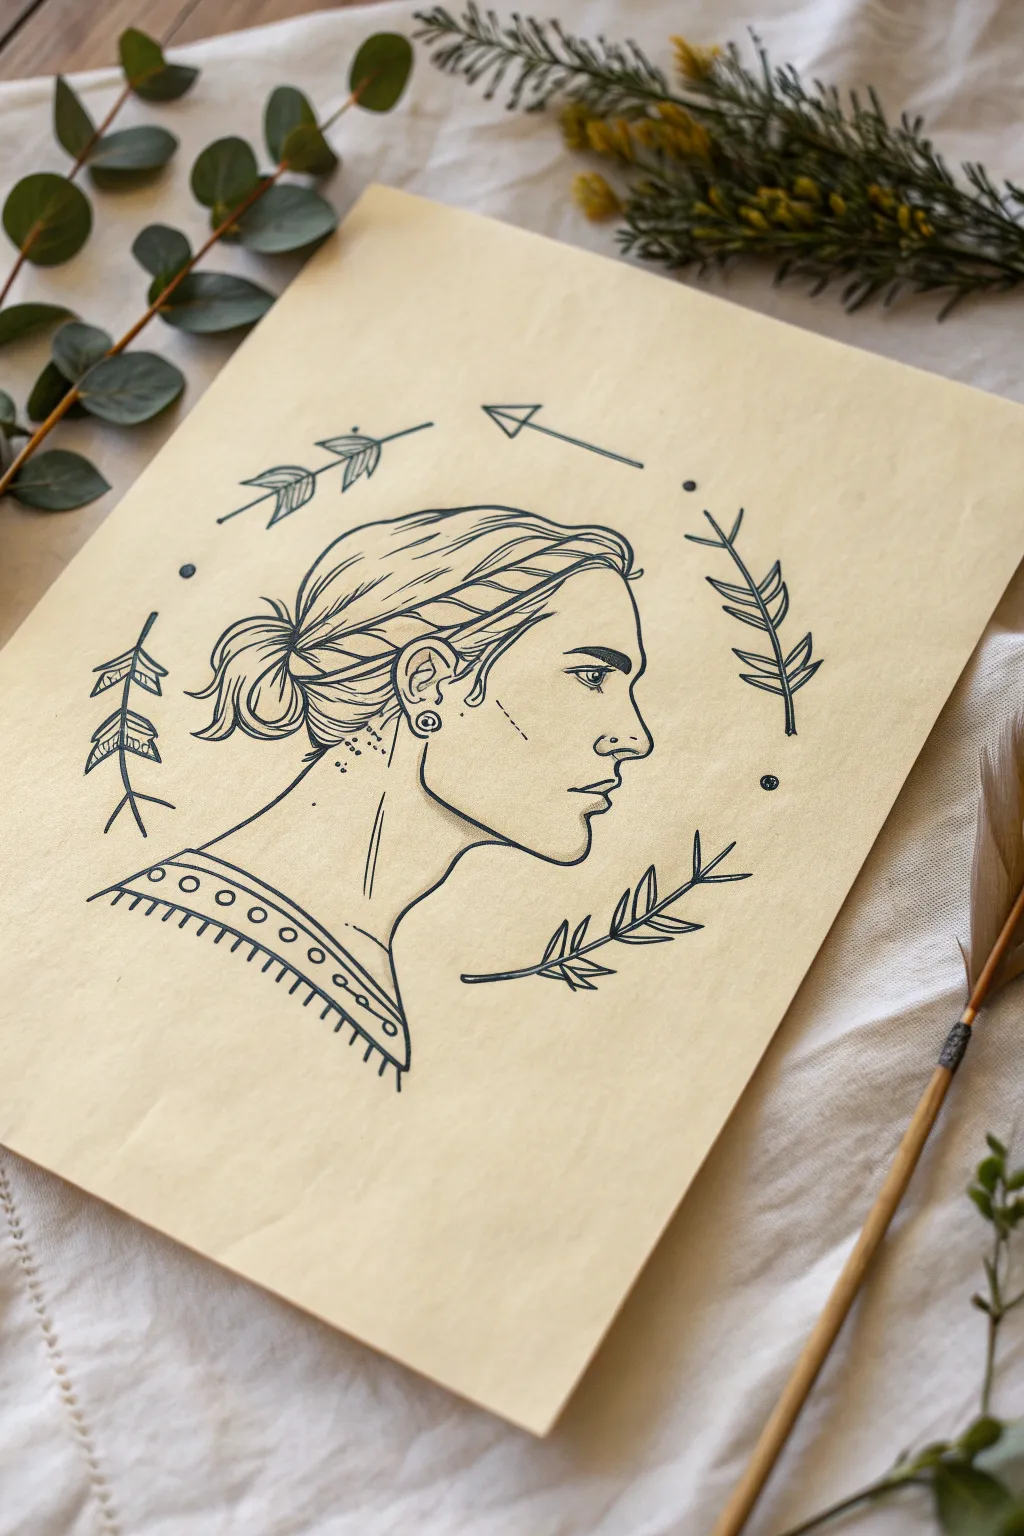
Capture the essence of quiet strength with this clean, tattoo-style illustration featuring a profile portrait encircled by botanical arrows. The minimalist black ink on varying cream paper creates a timeless, artisanal look that works perfectly as framed wall art or a journal cover.
Detailed Instructions
Materials
- Cream or beige drawing paper (smooth finish, approx. 180gsm)
- H or HB pencil for sketching
- Kneaded eraser
- Fine liner pens (sizes 0.1, 0.3, and 0.5)
- Compass or circular object (approx. 5-6 inches diameter)
- Ruler
Step 1: Drafting the Foundations
-
Establish the boundary:
Begin by lightly tracing a circle in the center of your paper using a compass or by contouring a bowl. This circle won’t be inked but serves as a guide for placing the decorative elements. -
Sketch the head shape:
Inside the circle, sketch the basic profile shape. Start with an oval for the cranial mass and a jawline extending down. Position the face looking toward the right side of the paper. -
Define facial features:
Lightly pencil in the brow ridge, nose, lips, and chin. The style is somewhat realistic but stylized, so focus on strong, clean contours rather than heavy shading. -
Block in the hair:
Sketch the hair pulled back from the forehead. Instead of individual strands, think in large sections or ‘ribbons’ of hair flowing toward the nape of the neck into a low, messy bun.
Step 2: Adding Illustrative Details
-
Detail the hair texture:
Refine your pencil sketch to show the flow of the hair strands. Indicate a braid or twist along the side of the head above the ear, feeding into the bun. -
Draw the ear and neck:
Place the ear just behind the jawline. Sketch a small stud earring for detail. Extend the neck downwards, keeping the lines elegant and slightly curved. -
Sketch the collar:
At the base of the neck, draw a curved neckline representing clothing. Add a decorative pattern, such as small circles and a fringe-like border, to give it a folk-art feel. -
Place the botanical arrows:
around the outer circle guide, sketch four distinct elements. I like to alternate between stylized arrows and leafy branches that mimic the shape of fletching. -
Finalize pencil details:
Add small decorative dots between the arrow elements and faint dotted lines on the neck and cheek for texture.
Wobbly Lines?
Don’t panic! If a line isn’t perfectly straight, thicken it slightly to correct the curve. This style benefits from varying line weights, so corrections often look intentional.
Step 3: Inking and Finalizing
-
Outline the profile:
Switch to your 0.5 fine liner. Carefully ink the main profile line—forehead, nose, lips, and chin. Use a confident, steady hand for a smooth stroke. -
Ink the main hair shapes:
Still using the 0.5 or 0.3 pen, outline the major masses of the hair bun and the main clear lines of the hairstyle. -
Add fine hair details:
Switch to a 0.1 pen. unexpected breaks in the line weight add character here. Draw thin, sweeping lines inside the hair shapes to suggest individual strands and movement without cluttering the drawing. -
Ink the facial features:
Use the 0.3 pen for the eye and eyebrow. Keep the eye shading minimal—just the pupil and upper lash line are mostly needed. Use the 0.1 pen for the delicate nostril and lip details. -
Define the clothing:
Ink the collar pattern with the 0.3 pen. Be precise with the small circles and the fringe lines for a geometric contrast to the organic hair lines. -
Trace the surrounding motifs:
Ink the arrows and branches surrounding the head. You can vary line weight here—thicker for stems, thinner for leaf veins or arrow fletching. -
Add texture dots:
Stipple the small dots on the neck, cheek, and around the outer circle using your finest pen tip. This adds a subtle shading effect known as dotwork. -
Erase and clean up:
Wait at least 15 minutes to ensure the ink is totally dry. Gently erase all pencil guidelines with the kneaded eraser to reveal the crisp black lines.
Pro Tip
For the hair, don’t draw every single strand. Focus on ‘S’ curves that follow the shape of the skull to suggest volume and direction effectively.
Frame your new artwork or use the techniques to create a personalized card for a friend
Hair Made of Patterns, Shapes, or Elements

Merge the beauty of nature with classical portraiture in this delicate sketchbook illustration. By replacing flowing locks with structured leaves and gentle ferns, you’ll create a whimsical profile that feels both organic and stylized.
Step-by-Step Guide
Materials
- Spiral-bound sketchbook (smooth or mixed media paper)
- Fine liner pens (sizes 0.05, 0.1, and 0.3mm, black)
- Pencil (HB or 2H for initial sketching)
- Kneaed eraser
- Gold or bronze metallic gel pen or marker
- Reference images of leaves (oak, fern, etc.)
Step 1: Laying the Foundation
-
Sketch the Head Shape:
Begin with a faint pencil sketch of the head’s profile. Start with a circle for the cranium and jawline, extending into the neck. Don’t worry about details yet; just capture the gentle slope of the forehead and the curve of the chin. -
Refine the Profile:
Lightly define the facial features. Sketch a softly closed eye with long lashes, a neat nose, and full lips. The expression should be peaceful and contemplative. -
Mark the Headline:
Draw the hairline starting above the forehead and curving down behind the ear. This line tells you where the skin ends and the botanical elements begin. -
Outline the Neck and Shoulders:
Extend a long, graceful neck line downwards, curving into the shoulder. Sketch a curved line for the clothing neckline, hinting at a dress or blouse sitting off the shoulder.
Step 2: Constructing the Botanical Hair
-
Map Out Leaf Placement:
Before inking, lightly sketch large leaf shapes where hair volume would typically be. Place a large, broad leaf shape near the crown and several smaller ones cascading down towards the nape of the neck. -
Add Fern Accents:
Draw a long, curving line extending upward from the top of the head to represent a fern stem. Add a few smaller stem lines poking out from the main leaf cluster to create texture. -
Inking the Face:
Switch to your 0.1mm fine liner. Carefully go over your pencil lines for the profile, lips, and eye. Use a very light touch for the eyelashes to keep them wispy. -
Drawing the Hairline Strands:
Use the 0.05mm pen to draw fine, individual hair strands at the temple and in front of the ear. These should not be leaves yet—just natural hair that transitions into the botanical shapes. -
Inking the Main Leaves:
Use the 0.1mm or 0.3mm pen to outline the large leaves. Add central veins to each leaf, but keep the outer edges clean and sharp. -
Detailed Leaf Texturing:
Inside the large leaves, draw tight, parallel lines or small veins to shade them. This linear texturing mimics the density of hair while maintaining the leaf structure. -
The Fern Fronds:
Ink the fern at the top. Draw small, repetitive leaflets along the main stem. I like to vary the size, making them smaller at the tip for a realistic look. -
Adding Floral Clusters:
At the nape of the neck, draw a small cluster of circular shapes or tiny flowers to gather the ‘hair’ together. Ink these delicately. -
Lower Bun Formation:
Sketch the hair gathered at the bottom as a loose, messy bun, but intertwine it with more leaf shapes. Let the lines flow in curves to suggest movement.
Natural Flow
Ensure your leaves follow the same directional flow that real hair would. If the hair is pulled back, point your leaves backward.
Step 3: Finishing Touches
-
The Earring Detail:
Draw a geometric or dangling earring hanging from the earlobe. Use clean, straight lines for contrast against the organic hair shapes. -
Clothing Details:
Ink the neckline of the dress. Add small circles or stitching details along the hem to give the fabric some character without overpowering the portrait. -
Erase Sketches:
Wait for the black ink to be completely dry. Gently use your kneaded eraser to lift all the underlying pencil marks, leaving a crisp black-and-white illustration. -
Metallic Accents:
Take your gold or bronze pen. Carefully color in just a few specific leaves—perhaps the fern at the top or a few broad leaves near the crown. This selective coloring adds a pop of elegance. -
Final Line Weight Check:
Look at the overall balance. If the profile feels too light compared to the hair, thicken the line under the chin and jaw slightly with the 0.3mm pen to ground the image.
Seasonal Shift
Change the botanical elements to match the season; try pine needles and holly for winter, or cherry blossoms for a spring version.
Close your sketchbook knowing you’ve created a unique fusion of nature and portraiture that captures a quiet autumnal mood


Have a question or want to share your own experience? I'd love to hear from you in the comments below!