A plain plant pot is basically a tiny curved canvas just waiting for your personality. Here are my favorite plant pot painting ideas—from classic patterns you can finish in one sitting to artsy, unexpected designs that feel like little sculptures for your plants.
Simple Color Block Bands
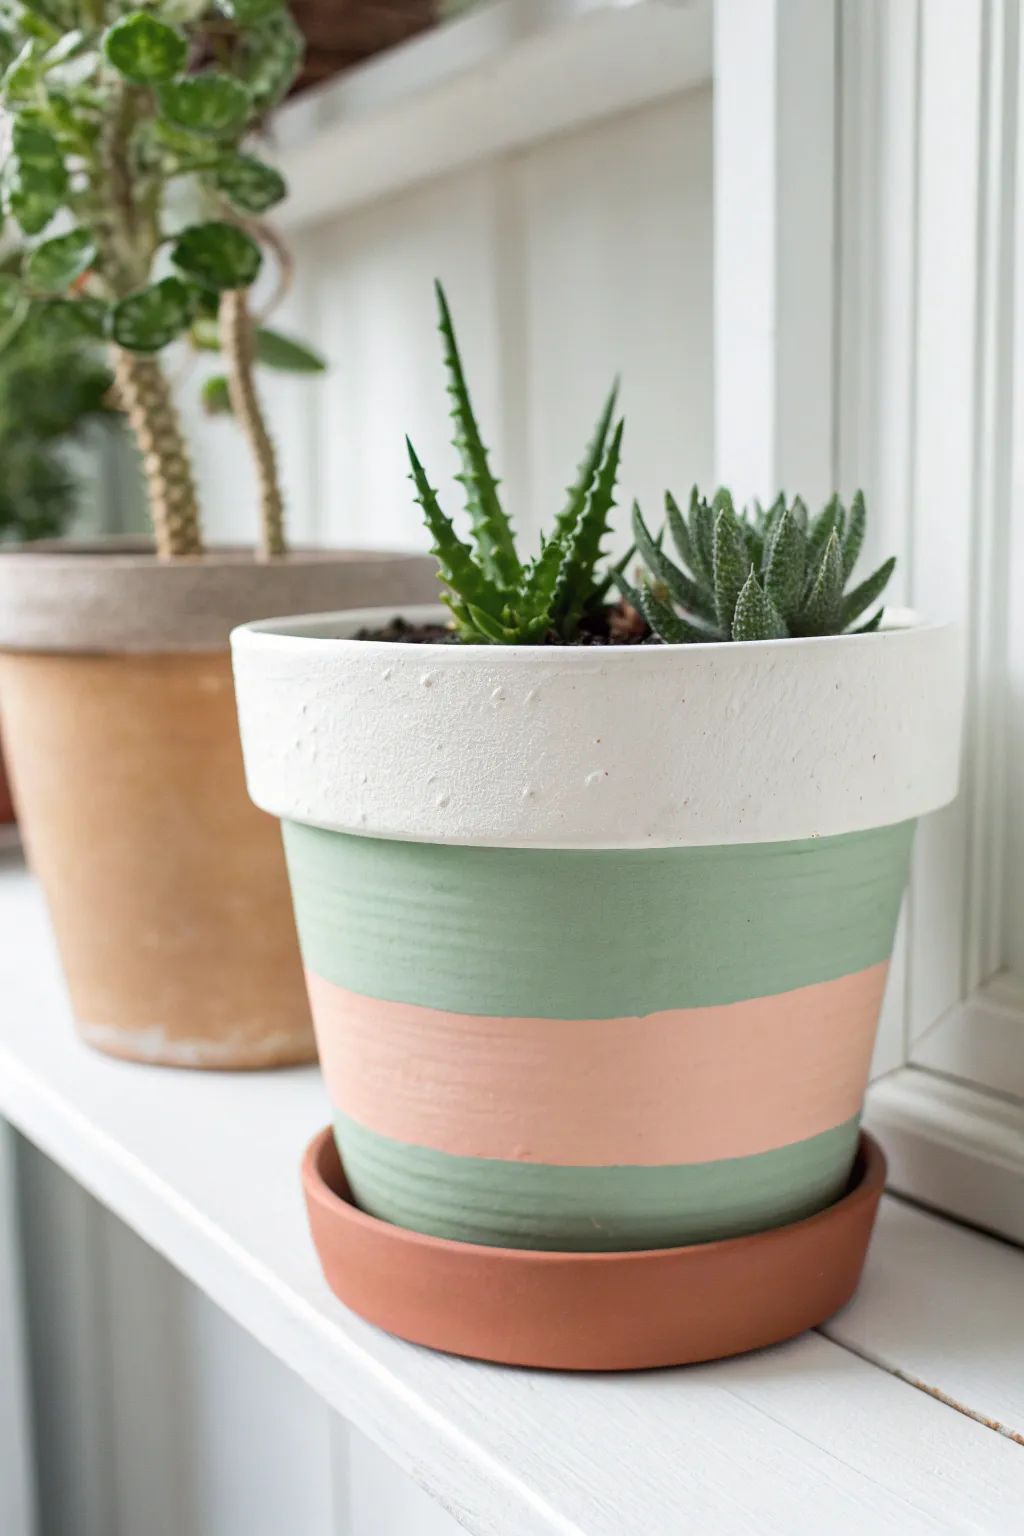
Transform a plain terracotta vessel into a soft, modern accent piece with this simple color-blocking technique. The combination of clean white, sage green, and warm peach tones creates a calming palette perfect for showcasing succulent gardens.
How-To Guide
Materials
- Standard terracotta pot (cleaned and dried)
- White acrylic craft paint (matte finish)
- Sage green acrylic craft paint
- Peach or light coral acrylic craft paint
- Painter’s tape or masking tape (1 inch width)
- Flat paintbrush (medium size, approx. 1 inch)
- Small detail brush (optional for touch-ups)
- Water cup and paper towels
- Sealer spray (optional, matte finish)
Step 1: Preparation & Base Coat
-
Clean surface:
Begin by wiping down your terracotta pot with a damp cloth to remove any dust or store residue. Let it dry completely, as moisture will prevent the paint from adhering properly. -
Paint the rim:
Load your medium flat brush with white acrylic paint. Apply a generous coat to the thick upper rim of the pot. Don’t worry about getting a perfect line underneath just yet. -
Extend inside:
Bring the white paint just over the top edge and paint about an inch down the inside of the pot. This gives a finished look even when the soil level settles. -
Second coat:
Allow the first layer of white to dry for about 15-20 minutes. Apply a second coat to ensure solid, opaque coverage where no orange clay shows through.
Bleeding Lines?
If paint bleeds under the tape, wait for it to dry completely. Then, scrape the excess gently with a craft knife or touch it up with the base color.
Step 2: Creating the Green Bands
-
Tape the first line:
Once the white rim is fully dry to the touch, place a strip of painter’s tape horizontally just under the rim. Press the edges down firmly to prevent bleed-through. -
Mix your sage:
Prepare your sage green paint. If your green is too bright, I find mixing in a tiny drop of grey or white helps achieve that soft, earthy look seen in the photo. -
Paint the top green section:
Paint a wide band of sage green directly below your tape line. This section is the widest part of the design, covering roughly the upper third of the pot’s body. -
Paint the bottom green section:
Skip a section in the middle (leave it bare terracotta for now) and paint the bottom third of the pot with the same sage green. Paint all the way down to the base edge. -
Layering:
Let the green paint dry, then apply a second coat to both the top and bottom green sections for a smooth, streak-free finish.
Step 3: The Peach Accent
-
Dry partially:
Allow the green paint to dry completely. This is crucial—if the paint is tacky, the next round of tape might peel it off. -
Tape the middle gap:
Apply strips of tape over the bottom edge of the top green band and the top edge of the bottom green band. This isolates the middle strip that remained unpainted. -
Apply peach paint:
Paint the exposed middle band with your peach or light coral color. Use horizontal strokes that follow the curve of the pot. -
Check coverage:
Peach tones can sometimes be translucent. Apply a second or third coat as needed until the color looks solid and creamy.
Make it Pop
Mix a little baking powder into your acrylic paint before applying. This creates a textured, ceramic-like finish that mimics high-end pottery.
Step 4: Finishing Touches
-
Remove tape:
While the final coat of peach is still slightly damp, carefully peel away the painter’s tape at a 45-degree angle. This crisp removal helps ensure sharp lines. -
Clean up edges:
Inspect your lines. If any paint bled under the tape, use a small detail brush or a damp Q-tip to tidy up the edges. -
Protect the work:
If you plan to keep this pot outdoors or water it frequently, spray the painted exterior with a matte clear sealer to prevent bubbling. -
Pot your plants:
Once fully cured (wait 24 hours just to be safe), fill your pot with well-draining soil and add your succulents like the Aloe and Haworthia shown here. -
Add the saucer:
Place the finished pot on a matching terracotta saucer to complete the look and protect your windowsill from drainage.
Enjoy the fresh, contemporary look your new custom planter brings to the room


Clean Black-and-White Linework
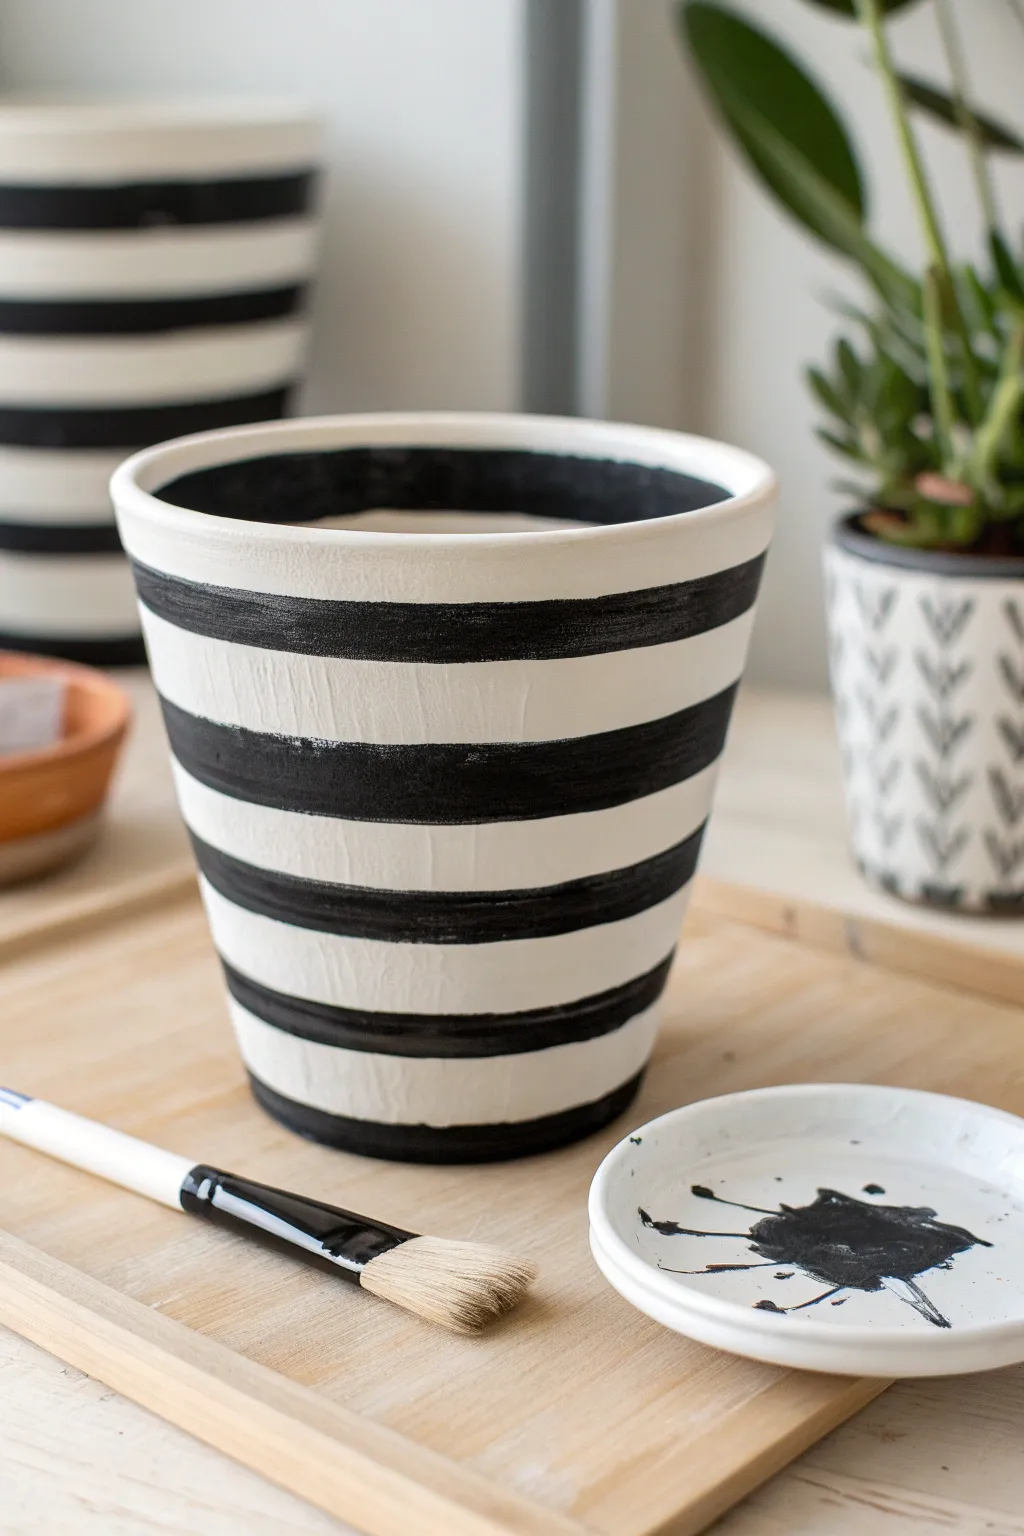
For a look that never goes out of style, transform a plain planter into a modern statement piece with bold black and white banding. This project focuses on freehand precision to achieve an organic yet clean aesthetic that highlights your favorite greenery.
Detailed Instructions
Materials
- Clean terracotta or ceramic pot
- White acrylic paint (matte or satin finish)
- Black acrylic paint
- Flat shader brush (medium width, roughly 1/2 inch)
- Small round brush (for touch-ups)
- Palette or small dish
- Water cup
- Paper towels
- Matte clear sealant spray (optional)
Step 1: Base Preparation
-
Clean surface:
Begin with a completely clean and dry pot. If you are reusing an old planter, scrub away any dirt or mineral deposits and let it dry fully so the paint adheres properly. -
Prime with white:
Squeeze a generous amount of white acrylic paint onto your palette. Using your flat brush, apply a smooth, even base coat over the entire exterior of the pot. -
Extend to the rim:
Don’t forget to paint the top rim and just inside the upper lip of the pot, as this area will be visible once the soil is added. -
Let dry and repeat:
Allow the first coat to dry for about 15-20 minutes. Apply a second coat of white to ensure full opacity, covering any streaks or the underlying pot color completely. -
Full cure:
Let this white base layer dry completely before moving on to the stripes. It should feel dry to the touch and not tacky.
Wobbly Lines?
If you struggle with freehand painting, rest your painting wrist on a steady object (like a stack of books) while you rotate the pot. This acts as a stabilizer.
Step 2: The Black Stripes
-
Load the brush:
Clean your flat brush thoroughly or switch to a fresh one. Load it with black acrylic paint, wiping perfectly flat against the palette edge to keep the bristles sharp. -
Paint the rim:
I usually start at the very top. Paint the flat top edge of the rim black. This creates a defining boundary for the rest of the design. -
Paint the interior lip:
Carry that black paint down into the interior of the pot for about an inch, creating a solid dark band that hides dirt lines later. -
Start the first exterior stripe:
Position your brush horizontally just below the rim. Press the bristles flat against the pot and drag the brush sideways to create your first stripe. -
Rotate and extend:
Instead of moving your hand around the pot, hold your brush hand steady and rotate the pot with your other hand. This helps maintain a level line. -
Spacing the white:
Leave a gap of white space that is roughly equal in width to your black stripe. This visual balance is key to the clean look. -
Middle stripes:
Continue working downward, painting parallel black bands. Don’t worry if the edges aren’t laser-straight; the slight irregularity adds to the hand-painted charm. -
Reload frequently:
Reload your brush often to ensure the black paint remains opaque and stark against the white background. -
Bottom stripe:
Finish with a black stripe at the very bottom edge of the pot to ground the design.
Make It Pop
Mix a tiny amount of texture medium or baking soda into the white base coat before applying. This adds a subtle, stony texture behind the sleek black stripes.
Step 3: Finishing Touches
-
Inspect edges:
Once the stripes are dry, look closely at your edges. You can use a small round brush with white paint to clean up any major slips or drips. -
Check opacity:
If the black paint looks streaky or gray in spots, carefully apply a second layer over just the black stripes. -
Seal (Optional):
To protect your work from water damage, take the pot outside and spray it with a clear matte sealant. -
Re-pot:
Wait 24 hours for the paint and sealer to fully cure before adding soil and your plant.
Now you have a chic, modern home for your favorite succulent or leafy friend


Classic Polka Dots That Pop

Transform a simple terracotta planter into a stylish accent piece with this high-contrast polka dot design. The clean white base makes the dark gray circles pop, offering a modern and playful home for your favorite succulents.
Step-by-Step
Materials
- Terracotta pot
- White acrylic gesso or primer
- White acrylic paint (matte finish)
- Dark grey or charcoal acrylic paint
- Medium flat paintbrush
- Round foam pouncer (medium size) or round stencil brush
- Small round detail brush
- Water cup and paper towels
- Clear matte sealant spray
Step 1: Preparation and Base Coat
-
Clean the pot:
Before you begin, ensure your terracotta pot is completely clean and dry. Wipe away any dust or clay residue with a damp cloth or sponge, as this helps the paint adhere much better. -
Apply primer:
Using your medium flat brush, apply a coat of white acrylic gesso or primer all over the exterior of the pot. Terracotta is very porous, so this layer creates a barrier that prevents the pot from soaking up all your paint. -
Paint the rim:
Don’t forget to paint the inside rim of the pot—about an inch or two down—since this area will be visible above the soil line once your plant is potted. -
Dry completely:
Let the primer dry fully before moving on. This usually takes about 20-30 minutes, depending on the humidity. -
First white coat:
Paint a solid layer of matte white acrylic paint over the dried primer. Use horizontal brush strokes to minimize texture and keep the finish smooth. -
Second white coat:
Once the first coat is dry, apply a second layer of white to ensure full opacity. You shouldn’t see any of the orange clay color peeking through at this point. -
Final dry:
Allow the white base to cure completely. I like to wait at least an hour here because painting dots on wet paint can cause muddy colors.
Clean Circle Hack
If you don’t have a foam pouncer, trace a coin or bottle cap lightly with a pencil, then fill it in with a brush for perfect circles every time.
Step 2: Painting the Polka Dots
-
Plan your pattern:
Visualize where your dots will go. For the look in the photo, you want a staggered, random-looking pattern rather than a perfect grid. -
Load the pouncer:
Dip your round foam pouncer into the dark grey acrylic paint. Dab off the excess paint on a paper towel so it isn’t dripping; too much paint causes bleeding around the edges. -
Stamp the rim:
Start by stamping dots along the rim of the pot. Press the foam pouncer straight down firmly, twist slightly, and lift straight up. -
Stamp the body:
Move to the body of the pot. Offset these dots from the ones on the rim, placing them in the empty spaces below the rim dots to create that classic polka dot rhythm. -
Fill the gaps:
Continue adding dots around the base, ensuring you leave generous white space between them to match the airy feel of the original design. -
Touch up edges:
Foam pouncers sometimes leave slightly rough edges. Use your small round detail brush to smooth out the circumference of any dots that look a little uneven. -
Solidify the color:
If your grey looks translucent, carefully hand-paint a second layer of grey over just the circles using the detail brush or the flat side of the pouncer. -
Seal the deal:
Once all paint is bone dry (give it a few hours), spray the entire pot with a clear matte sealant. This protects your design from water damage when you water your plant.
Reverse the Look
Try painting the entire pot charcoal grey first, then adding bright white or metallic gold dots for a dramatic, moody variation.
Now your custom planter is ready to add a spot of charm to your windowsill or garden shelf


Modern Geometric Tape Patterns
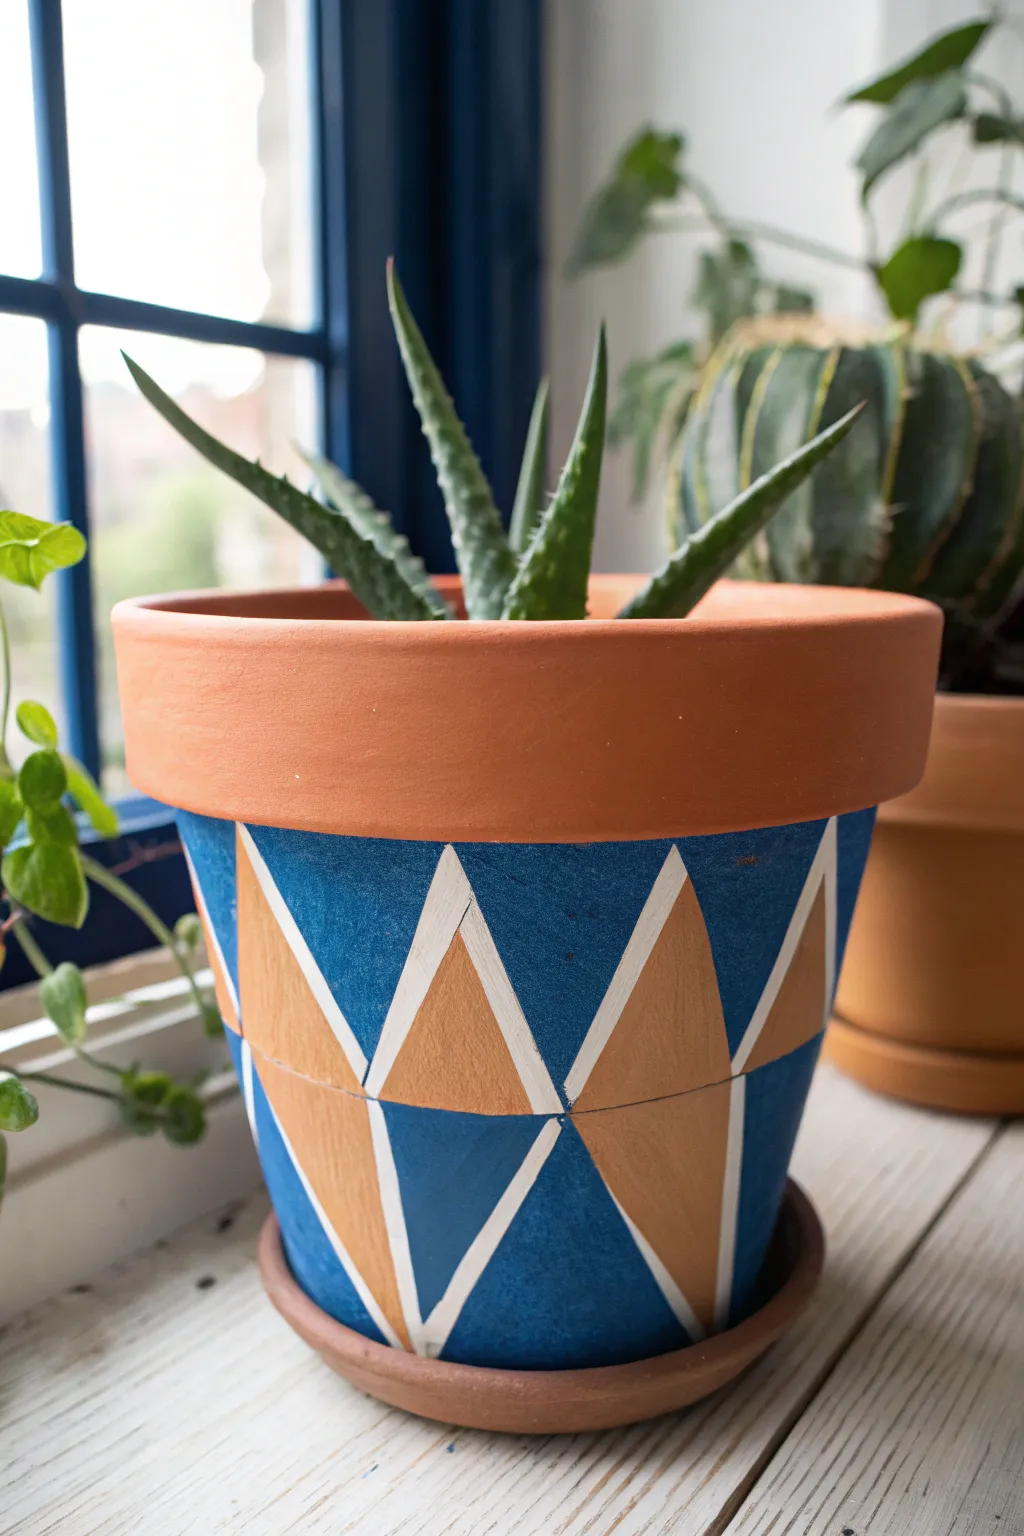
Bring a touch of modern desert style to your windowsill with this striking geometric painted pot. By using painter’s tape and the natural clay color as part of the design, you can achieve crisp, professional-looking lines with minimal effort.
Step-by-Step Guide
Materials
- Standard terracotta pot (clean and dry)
- Deep blue acrylic craft paint
- White or cream acrylic craft paint (for the lines)
- Painter’s tape or masking tape (1/4 inch width works best)
- Flat paintbrush (medium size)
- Fine detail paintbrush
- Ruler or flexible measuring tape
- Pencil
- Clear acrylic sealer spray (matte or satin finish)
Step 1: Preparation & Mapping
-
Clean surface:
Ensure your terracotta pot is completely clean and dry. Wipe it down with a damp cloth to remove any pottery dust, as this will prevent the tape from sticking properly. -
Tape the rim:
Apply a strip of painter’s tape directly below the heavy rim of the pot. This protects the upper lip, keeping it the natural clay color as shown in the original design. -
Measure the circumference:
Use a flexible measuring tape to find the circumference of the pot’s body just below the rim tape. You want to divide this number evenly so your triangles meet perfectly. -
Mark vertical guides:
Based on your measurement, mark small pencil ticks around the top edge (below the tape) and the bottom edge of the pot. Aim for an even number of sections, roughly 2-3 inches wide depending on pot size. -
Connect the dots:
Lightly sketch zigzag lines connecting your top and bottom marks to form a continuous row of triangles around the drum of the pot.
Tape Trouble?
If paint bleeds under the tape, wait for it to dry completely. Then, gently scratch the excess paint away with a craft knife or toothpick to restore the sharp edge.
Step 2: Painting the Design
-
Tape the triangles:
This is the trickiest part. You need to tape off the triangles you want to paint blue first. Apply tape along the pencil lines, pressing down firmly on the edges to prevent bleed-through. -
Select paint zones:
Note that the design alternates: one triangle is blue, the next is natural terracotta. Only expose the areas intended for blue paint. -
Paint the blue base:
Using your flat brush, fill in the exposed triangles with the deep blue acrylic paint. Paint from the tape inward to avoid pushing paint under the adhesive. -
Second coat:
Terracotta is porous and soaks up paint. I always apply a second coat of blue once the first is dry to the touch to ensure a solid, opaque color. -
Re-tape for white lines:
Once the blue paint is completely dry (give it an hour), carefully peel off the tape. Now, you need to paint the dividing lines. You can freehand this, but for crispness, re-tape to create a thin gap between the blue and orange sections. -
Paint the white lines:
Using a fine detail brush (or the existing gap in your tape), paint the white lines that separate the blue triangles from the unpainted terracotta ones. -
Clean up edges:
If any paint bled or lines look wobbly, use a tiny bit of damp cotton swab or a detail brush with the background color to tidy up the mistakes while the paint is still slightly workable.
Step 3: Finishing Touches
-
Remove all tape:
Gently peel away all remaining painter’s tape, including the strip protecting the rim. Pull at a 45-degree angle away from the wet paint to get the cleanest line. -
Check the bottom:
Flip the pot over and ensure the paint lines terminate neatly at the base. You can add a solid blue line around the bottom edge if the triangle points look uneven. -
Dry time:
Let the pot sit overnight to fully cure. Acrylics dry fast on the surface but need time to harden against the clay. -
Seal the deal:
Take the pot to a well-ventilated area and spray it with a clear acrylic sealer. This is crucial for terracotta, as moisture from the plant can eventually bubble the paint from the inside out. -
Let it cure:
Allow the sealer to dry according to the manufacturer’s instructions before potting your succulent or cactus.
Go Geometric
Add a second row of triangles underneath the first but invert the colors (blue on natural, natural on blue) to create a cool diamond or argyle effect.
Once sealed and dry, your geometric pot is ready to give your favorite houseplant a stylish new home
BRUSH GUIDE
The Right Brush for Every Stroke
From clean lines to bold texture — master brush choice, stroke control, and essential techniques.
Explore the Full Guide
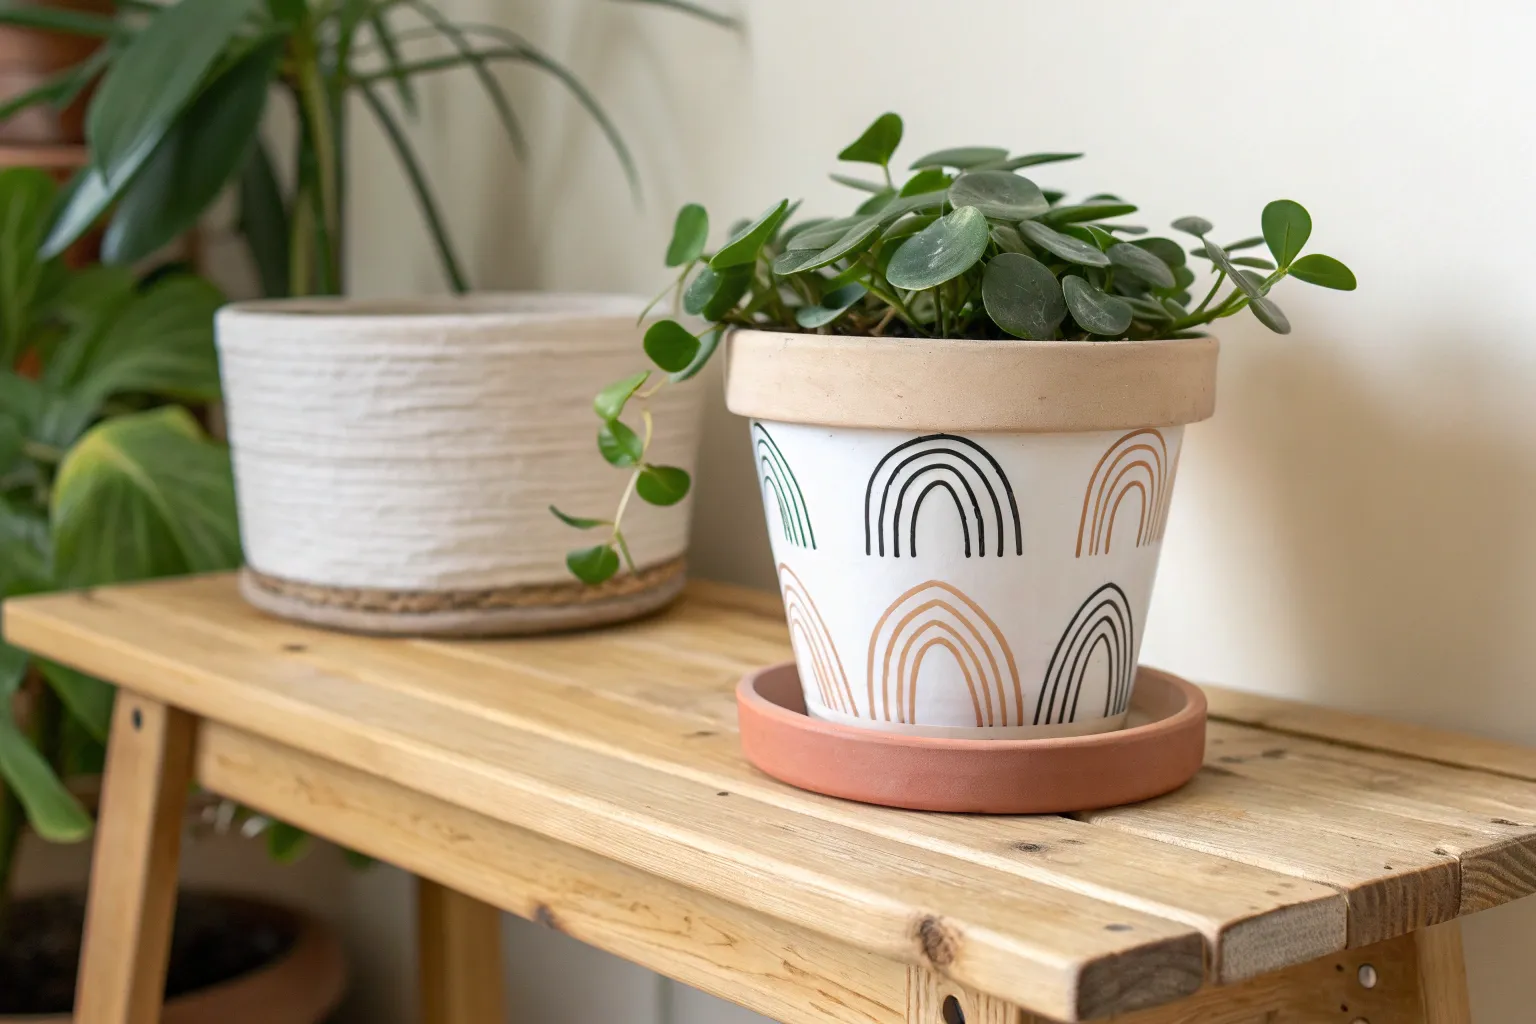
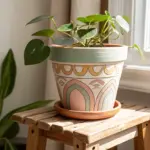
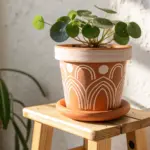
Minimal Scalloped Rim Detail
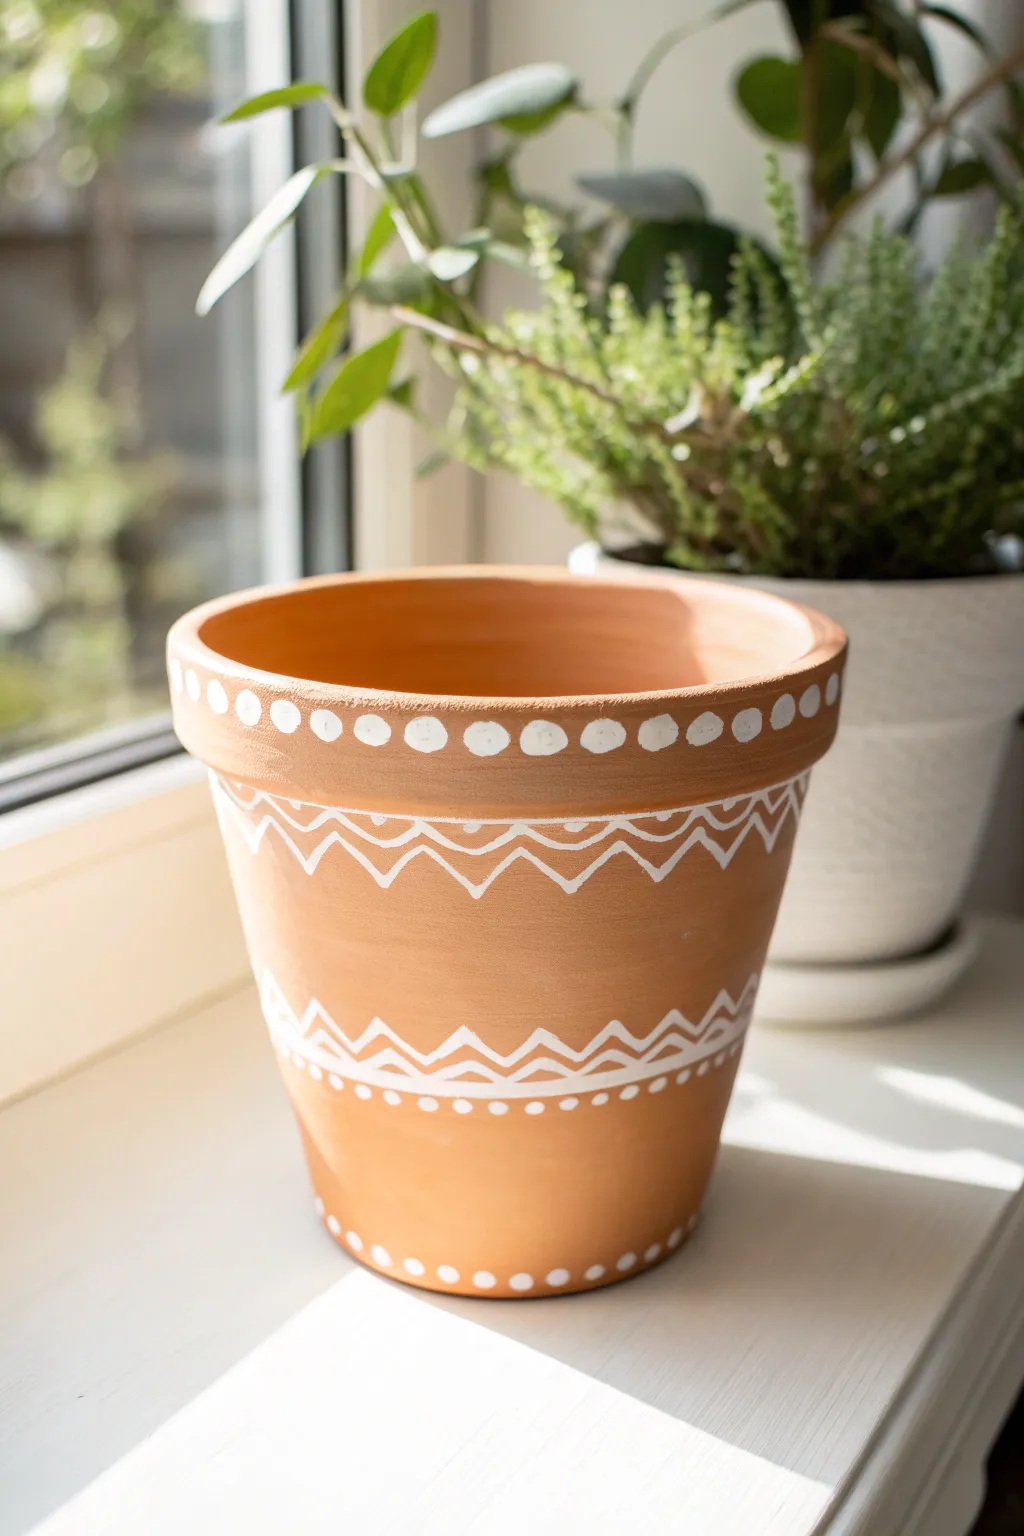
Transform a plain terracotta pot into a stylish home accent with simple white geometric patterns. This design features delicate zig-zags and playful dots that create a fresh, bohemian look perfect for brightening up any windowsill.
How-To Guide
Materials
- Clean terracotta pot (any size)
- White acrylic paint (outdoor multi-surface formula recommended)
- Small round paintbrush (size 1 or 2)
- Very fine detail brush or paint pen (optional)
- Pencil
- Eraser
- Paper plate or palette
- Clear acrylic sealer (matte or satin finish)
- Cup of water and paper towels
Step 1: Preparation and Base Design
-
Clean the surface:
Before starting, ensure your terracotta pot is completely clean and dry. Wipe away any dust or sticker residue with a damp cloth and let it air dry for at least 30 minutes to ensure the paint adheres properly. -
Map out the rim:
Using a pencil, lightly mark where you want your dots to go along the thick upper rim of the pot. Aim for even spacing, leaving about a finger-width between each mark. -
Paint the rim dots:
Dip your small round brush into the white acrylic paint. Press the brush tip firmly onto your pencil marks on the rim to create solid, round dots. Reload your brush frequently to keep the circles opaque. -
Sketch the upper zig-zag:
Move down to the main body of the pot, just below the rim. Lightly sketch a continuous zig-zag line all the way around. Try to keep the peaks and valleys consistent in height. -
Add the scoop detail:
Draw curved ‘scoops’ connecting the top points of your zig-zag to create a scalloped effect. This softens the geometric feel and adds that boho touch. -
Paint the upper pattern:
Using your fine detail brush, trace over your pencil sketch with white paint. I like to stabilize my hand by resting my pinky against the pot while painting these thin lines.
Use Tape for Guidance
Attach a strip of painter’s tape horizontally around the pot before sketching your zig-zags. This acts as a visual guide to keep your pattern level all the way around.
Step 2: Lower Design and Finishing Touches
-
Plan the lower band:
About two-thirds of the way down the pot, sketch a double zig-zag pattern. Draw two parallel zig-zag lines, leaving a small gap between them. -
Paint the first lower line:
Carefully paint the top zig-zag line of the bottom band. Keep your brush strokes smooth and confident to avoid shaky lines. -
Paint the second lower line:
Paint the second zig-zag line directly beneath the first one, mirroring the angles perfectly. -
Add detail dots:
Once the lines are dry, add a horizontal row of small dots right underneath the lower zig-zag band. Use the very tip of your brush or a dotting tool for precision. -
Create the base border:
At the very bottom edge of the pot, paint a final ring of small dots. These should be smaller than the rim dots but larger than the detail dots you just painted. -
Inspect and touch up:
Look over your work. If the terracotta is showing through the white paint too much, carefully go over the lines and dots with a second coat for a brighter, more solid white. -
Erase guidelines:
Allow the paint to dry completely (wait at least an hour). Then, gently use an eraser to remove any visible pencil marks that weren’t covered by paint. -
Seal the pot:
To protect your design from water and dirt, apply a coat of clear acrylic sealer over the painted areas. A spray sealer works best for an even finish without smudging your work.
Add Color Contrast
Try painting the entire pot a solid color like navy blue or sage green first. Once dry, add the white geometric patterns on top for a striking, high-contrast look.
Now your custom planter is ready to showcase your favorite succulents or herbs in style
Sweet Floral Scatter (Daisies, Minis, Sprigs)
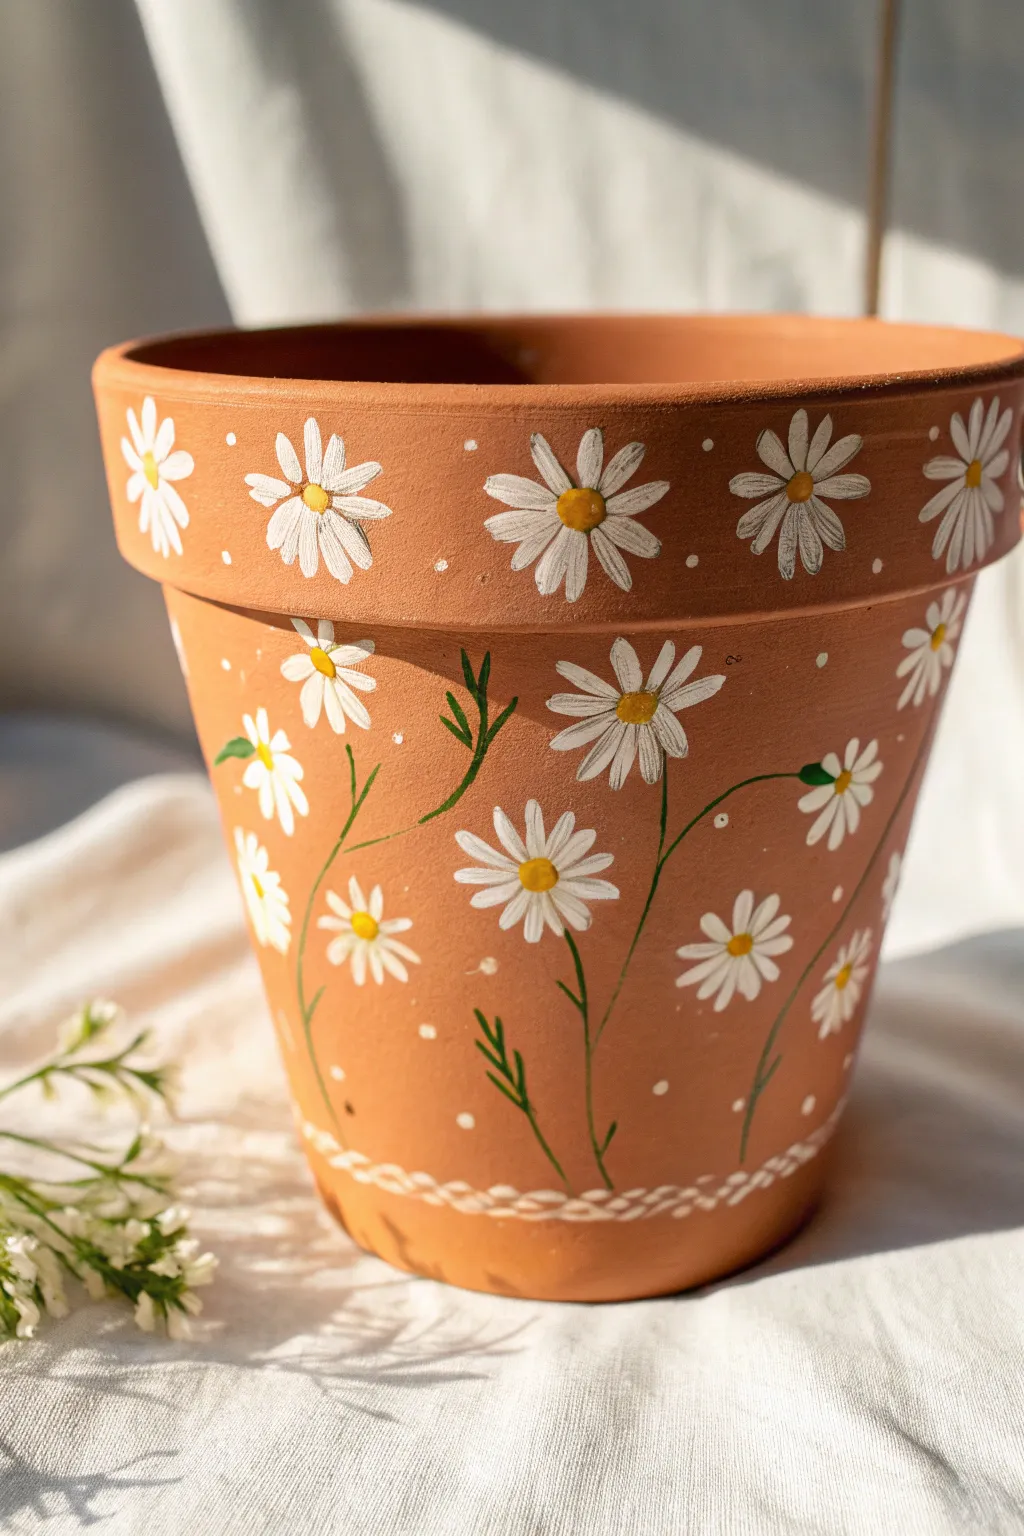
Transform a simple terra cotta pot into a cheerful garden staple with this whimsical daisy design. By combining a structured rim pattern with a free-flowing floral scatter below, you achieve a balanced yet organic look that feels freshly picked.
Step-by-Step Guide
Materials
- Terra cotta pot (clean and dry)
- White acrylic paint
- Yellow acrylic paint (golden yellow or ochre)
- Green acrylic paint (leaf green or forest green)
- Round paintbrush (size 4 or 6 for flowers)
- Fine liner brush (size 0 or 1 for stems/leaves)
- Small dotting tool or toothpick
- Matte or satin sealant spray
- Palette or paper plate
- Cup of water and paper towels
Step 1: Prepping the Canvas
-
Clean and Dry:
Ensure your terra cotta pot is free of dust and debris. If you’ve just washed it, let it dry completely—terra cotta absorbs water and can mess with paint adhesion if damp. -
Optional Base Seal:
If you want to prevent water from seeping through the clay later, apply a clear acrylic sealer to the inside and outside of the pot before you start painting.
Uneven Petals?
Don’t stress if petals look messy! Once dry, you can refine edges with a bit of sandpaper for a distressed look, or simply paint a second coat to crisp up the lines.
Step 2: Painting the Rim
-
Placement Planning:
Visualize the spacing for the large daisies on the rim. You want them evenly spaced around the circumference. You can make tiny, faint pencil marks as guides if you’re worried about symmetry. -
Petal Basics:
Load your round brush with white paint. Press the brush down and lift as you pull toward the center to create a teardrop petal shape. -
Complete the Circle:
Paint about 8 to 10 petals in a circle to form a single flower. Repeat this process around the entire rim, leaving equal gaps between each flower. -
Add Polka Dots:
Dip your dotting tool or the back of a brush handle into white paint. Place a single neat dot in the empty space between each rim daisy. -
Center the Flowers:
Once the white petals are dry to the touch, dip a clean brush or dotting tool into yellow paint and place a generous dot in the center of each rim flower.
Step 3: The Floral Scatter
-
Main Flowers:
Moving to the body of the pot, paint 3-4 larger daisies similar to the ones on the rim. Scatter them randomly, placing some higher and some lower to create movement. -
Add Budding Blooms:
Fill in gaps with smaller, simpler flowers. For these ‘mini’ daisies, paint fewer petals or make the petals shorter to suggest they are further away or just opening. -
Drawing Stems:
Switch to your fine liner brush and green paint. Paint thin, slightly curved lines extending downward from your scattered flowers. Vary the lengths and curves so they don’t look like stiff soldiers. -
Leafy Details:
Along the green stems, add small leaves. Press the liner brush down gently and lift to create small, elongated leaf shapes branching off the main stems. -
Sprigs of Greenery:
In large empty spaces, paint standalone sprigs of greenery. A central stem with tiny leaves branching off both sides adds lushness without needing a flower attached. -
Adding Dimension:
Go back to your white flowers on the body. Using the liner brush and a tiny bit of grey or watered-down black, add very subtle, thin lines on a few petals to define them, giving the illusion of texture. -
Yellow Centers:
Add the yellow centers to all the flowers on the body of the pot. For the flowers that are angled sideways, place the yellow center slightly off-center to match the perspective. -
Tiny Filler Dots:
Use your dotting tool again to scatter tiny white dots randomly in the empty terracotta spaces. This fills the void and ties the body design back to the rim.
Make It Pop
Mix a tiny drop of orange into your yellow paint for a warmer flower center, or add a white highlight dot on the yellow centers to make them look glossy and 3D.
Step 4: Finishing Touches
-
Base Pattern:
At the very bottom edge of the pot, use your white paint and liner brush to create a simple cross-hatch or faux-basket weave pattern. Short diagonal strokes crossing each other will create this texture. -
Dry Time:
Allow the entire pot to dry for at least 24 hours. Acrylic dries fast, but curing takes a bit longer on porous clay. -
Seal the Artwork:
Spray the painted areas with a matte or satin sealant to protect your handiwork from moisture and dirt when watering your plants.
Now you have a charming custom planter ready to house your favorite greenery

PENCIL GUIDE
Understanding Pencil Grades from H to B
From first sketch to finished drawing — learn pencil grades, line control, and shading techniques.
Explore the Full Guide
Loose Leafy Vines Around the Pot
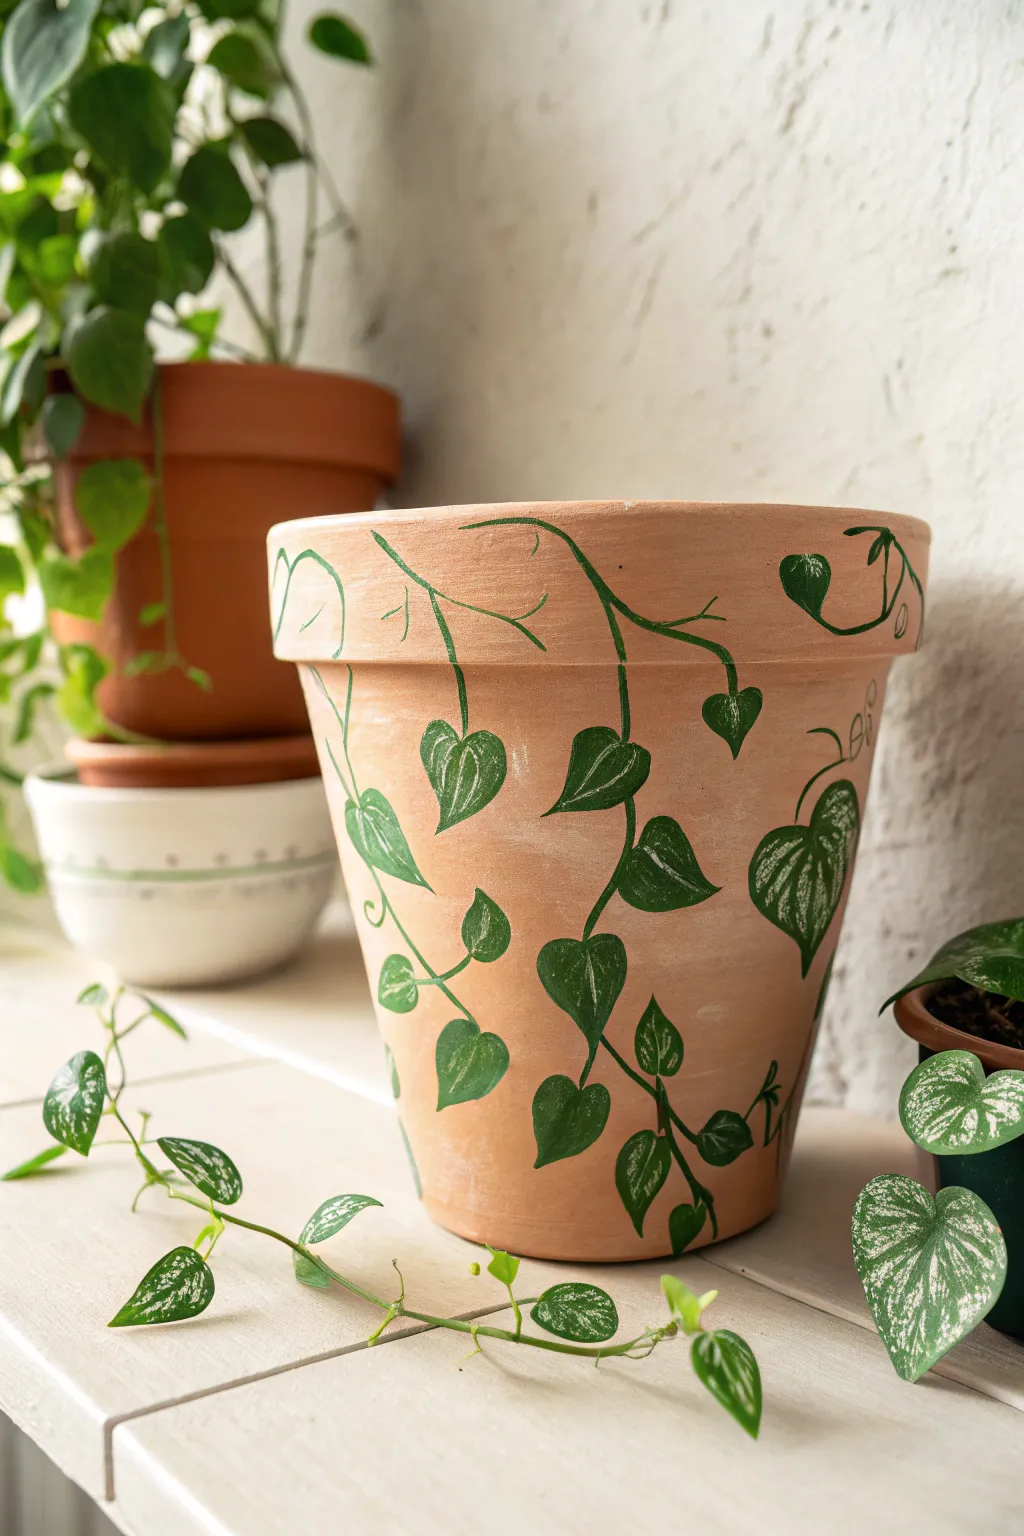
Bring the beauty of nature directly onto your planter with this loose, sketch-style vine design. The terracotta background serves as the perfect earthy canvas for deep green, heart-shaped leaves that seem to climb organically around the rim.
Detailed Instructions
Materials
- Terracotta pot (clean and dry)
- Deep green acrylic paint
- Slightly lighter/warmer green acrylic paint (for variety)
- White acrylic paint or a white Posca paint pen (fine tip)
- Round paintbrush (size 4 or 6)
- Fine liner brush (size 0 or 1)
- Palette or paper plate
- Water cup and paper towels
- Pencil (optional)
Step 1: Preparation and Planning
-
Clean surface:
Ensure your terracotta pot is free of dust and debris by wiping it down with a damp cloth and letting it dry completely. -
Visualize the flow:
Before painting, look at the pot and imagine how a vine would naturally grow. It usually starts from the bottom and winds upward, or drapes down from the rim. -
Light sketch:
If you are hesitant to freehand, use a pencil to very lightly trace the main S-curves of the vines. Don’t worry about the leaves yet, just get the ‘spine’ of the plant placed.
Natural Flow Tip
Rotate the pot constantly while painting the stems. Connecting lines across the ‘back’ creates an infinite loop, making the design seamless from every angle.
Step 2: Painting the Vines
-
Mix your base green:
Squeeze out your deep green acrylic paint. This primary color will form the stems and leaf outlines. -
Thin the paint:
Add a tiny drop of water to your green paint on the palette to make it flow smoothly, almost like ink. This helps create long, unbroken lines. -
Paint the main stems:
Using your fine liner brush or the tip of a small round brush, paint long, wandering lines that curve around the pot’s belly and up over the rim. -
Add dimension:
Paint a few stray tendrils that hook off the main stems, curling them into little spirals for a whimsical touch. -
Let the stems dry:
Give the stems about 5-10 minutes to set so your hand doesn’t smudge them while adding leaves.
Step 3: Adding the Foliage
-
Leaf placement:
Load your round brush with the deep green paint. Identify spots along the vine where you want leaves, spacing them somewhat irregularly for a natural look. -
Paint the leaves:
Press the belly of the brush down and pull up to create heart-shaped leaves. Make some leaves face upward and others downward, mimicking gravity. -
Vary sizes:
Paint larger leaves near the thickest parts of the vine and tiny, budding leaves near the ends of the tendrils. -
Second green tone:
I like to mix a little of the lighter green into the dark green for a few random leaves to add subtle depth, though keeping it mostly monochrome works too. -
Rim details:
Don’t forget to paint a few leaves spilling over onto the the rim of the pot, connecting the design from bottom to top. -
Dry thoroughly:
Allow all the green paint to dry completely. This is crucial before adding the fine white details.
Level Up: Realism
Mix a tiny amount of brown into your green for the lower stems to mimic older growth, keeping the vibrant green for the tips of the vines.
Step 4: Detailing and Finishing
-
Prepare the highlighter:
Get your white paint pen ready, shaking it well. Alternatively, load a size 0 liner brush with slightly watered-down white acrylic paint. -
Sketch the veins:
Inside each green leaf, draw quick, scratchy lines to represent veins. Do not aim for perfection; a sketchy, loose hand looks best here. -
Add highlights:
Add tiny little dashes or curves of white along the main green stems to simulate light hitting the vine. -
Clean up:
If any white lines are too stark, you can gently dab them with a clean, damp finger to subtle them out. -
Final inspection:
Rotate the pot and see if any areas look too empty. Feel free to add a stray floating leaf or a curling tendril to fill gaps. -
Optional sealing:
To protect your art from water damage, brush a coat of matte spray sealer or Mod Podge over the exterior once entirely dry.
Now your pot is ready to house a real trailing plant that will mirror your beautiful artwork
Bee Trails and Tiny Garden Icons
Brighten up your indoor or outdoor garden with this cheerful, pollinator-friendly design featuring busy bumblebees and delicate daisies. The warm mustard yellow base creates a cozy, sun-drenched backdrop for crisp black details and white floral accents.
How-To Guide
Materials
- Terracotta pot (clean and dry)
- Acrylic craft paint (mustard yellow, black, white)
- Wide flat brush (for base coating)
- Small round brush (size 1 or 2 for details)
- Fine liner brush (size 0 or 00 for stems and outlines)
- Pencil
- Dotting tool or toothpick
- Water cup and palette
- Clear acrylic sealer (matte or satin spray)
Step 1: Base Coat & Banding
-
Prime the surface:
Start with a clean terracotta pot. If your pot has rough patches, give it a quick sanding. Using a large flat brush, apply a coat of mustard yellow paint over the entire exterior, including the top inch of the inner rim. Let it dry completely. -
Apply second coat:
Because yellow can be sheer, apply a second or even third coat to ensure an opaque, vibrant finish without streakiness. Allow full drying time between coats. -
Mark the bottom band:
Using a pencil, lightly sketch a horizontal line circling the pot, about 1.5 to 2 inches from the bottom edge. This will define your dark soil or grass line. -
Paint the bottom section:
Switch to black acrylic paint and fill in the area below your pencil line. Use a steady hand or masking tape to keep the top edge neat. This creates a strong contrast for the yellow above. -
Add polka dots:
Once the black paint is dry to the touch, dip a dotting tool or the handle end of a paintbrush into white paint. Stamp small, evenly spaced dots in a staggered brick pattern all over the black band.
Uneven Stripes?
Painting bees over a curved surface is tricky. If your black stripes look wobbly, clean them up by painting over the edges with your base yellow color once the black is fully dry.
Step 2: Rim Florals
-
Plan the rim daisies:
Focus on the thick upper rim of the pot. Visualise where your flowers will go; spacing them irregularly gives a more organic, wildflower meadow feel. -
Paint petals:
Using white paint and a small round brush, press and lift to create simple teardrop petals. Group 5 to 7 petals together to form each flower head. -
Add flower centers:
After the white petals are dry, use a small dot of black paint in the center of each flower. Add tiny white lines radiating from the black centers on a few flowers for extra detail.
Step 3: Bees & Botanicals
-
Sketch the main elements:
Lightly sketch the outlines of three or four large bumblebees around the center section of the pot. Also, draw rough vertical lines rising from the black band to represent flower stems. -
Paint bee bodies:
Fill in the oval shape of the bee bodies with the mustard yellow (if you painted over it) or simple black stripes directly on the yellow background. The bees in this design have alternating black and yellow stripes. -
Add wings:
Using a liner brush and white paint, carefully outline and fill the bee wings. They should look like transparent tear-drop loops attached to the upper back of the bee. -
Define the wings:
Once the white wing paint is dry, outline them thinly in black ink or paint. Add a straight line down the center of the wing for definition. -
Draw antennas and legs:
Use your finest liner brush with black paint to add tiny, curved antennae to the bee heads and delicate legs extending from the body. -
Paint rising stems:
From the black bottom band, paint thin black lines sprouting upward. Add small leaves along these stems—some can be fern-like with multiple leaflets, others simple oval leaves. -
Add lower daisies:
I like to cap a few of these black stems with white daisy heads, similar to the ones on the rim but perhaps slightly larger. Outline their petals thinly in black to make them pop against the yellow. -
Create background atmosphere:
To fill empty negative space, use your finest brush or a toothpick to add tiny, random black dots floating around the bees, simulating pollen or movement. -
Seal the artwork:
Wait at least 24 hours for all paint to cure fully. Take the pot to a ventilated area and apply a clear acrylic spray sealer to protect your painting from moisture and fading.
Pro Tip: Transparency Trick
For the bee wings, mix a tiny drop of water into your white paint. This makes it slightly translucent, allowing the yellow background to show through just enough to look like gossamer.
Fill your new masterpiece with soil and a favorite succulent to complete the look


Ombre Fade From Dark to Light
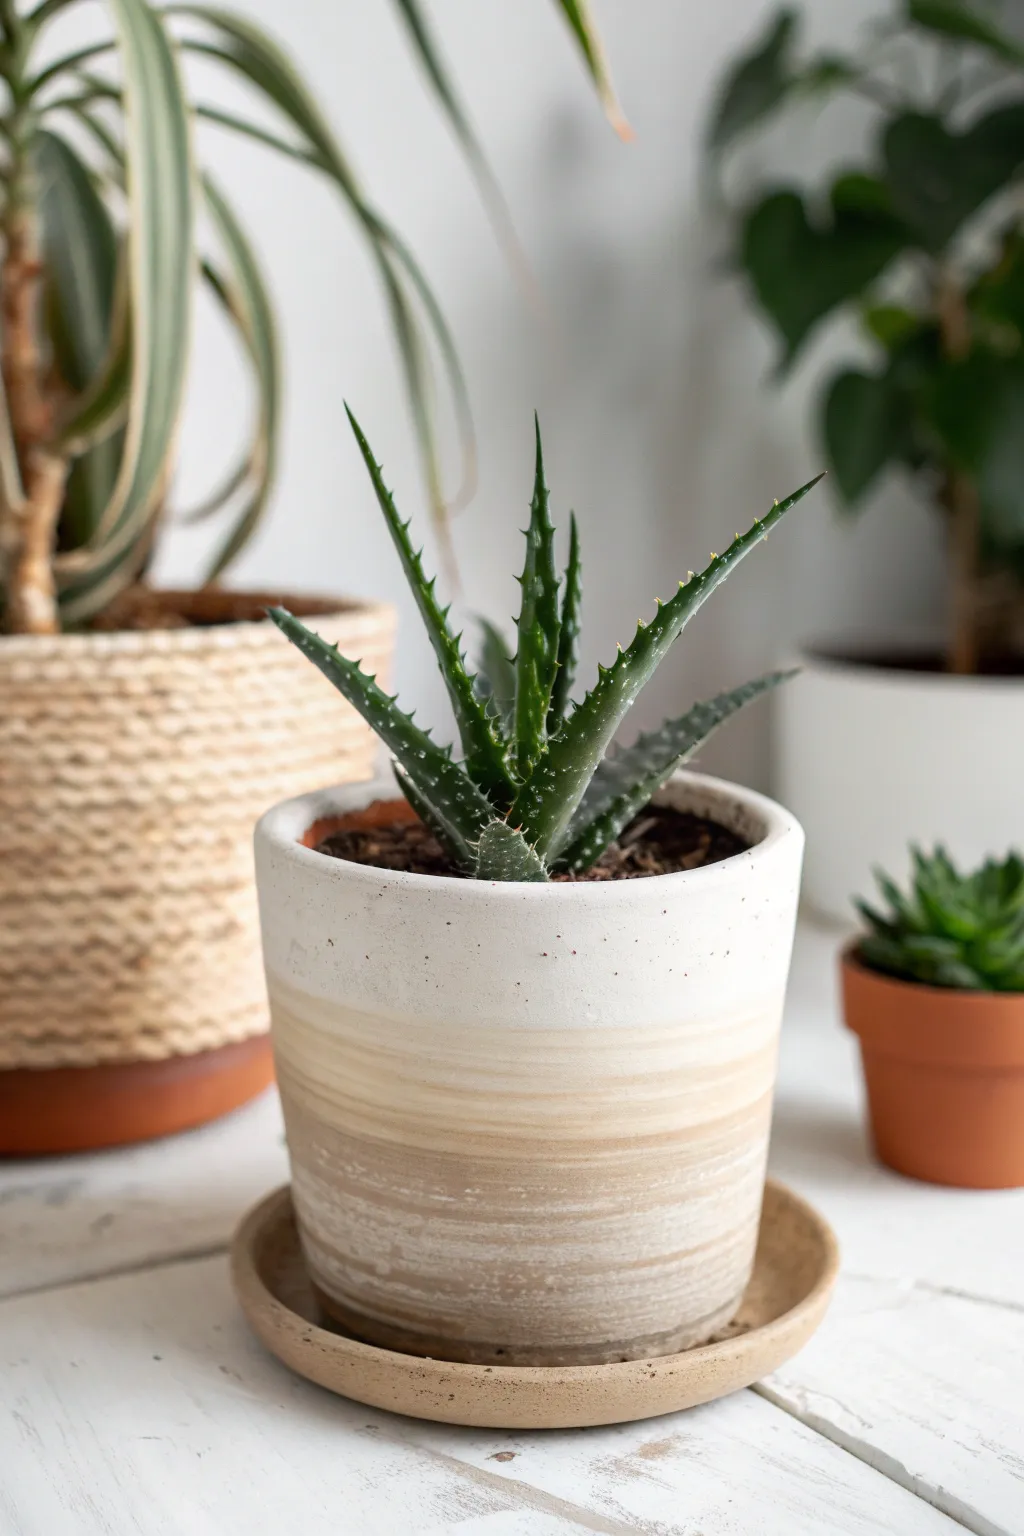
Capture the subtle beauty of natural transitions with this gentle ombre design that fades from a crisp white rim into earthy beige tones. This technique mimics the look of high-end glazed ceramics using simple acrylics, perfect for giving a plain planter a sophisticated, hand-dipped appearance.
Step-by-Step
Materials
- Clean terra cotta or ceramic pot (approx. 5-6 inch diameter)
- White acrylic paint (matte or satin finish)
- Beige/Sand acrylic paint
- Light brown/Taupe acrylic paint
- Flow improver medium or water
- Medium flat synthetic brush
- Wide soft blending brush (dry)
- Palette or paper plate
- Paper towels
- Clear matte sealer spray
Step 1: Preparation & Base Coat
-
Clean surface:
Begin by wiping down your pot with a damp cloth to remove any dust or oils that might prevent adhesion. -
Prime the pot:
If using raw terra cotta, apply a generic craft sealer first to stop the pot from soaking up all your paint. -
Mix the top color:
Pour a generous amount of white acrylic paint onto your palette. Add just a tiny drop of the beige to warm it up slightly so it isn’t stark white. -
Apply the top band:
Paint the top third of the pot with your white mixture, covering the exterior rim fully. Use horizontal strokes for even coverage. -
Paint interior rim:
Don’t forget to paint just inside the top rim (about an inch down) so the soil line looks neat once planted.
Extended Drying Time
Acrylics dry fast! Mix a few drops of ‘retarder medium’ or ‘slow-dry medium’ into your paints. This gives you extra minutes to perfect that smooth gradient blend.
Step 2: Creating the Ombre Fade
-
Mix the middle tone:
While the white is still slightly wet, mix equal parts white and beige on your palette to create a soft cream color. -
Apply middle band:
Paint the middle section of the pot with this cream color, slightly overlapping the bottom edge of the white section. -
Wet-blend the transition:
Here I prefer to take a slightly damp, clean brush and lightly stroke back and forth horizontally where the white and cream meet to blur the line. -
Mix the base tone:
Create your darkest color by mixing the beige with a small dab of light brown/taupe. You want a sandy, earthy color, not dark brown. -
Paint the bottom section:
Apply this darker sandy mix to the bottom third of the pot, bringing it up to meet the cream section. -
Blend the lower transition:
Use your blending brush to feather the darker paint upward into the cream section. Work quickly before the acrylic dries. -
Add texture:
For that imperfect, handmade look seen in the photo, dip a stiff dry brush into very little beige paint and drag it horizontally across the transition zones.
Harsh Lines appearing?
If you get hard stripes instead of a fade, your paint dried too fast. Re-apply fresh wet paint to both adjacent colors and blend them immediately with a damp brush.
Step 3: Finishing Touches
-
Create distressing:
Once the paint is tacky but not fully dry, use a slightly rough paper towel to gently rub a few spots near the bottom, revealing faint hints of the original pot texture. -
Check opacity:
Step back and look at your gradient. If the colors look too sheer, apply a second thin layer following the same blending steps once the first coat is dry. -
Re-whiten the rim:
Often the top rim gets messy during blending. Go back with pure white and tidy up the very top edge for a crisp finish. -
Let it cure:
Allow the pot to dry completely for at least 24 hours to ensure the paint hardens. -
Seal the work:
Take the pot to a well-ventilated area and spray it with a clear matte sealer. This protects the ombre effect from water damage during watering. -
Add saucer:
If you have a saucer, paint it a solid color matching the darkest tone on your pot, or leave it natural for contrast.
Now your shelf has a custom piece that brings a calm, sandy aesthetic to your indoor garden
Drippy Paint Top That Looks Like Icing
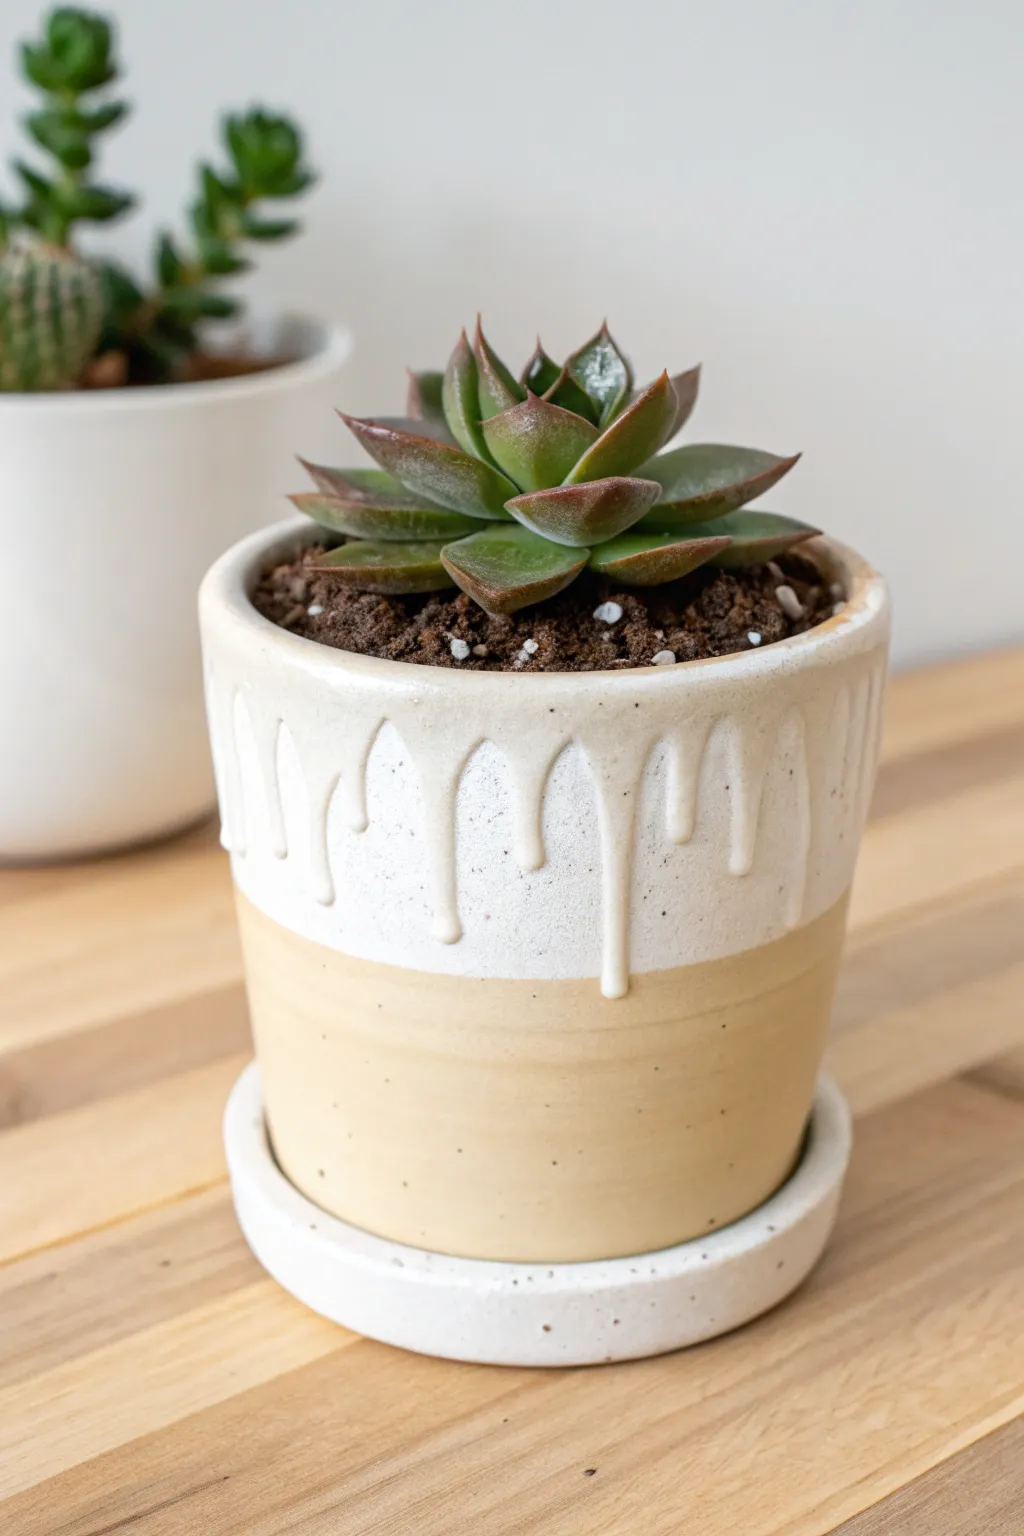
Transform a simple terracotta or ceramic pot into a delightful piece of decor that mimics the look of a cake with drippy icing. This technique uses thick paint or glaze to create textured, raised drips against a natural, neutral base for a modern and playful aesthetic.
Step-by-Step Tutorial
Materials
- Small ceramic or terracotta pot with matching saucer
- Sandpaper (medium grit)
- Clean cloth
- Beige or tan acrylic paint (matte finish)
- White puff paint (dimensional fabric paint) OR thick white glossy acrylic heavy body paint
- White acrylic paint (standard flow)
- Small paintbrush
- Squeeze bottle (optional, if not using puff paint)
- Matte finish sealant spray
- Glossy varnish (brush-on)
Step 1: Preparation and Base Coat
-
Clean surface:
Begin by wiping down your ceramic pot and saucer with a damp cloth to remove any dust or oils. If the pot has a previous glossy finish, lightly sand it with medium grit sandpaper to help the paint adhere. -
Mix base color:
If you don’t have a pre-mixed beige that matches the natural pottery look in the photo, mix a small amount of brown or ochre into white acrylic paint until you achieve a soft, sandy tan color. -
Apply base layer:
Paint the bottom half of the pot and the entire exterior of the saucer with your beige color. Don’t worry about the top rim yet; focus on getting a smooth, opaque coat on the lower section. -
Add texture specs:
To recreate the speckled stoneware look, create a diluted wash of dark brown paint. Dip an old toothbrush into it and run your thumb across the bristles to flick tiny speckles onto the wet beige paint. -
Dry thoroughly:
Allow the base coat and speckles to dry completely. This creates the foundation for your ‘icing’ layer.
Gravity Is Your Friend
Turn the pot upside down while the thick paint is wet to control the speed of the drip. Flip it right-side up briefly to let drips fall, then invert again to freeze them in place.
Step 2: Creating the Drip Effect
-
Paint the rim:
Using standard white acrylic paint, cover the top 1-2 inches of the pot’s exterior and the inside rim. This acts as a background for the drips. -
Prepare the dimensional paint:
The key to this look is volume. If you aren’t using pre-bottled puff paint, mix heavy body white acrylic with a thickening medium and load it into a squeeze bottle. -
Start the drips:
Place the nozzle against the painted white section on the side of the pot. Squeeze gently to release a bead of paint and let gravity pull it down slightly. -
Vary the lengths:
Continue creating drips around the circumference. Make some drips long and heavy, reaching halfway down the pot, and others short and subtle for a natural, organic look. -
Connect the top:
After establishing your vertical drips, fill in the space between the drips and the top rim with more thick white paint so it looks like a continuous pour. -
Clean the transitions:
If the bottom of a drip looks too sharp or pointy, use a small, dry brush to gently round it out while the paint is still wet, mimicking liquid glaze. -
Do the saucer:
Though subtle, you can add a tiny rim of white to the edge of the saucer to tie the set together, though the main focus should remain on the pot itself.
Make It Sprinkle
Before the white ‘icing’ paint dries, gently press real rainbow sprinkles or small colorful beads into the wet paint for a fun, confetti-cake birthday theme.
Step 3: Finishing Touches
-
Long drying time:
Because the white ‘icing’ layer is thick, it will take significantly longer to dry than standard paint. Leave it undisturbed for at least 24 hours. -
Seal the base:
Once dry, mask off the white top section with paper. Spray the beige bottom section with a matte sealant to protect the paint without adding unwanted shine. -
Gloss the icing:
To make the white drips look like wet ceramic glaze or sweet icing, brush a high-gloss varnish carefully over just the white sections. -
Final inspection:
Check for any gaps in the gloss coat. A second coat of varnish often helps achieve that super-shiny, wet look shown in the photo. -
Planting:
Once fully cured, pot your favorite succulent directly simply place a nursery pot inside to keep the interior clean.
This charming pot is now ready to add a sweet touch to your windowsill garden
Face Planter With Plant “Hair”
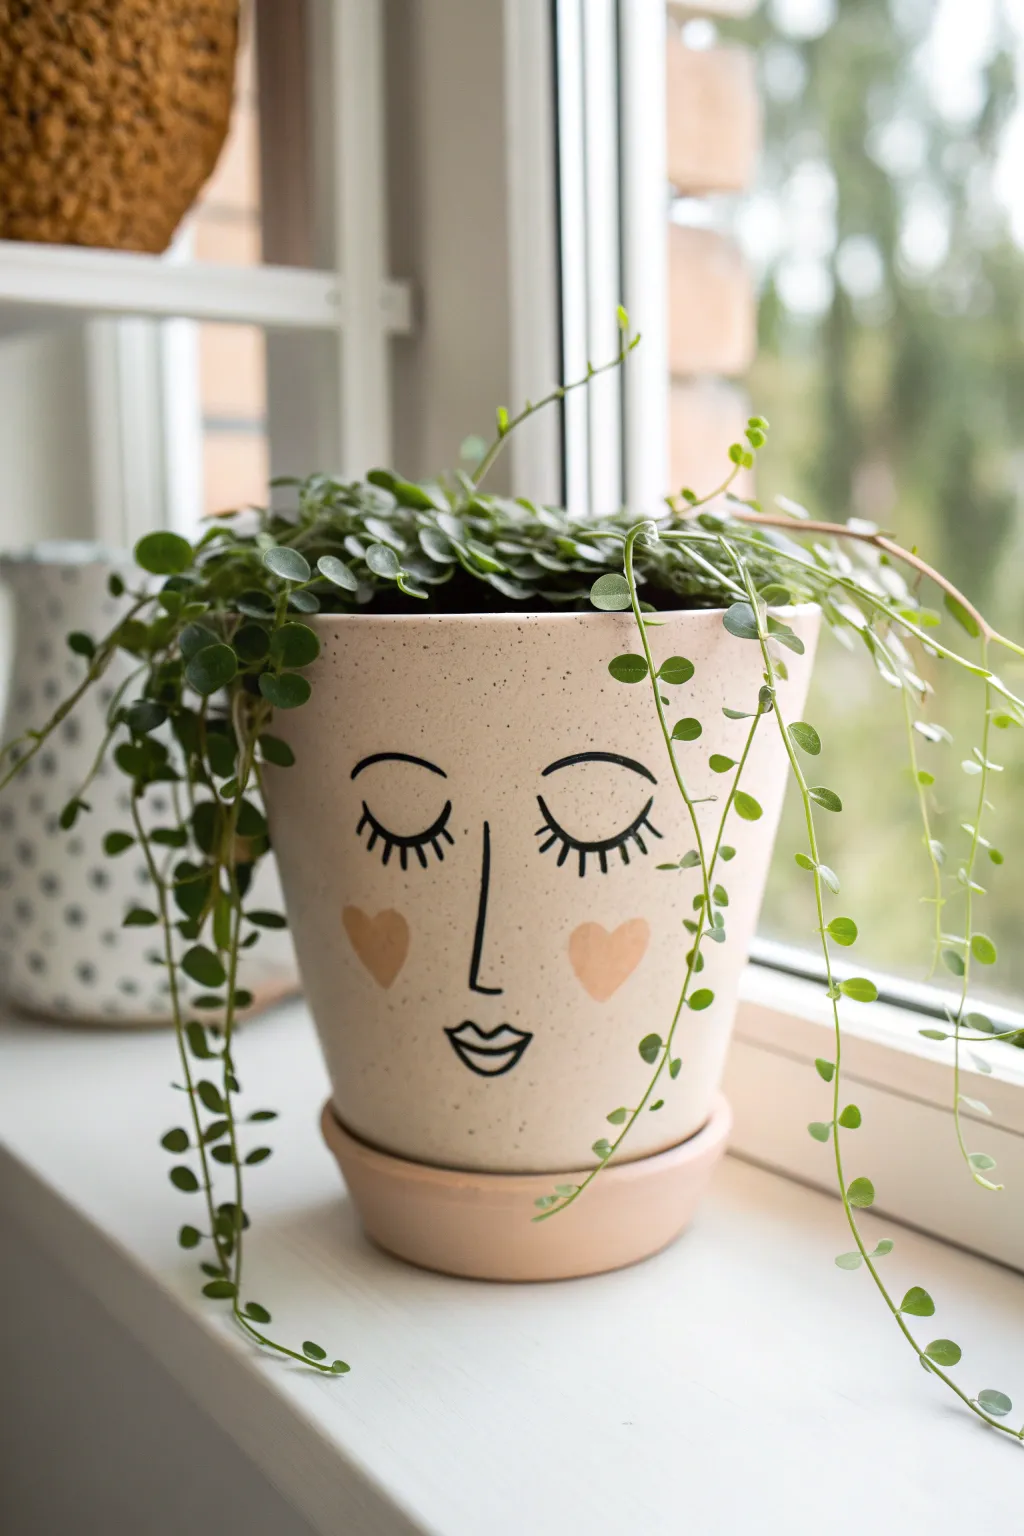
Transform a plain pot into a whimsical character with just a few simple brushstrokes. This project uses minimalist line art and trailing greenery to create a serene, sleeping face that adds personality to any windowsill.
Step-by-Step Guide
Materials
- Terracotta pot and matching saucer
- Light beige or pale pink acrylic paint (matte finish)
- Black acrylic paint or black medium-point paint marker
- Soft pink and/or peach acrylic paint (for cheeks)
- Small flat brush (approx. 1/2 inch)
- Fine detail brush or liner brush (size 0 or 00)
- Pencil and eraser
- Matte spray sealer or Mod Podge
- Small round sponge dabber (optional)
Step 1: Base Preparation
-
Clean surface:
Begin by wiping down your terracotta pot with a damp cloth to remove any dust or oils. Let it dry completely so the paint adheres properly. -
Mix base color:
Mix white acrylic paint with a tiny drop of brown and a hint of pink to create a creamy, skin-tone base like the one shown. You want a warm, oatmeal-like shade. -
First coat:
Apply the base color to the entire exterior of the pot and the rim using the small flat brush. Don’t forget to paint the outer edge of the saucer as well. -
Let dry:
Allow the first coat to dry for about 20-30 minutes. Terracotta absorbs paint quickly, so it might dry faster. -
Second coat:
Apply a second layer of the base color to ensure full, opaque coverage. If you want a speckled pottery look, you can gently flick a toothbrush loaded with slightly darker beige paint over the wet second coat, though plain is lovely too.
Step 2: Drawing the Features
-
Sketch placement:
Once the paint is bone dry, lightly sketch the face features with a pencil. I usually start by marking the center for the nose to keep everything symmetrical. -
Draft the eyes:
Draw two downward-curving crescents for the closed eyelids. Place them about a third of the way down from the rim. -
Add details:
Sketch the dramatic eyelashes extending downward from the lids, a simple ‘L’ shape for the long nose, and small outlined lips below the nose. -
Cheek placement:
Draw faint outlines for two heart shapes on the cheeks. Position them slightly lower than the nose tip for a cute, flushed look.
Uneven Lines?
If your hand shakes while painting thin black lines, steady your pinky finger against the dry surface of the pot as an anchor while you paint.
Step 3: Painting the Design
-
Paint the cheeks:
Start with the cheeks to avoid smudging black ink later. Use a soft pink or peach paint to fill in the heart shapes. A small round brush works best here. -
Outline the eyelids:
Using your fine detail brush and black paint (or a paint marker for better control), carefully trace over the eyelid curves. Keep the pressure steady for a smooth line. -
Lash details:
Paint the eyelashes using quick, confident flicks. Make the center lashes slightly longer than the ones on the sides. -
Nose and mouth:
Trace the long vertical line of the nose, stopping just above the lips. Then, carefully outline the lips with black, leaving the inside the base color. -
Clean up:
If you made any pencil marks that are still visible, wait until the paint is absoluteley 100% dry, then gently erase them.
Pottery Texture Trick
To mimic the speckled ceramic look in the photo, mix a tiny bit of baking soda into your base paint for a gritty, stone-like texture.
Step 4: Finishing Up
-
Sealing:
Protect your artwork by applying a coat of matte spray sealer or brushing on a thin layer of Mod Podge. This step is crucial to prevent water damage when watering your plant. -
Plant selection:
Choose a trailing plant like the String of Turtles (Peperomia prostrata) seen here, or a String of Pearls. These spill over the edge to mimic hair perfectly. -
Potting:
Place your plant into the pot, fluffing the vines so they drape around the painted face to complete the personality.
Now you have a charming new friend to brighten up your desk or windowsill
Pet Silhouettes (Cats, Dogs, Bunnies)
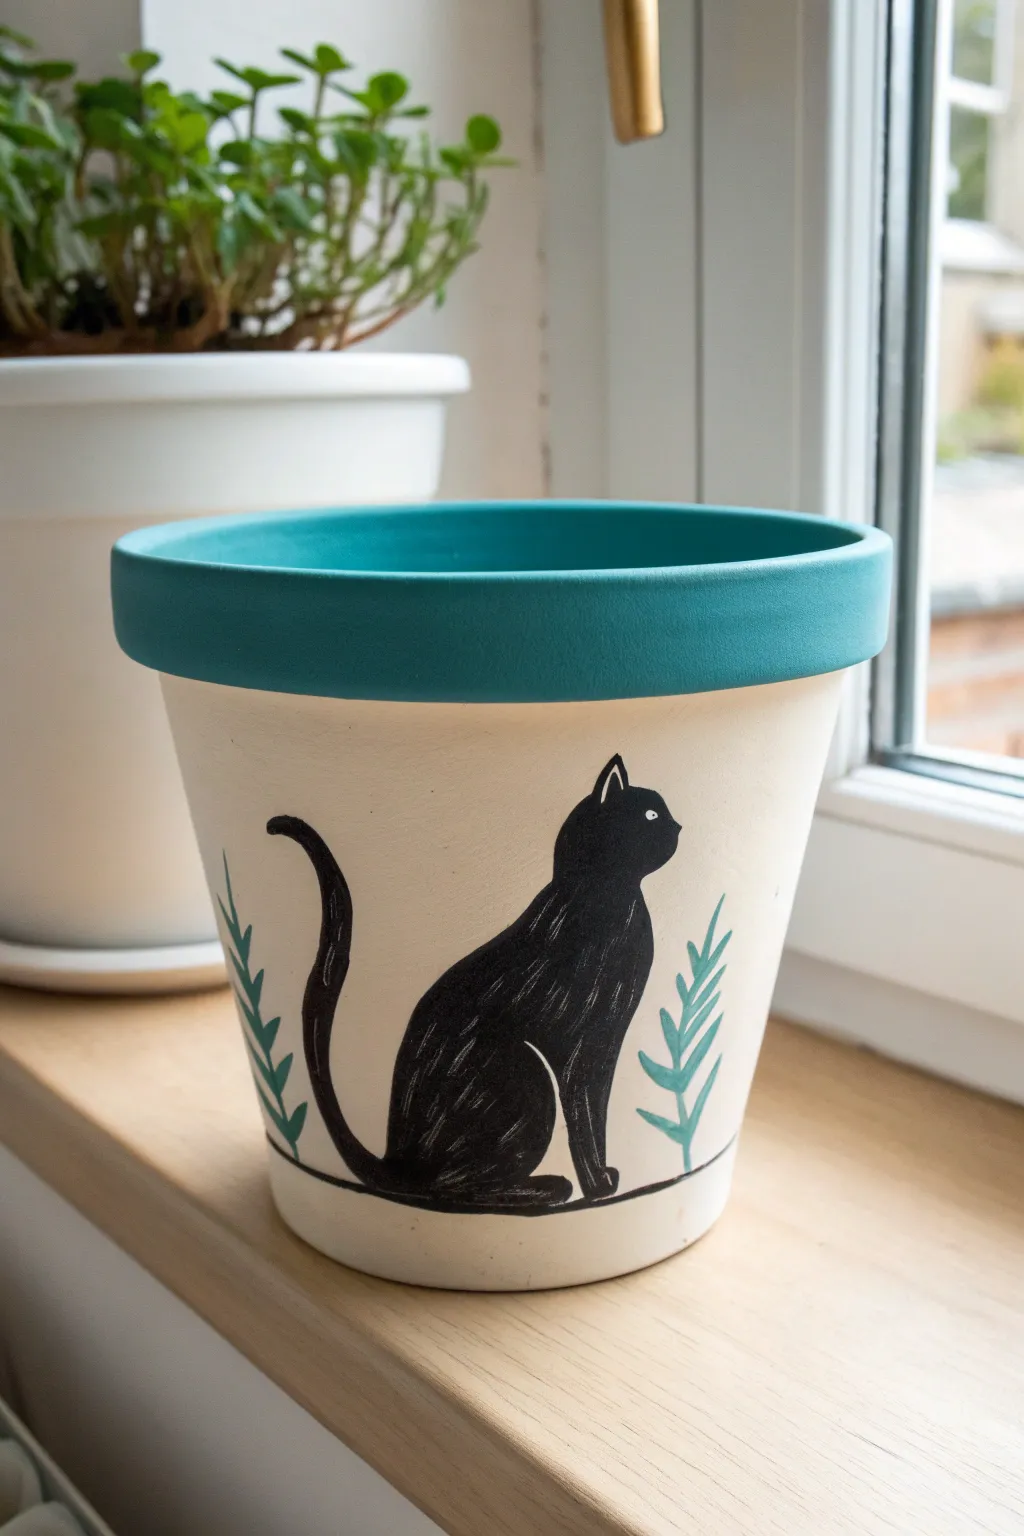
Transform a plain terracotta pot into a charming home for your plants with this elegant black cat design. The contrast between the creamy base, the bold teal rim, and the scratch-art style kitty creates a modern yet playful look perfect for any windowsill.
How-To Guide
Materials
- Terra cotta pot (standard size)
- White or cream acrylic paint (matte finish)
- Teal or turquoise acrylic paint
- Black acrylic paint
- Black permanent marker or fine liner paint pen
- Medium flat paintbrush
- Small round detail brush
- Pencil
- Eraser
- Acrylic sealer spray (matte or satin)
- Water cup and paper towels
Step 1: Base Preparation
-
Clean the surface:
Before starting, ensure your terracotta pot is completely clean and dry. Wipe away any dust with a damp cloth and let it air dry so the paint adheres properly. -
Apply the base coat:
Using a medium flat brush, paint the entire exterior of the pot (excluding the rim) with your cream or off-white acrylic paint. You don’t need to paint the very bottom. -
Layer for opacity:
Allow the first coat to dry for about 15-20 minutes. Apply a second or even third coat until you have a solid, opaque background where the orange clay doesn’t show through. -
Paint the rim:
Once the body is dry, load your flat brush with teal paint. Carefully paint the thick upper rim of the pot. Don’t forget to paint the top edge and just inside the lip for a clean finish. -
Second rim coat:
Let the first coat of teal dry completely, then apply a second layer to ensure the color is rich and vibrant against the white base.
Purr-fect Fur Texture
For the scratchy fur effect, try using a white gel pen over the dried black paint instead of wet paint. It gives you more control over the fine lines.
Step 2: Drafting the Design
-
Sketch the ground line:
Using a pencil very lightly, draw a thin horizontal line near the bottom of the pot. This will serve as the ground for your cat to sit on. -
Outline the cat:
Lightly sketch the silhouette of a sitting cat. Start with an oval for the body, a smaller circle for the head, and triangular ears. Add a long, curved tail swooping up to the left. -
Add floral accents:
Sketch two simple leafy stems on either side of the cat. Draw a central curved line for the stem and small V-shapes for the leaves. -
Refine the sketch:
Take a moment to adjust your pencil lines. Make sure the cat’s posture looks natural and the composition feels balanced between the two leafy sprigs.
Step 3: Painting the Silhouette
-
Fill in the cat:
Use your small round brush and black acrylic paint to carefully fill in the cat shape. Start by outlining your pencil marks, then work your way inward. -
Add texture details:
While the black paint is wet (or dry, if using a white pen later), you can create the scratch-texture look. I like to use a very fine, dry brush with a tiny bit of white or grey to add faint streaks on the fur, or scratch through wet paint with a toothpick. -
Paint the ground line:
Carefully trace over your pencil ground line with the black paint. Keep this line thin and organic-looking rather than perfectly straight. -
Paint the leaves:
Clean your small brush thoroughly. Pick up some of the teal paint you used for the rim and carefully paint the leafy stems on either side of the cat. -
Add the eye:
Dip the non-brush end of a paintbrush into white paint and dot it onto the cat’s face to create the eye. Let it dry, then add a tiny black dot in the center for the pupil. -
Define the ears:
Use a white paint pen or a very fine brush with white paint to outline the inner triangles of the ears, giving them definition. -
Clean up:
Once everything is dry, use an eraser to gently remove any visible pencil marks that weren’t covered by paint.
Make It Yours
Personalize the pot by painting the silhouette of your actual pet. Adjust the ear shape for a dog or add long ears for a bunny.
Step 4: Finishing Touches
-
Seal the artwork:
Take the pot to a well-ventilated area. Spray the entire exterior with a matte or satin acrylic sealer. This protects your artwork from water damage when you water your plants. -
Let it cure:
Allow the sealer to cure for at least 24 hours before filling the pot with soil and adding your favorite plant.
Now you have a beautifully customized planter ready to add a touch of personality to your indoor garden
Farm Animal Pot Characters
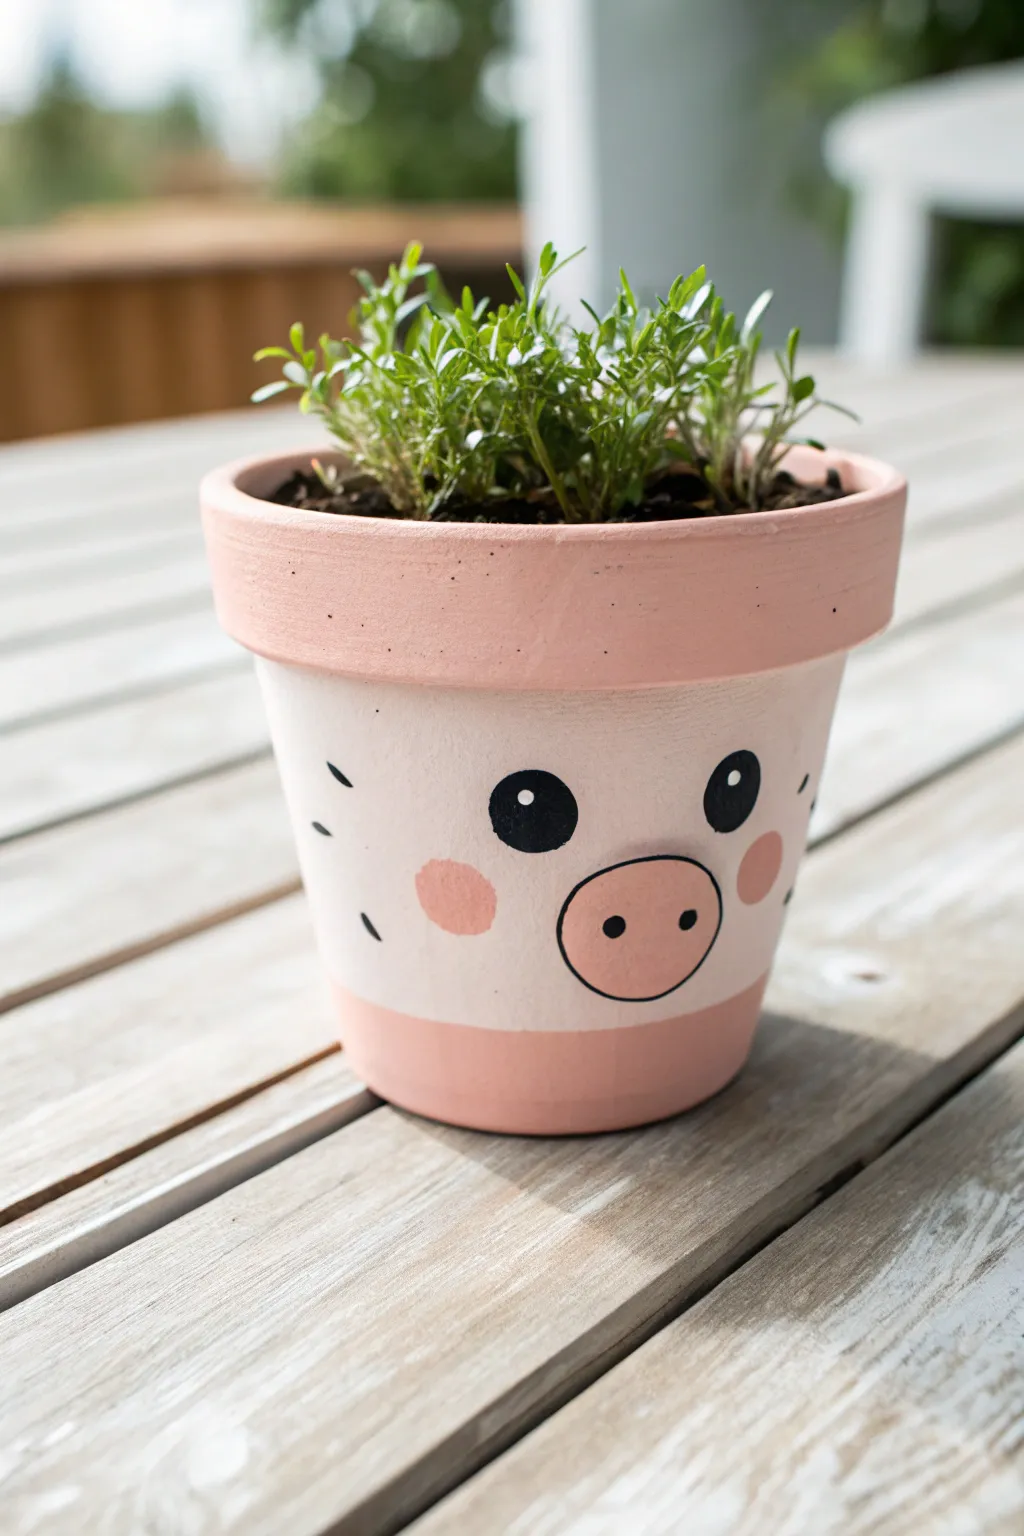
Transform a standard terracotta planter into a charming farmyard friend with this delightful pig design. The soft pink tones and wide-eyed expression make this pot an adorable home for low-growing herbs or flowers.
Step-by-Step Tutorial
Materials
- Standard terracotta pot (clean and dry)
- Acrylic craft paints: light pink, medium pink (salmon), dark pink (dusty rose), black, white
- Wide flat paintbrush (approx. 1 inch)
- Medium round paintbrush
- Fine detail paintbrush (sizes 0 or 1)
- Pencil for sketching
- Water cup and paper towels
- Clear matte sealer/varnish spray
Step 1: Base Coat and Blocking
-
Prepare the surface:
Ensure your terracotta pot is completely clean and dry. Wipe away any dust with a slightly damp cloth and let it air dry for a few minutes before starting. -
Mix the perfect piggy pink:
On your palette, prepare your main body color. If you don’t have a very pale pink, mix a tiny drop of salmon pink into a large dollop of white. You want a very soft, pastel hue. -
Paint the central band:
Using the wide flat brush, paint the middle section of the pot with your pale pink mixture. Leave the rim and the very bottom base unpainted for now. -
Apply a second coat:
Terracotta is porous and drinks up paint. Once the first layer is touch-dry, apply a second coat of pale pink to get solid, opaque coverage. -
Paint the rim:
Switch to your medium pink (salmon) color. Use the flat brush to paint the entire rim of the pot. Carefully follow the groove where the rim meets the body for a clean line. -
Paint the base:
Using the dark pink (dusty rose) shade, paint the bottom inch or so of the pot. I often use masking tape here to get a perfectly straight horizontal line, but freehand works if you have a steady hand.
Paint Soaking In?
If the terracotta absorbs the paint too fast, making it look streaky, apply a base coat of white acrylic or gesso first. This seals the clay and makes the pink pop.
Step 2: Adding the Face Details
-
Sketch the features:
Once all base layers are fully dry, lightly use a pencil to sketch the pig’s face. Draw two circles for eyes, an oval for the nose, and two cheek circles. -
Paint the nose shape:
Fill in the nose oval using the medium pink (salmon) color—the same shade you used for the rim. Use the round brush for smooth edges. -
Add rosy cheeks:
Using the same medium pink (salmon), fill in the two cheek circles on either side of the face. -
Paint the eyes:
Dip your medium round brush into black acrylic paint. Carefully fill in the two large eye circles. Take your time to keep them round. -
Outline the nose:
Switch to your fine detail brush. Load it with black paint and carefully outline the pink nose oval. A thin, consistent line looks best here. -
Add nostrils:
Using the handle end of a paintbrush is a great trick here. Dip the end of the handle in black paint and dot two nostrils onto the pink nose. -
Add eye highlights:
Clean the brush handle or use a smaller tool. Dip it into white paint and place a small dot in the upper right quadrant of each black eye. This brings the character to life. -
Add whimsical dashes:
Using the fine detail brush and black paint, add three small floating dashes on the left and right sides of the face, just outside the cheeks.
Step 3: Finishing Touches
-
Clean up lines:
Look over your work. If any pink paint smudged onto the rim or base, use the appropriate color to touch up the edges. -
Seal the pot:
Once the paint is completely cured (wait at least a few hours), spray the entire pot with a clear matte sealer. This protects the paint from water damage when you water your plant.
Make it a Set
Create a barnyard trio by painting a cow pattern on a second pot and a yellow chick face on a third. Vary the pot sizes for visual interest.
Now your piggy pot is ready to be filled with soil and your favorite greenery
Celestial Night Sky With Starbursts
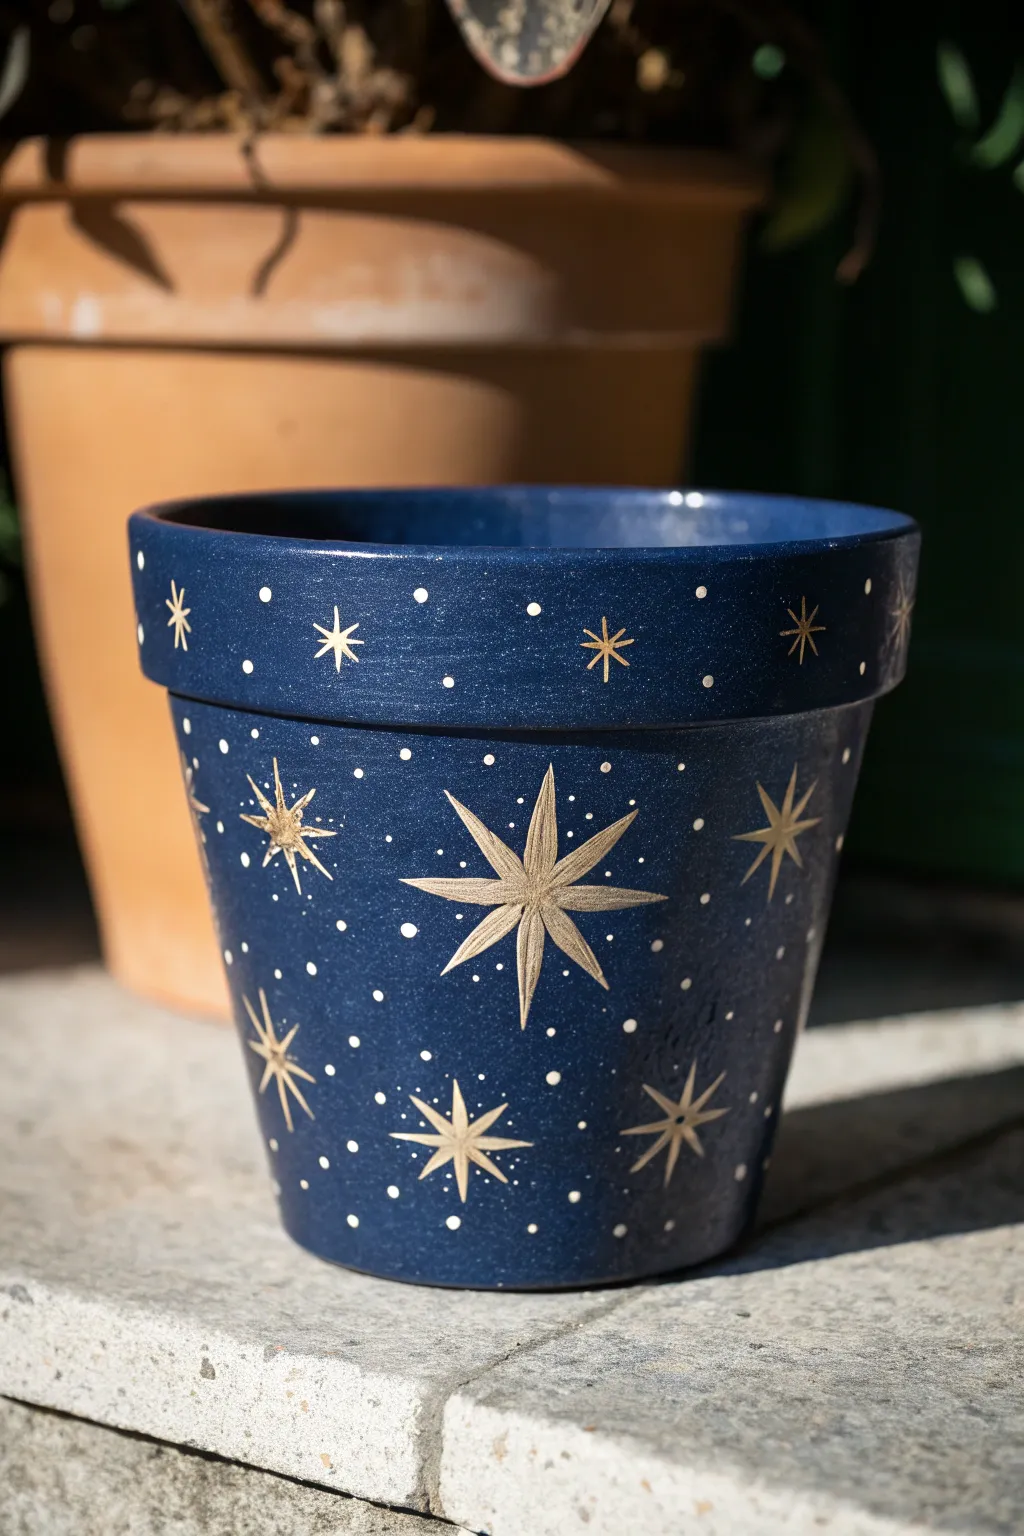
Transform an ordinary terracotta pot into a piece of the cosmos with this elegant celestial design. The deep midnight blue background contrasts beautifully with shimmering gold starbursts and delicate white speckles to mimic a starry night.
How-To Guide
Materials
- Terracotta plant pot (cleaned and dried)
- Deep blue acrylic paint (navy or midnight blue)
- Metallic gold acrylic paint
- White acrylic paint
- Large flat paintbrush for the base coat
- Fine detail paintbrush (size 0 or 00)
- Small dotting tool or toothpick
- Matte or satin waterproof spray sealer
- Palette or paper plate
- Cup of water and paper towels
Step 1: Preparing the Canvas
-
Clean the surface:
Ensure your terracotta pot is completely free of dust and dirt. Wipe it down with a damp cloth and let it dry fully before starting; moisture can prevent the paint from adhering properly. -
Apply the first base coat:
Using a large flat brush, apply a smooth layer of deep navy blue acrylic paint over the entire exterior of the pot, including the rim. Don’t forget to paint the inner rim down about an inch so the soil line is hidden. -
Let it dry:
Allow the first coat to dry completely. Terracotta absorbs paint quickly, so this shouldn’t take too long, but it needs to be dry to the touch. -
Add a second coat:
Apply a second layer of the navy blue paint to achieve a solid, opaque coverage. Brush in the same direction to minimize brushstrokes and create a smooth, velvety finish. -
Dry thoroughly:
Let the base coat dry overnight or for at least a few hours. A completely dry surface is crucial for the fine detail work coming next.
Step 2: Painting the Starbursts
-
Plan your largest stars:
identify where you want your main focal points. I like to start by visualizing the largest eight-pointed starbursts spaced irregularly around the middle band of the pot. -
Create the central cross:
Dip your fine detail brush into the metallic gold paint. For the large stars, paint a long, thin vertical line crossed by a horizontal line of the same length to create a plus sign. -
Add diagonal rays:
Paint a smaller ‘X’ through the center of your plus sign. These diagonal lines should be shorter than the main vertical and horizontal lines. -
Shape the points:
Carefully thicken the center of the lines where they meet and taper them out to sharp points at the ends. This gives the starburst its distinctive flair. -
Add medium stars:
Around the large starbursts, paint smaller, six-pointed stars. Create these by painting a simple vertical line crossed by an ‘X’. -
Shoulder details:
Move to the rim of the pot. Paint smaller, simplified stars along the band. An alternating pattern of small six-pointed stars and simple four-pointed crosses creates a nice rhythm. -
Fill empty spaces:
Look for large gaps in your design on the main body of the pot. Add tiny four-pointed stars (just a simple cross) to fill these voids without overcrowding the design.
Wobbly Lines?
If your star lines aren’t sharp, wait for the gold to dry fully. Then, use the navy base color and a detail brush to carefully “erase” and reshape the edges back to a point.
Step 3: Adding the Milky Way
-
Prepare the dots:
Dip a dotting tool, the wrong end of a paintbrush, or a toothpick into white acrylic paint. You want a very small amount of paint. -
Add large distant stars:
Place random white dots in the negative space between your gold starbursts. Press gently to create slightly larger, distinct circles. -
Create the starry dust:
Using a toothpick or a very fine tool, add tiny speckles of white. Grouping some closer together can simulate the dense look of the Milky Way. -
Detail the rim:
Continue the dot pattern onto the rim of the pot, placing white dots between the gold rim stars to tie the whole look together. -
Check balance:
Step back and look at the pot from a distance. If an area looks too dark, add a few more white specks or a tiny gold cross to balance the composition. -
Seal the artwork:
Once all paint is perfectly dry (give it 24 hours to be safe), take the pot to a well-ventilated area. Apply two light coats of a clear waterproof spray sealer to protect your painting from water and dirt.
Make It Shimmer
For extra dimension, dab a tiny dot of extra bright gold or even a speck of white right in the very center of your largest starbursts after the first layer dries.
Now you have a stunning, galaxy-themed home for your favorite green plant
Galaxy Swirls With Layered Sponging
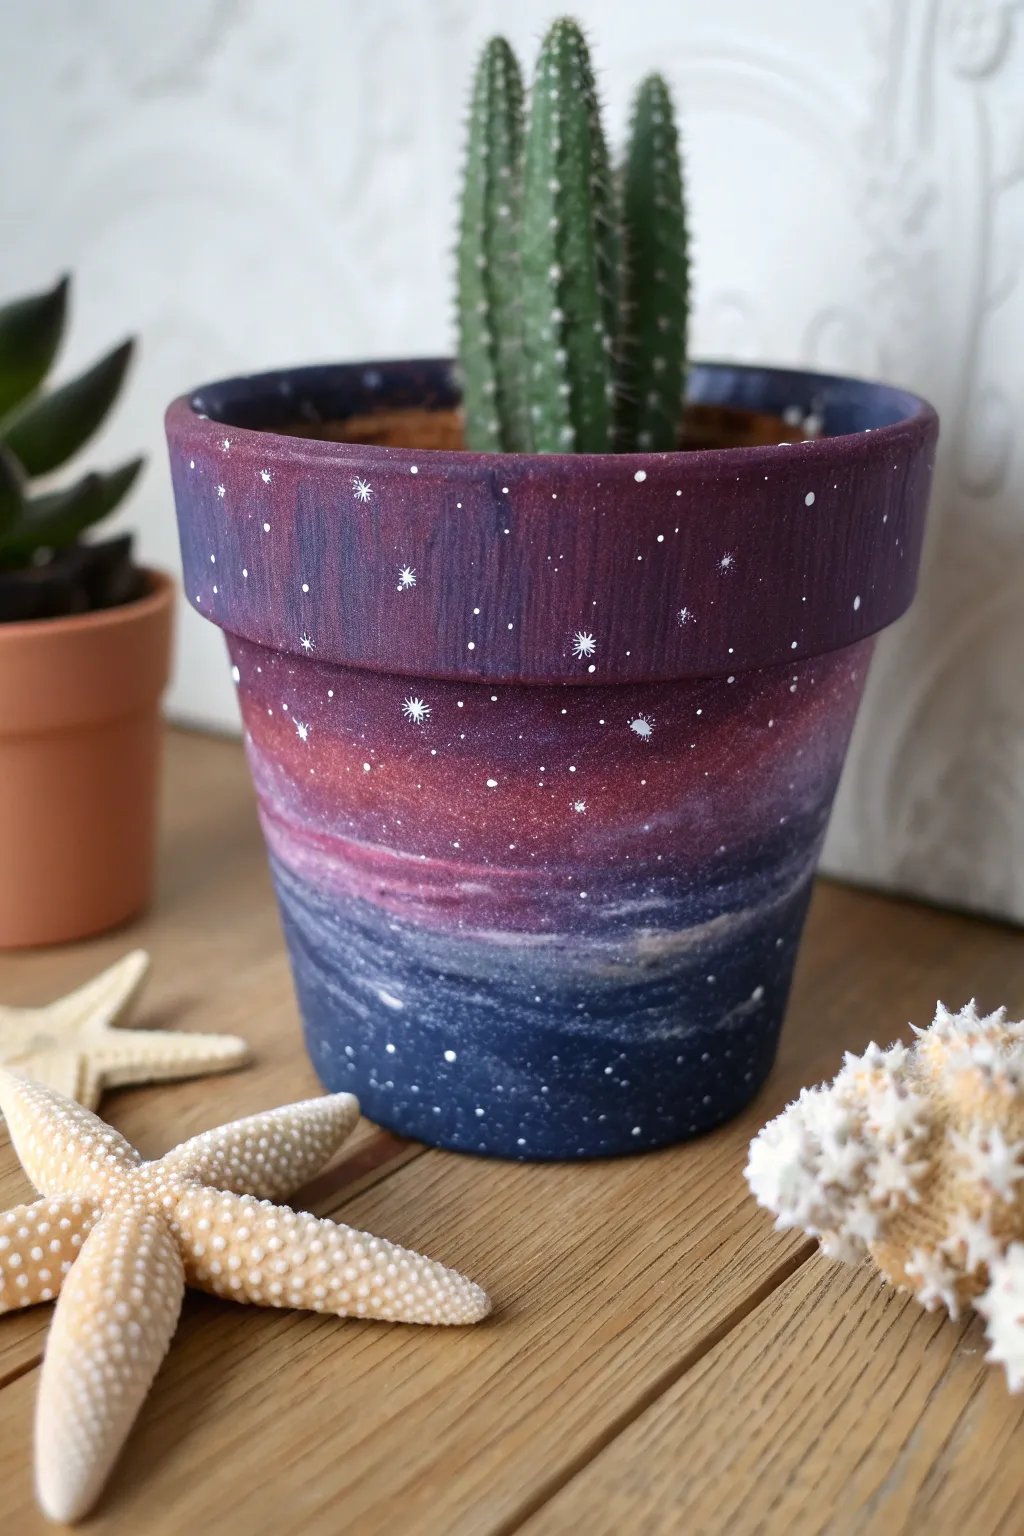
Transform a plain terracotta vessel into a piece of the cosmos with this layered sponging technique. By blending deep violets, indigos, and hints of cosmic red, you’ll create a dreamy, starlit backdrop for your favorite cactus or succulent.
Step-by-Step
Materials
- Terracotta pot (clean and dry)
- Acrylic craft paints (black, navy blue, deep purple, violet, magenta/crimson, white)
- Small kitchen sponge or cosmetic sponge wedges
- Small flat paintbrush
- Fine detail paintbrush or toothpick
- Palette or paper plate
- Water cup and paper towels
- Clear acrylic sealer spray (matte or gloss)
Step 1: Setting the Background
-
Prep the surface:
Ensure your terracotta pot is completely free of dust and dirt. If it’s an old pot, scrub it well and let it dry fully before starting. -
Base coat application:
Using a flat paintbrush, apply a solid coat of black acrylic paint to the entire exterior of the pot, including the top rim and just inside the lip. -
Second coat coverage:
Let the first layer dry for about 15-20 minutes. If the terracotta orange is still peeking through, apply a second coat of black for a true deep space foundation. -
Prepare the sponges:
While the base dries, cut your sponge into small, manageable pieces about the size of a large coin. You will need a fresh piece for each main color family.
Muddy Colors?
If your galaxy looks brown or muddy, you are blending wet paint too much. Let layers dry completely between colors to keep the hues vibrant and distinct.
Step 2: Layering the Galaxy
-
Start with deep blue:
Pour a small amount of navy blue paint onto your palette. Dampen a sponge piece slightly (squeeze out all excess water) and dab it into the paint. -
Sponge the bottom:
Gently sponge the navy blue around the bottom third of the pot. Don’t create a solid line; use a dabbing motion to create a clouded, irregular edge that fades upward. -
Introduce purple tones:
Using a fresh sponge piece, pick up the deep purple paint. Dab this around the upper rim and the top section of the pot’s body, letting it extend downwards. -
Create the middle nebula:
Load a sponge with the magenta or crimson red. Dab this color primarily in the middle band of the pot, where the blue and purple sections meet. -
Blend the transitions:
While the paints are still tacky, use a mostly dry sponge to lightly tap over the areas where colors overlap. This soft mixing is crucial for that authentic, gas-cloud look. -
Add highlights:
Where the red meets the blue or purple, lightly dab a tiny amount of violet or lighter pink to create depth and dimension within the nebula cloud. -
Rim detailing:
Don’t forget the heavy rim of the pot. Carry the deep purple and navy mixture up and over the edge so the design looks seamless from above. -
Dry and assess:
Step back and look at your galaxy. If it looks too dark, sponge on brighter layers of pink or violet once the bottom layers are dry. I find that building up 2-3 thin layers creates the best depth.
Pro Tip: Depth
Mix a tiny drop of white into your violet or blue for the final layer of sponging. These lighter patches create the illusion of illuminated gas clouds.
Step 3: Adding the Stars
-
Create distant stars:
Dip an old toothbrush or a stiff bristled brush into watered-down white paint. Run your thumb over the bristles to flick tiny specks of white mist across the pot for distant star clusters. -
paint specific stars:
Using your finest detail brush or a toothpick, dip into pure white paint and place distinct dots randomly around the pot. -
Make starbursts:
Choose a few of the larger white dots to turn into twinkling stars. Paint a tiny cross (+) over the dot, then add an even smaller diagonally crossed X over that to create an 8-point flare. -
Cluster check:
Add a few clusters of tiny dots near the ‘brightest’ parts of your nebula (the pink/red areas) to simulate star formation zones. -
Seal the deal:
Allow the pot to dry completely, preferably overnight. Finish with a coat of clear acrylic sealer to protect your paint from water damage when you water your plant.
Pop in a spiky cactus to complete this interstellar look and enjoy your new piece of decor
Marbled Dip Effects for Instant Abstract Drama
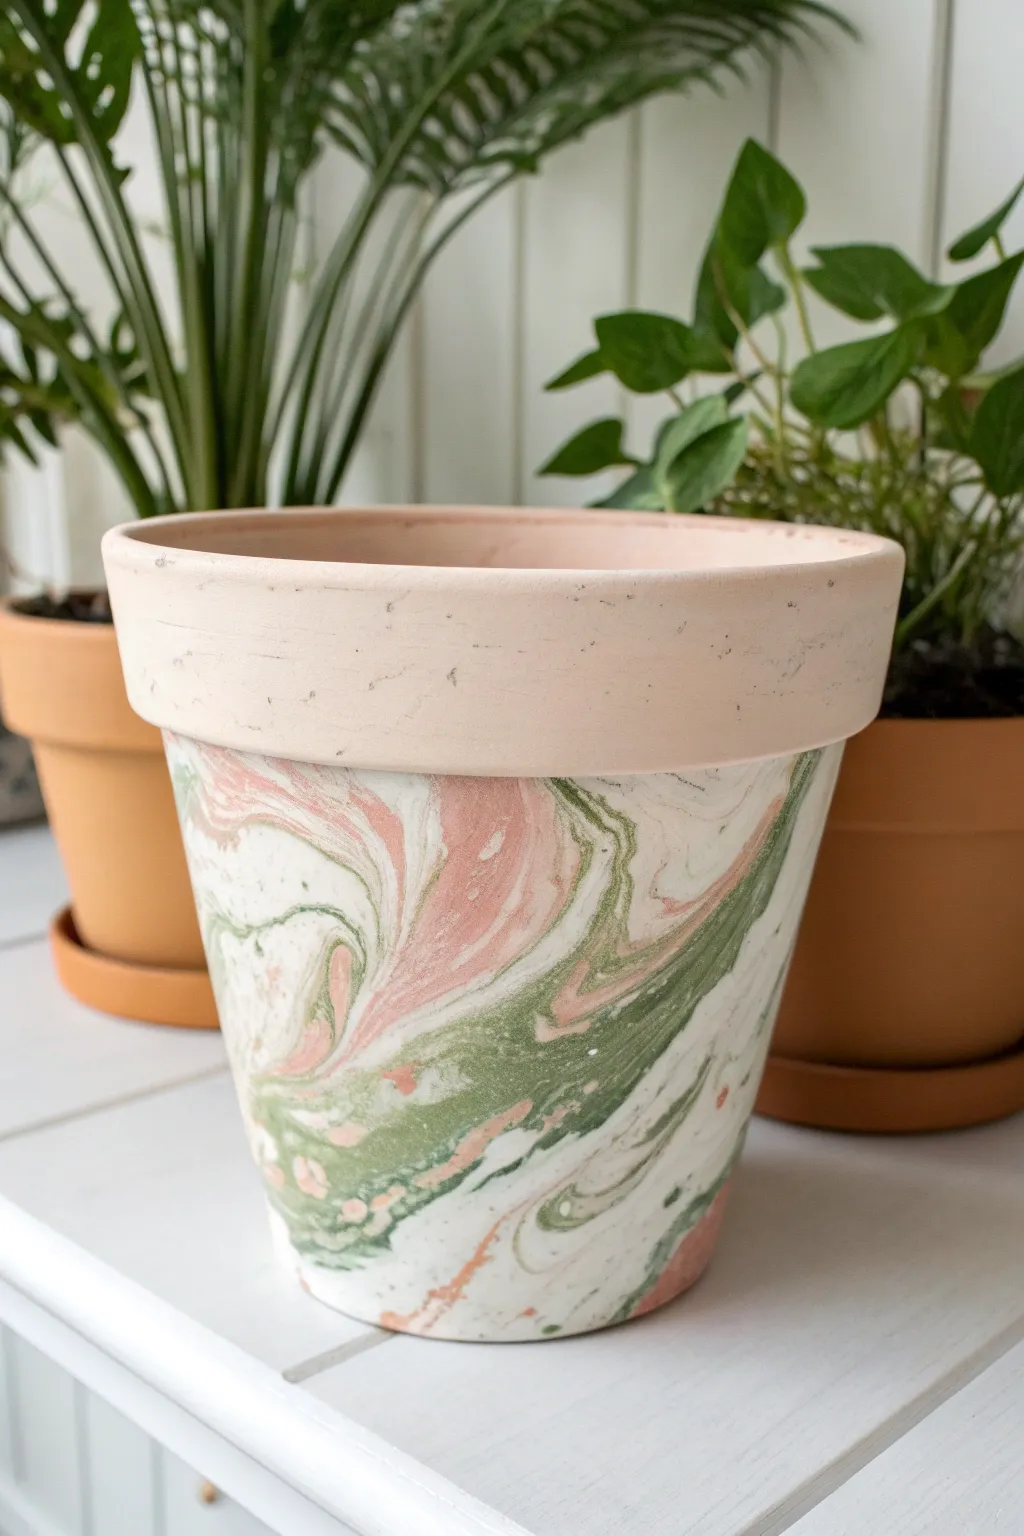
Transform a plain terracotta pot into a swirling masterpiece of sage greens, rusty pinks, and creamy whites using a mesmerizing fluid art technique. This marbled dip effect creates instant abstract drama that looks sophisticated but is surprisingly simple to achieve.
Step-by-Step Tutorial
Materials
- Standard terracotta pot (clean and dry)
- Acrylic paints (White, Sage Green, and Terracotta/Salmon Pink)
- Pouring medium
- Painter’s tape
- Plastic cups (one for mixing each color, one for the pour)
- Craft sticks for stirring
- Large plastic bin or cardboard box (to catch drips)
- Small jars or cups (to prop up the pot)
- Clear acrylic sealer spray (matte or satin)
- Water
Step 1: Preparation
-
Clean surface:
Begin by wiping down your terracotta pot with a damp cloth to remove any dust or debris, ensuring a clean surface for the paint to adhere to. -
Tape the rim:
If you want to keep the rim distinct as shown in the photo, apply painter’s tape just below the rim’s lip. Press it down firmly to create a sharp seal where the marbling will stop. -
Prop it up:
Set up your drying station inside a bin or box. Place small jars or overturned cups in the center to elevate the pot, allowing excess paint to drip off freely without pooling at the base.
Step 2: Mixing the Paints
-
Prepare individual colors:
In separate cups, mix your acrylic paints with the pouring medium. A standard ratio is 1 part paint to 1 part medium, but check your bottle’s instructions. -
Adjust consistency:
Stir the mixtures thoroughly. You are looking for a consistency similar to warm honey—it should flow off the stick in a continuous stream but not be as thin as water. -
Add water if needed:
If the paint feels too thick, add a few drops of water at a time, stirring constantly until the fluidity feels right. -
Create the dirty pour cup:
Take a clean, empty cup. Pour a substantial amount of white paint into the bottom as your base. -
Layer the colors:
Does not stir! Gently pour a bit of the sage green into the center of the white, followed by the salmon pink. Repeat this layering process until the cup is full enough to cover the pot surface.
Clean Lines
Burnish the edge of your painter’s tape with a credit card or fingernail to prevent paint bleed. This ensures that crisp, professional transition between the rim and the marbled body.
Step 3: The Pour and Finish
-
Invert the pot:
Place your pot upside down on the raised props in your catch bin. This allows gravity to help create the marbled streaks. -
Start pouring:
Begin pouring the layered paint cup over the bottom (which is currently the top) of the pot. Move your hand in circular motions to distribute the paint. -
Cover the sides:
Let the paint cascade down the sides of the pot. As the colors slide over each other, they will create the beautiful marbling and organic veins seen in the photo. -
Touch ups:
If there are bare patches near the taped rim, you can carefully tilt the pot or use a gloved finger to guide the paint, though I prefer letting gravity do most of the work to keep the pattern natural. -
Wait for the drip:
Allow the pot to sit undisturbed for at least 20 minutes while the excess paint drips off the bottom rim. -
Remove tape:
Carefully peel away the painter’s tape while the paint is still slightly tacky, not fully dry, to ensure a crisp line. -
Dry time:
Let the pot dry completely for at least 24 to 48 hours. The thick layers of a poured painting take much longer to cure than standard brushing. -
Seal the deal:
Once fully cured, take the pot outside and apply two light coats of clear acrylic sealer. This protects the design from water damage when you water your plants.
Gold Veining
Mix a small amount of metallic good paint into your dirty pour cup. The metallic pigment will separate slightly, creating stunning, shimmering veins throughout the matte marble pattern.
Once dry and potted up, your new creation will rival any high-end ceramic planter found in a boutique shop


Have a question or want to share your own experience? I'd love to hear from you in the comments below!