A blank tote bag is basically a mini canvas you can actually take out into the world, and it’s one of my favorite low-pressure painting projects. Here are my go-to tote bag painting ideas, starting with the classics and moving into some more playful, artsy experiments.
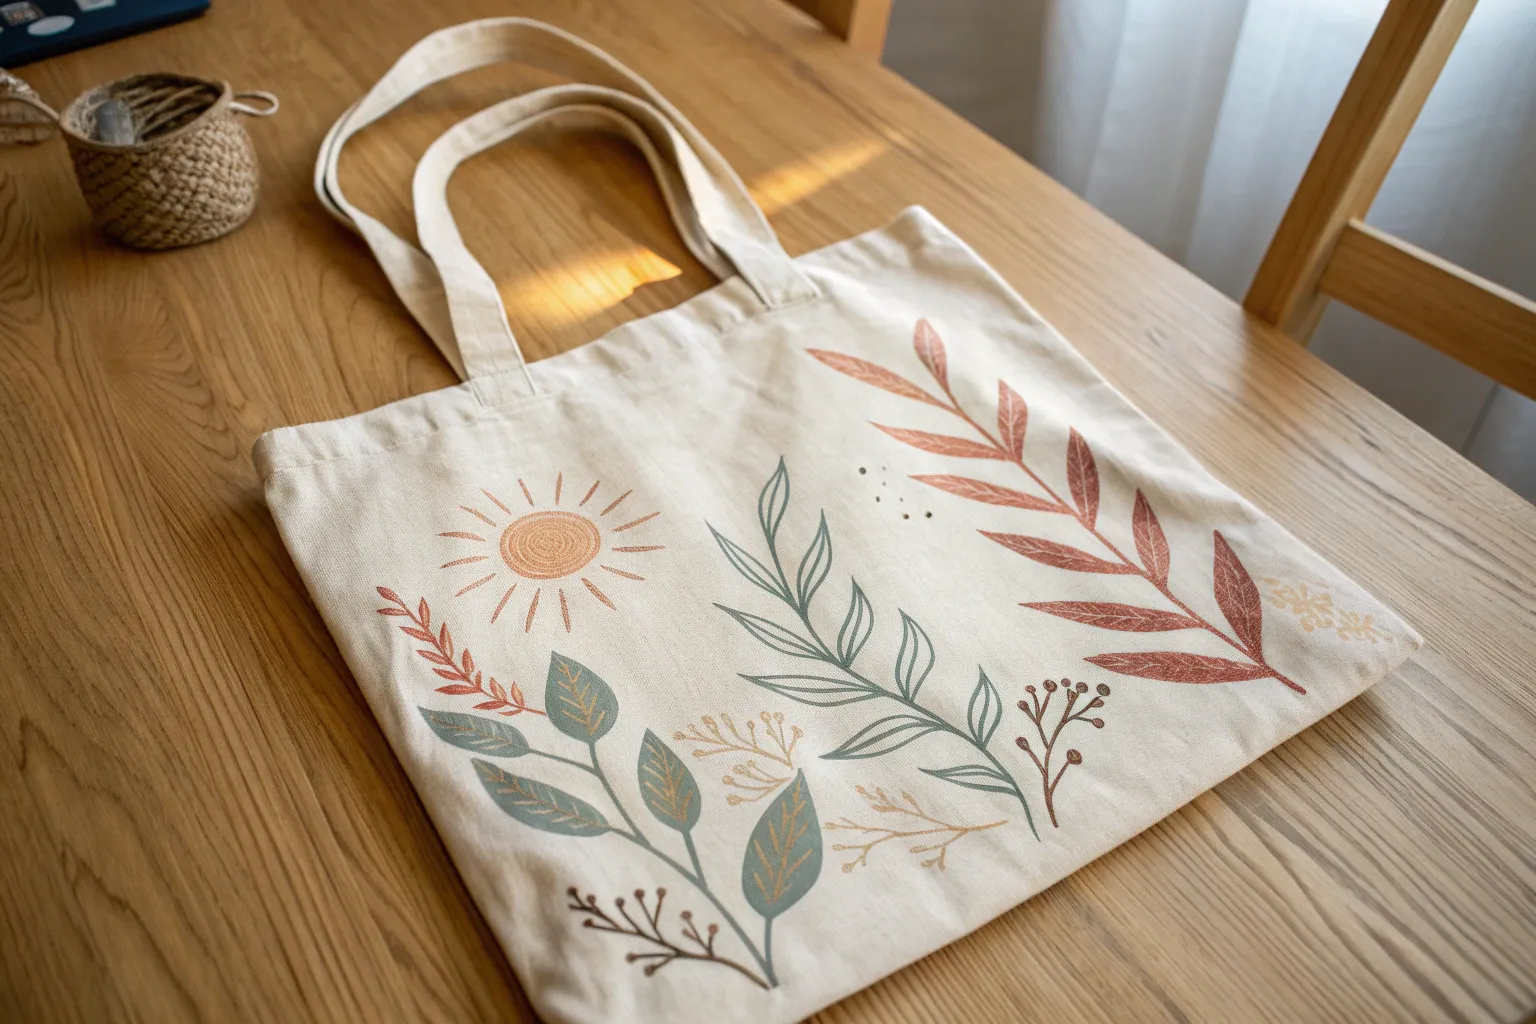
Easy Wildflower Scatter
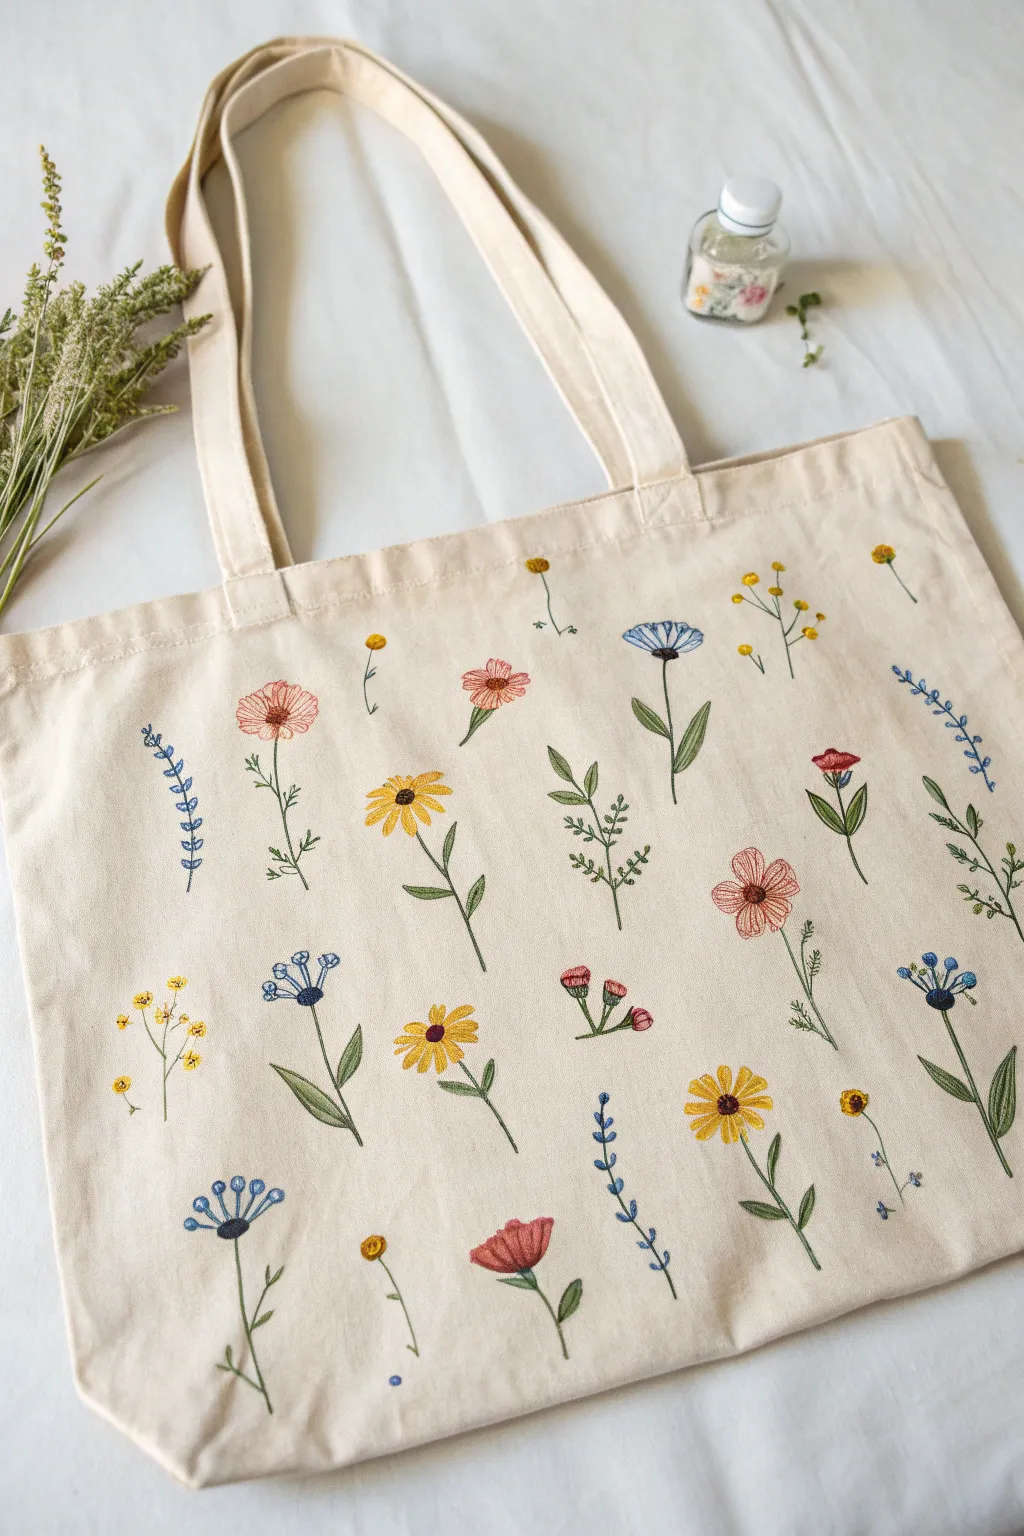
Transform a plain canvas tote into a blooming meadow with this delightful wildflower scatter design. Though often mistaken for paint, this look is achieved through simple embroidery stitches that add wonderful texture and charm to your everyday carry.
Detailed Instructions
Materials
- Plain canvas tote bag (cream or beige)
- Embroidery hoop (8-10 inch)
- Embroidery floss in assorted colors (yellow, rusted orange, blue, sage green, forest green, red)
- Embroidery needles (sizes 5-9)
- Water-soluble fabric marker or transfer paper
- Scissors
- Iron and ironing board
Step 1: Setting the Stage
-
Prep your canvas:
Start by ironing your tote bag thoroughly to remove wrinkles. This ensures a smooth surface for your stitching and prevents puckering later. -
Sketch the layout:
Using a water-soluble fabric marker, lightly draw the stems of your flowers first. Scatter them randomly across the bag, varying their heights and angles to mimic a natural field. -
Add blossom details:
Draw small circles, ovals, and fan shapes at the tops of your stems to indicate where different flower heads will go. Don’t worry about perfection; sketchy guides are fine. -
Secure the hoop:
Place your embroidery hoop over the first section of flowers you plan to stitch. Ensure the fabric is taut like a drum for the best tension control.
Step 2: Stitching the Greenery
-
Thread selection:
Cut a length of sage green floss and separate it into 3 strands. Thread your needle and knot the end. -
Stem stitch basics:
Use a stem stitch or backstitch to outline the main stalks of your plants. Keep your stitches relatively small (about 1/4 inch) to navigate any slight curves gracefully. -
Leaf details:
For the leaves, switch to a lazy daisy stitch for teardrop shapes, or simple straight stitches for grassy blades. Vary the shades of green between sage and forest green to create depth. -
Vine accents:
For the climbing vine motif (the blue leafy plant on the left), use small, single detached chain stitches in blue or green along a curved stem spine.
Don’t Stitch Through!
Be essentially careful not to stitch through both sides of the tote bag! Keep one hand inside the bag to ensure you are only sewing through the top layer of canvas.
Step 3: Blooming Colors
-
Satin stitch petals:
For the solid red and peach flower petals, use a satin stitch. Fill the drawn shapes with parallel stitches placed closely together for smooth coverage. -
Lazy daisy flowers:
Create the yellow sunflowers and blue cornflowers using lazy daisy stitches radiating from a center point. This creates lovely open petals with slight volume. -
French knot centers:
Fill the centers of your daisies and cone-flowers with French knots. Wrap the thread twice around the needle before pulling through to create a defined, textured bump. -
Fan-shaped blooms:
For the blue thistles or fan-shaped flowers, use straight stitches specifically fanned out from a single base point at the top of the stem. -
Adding tiny buds:
Scatter groups of three French knots in yellow or red near the tips of some stems to represent unopened buds or pollen.
Puckered Fabric?
If the fabric is bunching around your stitches, your tension is too tight. Cut those stitches out and redo them with a looser hand, or use a stabilizer backing.
Step 4: Finishing Touches
-
Check density:
Step back and look at your composition. If there are large empty gaps, add small floating sprigs or single color dots to balance the ‘scatter’ effect. -
Secure the back:
Turn the bag inside out. Weave your loose thread ends under existing stitches on the back to secure them, then trim excess floss. -
Remove markings:
Dab the fabric gently with a damp cloth or sponge to dissolve the blue water-soluble marker lines, revealing your clean design. -
Final press:
Once dry, iron the bag once more, but be careful not to flatten your beautiful textured stitches. I prefer to place a thick towel inside the bag while ironing around the embroidery.
Now you have a charming, reusable accessory that brings a touch of spring wherever you go


Leafy Vine Border Frame
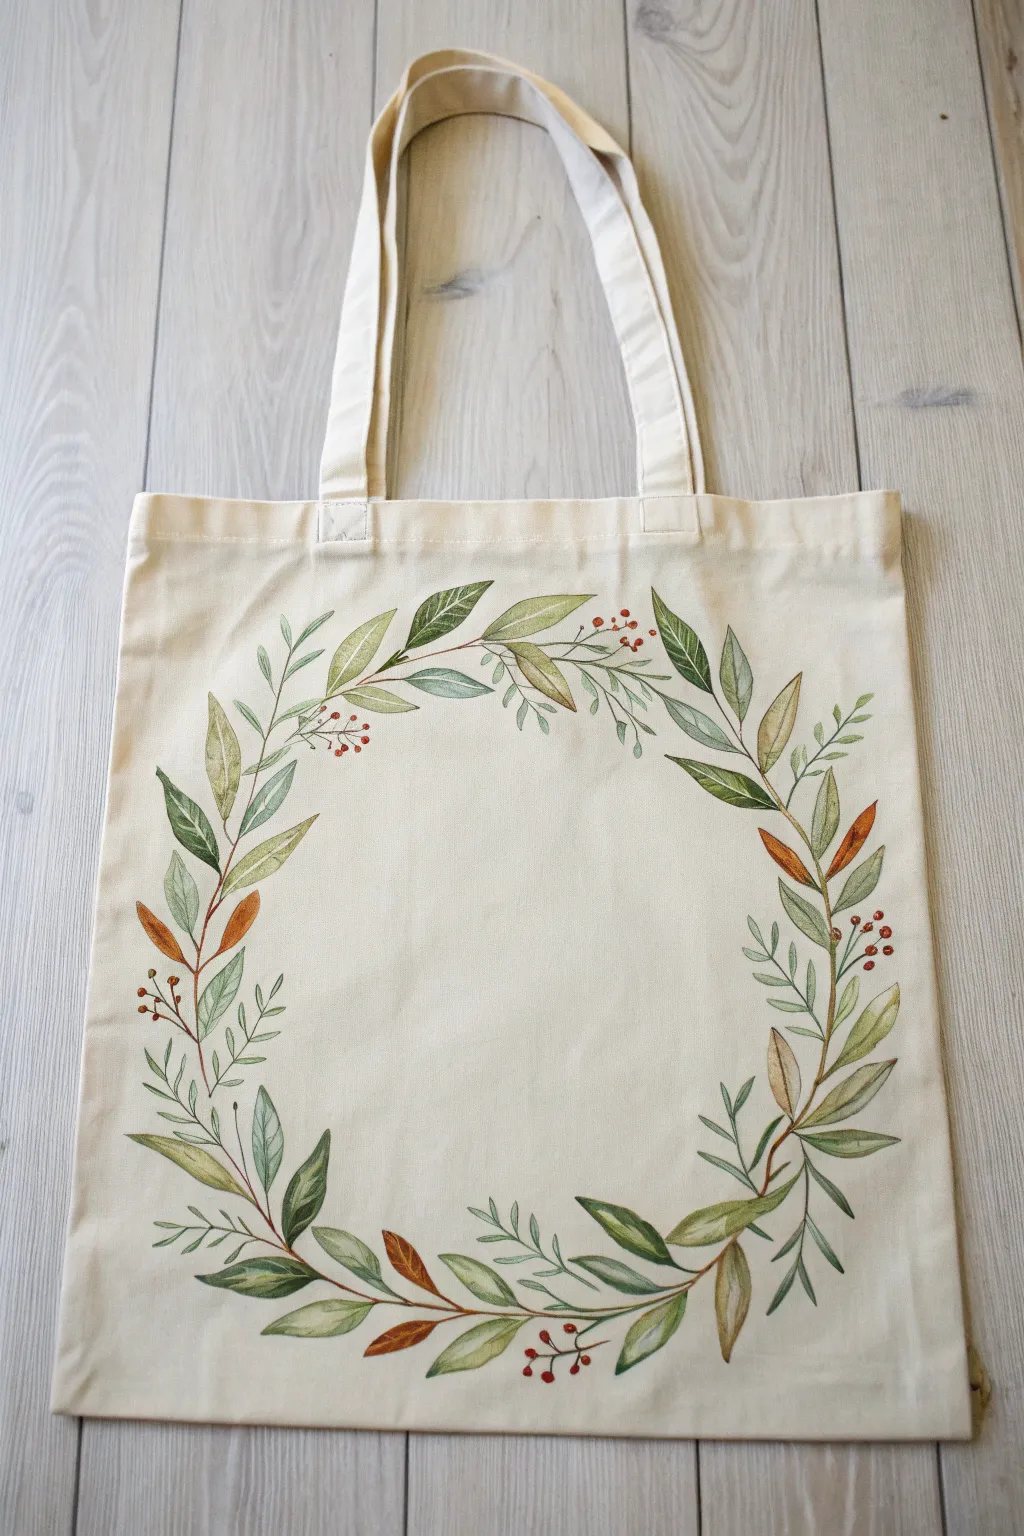
Transform a plain canvas tote into a wearable piece of art with this delicate, nature-inspired wreath design. Using fabric painting mediums, you’ll create a soft, watercolor-like finish featuring earthy leaves and tiny berry accents.
How-To Guide
Materials
- Cotton canvas tote bag (washed and ironed)
- Fabric paint or acrylic paint mixed with fabric medium
- Paint colors: Olive green, sap green, forest green, burnt sienna/orange, deep red, metallic gold (optional)
- Round paintbrushes (sizes 2 and 4)
- Liner brush (size 0/00)
- Piece of cardboard (to fit inside the bag)
- Water cup and paper towels
- Palette or mixing plate
- Faint pencil or erasable fabric pen
Step 1: Preparation and Sketching
-
Prepare the surface:
Before starting, ensure your tote bag has been pre-washed to remove sizing, dried, and ironed flat. Slide a piece of cardboard inside the bag to prevent paint from bleeding through to the other side. -
Draft the circle:
Lightly trace a large circle in the center of the bag using a round object (like a dinner plate) or a compass. This will serve as the invisible spine for your wreath. -
Map the main vines:
Using your pencil, sketch a wavy, organic line that roughly follows the circle guideline. Let the line meander slightly inside and outside the perfect circle to keep it looking natural. -
Sketch placement leaves:
Mark the positions for the largest leaves first, distributing them evenly around the circle. Don’t worry about details yet; just get the general flow and direction established.
Step 2: Painting the Foliage
-
Mix your base greens:
Prepare your palette with a few shades of green. Mix a little fabric medium into your acrylics if using them, and water them down slightly to achieve a transparent, watercolor effect. -
Paint the main stems:
Using a liner brush and brown or dark green paint, trace over your wavy vine line. Keep the pressure light to maintain a thin, delicate stem. -
Adding large leaves:
Load a size 4 round brush with a watered-down olive green. Press the belly of the brush down and lift as you pull outward to create the leaf shape. Variety is key here, so vary the pressure for different sizes. -
Layering colors:
While the first leaves are still slightly damp, drop a tiny bit of darker green or brown near the base of the leaf. This wet-on-wet technique creates a lovely gradient without harsh lines. -
Incorporate autumn tones:
Switch to your burnt sienna or muted orange paint. Add occasional leaves in these warmer tones to break up the green monopoly and add visual interest. -
Create smaller filler leaves:
Using your size 2 brush and a lighter sap green, paint clusters of smaller, teardrop-shaped leaves branching off the main vine to fill in gaps. -
Add wispy sprigs:
With the liner brush, paint very fine, fern-like sprigs extending outward from the wreath. These should be faint and airy, almost like shadows.
Watercolor Effect
To get that translucent look on canvas, mix water into your fabric paint. Test on a scrap first to ensure it doesn’t bleed too much.
Step 3: Details and Finishing
-
Paint the veins:
Once the main leaves are dry to the touch, use your finest liner brush and a dark mix (dark green or brown) to paint a central vein down the middle of the larger leaves. -
Add berries:
Dip the handle end of a paintbrush into your deep red paint. Dot it onto the canvas near the stems to create perfect little round berries in clusters of two or three. -
Connect the berries:
Use the liner brush to draw tiny, hair-thin stems specific to the berry clusters, connecting them back to the main vine. -
Optional texture:
I sometimes like to add extremely subtle metallic gold accents to just the tips of a few leaves for a bit of shimmer, though this is optional. -
Review and refine:
Step back and look at the wreath as a whole. If any areas look too sparse, add a few extra small leaves or a curling tendril to balance the composition. -
Heat set the design:
Allow the bag to cure for at least 24 hours. Once fully dry, place a pressing cloth over the design and iron on a high heat setting (no steam) to permanently seal the paint into the fabric.
Fixing Blotches
Did a drop of paint fall where it shouldn’t? Turn it into a loose, falling leaf or a stray berry rather than trying to wipe it off.
Now you have a charming, custom accessory perfect for casual outings or hauling books.


Monogram With Laurel Wreath

Transform a plain canvas tote into a personalized accessory with this elegant, botanical-inspired design. The look combines a classic, leafy laurel wreath with a bold serif font, perfect for custom gifts or personal branding.
Step-by-Step
Materials
- Canvas tote bag (pre-washed and ironed)
- Fabric medium
- Acrylic paints (Forest Green, Olive Green, White, Navy Blue)
- Small round paintbrush (size 2 or 4)
- Fine liner paintbrush (size 0 or 00)
- Pencil
- Circular object for tracing (like a plate) or a compass
- Piece of cardboard (to fit inside the bag)
- Palette or mixing plate
- Paper towels and water cup
Step 1: Preparation & Sketching
-
Prepare the fabric canvas:
Begin by sliding a piece of stiff cardboard inside your tote bag. This is a crucial step to prevent paint from bleeding through to the back side and provides a firm surface for sketching and painting. -
Establish the wreath shape:
Center your circular object (a dinner plate works well for this size) on the bag. Lightly trace around it with a pencil to create a perfect circle guide for your wreath. -
Draft the text layout:
Using a ruler to keep things straight, faint pencil lines across the center of the circle where you want your text to sit. Sketch your chosen name or word in a serif font on the top line, and the initial below it. Don’t worry about perfection; you can refine the serifs with paint later. -
Sketch the leaves:
Draw the basic shapes of the leaves along the circle guide. Angle them outwards in a ‘V’ formation, making sure the leaves at the bottom meet in the center and flow upwards towards the top opening.
Step 2: Painting the Wreath
-
Mix your leaf greens:
Create three shades of green on your palette by mixing fabric medium with your acrylics: a dark forest green, a mid-tone olive, and a lighter sage (by adding white). The fabric medium ensures the paint remains flexible. -
Paint the main stems:
Using your fine liner brush and the darkest green, carefully trace the curved line of the circle to create the main stem. Keep this line thin and delicate. -
Base coat the leaves:
With the round brush, fill in the sketched leaf shapes. I like to alternate between the mid-tone olive and the darker forest green to give the wreath natural depth and variety. -
Add dimension:
While the base coat is still slightly tacky, mix a tiny bit of white into your green. Paint a single stroke on one half of each leaf to suggest a highlight or light source. -
Incorporate delicate sprigs:
Use the fine liner brush and your lightest sage green to add tiny, whispy sprigs and smaller leaves sticking out between the larger ones. This adds that fluffy, illustrative texture seen in the reference.
Oops! Paint Bleed?
If paint bleeds outside your lines, don’t panic. Dip a stiff brush in rubbing alcohol and gently scrub the spot to lift pigment before it dries. Or, simply paint a small extra leaf over the mistake.
Step 3: Lettering & Details
-
Mix the lettering color:
Combine Navy Blue acrylic with fabric medium. You want a consistency that isn’t too watery but flows smoothly off the brush. -
Outline the text:
Using the fine liner brush, carefully outline your penciled letters. Pay close attention to the serifs (the little feet at the ends of the letters) to keep them sharp. -
Fill the letters:
Switch to a slightly larger small brush to fill in the body of the letters. Apply two thin coats rather than one thick one for the most opaque, even finish. -
Add leaf vein details:
Once the green leaves are fully dry, use your finest liner brush and the dark Navy Blue (or a very dark green) to paint a thin central vein line down the middle of the larger leaves. -
Refine the edges:
Check for any uneven edges on your text or leaves. You can use a clean, slightly damp brush to tidy up mistakes if the paint is fresh, or touch up with white paint if dried. -
Heat set the design:
Allow the bag to dry for at least 24 hours. Once dry, place a pressing cloth over the design and iron on a cotton setting (no steam) for 3-5 minutes to permanently set the paint.
Level Up: Texture
Make the design pop by embroidering over the main stem line with a simple backstitch using dark green embroidery thread. It adds a lovely tactile element.
Now you have a chic, custom tote ready for the market or library


Simple Brush Lettering Quote
Sometimes less really is more, and this clean, typographic design proves it by letting the words speak for themselves. This tutorial guides you through creating crisp, professional-looking lettering that mimics a high-end printed bag using simple fabric painting techniques.
How-To Guide
Materials
- Cream or off-white canvas tote bag (washed and dried)
- Black fabric paint (or heavy body acrylic mixed with fabric medium)
- Small flat shader paintbrush (size 4 or 6)
- Fine liner brush (size 0 or 00)
- Computer and printer
- Paper
- Pencil or disappearing fabric marker
- Painter’s tape or masking tape
- Piece of cardboard (to fit inside the bag)
- Iron and ironing board
Step 1: Preparation & Design
-
Prep the fabric:
Before you begin, ensure your canvas tote has been washed and dried without fabric softener. This removes sizing chemicals and ensures the paint adheres permanently. Iron the bag completely flat to remove all wrinkles. -
Protect the layers:
Insert a sturdy piece of cardboard inside the tote bag. This is crucial as it creates a stable painting surface and prevents the black paint from bleeding through to the back side of the bag. -
Create the template:
On your computer, type out your design. Use a classic serif font (like Times New Roman or Garamond) for the top line ‘NATURAL COTTON CANVAS’ and a bold sans-serif font (like Arial Black or Helvetica) for the large word ‘TOTE’. Size it to fit the center of your bag. -
Print and position:
Print your design on standard paper. Trim the paper edges so you can see exactly where the text will sit. Place the printed design inside the tote bag, on top of the cardboard but under the top layer of fabric. -
Secure the template:
If the fabric is thick, you might not see the letters clearly. If so, cut out the paper letters to create a stencil, or tape the paper on top and use the ‘pencil transfer’ method (scribbling graphite on the back) to trace the outline onto the fabric. -
Trace the outline:
Using a pencil or a disappearing fabric marker, carefully trace the outline of every letter onto the canvas. Take your time here to ensure your baselines are straight and the spacing is even.
Step 2: Painting the Text
-
Prepare the paint:
Squeeze a small amount of black fabric paint onto a palette or paper plate. If you are using acrylics, mix it with fabric medium according to the bottle’s instructions now. The consistency should be creamy but not runny. -
Start with the large text:
Begin with the large ‘TOTE’ letters. I find it easiest to use a small flat shader brush for the straight edges of these block letters. Load the brush moderately; too much paint leads to bleeding. -
Define the edges:
Paint the straight vertical and horizontal lines of the ‘T’, ‘O’, ‘T’, and ‘E’ first. Use the flat edge of your brush to get a crisp line. Don’t worry about filling the middle perfectly yet. -
Fill in the bold letters:
Once the outlines of ‘TOTE’ are established, go back and fill in the centers of the letters until they are solid opaque black. Apply a second coat if the canvas texture is showing through too much. -
Switch brushes:
For the upper line, ‘NATURAL COTTON CANVAS’, switch to your fine liner brush. These letters are delicate and require a steady hand. -
Paint the serifs:
Carefully paint the main strokes of the smaller letters. Pay special attention to the ‘serifs’ (the small feet or decorative strokes at the ends of the letters). Use just the very tip of the liner brush for these details. -
Refine the lines:
Check your work for any jagged edges. You can smooth out lines by very gently dragging a barely-damp liner brush along the edge of the wet paint to correct minor wobbles.
Straight Line Secret
For the ultra-straight edges on the big ‘TOTE’ letters, apply strips of painter’s tape directly on the fabric to mask the edges. Paint away from the tape to prevent bleeding.
Step 3: Finishing Touches
-
Let it dry:
Allow the paint to air dry completely. This usually takes at least 24 hours, but check your specific paint brand’s instructions. Do not remove the cardboard yet. -
Heat set the design:
Once fully dry, turn the bag inside out (or place a clean cloth over the painted side). Use an iron on a cotton setting (no steam) and press over the design for 3-5 minutes to heat-set the ink, making it washable.
Add a Pop
Instead of black, paint the smaller serif text in a muted color like sage green or terracotta to give the bag a modern, two-tone branding look.
Your stylish, typographic tote is now ready for the farmer’s market or a library run
BRUSH GUIDE
The Right Brush for Every Stroke
From clean lines to bold texture — master brush choice, stroke control, and essential techniques.
Explore the Full Guide
Playful Food Doodles
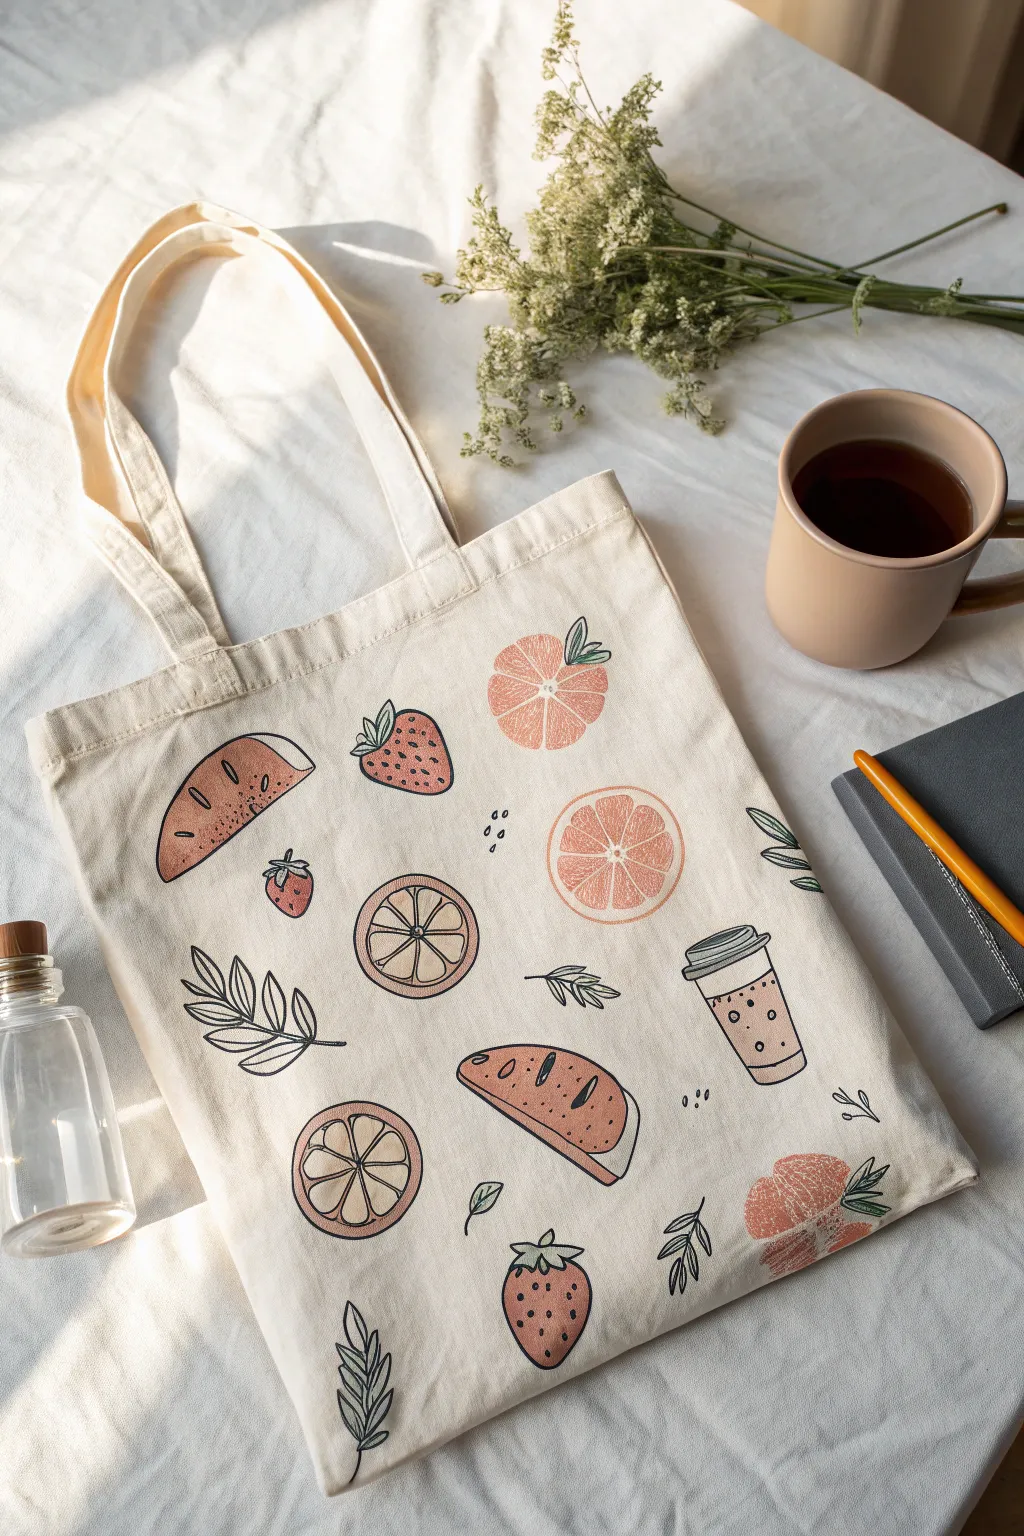
Transform a plain canvas tote into a charming accessory featuring whimsical doodles of fruits, bread, and coffee cups. This project uses fabric markers and soft acrylic washes to create a warm, inviting pattern perfect for your next market run.
Step-by-Step Tutorial
Materials
- Plain beige or natural canvas tote bag
- Fabric markers (fine tip black)
- Fabric paint or soft body acrylics (terra cotta, soft pink, beige, muted orange)
- Small flat tip paintbrush
- Pencil and eraser
- Piece of cardboard (to fit inside the bag)
- Iron (for setting the ink/paint)
Step 1: Preparation & Layout
-
Prep the surface:
Begin by washing and drying your tote bag to remove any sizing chemicals that might repel the paint. Iron it flat to ensure a smooth drawing surface. -
Protect the layers:
Slide a piece of sturdy cardboard inside the tote bag. This is crucial as it prevents ink and paint from bleeding through to the back side of the bag. -
Sketch the motifs:
Using a pencil, lightly sketch your scattered food pattern. Aim for a mix of large and small items. Start by placing the larger elements: slices of watermelon, orange halves, and coffee cups. -
Fill the gaps:
In the spaces between the larger fruits and bread, lightly sketch smaller filler items like strawberries, individual leaves, and small seed clusters.
Step 2: Adding Color Washes
-
Mix your palette:
Prepare your paints. You want a ‘washed’ or watercolor look, not heavy opaque coverage. I like to dilute my acrylics slightly with water or fabric medium to achieve that semi-transparent, stamped effect seen in the orange slices. -
Paint the citruses:
Dip your flat brush into a muted orange or coral tone. Paint rough circles for the oranges and grapefruits. Don’t worry about perfect edges; the slightly messy look adds charm. Leave the center segments unpainted or paint over them lightly—we will outline them later. -
Color the strawberries:
Using a soft pink or terra cotta shade, fill in the strawberry shapes. Keep the paint application fairly thin so the fabric texture shows through. -
Paint the bread and coffee:
Use a beige or light brown mix for the baguette slices and the coffee cup liquid. Add a tiny touch of pink to the top of the coffee cup for the lid. -
Dry completely:
Let the paint dry thoroughly. If the fabric is still damp, the marker ink in the next step will bleed and ruin the crisp lines.
Uneven Paint?
Don’t panic if paint looks blotchy! This style thrives on imperfection. Once you add the black outlines, uneven edges instantly look intentional.
Step 3: Inking the Details
-
Outline the citrus:
With your fine-tip black fabric marker, draw the outer rim of the orange slices. Inside the painted circle, draw the triangular segments. Add small dots or ‘seeds’ near the center juice vesicles. -
Define the watermelon:
Outline the watermelon wedge shape. Draw a second line parallel to the rind to create depth, and add small, dark teardrop shapes for the seeds. -
Detail the strawberries:
Outline the pink strawberry shapes. At the top, draw a cluster of three or four leaves. Add tiny dots all over the fruit body for texture. -
Ink the coffee cup:
Trace the coffee cup shape. Draw the lid with a double rim and add a simple sleeve around the middle. Little dots on the sleeve give it a nice textured look. -
Draw the leaves:
For the leaf sprigs, simply draw a center stem line and add almond-shaped leaves branching off. Leave these unpainted for a clean, graphical contrast. -
Add floating seeds:
Fill any awkward empty spaces by drawing tiny clusters of three or four small ovals or seeds. This helps balance the composition. -
Variation: White Highlights:
If your paint turned out a bit opaque, you can use a white paint pen to add small highlights to the seeds or fruit rinds.
Stamp Instead
Carve the citrus and watermelon shapes out of a potato or soft block eraser to stamp the color bases quickly before doodling the details on top.
Step 4: Finishing Touches
-
Erase pencil marks:
Once you are certain the ink is 100% dry, gently erase any visible pencil sketch lines that weren’t covered by the marker. -
Heat set the design:
To make your bag washable, heat set the design. Place a thin cloth over your artwork and run a hot iron (no steam) over it for several minutes to lock in the pigment.
Now you have a custom, eco-friendly tote ready for carrying your favorite sketchbook or fresh produce
Clean Geometric Pattern Grid
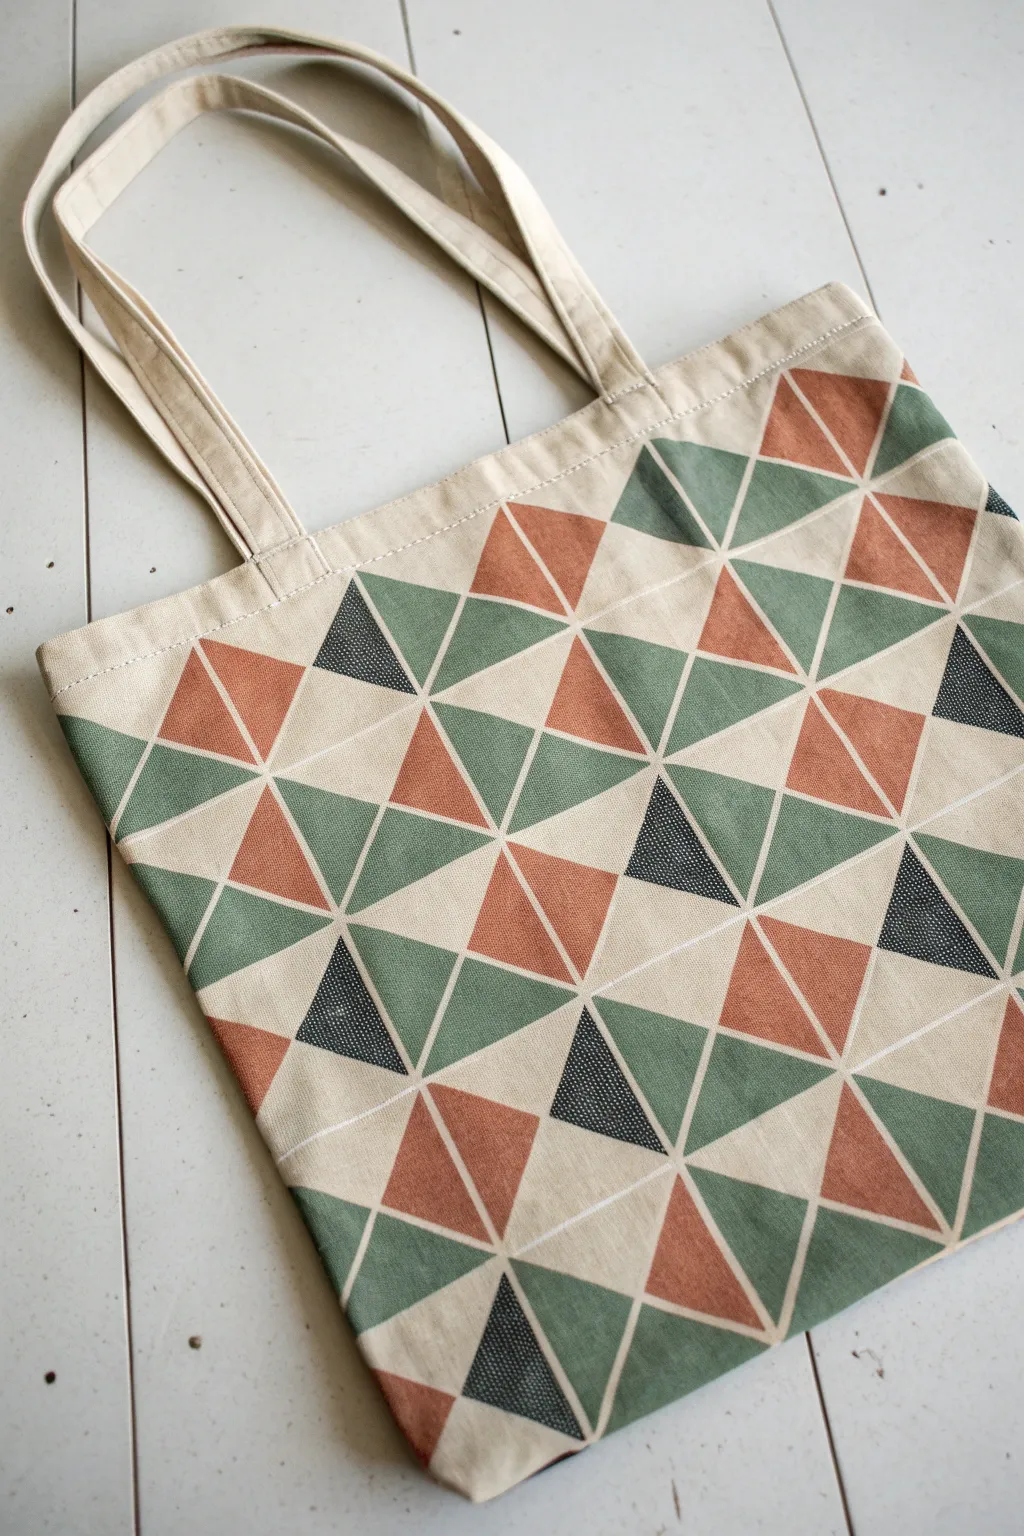
Transform a plain canvas bag into a stylish accessory using a simple masking technique that yields incredibly crisp lines. This geometric pattern combines earthy terracotta, sage green, and charcoal tones for a sophisticated, modern look that pops against the natural fabric.
Step-by-Step
Materials
- Plain canvas tote bag (washed and ironed)
- Fabric paint (Sage Green, Terracotta/Rust, Charcoal Grey, Cream/White)
- Painter’s tape or finishing tape (approx. 1/4 inch width)
- Flat shader paintbrush (medium size)
- A scrap piece of cardboard (to fit inside the bag)
- Ruler or straight edge
- Fabric medium (optional, if using regular acrylics)
- Iron and ironing board
Step 1: Preparation and Masking
-
Prepare your surface:
Begin by sliding a sturdy piece of cardboard inside your tote bag. This is crucial because it creates a flat surface for painting and prevents the paint from bleeding through to the back side of the bag. -
Plan the grid:
Using your ruler and painter’s tape, first create a large diagonal grid across the bag. Lay down long strips of tape diagonally from left to right, spacing them evenly apart (about 2-3 inches depending on your desired triangle size). -
Cross the diagonals:
Create the opposing diagonal lines to form diamond shapes. Lay tape strips going from right to left, maintaining the same spacing as your first set. You should now see a grid of diamonds separated by your tape. -
Bisection:
To turn those diamonds into triangles, apply a horizontal strip of tape directly through the center of every row of diamonds. Ensure every piece of tape is pressed down firmly, especially at the intersections, to prevent paint seepage. -
Seal the edges:
For the crispest lines possible, I like to paint a very thin layer of the cream/white paint (or the base color of your bag) over the tape edges first. This seals the tape, meaning any bleed-through will match the background and be invisible.
Seal It Tight
Before adding color, run a credit card or bone folder firmly over all tape strips. This extra pressure ensures a perfect seal and cleaner lines.
Step 2: Painting the Design
-
Mix your palette:
Squeeze out your sage green, terracotta, and charcoal paints onto a palette. If you are using standard acrylics, mix them with fabric medium according to the bottle instructions to ensure the bag remains soft. -
Strategy for color placement:
Notice the reference image uses triangles in clusters. Try not to place two of the same colors directly next to each other. Pick a triangle to start with and paint it sage green. -
Apply the sage green:
Using the flat shader brush, fill in scattered triangles with the sage green paint. Use confident strokes from the tape inward to avoid pushing paint under the adhesive. -
Add the terracotta tones:
Cleaning your brush thoroughly, switch to the rust/terracotta color. Paint a similar number of triangles as you did with the green, creating a balanced distribution across the grid. -
Integrate charcoal accents:
The dark charcoal triangles act as high-contrast accents. Paint fewer of these than the other colors—perhaps one for every three or four colored triangles—to keep the design from looking too heavy. -
Leave negative space:
Don’t feel the need to paint every single triangle. You can leave some sections the natural color of the canvas, or paint them with a cream shade for a subtle variation in texture. -
Second coat:
Fabric tends to absorb the first layer of paint. Once your first coat is touch-dry (usually about 20 minutes), apply a second coat to ensure the colors are opaque and vibrant.
Add Metallic Flair
Swap the charcoal grey paint for gold or copper metallic fabric paint to give the tote bag a glamorous, shimmering upgrade.
Step 3: Finishing Up
-
The reveal:
Wait until the paint is tacky but not fully cured to remove the tape. Slowly peel back the strips at a 45-degree angle. This is the most satisfying part, revealing the clean white grid lines between your colors. -
Touch-ups:
Inspect your lines. If any paint bled through, use a tiny detailed brush with a bit of white or cream paint to carefully cover the mistake. -
Dry completely:
Allow the bag to dry undisturbed for at least 24 hours. The paint needs to fully cure before it can withstand wear and tear. -
Heat set:
To make the bag washable, place a thin cloth or piece of parchment paper over your dry design. Iron on a high heat setting (no steam) for 3-5 minutes to lock the pigment into the fibers.
Once heat set, your custom geometric tote is ready for the farmer’s market or library.

PENCIL GUIDE
Understanding Pencil Grades from H to B
From first sketch to finished drawing — learn pencil grades, line control, and shading techniques.
Explore the Full Guide
Modern Color-Block Shapes
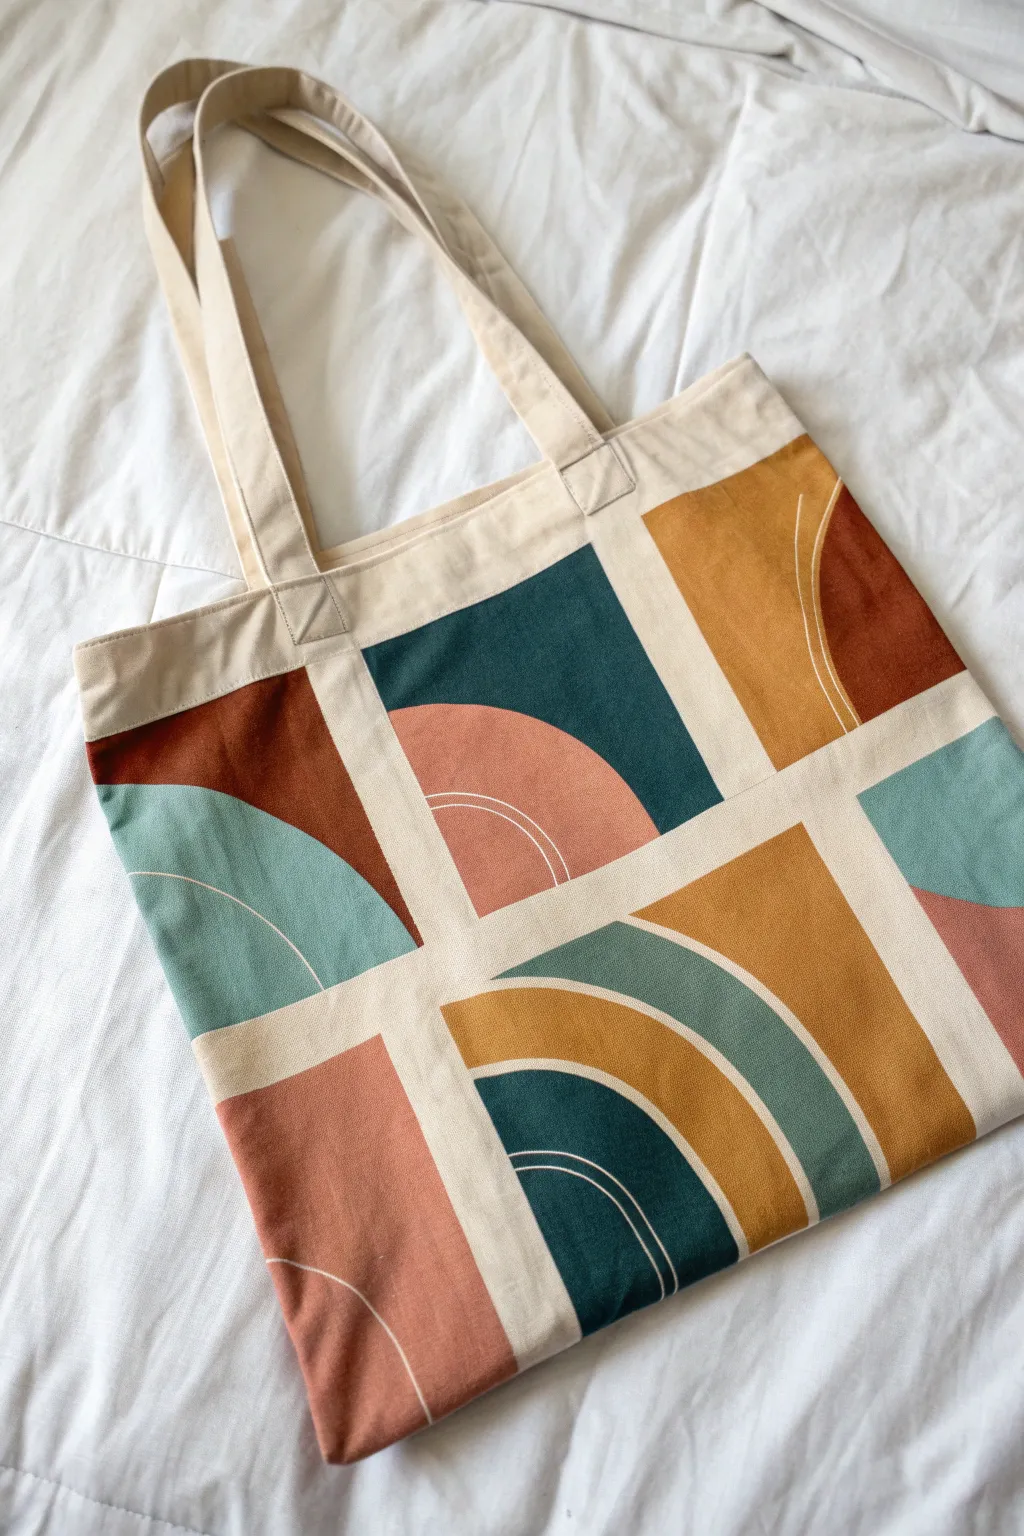
Transform a plain canvas tote into a piece of wearable art with this mid-century modern inspired design. Featuring earthy terracotta, deep teal, and mustard tones in bold abstract arches, this project uses crisp masking techniques to achieve professional-looking clean lines.
Detailed Instructions
Materials
- Plain canvas tote bag (washed and ironed)
- Fabric medium
- Acrylic paints (Teal, Terracotta/Rust, Mustard Yellow, Sage Green, White)
- Painter’s tape or masking tape (various widths)
- Flat shader brushes (medium and large)
- Fine detail liner brush (size 0 or 1)
- Cardboard insert
- Ruler
- Pencil
- Paper plate or palette
- Iron and press cloth
Step 1: Preparation & Grid Layout
-
Prepare the bag:
Start by inserting a piece of cardboard inside the tote bag. This is crucial to prevent paint from bleeding through to the back side while you work. -
Create the grid:
Using your ruler and painter’s tape, tape off a large 2×3 or 3×3 grid on the front of the bag. The tape lines will serve as the negative space between your painted blocks, so press the edges down firmly. -
Seal the tape edges:
To get super crisp lines, I like to brush a very thin layer of white paint (or clear matte medium) along the edges of the tape first. This seals the gaps so your colored paint won’t bleed underneath.
Bleeding Edges?
If paint seeps under the tape, wait for it to dry, then use a small stiff brush with a tiny amount of water (or white paint) to gently scrub or cover the mistake.
Step 2: Painting the Color Blocks
-
Mix your mediums:
Mix your acrylic paints with fabric medium according to the bottle instructions (usually 2:1 ratio). This ensures the paint stays flexible on the fabric and won’t crack later. -
Sketch the curves:
Lightly pencil in your design within the taped grid squares. Focus on geometric simplicity: draw large semi-circles, quarter circles within corners, and simple rectangular blocks. -
Paint the first layer – Dark Teal:
Start with your darkest color, the deep teal. Fill in the square sections and the large semi-circle shapes designated for this color using a flat brush. -
Apply the Rust tones:
Switch to your terracotta or rust color. Paint the opposing shapes, focusing on creating balance. Ensure the paint goes right up to the tape edge for that sharp look. -
Add Mustard accents:
Fill in the remaining large geometric shapes with the mustard yellow paint. This bright, warm tone acts as a nice highlight against the darker teal. -
Paint the Sage elements:
Use the sage green or lighter blue for the final blocks, usually quarter-circles in the corners. Allow all the base colors to dry completely before adding a second coat if needed for opacity.
Add Texture
Mix a tiny amount of baking soda into your paint mix for the darker blocks. This creates a slightly raised, velvety texture that mimics expensive screen printing.
Step 3: Details & Finishing
-
Remove the tape:
Once the paint is dry to the touch but not fully cured, carefully peel back the painter’s tape to reveal the clean canvas grid lines between your shapes. -
Draft the fine lines:
The design features delicate white line work over the color blocks. You can freehand this, or use a drinking glass or bowl to lightly trace curves over your painted shapes with a pencil. -
Paint the arches:
Using your fine detail brush and straight white paint (mixed with a little fabric medium), carefully paint thin arching lines over the colored blocks. These should echo the shape of credit blocks. -
Add final details:
Add any final short straight lines or accents as seen in the reference, keeping your hand steady and the brush pressure light. -
Dry completely:
Let the bag sit undisturbed for at least 24 hours to ensure the paint is fully dry on the surface and throughout the fabric fibers. -
Heat set the design:
To make the bag washable, place a press cloth or scrap fabric over the design and iron it on medium-high heat (no steam) for about 3-5 minutes to seal the paint.
Now you have a stylish, custom accessory perfect for the farmers market or library runs
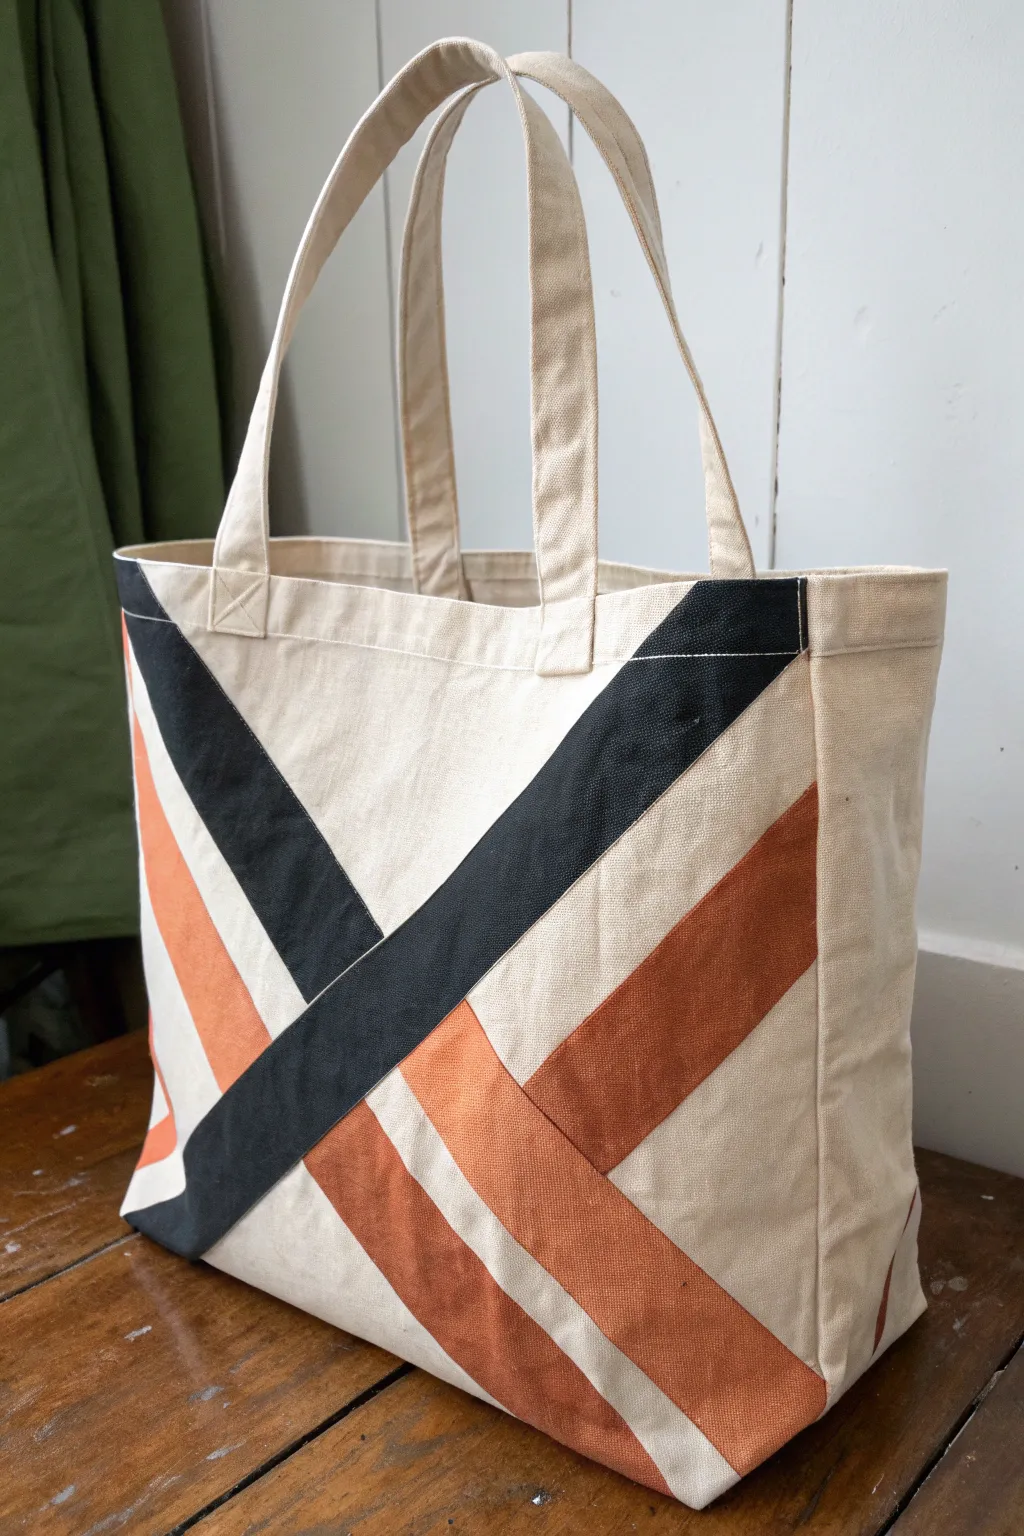
Classic Stripes From Top to Bottom
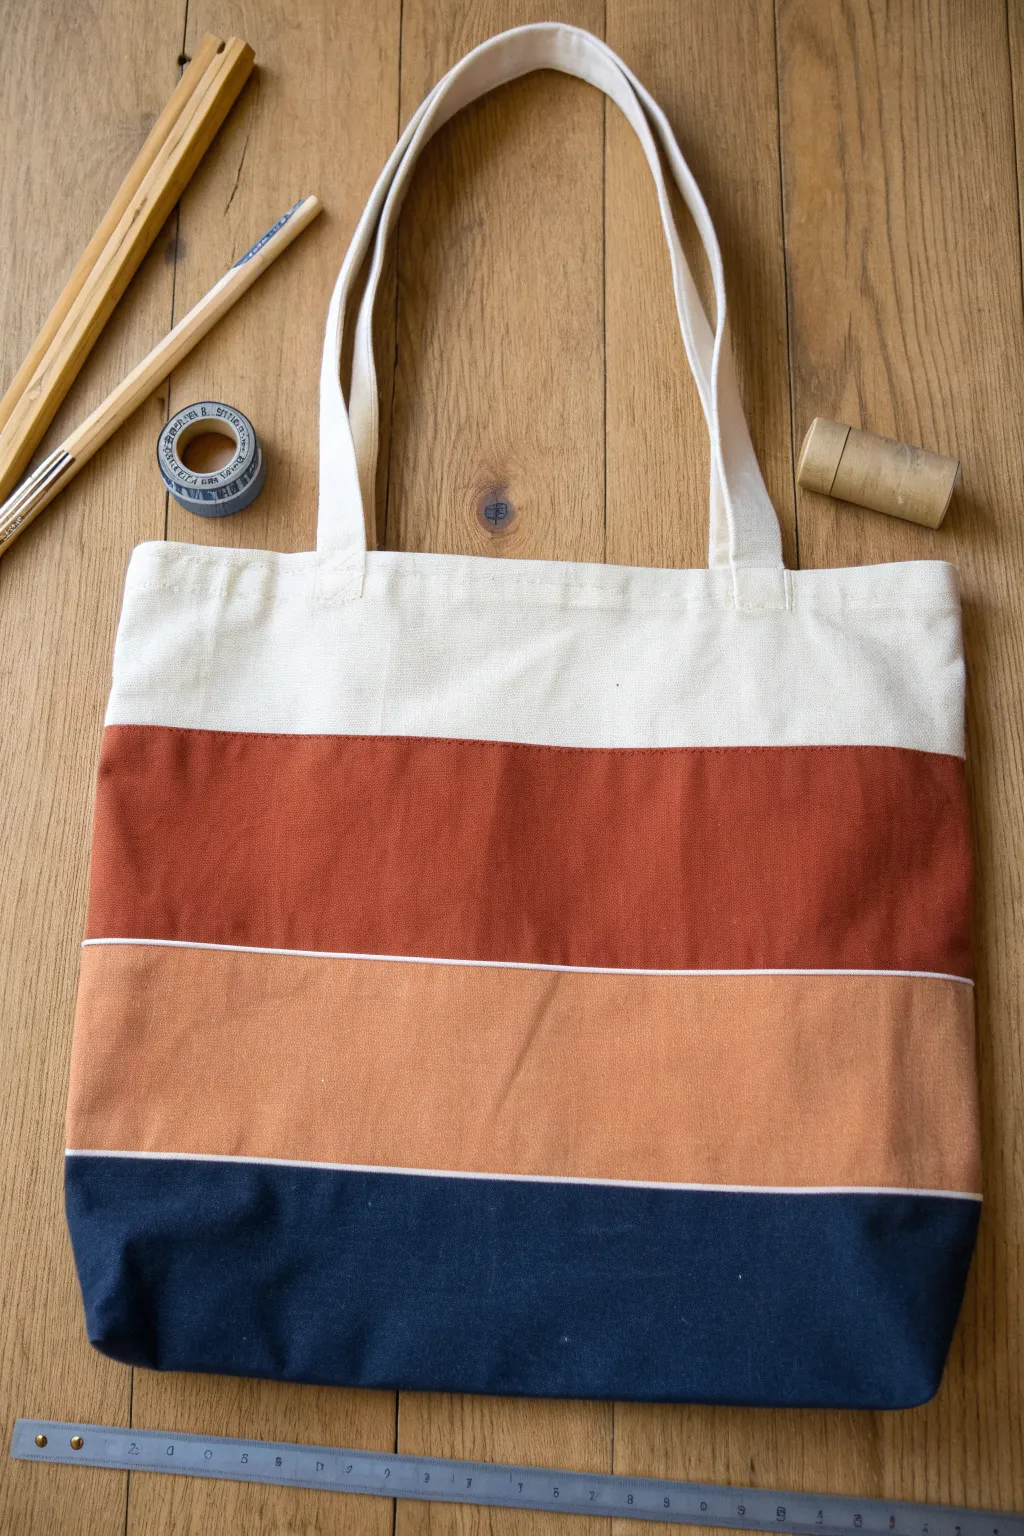
Transform a plain canvas tote into a stylish, minimal accessory using bold blocks of color separated by crisp negative space. This project creates a timeless striped design with a modern, earthy palette featuring rust, peach, and navy.
Step-by-Step
Materials
- Plain canvas tote bag (natural or white)
- Painter’s tape or masking tape (approx. 0.5 to 1 inch width)
- Fabric medium
- Acrylic craft paints (Rust Red, Muted Peach, Navy Blue)
- Flat paintbrush (1-inch width works best)
- Cardboard or stiff paper (to insert inside bag)
- Ruler or measuring tape
- Iron and ironing board
- Pencil (optional)
Step 1: Preparation
-
Wash and Iron:
Before you begin painting, wash your canvas tote without fabric softener to remove any sizing chemicals. Once dry, iron it completely flat to ensure a smooth painting surface. -
Protect the Interior:
Cut a piece of cardboard or stiff paper to size and slide it inside the tote bag. This is crucial as it prevents the paint from bleeding through the fabric and staining the back side of the bag. -
Mix Paints:
Prepare your acrylic paints by mixing them with a fabric medium according to the manufacturer’s instructions (usually a 2:1 or 1:1 ratio). This ensures the paint remains flexible and soft on the fabric rather than cracking.
Tape Sealing Trick
Paint a very thin layer of the background color (or white) over the tape edges first. This seals the tape so your colored paint won’t bleed underneath.
Step 2: Taping the Design
-
Mark Layout:
Using a ruler, lightly mark where you want your stripes to sit. For this design, leave the top third of the bag unpainted (about 4-5 inches depending on bag size). -
First Tape Line:
Place your first strip of painter’s tape horizontally across the bag to define the bottom edge of the unpainted section. -
Create Negative Space:
To create the thin white lines between colors, you will need to tape off thin strips. Measure down roughly 3-4 inches for the first colored block (rust) and apply a strip of tape. -
Continue Taping:
Measure another 3-4 inch section for the middle stripe (peach) and apply another strip of tape. -
Define the Bottom:
The bottom section will be the navy block. Ensure the bottom of your peach section is taped off clearly. Rub all tape edges firmly with your fingernail or a spoon to seal them tight against the canvas texture.
Texture Play
Mix a small amount of textile thickener or puff paint additive into one of the stripe colors to create a raised, tactile 3D effect on just one band.
Step 3: Painting
-
Paint the Top Stripe:
Load your flat brush with the rust/terracotta paint mixture. Apply the paint to the top designated section, brushing away from the tape edges initially to prevent seepage, then filling in the center. -
Paint the Middle Stripe:
Rinse your brush thoroughly (or use a fresh one) and apply the muted peach color to the middle section. Use long, horizontal strokes for an even finish. -
Paint the Bottom Stripe:
Switch to your navy blue paint mixture for the bottom-most section. Since this color is dark, make sure you get full coverage near the seams and bottom gusset. -
Check Coverage:
Look closely at the canvas weave. If the fabric is soaking up a lot of paint, I find it helpful to let the first coat dry for about 20 minutes and add a quick second coat for vibrancy.
Step 4: Finishing
-
Remove Tape:
While the paint is still slightly tacky (not fully bone dry), carefully peel back the painter’s tape at a 45-degree angle to reveal your crisp white lines. -
Dry Completely:
Allow the bag to dry flat for at least 24 hours. Don’t rush this step, as thick layers of fabric paint can take time to cure underneath. -
Heat Set:
Once dry, turn the bag inside out (or place a scrap cloth over the painted design). Set your iron to medium-high heat (no steam) and iron over the painted areas for 3-5 minutes to permanently set the color.
Now you have a durable, custom tote ready for the grocery store or library runs


Polka Dot Confetti Sprinkle
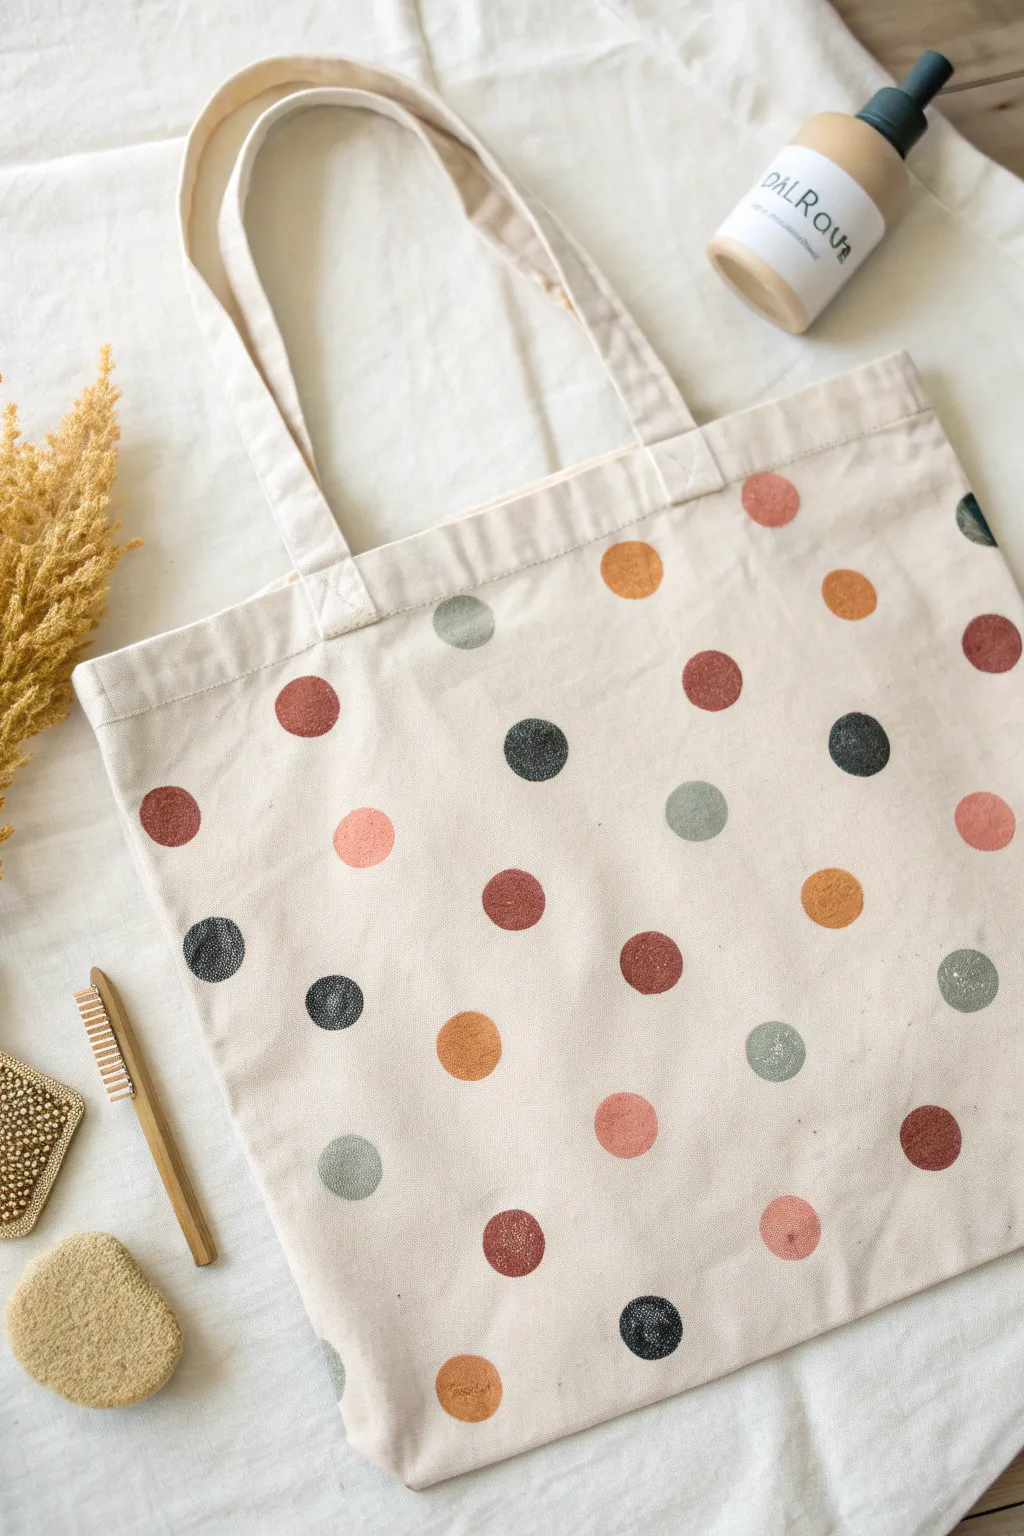
Transform a plain canvas tote into a stylish accessory using a warm, muted color palette and simple stamping techniques. The scattered polka dot pattern mimics sophisticated confetti, giving your everyday bag a modern, artisanal feel.
How-To Guide
Materials
- Plain canvas tote bag (washed and dried without fabric softener)
- Fabric paints (rust, mustard yellow, olive green, sage green, charcoal grey)
- Round foam pouncers or spouncers (approx. 1-inch diameter)
- Paper plate or painting palette
- Scrap cardboard or thick paper
- Iron and pressing cloth (for setting)
- Paper towels
Step 1: Preparation
-
Prep the Bag:
Start by inserting a piece of scrap cardboard inside the tote bag. This is crucial as it prevents the paint from bleeding through to the other side of the fabric while you work. -
Smooth the Surface:
Run your hands over the canvas to ensure it is flat against the cardboard insert. If the bag is very wrinkled, give it a quick iron beforehand so you have a smooth canvas for stamping. -
Prepare the Paints:
Squeeze a coin-sized amount of each fabric paint color onto your palette or paper plate. Keep the colors separated so they don’t accidentally mix just yet.
Step 2: Stamping Process
-
Load the Pouncer:
Select your first color—let’s start with the rust tone. Dip your round foam pouncer straight down into the paint. -
Offload Excess:
Before hitting the bag, dab the pouncer lightly onto a clean part of the paper plate or a paper towel. You want an even coating on the foam, but not a dripping glob of paint, which creates messy edges. -
First Stamp:
Press the foam pouncer firmly onto the canvas. Apply even pressure and give it a tiny, almost imperceptible twist to ensure the paint transfers fully into the fabric weave, then lift straight up. -
Scatter the First Color:
Continue stamping the rust color randomly across the bag. Avoid creating lines or distinct grids; aim for a natural, scattered look. Leave plenty of open space for the other four colors. -
Cleaning Between Colors:
If you are using the same pouncer for all colors, wash and dry it thoroughly now. Personally, I prefer using a separate pouncer for each shade to keep the workflow smooth and avoid muddy colors. -
Add Mustard Tones:
Load your pouncer with the mustard yellow paint and repeat the stamping process. Fill in some of the larger gaps left by the rust dots. -
Integrate Greens:
Move on to your olive and sage green shades. Stamp these randomly, trying to balance the distribution so you don’t have clumping of just greens in one corner. -
Add Contrast:
Finally, use the charcoal grey or black paint. These dark dots act as anchors for the design, providing a nice pop of contrast against the lighter earthy tones. -
Check the Balance:
Step back and look at the bag as a whole. If you see any large empty spaces that look unintentional, stamp a dot there in whichever color is least represented in that area. -
Edge Detailing:
Don’t be afraid to stamp a few partial dots right off the edge of the seams or near the bottom. This makes the fabric look like it was printed before being sewn, rather than just decorated in the center.
Stamp Master Tip
For a vintage, distressed look like the photo, don’t reload the paint for every single stamp. The second stamp without reloading will be lighter and textured.
Step 3: Finishing Touches
-
Let it Dry:
Allow the paint to air dry completely. Depending on how thick your paint application was, this usually takes about 24 hours. Do not remove the cardboard insert until it is dry to the touch. -
Heat Setting:
Once fully dry,heat set the paint to make it washable. Place a pressing cloth or thin scrap of cotton fabric over your design. -
Ironing:
With your iron on a high, dry setting (no steam), press over the design for 3-5 minutes, moving the iron constantly to avoid scorching. -
Final Step:
Remove the cardboard insert. Your custom tote is now ready to carry your essentials.
Go Metallic
Swap one of the earth tones for a muted metallic gold or copper paint. It adds a subtle shimmer that catches the sunlight without overpowering the design.
Now you have a stylish, reusable bag that carries a unique, handcrafted touch wherever you go
Soft Ombre Dip-Paint Fade
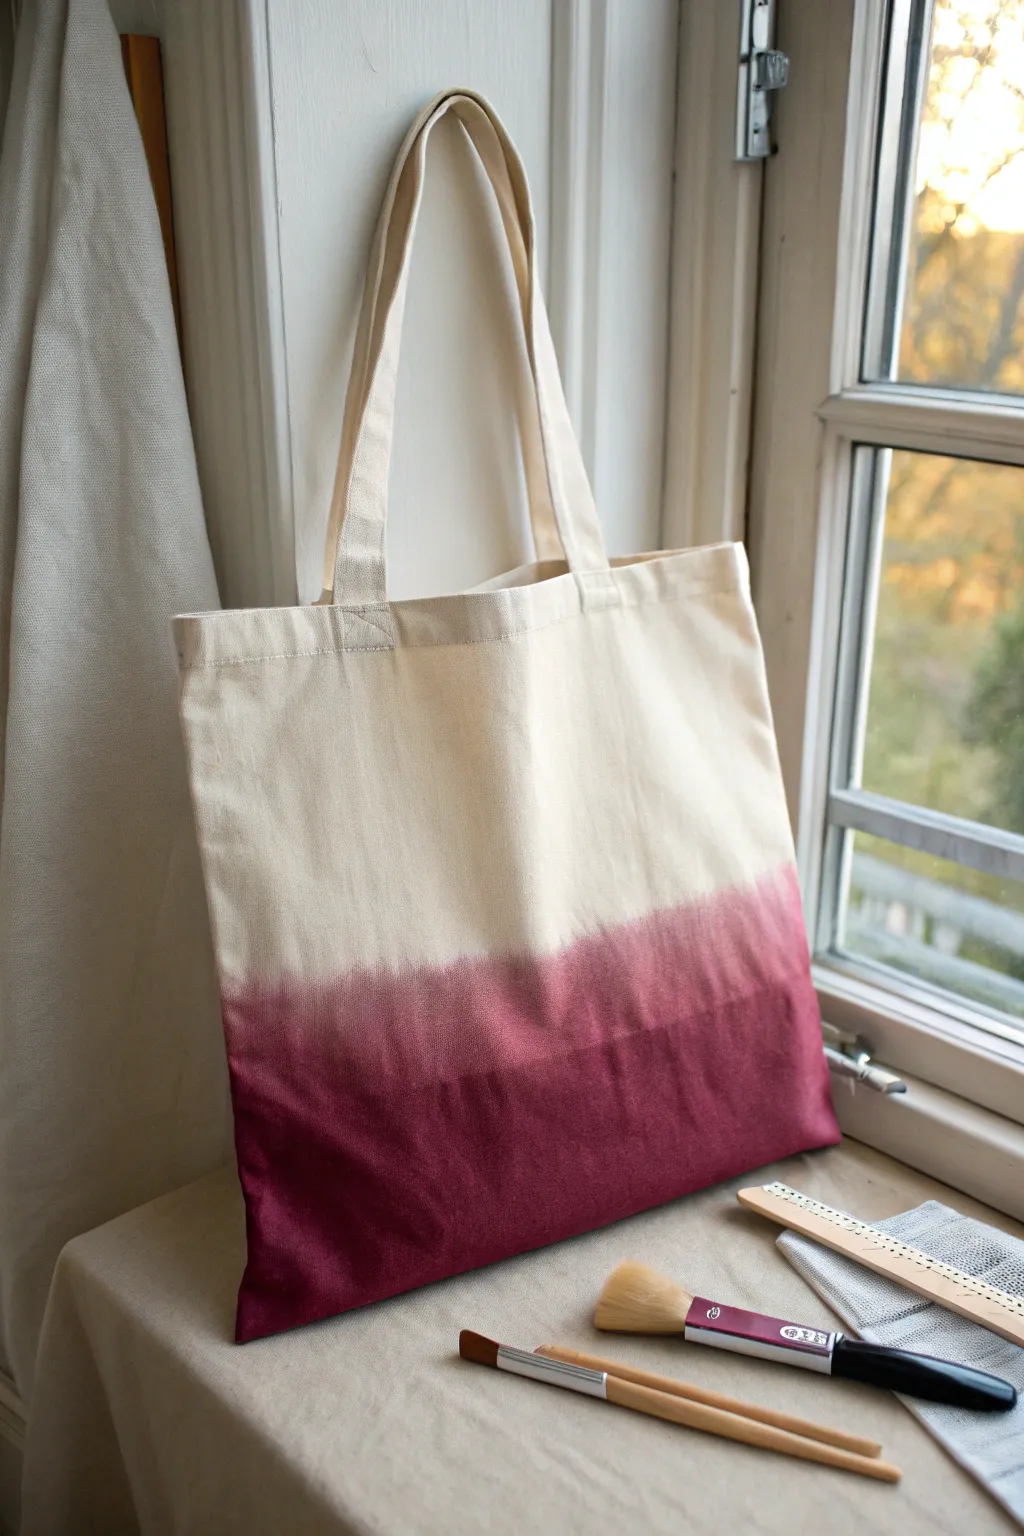
Transform a plain canvas tote into a stylish accessory with this rich burgundy ombre effect. This method uses a dip-dye technique combined with careful brushwork to create a soft, sophisticated gradient that looks professionally made.
Step-by-Step Tutorial
Materials
- Canvas tote bag (pre-washed and dried)
- Fabric dye (burgundy or deep red)
- Large plastic tub or bucket
- Water
- Salt or vinegar (depending on dye instructions)
- Clean sponge or wide foam brush
- Soft bristle paintbrush
- Painter’s tape or ruler (optional)
- Plastic drop cloth or garbage bags
- Rubber gloves
- Clothes drying rack or clips
Step 1: Preparation and Dye Mixing
-
Protect your workspace:
Before starting, cover your entire work surface with plastic drop cloths or flattened garbage bags. Dye can splash easily and is difficult to remove from porous surfaces. -
Prepare the bag:
Ensure your canvas tote is clean. I find that pre-washing removes the sizing (stiffening chemicals), which allows the fabric to absorb the dye more evenly. -
Dampen the fabric:
Run the bottom half of the tote bag under warm water until fully saturated, then wring it out so it is damp but not dripping. Wet fabric helps the dye travel upwards for that soft fade. -
Mix the dye bath:
In your large plastic tub, mix hot water with your fabric dye according to the package instructions. Add salt or vinegar if the specific dye brand recommends it for setting color. -
Test the color:
Dip a scrap piece of paper towel or fabric into the mix to check the intensity. If it’s too light, add more dye; if it’s too dark, dilute with more water.
Uneven Dye Line?
If the transition line looks too harsh or jagged, use a spray bottle filled with water to mist the boundary while wet, helping the color bleed upward naturally.
Step 2: Creating the Ombre Effect
-
Perform the first dip:
Wearing your rubber gloves, hold the tote by the handles and lower the bottom third of the bag into the dye bath. Hold it steady at this level for about 5-10 minutes to saturate the darkest section. -
Lift and lower:
Slightly lift the bag out of the dye by an inch or two, then dunk it back in quickly. Repeating this vertical motion helps prevent a harsh, straight line from forming. -
Create the mid-tone:
Lower the bag slightly deeper into the dye for just 30 seconds to create a transition zone, then lift the bag out entirely to inspect the gradient. -
Refine the fade:
Lay the bag flat on your plastic-covered surface. While the fabric is still wet, use a wet sponge or wide foam brush to gently drag the color upwards from the dipped line into the dry canvas area. -
Soften the edge:
Using a clean, damp paintbrush, feather the top edge of the dye line. Use just water on the brush to dilute the dye right at the border, creating that misty, soft transition seen in the photo. -
Spot check saturation:
If the bottom edge isn’t dark enough for your taste, you can carefully re-dip just the bottom inch or two back into the dye bath to intensify the base color.
Add Metallic Accents
Once the ombre is fully dry, painting a thin gold or copper stripe right at the fade line adds a glamorous, modern touch to the rustic canvas.
Step 3: Setting and Finishing
-
Hang to dry:
Using clips, hang the bag vertically over a sink, bathtub, or bucket to drip dry. Gravity will help pull the dye downward, keeping the top section crisp white. -
Wait patiently:
Allow the bag to dry completely. This usually takes overnight. Do not rinse the bag until the dye has fully dried on the fabric. -
Initial rinse:
Once dry, rinse the dyed portion under cold running water until the water runs clear. Try to keep the un-dyed handles out of the water stream to prevent color bleeding. -
Wash and set:
Hand wash the bag gently with a mild detergent. This removes excess dye and ensures the color won’t rub off on your clothes later. -
Final press:
Once the bag is dry again, iron it on a cotton setting to smooth out wrinkles and heat-set the color one final time.
Enjoy using your custom dip-dyed tote for grocery runs or carrying crafty supplies
Faux Tie-Dye Sponge Swirls
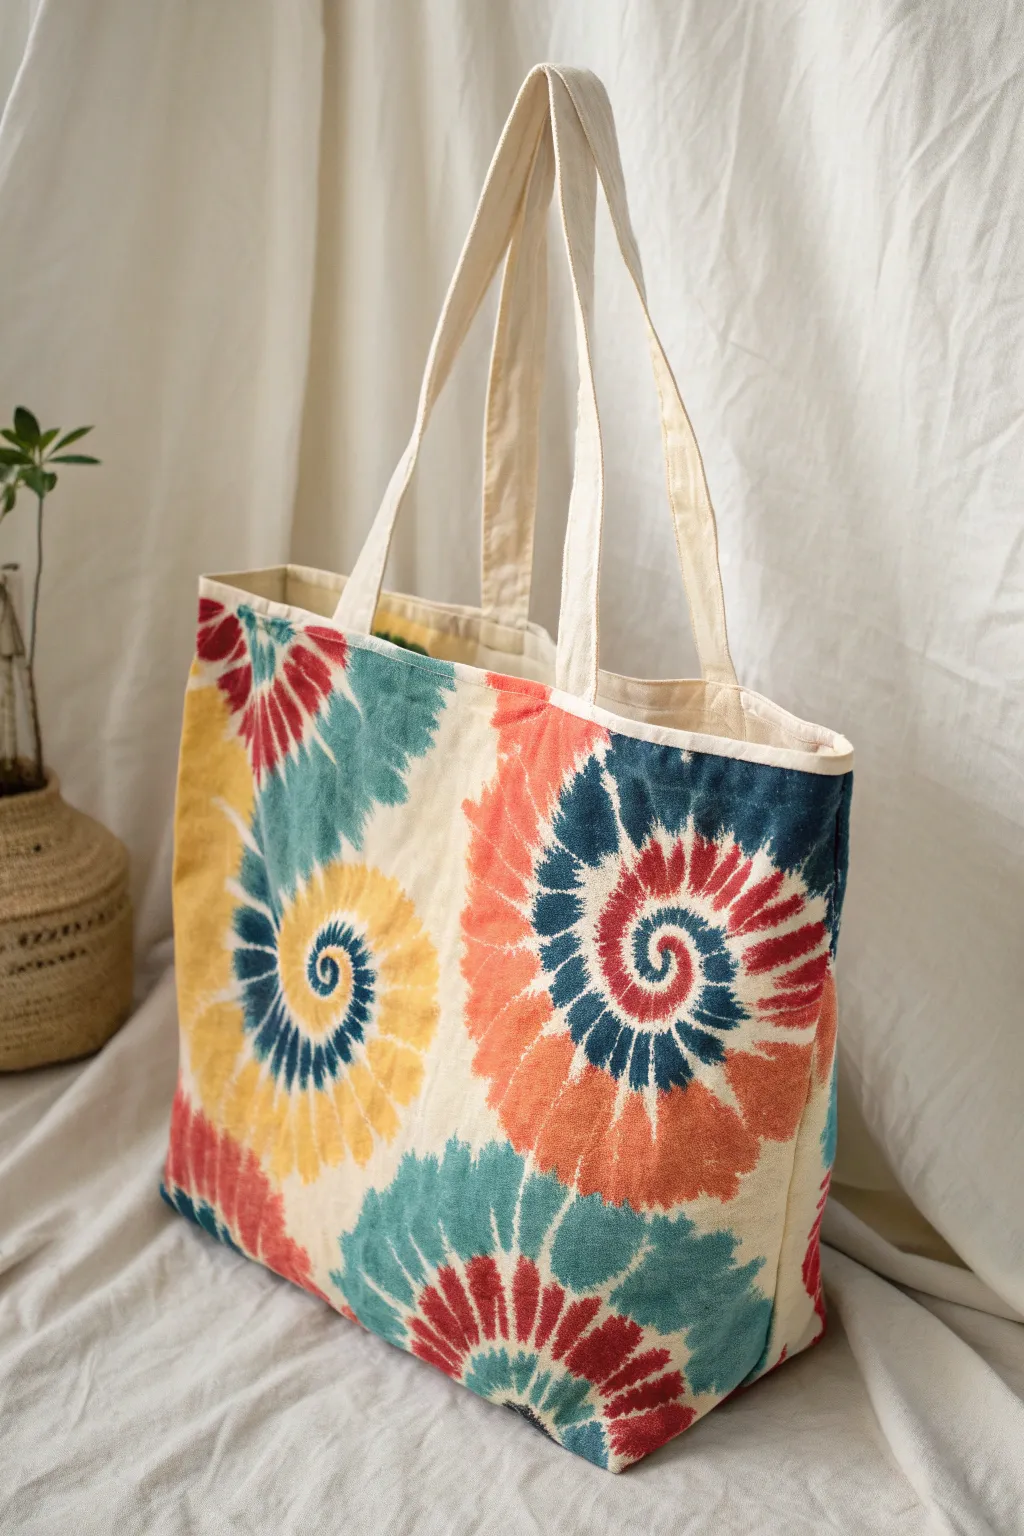
Capture the iconic spiral energy of traditional tie-dye without the messy buckets or wait time. This technique uses simple sponges and fabric paint to create vibrant, soft swirls directly on your tote for an instant summer vibe.
How-To Guide
Materials
- Canvas tote bag (pre-washed and dried)
- Fabric paints (Red, Orange, Yellow, Teal, Dark Blue)
- Textile medium (optional, for softer feel)
- Round synthetic sponges (multiple sizes)
- Fine detail paintbrush
- Cardboard insert
- Paper plate or palette
- Water cup
- Paper towels
Step 1: Preparation & Planning
-
Prep the Surface:
Begin by ironing your canvas tote bag to ensure a smooth painting surface. Insert a piece of cardboard inside the bag to prevent paint from bleeding through to the other side. -
Prepare the Colors:
Squeeze your fabric paint colors onto a palette. If you want a more watercolor-like, traditional dye look, mix a little textile medium or water into the paints to thin them slightly. -
Shape the Sponges:
Take your round sponges and cut them into wedge shapes, similar to pie slices. You want varied widths to create the tapering effect of the spiral arms.
Muddy Colors?
If colors look brown where they meet, let the first color dry to the touch (about 5-10 mins) before stamping the neighboring color. This keeps them vibrant.
Step 2: Creating the Swirl Centers
-
Start the First Spiral:
Choose a focal point on the bag for your main spiral. Dip the tip of a small sponge wedge into your darkest blue paint. -
Stamp the Center:
Press the sponge tip down and twist your wrist slightly to create the tight center knot of the spiral. Keep this initial mark small. -
Add Adjacent Colors:
Rotate the bag or your hand. Using a fresh sponge wedge, pick up red paint and stamp a small curved shape right next to the blue center, establishing the start of a second arm.
Texture Pro Tip
Use a natural sea sponge instead of synthetic foam for an even more organic, uneven texture that mimics fabric folds perfectly.
Step 3: Building the Spiral Arms
-
Expand the Blue Arm:
Return to your blue paint. Dab the sponge outwards from the center knot, curving gently as you move away to simulate the spinning motion. -
Soften the Edges:
As you stamp, tap the sponge lightly on paper towels first if it’s too saturated. This creates the textured, slightly ‘faded’ look characteristic of real tie-dye. -
Introduce New Colors:
Continue the spiral pattern by adding an orange section next to the red, and teal next to the blue. Stamp these in widening arcs that follow the curve of the previous colors. -
Blend the Transitions:
Where two colors meet (like the red transition to orange), stamp lightly over the boundary so the colors visually bleed together rather than having a hard line. -
Widen the Arcs:
As the spiral grows larger towards the edges of the bag, use the wider part of your sponge wedges to make the color bands thicker.
Step 4: Filling the Canvas
-
Start Secondary Spirals:
Choose another spot on the bag, perhaps near the corner or bottom, to start a second spiral. I like to vary the starting color here—maybe start with yellow this time—to keep visual interest high. -
Intersecting Patterns:
When your second spiral meets the first, let the paint fade out naturally. Don’t worry about perfect connections; the white space between them mimics the areas where dye doesn’t reach in bound fabric. -
Add Detail Flicks:
Take a fine paintbrush with a tiny bit of dark blue or red paint. Add small, feathery flicks or lines coming off the main spiral arms to mimic fabric creases and dye bleeds. -
Check White Space:
Step back and look at the composition. Ensure you have left enough cream canvas visible between the spirals to let the design breathe.
Step 5: Finishing Touches
-
Clean Up Edges:
If any spiral arms end abruptly, use a barely damp sponge (no paint) to smudge the end slightly, fading it into the canvas. -
Heat Set:
Allow the bag to dry completely for at least 24 hours. Once dry, heat set the paint according to the manufacturer’s instructions (usually by ironing on the reverse side) to make it washable.
Now you have a retro-inspired accessory that carries the spirit of summer wherever you go
Minimal Line Art Face
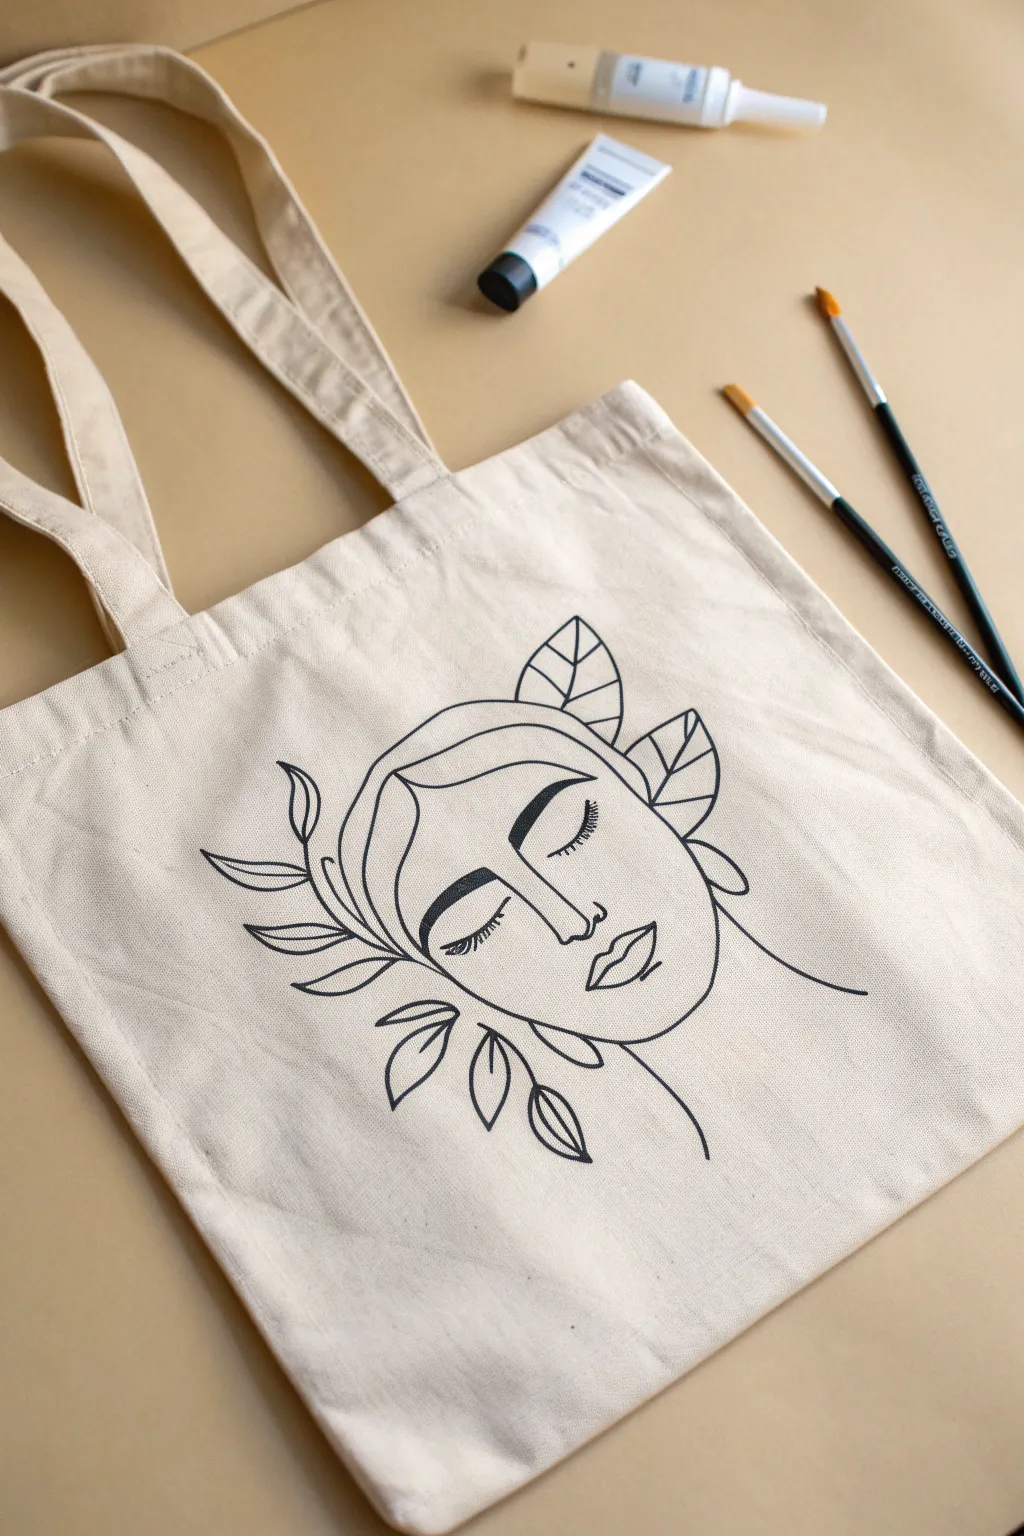
Transform a plain canvas tote into a wearable piece of art with this elegant, minimalist design. This project combines floral motifs with continuous-line inspired facial features for a look that is both modern and peaceful.
Step-by-Step
Materials
- Canvas tote bag (natural or beige)
- Black fabric paint or acrylic paint mixed with fabric medium
- Fine liner brush (size 0 or 00)
- Small round brush (size 2)
- Pencil (HB or lighter)
- Eraser
- Piece of cardboard (to fit inside the bag)
- Iron and ironing board (for setting)
- Tracing paper (optional)
Step 1: Preparation & Sketching
-
Prepare the Surface:
Before you begin, iron your canvas tote bag to remove any deep creases that could disrupt your painting lines. Lay it flat on your workspace. -
Protect the Layers:
Insert a piece of cardboard inside the tote bag. This is crucial as it prevents the paint from bleeding through to the back side of the fabric while you work. -
Establish the Placement:
Decide where you want the face to sit. For this design, aim for the lower center of the bag, leaving some negative space at the top near the handles. -
Sketch the Basic Shape:
Using a light pencil, draw the general outline of the head. Think of an inverted egg shape but keep the jawline soft and rounded. -
Draft the Facial Features:
Sketch a long, vertical line for the nose bridge, connecting it to the brow line. Add two closed, curved eyelids with prominent lashes. Below the nose, sketch simple, full lips. -
Add the Floral Elements:
Draw three large leaves extending from the top right of the head. Then, sketch a leafy branch curving up the left side of the face, mirroring the jawline curve.
Smooth Operator
Work from the top left to bottom right (if right-handed) to avoid smudging wet paint with your hand.
Step 2: Painting the Lines
-
Load Your Brush:
Dip your fine liner brush into the black fabric paint. You want the consistency to be fluid enough to glide but thick enough to be opaque. If it’s too thick, add a drop of water. -
Start with the Eyes:
Begin painting at the center. Carefully trace over your pencil lines for the closed eyelids. Use the very tip of the brush to flick out the eyelashes for a delicate look. -
Define the Brows and Nose:
Paint the thick, bold eyebrows. Connect the right eyebrow seamlessly into the long vertical line of the nose bridge, ending with the nostril curve. -
Outline the Face:
Trace the chin and jawline. Keep your hand steady and try to make long, continuous strokes rather than short, sketchy ones for smoother lines. -
Detail the Hairline:
Paint the wavy lines across the forehead to suggest hair strands. Allow these lines to flow naturally into the side of the face.
Step 3: Finishing Touches
-
Paint the Leaves:
Switch to the slightly larger round brush if needed to fill the leaf shapes, or stick with the liner for the outlines. Trace the veins inside each leaf clearly. -
Refine Line Quality:
Look over your work. Go back and thicken any lines that look too thin or uneven, particularly around the outer contour of the face and the main hair waves. -
Erase Guide Lines:
Once the paint is completely dry (wait at least an hour), gently erase any visible pencil marks. Be careful not to scrub too hard over the paint. -
Heat Set the Design:
To make your bag washable, place a thin cloth over the dry design and iron it on a medium-high setting for about 3-5 minutes to seal the paint.
Add Color
Once the black lines are dry, add transparent washes of watercolor-style fabric paint inside the leaves for a pop of soft green.
Now your stylish, custom tote is ready to handle your daily errands with artistic flair
Trendy Animal Print Patch
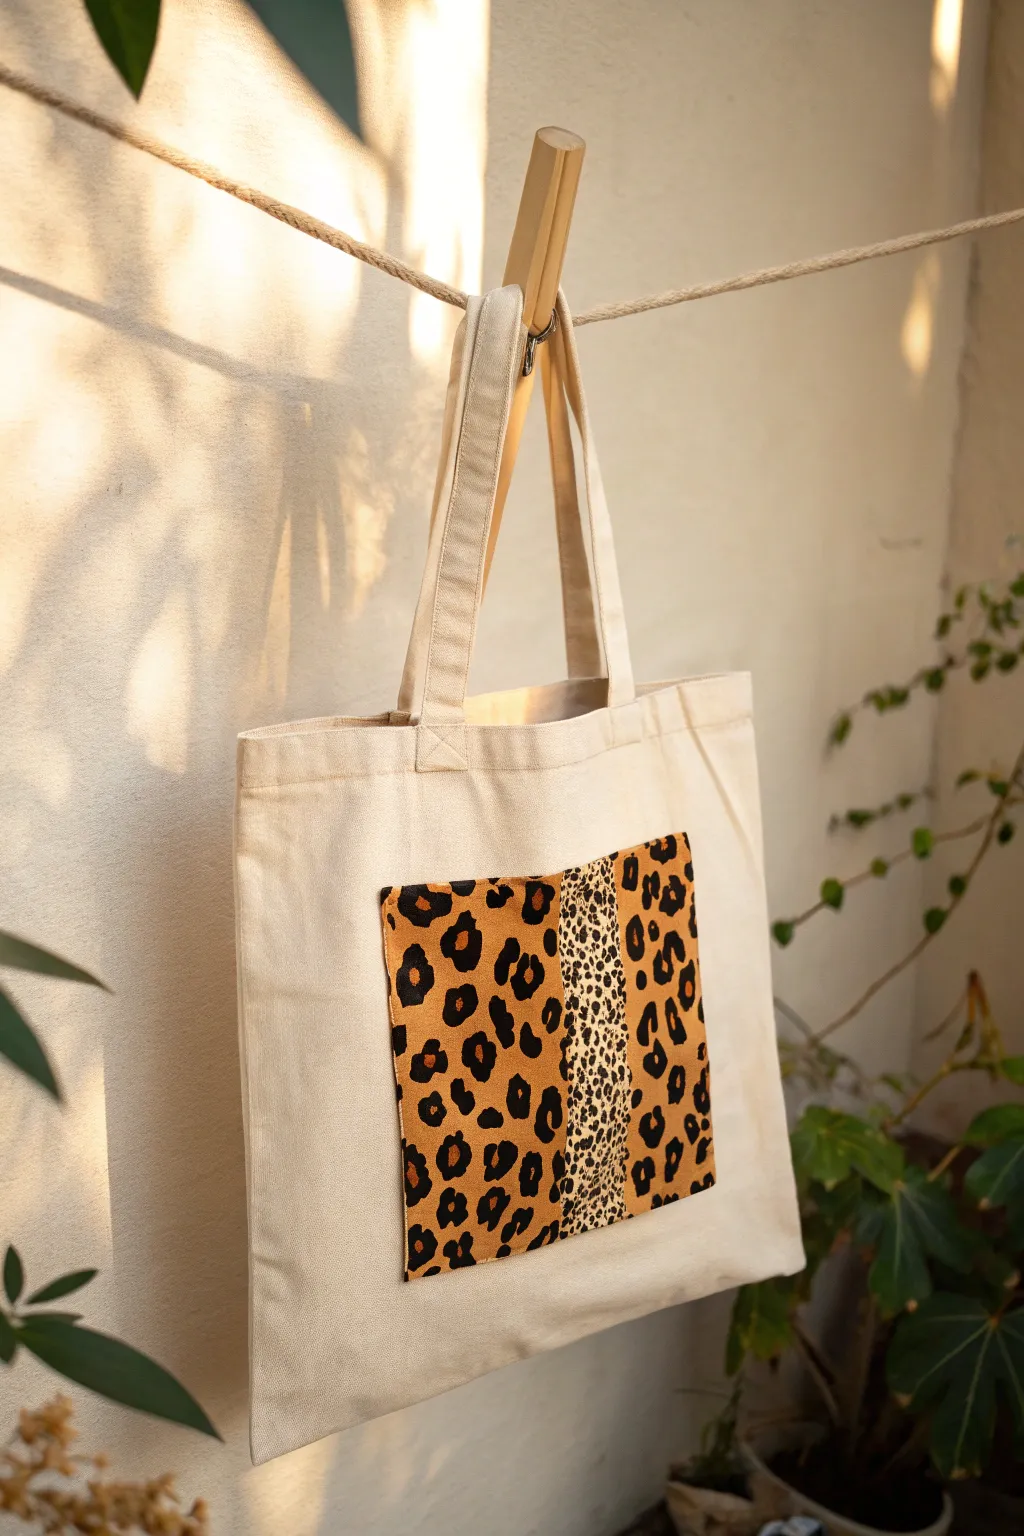
Transform a plain canvas tote into a stylish accessory with this clever faux-patchwork design. By painting contrasting animal prints side-by-side, you’ll create the illusion of a sewn-on fabric patch without picking up a needle and thread.
Step-by-Step Guide
Materials
- Canvas tote bag (pre-washed and ironed)
- Fabric paints (black, camel/tan, dark brown)
- Painter’s tape or masking tape
- Cardboard insert for the bag
- Flat shader brush (medium size)
- Small round detail brush
- Pencil or disappearing fabric marker
- Ruler
- Paper palette or plate
Step 1: Preparation & Layout
-
Protect your bag:
Before starting anything, slide a piece of thick cardboard inside the tote bag. This is crucial to prevent the paint from bleeding through to the back side of the bag while you work. -
Map out the patch:
Using a ruler and pencil, lightly draw a large rectangle in the center of the bag where you want your ‘patch’ to be. A good size is roughly 8×10 inches, but scale it to fit your specific bag. -
Divide the sections:
Draw two vertical lines inside your main rectangle to split it into three distinct columns. Make the center column significantly distinct; a thin 1-inch strip works well to separate the two larger outer panels. -
Tape the borders:
Firmly apply painter’s tape around the outside perimeter of your main rectangle. Press the edges down hard with your fingernail to ensure a crisp, clean line later. -
Base coat application:
Mix a warm camel or tan shade. Using the flat brush, paint the entire rectangle inside the tape with a solid coat of this background color. I find two thin coats are better than one thick one for even coverage. -
Let it dry:
Allow this base layer to dry completely to the touch. This prevents your animal print patterns from becoming muddy.
Clean Edges Pro Tip
Paint a thin layer of the background color along the tape edge first. This seals the tape, so any bleeding is the same color as your base, keeping the final line crisp.
Step 2: Painting the Prints
-
Left panel spots:
Start on the left-most column. Dip your round brush into dark brown paint and create large, irregular blob shapes. Space them out slightly to leave room for the black outlines later. -
Outline the left spots:
Once the brown blobs are tacky-dry, use black paint and a detail brush to paint ‘brackets’ around them. Don’t encircle the whole spot; just paint two or three broken lines around the edges of each brown shape. -
Right panel variation:
Move to the far right column. Repeat the process used on the left, but try to make these spots slightly different in size or density to enhance the ‘patchwork’ feel. -
The center strip:
For the thin middle column, switch to a very fine brush or the tip of your round brush. Instead of large rosettes, simply dot small, dense black marks over the tan background to create a cheetah-style print. -
Filling the gaps:
Go back to your left and right panels. Add small, solid black irregular dots in the empty tan spaces between your large rosettes to make the pattern look authentic and full. -
Dry and reveal:
Let the paint dry completely, ideally for several hours. Once dry, carefully peel away the painter’s tape to reveal the sharp edges of your faux patch. -
Set the paint:
To make your design washable, cover the painted area with a pressing cloth or parchment paper and iron it on a cotton setting (no steam) for several minutes to heat-set the fabric paint.
Paint Looking Streaky?
Canvas has texture that can cause streaks. Don’t add water to fabric paint; instead, dab or stipple the paint into the weave rather than just dragging the brush.
Enjoy using your custom-designed tote for your next outing or market run
Sweet Pet Portrait Silhouette
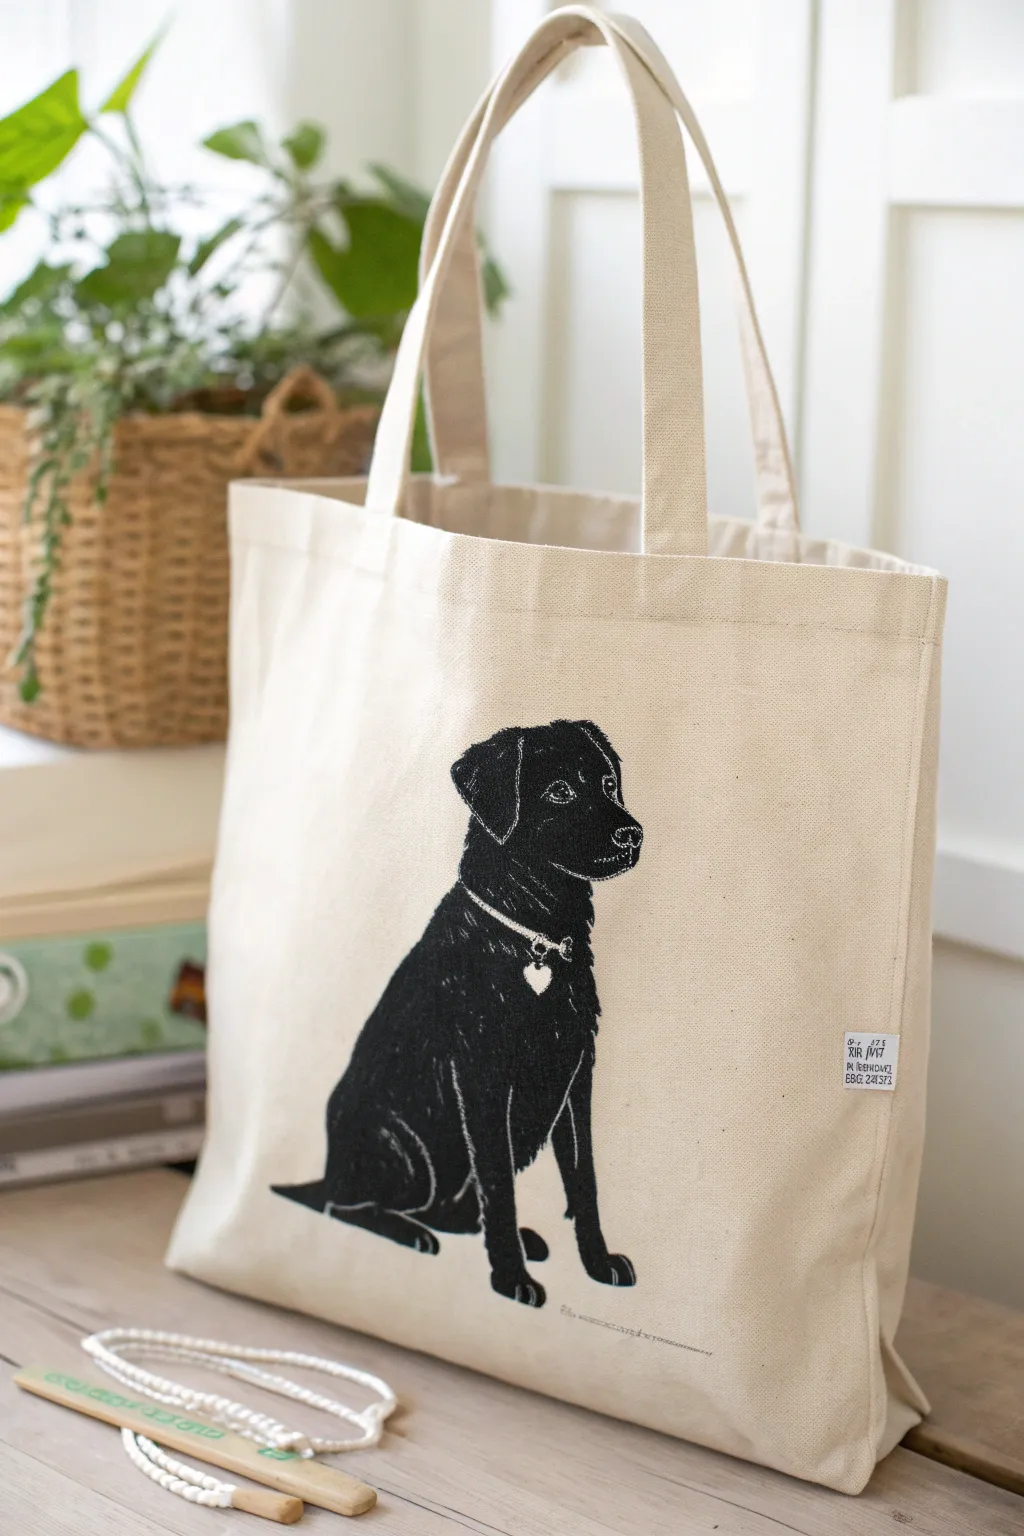
Transform a plain canvas tote into a stylish accessory featuring your furry best friend. This project uses negative space techniques to create a striking black silhouette with charming ‘scratched’ details that bring the texture of fur to life.
Step-by-Step Tutorial
Materials
- Cotton canvas tote bag (washed and ironed)
- Black fabric paint or fabric ink
- White fabric paint or fabric marker (fine tip)
- Cardboard insert
- Painter’s tape or masking tape
- Printed photo of your pet for reference
- Tracing paper or carbon paper
- Pencil
- Fine liner brush (size 0 or 00)
- Flat brush (medium size)
Step 1: Preparation and Outline
-
Prepare the fabric:
Before starting, ensure your tote bag is pre-washed to remove any sizing chemicals that might repel the paint. Iron it completely flat to ensure a smooth painting surface. -
Protect the layers:
Slide a piece of thick cardboard inside the tote bag directly under where you plan to paint. This is crucial to prevent the black paint from bleeding through to the back side of the bag. -
Create your template:
Print a photo of your pet roughly the size you want the final image to be. Outline the main shape of the dog on the paper with a dark marker to simplify the form into a silhouette. -
Transfer the design:
Place a sheet of carbon paper face down on the tote, then tape your printed image on top. firmly trace the outer perimeter of the dog onto the fabric using a pencil or stylus. -
Refine the sketch:
Lift the paper and check your transfer. If lines are faint, go over them lightly with a pencil directly on the fabric so you have a clear boundary for painting.
Bleeding Lines?
If fabric paint bleeds past your outline, don’t panic. Use a slightly damp Q-tip to lift wet paint, or wait for it to dry and cover the mistake with a white fabric marker.
Step 2: Painting the Silhouette
-
Outline the edge:
Using your fine liner brush and black fabric paint, carefully paint along the pencil lines. This creates a crisp barrier known as a ‘dam’ that helps keep the larger fill-in strokes neat. -
Fill the interior:
Switch to your medium flat brush to fill in the body of the dog. Apply the paint evenly, working from the center toward your outlined edges. -
Check for opacity:
Fabric tends to absorb the first layer. I usually let the first coat dry for about 20 minutes and then apply a second thin coat to ensure a solid, deep black color. -
Dry completely:
This is the hardest part—waiting! Let the black silhouette dry completely. It must be dry to the touch before adding white details, or the colors will mix into gray mud.
Step 3: Adding Texture and Details
-
Map the highlights:
Look at your reference photo to see where the light hits the fur—usually the shoulder, chest, and top of the head. Visualizing these areas helps you know where to place your white strokes. -
Paint the eye:
Using a very fine brush or a white fabric marker, add the small white outline of the eye and the pupil highlight. This immediately gives the dog personality. -
Create fur texture:
Instead of drawing solid lines, use short, quick strokes with the white paint to mimic fur. Scratch these lines along the chest, legs, and back where the light would naturally fall. -
Add the accessories:
Paint the collar detail using a steady hand. Draw the thin line around the neck and add the heart-shaped tag, filling it in with solid white to make it pop against the black fur. -
Refine the edges:
If you went slightly outside the lines with the white, you can touch it up with a tiny bit of black paint once the white is dry. -
Set the paint:
Once the entire artwork is dry (ideally overnight), heat set the paint according to the manufacturer’s instructions, usually by ironing the reverse side of the fabric for a few minutes.
Make it Yours
Personalize the tag! Instead of a plain white heart, use a super-fine permanent marker to write your actual pet’s name inside the heart once the white paint is fully dry.
Now you have a custom, durable tote bag that celebrates your pet with artistic flair
Book Stack With Tiny Titles
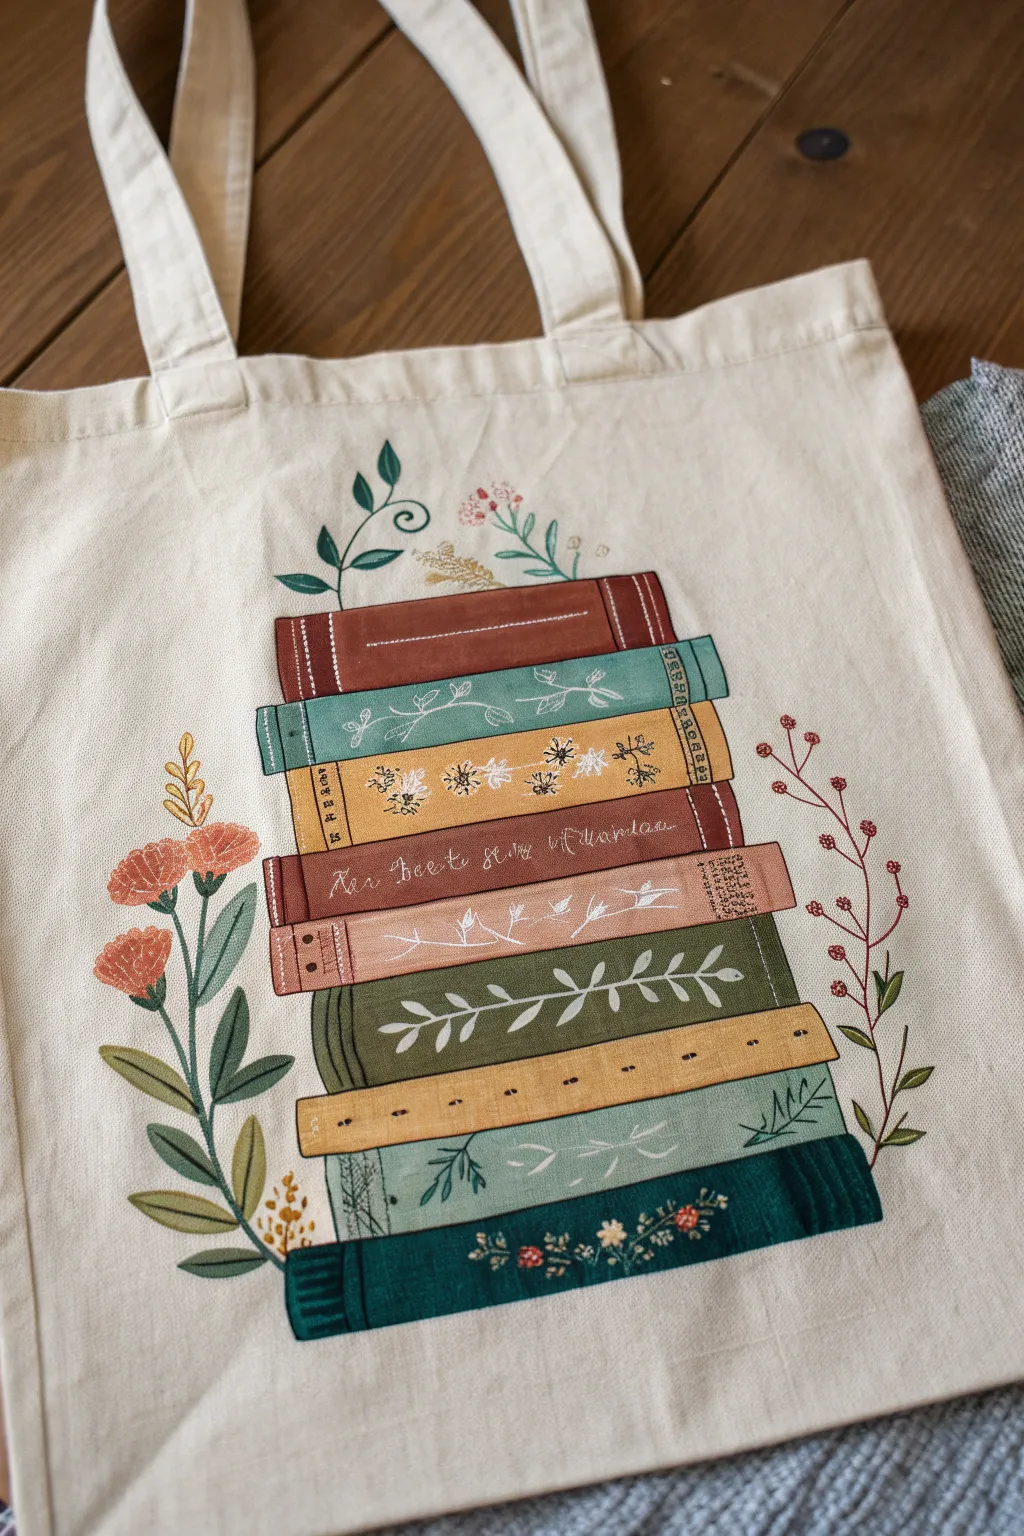
Transform a plain canvas tote into a bibliophile’s dream with this charming stack of hand-painted books intertwined with delicate wildflowers. The design features a cozy, rustic palette and intricate spine details that give the piece a lovely folk-art aesthetic.
How-To Guide
Materials
- Canvas tote bag (pre-washed and ironed)
- Fabric medium
- Acrylic paints (Burgundy, Teal, Mustard Yellow, burnt Sienna, Sage Green, Deep Evergreen, Cream/White)
- Set of detail brushes (specifically a fine liner 00 or 000, and a small flat brush)
- Fabric marker or disappearing ink pen
- Piece of cardboard (to fit inside the bag)
- Hairdryer (optional, for speeding up drying)
Step 1: Preparation and Sketching
-
Prep the surface:
Before starting, slip a piece of cardboard inside your tote bag. This is crucial as it creates a stable surface for painting and prevents any paint from bleeding through to the other side of the bag. -
Outline the stack:
Using a ruler and your disappearing ink pen, lightly sketch a stack of eight horizontal rectangles in the center of the bag. Vary the thickness slightly for realism—some books are naturally thicker than others. -
Add nature elements:
Freehand sketch the floral elements. Draw curving stems coming out from the bottom left and right, hugging the book stack. Add a sprig of leaves and a few tiny flowers popping out of the top book.
Clean Lines Hack
Struggling with straight edges on the books? Use low-tack painter’s tape or washi tape to mask off the rectangles before painting. Peel it off while the paint is still slightly damp.
Step 2: Painting the Base Layers
-
Mix your medium:
Mix your acrylic paints with fabric medium according to the bottle instructions (usually 1:1 or 2:1). This ensures the paint moves smoothly on canvas and won’t crack later. -
Paint the bottom book:
Start with the bottom-most book using a deep evergreen or dark teal shade. Using a small flat brush, fill in the rectangle, keeping edges crisp. Add a small vertical rectangle on the left side to represent the spine binding. -
Layer the lighter colors:
Move up to the next book with a muted sage green. Continue upward, alternating colors to create contrast. Use mustard yellow for the third book from the bottom, followed by a dark olive green. -
Paint the middle books:
For the middle section, use a warm terracotta or burnt sienna for the thin book, and a creamy beige for the one above it. I find that alternating warm and cool tones makes the stack look more balanced. -
The top stack:
Paint the second-to-top book in a soft teal blue. Finish the stack with a rich burgundy or mahogany red for the very top book. -
Dry thoroughly:
Let this base layer dry completely. This is the most important patience test! If the paint is wet, your fine details in the next step will smudge.
Step 3: Adding Spine Details
-
Add spine definition:
Using a slightly darker shade of each book’s base color (or a diluted black), paint thin vertical lines on the left and right edges of each spine to simulate the binding indentations. -
Paint the intricate patterns:
Switch to your finest 00 liner brush. Mix a creamy white paint for high contrast. On the green books, paint varying leaf vines—some with simple ovals, others with small branching stems. -
Detail the yellow book:
On the mustard yellow spine, carefully paint tiny black dots or dashes to mimic stitching or embossed leather texture. -
Create faux titles:
On the terracotta spine, use white paint to create loopy, illegible cursive text that mimics a title. It doesn’t need to say anything real; just the suggestion of script is enough. -
Add floral motifs to spines:
On the beige and teal books, paint tiny asterisks or star-shaped flowers in white or dark brown to create a patterned cloth-bound look. -
Final spine touches:
Add small horizontal lines at the very top and bottom of each spine to represent headbands or decorative gilding.
Texture Tip
For a more vintage, worn-book look, lightly dry brush a tiny bit of white paint on the corners and center of the spines to simulate wear and highlights.
Step 4: Floral Background and Finishing
-
Paint the greenery:
Using various shades of green, fill in the stems and leaves you sketched earlier on the sides. Use a darker green for the large leaves on the left to ground the design. -
Add the flowers:
Paint the flower heads using coral, orange, and soft pink tones. For the flowers on the left, use small dabbing motions to create a textured, carnation-like appearance. -
Connect the sprigs:
Don’t forget the tiny sprigs coming out of the top book. Use a very light hand with the liner brush to make these look delicate and airy. -
Heat set:
Once the paint is fully dry (wait at least 24 hours), heat set the design by ironing the reverse side of the bag on a cotton setting without steam.
Now you have a literary masterpiece to carry your current reads in style
Mini Mountain Landscape Scene
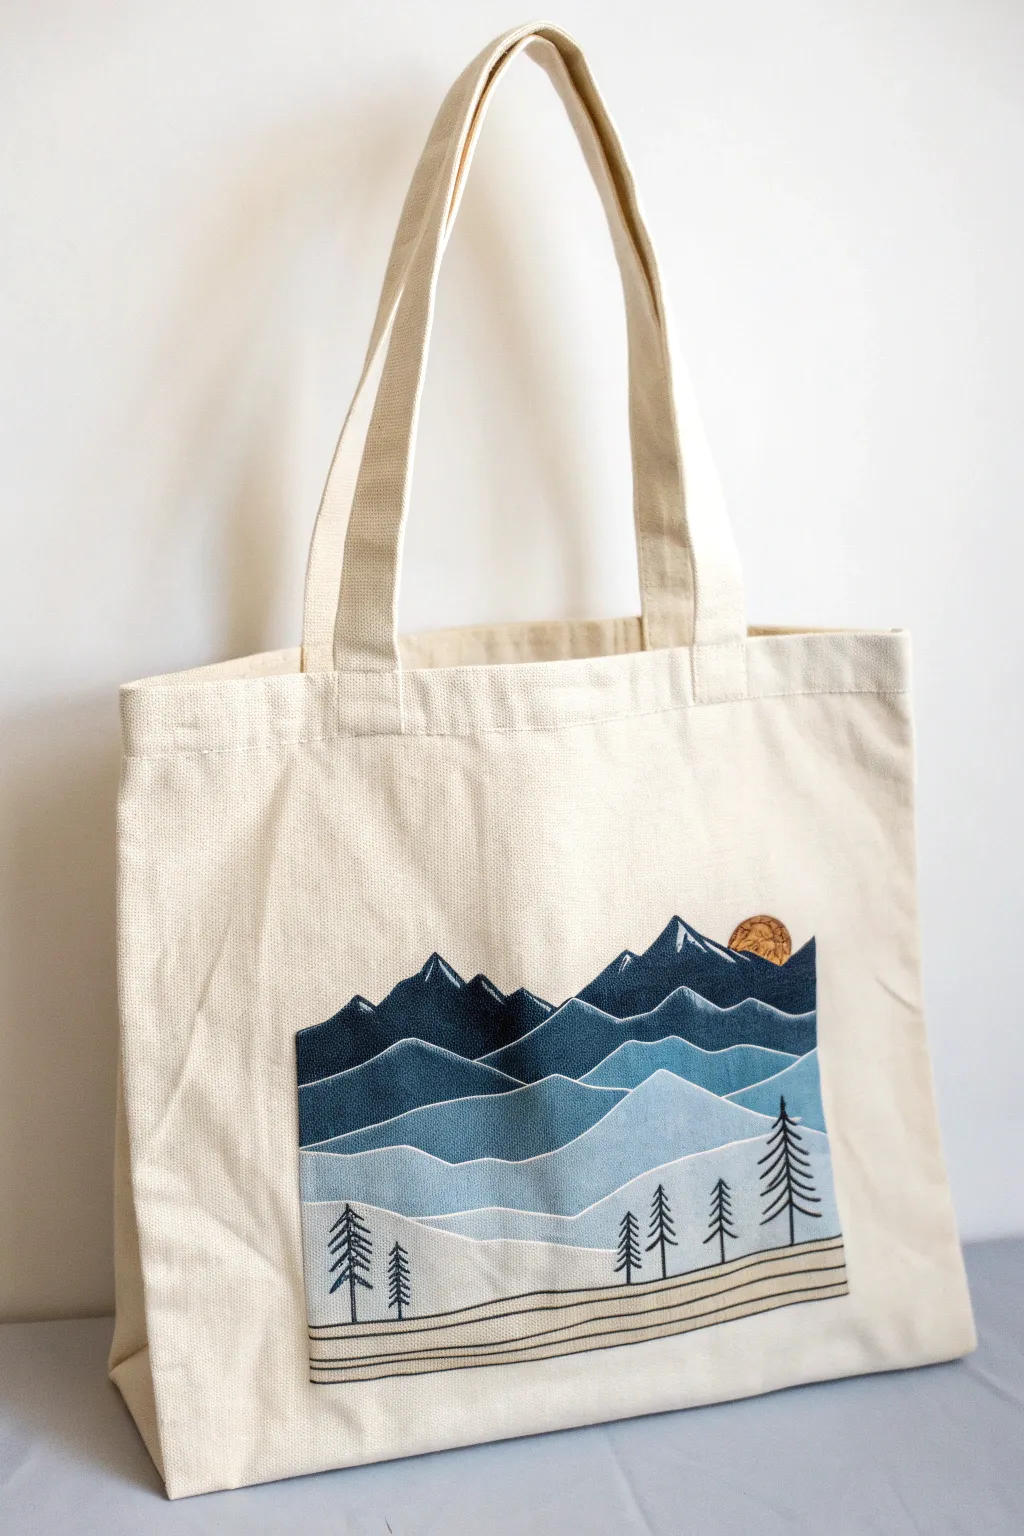
Transform a plain canvas tote into a serene landscape with this tiered mountain design. Using a simple layering technique and shades of blue, you’ll create a graphic, patch-style artwork that looks professionally printed.
Step-by-Step Guide
Materials
- Canvas tote bag (natural or white)
- Fabric paints (Navy Blue, Royal Blue, Light Blue, White, Black, Gold/Yellow)
- Flat paintbrushes (medium and small)
- Fine liner brush or fabric marker (black)
- Masking tape or painter’s tape
- Palette for mixing
- Piece of cardboard (to fit inside the bag)
- Pencil
- Iron (for heat setting)
Step 1: Preparation and Base Layer
-
Prep the Bag:
Start by washing and drying your tote bag without fabric softener to remove any sizing chemicals. This ensures the paint adheres properly. -
Insert Protection:
Slide a piece of cardboard inside the tote bag directly behind where you plan to paint. This prevents paint from bleeding through to the other side. -
Define the Frame:
Use masking tape to create a crisp rectangle or square on the front of the bag. This acts as your stencil frame to give the artwork that clean, patch-like appearance. Press the edges of the tape down firmly. -
Sketch the Peaks:
Lightly sketch your mountain ranges using a pencil directly onto the fabric within your taped area. Draw three main tiers of mountains and a few rolling hills in the foreground. -
Mix the Darkest Blue:
On your palette, prepare your darkest shade—a deep navy blue. If your blue isn’t dark enough, add a tiny touch of black.
Crisp Edge Tip
Before painting blue, seal your masking tape edges by painting a thin layer of white paint over the tape line first. This prevents bleeding.
Step 2: Painting the Layers
-
Paint the Background Range:
Fill in the furthest mountain range (the top section) with your prepared navy blue. Use a flat brush to get sharp edges against the tape and careful strokes near your pencil lines. -
Paint the Middle Range:
Mix your navy blue with a little royal blue or white to create a medium-dark tone. Paint the middle tier of mountains with this shade. -
Create the Foreground Hills:
Mix a much lighter blue by adding a significant amount of white to your royal blue. Paint the rolling hills in the lower section of the design. -
Paint the Sky and Ground:
Leave the sky area unpainted (letting the canvas show through creates a great contrast). For the ground at the very bottom, mix a very pale beige or use a diluted white to create a subtle base strip. -
Add the Moon:
Using a small brush and gold or yellow paint, carefully dab a small semi-circle emerging from behind the darkest mountain peak. -
Let it Dry:
Allow the main blocks of color to dry completely. This is crucial before adding details to prevent muddying the lines.
Step 3: Detailing and Finishing
-
Add Separating Lines:
Using a fine liner brush and white paint, carefully trace the top edge of each mountain range. This white outline separates the layers and gives the design a crisp, illustrative style. -
Paint the Trees:
Switch to your finest brush or a black fabric marker. Draw simple, vertical lines for trunks in the foreground and middle ground layers. Add short, downward-sloping dashes to create the pine branches. -
Add Ground Stripes:
At the very bottom of the design, paint three or four thin horizontal black lines across the beige ground section to stylize the earth. -
Highlight the Peaks:
For extra dimension, I sometimes add a tiny triangle of lighter blue or white on the sun-facing side of the navy mountain peaks to mimic snow or light hitting the summit. -
Remove the Tape:
Once the paint is tacky but not fully hardened, slowly peel away the masking tape to reveal your sharp rectangular borders. -
Heat Set:
After allowing the bag to dry for at least 24 hours, place a piece of cotton cloth over the design and iron it on a medium setting to seal the paint and make it washable.
Make it Metallic
Swap the white outline paint for a metallic silver or gold fabric paint to make the mountain ridges shimmer in the sunlight.
Now you have a durable, custom piece of art ready to carry your books or groceries
Moody Night Sky With Splatter Stars
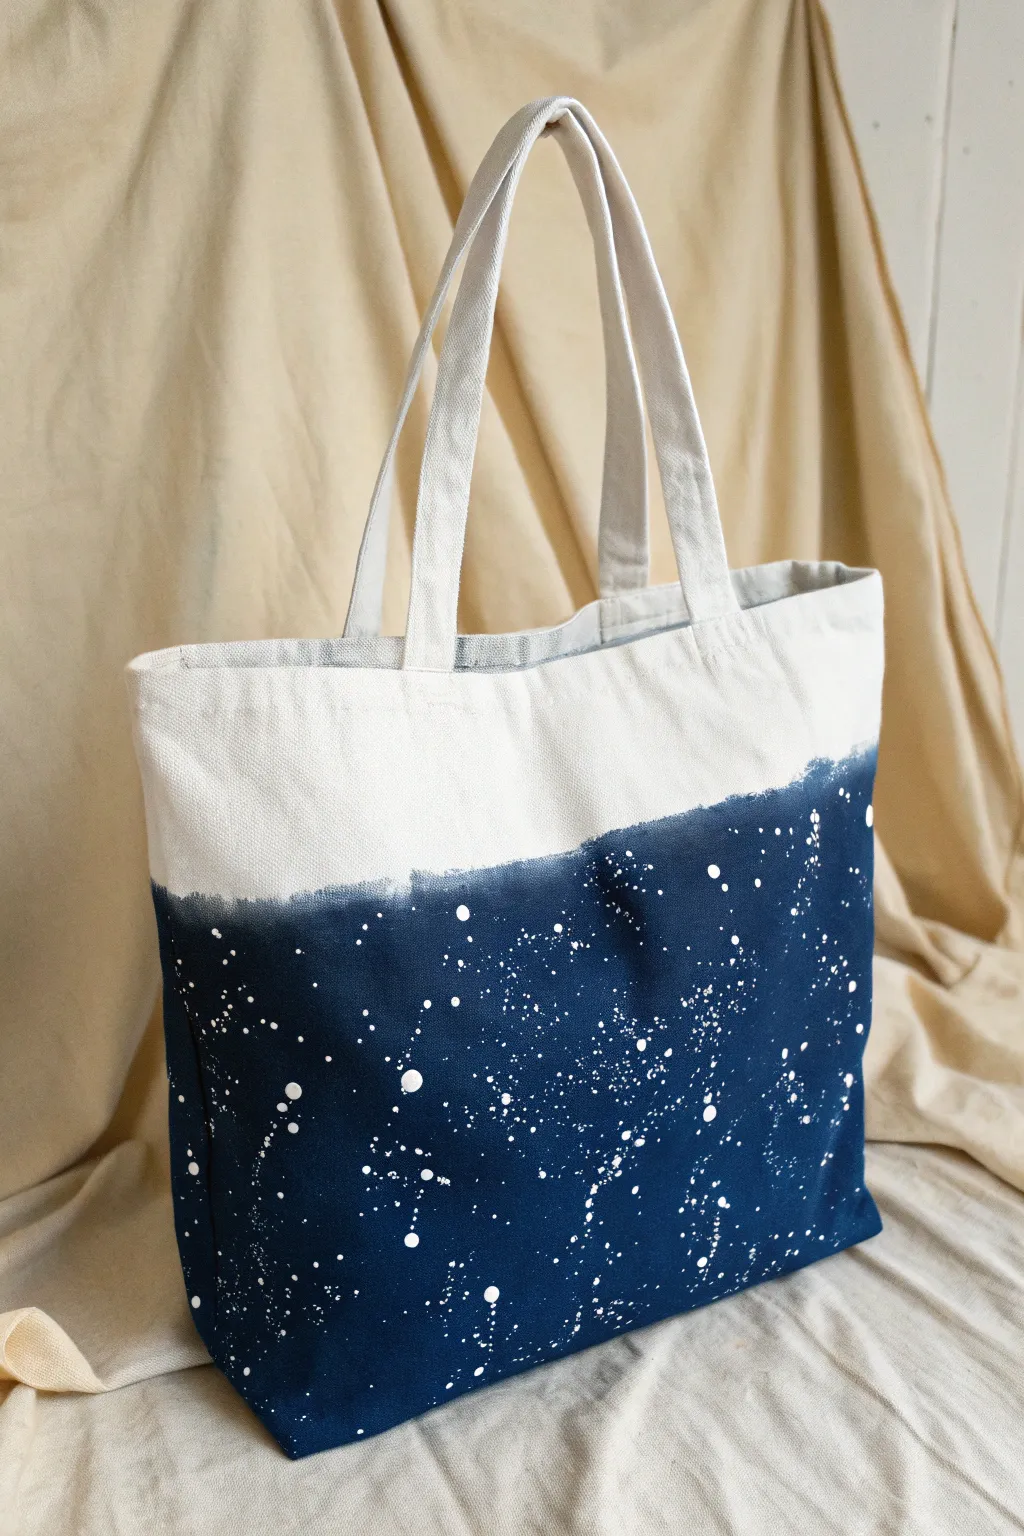
Transform a plain canvas tote into a portable piece of the galaxy with this moody night sky design. By combining a gradient painting technique with intentional splattering, you’ll create a striking celestial scene that makes everyday errands feel magical.
Detailed Instructions
Materials
- Plain canvas tote bag (washed and dried)
- Fabric paint or acrylic paint mixed with textile medium
- Colors: Midnight Blue, Black, White
- Wide flat paintbrush (1-2 inch)
- Small stiff-bristled brush or old toothbrush
- Cup of water
- Cardboard insert or thick paper layers
- Painter’s tape or masking tape
- Drop cloth or extensive table covering
Step 1: Preparation
-
Prep the workspace:
This project gets messy, especially during the star-making phase, so cover a large area of your table or floor with a drop cloth or old newspapers. -
Insert protection:
Slide a piece of thick cardboard or several layers of heavy paper inside the tote bag. This is crucial to prevent the paint from soaking through to the other side. -
Plan your horizon:
Decide where you want the night sky to begin. In the reference image, the color starts about one-third of the way down from the top handles. You can mark this lightly with a pencil if you wish, but freehand looks more organic. -
Tape the handles:
Wrap some painter’s tape around the base of the handles just in case your brush slips, keeping the natural canvas pristine.
Bleed Control
To get that soft, feather-like top edge, try dampening the clean canvas just above the paint line with clear water before applying the diluted blue paint.
Step 2: Painting the Sky
-
Mix the base color:
Squeeze out a generous amount of midnight blue fabric paint. To get that deep, infinite space look, I like to mix in a tiny drop of black to darken the blue slightly without making it pure black. -
Dilute for the edge:
In a separate small container, mix a small amount of your blue paint with water (about 50/50 ratio). This watery mix will be used later for the top edge. -
Apply the main block:
Using your wide flat brush, paint the bottom half of the bag with the undiluted dark blue paint. Ensure you saturate the canvas weave thoroughly. -
Work upwards:
Continue painting upwards toward your imaginary horizon line. As you get closer to the top edge, stop dipping your brush in fresh paint and just use what is left on the bristles. -
Create the soft transition:
Dip your brush into the watered-down paint mix created earlier. Gently paint the very top edge of the blue section, allowing the water to bleed slightly into the dry canvas above. This creates that ‘watercolor’ or dip-dye transition rather than a harsh line. -
Paint the bottom and sides:
Don’t forget to paint the gusset (bottom) and side panels of the bag so the design wraps all the way around. -
Let it dry completely:
Allow the blue base coat to dry fully. This is essential; if the blue is wet, your white stars will turn light blue or gray instead of staying crisp white.
Cosmic Glow Up
Mix a tiny amount of glow-in-the-dark pigment into your white star paint. The bag will look normal during the day but reveal a hidden galaxy at night.
Step 3: Creating the Stars
-
Prepare star paint:
Mix white fabric paint with a very small amount of water. You want a consistency similar to heavy cream or melted ice cream—fluid enough to fly off a brush, but thick enough to be opaque. -
Test your splatter:
Before hitting the bag, practice your splatter technique on a piece of scrap paper to gauge the size of the droplets. -
Create the Milky Way:
Dip a stiff brush or old toothbrush into the white mix. Using your thumb, flick the bristles to send a fine mist of spray across the blue section. Concentrate heavily in one distinct band to mimic a galaxy cluster. -
Add distinct stars:
Reload the brush with slightly more paint. Instead of flicking, tap the handle of the brush against your other hand over the bag. This creates larger, rounder drops. -
Manual placement:
For the largest planets or bright stars shown in the image, dip the non-brush end (the handle tip) into the white paint and gently dot it directly onto the canvas in random spots. -
Repeat on reverse:
Once the front is completely dry, flip the bag over and repeat the painting and splattering process on the back side. -
Heat set:
Once everything is cured (usually 24 hours), run a hot iron over the painted design (using a pressing cloth between the iron and bag) to seal the fabric paint permanently.
Now you have a stunning, celestial accessory ready to carry your belongings.
Sharp Tape-Resist Angles
Give a simple canvas bag a designer upgrade with bold, intersecting angles and a warm color palette. This tape-resist technique creates remarkably crisp lines, transforming everyday utility into a striking fashion statement.
Step-by-Step Tutorial
Materials
- Heavyweight canvas tote bag (cream/natural)
- Painter’s tape (1-inch and 2-inch widths)
- Fabric medium
- Acrylic paint (Black)
- Acrylic paint (Terracotta/Burnt Orange)
- Ruler or straight edge
- Flat paintbrushes (stiff synthetic bristles work best)
- Iron and ironing board
- Hairdryer (optional for speed)
- Cardboard or plastic insert
Step 1: Preparation and Planning
-
Pre-wash the fabric:
If your tote bag is new, wash and dry it without fabric softener to remove sizing chemicals. This ensures the paint adheres permanently to the fibers. -
Iron flat:
Press the tote bag thoroughly to remove all wrinkles. A completely smooth surface is critical for getting tight tape seals and preventing bleed-through. -
Protect the inside:
Slide a piece of thick cardboard or a plastic cutting mat inside the bag. This prevents paint from soaking through the front canvas layer to the back. -
Mix your medium:
Mix your black and terracotta acrylic paints with fabric medium according to the bottle instructions (usually a 2:1 ratio of paint to medium). This makes the paint flexible so it won’t crack when the bag bends.
Bleeding Lines?
Paint leaking under tape? Next time, apply a thin layer of the background color (or clear medium) over the tape edges first to seal them before adding color.
Step 2: Taping the Design
-
Lay the primary diagonal:
Start by placing a long strip of wider tape diagonally across the bag, running from the top left corner area down toward the bottom right. This will become one of your major negative-space (unpainted) lines. -
Create the ‘X’ shape:
Place a second long strip of tape running from the top right area toward the bottom left, intersecting your first piece. This establishes the main ‘X’ energy of the design. -
Add parallel blockers:
Use your ruler to measure parallel lines away from your main ‘X’. Place additional strips of tape to create the secondary white stripes, varying the spacing slightly to create visual interest like the example. -
Seal the edges:
I always take a moment here to run a fingernail or a credit card firmly along every edge of the tape. Pressing hard ensures the seal is tight against the fabric weave.
Step 3: Painting the Colors
-
Plan your color blocks:
Look at the spaces created between the tape. Decide which segments will be black and which will be terracotta. The example uses black for the prominent central diagonal and terracotta for the lower/side segments. -
Paint the black section:
Using a flat brush, apply the black paint mixture to the designated central stripe. Brush *away* from the tape edge or parallel to it, rather than pushing paint underneath the tape. -
Apply the terracotta:
Switch brushes and fill in the other geometric sections with your terracotta mixture. Ensure the coverage is solid and opaque; canvas is thirsty and might need a generous application. -
Touch up weak spots:
Let the first coat dry for about 20 minutes. If the canvas texture is still showing through too much, apply a second thin coat for deep, rich color. -
Let it set deeply:
Allow the paint to dry until it is tacky but mostly set. You don’t want it bone dry yet, as the tape can sometimes pull up dry paint chips.
Pro Tip: Texture
For a vintage, screen-printed look, use a stencil brush and pounce the paint on vertically rather than brushing it. It drives pigment deep into the weave.
Step 4: Finishing Touches
-
The reveal:
Slowly and carefully peel back the tape at a 45-degree angle. This is the most satisfying part, revealing the crisp cream canvas lines underneath. -
Clean up bleed:
If any tiny spots of paint bled under the tape, use a small stiff brush with a tiny bit of water or rubbing alcohol to gently scrub them away immediately. -
Full cure:
Allow the bag to dry completely for at least 24 hours. Don’t rush this, as the paint needs time to bond with the fabric. -
Heat set:
Once dry, place a thin cotton cloth over the painted design and iron on a high, dry setting for 3-5 minutes to permanently heat-set the design.
Take your new custom tote out for a spin and enjoy the durable, stylish finish you created by hand
Marbled Pour Painting Panel
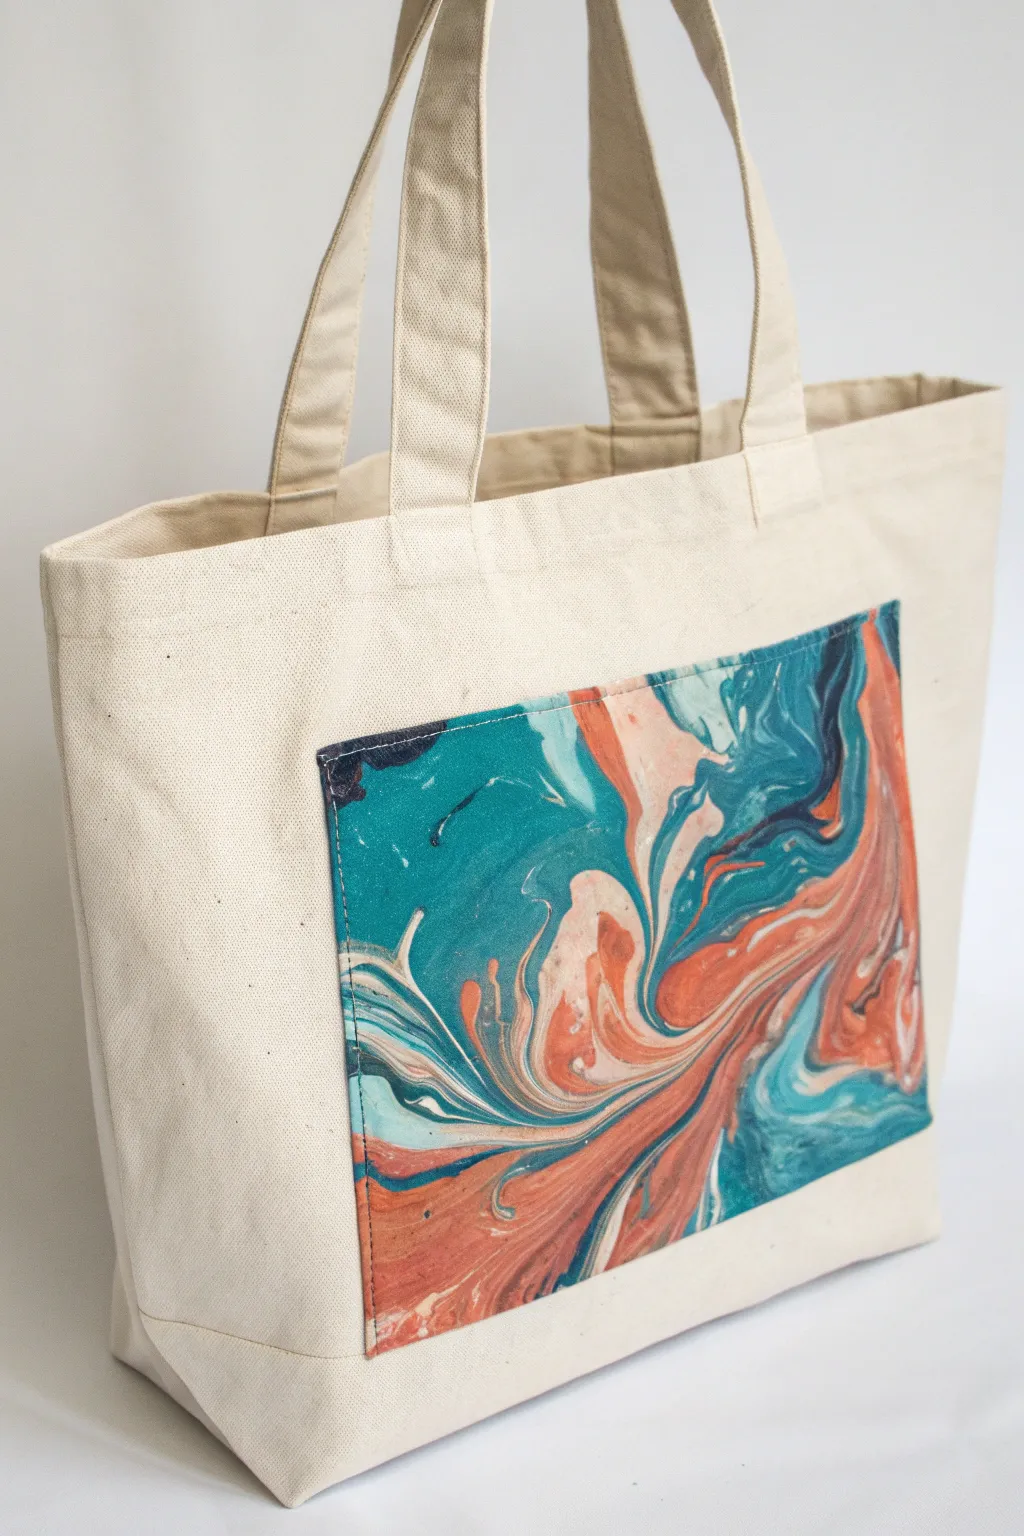
Transform a plain canvas tote into a stunning piece of wearable art with this fluid acrylic technique. By creating a custom marbled panel first and attaching it later, you achieve clean edges and a mesmerizing spin of teal and rust hues.
Step-by-Step Guide
Materials
- Canvas tote bag
- Heavyweight cotton canvas fabric (for the pocket panel)
- Acrylic pouring medium
- Acrylic paints (teal, burnt orange/rust, navy blue, white)
- Cardboard or plastic drop sheet
- Plastic cups and stirring sticks
- Masking tape
- Fabric glue or sewing machine
- Scissors and ruler
- Iron
- Clear acrylic sealer spray (optional)
Step 1: Preparing the Pour
-
Cut the Panel:
Measure and cut a rectangle of your spare canvas fabric that is slightly larger than your desired final pocket size to account for seam allowances. A 7×9 inch piece works well for standard totes. -
Prep the Surface:
Tape your canvas rectangle down flat onto a piece of cardboard or a plastic sheet using masking tape along the very edges. This keeps the fabric taut and prevents it from curling while wet. -
Mix Paints:
In separate cups, mix each acrylic paint color with pouring medium. Aim for a consistency like warm honey—fluid enough to flow but thick enough to hold color separation. A 1:1 ratio is a good starting point. -
Layer the Cup:
Take a clean, empty cup and begin layering your colors. Pour small amounts of teal, rust, navy, and white on top of each other without stirring. Repeat the layers until the cup is about half full.
Step 2: Creating the Marbling
-
The Flip Cup:
Place your taped-down canvas piece upside down over the cup opening, hold them tight, and quickly flip the assembly over so the cup is now sitting on the canvas. -
Release the Paint:
Wait a moment for the paint to settle, then gently lift the cup. The paint will puddle outward. -
Tilt and Flow:
Pick up the cardboard base (with the fabric taped to it) and gently tilt it in different directions. Guide the paint to cover the entire fabric surface, letting the excess run off the edges. -
Refine the Pattern:
If you see air bubbles, pop them gently with a pin or a quick pass of a culinary torch. If needed, add a few drops of specific colors to empty spots and tilt again to integrate them naturally. -
Detailed Adjustment:
I sometimes use a toothpick to drag through the paint very lightly to accentuate swirls or break up large blocks of color, but avoid over-mixing or the colors will turn muddy. -
Deep Drying:
Place the board on a level surface and let it dry completely. This can take 24 to 48 hours depending on humidity. Do not touch it while it dries.
Muddy Colors?
If your colors turn brown or grey, you likely over-tilted or stirred the paints too much. Next time, tilt slowly and stop as soon as the canvas is covered to preserve contrast.
Step 3: Assembly
-
Seal the Art:
Once fully dry, spray the painted surface with a clear acrylic sealer. This protects the design from cracking and makes it more water-resistant. -
Trim Edges:
Remove the masking tape. Using a ruler and scissors, trim the raw edges of the painted canvas to create straight, clean lines, leaving about half an inch of unpainted border if possible for folding. -
Create Hems:
Fold the edges of the canvas backward to create a clean rectangular shape. Press these folds firmly with a warm iron (use a pressing cloth over the paint!) to set the creases. -
Position on Tote:
Lay your tote bag flat and center your marbled panel on the front. Use pins or painter’s tape to hold it exactly where you want it. -
Secure the Panel:
Stitch around the three sides (sides and bottom) to create a functional pocket, or use strong fabric glue for a no-sew option. If sewing, a denim needle helps penetrate the layers easily.
Go Metallic
Mix a metallic gold or copper paint into your pouring cup. When dry, these ribbons of shimmer will catch the light and make the tote look high-end.
Now you have a practical bag that doubles as a gallery for your fluid art skills
Secret Inside Pattern Surprise
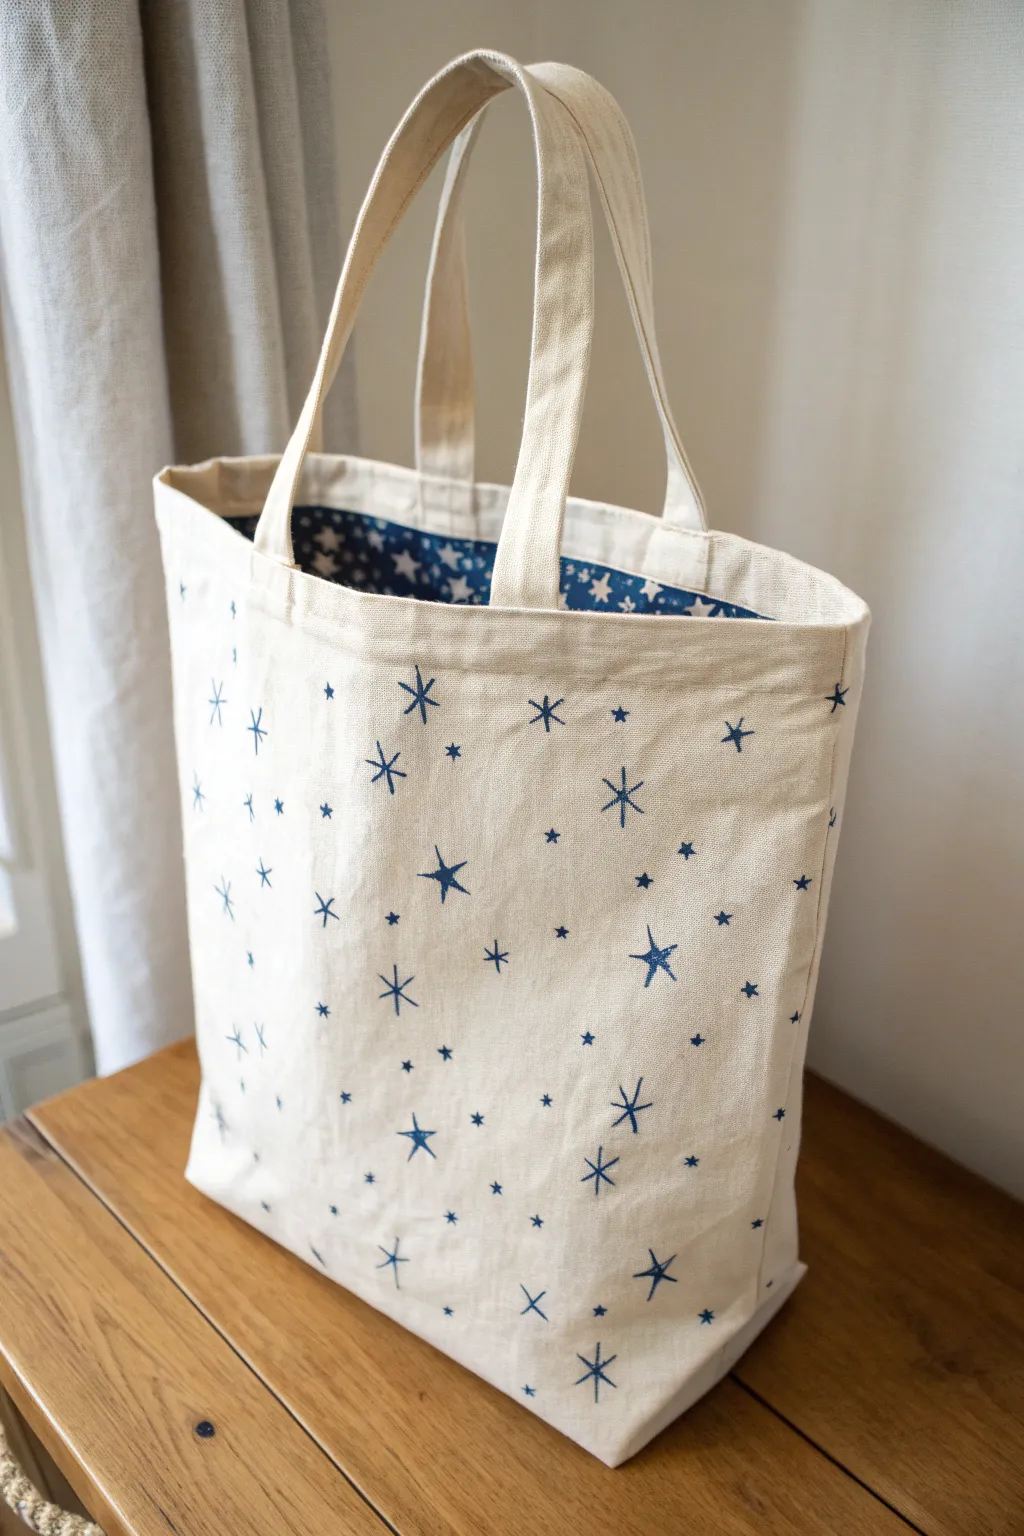
Transform a plain canvas tote into a celestial statement piece with this clever dual-sided project. This design combines a scattering of simple hand-painted stars on the outside with a darker, denser pattern peeking out from the lining for a delightful visual surprise.
How-To Guide
Materials
- Heavyweight canvas tote bag (natural or off-white)
- Fabric paint (Navy blue or Midnight blue)
- Fine-point round brush (size 2 or 4)
- Fine liner brush (size 0 or 00 for small details)
- Cardboard insert or heavy paper (to fit inside the bag)
- Small flat brush or star stamps (optional)
- Iron and ironing board
- Press cloth or parchment paper
Step 1: Preparation
-
Wash and dry:
Begin by pre-washing your canvas tote if it is new. This removes sizing chemicals and allows the fabric paint to adhere better. Let it dry completely and give it a quick iron to create a smooth painting surface. -
Protect the layers:
Insert a piece of thick cardboard or heavy paper inside the main compartment of the tote bag. This is crucial to prevent paint from bleeding through the front layer and staining the back of the bag as you work.
Stamp for Consistency
Carve a small eraser into a star shape to stamp the basic forms quickly, then use a brush to pull out sharp tips for a hand-painted look.
Step 2: Painting the Exterior
-
Plan the layout:
Visualize a random scatter pattern. You want a mix of large ‘hero’ stars, medium support stars, and tiny filler dots. Don’t arrange them in a grid; aim for an organic, constellations-like feel. -
Paint large twinkling stars:
Dip your fine-point round brush into the navy fabric paint. Start by painting the largest stars. Draw a simple cross first—one vertical line intersecting a horizontal line. Then, add diagonal lines intersecting the center, but make these slightly shorter than the main cross. -
Refine the shape:
Go back over your large stars to taper the ends of the lines. Lift the brush pressure as you reach the tip of each ray to create a sharp, pointy end rather than a blunt one. -
Create medium stars:
Using the same technique, paint medium-sized stars in the open spaces. For these, you might stick to just a simple five-point star doodle or a smaller cross shape without the extra diagonal rays. -
Add tiny details:
Switch to your fine liner brush or the very tip of your round brush. Fill in the remaining negative space with tiny five-point stars (like an asterisk shape) and simple dots to represent distant stars. -
Let it dry:
Allow the exterior paint to air dry completely. This usually takes about an hour, depending on the thickness of your paint application.
Cosmic Sparkle
Mix a tiny amount of silver fabric glitter or metallic medium into your navy blue paint for a subtle shimmer that catches the light.
Step 3: The Secret Inside Lining
-
Prepare the lining area:
If your tote has a separate lining fabric, great! If not, we will paint the upper inner rim to create the illusion of a full lining. Turn the top edge of the bag inside out or simply prop the bag open wide to access the inner fabric. -
Base coat (optional):
For a truly dramatic effect, you can paint a solid block of navy blue on the inner upper facing, leaving white stars in negative space. However, the easier method shown here is to simply paint a very dense pattern of blue stars on the natural fabric. -
Paint dense stars:
Using your navy paint, create a much tighter pattern on the inside fabric. Paint small, solid five-point stars or asterisks very close together. The goal is to make the inside look darker and busier than the airy outside. -
Fill the gaps:
I like to add extra dots and tiny dashes in between the inside stars to create a ‘galaxy’ texture that contrasts with the minimalist exterior. -
Dry carefully:
Prop the bag open so the wet inner sides don’t touch each other. Let this dry completely, preferably overnight.
Step 4: Finishing Touches
-
Heat set the paint:
Once the paint is fully dry, heat setting is essential for washability. turn the bag inside out gently. -
Iron the design:
Place a scrap of fabric or parchment paper over the painted areas. Run a hot iron (no steam) over the design for 3-5 minutes, keeping the iron moving constantly to set the ink into the fibers.
Now you have a custom star-studded accessory perfect for carrying your daily essentials


Have a question or want to share your own experience? I'd love to hear from you in the comments below!