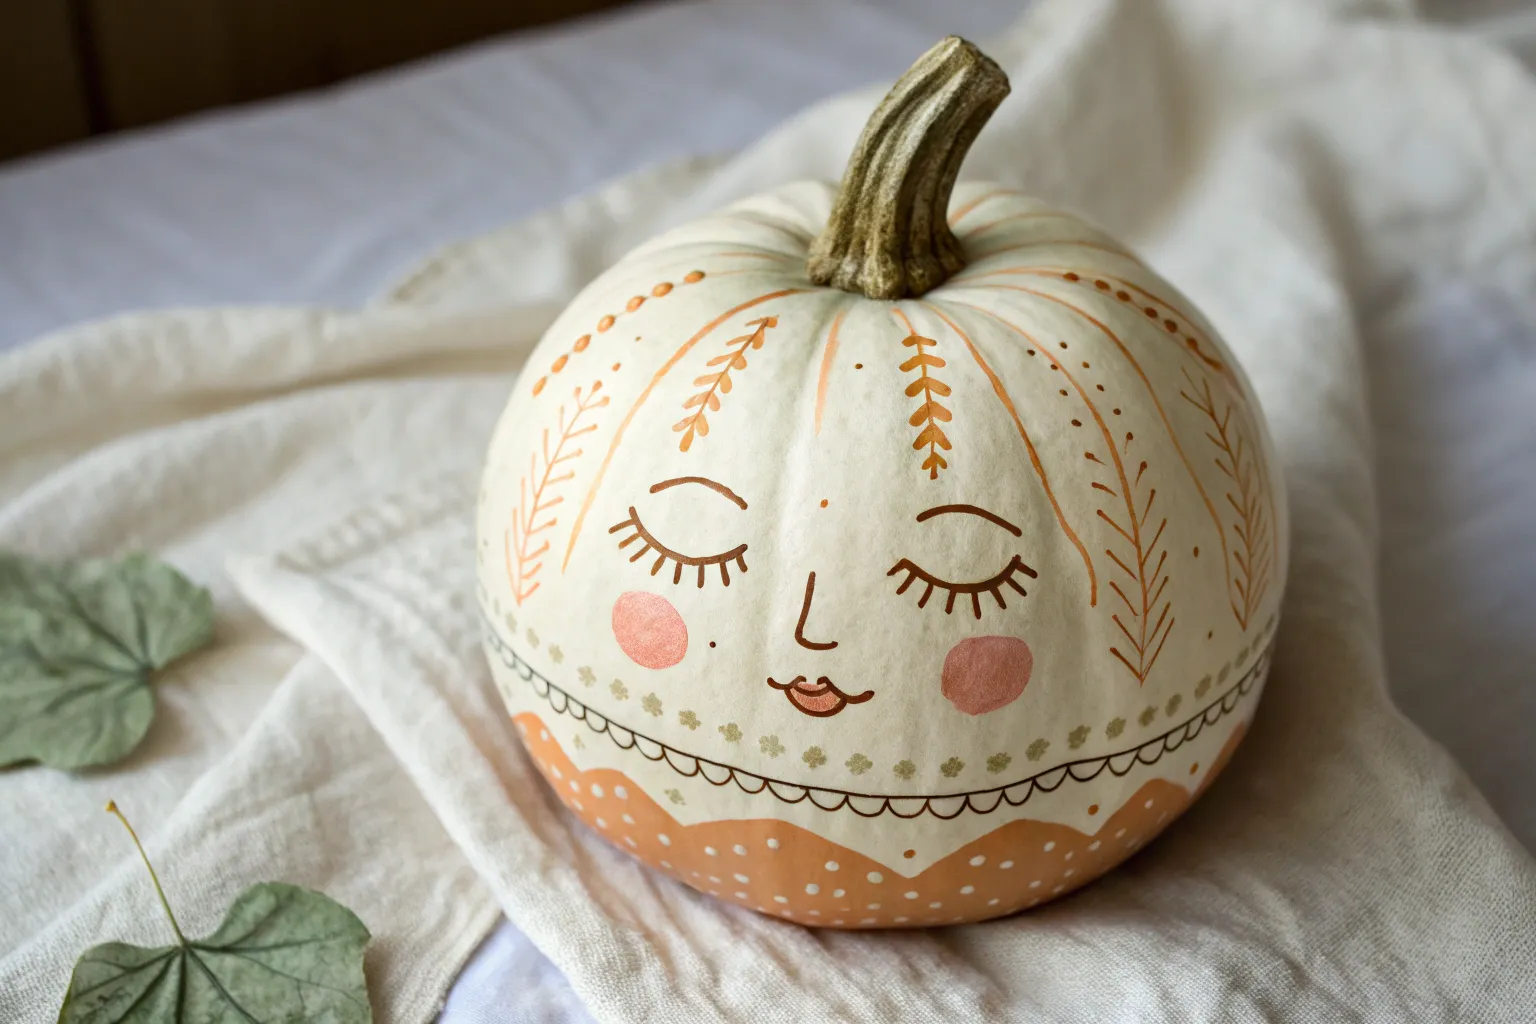
If you’re craving fresh pumpkin drawing ideas, you’re in the right headspace—quick wins, cozy vibes, and plenty of room to play. I’m sharing my favorite ways to draw pumpkins (and draw on pumpkins) using simple shapes, bold line art, and fun pattern twists.
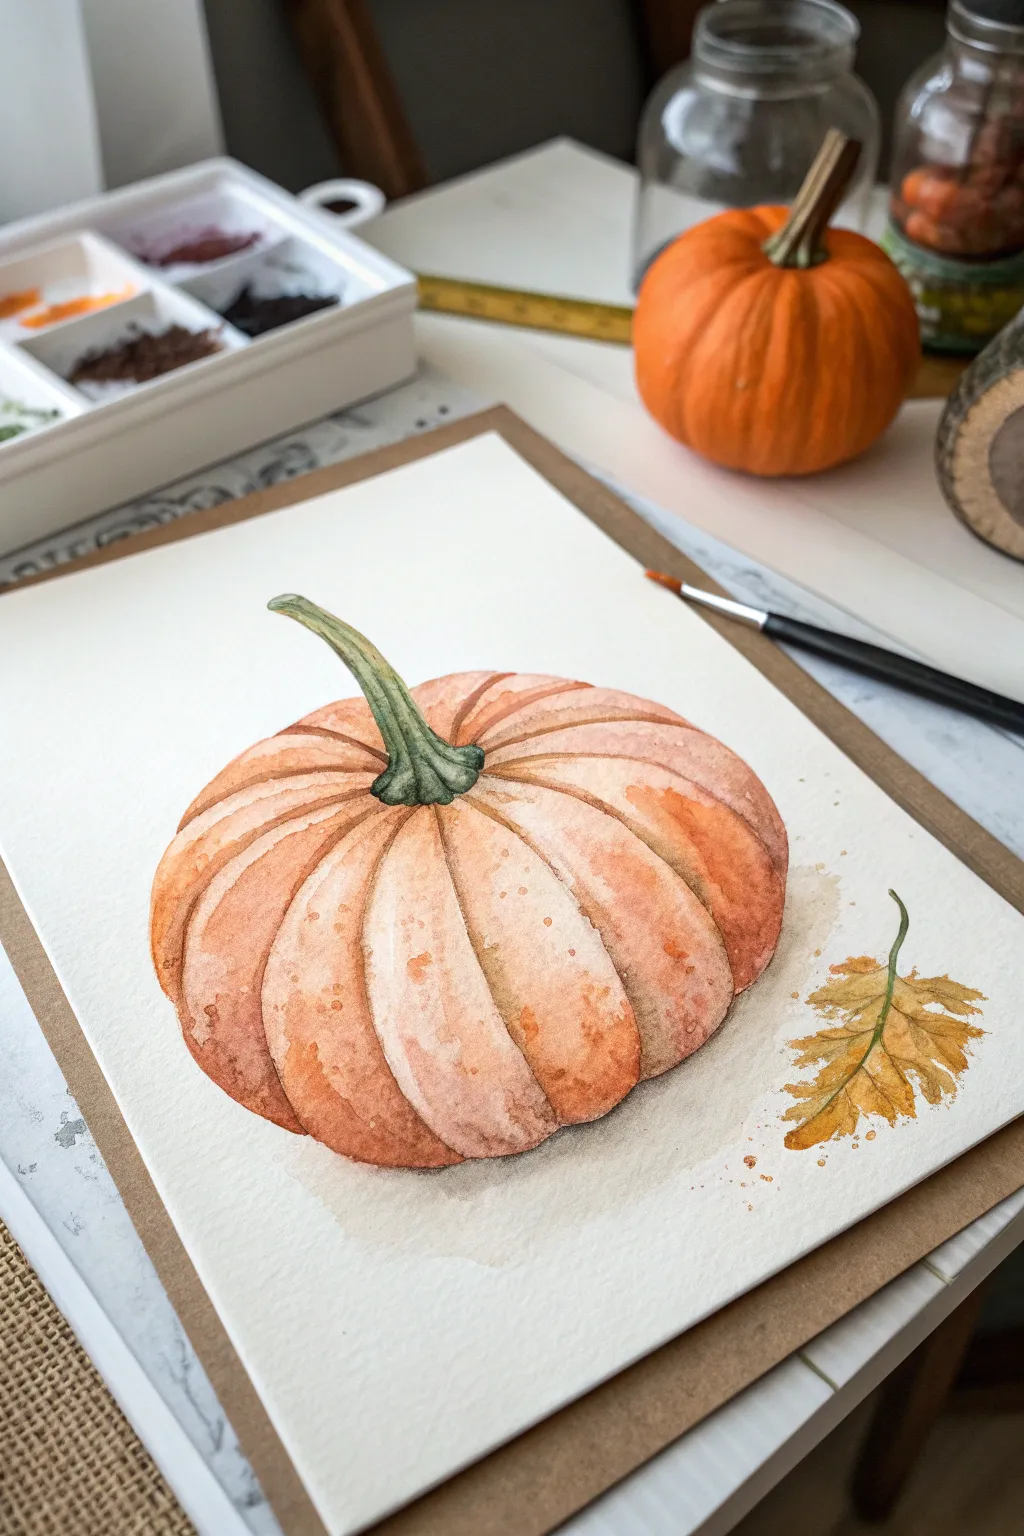
Classic Ribbed Pumpkin Sketch
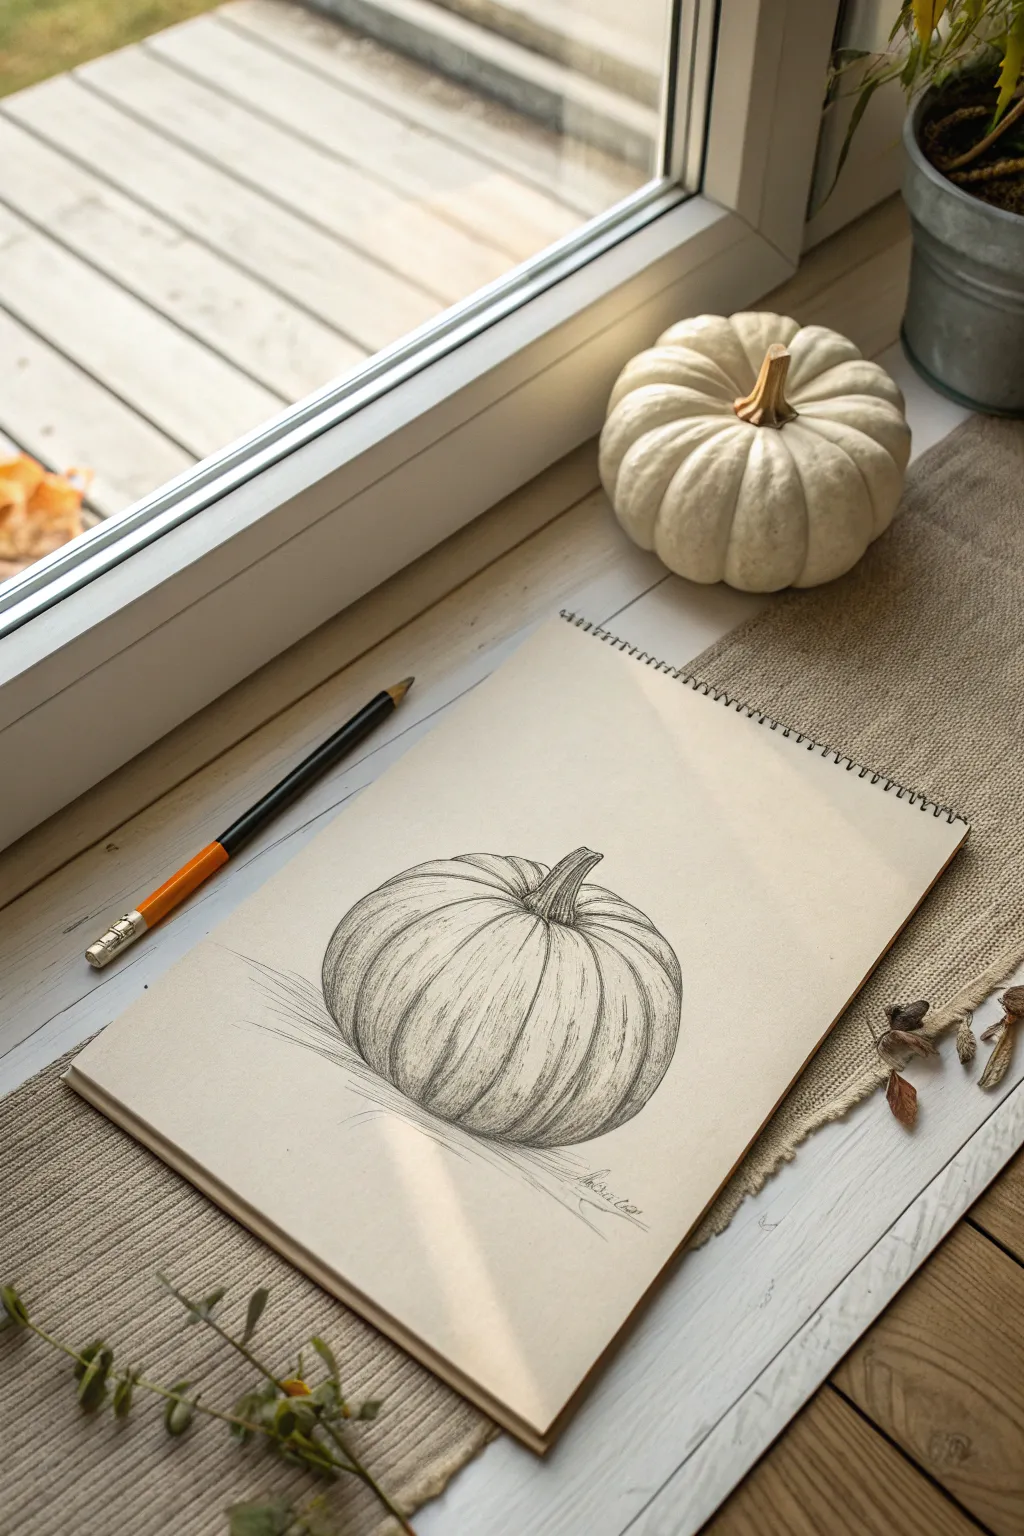
This elegant pencil sketch captures the organic beauty of a pumpkin through delicate shading and precise line work. By focusing on the natural curves and ribbed texture, you’ll create a drawing that feels dimensional and grounded.
Detailed Instructions
Materials
- Sketchbook with cream or toned paper
- HB graphite pencil (for initial outlines)
- 2B or 4B graphite pencil (for shading)
- Mechanical pencil (optional, for fine details)
- Kneaded eraser
- Blending stump (paper tortillon)
Step 1: Drafting the Basic Shape
-
Establish the horizon:
Begin by lightly marking the surface line where your pumpkin will sit. This grounds the object immediately rather than having it float in white space. -
Sketch the oval:
Using your HB pencil and a loose grip, draw a wide, slightly flattened oval. Don’t worry about perfection here; you just want the general mass of the pumpkin. -
Locate the stem:
Mark a small ellipse near the top center of your main oval. This will be the base of the stem. Draw a curved line extending upward from this point, slightly angled to the right to give the pumpkin character. -
Define the stem shape:
Flesh out the stem by adding thickness around your guide line. The top should be cut off abruptly, showing a flat, jagged edge where it was harvested.
Shape Issues?
If your pumpkin looks flat, check your contour lines. The lines creating the ribs must be curved like parenthesis ( ) symbols. Straight lines kill the volume.
Step 2: Creating the Ribs
-
Draw the central rib:
Starting from the base of the stem, draw a curved line down the front center of the pumpkin to the bottom edge. This C-curve defines the pumpkin’s main volume. -
Map the side ribs:
Work outward from the center, adding C-curves on the left and right. Remember that as the ribs wrap around the side, the spacing between lines should get narrower due to perspective. -
Refine the contour:
Now, go back to the top and bottom outlines. Instead of a smooth oval, erase sections and redraw them as a series of bumps, following the curves of the ribs you just drew. -
Detail the stem attachment:
Make sure the ribs don’t just touch the stem but seem to tuck underneath or flow out from it. Add small ridges on the stem itself.
Step 3: Shading and Texture
-
Switch to a softer pencil:
Pick up your 2B or 4B pencil. We want richer darks now to build volume. -
Shade the valleys:
The deepest shadows on a pumpkin occur between the ribs. Apply darker graphite strokes in the grooves where the ribs meet. Use long, vertical strokes. -
Hatch the rounded forms:
Using curved hatching lines that follow the shape of the pumpkin, shade the sides of each rib. Leave the center of each rib lighter to represent the highlight where the light hits. -
Deepen the contrast:
I find that pushing the contrast really sells the realism. Go back into the deepest crevices, specifically near the bottom and right underneath the stem, and press harder for a near-black tone. -
Texture the stem:
The stem is woody and rough. Use short, jagged vertical lines and stippling to distinguish this texture from the smooth skin of the pumpkin.
Pro Tip: Pencil Pressure
Vary your line weight. Make the bottom lines of the pumpkin thicker and darker (where there’s less light) and keep top lines delicate and thin to suggest lightness.
Step 4: Final Touches
-
Cast shadow:
Add a horizontal shadow underneath the pumpkin using horizontal hatching strokes. Make the shadow darkest right where the pumpkin touches the table and fade it out as it moves away. -
Blend selectively:
Take your blending stump and simplify gently soften the shading on the curved ribs, but keep the definition of the specific lines sharp. -
Clean up highlights:
Use your kneaded eraser to lift graphite off the highest points of the rounded ribs to create a bright highlight. -
Sign your work:
Add a faint, illegible signature or scribble near the shadow to replicate the casual sketchbook aesthetic shown in the example.
Now you have a timeless autumn study captured in your sketchbook, ready to be displayed or kept as part of your drawing journey


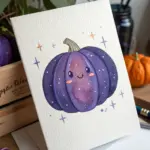
Cute Smiley Pumpkin Character
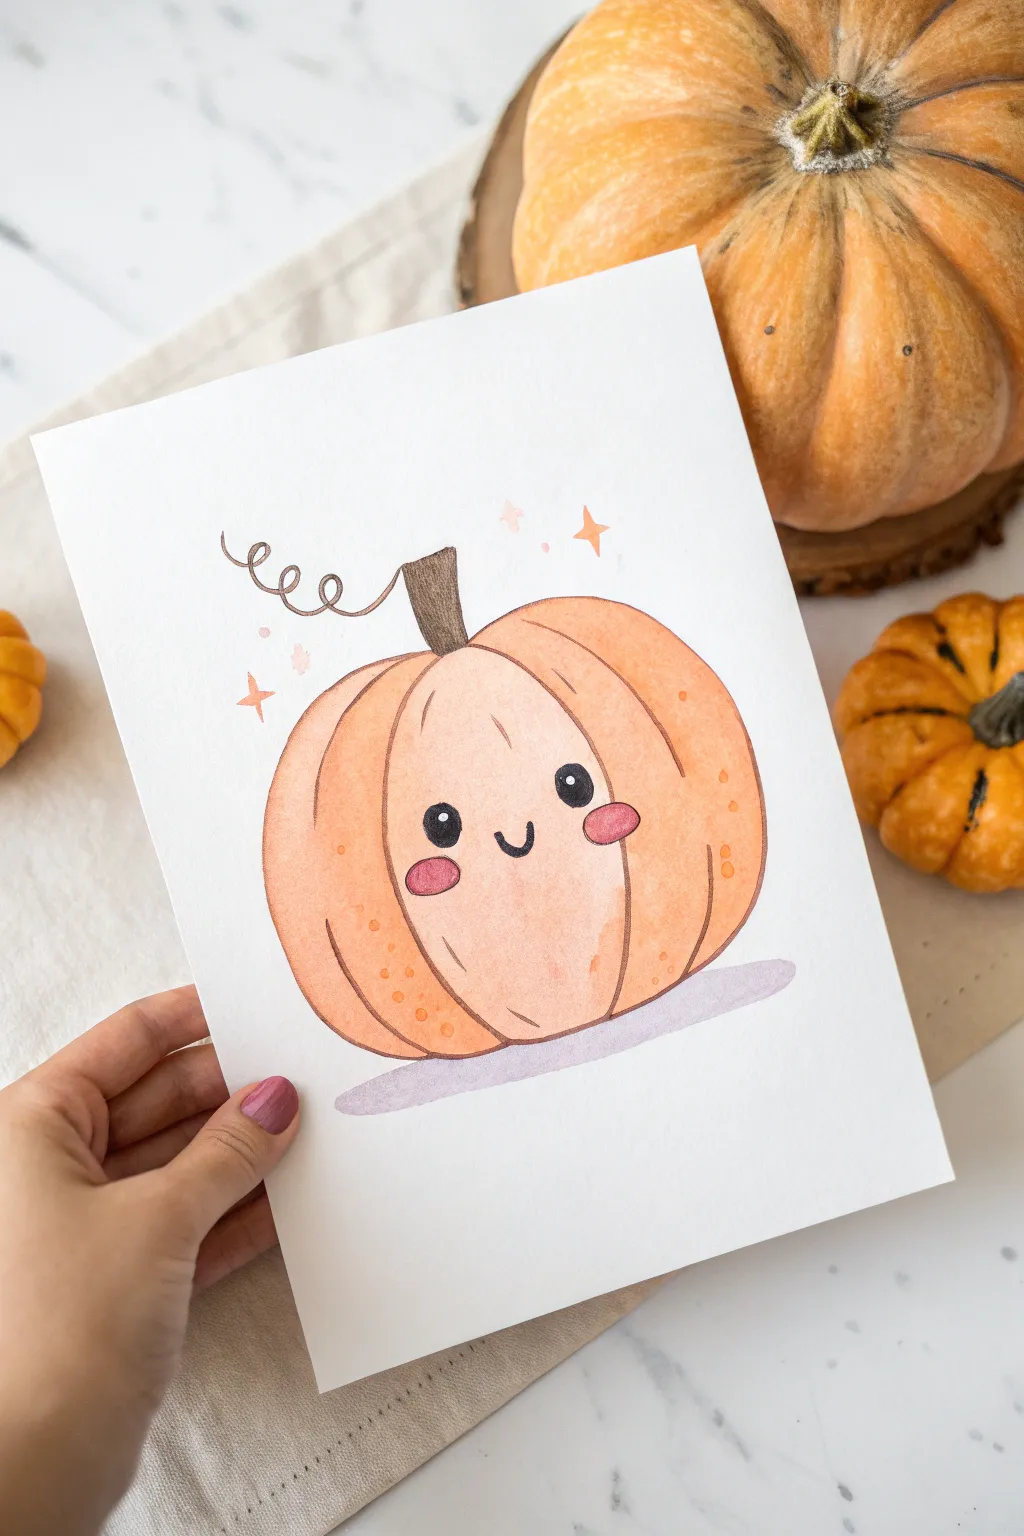
Bring some adorable autumn charm to your sketchbook with this sweet, smiling pumpkin character. Using a combination of watercolor and fine liners creates a soft, translucent look paired with crisp, expressive details.
Step-by-Step Tutorial
Materials
- Cold press watercolor paper (A5 size or greeting card format)
- Pencil (HB or 2H)
- Kneaded eraser
- Watercolors (Orange, Burnt Sienna, Yellow Ochre, Brown, Pink)
- Round watercolor brush (Size 4 or 6)
- Fine liner pen (Black, waterproof, 0.3mm or 0.5mm)
- Fine liner pen (Brown, waterproof, optional)
- White gel pen
- Cup of water and paper towels
Step 1: Sketching the Base
-
Outline the central shape:
Start by drawing a large, slightly flattened oval in the center of your paper. This will be the main body of the pumpkin. Keep your pencil pressure very light so the graphite doesn’t show through the watercolor later. -
Divide into segments:
Draw curved lines starting from the top center dip down to the bottom. Create a wide central segment for the face, and add two or three curved segments on either side to give the pumpkin its ribbed, round shape. -
Add the stem:
Sketch a short, squared-off stem emerging from the top center dip. Angle it slightly to the left or right to give the character a bit of personality. -
Draw the curly vine:
Extend a playful, curly line coming off the left side of the stem. Make three or four loops to create a whimsical tendril.
Step 2: Painting the Pumpkin
-
Mix your base orange:
Create a watery mix of orange with a tiny touch of yellow ochre. You want a pale, translucent wash for the first layer. -
Apply the first wash:
Fill in the entire pumpkin shape with your pale orange mix. Work quickly so the edges don’t dry out, creating a smooth, even layer of color. -
Add depth to the edges:
While the first layer is still slightly damp, drop a slightly more saturated orange pigment along the left and right outer edges of the pumpkin to create a rounded 3D effect. -
Paint the stem:
Mix a medium brown color and carefully fill in the stem shape. I like to keep the top edge of the stem a little uneven for a natural look. -
Let it dry completely:
Pause here and let the paint dry fully. If you rush this step, your pen lines will bleed later. -
Paint the shadow:
Mix a very watery, pale violet or purple-grey. Paint a simple, long oval shadow directly underneath the pumpkin to ground it.
Clean Lines Secret
To keep your cute face perfectly symmetrical, try turning your paper upside down while sketching the eyes. It helps your brain see the shapes more accurately.
Step 3: Adding the Cute Face
-
Position the eyes:
Lightly pencil in two wide-set circles in the middle segment of your pumpkin. They should be level with each other. -
Draw the mouth:
Sketch a tiny ‘u’ shape right between the eyes, placed slightly lower than the center of the eyes. -
Paint the cheeks:
Load your brush with a bright, watery pink. Paint oval blushing cheeks just under the outer corners of the eyes. The paint should be transparent enough to see the orange underneath.
Check Your Ink
If your black pen bleeds into the orange paint, your paper wasn’t dry enough. Use a hairdryer on the cool setting for 30 seconds before inking to be safe.
Step 4: Inking and Details
-
Outline the pumpkin segments:
Using a brown or black fine liner, carefully trace the vertical lines that separate the pumpkin’s ribs. Don’t trace the entire outer silhouette heavily; broken lines can look softer. -
Ink the stem and vine:
Outline the stem and trace over your curly vine pencil line. Add a few vertical texture lines inside the brown stem. -
Fill in the face:
Use your black fine liner to fill in the eye circles completely. Trace the small smiling mouth carefully. -
Add eye highlights:
Once the black ink is totally dry, use a white gel pen to add a small white dot in the upper right corner of each eye. This spark of life is crucial for the ‘kawaii’ look. -
Create texture spots:
Using a slightly darker orange paint or a colored marker, add tiny dots or speckles on the outer segments of the pumpkin for texture. -
Draw sparkle accents:
Use a pink or orange pen to draw small four-pointed stars and dots floating around the top of the pumpkin for a magical touch.
Now you have a charming little pumpkin friend ready to brighten up a greeting card or journal page


Curly Vine and Leaf Details
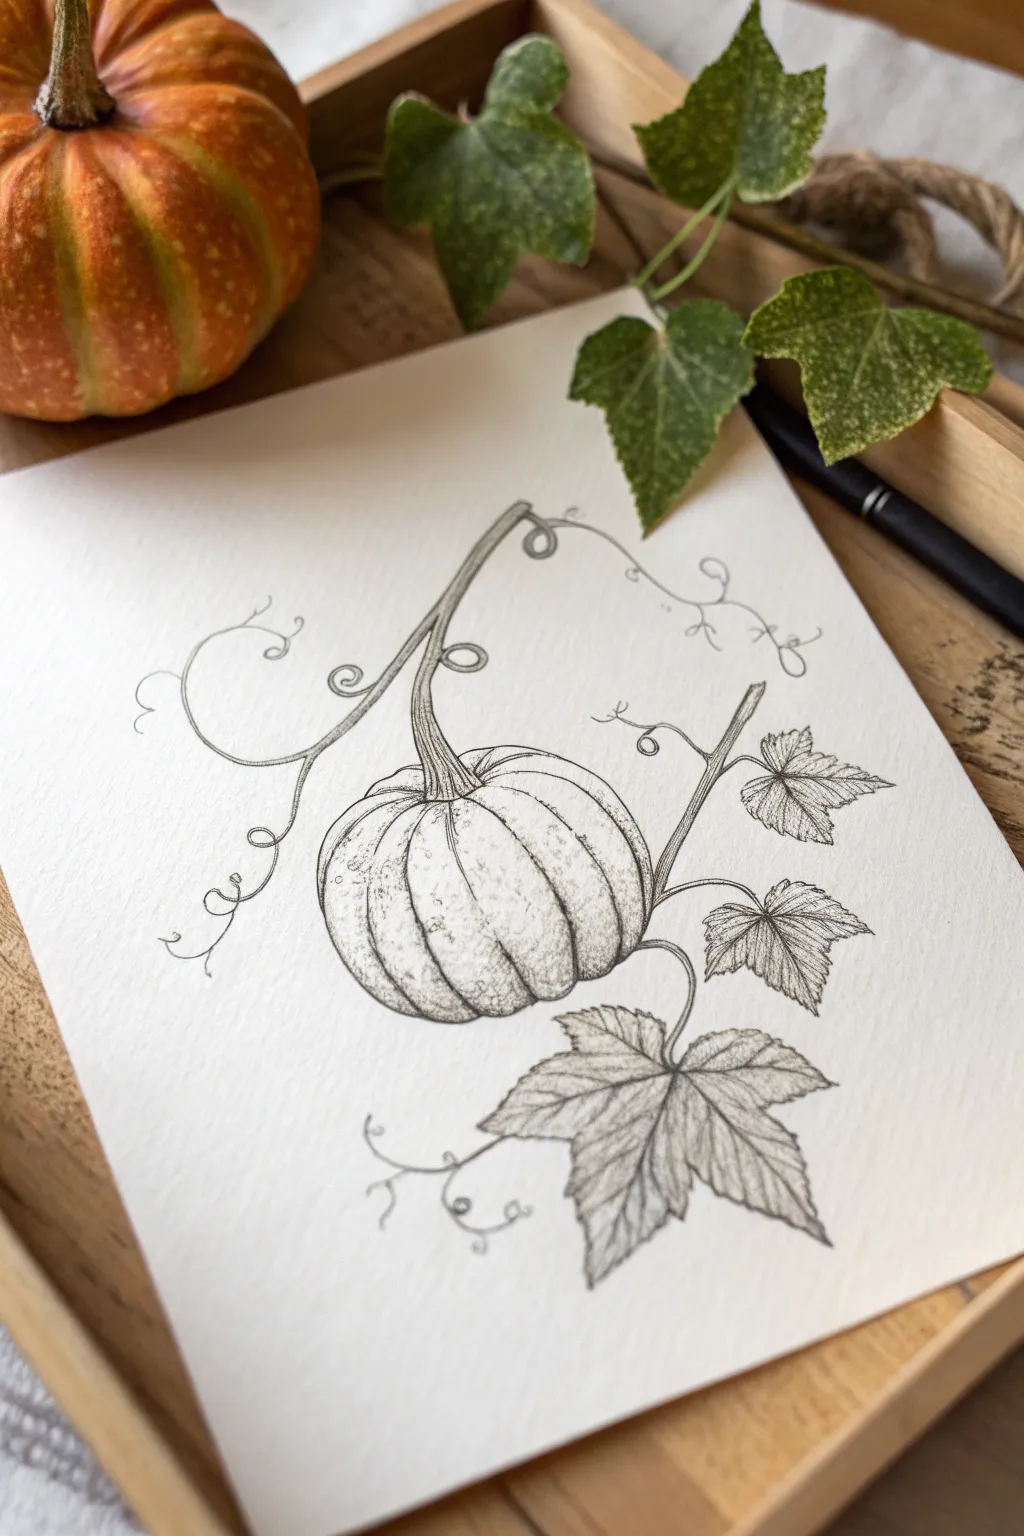
This project captures the delicate, organic nature of a pumpkin on the vine using fine line work and careful shading. The result is a botanical-style illustration that feels both classic and beautifully crisp on textured paper.
Detailed Instructions
Materials
- Cold press watercolor paper or textured sketch paper
- HB graphite pencil (for sketching)
- Fine liner pens (0.1mm, 0.3mm, 0.5mm)
- Kneaded eraser
- Blending stump (optional)
Step 1: Structural Sketching
-
Establish the Pumpkin Shape:
Begin lightly with your HB pencil by drawing a flattened oval in the lower center of your page. Don’t make it a perfect circle; squashing it slightly gives it that characteristic pumpkin weight. -
Divide the Sections:
Draw curved C-shaped lines radiating from the center top point down to the bottom. These lines define the ribs of the pumpkin. Make the sections in the front wider than the ones on the sides to create perspective. -
Add the Main Stem:
From the top center of the pumpkin, draw a thick, ribbed stem that curves upward and to the left. It should look sturdy where it connects to the fruit and taper slightly as it extends. -
Map the Vine path:
Extend a single main vine line from the pumpkin stem, curving it loosely upward and then branching out to the right. Keep this line fluid and organic rather than stiff. -
Place the Leaves:
Sketch the rough outlines of three leaves attached to the right-side vine branch. Use geometric shapes like triangles or diamonds first to get the placement right before detailing the jagged edges.
Pro Tip: Line Weight
Use a thicker 0.5mm pen for the main pumpkin outline and the primary vine, but switch to a 0.05mm or 0.1mm pen for the delicate curly tendrils. This contrast makes the drawing pop.
Step 2: Inking and Outline
-
Refine the Leaf Shapes:
Using your pencil, detail the edges of the leaves with their characteristic jagged, saw-toothed perimeter. Draw the main veins radiating from the leaf stem to the tips. -
Ink the Pumpkin Outline:
Switch to your 0.3mm fine liner. Trace the outer contour of the pumpkin and the vertical rib lines. I suggest breaking the line very slightly in a few highlight areas to keep the drawing feeling light. -
Ink the Stem and Vines:
Go over your pencil lines for the thick stem and the trailing vines. Where the vine segments connect or branch off, add small bumps or joints for realism. -
Ink the Leaves:
Trace the jagged leaf edges and the central veins. Use a lighter touch or a 0.1mm pen for the smaller veins inside the leaf to prevent them from overpowering the outline. -
Clean Up:
Once the ink is fully dry—give it a good few minutes to be safe—gently erase all the underlying graphite sketch lines with your kneaded eraser.
Step 3: Shading and Texture
-
Shade the Stem:
Use vertical hatching lines on the pumpkin stem to show its fibrous texture. Cluster the lines more densely on the left side to create a shadow, suggesting a light source from the right. -
Add Pumpkin Volume:
On the pumpkin body, add stippling (tiny dots) and short, curved hatch lines near the bottom and top of each rib section. This creates a rounded, 3D effect without needing heavy shading. -
Texture the Skin:
Add a few random, tiny imperfections or specks on the pumpkin skin using the 0.1mm pen. This prevents the surface from looking too smooth and plastic. -
Detail the Leaves:
Fill the leaves with gentle shading lines that follow the direction of the veins. Keep the shading darker near the center of the leaf and lighter toward the tips. -
Create Depth:
Darken the areas where the leaves or vines overlap each other. A small cast shadow under a leaf creates instant depth. -
Draw Curly Tendrils:
This is the fun part—using a quick, confident hand, draw thin, spiraling tendrils branching off the main vine. These corkscrew shapes add whimsy and movement to the composition. -
Final Touches:
Review the drawing for balance. If an area looks too empty, add a small, loose curlicue vine or a tiny budding leaf to fill the space.
Level Up: Antique Wash
For a vintage botanical look, dilute a small amount of coffee or tea and paint a very light wash over the entire page before you start drawing. It gives the paper a beautiful aged warmth.
Now you have a timeless botanical sketch perfect for framing or as a seasonal greeting card design


Watercolor Wash Pumpkin
Capture the delicate warmth of autumn with this watercolor study, balancing defined ridges with gentle color washes. This project creates a realistic yet soft pumpkin portrait, accented by a single dried leaf and artistic splatters.
Detailed Instructions
Materials
- Cold-pressed watercolor paper (300 gsm)
- Pencil (HB or 2B) and kneaded eraser
- Watercolor paints (Burnt Sienna, Cadmium Orange, Yellow Ochre, Sap Green, Burnt Umber)
- Round watercolor brushes (sizes 4 and 8)
- Fine liner brush (size 0 or 1)
- Jars of water
- Paper towel
- Palette
Step 1: Sketching the Form
-
Outline the pumpkin shape:
Begin by drawing a faint, flattened oval in the center of your paper. Keep your pencil pressure extremely light so the graphite doesn’t show through the transparent watercolor later. -
Define the stem:
Draw the stem curving out from the top center. Give it a twisted, organic look with a slightly wider base where it connects to the pumpkin body. -
Draw the ribs:
Sketch curved lines radiating from the stem base down to the bottom of the pumpkin to create the segments, or ‘ribs’. Make the segments in the front appear wider than those receding on the sides to create volume. -
Add the leaf:
To the right of the pumpkin, lightly sketch the jagged outline of a single dried oak leaf.
Step 2: Base Washes
-
Prepare your palette:
Mix a watery wash of Yellow Ochre with a touch of Cadmium Orange. You want a very pale, peachy tone for the initial layer. -
Paint the first segments:
Using the size 8 brush, apply this pale wash to every *other* segment of the pumpkin. This technique, called ‘skip-painting’, prevents wet sections from bleeding into each other initially. -
Soften the edges:
While the paint is still wet, drop a slightly more saturated orange (Cadmium Orange mixed with Burnt Sienna) near the top and bottom of each segment to suggest shadow and curvature. -
Fill remaining segments:
Once the first set is dry to the touch, paint the remaining segments with the same base wash technique, ensuring crisp white space remains occasionally for highlights.
Muddy Colors?
If your orange looks brown or dull, you may be overworking the layers while they are still damp. Wait for sections to dry completely before glazing new color on top.
Step 3: Building Depth and Texture
-
Deepen the crevices:
Mix Burnt Sienna with a tiny dot of Burnt Umber. Using the size 4 brush, carefully paint along the lines separating the ribs to create deep shadows. -
Blend out shadows:
Immediately use a clean, damp brush to soften one side of that shadow line, blending it gently into the curve of the pumpkin segment. This creates a rounded 3D effect rather than a flat stripe. -
Paint the stem:
Mix Sap Green with a little Burnt Umber for an earthy, dried look. Paint the stem, using vertical brush strokes to mimic the fibrous texture. -
Add stem details:
While the stem is damp, drop darker green concentrate at the base where it meets the orange skin, and lift out a highlight on the top curve with a dry brush. -
Paint the leaf:
Color the leaf with a mix of Yellow Ochre and Burnt Umber. Let colors bleed naturally on the wet shape, making the edges slightly crispy and brown.
Highlight Control
Don’t use white paint for highlights. Instead, leave the white of the paper exposed on the highest curve of each rib. This natural brightness makes the watercolor glow.
Step 4: Final Details
-
Add surface texture:
Load a toothbrush or stiff brush with watered-down Burnt Sienna. Tap it gently over a separate paper first to test, then flick tiny speckles onto the pumpkin skin to mimic imperfections. -
Enhance the leaf:
Using the fine liner brush, paint delicate veins on the dried leaf using a concentrated brown mix. -
Ground the subject:
Paint a very faint, cool grey wash underneath the pumpkin and leaf to act as a cast shadow, preventing the objects from looking like they are floating. -
Stray splatters:
Add a few intentional paint splatters around the leaf area in gold or orange tones to enhance the loose, artistic watercolor vibe.
Step back and admire the warm, translucent glow of your autumnal artwork
BRUSH GUIDE
The Right Brush for Every Stroke
From clean lines to bold texture — master brush choice, stroke control, and essential techniques.
Explore the Full Guide
Pastel Geometric Pumpkin
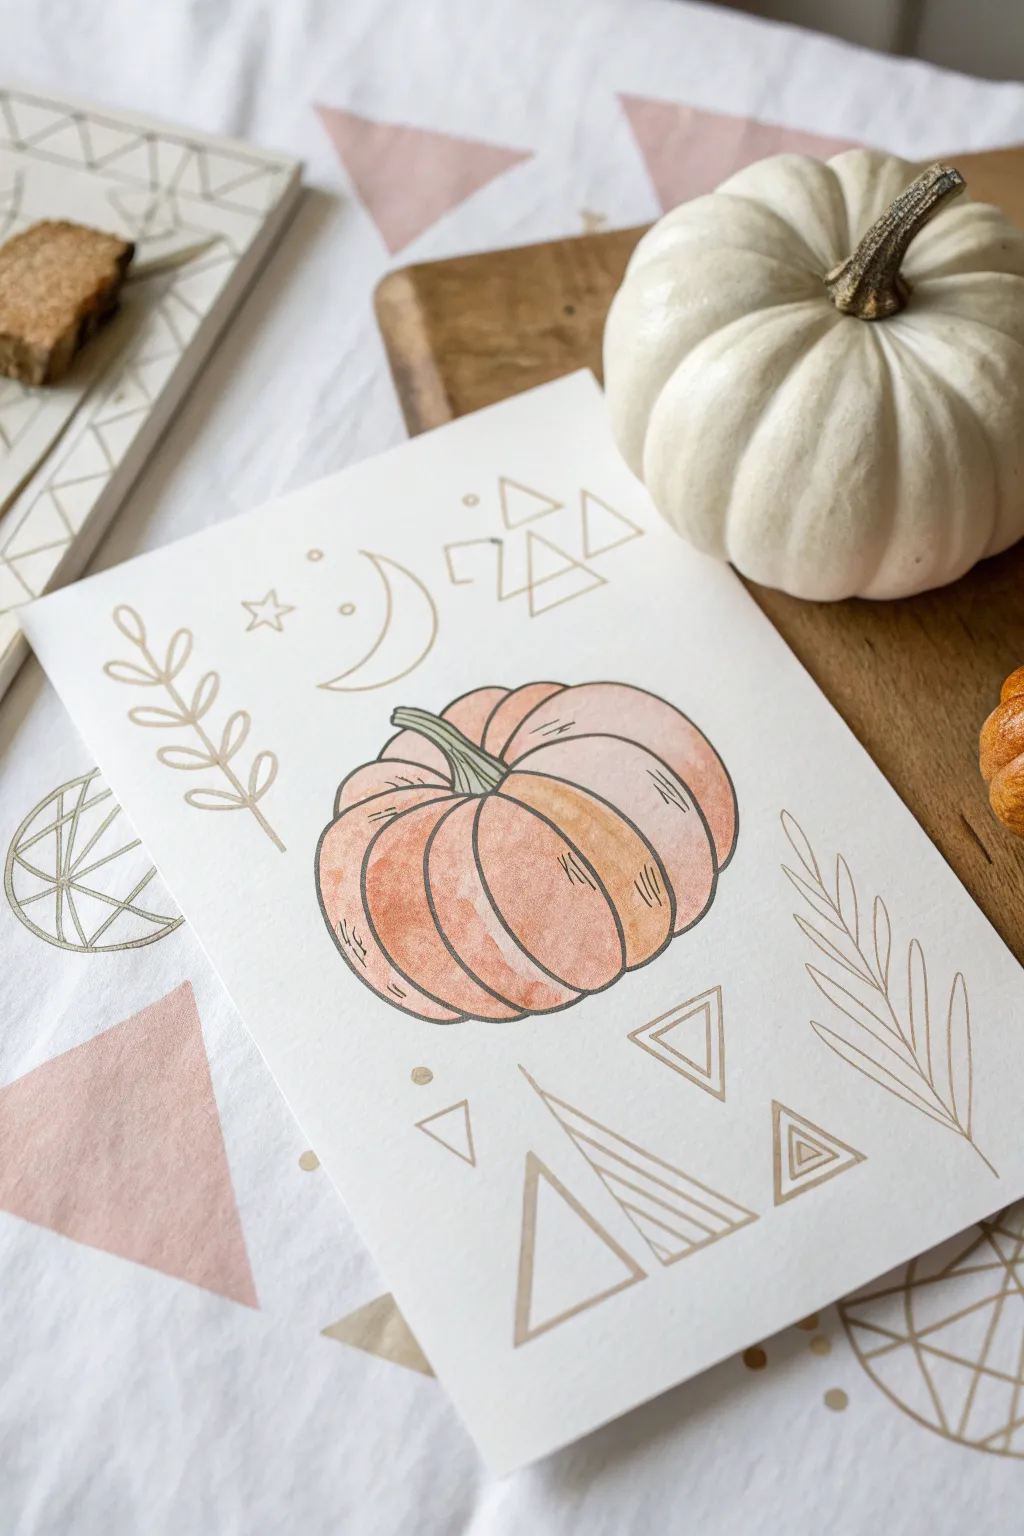
This charming illustration combines soft, peachy watercolor tones with clean, geometric line art for a modern autumnal look. The delicate gold or taupe outlines give it a whimsical, boho vibe perfect for greeting cards or seasonal wall art.
Detailed Instructions
Materials
- Cold press watercolor paper (A5 size)
- Watercolor paints (Peach, Burnt Sienna, Sage Green)
- Round watercolor brush (size 4 or 6)
- Fine liner pen (Light brown, Taupe, or Metallic Gold)
- Pencil (HB)
- Eraser
- Ruler
- Paper towel
- Jar of water
Step 1: Sketching the Layout
-
Center the Pumpkin:
Start by lightly sketching a flattened oval shape in the center of your paper using your HB pencil. This will be the main body of your pumpkin. Keep your pressure light so the graphite doesn’t show through later. -
Define the Ribs:
Divide the oval into curved sections to create the pumpkin’s ribs. Draw a central oval first, then add C-curved sections radiating outwards on both sides to give the pumpkin its signature plump look. -
Add the Stem:
Sketch a short, curved stem emerging from the top center dip of the pumpkin. Give it a slightly cutoff, angular top for realism. -
Draft Geometric Elements:
Around the pumpkin, lightly plan out your decorative elements. Sketch simple triangles, a crescent moon, and leafy branches. Use your ruler to ensure the triangles and geometric lines are crisp and straight.
Clean Lines Only
If your pen ink smears when erasing pencil marks, your watercolor wasn’t fully dry. Use a hairdryer on low heat before any inking to be safe.
Step 2: Watercolor Wash
-
Mix Your Peach Tone:
On your palette, mix a watery wash of Peach with a tiny touch of Burnt Sienna to dull it down slightly. You want a soft, translucent muted orange rather than a bright, vibrant one. -
First Layer:
Paint the pumpkin sections one by one. I like to skip every other rib (painting ribs 1, 3, and 5) and let them dry before painting the neighbors. This technique, called wet-on-dry, prevents the colors from bleeding together and keeps crisp definitions between segments. -
Fill the Gaps:
Once the first set of ribs is dry to the touch, fill in the remaining sections with the same peach mixture. -
Add Depth:
While the paint is still slightly damp on the second set of ribs, drop a slightly more concentrated orange pigment at the bottom curves and near the stem divot. This creates a natural shadow effect. -
Paint the Stem:
Mix a very pale Sage Green. Carefully fill in the stem area. If you want more definition, add a thin line of darker green along one side while it’s still wet. -
Thorough Drying:
Let the entire painting dry completely. The paper must be bone dry before you add ink, or the pen lines will feather and bleed.
Step 3: Inking & Details
-
Outline the Pumpkin:
Using your light brown or gold fine liner, trace over your pencil lines on the pumpkin. Use broken, sketchy lines in some areas rather than a solid heavy border to maintain a delicate, hand-drawn feel. -
Texture Details:
Add small, quick flicking lines inside the pumpkin ribs, focusing on the top and bottom curves. These little hatch marks suggest roundness and texture. -
Inking Geometric Shapes:
Trace your geometric pencil sketches. Use a ruler with your pen for the triangles to get that sharp, modern contrast against the organic pumpkin shape. -
Draw the Crescent Moon:
Ink the crescent moon and star near the top left. Keep the lines thin and consistent. -
Add Botanical Elements:
Ink the leafy branches on the sides. Draw a central stem first, then add simple loops or straight lines for leaves, keeping the style minimal and open. -
Final Geometric Accents:
Draw the nested triangles at the bottom. Adding parallel lines inside some triangles adds visual interest without needing more color. -
Erase Sketches:
Wait at least 15 minutes to ensure the ink is fully set. Then, gently erase any visible pencil marks to clean up the illustration.
Metallic Magic
Use metallic watercolor paint for the geometric shapes instead of pen. Gold leaf or metallic gold paint adds a stunning shimmer.
Frame this delicate piece in a light wood frame to complement the soft autumn colors
Floral Wreath Around the Pumpkin
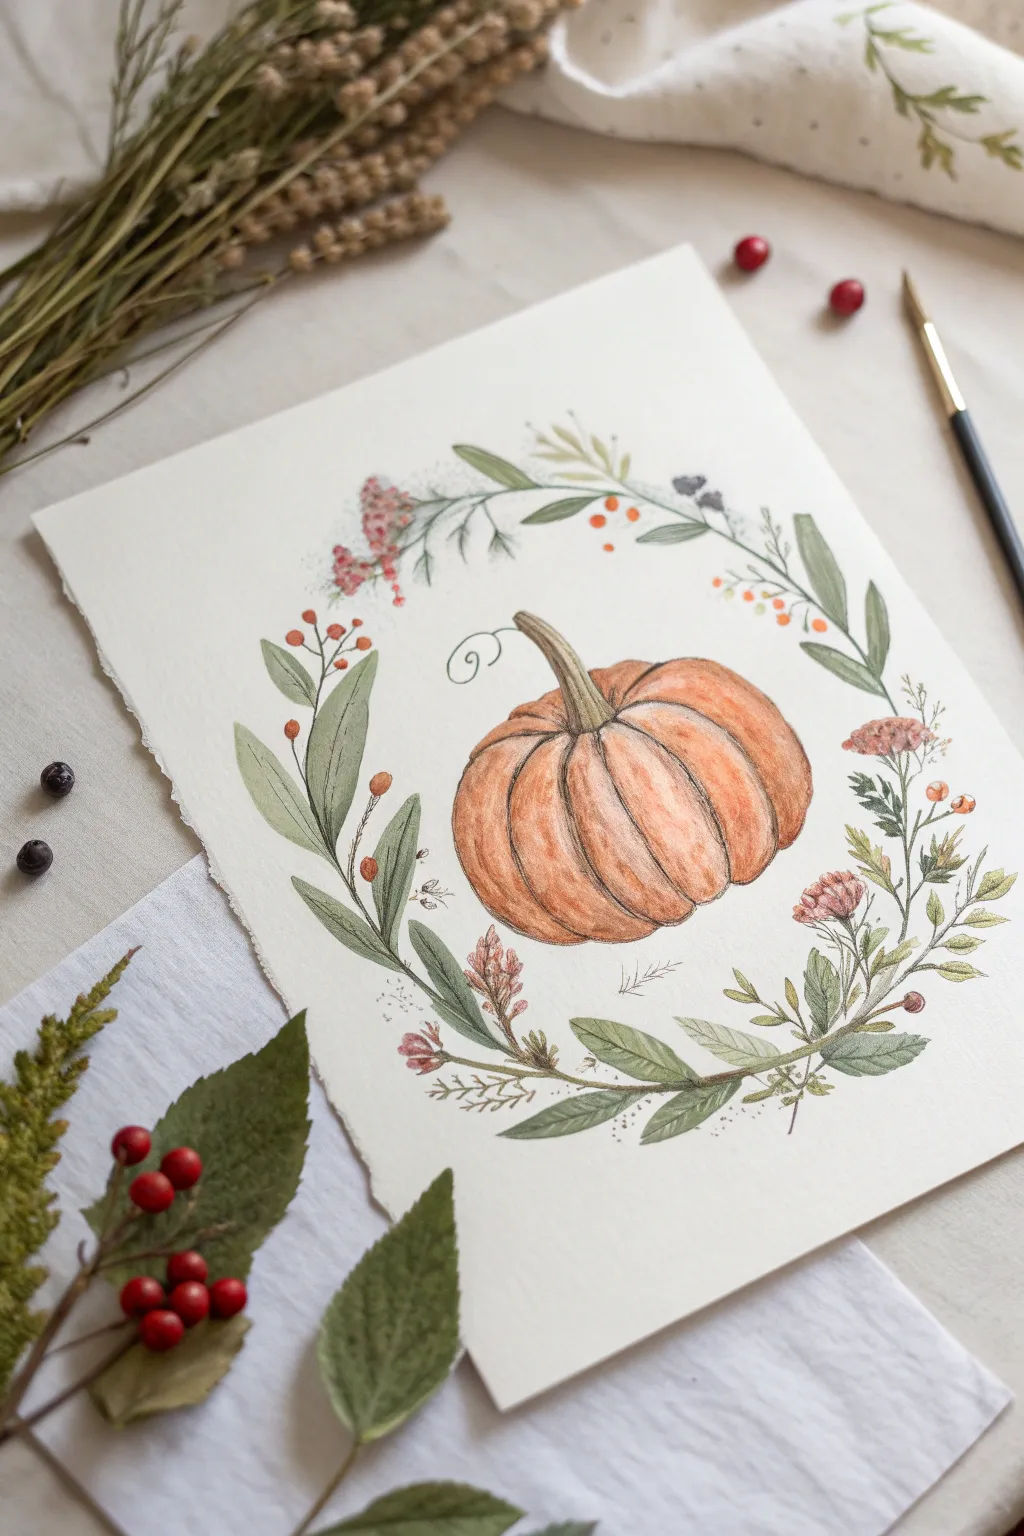
Embrace the harvest season with this delicate watercolor illustration, featuring a central pumpkin framed by a loose, whimsical wreath of autumn foliage. The soft textures and muted palette create a cozy, vintage botanical feel perfect for seasonal decor.
How-To Guide
Materials
- Cold press watercolor paper (textured, 300gsm)
- Pencil (HB or 2B) and kneaded eraser
- Waterproof fine liner pens (sepia or dark brown, 0.1 and 0.3 sizes)
- Watercolor paints (Burnt Sienna, Cadmium Orange, Sap Green, Olive Green, Alizarin Crimson, Yellow Ochre)
- Round watercolor brushes (sizes 2, 4, and 6)
- Two jars of water
- Paper towels
Step 1: Sketching the Composition
-
Center the pumpkin:
Begin by lightly sketching the central pumpkin shape in pencil. Draw a flattened sphere slightly wider than it is tall, and define the segments (ribs) with curved lines that radiate from the top center divot down to the bottom. -
Add the stem:
Draw a sturdy stem emerging from the top center, giving it a slight curve to the left. Detail the cut end so it looks fibrous and woody, and add a small, playful vine tendril curling off to the left side. -
Mark the wreath boundary:
Visualize or very faintly draw a large circle surrounding the pumpkin to serve as a guide for your wreath. This ensures your foliage stays balanced and doesn’t encroach too much on the central subject. -
Draft the main leaves:
Sketch the larger, elongated sage leaves along the wreath’s curve, particularly clustering them on the bottom left and top right to create visual flow. Vary their angles so they aren’t too uniform. -
Fill in botanical details:
Fill the gaps between the main leaves with smaller sprigs. Sketch clusters of berries, tiny branching wildflowers, and a few small buds. Keep the sketch light, as we only need faint guides for the paint.
Step 2: Painting the Pumpkin
-
First wash of orange:
Mix a diluted wash of Cadmium Orange and Burnt Sienna. Using your size 6 brush, paint the pumpkin segments, leaving thin, unpainted gaps between the ribs to simulate highlights and separation. -
Adding dimension:
While the paint is still damp but not soaking wet, drop a slightly more concentrated mix of Burnt Sienna into the bottom curves and the crevices where the ribs meet. Let the color bleed naturally. -
Painting the stem:
Mix Olive Green with a touch of brown for the stem. Paint it carefully, using vertical strokes to mimic the wood grain. I like to darken the base where it meets the pumpkin for extra contrast. -
Refining texture:
Once the pumpkin is completely dry, use a drier brush with reddish-brown paint to create subtle vertical texture lines on the skin, following the curve of the fruit.
Bleeding Colors?
If your ink runs when painting near it, check your pen type! Ensure it is labeled ‘waterproof’ or ‘archival.’ If not, simply change your order: paint first, let dry completely, then ink.
Step 3: Watercoloring the Wreath
-
Painting the greenery:
Mix a muted Sap Green (you can dull it with a heavy touch of brown or red). Paint the larger leaves using two strokes per leaf to leave a tiny white line down the center for the vein. -
Varying greens:
For variety, paint some of the smaller leaf sprays with a lighter, fresher Olive Green wash. This creates depth and makes the wreath look more gathered and organic. -
Adding floral colors:
Using Alizarin Crimson and touches of orange, paint the small berry clusters and flower buds. Keep these strokes loose and don’t worry about staying perfectly inside your pencil lines. -
Softening edges:
If any botanical elements look too stiff, take a clean, damp brush and gently soften the outer edges of the paint to give them a dreamy, atmospheric look.
Pro Tip: Vintage Tone
To get that muted, vintage seed-packet look shown here, mix a tiny bit of the complementary red into your green paints. It desaturates the bright greens instantly.
Step 4: Inking and Final Touches
-
Ensuring dryness:
Wait until the painting is bone dry. If the paper feels cool to the touch, it still contains moisture. Use a hairdryer on a low setting if you’re impatient. -
Outlining the pumpkin:
Using a 0.3 sepia fine liner, outline the pumpkin segments. Use broken, sketchy lines rather than solid heavy ones to maintain the delicate aesthetic. Accentuate the stem’s texture with fine vertical distinct lines. -
Detailing the foliage:
Switch to a finer 0.1 pen for the wreath. Add central veins to the leaves and draw the thin stems connecting the berries and buds. Add tiny scribbles or dots to the flower centers for texture. -
Adding whimsical elements:
Draw tiny stray markings—little dots, dashes, or faint pine needles—floating near the wreath to fill empty white space without adding visual weight. -
Final erase:
Once sure the ink is set, gently run your kneaded eraser over the entire piece to lift any visible pencil graphite, revealing the clean illustration underneath.
Sign your beautiful botanical study and display it to welcome the autumn chill.

PENCIL GUIDE
Understanding Pencil Grades from H to B
From first sketch to finished drawing — learn pencil grades, line control, and shading techniques.
Explore the Full Guide
Mini Pumpkin Doodle Grid
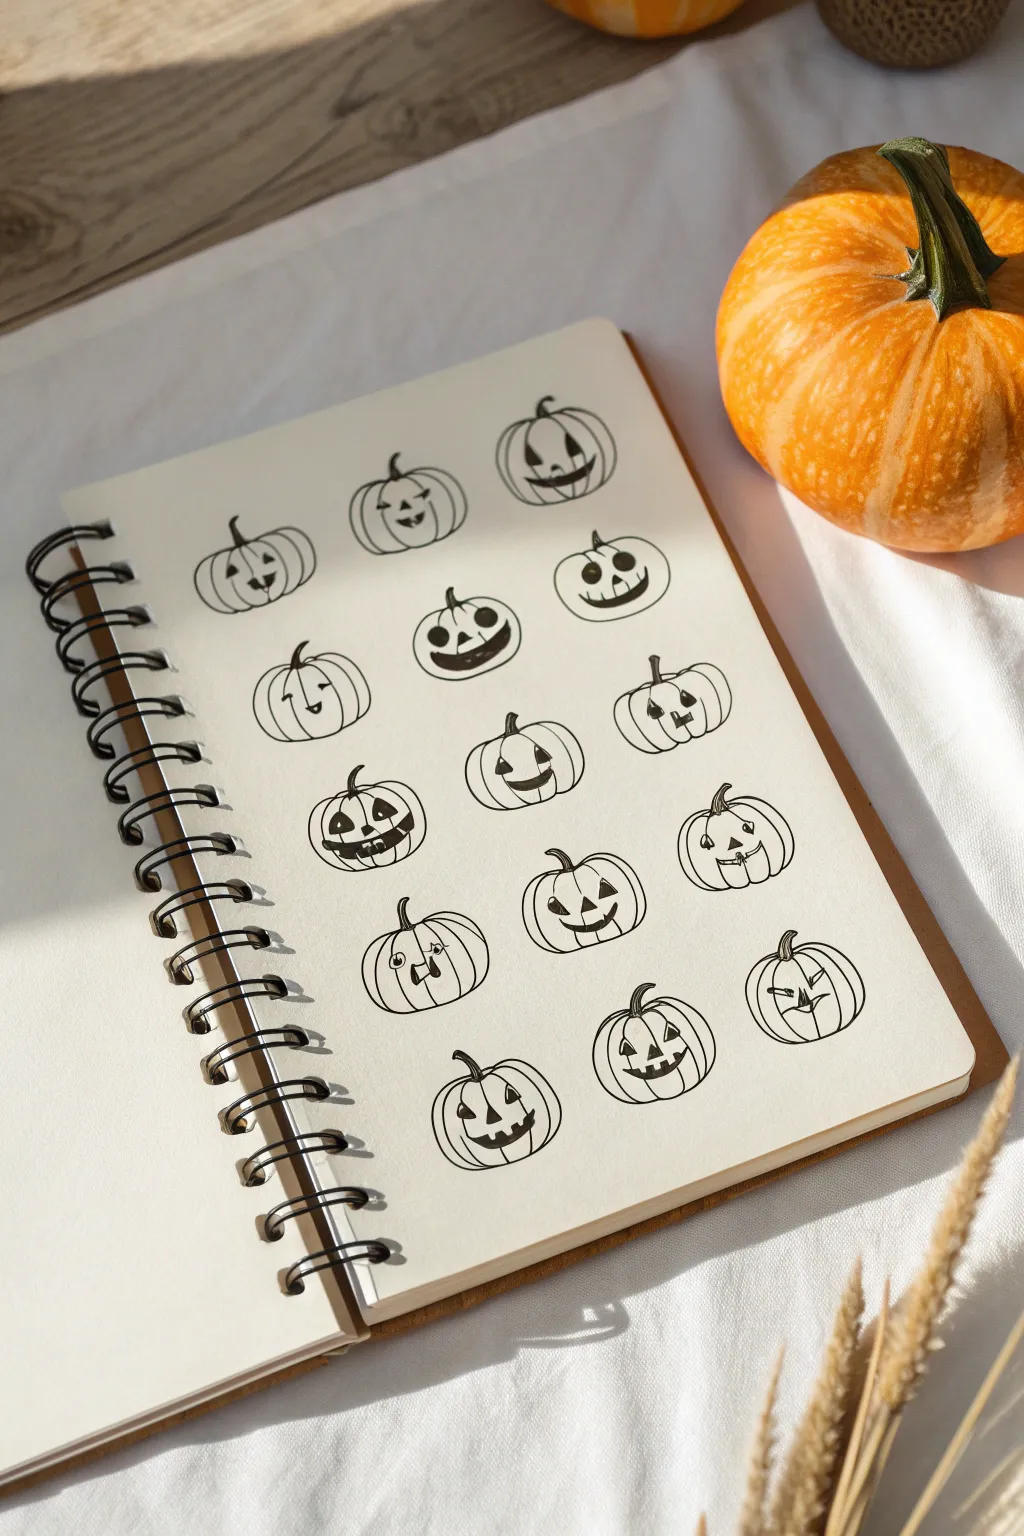
This charming sketchbook page features a delightful grid of hand-drawn jack-o’-lanterns, each boasting a unique and quirky expression. It’s a perfect exercise for practicing simple line work and exploring how tiny variations in shapes can create entirely different characters.
Detailed Instructions
Materials
- Spiral-bound sketchbook (smooth paper preferred)
- Fine-liner pen (black, 0.3mm or 0.5mm)
- Pencil (for sketching guidelines)
- Eraser
Step 1: Setting the Stage
-
Lightly sketch a grid:
Start by using a pencil to lightly mark out a grid on your page. You’ll want roughly four columns and five rows. These don’t need to be perfect boxes, just faint placement markers to keep your pumpkins evenly spaced. -
Draw basic pumpkin shapes:
In each grid space, lightly pencil in a variety of oval and circular shapes. Make some squat and wide, others round, and a few slightly taller to add variety to your patch.
Step 2: Inking the Outlines
-
Start the first pumpkin:
Switch to your black fine-liner. Starting in the top left, draw the outer contour of your first pumpkin. Instead of a perfect circle, use curved segments that dip slightly inward at the top and bottom to suggest segments. -
Add vertical ribs:
Draw three or four curved vertical lines inside the outline. These lines should follow the curve of the pumpkin’s sides, starting from the central stem area and sweeping down to the bottom center. -
Draw the stem:
Top the pumpkin with a small, curved stem. Vary the direction they point—some left, some right, some curled—to give each one personality. -
Repeat for the top row:
Move across the top row, inking the outlines, ribs, and stems for the next three pumpkins. Try to vary the body shapes slightly as you go. -
fill the page with bodies:
Continue down the rows, inking only the pumpkin bodies and stems for now. Leaving the faces for last helps you focus on getting a nice variety of shapes first.
Smudge Alert
Work from left to right (or right to left if left-handed) to avoid dragging your hand through wet ink.
Step 3: Adding Personalities
-
Classic triangular eyes:
For the first pumpkin, draw two small triangles for eyes and a curved, toothless mouth. Fill in the eyes with solid black ink. -
Create a goofy grin:
On the next pumpkin, draw wider, rounder eyes and a big, open mouth with a single square tooth at the bottom. Fill in the mouth, leaving the tooth white. -
Make a spooky face:
Draw slanted, angry triangular eyes on another pumpkin. Pair this with a jagged, zigzag mouth to create a more menacing look. -
Try circular features:
I like to mix it up by using simple black dots for eyes on some pumpkins. Give one of these a small, stitched-line mouth for a ‘Nightmare Before Christmas’ vibe. -
Experiment with mouth shapes:
Draw a wide bean-shape mouth on one, a thin line on another, and a surprised ‘O’ shape on a third. The more variety, the better the grid looks. -
Add filled details:
Go back through your pumpkins and fill in the mouths and noses with solid black ink where appropriate, leaving little white squares for teeth to pop against the dark ink. -
Final touch-ups:
Once the ink is completely dry—give it a minute or so to be safe—gently erase your pencil grid lines and sketching marks to leave a clean, crisp finish.
Add Color Pop
After inking, use orange watercolor or marker to color just one or two pumpkins for a fun focal point.
Now you have a full page of expressive doodle pumpkins ready for the Halloween season


Have a question or want to share your own experience? I'd love to hear from you in the comments below!