When you’re painting on cheeks, tiny designs can look ridiculously cute without eating up your whole event (or your patience). Here are my go-to easy face painting ideas that sit beautifully on the cheekbone area and still feel special with just a few quick details.
Simple Butterfly Wing

This elegant and understated design captures the delicate beauty of a butterfly wing in soft, earthy tones. Combining matcha green shades with crisp white details creates a serene look perfect for spring festivals or garden parties.
Detailed Instructions
Materials
- Light sage green face paint
- Dark forest green or olive face paint
- White or cream face paint
- Black face paint (for the body)
- Medium round brush (size 4 or 6)
- Fine detail brush (size 1 or 2)
- Small cup of water
- Paper towels
Step 1: Painting the Wings
-
Outline the upper wing:
Start with your medium round brush and the light sage green paint. Draw a curved triangle shape starting near the outer corner of the eye, sweep up towards the temple, and curve back down towards the ear. -
Outline the lower wing:
Continuing with the same sage green, create a smaller, rounded loop directly below the first shape. It should angle slightly downward towards the jawline, connecting at the same central point near the cheekbone. -
Fill the base color:
Using the same brush, fill in both wing shapes completely with the light sage green. Aim for a smooth, even opacity so the skin doesn’t show through too much. -
Clean up edges:
While the paint is wet, refine the outer edges of your wings to make sure they are crisp and flowing. Let this base layer dry for a minute or two.
Step 2: Adding Veins and Details
-
Mix the vein color:
While the green dries, prepare your fine detail brush. If you don’t have a pre-mixed forest green, darken your sage green with just a tiny touch of black. -
Draw the central veins:
Starting from the inner corner where the two wings meet, paint a thin, dark line extending outward through the center of the top wing. -
Add branching veins:
From that central line in the top wing, flick out two or three lighter, branching lines toward the top edge, tapering them off so they disappear into the green. -
Detail the lower wing:
Repeat the veining process on the bottom wing, drawing a primary vein down the center and adding two smaller branches fanning out to the sides. -
Highlight with white:
Clean your detail brush thoroughly. Load it with creamy white paint and add soft highlights inside the wing panels, right next to the dark veins. I find this really adds dimension and softness. -
Define the perimeter:
Using the dark green again, carefully outline the very outer edge of the upper wing, slightly thickening the line as you reach the tip.
Pro Tip: Better Points
To get super sharp ends on your veins and antennae, lift the brush gradually off the skin as you finish the stroke, ending on the very tip of the bristles.
Step 3: The Body and Finishing Touches
-
Paint the butterfly body:
Switch to black paint on your finest brush. Paint a very thin, curved line along the inner edge of the wings (closest to the nose) to represent the butterfly’s body. -
Add the antennae:
At the top of the black body line, paint two delicate, curving antennae. Keep the pressure light so the lines remain wispy. -
Create outer spots:
Reload your small brush with white paint. Dot a series of small, uniform circles along the dark green outer edge of the top wing. -
Scatter the magic dust:
To finish the look, add a loose trail of white dots floating away from the butterfly, curving under the eye and down the cheek for a magical effect. -
Final check:
Step back and check for symmetry or any smudges that need a quick wipe with a damp cotton swab.
Level Up: Glitter Accents
While the paint is still slightly tacky, tap a sheer, iridescent cosmetic glitter over the sage green sections to make the wings sparkle in the sunlight.
Now you have a serene little creature ready to flutter through the day


Rainbow With a Puffy Cloud
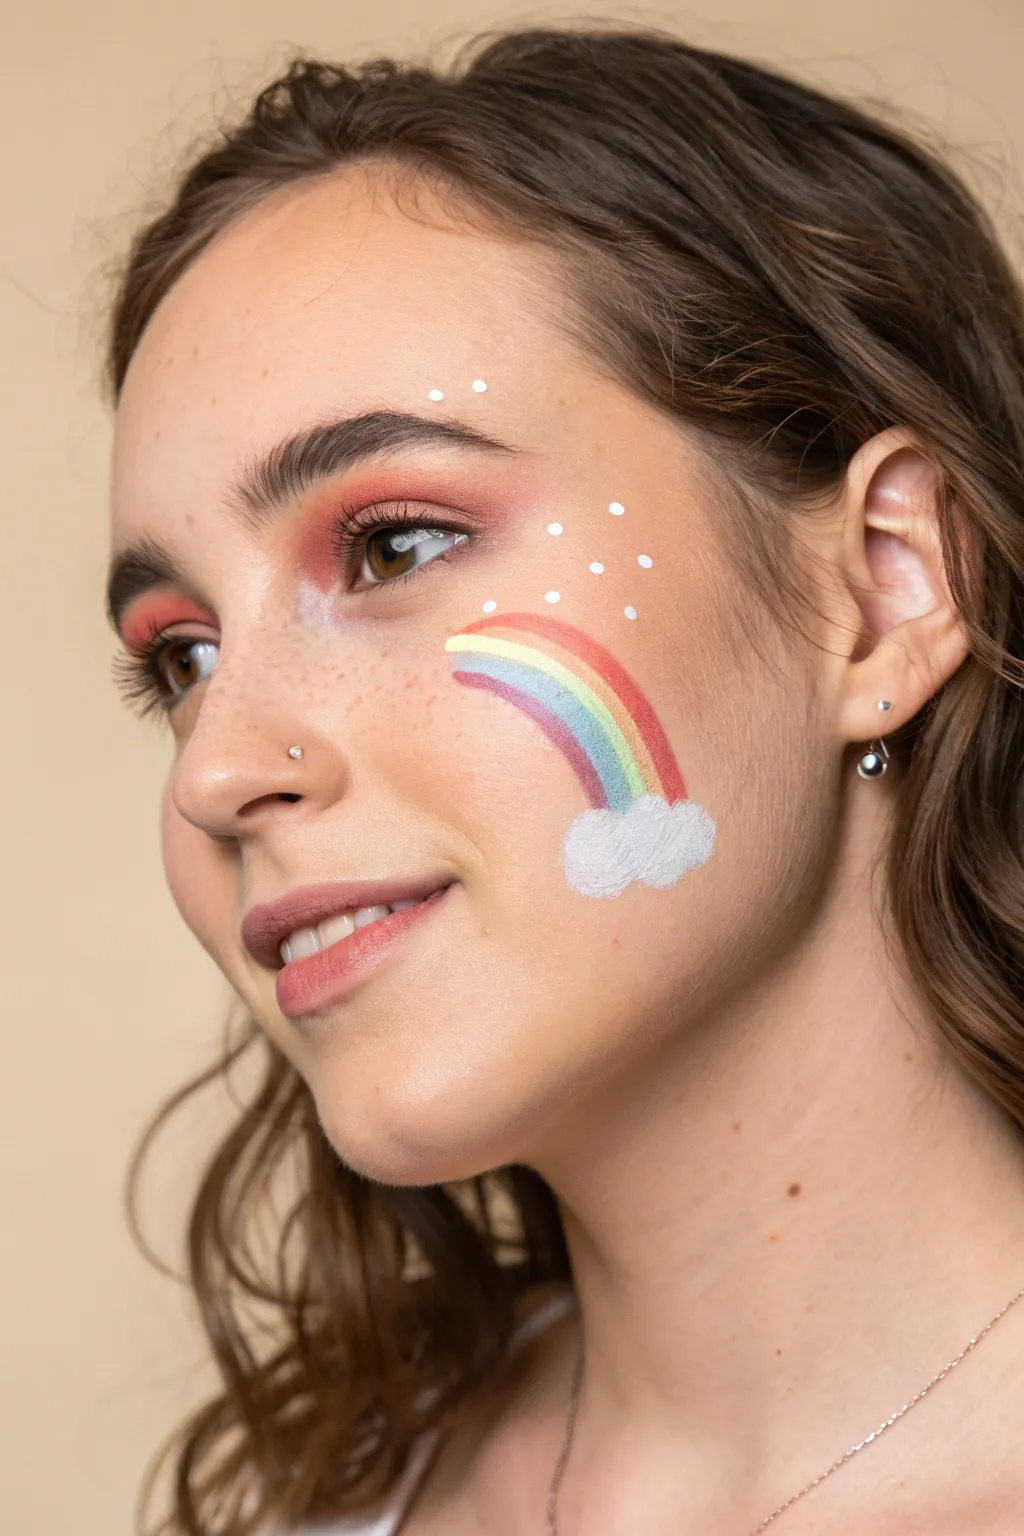
Brighten up any look with this cheerful and minimalistic face paint design featuring a classic rainbow arching over a fluffy cloud. It’s a quick, festival-ready style that pairs beautifully with warm-toned makeup for a sun-kissed effect.
Step-by-Step Guide
Materials
- White face paint (water-activated)
- Red face paint
- Orange face paint
- Yellow face paint
- Light blue/teal face paint
- Purple/violet face paint
- Small flat brush (approx. 1/4 inch)
- Fine round brush (size 1 or 2)
- Cup of water
- Paper towels
- Warm-toned eyeshadow (terracotta or coral)
- Mascara (optional)
Step 1: Base Makeup Prep
-
Apply eyeshadow:
Before starting the face paint, create a warm base by sweeping a terracotta or coral eyeshadow over the eyelids. Blend it softly into the crease and slightly outward for a hazy, romantic look. -
Define the lower lash line:
Take a small pencil brush and smudge the same eyeshadow color along the lower lash line to balance the eye makeup. -
Add mascara:
Apply a coat of mascara to the upper lashes to open up the eyes, keeping the lower lashes natural. -
Ensure clean cheeks:
Make sure the cheek area where you will be painting is free of heavy oils or setting sprays so the water-activated paint adheres smoothly.
Fixing Smudges
If a color bleeds into another, wait for it to dry completely. Then, use a barely damp cotton bud to lift the mistake before reapplying the correct color.
Step 2: Painting the Rainbow
-
Load the red paint:
Moisten your small flat brush and load it with red face paint. Test the consistency on your hand; it should be creamy but not dripping. -
Paint the red arch:
Start high on the cheekbone, slightly under the outer corner of the eye. Paint a smooth, curved line curving downward towards the jawline. This forms the top band of your rainbow. -
Clean the brush:
Rinse your brush thoroughly in water and wipe it clean on a paper towel before switching colors. -
Add the orange stripe:
Load the brush with orange paint. Carefully paint a second curved line directly underneath and hugging the red line. Try to keep the width consistent. -
Apply the yellow stripe:
Repeat the process with yellow paint, following the curve of the orange line closely. -
Paint the teal stripe:
With a clean brush, apply the light blue or teal stripe next. I find using a lighter blue keeps the look pastel and dreamy. -
Finish with purple:
Complete the rainbow arc by painting the final purple line at the bottom of the stack.
Step 3: The Cloud and Details
-
Load white paint:
Switch to a clean, slightly larger round brush or the same flat brush loaded heavily with white face paint. -
Create the cloud base:
At the bottom end of the rainbow (where it ends on the cheek), press the brush down to create fluffy, rounded shapes. Overlap these blobs to form a solid white cloud that covers the rough ends of the rainbow lines. -
Texture the cloud:
Dab a little extra white paint on top of the cloud shape while it’s still damp to give it some texture and opacity. -
Switch to a fine brush:
Pick up your fine round brush (size 1 or 2) and load it with white paint for the delicate details. -
Add sky dots:
Gently touch the tip of the brush to the skin above and around the rainbow to create tiny white dots. Vary the spacing to make them look like scattered stars or snowflakes. -
Accent the eyes:
Add a couple of small white dots near the eyebrow or temple area to tie the whole look together. -
Check symmetry:
Step back and look in the mirror. If any rainbow lines look uneven, you can carefully clean up the edges with a slightly damp cotton swab.
Add Some Sparkle
Press cosmetic-grade glitter onto the wet white cloud paint before it dries. It adds a magical shimmer that catches the light beautifully.
You now have a dreamy, sky-inspired look that is perfect for spreading a little joy


Classic Heart With Sparkle Dots
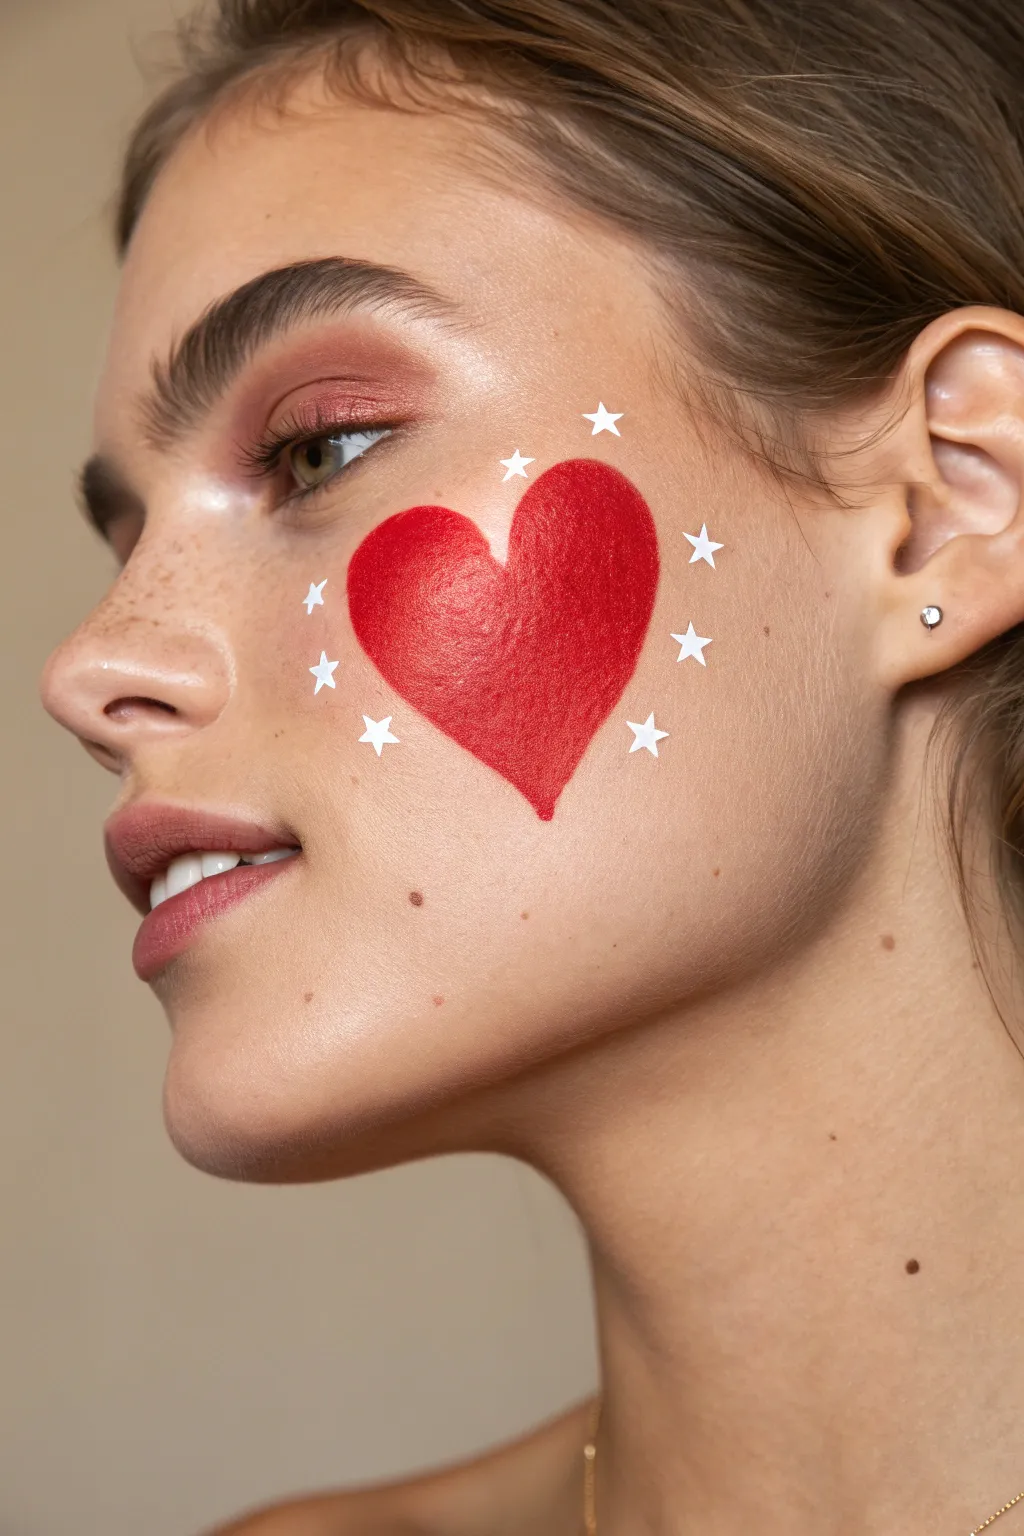
This striking yet simple design features a bold crimson heart surrounded by a constellation of delicate white stars, perfect for adding a pop of romance to your look. It combines classic face painting techniques with sticker accents for a professional finish that is surprisingly easy to achieve.
Step-by-Step
Materials
- High-quality red face paint (ideally water-activated or cream-based)
- Small white star stickers (scrapbooking or nail art decals work well)
- Flat, rounded synthetic brush (size 6 or 8)
- Setting spray or translucent powder
- Pointed cotton swabs (for cleanup)
- Red-toned eyeshadow palette (optional, to match the look)
Step 1: Prepping the Canvas
-
Prepare the skin:
Start with a clean, moisturized face. If you plan to wear foundation or concealer, apply that first and let it set completely so the face paint glides on smoothly without mixing. -
Positioning the heart:
Visualize where the heart will sit. Aim for the apple of the cheek, angled slightly upward towards the ear to lift the face visually.
Paint Consistency Check
If your red paint looks streaky or transparent, let the first layer dry completely, then pat on a second layer rather than dragging the brush.
Step 2: Painting the Heart
-
Load your brush:
Wet your flat, rounded brush and load it generously with red face paint. You want a creamy consistency, like melted chocolate, to ensure totally opaque coverage. -
Outline the first lobe:
Start near the center of your cheek. Using the tip of the brush, draw a curved arch moving upwards and outwards to form the top of the first heart lobe. -
Create the second lobe:
Mirror that shape on the other side, connecting them at the center divot. Don’t worry if it’s not perfectly symmetrical yet; hearts look lovely when they have a bit of character. -
Define the point:
Bring the outer lines of both lobes down to meet at a sharp point on the lower cheek. Keep your hand steady and lift the brush pressure as you reach the tip for a fine line. -
Fill it in:
Use the flat side of your brush to fill in the outline. Use smooth, horizontal strokes to minimize streaking and build up a rich, solid red color. -
Refine the edges:
Inspect your edges. I find it helpful to use a tiny detail brush here to sharpen the cupid’s bow dip and the bottom point if the larger brush was too clumsy. -
Clean up mistakes:
If you smudge the red, dip a pointed cotton swab in a little micellar water or makeup remover and gently erase the error before re-applying paint.
Glitter Upgrade
Before the red paint dries, dab loose cosmetic red glitter onto the center of the heart for a textural, sparkling 3D effect.
Step 3: Adding the Stars
-
Let the paint dry:
Wait about two to three minutes for the red heart to dry completely. It should lose its wet sheen and look matte before you proceed. -
Planning the constellation:
Look at the negative space around the heart. You will be placing stars in an arc that frames the outer, upper curve of the heart shape. -
Placing the first star:
Peel off a small white star sticker. Place the first one directly above the dip of the heart, leaving a small gap of skin showing. -
Continue the arc:
Place three stars descending down the left side and three down the right side, following the curve of the heart. Space them evenly for a balanced look. -
Press to secure:
Once you are happy with the placement, gently press each sticker down with your fingertip to ensure the edges adhere firmly to the skin.
Step 4: Finishing Touches
-
Add matching shadow:
To recreate the full look from the image, sweep a soft terracotta or reddish-brown eyeshadow across your eyelids and into the crease. -
Set the look:
Lightly mist your face with setting spray from arm’s length. This seals the face paint and helps keep the stickers in place for longer wear.
Wear your heart on your cheek and enjoy the playful energy this look brings to your day


Quick Daisy Cluster
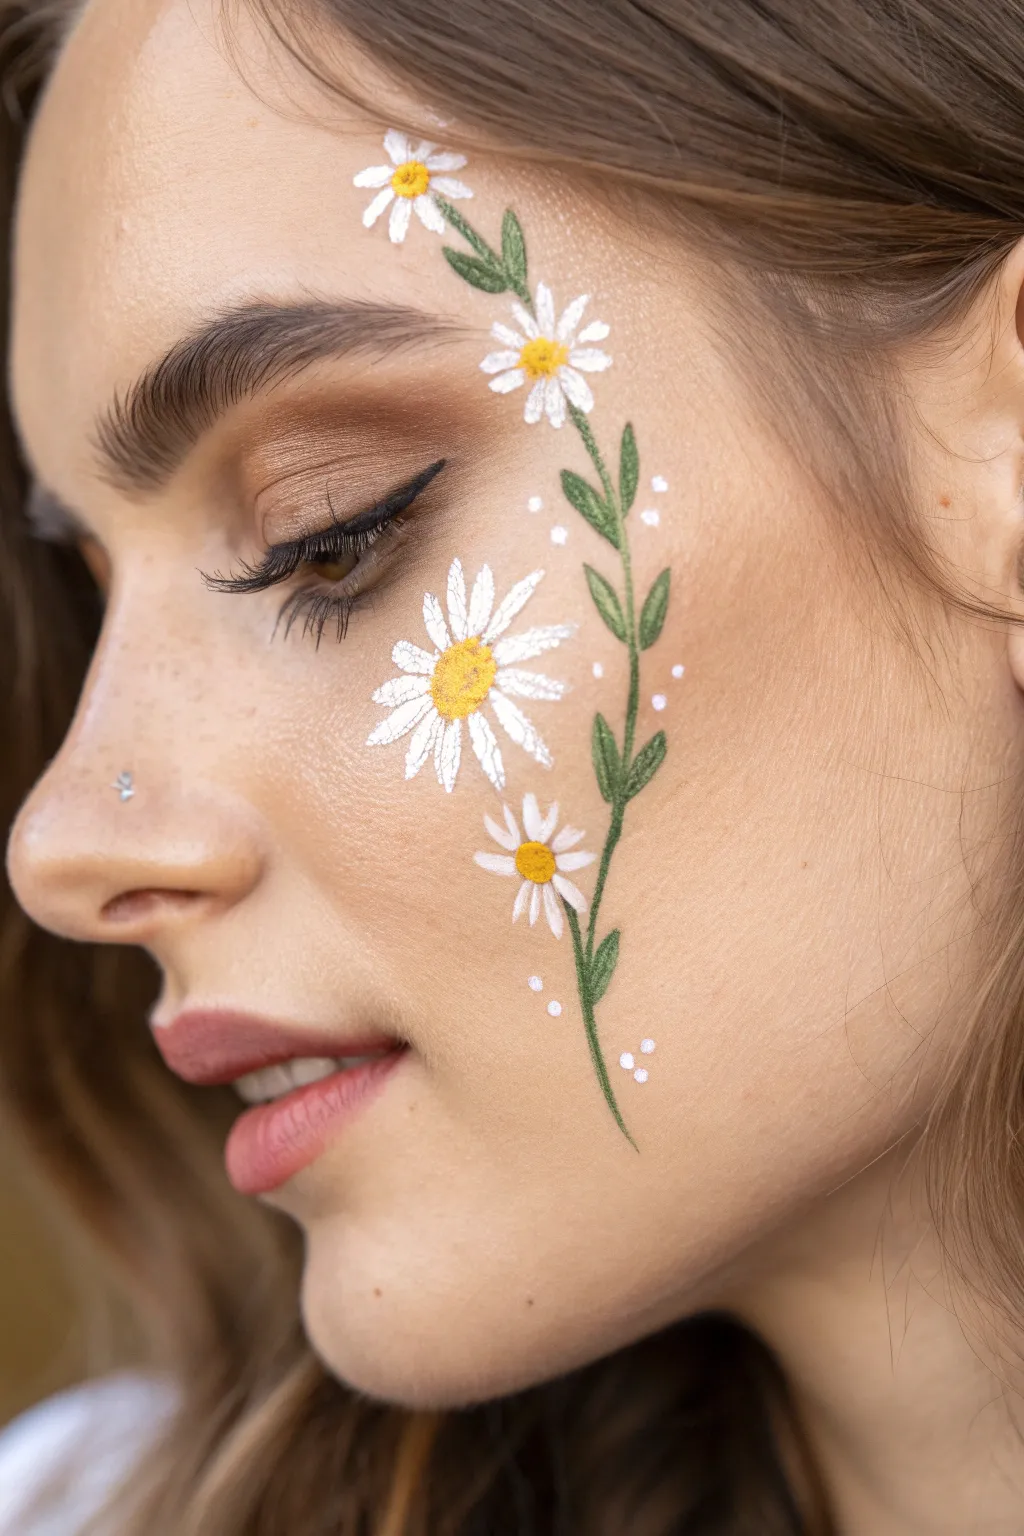
Transform a simple cheek look into a flowering garden with this delicate daisy chain design. The trailing vine of white blooms and green leaves contours the cheekbone beautifully, creating an ethereal, nature-inspired accessory perfect for festivals or spring parties.
Step-by-Step Tutorial
Materials
- White face paint
- Yellow face paint
- Dark green face paint
- Round brush (size 2 or 3)
- Fine liner brush (size 0 or 00)
- Small cup of water
- Paper towels or sponge
Step 1: Painting the Vine
-
Load your brush:
Dip your round brush into the water and activate the dark green face paint. Ensure the consistency is creamy but fluid enough to glide smoothly. -
Start the main stem:
Begin near the temple or the outer corner of the eye. With light pressure, drag the brush downwards in a gentle, wavy line following the curve of the cheekbone. -
Extend the vine:
Continue the green line down towards the jawline, letting it taper off naturally at the bottom. It doesn’t need to be a perfectly solid line; slight breaks are okay as flowers will cover them. -
Add leaves:
Using the same green brush, press down and lift quickly to create small, teardrop-shaped leaves coming off the main stem. Alternate sides as you move down the vine. -
Refine the leaves:
For a more realistic look, I like to use the very tip of the brush to pull the end of each leaf into a sharp point.
Fixing Smudges
If you smudge a petal, wait for it to dry completely. Once dry, use a slightly damp Q-tip to lift the mistake, then re-paint over the clear area
Step 2: Creating the Daisies
-
Prepare the white paint:
Clean your brush thoroughly or switch to a fresh round brush. Load it with white face paint, aiming for a thick, opaque consistency. -
Place the main flower:
Locate the widest part of the cheek, right over the vine. Press the brush down and pull inward toward a center point to create the first petal. -
Complete the large daisy:
Continue creating petals in a circle until you have a full flower. Make the petals slightly irregular in length for a natural, wildflower appearance. -
Add smaller blooms:
Paint a smaller daisy near the top of the vine (near the temple) and another smaller one near the bottom jawline. These should have fewer, shorter petals. -
Paint the centers:
Rinse your brush and load it with bright yellow paint. Dab a textured circle in the center of each white flower. -
Add texture:
While the yellow is wet, you can tap it lightly with a dry brush or sponge edge to make the pollen look fuzzy.
Step 3: Details & Highlights
-
Switch to the liner brush:
Pick up your fine liner brush and load it with more white paint. -
Enhance the petals:
Add tiny, thin white lines inside the petals of the largest flower to give them texture and dimension, mimicking embroidery threads. -
Add decorative dots:
Dip the handle end of a brush or your liner brush into white paint. Place tiny white dots randomly around the vine and flowers to act as ‘pollen’ or magical dust. -
Final leaf details:
If you want extra definition, mix a tiny bit of white into your green and add a subtle highlight line down the center of the larger leaves. -
Check balance:
Step back and look at the design. If there are any large empty gaps along the vine, fill them with an extra leaf or a tiny white dot.
Add Sparkle
While the yellow centers are still tacky, press a pinch of cosmetic-grade gold glitter into them for a design that catches the sunlight
Now you have a blooming floral accent that brings a touch of spring to any look
BRUSH GUIDE
The Right Brush for Every Stroke
From clean lines to bold texture — master brush choice, stroke control, and essential techniques.
Explore the Full Guide
Cute Ladybug Dot
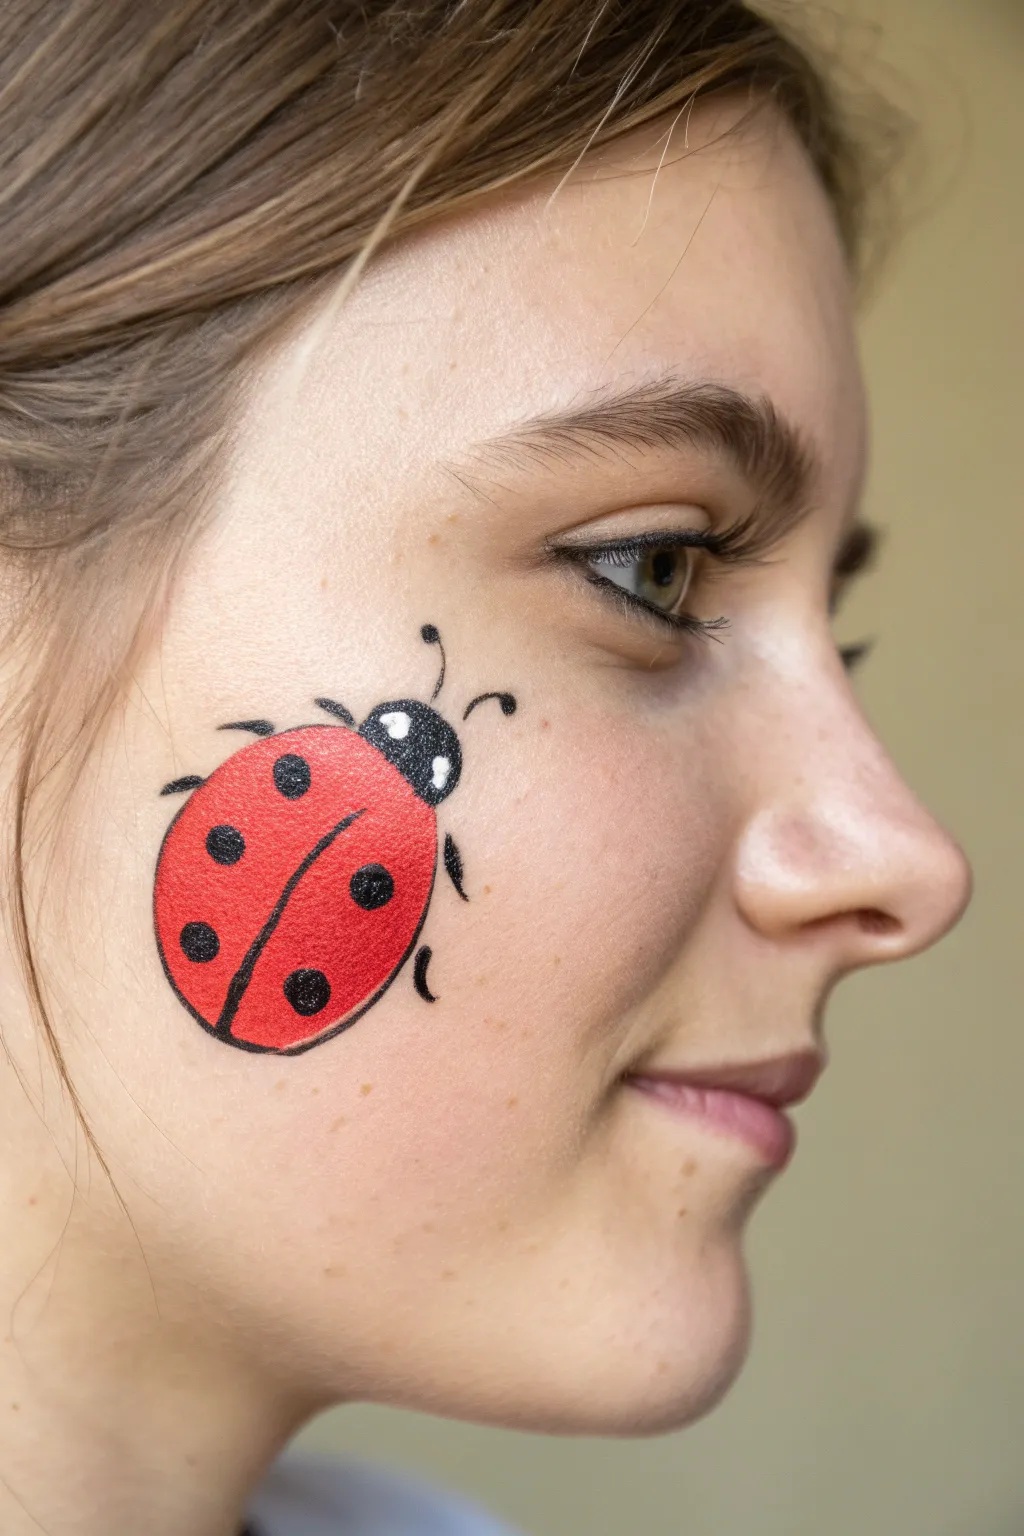
This charming ladybug design adds a sweet touch of nature to any face painting session. With its vibrant red wings and delicate black details, it’s a simple yet striking look perfect for beginners and kids alike.
Step-by-Step
Materials
- Red face paint (high pigment)
- Black face paint
- White face paint
- Medium round brush (size 4 or 6)
- Fine liner brush (size 1 or 2)
- Cup of water
- Paper towels or sponge
Step 1: Painting the Body
-
Load your brush:
Start by wetting your medium round brush and loading it thoroughly with bright red face paint. You want a creamy consistency that isn’t too drippy so the color applies opaquely. -
Create the shape:
Position the brush on the apple of the cheek. Paint a smooth, slightly tilted oval shape. This will be the main body of the ladybug. Fill it in completely with the red paint. -
Refine the edges:
While the paint is still wet, use the tip of your brush to smooth out the edges of the oval, ensuring a nice, rounded shape. Let this red base dry for a moment before moving on.
Step 2: Adding the Head and Details
-
Prepare the black paint:
Switch to your fine liner brush or wash the medium brush very well. Load it with black face paint. I like to twist the brush on the palette to get a sharp point. -
Paint the head:
At the top, narrower end of the red oval, paint a small semi-circle or mushroom cap shape that slightly overlaps the red. This forms the ladybug’s head. -
Divide the wings:
Starting from the bottom center of the black head, draw a thin, curved line down the middle of the red body to the bottom tip. This line separates the wings. -
Add the spots:
Using the same fine brush, carefully press down to create small black dots on the red wings. Aim for about three spots on each side for a balanced look. -
Outline the body:
Very lightly outline the entire red shape with a thin black line. This defines the edges and makes the ladybug pop against the skin. -
Add the legs:
Paint three tiny, curved lines coming out from each side of the body. These little legs give the ladybug movement and character. -
Draw the antennae:
From the top of the black head, paint two delicate, curving lines that go upwards and outwards. Add a tiny dot at the end of each antenna.
Uneven Spots?
If your black dots look messy, use the back end of a paintbrush handle. Dip it in paint and stamp it onto the wings for perfectly round circles every time.
Step 3: Highlights and Finishing Touches
-
Clean your brush:
Thoroughly rinse your fine liner brush until the water runs clear, then load it with white face paint. -
Highlight the head:
Add two small white dots or commas inside the black head area. These reflections make the little bug look shiny and alive. -
Highlight the wing:
Paint a very faint, thin white curve along the upper edge of one wing to suggest a glossy texture. Keep this subtle. -
Check your work:
Step back and look at the design. If any lines look shaky, you can gently tidy them up with a clean, slightly damp brush, but be careful not to smudge the main colors. -
Dry completely:
Allow the entire design to dry for another minute or so to prevent immediate smudging when the model smiles.
Pro Tip: Symmetry
Angle the wing dividing line slightly to match the natural contour of the cheekbone. This makes the ladybug look like it’s crawling up the face rather than just sitting flat.
Enjoy showing off your cute new garden friend at your next party or event
Bumblebee With Dotted Flight Trail
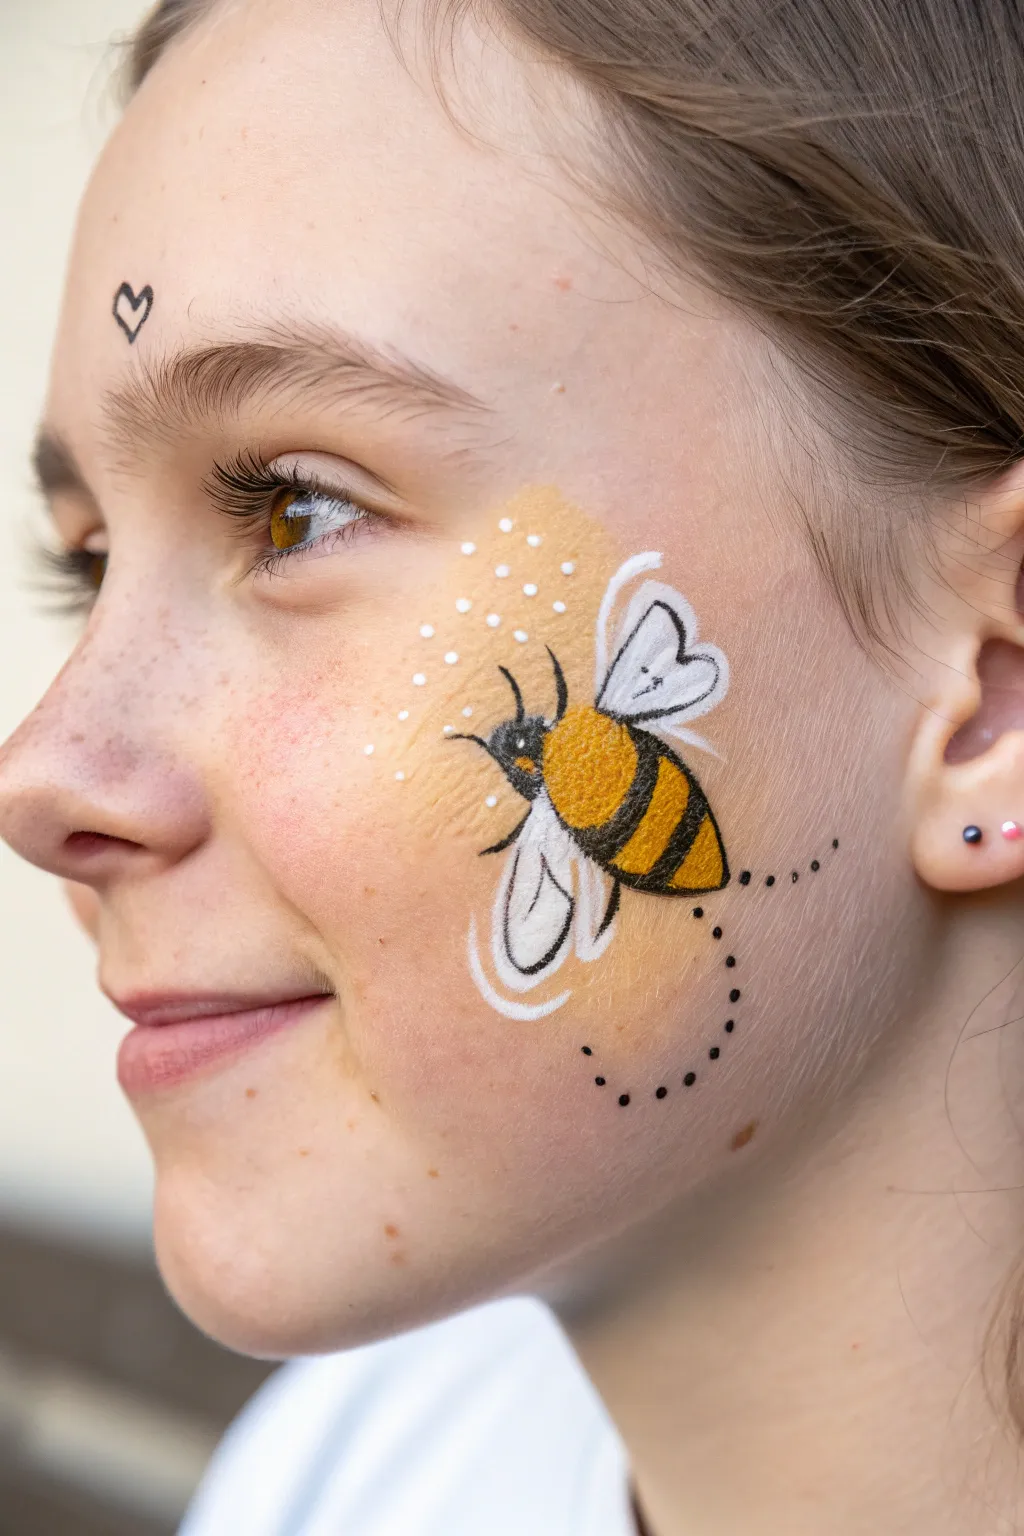
This sweet and simple cheek art features a fuzzy bumblebee in flight, complete with a whimsical dotted trail and delicate pollen speckles. It is a perfect design for a sunny afternoon, combining soft blended textures with crisp linework for a standout look.
Detailed Instructions
Materials
- Face paint: bright yellow, amber/orange/gold
- Face paint: black and white
- Small painting sponge or dauber
- Round brush (size 2 or 3)
- Fine liner brush (size 0 or 1)
- Water cup
Step 1: The Pollen Background
-
Load the sponge:
Dampen your small sponge or dauber and pick up a mixture of bright yellow and a touch of white paint to create a soft, pastel glow. -
Create the base:
Gently tap the sponge onto the upper cheekbone area, creating an amorphous, cloudy shape. Keep the edges soft and faded rather than sharp. -
Add warmth:
While the base is still slightly damp, take a clean corner of your sponge with a tiny bit of amber or gold paint and dab it lightly in the center of the yellow patch to add dimension.
Step 2: Painting the Bee Body
-
Outline the shape:
Using a round brush and your amber/orange paint, paint an oval shape directly over the yellow background. Orient it diagonally, pointing down towards the invisible flower it is landing on. -
Create texture:
For that fuzzy bee look, use the tip of your brush to stipple tiny little strokes around the edges of the orange oval instead of painting a smooth line. -
Paint the stripes:
Load a round brush with black face paint. Paint two curved, thick stripes across the bee’s abdomen. Use a light flickering motion at the edges to maintain the furry texture. -
Head and stinger:
Paint a smaller, rounded black shape at the top left of the body for the head, and a tiny, sharp point at the bottom right for the stinger.
Fuzz Factor
To make the bee look extra fluffy, dry your brush slightly after loading the black paint. This rougher ‘dry brush’ leaves a textured, hair-like finish on the stripes.
Step 3: Wings and Details
-
Top wing outline:
Switch to a fine liner brush with white paint. Draw the outline of the upper wing, shaped like a rounded triangle or heart half, extending from the bee’s back. -
Bottom wing outline:
Draw the lower wing slightly smaller and tucked underneath the body, using clean white strokes. -
Fill the wings:
Lightly fill inside the white outlines. I find that leaving some of the skin tone or background showing through makes the wings look delightfully translucent. -
Wing veins:
Once the white is dry, use your thinnest liner brush with a tiny amount of watered-down black paint to draw very faint vein lines inside the wings. -
Legs and antennae:
Using the black liner brush, flick two tiny curved lines from the head for antennae and add delicate little legs extending from the body.
Glitter Upgrade
Before the paint fully dries, press cosmetic-grade gold glitter onto the yellow body or iridescent white glitter onto the wings for a sparkling finish.
Step 4: Magical Touches
-
Highlight the body:
Add a small swipe of white paint on the top of the bee’s thorax and abdomen to make it look shiny and round. -
Pollen dots:
Dip the back end of a paintbrush handle into white paint. Dot a cluster of various-sized specks around the bee’s head and upper wing to represent pollen. -
The flight trail:
Using the tip of your fine liner brush and black paint, create a trail of tiny dots. Start from the stinger and loop downward and around, curving up toward the ear. -
Final flourish:
Complete the look by drawing a small, simple black heart outline on the forehead above the eyebrow for extra sweetness.
Now you have a buzzing little friend ready to fly off your cheek on a beautiful adventure

PENCIL GUIDE
Understanding Pencil Grades from H to B
From first sketch to finished drawing — learn pencil grades, line control, and shading techniques.
Explore the Full Guide
Bright Starburst Pop
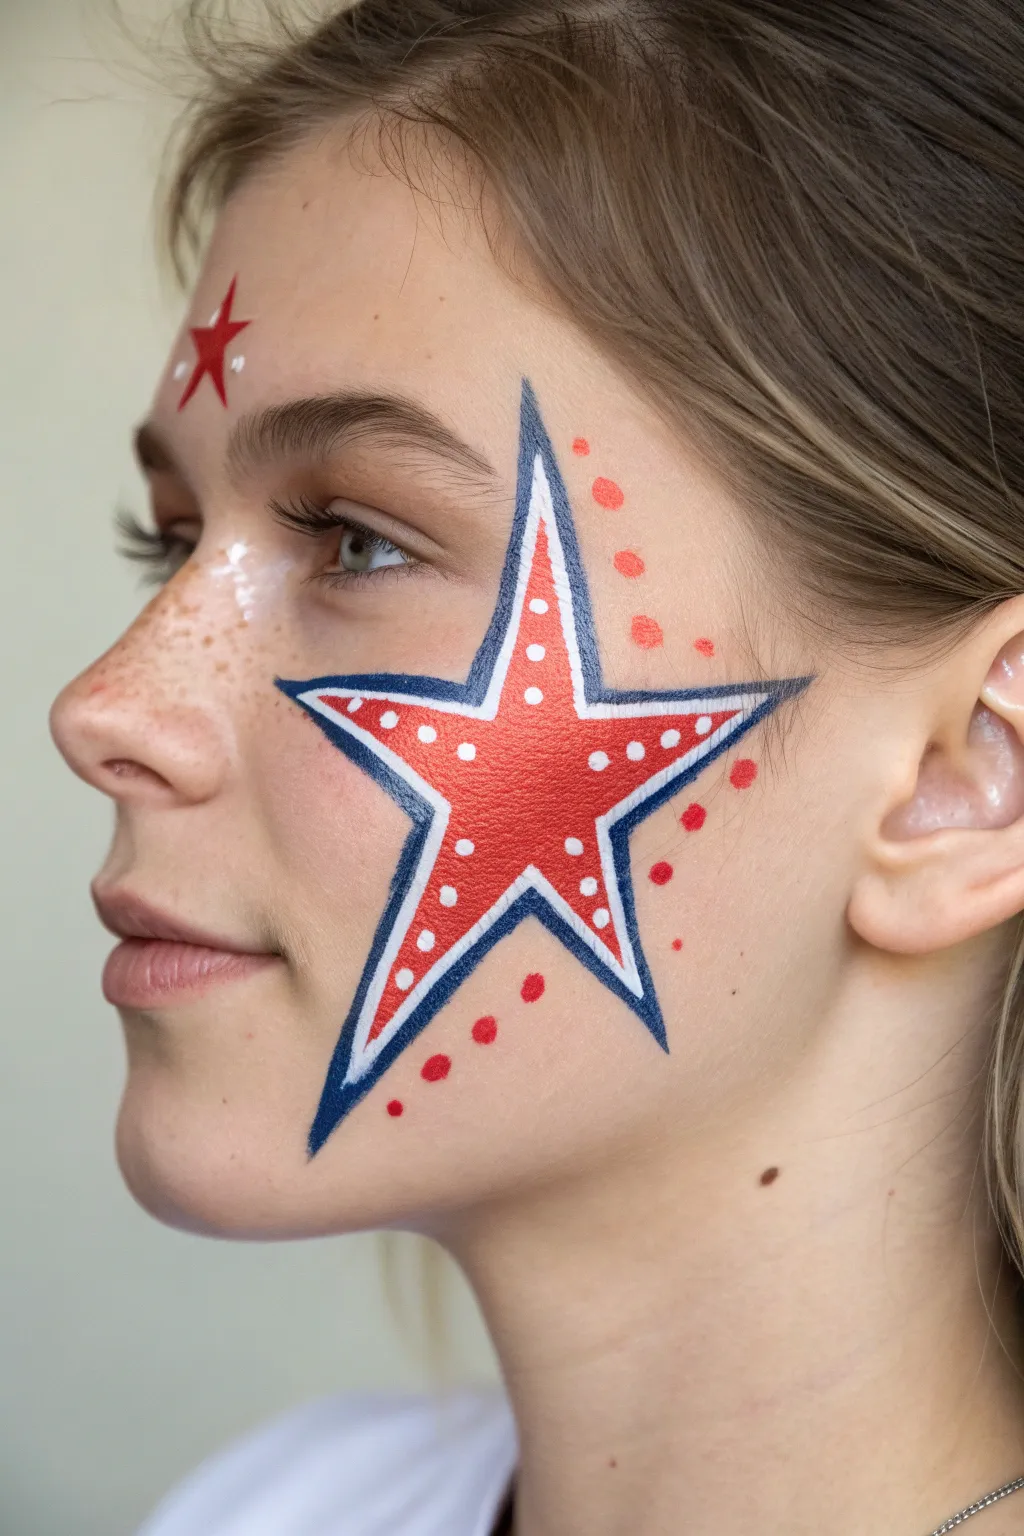
Transform a simple cheek design into a patriotic or pop-art statement with this striking starburst pattern. The bold blue outline frames a vibrant red center speckled with whimsical white dots, creating a look that’s perfect for holidays or spirit days.
Step-by-Step Guide
Materials
- Face paint (royal blue, bright red, flat white)
- Round brush (size 2 or 3 for outlining)
- Round brush (size 4 or 5 for filling)
- Fine detail brush (size 1)
- Small cup of water
- Paper towels
- Cosmetic glitter gel (optional, clear or iridescent)
Step 1: Laying the Foundational Shape
-
Map the points:
Visualize a five-pointed star spanning from the top of the cheekbone down to the jawline. Using a very damp, clean brush or a faint white paint dot, lightly mark the five tips of your star to ensure the proportions look right before committing to color. -
Create the inner white border:
Load a medium round brush (size 3) with white face paint. Connect your marked points to draw the full star shape. Make the lines fairly thick, about 1/4 inch, because this white line will serve as the bright gap between the red and blue sections later. -
Fill the center:
Switch to a larger round brush loaded with bright red paint. Fill in the center of your white star outline. Work carefully to leave a crisp white edge visible all around the red interior; don’t paint all the way to the outside edge of the white. -
Smooth the coverage:
If the red looks streaky, wait about 30 seconds for the first layer to dry slightly, then dab on a second coat to get that solid, opaque candy-apple red look.
Shaky Lines?
If your hand shakes while outlining, rest your pinky finger gently on the model’s chin or cheek (use a dry spot!) to anchor your hand for smoother strokes.
Step 2: Defining the Edges
-
Outline in blue:
Using a size 2 or 3 round brush and royal blue paint, trace the outermost edge of your original white star shape. -
Refine the points:
Extend the tips of the blue outline into sharp, tapered points. The top point should reach toward the outer corner of the eye, and the bottom points should sweep down towards the jaw. Clean lines here make the design look professional. -
Sharpen the inner angles:
Ensure the inner corners of the star (where the points meet) are sharp and pointy, not rounded. Use the very tip of your brush to drag the blue paint into a tight V-shape.
Pro Tip: Consistency
For the dots, your paint needs to be thick and creamy like soft butter. If it’s too watery, the dots will drip or become transparent as they dry.
Step 3: Adding Details & Accents
-
Add pure white dots:
Take the back end of a paintbrush handle or a dotting tool and dip it into creamy white consistency paint. -
Place the center dots:
Press dots onto the red section of the star. Start with a central vertical line of dots, then fill in the arms of the star. Space them somewhat evenly, but keep it playful rather than mathematically perfect. -
Create the splatter effect:
Switch back to your red paint and a small round brush. Create a series of dots trailing off the top right and bottom left points of the star. Press harder for large dots near the star and lighter for tiny dots further away to create a fading effect. -
Paint the forehead accent:
On the forehead above the opposite eye, paint a smaller, freehand red five-pointed star. Keep it simple and solid red. -
Highlight the forehead star:
Add three tiny white dots around the forehead star to tie it into the main cheek design. -
Bridge of nose highlight:
I like to dab a little white paint or glitter spacing across the bridge of the nose and inner corner of the eye to add extra brightness to the face.
Now step back and admire how this crisp, graphic design brings an immediate burst of energy to the face
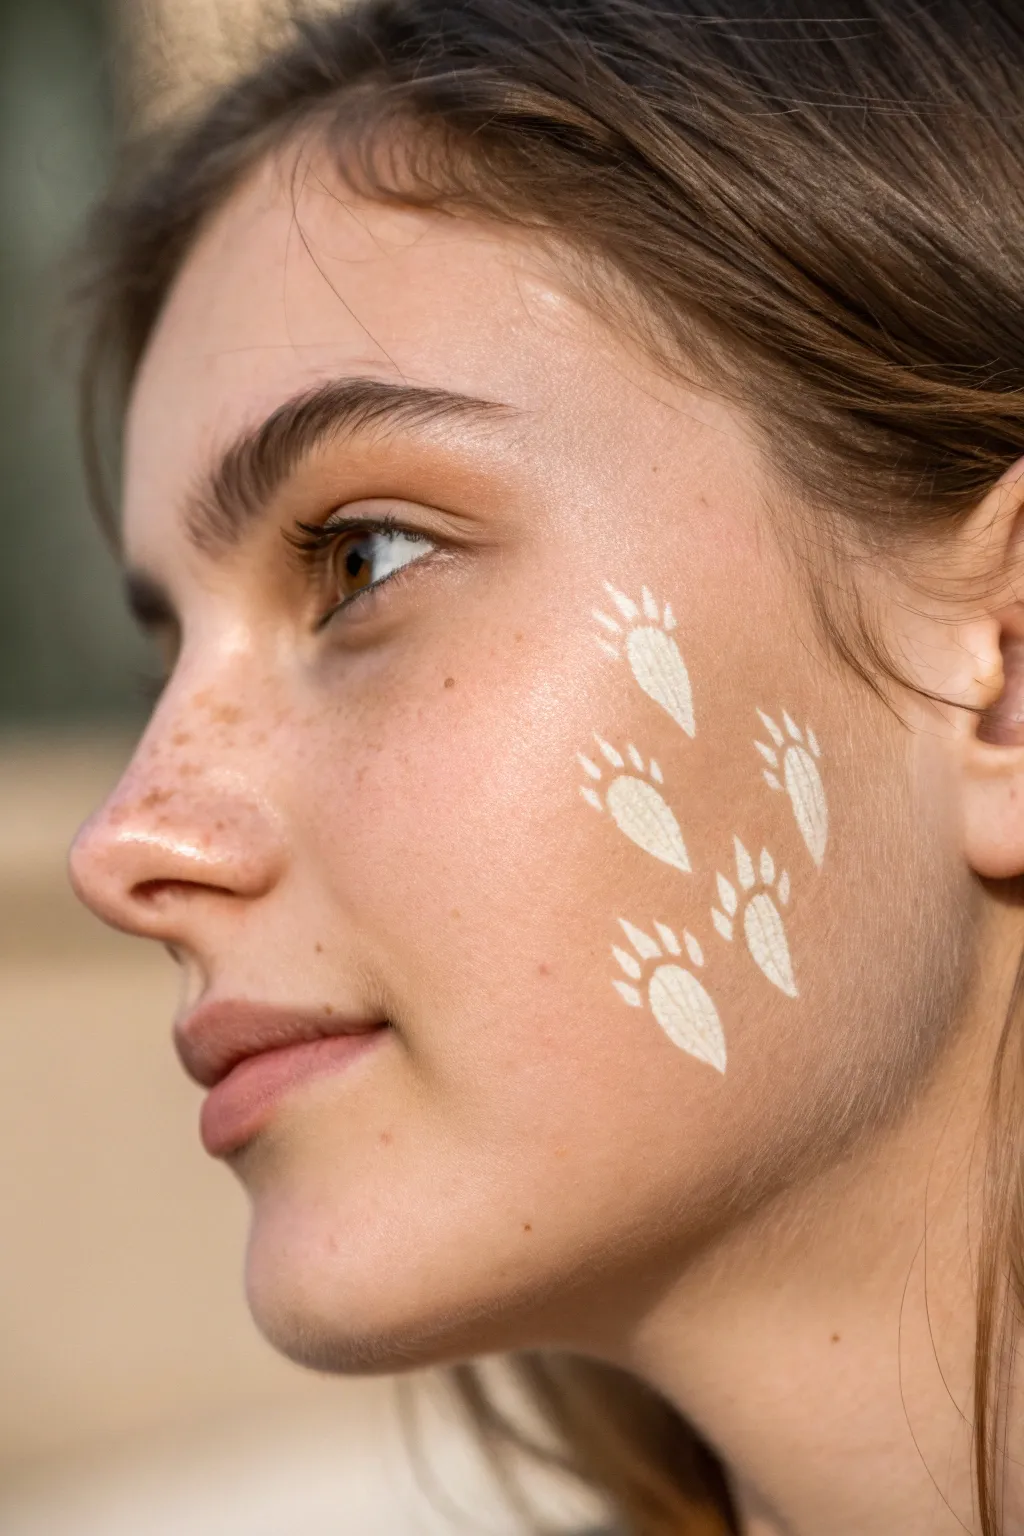
Tiny Paw Print Stamp
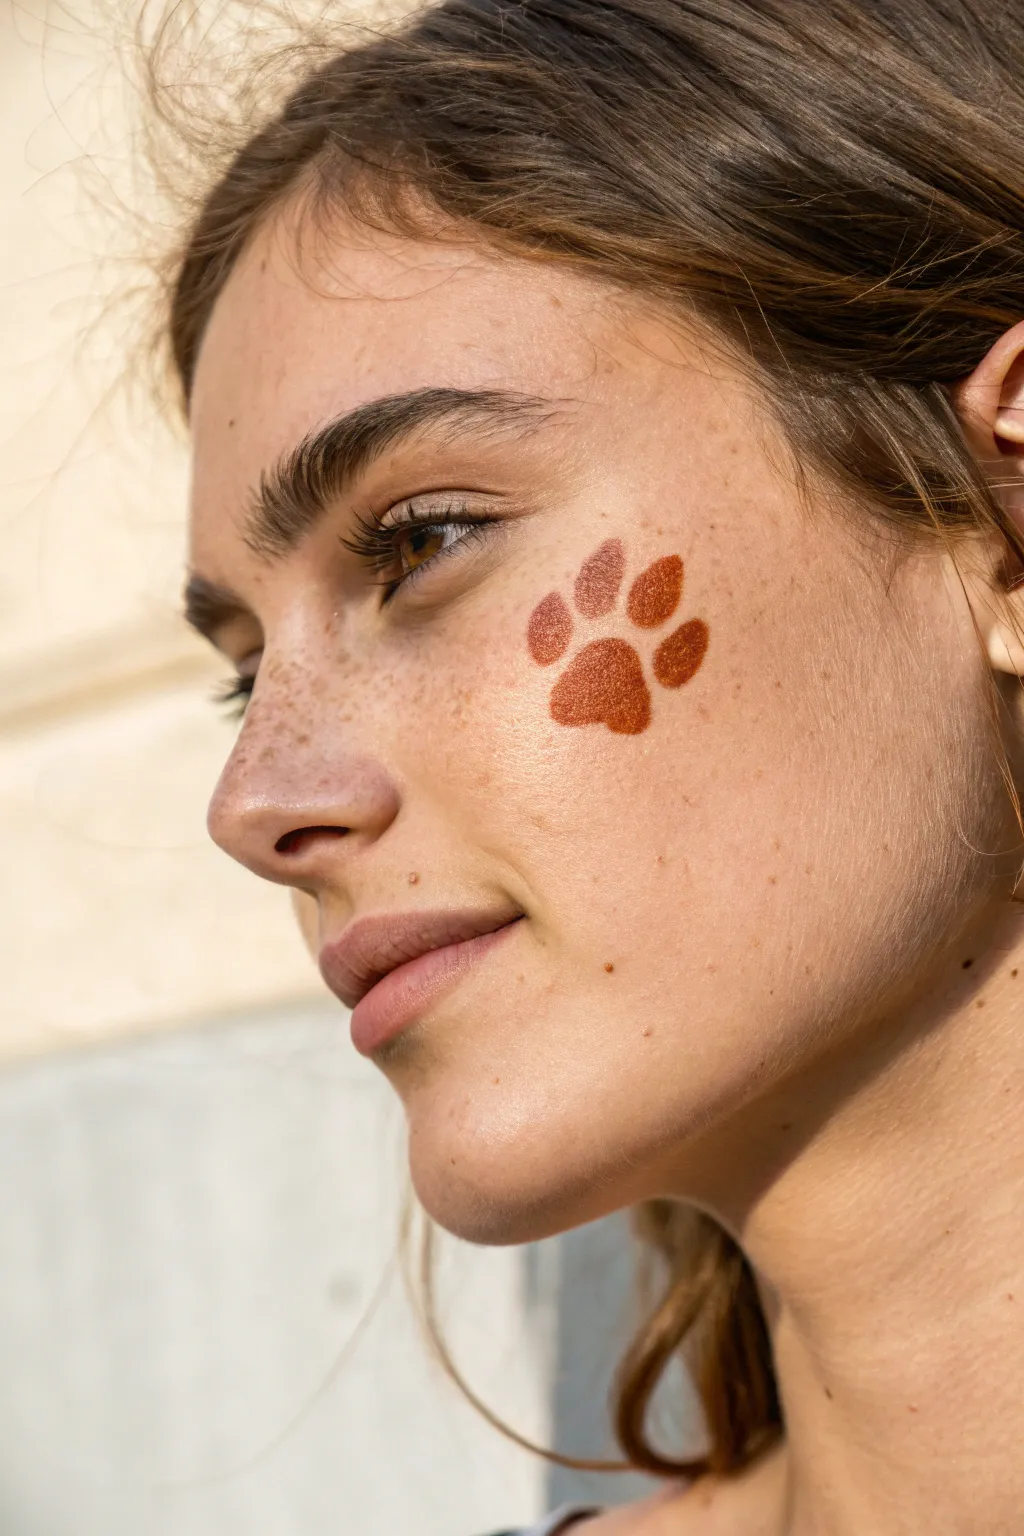
Add a touch of playful charm to your look with this incredibly simple yet effective paw print cheek stamp. The warm, metallic brown tone mimics henna or a sun-kissed freckle, making it subtle enough for everyday wear but special enough for a festival or party.
Detailed Instructions
Materials
- Metallic bronze or copper face paint (water-activated)
- Small foam pouncer or circular dauber (approx. 1/2 inch)
- Small round detail brush (size 1 or 2)
- Small water container
- Paper towel
Step 1: Preparation
-
Cleanse the canvas:
Start with clean, dry skin on the cheek area where you intend to place the stamp. If the model is wearing foundation, ensure it is set with powder so the face paint adheres properly without sliding. -
Activate the paint:
Dip your foam pouncer slightly into water, then swirl it firmly into your metallic bronze face paint cake. You want a creamy, opaque consistency—not too watery, or it will drip. -
Test the consistency:
Before touching the face, press the loaded pouncer onto the back of your hand or a paper towel to ensure the pigment is solid and the sponge isn’t oversaturated.
Uneven Edges?
If your stamp looks messy, wait for it to dry completely. Then, use a damp Q-tip to ‘erase’ and reshape the edges cleanly.
Step 2: Stamping the Main Pad
-
Position the stamp:
Identify the placement on the apple of the cheek or slightly higher on the cheekbone. Angle the tool so the ‘pad’ will sit diagonally. -
Create the main pad:
Press the circular foam pouncer firmly against the skin once to create the large, central pad of the paw print. Lift it straight off to avoid smudging. -
Refine the shape:
If the circle is too perfectly round, I like to use the edge of the pouncer to slightly flatten the top edge, giving it that characteristic subtle ‘heart’ dip found in animal paw pads.
Stamp Hack
Don’t have a pouncer? The eraser on the end of a standard pencil makes a perfect stamp for the smaller toe pads.
Step 3: Adding the Toes
-
Switch tools:
Load your small round detail brush with the same metallic bronze paint mixture. -
Map out the toes:
Visualize an arc above the main pad where the four toes will go. They should be evenly spaced and slightly curved around the main pad. -
Paint the first toe:
Start with the leftmost toe. Press the brush down to create a teardrop or oval shape, tapering slightly toward the main pad. -
Paint the outer toe:
Move to the far right side and paint the opposing toe to establish the width of the paw print. -
Fill the middle:
Paint the two middle toes in the remaining space. Keep them slightly smaller than the main pad but distinct enough to see clearly. -
Adjust the edges:
Use the very tip of your brush to smooth out any rough edges on the toes, making them look soft and rounded like a real animal print. -
Connect the look:
Step back and check the symmetry. If any toe looks too thin, gently dab a little more paint to round it out.
Step 4: Finishing Touches
-
Let it dry:
Allow the paint to air dry for about 30 seconds. Metallic paints often dry faster than matte ones. -
Cleanup:
If any stray marks occurred, use a damp cotton swab to gently lift the pigment away without ruining the foundation underneath. -
Add freckles (optional):
To blend the look even more naturally, dot tiny speckles of the same bronze paint around the paw print to mimic freckles.
Now you have a sweet, subtle design that celebrates your love for animals.


Tiger Stripe Scratch Marks
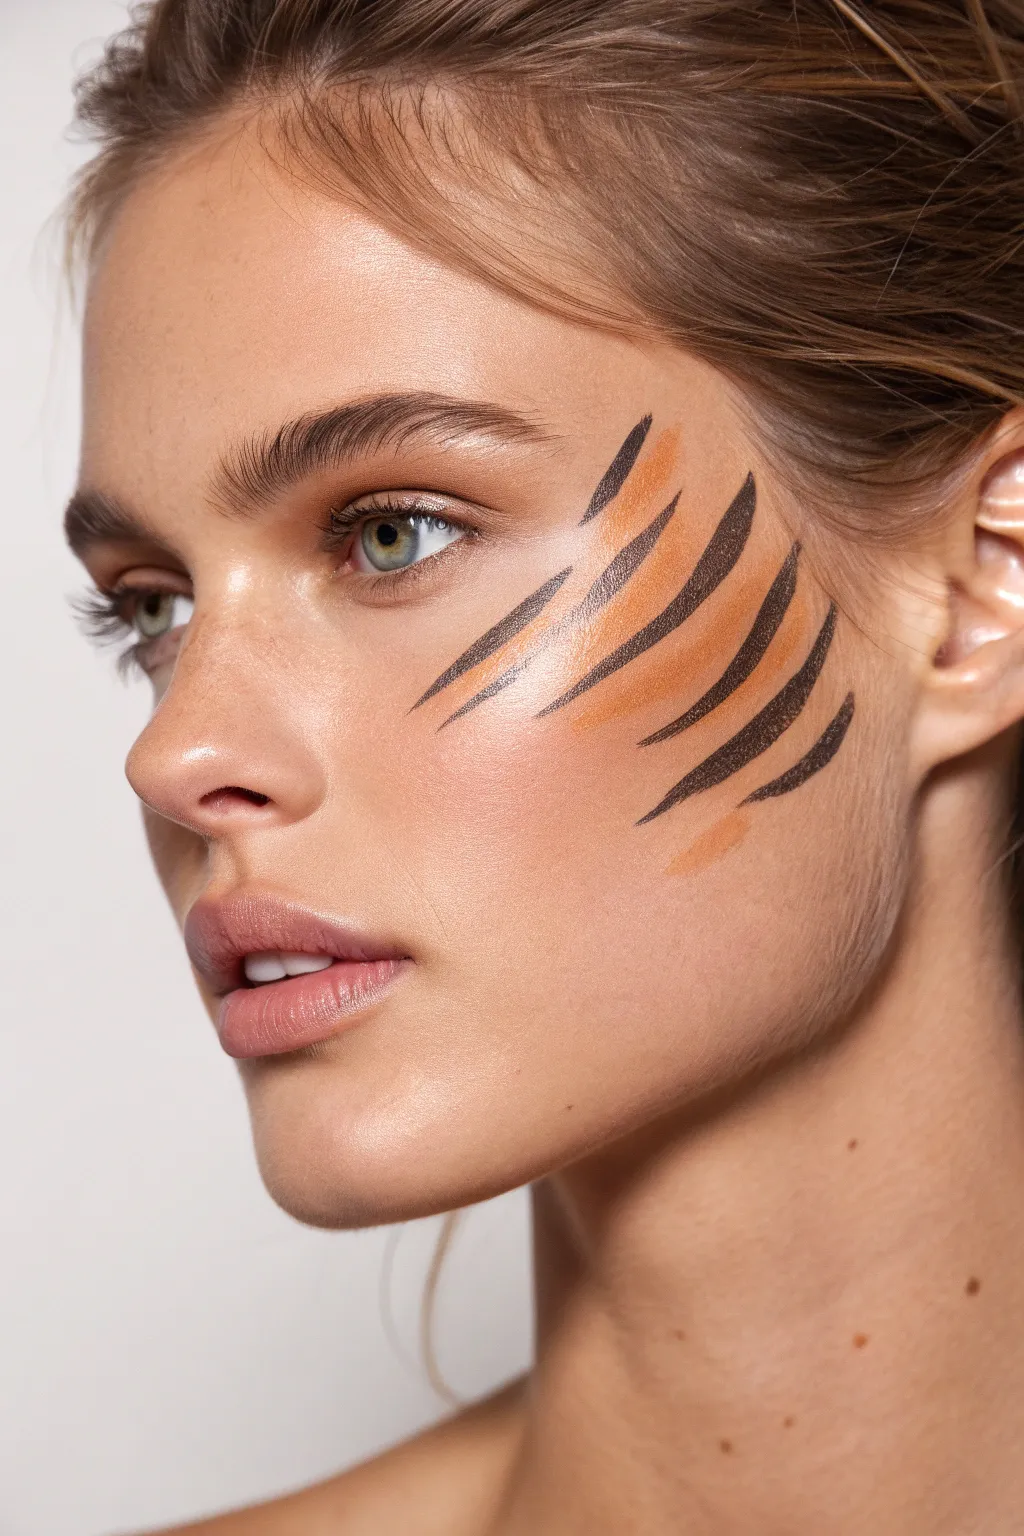
Unleash your wild side with these striking tiger stripe scratch marks that curve elegantly along the cheekbone. This design combines bold black lines with warm orange accents for a fierce yet sophisticated animalistic look.
Step-by-Step Guide
Materials
- Black face paint (liquid or crème) or gel eyeliner
- Orange or terracotta face paint (or cream eyeshadow)
- Fine liner brush (size 0 or 00)
- Small angled brush
- Setting spray
- Micellar water and cotton buds (for clean-up)
Step 1: Base Preparation
-
Prep the canvas:
Begin with a clean, moisturized face. Apply your usual foundation or concealer if desired, but aim for a fresh, dewy skin finish as seen in the photo. -
Map the placement:
Visualize where the stripes will go. They should start near the temple or upper ear and curve downwards across the cheekbone towards the nose, following the natural shadow of your bone structure.
Step 2: The Dark Stripes
-
Load the brush:
Take your fine liner brush and load it with black face paint or gel eyeliner. Ensure the consistency is fluid enough to glide but not drippy. -
Draw the first stripe:
Starting from the highest point near the outer corner of the eye, draw a thin line curving downwards. Press lightly at the start, increase pressure slightly in the middle for thickness, and lift off at the end for a tapered point. -
Create the parallel line:
Draw a second black stripe slightly lower down the cheek, maintaining a parallel curve to the first one. Remember to taper the ends to sharp points. -
Add the lower stripes:
Continue adding 2-3 more black stripes, moving further down the cheek. Vary the lengths slightly; generally, the middle stripes are longer, while the bottom ones can be shorter. -
Refine the edges:
Check your lines for any jagged edges. Carefully smooth them out with the very tip of your brush to ensure they look sleek and sharp. -
Clean up mistakes:
If a line gets too thick or messy, dip a cotton bud in micellar water and carefully carve out the shape again.
Flick of the Wrist
To get those perfectly sharp, tapered ends, lift your brush off the skin quickly at the end of every stroke, like a plane taking off from a runway.
Step 3: The Orange Accents
-
Prepare the orange color:
Clean your brush or switch to a small angled brush. Load it with a warm orange or terracotta shade. -
Fill the gaps:
Paint orange stripes in the spaces between your black lines. I find it easiest to start these slightly further back than the black lines so they feel nestled in. -
Control the opacity:
The orange layer doesn’t need to be fully opaque. A slightly translucent application allows skin texture to show through, creating a more organic feel. -
Mirror the motion:
Use the same sweeping motion—thin start, thicker middle, tapered end—to match the flow of the black stripes. -
Be mindful of spacing:
Try to keep a tiny sliver of skin visible between the black and orange lines to prevent the colors from muddying together.
Glittery Upgrade
Trace over the orange stripes with a clear glitter gel or gold eyeliner to turn this costume look into glam festival makeup.
Step 4: Finishing Touches
-
Add a highlight:
For extra dimension, tap a small amount of liquid highlighter on the high point of the cheekbone, just above the top stripe. -
Set the look:
Mist your face lightly with a setting spray to lock the design in place and prevent smudging throughout the day or night. -
Final check:
Step back and check the symmetry if you are painting both cheeks, though an asymmetrical single-side look is also very stylish.
Now you are ready to show off your sophisticated jungle-inspired style
Mini Spider and Web Corner

This elegant little design adds just the right amount of creepy-crawly flair without covering the entire face. It features a crisp white spiderweb radiating from the ear, complete with a tiny black spider dangling for a classic Halloween touch.
How-To Guide
Materials
- White face paint (water-activated or cream)
- Black face paint (water-activated or cream)
- Round brush (size 2 or 3) for the web
- Fine detail brush (size 0 or 1) for the spider
- Cup of water
- Paper towel or sponge
Step 1: Weaving the Web
-
Load your brush:
Dip your medium round brush (size 2 or 3) into water and then swirl it into the white face paint. You want a creamy consistency that flows easily off the bristles but isn’t drippy. -
Anchor the center:
Identify your starting point right at the hairline in front of the ear, roughly level with the tragus (that little nub of cartilage at the center of the ear). -
Draw the main spokes:
Paint four or five long, straight lines radiating outward from that anchor point. The top line should angle toward the temple, and the bottom line should angle down toward the jawline. -
Extend the lines:
Make sure these spoke lines are slightly different lengths, reaching about halfway across the cheek, to give the web a natural, stretched look. -
Start the inner cross-lines:
Beginning close to the ear, paint curved lines that connect your spokes. These little scallops should swoop inward toward the ear to create that classic sticky web shape. -
Build the second row:
Move about half an inch outward and paint a second row of connecting scallops. I find it helps to use just the very tip of the brush here to keep the lines delicate. -
Finish the outer web:
Add a third and final row of curved connecting lines near the ends of your spokes. If your spokes are long enough, you can even add partial fourth connections on the distinct outer edges. -
Refine the edges:
Look at the tips of your radiating spokes. If they look blunt, use the tip of your brush to drag them out into fine, sharp points that fade into the skin.
Rest Your Hand
Shaky lines? Try resting your pinky finger gently on the model’s chin or cheekbone while you paint. This creates a stable pivot point for smoother strokes.
Step 2: Adding the Spider
-
Switch to black:
Clean your brush thoroughly or switch to a finer detail brush (size 0 or 1). Load it with black face paint, aiming for an inky consistency. -
Create the body:
Choose a spot on the upper section of the web. Paint a small oval for the spider’s abdomen and a tiny dot connected to it for the head. -
Paint the legs:
Carefully paint four angled legs coming off each side of the body. The front legs should reach forward, and the back legs should trail backward. -
Add the silk thread:
Using a very light touch, draw a thin black line connecting the spider’s body back to the white web, so it looks like it is actively crawling or descending. -
Check for gaps:
If the white paint has dried too transparent in some areas, simply retrace those specific lines with a fresh coat of white to make the design pop. -
Clean up:
Use a damp cotton swab or the corner of a paper towel to gently wipe away any unsteady lines or smudges around the edges.
Web Symmetry
Don’t stress if your web lines aren’t perfectly symmetrical or evenly spaced. Real spiderwebs are often irregular, and uneven gaps actually make it look more realistic.
This simple yet striking design is perfect for a quick costume upgrade without the fuss of a full mask
Smiling Fish With Bubbles
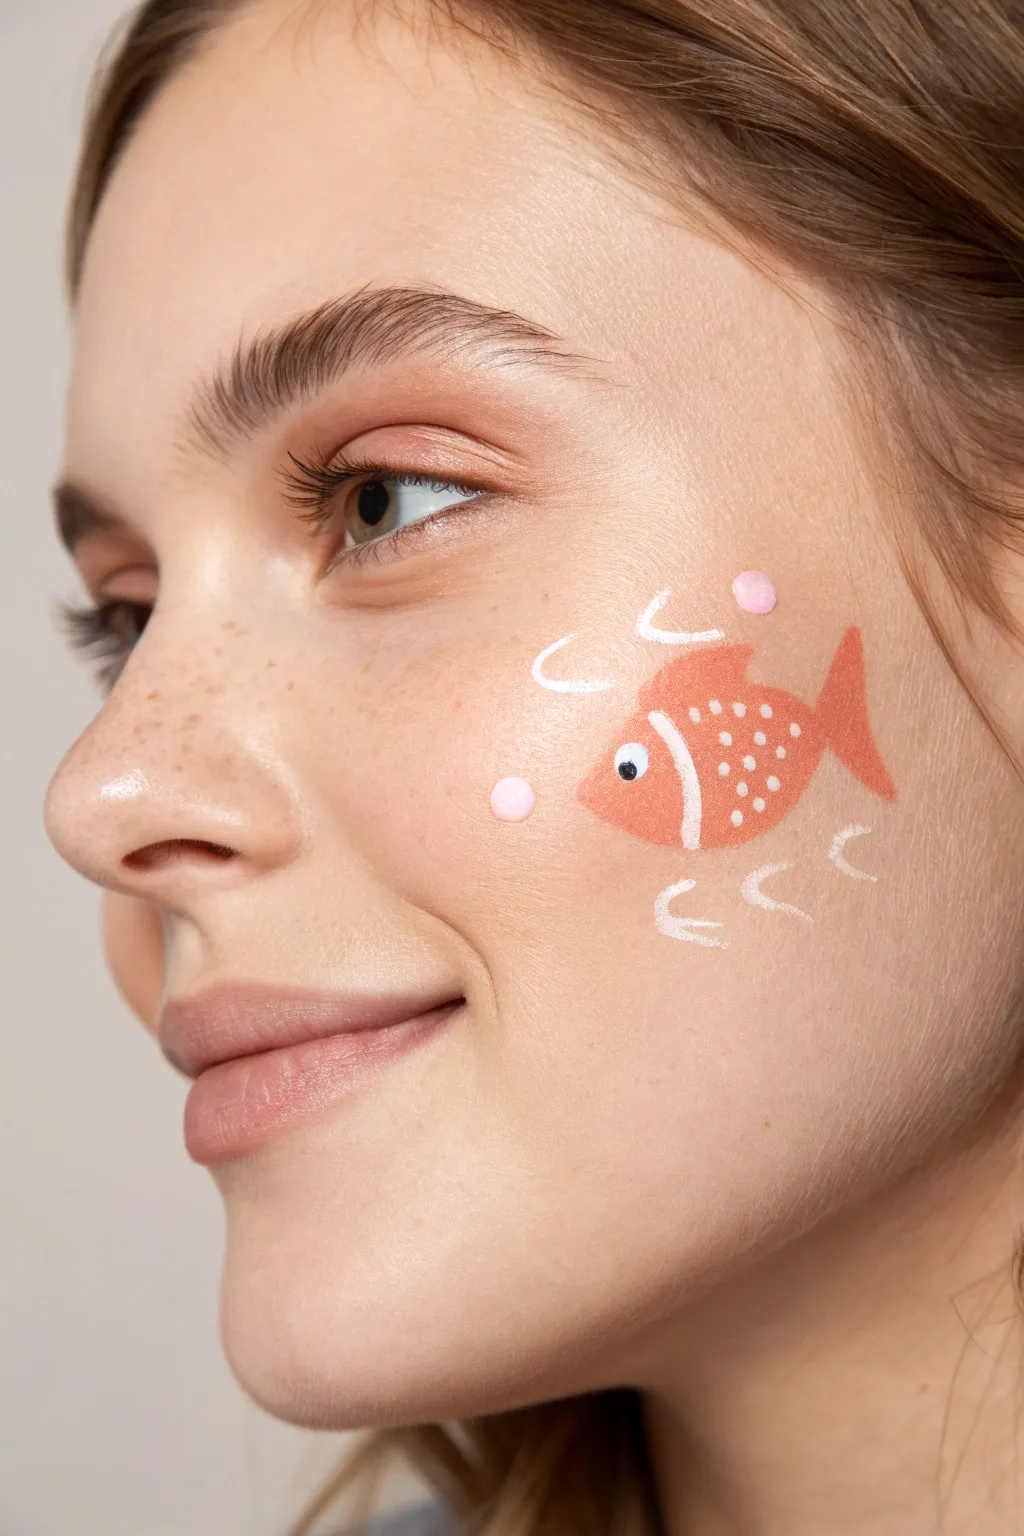
Brighten up any day with this whimsical little fish, swimming happily across a cheek. The design pairs a soft coral-orange body with playful white accents for a look that is both simple to paint and charmingly festive.
Step-by-Step
Materials
- Face paint: Coral/Orange
- Face paint: White
- Face paint: Black
- Face paint: Soft Pink
- Flat brush (small)
- Round detail brush (fine)
- Medium round brush
- Cup of water
- Paper towels
Step 1: Painting the Fish Body
-
Map out the shape:
Load your flat brush or a medium round brush with the coral-orange face paint. Find the apple of the cheek—this is the perfect spot for your fish to swim. -
Create the main oval:
Paint a solid, horizontal oval shape for the fish’s body. It should be about an inch and a half wide, angling slightly upwards so the fish looks like it’s swimming. -
Add the tail fin:
At the back end of the oval, paint a triangular tail fin pointing toward the ear. Make the top point slightly longer than the bottom one for a classic fish silhouette. -
Paint the dorsal fin:
Using the very tip of your brush, add a small, curved fin on the top of the fish’s back. -
Fill and smooth:
Go back over the orange shape to ensure the color is opaque and even. Let this base layer dry completely to avoid smudging when we add details.
Fixing Smudges
If the orange paint bleeds into the white lines, wait for it to dry completely. Then, use a damp cotton swab to lift the mistake before reapplying.
Step 2: Adding Details & Expressions
-
Outline the head:
Switch to your fine detail brush loaded with white paint. Draw a curved vertical line roughly one-third of the way from the front of the fish to separate the head from the body. -
Paint the eye base:
Inside the head section, paint a small, solid white circle for the eye. I find it helpful to press the brush down and twist slightly to get a perfect round shape. -
Add the pupil:
Once the white eye circle is dry, use the very tip of a clean detail brush with black paint to add a tiny dot in the center for the pupil. -
Create the scales:
Clean your detail brush and reload with white. Dot small specks onto the body of the fish, behind the curved head line, to create the illusion of shimmering scales. -
Highlight the fins:
Add a tiny white accent line on the tail fin and perhaps a small dot on the dorsal fin to give them a bit of definition.
Make It Sparkle
While the paint is still slightly tacky, tap cosmetic-grade biodegradable glitter onto the fish’s scales for a magical, shimmering effect.
Step 3: Bubbles and Waves
-
Paint the upper spray:
Using the white paint and a round brush, paint two curved, sweeping motion lines above the fish. These should look like stylized waves or water movement. -
Add lower movement lines:
Repeat the process under the fish with three smaller, curved ‘u’ shapes or hooks to balance the composition. -
Create pink bubbles:
Load a medium round brush with soft pink paint. Place one dot directly in front of the fish’s nose and another larger one floating above the tail. -
Highlight the bubbles:
Add a tiny speck of white to the top of each pink bubble to make them look wet and reflective. -
Final touches:
Step back and check your symmetry. If the lines look a bit faint, you can carefully go over the white wave accents one last time for a brighter pop.
Now you have a happy little aquatic friend ready to make a splash at your next event
Watermelon Slice Wedge
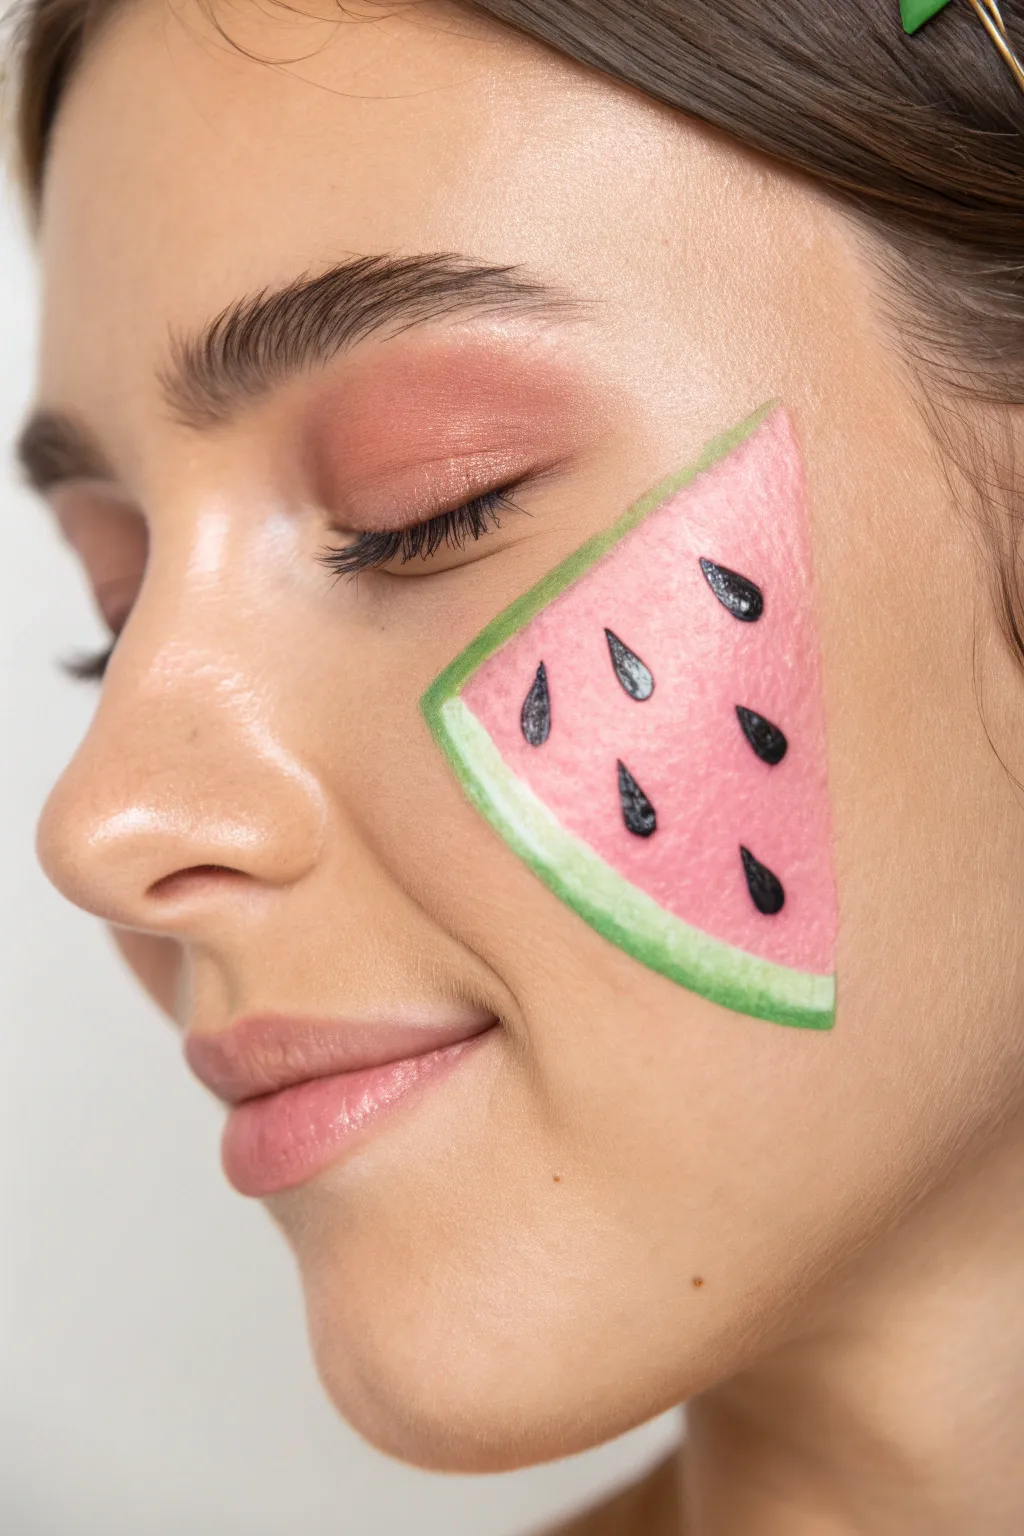
Capture the essence of summer with this fresh and fruity watermelon slice design. This cheek art features a vibrant pink wedge with a realistic rind gradient and crisp black seeds, perfect for a sunny day out.
Step-by-Step
Materials
- Face paint (Pink or Watermelon Red)
- Face paint (White)
- Face paint (Light Green or Lime Green)
- Face paint (Dark Green)
- Face paint (Black)
- Flat brush (medium size)
- Detail round brush (small, size 1 or 2)
- Small blending sponge or additional flat brush
- Cup of water
- Paper towels
Step 1: Planning and Base Shape
-
Map the Triangle:
Start by visualizing an inverted triangle on the cheek. The point should aim downwards towards the corner of the mouth, while the wider base sits closer to the ear. -
Load the Pink:
Load a medium flat brush with a generous amount of pink or watermelon red face paint. Ensure the consistency is creamy but not too watery to avoid drips. -
Paint the Flesh:
Fill in the main body of the triangle with the pink paint. Create crisp, straight edges for the sides of the wedge, but leave the bottom curved edge somewhat rough or open for now. -
Soften the Texture:
While the pink is still slightly damp, gently dab across the surface with a barely-damp sponge or finger to give it a slightly organic, fruity texture rather than a perfectly flat color.
Juicy Texture Tip
Don’t aim for perfect opacity with the pink. Letting a bit of skin show through or dabbing with a sponge mimics the juicy, semi-translucent texture of real fruit flesh.
Step 2: Creating the Rind
-
White Transition Line:
Clean your flat brush thoroughly and load it with white face paint. Draw a curved line hugging the bottom edge of your pink triangle. -
Blend the Transition:
I like to gently feather the white paint upward into the pink just a tiny bit while it’s wet. This creates that natural faded look where the red flesh meets the white rind. -
Apply the Green Rind:
Load a clean flat or round brush with light lime green paint. Paint a distinct curved strip right below the white line you just created. -
Deepen the Rind Edge:
Take a very small amount of darker green on the tip of your brush. Carefully outline just the very bottom outer edge of the lime green curve to define the hard skin of the melon. -
Refine the Edges:
Use a clean, slightly damp brush to tidy up the outer perimeter of the triangle if any paint went astray, ensuring a sharp geometric shape.
Step 3: Seeds and Details
-
Load the Black:
Switch to your smallest detail round brush. Load it with black face paint, mixing it to an inky consistency that flows smoothly. -
Position the Seeds:
visualize where the seeds will go. You want a random scatter pattern, mostly concentrated in the center and lower areas of the pink flesh. -
Paint the Teardrops:
Paint small teardrop shapes for the seeds. Press down to create the rounded bottom of the seed, then lift the brush as you pull up to create a sharp point. -
Vary the Angles:
Don’t make all seeds point straight up. Tilt some slightly left and others slightly right to mimic how seeds naturally sit inside the fruit. -
Add Highlights:
Rinse your detail brush extremely well and load it with a tiny bit of white. Add a microscopic white dot or dash inside each black seed to make them look wet and shiny. -
Final Check:
Step back and look at the overall balance. If the pink area looks too flat, you can lightly stipple a slightly darker red in the upper corner for subtle dimension.
Sparkle Upgrade
While the paint is still tacky, press cosmetic-grade biodegradable glitter onto the pink area. It makes the melon look sugared and extra summery in the sunlight.
Enjoy wearing your refreshing summer fruit design at your next picnic or festival
Dinosaur Footprint Track
Transform a simple cheek design into a stomping success with these crisp white dinosaur tracks. This minimalist look uses clean lines and a simple footprint shape to create an adventurous style without overwhelming the face.
Step-by-Step Guide
Materials
- White face paint (water-activated or cream-based recommended)
- Small round brush (size 1 or 2)
- Small filbert brush (optional, for the main pads)
- Setting spray (optional)
- Makeup sponge (for cleanup)
Step 1: Planning the Path
-
Assess the canvas:
Begin with a clean, dry cheek. Look at the natural angle of the cheekbone to decide where the track path will flow. -
Visualize the spacing:
Imagine a diagonal line running from the mid-cheek up toward the temple. You want the footprints to look like the creature was walking upwards. -
Check consistency:
Activate your white face paint with a little water until it reaches a creamy, ink-like consistency that won’t drip.
Step 2: Painting the Main Pads
-
Start with the lowest print:
Using your small round brush (or filbert), press down gently on the lower cheek area to create the first teardrop shape. This is the main sole of the foot. -
Shape the heel:
Pull the brush slightly downward and lift off to create a tapered point at the bottom of the teardrop. -
Create the second print:
Move up and slightly to the right for the next track. Paint another teardrop shape, angled slightly differently to mimic a natural step. -
Add the upper pair:
Continue the pattern by painting two more main pads near the temple area, keeping that diagonal flow consistent. -
Fill in gaps:
Go back over the main pad shapes to ensure the white is opaque and solid. I find a second layer helps the design pop against the skin.
Stamp It Out
For super fast application, cut a teardrop shape out of a dense makeup sponge. Dip in paint and stamp the main pads instantly.
Step 3: Adding the Claws
-
Load a fine brush:
Switch to your smallest round brush (size 1) and ensure it has a nice sharp point with plenty of paint. -
Position the first toe:
Above the lowest main pad, paint a very small, short stroke hovering just above the rounded top. -
Fan them out:
Add two or three more small toe strokes around the top curve of the main pad, fanning them slightly outward like a crown. -
Connect the claws:
Make sure each little toe mark is distinct and separated from the main pad, not touching it. -
Repeat the process:
Move to the second track and add its corresponding toes, angling them to match the direction of that specific footprint.
Jurassic Texture
Once the white is dry, lightly tap some iridescent or silver glitter over the wet paint for a magical, fossilized shimmer effect.
Step 4: Refining the Details
-
Complete the upper tracks:
Add the toes to the final two upper footprints near the temple. These can be slightly smaller to suggest distance, though uniform size works well too. -
Sharpen edges:
Use the very tip of your brush to clean up any rough edges on the main teardrop shapes for a crisp look. -
Check for symmetry:
Step back and look at the overall flow. If any track looks too thin, carefully widen the main pad. -
Allow to dry:
Let the white paint set completely for about a minute. Avoid touching or smudging the area. -
Set the look:
If you are expecting a long day of wear, a light mist of setting spray will keep those tracks from walking away.
You now have a clean, eye-catching design perfect for any dinosaur enthusiast
Tiny Pumpkin With a Face
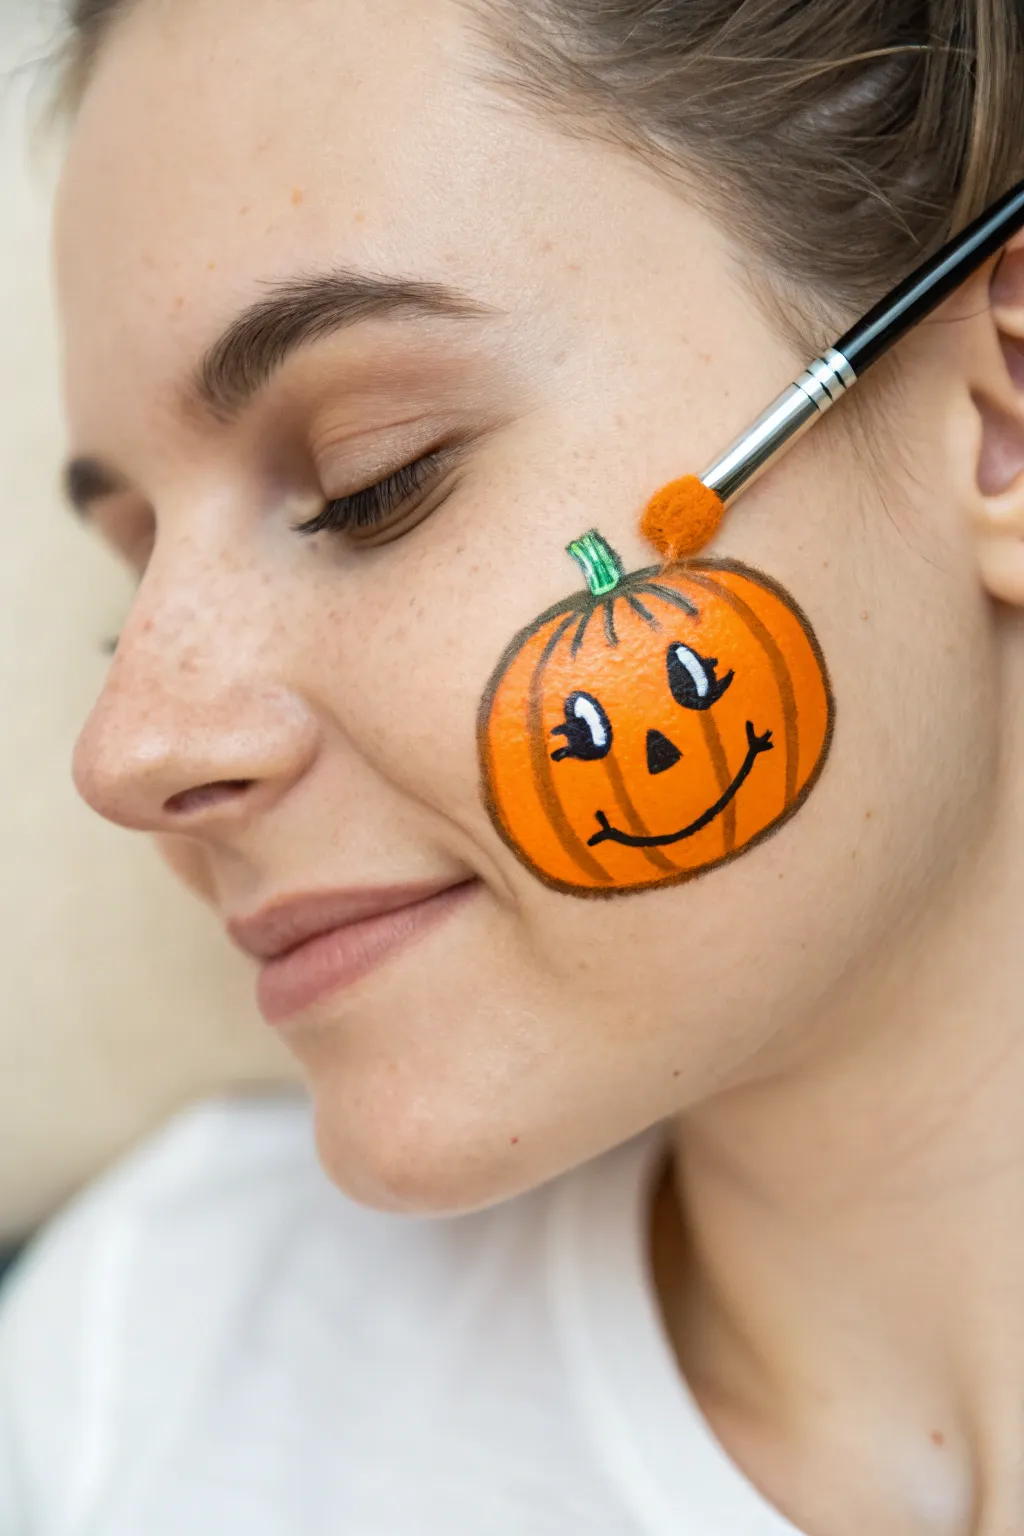
This adorable little pumpkin sits perfectly on the apple of a cheek, bringing a cheerful autumn vibe to any look. With its classic friendly face and vibrant orange hue, it’s a timeless face paint design that’s surprisingly simple to execute.
Step-by-Step Tutorial
Materials
- Orange face paint (cake or cream)
- Black face paint (liner consistency)
- Green face paint
- Small round brush (size 2 or 3)
- Fine liner brush (size 0 or 1)
- Small sponge or thick eyeshadow brush (optional for base)
- Cup of water
- Paper towels
Step 1: Painting the Pumpkin Base
-
Position the design:
Visualize the center of the apple of the cheek. This is where the middle of your pumpkin will sit, allowing it to move slightly when the person smiles. -
Outline the shape:
Load your small round brush or an applicator with bright orange face paint. Gently sketch a rounded, slightly flattened oval shape directly onto the cheek. -
Fill the center:
Using the same orange paint, fill in the entire oval. You can use a dabbing motion to get solid coverage. -
Add dimension:
While the paint is still slightly wet, I like to reload with fresh orange and add a second coat just in the center to make the color pop. -
Let it dry:
Wait about 30 to 60 seconds for the orange base to dry completely to the touch. This prevents the black details from smudging into a muddy brown later.
Step 2: Creating the Ribs & Stem
-
Outline the perimeter:
Switch to a fine liner brush loaded with black face paint. Carefully trace the outer edge of your orange oval to define the pumpkin’s silhouette. -
Draw the center rib:
Starting from the top center dip of the pumpkin, draw a curved line straight down to the bottom center dip. -
Add side ribs:
From that same top point, draw two more curved lines bowing outward—one to the left and one to the right—matching the curve of the pumpkin’s sides. -
Paint the stem:
Clean your brush and load it with bright green paint. Draw a small, rectangular or slightly curved stalk sticking out from the top center divot. -
Detail the stem:
Once the green is dry, take your fine liner brush with a tiny bit of black paint and add thin vertical lines inside the stem for texture.
Use Powder for Texture
For a softer look like the reference, apply the orange base with a sponge applicator using pigmented eyeshadow or dry cake paint instead of wet cream.
Step 3: Adding the Face
-
Paint the eye outlines:
Using the liner brush with black paint, draw two small teardrop or oval shapes on the upper half of the pumpkin. -
Fill the eyes:
Fill these shapes in with black, but leave small spaces empty if you plan to add white highlights later, or just fill them completely solid for now. -
Add the nose:
Paint a small black triangle in the center of the face, just below the eyes. -
Create the smile:
Draw a wide ‘U’ shape for the mouth. Add small tick marks at the ends of the smile to create cheek creases. -
Add highlight dots:
Clean your fine brush thoroughly and load it with white paint. Add a tiny dot inside the black area of each eye to bring the character to life. -
Highlight the body:
Paint a very thin, short white line on the upper left curve of the pumpkin body to make it look shiny and round.
Uneven Lines?
If your black lines look shaky, your paint is likely too thick. Dilute it with a tiny drop of water until it has an inky consistency that flows smoothly.
Now you have a festive little pumpkin ready to celebrate the season
Crescent Moon and Stars
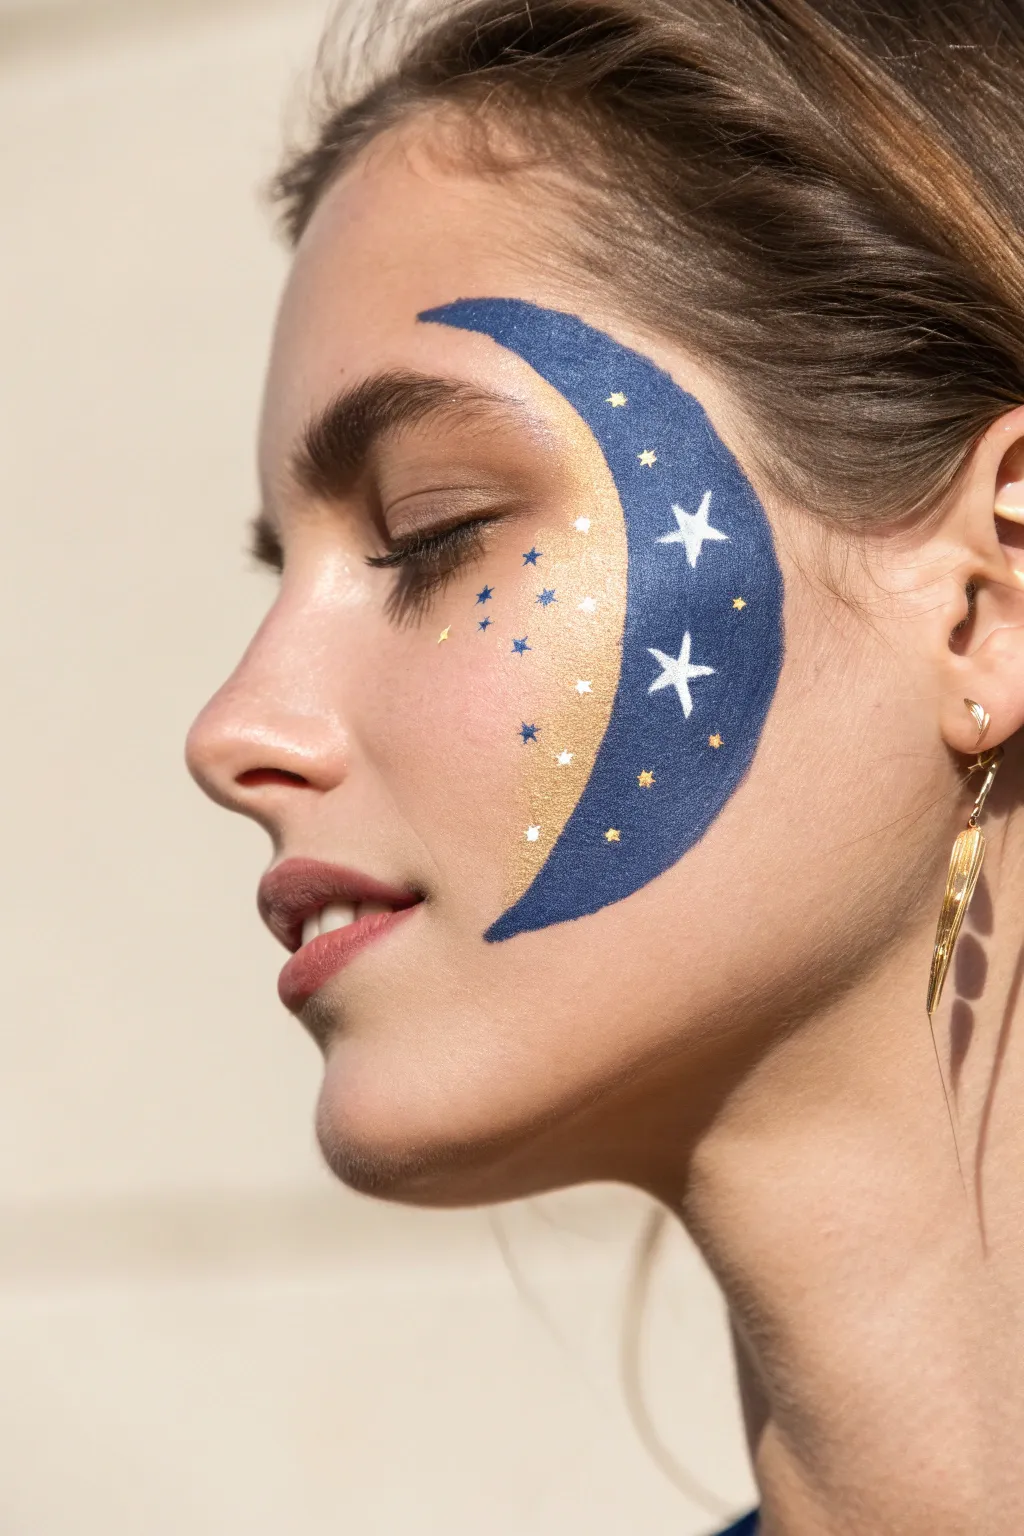
Embrace a dreamy, night-sky aesthetic with this elegant crescent moon design, featuring deep navy blue contrasting beautifully against shimmering gold. The mix of sharp white stars and tiny golden accents creates a magical galaxy effect right on your cheek.
Step-by-Step
Materials
- Navy blue face paint (water-activated or cream)
- Metallic gold face paint or powder pigment
- White liquid face paint or liner
- Flat angled brush (medium size)
- Fine detail brush (liner brush)
- Small round brush
- Setting spray (optional)
- Gold glitter gel (optional)
Step 1: Shaping the Crescent
-
Map the Curve:
Start by visualizing the curve. The crescent should hug the cheekbone, starting just above the eyebrow tail and curving down towards the jawline. -
Paint the Outer Edge:
Load your flat angled brush with navy blue face paint. Carefully draw the smooth, convex outer edge of the moon first to establish the shape’s boundary. -
Define the Inner Edge:
Using the same blue brush, draw the concave inner curve. Taper the top and bottom points brilliantly so they look sharp and delicate. -
Fill the Blue:
Fill in the space between your outlines with the navy blue. Apply distinct, even strokes to ensure opacity, but work quickly so it doesn’t dry patchy.
Step 2: Adding the Gold Glow
-
Inner Halo:
Take a small round brush loaded with metallic gold paint. Paint a soft, sweeping line right along the inner curve of the blue moon, hugging the navy line but staying on the skin. -
Blend the Gold:
While the gold is slightly damp, I like to gently pat the edge blending outward towards the nose to create a fading ‘glow’ effect rather than a hard line. -
Refining the Transition:
If the blue and gold touch, ensure the blue is fully dry first so the colors don’t muddy together.
Fixing Wobbly Lines
If your crescent edge looks shaky, use a flat brush with a tiny bit of concealer to ‘cut’ the edge and sharpen the line after the paint dries.
Step 3: Stellar Details
-
Main White Stars:
Load a fine liner brush with bright white paint. Inside the blue field, paint two prominent five-point stars—one near the top and one lower down. -
Star Technique:
To get sharp points, press the brush down for the center and flick outward quickly for the rays. -
Tiny White Accents:
Add a few tiny white dots scattered within the blue area to mimic distant stars. -
Blue Star Accents:
Clean your liner brush and pick up the navy blue again. Paint three tiny four-point stars in the gold/skin area near the inner curve. -
Adding Gold Stars:
Using the gold paint and a clean detail brush, add small four-point stars and dots interspersed within the blue area. -
Cluster the Details:
Group a few tiny gold dots near the tips of the crescent for visual balance.
Cosmic Shimmer
Press loose cosmetic biodegradable glitter onto the wet navy paint before it dries for a textured, sparkling finish that catches the light.
Step 4: Final Touches
-
Sharpness Check:
Check the very tips of the crescent moon. If they aren’t razor-sharp, use a cotton swab with a tiny bit of makeup remover to clean them up. -
Highlighting:
Apply a tiny dot of white in the center of the largest gold stars to make them pop. -
Set the Look:
Mist lightly with a setting spray to keep the design smudge-proof throughout your event.
Now you have a serene and sophisticated celestial design perfect for any costume party
Fairy Dust Cheek Swirl
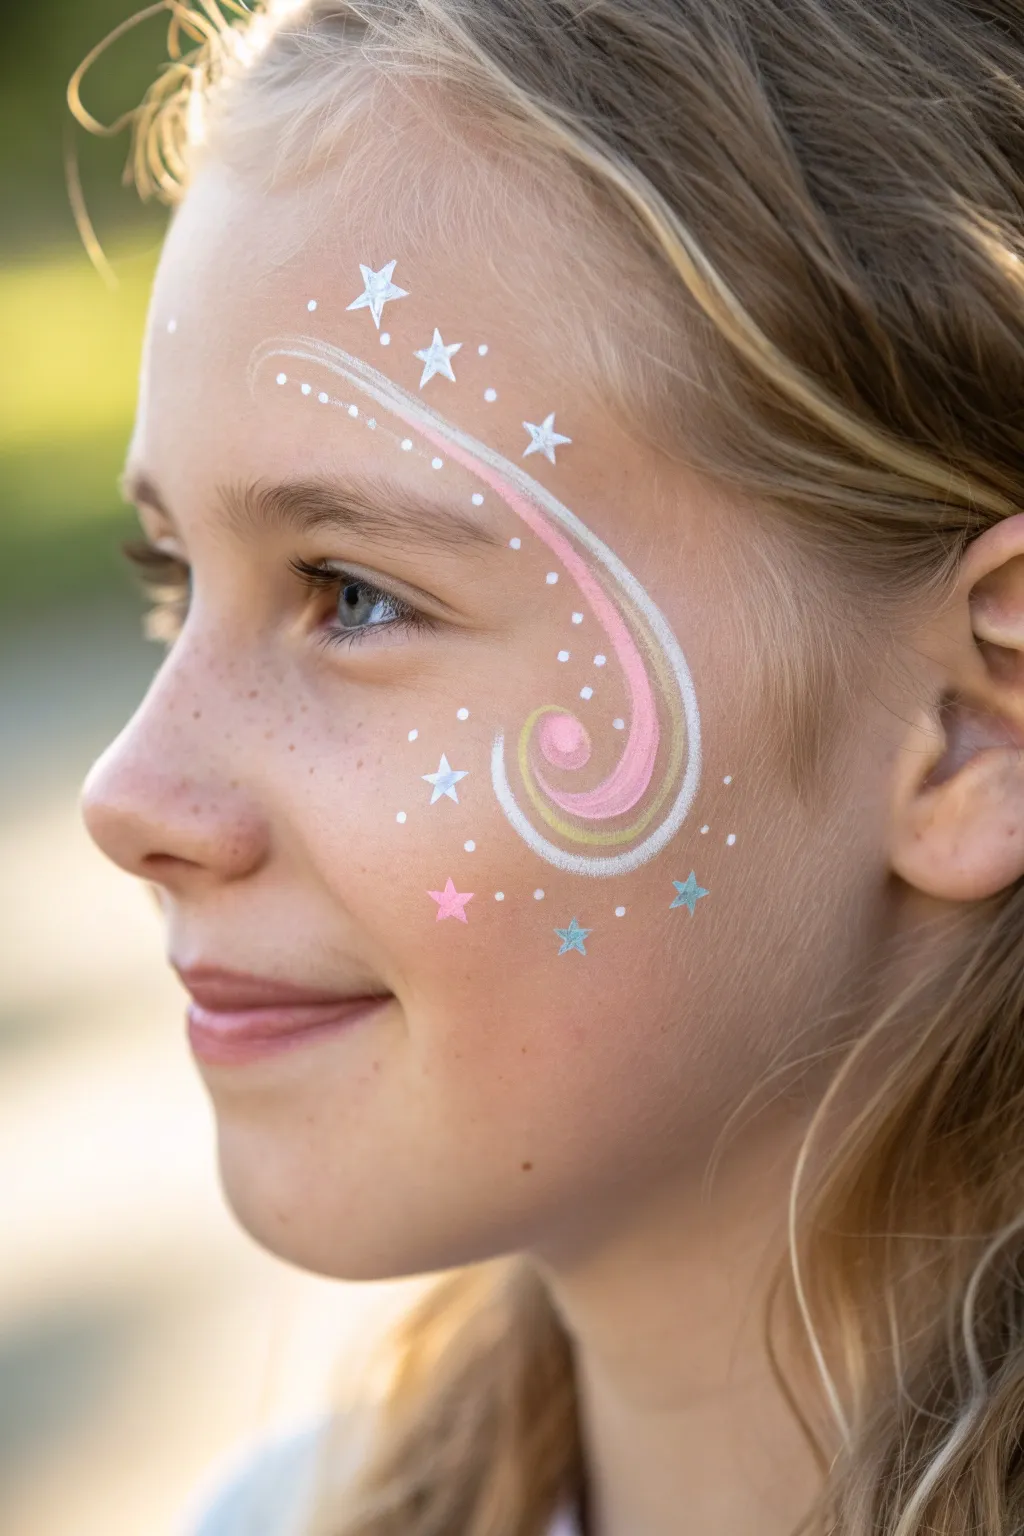
Transform a simple afternoon into a magical moment with this elegant and airy design. Featuring a graceful tricolor swirl adorned with twinkling stars, this look captures the essence of fairy magic without covering the entire face.
Step-by-Step Tutorial
Materials
- White face paint
- Light pink face paint
- Gold or metallic yellow face paint
- Baby blue face paint
- Round brush (size 4 or 6)
- Fine liner brush (size 1 or 2)
- Small cup of water
- Face painting sponge (optional)
- Cosmetic glitter (optional)
Step 1: Creating the Main Swirl
-
Load your round brush:
Start by dampening your medium round brush and loading it generously with creamy white face paint. You want the consistency to be like melted ice cream for smooth lines. -
Begin the outer curve:
Place the tip of your brush just above the eyebrow, slightly towards the temple. Draw a long, confident curve that sweeps down past the corner of the eye and curls inward onto the apple of the cheek. -
Add the pink layer:
Rinse your brush thoroughly and load it with light pink paint. Starting right next to the top of your white line, paint a parallel curve that nestles inside the white one, tapering it off as it curls into the center of the cheek. -
Insert the gold accent:
Using a clean round brush or a smaller size if you prefer, pick up your gold or metallic yellow paint. Carefully paint a thin line right in the middle of the spiral, sandwiched between the white outline and the pink interior curve, completing the rainbow-like effect. -
Define the swirl center:
To make the center pop, use a bit more pink to create a tighter spiral at the very end of the curl on the cheek, ensuring the colors flow together smoothly.
Stay Steady
Rest your pinky finger gently on the child’s chin or cheekbone while painting. This anchors your hand, giving you much better control for fine lines and stars.
Step 2: Adding Starry Details
-
Paint the first white star:
Switch to your fine liner brush loaded with white. Paint a medium-sized, five-pointed star just above the highest point of the white arch on the forehead. -
Add a second white star:
Paint another slightly smaller white star below the first one, closer to the eyebrow line. -
Create the cheek star:
Place a prominent white star on the cheek, just outside the curl of the main swirl. -
Add colored stars:
Clean your liner brush and pick up the baby blue paint to add a small star near the jawline area. I like to keep these points sharp for a twinkling effect. -
Paint the pink star:
Using the pink paint, add a small five-pointed star near the blue one on the lower cheek area to balance the colors. -
Add smaller accent stars:
Fill in any gaps with tiny, simple cross-shaped ‘twinkle’ stars using white paint, specifically near the temple and top of the swirl.
Step 3: Magical Finishing Touches
-
Dot the upper line:
Reload your liner brush with white paint. Add a series of tiny dots following the upper curve of the main swirl, starting from the forehead and fading out as you go down. -
Sprinkle dots around the cheek:
Place random white dots of varying sizes around the swirl and stars on the cheek to simulate floating fairy dust. -
Highlight the pink star:
If the pink star looks too flat, add a tiny white dot in its center to make it shine. -
Refine the lines:
Check your main swirl edges. If any lines look fuzzy, re-outline the outer white edge carefully with the fine liner brush to crisp it up. -
Optional glitter application:
While the paint is still slightly tacky, you can tap a small amount of cosmetic glitter over the wettest parts of the white swirl for extra sparkle.
Double Dip Method
Load a flat brush half-white and half-pink to paint the swirl in one single stroke for a seamless, professional gradient effect.
Now step back and admire the enchanting fairy design you have created
Mini Planet With Orbit Ring
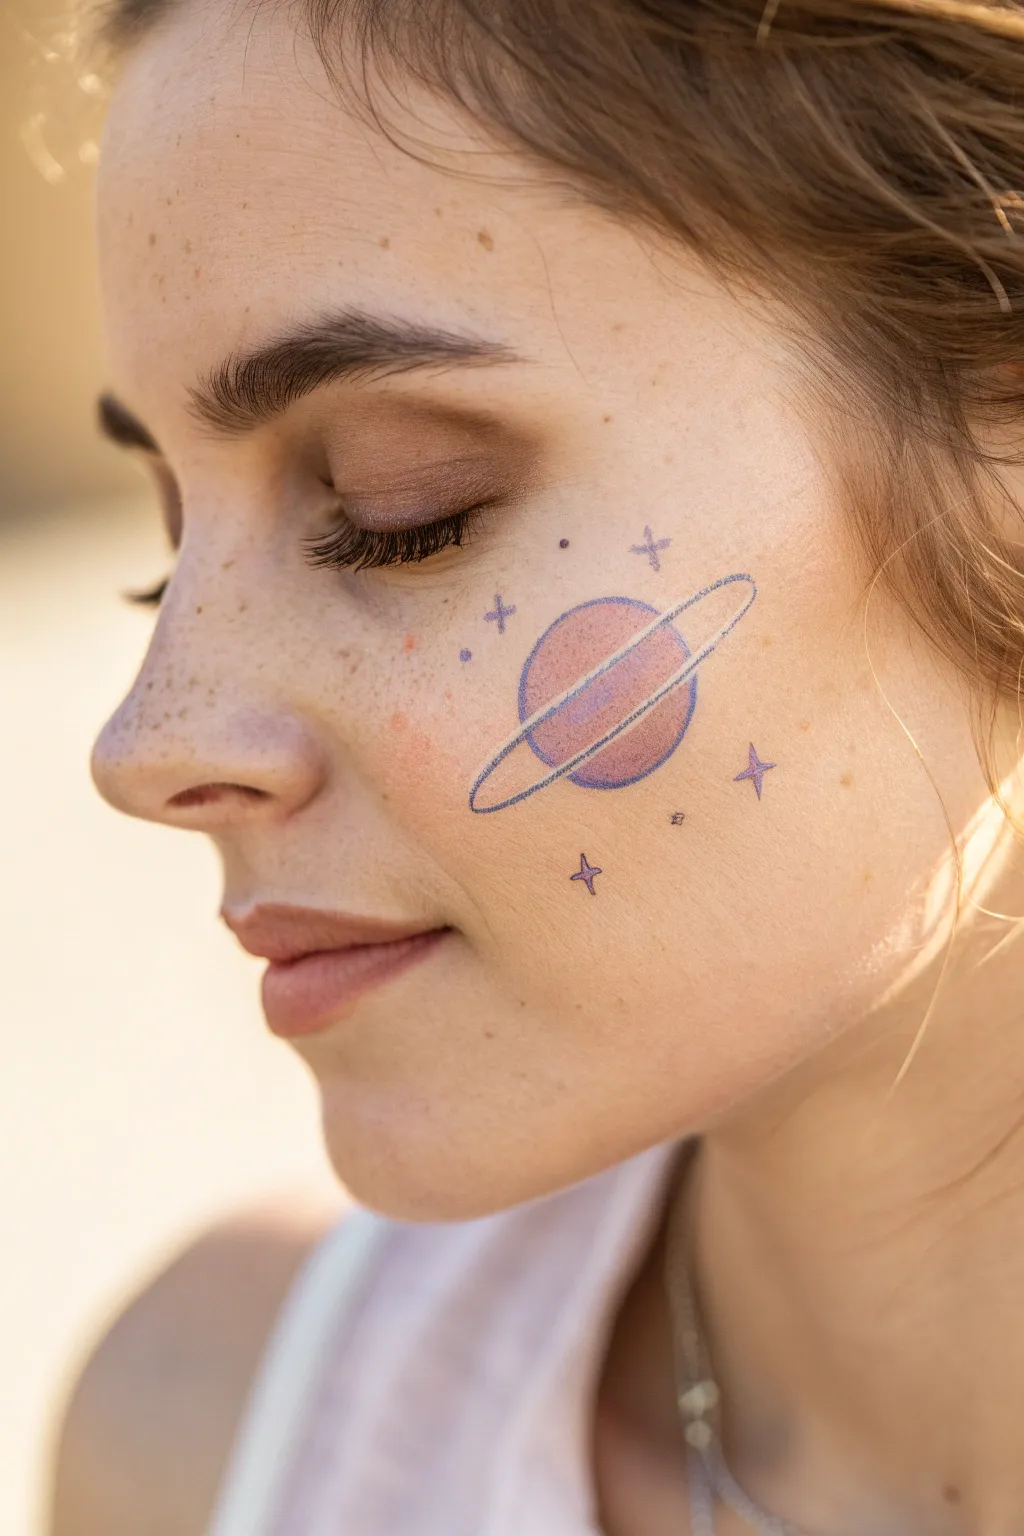
This whimsical celestial design brings a soft, sketchy charm to your cheek art, looking almost like it was drawn with cosmic crayons. The gentle lavender and peach tones create a dreamy planet with a classic orbital ring, perfect for a subtle standout look.
Detailed Instructions
Materials
- Face paint crayons or high-quality cosmetic pencils (Lavender/Purple)
- Face paint crayons or high-quality cosmetic pencils (Peach/Soft Pink)
- Face paint crayons or high-quality cosmetic pencils (White or Silver)
- Setting spray (optional)
- Micellar water/cotton swabs for cleanup
Step 1: Planning and Outline
-
Position the planet:
Visualize where you want the main planet to sit. Aim for the high part of the cheekbone, roughly centered between the nose and the ear. -
Draw the basic sphere:
Using a light hand and your purple cosmetic pencil or fine-tip crayon, sketch a circle about the size of a quarter. Don’t worry about making it geometrically perfect; a hand-drawn look is part of the charm. -
Draft the ring’s angle:
Lightly mark a diagonal line cutting through the center of your circle to guide the angle of the planetary ring. It should tilt upward towards the temple.
Sharpen Up
Keep a sharpener handy! Since this look mimics a pencil sketch, blunt tips will make the lines looks messy. Resharpen your cosmetic pencil before doing the ring detail.
Step 2: Coloring the Planet
-
Apply the warm tone:
Take your peach or soft pink crayon and color in the top half of the circle. Use short, light strokes to build up the color without making it too opaque. -
Fill the bottom half:
Switch back to the purple hue and fill in the bottom semi-circle of the planet. Let the two colors meet in the middle but try not to blend them excessively; distinct blocks of color look best here. -
Add texture:
I like to go back over the colors lightly to ensure the skin texture still peeks through slightly, maintaining that soft, sketchy appearance.
Step 3: Creating the Orbit Ring
-
Start the ring shape:
Using the purple pencil again, draw a long, thin oval that surrounds the planet. Start the line on the outside of the planet sphere. -
Cross over the planet:
Draw the front section of the ring so it visibly crosses over the face of the planet. This line should be slightly curved to show dimension. -
Define the back of the ring:
Draw the back section of the ring, but lift your pencil when you reach the planet’s body, so it looks like the ring goes behind the sphere. -
Double the line:
Carefully trace a second purple line just outside the first ring line to give the orbit some thickness and definition. -
Color the ring:
Fill the space between your two ring lines with the peach crayon. If the space is tight, just a faint wash of color will do.
Galactic Glitter
Tap a tiny bit of iridescent loose glitter over the peach section of the ring while the face paint is still slightly tacky for a sparkling, magical 3D effect.
Step 4: Details and Stars
-
Strengthen the outline:
Go over the main circle’s purple outline one more time to make sure the planet pops against the lighter filling colors. -
Draw the North Star:
Choose a spot slightly above and to the right of the planet. Draw a small four-point star (a cross) using the purple pencil. -
Add a twin star:
Place a second four-point star below and to the left of the planet to balance the composition. -
Scatter tiny details:
Add two or three simple dots or tiny circles around the larger stars to simulate distant galaxies. -
Add a touch of white:
If you have a white pencil, add a tiny highlight to the top left curve of the planet and the tips of the stars for a bit of shine. -
Clean edges:
Use a cotton swab with a tiny bit of makeup remover to tidy up any smudged lines on the ring to keep it crisp. -
Set the look:
If you need this to last all day, a quick spritz of setting spray will keep the crayon from transferring.
Enjoy showing off your own little piece of the universe
Geometric Cheek Badge
This minimalist, geometric face paint design combines sharp white linework with earthy terracotta tones for a modern bohemian look. It’s a perfect accessory for festivals or photoshoots, adding an artistic touch without requiring a full-face mask.
Step-by-Step
Materials
- White liquid eyeliner or water-activated face paint
- Fine liner brush (size 0 or 00)
- Flat angled brush (small)
- Brown eyeshadow (warm, matte)
- Terracotta or rust-colored cream makeup/face paint
- Bronze or gold metallic cream makeup
- Setting spray
- Brown eyeliner pencil (for freckles)
Step 1: Base & Layout
-
Prep the canvas:
Start with clean, moisturized skin. Apply your regular foundation and concealer if desired, ensuring the cheek area is matte and dry so the paint adheres properly. -
Plan the placement:
Visualize a vertical rectangle on your cheekbone. It should start just under the outer corner of your eye and extend down towards the hollow of your cheek. -
Draft the outline:
Using a very fine liner brush and white face paint (or a white liquid eyeliner pen), carefully draw a long, vertical rectangle. Keep the lines as thin and crisp as possible. -
Bisect the shape:
Draw diagonal lines inside the rectangle to form two main stacked ‘hourglass’ or triangle-based sections. Reference the image to see how the lines cross to create distinct triangular compartments.
Shaky Lines?
If your hands shake, rest your pinky finger against your chin or jawline as an anchor while drawing. This stabilizes your hand for crisp straight lines.
Step 2: Adding Color
-
Apply the rust tone:
Dip a small angled brush into your terracotta or rust-colored cream makeup. Carefully fill in the upper-left triangle within your geometric structure. -
Blend the edges:
For a softer look, I like to gently tap the filled color with a clean finger to mesh it with the skin, but be careful not to smudge over your white lines. -
Add metallic depth:
Clean your brush or switch to a new one. Pick up the bronze or gold metallic cream. Fill in the central triangular section of the lower half of the badge. -
Create texture:
In the remaining empty triangular spaces, use your fine white liner again to draw parallel hatching lines. This adds intricate detail without adding heavy color. -
Reinforce the white:
Go back over your main white structural lines. The colored paint might have touched them, so a second pass ensures they pop brilliantly against the skin.
Sharpen Your Edges
Keep a cotton swab dipped in micellar water nearby. Use it like an eraser to clean up any paint that bleeds outside your geometric boundaries.
Step 3: Ornamental Details
-
Top decoration:
Above the main rectangle, draw three tiny vertical dashes followed by a single white dot at the very top, creating a crown-like finial. -
Bottom structure:
Below the main rectangle, paint a horizontal line slightly wider than the base. From this, draw an inverted triangle shape composed of open lines. -
Hanging accents:
Add three small dashes hanging from the bottom structure, mimicking tassels or feathers. -
The final dots:
Paint a descending line of three to four dots trailing down from the bottom ‘tassel’ to elongate the design down the cheek.
Step 4: Finishing Touches
-
Shadow application:
Take a fluffy eyeshadow brush and your warm brown matte eyeshadow. Sweep a wash of color over the eyelid, concentrating the pigment in the crease to balance the cheek art. -
Create faux freckles:
Using a brown eyeliner pencil or a specialized freckle pen, dot random spots across the nose bridge and the upper cheekbone area near the geometric design. -
Soften the freckles:
Immediately after dotting, tap them with a fingertip to blur the harsh edges, making them look like natural sun-kissed skin. -
Set the look:
Close your eyes and mist the face lightly with a setting spray. This is crucial to prevent the white lines from cracking or the cream makeup from sliding.
Enjoy wearing this chic geometric art piece that turns your face into a canvas


Have a question or want to share your own experience? I'd love to hear from you in the comments below!