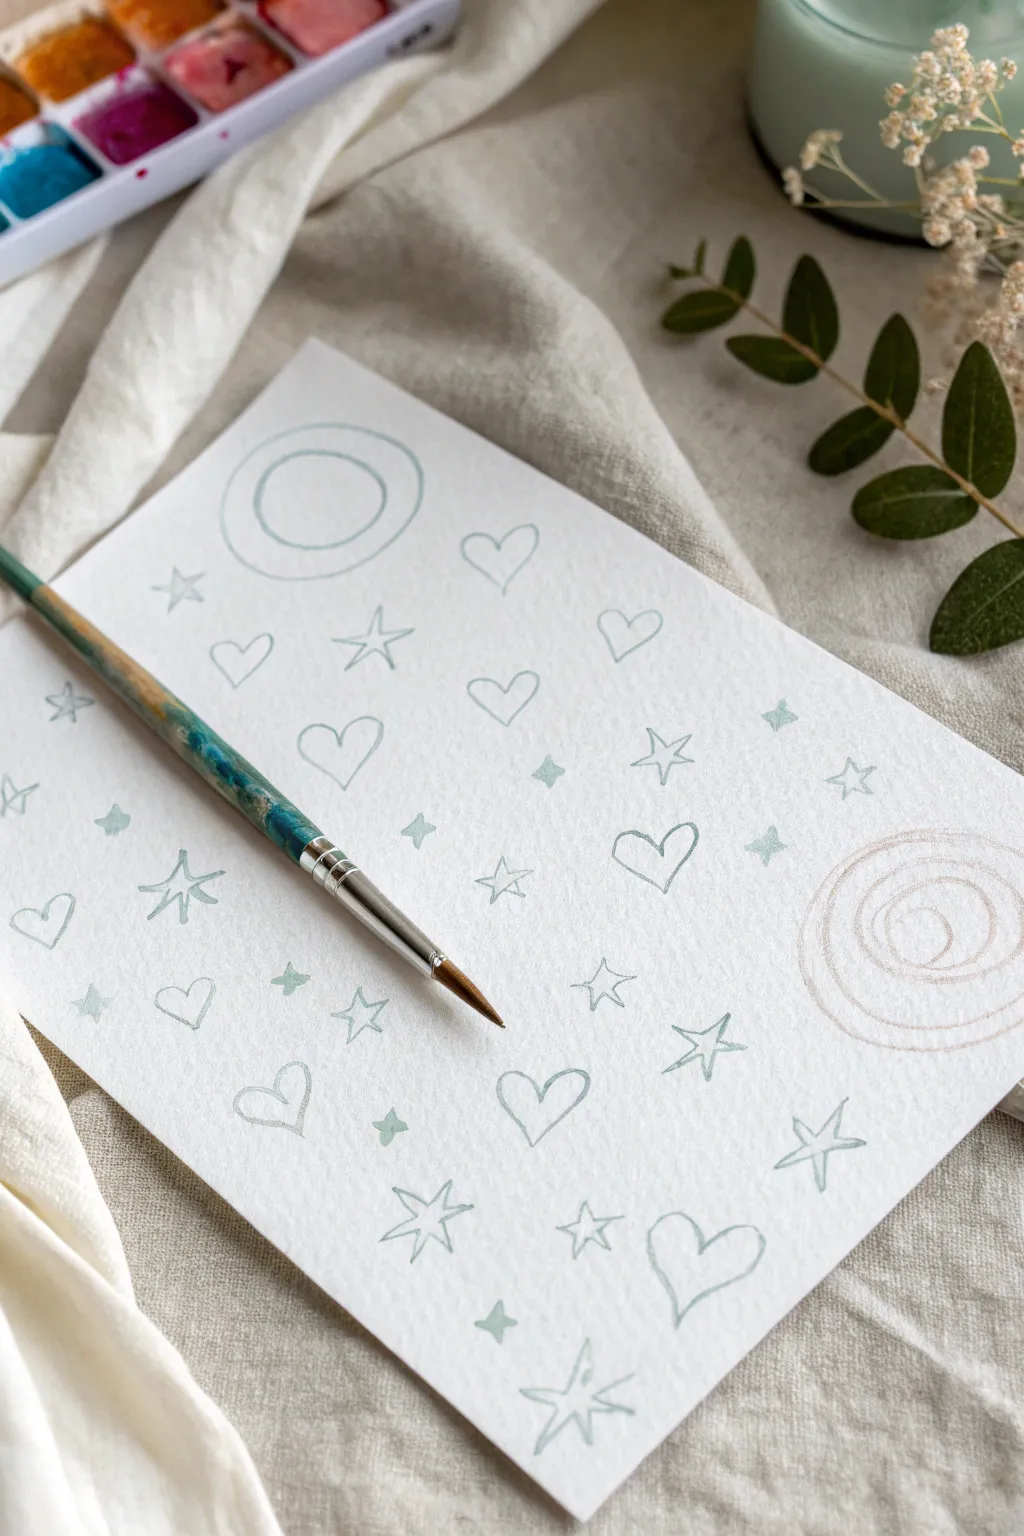
When kids paint, the goal isn’t perfection—it’s that sweet little spark when they realize they can make something from nothing. Here are my go-to painting ideas for kids that keep the setup simple, the colors bold, and the process way more fun than the outcome.
Rainbow Finger Painting
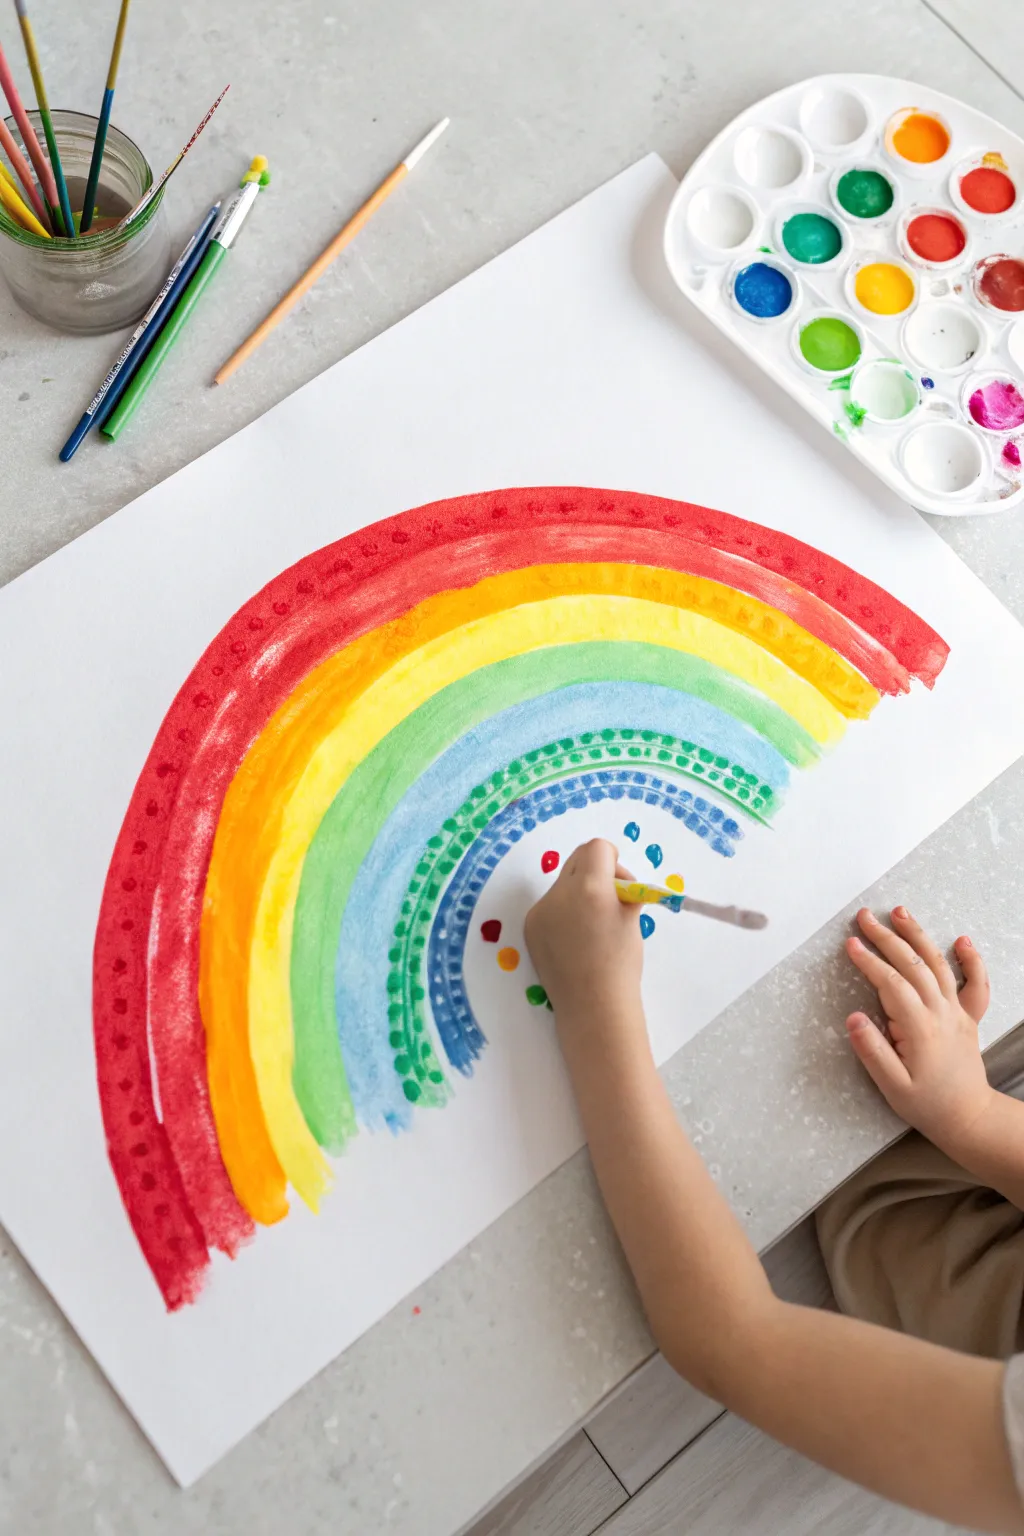
Brighten up a rainy day with this vibrant watercolor rainbow that mixes sweeping strokes with delicate pattern work. It’s a fantastic project for exploring color order and practicing brush control through playful dots and dashes.
Detailed Instructions
Materials
- Large sheet of thick watercolor paper or mixed-media paper (A3 recommended)
- Watercolor paint set (pan set or tubes)
- Flat paintbrush (medium width, about 1/2 inch)
- Round paintbrush (small to medium size)
- Jar of water for rinsing
- Paper towels
Step 1: Painting the Arches
-
Prepare your space:
Start by clearing a large flat surface. Tape down the corners of your watercolor paper if you want to prevent it from buckling while you paint. -
Mix the red:
Wet your red paint cake or squeeze a small amount of tube paint onto a palette. Add enough water to make the paint flow easily but keep the color rich and saturated. -
Paint the red arch:
Using the flat brush, paint a large, wide arch starting from the bottom left and swooping all the way to the bottom right. Make this the outermost layer of your rainbow. -
Add the orange band:
Rinse your brush thoroughly. Mix a bright orange and paint a second arch directly underneath the red one. Try to let the edges touch slightly so the colors bleed together just a tiny bit for a soft look. -
Yellow and green layers:
Continue the process with yellow and then a light green. For each new color, follow the curve of the previous arch, getting slightly smaller each time. -
Paint the blue bands:
Finish the main structure with a light sky-blue arch, followed by a deeper indigo or dark blue arch in the center. I like to leave the very center of the rainbow empty for now. -
First drying phase:
Let the main colorful arches dry until they are damp but no longer sopping wet. This prevents the next layer of details from spreading uncontrollably.
Muddy Colors?
If your rainbow bands are bleeding together and turning brown, let each color strip dry for 2-3 minutes before painting the one right next to it.
Step 2: Adding Texture & Patterns
-
Switch brushes:
Swap your flat brush for a smaller round brush. This will give you more control for the detail work. -
Add red dots:
Load your brush with concentrated red paint (less water this time). Dab small dots along the center of the dried red arch to create a speckled pattern. -
Detail the orange:
Instead of dots, try barely touching the wet orange band with a slightly darker orange mix to add subtle texture, or leave it smooth for contrast. -
Green dashes:
On the light green band, use a darker green paint to create a row of small dashes or squares following the curve of the arch. -
Double dotted blue:
For the light blue band, create two rows of tiny dots. This creates a lovely ‘stitched’ look that adds visual interest to the cooler colors. -
Indigo texture:
Add heavier, blockier dashes along the dark blue inner arch. Press the brush down flat to make rectangular marks. -
Center splashes:
To fill the white space under the rainbow, dip your brush in various colors (blues, reds, yellows) and dab floating spots freely in the empty middle area. -
Final touches:
Look over your work. If any bands look too pale, you can gently glaze a second layer of color over them, being careful not to disturb the pattern work.
Sky Background
Once the rainbow is fully dry, wet the remaining white paper and drop in very diluted blue paint for a soft, cloudy sky effect behind the arches.
Allow your beautiful creation to dry completely flat before hanging it up to admire the colors


Sponge-Painted Animal Shapes
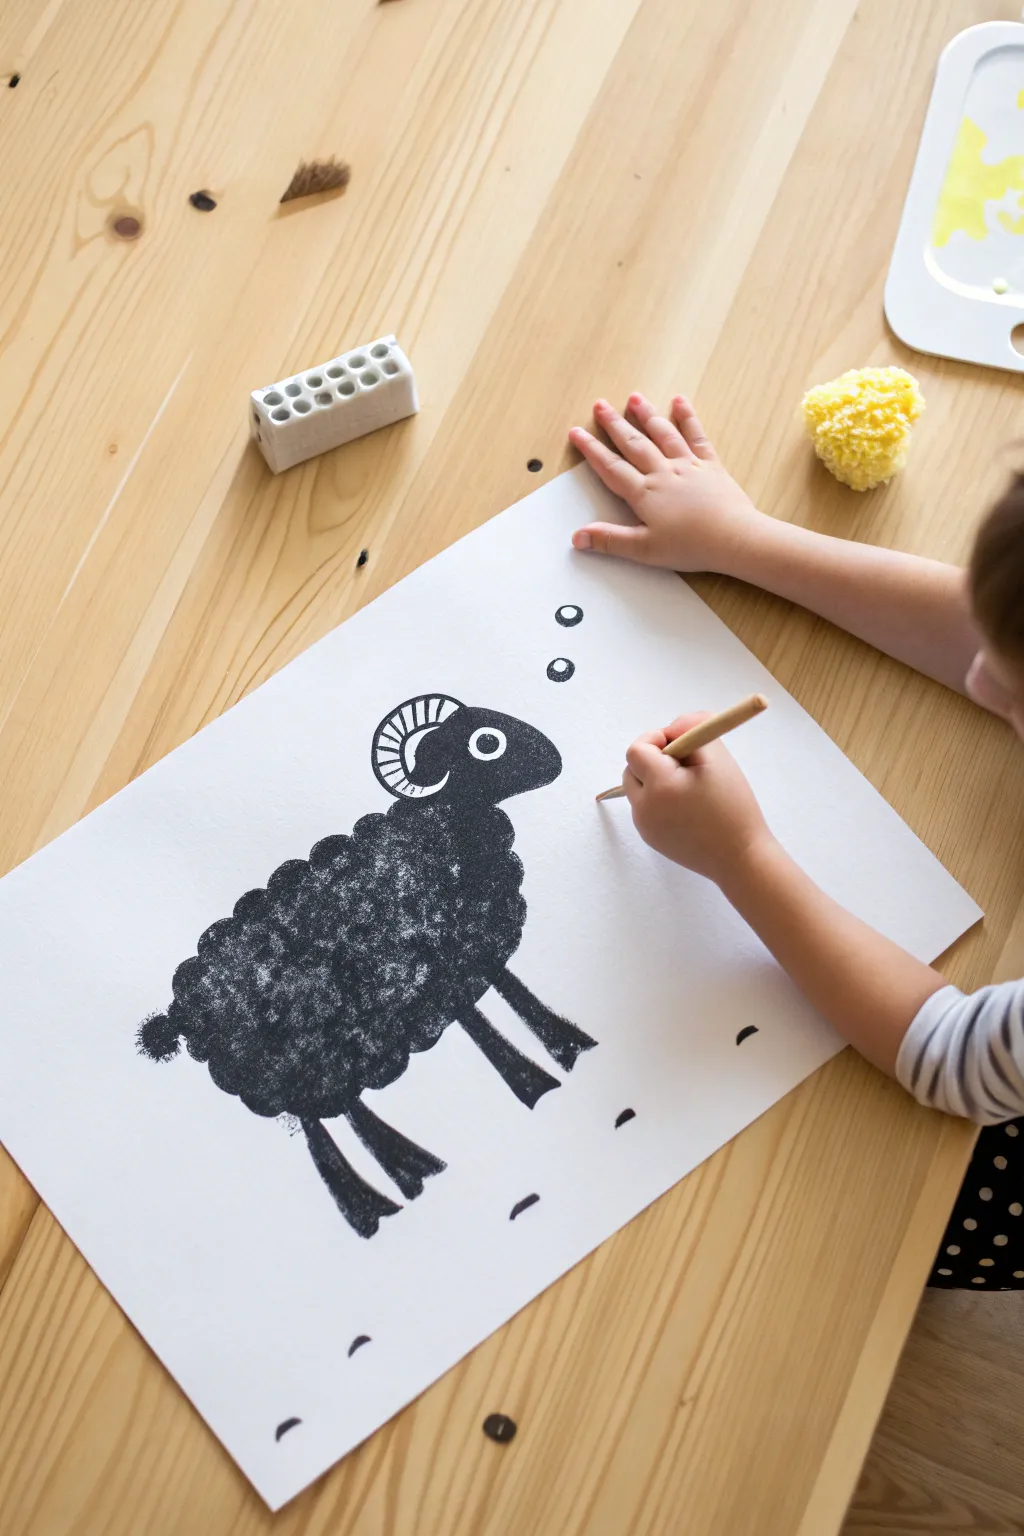
Create a bold, contrasting artwork featuring a fluffy-looking ram using a fun stamping technique. This project combines simple shapes with rich textures to bring a charming farm animal to life on the page.
Step-by-Step
Materials
- White heavyweight drawing paper or cardstock
- Black tempera or acrylic paint
- White paint (opaque acrylic or gouache)
- Small kitchen sponge or specialized texture sponge tool (like the white rectangular one shown)
- Small round paintbrush
- Pencil (optional for sketching)
- Palette or paper plate for paint
Step 1: Creating the Fluffy Body
-
Prepare your paint palette:
Squeeze a generous amount of black paint onto your palette or paper plate. You want a puddle wide enough to dip your sponge tool into. -
Load the sponge:
Take your sponge tool—the rectangular version with holes works perfectly for this texture—and dip the flat surface into the black paint. Press it a few times on a clean part of the plate to ensure the paint is evenly distributed and not gloopy. -
Stamp the body shape:
Start stamping the main body of the ram in the center of your paper. Use gentle, repeated dabbing motions to create an oval-like cloud shape. Overlap your stamps so the texture looks dense and fluffy. -
Shape the head:
Continue stamping attached to the upper right side of the body to form the head. This area should be slightly smaller and smoother than the body, shaped somewhat like a rounded snout. -
Refine the outline:
Go around the edges of your sheep shape with the sponge, adding lighter dabs to give the wool a fuzzy, irregular outline rather than a hard edge. -
Let the base dry:
Before adding details, let this black base layer dry completely. Since the paint is stamped on thickly, this might take 10-15 minutes.
Sponge Secrets
A rectangular sponge with holes produces the best ‘wooly’ texture. If you only have a smooth kitchen sponge, pluck small bits out of the surface to create a rougher stamping face.
Step 2: Adding Character Details
-
Paint the legs:
Using a small round brush dipped in black paint, draw two front legs and two back legs coming down from the body. Keep them fairly straight and simple, adding slight angles at the bottom for hooves. -
Add the tail:
Use the tip of your sponge or a brush to add a tiny, nubby tail on the left side of the body. -
Let the black details set:
Give the legs and tail a moment to dry so you don’t smudge them while working on the face. -
Start the horn:
Switch to your white paint. Using a fine detail brush, paint a curved, C-shaped horn starting from the top of the head and curling backward towards the neck. -
Detail the horn:
Once the white horn shape is filled in, you can go back with a tiny bit of black paint (or a marker once dry) to add the ridges across the horn. -
Create the eye:
Dip the handle end of a paintbrush into white paint and dot it onto the face to make a perfect circle for the eye. -
Finish the pupil:
Once the white dot is dry, add a tinier black dot in the center to complete the look. -
Ground the animal:
Use your brush or a pencil to add tiny horizontal dashes under the feet or floating around the ram to suggest grass or ground. -
Final touches:
Review your ram and see if any areas of the wool need a quick touch-up with the sponge.
Background Fun
Before painting the sheep, use a watercolor wash to create a soft blue sky or green pasture background. Let it dry fully, then stamp your black sheep right on top.
Display your textured ram proudly on the fridge or frame it for the bedroom wall


Bubble Wrap Texture Prints
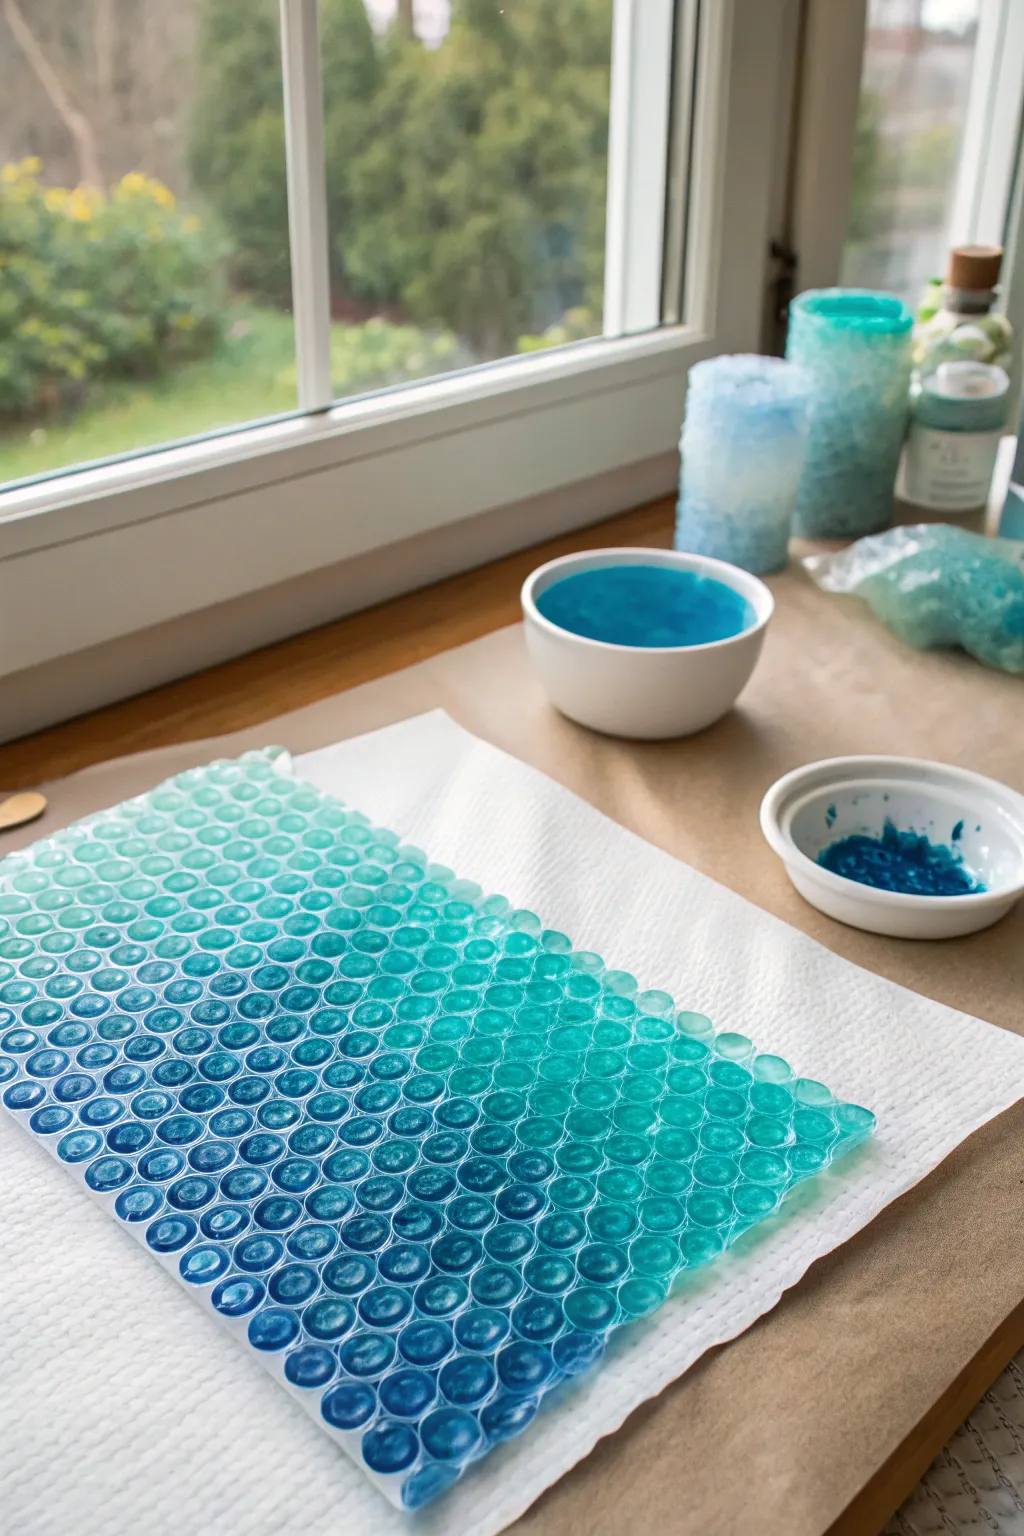
Transform a humble piece of packing material into a stunning tool for creating textured art. This project captures the soothing gradient of ocean waves using bubble wrap to stamp distinct, cell-like patterns.
Detailed Instructions
Materials
- Sheet of bubble wrap (small bubbles)
- White cardstock or heavy watercolor paper
- Paper towels
- Acrylic paints (dark blue, teal/turquoise, white)
- Small bowls for mixing
- Flat paintbrush or foam brush
- Palette or small plate
- Protective workspace covering (brown paper or plastic)
Step 1: Preparation
-
Cut the Wrap:
Begin by cutting a rectangular piece of bubble wrap. It should be slightly smaller than the paper you intend to print on to keep the edges clean. -
Set the Station:
Lay down a few sheets of paper towel on your work surface. Place the bubble wrap bubble-side up on top of the towels to catch any drips. -
Mix the Gradient:
Prepare three distinct shades in your bowls. You’ll want a deep navy blue, a medium teal, and a lighter, watery turquoise. I usually mix a little white into the teal for that third, lighter shade. -
Dilute Slightly:
Add a tiny drop of water to your acrylic paints if they are very heavy body. You want a creamy consistency that spreads easily but isn’t runny.
Smudgy Prints?
If the circles are blurring together, you likely used too much paint. Use a dryer brush or blot the painted wrap very lightly on a scrap paper before printing.
Step 2: Painting the Texture
-
Start Dark:
Starting at the bottom edge of the bubble wrap, use your brush to apply the darkest blue paint. Cover about one-third of the sheet’s height. -
Apply the Mid-Tone:
Paint the middle section with your teal color. Let this section slightly overlap with the dark blue line you just painted. -
Add the Lightest Shade:
Finish the top third of the bubble wrap with your lightest turquoise mixture, ensuring all bubbles are coated. -
Blend the Seams:
Using a clean brush (or your finger), gently tap over the areas where the colors meet. This softens the transition so you get a smooth ombre effect rather than stripes. -
Check Coverage:
Look closely at the bubbles. You want paint on the raised ‘domes’ but try to avoid big pools of paint in the flat valleys between them, as this creates blobs.
Step 3: Printing Process
-
Position the Paper:
Carefully lift your painted bubble wrap. Flip it over so the paint side is facing down. -
Initial Contact:
Hover the wrap over your white cardstock until it’s aligned, then gently drop it into place. Do not shift it once it touches the paper. -
Applying Pressure:
Use your hands to press firmly all over the back of the bubble wrap. You might hear little popping sounds, which is fine, but focus on even pressure. -
The Reveal:
Peel the bubble wrap away from the paper slowly, starting from one corner. This is the magic moment where the cell pattern appears. -
Drying Time:
Set your print aside on a flat surface to dry completely. Acrylics dry fast, so 15-20 minutes should be sufficient.
Collage It
Once dry, cut your textured paper into shapes like fish, coral, or sea stars. The bubbly texture mimics scales and sea life perfectly for a collage.
Now you have a serene, ocean-inspired texture waiting to be turned into a card or framed artwork


Tape Resist Geometric Painting
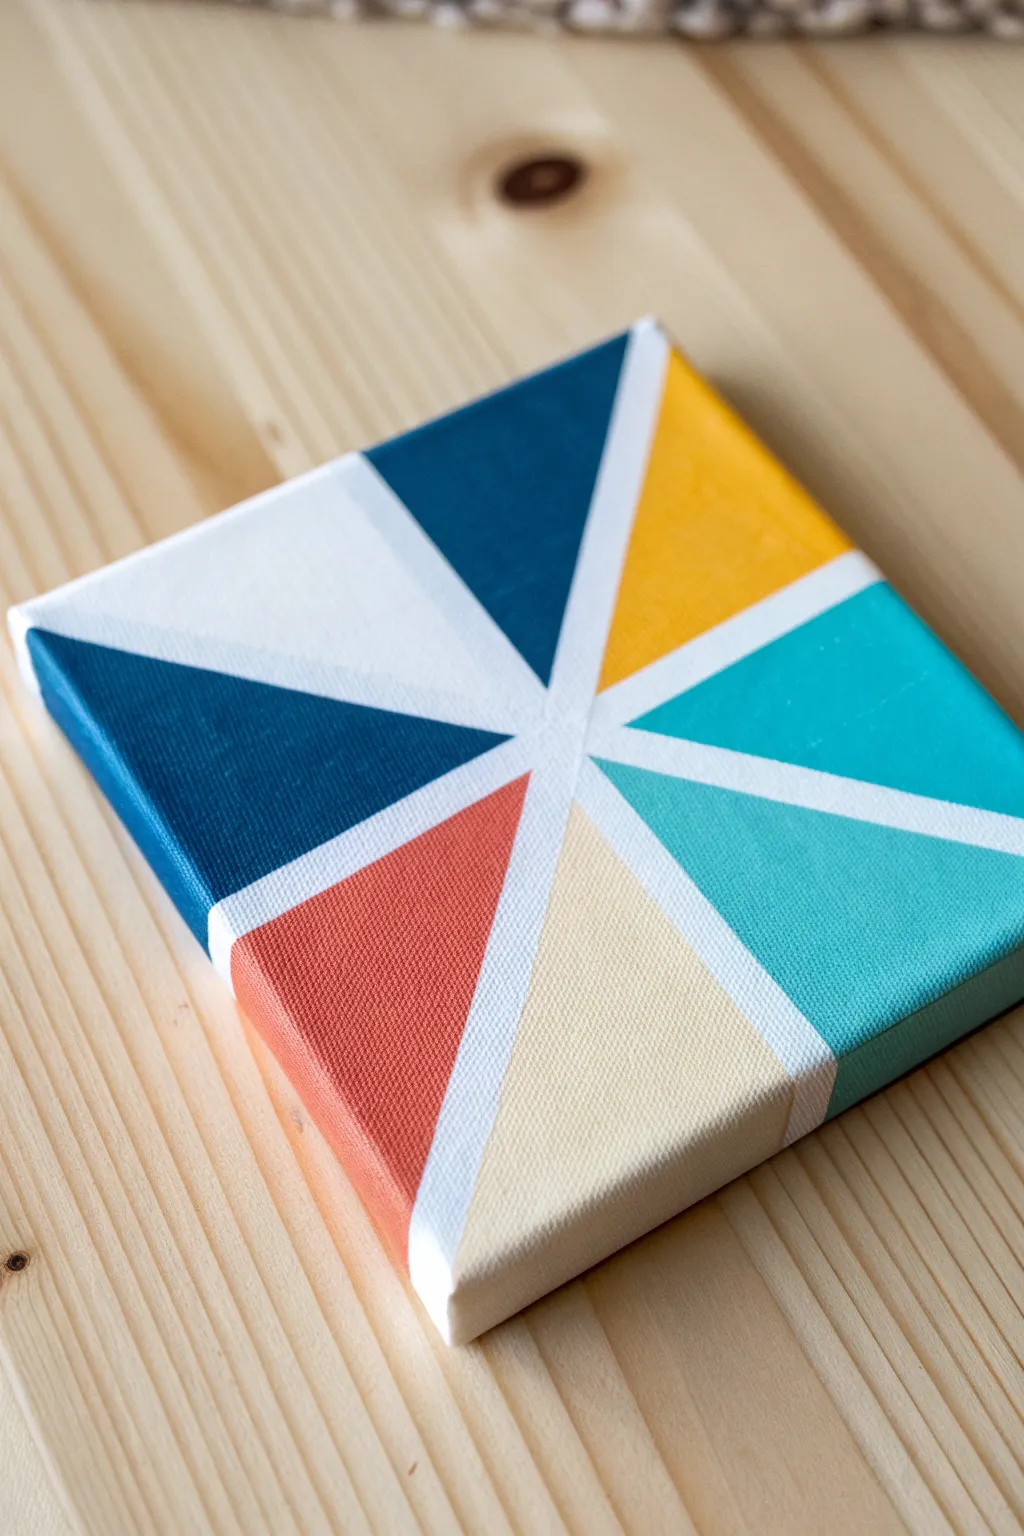
Create a modern, eye-catching piece of art using nothing but simple geometric sections and bold colors. This tape resist project transforms a plain canvas into a professional-looking starburst pattern with satisfyingly crisp white lines.
Step-by-Step Tutorial
Materials
- Small square artist canvas (e.g., 6×6 or 8×8)
- Painter’s tape or wash tape (approx. 1/4 inch width)
- Acrylic paints (Navy, Mustard Yellow, Teal, Light Aqua, Beige, Terracotta)
- White acrylic paint
- Paintbrushes (flat shader brush recommended)
- Palette or paper plate
- Scissors
Step 1: Preparation & Taping
-
Prep the canvas:
Start with a clean, dry canvas. If your canvas isn’t pre-primed, giving it a quick base coat of white acrylic paint helps ensure the final white lines look bright and clean. -
Find the center:
Visually estimate or lightly measure the center point of your canvas. You don’t need to be mathematically perfect, but having a central anchor point helps the starburst effect. -
Apply the first tape line:
Cut a strip of painter’s tape longer than the diagonal of the canvas. Place it going from one corner across the center to the opposite corner. -
Create the ‘X’:
Place a second strip of tape crossing the first one, creating a large ‘X’ shape. Ensure the intersection is right at your center point. -
Add vertical and horizontal lines:
Continue adding tape strips that radiate from the center out to the edges. You want to create roughly 8 triangular sections, like slicing a pizza. -
Wrap the edges:
Press the excess tape firmly down over the sides of the canvas. This is crucial because painting the sides gives the artwork a finished, gallery-ready look. -
Seal the tape:
Run your fingernail or a credit card firmly along the edges of every piece of tape. I like to double-check the center overlap especially, as paint loves to sneak under there. -
The secret sealing step:
Paint a thin layer of *white* paint over all the tape edges. This bleeds under the tape first, blocking any colored paint from leaking later, guaranteeing super crisp lines.
Tape Removal Tip
Peel the tape *away* from the painted area. If you see paint lifting, stop immediately and use a craft knife to gently score the edge before continuing.
Step 2: Painting & Reveal
-
Select your palette:
Squeeze out your chosen colors. For this look, aim for a mix of cool tones (blues/teals) balanced with warm accents (mustard/terracotta) and neutrals (beige/white). -
Paint section one:
Choose a triangle section and fill it completely with your first color, painting away from the tape edge to minimize bleeding. -
Continue painting:
Paint the remaining sections, switching colors for each neighbor. Make sure no two touching sections share the same color unless you want them to merge visually. -
Don’t forget the sides:
Extend your paint color down the sides of the canvas for each section. This wraps the design around the physical object. -
Include a white section:
Leave one or two sections white (or paint them white if your canvas wasn’t white to begin with) to add negative space and breathing room to the design. -
Check for coverage:
Let the first coat dry and inspect your work. Some lighter colors like yellow or beige often need a second coat to be fully opaque. -
Let it dry partially:
Wait until the paint is dry to the touch but not fully cured—usually about 20-30 minutes. -
Remove the tape:
Slowly peel the tape off at a 45-degree angle. Pulling slowly is key to preventing the paint from peeling up with the tape. -
Touch ups:
If there are any tiny bleeds, use a very fine brush and a bit of white paint to tidy up the lines once everything is completely dry.
Level Up: Texture
Mix a little baking soda into your acrylic paints before applying. This creates a cool, matte, plastered texture that adds depth to the geometric shapes.
Hang your new masterpiece on the wall or prop it on a shelf for an instant pop of modern color
BRUSH GUIDE
The Right Brush for Every Stroke
From clean lines to bold texture — master brush choice, stroke control, and essential techniques.
Explore the Full Guide
Handprint Flower Bouquet
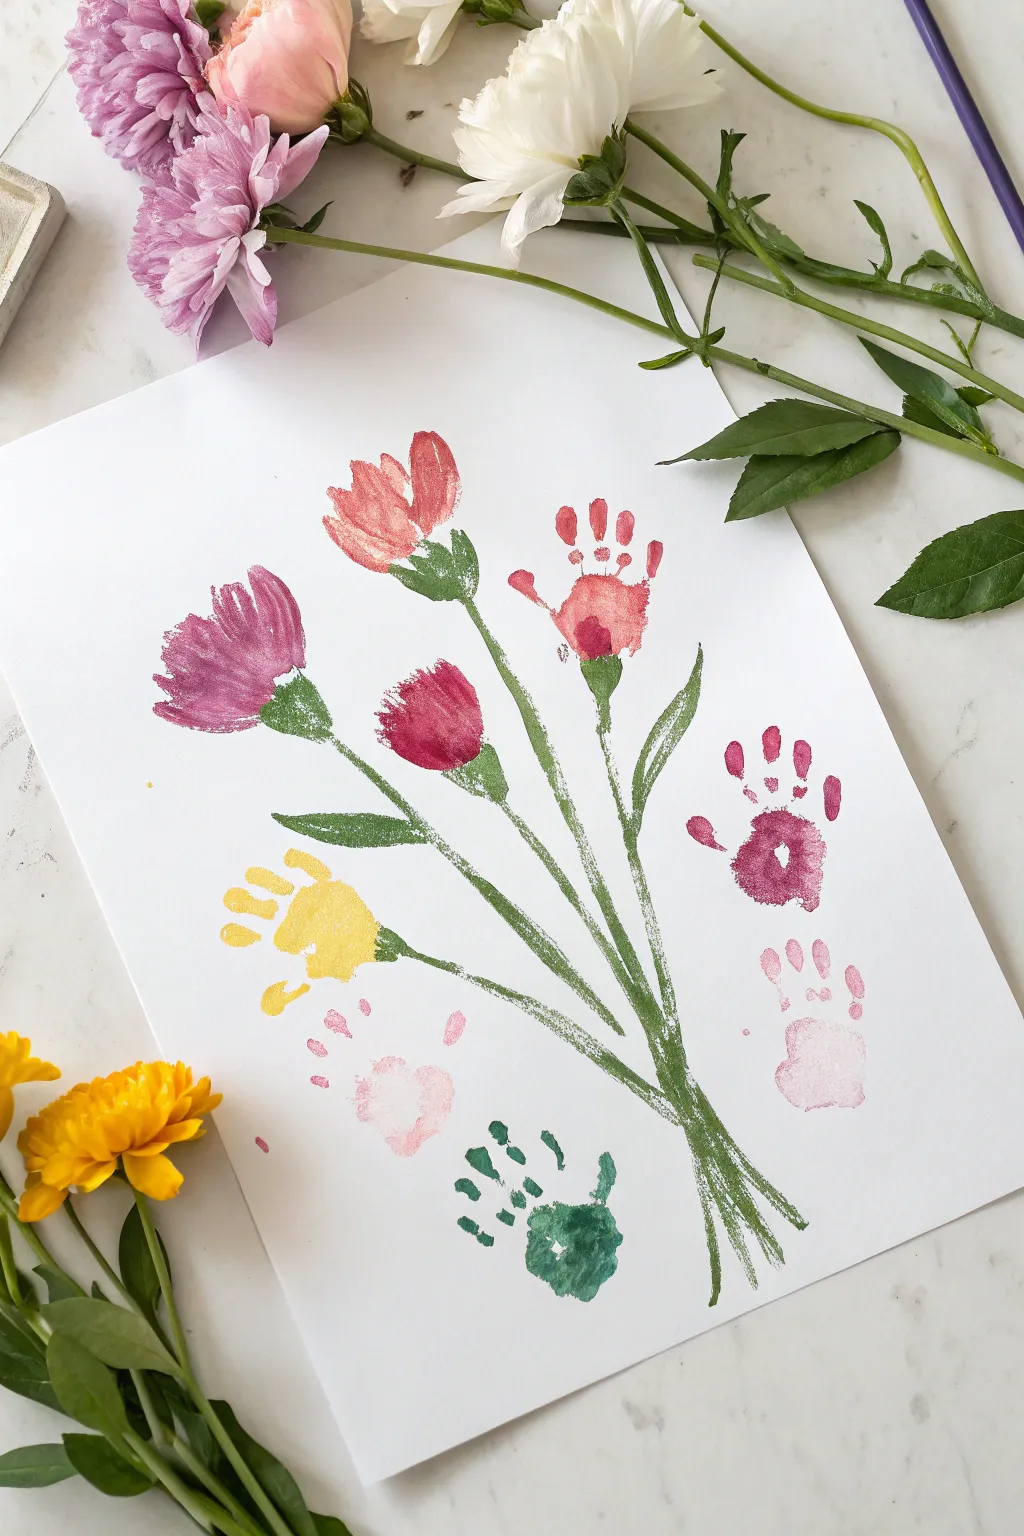
Turn tiny hands into a blooming garden with this adorable and sentimental keepsake project. By combining colorful handprints with painted stems and leaves, you’ll create a lively bouquet that captures a moment in time forever.
Step-by-Step
Materials
- Heavyweight white paper or cardstock (A3 or large format works best)
- Washable tempera paints or acrylic paints (red, pink, yellow, green, white)
- Medium-sized flat paintbrush
- Fine liner or small round paintbrush (for stems)
- Paper plate or palette for mixing
- Baby wipes or paper towels for quick cleanup
- Small cup of water
Step 1: Planning the Bouquet
-
Prepare your palette:
Squeeze out quarter-sized dollops of your flower colors: deep red, magenta, yellow, and a soft pink. Add a separate blob of green for the stems. -
Position the paper:
Lay your paper vertically on a flat surface. Visualize where the stems will gather at the bottom center, fanning out towards the top. -
Mix custom shades:
To get the variety seen in the example, mix a little white with your red to make a coral shade, or combine magenta and red for a deep rose color. Having distinct shades makes the bouquet look more vibrant.
Clean Print Secret
Apply paint to the hand with a sponge brush rather than dipping the hand directly into paint. This ensures an even coat without slippery blobs that smear.
Step 2: Creating the Handprint Flowers
-
Paint the first hand:
Starting with the red-orange color, use the flat brush to coat the child’s palm and fingers. Apply a generous layer, but not so thick that it becomes gloopy. -
Press the tulip shape:
Guide the hand to the upper center of the paper. Keep fingers relatively close together rather than spread wide; this creates the shape of a tulip or closed blossom. -
Lift carefully:
Hold the paper down with one hand while lifting the child’s painted hand straight up to avoid smudging the print. -
Clean and repeat:
Wipe the hand clean immediately with a baby wipe. I find this much faster than running to the sink between every single color change. -
Add a yellow bloom:
Paint the hand with bright yellow paint. Press this print lower down on the left side, tilting the hand slightly outward to suggest a flower leaning away from the center. -
Create the magenta flower:
Using the deep magenta or purple-red mix, create another print slightly higher on the left side. Again, keep fingers somewhat close for that petal-like appearance. -
Add small pink accents:
For the tiny pink flowers on the right, paint just the fingertips and the top half of the palm with light pink paint. Press these gently to make smaller, softer impressions. -
Make the baby flower:
If you have a very small child or want a tiny bud, make a partial print near the bottom using very pale pink, just pressing the palm lightly. -
Let the prints dry:
Allow the handprints to dry completely before starting the stems. This prevents the green paint from bleeding into your beautiful flower colors.
Step 3: Painting the Greenery
-
Start the main stems:
Load your fine liner brush with green paint. Start from the base of the red/orange top flower and draw a long, slightly curved line down toward the bottom center of the page. -
Connect the other blooms:
Draw stems from the base of the yellow, magenta, and pink handprints, all converging at the same bottom point to look like a gathered bunch. -
Add flower bases:
Where the stem meets the paint of the palm, paint a small, U-shaped green cup (the sepal) to make it look like the flower is attached naturally to the stem. -
Paint textured leaves:
Using the flat sides of a slightly larger brush, dab and drag green paint along the stems to create long, slender leaves. Vary their lengths for a natural look. -
Include extra stems:
Paint a few extra ’empty’ stems or long blades of grass in the background to fill out the bouquet and make it look lush. -
Add the bottom leaf print:
For a unique touch, paint the child’s hand dark green and press it upside down at the very bottom of the stems to look like a large, fern-like leaf acting as the base. -
Final touches:
Check for any gaps in the stems or areas that need a little extra green definition and touch them up lightly.
Make It a Gift
Once dry, glue a real ribbon tied in a bow over the point where all the stems gather. This adds a lovely 3D element and makes it perfect for Mother’s Day.
Once the green paint dries, you’ll have a permanent garden of handprints to display proudly on your wall
Q-Tip Dot Painting
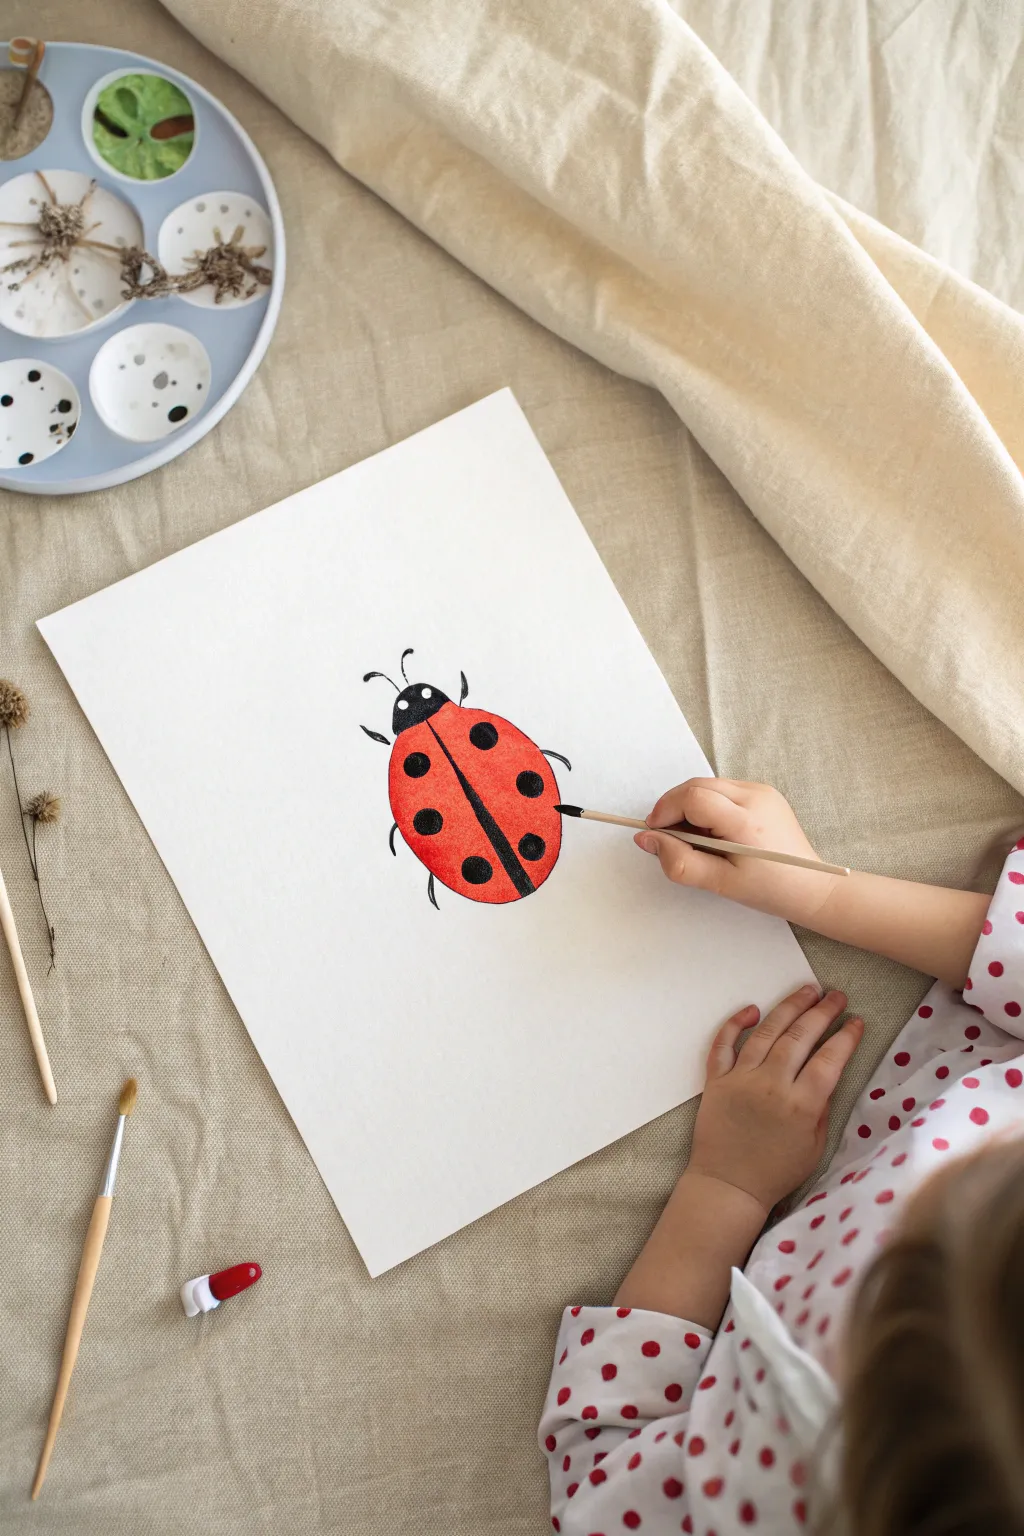
Create a cheerful, bright red ladybug using simple shapes and paints. This project focuses on bold colors and clean lines, perfect for practicing brush control or trying out dot painting techniques.
Step-by-Step Guide
Materials
- White art paper or cardstock
- Red acrylic or poster paint
- Black acrylic or poster paint
- Small round paintbrush
- Very fine detail brush or black marker
- Pencil for sketching
- Palette or small dish for mixing
Step 1: Sketching the Shape
-
Draw the main body:
Start by drawing a large, slightly elongated oval in the center of your paper. This will be the ladybug’s back. -
Add the head:
At the top of your oval, draw a smaller semi-circle shape that overlaps slightly with the body. This creates the head section. -
Divide the wings:
Draw a faint straight line down the center of the large oval, stopping just before the bottom edge to create the slight curve of the wings.
Perfect Circles
Instead of a brush, dip the end of a Q-tip or the eraser of a pencil into black paint to stamp perfectly round spots onto the wings.
Step 2: Painting the Red
-
Prepare the red paint:
Squeeze a generous amount of bright red paint onto your palette. If the paint is very thick, you can add a drop of water to make it flow better. -
Fill in the left wing:
Using your round brush, carefully paint the left side of the oval body. Follow the curved outline first, then fill in the middle with smooth strokes. -
Fill in the right wing:
Repeat the process for the right side, painting up to the center line but leaving the head section unpainted for now. -
Touch up edges:
Look for any uneven edges along the red oval and smooth them out with the tip of your brush to get that nice, round shape. -
Let it dry completely:
Wait for the red paint to be fully dry to the touch so the black paint won’t bleed into it later.
Step 3: Adding the Black Details
-
Paint the dividing line:
Load a fine brush with black paint. Carefully paint a thin line straight down the center where your two red wings meet, widening it slightly towards the top. -
Paint the head:
Fill in the semi-circle shape at the top with solid black paint. Make sure the connection between the head and the red body is clean. -
Create the heavy spots:
Dip your round brush into the black paint. Press firmly onto the red wings to create round spots. Try to place them symmetrically—typically three or four on each side. -
Detail the eyes:
Once the black head is dry, use a tiny dot of white paint or leave two small unpainted circles for eyes if you planned ahead. -
Add the antennae:
With your finest brush or a black marker, draw two small, curved lines coming out from the top of the head. -
Draw the legs:
Add six little legs around the body—two near the front, two in the middle, and two near the back. Keep these strokes short and curved.
Nature Texture
Glue a real twig or pressed green leaf underneath the painted ladybug to make it look like it’s crawling in a garden.
Display your finished ladybug on the fridge or frame it for a touch of garden charm in your room

PENCIL GUIDE
Understanding Pencil Grades from H to B
From first sketch to finished drawing — learn pencil grades, line control, and shading techniques.
Explore the Full Guide
Marble Roll Painting Tracks
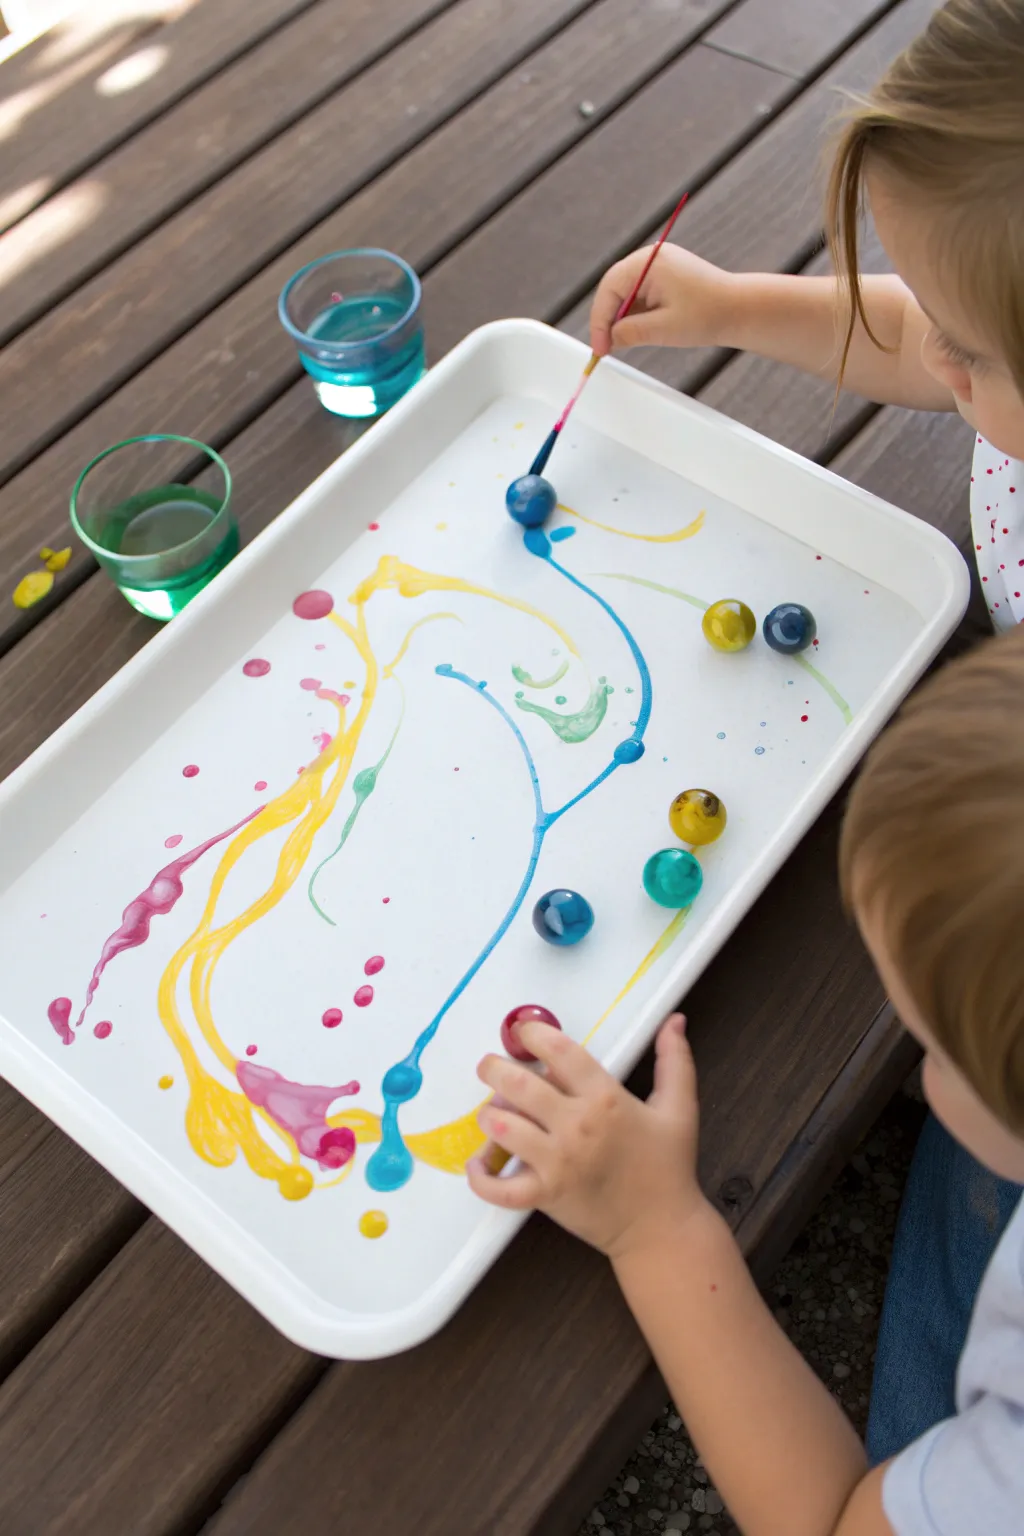
Transform a simple white tray into a canvas of motion with this engaging marble painting activity. By rolling paint-covered spheres across paper, kids create beautiful, abstract networks of intersecting lines and loops that capture the energy of their play.
Step-by-Step Tutorial
Materials
- Large, shallow white tray or baking pan (plastic or metal)
- Heavyweight white paper (cardstock or watercolor paper) cut to fit inside the tray
- Washable tempera or acrylic paints (yellow, blue, magenta, teal)
- Several glass marbles or wooden beads
- Small cups or bowls for paint
- Paintbrushes
- Small cups of water for rinsing (optional)
- Paper towels for cleanup
Step 1: Setting the Stage
-
Prepare the workspace:
Since this project involves rolling movement, find a flat, stable surface like a low table or the floor. If you are working outside on a wooden deck as shown, ensure the gaps between slats aren’t wide enough to lose a stray marble. -
Fit the paper:
Cut a sheet of heavyweight white paper so it fits flat against the bottom of your tray. It shouldn’t curl up the sides, as this can trap the marbles. -
Mix the paints:
Pour small amounts of yellow, blue, teal, and magenta paint into individual cups. If the paint is very thick, add a tiny drop of water to loosen it; it needs to be fluid enough to drip off the marble but not watery.
Muddy Colors?
If your colors turn brown, you likely have too many complementary colors wet at once. Stick to analogous colors (blue/green/yellow) for cleaner mixes.
Step 2: Ready, Set, Roll
-
Dip the marbles:
Place a marble directly into a paint cup. Use a spoon or a paintbrush to roll it around until it is thoroughly coated in color. -
Transfer to the tray:
Carefully lift the paint-covered marble out of the cup. I find using a spoon specifically for this transfer helps keep fingers cleaner. -
Drop and roll:
Place the marble gently onto the paper in the tray. Instruct the child to hold the edges of the tray and slowly tilt it back and forth. -
Observe the first trails:
Watch as the marble travels, leaving a solid line of paint behind it. Encourage slow movements to create long, winding curves rather than erratic splashes. -
Add more colors:
Repeat the process with a different colored marble. Add a yellow marble while the blue paint is still wet to see if they mix on the paper to create streaks of green.
Texture Twist
Swap smooth glass marbles for golf balls or textured bouncy balls. The divots and bumps create unique, dotted patterns instead of solid lines.
Step 3: Creative Techniques
-
Adding dabs of paint:
Instead of dipping the marble, try dropping small puddles of liquid paint directly onto blank spots on the paper. -
Roll through the puddles:
Drop a clean or lightly coated marble into the tray and tilt the tray so the marble rolls specifically through the fresh puddles of paint, dragging the color outward. -
Direct painting:
For more control, let the child use a paintbrush to dab paint directly onto a marble that is already sitting on the tray, giving it a fresh ‘charge’ of color before rolling again. -
Combining movements:
Try swirling the tray in a circular motion to create loops, or tilt it sharply to one side to create straight, fast racing lines. -
Managing the chaos:
If the tracks start getting muddy or brown from too many colors mixing, remove the marbles and let the layer dry for five minutes before adding fresh, bright colors on top.
Step 4: Finishing Up
-
Check coverage:
Continue rolling until you are happy with the balance of white space and colored tracks. The beauty is in the random intersecting lines. -
Remove marbles:
Scoop all marbles out of the tray and place them instantly into a bowl of soapy water for easier cleaning later. -
Lift the print:
Very carefully lift the paper out of the tray. Be gentle, as the paper will be heavy with wet paint. -
Dry flat:
Lay the artwork on a flat surface to dry completely. Because the paint is applied thickly, this might take a few hours.
Once dry, you can display your abstract masterpiece or cut it up to make beautiful greeting cards
Watercolor And Salt Magic
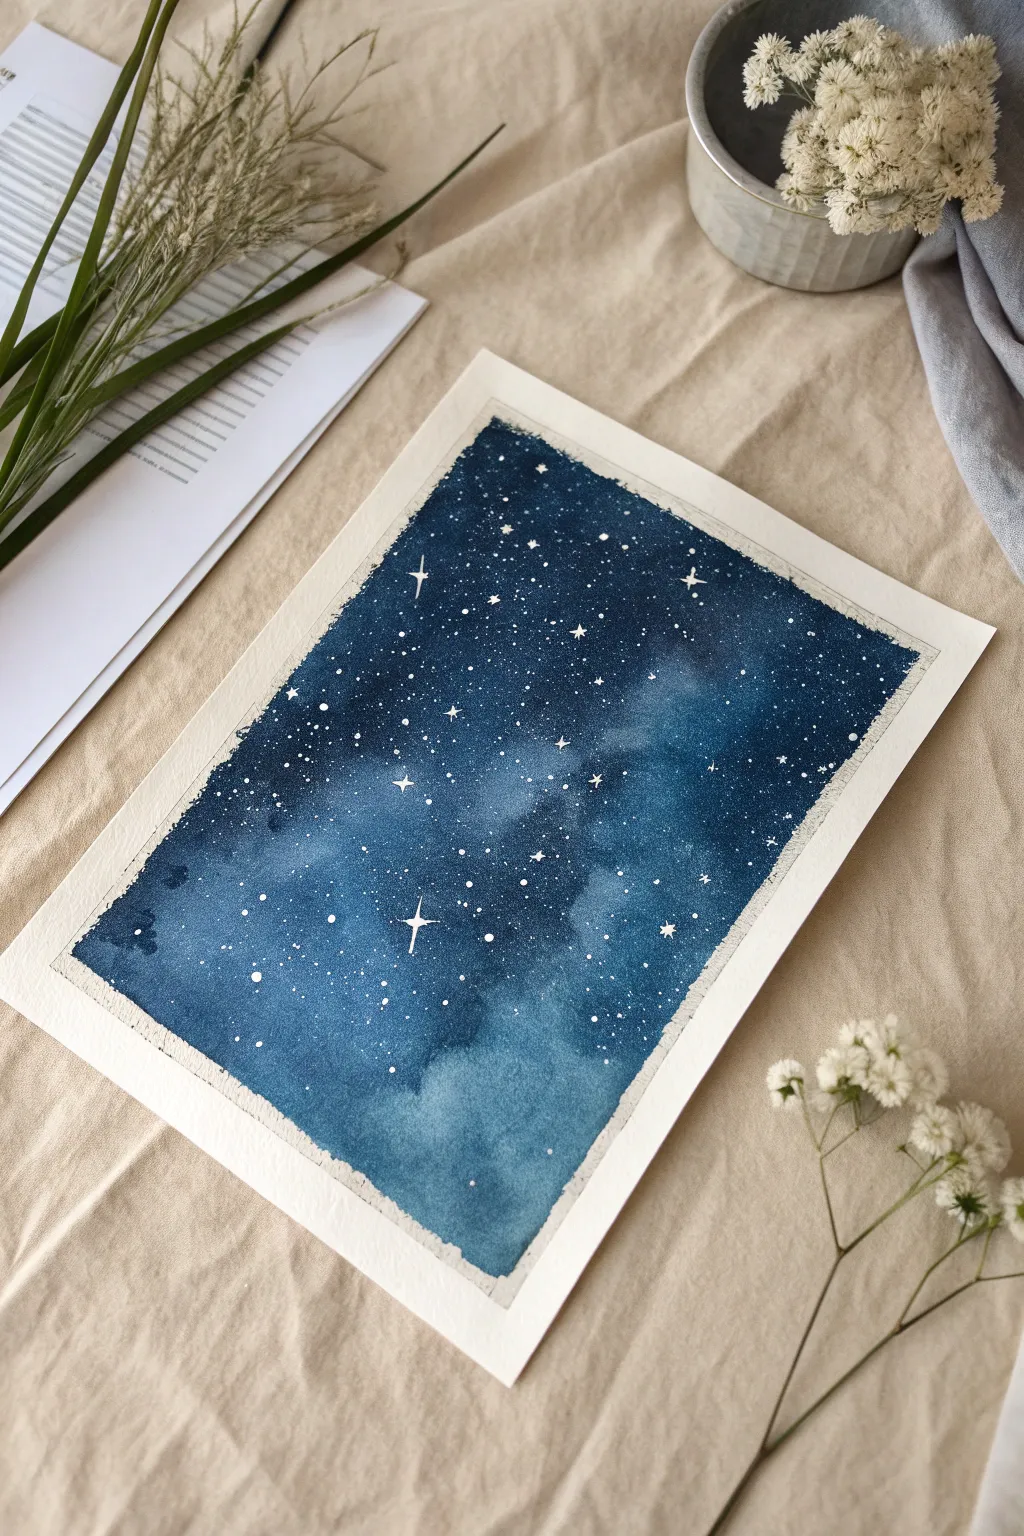
Capture the mysterious beauty of the cosmos with this simple yet stunning watercolor project. By mixing deep blues and using salt for texture, you’ll create a magical night sky filled with twinkling stars.
Step-by-Step Guide
Materials
- High-quality watercolor paper (cold press is best)
- Masking tape or painter’s tape
- Watercolor paints (Indigo, Prussian Blue, Black)
- White gouache or white acrylic paint
- Table salt or sea salt
- Large round watercolor brush
- Small detail brush (size 0 or 00)
- Jar of clean water
- Paper towels
- Old toothbrush (optional)
Step 1: Preparation
-
Secure the paper:
Tape down all four edges of your watercolor paper to a hard, flat surface. This creates that crisp, clean white border you see in the final piece and prevents the paper from buckling when it gets wet. -
Pre-wet the paper:
Using your large clean brush, apply a light wash of clear water over the entire area inside the tape. The paper should be damp and shiny, but not dripping with puddles.
Salt timing trick
Add salt when the paper has lost its ‘puddle’ shine but still looks damp (satin finish). Too wet, and the salt dissolves; too dry, and nothing happens.
Step 2: Painting the Galaxy
-
Lay down the base color:
Load your brush with a watery mix of lighter blue. Dab it randomly onto the wet paper, leaving some areas lighter than others to create the cloudy ‘nebula’ effect. -
Deepen the cosmos:
While the paper is still wet, pick up concentrated Indigo or Prussian Blue. Drop this darker pigment into the corners and edges, letting it bleed naturally towards the center. -
Add contrast:
Mix a small amount of black with your darkest blue. Apply this to the very edges to give the sky depth, making sure to keep the center lighter and dreamier. -
Blend gently:
If the colors aren’t moving enough, tilt your board slightly or use a clean, damp brush to soften any hard edges where the dark meet the light areas. -
The salt technique:
While the paint is still wet (this timing is key!), sprinkle a pinch of salt over the darker areas. As it dries, the salt will absorb the pigment, creating unique star-like textures. -
Patience is key:
Let the painting dry completely. This might take an hour or so. If the paper feels cool to the touch, it’s still wet inside. Do not use a hairdryer, or you might blow the salt crystals away. -
Brush off the salt:
Once bone dry, gently rub the salt off with your fingers or a clean, dry brush. You should see beautiful, lighter textured spots left behind.
Make it a nebula
Before painting blue, dab tiny spots of pink or teal watercolor in the center. Let the dark blue blend around them for a colorful deep-space nebula look.
Step 3: Adding Starts
-
Mix your white:
Squeeze a tiny dot of white gouache or acrylic paint onto your palette. Add just a drop of water so it has an inky consistency—thick enough to be opaque, but thin enough to flow. -
Splatter stars:
Dip a brush (or an old toothbrush) into the white paint. Hold it over the paper and tap the handle against another brush to spray fine mist droplets across your galaxy. -
Paint distinct stars:
Switch to your smallest detail brush. Dip the very tip into the white paint and gently dot individual stars where you want them to shine brighter. -
Create the flares:
Choose a few larger stars to be the main focal points. Carefully paint a vertical line through the dot, then a horizontal line crossing it, tapering the ends to sharp points to make a twinkling cross shape.
Step 4: Finishing Touches
-
Check density:
Step back and look at your sky. I like to add a few tiny clusters of dots in empty areas to balance the composition if it feels too sparse. -
The reveal:
Once everything is totally dry, slowly peel off the masking tape. Pull the tape away from the center of the painting at a 45-degree angle to keep the paper from tearing.
Frame your cosmic masterpiece or tape it to the wall to enjoy your own slice of the universe


Straw Blow Painting Creatures
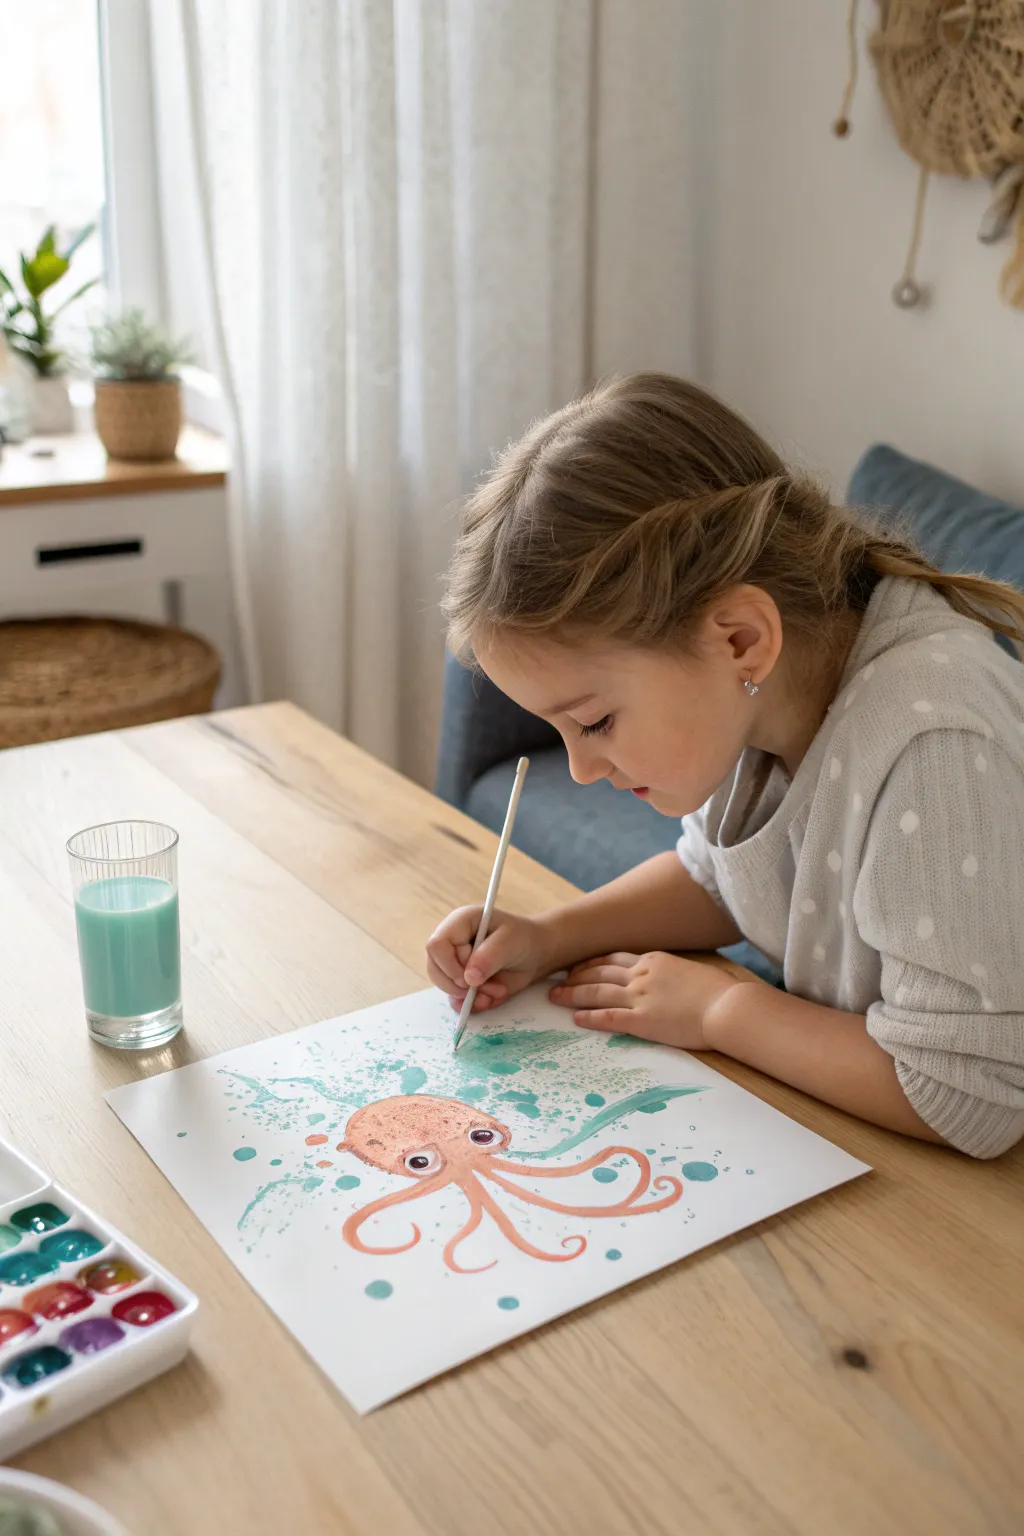
Combine traditional watercolor painting with fun splatter techniques to create this charming sea creature featuring wild, watery hair. The contrast between the neatly painted octopus and the organic splashes creates a lively underwater scene.
Step-by-Step
Materials
- Heavyweight watercolor paper (A4 or larger)
- Watercolor paints (pallet set)
- Small round paintbrush (size 4 or 6)
- Glass of water
- Paper towels
- Pencil (optional for sketching)
Step 1: Planning and Base
-
Sketch the outline:
Begin by lightly sketching a simple oval shape for the octopus’s head near the center-bottom of your paper. This doesn’t need to be perfect; a loose organic shape works best for sea creatures. -
Add the tentacles:
Extend 5-6 wavy lines coming down from the head shape. Curve them upwards and sideways to give the impression that the octopus is floating or dancing in the water. -
Mix your body color:
Load your brush with plenty of water and mix a peachy-orange or soft coral color. Combining a bit of orange with a touch of pink and plenty of water will achieve that gentle, translucent tone seen in the example.
Control the Chaos
Cover the painted octopus body with a scrap piece of paper while you do the splattering steps to keep its face clean and dry.
Step 2: Painting the Creature
-
Fill the head shape:
Carefully paint the inside of your head outline with the coral mixture. Keep the paint wet but not puddling. -
Paint the tentacles:
Using the tip of your round brush, trace over your tentacle lines. Press down slightly at the start of the tentacle and lift up as you reach the tip to create a tapered end. -
Add detail spots:
While the main body color is still slightly damp, dab in a few tiny spots of a darker orange or red on the forehead area to create subtle texture. -
Connect the shapes:
Smooth out the connection points between the head and the tentacles so the creature looks like one solid form. -
Let it dry completely:
This is crucial. Wait until the body is totally dry to the touch before moving on, or your background colors will bleed into the octopus.
Paint Not Moving?
If blowing the paint is hard, your mixture is too thick. Add more water to the puddle on the paper until it flows easily with air.
Step 3: Splatter and Eyes
-
Prepare the splash color:
Clean your brush thoroughly. Mix a watery teal or aquamarine color. You want this mixture to be quite fluid to splatter well. -
Create the wild hair:
Create the splatter effect above the octopus’s head. You can do this by loading the brush with the teal paint and tapping the handle against your finger over the paper. -
Blow the paint:
For the longer streaks that look like seaweed or flowing hair, drop a small puddle of teal paint on the paper and quickly blow on it (either directly or through a straw) to push the paint outward. -
Add bubble accents:
Dip your brush again and add a few deliberate larger dots of teal around the sides of the creature to represent bubbles. -
Paint the eyes:
Once everything is dry again, paint two large white circles for eyes. I find using a more opaque paint like gouache or white acrylic works best here if your paper isn’t white enough. -
Add the pupils:
Paint crisp black circles inside the whites of the eyes. -
Final highlight:
Add a tiny speck of white inside the black pupils to give the octopus a spark of life.
Your playful sea creature is now ready to swim on your wall
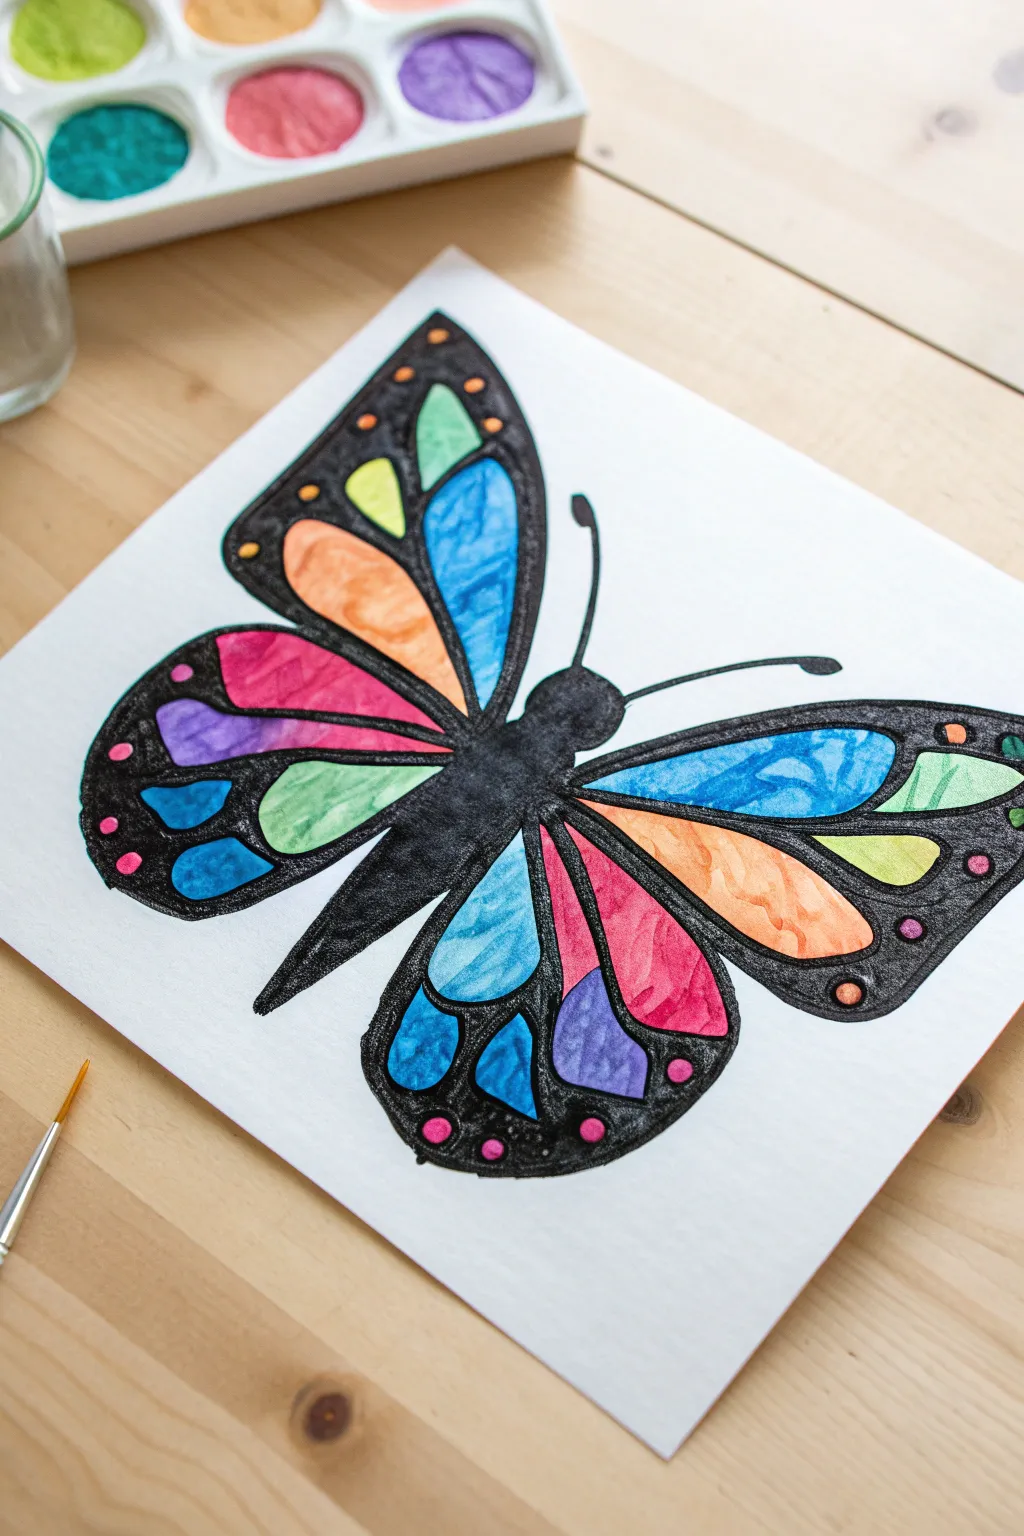
Butterfly Symmetry Fold Painting
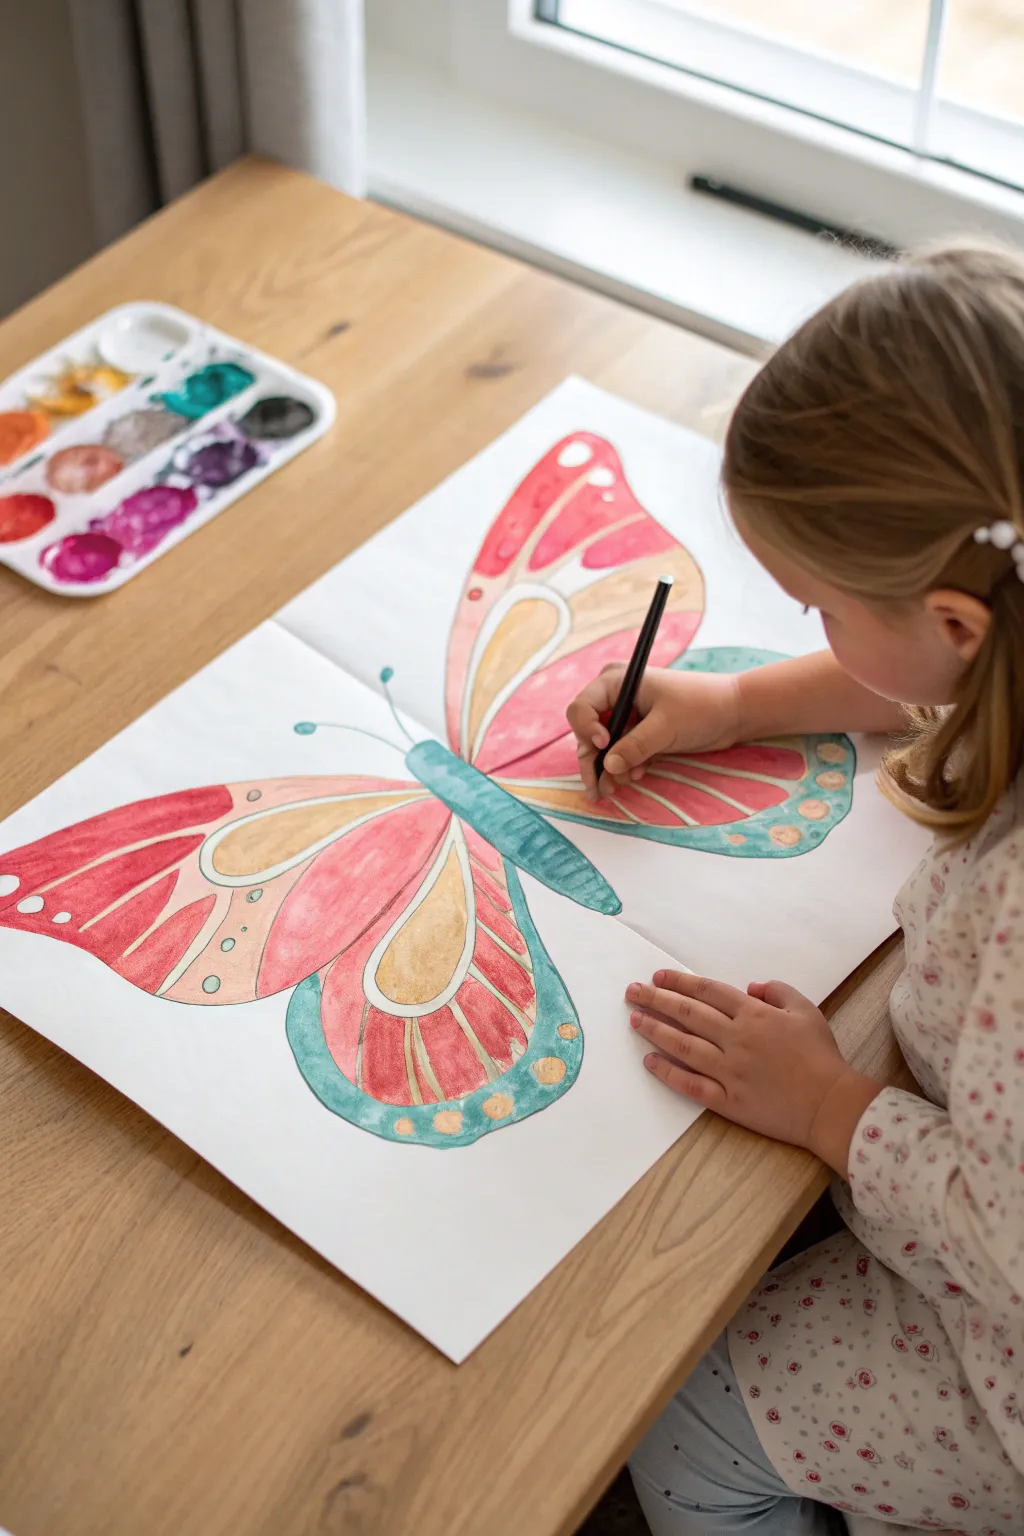
Learn to paint a stunning, large-scale butterfly using a combination of watercolor washes and precise brushwork. This project teaches symmetry and color blending while creating a vibrant piece of art perfect for a bedroom wall.
Detailed Instructions
Materials
- Large heavy-weight sketchbook or watercolor paper (A3 or similar size)
- Watercolor palette (set with reds, pinks, teal/green, gold, and black)
- Medium round watercolor brush (size 6 or 8)
- Fine detail brush (size 2 or 3)
- Black fine-liner or brush pen (optional for outlines)
- Pencil for sketching
- Cup of water and paper towels
Step 1: Drafting the Design
-
Establish the centerline:
Open your large sketchbook flat so the spine acts as a natural center guide, or if using a single sheet, lightly fold it in half and unfold to create a crease down the middle. -
Complete the body sketch:
Using a light pencil, draw a long, segmented abdomen directly over the center crease or spine. Add a rounded thorax and a small head at the top, then draw two curved antennae extending outward. -
Shape the upper wings:
Start from the upper thorax and draw a large, sweeping curve upward and outward to create the top edge of the forewing. Bring the line back down toward the body, curving it slightly inward near the bottom. -
Draft the lower wings:
Starting just below where the upper wing connects, draw a teardrop shape for the hindwing that extends downward, keeping it slightly smaller and rounder than the top wing. -
Mirror the design:
Repeat the exact same wing shapes on the opposite side of the center line. It doesn’t have to be mathematically perfect, but try to keep the proportions similar for a balanced look. -
Sketch interior patterns:
Lightly draw elongated teardrop shapes inside each wing section to designate where your different color zones will go. Add a border area along the outer edges of the wings for the scalloped trim details.
Symmetry Hack
Draw one side of the butterfly in pencil first. Fold the paper in half and rub the back with a spoon to transfer the graphite to the other side.
Step 2: Applying the Base Colors
-
Paint the body:
Load your medium brush with a teal or turquoise watercolor. Fill in the center body segments carefully, ensuring the paint doesn’t puddle too much. -
Start the inner wing sections:
Dip into a warm ochre or gold paint. Fill the large teardrop shapes closest to the butterfly’s body on both upper and lower wings. -
Add the vibrant reds:
Clean your brush thoroughly, then pick up a bright red or deep pink. Paint the mid-section stripes of the wings, carefully working around the gold sections you just painted. -
Create the pink transitions:
Dilute your red paint slightly or switch to a lighter rose shade. Fill the remaining outer sections of the main wing panels, blending the edge slightly where it meets the red if the paint is still damp. -
Paint the wing borders:
Using the same teal color from the body, paint the wide border along the bottom edge of the lower wings. For the upper wings, you can wash a very light pink or leave the paper white for now if you plan to add red details later. -
Let the base dry:
Pause here and let the first layer of paint dry completely. If you paint wet details on top now, they will bleed uncontrollably.
Add Some Shimmer
Once the paint is fully dry, paint over the gold or yellow sections with a glitter glaze or metallic watercolor for wings that sparkle in the light.
Step 3: Adding Details and Definition
-
Add decorative spots:
Mix a creamy, opaque gold or yellow. Dab small circles into the teal border on the lower wings to create the classic ‘eyespot’ pattern found on many butterflies. -
Define the veins:
Switch to your fine detail brush or a black drawing pen. Carefully outline the gold and red sections inside the wings to separate the colors and mimic wing veins. -
Refine the upper wing tips:
I like to use a concentrated strawberry red here to create bold, finger-like stripes at the very top corners of the upper wings. -
Add white space accents:
If you have any white gouache or a white gel pen, add tiny highlights to the body segments or the eyespots to make them pop. -
Outline the full form:
Using a steady hand and a fine black brush or pen, trace the entire outer perimeter of the butterfly to give it a crisp, finished illustrative look. -
Final touches:
Add small dots of color to the antennae tips and a few stray decorative dots on the upper wings for balance. Let everything dry flat to prevent the paper from buckling.
Hang your beautiful butterfly creation up to admire the symmetry and vibrant colors
Simple Sunset Silhouette
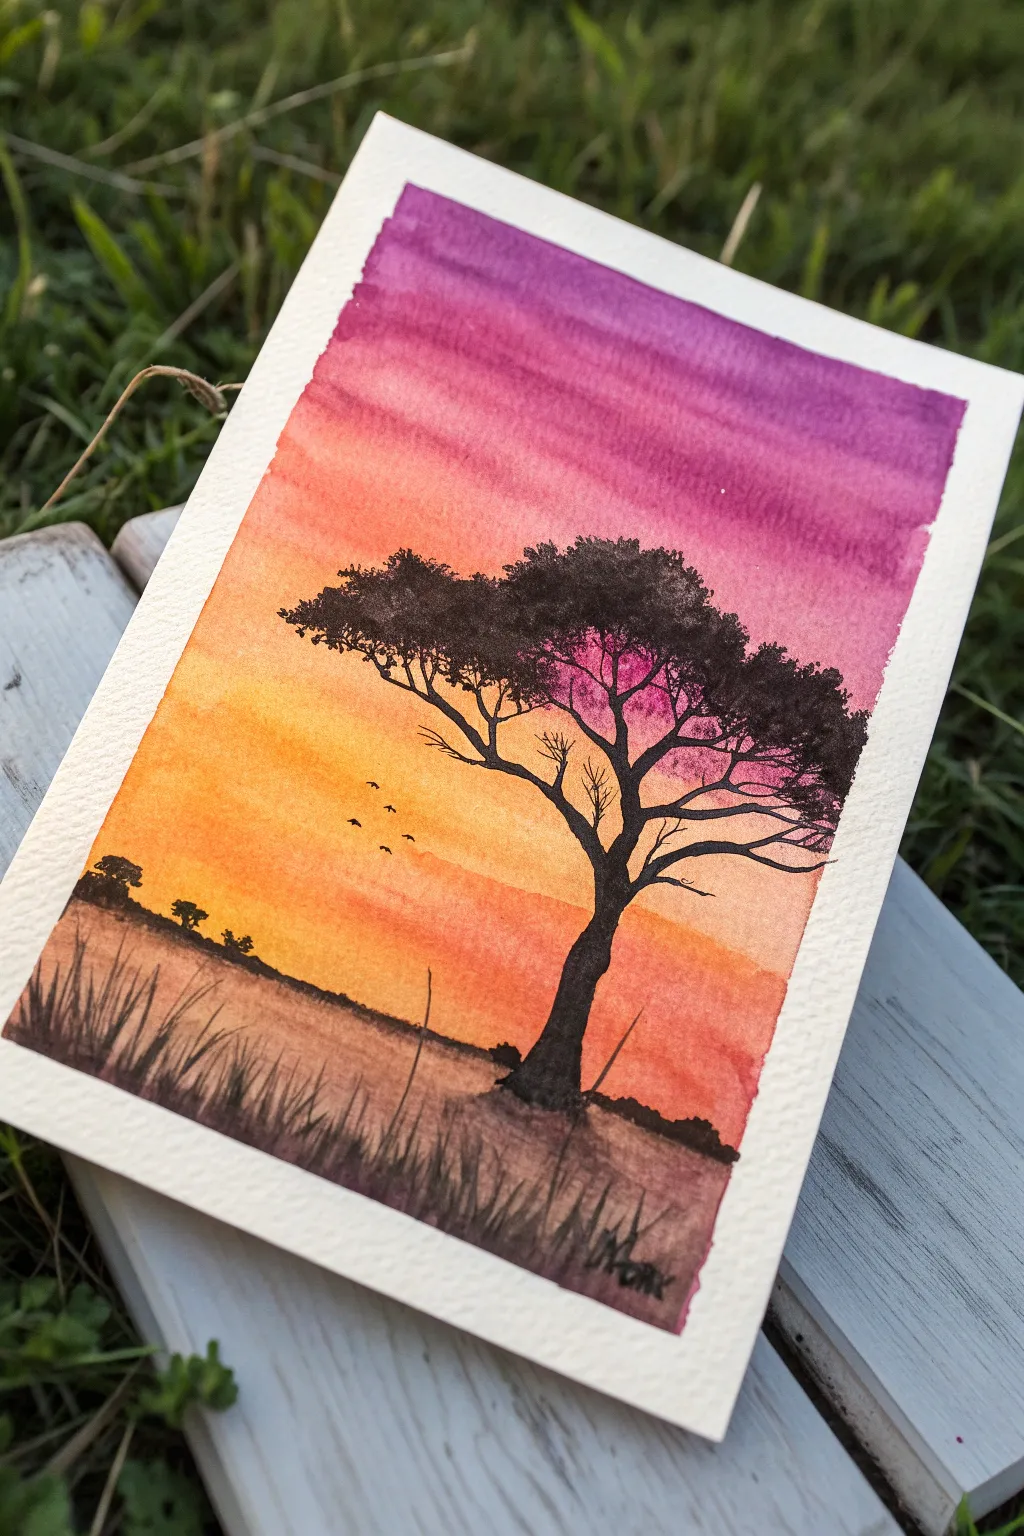
Capture the warmth of an African evening with this vibrant watercolor silhouette project. Using a simple wash technique, you’ll create a glowing sky that transitions from deep purple to sunny yellow, framed by the stark beauty of a lone acacia tree.
Step-by-Step Guide
Materials
- Watercolor paper (cold press, at least 140lb/300gsm is best)
- Watercolor paints (purple/violet, magenta/red, orange, yellow)
- Black ink, black gouache, or a black fine-tip marker
- Paintbrushes: a large flat or round brush for the sky, and a fine detail brush for the tree
- Clean water jar
- Paper towels
- Painter’s tape or masking tape
- Rigid board to tape the paper onto
Step 1: Setting the Sky Stage
-
Prepare your canvas:
Start by taping down all four edges of your watercolor paper onto a rigid board. This gives you a nice clean white border later and prevents the paper from buckling too much when wet. -
Wet the paper:
Using your largest clean brush, apply a coat of clean water over the entire upper two-thirds of the paper where the sky will be. You want the paper glistening but not swimming in puddles. -
Apply the purple:
Load your brush with a rich purple or violet mix. Apply a horizontal band across the very top of the wet area, letting the color bleed downwards slightly. -
Add the red transition:
Rinse your brush and pick up a magenta or deep red color. Paint a band directly below the purple, slightly overlapping the bottom edge of the purple so they blend together softly on the wet paper. -
Bring in the orange:
Continue down the paper with a vibrant orange stripe. Again, blend it gently into the red area above it. The wet paper should do most of the mixing work for you. -
Finish with yellow:
For the horizon line, use a bright, sunny yellow. Blend this into the orange above. Fade the yellow out as you reach the bottom third of the paper, leaving the very bottom area mostly unpainted or very pale for the ground. -
Let it dry completely:
Before moving on to the black silhouettes, the background must be 100% dry. If you paint on damp paper, your crisp black tree will turn into a fuzzy grey blob. I sometimes use a hairdryer on low heat to speed this up.
Step 2: Grounding the Scene
-
Paint the horizon:
Mix a diluted black or dark brown watercolor. Paint a textured, uneven line across the bottom of the yellow sky area to create the distant land. It shouldn’t be a perfectly straight line; make it bumpy for a natural look. -
Add distant shrubbery:
On the left side of the horizon, dab a few tiny, irregular shapes to represent distant bushes or smaller trees. Keep these very small to show depth. -
Create the foreground wash:
For the ground at the very bottom, use a watery mix of brown and black. Apply loose, horizontal strokes below your horizon line, letting some white paper show through for texture.
Clean Lines Pro Tip
For the absolute blackest silhouette without needing multiple coats, use waterproof black India Ink or a black brush pen instead of watercolor paint for the tree.
Step 3: The Silhouette Tree
-
Outline the trunk:
Using thick black paint (ink or gouache works best for opacity) and a fine brush, paint the trunk of the acacia tree. It should be positioned slightly off-center to the right. Make the base wider and taper it as it goes up. -
Branch out:
Split the trunk into two or three main large branches reaching upward and outward. Acacia trees often have a distinctive ‘flat top’ look, so aim for horizontal spread. -
Add fine twigs:
From your main branches, paint thinner and thinner lines extending out. Use the very tip of your brush. These tiny twigs should interlace and create a web-like structure. -
Stipple the foliage:
Instead of painting individual leaves, use an old, scruffy brush or a dry brush technique. Dip it in thick black paint, wipe off the excess, and ‘stamp’ or stipple clusters of foliage along the tops of the branches to create the canopy. -
Add birds:
Paint three or four tiny ‘v’ or ‘m’ shapes in the orange part of the sky to look like birds flying in the distance.
Level Up: Reflections
Turn the grassy ground into water! Instead of grass, paint a mirrored reflection of the tree in the bottom section and add horizontal white lines for ripples.
Step 4: Foreground Details
-
Paint tall grass:
Using your finest brush and black paint, flick quick, upward strokes from the bottom edge of the paper. Vary the height and direction slightly to make the grass look wild. -
Darken the base:
Add a little more concentrated black paint right at the base of the tree and into the grassy area to anchor the tree firmly to the ground. -
Reveal the border:
Once everything is completely dry, slowly and carefully peel off the masking tape at a 45-degree angle to reveal your crisp white edges.
Step back and admire your warm, peaceful sunset scene
Chalk Resist Surprise Painting
Create magical, revealing artwork using a simple wax resist technique that feels like a secret message appearing on the page. By drawing with a light substance first and painting over it, you’ll produce delicate, ghostly shapes perfect for beginners.
Step-by-Step
Materials
- Cold-pressed watercolor paper (300gsm ideal)
- White or pale-colored wax crayon (or oil pastel)
- Small round watercolor brush (size 4 or 6)
- Watercolor paints (pan set used here)
- Jar of clean water
- Paper towel
Step 1: Preparation
-
Select your paper:
Start with a high-quality sheet of cold-pressed watercolor paper. The textures helps catch the pigment later. -
Choose your resist tool:
Pick a white or very pale wax crayon. An oil pastel works beautifully too, but make sure it is waxy enough to repel water. -
Plan your layout:
visualize a scattered pattern of simple shapes. Think stars, hearts, and simple circles to keep it easy for young hands.
Too much paint?
If paint covers your wax lines instead of resisting, your paint is too thick. Add more water to your brush or blot the excess gently with a paper towel.
Step 2: Drawing the invisible layer
-
Draw the main motifs:
Pressing firmly with your crayon, draw several open hearts scattered across the page. -
Add celestial details:
intersperse the hearts with five-pointed stars. Draw some as simple outlines and others as smaller, filled-in star shapes. -
Create spiral accents:
In the corners or empty spaces, draw large, loose swirls or concentric circles. It’s okay if you can barely see them right now; that’s part of the magic. -
Fill the gaps:
Look for empty white spaces and add tiny four-pointed stars or sparkle shapes to balance the composition. -
Check your pressure:
Run your finger lightly over the paper. You should feel the waxy texture where you’ve drawn. If not, go over the lines again to ensure a good resist.
Pro Tip: Secret Messages
Use a white crayon on white paper to write secret notes. They will be totally invisible until the recipient paints over them with watercolors to reveal the text.
Step 3: The Watercolor Reveal
-
Prepare your wash:
Wet your brush and mix a very watery, pale blue-grey or seafoam green color. You want the paint to be transparent, not thick. -
Test the consistency:
I usually test the color on a scrap piece of paper first to make sure it’s light enough to let the white paper show through, but dark enough to reveal the wax. -
Begin the reveal:
Load your brush with the watery paint and gently sweep it over one of your drawn shapes. Watch how the paint heads away from the wax lines. -
Paint loosely:
Instead of painting the whole background, trace loosely over your drawn lines. Let the paint pool slightly around the edges of the hearts and stars. -
Emphasize the shapes:
If the resist isn’t showing well, dab a little more pigment right next to the wax line to create contrast. -
Vary the tones:
Dip your brush in water to lighten the paint for some stars, and add a tiny bit more pigment for others to create depth. -
Paint the spirals:
For the swirl shapes, follow the curve with your brush, allowing the paint to settle in the valleys between the wax lines. -
Soften edges:
If you have hard paint lines where you don’t want them, use a clean, damp brush to soften the edges into the white paper.
Step 4: Finishing Touches
-
Review the composition:
Stand back and look at your pattern. If any area looks too faint, add a second, gentle layer of watery paint. -
Dry completely:
Let the paper sit flat until completely dry. The wax will remain shiny while the matte watercolor dries around it.
This simple technique offers endless possibilities for creating hidden patterns and magical reveals
Leaf And Nature Brush Painting
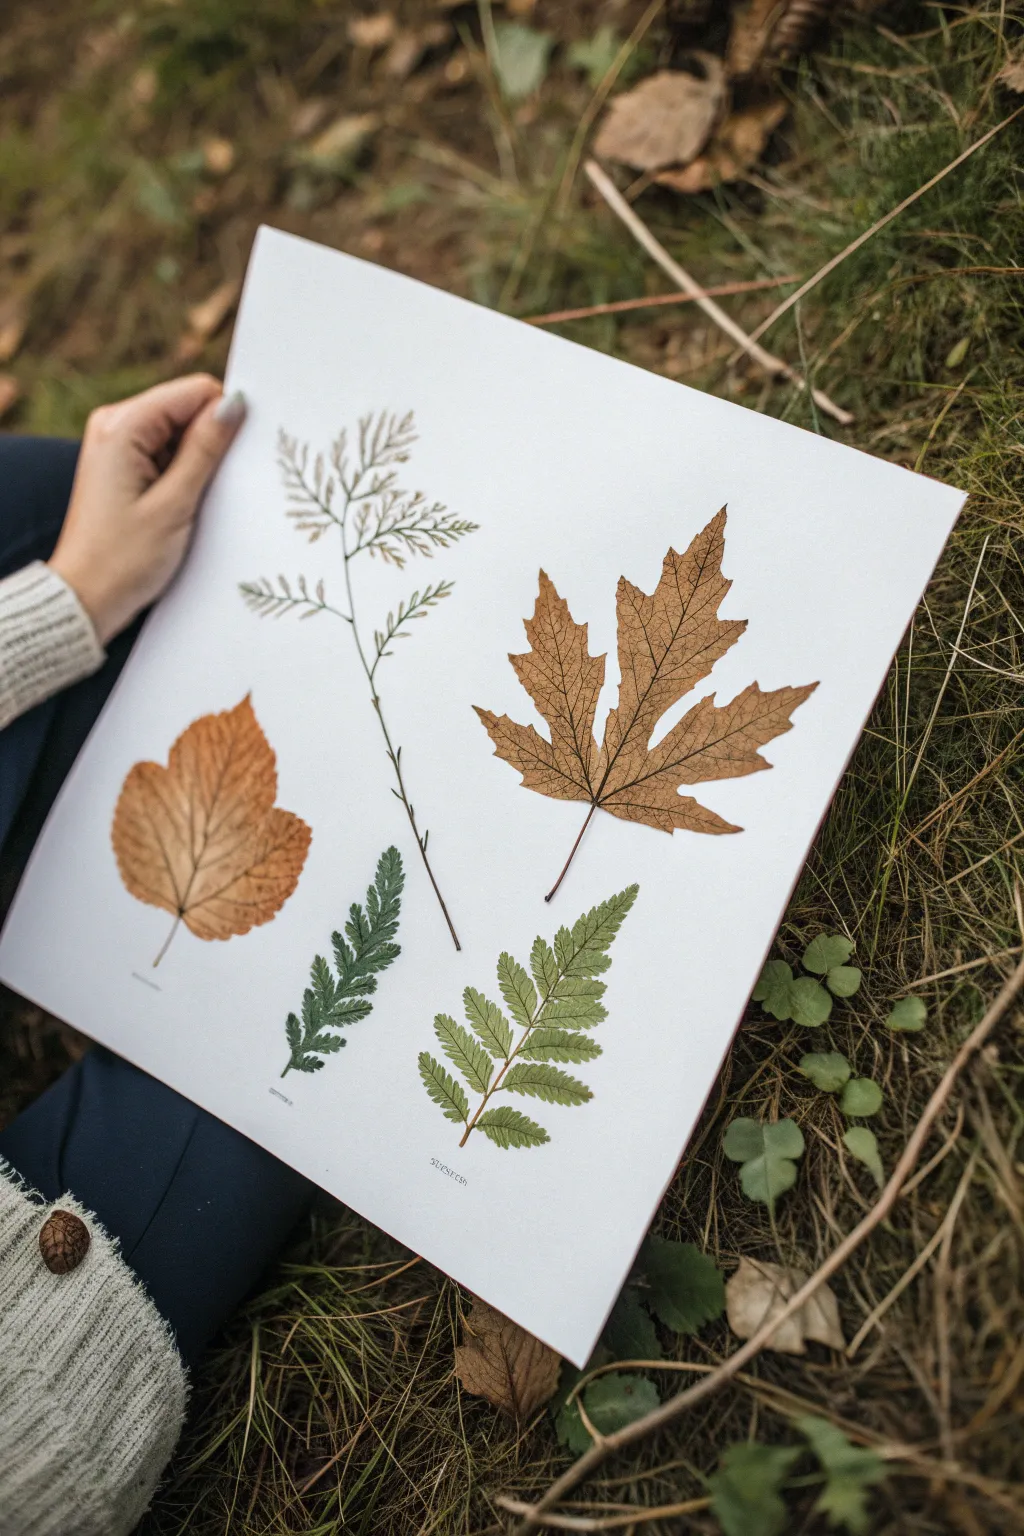
Capture the delicate veins and organic shapes of the forest floor with this elegant leaf printing project. By using real foliage as stamps, you can create a botanical study that looks like a vintage scientific illustration.
Detailed Instructions
Materials
- A variety of fresh, flat leaves (fern, maple, etc.)
- Heavyweight white drawing paper or cardstock (A3 size recommended)
- Acrylic paints (browns, ochres, deep greens)
- Flat paintbrush or foam roller
- Newsprint or scrap paper
- Paper towels
- Heavy books (optional)
Step 1: Preparation & Selection
-
Forage for foliage:
Begin by collecting leaves with interesting shapes and prominent veins. Look for ferns, maple leaves, and other distinct botanical forms. Avoid leaves that are too dry or brittle, as they will crumble. -
Clean and flatten:
Gently wipe any dirt from your collected leaves. If they curl up, place them under a heavy book for about 30 minutes to flatten them out, making them easier to print with. -
Prepare your workspace:
Lay down newspaper to protect your surface. Set up your white paper, paints, and brush. We will be working one leaf at a time.
Step 2: Inking the Leaves
-
Select your color palette:
Mix your acrylics to achieve natural, earthy tones. For the large maple leaf, aim for a warm, translucent brown. For the ferns, mix a deep forest green or a yellowish-olive shade. -
Apply paint to the first leaf:
Place a leaf vein-side up on a scrap piece of paper. The veins are usually more prominent on the underside, which gives a better print texture. -
Brush evenly:
Using a flat brush or foam roller, apply a thin, even layer of paint over the entire vein side. Ensure you coat the stem and the very tips of the leaves. -
Check paint consistency:
The paint should be wet but not gloppy. If there are puddles of paint in the crevices, dab them gently with a paper towel, or you’ll lose the fine details.
Blobby Prints?
If your print looks like a solid blob, you used too much paint. Using a foam roller often applies a thinner, more even coat than a brush.
Step 3: Printing the Botanical
-
Position the leaf:
Carefully lift the painted leaf by its stem. I like to hover it over the final paper first to visualize the layout before committing to the placement. -
Place and press:
Gently lay the leaf, paint-side down, onto the white paper. Once it touches the paper, do not shift or slide it. -
Secure the transfer:
Place a clean sheet of scrap paper over the leaf. Rub your hand firmly over the scrap paper, pressing down on all areas of the leaf, especially the edges and stem. -
Reveal the print:
Remove the scrap paper. Carefully peel the leaf off your artwork, starting from the stem and lifting slowly to reveal the intricate impression left behind.
Use A Brayer
For pro results, place scrap paper over the leaf while printing and roll a clean brayer over it. This ensures even pressure on every vein.
Step 4: Composition & Finishing
-
Repeat with variety:
Select a different leaf and a new color. Position this second print at a pleasing distance from the first, perhaps angling it differently to create movement. -
Balance the layout:
Continue until you have about 4-5 distinct prints. Try to balance large, solid shapes (like the maple leaf) with delicate, airy shapes (like the ferns). -
Add gentle details:
If a stem didn’t print clearly, you can use a very fine brush with a tiny amount of matching paint to lightly extend or connect the line, but keep it minimal. -
Labeling (Optional):
To mimic the look in the photo, you can use a fine-tip pen or small rubber stamps to add tiny scientific names or dates underneath each specimen once the paint is fully dry. -
Final drying:
Let the entire sheet dry flat for at least an hour. The acrylic paint will dry relatively quickly, leaving a beautiful, permanent botanical record.
Now you have a stunning piece of nature-inspired art ready to be framed or gifted
Spin Art Color Explosions
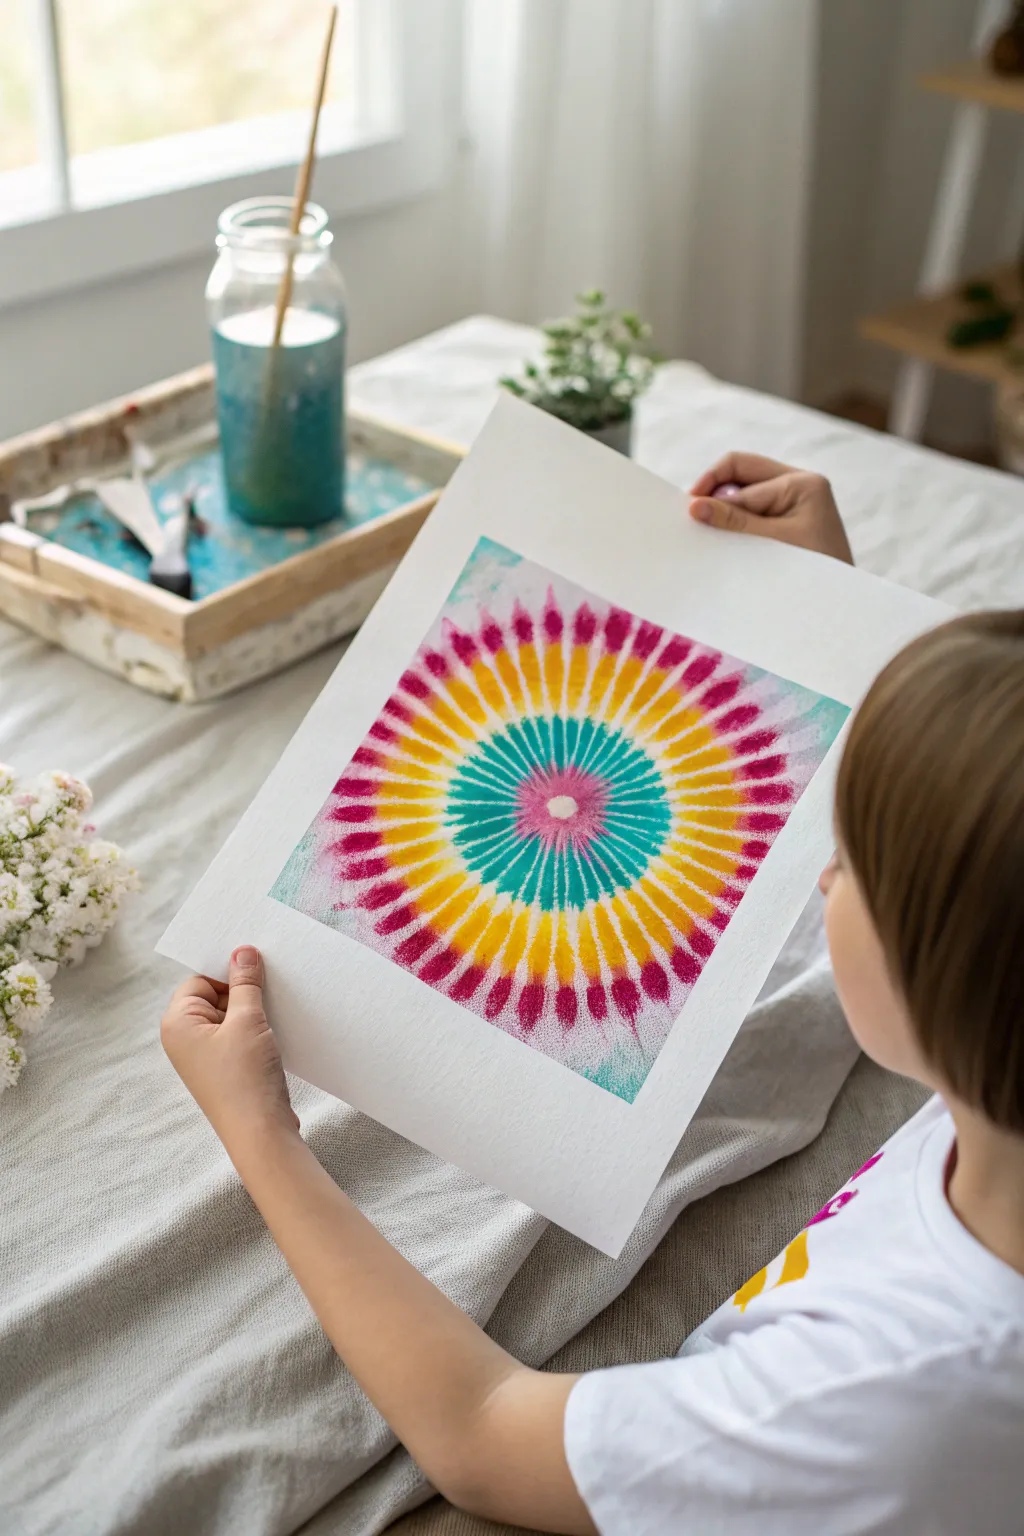
Create a mesmerizing, symmetrical burst of color that mimics the intricate patterns of a kaleidoscope. This project balances the wild energy of spin art with controlled placement to produce a stunning, sun-like radial design.
How-To Guide
Materials
- Salad spinner or dedicated spin art machine
- Square white cardstock or heavy watercolor paper (must fit flat inside the spinner)
- Liquid watercolor paints or diluted acrylics (Teal, Magenta, Yellow)
- Squeeze bottles or pipettes/eye droppers
- Removable mounting putty or masking tape
- Paper towels
- Newspaper or table covering
Step 1: Setting the Stage
-
Prep your station:
Cover your work surface with newspaper to catch any stray drops. While spin art is contained, accidents happen when moving wet paper. -
Prepare the paints:
Pour your teal, magenta, and yellow paints into separate squeeze bottles or cups. If using acrylics, dilute them with a little water until they have the consistency of heavy cream—they need to flow but still hold their color intensity. -
Secure the paper:
Place a square piece of cardstock into the bottom center of your salad spinner basket. Use a small dab of mounting putty or a loop of masking tape on the back to keep it perfectly centered during the spin.
Uneven Spreading?
If paint flies to one side only, your paper isn’t centered. Stop immediately, re-center the paper using the putty, and spin again to correct the balance.
Step 2: Creating the Core
-
Start the spin:
Begin spinning the device. Aim for a moderate, steady speed rather than a frantic fast spin, which gives you more control over where the paint lands. -
The center dot:
While the paper is spinning, carefully drop a single heavy drop of magenta paint exactly in the center. Watch it spread slightly into a small circle. -
Inner ring:
Immediately switch to your teal paint. With the spinner still moving, squeeze a steady stream slightly further out from the center, creating a teal ring that touches the magenta core. -
Stop and check:
Let the spinner come to a complete halt. Check your progress. You should have a distinct bullseye pattern forming.
Step 3: Expanding the Radius
-
Resume spinning:
Get the paper spinning again. This time, try to get it moving faster to help drag the paint outward dynamically. -
The yellow burst:
Apply the yellow paint in a ring just outside the teal. Because the paper is spinning faster, centrifugal force will pull this yellow ring outward into long, radiating spikes. -
Layering magenta:
Add a final ring of magenta near the outer edge of the yellow section. The force will blend it slightly with the yellow tips, creating beautiful orange and red transitions. -
Maximize the force:
Give the spinner its fastest spin yet. Stop adding paint and just let physics do the work, pulling those colored rings into the sharp, needle-like rays seen in the photo.
Crisp Lines Tip
For sharp, distinct separation between colors like the ring effect, pause the spinning briefly between adding new colors to let the previous layer settle.
Step 4: Finishing Touches
-
The reveal:
Wait for the basket to stop completely before opening. I always hold my breath a a little here—the reveal is the best part. -
Remove carefully:
Gently detach the paper from the putty. Be careful not to tilt the paper too much, as wet paint can still run and ruin your perfect symmetry. -
Corner details:
If you want the subtle corner accents seen in the example, you can add a tiny drop of teal to the corners while the paper is stationary, or gently dab it with a brush. -
Drying time:
Lay the artwork flat on a safe surface to dry. Depending on how thick your paint was, this could take anywhere from 30 minutes to a few hours.
Once dry, your radiant spin art is ready to be framed or gifted to someone special
String Pull Paint Monsters
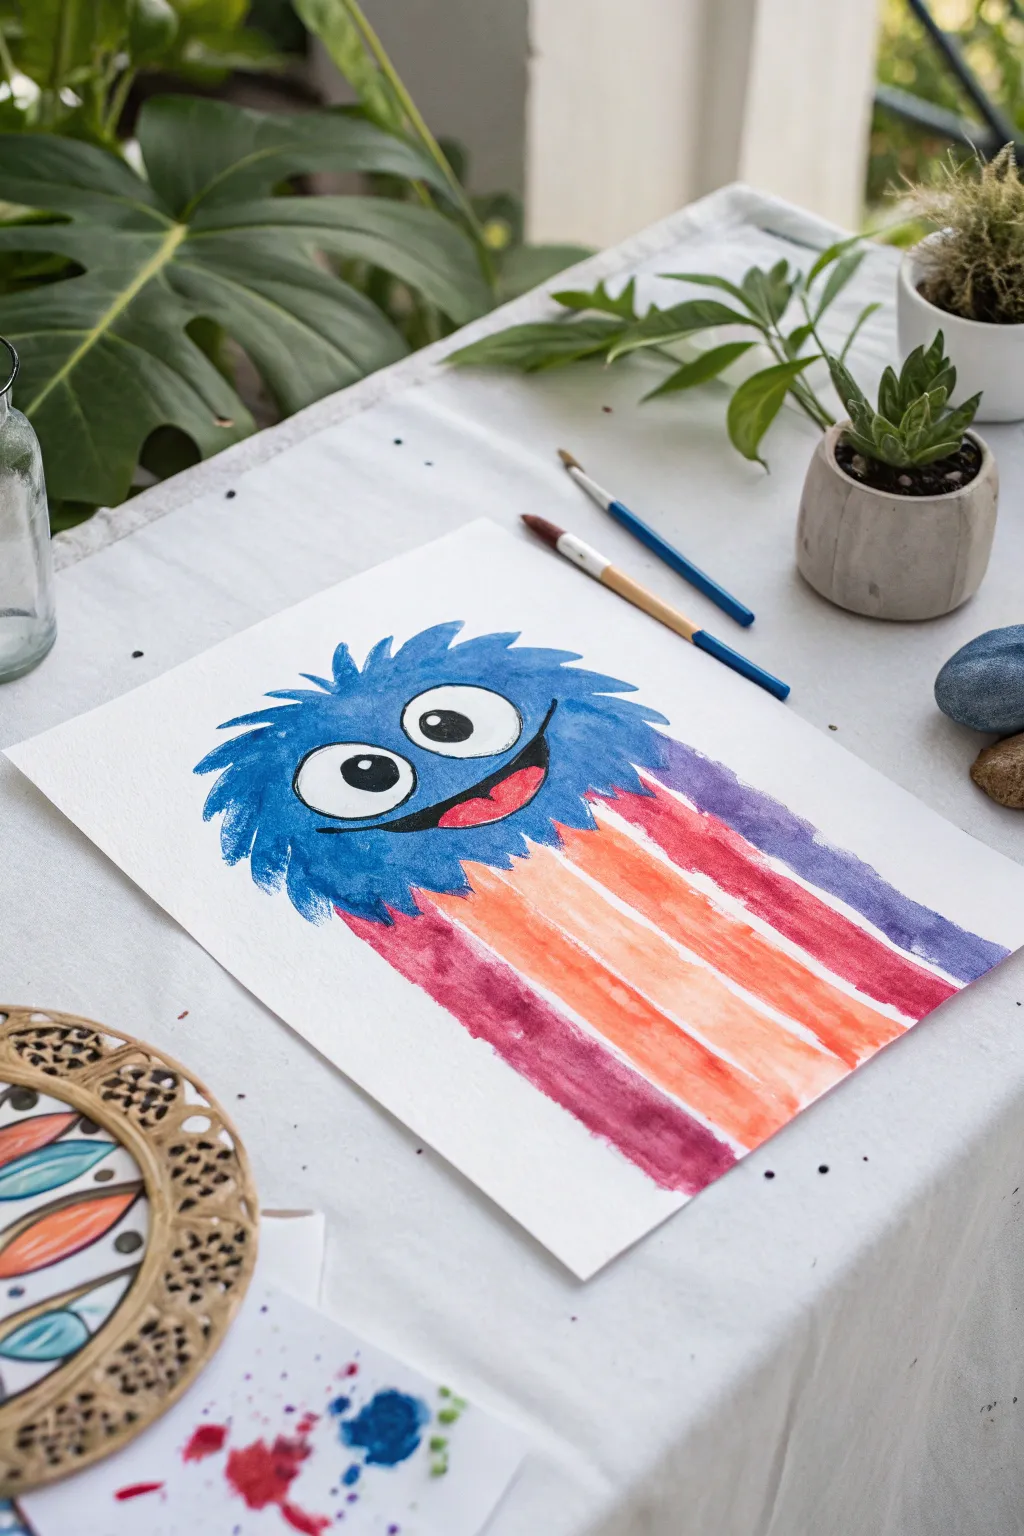
Bring a fuzzy, colorful creature to life using a clever drag-painting technique that creates exciting textures. This cheerful monster features bright blue fur and a cascading rainbow mane that looks wonderfully unpredictable and fun.
Step-by-Step
Materials
- Heavyweight watercolor paper or mixed media paper
- Watercolor paint set (pan or tube)
- Small round paintbrush (size 4 or 6)
- Medium flat paintbrush (size 8 or 10)
- Black fine liner pen or black acrylic paint
- Cup of water
- Paper towels
Step 1: Painting the Head
-
Outline the head shape:
Start by lightly sketching a wide, semi-circle shape for the monster’s head using a pencil if you wish, or go straight in with paint. Load your round brush with plenty of water and a vibrant blue pigment. -
Create the fuzzy texture:
Instead of painting a smooth line, use short, quick flicks of your brush outwards along the top curve of the head to create the look of spiky fur. Keep the edges rough and uneven for character. -
Fill the face area:
Fill in the rest of the blue face area, keeping the paint relatively wet so it stays workable. Leave two large white circular spaces blank for the eyes near the center. -
Define the eye sockets:
Carefully paint around your white circles to define the eye shape perfectly. If you accidentally paint inside them, don’t worry—we can touch it up with white acrylic or gouache later. -
Paint the mouth:
While the blue is drying slightly, use a clean, damp brush to lift a curved shape for the mouth if the paint is still wet, or wait for it to dry and paint a large black smile shape over the blue. -
Add mouth details:
Paint a bright red tongue inside the bottom curve of the mouth. Ensure the black outline is dry before adding the red so the colors don’t bleed together muddy.
Step 2: Creating the Color Streaks
-
Prepare your streak colors:
Mix puddles of purple, magenta, red, and orange watercolor. You want these mixtures to be juicy and fluid, not too dry. -
Apply the first streak:
Starting right at the bottom edge of the blue head, load your medium flat brush with purple paint. Place the brush down and pull it straight down the paper in one long, confident stroke. -
Add the next color:
Rinse your brush and switch to a reddish-magenta. Overlap this slightly with the previous purple edge or place it right next to it, pulling down from the monster’s chin to the bottom of the page. -
Continue the rainbow pattern:
Continue adding vertical stripes using orange and then a lighter peach or yellow-orange. Vary the width slightly; I find this makes the ‘hair’ look more organic. -
Blend the transition:
While the top of the streaks and the bottom of the blue head are still slightly damp, gently touch the colors together so they bleed just a little bit, creating a seamless connection. -
Soften the edges:
If your streaks look too rigid, run a clean, slightly damp brush along the edges of the stripes to soften the look, mimicking the texture of hanging fur or fabric.
Bleeding Troubles?
If the eye black bleeds into the blue, the blue paint wasn’t 100% dry. Let it dry completely, then fix the smudge with opaque white gouache or a white paint pen.
Step 3: Final Details
-
Outline the eyes:
Once the blue face paint is completely bone dry, use a black fine liner or a very thin brush with black paint to outline the large white eye circles. -
Add pupils:
Paint two large black circles inside the eyes. Leave a tiny speck of white paper showing in each pupil for a highlight, which gives the monster a lively expression. -
Enhance the smile:
Go back over your mouth line with black to make it crisp and bold, ensuring the smile really pops against the blue fur. -
Add texture strokes:
Use a darker shade of blue and a dry brush technique to add a few more fur details inside the face area for depth. -
Review and dry:
Check for any uneven edges or spots that need more color intensity. Let the entire painting sit flat until fully dry to prevent the wet stripes from running.
Make It Glossy
After the painting is completely dry, add a drop of clear glue or 3D dimensional paint over the pupils. It creates a realistic, shiny glass-eye effect!
Now you have a brilliantly colorful monster friend ready to brighten up your wall
Black Glue Resist “Stained Glass”
This vibrant project mimics the glowing look of stained glass using a simple resist technique. By outlining a design with black glue and filling it in with watercolors, you create bold, high-contrast art that pops off the page.
Detailed Instructions
Materials
- Heavy watercolor paper or cardstock
- Pencil
- Black school glue (or white glue mixed with black acrylic paint)
- Watercolor paint set
- Paintbrushes (small and medium)
- Cup of water
- Paper towels
Step 1: Creating the Black Glue Outline
-
Sketch the design:
Start by lightly sketching a large butterfly on your watercolor paper with a pencil. Draw a central body and two large wings on each side, making sure the shapes are big enough to paint inside later. -
Add wing details:
Draw geometric shapes inside the wings to create the ‘stained glass’ segments. Think of teardrops, circles, and elongated ovals that fit neatly within the wing borders. -
Prepare the black glue:
If you don’t have pre-made black glue, mix a generous squeeze of black acrylic paint into a nearly full bottle of white school glue. Shake it vigorously until the color is solid black. -
Test the flow:
Before applying it to your art, squeeze a line of glue onto a scrap piece of paper. Ensure the flow is smooth and consistent to avoid globs. -
Trace the main outlines:
Carefully trace over your pencil lines with the black glue. Hold the bottle nozzle close to the paper and move at a steady pace to create distinct, raised lines. -
Fill the body:
For the butterfly’s body and head, you can fill in the entire shape with the black glue to make it solid and bold. -
Add decorative dots:
Squeeze tiny dots of glue along the outer edges of the wings or in empty spaces for extra texture and detail. -
Let it dry completely:
Place the artwork on a flat surface and let it dry undisturbed. This is crucial—it usually takes several hours or overnight for the raised glue lines to harden perfectly.
Fixing Glue Smudges
If the black glue smears while tracing, don’t wipe it! Let it dry completely, then carefully scrape the mistake off with a craft knife or paint over it later with white acrylic.
Step 2: Painting the Glass Effect
-
Prepare your paints:
Wet your watercolor paints to get them ready. For this project, vibrant, saturated colors work best to simulate light shining through glass. -
Start with the top wings:
Choose a bright color like teal or blue. Dip your brush and fill in one of the segments on the upper wing. The black glue acts as a wall, keeping the paint contained. -
Create gradients:
To add depth, paint one end of a segment with a darker shade (like purple) and the other with a lighter shade (like pink), letting them blend in the middle while wet. -
Move to the warm tones:
Select warm colors like orange, red, or yellow for other segments. High contrast between adjacent sections makes the stained glass effect stronger. -
Paint the small dots:
Use a very fine brush to dab bright colors into the small circular details on the wing tips. Neon or metallic watercolors look fantastic here. -
Fill remaining spaces:
Continue filling in every white space inside the butterfly. It helps to work from the center outward to avoid dragging your hand through wet paint. -
Check for gaps:
Inspect your work for any white spots near the black lines. Gently push the wet paint right up to the raised glue border for a clean finish. -
Final dry:
Allow the watercolor paint to dry completely. The paper might buckle slightly due to the water, which is normal, but heavy paper minimizes this.
Make it Shimmer
Once the watercolors are dry, brush a thin layer of glitter glue or clear iridescent medium over the colored sections to make the wings sparkle like real glass.
Display your colorful butterfly in a sunny window to let the colors shine
Giant Collaborative Story Mural
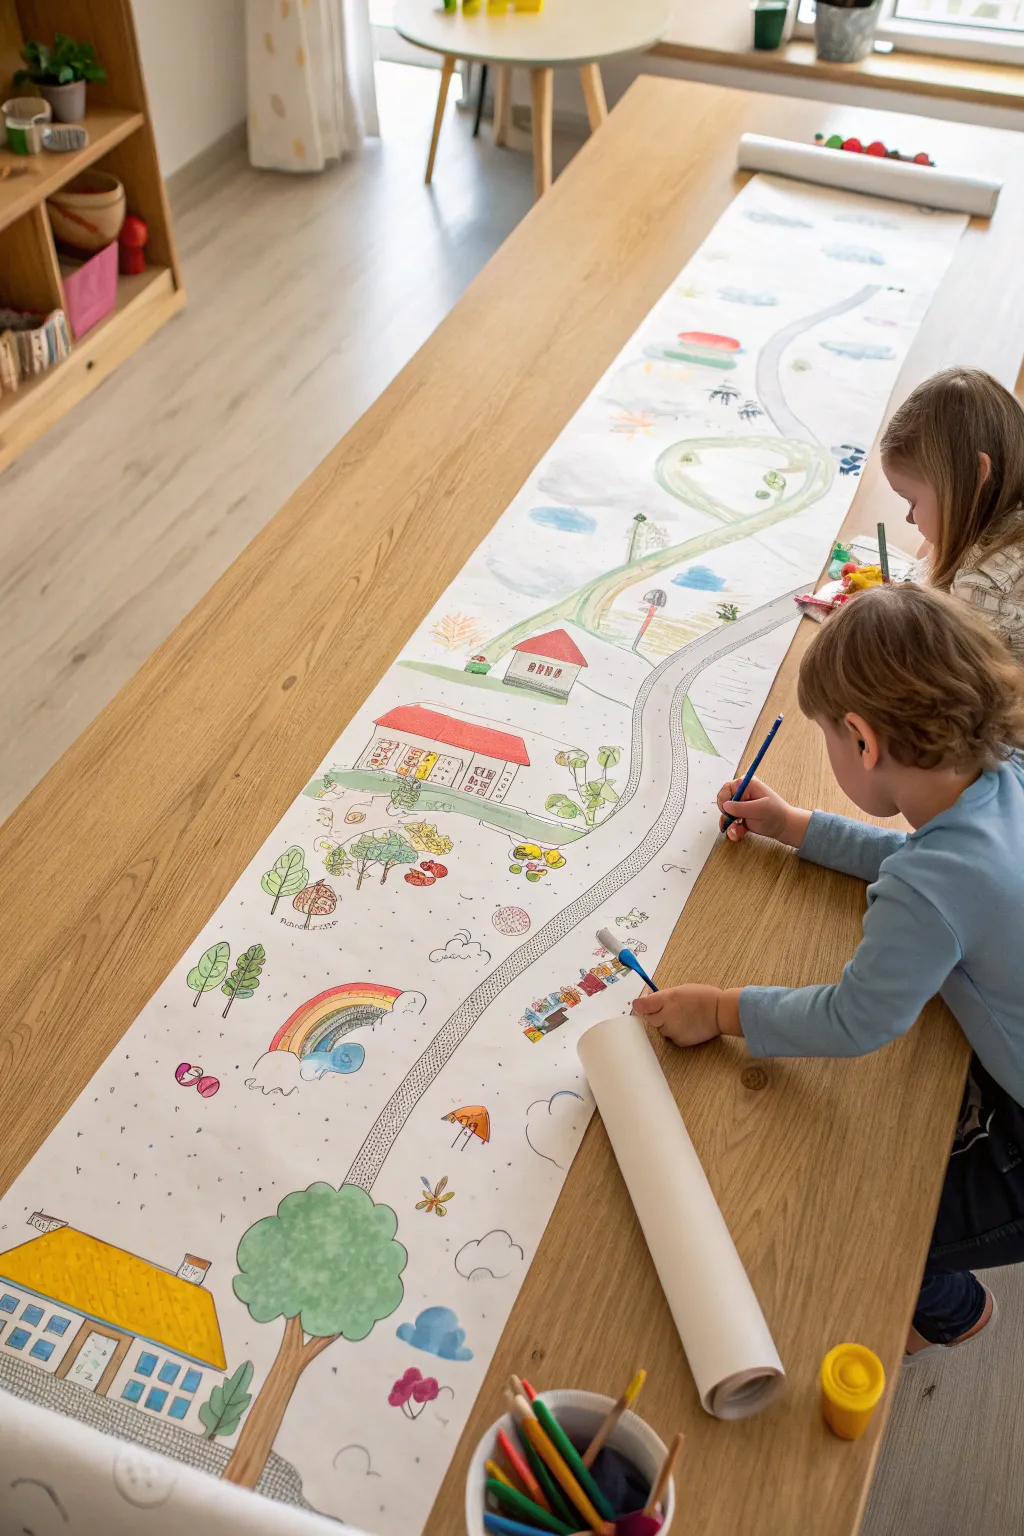
Transform a simple roll of paper into an expansive, imaginative world where roads wander past houses, rainbows, and forests. This collaborative project allows multiple artists to work side-by-side, connecting their individual ideas into one cohesive, sprawling village scene.
Step-by-Step Tutorial
Materials
- Large roll of white craft paper or easel paper (18-24 inches wide)
- Pencil for sketching
- Colored pencils (assorted colors including greens, greys, and reds)
- Fine-tip markers or black fineliners for outlining
- Small container of water (if using watercolor pencils or paints)
- Small round paintbrushes
- Masking tape or painter’s tape to secure the paper
- Optional: Crayons or watercolors
Step 1: Setting the Stage
-
Prepare the workspace:
Clear a long dining table or a large section of floor space. Unroll a generous length of your paper roll—aim for 4 to 6 feet to give everyone plenty of room. -
Secure the canvas:
Use small pieces of masking tape at the corners and along the edges to stick the paper directly to the table surface. This prevents the paper from curling back or sliding around while little hands are working. -
Establish the main artery:
Using a light pencil, draw a single, continuous road that winds from one end of the paper to the other. Make it meander with curves, loops, and hills rather than drawing a straight line. -
Add road details:
Go back over your road lines with a grey colored pencil or marker. Draw parallel lines to create the width of the street, and add dashed lines down the center to mimic real pavement markings.
Paper Curling Up?
If the rolled paper keeps springing back despite the tape, roll it backward (counter-curl) gentle briefly before taping it down to break the memory of the curve.
Step 2: Building the Village
-
Sketch large structures:
Encourage the artists to pick spots along the road to place major landmarks. Sketch out the basic shapes of houses, barns, or schools using a pencil first to get the proportions right. -
Outline the buildings:
Trace over the pencil sketches with black fineliners or dark markers. I find this step crucial because it gives the scene a storybook illustration style and makes coloring easier later. -
Color the architecture:
Fill in the roofs with vibrant reds, yellows, or oranges using colored pencils. For the walls, leave them white for a clean look or shade them lightly with contrasting colors. -
Add windows and doors:
Don’t forget the architectural details. Draw grid lines for window panes and add little rectangles for doors using a fine blue or black marker.
Creative Connection
Challenge the artists to connect their sections. Ask questions like ‘Where does this road lead?’ or ‘Who lives in that house?’ to spark shared storytelling as they draw.
Step 3: Adding Nature and Whimsy
-
Plant forests and trees:
In the empty spaces between the road loops, draw clusters of trees. Use varied shapes—some round and fluffy like oaks, others tall and pointy like pines. -
Shade the greenery:
Color in the tree canopies with different shades of green colored pencils to create depth. Add brown trunks connecting them to the ground. -
Create weather elements:
Look for open sky areas above the horizon line or road. Draw fluffy clouds, a bright sun, or a multi-colored rainbow arcing over the town. -
Incorporate small details:
Sprinkle in tiny fun elements like mushrooms, flowers, or small patches of grass near the roadside. These little touches make the map fun to explore up close.
Step 4: Final Touches
-
Draw vehicles and travelers:
Add life to the road by drawing cars, trucks, or buses traveling along the path. You can also add tiny stick figures or animals walking near the houses. -
Enhance texturing:
Use a technique called stippling (lots of little dots) in the sky or grass areas to add texture without needing to color the entire background solid. -
Review and refine:
Stand back and look for any large empty white spaces that feel unbalanced. Add a wandering bird, a kite, or a second smaller path to fill these gaps. -
Sign the masterpiece:
Have every artist find a spot to sign their name or initials, perhaps hidden in the grass or on a building sign, to mark their contribution.
Now you have a sprawling panoramic story ready to be hung on a hallway wall


Have a question or want to share your own experience? I'd love to hear from you in the comments below!