Painted kitchen cabinets are basically a blank canvas—one color choice can shift your whole kitchen from builder-basic to totally personal. Let’s talk realistic, beautiful ways to use non-white paint colors, smart contrast, and finishes that hold up to real life.
Classic Two-Tone Uppers and Lowers
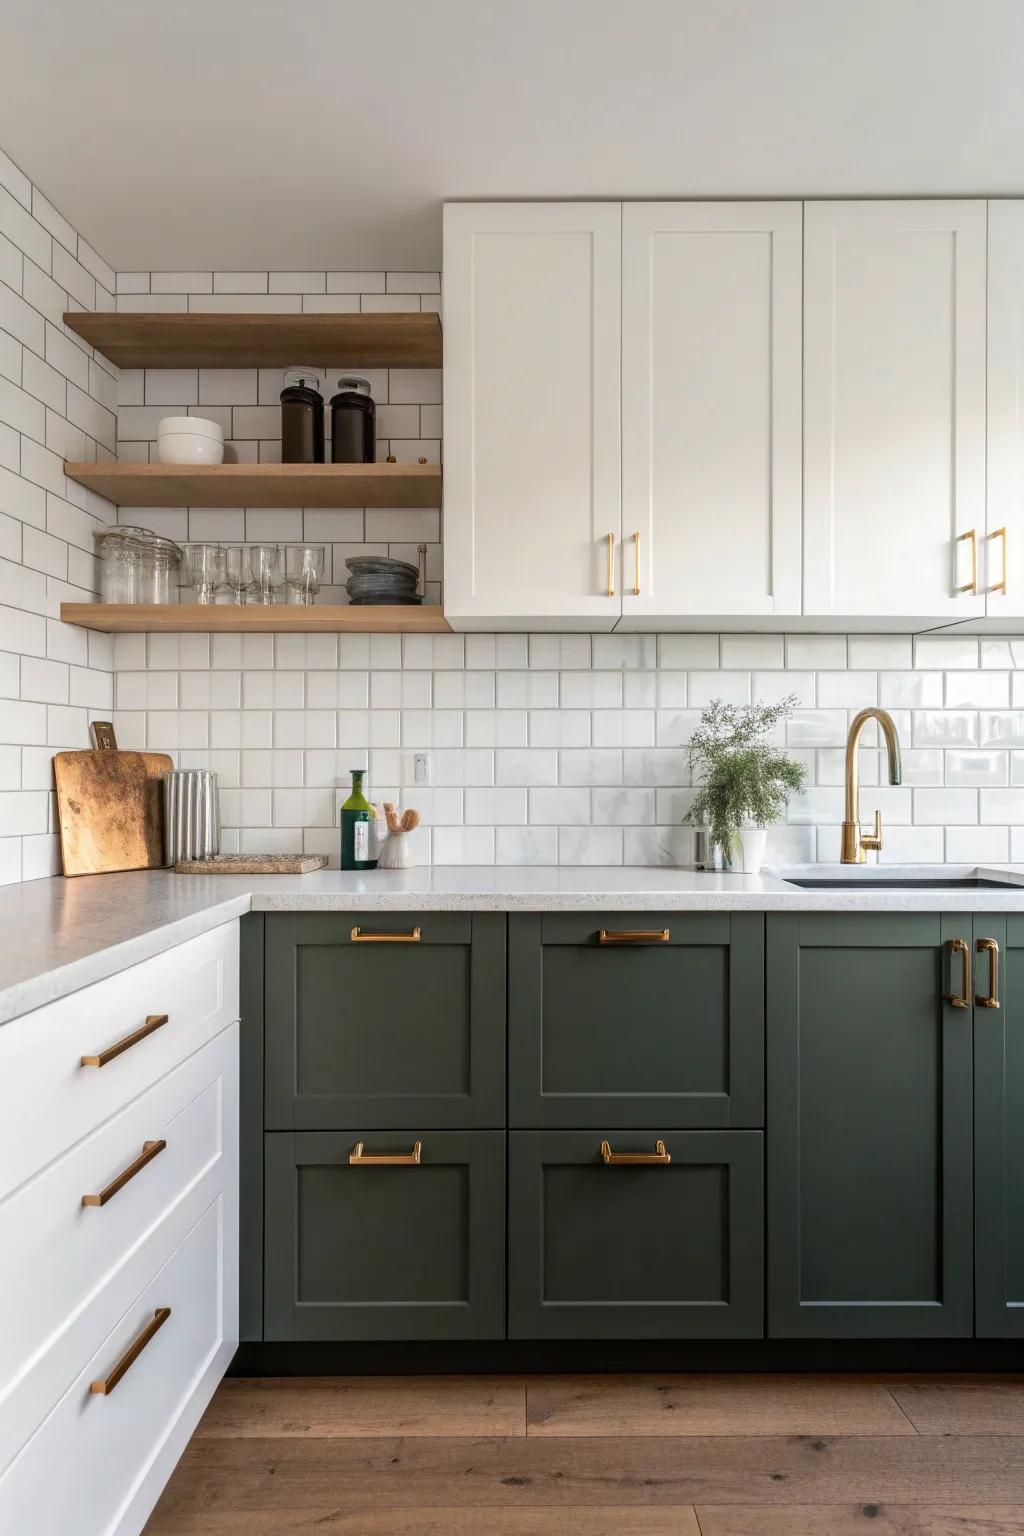
Recreate this sophisticated two-tone kitchen look by painting your existing cabinetry with a deep forest green on the bottom and a crisp, clean white on top. This project transforms a standard builder-grade layout into a custom, designer-inspired space using the power of paint and hardware.
Step-by-Step
Materials
- TSP substitute degreaser
- Medium and fine grit sandpaper (120 and 220 grit)
- High-quality bonding primer (oil-based or shellac-based)
- Cabinet-grade enamel paint (White: BM Simply White or similar)
- Cabinet-grade enamel paint (Green: BM Salamander or similar)
- 4-inch foam rollers and roller handle
- 2-inch angled sash brush (synthetic bristle)
- Painter’s tape
- Drop cloths
- New brass cabinet pulls and knobs
- Screwdriver or drill
Step 1: Preparation & Demolition
-
Remove Hardware:
Start by removing all cabinet doors and drawer fronts using your screwdriver or drill. Take off all existing hinges, knobs, and pulls. Place the hardware in labelled bags if you plan to reuse the hinges, noting which door they belong to. -
Clean Thoroughly:
Scrub every inch of the cabinet boxes, doors, and drawer fronts with a TSP substitute degreaser. Kitchen cabinets accumulate invisible grease layers that will repel paint, so be extremely diligent here. -
Sand Surfaces:
Lightly scuff sand all surfaces with 120-grit sandpaper. You don’t need to remove the old finish entirely, just dull the shine to give the primer something to grip. Wipe away all dust with a tack cloth or damp rag. -
Protect the Area:
Apply painter’s tape along the walls, ceiling, backsplash, and floor where they meet the cabinets. Lay down drop cloths to protect your flooring and countertops.
Step 2: Priming & Painting
-
Apply Primer:
Roll or brush a coat of high-quality bonding primer onto all surfaces. If you have dark cabinets currently, you might need two coats. I like to let this dry overnight to ensure maximum adhesion. -
Sand Primer:
Once dry, lightly sand the primed surfaces with 220-grit sandpaper until they feel smooth to the touch. This step is crucial for that professional, factory-finish look. Wipe away dust again. -
Paint Uppers White:
Start with the upper cabinets. Use an angled brush to cut in corners and detailed areas of the doors and face frames. Then, use a foam roller to apply the white enamel to the flat surfaces for a smooth texture. -
Apply Second Coat:
Allow the first coat of white to dry according to the can’s instructions (usually 4-6 hours). Lightly sand with fine grit paper if needed, then apply a second coat for full, opaque coverage. -
Paint Lowers Green:
Move on to the lower cabinets. Stir your deep forest green paint thoroughly. Repeat the process: cut in with a brush around edges and recessed panels, then roll the flat surfaces. -
Finish Lowers:
Apply a second (and potentially third, given the dark pigment) coat of green paint, allowing proper drying time between each layer. Dark colors can sometimes require an extra coat for true depth. -
Cure Time:
This is the hardest part—waiting. Let the paint cure for at least 24-48 hours before re-hanging doors. The paint won’t be fully hard for a few weeks, so be gentle.
Sticky Doors?
If painted doors stick to the frame, apply small clear bumper pads to the corners. This creates a tiny gap for airflow and prevents paint from fusing.
Step 3: Reassembly & Styling
-
Reinstall Doors:
Carefully reattach the hinges to the cabinet boxes and then mount the doors. Slide the drawers back onto their tracks. Adjust hinges as necessary to ensure doors hang straight. -
Install New Hardware:
Measure and drill holes for your new brass pulls if the spacing differs from your old hardware. Screw in the new gold handles and knobs to pop against both the white and green paint. -
Style Shelves:
If you have open shelving like the image, arrange clear glassware and white ceramics to echo the clean upper cabinets. -
Final Touches:
Remove the painter’s tape slowly at a 45-degree angle. Replace any outlet covers and give the countertops a final wipe down.
Level Up: Wood Accents
Add warmth by swapping a melamine shelf for a thick white oak floating shelf. Use a penetrating oil finish to protect it while keeping the natural look.
Enjoy your beautifully modernized kitchen with its striking color contrast and fresh new look


Navy Cabinets With Crisp Contrast
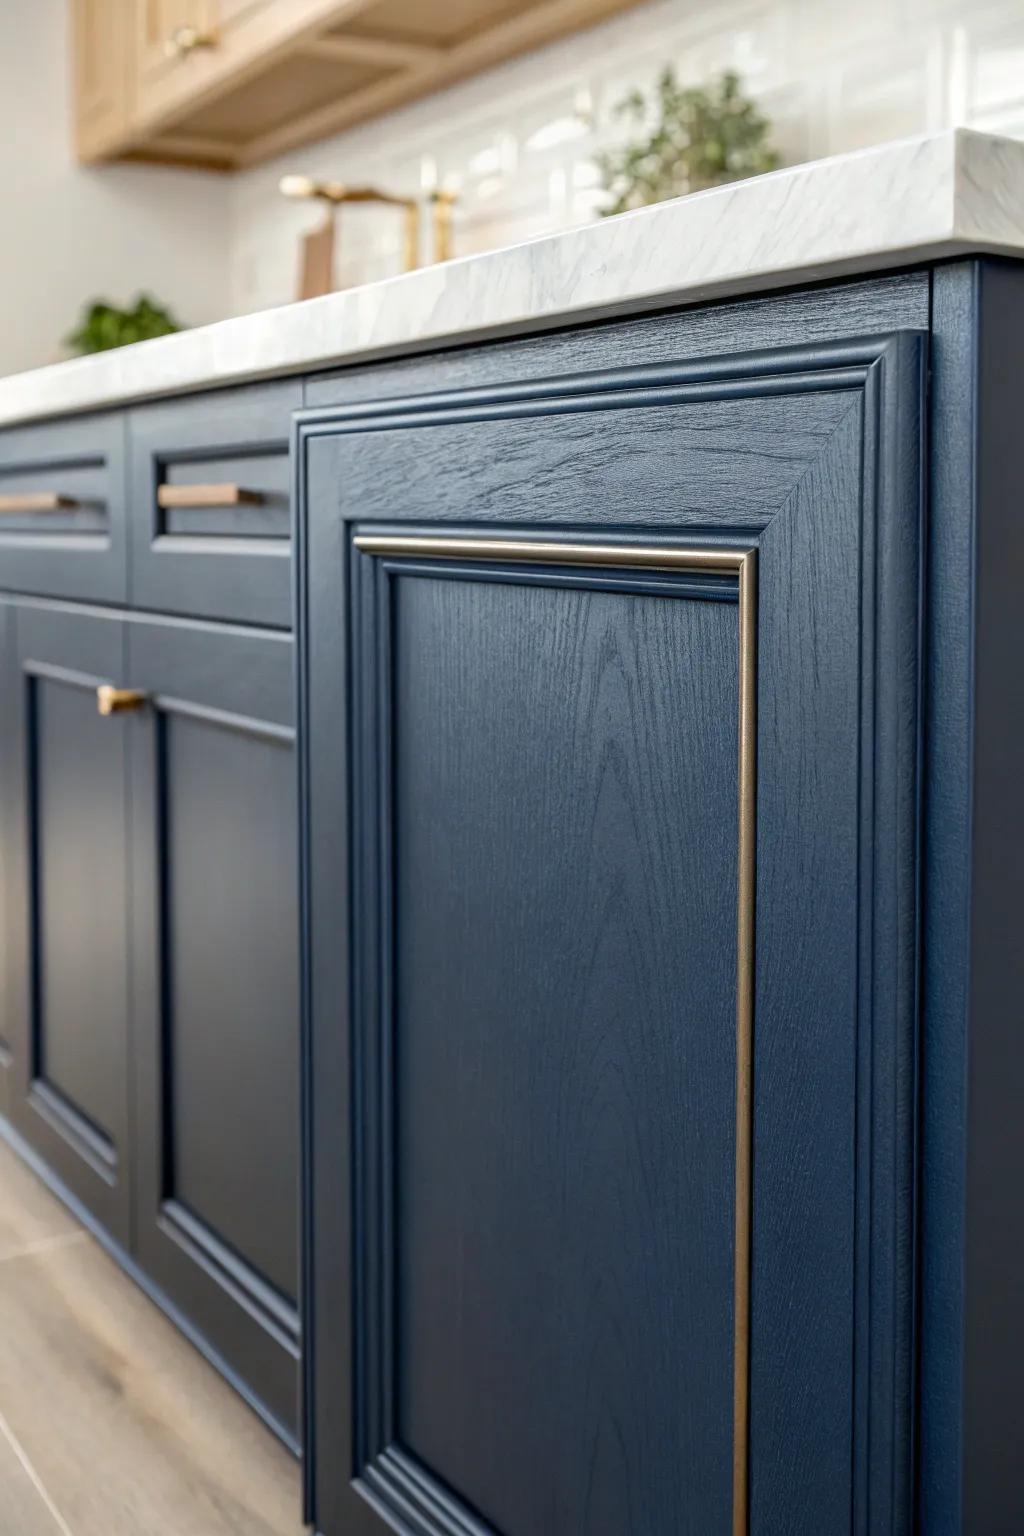
Transform standard oak or textured wood cabinets into a sophisticated statement piece by combining deep navy paint with exposed grain texture and metallic detailing. This project creates a high-end, custom look that balances modern color with traditional warmth and tactile appeal.
Step-by-Step Tutorial
Materials
- Solid wood cabinet doors (oak works best for grain)
- Deep navy blue mineral or chalk paint
- High-adhesion primer (oil-based recommended for oak)
- Metallic antique brass gilding wax or paint pen
- Fine-grit sandpaper (220) and medium-grit (120)
- Wire brush (brass or stiff nylon)
- Tack cloth and TSP cleaner
- High-quality synthetic angle brush
- Small artist detail brush
- Matte or satin polyurethane topcoat
- Painter’s tape
Step 1: Preparation & Texture Enhancement
-
Remove hardware and clean:
Begin by removing all doors, drawers, and hardware. Lay the doors flat on a stable work surface. scrub every inch thoroughly with TSP or a degreaser to remove years of kitchen grease, which is critical for paint adhesion. -
Highlight the grain:
Since we want the wood grain to remain visible through the paint, take a wire brush and run it firmly along the direction of the grain. This opens up the pores without scratching the surface too deeply. -
Scuff sand:
Lightly sand the entire surface with 120-grit sandpaper to knock down the previous finish. You aren’t trying to strip it to bare wood, just giving the primer something to grip. -
Clear the dust:
Use a vacuum with a brush attachment to pull dust out of the open grain, then follow up with a tack cloth to ensure a perfectly clean surface. -
Prime strategically:
Apply a thin coat of oil-based primer. I find that using a slightly thinned primer helps it sink into the grain rather than filling it in, preserving that beautiful texture we want to see later.
Grain-Saving Pro Tip
Avoid thick ‘cabinet enamel’ paints if you want this specific look. They self-level too much and fill the grain. Stick to thinner chalk or mineral paints to keep that texture visible.
Step 2: Painting the Navy Finish
-
First coat application:
Stir your navy blue mineral paint thoroughly. Apply the first coat using a synthetic angle brush, brushing exclusively in the direction of the wood grain to enhance the linear texture. -
Watch the crevices:
Pay special attention to the corners of the recessed panels. Use the brush tip to push paint into these areas, but immediately smooth out any pooling to avoid drips. -
Dry and lightly sand:
Let the first coat dry completely (usually 2-4 hours). Run a 220-grit sanding sponge very lightly over the surface to smooth any raised fibers, then wipe clean. -
Second coat coverage:
Apply the second coat of navy paint. This coat should provide full opacity. If you are using a lighter coverage paint, a third thin coat might be necessary to get that rich, deep indigo color. -
Final cure time:
Allow the paint to cure for at least 24 hours before moving on to the detailing work. The paint needs to be hard enough to withstand the taping process.
Step 3: Adding the Brass Accent
-
Tape the molding line:
Identify the inner molding ridge where you want the gold accent. Apply painter’s tape precisely along both sides of this ridge, pressing down firmly to prevent bleed-under. -
Apply the metallic finish:
Using a small artist brush or a metallic paint pen, carefully fill in the exposed ridge with antique brass gilding wax or metallic paint. Several thin passes are better than one thick glob. -
Remove tape immediately:
Peel back the painter’s tape while the metallic paint is still slightly wet. Pulling at a 45-degree angle away from the line ensures a crisp, clean edge. -
Clean up edges:
If any gold seeped out, use a tiny brush with a bit of the navy paint to touch up the edges once the gold is fully dry. -
Seal the cabinet:
Protect your work with two coats of matte or satin polyurethane. A sprayer offers the smoothest finish, but a high-quality foam roller works well for flat surfaces if you work quickly. -
Reassemble:
Once the topcoat has cured for at least 48 hours, reinstall your hardware and hang the doors back up to reveal your stunning new kitchen look.
Level Up: Hardware Match
Rub a tiny amount of the same gilding wax you used on the trim onto your metal cabinet pulls. This creates a custom, perfectly coordinated hardware finish that ties the whole look together.
Enjoy the sophisticated atmosphere your new navy cabinets bring to the heart of your home


Sage Green for a Soft, Natural Look
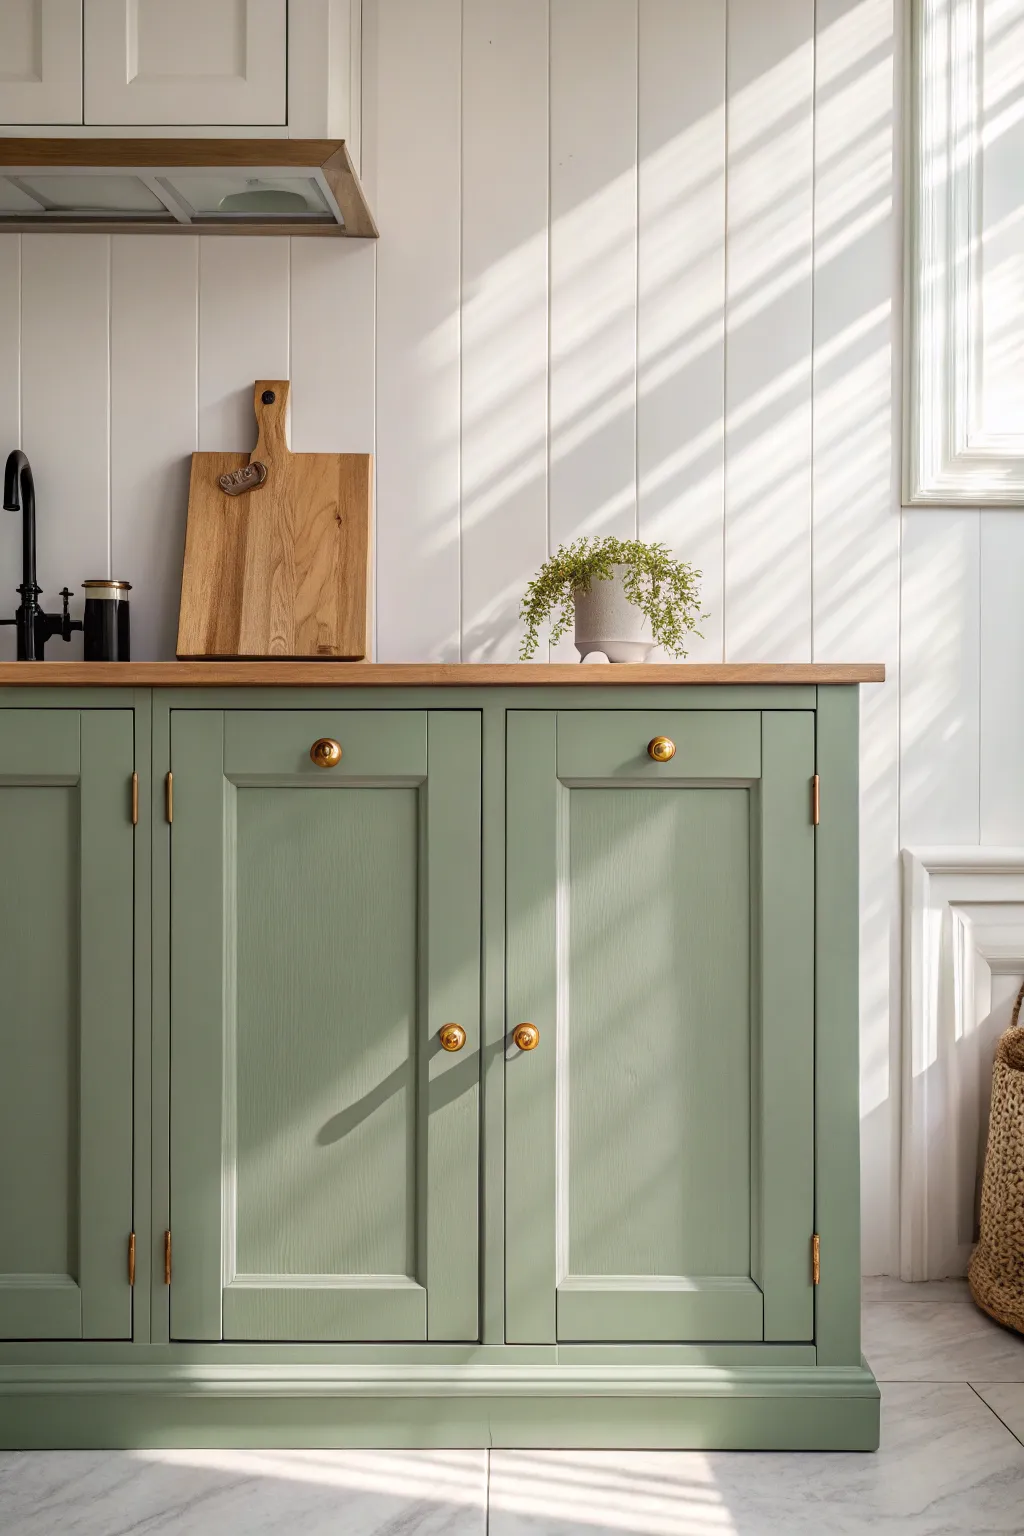
Transform your kitchen with the calming elegance of sage green cabinetry, a color that brings the outdoors in while maintaining a sophisticated feel. This project focuses on achieving that smooth, factory-like finish on shaker-style doors, complete with classic brass hardware.
Step-by-Step Guide
Materials
- Sage green cabinet paint (semi-gloss or satin enamel)
- High-quality adhesion primer
- Degreaser or TSP substitute
- 120-grit and 220-grit sandpaper
- Tack cloth
- Painter’s tape
- Liquid sandpaper or deglosser (optional)
- Small foam roller
- 2-inch angled sash brush (synthetic bristles)
- Brass knobs or pulls
- Screwdriver or drill
- Drop cloths
- Wood filler (if filling old hardware holes)
Step 1: Preparation
-
Remove Hardware and Doors:
Start by removing all cabinet doors, drawers, and existing hardware. Label each door and its corresponding opening with a piece of painter’s tape to ensure they go back in the exact same spot later. -
Clean Thoroughly:
Scrub all surfaces with a heavy-duty degreaser or TSP substitute. Kitchen cabinets accumulate invisible grease oils that will ruin your paint job if not removed completely. -
Fill Imperfections:
If you are changing the size of your handles or notice any dings, use wood filler to patch the holes. Overfill slightly, as the filler shrinks when drying. -
Initial Sanding:
Once the filler is dry, sand all surfaces with 120-grit sandpaper. You don’t need to strip the old finish entirely, but you must scuff it up enough so the new primer has something to bite into. -
Dust Removal:
Vacuum up the sanding dust, then wipe everything down with a tack cloth. Even tiny specks of dust will show through your final finish. -
Protect Surroundings:
Tape off the walls, floor, and countertops near the cabinet frame. Lay down drop cloths to protect your kitchen flooring from inevitable drips.
Keep it Floating
Prop cabinet doors up on small painter’s pyramids or even soup cans while painting. This allows you to paint the edges without them sticking to your drop cloth.
Step 2: Priming and Sanding
-
Apply Primer:
Using your angled brush for corners and the foam roller for flat areas, apply a coat of high-quality adhesion primer. Don’t worry if it looks streaky; coverage isn’t the goal here, adhesion is. -
Intermediate Sanding:
After the primer is fully dry (check the can for times), lightly sand the surfaces with fine 220-grit sandpaper to smooth out any brush strokes or raised grain. -
Second Cleaning:
Wipe away the fine white primer dust with a fresh tack cloth. This step is crucial for that super-smooth, professional look.
Step 3: Painting
-
Paint the recessed areas:
Dip your angled brush into the sage green paint and tackle the recessed panels and corners of the shaker doors first. I prefer to work the paint into the heavy corners and then pull the brush out to smooth it. -
Roll the flat surfaces:
While the brushed edges are still wet, use the foam roller to paint the flat center panel and the outer frame stiles and rails. This helps blend the brush marks into the roller texture. -
Paint the Cabinet Frame:
Repeat the brush-and-roll method on the cabinet boxes that are still attached to the wall, being careful near the floor and countertops. -
Allow to Cure:
Let the first coat dry completely. Resist the urge to touch it, as enamel paints can remain tacky for several hours. -
Apply Second Coat:
Apply a second coat using the same technique. This coat provides the true color depth and durability needed for a kitchen environment. -
Optional Third Coat:
Depending on the opacity of your specific sage green, a third light coat might be necessary for perfect coverage, though two is usually sufficient.
Sticky Situation?
If doors are sticking to the frame after re-hanging, apply small clear bumpers to the inside corners. The paint needs more cure time and shouldn’t touch directly yet.
Step 4: Reassembly
-
Cure Time:
Wait at least 24 to 48 hours before reattaching doors. Even if it feels dry, the paint is soft and easily dented at this stage. -
Install Hardware:
Attach your new brass knobs or pulls. Since you labeled your doors, matching them back to the correct hinges should be easy. -
Rehang Doors:
Carefully screw the hinges back onto the cabinet frame, adjusting the screws as needed to ensure the doors hang straight and level.
Enjoy the fresh, organic atmosphere your new sage green cabinets bring to the heart of your home


Moody Forest Green Drama
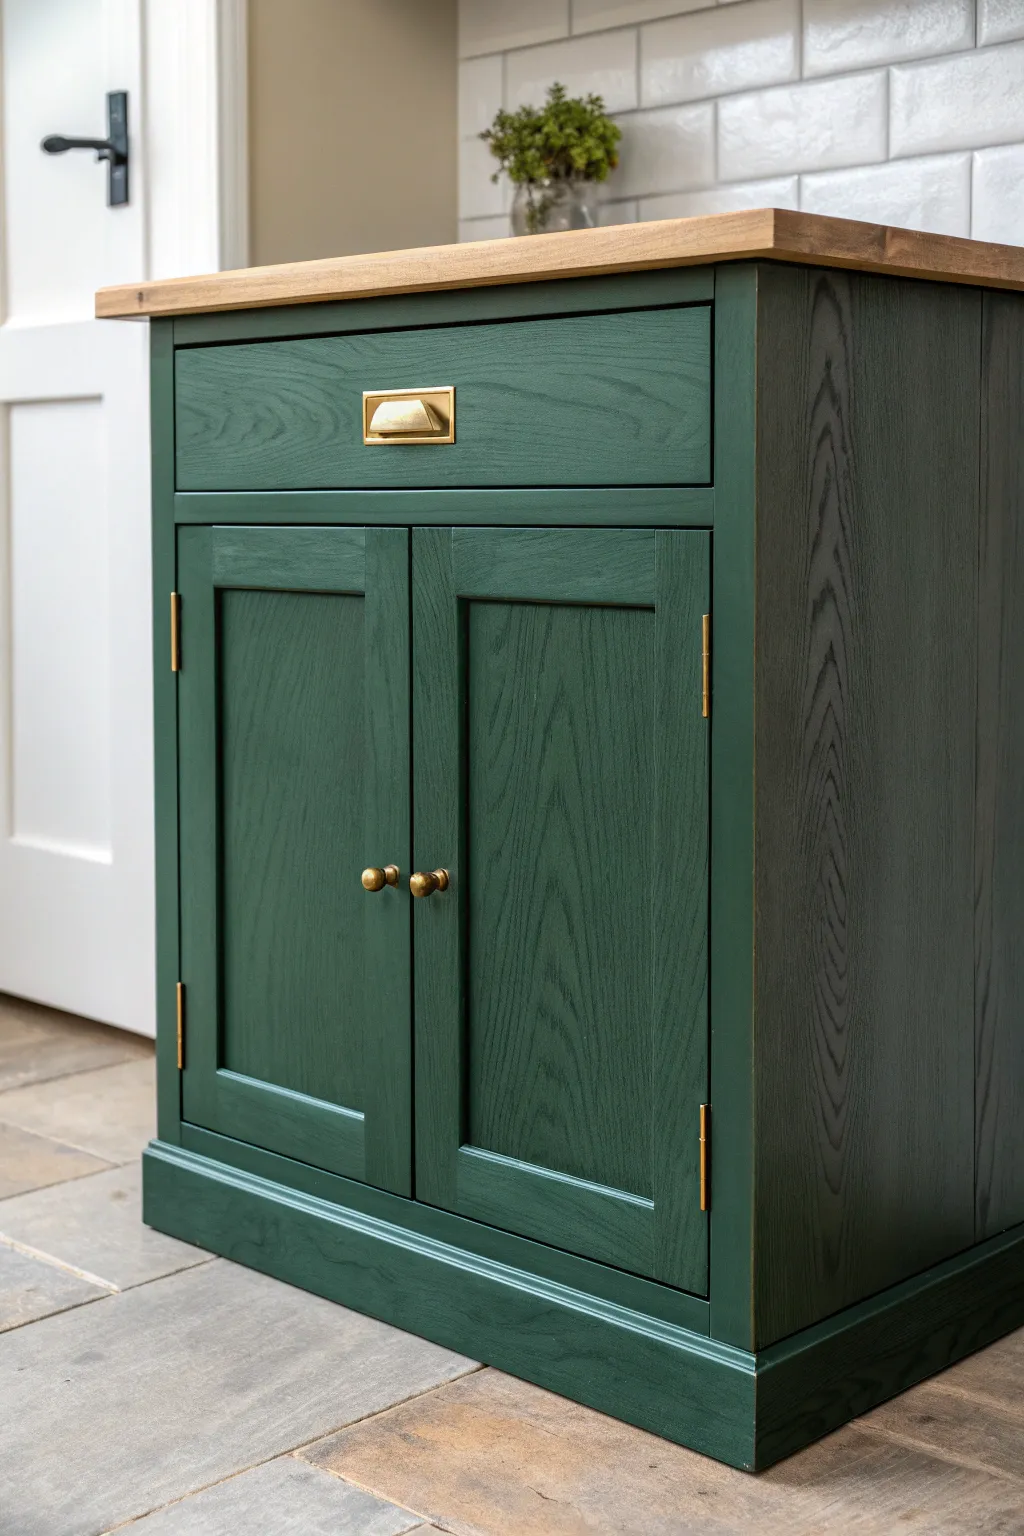
Bring sophisticated drama to your kitchen with this deep, moody forest green cabinet update that beautifully highlights the natural wood grain. This project transforms a standard oak unit into a bespoke furniture piece using specialized primers and a rich, durable satin finish.
Step-by-Step Tutorial
Materials
- Unfinished or stripped oak cabinet
- Degreaser or sugar soap
- 120 and 220 grit sandpaper
- Tack cloths
- Adhesion primer (tintable)
- Forest green satin cabinet paint
- Brass cup pull handle
- Two small brass knobs
- Four brass butt hinges
- Butcher block oil or stain
- 2-inch angled sash brush
- 4-inch foam roller
- Screwdriver and drill
- Painter’s tape
Step 1: Preparation & Sanding
-
Remove hardware and doors:
Begin by unscrewing all existing hinges, handles, and knobs. Label the doors and their corresponding openings with painter’s tape to ensure they go back in the exact same spot later. -
Clean surfaces thoroughly:
Scrub the entire cabinet with a strong degreaser or sugar soap solution to remove any kitchen oils, wax, or dust. This step is critical for paint adhesion. -
Sand the wood:
Using 120-grit sandpaper, sanding with the grain, scuff the entire surface. You want to break any previous finish without removing the deep texture of the oak grain itself. -
Refine the surface:
Follow up with a quick pass of 220-grit sandpaper to smooth out any rough patches caused by the coarser paper. Wipe everything down with a tack cloth to remove every speck of dust. -
Protect the top:
If you are keeping the existing butcher block top natural, apply painter’s tape precisely along the underside edge where the wood top meets the cabinet frame.
Step 2: Priming & Painting
-
Apply primer:
Using a high-quality bonding primer, coat the frame, drawers, and doors. I find using a tinted grey primer helps the dark green cover better later on. -
Sand the primer:
Once the primer is fully dry, lightly sand with 220-grit paper to knock down any raised grain or brush marks, then tack cloth it clean again. -
Cut in the edges:
Start your first coat of forest green paint by using the angled sash brush to hit the corners, recessed panels, and detailed molding areas. -
Roll the flat surfaces:
While the cut-in paint is still wet, use the foam roller to apply paint to the larger flat areas like the side panels and door centers for a smooth, streak-free finish. -
Let dry and assess:
Allow the first coat to dry according to the manufacturer’s instructions (usually 4-6 hours). Don’t worry if it looks patchy; dark colors often need multiple coats. -
Apply second coat:
Repeat the cutting-in and rolling process. This second coat should provide full opacity and richness. -
Inspect the grain:
Check your work. The goal is to see the texture of the oak grain through the paint, so ensure paint isn’t pooling in the crevices of the wood.
Sticky Drawer?
If paint buildup makes the drawer stick, sand the unpainted sides of the drawer box and rub a plain candle or beeswax along the runners for smooth gliding.
Step 3: Finishing Touches
-
Treat the butcher block:
If the top is unfinished, apply a food-safe butcher block oil or conditioner using a clean rag, wiping away excess after it soaks in. -
Install hinges:
Carefully screw the brass butt hinges back onto the cabinet frame and doors. Ensuring they are level is key for the inset doors to close properly. -
Attach the drawer pull:
Center your brass cup pull on the drawer front. Mark the holes, drill pilots if necessary, and secure it tightly. -
Add door knobs:
Drill holes for the small brass knobs on the cabinet doors, ensuring they are perfectly aligned horizontally with each other. -
Final reassembly:
Slide the drawer back in and hang the doors. Adjust the hinges if the gaps around the doors look uneven.
Level Up: Interior Pop
For a surprise element, paint the interior of the cabinet in a contrasting pale pink or line the shelves with a vintage floral wallpaper.
Enjoy the timeless elegance your new custom-colored cabinet brings to the space
BRUSH GUIDE
The Right Brush for Every Stroke
From clean lines to bold texture — master brush choice, stroke control, and essential techniques.
Explore the Full Guide
Charcoal Gray for Modern Depth
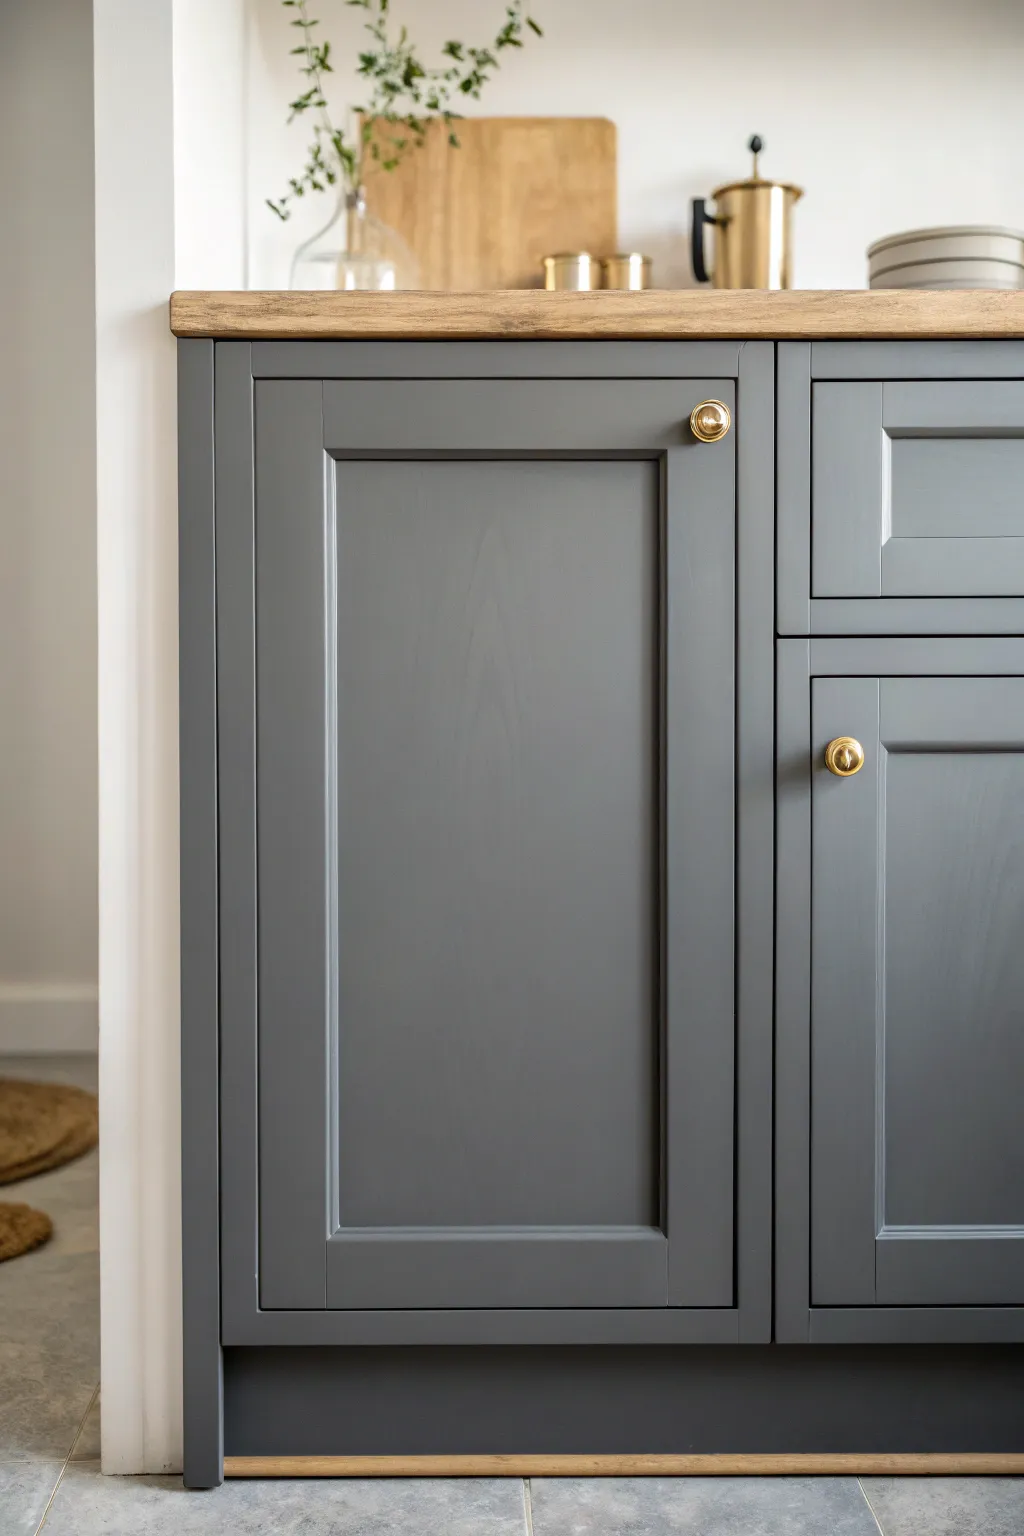
Achieve a sophisticated, modern look by refreshing your kitchen cabinets with a deep charcoal gray finish. This project focuses on achieving a smooth, professional-grade surface that pairs beautifully with brass hardware and natural wood accents.
Step-by-Step Guide
Materials
- Cabinet doors and drawers (removed)
- Degreaser or TSP alternative
- Medium-grit sandpaper (120-grit)
- Fine-grit sandpaper (220-grit)
- Wood filler (if repairing old holes)
- High-quality bonding primer
- Interior semi-gloss or satin enamel paint (Charcoal Gray)
- Angled sash brush (2-inch)
- Mini foam roller or microfiber roller suitable for cabinets
- Painter’s tape
- Tack cloth
- Gold or Brushed Brass knobs
- Screwdriver or drill
Step 1: Preparation & Cleaning
-
Remove hardware:
Begin by removing all cabinet doors, drawers, and existing hardware. Place the screws and hinges in labeled bags so you don’t lose track of them later. -
Deep clean surfaces:
Scrub the doors and cabinet frames thoroughly with a degreaser or TSP alternative. Kitchen cabinets often have invisible grease buildup that will prevent paint from sticking, so be diligent here. -
Fill imperfections:
Inspect the wood for deep scratches or old hardware holes you want to move. Apply wood filler, let it dry completely, and sand it flush with the surface. -
Sand for adhesion:
Scuff sand all surfaces using 120-grit sandpaper. You aren’t trying to strip the old finish entirely, just creating a ‘tooth’ for the primer to grab onto. -
Remove dust:
Vacuum up the sanding dust, then wipe every piece down with a tack cloth to ensure a perfectly clean surface.
Step 2: Priming
-
Apply painter’s tape:
Protect walls, countertops, and floors around the cabinet frames with painter’s tape. -
Prime the details:
Using your angled sash brush, apply a coat of high-quality bonding primer to the recessed panels, corners, and edges first. -
Prime flat surfaces:
Follow up immediately with the foam roller on the flat panels and rails to smooth out the brush strokes. Let the primer dry according to the manufacturer’s instructions. -
Light sanding:
Once the primer is fully cured, lightly sand everything with 220-grit sandpaper to knock down any bumps. Wipe away the dust with a fresh tack cloth.
Paint Choice Matters
Use a self-leveling cabinet enamel rather than standard wall paint. It dries harder and eliminates brush strokes for a pro finish.
Step 3: Painting & Reassembly
-
Paint the first coat:
Stir your charcoal gray enamel thoroughly. Just like with priming, I prefer to brush the recessed crevices first, feathering out any pooling paint in the corners. -
Roll the finish:
Immediately roll the flat surfaces while the brushed areas are still wet to blend the textures. Apply thin, even coats to avoid drips. -
Allow to dry:
Let this first coat dry completely. Dark colors often require longer drying times to avoid tackiness, so overnight is often best. -
Sand between coats:
Very lightly sand with 220-grit paper to remove any dust nibs. This step is crucial for that factory-smooth feel. -
Apply second coat:
Repeat the painting process for a second coat, ensuring full coverage and depth of color. Check for any missed spots under good lighting. -
Install hardware:
Once the paint has cured for at least 24-48 hours (or longer if possible), carefully reattach the hinges and hang the doors. Install your new brass knobs to complete the modern look.
Visible Brush Strokes?
If you see streaks, your paint is drying too fast. Add a paint conditioner like Floetrol to extend the drying time and improve flow.
Enjoy the dramatic and elegant update to your kitchen space with your freshly painted cabinets
Warm Greige as a Not-White Neutral
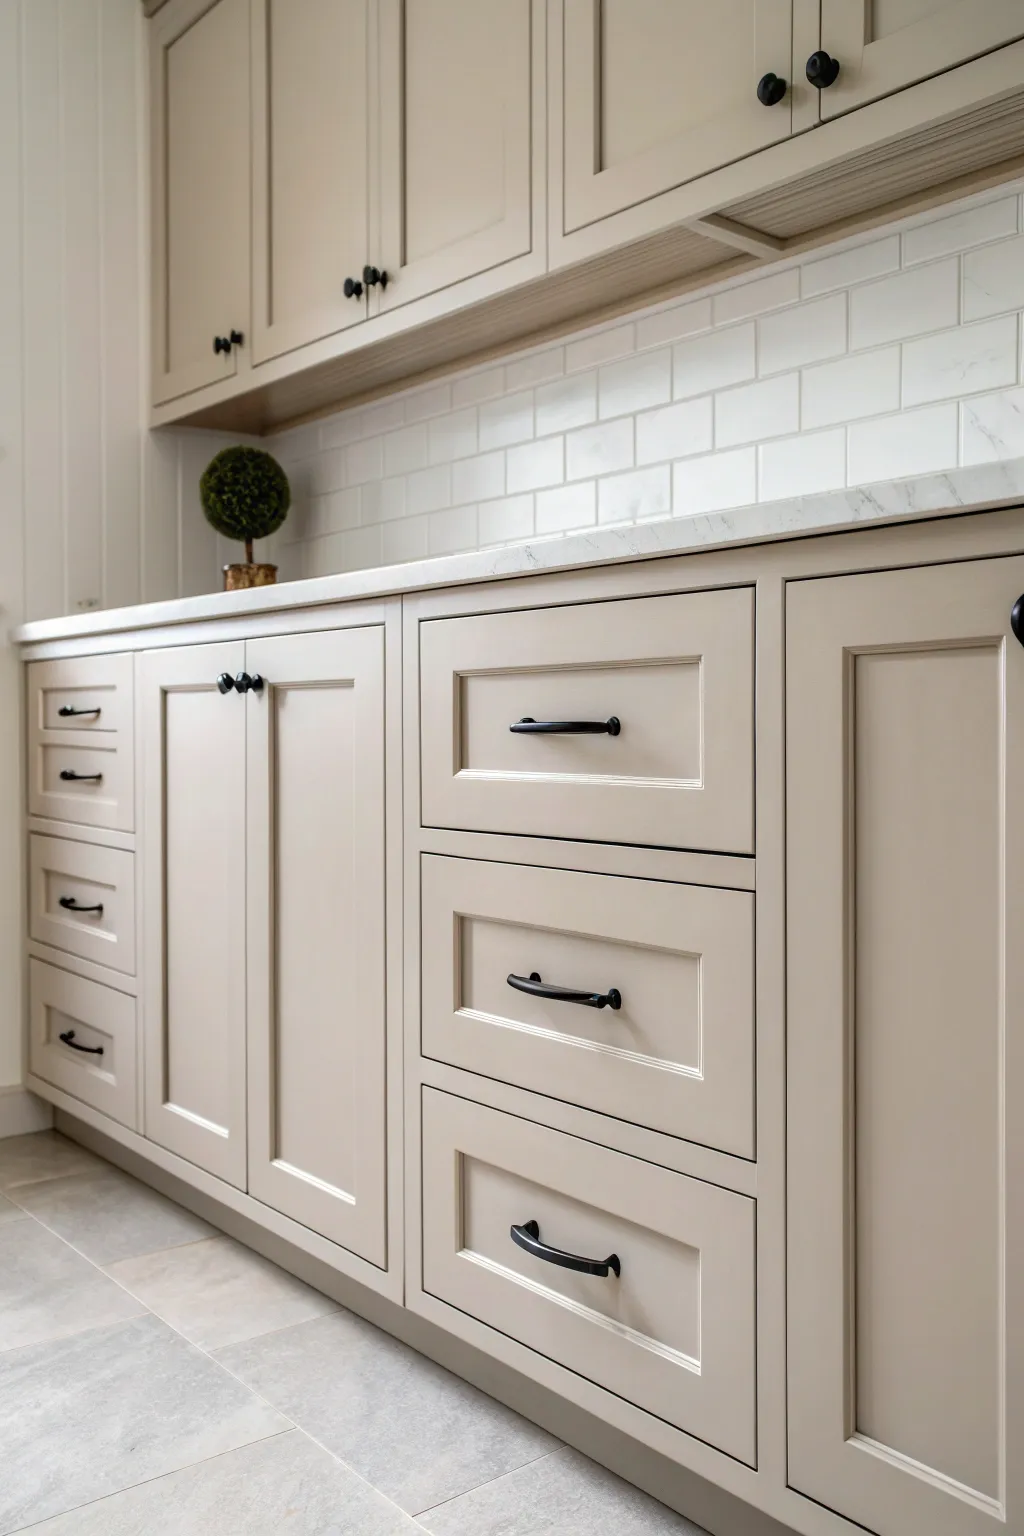
Transform outdated kitchen cabinets with this sophisticated, warm greige finish that bridges the gap between gray and beige. This project creates a smooth, factory-like surface that feels modern yet timeless, perfectly complemented by matte black hardware.
Step-by-Step
Materials
- High-quality cabinet cleaner/degreaser (like TSP substitute)
- Medium-grit sandpaper (120-grit)
- Fine-grit sandpaper (220-grit)
- Tack cloth
- Liquid deglosser (optional but recommended)
- High-adhesion stain-blocking primer
- High-quality cabinet paint in ‘Warm Greige’ (satin or semi-gloss finish)
- 2-inch angled distinct sash brush (high quality)
- 4-inch foam roller or mohair roller for smooth surfaces
- Painter’s tape
- Drop cloths
- Screwdriver or drill for hardware removal
- Wood filler and putty knife (if filling grain or holes)
Step 1: Preparation
-
Clear and Clean:
Begin by removing all items from your drawers and cabinets. It feels tempting to skip this, but you need full access. Wipe down every surface with a heavy-duty degreaser to remove cooking oils and grime, which are paint’s worst enemies. -
Remove Hardware:
Using your screwdriver or drill, carefully remove all knobs, pulls, and hinges. Place the screws and hardware in labeled baggies so you know exactly where they go later. Label the doors themselves with painter’s tape on the back to ensure they return to the right spot. -
Protect Surroundings:
Lay down drop cloths to protect your flooring. Apply painter’s tape precisely along the edges where the cabinets meet the walls, backsplash, and countertops to ensure a crisp line later. -
Sand Surfaces:
Scuff sand all cabinet surfaces—face frames, doors, and drawer fronts—with 120-grit sandpaper. You aren’t trying to strip the wood bare, just dulling the previous finish to give the new paint something to grab onto. -
Fill Imperfections:
If your cabinets have deep wood grain or existing nicks, smooth a thin layer of wood filler over them with a putty knife. Let it dry completely, then sand flush with 220-grit paper. -
Final Clean:
Vacuum up all sanding dust. For the final pass, I always use a tack cloth to pick up those microscopic particles that a rag might miss. A clean surface is crucial for that smooth finish.
Step 2: Priming
-
Apply Primer:
Use your angled brush to cut in the primer on the recessed corners and detailed edges of the shaker panels. Immediately follow with the foam or mohair roller on the flat surfaces to smooth out brush marks. -
Dry and Assess:
Allow the primer to dry according to the can’s instructions—usually overnight is best for cabinets. Check for any bleed-through of tannins; if you see dark spots coming through, spot-prime those areas again. -
Light Sanding:
Once the primer is fully cured, lightly sand everything with 220-grit sandpaper. This knocks down any ‘fuzz’ or brush texture. Wipe clean with a tack cloth again.
Sticky Drawers?
If drawers stick after painting, run a plain candle or beeswax along the wooden runners or contact points. This lubricates the surface without damaging your new paint job.
Step 3: Painting
-
First Coat – Edges:
Stir your Warm Greige paint thoroughly. Start with the backs of the doors first. Use the angled brush to paint the recessed panels and corners. -
First Coat – Flats:
While the paint in the corners is still wet, use your mini roller to paint the flat center panel and the outer frames. Maintain a ‘wet edge’ to avoid lap marks. -
Frame Application:
Move to the cabinet boxes (face frames). Paint the styles (vertical pieces) and rails (horizontal pieces) using long, smooth strokes with your brush or roller. -
Dry Time:
Let this first coat dry completely. Don’t rush this part; paint that feels dry to the touch might still be soft underneath. -
Sand Between Coats:
Very lightly hand-sand the first coat with ultra-fine 320-grit sandpaper or a sanding sponge. This is the secret pro step for a furniture-like finish. -
Second Coat:
Apply the second coat exactly like the first. Watch for drips in the corners of the shaker panels and smooth them out immediately. -
Reassembly:
Wait at least 24-48 hours before reattaching hardware and hanging doors. Paint can take up to 30 days to fully cure, so be gentle with your new finish for the first few weeks.
Pro Tip: The Layout
Set up a dedicated ‘drying station’ in a garage or spare room using 2x4s on sawhorses. This lets you paint assembly-line style and keeps dust from the main house away from wet doors.
Enjoy your beautifully updated kitchen space knowing you achieved a professional look on your own terms

PENCIL GUIDE
Understanding Pencil Grades from H to B
From first sketch to finished drawing — learn pencil grades, line control, and shading techniques.
Explore the Full Guide
Dusty Blue That Still Feels Bright
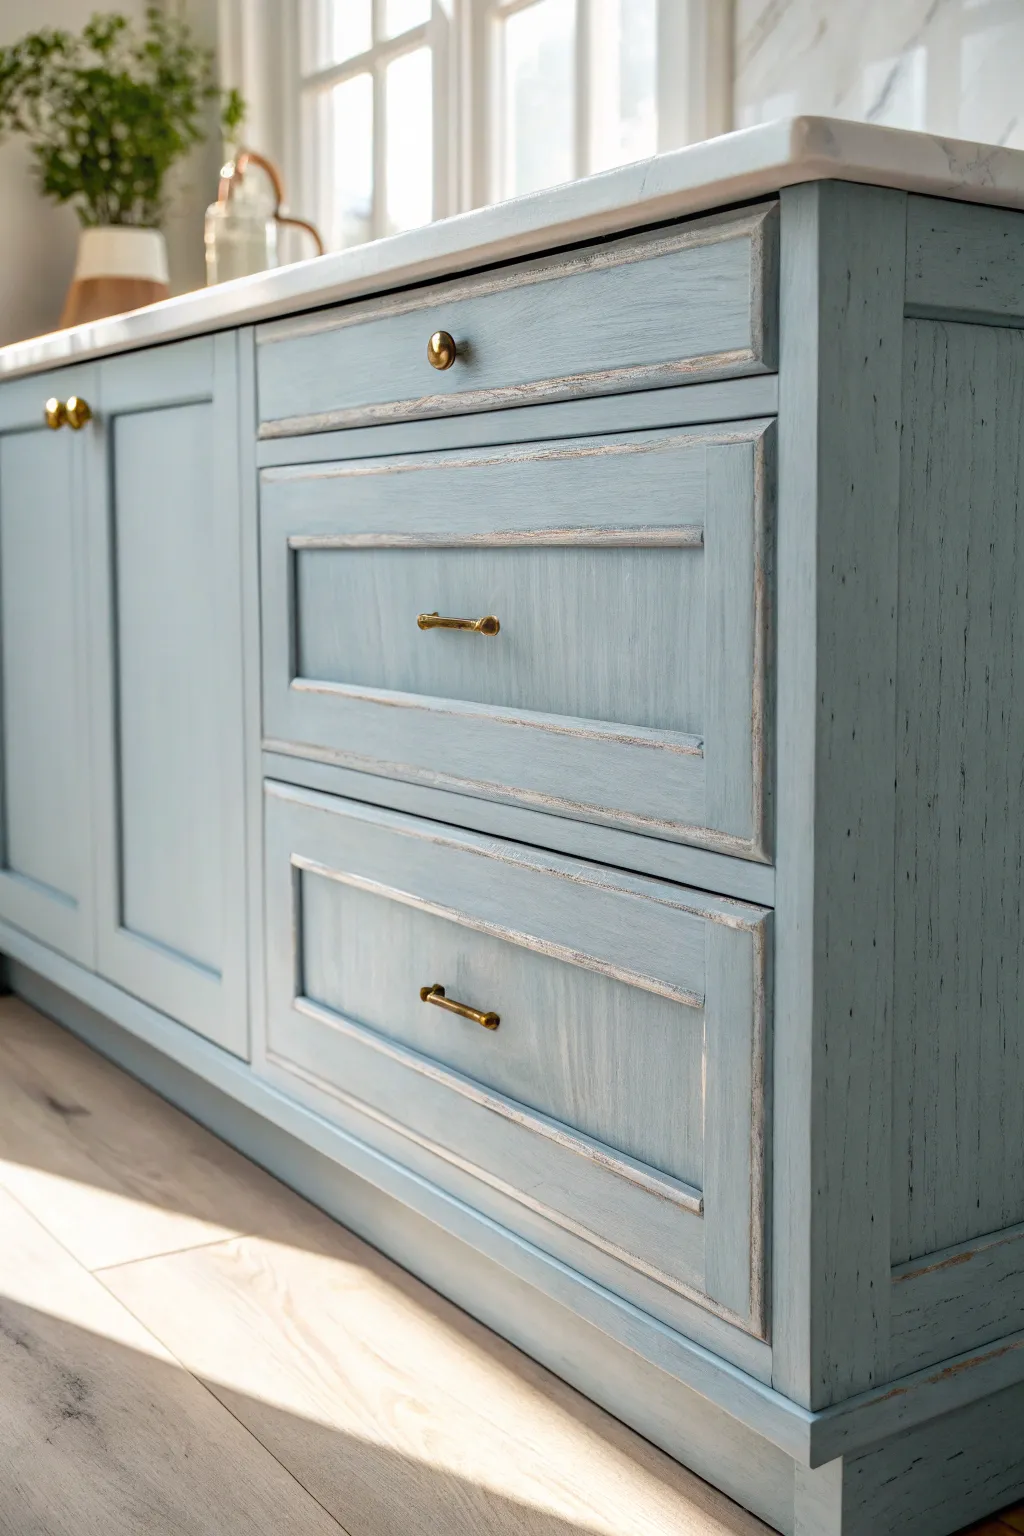
Transform standard cabinetry into a farmhouse-chic statement piece with this textured, layered finish. The soft dusty blue hue combined with white glazing creates a timeless, airy look that reveals beautiful depth and character.
Detailed Instructions
Materials
- Raw wood or previously painted cabinet drawer front
- Dusty blue chalk-style paint (e.g., Annie Sloan Svenska Blue)
- White cream wax or white glaze
- Clear finishing wax
- 150-grit sandpaper
- 220-grit sandpaper
- Medium-sized oval bristle brush
- Small lint-free cotton rags
- Tack cloth
- Gold or antique bronze handle hardware
- Screwdriver
- Drop cloth
Step 1: Preparation and Base Coat
-
Remove hardware:
Begin by removing any existing knobs or pulls from your drawer front using a screwdriver. Set these aside in a safe spot if you plan to reuse them, but for this specific look, new antique gold hardware works best. -
Clean the surface:
Wipe down the entire wood surface thoroughly to remove grease and dust. If the old finish is glossy, give it a quick scuff sand with 150-grit paper to help the new paint adhere. -
First coat application:
Dip your oval brush into the dusty blue chalk paint. Apply a generous first coat, brushing in the direction of the wood grain. Don’t worry about being perfectly smooth; texture is good here. -
Dry time:
Allow the first coat to dry completely, which usually takes about 30 to 60 minutes depending on your humidity levels. -
Second coat coverage:
Apply a second coat of blue paint to ensure full opacity. Pay special attention to the recessed areas of the molding around the center panel.
Too Much White?
If the white wax looks too heavy, apply a dab of CLEAR wax on a rag and rub it over the area. The clear wax acts like an eraser for the colored wax.
Step 2: Distressing and Texturing
-
Full dry:
Let the paint cure for at least 2-3 hours. It needs to be hard enough to withstand sanding without peeling. -
Initial distressing:
Take your 150-grit sandpaper and gently sand the high points and edges of the drawer molding. You want to expose a little bit of the raw wood underneath to create that worn, vintage effect. -
Surface sanding:
Switch to 220-grit sandpaper and lightly run it over the flat panels. This smoothens the brushstrokes slightly while leaving enough texture to catch the wax later. -
Clean up dust:
Use a tack cloth or a slightly damp rag to remove every speck of sanding dust. This step is crucial for a clean wax application.
Add Age
For a darker, more antique look, mix a tiny amount of dark brown wax into your clear wax and apply it only to the very deepest corners after the white wax dries.
Step 3: Waxing and Finishing
-
Apply clear wax:
Using a clean rag or wax brush, apply a thin layer of clear wax over the entire drawer. This seals the paint and gives you a workable surface for the colored glaze. -
Apply white wax:
While the clear wax is still fresh, dip a rag into the white wax or glaze. Rub it into the wood grain, focusing heavily on corners and the crevices of the molding. -
Wipe back:
Immediately use a clean lint-free cloth to wipe away the excess white wax from the flat, high surfaces. I like to leave more white pigment in the grooves to highlight the architectural details. -
Buffing:
Wait 15-20 minutes for the wax to set up, then buff the surface vigorously with a clean soft cloth to create a soft, satin sheen. -
Install hardware:
Once the finish feels dry to the touch, reinstall your hardware. Center the gold bar pull on the recessed panel for that modern-traditional update.
Enjoy the sophisticated yet rustic charm your new cabinet front brings to the space
Black Cabinets Done the Cozy Way
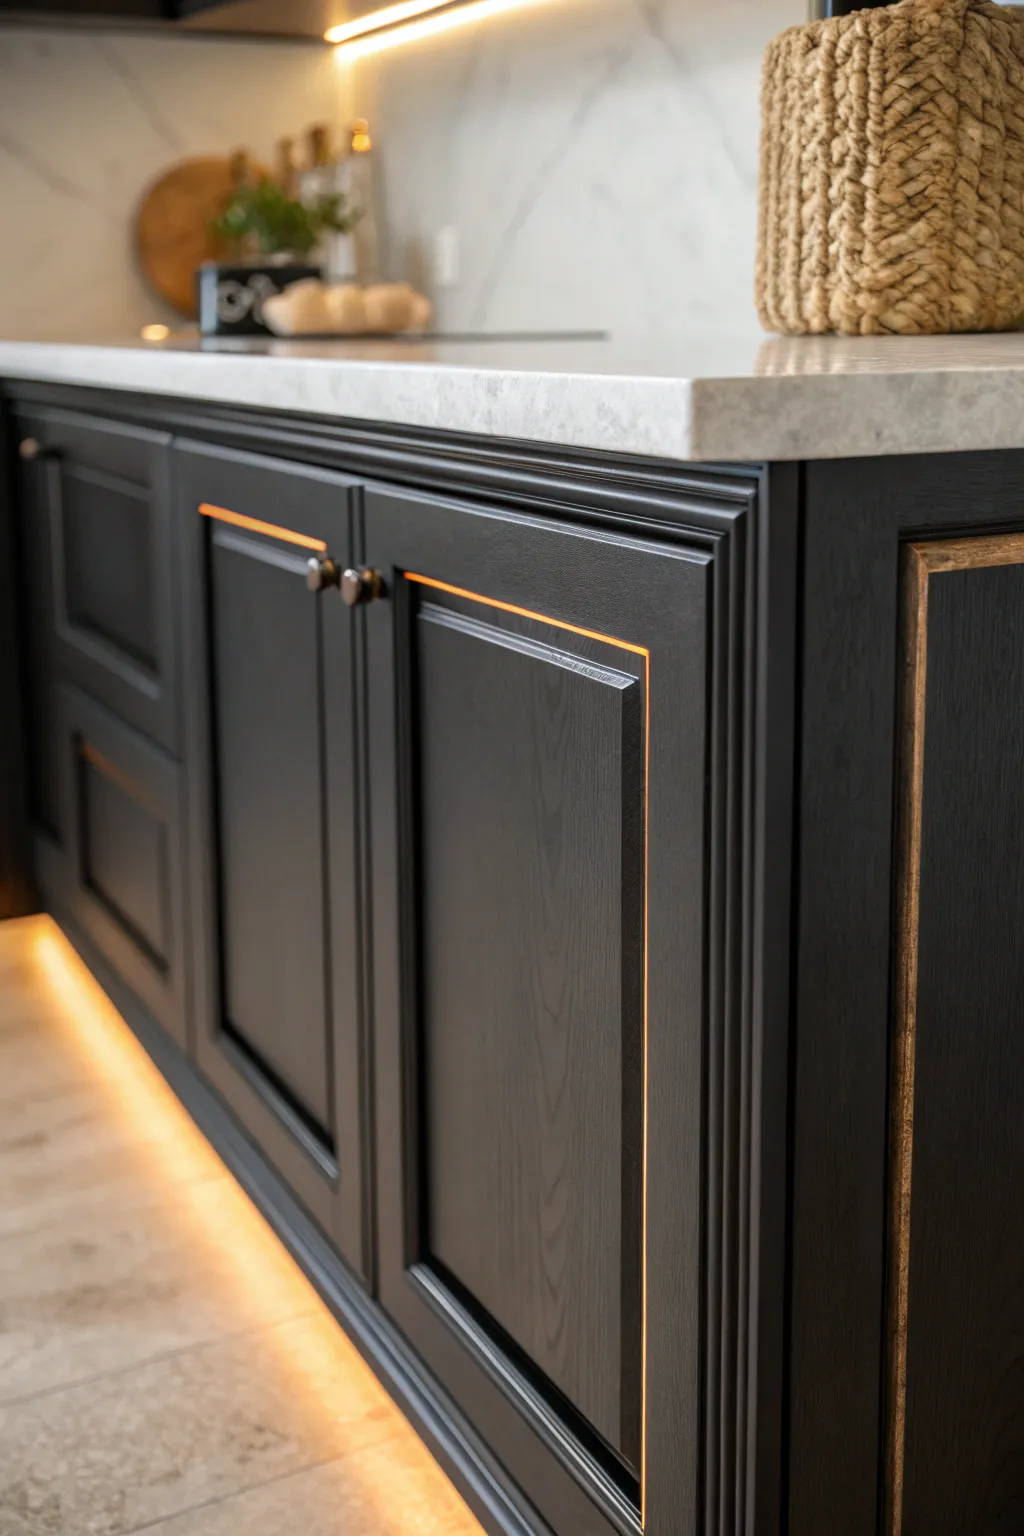
Transform standard shaker cabinets into a high-end design statement by combining rich matte black paint with integrated warm lighting. This project focuses on achieving that velvety, deep finish while installing subtle LED glowing accents that make the kitchen feel incredibly cozy.
Step-by-Step
Materials
- Unfinished wood shaker cabinets (oak or ash preferred for grain)
- Black cabinet paint (matte or eggshell finish)
- High-adhesion primer (tinted gray recommended)
- Warm white LED strip lights (2700K-3000K)
- LED aluminum channels with diffusers
- Gold or antique brass leafing kit (optional for trim)
- Low-voltage wiring and transformer
- Router or chisel
- 220-grit and 320-grit sandpaper
- Tack cloths
- High-quality synthetic angle sash brush
- Mini foam rollers for cabinets
- Painter’s tape
Step 1: Preparation & Routing
-
Remove hardware:
Begin by removing all doors, drawers, and hardware from the cabinet boxes. Label each door and hinge location clearly with painter’s tape to ensure they go back in the right spot later. -
Plan lighting channels:
Identify where the vertical light strips will go. In the image, these are nestled in the vertical stiles between doors. Mark straight lines for your routing channel. -
Route the channels:
Using a router with a straight bit, carve out a shallow groove that perfectly fits your aluminum LED channel width and depth. Test fit the aluminum channel frequently to ensure a flush mount. -
Sand the wood:
Thoroughly sand all wood surfaces with 220-grit sandpaper. You want to smooth out rough spots but leave the natural grain texture open if you’re using oak, as that texture adds character to the black finish. -
Clean surfaces:
Vacuum away all dust and follow up with a tack cloth. Any remaining dust will look glaringly obvious under the black paint.
Pro Tip: Masking Precision
When painting near the routed channel, place a strip of foam backer rod or thick tape inside the groove. This keeps paint from clogging the area where the LED channel needs to sit flush.
Step 2: Painting the Midnight Finish
-
Apply gray primer:
Apply a coat of high-bond primer. I prefer using a gray-tinted primer rather than white, as it makes covering with black much easier and requires fewer topcoats. -
Sand the primer:
Once the primer is fully dry, lightly scuff it with 320-grit sandpaper to knock down any raised grain or brush marks. Wipe clean again with a tack cloth. -
First coat of black:
Using a quality synthetic brush for corners and a foam roller for flat areas, apply the first coat of matte black paint. Apply thin, even layers rather than one thick one to avoid drips. -
Dry and assess:
Let this coat dry completely according to the can’s instructions. Check for any light spots, but don’t worry if coverage isn’t perfect yet. -
Final coat application:
Apply the second (and third if necessary) coat of black paint. Focus on long, smooth strokes to minimize texture. Let the final coat cure for at least 48 hours before handling. -
Optional gold detailing:
If you want the subtle gold edge seen on the far right cabinet, use a small artist’s brush to apply gold leaf sizing and gold leaf to the exposed vertical edge, or simply use a metallic wax rub.
Step 3: Lighting & Assembly
-
Install aluminum channels:
Place the aluminum LED channels into your routed grooves. Secure them with small screws or construction adhesive. -
Insert LED strips:
Peel the backing off your warm white LED strips and stick them inside the aluminum channels. Do the same for the toe-kick area underneath the cabinets for that floating floor glow. -
Wire the system:
Connect the strip wires to your low-voltage transformer. Hide the wiring behind the cabinet backs or through pre-drilled holes in the cabinet floor. -
Attach diffusers:
Snap the frosted plastic diffusers onto the aluminum channels. This is crucial for creating that soft, neon-like line of light rather than seeing individual LED dots. -
Rehang doors:
Carefully reattach your doors and drawer fronts. Adjust the hinges to ensure the gaps between doors are perfectly even, especially where the vertical light strips are located. -
Install hardware:
Drill holes and install your drawer pulls and knobs. Dark bronze or soft black hardware complements the matte finish perfectly without distracting from the lighting.
Troubleshooting: Visible LED Dots
Does your light look like spotted dots instead of a solid beam? You need a deeper aluminum channel or a ‘cob’ style LED strip, which pack diodes closer together for a seamless line of light.
Now turn on your lights and admire the dramatic, modern atmosphere you have created in your kitchen.


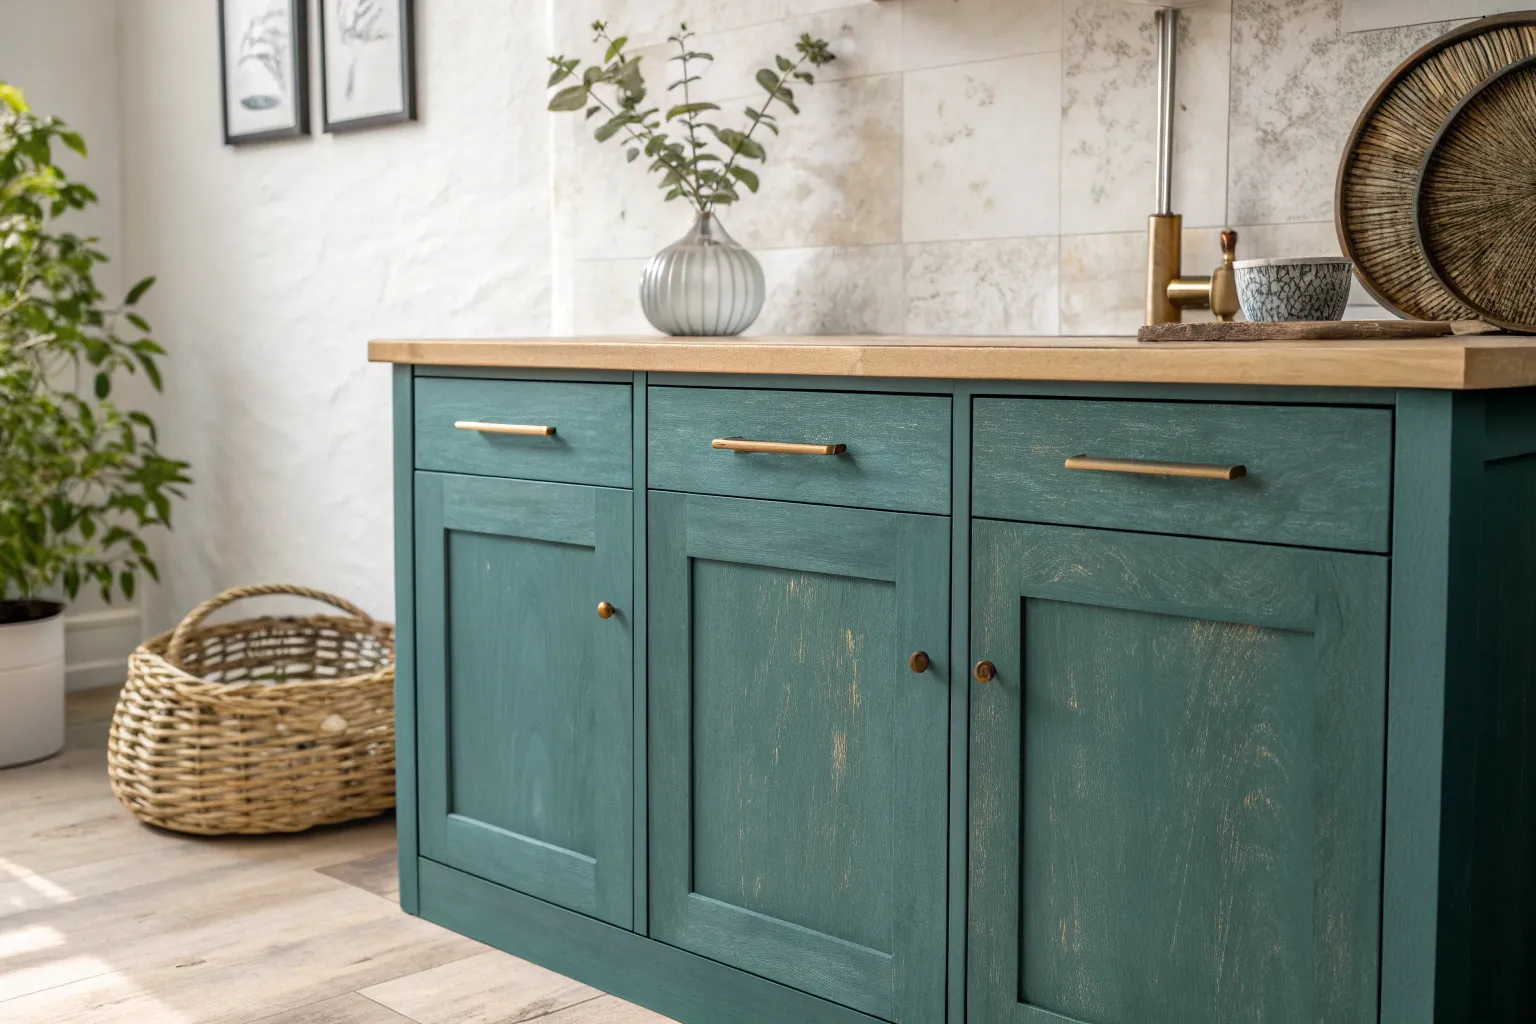
Island in a Different Statement Color
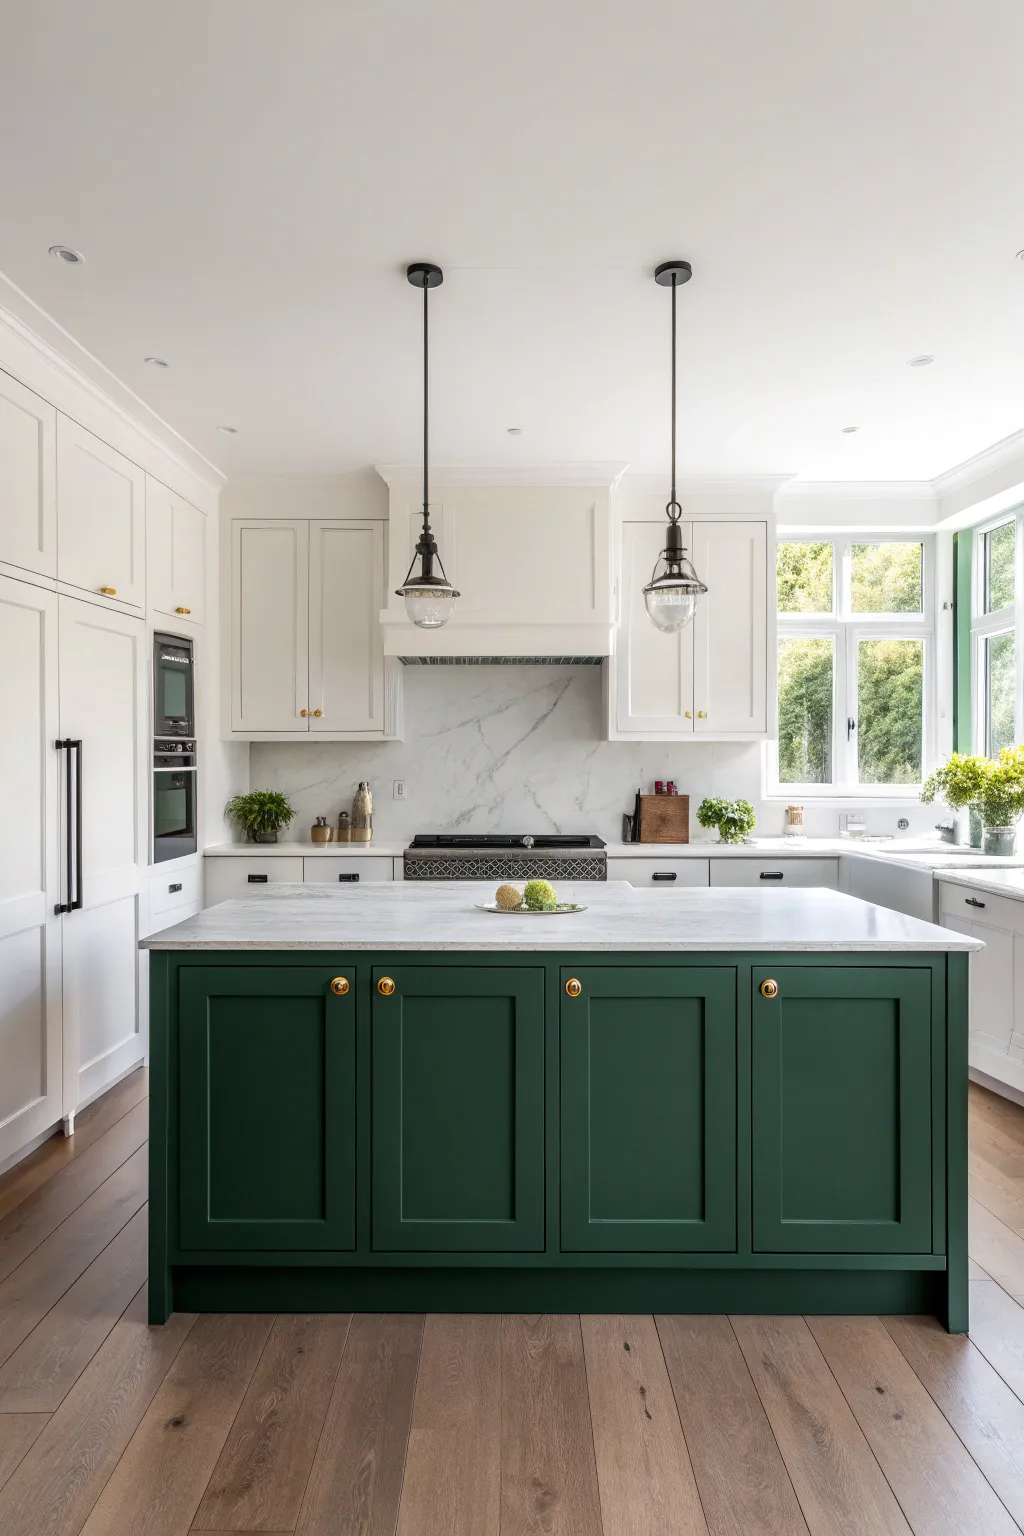
Bring a bold, grounding focal point to your kitchen by painting your existing island in a rich, velvety forest green while keeping the rest of the cabinetry crisp and white. This project transforms a standard builder-grade island into a custom-look masterpiece that anchors the entire room.
Step-by-Step Tutorial
Materials
- High-quality cabinet enamel paint (Forest Green/Deep Emerald)
- Bonding primer (stain-blocking)
- TSP (Trisodium Phosphate) cleaner or degreaser
- Medium (120-150 grit) sanding sponges
- Fine (220 grit) sandpaper
- Tack cloths
- Painter’s tape
- Drop cloths or rosin paper
- 4-inch foam roller and frame
- Angled sash brush (2-inch)
- Screwdriver or drill
- Wood filler (optional)
- New brass hardware handles and knobs
Step 1: Preparation & Dismantling
-
Clear the area:
Begin by removing everything from the kitchen island, both on the countertop and inside the drawers or cabinets. Lay down drop cloths or rosin paper to protect your flooring. -
Remove hardware:
Using your screwdriver or drill, carefully remove all cabinet doors, drawer fronts, knobs, handles, and hinges. Place hardware in labeled bags so you don’t lose any screws. I suggest numbering the doors and their corresponding openings with painter’s tape to make reassembly easier. -
Deep clean surfaces:
Scrub every inch of the island’s wood surfaces with TSP or a heavy-duty degreaser. Kitchen cabinets accumulate invisible grease layers that repel paint, so be thorough and wipe away any residue with a clean, damp cloth.
Uneven Sheen?
If you see shiny and dull spots after the paint dries, it’s likely due to uneven paint thickness. A final, very thin coat applied continuously without stopping usually fixes the flashing.
Step 2: Sanding & Priming
-
Initial sanding:
Scuff sand all surfaces (doors, drawer fronts, and the island frame) using 120-150 grit sanding sponges. You don’t need to strip the finish completely, just degloss it enough for the primer to bite. -
Fill imperfections:
Inspect the wood for deep scratches or dents. If you find any, or if you’re changing hardware sizes, fill the holes with wood filler. Let it dry completely, then sand smooth. -
Dust removal:
Vacuum up the sanding dust and follow up by wiping everything down with a tack cloth. Any remaining dust will create a gritty finish. -
Apply primer:
Brush primer into the corners and recessed areas of the doors first, then roll the flat surfaces. Apply a coat to the island frame as well. A bonding primer is essential here to prevent the dark paint from chipping later. -
Light sand:
Once the primer is fully dry (check the can for times), give everything a very light sanding with fine 220-grit sandpaper to knock down any brush marks or raised grain. Wipe clean with a tack cloth again.
Pro Tip: Elevate Your Doors
Use ‘painter’s pyramids’ or simple plastic cups to prop up your cabinet doors while painting. This lets you paint the edges easily without them sticking to your drop cloth.
Step 3: Painting the Green Finish
-
Cut in edges:
Stir your forest green enamel thoroughly. use your angled sash brush to carefully paint the recessed panels of the doors and the corners of the island frame. Watch for drips pooling in the corners and brush them out immediately. -
Roll the flats:
Use the foam roller to apply paint to the flat center panels and outer stiles of the doors. Apply thin, even coats rather than one thick one. For the island frame, roll the larger flat sides and toe kick areas. -
Dry and recoat:
Allow the first coat to dry usually for at least 4-6 hours, or overnight if humidity is high. I prefer to wait longer than the can says just to be safe. Apply a second coat using the same method to achieve that deep, opaque emerald color. -
Assess coverage:
Dark colors sometimes require a third thin coat to look truly solid and uniform. Check your finish in different lighting; if it looks patchy, add one more light coat. -
Curing time:
Let the doors and frame cure undisturbed for at least 24-48 hours before handling them. Cabinet paint needs time to harden so it doesn’t dent or stick when reattached.
Step 4: Reassembly
-
Reattach doors and drawers:
Carefully re-hang the cabinet doors and slide the drawers back in, referencing your numbered tape labels. Adjust the hinges to ensure the gaps are even and doors hang straight. -
Install hardware:
Attach the new brass knobs to the drawers and doors. The contrast of gold against green is what gives this look its elegance, so tighten them gently to avoid scratching your fresh paint.
Step back and admire how a single color change has completely sophisticated your kitchen space
Hardware That Pops Against Paint
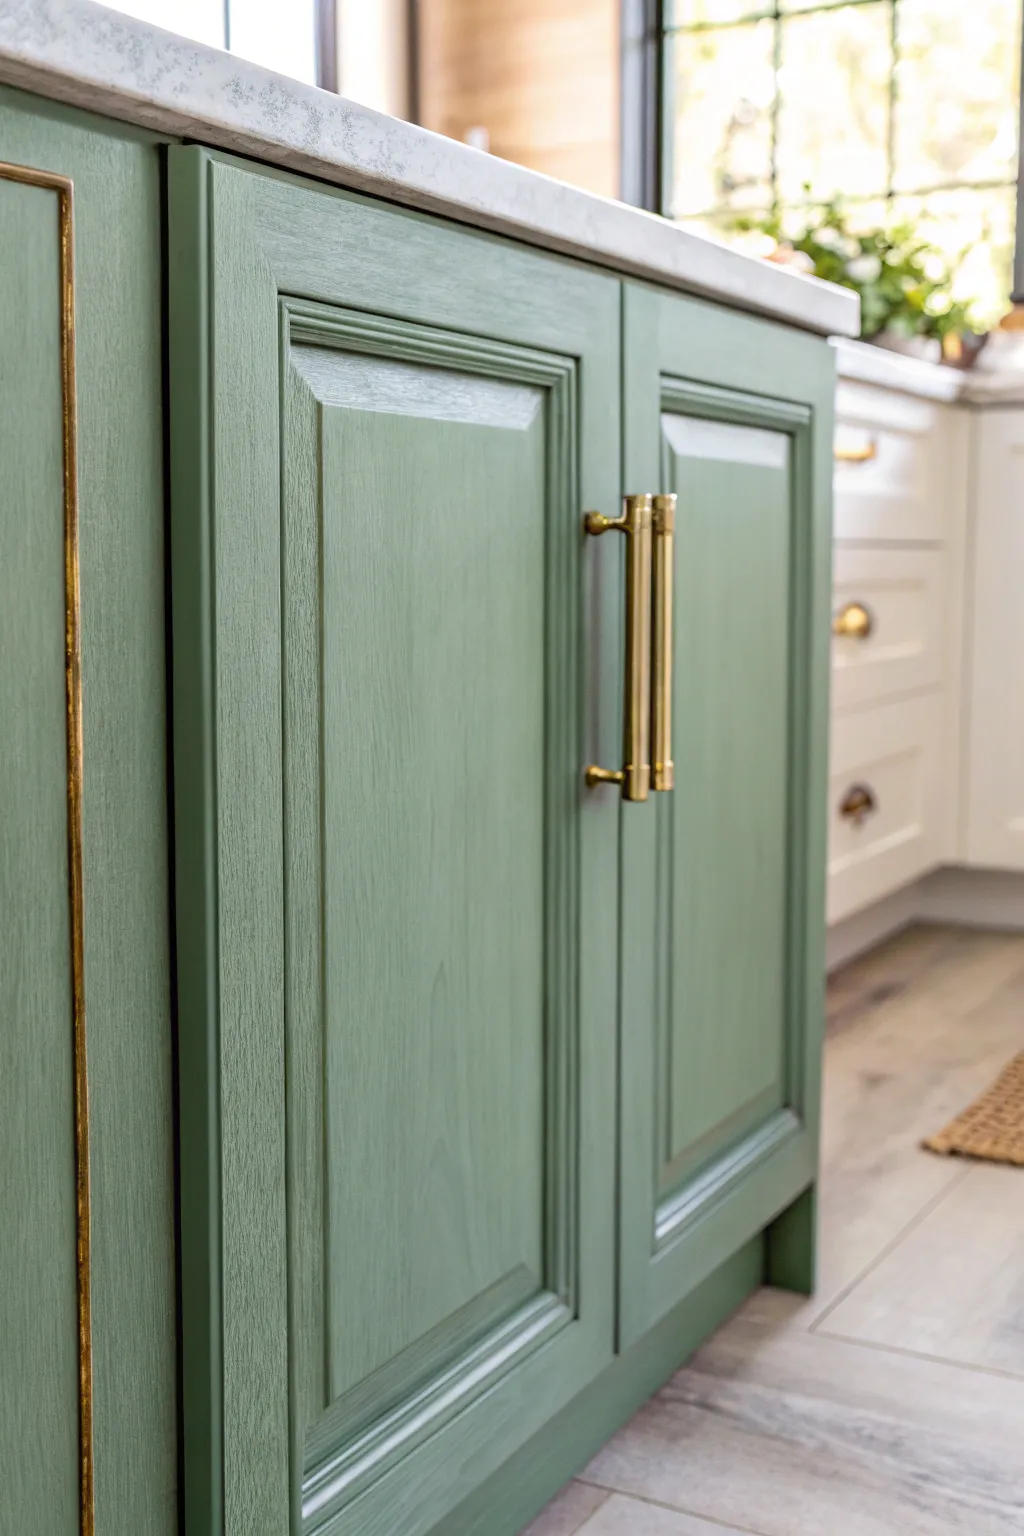
Transform plain wooden cabinetry into a sophisticated focal point with a matte sage finish and striking gold hardware. This project highlights the beauty of natural wood grain while adding a modern, luxurious touch through thoughtful metallic accents.
Step-by-Step
Materials
- Unfinished or oak kitchen cabinet door/base
- High-quality bonding primer (stain-blocking)
- Sage green cabinet paint (satin or matte finish)
- Clean-strip degreaser or TSP alternative
- Sanding block (medium and fine grit)
- Tack cloth
- Gold leaf styling tape or gold metallic paint pen
- Brushed brass bar pull handle (approx. 5-7 inches)
- Drill with bit set corresponding to hardware screws
- Synthetic angled sash brush (2-inch)
- Template or jig for hardware placement
- Screwdriver
- Drop cloths
- Measurement tape and pencil
Step 1: Preparation & Priming
-
Clean surface:
Begin by thoroughly cleaning the cabinet door and frame with a degreaser or TSP substitute to remove any cooking oils, dirt, or old wax. This step is crucial for paint adhesion. -
Remove hardware:
If you are working on an existing door, unscrew and remove any old knobs or pulls. Fill old holes with wood filler only if the new hardware requires different spacing. -
Sand the surface:
Lightly scuff sand the entire surface using a medium-grit sanding block. You aren’t trying to remove all the previous finish, just creating ‘tooth’ for the primer to grip. -
Dust removal:
Wipe away all sanding dust with a tack cloth. Even tiny particles can ruin the smooth finish we are aiming for. -
Apply primer:
Brush on a coat of high-quality bonding primer. Use an angled sash brush to get into the recessed molding details of the door panel first. -
Prime flat areas:
Finish priming the flat center panel and outer rails. Don’t worry if the wood grain still shows through slightly; the paint will cover it while keeping the texture. -
Light sand:
Once the primer is fully dry (check the can instructions), verify smoothness by running your hand over it. Do a very quick, light pass with a fine-grit sponge if any rough spots appeared.
Uneven Finish?
If you see brush strokes after drying, your paint may be drying too fast. Add a paint conditioner like Floetrol to improve flow and leveling.
Step 2: Painting & detailing
-
First coat of sage:
Stir your sage green cabinet paint thoroughly. Apply the first coat, starting again with the recessed corners and molding details to avoid paint pooling there later. -
Paint with grain:
Paint the flat surfaces using long, even strokes that follow the direction of the wood grain. This helps camouflage brush marks and highlights the natural texture. -
Dry time:
Allow the first coat to dry completely. I like to let this sit overnight if possible to ensure the finish hardens properly, but follow the manufacturer’s re-coat window. -
Second coat:
Apply a second coat of green paint for full opacity and depth of color. The finish shown in the image is matte, which is forgiving but requires good coverage. -
Add gold accent strip:
To recreate the vertical gold detail on the side panel, wait until the paint is fully cured. Carefully apply a strip of gold leaf styling tape along the edge, or use a ruler and gold paint pen for a permanent line.
Elevate the Look
Apply a thin layer of antique wax over the dry sage paint, focusing on the corners, to deepen the color and add a subtle, aged patina.
Step 3: Hardware Installation
-
Measure placement:
Determine where your brass bar pull will sit. On shaker-style doors like this, placing the top screw hole aligned with the bottom rail of the top frame is a classic look. -
Mark holes:
Use a hardware jig or a precise template to mark the drill holes with a pencil. Double-check your measurements to ensure the handle will be perfectly vertical. -
Drill pilot holes:
Drill through the marked spots from the front to the back. Applying a piece of painter’s tape over the mark before drilling can help prevent the new paint from chipping. -
Attach the pull:
Insert the screws from the back of the door and thread them into the brass handle on the front. Tighten firmly with a screwdriver, but be careful not to over-torque and crack the finish. -
Final inspection:
Wipe down any fingerprints from the installation and check that the gold edge detailing is straight and secure.
Enjoy the refined atmosphere your new cabinetry brings to the kitchen
Satin Finish for Easy-Clean Everyday
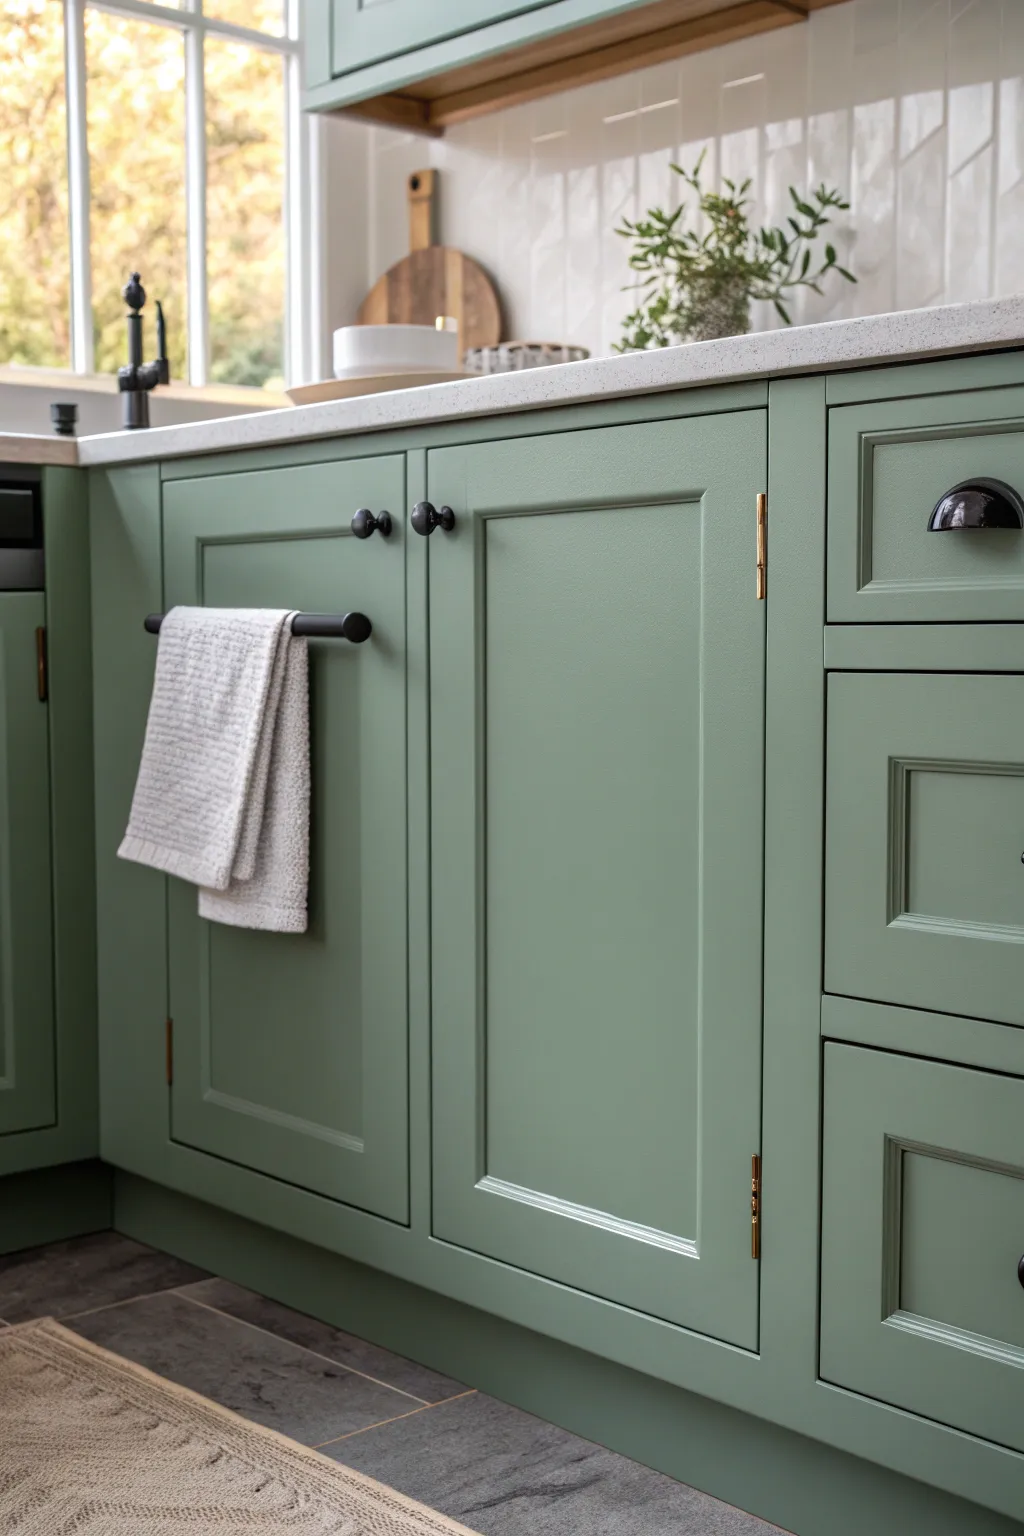
Transform dated kitchen cabinets into a serene, sophisticated focal point with a durable satin finish that stands up to daily life. This project achieves a smooth, professional-looking sage green surface on Shaker-style doors, accented by classic black hardware and exposed brass hinges.
Step-by-Step
Materials
- Cabinet doors (wood or MDF)
- Sandpaper (120, 220, and 320-grit)
- Tack cloth
- High-quality bonding primer
- Satin finish cabinet paint (Sage Green)
- Mini foam roller and tray
- Angled sash brush (1.5 – 2 inch)
- Painter’s tape
- Drill and bits
- Black cabinet knobs and cup pulls
- Black towel rail
- Brass finish hinges
- Drop cloths
- Screwdriver
Step 1: Preparation & Dismantling
-
Remove hardware:
Begin by removing all cabinet doors from their frames. Use a screwdriver or drill to detach the old hinges, handles, and knobs. Keep the screws in labeled baggies if you plan to reuse them, though for this look, we are swapping them. -
Clean thoroughly:
Scrub the doors and frames with a degreasing cleaner. Kitchen cabinets accumulate invisible oils that will repel paint, so don’t skip this. Wipe them down with a damp cloth to remove residue and let them dry completely. -
Protect the area:
Lay down drop cloths to protect your flooring. Use painter’s tape to mask off the walls, countertops, and the insides of the cabinet frames if you aren’t painting the interior. -
Initial sanding:
Scuff sand all surfaces with 120-grit sandpaper. You don’t need to remove the old finish entirely, just roughen it up to create a ‘tooth’ for the primer. Sand with the grain of the wood. -
Dust removal:
Vacuum up the sanding dust, then wipe everything down with a tack cloth to catch the fine particles. Any dust left behind will create a bumpy finish.
Sticky Doors?
If doors stick after painting, the paint hasn’t fully cured. Stick small felt bumpers on the inside corners to keep the painted surfaces from touching the frame for the first week.
Step 2: Priming & Painting
-
Apply primer:
Using the angled brush, apply a high-quality bonding primer to the recessed corners and molding profiles first. Then, use the foam roller for the flat center panels and outer frames. Let the primer dry according to the manufacturer’s instructions. -
Sand the primer:
Once the primer is fully cured, lightly sand it with 220-grit sandpaper until it feels smooth to the touch. Wipe away the dust with a fresh tack cloth. -
First coat of color:
Stir your sage green satin paint thoroughly. Cut in the corners and recessed areas with your brush first. I find it works best to feather the brush strokes out so they blend when you roll. -
Roll the surfaces:
Immediately follow the brushing with the foam roller on the flat surfaces. Apply thin, even coats to avoid drips. Don’t overwork the paint; lay it down and leave it alone to self-level. -
Dry and sand:
Allow the first coat to dry for at least 4-6 hours (or overnight). Lightly sand with 320-grit sandpaper to knock down any imperfections, then wipe clean. -
Second coat:
Apply the second coat of sage green using the same brush-then-roll technique. This coat provides the rich, solid color and the durable satin sheen. -
Inspect and touch up:
Check for any thin spots or missed edges once the paint is dry. If necessary, a third light coat can be applied for ultimate durability, especially on high-traffic doors.
Add Dimension
For a truly bespoke look, add a very thin bead of paintable caulk to the inside edges of the shaker panel before priming to hide the seam where the panel meets the frame.
Step 3: Reassembly & Hardware
-
Install towel rail:
Measure and mark the center of the cabinet door where you want the towel rail. Drill pilot holes carefully, ensuring you don’t go through the other side, and screw the black rail into place. -
Attach knobs and pulls:
Drill holes for the black mushroom knobs and cup pulls. Using a template jig helps ensure they are perfectly aligned across all drawers and doors. -
Mount hinges:
Attach the new brass hinges to the cabinet doors. The contrast between the sage green, black hardware, and brass hinges is key to this specific aesthetic. -
Hang the doors:
Reattach the doors to the cabinet frames. It helps to have a second pair of hands for this step to hold the door while you drive the screws. -
Adjust alignment:
Use the adjustment screws on the hinges to ensure the doors hang straight and the gaps between them are even. This small detail makes the result look custom-made.
Enjoy the calm atmosphere your newly painted kitchen brings to your home.
Color Drenching: Cabinets to the Ceiling
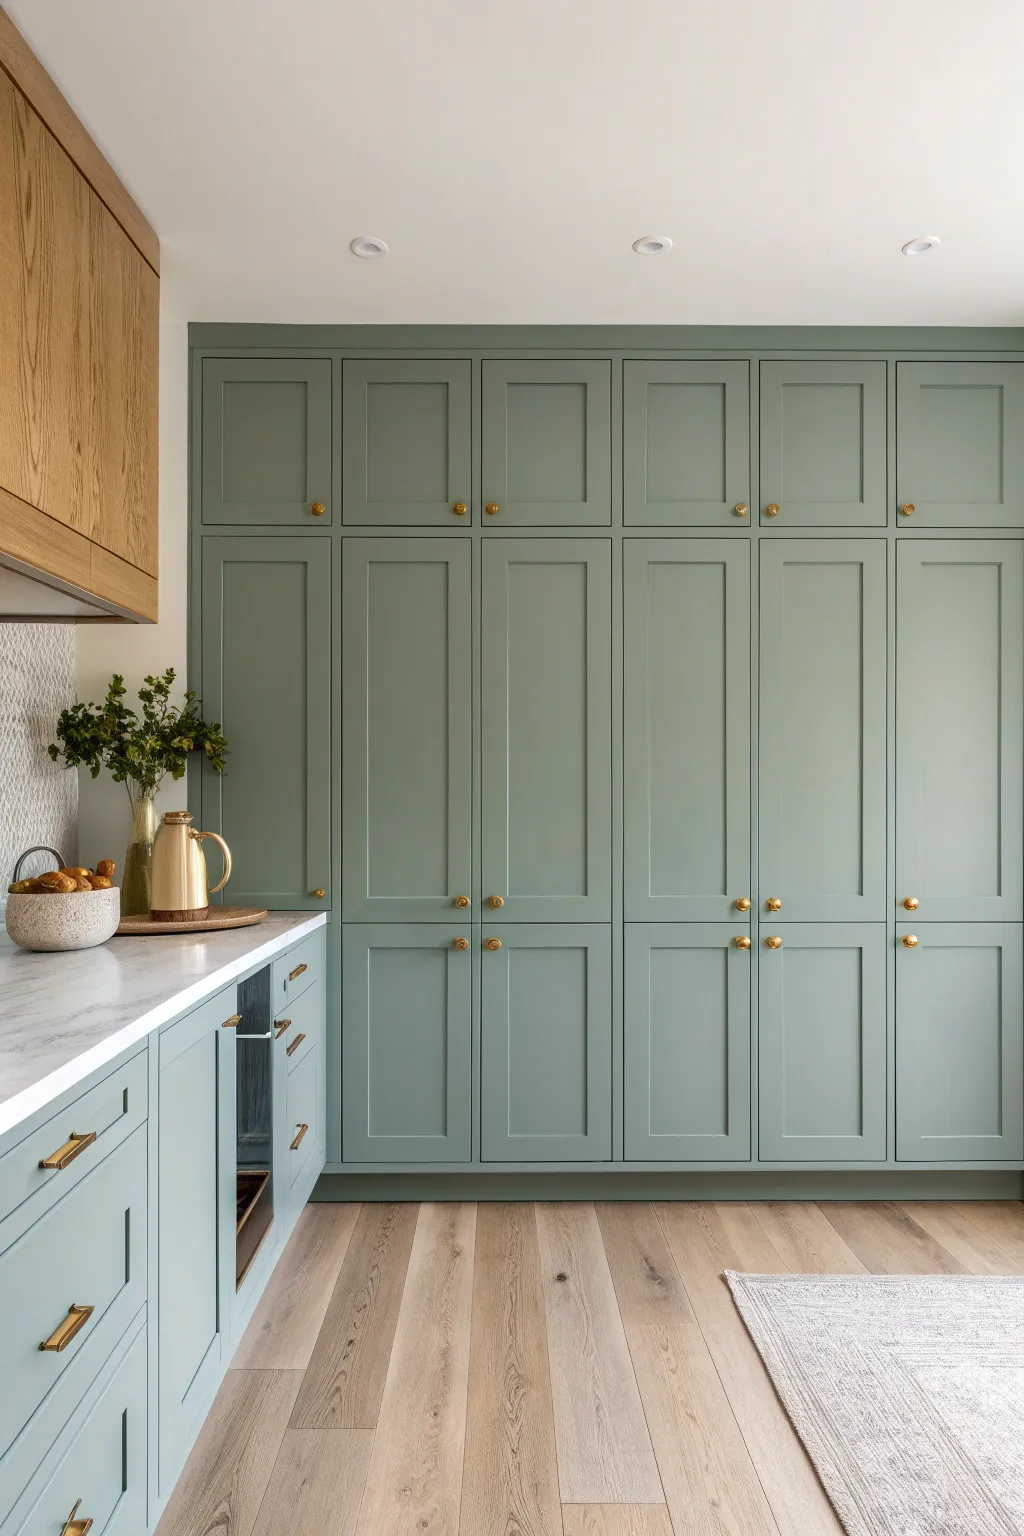
Transform a wall of standard pantry units into a bespoke, high-end feature using the ‘color drenching’ technique. This project bridges the gap between basic storage and architectural design by painting floor-to-ceiling cabinetry in a soothing, sophisticated sage green.
Detailed Instructions
Materials
- Cabinet grade paint (Satin or Semi-Gloss finish)
- High-bonding primer (oil-based or shellac-based recommended)
- Sage Green tint (e.g., Farrow & Ball ‘Lichen’ or similar)
- 220-grit sandpaper
- Tack cloths
- Liquid deglosser (tsp substitute)
- Mini foam roller and tray
- High-quality angled sash brush (1.5 – 2 inch)
- Painters tape
- Gold cabinet knobs
- Gold cupboard latches
- Screwdriver or drill
Step 1: Preparation & Hardware Removal
-
Clear the area:
Begin by removing all items from your cabinets and drawers. This is crucial to ensure dust doesn’t settle on your belongings and allows you full access to every corner. -
Remove hardware:
Unscrew all existing knobs, handles, and hinges. Label each door and its corresponding hardware in a Ziploc bag if you plan to reuse the hinges, as they often settle into their specific frames over time. -
Clean surfaces thoroughly:
Scrub every inch of the cabinet doors and frames with a degreaser or TSP substitute. Kitchen cabinets often have invisible layers of grease that will prevent paint from adhering properly. -
Sand for adhesion:
Using 220-grit sandpaper, lightly scuff all surfaces. You aren’t trying to remove the old finish entirely, just creating ‘tooth’ for the new primer to grab onto. -
Wipe away dust:
Vacuum up the sanding dust, then wipe everything down with a tack cloth. Even a tiny amount of dust can ruin the smooth finish we are aiming for.
Step 2: Priming & Painting
-
Apply bonding primer:
Roll a thin, even coat of high-bonding primer onto the frames and door fronts. I like to use a shellac-based primer for this step because it seals in wood tannins and prevents bleed-through. -
Address the crevices:
While the roller handles the flat areas, use your angled sash brush to work primer into the recessed panels and corners of the shaker doors. Check for drips immediately. -
Light sanding between coats:
Once the primer is fully dry (check manufacturer times), verify smoothness. Run 220-grit sandpaper lightly over the surface again to knock down any raised grain or fuzz. -
First coat of Sage color:
Stir your sage green paint thoroughly. Apply the first coat using the sash brush for the recessed edges first, feathering out the paint to avoid heavy brush marks. -
Roll the flat surfaces:
Immediately follow up with your mini foam roller on the flat panels and stiles. This ‘tipping off’ technique helps achieved that sprayed-on look without a sprayer. -
Dry and assess:
Allow the first coat to dry for at least 24 hours. Don’t rush this; satin and semi-gloss enamels need time to cure slightly to avoid dragging when the next coat is applied. -
Second coat application:
Apply the second coat of green exactly like the first. If the coverage looks solid, two coats might be enough, but darker greens sometimes require a thin third coat for depth. -
Cure time:
Let the cabinets cure for at least three to four days before reattaching heavy doors. The paint may feel dry to the touch, but it is still soft and prone to chipping.
Sticky Situation?
If doors are sticking after painting, rub a clear candle or beeswax along the contact points on the frame. This creates a barrier that prevents paint-on-paint adhesion.
Step 3: Reassembly & styling
-
Re-hang doors:
Carefully screw the hinges back into the frames. Having a helper hold the door while you align the screws makes this much easier and prevents accidental scratches. -
Drill for new hardware:
If your new gold knobs have different spacing or placement than the old ones, measure carefully, mark with a pencil, and drill new pilot holes. Use a template for consistency. -
Install the gold accents:
Attach the small gold knobs to the upper and lower doors. Notice how the small size of the knobs in the inspiration image keeps the look minimal and elegant. -
Add latches (optional):
For that extra vintage charm seen in the photo, install surface-mounted cupboard latches on the middle join of double doors, ensuring the catch aligns perfectly. -
Final wipe down:
Gently wipe away any pencil marks or fingerprints with a damp microfiber cloth to reveal your stunning new color-drenched wall.
Level Up: Interior luxe
Paint the inside of the cabinets a contrasting deep walnut color or line the back panel with a subtle patterned wallpaper for a surprise pop of design when opened.
Enjoy the calm and grounded atmosphere your new sage green feature wall brings to the heart of your home
Painted Wood Grain for Subtle Texture
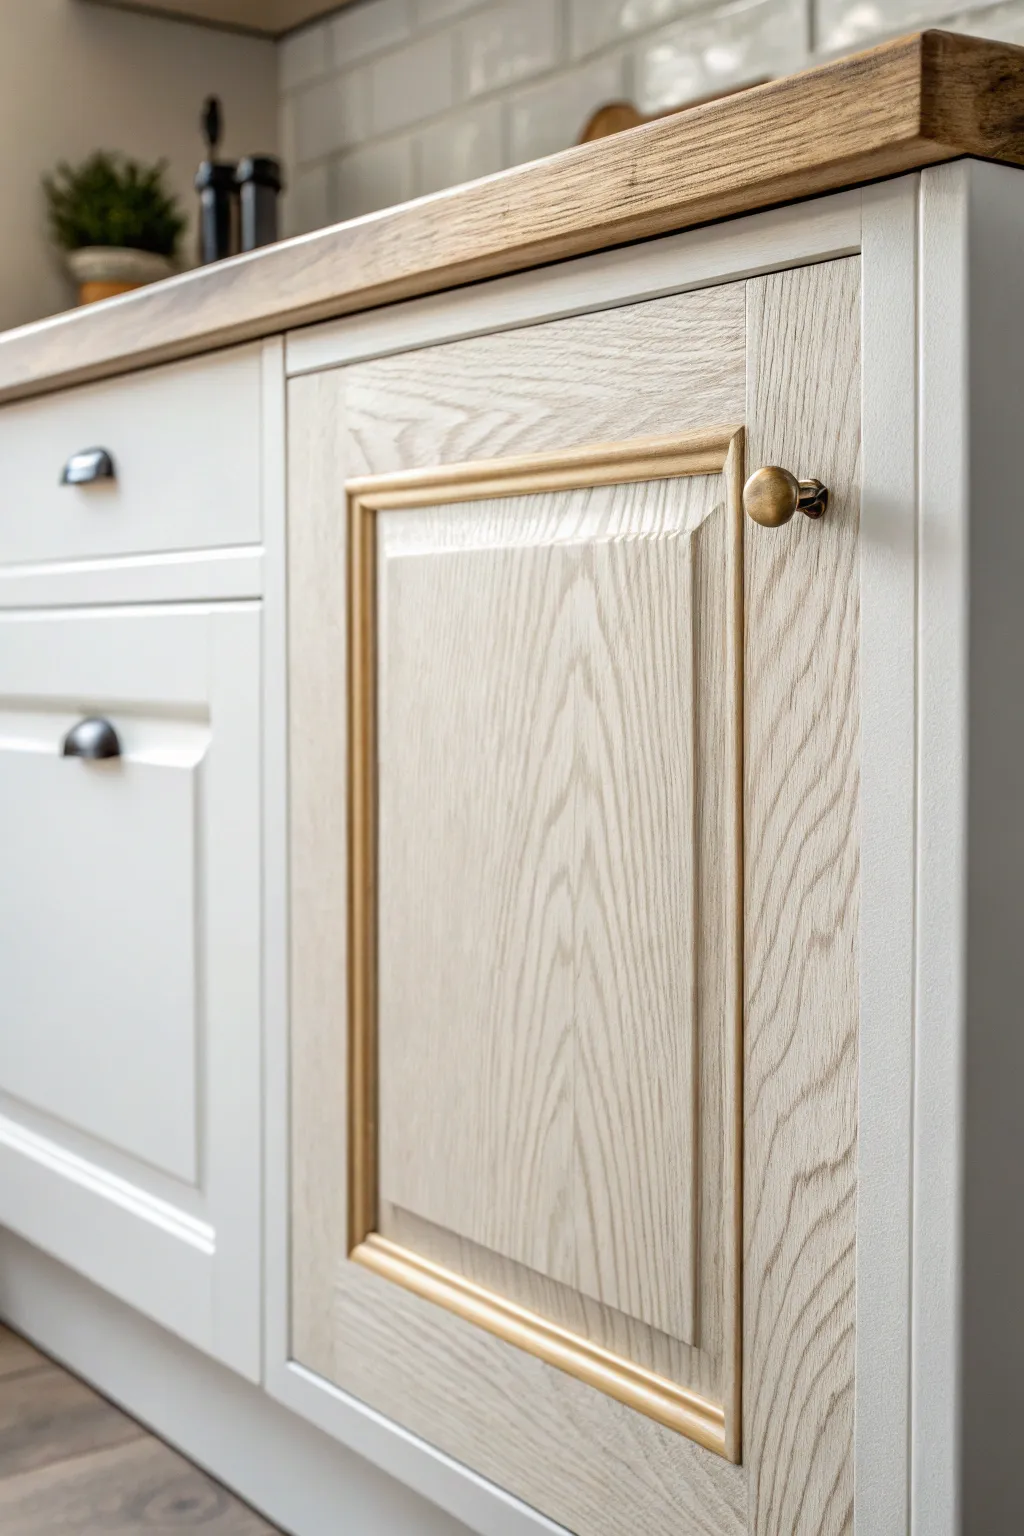
Achieve a sophisticated, custom kitchen look by combining solid painted frames with exposed, whitewashed wood grain centers. This subtle texture contrast adds depth and organic warmth to shaker-style cabinetry without overwhelming the space.
Detailed Instructions
Materials
- Cabinet door with center panel
- Power drill/screwdriver
- Sanding block (medium and fine grit)
- Chemical paint stripper
- Putty knife or scraper
- Painter’s tape
- Creamy white cabinet enamel paint
- Angled sash brush
- Whitewash pickling stain or diluted white latex paint
- Lint-free rags
- Water-based matte polyurethane
- Small artist brush
- Metallic bonding primer (optional)
- Gold or brass accent paint (optional)
- New hardware (brass knob)
Step 1: Preparation & Stripping
-
Remove hardware:
Begin by removing the cabinet door from the hinges using your drill or screwdriver. Take off any existing knobs or handles and store the screws safely in a baggie. -
Clean surfaces:
Wipe down the entire door with a degreaser or TSP substitute to remove kitchen grease and grime. This is crucial for adhesion later on. -
Strip the center panel:
Apply a thick layer of chemical paint stripper to the central wood panel only. Let it sit according to the manufacturer’s time, usually about 15-30 minutes, until the old finish bubbles up. -
Scrape away finish:
Gently use a putty knife to scrape away the old varnish or paint from the center panel. Be careful not to gouge the wood surface underneath. -
Sand the center:
Once dry, sand the stripped center panel thoroughly. Start with medium grit to remove residue, then finish with fine grit to smooth the wood grain. -
Scuff sand the frame:
For the outer frame that will be painted solid, you don’t need to strip it to bare wood. Just scuff sand it with medium-grit sandpaper to create a ‘tooth’ for the new paint to grab.
Step 2: Painting the Frame
-
Tape off the center:
Carefully apply painter’s tape along the inner edge where the frame meets the center panel. Press the edges down firmly to prevent paint bleed. -
Prime the frame:
Apply a high-quality bonding primer to the outer frame stiles and rails. I usually let this cure overnight to ensure maximum durability. -
Apply first coat:
Using an angled sash brush, paint the frame with your creamy white cabinet enamel. Use long, smooth strokes to minimize brush marks. -
Sand and recoat:
Once the first coat is dry, lightly sand with fine grit paper to knock down any bumps. Apply a second coat of enamel for intricate, opaque coverage.
Grain Enhancement
Before whitewashing, use a wire brush gently on the bare oak. This opens the grain further, allowing more white pigment to settle in for high contrast.
Step 3: The Whitewashed Grain
-
Prepare the wash:
If you aren’t using a pre-mixed pickling stain, mix water and white latex paint in a 1:1 ratio. The mixture should be milky and thin. -
Apply the wash:
Brush the whitewash mixture onto the bare center panel, working in small sections. You want the liquid to settle into the wood grain. -
Wipe back:
Immediately wipe off the excess wash with a lint-free rag. Wipe in the direction of the grain. This leaves white pigment in the deep grain lines while keeping the surface wood tone visible. -
Dry and assess:
Let the panel dry completely. If you want a whiter look, repeat the wash and wipe process one more time.
Bleed-Through Blues
If paint bleeds onto your natural wood center, don’t wipe it while wet! Let it dry completely, then gently scrape it off with a razor blade or sand it away.
Step 4: Detailing & Finishing
-
Highlight the molding:
For the decorative trim piece surrounding the center panel, use a small artist brush to apply a subtle gold or brass metallic paint. This mimics the raw wood look or adds a touch of glam. -
Seal the wood:
Protect the whitewashed center panel with two coats of water-based matte polyurethane. This seals the raw wood against kitchen humidity without adding shine. -
Reattach hardware:
Once everything is fully cured (give it 24 hours if possible), attach your new brass knob. Since the style is simple, a classic round knob works beautifully. -
Rehang the door:
Screw the hinges back onto the cabinet frame and adjust them to ensure the door sits level and flush with the adjacent drawers.
Now step back and admire how the natural texture transforms your kitchen into a warm, inviting space
Hand-Painted Pattern on Cabinet Fronts
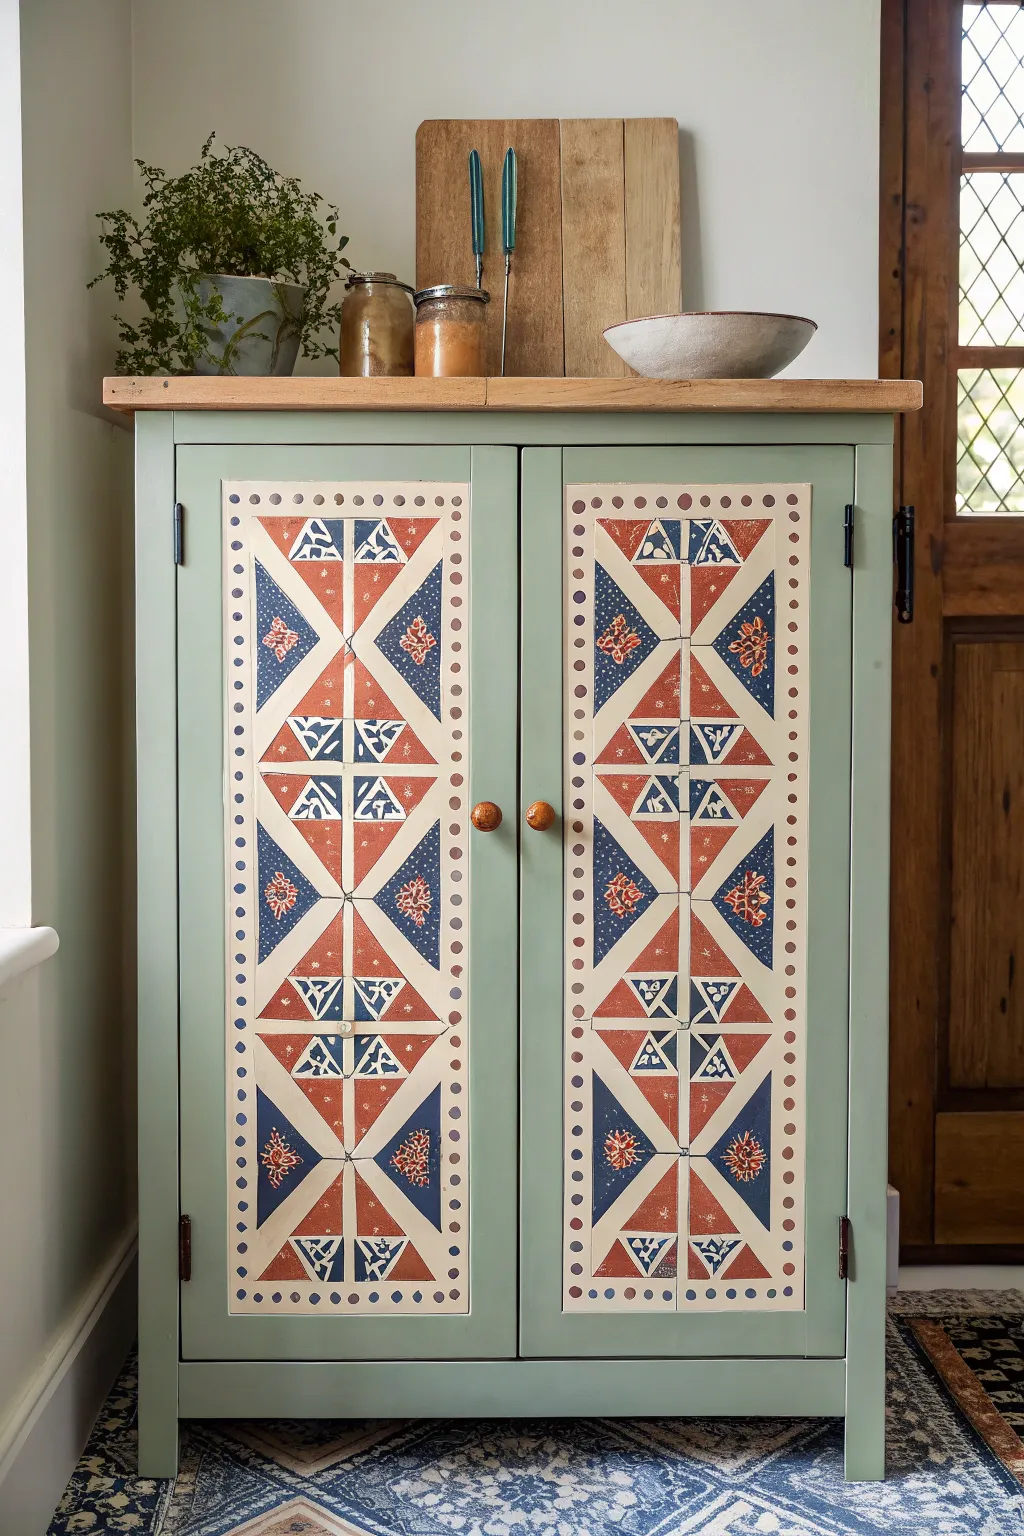
Transform a plain, flat-fronted cabinet into a charming focal point with this hand-painted geometric design. Inspired by vintage folk art and textile block prints, this project uses earthy reds and indigos against a soft sage backdrop to create a warm, handcrafted look.
Step-by-Step
Materials
- Wooden cabinet (painted sage green)
- Medium-grit sandpaper
- Painter’s tape
- Ruler and pencil
- Cream or off-white chalk paint
- Rust red acrylic or chalk paint
- Navy blue acrylic or chalk paint
- Small flat brush (1/2 inch)
- Fine liner brush
- Small round sponge dobber or q-tips
- Clear matte polyurethane sealer
- Small stencils (optional, for the floral centers)
- Cardstock (for making templates)
Step 1: Preparation & Base Block
-
Clean surface:
Begin by removing the cabinet hardware to ensure a smooth working area. Clean the door surfaces thoroughly with a degreaser to remove any kitchen oils. -
Define the panel:
Since this is a flat door, we need to create the illusion of a recessed panel. Measure about 2-3 inches in from the outer edge of the door on all sides. Use painter’s tape to mark off a large rectangle in the center. -
Mask the frame:
Press the tape down firmly to prevent bleed-through. You are essentially creating a ‘canvas’ area in the middle of the door where the pattern will live. -
Paint the background:
Using the cream or off-white chalk paint, fill in the rectangular area inside your tape. Apply two thin coats rather than one thick one for the smoothest finish, letting it dry completely between layers. -
Remove tape:
Carefully peel away the painter’s tape while the second coat is still slightly tacky to get a crisp edge. Let the cream block cure fully, preferably overnight.
Step 2: Drafting the Geometry
-
Find the centerline:
Lightly draw a vertical line down the exact center of your cream rectangle using a ruler and pencil. -
Create the grid:
Divide the vertical line into equal sections—roughly 4 to 5 inches tall depending on your door height. Draw horizontal lines across the cream panel at these intervals to create a stacked grid of rectangles. -
Draw the X’s:
Inside each rectangle you just created, use your ruler to draw a large ‘X’ from corner to corner. This creates four triangles per section: top, bottom, left, and right. -
Create the border guide:
Lightly sketch a 1-inch border inside the perimeter of the entire cream rectangle. This space will be reserved for the dotted border later.
Uneven Lines?
Keep a damp Q-tip handy while painting the triangles. If you wobble outside the line, quickly wipe the wet paint away to keep the geometric shapes sharp.
Step 3: Painting the Pattern
-
Block in the triangles:
Start with your rust red paint and the small flat brush. Paint the top and bottom triangles of each ‘X’ section. I find it helpful to outline the triangle first with the brush edge, then fill the center. -
Add the blue accents:
Once the red is dry, switch to navy blue. Paint the side (left and right) triangles. You now have a repeating hourglass pattern down the door. -
Add separation lines:
Using a fine liner brush and the cream paint (or the original sage green body color if you prefer high contrast), re-trace the lines between the triangles. This cleans up any messy edges and separates the geometric shapes. -
Detail the red sections:
Inside the red triangles, hand-paint small simplified motifs using cream or blue. Think about simple shapes like a small house, a bird, or a geometric knot. If you aren’t confident freehanding, use a tiny stencil here. -
Detail the blue sections:
Repeat the process for the blue triangles. In this project, the blue sections feature small floral bursts or sun patterns painted in red and cream.
Add Texture
Mix a tiny amount of baking soda into your chalk paint for the triangle fills. This creates a raised, block-print texture that feels authentic to the touch.
Step 4: Finishing Touches
-
Dot the border:
Dip your round sponge dobber or a Q-tip into the rust red paint. Press dots evenly along the 1-inch border space you reserved earlier, spacing them about an inch apart. -
Add secondary dots:
Once the red dots are dry, go back with the navy blue and add smaller dots in the spaces between the red ones for a rhythmic border. -
Distress lightly:
For that aged, folk-art feel, very lightly run high-grit sandpaper over the painted design. Focus on the edges and corners where wear would naturally occur. -
Seal the work:
Protect your artwork with two coats of clear matte polyurethane. This is crucial for kitchen cabinets that face daily wear and tear. -
Reattach hardware:
Once the sealer has cured for at least 24 hours, screw your knobs back on and enjoy your custom creation.
Step back and admire how a simple geometric repetition brings warmth and personality to the entire room


Have a question or want to share your own experience? I'd love to hear from you in the comments below!