If you want all the Halloween fun without the sharp tools, pumpkin painting is my favorite go-to with kids. These kid-friendly ideas keep things simple, bright, and totally no-carve, while still letting your little artists show off their personalities.
Painted Jack-o’-Lantern Faces
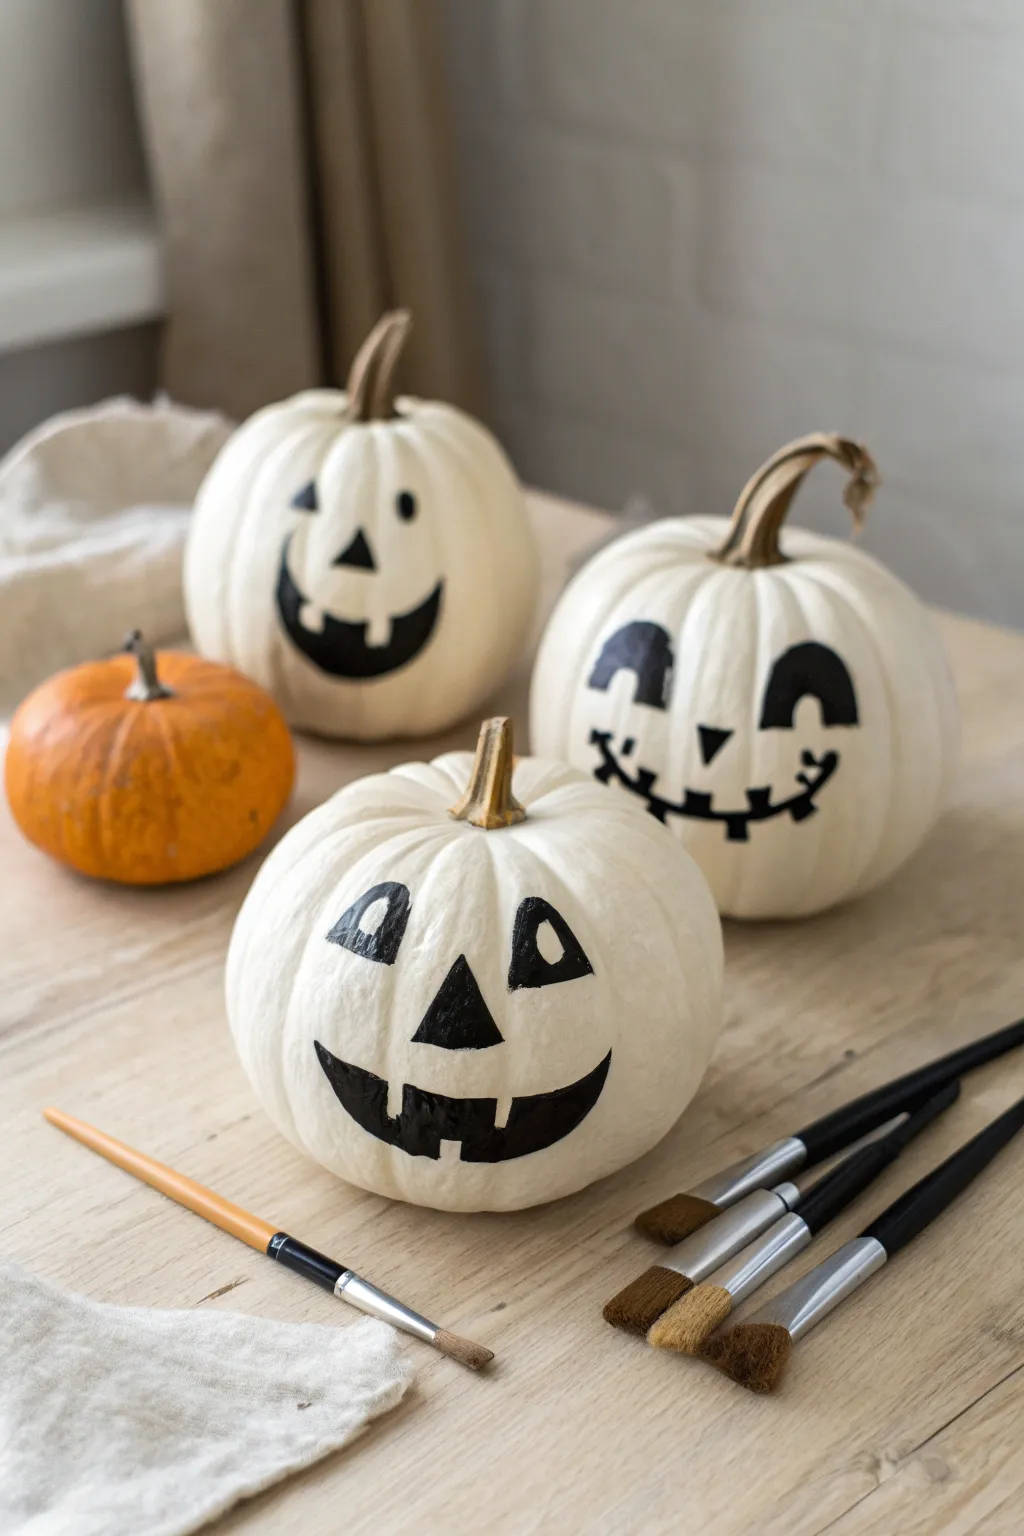
Skip the messy carving this year and opt for these striking high-contrast pumpkins that are perfect for younger crafters. By using white pumpkins as a canvas, simple black acrylic paint creates bold, classic Jack-o’-Lantern expressions that pop on any front porch.
Step-by-Step
Materials
- Small to medium white pumpkins (real or faux)
- Black acrylic craft paint
- Pencil (soft lead like 2B or 4B)
- Medium round paintbrush
- Small liner or detail paintbrush
- Damp cloth or paper towels
- Matte spray sealer (optional)
Step 1: Preparation & Planning
-
Clean the surface:
Before you start, wipe down your white pumpkins with a damp cloth to remove any dirt or field dust. Let them dry completely so the paint adheres properly. -
Choose your faces:
Decide on which personality you want for each pumpkin. You can go for a goofy grin with round eyes, a classic spooky face with triangles, or a friendly stitched smile. -
Sketch the outlines:
Take your pencil and very lightly sketch the face designs directly onto the pumpkin skin. -
Adjust the placement:
Step back and look at your sketch. If the eyes look too high or the mouth is crooked, simply wipe the pencil mark away with a damp finger and try again.
Fixing Smudges
Did you accidentally smudge wet black paint on the white skin? Don’t panic! Use a wet q-tip or a baby wipe immediately to lift the mistake before it sets.
Step 2: Painting the Features
-
Outline the eyes:
Start with your smaller detail brush. Dip it into the black acrylic paint and carefully trace over your pencil lines for the eyes. -
Fill in the eyes:
Switch to your medium round brush to fill in the larger areas of the eyes. For the pumpkin with white pupils, leave a small circle unpainted in the corner of the eye. -
Define the nose:
Using the detail brush again, outline and fill the nose shape. A small triangle usually works best for these classic designs. -
Outline the mouth:
Move down to the mouth. Since the surface is curved, I find it helpful to rest my pinky finger on a dry part of the pumpkin to steady my hand while outlining the smile. -
Create the teeth:
If your design has teeth, carefully outline the square or rectangular shapes along the gum line first. -
Fill the mouth cavity:
Use the medium brush to fill in the black space of the mouth, painting around the teeth shapes you just created. -
Add character details:
For the pumpkin with the stitched smile, use the detail brush to add small vertical hash marks across the main smile line.
Step 3: Finishing Touches
-
Check for opacity:
Once the first coat is dry to the touch (usually 15-20 minutes), check if the black looks solid. If you see streaks, apply a second thin coat of black paint. -
Clean up edges:
If any lines look wobbly, use a clean, damp brush or a cotton swab to gently tidy up the edges while the paint is still slightly fresh. -
Erase pencil marks:
After the paint is bone dry, take a clean eraser and gently remove any visible pencil lines that peek out from behind the paint. -
Seal the work:
If these pumpkins will live outside, give them a quick coat of clear matte spray sealer to protect the paint from the elements.
Glow in the Dark
For a spooky nighttime surprise, paint a final layer of clear glow-in-the-dark medium over the white parts of the eyes or teeth.
Set your trio of pumpkins together on the porch for a delightfully simple Halloween display


Cute Monster Face Pumpkins
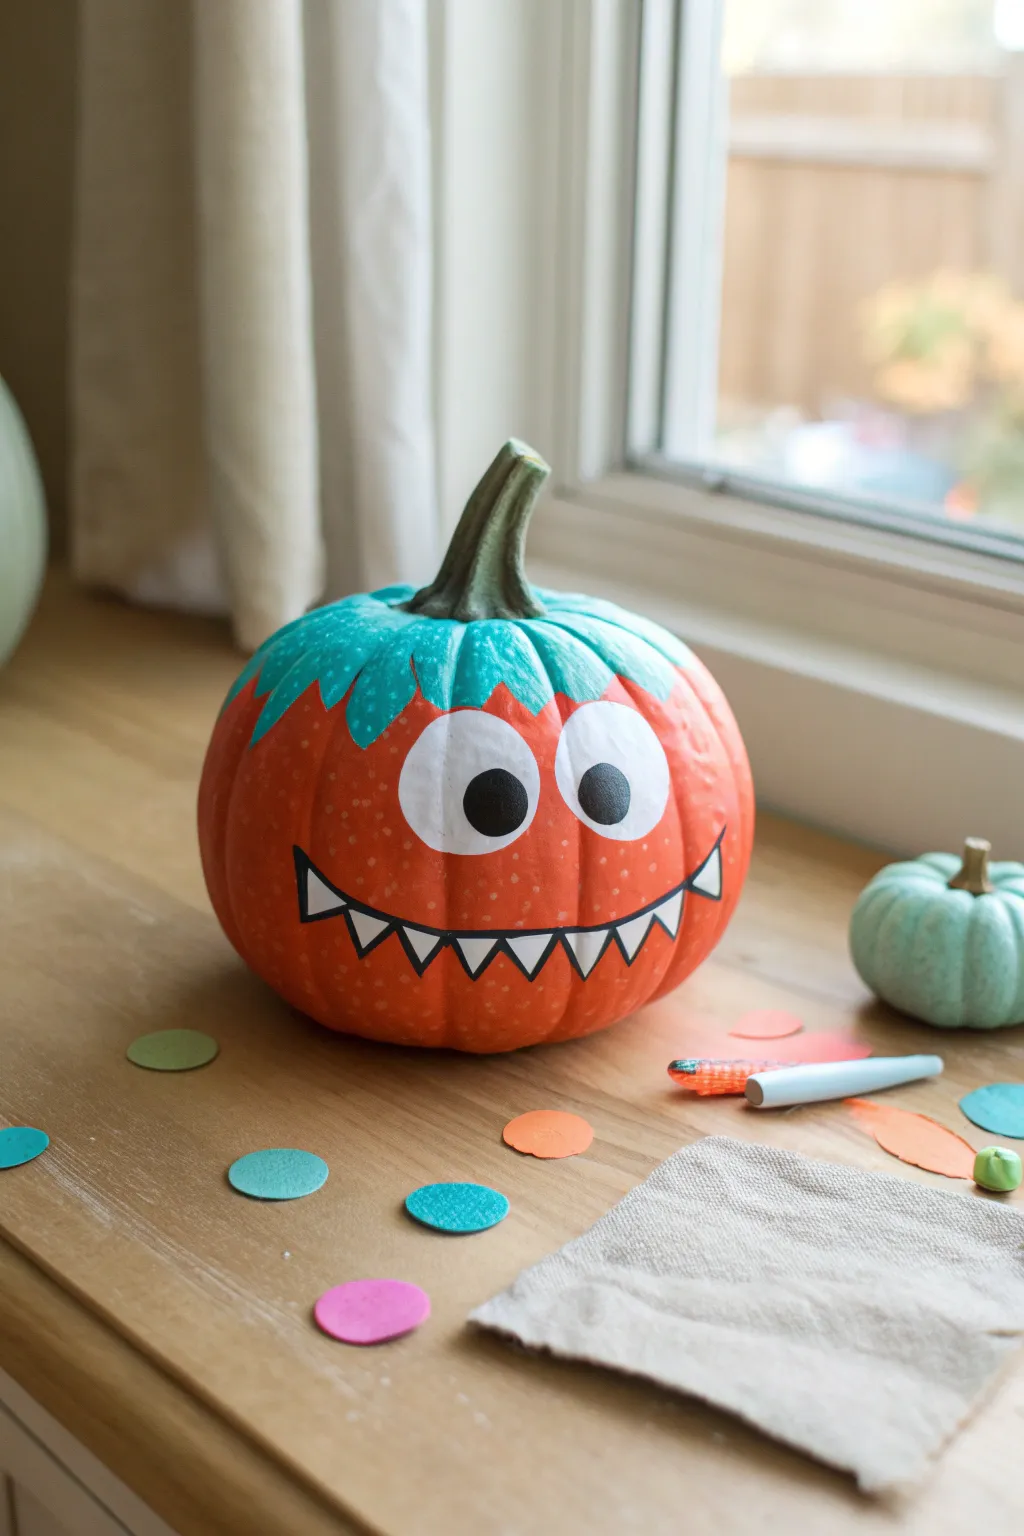
Transform a classic orange pumpkin into a friendly, grinning monster with this simple yet striking design. Featuring a distinct teal ‘hairdo’ and massive cartoon eyes, this project relies on clean lines and bold color blocking to create a character that feels animated and fun.
Step-by-Step Guide
Materials
- Medium-sized orange pumpkin (real or faux)
- Small teal or turquoise acrylic paint
- White acrylic paint
- Black acrylic paint or black paint marker
- Medium flat paintbrush
- Small detail paintbrush
- Pencil/Eraser
- Plate or palette
- Water cup and paper towels
Step 1: Planning and Prepping
-
Clean the surface:
Wipe down your pumpkin with a damp cloth to remove any dirt or oils. If you are using a real pumpkin, ensure it is completely dry before you start painting so the acrylic adheres properly. -
Outline the hair:
Using a pencil, lightly sketch a wavy, zig-zag line around the top of the pumpkin, about an inch or two down from the stem base. This will be the separation line between the orange face and the teal ‘hair’. -
Sketch the face:
Draw two large ovals for the eyes just below your hair line. Make them slightly uneven or tilted to add personality. For the mouth, sketch a wide, U-shaped smile that spans most of the pumpkin’s width. -
Detail the teeth:
Inside the smile line, draw a series of triangles pointing downward from the top lip and upward from the bottom lip to create sharp, jagged teeth.
Paint Slipping?
If acrylic paint beads up or slides off a waxy real pumpkin, mix a tiny drop of dish soap into your paint puddle. This breaks the surface tension for better grip.
Step 2: Painting the Base Colors
-
Paint the hair:
Fill in the top section around the stem using your teal paint. Use the medium flat brush to get a smooth coat, carefully following the wavy pencil line you drew earlier. -
Refine the hair edges:
For the tips of the ‘hair’ points, switch to a smaller brush to get sharp, clean points. I find it helpful to pull the brush downward toward the point for a crisper look. -
Fill the eyes:
Paint the two large eye ovals completely white. You will likely need two coats here to make sure the orange pumpkin skin doesn’t show through. -
Paint the teeth:
Using your small detail brush, carefully fill in the triangle teeth with white paint. Take your time here, as these shapes are small and precise. -
Let it dry:
Allow the white and teal paint to dry completely. This usually takes about 15-20 minutes, depending on how thick the layers are.
Step 3: Adding Details and Defining Features
-
Outline the eyes:
Once the white paint is dry, outline the large ovals with black paint using a very fine brush or a black paint marker for steady control. -
Add pupils:
Paint a solid black circle inside each white oval. Place them slightly off-center—looking sideways or cross-eyed makes the monster look sillier rather than scary. -
Outline the mouth:
Trace the main smile line with your black paint or marker. Make this line slightly thicker than the others to ground the face. -
Define the teeth:
Outline each individual white tooth triangle with black. This separation is crucial for making the grin readable. -
Add texture spots:
To give the skin some texture, dip the non-brush end (the handle tip) of a small paintbrush into a lighter orange or yellow paint. -
Dot the face:
Gently dot the orange sections of the pumpkin with the handle tip. Keep the dots random and sparse to simulate freckles or monster skin texture. -
Detail the hair:
Using a slightly lighter shade of teal (mix a little white into your teal), add small dots or short strokes to the hair section to give it depth and interest. -
Final touch-ups:
Check for any smudges or transparent spots. A quick second coat on the black pupils usually makes them pop nicely.
Make it 3D
Cut foam triangles for teeth and glue them on instead of painting, or glue real yarn strands over the teal paint area for textured, fuzzy monster hair.
Place your creation on a windowsill and enjoy the goofy charm it brings to the room


Friendly Ghost Pumpkin
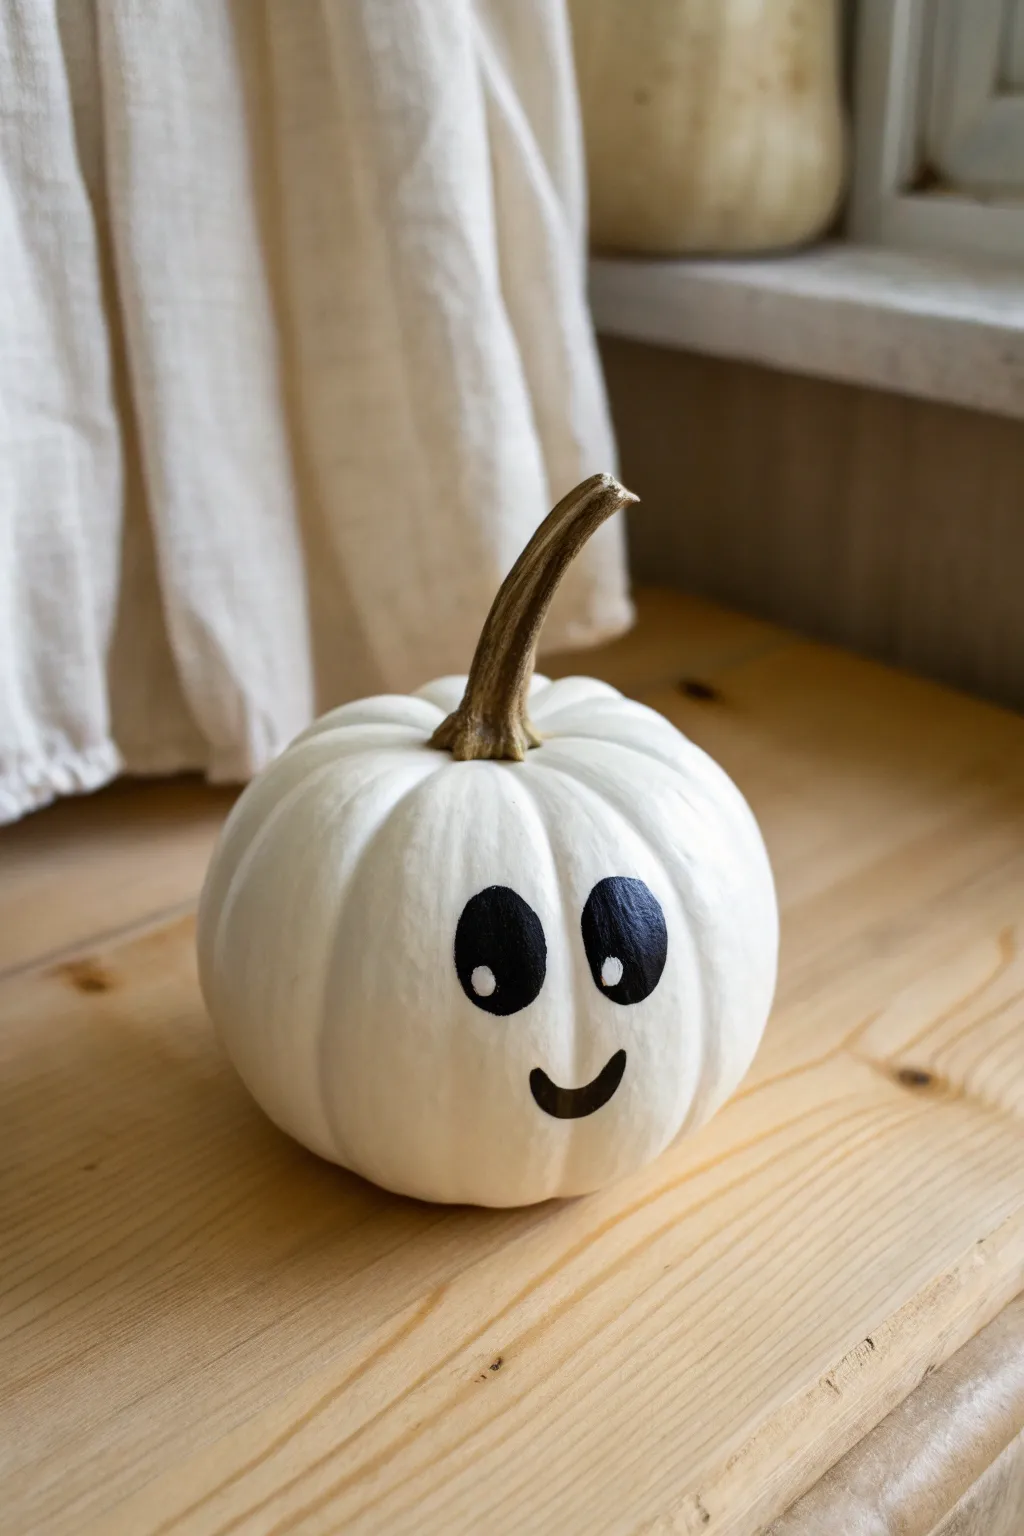
Turn a simple mini pumpkin into an adorable spooky friend with just a few strokes of paint. This minimalist design relies on high-contrast black eyes and a sweet smile to create a charming, not-so-scary Halloween decoration.
Step-by-Step Tutorial
Materials
- Small white pumpkin (real or faux)
- Black acrylic paint
- White acrylic paint
- Small round paintbrush
- Very fine detail brush or dotting tool
- Damp cloth or paper towel
- pencil (optional)
Step 1: Preparation
-
Clean surface:
Begin by wiping down your pumpkin with a damp cloth to remove any dirt or dust from the pumpkin patch. Let it dry completely so the paint adheres properly. -
Positioning:
Place the pumpkin on your work surface and rotate it to find the best ‘face’ side. Look for a relatively smooth section without deep grooves or blemishes. -
Drafting lightly:
If you’re worried about symmetry, use a pencil to very lightly sketch two tall ovals for eyes and a small curved line for the mouth. Keep the marks faint so they don’t show through the paint later.
Clean Lines Secret
If you struggle painting perfect ovals, use a thumbprint! Dip your thumb in black paint, press it onto the pumpkin, and fill in gaps with a brush.
Step 2: Painting the Features
-
Load the brush:
Load your small round paintbrush with black acrylic paint. You don’t need a huge gob, just enough to coat the bristles evenly. -
Outline the first eye:
Start with the left eye. Paint a tall, vertical oval shape. It should look a bit like an egg standing on its end. -
Fill it in:
Once you have the outline, fill in the center of the oval with black paint. Smooth out any brushstrokes for a solid, opaque look. -
Paint the second eye:
Move to the right side and paint the second oval. Try to keep it roughly the same size and height as the first one, leaving a gap between them about the width of one eye. -
Check for symmetry:
Take a quick step back to look at the eyes. If one looks smaller, carefully broaden the outline until they match. -
Start the smile:
Reload your brush with black paint. Position the brush below the eyes, centered in that gap between them. -
Paint the curve:
Paint a simple, small ‘U’ shape for the smile. Keep the line thickness consistent with the paintbrush width. -
Thicken the smile:
Go back over the smile line just once more if needed to make the black color solid and dark like the eyes. -
Drying time:
Let the black paint dry completely. This is crucial—if the black is wet, the next step will turn gray and muddy.
Add Some Blush
Make your ghost extra shy by dipping a dry brush into pale pink paint and lightly dabbing blurry circles on the ‘cheeks’ just under the eyes.
Step 3: Adding the Sparkle
-
Prepare white paint:
Squeeze a tiny dot of white acrylic paint onto your palette. -
Tool selection:
Using a very fine detail brush, a dotting tool, or even the handle end of your paintbrush, dip into the white paint. -
First highlight:
Gently press a white dot into the upper left area of the left black eye oval. This ‘catchlight’ brings the character to life. -
Second highlight:
Repeat the process on the right eye, placing the white dot in the exact same relative position (upper left) to ensure the ghost looks like it is focusing in one direction. -
Touch ups:
Check the edges of your black paint. If you see any unevenness against the white pumpkin skin, you can carefully neaten them with a damp brush or a tiny bit of white paint. -
Final dry:
Allow the white highlights to dry fully before moving the pumpkin.
Place your friendly little ghost on a windowsill or shelf to greet visitors with a smile


Silly Frankenstein-Style Pumpkin
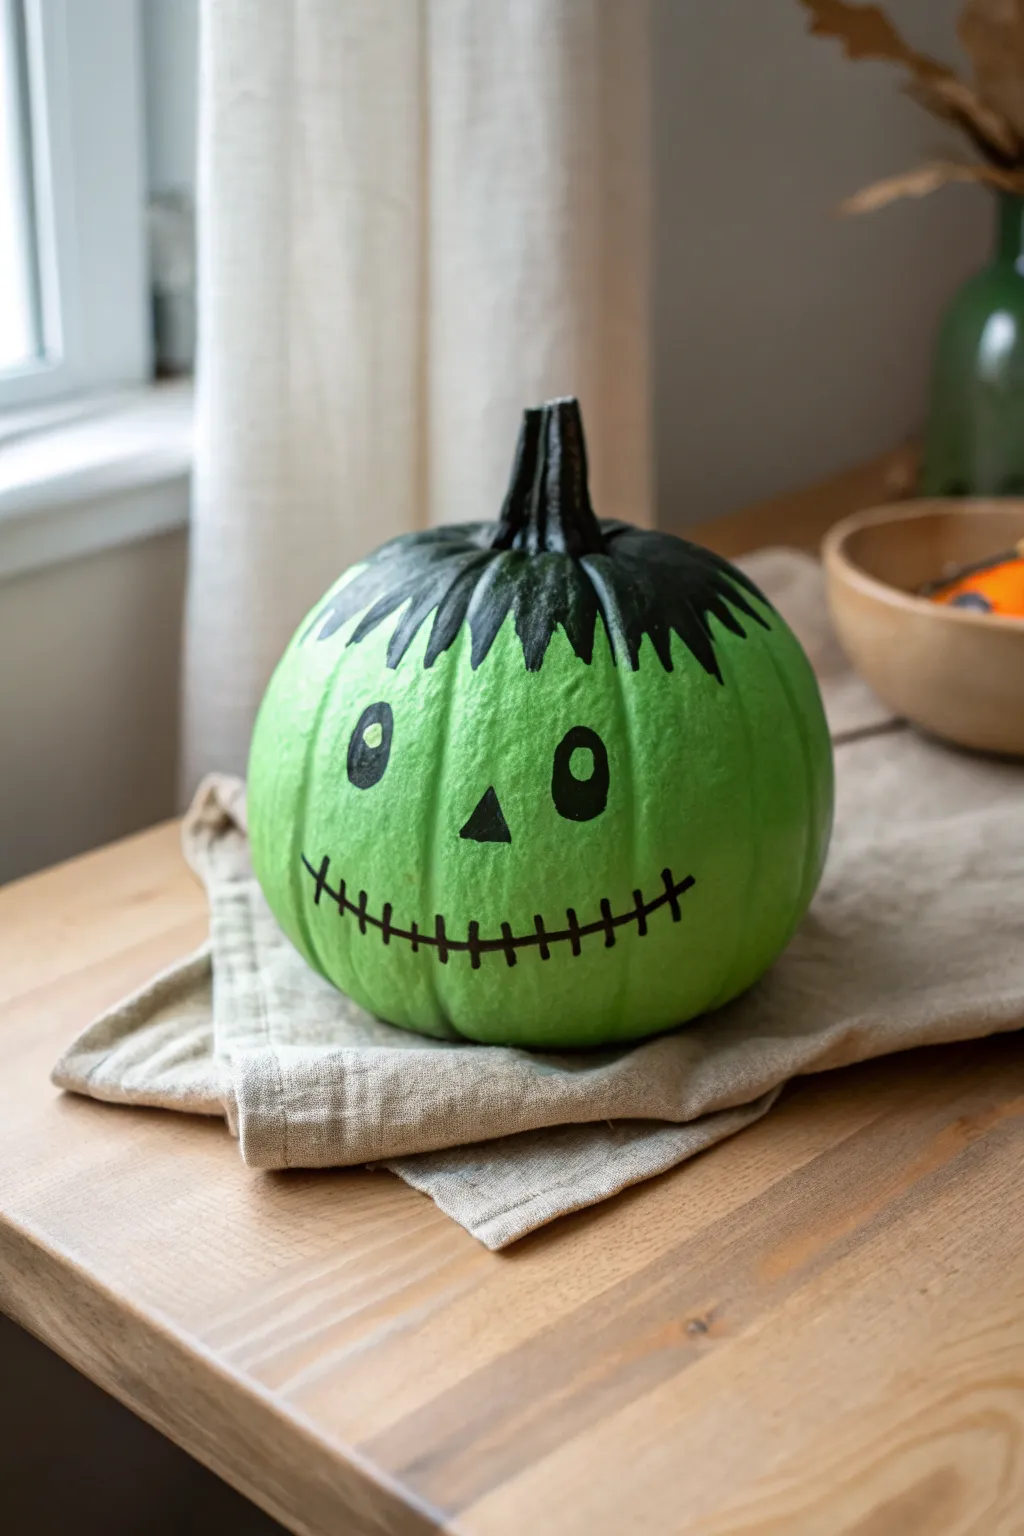
Transform a simple round pumpkin into a friendly monster with just a few strokes of paint. This Frankenstein-inspired design features a bright green face, jagged black hair, and that signature stitched smile.
Step-by-Step
Materials
- Medium-sized round pumpkin
- Bright lime green acrylic paint
- Black acrylic paint
- White acrylic paint
- Large flat paintbrush
- Medium round paintbrush
- Small detail brush
- Paper plate or palette
- Cup of water
- Paper towels
- Pencil (optional)
Step 1: Base Coat
-
Clean surface:
Before you start, make sure your pumpkin is clean and dry. Wipe it down with a damp cloth to remove any dirt or dust so the paint sticks properly. -
Initial green layer:
Squeeze a generous amount of bright lime green acrylic paint onto your palette. Using the large flat brush, apply a coat of green paint over the entire pumpkin, but you can leave the very bottom unpainted for easier handling. -
Drying time:
Let this first coat dry completely. This usually takes about 15-20 minutes depending on how thick the paint is. -
Second green layer:
For a really vibrant monster face, apply a second coat of green paint. This ensures the orange pumpkin skin doesn’t show through. -
Smooth finish:
While applying the second coat, try to brush in vertical strokes from top to bottom for a smoother finish.
Step 2: Hair and Features
-
Paint the stem:
Switch to black acrylic paint. Use your medium round brush to paint the entire stem of the pumpkin black. -
Start the hair:
Continue bringing the black paint down from the stem onto the top of the pumpkin, creating a circle of black around the stem base. -
Create bangs:
Now for the classic monster look. Paint jagged triangles pointing downwards from that black circle onto the upper forehead area. Make them uneven—some long, some short. -
Fill the hair:
Go back and fill in the triangles so they are solid black, connecting seamlessly to the painted stem area. -
Draft the face:
If you are worried about spacing, lightly sketch the eyes, nose, and mouth placement with a pencil directly on the dry green paint.
Paint Slipping?
If the acrylic paint beads up on the pumpkin’s waxy skin, try mixing a tiny drop of liquid dish soap into your green paint before applying to help it adhere.
Step 3: Face Details
-
Paint the eyes:
Using the medium round brush and black paint, create two oval-shaped eyes. I personally like making them slightly different sizes to give him a goofy expression. -
Add the nose:
Paint a small, black triangle for the nose right in the center of the face, below the eyes. -
Draw the smile:
Switch to your small detail brush. Paint a thin, curved black line for the mouth, stretching it wide across the face. -
Stitch it up:
Using the same small brush, paint short vertical tick marks all along the mouth line to create the stitched appearance. -
Eye highlights:
Once the black eye paint is totally dry, dip the handle end of a small brush into white paint and dot it onto the black ovals to create a little sparkle. -
Final touch:
Check your work for any spots that need a touch-up and let the entire pumpkin dry overnight before displaying.
Bolts Included
Glue two painted wine corks or metallic bottle caps to the sides of the pumpkin using a hot glue gun to give Frankie his iconic neck bolts.
Now you have a spooky yet adorable decoration ready for the porch
BRUSH GUIDE
The Right Brush for Every Stroke
From clean lines to bold texture — master brush choice, stroke control, and essential techniques.
Explore the Full Guide
Witch Hat Pumpkin Portrait

This adorable pumpkin project transforms a classic gourd into a friendly witch character with big, bright eyes and a charming hat. It pairs perfectly with a miniature striped pumpkin sidekick for a delightful porch display.
How-To Guide
Materials
- Medium-sized round orange pumpkin
- Miniature pumpkin
- White acrylic paint
- Black acrylic paint
- Medium flat paintbrush
- Small round detail brush
- Black witch hat (fabric or felt)
- Pencil or chalk (for sketching)
- Paper towels
- Water cup
Step 1: Planning the Face
-
Clean surface:
Begin by wiping down your pumpkin with a damp cloth to remove any dirt or residue. A clean, dry surface ensures the paint adheres properly. -
Position the hat:
Place the witch hat on top of the pumpkin temporarily. This helps you figure out exactly where the eyes should sit so they aren’t covered by the brim later. -
Sketch the eyes:
Using a pencil or a piece of white chalk, lightly draw two large, vertical oval shapes on the upper half of the pumpkin. Space them slightly apart to create a cute, wide-eyed look.
Paint Pen Magic
Struggling with brush control? Use black and white acrylic paint pens instead. They make drawing straight eyelashes and crisp diamonds much easier giving precise results.
Step 2: Painting the Features
-
Fill in the whites:
Load your medium flat brush with white acrylic paint. Fill in the oval shapes you just sketched. You will likely need two to three coats to get a solid, opaque white; let each layer dry completely before adding the next. -
Sketch the pupils:
Once the white paint is bone dry, lightly mark where the pupils will go. Positioning them slightly inward and upward gives the character a curious expression. -
Paint pupils:
Switch to your small round detail brush and black paint. Carefully paint small black circles for the pupils. -
Add highlights:
If you want extra sparkle like in the photo, leave a tiny speck of white unpainted inside the black pupil, or come back later with a tiny dot of white paint once the black is dry. -
Create the smile:
Using the small detail brush with black paint, draw a small, simple ‘U’ shape between and slightly below the eyes for a gentle smile. -
Add eyelashes:
Paint three small vertical lines extending upward from the top of each white eye oval to create sweet eyelashes.
Sheer White Paint?
If your white paint looks streaky or transparent, mix in the tiniest drop of light gray or buff paint. It improves opacity without changing the color too drastically.
Step 3: Adding Charming Details
-
Draw sparkles:
To give the face a magical touch, use the fine tip of your brush to paint four-pointed star or diamond shapes on the cheeks. Outline them in black. -
Refine the lines:
Go over any of your black lines that look a bit faint. A second pass with the liner brush makes the features pop against the orange skin. -
Top it off:
Place the witch hat back onto the pumpkin. Adjust the tilt until it looks jaunty and fun.
Step 4: The Mini Sidekick
-
Prep the mini pumpkin:
Clean and dry your miniature pumpkin just like you did the larger one. -
Paint stripes:
Using your small round brush and black paint, follow the natural vertical ribs or grooves of the pumpkin. I find it easiest to start at the stem and pull the brush down to the base. -
Add dots:
In the spaces between the vertical stripes, add a single black dot near the middle or bottom for a patterned look. -
Paint the stem:
Give the stem of the mini pumpkin a coat of black paint to match the stripes and tie the look together. -
Final arrangement:
Place your large witch pumpkin on your step or table and arrange the striped mini pumpkin right next to it to complete the scene.
Set your charming duo on the porch to greet trick-or-treaters
Pumpkin Family Face Set
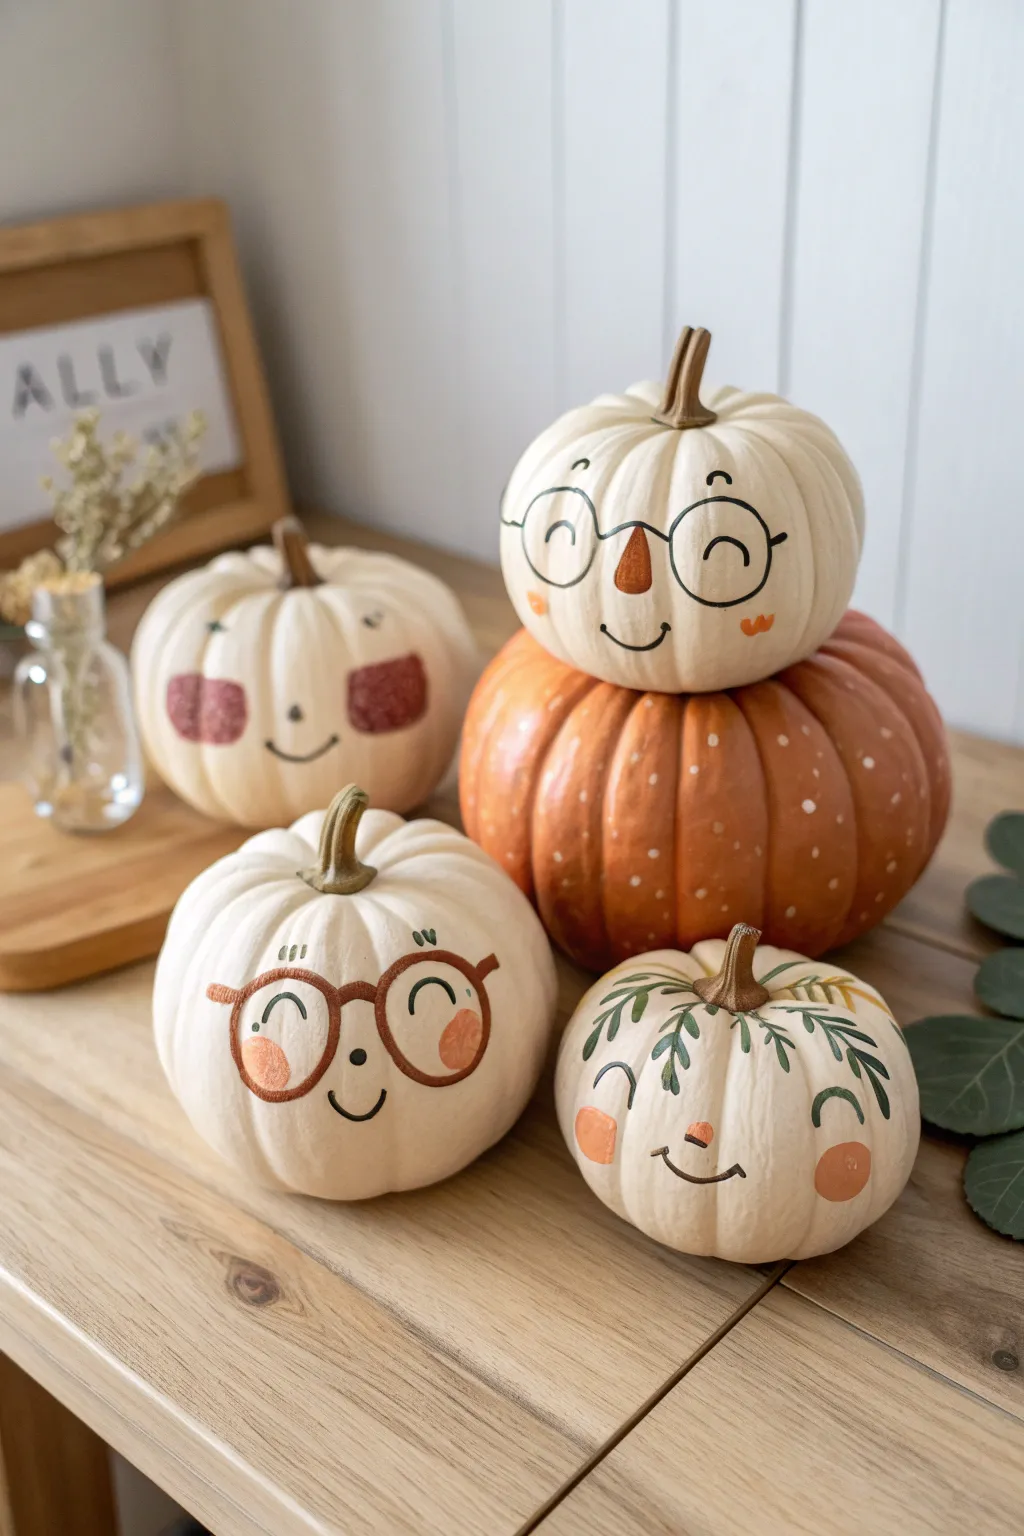
Gather a charming little family of gourds with this sweet and simple decorating idea. Using mostly white pumpkins as your canvas, you’ll create diverse personalities featuring hand-painted glasses, leafy hairstyles, and adorable expressions.
Detailed Instructions
Materials
- 3 small to medium white pumpkins (real or faux)
- 1 medium orange pumpkin (for the base)
- Acrylic paint markers (brown, black, orange, pink)
- Fine-tip paintbrush
- Acrylic craft paint (white, sage green, terracotta)
- Small cup of water
- Paper towels
- Clear matte sealant spray (optional)
Step 1: Setting the Scene
-
Clean Your Canvases:
Wipe down all your pumpkins with a damp cloth to remove any dirt or waxy residue. If you are using real pumpkins, make sure they are completely dry before you start adding any color. -
Prep the Orange Base:
Take your large orange pumpkin and prepare it to be the seat for the leader of the pumpkin family. Using a fine-tip brush or a white paint pen, add small, random dots all over the orange surface to give it a whimsical texture. -
Dry the Base:
Set the dotted orange pumpkin aside to dry completely while you work on the character faces. This ensures you won’t smudge the dots when stacking later.
Fixing Wobbly Lines
If a painted line goes astray, quickly wipe it with a damp Q-Tip before it dries. If it’s already dry, paint over the mistake with white acrylic paint to ‘erase’ it.
Step 2: Creating the Bespectacled Pumpkins
-
Outline the Round Glasses:
Select a round white pumpkin. Using a brown or black paint pen, carefully draw two large circles near the center of the pumpkin to form the frames. -
Add the Bridge:
Connect the two circles with a small, curved line acting as the nose bridge. -
Paint the Eyes:
Inside the glasses frames, draw simple curved lines. You can make them classic upward arches for happy eyes or simple dots for a curious look. -
Add Cheeks:
On the pumpkin with brown glasses, paint large, round terracotta-colored circles on the lower outer corners of the frames for blushed cheeks. On the other glasses-wearing pumpkin, add small orange triangles or hearts. -
Give Them Noses:
For the pumpkin sitting on top of the orange base, paint a tall, triangular orange nose right between the eyes. For the other, just a tiny black dot works perfectly. -
Draw the Smiles:
Finish these two faces with simple, small smiles using a thin black liner. Keep the lines delicate for a sweet expression.
Step 3: The Nature-Lover Pumpkin
-
Start the Foliage:
On your third white pumpkin, you are going to create ‘hair’ using leaf motifs. Start at the very top near the stem. -
Paint the Vines:
Using a fine brush and sage green paint (or a green marker), draw thin vines cascading down from the stem towards the middle of the pumpkin. -
Add Leaves:
Add small, simple leaf shapes along the vines. Vary the direction of the leaves to make them look organic and flowing. -
Face Details:
Draw widely spaced, arched eyes below the foliage line. Add a tiny terracotta nose and a curved smile. -
Rosy Cheeks:
Daub two distinctive round pink or orange spots on the cheeks to complete this nature-inspired look.
Add Dimension
Use a white gel pen to add tiny ‘highlights’ inside the pupils or on the rosy cheeks to make the faces look shiny and lively.
Step 4: The Rectangular Blush Pumpkin
-
Position the Features:
If you have a fourth white pumpkin, situate the eyes slightly wider apart. -
Create Unique Cheeks:
Instead of circles, paint two soft, rectangular patches of reddish-brown or dark pink on the cheeks. I find loosely brushing this on creates a nice textured look. -
Final Expressions:
Add tiny dot eyes and a gentle smile to finish this character. -
Assemble the Stack:
Once all paint is dry, carefully stack the pumpkin with the triangle nose on top of the spotted orange pumpkin. -
Arrange the Group:
Place the other painted pumpkins around the base to complete your adorable pumpkin family gathering.
Enjoy displaying your cute and customized pumpkin family on your porch or entryway table

PENCIL GUIDE
Understanding Pencil Grades from H to B
From first sketch to finished drawing — learn pencil grades, line control, and shading techniques.
Explore the Full Guide
Handprint Feature Pumpkin
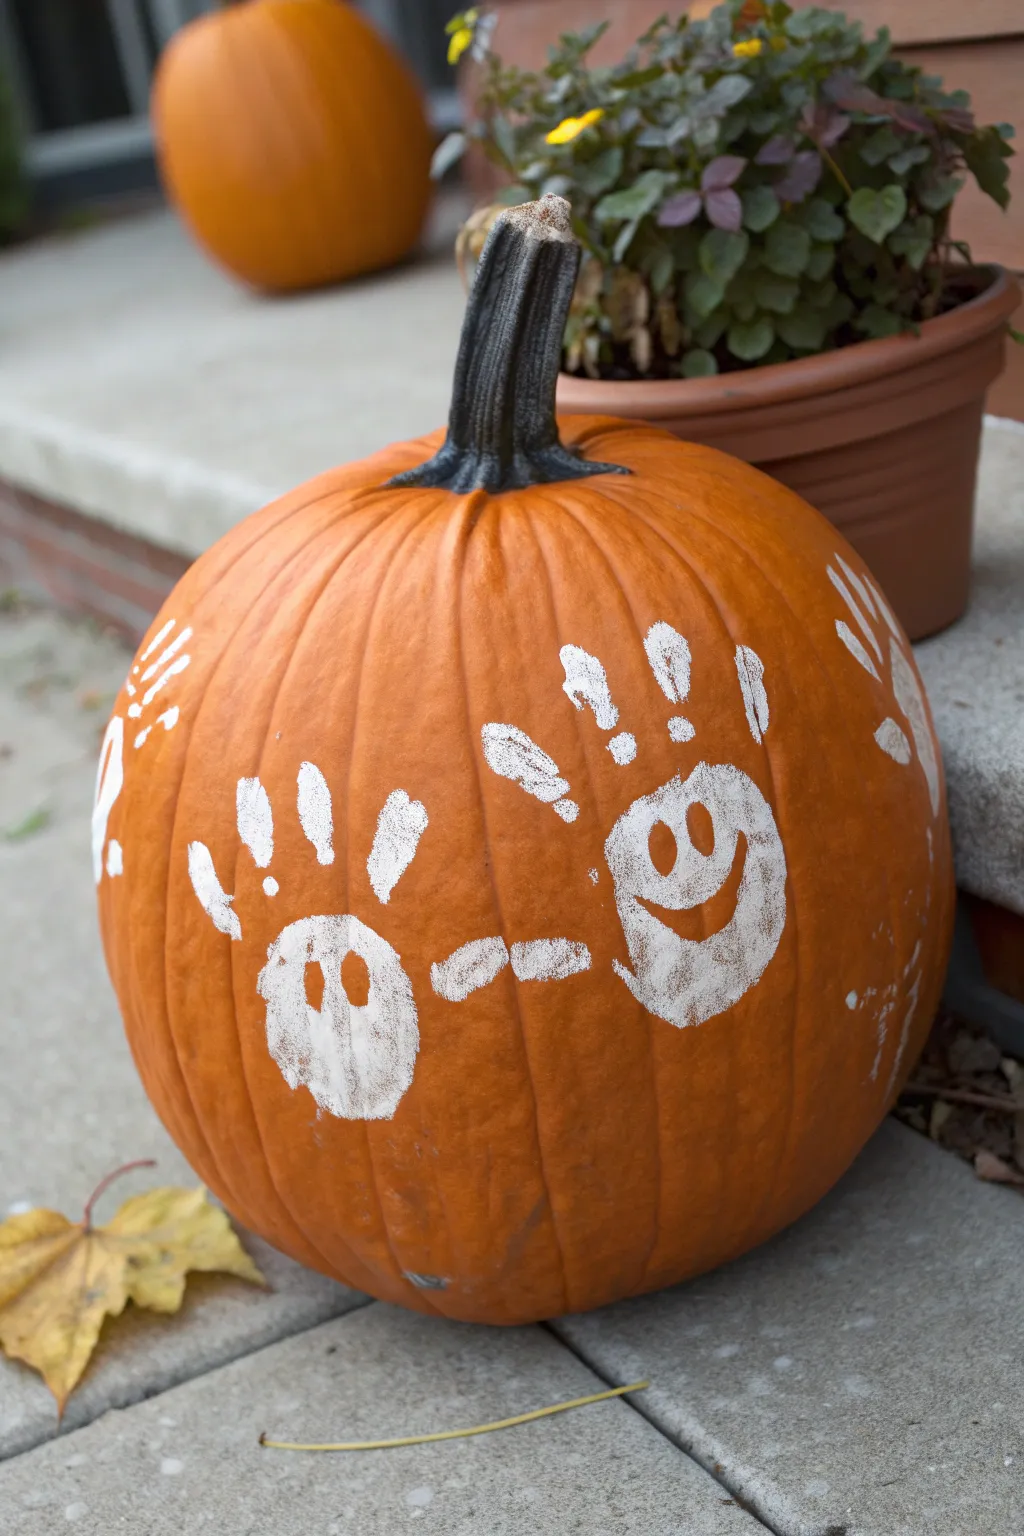
Transform a classic autumn gourd into a spooky yet adorable decoration with just a few simple supplies. This project turns simple white handprints into friendly little ghosts that seem to float right across the orange surface.
Step-by-Step
Materials
- Medium-sized orange pumpkin
- White acrylic paint (washable craft paint works well)
- Black acrylic paint
- Large foam brush or paintbrush
- Small round paintbrush
- Paper plate or palette
- Baby wipes or paper towels
- Newsprint or drop cloth
Step 1: Preparation
-
Clean the Surface:
Before you begin, wipe down your pumpkin with a damp cloth to remove any dirt or field dust. Dry it completely with a paper towel so the paint adheres properly. -
Set Up Your Station:
Cover your work area with newsprint or a drop cloth. Pour a generous amount of white acrylic paint onto a paper plate, spreading it out slightly to make dipping easier.
Smudged Prints?
If a hand slides while printing, wait for the smudge to dry completely. Then, paint over the mess with orange paint (mixed to match your pumpkin) to erase it before trying again.
Step 2: Creating the Handprints
-
Coat the Hand:
Have the child open their hand flat. Use the large foam brush to apply a thick, even coat of white paint to the entire palm and all five fingers. Make sure the paint is wet but not dripping. -
Position the Print:
Select a spot on the middle of the pumpkin’s side. Orient the hand so the fingers are pointing upward—these will become the ghost properties. -
Press Firmly:
Press the painted hand firmly against the pumpkin’s curve. Gently push down on each finger and the center of the palm to ensure a solid transfer. -
Lift Away:
Carefully peel the hand away from the pumpkin surface, lifting straight back to avoid smearing the wet paint. -
Repeat the Process:
Re-apply paint to the hand and create a second print next to the first one. Leave a few inches of space between them. You can rotate the second hand slightly or place it at a different height for visual interest. -
Fill the Gaps:
Depending on the size of your pumpkin, add more handprints around the sides and back to create a full circle of ghosts. -
Touch Ups:
If any parts of the print look too patchy or faint, use your foam brush to gently dab a little extra white paint into the center of the palm area while it’s still wet. -
Clean Up Hands:
Use baby wipes to immediately clean the child’s hands before moving to the next step. -
Drying Time:
Let the white handprints dry completely. This usually takes about 20-30 minutes depending on how thick the paint is. The white layer must be dry before adding the faces.
Level Up: Glow Time
Swap the standard white paint for glow-in-the-dark acrylic paint. Apply two or three layers for a strong glow, and your ghostly handprints will actually shine at night.
Step 3: Adding the Faces
-
Mix Black Paint:
Squeeze a small dime-sized amount of black acrylic paint onto your palette. -
Paint First Eyes:
Using the small round paintbrush, dip into the black paint. On the first handprint, paint two vertical, oval-shaped eyes in the upper portion of the palm area. -
Paint First Mouth:
Beneath the eyes, paint a mouth. For a surprised ghost look, paint a tall vertical oval. This creates a classic ‘O’ mouth shape. -
Paint Second Eyes:
Move to the second handprint. Paint two similar oval eyes in the palm area. -
Paint Second Mouth:
For this ghost, paint a wide, U-shaped curved line to create a happy, smiling face. Thicken the line slightly in the middle for a friendly expression. -
Add Personality:
I like to vary the expressions on the remaining handprints around the back, mixing smiles and surprised faces to give each ghost a unique character. -
Final Dry:
Allow the black paint features to dry completely before moving or displaying the pumpkin.
Enjoy displaying your personalized pumpkin that captures a snapshot of your little one’s helping hands
Fingerprint Dot Pattern Pumpkin
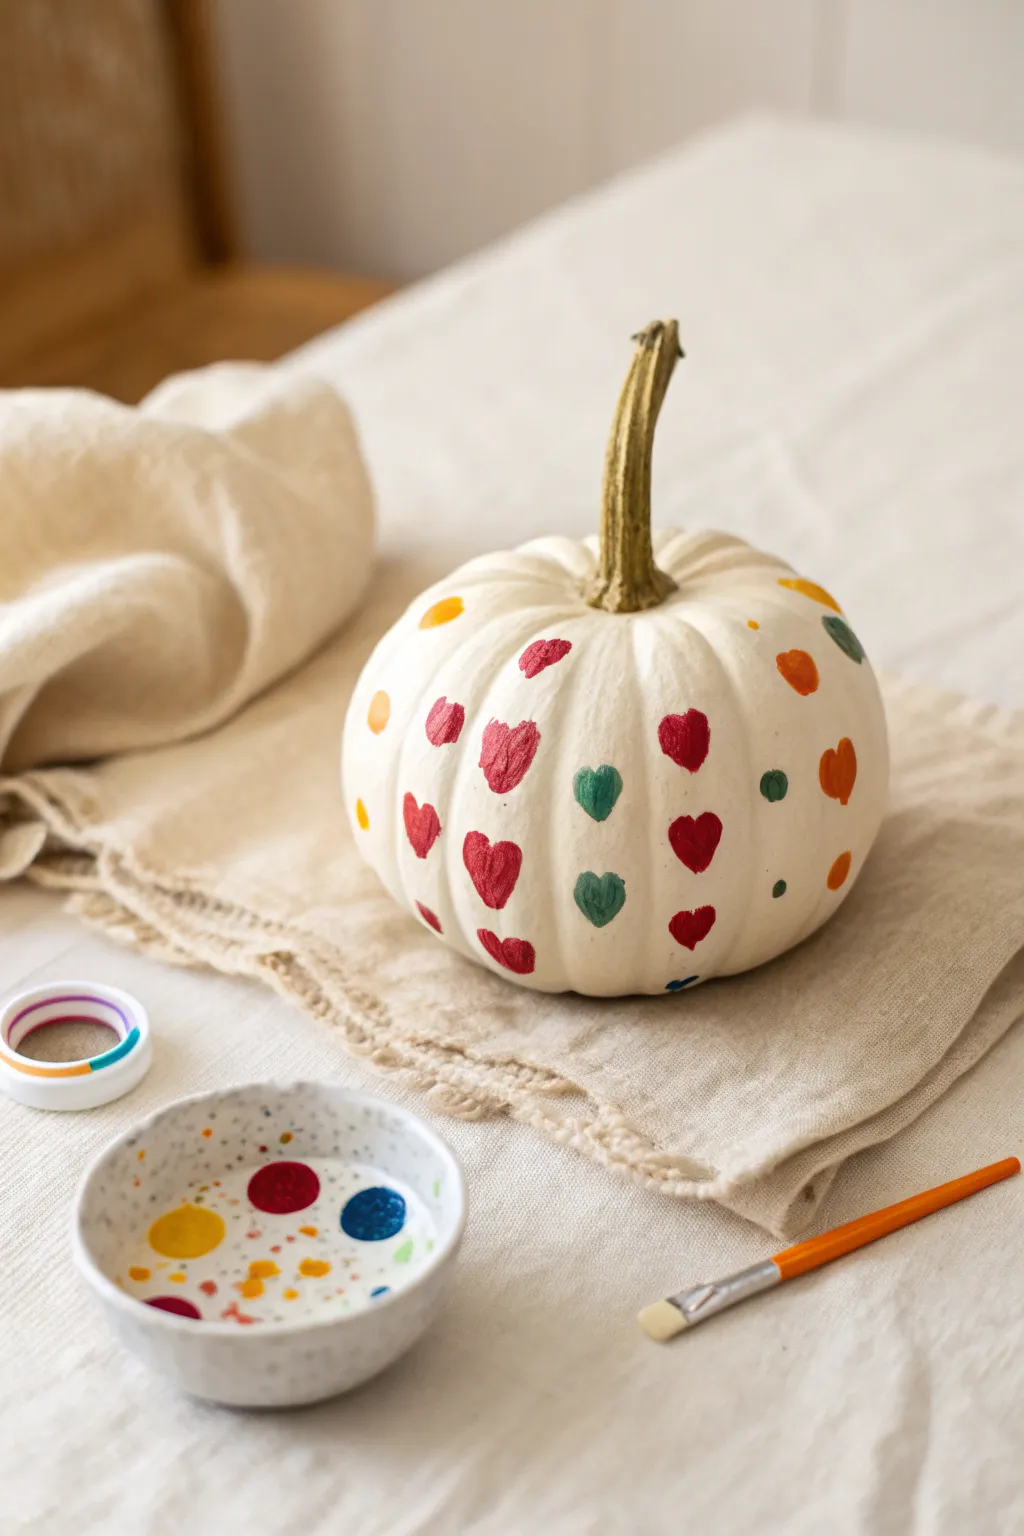
Transform a simple white pumpkin into a charming display piece covered in hand-painted hearts and playful polka dots. This easy-to-follow design uses a bright palette of red, orange, and forest green to create a cozy, whimsical look perfect for autumn decor.
Step-by-Step Guide
Materials
- Small white pumpkin (real or faux)
- Acrylic craft paints (Red, Burnt Orange, Forest Green, Mustard Yellow)
- Small round paintbrush (size 2 or 4)
- Flat paintbrush (optional, for larger hearts)
- Small ceramic dish or palette for mixing
- Paper towel
- Cup of water
- Clear sealant spray (optional)
Step 1: Preparation
-
Clean and Dry:
Before you begin, wipe down your pumpkin with a slightly damp cloth to remove any dirt or dust. If you are using a real pumpkin, ensure the surface is completely dry so the paint adheres properly. -
Set Up Your Palette:
Squeeze dime-sized amounts of your red, orange, green, and yellow acrylic paints into a small dish. Arranging them separated like a painter’s palette makes it easy to dip without muddying colors.
Step 2: Painting the Hearts
-
Start with Red Hearts:
Dip your small round brush into the red paint. Choose a vertical rib on the pumpkin to start your pattern. -
Form the First Shape:
Paint a small ‘V’ shape first, then round out the top two bumps to form a heart. Aim for a slightly rustic, hand-painted look rather than perfect symmetry. -
Create a Column:
Continue painting red hearts down that same vertical rib, spacing them about an inch apart. You should be able to fit 3-4 hearts depending on your pumpkin’s height. -
Add Green Accents:
Clean your brush thoroughly. Move two ribs over from your red column and paint a column of forest green hearts using the same technique. -
Alternating Pattern:
Continue around the pumpkin, leaving blank ribs between your heart columns. I like to alternate colors or keep the red dominant with occasional green accents for variety.
Paint Slipping?
If paint beads up on a faux pumpkin, the plastic is too slick. Lightly sand the surface with fine-grit sandwich paper or apply a clear matte primer first.
Step 3: Adding the Dots
-
Yellow Highlights:
Load your brush with mustard yellow paint. In the empty spaces near the top of the pumpkin between your heart columns, dab small, solid circles. -
Orange Polka Dots:
Switch to burnt orange paint. Add larger, bolder dots in the remaining negative spaces, particularly on the ribs that don’t have hearts. -
Vary sizes:
Make some dots slightly larger and others smaller to create a playful, scattered confetti effect. -
Fill the Gaps:
Look for any large white spaces that feel too empty and fill them with a tiny green or yellow dot to balance the composition.
Add Sparkle
While the paint is still wet, sprinkle ultra-fine glitter over just the red hearts. This adds a subtle shimmer that catches the light wonderfully.
Step 4: Finishing Touches
-
Check Coverage:
Look closely at your hearts and dots. If the pumpkin skin is showing through too much, lightly dab a second coat of paint over the existing shapes once they are tacky to the touch. -
Dry Completely:
Let the pumpkin sit undisturbed for at least an hour. The acrylic paint needs to fully cure so it doesn’t smear when handled. -
Seal (Optional):
If you plan to display this outdoors or want it to last longer, spray a light coat of clear matte sealer over the entire pumpkin.
Place your lovely patterned pumpkin on a mantle or table runner to enjoy the festive cheer you’ve created


Rainbow Ombre Pumpkin
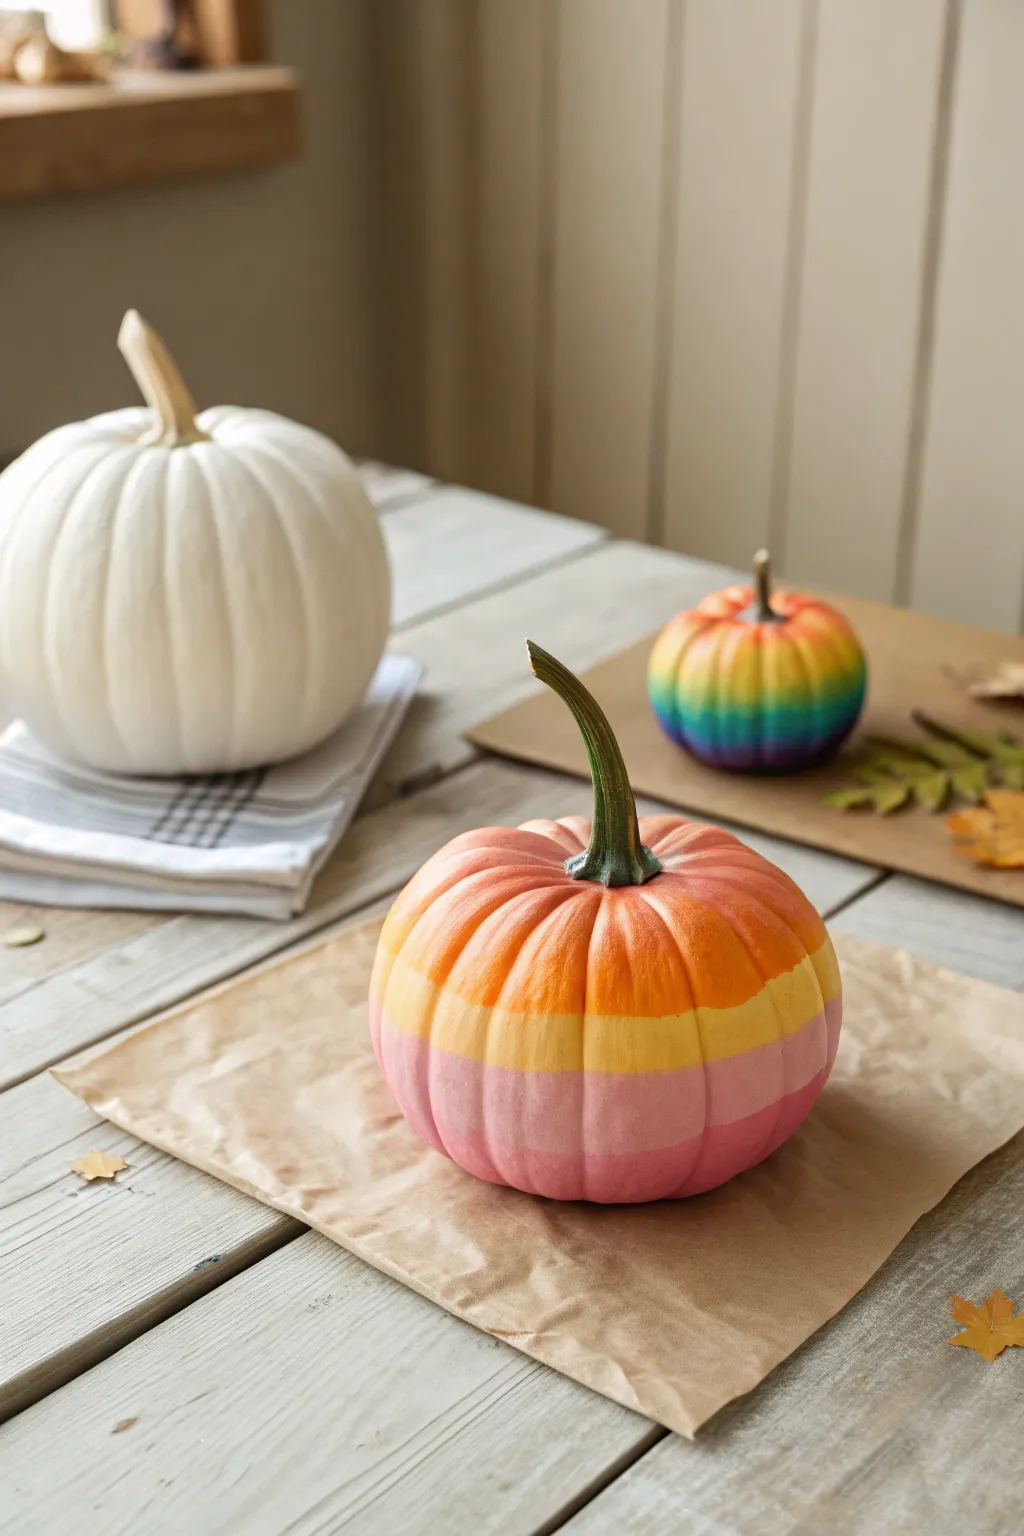
Capture the warmth of a late summer sunset with this delightful painted pumpkin project. Featuring horizontal bands of soft orange, sunny yellow, and rosy pinks, the finished result looks like a scoop of sherbet.
Step-by-Step
Materials
- Medium-sized round pumpkin (real or faux)
- White acrylic craft paint (primer)
- Acrylic paints: Orange, Bright Yellow, Pale Pink, Dark Rose/Magenta
- Large flat paintbrush (1-inch width)
- Medium flat paintbrush
- Soft blending brush or makeup sponge
- Paper plate or palette
- Painter’s tape (optional)
- Newspaper or kraft paper for surface protection
Step 1: Preparation & Base Coat
-
Clean the surface:
Wipe down your pumpkin with a damp cloth to remove any dirt or oils. If you are using a real pumpkin, ensure it is completely dry before starting. -
Prime with white:
Using the large flat paintbrush, coat the entire pumpkin with white acrylic paint. This step is crucial because it makes the subsequent colors pop, especially the yellow and pale pink. -
Let it dry completely:
Allow the white base coat to dry fully. It should not be tacky to the touch. If the original pumpkin color is still showing through, apply a second coat of white. -
Plan your bands:
Visually divide your pumpkin into four horizontal sections. You don’t need to draw lines, but mental spacing helps keep the stripes even.
Step 2: Painting the Color Bands
-
Start at the top:
Load your medium flat brush with orange paint. Paint a circle around the top of the pumpkin, surrounding the stem but being careful not to paint the stem itself. -
Bring the orange down:
Extend the orange paint down about two to three inches. Don’t worry about a perfect straight line at the bottom edge; a messy edge actually helps with blending later. -
Apply the yellow band:
Clean your brush thoroughly. Pick up the bright yellow paint and apply a band directly below the orange section. -
Create the first blend:
While the paint is still wet, use a clean, slightly damp soft blending brush to lightly stroke the area where the orange and yellow meet. Back and forth horizontal strokes work best here creates a soft transition. -
Add the pale pink:
Below the yellow band, paint a wide stripe of pale pink. This should take up the middle-lower section of the pumpkin’s belly. -
Blend yellow into pink:
Just like before, gently blend the seam between the yellow and pale pink while the paint is wet. If the paint has dried, add a tiny bit of fresh paint to re-hydrate the blending zone. -
Paint the bottom tier:
Fill the remaining bottom section of the pumpkin with the dark rose or magenta paint. -
Final blend:
Blend the transition where the pale pink meets the dark rose. Since these colors are in the same family, they usually merge together very easily.
Muddy colors?
If blending orange into pink creates a weird brown hue, let the layers dry first. Then, apply the transition color as a thin glaze over the dry base layers.
Step 3: Finishing Touches
-
Check for gaps:
Rotate the pumpkin to look for any white spots you might have missed in the crevices of the ribs. -
Touch up the blending:
If any lines look too harsh, I like to use a dedicated dry brush to very lightly feather the boundary between colors. -
Clean the stem:
If you accidentally got paint on the stem, use a damp paper towel to wipe it off immediately, or paint over the mistake with a realistic green or brown later. -
Dry styling:
Let the pumpkin sit undisturbed for at least an hour. Acrylics dry fast, but thick layers in the crevices take a bit longer.
Make it Sparkle
Before the paint fully dries, sprinkle ultra-fine iridescent glitter over the wet paint. It will stick naturally and give the ombre a sugary, frosted look.
Place your colorful creation on a rustic surface or kraft paper to let those warm sunset tones truly shine
Drip-Paint “Melting” Pumpkin
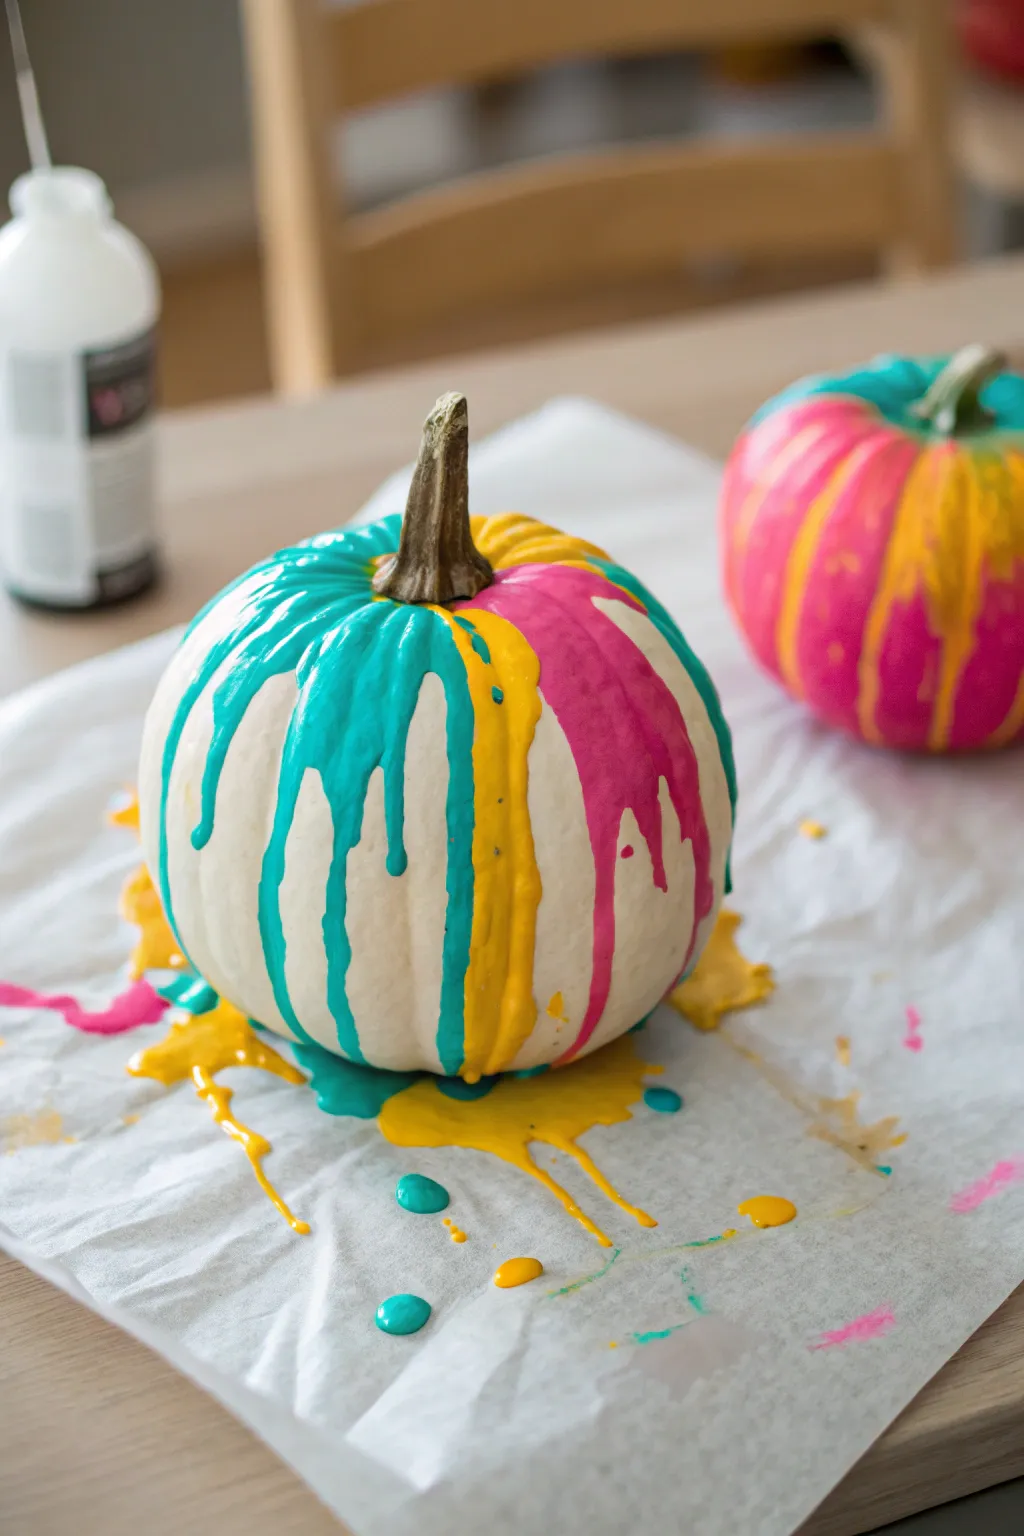
Transform a plain white pumpkin into a colorful, melting masterpiece with this delightfully messy drip-paint technique. By layering bright teal, yellow, and magenta paints, you create vibrant streaks that look like drizzled frosting or melting crayons without any heat required.
Step-by-Step Tutorial
Materials
- Medium-sized craft pumpkin (white, faux)
- Acrylic paints (teal, yellow, magenta/hot pink)
- Squeeze bottles or small plastic cups
- Water
- Parchment paper or wax paper
- drop cloth or newspaper
- Paper towels
- Spoon or pipette (optional)
Step 1: Setting the Stage
-
Prepare your workspace:
Since this project involves dripping paint, start by covering your table generously with a drop cloth or old newspaper to catch any runaway spills. -
Create a drip zone:
Place a sheet of parchment paper or wax paper directly in the center of your workspace. This will act as the landing pad for your pumpkin and allow the puddles to pool artistically around the base. -
Position the pumpkin:
Set your white faux pumpkin right in the middle of the parchment paper. Make sure it sits level so the paint flows evenly down the sides rather than pooling in just one spot.
Step 2: Mixing the Paint
-
Check consistency:
Open your acrylic paints. The paint needs to be fluid enough to run down the pumpkin’s ribs but thick enough to leave a solid, opaque streak. -
Thinning the paint:
If I find the paint is too thick coming out of the tube, I mix in a tiny splash of water—just a few drops at a time—until it has the consistency of heavy cream. -
Load the applicators:
Pour your thinned teal, yellow, and magenta paints into separate squeeze bottles for the easiest application. If you don’t have bottles, small cups with spoons will work just fine. -
Test a drip:
Before committing to the pumpkin, do a quick test drip on a piece of scrap paper to ensure the paint moves slowly but steadily.
Pro Tip: Better Flow
For super smooth drips that don’t crack when drying, mix a pouring medium into your acrylics instead of just water. This keeps the paint flexible and glossy.
Step 3: The Drip Process
-
Start with the first color:
Take the teal paint and position the nozzle (or spoon) right next to the pumpkin stem. Squeeze a generous dollop so it begins to overflow over the edge. -
Guide the flow:
Watch as gravity pulls the teal paint down a natural groove of the pumpkin. Add a little more paint to the top if the stream stops halfway down. -
Rotate and repeat:
Turn the pumpkin slightly and add another stream of teal a few inches away from the first one. Leave plenty of white space between these initial drips. -
Introduce the second color:
Grab your yellow paint. Squeeze a puddle near the stem in the empty spaces between the teal drips and let it run down freely. -
Encourage mixing:
It is okay if the yellow paint touches the teal paint at the top or overlaps slightly on the way down; these happy accidents create interesting blended edges. -
Add the pop of pink:
Finally, fill in the remaining gaps with the magenta paint. Apply a heavy amount near the stem so you get nice, thick ribbons of pink cascading down. -
Check the coverage:
Walk around the table to inspect all sides. If there is a large white gap that feels too empty, add a small, controlled drip to fill it. -
Let it puddle:
Allow the excess paint to hit the parchment paper and form colorful pools at the base. These bright puddles are a key part of the ‘melting’ aesthetic.
Level Up: Glitter Rain
While the paint drips are still wet, gently sprinkle fine iridescent glitter over the top of the pumpkin. It adds magical sparkle to the colorful ‘melt’.
Step 4: Drying and Finishing
-
Clean the stem:
If any paint accidentally got on the brown stem, carefully wipe it off with a damp paper towel or a cotton swab while it is still wet. -
Initial drying time:
Let the pumpkin sit undisturbed for at least an hour. The thick drips take much longer to dry than a standard coat of paint. -
Final cure:
Leave the pumpkin overnight to ensure the thickest parts of the paint and the base puddles are completely hardened before moving it. -
Display:
Once fully dry, you can carefully peel the parchment paper away from the paint puddles, or trim the paper close to the paint edge to keep the ‘splat’ effect intact for display.
Now you have a vibrant, eye-catching decoration that looks like a beautiful art experiment gone right
Splatter-Paint Party Pumpkin
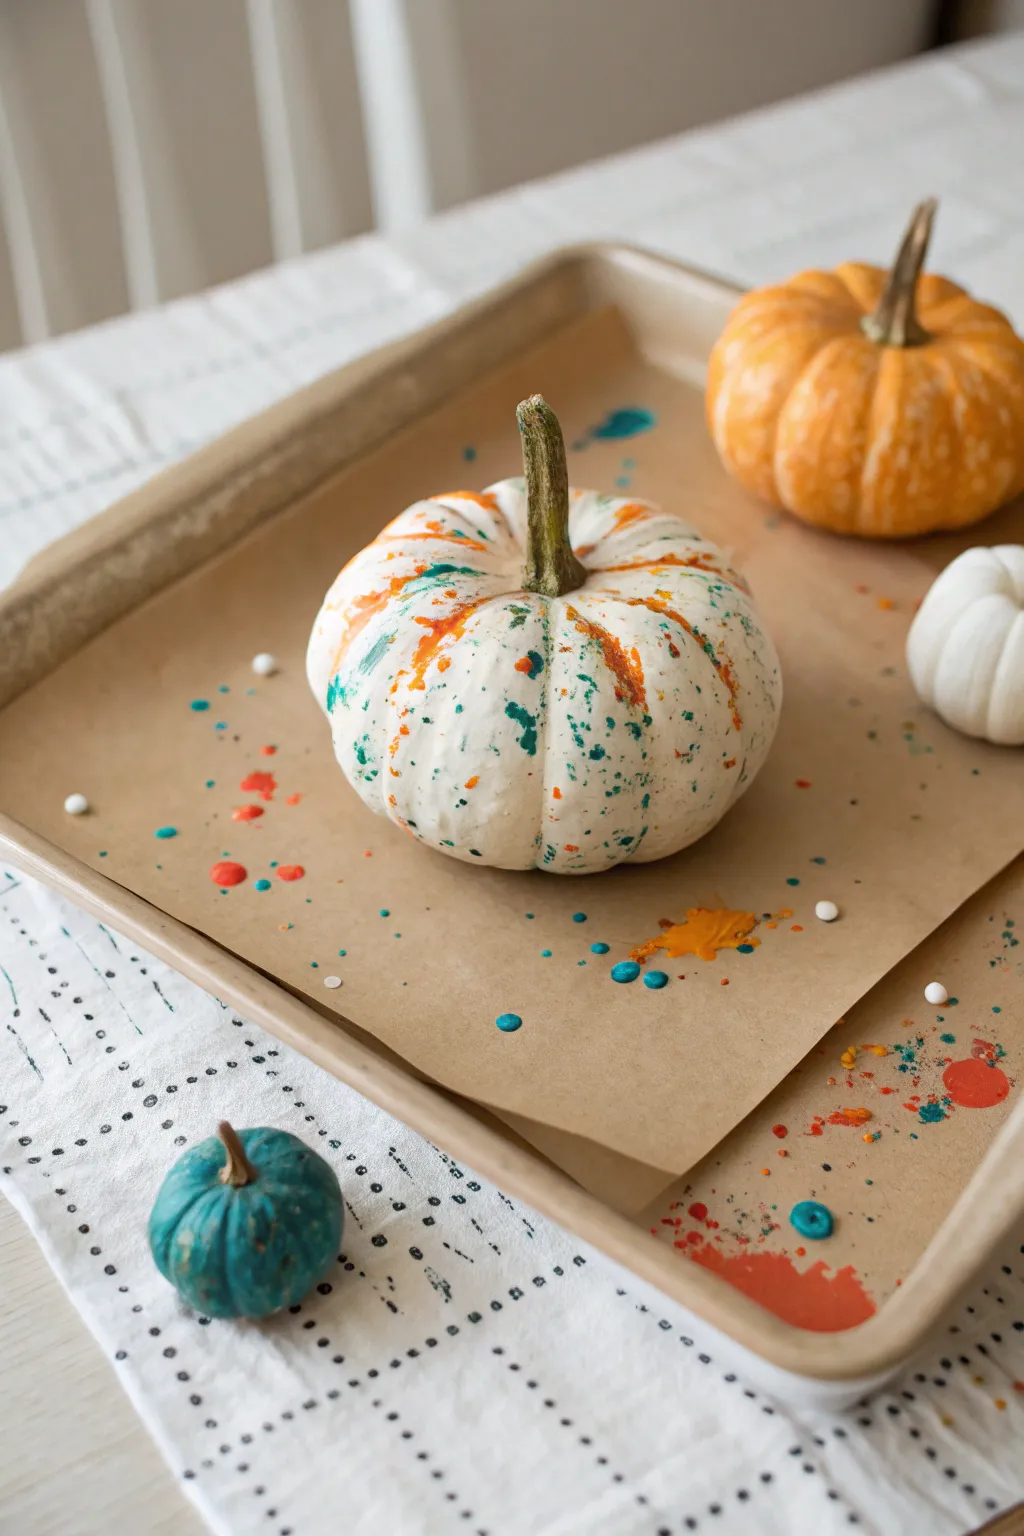
Embrace the wonderful mess of creativity with this vibrant, abstract art project. By flicking liquid paint onto a stark white base, kids can transform an ordinary gourd into a modern masterpiece covered in energetic dots and dashes of color.
Step-by-Step Guide
Materials
- Small to medium white pumpkin (real or faux)
- Acrylic paints (bright orange, teal/turquoise, and white)
- Baking sheet or large tray
- Brown parchment paper or butcher paper
- Paintbrushes (stiff-bristled brushes or old toothbrushes work best)
- Small containers for water
- Paper towels
- Plastic drop cloth (highly recommended)
Step 1: Preparation
-
Clean Your Canvas:
Begin by wiping down your white pumpkin with a damp cloth to remove any dirt or oils. If you are using a real pumpkin, ensure it is completely dry before starting; a clean surface ensures the paint adheres properly without sliding off. -
Set the Stage:
Line a baking sheet with a sheet of brown parchment paper. This serves two purposes: it contains the mess and creates a nice neutral background that makes the colors pop while you work. -
Prepare the Paint:
Squeeze your acrylic paints onto a palette or disposable plate. For this look, stick to a limited palette of bright orange and deep teal to keep it striking. -
Test Consistency:
Check the thickness of your paint. If the acrylic is too heavy, it will create globs rather than splatters. Thin it slightly with a few drops of water until it has a heavy cream consistency.
Mess-Free Magic
Place the baking sheet inside a larger cardboard box with the top flaps open. This catches flying droplets that miss the tray, keeping your table clean.
Step 2: Creating the Splatter
-
Load the Brush:
Dip your stiff-bristled brush into the teal paint first. Ensure the bristles are saturated but not dripping uncontrollably. -
The Flick Technique:
Hold the brush near the pumpkin (about 6 inches away). Use your index finger to pull back the bristles and release them quickly, flicking fine sprays of paint onto the pumpkin’s surface. -
Tap Method Option:
Alternatively, you can load the brush and tap the handle firmly against another brush handle or your finger over the pumpkin to release larger, bolder droplets. -
Rotate and Repeat:
Turn the pumpkin slowly as you work to ensure coverage on all sides. Don’t worry about being perfectly even; the randomness is part of the charm. -
Switch Colors:
Rinse your brush thoroughly in water and dry it on a paper towel, or switch to a clean brush. Load it with the bright orange paint. -
Layering Contrast:
Apply the orange splatters right over the dry or semi-dry teal layer. Aim for the empty white spaces, but allow some overlaps to create interesting visual depth. -
The Stem Detail:
Don’t avoid the stem! Let the splatter naturally fall onto the green stem as well, which integrates it into the artwork rather than leaving it starkly separating.
Glow Up
Mix a small amount of glow-in-the-dark medium into your white or light-colored paint for a splatter design that reveals a spooky surprise when the lights go out.
Step 3: Finishing Touches
-
Check the Balance:
Step back and look at the pumpkin from a distance. If one area looks too empty, add a few targeted flicks of either color to balance the composition. -
Create a Scene (Optional):
Allow some of the paint to intentionally fall onto the parchment paper beneath. This creates a cohesive display if you plan to keep the pumpkin on the tray as a centerpiece. -
Drying Time:
Let the pumpkin sit undisturbed for at least an hour. Because the paint is applied in droplets, some thicker spots may take longer to cure than a standard brushed layer. -
Adding Friends:
If you have smaller gourds or mini pumpkins, simple solid coats of the same teal or orange colors make excellent companion pieces for your main splatter pumpkin.
Once fully dry, this modern art pumpkin is ready to bring a pop of energetic color to your festive display
Galaxy Night-Sky Pumpkin
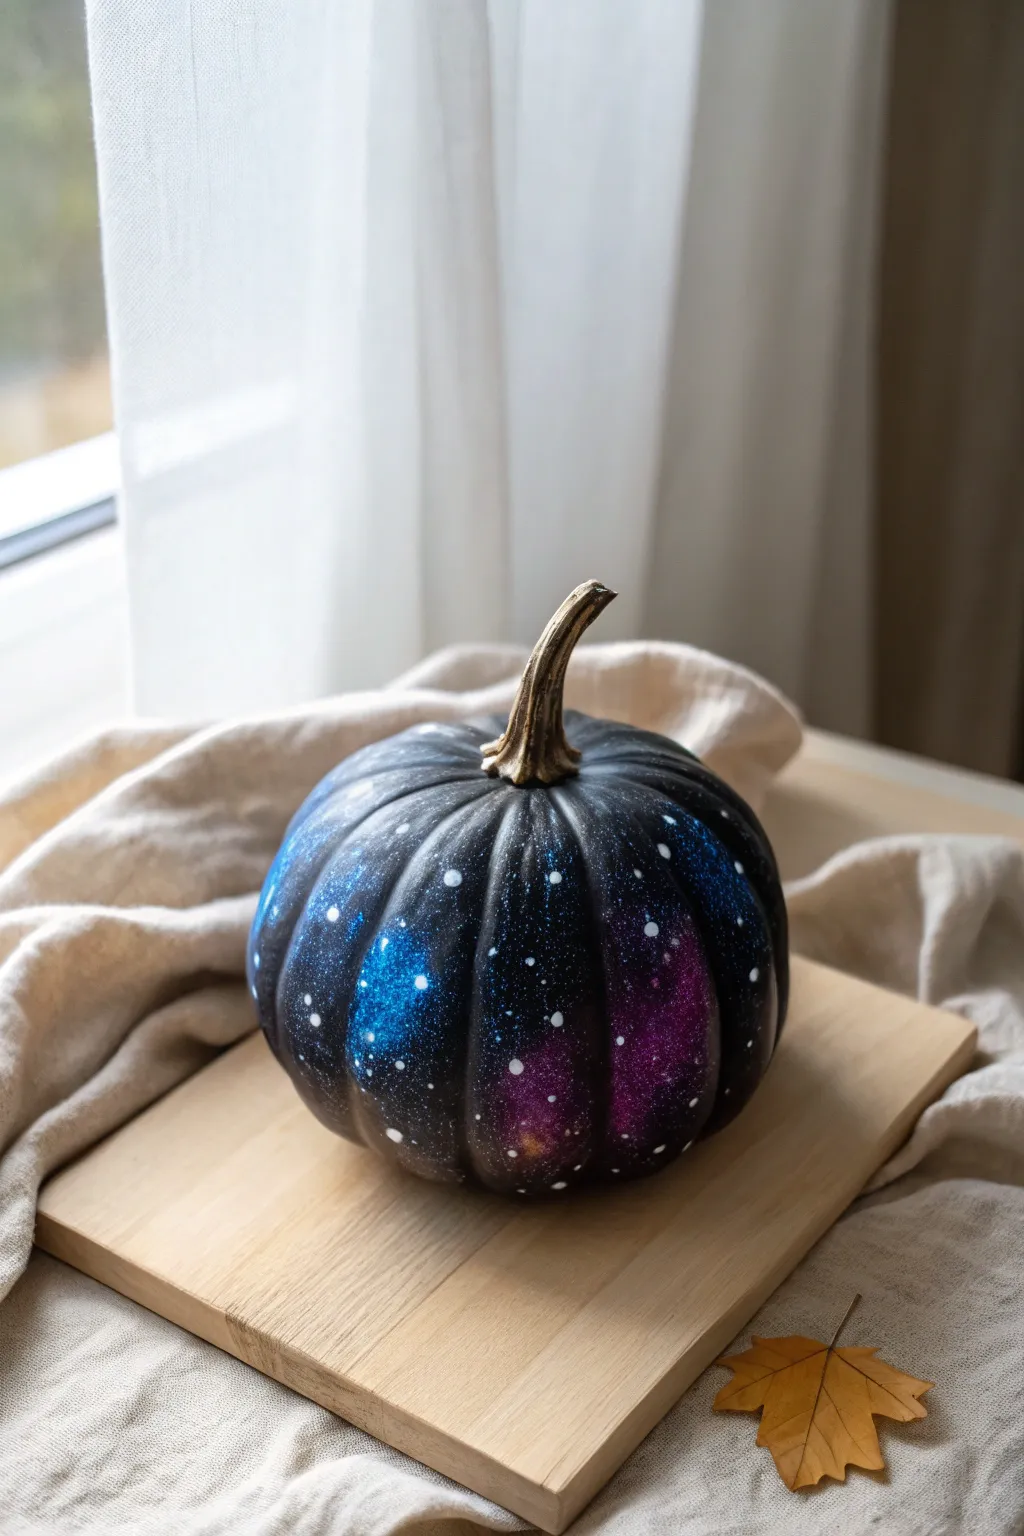
Transform an ordinary pumpkin into a piece of the cosmos with this stunning galaxy effect. Using sponging techniques and simple splattering, you’ll create a deep space look swirling with nebulas and stars.
Step-by-Step
Materials
- Faux or real pumpkin
- Matte black acrylic paint
- Metallic or pearl acrylic paints (blue, purple, magenta, teal)
- White acrylic paint
- Gold metallic paint
- Large flat paintbrush
- Small detail paintbrush
- Makeup sponges or small kitchen sponge pieces
- Old toothbrush
- Cup of water
- Paper towels
- Clear sealant spray (optional)
- Glitter spray or loose fine glitter (optional)
Step 1: Setting the Scene
-
Clean surface:
If using a real pumpkin, wipe it down with a damp cloth to remove any dirt or oils that might prevent the paint from sticking. Let it dry completely. -
Base coat:
Paint the entire pumpkin with matte black acrylic paint. Use a large flat brush for quick coverage, ensuring you get into the deep ridges. -
Solidify the black:
Allow the first coat to dry. Apply a second coat if the orange skin is still peeking through. A solid, deep black background is crucial for making the galaxy colors pop. -
Gilding the stem:
While the black body dries, carefully paint the stem with metallic gold paint. This adds an elegant contrast to the dark galaxy theme.
Too much paint?
If your sponge leaves big blobs instead of misty clouds, dab the excess paint onto a paper towel. The sponge should be almost dry before touching the pumpkin.
Step 2: Creating Nebulas
-
Prepare sponges:
Cut your sponge into small, manageable wedges. You will need a separate clean surface area on your sponge for each color. -
First nebula layer:
Dip a sponge lightly into your darkest blue metallic paint. Dab off the excess onto a paper towel until the sponge looks almost dry—this is key for a misty effect. -
Sponging technique:
Gently dab the blue paint in diagonal clusters or winding paths across the pumpkin. Keep the edges soft and irregular rather than making perfect circles. -
Adding purple depth:
Switch to a fresh sponge section and pick up the purple paint. Dab this over parts of the blue and into new black areas, blending the edges where the two colors meet. -
Brightening with magenta:
I like to use magenta or bright pink sparingly in the center of the purple clusters to create a ‘glowing’ core for the nebulas. -
Adding teal highlights:
For extra dimension, dab tiny amounts of teal or turquoise near the blue sections. Remember to keep the sponge dry to maintain that airy, cloud-like texture. -
Softening transitions:
If a color looks too solid, take a clean sponge with a tiny bit of black paint and gently dab the edges to push them back into the background.
Step 3: Stars and Shimmer
-
Dilute white paint:
Mix a small amount of white acrylic paint with a few drops of water. It should be the consistency of ink or heavy cream. -
The flicking technique:
Dip an old toothbrush into the thinned white paint. Test on a paper towel first by running your thumb across the bristles to spray fine droplets. -
Creating the starfield:
Hold the toothbrush a few inches from the pumpkin and flick the bristles to create a spray of tiny white stars across the black and colored areas. -
Adding major stars:
Use the tip of a small detail brush or the handle end of a paintbrush to place larger individual white dots randomly. Place some in the center of the brightest nebula clouds. -
Creating the sparkle:
While the paint is still slightly tacky, you can sprinkle a tiny pinch of fine glitter over the wettest nebula parts, or wait until dry and use a glitter spray. -
Final dry:
Let the entire pumpkin dry undisturbed for at least an hour. -
Sealing the work:
To protect your galaxy from moisture or scratches, spray a light coat of clear acrylic sealer over the finished pumpkin.
Starry Eyes
Make a ‘North Star’ by painting a simple cross shape with thin, tapered lines over one of your larger white dots. It adds a magical focal point.
Place your finished galaxy pumpkin in a well-lit spot to watch the metallic paints shimmer as you walk by
Tissue-Paper Stained-Glass Pumpkin
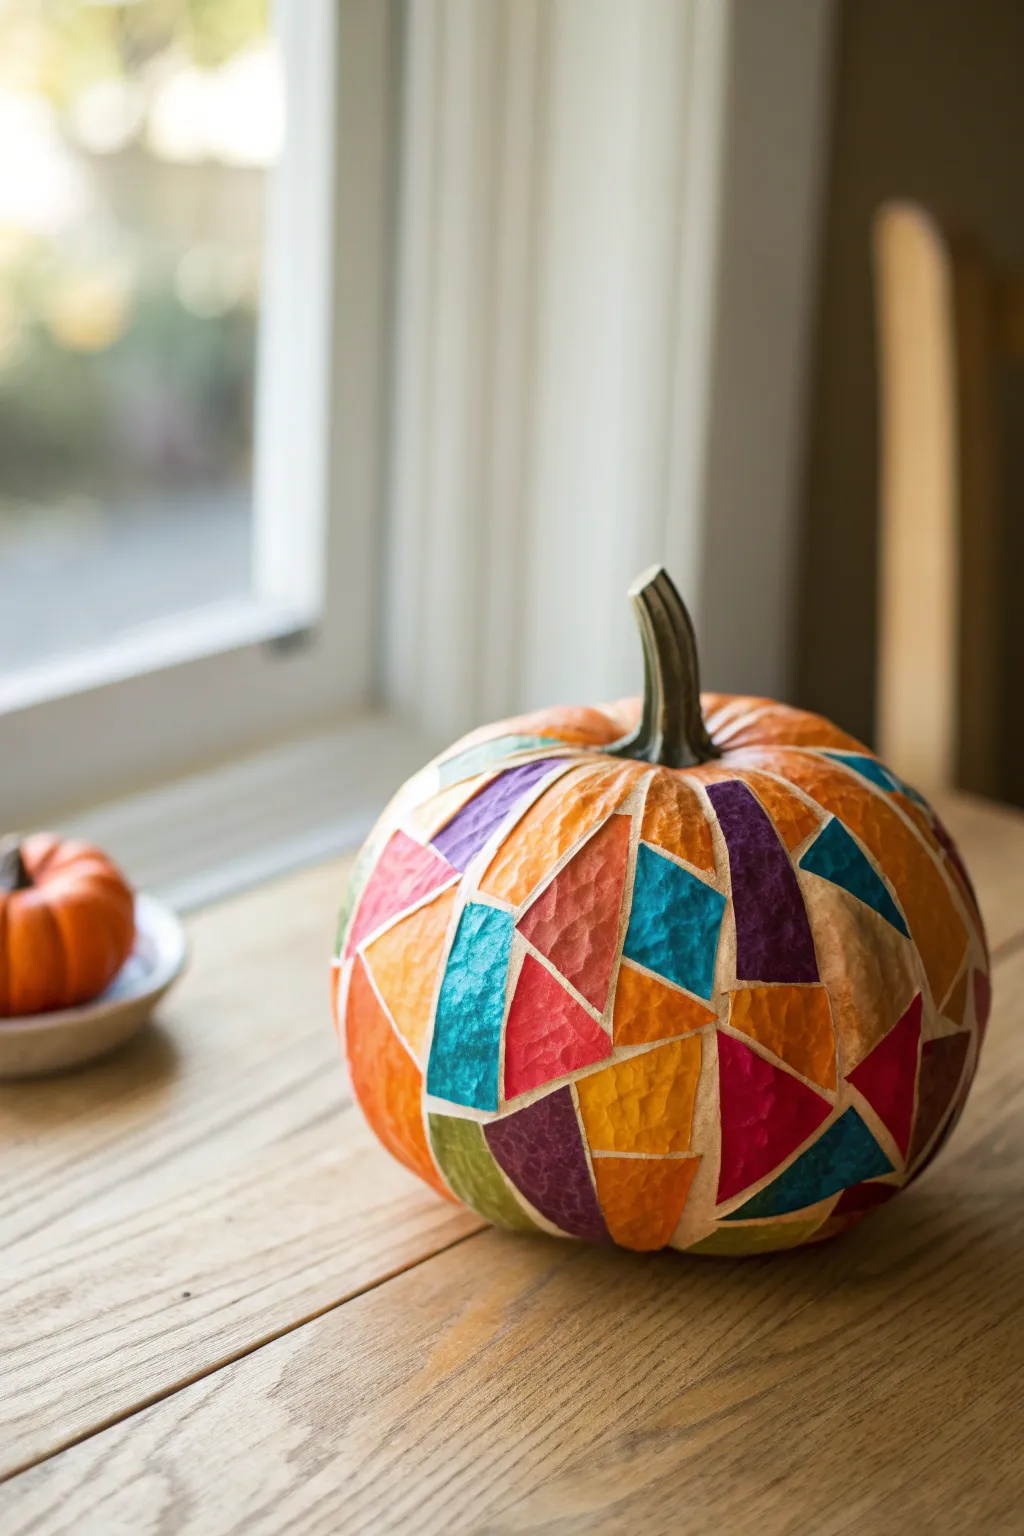
Transform a simple pumpkin into a vibrant work of art that mimics the glowing beauty of a stained-glass window. This project uses colorful tissue paper and decoupage medium to create a textured, geometric mosaic that brightens up any fall display.
Step-by-Step Tutorial
Materials
- Faux or real pumpkin (white or cream works best)
- Tissue paper in assorted bright colors (teal, purple, red, orange, yellow)
- Mod Podge or decoupage glue (matte or gloss)
- Foam brush
- Scissors
- Pencil
- White acrylic paint (optional, for priming)
- Gold or silver paint pen (optional, for grout lines)
Step 1: Preparation
-
Clean the surface:
Start by wiping down your pumpkin with a damp cloth to remove any dirt or oils. If you are using a real pumpkin, ensure it is completely dry before starting. -
Prime the base (Optional):
If your pumpkin is bright orange or a dark color, apply a coat of white acrylic paint. This helps the translucent tissue paper colors pop and appear more vibrant. -
Cut the shapes:
While your pumpkin dries, cut your tissue paper into small geometric shapes. Aim for triangles, irregular quadrilaterals, and trapezoids about 1 to 2 inches in size. Varying the shapes adds to the authentic mosaic look. -
Plan your palette:
Sort your cut pieces into color piles. This makes it easier to grab alternating colors quickly so you don’t end up with twp of the same shade right next to each other.
Wrinkle Rescue
If the tissue paper wrinkles too much, don’t panic. The texture actually mimics real stained glass. Just smooth it gently with a wet finger or brush.
Step 2: Creating the Mosaic
-
Apply the first layer of glue:
Working in a small section near the top stem, brush a thin layer of Mod Podge directly onto the pumpkin surface using your foam brush. -
Place the first shape:
Gently press a piece of tissue paper onto the wet glue. Smooth it down lightly with your finger to remove any big air bubbles, but don’t worry about tiny wrinkles—they add nice texture. -
Seal the shape:
Immediately brush another thin layer of Mod Podge over the top of the tissue paper to seal it in place. Be gentle to avoid tearing the wet paper. -
Add adjacent pieces:
Place your next shape close to the first one, leaving a narrow gap (about 1/8th of an inch) between them. This gap reveals the pumpkin underneath and acts as the ‘grout’ line for your mosaic. -
Work in clusters:
Continue adding shapes, working your way down the side of the pumpkin. I find it easiest to complete one vertical section almost to the bottom before moving horizontally to the next section. -
Mind the curves:
When you encounter the deeper ridges of the pumpkin, press the paper firmly into the grooves. You may need to use smaller shapes in these areas so the pattern flows naturally over the uneven surface.
Step 3: Finishing Touches
-
Fill in the gaps:
Scan your pumpkin for any large empty spaces. Cut smaller, custom triangles to fit into these awkward spots so the mosaic coverage feels complete. -
Let it cure:
Once the entire pumpkin is covered, let it sit and dry completely. This usually takes about 1-2 hours depending on humidity. The glue will turn from milky white to clear. -
Define the lines (Optional):
If you want a sharper look, use a gold or silver paint pen to trace the empty channels between the tissue paper shapes. This emphasizes the stained-glass effect. -
Final seal:
Apply one last, generous coat of Mod Podge over the entire pumpkin. This seals all the edges and gives the project a uniform finish. -
Dry and display:
Allow the final coat to dry overnight. Your faux stained-glass pumpkin is now ready to catch the light on a windowsill or center a dining table.
Glow Up
Use a white faux pumpkin and cut a hole in the bottom for an LED tea light. The light will shine through the tissue paper for a real lantern effect.
Enjoy the colorful glow of your handmade autumn centerpiece as the sunlight hits it
Puffy-Paint Texture Pumpkin
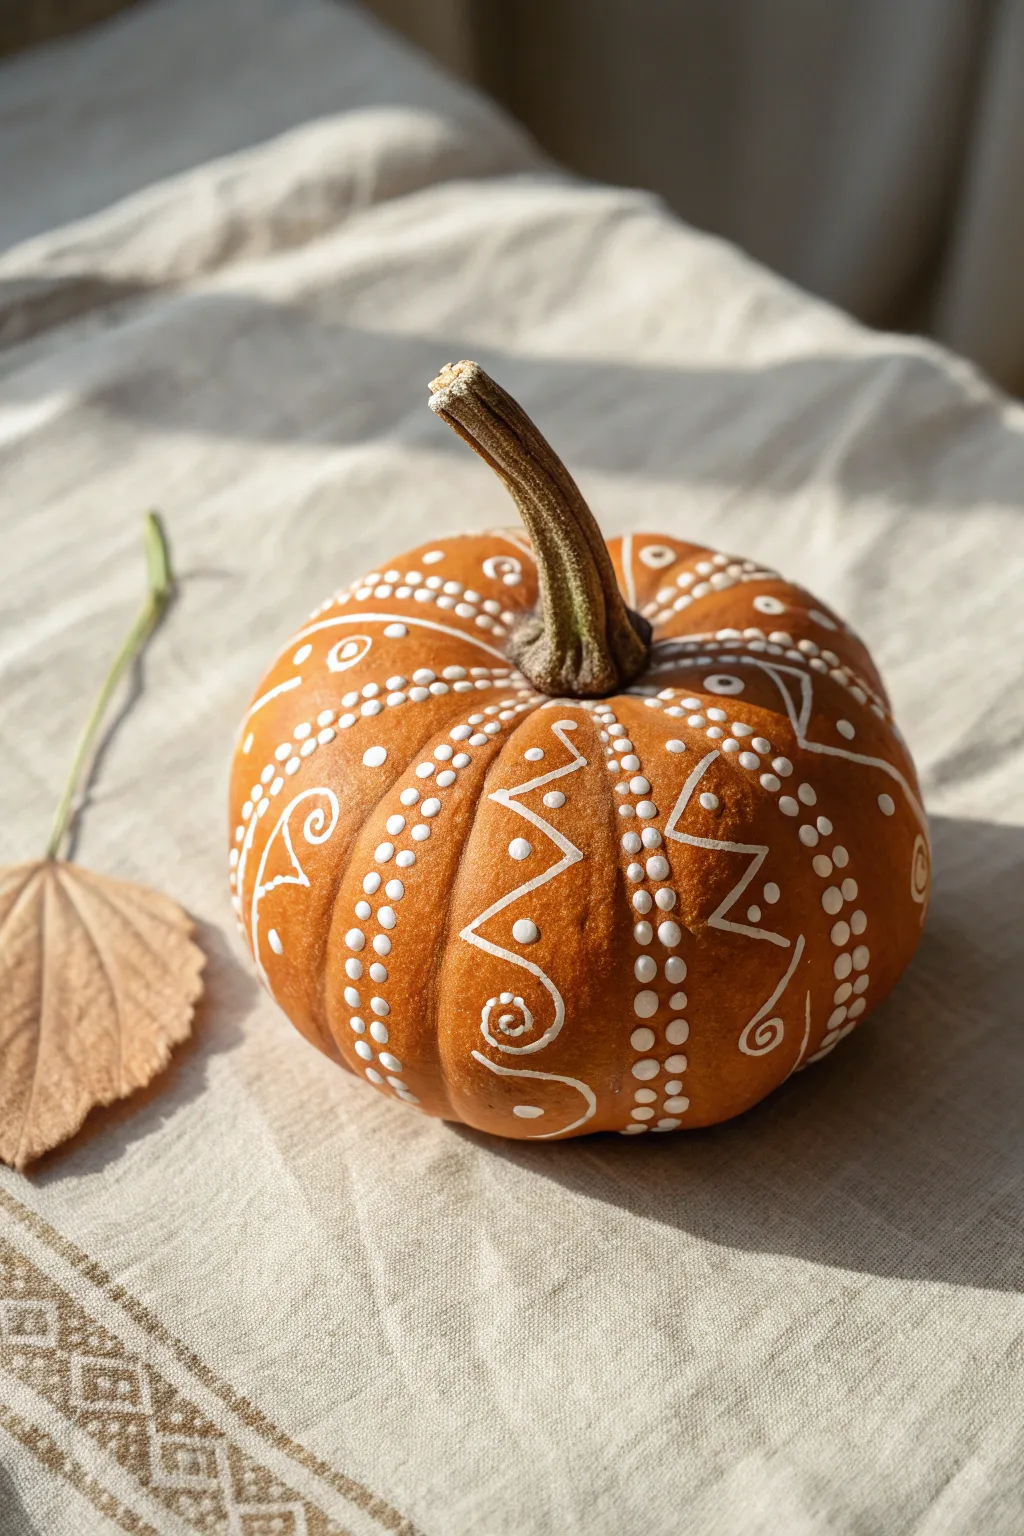
Transform a simple orange pumpkin into a textured work of art using dimensional paint. This project combines geometric patterns with delicate swirls for a sophisticated yet playful look that’s surprisingly easy for kids to achieve.
Detailed Instructions
Materials
- Small to medium round pumpkin (real or faux)
- White dimensional fabric paint (puffy paint) writer bottle
- Damp paper towel or baby wipes
- Pencil (optional)
- Scrap paper for practice
Step 1: Preparation & Planning
-
Clean surface:
Begin by wiping down your pumpkin with a damp cloth to remove any dirt or oils. A clean surface ensures the paint sticks properly. Dry it thoroughly. -
Test flow:
Shake your bottle of dimensional paint well to remove air bubbles. Squeeze a few test lines and dots onto scrap paper to get a feel for the pressure needed for consistent flow. -
Plan segments:
Observe the natural vertical ribs or grooves of the pumpkin. These will serve as your guides. You can lightly mark the main vertical lines with a pencil if you feel unsure, though freehanding adds charm.
Uneven Dots?
If a paint blob gets too big or messy, don’t wipe it immediately! Wait for it to dry slightly, then peel it off with a toothpick and try again.
Step 2: Creating the Ribbed Structure
-
Start at the top:
Position your paint tip near the stem on one of the pumpkin’s natural valleys or indentations. -
Dot the line:
Slowly create a vertical column of dots following this groove all the way down to the base. Try to keep the dots evenly spaced, about a quarter-inch apart. -
Repeat vertically:
Rotate the pumpkin carefully and repeat this dotted line process on every major vertical rib. These columns define the ‘sections’ for your other designs. -
Double up:
For a richer look, like the one in the photo, add a second column of dots right next to the first one. This creates a thick, decorative border between sections. -
Let it set:
Wait about 15-20 minutes before moving to the next step. I find this prevents accidental smearing while you work on the intricate middle parts.
Glow Up
Before the white paint dries, sprinkle ultra-fine iridescent glitter over the wet designs for a frosty, magical finish.
Step 3: Filling the Panels
-
Select a panel:
Choose one of the open orange spaces between your double-dotted lines to start decorating. -
Draw zig-zags:
In the upper portion of the panel, squeeze the bottle gently to draw a continuous zig-zag line. Think of it like drawing sharp mountains. -
Add accent dots:
Place a single, small dot inside each triangle created by your zig-zag line for added detail. -
Create spirals:
Near the bottom of the panel, draw a small spiral or scroll shape. Start from the center and curl outward. -
Connect with lines:
Draw loose, curved lines to connect your zig-zags and spirals. Don’t worry about perfection; organic shapes look best here. -
Fill the gaps:
Look for empty spots in the panel and add tiny groups of three dots or small circles to balance the design. -
Rotate and repeat:
Turn the pumpkin to the next empty panel. You can mirror the same design or mix it up with slightly different variations of swirls and lines. -
Check the perimeter:
Examine the top near the stem. Add a ring of dots or small dashes around the base of the stem to finish the look cleanly. -
Final drying time:
Place the pumpkin in a safe, dry spot. Dimensional paint takes quite a while to fully cure—usually at least 4 hours, but overnight remains best to ensure the paint creates that hard, raised shell.
Once fully dry, your textured masterpiece is ready to add a cozy autumn vibe to your table
Mixed-Media Costume Pumpkins
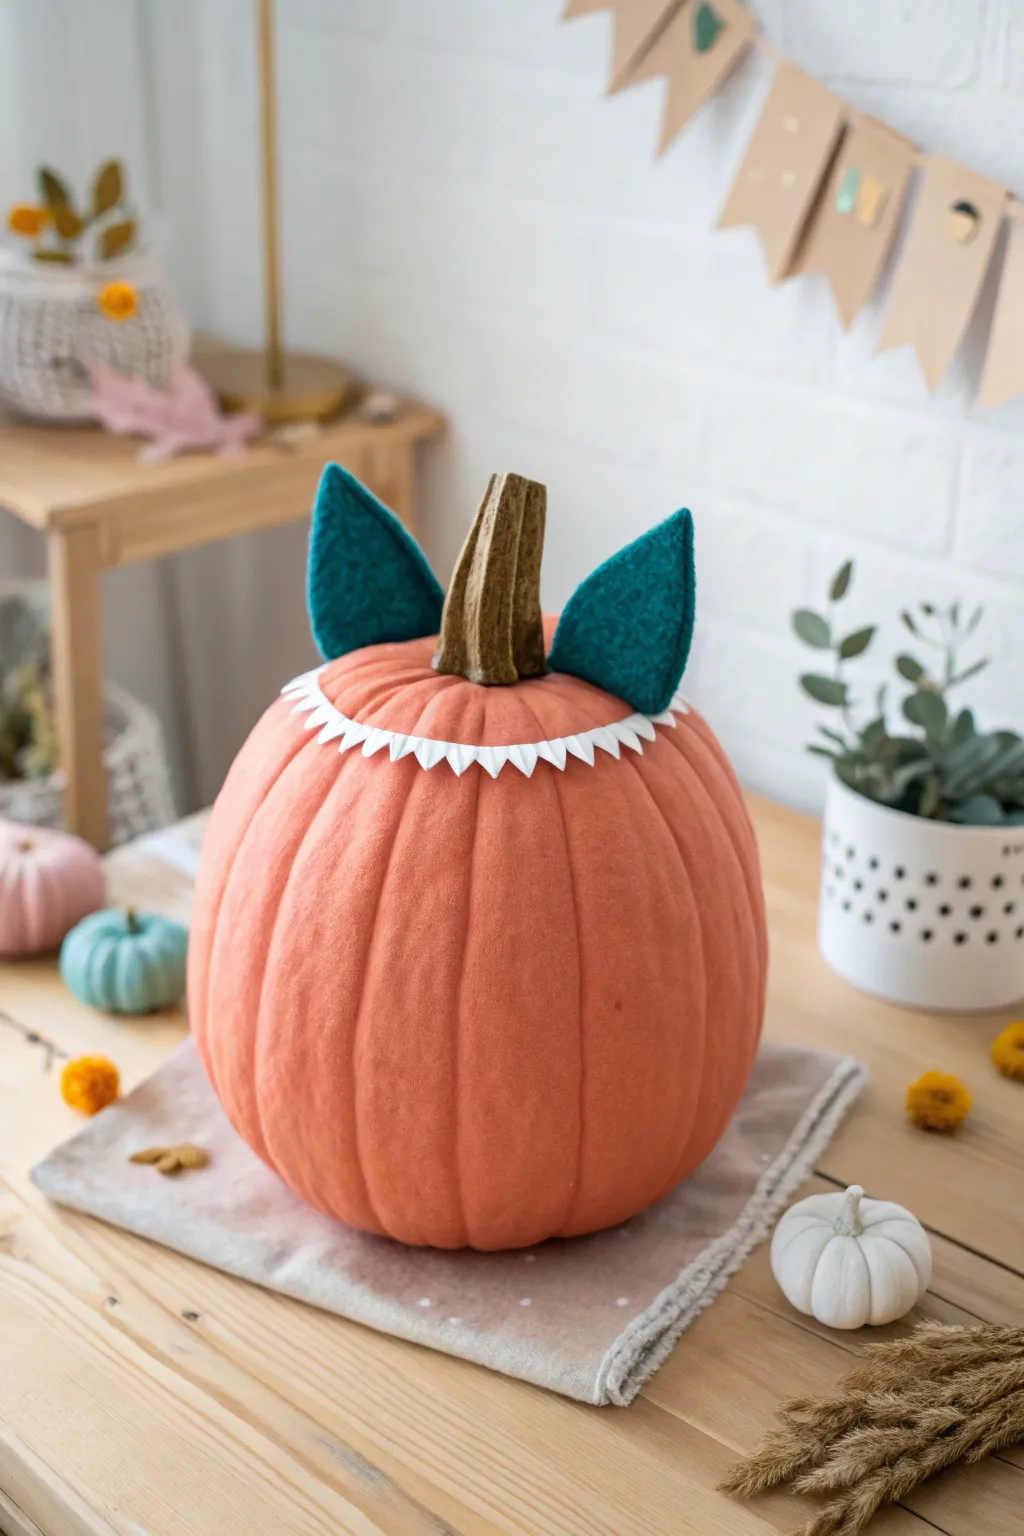
Transform a simple pumpkin into a whimsical woodland creature with this soft, touchable design. Instead of messy carving, this project uses felt accents to give your pumpkin personality, creating an approachable monster perfect for a child’s bedroom or playroom.
Step-by-Step Tutorial
Materials
- Large artificial pumpkin (orange, matte finish)
- Teal wool felt sheet (thick, stiff felt works best)
- White craft felt sheet
- Brown textured felt or fabric (suede or velvet)
- Fabric scissors
- Hot glue gun and glue sticks
- Pinking shears (optional)
- Cardstock (for templates)
- Pencil or fabric marker
- Stuffing or cotton batting (small amount)
Step 1: Preparation & Shapes
-
Draft the ear template:
Start by drawing a teardrop or leaf shape on your cardstock to serve as the ear template. Aim for a size that feels proportional to your pumpkin—about 4 to 5 inches tall usually works well for a standard pumpkin. -
Cut the teal ears:
Trace your ear template twice onto the thick teal wool felt. Using sharp fabric scissors, cut out both shapes smoothly to ensure clean, crisp edges. -
Create the collar strip:
Cut a long strip of white felt approximately 1 inch wide and long enough to wrap around the top crown of your pumpkin. This process is much easier if you cut multiple shorter strips rather than one giant continuous piece. -
Shape the teeth:
Cut small, jagged triangles along one edge of your white felt strip to create a sawtooth pattern. If you’re working with kids, you can draw the zigzag line first for them to follow.
Step 2: Stem Construction
-
Prepare the stem fabric:
Cut a rectangular piece of your brown textured fabric or felt. The height should be slightly taller than the pumpkin’s original plastic stem. -
Wrap the existing stem:
Apply a line of hot glue vertically up the pumpkin’s original stem. press the edge of your brown fabric into the glue and wrap it tightly around the plastic base. -
Create texture:
As you wrap the fabric, pinch it vertically here and there to create ridges that mimic a natural stem’s texture. Adding a little extra glue in the folds helps hold this shape. -
Seal the top:
Trim any excess fabric at the very top, fold the edges inward, and glue them down to create a flat, neat cap on the stem.
Floppy Ears Fix
If the felt is too soft and the ears droop, glue a toothpick or a small piece of floral wire onto the back of the felt to act as a hidden spine for support.
Step 3: Assembly
-
Position the collar:
Drape your jagged white felt strip around the top of the pumpkin, creating a circle about 2 inches away from the stem base. The points should face outward. -
Glue the collar:
Lift the felt strip in sections and apply small dots of hot glue to secure it. I prefer to leave the tips of the triangles unglued so they lift slightly, adding dimension. -
Shape the ears:
Take one of your teal felt ears and pinch the bottom flat edge together slightly to create a curve. Add a dab of glue inside the pinch to hold this cupped shape permanently. -
Attach the ears:
Apply a generous amount of hot glue to the bottom pinched edge of each ear. Press them firmly onto the pumpkin surface, just inside the white collar ring. -
Hold in place:
Continue holding each ear upright for at least 30-60 seconds while the glue cools completely; felt is heavy and can flop over if released too early. -
Secure the back:
If the ears feel wobbly, add a tiny extra bead of glue behind the base of the ear to create a stronger ‘propped up’ support. -
Final fluffing:
Gently shape the felt ears with your fingers to ensure they are symmetrical. Check the white collar and trim any loose threads or glue strings.
Glow-in-the-Dark
Use glow-in-the-dark fabric paint to outline the white teeth or the edges of the teal ears. When the lights go out, your pumpkin monster will reveal a spooky surprise.
Place your adorable felt monster on a low shelf where little hands can safely admire the soft textures


Have a question or want to share your own experience? I'd love to hear from you in the comments below!