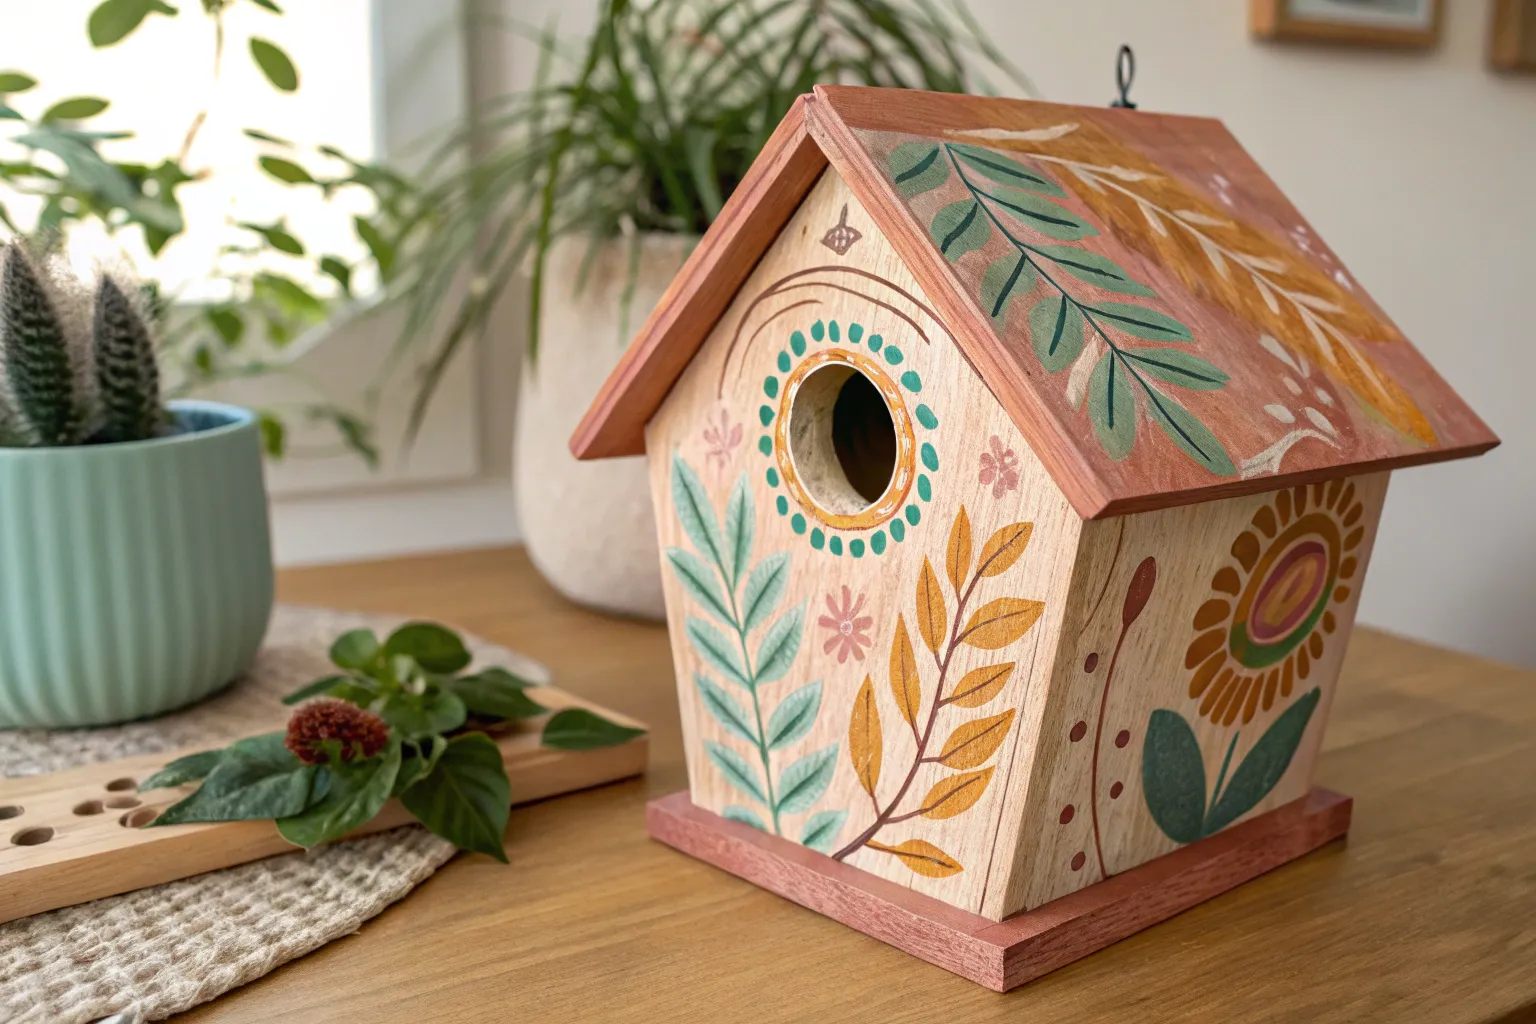
A plain wooden birdhouse is basically a tiny 3D canvas, and painting it is one of those projects that feels instantly cheerful. Here are my favorite birdhouse painting ideas—from classic, easy designs to playful, head-turning themes you can make totally your own.
Classic Two-Tone Birdhouse (Body and Roof)
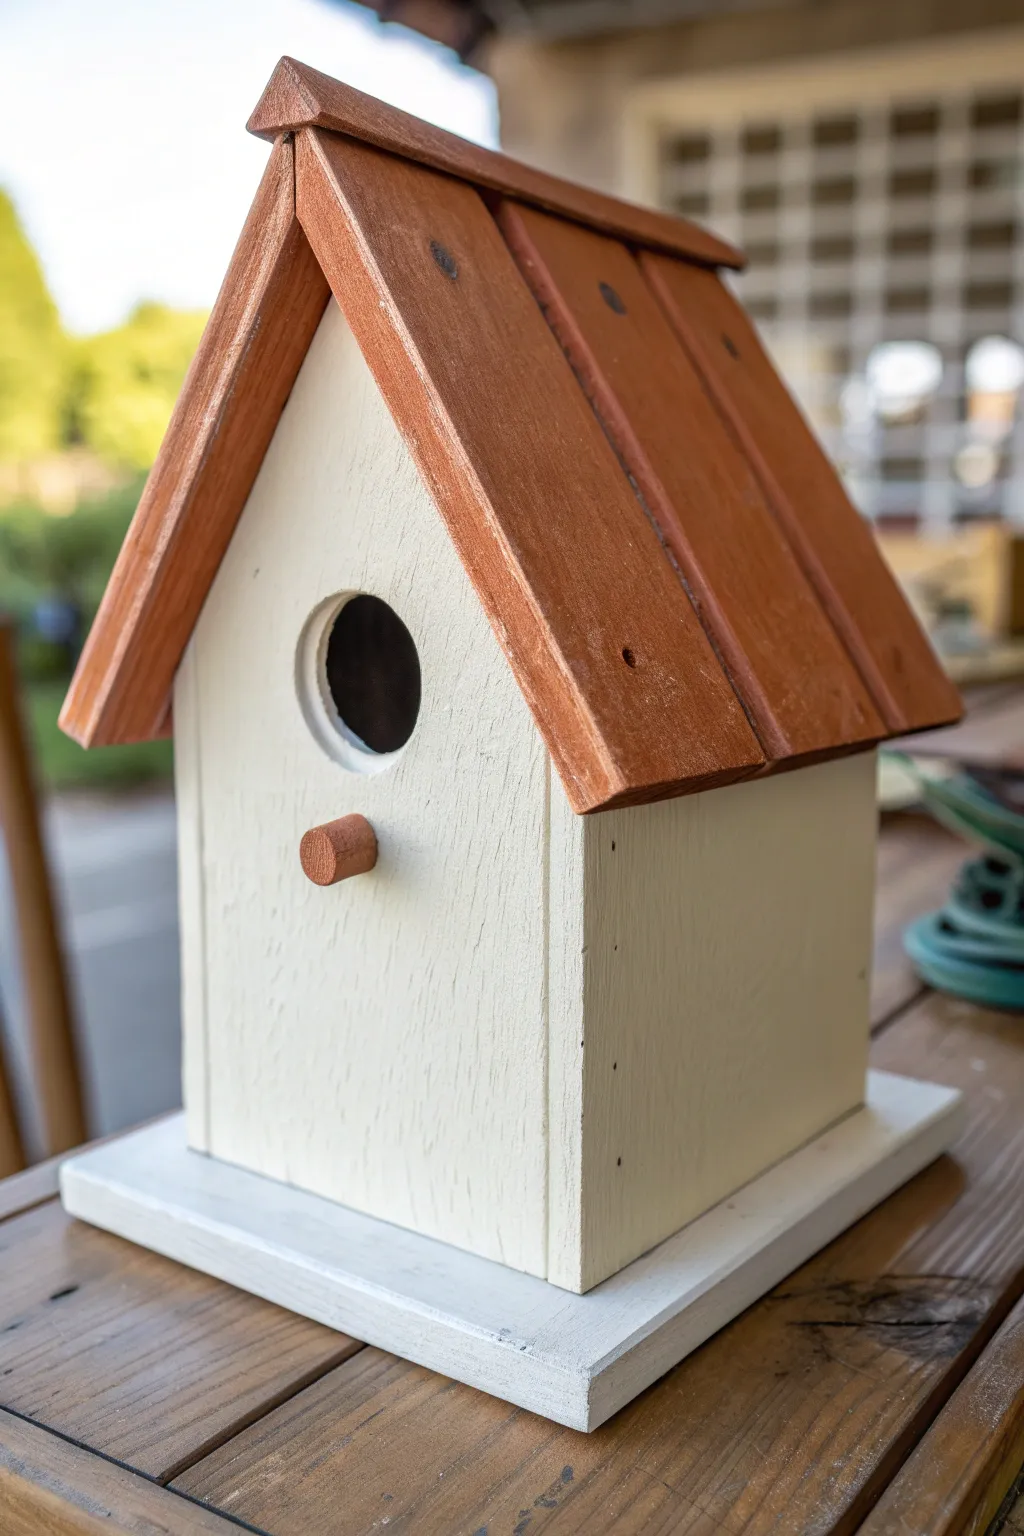
This classic design combines the rustic warmth of stained wood with a clean, creamy white finish for a timeless garden accessory. It creates a charming contrast that looks great nestled among green leaves while offering a cozy home for your feathered neighbors.
Step-by-Step
Materials
- Unfinished wooden birdhouse
- Cream or off-white exterior latex paint
- Reddish-brown wood stain (Cedar or Mahogany tone)
- White primer
- Painter’s tape (blue or green)
- Medium flat brush (1 inch)
- Small foam brush
- Fine-grit sandpaper (220 grit)
- Clean lint-free rag
- Drop cloth or newspaper
- Clear outdoor sealer (polyurethane)
Step 1: Preparation
-
Sand the surfaces:
Begin by lightly sanding the entire birdhouse with 220-grit sandpaper. Focus on removing any splinters around the entrance hole and smoothing out rough patches on the roof slats. -
Wipe it down:
Use a tack cloth or a slightly damp rag to remove all the sawdust. A clean surface is crucial for the stain and paint to adhere properly. -
Remove hardware (optional):
If your birdhouse has any metal hooks or hangers screwed into the top, remove them now to keep them clean. You can reattach them once the finish is dry. -
Protect the perch:
Wrap a small piece of painter’s tape around the wooden perch peg if you want it to remain stained, like the roof. If you plan to paint the perch (as shown in the image, where the perch matches the roof color), you can actually leave it bare for now.
Step 2: Staining the Roof
-
Tape the body:
Apply painter’s tape directly under the roof overhang on the main body of the house. This prevents the runny stain from dripping onto the wood you intend to paint white. -
Apply the stain:
Dip your foam brush into the reddish-brown wood stain. Apply it generously to the roof slats, ensuring you get into the grooves between the boards. -
Stain the perch:
Don’t forget to dab a little stain on the perch peg as well, since this design matches the perch to the roof tone for a cohesive look. -
Wipe excess stain:
Let the stain sit for about 1-2 minutes to penetrate the wood grain. Then, take your lint-free rag and wipe away any excess liquid. Creating a thin, semi-transparent layer highlights the wood texture beautifully. -
Dry time:
Allow the stain to dry completely according to the manufacturer’s instructions. This usually takes at least 4-6 hours, though I like to let it sit overnight to be safe.
Clean Lines Helper
Run a credit card or flat edge over the painter’s tape before painting. This seals the tape edges tightly against the wood texture, preventing the stain or paint from bleeding underneath.
Step 3: Painting the Body
-
Tape the roof edge:
Once the roof is fully dry, place a strip of painter’s tape along the bottom edge of the roof shingles to protect your fresh stain work. -
Prime the wood:
Apply a coat of white primer to the four walls and the base of the birdhouse using your flat brush. Primer helps the cream topcoat look solid and prevents wood tannins from bleeding through. -
Paint inside the hole:
Carefully paint the inside rim of the entry hole. This small detail gives the birdhouse a much more finished, professional appearance. -
Apply the first coat:
Brush on your cream or off-white exterior paint. Use long, vertical strokes that follow the grain of the wood walls. Don’t worry if it looks a bit streaky; two thin coats are better than one thick one. -
Let it dry:
Allow the first coat to dry for about 2 hours, or until it is dry to the touch. -
Apply the second coat:
Add a second layer of cream paint for full, opaque coverage. Check the corners and the underside of the base to ensure no bare wood is showing.
Vintage Vibe
Once the cream paint is dry, lightly sand the corners and edges of the body with 220-grit paper to reveal a bit of the wood underneath for a trendy ‘distressed’ farmhouse look.
Step 4: Finishing Touches
-
Remove tape:
While the final coat of paint is still slightly tacky (but not wet), carefully peel off the painter’s tape. Pulling it off at a 45-degree angle helps ensure a crisp line. -
Touch ups:
If a little paint seeped onto the stained roof or vice versa, use a tiny artist’s brush to correct the mistake. -
Seal for weatherproofing:
To protect your work from rain and sun, apply a clear outdoor polyurethane sealer over the entire house. A matte or satin finish looks best to maintain that rustic charm.
Now you have a beautifully finished birdhouse ready to welcome new residents to your garden
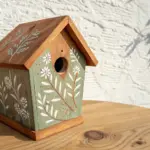


Whimsical Fairy Cottage Birdhouse Details
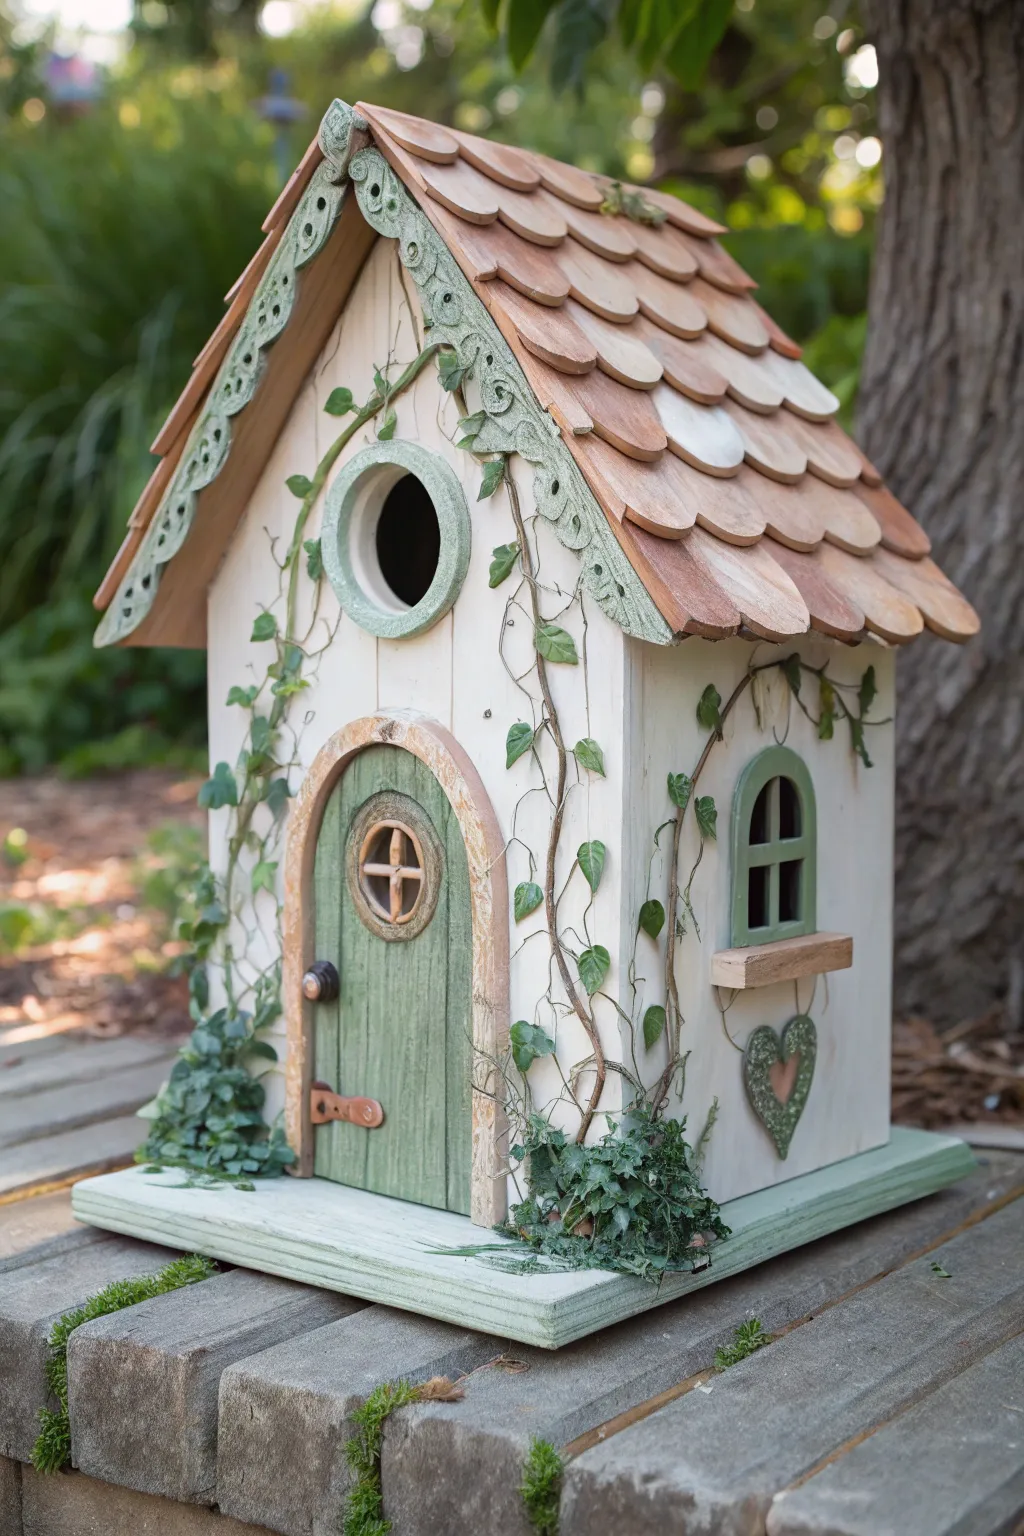
Transform a plain wooden birdhouse into an enchanting woodland dwelling fit for the finest feathered friends. With its scalloped shingle roof, distressed cream walls, and trailing vines, this project captures the charm of a hidden forest cottage.
Detailed Instructions
Materials
- Unfinished wooden birdhouse with a steeply pitched roof
- Small wooden shingles (scalloped edge) or wooden craft sticks
- Acryllic paints: Creamy white, sage/moss green, warm cedar brown, dark brown
- Crackle medium (optional)
- Small artificial vine garland or preserved moss
- Wood glue or strong craft adhesive
- Sandpaper (medium grit)
- Flat paintbrushes (various sizes)
- Fine detail brush
- Small wooden findings (arched door shape, heart, circular trim)
- Miniature hardware (tiny doorknob and hinge)
- Matte spray sealer
Step 1: Preparing the Structure
-
Sand and Prime:
Begin by lightly sanding the entire birdhouse to remove any rough splinters. Wipe away the dust with a damp cloth. If your wood is very dark or knotty, apply a base coat of white primer to ensure your top colors pop. -
Base Coating:
Paint the main body of the house with a creamy white acrylic paint. Don’t worry about perfect coverage; a slightly uneven coat adds to the rustic charm. Let this dry completely before moving on. -
Distressing the Walls:
Once dry, take your sandpaper and gently scuff the edges and corners of the white walls to reveal a bit of the raw wood underneath. This gives it that weathered, lived-in look. -
Painting the Base:
Paint the bottom platform of the birdhouse in a soft sage green. Apply two thin coats rather than one thick one for a smoother finish.
Sticky Situation?
If vines won’t stay put while the glue dries, use small sewing pins or masking tape to hold them in place temporarily. Remove carefully once the adhesive sets.
Step 2: Creating the Roof
-
Pre-painting Shingles:
It is much easier to paint your wooden shingles before attaching them. Mix water with warm cedar brown paint to create a stain-like consistency. Brush this onto your scalloped shingles for a natural, varied look. -
Installing the Roof:
Starting from the bottom edge of the roof, glue the shingles in horizontal rows, overlapping each row slightly as you move upward toward the peak. Ensure the scallops act as the exposed edge. -
Adding the Facia:
Paint the decorative trim (facia boards) that line the front roof edge in sage green. If your birdhouse didn’t come with scrollwork trim, you can glue on pre-cut wooden filigree pieces. Distress this paint slightly with sandpaper once dry.
Natural Texture
For a mossy roof effect, dab a mix of green paint and baking soda onto random shingle spots. It dries with a fluffy, gritty texture that looks like real growth.
Step 3: Adding Charming Details
-
Crafting the Door:
Take your arched wooden door piece and paint it a slightly darker moss green than the base. Use a fine brush to paint vertical lines in a darker shade to simulate wood planks. -
Framing the Door:
Paint the arched frame around the door in a light tan or beige to mimic stone or lighter wood. Glue the door and frame onto the front center of the house. -
Window Accents:
Paint the circular trim for the entry hole and the side window frame in the same sage green used on the roof trim. Attach the heart accent beneath the side window. -
Hardware Installation:
Using a tiny dab of strong glue, attach the miniature doorknob and the faux hinge strap to the door. These metal accents instantly add realism.
Step 4: Finishes and Flora
-
Antiquing Wash:
Mix a very small amount of dark brown paint with water. Lightly brush this wash into the crevices of the roof shingles and around the door frame, then immediately wipe off the excess with a rag to create depth. -
Attaching the Vines:
Cut your artificial vine garland into small sections. Glue the main stems so they appear to be climbing up the sides and over the roof peak. I like to twist the vines slightly before gluing so they look organic. -
Adding Moss:
Tuck small tufts of preserved moss around the base of the house and in scattered spots along the roofline where moisture would naturally gather. -
Final Seal:
Once all glue is fully cured, spray the entire project with a matte clear acrylic sealer. This protects the wood from moisture and keeps the paint from fading in the sun.
Place your finished cottage in a sheltered garden spot and wait for the first visitors to arrive


Rustic Farmhouse Birdhouse With a Weathered Wash
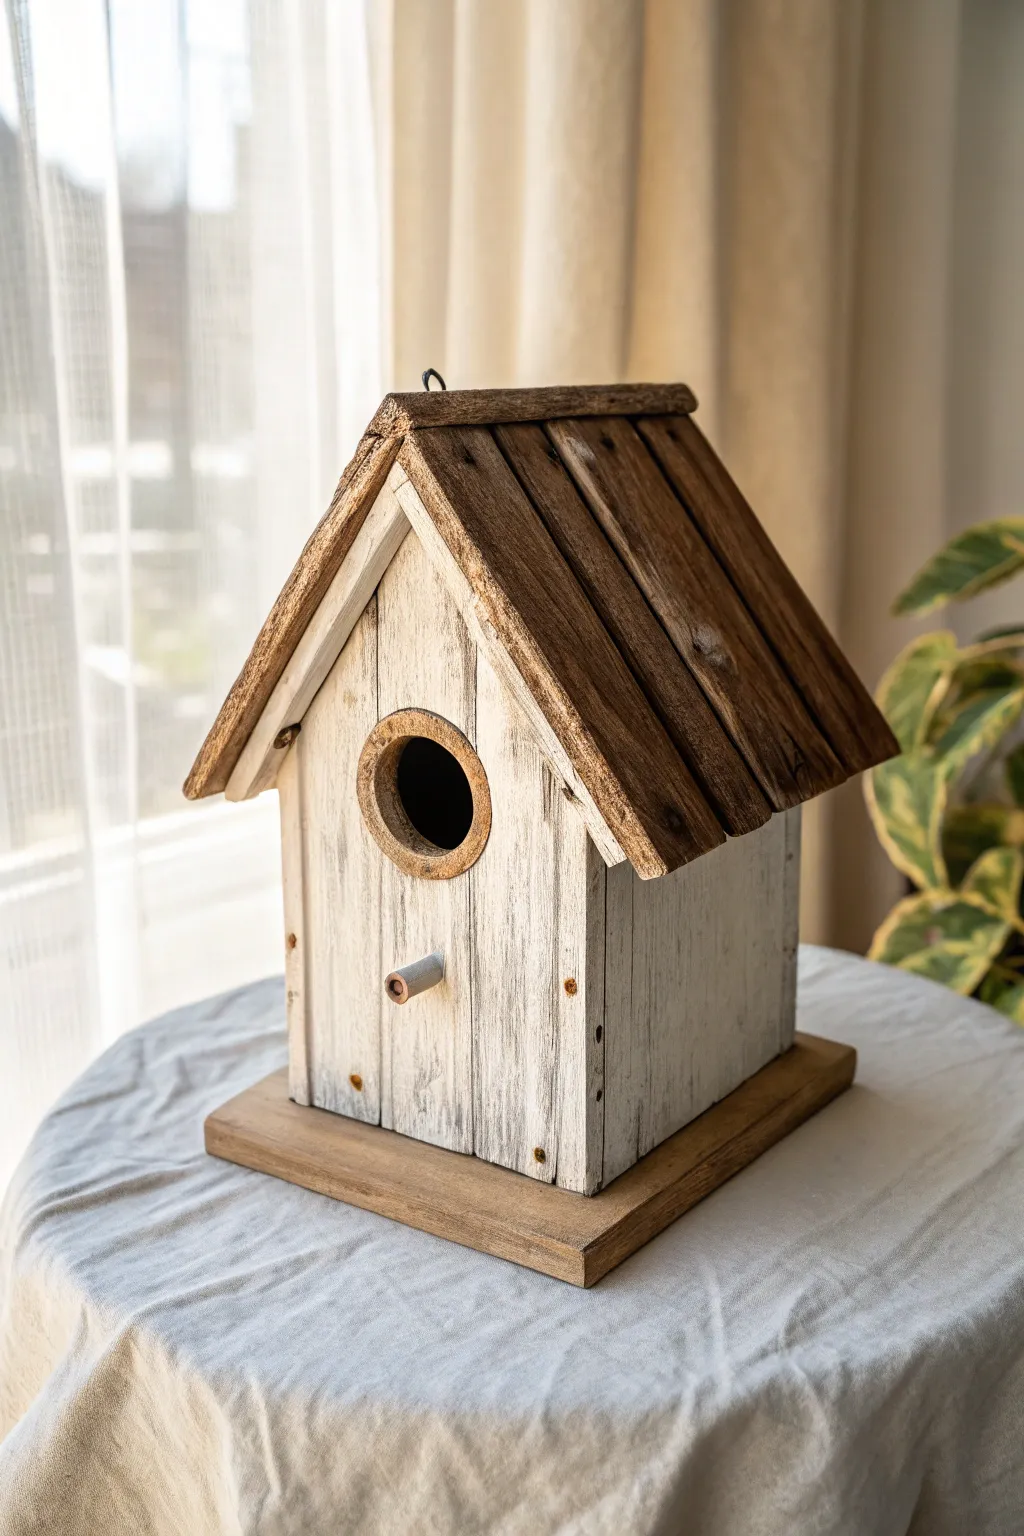
Embrace the beauty of imperfection with this rustic farmhouse birdhouse project, featuring a heavily distressed whitewash finish that lets the natural wood grain peek through. The contrasting dark stained roof and base create a cozy, aged look perfect for any garden or shelf display.
Step-by-Step Guide
Materials
- Unfinished wooden birdhouse with slat roof
- Medium-grit sandpaper (120-150 grit)
- White or creamy off-white acrylic paint
- Dark walnut or espresso wood stain
- Matte clear sealant spray
- Assorted paintbrushes (foam brush and bristle brush)
- Clean rag or old t-shirt
- Paper towels
- Water cup for thinning paint
- Small wooden perch dowel (if not attached)
Step 1: Preparation & Staining
-
Surface Prep:
Begin by lightly sanding the entire birdhouse to remove any splinters or rough patches. Wipe away the dust with a clean, dry cloth to ensure the stain adheres properly. -
Stain Application:
Using a foam brush or rag, apply the dark walnut wood stain to the roof slats. Work the stain deep into the grooves and gaps between the slats for a shadowed effect. -
Base & Perch Coating:
Apply the same dark stain to the square wooden base and the small perch dowel. I find using a rag here gives me better control to avoid dripping. -
Initial Body Stain:
Surprisingly, you’ll want to stain the main body of the house too, or at least the edges and corners. This underlying dark layer is crucial for the distressed look later. -
Wipe & Dry:
Wipe off any excess stain after a few minutes to reveal the grain pattern. Allow the stain to dry completely according to the manufacturer’s instructions—usually overnight is safest.
Natural Texture Hack
Before painting, use a wire brush to scrub the raw wood along the grain. This raises the grain pattern, making the dry-brushing technique much more effective.
Step 2: Creating the Weathered Wash
-
Mix the Wash:
In a small container, mix your white acrylic paint with a little water. Aim for a consistency slightly thinner than heavy cream so it doesn’t cover opaquely. -
Dry Brushing Technique:
Dip a dry bristle brush lightly into the white paint. Offload most of the paint onto a paper towel until the brush is almost dry. -
Apply to Sides:
Drag the brush vertically down the sides of the birdhouse. The goal is to catch the raised wood grain while leaving the recessed areas dark. -
Layering the White:
Apply a second, slightly heavier coat of white to the center of the panels, feathering it out towards the edges to create a sun-bleached effect. -
Detailing the Entry:
Carefully paint around the circular entry hole, but leave the inner rim dark stained to create depth and definition.
Step 3: Distressing & Finishing
-
Sanding Back:
Once the white paint is fully dry, take your sandpaper and vigorously sand the edges, corners, and random spots on the flat surfaces. -
Revealing the Dark:
Continue sanding until the dark stain underneath shows through clearly. This wear-and-tear look simulates years of weathering. -
Roof Accents:
If desired, very lightly dry brush a tiny amount of white onto the edges of the roof slats to mimic dust or age, but keep the roof predominantly dark. -
Entry Ring:
If your birdhouse has a decorative ring around the entrance hole like the one shown, sand this area heavily to make the ‘metal’ or wood look rusted and worn. -
Clean Up:
Wipe down the entire piece with a dry cloth to remove all sanding dust before sealing. -
Sealing:
Take the project to a well-ventilated area and spray it with a matte clear coat. This protects the finish without adding an unnatural glossy shine.
Paint Too Opaque?
If you applied too much white paint and lost the wood look, don’t panic. Let it dry, then use coarse sandpaper to cut through the paint layer back to the stain.
Place your newly aged birdhouse on a mantel or a covered porch to add a touch of timeless rustic elegance to your home


Wildflower Wraparound Birdhouse Florals
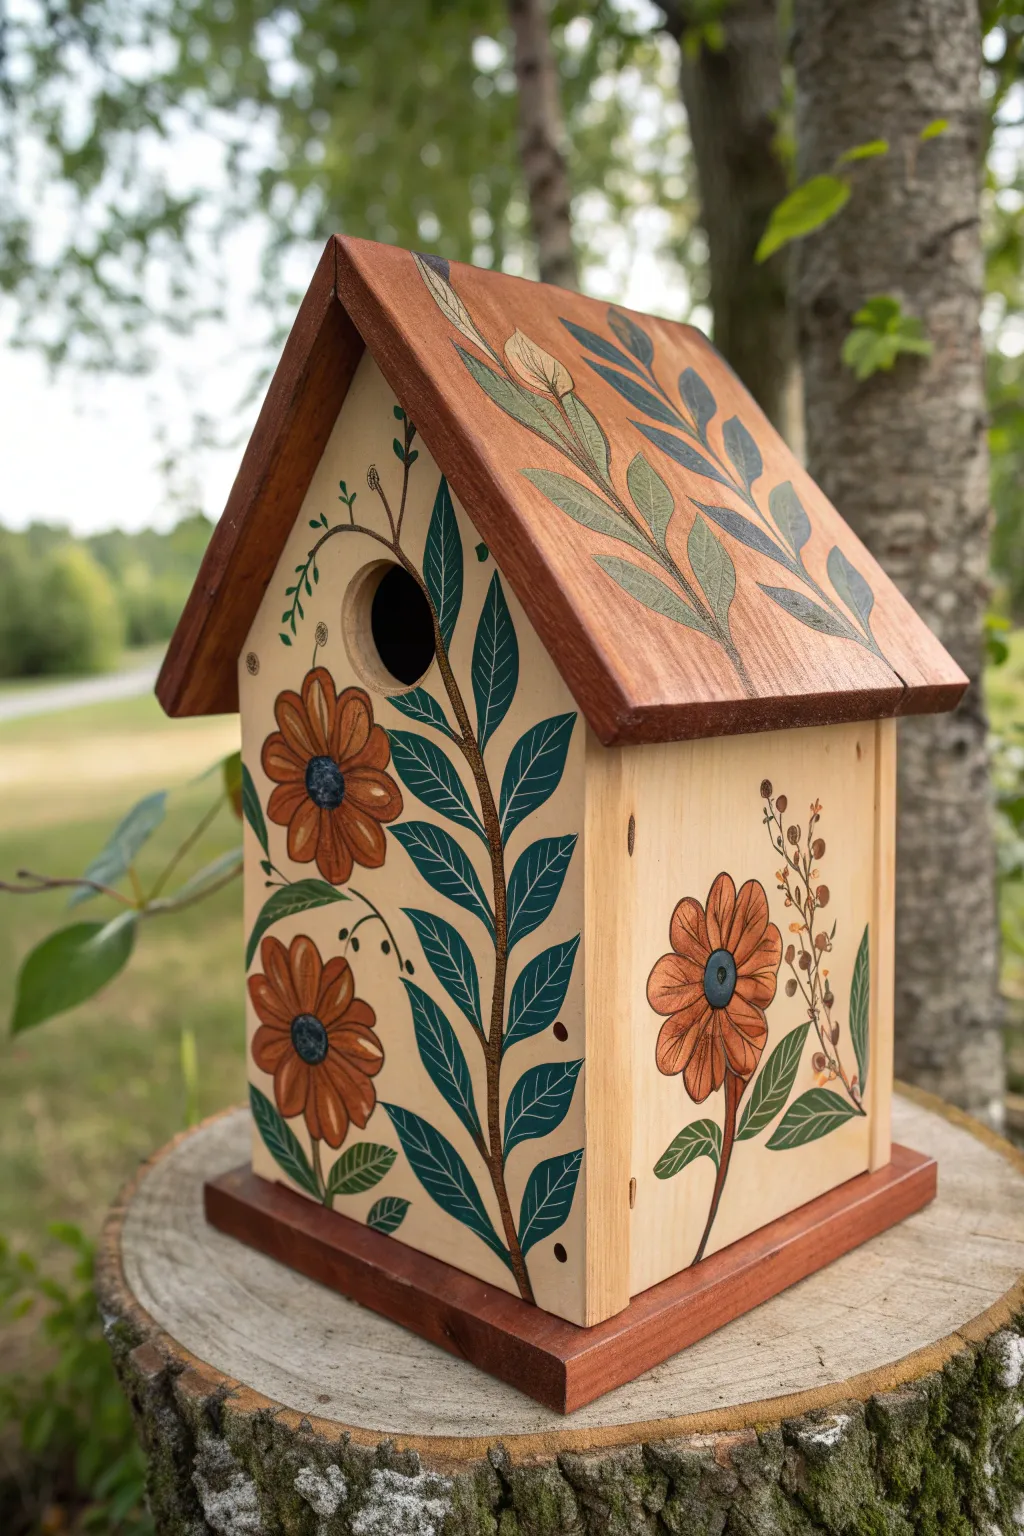
Bring a touch of botanical beauty to your garden with this hand-painted birdhouse featuring stylized orange wildflowers and trailing vines. The design wraps seamlessly around the structure, using the natural wood grain as a warm, rustic canvas.
Step-by-Step
Materials
- Unfinished wooden birdhouse with a pitched roof
- Sandpaper (medium and fine grit)
- Wood stain (medium cherry or mahogany)
- Acrylic paints: Burnt Orange, Golden Yellow, Dark Green, Sage Green, Deep Blue, Black, White, Brown
- Paintbrushes: Flat brush (for staining), Round #4 and #2, Liner brush #00
- Pencil and eraser
- Clean rag or cloth
- Clear outdoor sealant (spray or brush-on polyurethane)
Step 1: Preparation & Base Staining
-
Prepare the surface:
Begin by lightly sanding the entire birdhouse to remove any rough splinters or labels. Use a clean cloth to wipe away all sawdust so your paint adheres smoothly. -
Stain the roof and base:
Using a flat brush or a rag, carefully apply the medium cherry or mahogany wood stain to just the roof panels and the flat base platform. Be careful not to drip stain onto the light wood walls. -
Wipe and dry:
Wipe away excess stain with a rag to let the wood grain show through. Allow this to dry completely according to the manufacturer’s instructions before starting any painting.
Paint Bleeding?
If paint bleeds into the wood grain, seal the raw wood with a clear matte medium or a thin layer of Mod Podge before you start your colored painting.
Step 2: Sketching the Design
-
Map out the main vine:
Using a pencil very lightly, draw a central curving vine on the front panel that starts near the bottom right and curves up towards the left, passing under the bird hole. -
Position the flowers:
Sketch two large circles for the flower heads on the front—one on the lower left and one on the upper left. Add a third flower on the side panel. -
Draw the leaves:
Fill the space around the vine with long, pointed leaf shapes. On the roof, sketch large, sweeping leaf sprigs that follow the angle of the slope.
Step 3: Painting the Wildflowers
-
Base coat the petals:
Mix Burnt Orange with a tiny touch of Golden Yellow. Using a #4 round brush, fill in the flower petal shapes. Don’t worry about shading yet; just get a solid color down. -
Add petal definition:
Once the orange is dry, use a slightly watered-down brown paint to outline each individual petal and add small lines radiating from the center to suggest texture. -
Paint the flower centers:
Paint a solid circle in the middle of each flower using Deep Blue mixed with a little Black for a rich, dark indigo tone. -
Highlight the centers:
Dip the tip of a small brush or a liner into White paint and tap tiny dots onto the dark centers to give them depth and a pollen-like texture.
Make It 3D
Glue small wooden beads to the center of the painted flowers before painting the indigo centers to add real texture and dimension to the blooms.
Step 4: Painting the Greenery
-
Paint the main stem:
With a steady hand and a #2 brush, paint the main vine stems using Brown paint. I usually add a drop of water to the paint to help it flow smoothly for long lines. -
Block in the wall leaves:
Use Dark Green to fill in the leaves on the light wood panels. While the paint is wet, you can blend in a little lighter green on one side for dimension. -
Paint the roof foliage:
On the stained roof, paint the leaves using Sage Green. The lighter, muted green contrasts beautifully against the reddish wood stain. -
Add leaf veins:
Using your liner brush and very thinned light green or white paint, carefully draw the central vein and side veins on all the leaves. -
Add delicate details:
Use the liner brush to add tiny sprigs, curlicues, or small buds coming off the main stems to fill any empty negative space.
Step 5: Finishing Touches
-
Erase guidelines:
Once the paint is 100% dry, gently erase any visible pencil marks. Be gentle so you don’t rub off the acrylic paint. -
Seal the project:
Apply two to three coats of clear outdoor polyurethane sealant, paying special attention to the roof edges, to protect your artwork from the elements.
Hang your new masterpiece in a spot with partial shade to keep the colors vibrant for seasons to come
BRUSH GUIDE
The Right Brush for Every Stroke
From clean lines to bold texture — master brush choice, stroke control, and essential techniques.
Explore the Full Guide
Polka Dot Birdhouse in Playful Color Combos
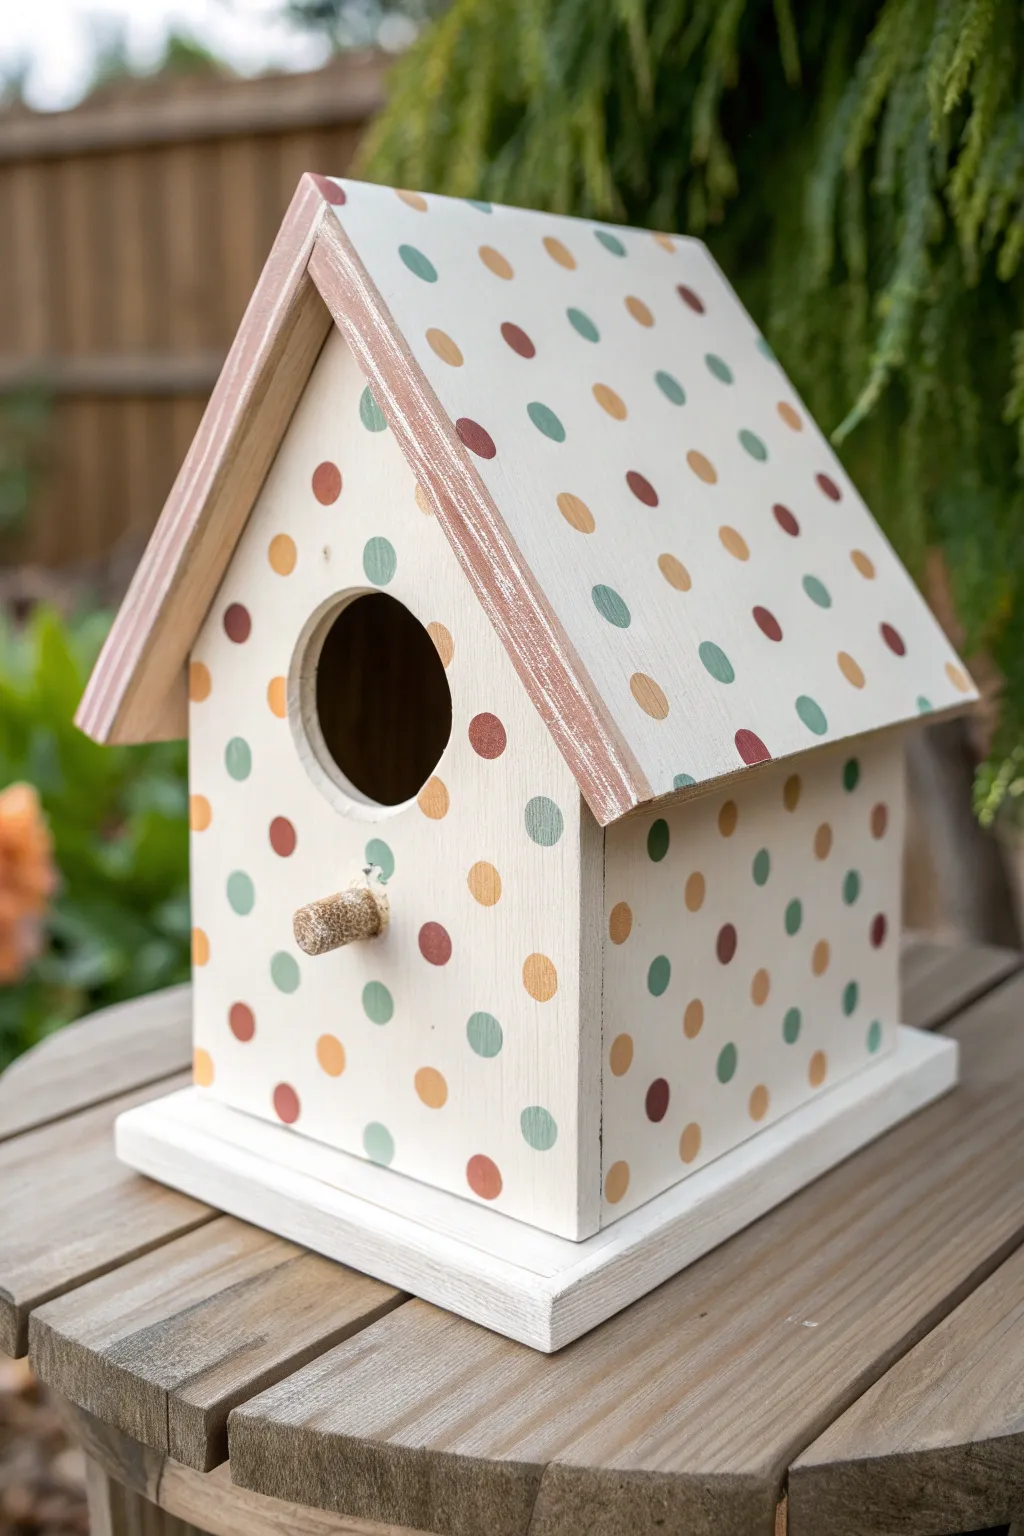
Transform a plain wooden birdhouse into a charming garden addition with this delightful polka dot design. Featuring a creamy base and soft, earthy dots in sage, terracotta, and mustard, this project brings a playful yet sophisticated touch to your outdoor space.
How-To Guide
Materials
- Unfinished wooden birdhouse
- Sandpaper (medium and fine grit)
- Tack cloth or slightly damp rag
- Cream or off-white acrylic outdoor craft paint
- Mustard yellow acrylic outdoor craft paint
- Terracotta or rust-red acrylic outdoor craft paint
- Sage green acrylic outdoor craft paint
- Small round foam pouncers (approx. 1/2 inch) or a round stencil brush
- Fine detail paintbrush
- Medium flat paintbrush
- Small wooden perch/dowel (if not attached)
- Clear outdoor sealant (spray or brush-on, matte finish)
Step 1: Preparation and Base Coat
-
Smooth the Surface:
Begin by sanding the entire birdhouse with medium-grit sandpaper to remove any rough splinters or uneven edges. Follow up with fine-grit sandpaper for a smooth finish suitable for painting. -
Clean the Wood:
Wipe down the entire structure with a tack cloth or a slightly damp rag to remove all sanding dust. This ensures your paint adheres properly and doesn’t get gritty. -
Paint the Base Layer:
I like to use a medium flat brush to apply the cream or off-white paint to the entire birdhouse, including the roof, walls, and base. Don’t forget the underside of the roof overhang. -
Apply a Second Coat:
Allow the first coat to dry completely (usually 20-30 minutes). Apply a second coat of the cream paint to ensure solid, opaque coverage where the wood grain is barely visible. -
Paint the Roof Trim (Optional):
If you want a rustic look like the example, apply a very thin, watery wash of the terracotta paint to the front edge of the roof trim, or lightly dry-brush it to let the wood texture peek through.
Step 2: Adding the Polka Dots
-
Plan Your Pattern:
Before painting, visualize a staggered diagonal grid pattern. The dots shouldn’t be lined up perfectly in rows and columns; offset them so a dot in the second row sits between two dots in the first row. -
Prepare the Applicators:
Pour small puddles of your sage green, terracotta, and mustard yellow paints onto a palette or paper plate. Have a separate foam pouncer or stencil brush ready for each color to avoid muddying. -
Start the Terracotta Dots:
Dip your foam pouncer into the terracotta paint, dab off the excess on a paper towel, and press straight down onto the birdhouse wall. Gently twist and lift to get a clean circle. -
Space the First Color:
Continue placing terracotta dots spaced widely apart across the front and sides. Leave plenty of empty cream space between them for the other two colors. -
Add Sage Green Dots:
Switch to a fresh pouncer with sage green paint. Fill in some of the gaps, aiming to keep the spacing consistent with the terracotta dots you’ve already placed. -
Finish with Mustard Dots:
Complete the pattern with the mustard yellow paint, filling the remaining empty spaces. Step back occasionally to ensure the distribution of colors looks balanced. -
Dot the Roof:
Repeat the same staggered three-color pattern on the roof panels. Be careful near the edges; allow some dots to go off the edge for a natural, printed-fabric look. -
Touch-Up Edges:
Use a fine detail brush to neaten up the edges of any dots that aren’t perfectly round or to fill in centers where the foam pouncer might have missed.
Uneven Circles?
If pouncers slip, use the eraser end of a standard pencil. Dip it in paint and stamp. It creates perfectly uniform, small circles every time and is easier to control.
Step 3: Final Details and Protection
-
Paint the Perch:
If your birdhouse has a perch, you can leave it natural wood for contrast or paint it with a light wash of brown to match the rustic roof trim. -
Allow Full Drying:
Let the birdhouse sit for at least 24 hours to ensure all layers of paint are thoroughly cured and hard to the touch. -
Apply Sealant:
Spray or brush on a clear outdoor polyurethane sealant. A matte finish looks best for this style. Apply two thin coats, letting it dry between applications, to protect your work from the elements.
Distressed Charm
Once fully dry, lightly sand over the polka dots with fine-grit sandpaper. This scuffs the paint slightly for a weathered, vintage farmhouse aesthetic.
Hang your new colorful creation in a shady spot and wait for your feathered neighbors to move in.
Striped Birdhouse With Clean Bands and Borders
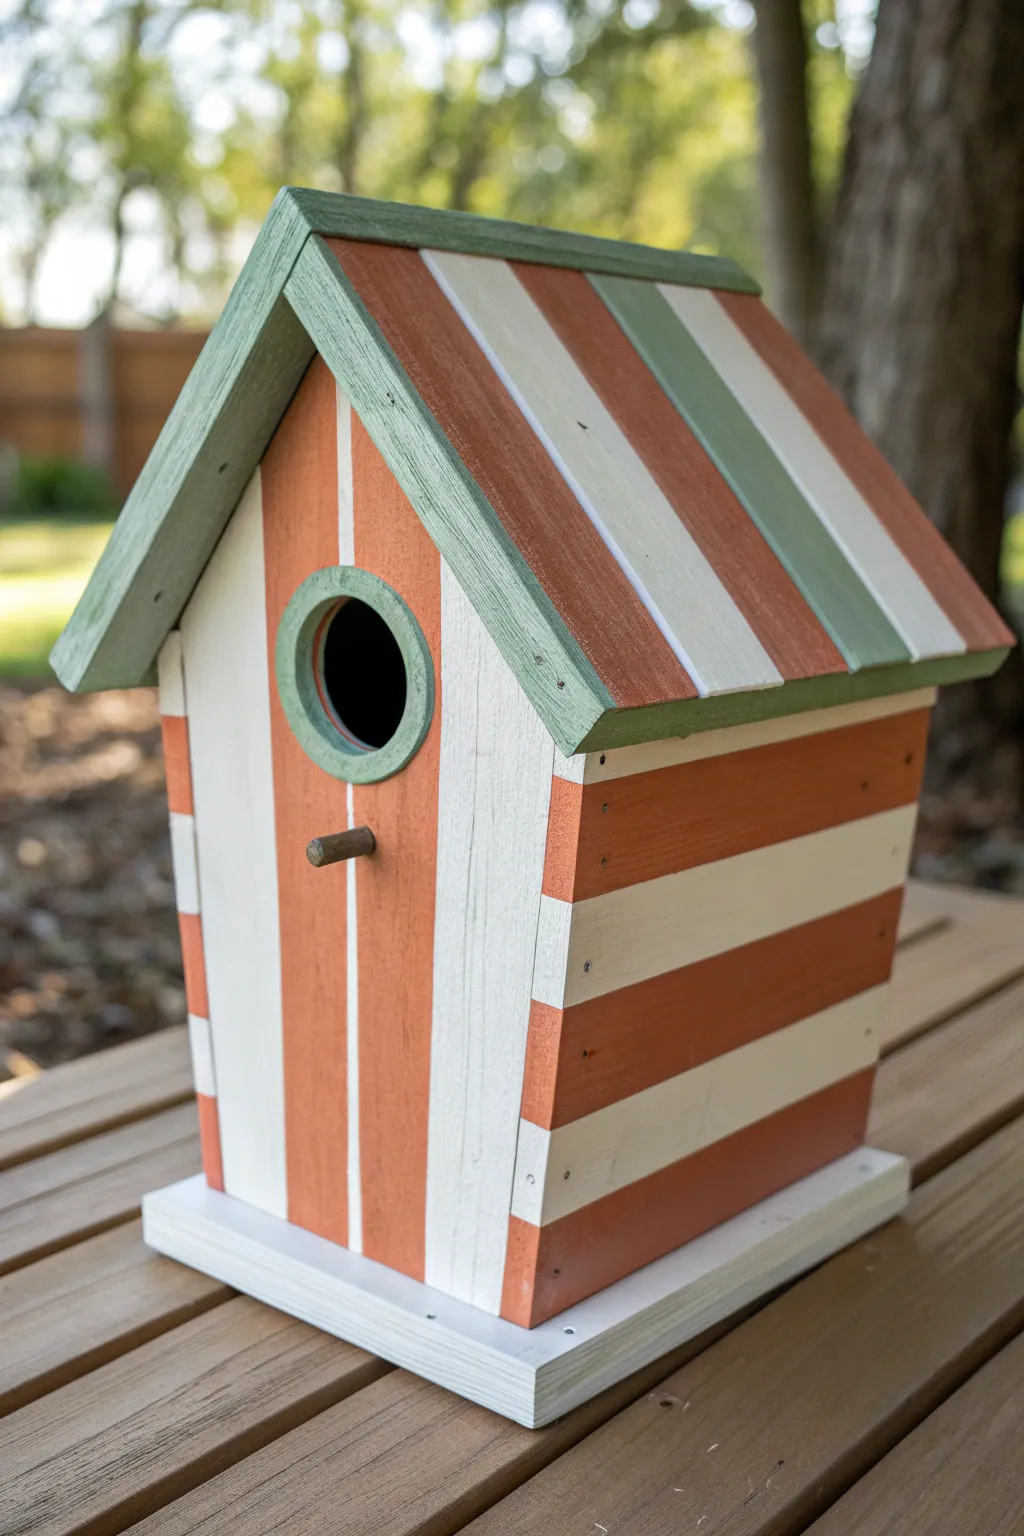
This charming birdhouse project elevates a simple wooden structure with crisp, alternating bands of terracotta orange and creamy white, capped with sage green details. The clean lines evoke a classic beach cabana feel, making it a cheerful addition to any garden or porch.
Detailed Instructions
Materials
- Unfinished wood birdhouse (classic gable roof style)
- Fine-grit sandpaper (220-grit)
- Tack cloth
- Painter’s tape (high quality, meant for delicate surfaces)
- Acrylic outdoor craft paint: Terracotta Orange, Creamy White, Sage Green
- Small flat synthetic brushes (1/2 inch and 1/4 inch)
- Small round detail brush
- Ruler and pencil
- Clear outdoor sealant (polyurethane or acrylic spray)
- Wood glue (optional, for repairs)
Step 1: Preparation & Base Coat
-
Sand the Wood:
Begin by giving the entire birdhouse a light sanding with 220-grit sandpaper. Focus on any rough edges around the entry hole, the perch, and the roofline to ensure a smooth painting surface. -
Clean the Surface:
Wipe away all sawdust using a tack cloth or a slightly damp rag. A dust-free surface is crucial for crisp paint lines later. -
Prime with White:
Paint the entire exterior of the birdhouse with your Creamy White paint. Use the 1/2 inch flat brush for broad strokes on the walls and roof. -
Finish Coverage:
Apply a second coat of white once the first is dry to ensure fully opaque coverage. Don’t forget the underside of the roof overhangs and the bottom edge of the base. -
Dry Completely:
Allow the base coat to cure fully for at least 2-3 hours. If the paint is even slightly tacky, the tape in the next phase might peel it off.
Seal the Tape Edges
Before applying your colored paint, brush a tiny amount of the base white paint over the tape edges. This fills any gaps and ensures perfect, bleed-free lines.
Step 2: Creating the Stripes
-
Measure the Front Stripes:
With a ruler and pencil, lightly mark vertical lines on the front face of the birdhouse. The design features a broad central orange stripe, flanked by white stripes and narrower orange edges. -
Mask the Vertical Lines:
Apply painter’s tape to the areas that need to remain white on the front face. Run your fingernail or a credit card firmly along the tape edges to seal them tight against the wood grain. -
Tape the Horizontal Stripes:
On the side walls, measure and tape off horizontal bands. The pattern alternates between wide white bands and wide orange bands. Ensure the tape wraps neatly around the corners if you want the pattern to connect. -
Mark the Roof Pattern:
For the roof, mark vertical sections. This design features a unique mix: alternating orange and white stripes, but with a sage green accent band near the outer edge. -
Tape the Roof:
Tape off the sections of the roof that will remain white. Be very precise at the peak of the roof where the two sides meet. -
Paint Terracotta Orange:
Using a flat brush, fill in the exposed areas on the front, sides, and specific roof stripes with Terracotta Orange paint. Apply thin layers to prevent bleeding under the tape. -
Second Orange Coat:
Apply a second coat of orange for a rich, deep color. I like to let this dry briefly, just until the surface sheen disappears. -
Remove Tape Carefully:
While the second coat is still slightly damp, gently peel away the painter’s tape at a 45-degree angle to reveal your crisp lines.
Add Texture
Mix a small amount of fine sand into the roof paint before applying. This adds a weathered, shingle-like texture and gives birds better grip.
Step 3: Sage Accents & Finishing
-
Mask for Green:
Once the orange is fully dry (wait overnight if possible), tape off the specific roof stripe reserved for the green accent. You’ll need to tape over the dry orange and white sections adjacent to it. -
Paint the Roof Accent:
Fill in the reserved roof stripe with Sage Green paint. Two coats may be necessary for even coverage. -
Paint the Roof Edges:
Using a steady hand and a small brush, paint the front-facing edge trim of the roof in Sage Green. This frames the house beautifully. -
Detail the Entry:
Carefully paint the rim of the circular entry hold in Sage Green using a small round brush. Go slowly to keep a perfect circle. -
Paint the Perch:
Don’t forget the dowel perch! Paint it a solid, dark neutral or simply stain it dark to contrast with the bright stripes. -
Clean Up Edges:
Inspect your work. If any paint bled under the tape, use a tiny detail brush and the background white color to touch up the lines. -
Seal the Project:
Once all paint is cured (24 hours), spray the entire birdhouse with a clear outdoor sealant to protect it from the elements
Hang your newly painted masterpiece in a visible spot and wait for your first feathered tenants to move in

PENCIL GUIDE
Understanding Pencil Grades from H to B
From first sketch to finished drawing — learn pencil grades, line control, and shading techniques.
Explore the Full Guide
Ombre Sunset Birdhouse Fade
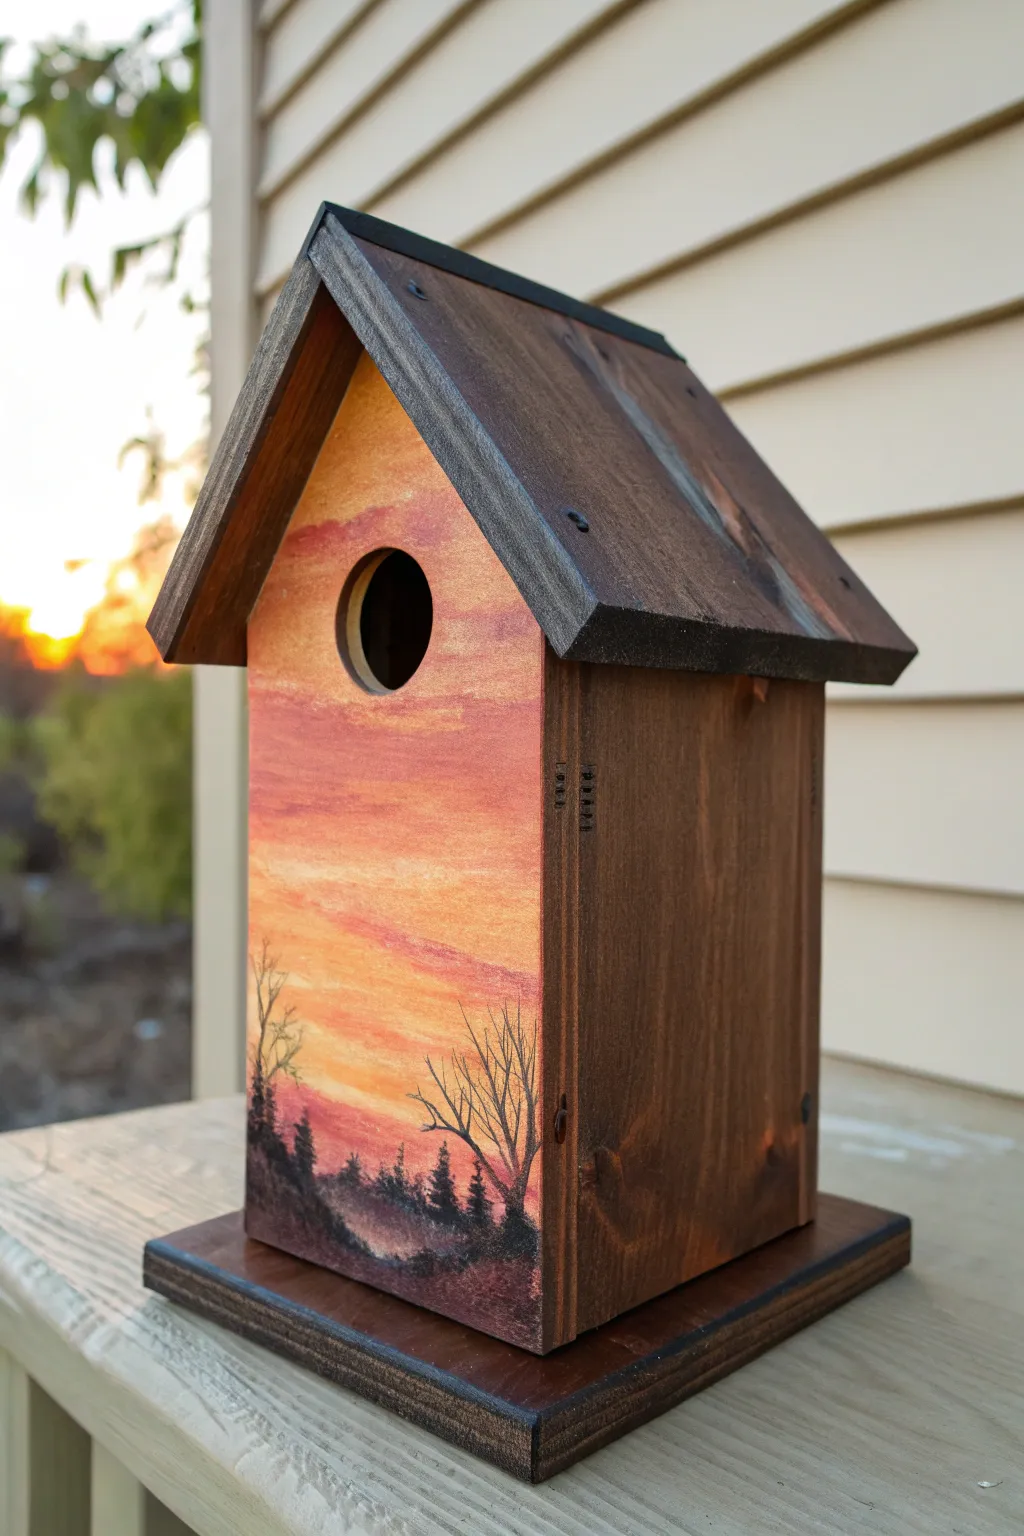
Capture the serene beauty of a setting sun with this ombre-style birdhouse that blends warm twilight hues into a silhouette landscape. The rich stain on the sides and roof frames the artwork beautifully, turning a simple wooden structure into a rustic masterpiece.
Step-by-Step Tutorial
Materials
- Unfinished wooden birdhouse
- Medium-grit sandpaper
- Tack cloth
- Dark walnut wood stain
- Acrylic paints (bright yellow, orange, coral pink, muted violet, black)
- Foam brushes
- Small flat brush
- Fine liner brush
- Painter’s tape
- Clear outdoor sealer (matte or satin)
- Rag or staining pad
Step 1: Preparation & Staining
-
Sand the surface:
Begin by lightly sanding the entire birdhouse, paying special attention to the front panel where you’ll be painting. You want a smooth canvas for the gradient blending. -
Clean the dust:
Wipe down the entire wood surface with a tack cloth to remove any sawdust particles that could ruin your finish. -
Mask the front:
Carefully apply painter’s tape along the edges of the front panel to protect it from the wood stain. Ensure the tape is pressed down firmly to prevent bleeding. -
Apply the stain:
Dip a rag or foam brush into the dark walnut stain and apply it to the roof, sides, back, and base. Work with the grain for the best absorption. -
Wipe excess:
Wait a few minutes for the stain to penetrate, then wipe away any excess with a clean rag. Let the stain dry completely according to the can’s instructions before moving on.
Step 2: Painting the Ombre Sky
-
Prime the front:
Paint the entire front panel with a coat of white acrylic paint if the wood is dark, or go straight to yellow if the wood is very light. This helps the sunset colors pop. -
Start with yellow:
Using a flat brush, apply bright yellow paint to the middle section of the panel, right around the bird hole. -
Add the orange:
While the yellow is still wet, add orange paint just below it. Use horizontal strokes to blend the two colors where they meet, creating a soft transition. -
Blend the upper sky:
Mix a coral pink with a touch of the orange and paint the area above the hole, blending it downwards into the yellow. -
Create the twilight top:
At the very peak of the roofline, apply a muted violet or deep pink. Blend this downwards into the coral section while the paint is still workable. -
Add lower warmth:
Returning to the bottom third, add a deeper reddish-orange below your initial orange layer, preparing the ground for the silhouette. -
Smooth the gradient:
I find it helpful to take a clean, slightly damp brush and run it lightly back and forth horizontally across the transition zones to remove harsh lines.
Wet-on-Wet Blending
Work quickly while blending the sky colors. Acrylics dry fast, and wet paint is essential for that seamless, foggy transition between the yellow and pink hues.
Step 3: Silhouettes & Sealing
-
Paint the ground:
Once the sky is fully dry, use black acrylic paint to create uneven, rolling hills at the very bottom of the panel. -
Add tree trunks:
Switch to a fine liner brush. Paint thin, vertical lines rising from the hills to serve as the trunks for your barren trees. Vary the heights for a natural look. -
Detail the branches:
Using the very tip of your liner brush, pull tiny branches outward from the trunks. Keep your hand loose and stick to ‘V’ shapes to mimic natural growth. -
Add background mist:
Mix a tiny drop of black with water to create a translucent wash. Dab this lightly at the base of the trees to create a misty, shadowed effect at the horizon line. -
Remove the tape:
Carefully peel away the painter’s tape to reveal the crisp line between your painted art and the stained wood. -
Seal the project:
Protect your work from the elements by applying two coats of clear outdoor sealer over the entire birdhouse, letting it dry between coats.
Fixing Harsh Lines
If your gradient looks stripey, mix an intermediate color (like yellow-orange) and glaze it thinly over the harsh line to soften the transition.
Now you have a stunning piece of garden art that captures the magic of dusk
Coastal Cottage Birdhouse in Blues and Sand Tones
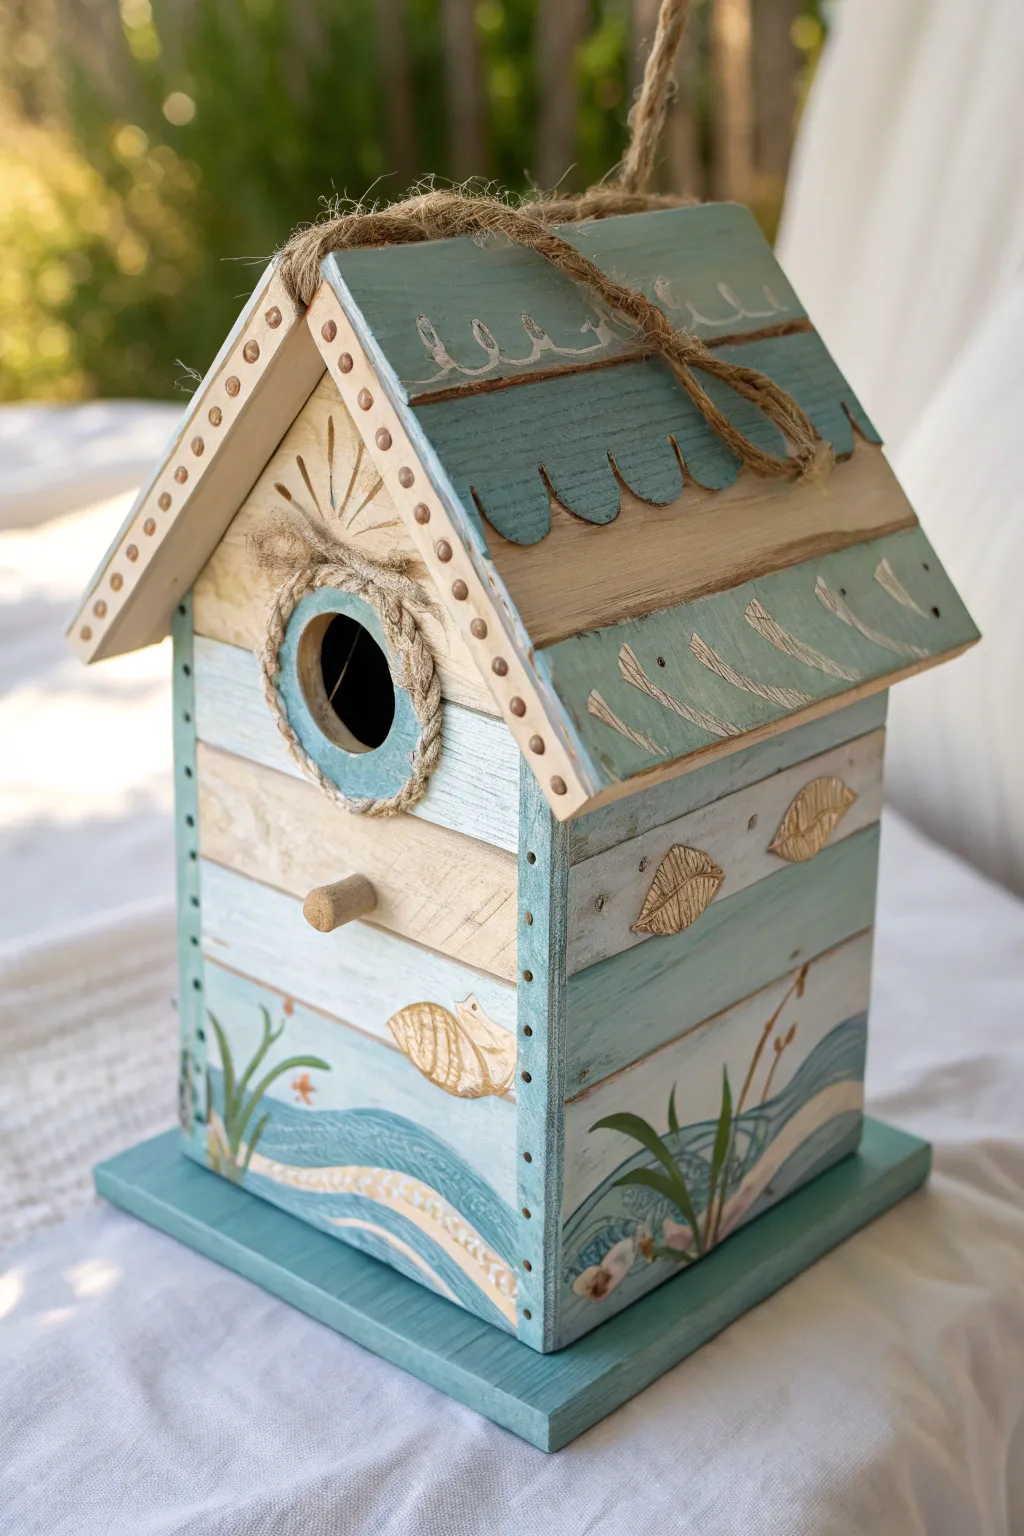
Bring the soothing essence of the seaside to your garden with this charming cottage-style birdhouse. Featuring weathered teals, sandy creams, and delicate rope accents, this project transforms a simple wooden base into a miniature beach retreat.
How-To Guide
Materials
- Unfinished wood birdhouse (cottage style with pitched roof)
- Acrylic craft paints: Teal/Sky Blue, Cream/Sand, White, Metallic Gold
- Jute twine or thin rope
- Paintbrushes: Flat shader (medium), round detail brush, fine liner brush
- Hot glue gun and glue sticks
- Wood glue (optional)
- Sandpaper (fine grit)
- Pencil
- Ruler
- Clear outdoor sealer (matte or satin spray)
Step 1: Base Painting and Weathering
-
Surface Preparation:
Begin by lightly sanding any rough edges on your unfinished birdhouse to ensure a smooth painting surface. Wipe away all sawdust with a damp cloth or tack cloth before opening your paints. -
Blocking the Siding Colors:
Imagine the front and sides of the house as striped siding. Paint thicker horizontal bands, alternating between the soft teal and the cream/sand color. Don’t worry about perfect lines yet; a slightly rustic look fits the theme. -
Painting the Roof:
Paint the two main roof panels in your solid teal shade. For the scalloped trim often found on these houses (or if you paint your own scalloped design), use the same teal but perhaps darken it slightly with a touch of black for depth, or keep it uniform. -
Dry Brushing for Texture:
Once the base coats are fully dry, dip a dry flat brush into a tiny amount of white paint and wipe most of it off on a paper towel. Lightly drag the brush over the teal roof and blue siding areas to create a sun-bleached, weathered wood effect.
Uneven Wooden Surface?
If the wood grain effectively ‘drinks’ your paint and looks blotchy, apply a base coat of white Gesso or primer first. This seals the wood and makes your top colors pop.
Step 2: Roof and Facade Details
-
Adding Roof Accents:
Using a fine liner brush and cream paint, add decorative strokes to the roof. On the upper section, paint small loops or ‘u’ shapes to mimic waves or shingles. On the lower roof section, paint diagonal dashes to simulate texture. -
Painting the Sunburst:
Above the entry hole, use a thin brush with gold or dark brown paint to create a simple sunburst design. Paint thin lines radiating outward from the center point above the hole. -
Dotted Roof Trim:
Dip the handle end of a paintbrush into your metallic gold or dark sand paint. Dot along the front edge of the roof overhang, spacing them evenly to look like decorative nail heads. -
Installing the Rope Trim:
Cut a length of jute twine long enough to circle the birdhouse entry hole. Apply a thin bead of hot glue around the rim of the opening and press the twine firmly into place. I find overlap at the top looks neatest.
Pro Tip: Texture Trick
Mix a pinch of baking soda into your sand-colored paint for the bottom ‘beach’ section. It creates a gritty, realistic sand texture that looks amazing when dry.
Step 3: Seascape and Embellishments
-
Sketching the Waves:
At the very bottom of the birdhouse walls, lightly sketch a wavy horizon line with a pencil to mark where the ocean meets the sand. -
Painting the Ocean:
Fill in the bottom inch or two with a darker teal or blue mixture. While the paint is wet, blend in some white streaks to create the look of rolling waves and sea foam. -
Adding Dune Grass:
Using your finest liner brush and green paint (or a mix of teal and gold), paint long, wispy blades of grass rising from the bottom edge. Curve them slightly as if blowing in a sea breeze. -
Painting Sea Life Details:
In the sandy colored bands of the siding, paint simple leaf or shell shapes using gold paint. For better definition, outline these shapes thinly with a darker brown or grey. -
Adding a Perch:
If your birdhouse kit came with a dowel, leave it natural wood or stain it lightly. Glue it securely into the pre-drilled hole below the entrance.
Step 4: Final Assembly and Protection
-
Creating the Hanger:
Thread a thick piece of jute rope through the top hanging mechanism or loop. Knot it securely. For extra flair, wrap loose jute ends around the main rope for a ‘bound’ look. -
Decorative Binding:
If desired, drape a piece of thinner twine over the roof peak and glue it down to simulate a tied-down cottage roof, adding a rustic knot at the front. -
Sealing the Project:
To protect your artwork from the elements, take the birdhouse to a well-ventilated area and apply two even coats of clear outdoor sealer spray, allowing proper drying time between coats.
Now you have a serene, beachy haven ready to welcome your feather friends to the garden


Woodland Camouflage Birdhouse With Leaves and Bark
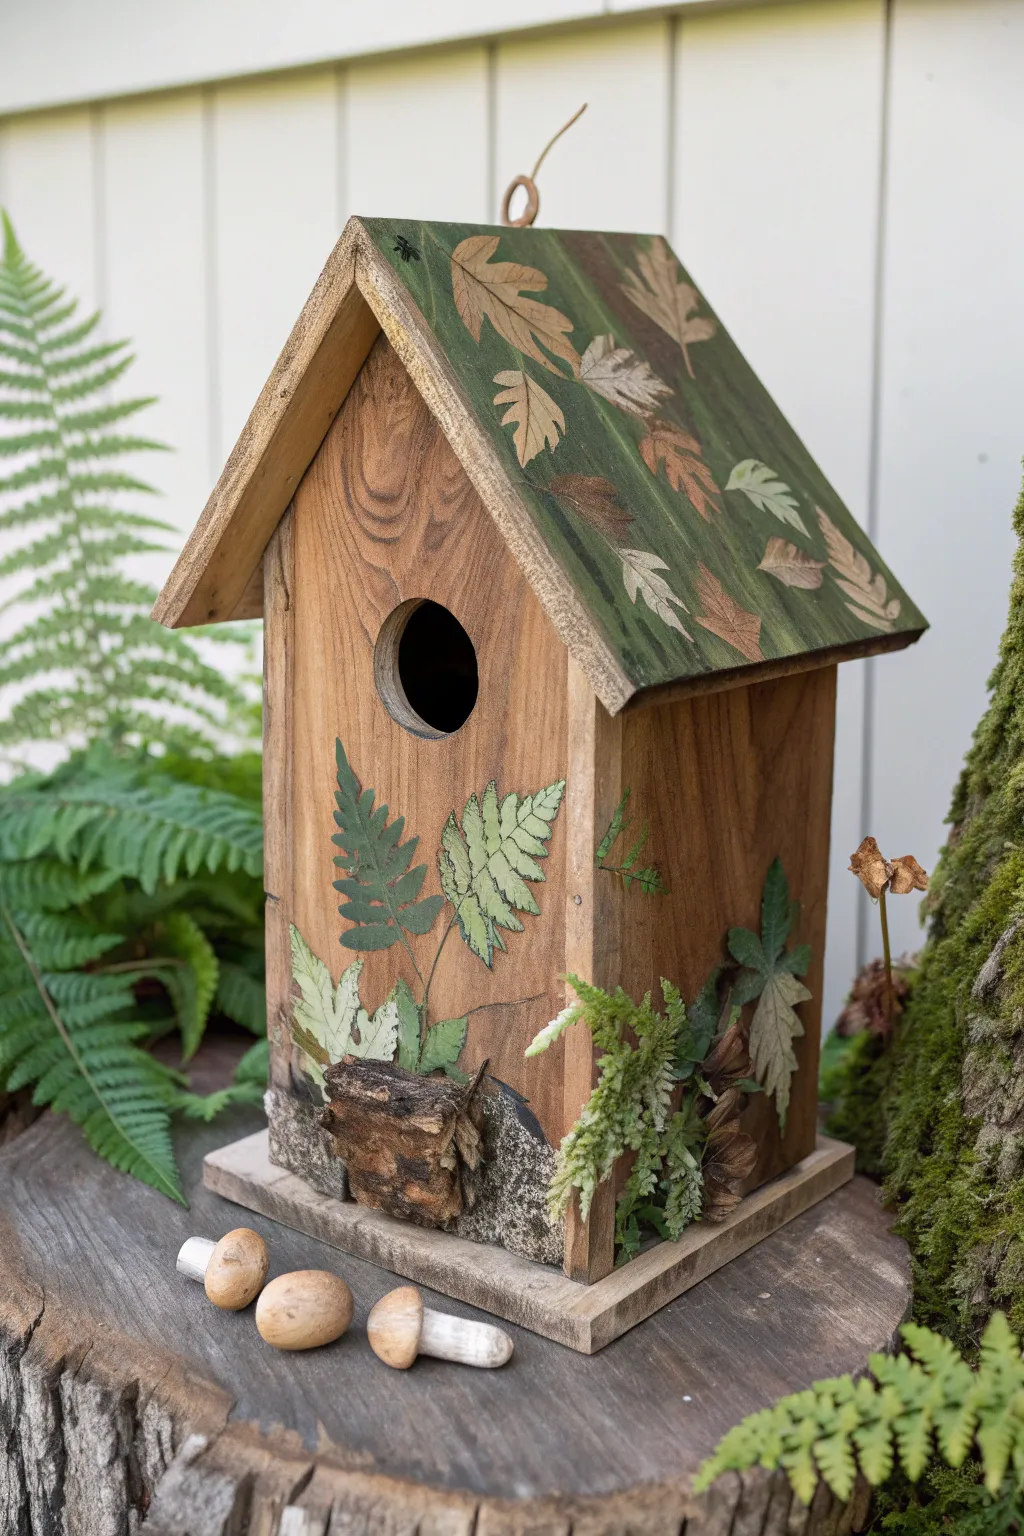
Transform a plain wooden birdhouse into a secret forest hideaway with this camouflage-inspired project. By combining simple painting techniques with natural textures like bark and dried moss, you’ll create a charming nesting spot that blends seamlessly into the trees.
Detailed Instructions
Materials
- Unfinished wooden birdhouse
- Acrylic craft paints (hunter green, olive green, medium brown, cream/beige)
- Assorted paintbrushes (flat brush and fine liner brush)
- Mod Podge or decoupage medium
- Dried pressed leaves or fern cutouts (printed paper works well)
- Real or faux moss
- Pieces of tree bark
- Hot glue gun and glue sticks
- Clear matte outdoor sealer spray
- Sandpaper (fine grit)
- Wooden mushroom accents (optional)
Step 1: Preparing the Base
-
Smooth the Surface:
Begin by lightly sanding the entire birdhouse to remove any splinters or rough patches. Wipe away the dust with a damp cloth or tack rag to ensure a clean surface for painting. -
Base Stain Application:
Water down a medium brown acrylic paint until it creates a wash-like consistency. Brush this over the main body of the house to stain the wood while letting the natural grain show through. -
Roof Base Coat:
For the roof, mix olive and hunter green paints to create a deep, mottled woodland green. Paint the entire roof surface, using crisscrossing brushstrokes to create a varied, non-uniform texture.
Glue Not Holding?
Bark can be tricky to adhere to smooth wood. Try scoring the wood surface with sandpaper first to create a rougher texture for the hot glue to grip onto.
Step 2: Painting the Foliage
-
Roof Leaf Details:
Dip a flat brush into beige or light brown paint. Press the brush flat against the green roof to create leaf shapes, slightly twisting your wrist to form the edges. I like to scatter these randomly across the roof slopes. -
Adding Veins:
Using your finest liner brush and a dark brown paint, carefully draw thin central veins and side veins onto your painted roof leaves once the beige layer is dry. -
Front Fern Design:
On the front of the house, paint delicate fern fronds rising from the bottom edge. Use a mix of sage and forest green, dabbing a small round brush repeatedly to create the segmented look of fern leaves. -
Layering Colors:
Add dimension to your painted ferns by revisiting them with a lighter shade of green on just the tips. This highlights the leaves as if sunlight is hitting them.
Real Nature Style
Swap painted leaves for real decoupage! Press ferns in a book for a week, then use Mod Podge to adhere the real dried leaves directly onto the house walls.
Step 3: Adding Natural Texture
-
Bark Application:
Select pieces of bark that fit the scale of your birdhouse. Using a hot glue gun, attach a prominent piece of bark to the bottom front center, creating a rustic ‘foundation’ for your house. -
Side Accents:
Glue smaller shards of bark or dried seed pods vertically along the lower corners or sides to soften the straight edges of the wood. -
Mossy Growth:
Tuck clumps of moss or dried lycopodium fern into the crevices around the bark and up the side of the house. Secure them with small dabs of hot glue to simulate organic overgrowth. -
Weathering the Edges:
Dry brush a tiny amount of charcoal or dark brown paint along the corners and under the eaves to give the birdhouse an aged, weathered appearance.
Step 4: Finishing Touches
-
Sealing the Artwork:
Once all paint and glue are completely dry, take the birdhouse to a well-ventilated area. Apply two coats of clear matte outdoor sealer to protect the wood and paint from the elements. -
Mushroom Accessories:
If you have small wooden mushrooms, paint their caps light brown and glue them to the base platform for an extra touch of forest magic.
Hang your new creation in a shady tree spot and wait for the birds to discover their cozy new home
Faux Brick or Stone Birdhouse Texture Illusions

Transform a plain wooden birdhouse into a charming brick cottage using clever paint techniques and textured finishes. The realistic mortar lines and varied brick tones give this piece a delightful architectural feel that looks great in any garden setting.
Step-by-Step Tutorial
Materials
- Unfinished wooden birdhouse
- Air-dry clay or wood putty (stone texture)
- Acrylic craft paints (terra cotta, deep red, brown, tan, cream, gray)
- Medium grit sandpaper
- Painters tape (narrow/masking)
- Small flat brush
- Detail brush
- Texture paste or pumice gel (optional)
- Matte outdoor sealer/varnish
- Scrap wood or clay (for chimney)
- Hot glue gun or wood glue
Step 1: Base Preparation
-
Surface Prep:
Start by lightly sanding your wooden birdhouse to remove any splinters or rough patches. Wipe it down with a damp cloth to remove the dust. -
Base Coat Application:
Paint the entire body of the house (where the bricks will go) with a light gray or cream acrylic paint. This color will serve as your mortar lines later, so ensure solid coverage. Let this dry completely. -
Chimney Addition:
If your birdhouse doesn’t have a chimney, cut a small block of scrap wood or sculpt a rectangular prism from air-dry clay. Glue this to the roof peak. I find wood glue offers the best long-term bond for outdoor use.
Sticky Situation?
If paint bleeds under the tape, don’t panic. Use a fine liner brush and your gray mortar paint to touch up the lines after peeling the tape.
Step 2: Creating the Brickwork
-
Taping the Mortar:
Using very narrow masking tape (1/8 or 1/4 inch), tape horizontal lines around the body of the house. These will become the horizontal mortar joints between your brick rows. -
Vertical Joints:
Cut small pieces of the same tape and place them vertically between the horizontal lines to create individual brick shapes. Remember to stagger these vertical lines row by row for a running bond pattern. -
Texture Application:
To mimic the rough texture of real brick, dab a little texture paste or a mixture of paint and baking soda onto the exposed ‘brick’ areas. Keep it uneven for realism. -
Brick Base Colors:
Pour out your brick colors: terra cotta, deep red, tan, and brown. Paint individual bricks using a flat brush, varying the colors randomly. Don’t worry about being perfectly neat; slight bleeding can actually look aged. -
Adding Depth:
While the base colors are still slightly wet, dab a tiny bit of darker brown or gray onto the corners of some bricks to simulate weathering and soot. -
The Reveal:
Once the paint is dry to the touch but not fully cured, carefully peel away all the tape to reveal the clean gray mortar lines underneath.
Step 3: Roof and Details
-
Shingle Painting:
Paint the roof shingles using alternating shades of light wood, tan, and faded red to complement the brickwork. A dry-brush technique works well here to highlight the wood grain. -
Chimney Texture:
Paint the chimney with a textured gray paint (or gray mixed with sand) to replicate a stucco or concrete finish. -
Entryway Detail:
If there is a raised trim around the entry hole, paint it a solid tan or wood color to frame the opening. -
Corner Posts:
For the corner posts shown in the image, use the same textured gray mix used on the chimney. This mimics concrete structural columns often found on old cottages.
Mossy Makeover
Dab bits of green craft moss or olive green sponge paint in the corners of the roof and base to give the cottage an established, overgrown look.
Step 4: Finishing Touches
-
Aging the Mortar:
If the mortar lines look too stark and white, create a very watery wash of brown paint and brush it over the entire brick area, then quickly wipe it off with a rag. This settles into the crevices. -
Chimney Elements:
Drill two small shallow holes near the top of the chimney or paint black dots to simulate vents. Add a decorative finial or bead to the top if desired. -
Sealing:
Protect your masterpiece from the elements by applying two coats of matte outdoor sealer. Ensure you cover all nooks and crannies to prevent water damage.
Now your garden has a custom brick cottage ready for its first feathered tenants
Panoramic Landscape Birdhouse Around All Sides
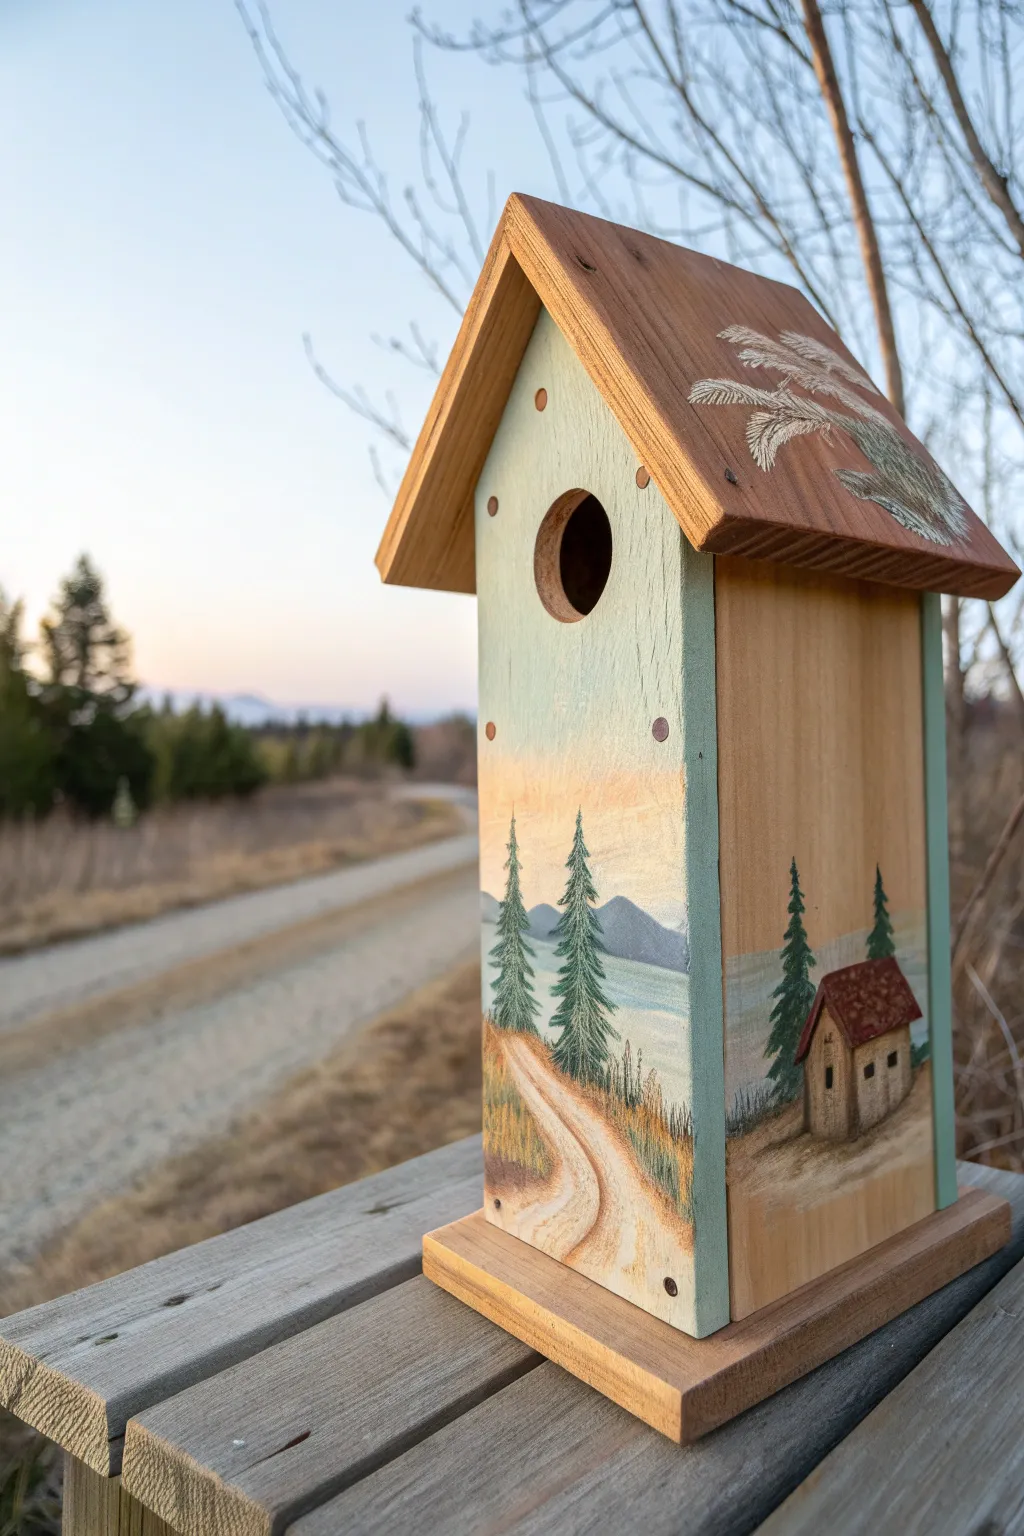
Transform a plain wooden birdhouse into a serene escape with this panoramic landscape design. By blending natural wood grain with soft acrylics, you’ll create a seamless scene of winding paths, evergreens, and a cozy cabin that wraps elegantly around the structure.
Detailed Instructions
Materials
- Unfinished wooden birdhouse (pine or similar)
- Sandpaper (220 grit)
- Painter’s tape
- Acrylic paints: Titanium White, Light Blue, Burnt Sienna, Yellow Ochre, Sap Green, Dark Green, Burnt Umber, Crimson Red
- Paintbrushes: 1-inch flat wash, medium round brush (size 6), fine detail liner brush (size 0 or 1)
- Palette or paper plate
- Paper towels
- Water cup
- Matte or satin outdoor spray sealant/varnish
Step 1: Preparation and Backgrounds
-
Prepare the surface:
Begin by lightly sanding the entire birdhouse, paying special attention to the edges and the roof, to ensure a smooth painting surface. Wipe away any dust with a damp cloth or tack cloth. -
Masking off areas:
Decide which panels will have a full painted background and which will show natural wood. On this project, tape off the side walls and the roof eaves so you only paint the front panel’s sky initially. I like to press the tape down firmly with a fingernail to prevent bleed-under. -
Painting the sky gradient:
On the front panel, mix a pale minty-blue using Titanium White, a touch of Light Blue, and a tiny drop of Sap Green. Paint the upper two-thirds of the front face. -
Adding sunset warmth:
While the sky paint is still slightly tacky, mix White with a very small amount of Yellow Ochre and Crimson Red to make a pale peach. Blend this into the bottom third of the sky area, creating a soft horizon glow.
Paint Bleeding?
If paint bleeds under your tape onto the natural wood side, don’t wipe it! Let it dry, then gently sand the unwanted paint away with fine-grit sandpaper for a clean edge.
Step 2: Painting the Landscape
-
Establishing the horizon:
Using a light grey-blue mixture, paint a low mountain range across the middle of the front panel where the sky meets the ground. Let this dry completely. -
Blocking in the lake:
Below the mountains, add a strip of light blue for the water. You can dry-brush a little white over it to suggest movement or reflection. -
Creating the path:
Mix Titanium White with Burnt Sienna to create a sandy beige. Start at the bottom center of the front panel and paint a winding path that gets narrower as it moves upward toward the lake. Use choppy strokes to mimic dirt texture. -
Adding grassy textures:
Mix Yellow Ochre with a bit of Burnt Sienna. Using a dry round brush, stipple and flick paint around the edges of the path to create the look of dried winter grass or wheat. -
Painting the evergreens:
Load a medium round brush with Dark Green. Paint two prominent trees on the left side of the path. Start with a vertical line for the trunk, then use quick, downward diagonal dashes to create boughs, getting wider at the bottom.
Step 3: Side Details and Finishing
-
Transition to the side:
Remove the tape from the side panel. On the bare wood, paint a continuation of the horizon line and water using the same colors as the front, but keep the paint thinner so the wood grain shows through slightly. -
Adding the cabin:
Using Burnt Umber, paint a small rectangular box shape on the side panel for the cabin body. Add a triangular shape on top for the roof gable. -
Roof and windows:
Paint the cabin roof with Crimson mixed with a little Burnt Umber for a rustic red. Use a fine liner brush and black or dark brown to add two tiny windows and a door. -
Surrounding trees:
Add two more tall pine trees behind the cabin using your Dark Green mix. Ensure these trees visually connect with the style of the ones on the front panel. -
Roof embellishment:
On the actual wooden roof of the birdhouse, use a very dry brush with Light Grey or Off-White to paint a large, stylized pine branch sweeping across the corner. This connects the roof to the scene below. -
Adding highlights:
Take your fine liner brush with pure White. Add tiny highlights to the tops of the tree boughs, the roof of the painted cabin, and the edges of the dirt path to imply sunlight hitting the scene. -
Sealing the work:
Once the paint is cured (usually 24 hours), take the birdhouse to a well-ventilated area. Spray the entire piece with two light coats of outdoor matte sealant to protect the wood and artwork from the elements.
Add a 3D Touch
Glue small twigs or dried moss around the base of the birdhouse or near the painted cabin foundation to blend your 2D painting with real 3D natural textures.
Hang your masterpiece in a spot protected from direct heavy rain to enjoy your miniature landscape for seasons to come
Modern Color-Blocked Birdhouse Geometrics
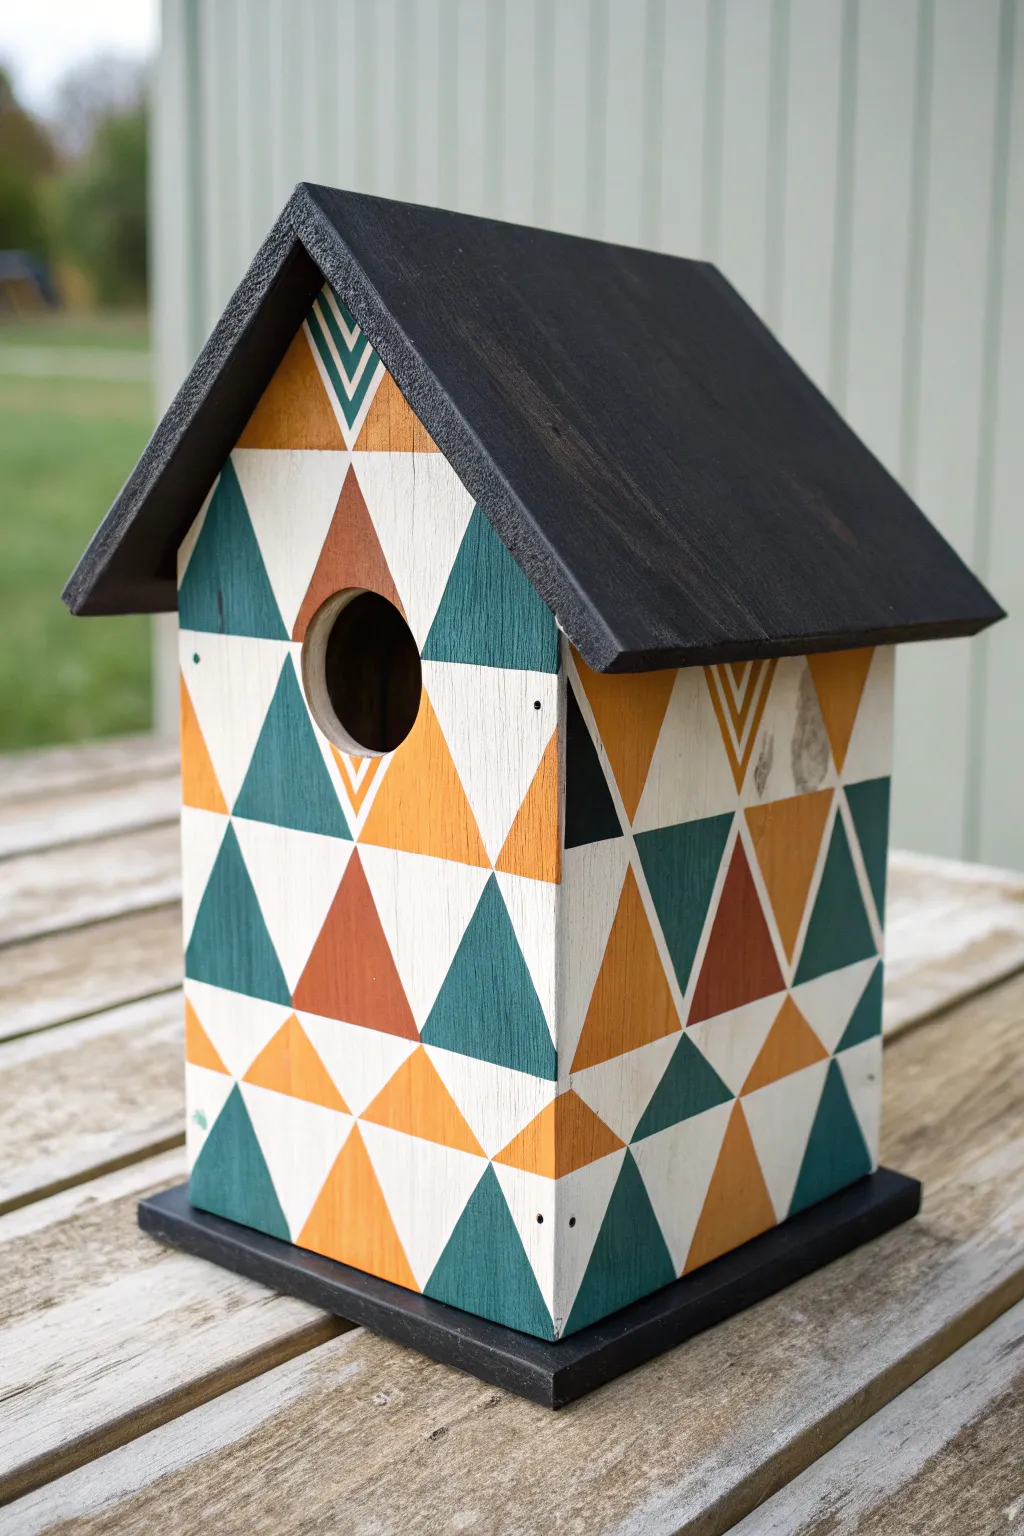
Give your garden birds a mid-century modern upgrade with this striking geometric birdhouse. Featuring a crisp pattern of triangles in teal, ochre, and rust against a clean white background, this project combines bold aesthetics with simple shapes for a truly standout finish.
Step-by-Step Guide
Materials
- Unfinished wooden birdhouse with a pitched roof
- Fine-grit sandpaper (220 grit)
- White primer
- Exterior acrylic craft paint: Warm White
- Exterior acrylic craft paint: Teal or Deep Turquoise
- Exterior acrylic craft paint: Golden Ochre or Mustard Yellow
- Exterior acrylic craft paint: Rust or Terracotta
- Exterior acrylic craft paint: Matte Black
- Ruler
- Pencil
- Painter’s tape (optional but helpful for straight lines)
- Small flat-bristle brushes (various sizes)
- Detail liner brush
- Clear matte exterior varnish or sealant
- Tack cloth
Step 1: Preparation & Base Coat
-
Sand and smooth:
Begin by sanding the entire unfinished birdhouse with 220-grit sandpaper. Pay special attention to the roof edges and the entrance hole to ensure there are no splinters that could catch paint. Wipe away all dust with a tack cloth. -
Prime the surface:
Apply a coat of white primer to the entire exterior. This is crucial for raw wood, as it prevents the wood grain from soaking up your colored paint and ensures the white sections stay crisp. -
Paint the main body white:
Once the primer is dry, paint the walls of the birdhouse with your warm white exterior acrylic. You may need two coats for full opacity. Let this dry completely—at least an hour—before starting any design work.
Bleeding Lines?
If paint bleeds under tape, let it dry. Then, use a small angled brush and your base white color to paint over the bleed, re-establishing a crisp, straight line.
Step 2: Drafting the Pattern
-
Mark vertical guides:
Using your ruler and pencil, lightly mark vertical lines down the face of the birdhouse. Space them evenly based on the width of your birdhouse (e.g., every 1.5 to 2 inches). -
Mark horizontal guides:
Draw faint horizontal lines across the vertical ones to create a grid of rectangles or squares. The height of these rows will determine the height of your triangles. -
Draw the triangles:
Connect the corners of your grid squares diagonally to form a series of alternating triangles. I like to work row by row, ensuring the points of the triangles alter direction (one pointing up, the next pointing down) to create that tessellated look. -
Plan the color placement:
Before picking up a brush, lightly mark a ‘T’ for Teal, ‘O’ for Ochre, ‘R’ for Rust, or ‘W’ for White inside each triangle. Reference the photo to mimic the semi-random but balanced distribution of colors.
Pro Design Tip
For the nested ‘V’ shapes near the top, paint the larger triangle first. Let it dry, then use a ruler to draw the smaller inner triangle before painting it.
Step 3: Painting the Geometrics
-
Paint the Teal sections:
Start with your darkest color. Using a small flat brush, fill in all triangles marked for Teal. Use the straight edge of the brush to cut in sharp lines against the pencil marks. -
Fill in the Ochre triangles:
Next, move to the Golden Ochre paint. Apply this to the designate triangles, being careful where colors touch. If you have a steady hand, freehand painting is faster, but you can use painter’s tape for perfect edges if you let the neighboring color dry fully first. -
Add the Rust accents:
Paint the Rust or Terracotta triangles. Notice in the design that some sections, particularly near the roofline or hole, might have nested triangles (a smaller triangle inside a larger one). Use your detail liner brush for these finer lines. -
Detail the entrance:
Carefully paint the inside rim of the birdhouse hole. For a neat look, you can continue the pattern slightly inside or just paint the rim a solid color like black or dark teal to verify depth. -
Touch up the White:
Go back with your Warm White paint and a clean brush to tidy up any edges where the colors might have bled over the lines. This ‘cutting back’ technique sharpens up the whole geometric effect.
Step 4: Roof & Finishing
-
Paint the roof black:
Using the Matte Black paint, coat the entire roof structure. Don’t forget the underside of the overhang and the front-facing edge of the roof trim. -
Paint the base:
If your birdhouse has a base platform, paint this Matte Black as well. This grounds the design and frames the colorful pattern nicely. -
Erase guidelines:
Once the paint is 100% dry, gently erase any visible pencil lines that weren’t covered by paint. -
Apply sealant:
Protect your hard work from the elements by applying two coats of clear matte exterior varnish. Ensure the first coat is dry before applying the second.
Hang this colorful shelter in a visible spot and watch as it becomes the focal point of your backyard view.
Watermelon Birdhouse Fruit Mimic Paint Job
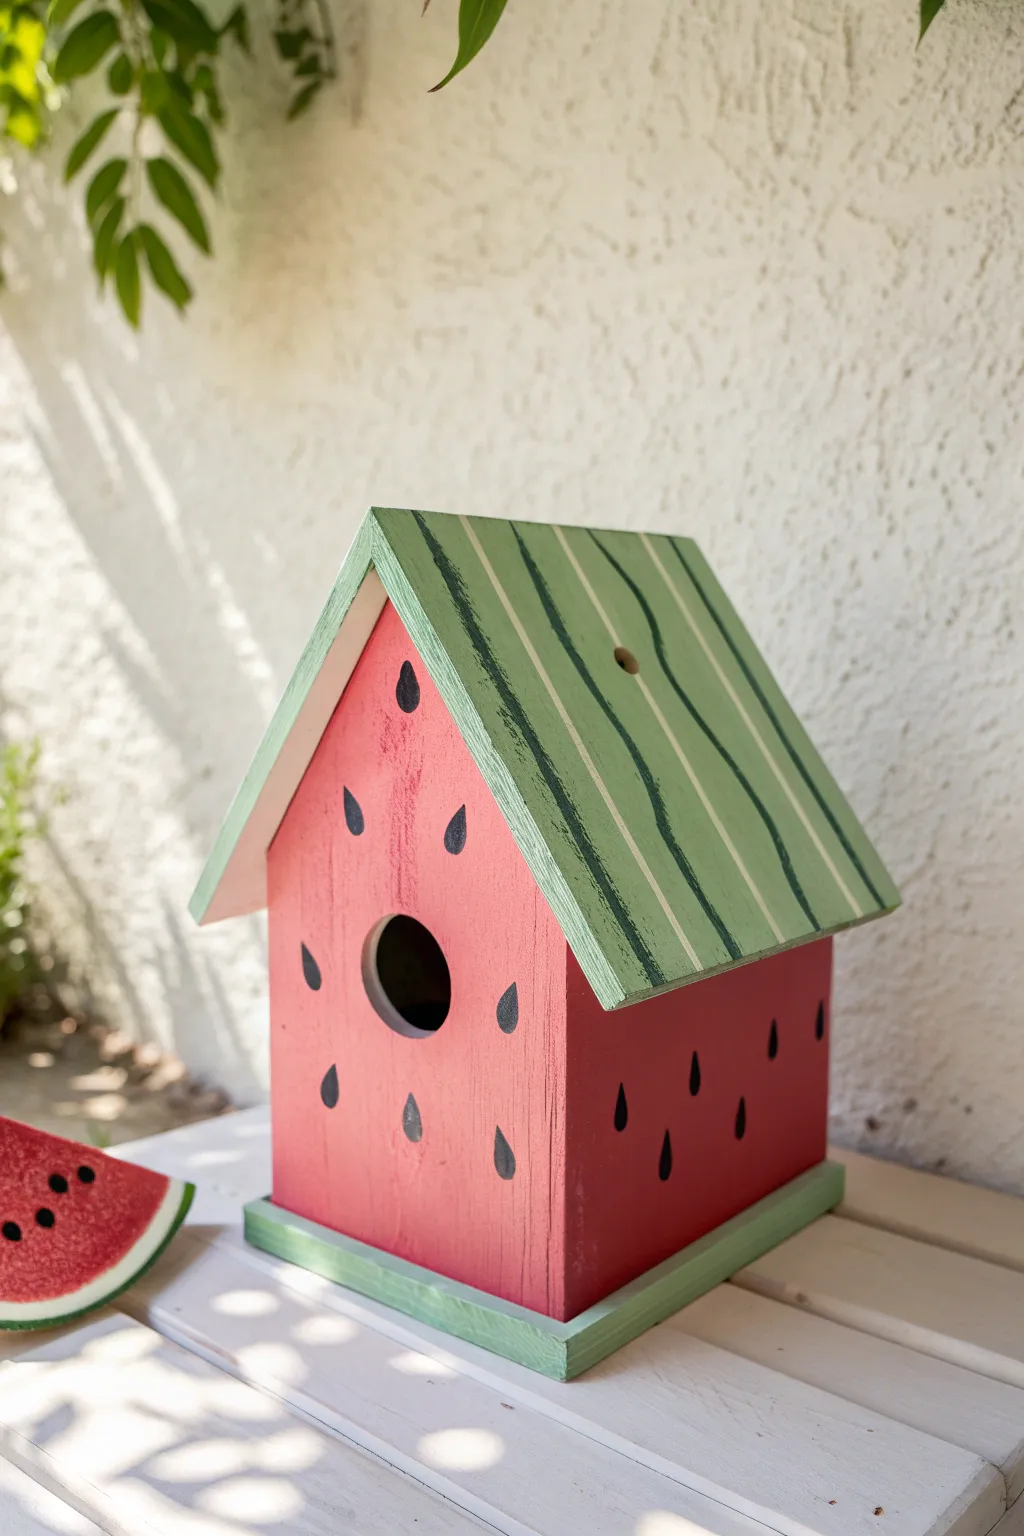
Transform a plain wooden birdhouse into a refreshing slice of summer with this charming watermelon paint job. The juicy pink walls and striped rind roof make for a standout garden accent that feels both playful and inviting.
How-To Guide
Materials
- Unfinished wooden birdhouse
- Sandpaper (medium and fine grit)
- Acrylic paints: Bright watermelon pink/red, lime green, dark forest green, white, and black
- Flat paintbrushes (1-inch and 1/2-inch)
- Small round detail brush
- Painter’s tape
- Clear outdoor sealant spray (matte or satin)
- Palette or paper plate for mixing
- Water cup and paper towels
Step 1: Preparation and Base Coats
-
Sand the surface:
Before dipping into your paints, give the entire birdhouse a quick sanding. Smoothing out any rough wood splinters ensures your watermelon colors go on evenly and look professional. -
Clean the wood:
Wipe the house down with a tack cloth or slightly damp paper towel to remove all sawdust. A clean surface is crucial for paint adhesion. -
Paint the pink body:
Start by painting the four walls of the birdhouse with your bright watermelon pink acrylic paint. Use a larger flat brush for broad strokes. Be careful not to get pink paint on the roof or the base yet. -
Apply a second pink coat:
Acrylics often need layers for full opacity. Once the first coat is dry to the touch, apply a second layer of pink to get that rich, juicy color intensity. -
Paint the base green:
While the walls dry, paint the bottom wooden base platform with a lime green shade. This acts as the outer rind at the bottom of the ‘slice’.
Uneven Seeds?
If painting freehand seeds feels daunty, cut a small teardrop shape from a sponge. Dip it in black paint and stamp it onto the wood for uniform seeds every time.
Step 2: Creating the Watermelon Seeds
-
Plan seed placement:
Visualize where your seeds will go on the pink walls. They should be scattered randomly but evenly, avoiding clumps. You want them to look like natural seeds floating in the fruit. -
Paint the teardrop shape:
Using your small round detail brush and black paint, press down gently and pull up to create a teardrop shape. The rounded bottom should be at the bottom, tapering up to a point. -
Vary direction slightly:
Keep most seeds upright, but a slight tilt here and there adds realism. I like to make sure to place a few seeds near edges where they might be ‘cut off’ visually. -
Don’t forget the sides:
Continue painting black teardrop seeds on all four sides of the house, maintaining consistent spacing.
Step 3: Painting the Rind Roof
-
Base coat the roof:
Paint the entire roof surface with your lime green paint. This lighter green serves as the background for the rind pattern. Let it dry completely. -
Paint dark green stripes:
Load a medium flat brush with dark forest green paint. Paint uneven, wavy stripes running from the peak of the roof down to the eaves. The wiggly nature of the lines mimics a real watermelon’s texture. -
Allow wide spacing:
Leave gaps of the lime green base showing between your dark green stripes. There’s no need for perfect symmetry here; organic lines look best. -
Add thin white accents:
Once the dark green is dry, take a very fine detail brush with white paint. Paint thin lines in the center of the lime green gaps. -
Refine the white lines:
These white lines shouldn’t be solid; make them slightly broken or sketchy to blend better with the rind texture.
Go 3D
Glue a small, rounded wooden bead to the top peak of the roof and paint it brown. It perfectly mimics the dried stem found on top of a real watermelon.
Step 4: Finishing Touches
-
Paint the entry hole:
Use a small brush to carefully paint the inside edge of the birdhouse hole black. This gives it a clean, finished look and hides the raw wood grain depth. -
Touch up edges:
Check for any spots where colors might have overlapped unintentionally. Use your base colors to tidy up the lines where the roof meets the walls. -
Seal for protection:
Since this will likely live outdoors, spray the entire birdhouse with a clear, UV-resistant outdoor sealant. Apply two thin coats rather than one heavy one to avoid drips.
Now hang your vibrant creation in a shady spot and wait for the birds to discover their sweet new home
Mushroom Roof Birdhouse Storybook Style
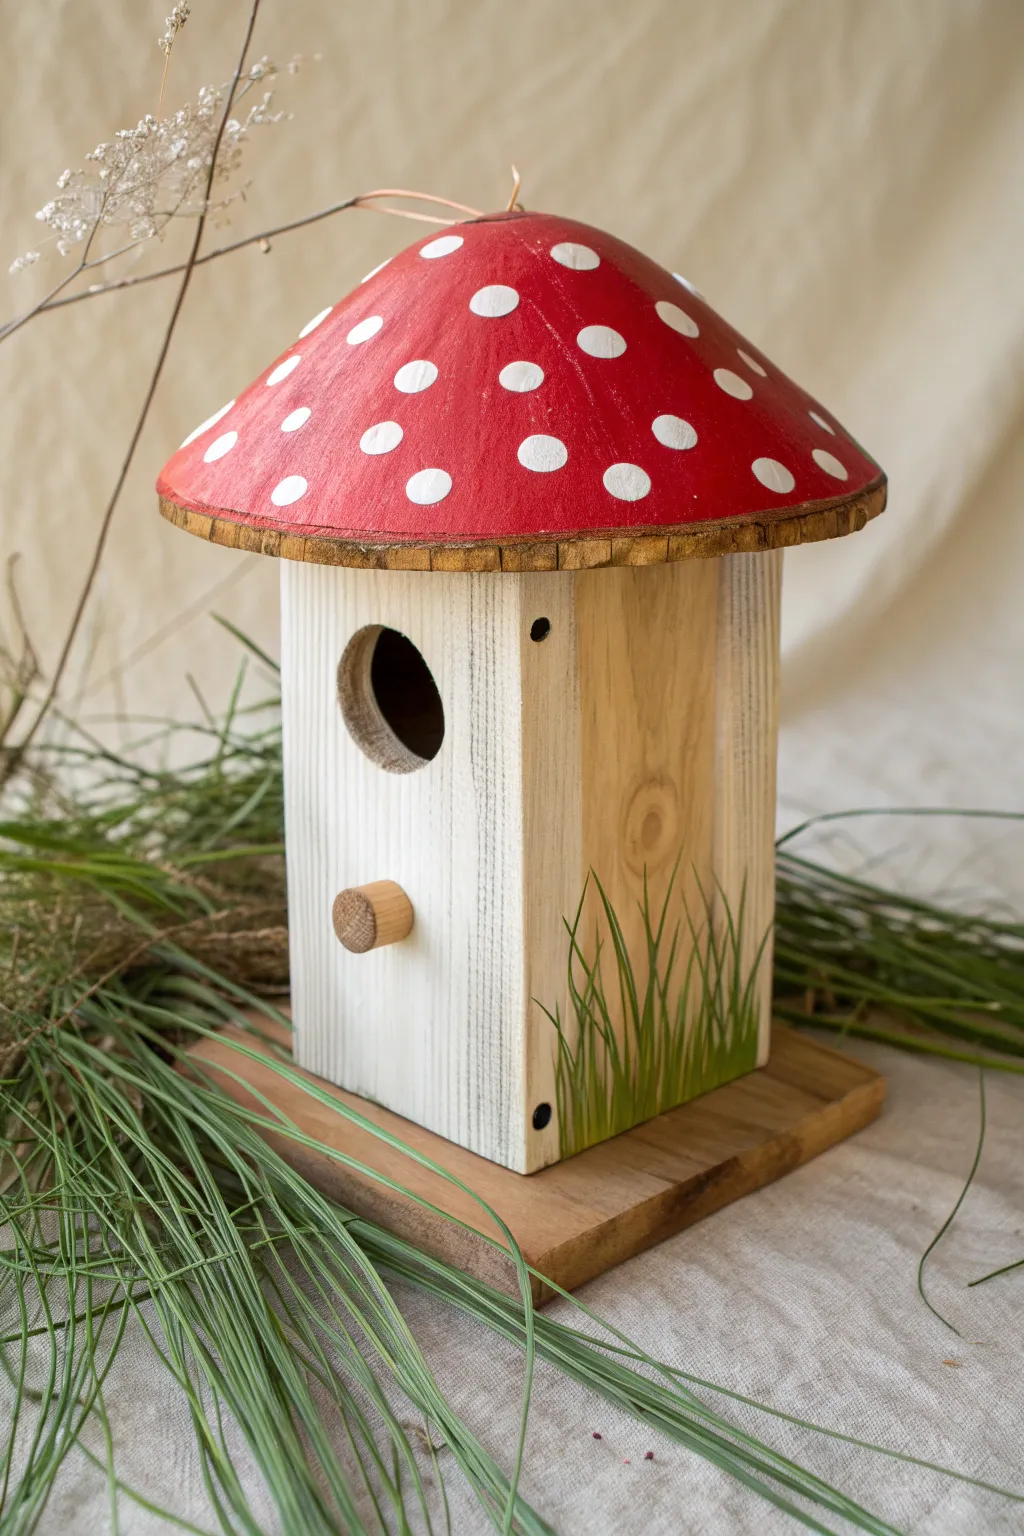
Transform a plain wooden birdhouse into a fairytale dwelling with this charming toadstool design. The striking red roof dotted with white creates an instant storybook feel, while the natural wood grain keeps it grounded and rustic.
Step-by-Step Guide
Materials
- Unfinished wood birdhouse (round roof style)
- Red acrylic paint (bright scarlet)
- White acrylic paint
- Green acrylic paint (grass green)
- Natural wood stain (light oak or pine)
- Fine-grit sandpaper
- Painter’s tape
- Foam brushes
- Small round paintbrush
- Fine liner brush
- Round foam pouncer (small size)
- Clear outdoor sealant spray (matte or satin)
- Small eye hook (optional, for hanging)
Step 1: Preparation and Base Coats
-
Sand the surface:
Begin by lightly sanding the entire birdhouse with fine-grit sandpaper to remove any rough splinters, paying special attention to the roof edges and the entrance hole. -
Clean the dust:
Wipe the entire structure down with a tack cloth or slightly damp rag to ensure a clean surface for painting. -
Tape off the natural areas:
Apply painter’s tape to the sides of the house that you want to remain natural wood. I prefer to tape precisely along the corner seams to get a crisp line. -
Paint the front panel:
Using a foam brush, paint the front face of the birdhouse with white acrylic paint. Apply a thin, even coat. -
Create a distressed look:
Once the white paint is tacky but not fully dry, lightly wipe it with a dry paper towel or sand it very gently after drying to let some wood grain peek through for a rustic, whitewashed effect. -
Stain the sides:
Remove the tape from the sides and apply a light wood stain to the unpainted side panels and the base to enhance the grain without darkening it too much.
Clean Lines
For the perfectly round dots on the roof, twist your foam pouncer slightly as you lift it off the surface. This prevents paint from pooling at the edges.
Step 2: The Mushroom Cap Roof
-
Paint the roof red:
Using your bright scarlet acrylic, paint the entire dome of the roof. Be careful near the bottom edge—you want to leave the very rim natural to look like the underside of a mushroom cap. -
Second coat:
Let the first coat dry completely, then apply a second coat of red for a rich, opaque finish. -
Add the polkadots:
Dip a round foam pouncer or a medium round brush into white paint. stamp differing sizes of dots randomly across the red roof. -
Refine the dots:
If the pouncer leaves a textured ring, gently fill in the center of the dots with your small brush to make them solid white. -
Detail the rim:
Mix a tiny amount of brown paint with water to create a wash. Use a fine liner brush to paint very faint vertical lines on the natural wood edge of the roof to mimic mushroom gills.
Mossy Texture
Mix sand or sawdust into green paint and dab it around the base for a 3D moss effect instead of painted grass blades.
Step 3: Finishing Details
-
Paint the grass:
On the side panels, use a fine liner brush and green paint to add tufts of grass rising from the bottom edge. Use quick, upward flicking motions to keep the blades thin and tapered. -
Vary the heights:
Make sure your grass blades vary in height and direction for a natural, organic look, overlapping them slightly at the base. -
Check the perch:
If your perch got any paint on it, sand it back to raw wood to match the rustic aesthetic. -
Attach the hardware:
If you plan to hang the birdhouse, screw a small metal eye hook into the very center top of the roof. -
Protect your work:
Take the birdhouse to a well-ventilated area and spray the entire project with two coats of clear outdoor sealant to protect it from the elements.
Place your new creation in the garden and wait for the fairies—or birds—to move in
Fingerprint Critters Birdhouse (Bugs and Butterflies)
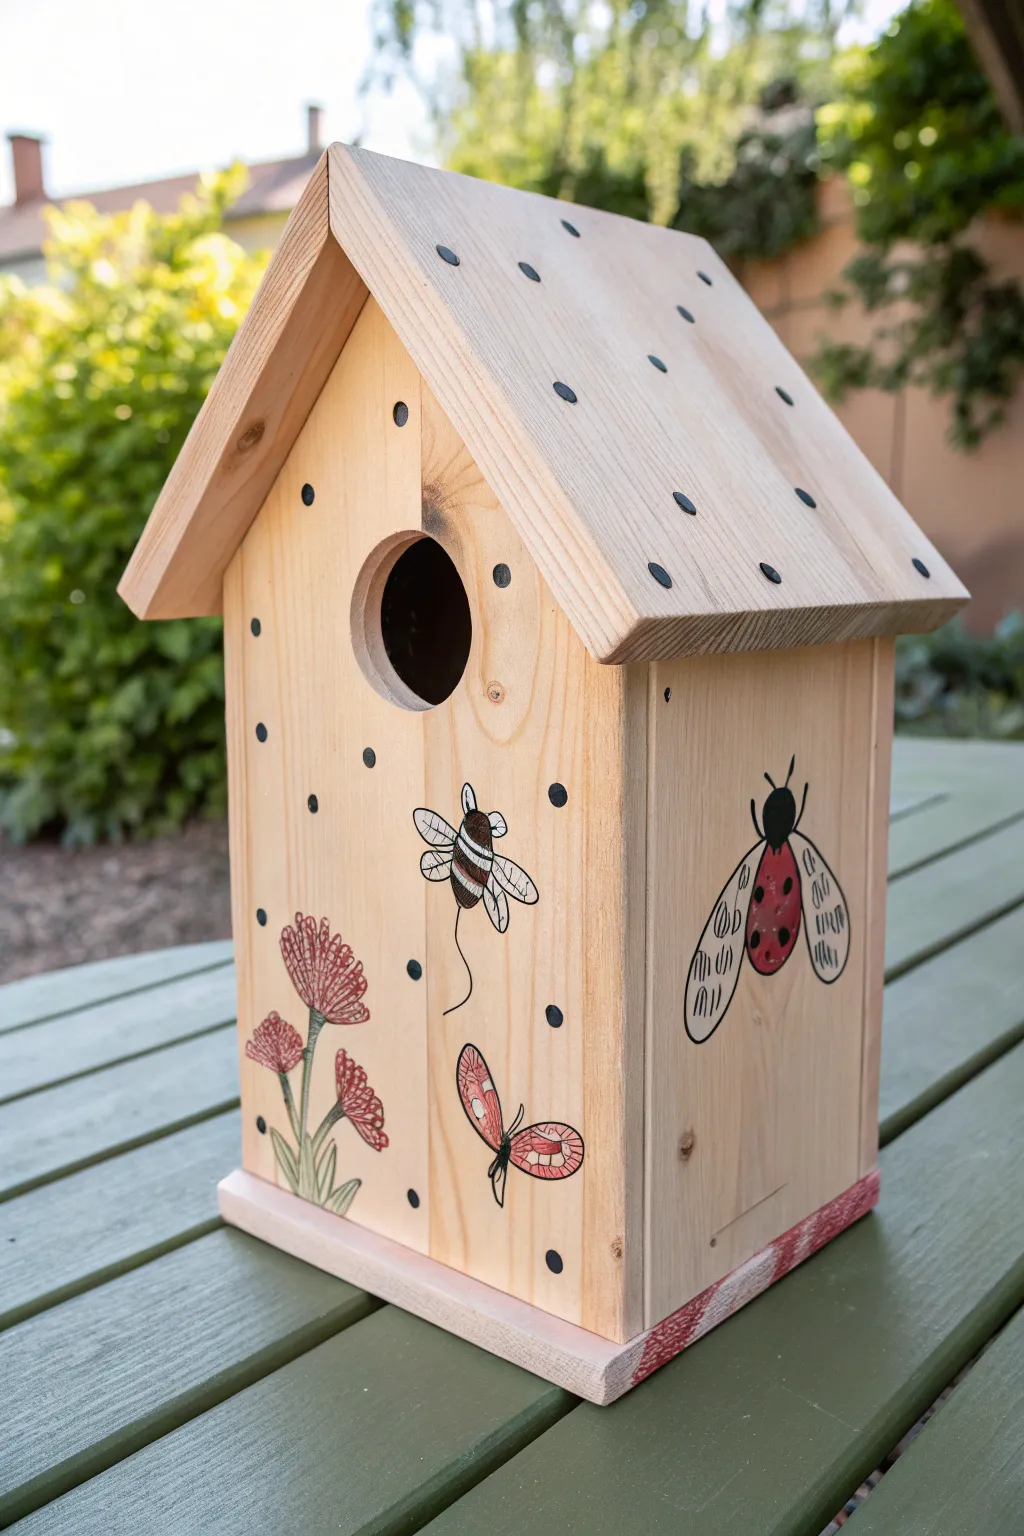
Bring your birdhouse to life with a buzzing collection of friendly bugs and blooms. This project combines the natural beauty of raw wood with simple, playful illustrations created using fingerprints and fine-line details.
Step-by-Step Tutorial
Materials
- Unfinished wooden birdhouse
- Sandpaper (medium and fine grit)
- Acrylic craft paints (red, pink, white, yellow, black)
- Fine-point black permanent marker or paint pen
- Small round paintbrush
- Paper plate or palette
- Matte spray varnish or outdoor sealant
- Pencil and eraser
Step 1: Preparation
-
Smooth the Surface:
Begin by sanding the entire birdhouse, paying special attention to the roof edges and the entry hole, to ensure a splinter-free surface for painting. -
Clean Up:
Wipe away all sanding dust with a slightly damp cloth or tack cloth so your paint adheres properly.
Ink Bleeding Info
If your marker ink bleeds into the wood grain, apply a thin layer of clear acrylic medium over the wood first to seal the pores before drawing with ink.
Step 2: Creating the Critters
-
Plan Your Layout:
Lightly sketch the placement of your main characters—the bee, butterfly, ladybug—and the flower stems using a pencil. -
Body Basics:
For the bee’s body, mix yellow and white paint for a soft tone, then paint an oval shape near the butterfly. I like to keep these shapes simple and organic. -
Painting the Ladybug:
On the side panel, paint a large, bold red oval for the ladybug’s main body, positioning it centrally. -
Adding the Butterfly:
Paint two small, elongated tear-drop shapes in pink or coral to form the butterfly wings near the bottom of the front panel. -
Fingerprint Flowers:
For the flower heads, you can use a small brush or even your thumb dipped in pink paint to create the textured, rounded tops of the blooms on the lower left. -
Let It Dry:
Allow all the painted shapes to dry completely before attempting any ink outlining to prevent bleeding.
Step 3: Fine Details and Ink Work
-
Outline the Bee:
Using your fine-point black marker, draw the outline of the bee, adding stripes across the painted body and sketching delicate, veined wings. -
Stinger and Trail:
Draw a tiny stinger and a playful, looping flight trail that extends downward from the bee. -
Detailing the Ladybug:
Outline the red oval on the side panel. Draw a black semi-circle at the top for the head with two antennae, then sketch large wings on either side with simple vein lines. -
Ladybug Spots:
Add the signature black spots onto the red body using either the marker or a small dot of black paint. -
Butterfly Features:
Outline the pink butterfly wings, adding interior details. Draw a slender black body between the wings and add two antennae. -
Finishing the Flowers:
Draw stems and leaves extending up to your flower heads. Add little tick marks inside the pink flower tops to simulate texture.
Make It 3D
Glue small wooden beads or buttons onto the center of the flowers or use googly eyes on the bugs for a fun, tactile element kids will love.
Step 4: Final Touches
-
Polka Dot Roof:
Dip the handle end of a paintbrush into black paint and stamp small, evenly spaced dots across the entire roof surface. -
Add Scatter Dots:
Continue using the brush handle to add smaller black dots randomly across the front panel to fill empty space. -
Base Trim:
Paint a thin strip of pink along the bottom edge of the birdhouse for a grounded, finished look. -
Seal for Outdoors:
Once all ink and paint are fully cured (wait 24 hours if possible), spray the entire house with a clear, UV-resistant outdoor sealer to protect your artwork from the elements.
Now you have a charming little habitat ready to welcome its first feathered tenants
Mixed-Media Tile Roof Birdhouse With Painted Underlayers
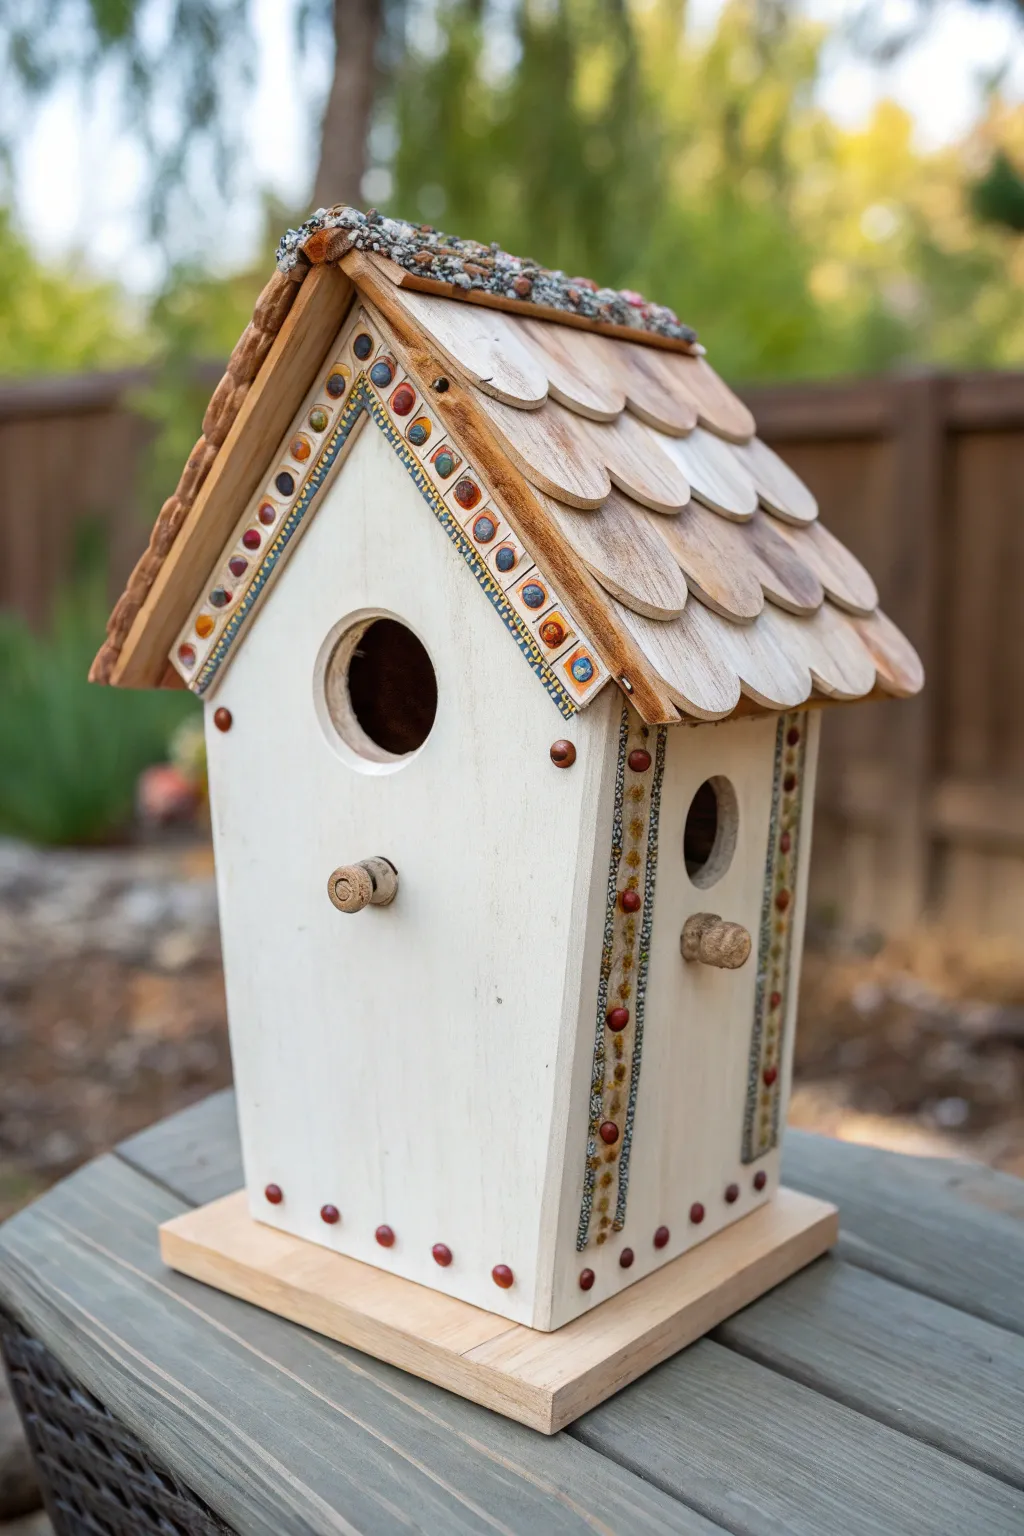
This charming project combines decorative painting with rustic wood elements to create a fairy-tale cottage feel for your garden. The standout feature is the unique roof treatment, imitating weathered wood shakes or ceramic tiles using overlapping scallops.
How-To Guide
Materials
- Unfinished wooden birdhouse (tall style with two holes preferred)
- Wooden craft circles or scallops (1-inch diameter)
- White acrylic paint (chalk finish works well)
- Acrylic paints: Terra cotta, gold, teal, deep red, and brown
- Fine-grit sandpaper
- Small round paintbrushes (sizes 0 and 2)
- Flat shader brush (size 6)
- Wood glue or strong craft glue
- Decorative trim tape or washi tape (patterned)
- Small self-adhesive gems or decorative thumbtacks (copper/red)
- Rough sand or textured medium
- Clear outdoor sealant spray
Step 1: Base Preparation
-
Sand and smooth:
Begin by giving your raw wooden birdhouse a light sanding. Pay special attention to the edges of the roof and the base to ensure there are no splinters that could snag your brush later. -
Paint the body:
Apply a solid coat of creamy white acrylic paint to the main body of the house. I find that a chalky finish paint gives it a nice, non-reflective cottage look. Let this dry completely, then add a second coat for full opacity. -
Stain the perches:
While the white paint dries, mix a little brown paint with water to create a wash. Paint the wooden dowel perches with this mixture to keep them looking wooden but slightly weathered.
Sticky Situation
If your roof tiles slide down while the glue is wet, use masking tape to hold each row in place temporarily. Let the glue set for 15 minutes before removing the tape and starting the next row.
Step 2: Roof Construction
-
Prepare the scallops:
Lay out your wooden craft scallops or circles. You want these to have a natural, varied look, so lightly stain them with a very diluted brown wash. Don’t make them uniform; some variation adds character. -
First row placement:
Starting at the very bottom edge of the roof slope, glue a row of scallops side-by-side. Let them overhang the edge slightly. -
Layering the tiles:
Glue the next row of scallops above the first, offsetting them so the center of the new tile sits over the seam of the two below it. Continue this overlapping pattern all the way to the peak of the roof. -
Create the ridge:
At the very peak where the roof panels meet, the scallops might not meet perfectly. Bridge this gap by mixing wood glue with rough sand or a texture medium and applying a thick, bumpy strip along the ridge. Paint this greyish-brown once dry to look like mortar or stone.
Step 3: Decorative Detailing
-
Painting the trim guides:
Along the front eaves of the roof and vertically down the sides, use a pencil to lightly mark where your decorative borders will go. -
The geometric border:
Using a fine liner brush and deep red or terra cotta paint, create a ‘beaded’ effect inside your trim lines. Paint small circles in a row. Alternatively, you can use a patterned washi tape here if you seal it well, but hand-painting gives that authentic folk-art feel. -
Adding gold accents:
Outline your decorative borders with a thin line of gold or yellow ochre paint. This highlights the architectural shape of the roofline. -
Gem placement:
Enhance the intricate borders by gluing small, flat-backed gems or decorative beads in the center of your painted circles on the trim. Use colors like amber, burnt orange, or teal. -
Accent dots:
Using the handle end of a paintbrush dipped in red or copper paint, add small dots along the very bottom edge of the white walls to mimic nail heads or rivets.
Fairy Garden Upgrade
Glue dried moss bits into the crevices of the roof tiles and around the base. It instantly makes the birdhouse look like an ancient, magical cottage found deep in the forest.
Step 4: Final Touches
-
Distressing:
Once all paint is dry, use a very light touch with fine sandpaper on the edges of the white walls to reveal just a hint of the wood underneath. -
Painting the base:
Leave the wooden base natural, or give it a clear coat to protect it from ground moisture without changing the color. -
Weatherproofing:
Since this will likely live outdoors, spray the entire piece with two coats of UV-resistant clear acrylic sealer. Ensure you spray up under the roof scallops to protect the glue bonds.
Place your new creation on a sturdy post or hang it from a strong branch to welcome your feathered neighbors


Have a question or want to share your own experience? I'd love to hear from you in the comments below!