When I’m stuck on what to paint, I always come back to landscapes—they’re basically endless practice for color, light, and depth. Here are my go-to landscape painting ideas, starting with the classic scenes everyone loves and moving into some playful, “try this just for fun” twists.
Classic Mountain Vista
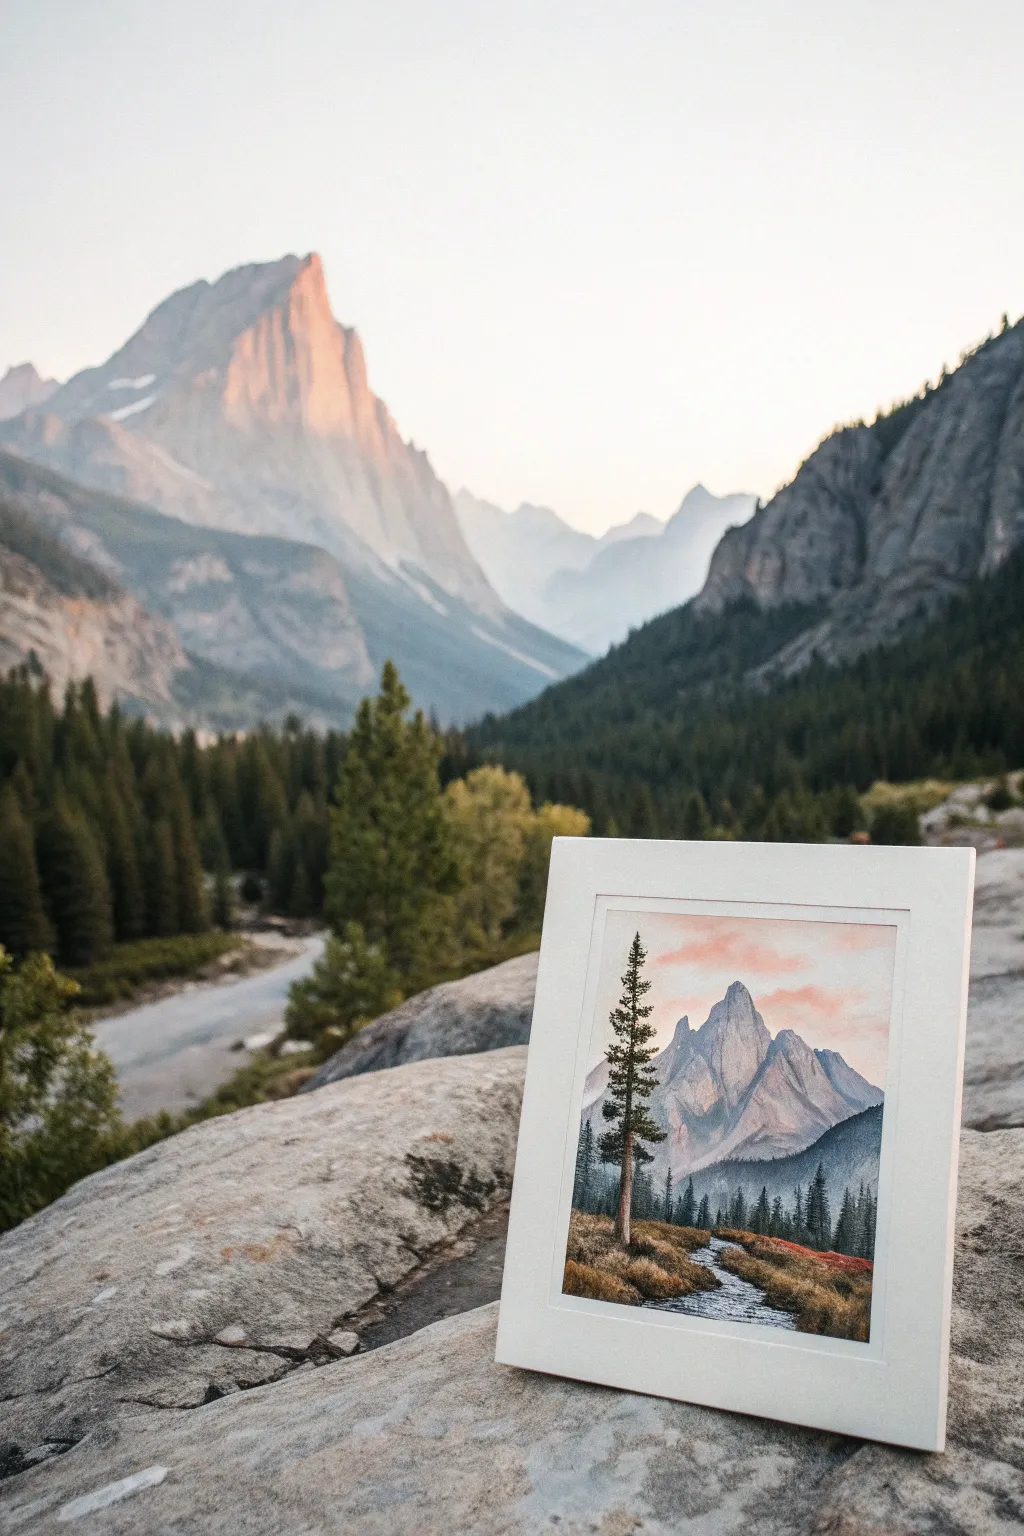
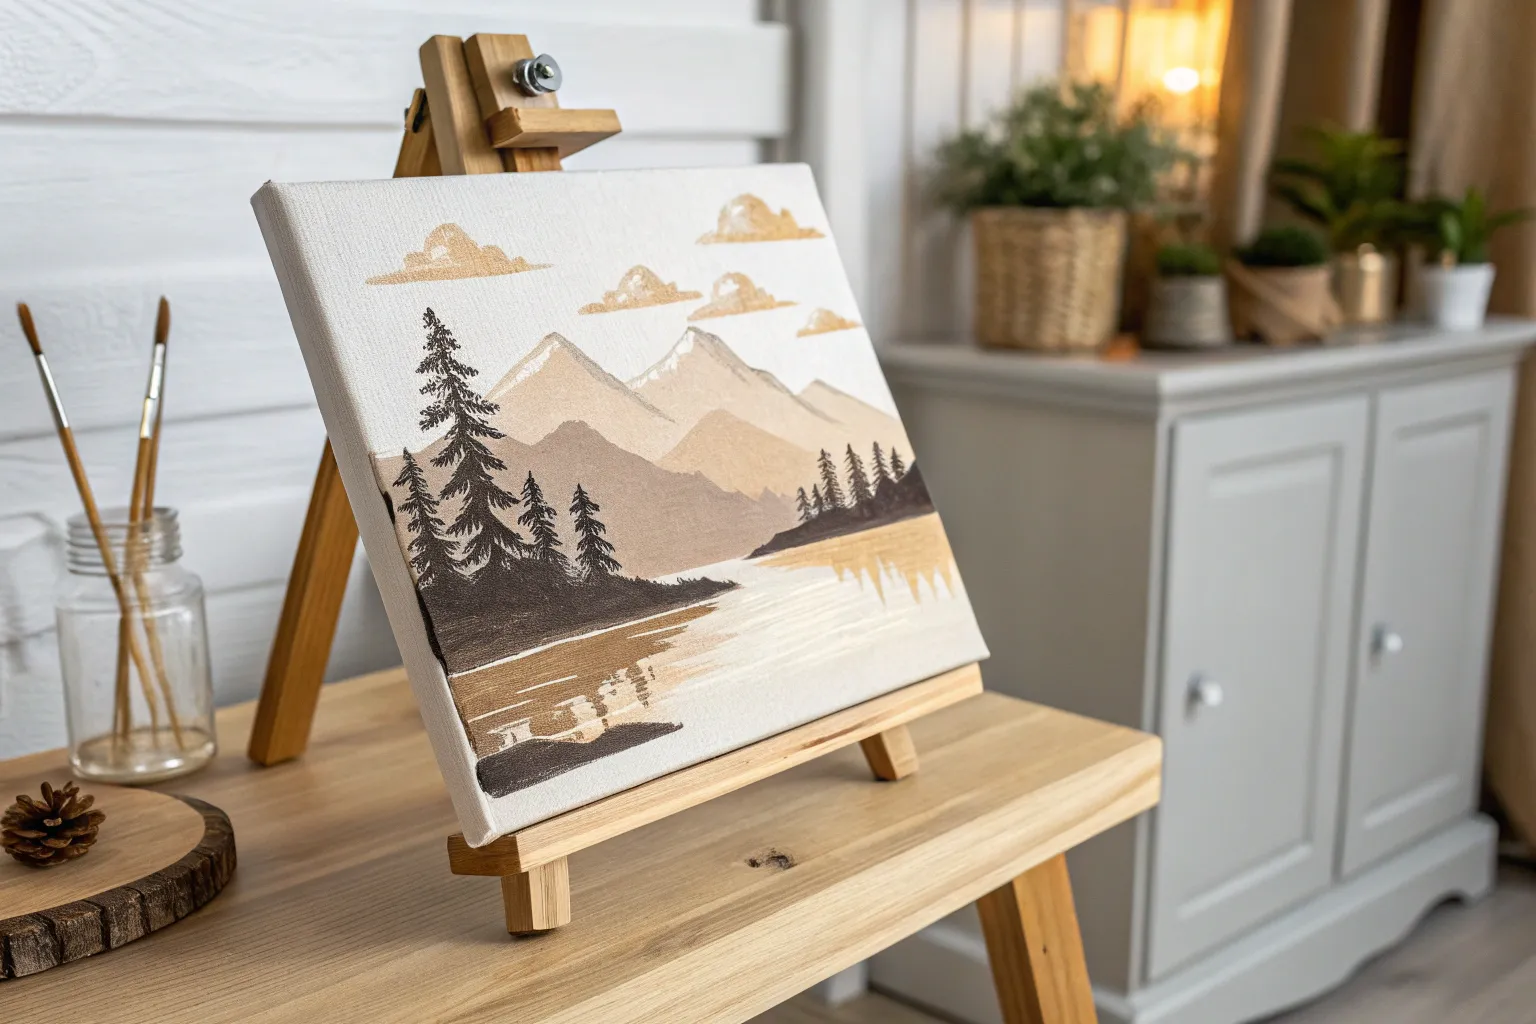
Capture the serene beauty of a mountain valley at dusk with this detailed acrylic landscape tutorial. You will learn to balance atmospheric perspective in distant peaks with the sharp details of foreground pines and rushing water.
Step-by-Step Guide
Materials
- Heavyweight watercolor or mixed media paper (pressed)
- White mat board frame (8×10 or similar)
- Acrylic paints: Titanium White, Ultramarine Blue, Payne’s Grey, Burnt Umber, Yellow Ochre, Alizarin Crimson, Sap Green, Cadmium Yellow
- Flat shader brushes (sizes 6 and 10)
- Round detail brushes (sizes 0/1 and 4)
- Palette knife (optional for mixing)
- Cup of water and paper towels
- Pencil for sketching
Step 1: Planning and Sky
-
Sketch the composition:
Begin by lightly sketching the horizon line about 1/3 up from the bottom. Sketch the large triangular mountain peak slightly off-center to the right, and mark the position of the tall pine tree on the left side to frame the scene. -
Map the stream:
Draw the winding path of the stream starting wide at the bottom center and narrowing as it snakes back toward the mountain base. -
Mix sky colors:
Prepare a soft blend for the sky. Mix Titanium White with a tiny touch of Ultramarine Blue for the upper corners. For the sunset glow, mix White with a dot of Alizarin Crimson and Cadmium Yellow to make a pale peach. -
Paint the background sky:
Using a large flat brush, paint the blue mix at the top, blending downwards. While wet, introduce the peach mix near the mountain tops, blending the transition smoothly to create a soft, hazy glow. -
Add soft clouds:
With a smaller brush and a slightly stronger peach/pink mix, dab in horizontal cloud wisps across the sky behind where the peak will be.
Fixing “Muddy” Colors
If your mountain shadows look brown instead of deep blue, stop mixing all three primaries. Stick to just Blue and Grey, avoiding Yellows in the shadow mixes.
Step 2: The Majestic Mountain
-
Block in the mountain shape:
Mix Ultramarine Blue, Payne’s Grey, and White to create a muted slate blue. Paint the silhouette of the central mountain peak, ensuring the edges are jagged and rocky. -
Establish light and shadow:
Determine your light source (coming from the left/sunset). Mix a lighter version of your mountain color with a touch of pink. Paint the left-facing facets of the mountain. -
Deepen the shadows:
Use a darker mix of Payne’s Grey and Blue for the right-facing shadowed crevices. This high contrast gives the mountain its three-dimensional granite look. -
Paint the foothills:
Behind the main peak, paint the distant ridges in a lighter, hazier blue-grey to push them into the background (atmospheric perspective). -
Mid-ground forest connection:
At the base of the rocky peak, stipple a dark blue-green mix (Sap Green + Payne’s Grey) to suggest a dense treeline that fades into the mountain base.
Level Up: Texture
Use coarse molding paste mixed with your mountain paint to give the granite peak actual physical texture that catches the light.
Step 3: Foreground and Details
-
Paint the meadow base:
Mix Yellow Ochre, Burnt Umber, and a touch of Sap Green. Paint the grassy areas on either side of the stream bank using upward, flicking strokes. -
Detail the stream:
Fill the stream bed with a reflection of the sky colors—mostly light blues and white. Add thin horizontal lines of white for ripples where the water moves over rocks. -
Create the signature tree:
Using a dark mix of Burnt Umber and Payne’s Grey, paint the thin vertical trunk of the foreground tree on the left. I usually use a size 0 round brush for this control. -
Add pine foliage:
Load a small round brush or fan brush with deep green. Tap onto the trunk branches, keeping the foliage sparse and layered so you can see the sky through the branches. -
Add background trees:
Paint smaller, less detailed pine tree shapes along the mid-ground ridge using a dark grey-green. Vary their heights to look natural. -
Final highlights:
Add bright ochre and white highlights to the tips of the meadow grass where the light hits. Paint small dark stones along the riverbank for contrast.
Place your dried painting into the white mat frame to give it that crisp, gallery-ready finish


Sunset Sky Gradient Study
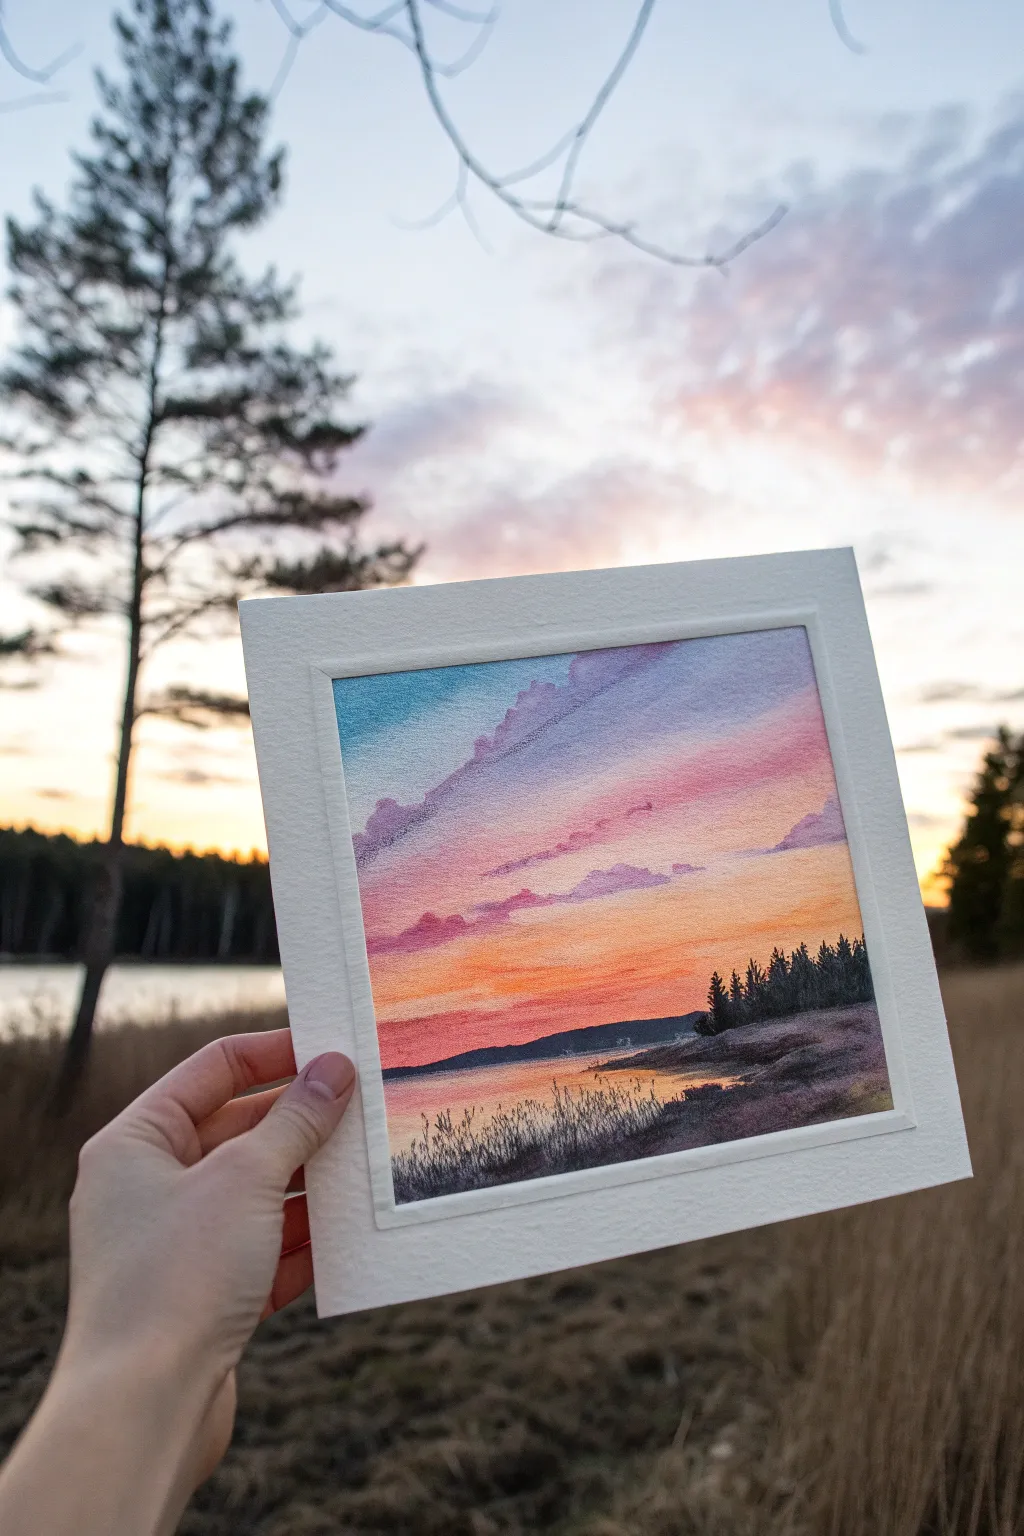
Capture the fleeting beauty of twilight with this vibrant watercolor study featuring a dramatic sky transition from cool blues to warm oranges. This project focuses on mastering the wet-on-wet technique to create seamless gradients and soft, drifting clouds over a tranquil shoreline.
Step-by-Step Tutorial
Materials
- Cold Press Watercolor Paper (approx. 6×6 inches)
- Masking Tape
- Watercolor Paints: Cerulean Blue, Dioxazine Purple, Alizarin Crimson, Cadmium Red, Cadmium Orange, Lemon Yellow, Paynes Gray or Indigo
- Round Brushes (Size 8 for washes, Size 4 for details)
- Flat Brush (3/4 inch for wetting paper)
- Two jars of water (clean and dirty)
- Paper towels
- Pencil
- White Gouache (optional for highlights)
Step 1: Preparing the Sky Horizon
-
Paper Setup:
Tape down all four edges of your watercolor paper to a board. Use a ruler to ensure your borders are straight and even, creating that crisp white frame later. -
Sketching the Landscape:
Lightly pencil in the horizon line about one-third of the way up from the bottom. Sketch the basic shape of the right-side shoreline and the distant hills on the left, but keep lines faint so they don’t show through the paint.
Step 2: Painting the Sky Gradient
-
Wetting the Paper:
Using your large flat brush, apply a generous layer of clean water to the sky area, stopping right at the horizon line. The paper should glisten, but not have puddles. -
Applying the Yellow Horizon:
While the paper is wet, load your Size 8 round brush with a mix of Lemon Yellow and a touch of Cadmium Orange. Paint a horizontal band just above the horizon line, letting it bleed slightly upwards. -
Adding the Warm Transition:
Clean your brush and pick up Cadmium Red mixed with a little Alizarin Crimson. Apply this directly above the yellow/orange band, blending the edges softly where they meet so there is no hard line. -
Introducing Cool Tones:
Moving further up the sky, mix Alizarin Crimson with Dioxazine Purple for a reddish-purple hue. Paint this band above the red, allowing the wetness of the paper to diffuse the color downwards. -
Finishing the Upper Sky:
For the top left corner, use Cerulean Blue mixed with the tiniest bit of purple. Apply this to the top area, blending it gently into the purple band below. Tilt your board slightly to encourage gravity to help the blend. -
Lifting Clouds:
While the sky is still damp but losing its sheen, use a thirsty (clean, slightly damp) brush to lift out diagonal shapes for clouds in the purple and pink sections. -
Deepening Cloud Shadows:
Mix a stronger purple-grey tone. Carefully paint the undersides of your lifted clouds to give them volume. Soften the top edges of these shadows with a clean, damp brush.
Wet-on-Wet Timing
Wait until the paper has a satin sheen—not a glossy puddle—before dropping in cloud colors. This prevents ‘cauliflowers’ or harsh back-runs.
Step 3: Painting the Water Reflection
-
Mirroring the Sky:
Once the sky is dry, wet the water area below the horizon. Repeat the same color sequence in reverse—starting with the yellow/orange mix near the horizon and transitioning to pinkish-purple at the very bottom edge. -
Softening the Horizon:
While the water area is wet, ensure the colors near the horizon line match the intensity of the sky immediately above it, creating a glowing effect. -
Adding Ripples:
Wait until the water layer is nearly dry. Use a smaller damp brush to gently lift horizontal lines near the foreground to suggest light catching on ripples.
Adding Birds
Use a rigger brush or fine liner pen to add tiny, V-shaped silhouettes of birds flying towards the sunset for extra life and scale.
Step 4: Adding the Silhouette Landscape
-
Mixing Dark Tones:
Create a rich dark color by mixing Indigo or Paynes Gray with a little Dioxazine Purple. Avoid using pure black to keep the painting vibrant. -
Painting Distant Hills:
With the Size 4 brush, paint the low hilly landmass on the left side of the horizon. Keep this shape flat and relatively smooth, as it is far away. -
Creating the Foreground Shore:
Paint the landmass on the right side using a slightly more saturated dark mix. Vary your brush pressure to create an uneven, grassy terrain texture along the top edge. -
Adding Trees:
Switch to the tip of your smallest brush. Paint vertical strokes on top of the right-side landmass to create pine trees. Use a stippling motion for the foliage to mimic needle clusters. -
Refining the Shoreline:
Darken the very bottom of the tree line where it meets the water. Drag a dry brush horizontally out into the water slightly to create the reflection of the land. -
Foreground Grasses:
In the immediate foreground (bottom right), paint thin, flicking strokes upward with your darkest paint mix to represent tall grasses and reeds catching the last light. -
Final Highlights:
If desired, use a tiny bit of white gouache or a white gel pen to add sparkles on the water or highlight the tips of the foreground grass. -
The Reveal:
Wait for the painting to be completely bone dry. Carefully peel away the masking tape at a 45-degree angle to reveal your clean, crisp borders.
Now you have a serene twilight landscape perfect for a greeting card or a framed miniature


Pine Forest Depth Layers
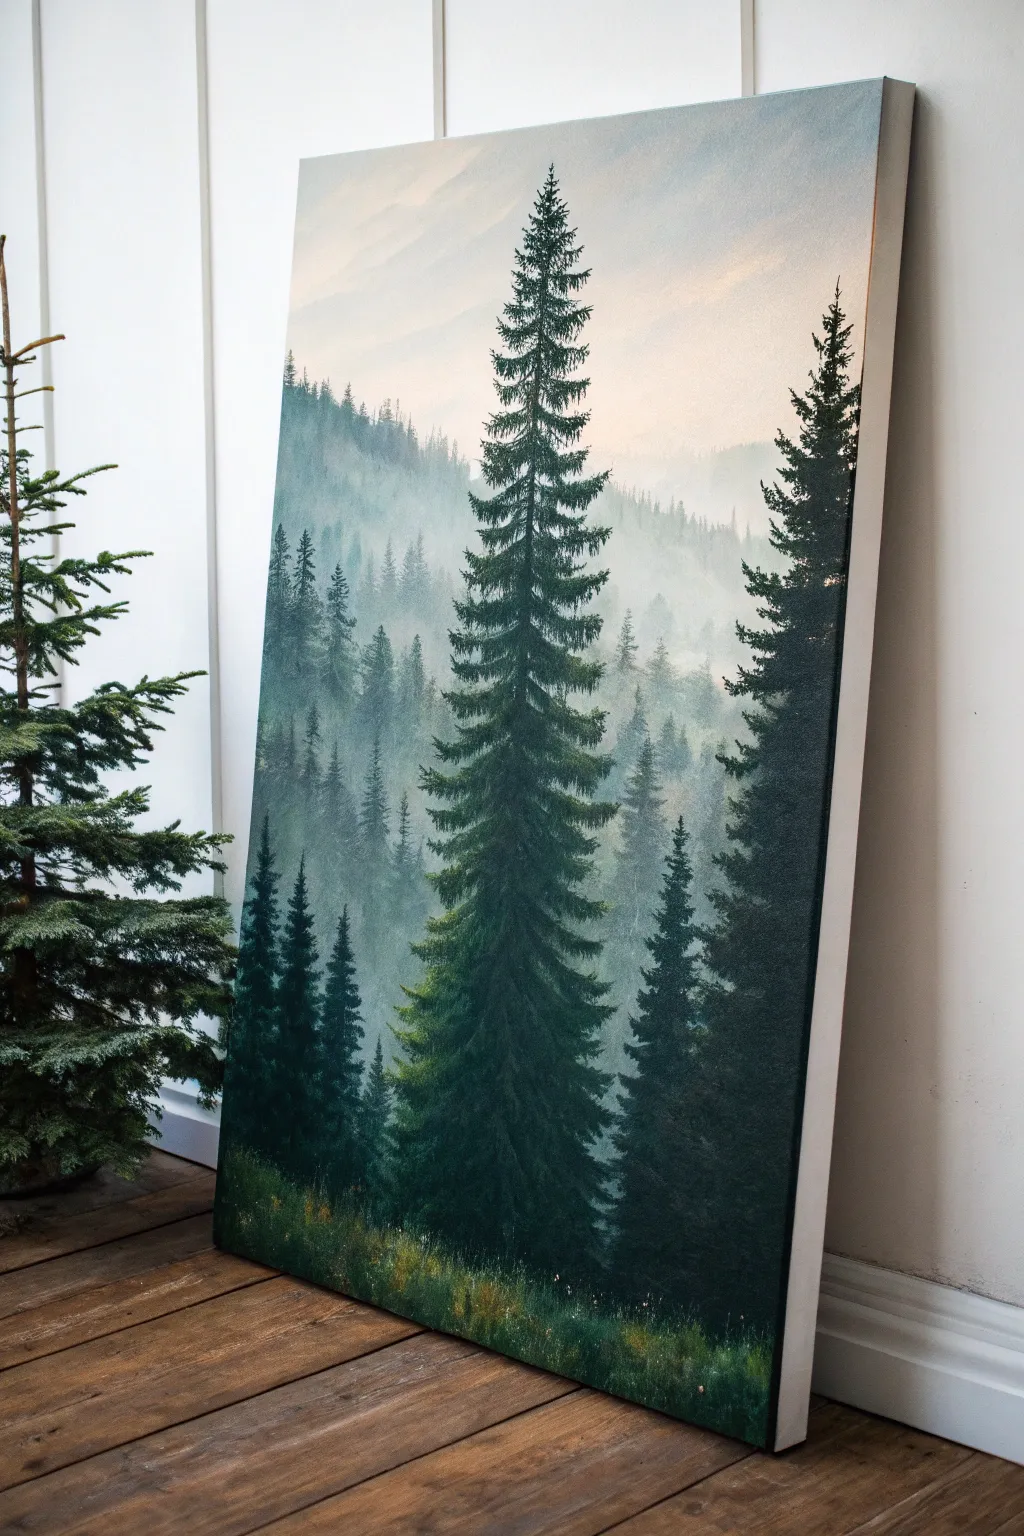
Capture the serene grandeur of a mountain forest with this vertical landscape study in atmospheric perspective. By layering lighter tones into the background and reserving deep, rich greens for the foreground, you will create a convincing illusion of depth and morning mist.
Detailed Instructions
Materials
- Large vertical canvas (e.g., 24×36 inches)
- Acrylic paints: Titanium White, Mars Black, Sap Green, Hooker’s Green, Phthalo Blue, Burnt Umber, Yellow Ochre
- Large flat brush (2-inch) for backgrounds
- Medium filbert brush (size 8-10)
- Small round or liner brush (size 1-2)
- Fan brush (optional)
- Palette knife
- Water container and paper towels
- Mist spray bottle
Step 1: Setting the Scene
-
Prime the sky:
Begin by mixing Titanium White with a tiny touch of Yellow Ochre and a speck of Phthalo Blue. Using your large flat brush, cover the top two-thirds of the canvas with this pale, warm off-white tone to establish the misty morning light. -
Blend the transition:
While the sky is still wet, introduce a very faint grey-green mixture near the middle of the canvas. Blend this upwards into the sky color to create a soft horizon line that disappears into the fog. -
Draft the background hills:
Mix a pale, milky grey-green using White, a touch of Black, and Sap Green. With a medium brush, paint the silhouette of the furthest mountain ridge about halfway down the canvas. Keep the edges soft and hazy.
Too Much Contrast?
If background trees look too dark, wait for them to dry, then apply a thin wash of water and white paint (glaze) over them to push them back into the mist.
Step 2: Building Atmospheric Perspective
-
Layer the second ridge:
Create a slightly darker version of your hill color by adding a bit more Sap Green and a hint of Phthalo Blue. Paint a second ridge of trees below the first one, allowing the shapes of individual treetops to be just barely visible against the mist. -
Add distant pines:
Using a smaller brush, tap in vertical strokes along this second ridge to suggest distant pine trees. Keep these vertical lines faint—atmospheric perspective means objects further away have less contrast and color saturation. -
Paint the middle ground:
Mix a ‘mid-tone’ green. This should still be somewhat muted with white but significantly darker than your background hills. Paint the tree line on the left side of the canvas, making the pine shapes more distinct with jagged edges. -
Create mist pockets:
Clean your brush and pick up a small amount of the sky color. Gently scumble (rub lightly) this pale paint over the base of the middle-ground trees to make it look like fog is settling in the valleys.
Natural Imperfection
Trees in nature aren’t symmetrical. intentionally ‘break’ a branch or leave a large gap on one side of your main pine tree to make it feel organic and realistic.
Step 3: The Hero Trees
-
Mix the foreground darks:
For the main trees, you need a deep shadow color. Mix Hooker’s Green with Mars Black and a touch of Burnt Umber. It should look almost black on the palette but rich green when applied. -
Establish the main tree trunk:
Using a small round brush or the edge of a flat brush, paint a thin, straight line from the bottom third of the canvas reaching up almost to the top edge, slightly right of center. This is the spine of your main focal tree. -
Paint the top branches:
Switch to a small filbert or liner brush. Starting at the very top of the trunk, paint short, downward-sloping branches. Keep them sparse at the pinnacle to let the sky show through. -
Widen the form:
As you move down the trunk, make the branches wider and heavier. Use a tapping motion with your brush to simulate pine needles, clustering them more densely near the trunk and leaving air gaps at the tips. -
Add the secondary giant:
Repeat this process for the large tree on the far right edge. Since it’s cut off by the canvas frame, focus on creating texture on the left side of its trunk, ensuring it feels just as dark and prominent as the central tree. -
Insert lower left trees:
Paint the cluster of smaller, dark pine trees in the bottom left corner. Vary their heights to create a natural, organic rhythm rather than a straight fence line.
Step 4: Highlights and Ground
-
Highlight the foliage:
Mix Sap Green with a little Yellow Ochre (do not add white, or it will look chalky). Using a fan brush or the toe of a filbert brush, gently dab this lighter green onto the tops of the foreground branches where sunlight would hit. -
Ground the forest:
At the very bottom of the canvas, block in a dark, uneven ground area using your deepest green-black mix. -
Texture the grass:
Take your highlight green mixture and use upward flicking motions with a liner brush to paint tall grasses in the immediate foreground. -
Final floral touches:
Add tiny specks of white and yellow ochre among the grass blades to suggest wildflowers catching the dim light, adding a moment of brightness to the dark forest floor.
Step back and admire the deep, foggy atmosphere you have built from the ground up.


Rolling Hills Color Blocks
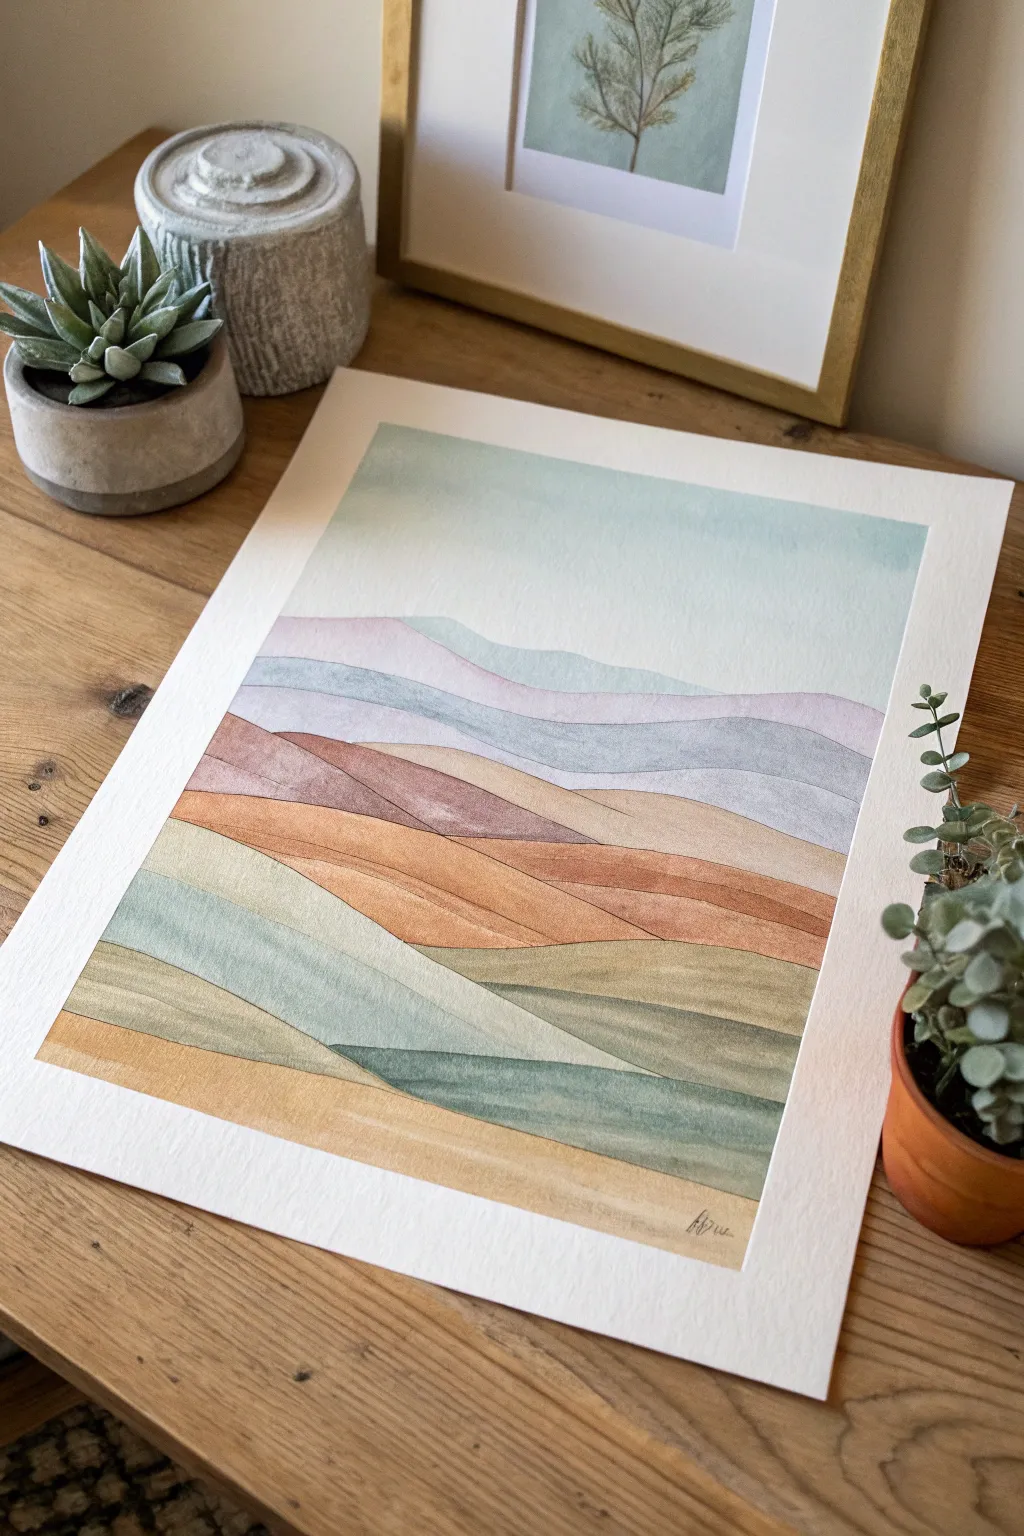
Capture the gentle rhythm of a rolling landscape with this segmented, color-blocked watercolor painting. By breaking the composition into smooth, flowing shapes, you can create a soothing abstract scene that celebrates soft earthy tones and delicate gradients.
Step-by-Step
Materials
- Cold press watercolor paper (140lb/300gsm)
- Watercolor paint box (focus on ochre, terracotta, sage, and pale blue)
- Round watercolor brush (size 6 or 8)
- Pencil (HB or similar light graphite)
- Kneaded eraser
- Jars of clean water
- Paper towel
- Masking tape
Step 1: Sketching the Composition
-
Tape the Edges:
Begin by securing your watercolor paper to a flat surface or drawing board using masking tape. This creates a clean white border around your finished piece and helps prevent the paper from buckling when wet. -
Map the Horizon:
Lightly sketch the highest line first, placing it about a third of the way down from the top. This will separate your sky from the first range of hills. -
Draw Flowing Hills:
Continuing downwards, draw a series of wavy, overlapping lines. Some hills should sweep from left to right, others from right to left, creating a woven effect. Keep lines organic and avoid perfect symmetry.
Bleeding Edges?
If paint bleeds into the next shape, stop immediately. Blot the mistake with a clean tissue, let it dry fully, then gently lift the stain with a damp stiff brush before repainting.
Step 2: Painting the Sky and Background
-
Lighten Your Sketch:
Before painting, use a kneaded eraser to gently lift mostly all of the graphite. You want the lines barely visible so they don’t show through the transparent watercolor. -
Sky Wash:
Mix a very dilute wash of pale blue. Paint the entire sky area with a large, clean wash. I prefer to keep the top slightly more saturated and let it fade near the horizon line for an atmospheric look. -
First Hill Layer:
While the sky dries, mix a soft lilac or muted purple. Paint the topmost hill shape directly under the sky. Ensure your brush is loaded with enough water so the pigment flows smoothly without leaving streak marks.
Add Metallic Touches
Once the painting is completely dry, trace the seam lines between the hills with a fine gold gel pen or metallic watercolor paint for a sophisticated, gilded finish.
Step 3: Developing the Middle Ground
-
Wait for Dry Edges:
Crucial step: Let the lilac layer dry completely before painting the section immediately next to it. If you paint adjacent wet shapes, the colors will bleed into each other and ruin the crisp lines. -
Introduce Cool Tones:
Paint the next band in a muted blue-grey tone. Notice how this color pushes the shape backward visually, creating depth. -
Warm Terracottas:
As you move lower into the middle ground, switch to warmer tones. Mix a burnt sienna or terracotta wash. Paint a prominent, sweeping hill shape, letting the pigment pool slightly at the bottom edge for natural texture. -
Adding Ochre Accents:
Nestle a band of yellow ochre or deep gold next to the terracotta. This contrast between warm earth tones creates the vibrant center of the composition. -
Work Non-Sequentially:
To speed up the process while waiting for sections to dry, jump around the paper. While a middle hill dries, you can safely paint a bottom section, provided they don’t touch.
Step 4: Foreground and Details
-
Sage Green Layers:
For the lower hills, mix a sage green using a touch of blue and yellow ochre. Apply this to the broad shapes near the bottom, keeping the wash fairly transparent. -
Darker Accents:
Add a slightly darker, more saturated green or teal to the small, tucked-away hill shapes in the foreground. This anchors the bottom of the painting. -
Final Sand Tone:
Paint the very bottom strip with a pale sandy beige or raw sienna wash to ground the entire landscape. -
Review and Correct:
Once totally dry, check for any gaps between your color blocks. You can carefully touch these up with a small brush, but be careful not to create a dark outline.
Peel back the tape slowly to reveal those crisp white borders and frame your tranquil landscape for a minimal, modern display
BRUSH GUIDE
The Right Brush for Every Stroke
From clean lines to bold texture — master brush choice, stroke control, and essential techniques.
Explore the Full Guide
Meadow Path Leading Lines
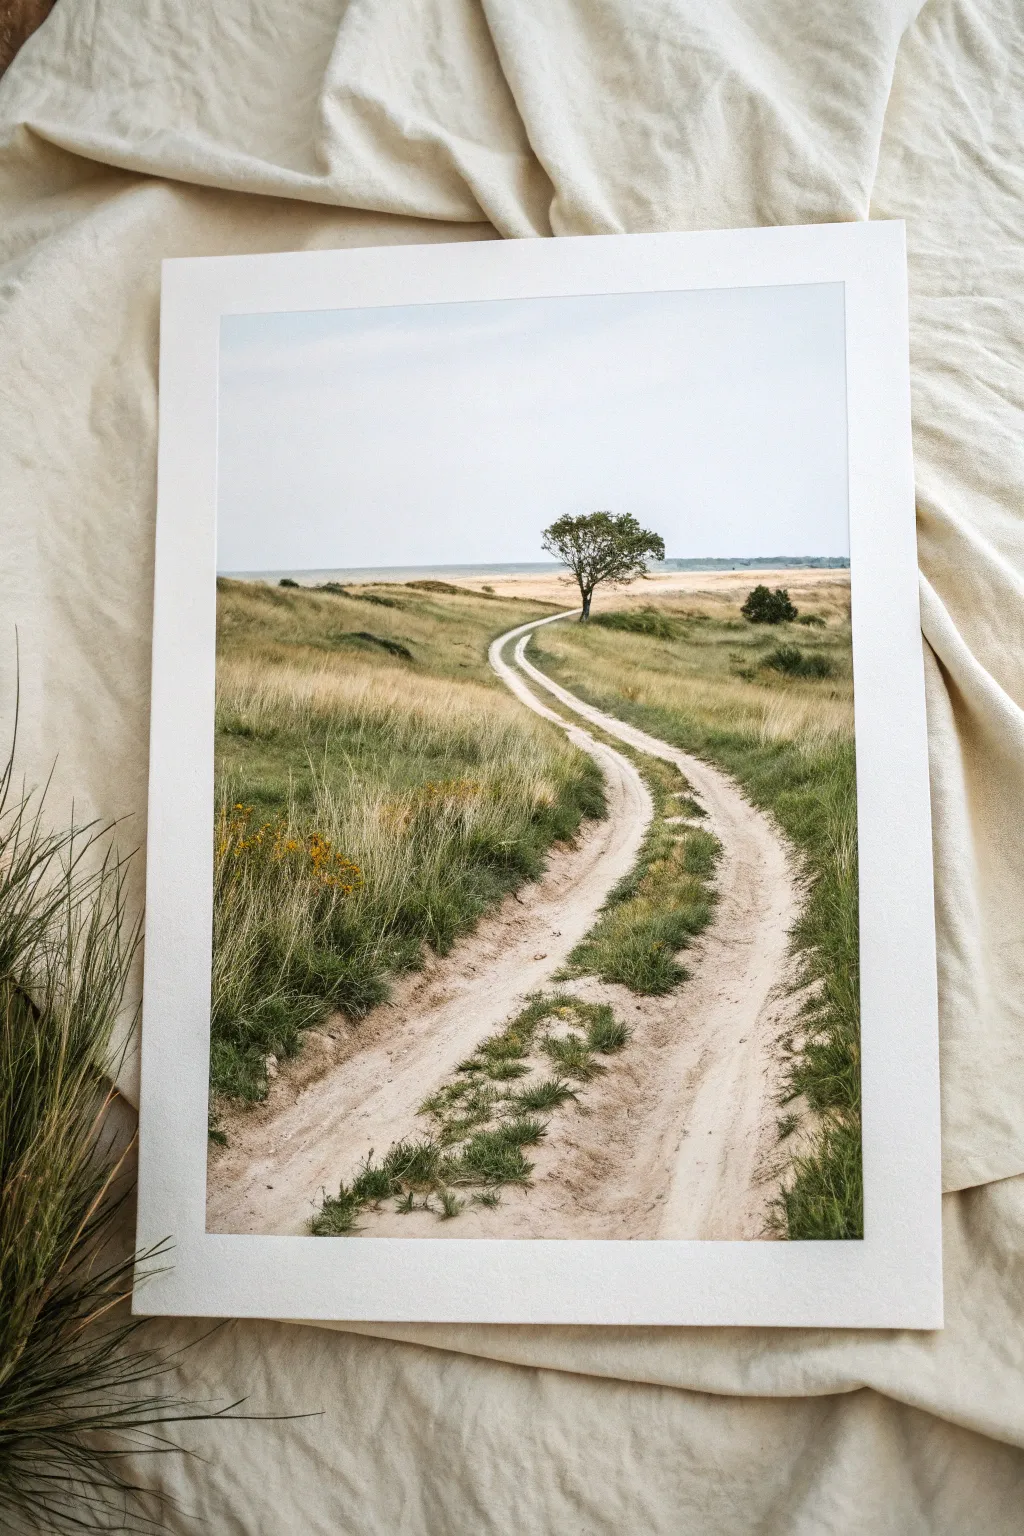
Capture the serene solitude of an open field with this landscape painting that focuses on perspective and natural textures. By guiding the viewer’s eye along a winding dirt track toward a distant tree, you’ll master the art of leading lines and atmospheric depth.
How-To Guide
Materials
- Heavyweight watercolor paper or canvas board (approx. 11×14 inches)
- White painter’s tape
- Acrylic or gouache paints (Titanium White, Yellow Ochre, Burnt Sienna, Sap Green, Ultramarine Blue, Raw Umber)
- Flat brush (3/4 inch) for sky and base layers
- Round brush (size 6) for grasses and path details
- Detail liner brush (size 1) for the distant tree
- Palette and water container
- Paper towels
Step 1: Setting the Scene
-
Prepare the borders:
Begin by taping down your paper to a hard board using white painter’s tape. Create a wide, clean border around the edges to mimic the professional gallery look of the reference image. -
Sketch the composition:
Lightly sketch the horizon line about two-thirds of the way up the paper. Draw two winding lines starting wide at the bottom center and converging significantly as they curve toward the horizon to form the path. -
Paint the sky:
Mix a large amount of Titanium White with a tiny touch of Ultramarine Blue. Paint the entire sky area, starting with a purer blue at the very top and fading into almost pure white as you reach the horizon line to create atmosphere.
Muddy colors?
If your path looks dirty rather than sandy, you may be using too much dark brown. Let it dry, then layer a mix of Titanium White and Unbleached Titanium over the top to bring back the brightness.
Step 2: Establishing Ground Layers
-
Block in the field colors:
Mix Yellow Ochre with a touch of Sap Green and White to create a pale dry grass color. Paint the meadow areas on either side of the path, using horizontal strokes near the horizon and slightly angled strokes closer to the foreground. -
Base coat the path:
Combine Titanium White with a very small amount of Burnt Sienna and Raw Umber to make a sandy beige. Fill in the path area, ensuring the paint remains lighter than the surrounding grass. -
Define the horizon:
Using a slightly darker, cooler green-blue mix, paint a very thin, soft strip along the distant horizon line to suggest faraway land or ocean, keeping the edge soft so it recedes visually.
Seasonal Shift
Change the mood by altering the palette. Use Burnt Orange and Reds for the grasses to create an autumn scene, or add cool purples to the shadows for a winter morning vibe.
Step 3: Adding Textures and Depth
-
Shadow the path:
Mix a diluted Raw Umber wash. Where the tire tracks would be, gently paint two parallel darker strips inside the path, leaving a lighter ridge in the center and light edges on the outside. -
Paint the middle ground grasses:
Use your round brush and a mix of Sap Green and Burnt Sienna to stipple texture along the edges of the path where it curves in the middle distance. This creates the illusion of vegetation overgrowing the track. -
Add foreground details:
Switching to a slightly darker grassy green, use quick upward flicking motions in the bottom corners and along the immediate path edges to create individual blades of tall grass. I like to vary the pressure here to keep the grass looking natural and wild. -
Introduce wildflowers:
Dab tiny spots of Yellow Ochre and pure Yellow mixed with a little green into the foreground grasses on the left side to suggest clusters of wildflowers. -
Refine the path texture:
Dry brush a little white and sand color over the center ridge of the path to highlight the dry earth, adding contrast against the darker tire ruts.
Step 4: The Focal Point
-
Paint the tree trunk:
Using the liner brush and dark Raw Umber, paint the small tree trunk slightly to the right of where the path vanishes. Keep the trunk varying in thickness to look organic. -
Add the canopy:
Mix a dark olive green (Sap Green + tiny bit of Black or Red). Stipple the foliage of the main tree, leaving small gaps of ‘sky holes’ so the tree doesn’t look like a solid lollipop. -
Place distant shrubs:
Add a few smaller, indistinct dark green blobs along the horizon line to the right of the main tree to represent distant bushes, balancing the composition. -
Cast shadows:
Mix a transparent glaze of dark green-brown. Paint a soft shadow stretching from the base of the tree across the grass to anchor it to the ground. -
Final highlights:
Add a few final touches of very light yellow-green to the top of the tree canopy and the tops of the nearest grass blades where the sun would hit. -
Reveal the border:
Once the painting is 100% dry, carefully peel away the painter’s tape at a 45-degree angle to reveal the crisp white edge that frames your landscape.
Step back and enjoy the sense of distance you have created in your peaceful meadow landscape
River Bend With Movement
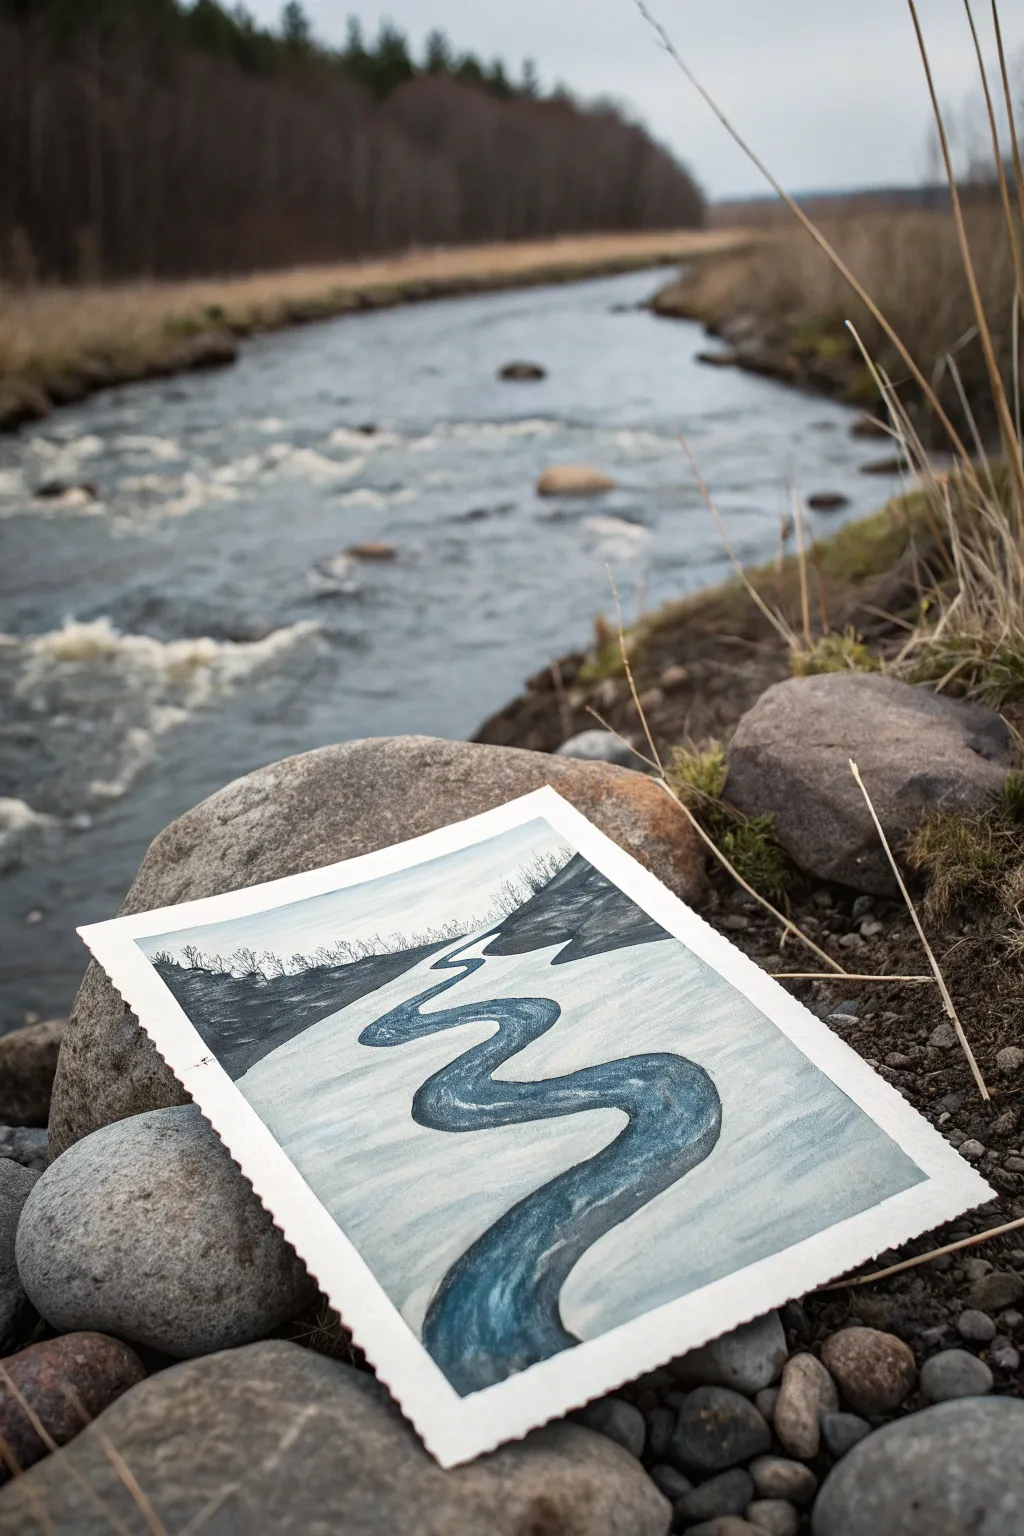
Capture the serene chill of a winter landscape with this stylized river study. Using cool tones and deliberate brushstrokes, you’ll create a winding path of water cutting through snow-covered banks.
Step-by-Step
Materials
- Cold press watercolor paper (approx. 5×7 inches)
- Watercolor paints (Indigo, Payne’s Grey, Cerulean Blue, Lamp Black)
- White Gouache (for opacity)
- Round brushes (sizes 4 and 8)
- Flat brush (size 1/2 inch)
- Pencil (HB) and eraser
- Masking tape
- Two jars of water
- Paper towels
Step 1: Sketching the Layout
-
Paper Preparation:
Tape down your watercolor paper to a board on all four sides. This prevents buckling and creates a crisp white border if you paint to the edge, though for this loose study, raw edges are fine too. -
Define the Horizon:
Lightly sketch a horizon line about one-third down from the top of the paper. This will separate your sky area from the ground. -
Map the River:
Draw the river’s path starting narrow near the horizon line and winding forward in large ‘S’ curves. Widen the river significantly as it approaches the bottom edge to create perspective. -
Outline the Background Hills:
Sketch irregular, sloping shapes on either side of the river in the distance to represent hills or banks covered in dark vegetation.
Step 2: Painting the Base Layers
-
Sky Wash:
Mix a very dilute wash of Indigo and plenty of water. Using your flat brush, paint the sky area with long horizontal strokes, keeping it very pale and almost white near the horizon. -
Snowy Banks:
The snow isn’t pure white; it reflects the sky. Mix a tiny amount of Payne’s Grey with water and wash over the snowy ground areas, leaving some white paper showing for the brightest highlights. -
River Surface:
Mix Cerulean Blue with a touch of Payne’s Grey. With a size 8 round brush, fill in the entire river shape. Keep the wash wet to avoid hard edges forming inside the water area. -
Initial Drying:
Let these initial washes dry completely. If the paper feels cool to the touch, it is still wet.
Edge Control
For the crisp edges seen in this painting, ensure the paper is completely dry before painting an adjacent section. Wet-on-dry technique gives you sharp control.
Step 3: Adding Depth and Detail
-
Deepening the Water:
Mix a stronger concentration of Indigo and Payne’s Grey. Paint sweeping strokes following the curve of the river, leaving some of the lighter blue underlayer visible to suggest movement and reflections. -
Dark Hills:
Using Lamp Black mixed with a little Indigo for a cold tone, paint the distant hills. I like to keep the edges slightly ragged to suggest tree lines or rough terrain. -
River Edges:
While the hill paint is damp, carefully define the edge where the water meets the land. A sharp, dark line here helps the snow look brighter by contrast. -
Flow Lines:
Switch to your size 4 round brush. With the dark Indigo mix, add thin, flowing lines within the river current, exaggerating the ‘S’ curve to guide the viewer’s eye.
Icy Sparkle
Sprinkle coarse salt onto the wet river paint before it dries. When you brush the salt off later, it leaves crystal-like textures perfect for an icy winter river.
Step 4: Final Touches
-
Distant Trees:
Using the tip of your smallest brush and a dry-brush technique with black paint, flick tiny vertical lines along the horizon line to suggest a distant forest. -
Texture on Snow:
Dilute your grey mix significantly. Add very subtle, horizontal shadows on the snow banks to show undulation in the terrain. -
Highlighting with Gouache:
Take a small amount of white gouache. If you lost any brightness in the water, add a few thin, opaque white lines to simulate ice or frothy water moving downstream. -
Clean Up:
Once everything is bone dry, carefully peel off the tape (or simply trim the edges if you didn’t tape). Assess the contrast and darken the river bends if needed.
Now you have a cool, crisp winter scene that evokes the quiet flow of a frozen landscape

PENCIL GUIDE
Understanding Pencil Grades from H to B
From first sketch to finished drawing — learn pencil grades, line control, and shading techniques.
Explore the Full Guide
Waterfall in a Rocky Gorge
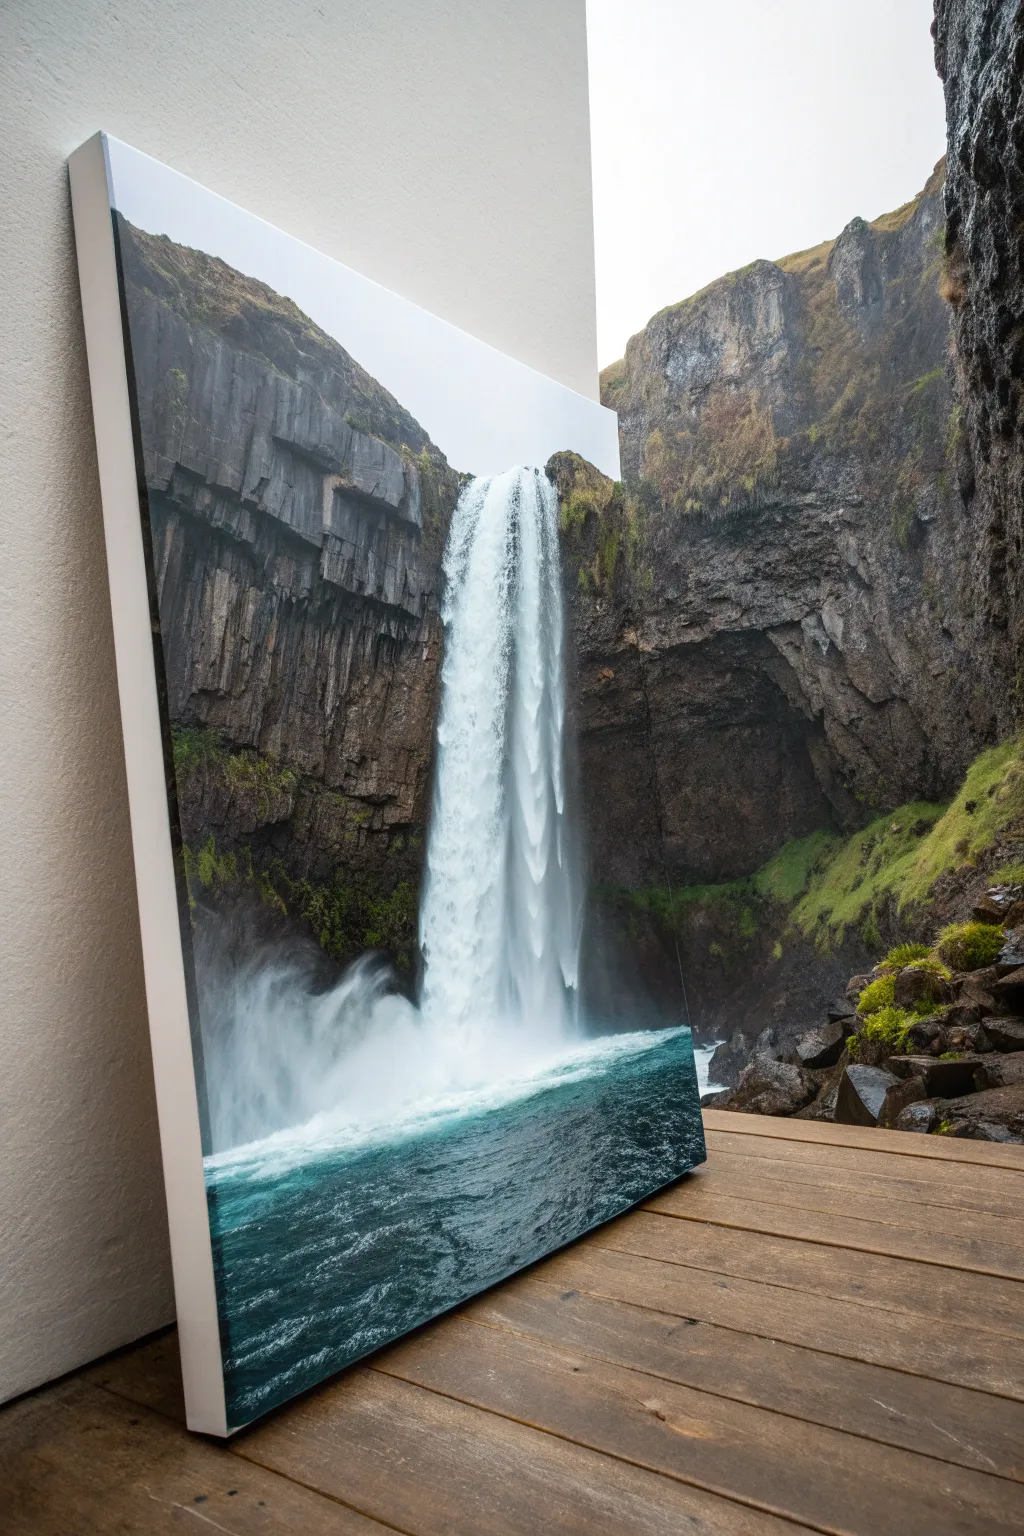
Capture the raw power and serene beauty of nature with this large-scale acrylic painting project. You will recreate the drama of a towering waterfall cutting through ancient basalt columns, contrasting the misty white spray against deep, mossy cliffs.
How-To Guide
Materials
- Large stretched canvas (at least 24×36 inches recommended)
- Acrylic paints (Titanium White, Mars Black, Burnt Umber, Hooker’s Green, Phthalo Blue, Cerulean Blue)
- Large flat brush (2-inch)
- Medium filbert brush
- Small round detail brush
- Fan brush (for waterfall texture)
- Palette knife
- Water container
- Paper towels
- Easel or sturdy wall space
Step 1: Setting the Scene
-
Prepare the canvas:
Start with a clean, primed canvas. If you want a smoother surface for the water, you can apply a thin coat of gesso and sand it lightly once dry. -
Sketch the composition:
Using a diluted mixture of Burnt Umber and water, lightly sketch the main shapes. Mark a vertical line for the waterfall just off-center to the right, and outline the jagged cliff faces on either side. Don’t worry about details yet; just block in the major masses. -
Block in the sky:
Mix Titanium White with a tiny touch of Phthalo Blue. Paint the small visible area of the sky at the top center. Keep this very pale and misty, as it will likely be partially obscured by the cliff edges later. -
Underpaint the cliffs:
Mix Mars Black and Burnt Umber to create a dark, warm grey. Paint the entire rocky area on the left and right sides of the canvas. This dark base layer provides depth and ensures no white canvas shows through the rocky textures later.
Troubleshooting: Flat Water
If the falling water looks too solid or like a white stripe, use a dry brush to feather the edges into the rocks. Glaze a very thin layer of watered-down grey over parts of the white to create depth.
Step 2: Structuring the Rocks
-
Define basalt columns:
Using your medium filbert brush and a mixture of grey (Black + White), paint vertical strokes on the left cliff face to suggest columnar basalt formations. These shouldn’t be perfect lines; keep them broken and organic. -
Add rocky texture:
Switch to a palette knife. Load it with a slightly lighter grey mix and gently scrape it downwards over the dried dark underpainting. The paint will catch on the canvas weave, creating a natural, rugged stone texture instantly. -
Introduce mossy greens:
Mix Hooker’s Green with a little Burnt Umber for a deep, earthy green. Stipple this color into the crevices and horizontal ledges of the cliffs where vegetation would naturally cling. -
Highlight the foliage:
Add a touch of yellow or white to your green mixture. Use a small round brush to dab lighter green highlights onto the mossy areas, focusing on the tops of rocks where light would hit.
Step 3: The Waterfall
-
Base layer for water:
Paint the background area behind the waterfall a medium-dark grey. This shadow layer is crucial; without it, your white water won’t pop off the canvas. -
Establish the flow:
Using a large flat brush loaded with Titanium White and a tiny drop of Phthalo Blue, pull long, vertical strokes from the top of the falls downwards. Let the brush run out of paint as you go down to create a feathery effect. -
Build opaque layers:
Reload your brush with pure Titanium White. Apply a thicker layer of paint to the brightest parts of the falls. I like to twist the brush slightly as I pull down to mimic the twisting motion of falling water. -
Create the mist:
At the bottom of the falls, use a dry blending brush or a soft filbert brush to swirl the white paint into a misty cloud. use circular motions to blur the hard bottom edge of the waterfall into the pool below.
Level Up: Gallery Wrap
Paint the image extending around the sides of the deep canvas. This creates a modern ‘gallery wrap’ look, meaning you won’t need a frame, just like the reference photo.
Step 4: The Pool and Details
-
Paint the deep water:
Mix Phthalo Blue, Mars Black, and a touch of Hooker’s Green for the deep water in the foreground. Apply this color across the bottom third of the canvas, using horizontal strokes. -
Add surface turbulence:
Mix Titanium White with a little Cerulean Blue. Using the edge of your palette knife or a fan brush, create choppy horizontal wake lines and foam patterns on the surface of the dark water, concentrating heavily near the splash zone. -
Refine the foreground:
Add more texture to the water closest to the viewer. Use chaotic, short strokes of white and light blue to show the churning energy of the pool. -
Final highlights:
Step back and assess the contrast. Add pure white highlights to the very top edge of the waterfall where it breaks over the cliff, and strengthen the brightest parts of the spray. -
Varnish:
Allow the painting to dry completely (at least 24 hours). Apply a coat of gloss or satin fluid varnish to protect the surface and make the dark rocky colors appear deeper and richer.
Hang your finished masterpiece where it can serve as a window to a refreshing, wild landscape
Coastal Waves and Foam
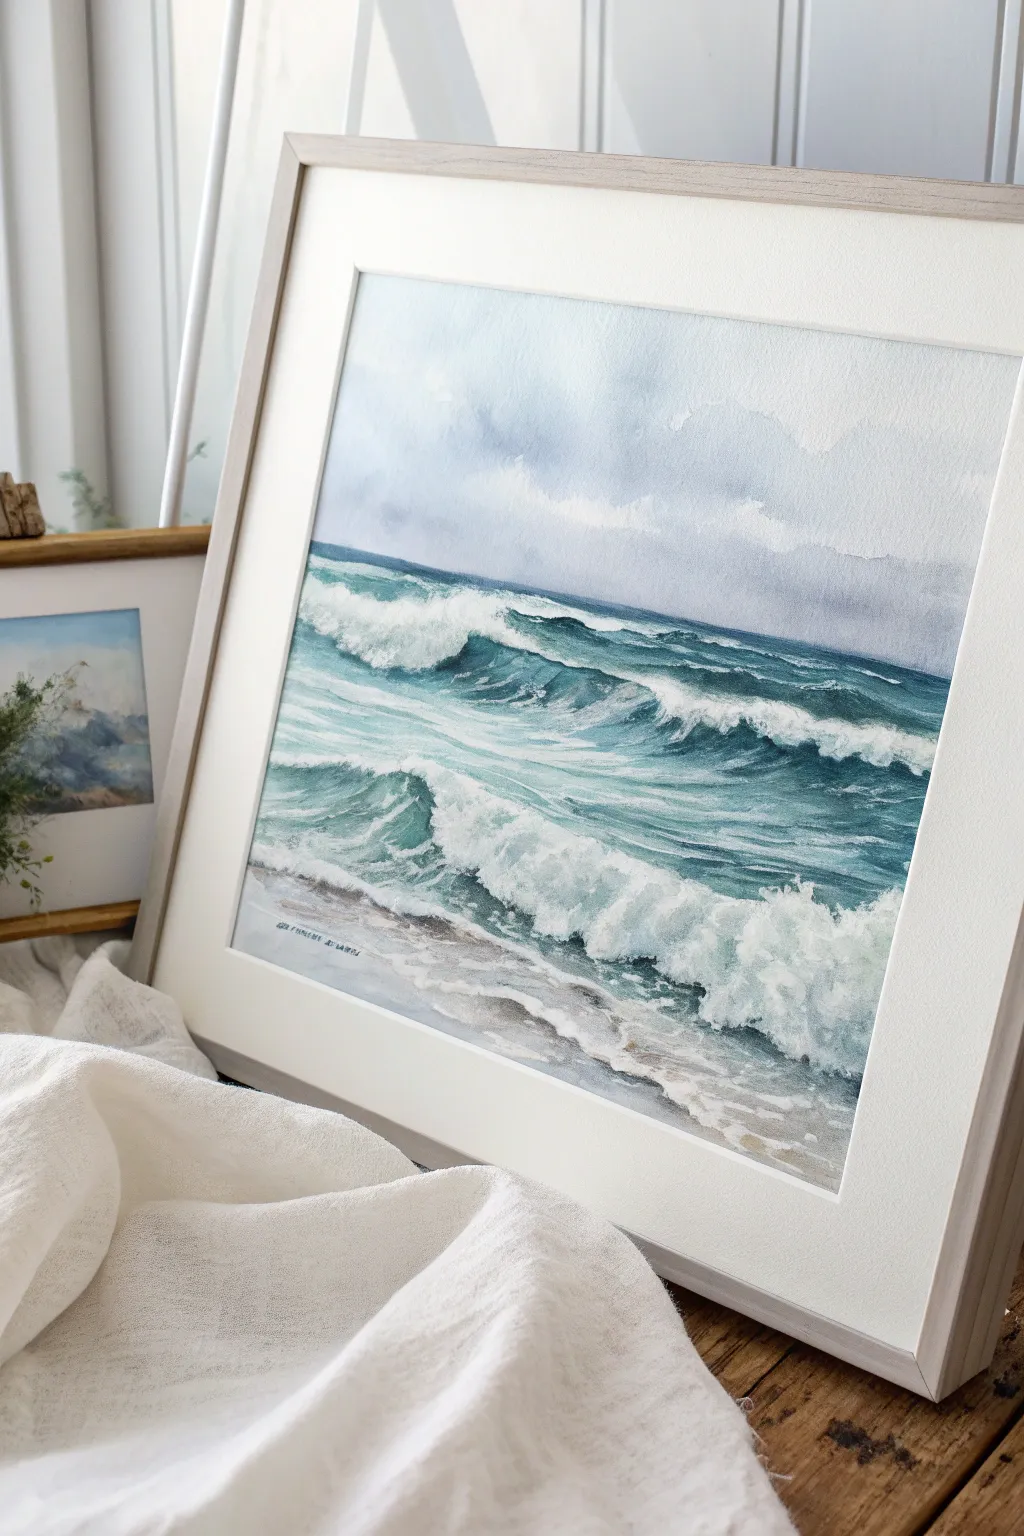
Capture the restless energy of the ocean with this dynamic watercolor seascape featuring crashing waves and sea foam. This project focuses on building layers of transparency to create depth in the water and preserving the white of the paper for brilliant highlights.
Step-by-Step Tutorial
Materials
- Cold press watercolor paper (140lb/300gsm), taped to a board
- Watercolor paints: Phthalo Blue, Prussian Blue, Viridian Green, Burnt Umber, Payne’s Grey, and Indigo
- White Gouache (for opaque highlights)
- Flat shader wash brush (1-inch)
- Round brushes (sizes 4, 8, and 12)
- Masking fluid and applicator (optional but helpful)
- Clean water containers (one for wash, one for rinse)
- Paper towels or cotton rag
- Palette for mixing
- Pencil for sketching
- Hairdryer (optional for speeding up drying)
Step 1: Planning and Sky
-
Horizon line:
Begin by lightly sketching your horizon line about one-third down from the top of the paper. Keep it perfectly straight to anchor the view. -
Wave structure:
Sketch the main wave shapes below the horizon. Focus on the large, crashing wave in the middle and the foamy shoreline at the bottom. Keep lines faint so they don’t show through later. -
Masking highlights:
If you are using masking fluid, apply it now to the very brightest crests of the waves and the foamy spray. Let this dry completely before painting. -
Wet the sky:
Use your large flat brush to wet the sky area with clean water. The paper should glisten but not have standing puddles. -
Sky gradient:
Drop in a very diluted mix of Payne’s Grey and a touch of Phthalo Blue. Keep the top darker and let it fade to near-white as it touches the horizon line. Add soft horizontal strokes for distant clouds.
Wave Motion Tip
Follow the ‘contour’ of the water with your brushstrokes. Curved strokes make the wave look like it’s rolling, while flat strokes flatten the image.
Step 2: The Deep Ocean
-
Distant water:
Once the sky is dry, mix a dark, distinct line of Indigo and Phthalo Blue right at the horizon. Soften the bottom edge of this line slightly with a damp brush. -
Mid-ocean wash:
Mix a vibrant teal using Viridian Green and Phthalo Blue. Paint the area behind the main crashing wave, leaving small gaps of white paper to suggest distant whitecaps. -
Establishing the swell:
As you move closer to the main wave, darken your mix with a little Prussian Blue. Paint the shadow side underneath the curling lip of the wave.
Level Up: Splatter
Load a toothbrush with white gouache and flick the bristles with your thumb over the crashing wave area to create realistic finish of fine sea mist.
Step 3: The Crashing Waves
-
Wave transparency:
For the translucent part of the wave (the ‘eye’), layer a watery wash of pure Viridian or Turquoise. This area catches the light, so keep it brighter than the deep water behind it. -
Shadows and depth:
Using a size 8 round brush, paint the troughs between the waves. Use a mix of Indigo and a tiny bit of Burnt Umber to desaturate the blue. Follow the curve of the water movement. -
Breaking foam:
Paint around the white foam shapes you planned. Don’t worry about perfect edges; ragged edges look more like splashing water. Use a damp, stiff brush to ‘lift’ pigment if you accidentally cover a highlight. -
Foreground water:
For the water rushing up the sand, dilute your teal mix significantly. Use horizontal, sweeping strokes to mimic the fast movement of shallow water.
Step 4: Shoreline and Details
-
Sandy texture:
Mix Burnt Umber with plenty of water and a touch of Payne’s Grey. Paint the bottom strip of sand, letting it mingle slightly with the wet foreground water for a soft transition. -
Shadowing the foam:
Pure white foam looks flat. Mix a very pale, watery violet-grey and paint shadows on the bottom/backside of the white foam piles to give them volume. -
Remove masking:
If you used masking fluid, gently rub it away once the paper is bone dry to reveal the crisp whites underneath. -
Gouache highlights:
I like to take a small round brush with white gouache to add the finest spray and mist. Dot and splatter tiny amounts of white on the wave crests for extra drama. -
Final assessment:
Step back and check your contrast. If the wave shadows aren’t deep enough, add a final glaze of Indigo to the darkest recesses to make the white foam pop.
Frame your finished seascape with a wide mat to give the expansive ocean view plenty of breathing room.


Golden Hour Field Glow
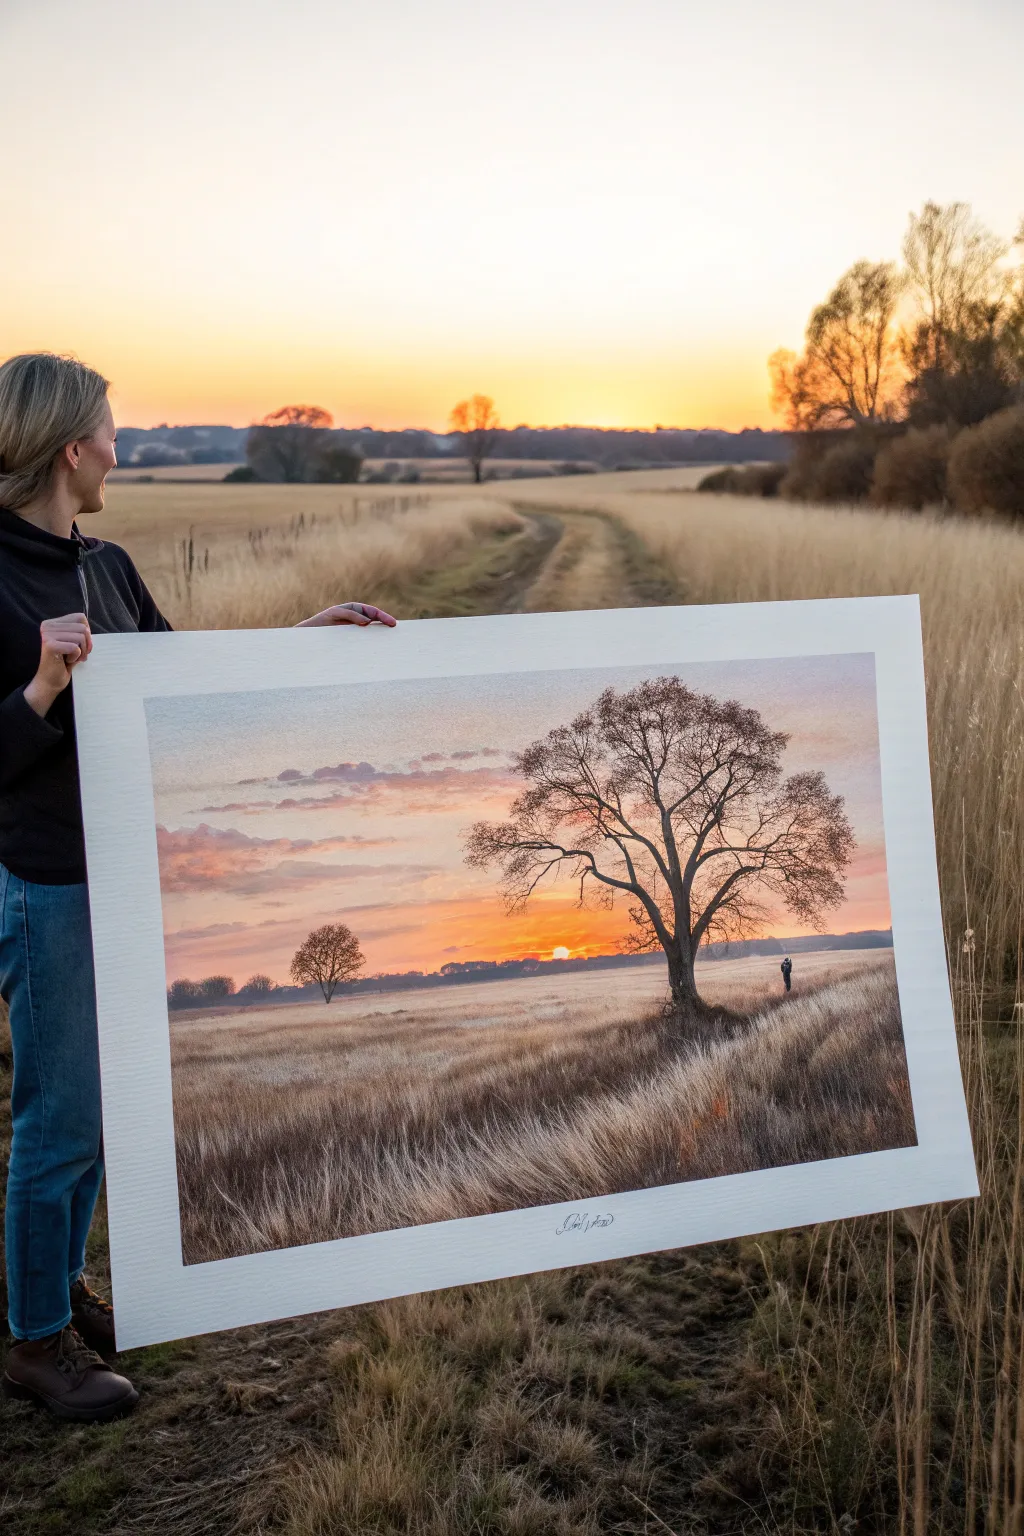
Capture the serene warmth of a sunset over a grassy meadow with this realistic landscape painting project. You will focus on creating atmospheric depth through soft gradients and mastering the silhouette of a majestic, leafless tree against a vibrant sky.
Step-by-Step Guide
Materials
- Large watercolor paper block (imitate the size in the photo, e.g., 18×24 inches or larger)
- Watercolor paints or fluid acrylics
- Colors: Cadmium Yellow, Alizarin Crimson, Ultramarine Blue, Burnt Umber, Ivory Black, Titanium White
- Large flat wash brush (2 inch)
- Medium round brush (size 8 or 10)
- Fine liner brush (size 0 or 1)
- Masking fluid (optional)
- Palette for mixing large pools of color
- Water containers and paper towels
- Sea sponge (optional for texture)
Step 1: Setting the Sky and Atmosphere
-
Prepare the wash:
Begin by wetting the entire sky area of your paper with clean water using your large flat brush. You want the paper glistening but not pooling with water. -
Paint the horizon glow:
While the paper is wet, drop in a vibrant mix of Cadmium Yellow near the horizon line where the sun will be. Let it bleed upwards naturally. -
Introduce sunset gradients:
Mix a soft orange using Yellow and a touch of Alizarin Crimson. Apply this above the yellow band, blending gently while everything is still wet to avoid hard edges. -
Deepen the upper sky:
For the top of the sky, mix a muted purple-grey using Ultramarine Blue and a tiny bit of Alizarin Crimson. Paint this at the very top, dragging it down to meet the orange. The wet paper will handle the gradient for you. -
Create soft clouds:
While the sky is damp (not soaking), use a thirsty, clean brush or a sea sponge to lift out soft horizontal shapes for the clouds. You can also dab in slightly darker purple-grey pigment to give the clouds volume. -
Establish the horizon line:
Mix a distant tree line color using Blue and Burnt Umber for a cool, dark grey. Painted across the horizon while the paper is slightly damp, this will create a soft-focus effect appropriate for distance. -
Add the sun flare:
If you used masking fluid for the sun, peel it off now. If not, lift a small circle of paint right on the horizon to reveal the white paper, or add a dot of opaque Titanium White later.
Muddy colors?
If your sky gradient turns brown or grey where the blue meets orange, let the orange layer dry completely before adding the blue top layer, or leave a gap of clean paper between them.
Step 2: Cultivating the Foreground
-
Base layer for the field:
Mix a large wash of Burnt Umber and Yellow Ochre (or dilute Cadmium Yellow). Apply this across the entire foreground field area. -
Building texture:
While the base layer is drying but still tacky, use a dry brush technique with darker brown to suggest the direction of the grass, sweeping diagonally from the bottom corners toward the center. -
Define the path:
If you want to include the subtle path seen on the left, lift out pigment or paint a lighter, cooler beige strip winding into the distance. -
Individual grass blades:
Using your fine liner brush and a mix of Burnt Umber and White, flick quick, upward strokes in the immediate foreground. This creates the sharp detail needed for the closest grass.
Pro Tip: Scratching technique
For realistic grass highlights in the foreground, use the edge of a credit card or a palette knife to scrape into the wet paint, revealing the lighter paper underneath.
Step 3: The Silhouette Trees
-
Drafting the main tree:
Ensure the sky is completely dry. Using a mix of Ivory Black and Burnt Umber, paint the trunk of the large tree on the right side. Keep the base slightly wider where it roots into the ground. -
Branch structure:
Switch to your liner brush. Pull branches outward and upward from the main trunk. Remember that branches get thinner as they move away from the trunk. -
Fine details:
Add the delicate, twiggy ends of the branches. I like to use a slightly shaky hand here to make the twigs look organic and natural rather than stiff. -
The distant tree:
Paint the smaller tree on the left side using a slightly lighter, more diluted mix of your dark grey. This atmospheric perspective makes it look further away. -
Grounding shadows:
Add horizontal cast shadows extending from the base of the trees. Since the sun is low on the horizon, these shadows should be long and stretch toward the viewer.
Now mount your finished piece on a sturdy backing board to give it that gallery-ready presence shown in the photo
Autumn Trees by a Stream
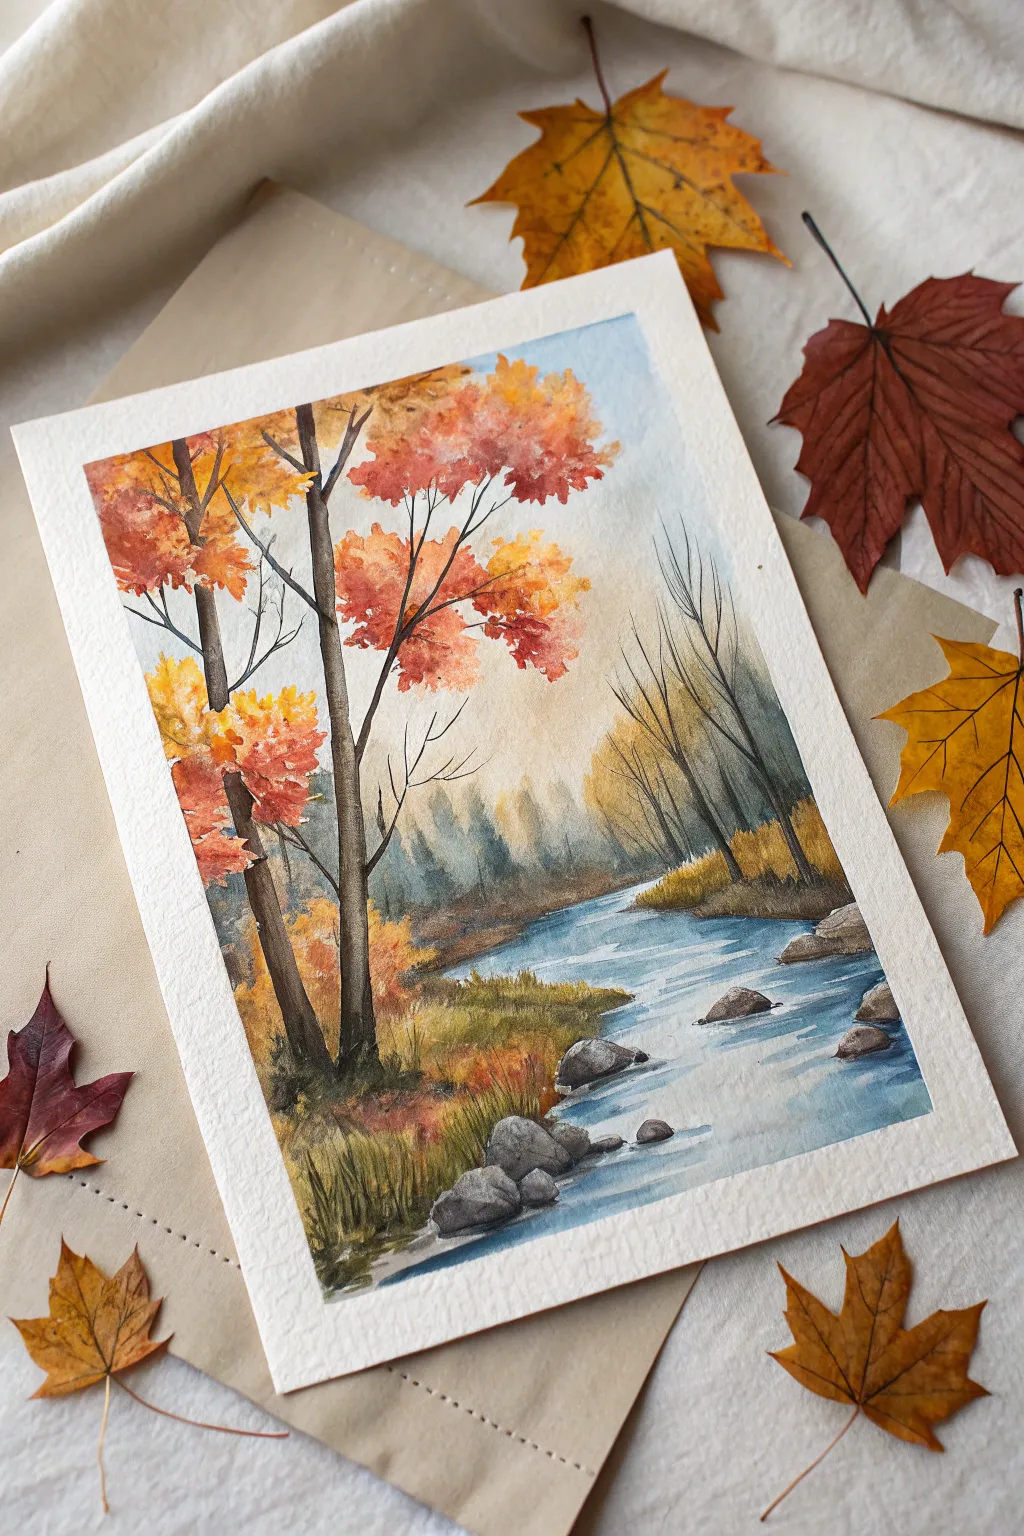
Capture the serene beauty of a crisp fall day with this vibrant watercolor landscape. You will paint tall, fiery maple trees standing guard over a gently flowing stream, using wet-on-wet techniques to create a soft, misty background.
How-To Guide
Materials
- Cold-pressed watercolor paper (300 gsm)
- Watercolor paints (Cadmium Orange, Burnt Sienna, Yellow Ochre, Ultramarine Blue, Paynes Gray, Sap Green)
- Round watercolor brushes (Size 4, 8, and a fine liner brush for branches)
- Masking tape
- Pencil (HB or 2B) and kneadable eraser
- Two jars of water
- Paper towels
- White gouache (optional for highlights)
Step 1: Sketching and Sky
-
Prepare the paper:
Tape your watercolor paper down to a board on all four sides. This keeps the paper flat when we apply water and creates that crisp white border at the end. -
Light sketch:
Using your pencil, lightly map out the main composition. Draw the vertical lines for the two main trees on the left, the curved bank of the stream, and gently indicate where the horizon line meets the distant trees. -
Wet the sky:
With a large clean brush, wet the sky area above the horizon line. Avoid the trunks of the main trees if you can, but don’t worry too much about precision here. -
Paint the sky:
Drop in a very dilute mix of Ultramarine Blue at the top corners. As you move down towards the horizon, mix in a touch of Yellow Ochre to create a warm, creamy glow, suggesting distant sunlight. -
Misty background trees:
While the sky is still slightly damp (but not soaking), mix a pale, grey-green color using Paynes Gray and Sap Green. Paint vertical streaks in the distance to suggest a dense forest, letting the bottom edges blur into the horizon.
Muddy colors?
If your orange leaves look brown when mixing with the blue sky, make sure the sky layer is 100% bone-dry before you start painting the foliage over it.
Step 2: The Stream and Banks
-
Base water wash:
Once the sky is dry, wet the stream area. Apply a wash of diluted Ultramarine Blue, leaving distinct horizontal slivers of white paper untouched to represent ripples and light reflecting on the water. -
Deepening the water:
While the blue wash is wet, drop in slightly darker blue-grey shadows near the banks and around where the rocks will be sitting. This anchors the water. -
Right bank foliage:
On the right bank, paint upward strokes using a mix of Yellow Ochre and Burnt Sienna to create tall, dry grasses. Add touches of darker brown at the base for shadow. -
Left foreground base:
Paint the grassy area on the bottom left with Sap Green mixed with a little Burnt Sienna for an earthy tone. Use upward flicking motions to mimic grass blades.
Level Up: Salt Texture
Sprinkle a pinch of table salt onto the wet rocks or the sandy bank. Let it dry completely and brush it off to create amazing gritty, stony textures.
Step 3: Details and Trees
-
Painting the rocks:
Mix a dark grey using Paynes Gray and Burnt Sienna. Paint the rocks in the stream and along the bank. Soften the top edges with a clean, damp brush to make them look round, and darken the bottoms where they touch the water. -
Main tree trunks:
Using a size 4 brush and a dark mix of Burnt Sienna and Paynes Gray, paint the two prominent tree trunks on the left. Keep the edges ragged and natural, not perfectly straight lines. -
Adding branches:
Switch to your fine liner brush. Pull thin, spindly branches extending from the main trunks and the smaller background trees on the right. Let the ink flow naturally; shaky hands actually help make branches look organic. -
Foliage texture:
For the leaves, load your size 8 brush with Cadmium Orange. Dab the brush onto the paper in clusters around the upper branches. Don’t paint individual leaves; think about cloud-like shapes. -
Color variation:
While the orange clusters are wet, drop in bold Burnt Sienna and touches of Yellow Ochre. This bleeding of colors creates the volume and light of the autumn canopy. -
Background details:
Add thin, faint tree trunks in the background using a watery grey mix. These should look like ghosts of trees compared to the bold foreground ones. -
Foreground grasses:
Darken the bottom left corner with deep green and brown strokes to create depth. Use the tip of your brush to flick distinct grass blades over the base of the tree trunks. -
Final touches:
Assess the painting. If the water needs more movement, add thin lines of blue-grey. If the rocks need highlights, a tiny dab of white gouache can restore the sunlit tops.
Peel off the tape carefully to reveal your crisp border and enjoy your finished autumn scene
Snowy Mountain Quiet
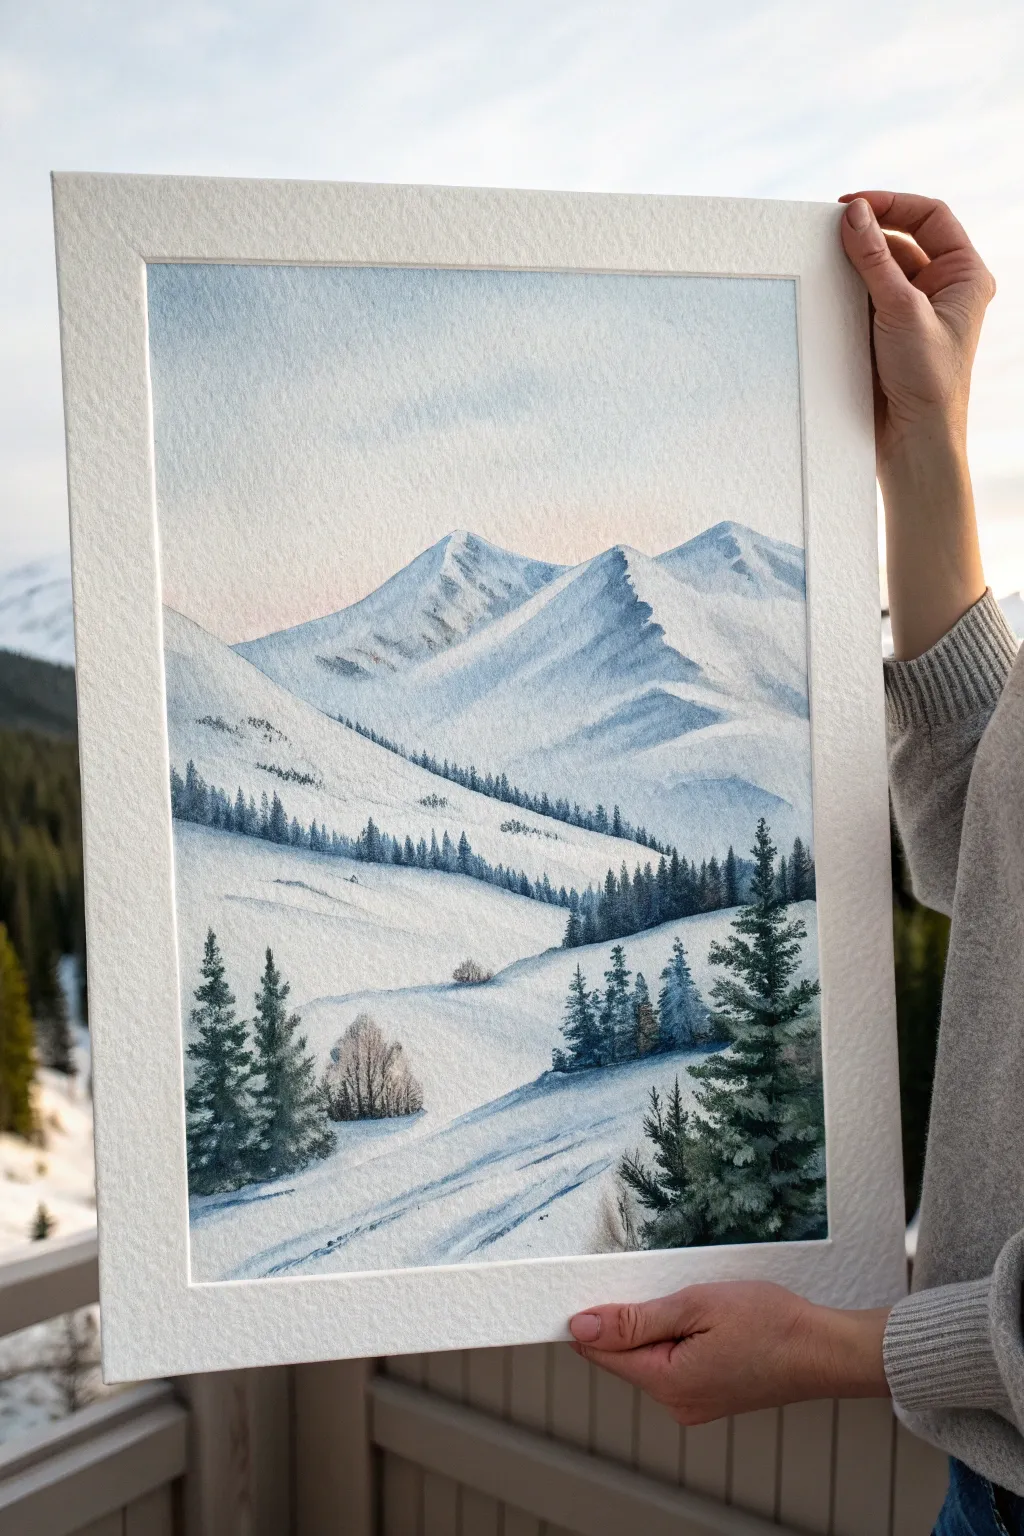
Capture the serene chill of a high-altitude morning with this delicate watercolor landscape. Using cool blues and soft purples, you will build up layers of distant peaks and snowy foreground pines to create a stunning sense of depth.
Step-by-Step
Materials
- Cold Press Watercolor Paper (140lb/300gsm), taped to a board
- Watercolor Paints: Indigo, Ultramarine Blue, Alizarin Crimson, Burnt Sienna, Payne’s Grey
- Large Round Brush (Size 10 or 12)
- Medium Round Brush (Size 6)
- Small Detail Brush (Size 2 or rigger)
- Masking fluid (optional)
- Two jars of water
- Paper towels
- Pencil (HB) and kneaded eraser
Step 1: Planning and Sky
-
Sketch the composition:
Lightly sketch the outlines of the main mountain peaks. Keep the lines faint so they don’t show through later. Mark the sloping hills in the mid-ground and the diagonal path of the foreground snowbank. -
Prepare the sky wash:
On your palette, mix a very watery, pale blue using Ultramarine and a tiny touch of Indigo. In a separate puddle, mix a faint, warm pinkish-purple using Alizarin Crimson and a dot of Ultramarine. -
Wet-on-wet sky:
Wet the entire sky area above the mountain line with clean water. While sheen is still visible, drop the pale blue into the upper corners and let it fade downward. -
Add sunrise warmth:
While the paper is still damp near the mountain peaks, gently introduce the pale pinkish-purple mix just above the mountain line. Allow the two colors to blend softly without overworking them, creating a sunrise glow.
Step 2: Major Mountain Forms
-
Base shadow layer:
Once the sky is bone dry, mix a cool shadow color (Ultramarine + Payne’s Grey). This layer defines the shadowed side of the distant mountains. Apply this wash to the right-side slopes of the peaks, leaving the left sides white to represent sunlit snow. -
Soften edges:
Use a clean, damp brush to soften some of the hard edges of your shadow shapes where the mountain slope is gradual. This prevents the mountains from looking like cut-out paper. -
Texture the rock faces:
With a slightly thicker mix of your shadow color, use the ‘dry brush’ technique to drag pigment across the shaded areas. The texture of the paper will catch the paint, creating the rugged look of exposed rock amidst the snow. -
Mid-ground slopes:
Move lower down the paper to the rolling hills. Paint broad, sweeping diagonal strokes of very pale blue-grey to suggest the undulation of the terrain. Leave plenty of white paper untouched for the brightest snow.
Muddy Shadows?
If your shadows look dirty instead of crisp, you likely overmixed the colors. Let the pigments mix on the paper rather than the palette for a cleaner look.
Step 3: Trees and Forests
-
Distant tree line:
Mix a dark, cool green-grey using Indigo and a touch of Burnt Sienna. With the tip of your size 6 brush, paint the distant tree line along the ridge of the mid-ground hill. These should be small, vertical marks that mass together. -
Varying density:
As you move slightly closer in the mid-ground, make the individual trees distinct but still grouped. Keep the color cool and muted to push them into the distance. -
Foreground evergreens:
Switch to a darker, more saturated mix of Indigo and Payne’s Grey for the large pine trees in the foreground. I like to start with a vertical line for the trunk, then dab horizontal branches outward, getting wider at the base. -
Layering foliage:
Paint the trees on the left and right foreground. Allow gaps between the branches so they don’t look like solid triangles. The dark value here is crucial for framing the scene. -
Deciduous shrubs:
In the lower valley area, paint a small cluster of bare bushes using a reddish-brown mix (Burnt Sienna + Alizarin). Use quick, flicking upward strokes for the thin branches.
Snowy Sparkle
For a magical winter touch, sprinkle a tiny amount of table salt onto the wet mountain shadow wash. Brush it off when dry for a crystallized ice texture.
Step 4: Final Details
-
Adding snow tracks:
Mix a translucent blue-violet shadow color. Paint diagonal streaks in the immediate foreground to mimic ski tracks or windblown depressions in the snow. These lines should lead the eye into the painting. -
Ground shadows:
Add cast shadows underneath the trees and shrubs. The shadows should stretch to the right, matching the light source direction established on the mountain peaks. -
Refine textures:
Use your smallest brush to add tiny details like individual distinct branches on the nearest pine tree or extra definition on the mountain ridges. -
Clean borders:
Wait until the painting feels room temperature to the touch (completely dry) before slowly peeling off the masking tape at a 45-degree angle to reveal the crisp white edge.
Step back and enjoy the peaceful chill of your mountain landscape
Desert Dunes and Big Sky

Capture the stillness of the desert with this warm and tranquil watercolor landscape featuring undulating sand dunes and resilient scrub brush. The painting contrasts the soft gradient of a vast sky against the sharp, warm contours of sunlit sand.
How-To Guide
Materials
- Cold-press watercolor paper (300 gsm or higher)
- Watercolor paints (Burnt Sienna, Yellow Ochre, Ultramarine Blue, Alizarin Crimson, Sap Green)
- Round watercolor brushes (Size 4, 8, and a larger wash brush)
- Masking tape (for borders)
- Pencil (HB or 2B) and kneaded eraser
- Two jars of water (clean and rinse)
- Paper towels or cotton rag
- Palette for mixing
Step 1: Sketch and Sky
-
Prepare your paper:
Tape down all four edges of your watercolor paper to a board to prevent warping. If you want the deckled edge look shown in the photo, you can paint freely without tape or tear the edges after painting, but for clean margins, taping is best. -
Lightly sketch the composition:
Using your HB pencil, lightly draw the horizon line about two-thirds of the way down the page. Sketch the rolling outlines of the dunes and the foreground ridge. Keep the lines faint so they disappear under the paint later. -
Wet the sky area:
With your large wash brush, apply clean water to the entire sky area above the dunes. The paper should be glistering but not soaking wet. -
Paint a gradient sky:
Load your brush with a watery wash of Ultramarine Blue. Start at the very top of the paper and sweep across, gradually adding more water as you move down toward the horizon to create a fade. The sky should be palest right above the dunes. -
Let it dry completely:
Allow the sky wash to dry fully before moving on. I prefer to wait until the paper is cool to the touch rather than damp, ensuring the dune colors won’t bleed upward.
Step 2: Painting the Dunes
-
Mix your sand tones:
On your palette, create a few puddles of sand colors. Mix Yellow Ochre with a touch of Burnt Sienna for the sunlit areas. For the shadows, mix Burnt Sienna with a tiny dot of Ultramarine Blue or Alizarin Crimson to deepen it. -
Paint the distant flat sands:
Paint the strip of flat desert in the far background using a dilute wash of your lighter sand mix. Keep this area subtle to suggest distance. -
Block in the main dune shapes:
Moving to the mid-ground, paint the lighter, sun-facing slopes of the dunes using your Yellow Ochre mix. Leave the shadow sides unpainted for a moment. -
Add the deep shadows:
While the sunlit edge is still slightly damp (or dry for harder edges), paint the shadow sides of the dunes with your darker Burnt Sienna mix. Follow the curve of the dune crests to define their shape. -
Soften the transitions:
Where the dune curves gently, use a clean, slightly damp brush to soften the edge between the light and dark paint. Where the crest is sharp, leave the edge crisp. -
Layering for uneven terrain:
Once the first layer is dry, glaze a very thin wash of Burnt Sienna over parts of the sand to create the look of uneven, rippled terrain. This adds dimension to the large shapes.
Edge Control
For realistic dunes, keep the top edge of the dune sharp (dry paper) and the bottom of the shadow soft (wet blending). This mimics how sand curves.
Step 3: The Foreground Ridge
-
Mix a foreground earth tone:
For the closest ridge, you need a darker, cooler brown. Mix Burnt Sienna with more Ultramarine Blue to create a darker, almost purplish-brown earth tone. -
Paint the foreground slope:
Using a sweeping motion, paint the foreground slope. Allow some texture to show by not overworking the brushstrokes; let the rough paper texture create natural ‘noise’ in the dirt. -
Add directional streaks:
While the paint is wet-on-dry, use a smaller brush to drag darker lines diagonally down the slope, mimicking erosion and the lay of the land.
Level Up: Texture
Splatter a very tiny amount of clean water or dark paint onto the foreground while it’s drying to create a gritty, sandy texture.
Step 4: Vegetation and Details
-
Mix green for the scrub:
Mix Sap Green with a little Burnt Sienna or Yellow Ochre to create a muted, dry desert green.Avoid bright, artificial greens. -
Paint the grass clumps:
Using the tip of your size 4 round brush, flick upward strokes to create tufts of grass on the foreground ridge. Vary the length and direction of the strokes. -
Add smaller bushes:
Dab small, irregular shapes of green further back on the lower slopes to represent distant desert sagebrush. -
Add shadows to vegetation:
Mix a dark cool grey (blue + brown) and paint small shadows at the base of the grass clumps to ground them to the earth. -
Final touches:
Review the painting for contrast. You might want to darken the deepest shadows of the large dunes one last time to make the sunlit ridges pop.
Peel off your tape to reveal crisp edges or tear the paper for a rustic finish, and enjoy your window into the desert
Misty Morning Atmosphere
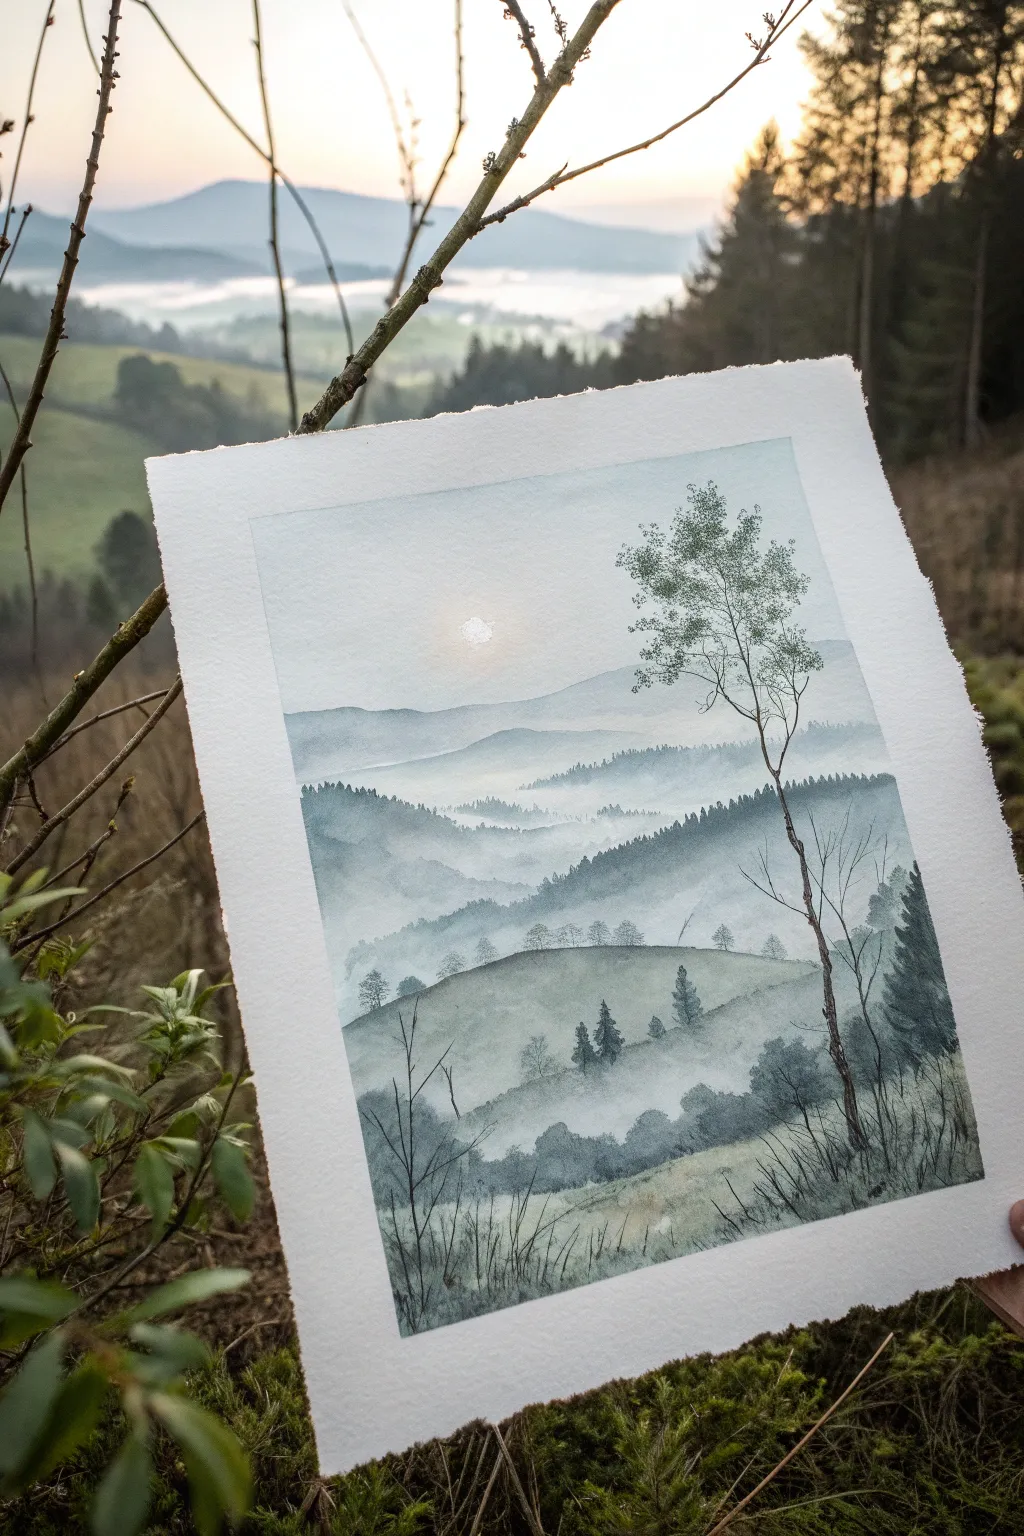
Capture the serene beauty of a foggy sunrise with this atmospheric watercolor tutorial. By layering translucent washes of blue-gray and green, you will build depth and distance, creating a sense of quiet stillness perfect for meditative painting.
Step-by-Step Guide
Materials
- Cold Press Watercolor Paper (140lb/300gsm)
- Watercolor Paints (Indigo, Payne’s Gray, Sap Green, Burnt Umber or Sepia, White Gouache)
- Masking Tape
- Drawing Board
- Flat Brush (1 inch)
- Round Brushes (Sizes 4, 8, and 0 or rigger brush)
- Paper Towels
- Two Water Containers
- Pencil (HB)
Step 1: Preparation and The Sky
-
Secure the Paper:
Begin by taping your watercolor paper down firmly to your board on all four sides. This creates that crisp white border seen in the example and prevents buckling. -
Initial Sketch:
Lightly sketch the horizon lines of the rolling hills. Keep the pencil pressure extremely light so the lines don’t show through the transparent paint later. Mark a small circle for the sun. -
Wet-on-Wet Sky:
Using your large flat brush, wet the entire upper sky area with clean water, stopping just above the first mountain line. The paper should glisten but not have puddles. -
Soft Sky Wash:
Mix a very dilute, pale wash of Indigo or Payne’s Gray. Gently sweep this across the top of the wet paper, letting it fade to almost clear water as you move downward toward the horizon. -
Lifting the Sun:
While the sky is still damp, rinse your brush and blot it almost dry on a paper towel. Gently lift the pigment out of the circle area where you marked the sun to create a soft, glowing light source.
Step 2: Layering the Hills
-
First Mountain Layer:
Once the sky is completely dry, mix a very watery, pale blue-gray. Paint the most distant mountain ridge. The edge should be crisp on top, but you can soften the bottom edge with clean water to simulate mist. -
Second Layer Depth:
Wait for the previous layer to dry. Mix a slightly darker value of the same blue-gray. Paint the next ridge of mountains, overlapping the first. The slightly darker tone brings this layer forward. -
Adding Texture:
While this second ridge is still wet, drop in tiny dots of slightly more concentrated pigment along the top edge to suggest distant treelines without painting individual trees. -
Mid-Ground Hills:
Mix a tiny touch of Sap Green into your gray mixture. Paint the middle hills, making the color stronger and darker than the previous layers. Use the tip of your round brush to create jagged top edges mimics fir trees. -
Creating Fog Pockets:
As you paint the bottom of these mid-ground hills, rinse your brush and run clear water along the bottom edge of the wet paint. This diffuses the color into white paper, creating the essential ‘mist’ effect. -
Foreground Hill:
For the prominent rounded hill in the lower third, mix a stronger green-gray. Paint the hill shape, but I like to leave patches of lighter color to suggest grassy textures.
Mist Mastery
Work top to bottom. Ensure each mountain layer is 100% dry before starting the next one closer to you, otherwise the crisp ridgelines will bleed and ruin the depth effect.
Step 3: Foreground Details
-
Adding Foliage:
On the foreground hill (while damp or dry), dab in darker spots of Payne’s Gray and Sepia to create small shrubs and bushes. Vary the sizes to keep it natural. -
The Main Tree:
Using a rigger brush or a size 0 round brush with a dark mix of Sepia and Payne’s Gray, paint the tall, thin tree on the right. Start from the bottom and pull upwards with a shaky hand to create organic branches. -
Fine Branch Work:
Extend delicate branches outward from the main trunk. Remember that branches get thinner as they move away from the trunk. Use the very tip of your brush. -
Tree Leaves:
Mix a muted green tone and use an old or scruffy brush to stipple small groupings of leaves near the top of the tree. Don’t overdo it; keep the canopy sparse and airy. -
Foreground Grasses:
With your smallest brush and dark paint, flick quick, upward strokes at the very bottom of the paper to create tall grasses in the immediate foreground. -
Final Touches:
If the sun has lost its brightness, add a tiny dot of white gouache to the center of the sun circle to make it pop against the misty sky. -
The Reveal:
Let the painting dry completely—paper should be cool to the touch. Carefully peel away the masking tape at a 45-degree angle to reveal your clean edges.
Level Up: Morning Glow
Add a tiny drop of Yellow Ochre or Naples Yellow to the water when wetting the sky area initially. This adds a subtle warmth to the sunrise that contrasts beautifully with the cool mountains.
Step back and admire the peaceful depth you have created in your misty landscape
Moonlit Night Landscape
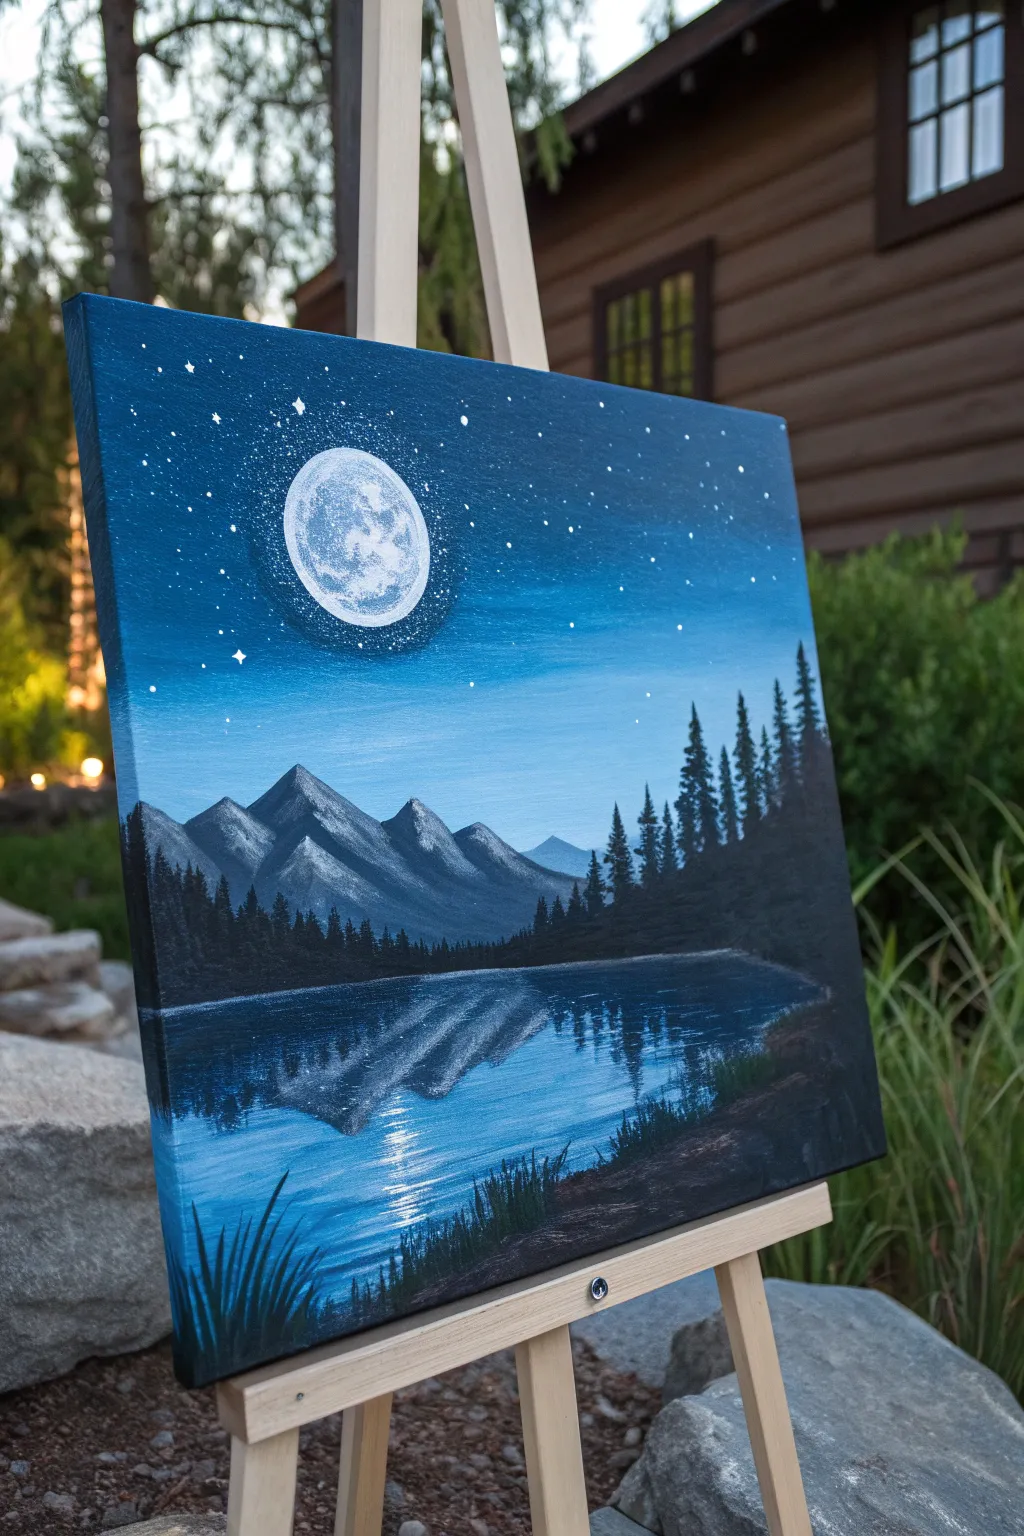
Capture the tranquil beauty of a full moon reflecting over a mountain lake in this acrylic painting tutorial. The cool blue tones and silhouetted pines create a peaceful night scene perfect for beginners looking to practice blending and reflection techniques.
Step-by-Step Tutorial
Materials
- Stretched canvas (e.g., 11×14 inches)
- Acrylic paints: Phthalo Blue, Ultramarine Blue, Titanium White, Mars Black
- Flat brushes (1-inch and 1/2-inch)
- Round brush (size 4 or 6)
- Small detail brush (liner or size 0)
- Palette for mixing
- Cup of water and paper towels
- Optional: Spatter brush or old toothbrush
Step 1: The Night Sky
-
Gradient Base:
Begin by covering the top two-thirds of the canvas with a horizontal gradient. Use Phthalo Blue mixed with a touch of black at the very top corners, transitioning into pure Phthalo Blue, and finally fading into a lighter blue (mixed with white) as you reach the horizon line. -
Lower Sky:
Near the horizon line (about halfway down the canvas), blend in plenty of Titanium White with your light blue to create a glowing effect where the mountains will sit. Ensure the transition from the dark top to the light bottom is smooth while the paint is still wet. -
Moon Placement:
While the sky dries, decide where your moon will go. Using a round brush and pure Titanium White, paint a solid white circle in the upper left quadrant. -
Moon Texture:
Once the white circle is tacky or dry, dab a tiny bit of light grey (white plus a speck of black) onto your brush. gently tap the inside of the moon to create craters and texture, keeping the edges crisp. -
Outer Glow:
Mix a very translucent wash of white and light blue. Used a dry brush technique to gently scumble a glowing ring around the moon, fading it out into the dark sky. -
Stars:
Thin down some white paint with water until it’s inky. Dip a small brush or toothbrush into it and flick the bristles to spatter tiny stars across the dark upper sky. Add a few larger specific stars with a detail brush.
Muddy Reflections?
If your water reflections look messy, wait for the base blue layer to dry fully. Then, dry-brush the reflections on top. This prevents the colors from churning together into mud.
Step 2: Mountains and Trees
-
Mountain Shapes:
Mix a dark grey-blue color using Ultramarine Blue, Black, and a little White. Paint the jagged outlines of a mountain range across the horizon line, making the peaks varied in height. -
Mountain Highlights:
Imagine the moonlight coming from the left. Mix a lighter grey-blue and paint highlights on the left slopes of the mountain peaks. Use a darker shade for the shadowed right sides to create dimension. -
Distant Trees:
Using a smaller flat brush and black paint, dab vertical lines along the base of the mountains to suggest a dense forest line in the distance. Keep these small and indistinct. -
Right-Side Forest:
On the right side of the canvas, paint a large, dark mass for the foreground forest. Use black mixed with a hint of blue. Create tall, jagged pine tree shapes extending up into the sky.
Galaxy Twist
Add a faint diagonal band of purple and magenta across the sky before adding stars to suggest the Milky Way, giving the scene a more cosmic, vibrant atmosphere.
Step 3: The Lake and Reflections
-
Water Base:
Fill the bottom third of the canvas with horizontal strokes of blue. Mirror the sky gradient: lighter near the mountains, getting darker blue towards the bottom edge. -
Mountain Reflection:
While the water paint is wet, loosely drag some dark grey paint downwards directly below the mountains to create their reflection. Distort the shape slightly with horizontal strokes to look like ripples. -
Tree Reflection:
Mirror the large trees on the right by painting dark, vertical strokes downwards into the water. Gently pull your brush horizontally across these strokes while wet to blur them. -
Moonlight Path:
Load a flat brush with white paint. directly under the moon, paint horizontal, dash-like strokes on the water. Make them brighter and more concentrated near the center of the reflection, fading out at the edges. -
Foreground Bank:
Paint a dark, sloping bank in the bottom right corner using black. This grounds the viewer. -
Grasses:
Using your liner brush and black paint, flick quick, upward strokes from the bottom bank to create tall grasses silhouetted against the reflected water. -
Final Glazing:
If the water looks too stark, apply a very thin glaze of Phthalo Blue over the reflections (avoiding the bright white moonlight path) to unify the colors.
Step back and admire your peaceful night scene, bringing a bit of calm to your workspace
Silhouette Trees Against Light

Capture the serene beauty of twilight with this striking landscape painting featuring a detailed tree silhouette against a vibrant gradient sky. The contrast between the dark, leafless branches and the soft, transitioning colors of the sunset creates a dramatic and peaceful atmosphere perfect for any wall.
How-To Guide
Materials
- Canvas panel or thick watercolor paper (8×10 or 11×14 inches)
- Acrylic paints (Titanium White, Primary Yellow, Magenta or Alizarin Crimson, Ultramarine Blue, Mars Black)
- Wide flat brush (for blending the sky)
- Medium round brush
- Small detail liner brush (size 0 or 00)
- Palette for mixing
- Water cup and paper towels
- Pencil (optional for sketching)
- White or light wood frame (optional for display)
Step 1: Painting the Gradient Sky
-
Prepare your palette:
Squeeze out generous amounts of white, yellow, magenta, and blue onto your palette. You will need plenty of paint to ensure a smooth, streaky blend for the sky without the paint drying too quickly. -
Start with the horizon:
Using your wide flat brush, mix a light, creamy yellow with a touch of white. Apply this horizontally across the lower third of your canvas, blending upward. This will represent the glowing light of the setting sun. -
Introduce pink hues:
While the yellow layer is still wet, pick up a small amount of magenta on the dirty brush. Blend this into the area just above the yellow, creating a soft coral and orange transition. Use long, horizontal strokes to keep the gradient smooth. -
Transition to purple:
Clean your brush slightly, then mix magenta with a tiny dot of blue to create a lavender shade. Apply this above the pink layer, blending the edges where the two colors meet. If the paint drags, dip your brush tip in a tiny bit of water. -
Complete the upper sky:
For the top of the canvas, use pure blue mixed with a little white. Blend this downward into the purple section. You want a seamless transition from the cool blue top to the warm yellow bottom. -
Add cloud streaks:
While the sky is still slightly damp, use a clean, dry brush with a tiny amount of magenta or white to whisper in a few horizontal streaks across the pink and blue areas. These suggest soft, drifting clouds. -
Let it dry completely:
Allow the background to dry fully before moving on. This is crucial; if the sky is wet, your sharp black silhouette lines will bleed and become muddy.
Fixing Muddy Blends
If your sky colors turn muddy or grey where they meet, let the layer dry completely. Then, glaze over it with a thin layer of the pure color you want to reinforce.
Step 2: Creating the Silhouette
-
Paint the distant horizon line:
Switch to a medium round brush and load it with black paint. Paint a bumpy, uneven line across the very bottom of the yellow sky area to represent distant bushes and terrain. Keep this low on the canvas. -
Establish the trunk:
Identify the placement for your main tree, slightly off-center to the right. Paint a thick, sturdy trunk that extends from the ground up into the middle of the sky. Make the base wider and taper it slightly as it goes up. -
Branch structure:
From the main trunk, split the tree into two or three large primary branches. These should twist and turn rather than being perfectly straight lines, imitating the natural growth of an old tree. -
Add secondary branches:
Using a smaller brush, add branches growing off your primary ones. Think of ‘Y’ shapes. Keep the lines getting thinner as they move away from the center. -
Detailing fine twigs:
Switch to your liner brush (size 0 or 00). Paint many tiny, delicate twigs extending from the ends of the branches. I find that holding the brush loosely near the end of the handle helps create more natural, jittery lines. -
Review the shape:
Step back and look at the overall shape of the tree crown. It should feel somewhat rounded or oval-shaped overall. Fill in any sparse areas with more crossing twigs to create density. -
Paint the foreground grass:
Mix a tiny bit of brown or yellow into your black to warm it up slightly. Using an old, frayed brush or a fan brush, flick upward strokes at the very bottom of the canvas to create tall, dry grass blades silhouetted against the light. -
Final touches:
Check for any light spots in the trunk that need a second coat of black for full opacity. Once dry, frame your piece in a white frame to make the colors pop.
Create Natural Asymmetry
Avoid making your tree perfectly symmetrical. Force branches to cross over each other and have some point slightly downward to mimic the weight of old wood.
Now you have a stunning twilight scene that brings a calm, natural elegance to your room
Monochrome Landscape Value Study
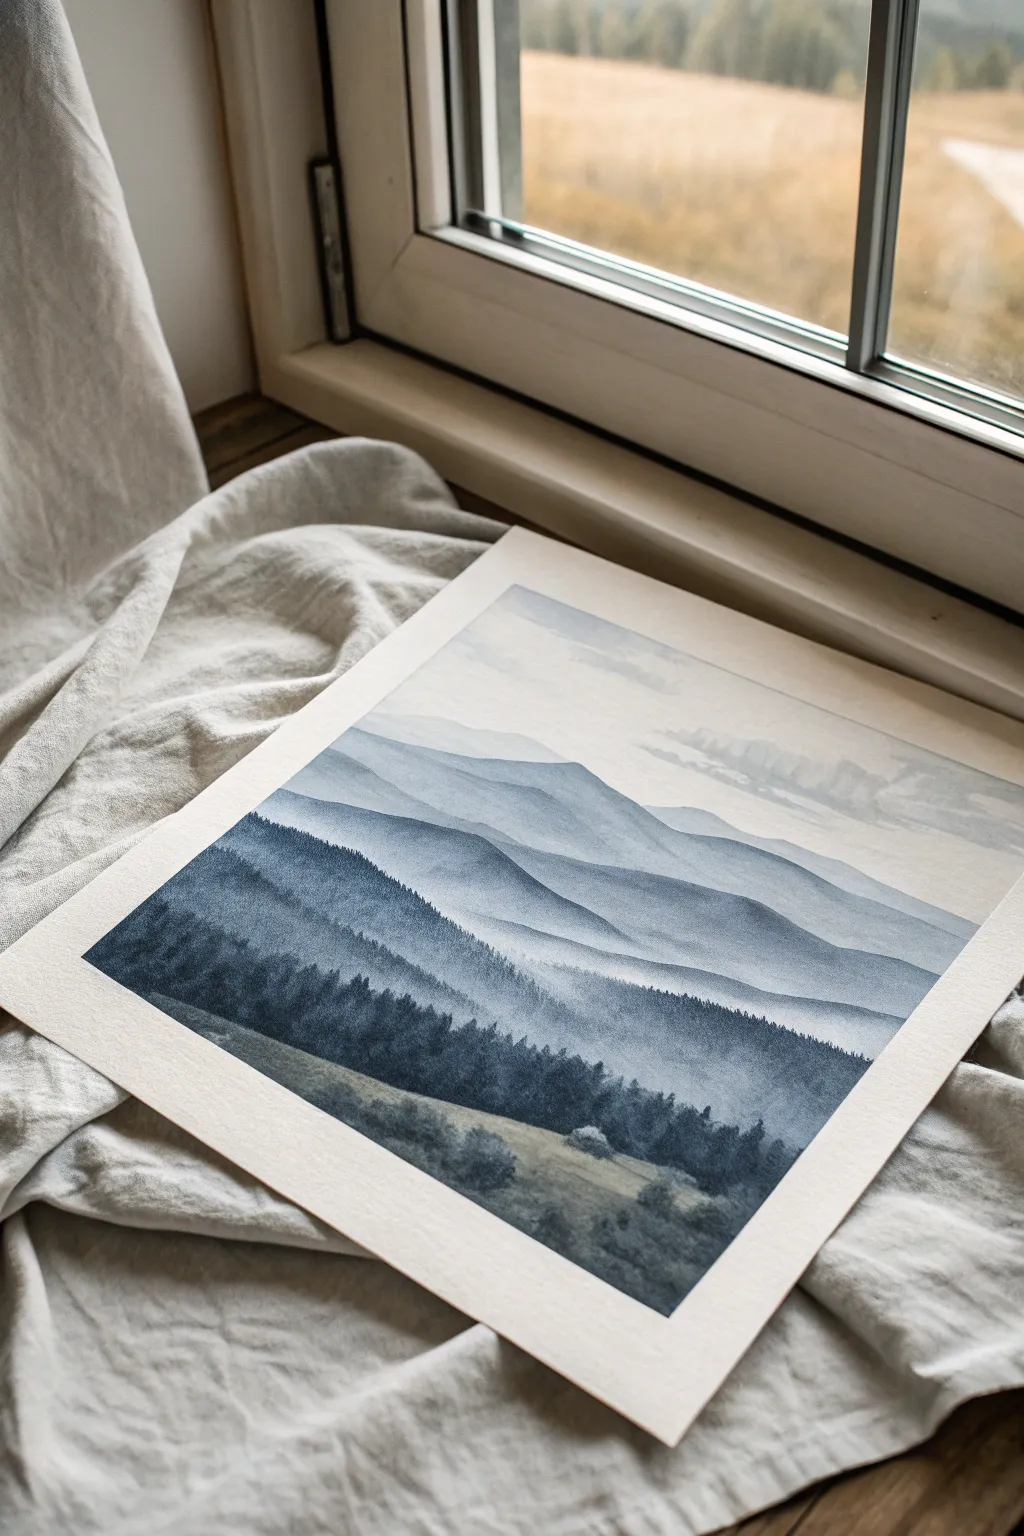
Master the art of atmospheric perspective with this serene monochromatic landscape. Using a single blue hue, you’ll create depth by layering translucent washes to build a misty, dreamlike mountain range.
Step-by-Step Tutorial
Materials
- Cold press watercolor paper (140lb/300gsm, approx 11×14 inches)
- Indigo or Payne’s Gray watercolor paint (tube or pan)
- Wide flat wash brush (1 inch)
- Round brush (size 6 or 8) for hills
- Small detail brush (size 2 or rigger) for trees
- Two jars of water (one for clean, one for dirty)
- Palette for mixing varied dilutions
- Paper towel or rag
- Masking tape (low tack)
Step 1: Preparation and Sky
-
Secure your paper:
Begin by taping the edges of your watercolor paper down to a board or table. This creates a crisp clean border, just like the one in the photo, and prevents the paper from buckling under heavy washes. -
Mix your base puddle:
Squeeze a generous amount of Indigo paint onto your palette. Create four distinct puddles of paint mixed with water: very pale (tea consistency), light (milk), medium (light cream), and dark (heavy cream). This value scale is crucial for the monochromatic effect. -
Paint the sky:
Wet the very top third of your paper with clean water using your wide flat brush. While damp, drop in the palest wash across the top, letting it fade to white as you move downward. Leave some irregular white patches near the horizon to suggest distant cloud formations. -
Initial drying:
Let this sky layer dry completely. The paper must be bone-dry and warm to the touch before starting the mountains to prevent unintentional bleeding.
Step 2: Creating Depth with Layers
-
First mountain ridge:
Using your palest wash mixture and the round brush, paint a jagged, organic line across the paper, starting just below the sky area. Fill the space below this line with the same pale wash. -
Soften the bottom edge:
Before the paint dries, dip your brush in clean water and run it along the bottom edge of this first ridge’s wash, fading the color out into the white paper below. This creates the illusion of mist rising from the valleys. -
Dry and repeat:
Allow the first ridge to dry. Now, load your brush with the ‘light’ mixture (slightly darker than the first). Paint a second mountain ridge overlapping the first one, placing its peak slightly lower on the page. -
Third layer intensity:
Once the previous layer is dry, switch to your ‘medium’ mix. Paint a third range of hills, adding more undulating curves. Notice how the increasing darkness pushes the lighter mountains into the background. -
Refining the edges:
As you paint these middle-ground mountains, use the tip of your brush to make the ridge lines crisp, but continue to soften the bottom edges with clean water to maintain that foggy atmosphere.
Mastering the Fade
To get that perfect misty bottom edge on your mountains, work quickly. Have a clean, damp brush ready to feather the edge before the paint creates a hard water line.
Step 3: Detailed Foreground
-
Darkest hill shape:
With the background layers dry, take your darkest paint mixture. Paint the largest, closest hill shape in the foreground, covering the bottom third of the composition. Keep the top edge rough to suggest tree tops. -
Adding texture:
While this dark wash is still wet, drop in concentrated pigment (almost straight from the tube) into the lower sections to create weight and shadow at the very bottom. -
Painting distant trees:
Switch to your small detail brush. Using the medium-dark mix, paint tiny vertical lines along the ridge of the middle-ground hills to suggest distant pine forests. -
Foreground forest details:
On the closest, darkest hill, paint distinct pine tree shapes. Use a tapping motion with the tip of your brush to create the jagged silhouette of evergreen branches. -
Varying tree heights:
I find it helpful to vary the height and thickness of these foreground trees to make the forest look natural and wild, rather than like a manicured hedge. -
The meadow wash:
Near the bottom right, leave an area slightly lighter or lift some pigment with a thirsty brush to suggest a clearing or meadow among the dark trees. -
Final dry and reveal:
Wait for the entire painting to dry completely—this might take longer due to the heavy pigment in the foreground. Once dry, carefully peel away the tape at a 45-degree angle to reveal your crisp white border.
Add Subtle Warmth
For a ‘Level Up,’ mix a tiny dot of Burnt Sienna into your Indigo for the closest foreground trees. It creates a deep, near-black green that contrasts beautifully with the blue hills.
Now step back and admire how a single color can create an entire world of depth and tranquility
Double-Exposure Landscape Silhouette
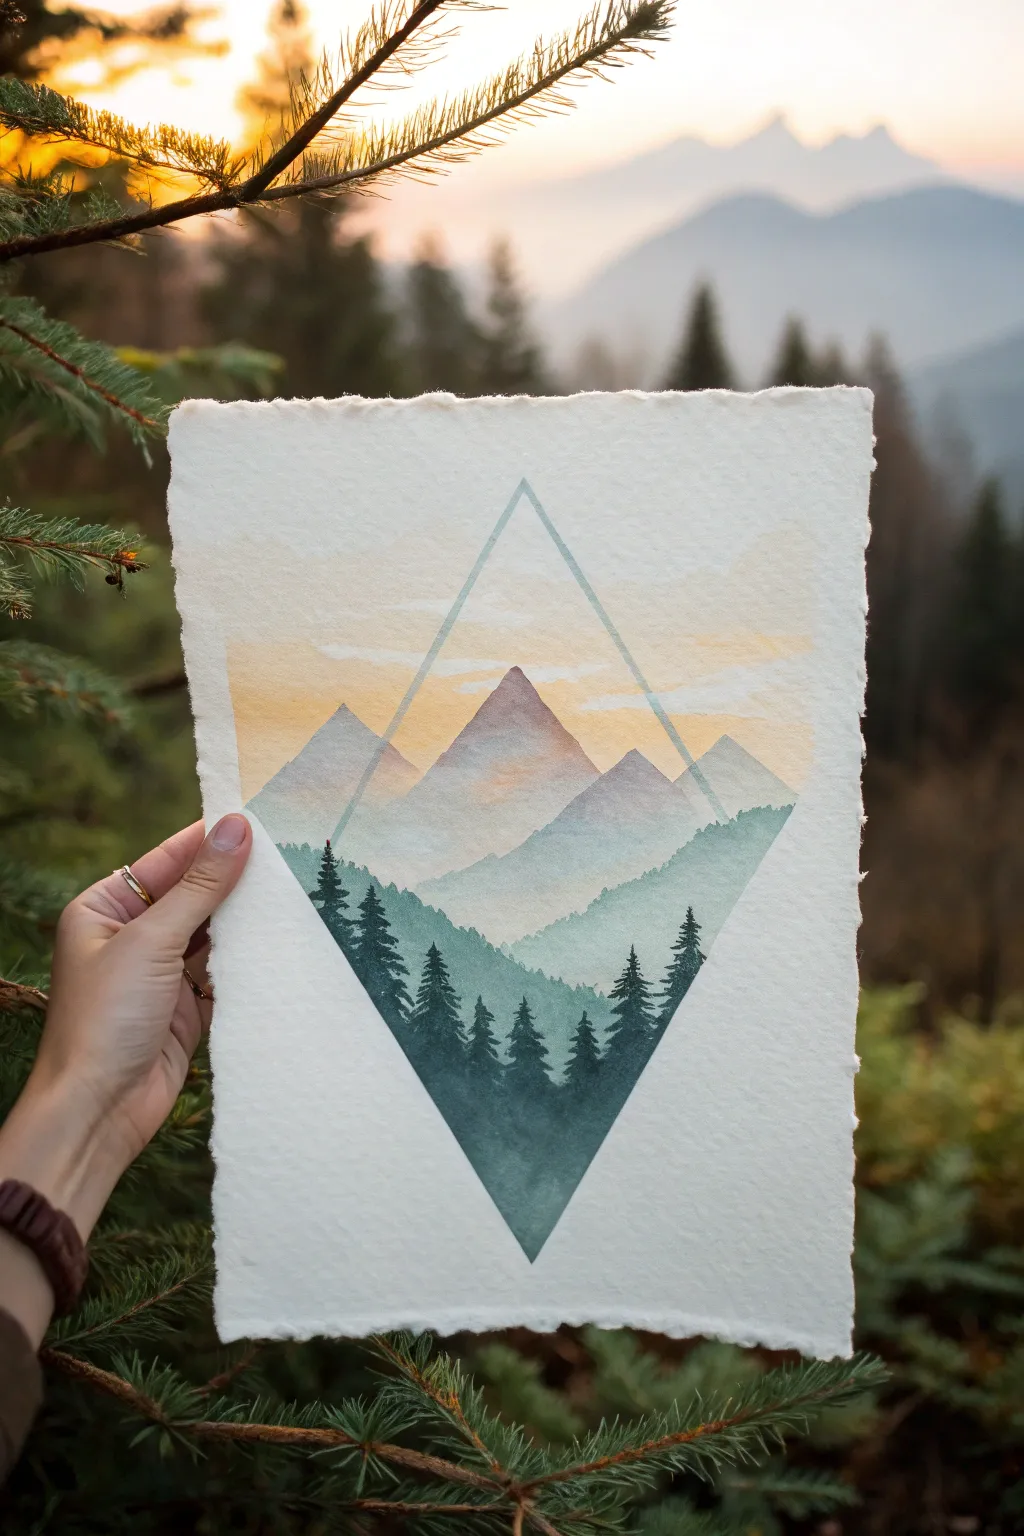
This captivating watercolor project fuses sharp geometric boundaries with the soft, flowing beauty of a mountain sunset. By framing a layered landscape within a diamond shape, you create a modern, structured piece that beautifully highlights contrasting warm skies and cool pine forests.
Step-by-Step Guide
Materials
- Cold press watercolor paper (rough edge/deckled edge preferred)
- Watercolor paints (Indigo, Payne’s Grey, Burnt Sienna, Yellow Ochre, Alizarin Crimson)
- Ruler
- Pencil (HB or lighter)
- Masking tape or painter’s tape
- Round brushes (size 4 and 8)
- Detail brush (size 0 or 1)
- Jar of clean water
- Palette for mixing
- Paper towels
Step 1: Drafting the Geometry
-
Establish the centerline:
Begin by lightly finding the center of your paper. Use a ruler to draw a very faint vertical line where the peak of the geometric shape will align. -
Draw the diamond frame:
Using your ruler, lightly sketch a large diamond (rhombus) shape. Ensure the top and bottom points land on your vertical centerline. The shape should be tall and elegant, occupying the center third of the paper. -
Mask the edges:
Carefully apply masking tape along the outside edges of your pencil lines. This forms the crisp, outer boundary of your painting. Run your fingernail along the tape edge to ensure a tight seal so paint doesn’t bleed underneath. -
Mark the internal triangle:
Inside your taped area, lightly sketch an inverted triangle shape starting from the midpoint of the diamond’s sides and pointing down to the bottom tip. This will be the dark forest section later.
Step 2: Painting the Sky and Mountains
-
Wet-on-wet sky wash:
Pre-wet the upper portion of the diamond with clean water. Drop in a pale wash of Yellow Ochre near the horizon line (just below the center of the diamond) and blend it upwards into a very faint blue or unpainted white at the top peak. -
Add warm sunset clouds:
While the sky is still damp, mix a dilute orange using Yellow Ochre and a touch of Alizarin Crimson. Swipe gentle, horizontal strokes across the sky area to suggest soft sunset clouds. -
Paint the first mountain range:
Once the sky is dry, mix a light, watery purple using Alizarin Crimson and a tiny dot of ultramarine. Paint the distant mountain silhouettes. Keep the edges soft or ragged to mimic craggy peaks. -
Create atmospheric perspective:
Let the first range dry. Mix a slightly darker, cooler purple for the next range of mountains slightly lower down. Overlap the first range, ensuring the paint is translucent enough to show depth. -
Define the central peak:
For the prominent central mountain, use a mix of Burnt Sienna and purple to give it a reddish, sunlit glow. Paint this shape cleanly, letting it stand out against the paler background mountains.
Bleeding Edges?
If paint seeped under the tape, wait for it to dry fully. Then, take a small flat brush slightly dampened with clean water and gently ‘scrub’ the error, lifting the pigment with a paper towel.
Step 3: The Forest Silhouette
-
Prepare the forest green:
Mix a deep, rich green using Indigo and a little Yellow Ochre or Sap Green. You want this color to be quite saturated and dark. -
Paint the misty mid-ground:
In the middle band of the diamond, paint a wash of lighter blue-green (diluted Indigo) to represent the distant forest hills. Let the top edge be uneven to suggest treetops, but keep the color fairly watery. -
Start the pine trees:
Switch to your detail brush. Using your darkest Indigo-green mix, start painting tiny vertical lines for tree trunks along the inverted triangle line you sketched earlier. -
Flesh out the branches:
Work your way down the tree trunks with small dabbing motions to create pine boughs. I find it helpful to start narrow at the top and widen the branches near the base of each tree. -
Fill the dense forest:
Continue filling the bottom point of the diamond with this dark forest texture. The trees should be distinct at the top of this section but can merge into a solid dark mass as they go deeper into the bottom point. -
Add foreground details:
Add a few larger, more detailed pine trees in the immediate foreground (the lowest part of the open green area) to enhance the sense of scale. Make these the darkest values in the painting.
Pro Tip: Texture
Sprinkle a tiny pinch of salt onto the wettest part of the misty mid-ground forest layer. As it dries, the salt pushes pigment away, creating a natural, blooming frost texture.
Step 4: Finishing Touches
-
Review contrast:
Check that the bottom forest section is significantly darker than the top sky section. This ‘grounding’ weight is crucial for the composition. -
Remove the tape:
Wait until the paper is completely bone-dry. Slowly peel the masking tape away at a 45-degree angle, away from the painted area, to reveal your crisp geometric edges. -
Erase guidelines:
Gently erase any remaining pencil lines from your initial sketch, particularly the centerline or the internal triangle boundary if it’s still visible through the lighter paint.
Now you have a stunning piece of geometric nature art that balances precision with organic beauty


Have a question or want to share your own experience? I'd love to hear from you in the comments below!