
A plain bowl is basically a tiny round canvas, and it’s so satisfying when the design finally clicks with the curve. Here are my favorite bowl painting ideas—from easy classics you can finish in one sitting to a few bold techniques that feel like a little art adventure.
Simple Floral Sprigs
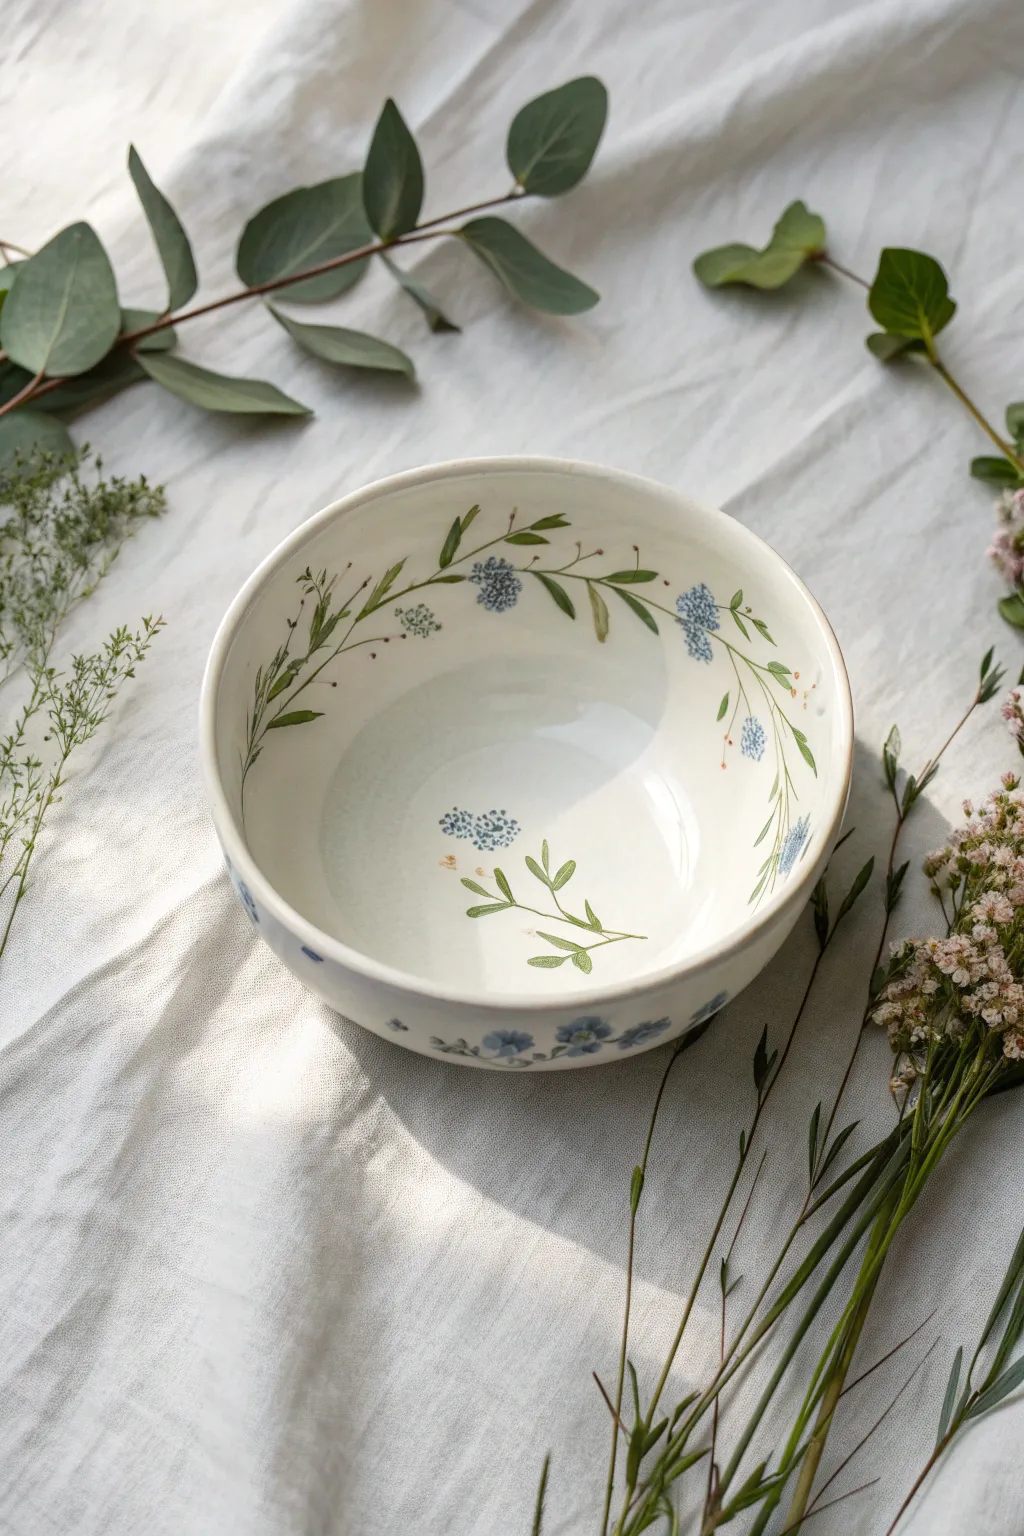
This project captures the gentle beauty of a meadow with airy floral sprigs painted directly onto a bowl’s interior and exterior. Using fine liners and soft washes, you’ll create a piece that feels both rustic and elegantly refined.
Detailed Instructions
Materials
- Biscuit-fired ceramic bowl (creamy white clay body preferred)
- Underglazes: Sap Green, Olive Green, Sky Blue, Periwinkle, Soft Brown, White
- Pointed round brush (size 2 or 4)
- Fine liner brush (size 0 or 00)
- Small palette or ceramic tile
- Water cup
- Clear dipping glaze
- Sponge
Step 1: Preparation & Mapping
-
Clean the surface:
Wipe down your bisqueware bowl with a damp sponge to remove any kiln dust or oils from your hands, ensuring a pristine surface for the paint. -
Plan the flow:
Visualize a U-shape or a sweeping curve along the inner rim. You don’t need a pencil sketch, but identifying where your main stems will flow helps create a balanced composition that follows the bowl’s curve.
Step 2: Painting the Greenery
-
Mix your greens:
On your palette, mix a small amount of Sap Green with a touch of Olive Green to create a natural, varied tone. Adding a drop of water can help the paint flow more smoothly for long lines. -
Draft the main stems:
Using the fine liner brush, paint thin, arching stems that creep along the upper interior wall of the bowl. Keep your hand loose; slight wobbles make the stems look organic and woody. -
Add secondary branches:
From your main lines, pull out shorter, finer branches at alternating intervals. These will hold your leaves and flower clusters later. -
Paint the leaves:
Switch to the pointed round brush (size 2) and load it with your green mix. Press the belly of the brush down gently and lift up quickly to create tapered, almond-shaped leaves. -
Vary the leaf placement:
Cluster some leaves in pairs and let others stand alone. Leave gaps on the tips of the stems—that’s where your blooms will go. -
Create the central sprig:
At the very bottom center of the bowl, paint a small, isolated sprig with two or three leaves and a short stem. This little hidden detail is a delightful surprise for the user.
Pro Tip: Watercolor Effect
To get that soft, airy look shown in the photo, dilute your underglaze with water until it’s like skim milk. This creates a translucent, watercolor-style wash.
Step 3: Adding the Blooms
-
Prepare the blue:
Mix Sky Blue with a tiny hint of Periwinkle for that soft, wildflower hue. Dilute this mixture slightly more than the green to get a semi-transparent effect. -
Stipple the flower heads:
Use the tip of your round brush to ‘stipple’ or dab small dots in loose clusters at the ends of your stems. These represent the tiny florets of the flower. -
Layer the color:
Once the first layer of blue dots is dry to the touch, add a few darker dots (less diluted paint) on top to give the flower heads depth and dimension. -
Add tiny details:
Using the fine liner brush and a very pale brown or orange, add microscopic dots or thin stamens near the base of the flower clusters for botanical realism. -
The exterior rim:
Don’t forget the outside! Paint a few simple blue florets or trailing leaves around the exterior base rim to tie the whole design together.
Troubleshooting: Shaky hands?
If you struggle with fine lines, rest your pinky finger on the bowl’s surface to stabilize your painting hand while you draw the delicate stems.
Step 4: Glazing & Firing
-
Dry completely:
Let the underglaze dry fully, usually for at least 24 hours depending on humidity. -
Apply clear glaze:
Dip the bowl into a clear transparent glaze. Ensure an even coat and shake off excess drips gently. -
Clean the foot:
Use a damp sponge to wipe any glaze off the foot ring of the bowl so it doesn’t stick to the kiln shelf. -
Final fire:
Fire the piece in the kiln according to the clay and glaze manufacturer’s instructions (typically cone 06 or cone 6).
Now you have a serene, nature-inspired vessel ready for your morning ritual


Clean Geometric Color Blocks

Transform a plain ceramic bowl into a piece of modern art with this striking geometric design. Using a palette of earthy rust, deep teal, and charcoal against a creamy base, you’ll build a sophisticated tessellated pattern that looks deceptively complex but relies on simple repeating shapes.
Step-by-Step Guide
Materials
- Bisque-fired ceramic bowl (creamy white)
- Underglaze paints: Rust/Terracotta, Deep Teal/Forest Green, Charcoal Grey/Black
- Pencil (light graphite)
- Ruler or soft measuring tape
- Small flat shader brush (size 4 or 6)
- Fine liner brush (size 0 or 1)
- Pottery sponge
- Clear dipping glaze (for firing) or clear sealant (if using acrylics on non-food surfaces)
Step 1: Preparation & Mapping
-
Clean the surface:
Before starting, wipe your bisque bowl down with a slightly damp sponge to remove any kiln dust or oils from your hands. Let it dry completely for a few minutes. -
Mark the rim:
Using a pencil, lightly mark even intervals around the top rim of the bowl. These marks will serve as the anchor points for your triangles. Aim for about 1.5 to 2 inches apart depending on your bowl size. -
Draft the interior grid:
This is the trickiest part, so take your time. Draw a horizontal line circling the interior about halfway down the bowl. Then, draw connecting diagonal lines from your rim marks down to the center base to create a web-like framework. -
Form the triangles:
Within your framework, sketch out the specific triangle shapes. You aren’t filling every space; you are creating clusters of three triangles that meet at points, leaving negative space in between. Reference the image to see how the shapes interact. -
Sketch the exterior border:
On the outside of the bowl, draw a simpler pattern. Create a repeating zigzag line about an inch or two from the bottom to form a row of standing triangles.
Step 2: Painting the Interior
-
Start with the Rust tones:
Select specific triangles in your sketched pattern to be rust-colored. Use your flat shader brush to fill them in. I find it helpful to distribute the color randomly to keep the design balanced but not perfectly symmetrical. -
Apply the Teal layer:
Switch to your deep teal or forest green paint. Fill in an equal number of triangles, ensuring they abut the rust triangles in some places but stand alone in others. -
Add Charoal accents:
Use the charcoal grey or black for the remaining triangles in your pattern. These darker shapes add necessary contrast and anchor the lighter earth tones. -
Refine the edges:
With a fine liner brush and a steady hand, tidy up the edges of your triangles. You want crisp, sharp lines where the color meets the creamy ceramic background. -
Second coat:
Most underglazes need three coats for solid opacity. Apply your second and third coats now, letting the paint dry to the touch between layers.
Uneven Lines?
If your hand shakes while painting lines, use art tape or thin masking tape to block off the triangles. Press edges down firmly to prevent paint bleed.
Step 3: Finishing the Exterior
-
Paint the outer triangles:
Move to the exterior band. Alternate your colors—rust, charcoal, teal—along the row of triangles you sketched earlier. -
Clean up smudges:
Check the unpainted ‘negative space’ areas. If you’ve smudged any paint, gently scratch it off with a craft knife or clean it with a damp cotton swab. -
Burnish or sponge:
If there are pencil lines still visible in the unpainted areas, they will usually burn off in the kiln. If using acrylics, gently erase them now. -
Glazing:
Apply a clear transparent glaze over the entire piece. If you are doing traditional ceramics, dip or brush the glaze now. If using acrylics for decorative use, apply a satin varnish. -
Final Fire or Cure:
Fire the bowl in the kiln according to clay specifications, or let your varnish cure completely before handling.
Level Up: Texture
Before painting, use a carving tool to lightly etch the outlines of the triangles into the clay (sgraffito) for a tactile, recessed border effect.
Enjoy your beautifully patterned bowl as a centerpiece or a stylish catch-all for keys and trinkets


Crisp Stripes Around the Rim
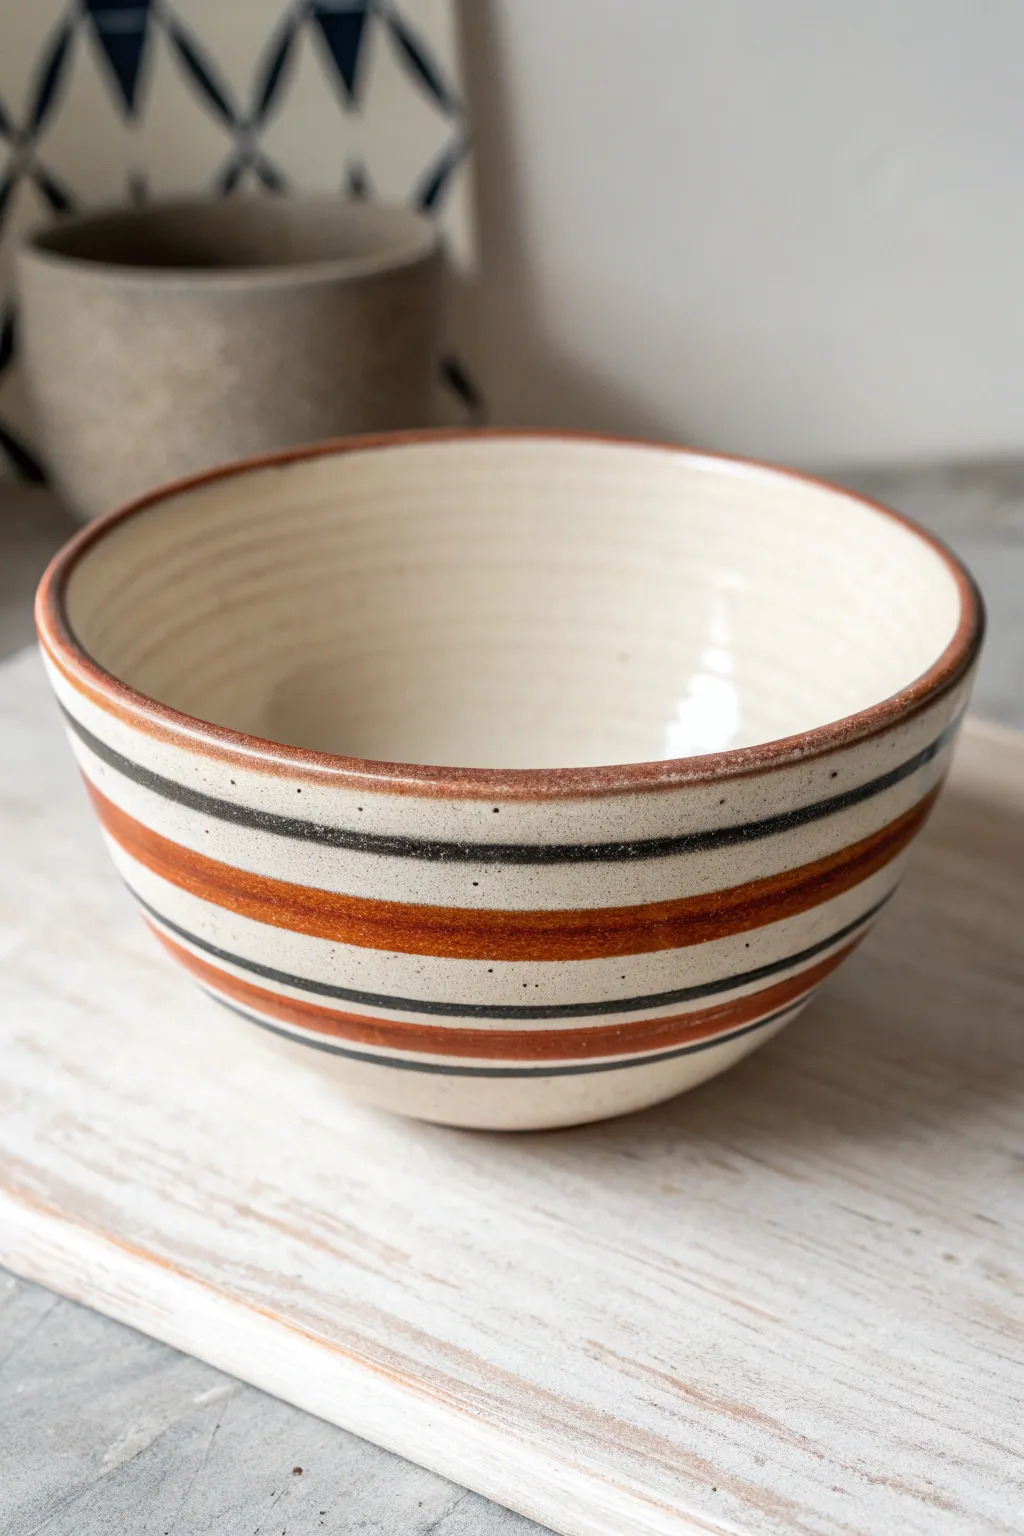
Embrace the warmth of pottery with this design that features alternating bands of burnt orange and charcoal black against a creamy speckled base. The result is a timeless, cozy vessel perfect for rustic kitchens or modern shelving displays.
Step-by-Step
Materials
- Bisque-fired ceramic bowl (creamy white or speckled clay body)
- Underglazes: Burnt Orange (or Terracotta), Charcoal Black (or Dark Grey)
- Clear dipping or brushing glaze (glossy or satin)
- Pottery wheel or heavy banding wheel
- Soft fan brush (for base coat, optional)
- Fine liner brush or small round brush
- Medium round brush
- Sponge
- Water container
Step 1: Preparation & Base
-
Clean the bisque:
Begin by wiping down your bisque-fired bowl with a slightly damp sponge. This removes any dust or oils that might resist the glaze application. -
Inspect the surface:
Check for any sharp burrs or rough spots on the clay body and gently sand them away if necessary before you start painting. -
Applying the interior glaze:
If your clay body isn’t naturally cream-colored like the one in the photo, apply 2-3 coats of a cream or off-white underglaze to the entire interior. -
Smooth the interior:
Allow the interior to dry completely. If you see brush strokes, you can lightly buff them with a dry finger for a smoother finish inside the bowl.
Steady Hands
Brace your elbows against your ribs and breathe out slowly as you touch the brush to the spinning bowl. This stability creates much sharper lines than free-handing.
Step 2: Painting the Stripes
-
Center the bowl:
Place your bowl exactly in the center of your pottery wheel or banding wheel. Giving the wheel a spin to ensure it isn’t wobbling is crucial for straight lines. -
Load the terracotta:
Load a medium round brush generously with the Burnt Orange underglaze. You want enough paint to complete a full rotation without lifting the brush. -
Paint the main band:
Get the wheel spinning at a slow, steady speed. Brace your painting arm against your body or a steady rest, and gently touch the brush to the middle of the bowl’s exterior to create the thick central orange band. -
Create the lower accent:
Reload your brush with the same orange hue. Apply a slightly thinner band near the bottom of the bowl, leaving about an inch of negative space between it and the main middle band. -
Rim application:
Using the side of your brush, carefully apply the Burnt Orange to the very lip of the bowl. Let the color naturally unevenly coat the edge to mimic that rustic, exposed-clay look. -
Switch to charcoal:
Rinse your brushes thoroughly. Load a fine liner brush with Charcoal Black underglaze. -
Upper black stripe:
With the wheel spinning again, gently touch the liner brush just above the main orange band to create a thin, crisp black line. -
Middle black stripe:
Create a second thin black line in the white space between the wide orange band and the lower orange band. -
Lower black stripe:
Add the final black line just below the bottom orange band. Keep your hand steady to maintain consistent thickness. -
Check opacity:
Stop the wheel and inspect your lines. If the underglaze looks transparent or streaky, spin the wheel again and apply a second coat directly over the existing lines.
Wobbly Lines?
If your stripes look wavy, your bowl likely isn’t perfectly centered on the wheel. Tap it gently into center before painting the next band.
Step 3: Finishing Touches & Glazing
-
Clean up smudges:
If any lines wandered or dripped, use a dedicated cleanup tool or a damp, stiff brush to gently scrape or wipe away the mistake while the underglaze is still powdery. -
Adding speckles (Optional):
To recreate the speckled clay look on a plain white bowl, dip an old toothbrush in watered-down brown underglaze and flick a very light mist of speckles over the exterior. -
Bisque fire or drying:
Depending on your specific underglaze instructions, you may need to bisque fire again to set the design, or you can proceed to glazing once fully dry. -
Apply clear glaze:
Dip the entire bowl into a clear gloss or satin glaze. I prefer dipping over brushing here to ensure the stripes don’t smear during application. -
Final smooth:
Once the clear glaze is dry to the touch, gently rub out any drips or finger marks from holding the bowl. -
Final firing:
Fire the bowl in the kiln according to the clay and glaze manufacturer’s temperature guidelines (usually Cone 5 or 6 for this type of stoneware look).
Once fired, fill your beautiful new bowl with soup or salad and enjoy the handmade charm.


Playful Polka Dot Scatter
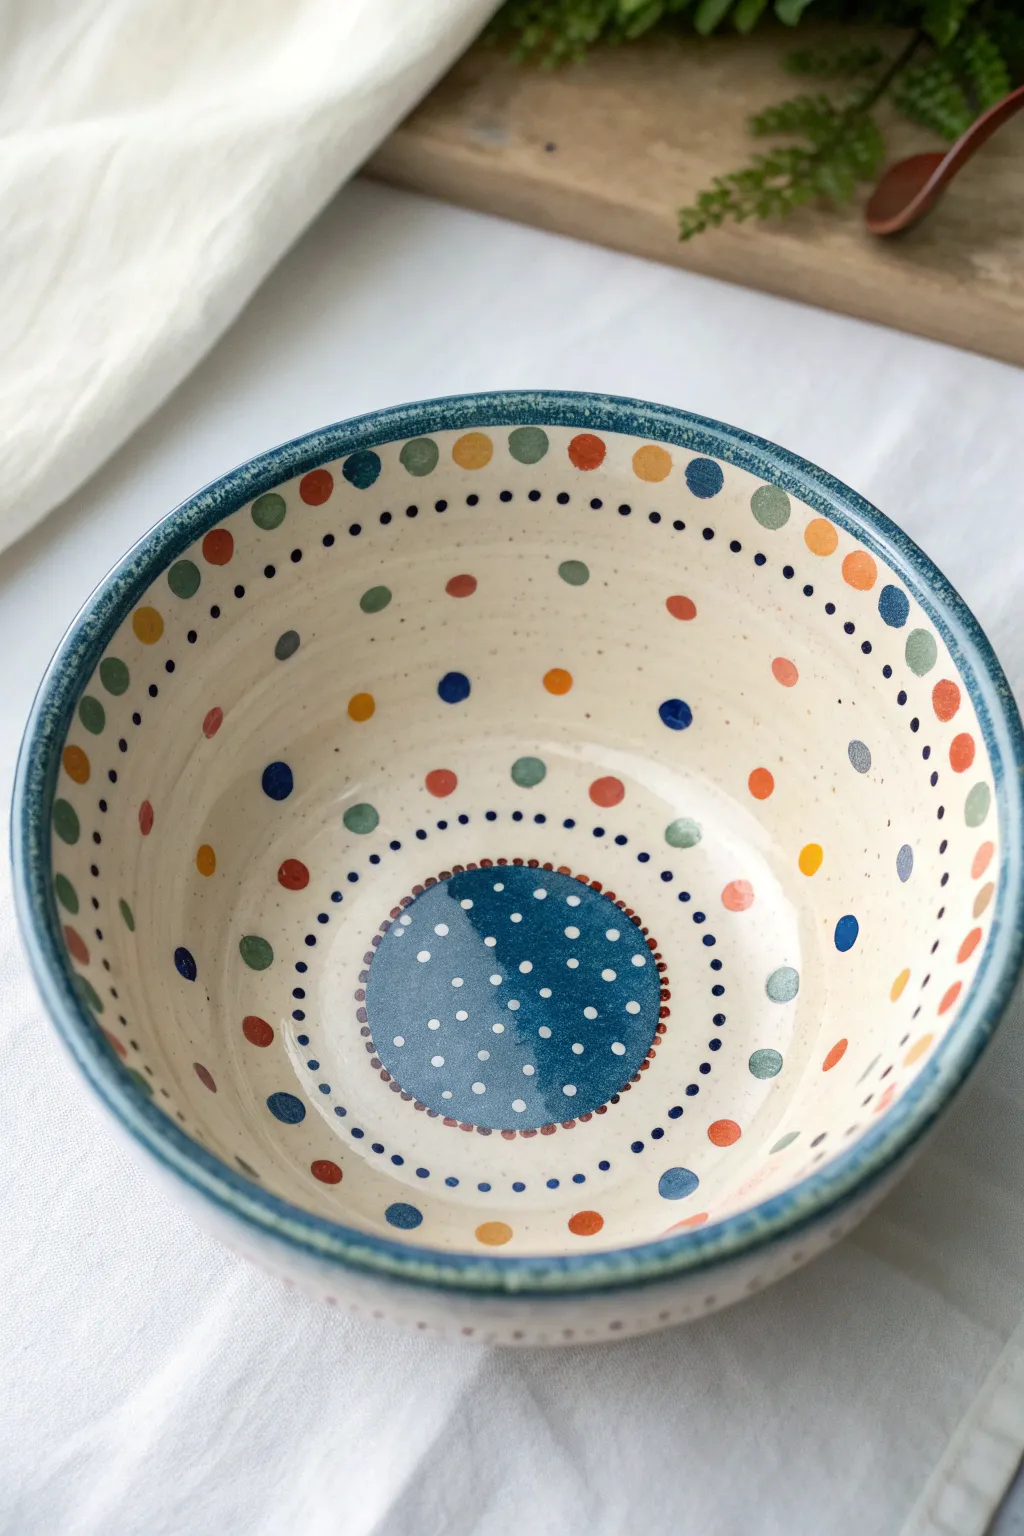
Bring a burst of joy to your table with this whimsical, hand-painted bowl design that balances orderly patterns with scattered fun. The combination of a structured center medallion and freely floating colorful dots creates a relaxed yet cohesive look perfect for everyday dining.
Detailed Instructions
Materials
- Bisque-fired ceramic bowl (medium size)
- Underglazes in: Navy Blue, Teal/Sage Green, Mustard Yellow, burnt Orange, Deep Red, and Light Grey/Cream (optional for speckles)
- Clear dipping glaze or brushing glaze
- Round brushes: Sizes 2, 4, and 6
- Detail liner brush or dotting tool
- Sponge
- Bowl of water
- Pencil (optional)
Step 1: Planning and Foundation
-
Prep the surface:
Begin by wiping down your bisque bowl with a damp sponge. This removes any dust or oils from handling and ensures your underglaze adheres perfectly to the clay body. -
Mark the center:
Using a pencil, lightly trace a circle in the very bottom well of the bowl. This will be your guide for the central blue medallion. Don’t worry about the pencil marks; they will burn off in the kiln. -
Paint the central medallion:
Load a size 6 round brush with Navy Blue underglaze. carefully fill in the circle you just traced. I like to apply three distinct coats here, letting each one dry until matte, to ensure the blue is deep and solid.
Smudged Rim?
If your blue rim looks messy, don’t wipe it! Let it dry completely, then use a stiff, damp tools or a scratch tool to gently scrape the excess paint off the bisque to clean up the edge line.
Step 2: Creating the Interior Pattern
-
Dot the center:
Once the blue medallion is dry, take a dotting tool or the back end of a small paintbrush. Dip it into white underglaze (or use the natural clay color by scraping away dots if using wax resist) and create a random scatter of white dots inside the blue circle. -
Ring the medallion:
Switch to a liner brush or a fine-tip applicator bottle with Navy Blue. Paint a ring of tiny, evenly spaced dots immediately surrounding the central blue circle. -
Establish the middle ring:
Visualize a ring about halfway up the inner wall of the bowl. Using Navy Blue again, paint a continuous horizontal line of small dots all the way around the interior. -
Establish the upper ring:
Repeat the previous step, painting a second horizontal ring of small Navy Blue dots about an inch below the rim. -
Paint the rim:
Using a size 4 brush and Navy Blue, paint the very top edge of the rim. Allow the brush to naturally waver slightly or sponge it lightly for a more organic, rustic feel rather than a perfect factory line.
Step 3: Adding the Color Scatter
-
Large primary dots:
Now for the fun part. Using your size 4 brush, paint larger dots (about the size of a pea) scattered randomly between your dotted rings. Start with your Deep Red color to anchor the pattern. -
Layer in warm tones:
Clean your brush and add similar-sized dots in Mustard Yellow and Burnt Orange. Try to spacing them so no two colors are clumping together excessively. -
Cool tone accents:
Switch to your Teal or Sage Green. Add these dots into the remaining negative spaces. The goal is an airy, confetti-like distribution, not a crowded grid. -
Extra blue accents:
Add a few medium-sized Navy Blue dots into the mix to tie the scattered pattern back to the rim and center medallion. -
Add speckling (optional):
To mimic the speckled clay body look if you are using white clay, load an old toothbrush with thinned Light Grey or watery brown underglaze and gently flick tiny specks over the entire interior.
Level Up: Texture
For a tactile experience, use slip trailing bottles for the colorful dots. This creates raised bumps you can feel, adding a lovely sensory dimension to the finished bowl.
Step 4: Finishing Touches
-
Check coverage:
Inspect your colorful dots. For underglaze, you usually need 2-3 coats for opacity. -
Apply clear glaze:
Once all underglazes are bone dry, apply a clear glaze over the entire piece. If dipping, one dip is sufficient. If brushing, apply two cross-hatched coats. -
Fire:
Fire the bowl in the kiln according to the specifications of your clay and glaze (typically cone 06 or cone 5/6).
Now you have a charming, speckled vessel ready to brighten up your morning cereal routine
BRUSH GUIDE
The Right Brush for Every Stroke
From clean lines to bold texture — master brush choice, stroke control, and essential techniques.
Explore the Full Guide
Lemon and Citrus Slices
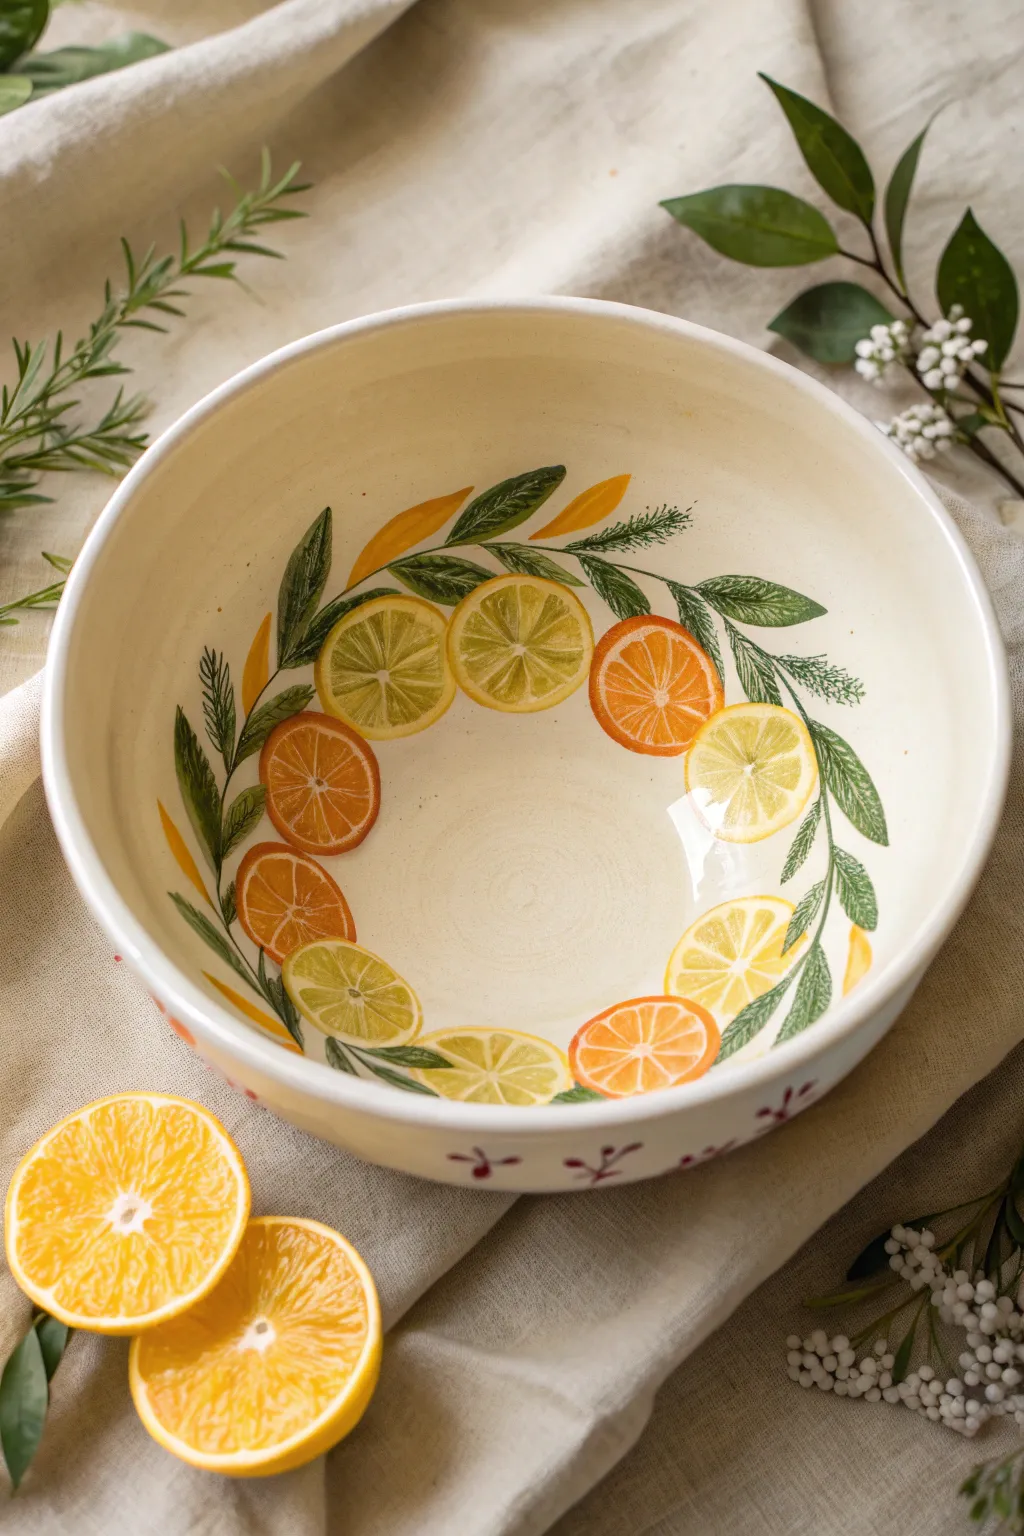
Brighten up your table setting with this cheerful ceramic bowl featuring a garland of lemon and orange slices nestled among lush greenery. The design is painted on the interior for a delightful surprise as you finish your meal.
Step-by-Step Tutorial
Materials
- Bisque ceramic bowl (white or cream)
- Underglaze paints (Yellow, Orange, Dark Green, Light Green, Brown)
- Round brushes (sizes 2, 4, and 6)
- Fine liner brush (size 0 or 00)
- Pencil for sketching
- Palette for mixing
- Water cup
- Paper towels
- Clear dipping glaze
- Kiln access (or oven if using oven-bake ceramic paints)
Step 1: Planning the Garland
-
Clean the surface:
Wipe down your bisque bowl with a slightly damp sponge to remove any dust or oils, ensuring a clean painting surface. -
Mark the circle:
Lightly sketch a circle halfway down the interior wall of the bowl using a pencil. This will serve as the guideline for your citrus garland. -
Place the fruit:
Sketch circles along your guideline where the citrus slices will go. Space them out somewhat evenly, but leave gaps for leaves. Alternate between slightly larger circles for oranges and smaller ones for lemons.
Step 2: Painting the Fruit
-
Base coat the fruit:
Using a size 4 round brush, fill in your sketched circles. Paint the lemons with a bright yellow underglaze and the oranges with a vibrant orange hue. Apply two coats for opacity, letting the first dry before adding the second. -
Add the segments (Lemons):
Once the yellow base is dry, mix a tiny bit of white or cream into your yellow to create a lighter shade. Use a liner brush to paint the triangular pulp segments inside each lemon, leaving thin lines of the darker yellow base visible to represent the membranes. -
Add the segments (Oranges):
Repeat the previous step for the orange slices. Mix a lighter orange or peach tone and paint the inner segments, leaving the original vibrant orange visible as the separating lines. -
Define the rinds:
With your liner brush, paint a thin, consistent ring around the outer edge of each fruit slice. Use the original, unmixed base color (yellow or orange) to make the rind pop against the lighter interior segments. -
Highlighting:
Add tiny, delicate strokes of white or very pale yellow to the top corners of the fruit segments to mimic the shine of juicy pulp.
Uneven Rinds?
If your circles are wobbly, don’t worry. The organic nature of cut fruit is imperfect. You can ‘fix’ edges by slightly overlapping a leaf over the wonky section.
Step 3: Adding Greenery
-
Connect the garland:
Using a size 2 brush and dark green underglaze, paint a thin, continuous vine heavily overlapping the fruit slices, connecting the entire ring. -
Paint main leaves:
Paint almond-shaped leaves branching off the main vine. Use dark green for the base of the leaves, pressing down on the brush belly and lifting up to create a pointed tip. -
Layer in light leaves:
Switch to a lighter green shade. Paint smaller, filler leaves nestled between the dark ones and the fruit to create depth and lushness. -
Add texture to leaves:
Use your fine liner brush and the dark green paint to add tiny veins to the lighter leaves, giving them a more realistic illustrative look. -
Incorporate pine accents:
For texture variety, add small springs of pine-like needles or dill. Use the liner brush and quick, feathery strokes in dark green.
Textured Centers
Use a pin tool or needle to gently scratch tiny radiating lines into the wet paint of the fruit centers. The glaze will pool in these recesses for real texture.
Step 4: Finishing Touches
-
Add external details:
If you wish to match the reference completely, paint small, simple red or purple sprigs on the lower exterior of the bowl using small dabbing motions. -
Clean up:
Check for any smudges or stray paint marks. You can gently scratch these off with a toothpick or a clean, damp stiff brush once the paint is dry. -
Glaze application:
Once the underglaze is bone dry, carefully dip the bowl into a clear glaze. Shake off excess glaze gently. -
Check the foot:
Wipe the very bottom foot of the bowl with a sponge to ensure no glaze remains there, preventing it from sticking to the kiln shelf. -
Fire:
Fire the piece in a kiln according to the specific temperature guidelines of your clay and glaze combination.
Now you have a stunning, functional piece of art that looks fresh from the orchard
Watermelon Slice Bowl Illusion
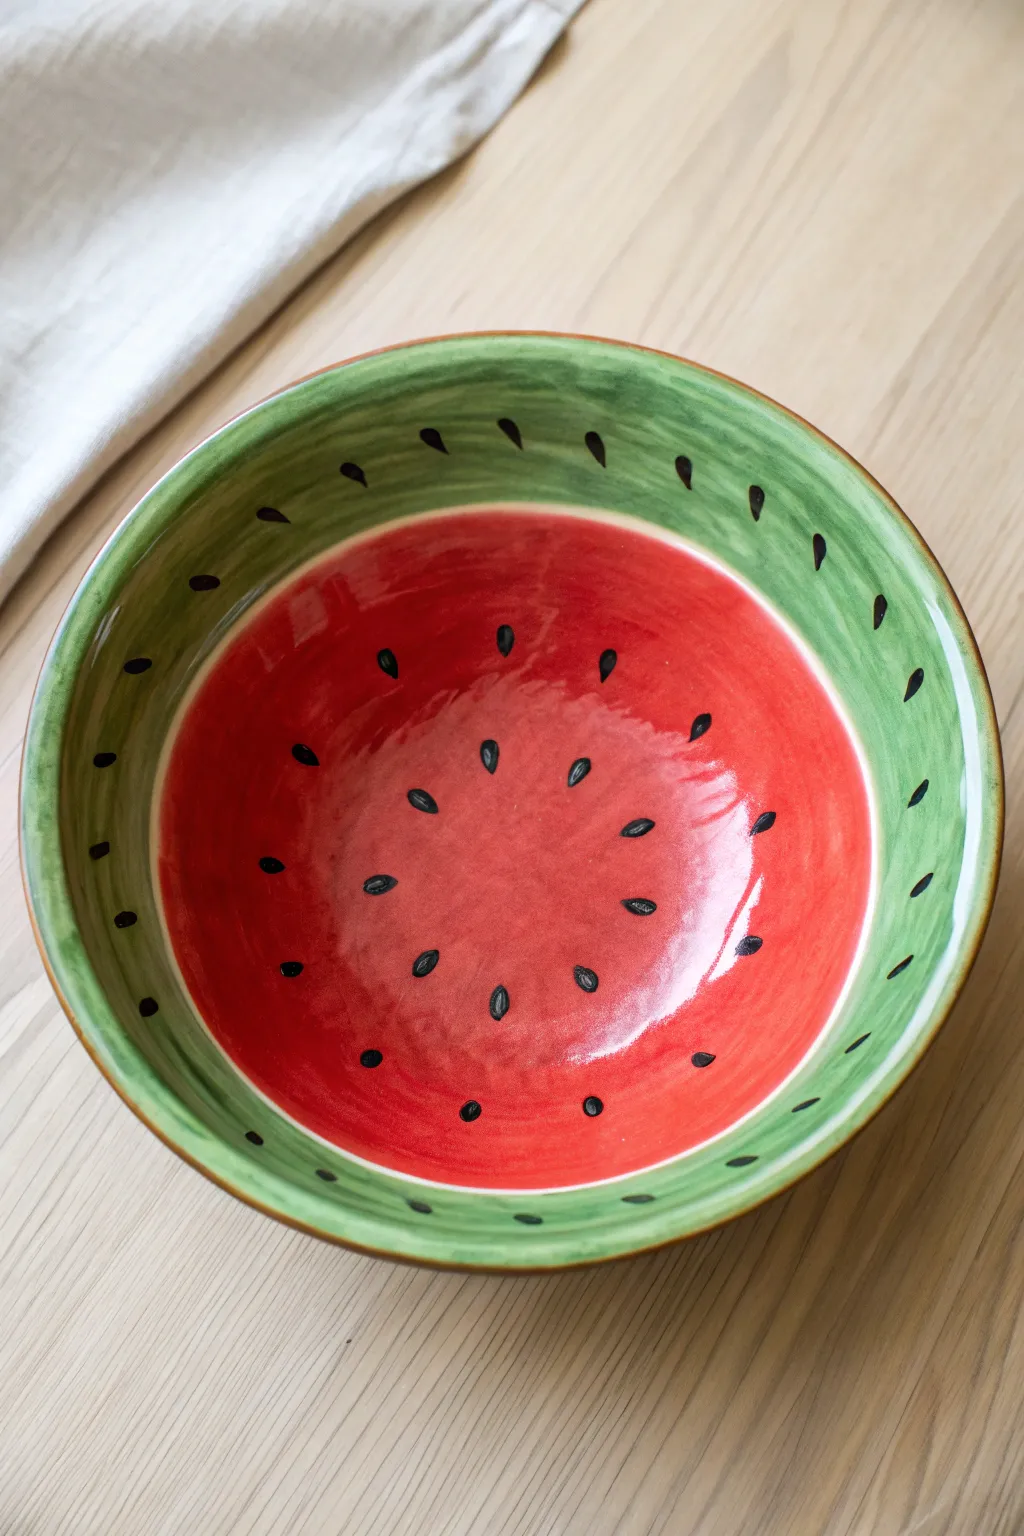
Transform a plain white ceramic bowl into a refreshing slice of summer with this vibrant watermelon design. The clever use of red and green sections mimics the fruit’s natural layers, complete with playful seeds for an authentic finish.
How-To Guide
Materials
- Plain white ceramic bowl (bisque or glazed, based on paint choice)
- Ceramic paints or underglazes (Bright Red, Leaf Green, Pitch Black)
- Clear ceramic glaze (food safe)
- Soft synthetic brushes (large flat brush, medium filbert, fine liner)
- Painter’s tape or masking tape
- Pencil
- Water cup and paper towels
- Sponge (optional for texturing)
- Kiln firing service (or oven-bake instructions if using Pebeo Porcelaine)
Step 1: Planning and Prepping
-
Clean the surface:
Before laying down any color, ensure your ceramic bowl is completely free of dust and oils. A quick wipe with rubbing alcohol or a damp sponge works perfectly to create a pristine base. -
Mark the rind line:
Use a pencil to lightly sketch a circle around the interior of the bowl. This line separates where the red flesh ends and the green rind begins. aim for about 1.5 to 2 inches down from the rim, depending on your bowl’s depth. -
Tape off the edge (optional):
If you struggle with steady lines, apply painter’s tape just above your pencil mark to protect the upper area while you paint the red center. Ensure the tape is pressed down firmly to prevent bleeding.
Step 2: Painting the Fruit Flesh
-
Apply the first red coat:
Using a large flat brush or a filbert brush, fill the bottom center circle with Bright Red paint. Don’t worry about opacity yet; the first layer often looks streaky. -
Let it dry:
Wait for the first coat of red to be touch-dry. This is crucial because painting over wet ceramic paint can lift the previous layer rather than adding to it. -
Add saturation:
Apply a second and possibly third coat of red. Alternate the direction of your brushstrokes with each layer to create a smooth, solid color block. -
Create faint texture:
For a more realistic look, I like to lightly dab a clean, nearly dry sponge over the wet red paint near the center. This mimics the slightly porous texture of watermelon flesh. -
Remove tape:
If you used tape, carefully peel it away now while the final red coat is still slightly damp to ensure a crisp edge.
Seed Spacing Trick
Imagine a clock face on your bowl. Paint seeds at 12, 3, 6, and 9 first. Fill the gaps evenly afterwards for a balanced distribution that doesn’t look cluttered.
Step 3: Adding the Rind
-
Start the green gradient:
With a clean medium brush, apply your Leaf Green paint to the upper rim section, working from the top edge down toward the red circle. -
Leave a white gap:
Intentionally leave a very thin, uneven gap of white between the red paint and the green paint. This represents the white rind found in real watermelons. -
Blend the green transition:
While the green is wet, you can dip your brush in a tiny bit of water to feather the bottom edge of the green slightly, making it look organic rather than a hard geometric stripe. -
Layer the green:
Apply a second coat of green to the upper rim area to ensure rich coverage. Using long, horizontal sweeping strokes follows the curve of the bowl nicely.
Go Green & Striped
Paint the exterior of the bowl with dark and light green vertical jagged stripes. This makes the outside look like the melon’s skin for a full 360-degree illusion.
Step 4: Seeds and Finishing
-
Plan seed placement:
Visualize where your seeds will go. You want a radial pattern, focusing the seeds in a ring about halfway between the center and the rind line. -
Paint the red section seeds:
Using a fine liner brush and Pitch Black paint, create teardrop shapes on the red background. Press down to make the round bottom of the seed, and lift up quickly to create the point. -
Add rind seeds:
Paint a second ring of seeds on the green section, closer to the white gap. These should point inward toward the center of the bowl. -
Create light reflections:
Once the black seeds are dry, add a tiny white dot or thin dash to one side of each seed. This highlights them and makes them look wet and shiny. -
Glazing:
After the paint is fully cured (check bottle instructions), apply a layer of clear, food-safe glaze over the entire interior to seal your design. -
Final firing:
Fire the bowl in a kiln according to your glaze specifications, or bake in a home oven if using specific oven-bake ceramic paints.
Now you have a cheerful vessel perfect for serving fruit salad or morning cereal

PENCIL GUIDE
Understanding Pencil Grades from H to B
From first sketch to finished drawing — learn pencil grades, line control, and shading techniques.
Explore the Full Guide
Strawberry Seed Speckles
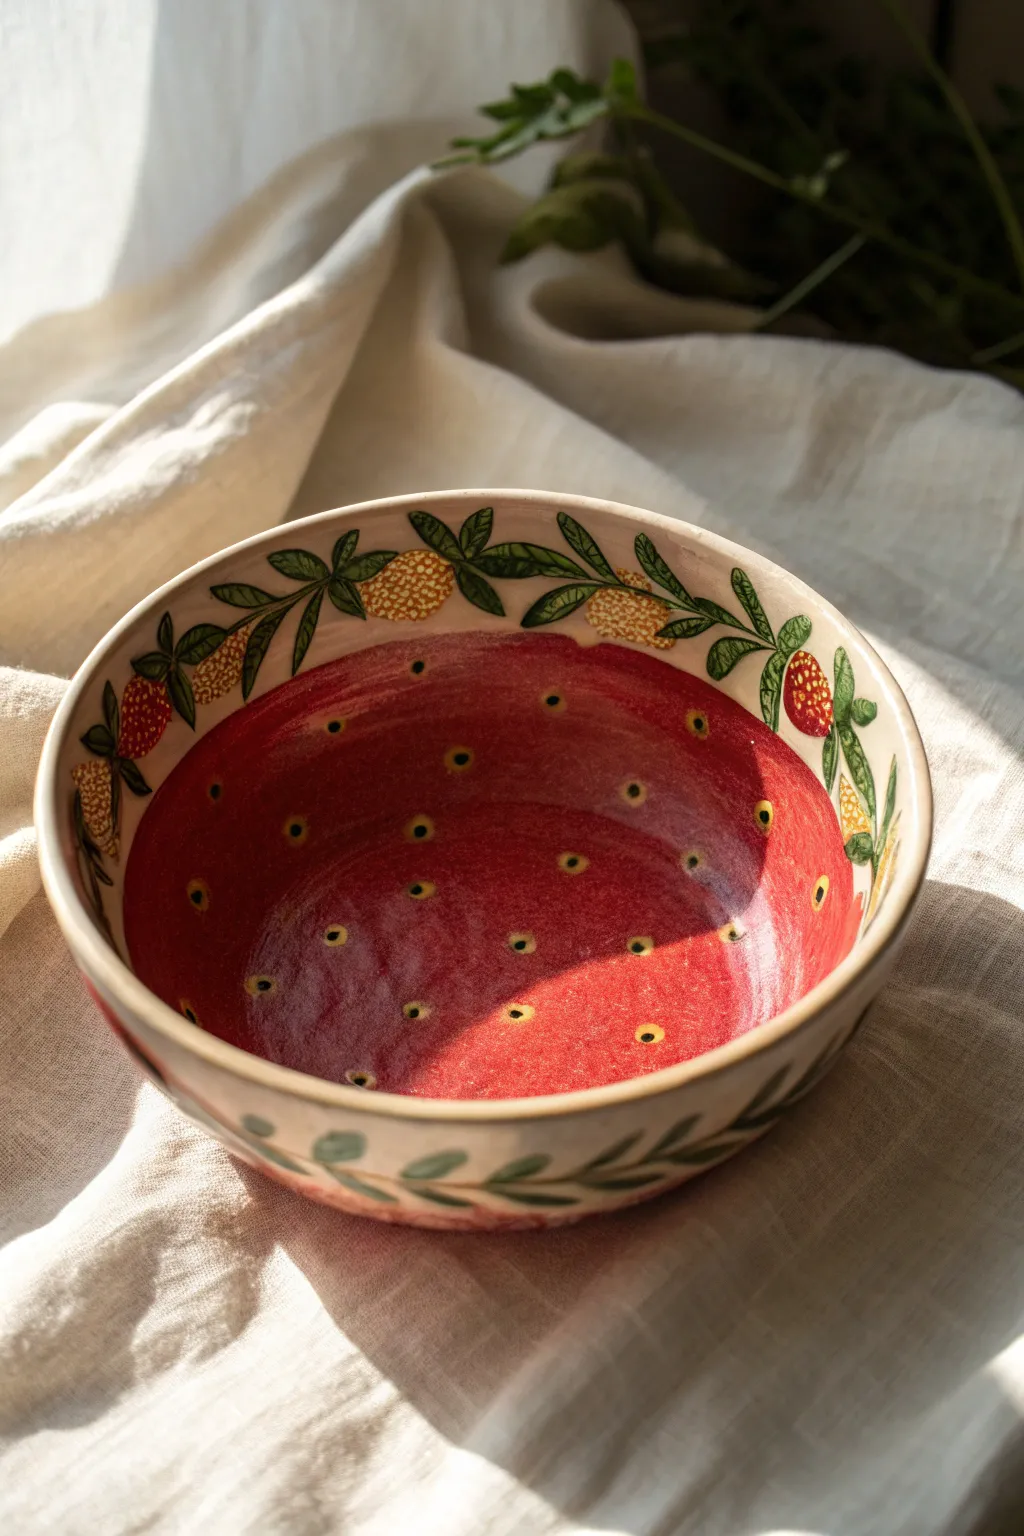
Transform a plain ceramic bisqueware bowl into a juicy, fruit-inspired masterpiece with this delightful strawberry design. The interior mimics the fleshy red center of a ripe berry, complete with golden seeds, while the rim features a delicate vine of blossoms and fruit.
Step-by-Step Tutorial
Materials
- Ceramic bisque bowl (wide and shallow works best)
- Underglazes: Bright Red, Golden Yellow, Forest Green, Black/Dark Brown, White/Cream
- Clear transparent food-safe glaze
- Soft fan brush (for broad coverage)
- Medium round brush (size 4 or 6)
- Fine liner brush (size 0 or smaller)
- Pencil
- Sponge and water
- Kiln access
Step 1: Preparation and Interior Base
-
Clean the bisque:
Start by wiping down your ceramic bowl with a damp sponge. This removes any dust that could prevent the underglaze from adhering properly. -
Map out the border:
Using a pencil, lightly sketch a line about 1.5 inches down from the rim on the inside of the bowl. This area will remain cream-colored for your vine design later. -
Apply the first red coat:
Load your soft fan brush with Bright Red underglaze. Apply a smooth, even coat to the entire interior of the bowl, stopping right at your pencil line. Don’t worry about brush strokes yet; just get good coverage. -
Layer for opacity:
Let the first coat dry until it’s chalky to the touch. I usually apply at least three coats here to ensure that rich, juicy red color is completely opaque and solid.
Seed Spacing Help
If your seeds look crooked, try picturing a diamond pattern. Place one seed, then place the next row’s seeds in the spaces between the first row’s seeds.
Step 2: Painting the Seeds
-
Dot the yellow seeds:
Using the handle of a small paintbrush or a dotting tool, dip into Golden Yellow underglaze. Press gently onto the dried red surface to create small, evenly spaced dots. Stagger them in offset rows rather than a grid for a more natural look. -
Add dimension:
Once the yellow dots are dry, dip your fine liner brush into a tiny amount of Black or Dark Brown underglaze. Carefully paint a tiny speck or crescent shape in the center of each yellow seed to create depth. -
Clean up the edge:
If any red paint strayed into your upper rim area, clean it up now with a damp brush or sponge so you have a crisp line before starting the border design.
Level Up: Texture
Use a slip trailer to apply the yellow seeds. This will leave them slightly raised, giving the finished bowl a bumpy, realistic strawberry texture you can feel.
Step 3: Creating the Vine Border
-
Base the rim:
Apply two coats of White or Cream underglaze to the upper rim area if your clay body isn’t naturally white. This provides a bright background for the vines. -
Sketch the vine:
Lightly sketch a waving vine pattern around the rim with a pencil. Mark placements for leaves and small strawberries. -
Paint the leaves:
With your medium round brush and Forest Green underglaze, fill in the leaf shapes. Use a simple single-stroke method: press down to widen the stroke and lift up to create the pointy tip. -
Add vine details:
Use the fine liner brush to connect the leaves with a thin, delicate green stem. Add a central vein line down the middle of each leaf for extra detail. -
Paint the mini berries:
In the spaces between leaves, paint small oval shapes using Golden Yellow or Red underglaze to represent unripe and ripe strawberries hanging from the vine. -
Texture the berries:
Once the berries are dry, use your finest brush to add tiny stippled dots of a darker color (orange on yellow berries, dark red on red berries) to give them texture.
Step 4: Glazing and Firing
-
Final drying:
Allow the entire piece to dry completely, ideally overnight, to ensure no moisture is trapped in the clay. -
Bisque fire (if needed):
If you painted on greenware, bisque fire now. If you painted on bisque, proceed directly to glazing. -
Clear glaze application:
Apply a clear, food-safe transparent glaze over the entire bowl. Dipping is usually best for even coverage, but brushing works too if you apply flowing coats. -
Clean the foot:
Wipe the bottom foot of the bowl completely clean of glaze with a wet sponge to prevent it from sticking to the kiln shelf. -
Final firing:
Fire the bowl in the kiln according to the clay and glaze manufacturer’s instructions (typically Cone 06 or Cone 6).
Once fired, fill your shiny new bowl with fresh fruit or breakfast cereal for a cheerful start to the day
Classic Blue-and-White Motifs

Achieve a heritage look with this charming blue-and-white bowl project, featuring delicate floral sprigs and a classic dotted rim. The freehand style of the painting adds an authentic, artisan warmth that pairs perfectly with rustic linens.
Detailed Instructions
Materials
- White ceramic bowl (bisque or glazed, depending on paint type)
- Cobalt blue ceramic paint or porcelain marker
- Fine round brush (size 0 or 1)
- Medium round brush (size 2 or 3)
- Pencil (for light sketching)
- Paper towel
- Water cup
- Rubbing alcohol (for surface prep)
- Oven (if using heat-set paints)
Step 1: Preparation & Planning
-
Clean surface:
Begin by wiping down your entire bowl with rubbing alcohol and a paper towel. This removes oils and fingerprints that could prevent the paint from adhering properly. -
Map the spacing:
Visualize the placement of the flowers. You want them evenly spaced around both the interior and exterior walls. Lightly mark the center points of each flower with a pencil if you need a guide. -
Plan the rim:
Decide on your rim pattern spacing. The charm of this piece is the hand-painted imperfection, so you don’t need to measure perfectly, but a few tick marks can help keep your rhythm.
Fixing Smudges
Paint landed where it shouldn’t? Don’t wipe large areas! Wait for the spot to dry slightly, then scratch it off with a toothpick for a clean removal.
Step 2: Painting the Exterior Motifs
-
Start the flower center:
Load your fine brush with cobalt blue paint. Create the center of the first flower by dabbing a small, rough circle or a cluster of tiny dots about an inch below the rim. -
Adding petals:
Paint five small, rounded petals radiating from the center. Keep them loose and organic looking rather than perfectly symmetrical. -
Stem structure:
Using the very tip of your brush, draw a thin, curving stem extending downward and to the right from the flower head. I like to let these curve naturally to imply movement. -
Leaf details:
Add two or three small leaves branching off the main stem. Use a ‘press and lift’ motion: press the brush down to widen the leaf, then lift as you pull away to create a sharp point. -
Repeat the pattern:
Continue painting these singular floral sprigs around the entire outside of the bowl, trying to keep them at relatively the same height.
Step 3: Painting the Interior
-
Shift to the inside:
Turn your attention to the inner walls of the bowl. You will be replicating the same floral pattern here. -
Mirror the placement:
Paint a flower on the interior wall. Painting inside a concave surface can be tricky, so rest your hand on a folded towel for stability. -
Stem direction:
Ensure all stems on the inside curve in the same direction (e.g., clockwise) to create a cohesive flow around the bowl. -
Check density:
Step back and look at the spacing. The white space is just as important as the blue, so ensure the bowl doesn’t feel overcrowded.
Vintage Variation
Dilute your blue paint slightly with water (if compatible) for a watercolor effect. Varying opacity creates that aged, antique pottery look.
Step 4: The Rim & Finishing Touches
-
Rim dots:
Load the medium brush with plenty of paint. Hold the brush perpendicular to the rim and dab small, consistent dots all along the very top edge. -
Inner rim Line:
Just below your dots on the interior side, paint a very fine, continuous blue line to frame the dotted border. -
Outer rim Line:
Repeat this thin line on the exterior side, just beneath the dots. This sandiwches the dots and gives the rim a finished, professional look. -
Clean up:
If you made any smudges, use a damp cotton swab or a toothpick to gently scrape away the mistake before the paint fully sets. -
Dry and cure:
Follow the instructions on your specific paint bottle. Most ceramic paints require 24 hours of air drying followed by baking in a home oven to make the design dishwasher safe.
Now you have a stunning, classic serving piece ready for your next gathering


Loose Botanical Leaf Wrap
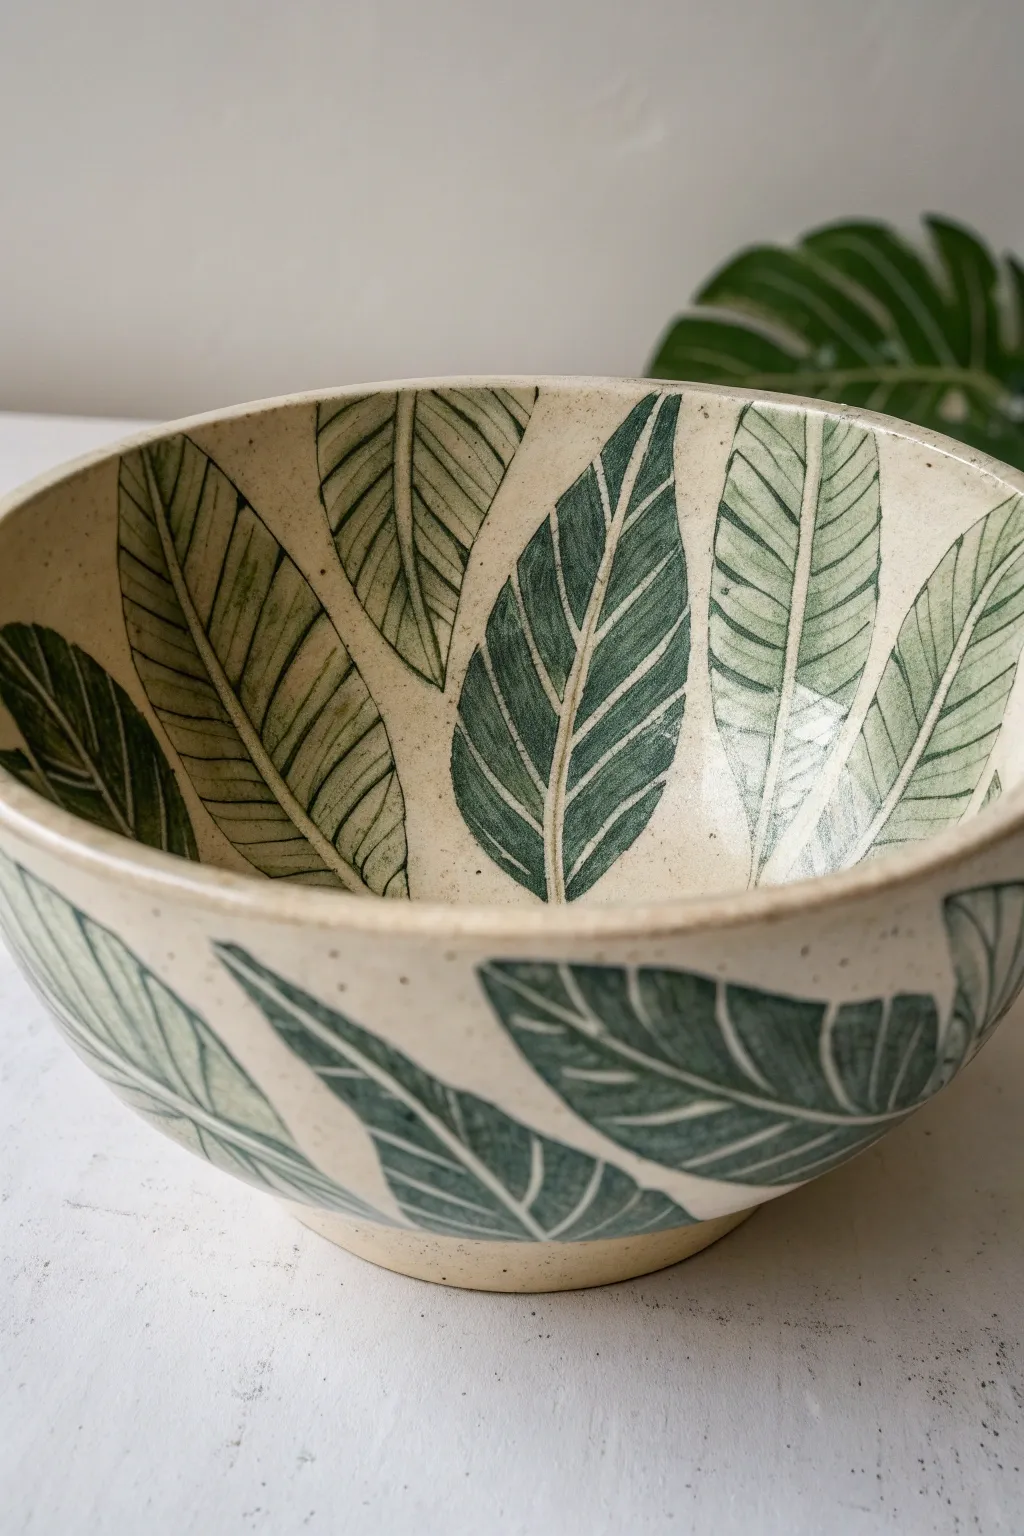
Bring the calming vibes of a greenhouse to your table with this botanical leaf wrap design. Featuring large, sweeping monstera-style leaves painted in deep green against a creamy speckled base, this project transforms a plain ceramic bowl into a functional piece of art.
Step-by-Step Guide
Materials
- Bisque-fired ceramic bowl (medium size)
- Underglaze pencil (dark green or black)
- Underglaze (dark forest green)
- Underglaze (creamy white or speckled beige)
- Clear transparent glaze
- Fine liner brush
- Medium round brush
- Sponge
- Pencil (optional for sketching)
- Needle tool or sgraffito tool (optional for texture)
Step 1: Planning and Base Coat
-
Prep surface:
Begin by wiping down your bisque bowl with a slightly damp sponge. This removes any dust that might resist the glaze application. -
Apply base color:
Using a wide brush or sponge, apply three even coats of your creamy white or speckled beige underglaze to the entire bowl, inside and out. Allow the glaze to dry until it feels chalky between each coat. -
Sketch the flow:
Lightly trace the general direction of your leaves using a regular pencil. The graphite will burn off in the kiln, leaving no trace. Aim for a diagonal flow where leaves wrap from the bottom exterior up and over the rim into the interior.
Clean Lines Pro Tip
Work from top to bottom when scratching the veins (sgraffito). This prevents your hand from resting on and smudging the work you’ve already completed below.
Step 2: Painting the Leaves
-
Outline the shapes:
Mix your dark forest green underglaze with a tiny drop of water to help it flow. Use a fine liner brush to paint the outlines of your large elliptical leaf shapes based on your pencil guides. -
Fill in the green:
Switch to a medium round brush to fill in the leaf shapes. Apply the green glaze fairly thin; translucent areas add a nice watercolor effect, while more opaque layers provide bold contrast. -
Refine the edges:
Go back over the edges of your leaves to sharpen the tips. Ensure some leaves look like they are tucked behind others by stopping the paint line where they intersect. -
Add the veins:
This is crucial for the illustrative look. Using a sgraffito tool or a needle tool, gently scratch through the layer of green paint while it’s leather-hard to reveal the cream base underneath. Draw a central vein line first. -
Detail the ribs:
Scratch diagonal lines stemming from the central vein to the outer edges of the leaf. Keep these lines slightly curved to suggest the volume and curvature of the leaf. -
Clean up crumbs:
Gently brush away the little clay crumbs created by the scratching tool using a soft, dry brush. Be careful not to smudge the green paint.
Level Up: Texture
Instead of scratching paint away, use wax resist for the veins before painting the green. The glaze will repel off the wax, leaving clean unpainted lines.
Step 3: Finishing Touches
-
Check the interior:
Ensure the leaves on the inside of the bowl align visually with where they wrap over the rim. Connect any broken lines for a continuous flow. -
Add speckles (optional):
If your base glaze wasn’t pre-speckled, load an old toothbrush with thinned brown underglaze and flick it lightly over the bowl to create organic spots. -
Final dry:
Let the underglaze design dry completely, usually overnight, to ensure no moisture is trapped. -
Apply clear glaze:
Dip or brush a coat of clear transparent glaze over the entire piece. This will seal the raw underglaze and make the bowl food-safe and glossy after firing. -
Wipe the foot:
Use a damp sponge to meticulously wipe any glaze off the very bottom rim (the foot) of the bowl so it doesn’t fuse to the kiln shelf. -
Fire the piece:
Fire the bowl in a kiln according to the temperature specifications of your clay and glaze (typically Cone 5 or 6 for stoneware).
Now you have a stunning, nature-inspired vessel ready for your next meal or display
Modern Abstract Shapes Inside the Bowl
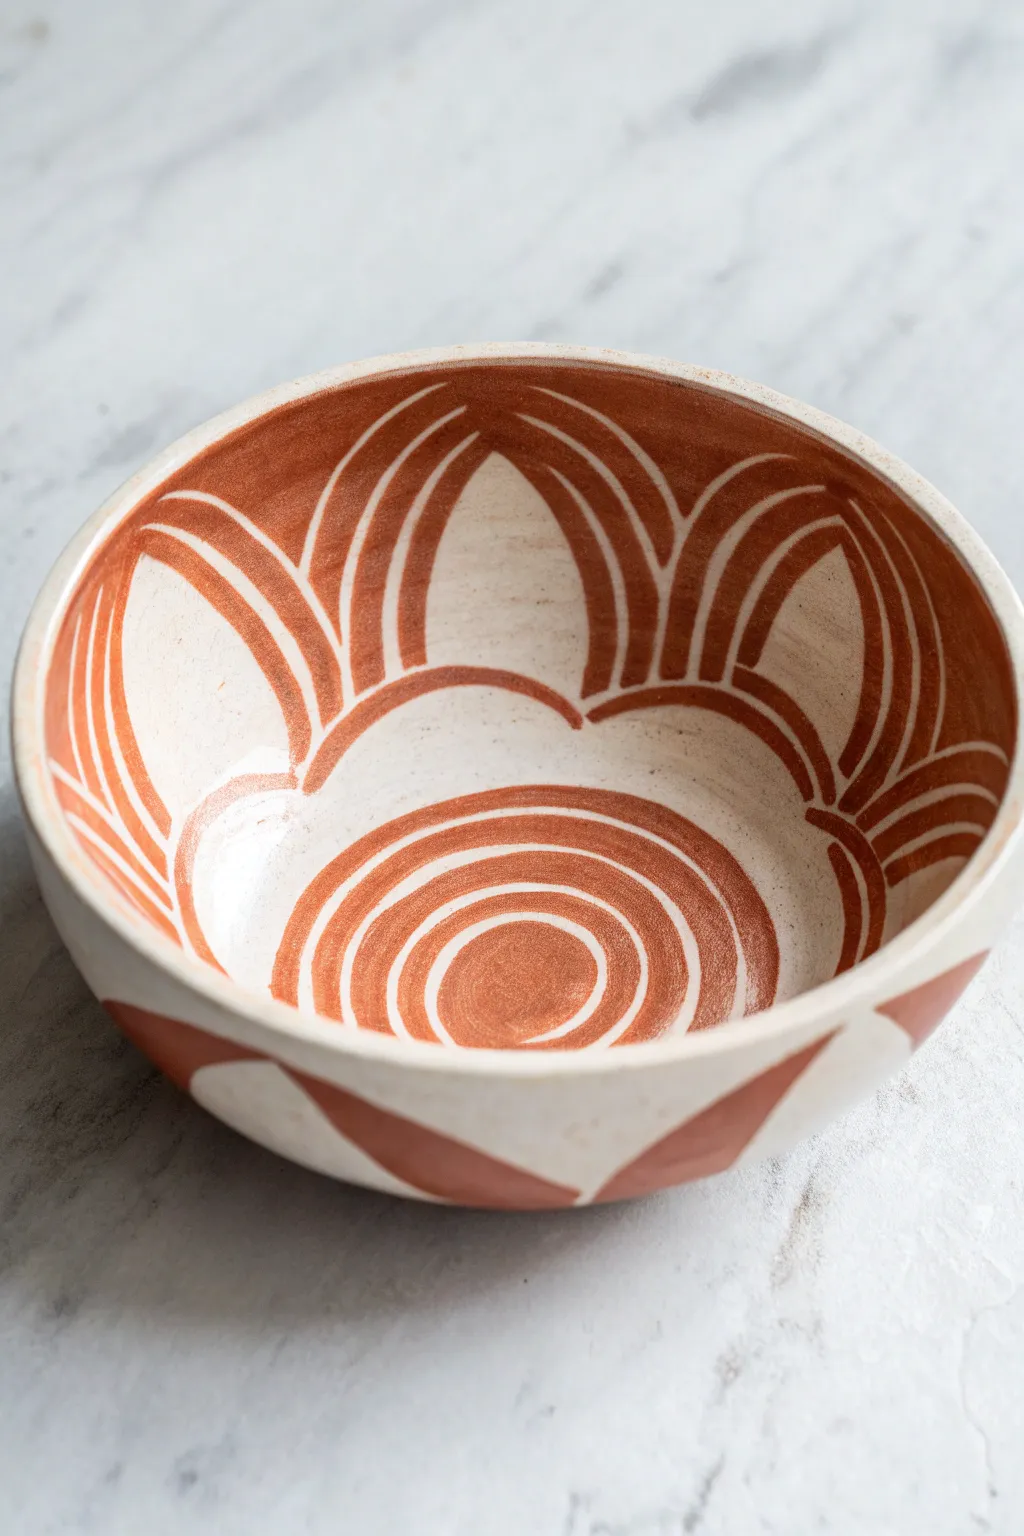
Bring warmth to your table with this stunning bowl featuring a radiating pattern of arches and concentric circles. The interplay between the creamy ceramic surface and the rich, rust-colored underglaze creates a modern yet earthy aesthetic perfect for any home.
Step-by-Step
Materials
- Bisque-fired ceramic bowl (creamy white clay body)
- Terracotta or rust-colored underglaze
- Fine liner brush (size 0 or 1)
- Medium round brush (size 4 or 6)
- Pencil for sketching
- Potter’s wheel or banding wheel (essential for the center)
- Clear transparent glaze
- Sponge and water
- Kiln access
Step 1: Preparation & Mapping
-
Clean surface:
Begin by wiping down your bisque-fired bowl with a slightly damp sponge. This removes any kiln dust that might resist the glaze application. -
Establish the center:
Place your bowl on a banding wheel. While spinning the wheel slowly, use your pencil to lightly mark the exact center of the bowl’s interior. -
Sketch the arches:
Lightly sketch the outlines of the large scalloped arches along the interior walls. Aim for 5-6 large petal-like shapes that curve from the rim down toward the bottom of the bowl. -
Sketch exterior details:
Continue your sketch on the outside of the bowl. Draw simple, bold triangular shapes that mirror the rhythm of the interior pattern, pointing upwards.
Wobbly Lines?
If your hand shakes while painting rings, anchor your pinky finger against the side of the banding wheel for support. Also, exhaling slowly while making the stroke helps steady your muscles.
Step 2: Painting the Interior Base
-
Load your brush:
Dip your medium round brush into the terracotta underglaze. Ensure it’s not too watery; you want opaque coverage. -
Create the center dot:
Spin the banding wheel at a steady, medium pace. Hold your brush steady at the marked center to paint a solid circle about the size of a coin. -
Paint concentric rings:
Still using the wheel’s momentum, paint a series of rings moving outward from the enter. Leave a small gap of unpainted clay between each ring to create the striped effect. -
Vary line thickness:
I like to make the outermost ring slightly thicker to ground the design. These circles should stop right where the bowl’s surface transitions from the flat bottom to the curved walls.
Step 3: Detailing the Wall Patterns
-
Outline the arches:
Switch to your fine liner brush. Carefully trace the large scalloped shapes you sketched on the interior walls. The lines should be clean and consistent. -
Fill the arch borders:
Thicken the outline of each arch significantly. This bold contour acts as the container for the inner stripes. -
Add inner stripes:
Using the fine liner brush, paint curved stripes inside each arch shape. These should follow the contour of the main arch, creating a nested rainbow effect within each petal. -
Connect the design:
Ensure the bottom tips of your wall arches meet or slightly overlap with the outermost ring of your bottom spiral. This connects the two distinct patterns. -
Refine edges:
Go back over your lines. If the underglaze looks transparent or streaky, apply a second coat to ensure a rich, solid color after firing.
Add Wax Resist
Paint wax resist over your finished terracotta design before dipping in clear glaze. This exposes the raw clay texture on the unpainted white sections for a stunning matte-gloss contrast.
Step 4: Finishing the Exterior
-
Paint exterior shapes:
Moving to the outside of the bowl, use the medium round brush to fill in the triangular shapes you sketched earlier. -
Solid fill:
Unlike the detailed interior, these exterior shapes are solid blocks of color. Apply 2-3 coats for full opacity. -
Clean up:
Check the rim and the foot of the bowl. Wipe away any accidental smudges with a damp sponge or a clean brush.
Step 5: Glazing & Firing
-
Dry completely:
Let the underglaze dry fully. It should look chalky and matte to the touch before you proceed. -
Apply clear glaze:
Dip the entire bowl into a clear transparent glaze, or brush it on carefully if dipping isn’t an option. Avoid dragging the brush too hard over the design to prevent smearing. -
Fire:
Load the kiln and fire to the appropriate cone temperature for your specific clay and glaze combination.
Once fired, the glossy finish will make that rust color pop beautifully against the smooth clay background
Sweet Words in the Bowl Center
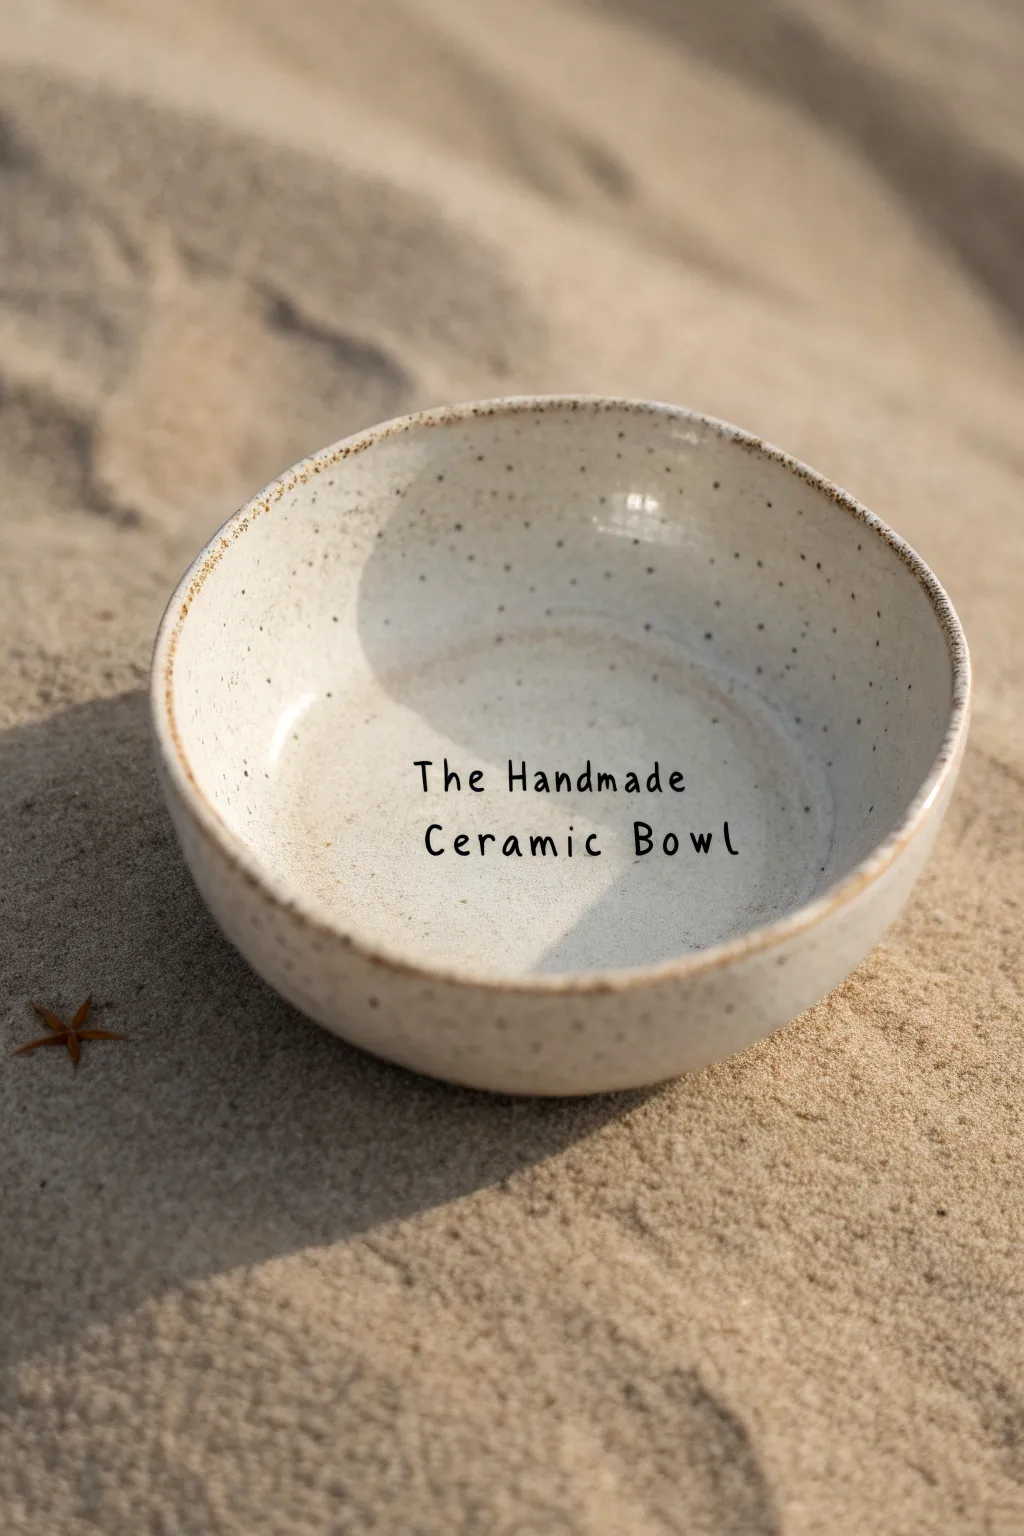
Transform a simple speckled bowl into a charming statement piece by adding sweet, handwritten-style text right in the center. This minimalist design allows the natural beauty of the ceramic to shine while carrying a personalized message.
Detailed Instructions
Materials
- Bisque-fired ceramic bowl (speckled clay body preferred)
- Cream or off-white underglaze
- Black undeerglaze writer bottle (precison tip)
- Small round paintbrush (size 4 or 6)
- Clear dipping glaze
- Sponge
- Water bowl
- Soft pencil/charcoal pencil
Step 1: Preparation & Base Coat
-
Clean the bisque:
Start by wiping down your bisque-fired bowl with a damp sponge. This removes any kiln dust or oils from your hands that might resist the glaze. -
Select your background:
Choose a cream or soft off-white underglaze. If your clay body is already speckled and light, you might simply apply a clear glaze later, but for this specific look, a semi-transparent cream wash works beautifully. -
Apply the wash:
Dilute your cream underglaze slightly with water. Using a soft round brush, apply a thin, even coat to the interior of the bowl. -
Reveal the speckles:
Since we want the clay’s natural speckles to show through like the inspiration image, endure the coat isn’t opaque. One thin layer is usually sufficient. -
Clean the rim:
If you dripped any cream glaze onto the rim, wipe it back slightly. The goal is to leave the rim raw or lightly stained to frame the piece.
Steady Hand Pro-Tip
Rest your painting hand’s wrist on a stable sponge or stack of books inside the bowl to stabilize your writing.
Step 2: Adding the Inscription
-
Draft the text:
Using a soft pencil, lightly sketch your chosen phrase—like ‘The Handmade Ceramic Bowl’—into the center of the bowl. -
Center carefully:
I prefer to mark a tiny dot in the absolute center first, then space the words above and below it to ensure symmetry. -
Prepare the writer bottle:
Shake your black underglaze writer bottle vigorously to ensure the pigment is mixed and flows smoothly without air bubbles. -
Test the flow:
Squeeze a small amount of black underglaze onto a paper towel or scrap clay to check the consistency before touching the bowl. -
Letter the text:
Carefully trace over your pencil lines with the writer bottle. Keep your hand steady and apply even pressure to create uniform line thickness. -
Refine the font:
For that charming ‘typewriter’ look, keep the letters simple and sans-serif, with slight imperfections that highlight the handmade nature. -
Clean up mistakes:
If you smudge a letter, wait for it to dry completely, then gently scratch it off with a needle tool or stiff brush before re-doing it.
Step 3: Finishing Touches
-
Rim detail:
Dip a damp sponge into a brown oxide or dark iron-rich underglaze. Gently dab or wipe it along the very edge of the rim to create that rustic, toasted border. -
Dry completely:
Allow the underglaze text and background wash to dry fully. This usually takes about 20-30 minutes depending on humidity. -
Burnish the pencil:
The pencil marks will burn off in the kiln, so don’t worry about erasing them perfectly unless they are very heavy. -
Clear glaze application:
Dip the entire bowl into a clear dipping glaze. Ensure you shake off excess drips immediately to prevent clouding over the text. -
Kiln fire:
Fire the bowl in the kiln according to your clay and glaze instructions (typically Cone 5 or 6 for stoneware) to seal the design and make it food safe.
Level Up: Hidden Messages
Paint a tiny matching icon, like a heart or star, on the underside of the base for a secret surprise.
Enjoy using your custom bowl for your morning cereal or as a beautiful display piece on your coffee table
One-Line Face Portrait Bowl
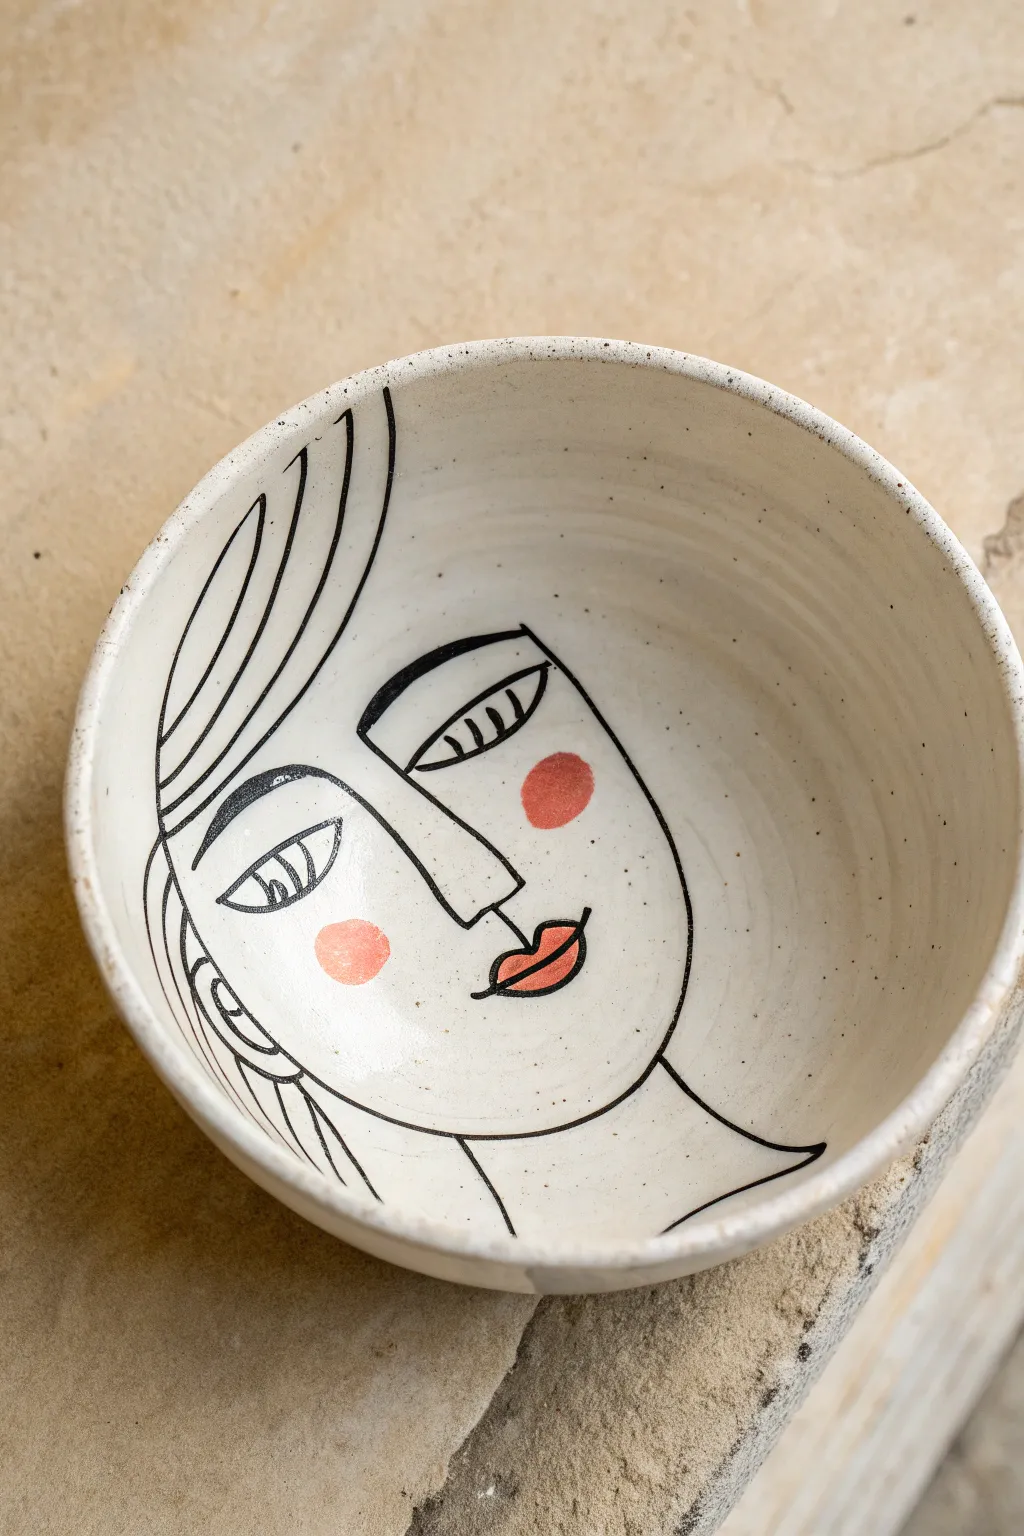
Transform a plain ceramic bowl into a piece of art with this chic, line-art portrait design. The minimalist, abstract style makes it surprisingly forgiving for beginners, while the pops of color add a playful touch to the sophisticated black linework.
Step-by-Step Tutorial
Materials
- White or cream ceramic bowl (speckled finish optional but recommended)
- Black ceramic paint marker (fine to medium tip)
- Ceramic paints (peach/coral, soft red)
- Fine detail paintbrush (size 0 or 1)
- Rubbing alcohol
- Cotton pads
- Pencil (optional)
- Oven (for curing, if using bake-on paints)
Step 1: Preparation & Planning
-
Clean the Surface:
Before making a mark, thoroughly wipe down the inside of your bowl with rubbing alcohol and a cotton pad. This removes invisible oils or fingerprints that can repel paint. -
Visualize the Placement:
Hold the bowl and identify where you want the face to sit. With a curved surface, the face will naturally warp slightly, which adds to the charm. -
Light Sketching (Optional):
If you’re nervous about freehanding, lightly sketch the main contours with a pencil. The graphite will burn off in the oven later, so don’t worry about erasing perfectly.
Clean Lines Pro-Tip
Keep a Q-tip dipped in rubbing alcohol nearby while drawing. You can quickly erase small mistakes or sharpen a line’s edge before the paint dries.
Step 2: Drawing the Linework
-
Start the Profile:
Begin with the distinctive L-shape of the nose. Draw a line downwards, slightly angled, then curve outward to the right for the nose tip. -
Add the Eye Details:
Draw the left eye first, connecting it to the bridge of the nose. Create a simple almond shape with a vertical pupil and hatched lines for lashes. -
Draw the Second Eye:
Position the right eye slightly higher or offset to maintain that abstract feel. Give it a bold upper lid and similar lash details. -
Outline the Jawline:
Starting near the left eye area, sweep a long, continuous curved line down and around to form the chin and jaw, stopping just past the center bottom. -
Form the Neck:
Extend a line downward from the chin area towards the bottom of the bowl to suggest a neck, anchoring the floating head. -
Create the Hair:
On the left side, draw sweeping, curved lines that follow the contour of the bowl’s rim. These should look like strands of hair falling over the forehead. -
Add Detail to the Lines:
Go back over your black lines. I like to thicken the upper eyelids and the main profile line slightly to give the drawing weight and confidence.
Step 3: Adding Color & Finishing
-
Paint the Left Cheek:
Dip your fine brush into the peach or coral paint. Carefully dab a soft, circular spot on the left cheek area, keeping the edges slightly organic rather than perfectly round. -
Paint the Right Cheek:
Add a second, slightly larger spot of coral paint on the right cheek, higher up near the eye. This asymmetry is key to the style. -
Paint the Lips:
Using the soft red paint, fill in the lip shape you drew earlier. Keep the color solid and opaque for a bold pop against the pale ceramic. -
Dry Completely:
Let the paint dry for at least 24 hours. The surface needs to be bone-dry before any heat is applied. -
Cure the Piece:
Follow the instructions on your specific ceramic paint bottle. Usually, this involves placing the bowl in a cool oven, heating it to 300°F-350°F, and baking for about 30 minutes. -
Cool Down:
Turn the oven off and let the bowl cool down completely inside the oven. Removing it while hot can cause the ceramic to crack due to thermal shock.
Make It a Set
Create a trio of bowls with different expressions—one winking, one sleeping, and one looking sideways—to make a cohesive decorative collection.
Now you have a stunning, gallery-worthy bowl ready to hold trinkets or display on a shelf
Mandala Dot Art Medallion
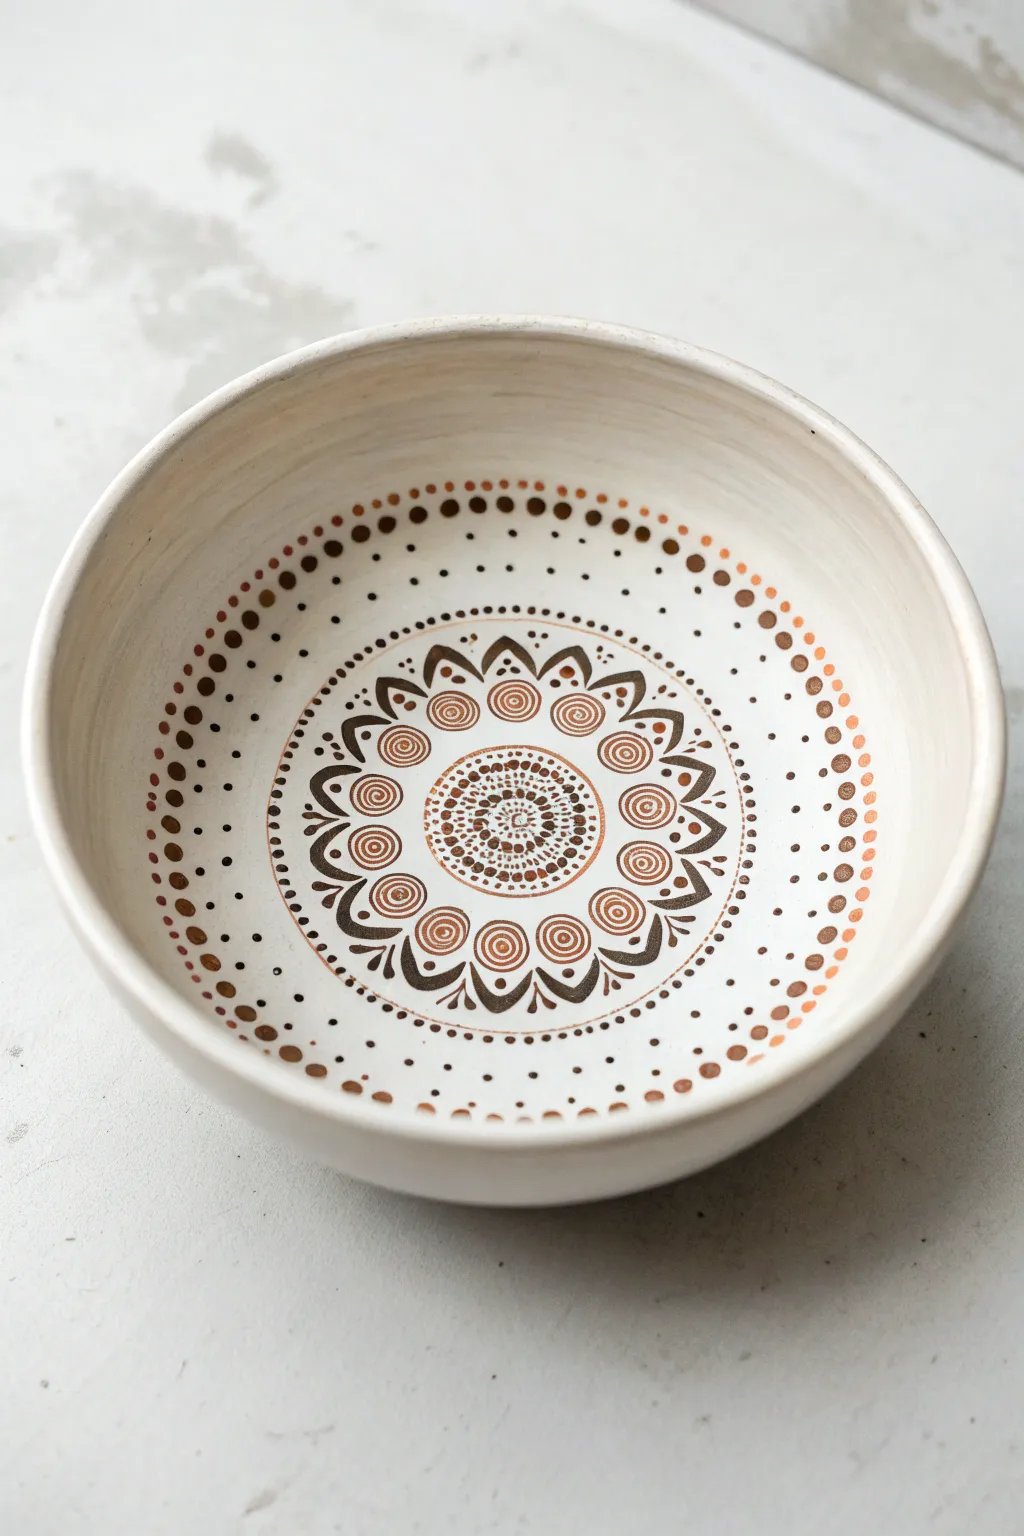
Bring warmth to your table with this mesmerizing mandala bowl design featuring rich terracotta, espresso, and sienna hues. The radiating patterns and delicate dot work create a stunning medallion effect that transforms a simple ceramic vessel into a piece of functional art.
How-To Guide
Materials
- White or cream ceramic bowl (unglazed bisque or matte glazed)
- Acrylic paints (ceramic-safe or multi-surface) in: Burnt Sienna, Dark Chocolate Brown, Ochre/Camel, Espresso
- Assorted dotting tools (styluses of varying sizes)
- Fine liner brush (00 or 000 size)
- Pencil for sketching
- Compass or circle template
- Paper towel and water cup
- Clear sealant (food-safe if the bowl is for eating)
- Cotton swabs for clean-up
Step 1: Setting the Grid
-
Find the center:
Begin by cleaning your bowl thoroughly to remove any oils. Using a ruler, lightly mark the absolute center of the inside bottom of the bowl with a pencil. -
Draw guide circles:
Use a compass or circle templates to draw a series of faint concentric circles radiating from the center. These don’t need to match every single ring of the design, but aim for guides at the 1-inch, 2-inch, and 3-inch marks to keep your pattern symmetrical. -
Section the bowl:
Lightly draw intersecting lines through the center (like slicing a pizza) to divide the bowl into 12 or 16 equal sections. These spokes will help you space the repeating petal motifs evenly.
Step 2: The Central Medallion
-
The central dot grid:
Load a medium dotting tool with Dark Chocolate paint. Create a tightly packed cluster of tiny dots right in the center circle, forming a textured core. -
First ring:
Switch to a fine liner brush and Burnt Sienna paint. Carefully paint a thin ring around your central dotted core. Let this dry for a few minutes. -
Inner details:
Inside this first Sienna ring, add a series of very small dots using Ochre paint to create contrast against the white background. -
Outer lattice ring:
Paint a second, slightly larger ring in Burnt Sienna. Between these two rings, use your finest dotting tool to create a widely spaced dotted lattice pattern with Dark Chocolate paint.
Clean Spiral Tip
Painting spirals with a brush is hard! Instead, paint a solid wet dot, then drag a dry toothpick through it in a swirling motion to ‘draw’ the spiral by removing paint.
Step 3: Petals and Spirals
-
Drafting the spirals:
Using your section guidelines, place a medium-sized dot of Burnt Sienna at the base of each ‘section’ just outside the central medallion. While the paint is wet, use a fine needle tool or toothpick to swirl each dot into a small spiral. -
Connecting petals:
With your fine liner brush and Dark Chocolate paint, draw teardrop or petal shapes around your spirals. The point of the teardrop should face outward, away from the center. -
Adding weight:
Thicken the lines on the bottom curves of these petals to give them a calligraphy-style look, making them feel grounded and substantial. -
Secondary petals:
Between the main spiral petals, paint smaller, simple convex curves or ‘bridges’ connecting them, using the Dark Chocolate paint. -
Inner petal details:
Inside the tips of your main petals, add a tiny dot of Ochre or diluted Sienna to bring a pop of lighter color to the dark outlines.
Metallic Accent
Swap the Ochre paint for a metallic copper or bronze acrylic. This will catch the light and give the medallion a luxurious, gilded ceramic look.
Step 4: Rim Borders
-
Inner dotted band:
Move outward to the wall of the bowl. Dip a medium dotting tool in Dark Chocolate paint and create a ring of evenly spaced dots about halfway up the side. -
Stippling texture:
Switch to a smaller tool. Between the petals and this new ring of dots, fill the negative space with very fine stippling (tiny dots) in varying sizes, creating a fading effect. -
The gradient rim:
For the outermost pattern near the rim, you will create three rows of dots. Start with the largest dots in Burnt Sienna on the outside. -
Transitional dots:
Beneath the Sienna dots, add a row of slightly smaller dots in Ochre/Camel. I like to offset these so they sit in the spaces between the larger dots above. -
Final dotted row:
Finish with the smallest row of dots in Dark Chocolate on the innermost edge of this border band.
Step 5: Finishing Touches
-
Erase guides:
Allow the paint to cure fully—usually at least 24 hours. Once completely hard, gently erase any visible pencil guidelines with a clean white eraser. -
Sealing:
If you plan to use this bowl for food, apply a food-safe, non-toxic sealant according to the manufacturer’s instructions. Usually, this requires a curing time of several weeks.
Enjoy the rhythmic process of creating this pattern and display your earthy bowl with pride equal to its beauty
Ocean Wave Banding
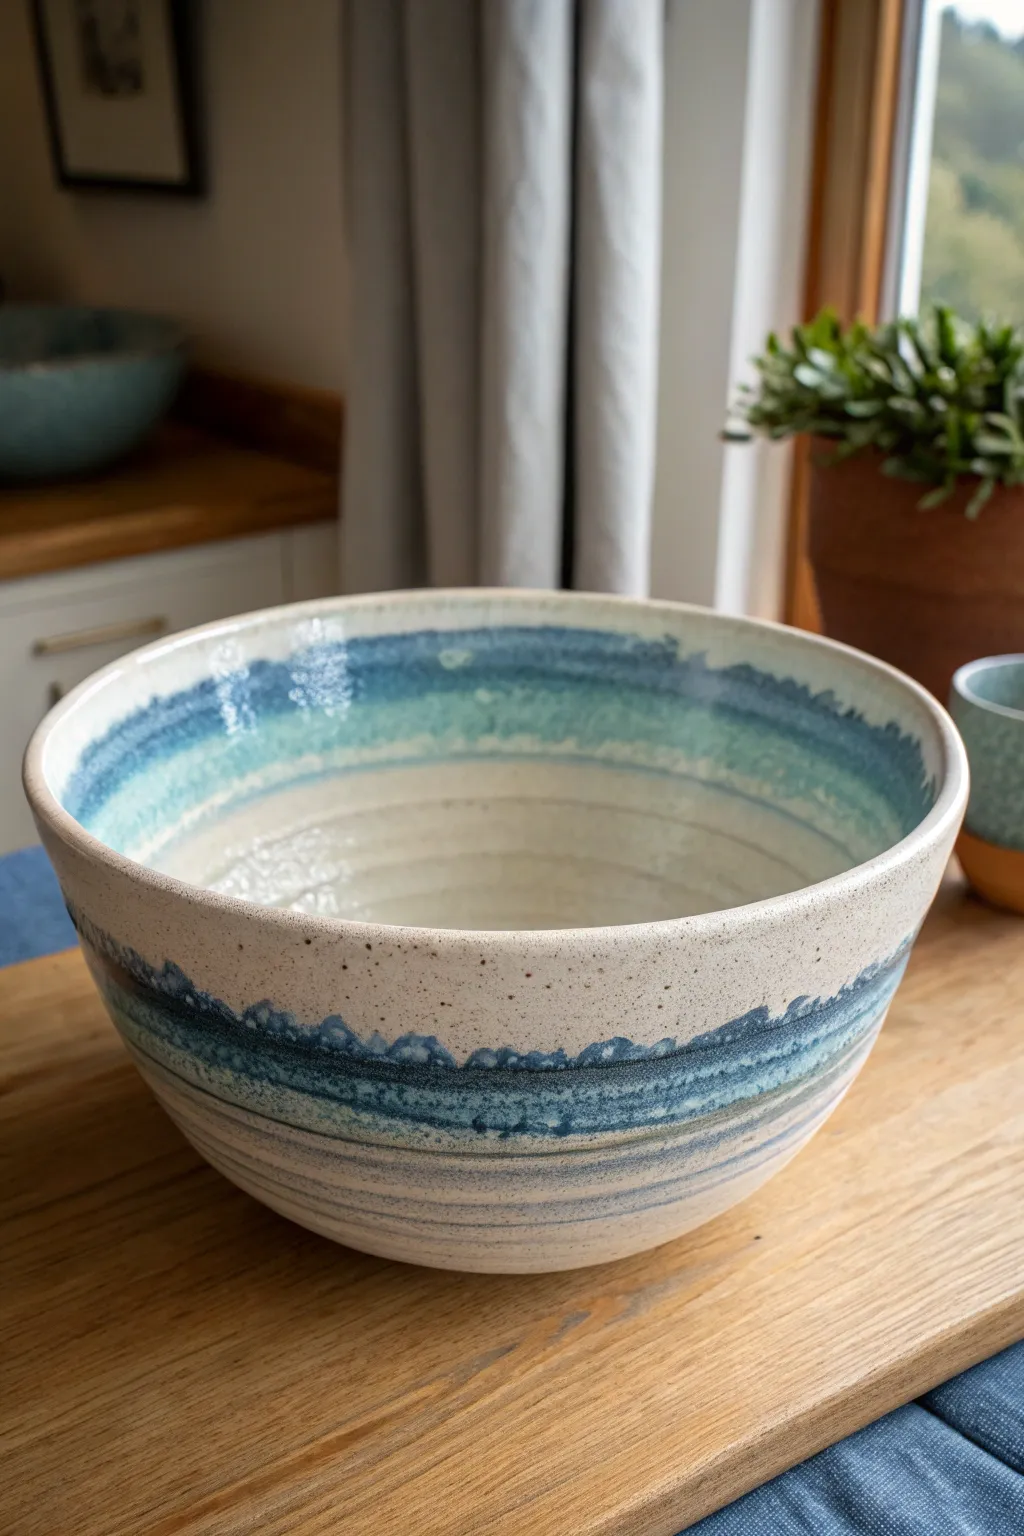
Capture the serene beauty of the seaside with this ocean-inspired ceramic project that layers soothing blues against a speckled cream background. The banding technique creates a natural, rhythmic pattern that mimics gentle waves lapping against a sandy shore.
Step-by-Step
Materials
- Bisque-fired ceramic bowl (large, wide rim)
- Speckled cream or ‘sand’ pottery glaze (base)
- Deep indigo blue pottery glaze
- Teal or turquoise pottery glaze
- Fan brush
- Medium soft round brush
- Potter’s wheel or banding wheel (turntable)
- Clean sponge and water bucket
- Fine grit sandpaper (for bisque prep)
- Clear dipping glaze (optional, if using underglazes instead of glaze)
Step 1: Preparation & Base Coat
-
Prepare the surface:
Begin by wiping down your bisque-fired bowl with a barely damp sponge. This removes any kiln dust or oils from your hands that might resist the glaze application. -
Center the bowl:
Place the bowl upside down on your banding wheel. Spin the wheel to ensure the bowl is perfectly centered; if it wobbles, adjust until it spins true, as this is crucial for even lines. -
Apply the speckled base:
Using a large fan brush, apple two to three even coats of the speckled cream glaze to the entire exterior of the bowl. Allow each coat to dry until it loses its sheen before applying the next. -
Flip and glaze interior:
Once the exterior is dry to the touch, flip the bowl over and center it again. Apply the same speckled cream base to the entire interior, or at least the bottom two-thirds if you plan to cover the top rim heavily with blue. -
Smooth the surface:
Check for any uneven drips or thick spots. You can gently rub these out with a fingertip while the glaze is powdery but not fully set to ensure a smooth canvas for your bands.
Pro Tip: Steady Hands
Rest your painting elbow on a stack of books or a steady table surface while the banding wheel spins. This anchors your arm, creating fluid, continuous lines without shaky interruptions.
Step 2: Creating the Ocean Bands
-
Load the brush for the exterior:
With the bowl right-side up on the spinning wheel, load a medium round brush generously with the deep indigo glaze. You want enough pigment for a solid line, but not so much that it immediately runs. -
Paint the lower wave line:
Spin the banding wheel slowly and steady your hand. Touch the brush to the exterior of the bowl, just below the halfway point. Create a thick, somewhat wavy line. Varying the pressure slightly creates that organic ‘wave’ look rather than a perfect manufactured stripe. -
Add the teal transition:
While the indigo is still damp, rinse your brush and pick up the teal glaze. Paint a band directly above the indigo, allowing the edges to touch and bleed into one another slightly. -
Feather the edges:
Use a clean, slightly damp brush to gently feather the top edge of the teal band upward, fading it into the cream background. This creates a soft, misty horizon effect. -
Detail the rim:
Apply a final thin band of the deep indigo right on the lip of the bowl. Let the brush naturally skip or deposit more pigment in some areas to enhance the rustic, handmade aesthetic.
Step 3: Interior Detailing & Finishing
-
Mirror the pattern inside:
Move to the interior of the bowl. I find it effective to replicate the pattern in reverse: start with the deep indigo near the rim and transition to lighter teal as you move down toward the center. -
Create the interior wash:
Dilute your teal glaze slightly with a drop of water. Apply a wide, translucent band below the rim’s indigo line, letting gravity pull the color down slightly toward the bowl’s center. -
Enhance texture:
For added visual interest, dip a stiff bristle brush (like a toothbrush) into the indigo glaze and flick tiny droplets onto the painted bands. This mimics sea spray and integrates well with the speckled clay body. -
Clean the foot:
This is a critical step: use a damp sponge to meticulously wipe all glaze off the bottom foot ring of the bowl. Any glaze left here will fuse the bowl to the kiln shelf during firing. -
Final drying:
Allow the entire piece to dry for at least 24 hours. The glaze should be completely bone dry and room temperature to the touch before firing. -
Fire correctly:
Fire the piece according to your clay and glaze specifications (typically Cone 5 or 6 for stoneware). A proper firing schedule ensures the colors meld and the speckles pop through the surface.
Troubleshooting: Drips
If a band drips too much, don’t wipe it while wet! Let it dry completely, then gently scrape the excess drip off with a razor blade and smooth the spot with a fingertip.
Once fired, you will have a stunning, functional piece of art that brings a calm coastal atmosphere to your kitchen table
Terrazzo Confetti Speckles
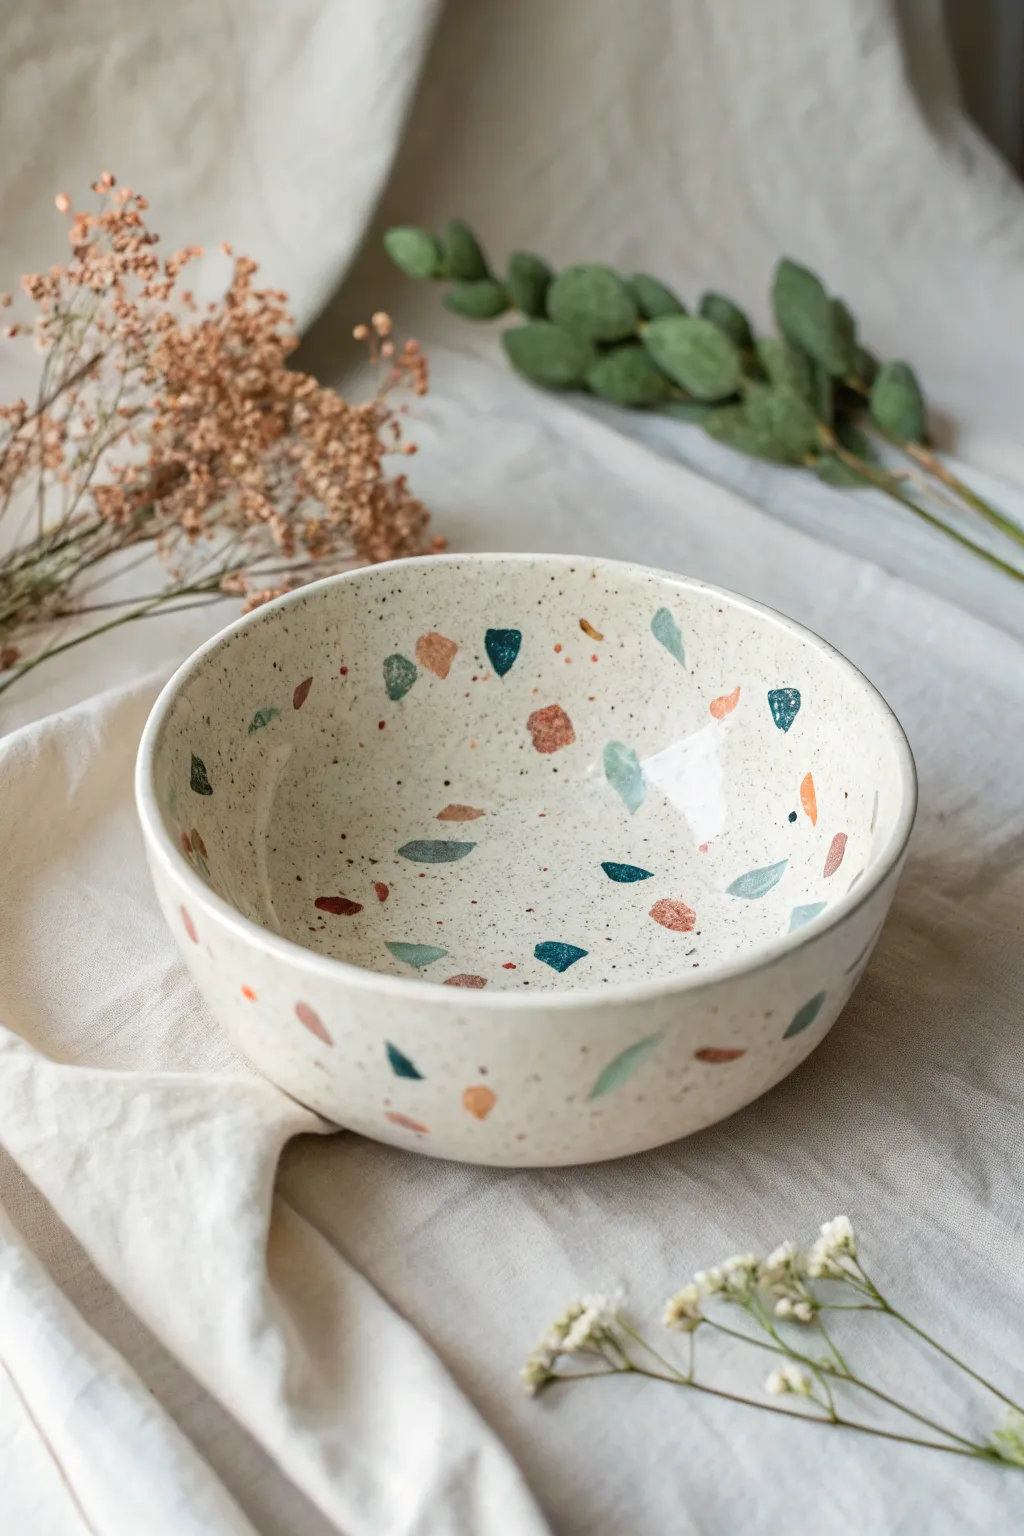
Recreate the trendy, high-end look of terrazzo stone using simple painting techniques on basic ceramicware. This project transforms a plain bowl into a speckled masterpiece featuring muted earth tones and scattered confetti-like shards.
Detailed Instructions
Materials
- Plain white ceramic bowl (clean and dry)
- Ceramic or multi-surface acrylic paints (Cream/Off-White, Teal, Rust Orange, Sage Green, Pastel Pink, Black)
- Small flat tip paintbrush (size 2 or 4)
- Old toothbrush or stiff bristle brush
- Paint palette or coated paper plate
- Rubbing alcohol and cotton pads
- Clear gloss or satin glazing medium (food-safe if using inside the bowl for food)
- Oven (optional, check paint instructions)
Step 1: Preparation & Base Coat
-
Clean the surface:
Before doing anything else, wipe the entire bowl down with rubbing alcohol and a cotton pad. This removes any invisible oils or fingerprints that might repel the paint. -
Mix the base color:
Mix a warm cream color using white paint with a tiny drop of yellow ochre or brown. You want a soft, natural stone background rather than a stark hospital white. -
Apply the first layer:
Using a wide, soft brush, paint the entire inside and outside of the bowl with your cream mixture. Stroke in one direction to minimize texture. -
Allow to dry:
Let this coat dry completely. If the original ceramic color is still showing through, apply a second coat for full opacity.
Step 2: Creating the Fine Speckles
-
Prepare the speckle paint:
Thin down a small amount of black paint with a few drops of water until it has an inky consistency. -
Load the tool:
Dip the bristles of an old toothbrush or a stiff hog-hair brush into the thinned black paint. Dab off excess moisture on a paper towel. -
Flick the paint:
Hold the brush near the bowl and run your thumb across the bristles to flick tiny droplets onto the surface. Aim for a fine mist rather than large globs. -
Rotate and repeat:
Rotate the bowl constantly to ensure the speckling is even on both the interior and exterior walls. Don’t overdo it; you want plenty of negative space left for the larger shapes. -
Fix imperfections:
If a large blotch lands accidentally, quickly wipe it away with a damp Q-tip or cotton bud before it dries.
Natural Shape Tip
Avoid making your terrazzo shapes too round or perfect. Real terrazzo is made of broken stone chips, so keep edges angular, sharp, and totally irregular for realism.
Step 3: Painting the Terrazzo Shards
-
Select your palette:
Pour small amounts of teal, rust orange, sage green, and pastel pink onto your palette. These colors should be opaque use straight from the tube. -
Paint the first shape type:
Starting with the teal, use a small flat brush to paint irregular, angular shapes. Think of them as broken shards of tile—some triangular, some trapezoid. -
Distribute unevenly:
Scatter these teal shapes randomly around the bowl. I find it looks more natural if you clump a few together and leave other areas sparse. -
Add the rust tones:
Clean your brush and switch to rust orange. Paint slightly smaller shapes than the teal ones, tucking them into the empty spaces. -
Layer in the sage:
Add the sage green shapes next. Try to vary the ‘weight’ of the shapes—make some long and sliver-like, and others chunkier. -
Finish with pink:
Finally, add the pastel pink accents. These can be quite small, acting as a bridge between the dark speckles and the larger colorful shards. -
Review the balance:
Step back and look at the bowl. If a spot looks too empty, add a small shard. If colors are overlapping, let the first layer dry before painting over it.
Level Up: Gold Leaf
For a luxe twist, add a few shards of gold leaf adhesive size and metallic foil in between the painted shapes to catch the light.
Step 4: Sealing & Curing
-
Dry completely:
Let the painted bowl sit for at least 24 hours to ensure all layers are fully dry and adhered to the surface. -
Apply glaze:
Brush on a coat of clear gloss or satin glaze to protect the design and give it that polished ceramic shine. -
Cure the project:
Follow the specific instructions on your paint bottle. Many ceramic paints require baking in a home oven (usually around 350°F/175°C for 30 minutes) to become durable and dishwasher safe.
Now you have a stunning, modern piece of decor that looks far more expensive than the materials used to make it
Ombre Fade From Rim to Base
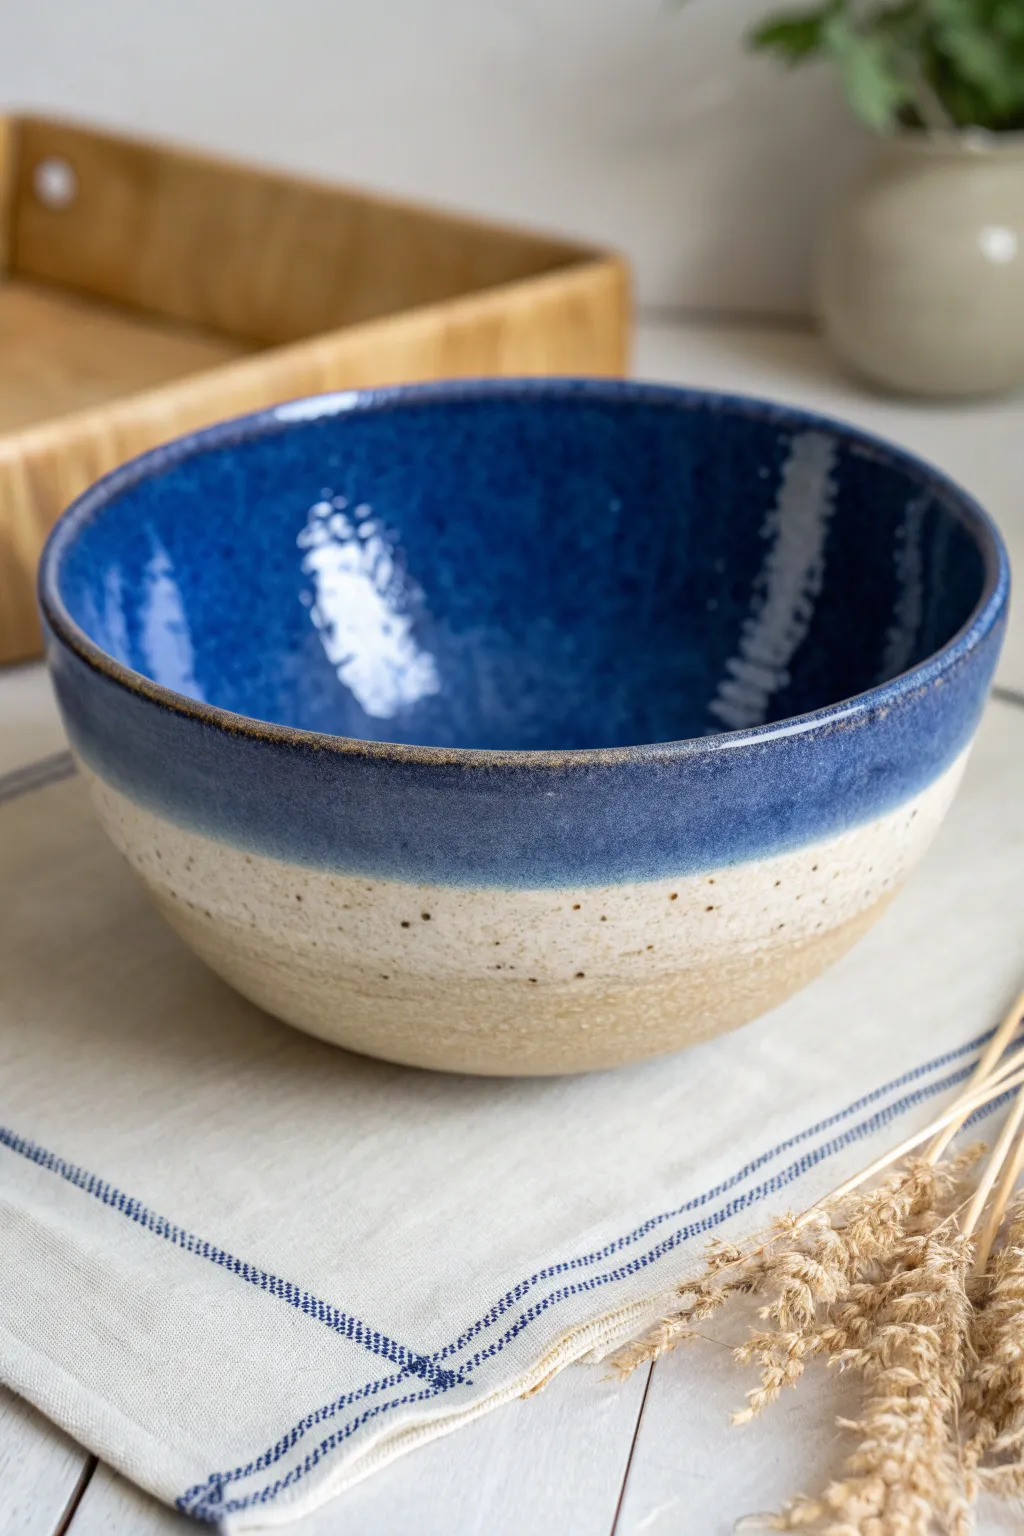
Capture the serene transition of ocean depths to sandy shores with this elegant glazing technique. This project combines a rich, glossy cobalt interior with a textural, three-tiered exterior fade that feels both modern and rustic.
Step-by-Step Tutorial
Materials
- Bisque-fired ceramic bowl
- Deep Cobalt Blue glossy glaze
- Speckled Oatmeal or Cream matte glaze
- Wax resist emulsion
- Fan brush
- Soft round glazing brush
- Sponge
- Bowl of water
- Turntable or banding wheel (optional but helpful)
Step 1: Preparation & Interior
-
Clean the Bisque:
Wipe down your entire bisque-fired bowl with a damp sponge to remove any kiln dust or oils from your hands, ensuring the glaze adheres perfectly. -
Wax the Foot:
Apply a coat of wax resist to the very bottom foot of the bowl. This prevents glaze from sticking to the bottom and ruining your kiln shelf. -
Pour the Interior:
Pour a generous amount of the Deep Cobalt Blue glaze into the center of the bowl. -
Roll and Coat:
Tilt and rotate the bowl in your hands to roll the glaze around, coating the entire interior surface evenly right up to the rim. -
Drain Excess:
Pour the remaining glaze back into your container, giving the bowl a firm shake to remove drips, and wipe any spilled blue off the exterior rim with a damp sponge.
Glaze Crawling?
If the glaze pulls back leaving bare spots, your bisque was likely dusty or oily. Wash bisque thoroughly and dry fully before glazing next time.
Step 2: Creating the Exterior Fade
-
Mark the Base Line:
Decide where you want the raw clay or sandy base to end. I like to leave the bottom third unglazed or very lightly washed to show the clay’s natural texture. -
Apply the Middle Tone:
Using a fan brush and the Speckled Oatmeal glaze, brush a wide band around the middle section of the bowl, slightly overlapping where your base section begins. -
Build the Cream Opacity:
Apply a second and third coat of the Speckled Oatmeal glaze to this middle band. You want this section to be solid and opaque, unlike the bottom fade. -
Add the Blue Rim:
Dip your soft round brush into the Deep Cobalt Blue glaze. Paint a solid band around the top exterior rim, about an inch to an inch-and-a-half wide. -
Blend the Transition:
While the blue rim is still damp, use a slightly wet clean brush to feather the bottom edge of the blue band down into the oatmeal section. -
Soften the Overlap:
Gently tap the area where the blue and oatmeal meet to encourage the glazes to mingle without creating a muddy color. -
Create the Lower Fade:
Return to the bottom edge of your Speckled Oatmeal band. Use a damp sponge to wipe the bottom edge downwards, thinning the glaze out as it reaches the raw clay base. -
Detailing the Texture:
If your white glaze has speckles, ensure they aren’t clumped together at the transition points. Use a dry brush to disperse them if needed. -
Dry and Inspect:
Allow the bowl to dry completely. Check the rim for any sharp glaze spots or drips.
Add Flux for Flow
To make the blue rim ‘drip’ more dramatically into the white, dab a tiny bit of flux on the blue-white border before firing.
Step 3: Firing
-
Clean the Foot Again:
Even with wax resist, double-check that the foot is spotless. Scrape off any stray droplets. -
Glaze Fire:
Fire the bowl in the kiln according to the specific cone requirements of your chosen glazes (likely Cone 5 or 6 for this type of look). -
Cool Down:
Let the kiln cool naturally before opening to prevent thermal shock and ensure those rich blues clarify beautifully.
Once cooled, your bowl is ready to hold fresh fruit or simply sit beautifully on your table
Sgraffito Scratch-Back Pattern
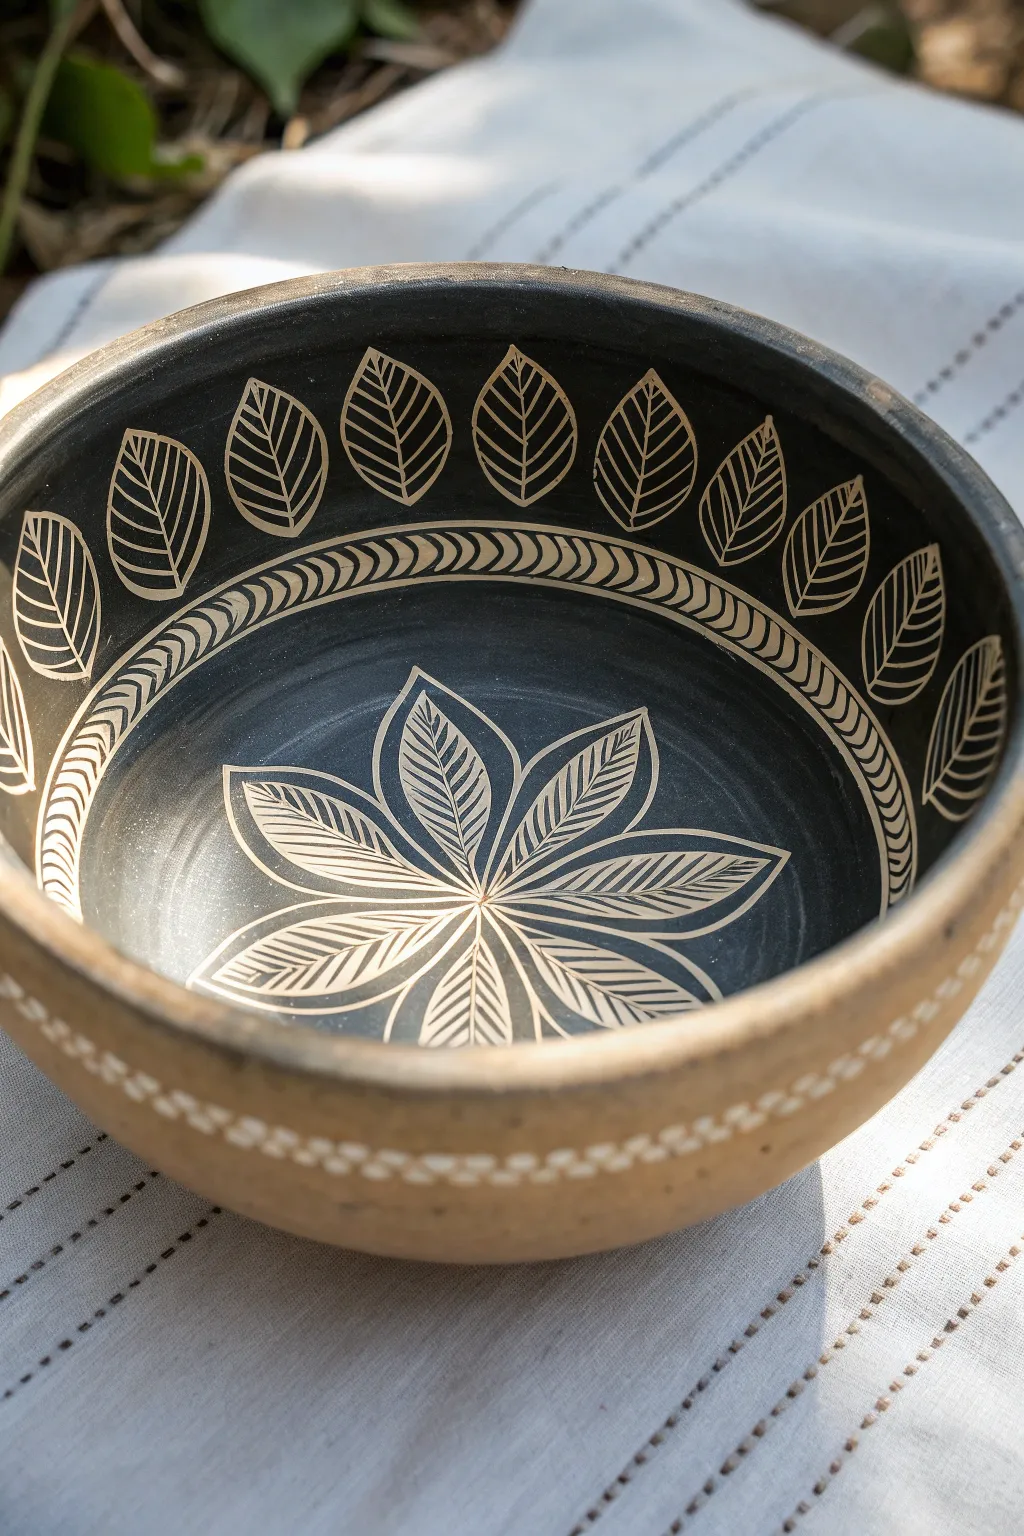
This stunning ceramic project utilizes the ancient technique of sgraffito to reveal a high-contrast design. By carving through a layer of darker slip to expose the lighter clay body beneath, you will create a botanical masterpiece featuring delicate leaf borders and a central floral motif.
Step-by-Step Guide
Materials
- Leather-hard clay bowl (light tan or white clay body)
- Black underglaze or decorative slip
- Wide fan brush or hake brush
- Sgraffito tool or ribbon tool (fine loop)
- Sharp needle tool
- Pencil (optional)
- Damp sponge
- Clear transparent glaze
- Kiln access
Step 1: Preparation & Underglazing
-
Throw or build your bowl:
Begin with a simple bowl form made from a light-colored stoneware or porcelain clay. Aim for a smooth inner curve to make carving easier. Allow the bowl to dry slowly until it reaches a sturdy leather-hard state—it should be firm enough to hold its shape comfortably but soft enough to carve into. -
Clean the surface:
Gently wipe the interior of the bowl with a slightly damp sponge to remove any dust or grog bumps that might interfere with your brushstrokes. -
Verify moisture content:
Check that the clay isn’t too dry. If the rim is turning white or chalky, it might be too brittle for clean sgraffito lines. The clay should feel cool to the touch and a bit waxy. -
Apply the first coat:
Using a wide fan brush, apply a smooth, even coat of black underglaze to the entire interior of the bowl. Apply the slip all the way up and over the rim. -
Build opacity:
Let the first coat dry until the sheen disappears, usually just a few minutes. Apply a second and possibly third coat, brushing in alternating directions (cross-hatching) to ensure solid, opaque coverage without streaks. -
Drying to the sweet spot:
Allow the underglaze to dry until it is no longer tacky to the touch. It shouldn’t smear when you rest your hand on it, but the clay underneath must remain leather-hard. This is critical for crisp lines.
Step 2: Carving the Design
-
Rough out the spacing:
Lightly sketch your design placement using a pencil directly on the black surface. The pencil marks will burn off in the kiln. Mark a circle at the bottom center and horizontal bands for the rim area to keep your patterns symmetrical. -
Carve the central flower:
Begin at the very bottom of the bowl. Using a fine-point sgraffito tool or loop tool, carve the outline of a large, eight-petaled flower star. The petals should radiate outward from the very center. -
Add petal veins:
Inside each petal shape, carve a central vein line. Then, etch delicate, angled lines branching off the center vein to create a leaf-like texture within each petal. I find that pulling the tool towards the center gives smoother lines. -
Create the border ring:
Moving up the wall of the bowl, carve two parallel horizontal lines around the circumference to create a band. Inside this band, carve a repeating ‘C’ shape or braided rope pattern. This separates the bottom motif from the rim. -
Outline the rim leaves:
Along the upper section of the bowl interior, scratch out a series of simple leaf shapes. These should be evenly spaced, pointing upwards toward the rim. -
Detail the rim leaves:
Similar to the center flower, carve a central vein and angled texture lines inside each leaf on the rim. Keep your pressure consistent so the lines are of equal width. -
Clean up burrs:
As you carve, little crumbs of clay (burrs) will accumulate. Do not wipe them with your hand, or you will smear black ink into your white lines. Instead, wait for them to dry slightly and use a soft, dry paintbrush to gently sweep them away.
Clean Lines Pro-Tip
Keep your carving tool extremely sharp. A dull tool will drag and tear the clay rather than slicing it cleanly, resulting in jagged edges that are harder to clean up later.
Step 3: Exterior & Finishing
-
Exterior decoration:
For the outside of the bowl, you can leave it mostly bare clay for contrast. However, adding a minimal dotted line near the bottom foot connects the design. Use a slip trailer or a small brush to dot white slip around the lower exterior. -
Slow drying:
Because you have carved into the walls, the bowl needs to dry very slowly to prevent warping. Loosely cover it with plastic for a day or two before uncovering it completely to become bone dry. -
Bisque fire:
Fire the bowl to a bisque temperature (usually Cone 06 or 04). This sets the shape and the underglaze. -
Glaze application:
For the final step, dip or brush a clear, transparent glaze over the entire interior. This will seal the surface and make the black pop against the clay while making the bowl food-safe. -
Final firing:
Fire the bowl to the final maturity temperature for your specific clay body (e.g., Cone 5 or 6). Once cool, sand the foot ring smooth if necessary.
Level Up: Color Tinting
Instead of a clear glaze, try a very translucent celadon (like pale blue or green) over the black sgraffito. It will tint the white clay lines while keeping the black distinct.
Once fired, you will have a beautiful, high-contrast vessel that highlights the natural beauty of the clay body beneath your design
Drip Edge Color Melt
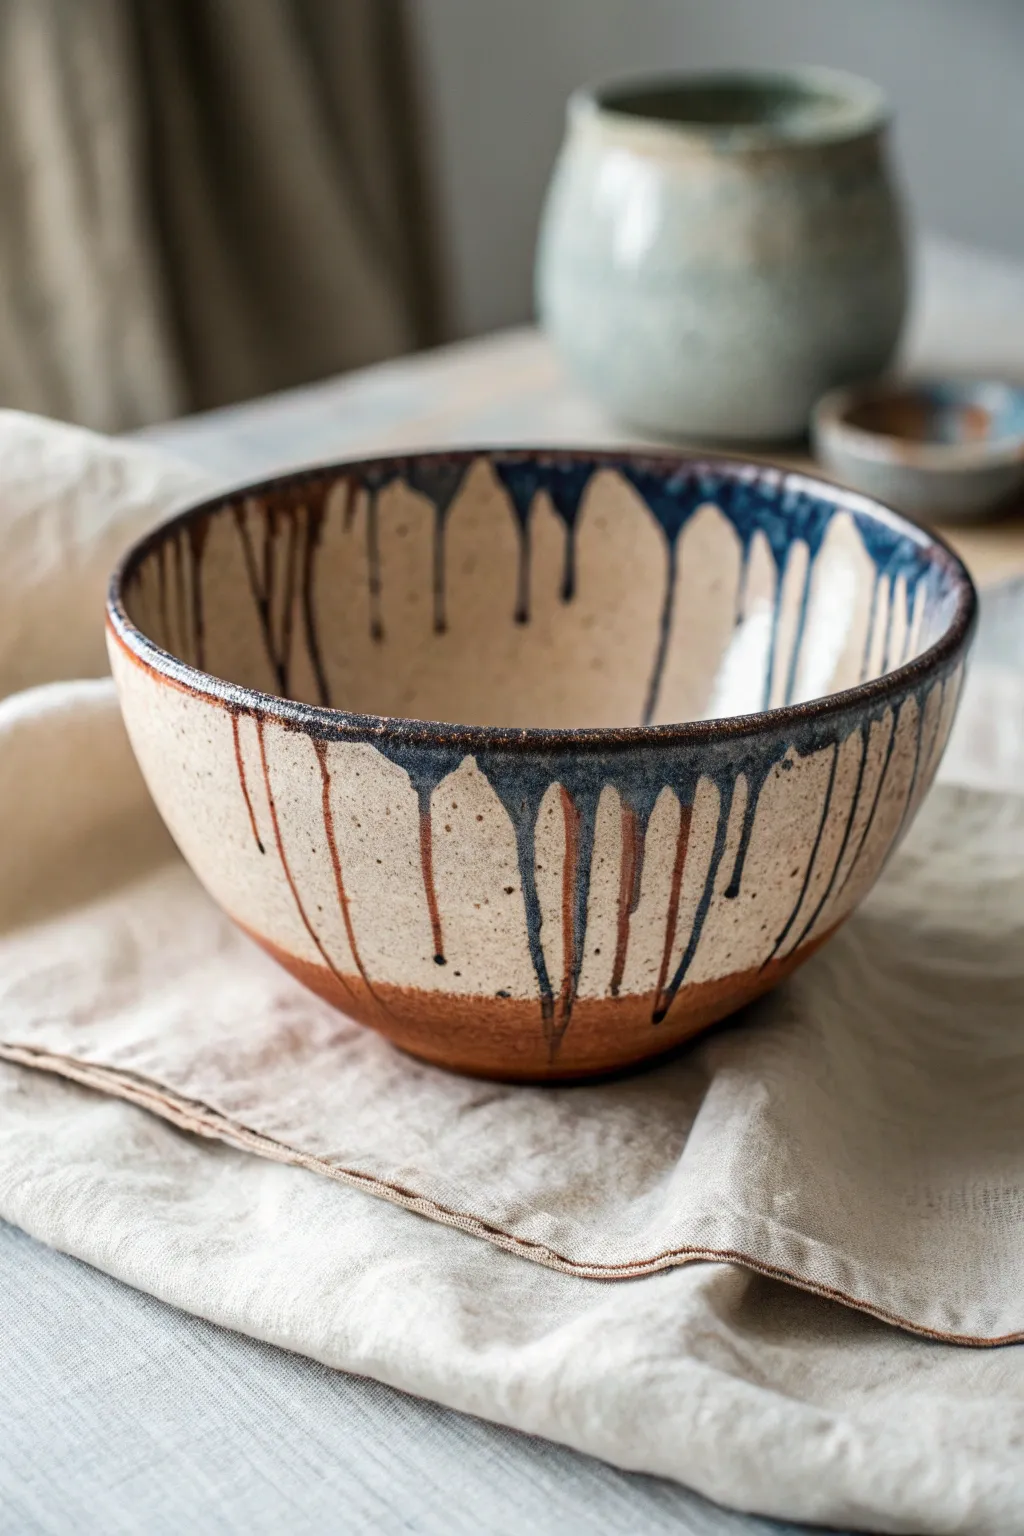
Embrace the unpredictable beauty of fluid glazing with this dramatic drip-edge bowl project. By layering contrasting glazes over a speckled base, you can achieve a stunning, earthy melt that looks professionally crafted.
How-To Guide
Materials
- Bisque-fired stoneware bowl
- Wax resist emulsion
- Sponge
- Banding wheel (essential for even application)
- Glaze 1: Matte speckled cream or oatmeal stoneware glaze (dipping consistency)
- Glaze 2: Deep cobalt blue stoneware glaze (brush-on)
- Glaze 3: Rutile brown or iron oxide wash (brush-on)
- Fan brush
- Small detail brush
- Kiln (fired to Cone 6 or appropriate temp for your clay)
Step 1: Preparation and Base Glaze
-
Clean the bisque:
Start by wiping down your bisque-fired bowl with a damp sponge to remove any kiln dust. This ensures the glaze adheres properly without crawling. -
Wax the foot:
Apply wax resist to the bottom foot of the bowl and about an inch up the exterior wall. This creates that distinct line where the raw red clay remains visible, grounding the piece. -
Dry the wax:
Allow the wax resist to dry completely. It should feel tacky but not wet before you proceed to dipping. -
Mix the base glaze:
Stir your cream speckled glaze thoroughly. You want a creamy consistency similar to heavy cream; if it’s too thin, the speckles won’t show, but too thick and it might craze. -
Dip the bowl:
Using glazing tongs or a steady hand, dip the entire bowl into the cream glaze. Hold it under for 3-4 seconds, then lift it out and shake gently to remove excess drips. -
Clean the distinct line:
As soon as the glaze is dry on the wax (it will bead up), wipe the waxed area firmly with a damp sponge to create a sharp, clean line where the glaze ends and the raw clay begins.
Step 2: Creating the Rim Drips
-
Set up the wheel:
Place your glazed and dried bowl on a banding wheel. Centering it helps you apply the rim glazes evenly. -
Apply the blue band:
Load a fan brush with the cobalt blue glaze. While spinning the banding wheel slowly, apply a thick band of glaze (about 1 inch wide) straddling the rim—covering both the inside and outside edge. -
Add the brown reactant:
Before the blue dries completely, take your second brush and apply the rutile brown glaze or iron oxide wash directly over the blue band. I like to dab this on unevenly rather than painting a straight line creates a more organic look. -
Encourage the drips:
Load a heavy amount of the blue glaze onto your brush again. Touch the tip of the brush to the very top edge of the rim and press down slightly so a bead of glaze forms and starts to run down the side. -
Vary the lengths:
Repeat this drip process around the rim, but vary the amount of glaze you deposit. Some drips should be long and thin, while others can be shorter and wider for natural variation. -
Check the interior:
Don’t forget the inside of the bowl. Apply similar heavy beads of glaze to the inner rim so the drips cascade down into the bowl’s center as well.
Drips stopping too soon?
If your drips aren’t running far enough, try adding a ‘flux’ like a clear glaze or a dedicated flux wash over your rim colors to lower the melting point and increase movement.
Step 3: Firing and Finishing
-
Clean the foot again:
Double-check the bottom of your bowl. Often, the drip application can cause splashes on the waxed area. Wipe the raw clay section perfectly clean one last time. -
Load the kiln:
Place the bowl in the kiln. If your glazes are known to be very runny, place a ‘cookie’ or catch-plate under the bowl to protect your kiln shelves. -
Fire to temperature:
Fire the kiln to the recommended cone for your clay body (usually Cone 5 or 6 for stoneware). The heat will cause the heavy rim application to melt and drag the colors down the side. -
Cool slowly:
Allow the kiln to cool naturally. Opening it too soon can cause thermal shock. Once cool, remove your piece and sand the bottom foot smooth if there are any rough clay burrs.
Try a Metallic Rim
Swap the brown oxide wash for a manganese wash. When fired, it often turns a rich, metallic bronze or gold that creates a stunning halo effect around the blue drips.
Once cooled, fill your new bowl with fruit or simply display it to admire how the colors fused during the firing
Faux Woodgrain Bowl Texture
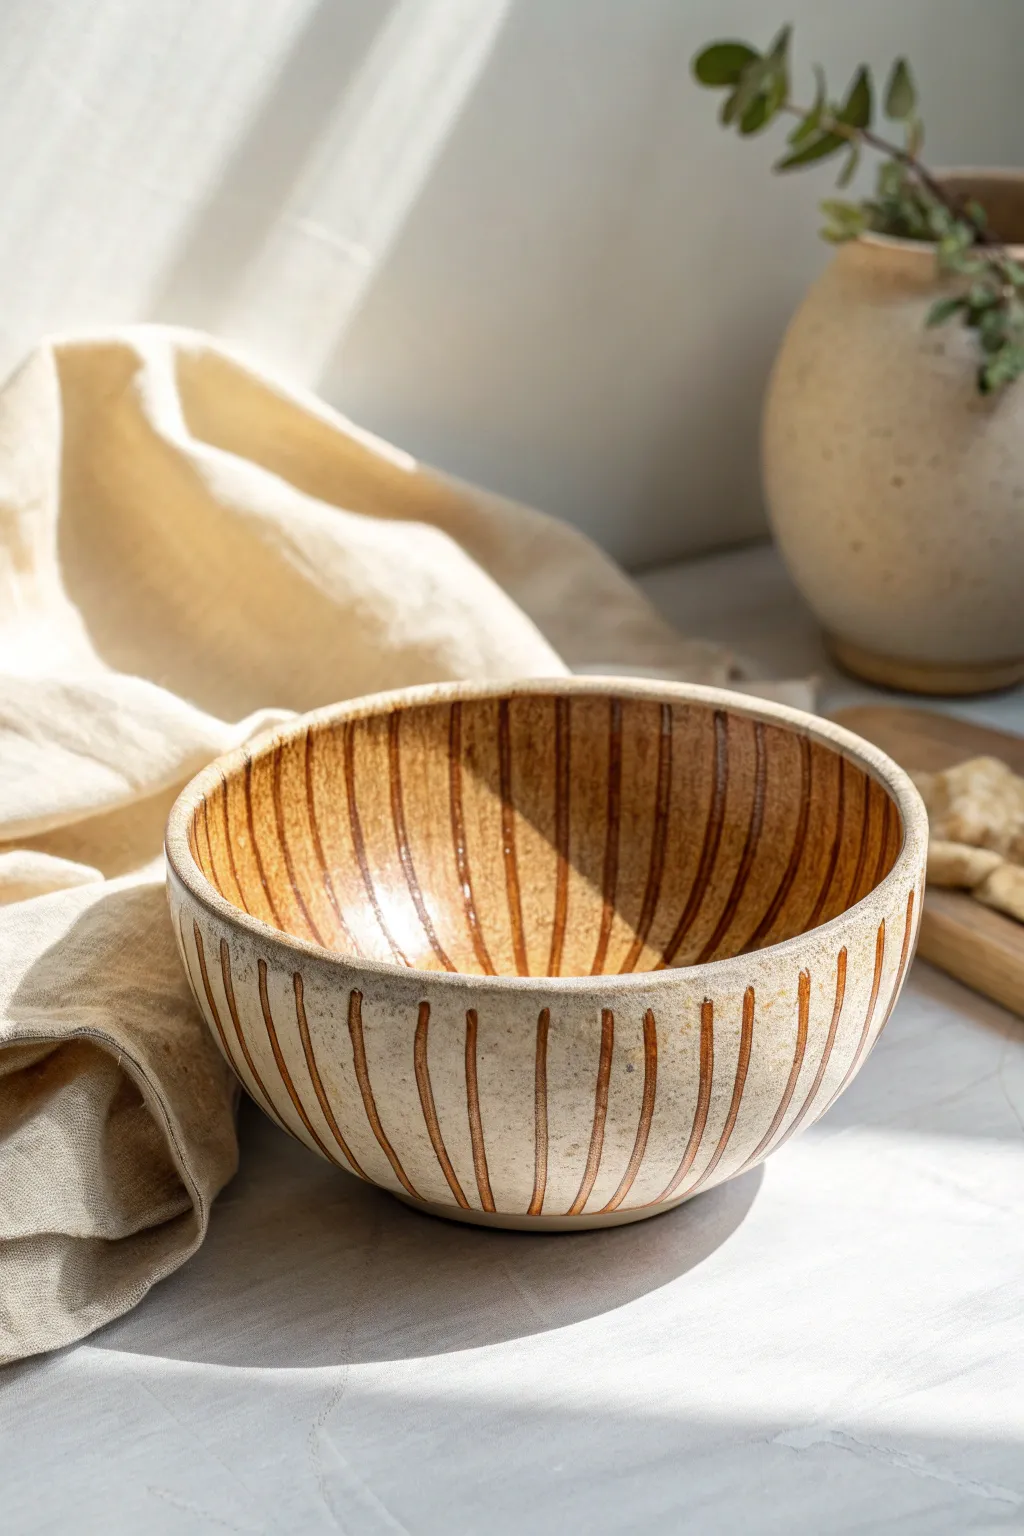
Transform a plain ceramic or wooden bowl into a high-end, artisan-style piece with this clever faux finish technique. By layering warm glazes and carving back into paint, you’ll achieve a textural, ribbed look that mimics handmade stoneware.
Step-by-Step Tutorial
Materials
- Plain ceramic or wooden bowl (smooth surface)
- Sanding block (fine grit)
- Primer suitable for your bowl material
- Cream or off-white acrylic paint (matte finish)
- Warm brown acrylic paint (burnt sienna or raw umber)
- Glazing medium
- Wide flat synthetic brush
- Fine detail brush or liner brush
- Matte spray sealant
- Paper towels
- Water container
Step 1: Base Preparation
-
Clean surface:
Begin by thoroughly cleaning your bowl with warm soapy water to remove any oils or dust. Let it dry completely. -
Light scuffing:
If your bowl is already glazed or very smooth, gently scuff the surface with a fine-grit sanding block. This gives the paint something to grip onto. -
Apply primer:
Coat the entire bowl, inside and out, with a bonding primer. This ensures your beautiful paint job won’t scratch off later. Allow this to cure according to the bottle instructions.
Step 2: Creating the Stoneware Base
-
First base coat:
Apply an even layer of your cream or off-white matte acrylic paint. Use broad strokes to cover the surface quickly. -
Check coverage:
Once the first coat is dry, inspect for translucent spots. Apply a second coat if necessary to get a solid, opaque finish that looks like unglazed clay. -
Optional texture:
For a grittier, more authentic ceramic feel, I sometimes mix a tiny pinch of baking soda into the final coat of cream paint before applying it.
Glaze Consistency Tip
If your brown stripes feel too opaque, add a drop of water to your glaze mix. It should flow like ink, not heavy cream.
Step 3: The Striping Technique
-
Mix the glaze:
In a small container, mix one part warm brown paint with three parts glazing medium. You want a translucent mixture that extends the drying time and allows for transparency. -
Paint vertical guides:
Using a fine liner brush dipped in the brown glaze mixture, paint a single vertical line from the rim to the center base of the bowl to act as your first guide. -
Establish spacing:
Paint a second line directly opposite the first one. Then, split the difference on the left and right sides. This helps keep your spacing relatively even as you fill in the rest. -
Fill in the pattern:
Continue painting vertical stripes around the exterior. Don’t worry about making them perfectly straight; a little wobble adds to the hand-thrown pottery aesthetic. -
Interior striping:
Repeat this process on the inside of the bowl, starting from the rim and pulling the brush down toward the center. The lines will naturally congregate and overlap at the bottom.
Make it Ancient
After the stripes dry, lightly dry-brush some leftover cream paint horizontally across the bowl to simulate aged wear.
Step 4: Refining the Look
-
Soften the edges:
While the glaze stripes are still tacky, take a clean, slightly damp flat brush and gently feather the edges of a few stripes if they look too harsh. -
Add depth:
Go back over random sections of the stripes with a second layer of the glaze mixture. This creates variation in color intensity, making the ‘woodgrain’ look more natural. -
Rim detailing:
Run a thin line of the brown glaze along the very top rim of the bowl to connect the interior and exterior patterns. -
Wait for drying:
Let the striping work dry completely. Because we used glazing medium, this might take a bit longer than standard acrylics—give it at least an hour.
Step 5: Sealing and Finish
-
Inspect the work:
Look over the bowl for any unintended smudges. You can touch these up with a dab of the original cream base color. -
Apply sealant:
Spray the entire bowl with a matte sealant. Avoid glossy sprays, as they will ruin the natural, earthy effect we are aiming for. -
Second seal coat:
Once the first misting is dry, apply a second light coat for durability. -
Final cure:
Allow the bowl to sit in a dry, dust-free area for 24 hours before handling or displaying to ensure the finish is rock hard.
Place your newly finished bowl on a side table or shelf to add instant organic warmth to your decor
Lace Stencil Doily Pattern
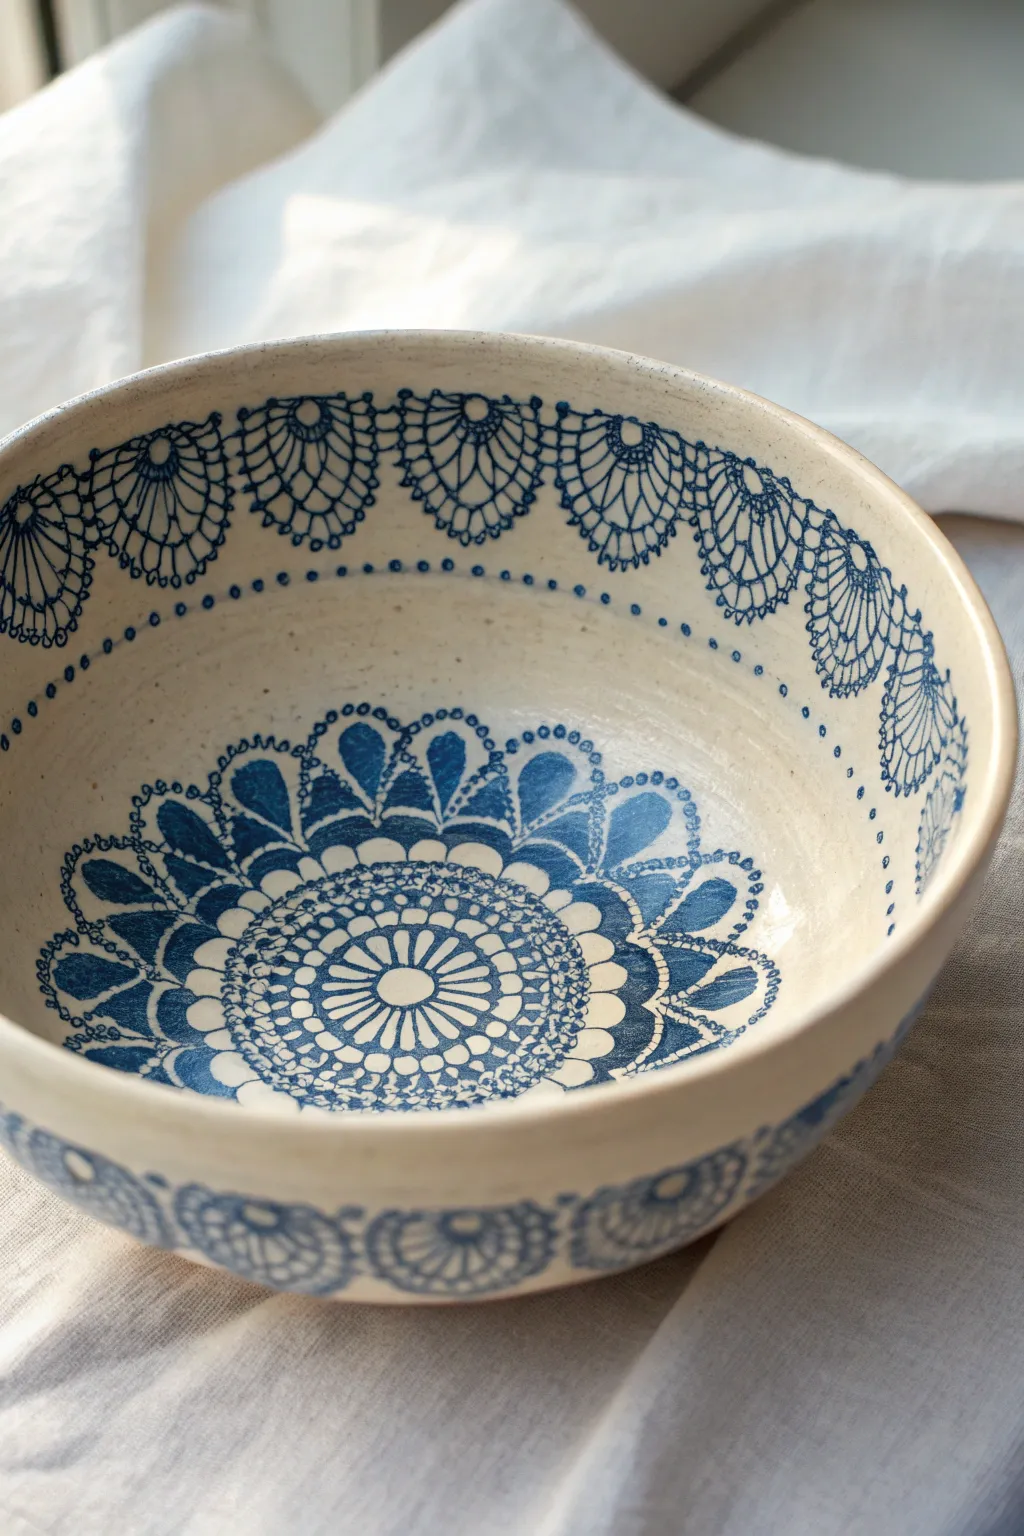
Achieve the delicate, vintage look of handmade lace on your ceramics without painting a single intricate line by hand. This technique uses real doilies or stencils and cobalt oxide wash to create a stunning blue-on-white pattern that feels both rustic and refined.
How-To Guide
Materials
- Bisque-fired ceramic bowl (stoneware or earthenware)
- Cobalt oxide or blue underglaze
- Clear transparent glaze
- Paper doilies or soft plastic lace stencils
- Small sponge applicator
- Fine-point detail brush
- Scissors
- Low-tack masking tape (optional)
- Bowl of water
- Kiln access (for firing)
Step 1: Preparing the Pattern
-
Select your motifs:
Examine your paper doilies or lace stencils. Look for distinct sections: the scalloped edges work best for the rim, while a full circular pattern is perfect for the bowl’s center. -
Cut the stencils:
Carefully cut the paper doilies into manageable sections. You’ll need a long strip of scalloped edging for the rim pattern and a central circular piece for the bottom. -
Plan the layout:
Dry-fit your cut pieces inside the bisque bowl to see how they sit. The curve of the bowl can make flat paper tricky, so you might need to make small relief cuts in the paper so it lays flush without wrinkling.
Pro Tip: Sticky Situation
To keep lightweight paper doilies in place on curved surfaces, mist the back with a temporary spray adhesive. It holds the intricate bits flat but peels off easily without residue.
Step 2: Applying the Design
-
Dampen the stencil:
Lightly dampen your paper doily cutout with water. It should be moist enough to stick to the bisque ware on its own, but not dripping wet. -
Position the center:
Place the central circular motif in the very bottom of the bowl. Press it down gently with a damp sponge to ensure every intricate hole is flush against the clay surface. -
Adhere the rim strips:
Position your scalloped edge pieces just below the rim of the bowl interior. Press them firmly into place, ensuring the paper conforms to the curve. -
Prepare the blue color:
Mix a small amount of cobalt oxide wash (or use your blue underglaze). If using oxide, dilute it slightly so it paints on smoothly but remains opaque. -
Sponge application:
Dip your sponge applicator into the blue color and dab off the excess on a paper towel. You want a ‘dry sponge’ consistency to prevent bleeding under the paper. -
Stippling the pattern:
Gently stipple (dab vertically) the blue color over the paper stencil. Work from the outside edges of the paper inward to keep paint from seeping underneath the stencil edges. -
Check coverage:
Ensure all the negative spaces in the lace pattern have received color. The paper itself will turn blue, which is fine; just focus on the holes.
Troubleshooting: Blurry Lines
If your lace pattern looks smudged, your sponge was too wet. The paint bled under the paper fibers. Ensure your sponge is almost dry and use multiple light layers instead of one thick soak.
Step 3: Refining and Glazing
-
Remove stencils:
Wait for the underglaze to look matte and dry to the touch. Carefully peel away the paper stencils or doilies to reveal the crisp white clay underneath. -
Clean up edges:
If any blue pigment bled under the paper, use a stiff, wet brush or a clay scraping tool to gently scratch or wipe away the mistake, refining the lace shape. -
Add dot accents:
Using your fine-point detail brush or the end of a bamboo skewer, dip into the blue color and add a ring of small dots between the rim pattern and the center pattern to connect the design elements. -
Detail the rim:
I like to finish the design by painting a very thin, consistent line of blue directly on the lip of the bowl to frame the entire interior preparation. -
Bisque fire or set:
If you used underglaze on greenware, fire it to bisque now. If you applied this to already-bisqued ware, let it dry completely before glazing. -
Apply clear glaze:
Dip the entire bowl into a clear, transparent glaze. This will seal the clay and make the cobalt blue pop vividly after firing. -
Final wipe:
Wipe the foot of the bowl clean so it doesn’t stick to the kiln shelf. -
Glaze fire:
Fire the bowl in the kiln according to the temperature requirements of your specific clay and glaze body.
Once cooled from the kiln, you will have a timeless piece that captures the nostalgia of lace in permanent stone
Galaxy Night-Sky Bowl Interior

Transform a simple ceramic bowl into a window to the universe with this stunning galaxy glaze technique. The contrast between the raw, creamy exterior and the deep, glossy nebula interior creates a captivating piece that feels like holding stardust in your hands.
Step-by-Step
Materials
- Bisque-fired ceramic bowl (white stoneware or porcelain)
- Deep midnight blue underglaze
- Purple or violet underglaze
- Black underglaze
- White underglaze (opaque)
- Clear glossy glaze (food safe)
- Fan brush
- Small sponge
- Fine detail brush (liner brush)
- Toothbrush (for speckling)
- Bowl of water
- Wax resist (optional)
Step 1: Preparation and Base Coat
-
Clean the bisque:
Begin by wiping down your bisque-fired bowl with a damp sponge to remove any dust or oils. This ensures your glaze adheres perfectly to the surface. -
Apply wax resist (optional):
If you want to keep the rim and exterior perfectly crisp, carefully apply a band of wax resist to the very top edge of the rim and the outside. This prevents stray underglaze marks. -
Base layer application:
Pour a small amount of deep midnight blue underglaze into the bowl. Swirl it around to coat the entire interior surface evenly, or use a soft fan brush to apply a solid, opaque coat. -
Dry the base:
Allow this initial blue layer to dry until it is no longer shiny. It creates the canvas for your galaxy.
Cosmic Depth Trick
Apply the clear glaze slightly thicker than usual. The glassiness adds a ‘lens’ effect that makes the galaxy look deeper.
Step 2: Creating the Nebula
-
Sponging the depths:
Dampen a small sponge and dip it lightly into black underglaze. Dab this sparingly around the very bottom center and some edges to create depth and shadow. -
Adding nebula clouds:
Rinse your sponge or take a clean piece. Dip it into the purple underglaze. Gently pat irregular cloud shapes onto the blue background, focusing on the center curve of the bowl. -
Softening transitions:
If the purple looks too harsh, dab a clean, slightly damp sponge over the edges of the purple patches to blend them softly back into the midnight blue. -
Layering lighter blues:
If you have a lighter blue or teal, sponge tiny amounts near the purple areas to suggest bright glowing gases. Keep this layer subtle and translucent. -
Check density:
Step back and look at the interior. You want a mix of very dark voids and colorful nebula clouds. Add more black or blue if the purple feels too overwhelming.
Smudged Stars?
If your white stars smear when applying the clear glaze, the underglaze wasn’t dry enough. Let the galaxy layer cure overnight first.
Step 3: Stars and Constellations
-
Prepare the stars:
Thin down a small amount of opaque white underglaze with water until it has the consistency of heavy cream or melted ice cream. -
Flick the stars:
Dip an old toothbrush into the thinned white underglaze. Hold the brush inside the bowl and run your thumb across the bristles to flick a fine mist of white specks onto the dark background. I find varying the distance creates different star sizes. -
Paint major stars:
Using your finest detail brush, dip into the un-thinned white underglaze. Paint a few larger, deliberate dots to represent brighter planets or stars. -
Add twinkle effects:
Select 3-5 of your larger white dots. Carefully paint a cross or an eight-pointed star shape over them to create a ‘twinkle’ effect. -
Refine the rim:
Check the rim of the bowl. If any galaxy splatter landed on the top edge or outside, wipe it away cleanly with a damp sponge to maintain that sharp contrast.
Step 4: Finishing and Firing
-
Bone dry:
Let the underglaze work dry completely. It should feel dry and room temperature to the touch before moving to the next step. -
Clear glaze application:
Apply a clear glossy glaze over the entire interior of the bowl. You can pour the glaze in, roll it around, and pour the excess out for an even coat. This will make the colors pop and become food safe. -
Wait for drying:
Let the clear glaze dry. Ensure the exterior remains unglazed (raw clay) or apply a matte clear glaze to the outside if you prefer a sealed surface that looks raw. -
Clean the foot:
Wipe the bottom foot of the bowl with a sponge to ensure no glaze is on the surface that touches the kiln shelf. -
Final Fire:
Fire the piece in the kiln according to the temperature requirements of your chosen clay and glaze (usually Cone 5 or 6 for stoneware).
Once cooled, your bowl will hold a permanent piece of the night sky ready for your morning cereal


Have a question or want to share your own experience? I'd love to hear from you in the comments below!