When I plan a Thanksgiving paint night, I aim for projects that feel cozy, festive, and totally doable in one sitting. Here are my favorite Thanksgiving painting ideas—starting with the classics everyone expects and ending with a few unexpected twists for that “wow, I made that” feeling.
Whimsical Swirl-Feather Turkey
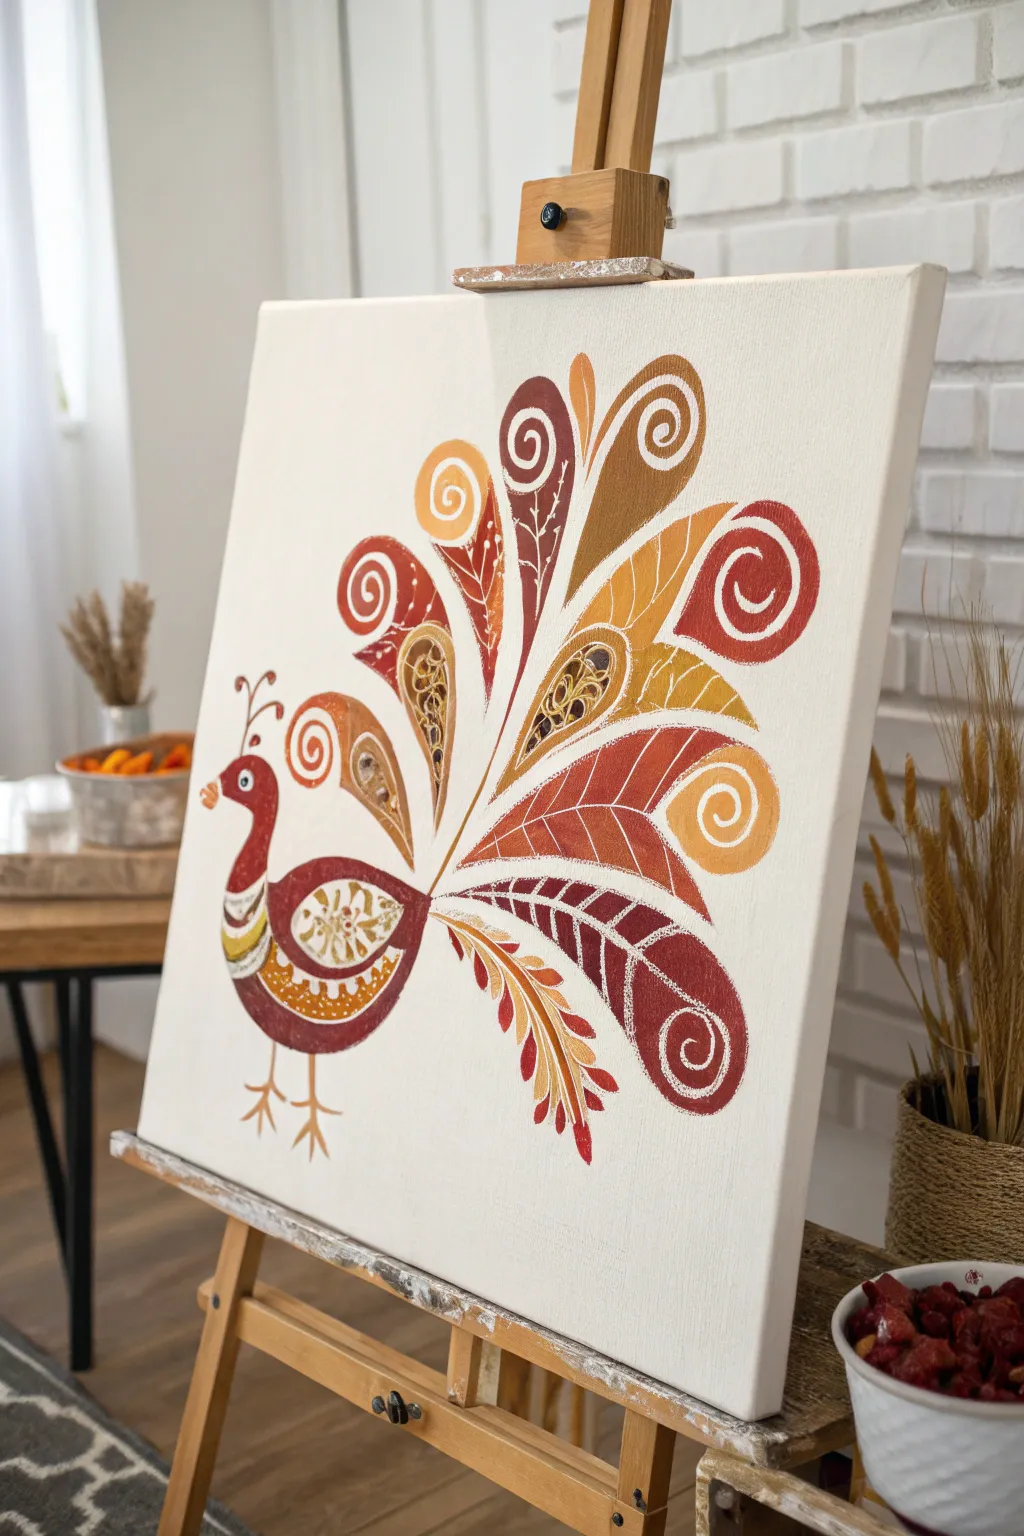
Embrace the fun side of fall with this vibrant, folk-art inspired painting that turns the traditional turkey motif into a swirling masterpiece. Using warm autumnal shades of rust, gold, and cream, you’ll create decorative feathers that look beautiful enough to display year-round.
Step-by-Step
Materials
- Square stretched canvas (12×12 or 16×16 inches recommended)
- Acrylic paints: Burnt Sienna (rust red), Yellow Ochre, Deep Orange, Burnt Umber, and Titanium White
- Round brushes: Sizes #4 and #8
- Fine liner brush: Size #1
- Pencil and eraser
- Palette or paper plate
- Cup of water and paper towels
Step 1: Sketching the Decorative Shapes
-
Outline the body:
Start by lightly sketching the bird’s body on the lower left side of your canvas. Draw a teardrop shape for the body angled upward, connected to a slender, curved neck and a round head. -
Map out the tail feathers:
From the center of the bird’s back, sketch large, radiating teardrop or petal shapes to form the tail fan. Make them vary slightly in size and curvature to create a dynamic, flowing look, ensuring the tips curl inward like fern fronds. -
Add the spiral details:
Inside the tip of each large feather shape, sketch a distinct spiral or ‘snail shell’ swirl. This is the signature element of the design, so take your time to get the curves smooth. -
Sketch the legs and crest:
Draw two simple stick legs with three notched toes at the bottom. Finish the sketch by adding three small, curved lines with dots on top for the head crest and a tiny triangular beak.
Smooth Operator
To get super clean swirls, thin your white paint slightly with a drop of water. This helps the paint flow off the liner brush like ink rather than dragging.
Step 2: Blocking in the Base Colors
-
Paint the body base:
Load your #8 round brush with Burnt Sienna (rust red). Fill in the main body, neck, and head, but leave a blank oval in the center of the body for the decorative wing pattern later. -
Fill the dark feathers:
Using the same rust red, paint alternating feathers in the tail fan. Focus on getting smooth edges on the long curves. I like to rotate the canvas as I work so my hand is always in a comfortable position. -
Apply the orange tones:
Mix a little Yellow Ochre with Deep Orange to create a warm pumpkin shade. Use this to fill in several more feathers, ensuring you don’t paint two of the same color right next to each other if possible. -
Add the golden feathers:
Use pure Yellow Ochre or a mustard yellow to fill in the remaining feather shapes. If the paint feels too transparent, let the first coat dry and apply a second one for solid coverage. -
Paint the decorative wing:
Fill the empty oval space in the body with a mix of Burnt Umber and a touch of Burnt Sienna to create a distinct, darker section for the wing details.
Step 3: Adding the Swirls and Details
-
Define the spirals:
Switch to your #4 round brush. Dip it in Titanium White (or a very light cream). Carefully paint the spiral designs at the tip of every feather. The white should sit boldly on top of your colored base layers. -
Create the feather veins:
With your liner brush and white paint, draw a central spine down the middle of each feather. Add delicate V-shaped veins branching off the spine to give the feathers a stylized leaf look. -
Detail the wing pattern:
Decorate the dark wing section using cream or white paint. Paint a flower-like motif or simple geometric shapes inside the oval to make it pop against the rust-colored body. -
Add neck and body patterns:
Paint small white dots, scallops, or zig-zags along the neck and the lower curve of the turkey’s body. These small folk-art touches add tremendous charm. -
Paint the face features:
Use white to paint a small circle for the eye, adding a tiny black dot in the center once dry. Paint the beak a bright orange. -
Outline the legs and crest:
Using Burnt Sienna or a thinned Burnt Umber and your liner brush, carefully paint the stick legs and the delicate crest curls on top of the head. -
Final texture touches:
For a rustic look, use a nearly dry brush with a tiny amount of white paint to lightly scuff or stipple texture onto the solid colored areas, giving it a slightly weathered appearance.
Opaque Fix
If your yellow or orange feathers look streaky or allow the canvas weave to show through, don’t overwork wet paint. Let it dry fully, then add a second coat.
Step back and admire your charming, swirled bird that brings a cozy artistic feel to your Thanksgiving decor


Classic Cornucopia of Plenty
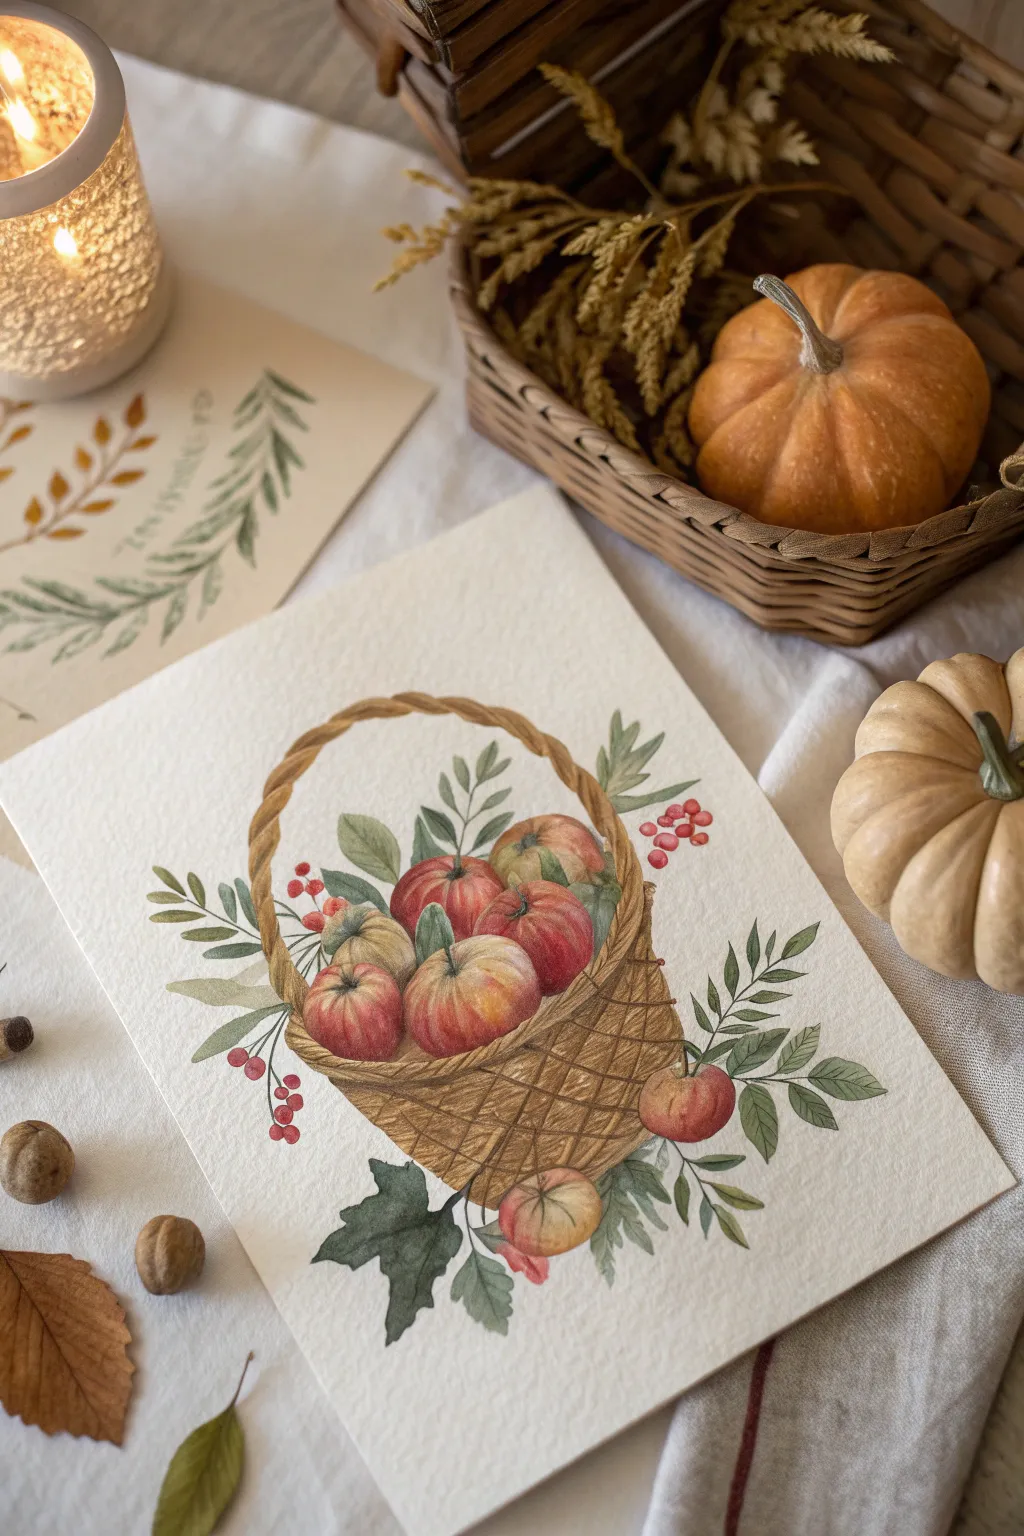
Capture the essence of a Thanksgiving harvest with this delicate watercolor study featuring a woven basket overflowing with apples and berries. The soft washes and detailed ink work create a cozy, vintage botanical illustration style perfect for the season.
Step-by-Step Tutorial
Materials
- Cold press watercolor paper (140 lb/300 gsm)
- Watercolor paints (Alizarin Crimson, Cadmium Red, Sap Green, Burnt Sienna, Yellow Ochre, Paynes Grey)
- Round watercolor brushes (sizes 2, 4, and 8)
- Pencil (HB) and kneaded eraser
- Fine liner pen (brown or sepia, 0.1mm or 0.3mm)
- Palette for mixing
- Two jars of water
- Paper towels
Step 1: Sketching the Composition
-
Outline the basket shape:
Begin by lightly sketching a rounded U-shape for the basket body in the lower center of your paper. Add an arched handle that connects to the rim on both sides. Keep your pencil pressure extremely light so lines disappear under the paint later. -
Drawing the weave pattern:
Lightly indicate the woven texture on the basket body using diagonal cross-hatching marks. You don’t need to draw every single strand, just suggest the direction of the wicker weave. -
Adding the apples:
Sketch a cluster of round shapes filling the basket opening. Overlap them slightly to create depth, making sure some sit lower in the basket and others peak out near the top. -
Placing foliage and berries:
Draw sprigs of leaves extending outward from the basket edges. Add small clusters of circles for berries trailing down the left side and peeking out on the right to balance the composition. -
Refining the sketch:
Gently erase any harsh lines with your kneaded eraser until only a faint ghost of the image remains as a guide.
Step 2: Painting the Fruit and Basket
-
First wash on the apples:
Using a size 4 brush, wet the apple shapes with clean water. Drop in diluted Yellow Ochre, then while wet, bleed in Alizarin Crimson on one side to create a soft blush. -
Deepening apple colors:
Once the first layer is tacky but not dry, dab deeper Cadmium Red into the shadowed areas of the apples. Leave small white spaces for highlights where the light hits the curved skin. -
Basket base layer:
Mix a light wash of Burnt Sienna with plenty of water. Paint the entire basket area, including the handle, with this flat, warm brown tone. -
Defining the weave:
Mix a darker brown using Burnt Sienna and a touch of Paynes Grey. With a size 2 brush, paint diagonal strokes over the dried base layer to mimic the woven wicker texture, leaving gaps to show the lighter underpainting. -
Shadowing the basket:
Add a second layer of the dark brown mix to the bottom right of the basket and under the rim to give the object volume and roundness.
Tip: Smooth Gradients
To get that smooth transition from yellow to red on the apple skin, ensure the paper is damp (not soaking) before adding the second color. This technique is called wet-on-wet.
Step 3: Details & Finishing Touches
-
Painting the leaves:
Mix Sap Green with a tiny bit of Burnt Sienna to assert an autumnal tone. Paint the leaves using a size 4 brush, pressing down for the belly of the leaf and lifting for a sharp point. -
Adding darker foliage:
For the lower leaves (like the ivy shape at the bottom), mix Sap Green with Paynes Grey for a moodier, dark green. Paint these shapes carefully to anchor the bottom of the design. -
Berry details:
Using your smallest brush, paint the berries with concentrated Alizarin Crimson. Leave a tiny speck of white paper on each berry to simulate a shiny reflection. -
Defining apple stems:
Use a dark brown mix to paint tiny, thin stems on the visible apples, grounding them into the fruit with a small shadow. -
Optional ink outlining:
If you like the illustrative look, wait for everything to be bone dry. Then use a sepia fine liner to loosely outline the basket weave and define the edges of the leaves for crispness.
Trouble: Muddy Colors?
If your apples look brown where red meets green leaves, wait for the fruit to dry completely before painting adjacent foliage. Wet green paint touching wet red paint creates mud.
Allow your beautiful harvest basket to dry fully before erasing any remaining pencil marks to reveal your crisp, autumnal masterpiece


Falling Leaves at Golden Hour
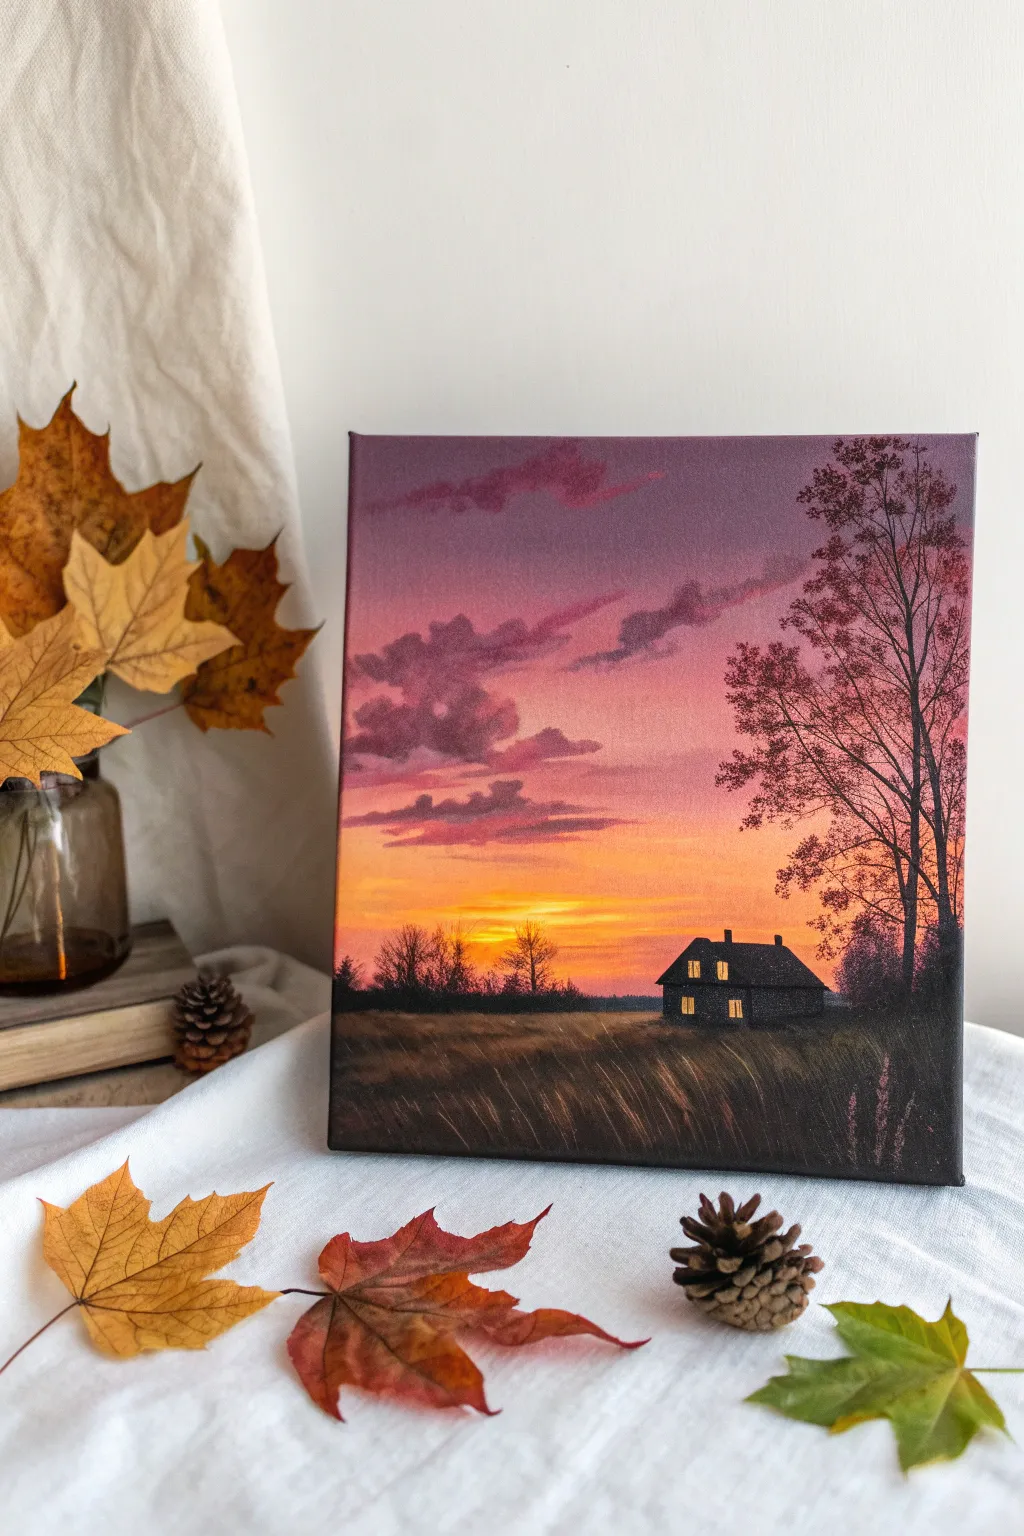
Capture the cozy solitude of a farmhouse at twilight with this stunning acrylic landscape. You’ll layer rich violets and glowing oranges to create a sunset sky that perfectly frames a silhouette home and towering tree.
Step-by-Step Guide
Materials
- Square stretched canvas (e.g., 8×8 or 10×10 inches)
- Acrylic paints: Titanium White, Cadmium Yellow, Napthol Crimson (or bright red), Dioxazine Purple, Mars Black
- Paintbrushes: 1-inch flat wash brush, medium filbert brush, small round detail brush, liner brush
- Palette for mixing
- Cup of water and paper towels
- Pencil (optional for sketching)
Step 1: Setting the Sky Gradient
-
Prime the horizon:
Visualize a horizon line about one-third of the way up from the bottom. Just above this line, paint a horizontal band of pure Cadmium Yellow using your flat wash brush. -
Blend the sunset orange:
Without cleaning the brush, pick up a tiny touch of crimson to make a vibrant orange. Paint this directly above the yellow, blending the transition while the paint is still wet to create a smooth glow. -
Transition to violet:
Clean your brush thoroughly. Mix a soft reddish-purple using purple, a touch of crimson, and a generous amount of white. Apply this above the orange band, blending downwards carefully to avoid making muddy brown tones. -
Deepen the upper sky:
For the top third of the canvas, mix a darker purple with less white. Paint the top edge and blend down into the lighter mauve color, creating a seamless gradient from dark violet at the top to bright yellow at the horizon.
Muddy Sky Fix
If blending orange into purple turns brown, let the blend dry. Paint a thin line of white or pink between them, then gently glaze the colors over it to bridge the gap cleanly.
Step 2: Building Clouds & Atmosphere
-
Form the cloud shapes:
Switch to a medium filbert brush. Mix a muted purple (purple + touch of black + tiny bit of white). Gently tap in irregular, horizontal cloud shapes drifting across the middle and upper sky. -
Add warmth to clouds:
While the clouds are slightly tacky, mix a little crimson into your purple. Highlight the bottom edges of the larger clouds to reflect the setting sun beneath them. -
Create the distant tree line:
Using the same dark purple-black mix, stipple a low, jagged line of trees right across the horizon where the yellow sky meets the planned ground. Keep these shapes loose and indistinct. -
Let it dry:
Allow the entire sky and horizon layer to dry completely before moving on to the sharp silhouettes in the foreground.
Step 3: The Silhouette Foreground
-
Block in the field:
Mix Mars Black with a tiny amount of purple. Use the flat brush to fill in the bottom third of the canvas, covering everything below the horizon line with a solid dark base coat. -
Paint the house structure:
Using a small flat or round brush and pure Mars Black, paint the silhouette of the house on the right side. Include the pitched roof and two small chimneys. -
Add the windows:
Once the black house shape is dry, use a small detail brush with pure Cadmium Yellow (mixed with a tiny spec of white for opacity) to paint four small rectangular windows glowing against the dark. -
Draft the main tree:
Mix a small amount of water into your black paint to make it fluid like ink. Using a liner brush, paint the main trunk of the large tree on the right, extending from the ground all the way off the top edge. -
Branch out:
Continue with the liner brush to add fine branches extending outward. Remember that branches get thinner as they move away from the trunk. I find rolling the brush slightly as I pull helps create organic lines.
Make It Personal
Change the season! Swap the leafy tree for bare winter branches and add white to the roof and ground for a snowy scene, or leave the windows unlit for a spooky abandoned house vibe.
Step 4: Final Details
-
Stipple the leaves:
Use an old, frayed brush or a sea sponge with semi-dry black paint. Lightly tap over the branch tips to create sparse, lacelike foliage that implies autumn leaves without blocking the sky. -
Highlight the field:
Mix a dark brown (black + orange). Using a fan brush or dry filbert brush, flick upward strokes from the bottom of the canvas to create tall grasses catching the dying light. -
Add foreground weeds:
Use the liner brush with a lighter brown or dull pink to add a few specific stalks of wildflowers or tall grass in the immediate foreground on the right side for depth. -
Refine the sun’s glow:
If the sun area looks dull, glaze a very thin, watery layer of bright yellow right above the tree line to make the sunset pop one last time.
Step back and admire the peaceful transition from day to night you’ve captured on canvas


“Give Thanks” Lettering on a Wreath
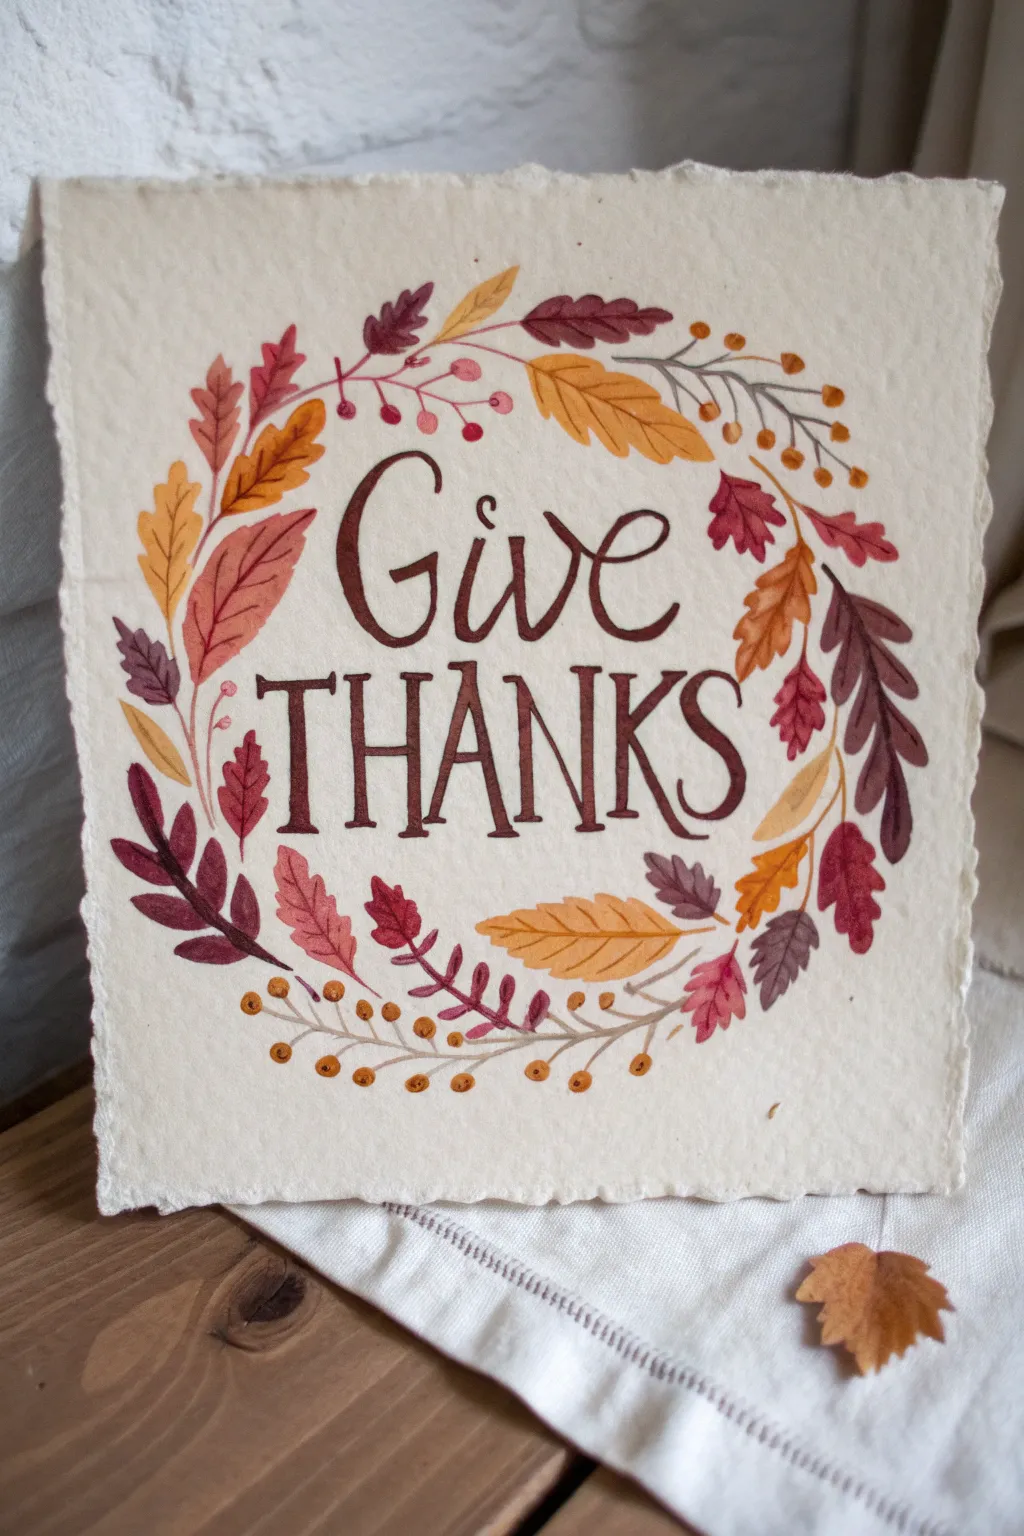
Capture the warmth of autumn with this graceful watercolor wreath, featuring delicate leaves in rich burgundies, burnt oranges, and golden yellows. The centerpiece is a classic serif lettering design that acts as a gentle reminder of the season’s purpose.
How-To Guide
Materials
- Heavyweight watercolor paper (300gsm, cold press/rough texture)
- Watercolor paints (Alizarin Crimson, Burnt Sienna, Yellow Ochre, Sap Green, Burnt Umber)
- Round watercolor brushes (Size 2 and Size 6)
- Pencil and eraser
- Palette for mixing
- Paper towels
- Jar of water
Step 1: Planning the Layout
-
Lightly Sketch the Circle:
Begin by lightly tracing or drawing a circle in the center of your paper to serve as a guide for your wreath. Keep the pencil marks very faint so they can be erased later. -
Draft the Lettering:
In the center of the circle, lightly sketch the words ‘Give’ and ‘THANKS.’ Place ‘Give’ on the top line in a flowing script style, and ‘THANKS’ below it in tall, serif capital letters. Ensure the text is centered within your circle guide. -
Map the Foliage:
Sketch the main branches of the wreath flowing clockwise around the circle. Mark loose shapes for larger oak and maple leaves to ensure balanced spacing before you start painting.
Wet-on-Wet Magic
For more vibrant leaves, drop a second color into the base of a leaf while it’s still wet. The colors will blend naturally as they dry.
Step 2: Painting the Foliage
-
Mix Your Palette:
Prepare puddles of your fall colors. You’ll want a mustard yellow (Yellow Ochre), a deep rust (Burnt Sienna + Red), a burgundy (Alizarin Crimson + tiny touch of Green or Brown), and a muted brown. -
Paint the Large Oak Leaves:
Using the size 6 brush, paint the large oak-style leaves first. Load your brush with the mustard yellow and create the lobed shapes. While wet, I like to drop in a tiny bit of orange at the tips for a natural transition. -
Add Burgundy Elements:
Switch to your deep burgundy mixture. Paint the smaller, pointed leaves scattered around the circle. Vary the pressure on your brush to create tapered tips. -
Create Fern-like Sprigs:
Using the size 2 brush and a brownish-purple mix, paint delicate fern stems. Use quick, short strokes for the individual leaflets to keep them looking airy and fine. -
Layer in Rust Tones:
Fill in the gaps with the rust-colored leaves. Create shapes that resemble beech or elm leaves—simple ovals with pointed ends. Allow these to touch the other wet leaves slightly if you enjoy a watercolor bleed effect. -
Paint the Berry Sprigs:
Mix a diluted brown for thin stems along the bottom curve. Add small dots of orange and yellow ochre to the ends to create berry clusters. -
Connect the Wreath:
Use your size 2 brush with a diluted brown to paint fine stems connecting all your floating leaves to the main circle shape. Keep these lines very thin and organic. -
Add Vein Details:
Once the large yellow and rust leaves are completely dry, use the size 2 brush and a slightly darker version of the base color to paint thin center veins.
Step 3: Lettering & Finishing
-
Paint ‘Give’:
Load your size 2 brush with a concentrated dark brown mixture (Burnt Umber + a touch of blue or black). Carefully paint the script word ‘Give,’ applying more pressure on downstrokes for thickness and light pressure on upstrokes. -
Paint ‘THANKS’:
Using the same dark brown mix, paint the capital letters for ‘THANKS.’ Keep the lines relatively uniform in thickness, adding small serifs (the little feet) at the ends of the strokes. -
Refine Edges:
Check your lettering for any shaky edges and smooth them out carefully with the tip of your small brush. -
Erase Guides:
Wait until the paint is bone dry—if the paper feels cool to the touch, it’s still wet. Once dry, gently erase any visible pencil marks from your initial sketch. -
Create the Deckled Edge (Optional):
To mimic the handmade paper look in the photo, place a ruler along the edge of your paper, wet the strip of paper outside the ruler with water, and gently tear it away to create a soft, fibrous edge.
Fixing Lettering Mistakes
If you smudge a letter, don’t wipe it! Blot directly downward with a clean paper towel, let it dry completely, and then carefully paint over.
Display this piece on a mantel or frame it to bring a personalized touch of gratitude to your home décor
BRUSH GUIDE
The Right Brush for Every Stroke
From clean lines to bold texture — master brush choice, stroke control, and essential techniques.
Explore the Full Guide
Rustic Barn at Thanksgiving Sunset
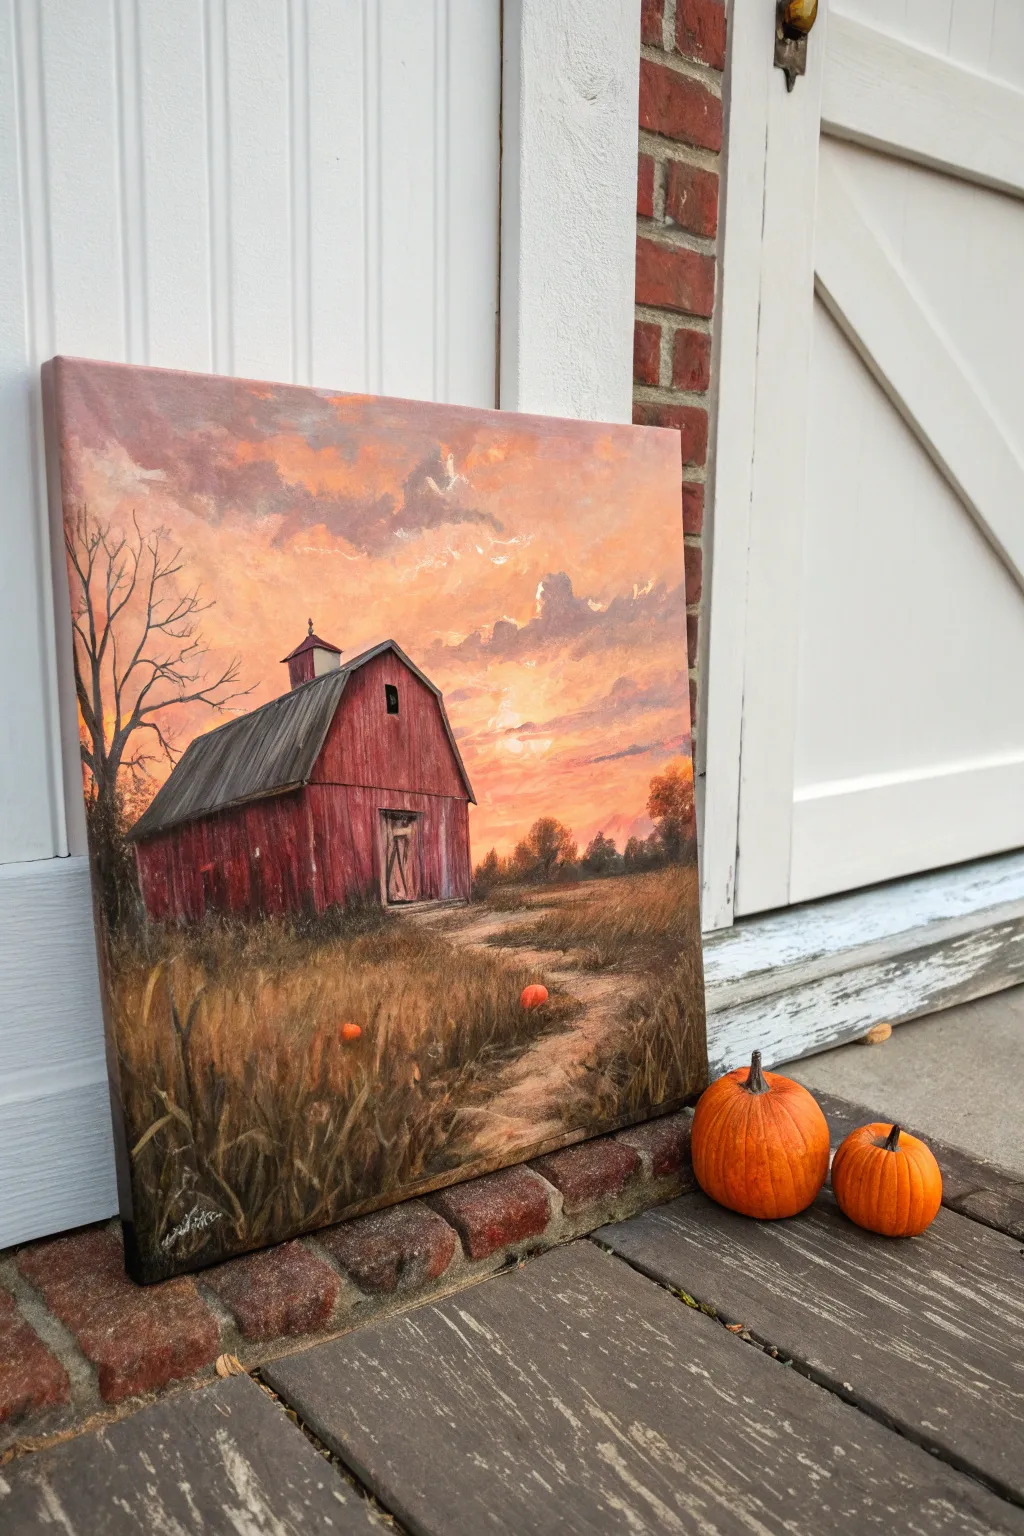
Capture the nostalgic warmth of a country autumn evening with this atmospheric acrylic painting. You’ll layer rich oranges and violets to create a glowing sky that serves as the perfect backdrop for a weathered red barn.
Step-by-Step Guide
Materials
- Canvas (square, approx. 12×12 or 16×16 inches)
- Acrylic paints: Cadmium Red, Alizarin Crimson, Cadmium Yellow, Burnt Sienna, Burnt Umber, Ultramarine Blue, Titanium White, Black
- Large flat wash brush (1-inch)
- Medium flat brush (size 6 or 8)
- Small round detail brush (size 2)
- Fan brush (optional, for grass)
- Palette knife
- Cup of water and paper towels
Step 1: Setting the Scene
-
Establish the horizon:
Mix a small amount of Burnt Sienna with white to create a light tan. Using your medium flat brush, lightly sketch a horizon line about one-third of the way up from the bottom of the canvas. This doesn’t need to be perfectly straight, as it represents rolling fields. -
Block in the sky colors:
For that vibrant sunset, start at the horizon line. Mix Cadmium Yellow with a touch of Cadmium Red to make a glowing orange. Paint horizontal strokes, moving upward. -
Deepen the sky:
As you move higher up the canvas, gradually mix in Alizarin Crimson and a tiny bit of Ultramarine Blue to create dusty purples and mauves. Blend these into the wet orange paint below for a seamless transition. -
Add cloud texture:
While the sky is still damp, pick up some Titanium White mixed with a hint of purple on the corner of your brush. Dab in irregular cloud shapes near the top, softening the bottom edges so they look fluffy and distant. -
Create the sun glow:
Near the center right, just above the horizon, paint a small, soft circle of pure white mixed with yellow. Gently dry brush outwards from this point to make the surrounding clouds look like they are catching the last rays of light.
Step 2: Constructing the Barn
-
Outline the structure:
Using a smaller brush and thinned Burnt Umber, sketch the basic shape of the barn. It should be positioned off-center to the left. Remember to angle the rooflines downward to match the perspective. -
Paint the siding base:
Mix Alizarin Crimson with a little Burnt Umber. Fill in the main body of the barn with vertical strokes. Don’t make the coverage perfect; letting the under-sketch show through adds to the weathered look. -
Add roof details:
Mix Ultramarine Blue, Burnt Umber, and White to make a slate grey. Paint the roof, allowing streaks of darker and lighter grey to mimic age and texture. Add the small cupola on top for extra character. -
Weather the wood:
Take your smallest detail brush with very dark brown (Burnt Umber plus a touch of Black). Paint thin vertical lines to separate the wooden planks on the barn’s side. Add a few diagonal strokes for the barn door cross-bracing. -
Add highlights:
I like to mix a pale pink-grey shade to hit the edges of the roof and the tops of the door frames, simulating where the moonlight or fading sun is catching the structure.
Brush Tip
To get realistic, thin branches on the bare tree, add a drop of water to your dark paint. Inky consistency flows better off a liner brush than thick paint.
Step 3: Foreground and Details
-
Lay down the field:
For the grassy foreground, mix Burnt Sienna, Yellow Ochre (or yellow with a touch of brown), and Burnt Umber. Use a large brush with vertical, flicking motions to fill the bottom third of the canvas. -
Paint the path:
Mix a light beige color using White and Burnt Sienna. Paint a winding path leading from the foreground toward the horizon, narrowing as it goes back. Blend the edges into the grass so it looks overgrown. -
Create tall grasses:
Using a fan brush or the edge of a flat brush, flick upward strokes of lighter yellow-brown over the dark field base. Vary the height and direction to make it look wild and natural. -
Shape the bare tree:
On the left side, use thin black-brown paint and your liner brush to create the silhouette of a bare tree. Start with a thicker trunk and branch out into very fine, shaky lines that reach up into the sky. -
Add distant foliage:
along the horizon line, stipple in small, dark bushes and trees using a mix of dark greens and browns. This separates the sky from the field and adds depth. -
Place the pumpkins:
Paint a few small orange ovals in the grass near the path. Use a brighter orange on the top left side of each oval for a highlight, and add a tiny brown stem on top. -
Final touches:
Add a few final bright highlights to the grass tips where the sun hits them, and deepen the shadows directly under the barn and pumpkins to ground them.
Make It Yours
Personalize your barn by adding a ‘hex sign’ or a wreath on the door. You can also paint a few birds silhouetted against the bright part of the sunset.
Step back and admire the cozy, rustic atmosphere you’ve created, perfect for the holiday season
Harvest Truck with a Giant Pumpkin

Capture the nostalgia of the fall season with this detailed watercolor painting featuring a classic teal pickup hauling a prize-winning pumpkin. This project balances soft, grassy textures with the clean lines of the vintage vehicle for a charming farmhouse aesthetic.
Step-by-Step
Materials
- Cold press watercolor paper (140lb/300gsm)
- Watercolor paints (Veridian Green, Burnt Sienna, Yellow Ochre, Cadmium Orange, Burnt Umber, Ultramarine Blue, Paines Gray)
- Round watercolor brushes (sizes 2, 6, and 10)
- Fine liner brush (size 0 or 00)
- Pencil (HB) and kneaded eraser
- Masking fluid (optional)
- Jar of water and paper towels
Step 1: Sketching the Composition
-
Map out the truck body:
Begin with a light pencil sketch. Draw a boxy, rectangular shape for the truck bed and a curved cab structure. Position the truck slightly angled away from the viewer to create depth. -
Draw the wheel wells and tires:
Sketch the prominent rear tire and the visible front tire. They should look slightly sunk into the imagined grass, not floating on top. -
Add the giant pumpkin:
Sketch a large, ribbed pumpkin shape sitting in the truck bed. It should be oversized, dominating the back of the truck, with the stem slightly tilted. -
Refine the details:
Lightly draw the wooden slats on the truck bed, the bumper, the side mirror, and the bare tree branches reaching up on the right side.
Step 2: Painting the Pumpkin and Truck
-
Base coat for the pumpkin:
Mix Cadmium Orange with a touch of Yellow Ochre. Using the size 6 brush, paint the pumpkin, leaving thin white gaps between the ribs to suggest highlights. -
Shadowing the pumpkin:
While the orange is still slightly damp, drop in Burnt Sienna along the bottom edges and the deep grooves of the pumpkin ribs to create roundness. -
Painting the truck body:
Mix Veridian Green with a lot of water and a tiny bit of Ultramarine Blue to get that vintage teal shade. Apply a wash over the truck body, carefully painting around the window and bumper. -
Deepening the truck color:
Once the first layer dries, add a second, more saturated layer of teal to the shadowed areas: under the wheel wells, the lower side of the cab, and behind the cab. -
Painting the wood slats:
Use Burnt Umber diluted with water for the wooden railing on the truck bed. Vary the color intensity to make the wood look aged and weathered. -
Detailing the tires:
Use a mix of Paines Gray and Burnt Umber for the tires. Don’t make them solid black; leave the centers lighter for the hubcaps and create texture for the treads. -
Adding chrome accents:
For the bumper and hubcaps, use a very watery wash of faint blue-grey. Leave the paper white for the brightest reflections to mimic shiny metal.
Muddy colors?
If your teal truck looks brown, wait for the pumpkin orange to dry completely before painting nearby. Touching wet complimentary colors creates mud.
Step 3: Creating the Landscape
-
Underpainting the grass:
With a large watery wash, apply patches of Yellow Ochre and watered-down Green around the base of the truck. Keep the edges soft and uneven. -
Adding texture to the field:
Using a dry-brush technique with darker greens and browns, flick the brush upward to create individual blades of grass overlapping the bottom of the tires. -
Drawing the bare tree:
With your finest liner brush and a dark grey-brown mix, paint the spindly tree on the right. Keep the branches thin and shaky for a natural look. -
Painting background trees:
In the distance on the left, add small, soft triangular shapes using a misty blue-green. These represent distant evergreens; keep them blurry to push them into the background. -
Final details:
Add tiny details like the red taillight, the truck logo, and a stray pumpkin on the ground near the front tire for extra storytelling.
Add Rustic Charm
Use a white gel pen after the paint fits to add crisp highlights to the truck’s chrome bumper or to add frost to the grass blades.
Now you have a charming piece of rustic art perfect for your Thanksgiving mantel display

PENCIL GUIDE
Understanding Pencil Grades from H to B
From first sketch to finished drawing — learn pencil grades, line control, and shading techniques.
Explore the Full Guide
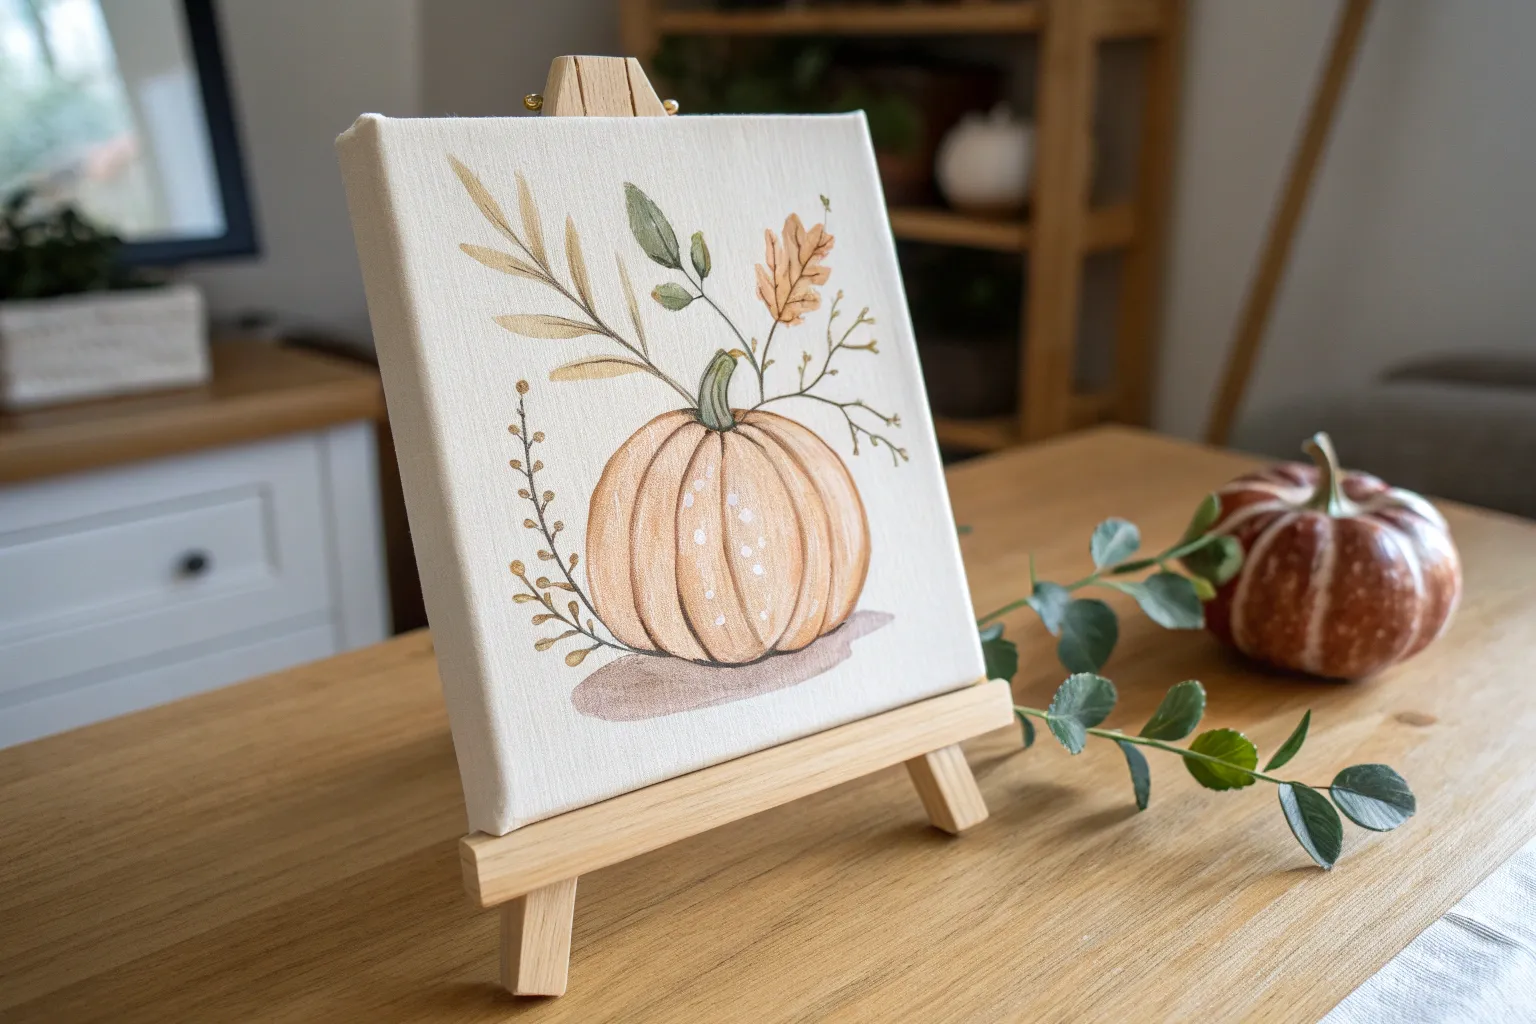
Thanksgiving Place Card Mini Canvases
These adorable miniature canvases act as perfect functional décor for your Thanksgiving table settings. The stylized pumpkin design uses color blocking and simple brushwork to create a rustic, welcoming charm that guests can take home as a favor.
Step-by-Step Tutorial
Materials
- Mini canvas panels (3×3 or 4×4 inch)
- Mini wooden display easels
- Acrylic paint: Bright Orange, Terracotta/Rust, Deep Green, Olive Green, White
- Small flat shader brush (size 2 or 4)
- Fine liner detail brush (size 00 or 0)
- Pencil for sketching
- Palette or small plate
- Water cup and paper towels
Step 1: Sketching the Shape
-
Center the pumpkin:
Begin by lightly sketching a wide oval shape in the center of your mini canvas. Keep it slightly below the vertical center to leave room for the stem and leaves at the top. -
Define the segments:
Draw curved lines inside your oval to create the pumpkin’s segments. Start with a central oval, then add C-curved sections radiating outward on both the left and right sides to give it dimension. -
Add the stem:
Sketch a sturdy, triangular stem sitting on top of the central segment. You can give it a little twist or jagged edge at the top for a natural look. -
Plan the greenery:
Lightly trace where your leafy sprigs will go. Sketch one curving out to the left and a slightly more detailed frond extending to the right.
Uneven Lines?
If your segment lines get messy, wait for the paint to dry fully. Then, use a white paint pen or a liner brush with white paint to re-draw the separation lines cleanly.
Step 2: Painting the Pumpkin Body
-
Paint the center segment:
Load your small flat brush with bright orange paint. Fill in the center oval segment entirely, using smooth vertical strokes to mimic the pumpkin’s texture. -
Alternate colors:
To create depth, use the terracotta or rust color for the segments immediately next to the center one. This contrast makes the pumpkin pop. -
Fill outer edges:
Return to the bright orange (or mix a little yellow into it for variation) to paint the outermost segments on the far left and right. -
Leave gaps:
Try to leave a microscopic hairline of unpainted white canvas between the color segments. This acts as a natural separator so the colors don’t blend into one blob. -
Dry break:
Let the orange layers dry completely for about 10 minutes. Detailed white work needs a dry surface.
Step 3: Adding Details and Foliage
-
Paint the stem:
Using the deep green paint and your fine liner brush, fill in the stem shape. Add a tiny vertical streak of white or lighter green while it’s wet to show a highlight. -
Create the left sprig:
Mix olive green with a touch of white. Paint delicate, thin lines curving upward from the stem base to the left. Add a tiny curly-cue vine for whimsy. -
Paint the right frond:
Using the deep green, paint a main stem extending right. Press down gently with the brush tip to create small, teardrop-shaped leaves along this stem. -
Add white highlights:
Once the orange paint is fully dry, take the fine liner brush with pure white paint. Add thin curved lines following the separating curves of the pumpkin segments. -
Stipple texture:
Dip the very tip of your brush (or a toothpick) in white paint and add small groupings of dots on the lower half of the orange segments. This mimics the speckled texture of a gourd. -
Final assembly:
Allow the canvas to dry completely before placing it onto the mini wooden easel.
Pro Tip: Customization
Write your guest’s name on the blank white space above the pumpkin using a fine-point gold metallic marker for an elegant, personalized place setting.
Set these on your table to greet your guests with a handcrafted touch of autumn warmth
Watercolor Turkey Feathers with Salt Texture
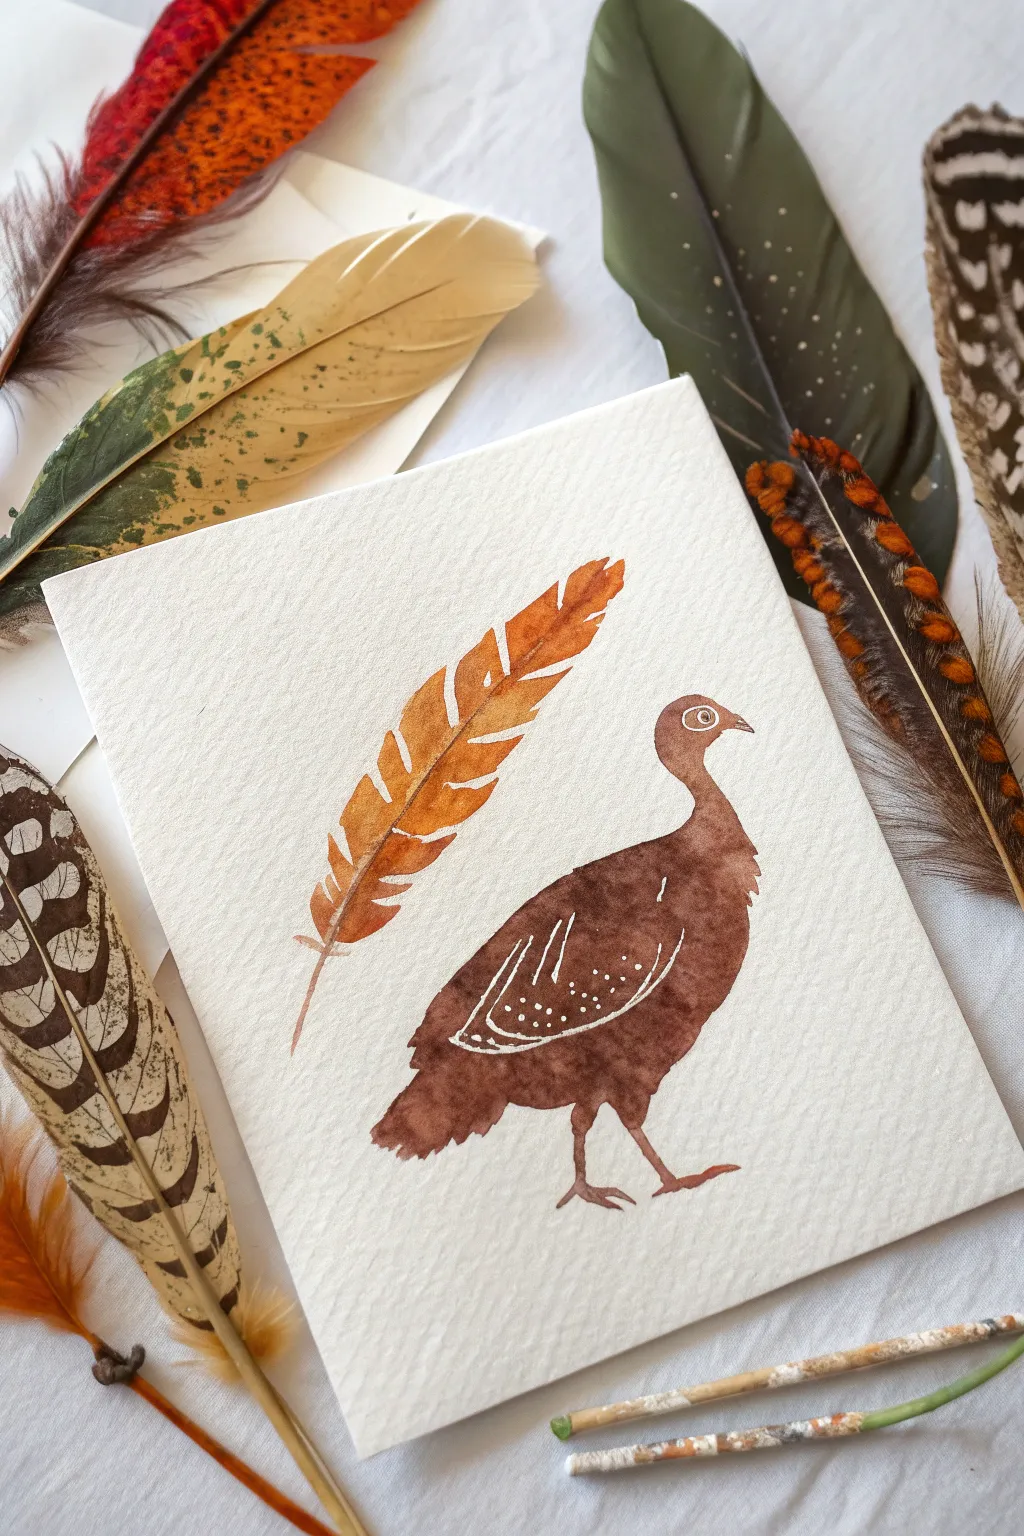
Embrace simplicity with this charming watercolor illustration featuring a stylized brown turkey and a vibrant single feather. The project uses the texture of cold-press paper to create an organic, rustic look perfect for Thanksgiving decor.
Detailed Instructions
Materials
- Cold-press watercolor paper (300 gsm recommended for texture)
- Watercolor paints (burnt sienna, burnt umber, yellow ochre)
- Round watercolor brushes (size 4 and size 0 for details)
- White gel pen or fine white gouache
- Pencil and eraser
- Jar of clean water
- Paper towel
Step 1: Sketching the Outline
-
Plan the composition:
Visualize your paper divided into two main areas. The large feather will float diagonally in the upper left, while the turkey will anchor the bottom right corner. -
Draw the feather spine:
Using a very light pencil touch, draw a curved line representing the central quill of the floating feather. Keep it gentle and arched. -
Map the turkey shape:
Sketch a teardrop shape for the turkey’s body, slanted slightly forward. Add a small oval for the head connected by a sleek neck, and sketch simple stick-like lines for the legs/feet.
Edge Control
If you struggle with shaky edges on the turkey silhouette, hold your breath slightly while pulling the long strokes for the neck and back curve.
Step 2: Painting the Feather
-
Mix your orange tones:
Create a warm autumn mix using burnt sienna and a touch of yellow ochre. You want a vibrant, rusty orange color. -
Paint the disconnected vanes:
Starting from the top of your pencil quill line, paint individual sections of the feather vanes. Instead of a solid shape, leave intentional white gaps between the brushstrokes to mimic barbs separating. -
Gradate the color:
As you move down the feather, I like to add a tiny bit more brown to the mix to make the base feel heavier and darker than the tip. -
Add the quill:
Once the vanes are damp but not soaking, use the tip of your brush to draw a thin, brownish-red line down the center to connect the floating sections.
Golden Splatter
For a magical finish, load a brush with metallic gold watercolor and tap it against a pencil to sprinkle tiny gold specks around the feather.
Step 3: Painting the Turkey Body
-
Mix a rich brown:
Combine burnt umber with a hint of red or burnt sienna to get a chocolatey, warm brown tone. -
Fill the silhouette:
Using your size 4 brush, fill in the turkey’s head, neck, and body. Keep the edges clean and crisp. -
Soften the tail:
At the rear of the bird (the tail area), dab your brush slightly irregularly to suggest ruffled feathers rather than a smooth line. -
Add the legs:
Switch to your size 0 brush or use the very tip of the larger brush to paint the thin legs and feet. Make the joints slightly knobby for realism. -
Let it dry completely:
This is crucial. The paint must be 100% dry before adding the white details, or the ink will bleed and turn muddy.
Step 4: Adding White Details
-
Draw the wing detail:
Using a white gel pen, draw the outline of a folded wing on the turkey’s side. The shape should resemble a rounded triangle pointing toward the tail. -
Add inner wing texture:
Fill the lower half of the wing shape with tiny white stippled dots, and draw 3-4 simple lines in the upper half to suggest long wing feathers. -
Detail the eye:
Draw a small white circle on the head for the eye. Add a tiny dot of dark paint or ink in the center for the pupil to bring the bird to life. -
Final touches:
Add a tiny white accent line on the beak to separate the top and bottom mandibles.
Display your painting alongside some gathered fall leaves or acorns for a lovely seasonal vignette


Turkey Silhouette over Splattered Autumn Sky
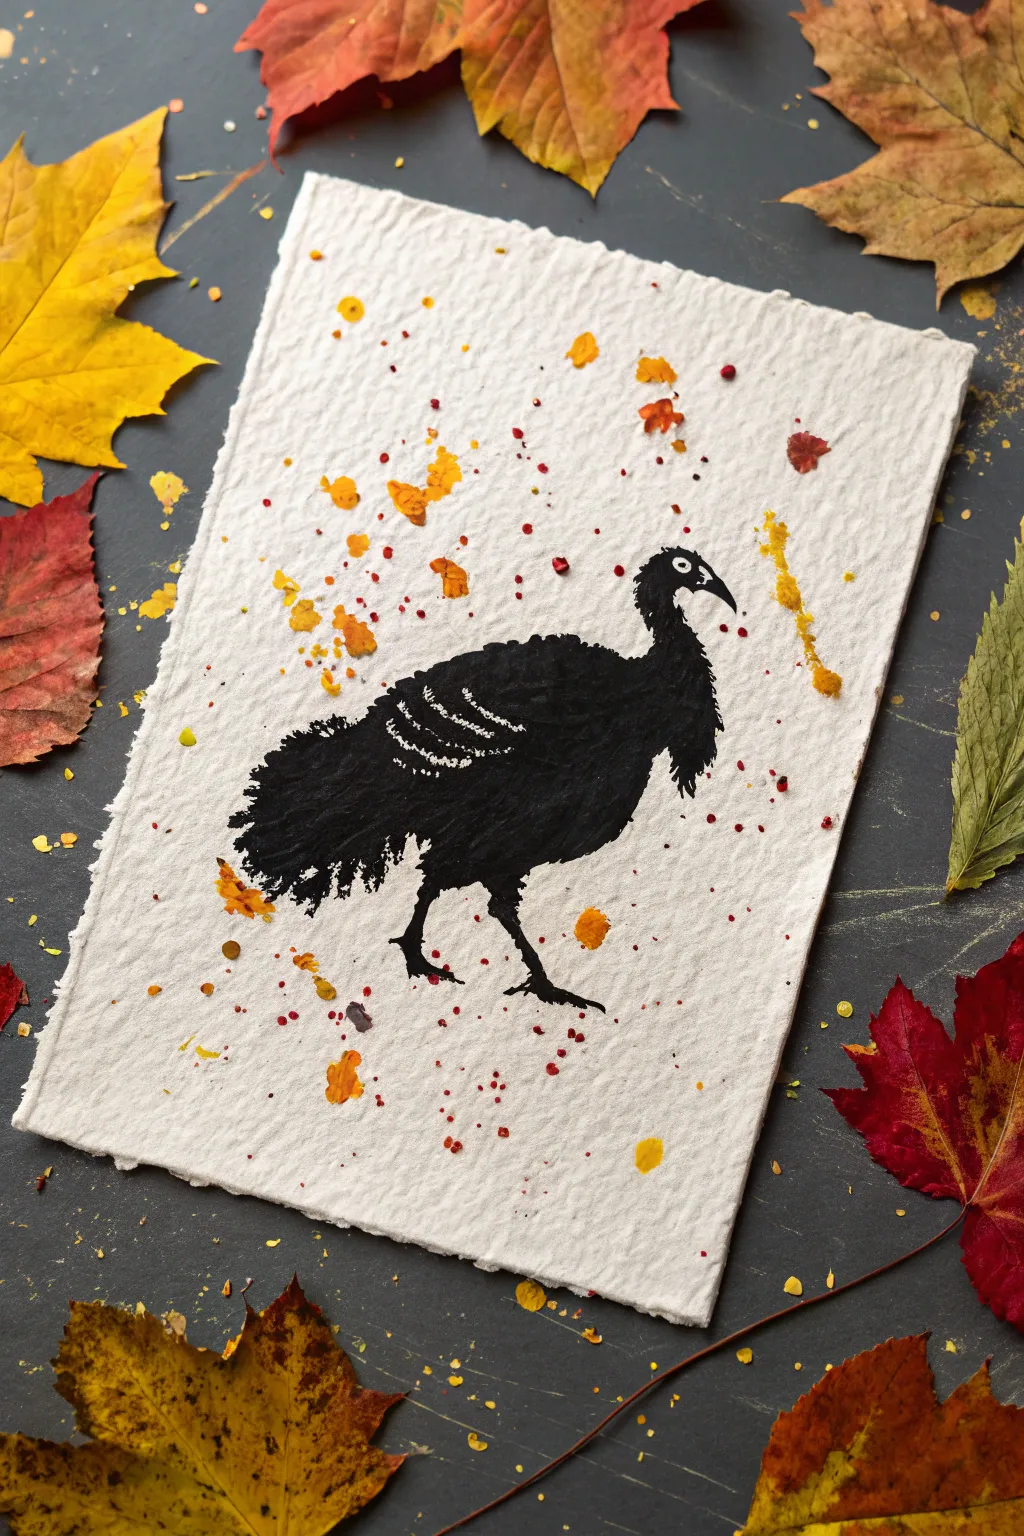
Capture the essence of a crisp fall evening with this striking turkey silhouette set against a playful, splattered background. The contrast between the stark black figure and the organic scattering of autumn colors creates a sophisticated yet rustic piece of art.
Step-by-Step Tutorial
Materials
- Heavyweight textured paper (cold press watercolor or handmade cotton paper)
- Black acrylic paint or gouache
- Yellow, orange, and red acrylic paints (fluid or watered down)
- Small round brush (size 2 or 4)
- Old toothbrush or stiff fan brush for splattering
- Pencil and eraser
- Paper towels
- White gel pen or fine white paint marker
Step 1: Preparing the Autumn Atmosphere
-
Select your canvas:
Choose a piece of paper with significant texture. A sheet with deckled (torn/rough) edges adds to the rustic charm seen in the photo. -
Prepare your splatter paints:
Mix small amounts of yellow, orange, and red paint with water in separate wells. The consistency should be inky—thin enough to flick easily, but pigmented enough to show up well. -
First splatter layer:
Dip an old toothbrush or a stiff brush into the yellow paint. Hold it over the paper and tap the handle or run your thumb against the bristles to flick tiny droplets across the surface. -
Adding richness:
Repeat the splattering process with orange and then red. Aim for a random distribution, letting some spots cluster and others remain sparse. -
Create larger splotches:
For the bigger, more distinct dots seen in the background, dip a round brush into the paint and lightly tap it against your finger directly over the paper, or manually dab a few larger dots. -
Dry completely:
This is crucial. Let the background dry fully before moving on, or the silhouette will bleed into the splatters. I find a hairdryer on a low cool setting speeds this up nicely.
Pro Tip: Texture Trick
To get those really organic-looking clustered spots, try flicking the paint from a greater height. Gravity helps the droplets land more naturally without streaking.
Step 2: Painting the Silhouette
-
Sketch the outline:
Using a pencil, very lightly sketch the turkey’s shape. Start with an oval for the body and extend a curved neck upwards. -
Define the head:
Draw the small head and beak at the top of the neck, making sure the beak points slightly downward. -
Add the tail fan:
Sketch the tail feathers jutting out from the back of the oval body. Keep the edges ragged to mimic feathers. -
Outline the silhouette:
Load your small round brush with undiluted black paint. Carefully trace over your pencil lines, refining the shape as you go. -
Fill the form:
Fill in the entire body with solid black paint. Ensure the coverage is opaque; you may need a second coat after the first dries. -
Feather the edges:
While the paint is wet or with a freshly loaded brush, use quick, short strokes along the neck and tail edges to create a fluffy, feathered texture rather than a smooth line. -
Add the legs:
With the very tip of your brush, paint the legs extending downward. Include the feet and back spurs, making them grounded and strong.
Troubleshooting: Blobs
If a splatter lands too big or fat, don’t wipe it! Let it dry completely, then you can either incorporate it into the design or paint over it with opaque white before splattering again.
Step 3: Final Details
-
Create the eye:
Once the black paint is 100% dry, use a white gel pen or a tiny dot of white paint to create the eye circle. Add a tiny black dot in the center for the pupil. -
Highlight the wing:
Using the white pen or paint, draw usually three or four curved, broken lines on the side of the body to suggest the folded wing structure. -
Integrate the feet:
If the turkey looks like it’s floating, add a tiny bit of horizontal shadow or a couple of extra paint splatters near the feet to ground it. -
Final assessment:
Step back and look at the balance. If the background feels too empty around the turkey, you can carefully add a few more controlled splatters, avoiding the black figure.
Now you have a charming, textured piece of Thanksgiving art ready to frame or display on the mantle
Mixed-Media Pressed Leaves and Painted Pumpkins
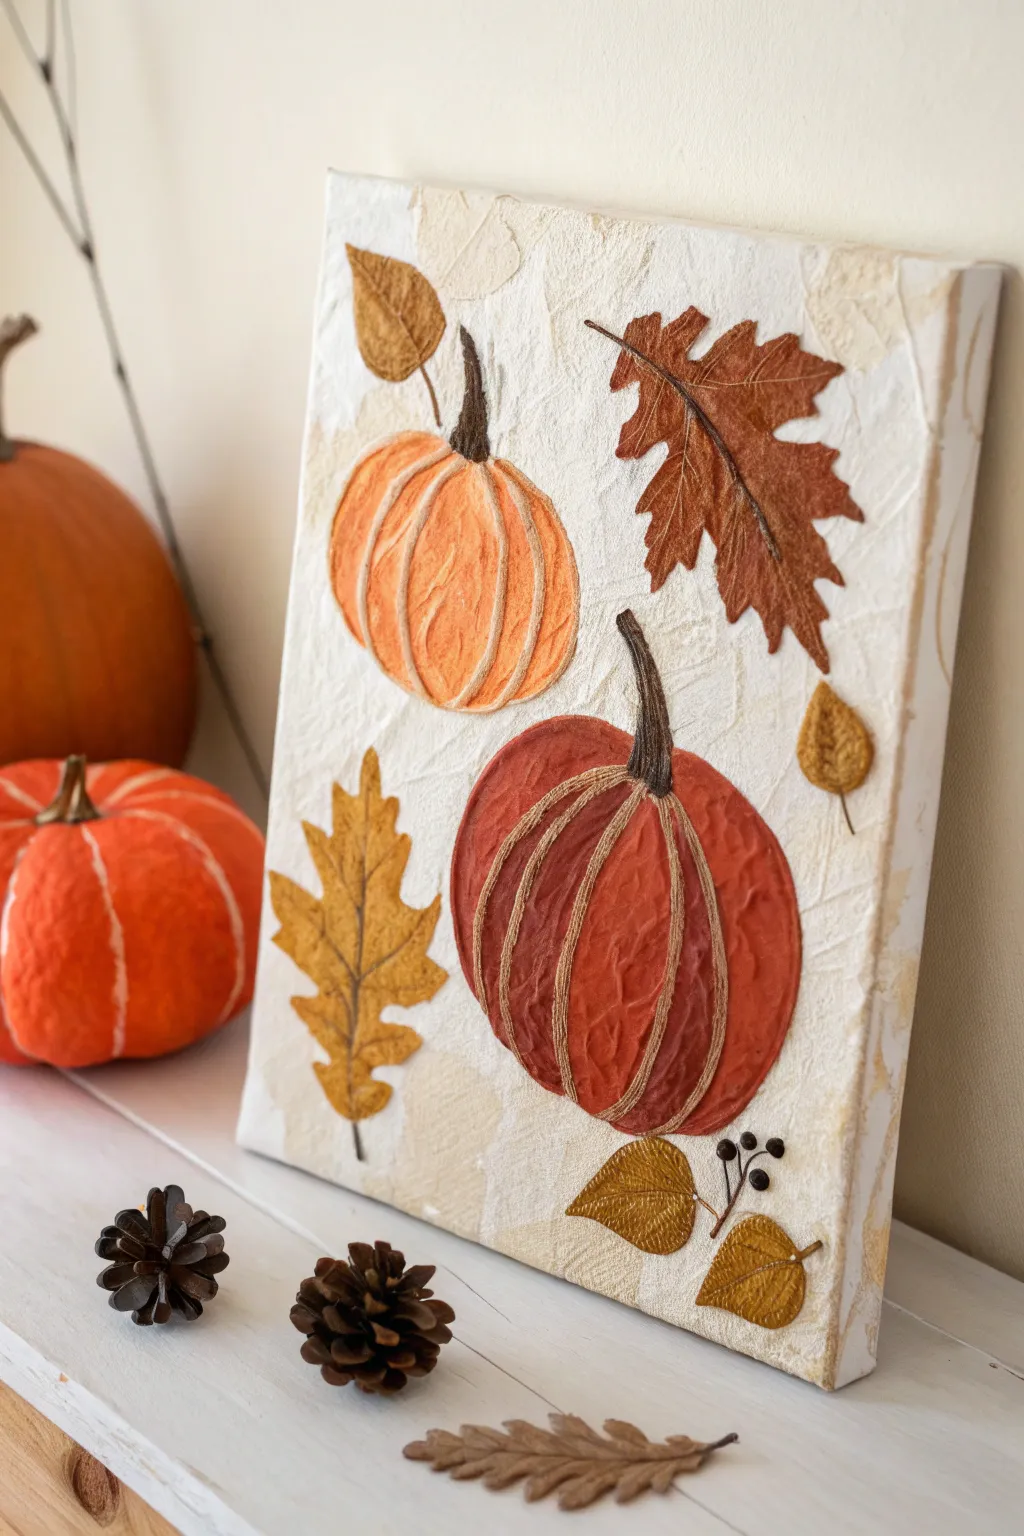
Bring the textures of the harvest season indoors with this delightful mixed-media canvas. By combining textured paper techniques with painting and decoupage, these pumpkins and leaves pop right off the surface for a uniquely tactile Thanksgiving decoration.
How-To Guide
Materials
- Pre-stretched canvas (8×10 or 11×14 inch)
- White tissue paper
- Mod Podge or decoupage glue
- Acrylic paints (orange, red-orange, burnt umber, tan, metallic gold)
- Cardstock or thick watercolor paper
- Jute twine or thick brown yarn
- Small black beads or seeds (for berries)
- Scissors
- Hot glue gun and glue sticks
- Paintbrushes (flat shader and fine liner)
Step 1: Preparing the Textured Background
-
Crumple tissue:
Begin by tearing pieces of white tissue paper into random shapes. Gently crumple them in your hand and then smooth them back out mostly flat; this creates the base wrinkles. -
Apply base layer:
Brush a layer of Mod Podge directly onto your blank canvas. Place the crumpled tissue pieces onto the wet glue, overlapping them slightly to cover the entire surface. -
Seal texture:
Brush another generous coat of Mod Podge over the top of the tissue paper. Use your brush to push the paper around slightly to enhance the wrinkles and texture, then let this layer dry completely until hard. -
Add vintage wash:
Mix a tiny drop of tan paint with water to create a very sheer wash. Lightly brush this over random sections of the dry background to give it an aged, parchment-like appearance.
Wrinkle Master
Don’t press the tissue paper too flat! The more ridges and wrinkles you leave in the decoupage step, the more realistic and interesting the pumpkin skin will look.
Step 2: Crafting the Elements
-
Cut shapes:
Sketch two oval pumpkin shapes and about 3-5 leaf outlines onto your cardstock or watercolor paper. Use scissors to cut these shapes out neatly. -
Texture the pumpkins:
Similar to the background, decoupage crumpled tissue paper onto your pumpkin cutouts. This step is crucial because it gives the pumpkins that rugged, organic skin texture seen in the photo. -
Paint the pumpkins:
Paint the smaller pumpkin with a bright orange acrylic. For the larger bottom pumpkin, use a deeper red-orange or rust color. Let the texture of the tissue paper catch the paint naturally. -
Paint the leaves:
Paint your leaf cutouts using burnt umber for the oak-style leaves and a mix of tan and metallic gold for the smaller, smoother leaves. -
Create stems:
For the pumpkin stems, you can either paint top sections of the pumpkin cutouts dark brown, or for more dimension, twist a piece of tissue paper into a stem shape, glue it on, and paint it dark brown.
Real Nature Texture
For the ultimate mixed-media look, swap the cardstock leaves for actual dried, pressed leaves. Seal them with Mod Podge before gluing to prevent shattering.
Step 3: Assembly and Detailing
-
Mount properties:
Arrange your dry painted pumpkins and leaves on the canvas. Once you are happy with the composition, use hot glue or strong craft glue to secure them in place. -
Add pumpkin ridges:
Cut lengths of jute twine to match the vertical curves of your pumpkins. Glue these strands vertically across the pumpkin bodies to define the ribs and segment the shape. -
Detail the leaves:
For the larger brown leaf, glue a single piece of twine down the center to act as the midrib vein. This adds a subtle 3D element that mimics real pressed foliage. -
Attach berry sprigs:
Paint a small, thin twig or wire dark brown and glue it near the bottom right corner. Glue small black beads or seeds to the ends to create the little berry cluster. -
Final shading:
Using a very dry brush and a tiny amount of dark brown paint, gently scuff along the edges of the pumpkins and leaves to create shadows and depth. -
Highlighting:
I like to add a tiny touch of white or light yellow paint to the highest points of the pumpkin texture to make the ‘skin’ look like it’s catching the light. -
Seal artwork:
Finish the piece with a final clear matte spray sealant or a light coat of Mod Podge (avoiding the twine) to protect the paint and ensure everything stays adhered.
Now hang your textured masterpiece and enjoy the cozy autumn vibes it brings to the room


Have a question or want to share your own experience? I'd love to hear from you in the comments below!