When the days get chilly, I love turning a handful of smooth stones into tiny winter rock paintings that feel like little pocket-sized scenes. These winter rock painting ideas range from super simple characters to more detailed snowy landscapes, so you can pick whatever matches your mood (and patience) today.
Classic Snowman Faces
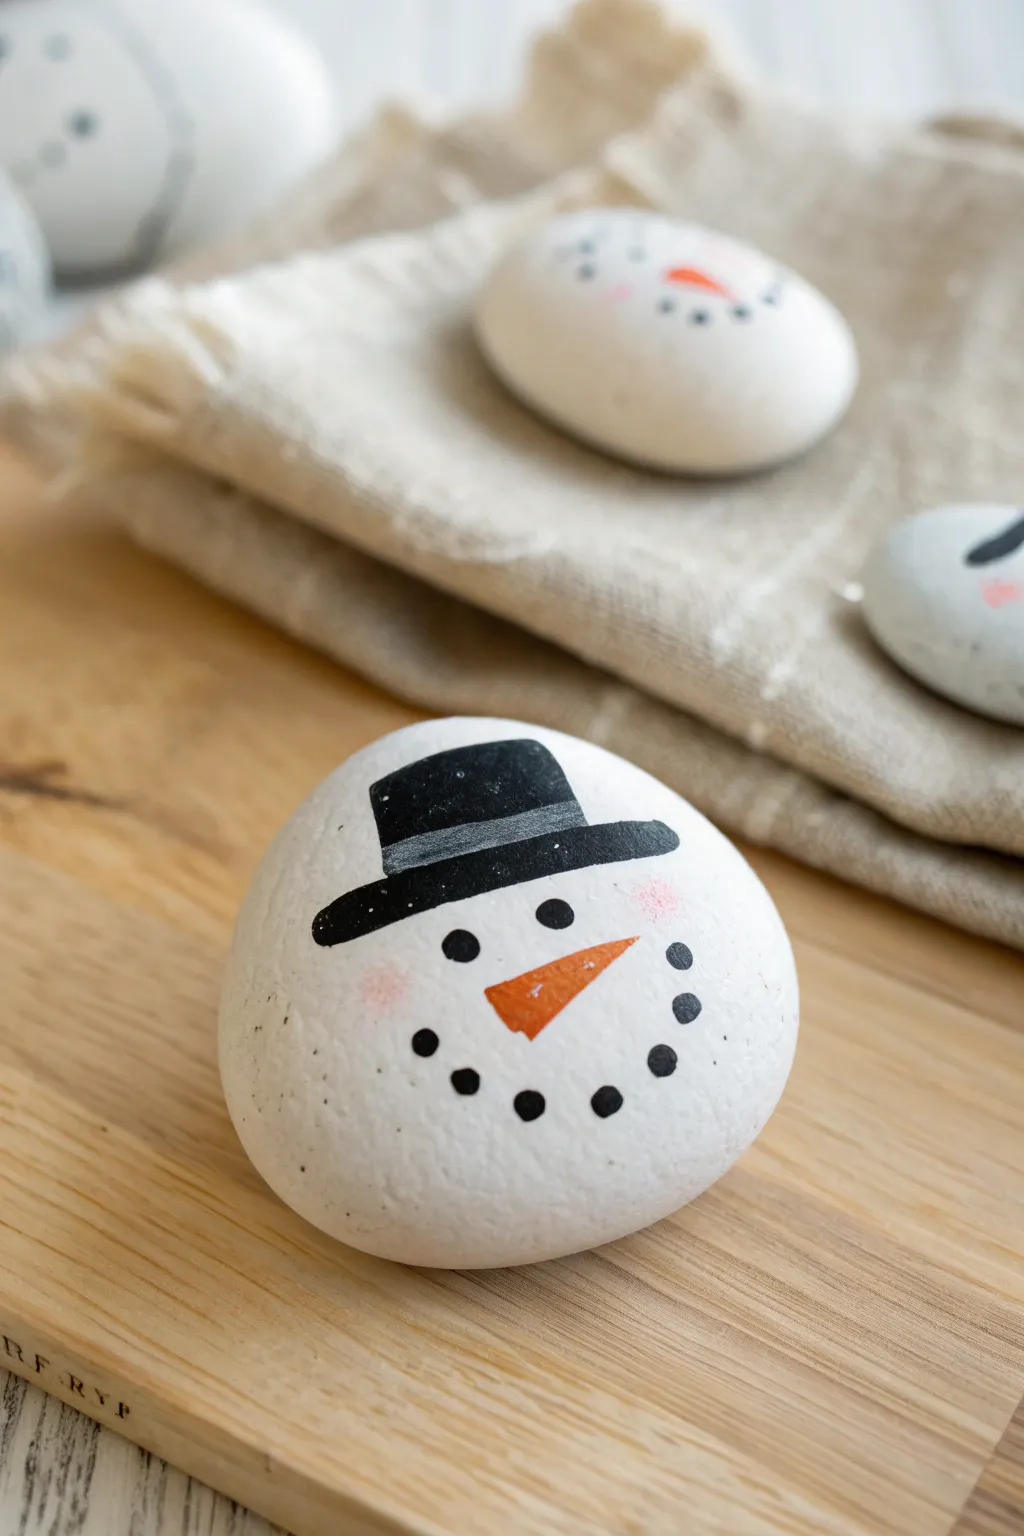
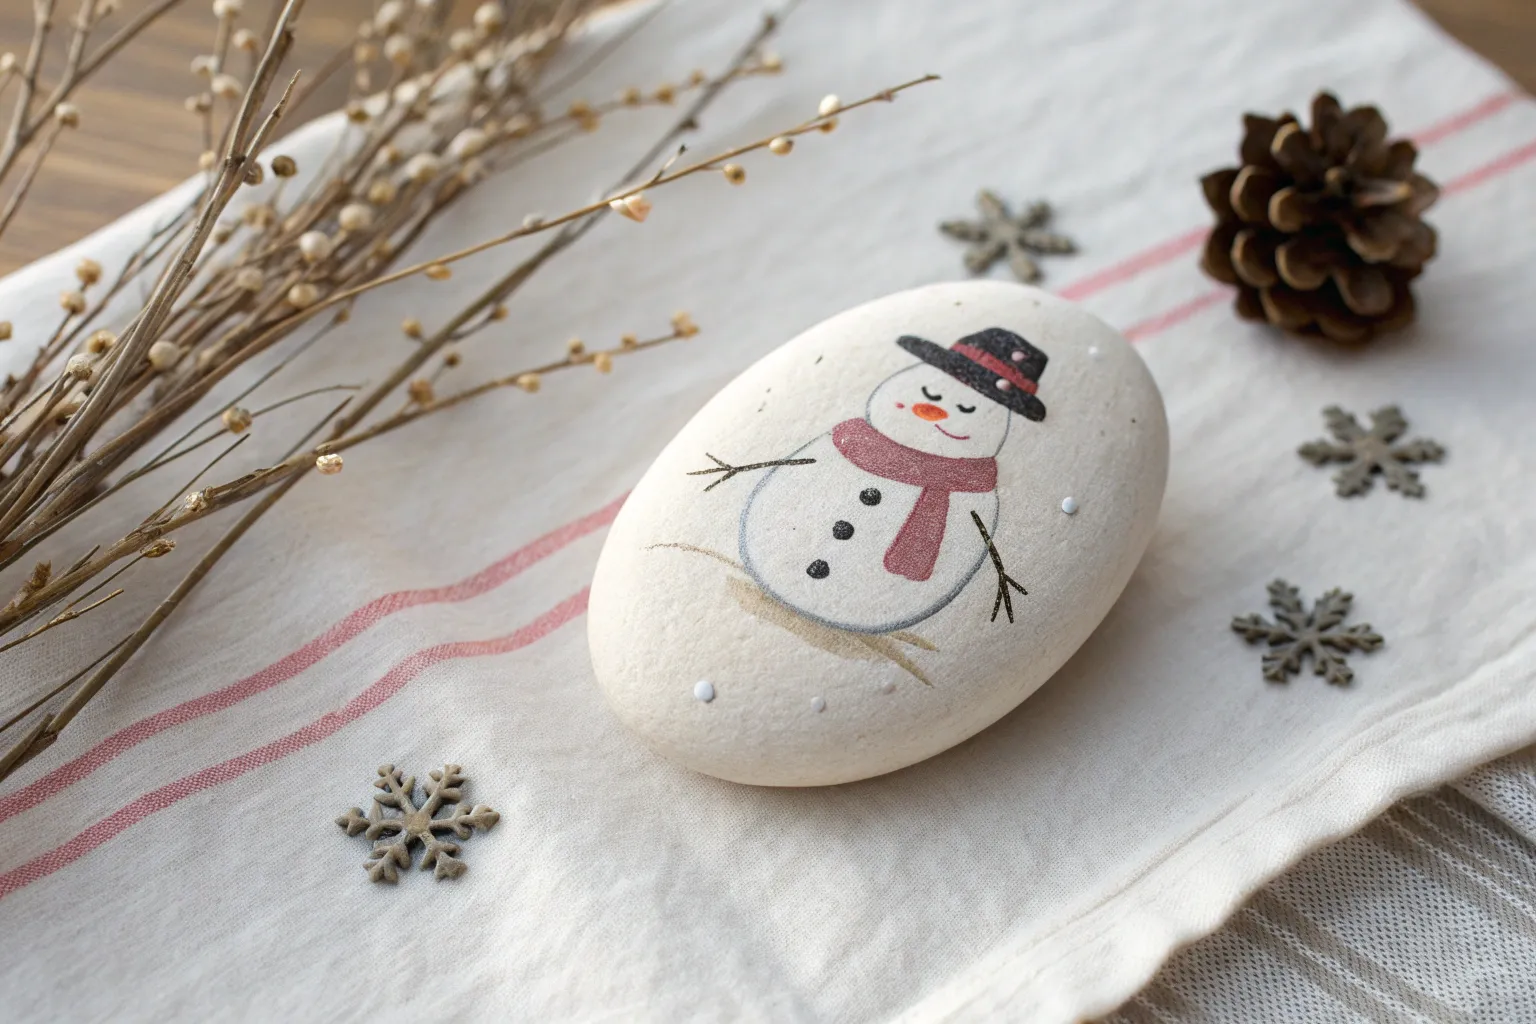
Transform a simple stone into a jolly winter friend with this classic snowman face design. The smooth, white finish and crisp black details give these rocks a modern farmhouse feel that looks perfect on a mantel or hidden in the garden.
Step-by-Step
Materials
- Smooth, oval-shaped river rocks
- White acrylic paint or gesso
- Black acrylic paint pen (fine tip)
- Orange acrylic paint pen or liner brush
- Pink acrylic paint or blush powder
- Flat paintbrush (medium)
- Small round paintbrush
- Matte sealant spray
Step 1: Preparing the Base
-
Clean Your Canvas:
Begin by thoroughly washing your rocks with warm, soapy water to remove any dirt or grit. Let them dry completely, preferably in the sun, to ensure no moisture is trapped inside. -
Base Coat Application:
Using your flat paintbrush, apply a generous coat of white acrylic paint to the entire surface of the rock. Don’t worry if it looks streaky at first. -
Second Layer:
Once the first coat is dry to the touch, apply a second layer of white paint. This ensures a solid, opaque background that will make your snowman’s face pop. -
Full Dry Time:
Allow the white base to cure fully. If the paint is even slightly tacky, your paint pens might snag or bleed in the next steps.
Paint Pen Won’t Flow?
If your paint pen tip feels dry, pump it gently on a piece of scrap paper until the ink flows again. Never pump it directly on your painted rock to avoid puddles.
Step 2: Painting the Hat
-
Hat Brim Outline:
About one-third of the way down the rock, use your black paint pen to draw a horizontal, slightly curved line for the brim of the top hat. -
Drawing the Crown:
Draw a rounded rectangle shape sitting on top of the brim line to create the crown of the hat. -
Filling In:
Carefully color in the entire hat shape with black. I find that using a paint pen here gives much sharper edges than a brush. -
Adding Dimension:
Once the black is dry, mix a tiny drop of white into black to make a dark grey. Paint a thin horizontal stripe across the hat crown to represent a hatband or shine.
Softer Cheeks
For the most realistic frosty glow, use a cotton swab dipped in powdered pink chalk pastel instead of acrylic paint for the cheeks. It creates a seamless fade.
Step 3: Adding the Features
-
The Eyes:
Using the black paint pen, draw two medium-sized dots below the brim for eyes. Space them somewhat widely for a friendly look. -
Carrot Nose Outline:
With an orange paint pen or a liner brush, draw a long, sideways triangle shape pointing to the right, starting from between and slightly below the eyes. -
Filling the Nose:
Fill in the orange triangle. You can make the wide end slightly rounded rather than distinctively flat for a more organic carrot look. -
Coal Mouth:
Create the smile using five or six smaller black dots arranged in a wide U-shape. Varying the size of the dots slightly adds a whimsical, hand-drawn charm.
Step 4: Finishing Touches
-
Rosy Cheeks:
Dip a dry, stiff brush into a tiny amount of pink paint (or use actual cosmetic blush). Dab most of it off on a paper towel until the brush is almost dry. -
Stippling:
Gently stipple or swirl the dry brush onto the cheeks at the ends of the smile. The goal is a soft, hazy glow, not a solid circle. -
Final White Highlights:
For extra life, add a tiny white dot to the top black part of the hat if it looks too flat, or touch up any white areas that got smudged. -
Sealing:
Once absolutely everything is dry, take the rock outside and spray it with a matte sealant. This protects the paint from chipping and weather without making it look plastic.
Now you have an adorable painted stone ready to brighten up your winter decor


Minimalist Penguin Pals
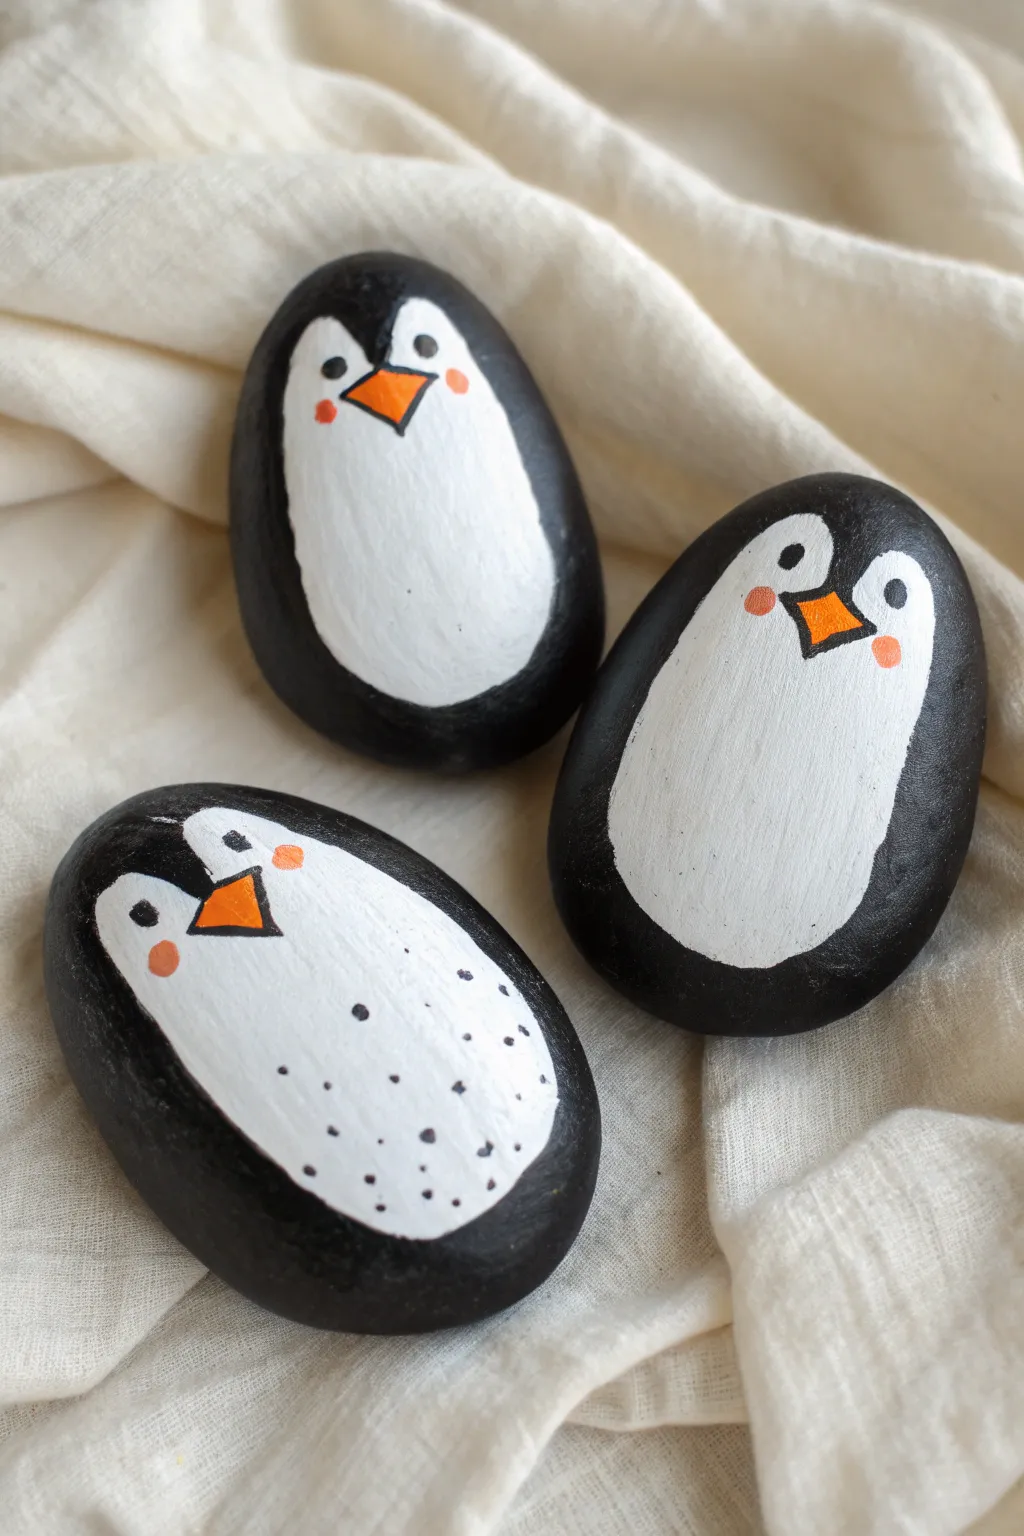
These charming little flightless birds prove that you don’t need complex skills to create adorable winter decor. With just a few smooth river stones and basic paint colors, you can bring a flock of personality-filled penguins to life.
Step-by-Step Tutorial
Materials
- Smooth, oval-shaped river rocks (roughly palm-sized)
- Black acrylic paint (matte finish works best)
- White acrylic paint
- Orange acrylic paint
- Pale pink or salmon acrylic paint
- Medium flat paintbrush
- Fine detail paintbrush (size 0 or 00)
- Pencil for sketching (optional)
- Clean water cup and paper towels
- Matte spray sealant (optional)
Step 1: Base Coat and Outline
-
Clean your canvas:
Start by washing your rocks thoroughly with soap and water to remove any dirt or oils. Let them dry completely before painting. -
Sketch the belly:
Using a light pencil, gently sketch a large, rounded oval shape in the center of the rock. This will be the white belly area. I find it helpful to make the top slightly narrower for the head. -
Paint the black body:
Using your medium flat brush and black acrylic paint, fill in the entire area *outside* of your pencil line. -
Cover the back:
Continue painting the black around the sides and back of the rock. You don’t need to paint the bottom if the rock sits flat, but covering the visible sides is crucial for a clean look. -
Let it dry:
Allow the black paint to dry completely. This usually takes about 15-20 minutes depending on how thick the coat is.
Step 2: Adding the Belly
-
Fill the center:
With a clean medium brush, fill in the center oval shape with white acrylic paint. -
Refine the edges:
Carefully smooth the edges where the white meets the black. You want a crisp, clean line. -
Second coat:
White paint can be translucent over dark stone. Apply a second or even third coat of white, letting each layer dry in between, until the belly is opaque and bright. -
Create the face shape:
At the top of the white oval, use your fine brush and a tiny bit of black paint to create a ‘widow’s peak’ or a downward curve in the center. This defines the forehead area.
Paint Pen Precision
Struggling with brush control? Use Posca paint pens for the fine black outlines and facial features. They offer much more stability than bristles.
Step 3: Facial Features
-
Paint the beak:
Using your fine detail brush and orange paint, create a small triangle in the center of the white face area, just below the forehead curve. Point the triangle downwards. -
Outline the beak:
Once the orange is dry, use the very tip of your fine brush with black paint to carefully outline the orange triangle. This makes the beak pop. -
Add the eyes:
Dip the handle end of a paintbrush into black paint to create two perfect dots for eyes. Place them on either side of the beak. -
Paint the cheeks:
Mix a tiny bit of pink paint (or mix red and white). Using the handle end of a smaller brush, add two soft pink dots on the cheeks, slightly lower and wider than the eyes.
Streaky White Paint?
If your white looks streaky, don’t keep brushing wet paint. Let it dry completely, then add another thin layer. Several thin coats are better than one thick glob.
Step 4: Unique Details
-
Add highlights:
If you want extra cuteness, add a microscopic dot of white paint inside the black eye dots to act as a light reflection. -
Speckle the belly (optional):
For variety, like the bottom penguin in the photo, use your finest brush to add tiny black specks across the lower belly to mimic feathers. -
Final touches:
Check for any uneven edges or smudges. You can easily fix mistakes by painting over them with the background color once dry. -
Seal the deal:
Once your penguin is 100% dry (give it a few hours), spray it with a matte clear coat to protect the paint from chipping or fading over time.
Arrange your finished trio on a mantle or window sill for a cozy touch of winter whimsy


Cozy Polar Bear With Scarf

Transform a smooth stone into this adorable polar bear bundled up for winter weather. This sweet woodland friend features soft colors, geometric scarf patterns, and simple lines perfect for beginner stone painters.
Step-by-Step Guide
Materials
- Smooth oval river rock
- Acrylic paints (white, black, beige/ochre, teal, rust orange, pink)
- Fine liner brushes (size 0 and 00)
- Flat shader brush
- Black fine-tip paint pen or micron pen
- Pencil and eraser
- Matte spray sealer
Step 1: Base Sketch & Blocking
-
Clean your canvas:
Begin by washing your stone with soap and water to remove any dirt or oils. Let it dry completely before starting to ensure the paint adheres properly. -
Sketch the outline:
Using a pencil, lightly draw the large oval shape for the bear’s body, which takes up most of the rock’s surface. Add two small semi-circles on top for ears. -
Define the face:
Sketch a curved line separating the head from the body where the scarf will sit. Draw the scarf wrapped around the neck with one tail hanging down the center. -
Paint the head:
Fill in the head area and the ears with solid white acrylic paint. You may need two thin coats to get nice opacity against the grey stone. -
Paint the coat:
Mix a warm beige or light ochre color and paint the entire lower body section, carefully painting around the scarf area you sketched.
Smooth Operator
If your paint feels streaky on the raw stone, mix a tiny drop of water into your acrylics. This improves the flow and helps create crisp, clean lines.
Step 2: Adding the Details
-
Base coat the scarf:
Paint the scarf sections with your teal blue paint. Don’t worry about the stripes yet; just establish the main color blocks of the scarf. -
Add scarf stripes:
Once the teal is dry, use your rust orange and beige paints to create horizontal stripes along the curve of the scarf and the hanging tail. -
Detail the scarf pattern:
I like to use a very fine brush here to add tiny dots or thin lines within the orange stripes to mimic a knitted texture. -
Create the face:
Paint a small, soft oval shape in the center of the face for the muzzle using a very faint grey or simply outlining it later. Add two rosy pink circles for cheeks. -
Draw the features:
Using your black fine-tip pen or a liner brush, carefully draw the nose (an inverted triangle with rounded corners), the mouth line, and two small dots for eyes.
Winter Wonderland
Paint the background of the rock (the unpainted stone parts) a dark navy blue with white splatter “snow” to make it look like a night scene.
Step 3: Refining & Finishing
-
Add linework:
Outline the entire bear, ears, and body with your black paint pen. Keep the lines steady and relatively thin. -
Outline the scarf:
Go over the edges of the scarf and define the separation between the stripes with your black pen to make the colors pop. -
Add coat texture:
Dip a toothpick or fine brush in white paint and add messy little dots all over the beige coat area to simulate snow or a woolen texture. -
Draw the arms:
Use the black pen to draw simple curved lines on the beige coat to suggest little paws resting at the bear’s sides. -
Add scarf fringe:
At the bottom of the hanging scarf tail, draw vertical black lines to create the look of tassels or fringe. -
Final highlights:
Add a tiny white dot reflecting light on the nose and in the eyes to bring the character to life. -
Seal the stone:
Once all ink and paint is bone dry, apply a matte spray sealer to protect your artwork from weathering.
Now you have a charming winter companion to decorate your garden or use as a paperweight


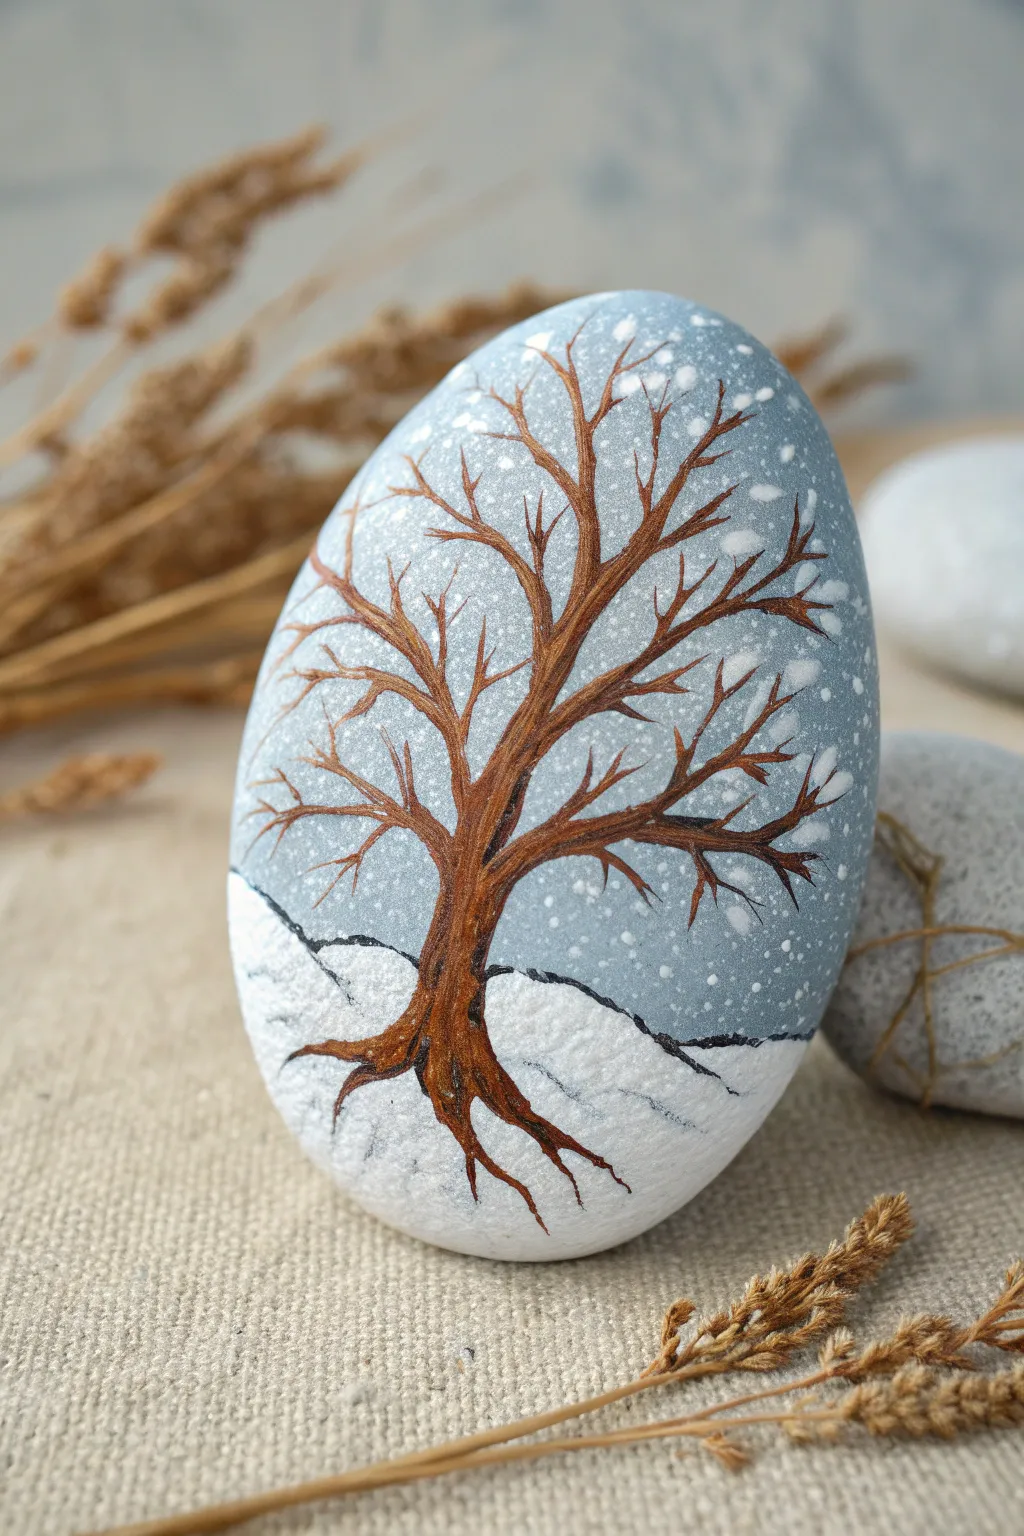
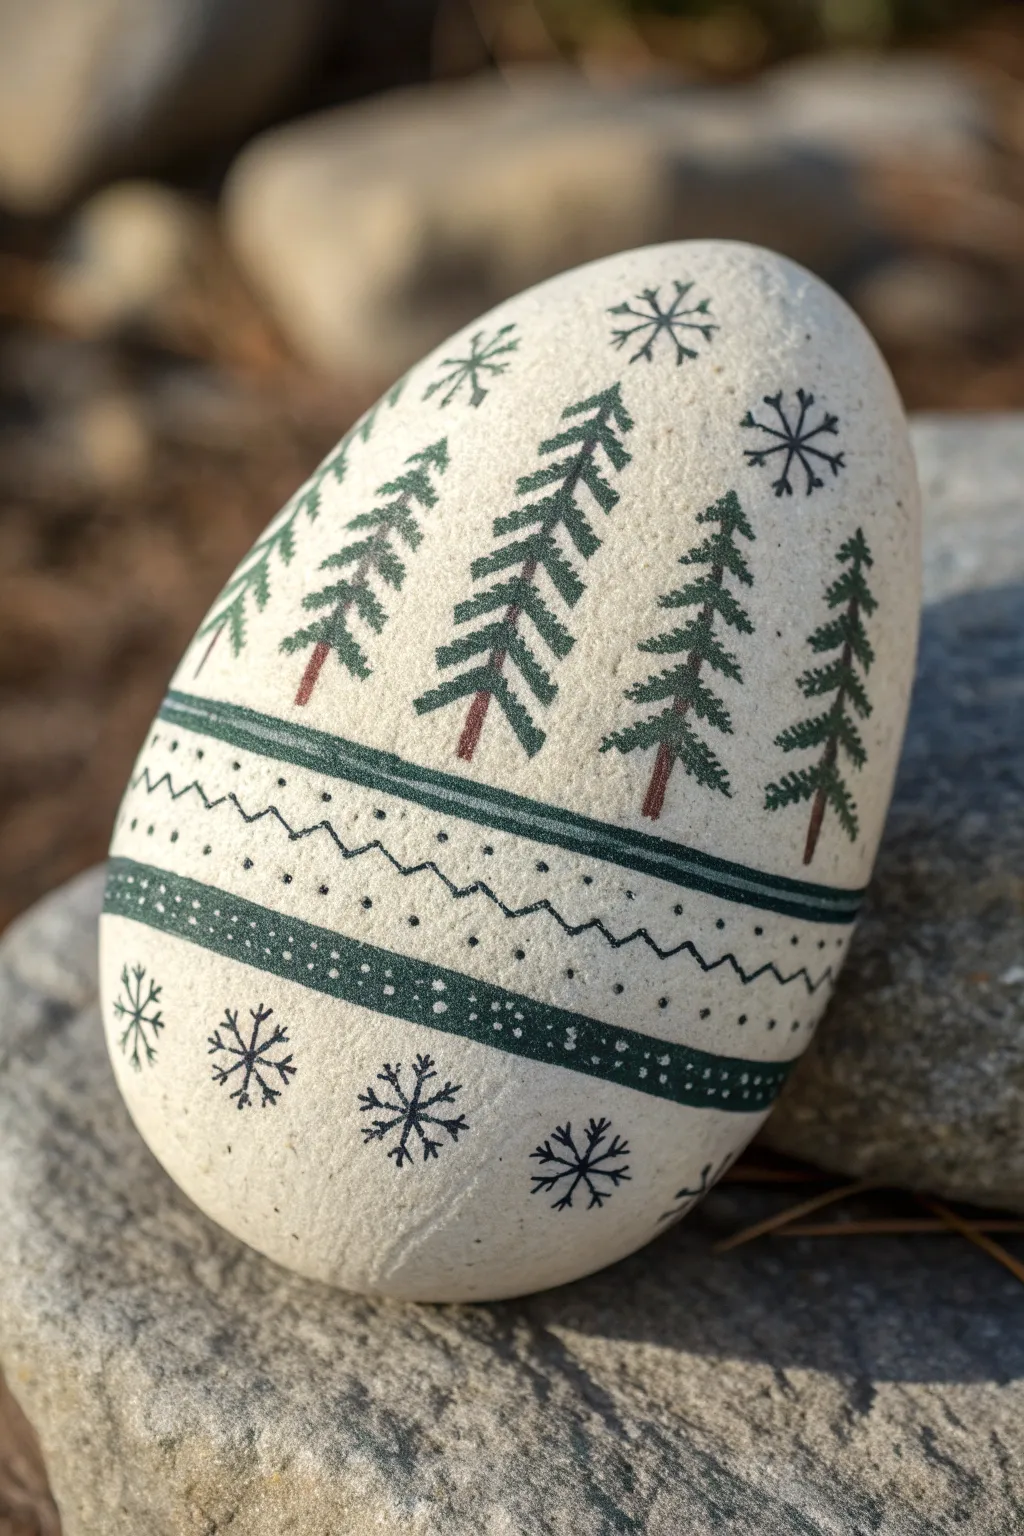
Snowy Pine Tree Silhouettes
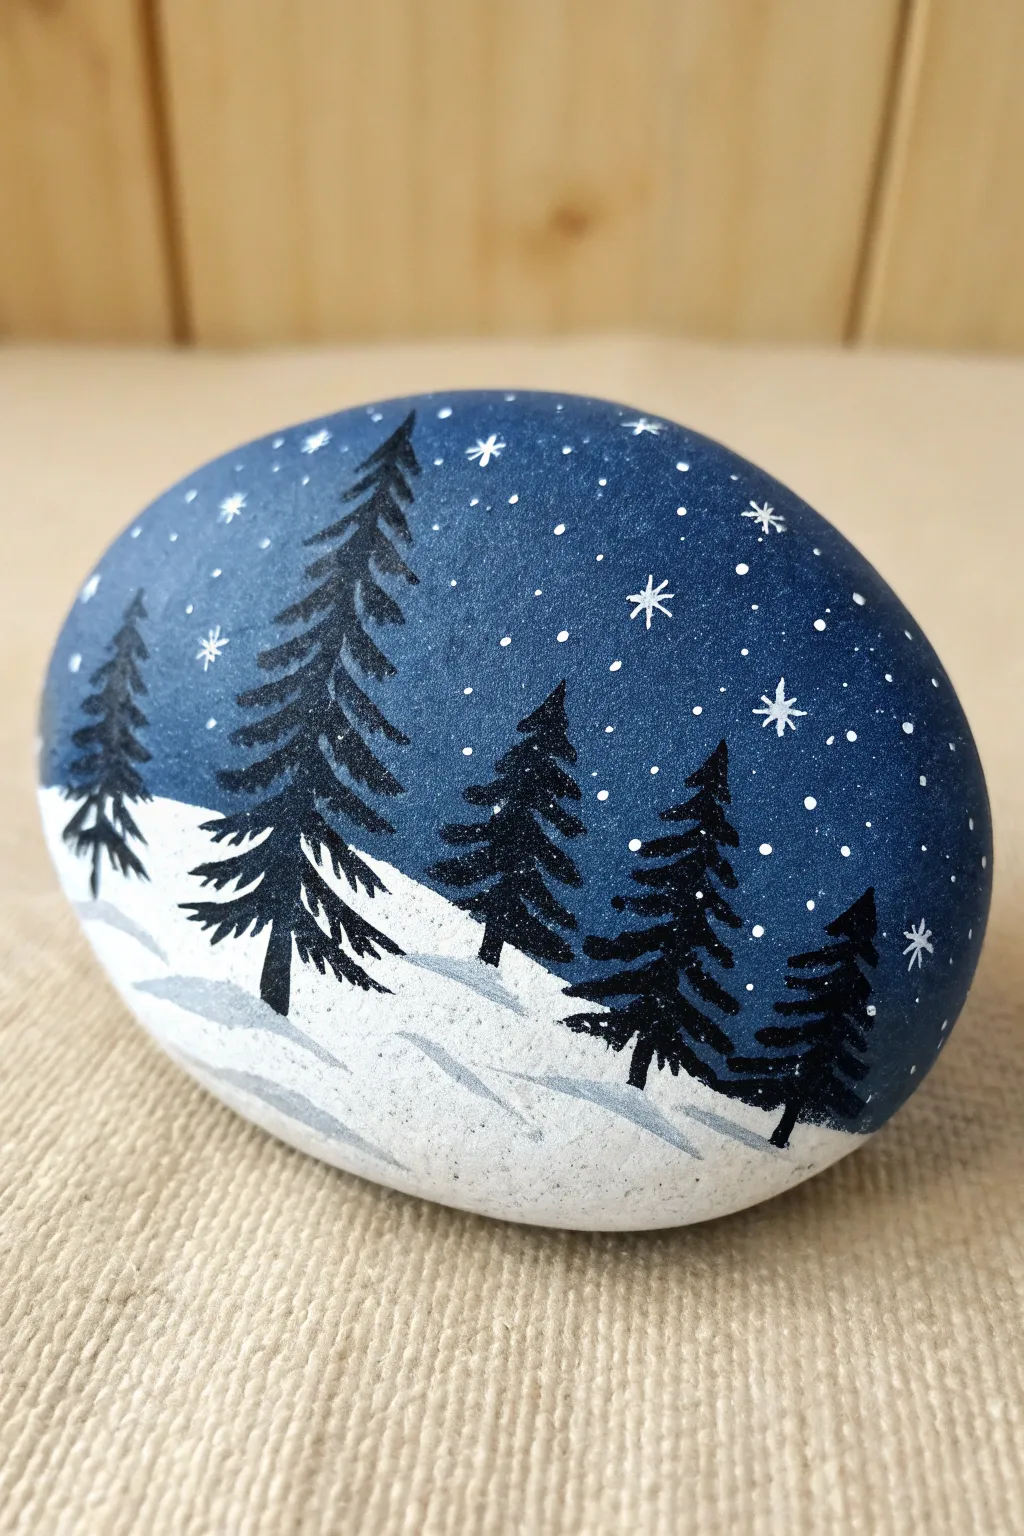
Capture the serene beauty of a winter evening with this hand-painted stone featuring striking black pine silhouettes against a deep blue, starry sky. The contrast between the snowy ground and the moody atmosphere makes for a stunning seasonal decoration.
Step-by-Step
Materials
- Smooth, rounded river rock (cleaned and dried)
- Acrylic paints: White, Dark Blue (Navy or Midnight), Black, Light Grey (or mix white with a tiny dot of black)
- Wide flat brush or sponge brush
- Small round detail brush (size 0 or 00)
- Fine liner brush (optional, for snowflakes)
- Water cup and paper towels
- Spray sealer or varnish (matte or glossy)
Step 1: Setting the Scene
-
Prepare the Surface:
Begin with a clean, dry rock. If the surface is rough, give it a quick sanding, but a naturally smooth river rock works best for detailed silhouettes. -
Paint the Base:
Using your wide flat brush, paint the top two-thirds of the rock with your dark blue acrylic paint. You may need two coats to get a solid, opaque coverage. -
Create the Snow Line:
While the blue is drying, clean your brush and paint the bottom third of the rock with pure titanium white. Don’t worry about making a straight line; a wavy, uneven edge where it meets the blue looks more like natural snow drifts. -
Blend the Transition:
I like to take a tiny bit of light grey paint or watered-down blue on a clean brush and gently sweep it along the horizon line where the blue sky meets the white snow. This creates a soft, foggy distance rather than a harsh cutout look.
Step 2: Painting the Pine Trees
-
Draft the Trunks:
Load your small round brush with black acrylic paint. Paint a thin vertical line for the trunk of your largest tree first. Position this one slightly off-center to key the composition. -
Start the Branches:
Starting from the top of your trunk line, use short, downward-angled strokes to create the needle clusters. Keep the top very narrow and pointed. -
Widen the Base:
As you move down the trunk, make your horizontal strokes wider and slightly more curved. Imagine the weight of snow pushing the branches down. -
Add Variation:
Paint smaller trees next to the large one. Vary their heights and widths to create depth. For the smallest trees on the far edges, use just the tip of your brush. -
Ground the Trees:
Where the black trunk meets the white snow, add a tiny bit of horizontal shading or a few jagged strokes to look like the tree is nestled into the snowbank, not floating above it.
Paint Consistency
Add a drop of water to your black paint for the trees. Ink-like consistency flows better for sharp, thin pine needles.
Step 3: Snowy Details
-
Add Shadows on Snow:
Mix a very pale grey wash (mostly water with a dot of black or blue). Paint subtle, wavy horizontal lines across the white snow section to suggest drifts and uneven terrain. -
Create the Stars:
Dip a fine liner brush or a toothpick into white paint. Dot tiny specks all over the blue sky area. Vary the pressure to create different sized stars. -
Paint Snowflakes:
Select a few larger dots and paint a simple cross shape (+) through them, then an ‘x’ shape over that to create detailed six-point snowflakes. -
Highlight the Needles:
Once the black trees are absolutely dry, you can lightly stipple a tiny amount of white on the upper edges of the black branches to show caught snow, though leaving them as pure silhouettes is also very striking.
Uneven Coverage?
If the blue sky looks streaky, don’t keep brushing wet paint. Let it dry fully, then add a second thin coat or sponge it on.
Step 4: Finishing Up
-
Dry Thoroughly:
Let the rock sit undisturbed for several hours. The thick layers of black and white need time to cure completely. -
Seal:
Finish with a spray varnish to protect your artwork from chipping, especially if you plan to keep the rock outdoors.
Place this peaceful little scene on your desk or windowsill to bring a quiet winter moment indoors all year round
BRUSH GUIDE
The Right Brush for Every Stroke
From clean lines to bold texture — master brush choice, stroke control, and essential techniques.
Explore the Full Guide
Simple Evergreen Tree Trio
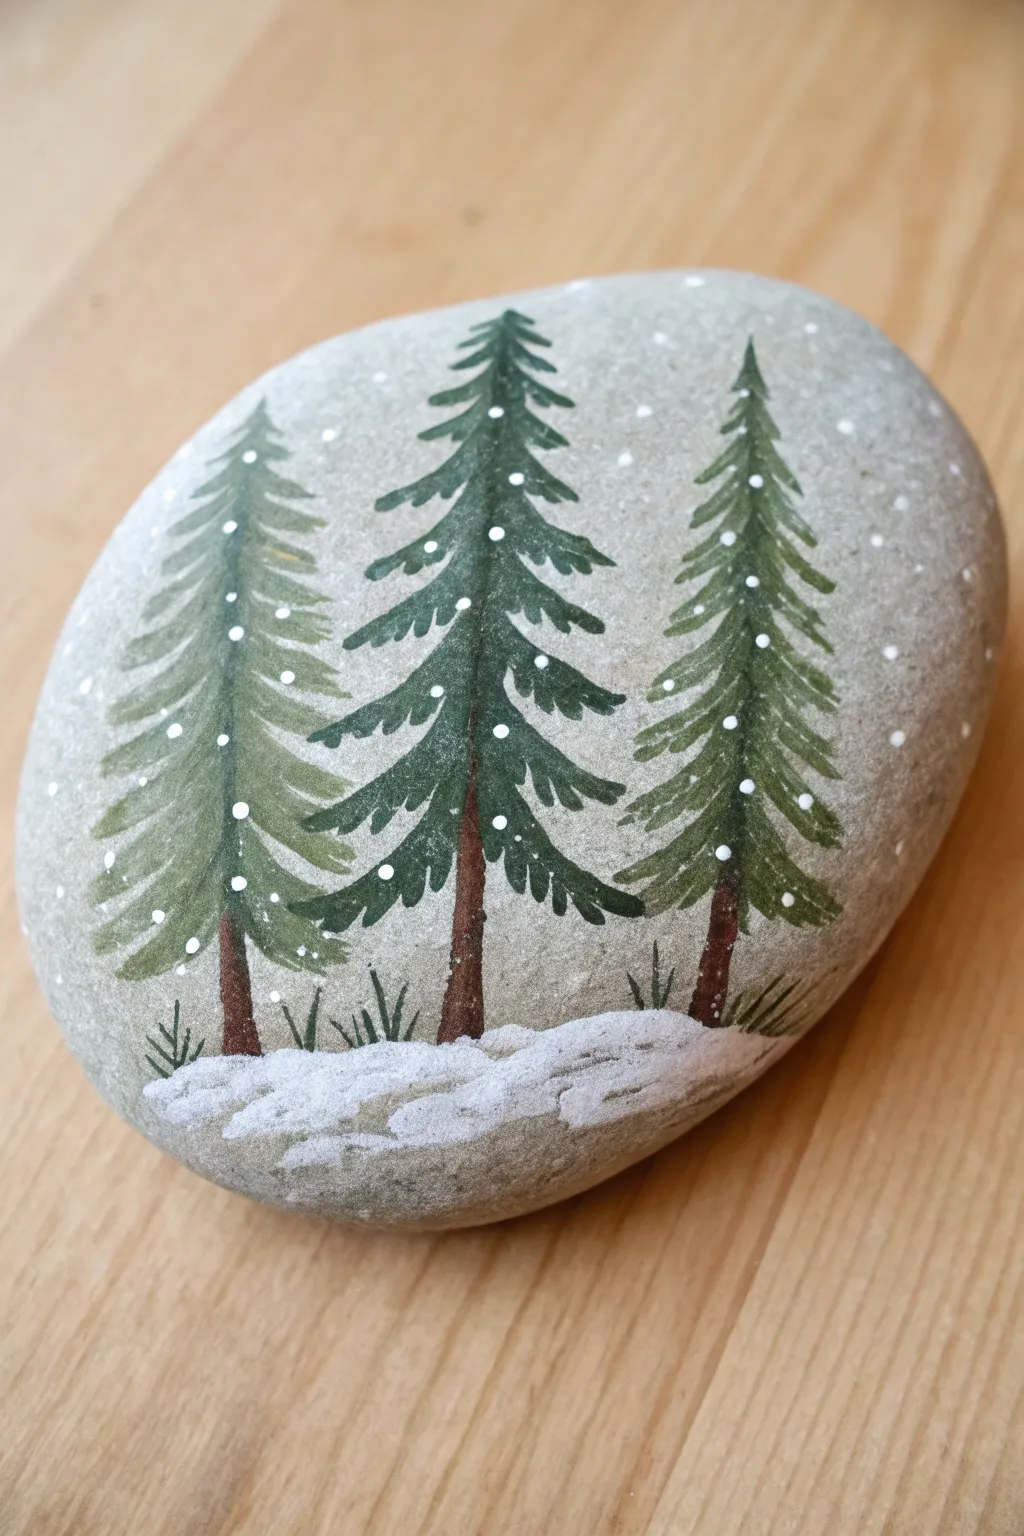
Transform a smooth, grey river rock into a serene forest scene with this beginner-friendly painting project. The design features three stately pine trees standing in a snowbank, dusted with delicate falling snowflakes against the natural stone background.
Step-by-Step Tutorial
Materials
- Smooth, oval-shaped river rock (cleaned and dried)
- Acrylic paint (Emerald Green, Forest Green, White, Dark Brown)
- Fine detail paintbrush (size 0 or 00)
- Small flat or filbert brush (size 2)
- Dotting tool or toothpick
- Water cup and paper towels
- Clear acrylic sealer (matte or satin finish)
Step 1: Planning and Base Structure
-
Select your canvas:
Choose a rock that is relatively flat and smooth. A natural grey tone works perfectly as the ‘sky’ for this project, so you won’t need a base coat. Ensure it is washed and completely dry before starting. -
Paint the trunks:
Load your fine detail brush with dark brown paint. Paint three vertical lines for the tree trunks. The center trunk should be the tallest and thickest, with the flanking trunks slightly shorter and thinner. -
Anchor the trees:
Slightly flare the bottom of each brown line where it meets the imaginary ground. I find this helps visually ‘plant’ the trees so they don’t look like they are floating.
Step 2: Creating Foliage
-
Start the center tree:
Mix a small amount of forest green with a tiny touch of black or brown to deepen it. Using the tip of your detail brush, start at the very top of the center trunk. -
Building branches:
Create the needle texture by making short, downward-angled strokes that radiate from the trunk. Keep the strokes very short at the apex and gradually lengthen them as you move down the tree. -
Layering the shape:
Continue these sweeping, downward strokes all the way to the bottom of the trunk. Leave small gaps between layers of branches to let the brown trunk and grey stone peek through slightly. -
Paint the side trees:
Repeat this process for the left and right trees. For variety, you can use a slightly lighter shade of green (mix emerald with forest green) for one of them to create depth. -
Add highlights:
Once the base green is dry, mix a lighter green using white and emerald. Add tiny, sparing strokes on the upper edges of the branches to simulate light hitting the needles.
Branch Technique
Don’t overthink the branches! Quick, confident flicks of the wrist create sharper, more realistic pine needles than slow, careful strokes.
Step 3: Snowy Details
-
Paint the snowbank:
Using the small flat brush and white paint, create a ground layer at the base of the trees. Use a dabbing motion rather than a smooth stroke to give the snow a fluffy, drifted texture. -
Add ground shading:
While the white is still wet, mix a tiny drop of grey or diluted black into the lower edge of the snowbank to create shadows and dimension in the drifts. -
Adding grass sprigs:
With your finest brush and the dark green mixture, paint tiny, simple tufts of grass poking up from the snowbank at the base of the trunks. -
Falling snow:
Dip a dotting tool or the very tip of a toothpick into white paint. Gently place random small dots all over the stone, covering the sky and overlapping the green branches. -
Varying snow size:
Make some dots tiny and others slightly larger to create a sense of depth in the snowfall. Let the falling snow sit on top of the tree boughs for a realistic winter look.
Too much paint?
If your snow dots look like peaks or Hershey’s kisses, gently tap the rock on the table to flatten them out before they dry.
Step 4: Finishing Touches
-
Dry completely:
Allow the paint to dry fully. Acrylics on stone dry relatively fast, but thick dots of ‘snow’ might need extra time. -
Seal the artwork:
Apply a coat of clear acrylic sealer. A matte finish looks very natural, while a satin finish gives it a slight sheen like wet ice.
Place this charming winter stone on a mantelpiece or hide it in a garden for a neighbor to find
Crisp Snowflake Medallions
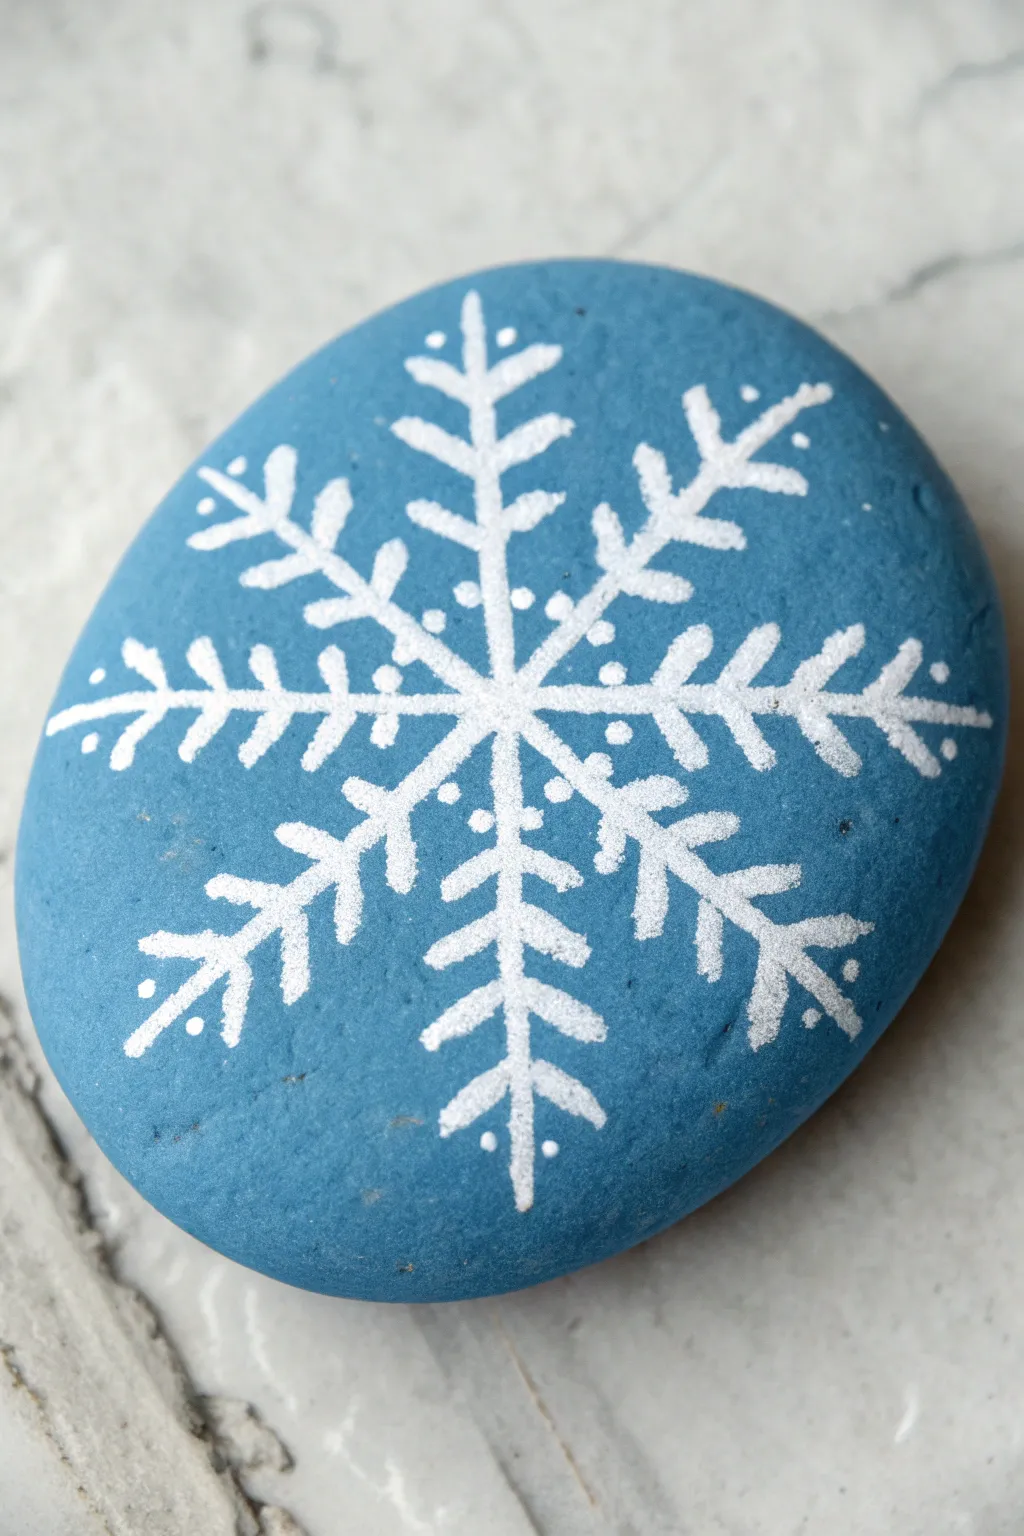
Capture the stillness of winter with this elegant painted rock, featuring a symmetrical white snowflake on a calming blue background. The sharp contrast between the snowy white lines and the matte blue stone makes for perfect seasonal decor.
How-To Guide
Materials
- Smooth, flat river rock (oval or round)
- Light blue acrylic paint (matte finish)
- White acrylic paint or a white Posca paint pen (extra fine tip)
- Flat paintbrush (medium size)
- Small round paintbrush or dotting tool
- Pencil for sketching (optional)
- Matte spray sealer or varnish
Step 1: The Foundation
-
Clean the surface:
Begin by thoroughly washing your rock with soap and water to remove any dirt or oils that might prevent the paint from sticking. Let it dry completely. -
Apply base coat:
Using your flat brush, paint the entire top surface of the stone with the light blue acrylic paint. Ensure your strokes are smooth to minimize texture. -
Add a second coat:
Once the first layer is dry to the touch, apply a second coat of blue to ensure solid, opaque coverage where no stone shows through. -
Check for smoothness:
Examine the blue surface. If there are heavy brush strokes, you might want to do a third, very thin layer to level it out, as a smooth base makes the line work much easier.
Pro Tip: Brighter White
White paint is often translucent. For the crispest look, sketch your lines with a white colored pencil first, which acts as a primer for the paint.
Step 2: Drafting the Design
-
Mark the center:
Find the approximate center of the rock and make a tiny, faint mark with a pencil or a dot of white paint to guide your symmetry. -
Draw vertical line:
Draw a straight vertical line through the center point, extending towards the top and bottom edges, leaving a small border of blue space. -
Create the ‘X’:
Draw an ‘X’ shape through the center point, intersecting the vertical line. Try to keep the angles even so you end up with six equally spaced arms. -
Verify symmetry:
Take a moment to look at your six main lines. If one looks shorter or askew, gently correct it now with a damp Q-tip or a touch more blue paint before moving on.
Troubleshooting: Shaky Hands
If you struggle with straight lines on the curved rock, rest your pinky finger on the table or a dry part of the stone to stabilize your painting hand.
Step 3: Detailed Line Work
-
Thicken main lines:
Using your white paint pen or a liner brush with white paint, carefully trace over your six skeleton lines to make them bold and bright white. -
Inner branches:
Starting near the center, paint small ‘V’ shapes or chevrons on each of the six arms pointing outward. These should be quite small and close to the middle intersection. -
Middle branches:
Move about halfway up each arm and paint a second set of V-shaped branches, making these slightly larger than the inner set. -
Outer branches:
Near the tip of each arm, add a third and final set of V-shapes. These are the tips of the snowflake, giving it that classic crystallized look. -
Connect the design:
Look closely at the intersection in the very center. Paint a tiny starburst or web connecting the inner joints to make the center feel solid and unified.
Step 4: Finishing Touches
-
Add interior dots:
Using a dotting tool or the tip of a toothpick, place a single white dot in the blue space between the arms, positioned near the inner V-shapes. -
Add exterior dots:
Place a second set of dots further out, nestled between the tips of the outer branches. I like to make these slightly smaller than the interior dots for variety. -
Refine lines:
If your blue background is showing through the white lines anywhere, gently retrace those specific segments to make the white pop. -
Dry completely:
Let the rock sit undisturbed for several hours. Though acrylic dries fast, the multiple layers need to harden fully. -
Seal the artwork:
Spray the rock with a matte clear coat. This protects your intricate line work from chipping and gives the stone a professional, lasting finish.
Now you have a frosty, permanent snowflake that won’t melt when spring arrives

PENCIL GUIDE
Understanding Pencil Grades from H to B
From first sketch to finished drawing — learn pencil grades, line control, and shading techniques.
Explore the Full Guide
Snowfall Splatter Over Night Sky
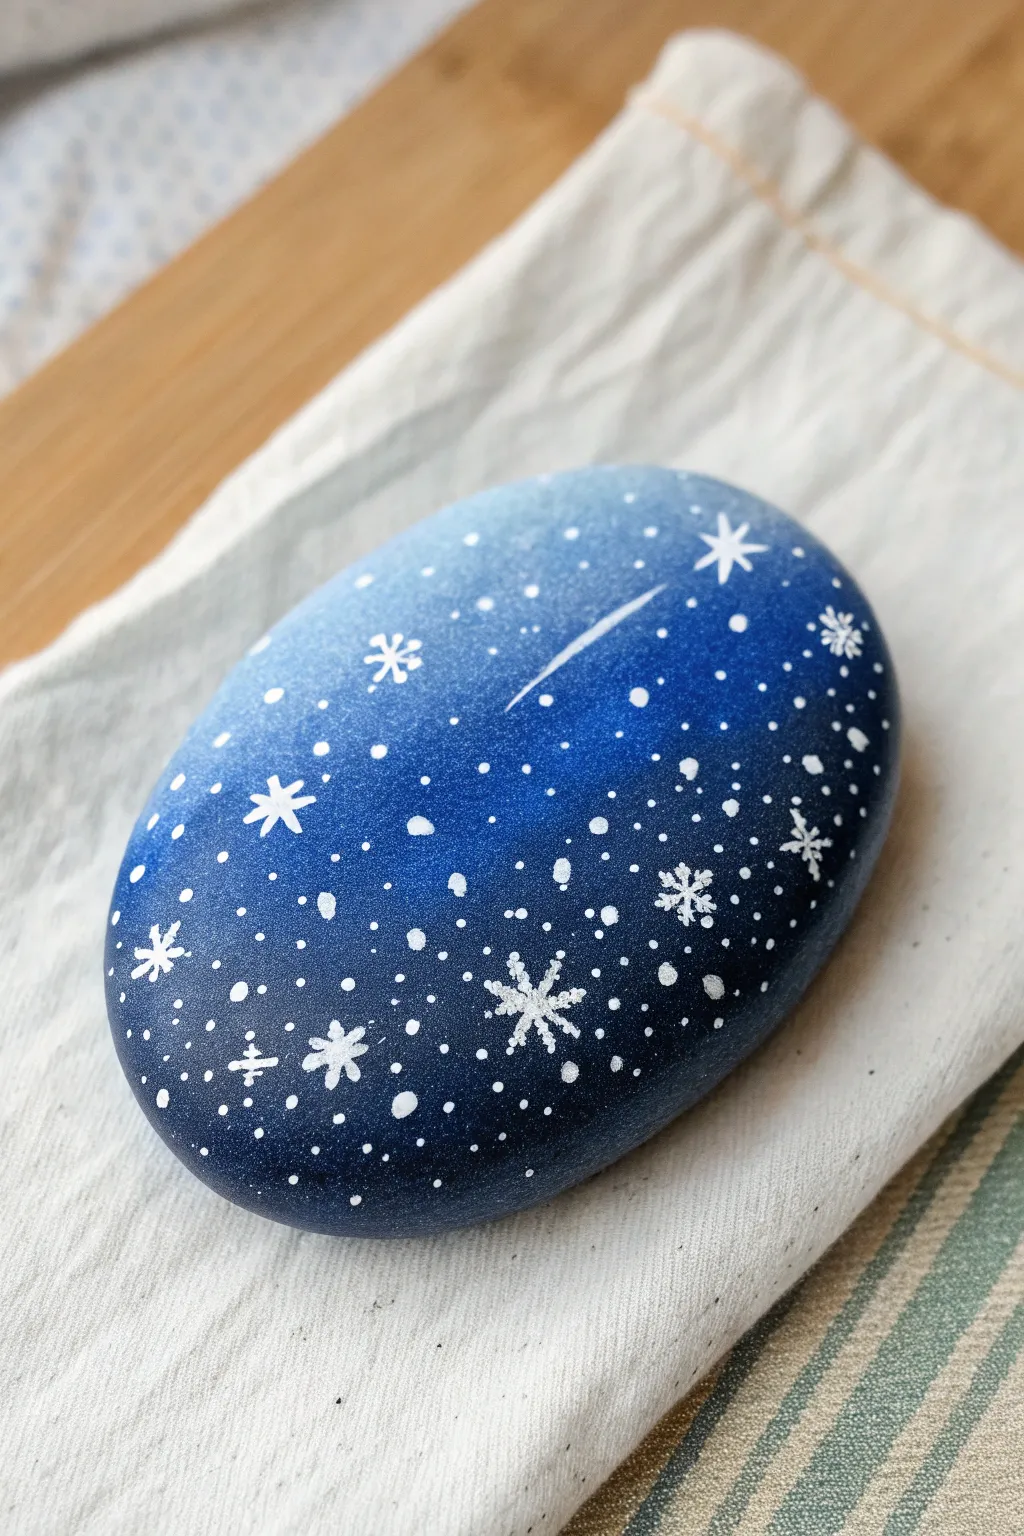
Capture the serene beauty of a crisp winter evening on a smooth river stone. This project features a stunning ombré gradient from frost blue to deep midnight, adorned with delicate snowflakes and a dusting of starry splatter.
Step-by-Step Guide
Materials
- Smooth oval river rock
- Gesso or white acrylic primer
- Acrylic paints: White, Ice Blue, Cobalt Blue, Navy Blue, Black
- Sponges (makeup wedges work perfectly)
- Old toothbrush
- Detail brush (size 0 or 00)
- Water container
- Paper towels
- Palette or paper plate
- Gloss varnish or resin (optional)
Step 1: Base Coat & Gradient
-
Prime the surface:
Begin by washing and drying your rock thoroughly to remove any dirt or oils. Apply a thin, even coat of gesso or white acrylic paint to create a bright foundation for your colors. -
Prepare your palette:
Squeeze out small amounts of white, ice blue, cobalt blue, navy blue, and black onto your palette. You will want them accessible for quick blending. -
Start with the light:
Load a sponge with a mix of white and ice blue. Dab this onto the upper left section of the rock to establish your light source area. -
Transition to mid-tones:
While the first color is still wet, pick up some cobalt blue on the same sponge. Blend it into the ice blue, moving diagonally towards the center of the rock. -
Deepen the gradient:
Switch to navy blue for the lower right half of the stone. Use a pressing and lifting motion with the sponge to seamlessly merge this darker shade into the cobalt blue mid-section. -
Add the night sky:
Finally, mix a little black into your navy blue. Stipple this darkest mixture onto the very bottom right edge to create depth and contrast. I find that multiple thin layers of sponging create the smoothest transition. -
Let it cure:
Allow the gradient background to dry completely. If you move on too quickly, the white stars will turn muddy blue.
Step 2: Creating the Galaxy
-
Prepare the splatter paint:
Mix a small amount of white acrylic paint with a few drops of water. The consistency should be like heavy cream—fluid enough to fly off a brush, but thick enough to stay opaque. -
Splatter the stars:
Dip an old toothbrush into the watered-down white paint. Point the bristles toward the rock and run your thumb across them to spray a fine mist of stars over the entire surface. -
Add larger stars:
Using the handle of a paintbrush or a dotting tool, place a few distinct white dots randomly among the splatter for variation in star size. -
Paint the snowflakes:
With your finest detail brush and pure white paint (undiluted), paint small asterisks (*) scattered across the darker areas of the rock to represent snowflakes. -
Detail the flakes:
For the larger snowflakes, add tiny ‘V’ shapes at the end of each arm to give them a crystalline structure. Keep your hand steady and pressure light. -
Create a shooting star:
Choose a spot in the upper mid-section. Paint a small dot for the star head, then quickly drag a faint, tapering line behind it using a fairly dry brush to create the tail. -
Highlight the glimmer:
Select two or three of the larger dots you painted earlier. Add four tiny points radiating from them to turn them into twinkling stars. -
Seal the artwork:
Once all paint is perfectly dry, apply a coat of gloss varnish or resin. This will protect the paint and make the deep blue colors look even richer and more like a glossy night sky.
Sponge Tactics
Don’t rinse your sponge between colors during the gradient phase. Letting the paint mix on the sponge itself creates the smoothest, most natural blends.
Splatter Control
If your star splatter blobs are too big, your paint is too watery. Let a large blob dry, then paint over it with the background blue before trying again.
Now you have a piece of winter magic to decorate your desk or gift to a friend
Little Cabin in a Snowy Forest
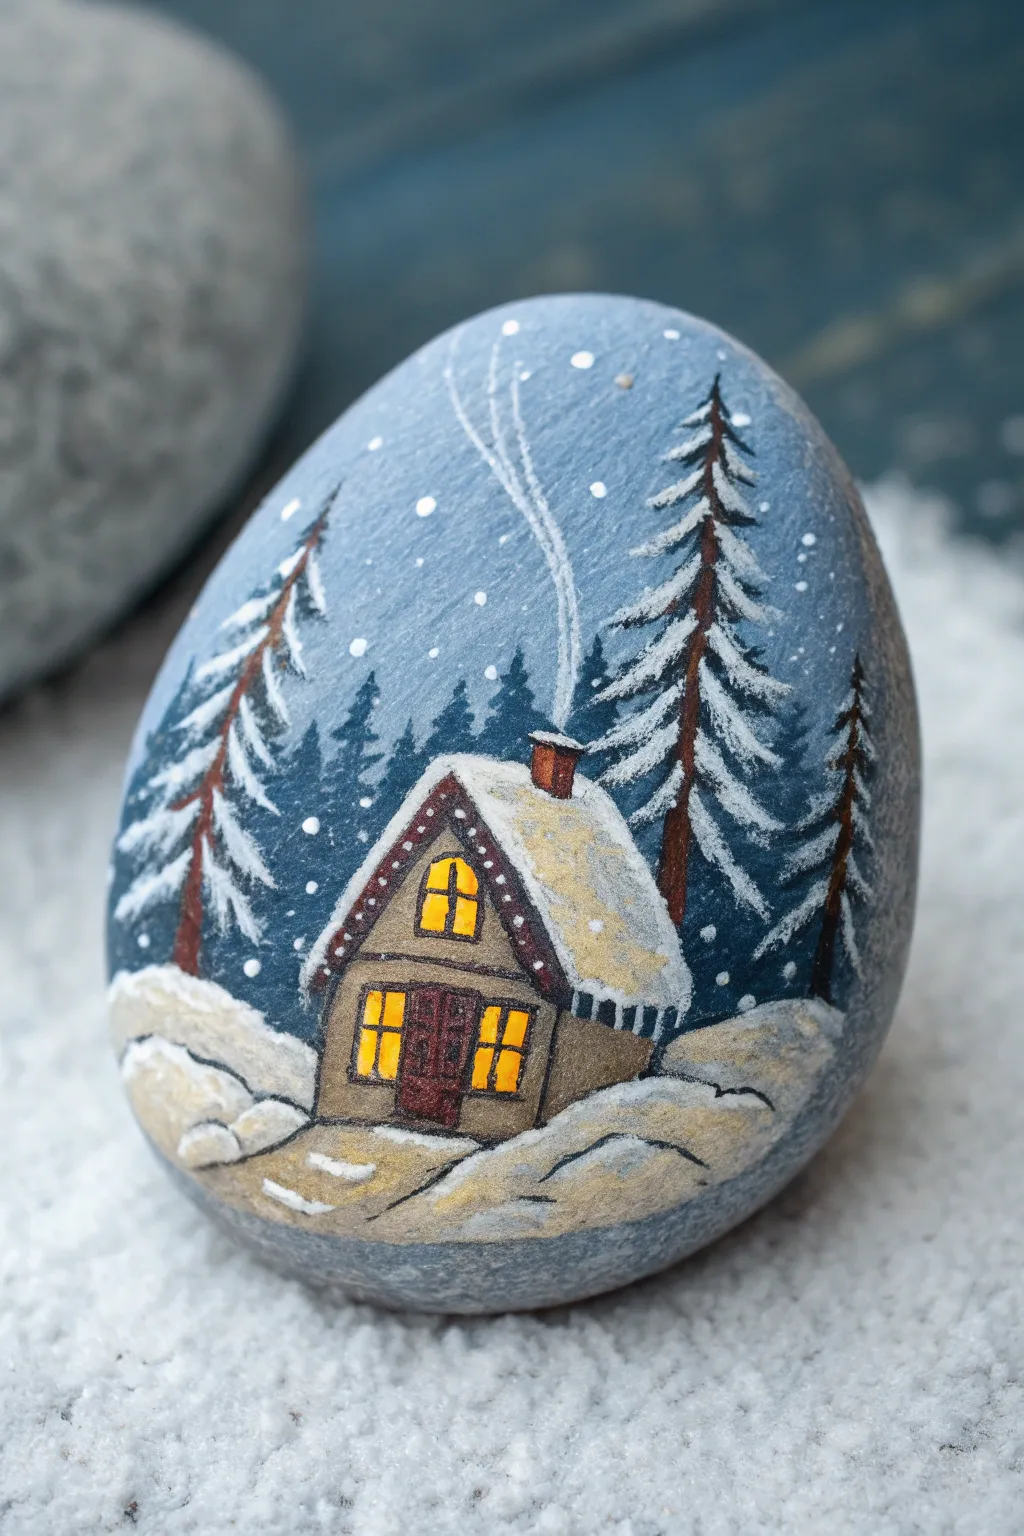
Capture the magic of a silent winter night with this charming painted rock project. The glowing windows of the little cabin create a warm contrast against the cool blue tones of the snowy forest.
Step-by-Step
Materials
- Smooth oval river rock (cleaned and dried)
- Acrylic paints: Black, White, Burnt Umber, Yellow Ochre, Cadmium Yellow, Dark Blue, Light Blue
- Paintbrushes: Flat brush (medium), fine detail liner brush
- Pencil (optional)
- Matte or satin sealer spray
Step 1: Setting the Scene
-
Base Coat:
Start by mixing a muted slate blue using Dark Blue, a touch of Black, and plenty of White. Paint the entire surface of the rock. Let it dry completely and apply a second coat if the stone’s natural color is showing through. -
Distant Trees:
Mix a darker shade of your base blue. Using a small brush, paint a jagged, uneven horizon line of tree silhouettes across the middle of the rock. These don’t need detail; simple vertical strokes with pointed tops work perfectly to create depth. -
Snowy Ground:
Load a medium brush with White and a tiny drop of Yellow Ochre for warmth. Paint curved, rolling mounds at the bottom of the rock to establish the snowbanks where the cabin will sit.
Uneven Lines?
If painting straight window grids is difficult with a brush, wait for the paint to fully dry and use a fine-tip ultra-permanent marker instead.
Step 2: Constructing the Cabin
-
Cabin Outline:
With Burnt Umber, paint the basic shape of the cabin in the center foreground. Start with a rectangle for the base and add a triangle on top for the roof structure. -
Roof Layer:
Paint the roof area White. While the white is still wet, dab in a little watered-down Burnt Umber or grey near the edges to give the snow some shadows and dimension. -
Wooden Beams:
Using your finest liner brush and dark brown paint (or black mixed with brown), outline the roof’s A-frame shape. I like to add tiny ‘dots’ or dashes along this trim to mimic decorative woodwork. -
Glowing Windows:
Paint two squares on the bottom floor and a small arched window in the attic space. Use bright Cadmium Yellow first, then blend a tiny dot of Orange or warm Ochre in the center to make them look like they are glowing. -
Window Grids:
Once the yellow is completely dry, use your thinnest brush or even a fine-tip paint pen to carefully draw the cross-patterns on the windows and the outline of the front door.
Make It Sparkle
While the white paint on the roof and ground is still wet, sprinkle a tiny pinch of iridescent fine glitter over it to mimic the shimmer of fresh frost.
Step 3: Adding the Forest
-
Foreground Trees:
Mix a very dark grey-blue or use black. Paint two tall, vertical lines on either side of the cabin for the tree trunks. -
Pine Boughs:
Starting from the top of each trunk, use quick, downward flicking strokes to create the pine branches. Keep the strokes wider as you move down the tree. -
Snowy Branches:
Dip your detail brush in pure White. Lightly tap white paint onto the tops of the pine branches you just painted, showing where the snow has settled. -
Chimney Elements:
Paint a tiny rectangle of reddish-brown on the roof for the chimney. With very watered-down white paint, drag a wispy, curving line upward to create thin smoke.
Step 4: Snowfall and Finishing
-
Falling Snow:
Dip the tip of a toothpick or a dotting tool into white paint. Gently dot random snowflakes across the sky and over the dark trees. Vary the size of the dots for a natural look. -
Ground Shadows:
Mix a very light grey-blue wash. Glaze this gently under the cabin and trees on the white ground to anchor the objects so they don’t look like they are floating. -
Final Highlights:
Add a few crisp white highlights to the snowdrifts in the foreground to make them pop. -
Seal It:
Allow the rock to dry overnight to ensure all thick paint is set. Finish with a spray sealer to protect your winter scene.
Enjoy displaying your peaceful winter cabin on a shelf or giving it as a thoughtful seasonal gift


Textured Puffy Snow on Branches
Capture the stark beauty of a dormant tree standing tall against a snowy sky on a smooth river rock. This evocative piece uses a soft, speckled blue background to make the rich browns of the twisted branches and bright white snowdrifts truly pop.
Step-by-Step
Materials
- Smooth, oval river rock (medium size)
- Acrylic paints: Titanium White, Light Blue-Grey, Burnt Umber, Dark Brown
- Puffy paint or texture paste (white)
- Small sea sponge or old toothbrush
- Fine liner brush (size 0 or 00)
- Small flat brush
- Matte spray sealer
Step 1: Setting the Snowy Scene
-
Clean the canvas:
Begin by scrubbing your rock with warm, soapy water to remove any dirt or oils. Let it dry completely before starting, as moisture can prevent the paint from bonding properly. -
Base coat application:
Using a flat brush, mix a small amount of Titanium White with Light Blue-Grey to create a soft, overcast sky color. Paint the entire surface of the rock. -
Second coat:
Allow the first layer to dry to the touch, then apply a second coat for full opacity. This ensures the natural color of the stone doesn’t peek through the sky. -
Create the snowfall effect:
Once the blue base is dry, dip an old toothbrush or a stiff-bristled brush into watered-down white acrylic paint. Gently flick the bristles with your thumb to splatter tiny ‘snow’ dots across the entire blue surface. -
Establishing the ground:
Paint the bottom third of the rock with pure Titanium White to create the snowy ground. Use a slightly curved, uneven line where the white meets the blue to mimic rolling drifts. -
Adding snow depth:
While the white paint is still wet, dab in a tiny touch of grey near the bottom edge to give the snowbank subtle dimension and shadow.
Step 2: Growing the Tree
-
Drafting the trunk:
Switch to your fine liner brush loaded with light brown or Burnt Umber paint. Start from the center of the snowy ground and paint a vertical line upward, thickening it at the base for the trunk. -
Rooting the tree:
Extend the base of the trunk downward into the white snow area. Paint gnarled roots that spread out like fingers, grounding the tree visually. -
Primary branches:
From the top of the trunk, paint three to four main branches reaching outward and upward. Keep your hand loose to create natural, organic curves rather than straight lines. -
Secondary branches:
From each main branch, split off into smaller ‘Y’ shapes. These should be thinner than the main branches and reach towards the edges of the rock. -
Adding the twigs:
Using the very tip of your liner brush, add tiny, delicate twigs to the ends of the branches. I find that pulling the brush quickly and lifting off at the end creates the sharpest points. -
Creating shadow and depth:
Mix a small amount of dark brown or black into your brown paint. Carefully trace along the left side of the trunk and the undersides of the main branches to create shadows.
Splatter Control
Practice your toothbrush splattering on a scrap piece of paper first. If the paint is too thick, you get blobs; too thin, and it runs. Aim for a milky consistency.
Step 3: Finishing Touches
-
Highlighting the bark:
Clean your brush and pick up a lighter tan or watered-down white. Add very thin highlight lines on the right side of the trunk and the tops of the larger branches to suggest light hitting the bark. -
Painting the snow line:
Use a very sparing amount of black ink or thinned black paint to outline the horizon line where the snow meets the sky, adding contrast behind the tree trunk. -
Adding texture:
To match the ‘puffy snow’ theme, use a toothpick or dotting tool to apply tiny dots of white puffy paint or texture paste onto the upper branches, mimicking freshly fallen snow collecting on the wood. -
Final splatter:
If painting the tree covered up too many of your background snowflakes, add one more very light flicking of white paint over the finished tree for a layered blizzard effect. -
Sealing the artwork:
Allow the rock to dry overnight, especially if you used puffy paint. Once fully cured, spray with a matte sealer to protect your winter scene without adding unnatural gloss.
Sparkle Upgrade
While the white paint for the snow drifts is still wet, sprinkle a tiny pinch of ultra-fine iridescent white glitter over it to make the snow glisten like real frost.
This serene winter landscape makes a perfect seasonal paperweight or a thoughtful handmade gift
Ice Crystal Geometric Patterns
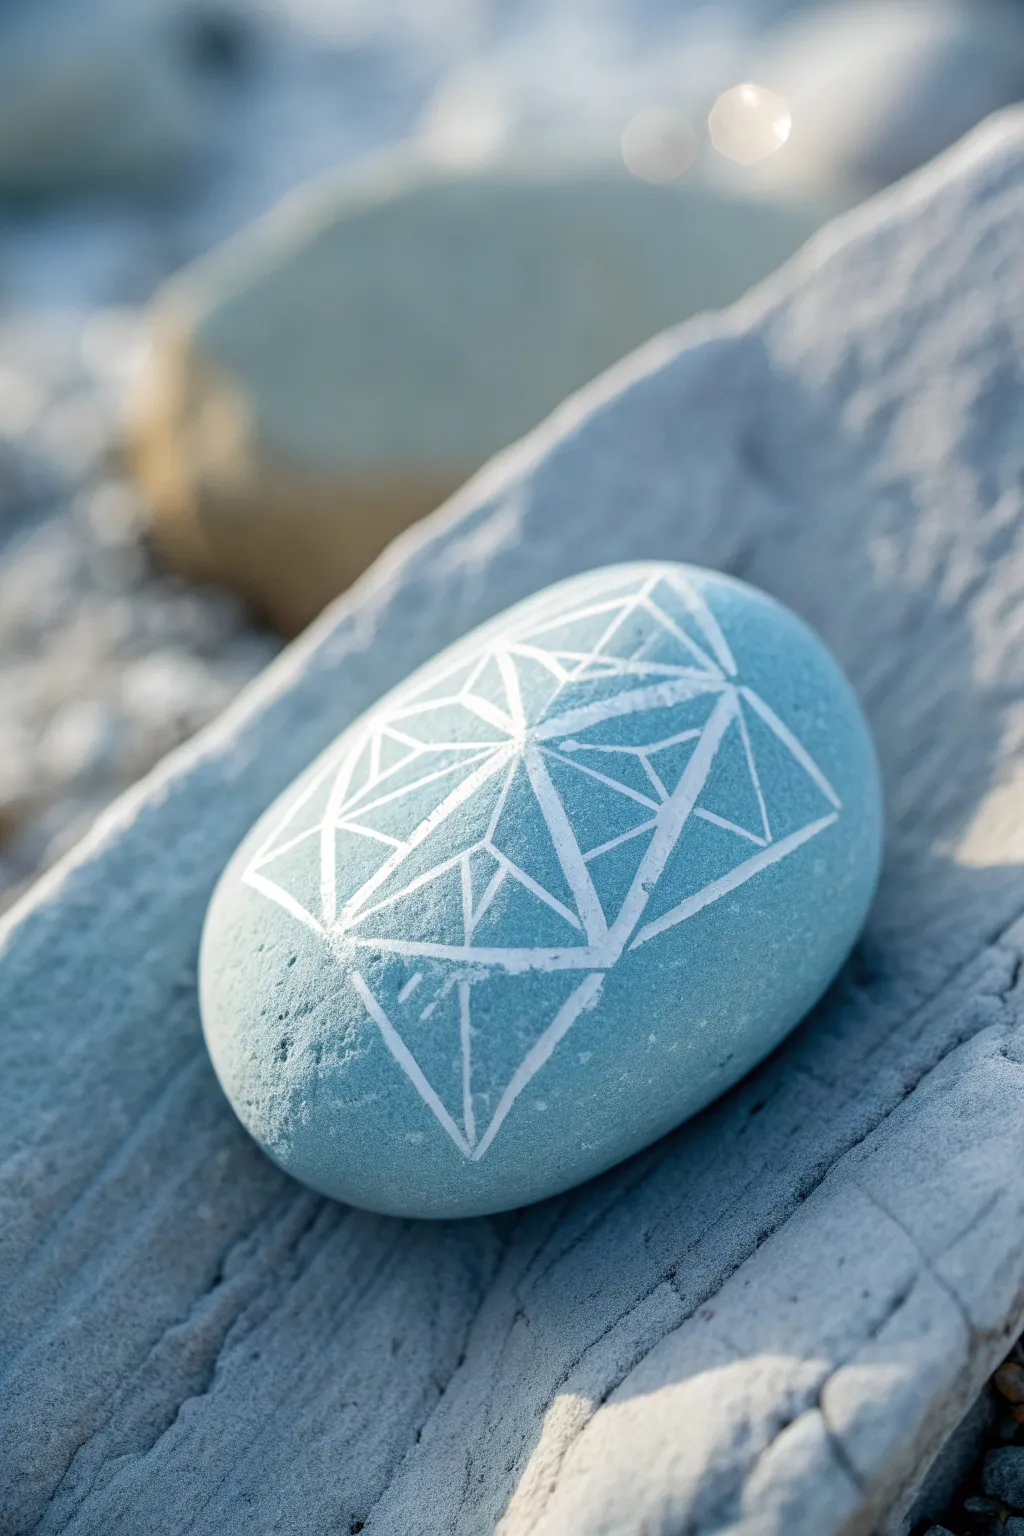
Capture the sharp, clean lines of winter ice with this geometric rock painting project. By layering crisp white triangles and diamonds over a frosty blue base, you’ll create an intricate crystal illusion that looks striking against rougher textures.
How-To Guide
Materials
- Smooth oval river rock
- Light icy blue acrylic paint
- White acrylic paint or specialized white paint pen (extra fine tip)
- Flat synthetic paintbrush (size 6 or 8)
- Ruler or straight edge (small, clear plastic is best)
- Pencil (HB or H for light lines)
- Spray sealer (matte or satin finish)
Step 1: Preparing the Frosty Base
-
Clean Your Canvas:
Begin by scrubbing your rock with warm soapy water and a stiff brush to remove any dirt or oils. Rinse it thoroughly and let it dry completely in the sun or with a hair dryer. -
Apply the Base Coat:
Squeeze a small amount of light icy blue acrylic paint onto your palette. Using your flat synthetic brush, apply a smooth, even coat across the top surface of the stone. I like to keep my brush strokes moving in one direction for a cleaner finish. -
Check for Opacity:
Let the first coat dry for about 15-20 minutes. If the natural rock color is peeking through too much, apply a second coat to build a solid, opaque blue foundation. -
Dry Thoroughly:
Ensure the blue paint is bone dry before moving on. Any dampness will cause the white lines to bleed or your pencil point to dig into the paint.
Clean Lines Hack
If your hand is shaking, rest your wrist on a heavy book or beanbag while you draw. This stabilizes your movement for straighter geometric lines.
Step 2: Mapping the Geometry
-
Establish the Center Line:
Using a ruler and a light pencil, draw a vertical line straight down the center of the rock’s face. This axis will help keep your pattern symmetrical. -
Create the Primary Diamond:
Mark a central point on your vertical line. Draw a large diamond shape around this center point, extending near the edges of the rock, keeping the points aligned with your central axis. -
Subdivide the Shape:
Inside your large diamond, draw a horizontal line connecting the left and right corners. You now have two triangles meeting base-to-base. -
Add Inner Triangles:
Within each of the four quadrants created by your cross lines, draw smaller triangles. Follow the angles of the outer diamond to keep the ‘crystalline’ look consistent. -
Double the Main Lines:
To give the design depth, lightly draw parallel lines next to your main structural lines. This creates the ‘thick’ white bands you see in the reference.
Step 3: Creating the Ice Lines
-
Prime the Pen:
Shake your white extra-fine paint pen vigorously. Press the nib down on a scrap piece of paper until the ink flows smoothly and consistently. -
Trace the Main Framework:
Starting from the center and working outward, trace your main diamond and horizontal axis lines with the white pen. Rotate the rock as you go so your hand stays in a comfortable position. -
Fill the Thick Bands:
Where you drew parallel lines to thicken the shapes, carefully color in the space between them. This creates bold, solid white geometric shapes that anchor the design. -
Draw Delicate Details:
Using just the very tip of the pen (or a liner brush with thinned white paint), add the finest interior lines. Apply lighter pressure here; these lines should look like fine cracks in ice. -
Refine Edges:
Inspect your bold white sections. If the edges look ragged, carefully go over the perimeter one last time to sharpen the corners and straighten the lines.
Winter Sparkle
Before the sealer dries, sprinkle a tiny pinch of ultra-fine iridescent white glitter over the wet center to mimic fresh snow hitting the ice.
Step 4: Finishing Touches
-
Clean Up Draft Lines:
Allow the white ink to cure for at least an hour. Once fully hardened, gently erase any visible pencil marks that weren’t covered by paint. -
Seal the Design:
Take the rock to a well-ventilated area. Apply a light mist of matte or satin spray sealer. This protects the delicate line work from scratching without making the rock too shiny and unnatural.
Place your finished geometric ice stone in a garden pot or on a sunny windowsill where the light can highlight your precision work
Cardinal on a Snowy Branch
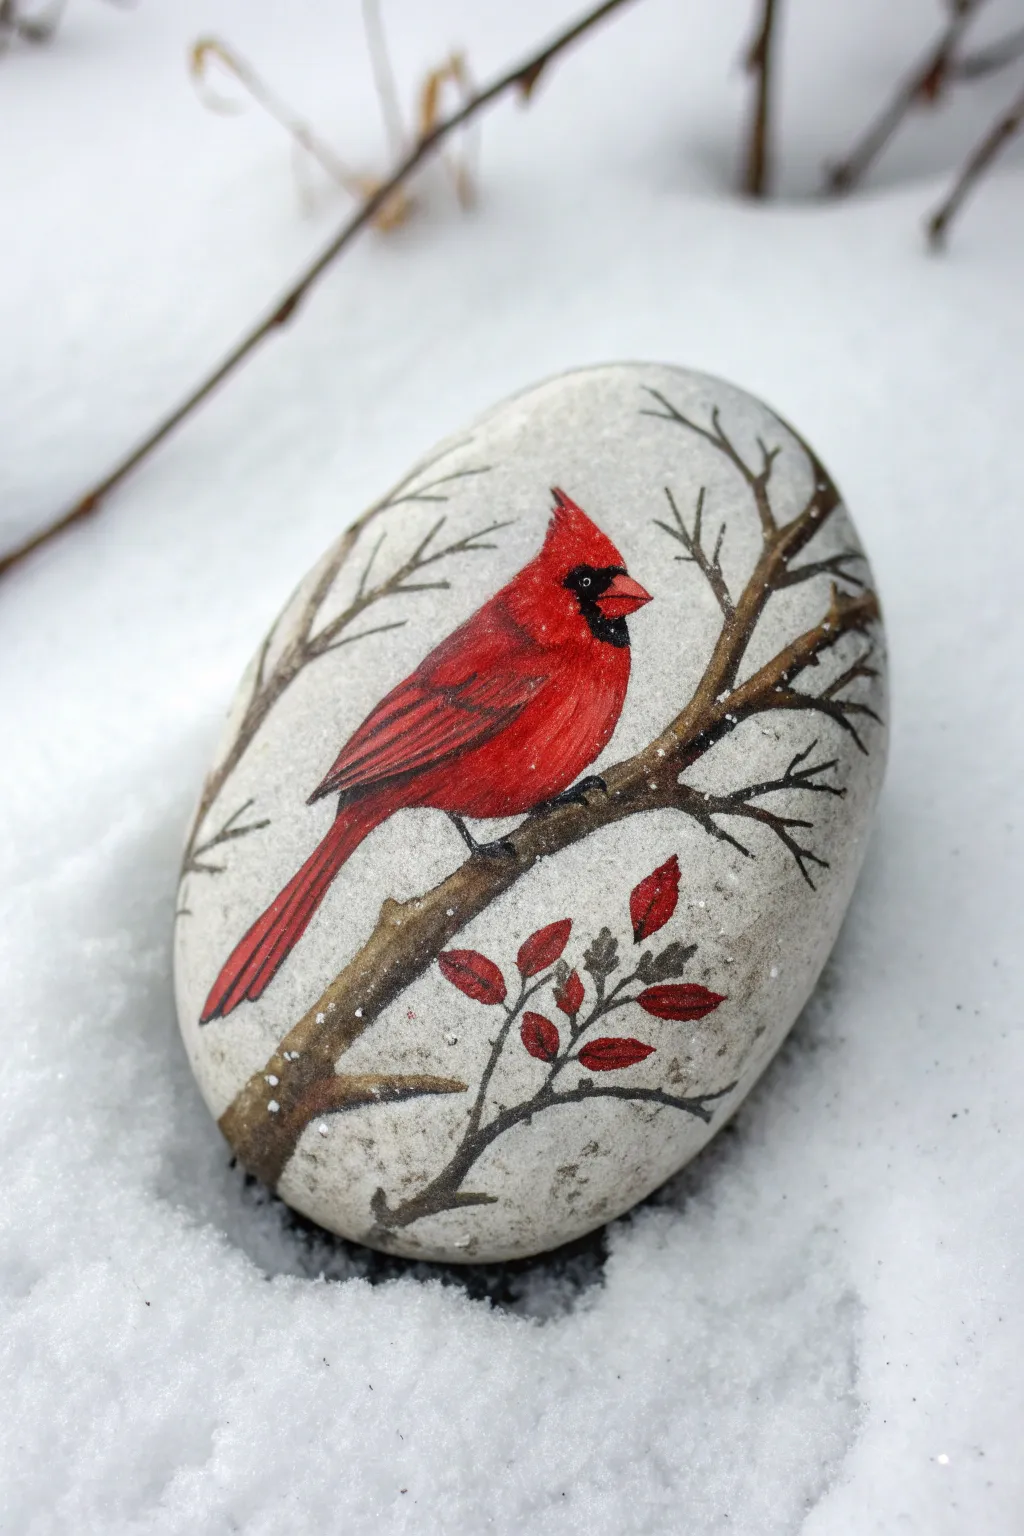
Capture the stark beauty of winter with this striking cardinal rock painting, featuring a brilliant red bird perched on bare branches against natural stone. The unpainted background lets the organic texture of the rock shine through, making the artwork feel rooted in nature.
Step-by-Step
Materials
- Smooth, oval-shaped river rock (white or light grey)
- Acrylic paints (Titanium White, Mars Black, Cadmium Red, Burnt Umber, Burnt Sienna)
- Round synthetic brushes (sizes 0, 2, and 4)
- Fine liner brush (size 00 or 000)
- Graphite transfer paper or pencil
- Palette or small dish
- Water cup and paper towels
- Matte or satin sealant spray
Step 1: Preparation & Sketching
-
Select the perfect stone:
Begin by finding a smooth, flat oval rock. A light grey or off-white color is ideal because it acts as a natural, overcast winter sky background without needing a base coat. -
Clean the surface:
Wash your stone thoroughly with warm soapy water and a scrub brush to remove any dirt or oils, then let it dry completely in the sun or near a heater. -
Plan your composition:
Visualize the cardinal sitting slightly off-center. The main branch should sweep upwards from left to right, providing a sturdy perch. -
Sketch the cardinal:
Using a pencil, lightly draw the outline of the bird. Focus on the signature crest on the head, the plump teardrop-shaped body, and the long tail stretching downward. -
Add the branches:
Sketch the primary branch under the bird’s feet, making it thicker at the base. Add smaller, spindly twigs reaching out into the empty space above and behind the bird to frame it.
Natural Texture Hack
Don’t paint the background! Leaving the raw stone visible creates a realistic, foggy winter atmosphere that painted backgrounds often struggle to replicate.
Step 2: Painting the Cardinal
-
Base coat the bird:
Using a size 2 brush, fill in the bird’s body with a solid coat of opaque white paint first. This crucial step ensures the red you apply later will look vibrant against the grey stone. -
Initial red layer:
Once the white is dry, apply a coat of Cadmium Red over the entire body, tail, and crest. -
Define the wings:
Mix a tiny dot of black into your red to create a dark crimson. Use a finer brush to paint the wing shape, adding thin, curved lines to suggest layered feathers. -
Add highlights and shadows:
Apply pure bright red to the chest and top of the head. Add deeper shading under the wing and belly using your dark crimson mix to give the bird a rounded, 3D appearance. -
Paint the mask and beak:
With a size 0 brush and black paint, carefully fill in the signature black mask around the eyes and chin. Then, paint the beak a bright orange-red or coral color to make it pop. -
Detail the eye:
Inside the black mask area, place a small black dot for the eye. Once dry, add a tiny pinprick of white reflection to bring the bird to life.
Level Up: Snow Effect
Mix white acrylic with a pinch of baking soda for a fluffy texture. Dab this ‘snow’ onto the tops of the branches and leaves for a tactile, 3D frost effect.
Step 3: Branches & Final Details
-
Paint the main branch:
Mix Burnt Umber with a touch of white to get a soft brown. Paint the main branch, making it slightly uneven and bumpy to mimic wood texture. -
Add dimension to wood:
Run a darker brown stripe along the bottom of the branch for shadow, and dab lighter tan or grey on the top edge to look like frost or reflected light. -
Draw fine twigs:
Switch to your liner brush and thinned dark brown paint. Create delicate, wispy branches extending outward, tapering them to almost nothing at the tips. -
Paint the feet:
Using charcoal grey or black, paint small, gripping claws over the branch where the bird is perched. -
Add winter foliage:
Paint a few lingering leaves on the lower branches using a deep red. Shape them simply like small ovals or teardrops. -
Create texture:
Vein the red leaves very lightly with thinned black paint or a fine-tip pen once the paint is fully dry. -
Seal the artwork:
Allow the rock to cure for at least 24 hours. Finish with a matte spray varnish to protect the paint while maintaining the natural look of the stone.
Place your finished rock in a garden bed or on a windowsill to enjoy a splash of color all winter long
Steaming Hot Cocoa Mug Rock
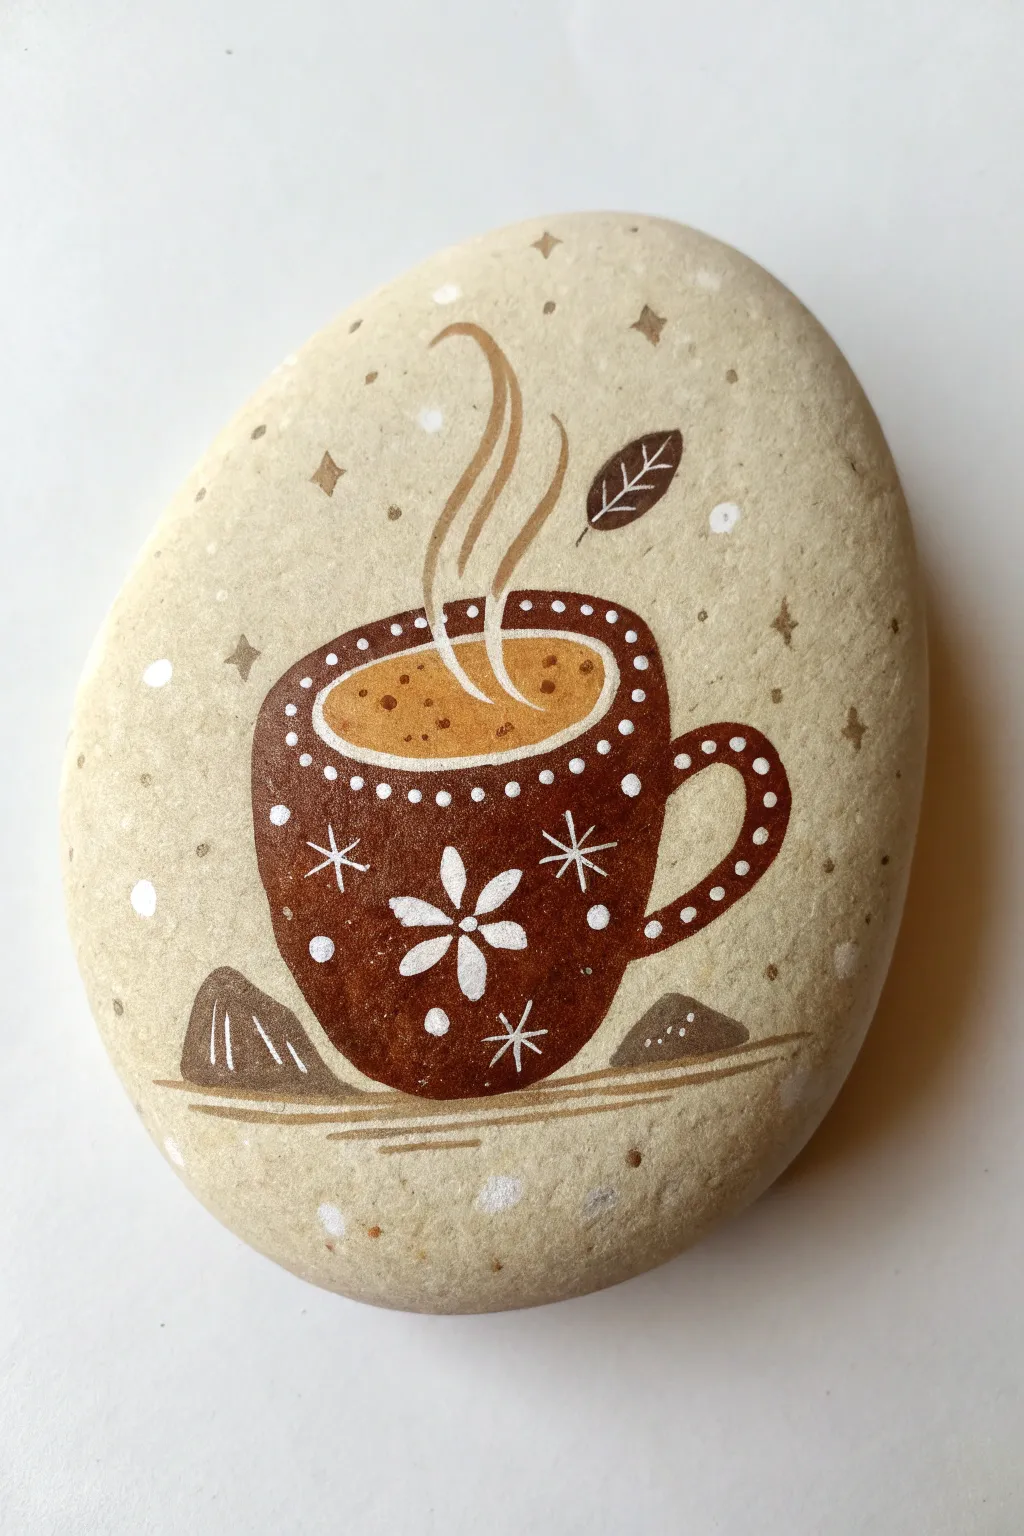
Warm up your winter crafting with this delightful hand-painted rock featuring a steaming mug of cocoa. The natural stone background perfectly complements the rustic brown tones and crisp white details, creating a charming piece of seasonal decor.
Detailed Instructions
Materials
- Smooth, oval-shaped light beige stone
- Acrylic paints: Dark brown, mocha/caramel, white, metallic gold (optional)
- Fine detail brushes (sizes 0 and 00)
- Small flat brush
- Dotting tool or toothpick
- Pencil and eraser
- Matte or satin sealant spray
Step 1: Sketching the Shape
-
Clean and prep:
Wash your stone with soap and water to remove any dirt or oils. Let it dry completely before starting. -
Outline the mug:
Using a pencil very lightly, draw a slightly flattened oval in the center of the rock; this will be the rim of your mug. Below it, sketch a U-shape for the body of the cup. -
Add the handle:
Draw a C-shaped ear on the right side of the mug for the handle. Make sure the width is even. -
Placement check:
Ensure there is enough empty space above the mug for the steam details later. Erase and adjust if the mug feels too high up on the stone.
Uneven Dots?
If your white dots look messy or uneven, let them dry fully, then paint over them with the dark brown base color. Try again using a dedicated dotting tool for perfect circles.
Step 2: Blocking in Color
-
Paint the cocoa:
Mix a warm mocha or caramel color using brown and a touch of white or yellow. Fill in the oval rim area completely. This represents the liquid. -
Paint the mug body:
Load your flat brush with dark brown acrylic paint. Carefully fill in the U-shaped body of the mug, surrounding the mocha oval you just painted. -
Fill the handle:
Use a smaller brush to paint the handle in the same dark brown. I like to do a second coat here to ensure the handle looks solid against the stone. -
Grounding accents:
While you have the dark brown out, paint two small, rough triangular shapes at the bottom left and right of the mug to act as small stones or chocolate chunks. -
Let it dry:
Allow the base coats to dry completely. If the stone beneath shows through, apply a second layer for opacity.
Level Up: Scent it!
Mix a tiny pinch of real cinnamon or cocoa powder into your sealant or a clear glaze for the final coat. Your rock will smell just like the cozy drink depicted!
Step 3: Adding Details
-
Rim accents:
Using a tiny detail brush, paint a thin dark brown line around the top edge of the rim to separate the cocoa liquid from the mug edge. -
Steam swirls:
Mix a translucent beige or watered-down white. Paint two or three wavy, tapered lines rising from the center of the cocoa to represent steam. -
Cocoa froth:
Dip a toothpick into dark brown paint and add tiny speckles onto the mocha liquid surface to look like cocoa powder or bubbles. -
Falling leaf:
To the right of the steam, paint a small pointed brown oval. Once dry, use a white gel pen or liner brush to draw the leaf’s spine and veins. -
Grounding lines:
Paint a few horizontal strokes beneath the mug and the small rock shapes in a light brown or watered-down brown to ground the composition.
Step 4: White Decoration
-
Central flower:
In the lower center of the mug, paint a simple white flower with 6-8 teardrop-shaped petals meeting in the middle. -
Starry sparkles:
Paint a few asterisks or six-pointed stars around the flower on the dark brown mug body. Use your finest brush for crisp lines. -
Dotting the rim:
Using a dotting tool or the back of a brush, place evenly spaced white dots along the upper rim of the mug. -
Handle dots:
Continue the pattern by placing a line of white dots following the curve of the handle. -
Atmospheric magic:
Add tiny white dots, small stars, and faint circles in the background around the mug to create a magical, snowy atmosphere.
Seal your artwork with a clear matte spray to protect your cozy creation for seasons to come
Knit Sweater Pattern Winter Rock
Transform a smooth river rock into a cozy piece of winter decor with this Fair Isle sweater design. The crisp pine trees and delicate distinct bands mimic the comforting texture of a favorite woolen knit.
How-To Guide
Materials
- Smooth, egg-shaped white or light-colored rock
- Acrylic paints: Forest Green, Black, White
- Fine detail brushes (size 000 and 00)
- Flat shader brush (size 2)
- Black ultra-fine tip paint pen (or waterproof ink pen)
- Pencil and eraser
- Ruler or flexible measuring tape
- Matte finish spray sealant
Step 1: Preparation & Bands
-
Select your canvas:
Choose a rock that is naturally light-colored and smooth. If your rock is dark, prime the entire surface with two coats of white acrylic paint and let it dry completely. -
Map the bands:
Lightly sketch three horizontal guidelines around the middle of the rock using a pencil. These will form the boundaries for the central pattern bands. -
Paint the thick band:
Mix a deep Forest Green. Using your flat shader brush, paint a solid stripe between your top two pencil lines. This should be the widest band, sitting just below the rock’s midline. -
Add the lower band:
Paint a second, slightly thinner green band near the bottom third of the rock. Ensure the paint is opaque; you might need a second coat for full coverage. -
Define the borders:
Once the green paint is dry, use your black paint pen or a very fine brush with diluted black paint to draw thin framing lines above and below both green bands.
Steady Hand Trick
Rest your pinky finger on a dry part of the rock while painting fine lines. It acts as a pivot point and stabilizer for shaky hands.
Step 2: The Forest Pattern
-
Set tree spacing:
In the large upper section of the rock, make small pencil marks where each tree will stand. Spacing them evenly is key to the repetitive ‘sweater’ look. -
Paint trunks:
Using thin brown or reddish-brown paint (or mix red into your green/black), paint simple vertical lines for the tree trunks at your marked spots. -
Create branches:
Switch to your Forest Green and a size 000 brush. Paint downward-slanting chevron strokes starting at the top of the trunk. Make them wider as you go down to form a triangular tree shape. -
Add texture:
I like to go back over the dried green branches with a slightly darker shade or pen to add tiny needles, giving the trees a more embroidered appearance.
Step 3: Stitching Details
-
Zig-zag feature:
In the white space between your two green bands, draw a crisp black zig-zag line. The points should be sharp to mimic stitching thread. -
Dotted accents:
Using the very tip of your brush or a dotting tool, place tiny black dots in the valleys of the zig-zag pattern and just above the lower green band. -
Pattern the green:
If your hand is steady, add tiny white or lighter green dots inside the thick green band to create a ‘snow’ texture on the fabric strip.
Make It Fuzzy
Tap a dry, stiff brush with a tiny amount of white paint over the finished design to simulate the texture of wool fibers.
Step 4: Snowflakes & Finishing
-
Top snowflakes:
In the empty spaces above the trees near the rock’s peak, paint simple six-point asterisks using black. -
Detail the flakes:
Add tiny ‘V’ shapes to the end of each snowflake arm to turn the asterisks into proper snowflakes. -
Bottom snowflakes:
Repeat the snowflake pattern on the very bottom section of the rock, below the last green band. -
Clean up:
Check for any stray pencil marks and gently erase them once you are certain all paint is bone dry. -
Seal the work:
Spray the rock with a matte sealant. Matte is preferred over glossy here because it maintains the soft, fabric-like illusion of the sweater pattern.
Place your warm little stone on a mantel or in a plant pot for instant winter charm
Aurora Sky Over Frozen Lake
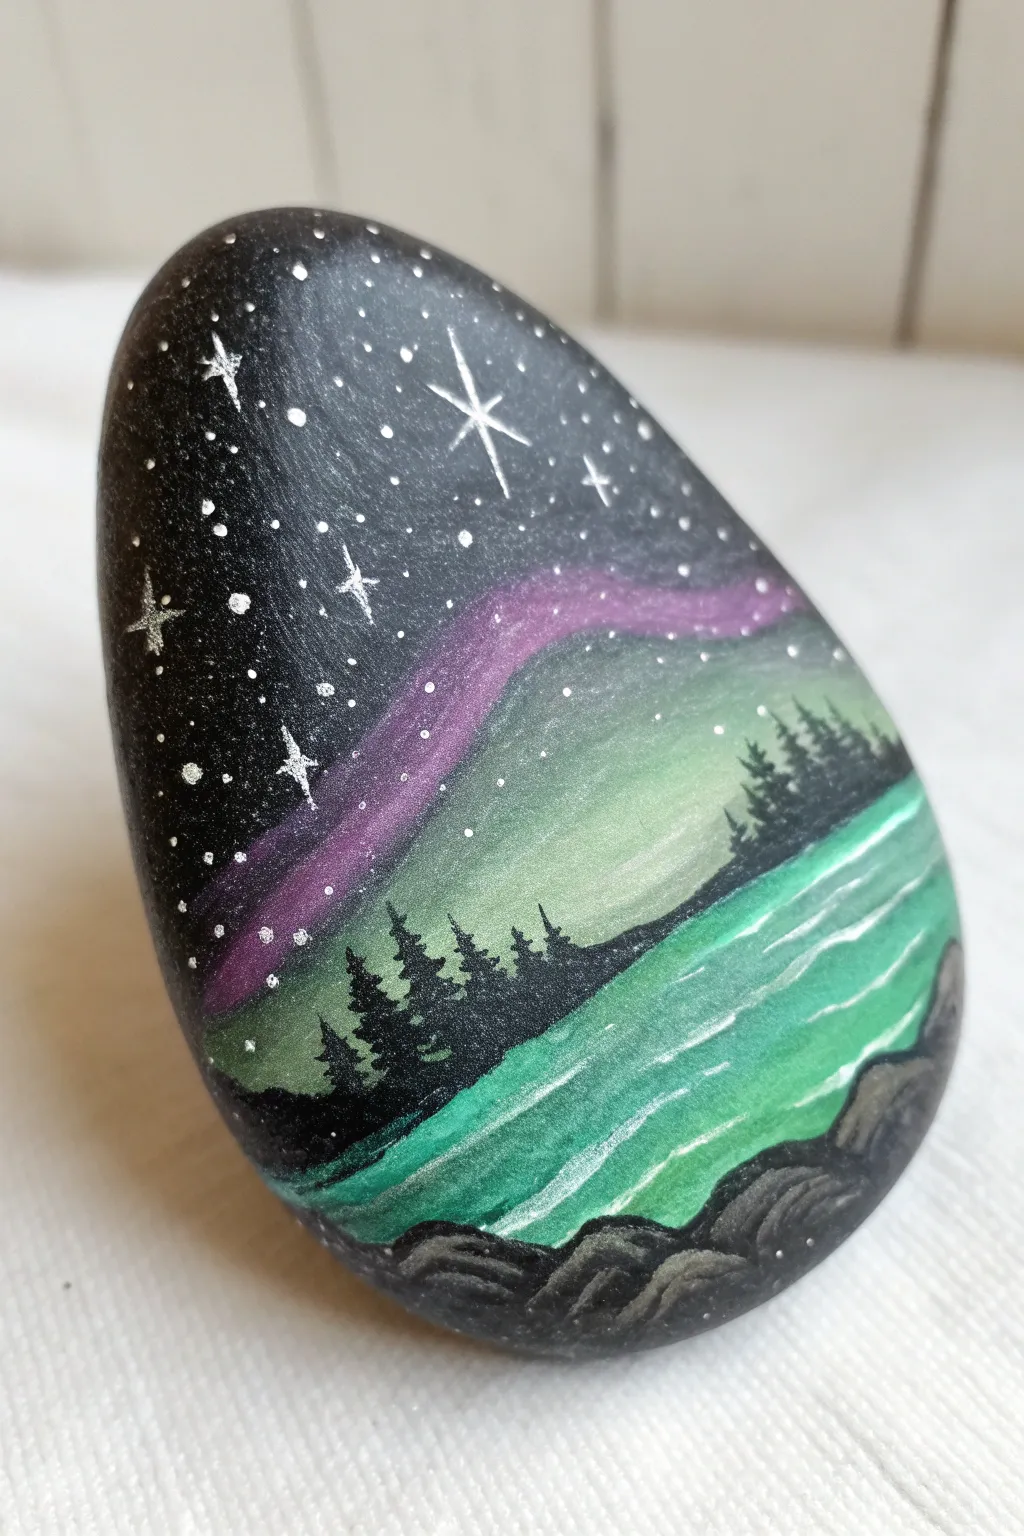
Capture the magic of the northern lights on a smooth stone canvas. This design features a glowing green and violet sky reflected over an icy lake, framed by distinctive silhouette pines.
How-To Guide
Materials
- Smooth oval river rock (clean and dry)
- Black acrylic paint or Posca paint pen (broad tip)
- White acrylic paint or Posca paint pen (extra fine tip)
- Acrylic paints: Violet/Purple, Phthalo Green, light teal/cyan
- Small flat brush
- Detail liner brush
- Makeup block sponge or small piece of kitchen sponge
- Clear acrylic sealer (spray or brush-on)
Step 1: Setting the Night Scene
-
Base Coat:
Begin by covering the entire front surface of your rock with a solid coat of black acrylic paint. Let this dry completely. If the rock texture shows through, apply a second coat for a truly opaque night sky background. -
Aurora Swirl:
Load a small flat brush or a makeup sponge with violet paint. Starting from the middle-left edge, sweep a curved band across the sky area, roughly a third of the way down from the top. -
Softening the Glow:
While the violet is still slightly tacky, use a clean, slightly damp sponge to dab the edges of the purple band, creating a hazy, glowing effect rather than a hard line. -
Green Horizon:
Below the purple band, apply a wash of green paint using your sponge. Dab gently to blend it upward into the darkness, creating the lower part of the aurora glow.
Step 2: Painting the Landscape
-
Water Line:
Mix a light teal color (or use cyan mixed with a touch of white and green). Paint the lower third of the rock to represent the frozen lake surface. -
Creating Depth:
Add horizontal streaks of white and lighter teal across the water area to simulate ice ridges and reflections. Keep these lines loose and organic. -
Horizon Line:
Using black paint and a detail brush, paint a slightly uneven horizon line extending diagonally from the right side down toward the left, separating the sky/green glow from the water. -
Tree Silhouettes:
With the detail brush and black paint, add tiny vertical lines along the horizon for tree trunks. Then, use quick, short dabbing motions to create the pine branches, making them wider at the bottom and pointy at the top. -
Rocky Foreground:
At the very bottom right corner, paint a few rounded, lumpy shapes in dark grey or black to represent large boulders on the shore. -
Rock Highlights:
Once the dark rocks are dry, use a tiny amount of grey or diluted white paint to highlight the top edges of the boulders, giving them dimension.
Blending Trouble?
If your aurora colors look too harsh, wait for them to dry, then dry-brush a tiny bit of black over the edges to push the color back into the darkness.
Step 3: Celestial Details
-
Brightest Star:
Using an extra-fine white paint pen or a liner brush, draw the main star in the upper center. Start with a simple cross, then add smaller diagonal lines in the corners to create a sparkle effect. -
Distant Stars:
Dot tiny white specks across the black portion of the sky. vary the pressure to make some stars larger and others barely visible. -
Star Clusters:
Group a few tiny dots closer together in random areas to mimic natural constellations. -
Reflection:
Add very faint, thin white horizontal lines on the ‘water’ directly below the brightest parts of the sky to enhance the icy reflection look. -
Final Sealing:
Allow the rock to dry for at least 24 hours. Once fully cured, apply a coat of clear sealer to protect the paint from chipping and to make the colors pop.
Add Some shiver
Mix a tiny pinch of fine iridescent glitter into your clear sealer coat. It gives the snow and stars a magical, frozen sparkle when the light hits it.
Now you have a piece of the frozen north to keep on your desk


Have a question or want to share your own experience? I'd love to hear from you in the comments below!