A plain pot is basically a tiny curved canvas, and it’s one of my favorite ways to make art that actually lives with you. Here are some pot painting ideas I use in my studio classes—starting with the classics and easing into the more “how did you do that?” looks.
Classic Solid Color With a Crisp Rim
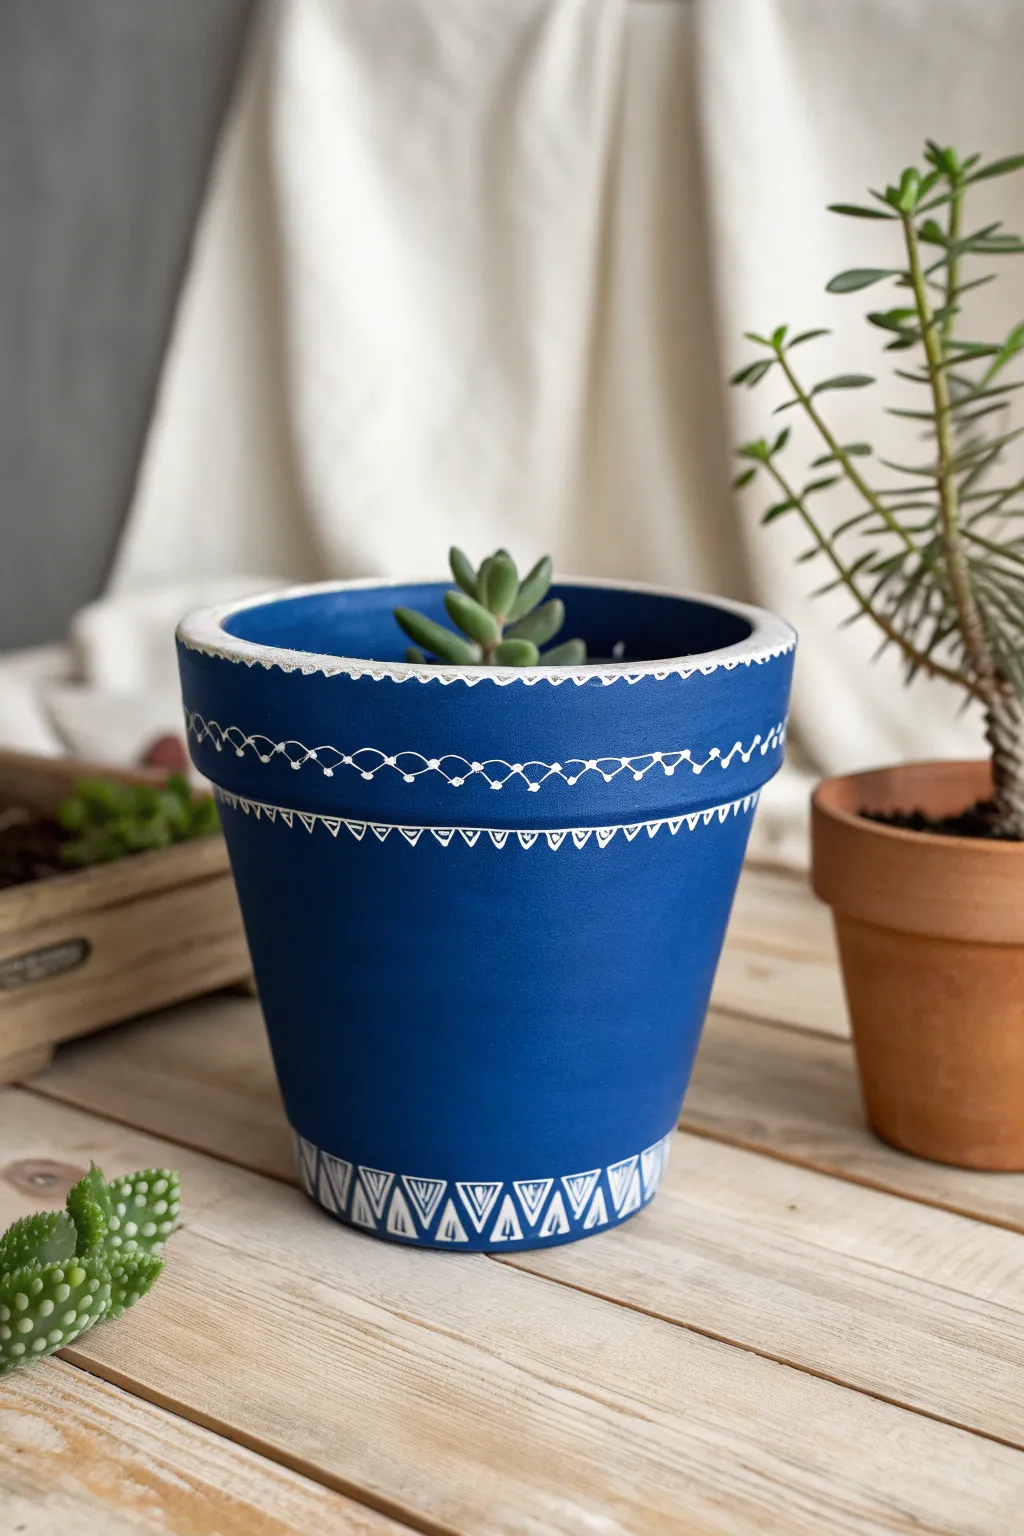
Transform a standard terracotta pot into a striking piece of decor with this rich cobalt blue design featuring crisp white accents. The combination of a solid, matte background with delicate geometric patterns creates a timeless, hand-crafted look perfect for succulents.
How-To Guide
Materials
- Terracotta pot (standard size)
- Acrylic paint (Cobalt Blue or Royal Blue)
- Acrylic paint (Titanium White)
- Wide flat paintbrush (approx. 1 inch)
- Fine detail paintbrush (size 0 or 00) or extra-fine white paint pen
- Water cup and paper towels
- Sealer (matte or satin finish spray)
- Pencil (optional)
Step 1: Base Coat Application
-
Prep the surface:
Ensure your terracotta pot is clean, dry, and free of dust. If it’s an old pot, give it a good scrub and let it dry completely overnight. -
First blue layer:
Using your wide flat brush, apply a generous coat of cobalt blue acrylic paint. Cover the entire exterior, including the rim. -
Paint the interior rim:
Don’t forget to paint the top two inches of the inside of the pot. Since the soil won’t fill it to the brim, this ensures a professional, finished look. -
Let it dry:
Allow the first coat to dry completely. Acrylics on terracotta dry relatively fast, about 20-30 minutes. -
Apply second coat:
Apply a second layer of blue paint to ensure opaque, solid coverage with no terracotta showing through. I find two coats usually does the trick for this depth of color. -
Full cure time:
Let the blue base coat dry fully for at least an hour before attempting any detail work to prevent smudging.
Step 2: Adding the Rim Details
-
Top rim edging:
Using your fine detail brush or paint pen, create a small, repeating scalloped or looped pattern along the very top edge of the rim. -
Rim base line:
Draw a thin, continuous white line around the circumference of the pot where the rim meets the neck. -
Scallop pattern:
Paint a series of connected semi-circles (scallops) sitting on top of the line you just drew. -
Adding dots:
Place a tiny white dot at the peak of every scallop arch for a delicate lace-like effect. -
Cross-hatch connection:
Draw small ‘X’ shapes or connecting diagonal lines underneath the main line to create a textured band effect.
Shaky Hands?
If using a brush for fine lines is difficult, swap it for an extra-fine water-based acrylic paint marker. It offers the control of a pen while drawing.
Step 3: Creating the Base Pattern
-
Base border line:
Move to the bottom of the pot. Paint a thin horizontal line about one inch up from the bottom edge. -
Triangle outlines:
Paint a series of triangles within this bottom band. Alternate them so some point up and some point down, fitting together like teeth. -
Inner details:
Inside each upward-pointing triangle, paint smaller inverted ‘V’ shapes or lines to fill the space. -
Contrast fill:
For the downward-pointing triangles, fill them with simple straight vertical lines to create visual contrast against the neighboring shapes. -
Final touches:
Check your white lines. If the blue shows through too much, carefully retrace the white patterns once the first layer is dry to brighten them. -
Seal the deal:
Once all paint is totally dry (give it 24 hours to be safe), spray the entire pot with a clear matte sealer to protect your design from water damage.
Metallic Twist
Replace the white acrylic paint with metallic gold or silver leaf paint. The shimmer against the matte blue creates a stunning, regal look.
Now you have a beautifully customized pot ready to house your favorite plant

Playful Polka Dot Confetti
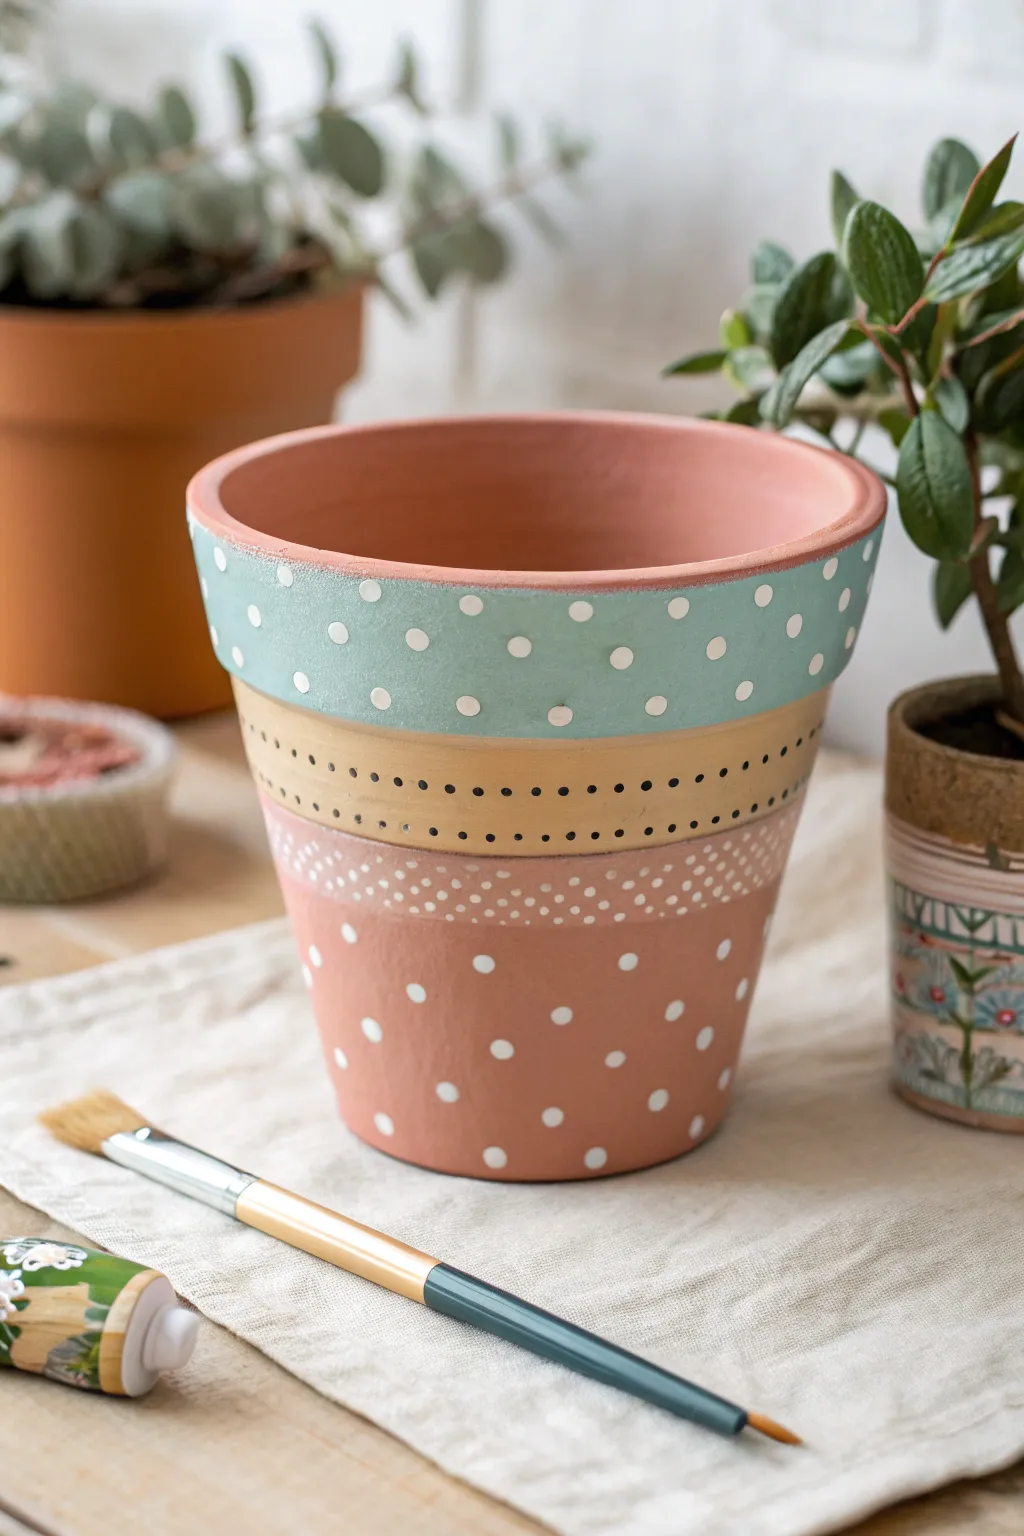
Transform a plain terracotta pot into a charming home for your plants using soft pastel stripes and varied polka dot patterns. This design combines a soothing color palette with whimsical details for a look that is both modern and sweet.
Step-by-Step Guide
Materials
- Terracotta pot (clean and dry)
- Acrylic craft paints (light blue/teal, muted yellow/gold, blush pink, white, black)
- Flat paintbrush (medium width)
- Small round paintbrush or dotting tool
- Painter’s tape or masking tape
- Palette or paper plate
- Water cup and paper towels
- Clear acrylic sealer spray (matte or satin)
Step 1: Base Stripes
-
Prepare the surface:
Ensure your terracotta pot is completely clean and free of dust. If it’s an old pot, scrub it well and let it dry thoroughly to prevent paint from peeling later. -
Create the top band:
Using your flat brush, paint a wide band around the very top rim of the pot with light blue or teal acrylic paint. I like to bring this color just over the lip into the inside for a finished look. -
Apply the second tape line:
Once the blue paint is dry to the touch, place a strip of painter’s tape horizontally around the pot, slightly below the blue band, to mark off the yellow section. -
Paint the yellow stripe:
Fill the space below the blue band with a muted yellow or gold paint. You may need two coats here to get a solid opacity over the terracotta clay. -
Paint the pink band:
Paint a third band below the yellow stripe using blush pink. Leave the bottom section of the pot unpainted to let the natural terracotta color show through as the final stripe. -
Clean up edges:
Carefully remove any tape while the paint is still slightly tacky to get crisp lines. If any paint bled through, use a damp brush or a tiny bit of the background color to touch it up.
Step 2: Dotting Details
-
Start large dots:
Dip the handle end of a paintbrush into white paint to create the larger polka dots on the blue band. Space them somewhat randomly but evenly for a confetti look. -
Add medium dots:
Using the same white paint, add medium-sized dots to the bottom terracotta section using a smaller brush handle or a large dotting tool. -
Detail the yellow band:
Switch to black paint. Using a very fine point brush or a toothpick, add a row of tiny black dots along the center of the yellow stripe. -
Add lower yellow border:
Paint a second row of even smaller black dots along the bottom edge of the yellow band to create a delicate border effect. -
Create the dense confetti:
On the pink band, create a dense pattern of tiny white dots. Focus most of them near the top of the pink stripe and scatter them more sparsely as you move down. -
Add rim details:
For a subtle finish, add a few tiny white dots along the very top rim of the blue band, spacing them widely apart. -
Let it cure:
Allow all the paint layers to dry completely, preferably overnight, to ensure the dots don’t smudge during sealing. -
Seal the project:
Spray the entire pot, inside and out, with a clear acrylic sealer. This protects the paint from water damage when you water your plant.
Uneven Dots?
If your dots look lumpy or have peaks, your paint is too thick. Mix in a tiny drop of water to thin the acrylics slightly so they settle flat and smooth.
Level Up: Metallic Pop
Swap the yellow ochre stripe for metallic gold paint. The shimmer adds a sophisticated touch that contrasts beautifully with the matte finish of the clay.
Now your custom confetti pot is ready to brighten up your windowsill with its cheery colors


Easy Stripes and Clean Bands
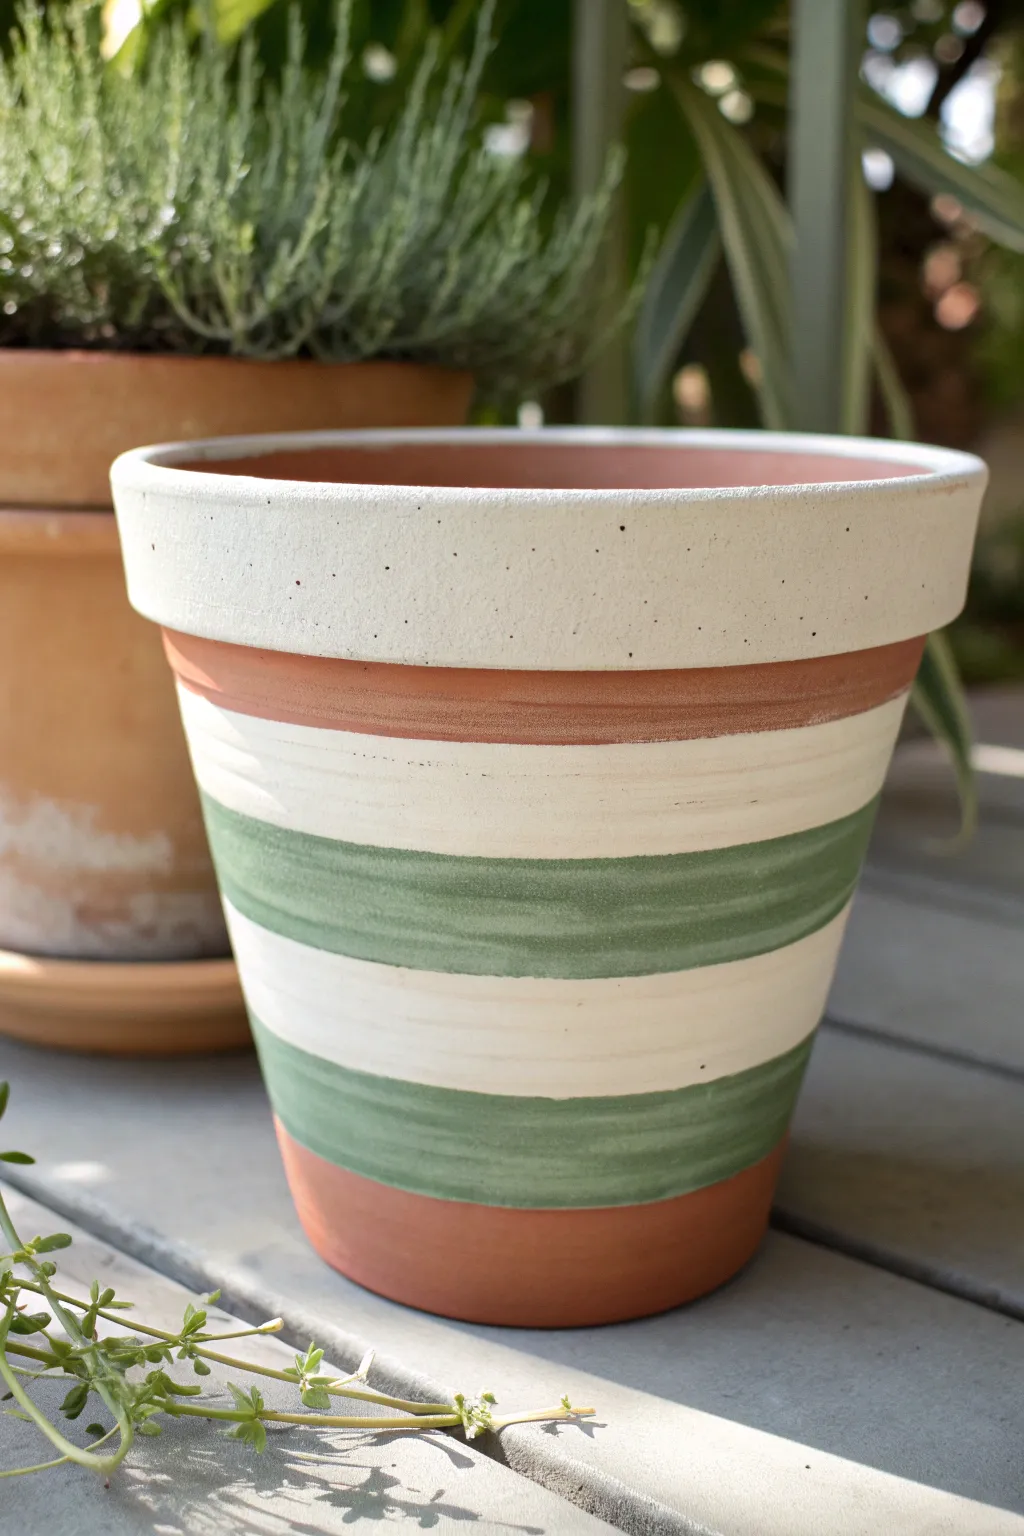
Bring a touch of modern rustic charm to your garden with this striped terracotta pot design. The muted greens and creams work beautifully against the natural clay background, creating a look that feels both organic and thoughtfully designed.
How-To Guide
Materials
- Standard terracotta pot (clean and dry)
- Wide flat artist brush (approx. 1 inch)
- Medium flat artist brush
- Cream or off-white acrylic paint
- Sage green acrylic paint
- Masking tape or painter’s tape
- Sealer or outdoor varnish
- Small mixing tray or palette
- Water cup and paper towels
Step 1: Preparation and Base
-
Clean the surface:
Before starting, ensure your terracotta pot is free from dust and completely dry. Wipe it down with a damp cloth if needed and let it air dry. -
Tape the rim:
Apply a strip of masking tape just below the protruding rim of the pot. This protects the body while you paint the top section. -
Paint the rim:
Using your wide flat brush, apply a generous coat of cream acrylic paint to the entire rim. Work in horizontal strokes to minimize texture. -
Apply a second coat:
Once the first coat is dry to the touch, apply a second layer to the rim to ensure the terracotta color doesn’t show through excessively. -
Remove rim tape:
Gently peel off the masking tape while the second coat is still slightly tacky to ensure a crisp edge.
Step 2: Creating the Stripes
-
Define the first stripe:
Leave a band of natural terracotta exposed below the rim. Place a strip of tape below this area to define the start of your first painted stripe. -
Paint the upper cream band:
Paint a cream stripe below the exposed terracotta band. Use a medium flat brush, and keep your hand steady; you can rotate the pot on a lazy susan or a towel to make this easier. -
Add the first green stripe:
Below the cream band, apply your first stripe of sage green. I find that dragging the brush in one continuous motion around the circumference helps keep the stripes looking fluid and hand-painted. -
Build the texture:
Don’t worry about perfect opacity on the green stripes. A slightly semi-transparent application adds to the rustic, washed feel of the design. -
Create the middle cream band:
Paint another cream stripe below the green one. Make this band slightly wider than the previous stripes to act as a visual anchor. -
Paint the lower green stripe:
Add a second, slightly wider band of sage green near the bottom. Leave the very bottom section of the pot unpainted to expose the natural clay base. -
Refine edges manually:
For a truly artisanal look like the reference photo, avoid using tape for every single line. Instead, use the flat edge of your brush to create soft, hand-painted boundaries between colors. -
Touch up:
Look for any unintentional drips or smudges. A damp paper towel can quickly wipe away wet paint, or you can paint over dried mistakes with the background color.
Uneven Lines?
If your hand-painted lines feel too wobbly, place the pot on a banding wheel or lazy susan. Hold your brush steady in one spot and spin the wheel to get a straight line.
Step 3: Finishing Touches
-
Dry thoroughly:
Allow the entire pot to dry for at least 2-3 hours. Terracotta is porous, so ensure the moisture has evaporated from the paint. -
Speckle effect (optional):
To mimic the subtle texture on the rim in the image, you can flick a tiny amount of watered-down black or brown paint onto the cream rim using an old toothbrush. -
Seal the interior:
If you plan to plant directly in the pot, apply a sealer to the inside to prevent moisture from bubbling your exterior paint. -
Seal the exterior:
Apply a coat of outdoor varnish or sealer over your painted design to protect it from the elements and sun fading.
Rustic Texture Tip
For that weathered look, lightly sand the painted stripes with fine-grit sandpaper after they dry. It reveals bits of clay underneath for a vintage vibe.
Now your pot is ready to be the perfect home for your favorite herbs or succulents


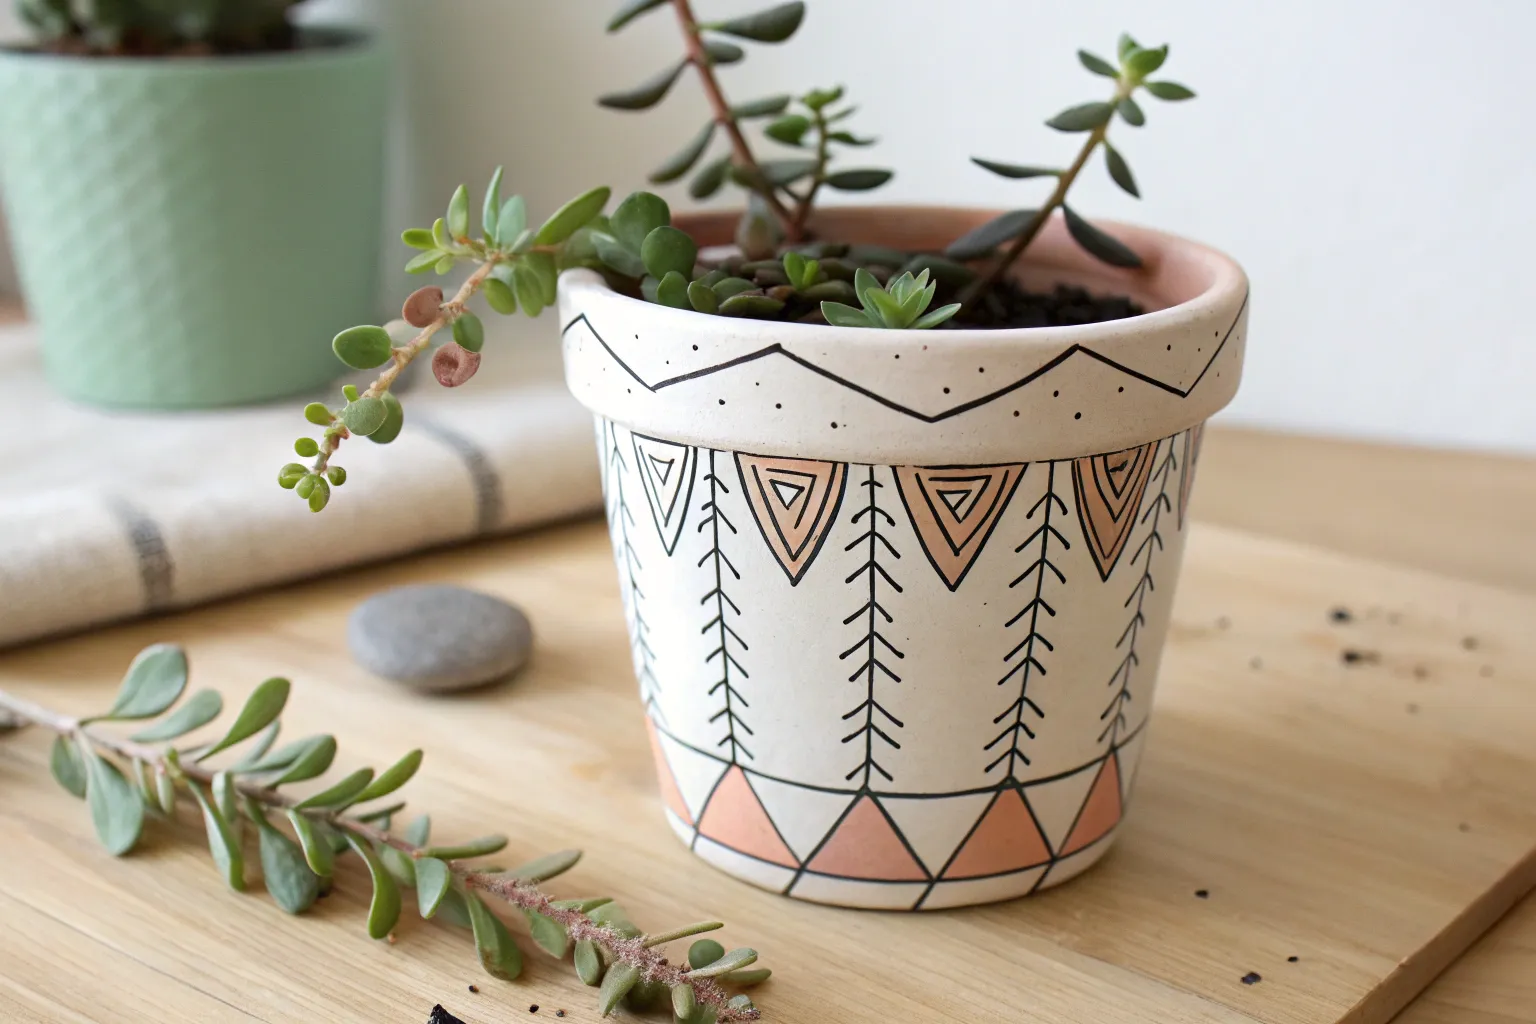
Bold Color-Block Geometry
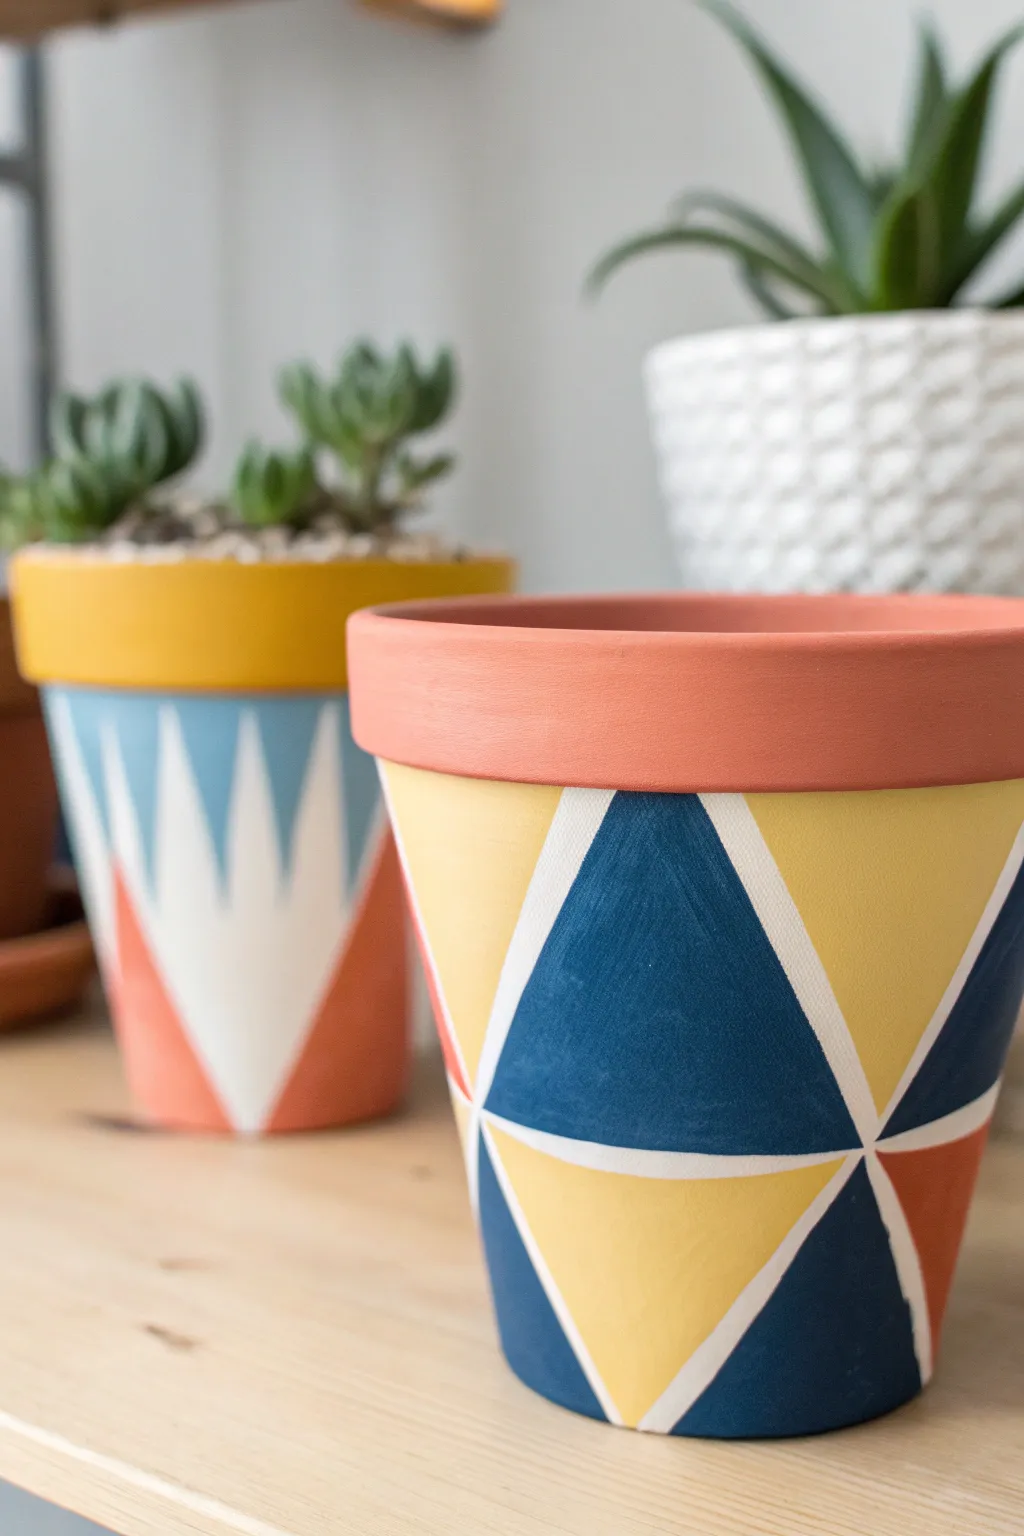
Transform a plain terracotta pot into a modern art piece with this bold geometric design. Using sharp triangles and a harmonious palette of deep blue, sunny yellow, and warm coral, this project creates a striking graphic look that will make your houseplants pop.
Step-by-Step
Materials
- Clean terracotta pot (standard size)
- White acrylic craft paint (for base coat or primer)
- Deep Navy Blue acrylic paint
- Mustard Yellow acrylic paint
- Coral or Terracotta Orange acrylic paint
- Painter’s tape (1/4 inch width is ideal, or standard width cut down)
- Flat shader paintbrush (medium size)
- Small round detail brush (optional for touch-ups)
- Clear matte sealer spray
Step 1: Preparation & Base Work
-
Clean the surface:
Before you begin, wipe down your terracotta pot with a damp cloth to remove any dust or debris. Let it dry completely to ensure the paint adheres well. -
Paint the rim:
Start by painting the upper rim of the pot. Apply a coat of the coral or terracotta orange paint around the entire top band. Extend this color slightly just under the lip onto the main body if you want a seamless transition. -
Let the rim dry:
Allow the rim paint to dry fully. Acrylics usually dry fast, but giving it 15-20 minutes ensures you won’t smudge it in the next steps. -
Prime the main body:
Paint the entire body of the pot below the rim with white acrylic paint. This acts as your background color and will eventually become the white lines between your triangles. Apply two coats for solid coverage.
Step 2: Masking the Design
-
Create the grid structure:
Once the white base is bone dry, begin taping. Use thin painter’s tape (or cut strips of regular tape) to create a large zig-zag pattern around the circumference of the pot. The tape lines should form large V-shapes. -
Form the triangles:
Intersect your first zig-zag line with a second one, or add vertical strips to break the space into distinct triangles. The goal is to create a tessellation of triangles that fit together like a puzzle. -
Seal edges:
Press down firmly on all tape edges with your fingernail or a credit card throughout the design. This is crucial for achieving crips lines later. -
Seal with white (optional):
For razor-sharp lines, I sometimes lightly brush a tiny bit of white paint over the tape edges. This fills any microscopic gaps with the background color instead of the colored paint.
Seal the Deal
Using specific thin ‘fineline’ tape instead of standard blue tape creates cleaner, sharper separation lines between your bold colors.
Step 3: Painting the Geometry
-
Plan your colors:
Look at your taped triangles and decide which will be blue, yellow, or coral. Aim for a balanced distribution where no two triangles of the same color touch directly. -
Apply the Navy Blue:
Start with the Deep Navy Blue. Paint selected triangles carefully, using a flat brush. Stroke from the tape inward to prevent pushing paint under the adhesive. -
Fill in the Yellow:
Wash your brush thoroughly and dry it. Move on to the Mustard Yellow triangles. You might need two layers of yellow to get an opaque, bright finish over the white. -
Add the Coral accents:
Finally, paint the remaining triangles with the Coral/Orange shade. This color ties the body design back to the painted rim. -
Dry and repeat:
Allow the first coat of colors to dry. If any look patchy, apply a second coat for a smooth, matte finish.
Metallic Upgrade
Swap out the white separation lines for gold leaf or metallic gold paint pens to add a touch of glamour to the geometry.
Step 4: Finishing Touches
-
The reveal:
Wait until the paint is dry to the touch but not fully cured (about 20 minutes). Carefully peel off the painter’s tape slowly at a 45-degree angle to reveal the white lines underneath. -
Touch ups:
If any paint bled under the tape, use a very small detail brush with white paint to tidy up the lines. -
Protect your work:
Once the pot is completely dry (preferably overnight), take it outside and spray it with a clear matte sealer. This protects the paint from water damage when you water your plants.
Now you have a stylish, custom planter ready to showcase your favorite succulent or leafy friend
BRUSH GUIDE
The Right Brush for Every Stroke
From clean lines to bold texture — master brush choice, stroke control, and essential techniques.
Explore the Full Guide
Soft Ombre Fade
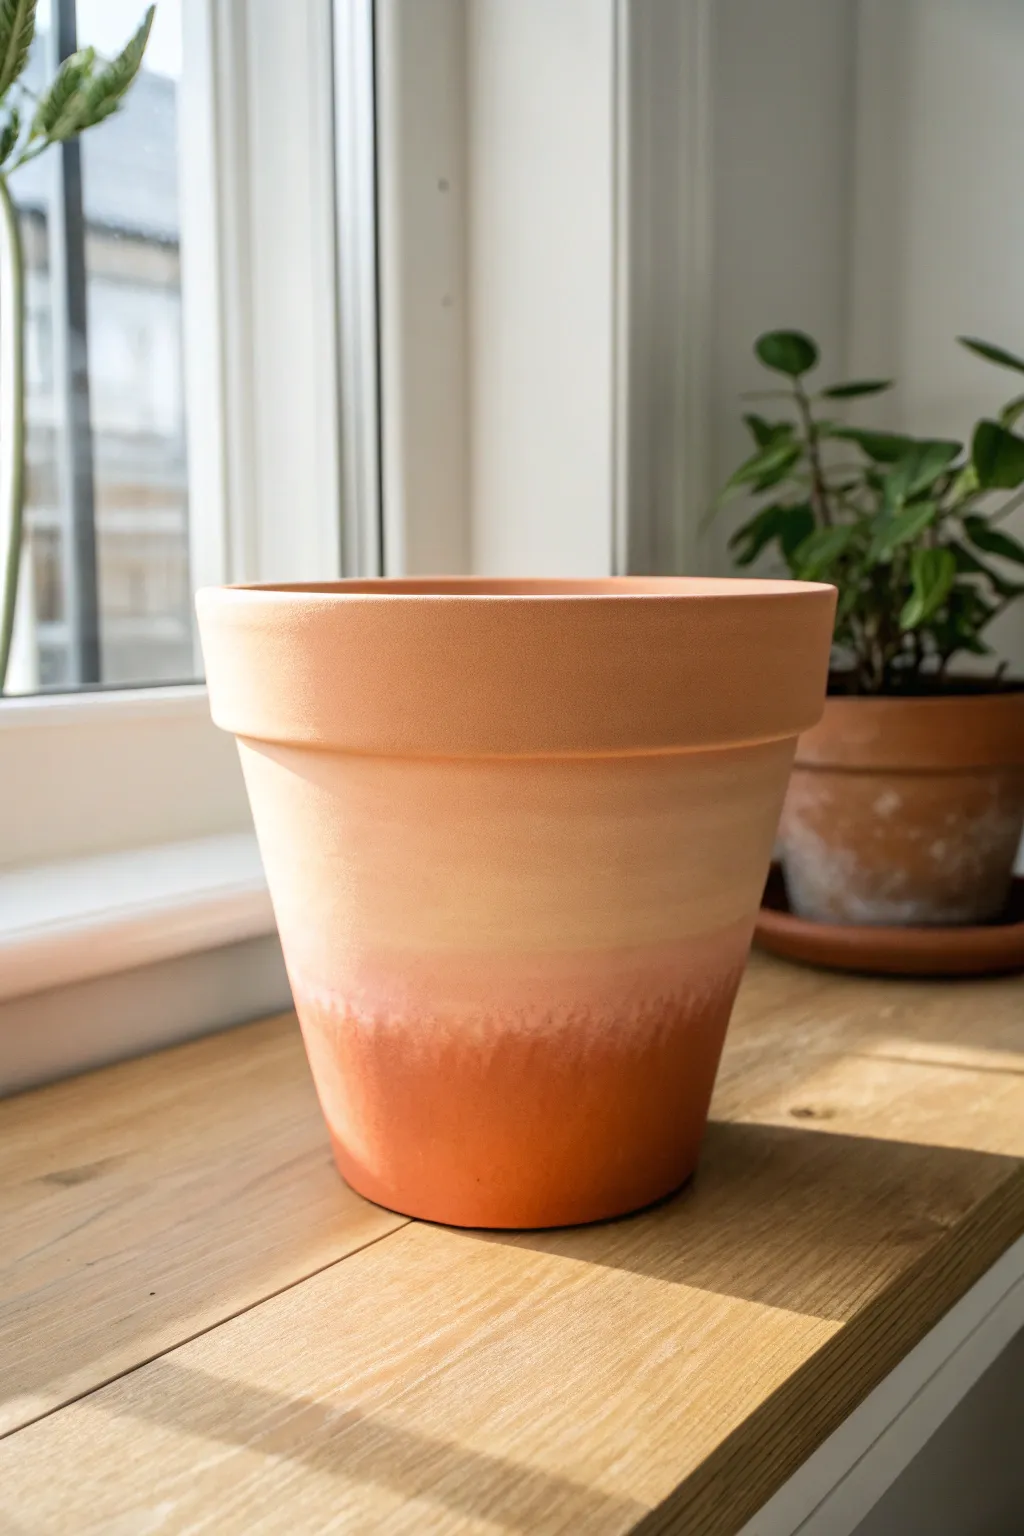
This project transforms a standard terra cotta planter into a glowing piece of decor that mimics the soft light of dawn. By blending warm peach, cream, and burnt sienna tones, you’ll create a seamless ombre fade that looks both modern and surprisingly organic.
Detailed Instructions
Materials
- Terra cotta pot (clean and dry)
- White or cream acrylic paint
- Peach or soft coral acrylic paint
- Burnt sienna or rust acrylic paint
- Medium flat paintbrush
- Makeup sponges or a stippling sponge
- Palette or paper plate
- Water cup
- Matte clear sealant spray
Step 1: Preparation & Base Coat
-
Surface Prep:
Ensure your terra cotta pot is completely clean. If it’s an old pot, scrub off any mineral deposits or dirt and let it dry fully, as trapped moisture can bubble the paint later. -
Mixing the Base Color:
On your palette, mix a generous amount of white acrylic paint with a tiny drop of peach. You want a very pale, creamy off-white color that still holds a hint of warmth. -
Applying the Top Third:
Using your flat paintbrush, paint the rim and the top third of the pot with this creamy mixture. Don’t worry about a perfect straight line at the bottom edge; an uneven edge helps blending later. -
Inside the Rim:
Paint the inside of the rim about two inches down. Since soil will cover the rest, you only need to make sure the visible interior matches the exterior aesthetic.
Sponge Tactics
Dampen your makeup sponge slightly before blending. A dry sponge absorbs paint, removing it from the pot, while a damp sponge moves the pigment around for a smoother blur.
Step 2: Creating the Mid-Tone Gradient
-
Mixing the Middle Shade:
Take your original peach paint and mix it with a small amount of white. The goal is a soft pastel peach that is clearly darker than the rim but still light and airy. -
Applying the Middle Section:
Paint the middle section of the pot, slightly overlapping the bottom edge of your creamy top layer. Work quickly so the paint remains wet for blending. -
Initial Blending:
While both paints are still wet, take a damp makeup sponge and lightly dab along the line where the cream and peach meet. This stippling motion breaks up the hard line. -
Smoothing the Transition:
Continue dabbing up and down the transition zone. If the paint starts to dry too fast, I sometimes dip the sponge lightly in water to re-activate the acrylics for a smoother blur.
Step 3: Deepening the Base
-
Painting the Bottom:
For the bottom third, use the burnt sienna or rust color directly. If it feels too dark, you can temper it with a drop of peach, but keep it rich and earthy. -
Overlapping the Peach:
Apply this dark shade to the bottom of the pot, bringing it up to meet and slightly overlap the peach mid-section. -
Creating the Rough Edge:
Look closely at the reference image—the bottom transition has a slightly more textured, ‘drip’ look. Achieve this by using a somewhat dry brush to pull the dark paint upward into the peach section with short, vertical strokes. -
Sponge Blending the Base:
Use a clean side of your makeup sponge to soften this lower transition. Dab repeatedly where the rust meets the peach creates that lovely, soft-focus fade. -
Checking the Gradient:
Step back and look at the pot from a distance. If any band of color looks too distinct, add a tiny bit of the adjacent color to your sponge and lightly tap over the area to integrate it.
Texture Twist
Mix a teaspoon of baking soda into your paint before applying. This creates a gritty, stone-like texture that gives the ombre fade an authentic, aged ceramic feel.
Step 4: Finishing Touches
-
Rim Refinement:
Check the upper rim. If your handling smudged the clean cream color, give it a quick touch-up coat for a crisp finish. -
Drying Time:
Let the pot sit undisturbed for at least an hour. The thick layers of blended paint might take a little longer to cure than a single coat. -
Sealing the Work:
Once fully dry, take the pot to a well-ventilated area and apply a light coat of matte clear sealant. This protects your ombre work from water damage when you water your plants.
Place your favorite green plant inside to contrast beautifully with the warm, sunset hues of your new pot
Tiny Wildflower Scatter
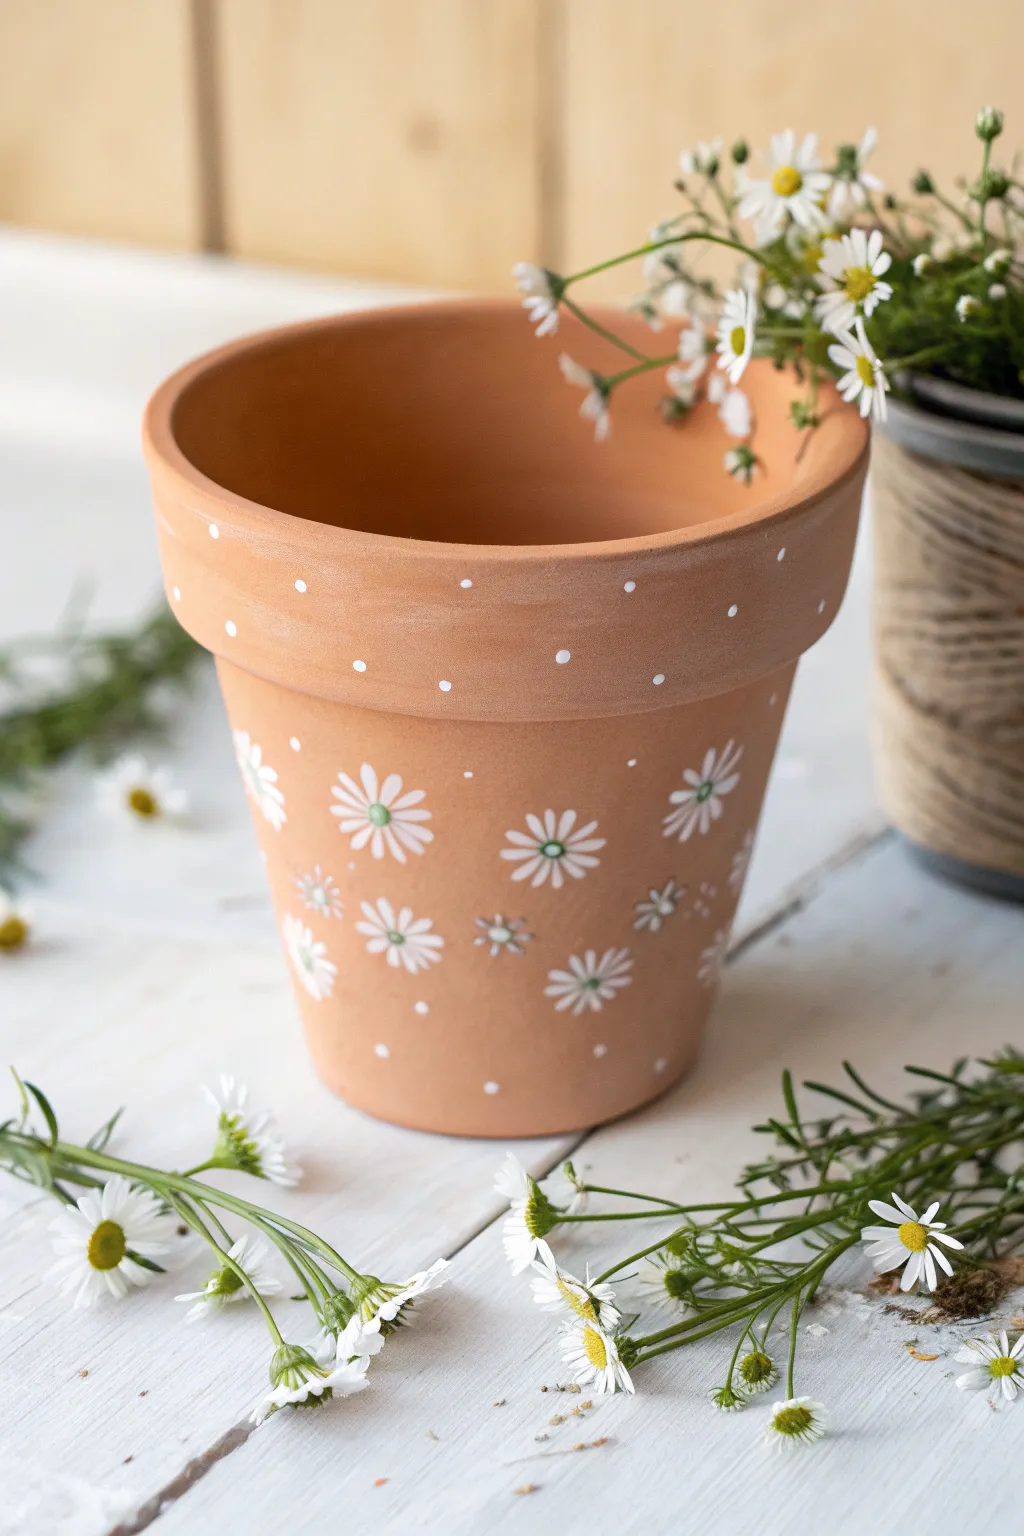
Transform a plain terracotta pot into a charming cottage-core accessory with this delicate wildflower design. Using just a single color of paint, you’ll create a scattered pattern of dainty daisies and dots that feels fresh and airy.
Step-by-Step Tutorial
Materials
- Terracotta pot (4-6 inch diameter)
- White acrylic craft paint
- Small round paint brush (size 0 or 1)
- Medium round paint brush (size 4)
- Pale green or yellow acrylic paint (optional, for flower centers)
- Palette or small dish
- Paper towels
- Water cup
- Matte spray sealer (optional)
Step 1: Preparation
-
Clean surface:
Begin by wiping down your terracotta pot with a slightly damp cloth to remove any dust or warehouse grit. Let it dry completely. -
Test spacing:
Before painting directly on the pot, practice the flower shape on a scrap piece of paper to get a feel for the size and brush pressure needed.
Perfect Petals
Work with the curve of the pot rather than against it. Rotate the pot in your hand as you paint each petal so your hand angle stays comfortable and consistent.
Step 2: Painting the Flowers
-
Start largest blooms:
Dip your medium round brush into the white acrylic paint. You want enough paint to be opaque but not so much that it drips. -
Create petals:
Press the tip of the brush gently against the pot and pull slightly inward to create a teardrop shape. Repeat this 5-7 times in a circle to form your first daisy. -
Random placement:
Paint 4-5 large daisies scattered randomly across the main body of the pot. Leave plenty of empty space between them. -
Add medium flowers:
Switch to your smaller round brush (size 0 or 1). Paint slightly smaller versions of the daisy shape in the open spaces. -
Paint flower centers:
Once the white petals are tacky or dry, dip the handle end of a paintbrush into pale green or yellow paint (or stick with terracotta for a natural look) and dot the center of each flower.
Step 3: Adding Details
-
Rim decoration:
Move your attention to the rim of the pot. Dip the handle end of your medium brush into the white paint. -
Dot the rim:
Press the handle against the rim to create uniform dots. Space them about an inch apart all the way around. -
Staggered row:
Create a second row of dots slightly lower on the rim, offsetting them so they sit between the dots of the top row. -
Micro-dots filler:
Return to the main body of the pot. Using the smallest end of a brush handle or a toothpick, add tiny white dots in the largest empty spaces between the flowers. -
Vary dot sizes:
I like to add a few even tinier dots around the flower clusters to make the pattern look like pollen or drifting seeds.
Add Some Buzz
Paint a tiny bumblebee silhouette near the rim using black and yellow paint to add a dynamic focal point to the floral pattern.
Step 4: Finishing Up
-
Dry time:
Allow the paint to dry completely for at least 30 to 60 minutes. -
Optional sealing:
If you plan to use this pot outdoors, take it to a well-ventilated area and apply a light coat of matte spray sealer to protect the design. -
Final inspection:
Check for any petals that might need a second coat of white to look truly bright against the terracotta, and touch up as needed.
Now you have a sweet, custom planter ready to welcome your favorite herbs or flowers

PENCIL GUIDE
Understanding Pencil Grades from H to B
From first sketch to finished drawing — learn pencil grades, line control, and shading techniques.
Explore the Full Guide
Big Botanical Leaf Strokes
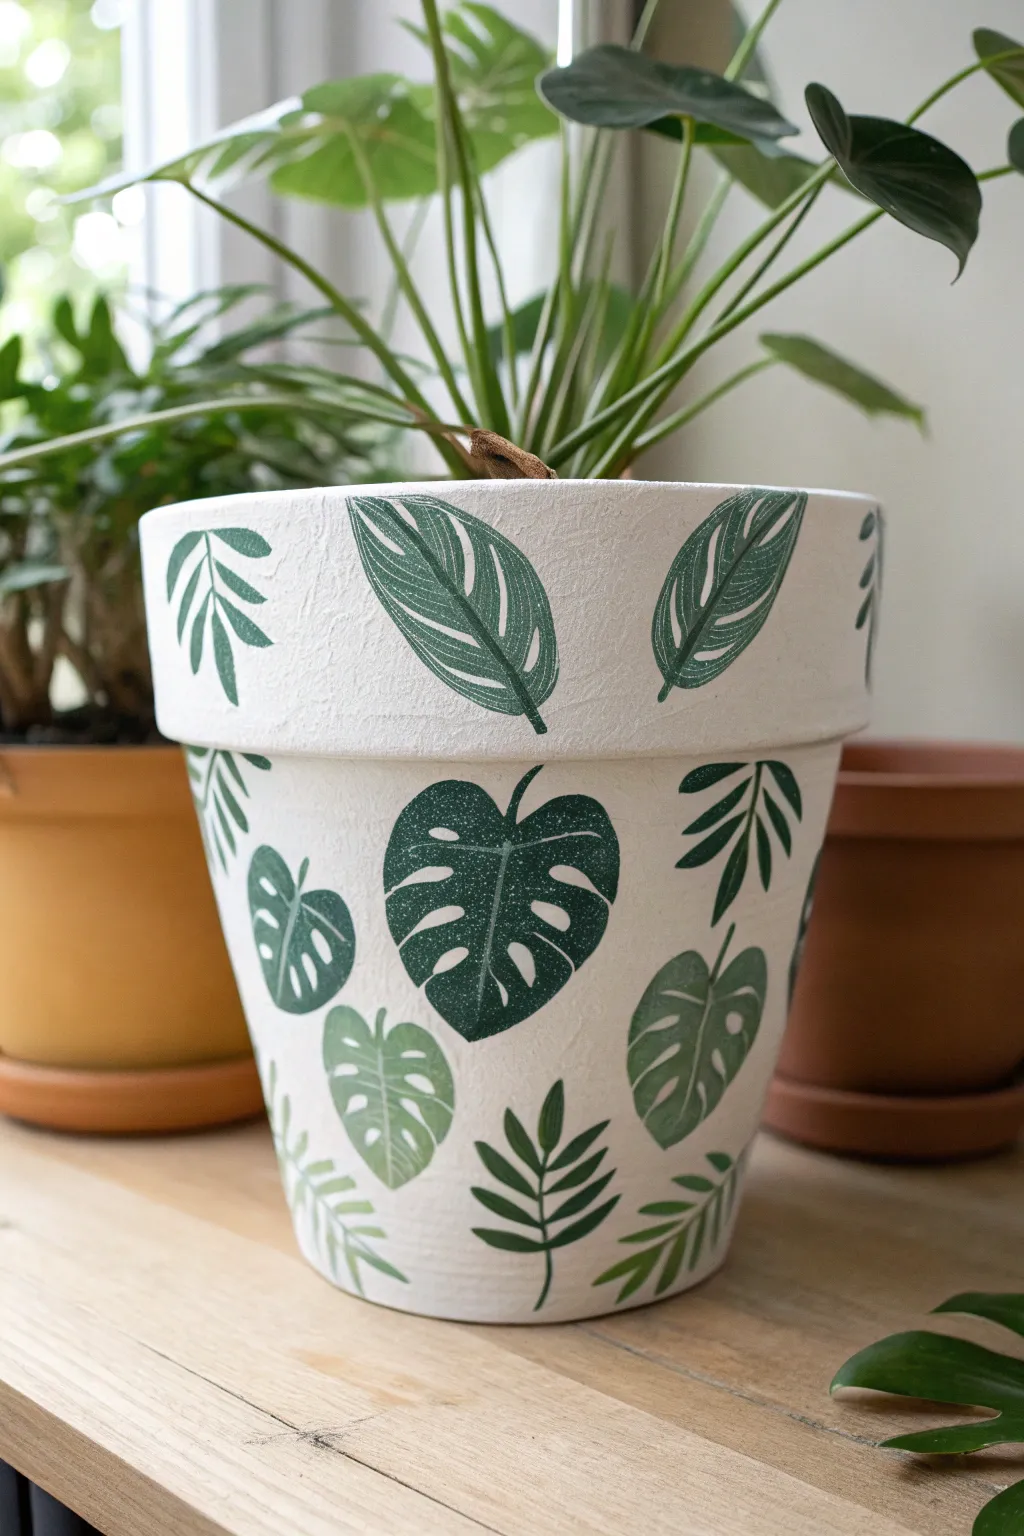
Transform a standard terracotta planter into a lush indoor jungle with this crisp botanical design. The combination of a textured white base and vibrant green leaf motifs creates a modern, airy look perfect for housing your favorite houseplants.
Detailed Instructions
Materials
- Terracotta pot (size of your choice)
- White acrylic paint (matte finish)
- Acrylic paint in dark forest green and medium sage green
- Baking soda (optional, for texture)
- Fine detail brushes (sizes 0 and 1)
- Small flat brush
- Pencil
- Paper palette or plate
- Water cup
- Spray sealer (matte polyurethane)
Step 1: Preparing the Canvas
-
Clean the surface:
Begin by thoroughly wiping down your terracotta pot with a damp cloth to remove any dust or manufacturing residue. Let it dry completely. -
Mix textured base:
To mimic the slightly rough, stucco-like texture seen in the photo, mix your white acrylic paint with a teaspoon of baking soda. Stir until you have a paste consistency. -
Apply the base coat:
Using a flat brush, apply the white mixture all over the pot, including the rim and just inside the top edge. Use crisscross strokes to enhance the textured look. -
Layer up:
Allow the first coat to dry for about 20 minutes. It will likely look streaky, so apply a second coat of plain white paint (no baking soda needed) to get solid, opaque coverage. -
Final drying time:
Let the white base cure fully for at least an hour. The surface needs to be completely dry before you start sketching.
Stamp for Uniformity
Not confident in your drawing? Carve the leaf shapes into a halved potato or a piece of craft foam to create DIY stamps. This ensures every leaf is identical.
Step 2: Planning the Foliage
-
Sketch the layout:
Lightly sketch your leaf placement using a pencil. Aim for a random scattering of three main shapes: the heart-shaped Monstera, an oval Calathea leaf, and a feathery palm frond. -
Space them out:
Ensure you vary the orientation of the leaves. Some should point up, some down, and some angled. Don’t forget to wrap the design around the rim as well. -
Draft the Monstera:
For the Monstera, draw a heart shape first. Then, mark small notches along the edges and a few oval holes in the middle to create the classic ‘Swiss cheese’ plant look. -
Draft the Palm:
Draw a central stem line, then sketch small, curved almond shapes coming off both sides to create the fern or palm look.
Step 3: Painting the Greenery
-
Outline in dark green:
Load a fine liner brush with dark forest green paint. Carefully trace the outline of your Monstera leaves and fill in the solid areas, leaving the ‘holes’ white. -
Detail the veins:
While the paint is wet, you can use a very fine brush to pull a tiny bit of white paint through the center for a vein, or paint it on top once dry for a sharper look. -
Paint the Palms:
Switch to your palm fronds. Use a single confident stroke for each leaflet, starting from the stem and lifting the brush as you pull outward to create a sharp point. -
Calathea coloring:
For the oval leaves, I like to mix a little white with the green to create a lighter sage tone. Fill in the oval shape with this lighter color. -
Add stripe details:
Once the sage oval is dry, take your dark forest green and paint thin, curved stripes from the center vein outward to mimic the Calathea pattern. -
Touch ups:
Step back and look for any patchy areas. Apply a second coat of green to the leaves if the white background is showing through too much. -
Clean the edges:
If you went outside the lines, use a small angled brush with white paint to ‘erase’ mistakes and sharpen the leaf edges. -
Seal the deal:
Once the artwork is completely bone dry (give it a few hours), take the pot to a well-ventilated area and spray it with a clear matte sealer to protect your painting from water damage.
Go 3D
After sealing, use a hot glue gun to attach small faux ladybugs or bees to one of the leaves for a playful, three-dimensional surprise.
Now your botanical masterpiece is ready to be the stylish new home for your favorite green friend
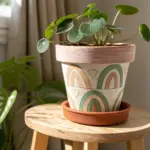
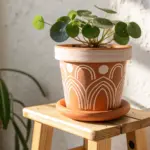
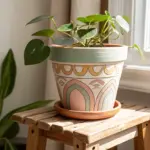
Dot-Mandala Medallions
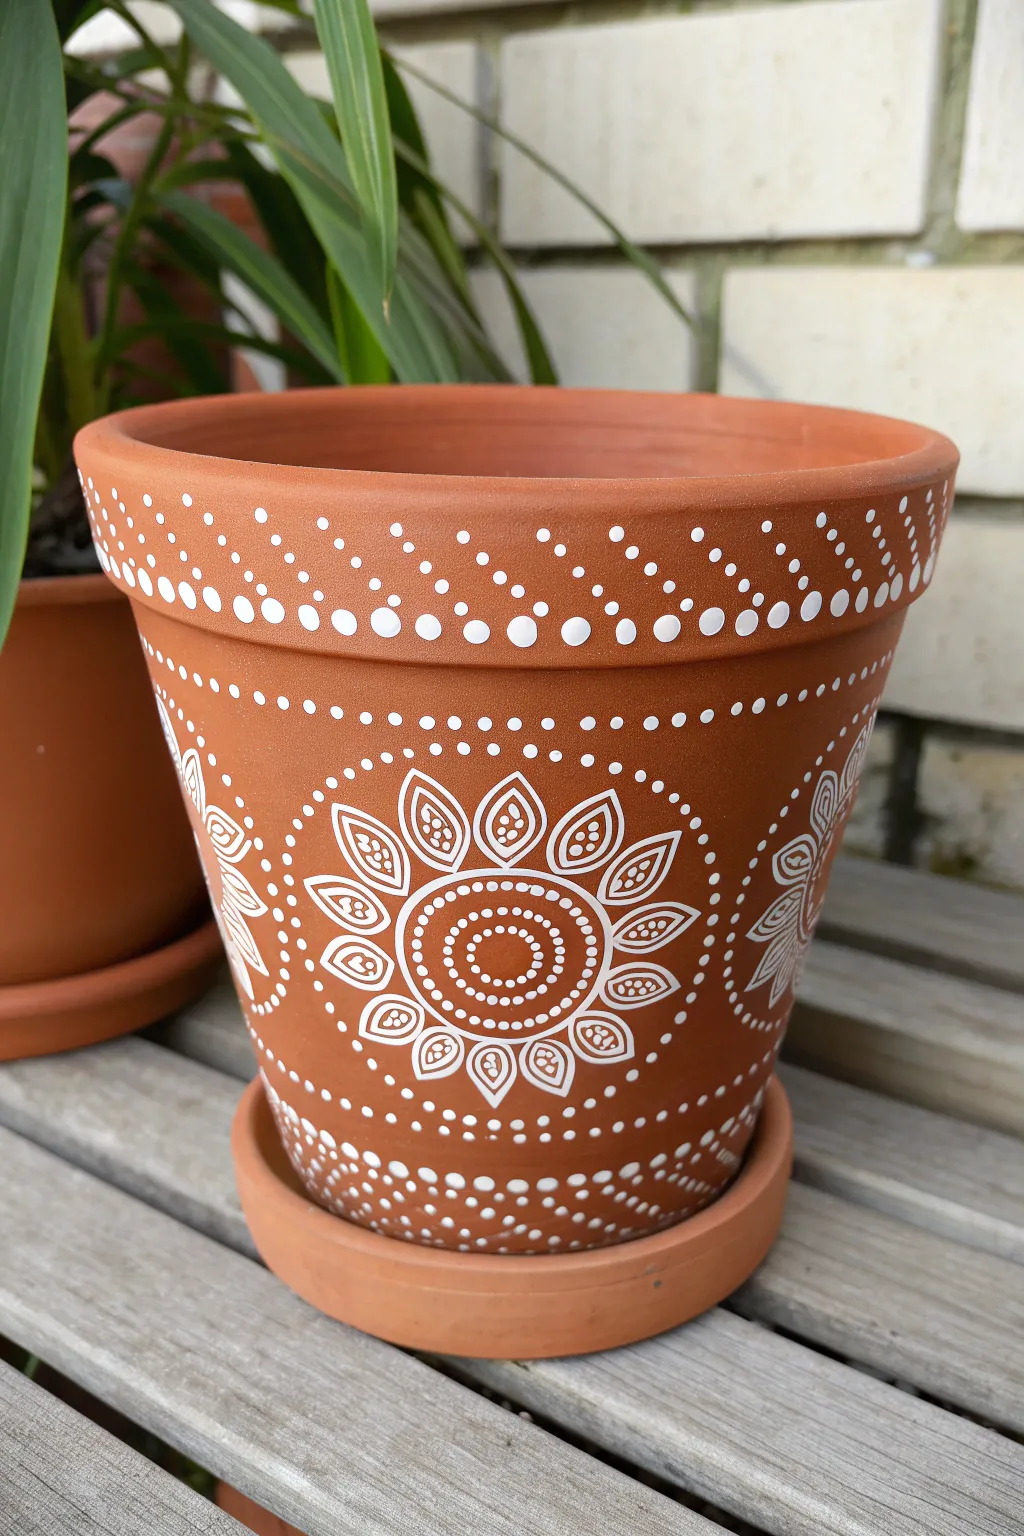
Transform a simple terracotta pot into a boho-chic masterpiece with these crisp white mandala medallions. The contrast between white acrylic and the warm, earthy clay creates a timeless look that brightens any plant shelf.
Step-by-Step Guide
Materials
- Clean terracotta pot (standard size)
- White acrylic paint (heavy body variety works best)
- Set of dotting tools (various sizes)
- Fine liner brush (size 0 or 00)
- Paint palette or disposable plate
- Cotton swabs and water (for corrections)
- Acrylic matte sealer spray
Step 1: Preparation and Planning
-
Clean the surface:
Before painting, ensure your terracotta pot is completely clean and dry. Wipe it down with a damp cloth to remove any dust or nursery grit, as paint adheres poorly to dusty clay. -
Seal the base (optional):
If you plan to plant directly inside, I like to seal the inside of the pot first to prevent moisture from bubbling your exterior paint later. -
Establish the centers:
Visualize where your main medallions will go. For a standard pot, three large medallions spaced evenly around the circumference usually fit perfectly. You can lightly mark the center point of each with a pencil.
Paint Consistency
If dots form peaks like Hershey’s Kisses, your paint is too thick. Add a tiny drop of water or pouring medium to smooth it out.
Step 2: Painting the Medallion Core
-
Start the central spiral:
Using a medium-sized dotting tool, place a single white dot at your center mark. Immediately surround it with a ring of very small dots. -
Create the second ring:
Move up one tool size. Create a second, slightly larger ring of dots around the first one, keeping the spacing tight and even. -
Paint the solid circle outline:
Switch to your fine liner brush. Carefully paint a solid white circle outline around your dotted center. This defines the core of your flower. -
Add the petal border dots:
On the outside of that painted line, use a small tool to add a ring of evenly spaced dots. These will serve as anchor points for your petals.
Uneven Spacing?
Mark the pot’s rim into quadrants (12, 3, 6, and 9 o’clock) with faint pencil marks first to ensure your pattern stays symmetrical as you work around.
Step 3: Creating the Petals
-
Outline the teardrops:
Using your fine liner brush, paint teardrop-shaped petal outlines radiating from the center. Each petal should encompass about two of the anchor dots you just painted. -
Fill the petals:
Dip a small dotting tool in white paint. Place three ascending dots inside each petal outline—start with a larger one at the base and use smaller ones toward the tip. -
Connect the design:
Between each petal tip, place a single medium-sized dot to bridge the gaps and expand the circular shape.
Step 4: Detailed Borders
-
Start the lower border:
Move down to the area just above the pot’s base. Paint a series of sweeping ‘U’ shapes or swags using dots. Start with large dots at the top of the ‘U’ and decrease size as you reach the bottom curve. -
Fill the bottom rim:
Fill the space below the swags with a dense field of random or grid-patterned dots to ground the design. -
Define the top rim:
At the very top rim of the pot, use your largest dotting tool to create a prominent row of dots spaced about a half-inch apart. -
Add diagonal accents:
Beneath each large rim dot, paint a diagonal line of decreasingly smaller dots, creating a slanted rain effect around the collar. -
Create the zig-zag:
Below the diagonal lines, add a zig-zag dotted line that encircles the neck of the pot, separating the rim design from the main body.
Step 5: Finishing Touches
-
Fill the gaps:
Look at the spaces between your main medallions. Add simple dotted circles or arcs to tie the three main flowers together visually. -
Clean up mistakes:
If any dots merged or smeared, use a damp cotton swab to wipe them away before they dry, or scrape dried paint gently with a craft knife. -
Let it cure:
Allow the paint to dry completely for at least 24 hours. The thick dots take longer to dry than standard brushstrokes. -
Seal the artwork:
Spray the exterior with a matte clear acrylic sealer. This protects your detailed work from water damage when you water your plants.
Now your custom planter is ready to be filled with your favorite greenery for a fresh, handcrafted display


Minimal Line Art Faces
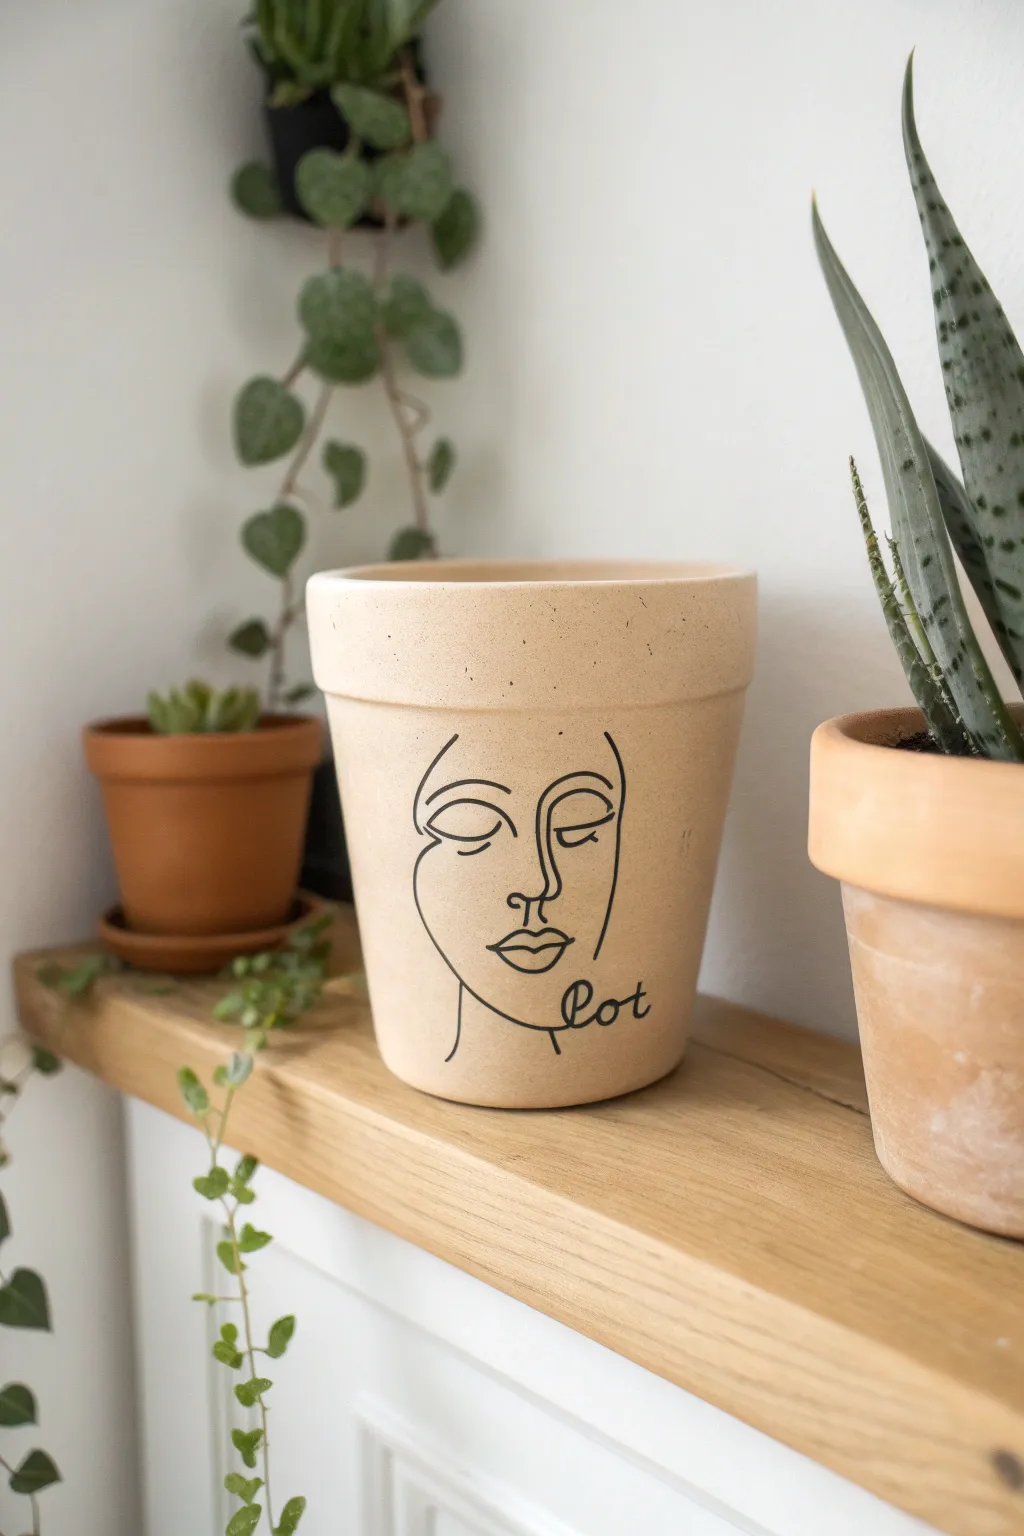
Transform a plain planter into a sophisticated piece of decor with this simple, continuous line art design. The striking contrast of black ink against light terracotta creates a modern look that feels both artistic and effortless.
How-To Guide
Materials
- Light beige or terracotta pot (unglazed surface works best)
- Pencil (HB or lighter)
- Eraser
- Black permanent marker or paint pen (fine point)
- Black permanent marker or paint pen (medium point, optional)
- Clear matte sealer spray
Step 1: Preparation & Sketching
-
Clean and Dry:
Begin by ensuring your pot is completely clean and free of dust. Wipe it down with a damp cloth and let it dry thoroughly. If you are recycling an old pot, scrub off any dirt or mineral deposits first. -
Establish the Center Line:
Mentally divide the front face of the pot in half vertically. Lightly mark a faint dot where the nose bridge will begin, which helps center the entire face design. -
Draft the Nose:
Using your pencil, draw a soft vertical line down the center for the nose. Curve it slightly to the left at the bottom to define the nostril area, keeping the lines loose and fluid. -
Outline the Eyes:
Sketch the eyes on either side of the nose bridge. Instead of realistic eyes, draw closed, elongated almond shapes to maintain that abstract, serene look. -
Add Eye Details:
Draw curved lines above the eyes to represent the eyelids and brow bone. I like to make the line on the right side connect directly to the nose line for a more continuous appearance. -
Define the Lips:
Sketch the lips below the nose. Use simple, undulating curves—a dip in the middle for the cupid’s bow and a fuller curve for the bottom lip. -
Create the Face Shape:
Draw the contour of the face. Start from the left temple, curve down past the cheekbone, narrow at the chin, and sweep up slightly on the right side. Don’t close the shape entirely; leave it open at the top.
Practice Makes Perfect
Draw the design on paper 2-3 times first. This trains your muscle memory for the continuous line style so you won’t hesitate when drawing on the curved pot.
Step 2: Inking & Finishing
-
Test Your Marker:
Before touching the pot, test your black marker or paint pen on a scrap piece of paper or the bottom of the pot to ensure the ink flows smoothly and isn’t dried out. -
Trace the Nose:
Begin tracing over your pencil lines, starting with the nose. Use steady, confident pressure. If you have a medium point marker, use it here for the main facial features. -
Ink the Eyes:
Carefully go over the eye outlines. If you want a more delicate look, switch to a fine point marker for these smaller details. -
Connect the Lines:
Trace the brow bone and connect it down the side of the nose if your sketch followed that path. The beauty of line art is in the flow, so try not to lift your pen too often. -
Check for Smudges:
Pause for a moment. Be extremely careful where you rest your hand, as the ink might still be wet on the textured surface. -
Finish the Outline:
Trace the outer face contour and the lips. Keep your wrist loose to maintain smooth curves rather than jagged angles. -
Add the Text:
In the bottom right area of the face design, write the word ‘Pot’ (or a name of your choice) in a cursive, loopy script. Connect the tail of the ‘t’ to the jawline of the face drawing for cohesion. -
Erase Guidelines:
Allow the ink to dry completely—wait at least 30 minutes to be safe. Then, gently erase any visible pencil marks. Rub lightly to avoid lifting any pigment. -
Seal the Work:
To protect your design from water damage when watering your plant, take the pot outside and apply a coat of clear matte sealer spray. Let it cure fully before potting.
Ink Bleeding Issues?
If the ink bleeds into the clay pores, the pot is too porous. Seal the area with a clear matte medium or Mod Podge *before* drawing to create a barrier.
Now step back and admire your trendy new planter that looks like it came straight from a boutique studio
Black-and-White Doodle Patterns
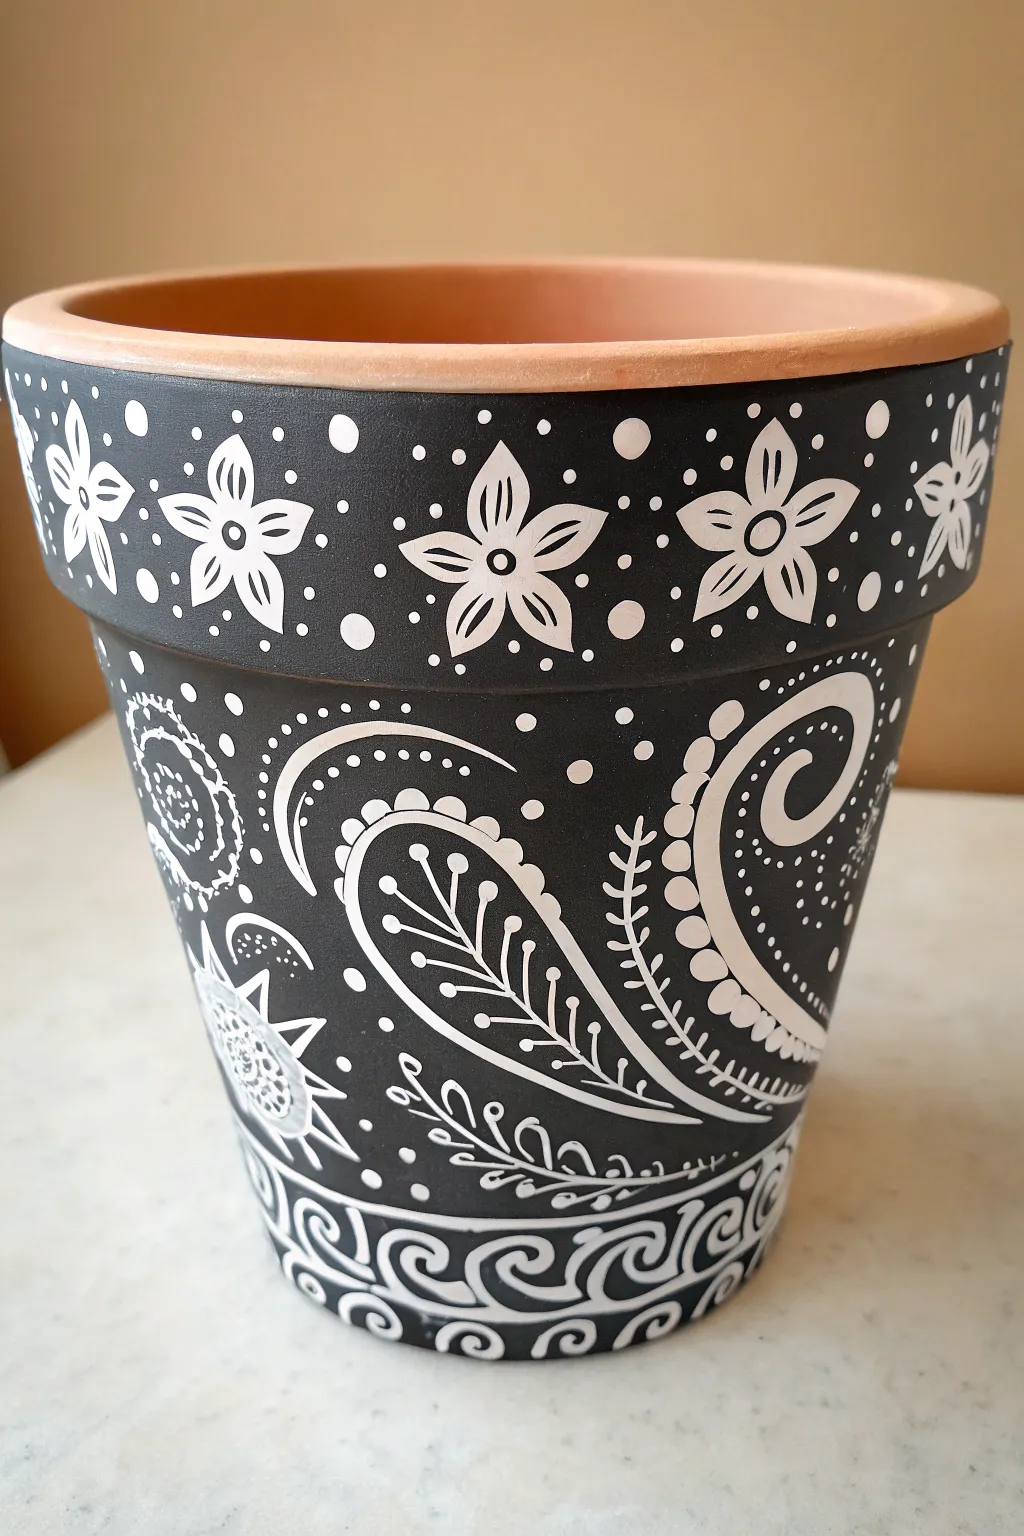
Transform a plain terracotta pot into a striking piece of decor with this high-contrast black and white design. This project focuses on mindful doodling, combining simple paisley shapes, floral motifs, and geometric patterns for an elegant bohemian finish.
Step-by-Step
Materials
- Standard terracotta pot (medium size)
- Black acrylic paint (or chalkboard paint)
- White acrylic paint (or a white paint pen)
- Flat paintbrush (medium width)
- Fine detail paintbrush (size 0 or 00)
- White gel pen or fine tip paint marker (optional but recommended for sharp lines)
- Pencil for sketching
- Clear spray sealer (matte or gloss)
- Cup of water and paper towels
Step 1: Preparation & Base Coat
-
Clean the pot:
Before you begin, wipe down your terracotta pot with a damp cloth to remove any dust or loose clay particles. This ensures the paint adheres properly. -
Define the rim:
Decide on the look for your rim. In the reference image, the top edge remains natural terracotta. If you like this look, use painter’s tape just below the lip to keep that line crisp. -
Apply the black base:
Using your medium flat brush, paint the exterior of the pot black. Paint horizontally around the pot for even coverage. -
Paint the rim area:
Make sure to paint the band of the rim itself fully black, stopping right at the top edge you previously decided on. -
Apply a second coat:
Terracotta is porous and soaks up paint quickly. Wait about 20 minutes for the first coat to dry, then apply a second layer of black to get a solid, opaque finish. -
Dry completely:
Allow the pot to dry fully for at least an hour. The surface must be completely dry before you start the white details to prevent smudging.
Step 2: Painting the Rim Details
-
Sketch the flowers:
Using a pencil, lightly draw five-petal flowers evenly spaced around the center of the rim’s band. Don’t worry if the pencil is hard to see against black; you just need a faint guide. -
Paint the flower centers:
With your fine detail brush and white paint (or a paint pen), create small circles for the centers of your flowers. -
Add petals:
Draw the five petals radiating from each center. Keep the shape simple and slightly pointed at the tips for a star-like appearance. -
Fill the details:
Inside each petal, paint a single straight line from the center outward to give the flower dimension. -
Add dots:
Using the back of your brush handle dipped in white paint, stamp larger dots in the empty spaces between the flowers and smaller dots surrounding the petals for texture.
Fixing Wobbly Lines
Did your hand shake? Wait for the white mistake to dry completely, then touch it up with a bit of black paint. It acts just like an eraser!
Step 3: Creating the Body Pattern
-
Outline the paisley:
On the main body of the pot, sketch large, sweeping paisley drop shapes. I find it easiest to start with the largest curve first. -
Paint the paisley spine:
Go over your sketch with the white paint. Inside the paisley curve, paint a central line that follows the curve of the shape. -
Add leaf veins:
Paint small, slanted lines coming off that central spine, turning the interior of the paisley into a stylized leaf or feather pattern. -
Border the shape:
Paint a second line outlining the paisley shape to create a double border. -
Add decorative swirls:
Fill the larger negative spaces between paisley shapes with bold spirals and swirls. -
Create dotted trails:
Following the curves of your swirls or paisley outlines, add rows of white dots. Vary the size of the dots—starting large and getting smaller—to create movement. -
Fill small gaps:
Look for empty black spaces. Fill them with tiny starbursts, small leaf sprigs, or clusters of stippled dots to balance the composition.
Pen vs. Paint
If you struggle with brush control, use a white oil-based paint marker for the details. It offers the precision of a pen but is as permanent as paint.
Step 4: Bottom Border & Sealing
-
Paint the base border:
Near the very bottom of the pot, paint two parallel horizontal white lines about half an inch apart. -
Add the wave pattern:
Inside those parallel lines, paint a continuous swirling wave pattern (like a series of connected letter ‘C’s or scrolls) all the way around the base. -
Final cure:
Let all your white detailed work dry for at least 24 hours to ensure it is completely set. -
Seal the pot:
Spray the entire exterior with a clear acrylic sealer. This protects your artwork from water damage when you water your plants.
Pop in your favorite succulent or fern and enjoy your stunning new handmade planter
Herb Label Pots With Hand Lettering
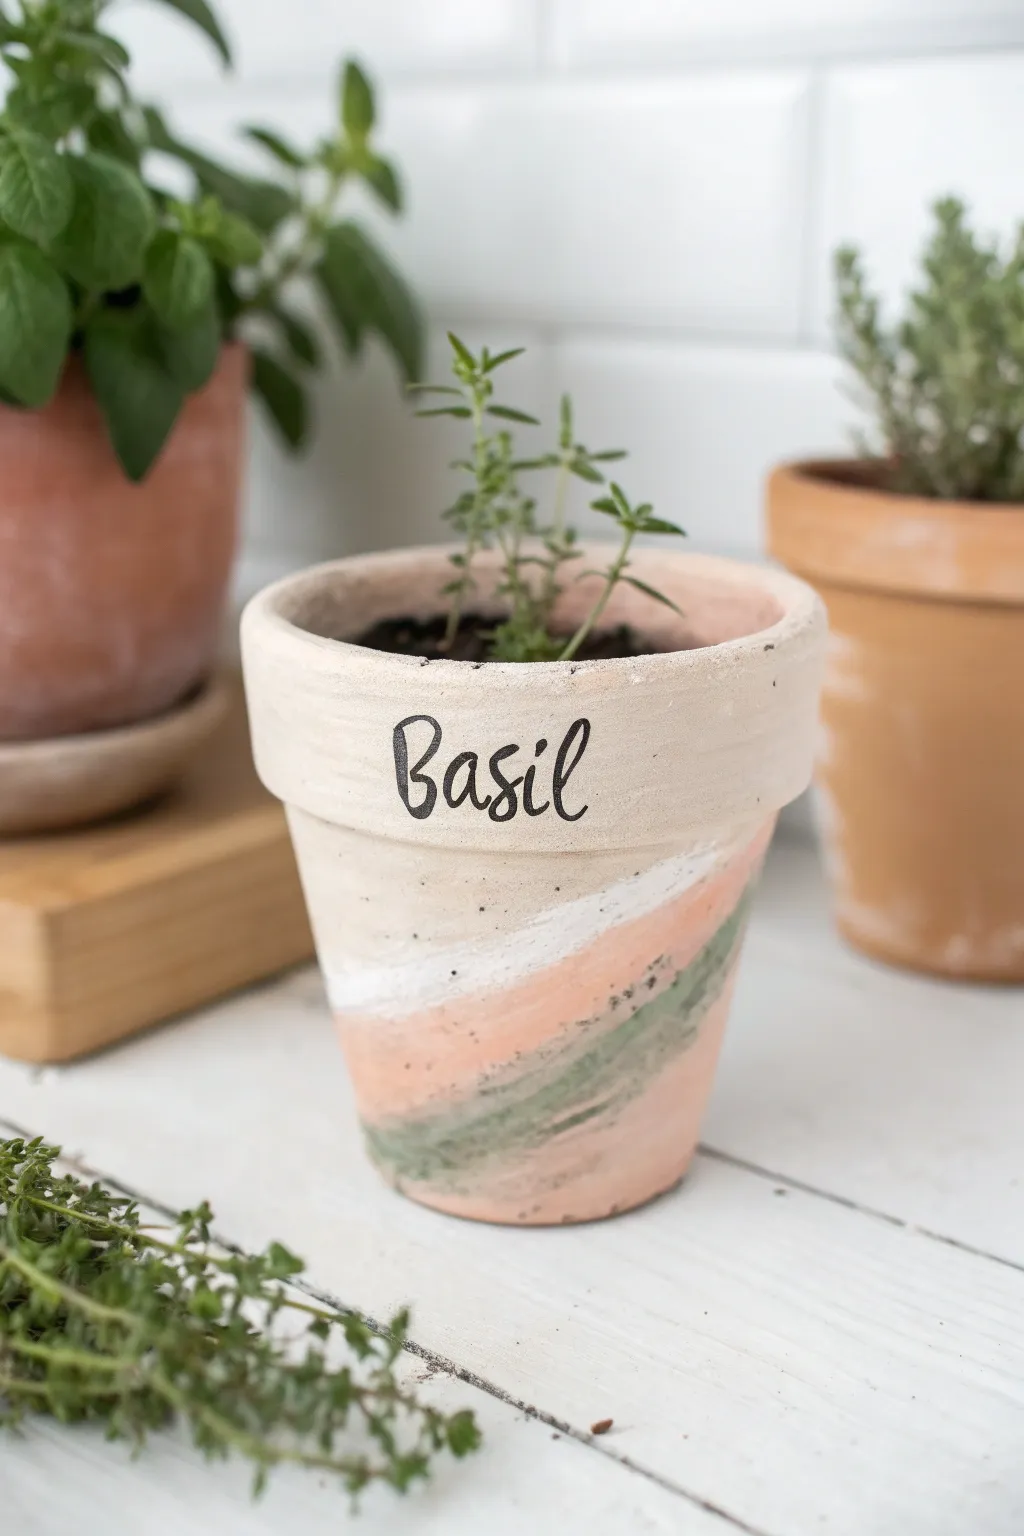
Bring a soft, artistic touch to your herb garden with this painted pot project that mimics the flow of watercolours. The combination of gentle abstract swirls and crisp, black calligraphy creates a modern farmhouse look that is perfect for any windowsill.
Step-by-Step Tutorial
Materials
- Small terracotta pot (standard rim)
- Acrylic paints (White, Peach/Soft Pink, Muted Green)
- Black paint pen (fine or medium tip)
- Flat paintbrush (medium width)
- Cup of water
- Paper towels
- Clear matte sealer spray (optional)
- Pencil (optional)
Step 1: Preparing the Canvas
-
Clean the surface:
Before adding any paint, wipe down your terracotta pot with a damp cloth to remove any dust or debris from the store shelf. -
Base coat application:
Squeeze a generous amount of white acrylic paint onto your palette. Using a flat paintbrush, cover the entire exterior of the pot, including the rim. -
Apply a second layer:
Terracotta is very porous and soaks up paint quickly. Once the first coat is dry to the touch, apply a second layer of white to ensure an opaque, bright background. -
Dry partially:
Let the white base dry completely, or at least until it is tacky but stable, so your next colors don’t turn into a muddy mix.
Smudged Lettering?
If you smudge the black ink, let it dry completely. Don’t wipe! Once dry, paint over the mistake with your white base color and try again.
Step 2: Creating the Abstract Wash
-
Prepare the peach tone:
Mix a small amount of peach or soft pink acrylic paint. You want this color to be somewhat translucent, so dip your brush in water before picking up the paint. -
First swish of color:
Starting from the bottom of the pot, drag your brush diagonally upward towards the right. Aim for a loose, organic stroke rather than a perfect line. -
Feather the edges:
While the paint is still wet, use a slightly damp, clean brush to soften the edges of your peach stroke, creating that dreamy watercolour effect. -
Add white highlights:
While the peach section is drying, streak a bit of fresh white paint into the middle of the color block to add dimension and break up the solidity. -
Introduce the green:
Pick up your muted green paint. Similar to the peach step, ensure your brush has some moisture on it to help the paint glide. -
Layer the green stroke:
Paint a diagonal swoosh of green that overlaps the bottom section of the peach area. I like to let the strokes cross playfully so the colors interact. -
Create texture:
Use a dry bristle technique here—drag the brush lightly so some of the white background and peach layer show through the green stroke. -
Inspect the composition:
Step back and look at your pattern. Add tiny dabs of white or watered-down color if any area looks too heavy or blocked in.
Make It Glossy
Swap the matte sealer for a high-gloss varnish (like Mod Podge) on just the colored swirl section to make it look like glazed ceramic.
Step 3: Lettering and Finishing
-
Dry completely:
This is crucial: allow the painted swirls to dry 100%. If the paint is wet, your paint pen will snag and bleed. -
Sketch the label:
Lightly pencil the word ‘Basil’ (or your chosen herb name) onto the center of the rim. Use a cheerful, looped cursive script. -
Ink the lettering:
Shake your black paint pen well to activate it. Carefully trace over your pencil lines, moving slowly to keep the curves smooth. -
Thicken the downstrokes:
To give the text a calligraphy feel, go back and thicken every line where your pen moved downwards, leaving the upstrokes thin. -
Add character:
If you want a rustic look, you can add tiny faux speckles by flicking a toothbrush with black paint near the bottom, though the pen works too for controlled dots. -
Seal the work:
Once the lettering is dry, spray the pot with a clear matte sealer to protect your artwork from water damage when you water your plants.
Pop your favorite herb inside and enjoy your customized miniature garden
Citrus and Watermelon Slice Designs
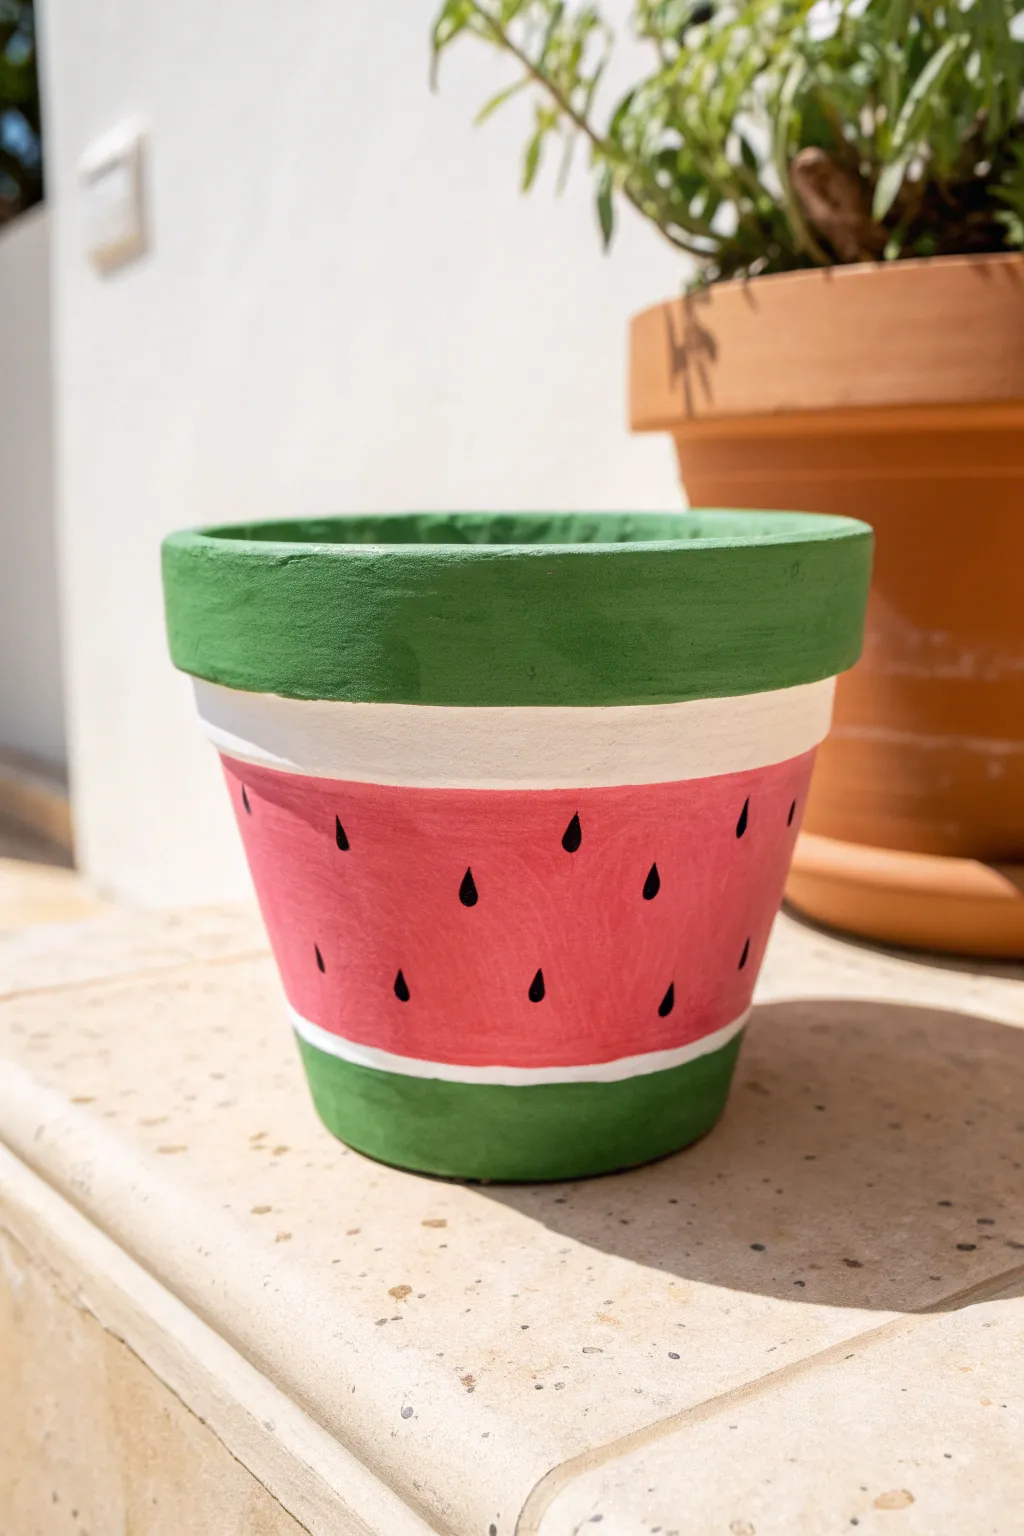
Transform a plain terra cotta pot into a refreshing slice of summer with this vibrant watermelon design. The broad bands of color mimic the fruit’s rind and juicy center, creating a playful home for your favorite succulents or herbs.
How-To Guide
Materials
- Terra cotta pot (standard planter shape)
- Acrylic craft paints (Emerald Green, White, Watermelon Pink/Red, Black)
- Flat paintbrushes (1-inch width for bands)
- Small round detail brush (size 2 or 3 for seeds)
- Palette or paper plate
- Cup of water and paper towels
- Clear acrylic sealer spray (optional)
Step 1: Preparation and Rind
-
Clean surface:
Begin by wiping down your terra cotta pot with a damp cloth to remove any dust or debris, then let it dry completely so the paint adheres properly. -
Paint the rim inner:
Start by painting the inside of the rim with your emerald green acrylic paint, extending just a bit down the inner wall for a finished look. -
Paint the rim outer:
Continue using the flat brush to paint the entire exterior of the thick rim with the same emerald green. Use smooth, horizontal strokes to minimize brush marks. -
Create the bottom rind:
Paint a band of emerald green around the very bottom of the pot, approximately 1 inch high. This mirrors the top rim and frames the design. -
Dry time:
Allow these green sections to dry fully before moving on; acrylics dry quickly, usually within 15-20 minutes.
Uneven Lines?
If you struggle with steady hands, use painter’s tape to mark off sections. Peel tape while paint is slightly wet for crispest edges.
Step 2: The Pith and Fruit
-
Upper white band:
Using a clean flat brush and white paint, create a band directly underneath the green rim. This should be about half an inch to 3/4 inch wide. -
Lower white band:
Paint a matching white band directly above the green section at the bottom of the pot. Don’t worry if the lines aren’t perfectly straight; a little waviness looks organic. -
Fill the center:
Use your watermelon pink or red paint to fill the large remaining space in the middle of the pot between the two white bands. -
Second coats:
The white and pink layers may look streaky on the first pass. I usually apply a second coat once the first is dry to get that solid, opaque finish. -
Touch-ups:
Inspect the edges where the colors meet. If you need to sharpen the lines, go back with the appropriate color and a steady hand.
Step 3: Seeds and Finishing
-
Practice seeds:
Before painting on the pot, practice making teardrop shapes on a piece of paper with your small round brush and black paint. -
Paint first row:
Dip your fine brush in black paint and create a staggered row of seeds near the top of the pink section. Press down to start the teardrop and lift up for the point. -
Fill the pattern:
Continue painting seeds across the pink band in a random or staggered pattern. Keep them somewhat spaced out to avoid cluttering the design. -
Final drying:
Let the black seeds dry completely to prevent smearing. -
Seal (optional):
If you plan to use this pot outdoors or water it frequently, spray the entire exterior with a clear acrylic sealer to protect your artwork.
Make It Pop
Add tiny white highlights to the top of each black seed for a glossy, 3D effect that makes the watermelon look extra juicy.
Pop in a leafy plant and enjoy the splash of color this fruity pot brings to your space
Strawberry or Cherry Repeat Print
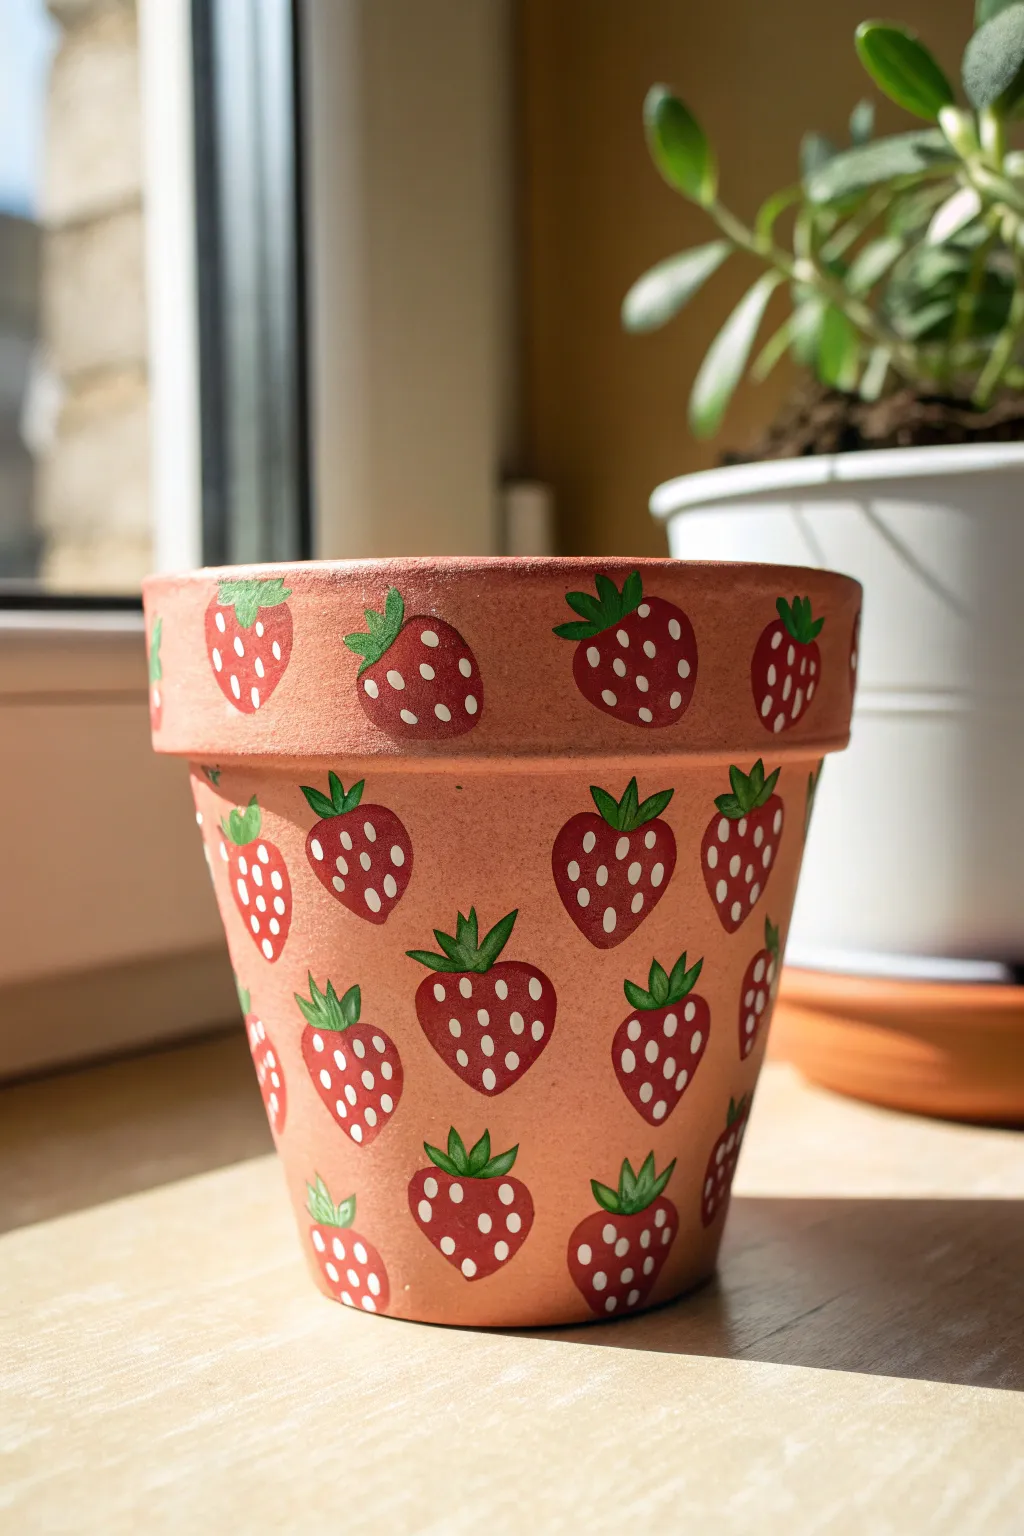
Transform a plain terracotta pot into a delightful summer accent with this hand-painted strawberry repeat pattern. The warm peach tones of the clay pair perfectly with the juicy red fruit for a sunny, garden-ready look
Step-by-Step Tutorial
Materials
- Terracotta pot (clean and dry)
- Acrylic paints: Bright red, leaf green, titanium white, and a peach/terracotta shade (optional for base)
- Small flat paintbrush (size 4 or 6)
- Fine detail paintbrush (size 0 or 1)
- Dotting tool or toothpick
- Water cup and paper towels
- Pencil
- Clear acrylic sealer (matte or satin)
Step 1: Preparation and Base
-
Clean the pot:
Before you begin painting, ensure your terracotta pot is completely free of dust and dirt. Wipe it down with a damp cloth and let it dry fully so the paint adheres properly. -
Apply base coat (optional):
While the pot in the image has a natural look, applying a coat of paint that matches the terracotta color can give you a smoother canvas. Mix a bit of white into orange and brown to get a soft peach-clay tone and paint the entire exterior surface. -
Let it dry completely:
If you applied a base coat, wait until it is dry to the touch before moving on to design placement.
Uneven Spacing?
If your berries end up too clustered, don’t worry. Paint smaller ‘filler’ berries or single green leaves in large gaps to balance the design visually.
Step 2: Painting the Strawberries
-
Plan the placement:
Visualize a grid around your pot. You want rows of strawberries that are staggered—like a brick pattern. Lightly mark the center of each future berry with a pencil if you need a guide, spacing them about an inch apart. -
Start the rim row:
Begin with the top rim. Using your small flat brush and bright red paint, create drop-like shapes. The shape should be slightly wider at the top and taper to a rounded point at the bottom, like a soft heart without the deep cleft. -
Paint the body rows:
Move to the main body of the pot. Paint the next row of red berry shapes, positioning each one so it sits below the gap between the two berries on the rim above it (staggered placement). -
Continue the pattern:
Continue painting rows of red berry shapes down to the bottom of the pot, maintaining that alternating brick-lay pattern. -
Add partial berries:
You might have spots near the very bottom or top edge where a whole berry won’t fit. Paint just the tip or top portion of the berry there to make the pattern look continuous, like wallpaper. -
Refine the shapes:
Go back over your red shapes if the terracotta is showing through too much. A second coat ensures the red pops vibrantly against the background.
Crisper Seeds
For the sharpest seed shapes, use a toothpick instead of a brush. Dip just the very tip in white paint and press gently for perfect, tiny teardrops.
Step 3: Adding Details
-
Paint the leaves:
Switch to your fine detail brush and leaf green paint. At the top of each red berry, paint three small, pointed leaves fanning out. They should look like little crowns sitting on the fruit. -
Vary the leaves:
I like to vary the direction of the stems slightly or make some leaves a bit longer than others to give the print a hand-painted, organic charm. -
Prepare for seeds:
Ensure the red paint is completely dry before adding the seeds, otherwise the colors will smear. -
Add white seeds:
Dip a dotting tool or the very tip of a clean detail brush into white paint. Add tiny dots all over the red part of the berries. -
Seed placement tip:
Try to arrange the dots in roughly diagonal rows or a diamond grid pattern on the berry for a neat, illustrative look rather than random polka dots.
Step 4: Finishing Touches
-
Check for gaps:
Look over the pot for any spots where the pattern looks uneven. You can add a tiny partial berry or adjust a leaf shape to fill empty visual space. -
Dry thoroughly:
Let the paint cure for at least 24 hours to ensure it is fully hardened. -
Seal the pot:
Apply a coat of clear acrylic sealer (water-based is best for crafts) over the entire painted area. This protects your hard work from water damage when you water your plant.
Once sealed and dry, your cheerful new pot is ready to house a succulent or herb on a sunny windowsill
Bee and Honeycomb Motif
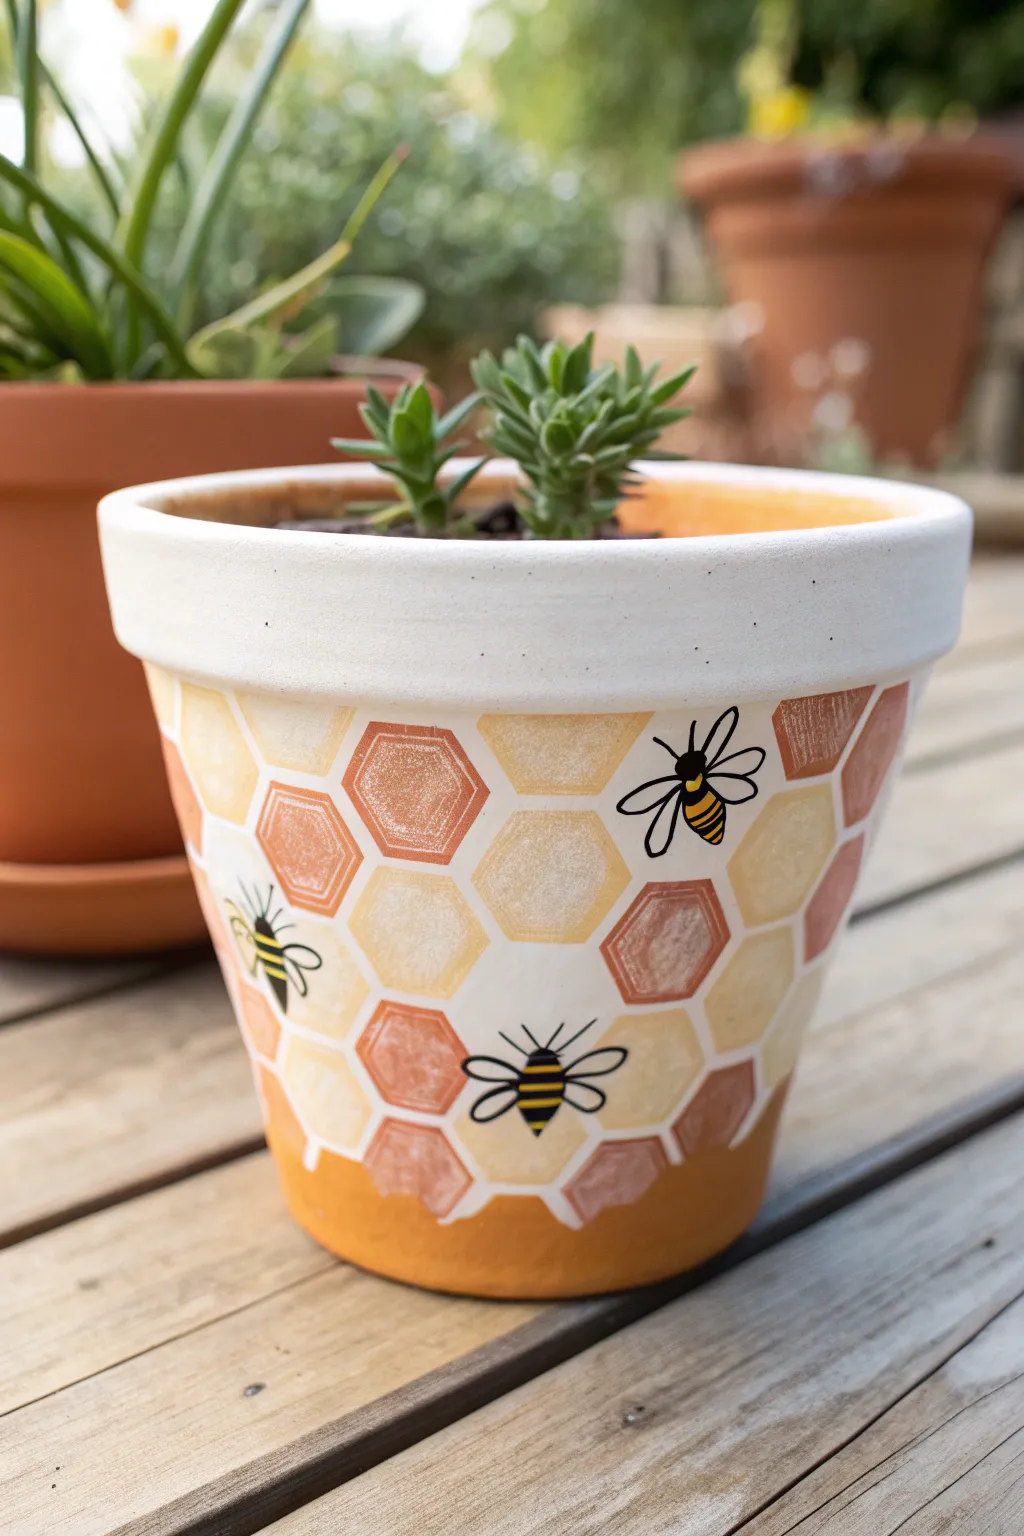
Transform a plain terracotta vessel into a buzzing garden highlight with this charming honeycomb design. Featuring warm golden heaxagons and delicate hand-painted bees, this project brings a sweet, graphic touch to your plant collection.
Detailed Instructions
Materials
- Terracotta pot (clean and dry)
- White acrylic paint (priming and base)
- Acrylic paints: sunshine yellow, golden ochre, burnt sienna/terracotta
- Black acrylic paint or paint pen
- Self-adhesive hexagon stencil or masking tape (optional but helpful)
- Pencil
- Flat shader brushes (medium)
- Fine liner brush or detail brush
- Sealer/Varnish (matte or satin)
- Paper plate or palette
Step 1: Preparation & Base Coat
-
Clean surface:
Ensure your terracotta pot is thoroughly cleaned and dried. Any dust or residue can prevent the paint from adhering properly. -
Prime the rim:
Load a medium flat brush with white acrylic paint. Apply an even, opaque coat around the entire rim of the pot. You may need two coats for full coverage. -
Base the body:
Paint the main body of the pot white as well. This white base will serve as the ‘grout’ lines between your honeycomb cells later. -
Dry thoroughly:
Allow the white base coat to dry completely. I like to let this sit for at least an hour to ensure the pencil sketching later doesn’t dig into soft paint.
Step 2: Designing the Honeycomb
-
Sketch the grid:
Using a pencil, lightly draw a hexagonal grid pattern over the white body of the pot. Alternatively, you can use a stencil to trace these shapes. -
Create spacing:
Be sure to leave a small gap between each hexagon to let the white base coat show through, creating that crisp honeycomb structure. -
Plan your palette:
Prepare your palette with three distinct shades: a bright yellow, a deeper golden ochre, and a rusty burnt sienna. -
Mix custom shades:
To add depth, mix a tiny bit of white into some of the yellow to create a pale cream shade, giving you four total colors to work with.
Uneven Hexagons?
If freehand drawing is tough, cut a single hexagon shape from cardstock and use it as a tracing template to keep every cell uniform.
Step 3: Painting the Cells
-
Fill the first color:
Start with your lightest yellow. Paint random hexagons across the pot, filling them in carefully while staying inside your pencil lines. -
Add golden tones:
Switch to the golden ochre shade and fill in another set of hexagons, scattering them around so no two adjacent cells are the same color if possible. -
Apply darker accents:
Use the burnt sienna or rust color for the remaining hexagons. This darker tone adds richness and mimics aged honey or beeswax. -
Address lower section:
Near the bottom of the pot, you can paint a solid band of the golden ochre that merges with the lowest partial hexagons, grounding the design. -
Texture technique:
For a rustic look, use a slightly dry brush when filling the hexagons. This allows a tiny bit of texture to show, rather than a perfectly flat color block.
Add Some Shimmer
Mix a small amount of metallic gold paint into your yellow ochre for a few random cells to make the honeycomb glisten in the sun.
Step 4: Adding the Bees
-
Paint bee bodies:
Select two or three spots on the pot for your bees. Using a small round brush and yellow paint, create small oval shapes for the bee bodies. Let dry. -
Draw outlines:
Using a fine liner brush with black paint (or a black paint pen), outline the yellow oval and draw horizontal stripes across the body. -
Add wings:
Draw two loops on either side of the body for wings. Keep the lines thin and delicate. -
Final details:
Add tiny antennae to the head and a small stinger at the bottom of the body using the very tip of your brush or pen.
Step 5: Finishing Up
-
Clean up lines:
If any paint went over the white ‘grout’ lines, use a small brush with white paint to touch up and crisp up the edges. -
Seal the pot:
Once absolutely dry, apply a coat of clear matte or satin sealer to protect your artwork from water and dirt.
Now your pot is ready to bee the center of attention in your garden or windowsill display
Mountain Silhouette Landscape Wrap
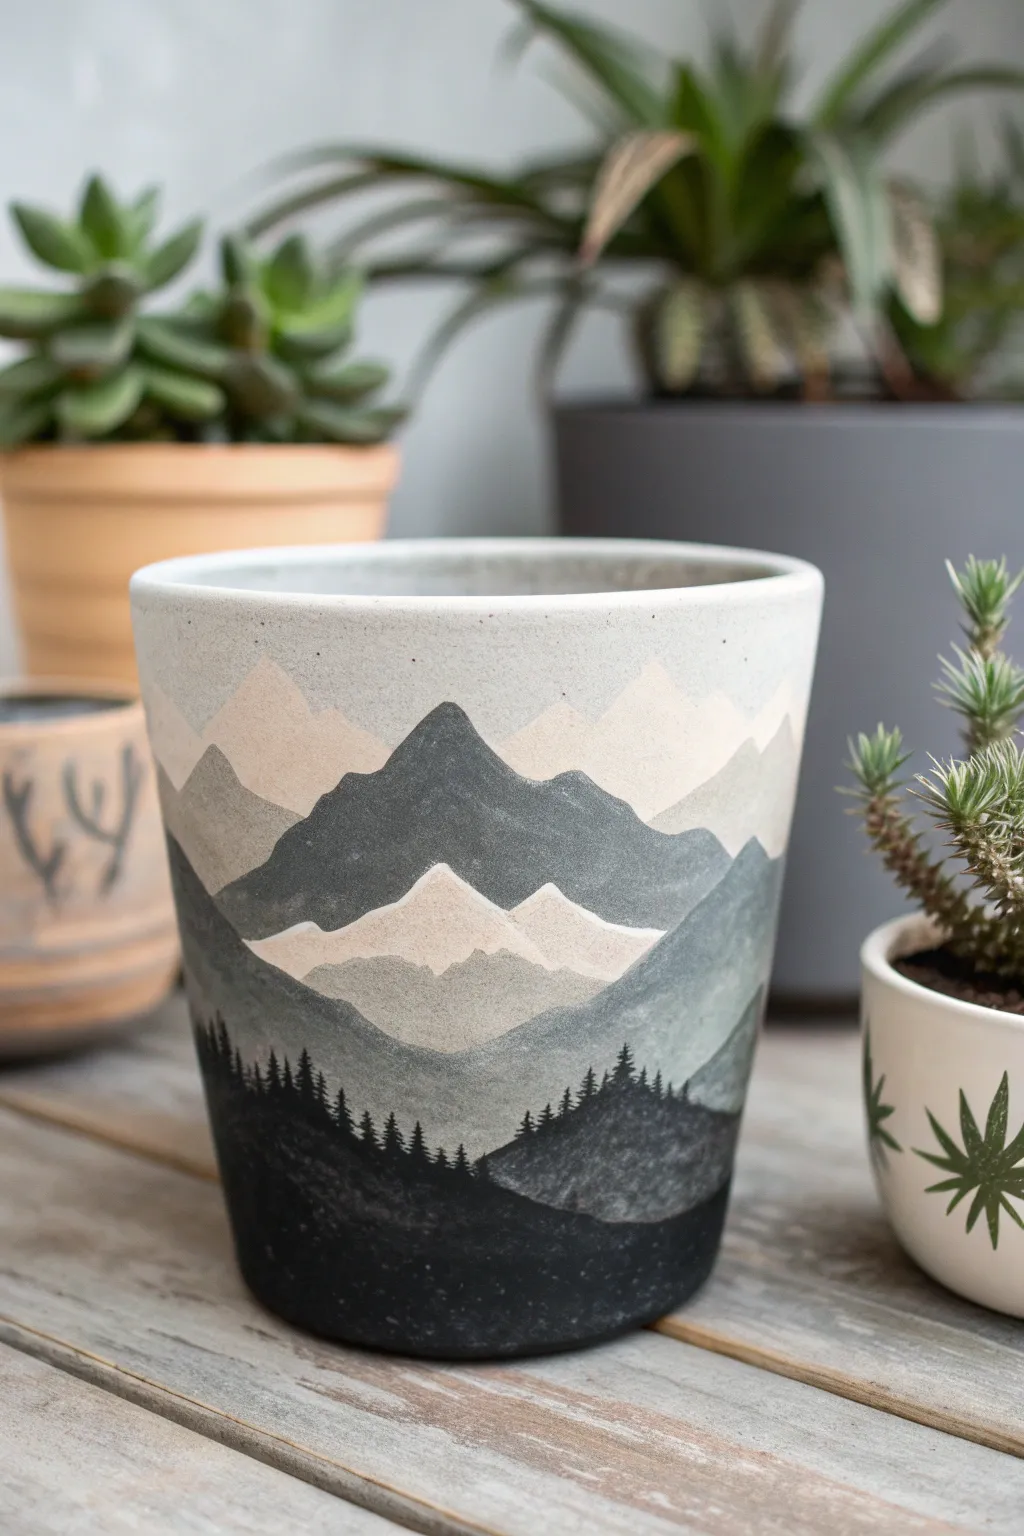
Capture the serene beauty of a foggy alpine morning on your planters with this layered landscape design. By using simple color blocking and silhouettes, you can create stunning atmospheric depth that wraps continuously around the entire pot.
How-To Guide
Materials
- Terra cotta or ceramic pot (cleaned and dried)
- Acrylic paints: Black, White, Cool Grey, and a hint of Beige or Cream
- Flat paintbrushes (approx. 1/2 inch width)
- Small fine-liner detail brush (size 0 or 00)
- Paint palette or mixing plate
- Cup of water and paper towels
- Clear matte acrylic sealer spray
Step 1: Setting the Scene
-
Base Prep:
Ensure your pot is completely clean and dry. If you are using a terra cotta pot, apply a base coat of white or very light cream acrylic paint over the entire outer surface to seal the clay and provide a bright background for your sky. Let this dry completely. -
Mixing the Palettes:
Prepare four distinct shades of grey on your palette before you start painting. You’ll need: pure black, a dark charcoal grey, a medium stone grey, and a very light misty grey (mix white with just a dot of black and beige). Having these ready ensures a smooth gradient workflow.
Mist Effect
Mix a tiny drop of water into your lighter grey paints. This separates the pigment slightly, giving the distant mountains a softer, dreamier texture compared to the sharp foreground.
Step 2: Building the Ranges
-
First Layer: Distant Peaks:
Start about 2 inches from the top rim. Using the lightest misty grey mixture and your flat brush, paint jagged, triangular mountain shapes. Make these peaks fairly small and subtle. -
Fill the Sky Gap:
Paint downward from these first peaks just a half-inch or so, filling in the shape solid. Don’t worry about the bottom edge of this layer being neat, as it will be covered by the next range. -
Second Layer: Mid-Range Mountains:
Once the top layer is dry to the touch, load your brush with the medium stone grey. Paint a second range of mountains slightly lower than the first, making the peaks larger and more defined. -
Overlap Technique:
Ensure these medium-grey peaks overlap the light grey ones behind them, creating the illusion of distance. Paint firmly downwards to cover the messy bottom edge of the previous layer. -
Third Layer: The Foothills:
Switch to your dark charcoal grey mix. Paint a third, prominent layer of mountains below the medium grey ones. These should be the largest peaks yet, spanning wider across the pot’s surface. -
Handling the Curve:
As you wrap the design around the pot, rotate the vessel frequently to keep your hand steady. Try to vary the height of the peaks so the pattern doesn’t look like a uniform zigzag line. -
The Foreground Base:
Using pure black paint, create the final, lowest landmass. This shouldn’t necessarily be peaks, but rather a rolling hill shape that covers the bottom quarter of the pot extensively. -
Solidifying the Bottom:
Fill in everything from the top of this black hill line all the way down to the base of the pot with solid black paint. Depending on your paint opacity, you might need a second coat here for true depth.
Golden Hour Glow
Instead of a white sky, paint a soft gradient of pale peach fading into yellow at the top rim before starting your mountains to simulate a sunrise.
Step 3: Detailing and Sealing
-
Tree Placement:
Switch to your fine-liner detail brush. Using the pure black paint, begin adding tiny tree silhouettes along the top ridge of the black foreground layer. -
Painting the Trunks:
Draw tiny vertical lines first to establish the height of each tree. Vary the heights slightly—some tall old pines, some younger saplings—to make the forest look natural. -
Adding Foliage:
Use a light stippling or dabbing motion to add branches to your trunks. Start narrow at the top and flare out slightly towards the bottom of the tree shape. -
Creating Density:
Cluster the trees together in groups. I find it looks best when the trees overlap slightly rather than standing individually in a row. -
Drying Time:
Allow the entire pot to cure for at least 24 hours. The thick layers of acrylic, especially the black base, need time to fully harden. -
Protective Coat:
Take the pot to a well-ventilated area and spray it with a clear matte acrylic sealer. This protects your landscape from water damage when you water your plants.
Place a succulent or small fern inside your finished pot to complete the wild, natural look of your miniature mountain range
Night Sky Galaxy Blend

Transform a simple terracotta planter into a magical piece of galaxy art with this dreamy night sky design. Featuring a seamless blend of deep blues and cosmic purples topped with delicate starlight, this pot brings the wonder of the universe right to your windowsill.
Step-by-Step
Materials
- Terracotta pot (clean and dry)
- Acrylic paints: Navy Blue, Deep Violet, Black, Titanium White
- Gold or Metallic White paint pen (fine tip)
- Flat shader brushes (medium and large)
- Small round detail brush or old toothbrush
- Palette or paper plate
- Water cup and paper towels
- Matte or glossy clear acrylic sealer spray
Step 1: Base Coating
-
Clean the surface:
Ensure your terracotta pot is completely free of dust or dirt. Wipe it down with a damp cloth and let it dry fully before starting. -
Prime the pot:
Apply a base coat of white acrylic paint if you want the colors to pop vividly, or you can paint directly on the terracotta for a slightly more muted, earthy tone. Let this dry completely. -
Painting the rim:
Load your large flat brush with Navy Blue acrylic paint. Paint the entire rim of the pot inside and out with a solid, even coat. -
Extend the blue:
Continue painting the Navy Blue down the body of the pot, covering about the top two-thirds. Don’t worry about a perfect bottom edge yet.
Starry Splatter Tip
Use a toothbrush for fine mist stars, but use a stiff paintbrush flicked against a handle for chunkier, more defined constellations.
Step 2: Creating the Galaxy Blend
-
Apply the purple base:
While the blue is still slightly tacky or just dry, paint the bottom third of the pot with your Deep Violet acrylic. -
Start the blend:
Where the violet meets the navy blue, use a damp brush to gently feather the two colors together. You want a soft transition, not a hard line. -
Deepen the shadows:
Mix a tiny drop of Black into your Navy Blue on the palette to create a midnight blue shade. -
Layering the midnight blue:
Apply this darker midnight mixture sporadically over the navy blue section, focusing near the top rim to add depth to the sky. -
Add bright highlights:
I like to mix a little White into the Violet to make a lighter lavender tone. Dab this gently into the center of the purple section to create a glowing nebula effect. -
Smooth the gradient:
Using a clean, slightly damp soft brush, work horizontally back and forth over the transition zones to blur any harsh brushstrokes created during layering. -
Let it cure:
Allow the gradient background to dry completely. This is crucial so your stars don’t smear into the background colors.
Step 3: Adding the Starlight
-
Prepare the splatter:
Dilute a small amount of Titanium White paint with a few drops of water until it reaches an inky consistency. -
Create distant stars:
Dip an old toothbrush or a stiff bristle brush into the watered-down white. Run your thumb across the bristles to flick tiny speckles onto the pot. Practice on paper first to control the spray. -
Focus the stars:
Aim for an even distribution of speckles, ensuring some land on the rim and some on the purple galaxy clouds. -
Hand-paint larger stars:
Using a fine-tip paintbrush or a needle tool dipped in white, add a few distinct, larger dots to represent brighter planets or stars. -
Allow splatter to verify:
Wait for these white speckles to be touch-dry before moving to the metallic details.
Handling Mistakes
If you accidentally splatter white paint where you don’t want it, quickly wipe it away with a damp Q-tip or paint over it with the background color once dry.
Step 4: Metallic Details & Finishing
-
Draw the sparkle shapes:
Using your Gold or Metallic White paint pen, draw four-pointed stars (cross shapes) or eight-pointed sparkles randomly around the pot. -
Vary the sizes:
Make some sparkles large and others tiny to create a sense of distance and variety in your night sky. -
Add rim details:
Add a few specific metallic stars to the thick rim of the pot to tie the design together. -
Seal the artwork:
Once all paint and ink are fully dry (give it at least an hour), spray the entire pot with a clear acrylic sealer to protect it from moisture and UV fading.
Enjoy planting your favorite succulent in this cosmic creation knowing you have captured a piece of the universe
Under-the-Sea Waves and Fish
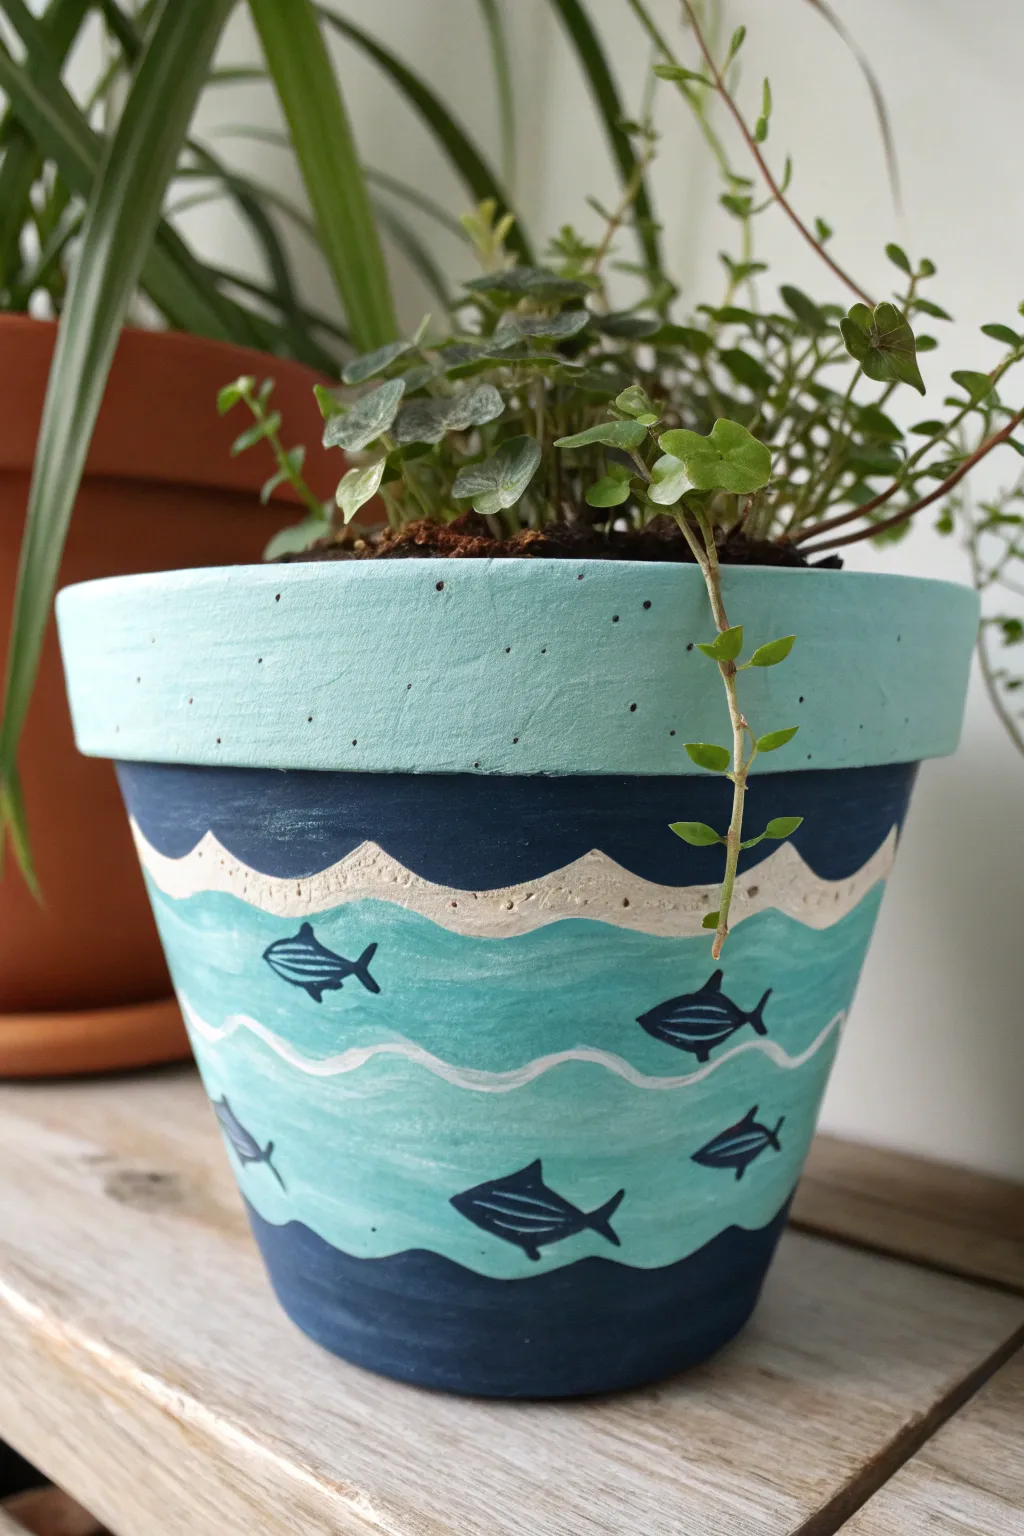
Transform a plain terracotta pot into a serene seascape with this layered wave design. Featuring rhythmic bands of blues and swimming fish silhouettes, this project captures the calming movement of the ocean perfectly.
How-To Guide
Materials
- Terracotta pot (clean and dry)
- Acrylic paints: Navy Blue, Teal/Aqua, Cream/White
- Flat paint brushes (various sizes)
- Small round detail brush
- Pencil
- Palette for mixing
- Water cup and paper towels
- Matte or satin sealant spray
Step 1: Base Layers
-
Prep the rim:
Start by painting the entire rim of the pot with a solid coat of teal or light aqua acrylic paint. This might need two coats for full opacity, so let the first one dry completely before adding the second. -
Add speckles (optional):
For a bit of texture on the rim, you can flick a tiny amount of watered-down dark blue paint from a toothbrush or stiff brush to create subtle speckles, though this is optional. -
Paint the bottom section:
Moving to the main body of the pot, paint the bottom third with your darkest navy blue. Keep the top edge of this section wavy and organic rather than a straight line to simulate deep water. -
Paint the top section:
Paint a band of the same dark navy blue right underneath the teal rim. This band should be about an inch or two wide, with its bottom edge also painted in a gentle wavy pattern.
Paint Consistency
If your acrylics are too thick to make smooth waves, mix in a drop or two of water. This helps the brush glide for those long, curved strokes.
Step 2: Creating the Waves
-
Sketch the wave guides:
Once your dark blue sections are dry, lightly use a pencil to sketch out the remaining wavy bands in the unpainted middle section. -
Fill the middle water:
Paint the large middle section with your teal or aqua color. Don’t worry about perfect edges yet, as we will define them with lighter colors later. -
Create the foam line:
Mix a cream or off-white color. Using a medium flat brush, paint a thick, wavy band separating the top navy section from the middle teal section. This represents the foamy crest of a wave. -
Add texture to the foam:
While the cream paint is still tacky, stipple (dab up and down) your brush slightly to give the ‘foam’ a rougher texture compared to the smooth water. -
Add lower wave definitions:
Using a thinner brush and a lighter tint of teal (mix teal with white), paint thin, flowing wavy lines across the middle aqua section to suggest current and movement. -
Define the bottom wave:
Paint another wavy line of the light teal/white mixture right where the middle aqua section meets the deep navy bottom, creating a clean visual separation.
Step 3: Adding the Fish
-
Draft the fish shapes:
Using your pencil again, very lightly draw simple oval shapes for the fish bodies swimming in the aqua section. Vary their heights so they aren’t in a straight line. -
Paint the fish bodies:
Use your smallest round detail brush and the dark navy blue paint to fill in the almond-shaped bodies of the fish. -
Add fins and tails:
Carefully paint small triangles for the tail fins and tiny strokes for the dorsal (top) and pectoral (side) fins on each fish. -
Detail the fish:
Once the navy silhouettes are dry, take your finest brush with a tiny amount of watered-down light blue or white. Paint simple lines across the fish bodies to suggest bones or texture. -
Clean up edges:
Look over your work for any messy edges between the color bands. Use the appropriate background color to touch up lines and make the waves look crisp. -
Seal the pot:
Allow the entire pot to dry for at least 24 hours. Finish by spraying a clear matte sealer over the outside to protect your artwork from water and soil.
Add Depth
Mix a tiny drop of metallic silver into your light blue wave lines. It will catch the light subtly, making the water look like it’s glistening.
Fill your new ocean-themed planter with a trailing plant like trailing jade or string of pearls to complete the underwater aesthetic
Faux Marble or Stone Veining
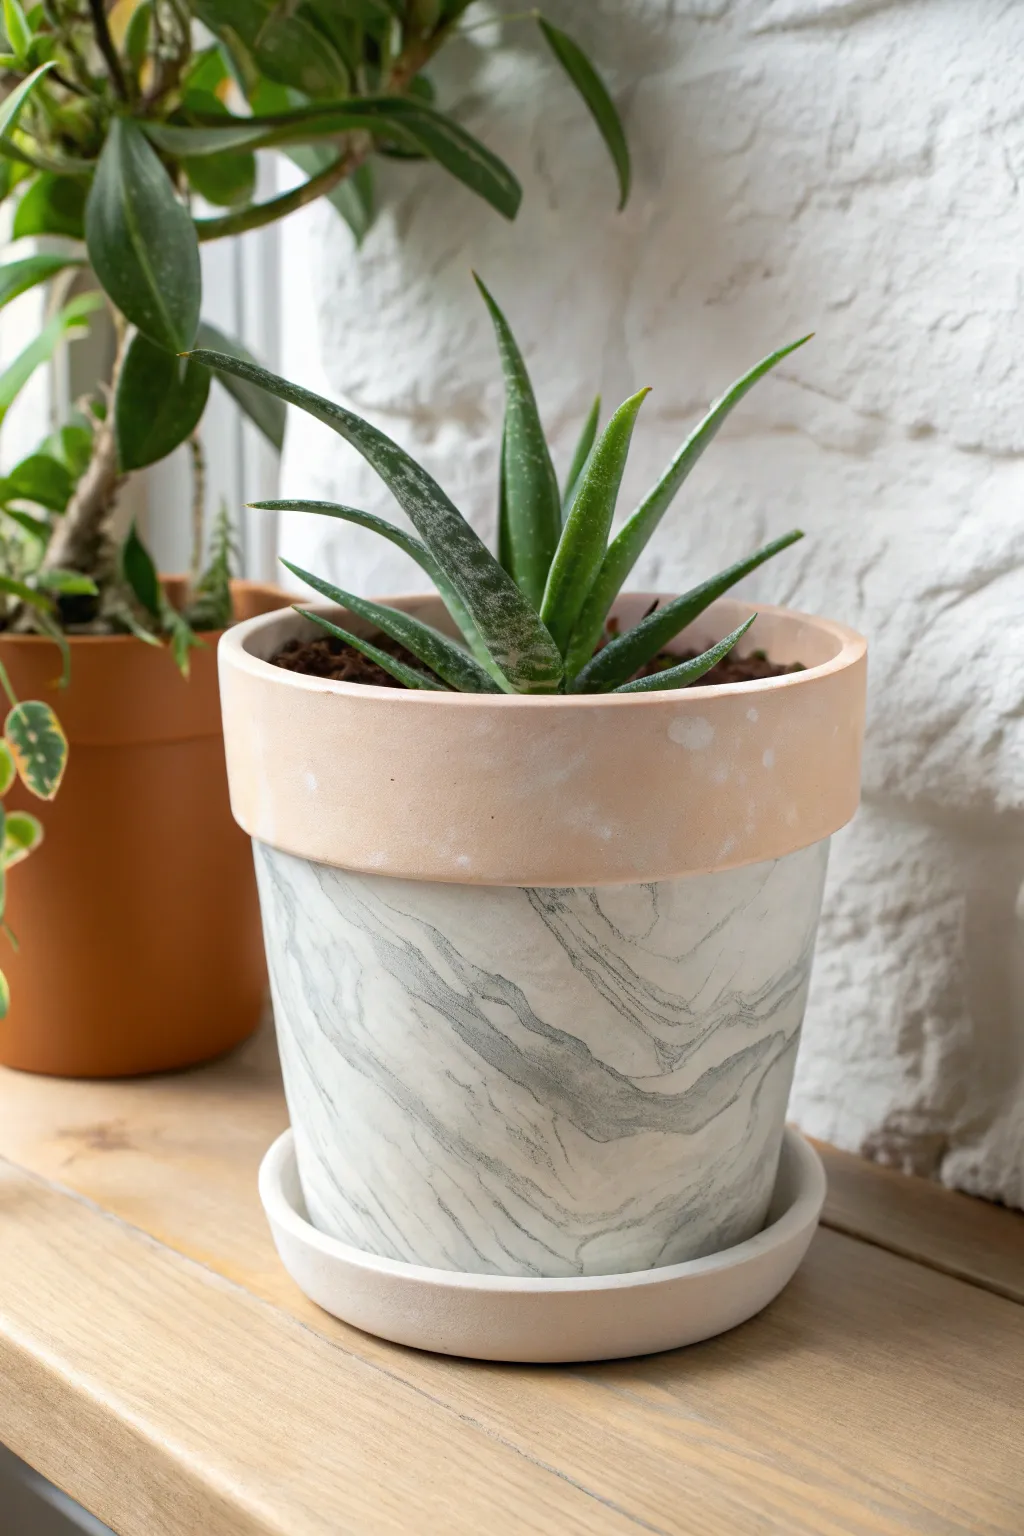
Transform a standard terra cotta pot into a chic, modern piece of decor with this faux marble technique. By leaving the rim natural and swirling soft grey veins across a white base, you achieve an elegant stone look that elevates any houseplant.
Detailed Instructions
Materials
- Terra cotta pot with saucer
- White acrylic craft paint (matte or satin finish)
- Grey acrylic craft paint
- Glazing medium or water (to thin paint)
- Medium flat brush
- Fine liner brush or feather
- Painter’s tape
- Paper plate or palette
- Paper towels
- Clear matte sealer spray
Step 1: Preparation and Base Coat
-
Clean surface:
Begin by wiping down your terra cotta pot with a damp cloth to remove any dust or manufacturing residues. Let it dry completely. -
Tape the rim:
Apply a strip of painter’s tape tightly around the pot, just below the rim. Press down the edges firmly to ensure a crisp line where the natural clay meets the paint. -
Base coat application:
Using your flat brush, paint the body of the pot and the entire exposed top and side of the saucer with white acrylic paint. -
Second layer:
Allow the first coat to dry for about 20 minutes. Apply a second coat of white to ensure full, opaque coverage, hiding the orange clay beneath.
Veins look too harsh?
If your grey lines look too stark or painted on, dip a brush in plain water and wash over the dry veins. This reactivates the acrylic slightly, allowing you to soften and blur them further.
Step 2: Creating the Marble Effect
-
Mix the glaze:
On your palette, mix a small amount of grey paint with a generous ratio of glazing medium (or water). You want a translucent, milky consistency, not solid paint. -
Initial thick veins:
Dip your fine liner brush into the grey mixture. While the white base is still slightly tacky, drag the brush diagonally across the pot’s surface. Wiggle your wrist slightly to create organic, non-straight lines. -
Soften the edges:
Immediately use a clean, slightly damp flat brush to gently pat or feather the edges of your grey line. This blurs the vein into the white background for a realistic stone look. -
Vary the direction:
Create a second major vein running roughly parallel to the first but with different spacing. Nature isn’t perfect, so variation is key. -
Add intricate details:
Using a tiny amount of undiluted grey on the very tip of your liner brush, trace thin, sharp lines through the center of your blurred grey sections to create the ‘core’ of the vein. -
Create secondary veins:
Branch smaller, fainter veins off the main lines. These should look like lightning bolts or river tributaries, fading out as they move away from the main vein. -
Connect to the bottom:
Ensure some veins run all the way to the bottom edge of the pot so the pattern feels continuous. -
Work on the saucer:
Repeat the veining process on the saucer rim. Try to align some lines with the pot when it sits inside, though perfect matching isn’t necessary. -
Review and refine:
Step back and look at the pot from a distance. If an area looks too empty, add a very faint, watery grey wash to connect the zones.
Step 3: Finishing Touches
-
Remove tape:
Once the paint is dry to the touch, carefully peel off the painter’s tape to reveal the clean terra cotta rim. -
Clean up lines:
If any white paint bled under the tape, use a damp Q-tip or a small piece of sandpaper to gently remove it from the raw clay. -
Final drying:
Let the entire project cure for at least 12 hours to ensure the paint has completely set. -
Seal the work:
Spray the painted sections with a clear matte sealer. This protects the faux finish from water damage when you water your plant.
Add a luxe touch
For a high-end variation, trace a very thin line of metallic gold leaf paint alongside the darkest grey veins. This adds a subtle shimmer that mimics quartz deposits in real stone.
Place your favorite succulent or aloe inside to enjoy the sophisticated contrast between the rustic rim and the polished marble body
Terrazzo Speckles With Metallic Accents
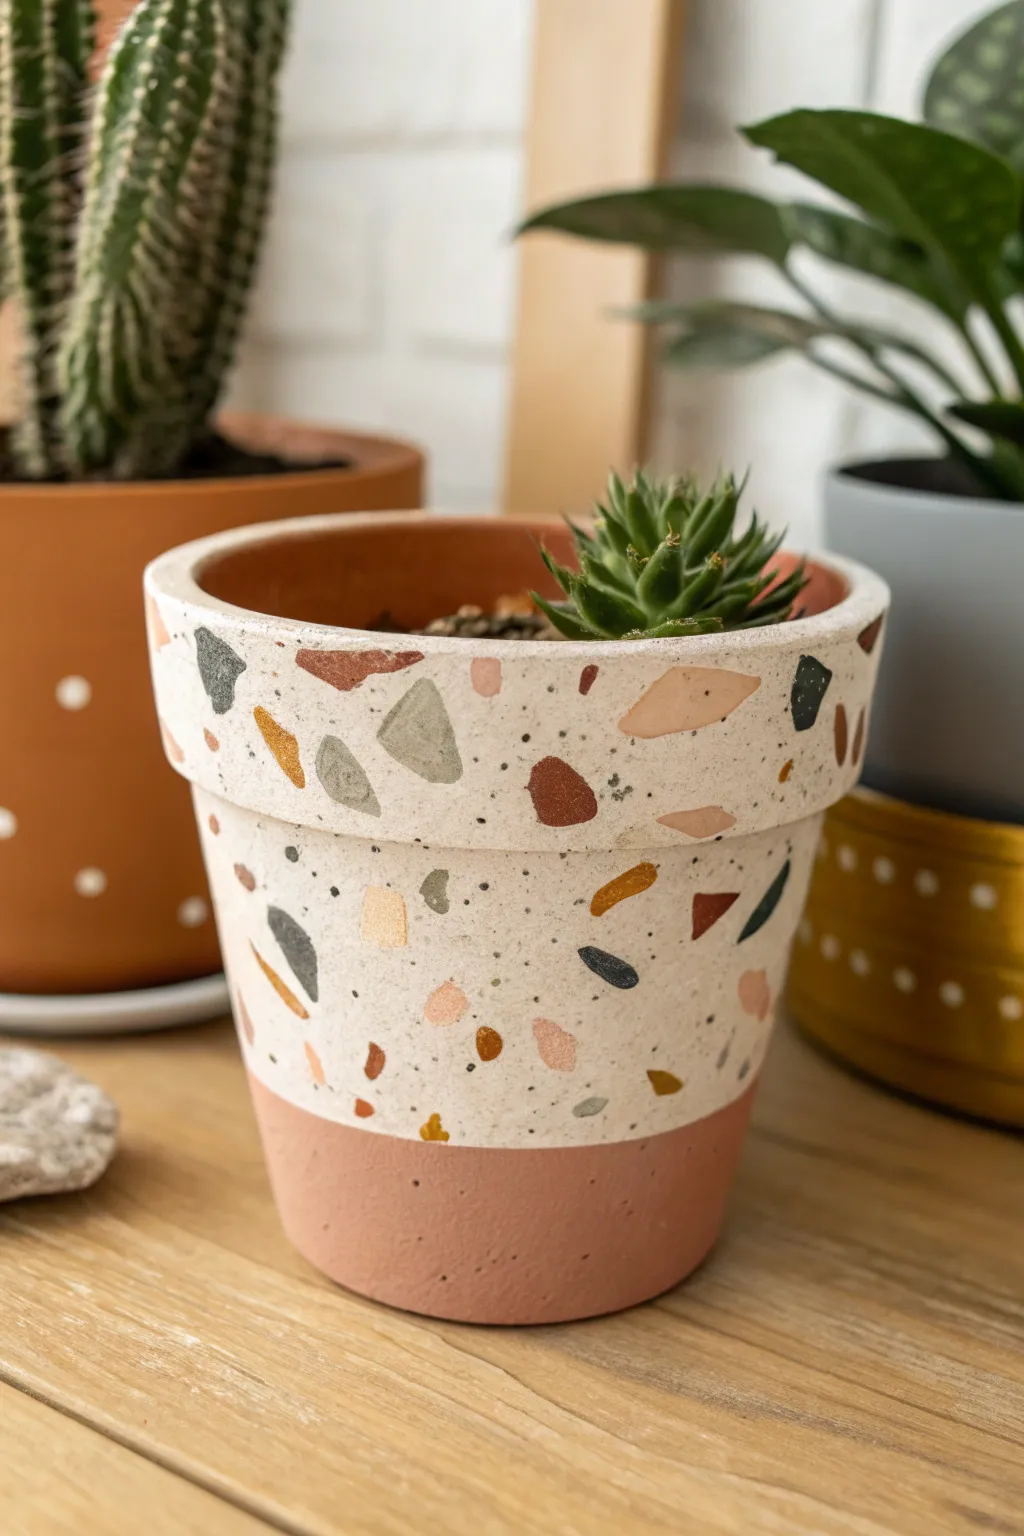
Transform a basic terracotta pot into a chic, trendy home accessory with this faux terrazzo painting technique. The look combines a crisp, creamy base with irregular geometric shards and subtle metallic touches for a sophisticated finish that mimics real stone composite.
Step-by-Step Guide
Materials
- Terracotta pot (clean and dry)
- Cream or off-white acrylic paint
- Assorted acrylic paints (terracotta orange, slate grey, muted peach, black)
- Metallic gold or copper acrylic paint
- Paintbrushes (medium flat brush and small detail brush)
- Painter’s tape
- Palette or paper plate
- Water cup and paper towels
- Matte or satin spray sealer
Step 1: Base Preparation
-
Prepare the pot:
Start with a clean, dry terracotta pot. Wipe away any dust with a slightly damp cloth to ensure the paint adheres properly. -
Tape the bottom rim:
Decide how much of the natural clay base you want to leave exposed. Apply a ring of painter’s tape around the pot, about an inch or two from the bottom, pressing down firmly to seal the edge. -
Paint the base color:
Using a flat brush, apply your cream or off-white acrylic paint to the area above the tape, covering both the exterior wall and the inner rim. -
Apply a second coat:
Allow the first layer to dry completely. Apply a second coat of the cream paint to ensure solid, opaque coverage where the terracotta color doesn’t peek through. -
Remove tape:
Carefully peel off the painter’s tape while the second coat is still slightly tacky to achieve a crisp, clean line.
Step 2: Creating the Terrazzo Pattern
-
Plan your palette:
Squeeze small amounts of your chosen accent colors (terracotta, slate grey, peach, black, and metallic gold) onto your palette. -
Paint the first large shapes:
Start with your most dominant color (like the terracotta or grey). Use a small detail brush to paint random, angular shapes. Think of triangles, trapezoids, and irregular shards. -
Vary the sizes:
Make sure these initial shapes vary in size, keeping them scattered loosely around the pot without clustering them too tightly. -
Add secondary colors:
Switch to your next color (e.g., the muted peach) and add more geometric shards in the empty spaces. Rotate the pot as you work to ensure even distribution. -
Incorporate dark accents:
Use the black or dark grey paint to add smaller, sharper fragments. These darker spots add contrast and depth to the terrazzo look. -
Layer shapes sparingly:
It’s okay if a couple of shapes slightly overlap, but generally, clear separation mimics the stone aggregate look best. -
Paint the rim:
Don’t forget to carry the pattern over the top lip of the pot and just inside the upper rim for a professional finish.
Natural Edges
For realistic stone shards, avoid perfect circles or squares. Wobble your brush slightly to create jagged, broken-looking edges.
Step 3: Adding Details and Sealing
-
Add metallic highlights:
Once the main shapes are dry, take your metallic gold or copper paint. Add small, focused geometric flecks interspersed among the matte colors to catch the light. -
Create the ‘grit’ texture:
To mimic the sand often found in terrazzo, load a toothbrush or stiff brush with diluted black or grey paint. Use your thumb to flick a very fine mist of speckles across the surface. -
Refine the shapes:
If any edges look too messy or round, use a tiny brush with the base cream color to cut back into the shapes and sharpen their angles. -
Let it cure:
Allow the entire pot to dry for several hours or overnight to ensure all paint layers are fully hardened. -
Seal the artwork:
Spray the painted area with a clear matte or satin sealer. This protects the design from water damage when you water your plant.
Paint Bleeding?
If paint bled under the tape, wait for it to dry, then use a small stiff brush dipped in water or rubbing alcohol to scrub the excess off the raw clay.
Now you have a stylish, custom planter ready to showcase your favorite succulent or houseplant
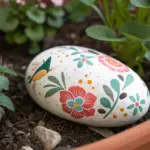


Have a question or want to share your own experience? I'd love to hear from you in the comments below!