
If you’ve got a handful of plain eggs and a little paint, you’ve got a tiny canvas just begging for personality. I pulled together my favorite Easter egg painting ideas—starting with the classics and drifting into the fun, unexpected stuff once you’re warmed up.
Classic Pastel Base Coats
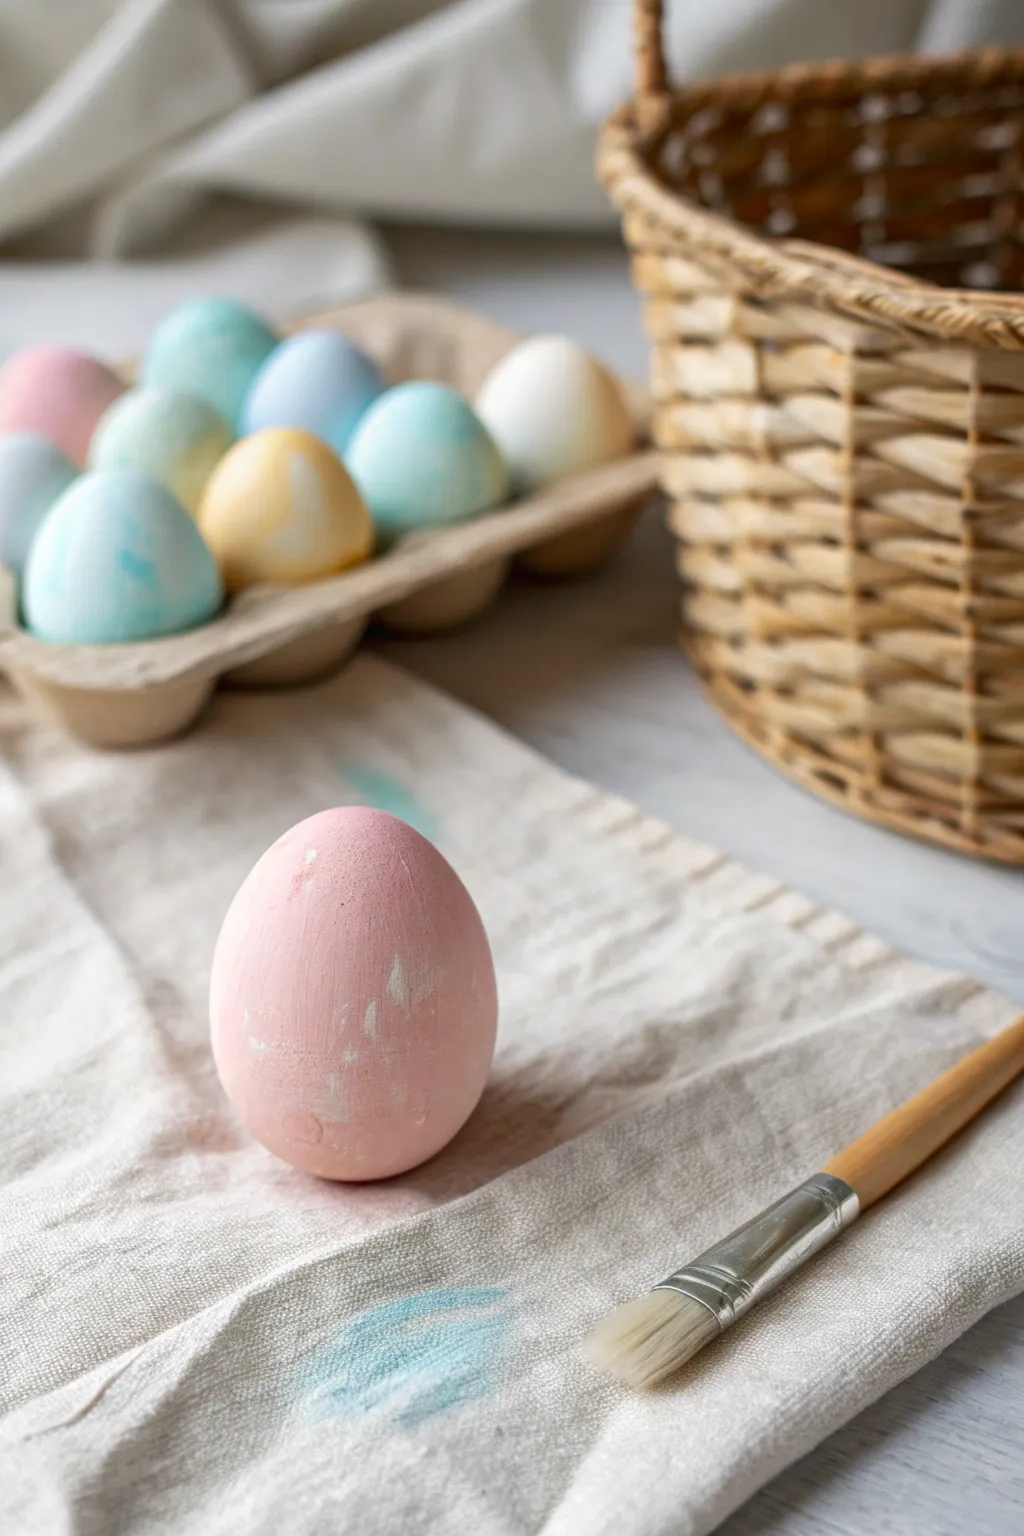
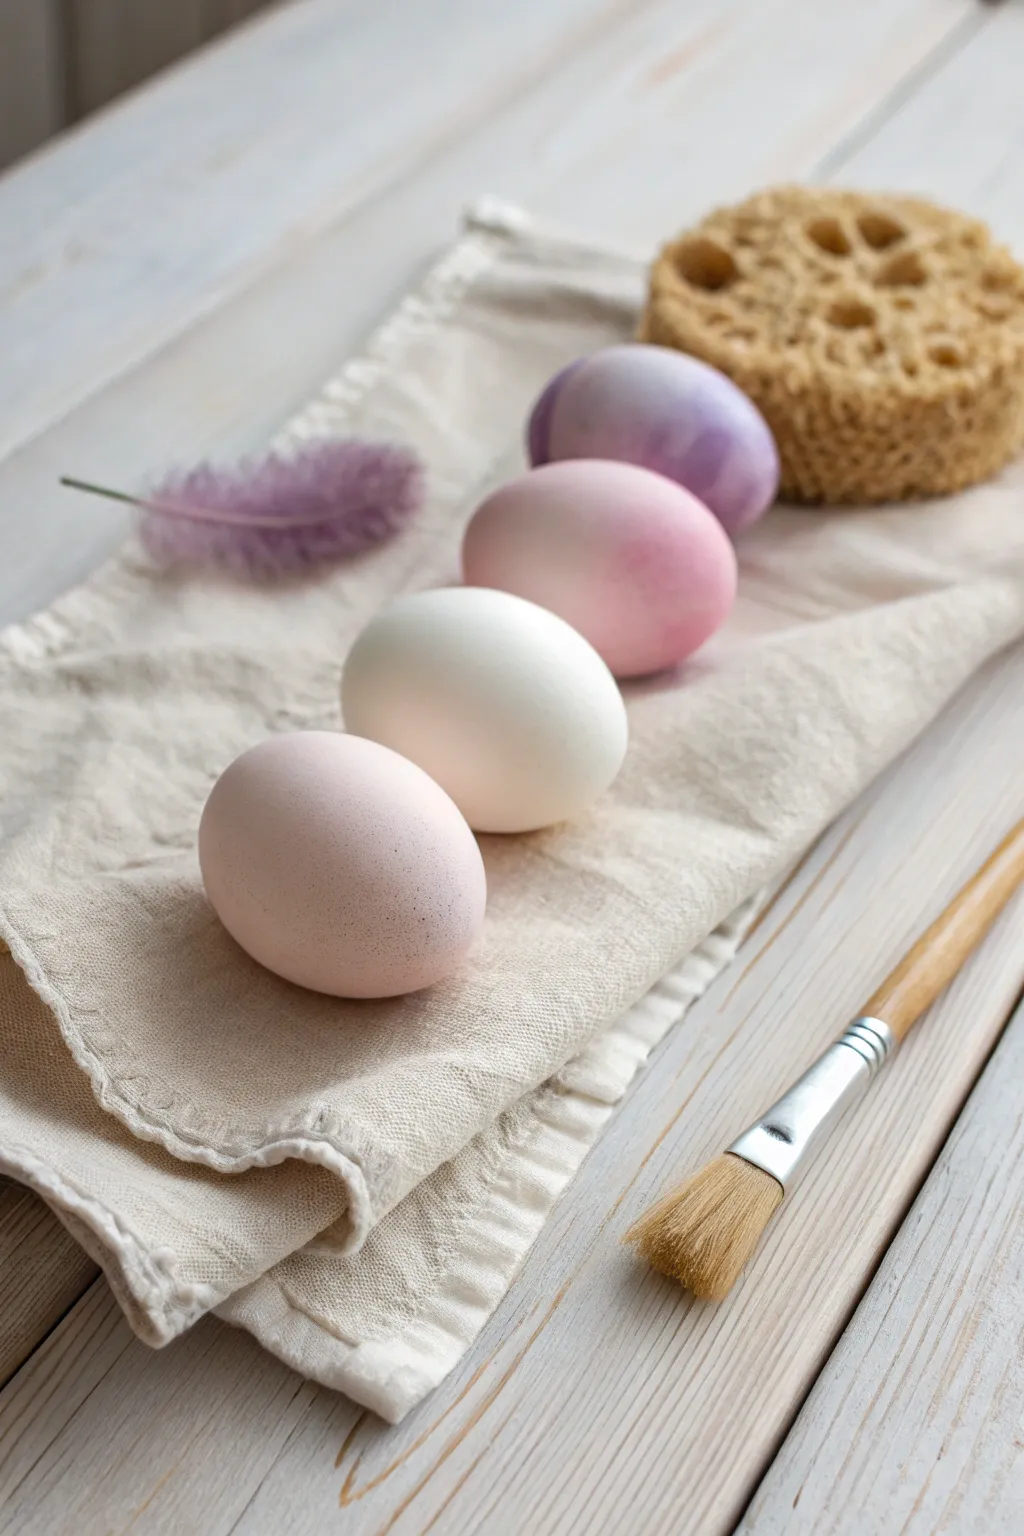
Achieve a dreamy, understated Easter aesthetic with these opaque pastel eggs that mimic the texture of chalk paint. The finish is beautifully matte and soft to the touch, creating a sophisticated alternative to traditional dye baths.
How-To Guide
Materials
- White eggs (hard-boiled or blown out)
- Acrylic craft paints (pastels: soft pink, baby blue, mint green, butter yellow, cream)
- Flat paintbrush (synthetic bristles, 1/2 inch)
- Small mixing palette or paper plate
- Water cup
- Paper towels
- Egg carton or cooling rack for drying
- Optional: Cornstarch or baking soda (for texture)
Step 1: Preparation & Mixing
-
Prepare your workspace:
Lay down newspaper or a dedicated drop cloth to protect your table. Have your clean, dry eggs ready in a carton or bowl nearby. -
Select your palette:
Squeeze a nickel-sized amount of each pastel acrylic paint onto your palette. If you don’t have premixed pastels, simply mix a tiny dot of standard color into a large dollop of white paint until you reach a soft, pale hue. -
Create a matte texture (optional):
For that ultra-matte, chalky finish seen in the photo, I like to mix a tiny pinch of cornstarch or baking soda into the acrylic paint. This cuts the shine and gives the egg surface a lovely, velvety tooth.
Step 2: Painting Base Coats
-
Load the brush:
Dip your clean, dry flat brush into your first color—let’s start with the soft pink seen in the foreground. Ensure the bristles are coated but not dripping. -
First pass: Top half:
Hold the egg gently by the bottom half. Use long, vertical strokes to paint the top half of the egg. Smooth out any glob marks immediately for a seamless finish. -
Let it tack up:
Place the egg back into the carton, painted side up. Let it dry for about 10-15 minutes until it is no longer tacky to the touch. Acrylics dry fast, so be quick with your strokes. -
Flip and finish:
Once the top is dry, flip the egg over. Hold it by the painted (dry) end and paint the bottom half, blending the seam where the two paint layers meet. -
Inspect the coverage:
Pastel colors can sometimes be streaky. If the white shell is showing through too much, let the first coat dry completely and apply a second thin layer. -
Clean brush thoroughly:
Before switching to a new color (like the soft blue or yellow), rinse your brush vigorously in water and dry it completely on a paper towel. Residual water can dilute the next color and make it runny.
Sticky Situation
If the egg sticks to the carton while drying, gently twist it to release. Touch up the bare spot with a small dab of paint on your finger.
Step 3: Creating Texture & Variation
-
Dry brushing technique:
To achieve the slightly weathered look on the pink egg, take a barely-damp brush with a tiny amount of white or cream paint. Wipe most of it off on a paper towel. -
Apply subtle texture:
Lightly drag the dry brush over the pink base coat in random areas. This deposits faint streaks that look like natural shell texture or gentle wear. -
Mixing tones:
For the other eggs in the carton, try mixing two colors slightly on the egg itself. For example, add a dot of blue into the wet yellow paint for a swirling green effect. -
Final drying time:
Allow all eggs to dry completely in the carton for at least 30 minutes before handling them excessively or arranging them in a basket. -
Clean up splatters:
If you accidentally got paint on your work surface, wipe it up with warm soapy water before it cures heavily.
Natural Speckles
Dip a toothbrush in brown diluted paint and flick the bristles over the dry pastel eggs for a realistic speckled robin’s egg effect.
Arrange your soft, matte masterpieces in a basket or crate for a stunning spring display


Sweet Polka Dot Eggs
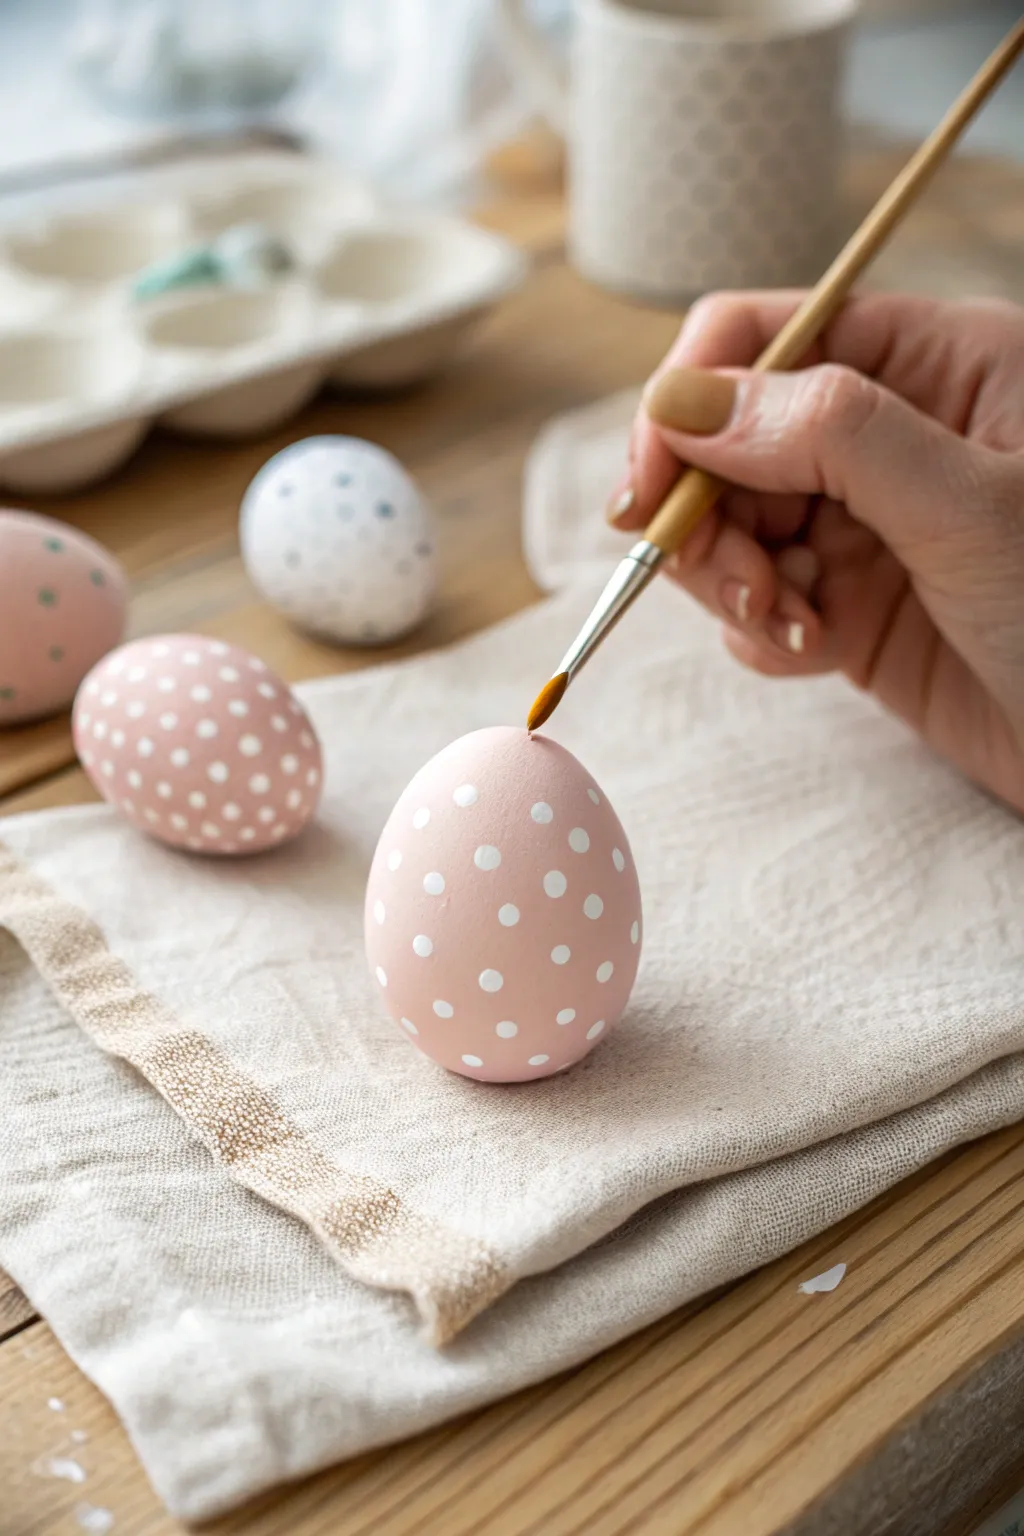
Achieve a timeless and delicate aesthetic with these charming pastel polka dot eggs. This project uses a soft, monochromatic pink base accented with crisp white dots for a look that is both sophisticated and incredibly simple to execute.
Step-by-Step Tutorial
Materials
- Hard-boiled white eggs (or wooden/ceramic egg blanks)
- Acrylic craft paint (pale blush pink)
- Acrylic craft paint (titanium white)
- Fine-point round paintbrush (size 0 or 1)
- Medium flat paintbrush (for base coat)
- Paper palette or small dish
- Empty egg carton (for drying)
- Jar of water
- Paper towels
Step 1: Setting the Stage
-
Prepare your workspace:
Clear a flat surface and lay down newspaper or a protective cloth. Set up your egg carton holder nearby so you have a safe place to rest wet eggs immediately. -
Clean the eggs:
Whether using real hard-boiled eggs or craft eggs, wipe them down gently with a damp cloth to remove any oils or dust. This ensures the acrylic paint adheres smoothly without streaking. -
Mix your base color:
Squeeze out your pale blush pink paint. If the pink is too vibrant, mix in a tiny drop of white to soften it into a pastel shade reminiscent of spring blossoms.
Step 2: Creating the Base
-
Apply the first coat:
Using your medium flat brush, paint the top half of the egg with the pink paint. Long, even strokes work best here to minimize brush marks. -
Let it dry:
Place the egg in the carton, painted side up, and allow it to dry to the touch, which usually takes about 10–15 minutes. -
Paint the other half:
Once the top is dry, flip the egg over and paint the bottom half. I like to hold the egg gently by the dry top section to maintain control. -
Assess opacity:
Check your coverage. If the white of the shell is peeking through too much, apply a second thin coat over the entire egg, following the same drying process. -
Full cure:
Allow the base coat to dry completely for at least 30 minutes. The surface must be totally dry before you start the detail work to prevent the colors from muddying.
Uneven Dots?
If brush control is tricky, dip the handle end of your paintbrush into the paint instead of the bristles. Press it onto the egg like a stamp for perfectly uniform circles every time.
Step 3: The Polka Dot Detail
-
Prepare the detail paint:
Dispense a small amount of titanium white acrylic paint onto your palette. It should be creamy but not too watery, so it holds its shape. -
Load the detail brush:
Dip just the tip of your fine-point round brush (size 0 or 1) into the white paint. Don’t overload the bristles, or you might get unwanted drips. -
Start the center row:
Pick up your pink egg. Start by painting a horizontal row of dots around the ‘equator’ (the widest part) of the egg. Space them about 1/2 inch apart. -
Apply with gentle pressure:
To make a dot, touch the tip to the surface and press down gently until the bristles splay slightly into a circle, then lift straight up. -
Stagger the second row:
Move up to the next row above your center line. Place these new dots in the spaces between the dots of the first row, creating a staggered brick pattern. -
Continue the pattern upward:
Work your way toward the top of the egg, maintaining that staggered spacing. As the surface curves inward, you may need to reduce the number of dots to keep the spacing visually consistent. -
Work downward:
Return to the center line and repeat the staggered brick pattern on the lower half of the egg. -
Refine the shapes:
If any dots look uneven or too thin, carefully dab a tiny bit more white paint onto the center of the existing dot to round it out. -
Final drying:
Place the finished egg back into the carton carefully, ensuring no wet dots touch the cardboard. Let it cure completely.
Pro Tip: Matte Finish
To get that velvety, chalky texture shown in the photo, mix a pinch of baking soda into your acrylic paint before applying. It removes the glossy sheen for a true matte look.
Now you have a set of elegant, speckled treasures ready for display in a simple bowl or basket


Cheerful Stripe Patterns
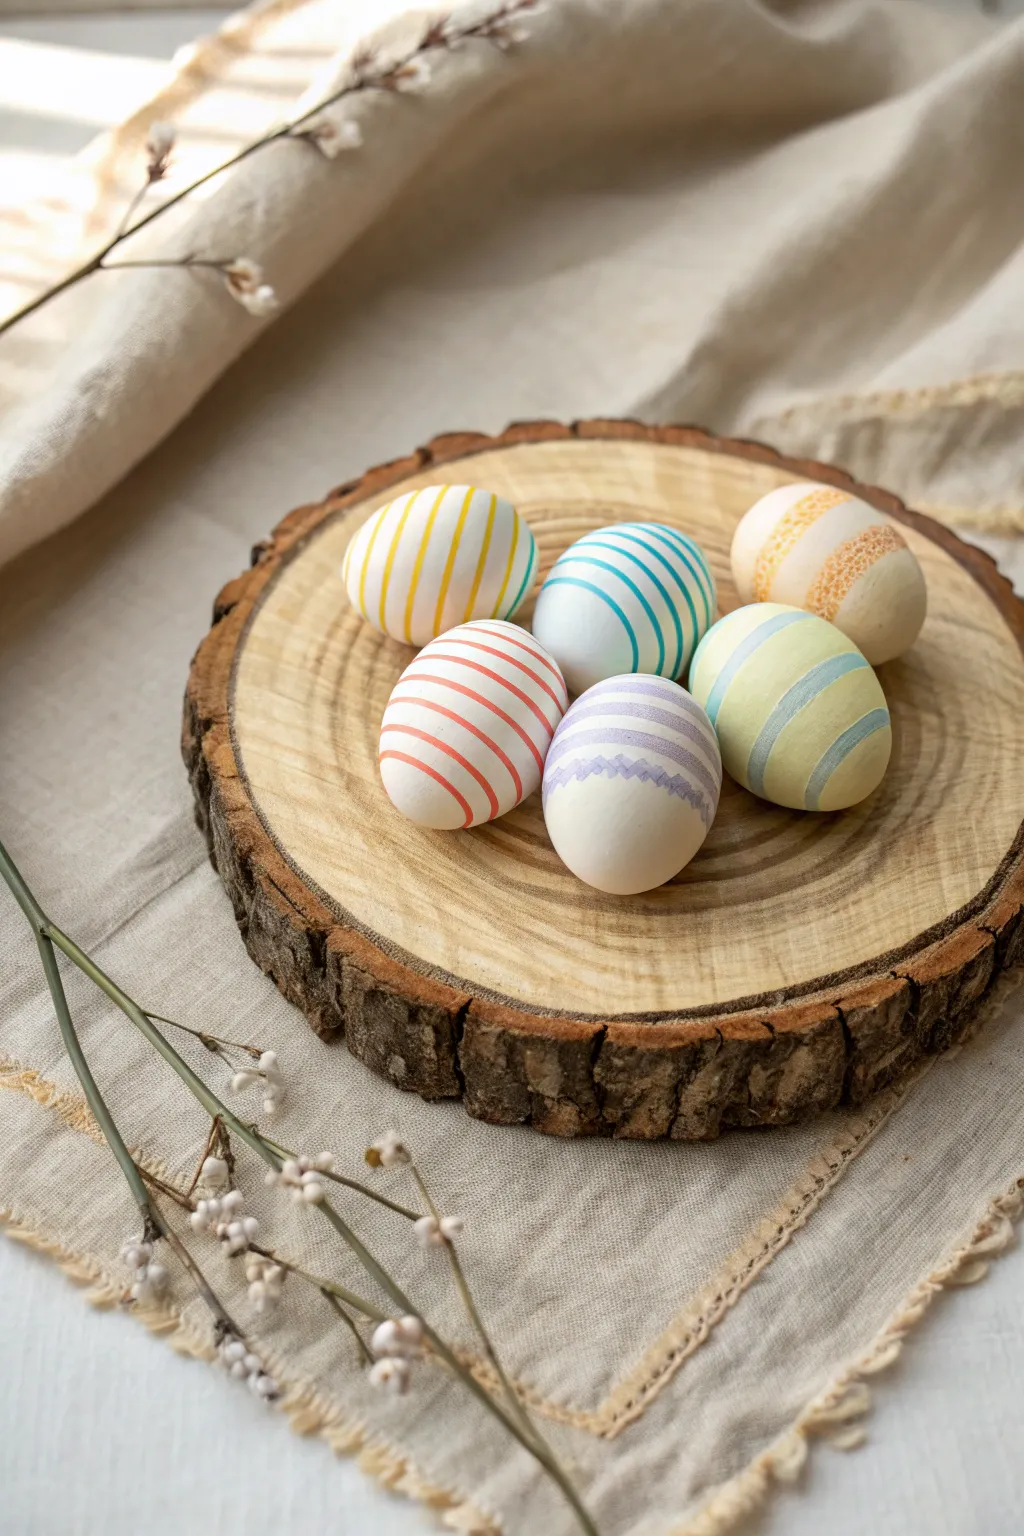
Embrace the beauty of simplicity with these charmingly rustic striped eggs. Using a soft pastel palette and clean lines against a white background creates a modern yet timeless look that fits perfectly with natural Easter decor.
How-To Guide
Materials
- White eggs (blown out or hard-boiled)
- Acrylic paints (pastel yellow, teal, coral, lavender, sage green, light orange)
- Fine liner paintbrush (size 0 or 00)
- Flat shader brush (small, optional)
- Bamboo skewers (for holding eggs)
- Egg cartoon or floral foam (for drying)
- Cup of water
- Paper towels
- Palette or small dish
Step 1: Preparation
-
Clean the surface:
Begin by wiping down your white eggs with a solution of water and vinegar to remove any oils or residue. This ensures the paint adheres smoothly and lasts longer. -
Set up your drying station:
Prepare a block of floral foam or an upside-down egg carton. If using blown-out eggs, you can mount them on bamboo skewers to make painting and drying much easier without smudging your work. -
Prepare the palette:
Squeeze out small amounts of your pastel acrylics. If your paints are too thick or heavy, I like to thin them slightly with a drop of water to improve the flow for long, continuous lines.
Step 2: Classic Thin Stripes
-
Choose your first color:
Dip your fine liner brush into the yellow paint. Load the brush moderately so paint doesn’t drip but flows freely. -
Paint the central band:
Starting near the middle of the egg, carefully paint a thin vertical line from the top almost to the bottom. Rotate the egg slightly and continue adding parallel vertical lines around the entire circumference. -
Checking spacing:
Aim for consistent spacing between each stripe, leaving a good amount of white space visible to maintain that airy, minimal feel. Let this egg dry completely. -
Switch to spiral stripes:
On a new egg, pick up your teal paint. Instead of vertical lines, paint horizontal bands that wrap around the egg. You can do this by holding the brush steady and slowly rotating the egg in your hand. -
Varying line weight:
For the teal egg, create a mix of slightly thicker lines and very thin ones. This variation adds visual interest compared to uniform pinstripes.
Steady Hand Trick
Rest your pinky finger against the egg’s surface while holding the brush. This anchors your hand and acts as a pivot point, helping you draw smoother curves.
Step 3: Thick & Thin Bands
-
Mixing widths:
Select the coral or reddish-orange paint. For this design, stroke slightly harder with your round brush to create a wider band near the center of the egg. -
Adding detail lines:
Above and below your main bands, add much thinner, delicate stripes. The contrast between the bold strokes and fine lines gives this pattern a dynamic look. -
Creating the sage green bands:
For the sage green egg, focus on perfectly horizontal stripes. If you are struggling with a steady hand, you can lightly pencil in a guide line before committing with paint. -
Fill opacity:
Make sure your green bands are opaque. If the paint looks streaky, let the first layer dry and apply a second coat just over the painted areas.
Uneven Lines?
Don’t panic if a line wobbles. Wait for the paint to dry fully, then gently scratch the excess paint away with a toothpick or cover the mistake with white paint.
Step 4: Special Pattern Accents
-
Textured lines:
For the light orange egg, try a stippling or ‘broken line’ technique. Instead of a solid stroke, dab the brush repeatedly to create a textured, fuzzy stripe effect that mimics fabric. -
The zigzag detail:
On your lavender egg, paint two solid horizontal bands first. In the white space between them, carefully paint a tiny zigzag or chevron pattern. -
Refining edges:
Use the very tip of your liner brush for sharp points on the zigzag. This delicate detail elevates the collection and breaks up the monotony of straight lines. -
Final drying:
Place all eggs back on their skewers or drying rack. Allow them to cure for at least an hour before handling to prevent fingerprints. -
Optional sealing:
If you want to preserve these for future years, apply a matte varnish spray over the dry eggs. Avoid glossy sprays if you want to keep the natural, rustic matte finish shown in the photo.
Arrange your beautiful batch on a wooden platter or in a basket for a fresh spring display


Soft Ombre Fade Eggs
These delicate eggs feature a whisper-soft gradient that transitions seamlessly from natural shell to gentle pastel hues, creating a sophisticated and ethereal look. This technique allows you to capture the romance of spring with minimal materials and a simple sponge-painting method.
Detailed Instructions
Materials
- Hard-boiled eggs (white shells work best for true color)
- Acrylic craft paints (pastel pink, soft lavender, white)
- Small natural sea sponge or cosmetic wedge sponge
- Paper plate or palette
- Soft-bristled brush (for blending if needed)
- Cup of water
- Paper towels
- Clean, dry cloth for polishing
Step 1: Preparation & Base
-
Prepare your workspace:
Begin by covering your table with protectant paper or newspaper. Set out your hard-boiled eggs, ensuring they are completely cool and dry, as condensation can repel the paint. -
Clean the shells:
Wipe each egg gently with a little white vinegar on a paper towel. This removes any natural oils from the shell surface, helping the acrylic paint adhere more evenly and last longer. -
Set up your palette:
Squeeze a dime-sized amount of pastel pink, soft lavender, and white acrylic paint onto your paper plate. Leave plenty of space between colors for mixing custom gradient shades.
Harsh Lines?
If your gradient looks blocky, dab a barely-damp clean sponge over the line where the colors meet. This lifts a tiny bit of pigment and softens the transition instantly.
Step 2: Creating the Solid Pastel Eggs
-
Dampen the sponge:
Take your natural sea sponge or cosmetic wedge and dip it briefly into the water, then squeeze it out tightly until it is barely damp. A sponge that is too wet will create runny, transparent paint. -
Load the pink paint:
Dab the sponge into the pastel pink paint, then tap it repeatedly on a clean part of the palette to offload excess pigment. You want a light, airy texture rather than a heavy glob of paint. -
Apply the first layer:
Holding the egg by the top and bottom, gently dab the pink sponge over the entire surface. Use a light, stippling motion to create a soft, textured finish rather than brush strokes. -
Let it dry:
Place the egg in a holder or carton to dry for about 5-10 minutes. Acrylics dry quickly, but you want it touch-dry before adding a second coat if you desire a more opaque look. -
Create the white accent egg:
For the plain white egg in the sequence, simply ensure you have a clean, white-shelled egg. If your eggs are off-white, you can stipple on a thin layer of white acrylic paint to brighten it up.
Step 3: The Ombre Gradient Technique
-
Mix a mid-tone shade:
For the pink ombre egg, mix a small amount of white into your pink paint on the palette to create an even softer, transitional shade. -
Sponge the dark base:
Load a clean area of your sponge with the original pink color. Dab it onto just the bottom third of a new white egg, concentrating the color at the very base. -
Apply the mid-tone:
Pick up your mixed lighter pink. Stipple this color around the middle section of the egg, slightly overlapping the darker bottom layer to begin the blending process. -
Blend upward:
As you move toward the top of the egg, use a clean part of the sponge (with no paint) to gently tap the boundary where the paint meets the white shell. This dry-sponging feathers the edge for a seamless fade. -
Repeat for lavender:
Clean your sponge or grab a fresh one. Repeat the gradient process with the lavender paint on the final egg: apply dark purple at the base (or top, for variety) and fade it out toward the center. -
Refine the gradients:
If the transition lines look too harsh, I like to take a slightly damp soft-bristled brush and very lightly sweep it across the boundary while the paint is still tacky to blur the line. -
Final drying time:
Allow all the eggs to dry completely for at least 20 minutes. Avoid touching the textured surfaces until you are sure the paint has fully set.
Texture Trick
Use a natural sea sponge rather than a synthetic kitchen sponge. The irregular holes in a sea sponge create that organic, speckled texture evident in the photo.
Step 4: Finishing Touches
-
Inspect the texture:
Check your eggs for any heavy clumps of paint. If you find any, you can very gently smooth them down with your finger, provided the paint is dry. -
Arrange the display:
Once fully dry, these matte-finish eggs look beautiful arranged on natural linens. You can add a subtle sheen by buffing them extremely gently with a dry cloth, though the matte look is part of their charm.
Enjoy styling your serene ombre creations as a centerpiece for your table
BRUSH GUIDE
The Right Brush for Every Stroke
From clean lines to bold texture — master brush choice, stroke control, and essential techniques.
Explore the Full Guide
Speckled Robin-Inspired Eggs
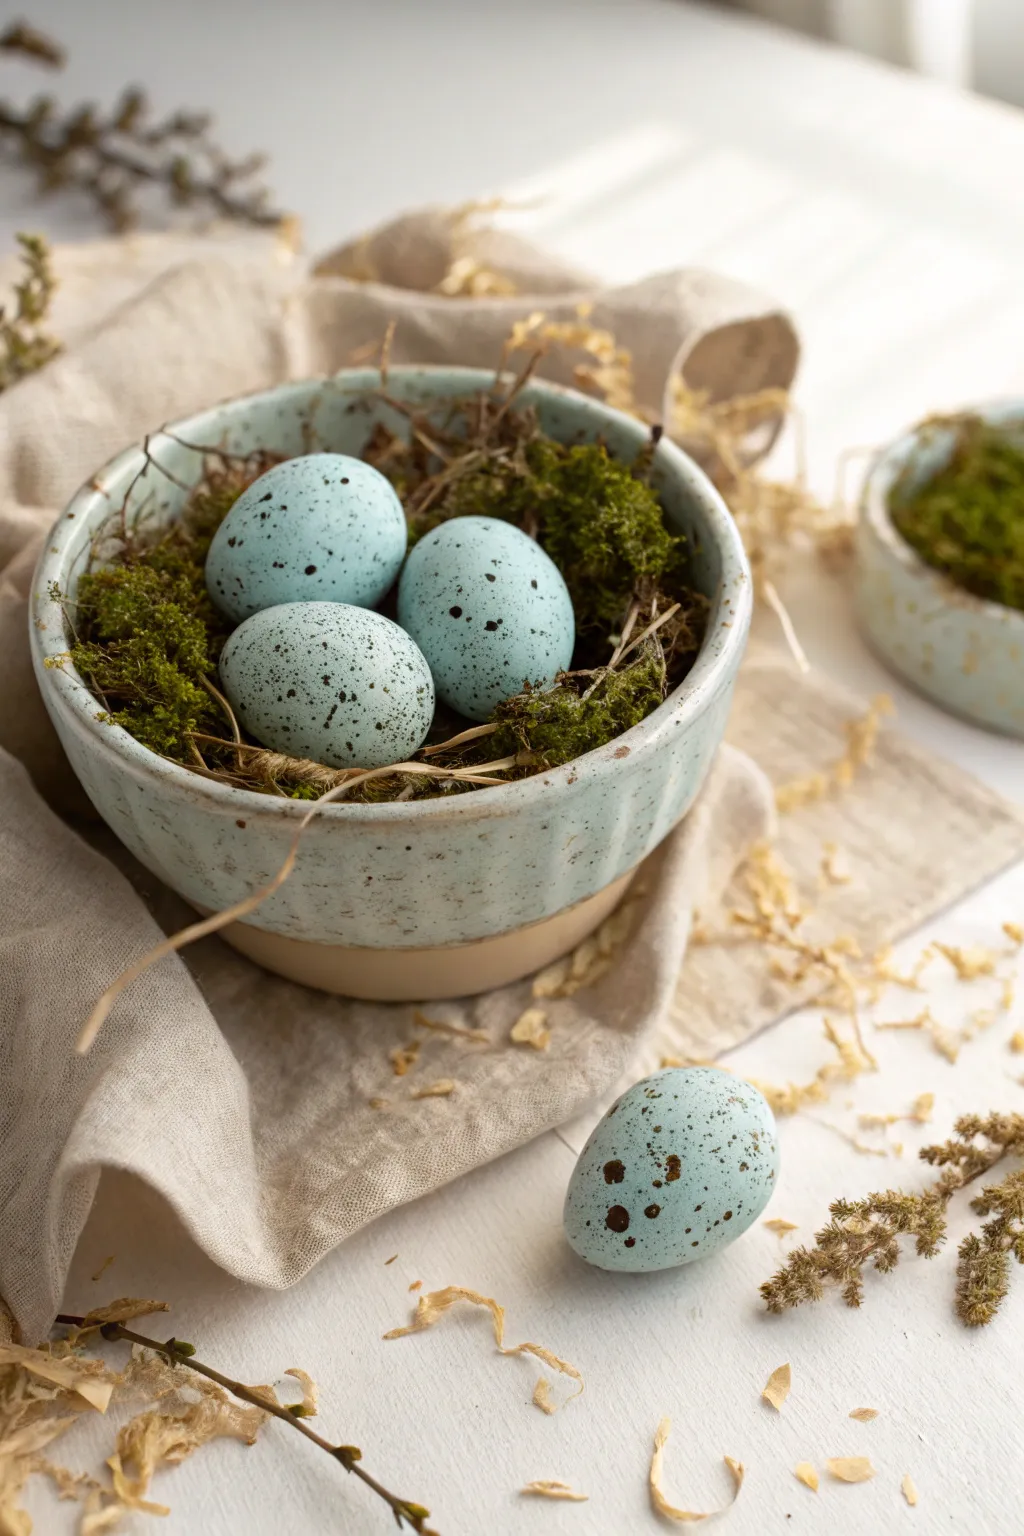
Capture the delicate beauty of spring with these faux robin’s eggs, featuring a soft blue base and realistic chocolate-colored speckles. Nested in moss, they make a stunningly natural centerpiece for your Easter table.
Step-by-Step
Materials
- White eggs (hard-boiled, blown out, or wooden/ceramic craft eggs)
- Acrylic paint: Robin’s Egg Blue (or Turquoise and White to mix)
- Acrylic paint: Burnt Umber or Dark Brown
- Paintbrush (medium flat or filbert)
- Old toothbrush or stiff bristle fan brush
- Water cup
- Paper towels
- Cardboard box or drop cloth (for splatter protection)
- Matte finish sealant spray
- Small ceramic bowl (rustic/handmade look preferred)
- Preserved sheet moss
- Dried twigs or hemp twine
Step 1: Base Coat Application
-
Prepare the workspace:
Lay down your drop cloth or set up a cardboard box as a splatter station. Painting eggs can get messy, and you’ll want to protect your surfaces from the acrylics. -
Clean the eggs:
Wipe down your chosen eggs—whether real or wooden—to ensure they are free of dust or oils. This helps the acrylic paint adhere smoothly without peeling later. -
Mix the perfect blue:
If you don’t have a pre-mixed robin’s egg blue, combine turquoise with a generous amount of white. Aim for a soft, pastel hue rather than a bright teal; adding a tiny dot of black can desaturate it slightly for realism. -
Apply the first coat:
Using your flat brush, paint the top half of the egg. Hold it by the bottom or rest it on a bottle cap to dry. I find thin layers work best to avoid brush strokes. -
Finish the base color:
Once the top is dry to the touch (usually 15-20 minutes), flip the egg and paint the remaining bottom half. Let this dry completely before moving on. -
Add a second coat:
Inspect the coverage. If the original white of the shell is showing through, apply a second coat of blue paint, repeating the top-and-bottom drying process.
Step 2: Creating the Speckles
-
Prepare the brown paint:
Squeeze a small amount of dark brown paint onto your palette. Add a few drops of water to thin it down until it reaches an inky consistency, similar to heavy cream. -
Test the splatter:
Dip your old toothbrush into the thinned brown paint. Point the bristles toward a piece of scrap paper and run your thumb across the bristles to flick paint. Adjust the thickness if the dots are too faint or too gloppy. -
Apply fine speckles:
Hold the egg inside your cardboard spray box. Flick the toothbrush bristles about 6 inches away from the egg to create a fine mist of tiny speckles. -
Create variation:
Move the brush closer for a few denser areas. Authentic robin’s eggs often have a concentration of spots on one end or random larger blotches. -
Add larger spots:
Dip the very tip of a paintbrush handle or a toothpick into un-thinned brown paint and gently dab a few larger, distinct spots onto the egg for texture variety. -
Dry the speckles:
Allow the speckles to dry completely. Be careful not to smudge them while handling the egg; resting them on a drying rack or egg carton works well here.
Blob Control
If a splatter lands too large or smears, don’t panic. Let it dry completely, then touch it up with a small dab of the base blue paint to cover the mistake.
Step 3: Sealing and Styling
-
Seal the artwork:
Take the dry eggs to a well-ventilated area. Spray them with a light coat of matte sealant. This protects the paint from chipping and removes any unnatural glossy sheen. -
Prepare the display bowl:
Select a rustic ceramic bowl, ideally one with a matching light blue or neutral glaze. Fill the bottom with crumpled paper or floral foam to give the moss some height. -
Arrange the moss:
Tuck pieces of preserved sheet moss into the bowl, covering the filler material completely. Fluff it up to create a soft, inviting bed for the eggs. -
Add natural elements:
Intertwine small dried twigs or snippets of hemp twine around the perimeter of the moss to mimic the construction of a real bird’s nest. -
Final assembly:
Gently nestle three of your painted eggs into the center of the moss. Place a fourth egg nearby on the table to complete the organic, styled vignette shown in the photo.
Metallic Touch
For a glamorous twist, mix a tiny bit of metallic gold paint into your dark brown splatter mixture. It adds a subtle shimmer that catches the light beautifully.
Enjoy the gentle rustic charm these lovely handmade eggs bring to your seasonal decor
Simple Daisy Chains
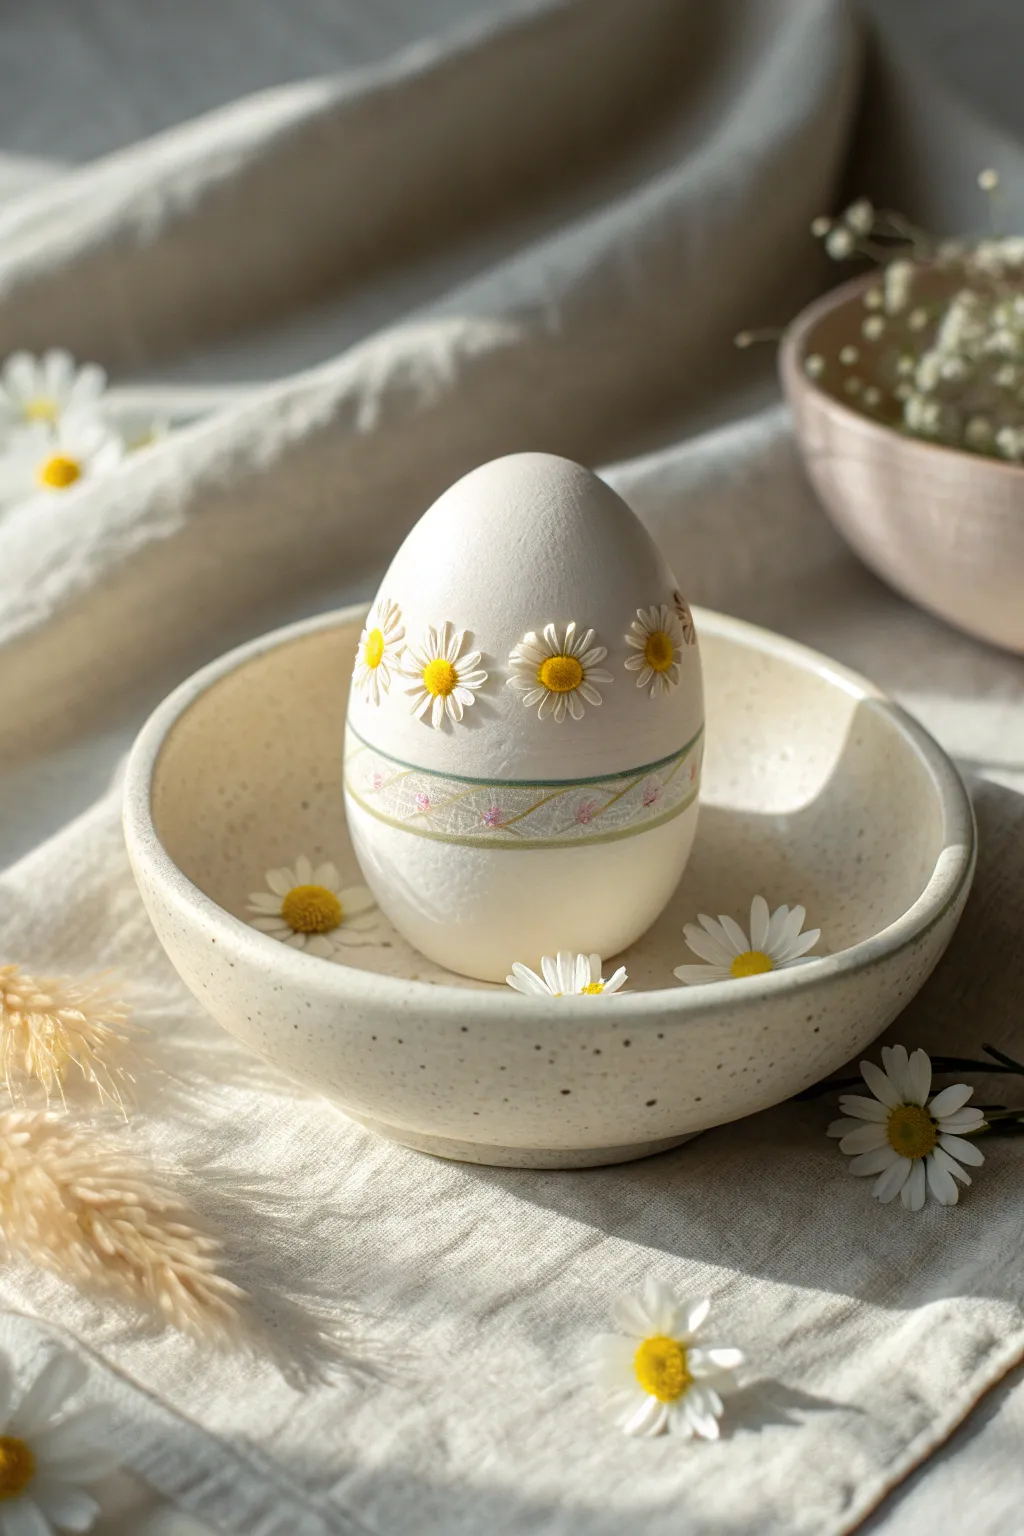
Embrace the freshness of spring with this elegant, minimalist design featuring a crown of tiny daisies and a subtle decorative band. The combination of clean white space and precise floral details creates a sophisticated look that feels both classic and modern.
How-To Guide
Materials
- Hard-boiled white egg (room temperature)
- White matte acrylic paint (high opacity)
- Yellow ochre acrylic paint
- Golden yellow acrylic paint
- Sage green acrylic paint
- Soft pink acrylic paint
- Fine detail brush (size 0 or 00)
- Linear brush (size 0)
- Small dotting tool or toothpick
- Pencil (optional)
- Egg stand or drying rack
Step 1: Preparation & Base
-
Prepare the egg:
Ensure your hard-boiled egg is completely dry and at room temperature before you begin painting, which prevents condensation from ruining your work. -
Prime the surface:
If your egg isn’t naturally a pristine white, apply a thin coat of matte white acrylic paint over the entire shell to create a smooth, porcelain-like canvas. -
Let it dry completely:
Allow this base coat to dry fully for at least 30 minutes before moving on to avoid smudging.
Step 2: The Decorative Band
-
Mark the guide:
Lightly sketch two parallel horizontal lines around the middle-bottom section of the egg with a pencil to define the width of your decorative band. -
Paint the borders:
Using your linear brush and sage green paint, carefully trace over your pencil guidelines to create thin, crisp border rings. -
Fill the texture:
Between the green lines, dab thicker white paint to create a slightly raised, textured background for the band detail. -
Add the lattice:
While the white is dry, paint very faint, diagonal sage green lines inside the band to create a gentle crisscross or lattice pattern. -
Dot the pink accents:
Dip the very tip of a toothpick into soft pink paint and add tiny clusters of dots where the lattice lines intersect, mimicking miniature buds.
Use Heavy Body Paint
For the petals, use ‘heavy body’ acrylic or let your regular paint sit out for 10 mins to thicken. This holds the brushstroke texture better.
Step 3: Painting the Daisies
-
Position the centers:
About an inch above the decorative band, place small dots of yellow ochre around the circumference of the egg. These will be the centers of your daisies. -
Paint the first petals:
Using the size 0 detail brush loaded with thick white paint, start painting teardrop shaped petals radiating outward from the yellow centers. -
Layer the petals:
I prefer to paint the top and bottom petals first, then fill in the sides, ensuring they overlap slightly for a realistic, lush look. -
Create texture in centers:
Once the yellow centers are dry, stipple a tiny bit of golden yellow on the top edge of each center to give them a rounded, 3D appearance. -
Add shadow depth:
Mix a tiny drop of grey into your white paint and add extremely subtle lines at the base of the petals near the yellow center to separate them visually.
Shaky Hands?
When painting the green band, rest your pinky finger on the egg’s surface for stability, or place the egg on a bottle cap and rotate the cap, not your hand.
Step 4: Finishing Touches
-
Review the spacing:
Check the gaps between your daisies; if there is too much empty space, you can add partial petals peeking out from behind the main flowers. -
Clean up lines:
If any green border lines look shaky, use a clean brush with a tiny bit of white paint to tidy up the edges. -
Final dry:
Place the egg continuously on a drying rack to ensure the raised texture of the petals hardens completely.
Now you have a stunning, nature-inspired centerpiece for your Easter basket

PENCIL GUIDE
Understanding Pencil Grades from H to B
From first sketch to finished drawing — learn pencil grades, line control, and shading techniques.
Explore the Full Guide
Watercolor-Style Florals
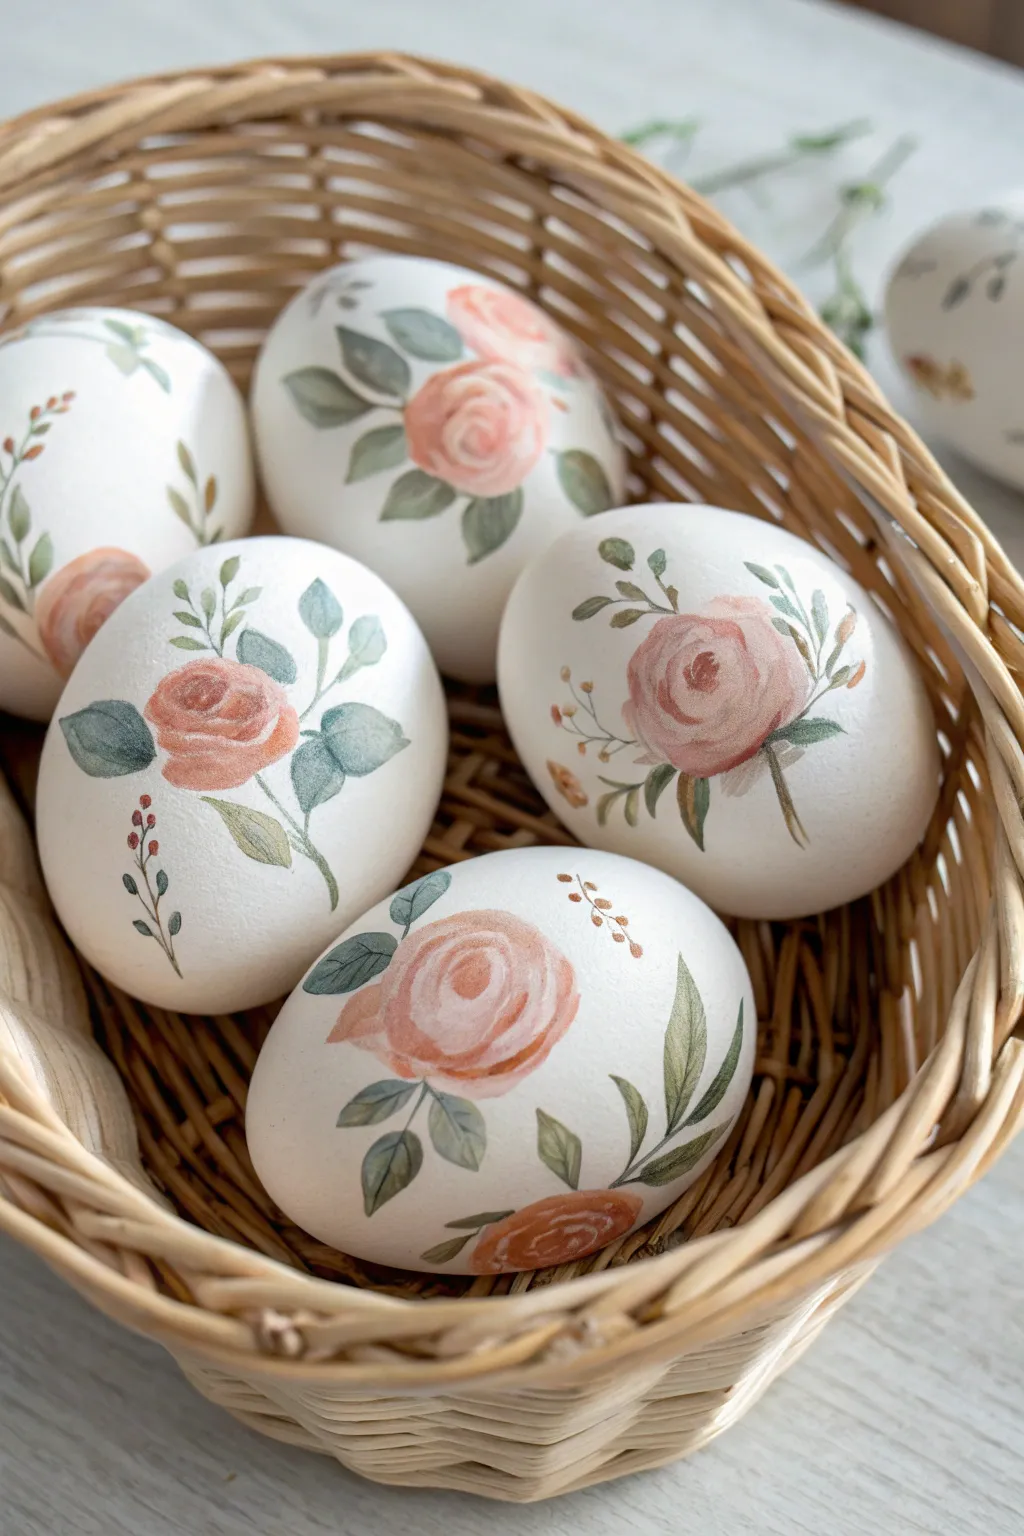
These elegant eggs feature soft, romantic floral motifs that capture the delicate beauty of watercolor painting. With blooming roses in dusty pinks and sage green leaves, this design transforms simple white eggs into sophisticated springtime decor.
Detailed Instructions
Materials
- Hard-boiled white eggs (or wooden/ceramic craft eggs for longevity)
- Watercolor paints (tube or pan)
- Small round brushes (sizes 0, 2, and 4)
- Palette for mixing
- Water cups (one for rinsing, one for clean water)
- Paper towels
- Matte spray sealant (optional)
- Egg stand or holder (bottle cap works well)
Step 1: Rose Blooms
-
Prepare your palette:
Begin by mixing a soft, dusty pink color. Combine a bit of Alizarin Crimson with white gouache or diluted watercolor, and tone it down with a tiny touch of Burnt Sienna to keep it vintage rather than neon. -
Paint the center swirl:
Using your size 2 brush, load it with a slightly more saturated version of your pink mix. Paint a small, tight ‘C’ shape or spiral in the spot where you want your main flower. -
Add first petals:
Rinse your brush slightly so it holds more water and less pigment. Paint curved strokes hugging the center spiral, leaving tiny gaps of white space between the strokes to define the petals. -
Expand the bloom:
Dip your brush in clean water again to further dilute the paint on your brush. Paint larger, looser curved shapes around the outside of the flower to create the outer petals, letting the color fade naturally. -
Create variation:
While the paint is still damp but not soaking, drop a tiny dot of darker pink or red into the base of a few petals to add depth and dimension. -
Repeat for buds:
Paint smaller, tighter buds nearby using just one or two simple oval strokes in the same pink tones. -
Dry partially:
Allow the flower heads to dry until they are no longer shiny before moving on to the greenery to prevent bleeding.
Step 2: Leaves and Stems
-
Mix foliage greens:
Create a sage green by mixing Sap Green with a touch of grey or blue. You want a muted natural tone, not a bright grass green. -
Paint main stems:
Using your smallest brush (size 0), paint very thin, delicate lines extending from the flower bases. I find it helpful to pull the brush toward me for steadier lines. -
Add leaf shapes:
Press down with the belly of a size 2 brush and lift up quickly to create teardrop-shaped leaves along the stems. -
Vary leaf opacity:
Paint some leaves with more pigment and others with a very watery wash to create the illusion of some leaves being in the background. -
Detailing veins:
Once the larger leaves are dry, use the size 0 brush with a darker, more concentrated green mix to paint a hair-thin line down the center of select leaves. -
Add filler accents:
Mix a warm ochre or light brown shade. Dot small clusters of berries or tiny sprigs around the roses to fill empty white spaces. -
Connect accents:
Use the size 0 brush to draw whisper-thin brown stems connecting these berries to the main floral cluster.
Handling the Curve
Painting on a curve is tricky. Rest your painting hand’s pinky finger on a dry part of the egg for stability while you work on the details.
Step 3: Finishing Touches
-
Check balance:
Rotate the egg to see if any areas look too empty. Add single floating leaves or tiny petals if needed to balance the composition. -
Final dry:
Let the eggs sit undisturbed for at least an hour to ensure all moisture has evaporated from the surface. -
Seal (optional):
If you want to preserve these longer, lightly mist them with a matte fixative spray. Do this from a distance to avoid making the watercolor run.
Antique Texture
Splatter tiny specks of watered-down brown paint completely over the finished design using an old toothbrush for a speckled, robin’s egg effect.
Arranging these in a simple woven basket highlights their delicate, artistic nature perfectly
Cute Bunny Face Eggs

Transform a plain white egg into an adorable sleeping bunny with just a few simple touches. This minimalist project relies on felt ears and a delicate hand-drawn face to create a character full of charm.
How-To Guide
Materials
- White egg (hard-boiled, blown out, or wooden)
- Orange felt sheet (stiffened felt works best)
- Black fine-point permanent marker or paint pen
- Pink paint marker or fine paintbrush
- Scissors
- Hot glue gun with glue sticks
- Pencil
- Paper scraps (for ear template)
Step 1: Preparation & Ears
-
Clean surface:
Begin by wiping down your white egg to ensure it is free of any oils or dust, which helps the ink adhere smoothly. -
Draft the ears:
On a scrap piece of paper, sketch a long, oval-shaped bunny ear approximately 1.5 to 2 inches tall. -
Refine the shape:
Cut out your paper template and test the size against the egg to make sure the proportions feel cute and balanced. -
Trace onto felt:
Place your paper template onto the orange felt and lightly trace it twice with a pencil. -
Cut the felt:
Carefully cut out the two felt ears using sharp scissors to get clean, crisp edges without fraying. -
Create a pinch:
To give the ears a 3D effect, apply a tiny dot of hot glue at the very bottom center of one ear. -
Fold the base:
Quickly pinch the bottom corners of the ear together over the glue dot, creating a small fold or pleat at the base. -
Repeat for second ear:
Do the same for the second ear, ensuring both fold in a similar direction so they look symmetrical. -
Attach the ears:
Apply a small bead of hot glue to the bottom pinched edge of each ear and press them firmly onto the top crown of the egg, spacing them slightly apart.
Glue Gun Troubles
If hot glue leaves visible globs, wait for it to dry fully, then slice away excess with a craft knife.
Step 2: Drawing the Face
-
Map the features:
Using a pencil, very lightly sketch where you want the eyes, nose, and mouth to sit. I find placing them slightly lower on the egg creates a cuter, ‘baby animal’ look. -
Draw the nose:
Start with the pink paint marker. Draw a small, inverted triangle in the center of the face for the nose. -
Shape the nose:
Fill in the pink triangle completely, rounding the corners slightly for a softer appearance. -
Draw the eyes:
Switch to your black fine-point marker. Draw two curved semi-circles arching downward to create sleepy, closed eyes. -
Add lashes:
Carefully add three to four short, vertical strokes extending from the bottom of each eye curve to create eyelashes. -
Create the mouth:
From the bottom point of the pink nose, draw a tiny black vertical line down. -
Finish the smile:
Extend two curved lines outward from the bottom of that vertical line—one to the left and one to the right—to create the classic bunny smile anchor. -
Add whiskers:
Draw three distinct horizontal lines on each cheek, extending outward from near the nose area, keeping them light and airy. -
Let it set:
Allow the ink and paint to dry completely for a few minutes before placing the egg in a carton to avoid smudging.
Alternative Tails
Glue a mini white pom-pom to the back of the egg for a fluffy bunny tail surprise.
Nestle your new bunny friend in a carton lined with straw for the perfect Easter display


Hatching Chick Eggs
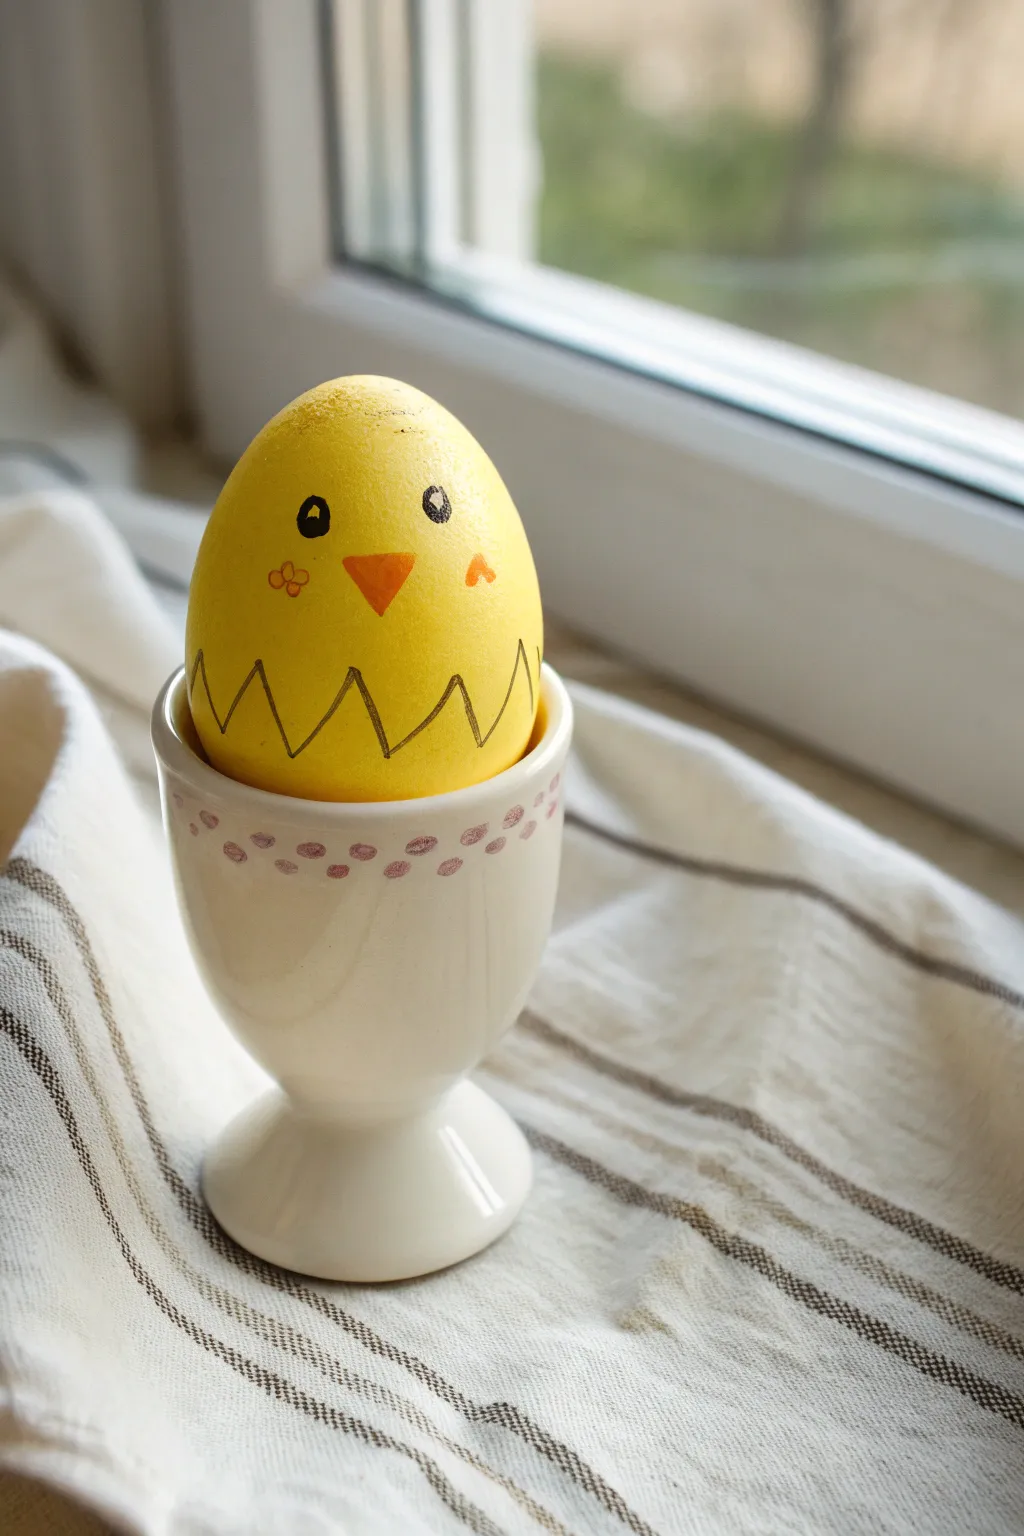
Transform a plain egg into a cheerful springtime character with just a coat of yellow dye and some simple marker details. This adorable chick looks like it’s just peeked out of its shell, making it a perfect, low-stress centerpiece for your Easter breakfast.
Step-by-Step
Materials
- Hard-boiled white egg (cooled)
- Yellow food coloring or egg dye kit
- White vinegar
- Hot water
- Mug or deep bowl for dyeing
- Spoon or egg dipper
- Paper towels
- Fine-point black permanent marker
- Orange permanent marker
- Egg cup for display
Step 1: Dyeing the Base
-
Prepare the dye bath:
Mix half a cup of hot water with a teaspoon of white vinegar in your mug. Add about 20 drops of yellow food coloring to get a vibrant, sunny shade. -
Submerge the egg:
Gently lower your hard-boiled egg into the dye using a spoon. Make sure the water level covers the entire egg. -
Soak for saturation:
Let the egg sit in the dye for at least 5 to 10 minutes. The longer it sits, the deeper the yellow will be. -
Check color intensity:
Lift the egg out briefly to check the shade. You want a solid, opaque yellow rather than a pale pastel. -
Dry completely:
Remove the egg and gently pat it with a paper towel. Place it in a carton or on a rack to dry fully. This is crucial—drawing on a damp egg will smear the ink.
Smudged Ink?
If your marker bleeds, the egg wasn’t fully dry. Wait another 10 minutes or use a hairdryer on cool to ensure the shell is bone-dry before drawing.
Step 2: Drawing the Features
-
Outline the eyes:
Using the fine-point black marker, draw two small circles near the top third of the egg. Space them slightly apart. -
Add eye details:
Color in the black circles, but leave a tiny white unfilled spot in the upper corner of each pupil for a cute ‘sparkle’ effect. -
Draw the beak:
Switch to your orange marker. Imagine an inverted triangle placed centrally below the eyes and draw the outline. -
Fill the beak:
Color in the triangle carefully with the orange marker. One layer of ink is usually enough to pop against the yellow. -
Create rosy cheeks:
Using the orange marker again (or a pink one if you prefer), draw small shapes just under the eyes. In the example, one cheek is a tiny flower and the other is a heart. -
Draw the shell crack:
About one-third of the way up from the bottom of the egg, use the black permanent marker to draw a continuous zig-zag line all the way around the circumference. -
Connect the zig-zags:
Ensure the start and end of your zig-zag line meet cleanly on the back of the egg. -
Detail the shell:
For extra dimension, you can draw straight vertical lines down from the points of your zig-zags to the bottom of the egg, though a simple line works great too.
Level Up
Glue a tiny craft feather to the back of the head or top of the egg for a fun, fluffy 3D tuft of baby chick hair.
Step 3: Final Display
-
Prepare the holder:
Place the finished egg into a simple ceramic egg cup. The white contrast of the cup helps the yellow chick stand out. -
Adjust the angle:
Rotate the egg so the face is perfectly centered and looking slightly upward.
Now you have a charming little breakfast buddy that is almost too cute to crack open
Carrot Patch Eggs
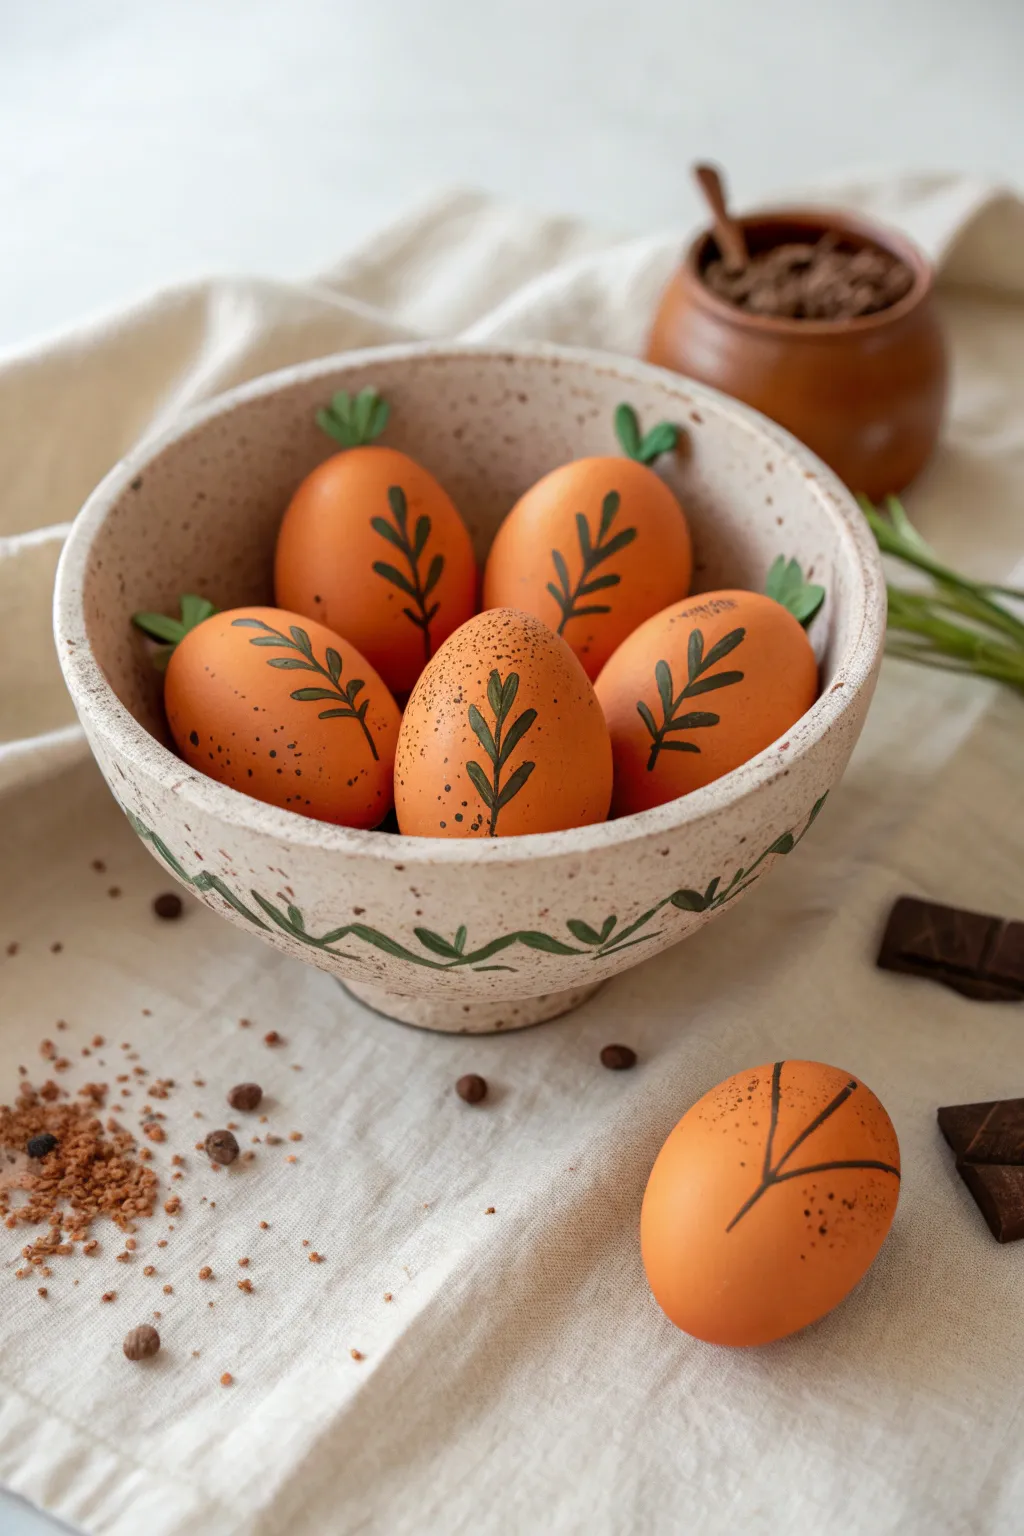
Transform ordinary eggs into a whimsical harvest of carrots with this charming project that combines warm orange tones with delicate botanical details. The speckled finish and hand-painted greens give these eggs a cozy, rustic feel perfect for a farmhouse-style Easter display.
Step-by-Step Tutorial
Materials
- Hard-boiled or hollowed white eggs
- Orange acrylic craft paint (warm terracotta or pumpkin shade)
- Dark brown acrylic paint (for speckling)
- Dark green acrylic paint
- Fine liner paintbrush (size 0 or 00)
- Small flat paintbrush
- Green cardstock or stiff felt
- Scissors
- Craft glue or low-temp hot glue gun
- Old toothbrush or stiff bristle brush
- Palette or paper plate
- Water cup and paper towels
Step 1: Base Coating
-
Prepare the workspace:
Lay down newspaper or a plastic tablecloth to protect your surface from paint splatters. Ensure your eggs are clean, dry, and room temperature before starting to prevent condensation affecting the paint adhesion. -
Paint the base color:
Using the flat paintbrush, coat the entire egg in the warm orange acrylic paint. Apply the paint in smooth, vertical strokes to mimic the texture of a carrot. -
Add a second coat:
Let the first layer dry completely for about 15-20 minutes. If the white shell is still showing through, apply a second coat of orange for a rich, opaque finish. -
Create the speckles:
Mix a tiny amount of dark brown paint with a drop of water to thin it slightly. Dip the tips of an old toothbrush or stiff brush into this mixture. -
Splatter texture:
Hold the brush about 6 inches away from the dry orange egg and run your thumb across the bristles to flick tiny droplets of brown paint onto the surface. Rotate the egg to get even coverage, aiming for a natural, earthy look. -
Dry completely:
Set the speckled eggs aside to dry fully before moving on to the detailed painting. This usually takes about 30 minutes.
Uneven Speckles?
If you get a large blob of brown paint while splattering, quickly dab it gently with a damp paper towel to lift it, or blend it out to look like a natural imperfection on the vegetable skin.
Step 2: Painting the Foliage
-
Plan the design:
Visualize a central stem running vertically down the center of the egg. The carrot greens design relies on a simple fern-like structure. -
Paint the main stem:
Load your fine liner brush with dark green paint. Starting near the top (narrower end) of the egg, paint a thin, slightly curved line extending about halfway down the egg. -
Add the first leaves:
Paint small, upward-curving strokes extending from the top of your central stem. These should be short and tapered at the ends. -
Continue the pattern:
Work your way down the stem, adding pairs of leaves on either side. Angle them upwards to mimic the growth pattern of carrot tops or ferns. -
Vary the sizes:
Make the leaves near the bottom of the stem slightly larger and the ones near the tip smaller and more delicate. I find that varying the pressure on the brush helps achieve those tapered points effortlessly. -
Let the design set:
Allow the green paint to dry completely. Acrylics dry fast, so this should only take a few minutes.
Add Depth
Mix a lighter shade of green to add highlights to one side of your painted leaves. This simple step adds dimension and makes the painted foliage pop against the orange background.
Step 3: Adding the Topper
-
Cut the stems:
While the paint dries, cut small, three-pronged shapes out of green cardstock or stiff felt. These should look like tiny crowns or tufts of grass, about half an inch tall. -
Shape the topper:
If using paper, gently curl the prongs slightly outward with your fingers to give them a 3D effect rather than laying flat. -
Attach the greens:
Apply a small dot of glue to the very top center of the egg. Press the base of your cut-out green topper firmly onto the glue. -
Hold in place:
Hold the topper steady for a few seconds until the glue tacks up and holds the paper upright on its own. -
Final inspection:
Check your eggs for any smudges or loose toppers. Arrange them in a bowl to create your festive carrot patch.
Enjoy arranging your freshly harvested carrot eggs in a rustic bowl for a centerpiece that celebrates the garden.
Modern Color-Block Eggs
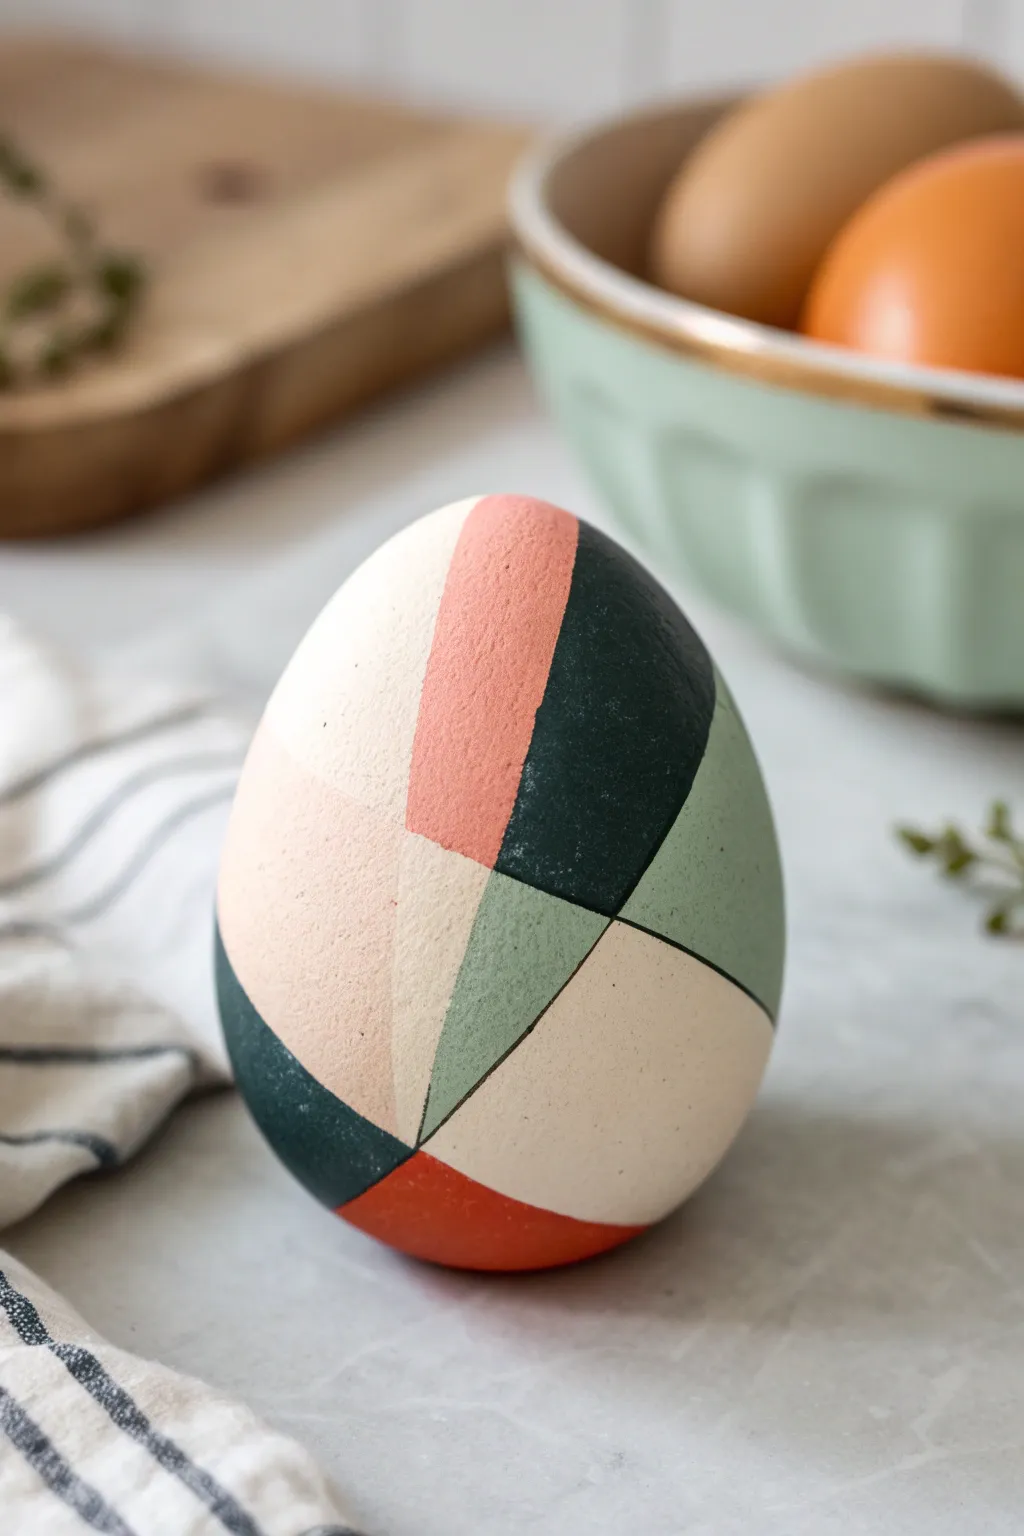
Elevate your Easter decor with this sophisticated, modern take on egg painting featuring bold geometric shapes and an earthy color palette. The combination of terra cotta, sage, and deep forest green against a natural egg creates a striking, architectural look that feels more like art than a craft.
Step-by-Step Guide
Materials
- White or light-colored eggs (hard-boiled, blown out, or wooden)
- Acrylic craft paints (Deep Forest Green, Terra Cotta/Coral, Sage Green, Beige/Cream)
- Fine-point black permanent marker or archival ink pen (0.5mm or 0.8mm)
- Small flat synthetic paintbrush (size 2 or 4)
- Very fine round detail brush (size 0 or 00)
- Pencil with a dull point
- Eraser
- Palette or small dish for paints
- Paper towels
- Egg holder or drying rack (bottle caps work well)
Step 1: Planning the Design
-
Prepare your canvas:
Ensure your egg is clean and completely dry. If you are using real eggs, wipe them down with a little vinegar to remove any oils that might repel the paint. -
Sketch the primary lines:
Using a dull pencil, heavily sketch your main intersecting lines. Think in terms of slicing the egg into large, irregular sections. Avoid perfect symmetry; asymmetrical angles look more modern. -
Create varying shapes:
Connect your main lines with smaller diagonal lines to create triangles and quadrilaterals. Aim for a mix of large ‘negative space’ areas and smaller, detailed geometric clusters. -
Refine the composition:
Step back and look at the egg from different angles. Ensure the pattern wraps around continuously so there isn’t a blank ‘back side’ to the egg. -
Lighten the sketch:
Gently roll a kneaded eraser or dab a standard eraser over your pencil lines. You want them just visible enough to guide you, but faint enough that they won’t show through lighter paint colors.
Step 2: Painting the Sections
-
Start with the lightest color:
Dip your flat brush into the beige or cream paint. Fill in about one-third of the shapes, trying to keep these sections separated so two of the same color don’t touch. -
Keep edges crisp:
Don’t worry about being perfectly precise right against the line, as we will add a border later, but try to keep the paint flat and smooth without raised ridges. -
Apply the mid-tones:
Move on to your terra cotta or coral shade. Paint another set of shapes, focusing on creating contrast against the beige sections you just finished. -
Add the green accents:
Using the sage green, fill in smaller triangles or connecting shapes. This soft green bridges the gap between the bold coral and the dark green coming next. -
Paint the dark contrast:
Switch to your Deep Forest Green. This is your anchor color. Paint the remaining shapes carefully. I find that using the smaller detail brush helps here to get into sharp corners without accidentally smudging the lighter colors. -
Let it cure:
Place the egg on your drying rack or bottle cap. Let the acrylics dry completely for at least 30 minutes. The surface must be hard to the touch before the next step.
Clean Lines Secret
Use ‘chart tape’ or very thin washi tape instead of pencil lines if you struggle with freehand painting. Paint the voids, peel the tape when dry, then draw your black marker lines in the empty channels.
Step 3: The Definiing Lines
-
Test your pen:
Test your black fine-point marker on a scrap piece of paper or a spare painted shell to ensure the ink flows smoothly and isn’t reacting with the acrylic paint. -
Outline the shapes:
Slowly trace over the boundaries where your colors meet. Use a steady hand and pull the pen towards you rather than pushing it away for better control. -
Thicken the lines:
Go over your initial lines a second time to create a deliberate, bold black border. The line needs to be thick enough to cover any tiny gaps where the paint colors didn’t quite touch. -
Clean up intersections:
Pay special attention to the corners where three or more shapes meet. Make sure these vertices are sharp and clean, not muddy or rounded. -
Final inspection:
Rotate the egg and look for any spots where the black line might skip over the texture of the eggshell. Gently touch up these areas. -
Seal (Optional):
If you want these to last for years, apply a very thin coat of matte spray varnish. Avoid brush-on varnish as it might smear the marker ink.
Smudged Ink?
If your marker tip clogs with paint or drags, the paint isn’t dry enough. Stop immediately. Let the egg sit for another hour, wipe the marker tip on a paper towel, and try again gently.
Arranged in a simple ceramic bowl, these geometric beauties bring a refined, artistic touch to your holiday table
Easy Zigzags and Chevrons
Elevate your Easter basket with this sophisticated, modern design featuring sharp navy and white chevrons against a soft, matte pink background. This steady-hand technique creates a striking graphic look that feels both contemporary and lovingly handmade.
How-To Guide
Materials
- White or brown chicken egg (blown out or hard-boiled)
- Acrylic craft paint: Pastel Rose Pink
- Acrylic craft paint: Navy Blue
- Acrylic craft paint: White
- Small flat shader brush (size 4 or 6)
- Fine liner brush (size 0 or 00)
- Pencil (light H grade preferred)
- Egg cup or drying stand
- Paper towels
- Palette or small dish for mixing
Step 1: Preparation and Base Coat
-
Clean the shell:
Ensure your egg is clean and completely dry. If you are using a blown-out egg, make sure the drainage holes are tidy. -
Apply the first pink coat:
Using your flat shader brush, apply an even coat of pastel rose pink paint over the entire egg. Long, smooth vertical strokes work best to minimize brush marks. -
Allow to dry:
Place the egg in a stand and let it dry completely. Acrylics dry fast, but give it at least 15-20 minutes so the next layer doesn’t lift the first. -
Apply a second coat:
For that beautiful opaque, matte finish seen in the photo, apply a second coat of pink. I find this second layer crucial for hiding any shell texture.
Steady Hands Trick
Rest your pinky finger on the egg surface (where the paint is dry!) to stabilize your hand while painting the fine chevron lines.
Step 2: Drafting the Design
-
Mark vertical guides:
Lightly sketch four vertical lines from the top center to the bottom center of the egg with a pencil. These will help keep your zigzags aligned. -
Sketch horizontal rings:
Visualize the egg divided into horizontal bands. Lightly mark where the peaks and valleys of your zigzags will fall to ensure the pattern stays level around the circumference. -
Draw the main chevron:
Connect your guide marks to form a continuous zigzag line around the center of the egg. Keep your pencil pressure extremely light so it doesn’t show through the paint.
Step 3: Painting the Pattern
-
Start the central white band:
Switch to your fine liner brush. Load it with white paint and carefully trace your pencil chevron guideline. -
Thicken the white line:
Once the initial trace is down, carefully widen the line to create a bold white band. Paint small sections at a time, rotating the egg as you go. -
Outline in navy:
Rinse your brush thoroughly. Load the liner brush with navy blue paint and paint a parallel zigzag line directly above the white band, leaving a small gap of pink showing between them. -
Create the lower navy line:
Repeat the process on the underside of the white band, painting a navy zigzag that mirrors the one above. Try to keep the spacing consistent. -
Refine the edges:
Go back over any uneven edges with the appropriate color. The key to that crisp look is sharp points on the zigzags, so take extra care at the peaks and valleys. -
Let the pattern set:
Allow the central pattern to dry completely before your hand touches it while working on other areas.
Metallic Accent
Replace the white paint with metallic gold leaf or gold paint for a luxurious, glamorous twist on this geometric classic.
Step 4: Adding Details
-
Add secondary chevrons:
If you wish to extend the pattern like the example, add another set of white or navy chevrons above or below your main band. -
Clean up stray marks:
If you made any mistakes, use a toothpick to gently scrape away wet paint, or touch up with a dab of the base pink color once dry. -
Final drying time:
Let the entire egg sit undisturbed for an hour to cure fully. -
Optional matte varnish:
To protect your work without adding unwanted shine, apply a spray matte varnish. This keeps the velvety look intact while sealing the design.
Display your stunning chevron egg in a simple ceramic dish to let the pattern speak for itself
Botanical Vine Wraps
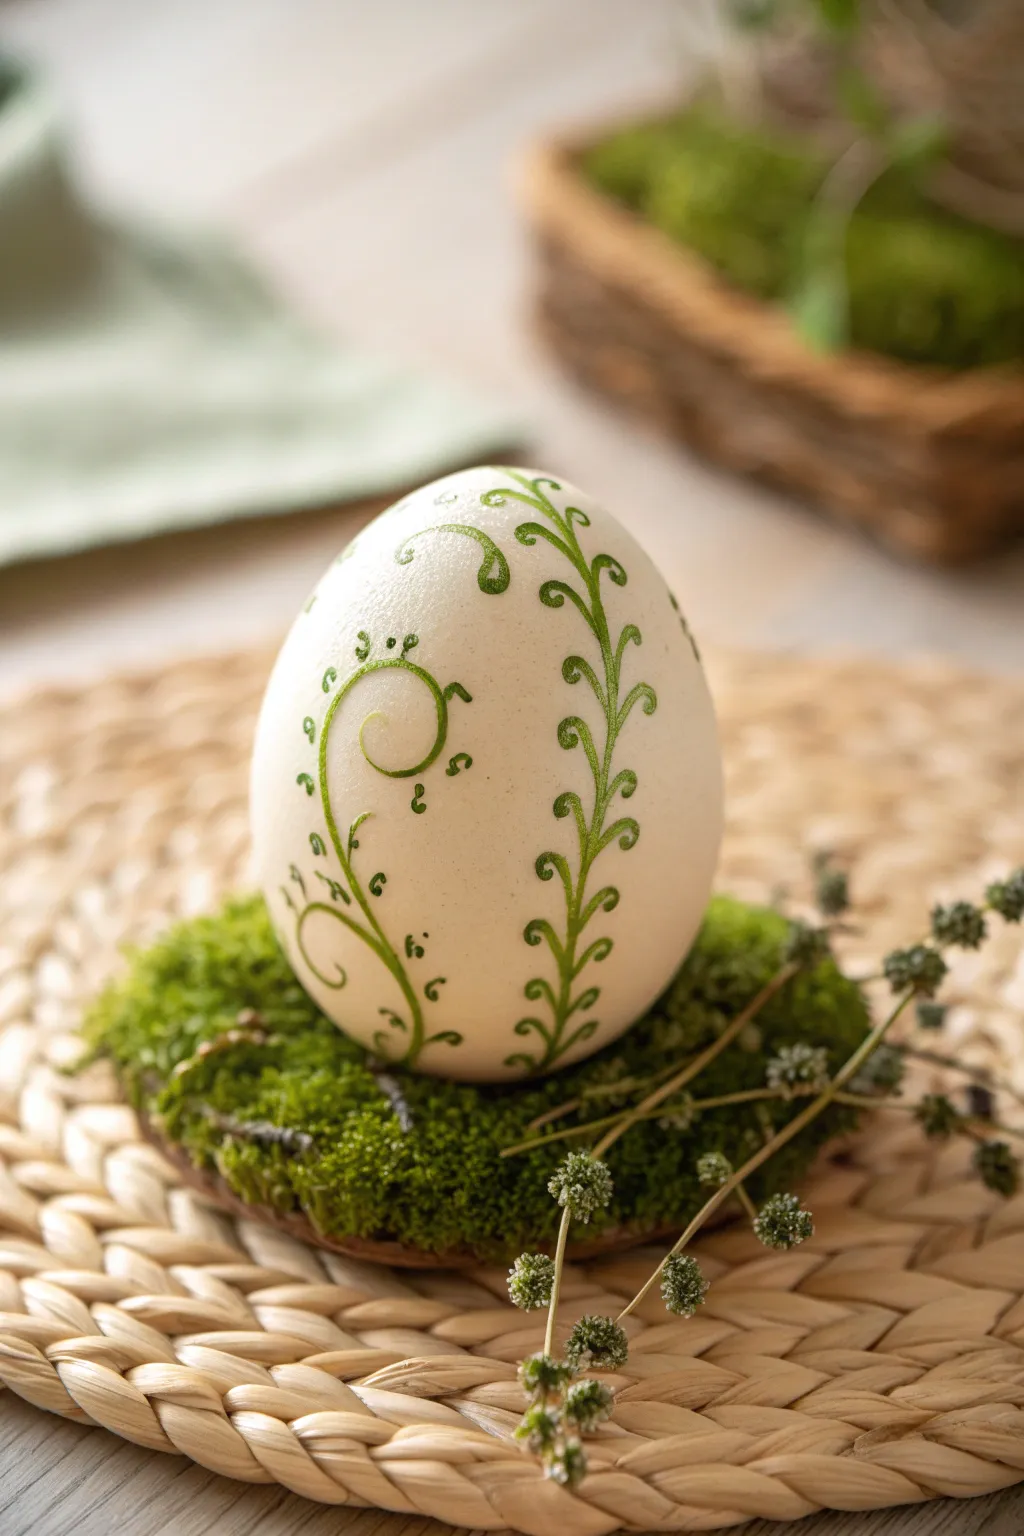
Capture the essence of spring with this minimalist yet stunning botanical design that wraps your egg in delicate greenery. The contrast of the vivid green vines against the natural white shell creates a fresh, organic look perfect for an elegant Easter display.
Step-by-Step
Materials
- Hard-boiled white egg (cooled and dry) or a ceramic/wooden craft egg
- Fine-point permanent marker (green) or a very fine liner brush
- High-flow acrylic paint (sap green or leaf green) if using a brush
- Pencil (HB or lighter)
- Kneaded eraser
- Paper towel
- Egg stand or holder (optional, for drying)
Step 1: Preparation & Sketching
-
Clean surface:
Ensure your egg is completely clean and free of oils. A quick wipe with vinegar and water helps paint adhere better. -
Plan the main stems:
Using a pencil very lightly, draw two main vertical lines curving gently from the bottom of the egg towards the top. These will serve as the spine for your vines. -
Sketch the scrolls:
Add a large, spiral scroll branching off to the left side of one main stem. The shape should resemble a fiddlehead fern unfurling. -
Add secondary curls:
Sketch smaller, secondary curls at the base of the stems to ground the design. -
Refine the lines:
Lightly erase any heavy pencil marks with a kneaded eraser until they are barely visible guides.
Smudge Alert
If you smudge the green ink, dampen a Q-tip with a tiny bit of rubbing alcohol to gently lift the mistake without ruining the whole design.
Step 2: Inking the Vines
-
Trace the main stems:
Using your green fine-point marker or a liner brush loaded with green paint, carefully trace the main vertical lines you sketched. Keep your hand steady and move slowly. -
Thicken the base:
Go over the lower portion of the stems a second time to add just a tiny bit of weight to the bottom, tapering off as you go up. -
Draw the main scroll:
Inking the spiral is the trickiest part; start from the stem connection and rotate the egg in your hand as you draw the curve outward. -
Add the leaf stems:
Along the main vertical vine, draw short, curved lines branching outward in alternating pairs. These are the anchors for your leaves. -
Create the leaves:
At the end of each short branch, draw a small teardrop or comma shape to form the leaves. -
Add tendrils:
On the large spiral scroll, add tiny, c-shaped hooks along the outer edge to give it a whimsical, fern-like texture. -
Detailing the spiral:
Add small dots or tiny leaves to the interior curve of the spiral for added interest.
Add Dimension
Use a second, slightly lighter shade of green marker to add highlights inside the larger leaves for a 3D effect.
Step 3: Finishing Touches
-
Check for gaps:
Look over your design for any faint lines or uneven connections and carefully touch them up. -
Let it set:
Allow the ink or paint to dry completely. I like to let this dry briefly for about 10 minutes to avoid smudging. -
Erase guidelines:
Once you are 100% sure the design is dry, gently dab (don’t rub) with the kneaded eraser to lift any remaining pencil marks. -
Optional sealing:
If you want this to last for years, apply a thin layer of matte varnish spray.
Place your finished egg on a bed of fresh moss to complete the natural woodland aesthetic
Mini Wreath Monograms
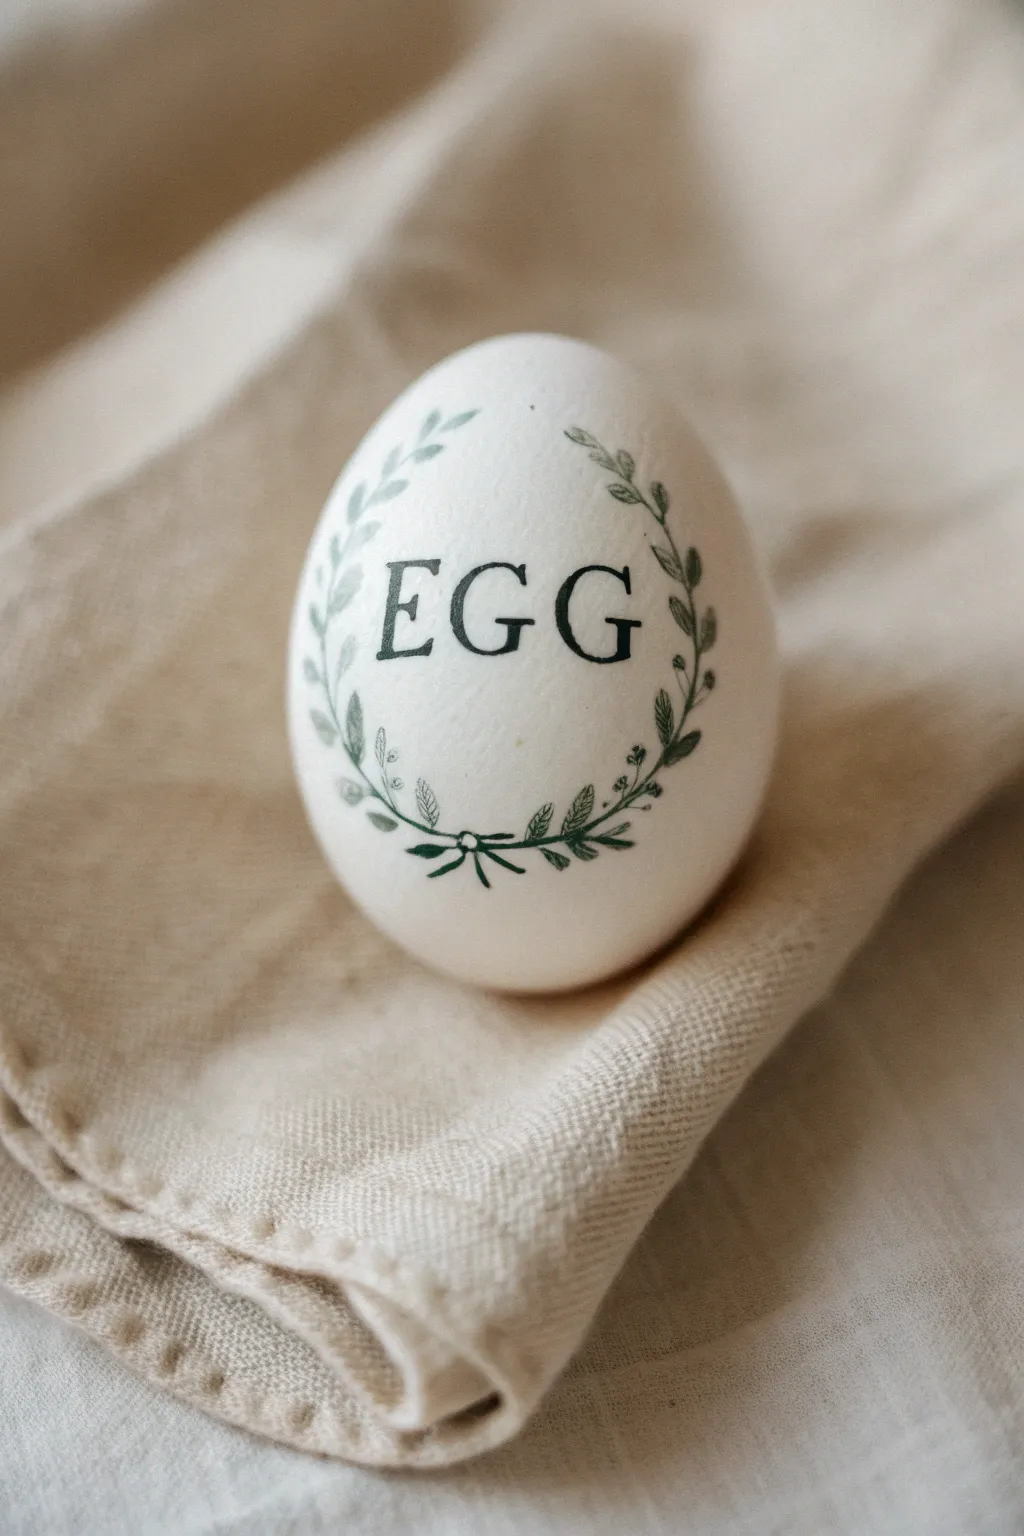
Embrace simplicity with this elegant design that features crisp, black serif typography framed by a delicate, hand-painted green wreath. The contrast of the dark ink against the white shell creates a modern farmhouse aesthetic perfect for sophisticated Easter decor.
Step-by-Step Tutorial
Materials
- Hard-boiled or blown white egg (clean and dry)
- Fine-point black permanent marker or archival ink pen (01 or 03 size)
- Fine detail paintbrush (size 0 or 00)
- Dark green acrylic paint
- Pencil (light H or HB)
- Kneaded eraser
- Paper towel
- Egg cup or napkin for stability
Step 1: Drafting the Design
-
Secure the egg:
Place your clean, dry egg in an egg cup or nestle it into a folded cloth napkin to keep it from rolling while you work. -
Mark the center:
Using a very light touch with your pencil, make a tiny dot in the visual center of the egg to anchor your text placement. -
Sketch the circle guide:
Lightly draw an oval or circle around your center point, leaving enough space inside for the lettering. This will serve as the guide for your wreath vines. -
Lettering draft:
Sketch the word ‘EGG’ (or your chosen monogram) inside the circle. Aim for a classic serif font style, paying attention to the spacing between letters. -
Refine the text:
Thicken the vertical strokes of your letters in the sketch to mimic the serif style shown in the reference image.
Step 2: Inking the Typography
-
Outline the text:
Take your fine-point black pen and carefully trace the outline of your letters. I find it helpful to anchor my pinky finger on the table to steady my hand. -
Fill the letters:
Slowly fill in the letters with the black ink. Short, consistent strokes work best to avoid streaking the marker. -
Clean up edges:
Go back and sharpen the serifs (the little feet on the letters) to ensure they look crisp and professional. -
Erase pencil marks:
Wait until the ink is completely dry—give it a few minutes—then gently dab (don’t rub hard) with a kneaded eraser to lift the pencil sketch lines.
Pro Tip: Steady Hands
If you struggle to paint on the curved surface, rest your painting wrist on a heavy book elevated to the same height as the egg for better stability and control.
Step 3: Painting the Wreath
-
Prepare the paint:
Squeeze a tiny amount of dark green acrylic paint onto your palette. If the paint is thick, mix in a drop of water to make it ink-like for fine lines. -
Paint the main stems:
Using the very tip of your detail brush, paint two curved lines following your pencil circle guide. Start from the bottom center and curve upwards on both left and right sides, leaving a gap at the top. -
Add the bottom tie:
Where the two stems meet at the bottom, paint a small stylized bow or simple crossover knot with two small ribbon tails hanging down. -
Start the leaves:
Begin adding leaves at the bottom of the stem. Press the brush down gently and lift up quickly to create a teardrop leaf shape. -
Vary direction:
Alternate the direction of the leaves as you move up the stem, making them slightly smaller as you reach the top tips of the wreath. -
Add detail branches:
In the upper half of the wreath, paint a few tiny, thin offshoot branches without leaves to add texture and visual interest. -
Layering density:
Go back to the bottom quadrant of the wreath and add a few overlapping leaves to make the foliage look denser near the base. -
Final drying:
Allow the green paint to dry completely. Since acrylic is involved, keep the egg steady for at least 15 minutes before handling to prevent smudges.
Level Up: Initial It
Instead of writing ‘EGG,’ customize a dozen eggs with the initials of your dinner guests to use them as edible, personalized place settings for Easter brunch.
Display this sophisticated little art piece in a ceramic cup or nestled in a napkin for a delightful spring accent
Minimal Line Art Eggs
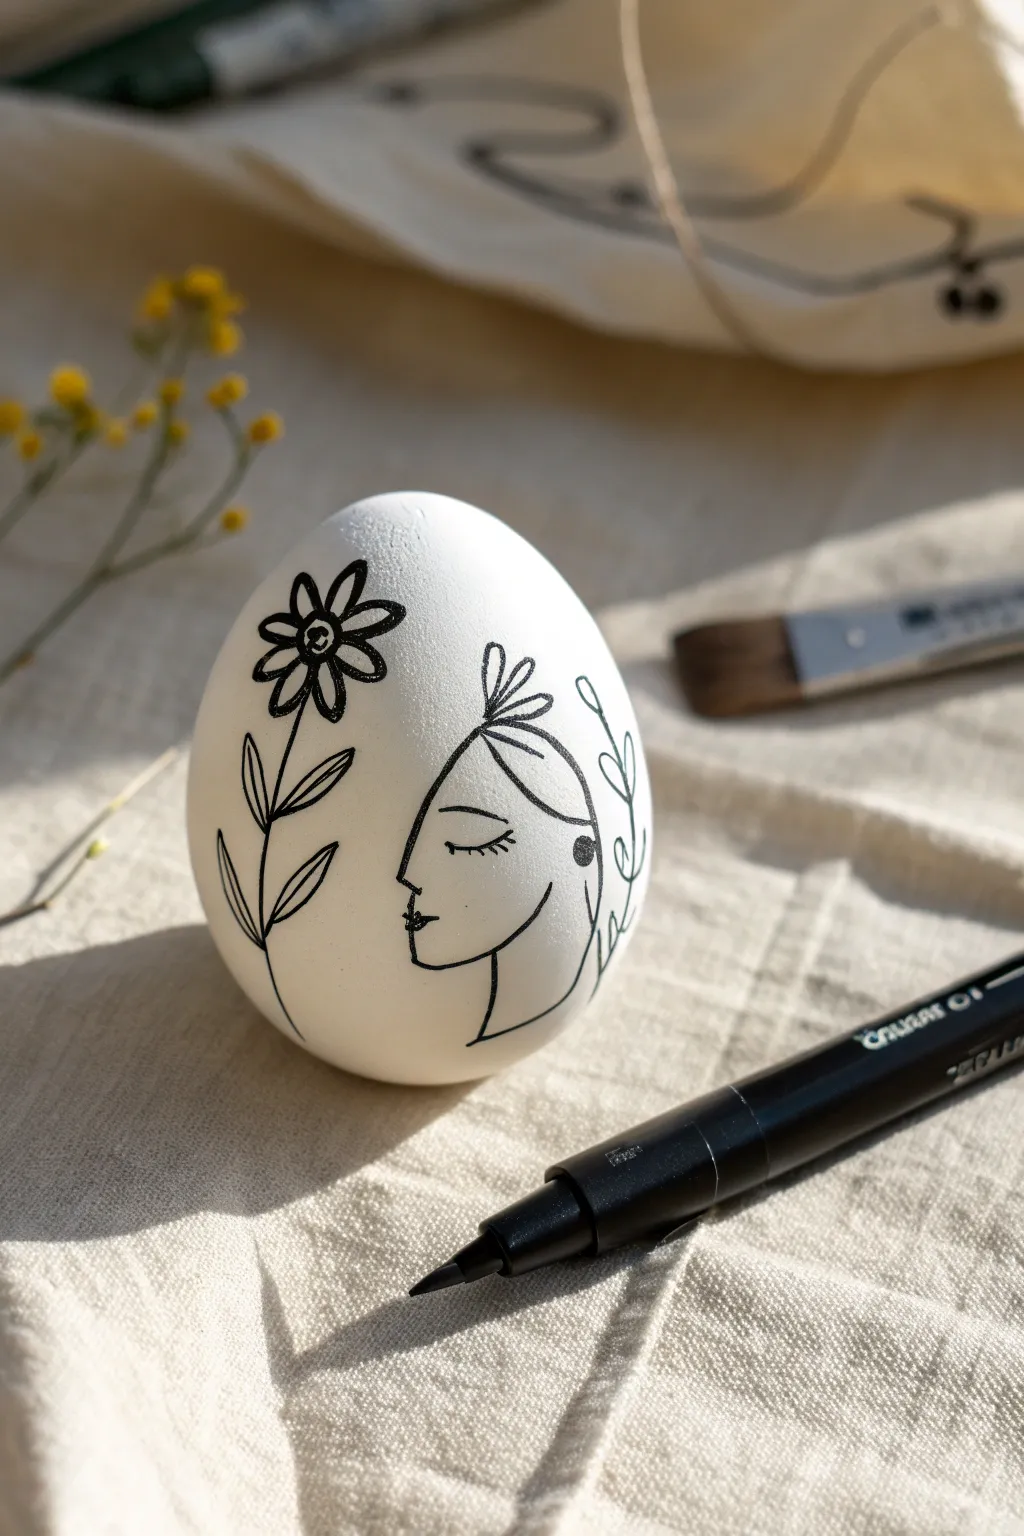
Embrace the elegance of minimalism with this sophisticated line art design featuring a serene profile intertwined with botanical elements. Using just a fine-tip marker and a steady hand, you can transform a plain egg into a piece of modern art that feels both personal and poetic.
Step-by-Step Guide
Materials
- White egg (hard-boiled, blown out, or wooden/ceramic for longevity)
- Black fine-tip permanent marker (0.1mm or 0.3mm)
- Pencil (HB or lighter)
- White eraser
- Paper towel or soft cloth
- Egg cup or masking tape roll (as a stand)
Step 1: Preparation & Planning
-
Clean surface:
Begin by ensuring your egg is completely clean and dry. Wipe it down gently with a paper towel to remove any natural oils or dust that might interfere with the ink adhesion. -
Secure the egg:
Place the egg in an egg cup or rest it on a roll of masking tape to keep it steady. Position it so the smoothest, most vertically centered face is facing you. -
Sketch placement:
Using a very light touch with your pencil, sketch a rough vertical centerline. This imaginary line will help separate the floral element on the left from the face on the right.
Smudge Alert
If you make a small mistake with the marker, try dipping a cotton swab in rubbing alcohol and very gently dabbing the error. Works best on ceramic eggs.
Step 2: Drawing the Profile
-
Outline the forehead:
Start your pencil sketch with the forehead curve. Draw a gentle arc moving downwards, slightly right of your center mark. -
Define the nose:
Extend the forehead line into a small, delicate nose. Keep the projection subtle to maintain the minimalist style. -
Shape the lips and chin:
Below the nose, sketch the upper and lower lips with two short curves, then flow immediately into the rounded chin and jawline, curving back up toward where an ear would be. -
Add the eye:
Place a closed eye in the center of the face area. Draw a downward curve for the eyelid and add three or four tiny lashes flicking outward. -
Suggest the hairline:
Draw single, sweeping lines above the forehead to suggest hair pulled back. I like to add a small ‘bun’ shape or topknot at the crown using a looped line. -
Finish hair details:
Add a few loose strands falling near the neck or ear area to soften the look, and draw a small semi-circle to indicate the ear.
Line Variation
Vary your pressure. Press slightly harder on the downstrokes of the leaves and hair to create thicker lines, mimicking calligraphy script.
Step 3: Adding the Flora
-
Draw the main stem:
Moving to the left side of the egg, lightly sketch a long, slightly curved vertical line parallel to the face. This will be the flower stem. -
Create the flower head:
At the top of the stem, draw a small circle for the flower center. Surround it with simple, elongated oval petals—aim for about 6-8 petals. -
Add leaves:
Along the stem, sketch pairs of pointed, oval leaves. Add a vein line down the center of each leaf for extra definition. -
Background foliage:
On the far right side, behind the head, sketch a very simple, single-line vine with small loop leaves to balance the composition.
Step 4: Inking & Finishing
-
Test your pen:
Scribble on a scrap piece of paper with your fine-tip marker to ensure the ink is flowing smoothly before touching the egg. -
Trace the flower:
Begin inking with the flower on the left. Outline the center and petals with confident strokes. Fill in the center circle with small scribbles or solid black. -
Ink the leaves:
Trace the stem and leaves carefully. Lift your pen at the end of each leaf tip to keep the lines sharp. -
Outline the profile:
Move to the face. Trace your pencil lines slowly. Pay special attention to the nose and lips, as these define the expression. -
Detail the hair:
Ink the hair lines with fluid, sweeping motions. If your hand shakes, embrace it—it adds organic character to the line work. -
Add artistic accents:
Add a small solid black dot for an earring on the ear lobe to create a focal point. -
Let it set:
Allow the ink to dry completely for at least 30 minutes. Touching it too soon will smudge the black lines against the white shell. -
Erase pencil marks:
Once fully dry, gently gently rub the white eraser over the entire design to remove visible graphite guidance lines.
Display your finished egg in a simple wooden stand to highlight the delicate line work
Metallic Accent Moments

Elevate your Easter basket with this sophisticated design that features delicate golden stars against a soft matte pink background. A distinct braided gold trim adds a regal touch, creating a centerpiece that feels both modern and luxurious.
How-To Guide
Materials
- White egg (hard-boiled, blown out, or wooden)
- Pale pink matte acrylic paint
- Soft flat paintbrush
- Gold paint pen (fine tip) or gold leaf pen
- Gold braided trim or thin gold chain (approx. 3mm width)
- Craft glue or strong clear adhesive
- Scissors
- Small liner brush (optional, for touch-ups)
- pencil (optional)
Step 1: Base Preparation
-
Clean surface:
Begin by ensuring your egg is clean and dry. If you are using a real egg, wipe it down with a little vinegar and water solution to remove any oils that might repel the paint. -
Apply base color:
Using a soft flat paintbrush, apply a coat of pale pink matte acrylic paint to the entire egg. Long, vertical strokes help minimize texture. -
Dry and repeat:
Allow the first coat to dry completely for about 15-20 minutes. Apply a second coat to ensure an opaque, solid finish with no streaks showing through. -
Initial drying:
Let the egg sit for at least an hour to ensure the base coat is perfectly cured before adding metallic details.
Step 2: Attaching the Trim
-
Measure the trim:
Take your gold braided trim and wrap it around the egg roughly one-third of the way up from the bottom to estimate the length needed. -
Cut to size:
Cut the trim, leaving just a tiny bit of overlap—about 2-3 millimeters—to ensure a seamless connection. -
Apply adhesive:
Carefully run a thin bead of craft glue around the circumference of the egg where you want the band to sit. I find applying the glue in small sections works best to prevent a mess. -
Secure the band:
Press the gold trim into the glue, working your way around the egg. hold the ends in place for a moment until they tack down securely.
Sharpen Your Stars
If your paint pen tip feels too thick for the delicate star points, put a puddle of the gold ink on a palette and use a fine detail liner brush to paint the sharp tips manually.
Step 3: Painting the Stars
-
Plan placement:
Visualize where your largest stars will go. You want a random scatter pattern, focusing mostly on the upper two-thirds of the egg. -
Draw the main star centers:
Using your gold paint pen, start by drawing a simple vertical line and a horizontal line crossing it to make a ‘plus’ sign. -
Complete the large stars:
Draw diagonal lines through the center of your ‘plus’ sign to create an eight-pointed starburst. Taper the lines so they are thinner at the ends. -
Add variety:
Repeat this process to add 4-5 large stars around the top section of the egg, varying their rotation slightly. -
Create medium stars:
In the spaces between the large stars, add smaller five or six-pointed stars. These can just be simple crossing lines without the extra detail. -
Fill with dots:
Look for empty voids in your design. Gently tap the tip of your gold pen to create small celestial dots or ‘dust’ to fill these gaps. -
Decorate the bottom:
Don’t forget the area below the gold trim. Add a few small dots or tiny stars here to integrate the design, though keep it less crowded than the top. -
Final drying time:
Set the egg aside carefully. Metallic paint pens can smudge easily if touched before they are fully separate, so give it a good 30 minutes to cure.
Fixing Trim Gaps
If the ends of your gold braid fray or don’t meet perfectly, dab a tiny dot of gold paint over the seam. It acts like visual camouflage for the connection point.
Nestle your finished masterpiece into a bed of dried grass for a stunning display
Tape-Resist Pattern Eggs
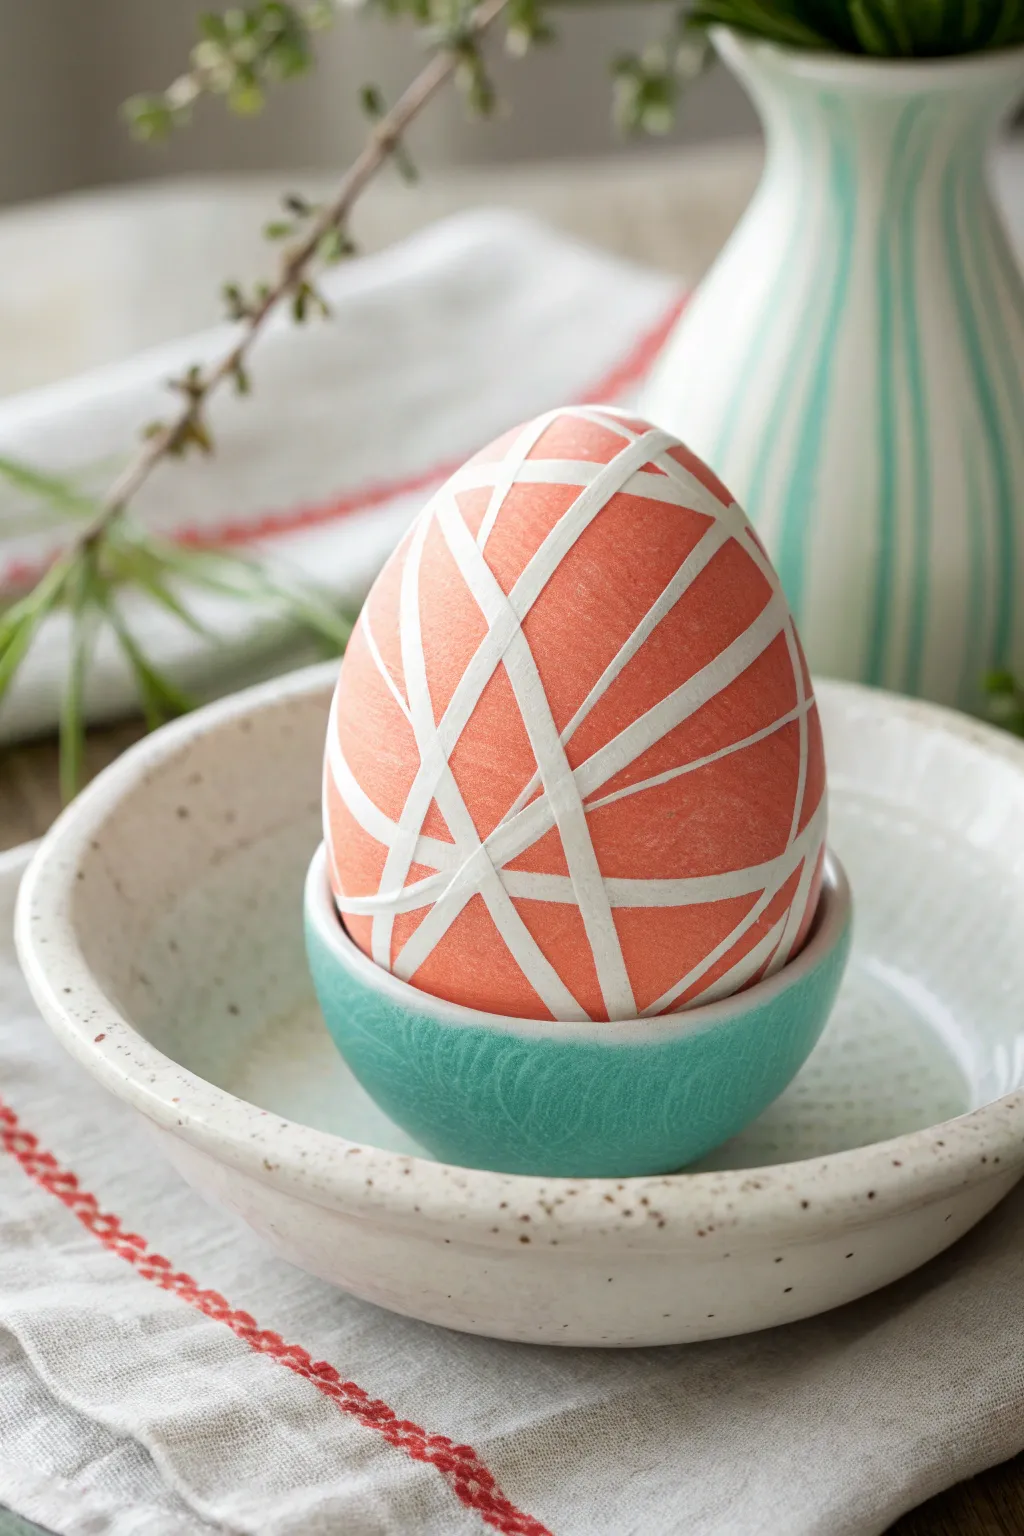
Achieve a striking modern look with crisp white geometric lines cutting through a soft, matte coral finish. This tape-resist technique is surprisingly simple but yields sophisticated, graphic results perfect for an elegant Easter display.
Step-by-Step Tutorial
Materials
- Hard-boiled white egg
- Thin crafting tape, washi tape, or electrical tape (1/8 inch or 3mm width)
- Scissors
- Liquid egg dye (coral or peach shade)
- White vinegar
- Warm water
- Glass, jar, or deep bowl for dyeing
- Paper towels
- Spoon or egg dipper
Step 1: Preparation & Taping
-
Clean the egg:
Ensure your hard-boiled egg is completely cool and dry. Wipe it gently with a paper towel dampened with vinegar to remove any natural oils, which helps the dye adhere evenly later. -
Cut the tape:
Cut several strips of your thin crafting tape. I find lengths of about 2-3 inches easier to manage than longer pieces that can get tangled. -
Apply the first strip:
Place your first strip of tape diagonally across the egg. Press it down firmly, especially at the edges, to prevent dye from seeping underneath. -
Create main intersections:
Add two or three more long strips that cross the first one at random angles. Wrap them around the curvature of the egg, smoothing them as you go to avoid puckering. -
Build the geometric web:
Continue adding shorter strips of tape to connect the existing lines, creating triangles and geometric shapes. Aim for a balanced, random ‘shattered glass’ pattern. -
Check the seals:
Once you are happy with your design, go over every piece of tape with your fingernail or the back of a spoon. Burnish the edges down tight against the shell.
Step 2: Dyeing Process
-
Mix the dye bath:
In your jar, mix ½ cup of warm water with 1 teaspoon of white vinegar and roughly 20 drops of liquid food coloring or egg dye. Adjust the drops to get a rich coral color. -
Submerge the egg:
Gently lower the taped egg into the dye bath using a spoon. Ensure it is fully submerged. -
Soak for saturation:
Let the egg soak for about 5 to 10 minutes. The longer it sits, the deeper the coral tone will be. -
Check the color:
Lift the egg out briefly to check the shade. Remember that the color will dry slightly lighter than it looks while wet. -
Remove and drain:
Carefully remove the egg from the dye and let the excess liquid drip off for a few seconds. -
Blot dry:
Place the egg on a paper towel. Gently blot—don’t rub—the surface to remove standing liquid. -
Full drying:
Allow the egg to dry completely. This is crucial; if you remove the tape while the shell is damp, the dye might bleed into the white lines.
Seal the Deal
Before dyeing, run your fingernail firmly along the edges of every tape strip. This ‘burnishing’ prevents fuzzy lines and keeps the white shell pristine.
Step 3: The Reveal
-
Locate tape ends:
Find the loose end of your last applied piece of tape. You may need to use a fingernail to gently lift the edge. -
Peel slowly:
Slowly peel back the tape strips one by one. Pulling too fast can sometimes chip the colored shell, so take your time. -
Clean up lines:
If there are any tiny spots where dye bled under the tape, you can sometimes gently scratch them away with a craft knife or a clean, dry toothbrush. -
Final polish:
For a slight sheen, you can rub a tiny drop of cooking oil over the dyed surface, though the matte look is also very chic.
Tape Won’t Stick?
If the tape lifts, your egg might be damp or cold from the fridge. Let the egg reach room temperature and ensure the shell is bone-dry before taping.
Enjoy the clean, architectural beauty of your new geometric egg
Marbled Swirl Eggs
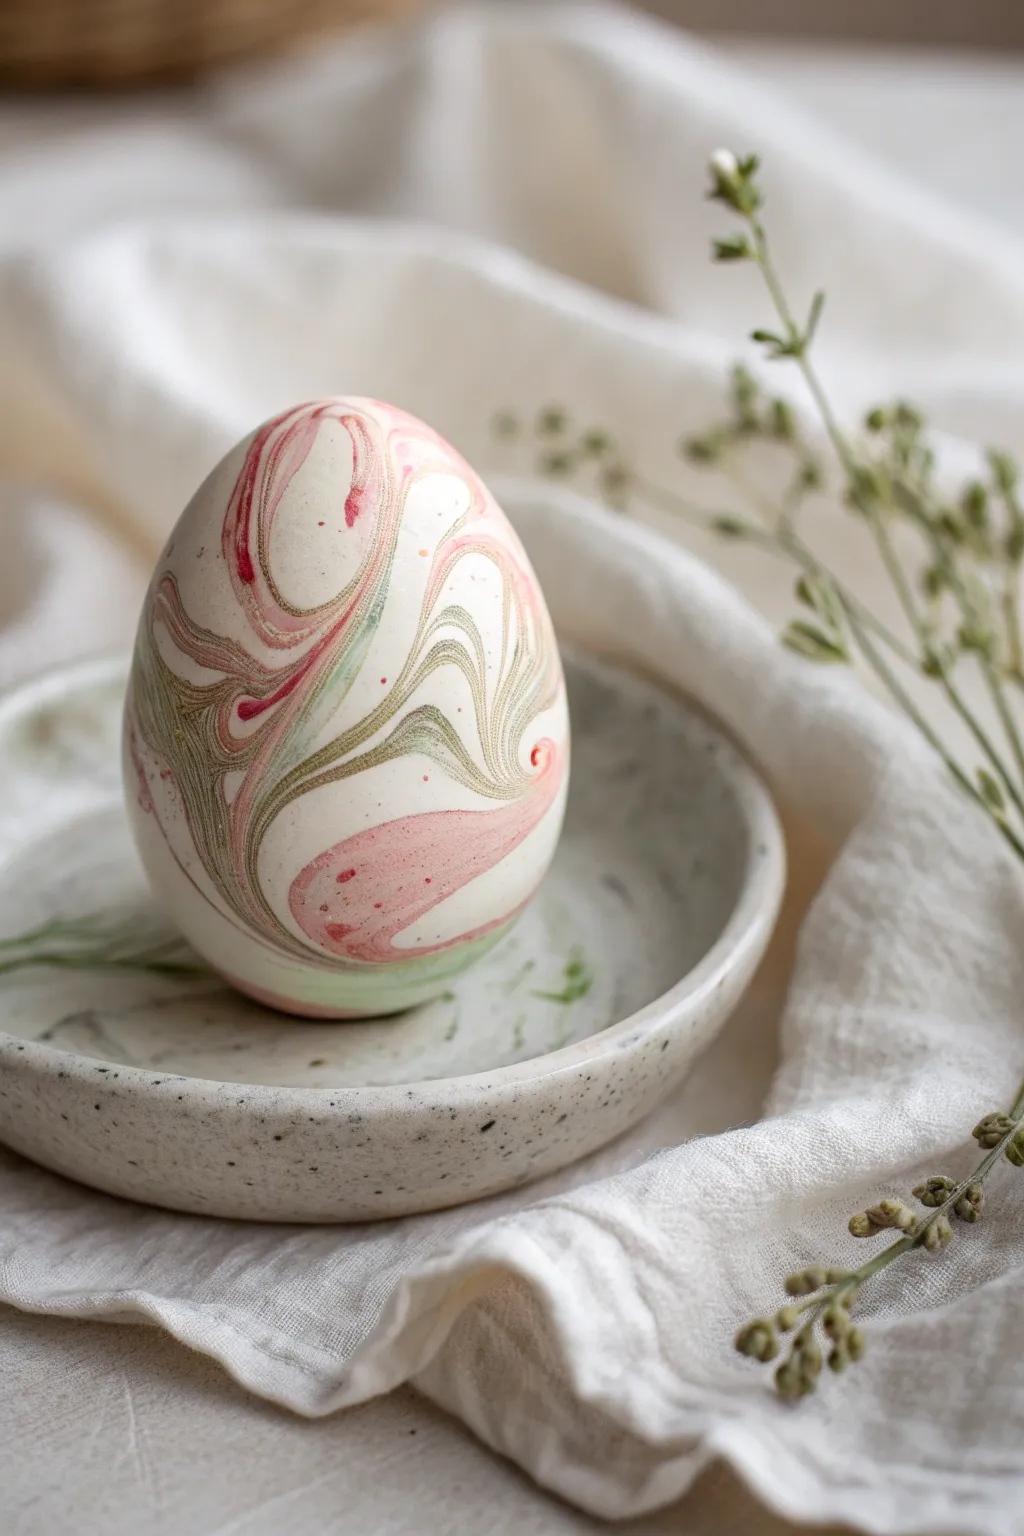
Achieve an elegant, organic look with this mesmerizing marbling technique that swirls soft pinks and sage greens together. The result is a smooth, stone-like finish that looks incredibly sophisticated but is surprisingly fun and unpredictable to create.
Detailed Instructions
Materials
- White hard-boiled eggs (cooled) or hollowed eggshells
- Nail polish in soft pink, sage green, and berry red
- Room temperature water
- Disposable plastic bowl or cup (deep enough to submerge an egg)
- Toothpicks or wooden skewers
- Latex or nitrile gloves
- Egg drying rack (DIY with pins in foam or a carton)
- Paper towels
- Nail polish remover (for cleanup)
Step 1: Preparation and Setup
-
Prepare the workspace:
Cover your work surface with old newspapers or a plastic tablecloth, as marbling can get a bit messy. Set up your drying rack nearby so you have a safe place to put the wet eggs immediately. -
Prepare the water bath:
Fill your disposable plastic container with room temperature water. It is crucial that the water is not too cold or too hot, as extreme temperatures can make the nail polish skin over too quickly or sink to the bottom. -
Ventilation check:
Ensure you are working in a well-ventilated area. Working with multiple bottles of nail polish simultaneously can produce strong fumes, so opening a window is a good idea. -
Protect your hands:
Put on your gloves. This technique involves dipping the egg—and your fingers—directly into the polish-filled water, so gloves are essential unless you want colorful fingertips for days.
Temperature Matters
Use room temperature water. If the water is too cold, the polish will seize up immediately. If it’s too hot, the polish may sink. The sweet spot is tepid water.
Step 2: Creating the Swirl Pattern
-
Shake the polish:
Vigorously shake your chosen nail polish bottles—soft pink, sage green, and the berry accent color—to ensure the pigments are well-mixed before opening them. -
Loosen minimal caps:
Unscrew the caps of all the bottles you intend to use and leave them resting loosely on top. Speed is key once you start pouring, so you don’t want to be fumbling with tight lids. -
Pour the first color:
Hold the brush of your first color (let’s start with the sage green) close to the water’s surface. Allow a few drops to fall gently onto the water. It should spread out into a thin film rather than sinking. -
Layer the second color:
Quickly add drops of the soft pink polish into the center of the green circle or randomly around it. I like to alternate placement to create varying islands of color. -
Add accent drops:
Add just one or two dabs of the berry red polish. Since this is a darker accent color, a little goes a long way to create contrast without overpowering the pastel tones. -
Swirl the colors:
Take a toothpick and gently drag it through the floating polish colors. Create swirls, figure-eights, or simple lines to marble the paints together. Work quickly before the film starts to dry and clump.
Step 3: Dipping the Egg
-
Position the egg:
Hold the egg firmly between your thumb and index finger (covering the least amount of surface area possible) or balance it on a stick if using hollow shells. -
Submerge with intent:
Push the egg straight down into the center of your swirled pattern, completely submerging it in one fluid motion. The polish film will wrap around the shell as it goes underwater. -
Clear the surface:
While the egg is arguably fully submerged, keep it underwater and use your other hand (or blow on the water surface) to clear away the remaining floating polish. This prevents double-layering the pattern when you pull the egg out. -
Remove the egg:
Lift the egg out of the water. The pattern should now be effectively shrink-wrapped onto the surface of the shell. -
Shake off excess water:
Gently give the egg a little shake to remove large water droplets, being careful not to touch the wet polish.
Polish Sinking?
If your polish drops sink straight to the bottom instead of spreading, your polish might be old or too thick. Try a newer bottle with a thinner consistency.
Step 4: Drying and Finishing
-
Initial dry:
Place the egg carefully on your prepared drying rack. Let it sit undisturbed. Touching it now will smudge the delicate design. -
Clean the water:
Between eggs, use a paper towel or a toothpick to skim the water’s surface, removing all leftover polish residue. You need a clean surface for the next design. -
Repeat the process:
Create new color combinations and swirl patterns for your remaining eggs. You can experiment with more or less of the accent color for variety. -
Full cure time:
Allow the eggs to dry completely, ideally for at least an hour. Nail polish is thicker than dye and needs time to harden fully. -
Optional clean-up:
If you used your fingers to hold the egg and have a blank spot or smudge, you can dab a tiny bit of matching polish over it, though the organic look usually hides imperfections well.
Display your beautiful swirled creations in a ceramic bowl to highlight their delicate, artistic patterns
Terrazzo Confetti Eggs
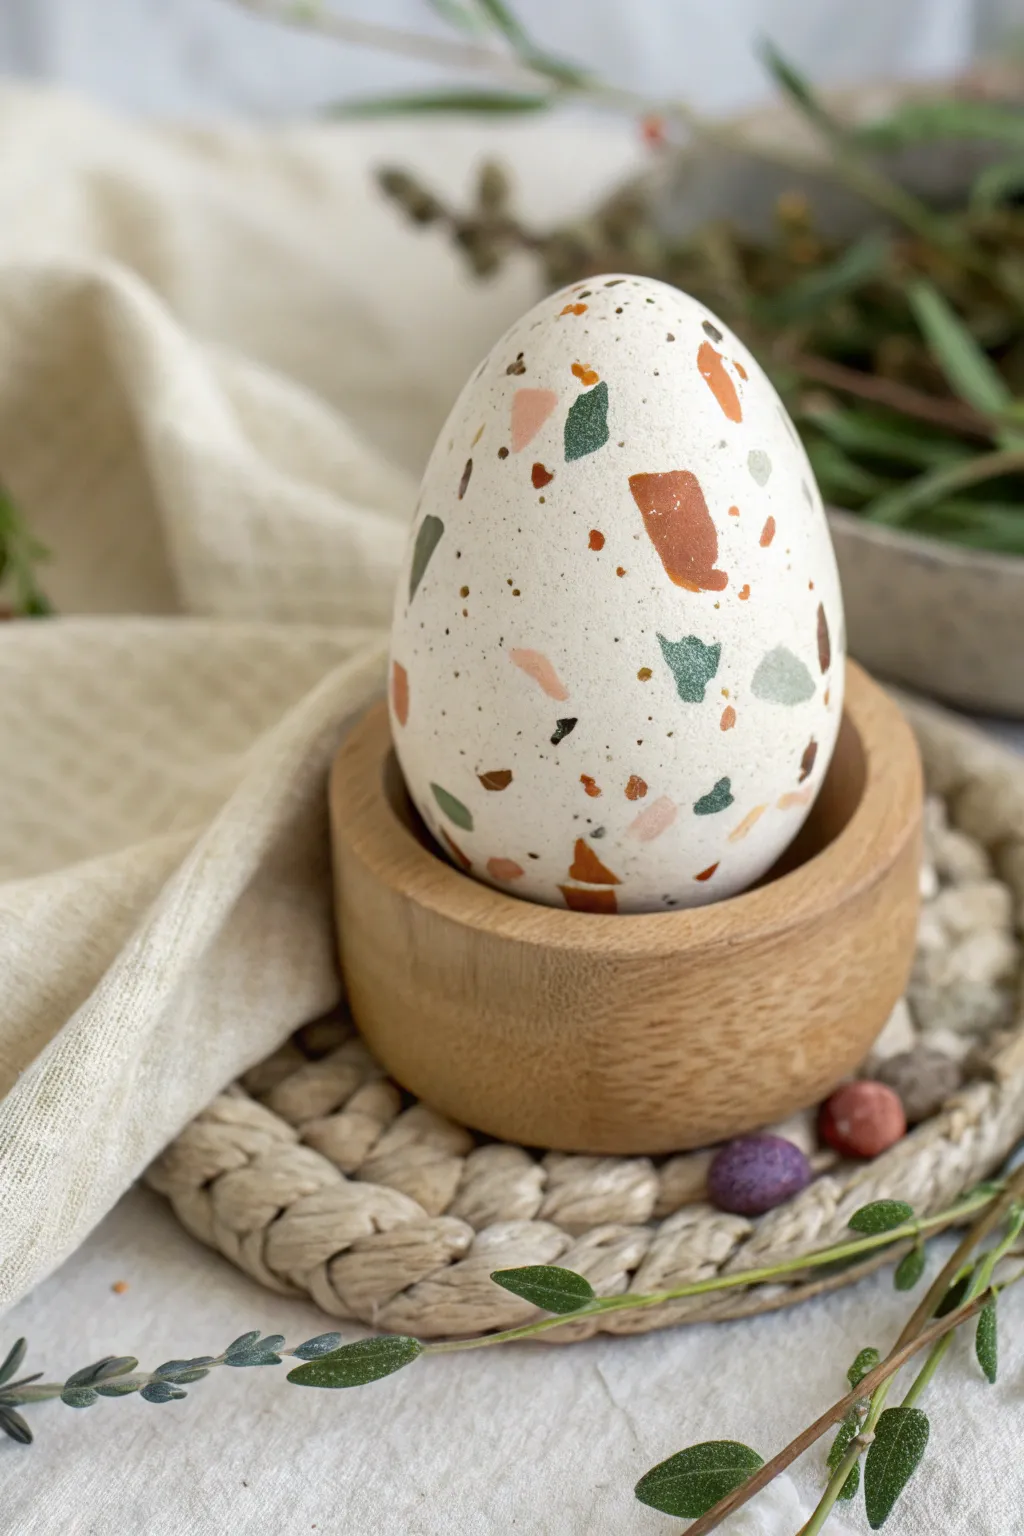
Bring a trendy, modern touch to your Easter basket with these chic terrazzo-inspired eggs. By layering irregular shapes of earthy tones over a crisp white base, you can recreate the look of polished stone flooring on a delicate shell.
Step-by-Step Guide
Materials
- White eggs (blown out or hard-boiled)
- Acrylic craft paints (rust, sage green, blush pink, slate gray, black)
- Small flat paintbrush (size 2 or 4)
- Fine detail paintbrush (size 0 or 00)
- Old toothbrush (stiff bristles works best)
- Palette or paper plate
- Water cup
- Paper towels
- Egg drying stand (or skewers and foam block)
Step 1: Painting the Base Shapes
-
Prep your palette:
Squeeze out small amounts of your chosen terrazzo colors: rust orange, sage green, blush pink, and slate gray. Keep the black aside for later. This earthy palette is key to the sophisticated look seen in the photo. -
Start with the largest shapes:
Dip your flat brush into the rust-colored paint. Paint 4-5 irregular, geometric shapes scattered randomly across the egg. Think triangles with clipped corners or uneven trapezoids. -
Create distinct edges:
Ensure the edges of your shapes are crisp and sharp, not rounded or blobby. This angularity mimics real stone chips found in terrazzo. -
Add the sage green:
Clean your brush thoroughly. Pick up the sage green paint and add another set of irregular shapes. Place some near the rust shapes but avoid touching them directly. -
Introduce contrast:
Using the slate gray, add smaller, more jagged shards between the existing shapes. Varying the size of your ‘chips’ makes the pattern look more authentic. -
Fill with soft pink:
Use the blush pink to fill in some of the larger gaps. I like to make these shapes slightly rounder or softer to balance the harsh angles of the darker colors. -
Let the first layer dry:
Wait about 10-15 minutes for the main shapes to be completely dry to the touch. If you paint over wet edges, the colors will muddy.
Smudged edges?
If shapes bleed into each other, let them dry completely, then paint over the mess with white paint to ‘erase’ the error before redrawing the shape.
Step 2: Adding Detail and Speckles
-
Add tiny color chips:
Switch to your fine detail brush. Dip it into the rust and green paints again to add very small, almost dot-like chips in the remaining white spaces. -
Prepare the splatter mix:
Mix a small amount of black paint with a few drops of water. You want an inky consistency that is fluid but still opaque. -
Test the splatter:
Dip your old toothbrush into the watered-down black paint. hold it over a paper towel and run your thumb across the bristles to test the spray pattern. -
Apply fine speckles:
Hold the toothbrush about 6 inches from the egg. Gently flick the bristles to spray a fine mist of black speckles over the entire surface. This binds the look together. -
Add larger speckles manually:
If the toothbrush didn’t create enough contrast, use the very tip of your fine brush to dot a few larger black speckles manually. -
Review and refine:
Rotate the egg and look for any large, empty white patches that feel unbalanced. Add a tiny chip of color there if needed. -
Final drying:
Place the finished egg on your drying stand. Let it cure for at least an hour to ensure the splatter doesn’t smear when handled.
Level Up: Stone Texture
Mix a pinch of baking soda into your acrylic paints before applying. This adds a gritty, realistic stone texture to the colored chips.
Now you have a stunning, architectural piece of art that elevates your holiday decor
Night Sky Galaxy Eggs
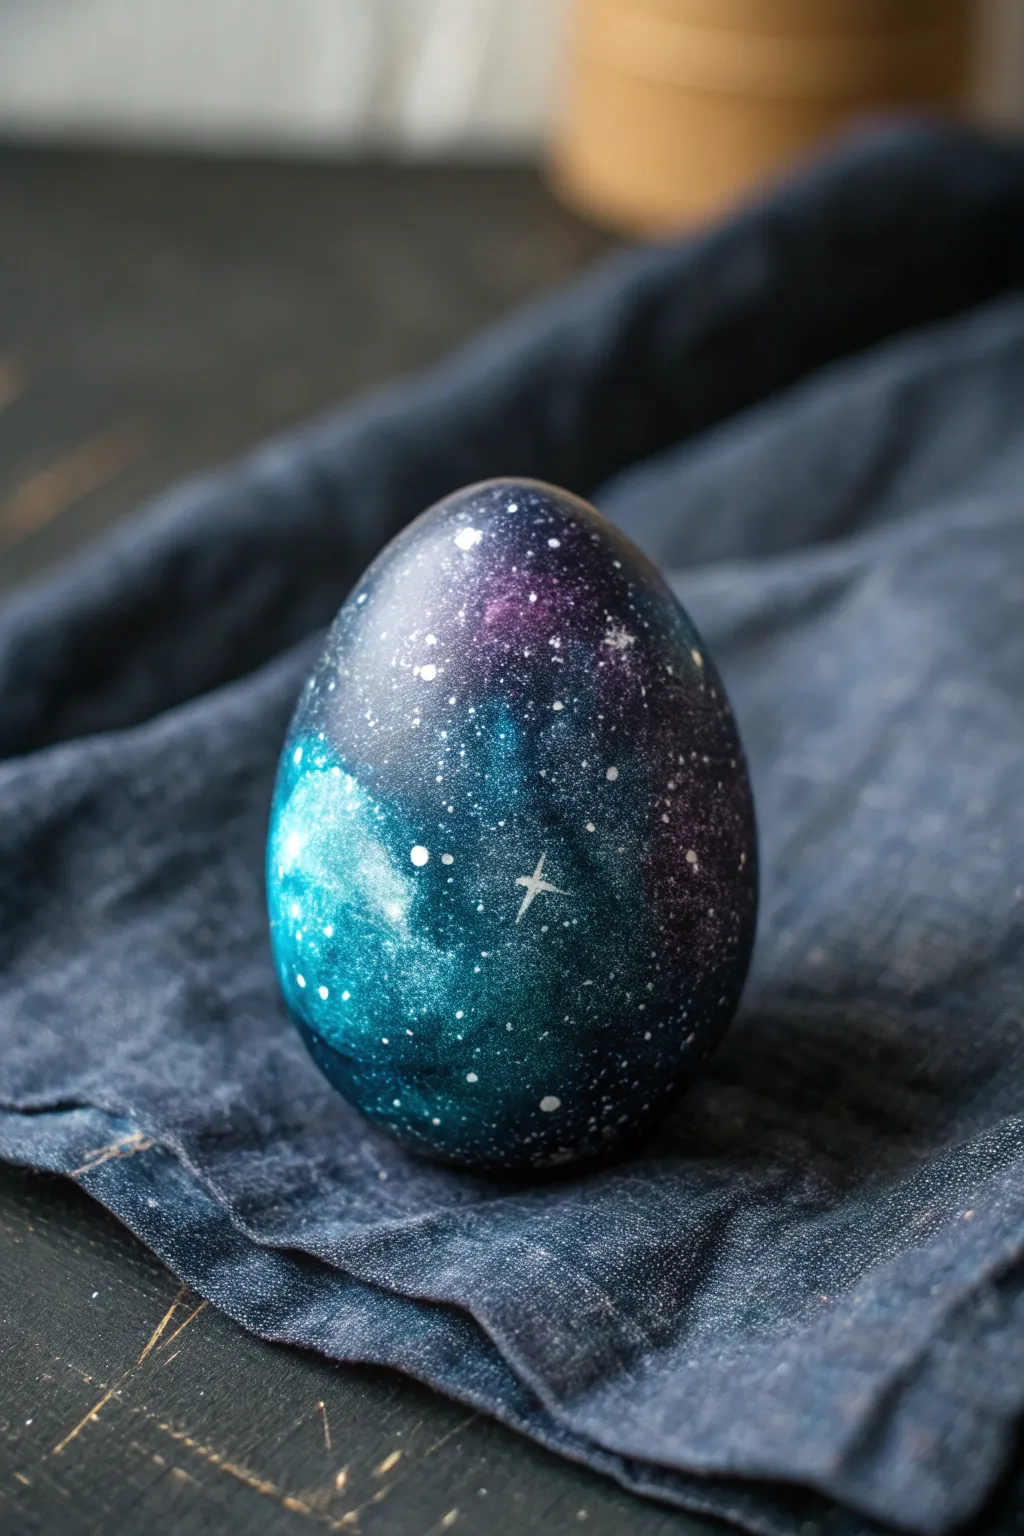
Capture the infinite wonder of the cosmos on a tiny scale with these mesmerizing galaxy eggs. Using layers of deep acrylics and simple spatter techniques, you’ll create swirling nebulas and distant star fields that look incredibly complex but are surprisingly easy to achieve.
Detailed Instructions
Materials
- Hard-boiled eggs or wooden/ceramic craft eggs
- Black acrylic paint
- Dark blue acrylic paint (Navy or Midnight Blue)
- Teal or Turquoise acrylic paint
- Purple or Violet acrylic paint
- White acrylic paint
- Small pieces of kitchen sponge
- Small flat paintbrush
- Stiff-bristled toothbrush or fan brush
- Fine-point detail brush
- Palette or paper plate
- Water cup and paper towels
- Clear acrylic sealer or Mod Podge (glossy)
Step 1: Setting the Darkness
-
Prepare the base:
Begin with a clean, dry egg. If using hard-boiled eggs, ensure they are cooled completely to prevent condensation from affecting the paint adhesion. -
Paint it black:
Squeeze a generous amount of black acrylic paint onto your palette. Using the flat paintbrush, coat the entire surface of the egg. You may need to paint one half, let it dry (or rest it on a bottle cap), and then paint the other half. -
Apply a second coat:
Once the first layer is dry to the touch, inspect it for any patchy areas. Apply a second coat of black to ensure a deep, opaque void which will serve as the background for your stars.
Nebula Nuance
Don’t cover the whole egg with color! Leaving at least 30-40% of the surface pure black is crucial for creating the contrast needed for a realistic deep-space effect.
Step 2: Creating the Nebulas
-
Prepare the sponges:
Tear a kitchen sponge into small, manageable chunks, about the size of a large coin. Tearing creates uneven edges which helps achieve a natural, organic cloud look compared to cutting with scissors. -
Start with dark blue:
Dab a sponge piece into the dark navy blue paint. Blot the excess off onto a paper towel until the sponge is almost dry—this is ‘dry sponging’ and prevents splotchy blobs. -
Sponge the first layer:
Lightly dab the navy blue diagonally across the black egg in irregular patches. I prefer to leave distinct areas of black showing through to create depth. -
Layering purple:
Take a fresh piece of sponge and dip it into the purple paint, blotting off the excess. Dab this over some of the blue areas and slightly onto the black, blending the edges softly. -
Adding brightness:
Using a new sponge piece, pick up the teal or turquoise paint. Apply this sparingly, focusing on the center of the blue and purple patches to create a ‘glowing’ core for your nebula. -
Highlights:
If you want an extra pop, mix a tiny dot of white into your teal paint to make a very pale blue. Sponge a tiny amount of this into the very center of the brightest teal sections. -
Dry blending:
If the transitions look too harsh, take a clean, dry piece of sponge and gently tap over the boundaries between colors to blur them together.
Metallic Magic
Mix a small amount of metallic silver or gold paint into your white splatter mixture. When the light hits the egg, your galaxy will have a subtle, shimmering dimensional quality.
Step 3: Adding the Stars
-
Prepare the splatter paint:
Mix a small amount of white acrylic paint with a few drops of water on your palette. You want a consistency similar to heavy cream or melted ice cream—fluid enough to fly, thick enough to stay opaque. -
Load the tool:
Dip the tips of a stiff toothbrush or a fan brush into the watered-down white paint. -
Test the splatter:
Before hitting the egg, run your thumb across the bristles over a piece of scrap paper to check the spray pattern. You want fine mists, not large drips. -
Create the star field:
Hold the brush near the egg and flick the bristles to spray fine white specks across the darkened surface. Rotate the egg to cover all sides. -
Paint larger stars:
Dip the handle end of a paintbrush or a toothpick into un-thinned white paint. Gently dot a few larger stars onto the egg in random spots. -
Add a cross flare:
Using your finest detail brush and pure white paint, carefully paint a small cross or four-pointed star shape on one of the larger white dots to create a twinkling effect. -
Final drying:
Let the egg sit undisturbed until the white specs are completely dry. Because the specs are raised, they might smear easily if handled too soon. -
Seal the galaxy:
Finish by applying a coat of glossy acrylic sealer or Mod Podge. This not only protects the paint but deepens the dark colors, making the galaxy looks like it’s behind glass.
Display your finished galaxy eggs in a basket or on stands to enjoy a little piece of the universe right on your table
Crystal Geode Eggs
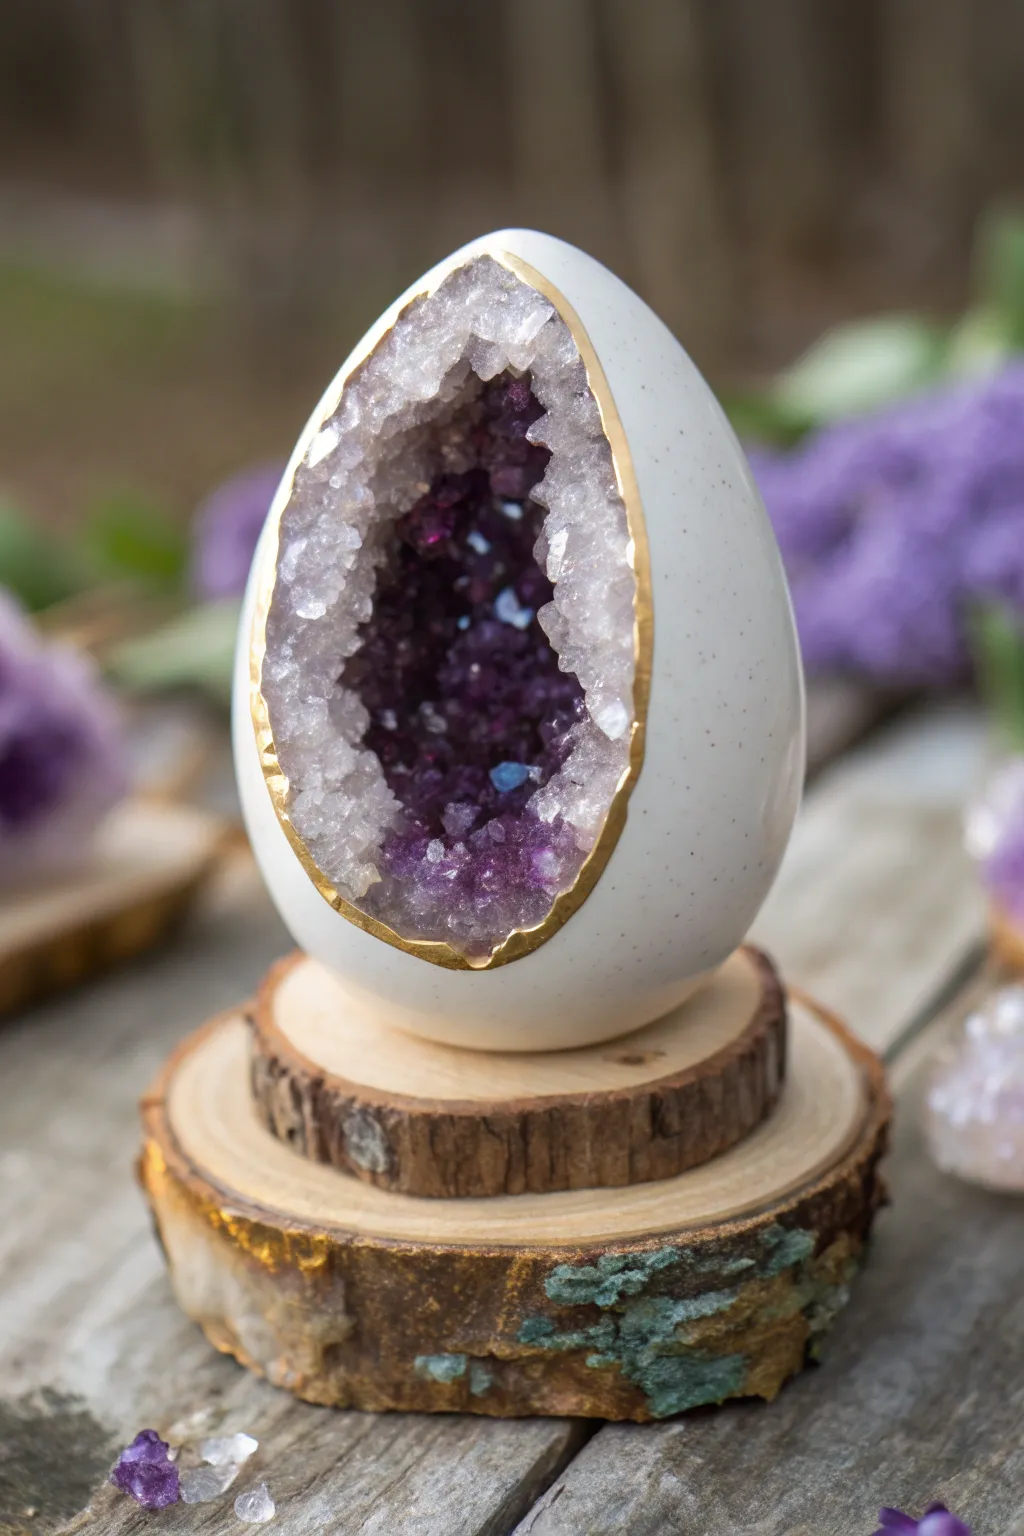
Transform a simple eggshell into a stunning geological wonder that looks just like a real amethyst geode. This luxurious craft combines the delicate matte finish of a white egg with sparkling crystallized depths and an elegant gold rim.
Step-by-Step Guide
Materials
- Large plastic or wooden craft egg (hollow)
- White matte acrylic paint
- Dark purple acrylic paint
- Mod Podge or strong clear craft glue
- Epsom salts or Alum powder (for crystals)
- Liquid gold leaf or metallic gold paint
- Fine detail paintbrush
- Medium flat paintbrush
- Craft knife or Dremel tool
- Clear gloss spray sealant or high-gloss varnish
- Stacked wood slices for display (optional)
Step 1: Preparing the Shell
-
Cut the opening:
Begin by carefully cutting an oval or irregular opening into the side of your hollow craft egg using a craft knife or Dremel tool. Aim for a jagged, natural edge rather than a perfect oval to mimic a real rock formation. -
Smooth the interior:
If there are any loose bits of plastic or wood inside the cut edge, gently sand them down so you have a clean surface to work with. -
Base coat the exterior:
Paint the outside of the egg with matte white acrylic paint. You may need two coats to fully cover the original material. Let this dry completely before moving on. -
Paint the interior darkness:
Paint the entire inside of the hollow egg with your dark purple acrylic paint. This provides depth and ensures no white shows through your crystals later.
Crystals dissolving?
If using water-based paint over Epsom salts, don’t over-saturate or the salt will melt. Use alcohol inks for coloring instead to keep sharp crystal edges.
Step 2: Creating the Crystal Core
-
Prepare the glue bed:
Apply a thick, generous layer of Mod Podge or craft glue to the entire inside painted surface of the egg. Work in sections if you feel the glue is drying too fast. -
Add large crystals:
While the glue is wet, sprinkle a heavy layer of Epsom salts or Alum powder into the egg. I like to press bigger chunks near the opening to look like larger quartz formations. -
Shake off excess:
Gently tap the egg upside down over a bowl to remove loose salt crystals, then let the glue dry completely. This usually takes overnight for a thick layer. -
Seal the crystals:
Once the first layer is dry, brush a thin layer of watered-down glue or clear gloss varnish over the crystals to seal them in place so they don’t crumble.
Step 3: Coloring and Detailing
-
Tint the center:
Mix a very watery wash of purple acrylic paint. Dab this gently into the very center of the geode cavity, allowing the color to pool slightly in the crevices for a saturated look. -
Fade to clear:
As you move toward the outer rim of the opening, use less purple wash, leaving the crystals near the edge mostly clear or white to create a realistic gradient. -
Add gloss:
Once your paint wash is dry, apply a high-gloss varnish to just the crystal interior. This makes the ‘stones’ look wet and sparkling. -
Clean the shell:
If you got any purple smudge on the white outer shell during the process, touch it up now with a bit of white paint. -
Speckle effect:
For added realism, dip a stiff brush or toothbrush in diluted grey paint and flick tiny speckles onto the white exterior shell.
Pro Tip: Depth of Field
Mix a tiny drop of iridescent or glitter medium into your interior gloss coat. It catches the light better than plain varnish for a true gemstone sparkle.
Step 4: The Golden Finish
-
Paint the rim:
Using a fine detail brush, carefully apply liquid gold leaf or metallic gold paint along the cut jagged edge of the shell. -
Refine the edge:
Allow the gold to overlap slightly onto both the white shell and the inner crystals. This connects the two textures beautifully. -
Final cure:
Let the egg sit undisturbed for at least 24 hours to ensure all layers of glue, paint, and varnish have fully hardened. -
Create the stand:
Glue two small rustic wood slices together to create a pedestal. Use a dab of hot glue or museum wax to secure the finished egg to the stand so it stays upright.
Display your glittering creation near a window where natural light can catch the interior crystals throughout the day


Have a question or want to share your own experience? I'd love to hear from you in the comments below!