There’s something extra satisfying about painting on a triangle rock—it already gives you a built-in composition with a bold point and strong edges. I love letting that natural geometry decide the subject, so your design looks like it was meant for that stone.
Shark Open-Jaw Face
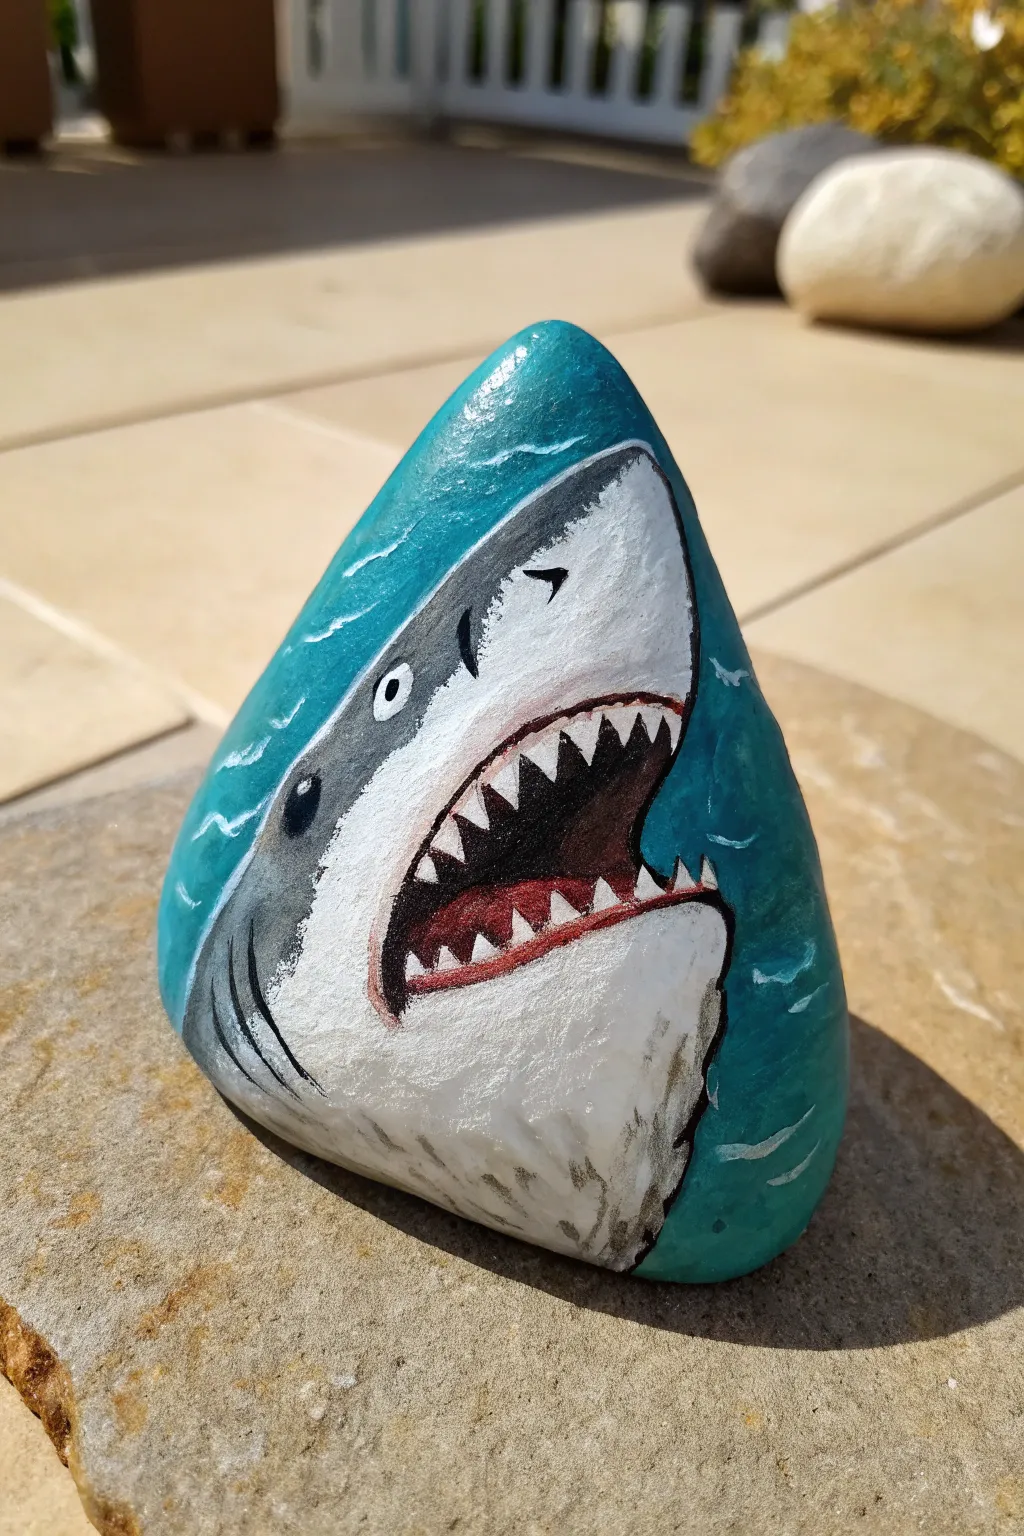
Transform a simple triangular rock into a ferocious great white shark lunging out of the deep blue sea. This dynamic design uses the natural shape of the stone to create a 3D effect of the shark rising to the surface.
How-To Guide
Materials
- Triangular, smooth river rock (approx. 4-5 inches tall)
- Acrylic paints: Teal/Turquoise, White, Black, Dark Grey, Light Grey, Dark Red
- Paintbrushes: Flat brush (medium), small round brush (detail), fine liner brush
- Pencil for sketching
- Palette or paper plate
- Cup of water
- Paper towels
- Spray sealant or Mod Podge (glossy finish)
Step 1: Base and Ocean Background
-
Clean the canvas:
Begin by washing your triangular rock thoroughly with soap and water to remove any dirt or oils. Let it dry completely before starting. -
Apply the base coat:
Using a flat brush, paint the entire surface of the rock with a solid coat of white acrylic paint. This primer layer ensures your colors will pop later. Let this dry fully. -
Create the ocean water:
Load your brush with a bright teal or turquoise paint. Paint the surrounding area of the rock, leaving a large, central triangular shape unpainted (white) in the middle. This white space will become the shark’s body. -
Define the water edge:
Curve the edges of the teal paint slightly inward toward the top point of the rock to mimic the water wrapping around the shark’s snout. Apply a second coat of teal if the coverage looks streaky.
Shark Tooth Shape
Can’t get the teeth sharp? Instead of painting triangles, paint a white zig-zag line along the gums, then fill in the triangles behind it with black.
Step 2: Sketching and Blocking the Shark
-
Outline the features:
Once the paint is dry, lightly use a pencil to sketch the internal details of the shark within the white area. Draw a curved line to separate the grey back from the white belly, and outline the large open mouth shape. -
Paint the grey upper body:
Mix a medium grey shade. Using a small round brush, fill in the top section of the shark’s body, following your pencil line. This grey area should curve around the eye and down the side. -
Paint the mouth interior:
Fill the large mouth shape with a very dark maroon or black mixed with a touch of red. This creates the deep, shadowy interior of the shark’s throat. -
Add the gums:
Carefully paint a thin band of red along the upper and lower edges of the mouth opening to represent the gums.
Make a Splash
Use a toothbrush to flick tiny speckles of white paint around the shark’s body. This creates a realistic ‘splashing’ effect as it breaches the water.
Step 3: Teeth and Facial Details
-
Create the teeth:
Using your finest liner brush and pure white paint, carefully dab small triangles along the red gum lines. Make the upper teeth slightly larger and more triangular than the bottom row. -
Add the eye:
Paint a small black circle in the grey area for the eye. Once dry, add a tiny white dot in the colored part of the eye to create a lifelike reflection. -
Detail the gills:
Paint three or four curved, dark grey lines on the lower left side of the white belly area to represent the gills. Use a light hand here so they don’t look too heavy. -
Add nostrils and markings:
Paint small black comma shapes near the snout for nostrils. I like to add a few scruffy grey marks on the white chin to give the shark a bit of texture and realism.
Step 4: Highlights and Finishing Touches
-
Highlight the water:
Switch back to the teal background. Mix a little white into your teal or use pure white on a fine brush to paint wavy, ripple lines on the ocean section. This suggests movement and surface tension. -
Add water interaction:
Paint tiny white ‘C’ shapes or dashes right where the blue water meets the grey shark body, making it look like the shark is breaking through the surface. -
Shade the belly:
Dilute a tiny bit of light grey paint with water. Glaze this lightly along the very bottom edge of the white belly to give the shark a rounded, 3D form. -
Seal the artwork:
Allow the rock to dry for at least 24 hours. Once cured, apply a glossy spray sealer or brush-on clear coat. The gloss finish makes the shark look appropriately wet and sleek.
Place your fierce shark rock in the garden or on a desk to add a bite of ocean adventure to your day


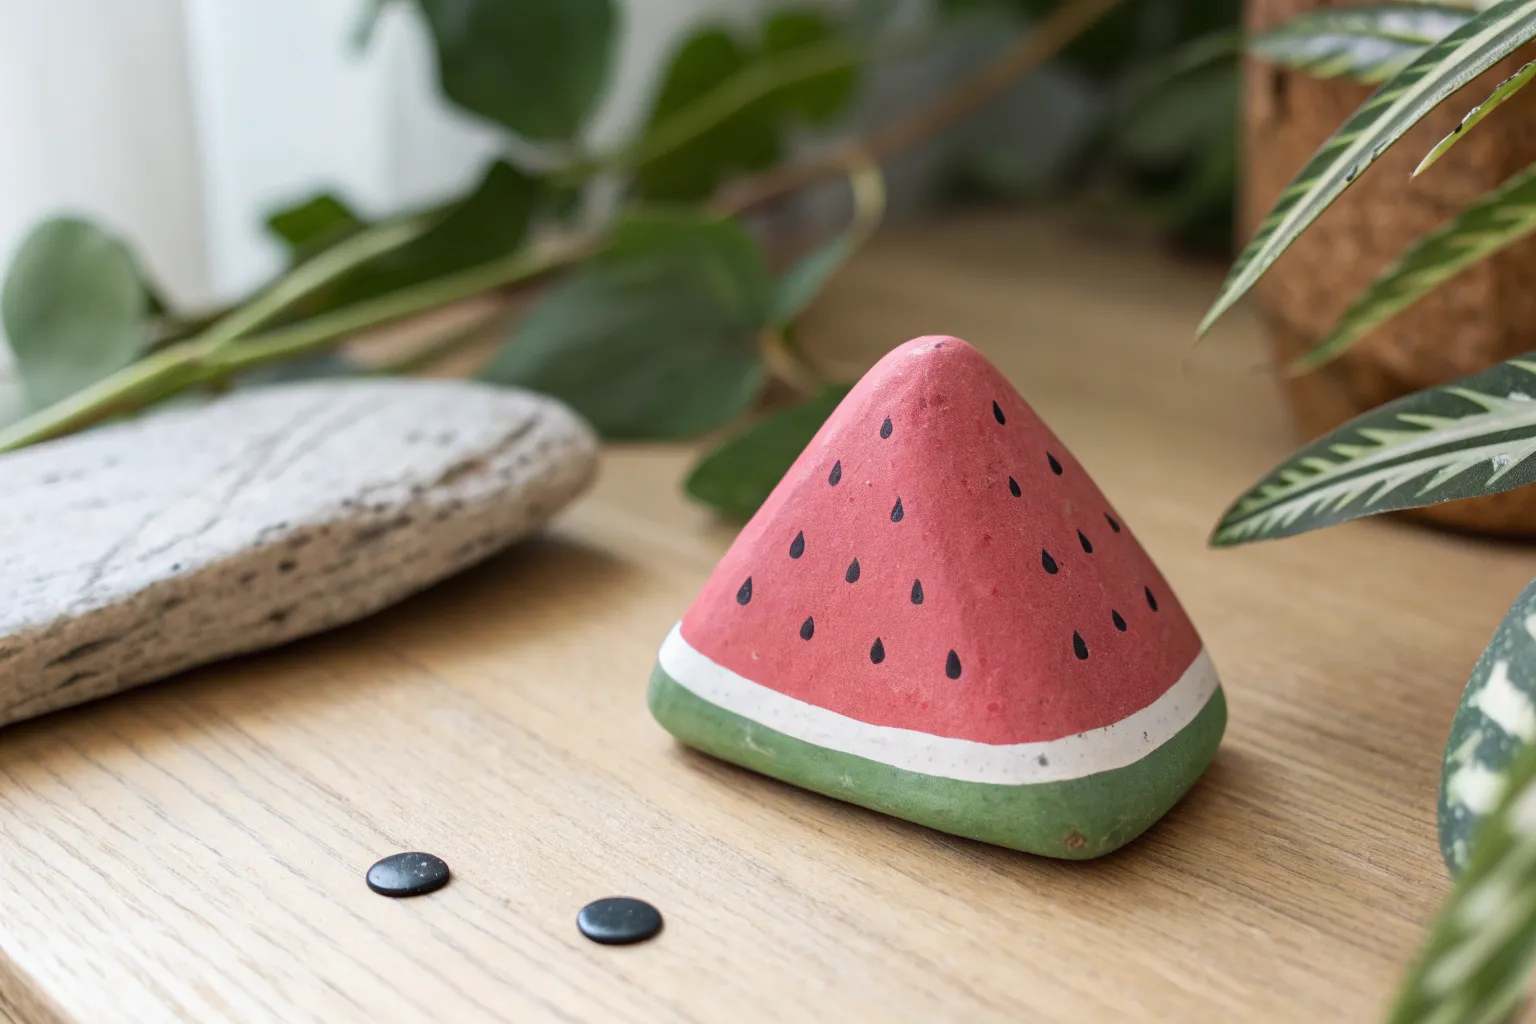
Watermelon Slice Wedge
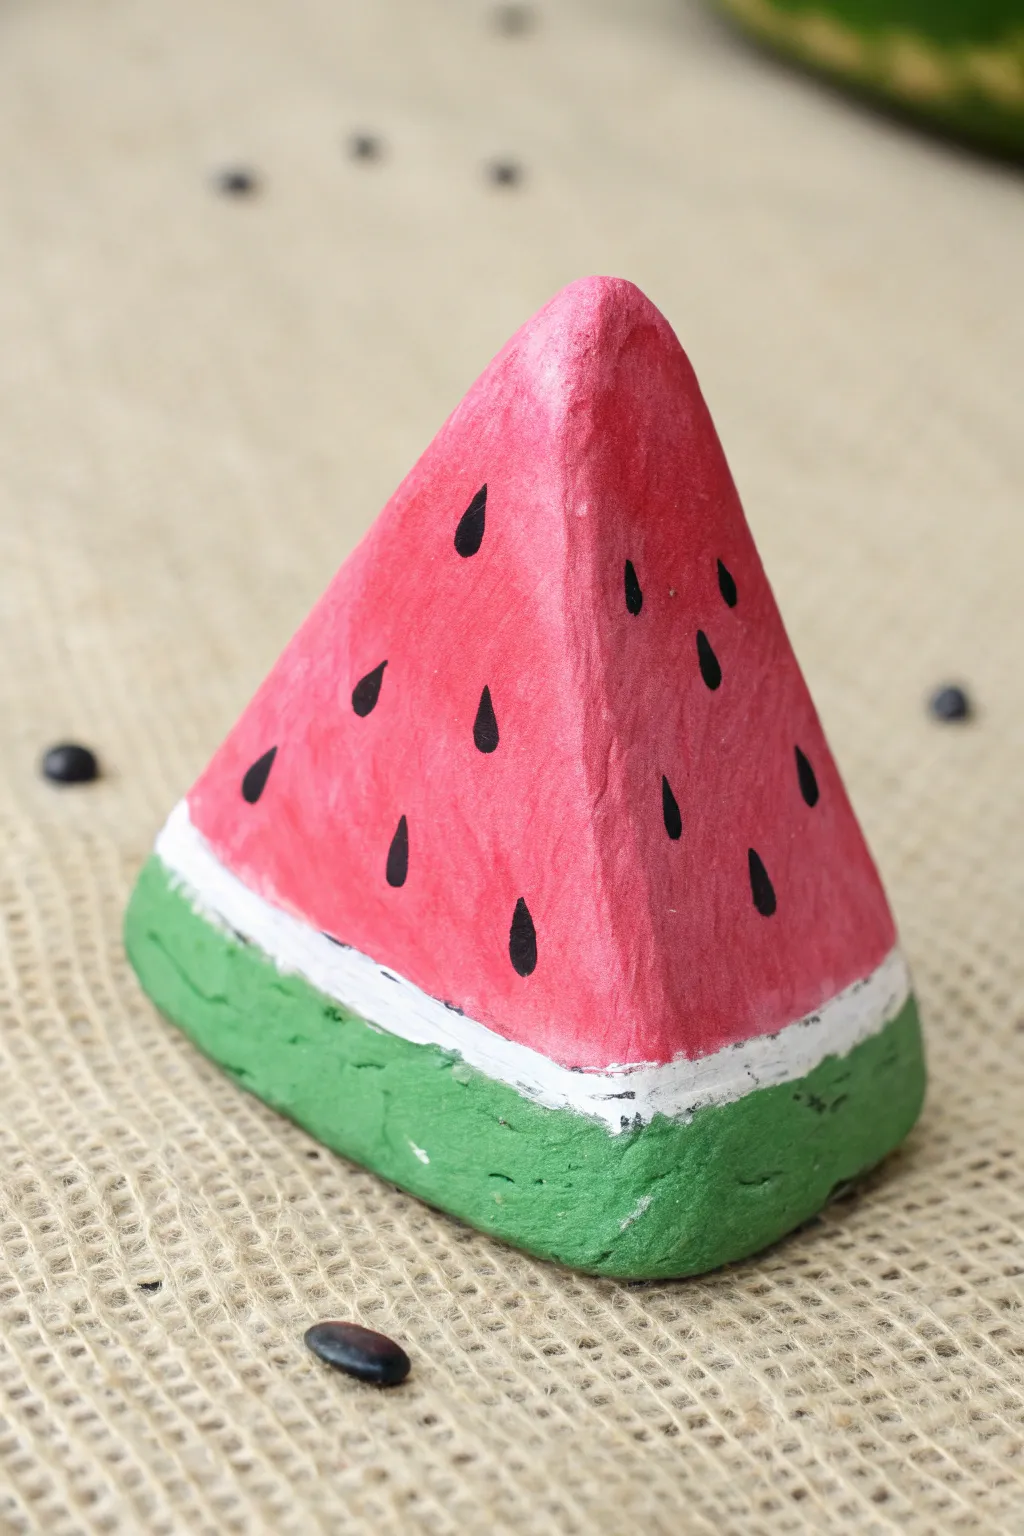
Transform a simple triangular stone into a slice of summer sweetness with this adorable watermelon wedge project. The textured surface of the rock mimics the fruit’s pulp perfectly, creating a delightful piece of decor that looks good enough to eat.
Detailed Instructions
Materials
- Triangular shaped rock (smooth but with slight texture)
- Acrylic paints: Bright red (or watermelon pink), white, grass green, black
- Paintbrushes: Medium flat brush, small detail brush or liner brush
- Pencil (optional)
- Sealer (Mod Podge or clear acrylic spray)
- Water cup for rinsing
- Paper towels
Step 1: Preparing the Base
-
Clean Your Canvas:
Begin by scrubbing your rock thoroughly with warm soapy water to remove any dirt or grit. Let it dry completely before applying any paint, as moisture inside the stone can ruin the finish later. -
Base Coat:
Apply a coat of white acrylic paint over the entire rock. This helps the brighter colors pop and provides a neutral background. If your rock is very dark, you might need a second coat of white once the first is dry.
Step 2: Painting the Fruit
-
Mix Your Red:
Choose a vibrant red or pinkish-red acrylic paint. If you want a more realistic melon color, mix a tiny dot of white into your red to soften it slightly. -
Paint the Pulp:
Using your medium flat brush, paint the upper triangular portion of the rock with your red mixture. Leave about an inch of space at the bottom (the widest part of the triangle) unpainted for the rind. -
Paint the Second Side:
Continue painting the red across the front face and onto the adjacent side face of the rock so the ‘slice’ looks consistent from multiple angles. -
Add Texture:
I like to dab the brush slightly while the paint is wet rather than using smooth strokes; this stippling effect mimics the fibrous texture of real watermelon flesh. -
Dry Check:
Allow the red section to dry completely. It should be dry to the touch before you move on to the rind so the colors don’t bleed together.
Bleeding Lines?
If your red paint bleeds into the white rind, wait for it to dry completely. Then, simply paint over the mistake with opaque white paint to ‘erase’ it before trying the line again.
Step 3: Creating the Rind
-
Green Layer:
At the very bottom of the rock, paint a thick band of grass green. This represents the outer skin of the watermelon. -
Wrap the Green:
Ensure the green band wraps around the bottom corners and sides, meeting the bottom edge of the rock neatly. -
The White Pith:
Load a clean, smaller brush with white paint. Carefully paint a stripe between the red fruit and the green skin. -
Refining the Lines:
This white line doesn’t need to be ruler-straight; a slightly uneven, organic line looks more natural. Just ensure it separates the red and green completely without gaps.
Make It Sweet
For a ‘bite-taken-out’ look, paint a jagged semi-circle of white into the red area near the top point, then outline it slightly to simulate teeth marks.
Step 4: Adding Details
-
Drafting Seeds:
If you are nervous about free-handing, lightly sketch teardrop shapes onto the red area with a pencil to plan your seed placement. -
Painting Seeds:
Using your smallest detail brush and black paint, fill in the teardrop shapes. Aim for the pointed end of the seed to face inward toward the center of the ‘slice’. -
Placement Strategy:
Scatter the seeds randomly but evenly across both red faces of the rock. Don’t crowd them too much; open space makes it look more realistic. -
Final Touch-ups:
Look over your rock for any spots where the white pith might need brightening or the red edge needs sharpening. Apply small corrections as needed. -
Seal It:
Once execute absolutely certain the black seeds are fully dry, apply a clear sealer or varnish to protect your artwork from chipping, especially if you plan to keep it outside.
Place your juicy-looking rock on a patio table or in a flower pot for a permanent splash of summer color


Snowcapped Mountain Peak
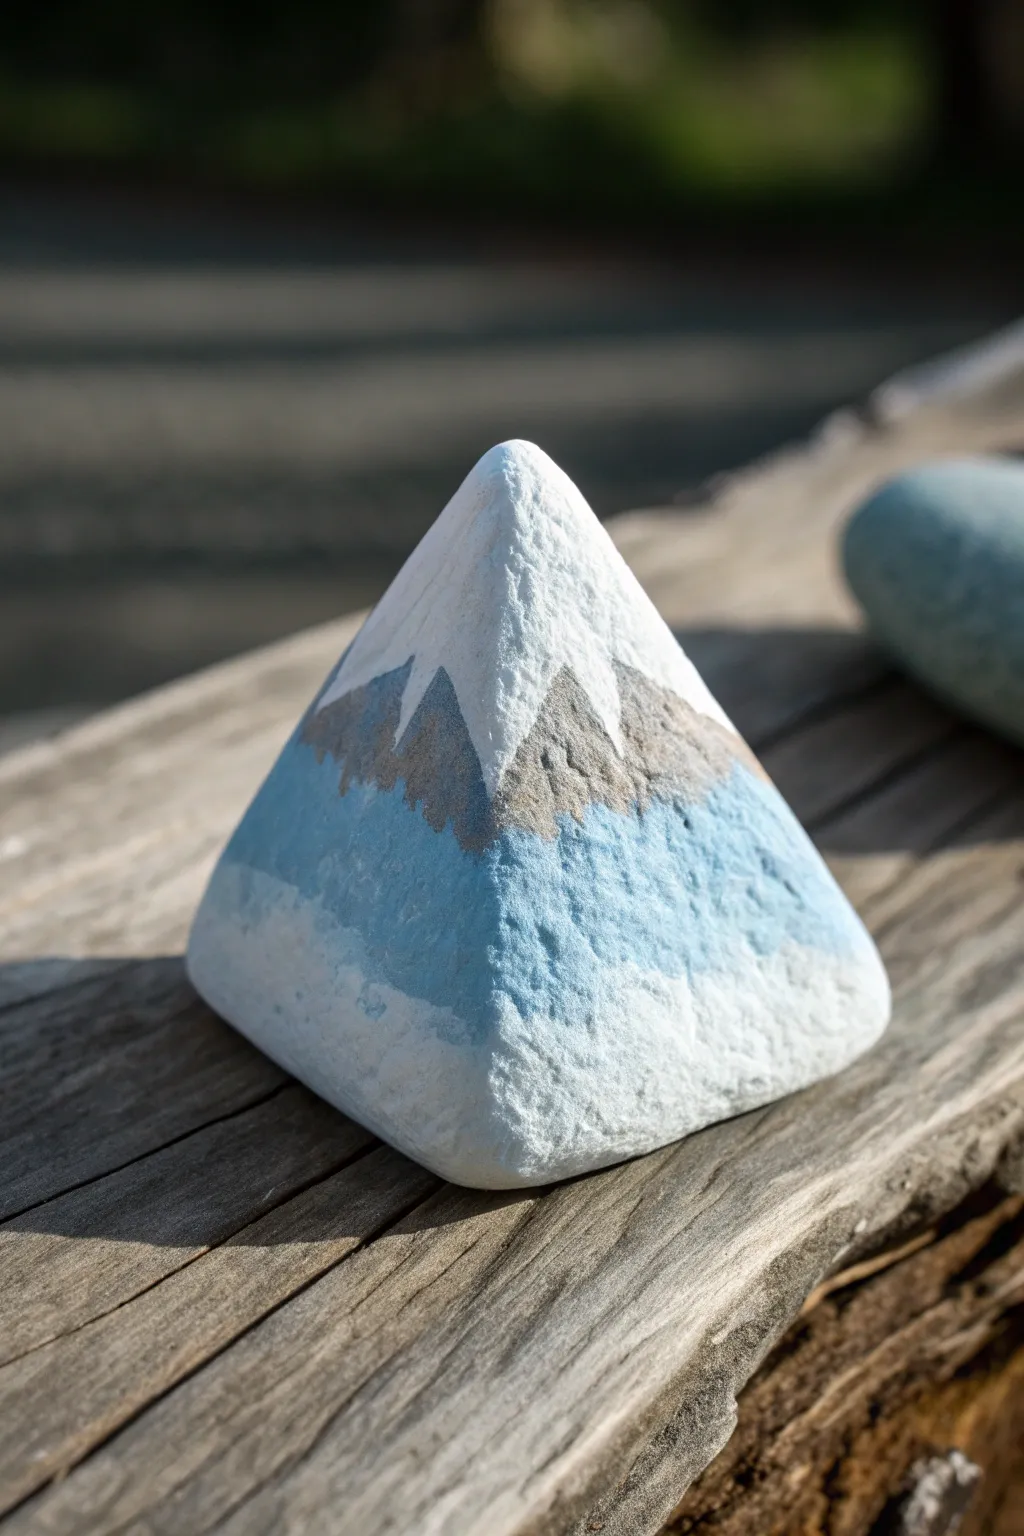
Transform a simple pyramid-shaped stone into a breathtaking snow-capped mountain peak that fits in the palm of your hand. This serene design uses soft blues and earthy greys to create a minimalist landscape that looks beautiful from every angle.
Step-by-Step Tutorial
Materials
- Pyramid-shaped river rock or cast stone
- Acrylic paints (Titanium White, Light Blue, raw umber, slate grey)
- Flat shader brush (size 4 or 6)
- Small round detail brush (size 0 or 1)
- Medium grit sandpaper (optional)
- Matte spray sealant
- Paper plate or palette
- Cup of water and paper towels
Step 1: Base Preparation
-
Clean the stone:
Begin by thoroughly washing your pyramid rock with warm soapy water to remove any dirt or oils. Use a stiff brush if necessary to get into the texture. -
Dry completely:
Allow the stone to dry fully in the sun or use a hair dryer to speed up the process. Moisture trapped inside can cause the paint to peel later. -
Smooth the surface:
If your rock has very rough jagged edges that might make painting straight lines difficult, lightly sand the faces with medium grit sandpaper, wiping away the dust afterwards.
Natural Texture
Don’t over-mix your grey paint. Leaving streaks of brown and darker grey creates a realistic rock banding effect.
Step 2: Establishing the Background
-
Mix a base blue:
On your palette, mix a small amount of light blue with plenty of Titanium White to create a very pale, icy blue shade. -
Paint the bottom section:
Using your flat shader brush, paint the bottom third of the pyramid on all four sides with this pale blue mix. It represents the misty base of the mountain. -
Gradient effect:
While the paint is still wet, blend in a bit more pure white near the very bottom edge. I find this creates a nice foggy effect. -
Paint the snowy peak:
Clean your brush and load it with pure Titanium White. Paint the top third of the pyramid, covering the point completely. -
Create the snow line:
Bring the white paint down towards the middle, but don’t worry about making a straight line; dragging the brush slightly dry creates a nice texture. -
Let it dry:
Allow these base layers to dry completely (about 15-20 minutes) before adding the mountain details.
Step 3: Creating the Mountain Range
-
Mix the mountain color:
Combine slate grey with a touch of raw umber to get a natural rocky color. You can add a tiny drop of blue to cool it down or brown to warm it up. -
Outline the peaks:
Using your small round brush, paint jagged triangular shapes around the middle section of the stone. These triangles should point upwards into the white ‘snow’ cap. -
Fill the silhouette:
Fill in the mountain shapes with your grey-brown mix. Ensure these shapes connect all the way around the stone for a 3D effect. -
Add texture:
While the grey paint is tacky, dab it lightly with a dry brush to give it a rough, stony appearance rather than a sleek finish. -
Soften the bottom edge:
Where the grey mountains meet the blue base, use a clean, slightly damp brush to blur the line, making the mountains look like they are rising from mist.
Dealing with Ridges
If the rock’s surface is too bumpy for a straight horizon line, paint with the flow of the bumps; let the stone dictate the mountain shape.
Step 4: Snow Details & Sealant
-
Add snow drifts:
Take your detail brush with pure white paint and add small downward strokes over the top of your grey peaks, mimicking snow settling on the ridges. -
Dry brush highlights:
Lightly dry-brush some white onto the grey areas to highlight the texture of the rock surface. -
Final dry time:
Let the entire stone sit for at least an hour to ensure all thick layers of paint are cured. -
Seal the artwork:
In a well-ventilated area, spray the stone with a matte sealant. A gloss finish reflects too much light and ruins the natural stone look, so matte is best.
Place your finished mountain peak on a shelf or desk for a peaceful reminder of the great outdoors


Glowing Tent Under Stars
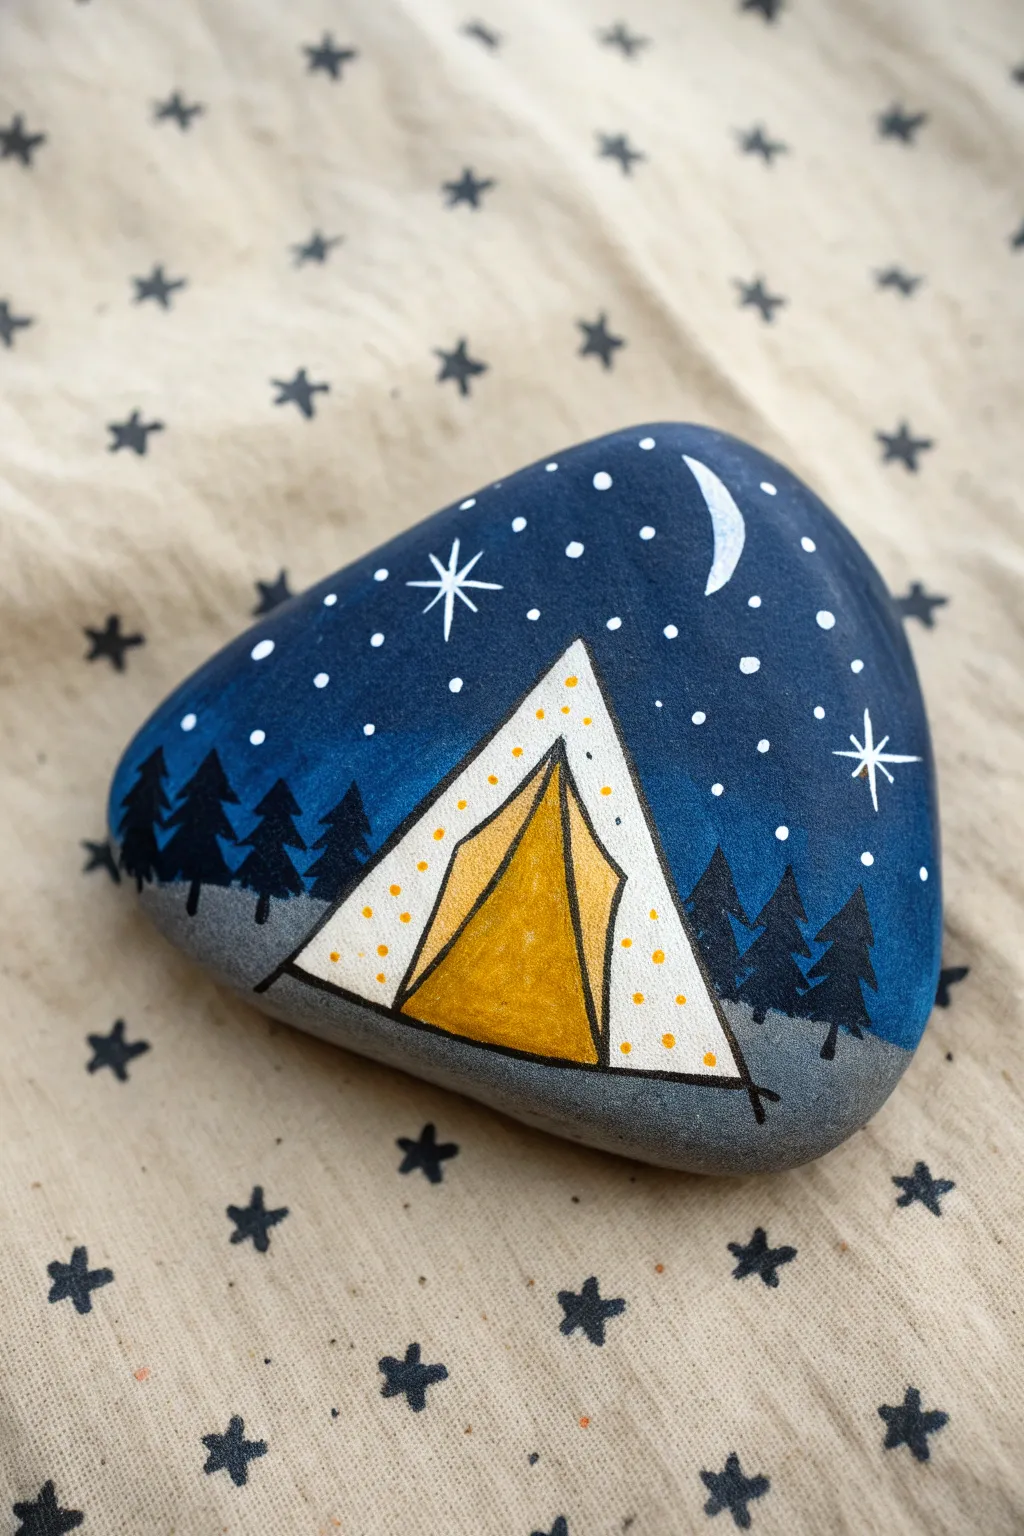
Capture the magic of a peaceful night outdoors with this charming rock painting project. Using simple geometric shapes and a deep blue palette, you’ll transform a triangular stone into a cozy scene featuring a glowing tent beneath a starry sky.
Detailed Instructions
Materials
- Smooth, triangular-shaped rock
- Acrylic paints (dark blue, black, white, gray, yellow/gold, orange)
- Flat paintbrushes (medium and small)
- Fine detail liner brush (0 or 00 size)
- Posca paint pens (white, black) – optional but helpful for details
- Sealant (spray or brush-on varnish)
- Palette or paper plate
- Water cup and paper towels
Step 1: Setting the Scene
-
Base coat:
Begin by washing and drying your rock thoroughly to ensure paint adhesion. Paint the entire front surface with a deep navy blue acrylic paint. You may need two coats for opaque coverage, letting the first dry completely before applying the second. -
Ground layer:
Mix a medium gray paint or use a premixed gray. Paint a strip across the bottom third of the rock to create the ground. The top edge of this gray strip doesn’t need to be perfectly straight; a slight bumpiness adds a natural terrain look.
Fixing Wobbly Lines
If your black outlines get shaky or too thick, wait for them to dry completely. Then, come back with white or the tent color to clean up the edges and thin the lines back down.
Step 2: Drafting the Tent
-
Tent Triangle:
Once the background is fully dry, use white paint or a white paint pen to draw a large triangle in the center of the rock. It should sit directly on the gray ground line and reach up into the blue sky. -
Filling the White:
Fill in this triangle completely with white paint. This serves as the bright canvas of the tent and ensures the yellow colors applied later will pop against the dark background. -
Tent Opening:
Inside the white triangle, draw a smaller, slightly narrower triangle for the tent opening. The base should align with the bottom of the white triangle. Leave a thick border of white all around it. -
Inner Flaps:
Divide that inner triangle vertically down the center. Paint the left side a mustard yellow and the right side a slightly lighter gold to suggest dimension and lighting.
Add a Glow Effect
Mix a tiny drop of white into your yellow paint. Lightly dry-brush this paler yellow around the center of the tent opening to make it look like a lantern is lit inside.
Step 3: Details & Atmosphere
-
Tent definition:
Using a very fine liner brush and black paint, or a fine-tip black paint pen, carefully outline the entire tent structure. Draw the vertical line separating the flaps and draw two diagonal lines descending from the tent peak to the corners to create the look of draped fabric. -
Anchor pegs:
Extend the corner lines slightly past the bottom edge of the tent into the gray ground to represent the tent stakes or ties. -
Pattern work:
Add small orange or gold dots in a pattern on the white borders of the tent. I find using the back end of a small paintbrush dipped in paint makes perfectly round dots every time. -
Forest silhouette:
On either side of the tent, paint simple pine tree silhouettes using black paint. Start with a vertical line for the trunk, then use small dabbing motions to create horizontal branches that get wider towards the bottom. -
Tree placement:
Place about three varied-height trees on the left and three on the right. Ensure the bottoms of the trees rest firmly on the gray ground line.
Step 4: The Night Sky
-
The Moon:
In the upper right corner of the blue sky, paint a crescent moon using white paint. A fine brush helps keep the points sharp. -
Stars:
Dip a fine rounded tool or toothpick into white paint to dot stars across the sky. Vary the pressure to create different sizes of stars. -
Sparkles:
Select two or three larger dots and add tiny cross-hatches over them to create twinkling ‘north star’ effects. -
Sealing:
Allow the rock to dry for at least 24 hours. Finish by applying a clear weather-resistant sealant to protect your artwork from chipping or fading.
Place your finished rock in a garden corner or gift it to a camping enthusiast to bring a little starlight into their day
BRUSH GUIDE
The Right Brush for Every Stroke
From clean lines to bold texture — master brush choice, stroke control, and essential techniques.
Explore the Full Guide
Pine Tree Silhouette Triangle
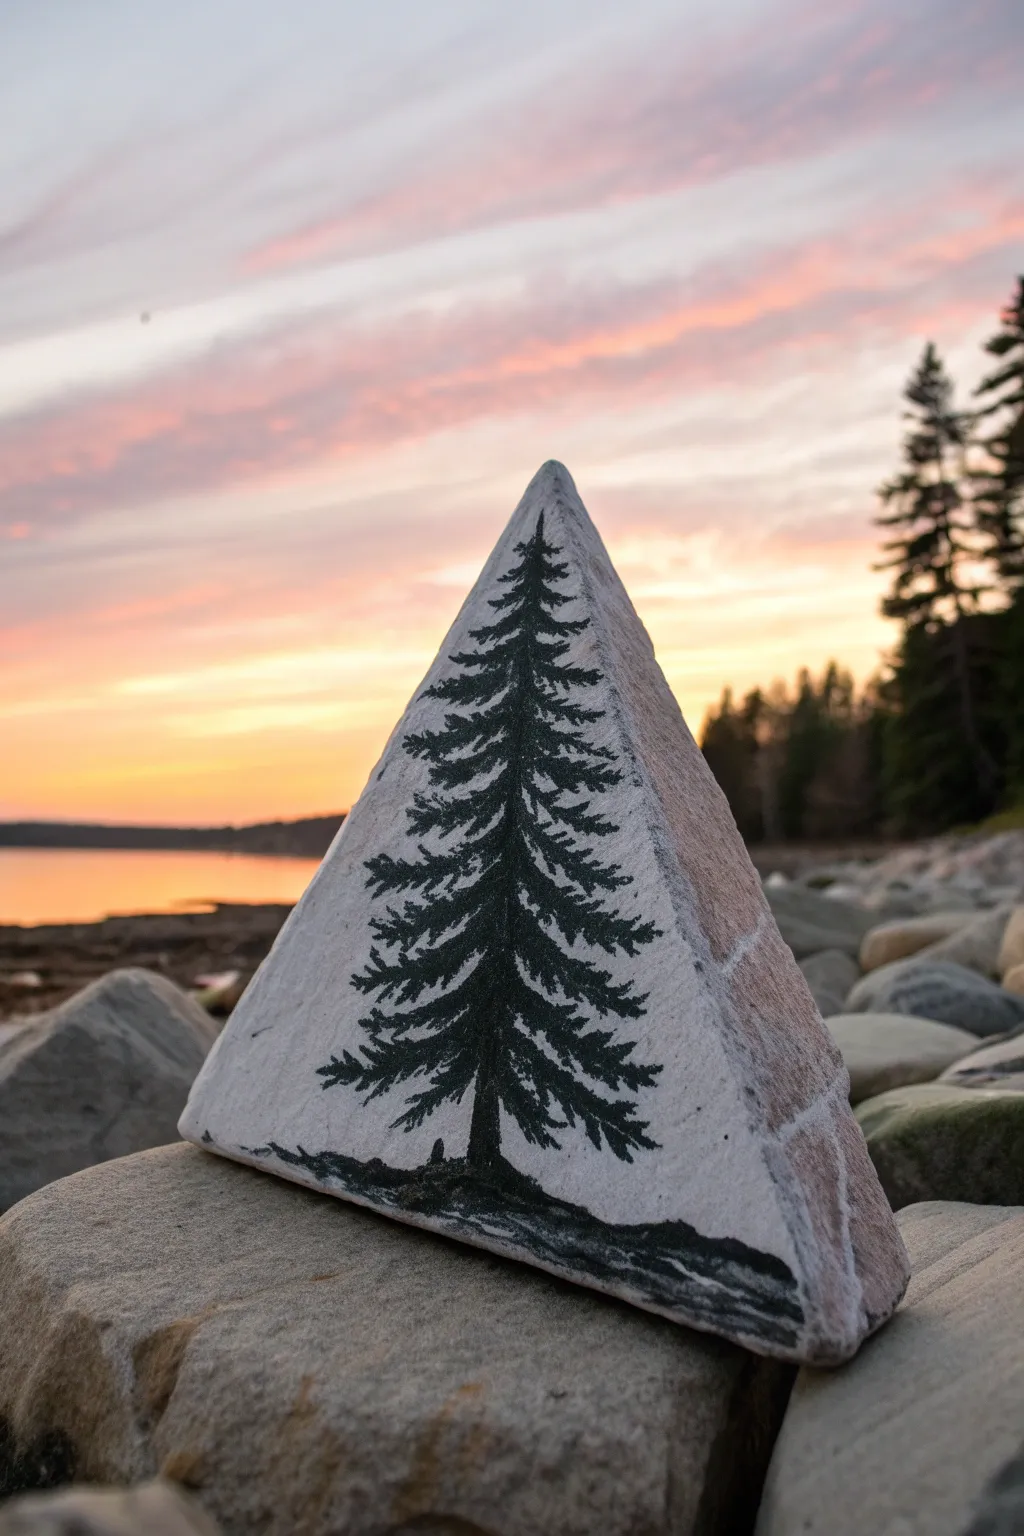
Capture the serene beauty of the forest with this striking pine tree silhouette painted on a triangle-shaped stone. By utilizing the rock’s natural pale color as negative space, the bold black tree creates a high-contrast design that mimics a twilight shadow.
Step-by-Step
Materials
- Triangle-shaped river rock (smooth surface)
- Black acrylic paint (high pigment)
- Fine liner brush (size 0 or 00)
- Small flat brush
- Pencil (HB or lighter)
- Spray varnish (matte or satin)
- Cup of water
- Paper towel
Step 1: Preparation & Sketching
-
Stone Selection:
Find a rock with a distinct triangular shape and a relatively flat face. The smoother the surface, the easier it will be to paint fine pine needle details. -
Cleaning:
Wash your stone thoroughly with soap and water to remove any dirt or oils that might repel the paint. Let it dry completely in the sun or with a hairdryer. -
Center Line:
Using a light touch with your pencil, draw a faint vertical line straight down the middle of the triangle. This will serve as the trunk guide to keep your tree upright. -
Base Sketch:
Sketch a slightly uneven horizontal line near the bottom edge of the rock to represent the ground. It doesn’t need to be perfectly straight; natural unevenness looks better.
Step 2: Painting the Trunk & Base
-
Loading the Brush:
Load your fine liner brush with black acrylic paint. I like to thin the paint just a tiny bit with a drop of water so it flows smoothly like ink. -
Painting the Trunk:
Starting from the bottom, paint the trunk following your pencil guide. Make the base of the trunk slightly wider and taper it until it becomes razor-thin near the peak of the rock. -
Filling the Ground:
Switch to your small flat brush to fill in the ground area at the bottom. Bring the black paint right to the bottom edge of the rock so it feels grounded. -
Texture the Ground:
While the ground paint is wet, dab it slightly with the brush tip to create a grassy or rocky texture rather than a smooth block of color.
Paint Too Thick?
If your branches look blobby, your paint is too heavy. Thin it with a little water until it has an inky consistency for sharper lines.
Step 3: Creating the Branches
-
Top Branches:
Switch back to the fine liner brush. Starting at the very top, make tiny, downward-angled dashes. These first branches should be very short and sparse. -
Widening the Shape:
As you move down the trunk, gradually increase the length of the branches. Remember that pine trees aren’t perfect triangles; vary the lengths slightly for realism. -
Technique:
Use a flicking motion. Start the stroke at the trunk and flick outward and slightly downward. This creates the tapered look of a branch tip. -
Adding Volume:
Go back over your main branch lines and add smaller ‘flicks’ coming off the top and bottom of each branch to mimic clusters of needles. -
Middle Section:
In the middle of the tree, make the branches denser. Allow some branches to overlap the trunk, obscuring it in places. -
Lower Branches:
For the bottom third, create heavy, drooping branches. These should be the widest and thickest parts of the tree, extending almost to the rock’s edge. -
Negative Space:
Step back and look at your tree. Ensure you’ve left some gaps between branches where the light stone shows through; this prevents it from looking like a solid black triangle.
Add a Sunset
Before painting the black tree, sponge a gradient of yellow, orange, and purple onto the rock for a vibrant sunset background.
Step 4: Finishing Touches
-
Clean Up:
If you made smudges or want to refine the outer shape, use a damp Q-tip or a brush with a tiny bit of white paint (if it matches your stone) to correct edges. -
Drying:
Allow the paint to cure for at least 20 minutes. Since the lines are thin, they typically dry fast, but you want them bone dry before sealing. -
Sealing:
In a well-ventilated area, apply a coat of matte spray varnish. A glossy finish might reflect too much light and obscure the silhouette.
Place your finished stone on a window sill where the light can highlight the stark contrast of your evergreen art
Strawberry-Inspired Triangle Berry
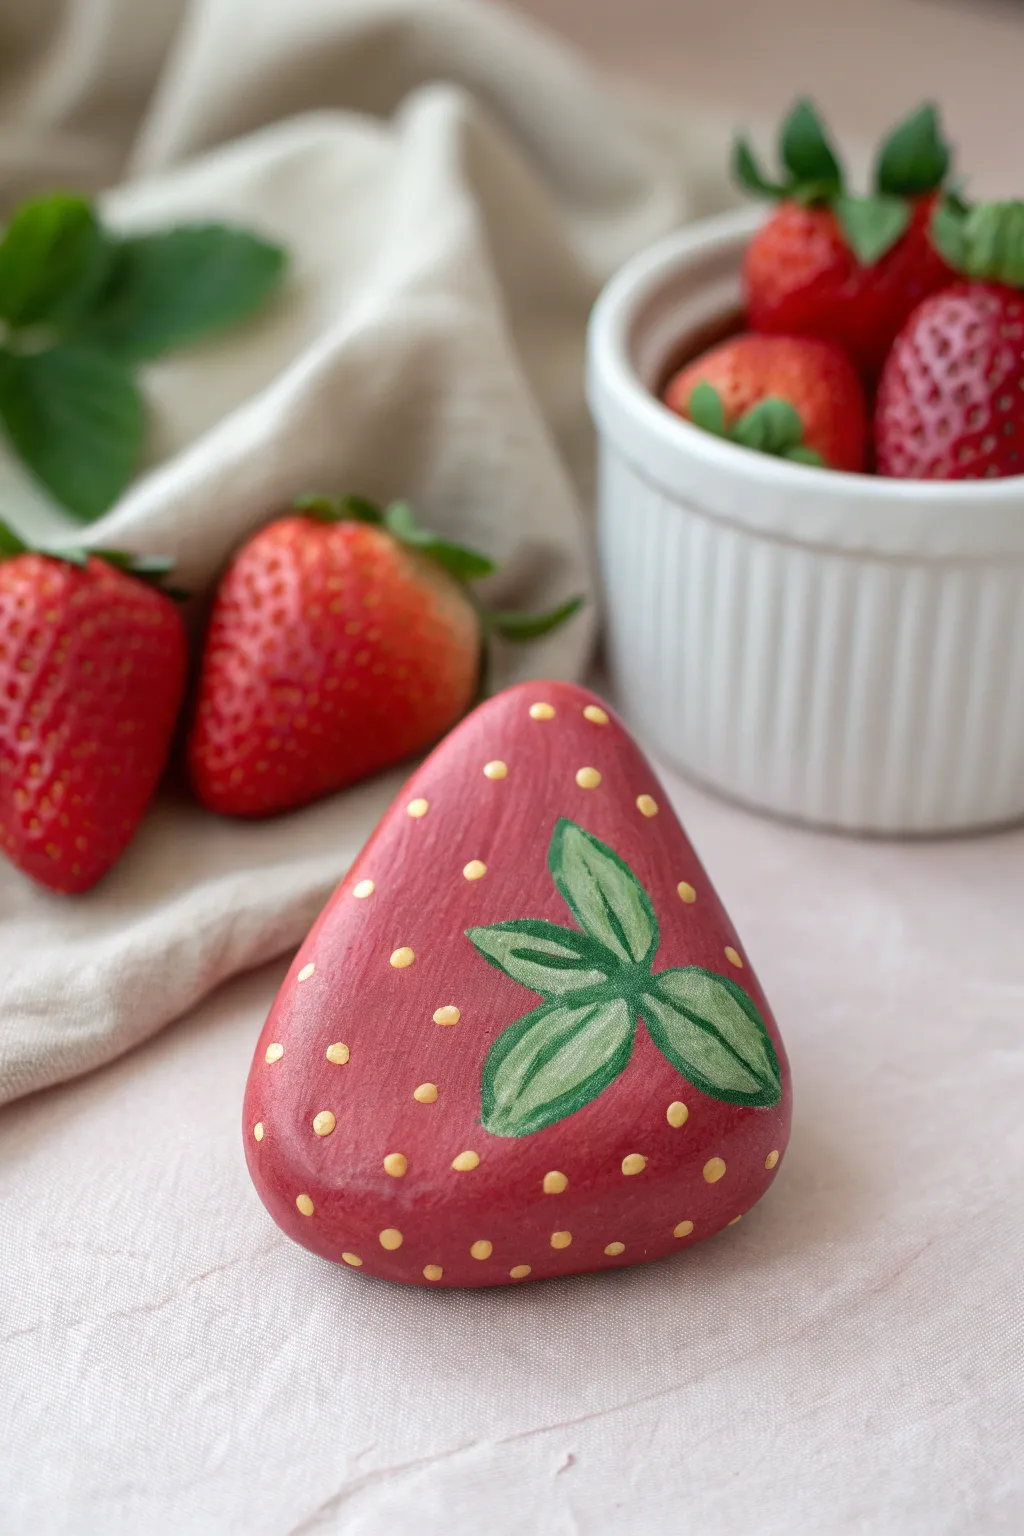
Turn a simple triangular stone into a delightful piece of faux fruit with this realistic strawberry painting tutorial. The result is a charmingly deceptive garden accent or paperweight that captures the sunny essence of summer berries.
Detailed Instructions
Materials
- Smooth, triangular river rock
- Acrylic paints: Bright red, deep red (carmine or maroon), light yellow or gold, sap green, and forest green
- Assorted paintbrushes: Flat brush (medium) and fine liner brush
- Water cup and palette
- Clear matte or satin sealant spray
- Pencil (optional for sketching)
Step 1: Preparation & Base Coat
-
Clean the canvas:
Start by thoroughly washing your stone with warm soapy water to remove any dirt or oils. Scrub it gently and let it dry completely in the sun or with a hairdryer before painting. -
Mix your base red:
Create a vibrant strawberry red on your palette. If your bright red is too transparent, mix in a tiny touch of white or orange to boost its opacity without dulling the color too much. -
Apply the first layer:
Using a medium flat brush, coat the entire top and sides of the rock with your red paint. Don’t worry about the underside unless you want a fully 3D fruit. -
Build opacity:
Acrylics often need layers. Allow the first coat to dry until it’s not tacky to the touch, then apply a second or even third coat until the grey stone is completely hidden. -
Add subtle depth:
While the final red coat is still slightly wet, I like to blend a tiny amount of deeper red (maroon) near the bottom edge of the stone to suggest shadowing and ripeness.
Seed Precision Tip
If you struggle with brush control for tiny seeds, try using a yellow or gold paint pen (Posca marker) instead. It gives you much more control over the teardrop shapes.
Step 2: Painting the Foliage
-
Outline the leaves:
Once the red base is bone dry, visualize where the stem would attach. Using a pencil or a very thinned green paint, lightly sketch a cluster of leaves extending from one corner or the top edge of the triangle. -
Block in green color:
Use your forest green paint and a small round brush to fill in the leaf shapes. The leaves should look like a small starburst or calyx resting on the berry’s shoulder. -
Highlight the leaves:
Mix a lighter sap green or add a touch of yellow to your green. Paint the center veins of the leaves and add highlights to the edges to make them pop against the red. -
Define the veins:
With your finest liner brush and a very dark green (or black mixed with green), paint extremely thin lines down the center of each leaf for realistic detailing.
Make a Berry Patch
Paint a dozen small, rounder pebbles as strawberries and display them all together in a real ceramic berry basket or a mason jar for a stunning summer centerpiece.
Step 3: Seeds & Finishing Touches
-
Plan the seed placement:
Strawberry seeds usually follow a diagonal grid pattern. You can lightly mark small dots with a pencil first to ensure they are evenly spaced and not too cluttered. -
Paint the seeds:
Dip the very tip of a fine liner brush or a dotting tool into yellow or light gold paint. Gently touch the rock to create small, teardrop-shaped seeds. -
Orient the seeds correctly:
Ensure the pointed end of your teardrop seeds faces toward the top (the leafy end) of the strawberry for a natural look. -
Add seed shadows:
To create dimension, mix a watery dark red or brown. Paint a tiny ‘C’ shape or a thin line right next to each yellow seed to make them look slightly recessed into the fruit flesh. -
Final leaf check:
If the red or seed painting overlapped your green leaves messily, touch up the edges of the greenery now to keep the lines crisp. -
Dry thoroughly:
Let the rock sit undisturbed for several hours. The paint needs to be fully cured before sealing to prevent smudging. -
Seal the artwork:
Spray the rock with a clear matte or satin sealant. A glossy finish works too, but a satin finish looks more like the natural sheen of a real strawberry skin.
Place your everlasting strawberry on a kitchen shelf or in a planter for a splash of color that never spoils

PENCIL GUIDE
Understanding Pencil Grades from H to B
From first sketch to finished drawing — learn pencil grades, line control, and shading techniques.
Explore the Full Guide
Prickly Pear Cactus Paddle
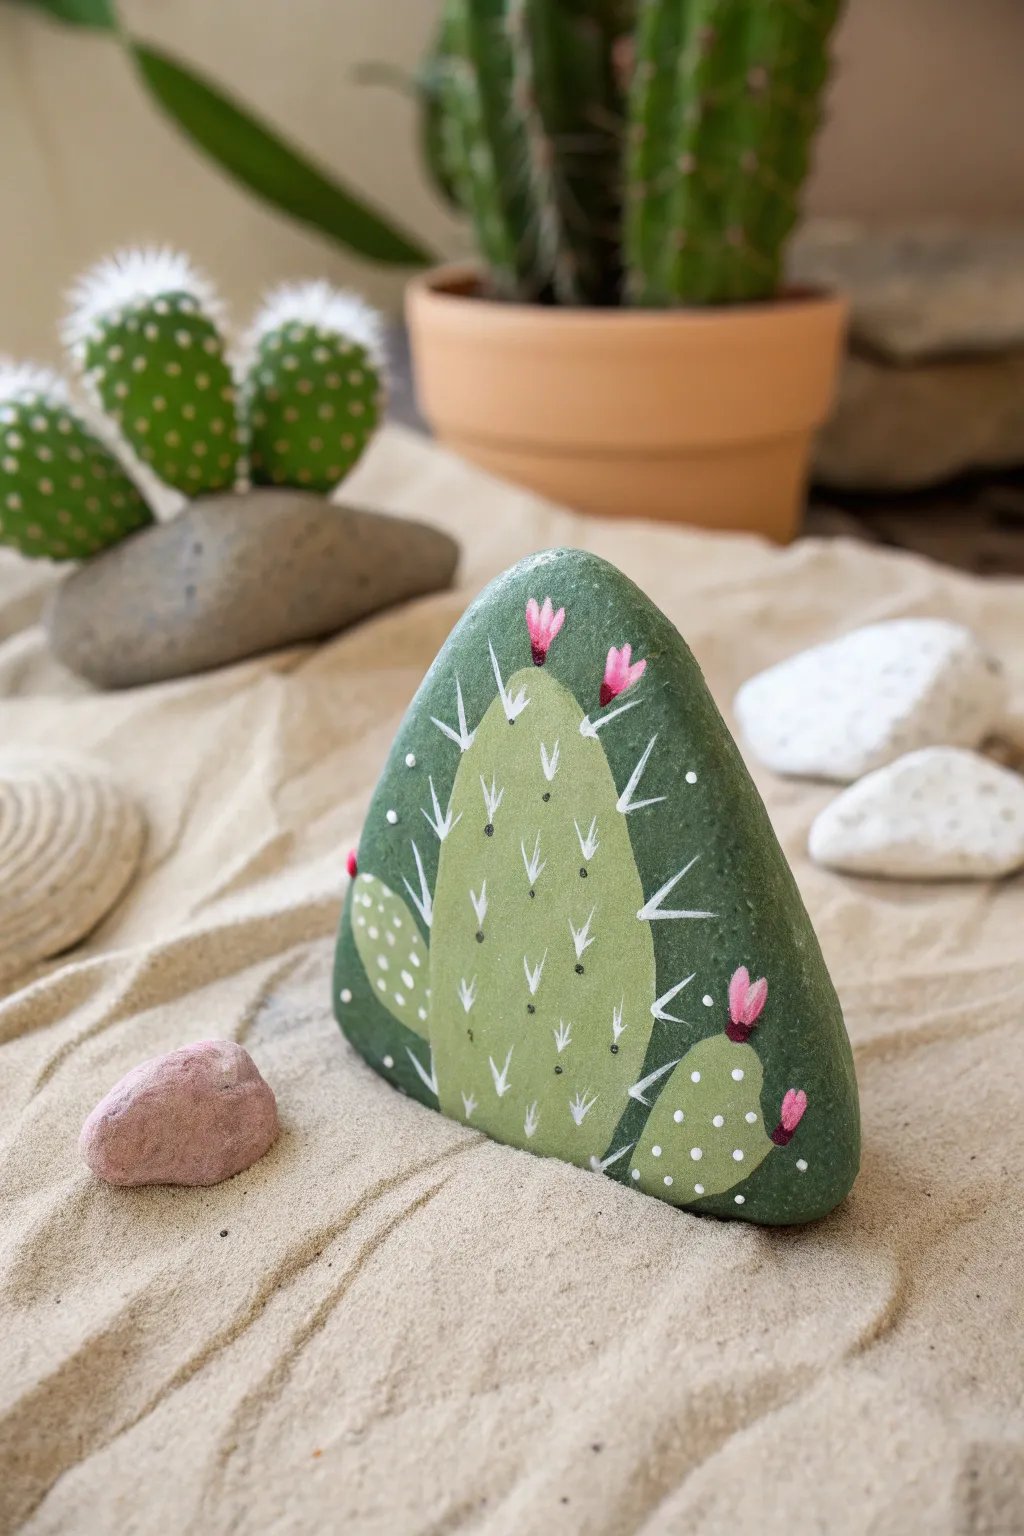
Transform a simple triangular stone into a charming cactus paddle worthy of any desert oasis. This project uses clever layering of greens to create depth, topped with delicate white spines and vibrant pink blooms for a pop of color.
Step-by-Step Guide
Materials
- Smooth, triangular river rock (flat is best)
- Acrylic paints: dark forest green, sage/olive green, bright pink/magenta, white, black
- Paintbrushes: flat basecoat brush, small round brush, fine liner brush
- Dotting tool or toothpick
- Acrylic matte sealer spray
- Palette or paper plate for mixing
Step 1: Base Coat and Background
-
Clean Your Canvas:
Begin by scrubbing your triangular rock with warm soapy water to remove any dirt or oils. Let it dry completely before starting; any moisture will prevent the paint from sticking properly. -
Apply the Base Green:
Using a flat brush, coat the entire front face of the rock with your dark forest green paint. Since rocks are porous, I usually apply two thin coats rather than one thick one to get solid, opaque coverage without brushstrokes. -
Create the Paddle Outline:
Once the dark green is dry, mix a lighter sage or olive green. Using a small round brush, paint a large oval shape in the center of the rock—this will be the main cactus paddle. -
Add Smaller Offshoots:
Paint a partial oval shape on the bottom left and another distinct, smaller oval on the bottom right corner using the same sage green. These represent smaller cactus pads growing from the main body. -
Blend the Edges:
While the lighter green is still slightly wet, gently feather the edges where it meets the dark background if you want a softer transition, although a crisp edge works well for a graphic style.
Step 2: Spines and Textures
-
Paint the Main Spines (Areoles):
Switch to your finest liner brush or a toothpick. Dip it in white paint and create small ‘V’ shapes scattered across the central sage green oval. -
Create Spine Clusters:
For a realistic look, group your spines. Instead of just single lines, add a third, slightly longer line coming from the center of some ‘V’ shapes to mimic the cluster of thorns found on prickly pears. -
Border Spines:
Along the outer edge of the main sage oval, paint short white lines extending outward into the dark green background. This emphasizes the prickly silhouette of the cactus. -
Detail the Side Pads:
Instead of full spines, use a dotting tool or the back end of a paintbrush to place small white polka dots on the two smaller side pads. This varied texture makes the rock visually interesting. -
Add Shadow Dots:
To give the spines dimension, place a tiny black dot at the very base of each white spine cluster. This subtle detail grounds the spines so they look like they are growing out of the cactus skin.
Paint rubbing off?
If your paint streaks or lifts previous layers, the bottom coat isn’t fully dry. Use a hairdryer on a low, cool setting to speed up drying between color changes.
Step 3: Flowering Details
-
Position the Blooms:
Select spots for your flowers, ideally near the top of the main paddle and the tip of the right-side pad. Paint small, elongated tear-drop shapes in bright pink or magenta. -
Layer the Petals:
Once the pink base is dry, add a slightly lighter pink stroke inside the petals to create a sense of curvature and light hitting the flower. -
Connect the Blooms:
Ensure the bottom of each flower touches the green cactus body. You can use a tiny dab of dark green slightly overlapping the base of the pink flower to make it look attached. -
Final White Accents:
Add tiny white specks or thin lines to the tips of the pink flowers for highlights. You can also add a few extra stray white dots on the dark green background for artistic flair. -
Seal the Artwork:
After the paint has cured for at least 24 hours, spray the rock with a matte acrylic sealer in a well-ventilated area. This protects your hard work from chipping and UV fading.
Add Realism
Mix a tiny drop of yellow into your sage green for the very center of the paddle. This creates a ‘highlight’ effect, making the cactus look rounded and 3D.
Place your finished stone in a terrarium or on a desk for a plant that never needs watering
Fox Face From the Point
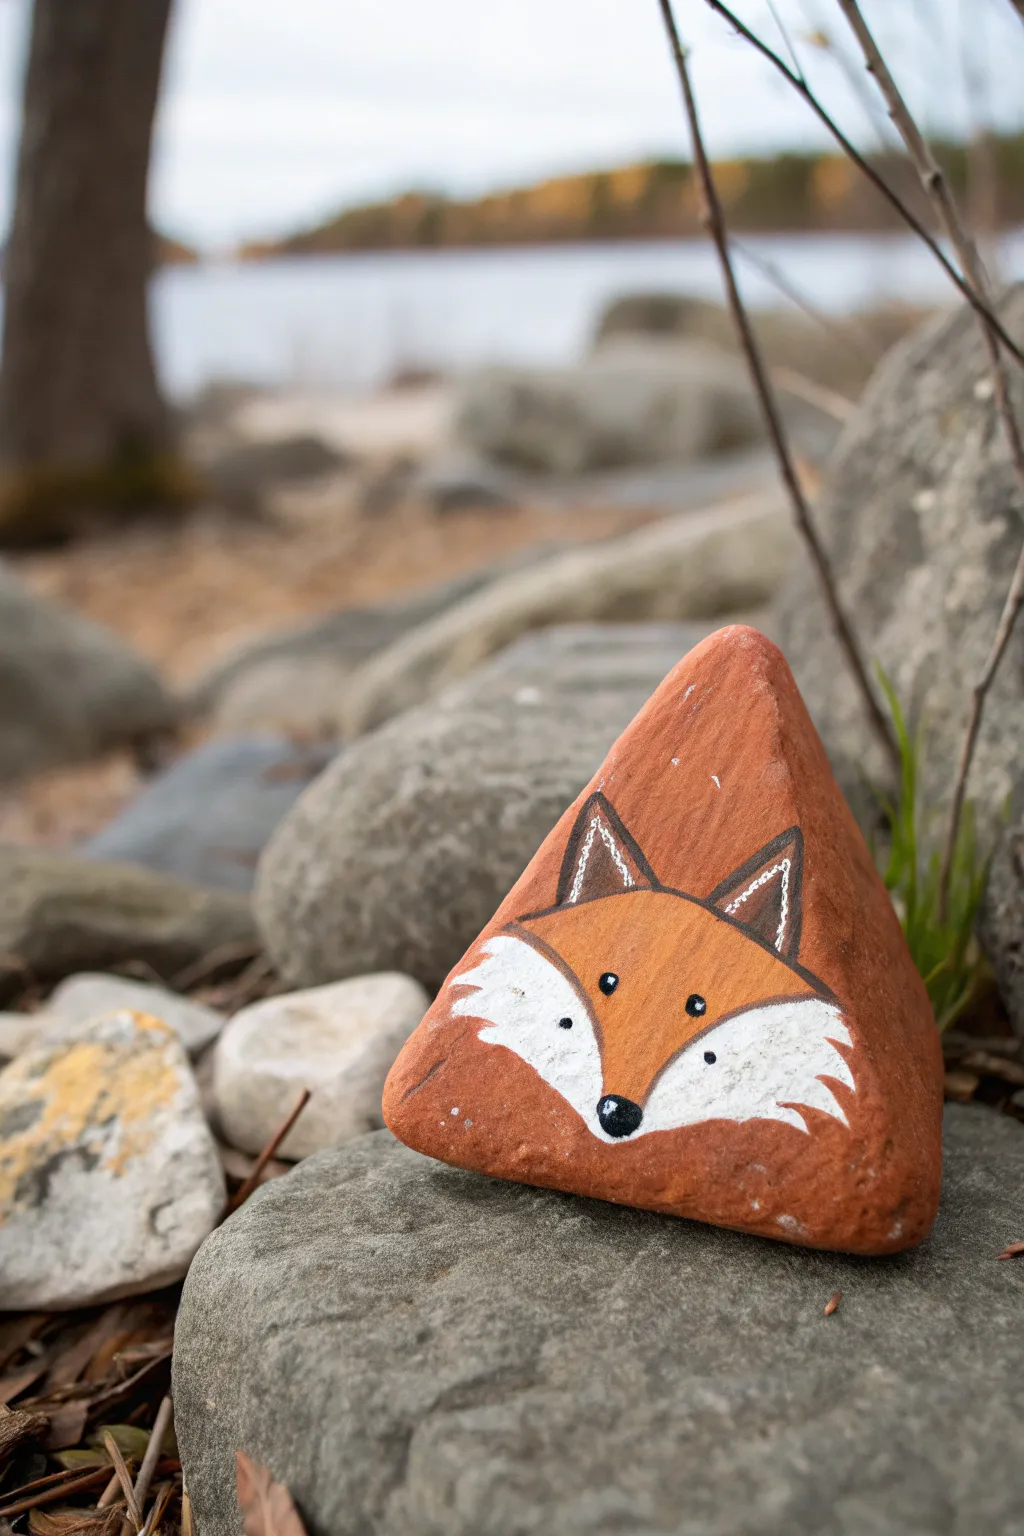
Utilize the natural shape and color of a triangular stone to create this clever woodland creature. By letting the rock’s own terracotta hue serve as the fox’s fur, you create a minimalist yet striking piece of garden art.
Step-by-Step Tutorial
Materials
- Triangular, smooth rock (preferably reddish-brown/terracotta color)
- White acrylic paint
- Black acrylic paint
- Fine liner paintbrush (size 0 or 00)
- Small flat paintbrush
- Pencil (optional for sketching)
- Matte or satin varnish/sealer
Step 1: Planning and Base Work
-
Select the perfect stone:
Finding the right canvas is half the work here. Look for a rock that is roughly triangular with a pointed top and a relatively flat face. If you find one that is naturally reddish-brown or rust-colored, you won’t need to paint a base coat at all. -
Clean the surface:
Scrub the rock thoroughly with warm soapy water and a stiff brush to remove any dirt or moss. Let it dry completely in the sun before you begin painting. -
Visualize the layout:
Orient the rock so the sharpest point is facing upward. The bottom two corners will anchor the white cheek fur, while the top point becomes the ears. -
Sketch the nose and ears:
Using a light pencil, draw a small inverted triangle near the bottom center for the nose. Then, sketch two large triangles starting from the middle of the rock and extending up towards the peak for the ears. -
Outline the cheeks:
Lightly sketch curved lines extending from the nose area out to the bottom corners of the rock to mark where the white fur will separate from the orange face.
Natural Base Tip
If you can’t find a rust-colored rock, simply mix burnt sienna and orange paint and cover a grey stone first. Let dry thoroughly before starting.
Step 2: Painting the Features
-
Fill the white cheeks:
Using your small flat brush and white acrylic paint, fill in the bottom sections you just sketched. You may need two coats here to ensure the dark rock doesn’t show through. -
Create fur texture:
While painting the top edge of the white area, flick your brush upward slightly or create jagged edges. This prevents the line from looking too smooth and mimics the texture of fluffy fur. -
Outline the ears:
Load a fine liner brush with black paint. Carefully trace the triangular outlines of the ears you sketched earlier. Keep the lines relatively thin for a delicate look. -
Paint the nose:
Fill in the small inverted triangle at the bottom center with solid black paint. Round off the corners slightly so it looks natural rather than geometric. -
Add the eyes:
Paint two small, solid black circles slightly above the nose line, spaced evenly apart. Their placement determines the fox’s expression, so take a moment to position them symmetrically. -
Inner ear details:
Once the black outlines are dry, use your fine brush and white paint to add details inside the ears. I prefer to use small stippling dots or tiny dashed lines to suggest inner ear fur.
Use a Pen
Struggling with the fine black outlines? Use a waterproof black Posca paint pen or permanent marker instead of a brush for steadier control.
Step 3: Refining and Sealing
-
Sharpen the lines:
Step back and look at your fox. If the boundary between the natural rock color and the white paint looks messy, re-outline with a very thin black line to define the snout, though leaving it natural is softer. -
Add eye highlights:
Dip the very tip of your liner brush handle (or a toothpick) into white paint. Place a tiny dot on the upper right side of each black eye pupil to bring the fox to life. -
Clean up edges:
If any white paint smudged onto an area intended to be orange, gently scrape it off with a fingernail if it’s dry, or wipe with a damp Q-tip if wet. -
Let it cure:
Allow the paint to dry completely. Acrylics dry to the touch quickly, but give it at least an hour to harden before sealing. -
Apply varnish:
Brush on a coat of outdoor-safe varnish. A matte finish looks more natural on stone, but gloss will make the colors pop more vividly.
Nestle this little fox among some green plants or moss to give your garden a touch of whimsical wildlife charm


Mermaid Tail Scale Gradient
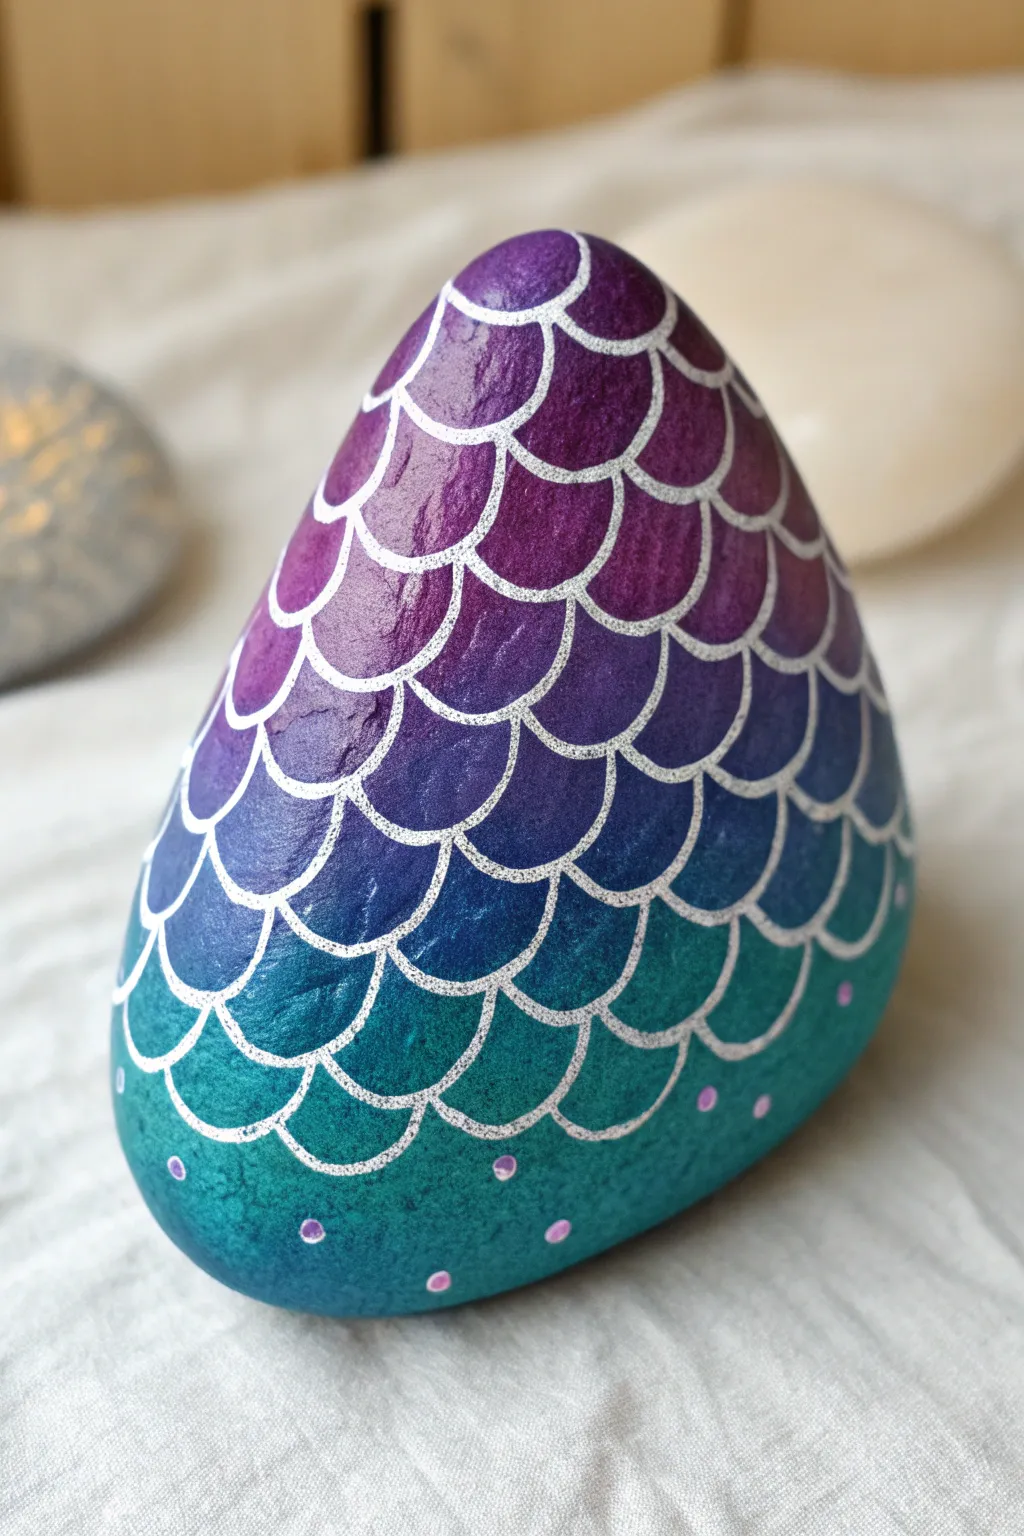
Transform a simple triangular stone into a mythical artifact with this striking gradient design. The seamless blend of deep purples into ocean teals, topped with metallic silver scales, creates a magical mermaid tail effect perfect for any garden or desk.
Detailed Instructions
Materials
- Smooth, triangular-shaped river rock
- Acrylic paints (dark purple, violet, indigo, teal, turquoise)
- Metallic silver paint pen (fine tip/extra fine tip)
- Dotting tool or toothpick
- Flat shader brush (size 4 or 6)
- Makeup sponge (wedge style)
- Palette or paper plate
- Spray gloss varnish or sealant
Step 1: Creating the Ombré Base
-
Prepare your canvas:
Begin by washing your rock thoroughly with soap and water to remove any dirt or oils. Let it dry completely. If your rock is dark, you might want to apply a base coat of white acrylic paint to help the colors pop, though it’s optional. -
Load the palette:
Squeeze out your acrylic colors onto your palette in a line: start with dark purple, then violet, indigo, and finally teal or turquoise. Having them ready helps when we start blending. -
Apply the top color:
Using your makeup sponge, dab the dark purple paint onto the top third of the rock. Use a stippling motion (rapid gentle patting) rather than brushing to get good texture and coverage. -
Blend the middle section:
While the purple is still slightly wet, pick up the indigo or violet paint on a clean part of the sponge. Sponge the middle section of the rock, overlapping slightly with the purple to create a soft transition. -
Finish with teal:
Apply the teal paint to the bottom third of the rock. Again, gently tap over the edge where it meets the indigo to blend the seam. Creating a smooth gradient takes a little patience, so keep tapping until the harsh lines disappear. -
Let it cure:
Allow this base layer to dry completely. A gradient background needs to be perfectly dry before you attempt fine line work, or the pen nib might clog or scrape up the paint.
Scale Sizing Tip
Keep your wrist loose. If you tense up, your scales will look rigid. Imperfect, slightly wobbly lines actually make the scales look more organic and natural.
Step 2: Drawing the Scales
-
Test your pen:
Shake your silver paint pen well and depress the nib on a scrap piece of paper until the ink flows smoothly. You want a consistent line without blobs. -
Start at the top:
Begin at the very peak of the rock. Draw a small, inverted ‘U’ shape or a small circle right at the tip to serve as your starting point. -
First row of scales:
Directly under your starting shape, draw a row of connected ‘U’ shapes. Each ‘U’ should attach to the one beside it, wrapping around the curve of the stone. -
Offset pattern technique:
For the subsequent rows, position the middle of each new scale directly under the point where two scales met in the row above. This brick-laying or offset pattern is crucial for the realistic scale look. -
Continue downwards:
Work your way down the rock, row by row. As the rock widens, you may need to stretch your ‘U’ shapes slightly or sneak in an extra half-scale on the sides to maintain the pattern’s flow. -
Adjusting size:
I prefer to let the scales get just a tiny bit larger as I move toward the bottom, which mimics natural patterns, but keeping them uniform works beautifully too. -
Closing the pattern:
Stop drawing scales about half an inch from the very bottom edge of the rock, leaving a band of solid teal color exposed.
Fixing Smudges
If you smudge a silver line, don’t wipe it! Let it dry completely, then carefully dab a tiny bit of the background color over the mistake before redrawing the line.
Step 3: Final Details
-
Add decorative dots:
Dip your dotting tool or the end of a toothpick into a light purple or lavender paint (you can mix your purple with a little white). Place small dots along the bottom edge of the last row of scales. -
Lower dot accents:
Add a few more scattered dots in the open teal space at the bottom for a magical, bubbling effect. -
Dry and seal:
Wait at least 24 hours for the paint pen ink to fully cure. Finally, seal your artwork with a spray gloss varnish to protect the gradient and make the silver really shimmer.
Place your mystical creation in a sunny spot to watch the silver scales catch the light
Galaxy Sky in a Triangle
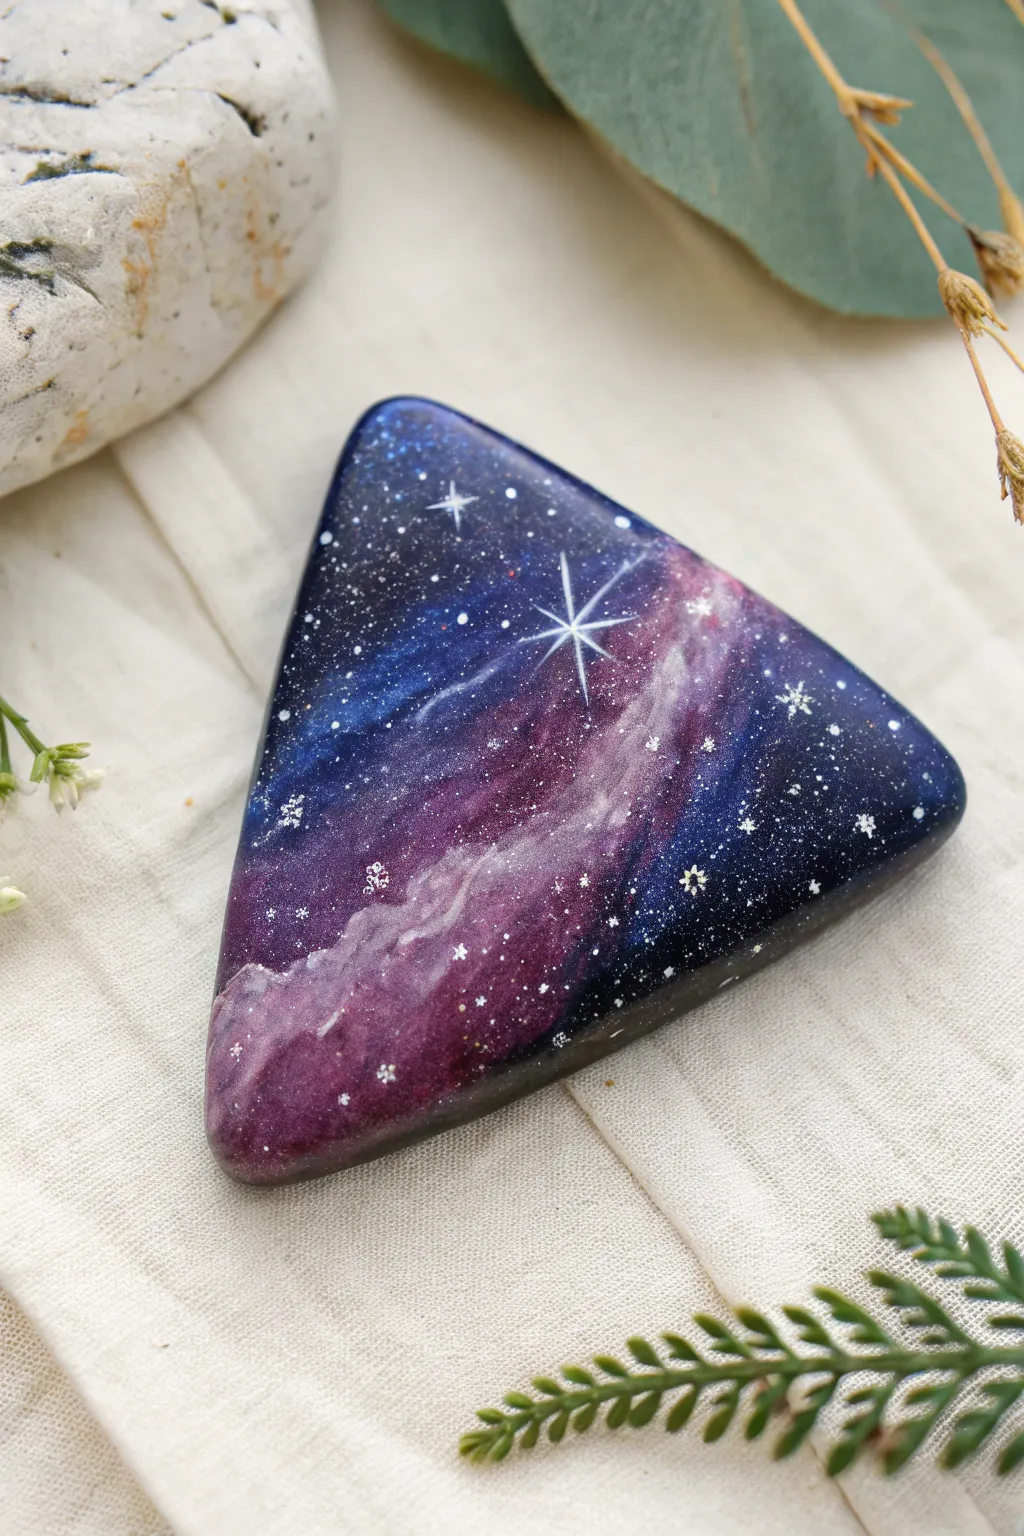
Transform a simple triangular rock into a breathtaking window to the cosmos with this galaxy painting tutorial. Using a blend of deep blues, vibrant purples, and sparkling stars, you’ll create a miniature universe that fits right in the palm of your hand.
Step-by-Step Guide
Materials
- Smooth, triangular river rock
- Gesso or white acrylic primer
- Acrylic paints: Black, Prussian Blue (or Navy), Dioxazine Purple, Magenta, Titanium White
- Flat brush (size 6 or 8) for base coats
- Small round brushes (size 0 and 2) for details
- Detail liner brush (size 000) for starbursts
- Makeup sponge or small pieces of kitchen sponge
- Old toothbrush (optional for spattering stars)
- Palette or paper plate
- Water cup and paper towels
- Gloss varnish or resin for topcoat
Step 1: Preparing the Base
-
Clean the stone:
Wash your triangular rock thoroughly with soap and water to remove any dirt or oils. Let it dry completely before starting. -
Prime the surface:
Apply a coat of white gesso or white acrylic paint to the top face of the rock. This creates a neutral base that will make your dark galaxy colors more opaque and vibrant. -
Apply the dark background:
Mix black with a little bit of Prussian Blue to create a very deep midnight color. Paint the entire surface of the triangle with this dark mixture. -
Dry thoroughly:
Allow this base layer to dry completely. A second coat might be necessary to ensure no white primer peeks through.
Muddy Nebula?
If your galaxy colors turn gray or muddy, you are blending too much while the paint is wet. Let the bottom layer dry completely before sponging a new, lighter color on top.
Step 2: Creating the Nebula
-
Start the color cloud:
Squeeze a small amount of Navy Blue and Purple onto your palette. Using a small piece of sponge, dab the blue gently into the corners and edges, leaving the center slightly darker. -
Add the purple band:
Load a clean area of your sponge with purple paint. Dab a diagonal band or cloud shape across the center of the triangle, blending it softly into the drying blue edges. -
Brighten with magenta:
While the purple is still slightly tacky, dab a small amount of magenta right into the center of the purple cloud. This creates depth and a glowing effect. -
Enhance the highlights:
Mix a tiny touch of white into your magenta to create a pale pink. Sponge this very sparingly into the brightest parts of the nebula cloud to suggest illumination. -
Soft blending:
If the transitions look too harsh, use a barely damp, clean sponge to gently tap over the edges where colors meet to blur them together.
Step 3: Adding Stars and Details
-
Create the milky way dust:
Water down a tiny bit of white paint until it is translucent. Using a brush or sponge, glaze a very faint, milky streak through the center of your nebula clouds. -
Spatter the stars:
Thin down white acrylic paint with water until it has an ink-like consistency. I like to load an old toothbrush and run my thumb across the bristles to flick tiny specks of ‘distant stars’ across the rock. -
Paint larger stars:
Using a fine round brush (size 0), dot several slightly larger white stars randomly around the galaxy, focusing on the dark corners to create contrast. -
Add major starbursts:
Choose one or two spots for a ‘hero’ star. Use your finest liner brush to paint a small plus sign (+) and then an ‘X’ over it to create an eight-pointed starburst. -
Detail varying sizes:
Add tiny cross-shaped stars (+ shapes only) around the main starburst to vary the visual interest. Keep your hand steady and your paint fluid for sharp lines. -
Add glittering accents:
Using the tip of a toothpick or a dotting tool, place tiny white dots in clusters to represent dense star fields.
Pro Tip: Depth trick
Add a few tiny dots of light blue or pale lavender among the white stars. This subtle color variation gives the starfield incredible realistic depth compared to just using plain white.
Step 4: Finishing Up
-
Let it cure:
Allow the painting to dry fully, ideally overnight, to ensure all moisture has evaporated from the layers of paint. -
Seal the artwork:
Apply a coat of gloss varnish or a layer of clear resin. A glossy finish is essential here as it deepens the black background and makes the stars sparkle like real jewels.
Now you have a stunning piece of the galaxy permanently captured on stone to display on your desk or shelf
Mandala Dots That Follow the Edges
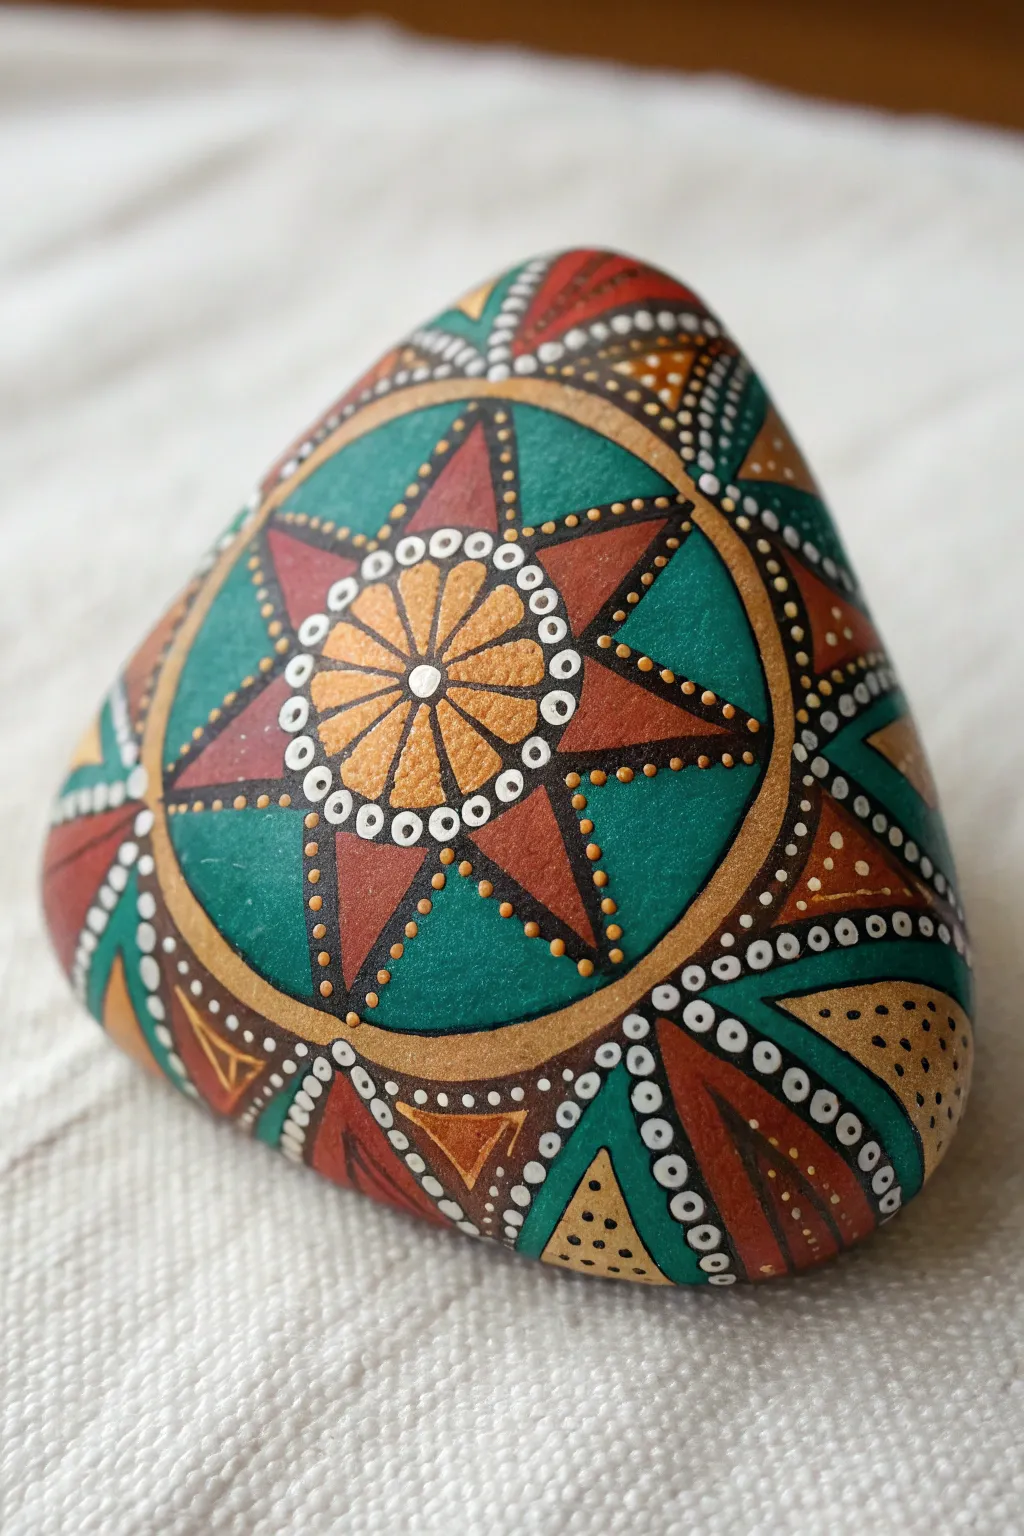
This intricate design transforms a simple triangular stone into a stunning geometric mandala, blending earthy terracotta tones with vibrant teal and gold. The central starburst motif radiates outward, perfectly framed by the rock’s natural edges for a balanced, harmonious look.
How-To Guide
Materials
- Triangular river rock (smooth surface)
- Acrylic paints (Teal/Turquoise, Terracotta/Rust, Gold/Ochre, White, Black)
- Fine liner brushes (sizes 0 and 00)
- Dotting tools (various sizes)
- Pencil and eraser
- Ruler or flexible straight edge
- Compass or circle stencil
- Gloss varnish or clear sealant
Step 1: Base and Structure
-
Clean the canvas:
Begin by scrubbing your rock with soap and water to remove any dirt or oils. Let it dry completely before starting to ensure the paint adheres properly. -
Sketch the center:
Using a pencil, find the approximate center of the rock face. Use a compass or a small stencil to lightly draw a perfect circle that fills the center but leaves about an inch of space around the perimeter. -
Divide the circle:
Lightly mark the center point of the circle. Draw eight evenly spaced radiating lines from the center to the circle’s edge, like slicing a pizza, which will guide your star points. -
Block in background colors:
Paint the background inside the circle. Fill the alternating pie-slice shapes with teal, but leave the radiating lines unpainted for now so you can still see your guides. Let this base coat dry. -
Paint the outer rim:
Paint a thick band of gold or ochre around the outside of your central circle. This creates the primary border separating the central star from the corner designs.
Wobbly Lines?
If your hands shake while doing fine outlines, rest your pinky finger on a dry part of the rock to anchor your hand. Using a paint pen instead of a brush can also offer more control.
Step 2: The Central Star
-
Create the star points:
Using the terracotta paint, create an eight-pointed star. The tips of the star should touch the outer edge of the circle, and the V-shapes between points should extend inward toward the center. -
Add the inner flower:
In the very center, paint a smaller circle in gold/ochre. Then, paint petal shapes radiating from a tiny white central dot, extending out to meet the terracotta star points. -
Outline for definition:
Once the paint is dry, use your finest liner brush and black paint to carefully outline the star points, the inner flower petals, and the main circle. This high contrast makes the design pop. -
Add central dot details:
Using a small dotting tool, place a ring of white dots around the center flower where the gold petals meet the terracotta star. I like to double-check my spacing before committing to paint here. -
Decorate the star points:
Dip a very fine tool into gold paint to add rows of tiny dots along the inner edges of the black outlines on the terracotta star points.
Level Up: Metallic Pop
Swap the standard gold paint for a high-shine metallic gold leaf or enamel. Apply it to the central ring and inner flower petals to make the rock shimmer beautifully in sunlight.
Step 3: Border and Edges
-
Sketch the corner triangles:
Look at the three corners of the rock outside your golden ring. Sketch triangular zones radiating from the ring toward the rock’s points. -
Fill the segments:
Paint these corner triangles in alternating sections of teal, terracotta, and ochre. Aim for symmetry in how the colors mirror each other across the rock. -
Outline the corners:
Use the black liner brush again to outline these new geometric segments, defining the separation between colors. -
Ornate dotting:
This is where the magic happens. Use white paint to add rows of graduated dots along the black divider lines. On darker sections like the terracotta, these white dots create a lace-like effect. -
Detail the outer teal:
On the teal sections near the corners, add tiny black dots for texture. On the gold sections, try adding small black stippling to create shading and depth. -
Final touches:
Inspect the design for any uneven lines. Use a tiny bit of the background color to clean up any messy dot edges. -
Seal the artwork:
Allow the rock to dry for at least 24 hours. Apply a coat of gloss varnish to protect the paint and give it that polished, ceramic-like shine.
Now you have a stunning geometric showpiece that looks complex but is built from simple shapes
Negative Space Edge Framing
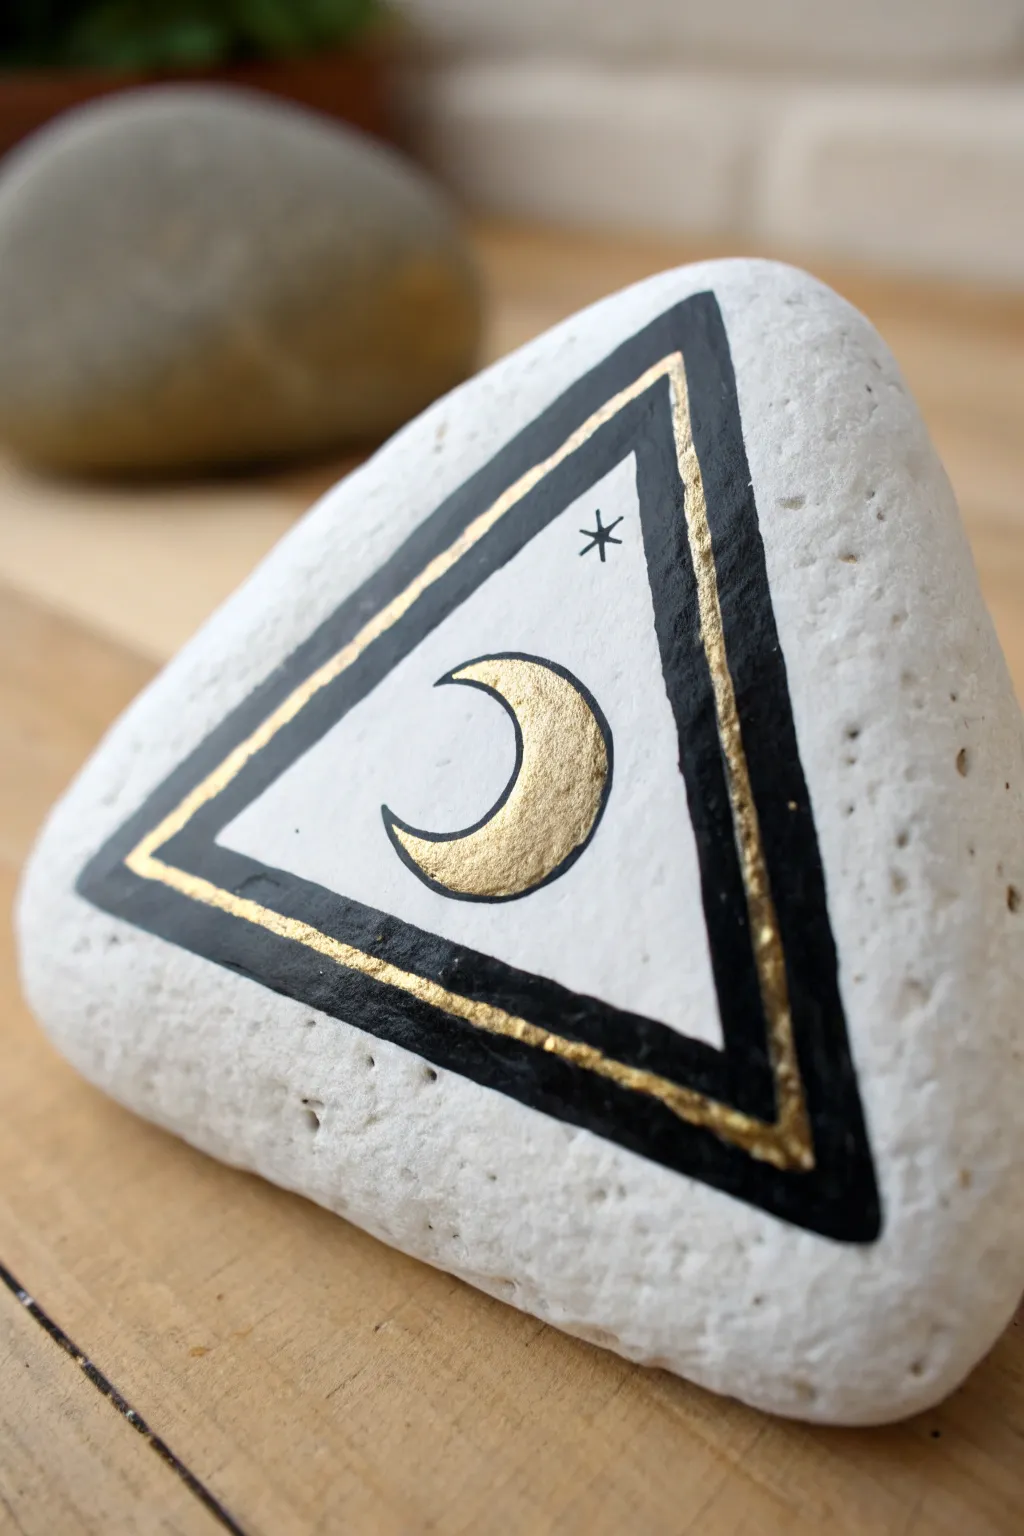
This elegant and mystical design utilizes negative space and striking metallic accents to create a modern talisman. By framing a bright white center with bold black and shimmering gold borders, you achieve a sophisticated look that highlights the celestial moon motif.
Step-by-Step
Materials
- Smooth triangular rock
- White acrylic paint (matte finish)
- Black acrylic paint
- Gold metallic paint (highly reflective)
- Wide flat brush
- Fine detail brush (liner brush, size 0 or 00)
- Pencil (HB or lighter)
- Clear matte or satin sealant spray
Step 1: Base Preparation
-
Clean the canvas:
Begin by scrubbing your triangular rock with soap and warm water to remove any dirt or oils, then let it dry completely. -
Apply the white base:
Using your wide flat brush, paint the entire top surface of the rock with white acrylic paint. You want a solid, opaque background. -
Add a second coat:
Allow the first layer to dry (about 15-20 minutes). If the natural rock color is peeking through, apply a second coat of white for full coverage. -
Settle the surface:
Let the white base coat cure fully. It needs to be perfectly dry before you start sketching, or the pencil will gouge the paint.
Shaky Hands?
Rest your pinky finger on the dry part of the rock while painting details. This anchors your hand and gives you much better control for straight lines.
Step 2: Layout and Sketching
-
Draft the outer triangle:
Using a light touch with your pencil, sketch a triangle shape that follows the contours of the rock, leaving about 1/4 inch of white space from the edge. -
Mark the border thickness:
Sketch an inner triangle line parallel to the first one to create a thick band for the black border. It should be roughly 1/4 inch wide. -
Sketch the moon:
In the exact center of the white negative space, lightly draw a crescent moon shape. Keep the curves smooth and balanced. -
Add the star:
Mark a small spot or tiny ‘x’ near the top point of the inner triangle where the star will eventually go.
Step 3: Border Painting
-
Paint the black border:
Load your fine detail brush with black paint. Carefully fill in the band between your pencil lines to create the thick triangular frame. -
Refine the edges:
Go over the black edges slowly to ensure they are crisp and sharp. I like to rotate the rock as I work to keep my hand angle comfortable. -
Let the black dry:
Wait for the black paint to dry completely. This is crucial so the gold paint doesn’t mix with it in the next step. -
Apply the gold liner:
Using a clean detail brush and metallic gold paint, paint a thin line directly down the center of the black border. The black should remain visible on both sides of this gold line. -
Enhance opacity:
Metallic paints can be semi-transparent. Dab on a second layer of gold over the line if needed to make it truly shine against the dark background.
Go Celestial
Paint the background deep navy instead of white, and splatter tiny white dots for ‘stars’ before painting the central gold moon.
Step 4: Central Motifs
-
Fill the moon:
Using the gold paint, carefully fill in your crescent moon sketch. Start from the center and push the paint gently toward the outline. -
Fix moon edges:
Smooth out the tips of the crescent moon with the very tip of your brush to make them sharp and pointy. -
Outline the moon:
Once the gold moon is dry, use your finest brush with a tiny amount of black paint to very thinly outline the crescent shape for definition. -
Detail the star:
Paint the small star motif near the top apex using black paint. A simple asterisk shape (three intersecting lines) works perfectly. -
Final touches:
Check for any smudges or uneven lines. You can touch up the white background if any black paint strayed too far. -
Seal the artwork:
Once absolutely dry (I wait overnight typically), spray the rock with a matte or satin sealant to protect the design and prevent the metallic paint from tarnishing.
Place your finished moon stone on a desk or altar to bring a little grounded magic to your space
Layered Mountains Inside the Triangle
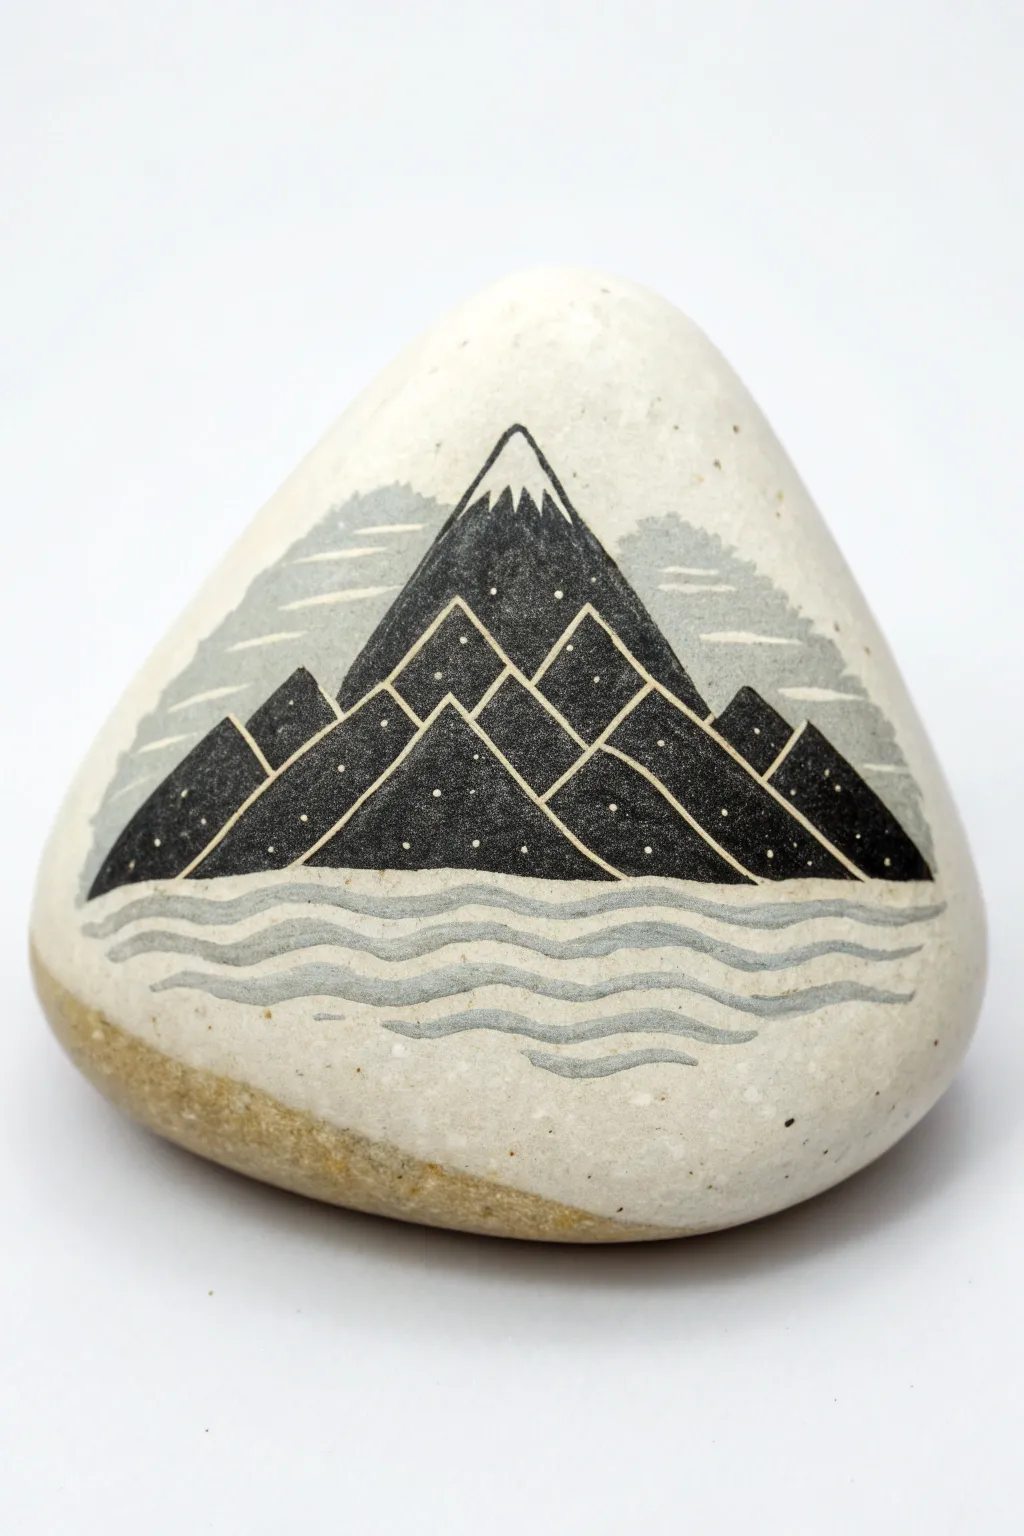
Transform a simple triangular stone into a striking monochrome landscape using clean lines and clever layering. This minimalist mountain design balances bold black geometry with soft grey wisps and waves for a sophisticated finish.
Step-by-Step Guide
Materials
- Smooth triangular rock (approx. palm-sized)
- Black acrylic paint or Posca marker (fine tip)
- White or light beige acrylic paint for mixing
- Very fine detail brush (00 or 000 size)
- Small flat brush
- Pencil for sketching
- Matte spray sealant
Step 1: Preparation and Background
-
Clean the canvas:
Begin by thoroughly washing your rock with soapy water and letting it dry completely. The surface needs to be free of dust for the fine lines to stick. -
Mix a cloud grey:
Mix a small amount of black with a larger amount of white acrylic paint to create a soft, mid-tone grey. You want this to look like mist or atmospheric clouds. -
Paint the background mist:
Using a small flat brush, paint indistinct, horizontal cloud shapes in the upper two-thirds of the rock. Don’t worry about crisp edges here; a slightly rough, dry-brush texture adds to the atmospheric effect. -
Add lower cloud banks:
Add a few more jagged patches of this grey wash lower down on the sides, where the base of your mountains will essentially sit. Let all paint dry fully before moving on.
Shaky Lines?
If you struggle painting straight lines on a curved rock, use small strips of washi tape or masking tape as stencils for the straight edges of your triangles.
Step 2: Drafting the Peaks
-
Sketch the central peak:
With a pencil, lightly draw a large triangle in the center. The tip should sit near the top of the rock, but leave some ‘sky’ visible above it. -
Sketch the foreground range:
Draw smaller overlapping triangles in front of the main peak. Create a jagged range by varying their heights and widths, ensuring they span the entire width of the rock. -
Outline the mountains:
Using your fine black marker or detail brush, carefully trace over your pencil lines. Keep your hand steady to ensure straight, geometric edges. -
Add snow caps:
Near the top of your large central mountain, draw a jagged, wobbly line to demarcate the snow cap. Leave the tip of the mountain unpainted (showing the stone’s natural color) and paint the rest of the triangle solid black.
Pen vs. Paint
For the crispest white separation lines, a white gel pen or extra-fine paint marker is much easier to control than a brush and delivers cleaner results.
Step 3: Filling and Detailing
-
Block in the mountains:
Fill in all the lower mountain triangles with solid black paint. I find it easiest to work from the center outwards to avoid smudging wet paint with my hand. -
Create distinct separations:
Once the black is dry, use a very fine brush with white or cream paint (or a white gel pen) to trace thin lines along the edges of the overlapping mountains. This separates the black shapes so they don’t blend into one blob. -
Add the starry texture:
Dip the very tip of your smallest brush or a toothpick into white paint. Gently dot the black areas of the mountains to create a starry or granite-like texture. Keep the dots random and sparse. -
Paint the water ripples:
Using the same grey mix from step 2, paint wavy, horizontal lines underneath the mountains at the base of the rock. Vary the thickness slightly to mimic moving water. -
Refine the water:
Add a few thinner, lighter lines in between the grey waves to create depth and movement in the water section. -
Final touches:
Check your ‘snow cap’ on the main peak. You can add small tick marks of black extending upwards into the white cap to make it look like rugged terrain. -
Seal the artwork:
Once absolutely dry (give it at least an hour), spray the rock with a matte sealant to protect the paint from chipping and to unify the finish.
Now you have a serene, portable mountain range that fits right in your pocket
Surreal Doorway in a Triangle Mountain
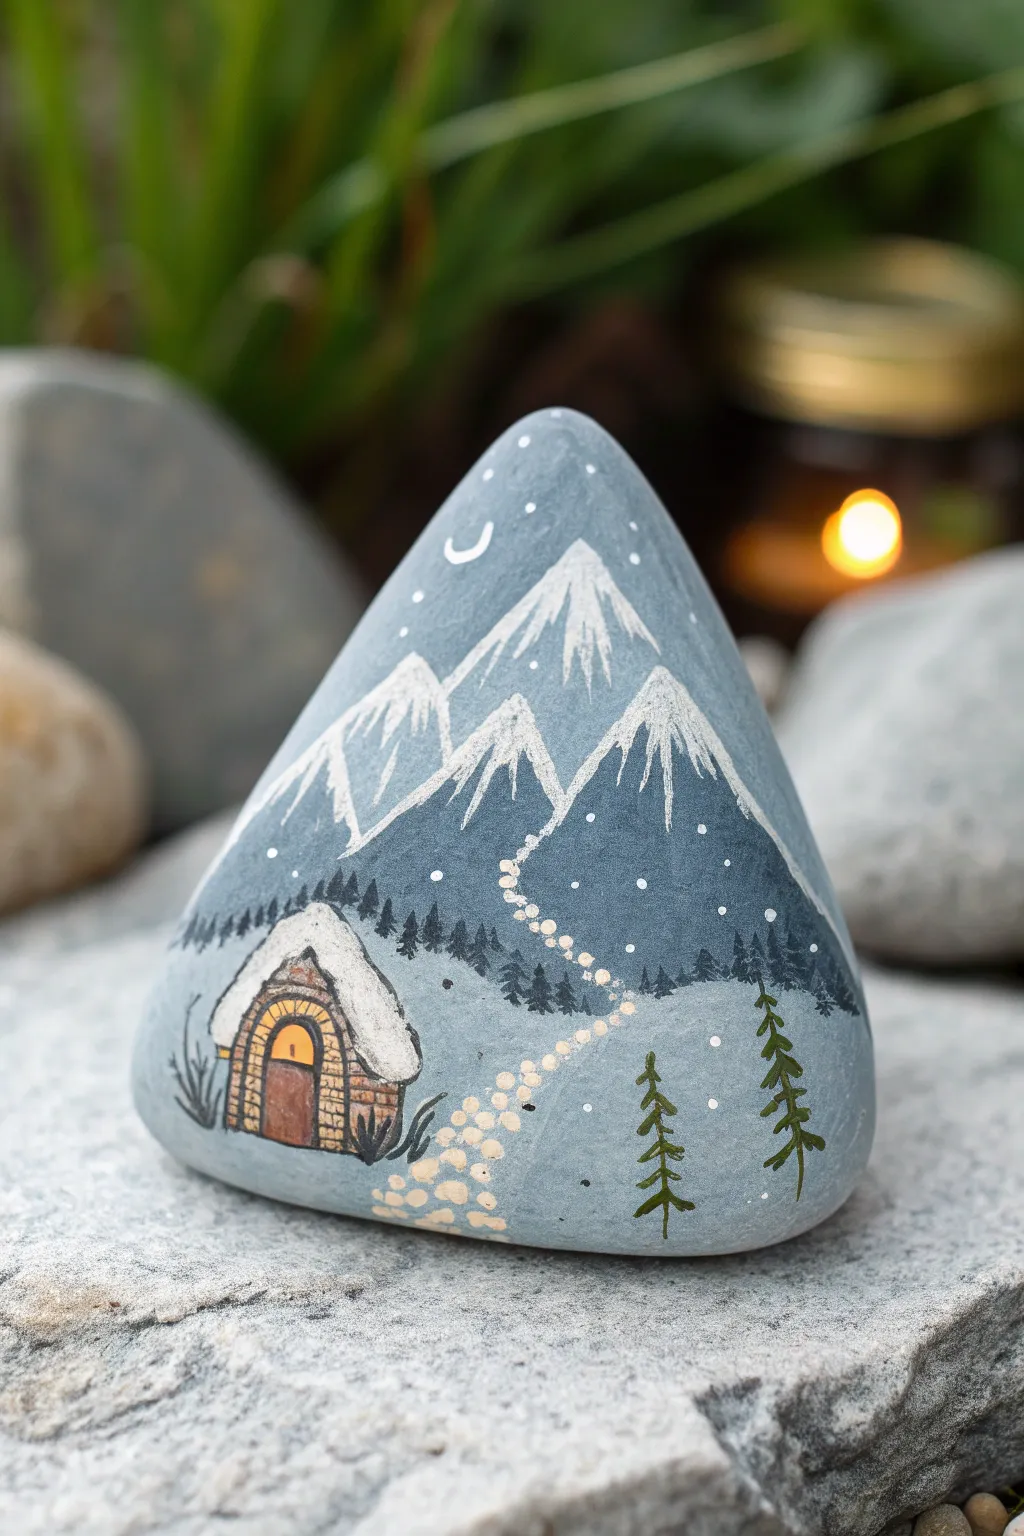
This charming painted rock features a cozy, glowing cottage nestled at the base of snowy peaks, perfect for bringing a touch of whimsy to your garden or desk. The triangular shape of the stone itself naturally frames the majestic mountain scene.
Step-by-Step Guide
Materials
- Triangular-shaped river rock (smooth surface)
- Acrylic paints: Slate Grey, Navy Blue, Titanium White, Burnt Umber, Yellow Ochre, Black
- Fine detail brushes (sizes 0 and 00)
- Small flat brush (size 2 or 4)
- Dotting tool or toothpick
- Spray varnish or clear sealer (matte or satin finish)
- Pencil for sketching
- Palette or small plate for mixing
- Cup of water and paper towels
Step 1: Base and Background
-
Clean the canvas:
Begin by scrubbing your rock with soap and warm water to remove any dirt or oils. Let it dry completely before starting, as moisture can trap bubbles under the paint. -
Mix the base color:
Create a cool, stormy grey by mixing a large amount of Slate Grey with a tiny touch of Navy Blue. This will serve as both the sky and the overall mountain tone. -
Apply the base coat:
Using your flat brush, cover the entire front face of the rock with your grey mixture. You may need two coats for full opacity, allowing the first to dry to the touch before adding the second. -
Sketch the mountains:
Once the base is fully dry, lightly use a pencil to outline the three main mountain peaks. Notice how they follow the rock’s natural triangular shape. -
Define the peaks:
Mix a slightly darker shade of grey-blue (add a bit more Navy or a tiny dot of Black to your base mix). Paint the mountain shapes below your pencil lines, leaving the very tips and ridges for the snow later.
Uneven Texture?
If your rock has deep pits, mix a little white glue with baby powder to create a paste. Fill the holes, let it dry hard, and sand smooth before painting.
Step 2: Snow and Landscape
-
Add snowcaps:
Using a small detail brush and Titanium White, paint the snow on the mountain peaks. Use downward, jagged strokes to mimic rugged terrain and snowdrifts. -
Create the horizon line:
About a third of the way up from the bottom, paint a horizontal flowing line of white to represent the snowy ground where the mountains meet the valley. -
Paint the forest:
Mix a very dark grey-green or black. Using your finest brush, paint a row of tiny, vertical lines along the horizon line for tree trunks. -
Fill out the trees:
Add tiny dabbed branches to these trunks to create a distant pine forest silhouette. Vary the heights slightly for a natural look. -
Foreground evergreens:
On the bottom right, paint two larger, distinct pine trees using a dark green mix. Start with a vertical line and use short, downward flicks for branches, getting wider at the base.
Step 3: The Cottage and path
-
Outline the cottage:
On the bottom left, sketch a small arch shape. Paint the main structure with Burnt Umber mixed with a little white for a lighter wood tone. -
Add the roof:
Paint a thick, curved layer of white on top of the cottage to look like a heavy blanket of snow. Let it overhang the edges slightly. -
Create the door:
Paint a smaller arch inside the cottage shape using a darker brown. Add a rectangular door in the center. -
Make it glow:
Paint the upper part of the doorway arch with Yellow Ochre to simulate warm light spilling out. I like to add a tiny dot of white in the center of the yellow to make the light look intense. -
Detailed stonework:
Use your finest brush or a black fine-liner pen to draw bricks or stones around the door frame and lines on the wooden door. -
Paint the path:
Using a dotting tool or the end of a paintbrush handle dipped in a cream color (White + tiny drop of Brown), creat a winding path of dots leading from the cottage up toward the mountains. -
Graduate the dots:
Make the dots larger near the house and gradually smaller as the path winds upward to create perspective.
Add Sparkle
While the white paint on the snowy roof and mountain peaks is still wet, sprinkle a tiny pinch of iridescent glitter over it for a magical, frosty shimmer.
Step 4: Finishing Touches
-
Starry night:
Dip a toothpick in white paint and add tiny dots in the sky area for stars. Add a small crescent moon near the top peak. -
Add falling snow:
Add a few more scattered white dots over the mountains and trees to create the effect of light snowfall. -
Seal the artwork:
Allow the rock to cure for at least 24 hours. Finish with a spray varnish to protect your painting from weather and scratches.
Place your finished mountain rock on a shelf or hide it in a park for someone to find


Have a question or want to share your own experience? I'd love to hear from you in the comments below!