Paint can turn an archway into the kind of detail that makes a room feel designed, even if everything else is simple. Here are my favorite archway painting ideas—from classic, clean looks to artsy statement moments you can totally make your own.
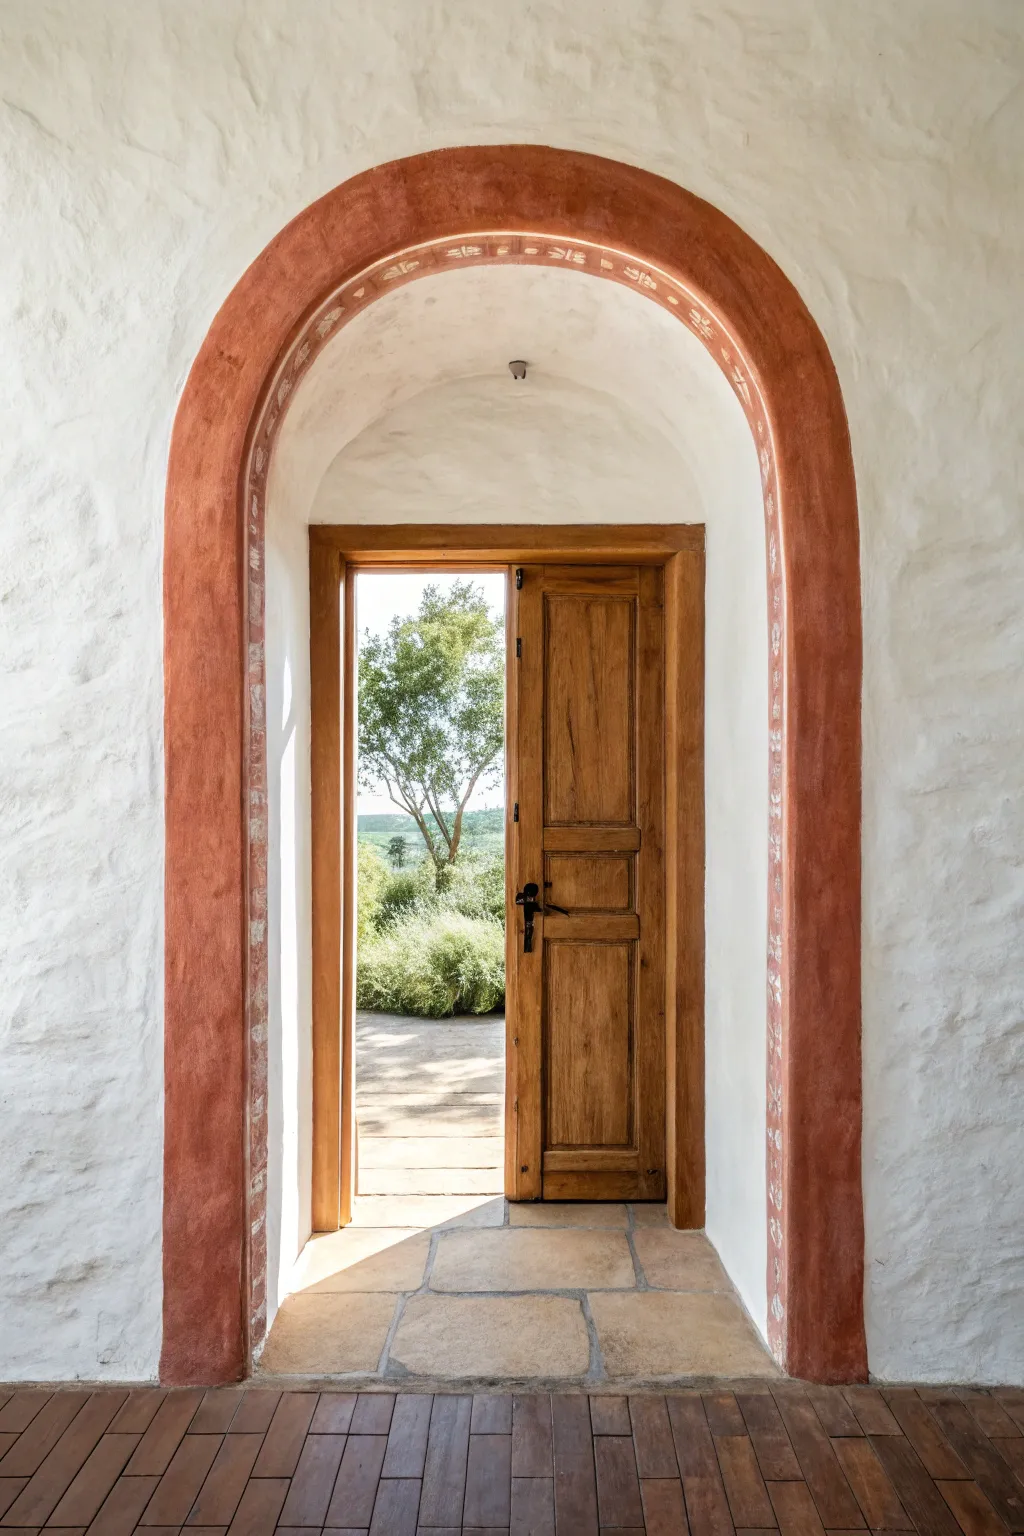
Contrast Color on a Real Archway
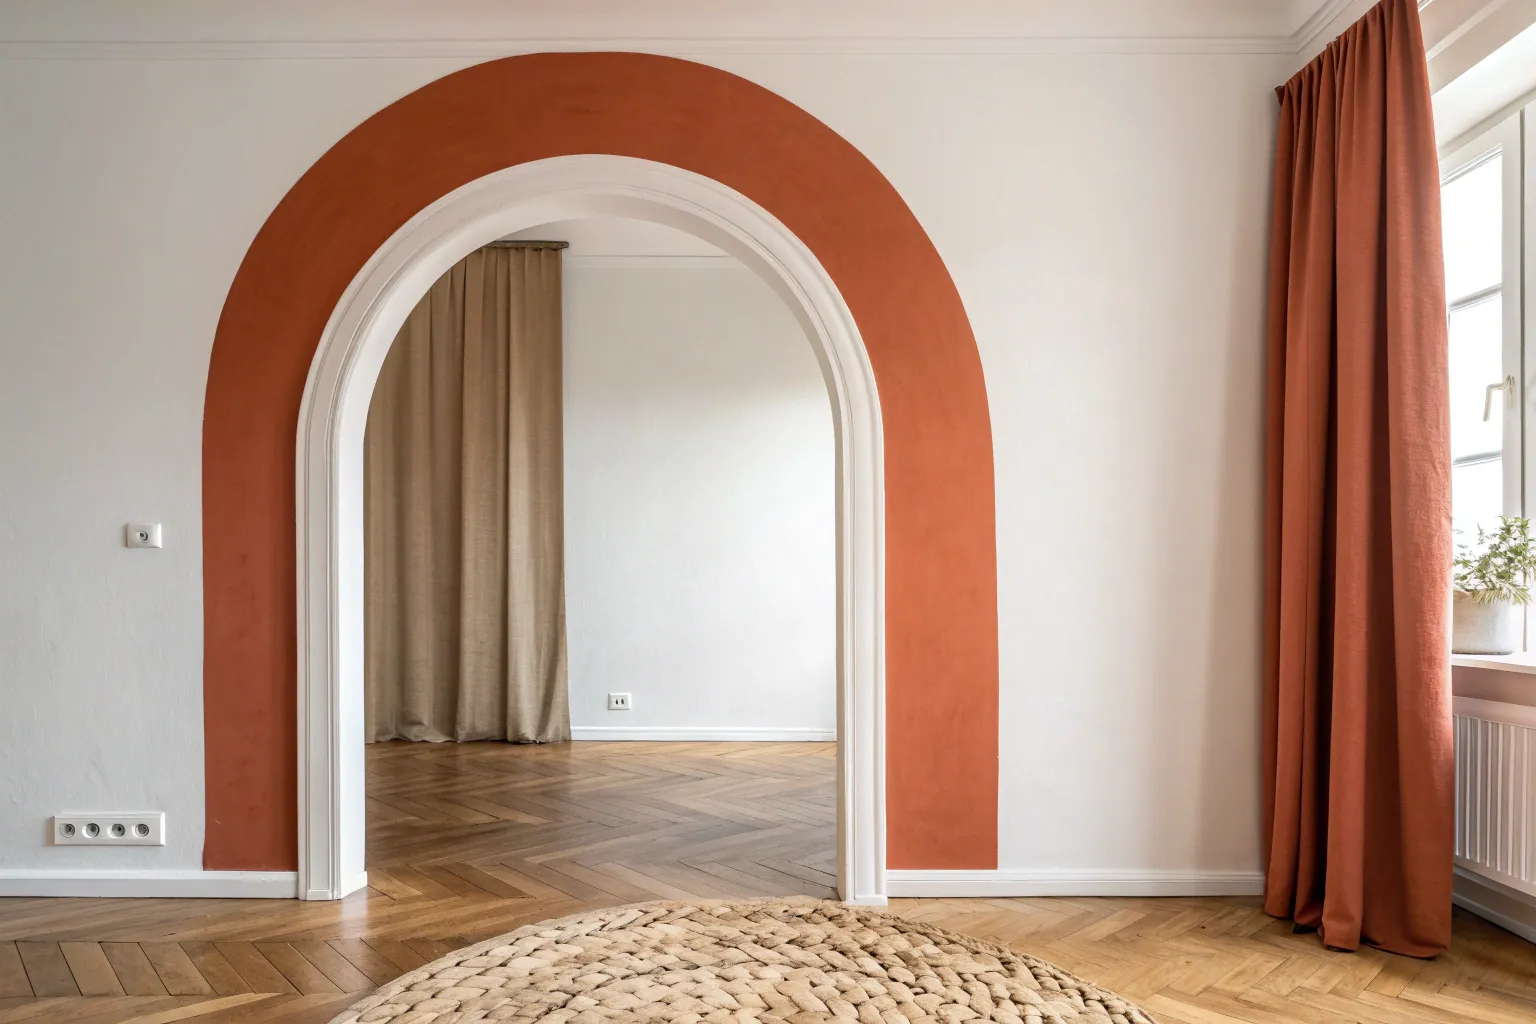
Transform a plain arched doorway into a striking architectural feature with this two-tone painted border. The warm rust tones and hand-painted striped detailing evoke a charming, rustic Mediterranean feel that adds instant character to white walls.
How-To Guide
Materials
- Terracotta or rust-colored interior latex paint (matte or eggshell)
- White interior latex paint (matching your wall color)
- 1-inch painter’s tape (high adhesion)
- Pencil
- Flexible measuring tape
- String and clear tape (for guiding curves)
- 1-inch angled sash brush
- Small flat artist’s brush (interior detailing)
- Medium round artist’s brush
- Drop cloth
- Damp rag
Step 1: Preparation & Mapping
-
Clean the surface:
Begin by wiping down the entire archway area with a damp rag to remove dust or grime, ensuring the paint adheres properly to the rough plaster texture. -
Protect the floor:
Lay down your drop cloth directly under the archway, securing it with tape if necessary to prevent it from sliding while you work overhead. -
Define the outer boundary:
Determine how wide you want the total festive border to be; in the example, it extends about 6-8 inches from the opening. Mark this outer edge lightly with a pencil at intervals around the arch. -
Create a guideline:
Connect your pencil marks. Because the walls are textured, a perfect curve might be hard to trace, so trust your eye to sketch a smooth, consistent arch line. -
Tape the inner edge:
Apply painter’s tape carefully along the inner door jamb where the wall face meets the inside of the archway to keep paint off the inner return for now.
Wobbly Lines?
If your white stripes look too shaky on the textured wall, use a ‘dry brush’ technique with very little paint to sketch them first, then fill them in solidly.
Step 2: The Base Coat
-
Outline the shape:
Using your 1-inch angled sash brush, carefully cut in the outer edge of your terracotta shape along the pencil line you drew, painting freehand for a slightly organic look or using tape for precision. -
Fill in the arch:
Fill the space between your outer line and the door opening with the terracotta paint. Don’t worry about the white stripes yet; paint the entire solid block of color first. -
Create the capitals:
At the base of the arch curve (the springline), extend the paint slightly horizontally to create the small rectangular ‘capitals’ or blocks shown in the image. -
Paint the jambs:
Continue painting a vertical strip of terracotta down the sides of the doorframe, narrower than the arch above, to ground the design. -
Apply a second coat:
Let the first coat dry for at least 2 hours. Apply a second coat to ensure a rich, opaque color, especially because textured walls can absorb paint unevenly. -
Dry thoroughly:
Allow this base layer to dry completely—ideally overnight—before attempting to paint the white details on top.
Pro Tip: Custom Curve
To get a perfect arc on the initial layout, tape a string to the exact center of the floor below the arch and use it like a giant compass to guide your pencil marks.
Step 3: Detailing the Stripes
-
Mark the center arc:
Using a pencil and string acting as a compass (anchored at the center of the doorway floor), lightly draw a curve through the middle of your dried terracotta arch. -
Draft the stripe segments:
Along this central curve, make small tick marks to space out your diagonal stripes evenly. Aim for roughly equal spacing, but remember imperfect spacing adds to the hand-painted charm. -
Paint the upper contour:
Dip your medium round artist’s brush in white paint. Paint a continuous thin white curved line near the top edge of the terracotta arch, following its shape. -
Paint the lower contour:
Paint a matching continuous white curved line near the bottom edge of the terracotta arch, just above the door opening. -
Paint the diagonals:
I like to start from the top center and work down. Using the flat artist’s brush, paint the diagonal hash marks connecting your upper and lower white contours. -
Refine the edges:
Go back over your white lines with a second pass if the terracotta is showing through too much, ensuring a crisp contrast. -
Clean up:
Remove any painter’s tape carefully at a 45-degree angle. Use a tiny brush with your original wall color to touch up any ragged edges on the outside of the arch.
Step back and admire how this simple painted addition completely redefines the entrance with warmth and architectural interest.


Paint the Inner Curve a Surprise Shade
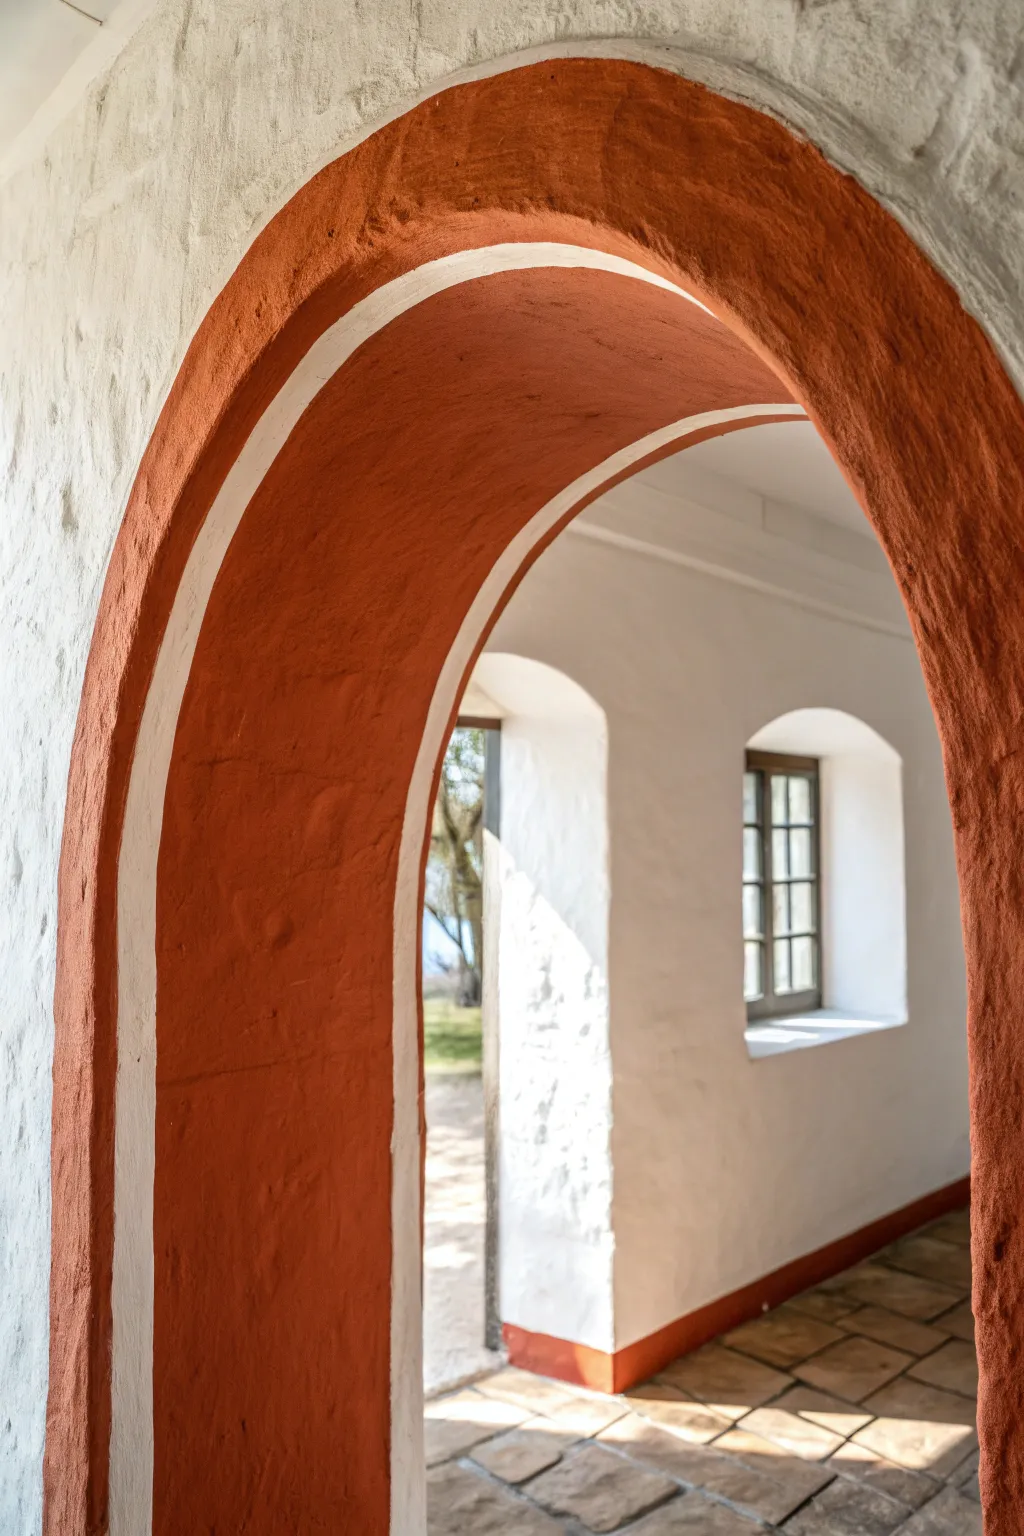
Transform a plain white archway into a striking architectural feature by painting the inner curve with a bold, earthy terracotta tone accented by a crisp white stripe. This technique highlights the depth of the wall and adds warmth to a minimalist space without overwhelming the room.
Step-by-Step
Materials
- High-quality interior latex paint (Terracotta/Rust Red)
- Small angled sash brush (1.5 – 2 inch)
- Painter’s tape (frog tape or similar sharp-line tape)
- Clean rag or tack cloth
- Drop cloth
- Small paint tray
- Ladder or sturdy step stool
- Sanding block (fine grit)
- Flexible measuring tape
- Pencil
Step 1: Preparation & Mapping
-
Clean surface:
Begin by thoroughly cleaning the inner curve of your archway. Use a damp rag to remove any dust or cobwebs that might be clinging to the textured stucco, as these will ruin your paint adhesion. -
Protect the floor:
Lay down your drop cloth directly underneath the arch, securing it if necessary, to catch any potential drips from overhead painting. -
Tape outer edges:
Apply painter’s tape along the outer corner edges of the archway where the inner curve meets the main wall face. Press the tape down firmly with your finger to seal it against the texture. -
Measure the center:
Using a flexible measuring tape, find the exact center width of the inner arch curve. Mark this center point lightly with a pencil at the top of the arch and near the floor on both sides. -
Map the stripe:
Decide on the width of your white pinstripe (approx. 1 inch works well). Measure half an inch out from your center marks on both sides to define the boundaries of the stripe. -
Tape the stripe:
Carefully apply two long strips of painter’s tape to mask off this center line. Follow the curve slowly to ensure the tape remains parallel all the way around the arch. -
Seal tape edges:
Run a clean, dry rag or your fingernail firmly along the edges of all your tape strips. On textured walls, this step is crucial to prevent paint from bleeding under the adhesive.
Step 2: Painting
-
Cut in edges:
Dip your angled sash brush into the terracotta paint. Carefully paint along the tape lines first—both the outer edges and the central stripe masking—using short, controlled strokes. -
Fill the gaps:
Once the edges are defined, fill in the remaining red sections of the arch. Using the brush helps get paint into the dimples of the stucco texture better than a roller would. -
Check for holidays:
Inspect the wet paint for ‘holidays’ (missed spots), which are common on rough surfaces. Dab the brush tip into any deep pores that didn’t catch paint on the first pass. -
Dry first coat:
Allow the first coat to dry completely according to the manufacturer’s instructions. I usually give it an extra hour if the humidity is high. -
Apply second coat:
Apply a second coat of the terracotta paint to ensure a rich, opaque finish that completely hides the white underneath.
Bleeding on Texture?
Textured walls are tricky! Before applying the red, paint over the tape edge with your WHITE base color first. This seals the tape gaps with white, so any red applied later can’t bleed under.
Step 3: Finishing Touches
-
Remove tape (wet):
While the second coat is still slightly tacky (not fully dry), carefully peel back the painter’s tape at a 45-degree angle. This helps create a sharp line without pulling up dried paint chips. -
Clean the stripe:
Inspect your central white stripe. If any red paint managed to bleed through, wait for it to dry fully, then effect a tiny touch-up with a small artist’s brush and your original white wall paint. -
Address outer edges:
Similarly, check the outer edges where the arch meets the room walls for any bleeding and touch up with white paint if needed to crisp up the line. -
Optional baseboard painting:
If your room has baseboards or a painted trim line at the floor (like the red trim in the photo), continue the red paint along the floor edge to visually ground the arch. -
Final cure:
Let the archway cure undisturbed for at least 24 hours before touching it or moving furniture back against it.
Smooth curves
For the curved top of the arch, use shorter pieces of tape (roughly 4-6 inches) slightly overlapped. This allows you to navigate the radius without the tape buckling or wrinkling.
Step back and admire how this simple splash of color creates a sophisticated frame for the view into the next room


Full Color Block Inside the Archway
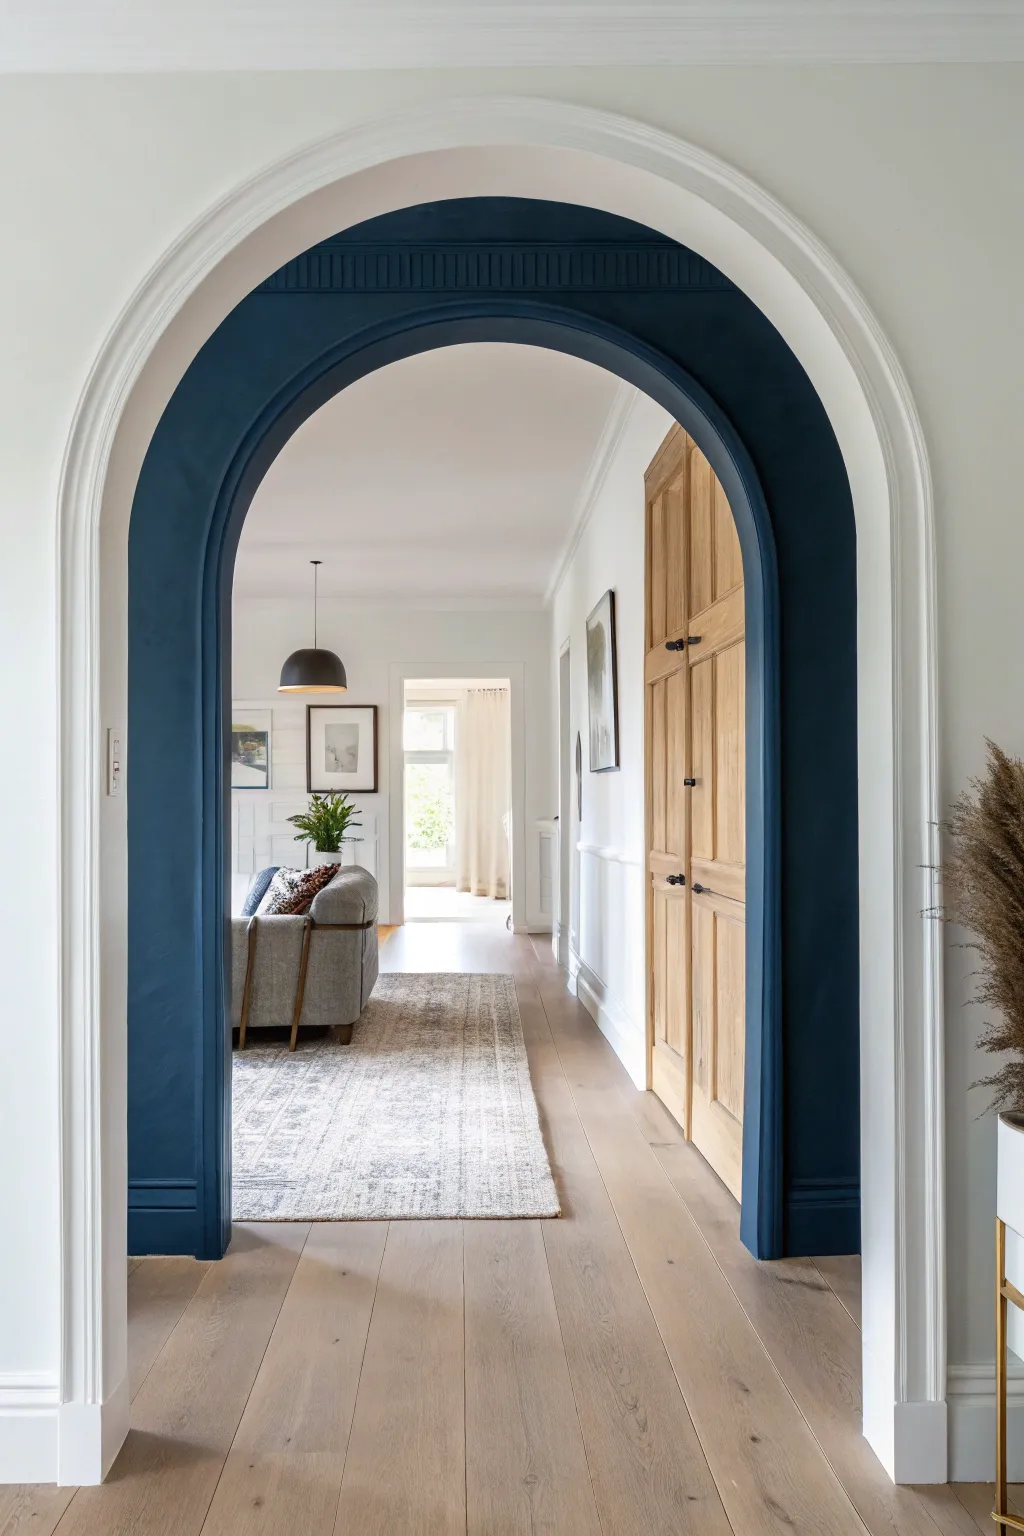
Transform a standard pass-through into a striking architectural feature by blocking out the archway’s interior reveal with a deep, moody color. This high-contrast technique adds instant depth and framing to your hallway without requiring any structural changes.
Step-by-Step
Materials
- Deep navy or charcoal interior paint (satin finish)
- High-quality angled sash brush (1.5 or 2 inch)
- 4-inch mini roller frame
- Microfiber roller covers (3/8 inch nap)
- Painter’s tape (delicate surface)
- Sanding sponge (fine grit)
- Tack cloth
- Drop cloth
- Small paint tray
- Ladder or sturdy step stool
- Screwdriver (for removing hardware if applicable)
Step 1: Preparation and Surface Work
-
Assess the archway:
Inspect the inner curve and the vertical sides (the jambs) of your archway. If there are any nail holes or dings, fill them with spackling paste now. -
Sand for adhesion:
Once any filler is dry, lightly scuff sand the entire inner surface of the arch using a fine-grit sanding sponge. This is crucial if the previous paint was gloss or semi-gloss. -
Clean deeply:
Wipe away all sanding dust. I like to use a tack cloth for the final pass to ensure absolutely no debris interferes with that smooth navy finish. -
Tape the perimeter:
Apply painter’s tape along the outer edge where the archway jamb meets the wall or the casing trim. Press the tape edge down firmly with a putty knife or your fingernail to prevent bleed-through. -
Protect the floor:
Tape down a drop cloth or heavy paper on the floor directly inside the archway. Painting ceilings and arches often leads to tiny drips.
Crisp Line Secret
Before painting the navy, seal your tape edge by painting over it with a thin layer of your existing WHITE wall color first. This blocks leaks.
Step 2: Cutting In and Edging
-
Open the paint:
Stir your deep navy paint thoroughly. Dark pigments settle quickly, so you need to make sure the color is perfectly uniform. -
Load the sash brush:
Dip your angled brush about one inch into the paint. Tap off the excess; you don’t want a heavy load when working overhead on a curve. -
Cut in the edges:
Carefully paint along the tape line where the jamb meets the wall. Work in small sections, about one foot at a time. -
Address the corners:
Use the tip of the brush to get into any detailed grooves if your archway has routed woodwork or molding profiles at the top. -
Feather the paint:
Feather the paint slightly inward toward the center of the jamb so you don’t leave a hard ridge of paint that the roller can’t smooth out.
Step 3: Rolling the Color Block
-
Prepare the mini roller:
Load your 4-inch roller with paint. It should be saturated but not dripping. -
Roll the vertical sides:
Start with the straight vertical sides of the archway. Roll in long, smooth up-and-down motions to cover the surface evenly. -
Roll the curve overhead:
Move to the curved top section. Roll slowly across the curve. You might need to make shorter, horizontal strokes here to follow the shape without scraping the roller frame on the wall. -
Check for coverage:
Dark colors often look patchy on the first coat. Don’t overwork it to fix this now; just let it dry completely. -
Allow drying time:
Wait at least 2-4 hours, or check your paint manufacturer’s recommendation for recoat time.
Add Texture
For a truly custom look, install flexible reeded molding inside the arch curve before painting it all navy to add tactile architectural interest.
Step 4: Second Coat and Finishing
-
Apply the second coat:
Repeat the cutting-in and rolling process. This second layer is where the deep, rich ‘color block’ effect really comes to life. -
Inspect for light spots:
Use a bright light to check for any holidays (missed spots), especially up in the curve which can be hard to see from the ground. -
Remove tape while wet:
For the cleanest line, carefully peel off the painter’s tape while the second coat is still slightly tacky, pulling it away from the fresh paint at a 45-degree angle. -
Touch up:
If any paint bled under the tape, wait for it to dry fully, then use a tiny artist’s brush and your wall color to correct the line.
Step back and admire how this simple block of color dramatically frames the room beyond.


Faux Arch Painted Over a Doorway
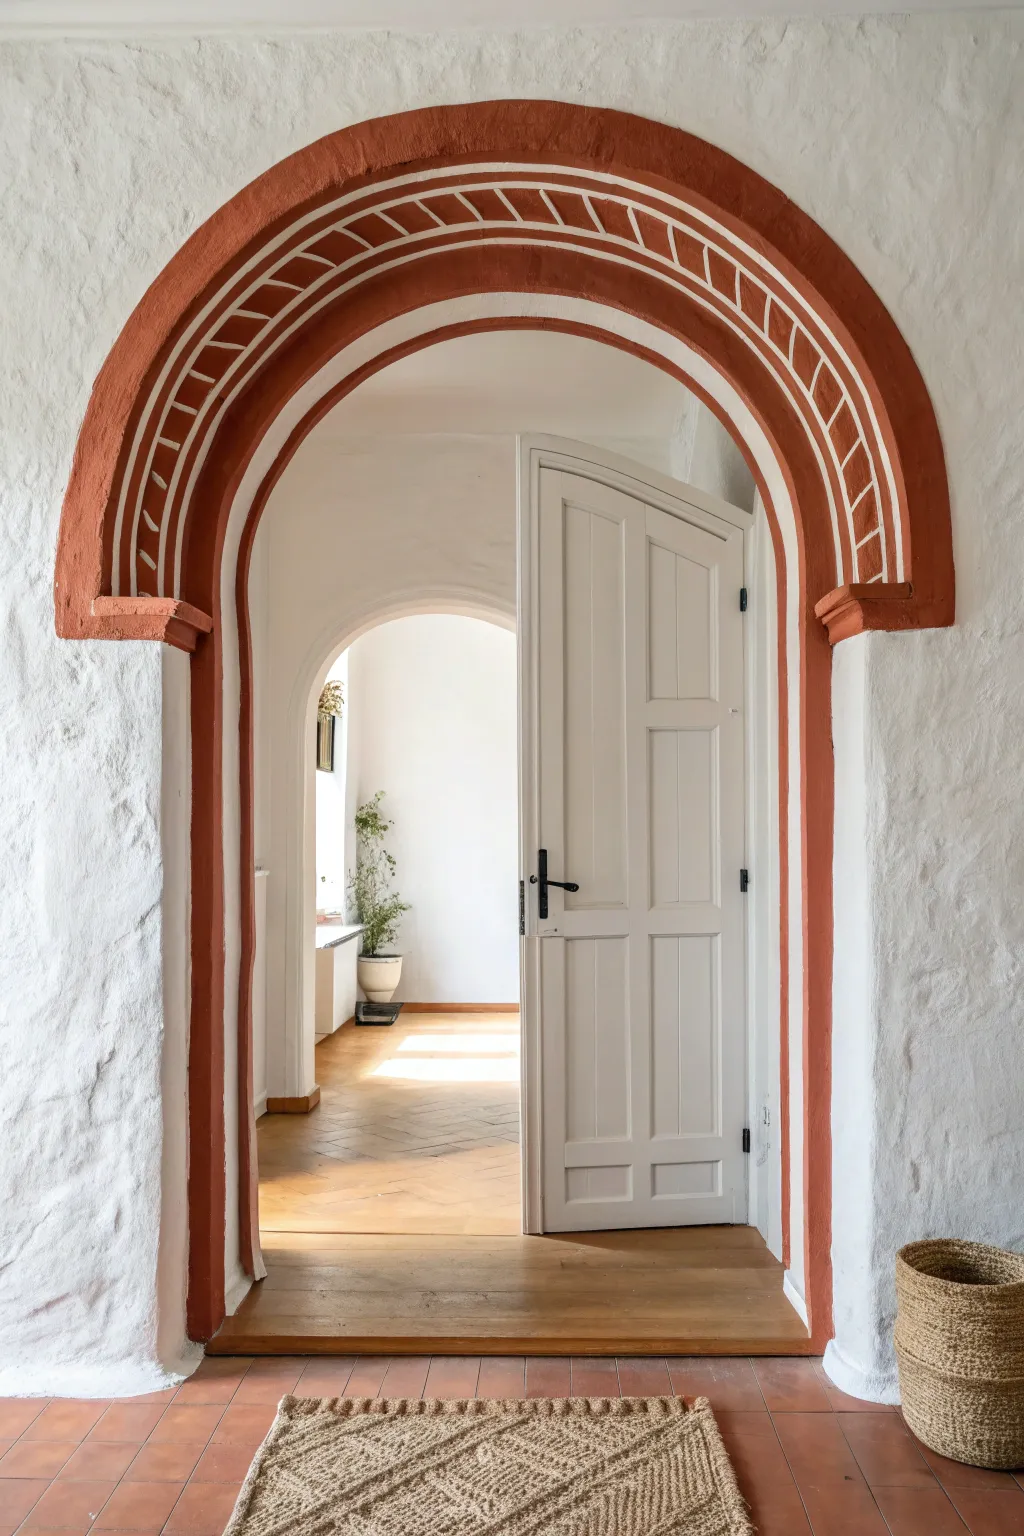
Transform a standard doorway into a grand Mediterranean entrance with this textured, faux-painted archway. By mimicking the look of aged plaster and exposed brickwork, you can add structural depth and warmth without any renovation debris.
Step-by-Step Guide
Materials
- Warm terracotta latex paint (matte finish)
- Off-white or cream latex paint (matte finish)
- Glazing medium
- Pencil
- Measuring tape
- String and push pin (for the compass trick)
- Painter’s tape (2-inch width)
- Small artist brush
- Sea sponge or rag (for texture)
- Small angular sash brush
- Level
Step 1: Planning and Outline
-
Measure the opening:
Begin by measuring the width of your existing door frame. Decide how wide you want the faux arch to be; in this project, the painted band is approximately 6–8 inches wide on either side. -
Find the center point:
Mark the exact center above your door frame with a pencil. Measure upwards to determine the peak of your arch relative to the door’s height. -
Draw the outer arch:
Create a makeshift compass using a piece of string and a push pin. Secure the pin at the center point below the top of the frame, tie a pencil to the other end at your desired radius, and lightly trace the outer curve of the arch. -
Draw the inner arch:
Shorten the string by the width of your painted band (e.g., 6 inches) and trace a second, smaller arch inside the first one to create the borders of your design. -
Connect the sides:
Use a level and a straight edge to drop vertical lines from the ends of your curved arches down to the floor, completing the outline of the archway structure.
Textural Depth Hack
Mix a teaspoon of baking soda or plaster of Paris into your terracotta base paint. This thickens the paint, creating physical texture that looks just like real stucco when dry.
Step 2: Base Painting
-
Tape the edges:
Apply painter’s tape along the outside of your pencil lines to ensure a crisp edge. Press the tape down firmly to prevent bleed-through. -
Paint the terracotta base:
Fill in the entire outlined area with your warm terracotta paint using an angular sash brush. Don’t worry about perfect opacity; a slightly uneven coat adds to the rustic plaster look. -
Create texture:
While the paint is still tacky, use a damp sea sponge to dab at the surface lightly. This lifts small amounts of paint and deposits it elsewhere, mimicking the porous texture of clay or adobe. -
Add depth:
Mix a small amount of dark brown or grey into your terracotta paint. Use a dry brush to feather this darker shade along the outer and inner edges of the arch, creating a subtle shadow effect that suggests three-dimensionality. -
Let it dry:
Allow the base coat to dry completely, ideally overnight, before moving on to the decorative details.
Level Up: Shadow Play
Paint a very thin, translucent line of dark grey glaze just outside the terracotta arch on one side only (e.g., the right side) to mimic a cast shadow and create a 3D illusion.
Step 3: Decorative Detailing
-
Mix the detail color:
Mix your off-white paint with a little glazing medium. This transparency will make the white details look like faded whitewash rather than stark, new paint. -
Outline the inner band:
Using a small artist brush, paint a thin, rough line about an inch inside the outer edge of the terracotta arch. Repeat this on the inner edge. Keep the lines purposefully imperfect. -
Add the decorative marks:
Between your two white lines, paint small, repetitive geometric motifs. The image uses simple dashes or ‘V’ shapes spaced evenly. I find counting out a rhythm helps keep the spacing consistent as you work around the curve. -
Distress the white paint:
Once the white details are tacky, lightly blot them with a clean rag to soften the edges and make them appear weathered by time. -
Remove tape:
Carefully peel away the painter’s tape while the final touches are still slightly damp to avoid peeling up any dried paint film. -
Final softening:
If the transition between the terracotta arch and the white wall feels too sharp, you can very lightly sand the edges with fine-grit sandpaper for an older, broken-in appearance.
Step back and enjoy the charm of your new Mediterranean-inspired entryway knowing it only took a weekend to create
BRUSH GUIDE
The Right Brush for Every Stroke
From clean lines to bold texture — master brush choice, stroke control, and essential techniques.
Explore the Full Guide
Faux Arch as a Headboard Moment
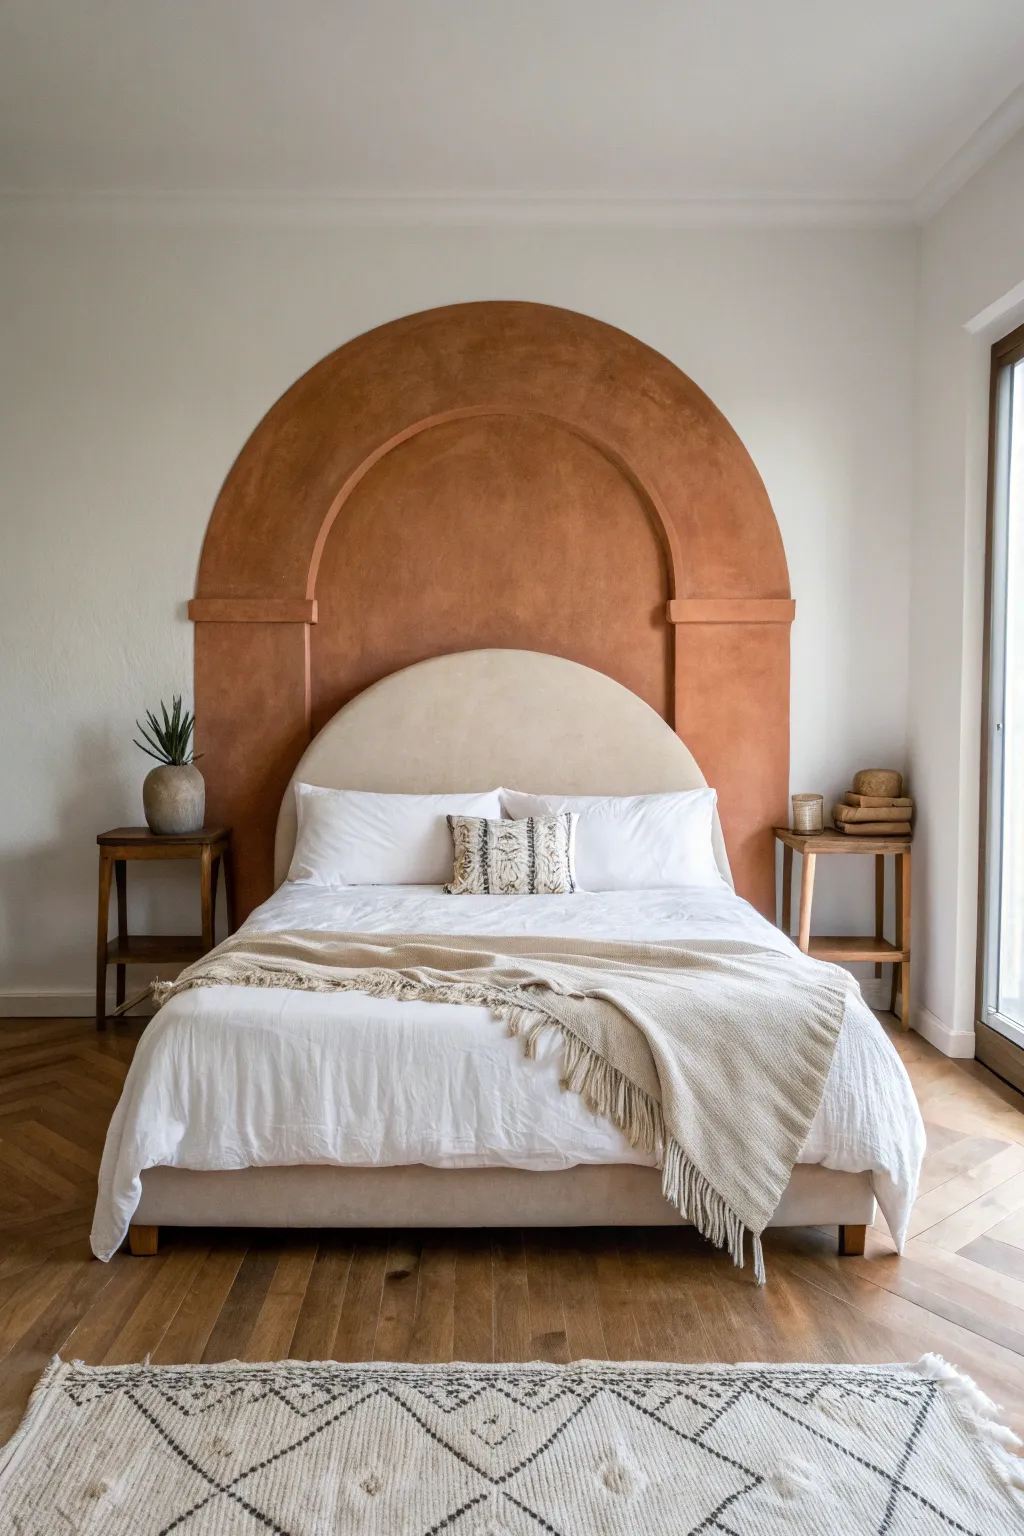
Transform a blank bedroom wall into a stunning focal point with this faux architectural feature. By combining precise geometry with the textured warmth of limewash or Roman clay, you can create a dimensional illusion that mimics the grandeur of structural plasterwork.
How-To Guide
Materials
- Pencil
- Measuring tape
- String or twine
- Push pin or small nail
- Wide painter’s tape
- Roman clay or limewash paint (terracotta or rust hue)
- Wide putty knife or trowel
- Small high-density foam roller
- Angled sash brush
- Level
- Sandpaper (fine grit)
Step 1: Drafting the Design
-
Find your center:
Measure the width of your bed or headboard to determine where the arch should be centered. Mark this center point on the wall at the height where the vertical sides of your arch will transition into the curve. -
Create the compass:
Cut a piece of non-stretchy string to slightly longer than half the desired width of your arch. Tie one end securely to a pencil and the other end to a push pin. -
Draw the outer arc:
Insert the push pin into your center mark. Pull the string taut and trace a large semi-circle on the wall, keeping consistent tension on the string to ensure a perfect curve. -
Draft the inner details:
To create the dimensional look seen in the photo, you need an inner ‘recessed’ arch line. Shorten your string by about 6-8 inches and draw a second, smaller semi-circle from the same center point. -
Mark vertical lines:
Use a long level to draw straight vertical lines extending down from the ends of your outer arc to the floor. Do the same for the inner arc lines, stopping where the ‘base’ or plinth begins. -
Sketch the molding details:
Referencing the image, sketch the horizontal details: a “ledge” or molding strip where the arch curve meets the straight legs. This slight bump-out is crucial for the architectural illusion.
String Theory
Use non-stretchy twine or fishing line for your compass. Yarn or elastic will stretch as you pull, causing a wobbly, uneven egg-shaped arch.
Step 2: Prepping and Framing
-
Tape the outline:
Carefully apply painter’s tape along the *outside* of your main pencil lines. For the curved sections, use many small overlapping pieces of tape or flexible masking tape to navigate the radius smoothly. -
Seal the edges:
To prevent bleed-through, press the tape edges down firmly with a credit card. I like to paint a thin layer of the existing wall color over the tape edge first to seal it perfectly. -
Create faux depth:
Since this project mimics plaster, you aren’t just painting a flat shape. You will need to tape off the ‘inner’ arch shape separately once the main body is painted, or paint it carefully freehand later to distinguish the planes.
Step 3: Applying Texture and Color
-
First textural layer:
Using a trowel or wide putty knife, apply your Roman clay or thick limewash. Start from the edges and work inward. Apply the material in random, sweeping X-motions rather than straight lines. -
Build the edges:
Pay special attention to the taped edges. Apply the clay slightly thicker here so that when you peel the tape, you get a palpable ‘lip’ that creates a shadow, enhancing the 3D effect. -
Let it set:
Allow the first coat to dry until it is tacky but not fully hardened. This usually takes about 30 to 60 minutes depending on humidity. -
Second layer application:
Apply a second thin layer of the clay. This time, as the material begins to dry, use your trowel to ‘burnish’ or smooth it down, which brings out the high-low color variation characteristic of plaster. -
Remove tape carefully:
While the second coat is still slightly damp, slowly peel away the painter’s tape at a 45-degree angle. If the clay has hardened too much, score the edge gently with a utility knife first. -
Define the inner arch:
Once the main body is dry, you can paint the inner recessed arch section. If you want it to look deeper, use a slightly darker shade of the same color, or simply rely on the trowel texture to catch the light differently. -
Add shadow lines:
To truly fake architecture, use a small artist’s brush and a darker glaze to paint a faint shadow line underneath the horizontal ‘molding’ details you sketched earlier. -
Final smooth:
Inspect the surface for any sharp peaks of dried clay that might be uncomfortable. Knock these down gently with fine-grit sandpaper, then wipe clean with a dry cloth.
Uneven Texture?
If your clay looks too patchy, don’t overwork it while wet. Let it dry completely, lightly sand the high spots, and apply a very thin third coat to unify the finish.
Step back and admire how this simple addition brings a sophisticated, Mediterranean warmth to your sleeping space
Layered Double Arch in Two Tones
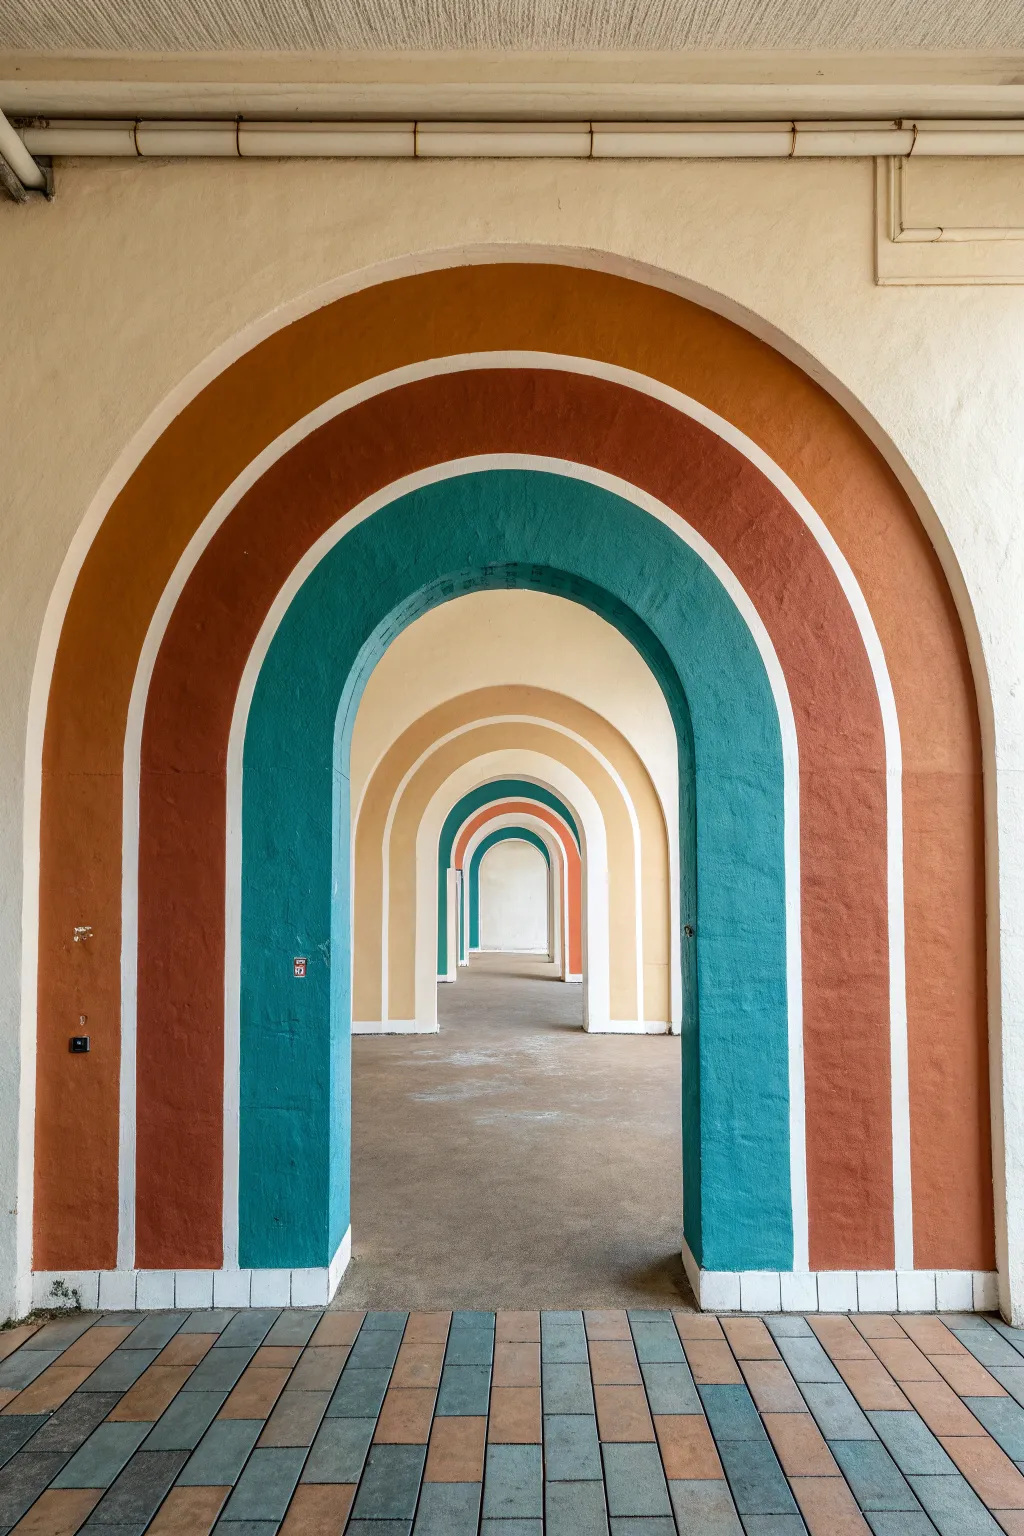
Transform a plain archway into a stunning focal point with this bold, retro-inspired mural. Using concentric bands of warm terracotta, deep rust, and vibrant teal separated by crisp white lines creates a mesmerizing tunnel effect that draws the eye inward.
Step-by-Step Tutorial
Materials
- Painter’s tape (various widths, especially 0.5-inch)
- Laser level or string and pencil
- Measuring tape
- Pencil
- Small roller with foam sleeves
- High-quality edger brush (1.5 to 2 inch)
- Latex wall paint: Warm Terracotta
- Latex wall paint: Deep Rust/Sienna
- Latex wall paint: Deep Teal/Turquoise
- Base wall color paint (for touch-ups)
- Drop cloth
- Ladder
Step 1: Preparation and Mapping
-
Clean surface:
Begin by wiping down your archway walls with a damp cloth to remove dust or grease. Ensure the existing paint is smooth; if there are holes, patch and sand them now. -
Establish the centerline:
Find the exact center point at the top of your arch. Mark this spot with a pencil. Drop a plumb line or use a laser level to trace this centerline all the way to the floor. -
Measure the bands:
Decide on the width of your colored bands. For the look in the image, the colored bands are roughly 8-10 inches wide, separated by 1-inch white gaps. Mark these measurements lightly with a pencil at intervals along the arch. -
Trace the curves:
To create perfect concentric curves, cut a piece of string or wire to the radius of your first band. Pin one end at the center point (or the calculated pivot point below the arch) and hold a pencil at the other end to swing a perfect arc. Repeat for each band layer.
Wobbly Arches?
If you can’t find a pivot point for a string compass, create a template. Cut a large piece of cardboard into the curve shape and trace it repeatedly.
Step 2: Taping the Design
-
Tape the white dividers:
Apply your 1-inch painter’s tape exactly over the layout lines where you want the white separation stripes to remain. This preserves the base color underneath. -
Press and seal:
Firmly run a credit card or putty knife over the tape edges to ensure a tight seal. This prevents paint bleed essential for those crisp lines. -
Seal with base color:
I like to take a tiny bit of the existing white base wall color and lightly brush it over the tape edges. This creates a barrier, so if any paint seeps under, it’s just the white, keeping your colors perfect.
Step 3: Painting the Bands
-
Start with the outermost band:
Pour your Warm Terracotta paint into a tray. Use the edging brush to carefully cut in near the tape lines, then fill the center of the band with the small foam roller for a smooth finish. -
Apply the second color:
Moving inward, apply the Deep Rust/Sienna color to the middle band. Be careful not to cross onto your taped lines. Two light coats often look better than one heavy one. -
Paint the inner arch:
Finally, paint the innermost arch section with the Deep Teal. Since this includes the underside of the arch itself, use the brush to get into the corners where the wall meets the ceiling curve. -
Let dry and recoat:
Allow the first coat to dry for at least 2-4 hours. Apply a second coat to all three colors to ensure rich, opaque saturation.
Level Up: Metallic Pop
Instead of leaving the separation lines white, paint them gold or copper after removing the tape for an Art Deco-inspired twist.
Step 4: The Reveal
-
Remove tape carefully:
The moment of truth! Remove the painter’s tape while the paint is still slightly tacky (or score the edge with a utility knife if fully dry). Pull the tape at a 45-degree angle away from the fresh paint. -
Touch up:
Inspect your lines. If a little paint bled through, use a small artist’s brush and your white base paint to clean up the edges. -
Clean the floor:
Ensure no paint splattered on the floor tiles. If you’re feeling ambitious, you can paint existing floor tiles to match the palette, though this tutorial focuses on the wall.
Step back and admire how these simple bands of color add immense depth and architectural interest to your hallway

PENCIL GUIDE
Understanding Pencil Grades from H to B
From first sketch to finished drawing — learn pencil grades, line control, and shading techniques.
Explore the Full Guide
Tone-on-Tone Arch for Subtle Depth
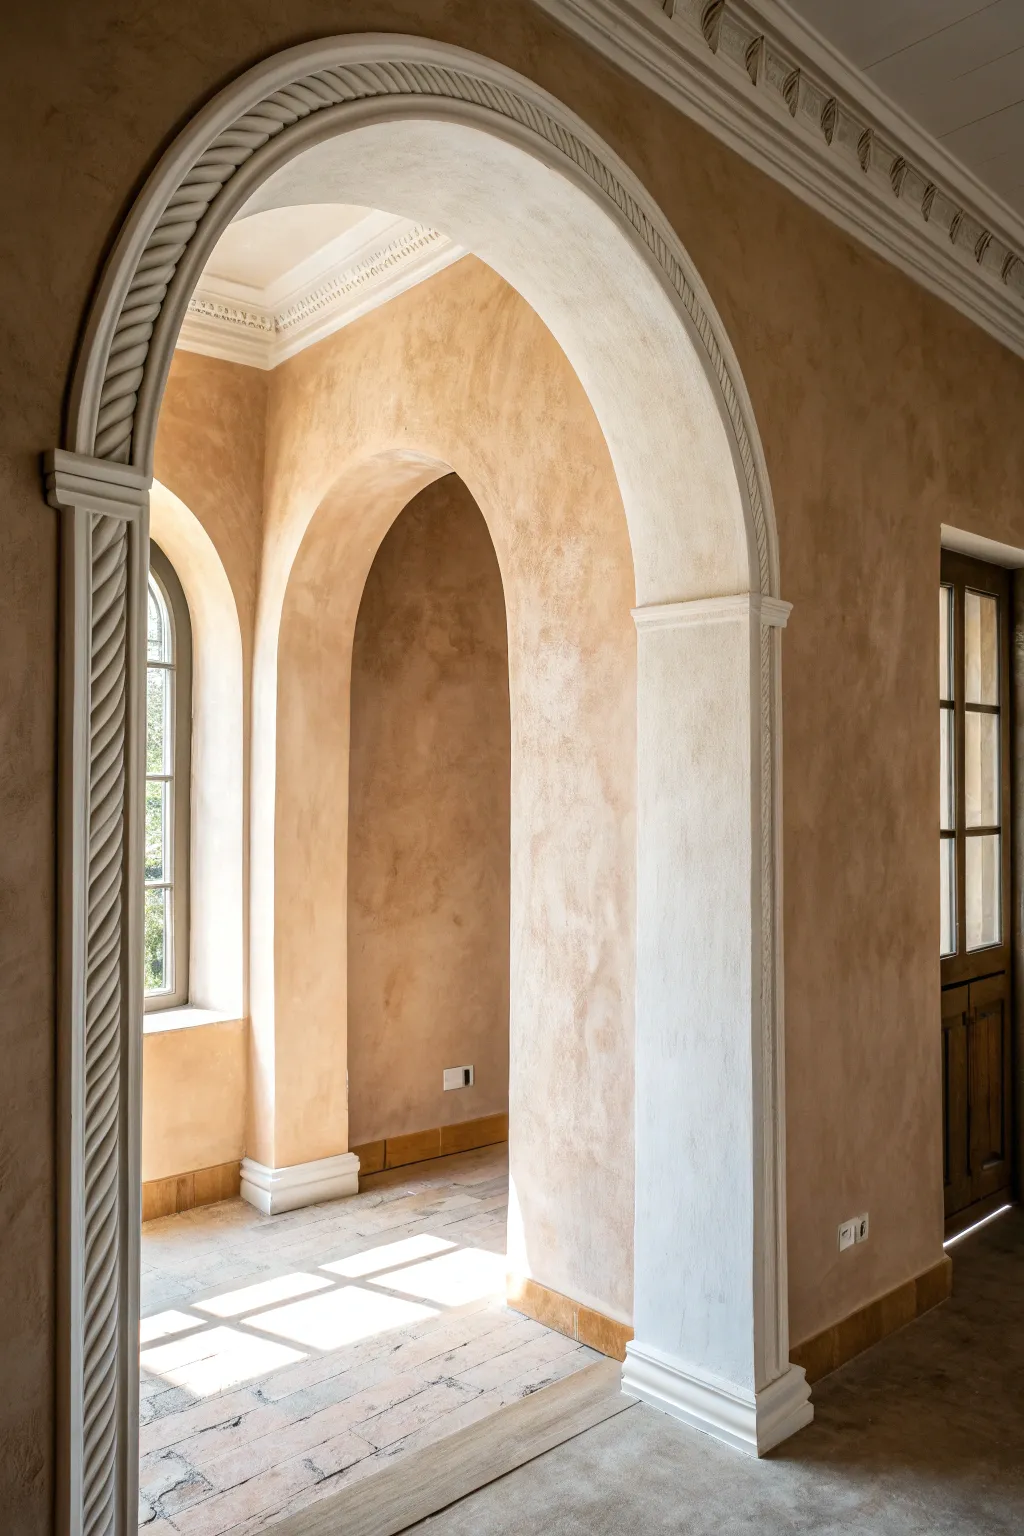
Transform a plain archway into a Mediterranean-inspired feature using a layered limewash technique. This project creates a soft, cloudy texture with warm earthy tones that adds instant history and depth to your hallway.
How-To Guide
Materials
- High-quality interior primer
- Base coat paint (creamy off-white/pale beige)
- Limewash paint or glaze medium mixed with terracotta/beige latex paint
- Wide block brush (4-6 inch) for limewash application
- Detail brush (1 inch)
- High-tack painter’s tape
- Drop cloths
- White satin or semi-gloss trim paint
- Fine-grit sandpaper (220 grit)
- Damp rags for cleanup
Step 1: Preparation & Base Work
-
Protect the area:
Begin by laying down drop cloths to protect your flooring, especially if you have sensitive surfaces like the brick or wood shown here. Secure the edges with tape so they don’t shift while you work. -
Clean and sand walls:
Wipe down the walls of the archway and surrounding area to remove dust. If the surface has a sheen, lightly scuff it with 220-grit sandpaper to help the new paint adhere better. -
Tape specific areas:
Apply painter’s tape carefully around the door frames, windows, and any distinct molding you want to keep pristine white. Press the tape edges firmly to prevent bleed-through. -
Deep clean moldings:
Since this look relies on the sharp contrast of the white trim, take a moment to clean the detailed rope molding and baseboards thoroughly with a damp cloth. -
Apply the primer:
Roll on a coat of high-quality primer over the wall surfaces. This provides a neutral, absorbent base that is crucial for the limewash effect to develop its signature variation.
Patchy problems?
If the texture looks too uneven, lightly mist the wall with water and use a clean, dry brush to soften and blend the harsh edges while the paint is reactivated.
Step 2: Creating the Limewash Texture
-
Mix your wash:
If you aren’t using pre-mixed limewash, create your own by diluting a matte terracotta or warm beige latex paint with water (about 70% paint to 30% water) or mixing it with a clear glaze medium for more transparency. -
First coat application:
Dip your wide block brush into the mixture. Apply the paint in a crisscross ‘X’ pattern rather than straight lines. This random brushwork creates the foundational texture. -
Work in sections:
Don’t try to paint the whole wall at once. Work in manageable 2-3 foot sections, keeping a ‘wet edge’ so you can blend new strokes into the previous ones without harsh lap lines. -
Let it dry completely:
Allow the first coat to dry fully. It will likely look patchy and uneven at this stage—don’t panic, this is exactly what builds the depth later. -
Apply the second coat:
Repeat the crisscross brushing technique with a second coat. I like to focus this layer slightly more on areas that look too light, building up that clouded, tone-on-tone richness. -
Feather the edges:
As you get close to the moldings and corners, switch to a smaller brush but maintain that dappled, uneven stroke to ensure the texture goes right up to the trim lines. -
Third coat optional:
Inspect the depth of color. If you want more intensity or shading, spot-apply a third, thinner wash in selective areas to mimic natural variations in plaster.
Step 3: Detailing the Architectural Trim
-
Remove tape carefully:
Once the walls are touch-dry but not fully cured, score the edge of the painter’s tape with a utility knife and peel it away slowly at a 45-degree angle. -
Prep the trim paint:
Open your white satin or semi-gloss trim paint. A slight sheen on the molding contrasts beautifully with the matte, chalky walls. -
Paint the rope molding:
Using a small angled or detail brush, carefully paint the ornate rope molding on the archway face. Work the paint into the crevices of the design but watch out for drips. -
Refine the baseboards:
Paint the baseboards around the bottom of the arch pillars. Clean lines here are essential to ground the textured walls. -
Clean up internal corners:
If any wall wash got onto the trim, use a damp cloth to wipe it immediately, or touch it up with the trim paint for a crisp, professional finish. -
Final inspection:
Stand back and look at the play of light. The variations should look organic and soft. If any brush strokes look too distinct, you can gently buff them with a dry cloth.
Aging the look
For an even more antique feel, mix a tiny drop of raw umber paint into clear glaze and brush it into the deepest crevices of the rope molding.
Enjoy the warm, timeless atmosphere your new textured archways bring to your home
Crisp Striped Arch Bands
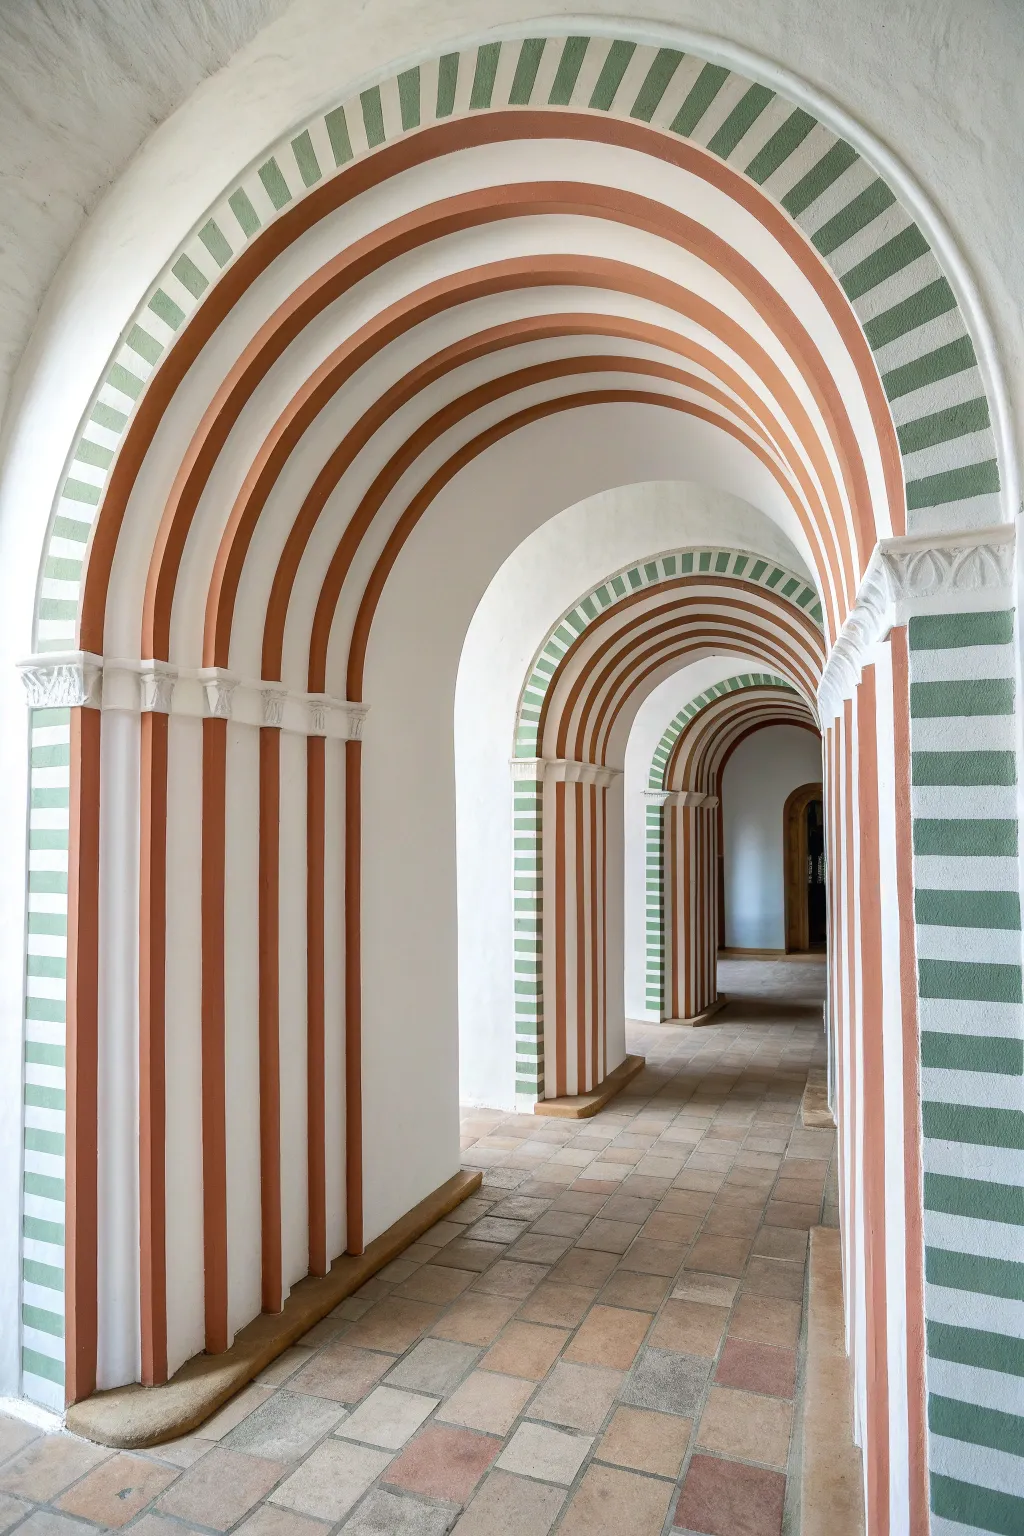
Bring dramatic depth and historical elegance to a plain hallway by painting faux architectural details inspired by Romanesque design. This project uses alternating color blocks and bold terracotta stripes to accentuate existing archways or create the illusion of grand depth.
Step-by-Step Guide
Materials
- High-quality painter’s tape (multiple widths, 1-inch and 2-inch)
- Laser level or plumb line
- Measuring tape and pencil
- Primer (white)
- Base wall paint (creamy off-white or soft limestone color)
- Terracotta or rust-colored semi-gloss interior paint
- Sage green or muted olive flat interior paint
- Small angled sash brush (1.5 to 2 inch)
- 4-inch foam roller and tray
- Small artist’s brush for touch-ups
- Drop cloths
Step 1: Preparation and Base Coat
-
Sanding and Cleaning:
Begin by ensuring your archway surfaces are incredibly smooth. Sand down any bumps on the moldings or flat outer faces, then wipe everything clean with a damp cloth to remove dust. -
Prime the Surface:
Apply a coat of high-quality primer to the entire archway area, ensuring a neutral starting point that will help your colors pop. -
Apply Base Color:
Paint the entire hallway, including the columns and arch interiors, with your creamy off-white base color. Two coats are usually necessary for a solid, stone-like finish. Let this cure fully for at least 24 hours before taping.
Bleed Patrol
Paint bleed happens. To prevent it, seal your tape edges by brushing a thin layer of the *base wall color* over the tape edge first. This fills imperfections before the colored paint goes on.
Step 2: Painting the Vertical Columns
-
Mark Vertical Guidelines:
On the vertical pilasters or columns supporting the arch, measure equal vertical sections. Use a laser level to drop straight lines from the capital (the top decorative lip) down to the floor. -
Tape the Ribs:
Apply painter’s tape along your pencil lines to mask off the areas that will remain white. Press the tape edges down firmly with a putty knife or fingernail to prevent bleed. -
Paint Terracotta Stripes:
Using the small sash brush or a mini trim roller, fill in the unmasked vertical stripes with the terracotta paint. I like to do light coats to avoid drips on these vertical surfaces.
Step 3: Painting the Arch Moldings
-
Define the Arch Curves:
Moving to the curved part of the arch, identify the recessed moldings. These curved ribs will continue the terracotta color from the vertical columns below. -
Mask the Curves:
Carefully run tape along the edges of these curved moldings. This can be tricky; use short overlapping pieces of tape or flexible masking tape designed for curves if needed. -
Apply Terracotta to Arches:
Paint the curved moldings with the terracotta paint. Ensure you get full coverage deep into the crevices where the molding meets the flat wall. -
Remove Tape While Damp:
Peel off the tape slowly at a 45-degree angle while the paint is still slightly tacky to get the cleanest lines.
Faux Stone Texture
For added realism, sponge a slightly darker glaze over the dry green and terracotta sections. This mimics the porous texture of real sandstone or colored limestone blocks.
Step 4: Creating the Green Voussoirs
-
Plan the Outer Band:
The outermost flat band of the arch will feature the alternating green blocks. Measure the total length of the curve and divide it mathematically to ensure your blocks are equal width. -
Mark the Segments:
Using a pencil, mark the radial lines for each block along the curve. These lines should radiate from the imaginary center point of the arch circle, not just straight out. -
Tape the Blocks:
Tape off every other segment. You are essentially creating a stencil for the green blocks. Tape firmly over the areas that will remain white. -
Paint Green Segments:
Fill in the exposed segments with your sage green paint. Use a small flat brush to keep the edges sharp near the terracotta molding and the outer wall edge. -
Repeat for Vertical Sides:
Don’t forget the vertical sides of this outer band. Continue the blocking pattern down the sides of the archway, ensuring the blocks maintain the same height as the ones on the curve. -
Final Touch-ups:
Once all tape is removed and paint is dry, use a tiny artist’s brush and your base white color to correct any small bleeds or uneven lines for a crisp architectural look.
Step back and admire how a little paint and geometry have transformed a simple passage into a grand corridor designed to impress


Scalloped Edge Along the Arch Curve
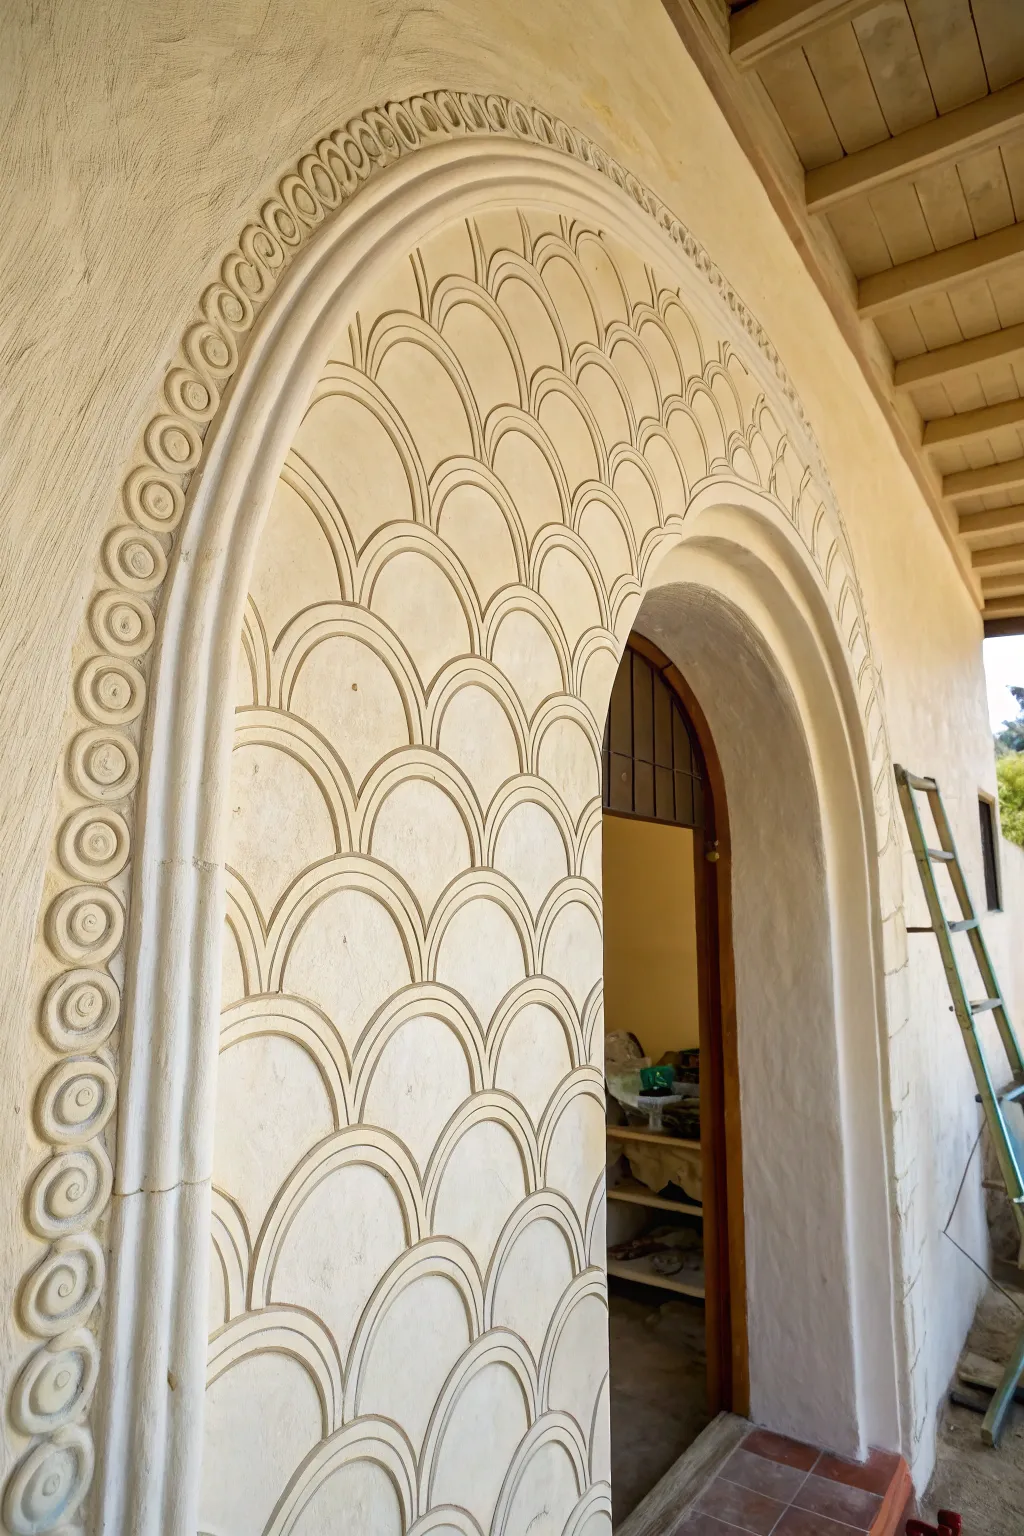
Transform a plain archway into a textural masterpiece by simulating carved plaster relief. This project uses dimensional paste and stencils to create an elegant, repeating fish-scale pattern framed by a spiral border.
Detailed Instructions
Materials
- High-quality modeling paste or texture medium
- Heavy body acrylic paint (ivory or warm white)
- Wide masking tape or painter’s tape
- Pencil and eraser
- Flexible plastic scallop stencil (or Mylar sheet to cut your own)
- Small round stencil brush
- Palette knife or spatulas
- Circle stencil or circular foam pouncer (approx. 2-inch diameter)
- Fine-grit sandpaper
- Matte finish sealer spray
Step 1: Preparation & Layout
-
Clean surface:
Begin by thoroughly cleaning the archway surface to remove grease and dust, ensuring the texture medium will adhere properly. -
Define the border:
Measure a consistent width (about 3-4 inches) from the outer edge of your archway inwards to create the zone for the spiral border. -
Tape separation line:
Apply masking tape along this measured line to separate the border area from the inner scallop field. -
Plan grid:
Lightly sketch horizontal guide lines across the inner panel using a pencil to keep your rows of scallops straight.
Clean Stencils Only
Keep a bowl of water nearby. Rinse your stencil every 2-3 applications. Dried texture paste builds up quickly and ruins the crispness of subsequent shapes.
Step 2: Creating the Scallops
-
Position first stencil:
Place your scallop stencil at the bottom center of the archway, aligning the bottom of the pattern with your first guideline. -
Apply paste:
Scoop a generous amount of modeling paste onto a palette knife. Swipe it smoothly over the stencil, filling the open areas completely. -
Level the texture:
Run the knife over the stencil one last time with light pressure to level the surface, ensuring the relief isn’t too peaked. -
Lift carefully:
Lift the stencil straight up—avoid dragging it sideways—to preserve the crisp raised edges of the scallops. -
Clean and repeat:
Wipe the back of the stencil immediately. Move to the adjacent spot on the wall, overlap the registration marks if your stencil has them, and repeat the application. -
Stagger rows:
Continue working row by row, moving upward. Stagger the scallops so the center of an upper arch sits between the two arches below it. -
Navigate curves:
As you reach the curved top of the arch, use a smaller, flexible palette knife to maneuver the stencil against the rounded tape line.
Step 3: Sculpting the Spiral Border
-
Remove tape:
Once the inner scallop section is touch-dry, gently peel away the masking tape separating the sections. -
Mark spacing:
Lightly mark spacing dots along the center of the border strip to ensure your spiral circles will be evenly distributed. -
Stencil outer rings:
Use a circle stencil and your modeling paste to create raised solid discs at each marked spot. -
Carve details:
I prefer to do this step while the paste is still wet: Use a toothpick or a clay sculpting tool to etch the spiral line into the center of each wet disc. -
Add inner detail:
Press a smaller circular object or cap into the very center of the spiral to create the innermost raised bead.
Bleeding Under Stencil?
Your paste might be too thin or you’re pressing too hard. Switch to a heavy-body gel medium or thicken your paste with a little marble dust.
Step 4: Finishing Touches
-
Dry thoroughly:
Allow the entire project to cure for at least 24 hours. The thick paste needs time to harden completely. -
Sand roughness:
Inspect the relief for any sharp peaks or unwanted blobs. Gently buff them down with fine-grit sandpaper. -
Base coat:
Paint the entire surface—including the flat wall and the raised texture—with your ivory or warm white heavy body acrylic. -
Seal work:
Spray a light coat of matte sealer over the archway to protect the plaster-like finish from dust and handling.
Step back and admire how the light catches the relief work, giving your entryway a sophisticated, architectural feel
Celestial Arch With Stars and Dots
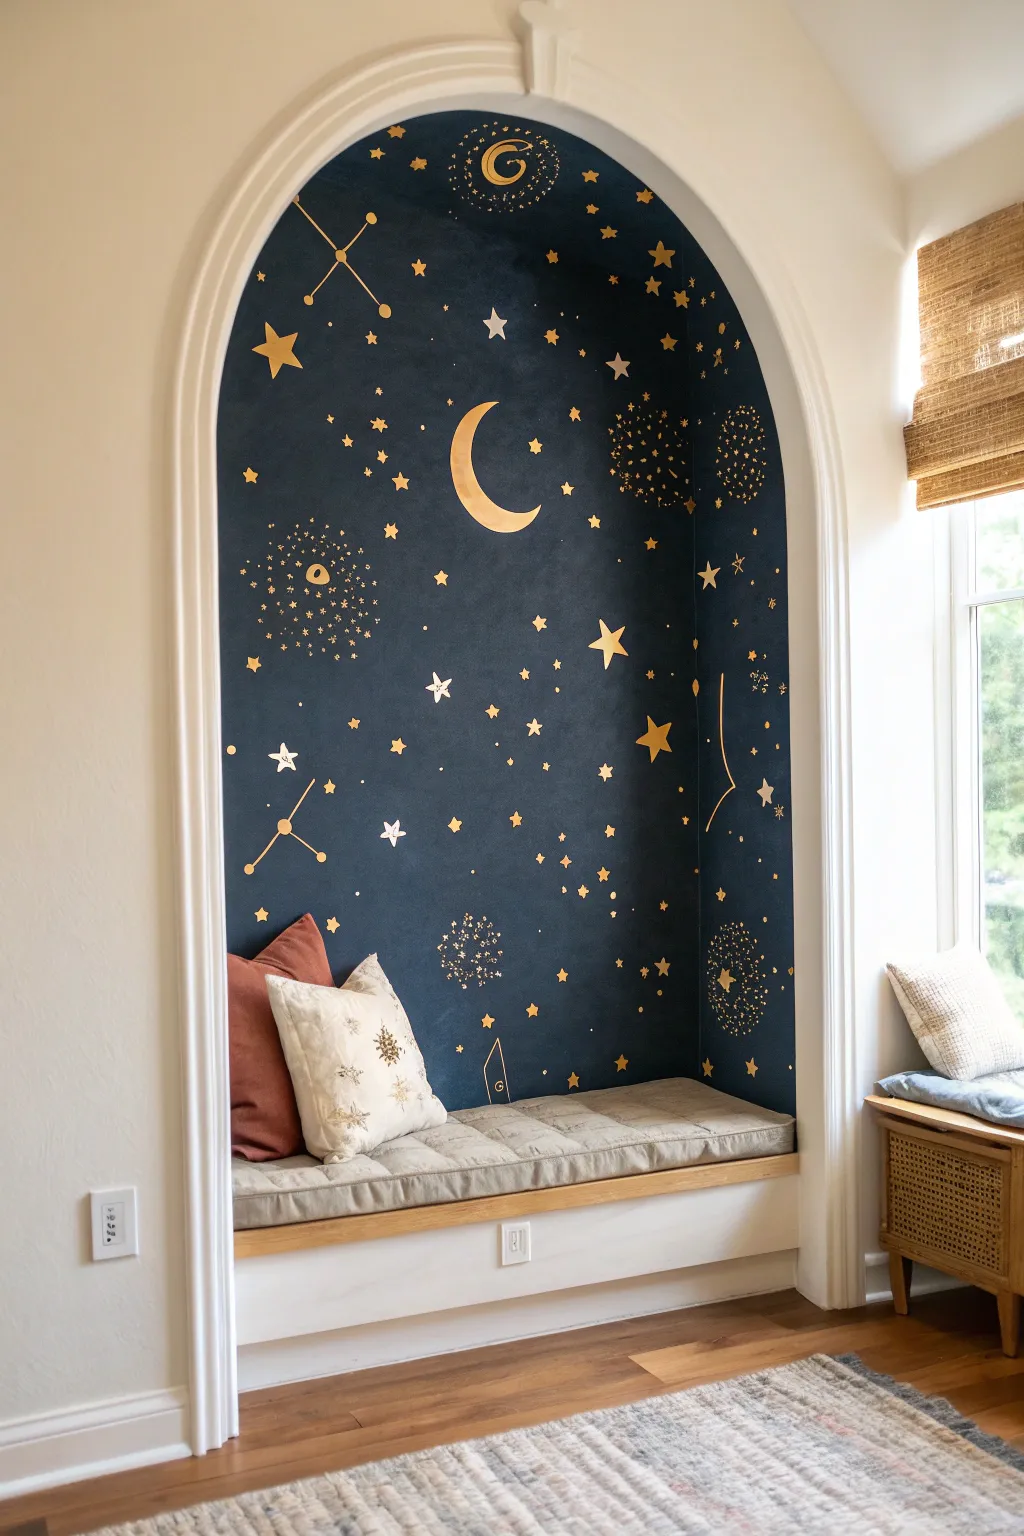
Transform a simple architectural nook into a dreamy window to the cosmos with this stunning celestial mural project. Using a deep navy backdrop and metallic gold accents, you will create a magical reading corner that sparkles with stars, moons, and constellations.
Step-by-Step Tutorial
Materials
- Deep navy blue interior latex paint (matte or eggshell finish)
- Metallic gold acrylic craft paint or gold leaf paint
- Painter’s tape
- Medium paint roller and tray
- Small foam roller
- Assorted stencils (moon, stars, constellations)
- Small stencil brushes or sponge daubers
- Fine-tip gold paint pen
- Drop cloth
- Damp rag for cleanup
- Paper plate or palette
Step 1: Preparation and Base Coat
-
Clear and Clean:
Remove any existing cushions, artwork, or furniture from the niche. Wipe down the walls with a damp cloth to remove dust and let them dry completely, as dust will prevent the paint from adhering properly. -
Protect Surfaces:
Lay down a drop cloth to protect your flooring. Use painter’s tape to carefully mask off the white trim of the archway, the wooden bench seat, and any baseboards to ensure crisp lines. -
Cut In Edges:
Open your navy blue paint and stir well. Using an angled sash brush, ‘cut in’ the edges where the walls meet the ceiling, corners, and the taped-off trim areas. -
Roll the Base:
Use a medium paint roller to fill in the rest of the wall space with the navy paint. Apply the paint in ‘W’ patterns for even coverage. -
Finish Coverage:
Let the first coat dry for at least 2-4 hours. Apply a second coat to ensure a rich, opaque background that resembles the night sky, then wait for the paint to cure fully overnight before stenciling.
Bleeding Edges?
If gold paint bleeds under the stencil, don’t wipe it while wet! Let it dry completely, then use a tiny brush and your navy base color to carefully paint over the mistake and reshape the star.
Step 2: Creating the Celestial Bodies
-
Plan Your Layout:
Before painting, hold up your main stencils—like the large crescent moon—against the wall to decide on placement. I usually mark the spot lightly with a piece of chalk so I don’t lose the position. -
Secure the Moon Stencil:
Tape your large crescent moon stencil onto the focal point of the back wall. Ensure it lays perfectly flat against the surface to prevent paint bleed. -
Apply Gold Paint:
Pour a small amount of metallic gold paint onto a paper plate. Load a foam roller or sponge dauber lightly, then offload excess paint onto a paper towel until the tool is almost dry. -
Stencil the Moon:
Gently dap or roll the paint over the stencil using a vertical motion. Avoid pushing paint under the edges. Peel the stencil back carefully while the paint is still wet to keep the lines sharp. -
Add Large Stars:
Select your larger star stencils. Place them randomly around the niche, varying their height and spacing to create a natural, non-uniform look. Repeat the stenciling process for each one.
The Dry Brush Trick
The secret to crisp metallic stars is ‘less is more.’ Your brush or sponge should feel almost dry to the touch before it hits the wall. This prevents globs and ensures clean stencil edges.
Step 3: Adding Details and Constellations
-
Draw Constellations:
To create the geometric constellations seen in the image, you can use a stencil or freehand it. If using a stencil, tape it in place and dab gold paint over the lines and connecting dots. -
Connect the Dots:
For a sharper look on the constellation lines, use a fine-tip gold paint pen and a ruler to draw the connecting lines between the stenciled star points. -
Create Star Clusters:
Find open dark spaces and add ‘burst’ designs or clusters of small dots. A small round sponge brush works perfectly for creating these uniform circular star clusters. -
Fill with Tiny Stars:
Using a very small artist’s brush or the tip of your gold paint pen, add tiny distinct four-point stars and single dots throughout the empty blue space to add depth to your galaxy. -
Corner Details:
Don’t forget the curved ceiling of the arch. Extend a few stars or dots up onto the ceiling portion of the niche to make the space feel all-encompassing. -
Clean Up:
Once all gold paint is touch-dry (about an hour), carefully peel away the blue painter’s tape at a 45-degree angle. -
Final Touches:
Inspect your edges. If any navy paint bled onto the white trim or gold paint smeared, use a small brush and the appropriate color for touch-ups before resetting your cushions.
Step back and enjoy the cozy atmosphere of your new personal galaxy perfect for reading or daydreaming
Trompe L’Oeil Portal Through the Arch
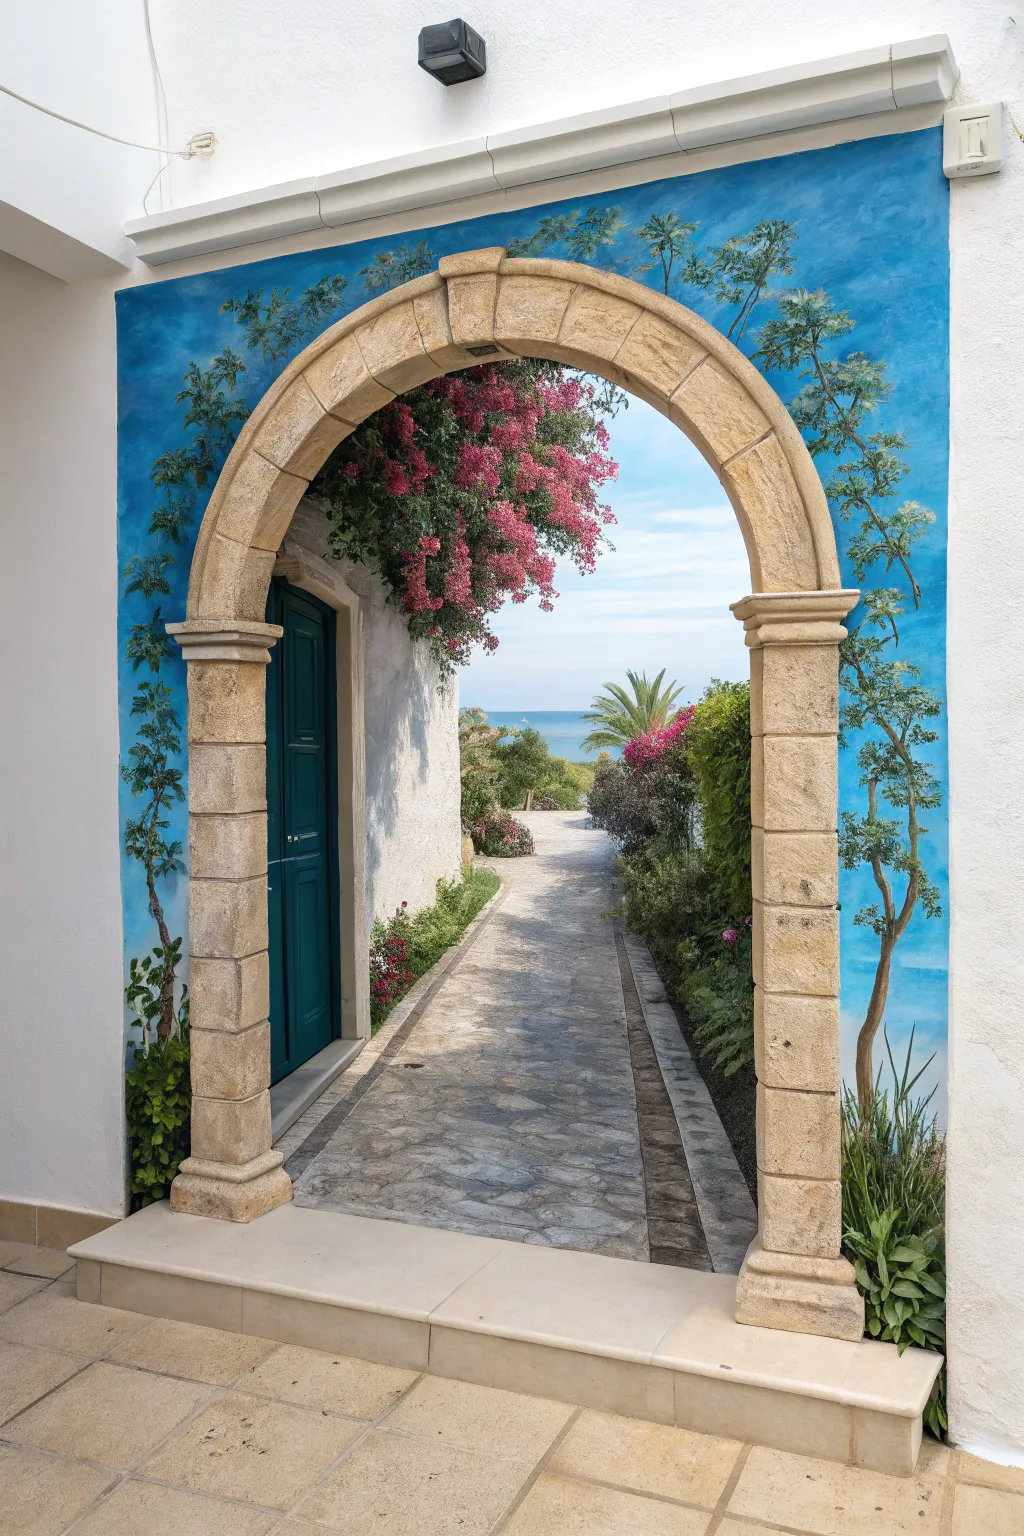
Transform a plain wall or niche into a breathtaking Mediterranean vista with this clever trompe l’oeil mural. Using perspective and careful shading, you’ll create the illusion of depth, making it feel as though you can step right through the archway onto a sunny, flower-lined path.
How-To Guide
Materials
- Interior/Exterior primer
- Acrylic latex wall paints (Sky Blue, White, Sand, Slate Grey, Teal, Pink, Green, Dark Brown)
- Glazing medium
- Painter’s tape
- Chalk line or level
- Assorted brushes (3-inch roller, large flat brush, medium angle sash brush, small detail liner)
- Natural sea sponge
- Pencil and eraser
- Drop cloth
Step 1: Preparation and Sky
-
Prepare the Surface:
Clean your wall area thoroughly to remove dust and grease. Apply a coat of high-quality primer to ensure the mural colors will pop and adhere properly. If your archway has actual stone trim like the image, tape it off carefully to protect it. -
Block in the Sky:
Mix your Sky Blue with a touch of White to create a soft, atmospheric base. Using a roller or large brush, paint the entire upper two-thirds of the inner arch area. While the paint is still wet, blend in pure White near the horizon line to create a natural fade. -
Add Wispy Clouds:
Dampen a natural sea sponge and dip it lightly into White paint. Dab gently onto the blue sky to create cloud shapes, softening the edges with a dry brush to make them look airy and distant.
Depth Perception Fix
If the path looks flat, darken the grout lines between stones in the foreground and fade them out as they go back. High contrast creates closeness.
Step 2: Constructing the Architecture
-
Sketch the Horizon and Path:
Using a pencil and a level, draw your horizon line about one-third of the way up from the floor. Sketch the converging lines of the stone path leading toward the horizon—remember, the path should be wider at the bottom (foreground) and narrow significantly as it recedes. -
Outline the Building:
On the left side, sketch the vertical line of the white building and the doorway. Ensure your vertical lines remain perfectly straight to maintain the illusion of valid structural perspective. -
Paint the Building Facade:
Fill in the building shape with White paint. To make it look like stucco, you can stipple the paint slightly or add a tiny drop of Grey to create texture. Let this dry completely. -
Detail the Door:
Paint the door area with a deep Teal. Once the base coat is dry, add shadows in the recessed panels using a mix of Teal and Black, and highlights on the ridges with Teal and White.
Interactive Element
Install a real hanging lantern hook at the top of the painted doorway or place a real potted plant at the base to seamlessly blend 2D and 3D worlds.
Step 3: The Pathway and Landscape
-
Base the Pathway:
Paint the pathway area with a light Sand or Grey color. This will serve as the grout and base tone for your stones. -
Create Stones:
Using a Slate Grey mixture, paint varying shapes of flagstones. Make the stones in the foreground larger and more detailed, and those in the distance smaller and less distinct. I find it helpful to vary the grey tones slightly for a more natural rock look. -
Add Ocean and Horizon:
Paint a thin strip of deep blue along the horizon line for the sea. Ensure the line is perfectly straight. You can add a lighter blue closer to the ‘shore’ to suggest shallow water. -
Paint Distant Foliage:
Using a small brush, dab in distant bushes and trees near the horizon using muted greens and browns. These should lack detail to enhance the feeling of depth.
Step 4: Foreground Details and Framing
-
Paint the Bougainvillea:
Above the door, stipple Dark Green paint to create a mass of hanging foliage. Once dry, layer vibrant Pink and Magenta dots over the green to simulate bougainvillea flowers, clustering them heavily in some spots and letting them trail off in others. -
Add Framing Vegetation:
Paint thin, climbing vines reaching up the sides of the mural using a liner brush and brown paint. Add small green leaves attached to the vines. -
Create Shadows:
Mix a transparent glaze with dark grey or black paint. Apply this sheer shadow mixture under the vines, along the edge of the building, and on the path to mimic the light source coming from the ‘outside’. -
Blend the Edges:
Carefully inspect the edges where the mural meets the real arch. You might need to dry-brush a little bit of the sky color onto the inner edge of the stone to make the transition seamless. -
Final Highlights:
Add tiny touches of pure white or light yellow to the tops of the path stones and the brightest leaves to simulate direct sunlight hitting the scene.
Step back and enjoy your permanent vacation view without ever leaving home


Have a question or want to share your own experience? I'd love to hear from you in the comments below!