If you’re staring at blank nursery walls, I promise you’re one good idea away from something really magical. Here are my favorite baby room wall painting ideas—from classic, soothing looks to artsy little surprises that still feel calm and baby-friendly.
Classic Feature Wall Behind the Crib
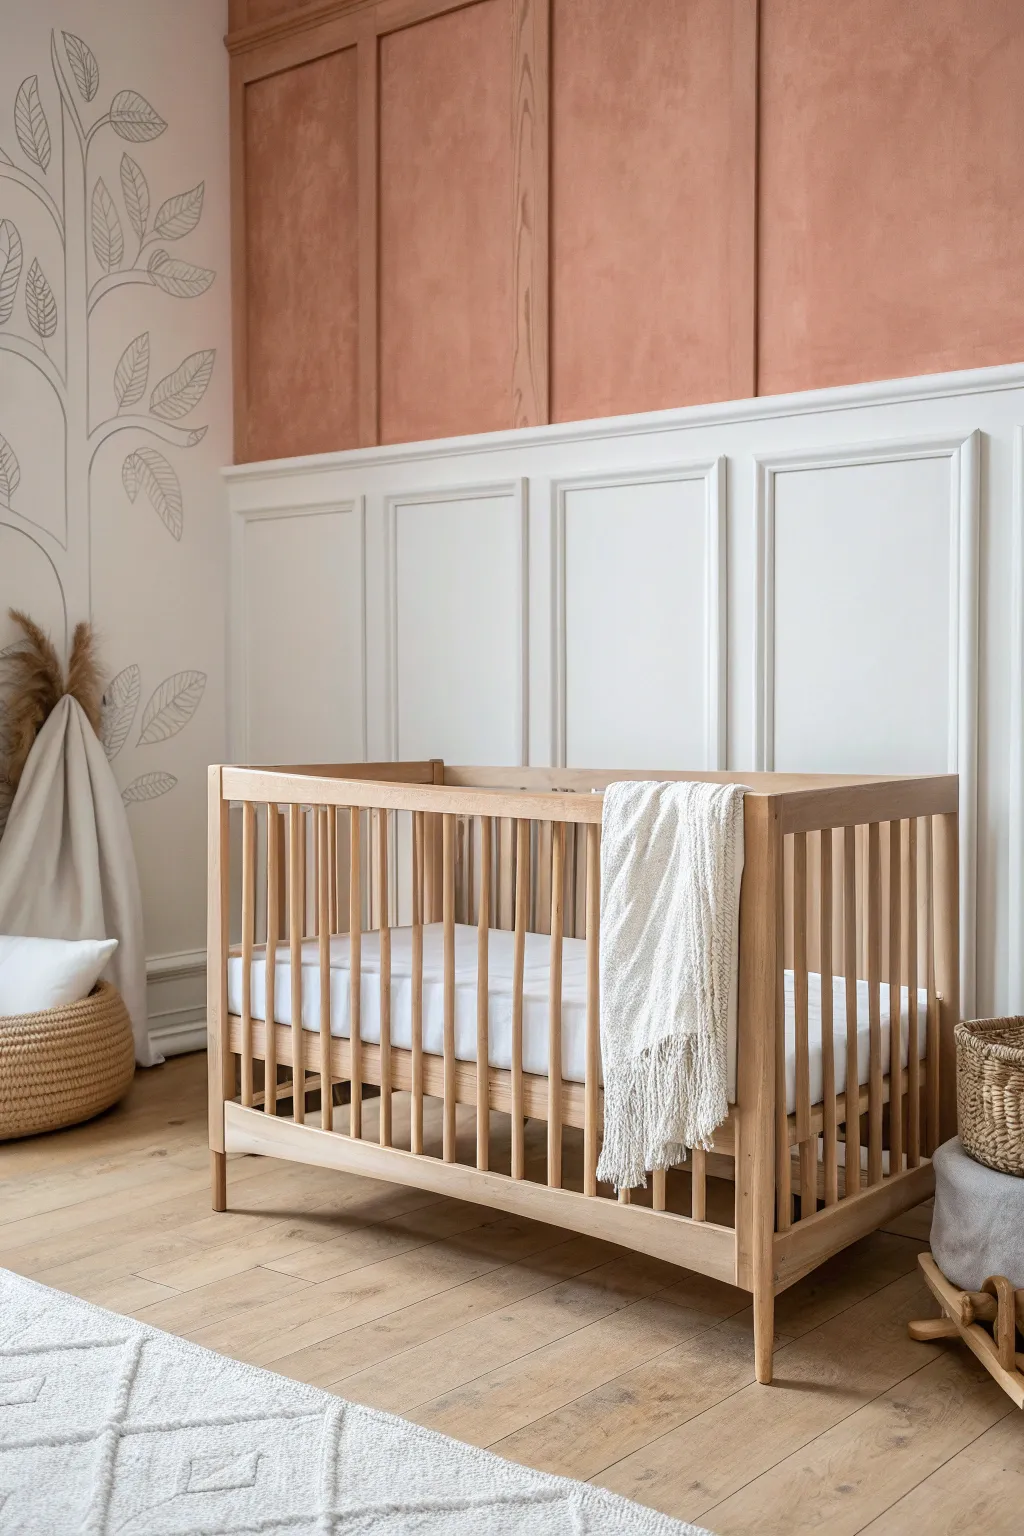
Transform a plain nursery wall into a stunning focal point by combining classic white wainscoting with a warm, textured terracotta feature. This project balances elegant architectural molding with an earthy, calming color palette perfect for a modern baby room.
Step-by-Step Tutorial
Materials
- MDF boards (1×4 for rails/stiles)
- Small molding trim (for inner rectangles)
- Wood glue
- Construction adhesive
- Brad nailer and brad nails
- Wood filler
- Sandpaper (120 and 220 grit)
- White semi-gloss paint
- Terracotta colored paint (matte finish)
- Glaze medium or limewash additive (optional for texture)
- Paint rollers and angled brushes
- Painter’s tape
- Level and measuring tape
- Caulk and caulk gun
- Raw wood strips (approx 1×2) for upper section
Step 1: Preparation & Lower Paneling Framework
-
Measure and mark:
Determine the height for your wainscoting—typically about one-third to half the wall height. Use a laser level or long spirit level to mark a horizontal line across the entire wall where the top railing will sit. -
Install the horizontal rails:
Cut your 1×4 MDF boards to length for the top horizontal rail and the baseboard. Apply construction adhesive to the back, position them on your guidelines, and secure them into the studs with a brad nailer. -
Plan vertical spacing:
Measure the distance between your top rail and baseboard. Decide on the spacing for your vertical stiles (the vertical pieces). A gap of 20-24 inches usually looks balanced. Mark these vertical positions lightly on the wall. -
Install vertical stiles:
Cut the vertical 1×4 pieces to fit snugly between the top rail and baseboard. Apply adhesive and nail them into place at your marked locations, ensuring each one is perfectly plumb with your level.
Uneven Walls?
If your walls aren’t perfectly flat, the molding might not sit flush. Apply a thicker bead of caulk behind the gaps and smooth it out to hide the hollows visibly.
Step 2: Adding Detail & Finishing the Wainscoting
-
Create inner boxes:
To achieve the classic look shown, cut your small molding trim to create rectangular frames. These should sit inside the panels you just created, spaced evenly about 2-3 inches inward from the stiles and rails. -
Attach the molding:
Use wood glue and micro pins or small brads to attach the molding rectangles. Miter the corners at 45 degrees for a professional, sharp join. -
Fill and sand:
Fill all nail holes, joints, and mitered corners with wood filler. Once dry, sand everything smooth. This preparation is key for that seamless, built-in appearance. -
Caulk the seams:
Run a bead of caulk along every edge where the wood meets the wall or other wood pieces. Wipe away excess with a damp finger or rag to seal gaps completely. -
Paint the lower section:
Apply primer if using raw wood or MDF. Then, paint the entire lower section—panels, trim, and the wall space inside them—with a durable white semi-gloss paint. Two coats usually give the best coverage.
Wall Mural Addition
Before sealing the project, stencil a simple line-art tree mural on adjacent walls using a silver or light grey paint marker to mirror the nursery theme shown.
Step 3: Upper Wall & Texture
-
Protect the lower border:
Once the white paint is fully cured, apply a strip of delicate-surface painter’s tape along the top edge of the wainscoting rail to protect it from the upper wall color. -
Apply base color:
Roll on your terracotta paint color primarily on the upper wall section. Don’t worry about perfect coverage yet; this layer establishes the undertone. -
Create the texture:
To mimic the soft, plaster-like look in the photo, mix a small amount of glaze or water into your paint, or use a specific limewash paint. Apply this second coat using a cross-hatch motion with a wide brush rather than a roller to create subtle movement. -
Install upper battens:
The image shows vertical wood strips extending up the colored wall. Cut narrow, raw wood strips to fit from the wainscoting shelf to the ceiling. -
Align and secure:
Align these upper strips directly above the vertical stiles of your lower wainscoting for visual continuity. You can stain them beforehand to match a natural wood tone or paint them the same terracotta color for a monochrome texture. -
Final touch-ups:
Remove the painter’s tape slowly. Use a small artist’s brush to touch up any bleed-through or missed spots where the two sections meet.
Step back and enjoy the warm, sophisticated atmosphere you have created for your little one


Geometric Color Blocking in Muted Tones
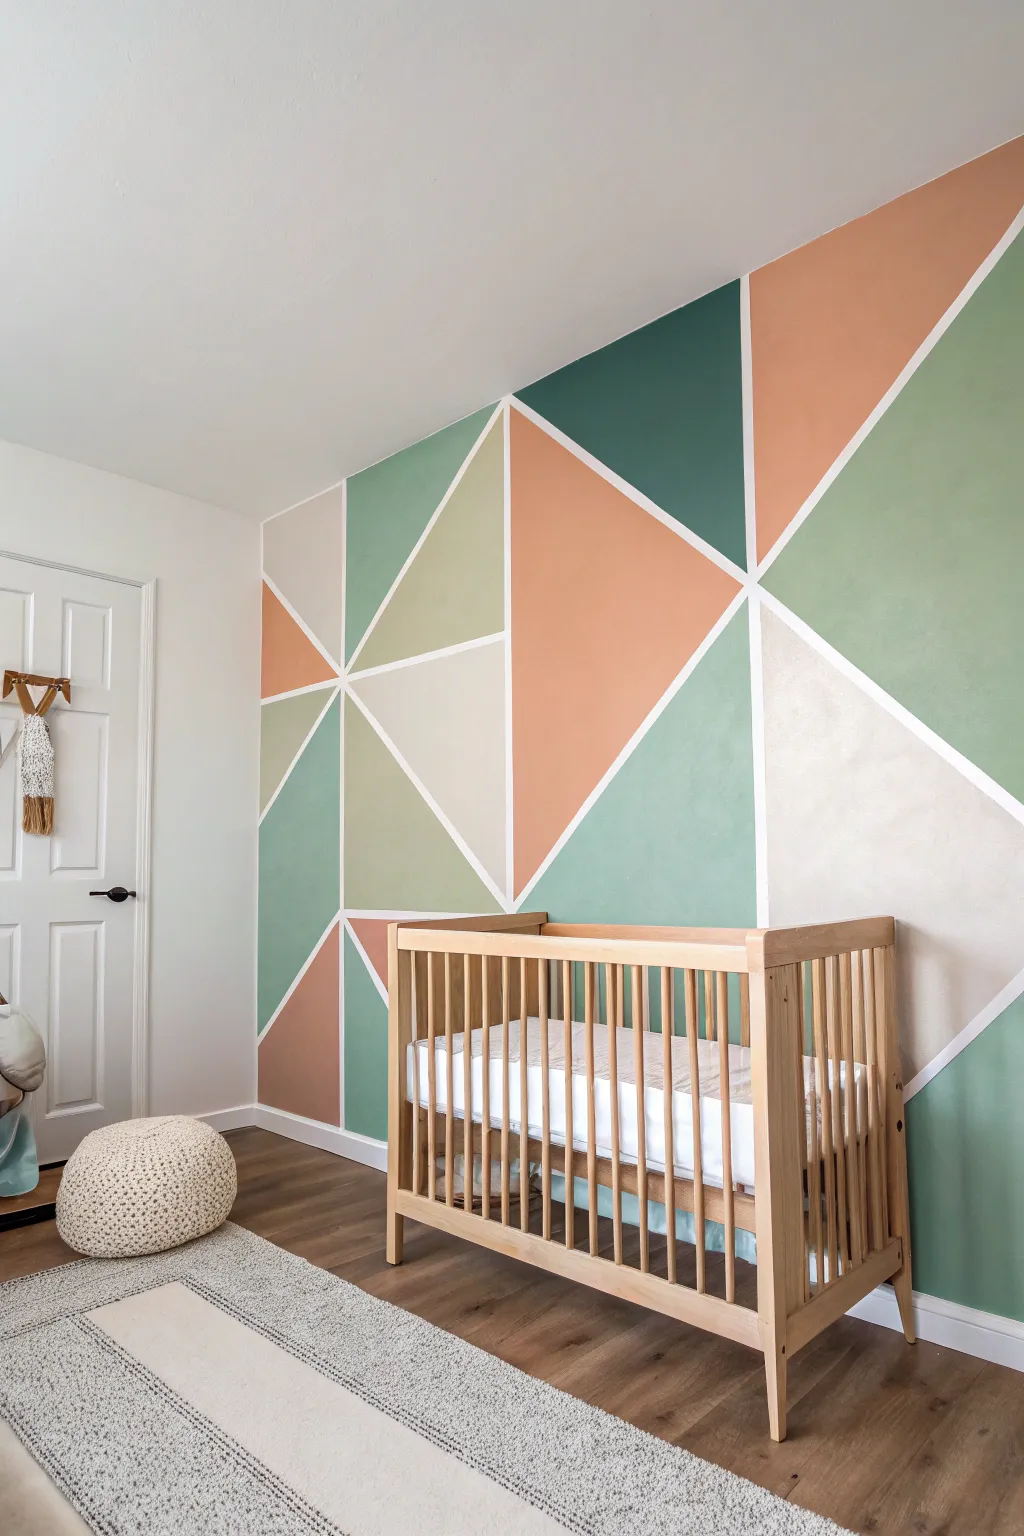
Transform a plain nursery wall into a modern masterpiece with this geometric accent wall featuring muted earth tones. By using painter’s tape to create crisp lines between large color blocks, you achieve a sophisticated yet playful look perfect for a soothing baby room.
Step-by-Step Guide
Materials
- Interior latex paint (Eggshell or Satin finish) in 4-5 shades: Terracotta/Peach, Sage Green, Forest Green, Beige, and Bright White
- High-quality painter’s tape (1-inch width works best)
- Small foam roller set
- Angled sash brush (2-inch)
- Paint tray and liners
- Drop cloth
- Ladder or step stool
- Pencil
- Level or straight edge (optional)
- Damp rag for cleanup
Step 1: Preparation & Base Coat
-
Clear and Clean:
Remove all furniture, including the crib, from the wall area. Wipe the wall down with a damp cloth to remove dust or grime, ensuring a clean surface for the tape to adhere to. -
Paint the Base Color:
Since the white lines between the shapes are actually the wall color underneath, paint the entire wall white first. Apply two coats of your chosen white shade and let it cure fully for at least 24-48 hours. This long drying time is critical to prevent the tape from peeling up your new base coat later.
Step 2: Tape Design
-
Plan Your Layout:
Sketch your geometric design on paper first to balance the colors. The goal is to avoid having the same color touch itself. Reference the photo to see how the triangles vary in size and orientation. -
Create the First Lines:
Start applying painter’s tape to the wall. Begin with one or two long diagonal lines that stretch across a significant portion of the wall to strictly divide the space. Don’t press the tape down firmly just yet in case you want to adjust the angle. -
Form the Triangles:
Intersect your main lines with smaller strips of tape to create the individual triangles. Step back frequently to ensure the shapes look balanced and aren’t too cluttered in one spot. -
Seal the Edges:
Once you are happy with the layout, run your finger or a plastic credit card firmly along all the tape edges. This friction creates a tight seal. -
The Sealing Trick:
For razor-sharp lines, brush a very light coat of your *base* white paint over the edges of the tape. This fills any microscopic gaps with white paint so that any bleed-under matches the lines, keeping your colored triangles crisp.
Bleed-Through Blues
If paint bleeds under the tape, wait for it to fully dry. Place a fresh piece of tape over the colored shape, leaving the white line exposed, and touch up with the white base paint.
Step 3: Painting the Shapes
-
Mark Your Colors:
To avoid confusion, place a small dot of the intended paint color on a piece of masking tape inside each triangle. This ‘paint-by-numbers’ map prevents accidental color repetition. -
Edge with Brush:
Start with your darkest color (the forest green). Use the angled sash brush to carefully paint the borders of the triangle, brushing away from the tape edge toward the center of the shape. -
Fill with Roller:
Use a small foam roller to fill in the center of the triangle. The foam provides a smooth, spray-like finish without heavy texture. Repeat this for all sections assigned to this specific color. -
Switch and Repeat:
Move on to the next color (sage green), using a fresh roller cover or a thoroughly washed and dried one. Continue this process until every triangle is filled with its designated color. -
I Prefer a Second Coat:
I always find that two light coats look better than one heavy one. Let the first coat dry to the touch (usually about an hour) and apply a second coat for rich, opaque coverage.
Color Balance Tip
Distribute your ‘heavy’ colors (like the dark green) evenly across the wall so one side doesn’t feel visually heavier than the other. Try to keep them separated by lighter tones.
Step 4: The Reveal
-
Peel Wet:
Don’t wait for the paint to dry completely essentially turning into plastic. When the second coat is tacky but not soaking wet, begin removing that tape. -
Pull at an Angle:
Slowly pull the tape off at a 45-degree angle away from the painted section. This shearing motion helps cut through the paint film cleanly. -
Touch Ups:
If a little paint bled through or a line isn’t perfect, don’t panic. Wait for everything to dry completely, then use a tiny artist’s brush and your base white paint to correct any minor imperfections.
Enjoy the calm and creative atmosphere you’ve built for your little one to grow into


Simple Painted Arch as a Crib Backdrop
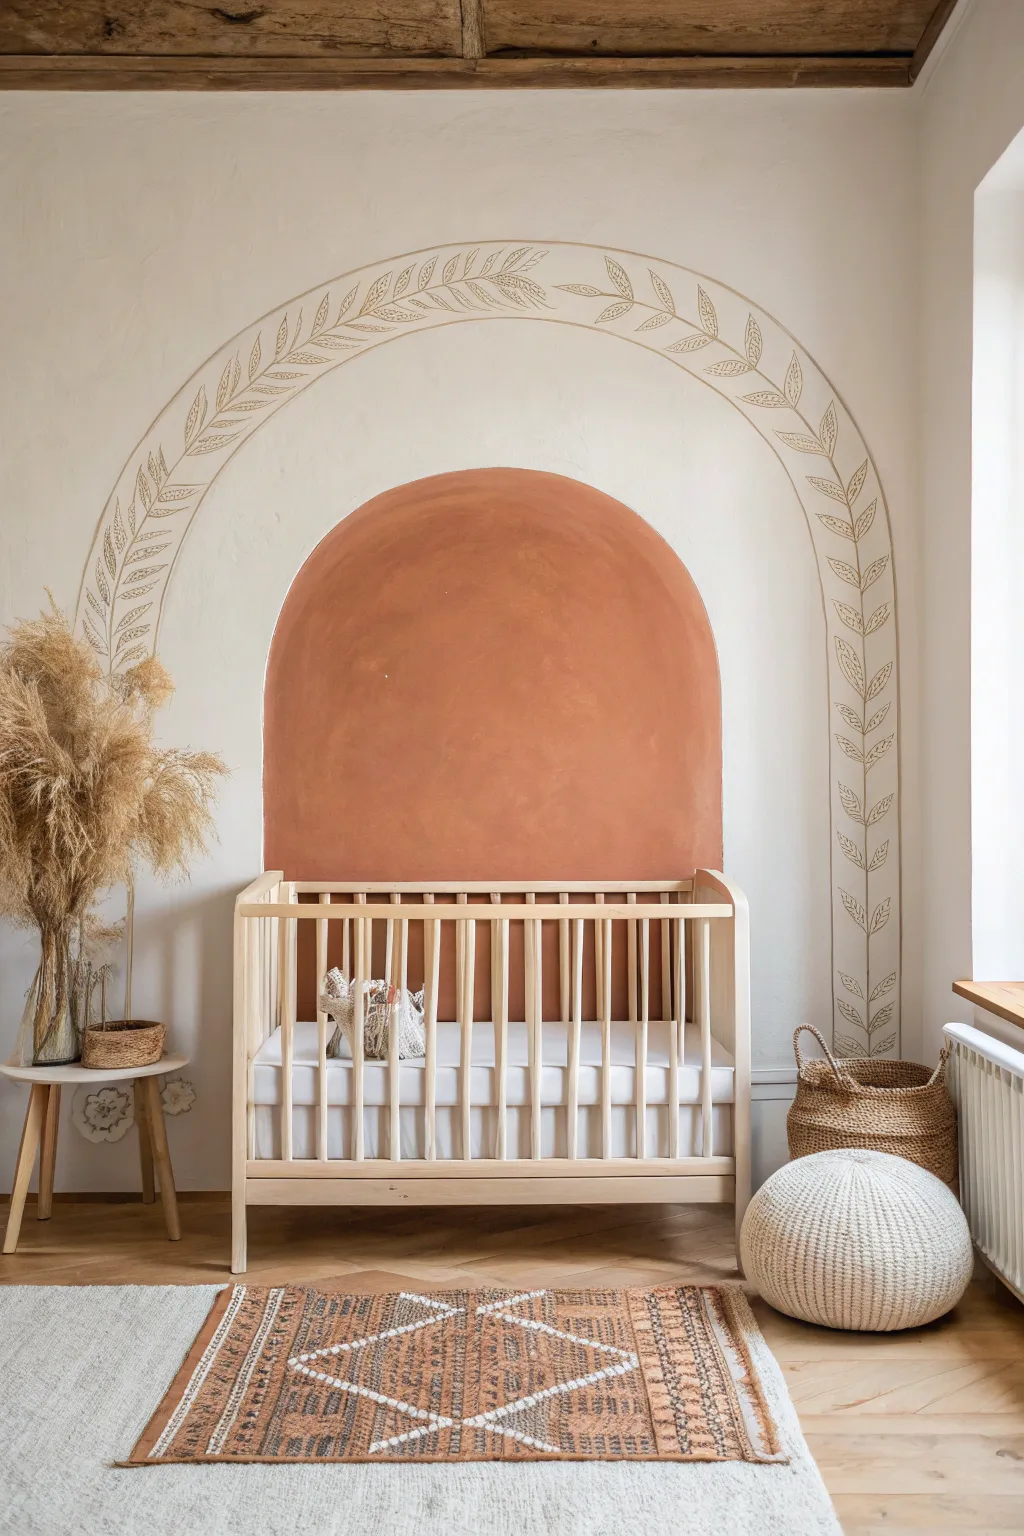
Transform a nursery wall with this earthy, bohemian-inspired double arch feature. The warm terracotta center provides a cozy focal point, while the delicate botanical line work adds height and artistic flair to the space.
Step-by-Step Tutorial
Materials
- Terracotta or burnt orange interior wall paint (matte or eggshell finish)
- Beige or taupe paint for the botanical outline
- Wall paint in existing room color (for touch-ups)
- Pencil
- String and push pin (or a thumbtack)
- Painter’s tape
- Small angled sash brush
- Medium paint roller and tray
- Fine liner brush (size 1 or 2)
- Long ruler or straight edge
- Level
- Drop cloth
Step 1: Planning and Marking
-
Prepare the wall:
Clear the area of furniture and wipe down the wall surface with a damp cloth to remove dust. Lay down your drop cloth to protect the flooring. -
Determine the width:
Measure the width of your crib. You’ll want the inner solid arch to be slightly wider than the crib—add about 4-6 inches on each side for a balanced look. -
Mark the center:
Find the center point on the wall where the crib will sit and mark it lightly with a pencil at the height where the curve of the arch should begin. -
Draw the inner arch curve:
Tie a string to a pencil. Pin the other end of the string to your center mark. Adjust the string length to match half the width of your desired arch. Keeping the string taut, draw a semi-circle upwards. -
Draw the vertical lines:
From the ends of your semi-circle, use a level and a long ruler to draw straight vertical lines down to the baseboard. This completes the outline of the inner solid arch. -
Outline the outer arch:
Using the same center point pin, extend your string by roughly 8-10 inches. Draw a larger semi-circle above the first one. Use the level to extend straight lines down to the floor, parallel to the inner arch.
Step 2: Painting the Solid Arch
-
Tape the edges:
Apply painter’s tape along the outside of the straight vertical lines of the inner arch to ensure crisp edges. Press down firmly to prevent bleed-through. -
Cut in the curve:
Using a small angled sash brush, carefully hand-paint the curved top edge of the inner arch. Take your time here—I usually brace my hand against the wall for steadiness. -
Fill the center:
Use a medium roller to fill in the rest of the arch with your terracotta paint. Apply a thin, even coat. -
Apply second coat:
Let the first coat dry completely (usually 2-4 hours). Apply a second coat to ensure rich, opaque color coverage. -
Remove tape:
Peel off the painter’s tape while the paint is still slightly tacky to avoid ripping the dried film.
Steady Hands
For the vine details, dilute your paint slightly with water. Inky paint flows smoother off a liner brush than thick paint, giving you cleaner lines.
Step 3: Adding the Botanical Detail
-
Define the outer boundary:
You already marked the outer arch lightly in pencil. Now, lightly sketch a second line about 3 inches inside that outer line, creating a ‘track’ for your vines to follow. -
Sketch the vine:
Lightly sketch a central stem winding through this track, followed by simple leaf shapes branching off on either side. Keep the leaves angled upwards for a growing effect. -
Paint the stem:
Load your fine liner brush with the beige paint. Carefully trace over your pencil stem line. Keep the pressure consistent for a smooth line. -
Paint the leaves:
Using the same fine brush, paint the outline of each leaf. You can add a single center vein line inside each leaf for extra detail, just like in the photo. -
Clean up:
Allow the detail work to dry fully. Use an eraser to gently remove any visible pencil marks that weren’t covered by paint.
Texture Twist
Mix a texture additive or baking soda into the terracotta paint for the center arch to give it an old-world, plaster-like tactile finish.
Step back and admire how this simple painted feature frames the crib and warms up the entire nursery


Minimal Mountain Range Nursery Mural
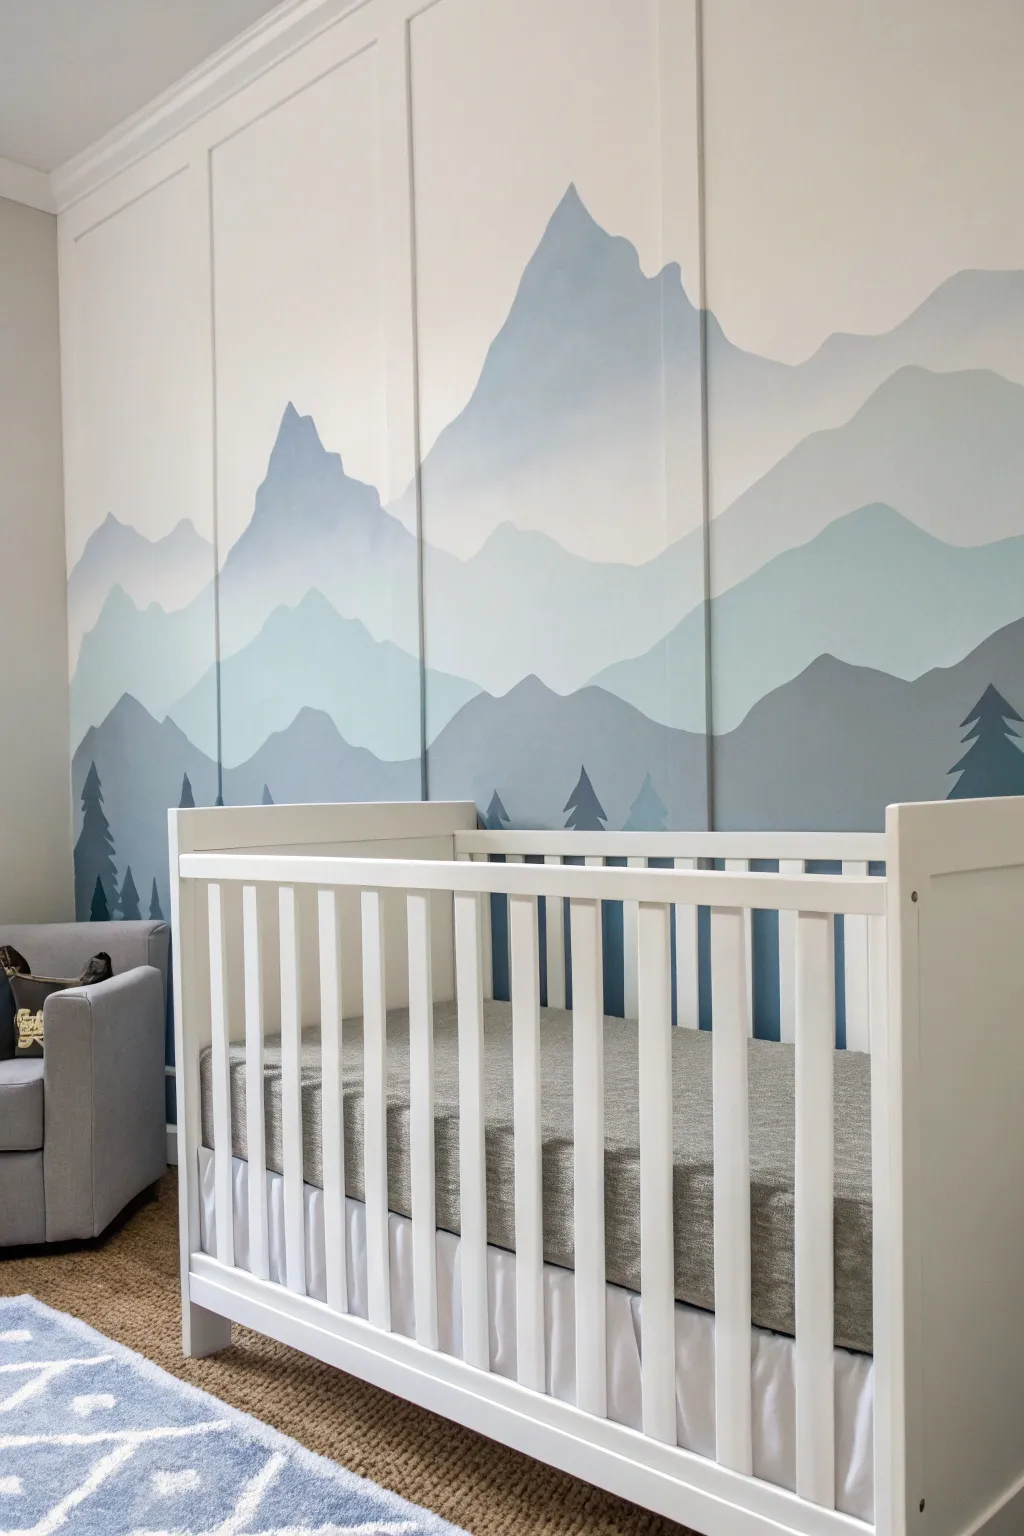
Transform a plain nursery wall into a tranquil alpine escape with this layered mountain mural integrated into a classic board and batten design. The soft, monochromatic gradient creates depth and calm, perfect for soothing a little one to sleep.
How-To Guide
Materials
- Interior latex paint (white base)
- Interior latex paint (darkest blue/grey shade)
- Painter’s tape (multi-surface)
- Drop cloths
- Sandpaper (220 grit)
- Angled sash brush (2-inch)
- Small foam roller and tray
- MDF or wood batten strips (1×2 or 1×3 inch)
- Brad nailer and nails
- Paintable caulk and caulk gun
- Wood filler
- Pencil
- Stencil brush (optional for trees)
Step 1: Planning and Grid Work
-
Prep the canvas:
Clear the room and lay down drop cloths to protect your flooring. Ensure the wall is clean, dry, and free of dust or grease before beginning. -
Measure and mark battens:
Decide on the spacing for your vertical batten strips. Measure the total width of the wall and divide it evenly to determine where each vertical strip will land, marking these lines lightly with a pencil. -
Install the battens:
Cut your MDF or wood strips to the full height of the wall. Using a level to ensure they are perfectly vertical, attach them to the wall over your pencil marks using a brad nailer. -
Fill and caulk:
Fill the nail holes with wood filler and let it dry. Run a bead of paintable caulk along both sides of every batten strip where it meets the wall to create a seamless, built-in look. -
Sand and prime:
Once the filler is dry, sand the nail holes flush. If you are using raw wood, apply a coat of primer to the strips; if pre-primed, you can skip straight to the base color.
Seamless Batten Trick
When painting over the batten strips, wrap the paint color around the sides of the wood. Viewing the mural from an angle will ruin the effect if the sides are left white.
Step 2: Sketching the Landscape
-
Apply base background:
Paint the upper portion of the wall—everything above where your mountains will start—in your lightest color (likely white or a very pale off-white). This acts as the sky. -
Sketch the ranges:
Using a pencil, lightly draw the outline of your mountain ranges directly onto the wall and over the batten strips. Create three distinct layers: a high, distant range, a middle range, and a lower, foreground range. -
Vary the peaks:
Keep the lines jagged and organic. I prefer to make the highest peaks asymmetrical to avoid a repeated pattern look.
Adding Texture
For a dreamy effect, sponge a tiny bit of watered-down white paint at the very base of the mountain valleys before they dry to create a subtle ‘mist’ look.
Step 3: Painting the Layers
-
Mix your palette:
You only need two cans of paint: pure white and your darkest blue-grey. Pour the dark paint into three separate containers. Mix increasing amounts of white into two of them to create a light, medium, and dark version of the same hue. -
Paint the distant range:
Start with the highest mountain layer (the one furthest back). Use the lightest mixed grey-blue color. Use an angled brush to carefully cut in the jagged ridgeline, then fill in the body of the mountains down to the next pencil line. -
Handle the battens:
When painting over the vertical strips, ensure you paint the sides of the batten to match the wall section it touches. This is crucial for the illusion of continuity. -
Paint the middle range:
Once the top layer is dry to the touch, move to the middle section. Use your medium-tone mixture. Cut in the new ridgeline, slightly overlapping the bottom of the previous lighter layer to ensure no gaps. -
Apply the foreground:
Finish with the lowest mountain range using your darkest, unmixed paint color. This anchors the mural and creates the most visual weight at the bottom. -
Touch up edges:
Inspect where the paint colors meet the vertical battens. Use your small brush to ensure the lines wrap around the sides of the wood strips cleanly.
Step 4: Detailing and Finishing
-
Add tree silhouettes:
Using the darkest paint color, hand-paint small pine tree silhouettes along the ridge of the bottom-most mountain layer. Keep them simple—just a vertical line with varying horizontal dashes. -
Add translucent trees:
For added depth, mix a slightly lighter shade and add a few larger tree silhouettes on the ‘middle’ mountain range, making them look like they are receding into the mist. -
Final inspection:
Check for any drips or uneven coverage. Apply a second coat to any mountain sections that look streaky, especially the darkest bottom layer. -
Clean up:
Remove any remaining tape carefully and clean your brushes immediately with warm soapy water.
Step back and admire the peaceful depth you’ve created for your little one’s new sanctuary
BRUSH GUIDE
The Right Brush for Every Stroke
From clean lines to bold texture — master brush choice, stroke control, and essential techniques.
Explore the Full Guide
Dreamy Cloud Wall With Sponging
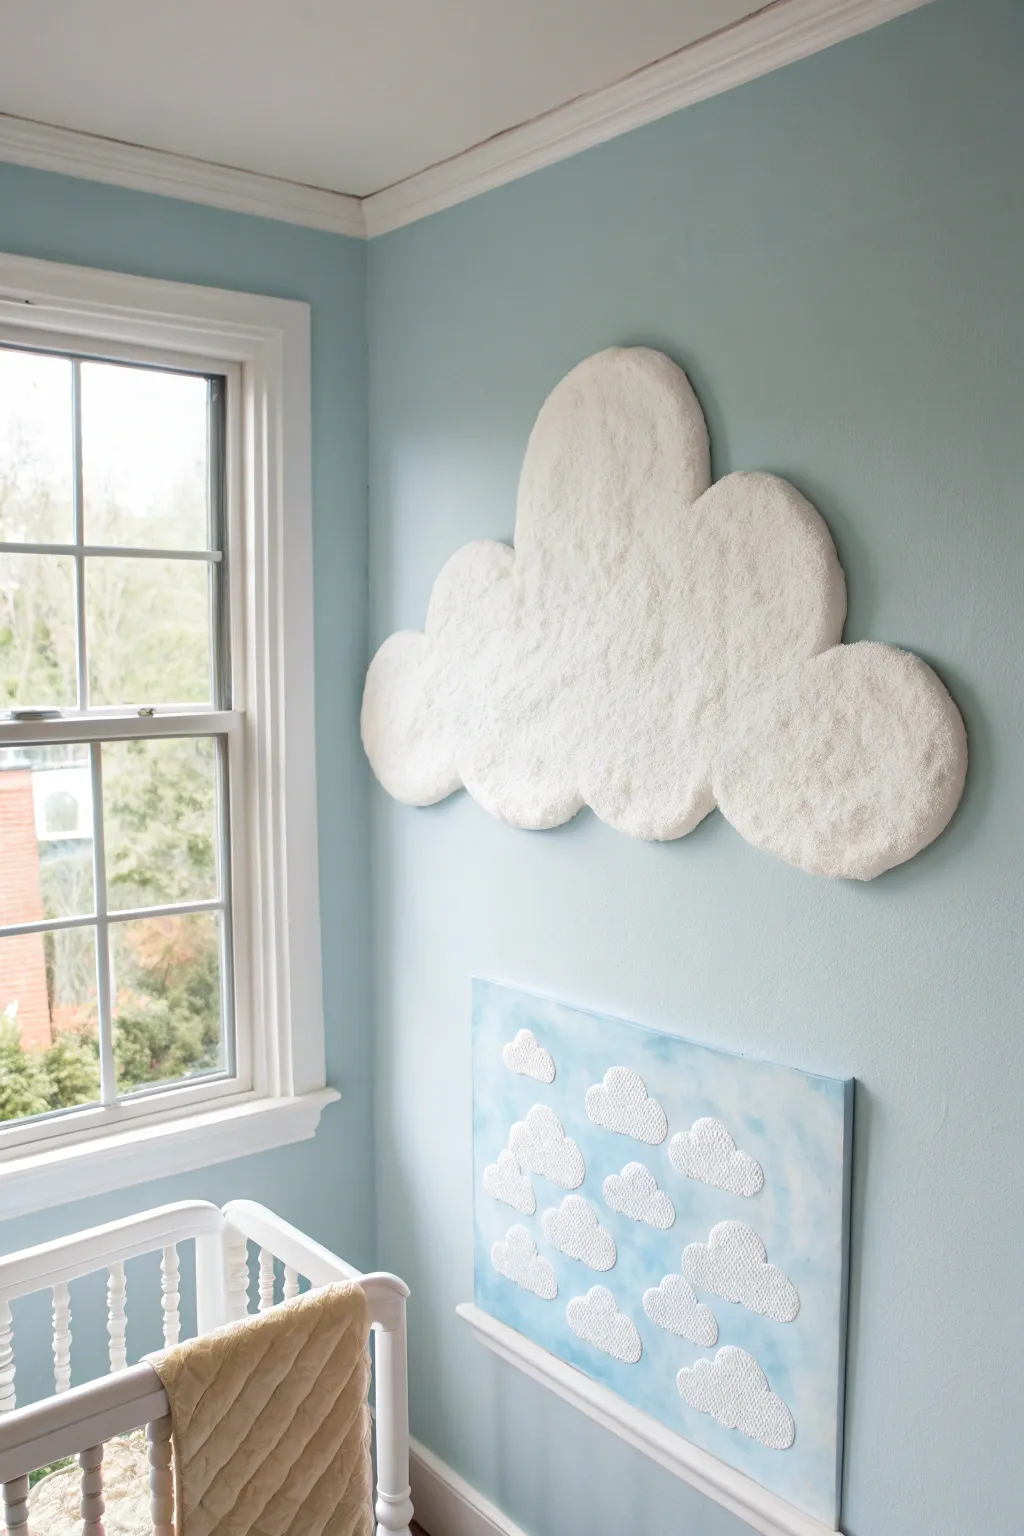
Bring the sky indoors with this dual-element project featuring a massive, touchable textured cloud sculpture and a complementary canvas painting. The heavy texture creates a soft, plush appearance that adds wonderful dimension to a nursery without overwhelming the space with color.
Step-by-Step Guide
Materials
- Large sheet of rigid foam insulation board or thick cardboard
- Utility knife or drywall saw
- Joint compound (pre-mixed bucket) or lightweight spackle
- White acrylic paint (matte)
- Sea sponge or large natural sponge
- Sandpaper (medium grit)
- Construction adhesive or heavy-duty mounting strips
- Rectangular canvas (approx. 24×36 inches)
- Light blue acrylic paint
- White puff paint or texture paste
- Paintbrushes (wide flat brush and small detail brush)
- Drop cloth
Step 1: Sculpting the Large Cloud
-
Sketch the shape:
Begin by drawing a large, fluffy cumulus cloud shape directly onto your rigid foam board. Aim for rounded, billowy humps rather than sharp edges to keep the look gentle. -
Cut out the base:
Carefully cut along your traced line using a sharp utility knife or a drywall saw. Take your time on the curves to ensure they remain smooth and flowing. -
Sand the edges:
Once cut, run sandpaper along the raw edges of the foam to smooth out any jagged bits or loose debris. -
Prepare the compound:
Open your bucket of joint compound. If it’s very stiff, mix in a tiny amount of water to make it more spreadable, roughly the consistency of thick frosting. -
Apply the first layer:
Using a putty knife or spatula, spread a thick, even layer of joint compound over the entire front surface and edges of the cloud cutout. -
Create the texture:
While the compound is still wet, take your damp sea sponge and firmly dab it all over the surface. Pulling the sponge straight up creates those wonderful little peaks and craters. -
Let it dry completely:
Allow the cloud to dry for at least 24 hours. The compound will turn bright white when fully dry; any gray spots indicate moisture remains. -
Seal with paint:
Paint the entire textured surface with matte white acrylic paint. This seals the joint compound and prevents it from dusting or crumbling over time.
Cracking Up?
If the joint compound cracks while drying, don’t panic. Simply mix a little water into fresh compound and smooth it into the cracks with your finger, then re-texture with the sponge.
Step 2: Painting the Canvas Companion
-
Paint the sky background:
On your rectangular canvas, mix light blue paint with a generous amount of white. Paint the entire background, blending in subtle streaks of pure white while wet to create a hazy, atmospheric effect. -
Outline small clouds:
Once the blue background is dry, use a pencil to lightly sketch several small cloud shapes in a scattered pattern across the lower half of the canvas. -
Apply texture paste:
Fill in your pencil outlines using white texture paste or puff paint. I find distinct, rapid dabbing motions work best here to mimic the texture of the large wall cloud. -
Build dimensional layers:
For extra pop, let the first layer of paste dry slightly and add a second dollop in the center of each cloud to give them a rounded, 3D profile.
Step 3: Installation
-
Mount the large cloud:
Apply construction adhesive or heavy-duty mounting tape to the back of your foam cloud. Press it firmly against the wall at your desired height, holding it in place for a minute to ensure a good bond. -
Hang the canvas:
Install the canvas painting below the large cloud using standard picture hanging hardware, aligning it so the cloud formations feel connected visually.
Silver Lining
For a magical touch, lightly dry-brush a metallic silver or soft gold paint onto the highest peaks of the texture once everything is dry. It catches the nursery light beautifully.
Step back and enjoy the serene, floating atmosphere you have created for the little one
Nursery Name Lettering Painted Into the Design
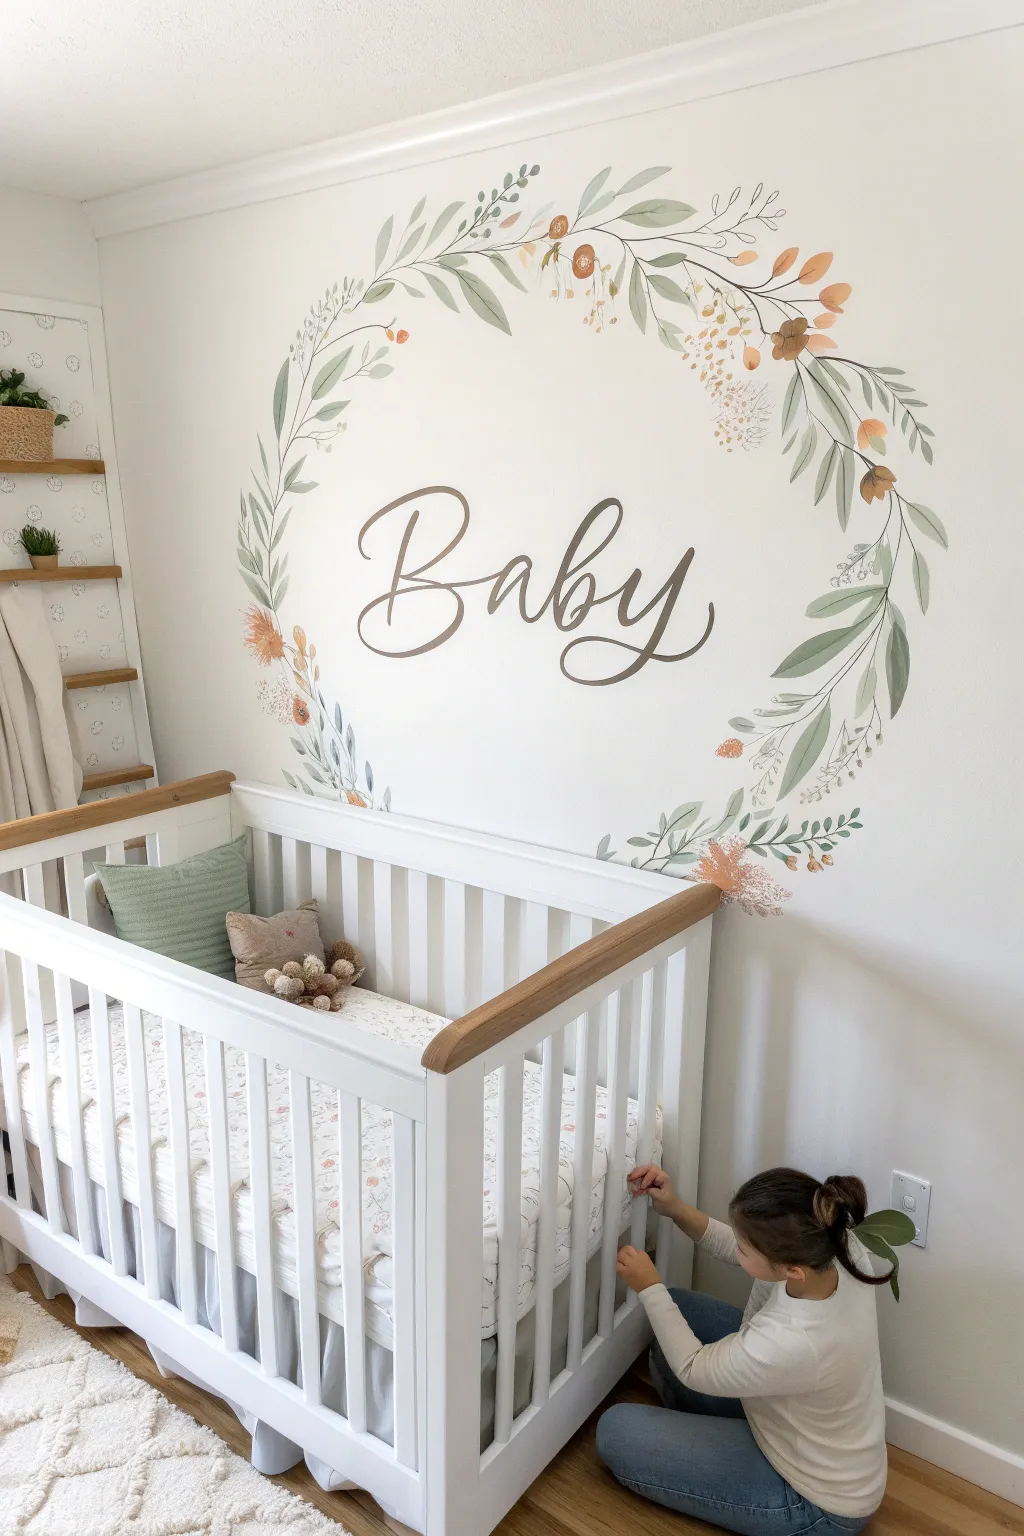
Bring a soft, organic touch to your nursery with this elegant floral wreath mural featuring custom lettering. The watercolor-style leaves and gentle script create a calming focal point that looks sophisticated yet sweet.
Step-by-Step Guide
Materials
- Interior latex paint (white base)
- Acrylic craft paints (sage green, olive green, terracotta, beige, brown)
- Glaze medium or water for dilution
- Assorted paintbrushes (various rounds sizes 4-10, liner brush)
- Pencil and eraser
- Large circular object or string/pin for tracing
- Laser level (optional)
- Paper towels
- Painter’s tape
Step 1: Planning & Sketching
-
Prepare the wall:
Ensure the wall is clean, dry, and free of dust. If you are painting over a dark color, apply a coat of primer first to ensure your delicate watercolor tones show up true to color. -
Mark the center:
Decide exactly where you want the wreath to sit. Measure the width of your crib and mark the center point on the wall above it using a pencil. This will be the center of your circle. -
Draw the main circle:
Create a guide for your wreath. You can tie a string to a pencil, pin the other end to your center mark, and lightly trace a large circle. Alternatively, trace a large round object like a hula hoop if the size fits. -
Sketch the lettering:
Lightly sketch the word ‘Baby’ (or your child’s name) across the center. Use a ruler or laser level to keep the baseline straight. Focus on getting the spacing and flow of the cursive right before committing to paint. -
Map out the botanical elements:
Lightly sketch the main stems flowing along your circle guide. Don’t worry about drawing every single leaf; just mark the direction of growth. For this design, the stems should generally curve upwards from the bottom and downwards from the top, meeting on the sides.
Fixing Faux Pas
If a watercolor leaf looks too heavy or opaque, damp a clean brush with water and gently lift some pigment off the wall while it is still wet. Dab with a paper towel to blot.
Step 2: Painting the Foliage
-
Mix your greens:
Prepare a palette with sage green and olive green. Mix these with a fair amount of glaze medium or water. You want the paint to be translucent to mimic a watercolor effect. -
Paint the main stems:
Using a size 4 or 6 round brush and your diluted olive green, paint thin, curving lines following your pencil guides. varying the pressure slightly to create organic, natural-looking stems. -
Add the large leaves:
Dip a size 8 or 10 round brush into the sage green wash. Use the ‘press and lift’ technique: touch the tip to the wall near the stem, press down to widen the bristles for the leaf body, and lift up as you pull away to create a pointed tip. -
Layer in darker leaves:
While the first set of leaves is drying, mix a slightly darker, less diluted green. Paint a second set of leaves interspersed with the first to add depth and dimension. Overlapping wet edges slightly can create beautiful watercolor blooms. -
Create distinct leaf shapes:
Vary your leaf shapes. Some should be long and willow-like, while others can be rounder like eucalyptus. Change the direction of the leaves so they don’t look too uniform.
Step 3: Painting Accents & Text
-
Add floral accents:
Mix a soft terracotta or muted orange wash. Use a smaller round brush to dab in small clusters of flowers or berries along the wreath. Keep these loose and abstract rather than detailed. -
Paint dainty sprigs:
Using a very fine liner brush and a beige or pale brown wash, add delicate, spindly twigs sticking out from the main wreath. Add tiny dots at the ends to represent buds or seeds. -
Dry check:
Step back and look at the wreath as a whole. Fill in any sparse areas with extra leaves or floral dots, balancing the colors around the circle. -
Outline the text:
Switch to your brown acrylic paint. It should be creamy but not too watery, as you want crisp lines for the text. Use a liner brush or small round brush to carefully trace over your pencil sketch. -
Thicken the downstrokes:
To achieve a calligraphy look, go back and thicken the downstrokes (any part of the letter where your pen would have moved downwards). Keep the upstrokes thin and delicate. -
Clean up sketch lines:
Once the paint is completely bone dry—I usually wait overnight to be safe—gently erase any visible pencil marks with a clean white eraser.
Add Dimension
Once the lettering is fully dry, use a very diluted gray paint to add a faint shadow to the right side of the letters. This makes the name pop off the wall slightly.
Step back and admire the serene, custom artwork that perfectly frames the nursery space.

PENCIL GUIDE
Understanding Pencil Grades from H to B
From first sketch to finished drawing — learn pencil grades, line control, and shading techniques.
Explore the Full Guide
Scallop Border for a Playful Nursery Wall
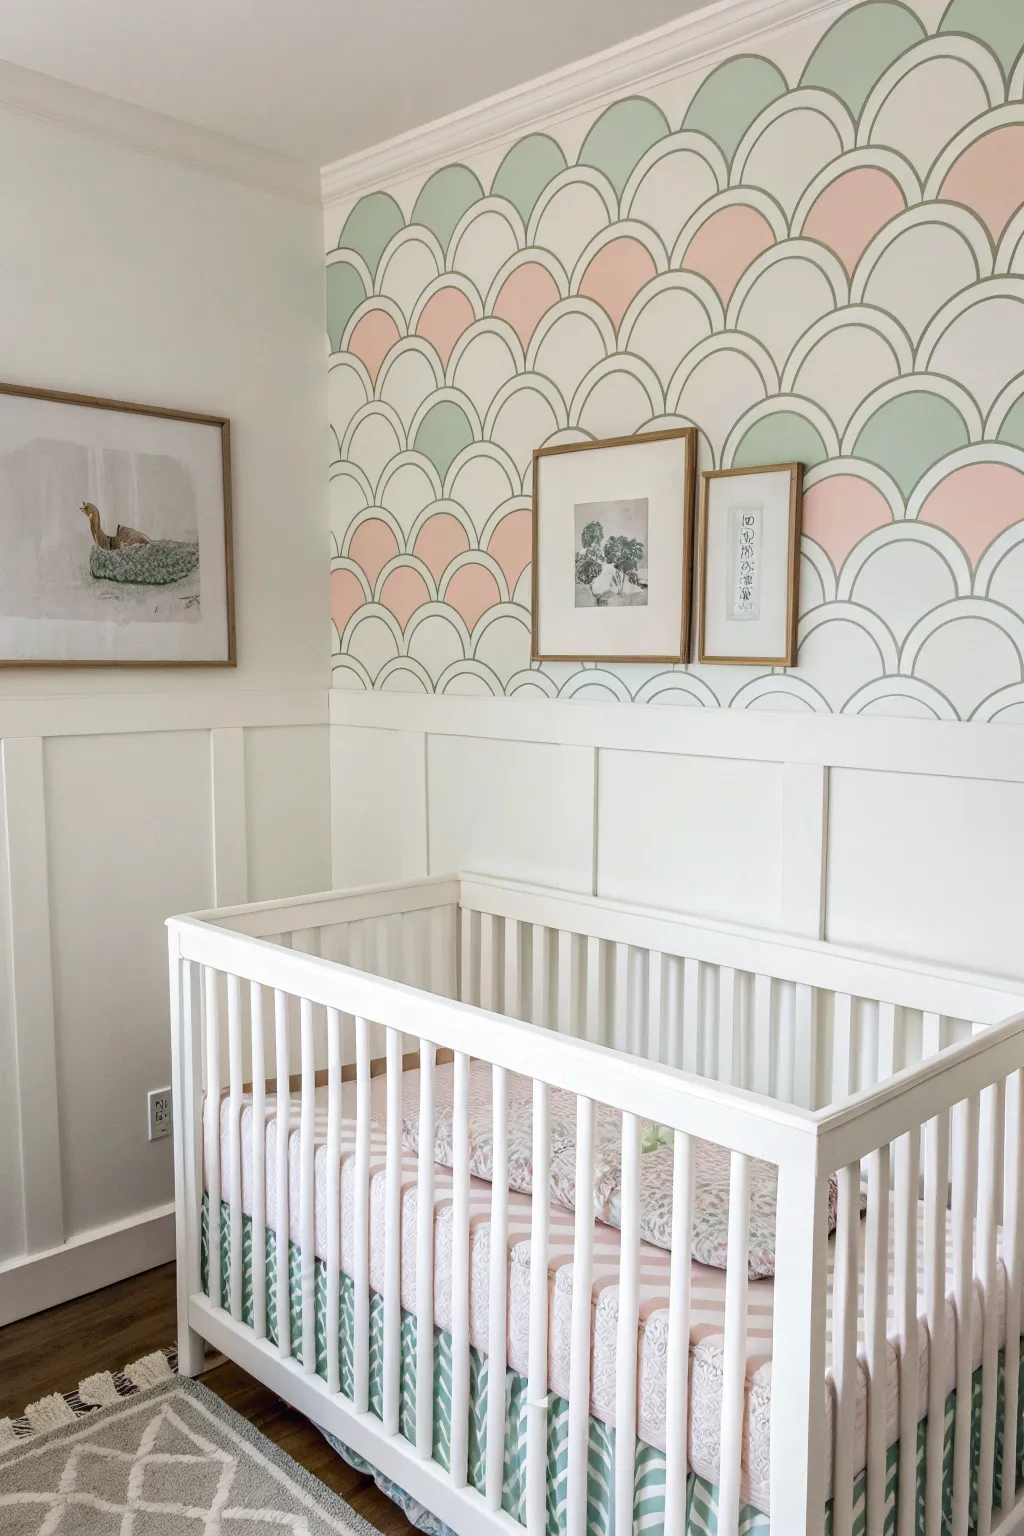
Bring whimsical elegance to your nursery with this delightful hand-stenciled scallop pattern. By combining soft pastel fills with crisp outline work above traditional wainscoting, creates a sophisticated yet playful backdrop for your little one.
Detailed Instructions
Materials
- Base wall paint (white or off-white)
- Accent paint: Sage green (matte or eggshell)
- Accent paint: Soft peach/pink (matte or eggshell)
- Accent paint: Darker grey-green for outlines
- Thick cardboard or stencil plastic sheet
- Pencil
- Scissors or X-Acto knife
- Level
- Painter’s tape
- Small angled sash brush
- Fine liner brush (size 1 or 2)
- Flat artist brush (medium size)
- Eraser
Step 1: Creating the Stencil Template
-
Draft the shape:
Begin by drawing your scallop shape on a piece of rigid cardboard or stencil plastic. For the look in the photo, you want a semi-circle that is roughly 8-10 inches wide. Use a compass or trace a large dinner plate to get a perfect curve. -
Add the border width:
Since this design features outlines rather than solid blocks, draw a second, slightly smaller semi-circle inside the first one, leaving about a 1/4 inch gap. This gap represents the thickness of the outline. -
Cut the template:
Carefully cut out your shape. You want the positive shape of the arch so you can trace around it. Check the edges for smoothness; any bumps here will show up on the wall later.
Wobbly Lines?
If brushwork is tricky, use a paint pen for the outlines! A water-based acrylic marker in grey-green offers way more control than a brush for thin curves.
Step 2: Mapping the Wall
-
Establish the baseline:
If you have wainscoting like the photo, use the top rail as your starting point. If working on a plain wall, use a level and extensive painter’s tape to mark a perfectly straight horizontal line where your pattern will begin. -
Trace the first row:
Starting at the center of the wall to ensure symmetry, place your template on the baseline. Lightly trace the outer edge of the scallop with a pencil. Repeat this across the entire length of the wall, ensuring the edges of the scallops touch perfectly. -
Stagger the second row:
For the second row, position the center of your scallop template exactly above the meeting point of the two scallops below it. This creates the classic fish-scale or mermaid tile effect. Trace the row. -
Continue upward:
Repeat the staggered tracing process until you reach the ceiling or crown molding. Don’t worry about partial shapes at the corners yet; just keep the spacing consistent. -
Trace the inner lines:
I find it easier to add the inner definition now. Go back over your traced aches and verify your pencil lines are visible but faint enough to be painted over easily.
Level Up: Texture
For the filled scallops, try mixing a little glazing medium into the paint. It creates a subtle, watercolor-wash effect rather than a flat, solid block of color.
Step 3: Painting the Design
-
Select your color placement:
Look at your grid of scallops. Plan a random but balanced distribution of colored scallops versus white ones. Roughly 1 in 5 scallops should be colored, alternating between sage green and peach. -
Mark the colors:
Place a tiny dot of painter’s tape or a light pencil mark inside the scallops you intend to fill with color so you don’t get confused once you start painting. -
Fill the pastel shapes:
Using your flat artist brush and the small angled brush, fill in the chosen scallops with the sage green and peach paints. carefully paint up to your pencil line, but try not to go over it. -
Wait for drying:
Let the filled shapes dry completely. This is crucial because wet paint might smudge when you work on the outlines. -
Start the outline work:
Dip your fine liner brush or a very steady small brush into the darker grey-green paint. You are now going to paint the outline grid. -
Paint the curves:
Follow your pencil tracings to paint the thin, consistent lines that separate the scallops. Since the design relies on outlines, you need to paint a uniform border around every single arch, including the ones you filled with color. -
Connect the visually:
Ensure the lines connect smoothly where the scallops meet. The line thickness should remain constant—about 1/4 inch thick—throughout the entire wall. -
Refine the edges:
Use a small brush to touch up any areas where the pastel fill didn’t quite meet the outline, or where the outline wobbled. Clean lines are the secret to this wallpaper-like effect. -
Final erase:
Once the paint has cured for at least 24 hours, gently erase any visible pencil marks that weren’t covered by the paint.
Step back and admire the soft, soothing rhythm created by your steady hand and creative eye.
Wide, Soft Stripes to Stretch a Small Baby Room
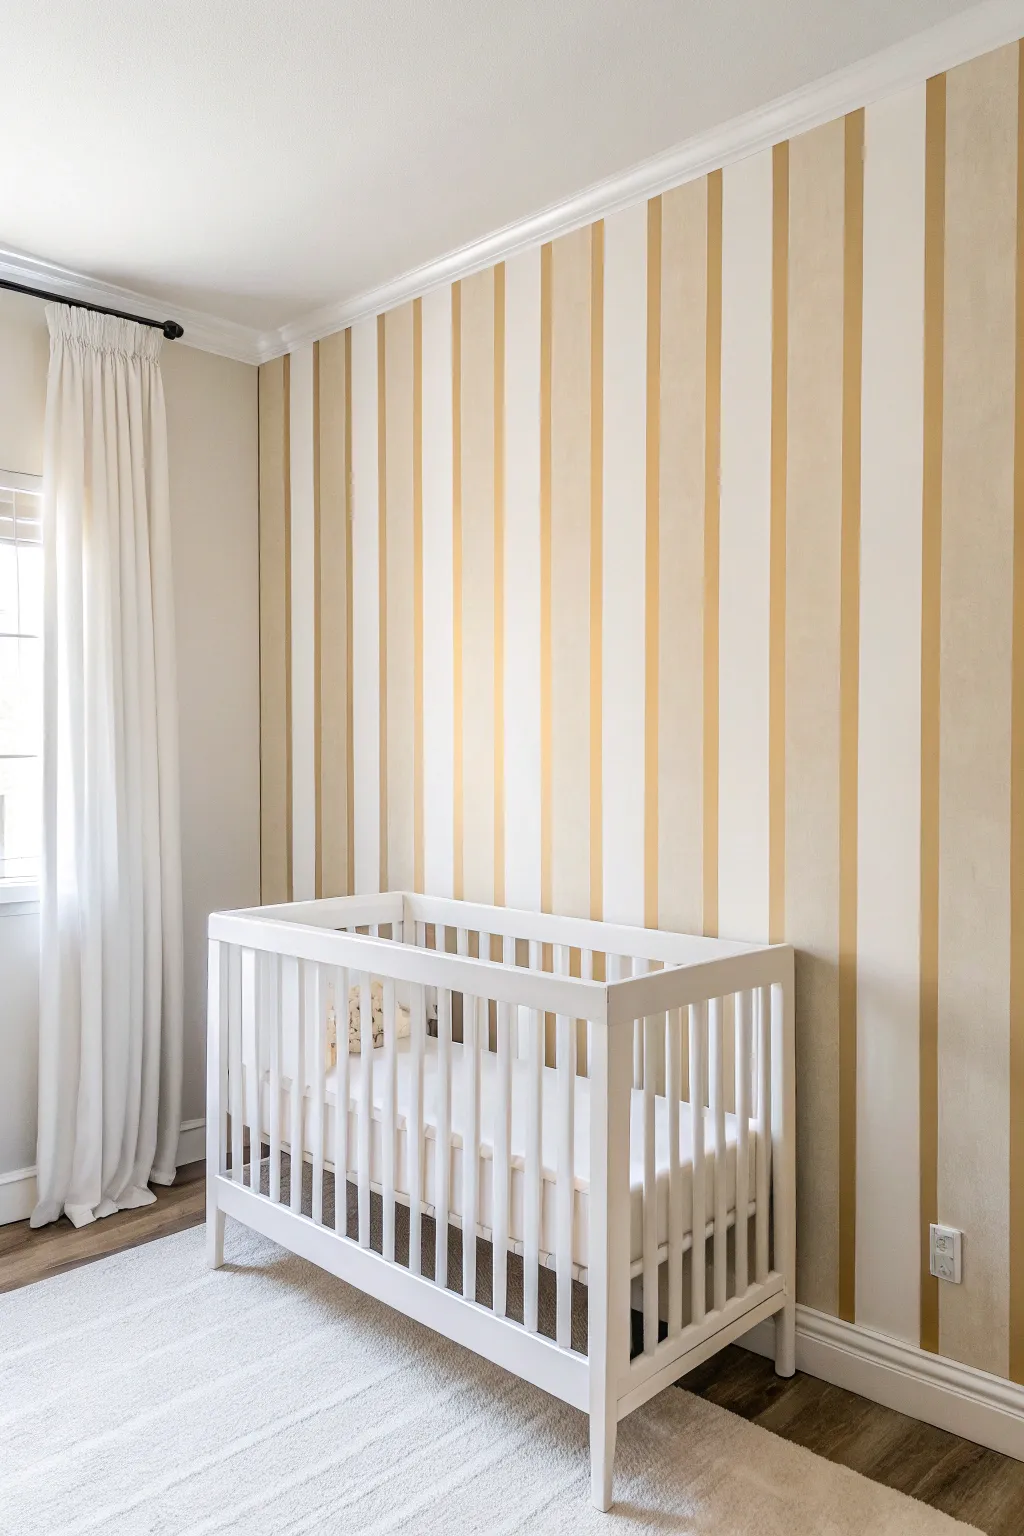
Transform a plain nursery wall into a sun-drenched statement piece with these sophisticated, wide vertical stripes. The combination of a soft creamy base and varying widths of warm gold creates an elegant, elongating effect that makes the ceiling feel endlessly high.
Step-by-Step Tutorial
Materials
- Interior latex paint (Creamy Off-White/Beige for base)
- Interior latex paint (Mustard Gold/Yellow)
- Painter’s tape (high quality, 1.5 inch or wider)
- Laser level (highly recommended) or manual level
- Pencil
- Tape measure
- Paint roller frame and roller covers (3/8″ nap)
- Small angled sash brush
- Drop cloths
- Paint tray and liners
- Ladder or step stool
Step 1: Preparation & Base Coat
-
Clear and Prep:
Empty the room or move furniture to the center and cover completely with drop cloths. Remove outlet covers and switch plates on the accent wall. -
Clean the Walls:
Wipe down the wall surface with a damp cloth or a mild TSP substitute to remove dust, oils, or crayon marks, ensuring the paint adheres properly. -
Apply the Base Color:
Paint the entire accent wall with your lighter color choice, the creamy off-white or beige. This lighter shade will serve as one set of your stripes. -
Cut in the Edges:
Use your angled sash brush to carefully paint along the ceiling line, baseboards, and corners where the roller can’t reach. -
Roll the Full Wall:
Use the roller to cover the main wall area. Apply a second coat if necessary for full coverage, and allow this base layer to dry completely—ideally for at least 24 hours so the tape won’t peel it up later.
Step 2: Measuring & Taping
-
Map Your Pattern:
Measure the total width of the wall. Decide on your stripe pattern; the image shows a repeating pattern of a wide cream stripe, a medium gold stripe, a narrow cream stripe, and a medium gold stripe. Sketch this out on paper first to handle the math. -
Mark the First Stripe:
Start from the least visible corner (usually behind the door). Measure out the width of your first stripe and mark it lightly with a pencil at eye level. -
Set the Laser Level:
Turn on your laser level and align the vertical beam with your pencil mark. If you don’t have a laser, use a long level and draw a faint vertical line from floor to ceiling. -
Apply the Tape:
Place your painter’s tape along the laser line. Crucial tip: Apply the tape on the *outside* of the area you intend to paint gold, preserving the cream stripe underneath the tape. -
Mark the ‘No-Paint’ Zones:
As you tape off the entire wall, place a small piece of tape or an ‘X’ made of tape inside the stripes that should remain cream. It prevents confusion once you start rolling.
Use an Odd Number
For the most visually pleasing layout, aim to start and end the wall with the same color stripe. Do the math to ensure your corners match.
Step 3: Painting the Stripes
-
Seal the Tape Edges:
To get crisp lines, lightly brush a small amount of the *base* color (cream) over the edge of the tape that faces the stripe you are about to paint. This seals any tiny gaps. -
Let the Seal Dry:
Wait 20-30 minutes for that sealing layer to dry. This simple step is the secret to perfect edges. -
Paint the Gold Stripes:
Dip your roller into the gold paint. Roll vertically inside the designated stripe areas, being careful not to push paint too aggressively under the tape. -
Second Coat:
Once the first gold coat is dry to the touch, apply a second coat for rich, opaque color saturation. -
The Reveal:
Remove the tape while the final coat of paint is still slightly damp. Pull the tape slowly at a 45-degree angle away from the painted edge. -
Touch Ups:
Inspect your lines. Use a tiny artist’s brush to correct any small bleeds or imperfections near the ceiling or baseboards.
Add Metallic Flair
Mix a subtle metallic glaze into your top coat of gold paint. It adds a gentle shimmer that catches sunlight during golden hour.
Step back and admire how your new vertical stripes make the ceiling feel delightfully higher and the room more expensive.


Polka Dots in an Easy, Organic Layout
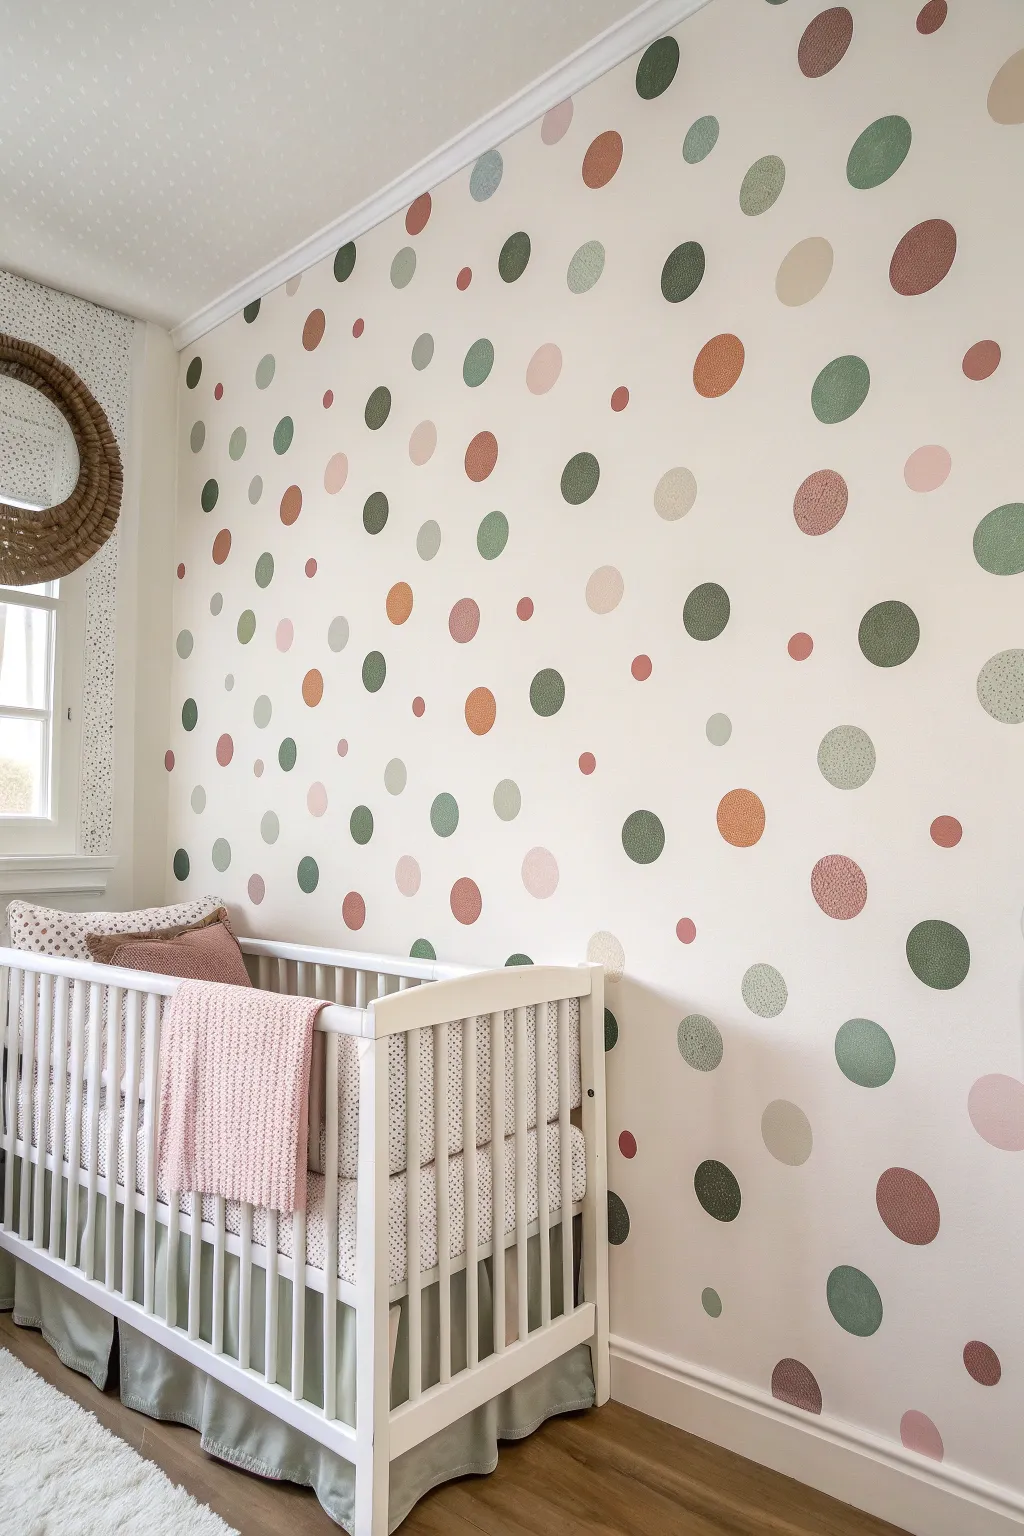
Transform a nursery wall into a playful masterpiece with this organic, scattered polka dot design. Using a palette of soft sage greens, terra cottas, and creams, this freehand-style application creates a cozy, modern look without the rigidity of a grid.
Step-by-Step Guide
Materials
- Interior latex wall paint (base color: off-white or cream)
- Sample pots of latex paint (sage green, forest green, terra cotta pink, muted rust, beige)
- Round stencil sponges or foam pouncers (assorted sizes: 1-inch, 2-inch, 3-inch)
- Small artist brush (for touch-ups)
- Paper plates or palette tray
- Painter’s tape
- Drop cloth
- Level (optional)
- Pencil (optional)
- Damp rag
Step 1: Preparation and Base
-
Clear the area:
Move the crib and any furniture away from the feature wall to give yourself plenty of maneuvering room. Lay down a drop cloth to protect the flooring. -
Prep the surface:
Wipe down the wall with a damp rag to remove dust or grime, ensuring the paint adheres properly. Let the wall dry completely. -
Apply the base coat:
If your wall isn’t already the desired background color, apply two coats of a warm off-white or cream latex paint. Allow this to cure for at least 24 hours before adding the dots.
Uneven Circles?
Does your sponge slide, creating ovals? Don’t stress. Use a small brush to round it out once dry, or leave it! The hand-painted imperfection adds to the charm.
Step 2: Planning the Layout
-
Test your colors:
Pour a small amount of each accent color onto a paper plate. It helps to see them side-by-side to ensure your palette feels balanced before touching the wall. -
Visualize the spacing:
Stand back and look at the wall. The goal is an organic ‘confetti’ look, not a grid. Imagine where clusters of large dots will go versus areas of smaller filler dots. -
Pre-mark big dots (optional):
If you are nervous about freehand placement, lightly mark the position of the largest dots with a pencil. Keep them spaced widely so you have room to fill in later.
Add Metallic Pop
For a glamorous twist, mix a metallic gold or copper paint for just the smallest size dots. It catches the light beautifully in a nursery setting.
Step 3: Applying the Large Dots
-
Load the large sponge:
Take your largest foam pouncer (about 3 inches) and dip it into your first color, like the deep forest green. Dab excess paint off on the textured part of the plate to prevent dripping. -
Press and twist:
Press the sponge firmly against the wall. Give it a gentle quarter-twist to ensure the edges are crisp and the center is filled, then pull straight back. -
Distribute the first color:
Apply 5-7 large dots of this first color randomly across the wall. avoid placing them in straight lines or perfect triangles. -
Switch colors:
Clean your sponge or grab a fresh large one. Repeat the process with the terra cotta and sage green colors, ensuring the large dots are spread evenly but not predictably.
Step 4: Layering Medium and Small Dots
-
Start the medium size:
Switch to a 2-inch pouncer. Use the lighter beige and pink tones now to create depth. Place these medium dots in the open spaces between the larger ones. -
Check density:
Step back frequently. You want some areas to feel slightly denser than others to maintain that organic, tossing-confetti movement. -
Add the smallest dots:
Using the 1-inch sponge, dip into your boldest colors (like the rust) and your softest colors. These small dots act as ‘filler’ and add whimsical detail. -
Vary vertical alignment:
Be careful not to accidentally align dots horizontally. If you see a row forming, break it up by placing the next dot significantly higher or lower. -
Focus on corners:
Don’t forget the edges! I like to place a few half-dots right at the moulding or baseboard to make the pattern look like wallpaper that continues beyond the frame.
Step 5: Refinement and Cleanup
-
Let the paint set:
Allow the dots to dry to the touch, usually about 30–60 minutes depending on humidity. -
Inspect the edges:
Foam sponges sometimes leave bubbly or rough edges. Take a small artist brush dipped in the matching paint color to smooth out the circumference of any messy dots. -
Fill opacity issues:
If the sponge application looks too sheer in the center, use the artist brush to fill in the middle of the dot for a solid, opaque finish. -
Final assessment:
Look at the wall from the doorway. If there are any large ‘bald spots’ that draw the eye, add a tiny 1-inch dot in a neutral color to balance it out. -
Clean up:
Wash your sponges immediately with warm soapy water if you plan to reuse them. Remove the drop cloth and move the crib back into place.
Now you have a custom, joy-filled feature wall that perfectly frames your nursery furniture
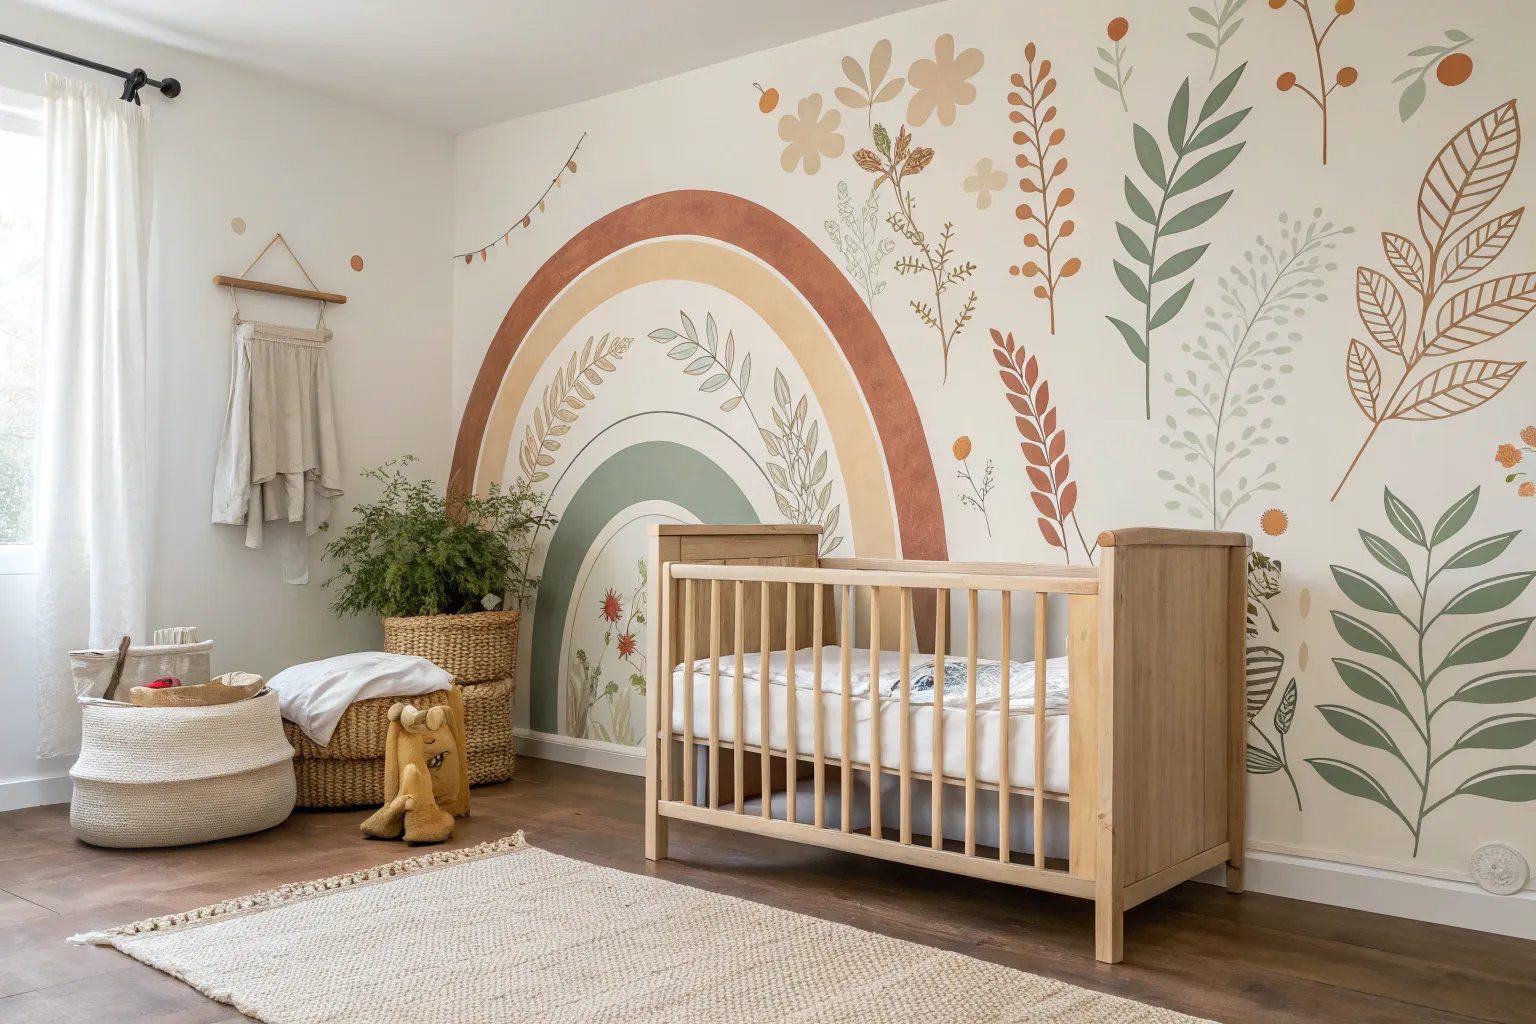
Rainbow Arc Mural in Earthy Pastels
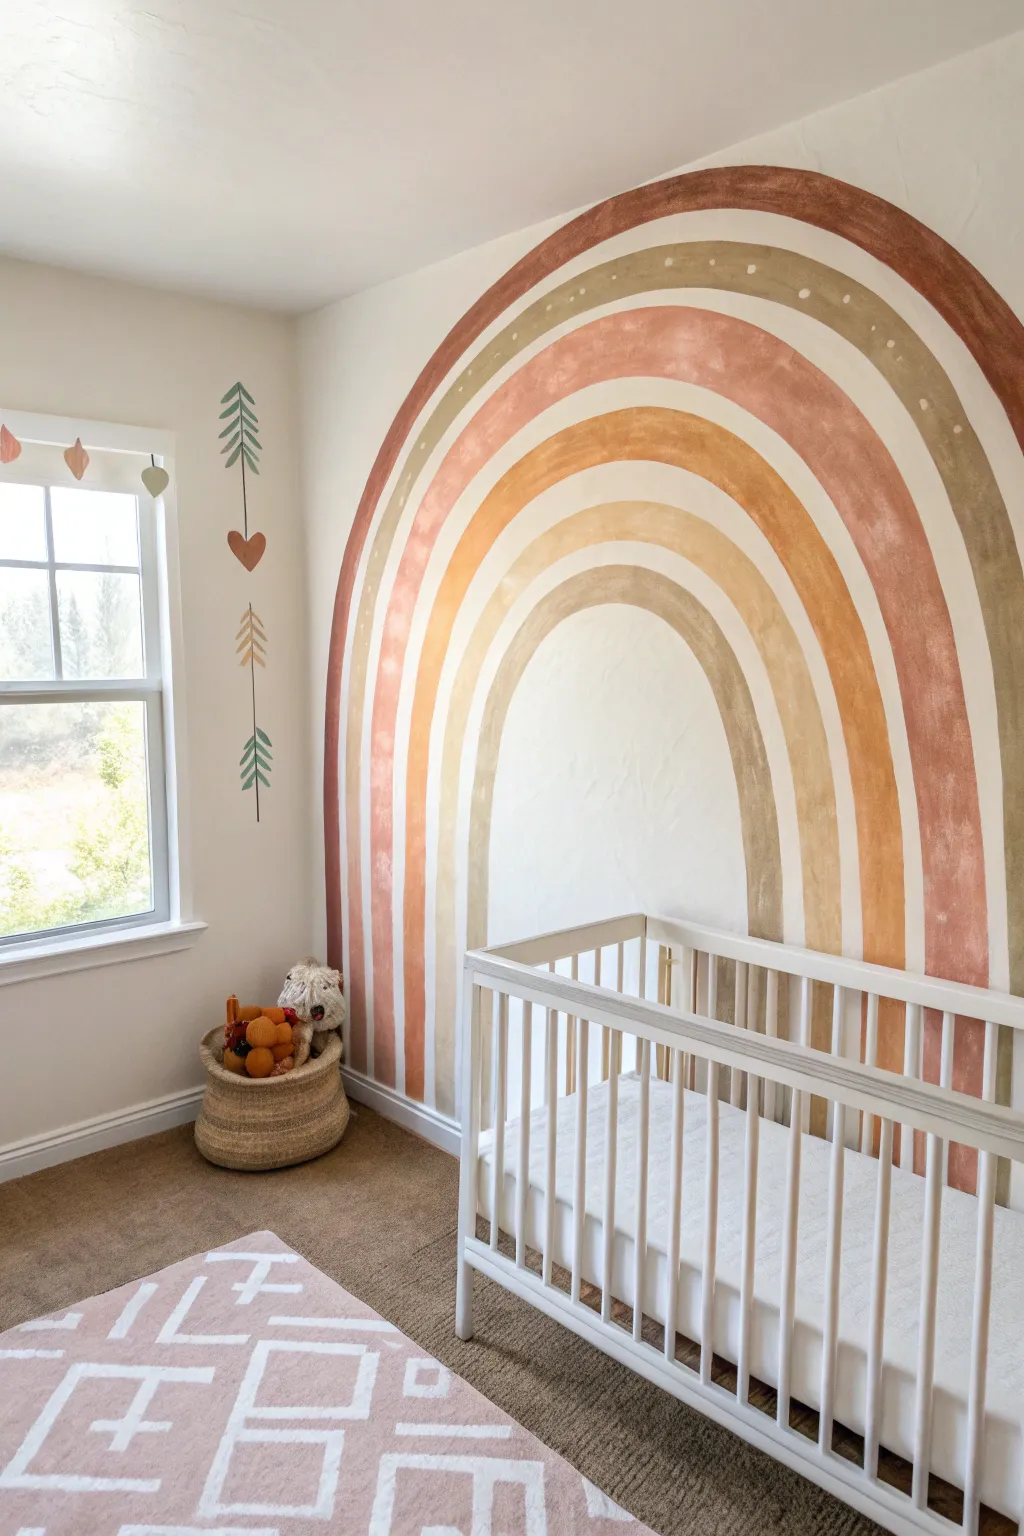
Transform a nursery wall into a warm, inviting focal point with this large-scale rainbow arc. Using a muted, earthy color palette and a soft, hand-painted technique, this mural adds a touch of bohemian charm without overwhelming the space.
Step-by-Step Tutorial
Materials
- Interior latex paint (sample pots work well) in 5-6 earthy colors (terracotta, mustard, beige, sage, rust)
- Painter’s tape (optional, primarily for baseboards)
- Pencil
- String
- Thumbtack or nail
- Measuring tape
- Angled sash brush (2-inch)
- Smaller flat artist brush (1-inch) for edges
- Rags or paper towels
- Drop cloth
- Ladder or step stool
Step 1: Planning and Sketching
-
Prepare the wall:
Clear the area of furniture, including the crib. Wipe the wall down with a damp cloth to remove dust and let it dry completely. Lay down a drop cloth to protect the carpet. -
Find the center:
Measure the width of the wall where you want the rainbow to sit. Mark the center point near the floor lightly with a pencil; this will be the anchor for your compass. -
Create a string compass:
Tie a piece of non-stretchy string to a pencil. Measure the string against the wall to determine the height of your outermost arch. Tie the other end of the string to a thumbtack or have a helper hold it firmly at the bottom center mark. -
Sketch the outer arch:
Pull the string taut and lightly draw the large semi-circle arch on the wall, moving from left to right. Keep your hand steady to ensure a smooth curve. -
Mark inner arches:
Shorten the string by about 5-7 inches (depending on how thick you want your stripes) and draw the next arch. Repeat this process for as many bands of color as you plan to paint, labeling each section lightly with the intended color initials.
Wobbly Lines?
Don’t panic if your arches aren’t perfect curves. The ‘hand-drawn’ imperfection is key to this style. If an edge is too jagged, use a damp Q-tip to wipe it back while wet.
Step 2: Painting the Arches
-
Start with the top arch:
Begin with your outermost color (the rust/terracotta shade). Dip your 2-inch angled brush into the paint, ensuring it’s not dripping. -
Outline the curve:
Carefully cut in the top edge of the outer arch. I find it easiest to paint just inside my pencil line so the graphite gets covered. -
Fill the band:
Fill in the rest of the first band. Use long, sweeping strokes that follow the curve of the arch to maintain a fluid look. Don’t worry about perfect opacity; a little texture adds to the boho vibe. -
Paint the second band:
Clean your brush or switch to a fresh one. Move to the next color (the sage/olive tone). Paint the outline of this second band, leaving a very small gap of white space between this color and the first one if you want distinct separation. -
Add detail dots:
For the specific look in the photo, stick to a solid color for the second band, but note that you can come back later with a small artist brush to add the cream-colored polka dots once the base is dry. -
Paint the third band:
Apply the third color (lighter terracotta/pink). Focus on keeping the brush strokes smooth and continuous. If the paint feels too thick, dip your brush tip in a tiny bit of water to extend the stroke. -
Continue inward:
Proceed with the remaining bands—mustard yellow, then beige, then the innermost taupe arch. Work your way down towards the center mark. -
Refine the edges:
Once the main blocks of color are on, use the smaller flat brush to neaten the bottom edges where the rainbow meets the baseboard or floor. You can tape this off, but a steady hand works well for a softer finish.
Step 3: Finishing Touches
-
Add decorative elements:
Return to the second band (sage green). Dip a small round brush or the handle end of a paintbrush into cream or white paint. Dab small dots along the center of the arch, spacing them evenly. -
Create the white stripe:
If copying the image exactly, paint a thin, white or cream pinstripe separating the third and fourth bands using a steady hand and a liner brush. -
Second coat check:
Step back and assess the opacity. I like to let this dry briefly and then spot-check. If any areas look too streaky, apply a light second coat, but remember that the slightly ‘brushed’ look is part of the charm. -
Erase guidelines:
If any pencil marks are still visible between the arches or on the outside, gently erase them once the paint is 100% dry to the touch to avoid smudging. -
Style the room:
Once fully cured (usually 24 hours), move the crib back into place and hang any complementary wall decor, like the arrow decals shown on the side wall.
Level Up: Texture
Mix a small amount of drywall joint compound or baking soda into your paint cups. This creates a raised, plastered effect that adds incredible depth and tactile quality to the rainbow.
Enjoy the calm and cozy atmosphere your new custom mural brings to the room
Woodland Tree Silhouette Wall for Cozy Vibes
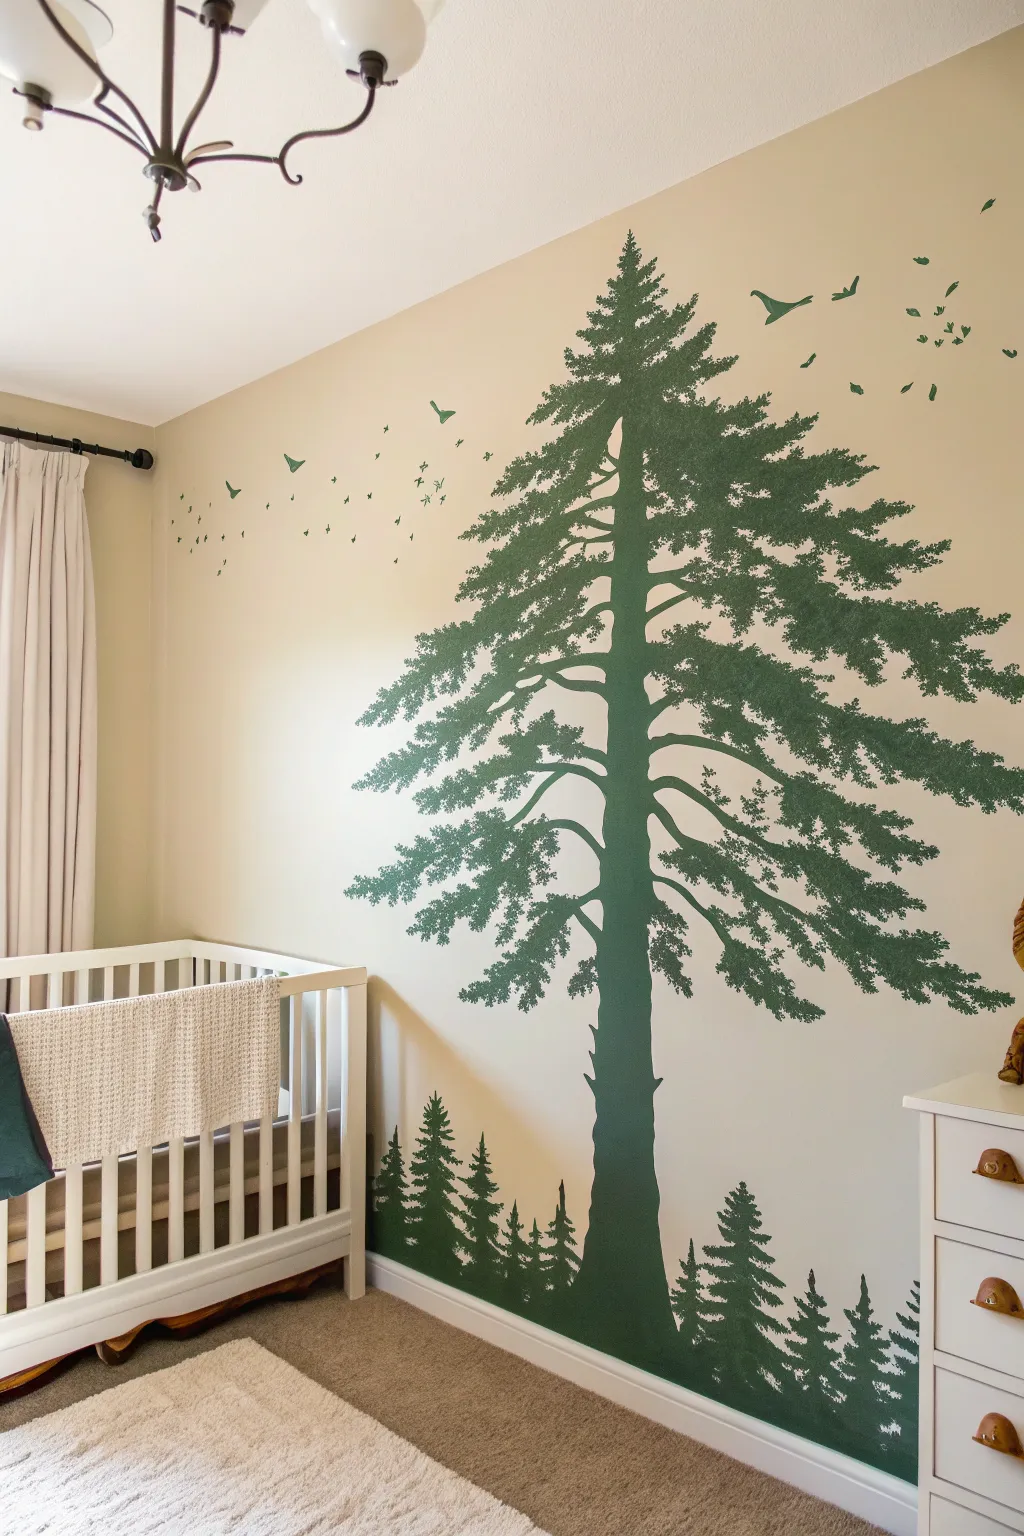
Transform a plain nursery wall into a calming woodland retreat with this majestic tree silhouette mural. Using a clever combination of a central decal or stencil and hand-painted details, you can achieve a professional, painterly look that adds depth and serenity to the room.
Step-by-Step Guide
Materials
- Matte finish interior wall paint (Forest Green)
- Painter’s tape (blue or green)
- Pencil and eraser
- Large tree wall stencil or vinyl decal transfer
- Digital projector (optional alternative to stencil)
- Small angled sash brush (1.5 inch)
- Detail brushes (round No. 4 and No. 6)
- Mini foam roller and tray
- Drop cloth
- Step ladder
- Damp cloth for clean-up
Step 1: Preparation and Layout
-
Clean the surface:
Start by wiping down the entire wall with a warm, damp cloth to remove any dust or oils. This ensures your paint adheres perfectly and edges stay crisp. -
Protect the room:
Lay down a drop cloth along the baseboard and secure it with painter’s tape to protect your carpet or flooring from rogue drips. -
Determine placement:
Visualize where the main tree trunk will go. It should act as the focal point, slightly off-center to balance with furniture like a crib or dresser. -
Establish the horizon:
Using painter’s tape, mark a very faint reference line near the baseboard if you want a flat ground, though this design uses an organic, uneven forest floor which is much more forgiving.
Uneven Edges?
If your pine needles look too blotchy, wait for them to dry. Then, take a small brush with the wall’s background color and ‘cut back’ into the green to sharpen the tips.
Step 2: Creating the Main Tree
-
Outline the trunk:
If you are freehanding, sketch the two main vertical lines of the trunk with a pencil, tapering slightly as you go up. For a decal or stencil, position and secure it in place now. -
Blocking in the trunk:
Use the mini foam roller to fill in the main trunk area with your forest green paint. If using a stencil, use a dry-brush technique to prevent bleed-under. -
Adding the main branches:
Extend the major branches outward from the trunk using your angled sash brush. Remember that pine tree branches often dip down slightly before curving up at the tips. -
Detailing the needles:
This is the most time-consuming part. Switch to a No. 6 round brush to stipple and dab paint along the tops and bottoms of your branches to create the texture of pine needles. -
Refining the silhouette:
Step back frequently to look at the overall shape. I like to add stray asymmetrical clumps of needles to break up any areas that look too uniform or triangular.
Step 3: Painting the Forest Floor
-
Sketch the undergrowth:
Lightly pencil in varying heights of smaller trees along the bottom of the wall. These should overlap the base of your giant tree to ground it in the scene. -
Fill the bottom layer:
Paint a solid, wavy band of green along the baseboard to represent the ground. Don’t worry about being perfectly straight; nature is bumpy. -
Paint medium trees:
Use the sash brush to pull paint upward into triangular shapes for the medium-sized ‘background’ trees. -
Texture the small trees:
Apply the same stippling technique used on the big tree to give these smaller triangles rough, needle-like edges. Keep them loose and sketchy. -
Blend the connection:
Ensure the base of the large tree blends seamlessly into the forest floor layer so it doesn’t look like it’s floating.
Natural Texture
Instead of a brush, use a small piece of natural sea sponge for the foliage. Dabbing it creates instant, organic pine needle clusters without the tedious hand-painting.
Step 4: The Flying Birds
-
Plot the flight path:
Decide on the flow of your birds. They look best when moving in a curved sweep from one side of the tree to the open space. -
Sketch first shapes:
Draw tiny ‘V’ or ‘checkmark’ shapes lightly in pencil. vary the sizes: larger shapes for closer birds, tiny dots for distant ones. -
Paint the flock:
Using your smallest No. 4 detail brush with just a little paint, trace over your pencil marks. Press harder in the middle of the wing and lift off at the tips for a sharp point. -
Final inspection:
Erase any visible pencil lines once the paint is completely dry. Touch up any wall spots with the original wall color if necessary.
Step back and admire the peaceful forest atmosphere you have created for your little one
Baby Animal Parade Along the Base of the Wall
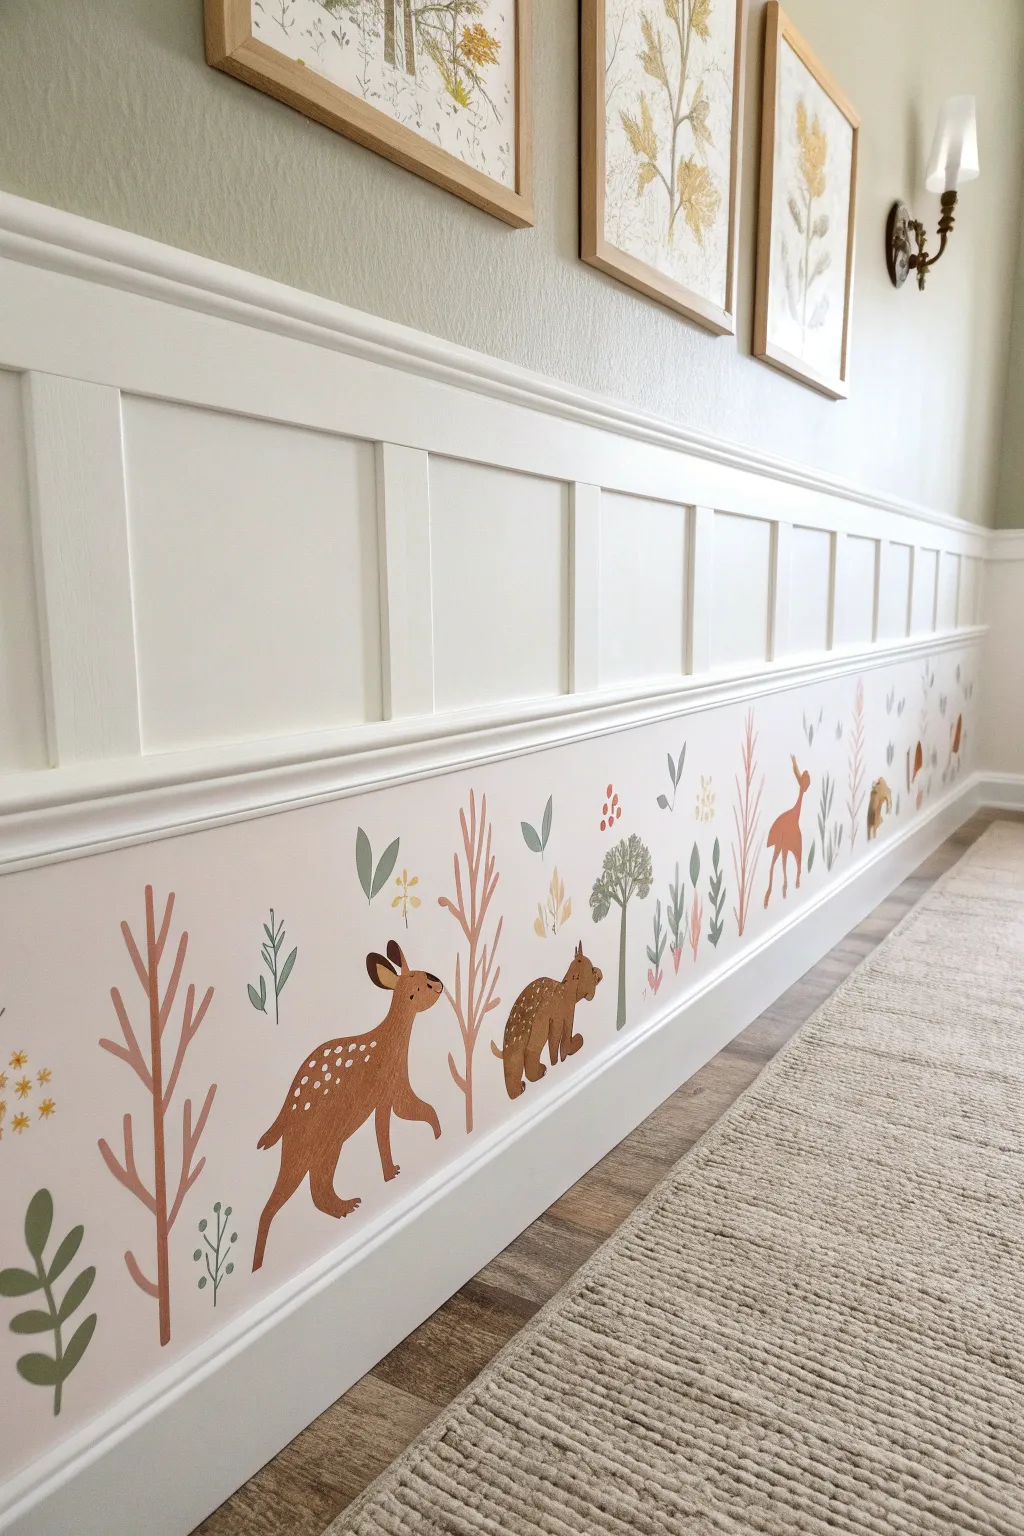
Transform the often-overlooked space above your baseboards into a storybook scene with this charming animal parade. This low-profile mural utilizes earthy tones and simple shapes to create a gentle, rhythmic pattern perfect for a nursery or playroom.
Step-by-Step
Materials
- Latex interior paint (white for base)
- Acrylic craft paints (burnt sienna, ochre, olive green, sage, dusky pink, dark brown)
- Small angled shader brush (¼ inch)
- Small round detail brush (size 2 or 4)
- Pencil
- Eraser
- Painter’s tape
- Cardstock (for stencils)
- Scissors
- Palette or paper plate
- Ruler or level
Step 1: Preparation & Base Work
-
Define the Canvas:
Begin by deciding the height of your mural strip. In the inspiration image, this is the space between the baseboard and the bottom of the wainscoting. If you don’t have wainscoting, use a ruler and level to mark a horizontal line about 10-12 inches above your baseboard. -
Mask the Edges:
Apply painter’s tape along the top edge of your baseboard to protect it. If you marked a line on the wall instead of using existing molding, tape off that top line as well to create a crisp border. -
Background Color:
Paint the area between your tape lines with a soft, creamy off-white or very pale blush pink latex paint. This provides a warm, neutral backdrop that makes the woodland colors pop. -
Let it Cure:
Allow this base coat to dry completely, ideally overnight, before attempting to draw or paint over it.
Pro Tip: Consistency
Keep a wet paper towel handy. If a stroke goes rogue, you can quickly wipe it away from the semi-gloss wall paint without damaging the background layer.
Step 2: Drafting the Design
-
Create Simple Stencils:
To ensure your repeating animals look consistent, sketch simple silhouettes of a fawn, a small bear, and perhaps a fox onto cardstock. Cut these out to use as tracing templates. -
Plan the Spacing:
Lightly mark intervals along the wall where you want your animals to walk. Leave roughly 12-18 inches between larger animals to allow room for foliage. -
Trace the Animals:
Hold your cardstock templates against the wall at your measured marks and lightly trace the outlines with a pencil. Vary their direction slightly if you want them interacting, but facing them all one way creates a ‘parade’ effect. -
Sketch the Flora:
Freehand sketch vertical plant life between the animals. Draw tall, stick-like trees with bare branches, small clusters of leafy bushes, and tiny sprigs of berries or flowers near the ground level.
Level Up: Texture
Mix a textile medium into your acrylic paints. This thins the paint slightly, creating a translucent, watercolor wash effect that looks softer and more artistic on the wall.
Step 3: Painting the Scene
-
Deer Base Coat:
Using the angled shader brush, fill in the fawn shape with a warm burnt sienna acrylic paint. Keep your strokes following the curve of the animal’s body. -
Bear Basics:
Paint the bear silhouette using a darker brown mixed with a touch of ochre. I like to add a tiny drop of water to acrylics here to get a smoother, more watercolor-like flow. -
Tall Trees:
Switch to dusky pink or terracotta paint. Using the round detail brush, paint the long vertical trunks and branching limbs of the tall trees. Keep the lines somewhat organic and wavy rather than perfectly straight. -
Greenery Accents:
Dip your round brush into sage and olive greens. Paint simple leaf shapes—ovals for the bushes and teardrops for the floating leaves. Vary the greens to create depth. -
Adding Details:
Once the animal base coats are fully dry (about 20 minutes), use a tiny detail brush with dark brown paint to add eyes, noses, and ear definitions. -
Fawn Spots:
Dip the back end of your paintbrush handle into cream or white paint and dot it onto the fawn’s back to create its spots. -
Bear Texture:
Use a lighter tan color to add small dashes or dots on the bear’s fur to give it a little texture and visual interest. -
Floral Finishing Touches:
Add tiny clusters of berries in burnt orange or yellow near the tips of some plants. These small pops of color tie the whole palette together. -
Cleanup:
Once all paint is dry to the touch, gently peel away the painter’s tape and erase any visible pencil lines that weren’t covered by paint.
Step back and enjoy the peaceful woodland vibe you’ve brought into the room with just a few simple strokes
Under-the-Sea Waves for a Soothing Nursery
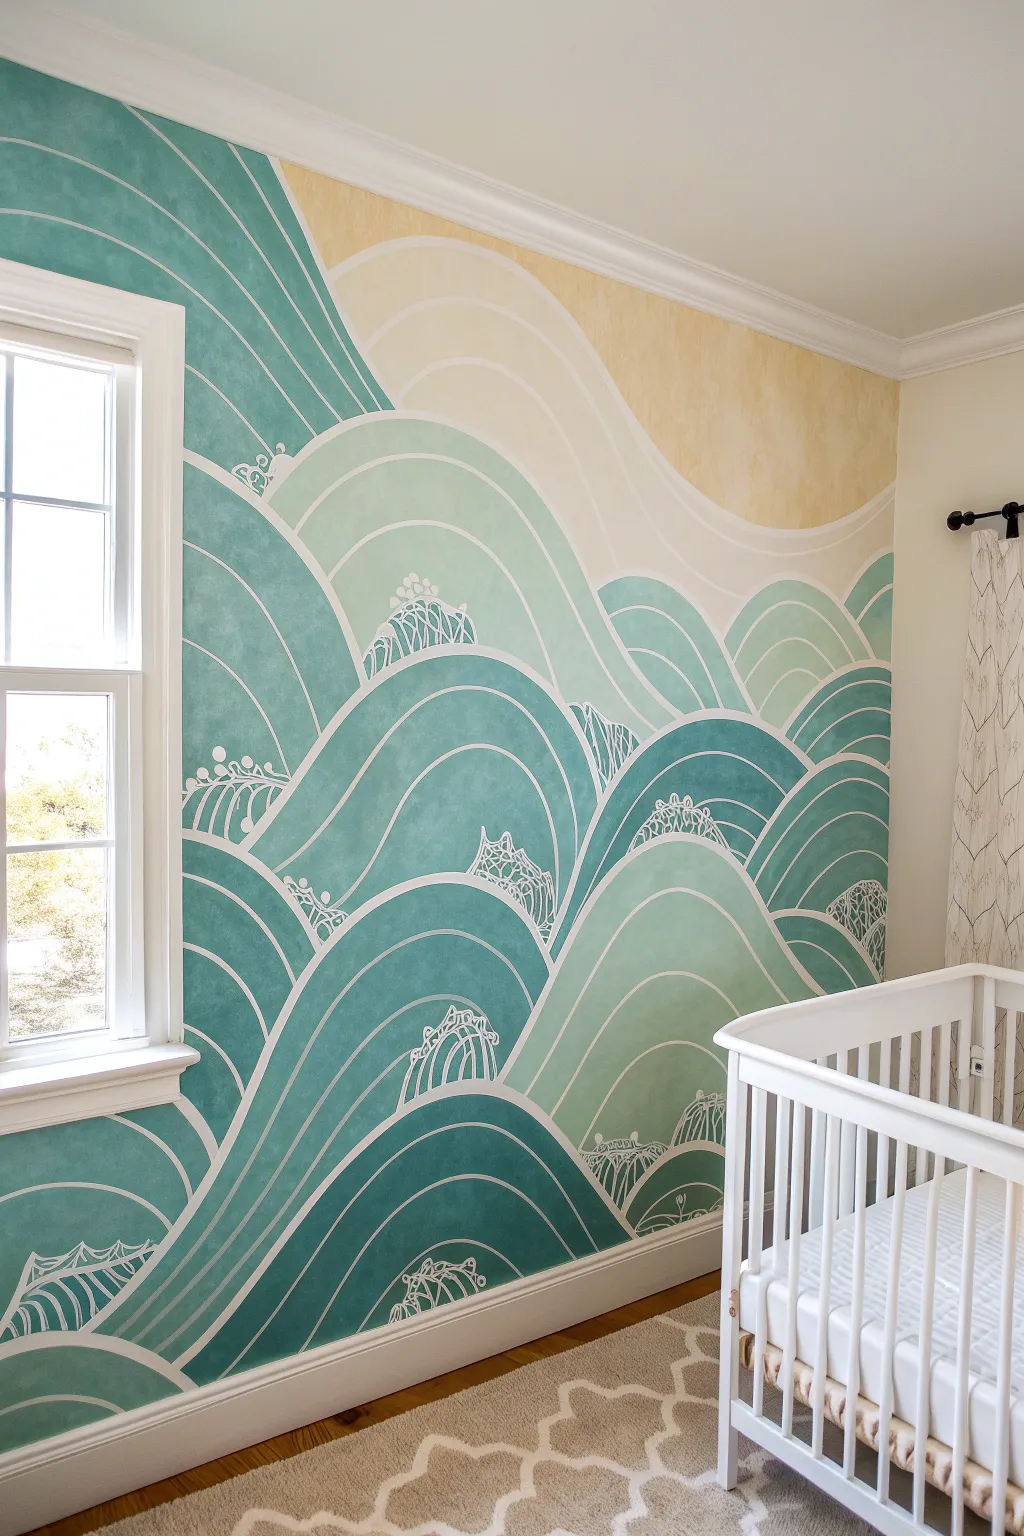
Transform a nursery wall into a serene seascape with this stylized wave mural, featuring calming teal and seafoam tones. The design uses flowing, organic curves and intricate white line work to create a sense of gentle motion that is perfect for a soothing environment.
Step-by-Step Tutorial
Materials
- Interior latex paint (white base)
- Sample pots of paint (dark teal, medium teal, seafoam green, cream, pale yellow)
- Glaze medium (acrylic or latex compatible)
- 2-inch angled sash brush
- Pencil and eraser
- White paint marker (fine and medium tip)
- Painter’s tape
- Drop cloth
- Small round detail brush (size 2 or 4)
- Sea sponge or rag (optional for texture)
Step 1: Preparation and Sketching
-
Prepare the workspace:
Clear the wall completely and lay down a drop cloth to protect your flooring. Tape off the baseboards, ceiling line, and window trim with painter’s tape to ensure crisp edges. -
Sketch the horizon:
Using a pencil, lightly draw the large, sweeping curve of the ‘sand’ or sky area at the very top right corner. This sets the scale for the rest of the waves. -
Outline the wave peaks:
Draw the overlapping hill-like shapes of the waves, starting from the bottom and working upward. Vary the sizes and heights to keep the composition organic and flowing, ensuring they overlap naturally like rolling hills. -
Refine the curves:
Go back over your pencil lines to define the internal curved stripes within each wave shape. These concentric lines mimic the movement of water and will guide your painting later.
Step 2: Painting the Base Colors
-
Mix your glazes:
Mix your paint colors with the glaze medium in a 1:1 ratio. This transparency gives that watercolor-like, textured look seen in the photo rather than a flat, opaque finish. -
Paint the background element:
Start with the top-right section (the sky or sand dune). Apply the pale yellow and cream glaze mixture using sweeping strokes. Don’t worry about perfect coverage; the visible brushstrokes add to the charm. -
Apply the darkest teal:
Identify the waves that will be the darkest shade (usually the ones in the foreground or specific accent waves). Fill these shapes with your dark teal glaze, brushing in the direction of the wave’s curve. -
Fill in mid-tones:
Move on to the medium teal color. Paint the adjacent wave sections, being careful to leave a tiny gap between colors if you want to keep your pencil lines visible, or touch the edges if you plan to paint the white lines on top later. -
Add the lightest waves:
Finish the block-painting phase with the seafoam green glaze for the remaining wave shapes. Let this base layer dry completely, which usually takes about 2-4 hours depending on humidity.
Wobbly Lines?
If your paint marker lines aren’t smooth, step back. Up close, flaws are huge; from a distance, they vanish. Fix big errors by painting over with the base color.
Step 3: Adding Detail and Definition
-
Outline with white:
Once the wall is fully dry, use a medium-tip white paint marker or a steady hand with a small brush and white paint to trace the major outlines of every wave shape. -
Add internal stripes:
Draw the concentric white curves inside each wave body. Keep the lines smooth and continuous. If your hand shakes, move your whole arm rather than just your wrist for smoother curves. -
Create the decorative crests:
At the peak of select waves, sketch the small, intricate ‘crest’ designs. These look like stylized splashes or little nets. Use the fine-tip marker for this delicate work. -
Thicken main lines:
Go back over the primary separation lines between the big wave shapes to make them slightly bolder than the internal decorative stripes. This creates better visual separation. -
Touch up texture:
If any areas look too flat, I like to lightly dry-brush a tiny bit of white or a lighter shade of the base color over the center of the wave to enhance the 3D effect. -
Clean up:
Remove the painter’s tape carefully while pulling away from the wet edge to avoid peeling. Erase any stray pencil marks that weren’t covered by the paint markers.
Add Sparkle
Mix a tiny amount of iridescent mixing medium into your white paint or use a pearlescent white marker for the wave crests to catch the light subtly.
Enjoy the peaceful atmosphere your new masterpiece brings to the room
Abstract Nursery Landscape With Painted Shapes
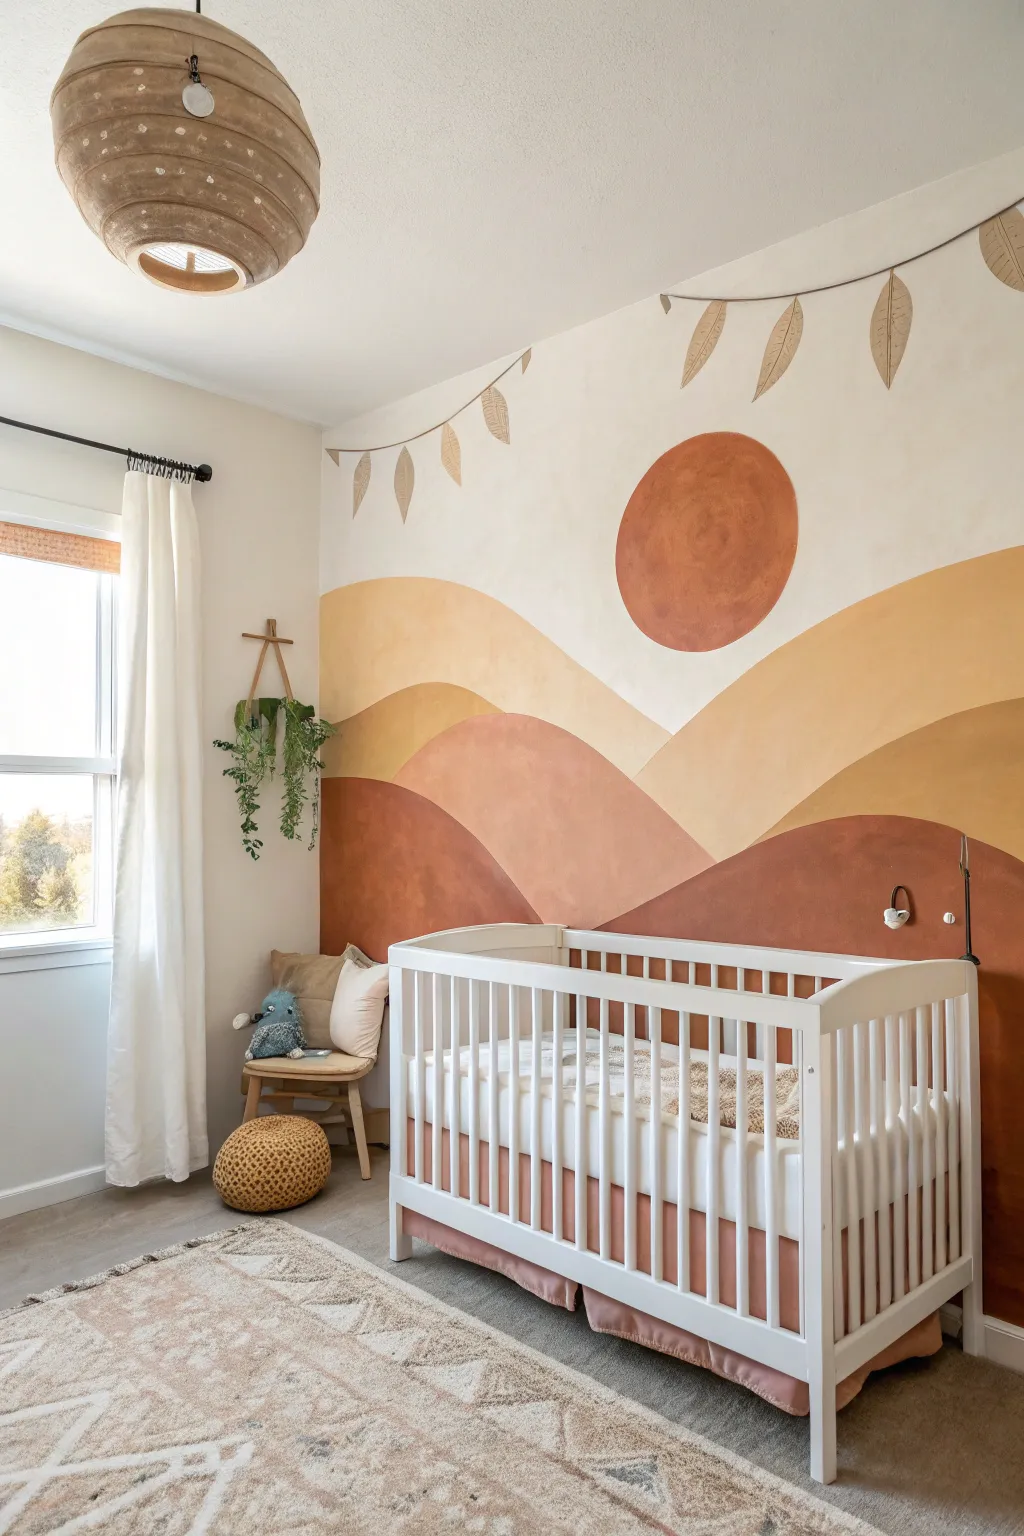
Transform a plain nursery wall into a warm, inviting landscape with this abstract sun and mountain mural. Using earthy tones and soft, organic shapes creates a calming focal point that feels both modern and timeless.
Detailed Instructions
Materials
- Interior latex paint (white base + 4-5 sample pots in terracotta, ochre, rust, and beige tones)
- Pencil and eraser
- Chalk (optional, excellent for sketching on walls)
- Angled sash brush (2-inch)
- Small artist brushes (for fine edges)
- Painter’s tape
- Drop cloths
- Roller and tray (for large fill-in areas)
- String and push pin (for the sun circle)
Step 1: Preparation and Sketching
-
Clean and prep:
Start by clearing furniture away from the wall and wiping the surface down with a damp cloth to remove dust. Lay down your drop cloths to protect the flooring and tape off the baseboards and adjoining walls. -
Mark the horizon lines:
Visualize the wall divided into rough thirds. Using a pencil or light chalk, sketch the rolling hills starting from the bottom. Don’t aim for perfection; create overlapping, organic humps that mimic distant mountains or dunes. -
Plan the color blocking:
Decide which hill will be which color. Typically, using darker shades (like deep rust) at the bottom and lighter shades (ochre or beige) as you move upward creates a sense of depth and perspective. -
Create the sun compass:
To draw a perfect circle for the sun, tie a piece of string to a pencil. Determine the radius you want for your sun (e.g., 12 inches) and measure that length on the string. -
Sketch the sun:
Secure the free end of the string to the wall with a push pin at the center of where you want the sun to be. Pull the string taut and rotate the pencil around the pivot point to draw a crisp circle. -
Draft the garland:
Lightly sketch the hanging leaf garland at the top of the wall. Draw a swooping line for the vine and simple leaf shapes dropping down at intervals.
Pro Tip: Fluid Lines
When painting curved mountain tops, don’t just use your wrist. Move your entire arm in a sweeping motion. This creates smoother, more natural-looking arches.
Step 2: Painting the Landscape
-
Start with the sun:
Begin painting the sun first using your medium terra cotta shade. Use a small angled brush or artist brush to carefully cut in the circular edge. Work slowly here, as this shape draws the most attention. -
Fill the sun:
Once the edge is defined, fill in the center of the circle. You can use a mini roller for a smooth finish or a brush for a slightly more textured, hand-painted look. -
Paint the top mountain layer:
Move to the highest mountain range using your lightest gold or ochre shade. Use your angled sash brush to carefully paint the top curved edge first. -
Extend the color down:
Paint downward from that top edge, covering the area until you reach the sketch line for the next set of hills below. It’s okay to overlap the sketch line slightly, as the darker paint below will cover it. -
Wait for drying:
Allow this top section to dry completely before starting the next layer. This prevents wet paint from smudging or blending where the mountains meet. -
Paint the middle range:
Using a slightly darker rust or clay color, cut in the top curve of the middle mountain range. Outline the shape confidently to get a clean, flowing line against the lighter color above. -
Fill the middle section:
Fill in the rest of this middle section. If you see brush strokes, that’s actually desirable here—it adds to the plaster-like, earthy aesthetic of the mural. -
Paint the foreground:
Apply your darkest rust or brown shade to the bottom-most hills. This grounds the mural visually. Ensure you paint all the way down to the taped baseboard. -
Second coats:
Once the first layer is dry, assess the coverage. I usually find that these earthy tones need a second coat to look rich and opaque, especially on the large mountain shapes.
Level Up: Texture Play
Mix a textured additive or a bit of baking soda into the paint for the sun or the mountains to give the mural a tactile, plaster-like old-world finish.
Step 3: Details and Finishing
-
Paint the garland vine:
Using a thin artist brush and a grey-brown paint mixture, carefully trace over your pencil line for the vine swooping across the top of the wall. -
Fill leaf details:
Paint the leaves hanging from the vine using a beige or soft tan color. Keep the strokes loose to mimic the organic feel of dried palm leaves or feathers. -
Add leaf veins:
Once the leaf shapes are dry, use a very fine brush and the grey-brown vine color to paint a simple center line and veins on each leaf for definition. -
Touch up edges:
Step back and inspect your work. Use a small brush to sharpen any wobbly lines on the sun or mountain peaks. A steady hand and a tiny bit of the wall’s base color can act as an eraser for mistakes. -
Clean up:
Peel off the painter’s tape while the final coat is still slightly tacky to ensure a crisp line at the baseboards, and move your furniture back into place.
Enjoy the peaceful atmosphere your new custom mural brings to the room
Ceiling Sky Fade to Wrap the Baby Room in Calm
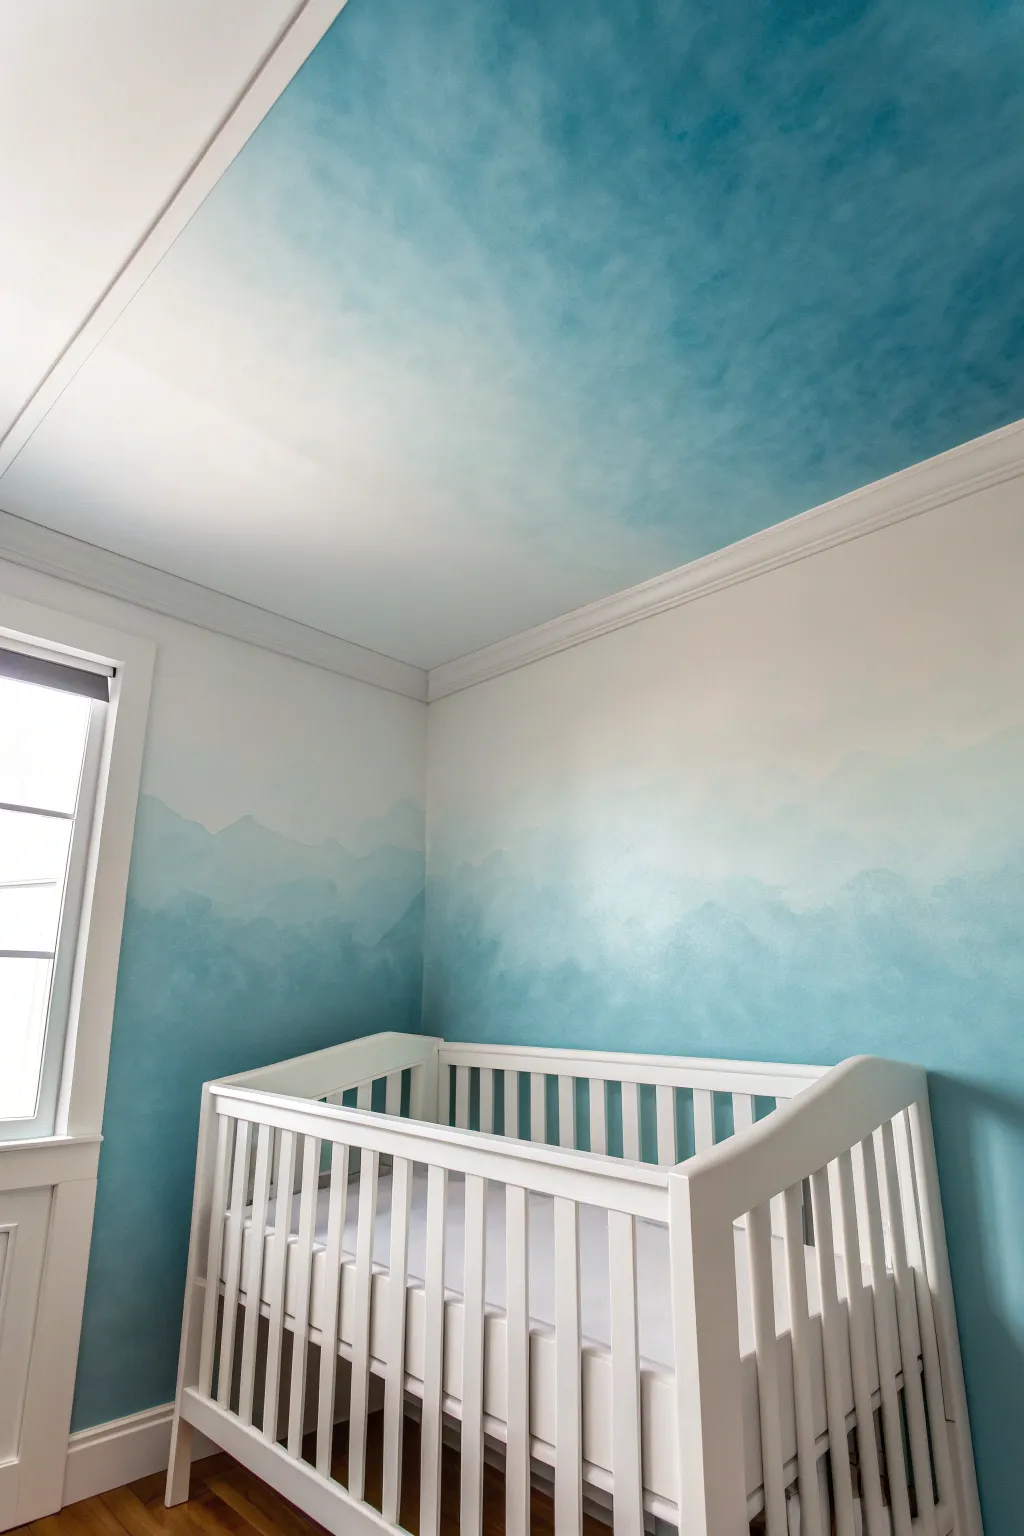
Transform your baby’s nursery into a serene, cloud-like sanctuary by carrying a soft ombre effect from the walls all the way onto the ceiling. This immersive technique creates a gentle gradation from crisp white corners to deep, calming teal, mimicking a peaceful sky enveloping the room.
Step-by-Step
Materials
- Interior latex wall paint (White base)
- Interior latex wall paint (Dark Teal/Cyan)
- Large paint roller and tray
- 4-inch paint brush (synthetic bristles)
- Large blending brush (dry softening brush)
- Small mixing buckets or cups
- Painter’s tape
- Drop cloths
- Ladder
- Water spray bottle (fine mist)
- Glazing liquid (optional, extends drying time)
Step 1: Preparation & Base Coat
-
Clear and protect:
Remove all furniture from the room or push it to the center and cover completely. Lay down drop cloths to protect the flooring, as blending can sometimes cause minor splatter. -
Tape the trim:
Apply painter’s tape carefully along the floor molding, window frames, and any door frames. Since the ceiling is part of the design, you do not need to tape the crown molding unless you want it to remain stark white. -
Prime the surface:
If the walls are currently a dark or bright color, apply a coat of white primer to ensure a neutral starting point. If they are already light, simply wipe them down to remove dust. -
Establish the white base:
Paint the upper corners of the room (where walls meet) and the upper portions of the walls in your crisp white base color. This acts as the lightest part of your gradient.
Stay Wet!
Keep a misting bottle handy. A light spritz of water on the wall keeps acrylics blenda-ble for an extra 5-10 minutes, making transitions effortless.
Step 2: Mixing Your Gradient
-
Create intermediate shades:
Pour your dark teal paint into a container. In three separate mixing buckets, mix the teal with varying amounts of white paint to create a light blue, a medium cyan, and a darker teal. You want about 4-5 distinct steps of color. -
Add glazing liquid:
I recommend mixing a generous amount of glazing liquid into your colored paints. This keeps the acrylic paint “open” or wet for longer, which is crucial for achieving that smoky, cloud-like blend.
Starry Night Upgrade
Once the sky is dry, flick a toothbrush loaded with diluted white paint across the darkest teal sections to create tiny, realistic stars.
Step 3: Painting the Walls
-
Apply the darkest band:
Starting at the bottom of the wall, apply the darkest teal shade in an uneven, wavy horizontal band. Don’t worry about clean lines; organic shapes look more like mountains or clouds. -
Apply the medium band:
While the bottom band is still wet, brush the medium cyan shade directly above it, slightly overlapping the wet edge of the dark paint. -
Blend the wall transition:
Take a clean, dry blending brush and work the transition line where the two colors meet. Use a cross-hatch (X-shape) motion to blur the hard edge until the gradient looks smooth. -
Continue upward:
Repeat this process with your lightest blue shade, moving upward toward the white section. Keep the horizon lines wavy and inconsistent to mimic rolling hills or drifting clouds. -
Fade into white:
As you reach the upper third of the wall, use your brush with very little paint to dry-brush the light blue into the existing white base coat, fading it out completely before hitting the ceiling line.
Step 4: Painting the Ceiling
-
Start from the center:
For the ceiling, reverse the logic slightly. Apply the darkest teal color in the center of the room (or choose one side to be the ‘stormiest’ point) using a roller or large brush. -
Work outward:
Apply concentric rings or patches of lighter shades moving away from the dark center. Use the spray bottle to lightly mist the paint if it starts drying too fast while you are overhead. -
Smudge the texture:
Instead of smooth blending, use a bunched-up rag or a stippling brush to dab the ceiling paint. This creates the mottled, fluffy texture of high-altitude clouds rather than a smooth wall gradient. -
Connect to the corners:
Ensure the ceiling paint fades to white as it approaches the corners of the room, leaving the space above the crib mostly light to keep the area feeling open and airy. -
Final softening:
Stand back and look for any harsh lines. I find that lightly tapping these areas with a dry brush softens them instantly into the background. -
Remove tape and dry:
Carefully peel off the painter’s tape while the paint is still slightly tacky to prevent peeling. Let the room cure for at least 24 hours before moving the crib back in.
Now you have a tranquil, immersive atmosphere that invites sweet dreams and peaceful play


Have a question or want to share your own experience? I'd love to hear from you in the comments below!