
Nothing says back to school like turning your driveway or walkway into a cheerful sidewalk chalk stage for that classic first day of school moment. Here are my go-to ideas—starting with the timeless favorites and ending with a few artsy curveballs that make the photos (and the feelings) extra special.
Grade And Year Spotlight
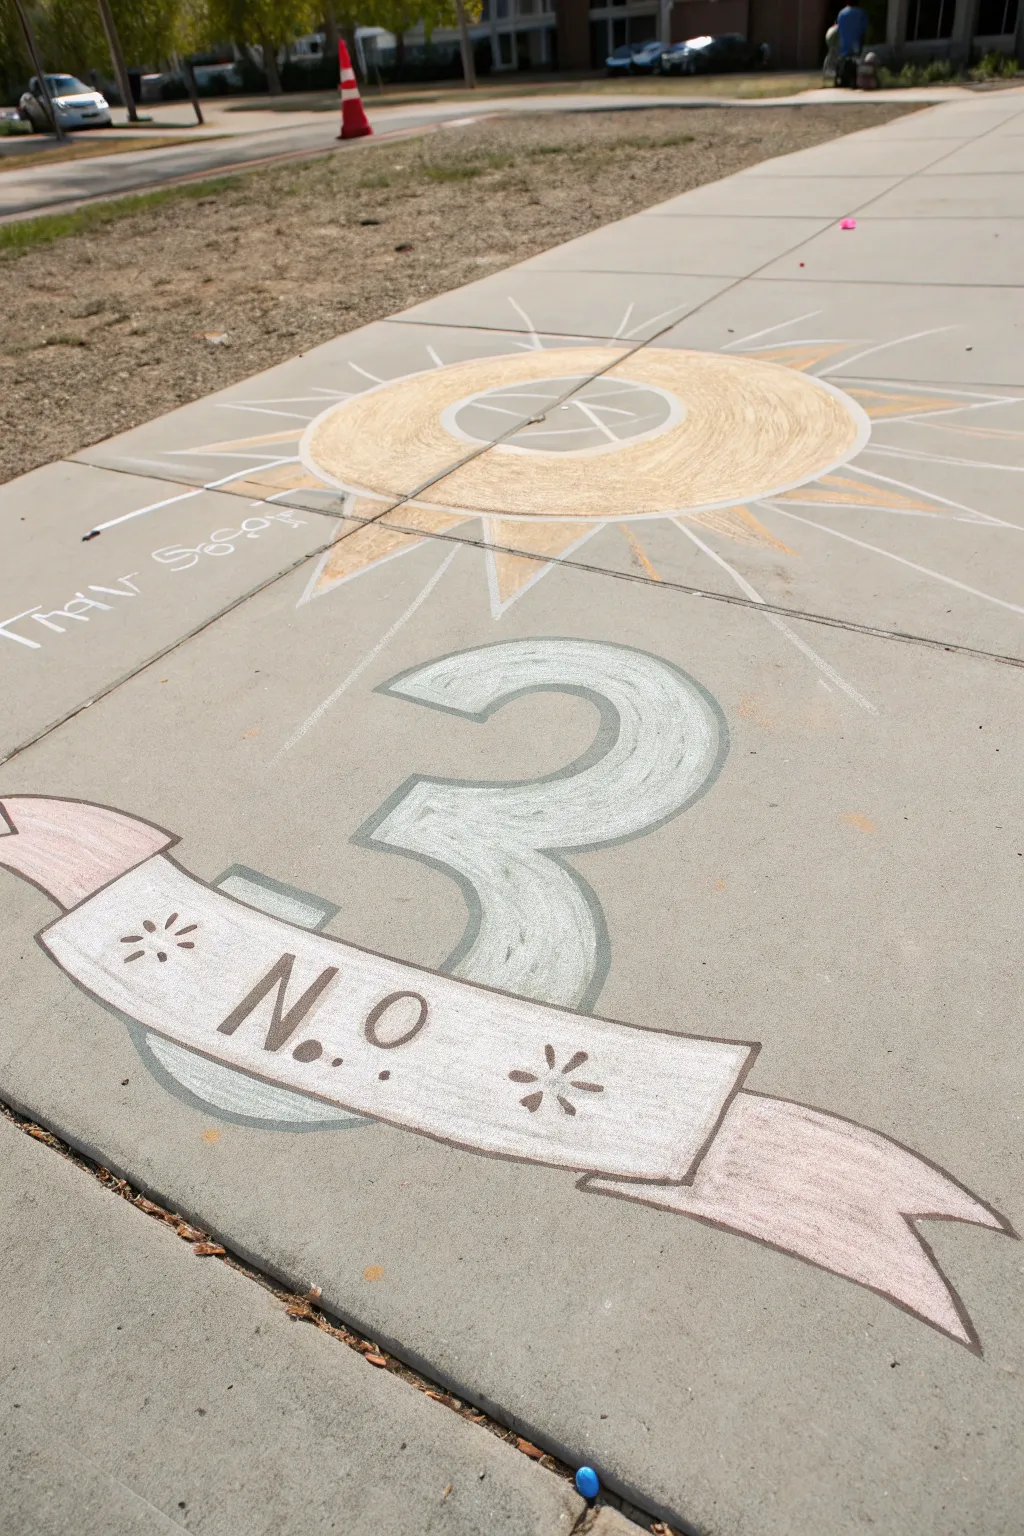
Celebrate the start of school by highlighting your student’s new grade with this bold, decorative sidewalk design. Featuring a prominent number wrapped in a classic banner and topped with a radiant sunburst, this artwork makes for the perfect first-day photo backdrop.
Step-by-Step Guide
Materials
- Sidewalk chalk in assorted colors (white, yellow, orange, light blue/green, pink)
- Black or charcoal chalk for outlining
- Measuring tape or yardstick (optional)
- String and a pivot point (optional, for circles)
- Blending foam or a cloth rag
- Knee pads or a gardening mat
Step 1: Drafting the Design
-
Find your center:
Select a clean, large square of concrete. Locate the center line where you want the design to flow, using the concrete’s expansion joint as a natural guide if available. -
Sketch the sun circle:
Lightly sketch a large circle for the sun at the top of your space. If you want it perfectly round, use a piece of string anchored at the center to guide your chalk. -
Outline the number:
Below the sun, sketch the outline of a large numeral—in this case, a ‘3’. Use a serif font style (with little feet and tails) to give it a classic academic look. -
Add the banner:
Draw a flowing banner ribbon across the bottom of the number. It should curve slightly, with folded edges at the ends to create a 3D ribbon effect.
Step 2: Filling and Coloring
-
Color the sun center:
Fill the inner circle of the sun with a pale yellow or cream chalk. Use a circular motion to get good coverage. -
Add visual texture:
For the outer ring of the sun, use a darker yellow or gold chalk. Instead of solid coloring, use tight scribbles or hatching to create a textured appearance. -
Create the sun rays:
Draw long, triangular rays extending outward from the sun. I like to alternate between filled-in triangles and simple line rays for variety. -
Fill the number:
Color in the number ‘3’ using a soft teal or seafoam green. Apply the chalk moderately, letting some concrete texture show through for a vintage feel. -
Color the banner:
Use white chalk to fill the main center panel of the banner, ensuring it’s bright and opaque to make the text pop later. -
Detail the ribbon ends:
Fill the folded ends of the ribbon with a soft pink or light red to distinguish them from the main white scroll.
Chalk breaking?
If your contour lines keep snapping, try soaking the tip of the chalk in water for 10 seconds. This softens the stick and creates a paint-like, vibrant line.
Step 3: Defining Details
-
Outline the main elements:
Take your black or charcoal chalk and carefully trace the outer edges of the number ‘3’ to sharpen the shape. -
Outline the banner:
Outline the entire winner ribbon, paying attention to where the ribbon ‘folds’ behind the main panel. -
Add the text:
In the center of the white banner, write ‘No.’ or your specific grade level (like ‘3rd’) in a bold, dark color. -
The decorative flourishes:
Draw small asterisks or star shapes on either side of the text within the banner to balance the negative space. -
Draw the shadow:
To make the number ‘3’ float, add a drop shadow. Use a grey or dark blue chalk to draw a thick line along the bottom and left edges of the number. -
Blend the shadow:
Smudge the shadow line slightly outward with your finger or a cloth to soften it and create a realistic depth. -
Final clean up:
Blow away any excess chalk dust and use a damp cloth to wipe up stray smudges on the surrounding concrete for a crisp finish.
Make it brighter
For a neon pop, layout a base layer of damp white chalk first. Let it dry for a minute, then layer your colored chalk on top to make the pigments explode.
Step back and admire your custom grade-level welcome mat ready for the morning school run


Classic Yellow Bus Scene
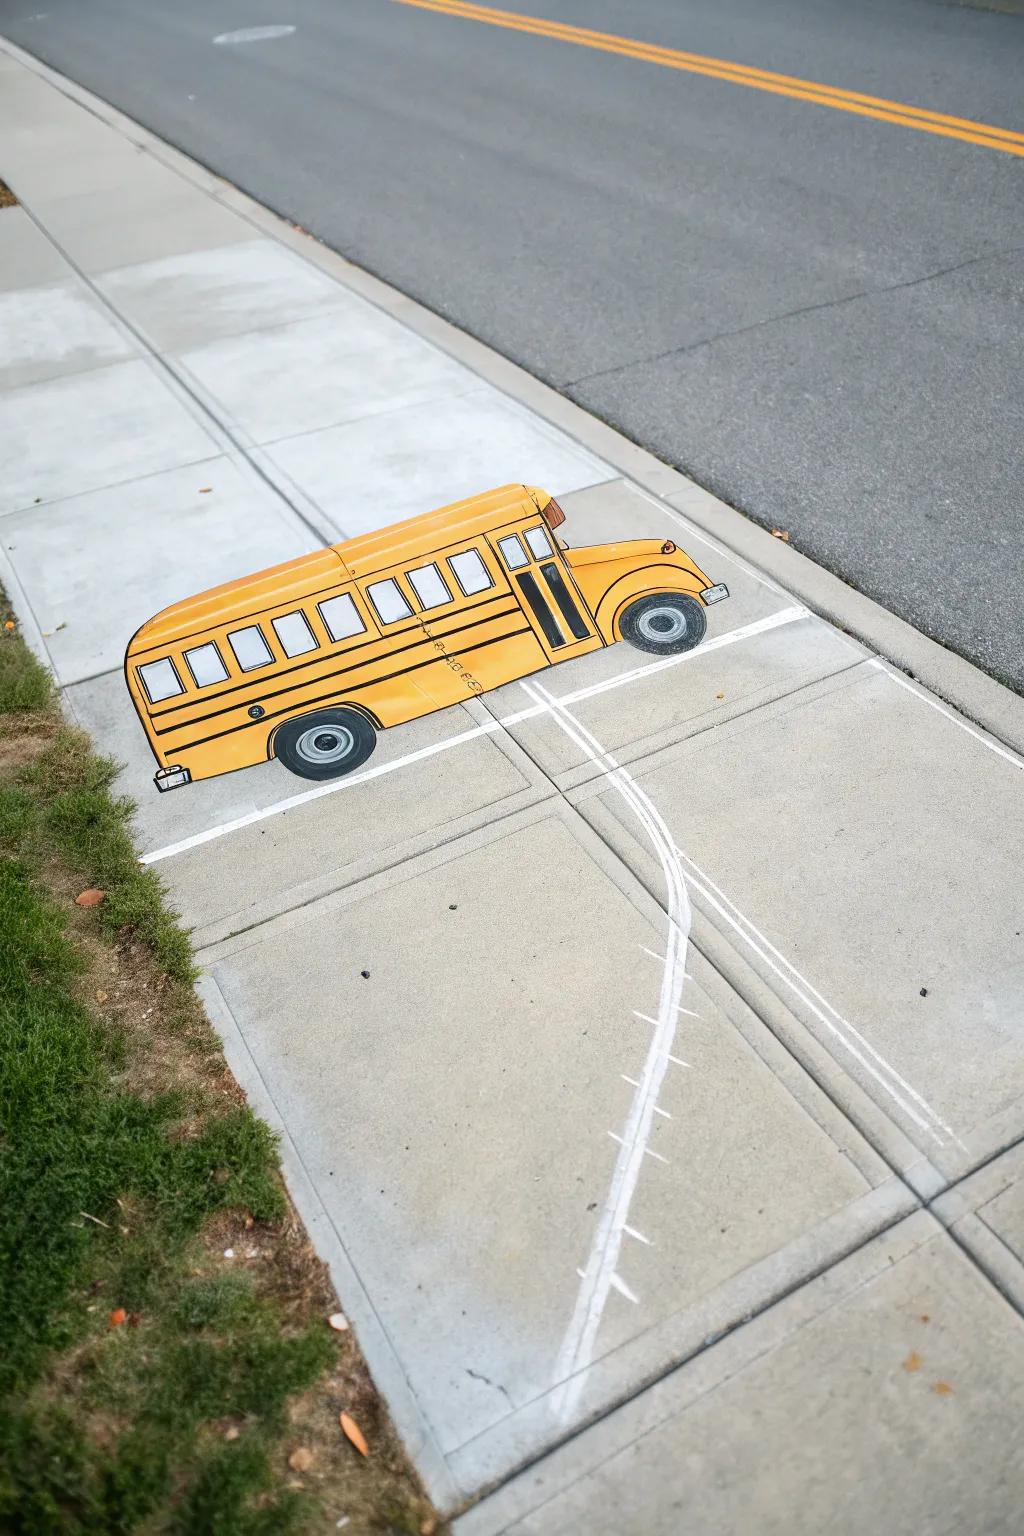
Celebrate the first day back with this classic yellow school bus design that brightens up any driveway. This project uses bold colors and simple perspective lines to create a striking 3D-like effect on the concrete canvas.
Step-by-Step Tutorial
Materials
- Jumbo sidewalk chalk (yellow, white, black, grey)
- Painter’s tape or masking tape (approx 1-inch width)
- Small blending sponge or old rag
- Measuring tape (optional)
- Spray bottle with water (for wetting chalk)
- Knee pads (highly recommended)
Step 1: Setting the Scene
-
Clean your canvas:
Start by sweeping the chosen sidewalk square completely clean. A quick rinse with a hose can help detailed chalk adhere better, but make sure the surface is fully dry before you begin taping. -
Lay the road lines:
Use your painter’s tape to layout the white road markings first. Place a long horizontal strip for the main road line and a vertical strip curving away from it to mimic the bus’s path. -
Outline the bus shape:
With a light touch of white chalk, sketch the basic rectangular body of the bus. Angle the front hood slightly downward and round the corners at the top to give it that classic curve.
Chalk breaking?
If your chalk keeps crumbling on rough concrete, dip the tip into a cup of water for 5 seconds before drawing. It creates a creamy, paint-like consistency.
Step 2: Technical Drawing
-
Wheel placement:
Draw two large semi-circles at the bottom of the bus frame for the wheel wells. Inside these, sketch the round tires, making sure the front one is slightly larger if you want a forced perspective look. -
Window framework:
Sketch a long horizontal line across the upper third of the bus body. Divide this section with vertical lines to create six or seven square passenger windows and the driver’s side window. -
Add the door details:
Right behind the hood area, draw the folding door. I like to make this slightly distinct by adding a vertical black stripe down the middle of it. -
Refining features:
Add the bumpers at the front and back, the headlight on the fender, and the small stop sign arm on the side.
Step 3: Coloring and Shading
-
Yellow base coat:
Fill in the main body of the bus with your bright yellow chalk. Apply heavy pressure to get a solid, opaque layer of color. -
Smoothing the yellow:
Take your blending sponge or rag and rub the yellow chalk into the pavement. This fills the concrete pores and makes the color pop significantly more. -
Window work:
Color the windows with a very light grey or pale blue. Leave small spots untouched or add white streaks to represent glass reflections. -
Tire details:
Fill the tires with black chalk, leaving a grey circle in the center for the hubcaps. Blend the black carefully so it doesn’t smudge into the yellow body. -
Deepening the shadows:
Use a darker orange or light brown chalk along the bottom edge of the bus and under the window frames to create depth and shadow.
Make it Personal
Write the name of your child’s actual school or their grade level (like ‘2nd Grade Express’) on the side of the bus for a great first-day photo op.
Step 4: Final Touches
-
Thick outlines:
Go over your initial sketch lines with a sharp piece of black chalk. A crisp, bold outline is the secret to making the drawing look like a sticker on the ground. -
Tape road markings:
Color directly over your tape lines on the pavement with white chalk. Rub it in aggressively to create a solid white line. -
The big reveal:
Carefully peel up the painter’s tape to reveal the crisp, straight road lines underneath. This contrast makes the whole drawing look professionally done. -
Adding tracks:
Draw faint white tire tracks trailing behind the bus curve to emphasize movement.
Step back and snap a picture of your masterpiece before the first rain washes it away


Apple For The Teacher Moment
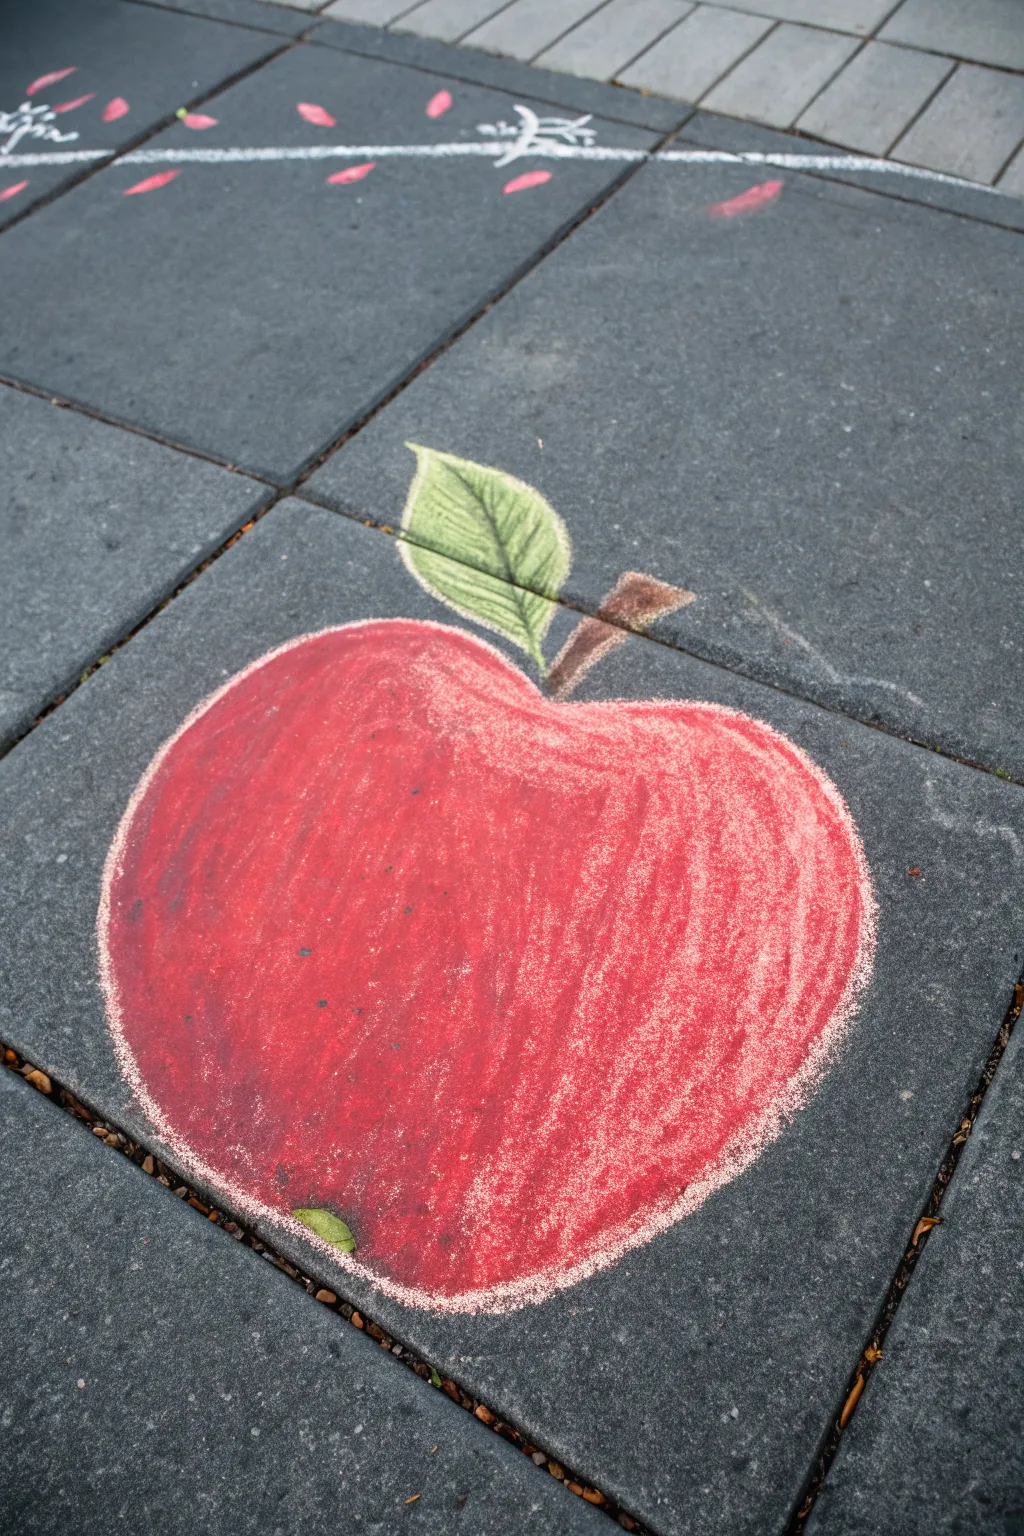
Welcome students back or appreciate a favorite teacher with this vibrant, oversized apple that pops right off the pavement. Using soft blending and bold outlining, you’ll create a classic school symbol with impressive depth and texture.
Step-by-Step
Materials
- Jumbo sidewalk chalk (Red, White, Green, Brown, Black)
- Blending foam, sponge, or old dry paintbrush
- Clean, dry pavement square
- Garden kneeling pad (optional but recommended for comfort)
Step 1: Shaping the Fruit
-
Rough Outline:
Start with your white chalk to sketch the basic apple shape. Draw a wide, slightly flattened heart shape, but avoid making the bottom point too sharp; keep it rounded like a real apple. -
Stem Placement:
At the top divot of your apple shape, sketch a short, slightly curved line angling upward to the right for the stem. -
Adding the Leaf:
Leaf shapes can be tricky, so visualize a teardrop shape attached to the left side of the stem, pointing upwards and slightly left.
Clean Edges Trick
Use masking tape to mock up your apple shape first. Color inside the tape, then peel it away for incredibly sharp, professional-looking edges.
Step 2: Coloring and Texture
-
Red Base Layer:
Take your jumbo red chalk and color in the entire body of the apple. Use broad, firm strokes to get as much pigment into the pavement pores as possible. -
First Blend:
Using your blending foam or sponge, rub the red pigment in circular motions to smooth out the stroke marks. This creates that solid, velvety base. -
Adding Depth:
Go back over the bottom curve and the left side of the apple with a second layer of red to make the color richer and darker in the ‘shadow’ areas. -
Stem Detailing:
Color the stem using brown chalk. Press harder on the left edge of the stem to imply a cylindrical shape. -
Leaf Coloring:
Fill the leaf shape with light green chalk. Apply the color in lines that angle outward from the center vein to mimic real leaf texture. -
Leaf Definition:
Use a darker green or lightly trace with a black piece of chalk to draw the center vein of the leaf and the jagged outer edges.
Step 3: Highlights and Finishing Touches
-
Creating the Shine:
This is crucial for the 3D effect. Take your white chalk and scumble a large, curved patch on the upper right shoulder of the apple. -
Gentle Highlight Blend:
I prefer to use my finger for this small area to lightly smudge the white into the red, creating a soft pinkish transition rather than a stark white spot. -
Rim Lighting:
Run the white chalk along the very top edge of the apple curves to separate it from the stem area visually. -
Strong Outline:
To make the drawing pop against the gray concrete, trace the very outer perimeter of the apple body with a thick line of white chalk. -
Clean Up:
Blow away any loose chalk dust that has settled on the gray pavement around your drawing to keep the edges crisp. -
Optional Shadow:
For extra realism, create a small, dark smudge under the bottom of the apple using black chalk to anchor it to the ground.
Make It Personal
Write a teacher’s name or ‘Welcome Back’ inside the red body of the apple using bold white letters before doing your final blending.
Step back and admire your colorful creation that is sure put a smile on everyone’s face on the first day of school


Pencil Border Runway
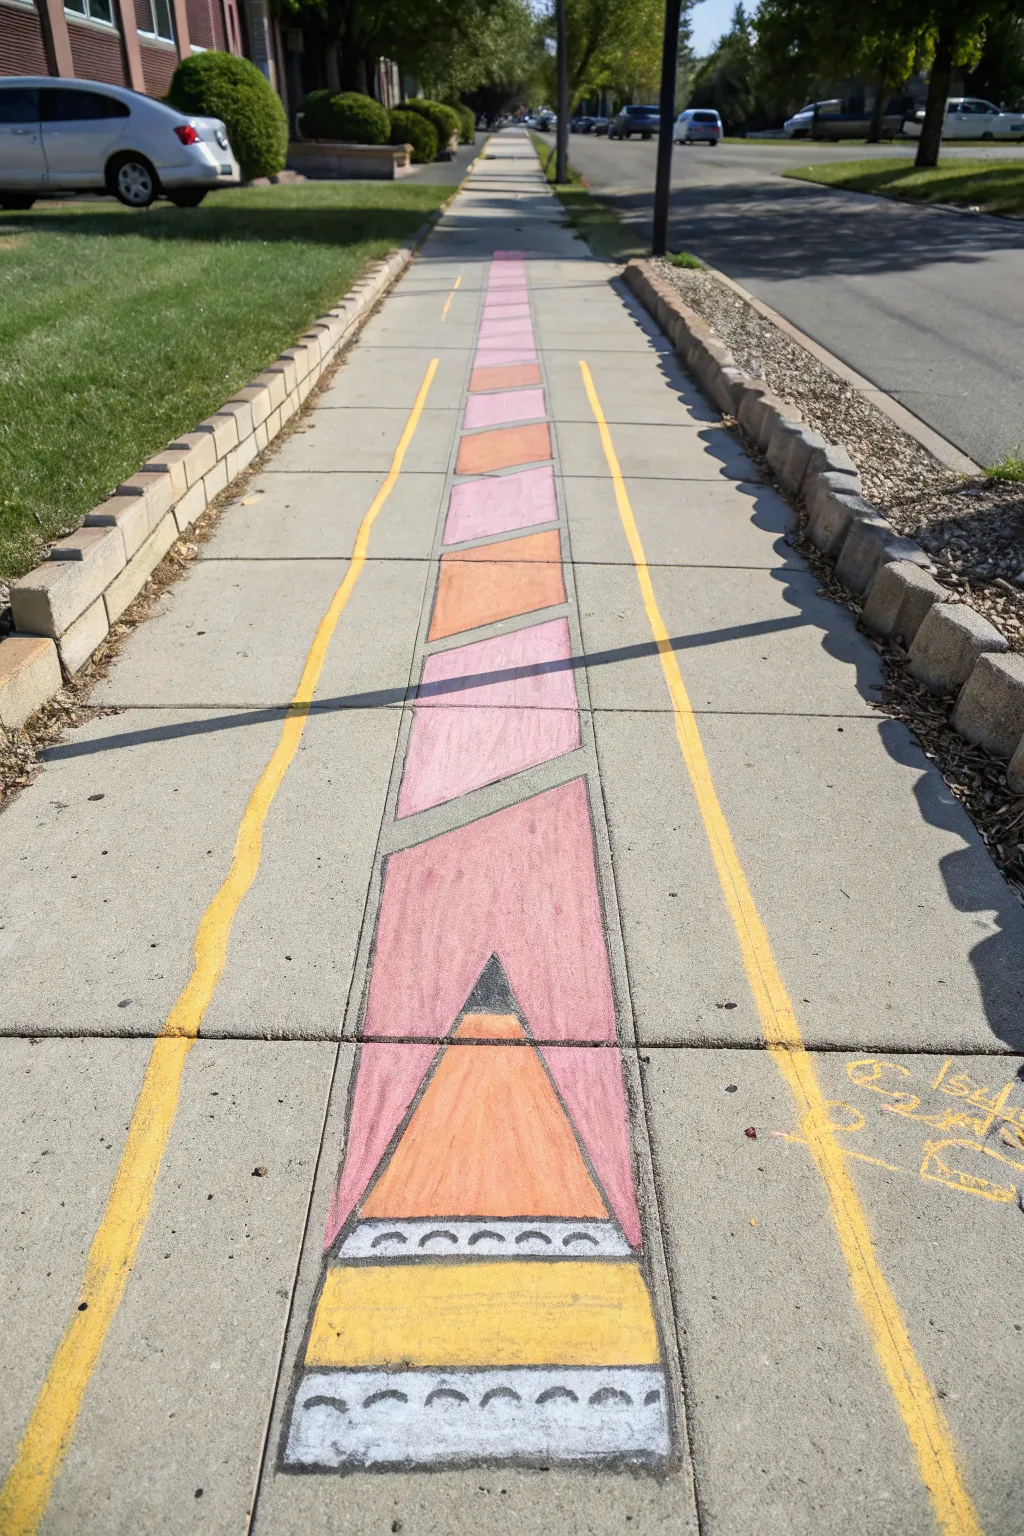
Transform an ordinary sidewalk into an exciting runway for the first day of school with this elongated pencil illusion. This impressive chalk mural creates a fun, oversized border that guides students straight toward their next big adventure.
Step-by-Step
Materials
- Sidewalk chalk (jumbo size recommended)
- Painter’s tape or masking tape (2-inch width)
- Measuring tape
- Long straightedge (like a yardstick or level)
- String or twine (optional for snapping lines)
- Kneeling pad or garden cushion
- Broom or leaf blower
Step 1: Setting the Stage
-
Prep the surface:
Before you begin, sweep the sidewalk thoroughly with a stiff broom. You need a clean, grit-free surface for the tape to stick properly and for the chalk colors to pop. -
Measure the width:
Decide how wide your pencil will be. About 18 to 24 inches is ideal for a standard sidewalk block. Find the center of your sidewalk and measure out from there to keep it centered. -
Tape the main outline:
Run two long, parallel strips of painter’s tape down the length of the sidewalk to define the edges of the pencil body. This could span several concrete squares depending on how long you want your runway to be. -
Create the outer lanes:
To add the simple yellow border lines seen in the photo, place two more strips of tape about 6-8 inches outside your main pencil body on both the left and right sides.
Step 2: Drafting the Design
-
Outline the tip:
At the far end of your pencil body, use tape to create a tall triangle point. The tip of the triangle should point in the direction the kids will be walking. -
Add the eraser end:
At the start of the pencil (bottom of the drawing), tape off a rectangle for the feral (the metal band) and a rounded or squared section below it for the eraser. -
Section the body:
Inside the main long rectangle of the pencil body, use tape to create diagonal lines or zig-zags. This mimics the faceted, painted wood of a sharpened pencil. -
Define the lead:
Inside your top triangle, place a small strip of tape horizontally near the peak to separate the ‘wood’ cone from the black graphite tip.
Smudge Master
Use a piece of carpet remnant or an old chalkboard eraser to blend large areas. This pushes the pigment into the cement pores for vibrant, long-lasting color.
Step 3: Coloring the Elements
-
Fill the eraser:
Start at the bottom with the eraser. Use a bright pink or white chalk to fill this area completely. Rub the chalk into the concrete with your hand or a chalkboard eraser for a smooth look. -
Draw the metal band:
Color the band above the eraser with grey or silver chalk. For the metal texture seen in the image, draw small ‘U’ shapes or scallops in a darker grey or black across the band. -
Color the pencil body:
Alternate colors for the sections of the pencil shaft. Use a classic yellow-orange for the main sections and a lighter pink or pale orange for the alternating facets to create dimension. -
Shade the wood cone:
For the sharpened wood area near the tip, use a beige or light tan chalk. Apply it heavily to ensure it stands out against the grey concrete. -
Darken the point:
Fill the very tip of the triangle with solid black chalk to represent the graphite lead.
Personalize It
Instead of a standard yellow number 2 pencil, write the teacher’s name or the grade level (like ‘2nd Grade Rocks’) down the side of the pencil body.
Step 4: Finishing Touches
-
Add the yellow lanes:
Go back to your outer lanes. Run a thick line of yellow chalk along the outside of those tape strips. I find that doing this last keeps me from smudging it while working on the center. -
Remove the tape:
Carefully peel up all your tape. Pull slowly at a 45-degree angle to keep edges crisp. The negative space left by the tape creates the sharp white outlines. -
Refine the edges:
If any chalk bled under the tape, use a damp cloth or a little water on a paintbrush to clean up the grey concrete lines. -
Add highlights:
Take a stick of white chalk and add a subtle highlight line down the center of the pencil body specifically on the yellow sections to make it look rounded and shiny.
Step back and admire your giant creation, ready to greet the students with a creative path to success
BRUSH GUIDE
The Right Brush for Every Stroke
From clean lines to bold texture — master brush choice, stroke control, and essential techniques.
Explore the Full Guide
Hopscotch With School Words

Transform a simple walk to school into an interactive learning game with this math-themed hopscotch grid. Using vibrant chalk pastels, you’ll create a structured grid that combines classic jumping fun with multiplication practice.
Step-by-Step
Materials
- Sidewalk chalk (white and assorted colors)
- Painter’s tape or masking tape (optional, for straight lines)
- Measuring tape or yardstick
- Broom or outdoor brush
Step 1: Preparing the Canvas
-
Clean the surface:
Begin by finding a long, flat stretch of sidewalk concrete. Use a broom to sweep away any loose dirt, pebbles, or leaves to ensure your chalk adheres well and your lines stay crisp. -
Plan the spacing:
Visualize where the main ‘Back to School’ text will go versus the grid. Leave about 3-4 feet of walking space between the start of your hopscotch grid and where you plan to write the header text.
Chalk Sizing Pointers
Use “jumbo” sidewalk chalk for the large grid lines to get thick, visible borders, but switch to standard-size chalk for writing the numbers so they are legible.
Step 2: Drawing the Grid
-
Outline the main box:
Using white chalk, draw a large rectangle for the main body of the hopscotch. It should be wide enough for two feet to land side-by-side comfortably, roughly 3 to 4 feet wide and 5 feet long. -
Divide vertically:
Draw a straight vertical line down the exact center of your large rectangle, splitting it into two long columns. -
Divide horizontally:
Mark out four evenly spaced horizontal lines across the rectangle to create a total of ten internal squares (a 2×5 grid). I find using a yardstick as a straight edge helps keep these looking neat. -
Add the start and finish:
At the bottom of your grid (closest to the viewer), draw a single square centered below the main rectangle. At the top, add another single square centered above the main rectangle to complete the traditional hopscotch structure. -
Draw the zero circle:
Below your bottom starting square, draw a large, loose circle. This acts as the ‘start’ or ‘0’ point for the jumper.
Step 3: Filling in the Math
-
Write the starting equation:
In the bottom-most square (the one attached to the grid), write ’10 x 1′ using pink chalk. This sets the theme for the multiplication table. -
Number the grid:
moving up into the main 2×5 grid, write numbers in the squares. The image shows a mix, but you can follow a sequence (like 2, 3, 4, 5) or randomize them for a challenge. Use alternating colors like blue and pink to distinguish the numbers. -
Highlight specific squares:
Select a few random squares in the grid to color in completely. Use the side of your chalk stick to shade the background of these squares lightly (e.g., a dusty red or blue), then write the number over top in a contrasting color. -
Add the top numbers:
In the top-most single square, draw a small square shape inside it or a final high number to signify the end of the level.
Math Level Up
Instead of static numbers, write a question in the square (like “2×2”) and the answer in the next square. The child has to shout the answer before they jump.
Step 4: Lettering the Header
-
Position the text:
Move about 4 feet down the path from the top of your hopscotch grid. This is where your greeting will go. -
Draft the letters:
Lightly sketch ‘Back to School’ in white chalk. Aim for a mix of script and print styles—loops on the ‘B’ and ‘S’ add a friendly, handwritten feel. -
Thicken the strokes:
Go back over your letters, pressing harder on the downstrokes to give the font a faux-calligraphy look. Make sure the ‘to’ is smaller and centered between the two main words. -
Clean up edges:
If any chalk lines look smudged, use a little water on your finger or a cloth to crisp up the edges of your letters and grid lines.
Now you have a colorful, educational path ready to welcome students back to school
School Entrance Welcome Path
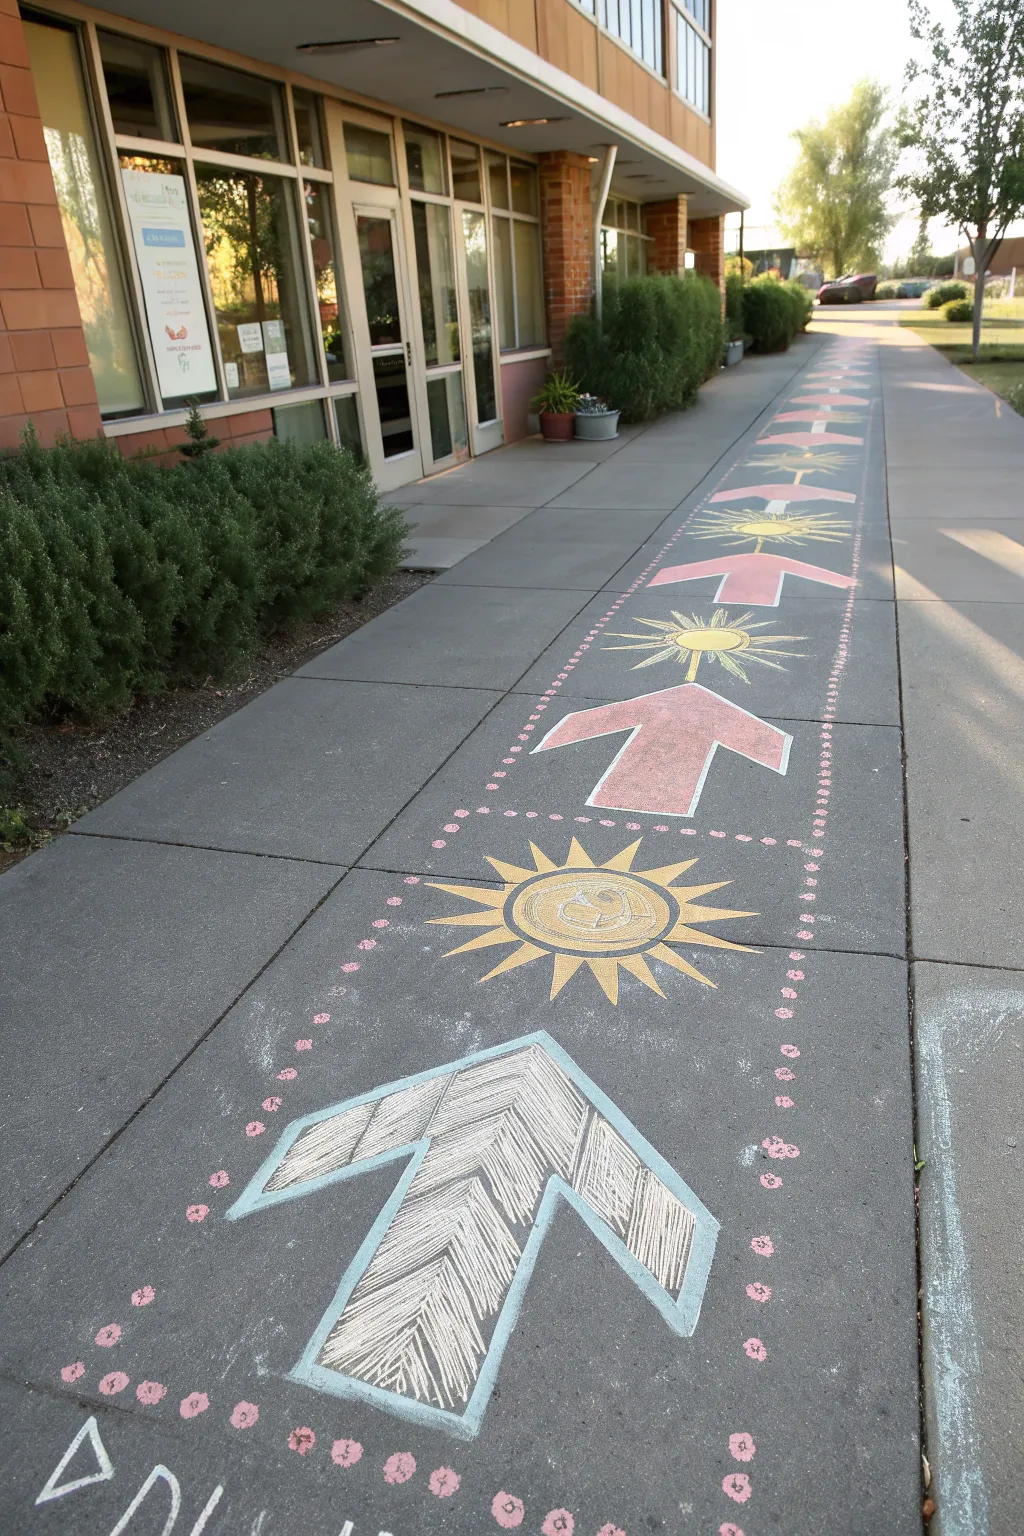
Guide students right to the front door with this vibrant, repeating pathway design featuring bright suns and directional arrows. The alternating pattern creates visual rhythm while the soft pink borders define a clear, welcoming lane for the first day of school.
Step-by-Step Guide
Materials
- Jumbo sidewalk chalk (white, yellow, light blue, pink)
- Painter’s tape or masking tape (2-inch width)
- Measuring tape or yardstick
- Kneeling pad (optional)
- Small broom or brush for cleaning pavement
Step 1: Preparation & Layout
-
Prep the surface:
Before you begin, sweep the sidewalk area thoroughly. Chalk adheres much better to clean concrete, and removing loose pebbles prevents your lines from getting bumpy. -
Mark the center line:
Visualize a straight line running down the center of your sidewalk squares. You can use small, faint chalk ticks every few feet to keep your path centered as you work backward from the entrance. -
Space out your elements:
Plan for alternating motifs: a large arrow, then a sun, then an arrow. Leave about 12–18 inches of gap between each main design element so the path doesn’t look cluttered.
Chalk Snapping?
If jumbo chalk keeps breaking, try drawing with the side of the stick rather than the tip. This covers more area faster and prevents snapping.
Step 2: Drawing the Arrows
-
Outline the first arrow:
Start with the arrow closest to the viewer (or furthest from the door). Draw a large, wide arrowhead pointing forward using light blue chalk. Add a wide shaft behind it. -
Create the inner border:
Inside your blue outline, draw a second outline about an inch inward. This creates a thick border effect. -
Fill with texture:
Instead of coloring it solid, use diagonal or chevron-style hatching lines inside the arrow shaft and head. I find this saves chalk and adds a nice sketchy texture that stands out on gray pavement. -
Alternate arrow colors:
For the next arrow further down the path, switch your main color. Use pink chalk for the outline and fill it solidly, or stick to the hatched style if you prefer consistency. The example shows alternating hatched arrows and solid pink arrows.
Step 3: Creating the Suns
-
Draw the central circle:
In the space between your arrows, draw a large circle with yellow chalk. This will be the face of your sun. -
Add the rays:
Draw long, triangular rays radiating outward from the circle. Aim for about 12–16 rays per sun to make them look full and energetic. -
Fill and detail:
Color in the central circle solidly with yellow. For the rays, you can alternate leaving them mere outlines or coloring them in fully to create contrast. -
Add a secondary color:
Take your light blue or white chalk and draw a thin ring around the central yellow circle, just inside the rays, to make the yellow pop against the gray concrete.
Make It Glow
Dip your chalk in a mixture of water and sugar before drawing. When it dries, the colors will be incredibly bright and smear-resistant.
Step 4: The Dotted Border
-
Establish the lane width:
Decide how wide your path should be. The border should sit about 6–10 inches outside your widest arrow or sun ray. -
Create the flower dots:
Using pink chalk, draw small circles or simple flower shapes. These don’t need to be perfect; quick organic loops work well. -
maintain spacing:
Space these border dots about 4 inches apart. Try to keep them aligned in a straight line on both the left and right sides to frame your artwork effectively. -
Connect the pattern:
Continue this dotted line for the entire length of your path, ensuring it encompasses every arrow and sun you’ve drawn.
Step 5: Final Touches
-
Clean up edges:
Walk back down your path and check for smudges. You can use a damp cloth to wipe away any wayward chalk dust around your outlines. -
Add message text:
At the very start of the path, write a welcoming word like ‘ADVENTURE’ or ‘WELCOME’ in large block letters to kick off the journey. -
Blend if desired:
For the solid filled arrows (like the pink ones), use your fingers or a lush piece of foam to rub the chalk into the pavement for a smoother, more painted look.
Now you have a cheerful, directional path that makes walking into school feel like a special event

PENCIL GUIDE
Understanding Pencil Grades from H to B
From first sketch to finished drawing — learn pencil grades, line control, and shading techniques.
Explore the Full Guide
Stained-Glass School Crest
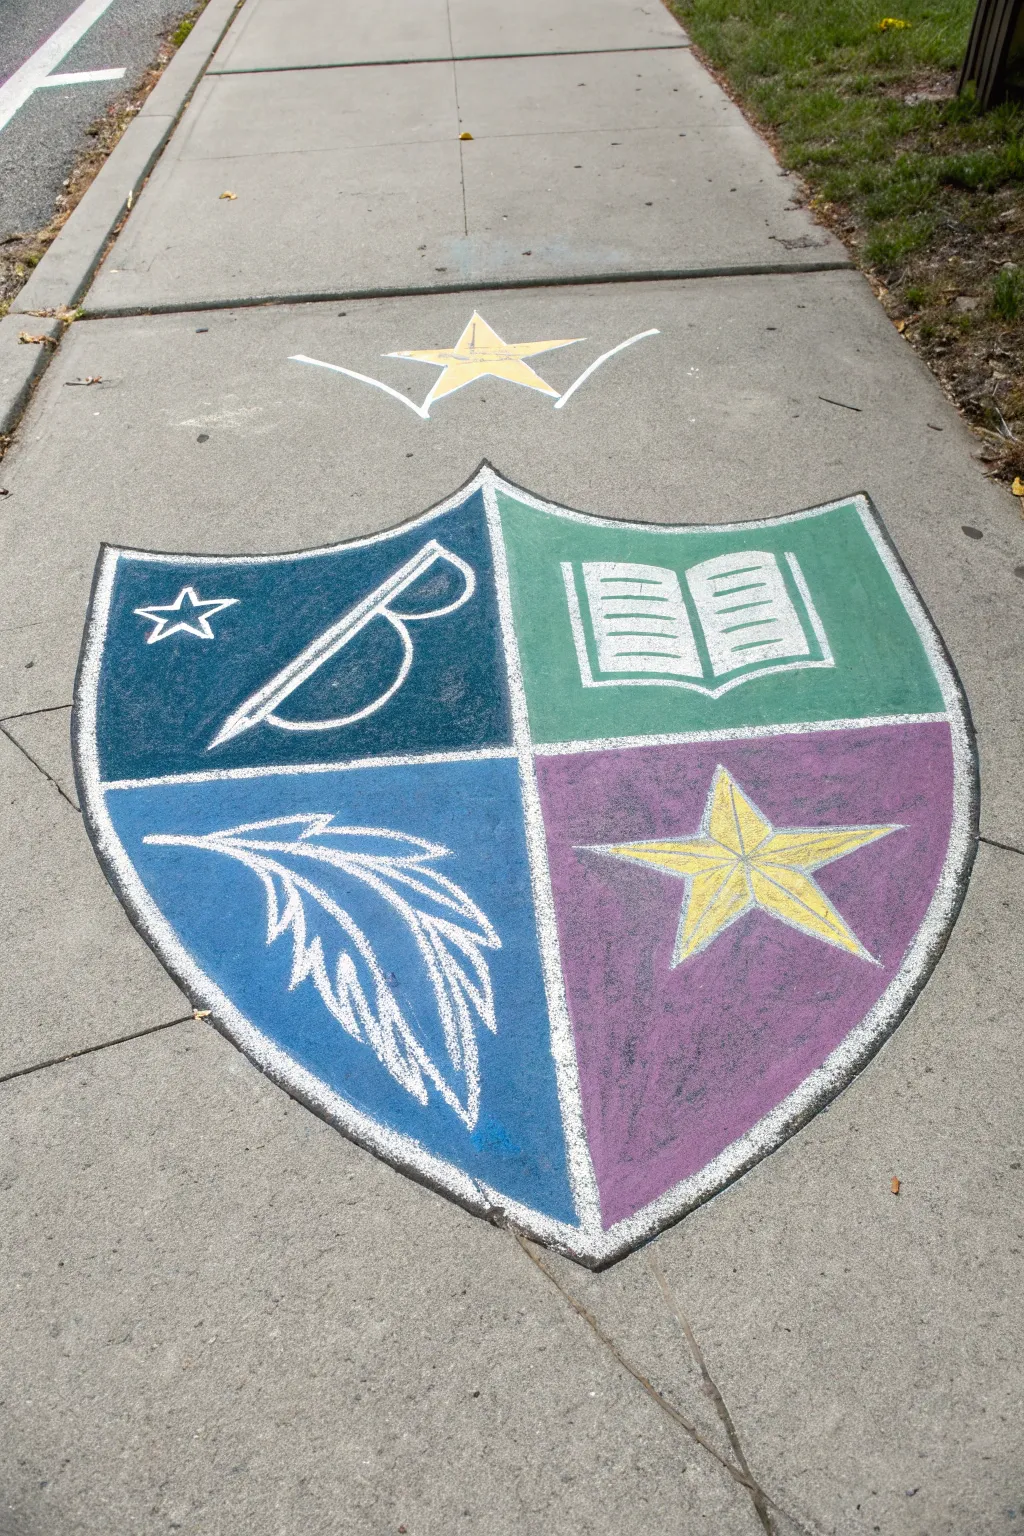
Transform a plain sidewalk slab into a vibrant symbol of academic spirit with this geometric crest design. The solid color blocking and bold white outlines mimic the look of traditional stained glass, making it a perfect back-to-school statement piece.
Step-by-Step Tutorial
Materials
- Sidewalk chalk (jumbo sticks)
- White sidewalk chalk (for outlining)
- Masking tape or painter’s tape (2-inch width)
- Measuring tape or ruler (optional)
- Broom or stiff brush
- Water spray bottle (optional, for blending)
Step 1: Preparation and Outline
-
Prep the surface:
Start by sweeping your chosen concrete square thoroughly to remove loose dirt and pebbles, which helps the tape stick better if you decide to use it. -
Draw the shield shape:
Using a white chalk stick, draw a large shield outline. Start with a horizontal curve at the top that points slightly upward in the middle, then bring two long curved lines down from the sides to meet at a point at the bottom. -
Add the inner border:
Draw a second, slightly smaller shield shape inside the first one to create a thick border. This double line is key for that bold, outlined look. -
Divide into quadrants:
Draw a vertical line straight down the center of the shield, then a horizontal line across the middle to split the crest into four equal sections. -
Create the upper star:
Above the shield, draw a five-pointed star. Add a simple V-shaped flourish on either side of the star to frame it nicely.
Step 2: Drawing the Symbols
-
Top Left: Glasses and Sparkle:
In the top-left quadrant, sketch a simple pair of eyeglasses angled diagonally. Add a small five-pointed star or ‘sparkle’ in the corner near the frames. -
Top Right: Open Book:
For the top-right section, draw an open book shape. Make a rectangle, split it down the middle, and add small horizontal lines to represent text. -
Bottom Left: Quill Feather:
In the bottom-left quadrant, draw a large, curved feather or quill. Use jagged lines along the edges to give it a feathery texture. -
Bottom Right: Large Star:
Draw a large five-pointed star in the center of the bottom-right quadrant. Connect the inner corners to the center point to give it a 3D faceted look.
Vibrant Color Tip
Dip your chalk in water for 15 seconds before drawing. The wet chalk goes on like paint, dries ultra-bright, and fills concrete pores better.
Step 3: Coloring and Filling
-
Fill the top left:
Color the background of the glasses quadrant with a deep teal or dark blue chalk. Press firmly to get solid coverage, working carefully around your white drawings. -
Color the top right:
Use a medium green chalk to fill the background behind the book. Try to color in consistent strokes to avoid patchy areas. -
Fill the bottom left:
Select a lighter or medium blue for the feather quadrant. The contrast between this blue and the white feather lines will really pop. -
Color the bottom right:
Fill the background of the final quadrant with a rich purple. This complements the yellow star perfectly. -
Color the main star:
Fill in the large star in the purple section with bright yellow. I like to alternate shades of yellow on the facets if I have them, but solid yellow works great too. -
Color the top decoration:
Color the floating star above the shield with the same bright yellow chalk.
Messy Lines?
If your colors are smudging into the white lines, wait for the background colors to be fully rubbed in before doing the final white outline pass.
Step 4: Refining and Finishing
-
Smudge for smoothness:
Use your fingers or a piece of foam to rub the colored backgrounds into the concrete. This fills the pores and creates that smooth, stained-glass opacity. -
Re-trace the white lines:
The coloring process likely dusted over your initial outlines. Take your fresh white chalk and trace over every single line again—the borders, the symbols, and the dividers. -
Thicken the borders:
Make the outer shield border and the central dividing cross extra thick with the white chalk to separate the colors distinctly. -
Clean up edges:
If you see any color that went outside the lines, use a little water on a cloth or a clean brush to gently scrub it away for a crisp edge. -
Final dust off:
Blow away any loose chalk dust settled on top of the drawing to reveal the bright colors underneath.
Step back and admire your colorful crest that welcomes students with a touch of artistic flair
3D Backpack Illusion Sketch
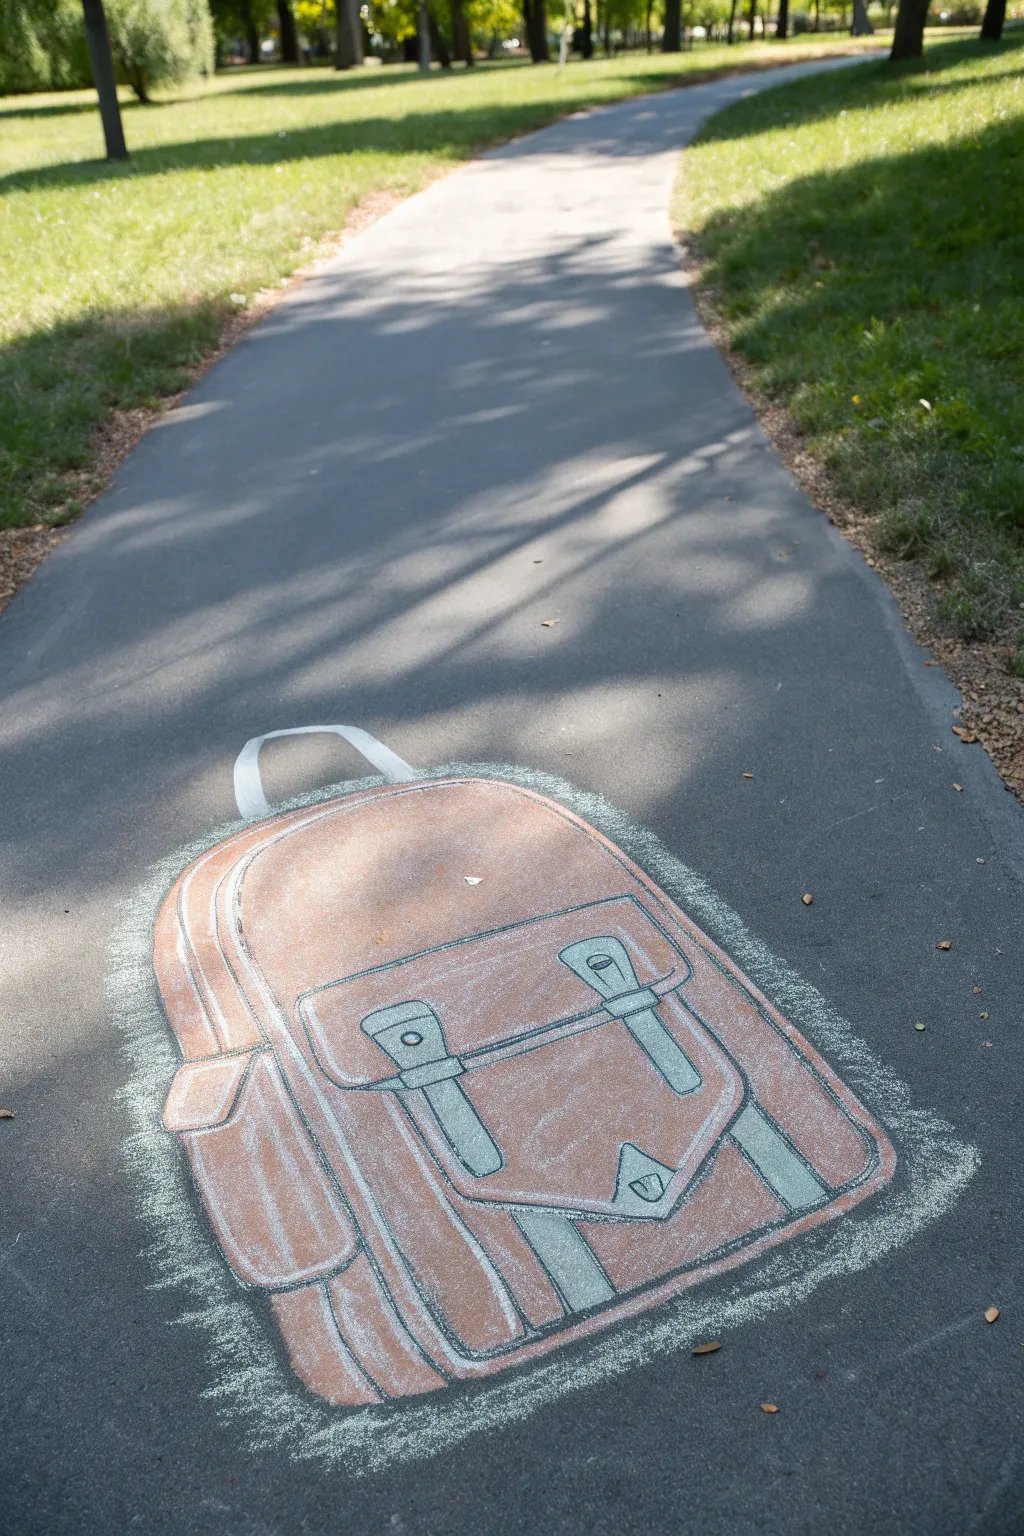
Transform an ordinary sidewalk into a whimsical back-to-school scene with this clever backpack illusion. Using basic geometric shapes and careful shading, you can create a drawing that looks like a real satchel resting right on the pavement.
Step-by-Step
Materials
- Sidewalk chalk (brown, white, black, grey/blueish-grey)
- Chalk pastels (optional, for deeper colors)
- Blending sponge or old rag
- Measuring tape (optional)
- Knee pads or gardening cushion
Step 1: Outlining the Form
-
Find your angle:
Choose a viewing spot for your illusion. The drawing will look distorted from the top but correct from this specific angle, so mark where your ‘camera’ or viewer should stand. -
Draw the main body shape:
Using white chalk, sketch a large, slightly elongated oval or rounded rectangle directly on the pavement. This will act as the base for the backpack. -
Add the front flap:
Draw a curved line across the upper third of the oval to define where the top flap folds over the main pocket. -
Sketch the straps:
Add two vertical strips hanging down from the flap. Make sure they end with pointed tips or rounded bottoms where the buckles would be. -
Detail the buckles:
Draw small rectangles or keyhole shapes near the bottom of your straps to represent the metal hardware. -
Add the handle:
At the very top of the bag, sketch a curved loop for the carry handle. Angle it slightly backward to enhance the 3D perspective. -
Define the side pocket:
On the left side of the main body, draw a smaller, protruding curved shape to represent a side pouch.
Step 2: Coloring and Shading
-
Fill the base color:
Use a warm brown chalk to color in the entire main body and the top flap. Apply the chalk using broad strokes for even coverage. -
Blend the brown:
Take your sponge or rag and rub the brown chalk into the pavement. This creates a smooth, fabric-like texture and fills in the asphalt’s pores. -
Color the accents:
Use a grey or light blueish-grey chalk to color in the straps, the handle, and the buckle straps. This contrast makes the brown pop. -
Add highlights:
Take your white chalk and draw lines along the top edges of the flap, the handle, and the straps. I find this step crucial for making the object look like it’s catching sunlight. -
Create distinct outlines:
Go back over your initial sketch lines with white chalk to create a ‘stitched’ look. Press firmly to ensure these lines stand out against the colored background. -
Define the seams:
Draw vertical lines down the main body of the bag to suggest different panels of fabric or leather, adding white highlights along these seams. -
Add the ‘glow’:
This is the secret to the pop-out effect: use white chalk to scribble a messy, thick border all around the outside of the backpack. -
Smudge the glow:
Use your fingers or a clean rag to smudge this white border outward into the pavement, fading it as it moves away from the bag.
Camera Ready
Look through your phone camera while sketching the initial outline. It helps correct the perspective distortion much better than the naked eye.
Step 3: Final Touches
-
Deepen geometric shadows:
Use black or a darker brown chalk to lightly shade underneath the main flap and along the bottom edge of the bag to give it weight. -
Detail the hardware:
Add tiny black dots or lines inside the grey buckle shapes to simulate the holes for the tongue of the buckle. -
Clean up edges:
If any color smudged outside the lines, use a little water on a rag to wipe it away, keeping the silhouette crisp. -
Check the perspective:
Walk back to your viewing spot. If the bag looks too flat, add more white highlight to the top surfaces and more dark shading to the bottom areas.
School Spirit
Personalize the backpack by drawing a school logo patch on the front pocket or adding a keychain charm hanging from the zipper pulls.
Step back to your designated viewing spot and enjoy the fun optical illusion you have created


Have a question or want to share your own experience? I'd love to hear from you in the comments below!