Mother’s Day drawings are the sweetest kind of art because they’re really just love, made visible. Here are my favorite Mother’s Day drawing ideas—from classic card-front designs to more creative, artsy keepsakes you can make your own.
Big “MOM” Bubble Letters With Hearts
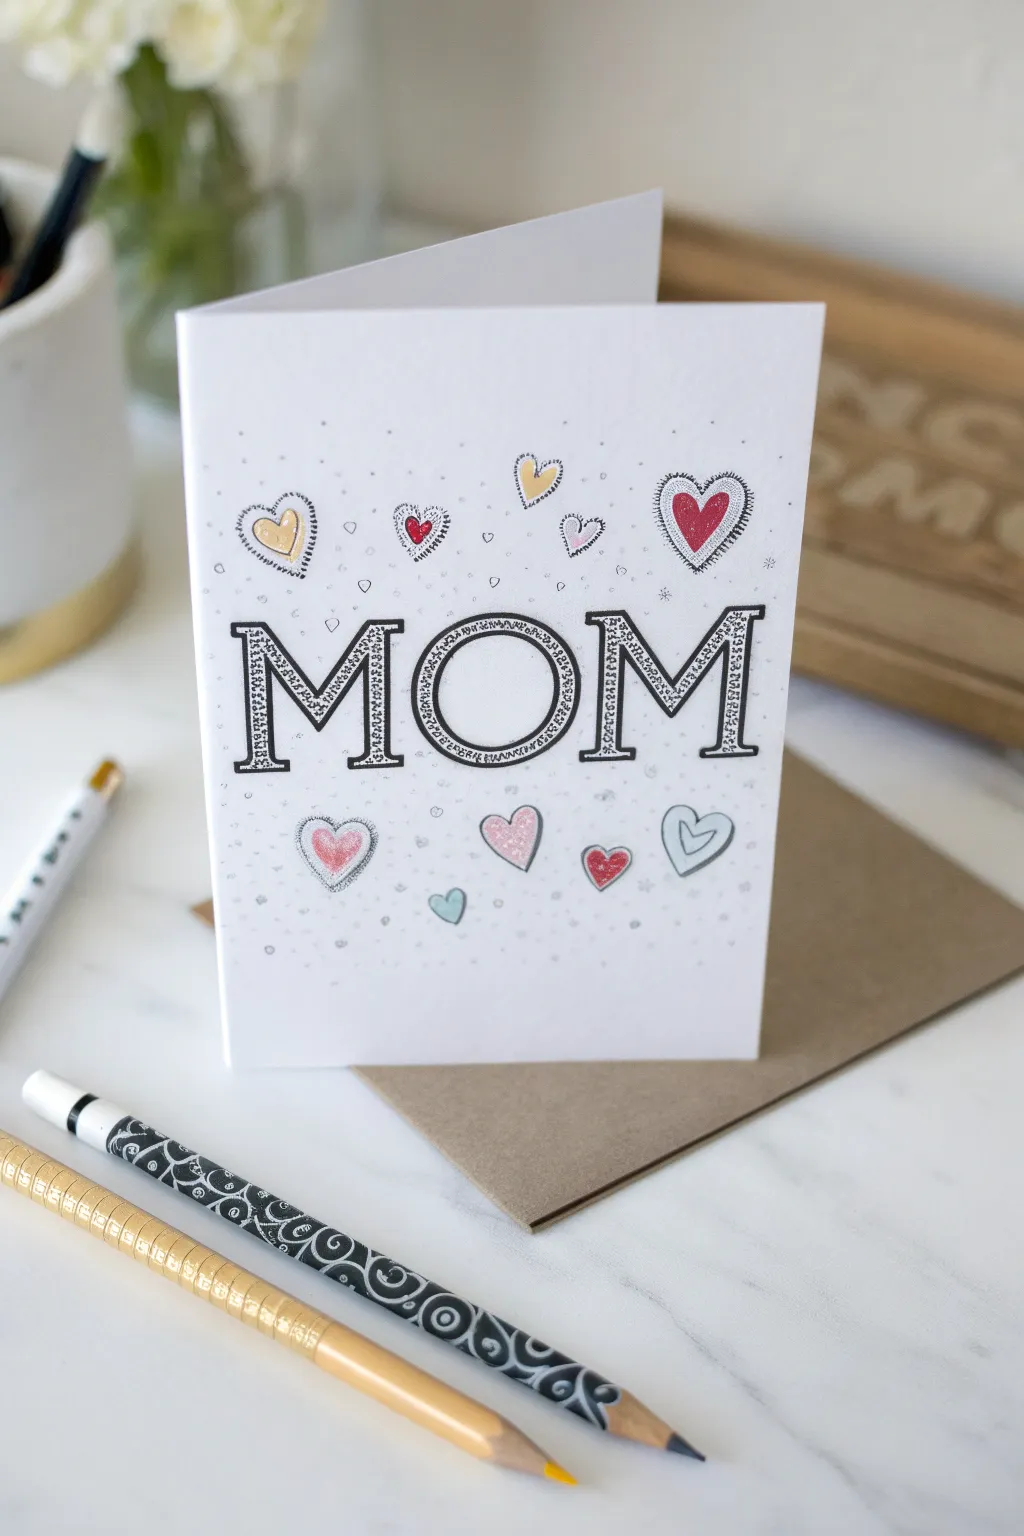
Create a sophisticated yet handmade Mother’s Day card featuring strong typography and delicate detailing. This design combines bold block lettering with soft, stippled hearts for a look that feels both modern and sentimental.
How-To Guide
Materials
- White cardstock (folded to A5 or standard greeting card size)
- Black fine-liner pens (0.3mm and 0.5mm)
- Black brush pen or thicker marker (for the bold outline)
- Colored pencils or fine-tip markers (red, pink, yellow, blue)
- Pencil and eraser
- Ruler
Step 1: Drafting the Layout
-
Mark the center:
Begin by lightly finding the center of your folded cardstock with a ruler. This will help ensure the word ‘MOM’ is perfectly balanced. -
Sketch the letters:
Using a light pencil grip, sketch out the block letters ‘M-O-M’ across the center. I prefer to use a serif font style like the one shown, adding distinct ‘feet’ to the Ms to give them a classic look. -
Create the inner border:
Drawing lightly, sketch a smaller version of each letter inside the original outlines. This inner space will eventually hold our textured pattern, creating a frame effect. -
Position the hearts:
Sketch various heart shapes floating around the letters. Place larger hearts near the corners and smaller ones filling the gaps, varying their angles slightly for a playful feel.
Stippling Rhythm
When stippling the letter borders, lift your pen straight up and down rapidly rather than dragging it. Randomize the dots to avoid making unintentional lines or patterns.
Step 2: Inking the Typography
-
Outline the letters:
Take your 0.5mm black fine-liner and carefully trace over your pencil lines for the main ‘MOM’ letters. Trace both the outer edge and the inner border line you sketched. -
Fill the frame:
Between the outer line and the inner line of each letter, use a stippling technique. Tap your pen repeatedly to create tiny dots filling this narrow channel. Keep the dots distinct rather than coloring it solid black. -
Add dimension:
To make the letters pop, draw a second, slightly thicker outline around the very exterior of the letters, leaving a tiny sliver of white space between this new line and your stippled border. -
Connect the loops:
On the rounded parts of the ‘O’ and the serifs of the ‘M’, ensure your double lines connect cleanly. This precision gives the drawing a polished, professional finish.
Go Metallic
Swap the colored pencils for metallic gel pens (gold or silver) when filling the hearts. This adds a beautiful shimmer that catches the light when the card is opened.
Step 3: Creating the Hearts
-
Outline the hearts:
Using the thinner 0.3mm pen, outline your floating hearts. For a unique touch, outline some hearts twice or create a ‘echo’ line inside the shape, mimicking the style of the text. -
Add inner texture:
For the hearts that have double outlines, fill the space between the lines with tiny hatching lines or small dots, similar to what you did for the text borders. -
Color soft gradients:
Select your colored pencils. Gently color the centers of the hearts. Instead of filling them solidly, start with slightly more pressure at the bottom and fade to white near the top for a highlighted effect. -
Vary the palette:
Rotate through your colors—soft pinks, muted reds, pastel yellows, and light blues works beautifully together. Keep the colors soft so they don’t overpower the black text.
Step 4: Final Touches
-
Erase guidelines:
Once you are certain the ink is completely dry, gently run a clean eraser over the entire design to remove the initial pencil sketches. -
Add background speckles:
Take a silver or light grey pencil (or a very fine grey marker) and add tiny dots and miniature circles scattered throughout the white background. -
Create mini-hearts:
Draw a few extremely tiny, uncolored hearts amongst the background speckles to tie the theme together. -
Review contrast:
Step back and check your work. If the main letters need more definition, you can carefully darken the outermost outline one last time.
Now you have a stunning, hand-drawn card that looks professionally printed but carries personal warmth


Heart Border Card Frame
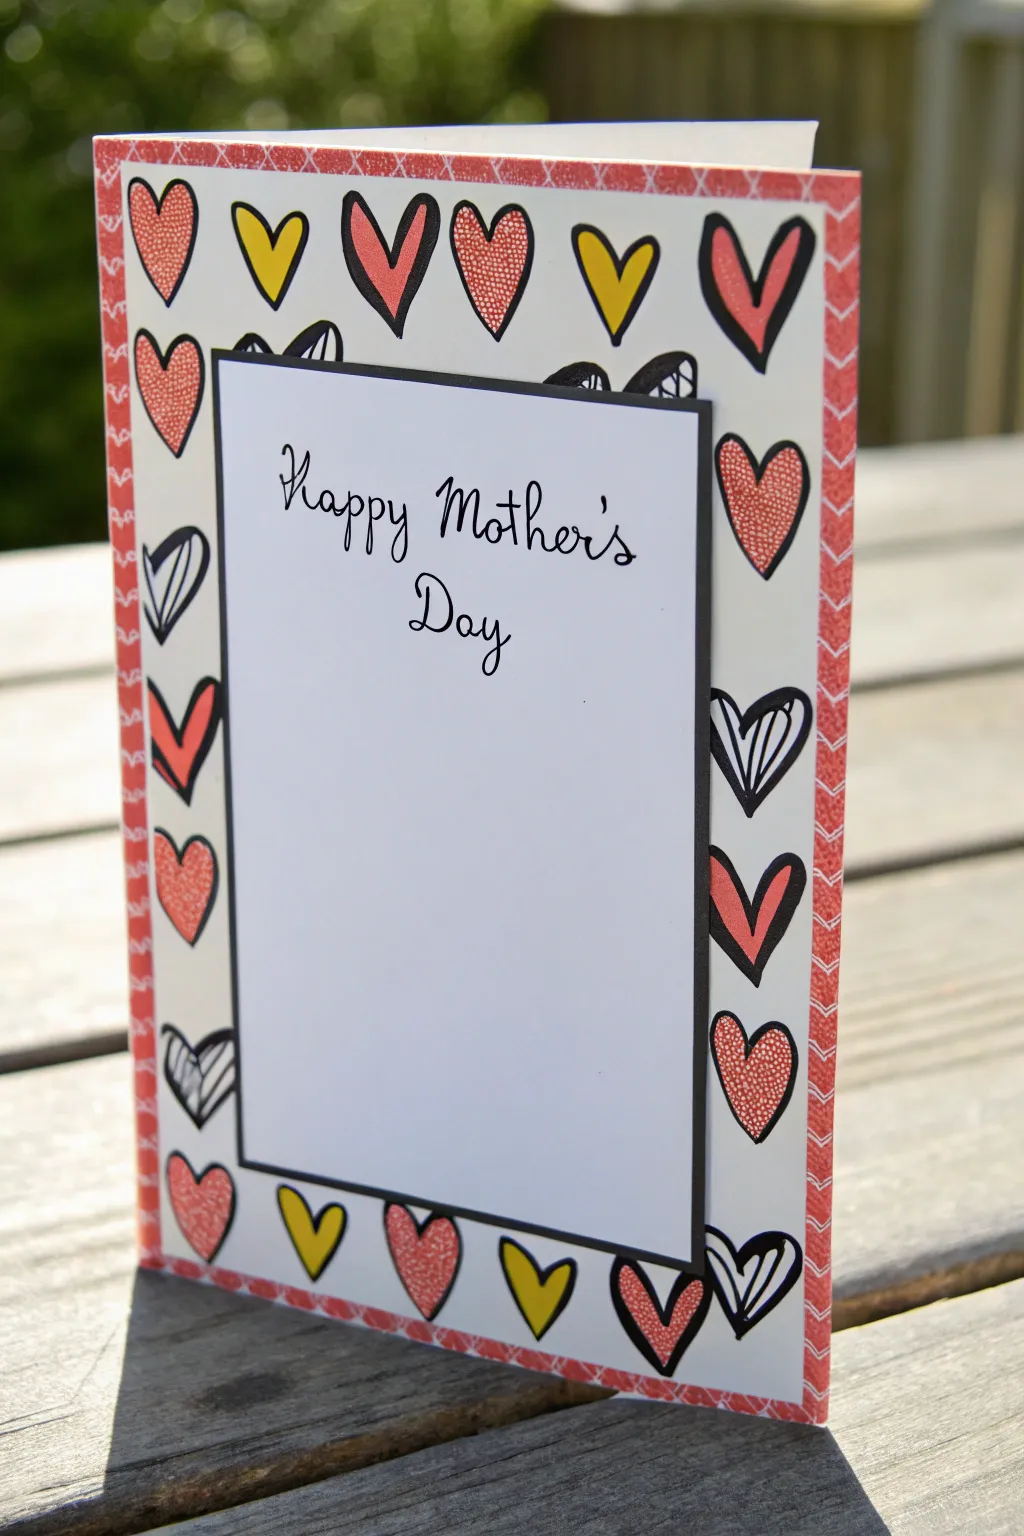
Create a heartfelt greeting with this playful, hand-drawn design that frames your message in love. The mix of solid colors, patterns, and bold outlines gives this card a charmingly graphic, doodle-art aesthetic.
Step-by-Step Guide
Materials
- White cardstock (heavyweight for the base, lighter for the panel)
- Black fine-liner pen (0.5mm or 0.8mm)
- Red decorative washi tape or patterned paper tape
- Red marker or colored pencil
- Yellow marker or colored pencil
- Scissors or a paper trimmer
- Ruler
- Double-sided foam tape or adhesive foam squares
Step 1: Preparing the Base
-
Cut and fold:
Begin by cutting a piece of bright white cardstock to your desired size (A5 folded to A6 works well). Fold it crisply in half to create the card base. -
Add the tape border:
Apply a strip of narrow, red patterned washi tape along the very vertical edges of the card front. Trim any excess tape cleanly at the top and bottom. -
Prepare the center panel:
Cut a smaller rectangle of white cardstock. I like to make mine about 1.5 inches smaller than the card front in both width and height, leaving plenty of room for the heart border. -
Mat the panel:
Cut a piece of black cardstock just slightly larger (about 1/8 inch) than your white center panel to create a thin, framing mat. -
Lettering the message:
Using your fine-Liner, write ‘Happy Mother’s Day’ in a loose, cursive script near the top of the white panel. Don’t worry about perfection; the hand-lettered look adds character.
Uneven Spacing?
If you have awkward gaps between hearts, fill them with tiny black dots or small ‘confetti’ triangles to make the pattern look intentional and dense.
Step 2: Drawing the Heart Frame
-
Outline positioning:
Lightly place the center panel (without gluing it yet) onto the card base to visualize where your border space is. -
Draw primary hearts:
Using the black fine-liner, draw various heart shapes in the empty border space. Draw them fairly large and let them point in different directions for a scattered look. -
Mix the styles:
Instead of identical hearts, draw some with a single outline and others with a thicker, double outline. -
Add striped hearts:
Select a few outline hearts and fill them with messy, diagonal black stripes. These add great contrast without needing color. -
Color with red:
Choose several hearts to fill with your red marker. For a textured look like the example, use small stippling dots or coloring that allows a little paper texture to show through. -
Color with yellow:
Fill the remaining single-outline hearts with bright yellow. This pop of citrus color breaks up the red and black palette beautifully. -
Add overlapping details:
If there are large gaps, draw partial hearts explicitly looking like they are tucking behind the central panel area.
Step 3: Assembly
-
Layer the panel:
Glue your white message panel directly onto the black mat piece, centering it to show an even black border. -
Apply foam tape:
Flip the matted panel over and apply double-sided foam tape or foam squares to the back. -
Final placement:
Center the panel over your heart-filled border and press down firmly. The foam tape lifts the message up, adding dimension and shadow.
Make it Sparkle
Trace over the red hearts with a clear glitter gel pen or cover them with Glossy Accents after drawing to give them a shiny, raised enamel finish.
This charming card is ready to share a personalized message of love with mom


Mother And Child Hug Silhouette
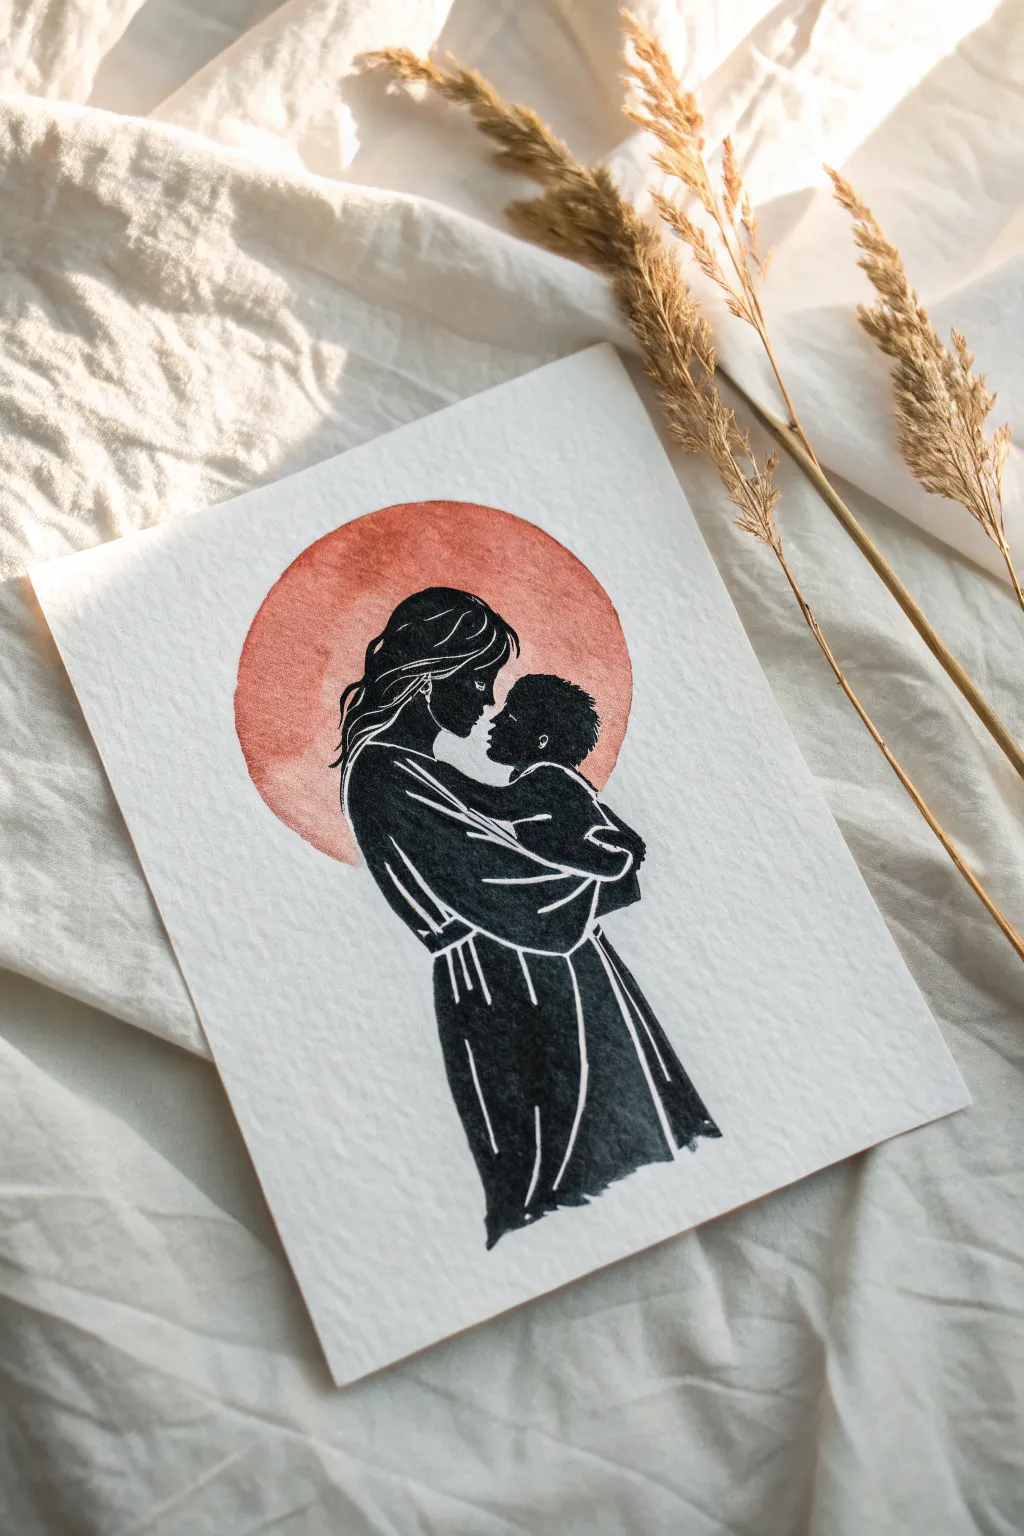
This striking linocut-style artwork captures a tender moment between mother and child silhouetted against a warm, terracotta sun. The high contrast between the deep black ink and the soft watercolor wash creates a timeless, minimalist piece perfect for Mother’s Day.
Detailed Instructions
Materials
- Heavyweight watercolor paper (300gsm cold press recommended)
- Black waterproof ink or acrylic paint
- Terracotta or burnt orange watercolor paint
- Large round watercolor brush (size 10 or 12)
- Small detail brush (size 0 or 1) for fine lines
- Medium flat or round brush (size 4 or 6) for filling
- Pencil for sketching
- Circular object for tracing (bowl or lid)
- Eraser
- Masking tape (optional)
Step 1: Setting the Scene
-
Prepare your paper:
Cut your watercolor paper to your desired size (A5 or 5×7 inches works well for this composition). Tape the edges down if you want a clean border, though this piece often looks lovely floating in the center. -
Trace the sun:
Place your circular object near the upper center of the page. Lightly trace around it with a pencil to create the boundary for your sun element. -
Paint the wash:
Mix a watery wash of terracotta or burnt orange watercolor. You want the consistency of tea—pigmented but transparent. Load your large round brush. -
Fill the circle:
Carefully paint inside your traced circle. Don’t worry about making the fill perfectly even; the slight variations and water blooms add texture that mimics the organic look of a sun or moon. -
Let it dry completely:
This is crucial. The paper must be bone-dry before you start the silhouette, or the black ink will bleed into the orange circle. A hairdryer on a low setting can speed this up.
Uneven Coverage?
If your black ink looks patchy or gray after drying, don’t hesitate to add a second coat. A solid, deep black provides the best contrast against the watercolor sun.
Step 2: Drafting the embrace
-
Rough positioning:
Using a very light pencil touch, sketch the general shape of the mother. Her head should overlap the upper left quadrant of the sun, and her body should extend down well below the circle. -
Place the child:
Sketch the child’s profile facing the mother. Their heads should be close, foreheads almost touching, creating an intimate connection within the circle’s boundary. -
Refine the profiles:
Detail the profiles of the faces. Since this is a silhouette, the outline is everything—make sure the noses, chins, and foreheads are clearly defined against the orange background. -
Define the clothing:
Sketch the draped fabric of the mother’s robe and the child’s body. Instead of drawing every fold, focus on the major negative space lines—the white lines you see in the final image—that will define the arms and folds.
Use a Pen Setup
Struggling with brush control for the white lines? Paint the whole shape black first. Once dry, use a white gel pen or opaque white gouache to draw the fold lines on top.
Step 3: Inking the Silhouette
-
Outline delicate areas:
Switch to your smallest detail brush and the black ink (or acrylic). Carefully outline the faces. Be steady here, as these shapes are the focal point. -
Paint the hair:
Fill in the hair shapes, leaving thin slivers of white paper exposed to suggest individual strands caught in the light. This ‘negative space’ technique gives the drawing its woodblock print aesthetic. -
Define the arms:
Paint the silhouette of the mother’s shoulder and arm. Leave a distinct white gap (a robust line) where her arm crosses her body to visually separate the limbs. -
Outline the child’s back:
Similarly, paint the child’s dark form, leaving a thin white line where their back meets the mother’s arm to distinguish the two figures. -
Fill the main body:
Switch to your medium brush to fill in the larger black areas of the robe. Work slowly to maintain a solid, opaque coverage without streaks. -
Add fabric details:
As you fill the lower robe, leave vertical, tapered white stripes unpainted. These negative spaces represent the deep folds of the fabric and add movement to the figure. -
Refine edges:
Go back over the outer edges of your silhouette to smooth out any brushstrokes. The contrast between the sharp black edge and the soft watercolor circle is key. -
Erase guidelines:
Let the black ink dry completely (give it ample time). Once set, gently erase any visible pencil marks remaining in the white negative spaces or outside the drawing.
Frame this beautiful high-contrast piece in light wood to complement the warm tones of the sun


Handprint-Inspired Flower Petals Drawing
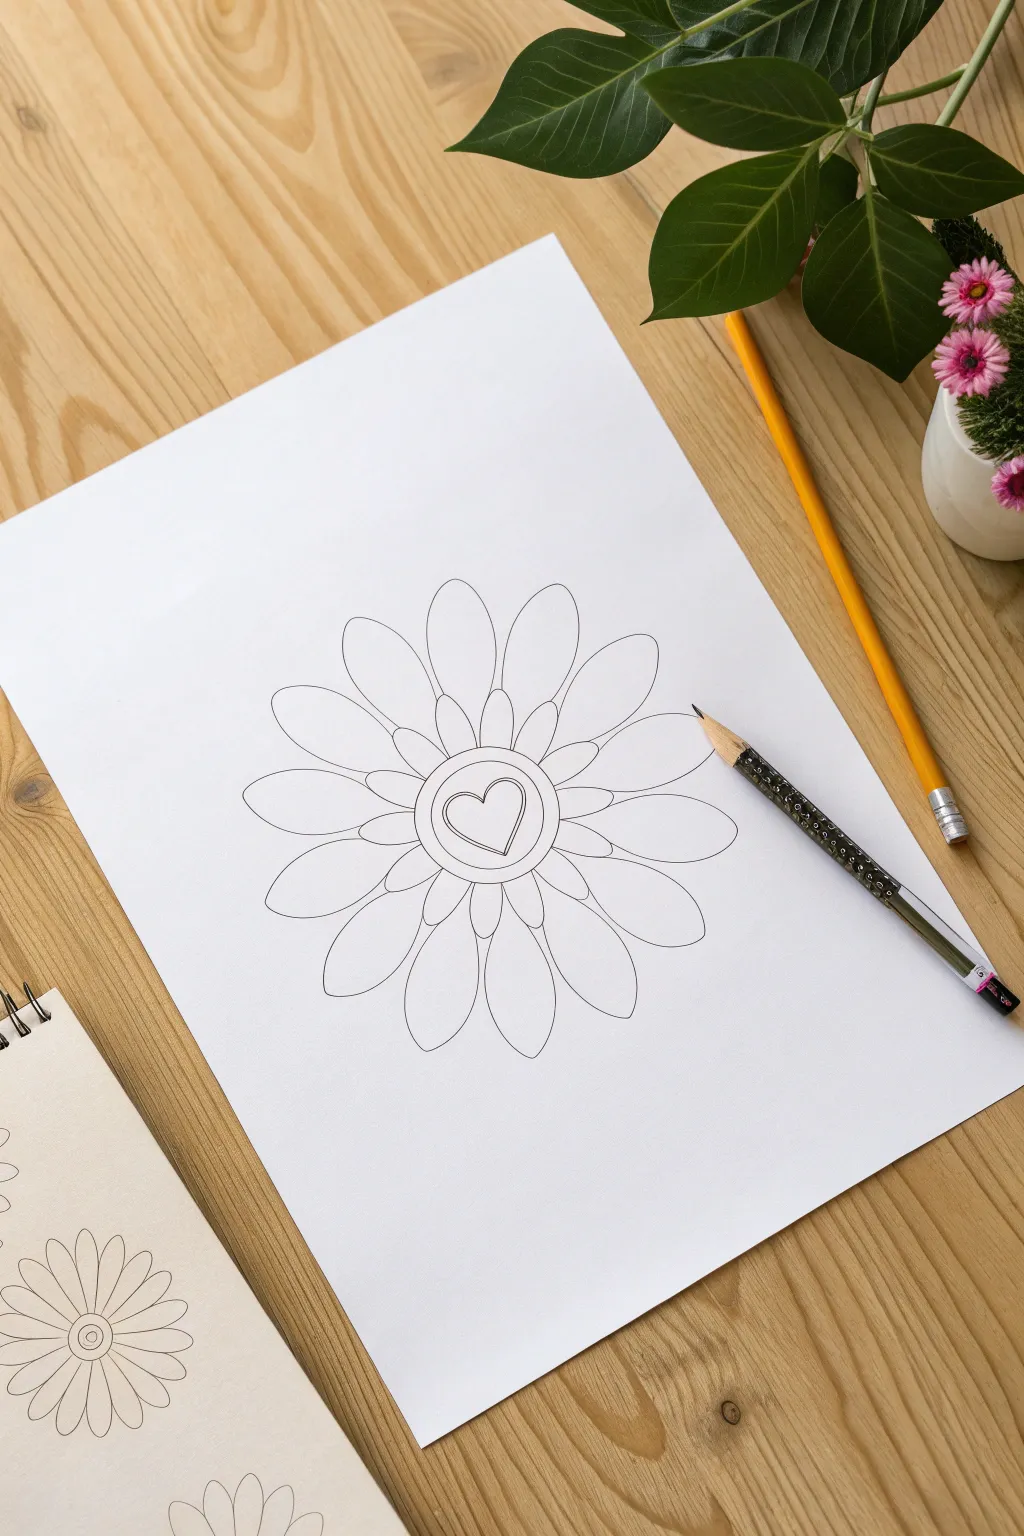
Create a meaningful and symmetrical floral design that radiates love from the very center outward. This charming line drawing features elongated, rounded petals reminiscent of a classic daisy, anchored by a sweet heart motif that makes it perfect for Mother’s Day cards or coloring pages.
Step-by-Step
Materials
- White drawing paper or cardstock (A4 or Letter size)
- Pencil (HB or #2)
- Fine-liner pen (black, 0.5mm or 0.8mm)
- Eraser
- Ruler (optional, for spacing guidance)
Step 1: Planning and Center Core
-
Mark the center:
Begin by finding the approximate center of your paper. You can do this by eye or by lightly folding the paper edge-to-edge to find the crease. -
Draw the central heart:
Sketch a small, symmetrical heart right in the middle. Keep the curves smooth and the bottom point sharp. -
Add an inner circle:
Draw a tight circle immediately surrounding the heart. It should be close enough to frame it but not touch the edges of the heart. -
Create the outer ring:
Sketch a second, slightly larger circle around the first one. This creates a donut-shaped band that acts as the hub for your petals. -
Refine lines:
Go over these central shapes to ensure they are as circular and symmetrical as possible before moving outward.
Step 2: Drawing the Inner Petals
-
Visualize the spacing:
Imagine a clock face on your outer circle. We will be placing small, leaf-shaped petals at regular intervals around this ring. -
Sketch the first inner petal:
Draw a small, narrow oval shape pointing outward from the top of the center ring (the 12 o’clock position). It should be relatively short. -
Add opposing petals:
Draw similar small petals at the 6, 3, and 9 o’clock positions to establish symmetry early on. -
Fill the gaps:
Add the remaining small petals in between your main four points. You should aim for roughly 8-12 small inner petals in total, depending on your spacing. -
Check consistency:
Ensure all inner petals are roughly the same length and width. Lightly erase and adjust any that look too unruly.
Symmetry Hack
Draw faint ‘crosshairs’ (a vertical and horizontal line) through the center of your paper first. This grid helps align opposite petals perfectly.
Step 3: Adding the Large Outer Petals
-
Start the main layer:
The larger petals will sit behind the smaller ones throughout the design. Start by drawing a large, elongated U-shape curve behind one of the gaps between the inner petals. -
Shape the petal:
I like to make these outer petals significantly longer and wider than the inner ones, giving the flower a bold, sunflower-like appearance. -
Continue the pattern:
Work your way around the flower, drawing a large petal in every gap between the smaller inner petals. -
Maintain flow:
Try to keep the tips of these large petals equidistant from the center so the flower looks balanced. -
Connect the base:
Ensure the base of each large petal visually connects to the circular core, appearing to tuck behind the smaller front petals.
Color It In
Turn this into a mixed-media card by using watercolor paints for the petals and a gold gel pen for the center heart to make it pop.
Step 4: Inking and Finishing
-
Prepare for ink:
Take a moment to clean up your sketch with an eraser, lightning the graphite lines so they are barely visible guides. -
Trace the heart and center:
Using your fine-liner pen, carefully trace the central heart and the two circular rings with a steady hand. -
Ink the small petals:
Outline the small inner petals next. Make sure these lines overlap the large petals (meaning the line for the small petal is unbroken). -
Ink the large petals:
Trace the large outer petals, stopping your line wherever it meets a small petal to create depth. -
Erase guidelines:
Wait for the ink to dry completely (give it at least a full minute), then gently erase all remaining pencil marks.
Now you have a beautifully structured floral design ready to be colored or gifted as a heartfelt card.
BRUSH GUIDE
The Right Brush for Every Stroke
From clean lines to bold texture — master brush choice, stroke control, and essential techniques.
Explore the Full Guide
Kawaii Heart With “Best Mom” Banner
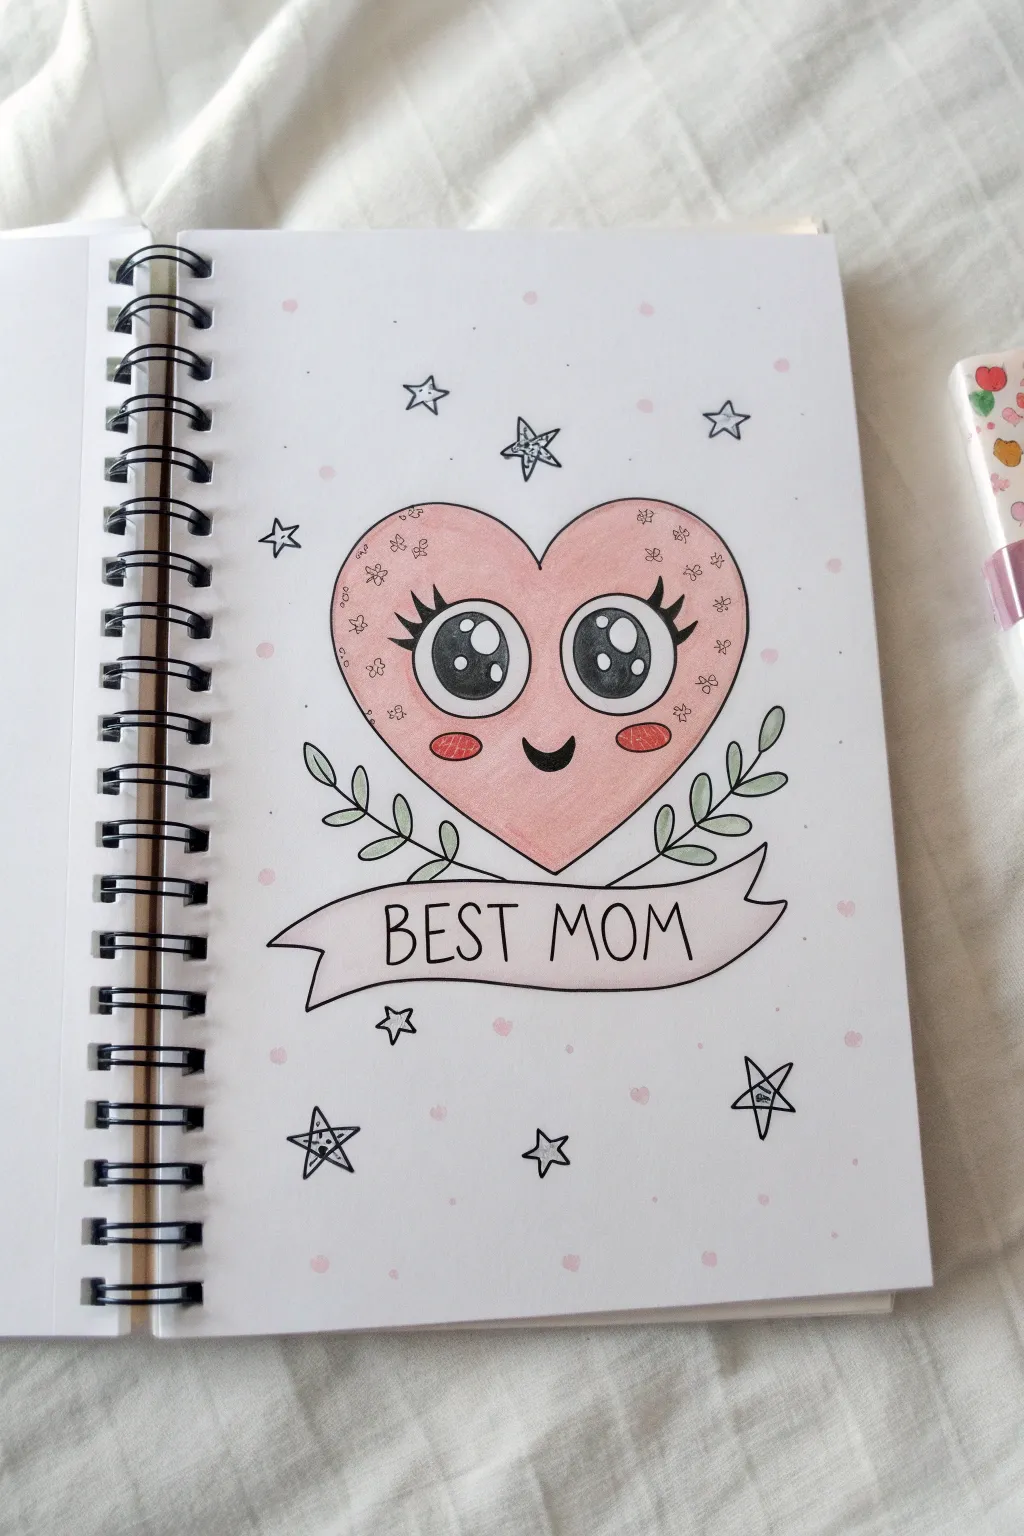
This adorable, doe-eyed heart character is the perfect way to add a touch of sweetness to a Mother’s Day card or bullet journal spread. With soft pink coloring and simple doodle elements, it captures a charming, hand-drawn aesthetic that feels personal and heartfelt.
Step-by-Step Tutorial
Materials
- A white notebook or high-quality drawing paper
- Pencil (HB or similar for sketching)
- Eraser
- Black fine-liner pen (0.3mm or 0.5mm)
- Black brush pen or thicker marker (for eyes)
- Colored pencils (Light pink, Rose pink, Sage green)
- White gel pen (optional, for extra highlights)
Step 1: Sketching the Main Shapes
-
Draw the heart outline:
Start in the center of your page by sketching a large, rounded heart. Keep the top curves wide and the bottom point slightly softer rather than extremely sharp to maintain the cute, ‘kawaii’ look. -
Add the banner:
Below the heart, sketch a wavy ribbon banner. Draw a long, slightly curved horizontal band that curls backward at the ends. Ensure the banner overlaps slightly with the bottom tip of the heart or sits just beneath it. -
Sketch the face features:
Inside the heart, draw two large circles for the eyes. These should be placed midway down the heart and spaced apart. Between and slightly below them, mark a small ‘u’ shape for the smiling mouth. -
Add nature details:
Drawing outwards from behind the banner, sketch two stems—one on the left and one on the right—curving upwards around the heart. Add small, simple leaf shapes along these stems.
Step 2: Inking and Refining
-
Outline the main elements:
Take your black fine-liner and carefully trace over your pencil lines for the heart, the banner, and the leafy vines. Use smooth, confident strokes. -
Detail the eyes:
This is crucial for the kawaii look. Inside each large eye circle, draw two smaller circles (one medium, one tiny) for the light reflections highlighted in white. Color in the rest of the eye solid black, leaving those reflection circles empty. -
Add eyelashes:
Flick three curved lines outwards from the top outer corner of each eye. Make the middle lash slightly longer for a fluttery effect. -
Draw the mouth and cheeks:
Ink the small smile. Then, draw small oval shapes just under the eyes for rosy cheeks. I like to add three tiny hatch marks inside these ovals for texture. -
Lettering:
Inside the ribbon banner, write “BEST MOM” in tall, thin capital letters. Try to center the text so it fits comfortably within the wavy shape.
Eye Sparkle Tip
If you accidentally color over the eye highlights, don’t worry! Use a white gel pen or a tiny dot of white acrylic paint to add the sparkle back in over the black ink.
Step 3: Coloring and Background
-
Color the heart:
Using a light pink colored pencil, gently shade the entire heart. Apply the color lightly at first, then layer it on to make it smoother, avoiding the eye and cheek areas. -
Blush and patterning:
Use a darker rose pink or red pencil to color in the cheek ovals. Then, take a fine-liner or a sharper pencil to draw tiny flower doodles scattered sparsely across the heart’s surface for texture. -
Shade the banner:
Use a very pale gray or a diluted wash of pink to lightly color the banner. Focus the shading on the folded parts of the ribbon to give it dimension. -
Color the leaves:
Fill in the leaves with a soft sage green pencil. You don’t need to press hard; a pastel look works best here. -
Draw background stars:
Around the main drawing, use your black pen to doodle several five-pointed stars. Vary them in size and rotation. Add tiny dots or texture inside some of the stars. -
Add polka dots:
Finally, use a pink marker or colored pencil to dot the background randomly. These floating pink circles tie the whole composition together. -
Final cleanup:
Once the ink is completely dry, thoroughly erase any remaining pencil sketch lines to leave your artwork crisp and clean.
Level Up: 3D Pop
Use a gray marker to add a faint shadow line along the right side and bottom of the heart and banner. This lifts the drawing off the page for a sticker-like effect.
You now have a delightfully sweet illustration ready to brighten your mom’s special day
Crown And Heart “Queen Mom” Doodle
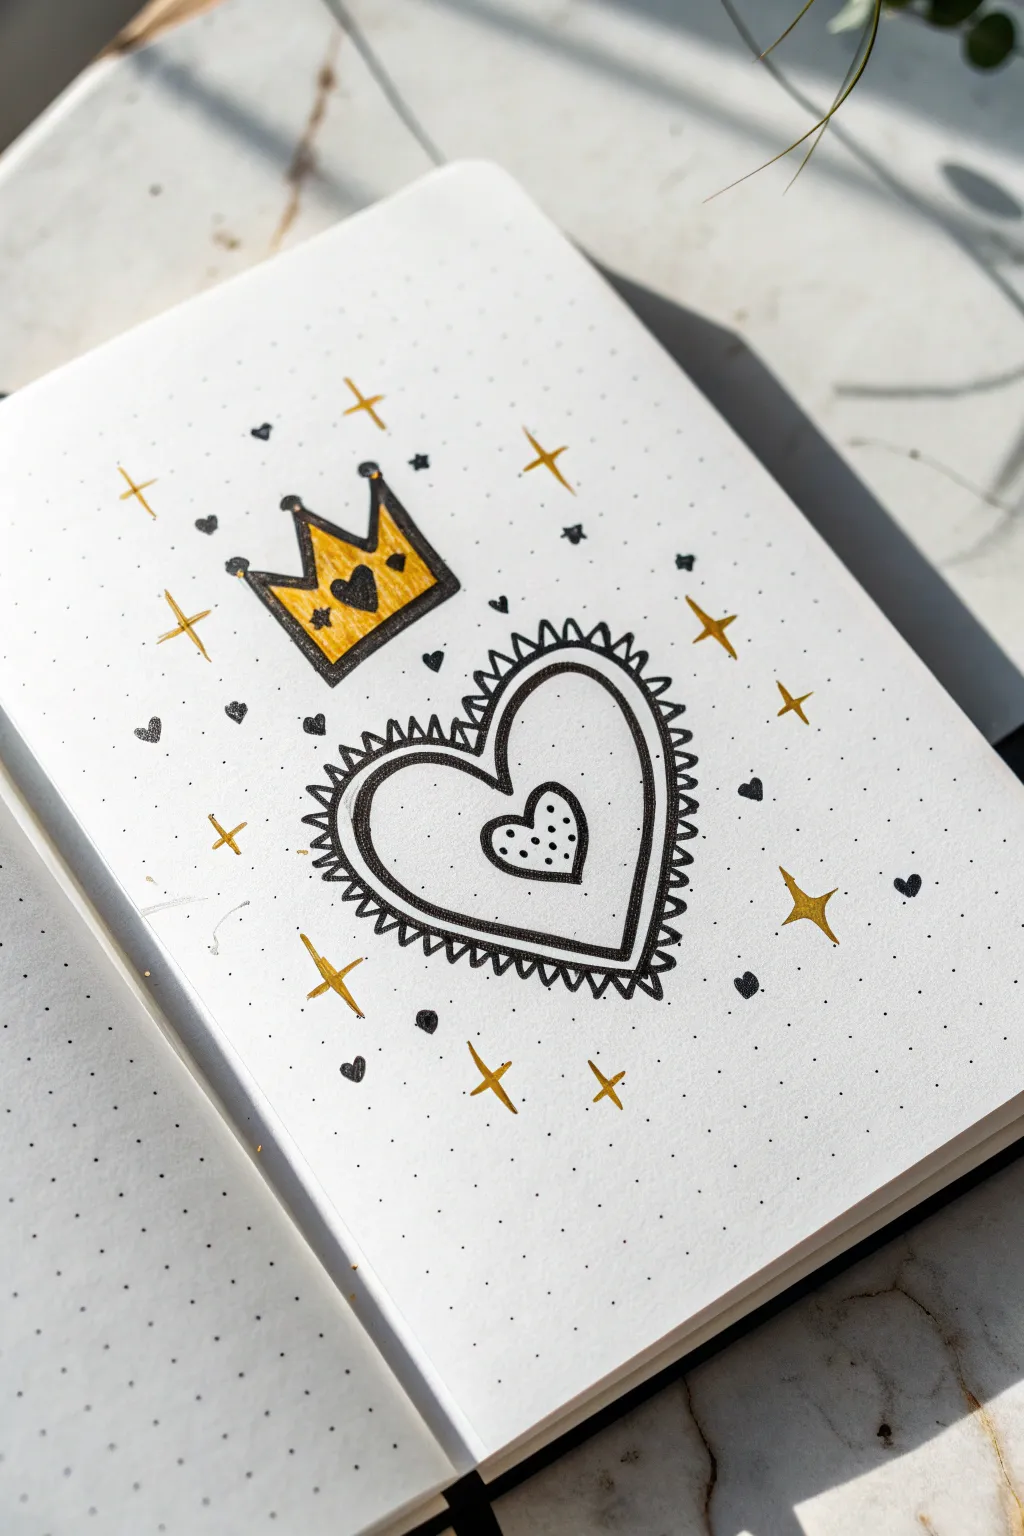
Celebrate the queen of your heart with this elegant yet simple doodle art. Using a classic black and gold palette on dot grid paper creates a striking, regal look perfect for a Mother’s Day card or bullet journal spread.
How-To Guide
Materials
- Dotted grid notebook or heavy paper
- Black fine liner pen (01 or 03 size)
- Thicker black marker or brush pen
- Metallic gold marker or gel pen
- Pencil and eraser (optional for sketching)
Step 1: The Crown Jewels
-
Base Outline:
Start by drawing the bottom horizontal line of the crown near the top center of your page. From the ends, draw two angled lines moving upward and outward to form the sides. -
Crown Spikes:
Connect the sides with a zigzag line to create the points of the crown. Aim for three main points, with the center one being slightly taller. -
Inner Details:
Draw a smaller ‘V’ shape inside the central point of the crown. Add a small heart right in the middle of the crown’s body. -
Adding the Gold:
Take your metallic gold marker and carefully fill in the entire shape of the crown. I like to work slowly here to ensure the saturation is even without bleeding outside the lines. -
Final Outline:
Once the gold ink is dry, retrace the exterior outline with a thicker black marker to make it pop. Add small circles on the tips of the crown points.
Step 2: The Queen’s Heart
-
Heart Shape:
Below the crown, draw a large, standard heart shape using your thick black marker. Leave a comfortable gap between the crown and the heart. -
Inner Frame:
Switch to your finer pen. Draw a second heart inside the first one, mirroring the outer shape but leaving a few millimeters of white space between the lines. -
Scalloped Edge:
Using the fine liner again, draw tiny triangles or scalloped bumps all along the *outside* edge of the large black heart. This creates a lace-like border. -
Central Heart:
Draw a small, third heart floating in the very center of the design. -
Texture Dots:
Fill this smallest central heart with tiny stippled dots using your fine liner. Keep the dots random but evenly spaced.
Grid Guide
Use the dots on your paper to ensure symmetry. Count the dots from the center line outward to match the left and right sides of your heart perfectly.
Step 3: Magical Embellishments
-
Gold Stars:
Using the gold marker, draw four-pointed stars (cross shapes) scattered around the illustration. Place some near the crown and surround the heart. -
Mini Hearts:
With the black fine liner, draw tiny, solid black hearts floating in the empty spaces between the stars. -
Accent Dots:
To fill awkward gaps, add single black dots or tiny diamonds randomly throughout the background. -
Crown Shine:
Go back to the crown and add a few black ink details over the gold, like small diamonds or dots, if the ink allows it. -
Highlight Lines:
For a final touch of dimension, you can add very faint white gel pen highlights on the thick black heart outline, though this is optional.
Smudge Alert
Metallic markers often take longer to dry than regular ink. Wait at least 60 seconds before drawing black lines near or over the gold areas.
Now you have a regal tribute ready to gift to your favorite queen mom

PENCIL GUIDE
Understanding Pencil Grades from H to B
From first sketch to finished drawing — learn pencil grades, line control, and shading techniques.
Explore the Full Guide
Heart Balloon Bouquet For Mom
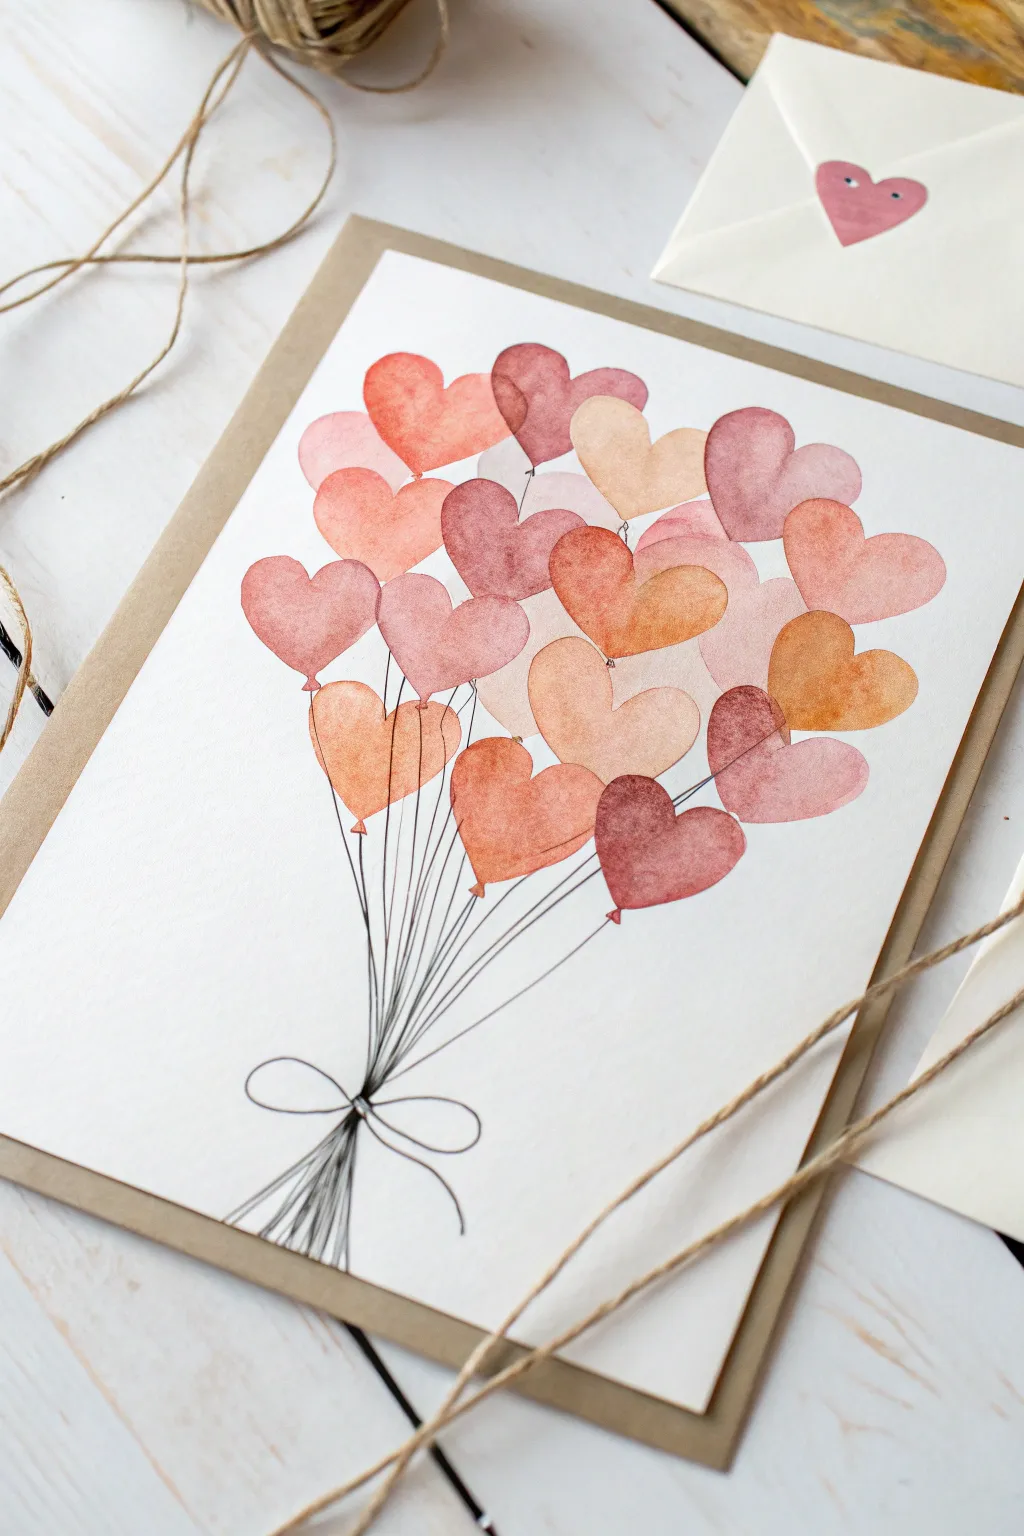
This charming Mother’s Day card features a cluster of heart-shaped balloons in warm shades of pink, peach, and dusty rose, all tied together with delicate pen lines. The soft watercolor textures create a dreamy, vintage feel that pairs perfectly with rustic kraft paper.
Step-by-Step Tutorial
Materials
- Cold Press Watercolor Paper (cut to 5×7 inches)
- Kraft Cardstock (folded to 5×7 card base)
- Watercolor Paint Set (reds, ochres, purples)
- Round Watercolor Brush (Size 4 or 6)
- Fine Liner Pen (Black, waterproof, 0.1mm or 0.3mm)
- Paper Towel
- Water Cup
- Pencil and Eraser (optional)
- Double-sided Tape or Glue Runner
Step 1: Painting the Heart Balloons
-
Prepare your palette:
Mix three or four distinct puddles of color on your palette to create variety. I suggest a dusty rose, a warm terracotta orange, a pale peach, and a light pink. Keep the mixtures watery and translucent. -
Paint the first heart:
Using your medium round brush, paint a single heart shape near the top center of your watercolor paper. Keep it loose and not perfectly symmetrical for a natural balloon look. -
Add variations in tone:
While the first heart is still wet, you can drop in a tiny bit of darker pigment at the bottom point to create volume, or lift a little color from the top curve with a clean, damp brush for a highlight. -
Paint adjacent hearts:
Continue painting hearts of similar sizes, working your way down in a V-shape or cluster formation. Switch colors for every new balloon to maximize variety. -
Create overlapping effects:
For a dimensional look, allow some hearts to touch or slightly overlap. If you paint a wet heart next to a dry one, you’ll get a crisp edge. If you touch two wet hearts together, the colors will bleed beautifully (wet-on-wet technique). -
Fill the cluster:
Build up the bouquet until you have about 15-20 balloons. Aim for a slightly narrower arrangement at the bottom and wider at the top. -
Add detail shapes:
On a few balloons, add tiny triangles at the very bottom point where the string would attach using the very tip of your brush. -
Let it dry completely:
This is crucial. The paper must be bone dry before you use the pen, or the ink will bleed and ruin the crisp lines. Wait at least 15-20 minutes.
Watercolor Texture
For a vintage look, tilt the paper while hearts are wet. The pigment will pool at the bottom, creating a natural gradient as it dries.
Step 2: Adding Line Work and Assembly
-
Test your pen:
Scribble on a scrap piece of paper to ensure your fine liner has a steady flow. -
Draw the knot:
Locate a point about two inches below the lowest balloon. Draw a small, tight knot shape or a tiny dark circle here. -
Draw the bow loops:
From that knot, draw a simple bow with two loops extending outward and two loose ribbon tails hanging down. -
Connect the strings:
Starting from the bottom of each balloon, draw a straight line down to the central knot. I like to do this fairly quickly to keep the lines looking straight but energetic. -
Add extra strings:
Draw several lines emerging from the bottom of the knot, fanning out slightly as if they are the ends of the balloon strings. -
Refine the connections:
Check that every balloon has a visible string leading toward the knot. If a balloon is buried in the back, simply start its string line from underneath the balloon in front of it. -
Mount the artwork:
Apply double-sided tape or a glue runner to the back of your dried watercolor painting. -
Center on cardstock:
Carefully press the watercolor paper onto the front of your folded kraft cardstock, leaving an even border of brown showing around the edges.
Shaky Lines?
If you struggle drawing straight lines for strings, use a ruler but lift the pen slightly near the end for a natural, hand-drawn finish.
Now you have a handmade card ready to write a sweet message inside for your mom
Mom And Kids Walking Scene
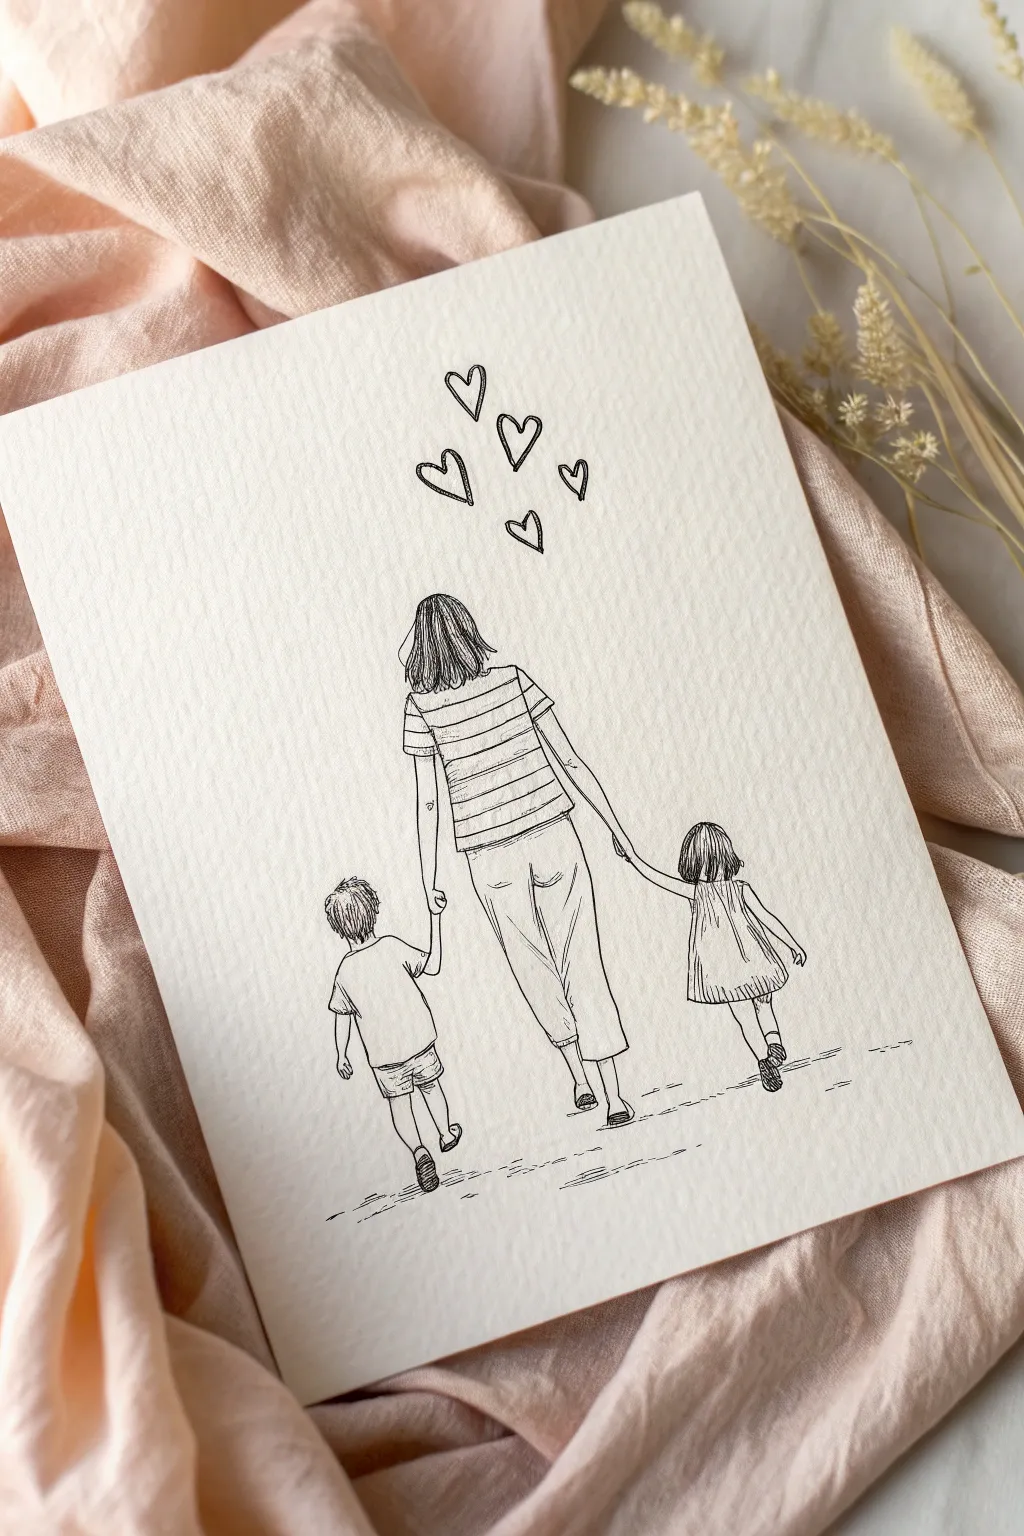
Capture the simple beauty of motherhood with this elegant pen and ink drawing featuring a mom walking hand-in-hand with her children. The clean lines and floating hearts create a timeless keepsake that looks beautiful framed on textured art paper.
Step-by-Step Guide
Materials
- High-quality textured art paper (watercolor or mixed media paper works well)
- Fine liner pens (sizes 0.1, 0.3, and 0.5)
- HB or H pencil for sketching
- Kneaded eraser
- Ruler (optional for guiding proportions)
Step 1: Planning and Sketching
-
Establish the central figure:
Start by lightly sketching the mother’s figure in the center of your page using your pencil. Draw a simple oval for the head and extend lines down for a relaxed, walking posture, keeping the shoulders slightly sloped. -
Position the children:
To the left, sketch a smaller figure for the son, positioning his head just below the mother’s elbow level. On the right, sketch the daughter slightly taller or shorter depending on your preference, creating a balanced triangular composition. -
Connect the hands:
Draw light guidelines connecting the mother’s hands to the children’s inside hands. The arms should look extended but natural, swinging slightly as they walk. -
Detail the clothing:
Sketch the mother’s striped contour shirt and cropped trousers. For the son, outline a t-shirt and shorts. For the daughter, draw a simple A-line dress that flares out slightly at the hem. -
Refine the hair and features:
Add the hair shapes. The mother has shoulder-length wavy hair, the son has a short, tousled style, and the daughter has a bob cut. Since they are facing away, no facial features are needed.
Step 2: Inking the Outlines
-
Start the main outlines:
Switch to your 0.3 fine liner pen. Begin tracing over your pencil lines for the clothing and body shapes. Use confident, broken strokes rather than one continuous rigid line to keep the sketch feeling organic. -
Detail the hair texture:
I like to use a finer 0.1 pen here to create individual strands. Draw vertical strokes following the curve of the heads, leaving some white space to suggest shine and volume. -
Add the stripes:
Using the 0.3 pen, carefully draw the horizontal stripes on the mother’s shirt. You don’t need a ruler; hand-drawn lines add character. Allow them to curve slightly around her back to show form. -
Define the clothing folds:
Add small crease lines at the mother’s elbows, back of the knees, and where the dress flares. These small details give the fabric weight and movement. -
Ink the shoes and feet:
Draw the shoes simply. Small slip-ons for the mom and daughter, and casual sneakers for the son. Add tiny hatched lines on the soles for texture.
Loose Lines
Don’t connect every single line perfectly. Leaving small gaps in the outline, especially on hair and loose clothing, makes the drawing feel artistic and airy rather than like a coloring book page.
Step 3: Adding Atmosphere and Finish
-
Ground the figures:
Beneath their feet, use the 0.1 pen to add short, horizontal dashes and broken lines. This suggests a path or ground without needing to draw a full background. -
Draw the floating hearts:
Above the mother’s head, sketch five distinct hearts of varying sizes rising upward. Ink them with the 0.5 pen for a bolder look that stands out against the delicate figure drawing. -
Add subtle shading:
Use your finest 0.05 or 0.1 pen to add very light hatching (diagonal lines) on the shaded sides of the limbs and the folds of the clothes to create depth. -
Erase pencil guides:
Wait at least 15 minutes for the ink to fully cure to prevent smudging. Then, gently roll a kneaded eraser over the entire drawing to lift the original graphite sketches. -
Final touches:
Assess the drawing from a distance. If any lines look too thin, go over them once more to add weight, particularly on the ‘ground’ lines and the outer contours of the figures.
Wobbly Stripes?
If your shirt stripes aren’t straight, don’t worry! Curved or uneven lines actually make the figure look more 3D, as if the fabric is wrapping around a real body. Embrace the imperfection.
Now you have a touching piece of art ready to be framed as a heartfelt gift


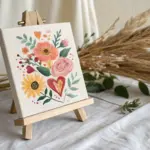
Flower Wreath Around A Message
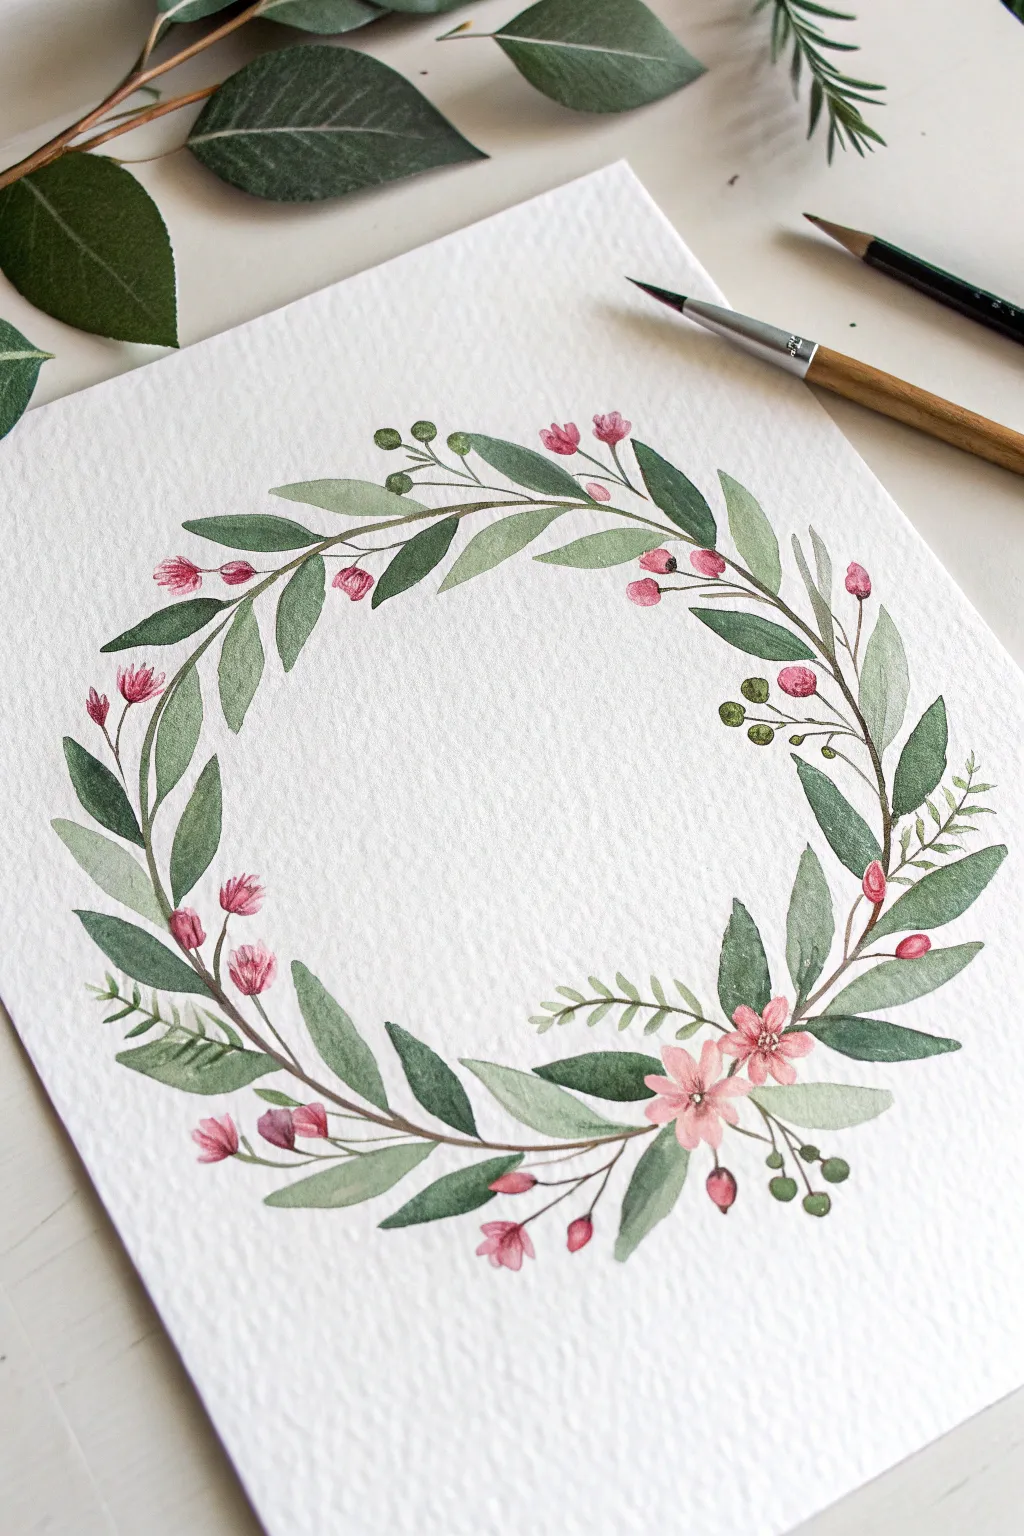
This elegant watercolor wreath frames a blank center perfect for writing a heartfelt Mother’s Day message. With its soft sage greens and gentle pink blossoms, it captures a classic botanical style that feels both organic and refined.
Detailed Instructions
Materials
- Cold press watercolor paper (300 gsm)
- Round watercolor brushes (sizes 2 and 6)
- Watercolor paints (Sap Green, Olive Green, Hooker’s Green, Alizarin Crimson, Burnt Umber)
- Pencil (HB or lighter)
- Circular object for tracing (plate or bowl)
- Jar of clean water
- Paper towel
Step 1: Planning and Sketching
-
Trace the guide:
Place your circular object in the center of the paper and very lightly trace around it with your pencil. This circle will serve as the spine for your wreath. -
Sketch main stems:
Draw faint, sweeping curved lines that overlap and weave around your circle guide. Don’t make it a perfect ring; let the ends of the stems cross over each other naturally at the bottom and top. -
Placement markers:
Mark tiny dots or small circles where you want your main flower cluster to be (bottom right) and where smaller buds will sit. This prevents you from overcrowding the leaves later.
Water Control Trick
Keep two water jars: one for rinsing dirty pigment and one for clean water. This keeps your light pinks and pale greens from getting muddy or gray.
Step 2: Painting the Foliage
-
Mix your greens:
Prepare three shades of green on your palette: a light, watery sage (Sap Green + lots of water), a medium olive, and a deeper forest green (Hooker’s Green + a touch of Burnt Umber or Red to dull it). -
Paint the first layer of leaves:
Using your size 6 brush and the lightest green, paint almond-shaped leaves scattered around the circle. Use the ‘press and lift’ technique: touch the tip to the paper, press down to widen the belly of the brush, and lift up to create a point. -
Add medium tones:
While the first leaves are drying, switch to your medium olive mix. Paint a second set of leaves, angling them slightly differently to create movement. I like to tuck these behind or slightly overlapping the lighter ones. -
Paint the thin stems:
Switch to the size 2 brush. With a mix of brown and green, carefully connect your floating leaves to the main circle spine with very thin, delicate lines. -
Create contrast:
Using the darkest green mixture, add small, slender leaves near the main stems. These darker accents give the wreath depth and prevent it from looking flat. -
Add fern details:
Paint a few fern-like sprigs using quick, short strokes with the tip of your size 2 brush. These should look feathery and stick out from the main arrangement, particularly on the left side.
Step 3: Adding Florals and Berries
-
Paint the main blooms:
Focus on the bottom right area. Load your brush with a watery pink mix (Alizarin Crimson + water) and paint five simple petal shapes that meet in a center point for the open flowers. -
Add flower centers:
While the pink petals are still slightly damp, drop a tiny dot of darker crimson or brown into the center. This will bleed slightly for a natural look. -
Create small buds:
Dip your small brush into a more concentrated pink. Paint small, oval buds at the tips of some upper branches. Add little green sepals (the green base of the flower) to the bottom of these buds. -
Paint berries:
Mix a muted red or deep pink. Paint small round berries on thin stems extending outward from the wreath, grouping them in twos or threes. -
Layering details:
Once your main pink flowers are dry, add tiny stamens in the center using a dark brown and your finest brush tip.
Adding Texture
Once the paint is dry, use a white gel pen or colored pencils to add veins to the leaves or highlights to the berries for a mixed-media pop.
Step 4: Final Touches
-
Evaluate balance:
Step back and look at the overall shape. If there are large gaps, fill them with faint, watery green leaves to create fullness without adding visual weight. -
Erase guidelines:
Ensure the paint is completely bone dry—if the paper feels cool to the touch, it’s still wet. Once dry, gently erase your pencil circle guide. -
Write your message:
Use a pen or thin brush to letter ‘Happy Mother’s Day’ or a name in the open center space.
Now your beautiful botanical frame is ready to surround a special message for Mom
Fold-Out Card: “Reasons I Love You, Mom”
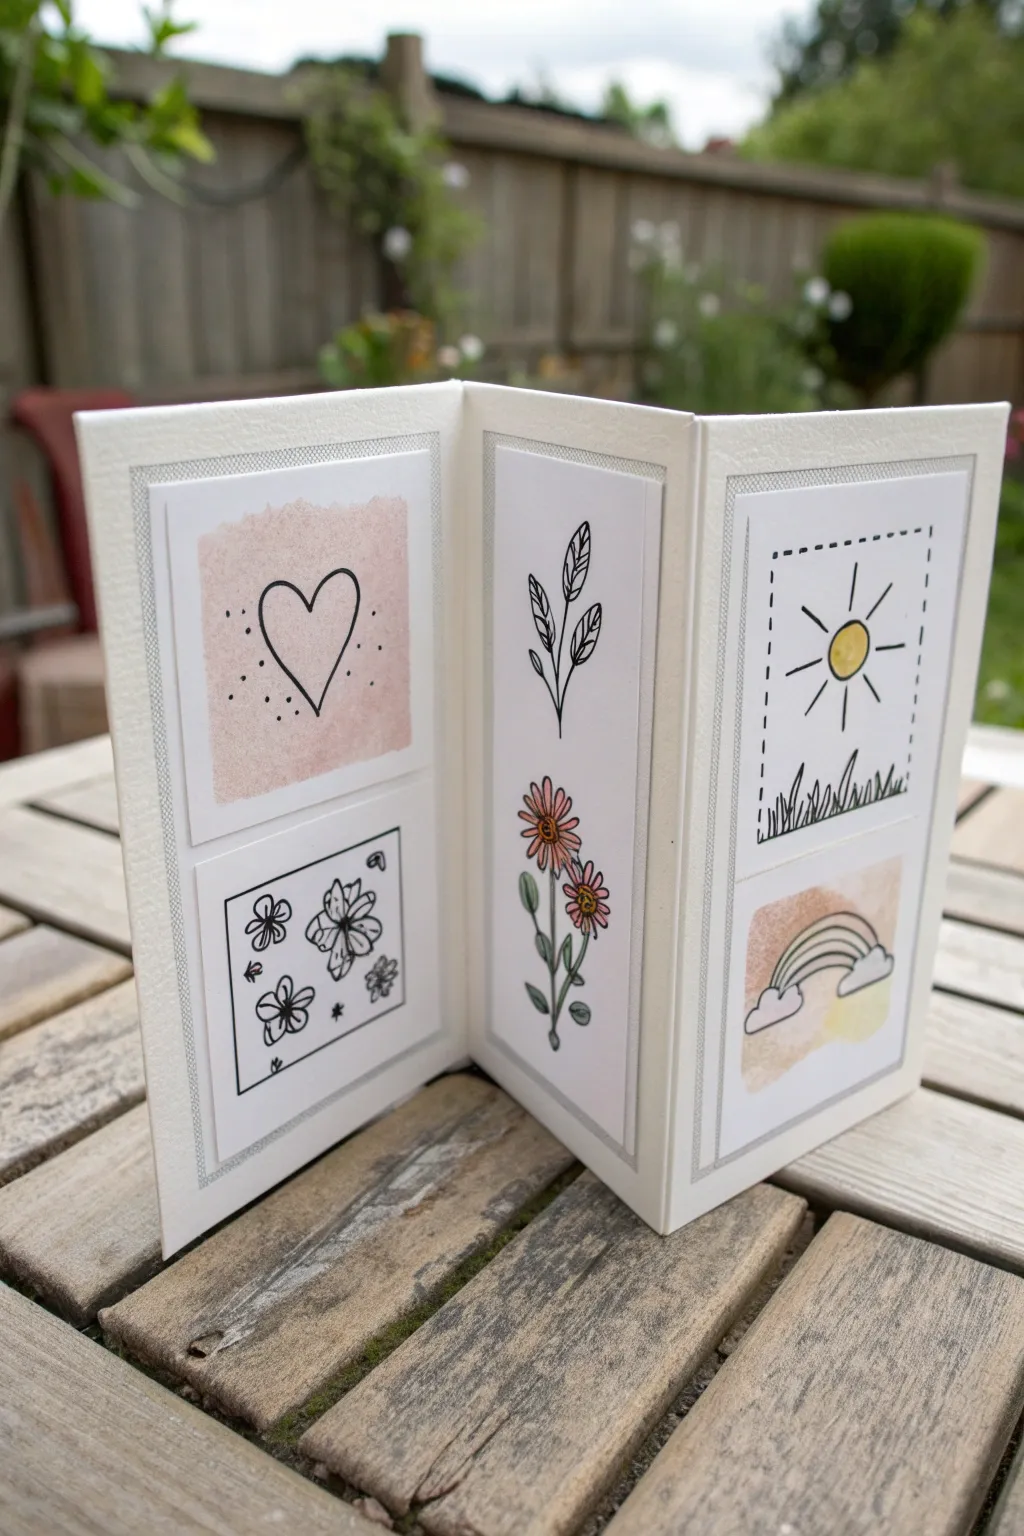
This charming three-panel fold-out card is a delightful way to showcase sweet doodles and heartfelt messages for Mom. With its clever accordion structure and mix of ink drawings and soft watercolor touches, it creates a standing display piece she can cherish on her desk or mantel.
Step-by-Step
Materials
- Heavyweight white cardstock (A4 or 12×12 cut to size)
- Watercolor paper
- Fine-liner black pens (0.3mm and 0.5mm)
- Watercolors (pan set preferred)
- Small round paintbrush (size 2 or 4)
- Ruler and pencil
- Bone folder or scoring tool
- Paper trimmer or scissors
- Glue stick or double-sided tape
- Silver or grey fine-liner (optional for borders)
Step 1: Constructing the Base
-
Cut the base strip:
Begin by cutting a long strip of your heavyweight cardstock. A size of about 6 inches tall by 12 inches wide works well, but you can adjust the height based on your preference. -
Score the fold lines:
Divide the length of your strip into three equal sections (e.g., mark at 4 inches and 8 inches if your strip is 12 inches long). Use a ruler and a scoring tool to create clean, straight vertical indentations at these marks. -
Create the accordion fold:
Fold along your scored lines in a zig-zag pattern—fold the first section forward and the second section backward. Use a bone folder to press the creases firmly so the card stands up crisply on its own.
Tape Trick
Use painter’s tape to mask off the edges of your watercolor paper squares before painting. This creates a crisp, professional white border around your colorful washes.
Step 2: Creating the Illustration Panels
-
Cut watercolor panels:
Measure the width and height of one folded section of your base card. Cut pieces of watercolor paper that are approximately 0.5 inches smaller on all sides to serve as the art panels. You will need one tall panel for the center and two split panels (top and bottom) for the side flaps if you want to mimic the reference layout. -
Design the layout:
Lightly sketch your design placements with a pencil. Based on the reference, the left flap has two square-ish stacked drawings, the center is a single tall vertical drawing, and the right flap mirrors the left with two stacked designs. -
Watercolor wash backgrounds:
For the heart and rainbow designs, paint a loose, soft square of color first. Use diluted pink for the heart’s background and a mix of warm tones for the rainbow’s base. Just let the water do the work and don’t worry about perfect edges. -
Let it dry:
Allow the watercolor paint to dry completely. If the paper curls slightly, you can press it under a heavy book for a few minutes once it’s dry to the touch. -
Ink the main illustrations:
Once the paint is bone dry, use your black fine-liner to draw the main motifs. Draw a simple heart over the pink wash, and outline the cloud and rainbow shape over the other wash. For the floral center panel, draw delicate stems and leaves in ink. -
Add detail doodles:
Fill the remaining empty panels. On the bottom left, draw a cluster of simple flowers. On the top right, sketch a sun with a dashed border for a stamp-like effect. Keep your lines loose and whimsical. -
Add color accents:
Use your paintbrush to carefully tint the flower petals in the center panel with pink, and add a bright yellow center to the sun. Keep the color application light and somewhat transparent for that airy, hand-drawn look.
Make it Interactive
Turn the bottom left square into a pocket! Glue only three sides of the paper down, then slip a tiny tag or a folded love note inside for Mom to discover.
Step 3: Assembly and Finishing Touches
-
Create decorative borders:
Before gluing, take your base card strip. Using a silver or grey fine-liner and a ruler, draw a double border line around the area where each art panel will sit. This creates a faux ‘matting’ effect that frames your artwork beautifully. -
Adhere the panels:
Apply glue or double-sided tape to the back of your finished watercolor drawings. Center them carefully inside the drawn borders on your cardstock base and press down firmly. -
Add texture dots:
As a final detail, add tiny stippling dots around the heart or near the flowers to give the drawing some texture and movement. -
Erase pencil marks:
Check the entire project for any lingering pencil sketches and gently erase them with a clean eraser to ensure a professional finish. -
Refold and check:
Fold the card back up along the original creases to ensure everything is aligned. The bulk of the watercolor paper might stiffen the card, so give the creases one final press with the bone folder.
Once folded, you can wrap this lovely card with a simple ribbon or place it in a custom envelope to surprise Mom on her special day.
Recipe Card Drawing: “Mom’s Love” Ingredients
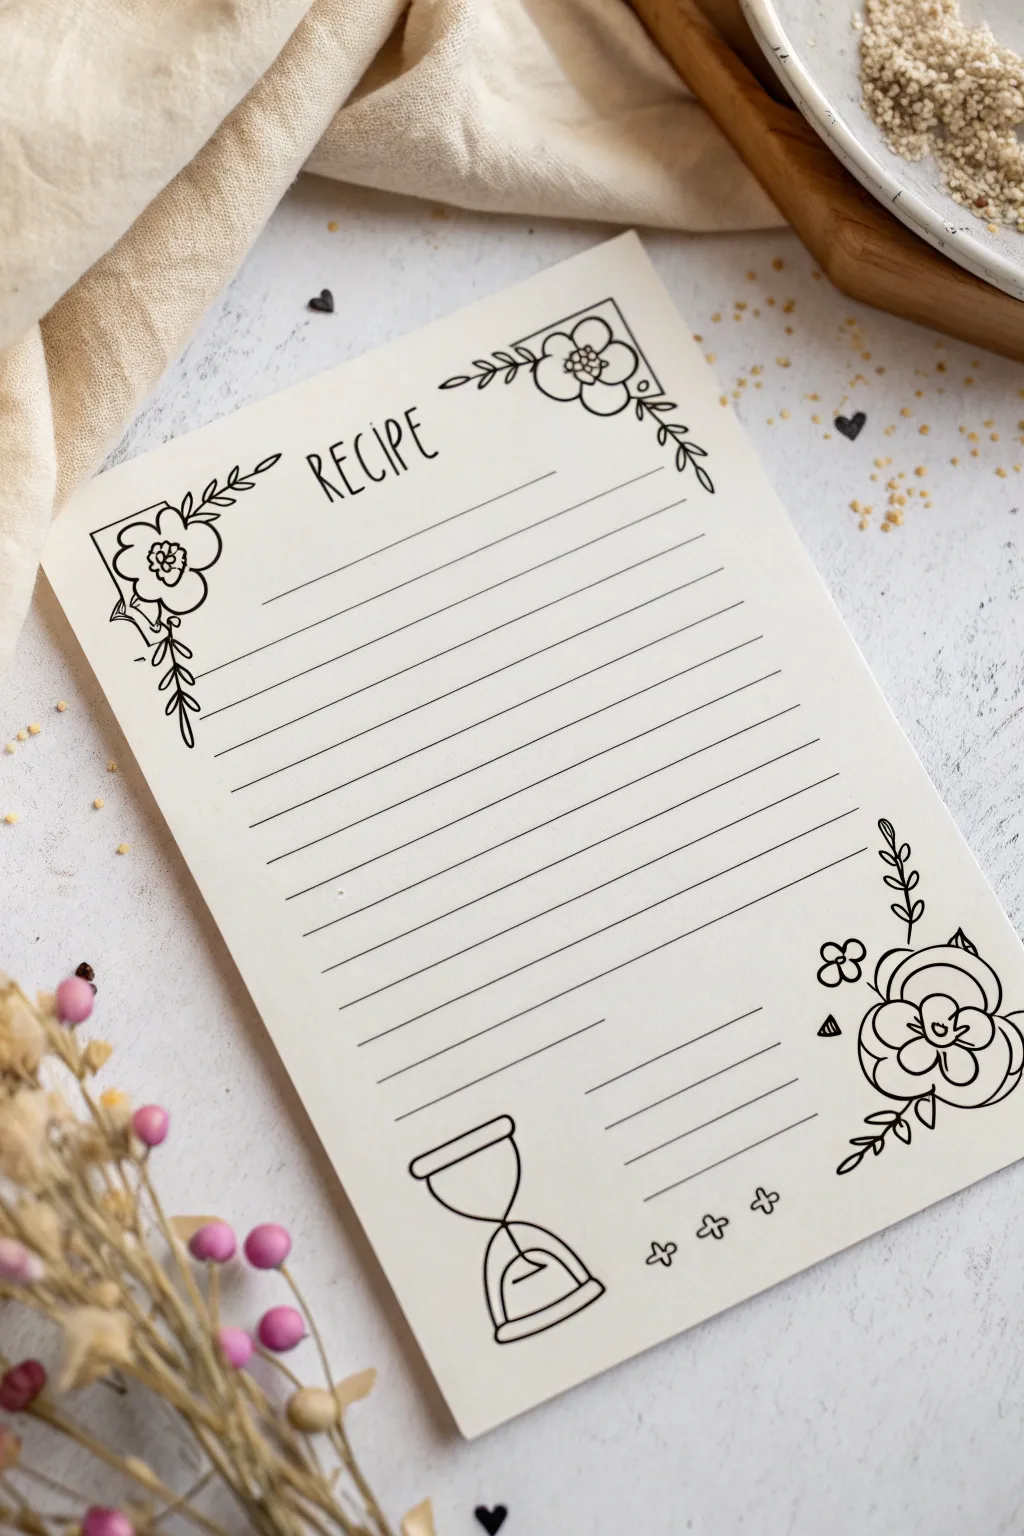
Create a heartfelt keepsake for Mom with this beautifully hand-drawn recipe card, featuring delicate floral corners and a charming hourglass motif. This project transforms simple cardstock into a reusable piece of art perfect for preserving her favorite culinary secrets.
Step-by-Step Tutorial
Materials
- Heavyweight cream or off-white cardstock (5×7 inches)
- Fine-tip black archival ink pen (0.3mm or 0.5mm)
- Ruler
- Pencil
- Eraser
- Faux floral stems (optional, for staging photos)
Step 1: Setting the Structure
-
Cut and measure:
Begin by trimming your cream cardstock to a standard recipe card size, typically 4×6 or 5×7 inches. A 5×7 size gives you a bit more room for decorative elements. -
Establish the margins:
Using a pencil and ruler, lightly mark a border about 0.5 inches from the edges to guide where your corner illustrations will sit so they don’t fall off the page. -
Draft the writing lines:
Draw the horizontal lines for the recipe text. Start about 1/3 of the way down the page. Space them evenly, roughly 0.25 inches apart. I like to leave a larger gap at the bottom for the cook time section. -
Block in the title:
At the top center-left, lightly sketch the word ‘RECIPE’ in a tall, narrow sans-serif style. Leave space to the left and right for the corner flowers.
Smudged Ink?
If you smudge ink while erasing, turn it into a ‘shadow’ by lightly stippling dots over the mistake, or cover it with a new small leaf or petal.
Step 2: Drawing the Floral Details
-
Sketch the top-left flower:
Pencil in a five-petaled flower shape in the top-left corner. Add a simple circle center with small dots for texture. -
Add corner framing:
Around the top-left flower, draw two lines that meet at a 90-degree angle to create a ‘frame’ effect, tucking the lines behind the petals. -
Incorporate leaves:
Extend a leafy stem downwards from the corner frame and another stem moving horizontally to the right. Keep the leaves simple and teardrop-shaped. -
Mirror the design:
Repeat this process for the top-right corner, flipping the design so the flower sits in the corner and leaves extend inward. -
Create the bottom bouquet:
In the bottom right corner, sketch a larger, fuller bloom—think rose or peony style with overlapping curved petals. Add a smaller four-petaled flower floating nearby. -
Connect with foliage:
Add vertical stems rising from this bottom cluster. Draw small, paired leaves along the stems to lead the eye up towards the lines.
Pro Tip: Line Variation
Use a slightly thicker pen (0.5mm) for the main flower outlines and the word ‘RECIPE’, and a thinner pen (0.1mm) for the writing lines and leaf veins.
Step 3: Inking and Finishing Touches
-
Ink the main title:
Switch to your fine-tip black pen. Carefully trace over your ‘RECIPE’ lettering. Keep your vertical strokes steady and confident. -
Outline the florals:
Go over your pencil sketches for the flowers. Don’t worry about perfect symmetry; slight wobbles add to the hand-drawn charm. -
Define the writing lines:
Use your ruler and pen to ink the horizontal writing lines. Stop your pen before you hit the floral drawings so the lines don’t run through the leaves. -
Draw the hourglass:
In the bottom left corner, draw a simple hourglass icon. Use curved lines for the top and bottom bases and a pinched waist in the middle. Add a small triangle inside to represent falling sand. -
Add lower details:
Next to the hourglass, draw three shorter horizontal lines for ‘Prep Time’ or notes. Finish with three small plus signs or crosses at the very bottom right for a decorative footer. -
Erase guidelines:
Wait at least 5-10 minutes for the ink to dry completely. Gently erase all pencil marks to reveal your clean design.
Now you have a beautiful, custom template ready to be filled with family traditions
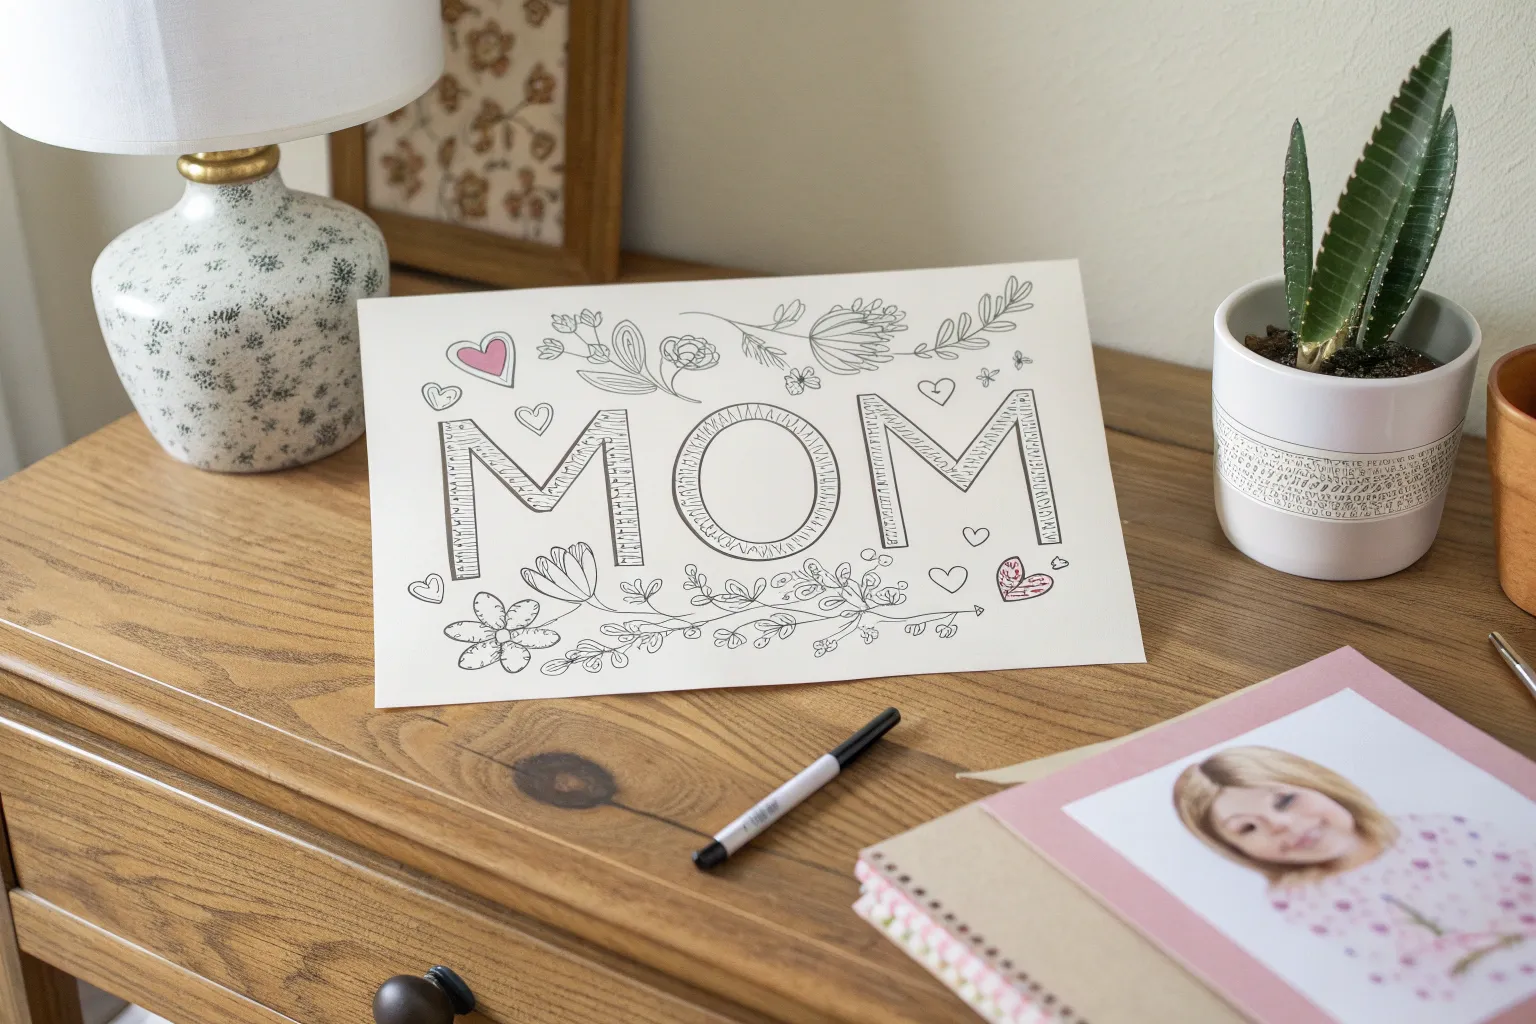
Hidden Message Art: “MOM” In Negative Space
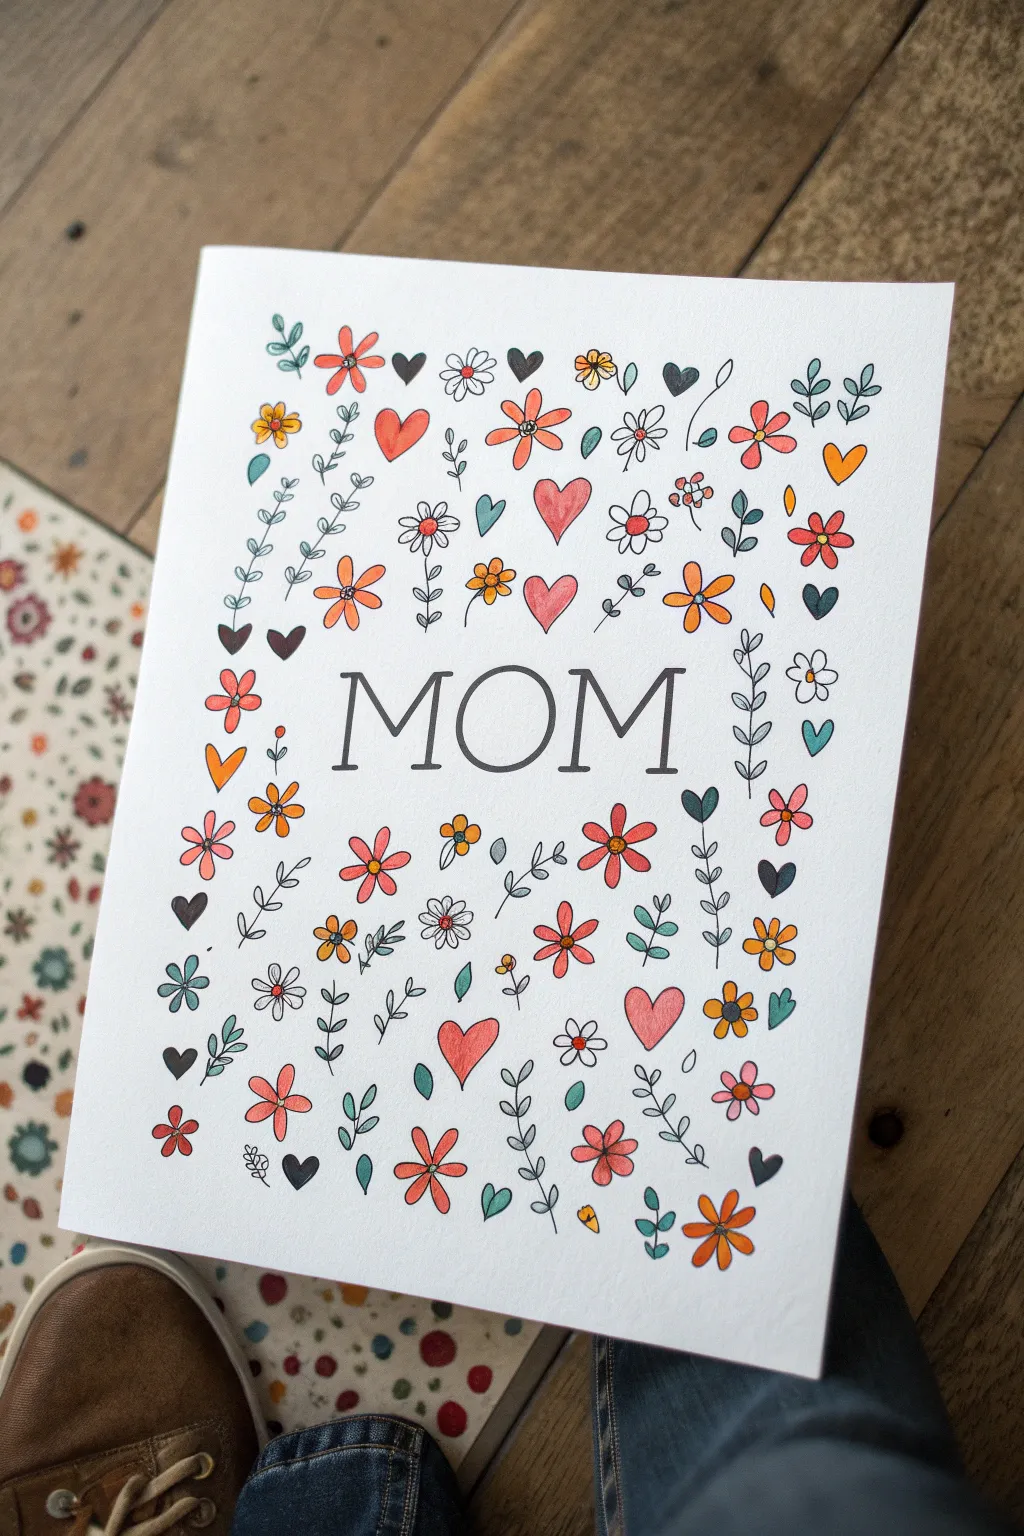
Surprise Mom with this charming, hand-drawn design where the message emerges from a garden of doodles. The clean, serif lettering creates a peaceful negative space amidst a lively border of colorful flowers and hearts.
How-To Guide
Materials
- White cardstock or heavy drawing paper (8.5″ x 11″ or A4)
- Pencil (HB or lighter)
- Eraser
- Fine-tip black ink pen (e.g., Micron 03 or 05)
- Colored pencils or fine-tip markers (coral, orange, teal, pink, yellow)
- Ruler
Step 1: Setting the Foundation
-
Define the boundaries:
Begin by lightly marking a rectangular border about an inch inward from the edges of your paper to contain your design. This is just a guide for layout and can be erased later. -
Sketch the letters:
In the exact center of the page, lightly sketch the word “MOM” in large, serif capital letters. Use your ruler to ensure the baseline is straight and the letters are evenly spaced. -
Refine the typography:
Thicken the lines of your letters slightly if you want a bolder look, but keep them elegant. The image uses a clean, classic serif font style that stands out against the busy background. -
Ink the main text:
Once you are happy with the positioning, trace over your “MOM” pencil lines with your fine-tip black pen. Let the ink dry completely, then gently erase the pencil marks underneath the letters.
Step 2: Doodling the Garden
-
Start with large elements:
Begin drawing your largest flower shapes first. Distribute simple five-petal flowers and larger hearts randomly around the “MOM” text, ensuring they don’t touch the letters. -
Add secondary flowers:
Fill in the gaps with different flower varieties. Try drawing small daisies with white centers and tulip-like shapes. vary the direction they face to create movement. -
Weave in vines:
Draw long, slender vines with small leaves attached. Use these to frame the text and fill larger vertical spaces on the sides of the paper. -
Sprinkle smaller fillers:
Look for empty pockets of white space and fill them with tiny hearts, single leaves, or teardrop shapes. The goal is to create a dense texture without overcrowding. -
Maintain the spacing:
I find it helpful to keep a consistent visual buffer around the word “MOM” so the text remains easy to read. Don’t let the doodles crash into the letters. -
Ink the doodles:
Carefully trace all your pencil sketches with the black ink pen. Use smooth, confident strokes for the vines and petals. Allow the ink to dry fully before erasing all remaining pencil guidelines.
Spacing Pro Tip
Imagine an invisible bubble around the word MOM. As you draw, pretend this bubble is a solid wall that your vines and flowers gently bounce off of.
Step 3: Adding Color
-
Color the hearts:
Using a coral or soft red pencil, color in the hearts scattered throughout the design. Vary the pressure to create subtle shading if desired. -
Brighten the blooms:
Identify your main five-petal flowers and color them with shades of orange and pink. Leave the centers of the daisies white or color them yellow for contrast. -
Add teal accents:
Select a muted teal or blue-green color for specific leaves and smaller filler botanical elements. This cool tone balances the warm pinks and oranges nicely. -
Highlight with yellow:
Use a warm yellow for small details like flower centers or specific tiny petals. This adds a pop of sunshine to the overall composition. -
Fill the grey hearts:
Notice in the reference that some hearts are dark grey or black. Use your black pen or a dark grey pencil to fill in a few small hearts or leaves for high contrast. -
Final touches:
Review your drawing for any spot you might have missed. If any areas feel too empty, add a tiny dot or small leaf directly in pen to balance the layout.
Ink Smudge Trouble?
If you are erasing pencil lines and the ink smears, stop immediately. Wait at least 15 minutes for the ink to cure, or use a kneaded eraser which is gentler.
This lovely floral artwork is ready to be framed or folded into a heartfelt card


Have a question or want to share your own experience? I'd love to hear from you in the comments below!