A t-shirt is basically the easiest wearable canvas, and I love how one strong idea can turn a plain tee into art you actually reach for. Here are my favorite t shirt art ideas—starting with the classics you’ll want to make right away, then drifting into the more unexpected, studio-play kind of designs.
Bold Hand-Lettered Quote

Transform a plain cream t-shirt into a message of courage with this simple hand-lettering project. The design features a charmingly rough, textured look that mimics the feel of charcoal or crayon on fabric.
Step-by-Step Tutorial
Materials
- Light-colored cotton t-shirt (cream or white)
- Black fabric markers (broad tip) or fabric paint pen
- Piece of cardboard (to fit inside the shirt)
- Pencil
- Eraser
- Ruler
- Computer paper (for drafting)
- Iron (for heat setting)
Step 1: Preparation and Drafting
-
Wash and dry:
Begin by washing and drying your t-shirt without fabric softener. This removes any factory sizing chemicals that might prevent the ink from adhering properly to the fibers. -
Prepare the workspace:
Lay the t-shirt flat on a hard, smooth surface. Insert the piece of cardboard inside the shirt, positioning it directly under the chest area where you plan to draw. This prevents ink from bleeding through to the back. -
Draft your design on paper:
Before touching the fabric, sketch the phrase ‘Be BRAVE’ on a piece of paper. -
Refine the typography:
For the word ‘Be’, practice a fluid, looping cursive script. For ‘BRAVE’, draw boxy, all-caps serif letters. Don’t worry about perfect lines; the charm lies in the hand-drawn aesthetic.
Keep it Taut
Use binder clips to secure the shirt to the cardboard insert. This keeps the fabric taut and prevents it from drag-puckering while you’re drawing the letters.
Step 2: Sketching on Fabric
-
Measure placement:
Use a ruler to find the center of the chest area. Lightly mark horizontal guidelines with your pencil to help keep the text straight, leaving a few inches of space between where the two lines of text will go. -
Pencil the script:
Very lightly sketch the word ‘Be’ on the top line. Focus on large, open loops for the ‘B’ and ‘e’. -
Pencil the block letters:
Sketch ‘BRAVE’ on the bottom line. Make these letters slightly taller than the cursive script to give the design weight. -
Review and adjust:
Step back and look at your pencil sketch. Does it look centered? Use your eraser gently if needed, but be careful not to stretch the fabric.
Add Dimension
Use a grey fabric marker to add a simple drop shadow to the right side of the block letters. This gives the 2D design a slight 3D pop without being overwhelming.
Step 3: Inking the Design
-
Outline the script:
Take your black fabric marker or paint pen. Carefully trace the outline of ‘Be’, creating a thick, ribbon-like shape rather than a single line. -
Fill in the script:
Color inside the outlines of ‘Be’. To achieve the textured look seen in the photo, use rapid, back-and-forth strokes rather than solid blocks of color. Leave tiny flecks of the shirt showing through. -
Outline the block letters:
Move down to ‘BRAVE’. Outline the block letters. Add small serifs (little feet) to the tops and bottoms of the stems for that classic typewriter vibe. -
Add texture to the letters:
Fill in the block letters using a scratchy, scribbling motion. I like to apply more pressure in the center of the strokes and lift off slightly at the edges to create a distressed effect. -
Darken key areas:
Go back over the thickest parts of your letters—like the downstroke of the ‘B’—to add contrast and make the text pop.
Step 4: Finishing Touches
-
Check for gaps:
Look closely at the connections between your letters. Ensure the script flows naturally and the block letters are legible. -
Let it dry:
Allow the ink to dry completely. This usually takes about 24 hours, but check your specific marker’s instructions. -
Heat set the design:
Once dry, heat set the design to make it permanent. Turn the shirt inside out or place a pressing cloth over the design. -
Iron carefully:
Iron over the design area on a high cotton setting (no steam) for several minutes to lock the pigment into the fabric fibers.
Now you have a custom, hand-lettered tee ready to inspire confidence wherever you go


Minimal Line Art Portrait

Embrace the beauty of simplicity with this elegant line art project that transforms a plain tee into a modern statement piece. The design features a delicate profile silhouette with an abstract, scribbled burst where the mind resides, all executed in crisp black ink.
How-To Guide
Materials
- Cream or off-white cotton T-shirt (pre-washed)
- Black fabric marker (fine tip for details)
- Black fabric marker (medium tip for bolder lines)
- Pencil (soft sketching pencil works best)
- Cardboard insert or T-shirt platen
- Ruler
- Tracing paper (optional)
- Iron (for heat setting)
- Ironing board
- Scrap paper or clean cloth
Step 1: Preparation & Layout
-
Prep the fabric:
Begin by washing and drying your T-shirt without fabric softener to remove any sizing chemicals that might repel the ink. Give it a quick iron to ensure a perfectly smooth surface. -
Establish the barrier:
Slide a piece of sturdy cardboard or a plastic platen inside the shirt. This is crucial to prevent ink from bleeding through to the back of the garment. -
Find the center:
Use a ruler to find the visual center of the chest area. You want the design to sit slightly higher than the actual center, roughly 3-4 inches below the collar seam. -
Secure the fabric:
Gently pull the fabric taut over the cardboard and clip it in place with binder clips or tape on the back side so it doesn’t shift while you work.
Design Transfer Hack
Not confident drawing freehand? Print the design on paper, slide it INSIDE the shirt on top of the cardboard, and trace the visible lines through the fabric using a window or light box.
Step 2: Sketching the Design
-
Draft the text:
Using a light pencil, gently sketch the words ‘Black line art’ in a clean, sans-serif font. Keep the letters small and widely spaced for a modern look. -
Outline the profile:
Beneath the text, lightly sketch the profile of a face. Focus on a simple, continuous line starting from the neck, up the jawline, defining the lips and nose, and curving up to the forehead. -
Add the abstract element:
Instead of drawing the back of the skull, sketch a circular area where the brain would be. Fill this circle with loose, chaotic loops or flower-like scribbles. -
Draw the ear and neck:
Complete the outline by drawing a simple line for the back of the neck and a minimal suggestion of an ear within the profile. -
Review and refine:
Take a step back. If the proportions feel off, gently erase and adjust your pencil lines now before committing to ink.
Step 3: Inking & Finishing
-
Test the marker:
I always grab a scrap piece of similar fabric to test the ink flow first. This prevents sudden blobs when you touch down on the real shirt. -
Ink the text:
Using the fine-tip fabric marker, carefully trace over your pencil letters. Keep your hand steady and maintain consistent pressure. -
Trace the silhouette:
Switch to the medium-tip marker if you want a slightly bolder look for the face, or stick with the fine tip for elegance. Trace the profile lines smoothly. -
Create the chaos:
Trace the abstract scribble design inside the head area. Don’t worry about being perfect here; the loose, overlapping lines are part of the charm. -
Let it dry completely:
Allow the ink to dry for at least 24 hours. Do not touch or move the fabric excessively during this time. -
Heat set the design:
Once dry, place a clean cloth or scrap paper over the design. Set your iron to the cotton setting (no steam) and press firmly over the area for 3-5 minutes to lock the ink into the fibers.
Fixing Wobbly Lines
If a line goes a bit astray, don’t panic. Thicken the line slightly to camouflage the wobble, or add a few intentional ‘sketchy’ loose lines nearby to make it look like an artistic choice.
Now you have a custom piece of wearable art that looks effortlessly chic and minimalist


Tiny Chest Icon Set
Transform a plain cream t-shirt into a boutique-worthy staple with this delicate trio of black botanical line drawings. Whether you choose hand embroidery for texture or fabric markers for speed, the result is a clean, modern aesthetic perfect for everyday wear.
Step-by-Step
Materials
- Light cream or beige cotton t-shirt (pre-washed)
- Black embroidery floss (6-strand) OR fine-tip black fabric marker
- Embroidery needle (size 5-7)
- 6-inch embroidery hoop
- Water-soluble fabric stabilizer or transfer paper
- Pencil or disappearing ink fabric pen
- Scissors
- Iron and ironing board
- Small piece of lightweight fusible interfacing (optional, for embroidery)
Step 1: Design & Transfer
-
Prepare the workspace:
Begin by laying your pre-washed t-shirt flat on a hard surface. Even out any wrinkles in the upper chest area where the design will go. -
Draft the botanicals:
On a piece of scrap paper, sketch out three small plant distinct designs: one with round buds, one with simple pointed leaves, and one taller stalk with stacked petals. Keep them roughly 1.5 to 2 inches tall. -
Determine placement:
Hold the shirt up to yourself in a mirror to find the perfect spot on the left chest. Mark the center point with a disappearing ink pen or a piece of masking tape. -
Transfer the trio:
Place your water-soluble stabilizer over the drawing and trace the three plants using a pencil. Peel and stick the stabilizer onto the marked area of the shirt, ensuring the three icons are spaced evenly apart—about a half-inch between each stem.
Step 2: Stitching the Designs
-
Hoop the fabric:
Place the inner ring of your embroidery hoop inside the shirt, under the design. Secure the outer ring on top, pulling the jersey fabric taut but be careful not to stretch or distort the weave. -
Prepare the thread:
Cut a length of black embroidery floss. Separate the strands and use only 2 strands for a crisp, fine line that mimics the look of an ink drawing. -
Start the first stem:
Thread your needle and knot the end. Begin with the leftmost plant (the one with round buds), bringing your needle up at the bottom of the stem. -
Stitch the outlines:
Use a backstitch for all the main lines. Keep your stitches small—about 3mm long—to navigate the tiny curves of the leaves and buds smoothly. -
Detailing the buds:
For the small round buds on the first plant, I find that filled satin stitches can look too heavy, so simply outline them with backstitch to keep the airy, sketched feel shown in the photo. -
Middle plant embroidery:
Move to the center plant. Stitch the central stem first using a stem stitch or backstitch, then add the paired leaves branching off symmetrically. -
Final plant execution:
Stitch the third, rightmost plant. Focus on sharp angles where the leaves meet the stem to differentiate it from the rounded shapes of the first icon. -
Key finishing check:
Flip the hoop over to check the back. Trim any long hanging threads that might show through the light-colored fabric.
Stabilize Stretchy Jersey
Don’t skip the stabilizer! T-shirt jersey stretches easily. Without a stabilizer backing, your round buds will warp into ovals and the fabric will pucker.
Step 3: Refinement & Finish
-
Remove stabilizer:
Unscrew the hoop and remove it. Rinse the embroidered area under lukewarm water to dissolve the stabilizer material completely. -
Dry carefully:
Gently squeeze out excess water with a towel—do not wring the fabric. Lay the shirt flat to air dry. -
Protect the back:
If the stitches feel scratchy against the skin, iron a small patch of lightweight fusible interfacing over the back of the embroidery. -
Final press:
Turn the shirt inside out. Place a fluffy towel underneath the design area and iron carefully from the back to re-flatten the fabric without crushing your stitches.
Add a Pop of Color
Keep the stems black but switch to a muted sage green or dusty rose thread for just the very tips of the buds for a subtle mixed-media effect.
Enjoy wearing your custom, minimalistic tee that pairs perfectly with denim or linen trousers


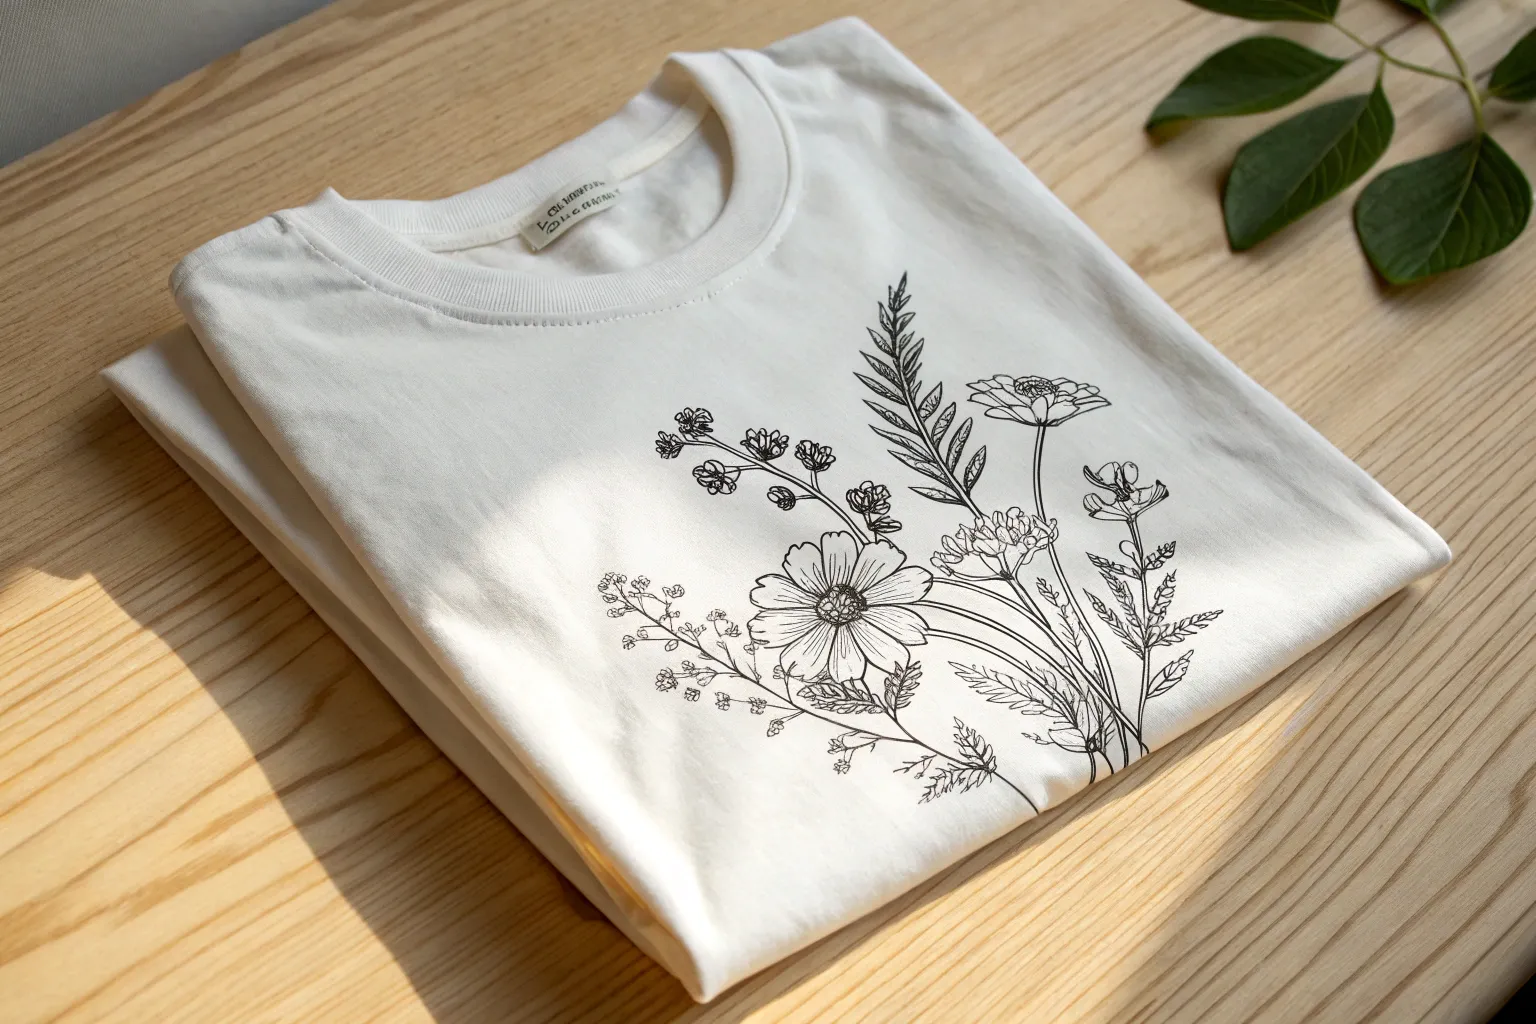
Botanical Line Drawing
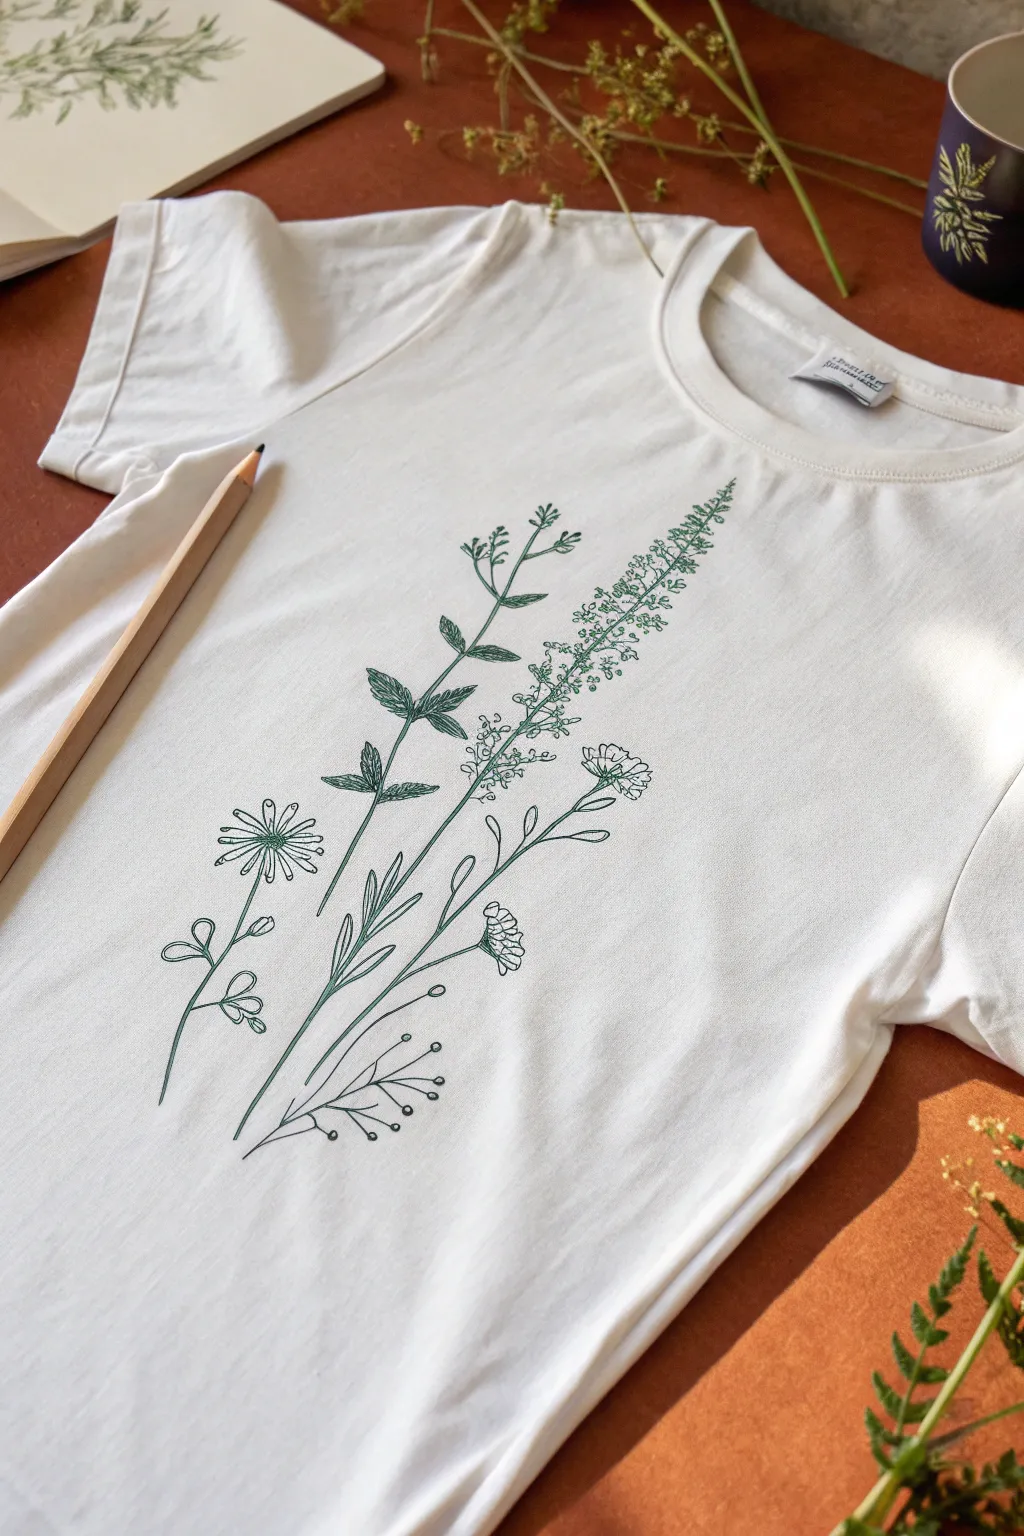
Transform a plain white t-shirt into a wearable sketchbook page with this delicate wildflower design. Using precise line work and a monochromatic palette, you’ll capture the effortless beauty of a meadow gathering right on your fabric.
How-To Guide
Materials
- White 100% cotton t-shirt (pre-washed)
- Fabric marker or fabric pen (fine tip/0.5mm, forest green)
- Pencil (HB or 2B)
- Piece of cardboard or drawing board (to fit inside shirt)
- Tracing paper (optional)
- Masking tape
- Iron (for heat setting)
- Paper for sketching ideas
- Botanical reference images (optional)
Step 1: Preparation and Planning
-
Prepare the fabric:
Ensure your t-shirt has been washed and fully dried without fabric softener. This removes any sizing chemicals that might prevent the ink from bonding effectively with the fibers. -
Stabilize the surface:
Insert a piece of smooth cardboard or a drawing board inside the t-shirt. This serves two crucial purposes: it creates a firm surface for drawing and prevents the ink from bleeding through to the back of the shirt. -
Secure the tension:
Pull the fabric taut against your board so there are no wrinkles, but be careful not to over-stretch it, which can distort the drawing later. Use masking tape on the back of the board to hold the excess fabric in place. -
Draft your composition:
On a separate piece of paper, sketch your botanical arrangement first. Aim for a vertical composition with variations in height—tall grasses, medium leafy stems, and shorter flowers—to create a balanced, organic bouquet.
Step 2: Sketching the Design
-
Lightly sketch the stems:
Using your pencil very lightly, draw the main vertical lines for your stems directly onto the fabric. Start these lines at slightly different starting points at the bottom to mimic a natural gathering. -
Mark leaf positions:
Add small tick marks or faint ovals where the major leaves and flower heads will go. This helps you ensure the spacing is correct before committing to ink. -
Detail the central fern:
Sketch the central, tallest element (resembling a fern or shepherd’s purse). Draw pairs of opposite leaves moving up the stem, getting gradually smaller as they reach the tip. -
Outline the daisy:
To the left, lightly sketch the round center of the daisy-like flower and indicate the direction of the petals. -
Position the accent sprigs:
Map out the finer elements, like the wispy bells on the far left and the delicate seeded sprig at the bottom. Keep these lines extremely faint.
Bleeding Lines?
If the ink starts feathering into the fabric, you’re pressing too hard or the fabric is too loose. Stop, stretch the fabric tighter against your board, and use a lighter hand.
Step 3: Inking the Botanicals
-
Begin inking the central stem:
Take your fine-tip green fabric marker. Start with the central, tallest plant. Draw the main stem with a confident stroke, then carefully outline the serrated edges of the leaves. -
Add veining detail:
While working on the central plant, add a single central vein to each leaf. I find that lifting the pen quickly at the end of the stroke creates a nice, tapered line. -
Ink the tall grass:
Move to the tall, textured grass on the right side. Instead of solid lines, use tiny, rapid stippling dots or very short hatching marks to create the fuzzy texture of the seed head. -
Draw the lower wildflowers:
Ink the daisy on the left. Draw the petals with slight irregularities to make them look organic, rather than perfectly symmetrical. Add a few small dots in the center. -
Create the delicate bells:
For the bottom-left stem with the bell flowers, use very light pressure. Draw fluid, curving lines for the stems and simple loop shapes for the flowers. -
Fill in the clover:
On the right side, draw the small clover-like flower head using tight, scalloped lines to suggest overlapping petals. -
Add the bottom seed spray:
Ink the geometric, berry-like sprig at the very bottom. Draw thin lines radiating from a central point and top each with a small circles; leave the circles open for a lighter look. -
Refine and cross:
Look for places where stems overlap. Carefully draw the foreground stems clearly, stopping your line where it hits a background stem to create depth.
Level Up: Watercolor Wash
Dilute a tiny drop of fabric paint with water and brush it loosely over the leaves. The pale wash of color over the line art adds a vintage botanical illustration vibe.
Step 4: Finishing Touches
-
Erase guidelines:
Allow the ink to dry completely (check your marker’s instructions, but 1-2 hours is usually safe). Gently erase any visible pencil marks, being careful not to snag the fabric. -
Heat set the ink:
Set your iron to the cotton setting (no steam). Place a thin scrap cloth or parchment paper over your design and iron it for 3-5 minutes keeping the iron moving. This locks the pigment into the fibers so it becomes wash-fast.
Now you have a custom piece of wearable art that celebrates the simple elegance of nature
BRUSH GUIDE
The Right Brush for Every Stroke
From clean lines to bold texture — master brush choice, stroke control, and essential techniques.
Explore the Full Guide
Cute Animal Sketch Style
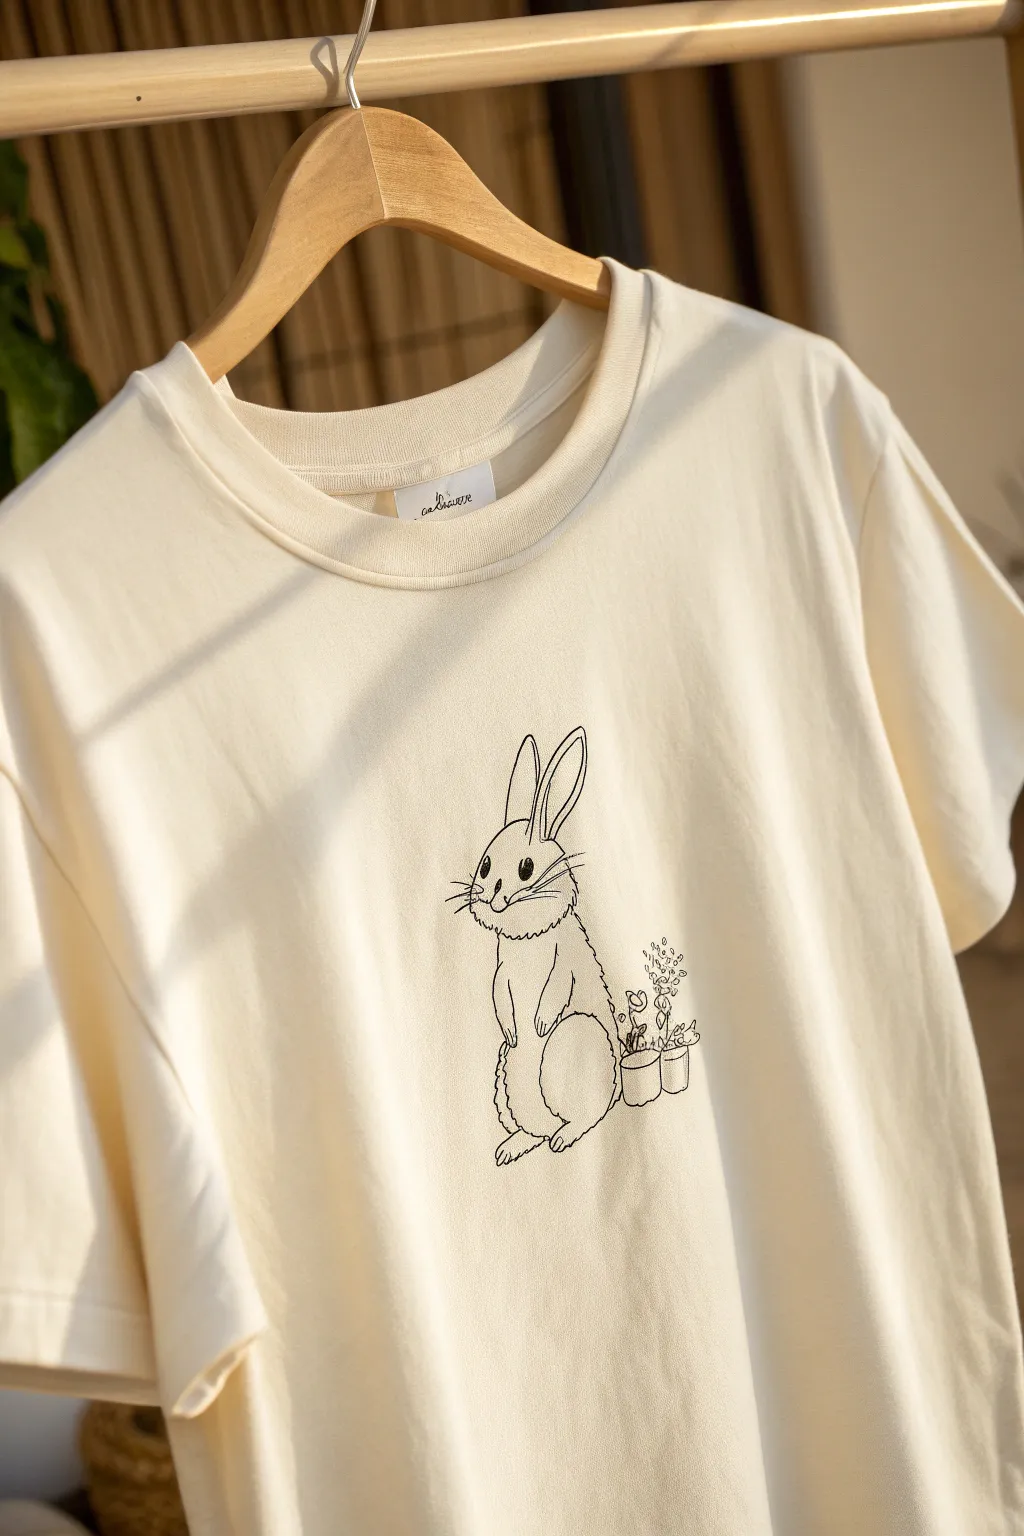
Transform a plain cream t-shirt into a charming piece of wearable art with this delicate bunny sketch design. Using fine-tip fabric markers or heat transfer vinyl, you’ll capture the simple elegance of a hand-drawn illustration featuring a curious rabbit and potted plants.
Detailed Instructions
Materials
- Cream or off-white cotton t-shirt (pre-washed)
- Black fine-tip fabric marker (0.5mm or 1.0mm) OR black Heat Transfer Vinyl (HTV)
- Printed template of the rabbit design
- Fabric pencil or disappearing ink pen
- Cardboard insert for the shirt
- Iron (if using HTV or to set ink)
- Parchment paper
- Masking tape
- Cricut or silhouette machine (optional for HTV method)
Step 1: Preparation and Transfer
-
Pre-wash your garment:
Before starting any fabric art, wash and dry your t-shirt without fabric softener. This removes factory sizing and ensures the ink or vinyl adheres properly to the fibers. -
Smooth the canvas:
Iron the shirt completely flat, paying special attention to the center chest area where the design will go. wrinkles now will distort your final drawing. -
Prepare your template:
Resize the rabbit sketch on your computer to fit the chest area—about 6 to 8 inches tall is usually perfect. Print this image out on standard paper. -
Create a stable surface:
Slide a piece of cardboard or a cutting mat inside the shirt. This prevents ink from bleeding through to the back and gives you a firm surface to draw on. -
Position the design:
Place your printed template underneath the front layer of the shirt, on top of the cardboard. Since the shirt is light-colored, you should be able to see the design through the fabric. Secure the paper with tape so it doesn’t shift.
Clean Lines
If you’re nervous about steady hands, stretch the fabric slightly with an embroidery hoop. This keeps tension even and prevents the fabric from bunching up under the marker tip.
Step 2: Tracing the Outline
-
Initial light trace:
Using your disappearing ink pen or a very light fabric pencil, trace the main outlines of the bunny and the plant pots. Don’t worry about the tiny fur details yet; just get the main shapes down. -
Start with the ears:
Switch to your black fabric marker. Begin at the top with the bunny’s ears. Use a confident, continuous stroke for the long curves to keep the line art smooth. -
Define the face:
Draw the head shape, adding the small, dark circular eyes. Leave a tiny white speck in the eyes for a highlight, which adds life to the character. -
Add facial details:
carefully flick the pen outward to create the whiskers. Keep these lines thinner and lighter at the ends for a realistic whisker effect. -
Sketch the body texture:
Move down to the neck and chest. Instead of a solid line, use small, jagged zigzag strokes to imply fluffy fur texture around the neck and chest area.
Step 3: Adding Details and Finishing
-
Draw the limbs:
Outline the front paws and the large rounded haunch of the back leg. Keep the lines clean here, distinct from the textured fur areas. -
Illustrate the plants:
Sketch the two small pots behind the bunny. Draw the stems and leaves with loose, organic shapes. The flowers can be simple clusters of small circles or irregular loops. -
Refine the line weight:
Go back over key areas like the bottom of the rabbit and the pots to thicken the lines slightly. This variation in line weight gives the drawing depth and makes it look more like a professional illustration. -
Remove the guide:
Once the ink is dry to the touch, carefully remove the paper template and cardboard from inside the shirt. -
Let it cure:
Allow the ink to dry completely for at least 24 hours. I usually leave it flat in a safe spot so nothing accidentally smudges it. -
Heat set the design:
To make the design permanent, place a piece of parchment paper over the drawing and iron it on high heat (no steam) for about 3-5 minutes, moving the iron constantly.
Add a Splash
Watercolor fabric paints can add a gentle wash of color. Try a very pale pink for the bunny’s ears or a soft sage green for the potted plants to keep the minimalist vibe.
Now you have a sweet, custom-illustrated tee that brings a bit of nature-inspired joy to your wardrobe.
Retro Color Band Sunset
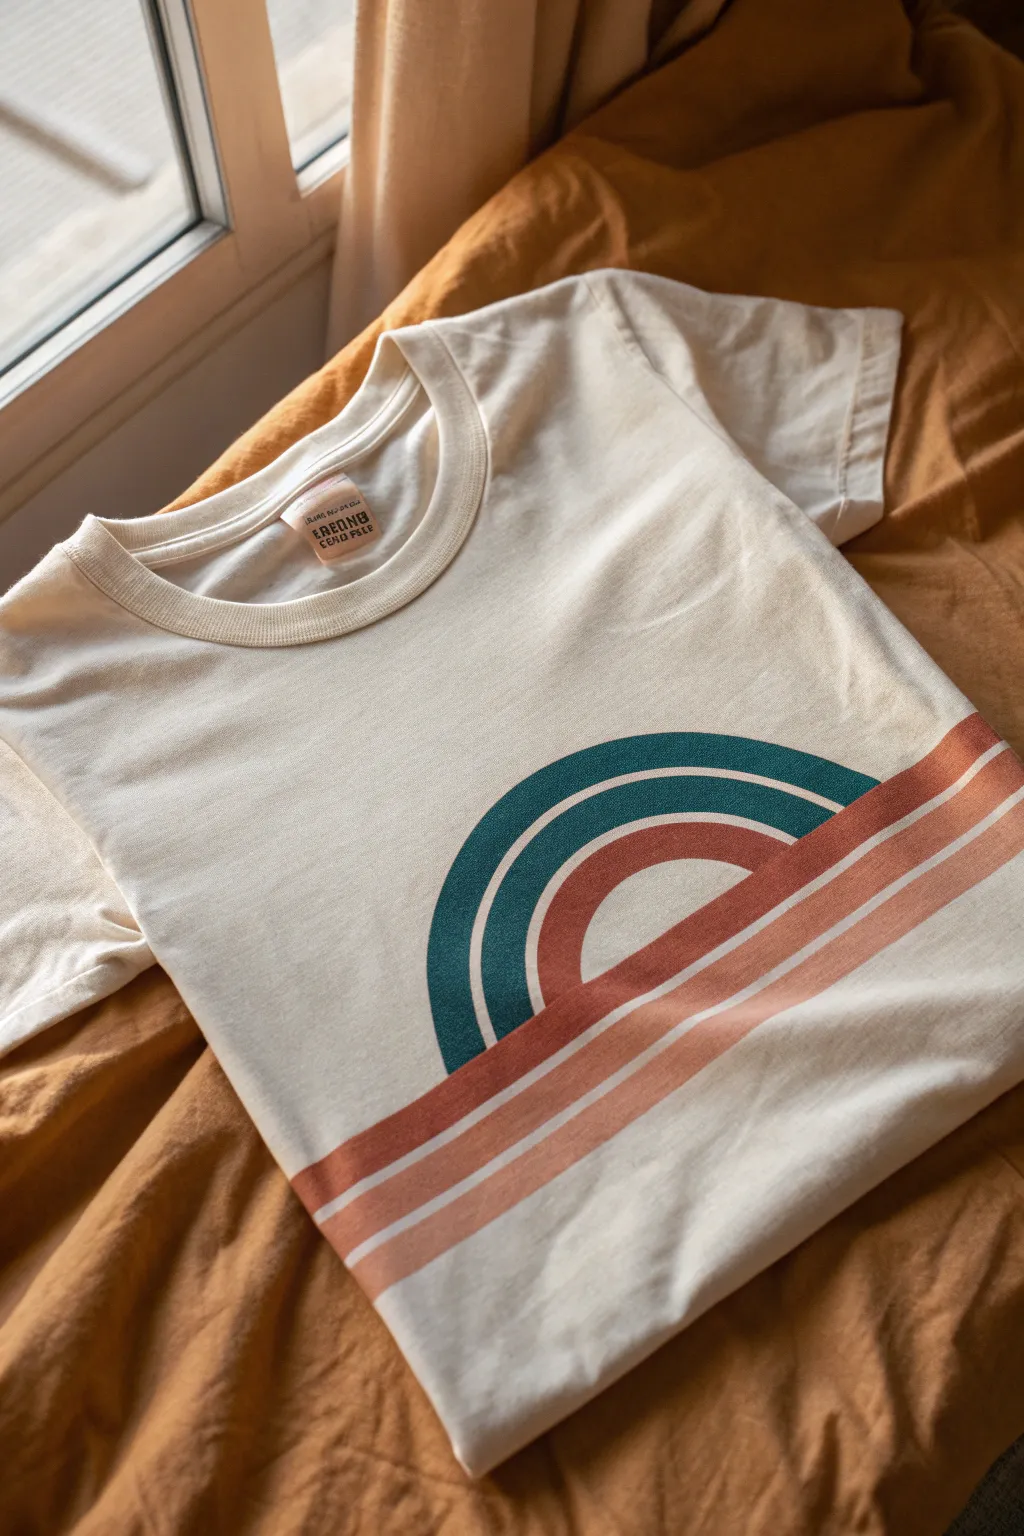
Capture the laid-back vibes of a vintage summer with this minimalist sunset design. By combining cool teal arches with warm, rusty horizontal stripes, you’ll create a graphic tee that feels like a thrift store treasure.
Step-by-Step Tutorial
Materials
- Cream or off-white cotton t-shirt (pre-washed)
- Fabric medium
- Acrylic paints (Teal/Dark Cyan, Burnt Sienna/Rust, Muted Peach/Salmon)
- Painter’s tape (various widths, 1-inch and 0.5-inch recommended)
- Flat paintbrushes (medium width)
- Cardboard insert for the shirt
- Iron for heat setting
- Compass or round object (like a dinner plate or bowl) for tracing
- Fabric chalk or disappearing ink pen
- Ruler
Step 1: Preparation & Layout
-
Prep the shirt:
Begin by sliding a piece of cardboard inside your t-shirt to prevent paint from bleeding through to the back. Smooth out any wrinkles with your hands to ensure a flat working surface. -
Define the horizon line:
Decide where you want the design to sit—usually mid-chest is best. Use your ruler and fabric chalk to draw a straight horizontal line across the chest where the arches will meet the stripes. -
Draft the arches:
Find the center point of your horizontal line. Using a compass or by tracing half of a round object, lightly draw the outermost semi-circle arch resting on that line. -
Add inner arches:
Draw a slightly smaller inner arch about 3/4-inch inside the first one. Then, draw a third, much smaller arch inside designed for the solid center color, leaving a gap between the teal rings. -
Draft the stripes:
Below your horizon line, use the ruler to mark out three parallel bands that extend diagonally or horizontally depending on your preference. For this exact look, connect them directly to the base of the arches, slanting slightly downward to the right.
Fuzzy Edges?
If paint bleeds under the tape, let it dry, then use a tiny brush with white paint (or shirt color) to touch up the line.
Step 2: Mixing & Painting Arches
-
Mix your medium:
Mix your acrylic paints with fabric medium according to the bottle instructions (usually 2:1 or 1:1). This creates a flexible, washable design that won’t crack. -
Paint the teal arch:
Load a flat brush with your mixed teal paint. Carefully fill in the outermost ring of the arch. Keep your hand steady to maintain a crisp curve. -
Second coat:
I prefer to let the first layer dry to the touch (about 15 minutes) before adding a second coat of teal for full opacity. -
Paint the inner rust arch:
Switch to your Burnt Sienna/Rust mixture. Carefully paint the innermost solid semi-circle. Leave the negative space (the shirt color) visible between the teal ring and this rust center.
Add Weathering
For a true vintage look, lightly sand the dried design with fine-grit sandpaper before heat setting to distress it.
Step 3: Painting the Stripes
-
Tape the boundaries:
Once the arches are fully dry, use painter’s tape to mask off the areas outside your drawn stripe lines. This ensures perfectly sharp edges. -
Paint the top stripe:
Fill the top stripe area with the Rust paint, connecting it seamlessly to the bottom of the rust arch you painted earlier. -
Paint the middle stripe:
Mix a transition color if needed, or stick to the Rust tone but slightly lighter. Apply this to the middle stripe area. -
Paint the bottom stripe:
Use the Muted Peach/Salmon mixture for the bottom stripe. This creates that lovely fading sunset gradient effect. -
Remove tape:
Peel off the tape while the paint is still slightly tacky—this helps prevent peeling up dry chunks of paint.
Step 4: Finishing Touches
-
Dry completely:
Let the shirt sit undisturbed for at least 24 hours to ensure the paint cures properly. -
Heat set:
Turn the shirt inside out. Iron the design area on a medium heat setting (no steam) for 3-5 minutes to permanently set the pigment into the fibers.
Wear your new retro masterpiece with pride and enjoy the sunset vibes all day long

PENCIL GUIDE
Understanding Pencil Grades from H to B
From first sketch to finished drawing — learn pencil grades, line control, and shading techniques.
Explore the Full Guide
Geometric Pattern Repeat
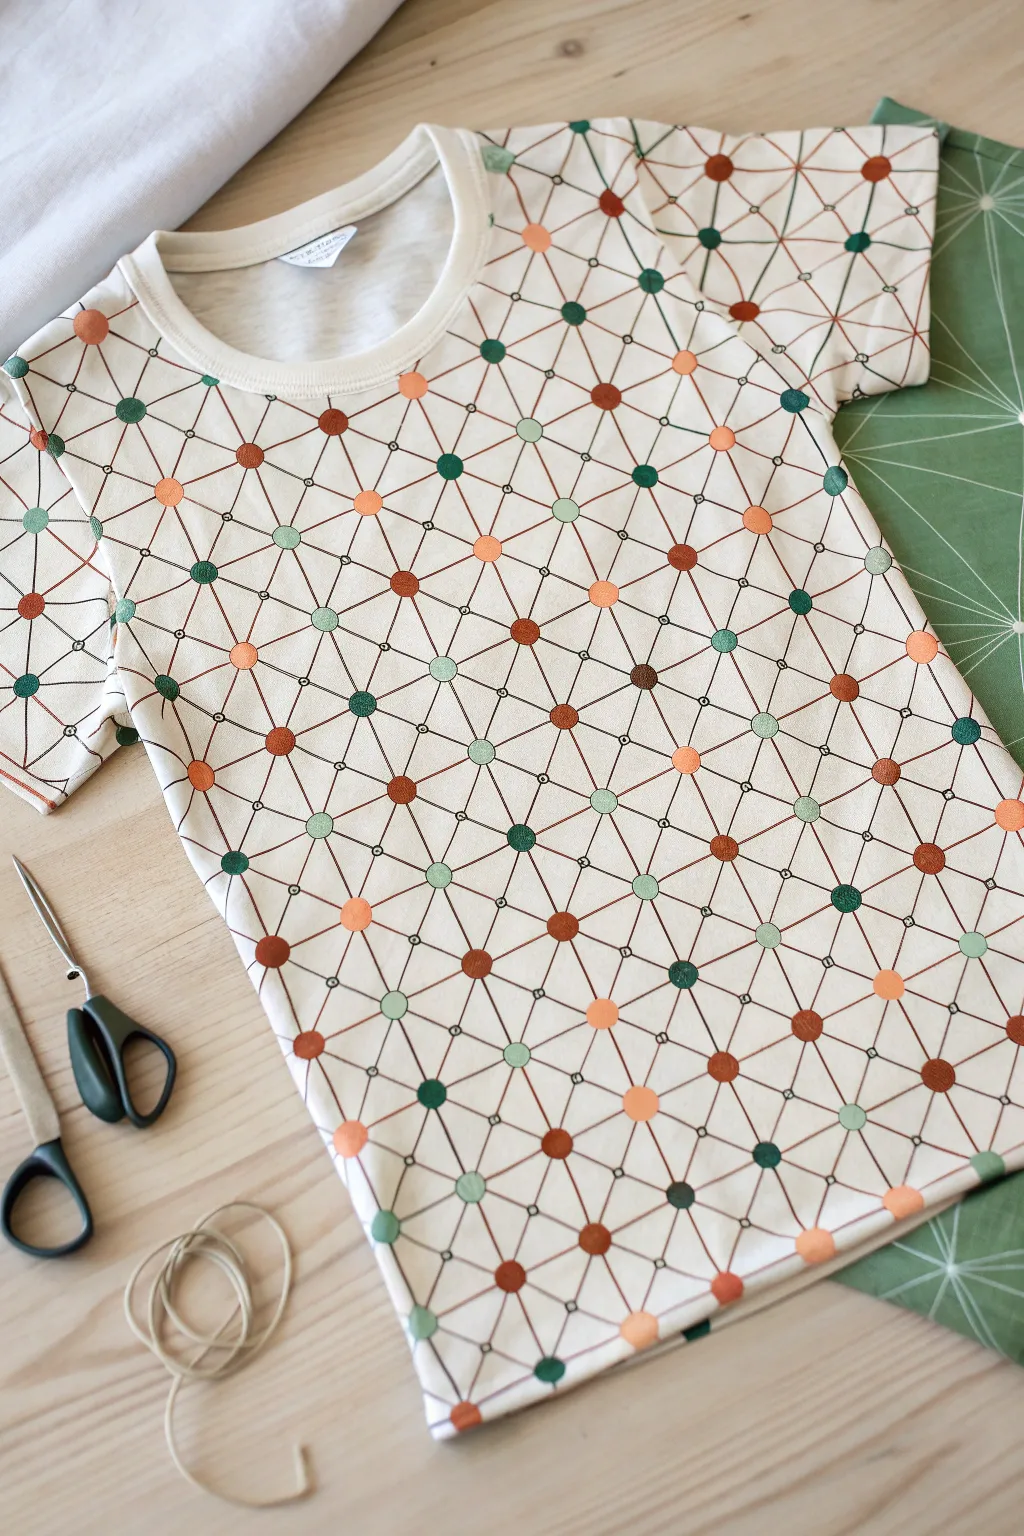
Transform a plain white t-shirt into a striking piece of wearable art with this molecular-inspired geometric design. The pattern uses a satisfying repetition of connected nodes and lines to create a complex, scientific look that is surprisingly simple to achieve.
Step-by-Step
Materials
- High-quality white cotton t-shirt (pre-washed)
- Fabric markers or fabric paint pens (fine tip for lines)
- Fabric paint (copper/brown, hunter green, muted teal, light coral)
- Foam pouncers or small round sponge brushes (approx. 1cm diameter)
- Long ruler or straight edge
- Tailor’s chalk or disappearing ink fabric pen
- Cardboard insert or shirt painting board
- Iron (for heat setting)
Step 1: Preparation and Mapping
-
Secure the workspace:
Begin by sliding a piece of cardboard or a shirt board inside your t-shirt. This is crucial to prevent ink from bleeding through to the back layer and provides a firm surface for drawing. -
Smooth the fabric:
Pull the fabric taut against the board without over-stretching it. Clip it in place if necessary using clothespins or binder clips to keep the grain straight. -
Establish the grid:
Using a ruler and your disappearing ink pen, mark a faint grid of dots across the shirt. These dots will serve as the centers for your colored circles. Aim for spacing about 2-3 inches apart in a diagonal offset pattern (diamond formation). -
Double-check spacing:
Step back and look at your mapped dots. The pattern should look consistent before you commit to paint. Adjust any stray marks now while the ink is still temporary.
Stamp Master
If you don’t have foam pouncers, us the flat eraser end of a new pencil dipped in paint. It creates perfect, small circles every time.
Step 2: Painting the Nodes
-
Prepare your palette:
Dispense small amounts of your fabric paint colors onto a palette or paper plate. You’ll need four distinct shades: a deep copper-brown, a hunter green, a soft teal, and a light coral orange. -
Start with the primary color:
Load a small round foam pouncer with the copper paint. Dab off excess paint on a paper towel to avoid globs. -
Stamp the first nodes:
Press the pouncer onto the fabric at selected grid points. I like to distribute this color randomly but evenly across the shirt so no area feels too heavy with one shade. -
Add secondary colors:
Switch to a clean pouncer and apply the hunter green dots. Try to place these adjacent to the copper ones without touching them, filling in about a quarter of the remaining spots. -
Fill the remaining spots:
Repeat the process with the teal and light coral paints until every grid mark you made earlier is covered by a colored circle. -
Let the dots dry:
Allow the painted dots to dry completely. This usually takes about an hour, depending on the thickness of the paint. Do not connect them while wet or you will smudge the design.
Metallic Pop
Swap the copper/brown paint for actual metallic gold or bronze fabric paint. The shimmer adds a sophisticated, industrial edge to the geometric look.
Step 3: Connecting the Web
-
Test your lines:
Before drawing on the shirt, test your fine-tip fabric marker on a scrap piece of fabric to ensure the ink flows smoothly and doesn’t bleed too much. -
Draw the main connections:
Place your ruler connecting two adjacent dots. Draw a thin, straight line from the edge of one circle to the edge of the next. Do not draw through the colored dots. -
Build the triangles:
Work your way across the shirt, connecting dots to form a web of triangles. Each dot should essentially have six lines radiating from it to create the hexagonal/triangular tessellation. -
Connect across seams:
Carefully continue the pattern over the side seams and onto the sleeves. You may need to shift the internal cardboard to support the sleeve area specifically. -
Add detail rings (optional):
For extra depth, use a very fine liner to draw small rings or tiny dots along the midpoint of some connecting lines, mimicking the look of a scientific diagram. -
Heat set the design:
Once all ink is fully dry (wait at least 24 hours to be safe), iron the shirt inside out on the cotton setting (no steam) for 3-5 minutes to permanently set the pigment.
Enjoy wearing your structured masterpiece, knowing the intricate design was built one simple connection at a time
Watercolor Splash Motif
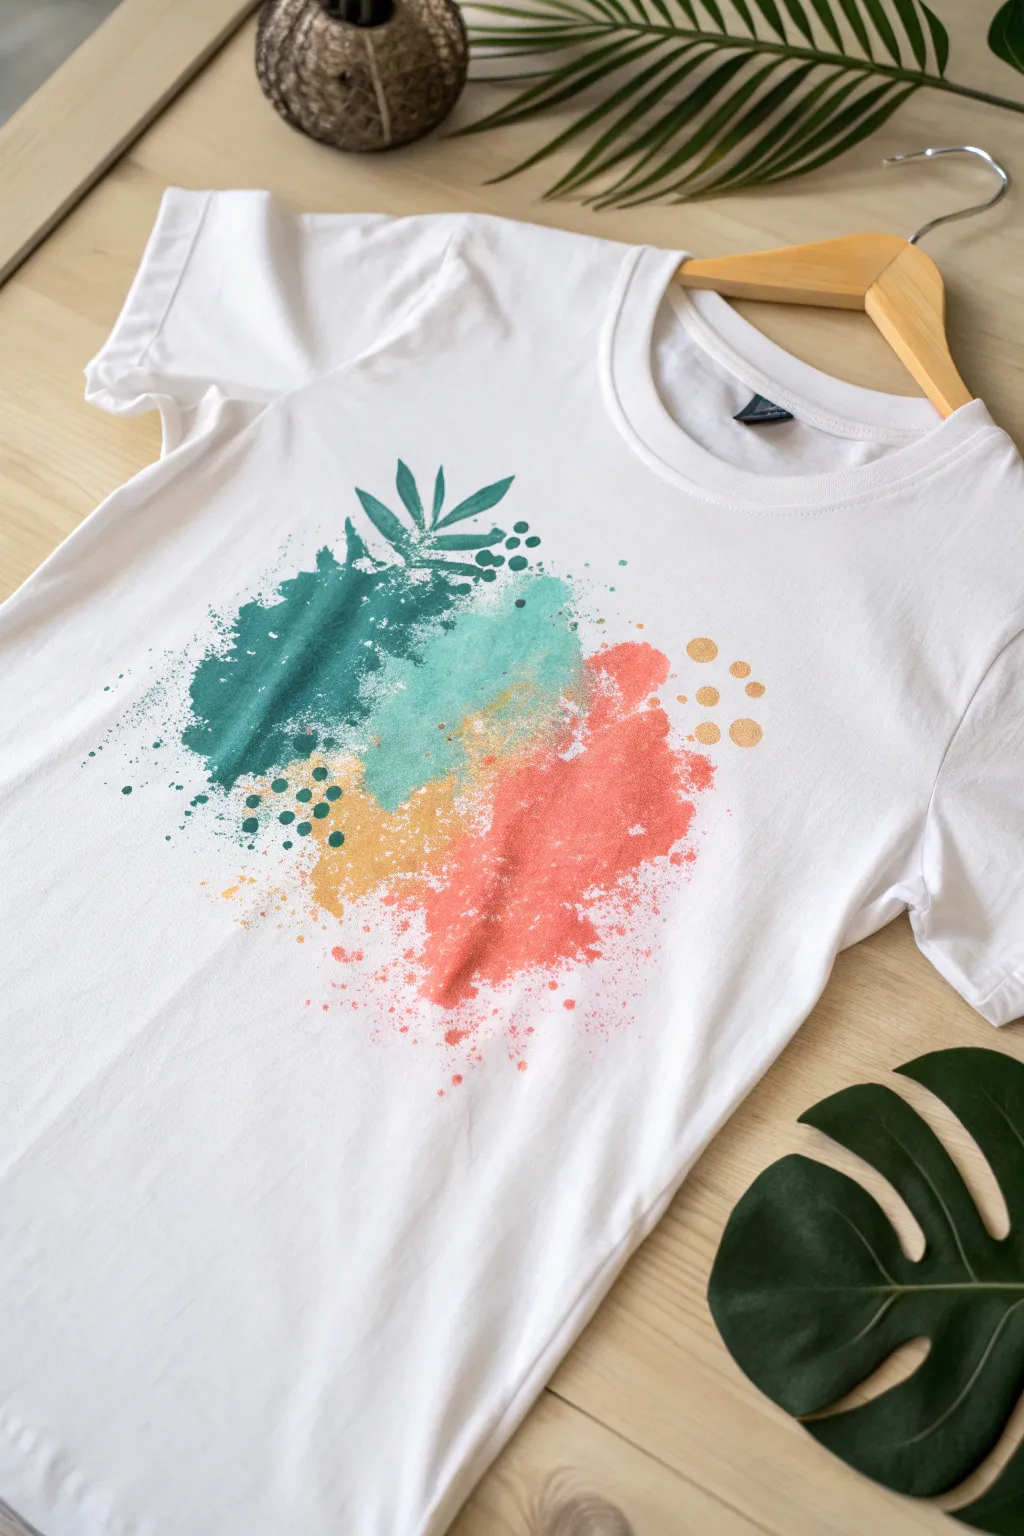
Transform a plain white t-shirt into a piece of wearable art with this breezy, watercolor-style design. Featuring a blend of teal, ochre, and coral splashes accented by botanical silhouettes, this project perfectly captures a relaxed, artistic vibe without needing advanced painting skills.
Detailed Instructions
Materials
- White cotton t-shirt (pre-washed)
- Fabric medium
- Acrylic paints (Teal, Mint Green, Golden Ochre, Coral/Peach)
- Cardboard insert for the shirt
- Sponge brushes or cosmetic sponges
- Old toothbrush
- Stencil material or freezer paper
- Craft knife
- Small round paintbrush
- Iron and cloth for heat setting
- Water cups and mixing palette
Step 1: Preparation and Stencil Creation
-
Prepare the workspace:
Begin by inserting a piece of cardboard inside the t-shirt. This is crucial as it prevents the paint from bleeding through to the back of the shirt. Smooth the fabric surface so it is taut and wrinkle-free. -
Create the botanical stencil:
Sketch a simple fern or palm frond silhouette on your stencil material or freezer paper. The design in the image uses a stylized, slightly geometric leaf shape. Cut this shape out carefully using a craft knife. -
Mix the watercolor medium:
To get that translucent watercolor look with acrylics, you need to dilute them properly. Mix one part fabric medium with one part acrylic paint, then add water drop by drop until you reach a milky, ink-like consistency.
Step 2: Applying the Splashes
-
Start with the dark teal:
Dip a sponge brush into your diluted dark teal mixture. Dab it onto the upper left chest area of the shirt. Don’t paint a perfect shape; dab irregularly to create rough, organic edges that mimic a paint spill. -
Add the mint tones:
While the teal is still slightly damp, pick up your mint green mixture with a clean sponge. Apply this next to and slightly overlapping the teal section, moving towards the center. Allow the colors to bleed together slightly at the border for a soft gradient. -
Incorporate the warmth:
Using the golden ochre paint, sponge a smaller section below the teal and mint areas. This yellow tone acts as a bridge between the cool greens and the warms to come. -
Finish the main color block:
Apply the coral or peach paint to the bottom right of the design, creating an abstract, sweeping shape that balances the composition. Ensure the edges remain wispy and textured rather than solid blocks of color.
Bleeding Lines?
If the watercolor effect is spreading too fast into the dry fabric, your paint is too watery. Let it dry, then layer a slightly thicker mix over the top to regain control of the shape edges.
Step 3: Details and Texture
-
Create the splatter effect:
Dip an old toothbrush into your diluted paints. Hold it over the shirt and run your thumb across the bristles to flick tiny droplets onto the fabric. Focus the green splatters near the green sections and coral near the coral sections, but let some crossover happen for a cohesive look. -
Place the stencil:
Once the base green layer is dry to the touch, position your leaf stencil over the upper teal section. If using freezer paper, iron it down lightly to secure the edges. -
Paint the botanical motif:
Using undiluted dark teal acrylic (mixed only with fabric medium, no water), dab over the stencil. Since this paint is thicker, it will stand out against the watery background. Peel the stencil away immediately to reveal the crisp design. -
Add geometric dots:
Dip the handle end of a paintbrush into your paint colors. Press it gently onto the fabric to create perfect circles. Use dark teal dots near the leaf and gold/ochre dots on the opposite side to balance the visual weight.
Add Some Shimmer
Mix a tiny amount of gold fabric paint or metallic powder into your ochre ‘dots’ for a subtle sparkle that catches the light when you move.
Step 4: Finishing Touches
-
Dry the design:
Let the shirt sit undisturbed for at least 24 hours. The paint needs to be completely dry before the next step. -
Heat set the artwork:
Turn the t-shirt inside out. Place a pressing cloth over the design area. -
Iron to cure:
Run a hot iron (no steam) over the reverse side of the design for 3-5 minutes. This curing process ensures your watercolor masterpiece won’t wash away in the laundry.
Now you have a custom, artsy garment ready for summer wear or gifting


Abstract Brushstroke Block
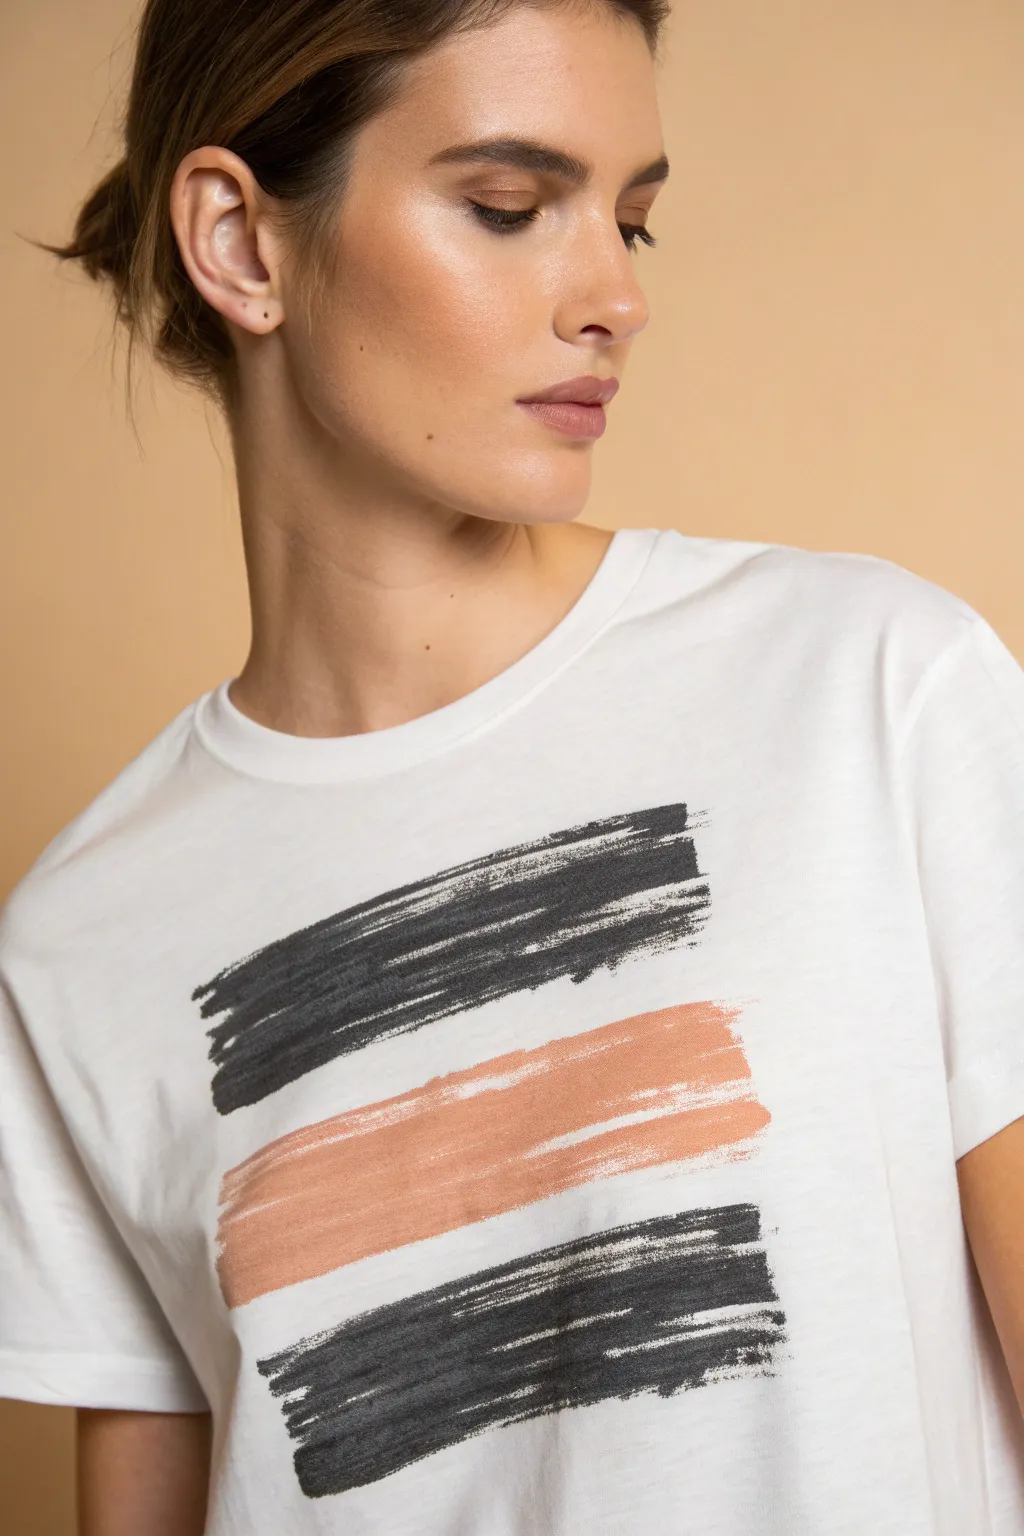
Master the art of minimalism with this striking three-bar design that mimics the raw texture of rugged paint strokes. Using a dry-brush technique on fabric creates a vintage, weathered look that feels significantly more expensive than a simple screen print.
Step-by-Step Tutorial
Materials
- White cotton t-shirt (pre-washed)
- Black fabric paint (or soft-body acrylic with fabric medium)
- Terracotta or muted peach fabric paint
- Wide, stiff-bristled flat brush (2-3 inches wide)
- Cardboard or poster board insert for the shirt
- Masking tape or painter’s tape
- Palette or paper plate
- Paper towels
- Iron (for heat setting)
- Pressing cloth or parchment paper
Step 1: Preparation & Layout
-
Prepare the shirt:
Begin by sliding a piece of cardboard or thick poster board inside your t-shirt. This prevents paint from bleeding through to the back and gives you a firm surface to press against. -
Smooth the canvas:
Ensure the fabric is pulled flat and taut against the cardboard insert. Smooth out any major wrinkles with your hand to prevent skips in the paint. -
Mark the boundaries:
Use small pieces of masking tape to mark the approximate outer widths of your design. You don’t want a hard edge, but these guides help keep the three blocks aligned relative to each other. -
Protect the workspace:
Since dry brushing can sometimes flick tiny specks of paint, lay down a protective cloth or paper on your table before beginning.
Step 2: Painting the Texture
-
Load the dark paint:
Squeeze a small amount of black fabric paint onto your palette. Dip just the tips of your wide, stiff brush into the paint. -
Offload excess paint:
This is the most critical step: dab and wipe the brush vigorously on a paper towel until almost no paint comes off. The brush should feel nearly dry to the touch. -
Paint the top block:
Start the first stroke for the top dark block. Place your brush on the left side and sweep quickly to the right. Don’t press too hard; let the bristles scratch across the fabric surface. -
Build the density:
Go back over the top block with another sweep or two to build up the color in the center, leaving the edges rough and streaky to maintain that distinct brushstroke aesthetic. -
Clean the brush:
Thoroughly wash and dry your brush. It must be bone-dry before you switch colors, or the water will ruin the textured effect. -
Apply the middle hue:
Load your brush with the terracotta or peach paint. Repeat the offloading process on a paper towel until the brush is ‘dry’. -
Paint the center block:
Paint the middle stroke about 1.5 to 2 inches below the black block. I like to make this stroke slightly wider or narrower than the others to keep it looking organic. -
Feather the edges:
Use the very tips of the brush to lightly flick the ends of the terracotta stroke outward, enhancing the jagged, artistic edge. -
Clean and dry again:
Wash the brush again to remove the peach tone and dry it completely with a towel. -
Paint the bottom block:
Load up the black paint for the final time and offload the excess. Paint the third block below the terracotta one, mirroring the spacing of the top section. -
Final touches:
Step back and assess the balance. If any block looks too solid, you can lightly drag a clean, dry brush over it while wet to lift a tiny bit of pigment.
Too much paint?
If you accidentally apply a solid blob of paint, wait for it to dry, then dry-brush a little white fabric paint over it to artificially recreate the texture.
Step 3: Setting the Design
-
Let it cure:
Allow the shirt to dry flat for at least 24 hours. Even though it feels dry to the touch quickly, the paint needs to bond with the fibers. -
Heat set the paint:
Once fully dry, place a pressing cloth or piece of parchment paper over the design. Run a hot iron (no steam) over the area for 3-5 minutes to permanently set the ink.
Add metallic flair
For a luxe touch, lightly dry-brush a layer of metallic gold or copper over the terracotta stripe once it’s dry to catch the light.
Wear your new modern art piece with confidence
Stencil Letters and Layers
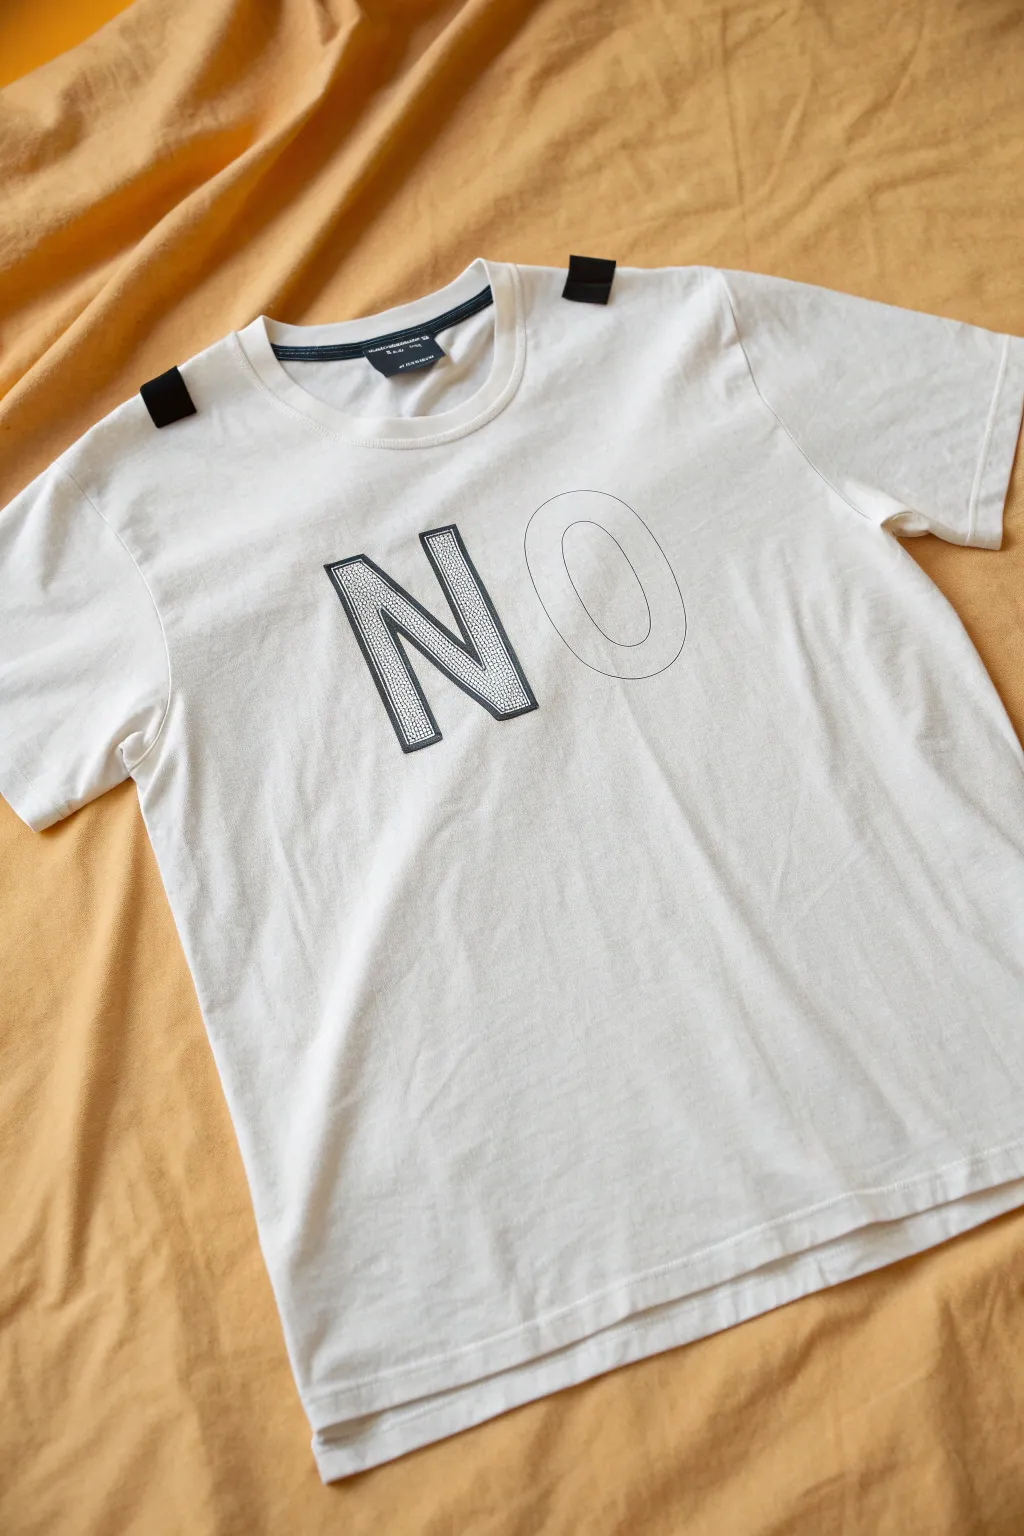
Transform a plain white t-shirt into a bold fashion statement with this minimalist design that plays with positive and negative space. Combining a textured appliqué letter with a delicate outline creates a striking contrast that looks high-end but is simple to achieve.
Step-by-Step Guide
Materials
- Plain white cotton t-shirt
- Black textured fabric (faux leather, glitter vinyl, or sequin fabric)
- Black fabric marker or fine-tip textile paint pen
- Double-sided fusible interfacing (e.g., Wonder Under or HeatnBond)
- Iron and ironing board
- Scissors or craft knife
- Ruler
- Pencil
- Two small rectangular scraps of black grosgrain ribbon (1 inch wide)
- Needle and black thread or fabric glue
- Computer and printer (optional for stencils)
Step 1: Designing the Layout
-
Choose your fonts:
Select a blocky, sans-serif font for the ‘N’ and a clean, thin circular font for the ‘O’. You want a strong contrast between the heavy first letter and the light second letter. -
Size and print:
Scale your letters so they fill the upper chest area nicely. Print them out on regular paper first to test the placement on your t-shirt. Aim for letters roughly 4-6 inches tall. -
Prepare the stencil:
Cut out your paper letters. For the ‘N’, you will use the shape itself. For the ‘O’, you’ll want to cut out the inside content carefully so you can trace the outline.
Step 2: Creating the Appliqué N
-
Bond interfacing:
Cut a piece of your textured black fabric slightly larger than your ‘N’. Following the manufacturer’s instructions, iron the fusible interfacing onto the *wrong* side of this fabric. -
Trace the letter:
Place your paper ‘N’ stencil onto the paper backing of the interfacing. *Important*: You must trace the letter in reverse (mirror image) so it faces the correct way when flipped. -
Cut carefully:
Using sharp scissors or a craft knife, cut out the ‘N’ shape. The crispness of these edges will define the quality of the final look, so take your time along the straight lines. -
Position the N:
Peel off the paper backing. Place the textured ‘N’ onto the t-shirt. Use a ruler to ensure it sits straight and matches your initial layout plan. -
Fuse in place:
Cover the letter with a pressing cloth (a scrap of thin cotton works) to protect the texture. Press firmly with your iron according to the fusing webbing’s directions to bond it permanently. -
Edge stitching (Optional):
If your fabric feels like it might fray or peel, hand-sew a few small tacking stitches around the corners for extra security.
Clean Lines
For the ‘O’ outline, place a piece of cardboard inside the shirt before drawing. This prevents the marker from bleeding through to the back and keeps the fabric flat.
Step 3: Drawing the Outline O
-
Position the stencil:
Place the paper ‘O’ stencil next to your fused ‘N’. Double-check the spacing; it should look balanced but not crowded. -
Trace lightly:
Use a pencil to very lightly trace the outline of the ‘O’ onto the shirt fabric. I find it helpful to stretch the fabric slightly taut with my other hand while doing this. -
Ink the outline:
Go over your pencil line with a black fabric marker or fine-tip textile paint pen. Use a steady hand and pull the pen towards you rather than pushing it away. -
Set the ink:
Allow the ink to dry completely. Once dry, run a hot iron over the area (without steam) to heat-set the ink so it won’t wash out.
Texture Play
Make the ‘N’ pop by using unexpected materials like black denim, faux snake skin, or even a patch of black sequins for a glamorous twist on the punk look.
Step 4: Adding the Shoulder Details
-
Prepare the tabs:
Cut two pieces of black grosgrain ribbon, each about 2 inches long. -
Fold and place:
Fold each ribbon piece in half to form a loop or tab. Place one on each shoulder seam, positioned about halfway between the neck and the sleeve seam. -
Secure the tabs:
Stitch the raw edges of the ribbon directly onto the shoulder seam using a needle and black thread. You can also use a strong fabric glue if you prefer a no-sew option, clamping it until dry.
This custom tee is now ready to wear, combining minimal design with maximum attitude
Vertical Landscape Panel
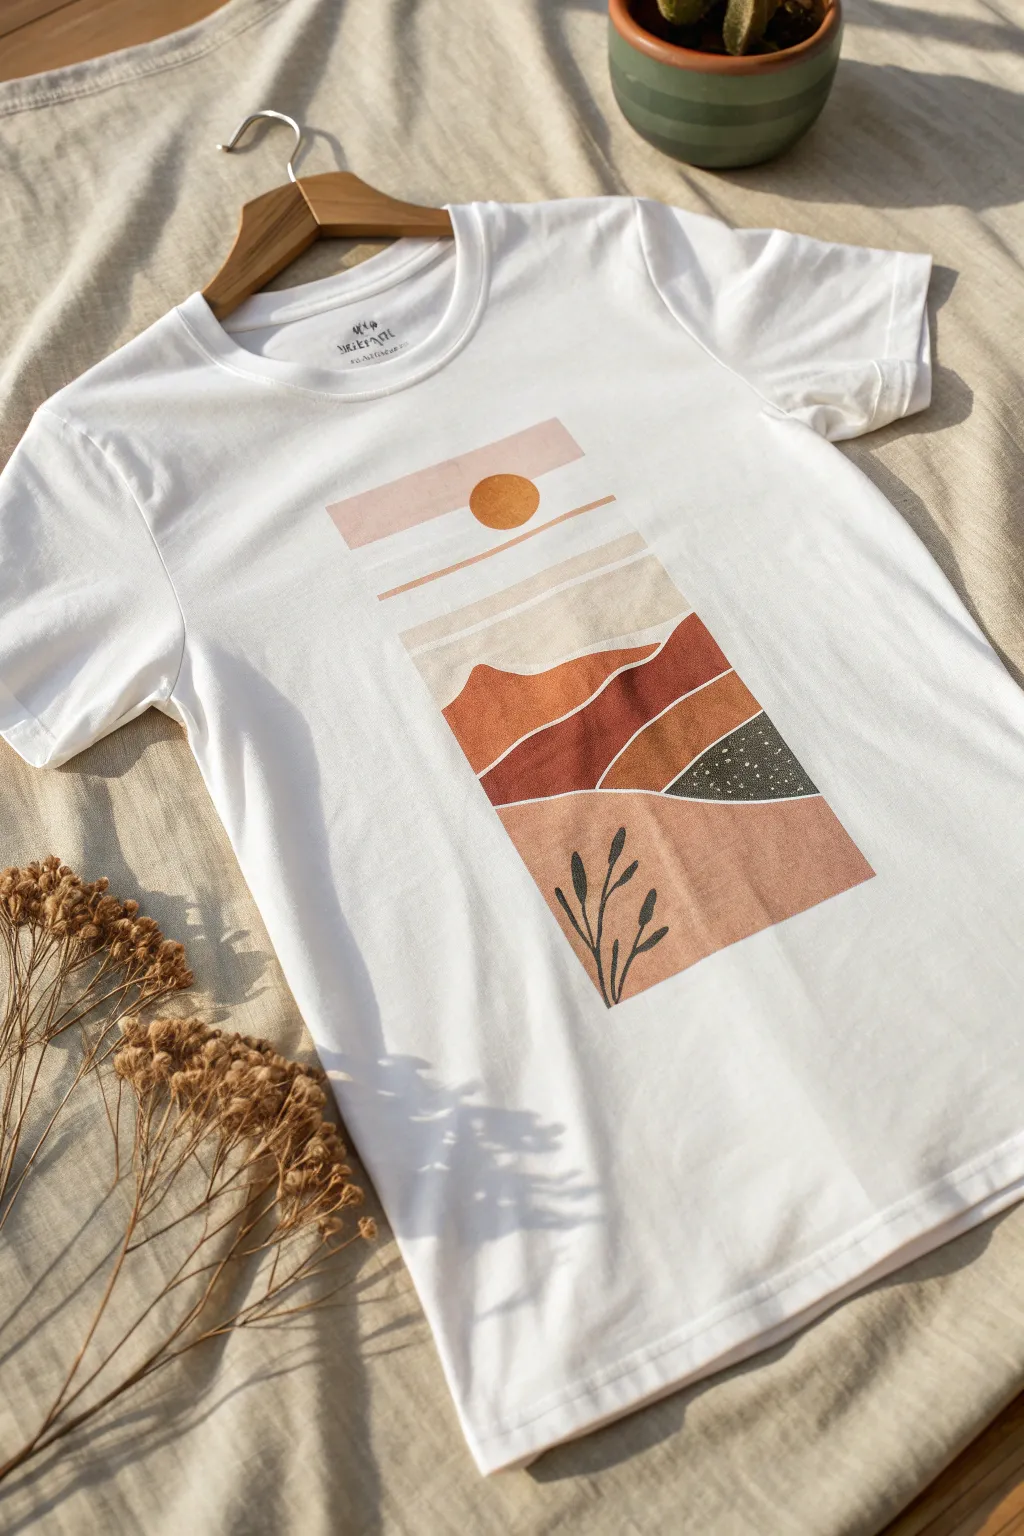
Transform a plain white t-shirt into a piece of wearable art with this vertical landscape design. Using fabric paints in warm terracotta and olive shades, you’ll create a clean, modern graphic that feels both earthy and minimal.
How-To Guide
Materials
- White cotton t-shirt (pre-washed)
- Fabric paints (Terracotta, Burnt Orange, Beige, Cream, Dark Olive Green, Black)
- Fabric painting medium (optional, if using acrylics)
- Painter’s tape or masking tape (various widths)
- Flat shader brushes (medium and small)
- Fine detail brush
- Ruler
- Cardboard or plastic insert (to place inside the shirt)
- Iron (for heat setting)
- Parchment paper or pressing cloth
Step 1: Preparation & Layout
-
Prepare the fabric:
Begin by sliding a piece of cardboard or a plastic barrier inside your t-shirt. This ensures the paint won’t bleed through to the back of the shirt while you work. -
Mask the main shape:
Using painter’s tape and a ruler, mask off a crisp vertical rectangle in the center of the chest. This will act as the outer boundary for your entire design. -
Sketch the horizon lines:
Lightly sketch the internal horizontal divisions and the rolling hills within your taped rectangle using a pencil. Keep the lines faint; you just need a guide for where the colors will change.
Clean Lines Hack
Before painting, seal your tape edges by painting a thin layer of the transparent medium or white paint over the tape line first. This prevents color bleed.
Step 2: Painting the Sky & Sun
-
Block in the top sky:
Mix a soft pinkish-beige. Paint the topmost horizontal strip. I like to keep the paint layer thin so the fabric stays flexible. -
Create the sun gap:
Paint the second strip down in a very pale cream or off-white, leaving a circular negative space in the center for the sun, or paint over it if your sun color is opaque enough to cover it later. -
Paint the sun:
Using a burnt orange or deep gold color, carefully paint the circle of the sun situated on the line between the top two sky bands. -
Add lower sky bands:
Continue painting the horizontal strips moving downward, transitioning from the pale cream to a slightly darker beige at the horizon line.
Paint Flexibility
Mix a fabric medium into acrylic paints (1:1 ratio) rather than using stiff tube acrylics alone. This keeps the design soft and wearable after washing.
Step 3: Painting the Landscape
-
First hill layer:
For the furthest hills, mix a medium terracotta. Paint the rolling wave shape, ensuring you stay strictly within the taped vertical borders. -
Second hill layer:
Switch to a darker burnt sienna or rust color for the middle range of hills. Following your sketched curve, fill in this section completely. -
Foreground hill:
Paint the bottom-most large section in a dusty pink or light clay color. This is the largest block of color at the bottom of the rectangle. -
The textured corner:
In the bottom right corner, paint the small hill segment with dark olive green. Once dry, use a toothpick or the very tip of a brush to dot on tiny white specks for texture.
Step 4: Finishing Touches
-
Add detail lines:
Using your thinnest detail brush and a diluted white or cream paint, carefully trace the separation lines between the hills to make the layers pop. -
Paint the botanical accent:
In the bottom “clay” colored section, paint simple botanical sprigs using a dark charcoal or black paint. Use confident, sweeping strokes for the stems and small dabs for leaves. -
Remove the tape:
Wait until the paint is tacky but not fully dry, then slowly peel away the painter’s tape to reveal your crisp, straight edges. -
Let it cure:
Allow the shirt to dry completely flat for at least 24 hours. Do not disturb the paint during this time. -
Heat set the design:
Once fully dry, place a piece of parchment paper over the design. Iron on a high cotton setting (no steam) for 3-5 minutes to permanently set the pigment into the fibers.
Now you have a custom-designed tee that brings a warm, desert aesthetic to your everyday wardrobe
Half Mandala Chest Design
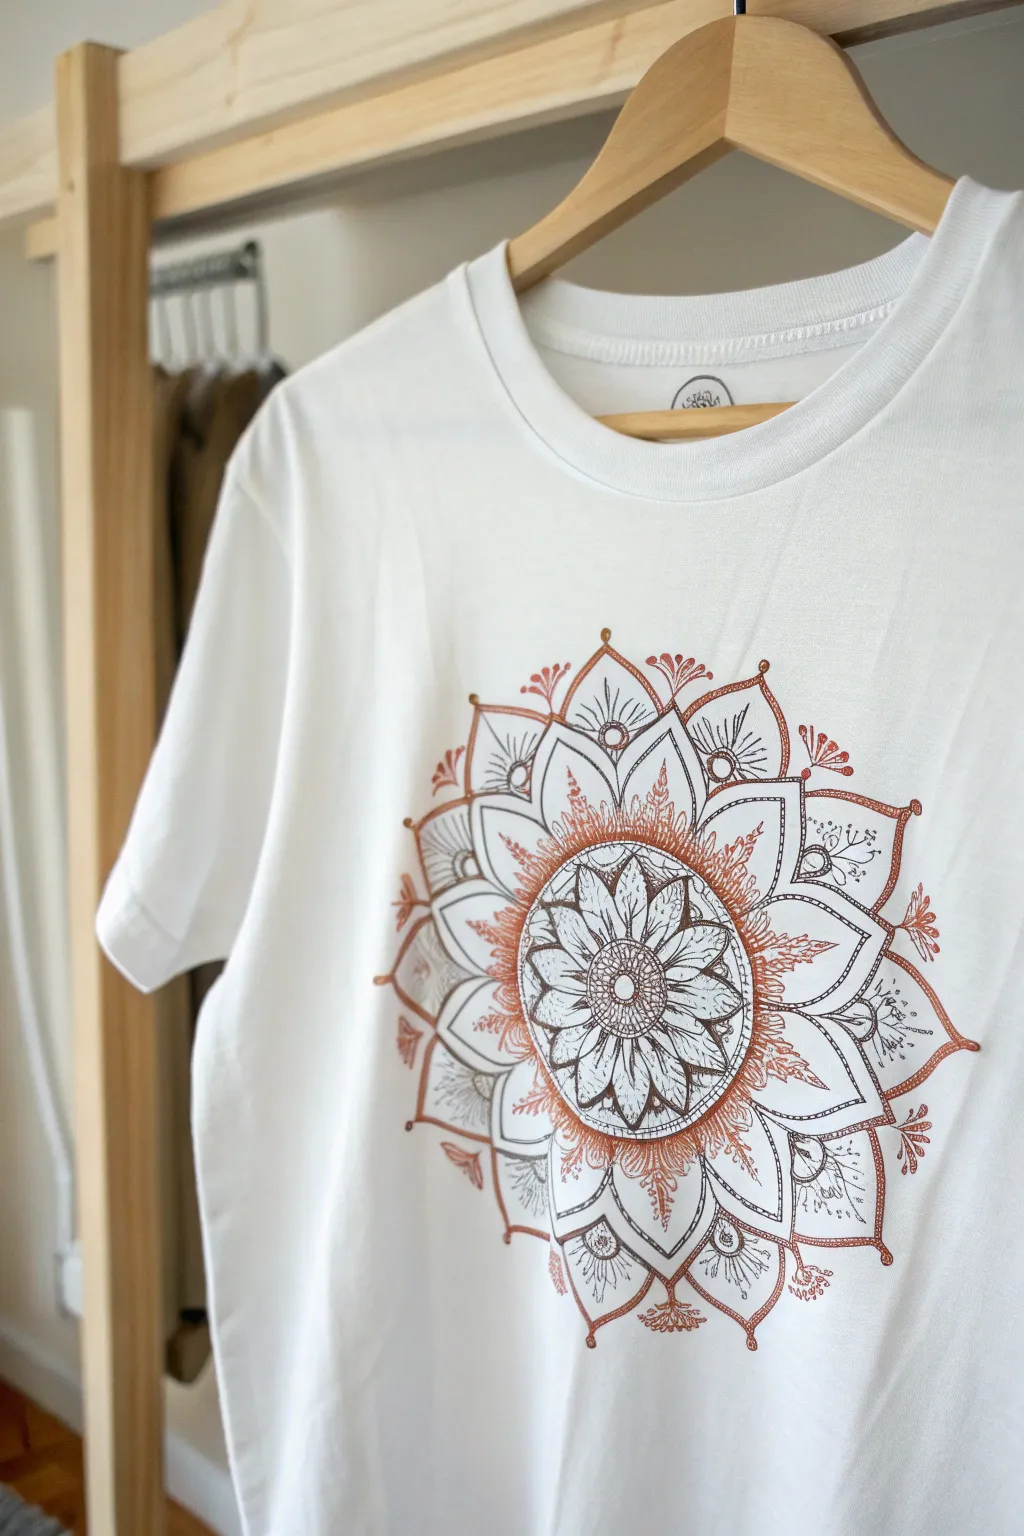
Transform a plain white tee into a wearable piece of art with this intricate mandala design. Using a combination of fine black linework and shimmering copper accents, you’ll create a sophisticated, meditative pattern that sits perfectly centered on the chest.
Step-by-Step Tutorial
Materials
- White cotton t-shirt (pre-washed)
- Black fabric marker (fine tip)
- Copper/metallic fabric paint or marker
- Cardboard insert or t-shirt form
- Compass or round object for tracing (approx. 8-10 inches diameter)
- Ruler
- Pencil (light sketching)
- Iron (for heat setting)
- Ironing cloth or parchment paper
Step 1: Preparation & Layout
-
Prep the fabric:
Begin by washing and drying your t-shirt without fabric softener to ensure the sizing is removed. This helps the ink bond permanently. -
Insert protection:
Slide a piece of cardboard or a t-shirt form inside the shirt. This is crucial to prevent ink from bleeding through to the back of the shirt while you work. -
Find the center:
Use a ruler to find the vertical center of the chest area. Mark a small dot lightly with a pencil about 3-4 inches down from the neckline collar seam. -
Draft the guide circles:
Using a compass centered on your mark (or tracing round household objects), sketch three concentric circles lightly in pencil. These serve as the boundaries for your mandala layers.
Step 2: Drawing the Mandala
-
Start the core:
With your fine-tip black fabric marker, draw a small central flower or starburst in the very center circle. Keep your lines steady and deliberate. -
Create the first petal layer:
Draw the first ring of petals around the core. I like to mark north, south, east, and west points first to keep the petals symmetrical. -
Expand with larger petals:
Move to the next concentric guide circle. Draw larger, pointed petals that extend out to this line. Fill the space between these petals with smaller geometric shapes or tiny overlapping semi-circles. -
Add detailed linework:
Inside the larger petals, add intricate details like stamens, veins, or small dots using the black marker. This is where the mandala starts to look professional. -
Draw the outer border:
Outline the outermost ring with a scalloped or pointed edge design. This defines the final shape of the artwork on the chest. -
Incorporate delicate flourishes:
Add small, floating details outside the main petals—tiny leaves, dots, or wisps—to give the design an airy, organic feel.
Bleeding Lines?
If the marker bleeds into the fabric grain, the cotton might still be damp or too loose. Stretching the fabric slightly on the board or using a finer tip pen helps create sharper lines.
Step 3: Adding Color & Finishing
-
Apply copper accents:
Switch to your copper fabric paint or marker. Select specific rings or petals to highlight. Don’t color everything; focus on alternating rings or specific petal tips to create depth. -
Layer the copper:
If using paint, apply a second thin coat on the copper areas to ensure the metallic pigment really shines against the white cotton. -
Final black contrast:
Once the copper is applied, go back with the black marker to re-outline any areas where the copper might have overlapped the black lines, crisping up the edges. -
Let it dry completely:
Allow the shirt to lay flat and dry undisturbed for at least 24 hours. The ink needs to cure fully before heat setting. -
Heat set the design:
Set your iron to the cotton setting (no steam). Place a thin cloth or parchment paper over the design and iron for 3-5 minutes, moving constantly to lock in the color.
Add Some Texture
For a mixed-media 3D effect, try sewing small bronze beads or sequins into the center of the geometric shapes after heat-setting the ink.
Wear your new custom-designed shirt with pride knowing it is a true one-of-a-kind original
Cut-Paper Collage Graphic
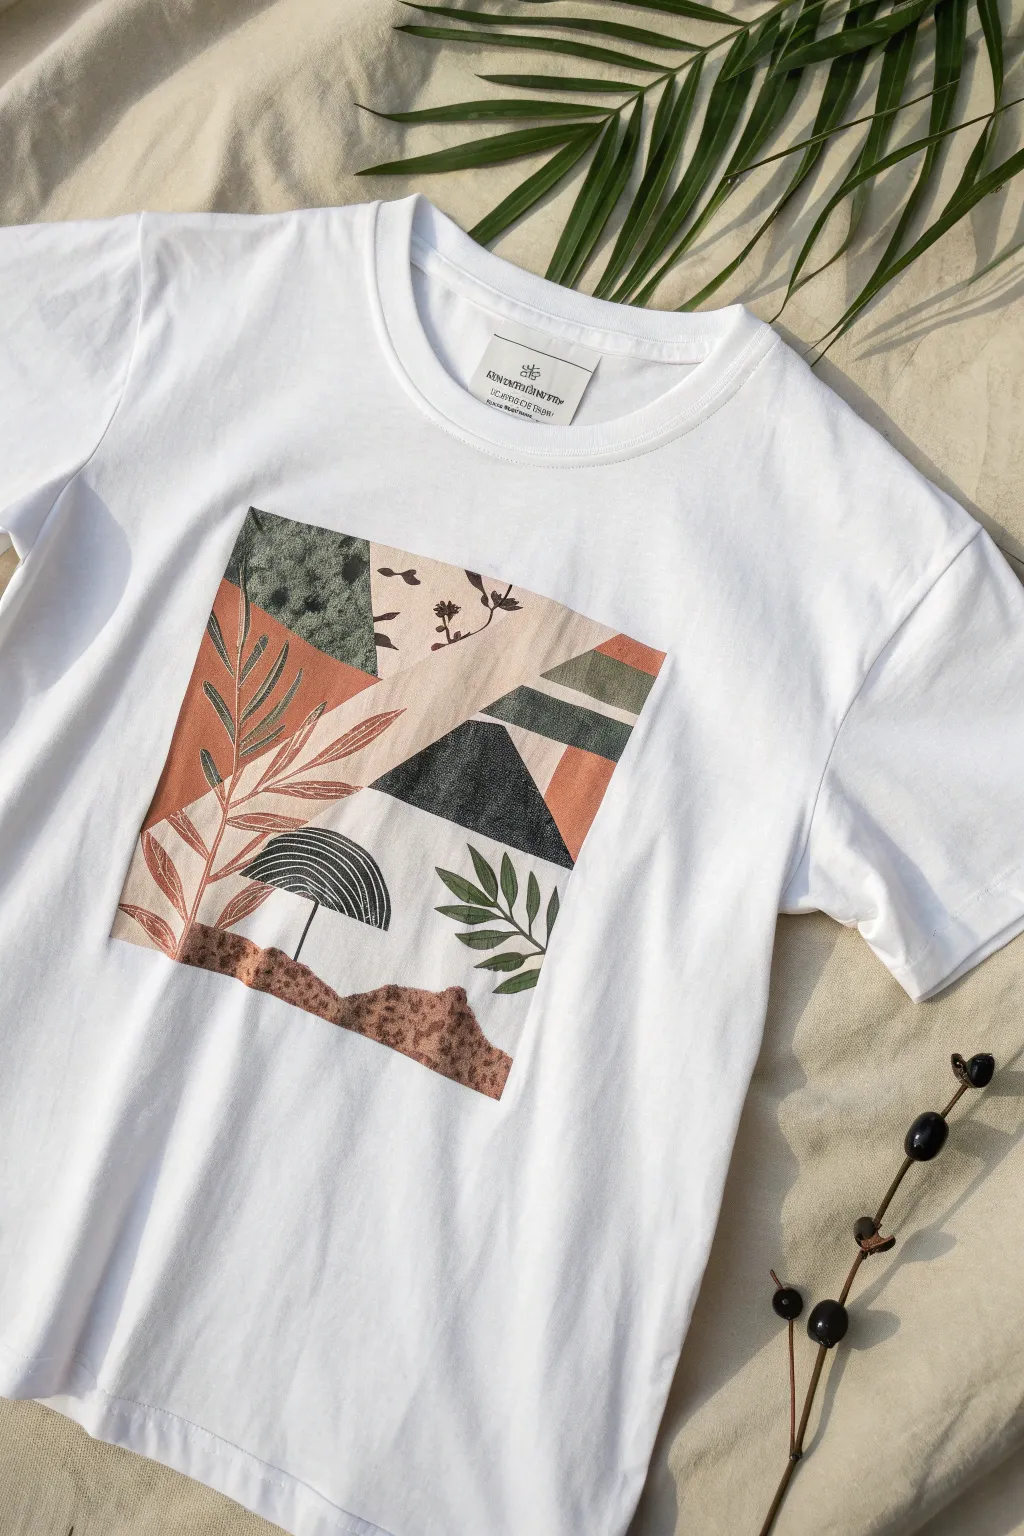
Transform a plain white tee into a piece of wearable modern art with this cut-paper style collage design. This project combines geometric abstraction with organic botanical elements in a muted, earthy color palette for a sophisticated yet DIY look.
Step-by-Step Guide
Materials
- White cotton t-shirt (pre-washed)
- Iron-on transfer paper (for light fabrics)
- Computer with graphic design software (Photoshop, Illustrator, or free alternatives like Canva)
- Scanner (optional, if using analog collage methods)
- Printer (inkjet or laser depending on your transfer paper)
- Scissors
- Iron and ironing board
- Parchment paper or silicone sheet
- Cardboard piece (to place inside shirt)
Step 1: Designing the Collage
-
Gather digital textures:
Since this is a printed graphic attempting to look like cut paper, start by sourcing high-resolution textures. Look for paper grain, speckled textures, watercolor washes, and flat earthy tones like terracotta, sage green, beige, and charcoal. -
Create the base square:
Open your design software and create a new canvas sized standard letter (8.5×11 inches). Draw a large square in the center to serve as your boundary; this will be the ‘container’ for your collage. -
Draft the background shapes:
Divide your square composition with large geometric blocks. Place a terracotta triangle on the left, a diagonal beige stripe across the middle, and varied rectangular blocks of sage and charcoal on the right side. -
Add the botanical sketches:
Overlay your geometric base with simple line drawings or silhouettes of plants. I like to use a dark brown or black for these to ensure they stand out. Draw a large fern frond on the left, small delicate branches at the top, and leafy stems in the bottom right corner. -
Insert the focal elements:
Create the stylized mushroom shape in the lower left quadrant using a semicircular cap with line details and a simple stem. Add a textured, hilly mound at the very bottom using a brown, speckled pattern to ground the scene. -
Refine textures and edges:
To mimic the cut-paper look, ensure your shapes have clean, sharp edges but slightly mismatched alignments. Apply your sourced textures to the shapes—give the green triangle a sponge-painted look and the terracotta sections a matte paper feel. -
Flip the image:
Before printing, horizontally flip (mirror) your entire design. This is crucial for iron-on transfers so the text or orientation appears correct once applied to the shirt.
Step 2: Printing and Prep
-
Test print on paper:
Run a test print on standard printer paper first. Check that the colors are vibrant and the size fits well on your t-shirt’s chest area. -
Load transfer paper:
Load your iron-on transfer paper into the printer, ensuring you are printing on the correct coated side. Set your printer settings to ‘High Quality’ or ‘Photo’ for the best color saturation. -
Print the final design:
Print your mirrored design onto the transfer sheet. Allow the ink to dry completely for at least 5-10 minutes to prevent smudging during handling. -
Trim the graphic:
Cut out your square design. You can leave a very thin (1/8 inch) border around the square if desired, but trimming right to the edge usually looks cleaner for geometric shapes.
Collage Pro Tip
Scan real hand-cut/painted paper pieces instead of digital fills. The authentic torn edges and brushstrokes create a much richer, organic final look.
Step 3: Application
-
Prepare the shirt:
Lay your pre-washed, dry t-shirt flat on an ironing board. Iron the chest area thoroughly to remove all wrinkles and heavy moisture, which can interfere with adhesion. -
Position adhesion barrier:
Slide a piece of sturdy cardboard inside the shirt, directly under where you plan to place the image. This prevents the glue from bleeding through to the back of the shirt. -
Place the transfer:
Place your trimmed transfer paper face-down onto the center of the chest. The backing paper (usually gridded) should be facing up at you. -
Apply heat:
Set your iron to the hottest cotton setting (no steam!). Press firmly, moving the iron constantly in small circles. Ensure you cover every inch, especially the corners and edges, applying heavy pressure for the time specified on your paper’s package instructions. -
Cool down peel:
Let the transfer cool completely until it is room temperature. This is often called a ‘cold peel’ and helps maintain the sharp geometric edges. -
Reveal the design:
Gently peel away the backing paper starting from one corner. Pull slowly and steadily. If any part of the image lifts, lay the paper back down and re-iron that spot. -
Final seal:
Place a sheet of parchment paper over the exposed design and iron it one last time for about 10-15 seconds to set the ink deeper into the fabric fibers.
Level Up Your Tee
Use fabric puff paint to trace over the botanical line drawings after ironing. This adds 3D tactile texture that contrasts beautifully with the flat transfer.
Wear your new geometric art tee with pride, knowing you’ve mastered the balance between digital design and handcrafted style
Faux Stitch Illustration
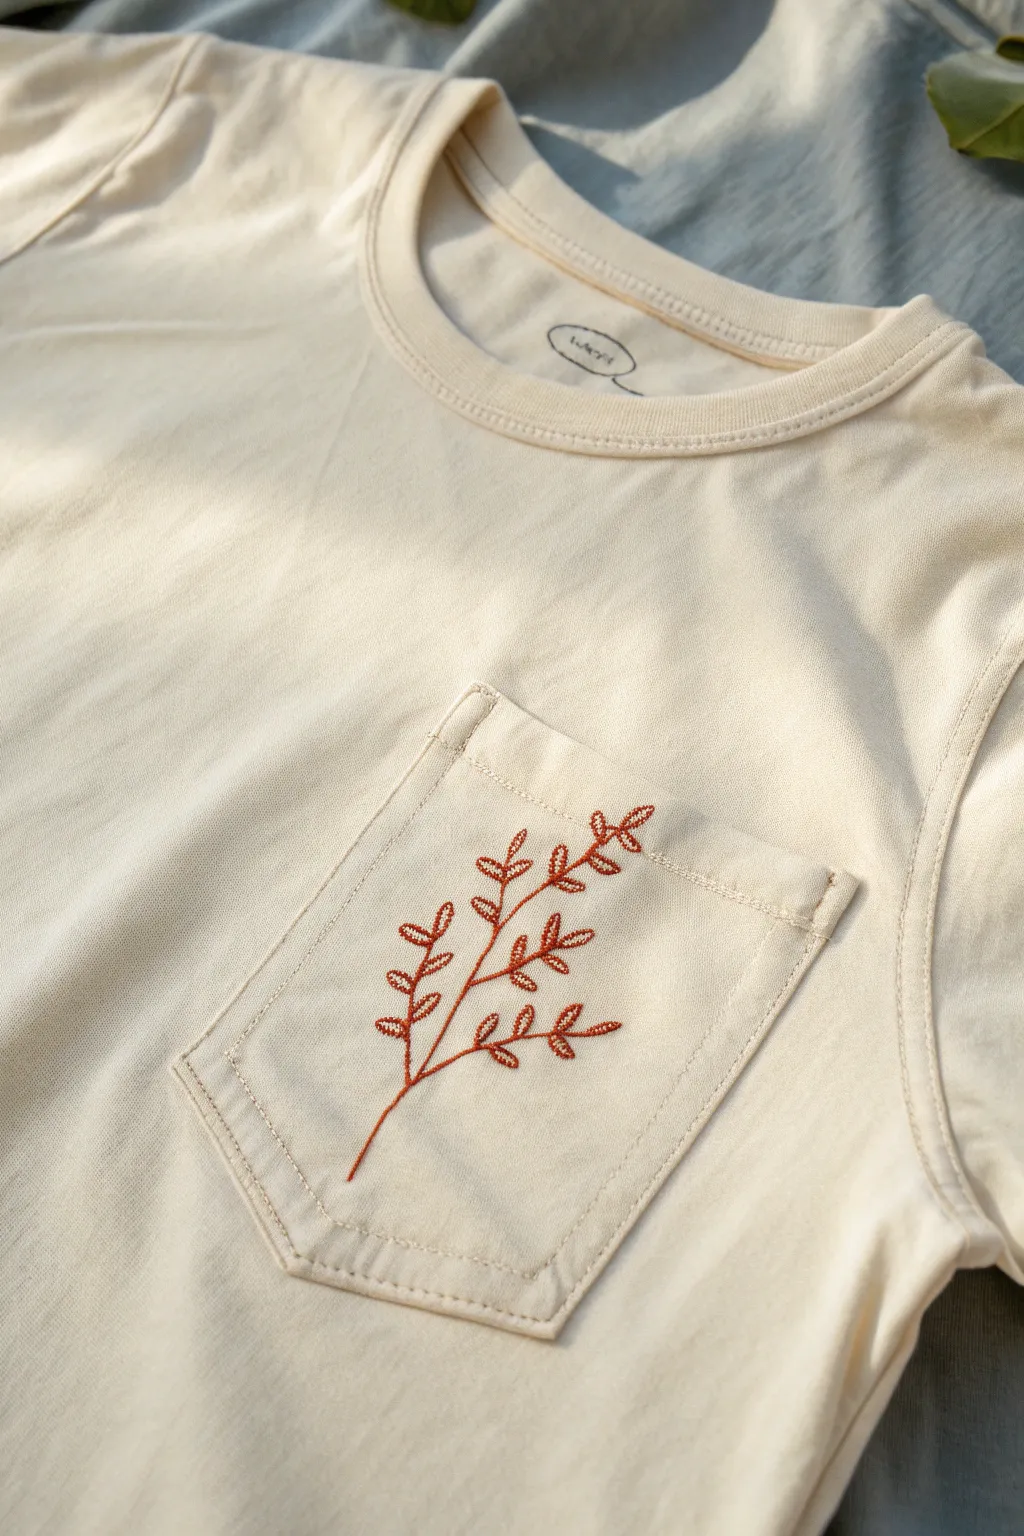
Achieve the cozy, handmade look of classic embroidery without threading a single needle using this faux-stitch technique. By carefully applying dimensional fabric paint, you’ll create a charming botanical branch that sits right on your pocket, offering tactile texture and vintage flair.
How-To Guide
Materials
- Cream or off-white cotton pocket t-shirt
- Dimensional fabric paint (Puff paint) in terracotta or rust
- Fine-tip applicator bottle (often included with the paint)
- Disappearing ink fabric marker or tailor’s chalk
- Cardboard scrap (cut to fit inside the pocket)
- Botanical branch stencil (optional, can freehand)
- Iron and ironing board (if heat activation is required by paint brand)
- Press cloth or parchment paper
Step 1: Preparation & Sketching
-
Prepare the surface:
Wash and dry your t-shirt first without using fabric softener, as this ensures the paint adheres properly to the fibers. Iron the pocket flat to remove any wrinkles. -
Insert the barrier:
Cut a small piece of cardboard just slightly smaller than the pocket’s dimensions. Slide it carefully inside the pocket to prevent any paint or ink from bleeding through to the shirt underneath. -
Draft the design:
Using your disappearing ink marker, lightly sketch a central stem starting from the bottom left corner of the pocket and curving gently towards the top right. -
Add foliage guide:
Draw small, paired leaves extending from the stem. Keep the shapes simple—ovals or teardrops work best for mimicking embroidery stitches later on. -
Review placement:
Take a step back and look at your sketch. The design should feel balanced within the pocket square, not too crowded against the edges.
Paint Flow Tip
Store your paint bottle upside down for 15 minutes before starting. This removes air bubbles near the tip, preventing sudden splatters that could ruin your line work.
Step 2: Painting the Faux Stitches
-
Test texturing:
Before touching the shirt, practice on a scrap piece of fabric or paper towels. Squeeze the dimensional paint gently to get a consistent flow and practice making short, dash-like strokes. -
Begin the stem:
Starting at the base of your sketched stem, apply the paint in a continuous, thin line. Moving slowly helps maintain an even thickness that resembles a stem stitch. -
Create leaf veins based on stitch style:
For the leaf stems, use very short, deliberate lines connecting the main stem to where your leaves will be. -
Outline the leaves:
Trace the outline of your first leaf with the paint. Instead of a single solid line, try breaking it into tiny, connected dashes if you want an ultra-realistic ‘running stitch’ look, or keep it solid for a ‘satin stitch’ outline vibe. -
Fill the leaves (Hatching technique):
To mimic thread texture, fill the inside of the leaf outlines with diagonal hatching lines. I find that angling these lines slightly creates the illusion of thread direction. -
Continue the pattern:
Work your way up the branch, completing one leaf pair at a time. Watch your hand placement to avoid smearing the wet paint from the lower sections. -
Refining the tips:
For the smaller leaves at the very top of the branch, use just a tiny dot or a single dash of paint to represent a budding leaf. -
Clean up:
If you notice any air bubbles in the paint, pop them gently with a pin while the paint is still wet to ensure a smooth finish.
Step 3: Setting & Finishing
-
Dry time:
Allow the shirt to lay flat undisturbed for at least 4 hours. The surface might feel dry sooner, but the interior of the paint needs time to set. -
Remove barrier:
Once the paint is dry to the touch, carefully slide the cardboard out of the pocket. -
Curing or Puffing:
Check your specific paint instructions. Some dimensional paints puff up with heat. If so, hold a steam iron slightly above the design (don’t touch it!) to activate the ‘puff’ effect. -
Remove guide lines:
If any blue marker lines are still visible, dab them gently with a damp cloth or let them fade with time if using air-soluble ink. -
Final cure:
Let the project sit for a full 72 hours before wearing or washing to ensure maximum durability of your faux embroidery.
Go Multicolored
Use a mossy green paint for the stem and a terracotta color for the leaves create a more complex, realistic botanical thread effect.
Enjoy the tactile charm of your new custom tee without the hassle of needlework
Painted Tie-Dye Spiral Remix
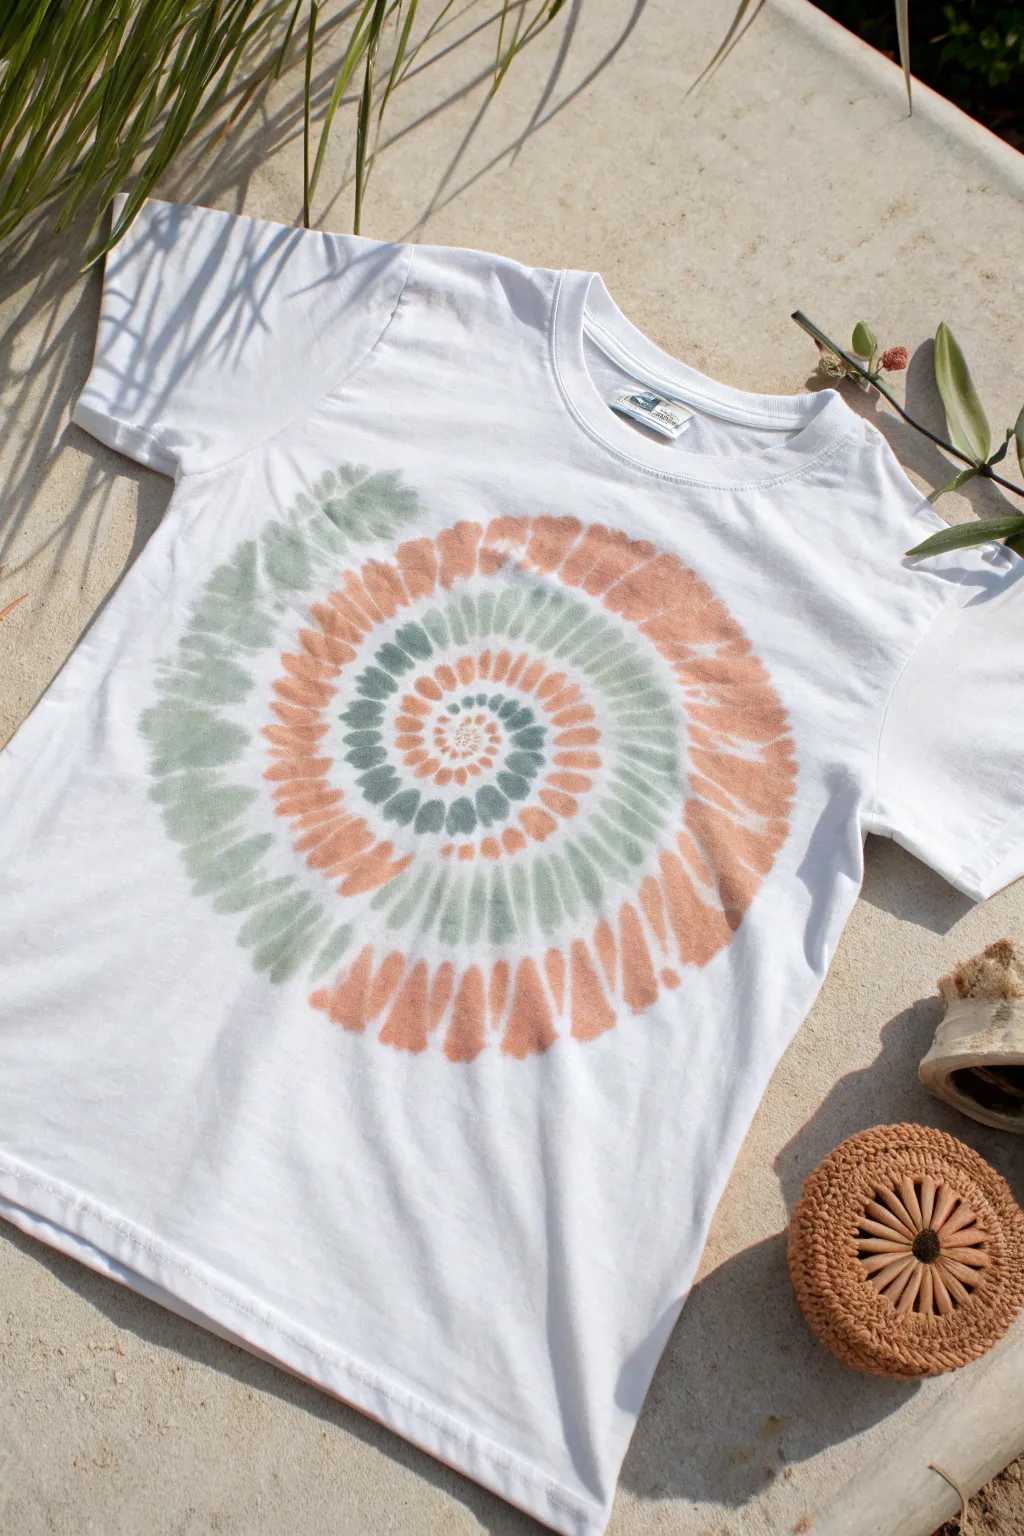
Achieve the classic spiral tie-dye look with more precision and control by painting the dye directly onto the fabric. This method creates crisp edges and a beautiful watercolor effect using a serene palette of sage green, terracotta, and slate blue.
Detailed Instructions
Materials
- White cotton t-shirt (pre-washed)
- Fabric paints or liquid fabric dye (sage green, terracotta, slate blue)
- Textile medium (if using acrylic paints)
- Round paintbrushes (Size 8-10)
- Water cup
- Cardboard insert or wax paper
- Iron (for heat setting)
- Disappearing ink fabric pen or light pencil
Step 1: Preparation
-
Prep the shirt:
Start with a clean, pre-washed white cotton t-shirt. Iron it flat to remove wrinkles, as a smooth surface makes painting the spiral much easier. -
Insert barrier:
Slide a piece of cardboard or wax paper inside the shirt. This is crucial to prevent the paint from bleeding through to the back layer of fabric. -
Mix your colors:
Prepare your palette. If you are using standard fabric paints, water them down slightly to achieve a fluid, dye-like consistency. If using acrylics, mix them with textile medium according to the bottle instructions.
Step 2: Sketching the Design
-
Mark the center:
Find the visual center of the shirt’s chest area and make a tiny dot with your disappearing ink pen. -
Draw the spiral guide:
Starting from that center dot, lightly sketch a loose spiral moving outward. Don’t worry about making it perfect; this is just a guideline for where your brush strokes will go. Aim for about 4-5 rotations.
Paint too stiff?
If your painted areas feel clearer plastic-y or stiff after drying, you likely didn’t use enough water or textile medium. Wash gently to soften it over time
Step 3: Painting the Spiral
-
Start with the center:
Load your brush with the terracotta color. Paint small, teardrop-shaped strokes distinctively following the very center of your spiral line. Keep the strokes separate rather than a solid line to mimic the tie-dye fold effect. -
Add the second color:
Switch to the slate blue. Paint a second trail of small dashes or teardrops right next to the terracotta ones, winding out from the center. -
Introduce the sage green:
Complete the triad by adding the sage green strokes. You should now have three distinct ‘arms’ of color spiraling out from the middle. -
Expand the strokes:
As you move further outward on the spiral, gradually increase the size of your brushstrokes. The dashes should become longer and slightly wider, mirroring how tie-dye patterns expand. -
Maintain spacing:
Keep a tiny sliver of white space between the different color spiral arms. This negative space helps define the swirl shape. -
Soften edges (optional):
I like to dampen my brush slightly with plain water and lightly touch the edges of the painted strokes while they are still wet. This feathers the paint just a bit for a softer, more authentic dyed look. -
Continue to the outer edge:
Keep following your spiral guide until the design spans nearly the full width of the shirt. The outer strokes should be large, loose wedges of color. -
Fill gaps:
Step back and look at the overall shape. If the spiral looks too sparse in areas, add smaller accent dots or dashes in the corresponding colors to fill the visual gaps.
Vintage Vibes
After heat setting, wash the shirt with a cup of salt in the cycle. This can help slightly distress the pigment for a worn-in, vintage tee appearance
Step 4: Finishing Touches
-
Dry completely:
Let the shirt sit undisturbed until the paint is completely dry to the touch. This usually takes about 24 hours depending on humidity. -
Heat set:
Once dry, verify the heat-setting instructions for your specific fabric paint. Typically, you will need to iron the design on a cotton setting (no steam) for 3-5 minutes to make it permanent. -
Wash:
Wait at least 72 hours before washing the shirt for the first time to ensure the best color retention.
Enjoy wearing your custom, artistically controlled tie-dye creation.
Bleach-Paint Night Silhouettes
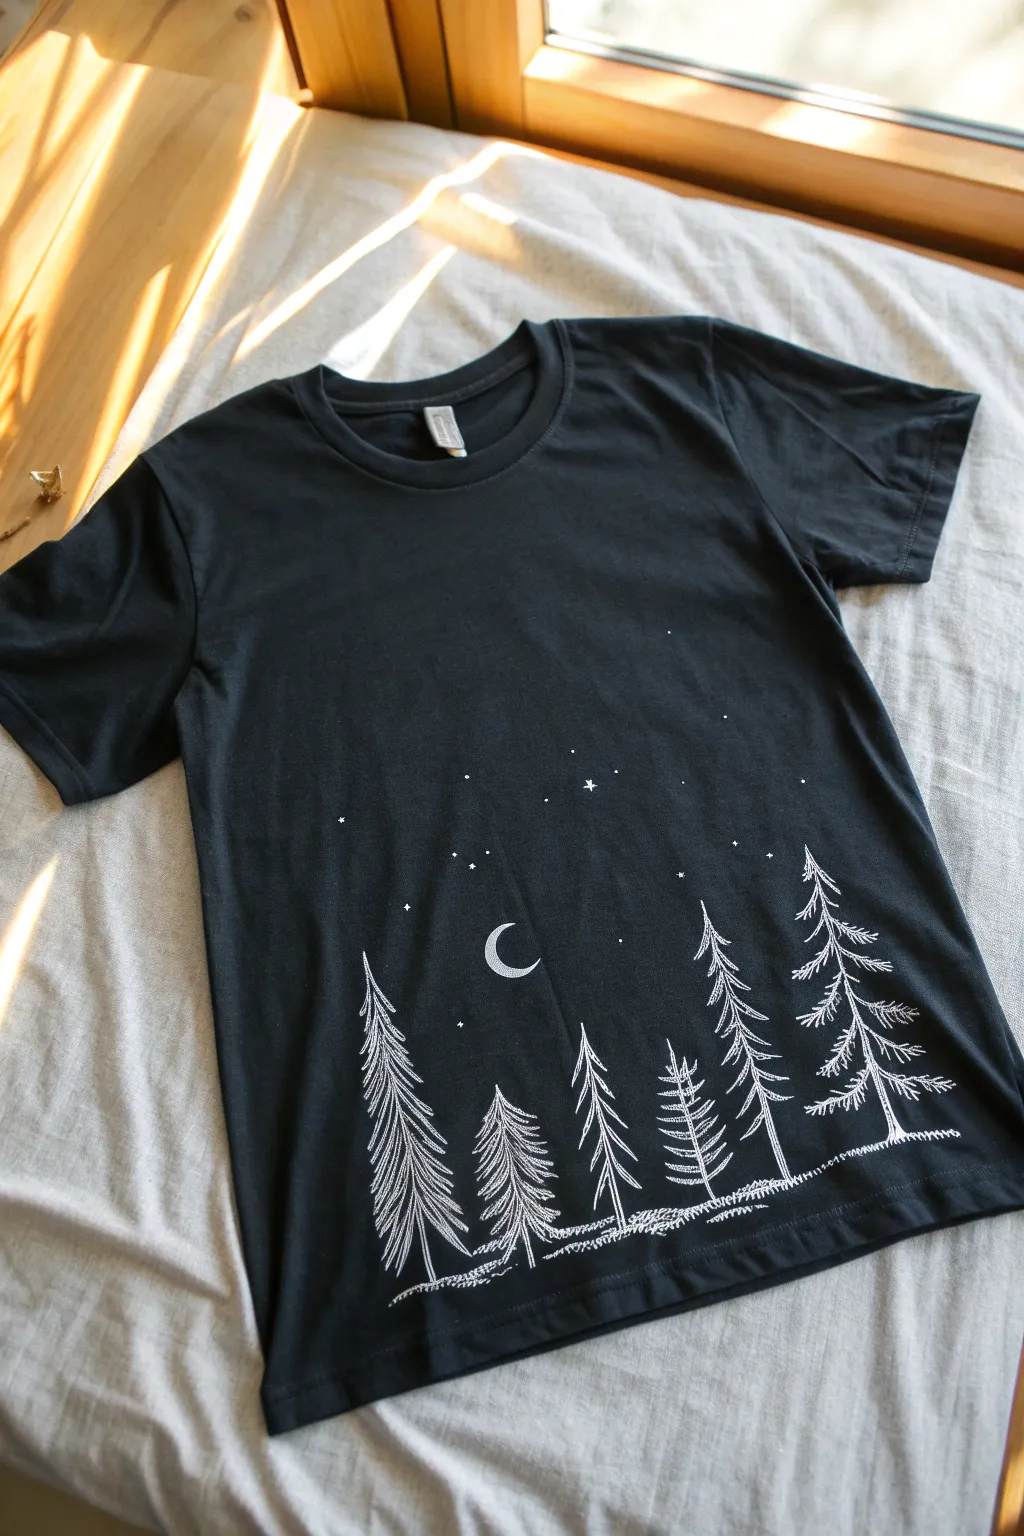
Transform a plain black t-shirt into a wearable piece of art with this delicate starry night silhouette. Using bleach as your ink creates a permanent, soft-to-the-touch design that won’t crack or fade like traditional screen printing.
Step-by-Step Tutorial
Materials
- Black cotton t-shirt (100% cotton works best)
- Household bleach
- Small plastic cup or jar
- Fine-point round paintbrush (size 0 or 00)
- White gel pen or chalk (for drafting)
- Piece of cardboard (to fit inside the shirt)
- Paper towels
- Protective gloves
Step 1: Preparation
-
Prepare your workspace:
Work in a well-ventilated area because bleach fumes can be strong. Lay down a protective covering on your table to prevent accidental spills. -
Insert the barrier:
Slide a piece of cardboard inside the t-shirt. This is crucial—it prevents the bleach from soaking through to the back of the shirt and creates a firm, flat surface for drawing. -
Smooth the canvas:
Pull the shirt taut over the cardboard to remove wrinkles, focusing on the bottom third of the shirt where your design will live. Smooth out the fabric with your hands.
Step 2: Drafting the Design
-
Sketch the baseline:
Using a white gel pen or piece of chalk, lightly sketch a slightly wavy horizontal line near the bottom hem. This ground line doesn’t need to be perfect; unevenness looks like natural terrain. -
Position the trees:
Mark faint vertical lines where you want your pine trees to stand. Vary the heights to create visual interest—maybe a tall one on the right and a cluster of smaller ones on the left. -
Add the moon:
Lightly outline a small crescent moon shape in the upper center of your layout, floating above the tree line.
Bleach Control Tip
If you’re nervous about drips, use a bleach pen for the main lines. It’s gel-based and won’t spread as easily as liquid bleach, giving you more control.
Step 3: Painting with Bleach
-
Prepare your ‘paint’:
Pour a very small amount of household bleach into your cup. Do not dilute it; straight bleach gives the sharpest white lines on black cotton. -
Test your brush:
Dip your fine-point brush into the bleach and wipe the excess on the rim or a paper towel. You want the brush damp, not dripping wet, to prevent bleeding. -
Draw the trunks:
Starting with the vertical lines you sketched, carefully trace the tree trunks with the bleach. Press lightly for thin, elegant lines. -
Create the branches:
For the pine needles, use short, quick strokes angling downward from the trunk. Start at the top of the tree with very small strokes and make them gradually wider as you move down. -
Detail the texture:
I like to leave small gaps between the branch strokes rather than coloring them in solid. This sketching style mimics the texture of pine needles. -
Ground the forest:
Go over your bottom ground line. Add little distinct scribbles or cross-hatching marks along the ground to suggest grass or fallen needles. -
Paint the moon:
Carefully fill in your crescent moon shape. You might need a second pass here to make it bright white, but let the first layer react for a minute before adding more.
Level Up: Galaxy Effect
Before painting the white stars, use a spray bottle with diluted bleach to create a faint, misty ‘nebula’ background behind the trees for added depth.
Step 4: Finishing Touches
-
Add the stars:
Dip just the very tip of your brush into the bleach. Gently touch the fabric in the sky area to create small dots for stars. -
Vary star sizes:
Create a few larger stars by making a tiny ‘x’ or cross shape, like the distinctive twinkle shown in the reference image. -
Watch the magic:
Let the shirt sit for about 10-15 minutes. As the bleach dries, the orange rust color will turn into a brighter white. Don’t panic if it looks dim at first. -
Deactivate the bleach:
Once the design is fully dry and white, rinse the shirt thoroughly in cold water to stop the chemical reaction. This prevents the bleach from eventually eating holes in the fabric. -
Wash and dry:
Wash the shirt on a normal cycle by itself for the first time, then dry it. Your custom design is now permanently part of the fabric.
Now you have a cozy, custom piece of wearable art perfect for your next outdoor adventure
Tape-Resist Sharp Shapes
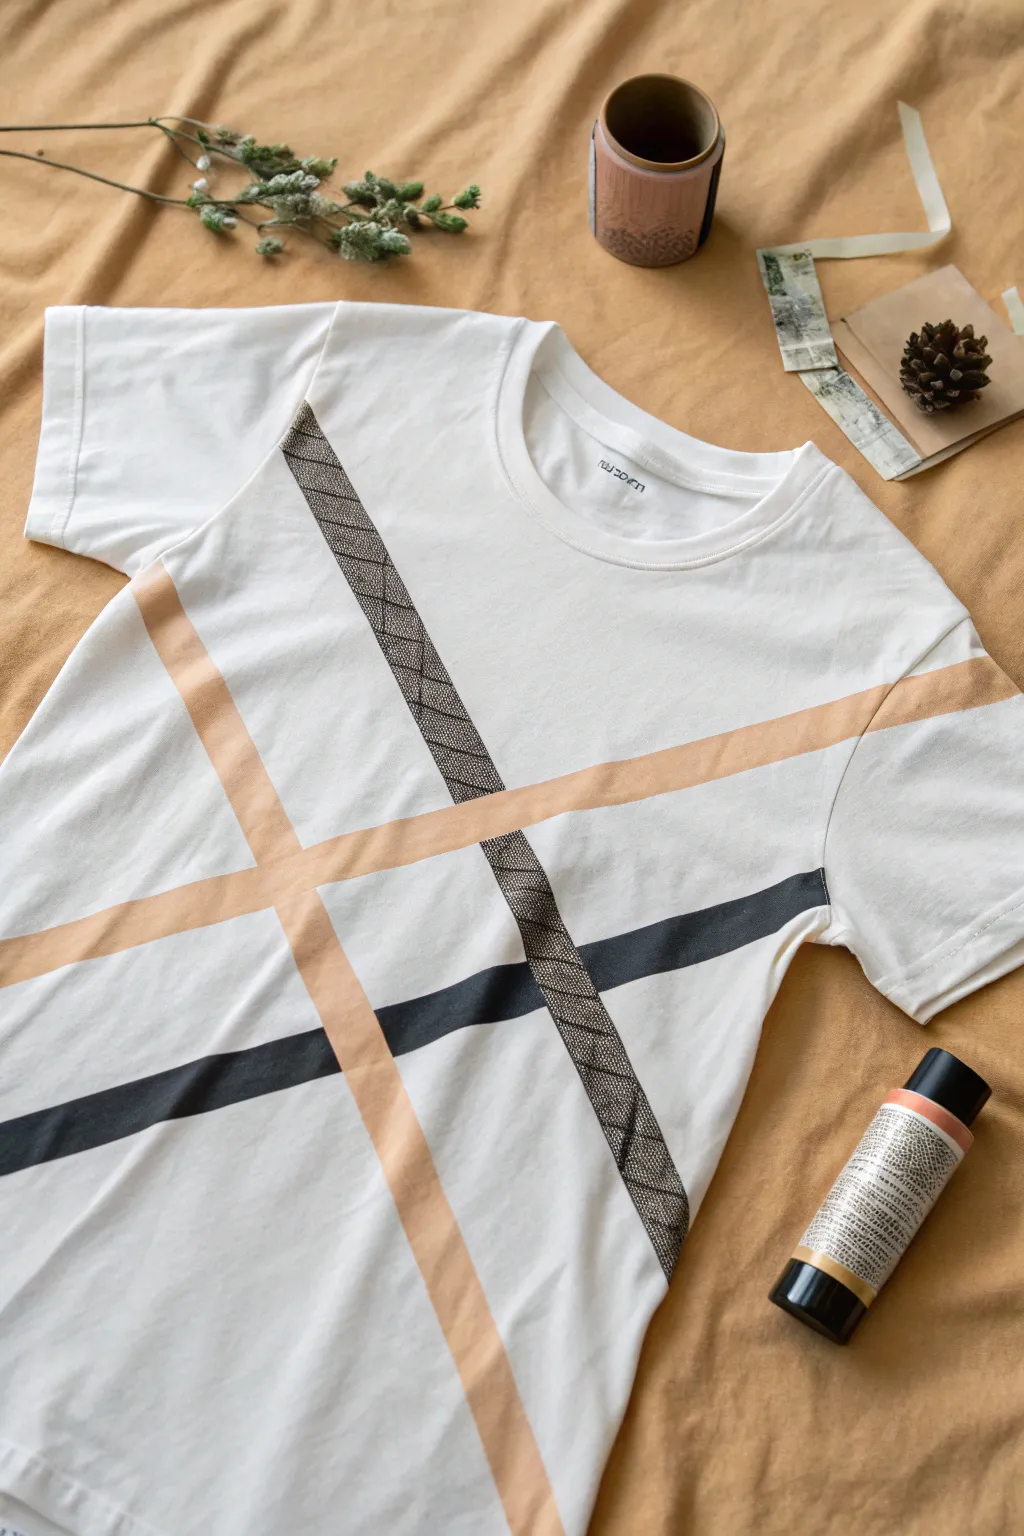
Transform a plain white t-shirt into a piece of modern wearable art using painter’s tape and geometric precision. The result is a crisp, intersecting design featuring peach, black, and a unique textured metallic accent.
Step-by-Step Guide
Materials
- Plain white cotton t-shirt (pre-washed)
- Fabric paint (Soft Peach or Salmon)
- Fabric paint (Black)
- Metallic or textured fabric paint (Bronze or Dark Silver)
- Painters tape (various widths: 1 inch, 0.5 inch)
- Cardboard or wax paper (to insert inside the shirt)
- Stencil brushes or foam pouncers
- Ruler or straight edge
- Iron (for heat setting)
- Pressing cloth or scrap fabric
Step 1: Preparation & Masking
-
Prep the shirt:
Begin by washing and drying your t-shirt without fabric softener to remove any sizing. Iron out any wrinkles to ensure a perfectly flat surface for taping. -
Protect the layers:
Slide a piece of cardboard or wax paper inside the shirt. This is crucial to prevent paint from bleeding through to the back during the process. -
Plan the first line:
Decide on the placement of your largest stripe (the peach one). Place two strips of 1-inch painter’s tape diagonally across the shirt, leaving a gap of about 1.5 to 2 inches between them. Extend the tape all the way onto the sleeves. -
Secure the edges:
Run your finger or a credit card firmly along the edges of the tape to seal them completely. This prevents paint seepage and ensures crisp lines. -
Mask the second line:
Create the crossing black line. Use thinner tape or space your tape closer together (about 0.75 inches wide) running in the opposite diagonal direction, intersecting the first path. -
Mask the texture line:
Finally, layout the path for the third, textured line. This one should roughly parallel the black line but cross over at a different point. I prefer angling it slightly differently to create dynamic tension.
Tape Sealing Tip
Paint a thin layer of white paint along the tape edges first. This seals the gap, so if anything bleeds, it’s just white-on-white.
Step 2: Painting
-
Apply the peach layer:
Using a foam pouncer, dab the soft peach fabric paint into the widest masked area. Apply thin, even layers rather than one thick globs to keep the fabric flexible. -
Paint the black stripe:
Carefully paint the thinner intersecting stripe with black fabric paint. Be mindful where the tape lines cross; ensure you are painting the correct sections. -
Create the texture effect:
For the third stripe, you have a few options to mimic the image. You can use a metallic bronze paint and dab it through a mesh stencil, or simply use a dry-brushing technique with a stiff bristle brush to create a scratchy, cross-hatch texture. -
Detailing the texture:
If hand-painting the texture, use very little paint on your brush and create small ‘x’ or diamond shapes in a dark metallic color to mimic the snakeskin look seen in the reference. -
Let it set:
Allow the paint to dry until it is tacky but not fully hardened—usually about 20 to 30 minutes.
Level Up: Texture
For the textured stripe, place a piece of drywall mesh tape between your masking lines and paint over it to create a perfect grid pattern.
Step 3: Finishing Touches
-
The reveal:
Slowly peel back the painter’s tape at a sharp 45-degree angle. This is the most satisfying part, revealing your crisp white lines underneath. -
Fix imperfections:
If any paint bled under the tape, use a small detail brush with opaque white fabric paint to touch up the edges. -
Full dry:
Let the shirt sit undisturbed for at least 24 hours to ensure the paint creates a permanent bond with the fibers. -
Heat set:
Once dry, place a pressing cloth over the design and iron on a medium-high setting (no steam) for 3-5 minutes to heat set the paint, making it machine washable.
Now you have a custom, gallery-worthy tee that adds a graphic punch to any outfit
Neon Outline on Dark Tee
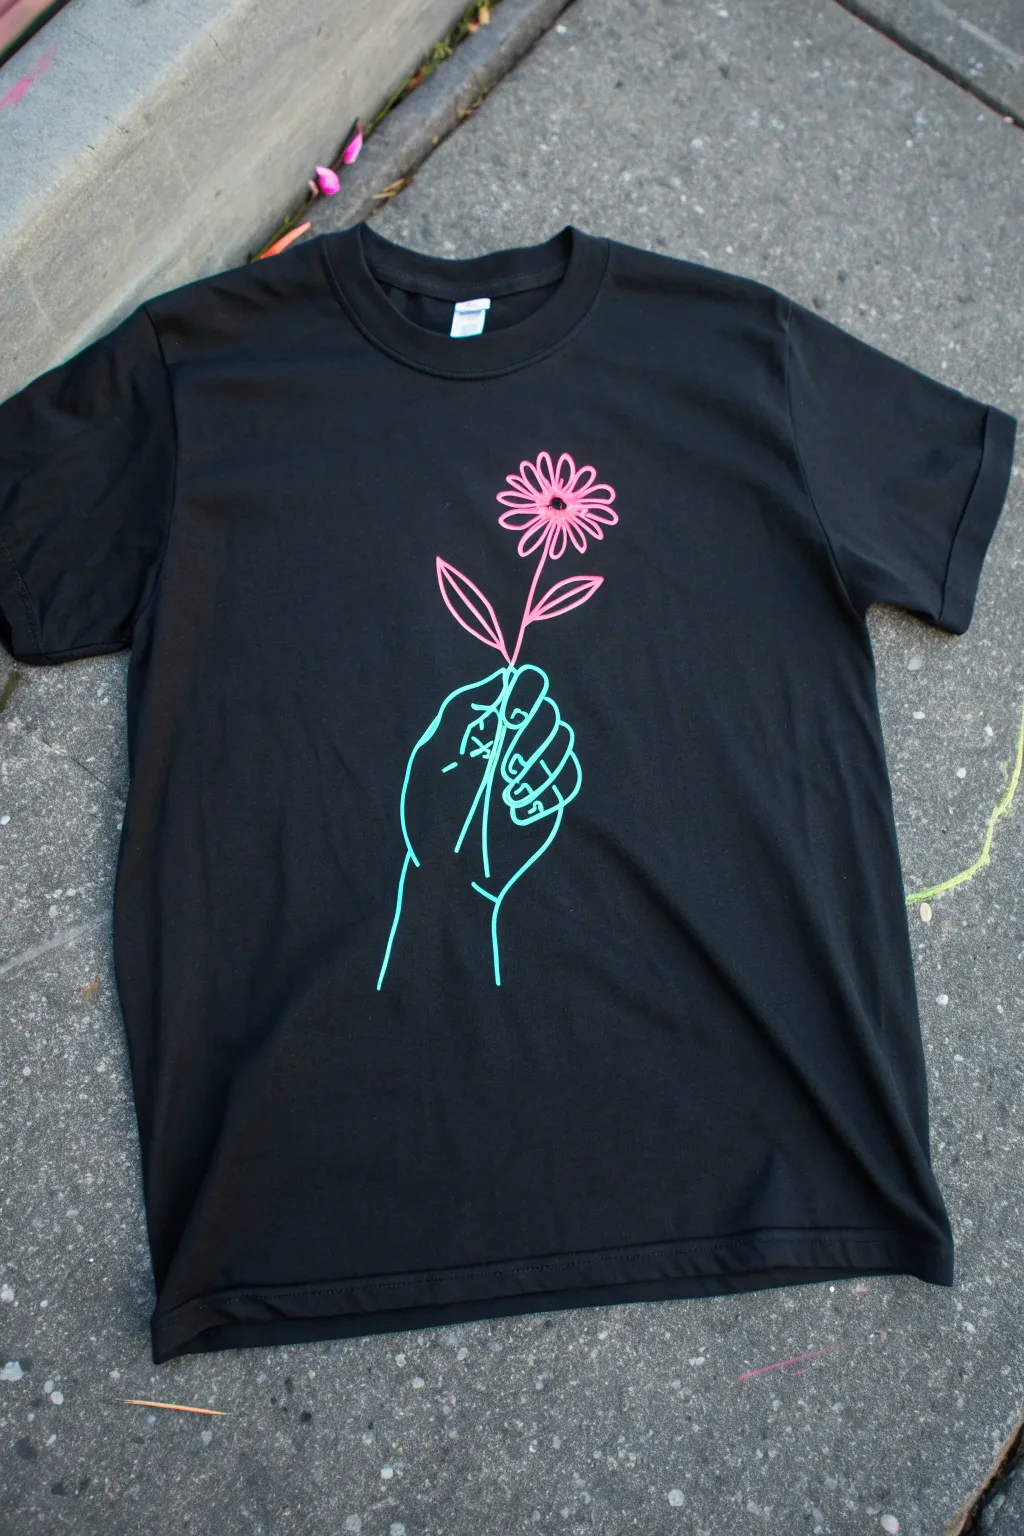
Transform a plain black shirt into wearable art with this striking neon outline design. The contrast of the bright teal and hot pink against the dark fabric creates a glowing effect that minimalist but bold.
Detailed Instructions
Materials
- Black cotton t-shirt (pre-washed)
- White fabric pencil or tailors chalk
- Cardboard insert or shirt cutting board
- Neon teal fabric paint (dimensional or puffy paint works best for lines)
- Neon pink fabric paint
- Fine liner paintbrush (size 0 or 00) if using jar paint
- Applicator bottles with fine metal tips (optional but recommended)
- Design template or reference image
- Iron and parchment paper (for heat setting)
Step 1: Preparation & Sketching
-
Prep the Surface:
Start by sliding a piece of cardboard or a shirt board inside the t-shirt. This creates a smooth, tensioned surface to work on and prevents any paint from bleeding through to the back of the shirt. -
Smooth it Out:
Use your hands to smooth out all wrinkles over the cardboard area. If the shirt is very wrinkled, give it a quick press with an iron before inserting the board. -
Draft the Hand:
Using your white fabric pencil, lightly sketch the outline of the hand in the lower center of the shirt. Focus on the gesture of the fingers curling around the stem; keep the lines simple and stylized rather than perfectly realistic. -
Add the Flower:
Sketch the flower stem rising from the grip of the hand. Top it with a simple daisy shape—a small oval center surrounded by loose petal loops. -
Refine the Lines:
Go back over your chalk sketch to clean up the connections. Make sure there is a small gap between the teal hand lines and the pink flower lines so the colors don’t muddy each other.
Paint Splattered?
If you drip paint where you don’t want it, don’t wipe it! Let it dry completely, then carefully pick it off with tweezers or a fingernail.
Step 2: Painting the Design
-
Test Consistency:
Before touching the fabric, squeeze a little paint onto a scrap paper or paper towel. You want a steady, even flow without air bubbles. -
Outline the Hand:
Starting with the neon teal paint, carefully trace over your chalk lines for the hand. Apply steady pressure to the bottle to create a line of consistent thickness. -
Detail the Fingers:
Add the small interior lines that define the fingers and knuckles. I find it helps to rotate the shirt board slightly as I work to get the best angle for these curves. -
Finish the Wrist:
Complete the teal section by drawing the wrist lines, letting them fade out slightly at the bottom for an artistic floating effect. -
Switch Colors:
Cap your teal paint and grab the neon pink. Ensure the tip is clean. -
Draw the Stem:
Draw the stem line going straight up from the hand, and then down below the hand if your design includes the bottom of the stem. -
Add Leaves:
Create the two simple leaves branching off the stem. Use a single continuous motion for the leaf outline to keep it looking smooth. -
Paint the Petals:
Trace the flower petals at the top. Since these are smaller, use a lighter touch on the bottle to keep the lines crisp and prevent blobs. -
Fill the Center:
Add a small dot or circle of pink in the center of the petals to anchor the flower.
Glow Up
Swap standard neon fabric paints for UV-reactive or glow-in-the-dark paints. Your design will look cool in daylight but truly pop under blacklight.
Step 3: Finishing Touches
-
Clean Up:
Check for any breaks in your lines. If you see a gap, carefully fill it in with a tiny amount of paint on a toothpick. -
Dry Time:
Let the shirt sit flat and undisturbed for at least 24 hours. Don’t remove the cardboard until the paint is dry to the touch to avoid smudging. -
Erase Sketches:
Once fully dry, gently brush away any visible white chalk lines. A slightly damp cloth or a soft toothbrush works well for stubborn marks. -
Heat Set:
To make the design permanent, place a piece of parchment paper over the dry design and iron it on a medium setting (no steam) for about 3-5 minutes.
Wear your new custom tee with pride knowing it is a one-of-a-kind creation
Optical Illusion Body Placement
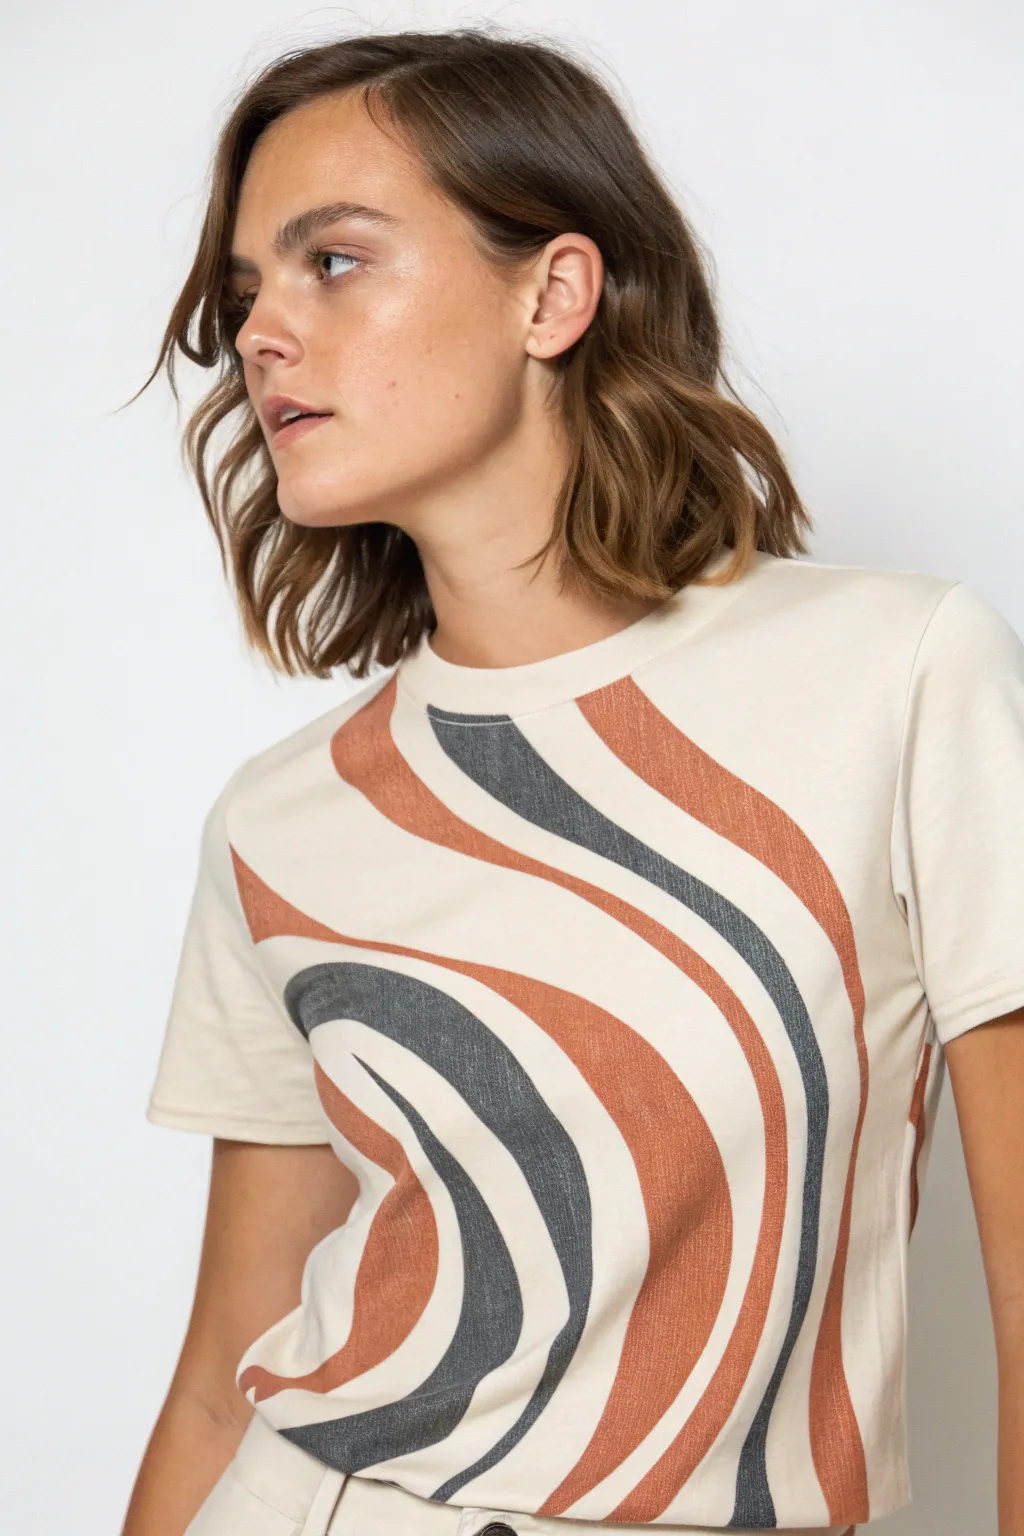
Transform a plain cream tee into a wearable piece of optical art using fluid, wavy lines that seem to move with you. This design uses contrasting terra cotta and charcoal tones to create a bold, retro-modern aesthetic that flows across the fabric.
How-To Guide
Materials
- Light cream or off-white cotton t-shirt
- Fabric paint (Terra Cotta/Rust Orange)
- Fabric paint (Charcoal/Dark Grey)
- Textile medium (if using acrylics)
- Flat shader brushes (medium and large)
- Fabric marking pen or chalk (fading)
- Cardboard insert
- Iron for heat setting
- Pressing cloth or parchment paper
Step 1: Planning and Sketching
-
Prepare the workspace:
Start by sliding a piece of cardboard inside your t-shirt. This is crucial to prevent the paint or ink from bleeding through to the back of the shirt, and it provides a smooth, taut surface for drawing. -
Smooth the fabric:
Pull the fabric gently so it is flat against the cardboard without stretching it too much, as over-stretching can distort the final design once the shirt relaxes. -
Map the main curves:
Using your fading fabric marker, draw the primary guiding curve. Start from the top right shoulder area and sweep down towards the bottom left hem in a large glorious S-curve. -
Create the parallel bands:
Sketch additional parallel wavy lines on either side of your main curve. Vary the width slightly—some bands should be thick and bold, while the negative space (the shirt color) acts as the third stripe color. -
Refine the flow:
Stand back and look at your sketched lines. I find it helpful to ensure the curves look fluid rather than jagged; adjust any kinks in the lines now before breaking out the paint.
Step 2: Painting the Design
-
Mix your palette:
Prepare your terra cotta and charcoal paints. If you are using standard acrylics, mix them with textile medium according to the bottle instructions to ensure the paint remains soft and flexible on the fabric. -
Start with the light accents:
Dip a medium flat brush into the terra cotta paint. Choose one of your sketched bands—perhaps the one starting near the collar—and begin filling it in with smooth, long strokes. -
Maintain clean edges:
Use the edge of your flat brush to carefully define the boundaries of the curve. Keep the edges crisp for that sharp, graphic quality. -
Paint the dark contrast:
Switch to a fresh brush and the charcoal grey paint. Fill in the alternating band next to your terra cotta stripe, leaving a gap of the original cream fabric showing between them. -
Establish the pattern rhythm:
Continue working down the shirt, alternating between rust, cream (unpainted), and charcoal. The spacing doesn’t need to be mathematically perfect; a little organic variation adds to the hand-painted charm. -
Fill the large swoops:
For the wider sections of the waves, switch to a larger brush to get better coverage without distinct brush strokes showing in the middle of the color block. -
Double-check opacity:
Fabric absorbs paint quickly. Once the first layer is touch-dry, check if the colors look solid. You might need a second coat on the darker charcoal sections to make them truly opaque. -
Let it dry completely:
Allow the shirt to sit undisturbed for at least 24 hours. Don’t remove the cardboard until the paint is fully dry to avoid smearing the design onto itself.
Clean Lines Hack
If you have shaky hands, use flexible artist masking tape or freezer paper stencils to block out the curves before painting for razor-sharp edges.
Step 3: Setting the Art
-
Heat set the paint:
Once fully dry, turn the t-shirt inside out. This protects the painted surface from direct contact with the iron while still applying enough heat. -
Iron the design:
Place a pressing cloth or parchment paper over the design area (even though it’s inside out) and iron on a cotton setting (no steam) for 3-5 minutes. Keep the iron moving constantly. -
Final inspection:
Turn the shirt right side out and check your work. The heat setting ensures your new optical illusion design will withstand the washing machine.
Go metallic
Swap the charcoal grey for a metallic bronze or gold fabric paint to give the shirt a shimmering, luxe 70s disco vibe.
Wear your new geometric masterpiece with pride and enjoy the visual movement it creates
Wrap-Around Story Scene
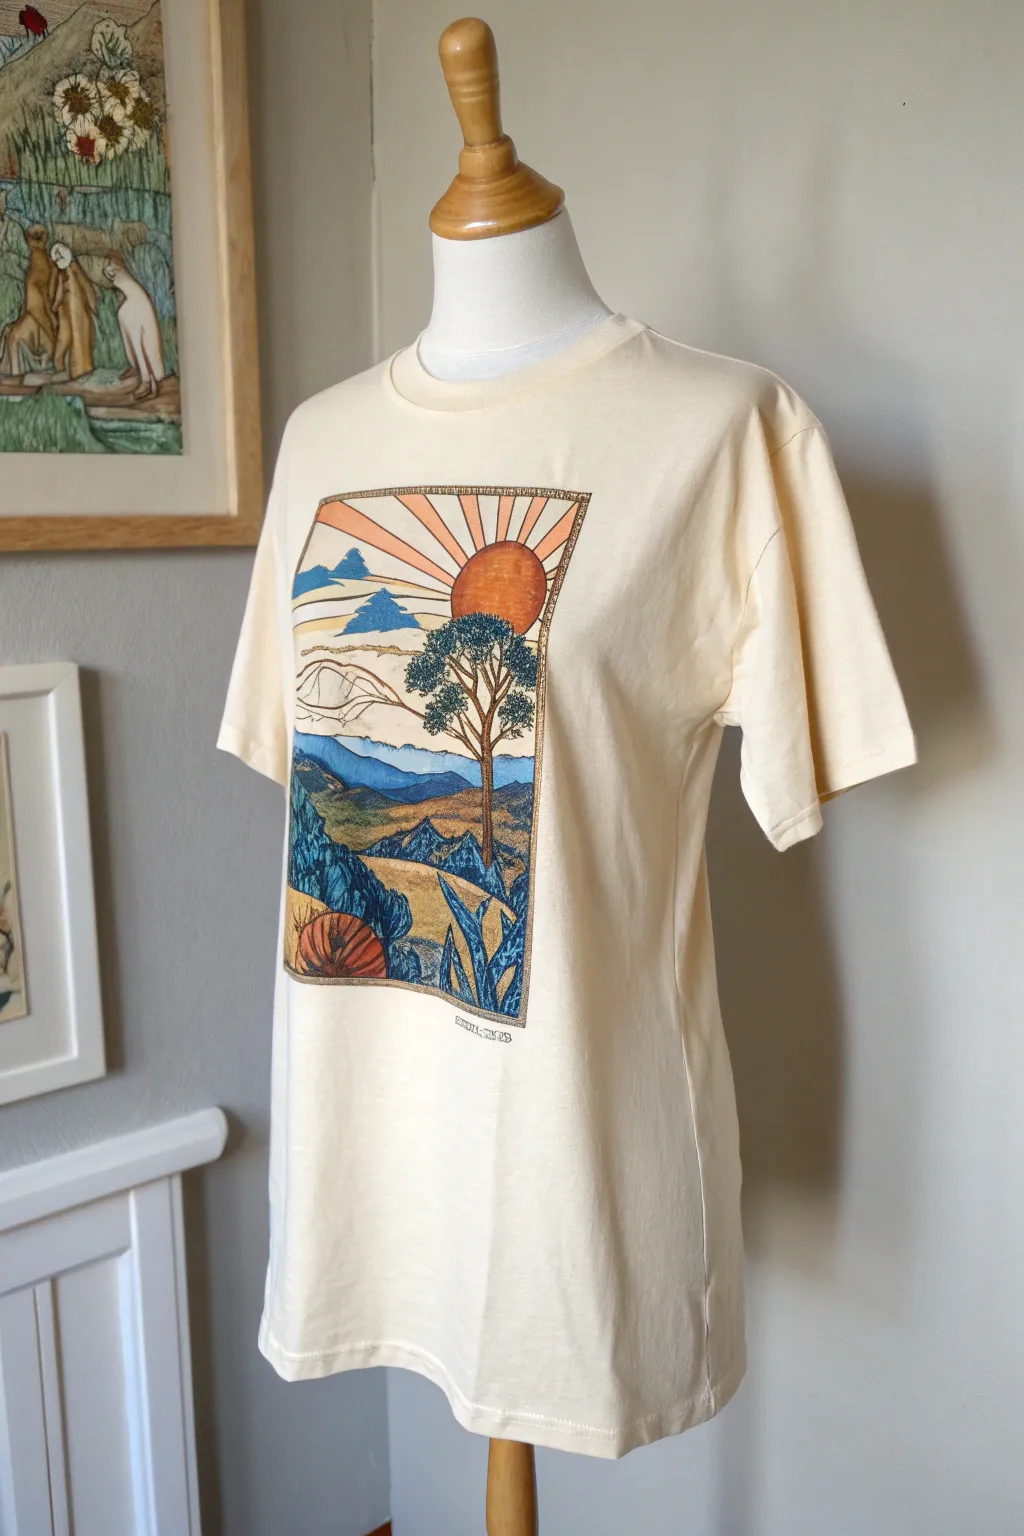
Transform a plain cream tee into a wearable piece of art with this stylized, vintage-inspired landscape design. The muted earth tones and bordered composition evoke the charm of classic book illustrations or Arts and Crafts movement posters.
Detailed Instructions
Materials
- Light cream or oatmeal colored cotton t-shirt
- Fabric paints (terra cotta, sage green, sky blue, navy blue, ochre/gold)
- Textile medium (if using acrylics)
- Fine tip black fabric marker or liner pen
- Cardboard or t-shirt form
- Graphite transfer paper
- Stylus or dull pencil
- Small flat shader brushes
- Fine detail liner brushes
- Painter’s tape or masking tape
- Iron (for heat setting)
Step 1: Preparation & Outline
-
Pre-wash the fabric:
Begin by washing and drying your t-shirt without using fabric softener. This removes sizing chemicals and ensures the paint adheres permanently to the fibers. -
Insert the stabilizer:
Slide a piece of thick cardboard or a plastic t-shirt form inside the shirt. This stretches the fabric slightly to provide a smooth surface and prevents paint from bleeding through to the back. -
Establish the boundaries:
Use painter’s tape to mark off a crisp rectangular border for your design in the center of the chest. This helps maintain the graphic ‘poster’ look. -
Draft the landscape:
Sketch your design on paper first, incorporating the sun, radiating rays, a central tree, rolling hills, and foreground plants. Place transfer paper face down on the shirt, lay your sketch on top, and trace over the main lines with a stylus to transfer the image. -
Ink the linework:
Trace over your transferred graphite lines carefully using a fine-tip black fabric marker. Create the double border looking frame and the main contours of the hills and tree. I find it helpful to vary line weight slightly for a more organic, hand-drawn feel.
Step 2: Painting the Scene
-
Paint the sky elements:
Mix a warm terra cotta color and carefully fill in the circular sun. Use alternating strokes of pale peach and the shirt’s natural cream color for the radiating sun rays. -
Define the distant mountains:
Using a dilluted sky blue, paint the furthest mountain range. Keep the paint thin so the texture of the shirt shows through slightly, giving it a vintage wash effect. -
Add mid-ground hills:
Switch to a darker blue or navy for the shadows on the middle hills, blending in some ochre or earthy yellow for the sunlit grassy areas. -
Detail the central tree:
Use a fine liner brush with brown paint to fill in the tree trunk and branches. Stipple dark green paint onto the canopy area to create the look of dense leaves. -
Fill the flowing river or path:
Paint the winding path or river section in the lower third using a soft yellow-ochre tone. Ensure it contrasts well against the blue hills. -
Work on the foreground:
paint the large foreground leaves and plants using a mix of sage green and navy tones. Leave small gaps between colors where the black outline will be re-emphasized later. -
Add the corner detail:
In the bottom left, paint the rounded form (perhaps a rock or stylized plant) with the terra cotta shade to balance the color of the sun at the top.
Fixing Bleeds
If paint bleeds past your black lines, wait for it to dry completely. Then, thicken the black outline slightly to cover the mistake rather than trying to wipe wet paint.
Step 3: Finishing Touches
-
Re-outline for crispness:
Once the paint is fully dry to the touch, go back over your black lines with the fabric marker. Paint can sometimes obscure the initial sketch, so this brings the definition back. -
Add texture and shading:
Use cross-hatching or stippling with the black marker to add depth to the mountains, the tree bark, and the shadows of the plants. -
Paint the decorative border:
Inside the double-line frame, you can add small tick marks or a simple gold or ochre wash to mimic an ornate picture frame. -
Remove tape and dry:
Carefully peel away the painter’s tape to reveal the sharp edges of your design. Allow the shirt to dry flat for at least 24 hours. -
Heat set the design:
Turn the shirt inside out and iron the reverse side of the design on a high heat setting (no steam) for 3-5 minutes to make the artwork permanent and washable.
Antiqued Look
Mix a tiny drop of brown paint into water and lightly wash over the entire finished dry painting (avoiding the shirt fabric itself) to give it an instant aged patina.
Now you have a custom, artistic garment ready to be worn casually or styled up with a blazer


Have a question or want to share your own experience? I'd love to hear from you in the comments below!