
If you’ve ever wanted to draw a bedroom that feels real and cozy, it all starts with a few simple shapes and a clear plan for space. I’m sharing my favorite bedroom drawing ideas that help you practice perspective, furniture placement, and those little lived-in details that make a room feel like a room.
One-Point Perspective Bedroom Box
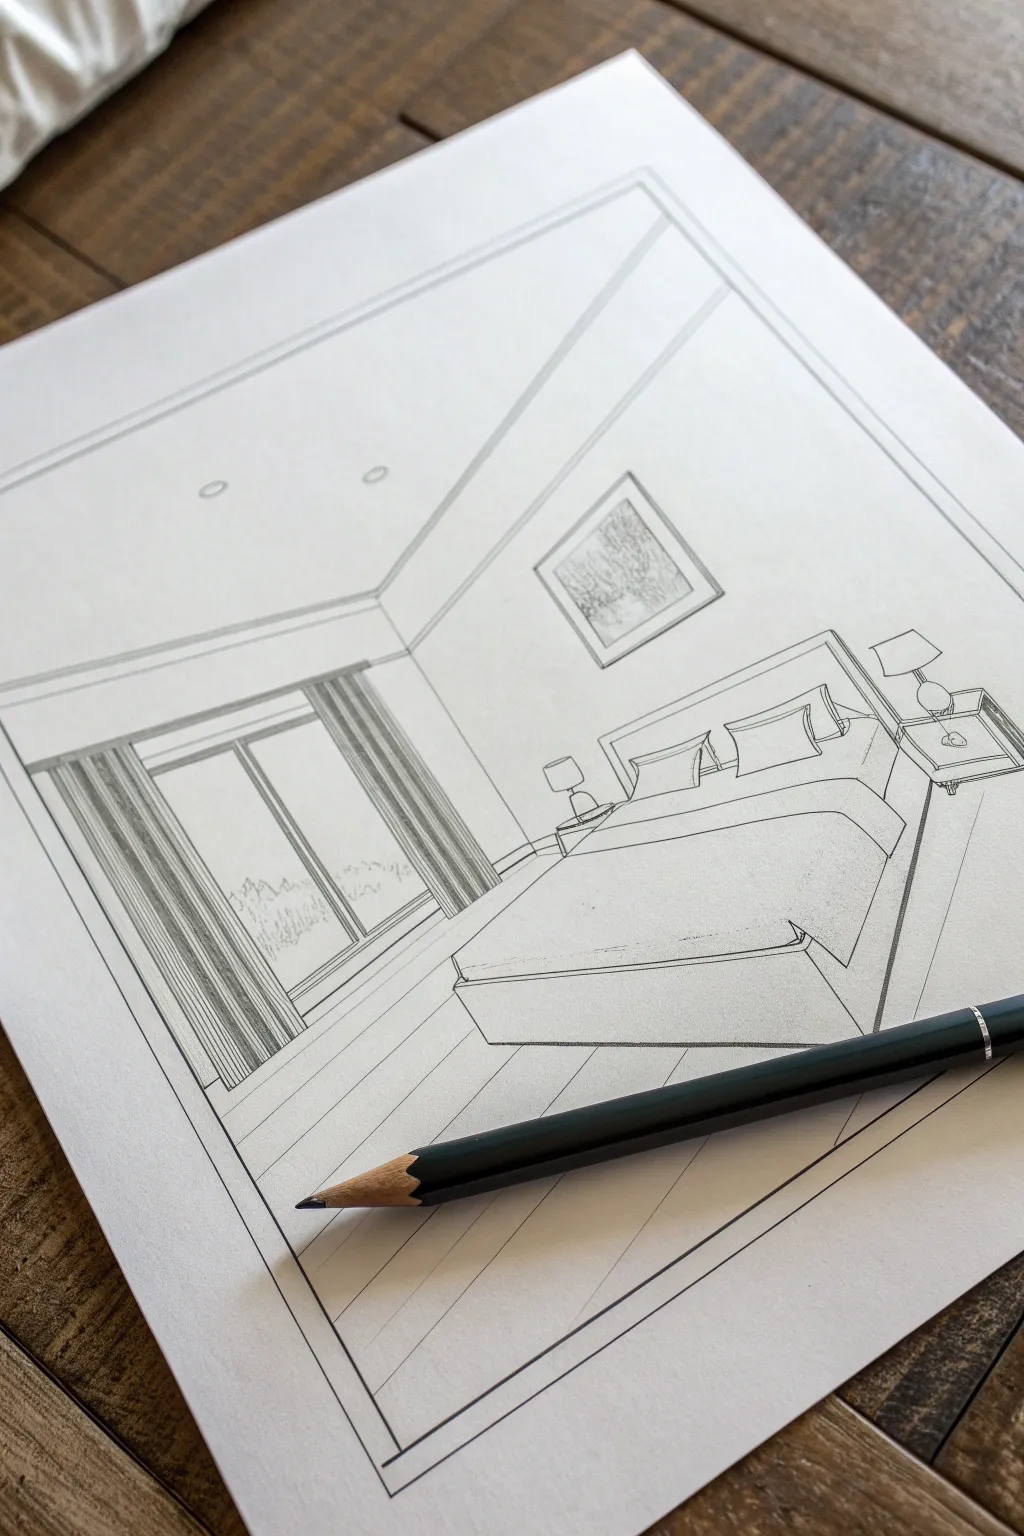
Master the art of architectural illustration with this clean, linear sketch of a modern bedroom. Using the principles of one-point perspective, you will transform a flat piece of paper into a convincing 3D interior space complete with furniture and light textures.
Detailed Instructions
Materials
- Drawing paper (smooth bristol or sketchbook paper)
- HB or 2B graphite pencil
- Metric ruler or straightedge
- High-quality eraser (kneaded or plastic)
- Pencil sharpener
Step 1: Establishing the Room Structure
-
Draw the back wall:
Start by drawing a large rectangle in the center of your page. This represents the back wall of the room and serves as the foundation for the entire perspective. -
Set the vanishing point:
Place a small, light dot exactly in the center of your rectangle. This is your vanishing point, where all diagonal lines will eventually converge. -
Create the walls, floor, and ceiling:
Draw distinct lines extending from the vanishing point through each of the four corners of your rectangle, continuing out to the edges of the paper. This creates the illusion of depth. -
Frame the boundary:
Draw a larger rectangle border around the outside of your drawing to create a clean ‘frame’ for your sketch, stopping the perspective lines at this border.
Step 2: Drafting the Bed and Furniture
-
Block in the bed frame:
Lightly sketch a rectangular box shape emerging from the lower right side of the back wall. Remember that horizontal lines stay horizontal, vertical lines stay vertical, but depth lines must angle back toward your vanishing point. -
Detail the headboard:
Draw a thinner rectangular shape against the back wall, slightly wider than your bed block, to represent the headboard. -
Add the nightstand:
To the right of the bed, sketch a smaller cube shape for the bedside table. I find it helpful to draw the entire transparent box lightly first to ensure the perspective is correct before darkening the visible lines. -
Position the artwork:
On the back wall above the bed, draw a rectangular frame. Since this is on the back plane, it’s just a flat rectangle with no converging lines. -
Sketch the window framing:
On the left wall, draw vertical lines to mark the sides of the sliding glass doors. Connect the top and bottom of these lines to the vanishing point to create the door frame’s depth.
Wonky Angles?
If furniture looks tilted or ‘sliding’ off the floor, check your verticals. In one-point perspective, all vertical lines must be perfectly parallel to the side of your paper.
Step 3: Refining and Texturing
-
Round out the bedding:
Soften the hard edges of your initial bed block. Add a curved line across the top third to show folded sheets and round the corners where the duvet drapes over the mattress. -
Draw the pillows:
Sketch two rectangular pillows leaning against the headboard. Add a smaller decorative pillow or two in front, keeping lines slightly organic to suggest softness. -
Detail the curtains:
Draw vertical sections on either side of the sliding doors. Fill these with tight, vertical shading lines to simulate folded fabric texture. -
Add the lamps:
Sketch simple lamp bases on the nightstand and a matching one implied on the other side. Top them with trapezoidal shapes for shades. -
Define the floorboards:
Using your ruler, draw lines on the floor radiating directly from the vanishing point outward toward the viewer. This creates realistic floor planks. -
Sketch the view:
Lightly scribble some organic shapes inside the window frame to suggest trees or bushes outside.
Pro Tip: Line Weight
Use thicker lines for objects closer to the viewer (like the foot of the bed) and thinner, lighter lines for distant objects (like the back wall) to enhance the 3D depth.
Step 4: Final Polish
-
Darken key lines:
Go over the main structural lines of the furniture and room with firmer pressure to make them pop. -
Add shading:
Use the side of your pencil lead to add light shading to the side of the bed frame and the interior of the artwork frame. -
Clean up guidelines:
Carefully erase the initial vanishing point dot and any construction lines that pass through solid objects like the bed or lamps. -
Add final details:
Draw two small ovals on the ceiling for recessed lighting and verify your border lines are crisp.
Step back and admire how a few simple lines have created a spacious, inviting room on a flat page


Bed and Rug for Instant Depth
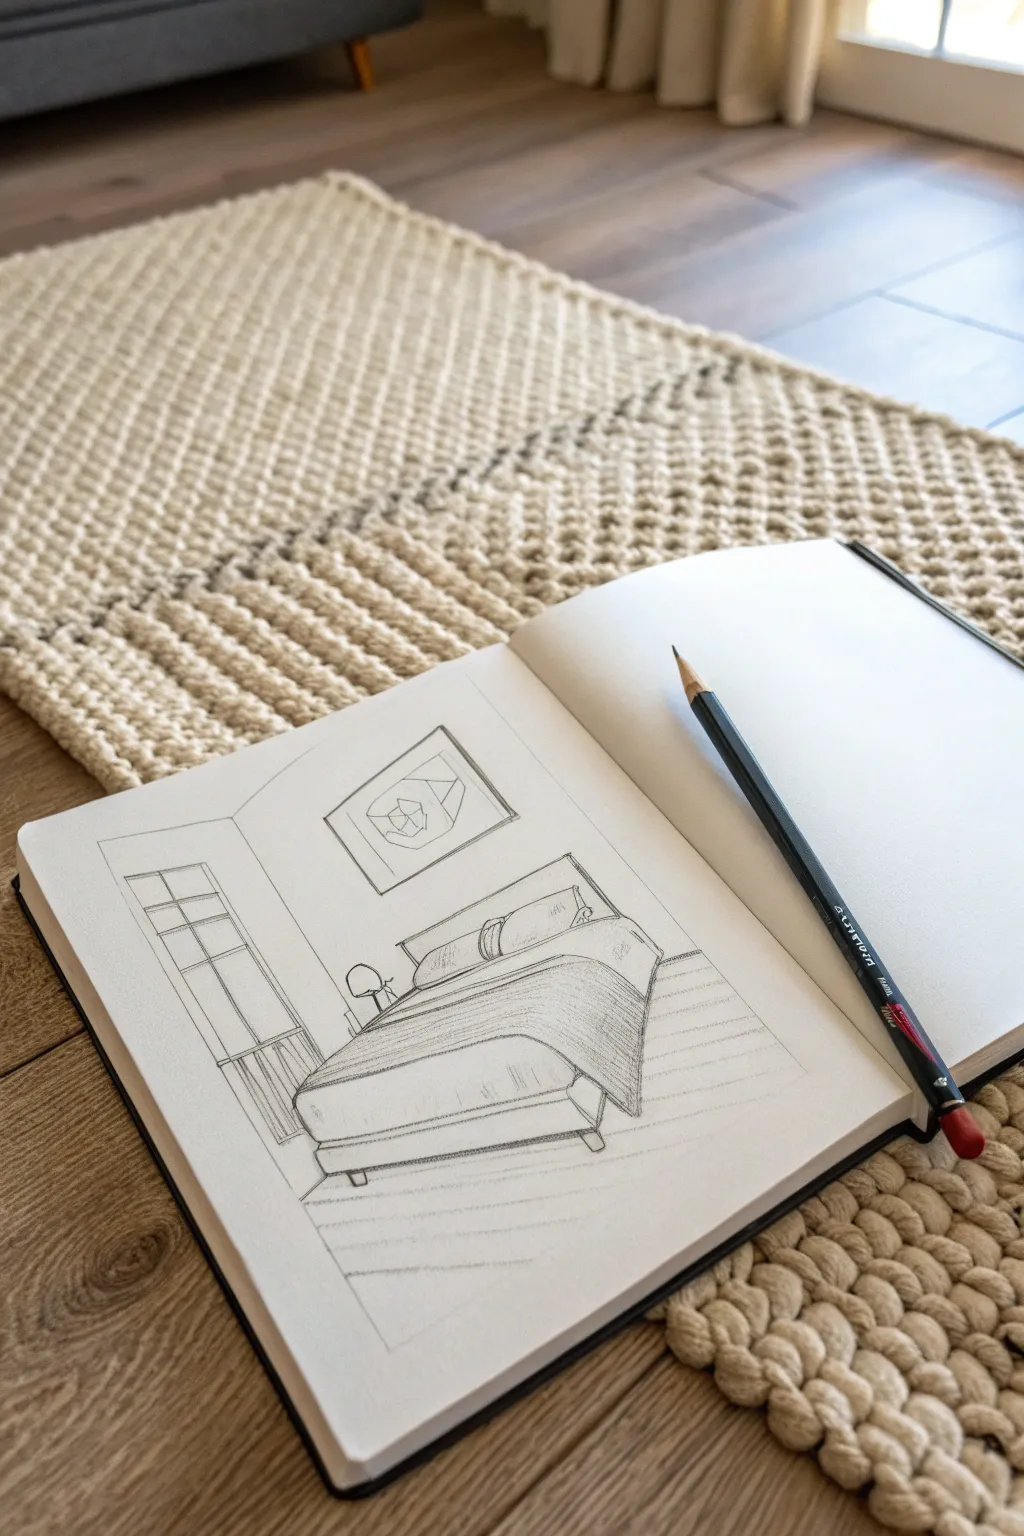
Capture the calm of a tidy bedroom using simple one-point perspective techniques. This pencil sketch focuses on clean lines and subtle shading to create depth, making the bed and rug pop off the page.
Step-by-Step Guide
Materials
- Sketchbook or drawing paper (medium tooth)
- HB or 2B graphite pencil
- 4B or 6B graphite pencil for deeper shading
- Fine-tip black drawing pen (optional for final outlines)
- Eraser (kneaded or vinyl)
- Ruler or straight edge
Step 1: Setting the Perspective
-
Establish the horizon line:
Start by drawing a faint horizontal line across the middle of your page. This represents the viewer’s eye level. -
Mark the vanishing point:
Place a small dot roughly in the center of your horizon line. All receding lines in this room will converge towards this single point. -
Draw the back wall:
Sketch a rectangle centered around your vanishing point. This creates the illusion of the back wall of the bedroom. -
Connect the corners:
Use your ruler to draw faint lines from the vanishing point through the four corners of your rectangle, extending them to the edges of the paper. These are your guide lines for the side walls, floor, and ceiling.
Step 2: Blocking in Furniture
-
Position the bed frame:
Draw the basic rectangular box for the bed’s base. Ensure the side lines of the bed aim toward the vanishing point, while the horizontal lines remain parallel to the horizon. -
Add the headboard:
Create a tall, thin rectangle against the back wall for the headboard. Keep it symmetrical with the bed frame. -
Sketch the window placement:
On the left wall, lightly outline a tall vertical rectangle for the window frame. Remember, the top and bottom angles of the window should align with the vanishing point. -
Outline the artwork:
Draw a square or rectangle floating above the bed on the back wall. Since it’s facing you directly, this shape doesn’t need perspective distortion.
Wonky Angles?
If furniture looks like it’s floating or twisted, check your orthogonal lines. Every receding line must align perfectly with your single vanishing point.
Step 3: Adding Details and Volume
-
Create the mattress and bedding:
Soften the hard block of the bed by drawing a curved line over the top for the duvet. Let the blanket drape over the sides slightly to suggest softness. -
Draw the pillows:
Sketch two fluffy rectangles leaning against the headboard. I usually sketch them slightly overlapping to look more natural. -
Detail the window panes:
Use your ruler to add the grid inside the window frame. Vertical lines stay straight up and down; horizontal dividers should slant toward the vanishing point. -
Design the rug:
Draw a large shape on the floor extending from under the bed. Draw faint horizontal lines across it to suggest texture or pattern. -
Add abstract art:
Inside the frame above the bed, sketch a simple geometric design, like a cube or overlapping shapes, to mimic the reference.
Drapery Effect
Study drawing fabric folds. Adding small ‘V’ shapes where the duvet hangs over the mattress edge makes the bedding look thick and realistic.
Step 4: Shading and Definition
-
Define the outlines:
Go over your main structural lines with stronger pressure or a slightly darker pencil (like a 2B) to solidify the drawing. -
Erase guide lines:
Carefully remove the original horizon line and vanishing point guides that pass through your solid objects. -
Shade the bed:
Use diagonal hatching lines on the side of the bed cover to show shadow. This gives the bed three-dimensional weight. -
Texture the rug:
Add light, repetitive horizontal strokes across the rug area. This simulates the weave without needing to draw every single thread. -
Add final contrast:
Darken the deepest shadows, such as the area directly under the bed frame and the corners of the room, to anchor the furniture to the floor.
Now you have a serene bedroom scene that captures depth and comfort


Flat Elevation of a Bedroom Wall

Learn to translate a cozy bedroom interior into a crisp, illustrative line drawing. This project focuses on capturing shapes, patterns, and perspective in a minimalist pen-and-ink style, perfect for drafting your dream room or documenting your current space.
Step-by-Step Guide
Materials
- Spiral-bound sketchbook with smooth, heavyweight paper
- HB graphite pencil for initial sketching
- Fine liner pen (black ink, 0.3mm or 0.5mm tip)
- Kneadable eraser
- Ruler or straight edge
- Reference photo of a bedroom (or use the one shown)
Step 1: Setting the Composition
-
Define the boundary:
Begin by drawing a neat vertical rectangle on your sketchbook page. This frame will contain your entire composition, acting as a window into the room. -
Establish the floor line:
About a fifth of the way up from the bottom of your rectangle, draw a light horizontal line. This separates the floor from the wall and grounds your furniture. -
Place the headboard:
In the center of the wall space, sketch a large rectangle for the headboard. Keep it centered but leave room on either side for bedside tables. -
Add the bed frame:
Attach a lower, wider rectangular shape to the bottom of the headboard to represent the mattress and frame. Angle the side lines slightly if you want to suggest a bit of depth, or keep them flat for a true elevation view.
Step 2: Drafting Furniture & Features
-
Sketch the nightstand:
On the right side of the bed, draw a simple box shape for the bedside table. Add two smaller rectangles within it to indicate drawers. -
Position the lamp:
Resting on the nightstand, sketch a lamp base and shade. A simple curved base with a trapezoid shade works perfectly for this clean style. -
Outline the pillows:
Draw two large squares leaning against the headboard for Euro shams, and layer two smaller, softer rectangles in front for the sleeping pillows. Keep the lines slightly loose to mimic fabric. -
Refine the bedding:
Draw a curved line sweeping across the mattress to show a folded duvet or coverlet. This adds a nice organic break to the rigid furniture lines.
Wobbly Lines?
If your straight lines aren’t perfect, don’t worry. Retracing a line once can make it look intentional and illustrative rather than messy.
Step 3: Inking the Lines
-
Outline the main shapes:
Switch to your fine liner pen. Carefully trace over your pencil lines for the bed frame, headboard, nightstand, and lamp. Use a ruler for the furniture edges to keep them crisp. -
Detail the headboard tufting:
This is a key detail. Draw a diagonal grid pattern across the headboard rectangle. At each intersection of lines, place a tiny circle or dot to represent buttons. -
Ink soft textures:
Go over the pillows and duvet lines freehand. I find that using a slightly wavering line here communicates the softness of the textile better than a ruler would. -
Add texture to the duvet:
Use close, diagonal hatching lines on the folded-over section of the duvet. This shading differentiates the layers of bedding. -
Finalize the nightstand:
Ink the drawers and add tiny knobs. Outline the lamp, ensuring the shade looks centered on the base. -
Detail the floor:
Add a few broken, horizontal dashed lines on the floor area to suggest a rug or floorboards without overcrowding the drawing.
Make It 3D
Create depth by adding thicker line weights to the bottom and right sides of furniture, mimicking a subtle shadow effect.
Step 4: Finishing Touches
-
Erase pencil marks:
Wait at least five minutes to ensure the ink is completely dry. Then, gently rub your kneadable eraser over the entire drawing to lift all graphite guidelines. -
Strengthen the frame:
Go over the outer boundary rectangle one last time to ensure it is bold and definitive, framing your artwork cleanly. -
Add annotations:
Beside the drawing, write loose notes about the design elements, like ‘linen’ or ‘oak finish.’ Use a cursive script to match the relaxed vibe of the sketch.
Now you have a charming architectural sketch that captures the essence of a restful bedroom


Corner Bedroom in Two-Point Perspective
Master the fundamentals of two-point perspective with this crisp, linear ink drawing of a serene bedroom corner. This project focuses on clean lines and spatial depth, turning a simple sketchbook page into an architectural study.
Detailed Instructions
Materials
- Sketchbook with smooth paper
- HB pencil
- Eraser (preferably kneaded)
- Fine liner pens (0.1mm, 0.3mm, 0.5mm)
- Ruler or straight edge
Step 1: Setting the Perspective Framework
-
Establish the Horizon Line:
Start lightly with your pencil. Draw a horizontal line across the middle of your page to representing the viewer’s eye level. -
Mark Vanishing Points:
Place two points on the far left and right ends of your horizon line. These are your Vanishing Points (VPs) where all receding lines will converge. -
Draw the Corner Edge:
Draw a vertical line slightly off-center to represent the corner of the room where the two walls meet. -
Define the Walls:
Connect the top and bottom of your vertical corner line to the left and right VPs. This creates the basic floor and ceiling lines, establishing the two walls.
Wonky Perspective?
If furniture looks twisted, check your verticals. In 2-point perspective, all vertical lines must be perfectly straight up and down, parallel to the side of your paper.
Step 2: Designing the Furniture Layout
-
Block in the Wardrobe:
On the left wall, draw a tall vertical rectangle for the wardrobe’s front edge. Connect the top and bottom corners to the left VP to create its depth. -
Outline the Dresser:
On the right wall, sketch a lower box shape for the dresser. Remember, vertical lines stay vertical, but horizontal edges must angle toward the respective VPs. -
Add the Floorboards:
Lightly sketch diagonal lines on the floor. Radiate these lines from the VPs to make the floorboards look like they are receding into the distance. -
Sketch Wall Decor:
Draw rectangular frames above the dresser. Use your VPs to angle the top and bottom edges of the frames so they look attached to the wall, not floating flat.
Add Realistic Lighting
Determine a light source (like a window) and add cross-hatching to the opposing sides of furniture for dramatic contrast and 3D pop.
Step 3: Detailing and Inking
-
Refine Furniture Details:
Add drawer handles to the dresser and door seams to the wardrobe. Sketch a small lamp and a potted plant on the dresser surface. -
Start Inking the Main Lines:
Switch to a 0.5mm fine liner. Carefully trace over the main structural lines of the room and the furniture outlines. -
Ink the Details:
Use a finer 0.1mm pen illustrating the artwork inside the frames, the plant leaves, and the lamp shade texture. -
Add Visual Weight:
Use the 0.5mm pen again to darken the shadows underneath the dresser and the wardrobe feet to ground the objects. -
Texture the Floor:
Ink the floorboard lines with a 0.3mm pen. I find it helps to break the lines occasionally rather than drawing one long continuous stroke, which adds a natural wood feel. -
Hatch for Shading:
Add simple diagonal hatching (parallel lines) on the side of the dresser and wardrobe to suggest shadow and volume. -
Erase Pencil Guidelines:
Wait for the ink to dry completely to avoid smudging. Gently erase all the underlying pencil construction lines. -
Final Touches:
Add tiny details like screws on handles or texture on the rug area if you included one, ensuring the drawing feels complete.
Now you have a structured, architectural sketch ready to be filled with color or left as a striking monochrome study
BRUSH GUIDE
The Right Brush for Every Stroke
From clean lines to bold texture — master brush choice, stroke control, and essential techniques.
Explore the Full Guide
Bird’s-Eye Bedroom Layout Sketch
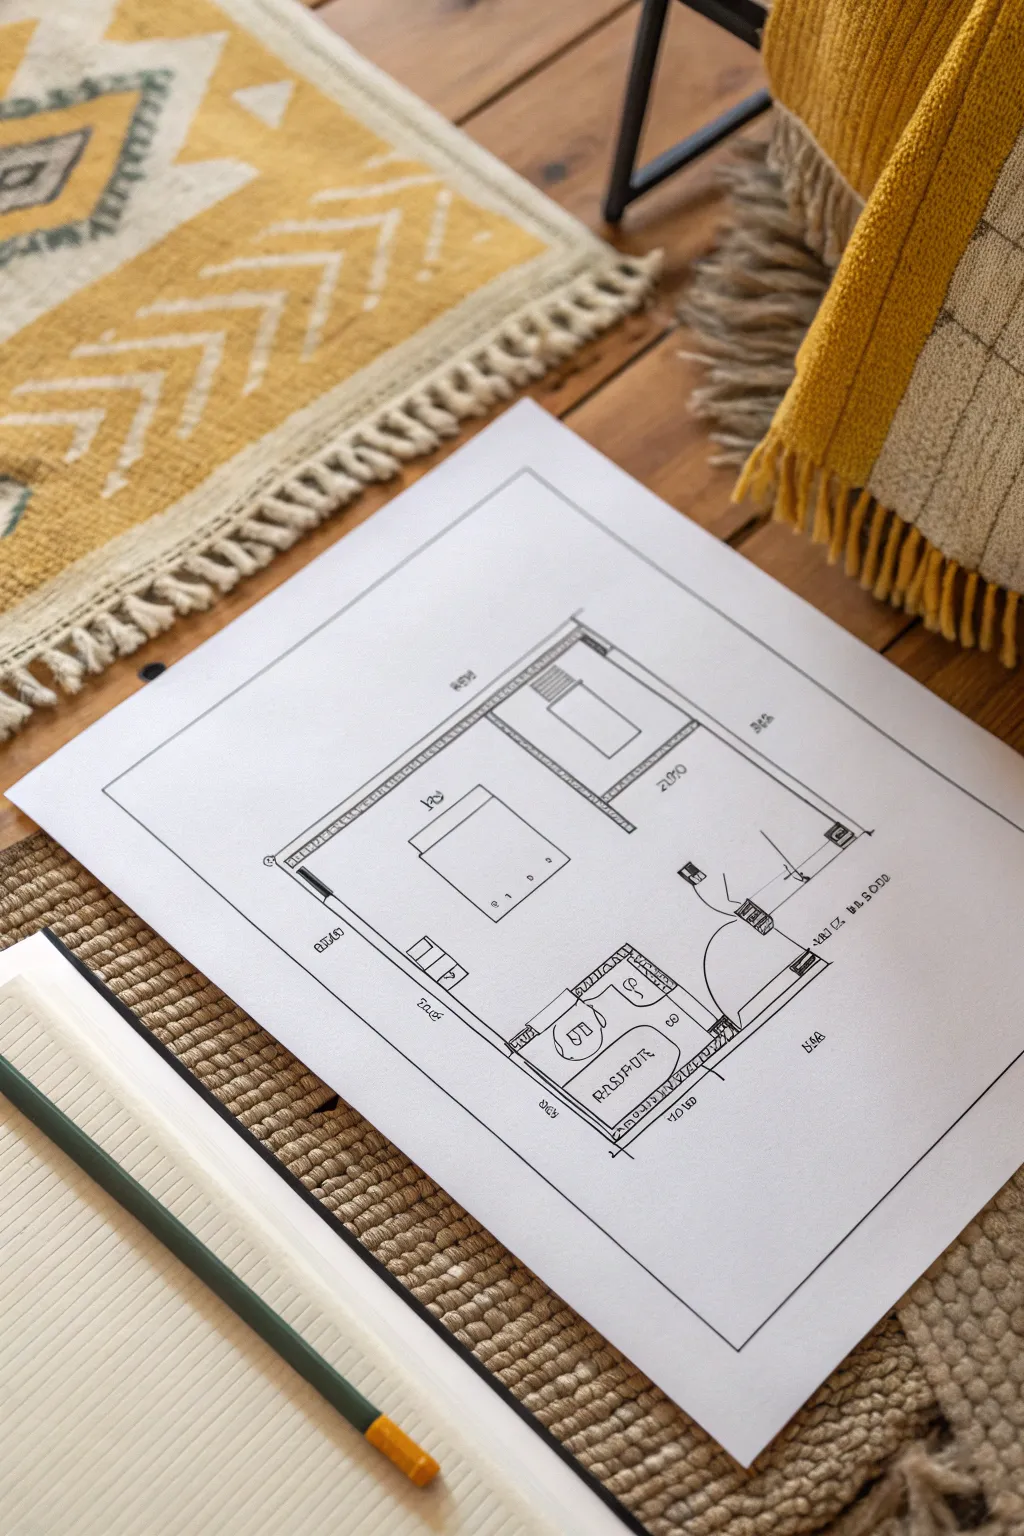
Visualizing your dream space has never been easier with this clean, bird’s-eye view floor plan sketch. This project teaches you how to draft a professional-looking layout that captures spatial flow and furniture placement with simple, elegant lines.
Step-by-Step
Materials
- Large sheet of smooth white drawing paper (A3 or 11×17 recommended)
- Mechanical pencil (0.5mm HB lead)
- Fine liner pen (0.3mm or 0.5mm, black)
- Architectural scale ruler or clear straightedge
- Eraser (kneaded or high-quality stick eraser)
- Graph paper (optional, for drafting)
Step 1: Setting the Foundation
-
Define the perimeter:
Begin by determining the overall dimensions of your room. Using your ruler and pencil, lightly draw a large rectangle in the center of your paper to represent the outer walls of the bedroom suite, leaving a wide margin of white space around the edges. -
Create the walls:
Give thickness to your walls. Draw a second, smaller rectangle inside the first one, spacing it about 1/8th of an inch (approx 3-4mm) inward. This creates the double-line effect used in architectural drawings to represent solid structures. -
Mark doorways and partitions:
Decide where the entrance and bathroom door will go. Erase small gaps in your double lines at these points. At the bottom right corner, sketch a partition wall to separate the ensuite bathroom from the main sleeping area.
Uneven Lines?
If your freehand straight lines are too wobbly, use a clear ruler for the inking phase. A clear ruler lets you see exactly where the line starts and stops, preventing overdrawing at corners.
Step 2: Drafting Major Furniture
-
Position the bed:
Place the largest item first. In the center of the main room area, lightly sketch a large square or rectangle for the bed. I find it helpful to leave ample walking space on all three accessible sides. -
Add the headboard and pillows:
At the top of the bed rectangle, draw a thin horizontal strip for the headboard. Below that, sketch two smaller rectangles for pillows to indicate orientation. -
Sketch the side tables:
Draw small squares on either side of the bed’s headboard area to represent nightstands. -
Draft storage units:
Along the top wall, opposite the bed, sketch a long, thin rectangle to represent a wardrobe or dresser. You can add internal lines to suggest shelves or hanging rails.
Step 3: Designing the Ensuite
-
Outline the bathroom fixtures:
Move to the smaller partitioned room. Sketch an oval or rounded rectangle near the bottom wall for the bathtub. Beside it, draw a smaller circle or oval for the toilet. -
Add the vanity area:
Draw a rectangular counter shape against the partition wall. Add a small oval inside it to represent the sink basin. -
Detail the flooring:
If you want to suggest a different texture for the bathroom (like tiles), you can lightly sketch a grid pattern on the floor, but keep it faint to maintain the minimalist aesthetic.
Scale Check
Use a standard scale like 1/4 inch equals 1 foot. This prevents the ‘tiny furniture in a giant room’ look and ensures your layout is actually functional and realistic.
Step 4: Inking and Finalizing
-
Ink the structural walls:
Switch to your fine liner pen. Trace over your initial pencil lines for the walls. To make the structure pop, you can hatch (draw small diagonal lines) inside the wall thickness, or simply darken these lines slightly more than the furniture. -
Ink the furniture:
Carefully trace your furniture outlines. Keep these lines clean and continuous. For the bed, you can add a simple line across the bottom third to suggest a duvet or throw blanket. -
Add architectural symbols:
Draw the door swings. Place your pen at the hinge point of a doorway and draw a quarter-circle arc into the room, showing the path the door takes when opening. Draw a straight line connecting the arc to the hinge to represent the door itself. -
Include textual labels:
Using neat, capitalized hand-lettering, label the areas. Write words like ‘MASTER’ or ‘BEDROOM’ in the center of the room and ‘ENSUITE’ or specific fixture names in the bathroom area. -
Add dimension lines:
Around the outside of the plan, draw thin lines parallel to the walls. Add small tick marks at the ends and write in hypothetical measurements (e.g., ’14ft’ or ‘4.2m’) to give the drawing authentic technical flair. -
Clean up the drawing:
Wait at least 15 minutes for the ink to dry completely. Then, gently erase all underlying pencil marks, being careful not to crumple the paper.
Now you have a crisp, architectural floor plan ready to guide your next decoration project
Isometric Bedroom With Clean Blocks
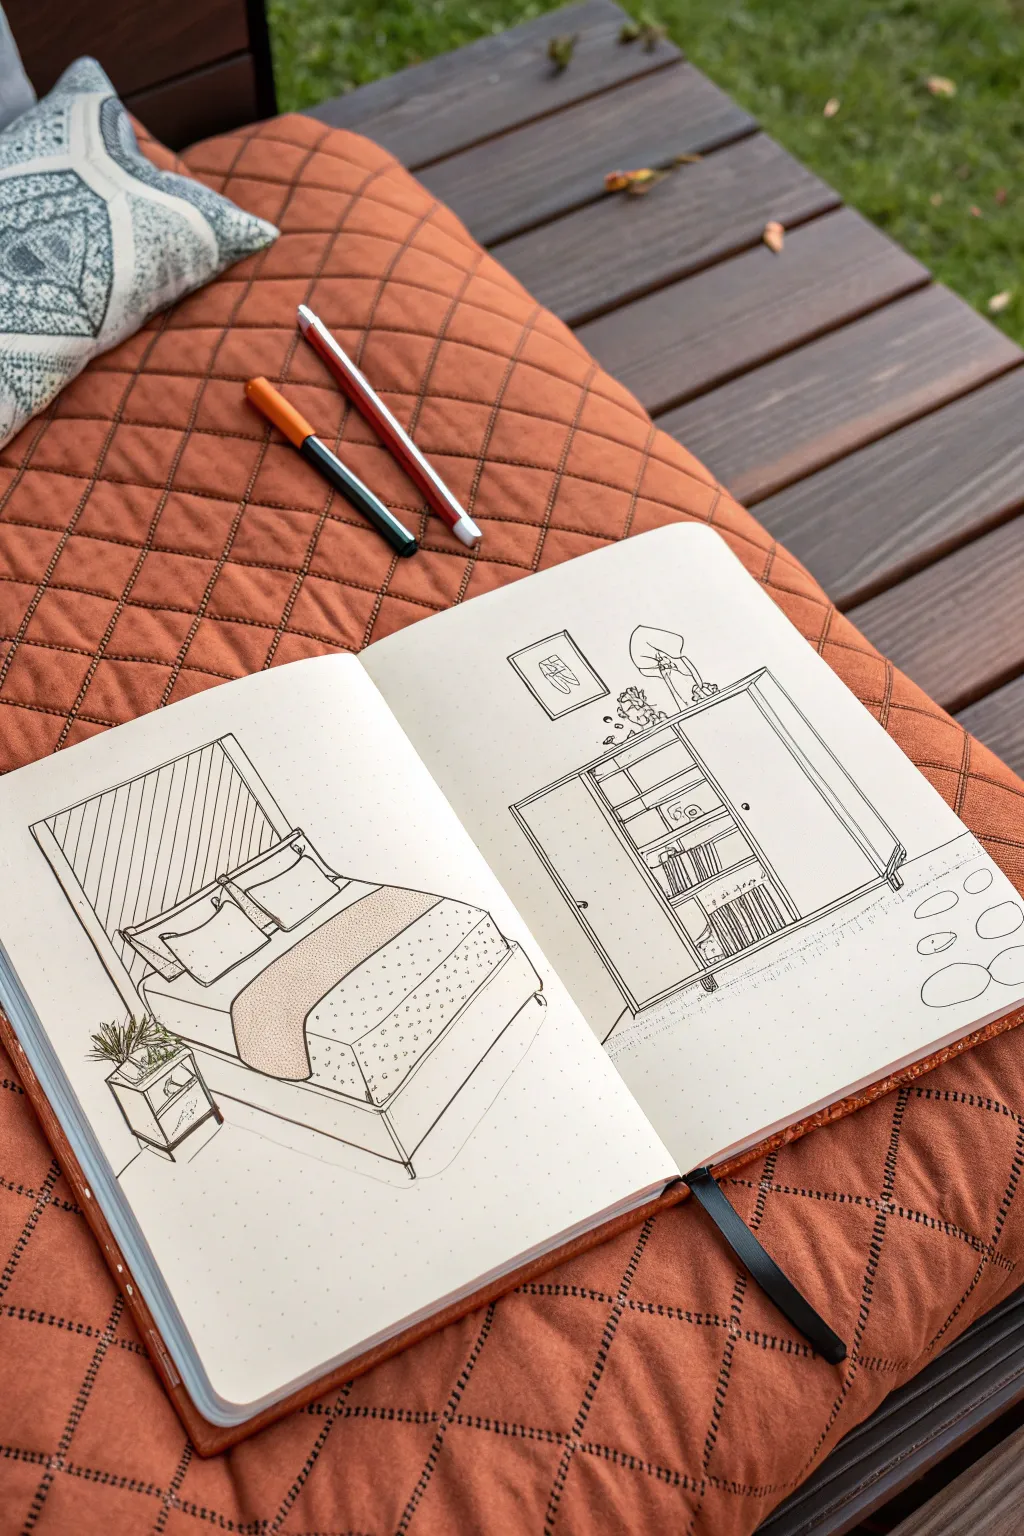
Learn to capture a cozy bedroom scene using clean lines and isometric perspective spread across two sketchbook pages. This drawing exercise focuses on geometric shapes and minimal shading to create a modern, architectural feel.
Detailed Instructions
Materials
- Dotted grid journal or sketchbook
- Fine liner pen (0.3mm or 0.5mm, black)
- Pencil (HB or 2H for sketching)
- Eraser
- Ruler or straight edge
Step 1: Planning and Layout
-
Define the ground plane:
Start by lightly sketching a baseline on both pages with your pencil to establish where the floor meets the wall. Since this is an isometric-style view, keep your lines clean and parallel where possible. -
Box out the main furniture:
Visualize the bed on the left page and the wardrobe on the right as simple rectangular prisms. Sketch these basic 3D blocks lightly in pencil to ensure the proportions feel right before adding details. -
Establish the bed frame:
Refine the block on the left page into a bed frame. Draw the base rectangle, then add vertical lines for the legs and headboard height. The headboard should be tall and rectangular.
Grid Guide
Use a dotted grid journal! The dots act as subtle guides for vertical lines and perspective angles without needing to draw complex vanishing points.
Step 2: Detailing the Bed Area
-
Add soft furnishings:
Draw the pillows and duvet. Instead of rigid straight lines, use slightly curved organic lines here to suggest the softness of the fabric. Add a second layer of pillows behind the first set. -
Detail the headboard:
Create the slatted texture on the headboard by drawing vertical lines spaced evenly apart. Don’t worry if they aren’t mathematically perfect; it adds character. -
Pattern the duvet:
Sketch a simple speckled or dotted pattern onto the duvet cover. Keep the dots random but evenly distributed across the surface area. -
Add the nightstand:
To the left of the bed, draw a small cube for the nightstand. Add a drawer handle and simple legs that match the perspective of the bed. -
Place the plant:
On top of the nightstand, sketch a small pot. Draw spiky, erratic lines pointing upwards and outwards for the plant leaves to contrast with the straight furniture lines.
Step 3: Constructing the Wardrobe
-
Define the wardrobe structure:
Move to the right page. Darken the outline of your wardrobe block. Draw a vertical line down the center to represent where the doors meet or where the shelving starts. -
Draw internal shelves:
Leave one door ‘open’ by drawing horizontal lines inside the right half of the wardrobe to create shelves. Make sure these lines follow the perspective of the top and bottom of the cabinet. -
Fill the shelves:
Add items like folded clothes (small stacks of rectangles), books (vertical strips), and boxes on the shelves. Vary the heights to make it look lived-in. -
Decorate the top:
Sketch a small lamp and a trailing plant on top of the wardrobe. Let the plant’s leaves drape slightly over the edge of the cabinet. -
Wall art:
Draw a small square frame on the wall above the wardrobe. Inside, sketch a simple abstract shape or line drawing.
Wobbly Lines?
If your straight lines are shaky, embrace it. Go over the line again loosely to create a sketchy, ‘architectural draft’ style purposely.
Step 4: Inking and Finishing
-
Ink the structural lines:
Switch to your fine liner pen. Go over the main furniture outlines first, using confident, continuous strokes. Use a ruler if you want a very sharp look, or freehand it for organic charm. -
Ink the details:
Carefully trace the smaller details like the plant leaves, duvet pattern, and shelf items. I find it helpful to rotate the sketchbook to get the best angle for my hand. -
Add ground details:
Sketch a few loose oval shapes on the right side of the floor to represent a rug or stepping stones. Keep these lines very light and thin. -
Erase pencil marks:
Wait until the ink is completely dry—give it a full minute just to be safe. Then, gently erase all the underlying pencil sketches to reveal the clean line art.
Now you have a stylish interior layout captured forever in your sketchbook.

PENCIL GUIDE
Understanding Pencil Grades from H to B
From first sketch to finished drawing — learn pencil grades, line control, and shading techniques.
Explore the Full Guide
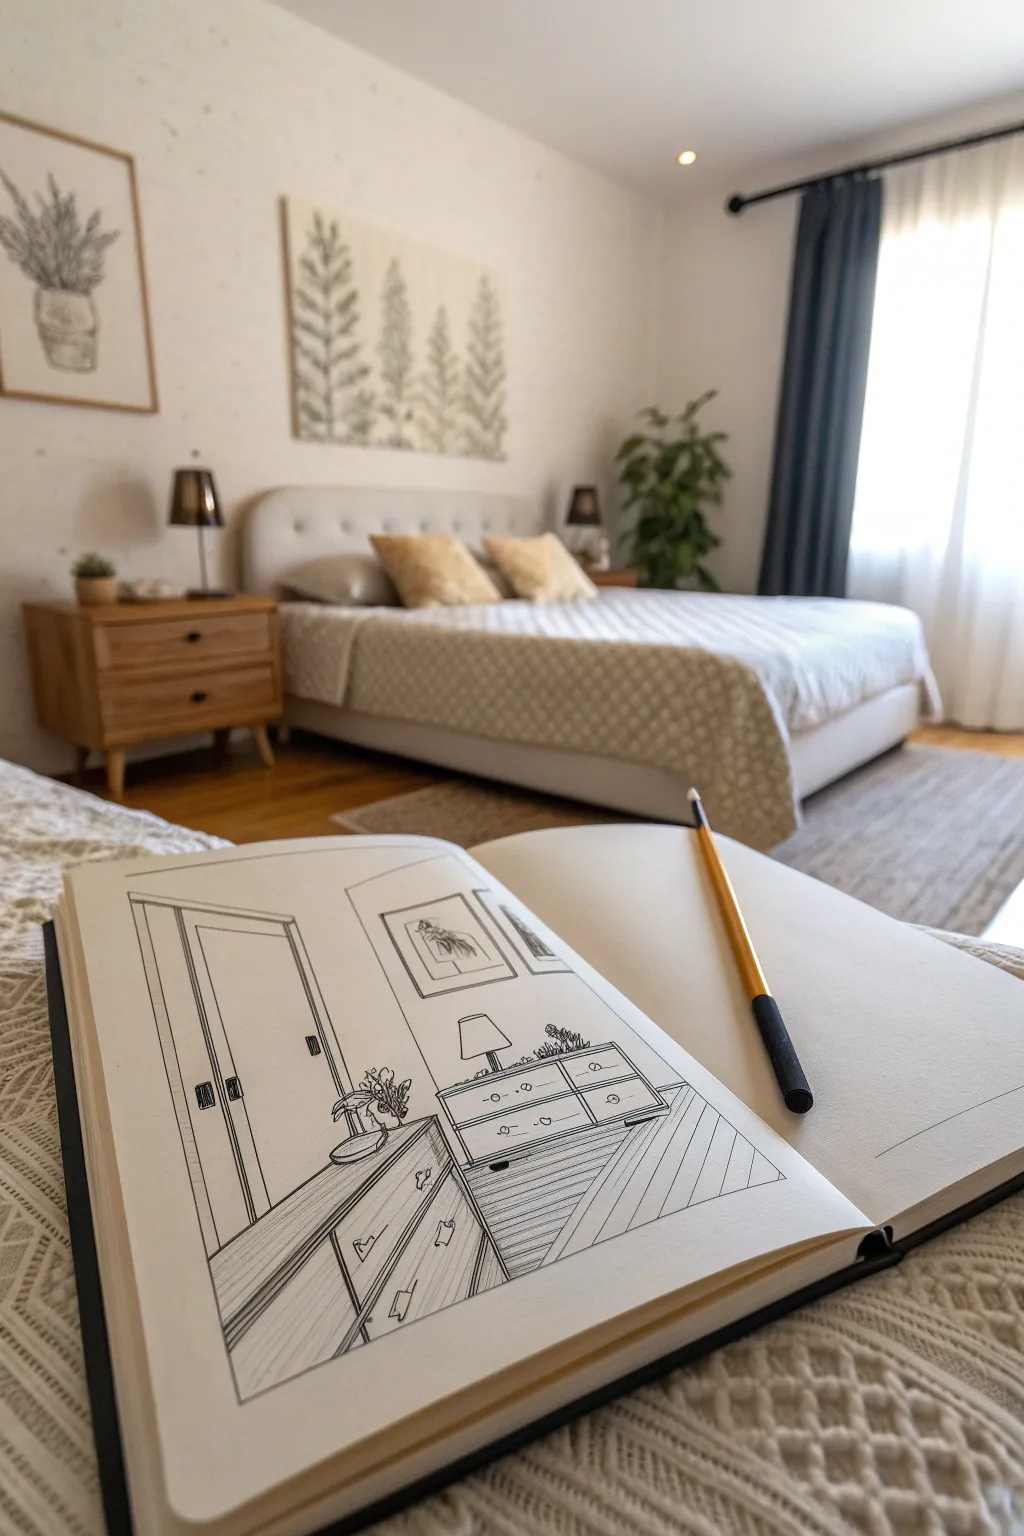
Dresser and Wardrobe as Perspective Blocks
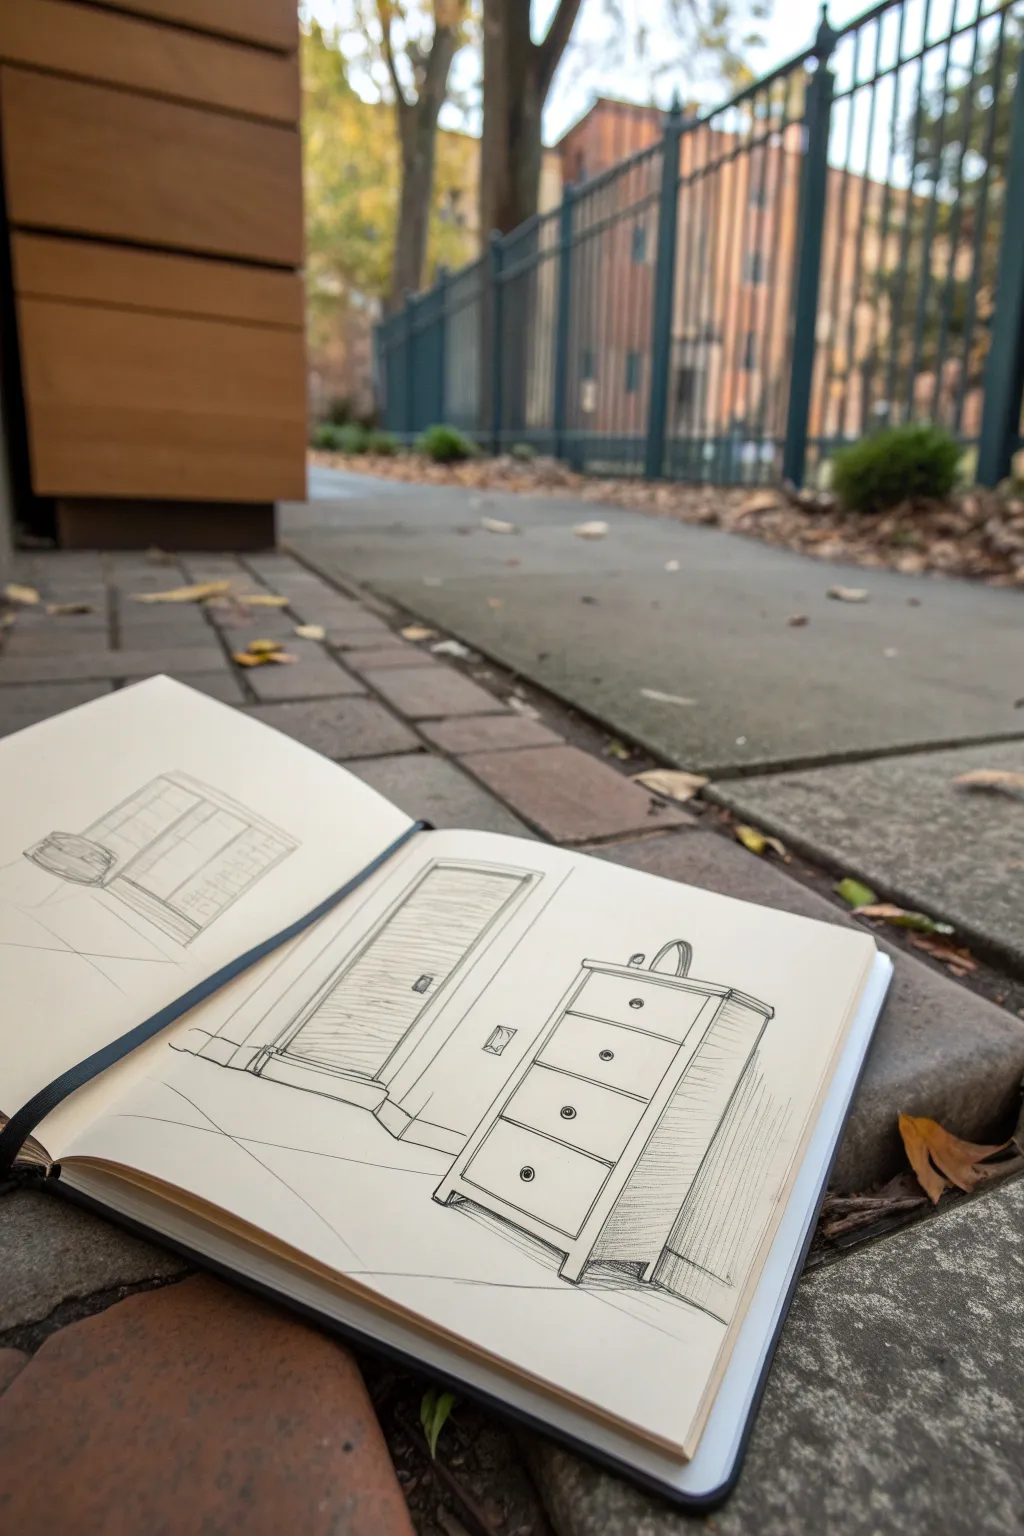
Learn to construct solid furniture forms using basic perspective principles with this detailed sketchbook study. This project focuses on drawing a tall chest of drawers and a wardrobe as simple geometric blocks before adding realistic details.
Step-by-Step Tutorial
Materials
- Hardbound sketchbook (smooth or mixed media paper, approx. A5)
- H or HB graphite pencil (for initial layout)
- Fine liner pen (0.3mm or 0.5mm, black)
- Ruler or straight edge
- Eraser
Step 1: Setting the Perspective Framework
-
Establish the ground line:
Begin by drawing a faint horizontal line near the bottom third of your page. This represents where the wall meets the floor and anchors your furniture. -
Mark the vanishing point:
Decide on a single vanishing point. For this drawing, imagine it slightly off the page to the left, which will give the furniture a subtle angle. -
Block in the dresser shape:
Using your pencil lightly, draw a tall, vertical rectangle on the right side of the page. This is the front face of the dresser. -
Add depth lines:
Connect the top left and bottom left corners of your rectangle towards your imaginary vanishing point to create the side panel’s depth. -
Outline the wardrobe:
To the left of the dresser, sketch a larger, taller rectangular shape for the wardrobe or door frame. Keep the spacing proportional to a real room.
Step 2: Structuring the Details
-
Divide the drawer fronts:
On the dresser’s front face, draw horizontal lines to separate the drawers. Start with a smaller top drawer and three equally sized larger drawers below it. -
Define the frame:
Draw an inner border around the drawer fronts to represent the thickness of the dresser’s wooden frame. -
Add legs and top:
Sketch small, sturdy legs at the bottom corners. Add a thin rectangle on top of the main block to represent the countertop or lid. -
Detail the wardrobe panels:
Draw horizontal slats or panel outlines across the front of the wardrobe door to suggest texture or louvers. -
Place hardware:
Mark small circles in the center of the drawer fronts for knobs and a small rectangle on the wardrobe for a handle. -
Sketch the electrical outlet:
Between the two furniture pieces, draw a small square with two tiny slots to indicate a wall outlet, adding realism to the scene.
Clean Lines
If your ink lines smudge when erasing pencil marks, your ink isn’t dry enough. Wait at least 5 minutes, or switch to a faster-drying sketching pen.
Step 3: Inking and Refining
-
Ink the main outlines:
Switch to your fine liner pen. Go over the main structural lines of the dresser and wardrobe. Use confident, straight strokes. -
Ink the drawers:
Trace the drawer dividers and the knobs. I prefer to make the knobs solid black circles for better contrast. -
Add shading to the side:
On the side panel of the dresser (the part receding in perspective), use vertical hatching lines. Keep them close together to create a shadow effect. -
Texture the wardrobe:
Ink the horizontal lines on the wardrobe door lightly, keeping the lines thinner than the outer frame. -
Ground the objects:
Add a few horizontal lines near the bottom legs to suggest the floor surface and shadows. -
Erase pencil guides:
Once the ink is completely dry—give it a full minute—gently erase all the underlying graphite sketch lines to clean up the drawing.
Wood Grain Effect
Instead of plain hatching on the side, use wavy, broken vertical lines to mimic wood grain. This adds material context without needing color.
Now you have a crisp, architectural study of bedroom furniture ready for more details
Minimal Bedroom Line Art Illustration
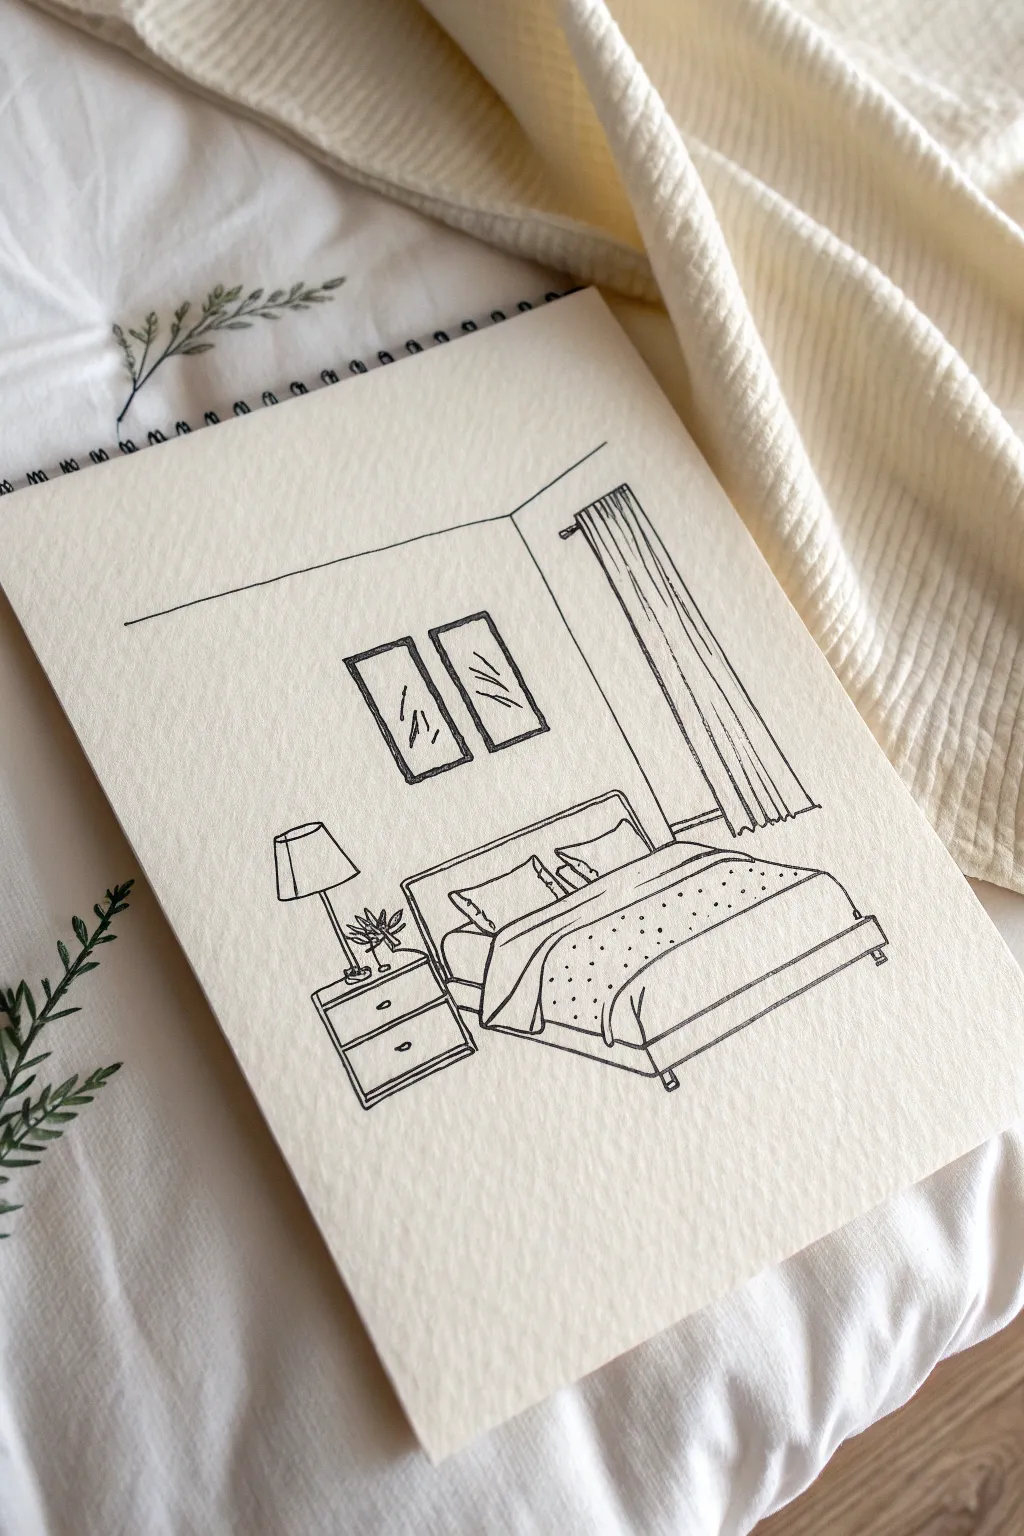
Capture the serenity of a quiet bedroom with this clean line art illustration. Focusing on perspective and simple geometric shapes, this project is perfect for practicing your architectural sketching skills in a relaxed, freehand style.
Detailed Instructions
Materials
- Sketchbook with cream or off-white paper (medium tooth)
- HB Pencil
- Kneaded eraser
- Fine liner pen (01 or 03 nib, black/waterproof)
- Ruler (optional, for guidelines)
Step 1: Setting the Perspective
-
Establish the Corner:
Start by drawing a simple vertical line near the right third of your page. This will represent the corner of the room where the two walls meet. -
Define the Ceiling Line:
From the top of your vertical line, angle a long line to the left and a shorter line to the right to create the ceiling boundary. -
Block in the Bed:
Lightly sketch a large rectangle angled away from the corner to define the bed’s position. This foundation shape determines the scale for everything else.
Don’t Overthink Straight Lines
For a cozy vibe, avoiding a ruler during the inking phase makes the room feel lived-in and organic. Let your hand wobble slightly.
Step 2: Drafting Furniture Elements
-
Headboard and Frame:
Draw a thin vertical rectangle at the top of your bed shape for the headboard, and outline the wooden frame base at the bottom. -
Adding Volume:
Add the mattress height by sketching parallel lines along the side of the bed frame, giving it a 3D appearance. -
Pillows and Bedding:
Sketch two fluffy rectangles leaning against the headboard for pillows. Draw a curved line across the mattress to indicate the duvet folded over. -
Nightstand Foundation:
To the left of the bed, draft a small cube shape. Ensure the bottom lines align roughly with where the bed legs would hit the floor to keep the perspective consistent. -
Lamp Silhouette:
Draw a trapezoid (narrow top, wide bottom) for the lampshade floating above the nightstand, connected by a simple stick base.
Make It Your Own
Customize the artwork by changing the pattern on the duvet to stripes or a grid, or swap the wall art for a circular mirror.
Step 3: Walls and Decor
-
Artwork Placement:
Above the bed on the left wall, sketch two vertical rectangles side-by-side. I like to tilt them slightly to match the perspective of the wall. -
Window and Curtains:
On the right wall, draw a tall, narrow rectangle for the window area. Add flowing, vertical lines to suggest heavy drapery gathering on the floor.
Step 4: Inking the Lines
-
Outline the Bed:
Switch to your fine liner. Trace your bed sketch, but use softer, slightly uneven lines for the fabric areas like the duvet and pillows to suggest softness. -
Frame Structure:
Use straighter, firmer ink lines for the hard surfaces like the bed frame and headboard. -
Nightstand Details:
Ink the nightstand, adding small semi-circles for drawer pulls. Don’t forget to ink a tiny plant or object on top for extra character. -
Curtain Texture:
When inking the curtains, use long, swift vertical strokes. Allow lines to break slightly rather than being perfectly solid to create a textile feel. -
Wall Art Details:
Ink the picture frames. Inside, rather than drawing detailed pictures, just add a few abstract scribbles or diagonal hatching to suggest reflections or abstract art.
Step 5: Final Touches
-
Patterning the Duvet:
Stipple small dots across the duvet cover area to create a polka-dot texture. Keep the dots random but evenly spaced. -
Adding Depth:
Add tiny hatch marks (short diagonal lines) on the shadowed side of the pillows and under the duvet fold where shadows would naturally fall. -
Clean Up:
Wait at least five minutes for the ink to fully bond with the paper fibers, then gently erase all your pencil guides.
Now you have a serene little interior scene captured forever in your sketchbook


Marker-Style Bedroom With Bold Color Blocks
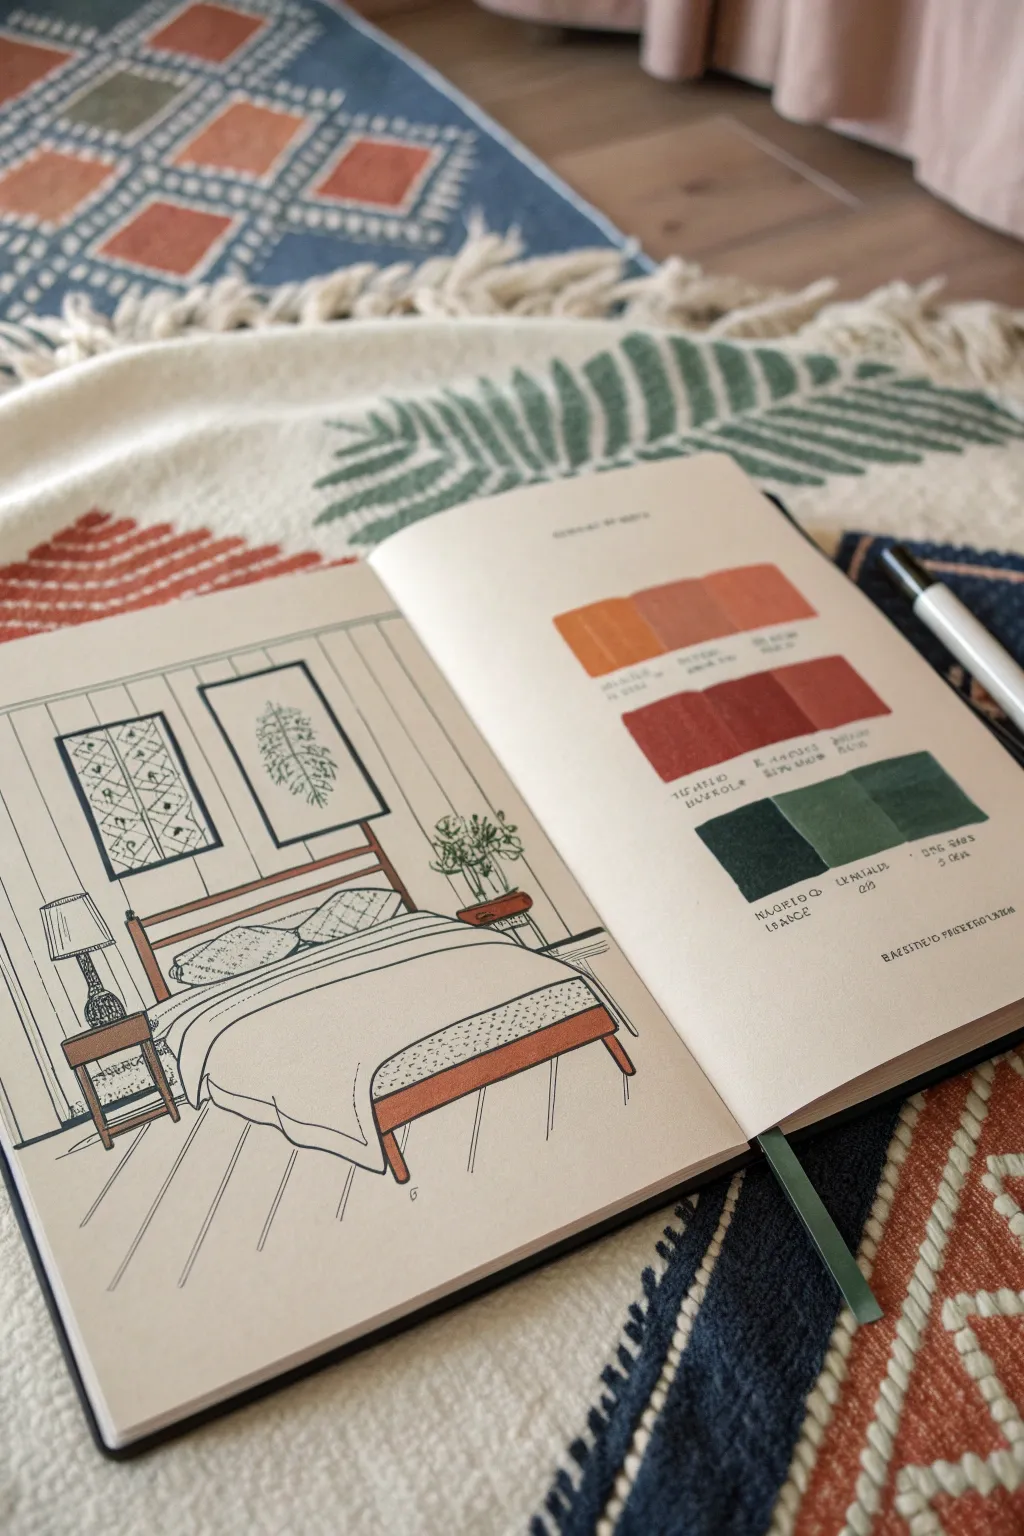
This project combines precise architectural sketching with bold marker swatches for a look that feels like a professional interior designer’s plan. It captures the cozy potential of a bedroom makeover while testing out a warm, earthy color palette right on the page.
Step-by-Step
Materials
- Sketchbook (heavyweight paper recommended)
- Fine liner pens (0.1, 0.3, and 0.5 sizes)
- Alcohol or water-based markers (terracotta, rust red, forest green, light grey)
- Ruler or straight edge
- Pencil (HB or 2H for light drafting)
- Eraser
Step 1: Drafting the Room Structure
-
Establish the horizon line:
Start by lightly drawing a horizon line across the lower third of your left page. This will help ground the bed and furniture so the perspective looks realistic. -
Outline the back wall:
Draw a large rectangle in the center of the page to represent the back wall of the bedroom. Use your ruler to ensure the vertical lines are perfectly straight. -
Add floor perspective:
From the bottom corners of your back wall rectangle, draw angled lines extending outward towards the bottom of the page. These lines create the floor area and the sense of depth. -
Block in the bed:
Sketch the main shape of the bed frame in the center. Start with a simple box shape, angling the sides to match the floor perspective lines you just drew. -
Add furniture outlines:
Lightly pencil in the shapes for the nightstands on either side of the bed. Keep them simple and geometric for now—just cubes or rectangular prisms.
Clean Lines Pro-Tip
When drawing long floorboards or wall panels, rotate your sketchbook so you are pulling the pen toward your body. This natural range of motion creates straighter, more confident lines.
Step 2: Inking the Details
-
Ink the structural lines:
Switch to your 0.5 fine liner. Go over the main lines of the room, including the wall edges and the floorboards. For the floorboards, draw vertical lines that slightly fan out as they come toward the viewer. -
Detail the headboard:
Using a 0.3 pen, draw a spindle or slat-style headboard. Careful spacing is key here; try using your ruler to keep the vertical slats evenly separated. -
Draw the soft furnishings:
Switch to a 0.1 pen for the bedding. Use looser, slightly wavy lines to depict the comforter draping over the mattress and the fluffiness of the pillows, contrasting with the rigid furniture lines. -
Add decor elements:
Draw two large rectangular frames above the bed. Fill one with a geometric pattern (like diamonds) and the other with a botanical leaf sketch. Add lamps to the nightstands and a potted plant in the corner. -
Erase pencil marks:
Once the ink is completely dry—give it a full minute—gently erase all the underlying pencil sketch lines to clean up the drawing.
Step 3: Applying the Color Palette
-
Create the swatch page:
On the right-hand page, draw three rows of small squares or rectangles. This serves as your color legend and balances the composition of the open book. -
Fill the warm swatches:
Use your lightest orange or terracotta marker for the top row. For the second row, use a deeper rust or brick red. Make sure to saturate the paper fully for a solid block of color. -
Fill the cool swatches:
For the bottom row of swatches, use your deep forest green markers. You can create a gradient effect by going over the left side of the swatch twice to make it darker. -
Color the bed frame:
Return to the drawing and use the rust or terracotta marker to color the wooden bed frame. Use a single stroke direction to mimic wood grain. -
Add green accents:
Use the forest green marker to color the geometric art print above the bed and the leaves of the potted plant. This ties the drawing to your color legend. -
Shade the bedding:
Take a very light grey marker and add subtle shadows under the pillows and along the side of the bedspread where it drapes down. I find this instantly gives the bed volume. -
Label the swatches:
Finally, use your finest pen to write small notes or color names under your swatches on the right page for that authentic ‘designer’s notebook’ aesthetic.
Level Up: Texture
Use dot stippling on the bedding or rug areas. Tiny clusters of dots add visual texture that mimics fabric weave without needing to draw every single thread.
Now you have a stylish interior sketches spread that looks ready for a client presentation
Dreamy Bedroom Scene With Floating Decor
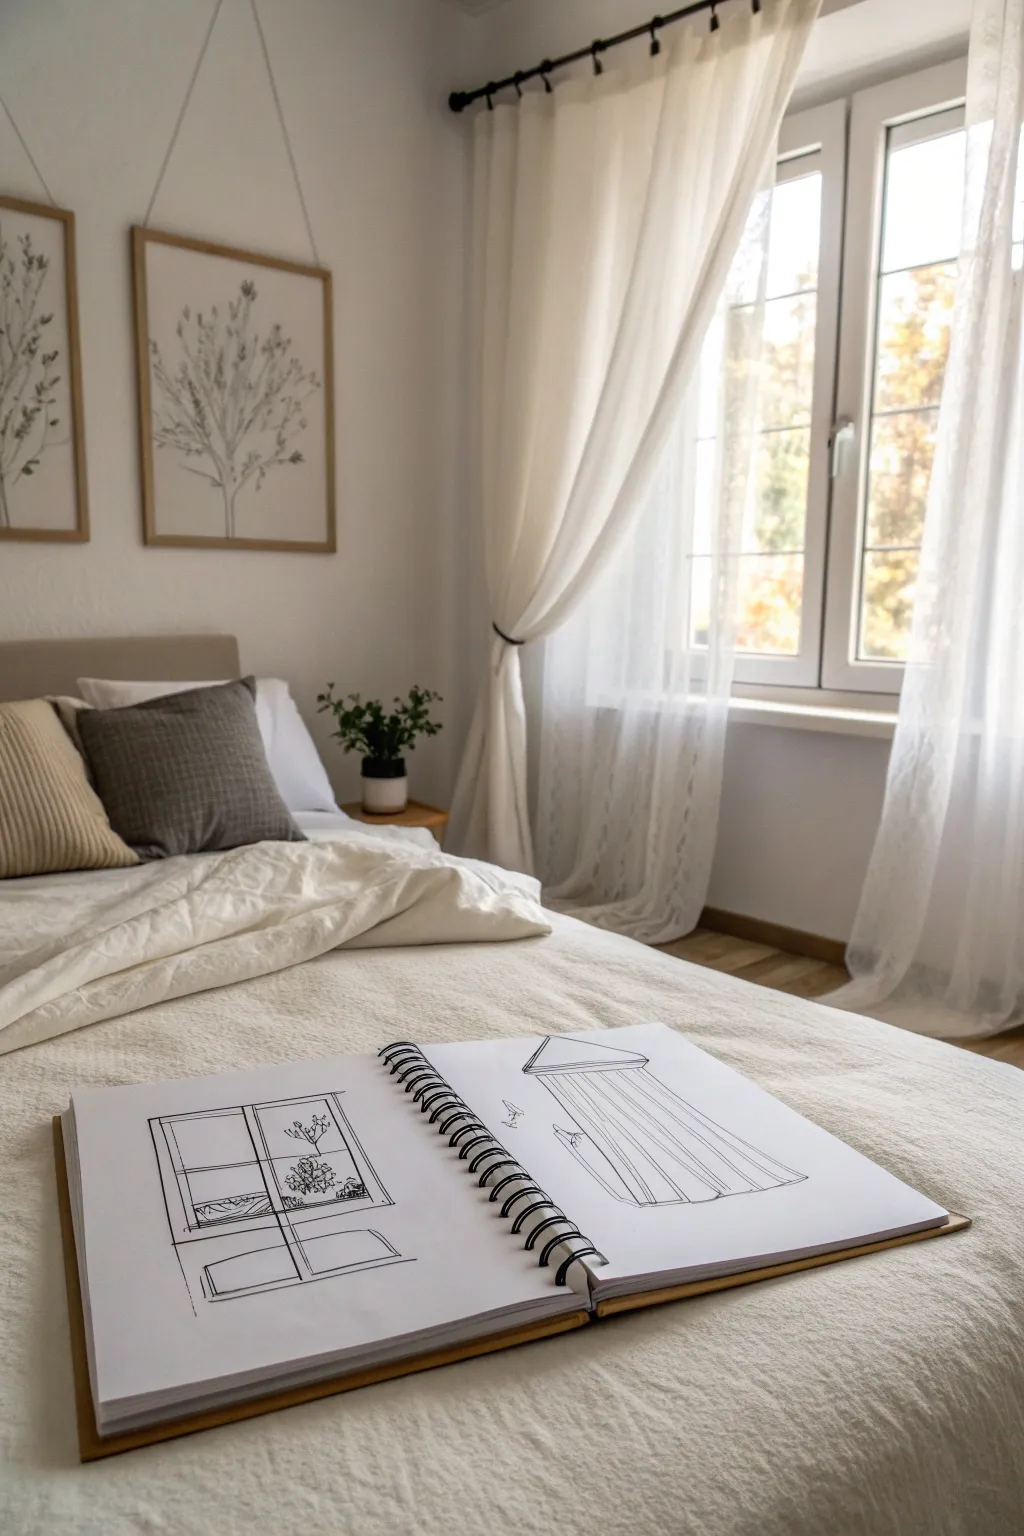
Capture the serene essence of your bedroom with this dual-page sketchbook spread, featuring clean lines and spatial studies. This project focuses on drawing simple architectural details like windows and drapery to practice perspective and line weight.
Step-by-Step Guide
Materials
- Wire-bound sketchbook (A4 or similar size)
- Fine liner pens (0.3mm and 0.5mm, black ink)
- Graphite pencil (HB or H for under-sketching)
- Kneaded eraser
- Ruler or straight edge
Step 1: Planning the Layout
-
Open the spread:
Begin with your sketchbook open flat. You will be using both the left and right pages for two distinct but stylistically related drawings. -
Visualize the subjects:
Decide on your subjects. The left page will feature the structural lines of a window frame, while the right page will focus on the softer, draped lines of a curtain or canopy element. -
Lightly sketch the left composition:
Using your HB pencil, lightly block in the rectangular shape of the window frame on the left page. Keep your pressure extremely light so these lines can be easily erased later. -
Lightly sketch the right composition:
On the right page, sketch a triangular top section and long, vertical guidelines flowing downward to represent the fabric folds. This creates the basic ‘tent’ shape.
Loose Lines
Don’t connect every line perfectly at the corners. Leaving small gaps or slight overlaps creates a breezy, architectural sketch style that looks professional.
Step 2: Drawing the Window (Left Page)
-
Define the outer frame:
Switch to your 0.5mm fine liner. Draw the outermost rectangle of the window. You can use a ruler if you want absolute precision, but a steady freehand line adds a nice organic touch. -
Add inner dimensions:
Draw the inner frame lines parallel to your first rectangle to give the window woodwork some thickness and depth. -
Create the panes:
Draw the crossbars (muntins) that divide the window panes. A simple cross shape works well here. Ensure the vertical line is centered. -
Sketch the bottom panel:
below the main window pane, draw a horizontal rectangular panel. Add a simple diagonal line or corner detail to suggest molding or dimension. -
Sketch the foliage:
Switch to a thinner 0.3mm pen. Inside the window panes, draw the delicate, spindly branches of a tree or bush. Use jagged, erratic lines to mimic natural growth, keeping the leaves sparse. -
Add a horizon line:
Draw a faint horizon line or a hint of a landscape in the lower corner of the window pane to ground the view.
Add Watercolor
Use a light wash of grey watercolor or a cool marker to add simple shadows to one side of the window frame and inside the deepest folds of the curtain.
Step 3: Drawing the Drapery (Right Page)
-
Ink the top triangle:
Using the 0.5mm pen, ink the triangular ‘roof’ or valance at the top. Give it a double line to suggest a hem or structural thickness. -
Draw primary folds:
Draw the main vertical lines extending down from the triangle’s base. These lines should not be perfectly straight; let them curve slightly inward or outward to suggest fabric hanging. -
Add depth lines:
Between your main vertical lines, add shorter, thinner lines (using the 0.3mm pen) to indicate secondary folds and shadows where the fabric ripples. -
Create the bottom hem:
Connect the vertical lines at the bottom with soft, curved strokes. This shows how the fabric pools or rests, rather than ending in a sharp straight line. -
Refine the shape:
Add a few small marks near the ‘shoulders’ of the drape to show where it might be gathered or attached.
Step 4: Finishing Touches
-
Clean up:
Wait at least five minutes for the ink to dry completely to prevent smudging. I like to use this time to step back and look at the balance of the page. -
Erase pencil marks:
Gently rub your kneaded eraser over both pages to lift all the initial graphite guidelines, leaving only the crisp ink work. -
Final assessment:
Check your line weights. If the outer frames feel too thin, carefully go over them one more time with the 0.5mm pen to make them pop against the finer details.
Close your book or display it open to enjoy your minimalist bedroom study


Have a question or want to share your own experience? I'd love to hear from you in the comments below!